micropipeting basics - edvotek
TRANSCRIPT
EVT 2011-08-12AM
All components are intended for educational research only. They are not to be used for diagnostic or drug purposes, nor administered to or consumed by humans or animals.
S-44EDVO-Kit #
Micropipeting Basics
Storage: Store this experiment at room temperature
EXPERIMENT OBJECTIVES:
The objectives of this experiment are to become familiar with metric units of measure-ment and their conversions, to learn how to accurately pipet different microliter volumes using a micropipet and to practice micropipet-ing solutions of different viscosities.

EDVO-Kit # S-44 Micropipeting Basics2
EVT 2011-08-12AM
Page
Experiment Components 3
Experiment Requirements 3
Background Information 4
Experiment Procedures
Experiment Overview 7
Activity One
Volumetric Applications of the Metric System 8
Activity Two
Option A: Micropipeting Using an Automatic Micropipet 9
Option B: Micropipeting Using a Fixed Volume Micropipet 10
Critical Thinking and Hypothesis Development 11
Study Questions 11
Instructor’s Guidelines
Notes to the Instructor 13
Optional Activities
Practice Pipeting Accurate Amounts of Sample 14
Practice Gel Loading for Agarose Gel Electrophoresis 14
Connections to National Content and Skill Standards 15
Pre-Lab Preparations 16
Experiment Results 17
Study Questions and Answers 18
Material Safety Data Sheets 19
Table of Contents

EDVO-Kit # S-44 Micropipeting Basics3
EVT 2011-08-12AM
• Reddye• Bluedye• Yellowdye• Glycerol• Alcohol• Buffer• PipetingCards• Microtiterplates
Experiment Components
•Automaticmicropipetswithtips
Variable automatic (5-50 µl) or Fixed Volume (10 µl)•Smallcontainerfordiscardingusedtips
Requirements
All components are intended for educa-tional research only. They are not to be used for diagnostic or drug purposes, nor administered to or consumed by humans or animals.
Storage: Store entire experiment
at room temperature.

4B
ackg
roun
d In
form
atio
n
Duplication of this document, in conjunction with use of accompanying reagents, is permitted for classroom/laboratory use only. This document, or any part, may not be reproduced or distributed for any other purpose without the written consent of EDVOTEK, Inc.
Copyright © 2004, 2010, 2011 EDVOTEK, Inc., all rights reserved. EVT 2011-08-15AM
EDVO-Kit # S-44Micropipeting Basics
Measuring Small Volumes with Micropipets
Over the past several decades, advances in biotechnology have influ-enced many changes in experimental techniques and methods, including the volume of reagents and biological samples used. Depending upon the procedure being performed, biotechnology experiments can utilize a variety of volumes of biological samples and reagents, ranging from several hundreds of liters to very small microliter (µl) volumes.
Pipeting is a critically important technique in life science experiments to ensure accurate experimental results. In typical biotechnology experi-ments, biologicals and reagents such as DNA, enzymes and buffers are transferred (by pipeting) into small microcentrifuge tubes which serve as reaction vessels. For these type of reactions, microliter volumes are typi-cally used. There are 1,000 microliters in 1 milliliter of a solution. To put it in perspective, a 50 microliter sample is approximately equal in size to a single raindrop. A raindrop-sized sample is relatively large when compared to experimental samples which often are 10 to 50 microliters in volume.
VARIABLE AUTOMATIC MICROPIPET
To measure microliter volumes, a special instrument called a micropipet is used. The variable automatic micropipet is the preferred instrument for delivering accurate, reproducible volumes of sample. These instruments are manufactured to deliver samples in various ranges (e.g., 0.5-10 µl, 5-50 µl, 200-1000 µl, etc.) and usually can be adjusted in one microliter increments. Typically, these instruments have an ejector button for re-leasing the tip after sample delivery. Variable au-tomatic micropipets can also be multi-channeled, designed to uniformly deliver several samples at the sample time. However, for this experiment, only one sample will be delivered at a time.
5B
ackground Information
Duplication of this document, in conjunction with use of accompanying reagents, is permitted for classroom/laboratory use only. This document, or any part, may not be reproduced or distributed for any other purpose without the written consent of EDVOTEK, Inc. Copyright © 2004, 2010, 2011 EDVOTEK, Inc., all rights reserved. EVT 2011-08-15AM
EDVO-Kit # S-44Micropipeting Basics
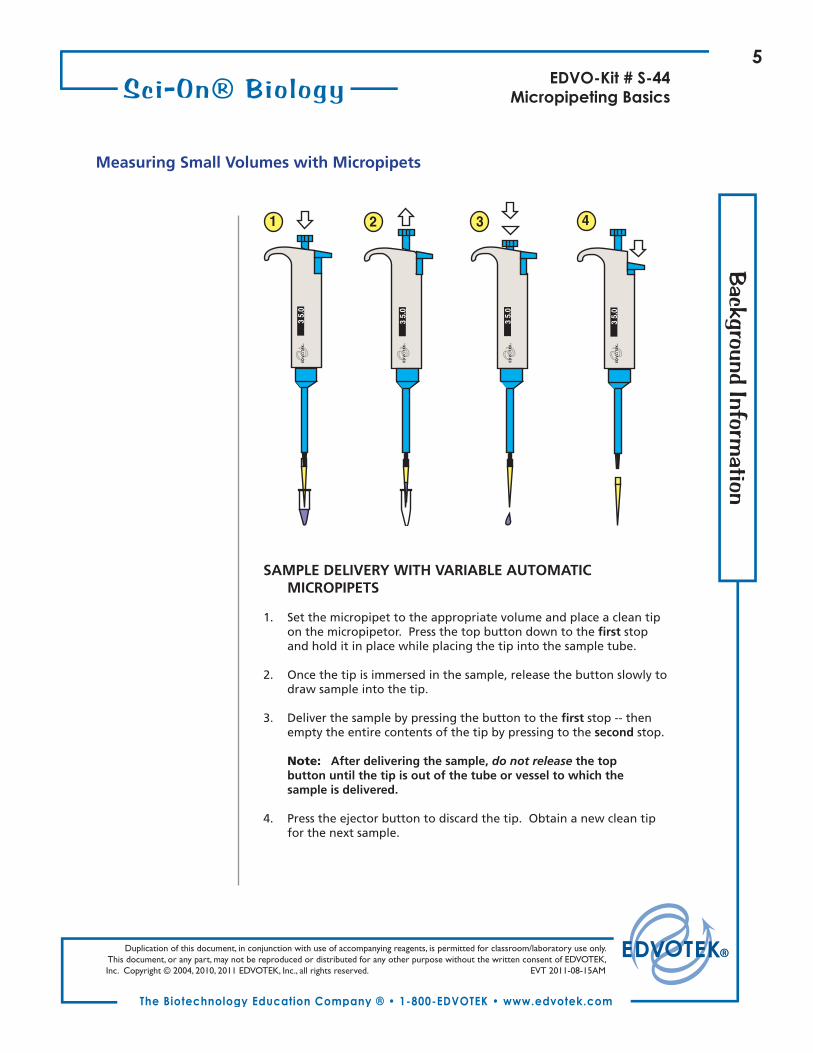
SAMPLE DELIVERY WITH VARIABLE AUTOMATIC MICROPIPETS
1. Set the micropipet to the appropriate volume and place a clean tip on the micropipetor. Press the top button down to the first stop and hold it in place while placing the tip into the sample tube.
2. Once the tip is immersed in the sample, release the button slowly to draw sample into the tip.
3. Deliver the sample by pressing the button to the first stop -- then empty the entire contents of the tip by pressing to the second stop.
Note: After delivering the sample, do not release the top button until the tip is out of the tube or vessel to which the sample is delivered.
4. Press the ejector button to discard the tip. Obtain a new clean tip for the next sample.
Measuring Small Volumes with Micropipets
6B
ackg
roun
d In
form
atio
n
Duplication of this document, in conjunction with use of accompanying reagents, is permitted for classroom/laboratory use only. This document, or any part, may not be reproduced or distributed for any other purpose without the written consent of EDVOTEK, Inc.
Copyright © 2004, 2010, 2011 EDVOTEK, Inc., all rights reserved. EVT 2011-08-15AM
EDVO-Kit # S-44Micropipeting Basics
Measuring Small Volumes with Micropipets
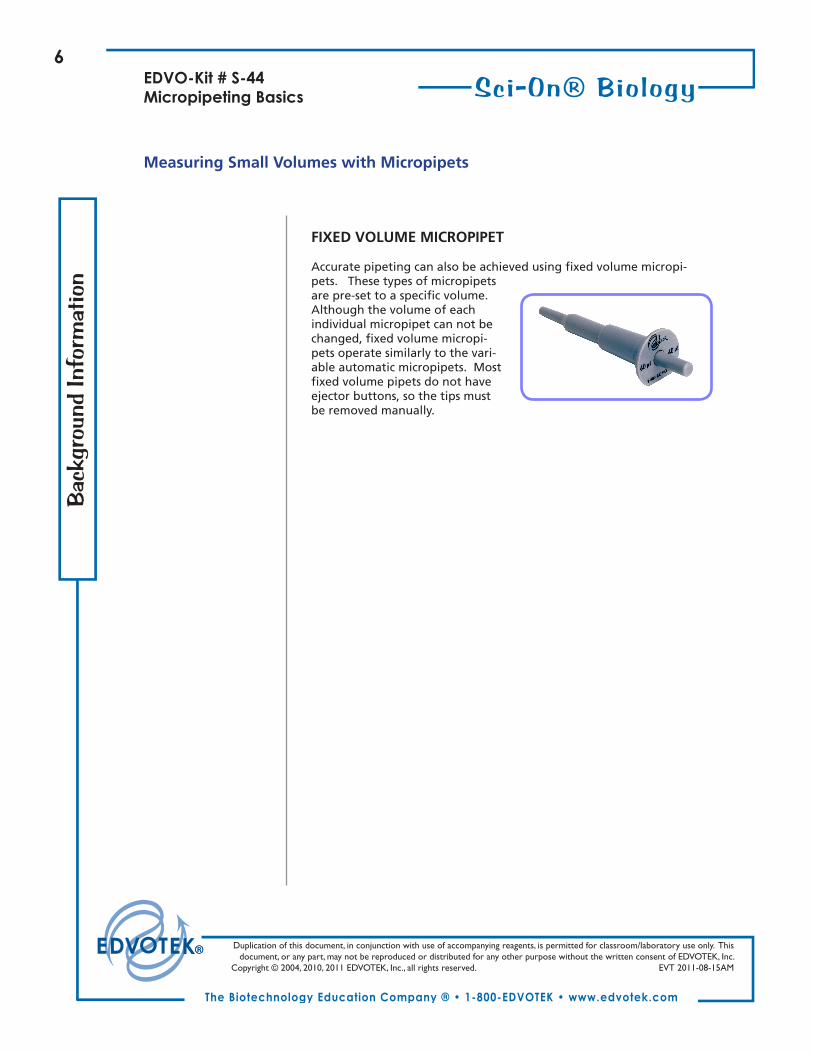
FIXED VOLUME MICROPIPET
Accurate pipeting can also be achieved using fixed volume micropi-pets. These types of micropipets are pre-set to a specific volume. Although the volume of each individual micropipet can not be changed, fixed volume micropi-pets operate similarly to the vari-able automatic micropipets. Most fixed volume pipets do not have ejector buttons, so the tips must be removed manually.

7EDVO-Kit # S-44
Micropipeting BasicsExperim
ent Procedures
Duplication of this document, in conjunction with use of accompanying reagents, is permitted for classroom/laboratory use only. This document, or any part, may not be reproduced or distributed for any other purpose without the written consent of EDVOTEK, Inc. Copyright © 2004, 2010, 2011 EDVOTEK, Inc., all rights reserved. EVT 2011-08-15AM
BEFORE YOU START THE EXPERIMENT
1. Read all instructions before starting the experiment.
2. Write a hypothesis that reflects the experiment and predict experi-mental outcomes.
EXPERIMENT CONTENT OBJECTIVE
The objective of this experiment is to learn how to accurately pipet differ-ent microliter volumes using a micropipet and to practice micropipeting solutions of different viscosities.
BRIEF DESCRIPTION OF THE EXPERIMENT
Activity One is a “Dry lab” exercise to familiarize students with the metric system in micropipeting.
In Activity Two, various dye samples will be diluted from concentrated solutions in microcentrifuge tubes and spotted in triplicate on a Pipet Card™.
• OptionAofthisexperimentinvolvespipetingofdifferentvolumesand requires a variable automatic micropipet (5-50 µl).
• OptionBrequiresa10µlfixedmicropipet.
Samples with various viscosities, such as a solution containing glycerol and/or alcohol, will also be used to provide the opportunity to practice micropipeting solutions with different viscosities. The concentrated dyes will be diluted in an aqueous buffer solution. The glycerol solution, which has a higher viscosity than the buffer solution, will emulate protein or DNA solutions that tend to be more viscous than aqueous buffers. By contrast, alcohol will serve as the example of a solution that is less viscous than buffer.
Experiment Overview

8EDVO-Kit # S-44Micropipeting Basics
Expe
rim
ent P
roce
dure
s
Duplication of this document, in conjunction with use of accompanying reagents, is permitted for classroom/laboratory use only. This document, or any part, may not be reproduced or distributed for any other purpose without the written consent of EDVOTEK, Inc.
Copyright © 2004, 2010, 2011 EDVOTEK, Inc., all rights reserved. EVT 2011-08-15AM
Activity One: Volumetric Applications of the Metric System
The metric system is used in micropipeting. The milliliter (ml) and mi-croliter (µl) are two very useful units of measure in molecular biology. “Milli” means one-thousandth and “Micro” means one-millionth. The symbol “µ” means micro, the prefix for 1 x 10⁻⁶ (expressed in sci-entific notation) or 0.000001 (expressed in decimals). One microliter is abbreviated as “µl”. The two ways that this would be expressed is:1 µl = .000001 or 1 µl = 1 x 10⁻⁶. There are 1,000 µl in 1 milliliter, and 1,000 ml in one liter.
1. Perform the following conversions:
In decimals In scientific notation
1 ml = ____________ liter 1 ml = ____________ liter1 liter = ____________ ml 1 liter = ____________ ml1 ml = ____________ µl 1 ml = ____________ µl1 µl = ____________ ml 1 µl = ____________ ml10 µl = ____________ ml 10 µl = ____________ ml20 µl = ____________ ml 20 µl = ____________ ml50 µl = ____________ ml 50 µl = ____________ ml100 µl = ____________ ml 100 µl = ____________ ml
2. How many times greater is a ml than a µl? ______________
3. How many times greater is a liter than a ml? ______________
4. How many times greater is a liter than a µl? ______________
5. Write an application sentence about each of the words in the fol-lowing vocabulary list:
Micropipet Metric system Microliter Viscosity Scientific notation
6. Discuss the importance of the following in scientific experimenta-tion:
• Usingaccurateandpreciselaboratorytechniques • Makingcarefulobservations • Recordingresultsinaconciseandaccuratemanner • Drawingvalidinterpretationsofresults

9EDVO-Kit # S-44
Micropipeting BasicsExperim
ent Procedures
Duplication of this document, in conjunction with use of accompanying reagents, is permitted for classroom/laboratory use only. This document, or any part, may not be reproduced or distributed for any other purpose without the written consent of EDVOTEK, Inc. Copyright © 2004, 2010, 2011 EDVOTEK, Inc., all rights reserved. EVT 2011-08-15AM
Activity Two - Option A: Micropipeting Using a Variable Micropipet
OPTION A: USING A VARIABLE MICROPIPET
In the activity which follows, you will use a variable micropipet to pre-pare (mix) seven different dye mixtures in the wells of a microtiter plate. Eachdyemixturewillbepreparedintriplicate.Youwillthenpipet10µlfrom each well of the microtiter plate onto the Pipet Card.
1. Place the microtiter plate as shown in the figure below, and care-fully mark the plate with your initials or lab group number.
2. Using a permanent marker, label the rows 1 – 7 down the side of the plate.
3. Refer to Table A below to prepare seven dye mixtures, with each dye mixture prepared in triplicate wells of the microtiter plate.
4. After preparing the seven dye mix-tures, pipet 10 µl in triplicate from each well of the microtiter plate onto the appropriate circles on the Pipet Card™. Pipet the dye mixture in the center of each circle in the appropriate row.
CAUTION: To avoid cross contamination and false results, always remember to use a fresh pipet tip for each dye mixture.
Wells
1
2
3
4
5
6
7
Microtiter Plate Pipet Card

10EDVO-Kit # S-44Micropipeting Basics
Expe
rim
ent P
roce
dure
s
Duplication of this document, in conjunction with use of accompanying reagents, is permitted for classroom/laboratory use only. This document, or any part, may not be reproduced or distributed for any other purpose without the written consent of EDVOTEK, Inc.
Copyright © 2004, 2010, 2011 EDVOTEK, Inc., all rights reserved. EVT 2011-08-15AM
Activity Two - Option B: Micropipeting Using a Fixed Volume Micropipet
OPTION B: USING A FIXED VOLUME MICROPIPET
In the following activity, you will use one or more fixed volume micro-pipet to prepare (mix) seven different dye mixtures in the wells of a microtiterplate.Eachdyemixturewillbepreparedintriplicate.Youwillthen pipet 10 µl from each well of the microtiter plate onto the Pipet card™.
1. Place the microtiter plate as shown in the figure below, and care-fully mark the plate with your initials or lab group number.
2. Using a permanent marker, label the rows 1 – 7 down the side of the plate.
3. Refer to Table B below to pre-pare seven dye mixtures, with each dye mixture prepared in triplicate wells of the microtiter plate.
4. After preparing the seven dye mixtures, pipet 10 µl in triplicate from each well of the microtiter plate onto the appropriate circles on the Pipet Card™. Pipet the dye mixture in the center of each circle in the appropriate row.
CAUTION: To avoid cross contamination and false results, always remember to use a fresh pipet tip for each dye mixture.
Wells
1
2
3
4
5
6
7
Microtiter Plate Pipet Card
11EDVO-Kit # S-44
Micropipeting BasicsExperim
ent Procedures
Duplication of this document, in conjunction with use of accompanying reagents, is permitted for classroom/laboratory use only. This document, or any part, may not be reproduced or distributed for any other purpose without the written consent of EDVOTEK, Inc. Copyright © 2004, 2010, 2011 EDVOTEK, Inc., all rights reserved. EVT 2011-08-15AM
Record the answers to the following Study Questions in your Laboratory Notebook or as instructed by your teacher.
1. Describe a good technique for withdrawing samples using a vari-able automatic micropipet or fixed volume micropipet.
2. How does the pipeting exercise help you understand the impor-tance of accurate pipeting using microliter volumes?
3. Why did you practice pipeting samples with various viscosities?
Critical Thinking and Hypothesis Development
Record the following in your Laboratory Notebook or as instructed by your teacher.
1. What is the variable in this experiment?
2. What is the control in this experiment?
3. What could one change in the experiment if this experiment was repeated?
4. Write a hypothesis that would reflect a change.
Study Questions

12EDVO-Kit # S-44Micropipeting Basics
Expe
rim
ent P
roce
dure
s
Duplication of this document, in conjunction with use of accompanying reagents, is permitted for classroom/laboratory use only. This document, or any part, may not be reproduced or distributed for any other purpose without the written consent of EDVOTEK, Inc.
Copyright © 2004, 2010, 2011 EDVOTEK, Inc., all rights reserved. EVT 2011-08-15AM
Notes

13Instructor’s Guide
Duplication of this document, in conjunction with use of accompanying reagents, is permitted for classroom/laboratory use only. This document, or any part, may not be reproduced or distributed for any other purpose without the written consent of EDVOTEK, Inc. Copyright © 2004, 2010, 2011 EDVOTEK, Inc., all rights reserved. EVT 2011-08-15AM
EDVO-Kit # S-44Micropipeting Basics
Technical ServiceDepartment
FAX: (301) 340-0582web: www.edvotek.com
email: [email protected]
Please have the following information:
• The experiment number and title• Kit Lot number on box or tube • The literature version number (in lower right corner)• Approximate purchase date
Mon - Fri9:00 am to 6:00 pm ET
Visit our web site for information about
EDVOTEK’s complete line of experiments for
biotechnology and biology education.
Online Ordering now available
Class size, length of laboratory sessions, and availability of equipment are factors which must be considered in the planning and the imple-mentation of this experiment with your students. These guidelines include Suggestions for Lesson Plan Content which can be adapted to fit your specific set of circumstances.
APPROXIMATE TIME REQUIREMENTS
Activity One: Approximately 30 minutes are required for students complete the dry lab exercise.
Activity Two: Approximately 40 minutes are required for students complete the pipeting exercise.
RESOURCES AND TECHNICAL SERVICE
The EDVOTEK web site provides a variety of resources which are con-tinuously being updated and added. Several suggestions and remind-ers for various aspects of biotechnology education are available.
Notes to the Instructor
www. edvotek.com If you do not find the answers to your questions in this sec-tion or at the EDVOTEK web site, Technical Service is avail-able from 9:00 am to 6:00 pm, Eastern time zone. Call for help from our knowledgeable technical staff at:
1-800-EDVOTEK (1-800-338-6835).

14In
stru
ctor
’s G
uide
Duplication of this document, in conjunction with use of accompanying reagents, is permitted for classroom/laboratory use only. This document, or any part, may not be reproduced or distributed for any other purpose without the written consent of EDVOTEK, Inc.
Copyright © 2004, 2010, 2011 EDVOTEK, Inc., all rights reserved. EVT 2011-08-15AM
EDVO-Kit # S-44Micropipeting Basics
Optional Activity - Practice Gel Loading for Agarose Gel Electrophoresis
PRACTICE GEL LOADING
Accurate sample delivery technique ensures the best possible gel results. Pipeting mistakes can cause the sample to become diluted with buffer, or cause damage to the wells with the pipet tip while loading the gel. The agarose gel is sometimes called a “submarine gel” because it is sub-merged under buffer for sample loading and electrophoretic separation. In this activity, students can practice gel loading in a gel placed under water to simulate gel loading in the electrophoresis apparatus under buffer.
1. Obtain a tube of practice gel loading solution and a gel section with wells submerged under water in a small tray or petri plate.
2. Practice delivering the practice gel loading solution to the sample wells. Take care not to damage or puncture the wells with the pipet tip.
• Ifyouareusingavariableautomaticmicropipet,loadthesample well with 35-38 microliters of sample.
• Ifusingfixedvolumepipetsforsampledelivery,loadeachsample well with 40 microliters of sample.
3. If you need additional practice, squirt water into the wells with a transfer pipet to remove the practice gel loading solution and prac-tice loading samples again.
Optional Activity - Practice Pipeting Accurate Amounts of Sample
1. Place a strip of laboratory parafilm paper on the lab bench2. Set the pipet to 1 µl and pipet the sample onto the parafilm paper.3. Repeat step 2.4. Compare the sizes of the two drops. They should be the same size.
If not, repeat steps 2 and 3 again.5. Set the pipet to 5 µl and pipet two times. Compare. Repeat if the
drops are not the same size.6. Repeat in duplicate for the following volumes: 10 µl, 20 µl, 30 µl, 50 µl, 100 µl, 200 µl, 400 µl, 500 µl, 1000 µl7. Compare the sizes of the drops as you go from lowest to the high-
est volume. What relationship do you observe if you have pipeted accurately?
Electrophoresis trays and well former templates (combs) required. Samples and reagents not included.
Samples and reagents not included.
15Instructor’s Guide
Duplication of this document, in conjunction with use of accompanying reagents, is permitted for classroom/laboratory use only. This document, or any part, may not be reproduced or distributed for any other purpose without the written consent of EDVOTEK, Inc. Copyright © 2004, 2010, 2011 EDVOTEK, Inc., all rights reserved. EVT 2011-08-15AM
EDVO-Kit # S-44Micropipeting Basics
1. Students will understand how to use equipment and learn proper techniques for conducting an experiment.
2. Students will understand the relationship between the metric system and English system in the measurement of small volumes (mi-croliters).
3. Students will develop an understanding through inquiry. They will:
• Developalogicalhypothesis • Makecarefulobservations. • Interpretresultscorrectly. • Formulateexplanationsfromresults.
Connections to National Content Standards
Connections to National Skill Standards
Students will be able to: 1. Use micropipets for metric measurements of small liquid volumes of
various viscosities.
2. Make careful observations and record results.
3. Compare and evaluate results.
4. Make metric conversions in decimals and scientific notation.

16In
stru
ctor
’s G
uide
Duplication of this document, in conjunction with use of accompanying reagents, is permitted for classroom/laboratory use only. This document, or any part, may not be reproduced or distributed for any other purpose without the written consent of EDVOTEK, Inc.
Copyright © 2004, 2010, 2011 EDVOTEK, Inc., all rights reserved. EVT 2011-08-15AM
EDVO-Kit # S-44Micropipeting Basics
Pre-Lab Preparations
For the Pipeting Exercise (Activity Two), dispense reagents for each student/group. The quantities listed below are sufficient for perform-ing either Option A (Variable automatic micropipets) or Option B (Fixed volume micropipets). Each student/ group should receive the following:
Red dye 150 µl Blue dye 150 µl Yellowdye 150µl Glycerol 150 µl Alcohol 100 µl Buffer 0.8 ml
Pipeting Card Microtiter plate section/strip for mixing dyes Micropipet and tips Small container for discarding used tips

17Instructor’s Guide
Duplication of this document, in conjunction with use of accompanying reagents, is permitted for classroom/laboratory use only. This document, or any part, may not be reproduced or distributed for any other purpose without the written consent of EDVOTEK, Inc. Copyright © 2004, 2010, 2011 EDVOTEK, Inc., all rights reserved. EVT 2011-08-15AM
EDVO-Kit # S-44Micropipeting Basics
Experiment Results
ANSWERS TO ACTIVITY ONE
1. Perform the following conversions:
In decimals In scientific notation
1 ml = ____________ liter 1 ml = ____________ liter
1 liter = ____________ ml 1 liter = ____________ ml
1 ml = ____________ µl 1 ml = ____________ µl
1 µl = ____________ ml 1 µl = ____________ ml
10 µl = ____________ ml 10 µl = ____________ ml
20 µl = ____________ ml 20 µl = ____________ ml
50 µl = ____________ ml 50 µl = ____________ ml
100 µl = ____________ ml 100 µl = ____________ ml
2. How many times greater is a ml than a µl? ______________
3. How many times greater is a liter than a ml? ______________
4. How many times greater is a liter than a µl? ______________
.001
1,000
1,000
.001
.01
.02
.05
.1
1 x 10⁻³
1 x 10³
1 x 10³
1 x 10⁻³
1 x 10⁻²
2 x 10⁻²
5 x 10⁻⁵
1 x 10⁻¹
1,000
1,000
1,000,000

18In
stru
ctor
’s G
uide
Duplication of this document, in conjunction with use of accompanying reagents, is permitted for classroom/laboratory use only. This document, or any part, may not be reproduced or distributed for any other purpose without the written consent of EDVOTEK, Inc.
Copyright © 2004, 2010, 2011 EDVOTEK, Inc., all rights reserved. EVT 2011-08-15AM
EDVO-Kit # S-44Micropipeting Basics
Study Questions and Answers
1. Describe a good technique for withdrawing samples using a vari-able automatic micropipet or fixed volume micropipet.
Hold the sample tube at eye level, depress the top button to the first stop and hold. Put the end of the tip into the fluid and gradu-ally depress the top button to draw up the sample. Be sure to keep the tip below the sample while pipeting. Check to see that there are no air bubbles at the tip or in the sample.
2. How does the pipeting exercise help you understand the impor-tance of accurate pipeting using microliter volumes?
By comparing the amounts of sample delivered when pipeting vari-ous volumes ranging from 5 to 50 µl, one can see only a small dif-ference between each succeeding increase in volume. Therefore, in order to have reliable experimental results, it is important to pipet each sample accurately.
3. Why did you practice pipeting samples with various viscosities? It is helpful to feel the small differences in pipeting small samples of
higher viscosity, such as samples containing glycerol, compared to less viscous solutions containing alcohol. In order to have reliable experimental results, it is important to pipet samples accurately.

08-12-111121 5th Street, NW. Washington, DC 20001 08-12-11
1121 5th Street, NW. Washington, DC 20001