mft platform server for unix user guide - tibco software · tibco mft platform server™ for unix ....
TRANSCRIPT

TIBCO MFT Platform Server™ for UNIX
User Guide Software Release 7.1 March 2012

Important Information SOME TIBCO SOFTWARE EMBEDS OR BUNDLES OTHER TIBCO SOFTWARE. USE OF SUCH EMBEDDED OR BUNDLED TIBCO SOFTWARE IS SOLELY TO ENABLE THE FUNCTIONALITY (OR PROVIDE LIMITED ADD-ON FUNCTIONALITY) OF THE LICENSED TIBCO SOFTWARE. THE EMBEDDED OR BUNDLED SOFTWARE IS NOT LICENSED TO BE USED OR ACCESSED BY ANY OTHER TIBCO SOFTWARE OR FOR ANY OTHER PURPOSE.
USE OF TIBCO SOFTWARE AND THIS DOCUMENT IS SUBJECT TO THE TERMS AND CONDITIONS OF A LICENSE AGREEMENT FOUND IN EITHER A SEPARATELY EXECUTED SOFTWARE LICENSE AGREEMENT, OR, IF THERE IS NO SUCH SEPARATE AGREEMENT, THE CLICKWRAP END USER LICENSE AGREEMENT WHICH IS DISPLAYED DURING DOWNLOAD OR INSTALLATION OF THE SOFTWARE OR IF THERE IS NO SUCH SOFTWARE LICENSE AGREEMENT OR CLICKWRAP END USER LICENSE AGREEMENT, THE LICENSE(S) LOCATED IN THE “LICENSE” FILE(S) OF THE SOFTWARE. USE OF THIS DOCUMENT IS SUBJECT TO THOSE TERMS AND CONDITIONS, AND YOUR USE HEREOF SHALL CONSTITUTE ACCEPTANCE OF AND AN AGREEMENT TO BE BOUND BY THE SAME.
This document contains confidential information that is subject to U.S. and international copyright laws and treaties. No part of this document may be reproduced in any form without the written authorization of TIBCO Software Inc.
TIBCO, The Power of Now, TIBCO Managed File Transfer, TIBCO Managed File Transfer Command Center, TIBCO Managed File Transfer Internet Server, TIBCO Managed File Transfer Platform Server, TIBCO Managed File Transfer Platform Server Agent, Edge Server, RocketStream Accelerator, and Slingshot are either registered trademarks or trademarks of TIBCO Software Inc. or its subsidiaries in the United States and/or other countries.
All other product and company names and marks mentioned in this document are the property of their respective owners and are mentioned for identification purposes only.
THIS SOFTWARE MAY BE AVAILABLE ON MULTIPLE OPERATING SYSTEMS. HOWEVER, NOT ALL OPERATING SYSTEM PLATFORMS FOR A SPECIFIC SOFTWARE VERSION ARE RELEASED AT THE SAME TIME.
THIS DOCUMENT IS PROVIDED “AS IS” WITHOUT WARRANTY OF ANY KIND, EITHER EXPRESS OR IMPLIED, INCLUDING, BUT NOT LIMITED TO, THE IMPLIED WARRANTIES OF MERCHANTABILITY, FITNESS FOR A PARTICULAR PURPOSE, OR NON-INFRINGEMENT.
THIS DOCUMENT COULD INCLUDE TECHNICAL INACCURACIES OR TYPOGRAPHICAL ERRORS. CHANGES ARE PERIODICALLY ADDED TO THE INFORMATION HEREIN; THESE CHANGES WILL BE INCORPORATED IN NEW EDITIONS OF THIS DOCUMENT. TIBCO SOFTWARE INC. MAY MAKE IMPROVEMENTS AND/OR CHANGES IN THE PRODUCT(S) AND/OR THE PROGRAM(S) DESCRIBED IN THIS DOCUMENT AT ANY TIME.
THE CONTENTS OF THIS DOCUMENT MAY BE MODIFIED AND/OR QUALIFIED, DIRECTLY OR INDIRECTLY, BY OTHER DOCUMENTATION WHICH ACCOMPANIES THIS SOFTWARE, INCLUDING BUT NOT LIMITED TO ANY RELEASE NOTES AND "READ ME" FILES.
TIBCO® Managed File Transfer Internet Server with RocketStream® Accelerator is entitled TIBCO® Managed File Transfer Internet Server in certain other product documentation and in user interfaces of the product. Copyright ©2003-2012 TIBCO Software Inc. ALL RIGHTS RESERVED. TIBCO Software Inc. Confidential Information

3 Contents
TIBCO® Managed File Transfer™ Platform Server for UNIX
Contents
Preface ........................................................................................................................... 6
RELATED DOCUMENTATION .......................................................................................................... 7 TIBCO MFT Platform Server for UNIX Documentation............................................................ 7
HOW TO CONTACT TIBCO CUSTOMER SUPPORT ............................................................................ 8 Installation ..................................................................................................................... 9
SYSTEM REQUIREMENTS ............................................................................................................. 10 Supported Platforms ............................................................................................................... 10 Minimum Hardware ................................................................................................................ 11 Sizing Guidelines .................................................................................................................... 11 Group Requirements ............................................................................................................... 12
INSTALL ON UNIX AND LINUX SYSTEMS ..................................................................................... 13 MFT Platform Server for UNIX and Linux Software Packages ................................................ 13 License Key ............................................................................................................................ 13 Root Install ............................................................................................................................. 14 Non-Root Install ..................................................................................................................... 19 Unattended (Silent) Mode Install ............................................................................................. 20 Changing Ownership and Group Permissions .......................................................................... 22 Upgrading MFT Platform Server ............................................................................................. 23
UNINSTALL ................................................................................................................................. 25 Configure MFT Platform Server .................................................................................... 26
CONFIG.TXT ................................................................................................................................ 27 Server configurations .............................................................................................................. 27 Client configurations ............................................................................................................... 36 Common configurations .......................................................................................................... 42
Administrator Commands ............................................................................................. 47
Start MFT Platform Server ...................................................................................................... 47 Stop MFT Platform Server ...................................................................................................... 48 Verify MFT Platform Server is started..................................................................................... 48 Display the MFT Platform Server Version Information ............................................................ 48
Setting up SSL ............................................................................................................... 49
GENERATING A CERTIFICATE REQUEST ........................................................................................ 50 ENCRYPTING THE SSL PRIVATE KEY PASSWORD .......................................................................... 53 CONFIGURE THE MFT PLATFORM SERVER TO USE SSL ................................................................. 54 VIEWING AN SSL CERTIFICATE.................................................................................................... 56
Transfer Commands ..................................................................................................... 57
FILE TO FILE TRANSFERS ............................................................................................................. 58 Transfers using cfsend and cfrecv commands .......................................................................... 59 Transfers using Wild Cards ..................................................................................................... 60

Contents 4
TIBCO® Managed File Transfer™ Platform Server for UNIX
Directory Transfers ................................................................................................................. 61 File Name Tokens ................................................................................................................... 64 Post Processing Actions (PPA) ................................................................................................ 70
FILE TO JOB TRANSFERS .............................................................................................................. 74 RUNNING REMOTE COMMANDS ................................................................................................... 75 TRANSFER PARAMETERS ............................................................................................................. 77
Nodes ........................................................................................................................... 96
CREATING NODES ....................................................................................................................... 98 NODES PARAMETERS .................................................................................................................. 103 EXAMPLE TRANSFERS USING NODES .......................................................................................... 109
Profiles ....................................................................................................................... 111
CREATING LOCAL PROFILES ....................................................................................................... 112 LOCAL PROFILE PARAMETERS .................................................................................................... 114 CREATING RESPONDER PROFILES................................................................................................ 117 RESPONDER PROFILE PARAMETERS............................................................................................. 119 PROFILE ACTION COMMANDS ..................................................................................................... 121
Distribution Lists......................................................................................................... 122
CONFIGURE DISTRIBUTION LISTS ................................................................................................ 123 Example Distribution List Transfer ........................................................................................ 124
Template Transfers..................................................................................................... 126
FILE TO FILE TRANSFERS USING TEMPLATES............................................................................... 127 FILE TO JOB TRANSFERS USING TEMPLATES ................................................................................ 131 RUNNING REMOTE COMMANDS USING TEMPLATES ..................................................................... 132
Extended Features...................................................................................................... 134
USING CHECKPOINT RESTART .................................................................................................... 135 CONVERSION TABLES/CUSTOM CODE CONVERSION .................................................................... 137 DIRECTORY NAMED INITIATION (DNI) ........................................................................................ 142 FUSPING UTILITY .................................................................................................................... 143 FUSUTIL UTILITY ..................................................................................................................... 145 CONFIGURED POST PROCESSING ................................................................................................. 147
Example Configured Post Processing Commands ................................................................... 148 Argument Substitution ........................................................................................................... 148
CFALIAS .................................................................................................................................... 150 CfAlias Parameters ................................................................................................................ 150 Substitutable Parameters ........................................................................................................ 152 Example of how CfAlias could be used .................................................................................. 152
AUDITING (CFINQ UTILITY) ........................................................................................................ 154 Log Files ............................................................................................................................... 154 CFINQ Command Format: ..................................................................................................... 155 CFINQ Parameters ................................................................................................................. 159
ACCESS CONTROL ...................................................................................................................... 163 Access Control Parameters ..................................................................................................... 163 Access Control Examples ....................................................................................................... 166

5 Preface
TIBCO® Managed File Transfer™ Platform Server for UNIX
Using DEFAULT Access Control Entries ............................................................................... 167 Access Control Format ........................................................................................................... 168
OCSP AND CRL SUPPORT .......................................................................................................... 170 Configuring CRL ................................................................................................................... 170 Configuring OCSP ................................................................................................................. 171 OCSP and CRL parameters .................................................................................................... 171 The following parameters in the config.txt file configure OCSP and CRL certificate revocation checking. .............................................................................................................. 172
PERSONALIZED SSL AUTHORIZATION ......................................................................................... 173 SSLAuth Parameters .............................................................................................................. 174 SSL Authorization File Examples .......................................................................................... 176
USER EXITS ............................................................................................................................... 178 Guidelines for Writing the C/C++ code .................................................................................. 178 CfXitData Structure ............................................................................................................... 179
CFUNIX2DOS UTILITY.................................................................................................................. 184 ROCKETSTREAM ........................................................................................................................ 185
Using RocketStream within MFT Platform Server for UNIX .................................................. 185

Preface 6
TIBCO® Managed File Transfer™ Platform Server for UNIX
Preface This user’s guide explains how to use TIBCO MFT Platform Server™ for UNIX.
Topics
• Related Documentation • How to Contact TIBCO Customer Support

7 Preface
TIBCO® Managed File Transfer™ Platform Server for UNIX
Related Documentation
This section lists documentation you may find useful.
TIBCO MFT Platform Server for UNIX Documentation
The following documents form the TIBCO MFT Platform Server for UNIX and Linux documentation set:
• TIBCO MFT Platform Server for UNIX Users Guide Read this manual for instructions on site preparation, installation, and on using the product to perform transfer requests and more between other Platform Server nodes.
• TIBCO MFT Platform Server for UNIX Release Notes Read the release notes for a list of new and changed features. This document also contains lists of known issues and closed issues for this release.
• TIBCO Perl Directory Named Initiation (DNI) Installation and Operations Guide Read this manual for instructions on installation, and on how to use the perl dni program to perform transfer requests and more between other MFT Platform Server nodes and MFT Command Center.

Preface 8
TIBCO® Managed File Transfer™ Platform Server for UNIX
How to Contact TIBCO Customer Support
For comments or problems with this manual or the software it addresses, contact TIBCO Support, as follows:
• For an overview of the TIBCO Support and information on getting started with TIBCO Support, visit http://www.tibco.com/services/support
• If you already have a valid maintenance or support contract, visit https://support.tibco.com
Entry to this site requires a user name and password. If you do not have to login credentials, click Register with Support.
• Technical Support email address [email protected]
• Technical Support Call Centers:
o North and South America: +1.650.846.5724 or +1.877.724.8227 (1.877.724.TACS)
o EMEA (Europe, Middle East, Africa): +44 (0) 870.909.3893
o Australia: +61.2.4379.9318 or 1.800.184.226
o Asia: +61 2 4379 9318

9 Installation
TIBCO® Managed File Transfer™ Platform Server for UNIX
Installation This section explains how to install TIBCO MFT Platform Server for UNIX and Linux systems.
Topics
• System Requirements • Minimum Hardware • Sizing Guidelines • Installation on UNIX and Linux Systems

10 Installation
TIBCO® Managed File Transfer™ Platform Server for UNIX
System Requirements Supported Platforms
This section lists the supported platforms.
• Solaris (SPARC)
--- Solaris 9
--- Solaris 10
• Solaris 10 (x86)
--- Solaris 10
• HP-UX
--- HP-UX 10
Note: Our ability to support TIBCO MFT Platform Server for UNIX v7.1 and below running on an HP RISC system is limited due to the fact that as of December 31, 2008 the HP RISC platform is no longer sold by HP. Please reference the following link.
http://www.hp.com/products1/servers/HP9000_family_overview.html
Future releases of TIBCO MFT Platform Server for UNIX will not include the HP RISC platform.
• HP-UX (IA64 Itanium)
--- HP-UX 11i
• Linux (x86)
--- Red Hat Enterprise Linux ES/AS 5.0
--- Red Hat Enterprise Linux WS Version 5.0
--- SUSE Linux Enterprise Server 9 SP4
• IBM AIX 5L

1
Preface
TIBCO® Managed File Transfer™ Platform Server for UNIX
--- AIX 5.3
• IBM System z
--- Red Hat Enterprise Linux WS Version 5.0
--- SUSE Linux Enterprise Server 9
MFT Platform Server™ for UNIX and Linux is a 32-bit application which is fully supported on 64-bit UNIX operating systems.
*Note: Support is provided by TIBCO only for the vendor’s generally supported release versions. Once the operating system goes into extended support mode, or the vendor no longer supports a version, it will cease to be supported by TIBCO Technical Support.
Minimum Hardware This section lists the minimum hardware requirements.
• Minimum system memory 1 GB
• 100 MB of available disk space
• An appropriate amount of additional local storage is recommended for file transfer data
Sizing Guidelines This section contains additional informational to the minimum hardware requirements you may find useful.
• For up to 100 concurrent transfers, two or more processor cores at 2.5 GHz or faster is recommended.
• For up to 200 concurrent transfers, four or more processor cores at 2.5 GHz or faster is recommended.
• For more than 200 concurrent transfers, eight or more processor cores at 2.5 GHz or faster is recommended.
• One additional processor core at 2.5 GHz or better for extensive use of encryption or compression.

Contents 12
TIBCO® Managed File Transfer™ Platform Server for UNIX
Group Requirements During the MFT Platform Server root installation the folders and files will be assigned to an administration group. The group used for this purpose can be one that already exists on the system or a new group. (The group does not need any users in it at installation time; the group just needs to exist.) By default MFT Platform Server will use group named cfadmin. However, you can create a group with a different name to use for this purpose. During the installation you will have the opportunity to either use the default group named cfadmin or choose a different group. For non-root user installations the user id running the installation will also have the opportunity to set the administration group however it does not have to exist at the time of the install. All ownership of the folders and files will be set to the user running the installation. For more information on root and non-root installations see the Installation section of this guide.

Installation 13
TIBCO® Managed File Transfer™ Platform Server for UNIX
Install on UNIX and Linux Systems MFT Platform Server for UNIX and Linux Software Packages
To install Platform Server for UNIX you will need to download your software from TIBCO, please contact Technical Support in order to put in a request.
Download the file required for your UNIX platform
License Key
MFT Platform Server for UNIX requires a license key. If you don’t have a license key yet, contact technical support at [email protected].
The license key is based on the machine name of your UNIX server. When requesting your license key from TIBCO’s technical support supply the output from the following UNIX command:
uname –n
Note: You can run the installation without a license key but you will not be able to conduct file transfers until one is received.
UNIX Platform MFT Platform Server tar file AIX cyberaix.tar
HP Itanium cyberihp.tar
HP-UX cyberhp.tar
Linux cyberlinux.tar
Solaris Sparc cybersun.tar
Solaris x86 cybersuni.tar
zLinux cyberZlinux.tar
Installation 14
TIBCO® Managed File Transfer™ Platform Server for UNIX
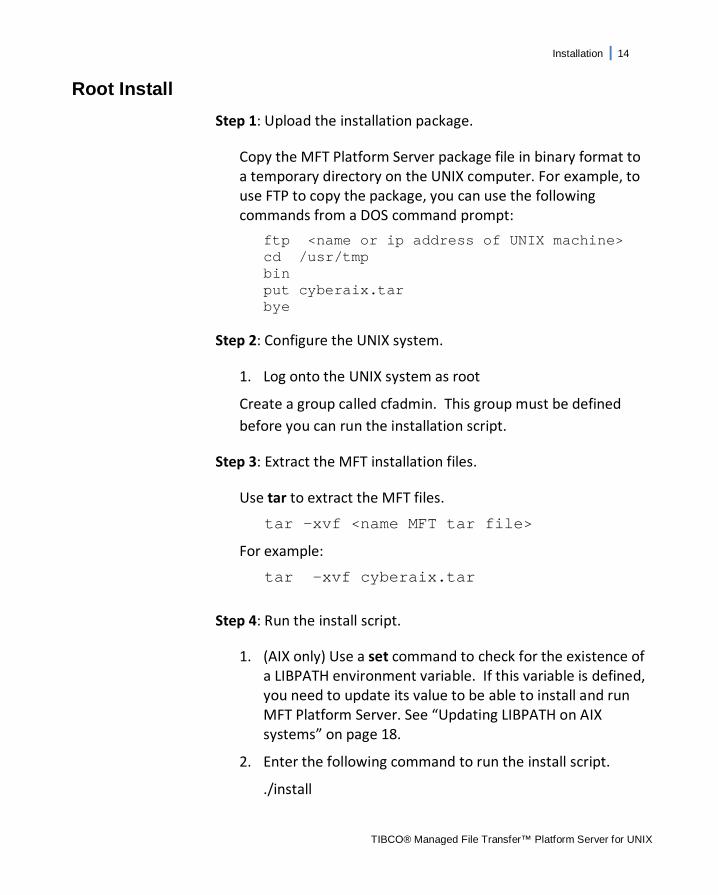
Root Install Step 1: Upload the installation package.
Copy the MFT Platform Server package file in binary format to a temporary directory on the UNIX computer. For example, to use FTP to copy the package, you can use the following commands from a DOS command prompt:
ftp <name or ip address of UNIX machine> cd /usr/tmp bin put cyberaix.tar bye
Step 2: Configure the UNIX system.
1. Log onto the UNIX system as root
Create a group called cfadmin. This group must be defined before you can run the installation script.
Step 3: Extract the MFT installation files.
Use tar to extract the MFT files.
tar -xvf <name MFT tar file>
For example:
tar -xvf cyberaix.tar
Step 4: Run the install script.
1. (AIX only) Use a set command to check for the existence of a LIBPATH environment variable. If this variable is defined, you need to update its value to be able to install and run MFT Platform Server. See “Updating LIBPATH on AIX systems” on page 18.
2. Enter the following command to run the install script.
./install

15 Installation
TIBCO® Managed File Transfer™ Platform Server for UNIX
The installer displays the default installation directory. You can accept this default even if you want to modify the installation location. The script prompts for an installation directory later.
Note: For information about configuring command line options when you run the script, see Unattended (Silent) Mode Install.)
3. Press Enter to continue.
The installer displays the software license agreement.
4. At the end of the license agreement, enter “Yes” to accept the license agreement and continue.
5. During an MFT Platform Server root installation the folders and files will be assigned to an administration group. This group must exist prior to the installation. By default MFT Platform Server will use group named cfadmin. However, you can create a group with a different name to use for this purpose.
MFT Platform Server utilizes two more groups which by default are called cfbrowse and cftransfer. These groups are also configurable but unlike the administration group they do not need to exist prior to install. Below is a description of what each group is responsible for:
Group Name Responsibility cfadmin A member of the cfadmin group can configure
nodes, profiles, and responder profiles, as well as view audit records from all users.
cfbrowse A member of the cfbrowse group can view audit records from all users. Note: A User not in the cfbrowse group will be able to view only transactions that they conducted.
cftransfer A member of the cftransfer group can conduct Platform to Platform file transfers initiated

Installation 16
TIBCO® Managed File Transfer™ Platform Server for UNIX
from MFT Command Center. Note: If this group does not exist and a transfer request comes in from Command Center it will be allowed based on the node configurations for the MFT Command Center. If the group does exist and the end user account being used for a file transfer initiated from Command Center is not a member the transfer will fail.
If you need to change the group name being used for these functions after the install you can open the file config.txt found in your <MFTPS_install>\config
directory. For more information please see the section, Configure MFT Platform Server.
For non-root user installations the user id running the installation will also have the opportunity to set the administration group however it does not have to exist at the time of the install. All ownership of the folders and files will be set to the user and users group running the installation.
6. Set the installation directory.
The install script prompts for an installation directory. By default MFT Platform Server is installed to:
/mftps
Enter “Y” or “y” to accept the default. To choose another directory, enter “N” or “n” and you will be given the opportunity to enter an installation path. The new directory will be created for you if it does not exist.
7. Create links.
Reply “Y” in response to the prompt that asks if you wish to create soft links. This creates symbolic links in

17 Installation
TIBCO® Managed File Transfer™ Platform Server for UNIX
/usr/lib for each file in the MFT Platform Server libs
8. Apply your license key.
directory.
The next prompt asks for your license key. If you have a key, respond “Y” and paste the license key (taking care not to include any blank spaces). If you don’t have a key at the time of the install, enter “N” at the prompt. You can apply the key later.
If the license key is valid you will see the message:
MFT license Key is valid
If you choose to apply the key later, use the MFT Platform Server cfapplykey program. This program is located in the MFT Platform Server install directory. To apply the key, enter the following on the command line:
cfapplykey –k <license_key>
Note: Before you can run this command, you need to export the required environment variables as described below in Step 6.
9. Review the final installation messages. Note the following:
• The location of the configuration file “Config File” (<MFTPS_install>/config by default). This is the config.txt file used to configure server settings. For information about settings in this file, see Configure MFT Platform Server.
• Path information you can use to configure required environment variables as described next.
Step 6: Set the required environment variables
MFT Platform Server requires correct configuration of the following environment variables.
CFROOT Used by MFT to locate the install directory

Installation 18
TIBCO® Managed File Transfer™ Platform Server for UNIX
PATH Used by UNIX to locate the Platform Server executables
LD_LIBRARY_PATH Used by UNIX to locate the necessary lib files (Note: This variable is not needed on HP RISC systems.)
Use the export statements provided in the installer’s final message to determine correct values for these variables. For example, if you installed to the default location, configure your variables as follows:
export CFROOT=/mftps export PATH=$PATH:$CFROOT export LD_LIBRARY_PATH=$LD_LIBRARY_PATH:$CFROOT/libs
These variables should be set for all for users that run MFT Platform Server. Environment variables can be set using any of the following techniques:
• In the System profile - This configures the default value for all users.
• In the User Profile - A User profile value overrides the System Profile and becomes the default for that user.
• By setting the variable value at a command prompt. This overrides the System and User Profiles for this UNIX session.
You have completed the installation of MFT Platform Server you can now go to the section Configure MFT Platform Server to read more about configuring your MFT Platform Server.
Updating LIBPATH on AIX systems
The installer configures access to required libraries using the environment variable LD_LIBRARY_PATH. If you have a LIBPATH variable set on an AIX system, the LD_LIBRARY_PATH fails. This causes the install to fail with an error saying that the dependent module libstdc++a could not be loaded.

19 Installation
TIBCO® Managed File Transfer™ Platform Server for UNIX
If you are running on an AIX system with a LIBPATH variable defined, you must make the following changes to install and run MFT Platform Server.
1) Before you run the install script, update the LIBPATH variable to point to the required libs
export LIBPATH=$LIBPATH:./libs
directory. To do this, execute the following command from the directory that contains the MFT install script:
2) After the install, update your LIBPATH variable to point to
required MFT Platform Server libraries before executing any MFT Platform Serve commands.
export LIBPATH=$LIBPATH:$CFROOT/libs Non-Root Install
MFT Platform Server for UNIX also supports a non-root install using the install script called install.noroot.
For non-root user installations the user id running the installation has the opportunity to set the administration group. This group does not have to exist at the time of the install. All ownership of the folders and files will be set to the user name and group of the user running the installation.
Warning: The non-root installation can be installed, configured and run without the knowledge and assistance of an administrator.
We do not recommend this option, as you will lose the following capabilities:
1. Password validation against the UNIX Security System - As a result, MFT Platform Server Responder Profiles will be required to provide authentication before any file transfers

Installation 20
TIBCO® Managed File Transfer™ Platform Server for UNIX
can be performed. To use MFT Platform Server Responder Profiles you must create MFT Platform Server Nodes. Each Responder Profile will be associated with an MFT Platform Server Node. See Nodes for creating node definitions and Responder User Profile for information about creating Responder Profiles.
2. Transfers run under the effective uid (euid) of the user initiating the transfer request – As a result, transfers will run under the euid executing CyberResp.
Unattended (Silent) Mode Install Both the install and install.noroot scripts allow you to
pass parameters to the script to ensure that all required parameters are set, thus allowing an unattended or quiet install. The supported parameters can be viewed by executing the –h (help) option. ./install –h MFT Platform Server For Linux Copyright (C) 1995-2012 TIBCO Software Inc. ALL RIGHTS RESERVED. TIBCO Software Inc Confidential Information http://www.tibco.com/ +1.(650).846.5724 usage: ./install [-d DirName] [-k LicenseKey] [-q] [-c] [-n] [-l] [-h] [-?] where:
-d: the directory where MFT Platform Server will be installed
-k: the MFT Platform Server license key -q: take the default installation options, do not ask
any questions -c: save and restore config files if doing reinstall -n: save, but do not restore config files if doing
reinstall -l: apply license key later -ulnk: create links for ../libs files to /usr/lib - ugr: configure special group names

21 Installation
TIBCO® Managed File Transfer™ Platform Server for UNIX
-agr: the group name for Admin functions -bgr: the group name for Audit Browse functions -tgr: the group name for Transfer functions -accepteula: accept end user license agreement -h: display help -?: display help
The parameters that are required for a quiet install are: -q Defines that the script will run in quiet (or
unattended) mode -accepteula Defines that you have read and accepted
the End User License Agreement
Note the following considerations when using the ulnk parameter:
• A soft link is created in /usr/lib for each file in the MFT Platform Server libs directory.
• Since root rights are required to create these links, the “install.noroot” script does not support the ulnk
parameter.
• If there is already a file in /usr/lib for the files in the
MFT Platform Server libs directory, a link will not be
created. In cases like this, you may need to set the LD_LIBRARY_PATH environment variable before using MFT Platform Server.
• Great care must be taken if you create links for different versions of MFT Platform Server. You may still require the LD_LIBRARY_PATH for versions of MFT Platform Server whose lib files are not in the /usr/lib directory.
At the end of the script, you’ll see information about setting the following environment variables. These variables should be set in the login profile for users that run MFT Platform Server.
CFROOT Used by MFT to locate the install directory

Installation 22
TIBCO® Managed File Transfer™ Platform Server for UNIX
PATH Used by UNIX to locate the MFT executables
LD_LIBRARY_PATH Used by UNIX to locate the necessary lib files
The example silent install below is setup to accept the EULA agreement and the default cfadmin, cfbrowse and cftransfer group names to be used. The MFT Platform Server will be installed into the /opt/mftps directory without a license key and a soft link will be created to point to the MFTPS libs directory: ./install –q –accepteula –ugr –d /opt/mftps –l –ulnk The example silent install below is setup to accept the EULA agreement, change the default cfadmin group to be MFTAdmins while leaving the default cfbrowse and cftransfer group names to be used. The MFT Platform Server will be installed into the /opt/mftps directory without a license key and a soft link will be created to point to the MFTPS libs directory: ./install –q –accepteula –ugr –agr MFTAdmins –d /opt/mftps –l –ulnk This completes the installation of MFT Platform Server. You can now go to the section Configure MFT Platform Server to read more about configuring your MFT Platform Server, Changing Ownership and Group Permissions.
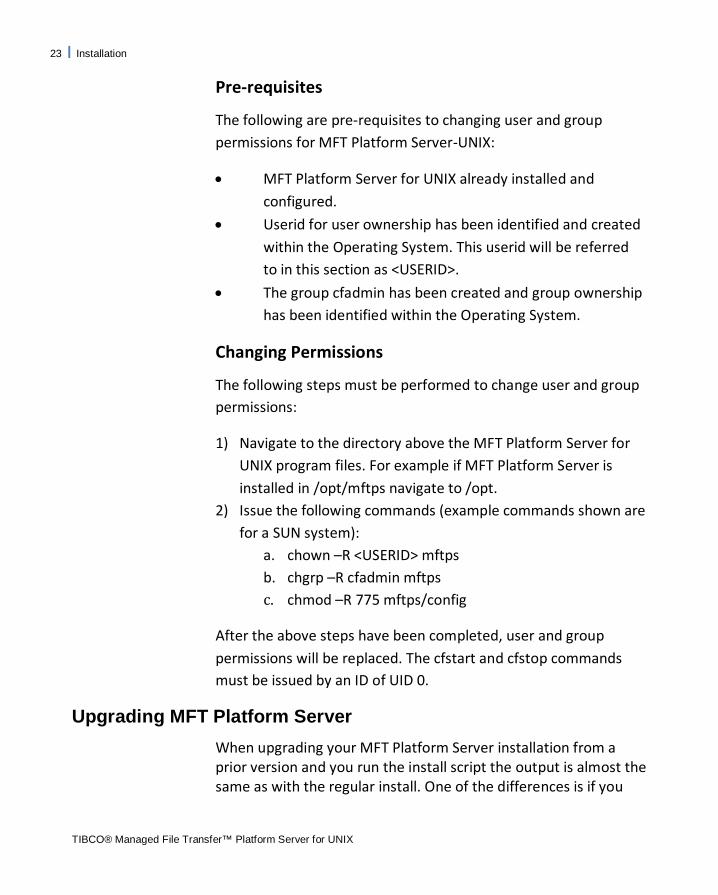
Changing Ownership and Group Permissions Most MFT Platform Server for UNIX program files are installed with user and group permissions of ROOT. This section contains the required steps to change user and group permissions to allow other users than ROOT to administer MFT Platform Server for UNIX.
23 Installation
TIBCO® Managed File Transfer™ Platform Server for UNIX
Pre-requisites
The following are pre-requisites to changing user and group permissions for MFT Platform Server-UNIX:
• MFT Platform Server for UNIX already installed and configured.
• Userid for user ownership has been identified and created within the Operating System. This userid will be referred to in this section as <USERID>.
• The group cfadmin has been created and group ownership has been identified within the Operating System.
Changing Permissions
The following steps must be performed to change user and group permissions:
1) Navigate to the directory above the MFT Platform Server for UNIX program files. For example if MFT Platform Server is installed in /opt/mftps navigate to /opt.
2) Issue the following commands (example commands shown are for a SUN system):
a. chown –R <USERID> mftps b. chgrp –R cfadmin mftps c. chmod –R 775 mftps/config
After the above steps have been completed, user and group permissions will be replaced. The cfstart and cfstop commands must be issued by an ID of UID 0.
Upgrading MFT Platform Server When upgrading your MFT Platform Server installation from a prior version and you run the install script the output is almost the same as with the regular install. One of the differences is if you

Installation 24
TIBCO® Managed File Transfer™ Platform Server for UNIX
choose to install directly on top of the prior installation you will be told the directory already exist, see the following example:
This Directory Already Exists. Do You Want To Reinstall MFT Platform Server (Y/N)?
If you type “N”or “n” here, the install will tell you remove the directory where you want to install MFT Platform Server and ask you to try the install again.
If you enter “Y” or “y”, the new program files will be installed. You will then be asked if you want to keep your old configuration files. See the following example:
installing configuration directory... Do you want to restore the old configuration files (Y/N)?
If you enter “Y” or “N”, your old configuration file will be backed up and placed in a folder called <MFTPS_install>/BACKUP_CONFIG. In order to use your old configuration files you would rename the new config folder that was created during the upgrade to for example config.new and then rename BACKUP_CONFIG to config.
The install will proceed as normal from that point.

25 Installation
TIBCO® Managed File Transfer™ Platform Server for UNIX
Uninstall
To uninstall MFT Platform Server, use the uninstall command that is provided in the MFT Platform Server install directory:
./uninstall
You will be asked if you want to uninstall MFT Platform Server from the directory where it was installed. Reply Y for yes and the product will be uninstalled.
All files that were put in the MFT Platform Server install directory and subdirectories other than the MFT Platform Server files themselves will remain after the software is uninstalled.

26 Configure MFT Platform Server
TIBCO® Managed File Transfer™ Platform Server for UNIX
Configure MFT Platform Server
This section describes how to configure your MFT Platform Server to be used as a Responder (Server) and as an Initiator (Client) on the UNIX platform. When you install MFT Platform Server it is able to run as it is as long as the default port 46464 is available on your server. Because each environment is different we provide an easy to use configuration file to allow you to fine tune your MFT Platform Server for UNIX settings.
Topics
• Config.txt

27 Configure MFT Platform Server
TIBCO® Managed File Transfer™ Platform Server for UNIX
Config.txt
The configuration file config.txt for MFT Platform Server can be found in the <MFTPS_install>/config directory. Use a text editor such as vi to update and save the configuration file.
Note: The MFT Platform Server MUST be restarted for any changes to the config.txt file to take effect.
The file config.txt is divided in to 3 sections, Server, Client, and Common. The next sections of this guide provide detailed information about the parameters available for each section of the configuration file.
Server configurations Below is the default server (Responder) configuration for an MFT Platform Server:
# System Configuration File. # Changing parameters in this file will NOT take effect until CyberResp is stopped and restarted. # [ SERVER ] ListenAdapterIP: All { All, IpName/Address } Port: 46464 TraceLevel: N { N, Low|L, Medium|M, High|H } TracePath: /mftps/trace/Responder { N, Path } TraceSizeServer: N { N, # of Kb } ConvTbl: N { N, FileName } ExitPrgm: N { N, FileName } RequiredNodeDefinition: N { N, Y } AcceptVerifiedUser: N { N, Y } ResponderProfile: N { N, Y, D } AllowRoot: N { N, All, Password } Umask_Default: N { N, 3 digit number } Uperm_Default: N { N, 3 digit number } Timeout: 120 { Transfer timeout in min } RunCyberRespAsNonRoot: N { Y, N } # When RunCyberRespAsNonRoot is set to Y ResponderProfile must be set to Y # SSL Communication Additional Parameters. SSLPort: 56565 ClientVerification: N { N, Y } CertificateFileName: PrivateKeyFileName: PrivateKeyPwdFileName: TrustedAuthorityFileName:

Configure MFT Platform Server 28
TIBCO® Managed File Transfer™ Platform Server for UNIX
AuthorizationFileName: N { N, FileName } SSLTraceLevel: N { N, Y } SSLTracePath: /mftps/trace/SSLResponder { N, Path } CheckOCSP: N { N, Y } OCSPURL: { URL } OCSPRootCertFileName: OCSPServerCertFileName: CheckCRL: N { N, Y } CAPath:
We will discuss each parameter in the tables that follow for the Server section in the order in which they are displayed above.
Parameter Description
ListenAdapterIP If a machine has more than one IP Address it is possible to bind the connection to a particular one. It can guarantee that all MFT Platform Server transfers will go only through this particular IP Address. The default value for this parameter is ALL which means bind to any IP Address. If this parameter is defined, the responder will listen for incoming connections only at this address.
Port Defines the IP port that MFT Platform Server will listen on for incoming requests. Valid values are 1024 to 65535, since the lower ports are usually reserved for standard applications.
TraceLevel Defines the level of tracing that should occur. The default value is N. Tracing should only be turned on at the request of TIBCO technical support. Note: This parameter cannot be used within a transfer template.
TracePath Defines the name of the path that will hold the [SERVER] Responder Trace file. MFT Platform Server has enhanced tracing that creates a unique trace file for each file transfer. The file name now contains the Process ID (PID). This means that should a transfer be restarted using Checkpoint
29 Configure MFT Platform Server
TIBCO® Managed File Transfer™ Platform Server for UNIX
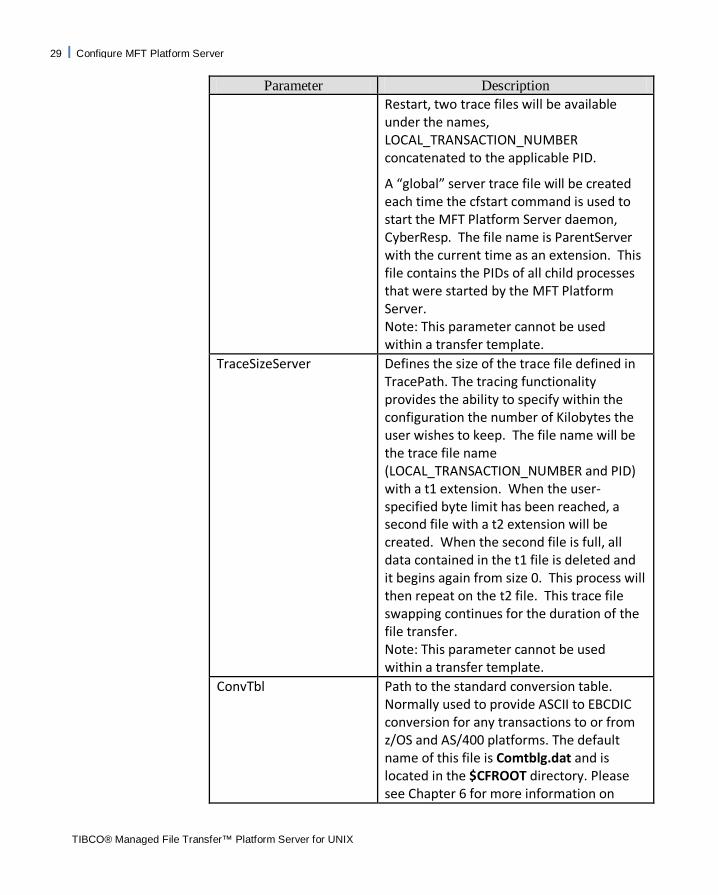
Parameter Description Restart, two trace files will be available under the names, LOCAL_TRANSACTION_NUMBER concatenated to the applicable PID.
A “global” server trace file will be created each time the cfstart command is used to start the MFT Platform Server daemon, CyberResp. The file name is ParentServer with the current time as an extension. This file contains the PIDs of all child processes that were started by the MFT Platform Server. Note: This parameter cannot be used within a transfer template.
TraceSizeServer Defines the size of the trace file defined in TracePath. The tracing functionality provides the ability to specify within the configuration the number of Kilobytes the user wishes to keep. The file name will be the trace file name (LOCAL_TRANSACTION_NUMBER and PID) with a t1 extension. When the user-specified byte limit has been reached, a second file with a t2 extension will be created. When the second file is full, all data contained in the t1 file is deleted and it begins again from size 0. This process will then repeat on the t2 file. This trace file swapping continues for the duration of the file transfer. Note: This parameter cannot be used within a transfer template.
ConvTbl Path to the standard conversion table. Normally used to provide ASCII to EBCDIC conversion for any transactions to or from z/OS and AS/400 platforms. The default name of this file is Comtblg.dat and is located in the $CFROOT directory. Please see Chapter 6 for more information on

Configure MFT Platform Server 30
TIBCO® Managed File Transfer™ Platform Server for UNIX
Parameter Description conversion tables.
ExitPrgm Path to the exit program on the local machine. The exit program allows the user to do customized post processing. For more information please refer to section named User Exits.
RequiredNodeDefinition There are two separate parameters, one under the Server section and one under the Client section. This parameter indicates whether a node definition is required so that MFT Platform Server may communicate to a remote system. Under the server section, a value of Y means that the remote IP address requires a defined node. If the remote address is not defined in a node (in either the cfnode.cfg or cfprofile.cfg), the Responder will reject the Initiator and send back error message. Under the Client section, a value of Y means that the remote IP address requires a defined node. If the remote address is not defined in a node, the Initiator will reject the transfer and display an error message.
AcceptVerifiedUser MFT Platform Server will login remote verified user with the remote userid and without password at all. MFT Platform Server will know that this client is verified if the client sends an internal password inside the password field.
The initiating platform will have to provide the following for the remote user id (this is case sensitive):
: *VER Password: (Password field should be left blank.)
This process will allow the initiating userid

31 Configure MFT Platform Server
TIBCO® Managed File Transfer™ Platform Server for UNIX
Parameter Description to be used as the responder user id. This means the same user id must exist on the responder as well as the initiating platforms.
ResponderProfile Responder Profiles define a local username and password that should be used in place of the incoming username and password. By using responder profiles, a remote MFT Platform Server installation does not have to know an actual username and password on your local machine to initiate a transfer.
ResponderProfile checking routine is always done prior to AcceptVerifiedUser checking. So if both are set up, AcceptVerifiedUser will take precedence over the remote userid if the local userid for this remote userid is found in the cfrprofile.cfg
ResponderProfile value D (Dual) means that the substitution of a real userid will occur only if the cfrprofile exists and a match is found. If there is no match found, then MFT Platform Server will attempt to login remote user with the userid and password they sent, rather than generate an error message that cfrprofile does not exist or the information does not match.
AllowRoot This parameter indicates whether the UNIX userid root will be considered as a valid userid for transfers. For example, if the responder profile defines root as the local userid, then CyberResp will allow this if AllowRoot=password or all, but disallow this if AllowRoot=no.
Umask_Default Umask_Default refers to the UNIX mask. This parameter allows an administrator to

Configure MFT Platform Server 32
TIBCO® Managed File Transfer™ Platform Server for UNIX
Parameter Description configure desired file permission on newly created files on the Server (Responder) side. The Umask_Default parameter allows the permissions to be modified according to the wishes of the remote user (Initiator), just as the UNIX umask sets the permissions on newly created files. If Umask_Default is set to N, then the file permissions will be set according the to the root user mask. On the Initiator side (UNIX Initiator), the desired permissions will be modified according to the umask of the user that issues the cfsend or cfrecv command. There is no command line or template option for Umask. This parameter is only contained in the MFT Platform Server config.txt file.
Uperm_Default Uperm_Default refers to UNIX permissions. This parameter allows an administrator to configure desired file permission on newly created files on the Server (Responder) side. The Uperm_Default parameter is used when a user sending a new file to the UNIX server has not provided the UPERM parameter. (This is not possible on a UNIX Initiator, as the UPERM parameter is set by default to the file permissions of the sending file). If the Uperm_Default is set to N, then the file permissions for the newly created file will be set according the Umask_Default parameter. Also, note that, for UNIX->UNIX transfers, if a file is not executable on the sender’s side, it will not be made into an executable on the responder’s side. This is a property of UNIX, not of MFT Platform Server.
TimeOut Specifies the amount of time in minutes that a connection will stay open while waiting for a response from the remote side. Once the time is reached the

33 Configure MFT Platform Server
TIBCO® Managed File Transfer™ Platform Server for UNIX
Parameter Description connection is ended.
RunCyberRespAsNonRoot This must be set if you are running MFT Platform Server by a non-root user. Note: When running CyberResp with a non-root user id you must use Responder Profiles. Therefore when RunCyberRespAsNonRoot is set to Yes, ResponderProfile must also be set to Yes.
Server SSL Communications Parameters:
Parameter Description SSLPort Defines the IP port that MFT Platform Server
will listen on for incoming SSL requests. Valid values are 1024 to 65535, since the lower ports are usually reserved for standard applications. If the parameter is not defined, MFT Platform Server will not listen for incoming SSL requests.
ClientVerification Defines whether MFT Platform Server is going to perform SSL client authentication. The default is N, which means that the client certificate will not be authenticated. If you specify Y, then client authentication will be performed. For more information, please see Setting Up SSL.
CertificateFileName Used only for SSL transfers, has no default value. Provides the path to the file with the certificate that will be used for a MFT Platform Server SSL transfer. There are separate parameters for Server and Client, but the same file name may be used for both. For more information, please see Setting Up SSL for more information.
PrivateKeyFileName Has no default value. Used only in order to perform SSL transactions. Provides the path to the file with the private key that is associated with the MFT Platform Server SSL certificate. There are separate parameters

Configure MFT Platform Server 34
TIBCO® Managed File Transfer™ Platform Server for UNIX
Parameter Description for Server and Client, but the same file name may be used for both. For more information, please refer to Setting Up SSL.
PrivateKeyPwdFileName
Has no default value. Used only in order to perform SSL transactions. Provides the path to the file with the private key password. To create this file, use the createPwd.exe utility that is part of the installation package. This can be found in the <MFTPS_install>/util directory. If the same certificate is used for the MFT Platform Server and Client, then the same private key password can be used for the Server and Client as well. For more information, please refer to Setting Up SSL.
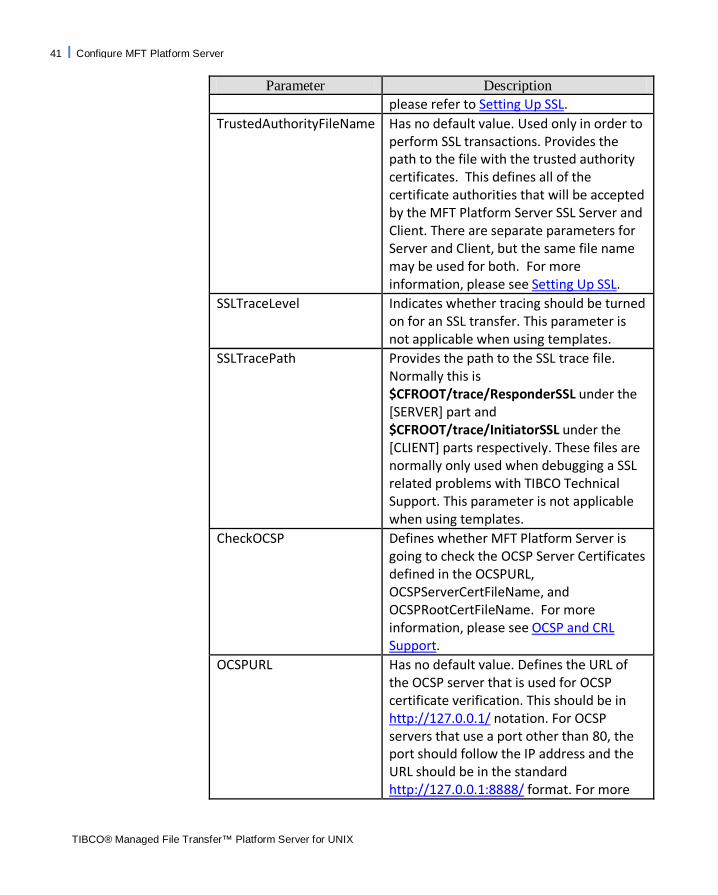
TrustedAuthorityFileName
Has no default value. Used only in order to perform SSL transactions. Provides the path to the file with the trusted authority certificates. This defines all of the certificate authorities that will be accepted by the MFT Platform Server SSL Server and Client. There are separate parameters for Server and Client, but the same file name may be used for both. For more information, please see Setting Up SSL.
AuthorizationFileName Provides the path to the authorization file to be used with SSL transfers. If this parameter is not defined or is defined as N, MFT Platform Server will not perform additional authentication to the client certificate. This parameter is only valid when ClientVerification is set to Y. You can find a sample authorization file that can be used called SSLAuth.cfg, located in the directory <MFTPS_install>/config/. For more information on configuring this file, please see the section Personalized SSL Authorization.
SSLTraceLevel Indicates whether tracing should be turned

35 Configure MFT Platform Server
TIBCO® Managed File Transfer™ Platform Server for UNIX
Parameter Description on for an SSL transfer. Tracing should only be turned on at the request of TIBCO technical support. Note: This parameter cannot be used within a transfer template.
SSLTracePath Provides the path to the SSL trace file. Normally this is <MFTPS_install>/trace/ResponderSSL under the [SERVER] part and <MFTPS_install>/trace/InitiatorSSL under the [CLIENT] parts respectively. These files are normally only used when debugging a SSL related problems with TIBCO Technical Support. Note: This parameter cannot be used within a transfer template.
CheckOCSP Defines whether MFT Platform Server is going to check the OCSP Server Certificates defined in the OCSPURL, OCSPServerCertFileName, and OCSPRootCertFileName. For more information, please see section OCSP and CRL Support.
OCSPURL Has no default value. Defines the URL of the OCSP server that is used for OCSP certificate verification. This should be in http://127.0.0.1/ notation. For OCSP servers that use a port other than 80, the port should follow the IP address and the URL should be in the standard http://127.0.0.1:8888/ format. For more information, please see OCSP and CRL Support.
OCSPRootCertFileName Has no default value. Defines the name of the certificate that is the root of the OCSP server’s Certificate Authentication tree. For more information, please see OCSP and CRL Support.
OCSPServerCertFileName
Has no default value. Defines the name of the certificate that verifies the OCSP server

Configure MFT Platform Server 36
TIBCO® Managed File Transfer™ Platform Server for UNIX
Parameter Description itself as being a trusted source for Certificate Authentication. For more information, please see OCSP and CRL Support.
CheckCRL Defines whether MFT Platform Server will check the CAPath field for the hashed CRL files. For more information, please see OCSP and CRL Support.
CAPath Defines the path where the CRL checking will look for the hashed filenames. For more information, please see OCSP and CRL Support for more information.
Client configurations
Below is the default server (Initiator) configuration for an MFT Platform Server:
# [ CLIENT ] RequiredNodeDefinition: N { N, Y } ConnectAdapterIP: All { All, IpName/Address } TraceLevelClient: N { N, Low|L, Medium|M, High|H } TracePathClient: /mftps/trace/Initiator { N, Path } TraceSizeClient: N { N, # of Kb } Umask_User: N { N, Y } Timeout: 120 { Transfer timeout in min } RunPPAEndDirTx: N { N, Y } RSHost: N { N, Host } RSPort: 9099 { Port Number } # SSL Communication. Additional Parameters. CertificateFileName: PrivateKeyFileName: PrivateKeyPwdFileName: TrustedAuthorityFileName: SSLTraceLevel: N { N, Y } SSLTracePath: /mftps/trace/SSLInitiator { N, Path } CheckOCSP: N { N, Y } OCSPURL: { URL } OCSPRootCertFileName: OCSPServerCertFileName: CheckCRL: N { N, Y } CAPath:
We will discuss each parameter in the tables below for the Client section in the order in which they are displayed above.
Parameter Description

37 Configure MFT Platform Server
TIBCO® Managed File Transfer™ Platform Server for UNIX
Parameter Description RequiredNodeDefinition There are two separate parameters, one
under the Server section and one under the Client section. This parameter indicates whether a node definition is required so that MFT Platform Server may communicate to a remote system. Under the server section, a value of Y means that the remote IP address requires a defined node. If the remote address is not defined in a node (in either the cfnode.cfg or cfprofile.cfg), the Responder will reject the Initiator and send back error message. Under the Client section, a value of Y means that the remote IP address requires a defined node. If the remote address is not defined in a node, the Initiator will reject the transfer and display an error message.
ConnectAdapterIP If a machine has more than one IP Address it is possible to bind the connection to a particular one. It can guarantee that all MFT Platform Server transfers will go only through this particular IP Address. The default value for this parameter is ALL which means bind to any IP Address. If this parameter is defined, the initiator will send/receive data for outgoing connections only through this address.
TraceLevelClient Defines the level of tracing that should occur. The default value is N. N|No – Indicates that no tracing will take place. L|Low – Provides minimal information about the transfer, including local and remote transaction numbers, file names, the number of bytes transferred, fail or success status indicator, general message string, and the start and finish times of the transfer. M|Medium – Includes all internal state

Configure MFT Platform Server 38
TIBCO® Managed File Transfer™ Platform Server for UNIX
Parameter Description messages. H|High – Includes all networking data in addition to the information provided by the medium level trace. Tracing should only be turned on at the request of TIBCO technical support. Note: This parameter cannot be used within a transfer template.
TracePathClient Defines the name of the path that will hold the [CLIENT] Initiator Trace file. MFT Platform Server has enhanced tracing that creates a unique trace file for each file transfer. The file name now contains the Process ID (PID). This means that should a transfer be restarted using Checkpoint Restart, two trace files will be available under the names, LOCAL_TRANSACTION_NUMBER concatenated to the applicable PID.
A “global” server trace file will be created each time the cfstart command is used to start the MFT Platform Server daemon, CyberResp. The file name is ParentServer with the current time as an extension. This file contains the PIDs of all child processes that were started by the MFT Platform Server. Note: This parameter cannot be used within a transfer template.
TraceSizeClient Defines the size of the trace file defined in TracePathClient. The tracing functionality provides the ability to specify within the configuration the number of Kilobytes the user wishes to keep. The file name will be the trace file name (LOCAL_TRANSACTION_NUMBER and PID) with a t1 extension. When the user-specified byte limit has been reached, a second file with a t2 extension will be

39 Configure MFT Platform Server
TIBCO® Managed File Transfer™ Platform Server for UNIX
Parameter Description created. When the second file is full, all data contained in the t1 file is deleted and it begins again from size 0. This process will then repeat on the t2 file. This trace file swapping continues for the duration of the file transfer. Note: This parameter cannot be used within a transfer template.
Umask_User This parameter applies only to the initiator doing a receive. N means that the user’s UMASK will be ignored on incoming files; Y means that it will be applied.
Timeout Specifies the amount of time in minutes that a connection will stay open while waiting for a response from the remote side. Once the time is reached the connection is ended.
RunPPAEndDirTx The Post Processing Action can be run after each file in a directory transfer or distribution list transfer has completed. This is the default, which is No. The second option is to have the Post Processing Action run after the entire directory or distribution list has been transferred. In this case set the parameter to Yes. If this parameter is set to Yes, the following rules also apply:
- StopOnFailure is automatically set to Yes. Transfers will stop on the first failed transfer.
- Failure PPA will be run on the first failed transfer.
- Successful PPA will run only on the last transfer (assuming it is successful).
- Since this is a global parameter, it affects
Configure MFT Platform Server 40
TIBCO® Managed File Transfer™ Platform Server for UNIX
Parameter Description all transfers.
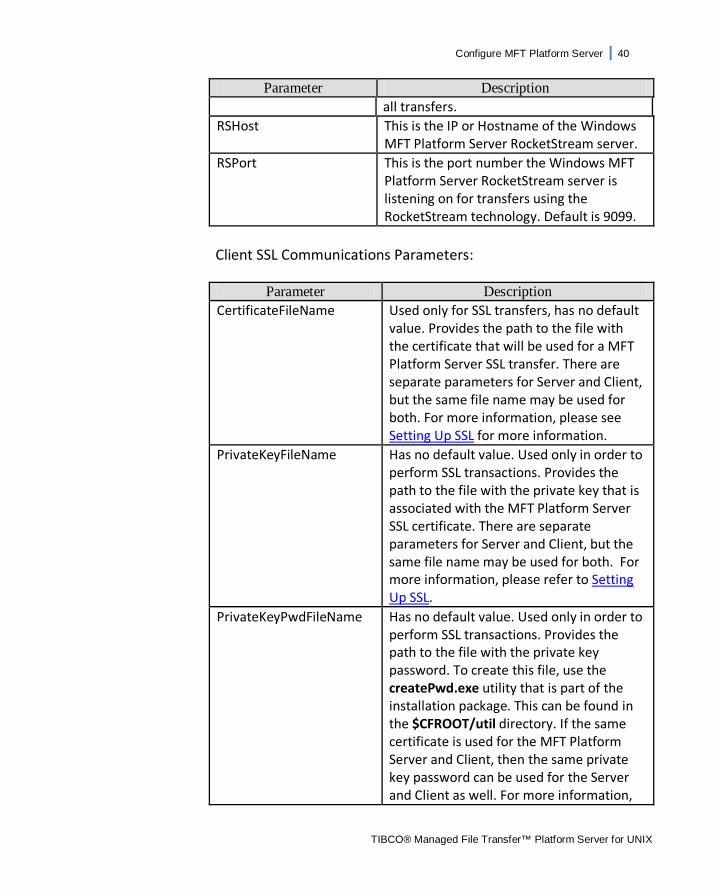
RSHost This is the IP or Hostname of the Windows MFT Platform Server RocketStream server.
RSPort This is the port number the Windows MFT Platform Server RocketStream server is listening on for transfers using the RocketStream technology. Default is 9099.
Client SSL Communications Parameters:
Parameter Description
CertificateFileName Used only for SSL transfers, has no default value. Provides the path to the file with the certificate that will be used for a MFT Platform Server SSL transfer. There are separate parameters for Server and Client, but the same file name may be used for both. For more information, please see Setting Up SSL for more information.
PrivateKeyFileName Has no default value. Used only in order to perform SSL transactions. Provides the path to the file with the private key that is associated with the MFT Platform Server SSL certificate. There are separate parameters for Server and Client, but the same file name may be used for both. For more information, please refer to Setting Up SSL.
PrivateKeyPwdFileName Has no default value. Used only in order to perform SSL transactions. Provides the path to the file with the private key password. To create this file, use the createPwd.exe utility that is part of the installation package. This can be found in the $CFROOT/util directory. If the same certificate is used for the MFT Platform Server and Client, then the same private key password can be used for the Server and Client as well. For more information,
41 Configure MFT Platform Server
TIBCO® Managed File Transfer™ Platform Server for UNIX
Parameter Description please refer to Setting Up SSL.
TrustedAuthorityFileName Has no default value. Used only in order to perform SSL transactions. Provides the path to the file with the trusted authority certificates. This defines all of the certificate authorities that will be accepted by the MFT Platform Server SSL Server and Client. There are separate parameters for Server and Client, but the same file name may be used for both. For more information, please see Setting Up SSL.
SSLTraceLevel Indicates whether tracing should be turned on for an SSL transfer. This parameter is not applicable when using templates.
SSLTracePath Provides the path to the SSL trace file. Normally this is $CFROOT/trace/ResponderSSL under the [SERVER] part and $CFROOT/trace/InitiatorSSL under the [CLIENT] parts respectively. These files are normally only used when debugging a SSL related problems with TIBCO Technical Support. This parameter is not applicable when using templates.
CheckOCSP Defines whether MFT Platform Server is going to check the OCSP Server Certificates defined in the OCSPURL, OCSPServerCertFileName, and OCSPRootCertFileName. For more information, please see OCSP and CRL Support.
OCSPURL Has no default value. Defines the URL of the OCSP server that is used for OCSP certificate verification. This should be in http://127.0.0.1/ notation. For OCSP servers that use a port other than 80, the port should follow the IP address and the URL should be in the standard http://127.0.0.1:8888/ format. For more

Configure MFT Platform Server 42
TIBCO® Managed File Transfer™ Platform Server for UNIX
Parameter Description information, please see OCSP and CRL Support.
OCSPRootCertFileName Has no default value. Defines the name of the certificate that is the root of the OCSP server’s Certificate Authentication tree. For more information, please see OCSP and CRL Support.
OCSPServerCertFileName Has no default value. Defines the name of the certificate that verifies the OCSP server itself as being a trusted source for Certificate Authentication. For more information, please see OCSP and CRL Support.
CheckCRL Defines whether MFT Platform Server will check the CAPath field for the hashed CRL files. For more information, please see OCSP and CRL Support.
CAPath Defines the path where the CRL checking will look for the hashed filenames. For more information, please see OCSP and CRL Support for more information.
Common configurations Below is the default server Common configuration used on all incoming and outgoing transfer requests:
# [ COMMON ] SecurityPolicy: None { None, HIPAA, FIPS140 } LogEventFileName: /mftps/log/Log.txt { N, FileName } AuditTempErrors: N { N, Y } SemaphoreKey: 0x07e9368b SMTPServer: N { IpName/Address, N } FromAddress: N { Email Address, N } Subject: N { Subject String, N } CfgPostProc: N { N, FileName } AccessControlConfig: N { N, FileName } AliasConfig: N { N, FileName } AdminGroup cadmin {group name} BrowseGroup cfbrowse {group name} TransferGroup cftransfer {group name} licensekey: e91906a0fbb3908d8eb8d686a798bd2304243478c89f0413a5a848ba lkstatus: 6ddc2aef25a633be55656cf9d240fea8

43 Configure MFT Platform Server
TIBCO® Managed File Transfer™ Platform Server for UNIX
Settings are listed in the order they appear in the default configuration file.
Parameter Description
SecurityPolicy This parameter defines whether this MFT Platform Server (MFT Platform Server) will enforce HIPAA or FIPS-140 regulations on initiated and responding transfers.
HIPAA – This setting requires MFT Platform Server to comply with HIPAA standards. At this time the standards require that all files are transferred using encryption key length that will be 128 bits or greater.
FIPS140 – This setting requires MFT Platform Server to comply with FIPS (Federal Information Processing Standard). This is a Government standard that certifies cryptographic modules used for the protection of information and communications in electronic commerce within a security system protecting sensitive but unclassified information. This requires that all files are transferred using SSL with an encryption type of Rijndael (AES) which uses a key length of 256 bits. To comply with the security policies of HIPAA or FIPS-140 transfer requests configured incorrectly, for example a transfer using an encryption type of DES which is not allowed for either HIPAA or FIPS-140, the encryption would be over ridden and to comply with HIPAA a pop-up message would be displayed informing you the encryption will be changed to Blowfish Long. If you were using FIPS-140 you would receive a pop-up message informing you the encryption will be changed to Rijndael (AES)

Configure MFT Platform Server 44
TIBCO® Managed File Transfer™ Platform Server for UNIX
Parameter Description when a transfer is initiated.
LogEventFileName Defines the name of the file that will hold the Initiator Log file. If you change the name of the log directory (and do not use $CFROOT/log), then you must make sure that the directory exists.
AuditTempErrors Indicates whether all transfer attempts will be logged or log only the final attempt.
SemaphoreKey Key used to create a semaphore that synchronizes access to the log file to prevent the situation when the output statements from different transactions can overwrite each other if there are several transfers going on at the same time. The valid values are a decimal number between 1 and 2147483647 or a hexadecimal number between 0x00000001 and 0x7fffffff. Hexadecimal numbers must be prefixed with “0x”. This field should not be changed unless instructed to do so by TIBCO’s Technical Support.
SMTPServer The name of the email server that will be used to send out email notification.
FromAddress Defines the From Name used in the email notification.
Subject This is what will appear in the Subject line of the MFT Platform Server email notification. The max number of characters for this field is 256.
CfgPostProc Defines the name of the file that will hold the Post Processing configuration. Please refer to Chapter 6 Configured Post Processing for details.
AccessControlConfig By defining the path to your AccessControl.cfg under the <MFTPS_install>/config directory

45 Configure MFT Platform Server
TIBCO® Managed File Transfer™ Platform Server for UNIX
Parameter Description you will be able to change the default directory for a file based on the USERID, NODE and/or IPADDR on responder transfer requests only. For more information on configuring this feature please read the section Access Control.
AliasConfig By defining the path to your CFAlias.cfg under the <MFTPS_install>/config directory you will be able to use an alias file name based on the USERID, NODE and/or IPADDR on responder transfer requests only. For more information on configuring this feature please read the section CfAlias.
AdminGroup This parameter is configured with the group name that will hold users that can configure nodes, profiles, and responder profiles, as well as view audit records from all users.
BrowseGroup This parameter is configured with the group name that will hold users that can view audit records from all users. Note: Users who are not in the specified browse group will be able to view only transactions that they conducted.
TransferGroup This parameter is configured with the group name that will hold users that can conduct Platform to Platform file transfers initiated from an MFT Command Center. Note: If this group does not exist and a transfer request comes in from Command Center it will be allowed based on the node configurations for the MFT Command Center. If the group does exist and the end user account being used for a file transfer initiated from Command Center is not a member the transfer will fail.

Configure MFT Platform Server 46
TIBCO® Managed File Transfer™ Platform Server for UNIX
Parameter Description licensekey This is a “display only” field. It shows the
license key that was applied using the cfapplykey program. This field should not be changed.
lkstatus This is a “display only” field. It shows the status of the license key that was applied using the cfapplykey program. This field should not be changed.

Administrator Commands 47
TIBCO® Managed File Transfer™ Platform Server for UNIX
Administrator Commands
This section will discuss the MFT Platform Server administrative commands.
Start MFT Platform Server
You can run your MFT Platform Server with or without an SSL certificate. To start the MFT Platform Server daemons you would issue the following commands:
Note: Before you run these commands, you need to configure the required environment variables. If you haven’t yet done this, see “Set the required environment variables” on page17.
./cfstart ./cfstart –ssl
Note: To use an SSL certificate please Setting Up SSL.
Both daemons can be running at the same time if you want to perform both SSL and non-SSL file transfers. A “global” server trace file will be created each time the cfstart or cfstart -ssl commands are used to start CyberResp. The file name is ParentServer with the current time as an extension. This file contains the process Ids (PIDs) of all child processes that were started by the Server.
If the parameter RequiredNodeDefinitions = Y in your config.txt [Server] section, remember you need to define nodes and profiles to be used for all responder transfer requests. See sections Nodes and Profiles for more information.

Configure MFT Platform Server 48
TIBCO® Managed File Transfer™ Platform Server for UNIX
Stop MFT Platform Server As with the MFT Platform Server start command you have the following two stop commands that would be used to stop both your non-SSL and SSL MFT Platform Server deamons:
./cfstop
./cfstop –ssl
Verify MFT Platform Server is started The name of the MFT Platform Server daemon is CyberResp. To verify that CyberResp is started successfully type the following command and press <enter>:
ps -ef | grep CyberResp | grep -v grep
The output from the grep command will look like the following for both the SSL and non-SSL daemons:
root 2732 1 0 Oct 16 ? 0:00 /mftps/CyberResp root 2732 1 0 Oct 16 ? 0:00 /mftps/CyberResp -ssl
Display the MFT Platform Server Version Information To display the version information for the MFT Platform Server you are running, use the following command:
./cfstart –v

Setting up SSL 49
TIBCO® Managed File Transfer™ Platform Server for UNIX
Setting up SSL In addition to supporting several types of encryption to secure the user’s data itself, MFT Platform Server supports SSL to protect the users that can access MFT Platform Server and to encrypt all data involved in the transfer. To do this we include in the MFT Platform Server product a utility that will generate Certificate Requests that can be given to the user’s Certificate Authority, as well as a password encryption program that allows the user to store their private key password securely. We use a proprietary system that provides for personalized Certificate checking in addition to the standard certificate validation protocols, and a mechanism for CA checking through CRL and OCSP.
Topics
• Generating a Certificate Request • Encrypting the SSL Private Key Password • Viewing a Certificate • Configure MFT Platform Server to use a Certificate

Setting up SSL 50
TIBCO® Managed File Transfer™ Platform Server for UNIX
Generating a Certificate Request
This section contains additional informational to the minimum hardware requirements you may find useful.
If your environment requires the software to issue a certificate request to a Certificate Authority, you must use our SSL Utility program sslutility.exe. It is located in the <MFTPS_install>/util directory. You must run the program from this directory. Issue the following command to run the program:
./sslutility.exe
The utility will create a certificate request and a private key, as well as allowing a user to view a certificate which we will show later in this section. In the example below you will see a certificate request being generated with the sslutility.exe:
Note: During the program execution, you will be asked to supply the directory where you will be placing the certificate request file and private key file. This directory must exist prior to running the program. The names of the directory and files must NOT contain any spaces.
SSL Utilities Menu 1. Generate a Certificate Request 2. View a Certificate 3. Exit Please enter your choice: 1 Generate Certificate Request Menu Please enter the certificate holder's name: SystemA Please enter the Organization Name: TIBCO Software Inc. Please enter the Department Name: Quality Assurance Please enter the City: Garden City

51 Setting up SSL
TIBCO® Managed File Transfer™ Platform Server for UNIX
Please enter the State: NY Please enter the Country: US Please enter the Email Address: [email protected] Please select a key length: 1. 1024 ( default ) 2. 2048 3. 4096 1 Please enter the location and file name for the Certificate Request that will be created: /mftps/certs/certreq.test Please enter the location and file name for the Private Key that will be created: /mftps/certs/privatekey.test Please enter the password for the Private Key File: Please re-enter the password for the Private Key File: Please enter a directory to which you have write access or hit enter for the default directory:[/tmp]. Generating RSA private key, 1024 bit long modulus ...++++++ .....++++++ e is 65537 (0x10001) . **** Request successfully created. **** SSL certificate request created in file: [/mftps/certs/certreq.test] SSL private key file created in file: [/mftps/certs/privatekey.test]
In the table below are the items you will need to supply when the sslutility program runs:
Parameter Description Certificate Holder’s Name Typically the IP or Host name of the
machine that will use the certificate. Organization Group or company to which the
certificate holder is associated Organizational Unit Department within the organization
making the request

Setting up SSL 52
TIBCO® Managed File Transfer™ Platform Server for UNIX
Parameter Description City City of the certificate holder State State of the certificate holder Country Country of the certificate holder Email address An email address to associated with the
certificate holder Certificate Key Length Choose the certificate key length to be
used. Certificate Request file name
The full path with the file name for the certificate request file that will be sent to a CA. Note: No spaces are allowed in the path or file name.
Private Key file name The full path with the file name for the your private key to be stored in. Note: No spaces are allowed in the path or file name.
Private Key Password A 1-20 character password that will be required to access the private key.
When you have finished creating a certificate request it can then be forwarded to a certificate authority (CA) to request a certificate. While you wait to receive the certificate from the CA you can encrypt the private key by following the instructions in the next section: Encrypting the SSL Private Key.

53 Setting up SSL
TIBCO® Managed File Transfer™ Platform Server for UNIX
Encrypting the SSL Private Key Password
In order to conduct file transfer requests using SSL, MFT Platform Server needs to access the SSL private key created when you generated your SSL certificate request. Private keys are protected by a password or pass phrase. To prevent this password from being stored in plain text, a password encryption utility called createPwd.exe is provided in the <MFTPS_install>/util
directory. In the example below we show a Private Key password being encrypted and placed in a password file to be used by MFT Platform Server for file transfers being conducted using SSL with the createPwd.exe program:
-bash-3.00$ ./createPwd.exe Please enter your Password (Max: 20 characters)... Please Reenter your Password to Confirm ... Please specify a Path and File Name for the encrypted password to be saved in... /mftps/certs/passwordfile Thank you...... Your encrypted Password has been saved in: /mftps/certs/passwordfile
From the example above you can see you are asked to type in your private key password that you used when you generated your certificate request and the full path and file name where you want the encrypted password stored.

Setting up SSL 54
TIBCO® Managed File Transfer™ Platform Server for UNIX
Configure the MFT Platform Server to use SSL
Now that you have generated your certificate request, encrypted your private key password and received a certificate from your CA, you can configure your MFT Platform Server to use that certificate for any MFT Platform Server SSL Server (Responder) and Client (Initiator) file transfer requests.
The config.txt file described Configuring MFT Platform Server, includes a section called “SSL Communications Additional Parameters” for configuring both the server and client. The next two examples show how to configure MFT Platform Server to use the certificate and key files.
Server SSL parameters set:
# SSL Communication Additional Parameters. SSLPort: 56565 ClientVerification: Y { N, Y } CertificateFileName: /mftps/certs/cert.AIX_NEW PrivateKeyFileName: /mftps/certs/privatekey.test PrivateKeyPwdFileName: /mftps/certs/passwordfile TrustedAuthorityFileName: /mftps/certs/certauth.all AuthorizationFileName: N { N, FileName } SSLTraceLevel: N { N, Y } SSLTracePath: /mftps/trace/SSLResponder { N, Path } CheckOCSP: N { N, Y } OCSPURL: { URL } OCSPRootCertFileName: OCSPServerCertFileName: CheckCRL: N { N, Y } CAPath:
Client SSL parameters set:
# SSL Communication Additional Parameters. CertificateFileName: /mftps/certs/cert.AIX_NEW PrivateKeyFileName: /mftps/certs/privatekey.test PrivateKeyPwdFileName: /mftps/certs/passwordfile TrustedAuthorityFileName: /mftps/certs/certauth.all SSLTraceLevel: N { N, Y } SSLTracePath: /mftps/trace/SSLInitiator { N, Path } CheckOCSP: N { N, Y } OCSPURL: { URL } OCSPRootCertFileName: OCSPServerCertFileName: CheckCRL: N { N, Y }

55 Setting up SSL
TIBCO® Managed File Transfer™ Platform Server for UNIX
CAPath:
Notice the only parameters configured in both examples above are the following:
CertificateFileName: /mftps/certs/cert.AIX_NEW PrivateKeyFileName: /mftps/certs/privatekey.test PrivateKeyPwdFileName: /mftps/certs/passwordfile TrustedAuthorityFileName: /mftps/certs/certauth.all
The additional SSL parameters are optional and are not required to perform SSL transfers. To read more about setting up and using these parameters, see OCSP and CRL Support .
Changes made to the config.txt file will require you to restart your daemon. After you have modified the SSL parameters and saved the config.txt file, you can run the daemon using cfcstart –ssl.

Setting up SSL 56
TIBCO® Managed File Transfer™ Platform Server for UNIX
Viewing an SSL Certificate
You can use the SSL Utility (sslutilty.exe) to view a certificate’s details. The next example shows how to use sslutility to view a certificate received from a CA.
The only item required is the full path and file name of the certificate you want to view.
SSL Utilities Menu 1. Generate a Certificate Request 2. View a Certificate 3. Exit Please enter your choice: 2 View Certificate Menu Please enter the Certificate Filename: /mftps/certs/cert.AIX_NEW Certificate: Data: Version: 3 (0x2) Serial Number: 90 (0x5a) Signature Algorithm: sha1WithRSAEncryption Issuer: C=US, ST=NY, L=GC, O=TIBCO, OU=DevlA390, CN=a390.tibco.com Validity Not Before: Jul 1 04:00:00 2009 GMT Not After : Jan 1 03:59:59 2016 GMT Subject: C=US, ST=NY, L=Garden City, O=TIBCO, OU=QA, CN=QA Test/[email protected] Subject Public Key Info: Public Key Algorithm: rsaEncryption RSA Public Key: (1024 bit) Modulus (1024 bit): 00:f2:0a:92:e8:b7:ad:b9:8d:b4:21:7f:1b:bd:8c:

Transfer Commands 57
TIBCO® Managed File Transfer™ Platform Server for UNIX
Transfer Commands There are several ways that a transfer can be done with another system using MFT Platform Server for UNIX.
• File to File
• File to Job
• File to Remote Command
Each transfer can be done by using the command line, template or node. The command line allows the user to type the send command and all the transfer options on the command line. The template allows the user to place all the transfer information such as remote file and local file names in a template and then select that template to do the transfer. This will lessen the amount of typing the user needs to do on the command line. The node allows the user to pre-define the remote location. This will also alleviate the user from typing repetitive information. The methods of sending a file to a remote system may also be used in combination.
The list of all parameters supported by MFT Platform Server is expressed at the end of this chapter, and a short list of command line parameters can be seen by typing cfsend /? or cfrecv /? at the command line.
Topics
• File to File Transfers • File to Job Transfers • Sending Remote Commands to be Run • Transfer Parameters

Transfer Commands 58
TIBCO® Managed File Transfer™ Platform Server for UNIX
File to File Transfers
To send or receive a file, you must specify several parameters. At a minimum, these parameters are:
• cfsend / cfrecv • local file • remote file name
• IP Address / IP Name
• IP Port
• User ID
• Password
There are several ways that transfer parameters can be specified for sending to or receiving from another system: on the command line, using templates and defining nodes. The command line allows the user to type the send command and all the transfer options on the command line. The template allows the user to place all the transfer information such as remote file and local file names in a template and then select that template to do the transfer. This will lessen the amount of typing the user needs to do on the command line. See Template Transfers for more information on templates. The node allows the user to pre-define the remote location. This will also alleviate the user from typing repetitive information. The methods of sending a file to a remote system may also be used in combination. See Nodes for more information transfers using nodes.
Because there are three ways to input transfer specifications, some of the ways can convey the same information, so sometimes the multiple input information will conflict. MFT Platform Server recognizes command line options with highest precedence, then node options, and finally template options.

59 Transfer Commands
TIBCO® Managed File Transfer™ Platform Server for UNIX
EXCEPTIONS: if HIPAA is set in either config.txt or the node definition, it always takes precedence, even over the command line. Also, Encryption: Never and Compression: Never in node definitions on the initiator’s side also take precedence over command line transfers.
Transfers using cfsend and cfrecv commands The cfsend and cfrecv commands are used to send and receive files from a remote MFT Platform Server system. An equal sign or a colon should be used to separate the transfer parameters from their values. See a cfsend example command below:
cfsend ip:remote.host.com port:46464 lf:/home/usr/file rf:dataset.name uid:zremote_user pwd:zremote_password
To cfrecv a file from a remote MFT Platform Server. The format of the cfrecv command is as follows:
cfrecv ip:111.222.33.44 port:46464 lf:/home/usr/file rf:”c:\temp\unix.txt” uid:wremote_domain\\wremote_userid pwd:wremote_password
If you wanted to send or receive a file using SSL you need to use the ssl:y parameter along with setting the SSL port to use with the sport parameter, see the cfsend example below:
cfsend ssl:y sport:56565 lf:/home/usr/file rf:dataset.name ip:remote.host.com uid:zremote_user pwd:zremote_password
Placing an ampersand (&) at the end of the command will allow it to run in the background:
cfrecv ip:111.222.33.44 port:46464 lf:/home/usr/file rf:”c:\temp\unix.txt” uid:wremote_user pwd:wremote_password &
Transfer Commands 60
TIBCO® Managed File Transfer™ Platform Server for UNIX
If the user intends to logoff before the cfrecv or cfsend command completes, they would need to prefix the command with nohup, see the following cfrecv command example:
nohup cfrecv ip:111.222.33.44 port:46464 lf:/home/usr/file rf:”c:\temp\unix.txt” uid:wremote_user pwd:wremote_password &
You may also send the screen output to a file. In the example below, the output goes to /tmp/file:
cfsend ip:remote.host.com port:46464 lf:/home/usr/file rf:dataset.name uid:zremote_user pwd:zremote_password > /tmp/file &
Transfers using Wild Cards MFT Platform Server supports * and ? wild cards. They have exactly the same meaning on each platform as they do in the Operating System.
For UNIX platforms, * means any number of any symbols in the file name and ? means any one symbol in the file name. MFT Platform Server interprets these symbols if they are present in the file name after the last forward slash (/). Any combination and amount of these symbols and alpha numeric characters may be used to narrow down desired files.
Only those file names that satisfy the selection criteria will be transferred.
For example, the name /home/johndoe/r?t* will match the files /home/johndoe/returns and /home/johndoe/ratelist but not the name /home/johndoe/report. To transfer an entire directory, a single * should be used and is considered a Directory Transfer. You can find more information on Directory Transfers in the next section.

61 Transfer Commands
TIBCO® Managed File Transfer™ Platform Server for UNIX
Directory Transfers
MFT Platform Server can send and receive entire directories. This is done using tokens and one of the following wildcards: * and/or ? after the last forward slash (/) in a file path of either the LocalFileName parameter value when running a cfsend and in the RemoteFileName parameter value on a cfrecv. See the following RemoteFileName example using the * and the LocalFileName using the $(RemoteFileName) token.
Directory Transfer Parameters:
The following table describes the available Directory Transfer
Parameters:
Parameter (Shortcut Parm) Description ScanSubDir (ssd) This will cause not only the directory
from the file path to be scanned, but all subdirectories, as well. Valid values: Y | N
StopOnFailure (sonf) If the current file transfer fails, MFT Platform Server will not try to transfer the rest of files.
Test Allows the user to display the Local and Remote File Names rather than do the actual transfers as a means of verifying that the file names are correct. Valid value: Y | N
RecvA (rarch) Effective when archived files are to be received from Windows. On other platforms, this parameter has no meaning. Valid values: Y | N

Transfer Commands 62
TIBCO® Managed File Transfer™ Platform Server for UNIX
Directory Tokens:
Note: Tokens are case sensitive
Token Description $(SDIR) This token is used in the LocalFileName field when
doing a cfrecv, and in the RemoteFileName field when doing a cfsend command.
$(MEMBER) This token should be used only for z/OS cfrecv file transfers. It is used for a similar purpose as the $(SDIR) token, but we use a different token because dataset names work differently than directory names.
So, this token allows you to have file names on the local side that are the same as Member names on z/OS side.
If there is no $(MEMBER) in the file name from the z/OS side, this token will be wiped out. For example, if the path was /mftps/$(MEMBER)/filename, it will become /mftps/data/filename
Examples of Directory Transfers:
1) Example cfrecv using a Wildcard to send all the files contained in a directory folder:
cfrecv LocalFileName:’/home/johndoe/data/$(RemoteFileName)’ RemoteFileName:’/mftps/data/*’ ip:10.1.1.228 port:46464 uid:JohnDoe pwd:xxxxxxx
The example above will cause the remote MFT Platform Server to send all the files that are located in the directory: /mftps/data/ to the local machine using the same file
names as the files that are on the remote server.

63 Transfer Commands
TIBCO® Managed File Transfer™ Platform Server for UNIX
2) Example Directory Transfer that scans a directory folder and sub-folders for more files:
cfrecv ScanSubDir:Y LocalFileName:’/home/johndoe/data/$(RemoteFileName)’ RemoteFileName:’/mftps/data/*’ ip:10.1.1.228 port:46464 uid:JohnDoe pwd:xxxxxxx
The example above will cause the remote MFT Platform server to send all the files that are located in the directory folder: /mftps/data/ and all the files contained in any sub-folder
within the data directory.
2) Example Directory Transfer that scans a directory folder and sub-folders for more files and duplicates the directory structure from the remote side by using the addition of the $(SDIR ) token:
cfrecv ScanSubDir:Y LocalFileName:’/home/johndoe/data/$(SDIR)/$(RemoteFileName)’ RemoteFileName:’/mftps/data/*’ ip:10.1.1.228 port:46464 uid:JohnDoe pwd:xxxxxxx
The example above will cause the remote MFT Platform Server to send all the files that are located in the directory: /mftps/data/ to the directory in the LocalFileName field
then when it scans the sub-folders it will not only copy the file but create the sub-directories containing the files in the LocalFileName directory.
So if we use the details from the cfrecv example above and you have on your remote server the following file:
/mftps/data/subdir1/subdir2/testfile
You will end up with on your local server:

Transfer Commands 64
TIBCO® Managed File Transfer™ Platform Server for UNIX
/home/johndoe/data/subdir1/subdir2/testfile
SubDirectories will be created with the same access rights as the base directory. If some of the directories do not exist at the base directory path (e.g. directory data from
LocalFileName), it will be created with the same access as its base directory (johndoe), and all directories after it will be
created under it with the same access rights.
Be aware of the CreationOption (co) parameter. If you are trying to run a cfrecv on a directory without scanning the subdirectories and there are no files with the same names specified in the receiving directory, the CreationOption must be CR or CRN.
If subdirectories are transferred and there are file names that match the specified names in the receiving directory, the CreationOption (co) must be CRN; if it is CR, the subdirectories will NOT be created.
If there are no subdirectory structures on the remote side (as on z/OS), then files from the remote side will be placed in the local base directory and $(SDIR) will be ignored.
File Name Tokens
File Name Tokens are a feature of MFT Platform Server. Given a string of tokens—characters containing a mixture of literal and substitution parameters—MFT Platform Server for UNIX generates a formatted file name that you can use to create or read file names based upon date, time, user and file transfer information. Thus, instead of entering a standard file name, you enter a name that consists of tokens.
The following is a list of tokens that are supported on UNIX:
Note: Tokens are case sensitive.

65 Transfer Commands
TIBCO® Managed File Transfer™ Platform Server for UNIX
Token Definition Generated Value
JDate Julian Date YYYYDDD
Time Local Time HHMMSSMSS
Time1 Local Time HHMMSS
Time2 Local Time HHMMSST
Date Local Date YYYYMMDD
Date1 Local Date YYMMDD
Date2 Local Date MMDDYY
Date3 Local Date DDMMYY
LocalFileBase The local file base name only.
Local file: /home/usr/temp/files/testfile1.txt
Remote File: c:\target\$(LocalFileBase)
Token resolves to: testfile1
LocalFileExt Only the extension of the local file is used.
Local file: /home/usr/temp/files/testfile1.txt
Remote File: c:\target\$(LocalFileExt)
Token resolves to: txt
LocalFileName The complete local file name.
Local file: /home/usr/temp/files/testfile1.txt
Remote File: c:\target\$(LocalFileNa
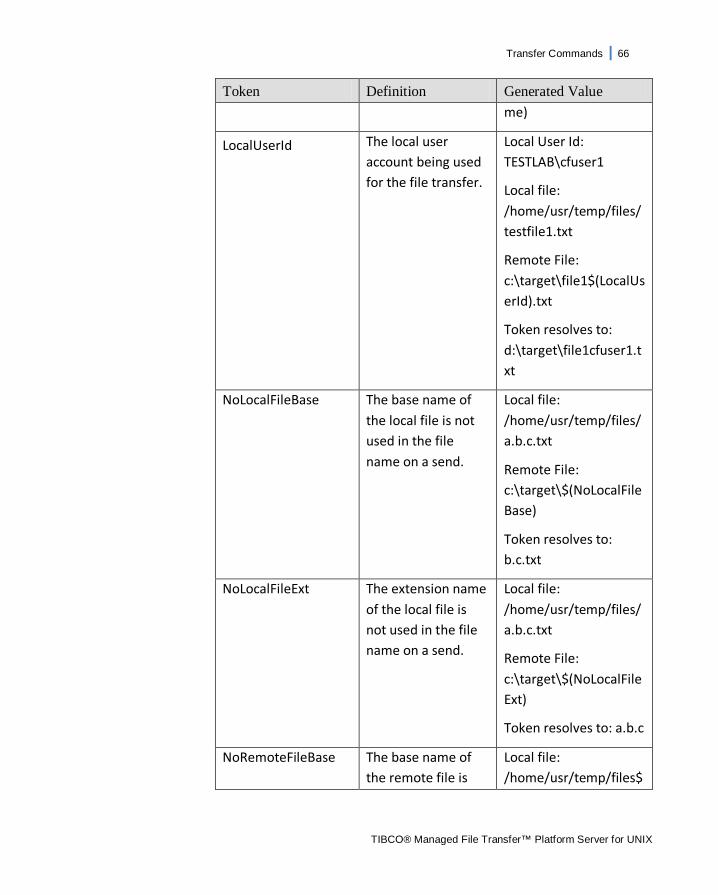
Transfer Commands 66
TIBCO® Managed File Transfer™ Platform Server for UNIX
Token Definition Generated Value me)
LocalUserId The local user account being used for the file transfer.
Local User Id: TESTLAB\cfuser1
Local file: /home/usr/temp/files/testfile1.txt
Remote File: c:\target\file1$(LocalUserId).txt
Token resolves to: d:\target\file1cfuser1.txt
NoLocalFileBase The base name of the local file is not used in the file name on a send.
Local file: /home/usr/temp/files/a.b.c.txt
Remote File: c:\target\$(NoLocalFileBase)
Token resolves to: b.c.txt
NoLocalFileExt The extension name of the local file is not used in the file name on a send.
Local file: /home/usr/temp/files/a.b.c.txt
Remote File: c:\target\$(NoLocalFileExt)
Token resolves to: a.b.c
NoRemoteFileBase The base name of the remote file is
Local file: /home/usr/temp/files$

67 Transfer Commands
TIBCO® Managed File Transfer™ Platform Server for UNIX
Token Definition Generated Value not used in the file name on a receive.
(NoRemoteFileBase)
Remote File: c:\source\directory\a.b.c.txt
Token resolves to: b.c.txt
NoRemoteFileExt The extension name of the remote file is not used in the file name on a receive.
Local file: /home/usr/temp/files$(NoRemoteFileBase)
Remote File: c:\source\directory\a.b.c.txt
Token resolves to: b.c.txt
TransactionNumber Local Transaction Number
Local file: /home/usr/temp/files/testfile1.txt
Remote File: c:\target\$(TransactionNumber).testfile1.txt
Token resolves to: IA18100117.testfile1
RemoteFileBase (Token used when doing a receive)
The remote file base name only.
Local file: $(RemoteFileBase)
Remote File: c:\source\directory\testfile1.txt
Token resolves to: testfile1 (File transferred to the MFT

Transfer Commands 68
TIBCO® Managed File Transfer™ Platform Server for UNIX
Token Definition Generated Value Platform Server Windows Directory unless a path is configured.)
RemoteFileExt (Token used when doing a receive)
Only the extension of the remote file is used.
Local file: /home/usr/files/$(RemoteFileExt)
Remote File: c:\source\directory\testfile1.txt
Token resolves to: txt
RemoteFileName (Token used when doing a receive)
The remote file name including the extension will be used.
Local file: /home/usr/files/$(RemoteFileName)
Remote File: c:\source\directory\testfile1.txt
Token resolves to: testfile1.txt
RemoteUserId Remote User Id used in the file transfer.
Remote User Id: TEST\cfuser1
Local file: /home/usr/files/file1.$(RemoteUserId).txt
Remote File: c:\source\directory\testfile1.txt
Token resolves to: /home/usr/files/file1.cf

69 Transfer Commands
TIBCO® Managed File Transfer™ Platform Server for UNIX
Token Definition Generated Value user1.txt
RemoteTransactionNumber
Remote Transaction Number
Local file: /home/usr/temp/files/testfile1.txt
Remote File: c:\target\$(RemoteTransactionNumber).testfile1.txt
Token resolves to: RA18100052.testfile1
The format of the file name using the token would be: $(TokenName), The tokens are case sensitive and must to be entered as shown in the chart above. All tokens will be converted before being sent to the remote system, except for Remote Transaction Number.
Note: When using $ or / on the command line, some UNIX systems require a backslash (\) before the $ or / in order to be read properly by the UNIX system.
Example Transfers Using File Name Tokens:
Below is an sample command to send a file from a UNIX system to a Windows system:
cfsend lf:/home/usr/file rf:’c:\reports\$(LocalFileBase).\$(Date1)-\$(Time1).\$(LocalFileExt)’ ip:remote.host.com port:46464 uid:zremote_user pwd:zremote_password
A sample resolved filename for this transfer might be:
C:\reports\revenue.080929-095201.txt

Transfer Commands 70
TIBCO® Managed File Transfer™ Platform Server for UNIX
Post Processing Actions (PPA) Post Processing Actions (PPA) gives you the capability of executing up to 4 commands when a file transfer completes either successfully or unsuccessfully. The PPA parameters are as follows:
Post_Action1 or ppa1 Post_Action2 or ppa2 Post_Action3 or ppa3 Post_Action4 or ppa4
The Post Processing command format is as follows, notice how each section of the command is separated with a comma (,):
Post_Action1=”S|F,L|R,COMMAND,<command data>”
The first section tells us if we want the action to be run when the file transfer request is either successful or a failure:
S | F – Success or Failure
The second section of the command tells us if the action is supposed to run on the local machine (Initiator) or the remote machine (Responder):
L | R – Local or Remote
The third section tells us what the action is. If the remote system is a mainframe, then CALLJCL, CALLPGM and SUBMIT are supported, otherwise you would use the parameter COMMAND.
COMMAND | CALLJCL |CALLPGM | SUBMIT
The last section of the command is the command data section and would hold the absolute path and file name of the command and any parameters to be passed. This is limited to 256 bytes.

71 Transfer Commands
TIBCO® Managed File Transfer™ Platform Server for UNIX
No spaces are allowed in the Post Processing Action command. If, at the command line, the ppa parameter is used, the information will go into the next undefined post processing action slot.
Example: ppa1:”S,L,COMMAND,batchjob.exe”
PPA Substitutable Parameters:
MFT Platform Server supports Substitutable Parameters to allow users to take full advantage of the 256 character maximum on the command data, and to allow users to not have to copy the filename from the LocalFileName or RemoteFileName parameters. Note that we do not support standard MFT Platform Server Tokens within PPA, because they are relatively long and the substitutable parameters conserve as many bytes as possible within the PPA action data field. The PPA Substitutable fields use the percent character (%) as the escape character instead of the $ that tokens use. Below is a list of the substitutable parameters that are supported. Resolved names in this table are based on a file called: C:\a\b\c\d\config.txt
Parameter Description Resolved Name
%DIR Directory without the file name or drive
a\b\c\d
%DRIVE Drive Name C
%FILE The file name without the directory
config.txt
%GDATE Gregorian Date (yymmdd)
080929
%GDATEC Gregorian Date with Century (ccyymmdd)
20080929
%HDIR The high level directory a
%HLQ High level qualifier of file
config

Transfer Commands 72
TIBCO® Managed File Transfer™ Platform Server for UNIX
Parameter Description Resolved Name
%JDATE Julian Date (YYDDD) 08273
%JDATEC Julian Date with Century (CCYYDDD)
2008273
%LFILE File name with directory
C:\a\b\c\d\config.txt
%LLQ Low Level Qualifier of file (data after last period(.))
txt
%LUSER Local User Id
%NODRIVE File name without Drive
a\b\c\d\config.txt
%NOHDIR Directory name w/o high level directory
b\c\d
%NOSDIR Directory name without lowest directory
a\b\c
%PROC Process Name ABC123
%RUSER Remote User Id
%SDIR The lowest level directory
d
%TIME Time (hhmmss) 165030
%TRN Transaction Number I929800001
%UDATA User Data USRDATAABC123
Note that there can be multiple PPA parameters within a single PPA data field. Each Substitutable parameter must be processed one at a time before going onto the next byte of PPA data.
Note that some fields do not make sense such as %DRIVE in a UNIX environment. If a field does not make sense in the environment where PPA is being used, then the substitutable data

73 Transfer Commands
TIBCO® Managed File Transfer™ Platform Server for UNIX
is the text in the name of the parameter without the % sign. If UNIX detects the %DRIVE parameter, then the value DRIVE should be used as substitution. Similarly, %PROC becomes PROC and %UDATA becomes UDATA if not interacting with a z/OS system.
PPA Error Codes:
Error codes will only be recorded when using tracing at the medium (M) or high (H) level. In the current version of MFT Platform Server, the only way to see if a Post Processing Action has failed is to see if the trace file has a positive error code, except in the case of a locally executed post processing action. In such a case, MFT Platform Server has access to the local terminal and will display the output of the post processing action there.

Transfer Commands 74
TIBCO® Managed File Transfer™ Platform Server for UNIX
File to Job Transfers
This section describes how to transfer an executable to a remote system and have it execute as a job. In order to do this, you must set the Transfer Type parameter to J (for job). This parameter can be set on the command line or in the template. This transfer can be in either direction (receiving a file from the remote side and having it execute on a local side or sending a file and having it execute on the remote side). The file name will depend on which way the transfer is occurring.
For example, if you are receiving a file from the remote side and having it execute on the local system, you would specify the name of the remote file. There is no need to specify a local file name since the output will not be written to any local file.
On the other hand, If you are sending a file to the remote side and having it execute on the remote system, specify the local file name, which is the name of the executable.
Below is a command line sample of File to Job:
cfsend lf:/home/usr/job ip:111.222.34.56 port:46464 uid:r_user pwd:r_pswd trtype:j

75 Transfer Commands
TIBCO® Managed File Transfer™ Platform Server for UNIX
Running Remote Commands
To execute a command on a remote system, you must specify both the type of command and the actual command to execute. If the remote system is a Windows or UNIX system, the parameter is rcmd: or remotecommand:. For z/OS, there are several options – e: and exec:, re: and rexxexec: are both acceptable for an executable, sj: and subjcl: are used for submitting job control language, cj: and calljcl: are used for calling programs with JCL linkage, and cpg: and callpgm: are used to call a program with standard linkage. Each of these must be followed by the command to be executed.
To have a command execute remotely, specify the parameter Transfer Type as C (for command).
Below is a command line sample of a Remote Command: cfsend ip:111.222.98.76 port:46464 uid:r_user pwd:r_pswd trtype:c rcmd:”ls –la”
Remote Commands can only be executed using the cfsend command. If a local file name is defined it will be used to store the output of the remote command if the remote system is Windows or UNIX (z/OS does not send back output.). Otherwise the output will be written to your terminal. The remote file name parameter is ignored. Because of how streams work in UNIX, any stdout data will be printed first, followed by the last 256 characters of stderr.
When the function is successful, the return code should be set as 0, and any output data should be returned to caller, in the same way as any other command.
When the function is unsuccessful, the return code should be set to a non-zero value, and a send error should be returned to the caller along with a message indicating the cause of the failure (if possible).
Network errors are normally a return code 4 and will be retried. For severe errors the return code is 8 and these errors will not be

Transfer Commands 76
TIBCO® Managed File Transfer™ Platform Server for UNIX
retried.
The following errors are not retried:
- License Key has expired. - Maximum number of nodes exceeded as per the license
key. - Invalid encryption type for international version. - Node not defined for an IP Address and Required Node
Definition = Y. - Node parameter not specified when Required Node
Definition = Y. - SSL Authentication failure. - Tokens and wildcard character errors. - File open errors. - Malloc errors (when system runs out of memory). - Any severity 1 errors received from the remote system. - Security Violation during Negotiation/Control record (SSL
and encryption is used). - Invalid encryption for HIPAA. - Trying to connect to a SSL port without proper handshake
and vice-versa. - Errors while staring a conversation. - OCSP or CRL authentication errors. - Error writing to the PQF file. - Error trying to chmod on the PQF file. - Bad user id or password. - Access control error. - Failure to apply umask. - Checkpoint file errors. - CFAlias errors. - Failure to execute cfdir or fusutil

77 Transfer Commands
TIBCO® Managed File Transfer™ Platform Server for UNIX
Transfer Parameters
The tables below describes the parameters you will need to supply when you run a cfsend or cfrecv command.
Minimum Transfer Parameters:
Parameter (Shortcut parm) Description IpName/Address (ip | ipname | address)
This is the IP Name or the IP Address of the remote location.
LocalFileName (lf) The name of the local file that is to be transmitted. This parameter is case sensitive.
Password (pwd) The password for the remote UserID (uid). This password is used on the remote system to validate the User has credentials to access the remote file. This field should be left blank when using verified users.
Port Is the IP Port on which MFT Platform Server is listening on the remote system. Valid values are 1024 to 65535.
RemoteFileName (rf) The name of the file or data set at the remote location. If backslashes are used in the file name, such as in a file going to a Windows system, then the remote file name should be enclosed in double quotes if specified on the command line. If a member name is being used, as in a dataset going to a mainframe, then the entire dataset may be enclosed in double quotes or backslashes may be used before the parentheses when specifying the remote file name on the command line.
UserId (uid) The remote UserID for the file transfer, this ID must exist on the remote system and have permission to access to the remote file (rf). For Windows security

Transfer Commands 78
TIBCO® Managed File Transfer™ Platform Server for UNIX
Parameter (Shortcut parm) Description systems use the format DOMAIN/USER. If this parameter is not specified, then MFT Platform Server will treat the user as if they are a Verified User (*VER).
z/OS Specific Transfer Parameters:
Note: To use any of the z/OS parameters you must set the parameter zOS to “Y”, otherwise all z/OS parameters are ignored.
Parameter (Shortcut parm) Description ALLOC_PRI (ap) Remote File Primary Allocation, z/OS
only. Valid values: 0 - 32000. MFT Platform Server now supports auto assign for ALLOC_PRI when the ALLOC_TYPE is M or K. If you set this value to zero, then the appropriate number of Megabytes or Kilobytes will be assigned, respectively.
ALLOC_SEC (as) Remote File Secondary Allocation, z/OS only. Valid values: 0 – 32000
ALLOC_TYPE (at) Remote File Allocation Type, z/OS Only. Valid values are: T – for Tracks, C – for Cylinders, M – for Megabytes, K – for Kilobytes
ASCII_to_EBCDIC (eb) This determines the type of data translation that is required for the remote system, valid values are:
Binary | N | 0 - File is binary and does not require any translation. ASCII | A | 1 - File is ASCII and does not
require translation but may require CR/LF (carriage Return, Line feed) insertion.
Text | Y | 2 - File is ASCII and the remote system requires EBCDIC, the data will be translated by MFT Platform Server on the

79 Transfer Commands
TIBCO® Managed File Transfer™ Platform Server for UNIX
Parameter (Shortcut parm) Description UNIX platform. Typically used for transfers to a z/OS system.
This command is the command that turns on the use of the Local and Remote Conversion tables. For more information on using Conversion Tables see the section Conversion Tables.
ebcdic_to_ascii This determines the type of data translation that is required for the remote system, valid values are:
Binary | N | 0 - File is binary and does not require any translation. ASCII | A | 1 - File is ASCII and does not
require translation but may require CR/LF (carriage Return, Line feed) insertion.
Text | Y | 2 - File is ASCII and the remote system requires EBCDIC, the data will be translated by MFT Platform Server on the UNIX platform. Typically used for transfers to a z/OS system.
This command is the command that turns on the use of the Local and Remote Conversion tables. For more information on using Conversion Tables see the section Conversion Tables.
AVAIL (da) Remote File volume availability, z/OS only. Valid values: I | Immediate, D | Deferred
BLKSIZE | blocksize (obs) Remote File Block Size, z/OS only. Valid values: 0 to 32760.
CALLJCL (cj) Valid Values: N or z/OS program to be called.
CALLPROG (cp) Valid Values: N or z/OS program to be called.

Transfer Commands 80
TIBCO® Managed File Transfer™ Platform Server for UNIX
Parameter (Shortcut parm) Description DATACLASS (dc) This represents the z/OS Data Class as
defined to the Data Facility/System Managed Storage. In addition, it is used to indirectly select file attributes such as Record Format and Logical Record Length. This is a 1 to 8 character value, which contains numeric, alphabetic, or national characters (in the United States the national characters are $, #, or @). The first character must be an alphabetic or national character.
DELIM (cr) This determines the file delimiter. This parameter is only valid if the remote system is a z/OS system. This parameter will only be used if the OS390 parameter for the transfer is set to Yes. If you are transferring to a Windows system, then the CR_LF parameter should be used. The valid values for this parameter are: Y | CRLF - CR (Carriage Return) will be
deleted on UNIX Side while receiving a file and that CR will be added before the LF (Line Feed) when sending text file from UNIX to another other platform.
L | LF - Records are delimited by LF (Line Feed). This is typically used when transmitting text data to z/OS. Note that the line conversion is done on the z/OS platform. No processing is done by MFT Platform Server for UNIX.
CRLFY - Means that CR will not be added to LF for the file for cfsend. Likewise, CR will not be removed for the file for cfrecv. This is done in the rare event that a UNIX file contains CRLF, or if the Application requires CRLF instead of LF.
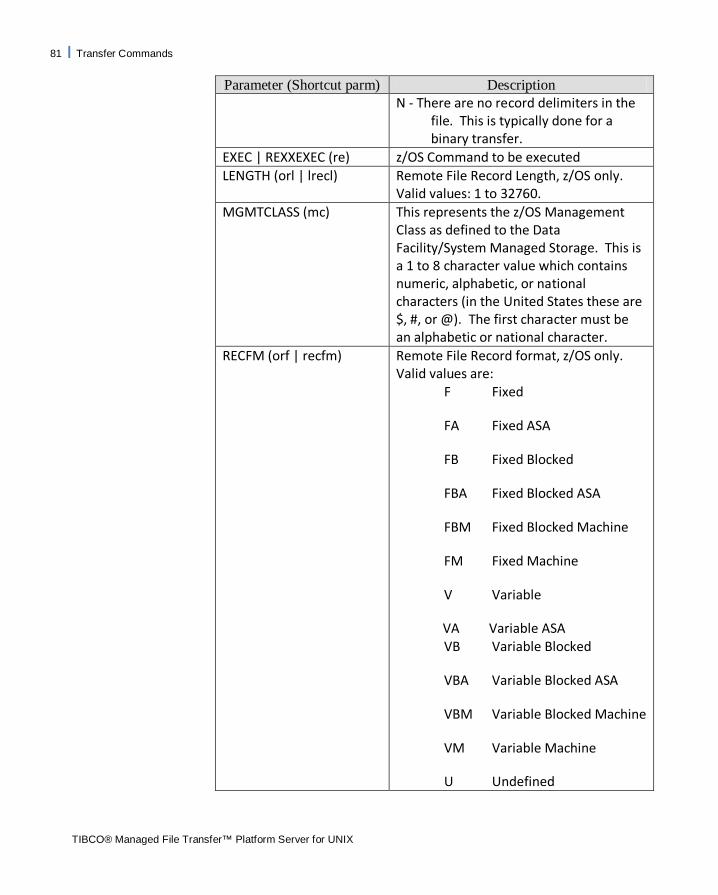
81 Transfer Commands
TIBCO® Managed File Transfer™ Platform Server for UNIX
Parameter (Shortcut parm) Description N - There are no record delimiters in the
file. This is typically done for a binary transfer.
EXEC | REXXEXEC (re) z/OS Command to be executed LENGTH (orl | lrecl) Remote File Record Length, z/OS only.
Valid values: 1 to 32760. MGMTCLASS (mc) This represents the z/OS Management
Class as defined to the Data Facility/System Managed Storage. This is a 1 to 8 character value which contains numeric, alphabetic, or national characters (in the United States these are $, #, or @). The first character must be an alphabetic or national character.
RECFM (orf | recfm) Remote File Record format, z/OS only. Valid values are: F Fixed
FA Fixed ASA
FB Fixed Blocked
FBA Fixed Blocked ASA
FBM Fixed Blocked Machine
FM Fixed Machine
V Variable
VA Variable ASA VB Variable Blocked
VBA Variable Blocked ASA
VBM Variable Blocked Machine
VM Variable Machine
U Undefined

Transfer Commands 82
TIBCO® Managed File Transfer™ Platform Server for UNIX
Parameter (Shortcut parm) Description The A extension indicates the use of ASA characters on z/OS and the M extension indicates the use of Machine characters.
REMOVETRAIL (rmtrail) This parameter is only valid when you are receiving a file/s using the cfrecv
STORCLASS (sc)
command and the zOS parameter is set to “Y”. This will remove all trailing spaces and nulls before the file is transmitted. Valid values: Y or N. This represents the z/OS Storage Class as defined to the Data Facility /System Managed Storage, which is used to indicate the host file's media type and the installation's backup, restore, and archive policies. This 1–8 character value must contain either numeric, alphabetic, or national characters (in the United States these are $,#, or @). The first character must be alphabetic or national.
SUBMIT (sj) z/OS JCL to be submitted. Valid Values { N, JCL to be submitted }
SysOutClass (sl) SYSOUT Class describes to which class the JES output will be routed. On z/OS systems, the printer queues are organized around a printer class, and not a specific printer. The class has a one-character name that is either alphabetic or numeric. You need to be told by the z/OS staff which value to supply.
SysOutCopies (sp) This is the number of copies to print of a particular report on the remote computer. Only valid when the remote platform is z/OS.
SysOutDestination (sd) This is the destination of the job submitted to the internal reader. Only valid when the remote platform is z/OS.
SysOutFcb (sb) This field is applied when the remote computer is a z/OS system. This is the Form Control Buffer name as defined to

83 Transfer Commands
TIBCO® Managed File Transfer™ Platform Server for UNIX
Parameter (Shortcut parm) Description JES.
SysOutUserName (si) This is the username assigned to a job submitted to the internal reader. Only valid when the remote platform is z/OS.
SysOutWriter (sw) This indicates the external writer name that will be used to process this printer file on a z/OS system. This is the name of a service program on a z/OS system, which will be given control when it is time to process this file from the printer queue. The service program, which is written by the customer, decides how it wants to process this print file. Do not specify a value for this parameter unless directed to by the systems analyst on the z/OS.
UNIT (du) Remote File unit name, z/OS only. Valid value, any 1-8 character z/OS unit name.
VOLUME (dv | vol | volser)
Remote File volume name, z/OS only. Valid value, any 1-6 character alpha-numeric z/OS volume name.
zOS (os390) This determines whether the file is being transferred to/from a z/OS platform. When N is specified, all z/OS parameters are ignored.
Optional Transfer Parameters:
Parameter (Shortcut parm) Description CheckPointInterval (cpint) The length of time at which a checkpoint
will be taken. The default value is N. If the transfer fails after a checkpoint has been taken, the transfer will continue from that last checkpoint. Valid Values: N – No checkpoint will be taken Y | 1 – The checkpoint will be taken every minute 2 – 90 – Interval at which the checkpoint will be taken

Transfer Commands 84
TIBCO® Managed File Transfer™ Platform Server for UNIX
Parameter (Shortcut parm) Description Compression (cmp) This is the type of compression to be
used. Valid Values: R | Y – RLE compression LZ – LZ compression ZLIB1 through ZLIB9 - ZLIB1 through ZLIB9
refer to levels of zlib compression. Level 1 is very fast but hardly compresses. Levels 7 to 9 yield the best compression but is much slower and produces the best quality of compression. Level 7 (ZLIB7) typically offers the best compromise of compression and speed.
N – No compression NEVER – Never use any compression
ConfigFileName (cf) Path to the configuration file on the local machine. Valid values, any valid path. This parameter is normally left unspecified.
CONVTBL (ct) Path to the conversion table. This parameter is not used if the LocalCTFile parameter is specified. Please see the section on Conversion Tables for more information.
CR_LF (cfrl) Carriage Return (CR) Line Feed (LF) control for transfers between UNIX and Windows operating systems using cfsend or cfrecv. A value of DELIM may also be used, but only when transferring with a z/OS platform. The valid values for this parameter are: Y | CRLF - CR will be deleted on the UNIX
side when doing a cfrecv. The CR will be added before the LF when doing a cfsend of a text file from UNIX to another platform.
L | LF - Records are delimited by LF. This is typically used when transmitting text data to z/OS.

85 Transfer Commands
TIBCO® Managed File Transfer™ Platform Server for UNIX
Parameter (Shortcut parm) Description Note that the line conversion is done on the z/OS platform. No processing is done by MFT Platform Server for UNIX.
CRLFY - Means that CR will not be added to LF for a file transfer using cfsend. Likewise, CR will not be removed for the file for cfrecv. This is done in the rare event that a UNIX file contains CRLF, or if the application requires CRLF instead of LF.
N - There are no record delimiters in the file. This is typically done for a binary transfer.
CreationOption (co) Remote File creation options, valid values are: R - Replace an existing file, this will only
work if the remote file already exists. A - Append to an existing file, this will
only work if the remote file already exists.
C - Create a new file at the remote location, this will only work if the remote file does NOT exist.
CR | X - Create a new file or Replace an existing file. This is the default option.
CA | Y - Create a new file or Append to an existing file.
CRN | Z - Create a new file and if necessary create the directory path to this file or replace an existing file.
EmailFailure (emf) Specifies the email address where MFT Platform Server will send a message when a transfer fails. Make sure your Email settings are configured in the config.txt file.
EmailSuccess (ems) Specifies the email address where MFT Platform Server will send a message

Transfer Commands 86
TIBCO® Managed File Transfer™ Platform Server for UNIX
Parameter (Shortcut parm) Description when a transfer is successful. Make sure your Email settings are configured in the config.txt file.
EmailNotificationLocal (eml)
This specifies the email address that you would like a copy of the local MFT Platform Server notification message to be sent to. The local servers Email settings must be configured in order to receive this notification.
EmailNotificationRemote (emr)
This specifies the email address that you would like a copy of the remote server’s notification message to be sent to. The remote server must have their Email settings configured in order to receive this notification.
EncryptionType (en) Type of encryption that should be used for this transfer, valid values are: N | 0 - No encryption is performed DES | 1 - DES encryption is used 3DES | 2 - Triple DES encryption is used Blowfish | BF | 3 - Blowfish encryption is used BlowfishLong | BFL | 4 - Blowfish Long (448 Bit) encryption is used Rijndael | RIJN | RJ | AES | 5 - Rijndael encryption AES 128 – AES 128 encryption is used
ExitPrgm (ep) Path to the exit program on the local machine. The exit program allows the user to do customized post processing. See section User Exits for more information.
LIST (list) Assigns the distribution list to use for the transfer request Valid values: 1 to 32 characters.
LocalCTFile (lct) The name of the file used as the local conversion table. Requires the ASCII to EBCDIC parameter to be set to Y to be used. Please refer to the section on

87 Transfer Commands
TIBCO® Managed File Transfer™ Platform Server for UNIX
Parameter (Shortcut parm) Description Conversion Tables for more information.
Node (n) Name of the node that file will be sent to or received from. Valid values are N or the name of the node.
PermittedActions (pa) The fields below are Windows-specific and are only valid when sending to a Windows machine. Valid values are: S | SYSTEM_FILE - Indicates that the file is
a system file and can only be viewed by the operating system and not the user.
H | HIDDEN_FILE - A file that cannot be seen by the user.
A | ARCHIVE_FILE - Select archive if you want to mark a file that has changed since it was last backed up.
R | READ_ONLY - This indicates that the file being accessed can only be viewed by the user. No changes can be made to the file.
C | NTFS_COMPRES - This attribute allows the user to create a file as compressed on the remote system. This attribute is only available on NTFS partitions. If the receiving file system is not NTFS, the option is ignored.
Z | EOF_CRLF - When enabled, the feature appends a CR/LF (0x0d, 0x0a) to the end of the file, followed by the DOS End of File character, Control Z (0x1a). If a trailing Control Z or CR/LF is already present, it does not add them again. This feature is only available when Carriage Return/Line Feed processing is enabled.

Transfer Commands 88
TIBCO® Managed File Transfer™ Platform Server for UNIX
Parameter (Shortcut parm) Description E | EOF - When enabled, this feature
appends a DOS End of File character, Control Z (0x1a).
Post_Action1 (ppa1) Post_Action2 (ppa2) Post_Action3 (ppa3) Post_Action4 (ppa4)
This is a command that will be executed upon the completion of a transfer. This command can be defined up to four times with the following format: Post_Action=”S|F,L|R,COMMAND,<command data>” S | F – Success or Failure L | R – Local or Remote COMMAND – The only option currently
supported by UNIX as a responder. data – The absolute path and file name of
command and any parameters to be passed. This is limited to 256 bytes.
No spaces are allowed in the Post_Action command. If the remote system is a mainframe, then CALLJCL, CALLPGM and SUBMIT are also supported in place of COMMAND. Please refer to the MFT Platform Server for z/OS documentation for more information. Note: If you are sending files to a MFT Platform Server for Windows if you append a # sign to the end of the data entered to have Platform Server for Windows launch the PPA and have it wait for the return code of the action. Append a & sign to the end of the data entered to have MFT Platform Server for Windows launch the PPA and not wait for the action to finish. The default behavior is the same as appending an & sign to the data entered. For more detailed information on Post

89 Transfer Commands
TIBCO® Managed File Transfer™ Platform Server for UNIX
Parameter (Shortcut parm) Description Processing Actions (PPA) see the section Post Processing Actions.
ProcessName (pn) This defines the 1 to 8 character process name used for the file transfer.
RecvA (rarch) This option applies to directory transfers only. This causes MFT Platform Server to receive archived files from Windows. On other platforms, this parameter has no meaning. When this option is set to N, archived files will not be transferred.
RemoteCommand (rcmd) Allows a command to be executed on the remote system. The valid values are N or the command to be executed or No. The default is No.
RemoteCTFile (rct) The name of the file used as the remote conversion table. Please see the information on Conversion tables in Chapter 6 for more information. Note: When defining the RemoteCTFile you must also define the LocalCTFile:NULL so no translation takes place locally.
RemotePrinterName (rp) This is the name of the remote printer to which the job will be sent.
RetenPeriod_ExpDate (rp_ed)
This parameter will be the retention period or expiration date of the file on the remote system. The format of the value entered will determine whether the parameter will be used as a retention period or as an expiration date. Retention Period is the number of days, after which the file will expire. Expiration Date is the date, in Julian format, on which the file will expire. This expiration parameter is typically used on z/OS systems for tape processing to prevent a tape from being overwritten. Care should be taken when using this with a disk file. The default is no expiration date on the file. Valid Values: { # of days, yyyy/ddd }

Transfer Commands 90
TIBCO® Managed File Transfer™ Platform Server for UNIX
Parameter (Shortcut parm) Description RetryInterval (ri) If the TryNumber parameter in the
Template file is greater than 1, then a failed transaction will be retried after this user-defined time. If the value of this parameter is N, the transaction will be retried immediately. Valid Values: {N, Y|1,# of min more than 1 }
ScanSubDir (ssd) This option applies to directory transfers only. This will cause not only the directory from the file path to be scanned, but all subdirectories, as well. Valid values are Y and N.
SecurityAttribTemplate (sa)
The file name that the remote Windows platform uses as a template for its Access Control List (ACL). The ACL of this file is copied to the ACL of the destination file. For this feature to function properly on Windows, the file specified must be readable by the partner which is receiving the File to File transfer and the file being created must reside on an NTFS drive.
SilentMode (sm) Valid values are Y or N. If this flag is set to Y then the progress bytes message will be suppressed from the output screen on the initiator side. Otherwise if defaulted to N, this additional message will display alongside the typical output to screen.
Note: Progress on bytes transmission is best seen with transfer of a larger file.
SSL Specifies if you are going to use SSL communication. For more information on SSL, please refer to section Setting up SSL. Y - Indicates that this file transfer should utilize SSL. N - specifies that SSL will not be used for this request

91 Transfer Commands
TIBCO® Managed File Transfer™ Platform Server for UNIX
Parameter (Shortcut parm) Description SSLPort (sport) Specifies if you are going to use SSL
communication. For more information on SSL, please refer to section Setting up SSL.
StopOnFailure (sonf) This option applies to directory transfers only. If the current file transfer fails, MFT Platform Server will not try to transfer the rest of files in the directory. Valid values are Y and N.
Template (t) This is the name of the Send or Receive template file. Note: This parameter cannot be set inside a template itself.
Test This option applies to directory transfers only. Allows the user to display the Local and Remote File Names rather than doing the actual transfers as a means of verifying that the file names are correct. Valid values are Y and N.
Timeout (to) Specifies the amount of time (minutes) a connection will stay open while waiting for a response from the remote side. Once the time is reached the connection is ended.
TraceFileName (tf) Path of where you would like the local trace file for this transfer. This should not be the same path as what is defined in the config.txt. This parameter is not applicable when using templates.
TransferType (trtype) This indicates the type of transfer that should be done. The default value is File. For more information, refer to the beginning of this chapter. F | File - Indicates a transfer between
your LocalFileName and RemoteFileName.
J | Job - Means you will send (cfsend) your local file to the remote system, remote server will run (execute it) and send you error if the execution failed. Or, you can receive (cfrecv)

Transfer Commands 92
TIBCO® Managed File Transfer™ Platform Server for UNIX
Parameter (Shortcut parm) Description the remote file and run (execute) it on your side. You will get an error if execution is failed.
C | Command - Means you will send the command to the remote system and receive the result. If you specified LocalFileName, the result of command will be saved there, otherwise it will be printed out. In case the remote command execution failed you will receive an error message with return code of failure reason. Note: The parameter will only work with cfsend.
TryNumber (trynum) This is the number of times the transfer will be attempted. The default is 1. 0 |U |Unlimited - The transfer will be
attempted 9999 times or until it is successful. It will restart the transfer from the beginning unless the CheckPoint/Restart option is set.
N | 1 - The transfer will be performed only one time.
2 – 10 - Number of times the transfer will be attempted.
UNIXPermissions (uperm) When a file is created on a UNIX system, MFT Platform Server has the ability to set the UNIX Permissions on the file. UNIX permissions are defined by a three digit number such as 777 (the same as for chmod command). The default value for this parameter is the file permissions of the file being sent or received.
This works differently for a Send and for a Receive. If a Send is initiated and the UNIX Permissions value is defined, pass this value to the remote system. If UNIX

93 Transfer Commands
TIBCO® Managed File Transfer™ Platform Server for UNIX
Parameter (Shortcut parm) Description Permissions is not defined, the permissions of the file being sent should be in the control record. If no values are passed in the control record, the responder will use the system default permissions.
Note: Permissions will be set up under the file only if file was created.
In other words UNIX Permissions works only with Create, CreateReplace and CreateReplaceNew file options when the file is being created.
UserData (ud) This is a 25 character field for user comments.
Optional RocketStream Accelerator Transfer Parameters: Note: RocketStream License required
Parameter (Shortcut parm) Description RSAccelerator (rsa) Setting this parameter to Y will force a
transfer to be conducted through a Windows MFT Platform Server RocketStream server using the RocketStream technology which allows you to greatly improve data transfer speeds over IP networks with high latency. Note: You must be licensed for RSA to use this technology. Valid Values: {N, Y}
RSCompression (rsc | rscompress)
When conducting file transfers through an RSAccelerator (RSA) you can configure the RSA server to compress the data being transferred. The RSA uses a proprietary compression compatible with zlib. By setting the compression to Default your file will receive the greatest

Transfer Commands 94
TIBCO® Managed File Transfer™ Platform Server for UNIX
Parameter (Shortcut parm) Description compression and may take slightly longer to transfer then if you used Fast wwhich will result in your file being less compressed but sent out faster. Valid Values: {N, Y|Best, Default, Fast}
RSEncryption (rse | rsencrypt)
When conducting file transfers through an RSAccelerator (RSA) you can tell the RSA server to encrypt the data with a 256-bit Blowfish encryption key by setting this parameter to Yes. Valid Values: {N, Y}
RSHost (rsh) This is the IP or Hostname of the Windows MFT Platform Server RocketStream server. By defining a host on the command line or in a transfer template you will be overriding the RSHost value configured in the config.txt if it is defined. If the value is N and you have RSAccelerator set to Yes then the value configured for RSHost in the config.txt will be used. Valid Values: {N, Host}
RSMaxSpeed (rsmax) When conducting file transfers through an RSAccelerator (RSA) you can set the Max Speed in Kilobytes per second to be used by the RSA server when you set this parameter in your command line or transfer template. Valid Values: {256 – 1000000}
RSPort (rsport) This is the port number the Windows MFT Platform Server RocketStream server is listening on for transfers using the RocketStream technology. By defining a port number on the command line or in a transfer template you will be overriding the RSPort value configured in the config.txt. Default is 9099. If the value is N and you have RSAccelerator set to Yes then the value configured for RSPort in the config.txt will be used. Valid Values:

95 Transfer Commands
TIBCO® Managed File Transfer™ Platform Server for UNIX
Parameter (Shortcut parm) Description {N, Port}
RSProtocol (rsp) When conducting file transfers through an RSAccelerator (RSA) you can tell the RSA server to use its own enhanced version of User Datagram Protocol (UDP), RocketStream’s parallel implementation of TCP, called Parallel Delivery Protocol (PDP), or straight TCP. Valid Values: {TCP, UDP, PDP}

Nodes 96
TIBCO® Managed File Transfer™ Platform Server for UNIX
Nodes Node definitions define default parameters needed by MFT Platform Server to interact with a remote system (node). This information includes:
• System Type • IP address for TCP/IP transfers • Port number for TCP/IP transfers • Security Compliance level (Used for HIPAA and FIPS mode
transfers) • (Optional) Netmask for TCP/IP transfers • (Optional) Use of SSL for secure communications • (Optional) Default type of compression to use for transfers • (Optional) Default type of encryption to use for transfers • (Optional) Default Local Conversion Table • (Optional) Default Remote Conversion Table • (Optional) Whether encryption is required • (Optional) Whether Responder Profiles are used • (Optional) Whether Verified Users will be accepted
Using node definitions for remote systems frees an end user from needing to constantly provide this information to MFT Platform Server when conducting transfers with remote systems. The settings for each remote system are stored in a clear text file named cfnode.cfg located in the <MFTPS_install>/config directory.
All optional node parameters use the config.txt file for defaults, if
not specified.
Once a node definition is created, a user may specify the name of the node to execute a transfer as opposed to using numerous transfer parameters to get the same results from a file transfer. MFT Platform Server will consult the definition for the specified node to obtain the parameters needed to execute a transfer.

97 Nodes
TIBCO® Managed File Transfer™ Platform Server for UNIX
Topics
• Creating Nodes • Node Parameters • Example Transfers Using Nodes

Nodes 98
TIBCO® Managed File Transfer™ Platform Server for UNIX
Creating Nodes
The MFT Platform Server cfnode command is used to add, update, and delete node definitions. Only the super-user (root) or members of the cfadmin group can create nodes.
Below is a sample of a Windows node being created with the cfnode prompt:YES command Note: If the node name you define for the first question already exists you will be asked if you want to edit the defined node:
> cfnode prompt:YES Enter a valid node name: dataServerB Enter a System Type for Node[dataServerB]: 1: HPUX 2: SUNOS/SOLARIS 3: AIX 4: LINUX 5: Windows 6: IBMi 7: z/OS 8: Command_Center 9: Other : 5 Would you like to specify netmask for remote IpAddress: 1: Yes 2: No 2 Enter a valid IP address for Node[dataServerB]: 192.168.0.44 Enter the port for which Node[dataServerB] is configured to use: 46464 Would you like to specify netmask for remote IpAddress: 1: Yes 2: No : 2

99 Nodes
TIBCO® Managed File Transfer™ Platform Server for UNIX
Enter the Security Compliance level for file transfers: 1: Default ( use Security Policy from Server Property ) 2: None 3: HIPAA : 1 Should SSL be used: 1: Yes 2: No : 1 What should be the default compression used: 1: LZ 2: RLE 3: No default compression 4: Never use compression : 2 What should be the default encryption used: 1: 3DES 2: BFL 3: RIJN : 3 Would you like to specify a local translation file: 1: Yes 2: No : 1 Please enter local translation file: : MyComtblg.dat Would you like to specify remote translation file: 1: Yes 2: No : 2 Accept Verified Users from this node? 1: Yes 2: No 3: Do not define : 1 Use Responder Profiles for this node? 1: Yes 2: No 3: Dual 4: Do not define

Nodes 100
TIBCO® Managed File Transfer™ Platform Server for UNIX
: 3 Would you like to add a description: 1: Yes 2: No : 1 Please enter a description: : Sample node Enter the Command Center parameters this node will support: 1: All 2: None 3: Audit 4: Node 5: Ping 6: Profile 7: Transfer : 7 Enter the Command Center parameters this node will support: 1: All 2: None 3: Audit 4: Node 5: Ping 6: Profile 99: No more parameters : 99 A Node definition was created for: [dataServerB] SystemType = Windows Protocol = tcpip HostName = 192.168.0.44 Server = 46464 SSL = Y Compression = RLE Encryption = RIJN SecurityPolicy = Default LocalCTFile = MyComtblg.dat AcceptVerifiedUsers = Y ResponderProfile = D Description = Sample node

101 Nodes
TIBCO® Managed File Transfer™ Platform Server for UNIX
CommandSupport = TRANSFER
In our sample node definition above we have created a node for a remote MFT Platform Server Windows machine using IP 192.168.0.44 and port 46464. We are going to use the Security Compliance level settings that are defined in the config.txt for this UNIX server. Any data being transferred out should be compressed using RLE and encrypted using Rijndael. When a file transfer comes in to this MFT Platform Server we will accept a verified user (this means we will not check the password supplied as they are already a valid user on the remote system.) and we will check if there is a responder profile defined for the remote user. If it is not defined, we will use the user id supplied in the transfer request. In addition to working with the remote MFT Platform Server we will also allow transfers to be conducted for this server using a MFT Internet Server command center. Please see your account representative for more information on our MFT Command Center software.
Nodes can be displayed and deleted using the following cfnode “action” parameters: list, add (acts the same as parameter prompt), and delete. Below are two sample commands using these parameters:
cfnode a:list
(The above command will list in the console the nodes defined to this MFT Platform Server.)
cfnode a:delete node:dataServerB
(This will delete a node previously defined) If you would prefer not to be prompted for both the required and optional parameters from the command cfnode prompt:YES, you can use the option prompt:NO. You can then provide values for

Nodes 102
TIBCO® Managed File Transfer™ Platform Server for UNIX
only the optional parameters you want to use. Below is a sample command:
cfnode n:dataserverA s:Windows net:255.255.255.0 h:192.168.0.43 p:46464 ssl:Y c:RLE e:NEVER security:Default v:Y r:D d:”This is a sample node definition” ccc:TRANSFER prompt:NO
103 Nodes
TIBCO® Managed File Transfer™ Platform Server for UNIX
Nodes Parameters
Required Node Parameters:
Parameter (Shortcut parm) Description HostName (h) The HostName parameter is used to
specify the IP address of the node. This value should be the dotted IP address of the remote machine, but may be a resolvable host name/DNS entry.
Node (n) This node parameter is used to specify the name of a node. The node name may be up to 256 characters long and may not contain any spaces. The node name is not case-sensitive.
Port (p) The Port parameter is used to specify the port number on which the remote node is listening on.
SystemType (s) The SystemType parameter is used to specify the type of system represented by this node definition. Valid system types are: HPUX | SUN/SOLARIS | AIX | LINUX | Windows | AS/400 | OS/390 | z/OS | Other
Optional Node Parameters:
Parameter (Shortcut parm) Description Action (a) This is an optional parameter. The
action parameter is used to specify the action to be taken. Valid values are Delete, List and Add. The cfnode command will not require the action parameter be defined if the prompt:NO parameter is supplied
Nodes 104
TIBCO® Managed File Transfer™ Platform Server for UNIX
Parameter (Shortcut parm) Description Verify (v) MFT Platform Server will login remote
verified user with the remote userid and without password at all. MFT Platform Server will know that this client is verified if the client sends an internal password inside the password field.
Note:To use this feature, the user on the client side will have to provide the following parameters:
UserId: *VER
Password: (Password field should be left blank.)
CommandSupport (ccc)
This is an optional parameter. The actions this node will allow Internet Server to perform. Valid Internet Server values are:
ALL, NONE, AUDIT, NODE, PING, PROFILE, TRANSFER
Note: The cfnode command will not require the Command Center Support parameter be defined if the prompt:NO parameter is supplied.
Compression (c) This is an optional parameter. The compress parameter is used to specify the default compression type to use for all transfers with this node. Valid compression values are: LZ, RLE, ZLIB1 through ZLIB9, NO, and NEVER
All default compression types may be overridden on the cfsend or cfrecv command line except when a node’s compression parameter is set to NEVER.

105 Nodes
TIBCO® Managed File Transfer™ Platform Server for UNIX
Parameter (Shortcut parm) Description Description (d) This is an optional parameter. The
description parameter is used to specify a text description of the node definition. The description may be up to 256 characters and may contain spaces. If the description contains spaces, then it must be encapsulated in double quotes. The cfnode command doesn’t require the description parameter defined if the prompt:NO parameter is supplied.
Encryption (e) This is an optional parameter. The encrypt parameter is used to specify the default encryption type to use for all transfers with this node. Valid encryption values are:
DES – 56 bit encryption
3DES – Triple DES is a 112 bit encryption
BF – Blow Fish encryption is 56 bit encryption
BFL – Blow Fish Long is a 128 bit encryption
RIJN - AES/Rijndael is a 256 bit encryption
AES128 – AES128 is a 128 bit encryption
NO – No encryption
NEVER – Never use encryption
All default encryption types may be overridden on the cfsend or cfrecv command line except when a node’s encryption parameter is set to NEVER.

Nodes 106
TIBCO® Managed File Transfer™ Platform Server for UNIX
Parameter (Shortcut parm) Description LocalCTFile (lct) Local Conversion Table (also referred
to as the Local Translation File) is an optional 16 character parameter. This parameter will contain the name of the file, which will be used to translate the data on the local side. The cfnode command will not require the LocalCTFile parameter be defined if the prompt:NO parameter is supplied. Values: filename or No
NetMask (net) This is an optional parameter. This specifies the netmask that applies to the node in question, so that the node can be used with any IPs in the specified subnet.
prompt The prompt parameter should be used to put cfnode into an interactive mode. If prompt:YES is supplied, cfnode will prompt the user for all information needed to create a node. Prompting is turned on by default. If the user does not wish to be prompted he/she should supply prompt:NO
RemoteCTFile (rct) Remote Conversion Table (also referred to as the Remote Translation File) is an optional 16 character parameter. This parameter will contain the name of the file, which will be used to translate the data on the remote side. . The cfnode command will not require the RemoteCTFile parameter be defined if the prompt:NO parameter is supplied. Values: filename or No

107 Nodes
TIBCO® Managed File Transfer™ Platform Server for UNIX
Parameter (Shortcut parm) Description ResponderProfile (r) This parameter is asking whether a
responder profile should be used for this node. Valid values are Yes, No or Dual. A value of D (Dual) means that the substitution of a real user id will occur only if the cfrprofile exists and a match is found. If there is no match found, then MFT Platform Server will attempt to login remote user with the user id and password sent with the transfer request. A value of “Yes” will not try to login the user with the user id and password they sent, and a value of “No” will not check the responder profiles at all.
Security (sl) This parameter defines whether this node will enforce MFT Platform Server, HIPAA, or FIPS-140 regulations.
Default – This setting will follow what is defined for the Security Policy parameter in the $CFROOT/config/config.txt file. Note: To follow FIPS140 security requirements you must have FIPS140 configured in the config.txt file.
HIPAA – This setting requires this node to comply with HIPAA standards. At this time the standards require that all files are transferred using encryption key length that will be 128 bits or greater.

Nodes 108
TIBCO® Managed File Transfer™ Platform Server for UNIX
Parameter (Shortcut parm) Description SSL This is an optional parameter. The ssl
parameter is used to specify whether SSL should be used for TCP/IP communications. The cfnode command will not require the ssl parameter be defined if the prompt:NO parameter is supplied. For more information on SSL, please refer to section Setting Up SSL.
/? or -? Online help.

109 Nodes
TIBCO® Managed File Transfer™ Platform Server for UNIX
Example Transfers Using Nodes
cfsend and cfrecv using a Node definition
Remember the remote IP address and port information are required parameters when sending a file to a remote system. But because these parameter values are now defined in the node definition, all we have to provide is the node name of the remote system where we want to send a transfer request. In this example we will use a node called zos. By using a node, the first examples given in the File to File transfer commands can now be simplified to the following: cfsend lf:/home/usr/file rf:dataset.name n:zos uid:zremote_user pwd:zremote_password
cfrecv lf:/home/usr/file rf:”c:\temp\unix.txt” n:windows uid:wremote_domain\\wremote_userid pwd:wremote_password
If transfer parameters are provided on the command line, they will override almost all equivalent parameters provided by the node definition. The only exception to this rule occurs when either Compression or Encryption are set to NEVER and the Security Configuration level Default is configured to use FIPS140 in the node definition. In these cases, the command line cannot be used to override either of these options.
Placing an ampersand (&) at the end of the command will allow it to run in the background.
cfrecv lf:/home/usr/file rf:”c:\temp\unix.txt” n:windows uid:wremote_domain\\wremote_userid pwd:wremote_password &
If the user intends to logoff before the cfrecv command completes, they would need to prefix the command with nohup:
nohup cfrecv lf:/home/usr/file rf:”c:\temp\unix.txt” n:windows

Nodes 110
TIBCO® Managed File Transfer™ Platform Server for UNIX
uid:wremote_domain\\wremote_userid pwd:wremote_password &
You may also send the screen output to a file. In the example below, the output goes to /tmp/file:
cfrecv lf:/home/usr/file rf:”c:\temp\unix.txt” n:windows uid:wremote_domain\\wremote_userid pwd:wremote_password > /tmp/file &
111 Profiles
TIBCO® Managed File Transfer™ Platform Server for UNIX
Profiles Local and Remote user profile definitions can be defined per node that correspond to a local and/or remote user id. (For more information on creating node definitions see the section Nodes. Local profiles are used for initiating transfers from the local machine and responder profiles are used for receive transfer requests. The profiles are activated when they simply specify a node for a given transfer.
Topics
• Creating Local Profiles • Local Profile Parameters • Creating Responder Profiles • Responder Profile Parameters • Profile Action Commands

Profiles 112
TIBCO® Managed File Transfer™ Platform Server for UNIX
Creating Local Profiles
Local user profiles define a remote login and remote password to be used for each local user and each node definition defined in cfnode.cfg. When a node is supplied on the cfsend or cfrecv command line or in a template, a user profile is chosen for the node based on the currently logged in user and the information in that user profile is used to log on to the remote system. A MFT Platform Server User Profile contains the following information:
• Node for which the User Profile is valid. • Local User Name who will use this User Profile. • Remote User Name to use to log on to the node. • Remote Password to use to log on to the node
(encrypted).
Only root and members of group cfadmin can make their own profiles as well as profiles for other MFT Platform Server users.
The following cfprofile command will create a local user profile:
cfprofile prompt:YES
Below is a sample:
cfprofile prompt:YES
Enter a valid Node Name: dataserverB
Add profile as local user ROOT? 1: Yes 2: No : 2 Enter new local user: johndoe Enter a valid Remote User: bob Enter a valid Remote Password: Profile added for... Local User = johndoe Remote User = bob Remote Password = ****************

113 Profiles
TIBCO® Managed File Transfer™ Platform Server for UNIX
This example creates a local profile that will be used each time local user johndoe initiates a transfer request to the remote server defined for node dataserverB. The local user does not need to know the remote system’s user id and password.
With this profile, all johndoe would need to define on his command line is the following:
cfsend lf:/home/usr/file rf:dataset.name n:dataServerB
or
cfrecv lf:/home/usr/file rf:”c:\temp\unix.txt” n:dataserverB

Profiles 114
TIBCO® Managed File Transfer™ Platform Server for UNIX
Local Profile Parameters
In the tables below are the required and optional local user profile parameters that are available at this time:
Required Local User Profile Parameters:
Parameter (Shortcut parm) Description node (n) The node parameter is used to specify
the name of the node to which the User Profile to be updated/added will be coupled. The node name is not case-sensitive. The node must already exist in order to successfully add or update a user profile.
password (p) The password parameter is used to specify a password to be used to log on to the remote node.
user (u) The user parameter is used to specify the user name to be used to log on to the remote node. Note: If the remote node is a Windows system, the domain must also be specified using either of the following formats: domain\\username or domain/username
Optional Local User Profile Parameters:
Parameter (Shortcut parm) Description action (a) This is an optional parameter. The
action parameter is used to specify the action to be taken. Valid values are Delete, List and Add. The cfprofile command will not require the action parameter be defined if the prompt:NO parameter is supplied.
localUser (l) This is an optional parameter. The localUser parameter is used to

115 Profiles
TIBCO® Managed File Transfer™ Platform Server for UNIX
Parameter (Shortcut parm) Description assume the identity of a different local user on the local system when a given node is specified. This allows userA to add a User Profile for userB without having to be logged in as userB. Only the root user or member of the cfadmin group may use this option. If the localUser parameter is not supplied and the prompt:YES parameter is supplied and the logged in user is root or a member of the cfadmin group, the user will be prompted as to whether they would like to assume another local user.
The root user or a member of cfadmin may use the localUser option to create a User Profile that can be used by all local users who wish to command transfers with a particular node. In this case the localUser option should be coupled with the *ALL option. If there is no User Profile for the current user on a given node but there is an *ALL entry defined, MFT Platform Server will use the *ALL User Profile for transfers.
prompt The prompt parameter should be used to put cfprofile into an interactive mode. If prompt:YES is supplied, cfprofile will prompt the user for all information needed to create or update a user profile. Using the prompt:YES parameter will also ask the user if he/she would like to create cfprofile.cfg is it could not be found. Prompting is turned on by default. If the user does not wish to be prompted he/she should supply prompt:NO.

Profiles 116
TIBCO® Managed File Transfer™ Platform Server for UNIX
Parameter (Shortcut parm) Description -? Online help.
It is possible to use the cfprofile command without being prompted for the required parameters. The example below defines the user profile on a single line:
cfprofile n:dataserverA u:kenny p:apple l:uk
Profile added for... Local User = uk Remote User = Kenny Remote Password = ****************

117 Profiles
TIBCO® Managed File Transfer™ Platform Server for UNIX
Creating Responder Profiles
Responder Profiles define a local username and password that should be used in place of the incoming username and password. By using responder profiles, a remote MFT Platform Server installation does not have to know an actual username and password on your local machine to initiate a transfer. A responder profile contains the following information:
• Remote User Name – Username to be supplied by the remote system initiating the transfer. (Does not have to be a valid username on the local system.)
• Remote Password – Password to be supplied by the remote system initiating the transfer. If the remote user is an already verified user, this parameter should be set to *VER on profile creation.
• Local User Name – Username to be used by MFT Platform Server when processing a transfer on your machine from the specified remote user.
Only root and members of group cfadmin can make their own profiles as well as profiles for other MFT Platform Server users.
The following cfprofile command will create a local user profile:
cfrprofile prompt:YES
Below is a sample command using prompts: cfrprofile prompt:YES Enter a valid Node Name: dataServerA Enter a valid Remote User: abc Enter a valid Remote Password: abc Re-enter Remote Password: Enter a valid Local User: johndoe Responder Profile updated for... Remote User = abc

Profiles 118
TIBCO® Managed File Transfer™ Platform Server for UNIX
Remote Password = **************** Local User = johndoe
The example above creates a responder profile that will be used each time a transfer request comes into this MFT Platform Server from the node dataServerA with the a user id and password of abc defined in the transfer request. This user does not exist on the UNIX system and is being used by dataServerA to send transfer request to this server. The transfer will be processed using johndoe’s local user id. All the remote user sending the file request needs to know is the user id and password abc/abc.
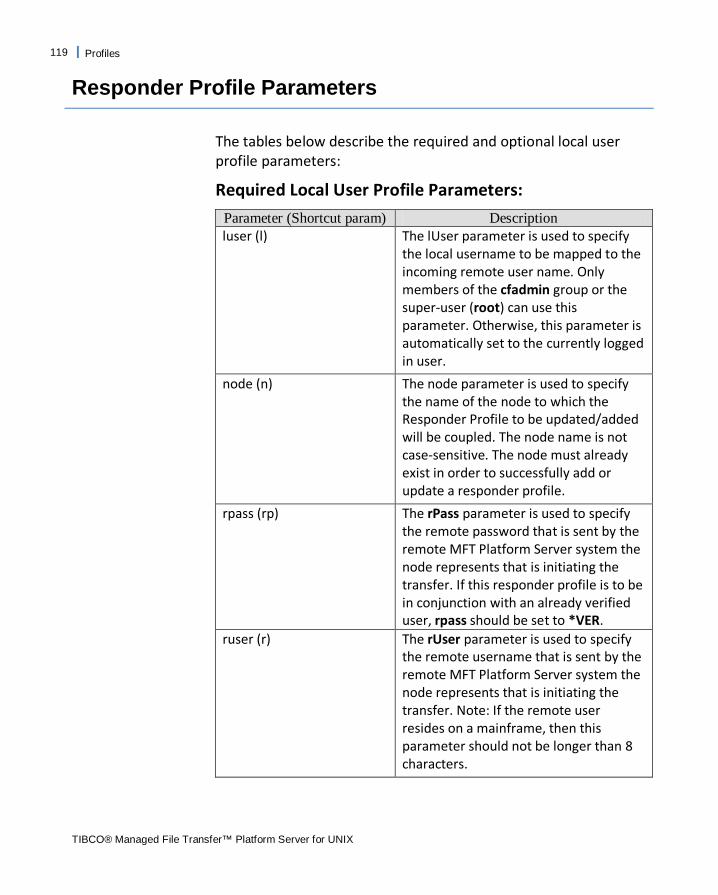
119 Profiles
TIBCO® Managed File Transfer™ Platform Server for UNIX
Responder Profile Parameters
The tables below describe the required and optional local user profile parameters:
Required Local User Profile Parameters:
Parameter (Shortcut param) Description luser (l) The lUser parameter is used to specify
the local username to be mapped to the incoming remote user name. Only members of the cfadmin group or the super-user (root) can use this parameter. Otherwise, this parameter is automatically set to the currently logged in user.
node (n) The node parameter is used to specify the name of the node to which the Responder Profile to be updated/added will be coupled. The node name is not case-sensitive. The node must already exist in order to successfully add or update a responder profile.
rpass (rp) The rPass parameter is used to specify the remote password that is sent by the remote MFT Platform Server system the node represents that is initiating the transfer. If this responder profile is to be in conjunction with an already verified user, rpass should be set to *VER.
ruser (r) The rUser parameter is used to specify the remote username that is sent by the remote MFT Platform Server system the node represents that is initiating the transfer. Note: If the remote user resides on a mainframe, then this parameter should not be longer than 8 characters.

Profiles 120
TIBCO® Managed File Transfer™ Platform Server for UNIX
Optional Local User Profile Parameters:
Parameter (Shortcut param) Description action (a) The action parameter is used to specify
the action to be taken. Valid values are Delete, List and Add.
prompt The prompt parameter should be used to put cfrprofile into an interactive mode. If prompt:YES is supplied, cfrprofile will prompt the user for all information needed to create or update a responder profile.
-? Online help.
As with the local user profile command, it is possible to use the cfrprofile command without being prompted for the required parameters. Below is an example of defining the local user profile using a single line:
cfrprofile n:dataServerA r:abc rp:abc l:johndoe prompt:NO Responder Profile added for... Remote User = abc Remote Password = **************** Local User = johndoe

121 Profiles
TIBCO® Managed File Transfer™ Platform Server for UNIX
Profile Action Commands
Local and Remote User Profiles can be listed, added and deleted using the following cfprofile and cfrprofile “action” parameters: list, add (acts the same as parameter prompt), and delete. Below are sample commands using these action parameters:
Local User Profile actions:
cfprofile a:list
(The above command will list in the console the local profiles defined to this MFT Platform Server.)
cfprofile a:delete node:dataServerB luser:johndoe
(This will delete a local profile previously defined.)
Responder Profile actions:
cfrprofile a:list
(The above command will list in the console the responder profiles defined to this MFT Platform Server.)
cfrprofile a:delete node:dataServerB ruser:johndoe
(This will delete a responder profile previously defined.)

DistributionLists 122
TIBCO® Managed File Transfer™ Platform Server for UNIX
Distribution Lists Distribution lists give you the capability to send a single or multiple files to multiple destinations, using a single command line interface command.
Topics
• Configure Distribution Lists • Example Distribution List Transfer

123 Distribution Lists
TIBCO® Managed File Transfer™ Platform Server for UNIX
Configure Distribution Lists
To configure distribution lists, use the file named cflist.cfg which is installed to <MFTPS_install>/config. You can use this file to define distribution lists that specify multiple destinations for sent files based on nodes that you have created using the cfnode command. You can specify a single default destination to be used for multiple nodes or specify a different directory to be used by each node included in the distribution list. When a distribution list is used, the host connection information is pulled from your node configurations.
Note: Distribution lists are used with send transfer requests only.
Below are sample distribution lists that are included in the default cflist.cfg file:
[AccList] # Distribution list : AcctList Node=NYAcct,LAACCT,chiacct [Stores] # Distribution list : Stores Node= Store1, Store2, Directory = /tmp/prod/data Node=Store3, Store4 Directory=c:\tmp\prod\data Node=Store5
Distribution List Parameters:
Parameter Description [<distribution_list_name>] This is a required parameter. Specify
the distribution list name between square brackets. It can be from 1 to 32

Distribution List 124
TIBCO® Managed File Transfer™ Platform Server for UNIX
Parameter Description characters and cannot contain spaces. Any name longer than 32 characters will be truncated.
Note: The pound sign, #, character should not be used within a distribution list name and it has special meaning in the UNIX environment.
Node This is a required parameter. The Node parameter is used to specify either a single or multiple nodes to conduct transfer requests with when this distribution list is used. Multiple nodes defined on 1 line must be delimited by a comma.
Directory The Directory parameter specifies a destination directory on the specified node. If no directory is specified, then the directory defined on the command line will be used. However, if a directory is defined in the distribution list, it will override a directory that is defined in the transfer window or on the command line.
Example Distribution List Transfer
In the example below AccList is a distribution list that must be defined in the cflist.cfg file. The example assumes that each node defined in AccList has the same user id and password on each system. (If a node has a different user id and password then a user profile must be configured. Initiator profiles can be configured locally for each node to map the local user executing the file transfer to the correct remote user id and password.

125 Distribution Lists
TIBCO® Managed File Transfer™ Platform Server for UNIX
Alternatively, the administrator(s) of the remote Platform Servers can configure responder profiles to map the incoming user ID.)
cfsend list:AccList lf:/home/user/file rf:”c:\temp\unix.txt” uid:remote_user pwd:remote_password
Distribution List Optional Transfer Parameters:
StopOnFailure – See StopOnFailure description.
Test – See Test description.
Optional config.txt parameter (global change) to be set when using a distribution list:
RunPPAEndDirTx – See RunPPAEndDirTx description.

Template Transfers 126
TIBCO® Managed File Transfer™ Platform Server for UNIX
Template Transfers Templates simplify transfers by letting you define and save transfer requests. All required transfer information is defined in the template. After you have created a template, you can run a transfer from the command line by using a cfsend or cfrecv command with the template name.
Topics
• File to File Transfer Using Templates • File to Job Transfer Using Templates • Running Remote Commands Using Templates

127 Template Transfers
TIBCO® Managed File Transfer™ Platform Server for UNIX
File to File Transfers Using Templates
The transfer information such as the local and remote file names, IP Address, IP port, userid and password are defined in the template file.
Sample templates called TSEND and TRECV are installed with MFT Platform Server in the MFT installation directory (/mftps by
default). Use these sample templates as a guide to create your own templates.
The format of the cfsend and cfrecv command using a template is as follows:
cfsend t:TemplateFileName cfrecv t:TemplateFileName
The TemplateFileName is the name of your template file name. To use the TSEND or TRECV template, the commands are:
cfsend t:TSEND cfrecv t:TRECV
Transfer parameters can be used on the command line with the template to override any of the parameters set within the template. For example, to send a file configured in a transfer template to a different IP address then defined in the template, you can include the IP address on the command line. For example:
cfsend t:TSEND ip:10.1.1.130
If a node definition and a template file are both specified on the command line as shown in the next example, the template file is read and processed first, followed by the node definition. Settings in the specified node definition override settings in the specified template file.
cfsend t:TSEND n:dataServerB
Notes:

Template Transfers 128
TIBCO® Managed File Transfer™ Platform Server for UNIX
• If a Node is specified in the transfer template and you define one on the command line, as in the above example, the node on the command line overrides the node specified in the template.
• If an IpName/Address is specified in the template, it takes precedence over the nodes location that is being defined on the command line. Because of this, we recommended the IpName/Address parameter be commented out.
Placing an ampersand (&) at the end of the command allows it to run in the background:
cfsend t:TSEND & If you intend to logoff before the command completes, t prefix the command with nohup:
nohup cfrecv t:TRECV & You can also send the screen output to a file. In the example below, the output goes to /tmp/file:
cfsend t:TSEND > /tmp/file &
Here is the installed TSEND template:
# Sample template file for MFT Platform Server command cfsend LocalFileName: /home/usr/file RemoteFileName: c:\tmp\unix.txt # ConfigFileName: /mftps/config/config.txt IpName/Address: 127.0.0.1 Node: N { N, Node Name } Port: 46464 UserId: uid { *VER } Password: pwd # Additional File Transfer Parameters CR_LF: Y { CRLF|Y,LF,N,CRLFY } ASCII_to_EBCDIC: N { N|Binary, Y|Text, A|Ascii } ConvTbl: N { N, FileName } CreationOption: CR { C,R,A,CR,CA,CRN } TryNumber: 1 { N|1, 0|U|Unlimited, 2 - 10 } RetryInterval: N { N, Y|1, # of min more than 1 }

129 Template Transfers
TIBCO® Managed File Transfer™ Platform Server for UNIX
CheckPointInterval: N { N, Y|1, # of min more than 1 } Compression: N { N, RLE|Y, LZ } EncryptionType: N (N, DES, 3DES, BlowFish|BF, BlowFishLong|BFL, Rijndael|RIJN|RJ|AES, AES128} LocalCTFile: N { N, NONE, FileName } RemoteCTFile: N { N, FileName } SSL: N { Y, N } SSLPort: 56565 TransferType: F { F|File, J|Job, C|Command, P|Print } RemoteCommand: N { N, Command to be executed } RemotePrinterName: N { N, printer name } ProcessName: N { N, string, $(TIME) } UserData: N { N, string } ExitPrgm: N { N, FileName } TraceFileName: N { N, FileName } SecurityAttribTemplate: N { N, any name } PermittedActions: N { N; E,Z,S,H,A,R,C } UnixPermissions: N { N, 3 digit number } EmailNotificationLocal: N { N, email address } EmailNotificationRemote: N { N, email address } EmailSuccess: N { N, email address } EmailFailure: N { N, email address } Post_Action1: N { N, parameters } Post_Action2: N { N, parameters } Post_Action3: N { N, parameters } Post_Action4: N { N, parameters } SilentMode: N { N, Y } Timeout: 120 { Transfer timeout in min } # Additional Directory Transfer Parameters ScanSubDir: N { N, Y } StopOnFailure: Y { N, Y } Test: N { N, Y } # Additional RocketStream Accelerator Transfer Parameters RSAccelerate: N { N, Y } RSProtocol: PDP { TCP, UDP, PDP } RSEncryption: N { N, Y } RSCompression: N { N, Y | Best, Default, Fast } RSMaxSpeed: 1000000 { 256 - 1000000 kbps } RSHost: N { N, Host } RSPort: N { N, Port } # Optional Parameters For zOS Transfers follow: # In Order For Them To Take Effect, Set zOS Parameter to Y. zOS: N { Y, N } DELIM: N { CRLF|Y,LF,N,CRLFY } REMOVETRAIL: N { Y, N } RECFM: FB { F,FB,VB,V,U,FBA,FA,FBM,FM,VBA,VA,VBM,VM } LENGTH: 80 { 1 - 32760 }

Template Transfers 130
TIBCO® Managed File Transfer™ Platform Server for UNIX
BLKSIZE: 0 { 0 - 32760 } ALLOC_TYPE: K { T,C,M,K } ALLOC_PRI: 0 { 0 - 32000 } ALLOC_SEC: 0 { 0 - 32000 } VOLUME: N { N, VolumeName } UNIT: SYSALLDA { N, UnitName } AVAIL: Immediate { Immediate|I, Deferred|D } EXEC: N { N, OS390 Command to be executed } CALLJCL: N { N, OS390 program be called } CALLPROG: N { N, OS390 program be called } SUBMIT: N { N, OS390 JCL to be submitted } DATACLASS: N { N, DataClass } MGMTCLASS: N { N, MgtClass } STORCLASS: N { N, StorClass } RetenPeriod_ExpDate: N { N, # of days, yyyy/ddd } SysOutClass: N { N, SysOutClass } SysOutFcb: N { N, SysOutFcb } SysOutForms: N { N, SysOutForms } SysOutCopies: N { N, SysOutCopies } SysOutWriter: N { N, SysOutWrites } SysOutDestination: N { N, SysOutDestination } SysOutUserName: N { N, SysOutUserName }

131 Template Transfers
TIBCO® Managed File Transfer™ Platform Server for UNIX
File to Job Transfers Using Templates
Like File to File transfer requests, File to Job requests can also be simplified using a template. Below is a section of the template file showing how a Job would be defined in a template. In this example, called TSENDJ, LocalFileName is the name of the executable file to send to the remote system and TransferType is set to J for job.
# TSENDJ Sample template file for MFT Platform Server File to Job LocalFileName: /home/user/job RemoteFileName: c:\tmp\unix.txt # ConfigFileName: /mftps/config/config.txt IpName/Address: 111.222.34.56 Port: 46464 Node: N { N, Node Name } UserId: r_user { *VER } Password: r_pswd # Additional File Transfer Parameters CR_LF: Y { Y, N } CreationOption: CR { C,R,A,CR,CA,CRN } TryNumber: 1 { N|1, 0|U|Unlimited, 2 - 10 } RetryInterval: N { N, Y|1, # of min more than 1} CheckPointInterval: N { N, Y|1, # of min more than 1 } Compression: N { N, RLE|Y, LZ } EncryptionType: N {N,DES,3DES,BlowFish|BF,BlowFishLong|BFL,Rijndael|RIJN|AES,
AES128 } LocalCTFile: N { N, FileName } RemoteCTFile: N { N, FileName } SSL: N { Y, N } SSLPort: 56565 TransferType: J { F|File, J|Job, C|Command } RemoteCommand: N { N, Command to be executed }
The template above is called TSENDJ. The LocalFileName is the name of the executable file to send to the remote system. The TransferType is set to J for job.

Template Transfers 132
TIBCO® Managed File Transfer™ Platform Server for UNIX
Running Remote Commands Using Templates
Remote Commands can also be simplified using a template. Below is a template file showing how a Remote Command would be defined in a template.
In this sample template, called TSENDC, LocalFileName is the name of the file that will contain the output when the remote command is executed. TransferType is set to C for Command. RemoteCommand is the command to be executed on the remote system.
The command line to use this template is:
cfsend t:TSENDC
Parameters can be overridden on the command line, as shown here:
cfsend t:TSEND trtype:c remotecommand:”ls”
# TSENDC Sample template file for MFT Platform Server File to Remote Command
LocalFileName: /home/usr/file # RemoteFileName: c:\tmp\unix.txt # ConfigFileName: /mftps/config/config.txt IpName/Address: 111.222.98.76 Port: 46464 Node: N { N, Node Name } UserId: uid { *VER } Password: pwd # Additional File Transfer Parameters CR_LF: Y { Y, N } CreationOption: CR { C,R,A,CR,CA,CRN } TryNumber: 1 { N|1, 0|U|Unlimited, 2 - 10 } RetryInterval: N { N, Y|1, # of min more than 1} CheckPointInterval: N { N, Y|1, # of min more than 1 } Compression: N { N, RLE|Y, LZ } EncryptionType: N
{N,DES,3DES,BlowFish|BF,BlowFishLong|BFL,Rijndael|RIJN|AES, AES128 } LocalCTFile: N { N, FileName } RemoteCTFile: N { N, FileName } SSL: N { Y, N } SSLPort: 56565 TransferType: C { F|File, J|Job, C|Command }

133 Template Transfers
TIBCO® Managed File Transfer™ Platform Server for UNIX
RemoteCommand: ls –la { N, Command to be executed }

Extended Features 134
TIBCO® Managed File Transfer™ Platform Server for UNIX
Extended Features This user’s guide explains how to use TIBCO MFT Platform Server™ for UNIX.
Topics
• Using Checkpoint Restart • Conversion Tables/Custom Code Conversion • Directory Named Initiation (DNI) • FUSPING Utility • FUSUTIL Utility • Configured Post Processing • CFALIAS • Auditing (CFINQ Utility) • Access Control • OCSP And CRL Support • Personalized SSL Authorization • User Exits • CFUNIX2DOS Utility • RocketStream • Uninstall

135 Extended Features
TIBCO® Managed File Transfer™ Platform Server for UNIX
Using Checkpoint Restart
Checkpoint Restart means that for a transfer, MFT Platform Server will take a checkpoint at a user-specified interval. A checkpoint will contain information about the transfer such as file pointers, byte count and compressed byte count; so in case of a failure, the transfer will not restart at the beginning of the file but instead will start at the last checkpoint stored. This feature is especially useful in the case where the network connections are slow or the file to be transferred is very large.
To use Checkpoint Restart you must use the following three parameters:
TryNumber - This parameter specifies a try count for each initiated transfer before it can fail.
RetryInterval - This parameter will determine how long the initiator will wait before the next retry of the transfer. By default this interval is set to 1 minute.
CheckPointInterval – This parameter determines a time limit as to how often a checkpoint is taken. By default, this interval is set to 1 minute.
Details of every checkpoint transfer and every initiated transfer that has a TryNumber defined are stored in a PQF (Persistent Queue File) file. This file is stored in the (MFT Platform ServerInstall)/PQF directory and is deleted once a transfer is successfully completed or has exceeded the TryNumber parameter.
If the MFT Platform Server initiator (CyberResp) is shut down while doing a checkpoint restart transfer, then CyberResp must be stopped and restarted so that it can pick up the PQF file in order to do a restart on that transfer.

Extended Features 136
TIBCO® Managed File Transfer™ Platform Server for UNIX
Note: If a checkpoint transfer fails when UNIX is a responder, the PQF file is not deleted.
Checkpoint Restart Example:
On the initiator’s side, a cfsend was performed with the following parameters:
TryNumber: 3 RetryInterval: 2 CheckPointInterval: 1
After this transfer has been in process for over a minute, assume the Responder’s side goes down for whatever reason. The initiator will try three times to restart the transfer from this checkpoint, instead of from the beginning of the file. Since the RetryInterval is set to 2 minutes, that is how long MFT Platform Server will wait between each retry attempt.
If the initiator is the side with the problem, then you can restart the process by restarting the CyberResp daemon. It will scan the PQF file and attempt to restart any files that are in the PQF directory.
137 Extended Features
TIBCO® Managed File Transfer™ Platform Server for UNIX
Conversion Tables/Custom Code Conversion
This feature allows the user to convert text files between various character-set specifications. With MFT Platform Server, we provide the following four conversion tables:
Comtblg.classic The old comtblg.dat shipped with prior versions. (Prior to v7.1)
Comtblg.cp037 Extended ASCII table that is based on IBM Code page 037
Comtblg.cp1047 Extended ASCII table that is based on IBM Code page 1047
Comtblg.dat ASCII/EBCIDIC table used by MFTPS at run time (Default is copy of Comtblg.cp037)
<MFTPS_install>/Comtblg.dat contains the table below
which converts data between the ASCII and EBCDIC and EBCDIC to ASCII character sets:

Extended Features 138
TIBCO® Managed File Transfer™ Platform Server for UNIX
Below is an explanation of how the ASCII to EBCDIC process works, a method which can be generalized to whatever text conversions are needed.
ASCII to EBCDIC Conversion Table Example:
To make better sense of the table above we have placed the ASCII to EBCDIC portion of the table in a spreadsheet format below for demonstration purposes:

139 Extended Features
TIBCO® Managed File Transfer™ Platform Server for UNIX
Each ASCII or EBCDIC character is represented by 2 hexadecimal digits. For example ASCII character E is hexadecimal 45 or X’45’. So to find the location of the ASCII character E within the table we go down to row 4. The second hexadecimal digit is 5 so we now move across to column 5. The point at which they meet is the hex value X’C5’. This means the hexadecimal EBCDIC value for E is X’C5’. If we wanted the E to be represented by a different EBCDIC hex value we would edit this value in the table. When a transfer request is done and the data is converted to EBCDIC the new value would be used.
Note: The ASCII character set in the default table supports the Extended ASCII range which covers special characters outside the English alphabet. For standard ASCII support you can use the comtblg.classic file. To replace the default table rename the existing comtblg.dat file then rename the existing comtblg.classic file to now become the new comtblg.dat file. The conversion tables

Extended Features 140
TIBCO® Managed File Transfer™ Platform Server for UNIX
presently available do not support wide or multibyte character sets at present.
The EBCDIC to ASCII translation works the same way. For other conversions besides standard ASCII to EBCDIC, you can copy the default comtblg.dat file to create new customized tables of your own to be used. These can be assigned per node if desired, see the section Nodes.
Additional Information:
• To activate Conversion tables, you must turn the ASCII_to_EBCDIC parameter on. When this parameter is on, it uses the file names that are specified in the ConvTbl, LocalCTFile, and RemoteCTFile parameters.
• The ConvTbl parameter in config.txt is used to specify the default conversion table for all transfers. If this is not specified, the (MFTPS_Install)/Comtblg.dat file will be used.
• In individual parameters, it is possible to specify two conversion tables; one on the local side, and one on the remote side. This way you can have a standard character set to be used for transmission, without having a conversion table between every two possible character sets.
• The local conversion table is specified with the LocalCTFile parameter in templates and the lct parameter at the command line. Similarly, the remote conversion table is specified with the RemoteCTFile parameter in templates and the rct parameter at the command line.
• If both the ConvTbl and the LocalCTFile parameters are specified, the LocalCTFile will override the ConvTbl parameter. MFT Platform Server will not convert the file twice. The ConvTbl parameter is unaffected by RemoteCTFile.
• The lct and rct parameters are capped at a 16 character max for purposes of shrinking the number of bytes sent per transfer. However, they support filenames relative to the current working directory and the $CFROOT directory on the local side. For a UNIX responder, the directories are searched in the following order: the

141 Extended Features
TIBCO® Managed File Transfer™ Platform Server for UNIX
directory where CyberResp is running on the remote side, the $CFROOT environment variable if it is defined in the environment of the CyberResp process, then in the /mftps directory. For z/OS, MFT Platform Server searches an in-core table that must be enabled at startup or through an operator command. For Windows, MFT Platform Server looks in the working directory.
• Nodes can also support both local and remote conversion tables. These will be used whenever that node is specified unless the parameters are overridden on the command line.
• Always replace a 2-digit hexadecimal number with a 2-digit hexadecimal number. If the table is invalid translation will not be performed. Remember, the table is comprised of two sections that are 16 lines each.. Thus the entire file should have 32 lines across and 32 lines down. If it has anything else it will not work!
• For all transfers, if the file is outgoing (a send), then the top half of the conversion table will be used. If the file is incoming, (a receive), then the bottom half of the conversion table will be used. For example, in a cfsend, if both the LocalCTFile and RemoteCTFile parameters are used, then the top half of the LocalCTFile will be used on the local side, and the bottom half of the RemoteCTFile will be used on the remote end. The reverse is true for cfrecv.
• Remember which table translates for sends and which translates for receives. TIBCO recommends placing a few lines between the two tables during editing to help remember which is which

Extended Features 142
TIBCO® Managed File Transfer™ Platform Server for UNIX
Directory Named Initiation (DNI)
Please refer to TIBCO Perl Directory Named Initiation (DNI) Installation and Operations Guide contained within the dni.tar file. Note: The TIBCO Perl Directory Named Initiation Guide (DNI) Installation and Operations guide is in pdf format.

143 Extended Features
TIBCO® Managed File Transfer™ Platform Server for UNIX
FUSPING Utility
Use the fusping utility to determine if a remote MFT Platform Server is running.
The following example shows using fusping command to determine the status of an MFT Platform Server z/OS remote server:
fusping h:11.22.33.55:46464
The output of the command:
Host: 11.22.33.55 Port: 46464 System Name: Name=A390,STC=CFUSN65,CPUType=1234,CPUID=5555 Key Expiration: 201210519 Version: MFT Platform Server z/OS,Version=710,PTFLevel=CZ01892
The next example shows using the fusping to determine the status of an MFT Platform Server Windows remote server:
fusping h:11.22.33.44:46464
Output:
Host: 11.22.33.44 Port: 46464 System Name: WIN44 Key Expiration: 20121019 Version: Ftms32.DLL, Version 7.1 (Build 1034 UNICODE) FtmsDni.DLL, Version 7.1 (Build 1034 UNICODE) FtmsTcpS.DLL, Version 7.1 (Build 1034 UNICODE) FtmsVer.DLL, Version 7.1 (Build 1034 UNICODE) FusionMs.DLL, Version 7.1 (Build 1034 UNICODE) HoLib.DLL, Version 7.1 (Build 1034 UNICODE) HOTrace.DLL, Version 7.1 (Build 1034 UNICODE) SMTPDll.DLL, Version 7.1 (Build 1034)

Extended Features 144
TIBCO® Managed File Transfer™ Platform Server for UNIX
FtmsMgr.EXE, Version 7.1 (Build 1034 UNICODE) FtmsCmd.EXE, Version 7.1 (Build 1034 UNICODE) FtmsMon.EXE, Version 7.1 (Build 1034 UNICODE) FtmsSvr.EXE, Version 7.1 (Build 1034 UNICODE) FusionVer.EXE, Version 7.1 (Build 1034 UNICODE)

145 Extended Features
TIBCO® Managed File Transfer™ Platform Server for UNIX
FUSUTIL Utility
When a file transfer completes, you may want to perform some action such as renaming or deleting a file. Different operating systems support different commands to rename or delete a file. The fusutil utility provides a common interface to rename or delete a file, and see if a file exists on a remote platform.
When a request is received by an MFT Platform Server platform, the request will be converted to the proper command for that operating system. The following table shows the relationship between the fusutil command and the UNIX operating system equivalent.
Function Alternate Parameter
UNIX equivalent command
RENAME R mv
DELETE D rm
EXIST E ls
You would use the fusutil command as a post processing action running COMMAND. Below are post processing command examples using each of the functions of the fusutil utility:
Post_Action1: S,L,COMMAND,fusutil DELETE <filename> Post_Action1: S,L,COMMAND,fusutil D <filename> Post_Action2: F,R,COMMAND,fusutil RENAME <old_filename> <new_filename> Post_Action2: F,R,COMMAND,fusutil R <old_filename> <new_filename> Post_Action3: S,R,COMMAND,fusutil EXIST <filename> Post_Action3: S,R,COMMAND,fusutil E <filename>
Note: When processing the EXIST function, you should also check if the file is available for use. This should be done on all platforms

Extended Features 146
TIBCO® Managed File Transfer™ Platform Server for UNIX
except UNIX, since there is no standard call to accomplish this on UNIX.
Note: When using the rename or delete options on UNIX in
a directory in which you have “write” access, it is possible to remove or rename a file that does not belong to you and for which you have no access rights. This is UNIX functionality.
0 = Success 4 = Generally Network Errors and the command will be retried 8 = Severe Error. The command will not be retried
Any other number = read the return code message for more information.
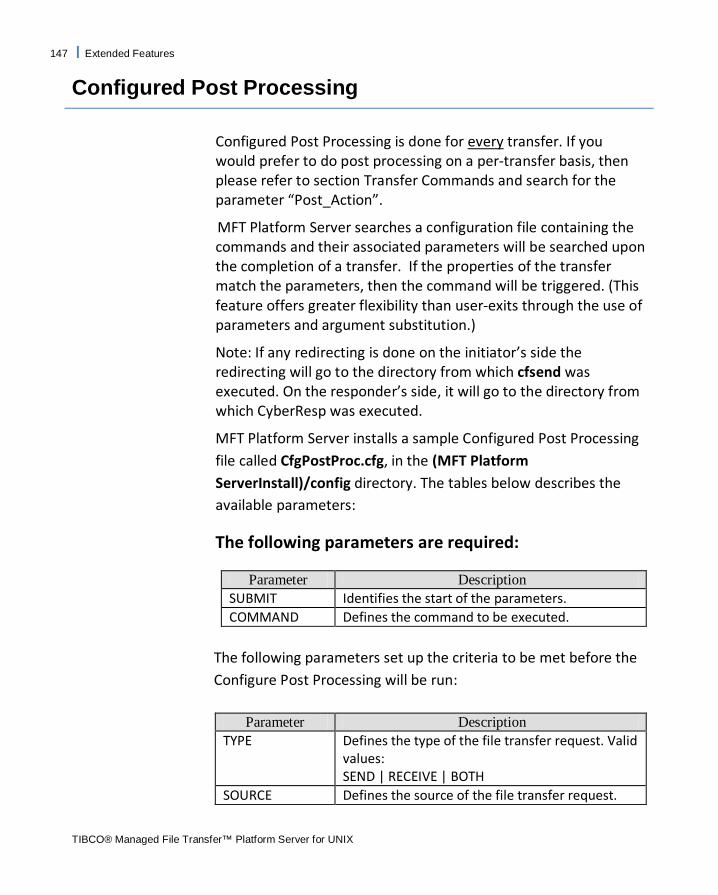
147 Extended Features
TIBCO® Managed File Transfer™ Platform Server for UNIX
Configured Post Processing
Configured Post Processing is done for every
MFT Platform Server searches a configuration file containing the commands and their associated parameters will be searched upon the completion of a transfer. If the properties of the transfer match the parameters, then the command will be triggered. (This feature offers greater flexibility than user-exits through the use of parameters and argument substitution.)
transfer. If you would prefer to do post processing on a per-transfer basis, then please refer to section Transfer Commands and search for the parameter “Post_Action”.
Note: If any redirecting is done on the initiator’s side the redirecting will go to the directory from which cfsend was executed. On the responder’s side, it will go to the directory from which CyberResp was executed.
MFT Platform Server installs a sample Configured Post Processing file called CfgPostProc.cfg, in the (MFT Platform ServerInstall)/config directory. The tables below describes the available parameters:
The following parameters are required:
Parameter Description SUBMIT Identifies the start of the parameters. COMMAND Defines the command to be executed.
The following parameters set up the criteria to be met before the Configure Post Processing will be run:
Parameter Description
TYPE Defines the type of the file transfer request. Valid values: SEND | RECEIVE | BOTH
SOURCE Defines the source of the file transfer request.

Extended Features 148
TIBCO® Managed File Transfer™ Platform Server for UNIX
Parameter Description Valid values: INITIATOR | RESPONDER | BOTH
STATUS Defines whether a transfer request was successful or unsuccessful: Valid values: SUCCESS | FAILURE | BOTH
FILENAME or DSN
This is the fully qualified file name. It is compared against the local file name in the file transfer request.
PROCESS Defines the 1 to 8 character PROCESS name associated with the transfer request. This only applies to z/OS transfers.
IPADDR Defines the IP Address of the machine that is communicating with this MFT Platform Server.
NODE For initiator requests, this parameter is used when the NODE parameter is used in a transfer request. For responder requests, MFT Platform Server will scan the list of nodes for matches on the IP Address. These entries are then matched against the value specified in this NODE parameter.
Example Configured Post Processing Commands SUBMIT,COMMAND=loaddb –-filename &FILENAME –source &IPADDR, TYPE=RECEIVE, STATUS=SUCCESS,SOURCE=RESPONDER, FILENAME=jan.sales, NODE=ACCOUNTING, PROCESS=cfusion SUBMIT,COMMAND=cmdfile,TYPE=SEND, STATUS=BOTH,SOURCE=INITIATOR, FILENAME=infile.txt, IPADDR=111.222.33.44
Argument Substitution Transfer properties can be passed to the executable command as substitutable command line arguments. Enter any of the argument names listed below after the COMMAND entry in the configuration file.

149 Extended Features
TIBCO® Managed File Transfer™ Platform Server for UNIX
Argument Name Data Substituted
&TYPE SEND or RECEIVE &SOURCE INITIATOR or RESPONDER &STATUS SUCCESS or FAILURE &RC Numeric return code (0 if successful) &FILENAME or &DSN Local file name &PROCESS Process name &NODE Node Name(or NODE if no node found) &IPADDR IP Address(or IPADDR if not IP) &TRN local transaction number
For example: COMMAND=cmdfile.com &FILENAME &TYPE,
In the example above, the filename and type of the transfer request will be substituted for &FILENAME and &TYPE and passed to the executable as command line arguments.

Extended Features 150
TIBCO® Managed File Transfer™ Platform Server for UNIX
CfAlias
Some architectures may not want users knowing the file names or locations of the files they send to the Server, or perhaps the administrator wants to handle file naming and locations automatically for users. CfAlias allows the administrator to associate an alias with an actual fully qualified filename, where the end user has no idea of the actual file name used by the system. MFT Platform Server also supports substitutable parameters that can be used to assign values to the Responder’s filenames.
Note: This facility is available for MFT Platform Server Responder transfer requests only.
CfAlias Parameters A sample MFT Platform Server Alias file called CfAlias.cfg is installed, in the (MFT Platform ServerInstall)/config directory. Parameters are one per line, and continuations are defined by a comma followed by a space.
Required CfAlias Parameters:
Parameter Description USERID The user id of the user initiating the transfer
request. Valid values: userid | DEFAULT (indicates a match with any user)
And/or
Parameter Description NODE The node initiating the transfer request.
Valid values: nodename | DEFAULT (indicates a match with any node)
IPADDR The IP address of the initiating transfer request.
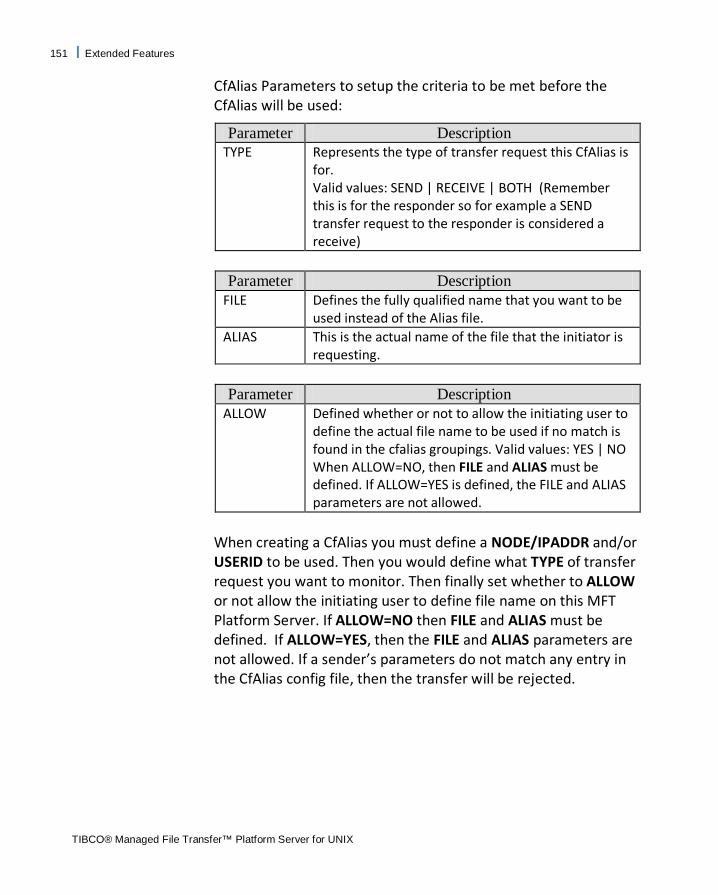
151 Extended Features
TIBCO® Managed File Transfer™ Platform Server for UNIX
CfAlias Parameters to setup the criteria to be met before the CfAlias will be used:
Parameter Description TYPE Represents the type of transfer request this CfAlias is
for. Valid values: SEND | RECEIVE | BOTH (Remember this is for the responder so for example a SEND transfer request to the responder is considered a receive)
Parameter Description
FILE Defines the fully qualified name that you want to be used instead of the Alias file.
ALIAS This is the actual name of the file that the initiator is requesting.
Parameter Description
ALLOW Defined whether or not to allow the initiating user to define the actual file name to be used if no match is found in the cfalias groupings. Valid values: YES | NO When ALLOW=NO, then FILE and ALIAS must be defined. If ALLOW=YES is defined, the FILE and ALIAS parameters are not allowed.
When creating a CfAlias you must define a NODE/IPADDR and/or USERID to be used. Then you would define what TYPE of transfer request you want to monitor. Then finally set whether to ALLOW or not allow the initiating user to define file name on this MFT Platform Server. If ALLOW=NO then FILE and ALIAS must be defined. If ALLOW=YES, then the FILE and ALIAS parameters are not allowed. If a sender’s parameters do not match any entry in the CfAlias config file, then the transfer will be rejected.

Extended Features 152
TIBCO® Managed File Transfer™ Platform Server for UNIX
Substitutable Parameters The administrator can define Substitutable parameters in the FILE parameter of the CfAlias file. Substitutable parameters are defined by a % followed by the parameter name. The following Substitutable parameters are allowed:
%JDATE Julian Date (YYDDD) %JDATEC Julian Date (CCYYDDD) %GDATE Gregorian Date (YYMMDD) %GDATEC Gregorian Date (CCYYMMDD) %TIMET Time (HHMMSST) %TIME Time (HHMMSS) %NODE Node Name (if no node defined, use the value
NODE) %USER User Name %TRN Transaction Number %SYSID System Name %ACB VTAM ACB Name (z/OS only)
Example Substitution: FILE=/u/%USER/abc123.%GDATEC.%TIMET Would be renamed to: FILE=/u/prtom/abc123.20090718.1601029
Example of how CfAlias could be used Problem: A daily report file named report.doc comes in to an MFT Platform Server running on UNIX everyday from a remote MFT Platform Server user named JohnDoe. The user sends a new report each day and the prior day’s report.doc is replaced with the new report file. The UNIX admin wants to prevent the new report from replacing the existing report.doc without involving JohnDoe.
Solution: Set up two CfAlias groupings in the CfAlias.cfg file that look like this:

153 Extended Features
TIBCO® Managed File Transfer™ Platform Server for UNIX
USERID=JohnDoe, NODE=DEFAULT, TYPE=RECEIVE, FILE=/home/JohnDoe/DailyReports/report.%GDATE.doc, ALIAS=report.doc * USERID=JohnDoe, NODE=DEFAULT, ALLOW=NO
With the settings configured in the first CfAlias grouping set, when JohnDoe sends in his daily report, it is put in the following directory with a new file name each day based on the current date: /home/JohnDoe/DailyReports/report.%GDATE.doc. For example, if the date is July 18, 2009 the file would be created as report.090718.doc. JohnDoe has no knowledge of where or how his report is being stored. Also, note the TYPE=RECEIVE setting. This is because a RECEIVE on the Responder is a SEND from the Initiator. Finally, the second CfAlias grouping restricts JohnDoe from having any other access to the server with any file that is not report.doc.

Extended Features 154
TIBCO® Managed File Transfer™ Platform Server for UNIX
Auditing (cfinq Utility)
MFT Platform Server writes log files to store transfer parameters and the values for all transfer requests for auditing purposes. This section describes the logging function and how to query past transactions.
Log Files MFT Platform Server has comprehensive logging to provide information about all transfer requests done from the server. One common daily log called, Log.txt.yyymmdd, located in the (MFT Platform ServerInstall)/log directory, is used to record all transfer request information. Each day a new log is generated with the date appended to the end of the filename. (You can change the path and log prefix by editing the config.txt parameter LogEventFileName.) This file is a standard ASCII text file that contains one record per line. The sample Log.txt below shows one transfer request log information:
VersionNumber=7.1 Build 284,Priority=N/A,LocalTranNumber=I929800019,RemoteTr anNumber=R929800020,TransferStartTime=095158,TransferStartDate=20080929, TransferEndTime=095201,TransferEndDate=20080929,TransferDirection=Send,TransferWork=File,TransferCommand=N/A,TransferProcessName=N/A,TransferScheduleDate=N/A,TransferScheduleTime=N/A,TransferExpirationDate=N/A,TransferExpirationTime=N/A,CompressionType=None,CompressedBytes=0,ConvertCRLF=no,EBCDICTranslate=no,SSL=no,SSLPortNumber=N/A,EncryptionType=Blowfish_448,RecordFormat=FixedBlock,FileCreateOptions=CreateReplaceNew,FileAttributes=N/A,UNIXFilePermissions=666,AllocationType=N/A,AllocationDirectory=N/A,AllocationPrimary=N/A,AllocationSecondary=N/A,Volume=N/A,Unit=N/A,NodeClass=N/A,StorClass=N/A,MgtClass=N/A,DataClass=N/A,BlockSize=0,RecordLength=80,UserData=N/A,LogonDomain=N/A,LocalFileName=/home/localfile,LocalUserid=root,RemoteFileName=/home/remotefile,RemoteUserid=root,RemoteNodeName=192.168.0.4,RemoteNodeType=N/A,RemotePortNumber=46464,TryCount=1,TryMaxCount=1,GoingToRetry=0,ByteCount=27,RecordCount=N/A,MemberCount=N/A,CheckPointCount=N/A,CheckPointRestart=no,CheckPointInterval=0,StatusMsg=File Transfer Complete,CrlMsg=N/A,StatusDiagCode=0,Stat

155 Extended Features
TIBCO® Managed File Transfer™ Platform Server for UNIX
usSeverity=00,StatusReturnCode=N/A, TransferStatus=Success,LocalCTFile=N/A
It is difficult to read these logs for auditing purposes in this format, so MFT Platform server includes a utility called the MFT Platform Server Inquiry program (cfinq) utility which provides alternate ways to view this information.
The cfinq program provides two ways of showing the audit information. The first is to display a summary view of the information you are looking for, and the second is a much more detailed view. The summary view consists of the following columns: Index, Transaction, Status, IP Address and Local File.
In order to obtain all transactions in the specified query, a user must be either the super-user (root), or be in the BrowseGroup or AdminGroup as defined in the <MFTPS_install>/config.txt file. Users without this access will be able to view only their own transactions.
Note: The BrowseGroup is used for audit purposes only and does not allow other rights that a user in the AdminGroup group may have.
CFINQ Command Format: To run the cfinq program type the following command at the command prompt:
cfinq
This will display the cfinq menu similar to the one below:
********************************************************** YOU HAVE ENTERED THE FOLLOWING VALUES FOR YOUR INQUIRY: LOCTRANSNUM..............[] REMTRANSNUM..............[] LOGDIR...................[] STARTDATE................[] ENDDATE..................[] DAYS.....................[] STARTTIME................[] ENDTIME..................[]

Extended Features 156
TIBCO® Managed File Transfer™ Platform Server for UNIX
MAXXFER..................[] LOCALFILE................[] LOCALUSER................[] REMHOST..................[] DESCRIPTION..............[] PROCESS..................[] EXCEPTIONS...............[] TEMPERROR................[] INITRESPFLAG.............[] ********************************************************** *** PRESS [q] [enter] TO QUIT THE PROGRAM *** PRESS [a] [enter] TO OBTAIN WHOLE RECORD LIST *** PRESS [c] [enter] TO OBTAIN CURRENT RECORD LIST *** PRESS [p] [enter] TO OBTAIN PREVIOUSLY VIEWED RECORD LIST *** PRESS [m] [enter] TO OBTAIN MENU SCREEN *** PRESS [n] [enter] or [enter] TO OBTAIN NEXT RECORD LIST *** PRESS [h] or [?] [enter] TO OBTAIN HELP SCREEN *** PRESS [index # ] [enter] TO OBTAIN DETAILED RECORD INFORMATION ********************************************************** ===>
From this point you can enter the following single letter values to obtain record listings: PRESS [q] [enter] TO QUIT THE PROGRAM PRESS [a] [enter] TO OBTAIN WHOLE RECORD LIST PRESS [c] [enter] TO OBTAIN CURRENT RECORD LIST PRESS [p] [enter] TO OBTAIN PREVIOUSLY VIEWED RECORD LIST PRESS [m] [enter] TO OBTAIN MENU SCREEN PRESS [n] [enter] or [enter] TO OBTAIN NEXT RECORD LIST PRESS [h] or [?] [enter] TO OBTAIN HELP SCREEN PRESS [index # ] [enter] TO OBTAIN DETAILED RECORD
INFORMATION
For example, if you enter “a” and hit the <Enter> key I would see a display something like this:
INDEX TRANSACTION STATUS IPADDRESS LOCALFILENAMEDIRECTORY ************************************************** 1 I929800007 Success 127.127.127.0:46464 /home/a.txt 2 R929800020 Success 127.127.127.0:46464 /home/remotefile
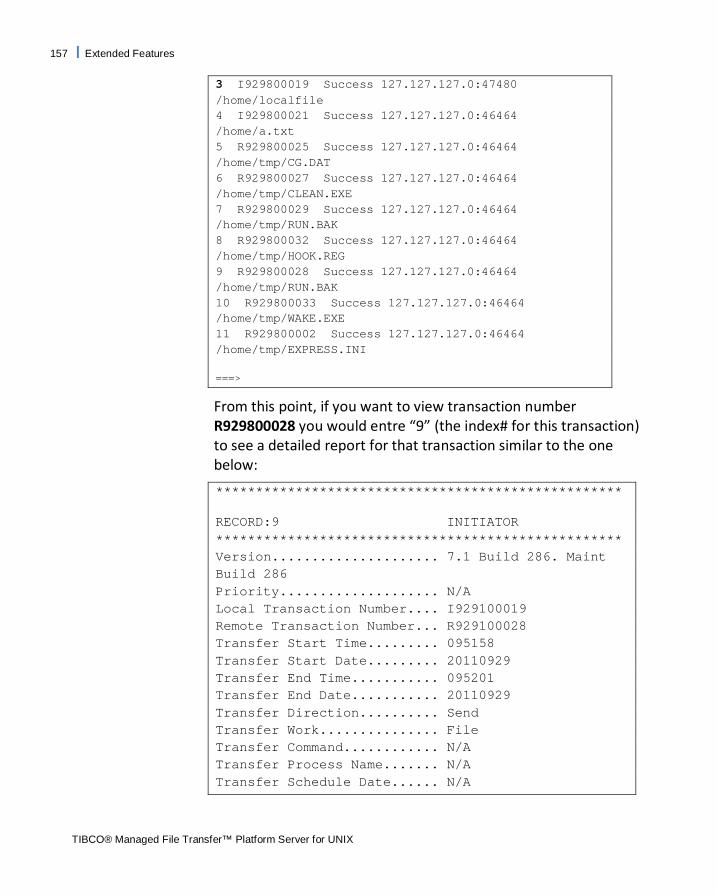
157 Extended Features
TIBCO® Managed File Transfer™ Platform Server for UNIX
3 I929800019 Success 127.127.127.0:47480 /home/localfile 4 I929800021 Success 127.127.127.0:46464 /home/a.txt 5 R929800025 Success 127.127.127.0:46464 /home/tmp/CG.DAT 6 R929800027 Success 127.127.127.0:46464 /home/tmp/CLEAN.EXE 7 R929800029 Success 127.127.127.0:46464 /home/tmp/RUN.BAK 8 R929800032 Success 127.127.127.0:46464 /home/tmp/HOOK.REG 9 R929800028 Success 127.127.127.0:46464 /home/tmp/RUN.BAK 10 R929800033 Success 127.127.127.0:46464 /home/tmp/WAKE.EXE 11 R929800002 Success 127.127.127.0:46464 /home/tmp/EXPRESS.INI ===>
From this point, if you want to view transaction number R929800028 you would entre “9” (the index# for this transaction) to see a detailed report for that transaction similar to the one below:
***************************************************
RECORD:9 INITIATOR *************************************************** Version..................... 7.1 Build 286. Maint Build 286 Priority.................... N/A Local Transaction Number.... I929100019 Remote Transaction Number... R929100028 Transfer Start Time......... 095158 Transfer Start Date......... 20110929 Transfer End Time........... 095201 Transfer End Date........... 20110929 Transfer Direction.......... Send Transfer Work............... File Transfer Command............ N/A Transfer Process Name....... N/A Transfer Schedule Date...... N/A
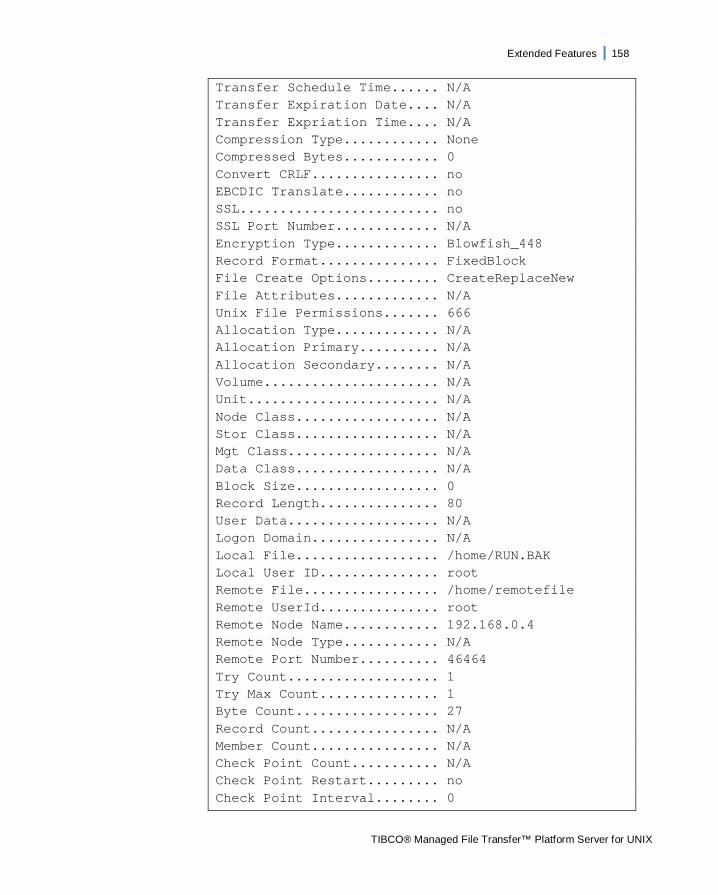
Extended Features 158
TIBCO® Managed File Transfer™ Platform Server for UNIX
Transfer Schedule Time...... N/A Transfer Expiration Date.... N/A Transfer Expriation Time.... N/A Compression Type............ None Compressed Bytes............ 0 Convert CRLF................ no EBCDIC Translate............ no SSL......................... no SSL Port Number............. N/A Encryption Type............. Blowfish_448 Record Format............... FixedBlock File Create Options......... CreateReplaceNew File Attributes............. N/A Unix File Permissions....... 666 Allocation Type............. N/A Allocation Primary.......... N/A Allocation Secondary........ N/A Volume...................... N/A Unit........................ N/A Node Class.................. N/A Stor Class.................. N/A Mgt Class................... N/A Data Class.................. N/A Block Size.................. 0 Record Length............... 80 User Data................... N/A Logon Domain................ N/A Local File.................. /home/RUN.BAK Local User ID............... root Remote File................. /home/remotefile Remote UserId............... root Remote Node Name............ 192.168.0.4 Remote Node Type............ N/A Remote Port Number.......... 46464 Try Count................... 1 Try Max Count............... 1 Byte Count.................. 27 Record Count................ N/A Member Count................ N/A Check Point Count........... N/A Check Point Restart......... no Check Point Interval........ 0

159 Extended Features
TIBCO® Managed File Transfer™ Platform Server for UNIX
LocalCTFile................. N/A RemoteCTFile................ N/A Status Msg.................. File Transfer Complete Crl Msg..................... N/A Status Diag Code............ 0000 Status Severity............. N/A Transfer Status............. Success
The cfinq program accepts the parameters on the command-line. This provides the ability to ask for specific criteria to be met in order to provide a detailed query of the MFT Platform Server records. Below is a command-line example: cfinq sdate:20120909 days:20 stime:120100 etime:152010 luser:JohnDoe lf:/unix/SERVER/log EXC:S max:1000
The example queries for records of successful transfers only for the specific local user named JohnDoe over a 20 day time span starting from September 9, 2012 at 9:01am and ending at 3pm with a maximum of 1000 records listed.
CFINQ Parameters The table that follows describes the parameters supported by cfinq.
Note the following:
Navigation commands are case sensitive.
Use either an equal sign or a colon to separate the parameter from the value. There must not be any space between the parameter name, equal or colon sign, and the parameter value.
The latest MFT Platform Server transfer information is gathered first. If the total number of records exceed 10000, the information close to the SDATE is not included I the transaction list.
The date must be in the following format: YYYYMMDD
The cfinq program will not accept any negative values.

Extended Features 160
TIBCO® Managed File Transfer™ Platform Server for UNIX
By default, 500 records will be displayed in the cfinq program. Use MAXXFER parameter to increase or decrease the number of default records to be viewed.
Parameter (Shortcut parm) Description DAYS Number of days to search. If SDATE
and EDATE are both defined, this field is ignored. DAYS must not exceed 1826 (5 years). If SDATE is not defined, the Start Date = Current Date - # of Days. If SDATE is not defined and EDATE is defined CFINQ program will start searching (EDATE - # of DAYS) and ends at the EDATE date.
DESCRIPTION (DESCR) Defines the MFT Platform Server UserData. By providing the DESCRIPTION parameter the user shall expect the CFINQ program to search the MFT Platform Server log files and present the detailed information for any transfers matching that description. A message will be displayed on the screen if there are no transactions for the DESCRIPTION specified.
ENDDATE (EDATE) The ENDDATE defines the end date in the format of yyyymmdd.
EDATE=TOD or EDATE=TODAY means today’s date.
EDATE=YES or EDATE=YESTERDAY means yesterday.
If EDATE is not defined the default is TODAY.
ENDTIME (ETIME) Defines the End Time in the 24 hour

161 Extended Features
TIBCO® Managed File Transfer™ Platform Server for UNIX
Parameter (Shortcut parm) Description format of hhmmss. The default is 240000. If STIME is not defined the CFINQ program will search for the MFT Platform Server transaction only within 000000 - ETIME period.
EXCEPTIONS (EXC) Status of the transaction. Defines the type of transfers to select. U = Unsuccessful S = SuccessfulDefault = Successful and Unsuccessful
LOCALFILE (LF) Defines the MFT Platform Server Local File Name
LOCALUSER (LUSER) Defines the Local User Name (userid). If you specify a user name other than your own, you must have Security Authorization.
LOCTRANSNUM (LTRN) The LOCTRANSNUM parameter defines the unique local transaction number of the MFT Platform Server transfer. By providing the LOCTRANSNUM parameter the user shall expect the CFINQ program to search the MFT Platform Server log files and will present the detailed information for that transaction number. A message will be displayed on the screen if there are no transactions for the LOCTRANSNUM specified.
LOGDIR (LOGD) Defines the MFT Platform Server log files directory.
MAXXFER (MAX) Defines the maximum number of requests that will be returned. The default is 500. The valid values are 1 to 100,000.
PRINT (PRI) Prints information to the screen –

Extended Features 162
TIBCO® Managed File Transfer™ Platform Server for UNIX
Parameter (Shortcut parm) Description non-interactive mode
PROCESS (PRO) MFT Platform Server Process name
REMHOST (RHOST) Remote System name. This can be a NODE name, SNA LUNAME, IP Name or IP Address in dotted decimal notation. Generic selection cannot be used for IP Addresses.
REMTRANSNUM (RTRN) Remote Transaction number
STARTDATE (SDATE) The STARTDATE defines the start date of the search in format: yyyymmdd SDATE=TOD or SDATE=TODAY will use today’s date. SDATE=YES or SDATE=YESTERDAY means yesterday. If SDATE is not defined, the default is TODAY
STARTTIME (STIME) Defines the Start Time in the 24 hour format of hhmmss. The default is 000000. If ETIME is not defined the CFINQ program will search for the MFT Platform Server transaction only within STIME – 24 hour period.
TEMPERROR (TMPERR) This parameter indicates whether MFT Platform Server will print the request for temporary errors that are in the audit file. This parameter will apply whether the Print parameter is defined or not. The valid values are Yes and No (default).
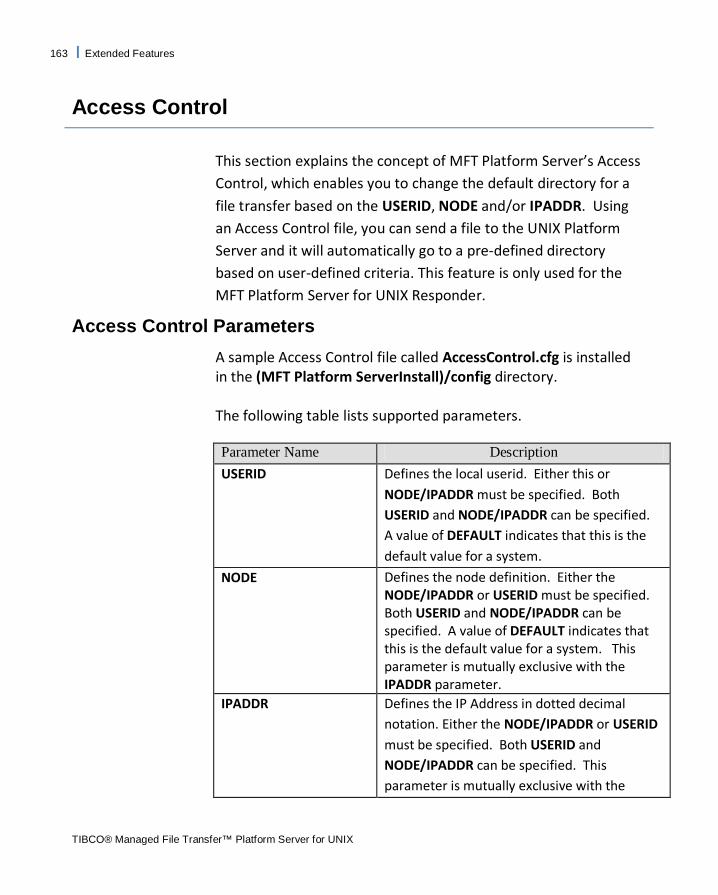
163 Extended Features
TIBCO® Managed File Transfer™ Platform Server for UNIX
Access Control
This section explains the concept of MFT Platform Server’s Access Control, which enables you to change the default directory for a file transfer based on the USERID, NODE and/or IPADDR. Using an Access Control file, you can send a file to the UNIX Platform Server and it will automatically go to a pre-defined directory based on user-defined criteria. This feature is only used for the MFT Platform Server for UNIX Responder.
Access Control Parameters A sample Access Control file called AccessControl.cfg is installed in the (MFT Platform ServerInstall)/config directory. The following table lists supported parameters.
Parameter Name Description USERID Defines the local userid. Either this or
NODE/IPADDR must be specified. Both USERID and NODE/IPADDR can be specified. A value of DEFAULT indicates that this is the default value for a system.
NODE Defines the node definition. Either the NODE/IPADDR or USERID must be specified. Both USERID and NODE/IPADDR can be specified. A value of DEFAULT indicates that this is the default value for a system. This parameter is mutually exclusive with the IPADDR parameter.
IPADDR Defines the IP Address in dotted decimal notation. Either the NODE/IPADDR or USERID must be specified. Both USERID and NODE/IPADDR can be specified. This parameter is mutually exclusive with the

Extended Features 164
TIBCO® Managed File Transfer™ Platform Server for UNIX
Parameter Name Description NODE parameter.
DESCRIPTION Allows the user to enter a 32 byte description (comment).
SEND_DIR Defines the default directory for files to be sent to another system. If this parameter is not defined, then there is no default value for files sent.
RECEIVE_DIR Defines the default directory for files to be received from another system. If this parameter is not defined, then there is no default value for files sent.
COMMAND_DIR Defines the default directory for commands executed on this system. If this parameter is not defined, then there is no default value for files sent.
SEND_OPTION Defines the options for Sending files. The valid values are: ROOT - If a directory is specified, the directory
will be appended to the directory defined by the SEND_DIR parameter.
FORCE - If a directory is specified, the directory will be changed to the directory defined by the SEND_DIR parameter. The directory name defined in the request is ignored. The file name is appended directly to the SEND_DIR.
ALLOW - If a directory is specified, the directory will be used. If a directory is not defined, it will be changed to the directory defined by the SEND_DIR parameter
REJECT - If a directory is specified on a send, the file transfer will terminate with errors. Otherwise, data will be processed from the SEND_DIR directory.
NEVER - The NODE or USERID is not allowed to
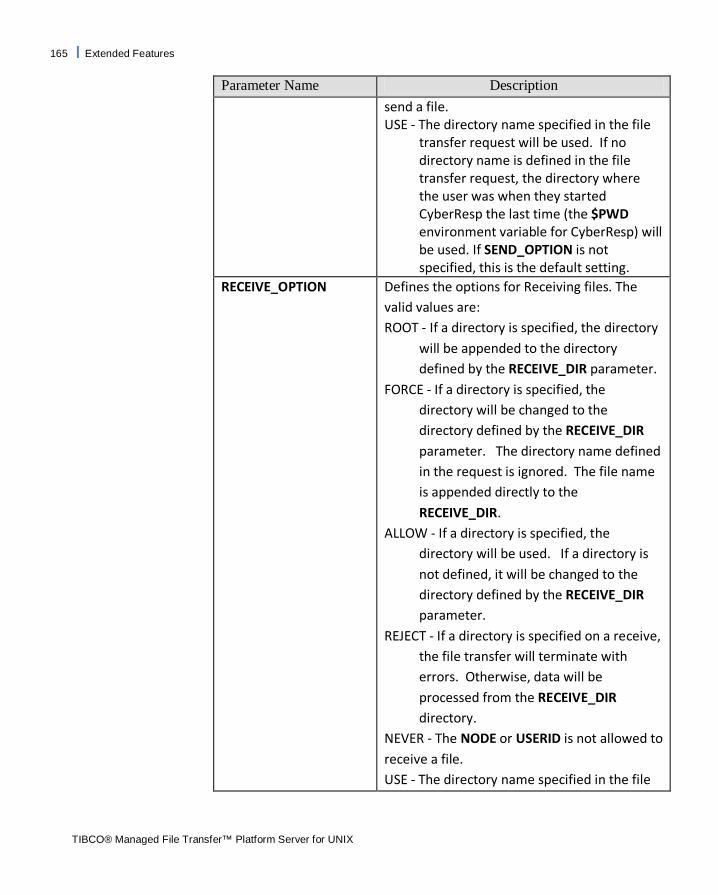
165 Extended Features
TIBCO® Managed File Transfer™ Platform Server for UNIX
Parameter Name Description send a file. USE - The directory name specified in the file
transfer request will be used. If no directory name is defined in the file transfer request, the directory where the user was when they started CyberResp the last time (the $PWD environment variable for CyberResp) will be used. If SEND_OPTION is not specified, this is the default setting.
RECEIVE_OPTION Defines the options for Receiving files. The valid values are: ROOT - If a directory is specified, the directory
will be appended to the directory defined by the RECEIVE_DIR parameter.
FORCE - If a directory is specified, the directory will be changed to the directory defined by the RECEIVE_DIR parameter. The directory name defined in the request is ignored. The file name is appended directly to the RECEIVE_DIR.
ALLOW - If a directory is specified, the directory will be used. If a directory is not defined, it will be changed to the directory defined by the RECEIVE_DIR parameter.
REJECT - If a directory is specified on a receive, the file transfer will terminate with errors. Otherwise, data will be processed from the RECEIVE_DIR directory.
NEVER - The NODE or USERID is not allowed to receive a file. USE - The directory name specified in the file

Extended Features 166
TIBCO® Managed File Transfer™ Platform Server for UNIX
Parameter Name Description transfer request will be used. If no directory name is defined in the file transfer request, the directory where the user was when they started CyberResp the last time (the $PWD environment variable for CyberResp) will be used. If RECEIVE_OPTION is not specified, this is the default setting.
COMMAND_OPTION Defines the options for executing Commands. The valid values are: ROOT - If a directory is specified, the directory
will be appended to the directory defined by the COMMAND_DIR parameter.
NEVER - The NODE or USERID is not allowed to execute Commands. USE - The directory name specified in the file
transfer request will be used. If no directory name is defined in the file transfer request, the directory where the user was when they started CyberResp the last time (the $PWD environment variable for CyberResp) will be used. If COMMAND_OPTION is not specified, this is the default setting.
SUBMIT_OPTION Defines the options for Submitting jobs. The valid values are: ALLOW - The user is allowed to submit jobs. NEVER - The NODE or USERID is not allowed to submit jobs.
Access Control Examples

167 Extended Features
TIBCO® Managed File Transfer™ Platform Server for UNIX
If the directory name is defined in the RECEIVE_DIR parameter and the FORCE option is set, then the file name is extracted from the LocalFileName in the request, and is appended to the directory defined by the RECEIVE_DIR parameter.
Example:
RECEIVE_DIR=/a/b RECEIVE_OPTION=FORCE
If the LocalFileName in the request is: /test/2008/accounting/tax.data The actual file name will be: /a/b/tax.data
If the directory name is defined in the RECEIVE_DIR and the ROOT parameter is defined, then the LocalFileName name (which can consist of a directory and file name) is appended to the directory defined by the RECEIVE_DIR parameter.
Example:
RECEIVE_DIR=/a/b RECEIVE_OPTION=ROOT
If the LocalFileName in the request is: /test/2008/accounting/tax.data The actual file name will be: /a/b/test/2008/accounting\tax.data
Using DEFAULT Access Control Entries You can specify default entries for the USERID and NODE parameters by using the value DEFAULT. This will provide a default entry in case no matches are made.
Example:
USERID=DEFAULT, NODE=NODEA,

Extended Features 168
TIBCO® Managed File Transfer™ Platform Server for UNIX
SEND_DIR=/mftps/data, SEND_OPTION=ROOT, RECEIVE_OPTION=NEVER * USERID=DEFAULT NODE=DEFAULT
SEND_OPTION=NEVER RECEIVE_OPTION=NEVER
With this setup, anyone receiving files from NODEA will have all their received files placed in the /mftps/data/<file they entered in the RemoteFileName>. No one else can send or receive from this server.
Access Control Format Parameters can be entered on a single line or on multiple lines. Parameters are delimited by a comma. If there is a special character in the parameter, it should be enclosed in double quotes.
If a space follows the comma, the parameter is continued on the next line. For example:
USERID=DEFAULT, NODE=NODEA, SEND_DIR=/mftps/data, SEND_OPTION=ROOT, RECEIVE_OPTION=NEVER
Is equivalent to:
USERID=DEFAULT,NODE=NODEA,SEND_DIR=”/mftps/data”,SEND_OPTION=ROOT,RECEIVE_OPTION=NEVER

169 Extended Features
TIBCO® Managed File Transfer™ Platform Server for UNIX
Comments are defined by placing a * in column 1. UNIX comments such as // and /* */ can be implemented as well.
On Windows and UNIX platforms, the Access Control file is read each time a transfer is received. Parameter validation will only be performed when there is a match for the NODE/USER and transfer type (Send, Receive, Command, File…). AccessControl processing completes at the end of the first match, so if you want to control multiple transfer types for the same pattern they should be done in the same grouping. Thus, more specific conflicting entries should come first, so that they are not matched by an earlier, less specific grouping.

Extended Features 170
TIBCO® Managed File Transfer™ Platform Server for UNIX
OCSP and CRL Support
OCSP (On-line Certificate Status Protocol) and CRL (Certificate Revocation List) are used with SSL transfers to ensure that certificates have not been revoked. These two options provide an additional way to verify that the certificates submitted to MFT Platform Server are from a trusted source.
Configuring CRL To use CRL, set the CheckCRL parameter to Y in the configuration file (<MFTPS_install>/config/config.txt) MFT Platform Server accesses CRL certificate authority files in a directory with hashed filenames, as per the OpenSSL naming convention. You can specify this directory with the CAPath parameter in config.txt and then rename the files using the instructions below to the correct file names. To get the correct hash value, use the copy of OpenSSL stored as <MFTPS_install>/util/openssl. In the example that follows, we assume that you already have a generic CRL configured with the name my.crl. For more information on CRLs, please refer to: http://www.ietf.org/rfc/rfc3280.txt
Step 1:
Go to the MFTPS_install>/util directory on the UNIX
machine.
Step 2: Type the following on the command line replacing my.crl with the absolute path of your CRL):
./openssl crl –hash –noout –in my.crl
You will see a display similar to this:
> ./openssl crl –hash –noout –in my.crl
592b5bc9

171 Extended Features
TIBCO® Managed File Transfer™ Platform Server for UNIX
The hash value displayed (in this case, 592b5bc9). Use this value to issue two copy commands:
cp <your certificate authority file> /usr/CAfiles/592b5bc9.0 cp my.crl /usr/CAfiles/592b5bc9.r0
Replace the hash value, the authority file and the my.crl file with the appropriate values for your system.
Step 3:
Edit the CAPath parameter to specify the directory where you placed the hashed files in the previous step. For the example, shown above, the CAPath parameter would be set to the /usr/CAfile directory.
Configuring OCSP MFT Platform Server supports OCSP (On-line Certificate Status Protocol to verify Certificate Authenticity. To use OCSP, set the CheckOCSP parameter to Yin the configuration file (<MFTPS_install>/conifg/config.txt.) Use OCSPURL to specify the IP address and port of your OCSP server.
The OCSPRootCertFileName parameter is used to specify the certificate that is the root of the Certificate Authentication tree. MFT Platform Server does not provide this certificate. You can get this certificate from a Certificate Authority such as Identrus, or make it yourself using the openssl.exe file that comes with MFT Platform Server. Please see the OpenSSL documentation on http://www.openssl.org/docs/ for more information. Remote certificates will be directly verified against this parameter.
The OCSPServerCertFileName parameter is the Certificate of the OCSP server itself. This Certificate is not used to verify remote certificates; it is used to establish SSL communication with the OCSP itself. MFT Platform Server checks this Certificate to make certain that the OCSP server is trusted. TIBCO suggests using OCSP servers inside your local intranet for security reasons.
OCSP and CRL parameters

Extended Features 172
TIBCO® Managed File Transfer™ Platform Server for UNIX
The following parameters in the config.txt file configure OCSP and CRL certificate revocation checking.
Parameter Name Description CAPath Defines the path where the CRL
checking will look for the hashed filenames. Valid values: N | FileName
CheckCRL Defines whether MFT Platform Server will check the CAPath field for the hashed CRL files. Valid values: N | Y
CheckOCSP Defines whether MFT Platform Server is going to check the OCSP Server Certificates defined in the OCSPURL, OCSPServerCertFileName, and OCSPRootCertFileName. Valid values: N | Y
OCSPURL Has no default value. Defines the URL of the OCSP server that is used for OCSP certificate verification. This should be in http://127.0.0.1/ notation. For OCSP servers that use a port other than 80, the port should follow the IP address and the URL should be in the standard http://127.0.0.1:8888/ format.
OCSPRootCertFileName Has no default value. Defines the name of the certificate that is the root of the OCSP server’s Certificate Authentication tree.
OCSPServerCertFileName Has no default value. Defines the name of the certificate that verifies the OCSP server itself as being a trusted source for Certificate Authentication.

173 Extended Features
TIBCO® Managed File Transfer™ Platform Server for UNIX
Personalized SSL Authorization
MFT Platform Server supports a proprietary extension to the standard SSL processing to allow the system administrator to determine which certificates should be accepted and which should be rejected. This is done by the creation of an SSL Authorization configuration file, which is by default stored as <MFTPS_install>/config/SSLAuth.cfg.
The authorization file checking is in addition to the authorization checking performed by SSL. This authorization is performed only if a certificate is accepted by SSL.
The authorization file is compared against the Certificate that was received by the MFT Platform Server. The authorization file is not used on MFT Platform Server clients. The components of the Certificate’s Distinguished Name (DN) are compared to the parameter in the authorization file to determine if a certificate should be accepted or rejected.
On many of the parameters, a generic terminating character is supported. MFT Platform Server uses the * character to represent that the entry matches all values that begin with the text preceding the * character. This feature does not support * in the middle of a word as a wildcard character.
If no authorization file is defined, or a match is not found in the authorization file, the request will be accepted. Entries are read in a first-in, first-out manner; in other words, if a certificate matches an early entry, it will ignore all later entries. Thus, if you want to reject all requests unless defined by the authorization file, then you should insert the following statement as the last entry in the authorization file:

Extended Features 174
TIBCO® Managed File Transfer™ Platform Server for UNIX
REVOKE There are two request types supported within the authorization file:
ACCEPT Accept an SSL request REVOKE| REJECT Do not accept an SSL request
All of these requests accept a variety of parameters. If a parameter is not defined, then it is assumed that the parameter is a match. Parameters can be defined on a single line or they can be continued over multiple lines. If the input record ends with a comma (,) then the input record will be continued on the next record. All parameter data except for the Accept and Revoke/Reject statements are case sensitive. Be very careful when entering the values when using mixed case fields.
SSLAuth Parameters Below is a list of parameters allowed in the authorization file, these parameters must be defined in uppercase:
/CN Define the Common Name defined in the Certificate. This is usually the name of the person who is requesting the certificate. Generic entries are supported.
/OU Defines the Organization Unit defined in the Certificate. This is also known as the Department. Generic entries are supported.
/O Defines the Organization defined in the Certificate. This is also known as the Company. Generic entries are supported.
/L Defines the Locality defined in the Certificate. This is also known as the City. Generic entries are

175 Extended Features
TIBCO® Managed File Transfer™ Platform Server for UNIX
supported.
/ST Defines the State/Province defined in the Certificate. Generic entries are supported.
/C Defines the Country defined in the Certificate. Generic entries are supported.
/SN Defines the Serial Number defined in the certificate. Generic entries are NOT supported.
/SDATE Defines the Start date for the certificate in the format: ccyymmdd. Generic entries are NOT supported. The start date is compared against the date that the transfer request is received by MFT Platform Server. If the start date is before the current date, then SSLAUTH processing will check the next parameter. If the start date is after the current date, then the transfer request will be terminated and an error will be sent to the remote system.
/STIME Defines the Start time for the certificate in the format: hhmm. Generic entries are NOT supported. The start time is only checked if the SDATE parameter exactly matches the current date. The start time is compared against the time that the transfer request is received by MFT Platform Server. If the start time is before the current time, then SSLAUTH processing will check the next parameter. If the start time is after the current time, then the transfer request will be terminated and an error will be sent to the remote system.
/EDATE Defines the End date for the certificate in the format: ccyymmdd. Generic entries are NOT supported. The end date is compared against the

Extended Features 176
TIBCO® Managed File Transfer™ Platform Server for UNIX
date that the transfer request is received by MFT Platform Server. If the end date is after the current date, then SSLAUTH processing will check the next parameter. If the end date is before the current date, then the transfer request will be terminated and an error will be sent to the remote system.
/ETIME Defines the End time for the certificate in the format: hhmm. Generic entries are NOT supported. The end time is only checked if the EDATE parameter exactly matches the current date. The end time is compared against the time that the transfer request is received by MFT Platform Server. If the end time is after the current time, then SSLAUTH processing will check the next parameter. If the end time is before the current time, then the transfer request will be terminated and an error will be sent to the remote system.
SSL Authorization File Examples 1) To setup your MFT Platform Server to accept all certificates defined with an Organization of TIBCO and an Organization Unit of Marketing and reject all other certificates you would set the following in your SSLAuth.cfg file:
Accept /OU=Marketing/O=TIBCO revoke
2) To setup your MFT Platform Server to reject any certificates with a serial number of 987654 or 123456 but accept all other certificates you would set the following in your SSLAuth.cfg file:
revoke /SN=987654 revoke /SN=12:34:56 Accept

177 Extended Features
TIBCO® Managed File Transfer™ Platform Server for UNIX
3) To setup your MFT Platform Server to accept all certificates defined with an Organization of ACME and an Organization Unit starting with ACCT but reject all other certificates you would set the following in your SSLAuth.cfg file:
Accept /OU=ACCT*/O=ACME revoke
1) To setup your MFT Platform Server to accept all certificates that match the information defined by the /CN, /L, /ST, /C, /OU and /O parameters as well as be valid from December 1, 2008 until November 30, 2009, and reject all other certificates not matching this specific criteria, you would set the following in your SSLAuth.cfg file:
Accept /CN=Joe*, /L=New York, /ST=NY, /C=US, /OU=Dept1, /O=ACME, /SDATE=20081201, /EDATE=20091130
revoke

Extended Features 178
TIBCO® Managed File Transfer™ Platform Server for UNIX
User Exits
MFT Platform Server User Exits allows for building additional processes on top of MFT Platform Server’s advanced file transfer capabilities.
The User Exits in MFT Platform Server allows you to have direct access to the transfer parameters for use in a C/C++ program (so that command line arguments do not have to be used). An example exit program is stored in the <MFTPS_install>/samples directory, with the name exitprg.cpp, and is compiled into exitprg.exe.
To tell MFT Platform Server where your C/C++ module is, set the ExitPrgm parameter in the <MFTPS_install>/config/config.txt file to point to the module itself.
Guidelines for Writing the C/C++ code All Exit programs should be compiled with the CfXitData.h file in the <MFTPS_install>/samples directory. It contains the data structure that contains all the information passed to your exit program, as outlined in section 0.
All user exit programs are called when a transfer attempt completes. The initiator will call the function: CF_INIT_POST_TRANSFER, and the responder will call CF_RESP_POST_TRANSFER. Both take a pointer to a CfXitData struct as an argument which contains all of MFT Platform Server’s parameters. The function prototypes are:
int CF_INIT_POST_TRANSFER(CfXitData* control);
int CF_RESP_POST_TRANSFER(CfXitData* control);
To compile your code, you should issue a change directory command to be in the same directory as your source code, and then issue the following command:
gcc –c <your output file> <your source code>

179 Extended Features
TIBCO® Managed File Transfer™ Platform Server for UNIX
The output file is the file that should be pointed to with the ExitPrgm parameter as described in the previous section.
CfXitData Structure typedef struct __CfXitData { int StatusDiagCode; BYTE StatusSeverity; BYTE Compression; char RecordFormat[2]; short int BlockSize; BYTE PermittedActions; char StatusMsg[255]; char LocalUserId[255]; DWORD Key; DWORD AllocationPrimary; DWORD AllocationSecondary; DWORD RecordLength; DWORD EncryptionType; char VolSer[7]; int IsVolSer; char UNIT[9]; int IsUnit; char AllocationType[2]; char NewFileAvail[2]; char LocalPassword[255]; char IpAddress[255]; char RemoteUserId[255]; char RemotePassword[255]; char RemoteDomain[255]; char LocalFileName[255]; char RemoteFileName[255]; char TraceFileName[255]; char WriteMode[2];

Extended Features 180
TIBCO® Managed File Transfer™ Platform Server for UNIX
char TransferFunction[2]; char TransactionNumber[11]; char TransferWork[2]; char CheckPointRestart[2]; char CR_LF[2]; int DataType; int Port; DWORD ByteCount; BOOL FirstTime;
int GoingToRetry; int TryCount;
int TriedCount; }CfXitData;
Data Type Field Name Field Values Int
StatusDiagCode Specifies return code on reply: x00 Success x01 Failure x09 Abort
BYTE StatusSeverity Severity of the transfer status Message:
x00 Success x01 Informational x02 Warning x03 Error x10 NoCheckpoint x20 NoRestart x80 Retry Network error x81 Retry file error
BYTE Compression x00 No Compression x11 LZ compression x12 RLE compression
char[2] RecordFormat F – Fixed Blocked V – Variable Blocked

181 Extended Features
TIBCO® Managed File Transfer™ Platform Server for UNIX
Data Type Field Name Field Values U -- Undefined X -- Fixed Y – Variable
Short int BlockSize z/OS Dataset block size
BYTE PermittedActions x00 None x02 EOF x04 CRLFEOF x08 System x10 Hidden x20 Archive x40 Read Only x80 NTFS Compressed
char[255]
StatusMsg Text message with status of transfe
char[255]
LocalUserId Local user ID initiating the transfer
DWORD AllocationPrimary
DWORD AllocationSecondary
DWORD RecordLength
DWORD EncryptionType; x80 – Data is not encrypted (check x00 too)
x40 – DES Encryption x20 – 3DES Encryption x10 – Blowfish Encryption x08 – Blowfish Long x04 – Rijndael x00 – No encryption (check x80 too
char[7] VolSer
int IsVolSer
char[9] UNIT
int IsUnit;

Extended Features 182
TIBCO® Managed File Transfer™ Platform Server for UNIX
Data Type Field Name Field Values char[2] AllocationType T – Tracks
C – Cylinders K – Kilobytes M –Megabytes
char[2] NewFileAvail I – Immediate D – Deferred (Tape)
char[255] LocalPassword Password for local system, may be NULL
char[255] IpAddress IP Address of remote system.
char[255] RemoteUserId User ID on Remote System
char[255] RemotePassword Password used to log on to remote system
char[255] RemoteDomain NT Domain for Logon, may not be used in all transfers
char[255] LocalFileName Name of the Local File for the transfer
char[255] RemoteFileName Name of Remote file for the transfe
char[255] TraceFileName Name of file which tracing is logged to
char[2] WriteMode Specifies options for file creation: R – Replace A –Append C – Create X – Create / Replace Y – Create / Append Z – Create / Replace / New
char[2] TransferFunction Type of transfer: S – Send R – Receive
char[11] TransactionNumber Transaction number for the transfe

183 Extended Features
TIBCO® Managed File Transfer™ Platform Server for UNIX
Data Type Field Name Field Values char[2] TransferWork F – File to File
P – File to Print C – Remote Command J – File to Job
char[2] CheckPointRestart Y – Checkpoint used N – Checkpoint not used
char[2] CR_LF CR/LF Indicator Y - YES N - NO L – Line Feed Only
int DataType 0 - Binary 1 - ASCII 2 – EBCDIC
int Port IP Port number used for transfer
DWORD ByteCount Number of Bytes transmitted
Int GoingToRetry 0 – transfer successful and will not be retried
4 – transfer unsuccessful due to a network error and will be retried
8 - transfer unsuccessful due to something other than a network erro and will not be retried
Int TryCount Value assigned to TryNumber parameter
Int TriedCount Attempts made for transfer

Extended Features 184
TIBCO® Managed File Transfer™ Platform Server for UNIX
cfunix2dos utility
TIBCO provides a utility program to convert a file from UNIX format to DOS format. What this means is the utility will add the Line Feed character (^M) to the end of each line of a UNIX file specified in the command. This will allow the file to be transferred to Windows in binary format. Use the command as shown here:
./cfunix2dos.exe filename
Below is an example of the command in use and the output you will see from the program:
./cfunix2dos.exe /usr/tmp/file.txt
cfunix2dos complete for file ==> /usr/tmp/file.txt Input bytes=3074
Output bytes=3131

185 Extended Features
TIBCO® Managed File Transfer™ Platform Server for UNIX
RocketStream
RocketStream Accelerator provides greatly improved data transfer speeds over high bandwidth/high latency IP networks. Tests have shown transfers completing up to 10 to 100 times faster than FTP, overcoming the slowness due to latency problems. We have added the RocketStream file transfer technology to MFT Platform Server in order to provide a faster way to send files to remote destinations, where there are normally latency problems in long distance connections.
Note: You must be licensed to use the RocketStream Accelerator technology. If you are not currently licensed for RocketStream please contact TIBCO technical support.
RocketStream Accelerator uses its own version of User Datagram Protocol (UDP) and RocketStream’s parallel implementation of TCP, called Parallel Delivery Protocol (PDP).
Note: Ports 9000, 9002 and 9100-9199 must be opened in the firewall to allow the RocketStream Client to access the RocketStream Server. If requests are initiated from an external computer, these ports must be opened on the firewall for incoming traffic. If requests are initiated from an internal computer, these ports must be opened on the firewall for outgoing traffic.
Using RocketStream within MFT Platform Server for UNIX RocketStream Acceleration is available in MFT Platform Server for Windows. A Windows MFT Platform Server installation can act both as a RocketStream Client and/or a RocketStream Server. It is possible to send and receive files from UNIX platforms, but only when they pass through the Windows MFT Platform Server

Extended Features 186
TIBCO® Managed File Transfer™ Platform Server for UNIX
running the RocketStream service (RsTunnel.exe). An example diagram and configuration instructions are presented below:
This diagram demonstrates sending a file from a UNIX MFT Platform Server (SystemA) to a z/OS MFT Platform Server system (SystemD). These servers do not have the RocketStream technology feature and therefore must forward the data to an MFT Platform Server for Windows running the RocketStream Accelerator service. For more information on configuring RocketStream on a Windows refer to MFT Platform Server v7.1 for Window User Guide. The sample command below shows how you would set up a UNIX transfer to be passed to the RocketStream Client. The command is set up to send a file to SystemD. The last four parameters have been added to send this transfer to the RocketStream Client:

187 Extended Features
TIBCO® Managed File Transfer™ Platform Server for UNIX
cfsend ip:10.1.2.148 port:46464 lf:/home/usr/file rf:dataset.name uid:zremote_user pwd:zremote_password rsa=Y rshost=10.1.2.150 rsport:9099 rsp:PDP By setting the rsa (or RSAccelerater) parameter to “Y” you are telling MFT Platform Server to send this file using RocketStream. We defined the RocketStream Client (rshost) which will be receiving the transfer request and defined what port (rsport) our rshost is listening on and what RocketStream protocol we want to use (rsp). Below is a table of the RocketStream parameters supported by UNIX. Please go to the Optional RocketStream Parameters section of this manual for detailed descriptions for each:
Parameter Shortcut Parm Short Definition RSAccelerator rsa Should transfers go to an
RSCompression rsc | rscompress Should RSA use compression
RSEncryption rse | rsencrypt Should RSA use encryption
RSHost rsh RSAccelerator Host name or RSMaxSpeed rsmax The max speed the RSA
should use. RSPort rsport RSAccelerator Port number
RSProtocol rsp Protocol the RSA should use
There are no configuration changes needed on the responder for this type of transfer. A RocketStream Server can send a file to any MFT Platform Server Responder v7.0 and below. This includes MFT Platform Server for Windows, UNIX, z/OS, and iBM i servers.