mfpsecurityconfigguide-eb3-v100
TRANSCRIPT

8/3/2019 MfpSecurityConfigGuide-eb3-v100
http://slidepdf.com/reader/full/mfpsecurityconfigguide-eb3-v100 1/29
Toshiba America Business Solutions Inc. June 2010 Version 1.0
This document pertains to the security of documents stored on the ToshibaMFD Hard Disk Drive (HDD). HDD security is part of the “Is Data Safe and Is
Disposal Secure?” segments of the Toshiba Security Vulnerability AssessmentProgram.
Following is a description of Basic, Enhanced and Optimal Security states for Toshiba MFDs as they apply to 1) MFPs at installation, 2) MFPs already inplace at customer locations and 3) MFPs leaving the customer’s possession.
This document pertains to the following machines:
e-STUDIO555, e-STUDIO655, e-STUDIO755, e-STUDIO855
e-STUDIO205L, e-STUDIO255, e-STUDIO305, e-STUDIO355, e-STUDIO455
e-STUDIO2330c, e-STUDIO2830c, e-STUDIO3530c, eSTUDIO4520c
e-STUDIO5520c, e-STUDIO6520c, e-STUDIO6530c

8/3/2019 MfpSecurityConfigGuide-eb3-v100
http://slidepdf.com/reader/full/mfpsecurityconfigguide-eb3-v100 2/29
Table of Contents
(1) Installation of New Toshiba MFPs .................................................................3
Basic Security: Secure Encryption ..................................................................................................... 3
Enhanced Security: Data Overwrite ................................................................................................... 4
Optimal Security: Enhanced Encryption and Data Overwrite Kit ....................................................... 5
Verification of Security Function ........................................................................................................ 6
(2) Toshiba MFPs at Customer Locations Prior to End of Life ..........................7
Backing Up Data ................................................................................................................................ 9
Basic Security: Secure Encryption with Data Overwrite Kit Cleaning ................................................ 12
Enhanced Security: Data Overwrite ................................................................................................... 14Optimal Security: Enhanced Encryption and Data Overwrite Kit ....................................................... 16
Verification of Security Function ........................................................................................................ 18
Reset User Items ............................................................................................................................... 19
Restoring Data From Backup File ...................................................................................................... 20
(3) Disposal or Return of Existing Toshiba Equipment .....................................23
Basic Security: Return HDD to customer, Clear SRAM and Fax....................................................... 23
Enhanced Security: Data Overwrite Kit, Clear SRAM and Fax ......................................................... 25
Optimal Security: : Data Overwrite Kit, Clear SRAM and Fax, Return Clean HDD ........................... 27

8/3/2019 MfpSecurityConfigGuide-eb3-v100
http://slidepdf.com/reader/full/mfpsecurityconfigguide-eb3-v100 3/29
(1) INSTALLATION OF NEW TOSHIBA MFPS
Secure Encryption
1) Turn on the machine while pressing the “0” and “8” keys. Release them after you hear a beep.
2) Key in code 9379 and press “START”.
3) Key in a value of 1 and press “ENTER”.
4) Key in code 690 and press “START”.
5) Press “ENTER” the display will say “WAIT”. When the process is finished “REBOOT THE MACHINE” will appear.
6) Press the “Power” button to turn off the machine.
7) Turn on the machine while pressing the “1” and “*” keys. Release them after you hear a beep.
8) Key in code 100 and press “START” and initialize the FAX Setup.
9) Key in code 102 and press “START” and initialize the FAX image data.
10) Press the “Power” button to turn off the machine.
How to test to see if the function is activated: when the machine is in the “ready” condition, press the “counter” button
on the control panel. On the touch screen above the counter information on the right hand side, you will see a small
“lock” symbol. This indicates encryption is activated.
Page 3

8/3/2019 MfpSecurityConfigGuide-eb3-v100
http://slidepdf.com/reader/full/mfpsecurityconfigguide-eb3-v100 4/29
Data Overwrite
1) With the machine off, insert GP-1070 USB Data Overwrite dongle into the USB connector on the machine.
2) Turn on the machine while pressing the “0” and “8” keys. Release them after you hear a beep.
3) Key in code 3840 and press “START”.
4) The “Data overwrite enabler” is displayed under the license name.
5) Touch the “Data overwrite enabler” message displayed on the touch screen. The background will change color
indicating it is selected.
6) Press the “INSTALL” button on the touch screen.
7) When the “Data overwrite enabler” license is successfully transferred to the machine a message will be displayed
saying “Registration Succeeded”.
8) Press the “Power” button to turn off the machine.
9) Tape the GP-1070 USB Data Overwrite dongle to the back of the machine for future use. Remember the license
key can only be moved back to the original installing dongle.
How to test to see if the function is activated: Press the “START” button to make a copy, you will see a message in
the lower left hand corner of the touch screen that says “printing”. Shortly after the message disappears, you will see
another message saying “erasing data”. This indicates the “data overwrite kit” is installed and working properly.
Page 4

8/3/2019 MfpSecurityConfigGuide-eb3-v100
http://slidepdf.com/reader/full/mfpsecurityconfigguide-eb3-v100 5/29
Enhanced Encryption and Data Overwrite Kit
1) Turn on the machine while pressing the “0” and “8” keys. Release them after you hear a beep.
2) Key in code 9379 and press “START”.
3) Key in a value of 1 and press “ENTER”.
4) Key in code 690 and press “START”.
5) Press “ENTER” the display will say “WAIT”. When the process is finished “REBOOT THE MACHINE” will appear.
6) Press the “Power” button to turn off the machine.
7) Insert GP-1070 USB Data Overwrite dongle into the USB connector on the machine.
8) Turn on the machine while pressing the “0” and “8” keys. Release them after you hear a beep.
9) Key in code 3840 and press “START”.
10) The “Data overwrite enabler” is displayed under the license name.
11) Touch the “Data overwrite enabler” message displayed on the touch screen. The background will change color
indicating it is selected.
12) Press the “INSTALL” button on the touch screen.
13) When the “Data overwrite enabler” license is successfully transferred to the machine a message will be displayed
saying “Registration Succeeded”.
14) Press the “Power” button to turn off the machine.
15) Tape the GP-1070 USB Data Overwrite dongle to the back of the machine for future use. Remember the license
key can only be moved back to the original installing dongle.
16) Turn on the machine while pressing the “1” and “*” keys. Release them after you hear a beep.
17) Key in code 100 and press “START” and initialize the FAX Setup.
18) Key in code 102 and press “START” and initialize the FAX image data.
19) Press the “Power” button to turn off the machine.
How to test to see if the function is activated: when the machine is in the “ready” condition, press the “counter” button
on the control panel. On the touch screen above the counter information on the right hand side you will see a small
“lock” symbol. This indicates encryption is activated. Press the “START” button to make a copy. You will see a
message in the lower left hand corner of the touch screen that says “printing”. Shortly after the message disappears,
you will see another message saying “erasing data”. This indicates the “data overwrite kit” is installed and working
properly.
Page 5

8/3/2019 MfpSecurityConfigGuide-eb3-v100
http://slidepdf.com/reader/full/mfpsecurityconfigguide-eb3-v100 6/29
Verification of security function activation
How to test to see if the “Secure Encryption” is activated: when the machine is in the
“ready” condition, press the “counter” button on the control panel. On the touch screenabove the counter information on the right hand side, you will see a small “lock” symbol.
This indicated encryption is activated.
How to test to see if the “Data Overwrite” is activated: Press the “START” button to
make a copy. You will see a message in the lower left hand corner of the touch screen
that says “printing”. Shortly after the message disappears, you will see another
message saying “erasing data”. This indicates the “data overwrite kit” is installed andworking properly.
Page 6

8/3/2019 MfpSecurityConfigGuide-eb3-v100
http://slidepdf.com/reader/full/mfpsecurityconfigguide-eb3-v100 7/29
(2) Toshiba MFPs at Customer Locations Prior to End of Life
Please read this section carefully as all the
processes require backing up the customersdata before proceeding with any of the securitylevels.
Outline Back-up HDD “User Data”
Print “Function List For Maintenance” Print “Function” List
HDD Forced Cleaning
Reinstalling firmware
Installing security option (s)
Reset HDD “User Data”
Reset “Function List For Maintenance”
Reset “Function” List
Verify Operation
IMPORTANTThis section requires a USB key with the latest firmware on itfor the model(s) you will be working on. The firmware can be
obtained from the “Tech-To-Go” section of “FYI”. Thefirmware always has the latest instructions for installation.
Page 7

8/3/2019 MfpSecurityConfigGuide-eb3-v100
http://slidepdf.com/reader/full/mfpsecurityconfigguide-eb3-v100 8/29
Ask the user (machine administrator) to back up the data in the HDD. Refer to the table below for the
type of data, availability and method of backup.
Type of data in HDD Availability Backup method
Image data in the e-Filing Available
Archive them in the “e-Filing” of TopAccess. As for the backup inBox data, all data (selectable by the
box) can be backed up / restored inone go by using “e-Filing Backup/Restore Utility”.
F-code information, Templateregistration information, Addressbook data
AvailableBack them up in the “Administrator”menu of TopAccess.
Department management data AvailableExport them in “Administrator”menu of TopAccess.
Log data (Print, Scan, FAX(Transmission/Reception)
AvailableExport them in the “Administrator”menu of TopAccess. (Import cannotbe performed.)
Data in the shared folder (Scanneddata, Saved data of copy / FAXtransmission)
Available
Copy them to the client computer via the network. (The data whichhave been copied tothe client computer cannot becopied to the shared folder.)
Role information Available
Export role information on theTopAccess menus.[User Management] tab >[User Confirm/Create/Modify] >[Role Information]
Print waiting data (Copying data andFAX reception data that are waiting tobe printed due to the paper run-outand jam, etc.)
Not availableFinish printing them after the paper supply and the jam release, etc.(The data cannot be kept.)
Print job (Private print data, Scheduleprint data)
Not availableIf any jobs are left, print them. (Thedata cannot be backed up.)
FAX saved data (Confidential /Bulletin board data)
Not availablePrint them. (The data cannot bebacked up.)
Registration data for FAXtransmission (Delayed transmission /
Recovery transmission)
Not availablePrint them. (The data cannot bebacked up.)
Back up HDD
Page 8

8/3/2019 MfpSecurityConfigGuide-eb3-v100
http://slidepdf.com/reader/full/mfpsecurityconfigguide-eb3-v100 9/29
Backing up data
The administrator can create backup files of the address book, mailboxes and templates that are stored in the hard disk of
this equipment. These data must be backed up in the cases such as the updating of system software or the replacement
of the hard disk.
Backing up data as files
Before backing up the data, confirm that there is no print job, no scan job, and no fax job. The backup files cannot
be created if there are any jobs that have been processed. If backing up the data takes a long time, perform
backing up the data after the equipment turns into the Sleep/Auto Shut Off mode.
The password for the template will be displayed as texts in the backup file. Keep the backup file carefully when
backing up the template data.
1 Access TopAccess in the administrator mode.
2 Click the [Maintenance] menu and [Backup] submenu.
The Backup submenu page is displayed.
If you previously created a backup file, the backup file link and information are displayed in each area. You can
click the link to save the previous backup file.
3 Click [Create New File] for the data that you want to back up, or click [Create New File]
in the [Combined Backup] section to create a backup file of all data.
The Password dialog box appears.
Page 9

8/3/2019 MfpSecurityConfigGuide-eb3-v100
http://slidepdf.com/reader/full/mfpsecurityconfigguide-eb3-v100 10/29
7.TopAccess ADMINISTRATOR MODE
4 Enter the password of the backup file.
The backup file will be created and the backup file name and file size will be displayed.
Passwords must be from 1 to 128 one-byte alphanumeric characters.
5 Right-click the [File Name] link and select [Save Target As].
The [Save As] dialog box appears.
6 Select the file location and select [All Files] in the [Save as type] box.
It is recommended to save the backup file as it is named. If you change the file name, the equipment cannot
restore the data from the backup files. The file name of each backup data must be the following name:
- Address Book: BACKUP_ADDR<date>.tbf
- MailBoxes: BACKUP_MBOX<date>.enc
- Template: BACKUP_TEMP<date>.enc
- Combined Backup: BACKUP_ALL<date>.enc
7 Click [Save].The backup file is saved in the selected location.
Page 10

8/3/2019 MfpSecurityConfigGuide-eb3-v100
http://slidepdf.com/reader/full/mfpsecurityconfigguide-eb3-v100 11/29
(1) Press the [USER FUNCTIONS] button and then the [USER] button.
(2) Press the [LIST] button.
(3) Key in [*] [#] [*] [*] [3] [3] and then press the [START] button. The “FUNCTION LIST FORMAINTENANCE” is printed out.
Print out “FUNCTION” list
(1) Press the [USER FUNCTIONS] button.
(2) Press the [ADMIN] button, enter the password, and then press the [ENTER] button.
(3) Press the [LIST/REPORT] button and then the [LIST] button.
(4) Press the [FUNCTION] button. The “FUNCTION” list is printed out.
Note:Explain the procedure to the user (machine administrator) and ask him/her to enter his/her
password.
Print out “FUNCTION LIST FOR MAINTENANCE”
Page 11

8/3/2019 MfpSecurityConfigGuide-eb3-v100
http://slidepdf.com/reader/full/mfpsecurityconfigguide-eb3-v100 12/29
Secure Encryption with Data Overwrite Kit Cleaning
NOTE: This process involves temporarily installing the “Data Overwrite Kit” to clean the HDD prior to turning on
“Secure Encryption”. After the cleaning is performed the license key is moved back to the original “Data Overwrite
“key which installed it. THIS PROCESS CAN ONLY BE PERFORMED 30 TIMES BEFORE A NEW GP-1070“DATA OVERWRITE KIT” IS REQUIRED.
1) With machine off, insert GP-1070 USB Data Overwrite dongle into the USB connector on the machine.
2) Turn on the machine while pressing the “0” and “8” keys. Release them after you hear a beep.
3) Key in code 3840 and press “START”.
4) The “Data overwrite enabler” is displayed under the license name.
5) Touch the “Data overwrite enabler” message displayed on the touch screen. The background will change color
indicating it is selected.
6) Press the “INSTALL” button on the touch screen.
7) When the “Data overwrite enabler” license is successfully transferred to the machine a message will be displayed
saying “Registration Succeeded” then press the “RETURN” button on the touch screen.
8) Key in code 1426 and press “START”.
9) The touch screen will display the following message “Are You Sure “
10) On the touch screen touch “INITIALIZE”.
11) The machine will display the following message “ HDD ERASE RUNNING” and display how much of the HDD
has been erased as a percentage( ie.. 12%). DO NOT turn off the machine until this percentage reaches 100% and
the machine stops and displays the following message “HDD ERASE [OK]”. The HDD has now been erased to aminimum of DOD 522022-M standards.
12) Use the “Power” switch to turn off the machine and remove the GP-1070.
13) Turn on the machine while pressing the “Clear” and “3” keys. Release them after you hear a beep.
14) Press the “3” key (All Partition Delete and create loader partition) and press “START” A message will be
displayed first saying “Initializing HDD table” then “Initialize Completed”.
15) Press the “Power” button to turn off the machine.
16) Insert a USB key with the appropriate machine firmware into the USB slot on the machine.
17) Turn on the machine while pressing the “9” and “4” keys. Release them after you hear a beep.
18) Select all of the firmware options and press “START”. When the firmware has completed updating it will display
“Update Completed”.
19) Press the “Power” button to turn off the machine and remove the USB key.
20) With machine off Insert GP-1070 USB Data Overwrite dongle into the USB connector on the machine.
21) Turn on the machine while pressing the “0” and “8” keys. Release them after you hear a beep.
Page 12

8/3/2019 MfpSecurityConfigGuide-eb3-v100
http://slidepdf.com/reader/full/mfpsecurityconfigguide-eb3-v100 13/29
22) Key in code 3841 and press “START”.
23) The “Data overwrite enabler” is displayed under the license name.
24) Touch the “Data overwrite enabler” message displayed on the touch screen. The background will change color
indicating it is selected.
25) Press the “MOVE” button on the touch screen.
26) When the “Data overwrite enabler” license is successfully transferred from the machine a message will be
displayed saying “Moving the License Succeeded”. Press return to continue.
27) Key in code 9379 and press “START”.
28) Key in a value of 1 and press “ENTER”.
29) Key in code 690 and press “START”.
30) Press “ENTER” and the display will say “WAIT”. When the process is finished “REBOOT THE MACHINE” will
appear.
31) Press the “Power” button to turn off the machine.
32) With machine off remove the GP-1070 USB Data Overwrite dongle from the machine.
33) Install the USB key and turn on the machine while pressing the “9” and “4” keys. Release them after you hear a
beep.
34) Select (1) OS Update and (2) HDD SYS Update firmware options and press “START”. When the firmware has
completed updating it will display “Update Completed”.
35) Press the “Power” button to turn off the machine.
36) Turn on the machine while pressing the “0” and “8” keys. Release them after you hear a beep.
37) Key in code 947 and press “START” and initialize the firmware.
38) Press the “Power” button to turn off the machine and remove USB key.
How to test to see if the function is activated: when the machine is in the “ready” condition, press the “counter” button
on the control panel. On the touch screen above the counter information on the right hand side, you will see a small
“lock” symbol. This indicates encryption is activated.
Page 13

8/3/2019 MfpSecurityConfigGuide-eb3-v100
http://slidepdf.com/reader/full/mfpsecurityconfigguide-eb3-v100 14/29
Data Overwrite
1) With machine off, insert GP-1070 USB Data Overwrite dongle into the USB connector on the machine.
2) Turn on the machine while pressing the “0” and “8” keys. Release them after you hear a beep.
3) Key in code 3840 and press “START”.
4) The “Data overwrite enabler” is displayed under the license name.
5) Touch the “Data overwrite enabler” message displayed on the touch screen. The background will change color
indicating it is selected.
6) Press the “INSTALL” button on the touch screen.
7) When the “Data overwrite enabler” license is successfully transferred to the machine a message will be displayed
saying “Registration Succeeded” then press the “RETURN” button on the touch screen.
8) Key in code 1426 and press “START”.
9) The touch screen will display the following message “Are You Sure “.
10) On the touch screen touch “INITIALIZE”.
11) The machine will display the following message “ HDD ERASE RUNNING” and display how much of the HDD
has been erased as a percentage( ie.. 12%). DO NOT turn off the machine until this percentage reaches 100% and
the machine stops and displays the following message “HDD ERASE [OK] ”. The HDD has now been erased to a
minimum of DOD 522022-M standards
12) Use the “Power” switch to turn off the machine.
13) Turn on the machine while pressing the “Clear” and “3” keys. Release them after you hear a beep.
14) Press the “3” key (All Partition Delete and create loader partition) and press “START” A message will be
displayed first saying “Initializing HDD table” then “Initialization Completed”.
15) Press the “Power” button to turn off the machine and remove the GP-1070.
16) Insert a USB key with the appropriate machine firmware into the USB slot on the machine.
17) Turn on the machine while pressing the “9” and “4” keys. Release them after you hear a beep.
18) Select all of the firmware options and press “START”. When the firmware has completed updating it will display
“Update Completed”.
19) Press the “Power” button to turn off the machine and remove the USB key.
20) Turn on the machine while pressing the “0” and “8” keys. Release them after you hear a beep.
21) Key in code 947 and press “START” and initialize the firmware.
22) Key in code 690 and press “START”.
23) Press “ENTER” the display will say “WAIT”. When the process is finished “REBOOT THE MACHINE” will appear.
24) Press the “Power” button to turn off the machine.
Page 14

8/3/2019 MfpSecurityConfigGuide-eb3-v100
http://slidepdf.com/reader/full/mfpsecurityconfigguide-eb3-v100 15/29
25) Tape the GP-1070 USB Data Overwrite dongle to the back of the machine for future use. Remember the license
key can only be moved back to the original installing dongle.
How to test to see if the function is activated: Press the “START” button to make a copy. You will see a message inthe lower left hand corner of the touch screen that says “printing”. Shortly after the message disappears, you will see
another message saying “erasing data”. This indicates the “data overwrite kit” is installed and working properly.
Page 15

8/3/2019 MfpSecurityConfigGuide-eb3-v100
http://slidepdf.com/reader/full/mfpsecurityconfigguide-eb3-v100 16/29
Enhanced Encryption and Data Overwrite Kit
1) With machine off, insert GP-1070 USB Data Overwrite dongle into the USB connector on the machine.
2) Turn on the machine while pressing the “0” and “8” keys. Release them after you hear a beep.
3) Key in code 3840 and press “START”.
4) The “Data overwrite enabler” is displayed under the license name.
5) Touch the “Data overwrite enabler” message displayed on the touch screen. The background will change color
indicating it is selected.
6) Press the “INSTALL” button on the touch screen.
7) When the “Data overwrite enabler” license is successfully transferred to the machine a message will be displayed
saying “Registration Succeeded” then press the “RETURN” button on the touch screen.
8) Key in code 1426 and press “START”.
9) The touch screen will display the following message “Are You Sure “
10) On the touch screen touch “INITIALIZE”.
11) The machine will display the following message “ HDD ERASE RUNNING” and display how much of the HDD
has been erased as a percentage( ie.. 12%). DO NOT turn off the machine until this percentage reaches 100% and
the machine stops and displays the following message “HDD ERASE [OK]”. The HDD has now been erased to a
minimum of DOD 522022-M standards.
12) Use the “Power” switch to turn off the machine and remove the GP-1070.
13) Turn on the machine while pressing the “Clear” and “3” keys. Release them after you hear a beep.
14) Press the “3” key (All Partition Delete and create loader partition) and press “START” A message will be
displayed first saying “Initializing HDD table” then “Initialization Completed”.
15) Press the “Power” button to turn off the machine.
16) Insert a USB key with the appropriate machine firmware into the USB slot on the machine.
17) Turn on the machine while pressing the “9” and “4” keys. Release them after you hear a beep.
18) Select all of the firmware options and press “START”. When the firmware has completed updating it will display
“Update Completed”
19) Press the “Power” button to turn off the machine and remove the USB key.
20) Turn on the machine while pressing the “0” and “8” keys. Release them after you hear a beep.
21) Key in code 9379 and press “START”.
22) Key in a value of 1 and press “ENTER”.
23) Key in code 947 and press “START” and initialize the firmware.
24) Key in code 690 and press “START”.
Page 16

8/3/2019 MfpSecurityConfigGuide-eb3-v100
http://slidepdf.com/reader/full/mfpsecurityconfigguide-eb3-v100 17/29
25) Press “ENTER” the display will say “WAIT”. When the process is finished a message will say
“REBOOT THE MACHINE” will appear.
26) Use the “Power” switch to turn off the machine.
27) With machine off remove the GP-1070 USB Data Overwrite dongle from the machine.
28) Tape the GP-1070 USB Data Overwrite dongle to the back of the machine for future use. Remember the licensekey can only be moved back to the original installing dongle.
How to test to see if the function is activated: when the machine is in the “ready” condition, press the “counter” button
on the control panel. On the touch screen above the counter information on the right hand side you will see a small
“lock” symbol. This indicated encryption is activated. Press the “START” button to make a copy. You will see a
message in the lower left hand corner of the touch screen that says “printing”. Shortly after the message disappears,
you will see another message saying “erasing data”. This indicates the “data overwrite kit” is installed and working
properly.
Page 17

8/3/2019 MfpSecurityConfigGuide-eb3-v100
http://slidepdf.com/reader/full/mfpsecurityconfigguide-eb3-v100 18/29
Verification of security function activation
How to test to see if the “Secure Encryption” is activated: when the machine is in the“ready” condition, press the “counter” button on the control panel. On the touch screen
above the counter information on the right hand side, you will see a small “lock” symbol.
This indicated encryption is activated.
How to test to see if the “Data Overwrite” is activated: Press the “START” button to
make a copy. You will see a message in the lower left hand corner of the touch screen
that says “printing”. Shortly after the message disappears, you will see another message saying “erasing data”. This indicates the “data overwrite kit” is installed and
working properly.
Page 18
8/3/2019 MfpSecurityConfigGuide-eb3-v100
http://slidepdf.com/reader/full/mfpsecurityconfigguide-eb3-v100 19/29
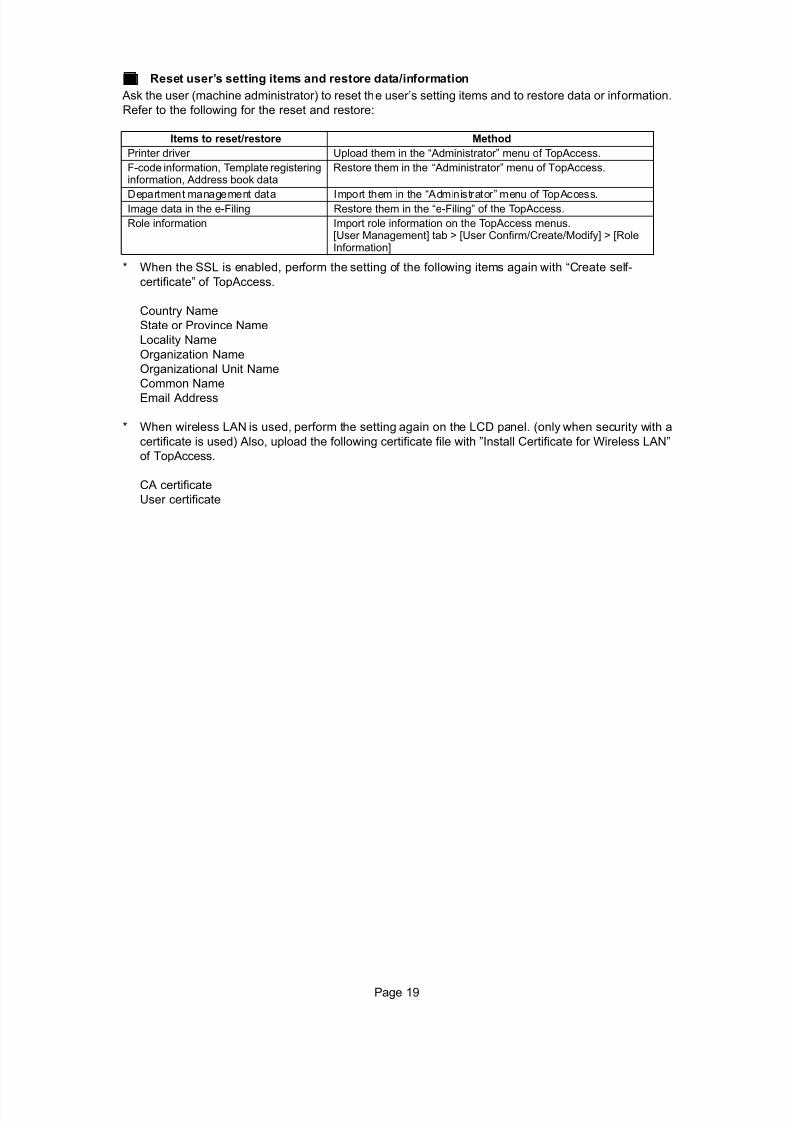
[F] Reset user’s setting items and restore data/information
Ask the user (machine administrator) to reset the user’s setting items and to restore data or information.
Refer to the following for the reset and restore:
* When the SSL is enabled, perform the setting of the following items again with “Create self-
certificate” of TopAccess.
Country Name
State or Province Name
Locality Name
Organization Name
Organizational Unit Name
Common Name
Email Address
* When wireless LAN is used, perform the setting again on the LCD panel. (only when security with a
certificate is used) Also, upload the following certificate file with ”Install Certificate for Wireless LAN”
of TopAccess.
CA certificate
User certificate
Items to reset/restore Method
Printer driver Upload them in the “Administrator” menu of TopAccess.
F-code information, Template registeringinformation, Address book data
Restore them in the “Administrator” menu of TopAccess.
Department management data Import them in the “Administrator” menu of TopAccess.Image data in the e-Filing Restore them in the “e-Filing” of the TopAccess.
Role information Import role information on the TopAccess menus.[User Management] tab > [User Confirm/Create/Modify] > [RoleInformation]
Page 19

8/3/2019 MfpSecurityConfigGuide-eb3-v100
http://slidepdf.com/reader/full/mfpsecurityconfigguide-eb3-v100 20/29
7.TopAccess ADMINISTRATOR MODE
Restoring data from backup file
An administrator can restore the address book, mailboxes, and templates data using the backup files. This maintenance
feature is used to restore data from backup files after updating the system software or hard disk replacement, etc., to
recover the original environments. Also you can upload the data in different equipment using this Function.
When restoring the data from the backup file, the same template number settings and mailbox settings are overwritten.
Restoring data from backup files
Before restoring the data from backup files, confirm that there is no print job, no scan job, and no fax job. The backup
files cannot be restored if there are any jobs that have been processed. If restoring the data takes a long time, restore
the data after the equipment turns into the Sleep/Auto Shut Off mode.
1 Access TopAccess in the administrator mode.
2 Click the [Maintenance] menu and [Restore] submenu.
The Restore submenu page is displayed.
3 Click [Browse] in the data section that you want to restore, or click [Browse] in the
[Combined Restore] section to restore all data from a backup file of all data.
You cannot restore several backup files at a time.
The Choose file dialog box appears.
Page 20

8/3/2019 MfpSecurityConfigGuide-eb3-v100
http://slidepdf.com/reader/full/mfpsecurityconfigguide-eb3-v100 21/29
4 Select a backup file and click [Open].
The file version and device name of the selected backup file will be displayed.
If the backup file name is not the name as shown below, the equipment cannot restore the data from the backup
files.
- Address Book: BACKUP_ADDR<date>.tbf
- MailBoxes: BACKUP_MBOX<date>.enc
- Template: BACKUP_TEMP<date>.enc
- Combined Backup: BACKUP_ALL<date>.enc
5 Click [Upload].
The Restore screen displays the backup file information.
6 Select the check box of data that you uploaded a backup file and click [Restore].
The restore process begins. This procedure may take several minutes.
Page 21

8/3/2019 MfpSecurityConfigGuide-eb3-v100
http://slidepdf.com/reader/full/mfpsecurityconfigguide-eb3-v100 22/29
(1) Print out the “FUNCTION LIST FOR MAINTENANCE” list after the formatting.
P.4-12 "[B] Print out “FUNCTION LIST FOR MAINTENANCE”"
(2) While pressing [1] and [3] simultaneously, turn the power ON. (Function Mode)
(3) Compare the lists which were printed before and after the formatting to check the setting items
having the different setting values. Set the value which was set before the formatting
Turn the power OFF.
(4) Turn the power OFF.
Reset “FUNCTION” list
• Reset the fax function by referring to the “function list” that was printed out in [C] Print out“function list”.
(1) Press the [USER FUNCTIONS] button.
(2) Press the [ADMIN] button, enter the password, and then press the [ENTER] button.
(3) Press the [FAX] button and then the [TERMINAL ID] button to set each item.
(4) Press the [INITIAL SETUP] button to set each item.
Note:
Explain to the user (machine administrator) about the next operation and ask him/her to enter his/her password.
Reset “FUNCTION LIST FOR MAINTENANCE”
Page 22

8/3/2019 MfpSecurityConfigGuide-eb3-v100
http://slidepdf.com/reader/full/mfpsecurityconfigguide-eb3-v100 23/29
(3) Disposal or Return of Existing Toshiba Equipment
IMPORTANTThis section requires a USB key with the latest firmware on it
for the model(s) you will be working on. The firmware can beobtained from the “Tech-To-Go” section of “FYI”. The
firmware always has the latest instructions for installation.
Basic Security – Remove original HDD and give to Customer,install new HDD, Clean SRAM and FAX
1) Turn on the machine while pressing the “Clear” and “3” keys. Release them after you hear a beep.
2) Press the “4” key (SRAM DATA FORMAT) and press “START”.
3) A message will be displayed on the touch screen saying “SRAM DATA FORMAT COMPLETED”.
4) Press the “Power” button to turn off the machine.
5) Turn on the machine while pressing the “0” and “8” keys. Release them after you hear a beep.
6) The touch screen will display a message saying “SRAM ERROR DOES NOT INITIALIZE” and display a list of
machine versions below it. The USA machines are called NAD and is next to number 1.
7) Press the number “1” on the 10 key pad and press the “START” button.
8) The machine will display on the touch screen “ARE YOU SURE” and you will press the “INTERRUPT” button on
the control panel.
9) The machine will automatically return to the “08” test mode.
10) Key in code 692 and press “START” and calibrate the touch screen.
11) Key in code 693 and press “START” and initialize the NIC.
12) Key in code 995 and press “START” and ENTER the machine serial number located on the back of the machine.
13) Key in code 690 and press “START” and initialize the HDD.
14) Press the “Power” button to turn off the machine.
15) Turn on the machine while pressing the “1” and “*” keys. Release them after you hear a beep.
16) Key in code 100 and press “START” and initialize the FAX Setup.
17) Key in code 102 and press “START” and initialize the FAX image data.
18) Press the “Power” button to turn off the machine.
Page 23

8/3/2019 MfpSecurityConfigGuide-eb3-v100
http://slidepdf.com/reader/full/mfpsecurityconfigguide-eb3-v100 24/29
19) Remove the existing machine HDD and give it to the customer. Please record the machine Serial Number andthe HDD Serial Number and have the customer sign a document showing they received it and have taken ownershipof the drive. Make sure the document is dated.
20) Install a new HDD into the machine.
21) Turn on the machine while pressing the “Clear” and “3” keys. Release them after you hear a beep.
22) Press the “3” key (All Partition Delete and create loader partition) and press “START” A message will be
displayed first saying “Initializing HDD table” then “Initialization Completed”.
23) Press the “Power” button to turn off the machine.
24) Insert a USB key with the appropriate machine firmware into the USB slot on the machine.
25) Turn on the machine while pressing the “9” and “4” keys. Release them after you hear a beep.
26) Select all of the firmware options and press “START”. When the firmware has completed updating it will display
“Update Completed”
27) Press the “Power” button to turn off the machine.
28) Turn on the machine while pressing the “0” and “8” keys. Release them after you hear a beep.
29) Key in code 947 and press “START” and initialize the firmware.
30) Key in code 690 and press “START”.
31) On the touch screen press “INITIALIZE”.
32) The touch screen will display “WAIT”. Once the HDD is properly formatted the touch screen will display “REBOOT
THE MACHINE”.
33) Press the “Power” button to turn off the.
34) Remove any network or phone cables from the machine and using the “Power Switch” to turn on the machine.
35) After the machine comes to ready, make a copy to ensure the machine is functioning properly.
36) Use the “Power” button to turn off the machine then turn off the “Power Switch”.
Page 24

8/3/2019 MfpSecurityConfigGuide-eb3-v100
http://slidepdf.com/reader/full/mfpsecurityconfigguide-eb3-v100 25/29
Enhanced Security – DATA Overwrite Kit, Clean SRAMand FAX
1) Turn on the machine while pressing the “0” and “8” keys. Release them after you hear a beep.
2) Key in code 1426 and press “START”.
3) The touch screen will display the following message “Are You Sure“.
4) On the touch screen touch “INITIALIZE”.
5) The machine will display the following message “ HDD ERASE RUNNING” and display how much of the HDD has
been erased as a percentage( ie.. 12%). DO NOT turn off the machine until this percentage reaches 100% and the
machine stops and displays the following message “HDD ERASE RUNNING”. The HDD has now been erased to a
minimum of DOD 522022-M standards.
6) Use the “Power” switch to turn off the machine.
7) Turn on the machine while pressing the “Clear” and “3” keys. Release them after you hear a beep.
8) Press the “3” key (All Partition Delete and create loader partition) and press “START” A message will be displayed
first saying “Initializing HDD table” then “Initialization Completed”.
9) Press the “Power” button to turn off the machine.
10) Insert a USB key with the appropriate machine firmware into the USB slot on the machine.
11) Turn on the machine while pressing the “9” and “4” keys. Release them after you hear a beep.
12) Select all of the firmware options and press “START”. When the firmware has completed updating it will display
“Update Completed”.
13) Press the “Power” button to turn off the machine and remove the USB key.
14) Turn on the machine while pressing the “0” and “8” keys. Release them after you hear a beep.
15) Key in code 947 and press “START” and initialize the firmware.
17) Key in code 690 and press “START”.
18) On the touch screen press “INITIALIZE”.
19) The touch screen will display “WAIT”. Once the HDD is properly formatted the touch screen will display “REBOOT
THE MACHINE”.
20) Press the “Power” button to turn off the machine.
21) Turn on the machine while pressing the “Clear” and “3” keys. Release them after you hear a beep.
22) Press the “4” key (SRAM DATA FORMAT) and press “START”
23) A message will be displayed on the touch screen saying “SRAM DATA FORMAT COMPLETED”.
24) Press the “Power” button to turn off the machine.
Page 25

8/3/2019 MfpSecurityConfigGuide-eb3-v100
http://slidepdf.com/reader/full/mfpsecurityconfigguide-eb3-v100 26/29
25) Turn on the machine while pressing the “0” and “8” keys. Release them after you hear a beep.
26) The touch screen will display a message saying “SRAM ERROR DOES NOT INITIALIZE” and display a list of
machine versions below it. The USA machines are called NAD and is next to number 1.
27) Press the number “1” on the 10 key pad and press the “START” button.
28) The machine will display on the touch screen “ARE YOU SURE” and you will press the “INTERRUPT” button onthe control panel.
29) The machine will automatically return to the “08” test mode.
30) Key in code 692 and press “START” and calibrate the touch screen.
31) Key in code 693 and press “START” and initialize the NIC.
32) Key in code 995 and press “START” and ENTER the machine serial number located on the back of the machine.
33) Key in code 690 and press “START” and initialize the HDD.
34) Press the “Power” button to turn off the machine.
35) Turn on the machine while pressing the “1” and “*” keys. Release them after you hear a beep.
36) Key in code 100 and press “START” and initialize the FAX Setup.
37) Key in code 102 and press “START” and initialize the FAX image data.
38) Press the “Power” button to turn off the machine.
39) Remove any network or phone cables from the machine and using the “Power Switch” to turn on the machine.
40) After the machine comes to ready, make a copy to ensure the machine is functioning properly.
41) Use the “Power” button to turn off the machine then turn off the “Power Switch”.
Page 26

8/3/2019 MfpSecurityConfigGuide-eb3-v100
http://slidepdf.com/reader/full/mfpsecurityconfigguide-eb3-v100 27/29
Optimal Security – Data Overwrite Kit, Clean SRAM and FAXand return cleaned original HDD to the customer
1) Turn on the machine while pressing the “0” and “8” keys. Release them after you hear a beep.
2) Key in code 1426 and press “START”.
3) The touch screen will display the following message “Are You Sure“.
4) On the touch screen touch “INITIALIZE”.
5) The machine will display the following message “ HDD ERASE RUNNING” and display how much of the HDD has
been erased as a percentage( ie.. 12%). DO NOT turn off the machine until this percentage reaches 100% and the
machine stops and displays the following message “HDD ERASE RUNNING”. The HDD has now been erased to a
minimum of DOD 522022-M standards.
6) Use the “Power” switch to turn off the machine.
7) Remove the existing machine HDD and give it to the customer. Please record the machine Serial Number and theHDD Serial Number and have the customer sign a document showing they received it and have taken ownership of
the drive. Make sure the document is dated.
8) Install a new HDD into the machine.
9) Turn on the machine while pressing the “Clear” and “3” keys. Release them after you hear a beep.
10) Press the “3” key (All Partition Delete and create loader partition) and press “START” A message will be
displayed first saying “Initializing HDD table” then “Initialization Completed”.
11) Press the “Power” button to turn off the machine.
12) Insert a USB key with the appropriate machine firmware into the USB slot on the machine.
13) Turn on the machine while pressing the “9” and “4” keys. Release them after you hear a beep.
14) Select all of the firmware options and press “START”. When the firmware has completed updating it will display
“Update Completed”
15) Press the “Power” button to turn off the machine and remove the USB key.
16) Turn on the machine while pressing the “0” and “8” keys. Release them after you hear a beep.
17) Key in code 947 and press “START” and initialize the firmware.
18) Key in code 690 and press “START”.
19) On the touch screen press “INITIALIZE”.
20) The touch screen will display “WAIT”. Once the HDD is properly formatted the touch screen will display “REBOOTTHE MACHINE”.
21) Press the “Power” button to turn off the machine.
22) Turn on the machine while pressing the “Clear” and “3” keys. Release them after you hear a beep.
23) Press the “4” key (SRAM DATA FORMAT) and press “START”.
24) A message will be displayed on the touch screen saying “SRAM DATA FORMAT COMPLETED”.
Page 27

8/3/2019 MfpSecurityConfigGuide-eb3-v100
http://slidepdf.com/reader/full/mfpsecurityconfigguide-eb3-v100 28/29
25) Press the “Power” button to turn off the machine.
26) Turn on the machine while pressing the “0” and “8” keys. Release them after you hear a beep.
27) The touch screen will display a message saying “SRAM ERROR DOES NOT INITIALIZE” and display a list of
machine versions below it. The USA machines are called NAD and is next to number 1.
28) Press the number “1” on the 10 key pad and press the “START” button.
29) The machine will display on the touch screen “ARE YOU SURE” and you will press the “INTERRUPT” button on
the control panel.
30) The machine will automatically return to the “08” test mode.
31) Key in code 692 and press “START” and calibrate the touch screen.
32) Key in code 693 and press “START” and initialize the NIC.
33) Key in code 995 and press “START” and ENTER the machine serial number located on the back of the machine.
34) Key in code 690 and press “START” and initialize the HDD.
35) Press the “Power” button to turn off the machine.
36) Turn on the machine while pressing the “1” and “*” keys. Release them after you hear a beep.
37) Key in code 100 and press “START” and initialize the FAX.
38) Key in code 102 and press “START” and initialize the FAX.
39) Press the “Power” button to turn off the machine.
40) Remove any network or phone cables from the machine and using the “Power Switch” to turn on the machine.
41) After the machine comes to ready, make a copy to ensure the machine is functioning properly.
42) Use the “Power” button to turn off the machine then turn off the “Power Switch”.
Page 28
8/3/2019 MfpSecurityConfigGuide-eb3-v100
http://slidepdf.com/reader/full/mfpsecurityconfigguide-eb3-v100 29/29
Note:If you have questions about any of the procedures you can refer to the
appropriate “Service Handbook” and or the “installation instruction”
included with each option. The latest handbooks and installationinstructions can be found on the “Tech-To-Go” section of FYI.
Version 1.0