mercury tv card user manual
TRANSCRIPT

Mercury TV Card User Manual
P/N: 400108013860 Ver: 1.04.148.0
Date: 2003-08-15

Copyright and Trademark Notice © All rights reserved by Kobian Pte Ltd. Information in this document is subject to change without notice. No part of this document may be reproduced or transmitted in any form or by any means, electronic or mechanical without prior written permission of Kobian Pte Ltd. Windows® is a trademark of Microsoft Corporation. All other brand names are registered trademarks of their respective companies. FCC Statement This equipment has been tested and found to comply with the limits for a Class B computing device in accordance with the specifications set forth in Subpart J of Part 15 of the FCC Rules.
Contents
1. Getting Started ...................................................................1
1.1. Introduction.................................................................................................. 1 1.2. Features ...................................................................................................... 1 1.3. Package Contents ....................................................................................... 2 1.4. System Requirements ................................................................................. 2
2. Input & Output Connections ...............................................3
2.1. Mercury TV Card Connections .................................................................... 3
3. Installation of Hardware and Drivers ..................................4
3.1. DirectX ........................................................................................................ 4 3.2. Installing the TV Card.................................................................................. 4 3.3. Driver Installation for Windows 98SE .......................................................... 5 3.4. Driver Installation for Windows ME.............................................................. 7 3.5. Driver Installation for Windows 2000 / Windows XP.................................... 9 3.6. Settings for Sound Card Owners............................................................... 10
4. The TV Application ...........................................................11
4.1. Installation of the TV Application ............................................................... 11 4.2. Launching the TV Application.................................................................... 11 4.3. Choosing your Video Source..................................................................... 11
5. Settings.............................................................................13
5.1. TV Settings Dialog Box ............................................................................. 13 5.2. Video Settings Dialog Box......................................................................... 14 5.3. Record Settings Dialog Box ...................................................................... 15 5.4. Misc Page Dialog Box ............................................................................... 16
6. Additional Settings............................................................17
6.1. Schedule Recording .................................................................................. 17 6.2. Auto Scan.................................................................................................. 18 6.3. Change Skin.............................................................................................. 18 6.4. Snapshot ................................................................................................... 18 6.5. Multiple Preview ........................................................................................ 18 6.6. Audio Settings ........................................................................................... 18 6.7. Teletext ..................................................................................................... 19 6.8. Volume ...................................................................................................... 19

7. How to record a TV Program............................................20
7.1. The Record Button .................................................................................... 20 7.2 The Time Shift Function ............................................................................. 20
8. The Remote Control .........................................................21
8.1. Accelerator Keys Summary....................................................................... 22
9. The Gallery .......................................................................23
9.1. The Function Buttons ................................................................................ 23 9.2. FM Radio (only for FM Models) ................................................................. 24
10. Technical Support...........................................................25
10.1. Troubleshooting....................................................................................... 25

1. Getting Started 1.1. Introduction Thank you for choosing the Mercury PCI TV tuner and video capture card. This product turns your PC quick and easy into a powerful desktop multimedia System. Capture video and still images; experience real-time MPEG-1 and MPEG-2 recording. 1.2. Features • Philips 713X Chipset • Plug & Play compliant PCI card • 125 channel cable/antenna ready TV tuner • Composite video and S-Video input • Multiple Channel Preview • Teletext* • Real-time recording • Time Shift Function • Scheduler Technology • Capture still images • TV screen scalable up to full size • Listen to FM radio** • Compatible with current Windows Versions (Windows® 98SE, ME, 2000, XP) * depends on the TV Broadcasting system in your country ** only FM Models
Getting Started
1
1.3. Package Contents When removing the contents of the package, please inspect all items to ensure no damage was sustained during shipping. The following items should be included in the package: • Plug and Play Mercury PCI TV PCI card • Audio cable for sound card • Remote Control • Infrared Receiver • Quick Installation Guide • Installation Manual • FM Radio Antenna (only for FM Models) 1.4. System Requirements To successfully use the Mercury TV Card solution, please ensure that your desktop system meets the following requirements: • Mainboard with available busmaster* capable PCI slot (v.2.1) • Pentium® III 500 MHz or faster PC
• MPEG-1 real-time encoding: PIII® 800MHz or AMD Athlon® 800 or higher • MPEG-2 real-time encoding: P4® 1.6GHz or AMD Athlon® 1.6 or higher • DVD real-time encoding: P4® 2GHz or AMD Athlon® 2GHz or higher
• 128 MB RAM (minimum), 256 MB RAM recommended • VGA-Card with DirectX 8.1 Support • Windows® 98 SE, Windows® ME, Windows® 2000, Windows® XP • CD-ROM or DVD drive • 20 MB available hard disk space for installation • Additional free space on your Hard disk for recording and editing files • VGA monitor with DirectShow installed supporting 16-bit color • Sound card • Speakers for audio output • Available IRQ • TV antenna or TV cable * Please refer to the manual of your mainboard
Getting Started
2
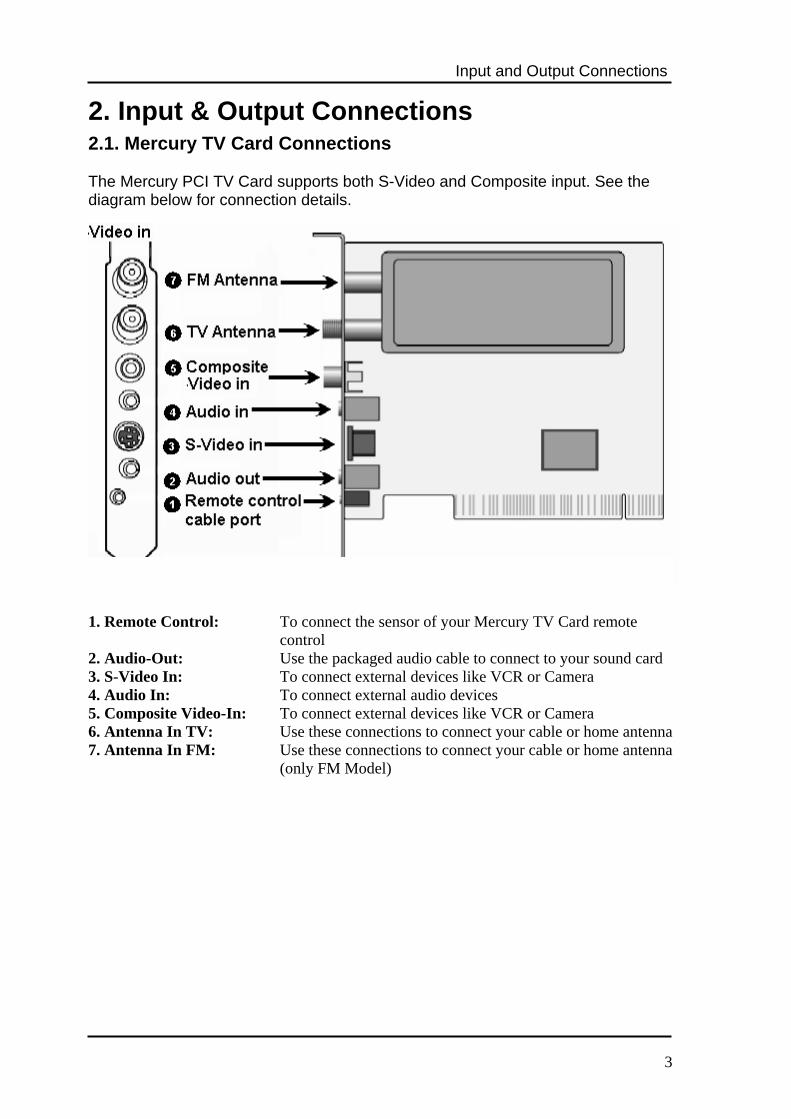
2. Input & Output Connections 2.1. Mercury TV Card Connections The Mercury PCI TV Card supports both S-Video and Composite input. See the diagram below for connection details. 1. Remote Control: To connect the sensor of your Mercury TV Card remote
control 2. Audio-Out: Use the packaged audio cable to connect to your sound card 3. S-Video In: To connect external devices like VCR or Camera 4. Audio In: To connect external audio devices 5. Composite Video-In: To connect external devices like VCR or Camera 6. Antenna In TV: Use these connections to connect your cable or home antenna 7. Antenna In FM: Use these connections to connect your cable or home antenna (only FM Model)
Input and Output Connections
3

3. Installation of Hardware and Drivers The following sections provide step-by-step instructions on installing and configuring the card, accessories and software. 3.1. DirectX Before installing your new Mercury TV Card, it is necessary to install DirectX 8.1 or higher for your Operating system. You find on the Installation CD-ROM DirectX 9.0 3.2. Installing the TV Card 1. Switch off your PC and all connected peripheral devices such as your printer and
monitor. Leave the AC power cable connected for the time being, so that your computer is still grounded.
2. Touch the metal chassis at the rear of the PC to ground and to discharge static. Now unplug the cord from the AC power socket.
3. Remove the cover from the case of your PC. 4. Look for a free PCI expansion slot. When selecting the PCI slot, note that TV
cards should not be plugged into PCI slot 1 in conjunction with an AGP graphics card because PCI slot 1 is very frequently assigned to the same interrupts as the AGP slot. This would give both cards the same interrupt, which can lead to crashes during operation! The numbers assigned to the PCI slots are listed in your motherboard manual.
5. Carefully remove the card from its packaging and pick it up by the edges with one hand while your other hand is touching a metal part of the PC. This will ensure that your body is completely discharged via your computer without damaging the TV card.
6. Align the holder at the rear of the TV card in the expansion slot in such a way that the card’s connectors are directly in line with the slot’s socket.
7. Push the TV card firmly into the slot, ensuring good contact. 8. Fasten the TV card with an appropriate screw. 9. If a sound card is installed, connect the TV card to it using the supplied audio
connector cable. Plug one end into the audio output of the TV card (light-green socket) and the other end into the Line-In terminal of the sound card (usually a light-blue socket).
10. Reinstall the cover of your PC case. 11. Connect the antenna cable (which you would normally connect to the antenna
input terminal on your television) to the TV antenna terminal on the TV/Radio card. Connect the radio antenna cable to the radio antenna terminal. Reconnect the AC power cable as well as all other cables. Make sure that your speakers are set to low volume.
12. Switch your computer on again to begin installing the software.
Installation of your TV Card
4

3.3. Driver Installation for Windows 98SE After rebooting, Windows 98 SE automatically detects the presence of a new hardware component in the system and tells you so in an “Add new Hardware Wizard” window.
Installation of your TV Card
If you have not already done so, place the Installation CD into your CD-ROM drive and click “Next” in the window.
Select now the “Search for the best driver for your device (Recommended)” item and click “Next”.5

Installation of your TV Card
Windows searches now for the drivers. These are located on your Installation CD so choose the option CD-ROM Drive and then click “Next”. Once Windows finds the driver, you will see a message. Simply click “Next” to continue. After installing the driver, Windows informs you that it has done so successfully. Click “Finish”. This completes the installation of the drivers and you can now start installing the application program.
6

3.4. Driver Installation for Windows ME After rebooting, Windows ME automatically detects the presence of a new hardware component in the system and tells you so in an “Add new Hardware Wizard” window. If you have not already done so, place the Installation CD into your CD-ROM drive. Select now the “Automatic search for a better driver (Recommended)” item and click “Next”.
Installation of your TV Card
7

Windows will now find the drivers on the Installation CD and install them automatically. After installing the driver, Windows informs you that it has done so successfully. Click “Finish”. This completes the installation of the drivers and you can now start installing the application program.
Installation of your TV Card
8

3.5. Driver Installation for Windows 2000 / Windows XP After rebooting, Windows 2000 / XP automatically detect the presence of a new hardware component in the system and tells you so in a “Found new Hardware Wizard” window.
If you have not already done so, place the Installation CD into your CD-ROM drive.
The CD will automatically start and show you the Installation Screen. Here please select “Driver Installation”. If the Autostart program does not appear automatically when you insert your Installation CD, go to “Start” -> “Run” and type “D:\Setup.exe” (if D:\ is your CD-Rom drive)
In the next window please select “Install Tv Card Drivers”. After that the installation of the Driver is finished. Note: The Setup Program currently supports only Windows 2000 / Windows XP for the following languages: English, German, Italian, French, Spanish, Dutch, Chinese traditional, Chinese simplified, Japanese
Installation of your TV Card
9

Installation of your TV Card
3.6. Settings for Sound Card Owners To do so, proceed as follows: 1. Double-click the volume control icon illustrated as a speaker on the taskbar.
2. Be sure that the “Mute” option under the “Line-In” slider is not checked and that
the “Line-In” slider is not at the bottom of its range. This makes sure you will be able to hear the tone of the TV signal through your system and control the volume. Other settings are required for recording (see instructions below):
3. Select the “Options\Properties” menu item. 4. Set the “Adjust volume for” option to “Recording”. Confirm your choice by clicking
“OK”. 5. Now enable the check box below the Line-In slider and move the slider itself to
its middle position. By checking the check box, you define the Line-In input of your sound card as a recording input source. These is essential if you want to record a video sequence with sound and want to use the sound card input to do so.
This completes the configuration of the sound card settings and you can now close the soundcard mixer!
10

4. The TV Application The heart of your TV Card is the TV Software. The TV Application program has a user-friendly design that maThe Utility allows the user to control the viewing and recording olisten to FM stereo.
4.1. Installation of the TV Application The installation of the TV software can be carried out either usprogram of the provided Driver and Application CD (“Software executing a single file if you have downloaded the program fromIf the Autostart program does not appear automatically when yInstallation CD, start it manually by running the “InstallCD.exe”Installation CD. 4.2. Launching the TV Application When starting your TV Software program for the first time, a dialchoose the correct country settings. When you click the “Ok” Bwill scan for available TV channels. The software provides all necessary access to the important TVUsing the buttons you can control the functions of your TV soft 4.3. Choosing your Video Source
When you receive your TV Signal with Home Ant
When you receive your TV Signal with Cable Ant
An external device connected to your Composite
An external device connected to your S-Video In
Listen to FM Radio (only FM Models)
The TV Application
kes it simple to use. f TV and video, plus
ing the Autostart Installation”), or by
the Internet. ou insert your file located on the
og box will appear to utton, the software
functions. ware.
enna
enna
-Video In
11

Simply click on one of the above-described buttons, and as long there is a signal present at your card, you will see a picture. You can adjust the size of the picture freely by dragging its edges using the mouse, and move the window to any screen location by clicking the window caption bar and dragging. Double-clicking the TV picture switches the picture to full-screen display. Double-clicking again switches back to window display mode.
On the left side you find the Channel buttons. Here you are able to click with your mouse on the channel numbers to switch to different channels. Alternatively you can use the num block of your keyboard. For additional information of shortcuts to use with your keyboard, please refer to Page 22 Chapter 8.1
The Info Panel shows you useful information about which channel you have tuned in. In addition with the both arrows up / down you can switch the Channel Up and Down.
The OSD Panel shows you useful information about the current time and which mode you have chosen.
When you are in Record Mode, it shows the elapsed time since the Recording started and how much MB is used on your Hard disk.
The TV Application
12

Settings
5. Settings If you click the button for TV Settings, you have numerous options to configure your TV Viewing
5.1. TV Settings Dialog Box The TV Setup dialog box allows you to select the TV system, scan for channels, select specific TV channels and rename the TV Channels.
1. Category: You can choose here, whether Air or Cable broadcasts your TV signal.
2. Country: Sets your TV standard and TV channel table according to the country of your residence.
3. Finetuning: When you don’t have a clear reception of the tuned channel, you can make here a finetuning.
4. Multiple Channel Preview: Here you can choose how long the available channels are shown, and how much channels you want to preview.
5. Channel Editing: Here you can edit and rename your favorite TV Stations. Double click the channel’s number and click in the white field located under “Edit this channel name”. Enter the name you wish to be displayed and click the “Input” button. The mark opens an additional side bar, here you see the edited channels, and by double-click on them, you can edit the channel names too.
13

5.2. Video Settings Dialog Box
The Video Setting dialog box allows the user to adjust the TV display characteristics, including brightness, contrast, hue and saturation. When you click on the “Default” Button all changes will disregard and the Default Settings will be restored.
Settings
14
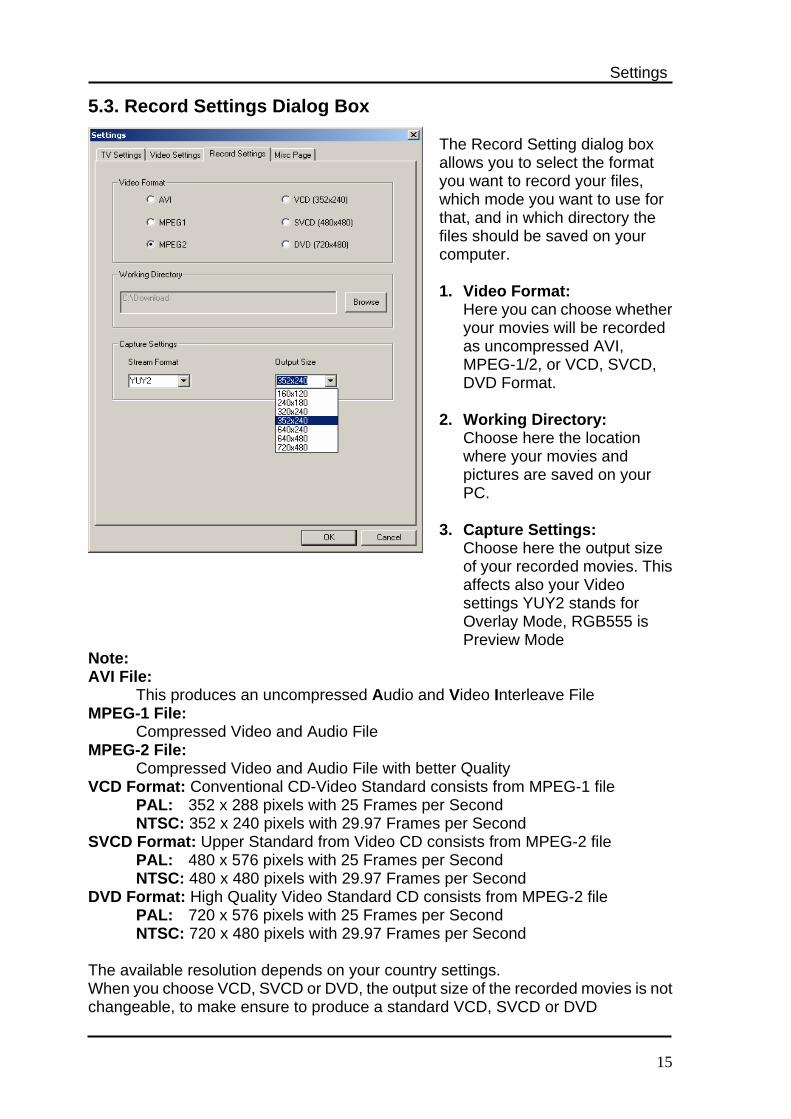
5.3. Record Settings Dialog Box The Record Setting dialog box allows you to select the format you want to record your files, which mode you want to use for that, and in which directory the files should be saved on your computer. 1. Video Format:
Here you can choose whether your movies will be recorded as uncompressed AVI, MPEG-1/2, or VCD, SVCD, DVD Format.
2. Working Directory: Choose here the location where your movies and pictures are saved on your PC.
3. Capture Settings: Choose here the output size of your recorded movies. This affects also your Video settings YUY2 stands for Overlay Mode, RGB555 is Preview Mode
Note: AVI File:
This produces an uncompressed Audio and Video Interleave File MPEG-1 File:
Compressed Video and Audio File MPEG-2 File:
Compressed Video and Audio File with better Quality VCD Format: Conventional CD-Video Standard consists from MPEG-1 file
PAL: 352 x 288 pixels with 25 Frames per Second NTSC: 352 x 240 pixels with 29.97 Frames per Second
SVCD Format: Upper Standard from Video CD consists from MPEG-2 file PAL: 480 x 576 pixels with 25 Frames per Second NTSC: 480 x 480 pixels with 29.97 Frames per Second
DVD Format: High Quality Video Standard CD consists from MPEG-2 file PAL: 720 x 576 pixels with 25 Frames per Second NTSC: 720 x 480 pixels with 29.97 Frames per Second
The available resolution depends on your country settings. When you choose VCD, SVCD or DVD, the output size of the recorded movies is not changeable, to make ensure to produce a standard VCD, SVCD or DVD
Settings
15

5.4. Misc Page Dialog Box
The Misc Page Dialog box allows you to select additional Settings for Record and Picture. Time Shift Recording:
When the Box is checked, the Temporary recorded files won’t be deleted after stop the Time Shift Mode. (see page 20 for additional description of the Time Shift Mode)
Snapshot Settings:
Here you can define, how much snapshots are taken, when you click the Snapshot Button. (see page 18 for additional description of the Snapshot function)
Settings
16

Additional Settings
6. Additional Settings 6.1. Schedule Recording
After you click the button for Schedule Recording, you will find in your Taskbar a new symbol.
When you click on this new symbol, a new window appears where you can plan the settings for Weekly and Designating Recordings
The Weekly Schedule is for programming recurring TV shows, which are broadcasted every day or every week at the same time. Give the file a specific name, choose the source and in which file-format you want to record, and confirm it by press the “OK” Button.
In the Designated Schedule, you can program one event, which is broadcasted by the TV Station. Give the file a specific name, choose the source and in which file-format you want to record, and confirm it by press the “OK” Button.
17

6.2. Auto Scan
When you click the button for AutoScan, you have the possibility to scan the available TV Channels and these will be saved.
6.3. Change Skin If you click the button for Change Skin, you can customize the view of the Application program.
6.4. Snapshot
When you click the camera icon for Snapshot, a picture will be taken
from the current frame of the TV Picture, and saved in your Gallery. The Gallery is a shortcut to the directory on your HD, which you have defined before in the Record Settings in Chapter 5.3. Page 15 – i.e. C:\Downloads 6.5. Multiple Preview
When you click the button for Multiple Previous you will see the current programs of all available channels. The preview time and how much channels are defined in TV settings in Chapter 5.1. Page 13. When you see a program, you want to watch, simple double-click on it.
6.6. Audio Settings
When you click the button for Audio Settings, you have the
possibility to define whether you want to receive the TV-Program in Stereo or Mono. As additional service some TV-Stations broadcast their program simultaneously in two languages.
Additional Settings
18

6.7. Teletext Simply clicking the Tx button opens the Teletext window. This service is not available in all countries. Furthermore not all TV Stations provide Teletext service. Everyday, however, competent editorial offices provide a selection of quickly and easily accessible information, which you can access for free, since it is constantly transferred along with the TV picture via the so-called vertical blanking interval of the picture signal. As long as there is an antenna signal present at the card
and you have already scanned and stored channels you will now see the Teletext information offered by the corresponding TV station Surfing through the pages is conveniently easy thanks to the preloaded text tables. Use the arrow buttons (on the software interface, the PC keyboard or the remote control) to navigate from one page to another or enter a page number directly. You can also click a page reference directly to call up its content, practically with no delay. 6.8. Volume
The Volume Slider lets you control the volume of the Audio + increases the volume - decreases the volume
The “M” symbol has a Mute function One click on it turns the audio off another click turns it on again.
Additional Settings
19
Recording
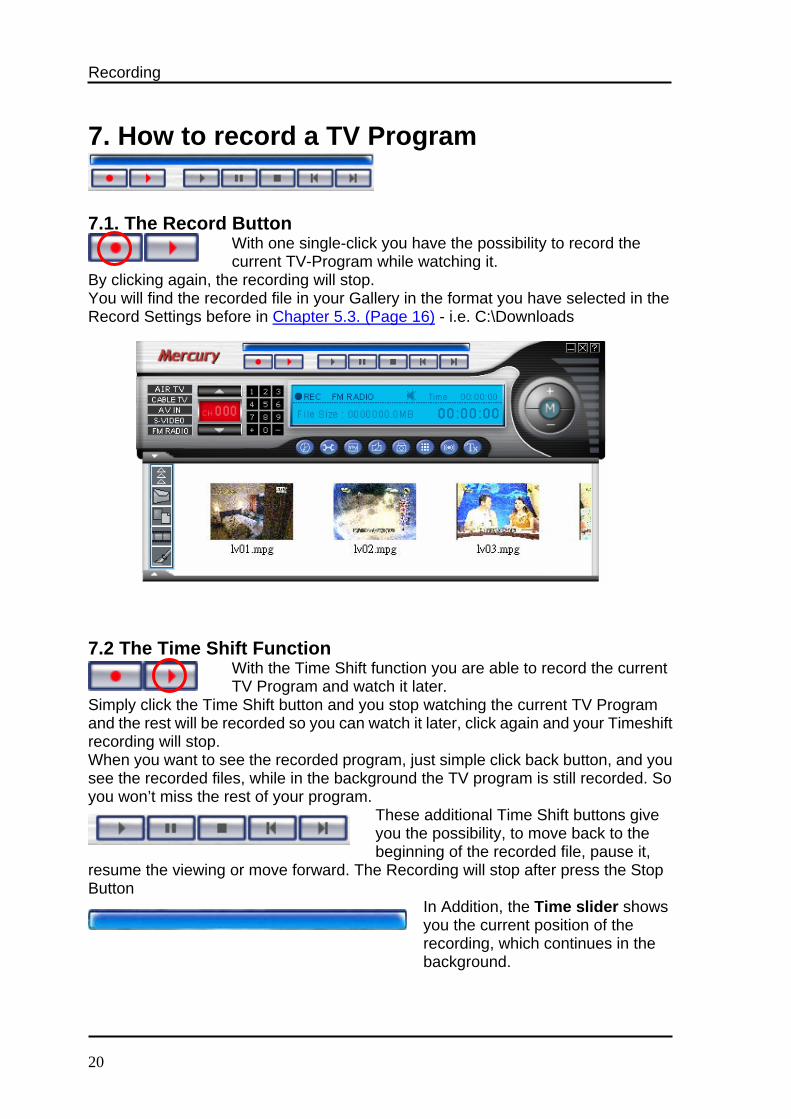
7. How to record a TV Program 7.1. The Record Button
With one single-click you have the possibility to record the current TV-Program while watching it.
By clicking again, the recording will stop. You will find the recorded file in your Gallery in the format you have selected in the Record Settings before in Chapter 5.3. (Page 16) - i.e. C:\Downloads 7.2 The Time Shift Function
With the Time Shift function you are able to record the current TV Program and watch it later.
Simply click the Time Shift button and you stop watching the current TV Program and the rest will be recorded so you can watch it later, click again and your Timeshift recording will stop. When you want to see the recorded program, just simple click back button, and you see the recorded files, while in the background the TV program is still recorded. So you won’t miss the rest of your program.
These additional Time Shift buttons give you the possibility, to move back to the beginning of the recorded file, pause it,
resume the viewing or move forward. The Recording will stop after press the Stop Button
In Addition, the Time slider shows you the current position of the recording, which continues in the background.
20
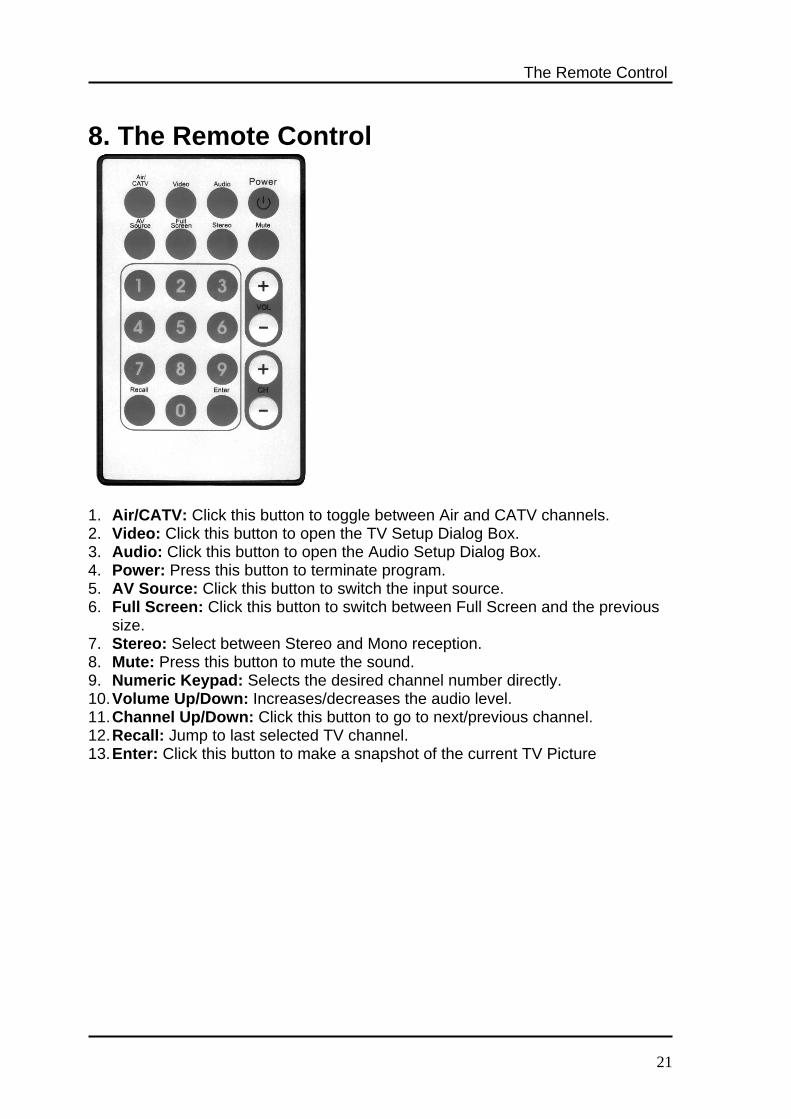
8. The Remote Control 1. Air/CATV: Click this button to toggle between Air and CATV channels. 2. Video: Click this button to open the TV Setup Dialog Box. 3. Audio: Click this button to open the Audio Setup Dialog Box. 4. Power: Press this button to terminate program. 5. AV Source: Click this button to switch the input source. 6. Full Screen: Click this button to switch between Full Screen and the previous
size. 7. Stereo: Select between Stereo and Mono reception. 8. Mute: Press this button to mute the sound. 9. Numeric Keypad: Selects the desired channel number directly. 10. Volume Up/Down: Increases/decreases the audio level. 11. Channel Up/Down: Click this button to go to next/previous channel. 12. Recall: Jump to last selected TV channel. 13. Enter: Click this button to make a snapshot of the current TV Picture
The Remote Control
21

8.1. Accelerator Keys Summary Use the following Hot-Key table for reference to conveniently control TV function via a PC keyboard or a wireless keyboard.
The Remote Control
Keyboard Remote Control Description Num 0~9 Num 0~9 Channel Number Page Up CH+ Channel Up Page Down CH- Channel Down Arrow Up Vol+ Volume Up or Video Setting (Brightness, Hue,
Contrast, Saturation) or Audio Setting (Balance, Bass, Treble)
Arrow Down Vol- Volume Down or Video Setting (Brightness, Hue, Contrast, Saturation) or Audio Setting (Balance ,Bass, Treble)
Spacebar Enter Snapshot R Recall Recall Previous Channel I AV source Input Source (Air, Cable, AV-in, S-Video in, FM)C Air / CATV Switch between Air / Cable reception V Video Video Setting (Brightness, Hue, Contrast,
Saturation) A Audio Audio Setting (Balance, Bass, Treble) M Mute Mute on / off S Stereo Stereo / Mono F Full Screen Full Screen Mode On / Off Alt+ / or ? About Dialog Ctrl+Alt+F4 Power TV Close / Open + Add Channel - Delete Channel
22
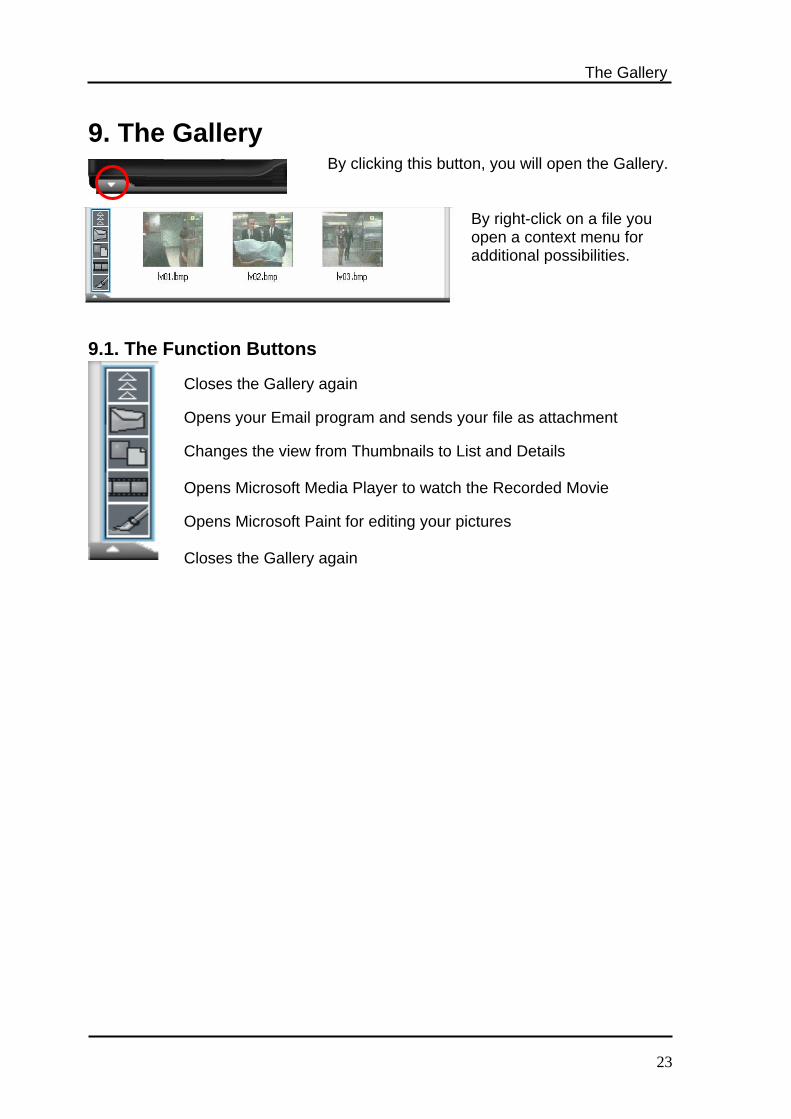
9. The Gallery By clicking this button, you will open the Gallery.
By right-click on a file you open a context menu for additional possibilities.
9.1. The Function Buttons Closes the Gallery again Opens your Email program and sends your file as attachment
Changes the view from Thumbnails to List and Details
Opens Microsoft Media Player to watch the Recorded Movie
Opens Microsoft Paint for editing your pictures Closes the Gallery again
The Gallery
23

9.2. FM Radio (only for FM Models) Switching to FM Mode
The TV Software allows the user to listen to FM Stereo. Simply click on the FM Radio button and you begin listening to FM Stereo on your computer. Auto Scan You have here the same Auto Scan possibilities like in the TV Application. Note: For further details, please refer to the On-Line Help of the software.
FM Radio
24

10. Technical Support 10.1. Troubleshooting Q: Why do I hear TV sound, but see no video display? A: Some VGA cards can’t support the Overlay display function. Simply select
non-overlay mode in the Video Setting dialog box. Q: Error message: Drivers have not been digitally signed in Windows
2000/XP. A: Saying “OK” to this should continue the installation, acknowledging that you
are aware that these drivers have not been certified by Microsoft. Q: Why I can’t see any picture while capture? A: Check graphics card display settings, try both 16bit and 24bit high color,
800*600 Resolution Q: Why I can’t record sound but see the picture? A: Please refer to Chapter 3.6 for the correct settings Q: What Operating Systems (O/S) does the TV Card support? A: Now the installation CD disk only provides the WDM driver for
Windows®98SE, ME, 2000 and XP. If you seek other operating system drivers, please see our website
Q: What can I do, when I get horizontal lines on my screen when watching
TV? A: 1. This could have to do with the bandwidth on the PCI bus. Place the car
closest to the PCI busmaster slot or place it closest to the AGP slot, but try to avoid PCI slot 1
1. There are some BIOS setting that you can change to get better performance. It should be noted that you might not have all these settings. There are also a number of various bios setups available, you should consult the documentation that came with your system for information on properly navigating your bios. 1. Assign IRQ to VGA (enabled, disabled)
For the PCTV to work with the graphics card this IRQ has to be enabled.
2. PCI Master 0 Write Waitstate (enabled, disabled) should the PCTV not function correctly, try switching this option. Enabling write waitstates slightly slows down the PCI write access, which might help solving problems with stability on some motherboards. Disabling write waitstates is faster but might cause problems.
3. IRQ Activated By (edge, level) For modern PCI cards this option should be "level".
4. PCI Latency Timer (N) Trying a higher value can help if you get "noise" or stripes in the TV picture if this not related to a bad reception
Technical Support
25

5. PCI Peer Concurrency (enabled, disabled) If the PCTV does not run stable, test if switching this option helps.
6. CPU to PCI Write Buffer (enabled, disabled) If the PCTV does not run stable, test if switching this option helps.
7. USB Controller (enabled, disabled) With some motherboards USB and AGP are "internally connected", should this be the case the USB controller on the motherboard has to be enabled for the AGP-mainboard drivers to work correctly.
8. Use USB IRQ (enabled, disabled) If this option can be found in the bios settings, enable the USB IRQ to fully activate the USB controller.
9. CPU to PCI Write Buffer (enabled, disabled) should the TV application crash during operation, test if switching this option helps
Q: Why I don’t hear any sound, but see a TV picture? A: First make sure that the audio out from the TV Card is connected to the line in
on your sound card. Next, make sure that your Windows mixer settings are set correctly. You can check for this by double-clicking on the speaker icon next to the clock in the bottom right hand corner of the screen. Make sure all the appropriate levels are set about 3/4 the way to the top. You can also click on Options - Properties - Recording and then set these levels the same. You may have to recapture your video.
Q: What can I do, when the audio is sometimes disappearing after
1 minute? A: If you have Windows Messenger running on the task bar, please disable it or
close it. You should update Messenger with the last version available. The problem can also happen with some anti-virus software.
Technical Support
26