mel/850 potable water laboratory
TRANSCRIPT

26888-22
MEL/850Potable Water Laboratory
© Hach Company, © Hach Company, 1998–2006. All rights reserved. jk/dp October 2006, Edition 2

ii
CERTIFICATION
Hach Company certifies the Portable Incubator was tested thoroughly, inspected and found to meet its published specifications when it was shipped from the factory. The Portable Incubator has been tested and is certified as indicated to the following instrumentation standards:
Product Safety: (Power Supplies Only)Power Supply, 115 or 220 VAC Input, 12 VDC Output: UnlistedPower Supply, 230 VAC Input, 12 VDC Output: CE/VDE Approved, GS
Immunity (Instrument Tested with external 230 VAC Power Supply):EN 50082-1 (European Generic Immunity Standard) per 89/336/EEC EMC: Supporting test records by Hach Company, certified compliance by Hach Company.
Required Standard/s include:EN 61000-4-2 “1995” (IEC 1000-4-2) Electro-Static DischargeEN 61000-4-4 “1995” (IEC 1000-4-4) Electrical Fast Transients/BurstEN 61000-4-11 “1994” (IEC 1000-4-11) Voltage Dips, Interruptions and VariationsENV 50140 “1993” (IEC 1000-4-3) Radiated RF Electro-Magnetic FieldsENV 50141 “1993” Conducted Disturbances Induced by RF FieldsENV 50204 “1995” Radiated Electro-Magnetic Field from Digital TelephonesEN 61000-4-5 “1995” (IEC 1000-4-5) Surge, Light Industrial Levels
Emissions (Instrument Tested with external 230 VAC Power Supply):EN 50081-1 (Emissions) per 89/336/EEC EMC: Supporting test records by Criterion Tech certified compliance by Hach Company.
Required Standard/s include:EN 55022 (CISPR 22) Emissions, Class A Limits (Testing to certify to “B” Limits by 31 January 1998)
Additional Standard/s include:EN 61000-2 Harmonic Disturbances Caused by Electrical EquipmentEN 61000-3 Voltage Fluctuation (Flicker) Disturbances Caused by Electrical Equipment
CANADIAN INTERFERENCE-CAUSING EQUIPMENT REGULATION, IECS-003, Class A: Supporting test records by Criterion Technology, certified compliance by Hach Company.
This Class A digital apparatus meets all requirements of the Canadian Interference-Causing Equipment Regulations.
Cet appareil numérique de la classe A respecte toutes les exigences du Règlement sur le matériel brouilleur du Canada.
iii

CERTIFICATION, continued
FCC PART 15, Class “A” Limits: Supporting test records by Criterion Technology, certified compliance by Hach Company.
This device complies with Part 15 of the FCC Rules. Operation is subject to the following two conditions:
(1) this device may not cause harmful interference, and (2) this device must accept any interference received, including interference that may cause undesired operation.
Changes or modifications to this unit not expressly approved by the party responsible for compliance could void the user's authority to operate the equipment.
This equipment has been tested and found to comply with the limits for a Class A digital device, pursuant to Part 15 of the FCC Rules. These limits are designed to provide reasonable protection against harmful interference when the equipment is operated in a commercial environment. This equipment generates, uses, and can radiate radio frequency energy and, if not installed and used in accordance with the instruction manual, may cause harmful interference to radio communications. Operation of this equipment in a residential area is likely to cause harmful interference, in which case the user will be required to correct the interference at his own expense. The following techniques of reducing the interference problems are applied easily.
1. Disconnect the Portable Incubator from its power source to determine if the Portable Incubator is the source of the interference.
2. If the Portable Incubator’s AC power supply is plugged into the same outlet as the device with which it is interfering, try another outlet.
3. Move the Portable Incubator away from the device receiving the interference.
4. Reposition the receiving antenna for the device receiving the interference.
5. Try combinations of the above.
iv

CERTIFICATION, continued
Hach Company certifies the Pocket Pal™ instruments were tested thoroughly, inspected and found to meet their published specifications when it was shipped from the factory. The instruments have been tested and are certified as indicated to the following instrumentation standards:
EN 55011 per 89/336/EEC EM. Tested by Blackstone Inc., certified by Hanna.
EN 50082-1 (Immunity) per 89/336/EEC. Tested by Blackstone Inc., certified by Hanna. Standards include:
IEC 801-2 (ESD)IEC 801-3 (RF Radiated)
v

vi

TABLE OF CONTENTS
CERTIFICATION.................................................................................................................... iiiSAFETY PRECAUTIONS ...................................................................................................... ix
OPERATION ..........................................................................................................................1
SECTION 1 INTRODUCTION ............................................................................................. 31.1 Portable Incubator ............................................................................................................... 31.2 DR/850 Colorimeter............................................................................................................ 41.3 Capabilities of the MEL/850 Potable Water Laboratory .................................................... 51.4 Preparation for Use.............................................................................................................. 51.5 Missing or Damaged Product.............................................................................................. 6
SECTION 2 PORTABLE INCUBATOR .............................................................................. 72.1 Specifications ...................................................................................................................... 72.2 Power Selection................................................................................................................... 7
2.2.1 Using In A Motorized Vehicle .................................................................................. 72.2.2 Using Portable Battery Pack...................................................................................... 72.2.3 Using Battery Eliminator........................................................................................... 8
2.3 Operation of Controls and Indicators .................................................................................. 92.3.1 The Display................................................................................................................ 9
2.4 Operation........................................................................................................................... 102.5 Calibration......................................................................................................................... 112.6 Maintenance ...................................................................................................................... 12
2.6.1 Cleaning................................................................................................................... 122.6.2 Replacing the Fuses ................................................................................................. 12
2.6.2.1 Replacing the 115/230 Volt Battery Eliminator Fuses ............................... 132.6.2.2 Replacing the Battery Pack Fuse ................................................................ 13
SECTION 3 MICROBIOLOGICAL PROCEDURES ...................................................... 153.1 Overview of Coliform Bacteria......................................................................................... 153.2 Testing Techniques ........................................................................................................... 163.3 Preparing Sample Containers ............................................................................................ 16
3.3.1 Presterilized Containers ........................................................................................... 163.3.2 Autoclavable Containers.......................................................................................... 16
3.4 Collecting and Preserving Samples................................................................................... 173.4.1 Samples from Faucets, Spigots, Hydrants, or Pumps.............................................. 183.4.2 Samples from Rivers, Lakes, and Reservoirs .......................................................... 18
3.5 Disposing of Completed Tests .......................................................................................... 183.6 Presence/Absence Methods—Bromcresol Purple Broth (Method 8319)
and Bromcresol Purple Broth with MUG (Method 8364)................................................ 19
vii

TABLE OF CONTENTS, continued
3.6.1 Preparing Materials ................................................................................................. 193.6.2 Convenient Packaging............................................................................................. 19
3.7 Using P/A Broth Disposable Bottles ................................................................................ 203.8 Using P/A Broth Ampules ............................................................................................... 213.9 Interpreting P/A Results.................................................................................................... 223.10 Confirming Positive Samples ......................................................................................... 223.11 Summary of Method 8319 .............................................................................................. 233.12 Summary of Method 8364 .............................................................................................. 23
SECTION 4 MEASURING TOTAL DISSOLVED SOLIDS (TDS) ................................ 254.1 Calibrating the TDS Pocket Pal Tester ............................................................................. 254.2 Replacing the Batteries ..................................................................................................... 264.3 TDS Procedure.................................................................................................................. 27
SECTION 5 MEASURING pH ........................................................................................... 295.1 Calibrating the pH Pocket Pal Tester................................................................................ 295.2 Replacing the Batteries ..................................................................................................... 305.3 pH Procedure .................................................................................................................... 31
DR/850 COLORIMETER PROCEDURES ................................................................. 33
CHLORINE, FREE, DPD Method ......................................................................................... 35
CHLORINE, TOTAL, DPD Method...................................................................................... 45
NITRATE, Low Range, Cadmium Reduction Method .......................................................... 55
NITRITE, Low Range, Diazotization Method ....................................................................... 63
NITROGEN, AMMONIA, Salicylate Method....................................................................... 69
pH, Colorimetric pH Determination Using Phenol Red ......................................................... 75
PHOSPHORUS, REACTIVE, PhosVer 3 (Ascorbic Acid) Method...................................... 79
SULFIDE, Methylene Blue Method....................................................................................... 87
GENERAL INFORMATION........................................................................................... 91HOW TO ORDER.................................................................................................................. 93REPAIR SERVICE................................................................................................................. 94LIMITED WARRANTY........................................................................................................ 95
viii

SAFETY PRECAUTIONS
Before attempting to unpack, set up, or operate any instruments in this kit, please read the instruction manuals shipped with them. Pay particular attention to all warnings, cautions and notes. Failure to do so could result in serious injury to the operator or damage to the equipment.
To ensure the protection provided by this equipment is not impaired, this equipment MUST NOT be installed or used in any manner other than that which is specified in this manual.
Use of Hazard InformationIf multiple hazards exist, the signal word corresponding to the greatest hazard shall be used.
DANGERIndicates either a potentially or an imminently hazardous situation which, if not avoided, could result in either death or serious injury
CAUTIONIndicates a potentially hazardous situation that may result in minor or moderate injury
NOTEInformation that requires special emphasis
Precautionary LabelsPlease pay particular attention to labels and tags attached to the instrument. Personal injury or damage to the instrument could occur if not observed.
The DR/800 Series Colorimeters are Class 1 LED products. A Class 1 LED product has insufficient energy to be considered an eye hazard.
This symbol, if noted on the instrument, references the Instruction Manual for operational and/or safety information.
ix

x

OPERATION
1
DANGERHandling chemical samples, standards, and reagents can be dangerous. Review the necessary Material Safety Data Sheets and become familiar with all safety procedures before handling any chemicals.
PERIGOA manipulação de amostras, padrões e reagentes químicos pode ser perigosa. Reveja as necessárias Fichas Técnicas de Segurança do Material e familiarizese com os procedimentos de segurança antes de manipular quaisquer substãncias químicas.
PELIGROLa manipulación de muestras químicas, patrones y reactivos puede ser peligrosa. Antes de manipular cualquier productor químico, conviene leer las Fichas Técnicas de Seguridad y familiarizarse con los procedimientos de seguridad.
DANGERLa manipulation des échantillons chimiques, étalons et réactifs peut être dangereuse. Lire les fiches de données de sécurité des produits nécessaires et se familiariser avec toutes les procédures de sécurité avant de manipuler tout produit chimique.
GEFAHRDa das Arbeiten mit chemikalischen Proben, Standards, Reagenzien und Abfällen mit Gefahren verbunden ist, empfiehlt die Hach Company dem Benutzer dieser Produkte dringend, sich vor der Arbeit mit sicheren Verfahrensweisen und dem richtigen Gebrauch der Chemikalien oder Biogefahrgut vertraut zu machen und alle entsprechenden Materialsicherheitsdatenblätter aufmerksam zu lesen.

2

SECTION 1 INTRODUCTION
1.1 Portable IncubatorThe Hach Portable Incubator is a bacterial incubator designed for field use in Hach’s Microbiological Environmental Laboratories (MELs). Available MELs include the MEL P/A Safe Drinking Water Laboratory, the MEL/MPN Laboratory for Total Coliforms and E. coli, the MEL/MF Laboratory for Total Coliforms, and the MEL/850 Potable Water Laboratory.
The Portable Incubator maintains temperatures with ± 0.5 °C and the incubation temperature is adjustable between 30 and 50 °C. Ideally suited for total coliform, fecal coliform, and E. coli testing, the incubator may be used for Presence/Absence (P/A), Membrane Filtration (MF), and the Most Probable Number (MPN) procedures.
The instrument power cord easily plugs into an automobile cigarette lighter. For remote field use, a 12 Vdc portable battery is available. The portable battery is rechargeable and includes recharger and nylon carrying case. Battery eliminators are also available for 115 and 230 Vac use.
Optional accessories include:
• Rack for P/A bottles (holds 6)
• Rack for MPN tubes (holds 39)
• Rack for MF petri dishes (holds 42 50-mm dishes)
• Portable battery
• Portable eliminators (115 or 230 Vac)
• Testing media and apparatus
See SECTION 2 PORTABLE INCUBATOR for operating instructions.
3
SECTION 1, continued
1.2 DR/850 ColorimeterThe Hach DR/850 Colorimeter is a microprocessor-controlled filter photometer with an LED light source. It is suitable for colorimetric testing in the laboratory or the field. The instrument is precalibrated for common colorimetric measurements and includes convenient calibration capability for user-entered and future Hach methods.
Some of the features it offers are:
• Displays results in concentration, absorbance, or % transmittance.
• Automatic wavelength selection and ranging in the preprogrammed parameters.
• Data storage and recall for datalogging in the field or laboratory.
• Icon prompts displayed during testing.
• IR output for RS232 interface capability allows an external printer or computer to interface with the colorimeter.
• Entry of user-entered methods or new Hach methods.
• Error signals for procedural or instrument troubleshooting.
The instrument holds four AA-size alkaline dry cells (batteries supplied) that power the instrument for at least six months. Optional rechargeable alkaline batteries are also available. The charger and optional rechargeable batteries must be purchased separately.
See the DR/800 Series Instrument Manual for more information on features, operation, calibration, and maintenance.
4

SECTION 1, continued
1.3 Capabilities of the MEL/850 Potable Water Laboratory
1.4 Preparation for UseRemove the instruments and accessories from the shipping boxes and inspect them for damage that may have occurred due to rough handling or extreme weather conditions. Use the Packaging Guide to verify that all the components are present. The legend is a materials list for the contents of the lab. See Section 1.5 if any items are damaged or missing.
Parameter Reasons for Measuring Range (mg/L) Method/Chemistry
Chlorine, Free and Total
Used as disinfectant. Indicates whether residual chlorine is available to maintain proper disinfection.
0-2.00 Free0-2.00 Total
Colorimetric/DPD
Coliform, Total and E.coli
Indicator organisms that can indicate possible problems with disinfection
Presence or Absence
P/A Broth with MUG
Nitrate Can indicate non-point source pollution, the breakdown of vegetation, and oxidation of nitrogen compounds in effluents. Can be hazardous to people at levels greater than 10 mg/L (ppm).
0-30.0 mg/L Colorimetric/Cadmium Reduction
Nitrite Intermediate product in the nitrogen cycle and harmful to aquatic life. Can originate from chemical fertilizers and can indicate non-point source pollution.
0-0.350 mg/L Colorimetric/Diazotization
Nitrogen, Ammonia
Occurs when nitrogenous products decompose in water and is harmful to aquatic life. Can indicate sewage contamination.
0-1.00 mg/L Colorimetric/Salicylate
pH Common water quality indicator. Proper pH levels ensure that chlorine will perform optimally.
6.5-8.5 pH units (DR/850)
Colorimetric/Phenol Red
0-14 pH units pH Pocket Pal Tester
Phosphorus, Reactive
Phosphates are used in food processing, detergents, and fertilizers. Although not directly toxic, phosphates can indicate eutrophication of water systems.
0-2.50 mg/L Colorimetric/Ascorbic Acid
Sulfide Toxic to aquatic life. Can indicate industrial effluent and/or sewage contamination.
0-0.70 mg/L Methylene Blue
TDS/Conductivity
Can indicate high levels of salinity, metals, and inorganic compounds.
10-1999 TDS TDS Pocket Pal Tester
5

SECTION 1, continued
1.5 Missing or Damaged ProductIf any items are missing or damaged, please contact the Customer Service Department in Loveland Colorado. International customers should contact the Hach office or authorized dealer serving your area. See page 93 for information on contacting Hach Company.
Please do not return items without prior authorization from Customer Service!
6

SECTION 2 PORTABLE INCUBATOR
Specifications are subject to change without notice.
2.1 Specifications
Ambient Operating Temperature: 0 to 40 °C
Storage Temperature: -40 to 60 °C (instrument only)
Temperature Stability: ± 0.5 °C
Temperature Range: 5° above ambient to 50 °C
Warm-up Time: 2 ± 1 hour
Capacity: 42 50-mm petri dishes
or 39 MPN tubes (19 mm OD)
or 6 P/A Disposable Bottles
Power Requirements: 12 Vdc battery or optional battery eliminator (either 115 Vac or 230 Vac available)
External Dimensions: 26 x 24 x 21 cm (10.2 x 9.4 x 8.3 in.)
Internal Dimensions: 19 x 12.5 x 13 cm (7.5 x 5 x 5.1 in.)
Instrument Weight: 1.8 kg (4 lb)
2.2 Power Selection
2.2.1 Using In A Motorized VehiclePlug the power cord of the instrument into the cigarette lighter outlet. The incubator will then be powered by the 12 Vdc vehicle battery.
Note: When using the incubator for extended periods, the automobile engine should be run periodically to ensure the automobile battery is recharged.
2.2.2 Using Portable Battery PackPlug the power cord of the instrument into the battery pack. The battery pack will operate the instrument for at least 12 hours, depending on ambient temperature. To recharge the battery, plug the male plug of the recharger into a 115 Vac outlet or use the appropriate adapter for other voltage sources. The battery will completely recharge in 24 hours.
7

SECTION 2, continued
2.2.3 Using Battery EliminatorPlug the power cord of the instrument into the Battery Eliminator. Plug the battery eliminator into the AC outlet.
CAUTIONBefore connecting the instrument power cord to any power source, ensure that the appropriate power supply is either 12 volt direct current (Vdc) or converts power to 12 Vdc. Before connecting the battery eliminator to a power source, ensure the appropriate line voltage is being used.
ATTENTIONAvant de raccorder le câble d’alimentation de l’appareil à toute source d’alimentation, vérifier que l’alimentation est soit une alimentation à courant continu 12 volts ou convertit l’alimentation en 12 volts continus. Avan de raccorder le transformateur d’alimentation basse tension à une source d’alimentation, s’assurer que la tension du secteur est appropriée.
PRECAUCIÓNAntes de conectar el cable del aparato a la fuente de alimentación, asegúrese de que el suministro de corriente sea de 12 voltios de corriente continua o que procede de un transformador a 12 V CC. Antes de conectur el eliminador de baterías a la fuente de alimentación, asegúrese de que el voltaje es el adecuado.
CUATELAAntes de ligar o cabo de alimentação a qualquer fonte de alimentação, certifique-se que a fonte de alimentação apropriada é 12 Volt corrente contínua (VCC) ou converte corrente em 12 VCC. Antes de ligar o “eliminador” de bateria a uma fonte de alimentação, assegure-se que a linha de voltagem apropriada está a ser usada.
VORSICHTBevor das Netzstromkabel mit einer Stromversorgung verbunden wird, überprüfen Sie bitte, ob es sich bei der jeweiligen Stromquelle entweder um 12 Volt Gleichstrom (VDC) handelt oder dass der Strom in 12 VDC umwandelt wird. Bevor man das Net zgerät an eine Stromquelle anschlieszt zu überprüfen, ob die Betriebsspannung korrekt ist.
8

SECTION 2, continued
2.3 Operation of Controls and IndicatorsFigure 1 shows the Portable Incubator controls and indicators.
Figure 1 Portable Incubator Controls and Indicators
2.3.1 The DisplayThe display shows the current temperature inside the incubator in degrees Celsius (°C). When either the up or down arrow key is pressed and held for several seconds, the display will begin to blink, displaying the temperature set point. To change the temperature set point, press the appropriate key to increase or decrease the set point. If one of the arrow keys is not pressed within 5 seconds, the display will stop blinking and will display the current temperature inside the unit.
To re-calibrate the digital display with your reference thermometer, follow the calibration instruction in Section 2.5. The incubator was calibrated at the factory to heat to 37 °C.
Key Description
Ι/Ο Power switch to turn instrument on and off. The switch must be on before any systems are operational, including the control circuitry.
∧Up Arrow. Press and hold until the display begins to blink, displaying the set point. Press this key to increase the incubation temperature set point.
∨Down Arrow. Press and hold until the display begins to blink, displaying the set point. Press this key to decrease the incubation temperature set point.
9

SECTION 2, continued
2.4 Operation
CAUTIONIf power sources other than those provided by Hach are used, they must be energy-limited to 12 Vdc, 15 amps maximum.
PRECAUCIÓNSi utiliza fuentas de alimentación distintas a las suministrados por Hach, la potencia de salida deberá estar limitada a un máximo de 12 voltios, 15 amperios.
CUATELASe estiver a utilizar fontes de alimentaição diferentes fornecidas pela Hach, estas têm de ser limitadas a um máximo de corrente de saída de 12 VCC, 15 amp.
ATTENTIONSi des sources d’alimentation autres que celles fournies par Hach sont utilisées, elles doivent être limitées à une puissance maximale de sotite de 12 volts continus, 15 ampères.
1. Plug the incubator power cord into an appropriate power source.
2. Turn the power switch on.
3. Press either the Up or Down arrow key until the display begins to blink. Use the Up or Down arrow key to adjust the display to the desired temperature set point. If one of the arrow keys is not pressed within 5 seconds, the display will stop blinking and will display the current temperature inside the unit.
4. Allow the incubator to warm up to the set point temperature.
Note: Unit is stable when it remains at a constant temperature for 60 minutes.
5. Open the incubator lid. Load the unit with the desired sample rack and close the lid.
10

SECTION 2, continued
2.5 Calibration1. Plug the incubator power cord into an appropriate power source.
2. Place a reference thermometer in the center of the incubator.
3. Turn the power switch on.
4. Press either the Up or Down arrow key until the display begins to blink. Use the Up or Down arrow key to adjust the display to the desired temperature set point. If one of the arrow keys is not pressed within 5 seconds, the display will stop blinking and will display the current temperature inside the unit.
5. Allow the incubator to warm up to the set point temperature.
Note: Unit is stable when it remains at a constant temperature for 60 minutes.
6. Compare the reading on the reference thermometer with the digital display. If there is a difference, put the display into the calibrate mode by pressing and holding both arrow keys for about 5 seconds or until the two outside decimal points start flashing.
7. When the decimal points are flashing, use the Up or Down arrow key to adjust the display reading to match the thermometer reading.
8. Allow the unit to stabilize again.
9. Repeat the process, if necessary.
11

SECTION 2, continued
2.6 Maintenance
DANGERFor protection against electrical shock, disconnect all external electrical connections.
PERIGOPara assegurar a protecção contra chogues eléctricos, desligue todas as ligações eléctricas externas.
PELIGROComo medida de protección frente a una posible descarga eléctrica, disconecte las conexiones eléctricas externa.
DANGERPour protection contre les chocs électriques, débranchar toutes les connexions électriques externes.
GEFAHRUm Stromschläge zu vermeiden, müssen all elektriktrischen Verbindungen zum Gerät unterbrochen werden.
2.6.1 Cleaning• Keep the incubator and accessories as clean as possible and store the
instrument in the carrying case. Wipe the outside of the incubator with a soft damp cloth.
• Wipe spills up promptly.
• Clean the inside chamber with a mild soap and water solution. Rinse with clean water and wipe dry with a soft cloth.
• Foreign materials inside the unit may rust or leave spots. If corrosion is seen, scrub out the stains with a mild abrasive. Do NOT use steel wool. Failure to remove corrosion may permanently damage the liner.
2.6.2 Replacing the FusesThe Portable Incubator itself has no fuses, but the alternate power sources available from Hach have fuses. The Battery Pack fuse is an in-line fuse and the Battery Eliminator fuses are located under the On/Off switch on the back of the Battery Eliminator enclosure.
12

SECTION 2, continued
2.6.2.1 Replacing the 115/230 Volt Battery Eliminator FusesThis applies to Hach Cat. No. 25804-00
1. Disconnect all power cords from the Battery Eliminator.
2. Use a small flat screwdriver or blade to gently pry the faceplate out of the enclosure. Pull on the faceplate until the fuse holder comes out.
3. The fuse holder has two T, 2 Amp, 250 V fuses. Both fuses must be operational for the Battery Eliminator to work. Remove blown fuses by gently pulling them out of the holder. Replace with a good fuse.
4. Replace the fuse holder into the instrument.
2.6.2.2 Replacing the Battery Pack Fuse1. Disconnect the Battery Pack cord from the Battery Pack.
2. The in-line fuse is located 2 to 3 inches from the Battery Pack connection in a plastic holder.
3. Twist the upper and lower part of the fuse holder in opposite directions to open the fuse holder.
4. Remove the ceramic fuse and replace it with a 15 Amp, 250 V fuse.
5. Reverse Steps 1 through 3 to reassemble.
REPLACEMENT PARTSDescription Unit Cat. No.Fuse, T, 2A, 250 V ...........................................................................................1 ..........45686-00Fuse, 15 A, 250 V, ceramic ..............................................................................1 ..........25850-00Hinge ................................................................................................................1 ..........25848-00Incubator, portable, for MELs..........................................................................1 ..........25699-00Lid Assembly ...................................................................................................1 ..........25849-00
PORTABLE INCUBATOR ACCESSORIESBattery Eliminator, 115/230 Vac (unlisted)......................................................1 ..........25804-00Battery Eliminator, 230 Vac, CE/VDE approved.............................................1 ..........40277-00Battery, portable, 12 Vdc, rechargeable ...........................................................1 ..........25803-01Battery, portable, 12 Vdc rechargeable, with carrying case and
115 Vac recharger........................................................................................1 ..........25803-00Battery Recharger Adapter, 12 Vdc, 230 Vac, CE/VDE, for 25803-01...........1 ..........25959-01Battery Recharger Adapter, 12 Vdc, 230 Vac, European plug, unlisted ..........1 ..........25959-02
13

SECTION 2, continued
PORTABLE INCUBATOR ACCESSORIES, continuedDescription Unit Cat. No.Rack, MF/General Purpose, holds 42 50-mm petri dishes................................ 1.......... 25805-02Rack, MPN tube, holds 39 tubes, 19-mm OD ................................................. 1.......... 25805-01Rack, P/A bottle, holds 6 bottles, 5-cm OD..................................................... 1.......... 25805-00Sample Transport Kit: includes cooler, plastic-coated rack,
100 sampling bags with dechlorinating agent, and a refrigerant pack ....... 1.......... 25687-00
MEDIA SETS (includes media and consumables required for testing)MEL/MF Media Set for Total Coliforms (200 tests) Includes:
200 m-Endo Broth PourRite Ampules, 200 sterile 50-mm petri dishes with pads, 216 sterile 0.45-µm membrane filters, 216 sterile push-fit funnels, 200 Whirl-Pak bags with dechlorinating agent ..................................................... 25801-00
MEL/MPN Media Set for Total Coliforms and E.coli (25 5-tube tests)Includes:
135 LT/MUG Broth tubes, 30 BGB Broth tubes (for total coliform confirmation), 50 sterile inoculating loops, 25 Whirl-Pak bags with dechlorinating agent) ......... 25802-00
MEL P/A Media Set for Total Coliforms and E. coliSee “REQUIRED MEDIA AND APPARATUS” on page 24.
MEL/850 Portable Water LaboratoryMEL/850 Reagent SetIncludes:
Reagents for measuring Ammonia Nitrogen, Coliform Bacteria, Free Chlorine, Total Chlorine, Nitrate, Nitrite, pH, Phosphate, and Sulfide (100 tests each) ....... 26911-00
MEL/850 Apparatus SetIncludes:
Clippers, pocket thermometer, demineralizer bottle, 2 100-mL beakers, portable UV lamp, P/A bottle rack, TDS Pocket Pal Tester, pH Pocket Pal Tester, 25-mL graduated plastic cylinder, 100 Whirl-Pak bags with dechlorinating agent, 60 plastic droppers with 0.5- and 1.0-mL marks................. 26912-00
For Technical Assistance, Price and OrderingIn the U.S.A.—Call 800-227-4224Outside the U.S.A.—Contact the Hach office or distributor serving you.
14

SECTION 3 MICROBIOLOGICAL PROCEDURES
3.1 Overview of Coliform BacteriaMany of the microorganisms that cause serious disease, such as typhoid fever, cholera, and dysentery, can be traced directly to polluted water. These disease-producing organisms, or pathogens, are discharged along with fecal wastes and are difficult to detect in water supplies. People may contact these pathogens in swimming pools, on bathing beaches, in rivers and streams, and from drinking contaminated water.
Testing for bacterial pathogens in water is impractical for a number of reasons, such as lengthy and involved test procedures. Most microbiological testing of water measures indicator organisms, not pathogens. Indicator organisms are bacteria that may not be pathogenic but usually are present when pathogens are present, and are more resistant to environmental stresses than pathogens. No organism or group of organisms satisfies all of the criteria for an indicator; however, coliforms satisfy most of the requirements.
Total coliform tests are used for potable water supplies. Fecal coliform tests usually are performed on untreated non-potable water, wastewater, bathing water, and swimming water.
For simultaneous detection of total coliforms and Escherichia coli (E. coli), a type of fecal coliform, Hach offers m-ColiBlue24® Broth, Presence/Absence Bromcresol Purple Broth with MUG, and Lauryl Tryptose with MUG Broth.
The Presence/Absence (P/A) method is a qualitative test that indicates only the presence or absence of organisms, not the number of organisms. The P/A method is fast and suited to spot-checking applications. Only a minimal amount of analytical experience is required to perform the test. Simply combine sample with medium, incubate for 24 to 48 hours, and check for a reaction indicating the presence of either total coliforms or E. coli.
U.S. Environmental Protection Agency drinking water regulations, effective December 31, 1990, require reporting only the presence or absence of coliforms. The World Health Organization recommends using the P/A method for drinking water to ensure zero total coliforms and zero fecal coliforms or E. coli. The maximum contaminant goal of zero total coliforms eliminates the need to enumerate coliforms.
15

SECTION 3, continued
3.2 Testing TechniquesGood laboratory technique is essential when accuracy is important, particularly in microbiological laboratory procedures. To assure reliable results use care when collecting and preserving samples; carefully clean the laboratory or work surface; use proper sterilization and inoculation practices; and maintain close temperature control.
Using high-quality laboratory equipment and ready-to-use media can also save time and minimize errors. Hach's prepared media help eliminate contamination due to individual technician technique.
3.3 Preparing Sample ContainersTake care to prevent contamination when conducting bacterial tests. All materials used for containing or transferring samples must be sterile! To collect samples, use presterilized plastic bags, presterilized disposable bottles, autoclavable glass bottles, or autoclavable plastic bottles.
3.3.1 Presterilized ContainersPresterilized plastic bags with dechlorinating agent are included in the MEL and media sets. Plastic bags are available presterilized with or without dechlorinating agent (sodium thiosulfate). Presterilized bottles are available with a 100-mL fill-to line.
Note: Use dechlorinating agent with potable water or chlorinated water samples. It is not necessary for unchlorinated water samples. However, dechlorinating agent will not interfere with unchlorinated samples. For simplicity, plastic bags containing dechlorinating agent may be used for all samples.
3.3.2 Autoclavable ContainersGlass or plastic bottles (at least 125 mL) may be used instead of plastic bags or bottles. Prepare these containers as follows:
1. Wash in hot water and detergent.
2. Thoroughly rinse with hot tap water, followed by a distilled water rinse to make sure that all detergent is removed.
3. If dechlorinating agent is needed (for chlorinated, potable water) add one Dechlorinating Reagent Powder Pillow to each 125-mL sample container. Add two powder pillows to a 250-mL sample container.
4. Steam sterilize glass and autoclavable plastic containers at 121 °C for 15 minutes. Glass sample containers may be sterilized by hot air at 170 °C for 1 hour. Store sterile containers tightly capped in a clean environment until needed.
16

SECTION 3, continued
3.4 Collecting and Preserving SamplesProper sampling technique ensures that seasonal variances are detected and that results are representative of the sample source.
Collect a sufficient volume of water for analysis, at least 100 mL of sample. World Health Organization guidelines suggest 200 mL per sample, while Standard Methods for the Examination of Water and Wastewater guidelines suggest 100 mL per sample. Avoid sample contamination during collection.
Dechlorination is not necessary if the sample is added directly to the medium on site. Otherwise, samples should be dechlorinated and immediately transported for analysis. Sodium thiosulfate, which has been sterilized within the collection vessel, is generally used to destroy chlorine residual.
Analyze as soon as possible after collection. The maximum time between collection and examination of samples should be 8 hours (maximum transit time 6 hours, maximum processing time 2 hours). If the time between collection and analysis will exceed 8 hours, maintain the sample at/or below 4 °C, but do not freeze. Maximum time between collection and analysis should not exceed 24 hours. Failure to properly collect and transport samples will cause inaccurate results.
Potable water should contain no coliforms per 100 mL, so testing should be done on undiluted samples. Collect at least 100 mL of sample in presterilized plastic bags or bottles or in sterile glass or plastic sample bottles. Sample containers should not be filled completely. Maintain at least 2.5 cm (approximately 1 in.) of air space to allow adequate space for mixing the sample prior to analysis.
MEL Portable Incubator Laboratories allow you to conduct all of your analysis in the field. But, if you are just transporting samples to a lab, your samples should arrive at the lab within 24 hours after collection. In warm climates, the samples must be packed in a freezing mixture to maintain the sample temperature between 4 and 10 °C. Failure to properly collect and transport samples will cause inaccurate results.
17

SECTION 3, continued
3.4.1 Samples from Faucets, Spigots, Hydrants, or PumpsCollect representative samples by allowing water to run from a faucet, spigot, hydrant, or pump at a moderate rate (without splashing) for 2 to 3 minutes before sampling. Do not adjust the flow rate while collecting the sample. Valves, spigots and faucets that swivel or leak should be avoided. Remove attachments, such as aerators and screens, prior to sampling.
Carefully open sample containers just prior to collection and close immediately following collection. Do not lay the lid or cap down. Avoid touching the mouths and insides of the containers. Do not rinse the containers. Properly label each sample container and analyze samples as soon as possible after collection.
3.4.2 Samples from Rivers, Lakes, and ReservoirsWhen sampling a river, lake, or reservoir, fill the sample container below the water surface. Do not sample near the edge or bank. Remove the cap, grasp the sample container near the bottom and plunge the container, mouth down, into the water. (This technique excludes any surface scum.) Fill the container by positioning the mouth into the current or, in nonflowing water, by tilting the bottle slightly and allowing it to fill slowly. Do not rinse. Label each sample container and analyze samples as soon as possible after collection.
3.5 Disposing of Completed TestsActive bacterial cultures grown during incubation must be disposed of safely. This may be accomplished in one of two ways.
1. Bleach. Used test containers may be sterilized by using a 10% bleach solution. Pour the test container contents and the test containers into the bleach solution. Allow 10 to 15 minutes contact time with the bleach. Pour the liquid down the drain. Dispose of the test containers in the normal waste.
2. Autoclave. Place used test containers in a contaminated items bag or a biohazard bag and seal tightly. Test containers must be placed in a bag before autoclaving to prevent media leakage into the autoclave. Autoclave test containers at 121 °C for 15 minutes at 15 pounds pressure. Once sterile, dispose of the test containers in the normal waste. Place the bag of test containers in a separate garbage bag and tie tightly.
18

SECTION 3, continued
3.6 Presence/Absence Methods—Bromcresol Purple Broth (Method 8319)and Bromcresol Purple Broth with MUG (Method 8364)
3.6.1 Preparing MaterialsTo save time, start the incubator while preparing other materials. Set the incubator for the proper temperature setting described in the procedure (usually total coliforms are incubated at 35 ± 0.5 °C and fecal coliforms are incubated at 45 ± 0.2 °C).
Disinfect the work bench with a germicidal cloth, dilute bleach solutions, bactericidal spray, or dilute iodine solution. Wash hands thoroughly with soap and water.
Mark container with the sample number, dilution, date, and other necessary information. Take care not to contaminate the inside of the sample container in any way.
See the preceding pages for information about preparing sample containers, and collecting and preserving samples.
3.6.2 Convenient PackagingHach’s Presence/Absence (P/A) Broth and P/A Broth with MUG come packaged in disposable bottles and in glass ampules. To reduce medium costs, both bottles and ampules contain 20 mL of 6X strength medium. The medium is sterilized by membrane filtration to prevent degradation. Disposable bottles and ampules are shipped with a Certificate of Analysis and have an expiration or manufacture date printed on the label.
19

SECTION 3, continued
3.7 Using P/A Broth Disposable Bottles
1. Collect 100 mL of sample in a sterile container. Do not contaminate the sample or sample container.
Note: Remove screens and other aeration devices from faucets and let water run for 2 to 3 minutes before collecting the sample.
2. Add sample to the fill line on the P/A Broth Sample Bottle. Sample may be added from a sterile container, or directly from a faucet or spigot.
3. Incubate the samples at 35 ± 0.5 °C for 24 to 48 hours.
4. Note the reaction after 24 hours of incubation. If sample is negative, continue incubating for another 24 hours. See Table 1.
5. Confirm positive samples by inoculating the appropriate media from positive P/A Broth samples. See Table 2.
6. Dispose of completed tests appropriately. See Disposing of Completed Tests on page 18.
ConfirmPositive Samples
Dispose of all completed tests
20

SECTION 3, continued
3.8 Using P/A Broth Ampules
1. Collect 100 mL of sample in a sterile container. Do not contaminate the sample or sample container.
Note: Remove screens and other aeration devices from faucets and let water run for 2 to 3 minutes before collecting the sample.
2. Add sample to the fill line on the P/A Broth Sample Bottle. Sample may be added from a sterile container, or directly from a faucet or spigot.
3. Add the contents of one P/A Broth Ampule to the 100 mL of sample.
4. Incubate the samples at 35 ± 0.5 °C for 24 to 48 hours.
5. Note the reaction after 24 hours of incubation. If sample is negative, continue incubating for another 24 hours. See Table 1.
6. Confirm positive samples by inoculating the appropriate media from positive P/A Broth samples. See Table 2.
7. Dispose of completed tests appropriately. See Disposing of Completed Tests on page 18.
ConfirmPositive Samples
Dispose of all completed tests
21

SECTION 3, continued
3.9 Interpreting P/A Results
3.10 Confirming Positive SamplesInoculum from incubated samples can be used to confirm the presence of bacteria. See Table 2. The media listed for fecal coliforms, total coliforms, and E. coli are USEPA-accepted for reporting purposes.
Table 1 Reactions Using P/A Broth
Reaction Comments Report as:
Color change from reddish purple to yellow or yellow brown
Positive for total coliforms
No color change after 24 hours Incubate for another 24 hours and re-check the sample for color change
No color change after 48 ± 3 hours
Negative for total coliforms
Fluorescence under long-wave UV light (if using P/A Broth with MUG)
Positive for E. coli
Table 2 Confirmation Media
Bacteria Confirmation Media Incubation Positive Result
Total Coliforms (USEPA)
Brilliant Green Bile Broth (Cat. No. 322-15; 15/pkg)
24-48 hours at 35 ± 0.5 °C Gas
Fecal Coliforms (USEPA)
EC Medium (Cat. No. 14104-15; 15/pkg)
24 hours at 44.5 ± 0.2 °C Gas
E. coli (USEPA) EC Medium with MUG (Cat. No. 24715-15; 15/pkg)
24 hours at 44.5 ± 0.2 °C Gas = positive for fecal coliformsFluorescence = positive for E. coli
22

SECTION 3, continued
3.11 Summary of Method 8319Hach’s Presence/Absence (P/A) Bromcresol Purple Broth is ideal for screening drinking water samples for total coliforms. The method is a simple modification of the multiple-tube method. It uses lactose and lauryl tryptose broths with bromcresol purple, which detects acidity formed during lactose fermentation by the bacteria.
Simply combine 100 mL of sample and P/A Broth, incubate for 24 hours and check for a color change. A yellow or yellow-brown color indicates the presence of total coliforms.
3.12 Summary of Method 8364Hach’s P/A Bromcresol Purple Broth with MUG allows simultaneous detection of total coliform bacteria and E. coli. In addition to the lactose and lauryl tryptose broths with bromcresol purple, this medium contains MUG reagent (4-methylumbelliferyl-ß-D-glucuronide). MUG reagent produces a fluorogenic product when hydrolyzed by glucuronidase (an enzyme specific to E. coli). MUG detects non-gas producing (anaerogenic) strains of E. coli and works well when competitive organisms are present.
Simply combine 100 mL of sample and P/A Broth with MUG, incubate for 24 hours and check for a color change and fluorescence. A yellow or yellow-brown color indicates the presence of total coliforms. To detect E. coli, examine samples under a long-wave ultraviolet (UV) light. Fluorescence indicates the presence of E. coli.
23

SECTION 3, continued
REQUIRED MEDIA AND APPARATUSQuantity Required
Description Per Test Unit Cat No.Bags, Sampling, Sterile Whirl-Pakwith dechlorinating agent, 170-mL............................. 1..................... 100/pkg.......... 20753-33
Incubator, portable, for MELs ...................................... 1........................... each.......... 25699-00Presence/Absence Broth w/MUG, disposable bottles .. 1....................... 50/pkg.......... 24016-50P/A Bottle Rack (for use with Portable Incubator)....... 1........................... each.......... 25805-00UV Lamp, long-wave, portable, 4 watt......................... 1........................... each.......... 24152-00
OPTIONAL MEDIA AND APPARATUSBags, for contaminated items................................................................ 200/pkg.......... 24633-00Bottles, presterilized, 100-mL fill-to line ............................................... 12/pkg.......... 24950-12Bottles, presterilized, 100-mL fill-to line ............................................... 50/pkg.......... 24950-50Breaker, P/A Ampule....................................................................................... 1.......... 25640-00Germicidal Cloths ................................................................................... 50/pkg.......... 24632-00Inoculating Loops, sterile 10 µL disposable (for confirmation) ............. 25/pkg.......... 27491-25P/A Broth Ampules................................................................................. 25/pkg.......... 24949-25P/A Broth Ampules with MUG .............................................................. 25/pkg.......... 24955-25P/A Broth Disposable Bottles ................................................................. 12/pkg.......... 23232-12P/A Broth Disposable Bottles ................................................................. 50/pkg.......... 23232-50P/A Broth Disposable Bottles with MUG............................................... 12/pkg.......... 24016-12Pen, Laboratory................................................................................................ 1.......... 20920-00UV Lamp, long-wave, 115 Vac........................................................................ 1.......... 21843-00UV Lamp, long-wave, 230 Vac........................................................................ 1.......... 21843-02
For Technical Assistance, Price and OrderingIn the U.S.A.—Call 800-227-4224Outside the U.S.A.—Contact the Hach office or distributor serving you.
24

SECTION 4 MEASURING TOTAL DISSOLVED SOLIDS (TDS)
4.1 Calibrating the TDS Pocket Pal TesterVerify the accuracy of the tester before use and periodically thereafter as follows:
1. Add a solution with a known TDS value to a 50-mL beaker.
Note: Best accuracy (± 2%) is obtained when samples are measured at the same temperature (25 °C) as that of the standards used for calibration. If samples are measured at a different temperature, the Pocket Pal Tester compensates for the difference by adjusting the reading 2% °C. The accuracy of temperature-compensated readings is ±10% in the temperature range of 0 to 50 °C.
2. Press the ON/OFF switch once to turn the tester on. (See Figure 2.)
3. Remove the protective cap from the bottom.
4. Immerse the bottom of the tester 2.5 to 8.9 cm (1 to 3.5 in.) into the standard.
5. Using the tester, gently stir the standard for several seconds. When the digital display stabilizes, read the TDS value.
Note: Readings may not stabilize for up to 2 minutes, especially if the temperature is far from ambient.
6. If necessary, adjust the Calibration Trimmer (see Figure 3) using the supplied trimmer tool (or a small flat-bladed screwdriver). Turn the trimmer tool until the reading corresponds to TDS value of the standard.
Note: To maintain or improve performance, periodically clean the stainless steel electrodes by rinsing in isopropyl alcohol.
Figure 2 Figure 3
25

SECTION 4, continued
4.2 Replacing the Batteries
1. Use a coin to turn the battery compartment cover, located on the top of the tester, to the lest 1/4 turn. (see Figure 4).
2. Remove the cover.
3. Replace all four batteries with EverReady E675E, Duracell RM675, or Hach batteries, Cat. No. 23678-00, in the same orientation (polarity) as they were removed.
4. Replace the cover.
Figure 4
26

SECTION 4, continued
4.3 TDS Procedure
1. Pour sample into a 50-mL plastic beaker.
2. Immerse the bottom of the tester 2.5 to 8.9 cm (1.0 to 3.5 in.) into the sample. Stir gently for several seconds.
3. When the digital display stabilizes, read and record the TDS value.
Note: Readings may not stabilize for up to 2 minutes, especially if the temperature is far from ambient.
4. Rinse the bottom of the tester with deionized water. Wipe with a tissue before continuing to the next sample.
5. After testing, rinse and dry the tester, press the on/off switch to off, and replace the cap.
Note: To maintain or improve performance, periodically clean the stainless steel electrodes by rinsing in isopropyl alcohol.
27

SECTION 4, continued
REQUIRED REAGENTS AND APPARATUSQuantity Required
Description Per Test Unit Cat. No.Batteries, 1.4 V (offer 100 hours of continuous use).... 4......................... 4/pkg.......... 23678-00Beaker, polypropylene, 50 mL...................................... 1........................... each............ 1080-41TDS Pocket Pal Tester, 10 to 1990 TDS....................... 1........................... each.......... 44400-01TDS Standard, sodium chloride, 85.47 mg/L NaCl.. .varies..................100 mL.......... 23075-42TDS Standard, sodium chloride, 491 mg/L NaCl..... .varies..................100 mL.......... 14400-42TDS Standard, sodium chloride, 1000 mg/L NaCl... .varies..................100 mL............ 2105-42
For Technical Assistance, Price and OrderingIn the U.S.A.—Call 800-227-4224Outside the U.S.A.—Contact the Hach office or distributor serving you.
28

SECTION 5 MEASURING pH
5.1 Calibrating the pH Pocket Pal TesterVerify the accuracy of the tester before use and periodically thereafter as follows:
1. Prepare a pH 7.00 and a pH 4.01 or 10.00 buffer (Cat. No. 22270-66, 22269-66, or 22271-66, respectively). Add a Buffer Powder Pillow to 50 mL of water. Mix well.
Note: Best accuracy is obtained when samples are measured at the same temperature (25 °C) as that of the standards used for calibration.
2. Press the ON/OFF switch once to turn the tester on. See Figure 5.
3. Remove the protective cap from the bottom.
4. Immerse the bottom of the tester 2.5 to 8.9 cm (1 to 3.5 in.) into the standard.
5. Using the tester, gently stir the standard for several seconds. When the digital display stabilizes, read the pH value.
6. If necessary, adjust the Calibration Trimmer (see Figure 6) using the supplied trimmer tool (or a small flat-bladed screwdriver). Turn the trimmer tool until the reading corresponds to the pH value of the buffer (7.0 or 4.0/10.0 pH).
7. Rinse the bottom of the tester. Replace the cap.
Figure 5 Figure 6
29

SECTION 5, continued
5.2 Replacing the Batteries
1. Use a coin to turn the battery compartment cover, located on the top of the tester, to the lest 1/4 turn. (see Figure 7).
2. Remove the cover.
3. Replace all four batteries with EverReady E675E, Duracell RM675, or Hach batteries, Cat. No. 23678-00, in the same orientation (polarity) as they were removed.
4. Replace the cover.
Figure 7
30
SECTION 5, continued
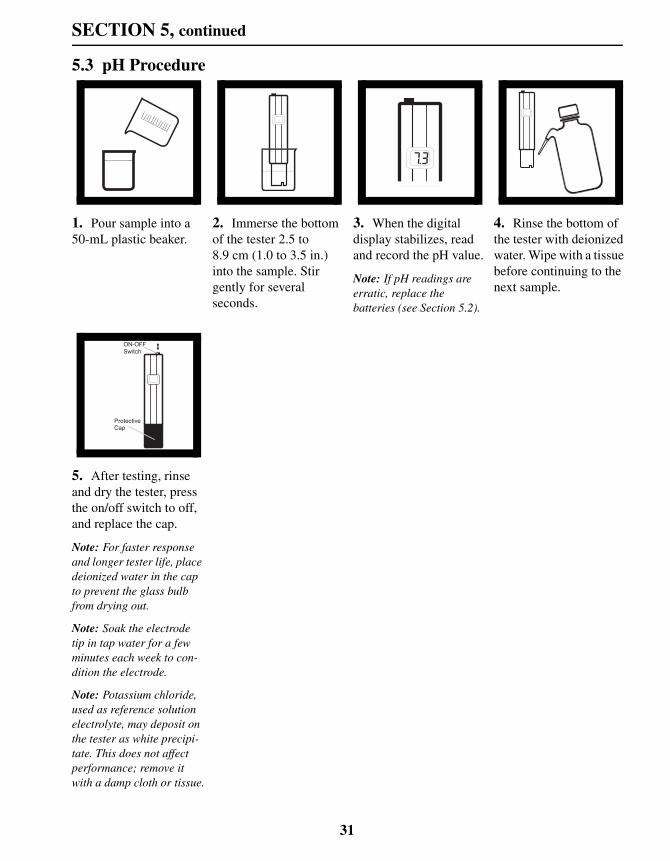
5.3 pH Procedure
1. Pour sample into a 50-mL plastic beaker.
2. Immerse the bottom of the tester 2.5 to 8.9 cm (1.0 to 3.5 in.) into the sample. Stir gently for several seconds.
3. When the digital display stabilizes, read and record the pH value.
Note: If pH readings are erratic, replace the batteries (see Section 5.2).
4. Rinse the bottom of the tester with deionized water. Wipe with a tissue before continuing to the next sample.
5. After testing, rinse and dry the tester, press the on/off switch to off, and replace the cap.
Note: For faster response and longer tester life, place deionized water in the cap to prevent the glass bulb from drying out.
Note: Soak the electrode tip in tap water for a few minutes each week to con-dition the electrode.
Note: Potassium chloride, used as reference solution electrolyte, may deposit on the tester as white precipi-tate. This does not affect performance; remove it with a damp cloth or tissue.
31

SECTION 5, continued
REQUIRED REAGENTS AND APPARATUSQuantity Required
Description Per Test Unit Cat. No.Batteries, 1.4 V (offer 100 hours of continuous use).... 4......................... 4/pkg.......... 23678-00Beaker, polypropylene, 50 mL...................................... 1........................... each............ 1080-41Buffer Powder Pillows, pH 4.01 ................................... 1....................... 50/pkg.......... 22269-66Buffer Powder Pillows, pH 7.00 ................................... 1....................... 50/pkg.......... 22270-66Buffer Powder Pillows, pH 10.00 ................................. 1....................... 50/pkg.......... 22271-66pH Pocket Pal Tester, 0 to 14 pH units ......................... 1........................... each.......... 44350-01
For Technical Assistance, Price and OrderingIn the U.S.A.—Call 800-227-4224Outside the U.S.A.—Contact the Hach office or distributor serving you.
32
DR/850 COLORIMETER PROCEDURES
33

34

Method 8021CHLORINE, FREE (0 to 2.00 mg/L) For water, wastewater, and seawater
DPD Method (Powder Pillows or AccuVac Ampuls)USEPA accepted for reporting wastewater and drinking water analyses*
Using Powder Pillows
* Procedure is equivalent to USEPA method 330.5 for wastewater and Standard Method 4500-Cl G for drinking water.
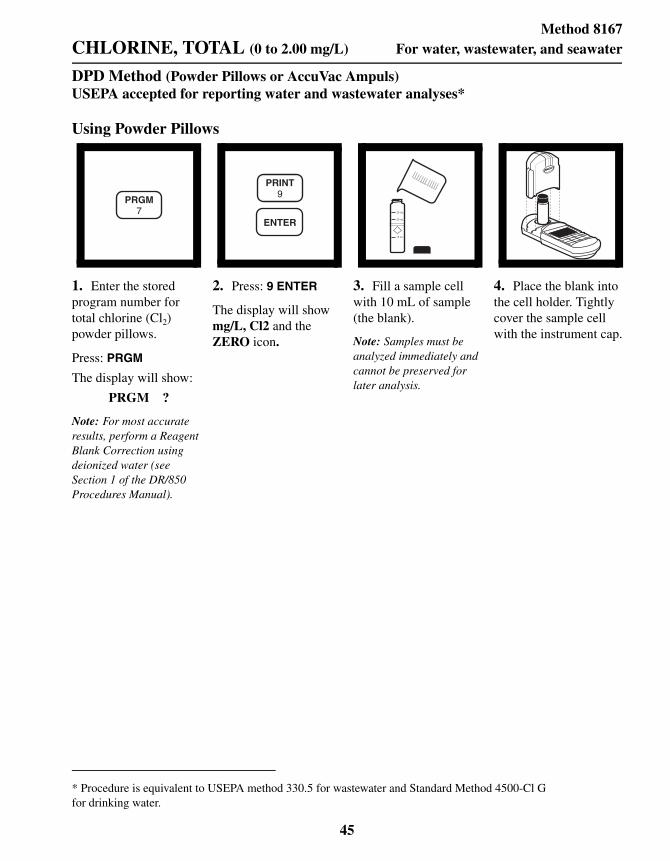
1. Enter the stored program number for free and total chlorine (Cl2) powder pillows.
Press: PRGM
The display will show:
PRGM ?
Note: For most accurate results, perform a Reagent Blank Correction using deionized water (see Section 1 of the DR/850 Procedures Manual).
2. Press: 9 ENTER
The display will show mg/L, Cl2 and the ZERO icon.
3. Fill a sample cell with 10 mL of sample (the blank).
Note: Samples must be analyzed immediately and cannot be preserved for later analysis.
4. Place the blank into the cell holder. Tightly cover the sample cell with the instrument cap.
35

CHLORINE, FREE, continued
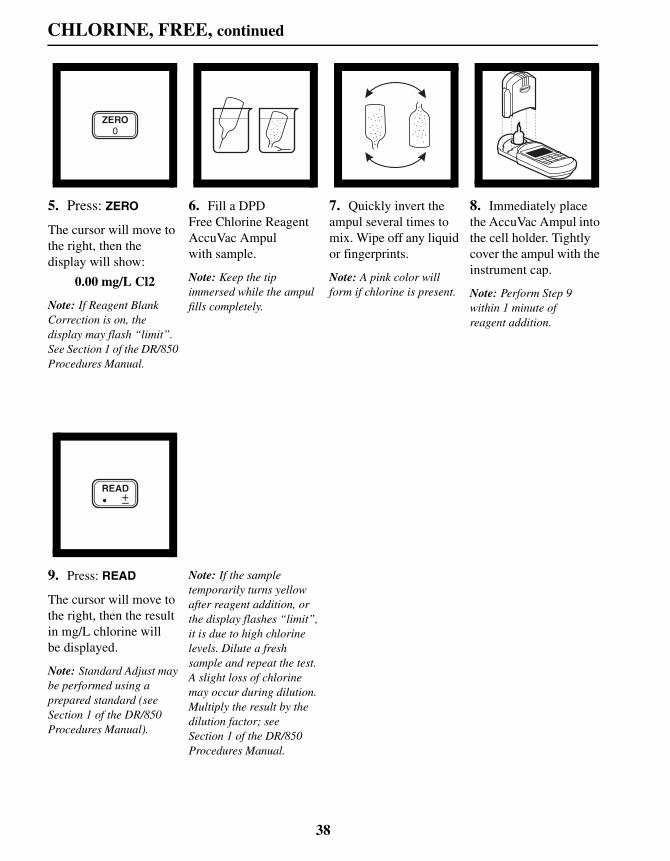
5. Press: ZERO
The cursor will move to the right, then the display will show:
0.00 mg/L Cl2
Note: If Reagent Blank Correction is on, the display may flash “limit”. See Section 1 of the DR/850 Procedures Manual.
6. Fill another cell with 10 mL of sample.
7. Add the contents of one DPD Free Chlorine Powder Pillow to the sample cell (the prepared sample). Cap the cell and swirl vigorously to dissolve the powder.
Note: A pink color will develop if free chlorine is present.
8. Immediately place the prepared sample into the cell holder. Tightly cover the sample cell with the instrument cap.
Note: Perform Step 9 within 1 minute of reagent addition.
9. Press: READ
The cursor will move to the right, then the result in mg/L chlorine will be displayed.
Note: Standard Adjust may be performed using a prepared standard (see Section 1 of the DR/850 Procedures Manual).
Note: If the sample temporarily turns yellow after reagent addition, or the display flashes “limit”, it is due to high chlorine levels. Dilute a fresh sample and repeat the test. A slight loss of chlorine may occur during dilution. Multiply the result by the dilution factor; see Section 1 of the DR/850 Procedures Manual.
36

CHLORINE, FREE, continued
Using AccuVac Ampuls
1. Enter the stored program number for free and total chlorine (Cl2) AccuVac Ampuls.
Press: PRGM
The display will show:
PRGM ?
Note: For most accurate results, perform a Reagent Blank Correction using deionized water (see Section 1 of the DR/850 Procedures Manual).
2. Press: 11 ENTER
The display will show mg/L, Cl2 and the ZERO icon.
3. Fill a sample cell with at least 10 mL of sample (the blank). Collect at least 40 mL of sample in a 50-mL beaker.
Note: Samples must be analyzed immediately and cannot be preserved for later analysis.
4. Place the blank into the cell holder. Tightly cover the sample cell with the instrument cap.
37
CHLORINE, FREE, continued
5. Press: ZERO
The cursor will move to the right, then the display will show:
0.00 mg/L Cl2
Note: If Reagent Blank Correction is on, the display may flash “limit”. See Section 1 of the DR/850 Procedures Manual.
6. Fill a DPD Free Chlorine Reagent AccuVac Ampul with sample.
Note: Keep the tip immersed while the ampul fills completely.
7. Quickly invert the ampul several times to mix. Wipe off any liquid or fingerprints.
Note: A pink color will form if chlorine is present.
8. Immediately place the AccuVac Ampul into the cell holder. Tightly cover the ampul with the instrument cap.
Note: Perform Step 9 within 1 minute of reagent addition.
9. Press: READ
The cursor will move to the right, then the result in mg/L chlorine will be displayed.
Note: Standard Adjust may be performed using a prepared standard (see Section 1 of the DR/850 Procedures Manual).
Note: If the sample temporarily turns yellow after reagent addition, or the display flashes “limit”, it is due to high chlorine levels. Dilute a fresh sample and repeat the test. A slight loss of chlorine may occur during dilution. Multiply the result by the dilution factor; see Section 1 of the DR/850 Procedures Manual.
38
CHLORINE, FREE, continued
Sampling and StorageAnalyze samples for chlorine immediately after collection. Free chlorine is a strong oxidizing agent, and it is unstable in natural waters. It reacts rapidly with various inorganic compounds and more slowly oxidizes organic compounds. Many factors, including reactant concentrations, sunlight, pH, temperature, and salinity influence decomposition of free chlorine in water.
Avoid plastic containers since these may have a large chlorine demand. Pretreat glass sample containers to remove any chlorine demand by soaking in a dilute bleach solution (1 mL commercial bleach to l liter of deionized water) for at least 1 hour. Rinse thoroughly with deionized or distilled water. If sample containers are rinsed thoroughly with deionized or distilled water after use, only occasional pretreatment is necessary.
Do not use the same sample cells for free and total chlorine. If trace iodide from the total chlorine reagent is carried over into the free chlorine determination, monochloramine will interfere. It is best to use separate, dedicated sample cells for free and total chlorine determinations.
A common error in testing for chlorine is introduced when a representative sample is not obtained. If sampling from a tap, let the water flow for at least 5 minutes to ensure a representative sample. Let the container overflow with the sample several times, then cap the sample container so there is no headspace (air) above the sample. If sampling with a sample cell, rinse the cell several times with the sample, then carefully fill to the 10-mL mark. Perform the analysis immediately.
Accuracy Check
Standard Additions Method (using powder pillows)
a) Snap the top off a LR Chlorine PourRite Ampule Standard Solution.
b) Use a TenSette Pipet to add 0.1 mL of the standard to the reacted sample (this is the spiked sample). Swirl to mix.
c) Re-zero the instrument using the original sample (the blank).
d) Place the spiked sample in the cell holder and press READ. Record the results.
39

CHLORINE, FREE, continued
e) Calculate the concentration of mg/L chlorine added to the sample:
f) The spiked sample result (Step d) should reflect the analyzed sample result + the calculated mg/L Cl2 added (Step e).
g) If this increase does not occur, see Standard Additions in Section 1 of the DR/850 Procedures Manual for more information.
Standard Additions Method (using AccuVac Ampuls)
a) Snap the top off a LR Chlorine PourRite Ampule Standard Solution.
b) Use a graduated cylinder to measure 25 mL of sample into each of two beakers.
c) Use a TenSette Pipet to add 0.2 mL of the standard to one of the beakers (this is the spiked sample). Swirl to mix.
d) Fill a DPD Free Chlorine AccuVac completely from each beaker.
e) Analyze the spiked and unspiked sample as described in the procedure.
f) Calculate the concentration of mg/L chlorine added to the sample:
The spiked sample result should reflect the analyzed sample result + the calculated mg/L Cl2 added (Step f).
g) If this increase does not occur, see Standard Additions in Section 1 of the DR/850 Procedure Manual for more information.
mg/L chlorine added0.1 vol. standard added( ) Certificate value mg/LCl2( )×
10.1 sample( standard volume )+-------------------------------------------------------------------------------------------------------------------------------------------------=
mg/L chlorine added0.2 vol. standard added( ) Certificate value mg L Cl2⁄( )×
25.2 sample( standard volume )+------------------------------------------------------------------------------------------------------------------------------------------------------=
40

CHLORINE, FREE, continued
Method Performance
PrecisionIn a single laboratory using a standard solution of 1.00 mg/L chlorine and two representative lots of reagents with the instrument, a single operator obtained a standard deviation of ± 0.01 mg/L chlorine.
In a single laboratory using a standard solution of 1.00 mg/L chlorine and two representative lots of AccuVac ampuls with the instrument, a single operator obtained a standard deviation of ± 0.01 mg/L chlorine.
Estimated Detection Limit (EDL)The estimated detection limit for programs 9 and 11 is 0.02 mg/L Cl2. For more information on derivation and use of Hach’s estimated detection limit, see Section 1 of the DR/850 Procedure Manual.
41

CHLORINE, FREE, continued
Interferences
Interfering Substance Interference Level and Treatment
Acidity Greater than 150 mg/L CaCO3. May not develop full color or color may fade instantly. Neutralize to pH 6-7 with 1 N sodium hydroxide. Determine amount to be added on separate sample aliquot, then add the same amount to the sample being tested. Correct for volume addition (see Correcting for Volume Additions, Section 1 of the DR/850 Procedure Manual).
Alkalinity Greater than 250 mg/L CaCO3. May not develop full color or color may fade instantly. Neutralize to pH 6-7 with 1 N sulfuric acid. Determine amount to be added on separate sample aliquot, then add the same amount to the sample being tested. Correct for volume addition (Correcting for Volume Additions, Section 1 of the DR/850 Procedure Manual).
Bromine Interferes at all levels
Chlorine Dioxide Interferes at all levels
Chloramines, organic May interfere
Hardness No effect at less than 1,000 mg/L as CaCO3
Iodine Interferes at all levels
Manganese, Oxidized (Mn4+, Mn7+)orChromium, Oxidized (Cr6+)
1. Adjust sample pH to 6-7.2. Add 3 drops potassium iodide (30 g/L) to a 25-mL sample.3. Mix and wait 1 minute.4. Add 3 drops sodium arsenite (5 g/L) and mix.5. Analyze 10 mL of the treated sample as described in the procedure.6. Subtract the result from this test from the original analysis to obtain the
correct chlorine concentration.
Monochloramine Causes a gradual drift to higher readings. When read within 1 minute after reagent addition, 3 mg/L monochloramine causes less than a 0.1 mg/L increase in the reading.
Ozone Interferes at all levels
Peroxides May interfere
Extreme sample pH and highly buffered samples
Adjust to pH 6-7. See Interferences, Section 1 of the DR/850 Procedure Manual.
42

CHLORINE, FREE, continued
Summary of MethodChlorine in the sample as hypochlorous acid or hypochlorite ion (free chlorine or free available chlorine) immediately reacts with DPD (N,N-diethyl-p-phenylenediamine) indicator to form a magenta color which is proportional to the chlorine concentration.
REQUIRED REAGENTS & APPARATUS (Using Powder Pillows)Quantity Required
Description Per Test Unit Cat. No.DPD Free Chlorine Powder Pillows, 10 mL ........... 1 pillow............... 100/pkg ..........21055-69Sample Cell, 10-20-25 mL, with cap ............................2 .........................6/pkg ..........24019-06
REQUIRED REAGENTS & APPARATUS (Using AccuVac Ampuls)DPD Free Chlorine Reagent AccuVac Ampuls ...... 1 ampul..................25/pkg ..........25020-25Beaker, 50 mL ..............................................................1 ...........................each ...........500-41H
OPTIONAL REAGENTSChlorine Standard Solution, PourRite Ampule, 25-30 mg/L, 2mL .......20/pkg ......... 26300-20DPD Free Chlorine Reagent, Swiftest Dispenser.................................250 tests ..........28023-00Potassium Iodide Solution, 30 g/L ........................................... 100 mL* MDB ............. 343-32Sodium Arsenite, 5 g/L ............................................................ 100 mL* MDB ............1047-32Sodium Hydroxide Standard Solution, 1.00 N ......................... 100 mL* MDB ........... 1045-32Sulfuric Acid Standard Solution, 1.000 N................................. 100 mL* MDB ........... 1270-32Water, deionized ........................................................................................... 4 L ..............272-56
OPTIONAL APPARATUSAccuVac Snapper ........................................................................................each ..........24052-00Cylinder, graduated, 25 mL ........................................................................each ..............508-40pH Meter, portable .....................................................................................each ............. HQ11dpH Electrode, gel, standard, with 1 meter cable .........................................each ....... PHC10101pH Paper, 1 to 11 pH units ................................................................5 rolls/pkg ..............391-33Pipet, TenSette, 0.1 to 1.0 mL ....................................................................each ..........19700-01Pipet Tips, for 19700-01 TenSette Pipet ................................................50/pkg ..........21856-96PourRite Ampule Breaker ...........................................................................each ......... 24846-00
For Technical Assistance, Price and OrderingIn the U.S.A.—Call 800-227-4224Outside the U.S.A.—Contact the Hach office or distributor serving you.
* Marked Dropper Bottle - contact Hach for larger sizes.
43

44
Method 8167CHLORINE, TOTAL (0 to 2.00 mg/L) For water, wastewater, and seawater
DPD Method (Powder Pillows or AccuVac Ampuls)USEPA accepted for reporting water and wastewater analyses*
Using Powder Pillows
* Procedure is equivalent to USEPA method 330.5 for wastewater and Standard Method 4500-Cl Gfor drinking water.
1. Enter the stored program number for total chlorine (Cl2) powder pillows.
Press: PRGM
The display will show:
PRGM ?
Note: For most accurate results, perform a Reagent Blank Correction using deionized water (see Section 1 of the DR/850 Procedures Manual).
2. Press: 9 ENTER
The display will show mg/L, Cl2 and the ZERO icon.
3. Fill a sample cell with 10 mL of sample (the blank).
Note: Samples must be analyzed immediately and cannot be preserved for later analysis.
4. Place the blank into the cell holder. Tightly cover the sample cell with the instrument cap.
45

CHLORINE, TOTAL, continued
5. Press: ZERO
The cursor will move to the right, then the display will show:
0.00 mg/L Cl2
Note: If Reagent Blank Correction is on, the display may flash “limit”. See Section 1 of the DR/850 Procedures Manual.
6. Fill a second cell to the 10-mL mark with sample.
7. Add the contents of one DPD Total Chlorine Powder Pillow to the sample cell (the prepared sample). Cap and swirl the sample cell vigorously to dissolve the powder.
Note: It is not necessary that all the powder dissolves.
8. Press:
TIMER ENTER
A 3-minute reaction period will begin.
Note: A pink color will develop if chlorine is present.
46

CHLORINE, TOTAL, continued
9. After the timer beeps, place the prepared sample into the cell holder. Tightly cover the sample cell with the instrument cap.
10.Press: READ
The cursor will move to the right, then the result in mg/L total chlorine will be displayed.
Note: If the sample temporarily turns yellow after sample addition, or the display flashes “limit”, it is due to high chlorine levels. Dilute a fresh sample and repeat the test. A slight loss of chlorine may occur during dilution. Multiply the result by the dilution factor; see Section 1 of the DR/850 Procedures Manual.
Note: Standard Adjust may be performed using a prepared standard (see Standard Adjust in Section 1 of the DR/850 Procedures Manual).
47

CHLORINE, TOTAL, continued
Using AccuVac Ampuls
1. Enter the stored program number for total chlorine (Cl2) AccuVac Ampuls.
Press: PRGM
The display will show:
PRGM ?
Note: For most accurate results, perform a Reagent Blank Correction using deionized water (see Section 1 of the DR/850 Procedures Manual).
2. Press: 11 ENTER
The display will show mg/L, Cl2 and the ZERO icon.
3. Fill a sample cell with at least 10 mL of sample (the blank). Collect at least 40 mL of sample in a 50-mL beaker.
Note: Samples must be analyzed immediately and cannot be preserved for later analysis.
4. Place the blank into the cell holder. Tightly cover the sample cell with the instrument cap.
5. Press: ZERO
The cursor will move to the right, then the display will show:
0.00 mg/L Cl2
Note: If Reagent Blank Correction is on, the display may flash “limit”. See Section 1 of the DR/850 Procedures Manual.
6. Fill a DPD Total Chlorine Reagent AccuVac Ampul with sample.
Note: Keep the tip immersed while the ampul fills completely.
7. Quickly invert the ampul several times to mix. Wipe off any liquid or fingerprints.
Note: A pink color will form if chlorine is present.
8. Press:
TIMER ENTER
A 3-minute reaction period will begin.
48

CHLORINE, TOTAL, continued
Sampling and StorageAnalyze samples for chlorine immediately after collection. Chlorine is a strong oxidizing agent, and it is unstable in natural waters. It reacts rapidly with various inorganic compounds and more slowly oxidizes organic compounds. Many factors, including reactant concentrations, sunlight, pH, temperature, and salinity influence decomposition of chlorine in water.
Avoid plastic containers since these may have a large chlorine demand. Pretreat glass sample containers to remove any chlorine demand by soaking in a dilute bleach solution (1 mL commercial bleach to l liter of deionized water) for at least 1 hour. Rinse thoroughly with deionized or distilled water. If sample containers are rinsed thoroughly with deionized or distilled water after use, only occasional pre-treatment is necessary.
9. When the timer beeps, place the AccuVac Ampul into the cell holder. Tightly cover the ampul with the instrument cap.
10. Press: READ
The cursor will move to the right, then the result in mg/L total chlorine will be displayed.
Note: If the sample temporarily turns yellow after sample addition, or the display shows “limit”, it is due to high chlorine levels. Dilute a fresh sample and repeat the test. A slight loss of chlorine may occur during dilution. Multiply the result by the appropriate dilution factor; see Section 1 of the DR/850 Procedures Manual.
Note: Standard Adjust may be performed using a prepared standard (see Section 1 of the DR/850 Procedures Manual).
49

CHLORINE, TOTAL, continued
Do not use the same sample cells for free and total chlorine. If trace iodide from the total chlorine reagent is carried over into the free chlorine determination, monochloramine will interfere. It is best to use separate, dedicated sample cells for free and total chlorine determinations.
A common error in testing for chlorine is introduced when a representative sample is not obtained. If sampling from a tap, let the water flow for at least 5 minutes to ensure a representative sample. Let the container overflow with the sample several times, then cap the sample containers so there is no headspace (air) above the sample. If sampling with a sample cell, rinse the cell several times with the sample, then carefully fill to the 10-mL mark. Perform the chlorine analysis immediately.
Accuracy Check
Standard Additions Method (using powder pillows)
a) Snap the top off a LR Chlorine PourRite Ampule Standard Solution.
b) Use a TenSette Pipet to add 0.1 mL of the standard to the reacted sample (this is the spiked sample). Swirl to mix.
c) Re-zero the instrument using the original sample (the blank).
d) Place the spiked sample into the cell holder and press READ. Record the results.
e) Calculate the concentration of mg/L chlorine added to the sample:
f) The spiked sample result (Step d) should reflect the analyzed sample result + the calculated mg/L Cl2 added (Step e).
g) If this increase des not occur, see Standard Additions in Section 1 of the DR/850 Procedures Manual for more information.
mg/L chlorine added0.1 (vol. standard added) iCertificate value (mg/L Cl2)×
10.1 sample standard volume+( )--------------------------------------------------------------------------------------------------------------------------------------------------------=
50

CHLORINE, TOTAL, continued
Standard Additions Method (using AccuVac Ampuls)
a) Snap the top off a LR Chlorine PourRite Ampule Standard Solution.
b) Use a graduated cylinder to measure 25 mL of sample into each of two beakers.
c) Use a TenSette Pipet to add 0.2 mL of the standard to one of the beakers (this is the spiked sample). Swirl to mix.
d) Fill a DPD Total Chlorine AccuVac completely from each beaker.
e) Analyze the spiked and unspiked sample as described in the procedure.
f) Calculate the concentration of mg/L chlorine added to the sample:
g) The spiked sample result should reflect the analyzed sample result + the calculated mg/L Cl2 added (Step f).
h) If this increase does not occur, see Standard Additions in Section 1 of the DR/850 Procedures Manual for more information.
Method Performance
PrecisionIn a single laboratory, using a standard solution of 1.00 mg/L chlorine and two lots of reagents with the instrument, a single operator obtained standard deviations of ± 0.01 mg/L chlorine.
In a single laboratory, using a standard solution of 1.00 mg/L chlorine and two representative lots of AccuVac Ampuls with the instrument, a single operator obtained a standard deviation of ± 0.01 mg/L chlorine.
Estimated Detection Limit (EDL)The estimated detection limit for programs 9 and 11 is 0.02 mg/L Cl2. For more information on derivation and use of Hach’s estimated detection limit, see Section 1 of the DR/850 Procedures Manual.
mg/L chlorine added 0.2 (vol. standard added) Certificate value (mg/L Chlorine)×25.2 (sample + standard volume)
---------------------------------------------------------------------------------------------------------------------------------------------=
51

CHLORINE, TOTAL, continued
Interferences
Interfering Substance Interference Level and Treatment
Acidity Greater than 150 mg/L CaCO3. May not develop full color or color may fade instantly. Neutralize to pH 6-7 with 1 N sodium hydroxide. Determine amount to be added on separate sample aliquot, then add the same amount to the sample being tested. Correct for volume addition (see Section 1 of the DR/850 Procedures Manual, Correcting for Volume Additions).
Alkalinity Greater than 250 mg/L CaCO3. May not develop full color or color may fade instantly. Neutralize to pH 6-7 with 1 N sulfuric acid. Determine amount to be added on separate sample aliquot, then add the same amount to the sample being tested. Correct for volume addition (See Correcting for Volume Additions, Section 1 of the DR/850 Procedures Manual).
Bromine Interferes at all levels
Chlorine Dioxide Interferes at all levels
Chloramines, organic May interfere
Hardness No effect at less than 1,000 mg/L as CaCO3
Iodine Interferes at all levels
Manganese, Oxidized (Mn4+, Mn7+)orChromium, Oxidized (Cr6+)
1. Adjust sample pH to 6-7.2. Add 3 drops potassium iodide (30 g/L) to a 25-mL sample.3. Mix and wait 1 minute.4. Add 3 drops sodium arsenite (5 g/L) and mix.5. Analyze 10 mL of the treated sample as described in the procedure.6. Subtract the result from this test from the original analysis to obtain the
correct chlorine concentration.
Ozone Interferes at all levels
Peroxides May interfere
Extreme sample pH and highly buffered samples
Adjust to pH 6-7. See Interferences, Section 1 of the DR/850 Procedures Manual.
52

CHLORINE, TOTAL, continued
Summary of MethodChlorine can be present in water as free available chlorine and as combined available chlorine. Both forms can exist in the same water and be determined together as the total available chlorine. Free chlorine is present as hypochlorous acid and/or hypochlorite ion. Combined chlorine exists as monochloramine, dichloramine, nitrogen trichloride, and other chloro derivatives.
The combined chlorine oxidizes iodide in the reagent to iodine. The iodine reacts with DPD (N, N-diethyl-p-phenylenediamine) along with free chlorine present in the sample to form a red color which is proportional to the total chlorine concentration. To determine the concentration of combined chlorine, run free chlorine and total chlorine tests. Subtract the results of the free chlorine test from the results of the total chlorine test to obtain combined chlorine.
Pollution Prevention and Waste ManagementSamples treated with sodium arsenite for manganese or chromium interferences will be hazardous wastes as regulated by Federal RCRA for arsenic (D004). See Section 3 of the DR/850 Procedures Manual for more information on proper disposal of these materials.
53

CHLORINE, TOTAL, continued
REQUIRED REAGENTS & APPARATUS (Using Powder Pillows)Quantity Required
Description Per Test Unit Cat. No.DPD Total Chlorine Reagent Powder Pillows .........1 pillow ............... 100/pkg.......... 21056-69Sample Cell, 10-20-25 mL, with caps .......................... 2......................... 6/pkg.......... 24019-06
REQUIRED REAGENTS & APPARATUS (Using AccuVac Ampuls)DPD Total Chlorine Reagent AccuVac Ampuls ......1 ampul ................. 25/pkg.......... 25030-25Beaker, 50 mL .............................................................. 1........................... each........... 500-41H
OPTIONAL REAGENTSChlorine Standard Solution, PourRite Ampule, 25-30 mg/L Cl2 ........... 20/pkg.......... 26300-20DPD Total Chlorine Reagent, Swiftest Dispenser ............................... 250 tests.......... 28024-00Potassium Iodide Solution, 30 g/L.............................................100 mL* MDB.............. 343-32Sodium Arsenite, 5 g/L............................................................. 100 mL* MDB............ 1047-32Sodium Hydroxide Standard Solution, 1.00 N ......................... 100 mL* MDB............ 1045-32Sulfuric Acid Standard Solution, 1.000 N ................................ 100 mL* MDB............ 1270-32Water, deionized............................................................................................4 L.............. 272-56
OPTIONAL APPARATUSAccuVac Snapper........................................................................................ each.......... 24052-00PourRite Ampule Breaker........................................................................... each.......... 24846-00Cylinder, graduated, 25 mL ........................................................................ each.............. 508-40pH Indicator Paper, 1 to 11 pH units ................................................ 5 rolls/pkg.............. 391-33pH Meter, portable ...................................................................................... each..............HQ11dpH Electrode, gel, standard, with 1 meter cable ........................................ each ........PHC10101Pipet, TenSette, 0.1 to 1.0 mL..................................................................... each.......... 19700-01Pipet Tips, for 19700-01 TenSette Pipet ................................................. 50/pkg.......... 21856-96
For Technical Assistance, Price and OrderingIn the U.S.A.—Call 800-227-4224Outside the U.S.A.—Contact the Hach office or distributor serving you.
* Marked Dropper Bottle - contact Hach for larger sizes.
54

Method 8192NITRATE, Low Range (0 to 0.50 mg/L NO3
--N)
Cadmium Reduction Method For water, wastewater, and seawater*
1. Enter the stored program number for low range nitrate-nitrogen (NO3
--N).
Press: PRGM
The display will show:
PRGM ?
Note: For most accurate results, perform a Reagent Blank Correction using deionized water (see Section 1 of the DR/850 Procedures Manual).
2. Press: 55 ENTER
The display will show mg/L, NO3-N and the ZERO icon.
Note: For alternate forms (NO3), press the CONC key.
3. Fill a 25-mL graduated mixing cylinder to the 15-mL mark with sample.
Note: Adjust the pH of stored samples before analysis.
4. Add the contents of one NitraVer 6 Nitrate Reagent Powder Pillow to the cylinder. Stopper.
Note: It is necessary to remove all the powder from the foil pillow. Tap the pillow until no more powder pours out. Be sure to remove powder from the corners of the pillow.
* Seawater requires a manual calibration; see Interferences.
55

NITRATE, Low Range, continued
5. Press:
TIMER ENTER
A 3-minute reaction period will begin. Shake the cylinder vigorously throughout this 3-minute period.
Note: Shaking time and technique influence color development. For most accurate results, analyze a standard solution several times and adjust the shaking time to obtain the correct result.
6. When the timer beeps, the display will show: 2:00 TIMER 2
Press: ENTER
A 2-minute reaction period will begin.
Note: A deposit will remain after the powder dissolves and will not affect results.
7. When the timer beeps, pour 10 mL of the sample into a sample cell.
Note: Do not transfer any cadmium particles.
8. Add the contents of one NitriVer 3 Nitrite Reagent Powder Pillow to the sample cell (the prepared sample). Cap the cell and shake gently for 30 seconds.
Note: A pink color will form if nitrate is present.
9. The display will show: 15:00 TIMER 3
Press: ENTER
A 15-minute reaction period will begin.
Fill another sample cell (the blank) with 10 mL of sample.
10.When the timer beeps, place the blank into the cell holder. Tightly cover the sample cell with the instrument cap.
11. Press: ZERO
The cursor will move to the right, then the display will show:
0.00 mg/L NO3-N
Note: If Reagent Blank Correction is on, the display may flash “limit”. See Section 1 of the DR/850 Procedures Manual.
12. Place the prepared sample into the cell holder. Tightly cover the sample cell with the instrument cap.
56
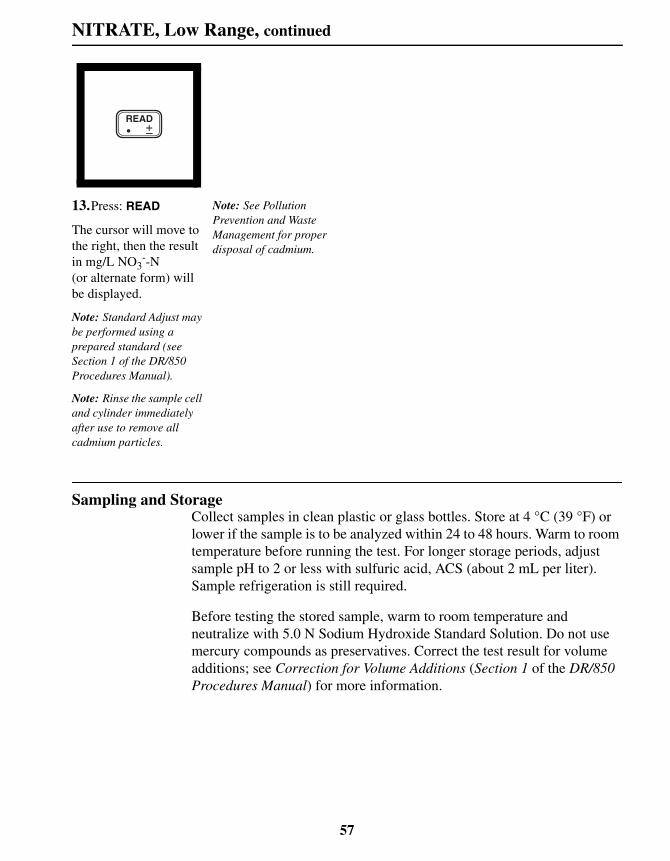
NITRATE, Low Range, continued
Sampling and StorageCollect samples in clean plastic or glass bottles. Store at 4 °C (39 °F) or lower if the sample is to be analyzed within 24 to 48 hours. Warm to room temperature before running the test. For longer storage periods, adjust sample pH to 2 or less with sulfuric acid, ACS (about 2 mL per liter). Sample refrigeration is still required.
Before testing the stored sample, warm to room temperature and neutralize with 5.0 N Sodium Hydroxide Standard Solution. Do not use mercury compounds as preservatives. Correct the test result for volume additions; see Correction for Volume Additions (Section 1 of the DR/850 Procedures Manual) for more information.
13.Press: READ
The cursor will move to the right, then the result in mg/L NO3
--N (or alternate form) will be displayed.
Note: Standard Adjust may be performed using a prepared standard (see Section 1 of the DR/850 Procedures Manual).
Note: Rinse the sample cell and cylinder immediately after use to remove all cadmium particles.
Note: See Pollution Prevention and Waste Management for proper disposal of cadmium.
57

NITRATE, Low Range, continued
Accuracy Check
Standard additions Method
a) Fill three 25-mL graduated mixing cylinders with 15 mL of sample.
b) Snap the neck off a Nitrate-Nitrogen Ampule Standard Solution, 12.0 mg/L NO3
--N.
c) Using the TenSette Pipet, add 0.1, 0.2, and 0.3 mL of the standard to the three samples. Stopper and mix well.
d) Analyze each sample as described above. The nitrate-nitrogen concentration should increase 0.08 mg/L for each 0.1 mL of standard added.
e) If these increases do not occur, see Standard Additions (Section 1 of the DR/850 Procedures Manual) for more information.
Standard Solution MethodPrepare a 0.20 mg/L nitrate-nitrogen standard by diluting 2.00 mL of a 10.0 mg/L Nitrate-Nitrogen Standard Solution to100.0 mL with deionized water. Use this standard in place of sample in Step 3 on page 55.
Standard AdjustTo adjust the calibration curve using the reading obtained with the 0.20-mg/L standard solution, press the SETUP key and scroll (using the arrow keys) to the STD setup option. Press ENTER to activate the standard adjust option. Then enter 0.20 to edit the standard concentration to match that of the standard used. Press ENTER to complete the curve adjustment. If you are using a reagent blank correction, enter the blank correction before the Standard Adjust feature is entered. See Standard Curve Adjustment, Section 1 of the DR/850 Procedures Manual for more information.
58
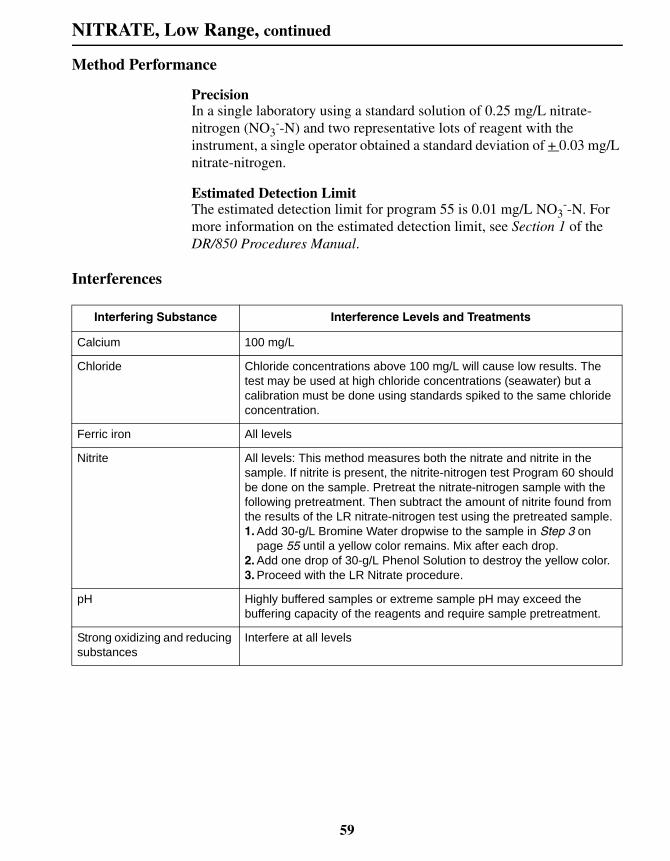
NITRATE, Low Range, continued
Method Performance
PrecisionIn a single laboratory using a standard solution of 0.25 mg/L nitrate-nitrogen (NO3
--N) and two representative lots of reagent with the instrument, a single operator obtained a standard deviation of + 0.03 mg/L nitrate-nitrogen.
Estimated Detection LimitThe estimated detection limit for program 55 is 0.01 mg/L NO3
--N. For more information on the estimated detection limit, see Section 1 of the DR/850 Procedures Manual.
Interferences
Interfering Substance Interference Levels and Treatments
Calcium 100 mg/L
Chloride Chloride concentrations above 100 mg/L will cause low results. The test may be used at high chloride concentrations (seawater) but a calibration must be done using standards spiked to the same chloride concentration.
Ferric iron All levels
Nitrite All levels: This method measures both the nitrate and nitrite in the sample. If nitrite is present, the nitrite-nitrogen test Program 60 should be done on the sample. Pretreat the nitrate-nitrogen sample with the following pretreatment. Then subtract the amount of nitrite found from the results of the LR nitrate-nitrogen test using the pretreated sample.1. Add 30-g/L Bromine Water dropwise to the sample in Step 3 on
page 55 until a yellow color remains. Mix after each drop.2. Add one drop of 30-g/L Phenol Solution to destroy the yellow color.3. Proceed with the LR Nitrate procedure.
pH Highly buffered samples or extreme sample pH may exceed the buffering capacity of the reagents and require sample pretreatment.
Strong oxidizing and reducing substances
Interfere at all levels
59

NITRATE, Low Range, continued
Summary of MethodCadmium metal reduces nitrates present in the sample to nitrite. The nitrite ion reacts in an acidic medium with sulfanilic acid to form an intermediate diazonium salt which couples to chromotropic acid to form a pink-colored product.
Pollution Prevention and Waste ManagementNitaVer 6 Nitrate Reagent contains cadmium metal. Both samples and reagent blanks will contain cadmium (D006) at a concentration regulated as hazardous wastes by the Federal RCRA. Do not pour these solutions down the drain. See Section 3 of the DR/850 Procedures Manual for more information on proper disposal of these materials.
REQUIRED REAGENTSLow Range Nitrate-Nitrogen Reagent Set .................................................................... 24298-00Includes: (1) 21071-69, (1) 21072-49
Quantity RequiredDescription Per Test Unit Cat. No.NitriVer 3 Nitrite Reagent Powder Pillows..............1 pillow ............... 100/pkg.......... 21071-69NitraVer 6 Nitrate Reagent Powder Pillows ............1 pillow ............... 100/pkg.......... 21072-49
REQUIRED APPARATUSCylinder, graduated, mixing, 25 mL............................. 1........................... each............ 1896-40Sample Cell, 10-20-25 mL, with cap............................ 2......................... 6/pkg.......... 24019-06
OPTIONAL REAGENTSBromine Water, 30 g/L...........................................................................29 mL*............ 2211-20Nitrate-Nitrogen Standard Solution, 10.0 mg/L as NO3
--N ..................500 mL.............. 307-49Nitrate-Nitrogen Standard Solution, 12 mg/L as NO3
--N, Voluette Ampule, 10 mL ..................................................................... 16/pkg.......... 14333-10
Phenol Solution, 30 g/L ...........................................................................29 mL............ 2112-20Pretreatment Kit, contains: (1) 2112-20, (1) 2211-20 ................................ each............ 2268-00Sodium Hydroxide Standard Solution, 5.0 N ............................ 50 mL* SCDB............ 2450-26Sulfuric Acid, ACS ..............................................................................500 mL*.............. 979-49Water, deionized............................................................................................4 L.............. 272-56
* Contact Hach for larger sizes
60

NITRATE, Low Range, continued
OPTIONAL APPARATUSDescription Unit Cat. No.Dropper, for 29-mL bottle ...........................................................................each ............2258-00Flask, volumetric, Class A, 100 mL............................................................each ..........14574-42pH Indicator Paper, 1 to 11 pH...........................................................5-roll/pkg ..............391-33pH Meter, portable ......................................................................................each ............. HQ11dpH Electrode, gel, standard, with 1 meter cable .........................................each ....... PHC10101Pipet, serological, 2 mL...............................................................................each ..............532-36Pipet, TenSette, 0.1 to 1.0 mL .....................................................................each ..........19700-01Pipet Tips, for 19700-01 TenSette Pipet .................................................50/pkg ..........21856-96Pipet, volumetric, Class A, 2.00 mL ...........................................................each ..........14515-36Pipet Filler, safety bulb................................................................................each ..........14651-00PourRite Ampule Breaker ...........................................................................each ..........24846-00Thermometer, -10 to 110 °C ...................................................................... each ........... 1877-01
Nitrate at these levels can be determined directly using the Nitrate Ion Selective Electrode (Cat. No. 50235-00).
For Technical Assistance, Price and OrderingIn the U.S.A.—Call 800-227-4224Outside the U.S.A.—Contact the Hach office or distributor serving you.
61

62
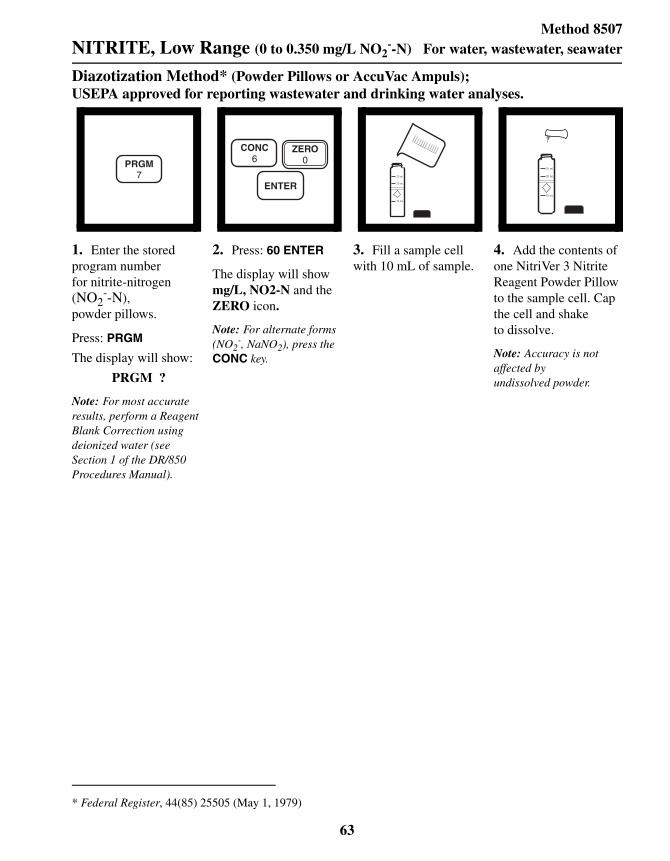
Method 8507NITRITE, Low Range (0 to 0.350 mg/L NO2
--N) For water, wastewater, seawater
Diazotization Method* (Powder Pillows or AccuVac Ampuls);USEPA approved for reporting wastewater and drinking water analyses.
* Federal Register, 44(85) 25505 (May 1, 1979)
1. Enter the stored program number for nitrite-nitrogen (NO2
--N), powder pillows.
Press: PRGM
The display will show:
PRGM ?
Note: For most accurate results, perform a Reagent Blank Correction using deionized water (see Section 1 of the DR/850 Procedures Manual).
2. Press: 60 ENTER
The display will show mg/L, NO2-N and the ZERO icon.
Note: For alternate forms (NO2
-, NaNO2), press the CONC key.
3. Fill a sample cell with 10 mL of sample.
4. Add the contents of one NitriVer 3 Nitrite Reagent Powder Pillow to the sample cell. Cap the cell and shake to dissolve.
Note: Accuracy is not affected by undissolved powder.
63

NITRITE, Low Range, continued
5. Press:
TIMER ENTER
A 15-minute reaction period will begin.
Note: A pink color will develop if nitrite is present.
6. When the timer beeps, fill an empty sample cell with 10 mL of sample (the blank).
7. Wipe the outside of the sample cell with a towel. Place the blank into the cell holder. Tightly cover the sample cell with the instrument cap.
Note: Wiping with a damp cloth, followed by a dry one, removes fingerprints and other marks.
8. Press: ZERO
The cursor will move to the right, then the display will show:
0.000 mg/L NO2-N
Note: If Reagent Blank Correction is on, the display may flash “limit.” See Section 1of the DR/850 Procedures Manual.
9. Place the prepared sample into the cell holder. Tightly cover the sample cell with the instrument cap.
10.Press: READ
The cursor will move to the right, then the result in mg/L nitrite-nitrogen (or an alternate form) will be displayed.
64

NITRITE, Low Range, continued
Using AccuVac Ampuls
1. Enter the stored program number for nitrite-nitrogen (NO2
--N), AccuVac Ampuls.
Press: PRGM
The display will show:
PRGM ?
Note: For most accurate results, perform a Reagent Blank Correction using deionized water (see Section 1 of the DR/850 Procedures Manual).
2. Press: 62 ENTER
The display will show mg/L, NO2-N and the ZERO icon.
Note: For alternate forms (NO2
-, NaNO2), press the CONC key.
3. Collect at least 40 mL of sample in a 50-mL beaker. Fill a NitriVer 3 Nitrite AccuVac Ampul with the sample.
Note: Keep the tip immersed while the ampul fills completely.
4. Quickly invert the ampul several times to mix. Wipe off any liquid or fingerprints.
Note: Accuracy is not affected by undissolved powder.
5. Press:TIMER ENTER
A 15-minute reaction period will begin.
Note: A pink color will develop if nitrite is present.
6. When the timer beeps, fill a sample cell with at least 10 mL of sample (the blank).
7. Place the blank into the cell holder. Tightly cover the sample cell with the instrument cap.
8. Press: ZERO
The cursor will move to the right, then the display will show:
0.000 mg/L NO2-N
Note: If Reagent Blank Correction is on, the display may flash “limit.” See Section 1 of the DR/850 Procedures Manual.
65

NITRITE, Low Range, continued
Sampling and StorageCollect samples in clean plastic or glass bottles.
Store at 4 °C (39 °F) or lower and analyze within 48 hours. Warm to room temperature before running the test.
Do not use acid preservatives.
Remove the suspended solids by filtration.
Accuracy Check
Standard Solution MethodPipet 5.00 mL of a fresh 250 mg/L NO2
--N standard into a 250.0 mL volumetric flask. Dilute to the mark with deionized water. This makes a 5.00-mg/L intermediate standard. To prepare a 0.100-mg/L NO2
--N standard solution, dilute 10.00 mL of the 5.00-mg/L intermediate standard to 500 mL in a volumetric flask. Prepare this solution immediately before use.
Run the test using the 0.100 mg/L NO2--N standard in place of the
sample. Results should be between 0.090 and 0.110 mg/L NO2--N.
9. Place the AccuVac Ampul into the cell holder. Tightly cover the ampul with the instrument cap.
10.Press: READ
The cursor will move to the right, then the result in mg/L nitrite-nitrogen will be displayed.
66

NITRITE, Low Range, continued
Method Performance
PrecisionIn a single laboratory, using a standard solution of 0.250 mg/L nitrite-nitrogen and two representative lots of reagent with the instrument, a single operator obtained a standard deviation of ± 0.001 mg/L NO2
--N for the powder pillow method and ± 0.003 mg/L NO2
--N for the AccuVac method.
Estimated Detection LimitThe estimated detection limit for programs 60 and 62 is 0.005 mg/L NO2
--N. For more information on derivation and use of Hach’s estimated detection limit, see Section 1 of the DR/850 Procedures Manual.
Interferences
Summary of MethodNitrite in the sample reacts with sulfanilic acid to form an intermediate diazonium salt. This couples with chromotropic acid to produce a pink colored complex directly proportional to the amount of nitrite present.
Interfering Substance Interference Levels
Antiminous ions Interfere by causing precipitation
Auric ions Interfere by causing precipitation
Bismuth ions Interfere by causing precipitation
Chloroplatinate ions Interfere by causing precipitation
Cupric ions Cause low results
Ferric ions Interfere by causing precipitation
Ferrous ions Cause low results
Lead ions Interfere by causing precipitation
Mercurous ions Interfere by causing precipitation
Metavanadate ions Interfere by causing precipitation
Nitrate Very high levels of nitrate (> 100 mg/L nitrate as N) appear to undergo a slight amount of reduction to nitrite, either spontaneously or during the course of the test. A small amount of nitrite will be found at these levels.
Silver ions Interfere by causing precipitation
Strong oxidizing and reducing substances
Interfere at all levels
67

NITRITE, Low Range, continued
REQUIRED REAGENTS Quantity Required
Description Per Test Unit Cat. No.NitriVer 3 Nitrite Reagent Powder Pillows..............1 pillow ............... 100/pkg.......... 21071-69orNitriVer 3 Nitrite Reagent AccuVac Ampuls...........1 ampul ................. 25/pkg.......... 25120-25
REQUIRED APPARATUS Beaker, 50 mL (for AccuVac procedure) ...................... 1........................... each........... 500-41HorSample Cells, 10-20-25 mL (powder pillow procedure)2 ........................ 6/pkg.......... 24019-06
OPTIONAL REAGENTSNitrite Standard Solution, 250 mg/L .....................................................500 mL .......... 23402-49Water, deionized............................................................................................4 L.............. 272-56
OPTIONAL APPARATUSAccuVac Snapper........................................................................................ each.......... 24052-00Flask, volumetric, 250 mL.......................................................................... each.......... 14574-46Flask, volumetric, 500 mL.......................................................................... each.......... 14574-49Pipet, serological, 10 mL ............................................................................ each.............. 532-38Pipet, TenSette, 1 to 10 mL......................................................................... each.......... 19700-01Pipet Tips for 19700-01 TenSette Pipet .................................................. 50/pkg.......... 21856-96Pipet, volumetric, Class A, 5.00 mL........................................................... each.......... 14515-37Pipet, volumetric, Class A, 10.00 mL......................................................... each.......... 14515-38Pipet Filler, safety bulb ............................................................................... each.......... 14651-00Thermometer, -10 to 110 °C....................................................................... each............ 1877-01
For Technical Assistance, Price and OrderingIn the U.S.A.—Call 800-227-4224Outside the U.S.A.—Contact the Hach office or distributor serving you.
68
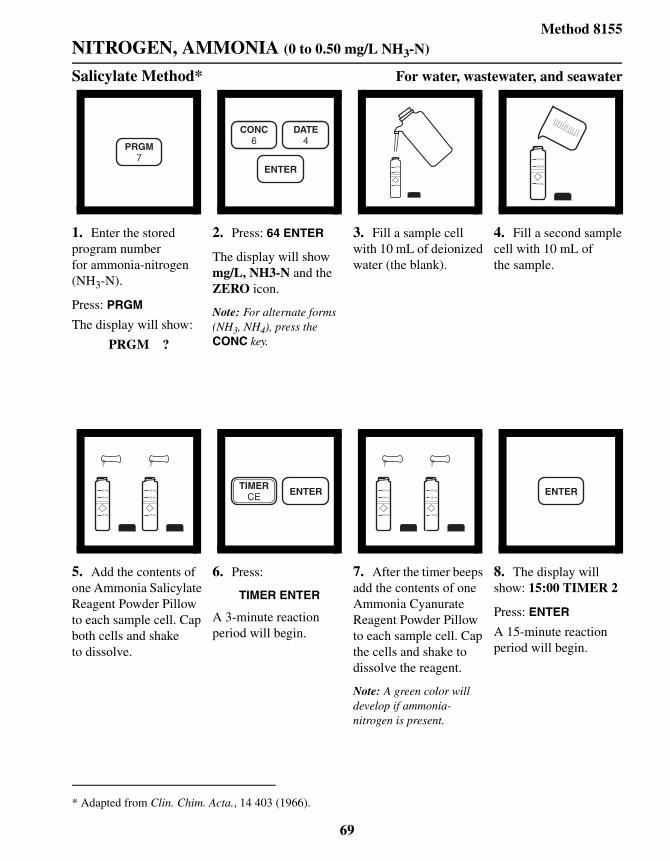
Method 8155NITROGEN, AMMONIA (0 to 0.50 mg/L NH3-N)
Salicylate Method* For water, wastewater, and seawater
* Adapted from Clin. Chim. Acta., 14 403 (1966).
1. Enter the stored program number for ammonia-nitrogen (NH3-N).
Press: PRGM
The display will show:
PRGM ?
2. Press: 64 ENTER
The display will show mg/L, NH3-N and the ZERO icon.
Note: For alternate forms (NH3, NH4), press the CONC key.
3. Fill a sample cell with 10 mL of deionized water (the blank).
4. Fill a second sample cell with 10 mL of the sample.
5. Add the contents of one Ammonia Salicylate Reagent Powder Pillow to each sample cell. Cap both cells and shake to dissolve.
6. Press:
TIMER ENTER
A 3-minute reaction period will begin.
7. After the timer beeps add the contents of one Ammonia Cyanurate Reagent Powder Pillow to each sample cell. Cap the cells and shake to dissolve the reagent.
Note: A green color will develop if ammonia-nitrogen is present.
8. The display will show: 15:00 TIMER 2
Press: ENTER
A 15-minute reaction period will begin.
69

NITROGEN, AMMONIA, continued
Sampling and StorageCollect samples in clean plastic or glass bottles. Most reliable results are obtained when samples are analyzed as soon as possible after collection.
If chlorine is known to be present, the sample must be treated immediately with sodium thiosulfate. Add one drop of Sodium Thiosulfate Standard Solution, 0.1 N, for each 0.3 mg of chlorine present in a 1-liter sample.
To preserve the sample, adjust the pH to 2 or less with concentrated sulfuric acid (about 2 mL per liter). Store samples at 4 °C or less. Samples preserved in this manner can be stored up to 28 days. Just before testing the stored sample, warm to room temperature and neutralize with 5.0 N Sodium Hydroxide Standard Solution. Correct the test result for volume additions; see Correction for Volume Additions, in Section 1 of the DR/850 Procedures Manual for more detailed information.
9. After the timer beeps, place the blank into the cell holder. Tightly cover the sample cell with the instrument cap.
10.Press: ZERO
The cursor will move to the right, then the display will show:
0.00 mg/L NH3-N
11. Place the prepared sample into the cell holder. Tightly cover the sample cell with the instrument cap.
12. Press: READ
The cursor will move to the right, then the result in mg/L ammonia-nitrogen will be displayed.
Note: Standard Adjust may be performed using a prepared standard (see Standard Adjust in Section 1 of the DR/850 Procedures Manual).
70
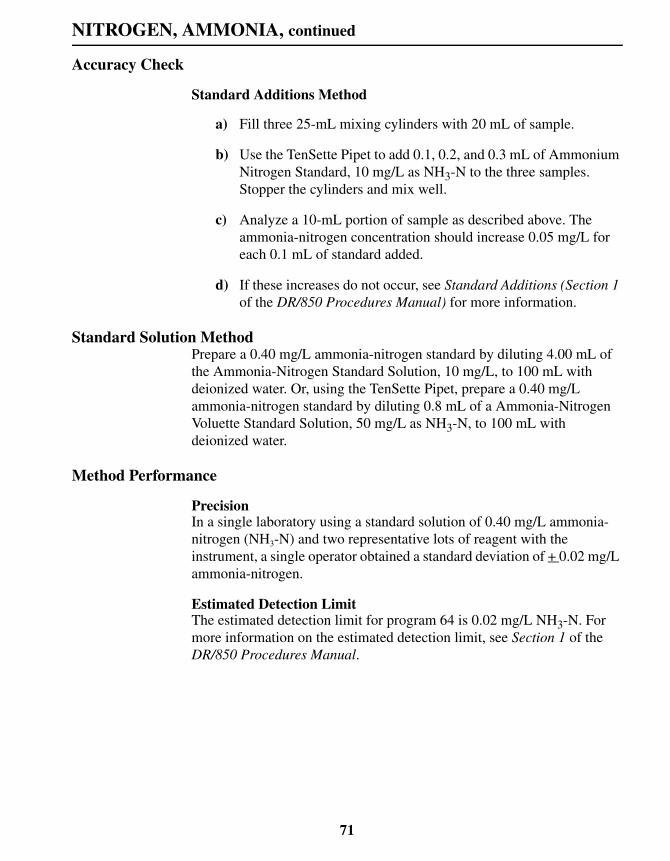
NITROGEN, AMMONIA, continued
Accuracy Check
Standard Additions Method
a) Fill three 25-mL mixing cylinders with 20 mL of sample.
b) Use the TenSette Pipet to add 0.1, 0.2, and 0.3 mL of Ammonium Nitrogen Standard, 10 mg/L as NH3-N to the three samples. Stopper the cylinders and mix well.
c) Analyze a 10-mL portion of sample as described above. The ammonia-nitrogen concentration should increase 0.05 mg/L for each 0.1 mL of standard added.
d) If these increases do not occur, see Standard Additions (Section 1 of the DR/850 Procedures Manual) for more information.
Standard Solution MethodPrepare a 0.40 mg/L ammonia-nitrogen standard by diluting 4.00 mL of the Ammonia-Nitrogen Standard Solution, 10 mg/L, to 100 mL with deionized water. Or, using the TenSette Pipet, prepare a 0.40 mg/L ammonia-nitrogen standard by diluting 0.8 mL of a Ammonia-Nitrogen Voluette Standard Solution, 50 mg/L as NH3-N, to 100 mL with deionized water.
Method Performance
PrecisionIn a single laboratory using a standard solution of 0.40 mg/L ammonia-nitrogen (NH3-N) and two representative lots of reagent with the instrument, a single operator obtained a standard deviation of + 0.02 mg/L ammonia-nitrogen.
Estimated Detection LimitThe estimated detection limit for program 64 is 0.02 mg/L NH3-N. For more information on the estimated detection limit, see Section 1 of the DR/850 Procedures Manual.
71
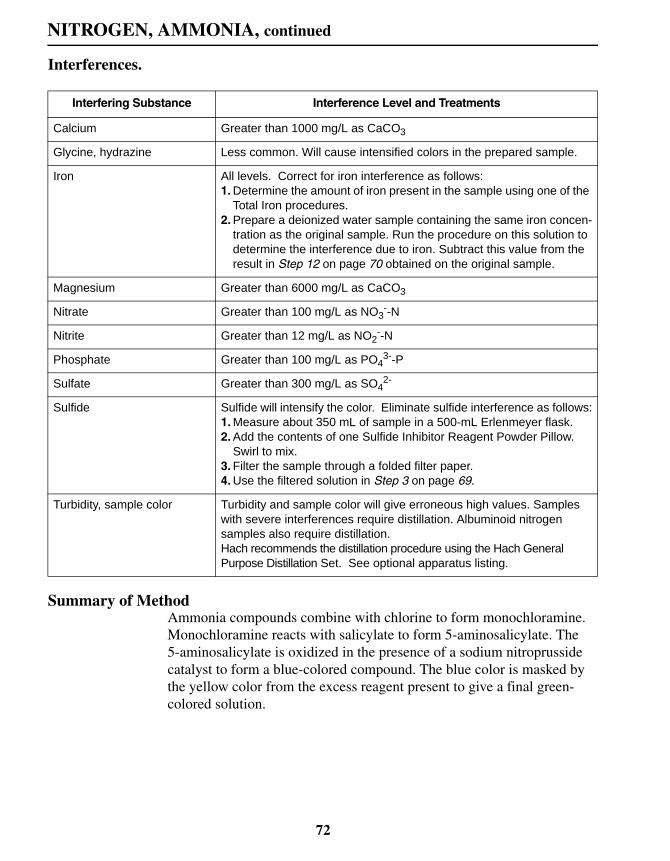
NITROGEN, AMMONIA, continued
Interferences.
Summary of MethodAmmonia compounds combine with chlorine to form monochloramine. Monochloramine reacts with salicylate to form 5-aminosalicylate. The 5-aminosalicylate is oxidized in the presence of a sodium nitroprusside catalyst to form a blue-colored compound. The blue color is masked by the yellow color from the excess reagent present to give a final green-colored solution.
Interfering Substance Interference Level and Treatments
Calcium Greater than 1000 mg/L as CaCO3
Glycine, hydrazine Less common. Will cause intensified colors in the prepared sample.
Iron All levels. Correct for iron interference as follows:1. Determine the amount of iron present in the sample using one of the
Total Iron procedures.2. Prepare a deionized water sample containing the same iron concen-
tration as the original sample. Run the procedure on this solution to determine the interference due to iron. Subtract this value from the result in Step 12 on page 70 obtained on the original sample.
Magnesium Greater than 6000 mg/L as CaCO3
Nitrate Greater than 100 mg/L as NO3--N
Nitrite Greater than 12 mg/L as NO2--N
Phosphate Greater than 100 mg/L as PO43--P
Sulfate Greater than 300 mg/L as SO42-
Sulfide Sulfide will intensify the color. Eliminate sulfide interference as follows:1. Measure about 350 mL of sample in a 500-mL Erlenmeyer flask.2. Add the contents of one Sulfide Inhibitor Reagent Powder Pillow.
Swirl to mix.3. Filter the sample through a folded filter paper.4. Use the filtered solution in Step 3 on page 69.
Turbidity, sample color Turbidity and sample color will give erroneous high values. Samples with severe interferences require distillation. Albuminoid nitrogen samples also require distillation. Hach recommends the distillation procedure using the Hach General Purpose Distillation Set. See optional apparatus listing.
72

NITROGEN, AMMONIA, continued
REQUIRED REAGENTS AND APPARATUSCat. No.
Ammonia-Nitrogen Reagent Set for 10-mL samples (100 Tests).................................26680-00 Includes: (2) 26531-99, (2) 26532-99
Quantity RequiredDescription Per Test Unit Cat. No.Ammonia Cyanurate Reagent Powder Pillows ...... 2 pillows...............100/pkg ..........26531-99Ammonia Salicylate Reagent Powder Pillows ....... 2 pillows...............100/pkg ..........26532-99Sample Cell, 10-20-25 mL, with cap ............................2 .........................6/pkg ..........24019-06
OPTIONAL REAGENTSAmmonia-Nitrogen Standard Solution, 10 mg/L as NH3-N................. 500 mL ..............153-49Ammonia-Nitrogen, PourRite Ampule, 50 mg/L as NH3-N, 2 mL ........20/pkg ..........14791-20Cylinder, graduated, mixing, 25 mL ...........................................................each ..........20886-40Sodium Hydroxide Standard Solution, 1.00 N............................ 100 mL MDB ............1045-32Sodium Hydroxide Standard Solution, 5.0 N...............................50 mL SCDB ............2450-26Sodium Thiosulfate Standard Solution, 0.1 N............................. 100 mL MDB ..............323-32Sulfide Inhibitor Reagent Powder Pillows ............................................100/pkg ............2418-99Sulfuric Acid, concentrated, ACS ......................................................... 500 mL ..............979-49Sulfuric Acid Standard Solution, 1.000 N................................... 100 mL MDB ............1270-32Water, deionized ........................................................................................... 4 L ..............272-56
OPTIONAL APPARATUSCylinder, graduated, polypropylene, 500 mL..............................................each ............1081-49Distillation Heater and Support Apparatus, 115 Vac ..................................each ..........22744-00Distillation Heater and Support Apparatus, 230 Vac ..................................each ..........22744-02Distillation Set, General Purpose ................................................................each ..........22653-00Filter Paper, folded, 12.5 cm .................................................................100/pkg ............1894-57Flask, Erlenmeyer, polypropylene, 500 mL ................................................each ............1082-49Flask, volumetric, Class A, 100 mL............................................................each ..........14574-42Funnel, poly, 65 mm....................................................................................each ............1083-67pH Meter, portable ......................................................................................each ............. HQ11dpH Electrode, gel, standard, with 1 meter cable .........................................each ....... PHC10101Pipet Filler, safety bulb................................................................................each ..........14651-00Pipet, TenSette, 0.1 to 1.0 mL .....................................................................each ..........19700-01Pipet Tips, for 19700-01 TenSette Pipet .................................................50/pkg ..........21856-96Pipet, volumetric, Class A, 2.0 mL .............................................................each ..........14515-36PourRite Ampule Breaker ...........................................................................each ..........24846-00Thermometer, -10 to 110 °C........................................................................each ............1877-01
For Technical Assistance, Price and OrderingIn the U.S.A.—Call 800-227-4224Outside the U.S.A.—Contact the Hach office or distributor serving you.
73

74

Method 10076pH (6.5 to 8.5 pH units)
Colorimetric pH Determination Using Phenol Red For water and wastewater
1. Enter the stored program number for the pH method.
Press: PRGM
The display will show:
PRGM ?
2. Press: 75 ENTER
The display will show PH and the ZERO icon.
3. Fill a sample cell with 10 mL of sample (the blank).
4. Place the blank in the cell holder. Tightly cover the sample cell with the instrument cap.
5. Press: ZERO
The cursor will move to the right, then the display will show:
6.0 PH
6. Fill another cell with 10 mL of sample.
Note: Sample temperature must be 21 to 29 °C.
7. Using a disposable pipet, add 1 mL of Phenol Red Indicator Solution to the cell (the prepared sample). Cap the sample cell and invert twice to mix.
8. Place the prepared sample into the cell holder. Tightly cover the sample cell with the instrument cap.
75

pH, continued
Sampling and StorageAnalyze samples immediately for best results.
Accuracy Check
Standard Solution MethodUsing a clear pH 7.0 buffer solution as the sample, perform the pH procedure as described above.
Method Performance
PrecisionIn a single laboratory using a standard solution of pH 7.0 and two lots of reagent with the instrument, a single operator obtained a standard deviation of less than 0.1 pH units.
Estimated Detection LimitThe estimated detection limit for program 75 is a pH of 6.5.
9. Press: READ
The cursor will move to the right, then the result in pH units will be displayed.
Note: Use of the Standard Adjust feature is highly recommended. See Accuracy Check.
Note: Any reading below 6.5 pH units will be erroneous.
76
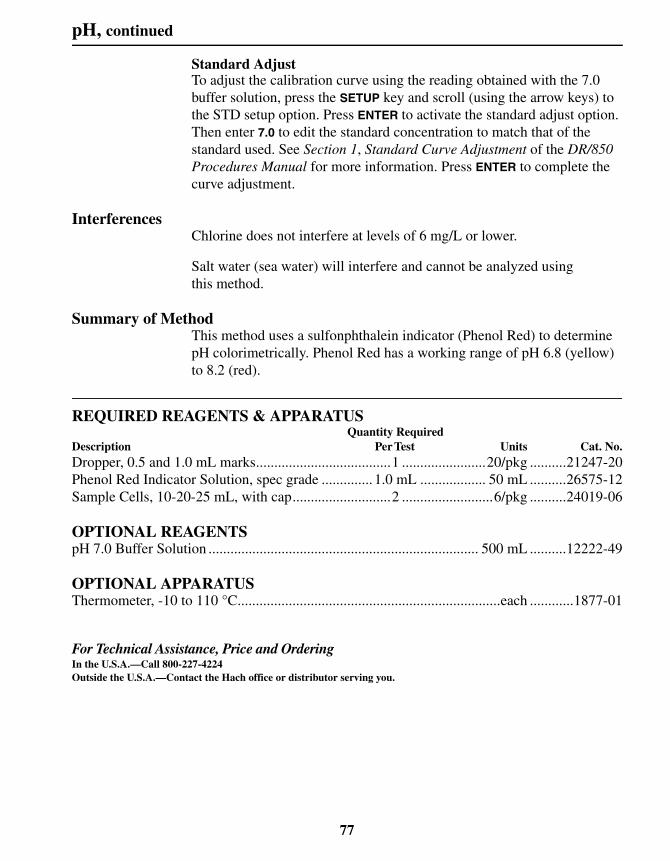
pH, continued
Standard AdjustTo adjust the calibration curve using the reading obtained with the 7.0 buffer solution, press the SETUP key and scroll (using the arrow keys) to the STD setup option. Press ENTER to activate the standard adjust option. Then enter 7.0 to edit the standard concentration to match that of the standard used. See Section 1, Standard Curve Adjustment of the DR/850 Procedures Manual for more information. Press ENTER to complete the curve adjustment.
InterferencesChlorine does not interfere at levels of 6 mg/L or lower.
Salt water (sea water) will interfere and cannot be analyzed using this method.
Summary of MethodThis method uses a sulfonphthalein indicator (Phenol Red) to determine pH colorimetrically. Phenol Red has a working range of pH 6.8 (yellow) to 8.2 (red).
REQUIRED REAGENTS & APPARATUSQuantity Required
Description Per Test Units Cat. No.Dropper, 0.5 and 1.0 mL marks.....................................1 .......................20/pkg ..........21247-20Phenol Red Indicator Solution, spec grade .............. 1.0 mL .................. 50 mL ..........26575-12Sample Cells, 10-20-25 mL, with cap...........................2 .........................6/pkg ..........24019-06
OPTIONAL REAGENTSpH 7.0 Buffer Solution .......................................................................... 500 mL ..........12222-49
OPTIONAL APPARATUSThermometer, -10 to 110 °C........................................................................each ............1877-01
For Technical Assistance, Price and OrderingIn the U.S.A.—Call 800-227-4224Outside the U.S.A.—Contact the Hach office or distributor serving you.
77

78

Method 8048PHOSPHORUS, REACTIVE (0 to 2.50 mg/L PO4
3-) For water, wastewater, seawater
(Also called Orthophosphate) PhosVer 3 (Ascorbic Acid) Method* (Powder Pillows or AccuVac Ampuls)USEPA Accepted for wastewater analysis reporting**
Using Powder Pillows
* Adapted from Standard Methods for the Examination of Water and Wastewater.** Procedure is equivalent to USEPA method 365.2 and Standard Method 4500-PE for wastewater.
1. Enter the stored program number for reactive phosphorus, ascorbic acid method.
Press: PRGM
The display will show:
PRGM ?
Note: For most accurate results, perform a Reagent Blank Correction using deionized water (see Section 1 of the DR/850 Procedures Manual).
2. Press: 79 ENTER
The display will show mg/L, PO4 and the ZERO icon.
Note: For alternate forms (P, P2O5), press the CONC key.
3. Fill a sample cell with 10 mL of sample.
Note: For samples with extreme pH, see Interferences following these steps.
Note: Clean glassware with 1:1 HCl. Rinse again with deionized water. Do not use detergents containing phosphates to clean glassware.
4. Add the contents of one PhosVer 3 Phosphate Powder Pillow for 10-mL sample to the cell (the prepared sample). Shake for 15 seconds.
Note: A blue color will form if phosphate is present.
79

PHOSPHORUS, REACTIVE, continued
5. Press:
TIMER ENTER
A 2-minute reaction period will begin. Perform Steps 6 through 8 during the reaction period.
Note: If the acid-persulfate digestion was used, an 8 to 10 minute reaction period is required.
6. Fill another sample cell with 10 mL of sample (the blank).
7. Place the blank into the cell holder. Tightly cover the sample cell with the instrument cap.
Press: EXIT
8. Press: ZERO
The cursor will move to the right, then the display will show:
0.00 mg/L PO4
Note: If Reagent Blank Correction is on, the display may flash “limit”. See Section 1 of the DR/850 Procedures Manual.
9. After the timer beeps, place the prepared sample into the cell holder. Tightly cover the sample cell with the instrument cap.
10.Press: READ
The cursor will move to the right, then the result in mg/L phosphate (PO4
3-) will be displayed.
Note: Standard Adjust may be performed using a 2.0-mg/L PO4
3-standard; see Section 1 of the DR/850 Procedures Manual.
80

PHOSPHORUS, REACTIVE, continued
Using AccuVac Ampuls
1. Enter the stored program number for reactive phosphorus- ascorbic acid method.
Press: PRGM
The display will show:
PRGM ?
Note: For most accurate results, perform a Reagent Blank Correction using deionized water (see Section 1 of the DR/850 Procedures Manual).
2. Press: 79 ENTER
The display will show mg/L, PO4 and the ZERO icon.
Note: For alternate forms (P, P2O5), press the CONC key.
3. Fill a sample cell (the blank) with at least 10 mL of sample. Collect at least 40-mL of sample in a 50-mL beaker.
Note: For samples with extreme pH, see Interferences.
Note: Clean glassware with 1:1 HCl. Rinse again with deionized water. Do not use detergent containing phosphates to clean glassware.
4. Fill a PhosVer 3 Phosphate AccuVac Ampul with sample.
Note: Keep the tip immersed while the ampul fills completely.
81

PHOSPHORUS, REACTIVE, continued
5. Place an ampul cap securely over the tip of the ampul. Shake the ampul for about 30 seconds. Wipe off any liquid or fingerprints.
Note: A blue color will form if phosphate is present.
Note: Accuracy is not affected by undissolved powder.
6. Press:
TIMER ENTER
A 2-minute reaction period will begin. Perform Steps 7 and 8 during the reaction period.
Note: Use an 8 to 10 minute reaction period if determining total phosphorus following the acid-persulfate digestion.
7. Place the blank into the cell holder. Tightly cover the sample cell with the instrument cap.
Press: EXIT
8. Press: ZERO
The cursor will move to the right, then the display will show:
0.00 mg/L PO4
Note: If Reagent Blank Correction is on, the display may flash “limit”. See Section 1 of the DR/850 Procedures Manual.
9. After the timer beeps, place the AccuVac Ampul into the cell holder. Tightly cover the ampul with the instrument cap.
10.Press: READ
The cursor will move to the right, then the result in mg/L phosphate (PO4
3-) will be displayed.
Note: Standard Adjust may be performed using a 2.0-mg/L PO4
3- standard; see Section 1 of the DR/850 Procedures Manual.
:30
82

PHOSPHORUS, REACTIVE, continued
Sampling and StorageCollect sample in plastic or glass bottles that have been cleaned with 1:1 Hydrochloric Acid Solution and rinsed with deionized water. Do not use commercial detergents containing phosphate for cleaning glassware used in this test.
Analyze samples immediately after collection for best results. If prompt analysis is impossible, preserve samples for up to 48 hours by filtering immediately and storing samples at 4 °C. Warm to room temperature before analysis.
Accuracy Check
Standard Additions Method
a) Fill three 25-mL graduated mixing cylinders with 25 mL of sample.
b) Snap the neck off a Phosphate PourRite Ampule Standard Solution, 50 mg/L as PO4
3-.
c) Use the TenSette Pipet to add 0.1 mL, 0.2 mL, and 0.3 mL of standard, respectively, to the three mixing cylinders. Stopper each and mix thoroughly.
d) For analysis with AccuVacs, transfer solutions to dry, clean 50-mL beakers to fill the AccuVac Ampuls. For analysis with powder pillows, transfer only 10 mL of solution to the sample cells.
e) Analyze each standard addition sample as described in the procedure. The phosphate concentration should increase 0.2 mg/L PO4
3- for each 0.1 mL of standard added.
f) If these increases do not occur, see Standard Additions in Section 1 of the DR/850 Procedures Manual for more information.
Standard Solution MethodPrepare a 2.0 mg/L PO4
3- standard solution by pipetting 4.0 mL of Phosphate Standard Solution, 50 mg/L as PO4
3-, into an acid-washed Class A 100-mL volumetric flask. Dilute to volume with deionized water. Stopper and invert to mix. Use this solution in place of the sample in the procedure to insure the accuracy of the test. The mg/L PO4
3- reading should be 2.00 mg/L.
83

PHOSPHORUS, REACTIVE, continued
Method Performance
PrecisionIn a single laboratory using a standard solution of 1.00 mg/L PO4
3- and two lots of reagents with the instrument, a single operator obtained a standard deviation of ± 0.05 mg/L PO4
3-.
In a single laboratory using a standard solution of 1.00 mg/L PO43- and
two representative lots of AccuVac Ampuls with the instrument, a single operator obtained a standard deviation of ± 0.03 mg/L PO4
3-.
Estimated Detection Limit (EDL)The EDL for program 79 is 0.05 mg/L PO4. For more information on the estimated detection limit, see Section 1 of the DR/850 Procedures Manual.
Interference
Interfering Substance Interference Levels and Treatments
Aluminum Greater than 200 mg/L
Arsenate All levels
Chromium Greater than 100 mg/L
Copper Greater than 10 mg/L
Hydrogen sulfide All levels
Iron Greater than 100 mg/L
Nickel Greater than 300 mg/L
Silica Greater than 50 mg/L
Silicate Greater than 10 mg/L
Turbidity or color Large amounts may cause inconsistent results in the test because the acid present in the powder pillows may dissolve some of the suspended particles and because of variable desorption of orthophosphate from the particles. For highly turbid or colored samples, add the contents of one Phosphate Pretreatment Pillow to 25 mL of sample. Mix well. Use this solution to zero the instrument.
Zinc Greater than 80 mg/L
Highly buffered samples or extreme sample pH
May exceed the buffering capacity of the reagents and require sample pretreatment. pH 2 to 10 is recommended.
84

PHOSPHORUS, REACTIVE, continued
Summary of MethodOrthophosphate reacts with molybdate in an acid medium to produce a Phosphomolybdate complex. Ascorbic acid then reduces the complex, giving an intense molybdenum blue color.
REQUIRED REAGENTS & APPARATUS (Using Powder Pillows)Quantity Required
Description Per Test Unit Cat. No.PhosVer 3 Phosphate Reagent Powder Pillows,10 mL sample size .................................................. 1 Pillow ................100/pkg ..........21060-69Sample Cell, 10-20-25 mL, with cap ............................2 .........................6/pkg ..........24019-06
REQUIRED REAGENTS & APPARATUS (Using AccuVac Ampuls)PhosVer 3 Phosphate Reagent AccuVac Ampuls.... 1 ampul ..................25/pkg ..........25080-25Beaker, 50 mL ..............................................................1 ...........................each ...........500-41HCap, ampul, blue ...........................................................1 .......................25/pkg ............1731-25Sample Cell, 10-20-25 mL, with cap ............................1 .........................6/pkg ..........24019-06
OPTIONAL REAGENTSDrinking Water Mixed Parameter Standard, Inorganic ........................ 500 mL ..........28330-49Hydrochloric Acid Standard Solution, 6.0 N (1:1) .............................. 500 mL ..............884-49Phosphate Pretreatment Powder Pillows ................................................50/pkg ..........14501-99Phosphate Standard Solution, 1 mg/L .................................................. 500 mL ............2569-49Phosphate Standard Solution, PourRite Ampule, 50 mg/L, 2 mL .........20/pkg ...........171-20HPhosphate Standard Solution, Voluette Ampule, 50 mg/L, 10 mL .........16/pkg ..............171-10Sodium Hydroxide Standard Solution, 5.0 N ........................... 100 mL* MDB ............2450-32Wastewater Effluent Mixed Parameter Standard, Inorganic ................. 500 mL ..........28332-49Water, deionized ........................................................................................... 4 L ..............272-56
* Larger sizes available.
85

PHOSPHORUS, REACTIVE, continued
OPTIONAL APPARATUSDescription Unit Cat. No.AccuVac Snapper........................................................................................ each .......... 24052-00Ampule Breaker Kit for 10-mL ampules .................................................... each.......... 21968-00Aspirator, vacuum pump............................................................................. each............ 2131-00Cylinder, graduated, mixing, 25 mL, tall (3 required)................................ each.......... 20886-40Filter Holder, 47 mm, 300 mL, graduated .................................................. each.......... 13529-00Filter Membrane, 47 mm, 0.45 micron................................................. 100/pkg.......... 13530-00Flask, filtering, 500 mL .............................................................................. each.............. 546-00Flask, volumetric, Class A, 100 mL ........................................................... each.......... 14574-42pH Indicator Paper, 1 to 11 pH ........................................................ 5 rolls/pkg .............. 391-33pH Meter, portable ...................................................................................... each..............HQ11dpH Electrode, gel, standard, with 1 meter cable ........................................ each ........PHC10101Pipet, 2 mL, serological ............................................................................. each.............. 532-36Pipet, TenSette, 0.1 to 1.0 mL TenSette Pipet ............................................ each.......... 19700-01Pipet Tips, for 19700-01 ........................................................................ 50/pkg.......... 21856-96Pipet Filler, safety bulb .............................................................................. each.......... 14651-00Pipet, volumetric, Class A, 4.00 mL........................................................... each.......... 14515-04PourRite Ampule Breaker........................................................................... each.......... 24846-00
For Technical Assistance, Price and OrderingIn the U.S.A.—Call 800-227-4224Outside the U.S.A.—Contact the Hach office or distributor serving you.
86

Method 8131SULFIDE (0 to 0.70 mg/L S2-) For water, wastewater and seawater
Methylene Blue Method* USEPA accepted for reporting wastewater analysis**
* Adapted from Standard Methods for the Examination of Water and Wastewater.** Procedure is equivalent to USEPA method 376.2 or Standard Method 4500-S2- D for wastewater.
1. Enter the stored program number for sulfide (S).
Press: PRGM
The display will show:
PRGM ?
2. Press: 93 ENTER
The display will show mg/L, S and the ZERO icon.
3. Pipet 25 mL of sample into a clean sample cell. This will be the prepared sample.
Note: Samples must be analyzed immediately and cannot be preserved for later analysis. Use a pipet to avoid agitation.
Note: For field testing, a 25-mL graduated cylinder may be used.
4. Fill a second sample cell with 25 mL of deionized water (the blank).
87

SULFIDE, continued
5. Add 1.0 mL of Sulfide 1 Reagent to each cell. Swirl to mix.
Note: Use the calibrated 1-mL dropper.
6. Add 1.0 mL of Sulfide 2 Reagent to each cell. Immediately swirl to mix.
Note: A pink color will develop, then the solution will turn blue if sulfide is present.
7. Press:
TIMER ENTER
A 5-minute reaction period will begin.
8. Place the blank into the cell holder. Tightly cover the sample cell with the instrument cap.
9. Press: ZERO
The cursor will move to the right, then the display will show:
0.00 mg/L S
10. After the timer beeps, place the prepared sample into the cell holder. Tightly cover the sample cell with the instrument cap.
11.Press: READ
The cursor will move to the right, then the result in mg/L sulfide will be displayed.
Note: Some sulfide loss may occur if dilution is necessary.
Note: Standard Adjust may be performed using a prepared standard (see Standard Adjust in Section 1 of the DR/850 Procedures Manual).
88
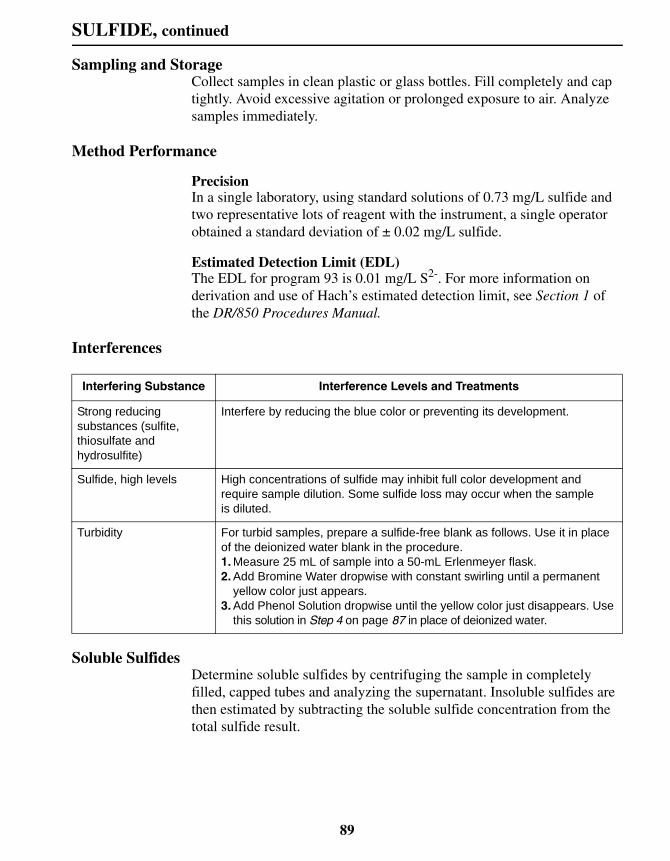
SULFIDE, continued
Sampling and StorageCollect samples in clean plastic or glass bottles. Fill completely and cap tightly. Avoid excessive agitation or prolonged exposure to air. Analyze samples immediately.
Method Performance
Precision In a single laboratory, using standard solutions of 0.73 mg/L sulfide and two representative lots of reagent with the instrument, a single operator obtained a standard deviation of ± 0.02 mg/L sulfide.
Estimated Detection Limit (EDL)The EDL for program 93 is 0.01 mg/L S2-. For more information on derivation and use of Hach’s estimated detection limit, see Section 1 of the DR/850 Procedures Manual.
Interferences
Soluble Sulfides Determine soluble sulfides by centrifuging the sample in completely filled, capped tubes and analyzing the supernatant. Insoluble sulfides are then estimated by subtracting the soluble sulfide concentration from the total sulfide result.
Interfering Substance Interference Levels and Treatments
Strong reducingsubstances (sulfite, thiosulfate and hydrosulfite)
Interfere by reducing the blue color or preventing its development.
Sulfide, high levels High concentrations of sulfide may inhibit full color development and require sample dilution. Some sulfide loss may occur when the sample is diluted.
Turbidity For turbid samples, prepare a sulfide-free blank as follows. Use it in place of the deionized water blank in the procedure.1. Measure 25 mL of sample into a 50-mL Erlenmeyer flask.2. Add Bromine Water dropwise with constant swirling until a permanent
yellow color just appears.3. Add Phenol Solution dropwise until the yellow color just disappears. Use
this solution in Step 4 on page 87 in place of deionized water.
89

SULFIDE, continued
Summary of Method Hydrogen sulfide and acid-soluble metal sulfides react with N, N-dimethyl-p-phenylenediamine oxalate to form methylene blue. The intensity of the blue color is proportional to the sulfide concentration. High sulfide levels in oil field waters may be determined after dilution.
Pollution Prevention and Waste ManagementSulfide 2 Reagent contains potassium dichromate. The final solution will contain hexavalent chromium (D007) at a concentration regulated as a hazardous waste by Federal RCRA. See Section 3 of the DR/850 Procedures Manual for more information on proper disposal of these materials.
REQUIRED REAGENTSCat. No.
Sulfide Reagent Set (100 tests) ..................................................................................... 22445-00 Includes: (2) 1816-32, (2) 1817-32
Quantity RequiredDescription Per Test Units Cat. No.Sulfide 1 Reagent.......................................................2 mL.........100 mL MDB............ 1816-32Sulfide 2 Reagent.......................................................2 mL.........100 mL MDB............ 1817-32Water, deionized........................................................25 mL.........................4 L .............. 272-56
REQUIRED APPARATUSCylinder, graduated, 25 mL .......................................... 1........................... each............. 508-40Pipet, volumetric, Class A, 25.00 mL........................... 1........................... each.......... 14515-40Pipet Filler, safety bulb ................................................. 1........................... each.......... 14651-00Sample Cell, 10-20-25 mL, with cap............................ 2......................... 6/pkg.......... 24019-06
OPTIONAL REAGENTSBromine Water, 30 g/L.............................................................................29 mL............ 2211-20Phenol Solution, 30 g/L ...........................................................................29 mL............ 2112-20Sodium Sulfide, hydrate ........................................................................... 114 g.............. 785-14
OPTIONAL APPARATUSBottle, Wash, 250 mL ................................................................................. each.............. 620-31Dropper, for 29 mL bottle ........................................................................... each............ 2258-00Flask, Erlenmeyer, 50 mL........................................................................... each.............. 505-41Standard Methods for the Examination of Water and Wastewater ............. each.......... 22708-00
For Technical Assistance, Price and OrderingIn the U.S.A.—Call 800-227-4224Outside the U.S.A.—Contact the Hach office or distributor serving you.
90

GENERAL INFORMATION
91
At Hach Company, customer service is an important part of every product we make.
With that in mind, we have compiled the following information for your convenience.

92
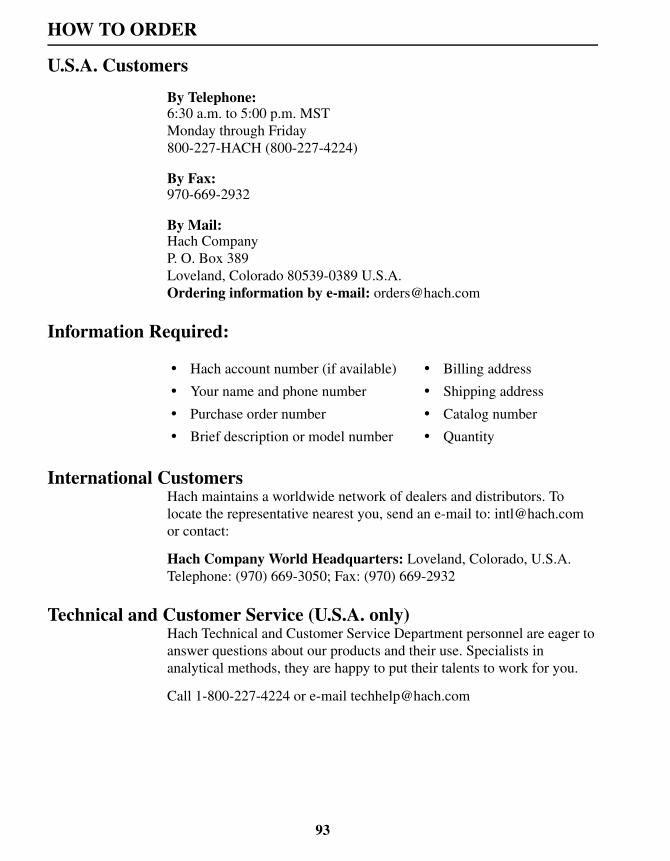
93
U.S.A. Customers
By Telephone:6:30 a.m. to 5:00 p.m. MSTMonday through Friday800-227-HACH (800-227-4224)
By Fax:970-669-2932
By Mail:Hach CompanyP. O. Box 389Loveland, Colorado 80539-0389 U.S.A.Ordering information by e-mail: [email protected]
Information Required:
International CustomersHach maintains a worldwide network of dealers and distributors. To locate the representative nearest you, send an e-mail to: [email protected] or contact:
Hach Company World Headquarters: Loveland, Colorado, U.S.A.Telephone: (970) 669-3050; Fax: (970) 669-2932
Technical and Customer Service (U.S.A. only)Hach Technical and Customer Service Department personnel are eager to answer questions about our products and their use. Specialists in analytical methods, they are happy to put their talents to work for you.
Call 1-800-227-4224 or e-mail [email protected]
• Hach account number (if available) • Billing address
• Your name and phone number • Shipping address
• Purchase order number • Catalog number
• Brief description or model number • Quantity
HOW TO ORDER

94
Authorization must be obtained from Hach Company before sending any items for repair. Please contact the Hach Service Center serving your location.
In the United States:Hach CompanyAmes Service100 Dayton AvenueAmes, Iowa 50010(800) 227-4224 (USA only)Telephone: (515) 232-2533FAX: (515) 232-3835
In Canada:Hach Sales & Service Canada Ltd.1313 Border Street, Unit 34Winnipeg, Manitoba R3H 0X4(800) 665-7635 (Canada only)Telephone: (204) 632-5598FAX: (204) 694-5134E-mail: [email protected]
In Latin America, the Caribbean, the Far East, Indian Subcontinent, Africa, Europe, or the Middle East:Hach Company World Headquarters, P.O. Box 389 Loveland, Colorado 80539-0389 U.S.A.Telephone (970) 669-3050FAX: (970) 669-2932E-mail: [email protected]
REPAIR SERVICE
LIMITED WARRANTY
Hach Company warrants its products to the original purchaser against any defects that are due to faulty material or workmanship for a period of one year from date of shipment unless otherwise noted in the product manual.
In the event that a defect is discovered during the warranty period, Hach Company agrees that, at its option, it will repair or replace the defective product or refund the purchase price excluding original shipping and handling charges. Any product repaired or replaced under this warranty will be warranted only for the remainder of the original product warranty period.
This warranty does not apply to consumable products such as chemical reagents; or consumable components of a product, such as, but not limited to, lamps and tubing.
Contact Hach Company or your distributor to initiate warranty support. Products may not be returned without authorization from Hach Company.
LimitationsThis warranty does not cover:
• Damage caused by acts of God, natural disaster, labor unrest, acts of war (declared or undeclared), terrorism, civil strife or acts of any governmental jurisdiction
• Damage caused by misuse, neglect, accident or improper application or installation
• Damage caused by any repair or attempted repair not authorized by Hach Company
• Any product not used in accordance with the instructions furnished by Hach Company
• Freight charges to return merchandise to Hach Company
• Freight charges on expedited or express shipment of warranted parts or product
• Travel fees associated with on-site warranty repair
This warranty contains the sole express warranty made by Hach Company in connection with its products. All implied warranties, including without limitation, the warranties of merchantability and fitness for a particular purpose, are expressly disclaimed.
95
LIMITED WARRANTY, continued
Some states within the United States do not allow the disclaimer of implied warranties and if this is true in your state the above limitation may not apply to you. This warranty gives you specific rights, and you may also have other rights that vary from state to state.
This warranty constitutes the final, complete, and exclusive statement of warranty terms and no person is authorized to make any other warranties or representations on behalf of Hach Company.
Limitation of RemediesThe remedies of repair, replacement or refund of purchase price as stated above are the exclusive remedies for the breach of this warranty. On the basis of strict liability or under any other legal theory, in no event shall Hach Company be liable for any incidental or consequential damages of any kind for breach of warranty or negligence.
96