meitrack ms02 user guide v2 - distrackershop.co · the ms02, meitrack gps tracking system, is a...
TRANSCRIPT

MEITRACK MS02 User Guide
MEITRACK MS02 User Guide

MEITRACK MS02 User Guide
Copyright © 2014 Meitrack Group All rights reserved. - 2 -
Change History File Name MEITRACK MS02 User Guide Created By Renny Lee
Project GPS Tracking System Creation Date
Update Date
2010-05-25
2014-09-23
Subproject MS02 Total Pages 50
Version V2.9 Confidential External Documentation

MEITRACK MS02 User Guide
Copyright © 2014 Meitrack Group All rights reserved. - 3 -
Contents
1 Copyright and Disclaimer ...............................................................................................................................................................- 5 -
2 Introduction ...................................................................................................................................................................................- 5 -
3 Quick Start .....................................................................................................................................................................................- 5 -
3.1 Configuring GPRS Parameters .............................................................................................................................................- 5 -
3.1.1 Configured By Using Software .................................................................................................................................- 5 -
3.1.2 Configured By Running SMS Commands..................................................................................................................- 7 -
3.2 Logging In to the MS02 .......................................................................................................................................................- 8 -
3.3 Adding a Device ..................................................................................................................................................................- 9 -
3.4 Checking Status Updates ..................................................................................................................................................- 11 -
4 Software Functions ......................................................................................................................................................................- 11 -
4.1 System ..............................................................................................................................................................................- 11 -
4.1.1 Language ................................................................................................................................................................- 11 -
4.1.2 Skin ........................................................................................................................................................................- 11 -
4.1.3 Time Zone ..............................................................................................................................................................- 11 -
4.1.4 Logout ....................................................................................................................................................................- 11 -
4.2 Management ....................................................................................................................................................................- 12 -
4.2.1 Admin ....................................................................................................................................................................- 12 -
4.2.1.1 Adding a Device ..........................................................................................................................................- 12 -
4.2.1.2 Adding an Existing Device ...........................................................................................................................- 12 -
4.2.1.3 Removing a Device ......................................................................................................................................- 14 -
4.2.2 Tracker Customization ............................................................................................................................................- 14 -
4.2.2.1 Customizing an Alarm .................................................................................................................................- 15 -
4.2.2.2 Customizing Status ......................................................................................................................................- 16 -
4.2.2.3 Customize a Sensor .....................................................................................................................................- 17 -
4.2.3 Customizing a Temperature Sensor .......................................................................................................................- 17 -
4.2.4 Setting a Fuel Sensor..............................................................................................................................................- 18 -
4.2.5 Setting a LED ..........................................................................................................................................................- 19 -
4.2.6 Setting Parameters .................................................................................................................................................- 20 -
4.2.7 Geo-fence ..............................................................................................................................................................- 21 -
4.2.8 RFID Functions .......................................................................................................................................................- 25 -
4.2.9 Online Upgrade ......................................................................................................................................................- 26 -
4.3 Querying a Report.............................................................................................................................................................- 27 -
4.3.1 Alarm Report..........................................................................................................................................................- 27 -
4.3.1.1 Search Criteria ............................................................................................................................................- 28 -
4.3.1.2 Search .........................................................................................................................................................- 28 -
4.3.2 Historical Data Report ............................................................................................................................................- 29 -
4.3.3 Speed Report (Pie Chart) .......................................................................................................................................- 30 -
4.3.4 Speed Report (Line Chart) ......................................................................................................................................- 31 -
4.3.5 Parking Report .......................................................................................................................................................- 32 -
4.3.6 Distance Report .....................................................................................................................................................- 32 -
4.3.7 Distance Statistics Report ......................................................................................................................................- 33 -
4.3.8 Sensor Report ........................................................................................................................................................- 34 -

MEITRACK MS02 User Guide
Copyright © 2014 Meitrack Group All rights reserved. - 4 -
4.3.9 Sensor Average Value Report .................................................................................................................................- 35 -
4.3.10 Platform Information ...........................................................................................................................................- 35 -
4.3.11 Input Status Report ..............................................................................................................................................- 36 -
4.3.12 Vehicle Driver RFID Report ...................................................................................................................................- 36 -
4.3.13 Photo Report ........................................................................................................................................................- 37 -
4.3.14 Vehicle Maintenance ...........................................................................................................................................- 38 -
4.4 Query ................................................................................................................................................................................- 39 -
4.4.1 Querying a Location ...............................................................................................................................................- 39 -
4.4.2 Querying a Path .....................................................................................................................................................- 40 -
4.4.3 POI .........................................................................................................................................................................- 41 -
4.4.3.1 Querying a POI ............................................................................................................................................- 41 -
4.4.3.2 Adding a POI ...............................................................................................................................................- 42 -
4.4.3.3 Editing a POI ................................................................................................................................................- 42 -
4.4.3.4 Deleting a POI .............................................................................................................................................- 43 -
4.4.3.5 Displaying a Selected POI ............................................................................................................................- 43 -
4.4.3.6 Hiding POIs ..................................................................................................................................................- 43 -
4.4.3.7 Displaying All POIs .......................................................................................................................................- 43 -
4.4.3.8 Exporting POIs .............................................................................................................................................- 43 -
4.5 Control Panel ....................................................................................................................................................................- 44 -
4.5.1 Device ....................................................................................................................................................................- 44 -
4.5.1.1 Toolbar ........................................................................................................................................................- 44 -
4.5.1.2 Device List ...................................................................................................................................................- 45 -
4.5.2 Sending a Command ..............................................................................................................................................- 45 -
4.6 Status Bar ..........................................................................................................................................................................- 46 -
4.6.1 Status .....................................................................................................................................................................- 46 -
4.6.2 Alarm .....................................................................................................................................................................- 46 -
4.6.3 Uploading a Report ................................................................................................................................................- 46 -
5 MS02 Mobile Phone Version .......................................................................................................................................................- 47 -
MEITRACK MS02 User Guide
Copyright © 2014 Meitrack Group All rights reserved. - 5 -
1 Copyright and Disclaimer
Copyright © 2014 MEITRACK. All rights reserved.
and are trademarks that belong to Meitrack Group.
The user manual may be changed without notice.
Without prior written consent of Meitrack Group, this user manual, or any part thereof, may not be reproduced for any
purpose whatsoever, or transmitted in any form, either electronically or mechanically, including photocopying and recording.
Meitrack Group shall not be liable for direct, indirect, special, incidental, or consequential damages (including but not limited to
economic losses, personal injuries, and loss of assets and property) caused by the use, inability, or illegality to use the product
or documentation.
2 Introduction
The MS02, Meitrack GPS Tracking System, is a server-based online positioning tracking platform. The MS02 can monitor people,
articles, and vehicles installed with trackers in real time on web pages. This facilitates remote management. The MS02 can view,
remotely control, analyze, and collect statistics on historical data.
3 Quick Start
3.1 Configuring GPRS Parameters
The GPRS parameters can be configured in any of the following ways:
3.1.1 Configured By Using Software
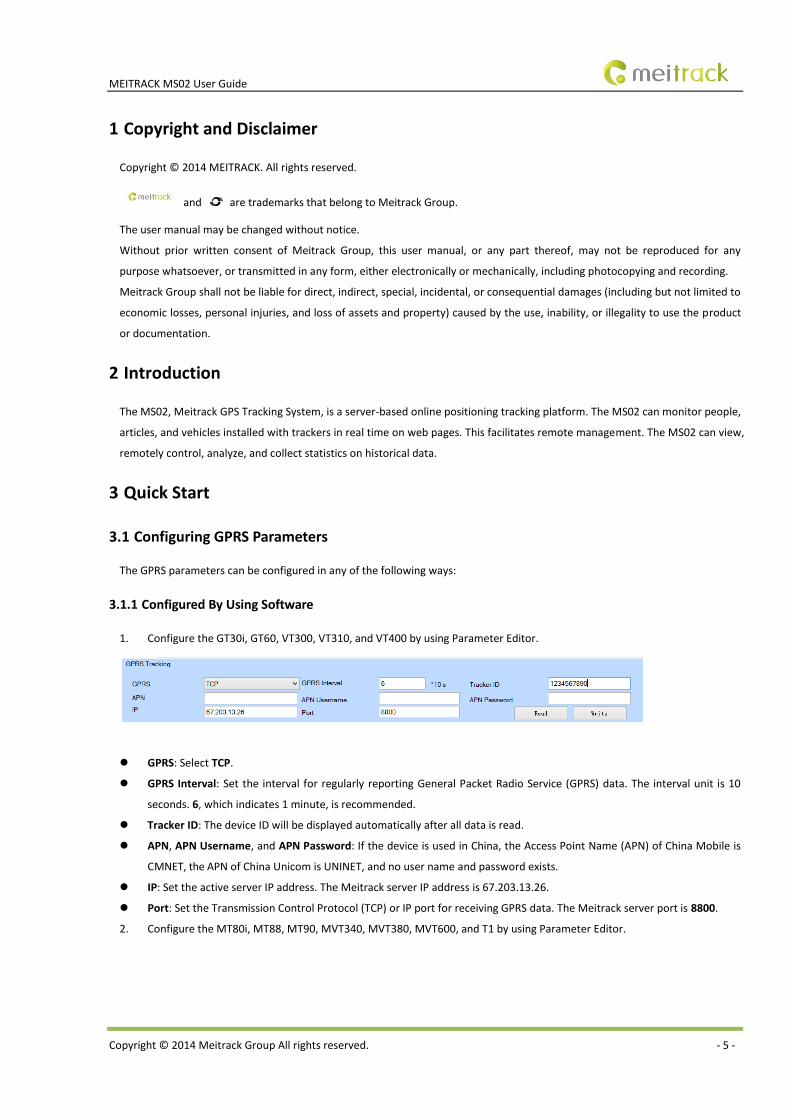
1. Configure the GT30i, GT60, VT300, VT310, and VT400 by using Parameter Editor.
GPRS: Select TCP.
GPRS Interval: Set the interval for regularly reporting General Packet Radio Service (GPRS) data. The interval unit is 10
seconds. 6, which indicates 1 minute, is recommended.
Tracker ID: The device ID will be displayed automatically after all data is read.
APN, APN Username, and APN Password: If the device is used in China, the Access Point Name (APN) of China Mobile is
CMNET, the APN of China Unicom is UNINET, and no user name and password exists.
IP: Set the active server IP address. The Meitrack server IP address is 67.203.13.26.
Port: Set the Transmission Control Protocol (TCP) or IP port for receiving GPRS data. The Meitrack server port is 8800.
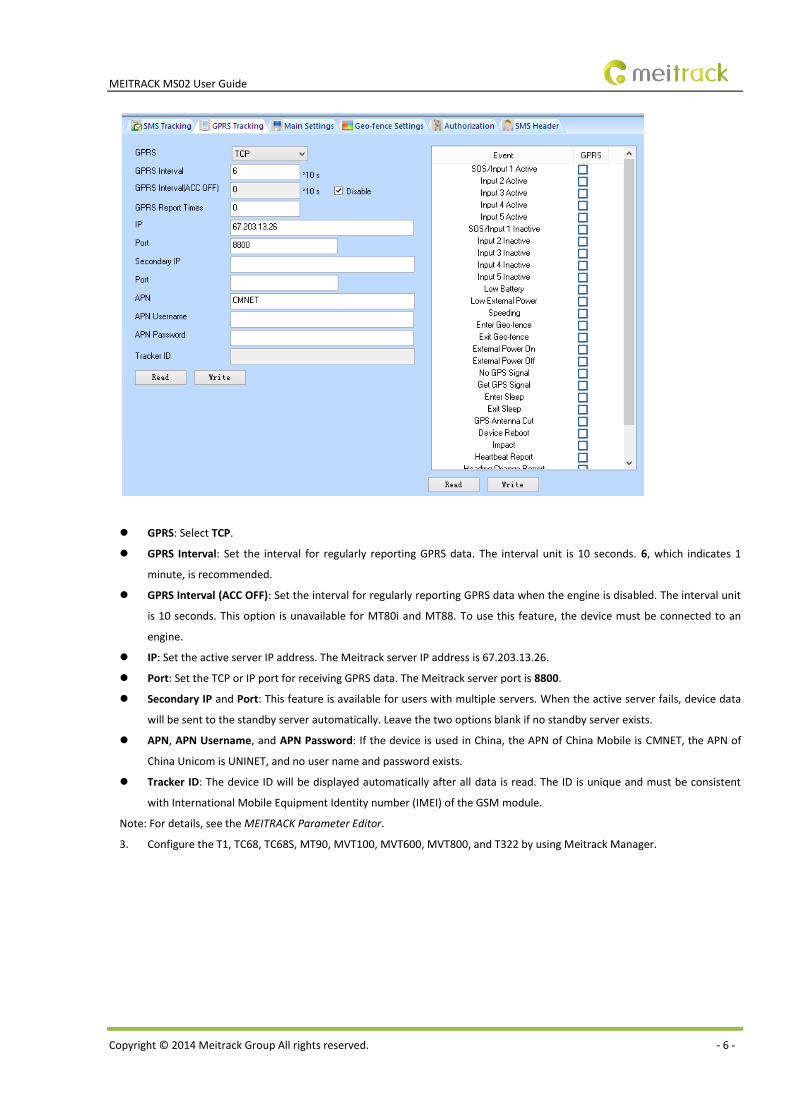
2. Configure the MT80i, MT88, MT90, MVT340, MVT380, MVT600, and T1 by using Parameter Editor.
MEITRACK MS02 User Guide
Copyright © 2014 Meitrack Group All rights reserved. - 6 -
GPRS: Select TCP.
GPRS Interval: Set the interval for regularly reporting GPRS data. The interval unit is 10 seconds. 6, which indicates 1
minute, is recommended.
GPRS Interval (ACC OFF): Set the interval for regularly reporting GPRS data when the engine is disabled. The interval unit
is 10 seconds. This option is unavailable for MT80i and MT88. To use this feature, the device must be connected to an
engine.
IP: Set the active server IP address. The Meitrack server IP address is 67.203.13.26.
Port: Set the TCP or IP port for receiving GPRS data. The Meitrack server port is 8800.
Secondary IP and Port: This feature is available for users with multiple servers. When the active server fails, device data
will be sent to the standby server automatically. Leave the two options blank if no standby server exists.
APN, APN Username, and APN Password: If the device is used in China, the APN of China Mobile is CMNET, the APN of
China Unicom is UNINET, and no user name and password exists.
Tracker ID: The device ID will be displayed automatically after all data is read. The ID is unique and must be consistent
with International Mobile Equipment Identity number (IMEI) of the GSM module.
Note: For details, see the MEITRACK Parameter Editor.
3. Configure the T1, TC68, TC68S, MT90, MVT100, MVT600, MVT800, and T322 by using Meitrack Manager.

MEITRACK MS02 User Guide
Copyright © 2014 Meitrack Group All rights reserved. - 7 -
GPRS: Select TCP.
Protocol: Select Auto Event Report.
IP/Domain: Set the active IP address. The Meitrack server IP address is 67.203.13.26.
Port: Set the TCP or IP port for receiving GPRS data. The Meitrack server port is 8800.
Backup IP/Domain, and Port: This feature is available for users with multiple servers. When the active server fails, device
data will be sent to the standby server automatically. Leave the two options blank if no standby server exists.
APN, APN Username, and APN Password: If the device is used in China, the APN of China Mobile is CMNET, the APN of
China Unicom is UNINET, and no user name and password exists.
GPRS Time Interval: Set the interval for regularly reporting GPRS data. The interval unit is 10 seconds. 6, which indicates 1
minute, is recommended.
GPRS Timezone: Displays the local time when the device communicates with the platform. Leave this option blank if the
MS02 is used. The time zone is set on the MS02.
GPRS Interval (ACC OFF): Set the interval for regularly reporting GPRS data when the engine is disabled. The interval unit
is 10 seconds. To use this feature, the device must be connected to an engine.
Note: For details, see the MEITRACK Parameter Editor.
3.1.2 Configured By Running SMS Commands
1. GT30i, GT60, VT300, VT310, and VT400 commands:
A. Set a command for the tracker (GPRS) ID.
W000000,010,S/N
Check the S/N on the device. The S/N is the unique identification code for the device on MS02. It cannot be changed.
For example, if the S/N is 4037828853, the command is as follows:
W000000,010,4037828853
B. Set a command for the APN.
W000000,011,APN,APN user name,APN password
For example, if a China Mobile phone card is used, the command is as follows:
W000000,011,CMNET
C. Set an IP address and port command.
W000000,012,IP address,port
For example, the command for setting the Meitrack server IP address is as follows:

MEITRACK MS02 User Guide
Copyright © 2014 Meitrack Group All rights reserved. - 8 -
W000000,012,114.112.54.134,8800
D. Enable the GPRS.
W000000,013,1
E. Set a GPRS interval.
W000000,014,XXXXX
For example, when the tracker sends data to the server once every minute, the command is as follows:
W000000,014,00006
2. MT90, MVT800, MVT100, MVT340, MVT380, MVT600, and T1 commands:
A. Set GPRS parameters.
Command: 0000,A21,Connection mode,IP address,Port,APN,APN user name,APN password
Descriptions:
When the connection mode is 0, the GPRS function is disabled.
When the connection mode is 1, the GPRS function is enabled, and the TCP/IP reporting mode is used.
When the connection mode is 2, the GPRS function is enabled, and the User Datagram Protocol (UDP) reporting
mode is used.
The IP address or domain name has a maximum of 32 bytes.
A port has a maximum of 5 digits.
APN/APN Username/APN Password: An APN, APN user name, and APN password have a maximum of 32 bytes
respectively. If no user name and password is required, leave these parameters blank.
Example: 0000,A21,1,114.112.54.134,8800,CMNET,
B. Set time tracking parameters.
0000,A12,Interval,Number of reporting times
Descriptions:
If the interval is 0, the GPRS regularly-reporting function is disabled. The interval unit is 10 seconds.
The maximum interval is 65535 x 10 seconds.
If the number of reporting times is 0, the GPRS has been reporting (for platform tracking generally). If the number of
reporting times is between 1 and 65535, set the number of reporting times. Reporting will stop after the number
of times is reached.
Example: 0000,A12,6,0
3.2 Logging In to the MS02
Log in to the MS02 in any of the following ways:
Visit ms02.trackingmate.com through your PC.
Obtain a user name and password when you purchase an account.

MEITRACK MS02 User Guide
Copyright © 2014 Meitrack Group All rights reserved. - 9 -
Visit m.ms02.trackingmate.com through your mobile phone.
Obtain a user name and password when you purchase an account.
3.3 Adding a Device
Log in to the system, and choose Manage > Admin.
Click the user name. The following page is displayed:

MEITRACK MS02 User Guide
Copyright © 2014 Meitrack Group All rights reserved. - 10 -
To add a device, click Add a New Device.
Device ID: The ID is unique.
The GT30, GT60, VT300, VT310, or VT400 ID is the S/N on the device.The MT90, MVT100, MVT340, MVT380, MVT600,
MVT800, or T1 ID is the device IMEI. The SMS query instruction is 0000,E91.
If the device ID is incorrect, device status cannot be queried.
Password: indicates the password for sending SMS commands.
For the GT30i, GT60, VT300, VT310, and VT400, the default password is 000000.
For the MT90, MVT100, MVT340, MVT380, MVT600, MVT800, and T1, the default password is 0000.
If the password is changed, enter the latest one.

MEITRACK MS02 User Guide
Copyright © 2014 Meitrack Group All rights reserved. - 11 -
Device Name: Set the device name, such as a vehicle licence plate, driver name, and company name.
SIM Number: indicates the phone number.
Model: indicates the device model.
3.4 Checking Status Updates
Open the GPS tracking system, choose Status > Updates to check whether the device is added. Ensure that the device is
connected to the server and the GPS tracking is normal.
4 Software Functions
4.1 System
4.1.1 Language
Choose System > Language. The MS02 supports 24 languages. The MS02 system language changes according to Window
languages. For example, if the Chinese Windows system is running, the default MS02 system language is Chinese.
4.1.2 Skin
Choose System > Skin. The MS02 supports blue, purple, black, and green. The default colour is blue.
4.1.3 Time Zone
Choose System > Time Zone. The MS02 time zone will be synchronized based on computer system time.
4.1.4 Logout
Choose System > Logout to log out of the system.

MEITRACK MS02 User Guide
Copyright © 2014 Meitrack Group All rights reserved. - 12 -
4.2 Management
4.2.1 Admin
4.2.1.1 Adding a Device
Choose Manage > Admin > Add a New Device.
Note:
Device Limits: The number of newly added devices cannot exceed the limit. The limit is 50 shown in the following figure.
When you want to add more devices, contact the supplier.
Expiry Date: indicates the account expiration date. When the account is about to expire and you want to use the account
continuously, contact the supplier.
For details about how to add a device, see section 3.3.
4.2.1.2 Adding an Existing Device
Choose Manage > Admin > User Name > Add Existing Device.
Multiple accounts can be used to monitor the same device.

MEITRACK MS02 User Guide
Copyright © 2014 Meitrack Group All rights reserved. - 13 -
Device ID: The ID is unique.
The GT30, GT60, VT300, VT310, or VT400 ID is the S/N on the device. The MT90, MVT100, MVT340, MVT380, MVT600,
MVT800, or T1 ID is the device IMEI.
The parameter must be consistent with the device ID you added the first time.
SIM Number: indicates the phone number. The parameter must be consistent with the device ID you added the first time.
Password: indicates the password for sending SMS commands. For the GT30, GT60, VT300, VT310, and VT400, the default
password is 000000. For the MT90, MVT100, MVT340, MVT380, MVT600, MVT800, and T1, the default password is 0000.
If the password is changed, enter the latest one.

MEITRACK MS02 User Guide
Copyright © 2014 Meitrack Group All rights reserved. - 14 -
4.2.1.3 Removing a Device
Device ID: Enter the S/N or IMEI when you add the device.
Password: indicates the password for sending SMS commands.
For the GT30i, GT60, VT300, VT310, and VT400, the default password is 000000.
For the MT90, MVT100, MVT340, MVT380, MVT600, T1, MT90, and MVT800, the default password is 0000.
If any of these parameters is entered incorrectly, the device cannot be removed.
4.2.2 Tracker Customization
Choose Manage > Tracker customer define to customize alarms, I/O status, and the connected sensor formula. The function is
only available for devices bounded to the MS02.

MEITRACK MS02 User Guide
Copyright © 2014 Meitrack Group All rights reserved. - 15 -
4.2.2.1 Customizing an Alarm
Define status changes (activity or inactivity) of input ports. When the status changes, the device sends GPRS data to the server.
For example, when you define SOS Pressed as SOS, the SOS button is pressed, the SOS alarm will be sent to the system. When
you define Input 4 Active as ACC ON, input port 4 is active and the engine is on. When you define Input 4 Inactive as ACC OFF,
input port 4 is inactive and the engine is off.
To customize an alarm, click , specify parameters shown in the following figure, and click Add.
For example, select a device, and set Alarm Type to SOS Pressed and Name to SOS. When the customized alarm triggers,
device status will be displayed on a map, as shown in the following figure.

MEITRACK MS02 User Guide
Copyright © 2014 Meitrack Group All rights reserved. - 16 -
4.2.2.2 Customizing Status
Define I/O port status. The status information is in data packages sent to the server.
Output 1 connects the engine circuit to a relay. When the circuit is cut off (output activated), cut is defined. If the circuit is
connected (output inactivated), normal is defined.
To customize status, click , specify parameters shown in the following figure, and click Add.

MEITRACK MS02 User Guide
Copyright © 2014 Meitrack Group All rights reserved. - 17 -
4.2.2.3 Customize a Sensor
Customize sensor formulas. The function applies for linear analogy sensors, such as fuel sensors. After formulas are customized,
formulas will be displayed in the system.
To customize a sensor, click , specify parameters shown in the following figure, and click Add.
4.2.3 Customizing a Temperature Sensor
The function is only available for the MVT600, T1, and MVT800.
A temperature sensor is used to measure temperature of vehicles and environments in real time.

MEITRACK MS02 User Guide
Copyright © 2014 Meitrack Group All rights reserved. - 18 -
For details, see the MEITRACK Temperature Sensor User Guide.
4.2.4 Setting a Fuel Sensor
The function is only available for the MVT600, T1, and MVT800.
A fuel sensor is used to measure vehicle fuel and check whether an alarm is generated.

MEITRACK MS02 User Guide
Copyright © 2014 Meitrack Group All rights reserved. - 19 -
For details, see the MEITRACK Fuel Sensor User Guide.
4.2.5 Setting a LED
The function is only available for the MVT600, and T1.
An LED is used to issue vehicle advertisements and emergent notices.

MEITRACK MS02 User Guide
Copyright © 2014 Meitrack Group All rights reserved. - 20 -
For details, see the MEITRACK LED User Guide.
4.2.6 Setting Parameters
The function is only available for the MVT100 and TC68S.
Set parameters for an online device.

MEITRACK MS02 User Guide
Copyright © 2014 Meitrack Group All rights reserved. - 21 -
For details, see the MEITRACK Parameter Editor.
4.2.7 Geo-fence
The function is only available for the MVT100.
A geo-fence includes tracker geo-fence settings and binding, which must be used together.
Tracker Geo-fence Settings: Draw a geo-fence as required.
Tracker Geo-fence Binding: Bind the geo-fence to a device.

MEITRACK MS02 User Guide
Copyright © 2014 Meitrack Group All rights reserved. - 22 -
: Enter a keyword to search a geo-fence.
: Select a geo-fence to be deleted, and click to delete it.
: Select a geo-fence whose location is to be queried, and click .
Circle/Polygon: A geo-fence can be circular and polygonal.
Draw a geo-fence:
Circle: Select Circle, and click . The map page is displayed.
Click the map, and drag the mouse to define the circle semidiameter.

MEITRACK MS02 User Guide
Copyright © 2014 Meitrack Group All rights reserved. - 23 -
Click the area. The dialog box is displayed, as shown in the following figure.
Enter the geo-fence name, and click OK.
The geo-fence can work after the geo-fence is bound to a device.
Polygon: Select Polygon, and click . The map page is displayed. Click the map to draw a geo-fence. A polygonal geo-fence
supports a maximum of 32 sides. Enter and save the geo-fence name. The geo-fence can work after the geo-fence is bound to a
device.
Tracker Geo-fence Binding: Bind the geo-fence to a device.

MEITRACK MS02 User Guide
Copyright © 2014 Meitrack Group All rights reserved. - 24 -
: Specify Device Name
or Keywords to query geo-fences that have been bounded.
Click to bind a geo-fence to a device.
Device Name: Select a device to be bounded.
Alarm Property: Select an alarm rule.
Select exist: Select a geo-fence from the drop-down list. Click to check the geo-fence location.

MEITRACK MS02 User Guide
Copyright © 2014 Meitrack Group All rights reserved. - 25 -
Add Geo-fence: Click to add a geo-fence. The method is the same as that above.
: Select a bounded geo-fence to be deleted, and click to delete it.
4.2.8 RFID Functions
The Radio Frequency Identification (RFID) functions are only available for the MVT600 and T1.
RFID functions include driver information management and RFID management. To better manage vehicles, the two functions
are used together.
1. Choose Manage > Manage Driver Information to add driver information.
2. Choose Manage > Manage RFID to create a RFID, and bind the RFID to a driver name.

MEITRACK MS02 User Guide
Copyright © 2014 Meitrack Group All rights reserved. - 26 -
Note: To manage RFIDs, driver information must be added first. RFIDs can be authorized. For details, see the MEITRACK RFID
User Guide.
4.2.9 Online Upgrade
The function is only available for the MT90, MVT100, MVT600, MVT800, and T1.
Upgrade firmware by Over-the-Air (OTA).
Enter the user name and password to log in to the OTA page.

MEITRACK MS02 User Guide
Copyright © 2014 Meitrack Group All rights reserved. - 27 -
For details, see the OTA User Guide.
4.3 Querying a Report
4.3.1 Alarm Report
Choose Reports > Alarm Report.
The alarm report page is displayed.

MEITRACK MS02 User Guide
Copyright © 2014 Meitrack Group All rights reserved. - 28 -
4.3.1.1 Search Criteria
Search alarms by the following method:
By device name. Enter the name of a device that is added to the system. If no device name is specified, all devices will be
searched.
By alarm type. Select an alarm type. If no alarm type is specified, all alarm types will be searched.
By time period. Select a time period.
4.3.1.2 Search
1. Click to search alarms. Alarm details are displayed, as shown in the following figure.
: If Get Address is selected, addresses will be displayed. One IP address can be used to parse a maximum of
2,500 addresses one day. If more addresses need to be parsed, locations will be displayed in latitude and longitude.
: Export data in an Excel file.
: Export data in a KML file.
2. Display an alarm point on the map.
Double-click an alarm. The alarm point together with the alarm type will be displayed on the map.

MEITRACK MS02 User Guide
Copyright © 2014 Meitrack Group All rights reserved. - 29 -
4.3.2 Historical Data Report
Choose Reports > History Report.
A historical data report includes regularly uploaded device data. Query these historical data to check device status in a specific
time period. This facilitates troubleshooting. Data within two months can be queried. Data before two months will be cleared
occasionally.
The historical data report page is displayed.
You can query historical data in the same way as the alarm report.
: Display historical routes.
: Select the check box to filter the same address while displaying the route.
The route with directions will be displayed on the map.

MEITRACK MS02 User Guide
Copyright © 2014 Meitrack Group All rights reserved. - 30 -
Menu Function
Switch to the start point.
Slow down the playback.
Play or stop
Speed up the playback.
Switch to the end point.
4.3.3 Speed Report (Pie Chart)
Choose Reports > Speed Report (Pie Chart).

MEITRACK MS02 User Guide
Copyright © 2014 Meitrack Group All rights reserved. - 31 -
Specify the device name, start time, and end time, and click . The pie chart will display the speed proportion. The function
helps learn drivers' driving habits and monitor drivers' speed.
4.3.4 Speed Report (Line Chart)
Choose Reports > Speed Report (Line Chart), specify the device name, start time, and end time, and click . The line chart
will display the speed trend. The function helps learn drivers' driving habits and monitor drivers' speed.

MEITRACK MS02 User Guide
Copyright © 2014 Meitrack Group All rights reserved. - 32 -
4.3.5 Parking Report
Choose Reports > Parking Report.
Specify the device name, parking duration, start time, and end time, and click to check the parking report.
Device Name: Select a device from the drop-down list, or leave it blank to search for all devices.
Parking Time: The unit is minute. For example, 00:45 indicates 45 minutes, and 01:23 indicates 1 hour and 23 minutes.
The minimum parking duration is 3 minutes. When the speed is lower than 10 km/h within over the parking duration, it
will be regarded as parking.
Parking Report: Information, such as the device name, start time, end time, spot, and time period, is displayed on this
area.
Get Address: If the Get Address check box is selected, addresses will be displayed. One IP address can be used to parse a
maximum of 2,500 addresses one day.
4.3.6 Distance Report
Choose Reports > Distance Report.

MEITRACK MS02 User Guide
Copyright © 2014 Meitrack Group All rights reserved. - 33 -
Specify the device name, start time, and end time, and click .
A distance is space between two parking points.
When the device speed is higher than 10 km/h for less than 3 minutes, the device is moving. When the device speed is lower
than 10 km/h for over 3 minutes, the device stops moving.
4.3.7 Distance Statistics Report
Choose Reports > Distance Statistics Report.
The report collects statistics on vehicle mileages in a specific time period.

MEITRACK MS02 User Guide
Copyright © 2014 Meitrack Group All rights reserved. - 34 -
4.3.8 Sensor Report
Choose Reports > Sensor Report.
The report can display fuel in graph after a formula is customized (see 3.2.2.3). For example, select a device (fuel sensor), set
the start time and end time, and click . The fuel changes are displayed, as shown in the following figure.

MEITRACK MS02 User Guide
Copyright © 2014 Meitrack Group All rights reserved. - 35 -
4.3.9 Sensor Average Value Report
Choose Reports > Sensor Average Report.
With the function, you can query average values of a sensor in a time period.
4.3.10 Platform Information
Choose Reports > Platform Message.
With the function, you can query information sent from the MS02 platform to the A21 sensor or from the A21 sensor to the
MS02 platform. Currently, A21 can be connected to MVT600 or T1 only.

MEITRACK MS02 User Guide
Copyright © 2014 Meitrack Group All rights reserved. - 36 -
4.3.11 Input Status Report
Choose Reports > Input Status Change Report.
4.3.12 Vehicle Driver RFID Report
Choose Reports > Vehicle Driver RFID Report.
The report is used to record driver attendance. Only MVT600 and T1 support RFID currently.

MEITRACK MS02 User Guide
Copyright © 2014 Meitrack Group All rights reserved. - 37 -
4.3.13 Photo Report
The function is only available for the MVT600 and T1.
Choose Reports > Picture Report.
Select a device, and specify the start time and end time to view photos.
Only the MVT600 and T1 support photographing.

MEITRACK MS02 User Guide
Copyright © 2014 Meitrack Group All rights reserved. - 38 -
4.3.14 Vehicle Maintenance
The function is only available for the TC68S.
Set the function in any of the following two ways:
1. Set by Meitrack Manager.The maintenance data is synchronized between the platform and the device after the device is
online.
2. Set by the MS02.
Choose Reports > Vehicle Maintenance.

MEITRACK MS02 User Guide
Copyright © 2014 Meitrack Group All rights reserved. - 39 -
Click to set the maintenance reminder. The reminder can be set only when the device is online.
4.4 Query
4.4.1 Querying a Location
Choose Search > Manual Location Search.

MEITRACK MS02 User Guide
Copyright © 2014 Meitrack Group All rights reserved. - 40 -
Query a location in any of the following two ways:
Queried by degree/minute/second. Specify Latitude and Longitude in degree/minute/second format. A device sends
messages in degree/minute/second format.
Queried by decimal.
Click Go. The location is displayed on the map.
4.4.2 Querying a Path
Choose Search > Get Directions.
The Get Directions window is displayed.
Enter the start point and destination, and click Search. The route will be displayed on the map. A is the start point, and B is the
destination.

MEITRACK MS02 User Guide
Copyright © 2014 Meitrack Group All rights reserved. - 41 -
4.4.3 POI
Choose Search > POI.
The function is used to mark points of interest (POIs).
4.4.3.1 Querying a POI
Query a POI that is added. Enter the POI name, and click . The result is displayed.

MEITRACK MS02 User Guide
Copyright © 2014 Meitrack Group All rights reserved. - 42 -
4.4.3.2 Adding a POI
To add a POI, display the destination. Click , and move the cursor to the destination. A dialog box is displayed, asking you
to enter the POI name. Then click Submit.
A dialog box is displayed, indicating that data is updated successfully. The POI will be displayed on the map.
4.4.3.3 Editing a POI
Select a POI to be edited, and click .

MEITRACK MS02 User Guide
Copyright © 2014 Meitrack Group All rights reserved. - 43 -
Move the cursor to a new POI on the map, enter the POI name, and click Submit. The old POI disappears after the new POI is
edited successfully.
4.4.3.4 Deleting a POI
Select a POI to be deleted, and click . A confirmation dialog box is displayed.
The following dialog box is displayed if the POI is deleted successfully:
Note: Press Ctrl or Shift to select multiple POIs at the same time.
4.4.3.5 Displaying a Selected POI
Select one or more POI, and click . The POI(s) are displayed.
4.4.3.6 Hiding POIs
Click to hide all POIs.
4.4.3.7 Displaying All POIs
Select Show all POI when map opens to display all POIs. The setting will affect forever.
4.4.3.8 Exporting POIs
Click to export POIs to an Excel file.

MEITRACK MS02 User Guide
Copyright © 2014 Meitrack Group All rights reserved. - 44 -
4.5 Control Panel
4.5.1 Device
4.5.1.1 Toolbar
: Enter a keyword to search for a device.
: Select all devices.
Deselect all devices.
: Save selected items. You can group the selected items and name the group.
: Enter a group name, and load the items in the group.

MEITRACK MS02 User Guide
Copyright © 2014 Meitrack Group All rights reserved. - 45 -
4.5.1.2 Device List
Input port status: When an input port is activated, the input port number is green.
Alarm status: No information is displayed when no alarm is generated. When is displayed, an alarm such as the SOS alarm,
overspeed alarm, geo-fence alarm, and low battery alarm is displayed.
Check box: indicates that the device is selected. indicates that the device is not selected. You can select multiple
devices simultaneously.
Device name: Set when you add the device.
Latest update: indicates the latest time of data received from the device. If the latest time is not consistent with the current
time, no device data has not been uploaded for a long time or data loading stops.
Transmission progress: indicates the data transmission progress. When you send a GPRS command, the progress is displayed,
such as Sending, Received, and Not Online.
Retry: If a GPRS command fails to be sent, click to send the command again.
4.5.2 Sending a Command

MEITRACK MS02 User Guide
Copyright © 2014 Meitrack Group All rights reserved. - 46 -
Ensure that the device has sent data to the server and is connected before a command is sent. Otherwise, a message will be
displayed, indicating that the command fails to be sent or the device is not online.
Model: indicates the device model. An incorrect model may result in command failures because different GPRS protocols
match different device models.
Command: A command can be sent by SMS or GPRS.
Send Command: Select the check box of a device, and click Send Command to send a command to the device by GPRS. For
details about command formats, see related product user guides.
Note: The MS02 can automatically detect the user time zone. Do not change the GPRS time zone, and remain default time zone
0. Otherwise, data may not be synchronized completely.
4.6 Status Bar
4.6.1 Status
Double-click a device in the device list. Device details will be displayed on the Status tab.
In the upper right corner, click to hide the whole status bar and maximize the main screen.
4.6.2 Alarm
Click the Alarm tab. Alarms generated for all devices are displayed.
4.6.3 Uploading a Report
Display device updates.
When a command fails to be sent, you can check whether the device is connected or sends new locations to the server on the
Updates tab. When a device is added, you can check whether the device sends data to the server.

MEITRACK MS02 User Guide
Copyright © 2014 Meitrack Group All rights reserved. - 47 -
5 MS02 Mobile Phone Version
The function is only available for iOS and Android.
Website: http://m.ms02.trackingmate.com/.
The user ID and password are the same as that of the MS02 computer system version.
Enter the user ID and password, and click Logon. The home page is displayed, as shown in the following figure.

MEITRACK MS02 User Guide
Copyright © 2014 Meitrack Group All rights reserved. - 48 -
Main functions:
1. Map: Vehicle locations can be displayed on the map in real time.
2. Device: Vehicle details, including the received time, latitude, longitude, speed, direction, altitude, and customized data, can
be queried.

MEITRACK MS02 User Guide
Copyright © 2014 Meitrack Group All rights reserved. - 49 -
Display: Click Display to switch to the map for displaying current device locations.
Track: Click Track to track devices in real time.
History track: Enter a time period to query the historical route.
Edit: Edit device information, such as the device name, password, model, and SIM card.
3. Command: Send a command by GPRS.
4. Settings: Set parameters shown in the following figure, and log out of the MS02.

MEITRACK MS02 User Guide
Copyright © 2014 Meitrack Group All rights reserved. - 50 -
If you have any questions, do not hesitate to email us at [email protected].