megiq vna-sandbox user guide vna-sandbox user guide megiq bv weegschaalstraat 3 5632 cw eindhoven...
TRANSCRIPT

VNA Sandbox User GuideVersion 2B
© 2013 - 2017, MegiQ www.megiq.com
MegiQVNA-Sandbox
User Guide
MegiQ BV
Weegschaalstraat 35632 CW EindhovenThe Netherlands
+31 (0)40 291 [email protected]
www.megiq.com

VNA Sandbox User GuideVersion 2B
table of contents
Table of Contents
table of contents...................................................................................................................3
general practice.....................................................................................................................5
about this guide....................................................................................................................6
performing a VNA measurement..........................................................................................7
calibration..............................................................................................................................9
Single port measurements.................................................................................................14
series resonant circuit (21).................................................................................................15
series resonant circuit with parallel resistor (22).............................................................16
series resonant circuit with resistor in series (23)...........................................................17
series resonant circuit with resistor parallel with inductor (24)......................................18
parallel resonant circuit (31)...............................................................................................19
parallel resonant circuit with parallel resistor (32)...........................................................20
parallel resonant circuit with resistor in series (33).........................................................21
parallel resonant circuit with resistor in series with inductor (34)..................................22
antenna circuit (41).............................................................................................................23
2-port measurements..........................................................................................................28
resistive Π-attenuator (15)..................................................................................................29
series resistor (16)..............................................................................................................31
low-pass filter (25)...............................................................................................................32
high-pass filter (26).............................................................................................................34
band-pass filter (43)............................................................................................................35
voltage controled low-pass filter (35)................................................................................36
www.megiq.com
© 2013 - 2017, MegiQ www.megiq.com

VNA Sandbox User GuideVersion 2B
© 2013 - 2017, MegiQ www.megiq.com
Aboutthis guide
VNA Sandbox User GuideVersion 2B
general practice
Vector network analysis is for electronic engineers and designers. The apparatus needs special care, it is by no means comparable to the robustness of most multimeter and oscilloscopes. If you are acquainted with the use of spectrum analysers you probably are on the safe side, since the vulnerabilities of spectrum analysers are in the same order as VNAs.
Misuse might damage the instrument or lead to nonsense results. Therefore you'll find a list below with suggestions to be on the safe side.
• Beware of the maximum input signals. With a VNA these are, just as with spectrum analysers, much lower then with e.g. an oscilloscope.There is often a difference between allowable AC and DC input. With the MegiQ VNA maximum DC input is 20 V and maximum AC input is +20 dBm (100mW into 50Ω -> 2.2V rms)
• Keep connectors clean and mate them carefully, not too tight or too loose.
• Be careful with cables:- If you use the 'real ones', the ones intended for measurement purposes:
- realize that they are very expensive- that mating them too often will wear them down.
- If you use inexpensive “standard” cables:- make sure not to move or bend them too much after calibrating the set-up. This way you can make good measurements with those inexpensive consumer grade cables.- check them before using them, specially look for good, stable contact.- throw them away every now and then, and use a fresh new one.
• Calibrate the whole set-up each time you make a change. Even if you change a cable with an other “same” cable. Most cables, although looking the same, are different, except the ones specially made to be the same. But those specials are very expensive.
• Use “SMA-savers” on the input connectors to the SMA, (a simple male-female adapter, or an adapter to an other standard, such as UFL).By using adapters, you (un)screw connectors at the “output side” of the adapter and not directly on the front panel. This way you make sure not to wear down the front panel SMA to much.The adapter itself is easily “calibrated-out”, so it will not spoil the measurement.
© 2013 - 2017, MegiQ www.megiq.com
4

VNA Sandbox User GuideVersion 2B
about this guide
This guide serves two goals. Because you might be new to vector network analysis, or you might be new to the MegiQ VNA models.
Learning a new instrument can be challenging, and although the MegiQ VNA has a very intuitiveuser interface, it still is a full blown VNA, with the many different features that make sense if you use them in the right way.
Therefore this Getting started helps you through both: getting used to the actual instrument and hands on training with vector network analysis.
Fore this you will use the MegiQ VNA-Sandbox, a PCB with several easy demo circuits, but wellchosen in order to present you with both the many features of the MegiQ VNA and the use of vector network analysis in every day life of an RF-engineer / -designer.
In principle you can use the MegiQ VNA-Sandbox with other VNAs in order to get accustomed to vector network analysis in case you do not have a MegiQ VNA available. In that case the buttons to push on the VNA will be different. And several measurements will be unavailable, because the MegiQ VNA -how simple it may look- has a lot to offer other instruments don't.
set-up
In this Getting Started we shall describe the set-up with the MegiQ VNA. You will need the following hardware / software:
• MegiQ VNA-0440 (standard or e-version) with USB cable and power adapter
• MegiQ VNA-Sandbox
• Windows XP or Win7 PC with the MegiQ VNA software installed
• SMA (f) to UFL (f) converter (3 times)
• coaxial cable UFL(m)-UFL(m) (3 times)
We presume the MegiQ VNA software has been installed. If not so, please refer to the Installation Guide.
Note that for some measurements, the ones using the internal bias generator or the third port, you will need the VNA-0440e.
the use of getting started
You can start with circuits on the MegiQ VNA-Sandbox where you want in this document, but if you are new to vector network analysis, we suggest to follow the order of this Getting Started manual. In all cases you should always start calibrating the set-up.
© 2013 - 2017, MegiQ www.megiq.com
5

VNA Sandbox User GuideVersion 2B
performing a VNA measurement
Performing a measurement with a Vector Network Analyser is not very difficult, as long as you do the right steps in the right order. These steps are independent of the kind of VNA measurement you want to do. It all just has to do with the use of the high frequencies, whichmakes it different from many other, lower frequency measurements.
• Think it all well over: what do you want to know, what do you want to do with the results, etc.?
• Choose the point where you want to measure. It is RF, so every millimetre counts: runlength transform impedances, so choose this point carefully.
• Make sure you use the right cables, connectors.
• Power up the instrument and let it warm up. (the MegiQ VNA is very temperature stable, so in most cases you do not have to wait)
• Make the right measurement set-up (hardware) and the set-up of the instrument. (using the PC software)
• Perform the calibration. (see “calibration”)
• Perform the measurements.
• Interpret and save the results.
© 2013 - 2017, MegiQ www.megiq.com
6
VNA Sandbox User GuideVersion 2B
© 2013 - 2017, MegiQ www.megiq.com
Calibration
VNA Sandbox User GuideVersion 2B
calibration
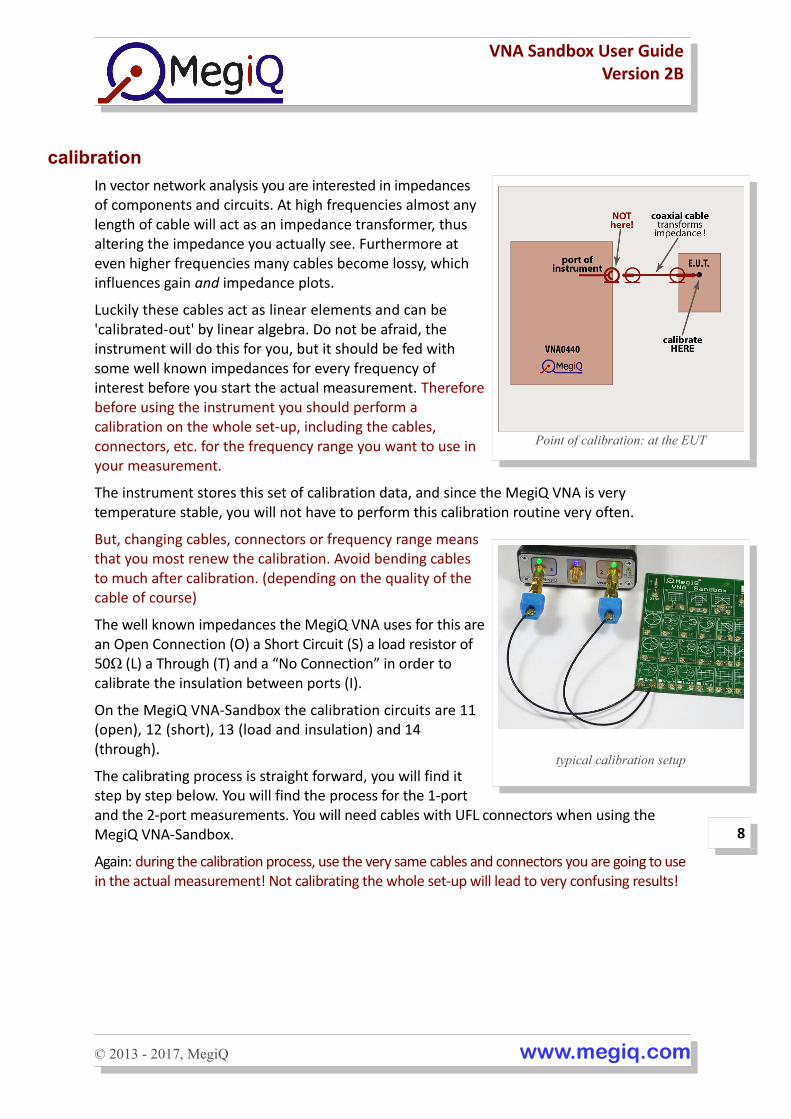
In vector network analysis you are interested in impedancesof components and circuits. At high frequencies almost anylength of cable will act as an impedance transformer, thusaltering the impedance you actually see. Furthermore ateven higher frequencies many cables become lossy, whichinfluences gain and impedance plots.
Luckily these cables act as linear elements and can be'calibrated-out' by linear algebra. Do not be afraid, theinstrument will do this for you, but it should be fed withsome well known impedances for every frequency ofinterest before you start the actual measurement. Thereforebefore using the instrument you should perform acalibration on the whole set-up, including the cables,connectors, etc. for the frequency range you want to use inyour measurement.
The instrument stores this set of calibration data, and since the MegiQ VNA is very temperature stable, you will not have to perform this calibration routine very often.
But, changing cables, connectors or frequency range meansthat you most renew the calibration. Avoid bending cablesto much after calibration. (depending on the quality of thecable of course)
The well known impedances the MegiQ VNA uses for this arean Open Connection (O) a Short Circuit (S) a load resistor of50Ω (L) a Through (T) and a “No Connection” in order tocalibrate the insulation between ports (I).
On the MegiQ VNA-Sandbox the calibration circuits are 11(open), 12 (short), 13 (load and insulation) and 14(through).
The calibrating process is straight forward, you will find itstep by step below. You will find the process for the 1-portand the 2-port measurements. You will need cables with UFL connectors when using the MegiQ VNA-Sandbox.
Again: during the calibration process, use the very same cables and connectors you are going to use in the actual measurement! Not calibrating the whole set-up will lead to very confusing results!
© 2013 - 2017, MegiQ www.megiq.com
8
Point of calibration: at the EUT
typical calibration setup

VNA Sandbox User GuideVersion 2B
the calibration pane
By selecting the calibration tab you get the calibration pane.
In the list “Calibration” you see what calibrations are needed. You can select a calibration you want to perform in this list and then press the button “Calibrate”. Of coarse after you made the right connections to known impedances. (The OSLT-kit)Green says the calibration has been done, red means there is no data.Note that the instrument does not know whether or not you changed anything since you lastcalibrated the set-up, so green does not always mean you've got a valid calibration!
check boxes
There are several check boxes.
• Dual Calkit: On the sand box, there are two of each calibration impedance (O, S, L,)This way you speed up calibration by doing two calibrations (both ports) at the same time, in case of a 2-port measurement.
• User Calibration: tells the instrument to use the calibration you perform with the OSLT kit.When this box is not checked the instrument will use the factory calibration at the SMA connectors of the instrument. You do not need to perform your own calibration now. But remember, the instrument will also measure any cable length, connectors, etc. that is in between the SMA of the instrument and your EUT. These will not be calibrated-out.
buttons
There are several buttons in the Calibration Pane:
• Calibrate: The instrument will calibrate what you just selected in the list. (double clicking in the list has the same effect)
• Renormalize: The instrument will apply the last calibration you made to the measurement data in the graphs. You can use this when you want to calibrate after you made your measurements, even on save data.
• Clear Data: This will clear the measurement data.
© 2013 - 2017, MegiQ www.megiq.com
9
Calibration Pane

VNA Sandbox User GuideVersion 2B
• Clear All: This will clear the measurement data and the calibration tables.
single-port calibration (OSL)
If you are performing a 1-port measurement, you only need the O,S and L, because there is no “through” to an other port and also the “insulation” between ports is of no importance. First in the GUI, load the session file “VSB Measurements.vns” and select the measurement “VSB21/22:LCR series” This will pre-set the instrument and the display, which is handy if you are an new-comer to the MegiQ VNA-0440. Later on you can do all these, or different settings yourself, depending on the measurement.
1. GUI, Tab Generator: choose frequency range & generator power as appropriate.
open
2. Connect the VNA to the “Open” circuit on the Sandbox (circuit 11)
3. GUI, Tab Calibration: select P1-Open and press Calibrate.
short
4. Connect the VNA to the “Short” circuit on the Sandbox (circuit 12)
5. select P1-Short and press Calibrate.
load
6. Connect the VNA to the “Load” circuit on the Sandbox (circuit 13)
7. select P1-Load and press Calibrate.
final check
Press Sweep. In the Smith chart all measurement points should now be close to the centre (50Ω) and in the Return Loss chart all points should be better then 45dB. (50 is better then 40 when it comes to Return Loss)
You are ready to go now, but remember, after changing cables, connectors or frequency range you'll have to renew the calibration!
2-port calibration (OSLTI)
If you are performing a 2-port measurement, you need the O, S and L on both ports, plus the “through” (T) from one port to the other and the “insulation” (I) between both ports.
First in the GUI, load the session file “VSB Measurements.vns” and select the measurement “VSB25: CLC LPF” This will pre-set the instrument and the display, which is handy if you are a new-comer to the MegiQ VNA-0440. Later on you can do all these, or different settings yourself, depending on the measurement.
© 2013 - 2017, MegiQ www.megiq.com
10

VNA Sandbox User GuideVersion 2B
instrument set-up
1. GUI, Tab Generator: choose frequency range & generator power as appropriate.
open
2. Connect both ports to the “Open” circuits on the Sandbox (circuit 11)
3. GUI, Tab Calibration: select P1-Open / P2-Open and press Calibrate.
short
4. Connect both ports to the “Short” circuits on the Sandbox (circuit 12)
5. select P1-Short / P2-Short and press Calibrate.
load
6. Connect both ports to the “Load” circuits on the Sandbox (circuit 13)
7. select P1-Load / P2-Load and press Calibrate.
insulation
8. The insulation between the two ports will be calibrated together with the load calibration above, so you do not need to perform any special action for that.
through
9. Connect both ports to the “Through” circuit on the Sandbox (circuit 14)
10. select P2-Tru-P1 and press Calibrate.
final check
Connect both ports to the “Load” circuit on the Sandbox (circuit 13).
Press Sweep. In the Smith chart all measurement points should now be close to the centre (50Ω) and in the Return Loss chart all points should be below 40dB.
You are ready to go now, but remember, after changing cables, connectors or frequency range you'll have to renew the calibration!
saving your calibration
You can press the button “Save As” and give your configuration a name. Specially the 2-port calibration is quiet some work. After saving the configuration, you also save the calibration tables and thus you'll have the saved configuration to go back to. Of coarse this only gives you a valid calibrated set-up as long as you change nothing.
© 2013 - 2017, MegiQ www.megiq.com

VNA Sandbox User GuideVersion 2B
© 2013 - 2017, MegiQ www.megiq.com
12
Single-PortMeasurements

VNA Sandbox User GuideVersion 2B
Single port measurementsNow you are ready to start performing actual measurements on the MegiQ VNA-Sandbox. RF in real Life! You will find a description of every circuit on the Sandbox together with an explanation what you see on the VNA display, and more important: “What does it mean”.
real life circuits!
No, do not be afraid, these RF circuits are not “life” in the sense of dangerous voltages. No, the VNA uses low signal levels which are not dangerous. With Real Life Circuits we mean: circuits you are likely to encounter in your day-to-day work as an RF-engineer.
experiment!
You can experiment freely with the circuits on the MegiQ VNA-Sandbox. Feel free to watch the effects of a loosely connected cable, of changing one cable by a slightly longer one without recalibrating. Also the effects of touching the circuit under test, or in case of the antenna experiments, just putting your hand in the neighbourhood of the circuit.
using the sandbox
This is very easy. Every circuit has a number, one or more UFL connectors and a small graph of the expected results. Connect the instrument to the connectors of the circuit of your choice, do the right settings on the instrument and perform the measurement.
The circuits and the measurements on it are explained in this document, one chapter per circuit You can start with any circuit at will. But if you are a new-comer to vector network analysis, we suggest you start in the order of this manual.
calibration
Of course, you have already calibrated the set-up with connectors and cables you are going to use in the real measurements. If not so, see the previous pages under “calibration”. The instrument is very stable, so once calibrated you can go on for quiet some time.
enjoy!
It is not for an exam. So play around and learn, learn and learn. And do no forget to enjoy, because learning RF is fun!
© 2013 - 2017, MegiQ www.megiq.com
13

VNA Sandbox User GuideVersion 2B
series resonant circuit (21)An ideal series resonant circuit consist of a pure capacitorin series with an inductor and is therefore a pureimaginative impedance, except at resonance where thecapacitive and the inductive part cancel each out resultingin a short circuit, which is a 'zero-vector' in the origin soyou cannot define it being real or imaginative atresonance.
what do you see
All pure imaginative impedances reside on the outer rim ofthe Smith chart. At very high frequencies the impedance isvery high due to the inductor. on the low side of thespectrum it is very high due to the capacitor. In betweenthe impedance goes from high through zero, to high again.As soon you see the graph of a series resonant circuit leave the outer rim going a bit to the middle it tells you that the circuit is not that ideal at all (which is with anything in real life)
Anything within the Smith chart is lossy, so there are pure resistive ('real') elements in the circuit. This has to do with the circuit-Q. Affecting this are resistance of the inductor (plus theskin effect), dielectric losses in the capacitor and PCB material.
You also see that these losses increase at higher frequencies.
Note: losses in the cables are NOT contributing to this effect. You've calibrated these out.. (You do have calibrated the whole set-up including cables and connectors, haven't you?)
All points outside the graph indicate a negative real resistance, e.g. an active circuit, like an oscillator, but this is not the case with circuit 21.
© 2013 - 2017, MegiQ www.megiq.com
14
explanation of the display
typical measurement display
schematic

VNA Sandbox User GuideVersion 2B
series resonant circuit with parallel resistor (22)Here the series resonant circuit is bypassed by a pureresistor, introducing a reel part in the impedance.
what do you see
Near to resonance you will see about the same behaviouras with the previous circuit, because the impedance of theLC is very low at those frequencies, thus shorting out theresistor.
But, when you move away from resonance, the impedanceof the LC will go way up and the influence of the parallelresistor will be greater, until finally, you only “see” thisresistor (50Ω). Above resonance the circuit is more like alossy inductor and on below resonance it looks like a verylossy capacitor.
Here the curve is much more to the inner of the chart, indicating a “lossy circuit”. Note that the word “lossy” only applies to the port you are looking into. It means there is less power “coming back”.
© 2013 - 2017, MegiQ www.megiq.com
15
explanation of the display
typical measurement display
schematic
VNA Sandbox User GuideVersion 2B
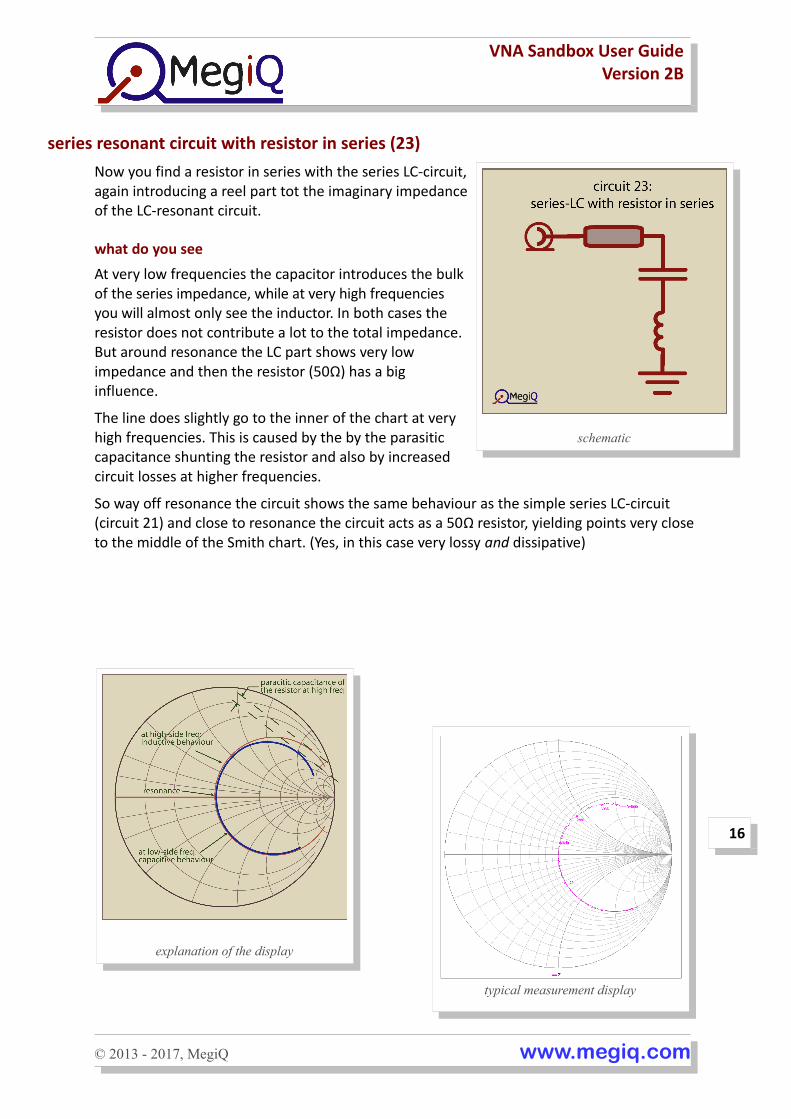
series resonant circuit with resistor in series (23)Now you find a resistor in series with the series LC-circuit,again introducing a reel part tot the imaginary impedanceof the LC-resonant circuit.
what do you see
At very low frequencies the capacitor introduces the bulkof the series impedance, while at very high frequenciesyou will almost only see the inductor. In both cases theresistor does not contribute a lot to the total impedance. But around resonance the LC part shows very lowimpedance and then the resistor (50Ω) has a biginfluence.
The line does slightly go to the inner of the chart at veryhigh frequencies. This is caused by the by the parasiticcapacitance shunting the resistor and also by increasedcircuit losses at higher frequencies.
So way off resonance the circuit shows the same behaviour as the simple series LC-circuit (circuit 21) and close to resonance the circuit acts as a 50Ω resistor, yielding points very closeto the middle of the Smith chart. (Yes, in this case very lossy and dissipative)
© 2013 - 2017, MegiQ www.megiq.com
explanation of the display
typical measurement display
16
schematic
VNA Sandbox User GuideVersion 2B
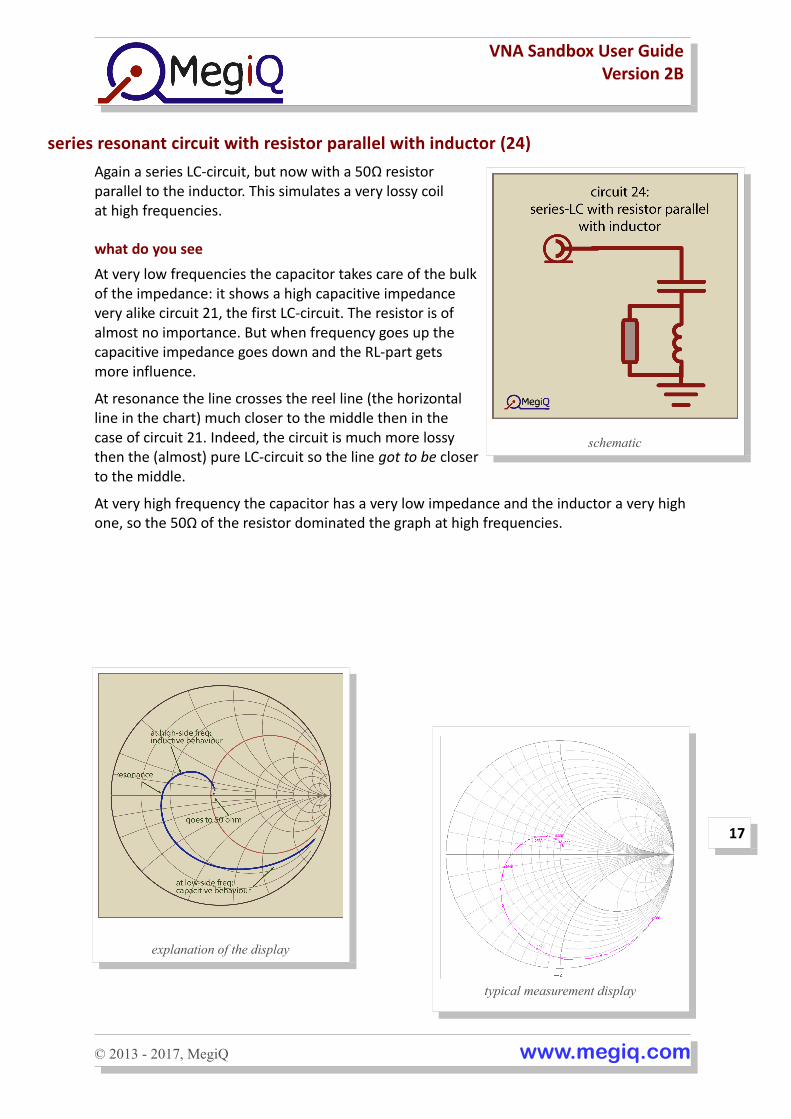
series resonant circuit with resistor parallel with inductor (24)Again a series LC-circuit, but now with a 50Ω resistorparallel to the inductor. This simulates a very lossy coil at high frequencies.
what do you see
At very low frequencies the capacitor takes care of the bulkof the impedance: it shows a high capacitive impedancevery alike circuit 21, the first LC-circuit. The resistor is ofalmost no importance. But when frequency goes up thecapacitive impedance goes down and the RL-part getsmore influence.
At resonance the line crosses the reel line (the horizontalline in the chart) much closer to the middle then in thecase of circuit 21. Indeed, the circuit is much more lossythen the (almost) pure LC-circuit so the line got to be closerto the middle.
At very high frequency the capacitor has a very low impedance and the inductor a very high one, so the 50Ω of the resistor dominated the graph at high frequencies.
© 2013 - 2017, MegiQ www.megiq.com
schematic
explanation of the display
typical measurement display
17

VNA Sandbox User GuideVersion 2B
parallel resonant circuit (31)
parallel resonant circuit with parallel resistor (32)
parallel resonant circuit with resistor in series (33)
parallel resonant circuit with resistor in series with inductor (34)
antenna circuit (41)
2-port measurements
resistive Π-attenuator (15)
series resistor (16)
low-pass filter (25)
high-pass filter (26)
band-pass filter (43)
voltage controled low-pass filter (35)
Please contact MegiQ for more information about the VNA-Sandbox that includes the full version of this tutorial.
+31-40-2911479
© 2013 - 2017, MegiQ www.megiq.com
18
Dual-PortMeasurements