meet your neato
TRANSCRIPT

MEET YOUR NEATO • 认识您的 NEATO

INTRODUCING NEATO
Congratulations on your new home robot! Neato can’t wait to start vacuuming – so you don’t have to. This guide introduces you to Neato’s features and gives you some important pointers to set up and maintain your robot.
And don't forget to register your Neato at www.neatorobotics.com to activate your Warranty and get product updates and special offers.
Leave the vacuuming to Neato. What will you do with your free time?
Go to page 1
NEATO 简介
恭喜您拥有一台新的家用机器人!Neato 已经迫不及待准备吸尘
打扫房间了 – 您可省事又省心。本指南将介绍 Neato 的功能并
向您提供一些重要提示,帮助您设置和维护您的机器人。
请记得在 www.neatorobotics.com 注册您的 Neato,以激活
保修,并获得产品更新和特别优惠。
放心将吸尘打扫工作交给 Neato。空闲时间将做些什么?
前往第 5 页

GETTING STARTED • English PAGE 1
1 2 4
3
SETTING UP YOUR NEATO See inside back cover for pictures that show the robot parts.
IMPORTANT! Remove the protective film from Neato’s screen and charge base. If the films are left on, the robot may not be able to see your home or find its charge base.
Plug the power cord securely into the charge base.
Adjust the length of the cord by wrapping it as shown.
IMPORTANT! Open the dirt bin and push DOWN on the Battery ON/OFF switch.
BATTERY ON/OFF SWITCH
OFF
ON
Choose a wall outlet that has a 3' (1 m) clearance on both sides and in front of the charge base. This helps your robot find the charge base.
Plug in the power cord and push the charge base against the wall. Place the rounded side of your Neato against the metal contacts on the charge base.
Find your language using arrows to the right of the screen.
Press SELECT button under the screen to choose a language.
5

CHARGING AND OPTIMIZING THE BATTERY • Before using, charge your Neato
overnight – about 12 hours.
• IMPORTANT! To get the most from your battery, charge it and discharge it completely two to three times.
• Always put your Neato back on its charge base when you are finished cleaning.
Status Lights
SOLID GREEN Fully charged and ready to clean.
BLINKING GREEN Charging, battery not fully charged, can clean.
BLINKING AMBER Charging, can’t clean yet.
SOLID AMBER Error, see message on screen.
CONFIGURING YOUR NEATO • Wake up Neato by pressing the
button. It may take a few seconds to wake up.
• From the home screen, press the SELECT button to get to the MENU.
Clock
• Select Set Clock and follow screens to set the time.
Schedule
• Select Schedule.
• Choose Set or Change and follow the screens to schedule cleaning.
GETTING STARTED • English PAGE 2

MAKING YOUR HOME NEATO FRIENDLY • Clear the area of small items like
toys and clothing–furniture is OK. Tie up wires, curtains and other low-hanging items.
• To keep your robot out of places you don't want it to go, set down boundary markers included in the package. You can cut them to fit.
• IMPORTANT! Keep your robot away from liquids and wet areas. Move or cover pet bowls and plant trays.
• Keep your Neato inside the house. It was not designed for outdoor cleaning or freezing temperatures.
• Be aware that shiny surfaces and black floors might confuse your robot.
USING YOUR NEATO
Wake Up
• Press the button to “wake up” your Neato.
Start Cleaning
• CLEAN House - Press the button to clean your house.
• CLEAN Spot – Press the button to clean a 4’ (1.2 m) x 6’ (1.8 m) square in front of your Neato.
Pause Cleaning
• Press or button.
Stop Cleaning
• Press or button.
• Press the arrows to highlight Stop Cleaning.
• Press SELECT using button under the screen on the PAUSE Menu or RESUME Menu.
Sleep
Hold the button down for 5 seconds to put your Neato to "sleep".
GETTING STARTED • English PAGE 3
MAINTAINING YOUR NEATO
IMPORTANT! Your robot needs regular maintenance to operate reliably.
Dirt Bin and Filters
• After each use, empty the dirt bin and clean the filter and airways/openings.
• Replace the filter in the dirt bin every one to two months.
Sensors
• Use a dry cotton swab to clean the two drop sensor windows on the bottom of the robot.
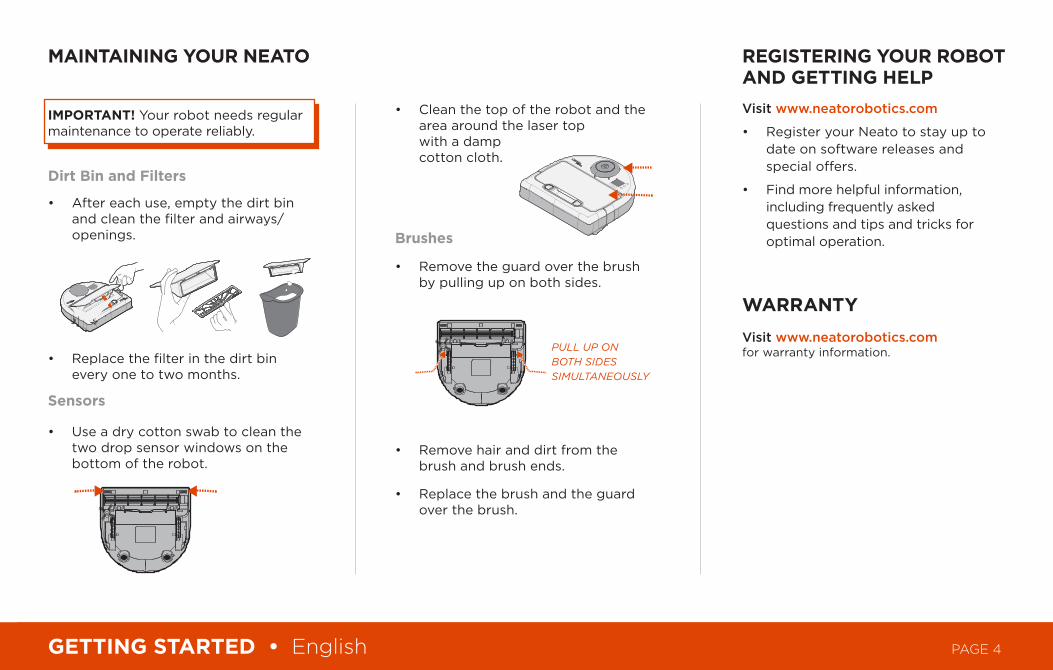
• Clean the top of the robot and the area around the laser top with a damp cotton cloth.
Brushes
• Remove the guard over the brush by pulling up on both sides.
PULL UP ON BOTH SIDES SIMULTANEOUSLY
• Remove hair and dirt from the brush and brush ends.
• Replace the brush and the guard over the brush.
REGISTERING YOUR ROBOT AND GETTING HELPVisit www.neatorobotics.com
• Register your Neato to stay up to date on software releases and special offers.
• Find more helpful information, including frequently asked questions and tips and tricks for optimal operation.
WARRANTY
Visit www.neatorobotics.com for warranty information.
GETTING STARTED • English PAGE 4

入门指南 • 简体中文 第 5 页
1 2 4
3
设置您的 NEATO 在封底内页查看机器人部件图片。
重要信息!从 Neato 屏幕和充
电基座揭下保护膜。如果保护
膜留在上面,机器人可能无法清
晰地看到您的家,或者找到充电
基座。
将电源线稳固地
插入充电基座。
按图中所示缠绕,调整
电源线长度。
重要信息!打开尘盒,然后按下
电池打开/关闭开关。
电池打开/ 关闭开关
OFF
ON
选择一个充电基座两边及前方空隙
达 3 英尺(1 米)的壁装电源插座。
这可帮助您的机器人找到充电基座。
插入电源线,将充电基座推倚在墙壁上。
将 Neato 的圆形侧顶在充电基座的金属接
触点。
利用屏幕右侧的箭头寻找适合您的
语言。
按屏幕下方的
“SELECT(选择)”
按钮选择语言。
5

电池充电和优化
• 使用前,请在头天晚上将 Neato 充电
约 12 个小时。
•• 重要信息!为最大限度地发挥电池作
用,请在充满电后再将电量耗尽,如此
循环两到三次。
• 完成清扫后,请始终将 Neato 放回充
电基座上。
状态指示灯
常亮绿色 充满电,准备清扫。
闪烁绿色
正在充电,但未充满,可以进行清扫。
闪烁琥珀色
正在充电,不可以进行清扫。
常亮琥珀色
错误,查看屏幕上的消息。
配置您的 NEATO
• 按 按钮唤醒 Neato。唤醒可能需要
几秒钟。
• 从主屏幕上,按选择按钮前往菜单。
时钟
• 选择设置时钟,然后按照屏幕提示设置
时间。
定时预约
• 选择定时预约。
• 选择设置或更改,然后按照屏幕提示定时
预约清扫。
入门指南 • 简体中文 第 6 页
滚动
后退选择

打造 NEATO 友好的家庭
• 清理摆放玩具和衣物等小物件的区域–
家具也可以。捆扎丝线、窗帘和其它低
垂物件。
• 要使机器人远离您不想打扫的区域,可
以放置包装中附带的边界标记。您可手
工裁剪,以方便使用。
•• 重要信息!使您的机器人远离液体和
潮湿区域。移走或盖上宠物碗和植物
托盘。
• Neato 只适用于多房间内清扫。不可
将其用于户外清扫,或在冻结温度环境
下使用。
• 请注意,光滑的表面和黑色地板可能干
扰机器人运作。
使用您的 NEATO
唤醒
• 按 按钮“唤醒”您的 Neato。
开始清扫
• 清扫多房间 - 按 按钮
清扫多房间。
• 清扫定点 – 按 按钮
清扫 Neato 前方 4 英尺
(1.2 米)x 6 英尺(1.8 米)
的区域。
暂停清扫
• 按 或 按钮。
停止清扫
• 按 或 按钮。
• 按箭头突出显示停止清扫。
• 使用暂停菜单或
恢复菜单屏幕下
方的按钮按选择。
睡眠
按住 按钮 5 秒钟,将 Neato 调到“睡
眠”模式。
入门指南 • 简体中文 第 7 页
维护您的 NEATO
重要信息!为确保机器人可靠运行,需对其
进行定期维护。
尘盒和过滤器
• 每次使用后,清空尘盒,并清洁过滤器
和通风道/开口。
• 一到两个月更换一次尘盒中的过滤器。
传感器
• 使用干棉签清洁机器人底部的两个防跌
落传感器窗口。
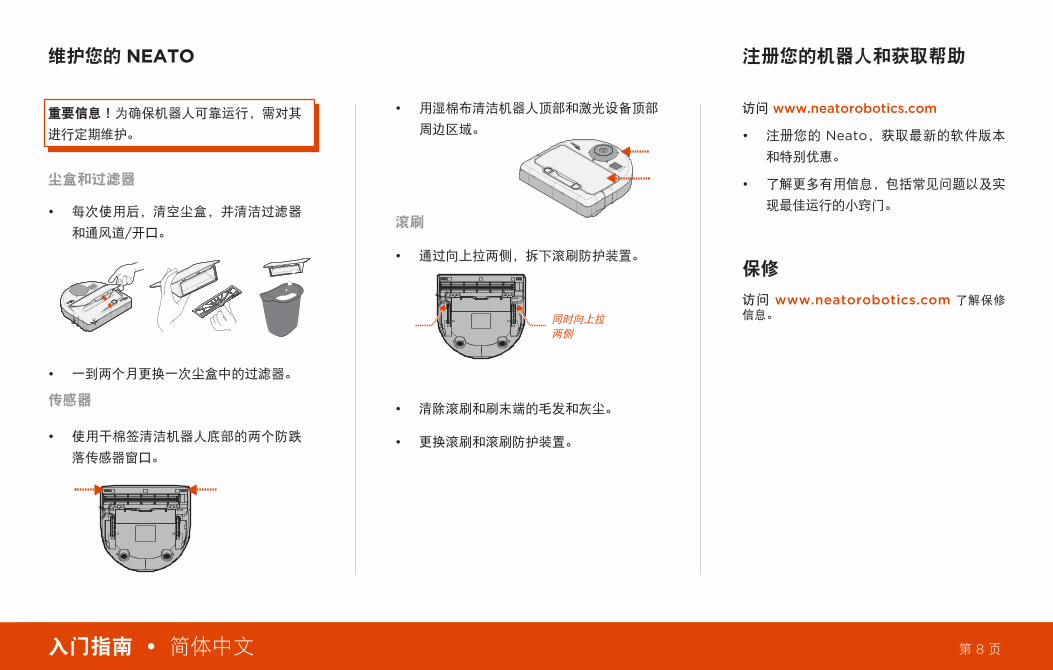
• 用湿棉布清洁机器人顶部和激光设备顶部
周边区域。
滚刷
• 通过向上拉两侧,拆下滚刷防护装置。
同时向上拉 两侧
• 清除滚刷和刷末端的毛发和灰尘。
• 更换滚刷和滚刷防护装置。
注册您的机器人和获取帮助 访问 www.neatorobotics.com
• 注册您的 Neato,获取最新的软件版本
和特别优惠。
• 了解更多有用信息,包括常见问题以及实
现最佳运行的小窍门。
保修
访问 www.neatorobotics.com 了解保修信息。
入门指南 • 简体中文 第 8 页

ENGLISH - 1) Dirt Bin 2) RobotTop 3) Laser Top 4) Screen 5) Bumper 6) Cleaning House 7) Cleaning Spot
简体中文 - 1) 尘盒 2) 机器人顶部 3) 激光设备顶部 4) 屏幕 5) 缓冲器 6) 清扫多房间 7) 清扫定点
1 3
4
67
2
5
8
9
12
13
11
10
14
15
ENGLISH - 8) Brush Guard 9) Brush 10) Side Brush 11) Drop Sensor Window 12) Battery Door 13) Serial Number Label 14) Charging Contacts 15) Wheel
简体中文 - 8) 滚刷防护装置 9) 滚刷 10) 侧滚刷 11) 跌落传感器窗口 12) 电池门 13) 序列号标签 14) 充电接触点 15) 轮子

neatorobotics.com | Neato Robotics, Inc., 8100 Jarvis Avenue, Suite 100, Newark, CA 94560 USA