medj'k'ai nebula 1 kelysine crashland -...
TRANSCRIPT

Medj'K'ai Nebula
1
Kelysine
Crashland
After six months the Separatists begin to
realise there will be no rapid conclusion
to the Clone Wars. In growing desperation
the leadership agrees to an enhancement to
their strategy: the establishment of
autonomous cells in remote areas of the
galaxy. Each cell is commanded by a fully-
armed Federation cruiser, is given its own
funding, told to go to ground and is tasked
with extending the fight against the
Republic in any way it can.
Under cover of a raid on a major system in
the Medj'K'ai Nebula, a minor sector in the
Outer Fringe, one such cell is established.
Short of military resources, the Separatist
Cell develops a creative solution and

Kelysine Crashland Medj'K'ai Nebula - 1
2
begins construction of an army big enough
to dominate the entire sector…
A 4-part Star Wars™ d20™ RCR Scenario for 4-6 1st-
2nd level characters
An introduction to the Medj'K'ai Nebula: Enclave of
Ice, Part I v4
By Tim Bancroft
Page 3
Contents
Introduction.............. 4
Aim ........................... 4
Location ...................... 4
Era of Play ................... 4
Time and approach ............. 4
Setting and Skills ............ 4
The Holonet ...................................................4 Goods and Prices ..........................................4 Starship Repair ..............................................5 Trade Federation/MNMC................................5
Part 1 - Crashland........ 6
Justification ................. 6
Jedi/Nobles with Soldiers & Tech Specialists .6 Group does not contain Jedi/Nobles...............6 Spacers .........................................................6
The Accident .................. 6
Landing on the Moon ........... 8
After the Crash ............... 9
Transfer in the Cold........................................9
Part 2 - Decisive Action. 10
Droids and Destruction ....... 10
Part 2 Possible Strands ...... 10
Strand 1 - Wandering ...................................10 Strand 2 - Repair the Freighter.....................10 Strand 3 - Search the Warehouses ..............10 Strand 4 - Investigating the Spoil Heaps.......11 Strand 5 - The Control Centre ......................11
Captured Heroes .............. 12
Part 3 - The Control Centre13
Console location ..........................................13 Base Personnel ............... 13
Personnel location .......................................13 CEW Locations ............................................13
Key Locations ................ 13
Medical Centre.............................................13 Power and Exhaust ......................................14 Secure Area.................................................14 Control Tower ..............................................14 Mining Corridor ............................................14 The Cavern ..................................................15
Part 4 - Cloud Mine Captives
......................... 16
The Shield-Station ........... 17
The Cloud Mine ............... 17
If the Moon is overrun ..................................17 Gerak's Last-Minute Surprise .......................17
Enslaved Heroes .............. 18
What happens to the Heroes?......................18 Broken Carbonite Freezing plant..................18
Cloud Mine Slaves ............ 19
General Cell Procedure................................19 Work, Shift and Patterns change-over..........19 New Slave-Prisoners....................................19 Prisoner/Slave Care.....................................19 Crew Quarters/Cells.....................................19 Work Locations ............................................20 Control Core ................................................20 If the slaves escape .....................................20
Known Alternatives ........... 20
Epilogue - Wrapping it up 21
Final XP ..................... 21
Rewards ...................... 21
Key NPCs................. 23
Standard LWD- series droid ... 23
CEWs, Droids and Remote Droid
Brains ....................... 23
Standard CEWs ...........................................23 Mining Brain Controlled CEWs.....................23 Heavy Restraint CEWs ................................23 Remote Brains and CEW control..................23
Knowledge .................... 24
Oy'sar Moy'inar - Base Commander25
Gerak-T'shon, Mine Boss ...... 25
Gerak's Gang - Thugs ......... 25
Administrators ............... 25
Guards/Laser Cannon Operators 25
Traffic Controllers .......... 26
Pshee Kemaar ................. 26
Twi'lek Spacer - Fith'an 'Oree 26
Freighter Starmech droid ..... 26
Additional Data.......... 27
Corellian Engineering YT-1457
Light Freighter .............. 27
Cob Class Cargo Shuttle ...... 27
Conventions
The information in this document is meant to be for a GMs use only. It is recommended that GMs read right through the scenario before running the adventure. However, some of the information can be read out directly to players, or is of particular importance to GMs.
As a result, the following presentation conventions are used throughout this document.
Information contained within such a dashed, shaded box is capable of being disclosed to characters who research the system on the Holonet or who make a successful Knowledge(Medj'K'ai) roll, DC 15. Take 10 is often possible.
Experience points are shown in yellow, based on 1
st or 2
nd level heroes. If the average level is
higher, drop the awards accordingly.
If successful, this counts as a challenging Encounter Goal and earns 300 XP.
Highlights and briefings which should be read to the players have the following shadowed format.
Read or paraphrase anything within a shadowed box directly to the players, or the relevant PC, "as is" if necessary but, at least, with minimal modification. Such a box contains game-related experience and action which will affect the players.
Particularly important notes to the GM tend to be put in italics like this. Such instructions refer to key plot moments or to particularly important NPC actions. It is suggested that GMs read the complete scenario first, especially the Key NPC section, to see how the NPCs may react.
Copyright & Disclaimer
This is a role-playing scenario based on, and requiring, the Wizards of the Coast (WotC) Star Wars d20 Roleplaying Game Revised Core Rulebook (RCR). This is not an official publication and is not endorsed by Lucasfilms, LTd, or WotC.
Information referenced within the RCR is Copyright © WotC. STAR WARS ® ™and © 2001 Lucasfilms, Ltd., Title, character and place names protected by trademark laws. Material presented within this document is not for sale and cannot be deemed a contest of the rights and ownership of Lucasfilms, Ltd., or its licensees, including WotC. References to films and plot lines are included for placement purposes only.
The document may not be distributed, reproduced or displayed other than where it is presented without the prior permission of the author. Reproduction with intent of sale, or of actual sale, may be deemed an infringement of Copyright Law.
Original material within this document is copyright the author. The author can be contacted via email on [email protected].
Kelysine Crashland Medj'K'ai Nebula - 1
4
Introduction
This scenario is intended for a group of between 4 to 6 first- or second- level Heroes, preferably with one or two Jedi (Consular or Guardian). The
companion GMs document "Kelysine Crashland Plans" is extremely useful, but not absolutely necessary as the GM can make such plans up on their own, and use their own ships and craft. The Medj'K'ai Nebula Players Guide and GMs Guide (PG and GMG) are useful for background information, but the scenario as written does not assume any resources other than the SW d20 RPG RCR, though the Heroes Guide and Power of the Jedi sourcebook may be useful.
This is the first part of a trilogy of adventures: the Enclave of Ice. Together they will give the players a solid background to the core planets and politics in the Medj'K'ai Nebula.
Aim
The Separatists have developed a prototype long-range remote droid control system and a way of retrofitting the antenna and remote droid brain communication system into any droids. This overrides their built-in abilities, the droids losing whatever programming they have normally, becoming combat-enabled droids instead.
This could be a serious threat to the future of the Nebula and, if not stopped, could even turn the tide of the Clone Wars.
The initial aim of the adventure is for the Heroes to transport two seriously injured freighter crew to suitable medical facilities and ensure their accident-damaged freighter comes to no further harm. This is complicated by the fact that the group crash-lands onto a moon and uncovers the clandestine Separatist droid prototype manufacturing facility in the early stages of construction.
They may also uncover and rescue enslaved cloud-miners in the atmosphere of the gas supergiant - which is being used as cover for the subterranean factory. As a bonus they may also apprehend a wanted criminal with a bounty on his head who is hiding amongst the staff in the undercover operation.
This is a challenging scenario: there is only a single long break for the heroes, plus the possibility of a few short breaks. GMs may wish to alter recovery times or increase XP awards.
Location
The adventure is based in the Medj'K'ai Nebula, an out-of-the-way Sector on the Outer Rim, fairly close to Mon Calamari. The nebula is renowned for difficult travel due to the large number of small meteoroids, dust and the presence of a number of microscopic black holes - though there are not as powerful or as dangerous as those in the Maw. Due to the constant need to keep updated astrogation information, this makes trade and contact into or
from the nebula only profitable for specialists, normally smaller traders.
Era of Play
This scenario, meant to be the first in a Medj'K'ai Nebula campaign, starts shortly after the start of the Clone Wars, between 6 to 9 months after the explosive events on Geonosis. The Separatists, under the control of the Techno-Union and Trade Federation have carried out a few successful raids within the sector but, on the whole, have left it alone in favour of other, more strategic and lucrative parts of the Galaxy - much why it has been left alone for centuries.
Under cover of the raids the local, and supposedly independent, Medj'K'ai Nebula Mercantile Combine have established an undercover guerrilla cell tasked with continuing the struggle using new and imaginative solutions…
Time and approach
The scenario should take around 9-12 hours of play to complete, assuming the Heroes carry out all the possible tasks. Experience shows that it can be complete in 2 long sessions or 3-4 shorter sessions. It is best suited to groups who use an effective mix of brawn and brain.
Setting and Skills
The Holonet
Use of the holonet in the nebula is sporadic - refer to the GMs guide for details but it is currently only active on a d20 result of 12+. When inactive, Heroes can attempt to force a connection by altering the device making the connection beyond its operational limits - DC 21+, DMs Computer Use, with re-rolls not possible. Heroes may take 10, but not 20, as a failure by 5+ means the device needs repairing;.
Where the information is of vital use to the group, up to 75 XP can be awarded to the successful PC at the GMs discretion.
Goods and Prices
Trade outside the nebula is sporadic: there are very few traders willing to risk their ships and hyperdrives, or are even prepared to carry out the constant repairs from dust-damage. Those who are specialists, prepared to adapt to the nebula and its problems - but charging a premium for the privilege.
As a result, relatively simple articles which can be built within the nebula are normal price. Such articles would be ATCs or Blaster Pistols. More advanced or more difficult items, such as eWeb repeating blasters or Bakta tanks, tend to be at a premium - as much as 20-50% above normal prices.
Highly complex or specialised items, such as starfighters or combat craft, will tend to be 50-100% more expensive than normal, if they are available at all, and would normally have to be shipped in from outside.
Freighters and starships within the nebula are classic Fringer affairs: almost cobbled together
Kelysine Crashland Medj'K'ai Nebula - 1
Page 5
with glue and string. The most common ships are those manufactured by the Losshaven Engineering Corporation who has a virtual monopoly on many mechanical or electronic equipment within the Nebula.
Starship Repair
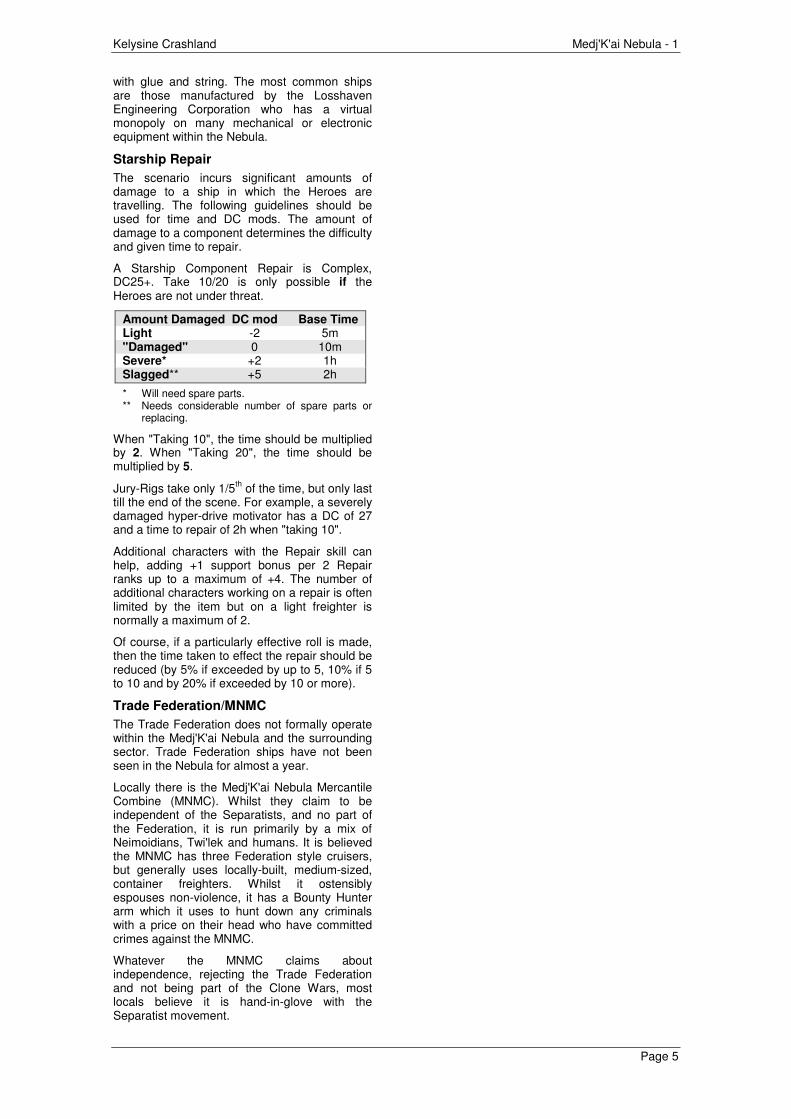
The scenario incurs significant amounts of damage to a ship in which the Heroes are travelling. The following guidelines should be used for time and DC mods. The amount of damage to a component determines the difficulty and given time to repair.
A Starship Component Repair is Complex, DC25+. Take 10/20 is only possible if the Heroes are not under threat.
Amount Damaged DC mod Base Time Light -2 5m "Damaged" 0 10m Severe* +2 1h Slagged** +5 2h
* Will need spare parts. ** Needs considerable number of spare parts or
replacing.
When "Taking 10", the time should be multiplied by 2. When "Taking 20", the time should be multiplied by 5.
Jury-Rigs take only 1/5th
of the time, but only last till the end of the scene. For example, a severely damaged hyper-drive motivator has a DC of 27 and a time to repair of 2h when "taking 10".
Additional characters with the Repair skill can help, adding +1 support bonus per 2 Repair ranks up to a maximum of +4. The number of additional characters working on a repair is often limited by the item but on a light freighter is normally a maximum of 2.
Of course, if a particularly effective roll is made, then the time taken to effect the repair should be reduced (by 5% if exceeded by up to 5, 10% if 5 to 10 and by 20% if exceeded by 10 or more).
Trade Federation/MNMC
The Trade Federation does not formally operate within the Medj'K'ai Nebula and the surrounding sector. Trade Federation ships have not been seen in the Nebula for almost a year.
Locally there is the Medj'K'ai Nebula Mercantile Combine (MNMC). Whilst they claim to be independent of the Separatists, and no part of the Federation, it is run primarily by a mix of Neimoidians, Twi'lek and humans. It is believed the MNMC has three Federation style cruisers, but generally uses locally-built, medium-sized, container freighters. Whilst it ostensibly espouses non-violence, it has a Bounty Hunter arm which it uses to hunt down any criminals with a price on their head who have committed crimes against the MNMC.
Whatever the MNMC claims about independence, rejecting the Trade Federation and not being part of the Clone Wars, most locals believe it is hand-in-glove with the Separatist movement.

Kelysine Crashland Medj'K'ai Nebula - 1
6
Part 1 - Crashland
At the start of their adventure, the player-characters are in transit to Losshaven from the Mon-Calamari space aboard a lightly-armed, (single-turret) stock light freighter which has been adapted for better passenger use. Whether a stock YT-1300, a YT-1457 as outlined below, or a similar stock freighter is a GM choice. However, it should have a single dorsal turret with basic ship-to-ship laser cannon.
Justification
Some Heroes insist on being provided with justification for joining with the others. We suggest that they do so out of enlightened (and heart-of-gold) self-interest: the PC group will be a great way to develop allies. Some easy purposes linking them to the core worlds are the dance school, needing protection, or needing work. As far as the adventure goes, there are several core justifications linking Heroes, depending on whether there are any Jedi or Nobles amongst the Heroes, and also what class the Heroes are.
Jedi/Nobles with Soldiers & Tech Specialists
Any Jedi within the group have been given the following instructions and are travelling together. If there are no Jedi, then hopefully a noble with diplomatic training or background will take their place as a diplomat. Any soldiers or Tech Specialists in the party will be there temporarily assigned support personnel (e.g. Republican guardsmen). Any Scouts, Scoundrels, Fringers or Adepts are merely passengers in transit to Losshaven.
There has recently been very limited contact between the governor of Losshaven - and the Medj'K'ai Nebula as a whole - and Coruscant. The Jedi Council have asked you to determine why. They suspect little trouble which is why a padawan/diplomatic aide such as yourself has been assigned to this task.
The Council also wish some news on the status of the Jedi Academy on Keysh'kar, reported destroyed in a Separatist raid on the nebula. They have given you a message canister which must be delivered personally to the senior Jedi Master/Knight remaining at the Academy (if any). As your Masters are not expected to return from a difficult mission, you are also transferred to the Keysh'kar Academy - if there is anyone left to continue your training.
As always, the Council and the Republic is interested if there is any more Separatist activity, it now being a standing order for the council that any and all such activity is to be reported - urgently if suspicious or of a threatening nature.
Group does not contain Jedi/Nobles
Whilst unlikely, it is possible that there are no Jedi or Nobles in the group. If this is the case use the following justification for one or two of
the Heroes travelling on the freighter. It is left to the GM to develop other justifications.
You have been approached by the Jedi to deliver a message to the senior Master or Knight left in or around the Academy in the Medj'K'ai nebula. You will be rewarded very well - they have already paid off your gambling debts and have promised more (up to 1,000 credits) if you succeed. Its not much but you are almost broke and need to get away from some other debtors.
They have asked for first-hand news about the nebula, but no price has been negotiated for such information. The trouble is that if you do not give them any such information, you suspect Separatists will benefit. And you don’t want to be known as a double-crossing crook to the Jedi…
Spacers
There is a Twi'lek spacer on board the light freighter. If any of the group is a spacer one will have been hired on as a spacehand and replace the Twi'lek. Any actions applying to the spacehand could be suggested to this spacer. The spacer is theoretically responsible to her employers and the safety of the passengers.
For small groups (3-4 heroes), their should also be an ancient S8R- series Starmech DROID on board. The forerunner of the famous Rx- series astromechs, the S8R- are rugged, useful and capable but have far less equipment than the Rx- series.
The Accident
The adventure starts with the following :
You are passengers [and crew] on a modified stock freighter. It is carrying a full load of strap-on cargo pods, the internal hold is packed, and the additional staterooms which are its chief modification are somewhat cramped. During the journey from Mon Calamari, via Amanus, you have come to know the other passengers, almost intimately in the confined space.
The hyperspace flight is routine and the crew, a pilot (Human m.), co-pilot (Sullustan m.) and spacehand (Twi'lek f.), are competent. The first signs of any trouble are when approaching the Losshaven system.
You are all in the lounge when the shrieking alarm of the proximity detector startles you. The freighter abruptly shudders out of Hyperspace accompanied by the sound of tearing and shrieking metal. The proximity alert turns to a fire alarm as the smell of burning wafts into the lounge.
There is a commotion as the pilot and co-pilot rush past, cursing. They are closely followed by the spacehand. All have fire extinguishers in their hands and are heading towards the Hyperdrive. As the co-pilot and pilot turn the corner there is an explosion: they are hurled against the wall and a fire blazes, threatening to rage out of control.
The Heroes should help put out the fire. This is a gradual process whereby the fire is reduced

Kelysine Crashland Medj'K'ai Nebula - 1
Page 7
from its starting DC, the aim being to reduce its DC to nothing, at which point the fire is out! The fire starts as a DC21 Profession (Fire-fighter) ability-based throw (Wis) and reduces in intensity by 5 for each successful roll, reflecting it being brought under control. Any failure of 5+, however, means the character closest to the fire will take 1D6 damage (to VP first) unless they make a DC15 Reflex SV; any fire-fighting roll which fails by 10 or more, or for any 5 rounds in which the fire is not fought, the DC of the fire will increase by 5, reflecting the fire flaring up under inept fire-fighting.
Up to four people can fight the fire at any one time, remembering the pilot and co-pilot are unconscious. Extinguishers are available throughout the ship. Tests can be taken every 5 rounds until the fire is out. Neither Take 10 or Take 20 is possible. DMs are +1 per person fighting the fire; and an extra +2 for each person fighting the fire with feats Spacer or Starship Operation (Freighter); +2 per person with Profession (Spacehand) or similar synergy bonus.
The Twi'lek spacer has Profession(Spacehand) synergy (see NPC appendix) and Spacer, therefore adding +5 (+1 person, +2 Spacer/Ss Ops, +2 Spacehand).
If successful in putting out the fire, this counts as a challenging Encounter Goal and earns 300 XP.
It is possible the fire blazes totally out of control. The Heroes and crew will have to abandon ship in the escape pods. If the ship is abandoned and the pods are used, the emergency rescue beacon will be set off automatically.
If the freighter they are one has sealable bulkheads or hatches, Heroes may be tempted to retreat to a particular part of the ship (preferably near the escape pods) and flush the atmosphere from the part containing the fire, intending to pump air back into the vessel from reserves. GMs should be aware that
a) The air re-processor is slagged (see Ship Damage) so one replenishment from reserve is all they have.
b) if the atmosphere is flushed the fire will die out, except for any inflammable gas, but the Heroes will not be able to allow the metal to cool or radiate away the heat. The metal will remain extremely hot, perhaps warming up the metal around it. It will re-ignite anything as soon as the oxygen returns (if slowly) but at 10 points less than when it went out. If they suddenly re-introduce atmosphere the fire will explode and end up at +3 strength above the level when the atmosphere was flushed.
If the fire is fought successfully, it will turn out that the co-pilot is very seriously injured and is dying (WP-5, Fort SV 10), whilst the Pilot is severely injured and fading in an out of consciousness (WP0, Fort SV11). In one of his
moments of consciousness, the pilot will suggest (weakly) the Heroes set off the distress/emergency beacon. Important: if
possible this should be done: if not by the Heroes, then the spacehand. On examining the wreckage, damage can be seen according to the "ship Damage" box, above.
Anyone examining the nav-computer will quickly determine that the ship is on the outskirts of the Losshaven system and approaching Arysine. They are slightly short of their objective but nowhere near close enough to the gas giant for anything to have troubled the hyperdrive.
Simple use/analysis of the NavComp will reveal the presence of a rogue asteroid nearby whose trajectory shows it was probably thrown from orbit around Arysine. Otherwise of no real danger it was certainly large enough to have damaged the hyperdrive and has actually crashed into the ship. If pressed as to its unusual nature, the spacehand will just shrug: "It's the nebula." - anyone with the Knowledge (Medj'K'ai Nebula) skill will also appreciate this fairly rapidly (DC10!).
Given the situation and the fact that repulsors are not capable of long-distance interplanetary flight, the thrusters need to be repaired: a long and difficult job requiring external access and parts.
Either from the semi-conscious Pilot, knowledge of the Nebula or from the astrogation computer, it appears the closest point of safety is the Arysine moon Kelysine: it has a landing area, storage facility and shuttle links to the Cloud Mine on Arysine where the injured crew could get the specialist medical attention needed. The hyperdrive and thrusters could also be repaired.
No transmission is possible yet to the Arysine mine or to Kelysine due to the interference around the gas giant/black hole binary.
At this point, the Heroes may try to find out more about Arysine and Kelysine using the ships on-board database. The information below is available if they are successful (simple DC13+). The key facts about this information is that the number of warehouses is supposed to be small and that there is a only a pair of shuttle landing pads. This conflicts with what the Heroes may later observe.
Ship Damage Component Damage Comments
Hyperdrive Slag has detached itself from its mountings and is mostly a molten heap. Inbound power is green: all else is red….
Thrusters Severe To the controls and to parts of the drive. Repulsors:
Controls light Readily repaired with on-board parts Motivators unknown Appear usable if controls repaired. Monitors
show some external damage which cannot be determined from inside (the repulsors will fail when put under stress, such as a landing).
Air-recycler Slagged Pumps can empty ship & replenish from reserves once. Air within the ship will last 5-6 hours before needing to be flushed and replenished. Recyler needs replacing.
Parts are available for the Repulsorlift controls, but not for the other equipment.
Kelysine Crashland Medj'K'ai Nebula - 1
8
Further information (plans) are available over the Holonet, but the ship has only subspace transceiver, not a Holonet Transceiver.
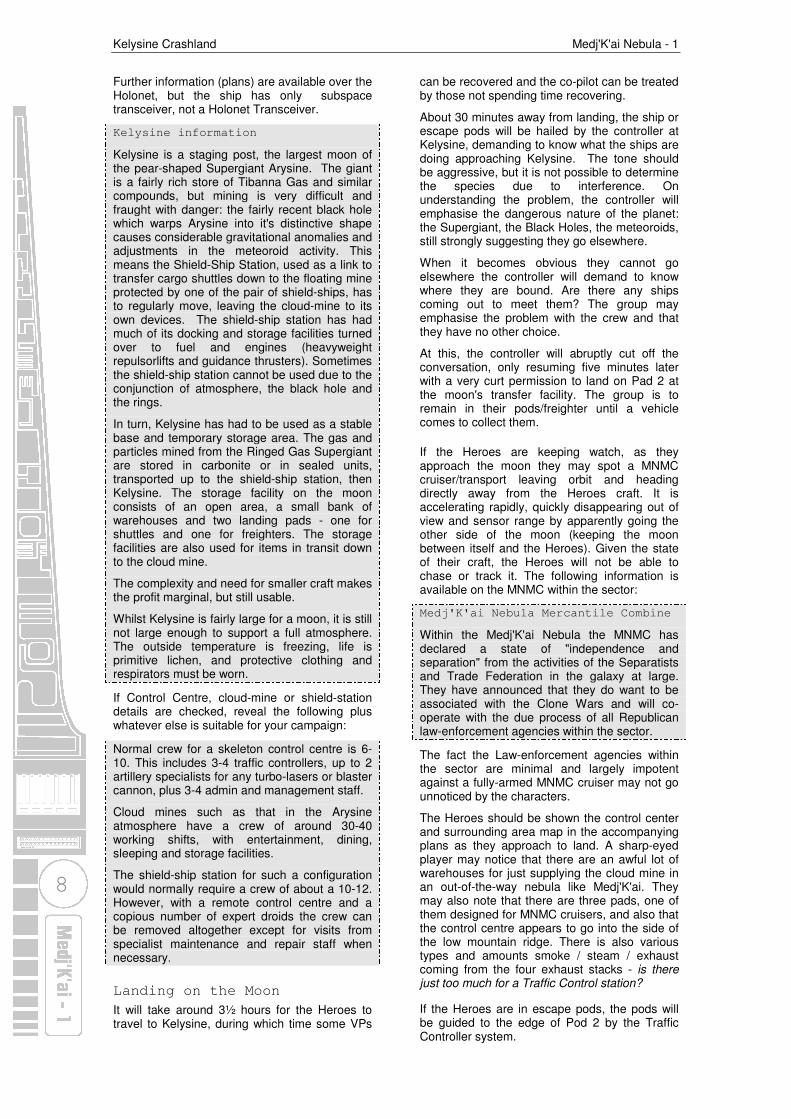
Kelysine information
Kelysine is a staging post, the largest moon of the pear-shaped Supergiant Arysine. The giant is a fairly rich store of Tibanna Gas and similar compounds, but mining is very difficult and fraught with danger: the fairly recent black hole which warps Arysine into it's distinctive shape causes considerable gravitational anomalies and adjustments in the meteoroid activity. This means the Shield-Ship Station, used as a link to transfer cargo shuttles down to the floating mine protected by one of the pair of shield-ships, has to regularly move, leaving the cloud-mine to its own devices. The shield-ship station has had much of its docking and storage facilities turned over to fuel and engines (heavyweight repulsorlifts and guidance thrusters). Sometimes the shield-ship station cannot be used due to the conjunction of atmosphere, the black hole and the rings.
In turn, Kelysine has had to be used as a stable base and temporary storage area. The gas and particles mined from the Ringed Gas Supergiant are stored in carbonite or in sealed units, transported up to the shield-ship station, then Kelysine. The storage facility on the moon consists of an open area, a small bank of warehouses and two landing pads - one for shuttles and one for freighters. The storage facilities are also used for items in transit down to the cloud mine.
The complexity and need for smaller craft makes the profit marginal, but still usable.
Whilst Kelysine is fairly large for a moon, it is still not large enough to support a full atmosphere. The outside temperature is freezing, life is primitive lichen, and protective clothing and respirators must be worn.
If Control Centre, cloud-mine or shield-station details are checked, reveal the following plus whatever else is suitable for your campaign:
Normal crew for a skeleton control centre is 6-10. This includes 3-4 traffic controllers, up to 2 artillery specialists for any turbo-lasers or blaster cannon, plus 3-4 admin and management staff.
Cloud mines such as that in the Arysine atmosphere have a crew of around 30-40 working shifts, with entertainment, dining, sleeping and storage facilities.
The shield-ship station for such a configuration would normally require a crew of about a 10-12. However, with a remote control centre and a copious number of expert droids the crew can be removed altogether except for visits from specialist maintenance and repair staff when necessary.
Landing on the Moon
It will take around 3½ hours for the Heroes to travel to Kelysine, during which time some VPs
can be recovered and the co-pilot can be treated by those not spending time recovering.
About 30 minutes away from landing, the ship or escape pods will be hailed by the controller at Kelysine, demanding to know what the ships are doing approaching Kelysine. The tone should be aggressive, but it is not possible to determine the species due to interference. On understanding the problem, the controller will emphasise the dangerous nature of the planet: the Supergiant, the Black Holes, the meteoroids, still strongly suggesting they go elsewhere.
When it becomes obvious they cannot go elsewhere the controller will demand to know where they are bound. Are there any ships coming out to meet them? The group may emphasise the problem with the crew and that they have no other choice.
At this, the controller will abruptly cut off the conversation, only resuming five minutes later with a very curt permission to land on Pad 2 at the moon's transfer facility. The group is to remain in their pods/freighter until a vehicle comes to collect them.
If the Heroes are keeping watch, as they approach the moon they may spot a MNMC cruiser/transport leaving orbit and heading directly away from the Heroes craft. It is accelerating rapidly, quickly disappearing out of view and sensor range by apparently going the other side of the moon (keeping the moon between itself and the Heroes). Given the state of their craft, the Heroes will not be able to chase or track it. The following information is available on the MNMC within the sector:
Medj'K'ai Nebula Mercantile Combine
Within the Medj'K'ai Nebula the MNMC has declared a state of "independence and separation" from the activities of the Separatists and Trade Federation in the galaxy at large. They have announced that they do want to be associated with the Clone Wars and will co-operate with the due process of all Republican law-enforcement agencies within the sector.
The fact the Law-enforcement agencies within the sector are minimal and largely impotent against a fully-armed MNMC cruiser may not go unnoticed by the characters.
The Heroes should be shown the control center and surrounding area map in the accompanying plans as they approach to land. A sharp-eyed player may notice that there are an awful lot of warehouses for just supplying the cloud mine in an out-of-the-way nebula like Medj'K'ai. They may also note that there are three pads, one of them designed for MNMC cruisers, and also that the control centre appears to go into the side of the low mountain ridge. There is also various types and amounts smoke / steam / exhaust coming from the four exhaust stacks - is there just too much for a Traffic Control station?
If the Heroes are in escape pods, the pods will be guided to the edge of Pod 2 by the Traffic Controller system.

Kelysine Crashland Medj'K'ai Nebula - 1
Page 9
[Escape Pods] As you approach the moon, the pods thrusters fire as they come under the automatic management of traffic control. They thump to a landing on the edge of Pad 2 in front of the mountain range. You are bruised, but otherwise unharmed.
If in the freighter, the landing will be rough:
[Freighter] As you come in to land, the repulsors stutter and shake under the strain of slowing the craft and the landing. You fight to control the freighter into a gentle land as the repulsors threaten to fail.
The landing is 10% more difficult than normal due to the stuttering and straining repulsorlifts (e.g. DC22 at docking speed) and, whilst a Take 10 is possible at docking speed, it is not at other speeds. On crashing at docking speed up to 10d4x2 of damage could be taken by the freighter (and the ground) on failure, potentially requiring further repair. The pilot will not be able to land the ship if he is alive.
Whilst not too dangerous for the characters themselves, a successful freighter landing could give 25-50Xp to the piloting PC as it could give rise to problems later.
Unfortunately, the repulsors will finally fail, having been severely damaged in the crash with the asteroid. Parts for the repulsors are available on-board, not that it will help much with long-distance, in-system travel.
On landing, the players should be shown the profile of the Control Centre.
After the Crash
Immediately the ship/pods land (or crash) a small passenger repulsor minibus can be seen driving from the main entrance to the reception area to the landing site. The controller calls and invites you to get into the vehicle for transport to the control centre.
[If the landing was good] The controller also appears a bit puzzled about how good and stable your landing was - he makes a point of saying that you don't seem as badly destroyed as you had claimed. In fact the controller questions who you really are - he even goes so far to ask if you are pirates or raiders looking for some easy booty. However, he seems to accept your strident denials.
Whilst the distance is only around 200m and could be walked, the controller points out the dangers of the severe cold and low pressure.
Transfer in the Cold
Leaving the ship and crossing to the truck will involve crossing the cold and low-pressure wastes: if the group does not take precautions, an immediate Fort SV will be required to avoid low-pressure damage. If the Heroes are outside for more than a minute without protection, then cold damage will be taken each minute a Fort SV is failed. After an hour outside in any event, a Fort SV will be required as cold seeps through the suits.
The control centre has a single weapons turret for use against pirates. This has 2 crew and is armed with anti-ship Laser Cannon. All the warehouses and landing pads are within the normal 0-square 500m range band
Control Centre Turret Defense: 18 (+2 size, +10 armour, -4 stationary); Hull Points: 30 (DR 10) Weapon: Laser Cannon; Attack Bonus: +6 (+2 size,
+4 fire control); Damage: 4d10x2; Range Mod: see 11-8).
The minibus is heated and pressure-insulated (a clue to its regular need). Within a few moments of the door being closed they will lock and the pressure will rise to near-normal. It is driven by what looks like a standard Losshaven Engineering Corporation (LEC) worker droid (LWD- class, similar to ASP- or J9-, but refer to the NPCs section). Its vocabulator is apparently malfunctioning as all it will say, if questioned, is "I am to take you to the control centre".
The Heroes may wish to search the vehicle before they get in: a successful Search DC20 ("Take 20" takes 2 minutes = 2 Fortitude SV) will reveal a small explosive device with a crudely built remote strapped to the underside. This can be removed and either discarded (in which case it will promptly explode - 4D6+1 within 4m, DC13 Reflex SV = ½ damage) or disabled. They will also find no respirators onboard at all, despite lockers for them: perhaps strange for a low-pressure environment.
If they do not search the vehicle, it will drive slowly towards the control centre. With about 50m to go, the device will be triggered. Those within the bus will be protected by the underside, so only half damage (2D6) will be taken - to difficult DC16 Reflex SVs are possible due to the confined space and, if successful, reduce damage taken to ¼. The minibus will crash to the ground, the repulsors, heating and power having failed. The DROID will be a smoking wreck. The doors will remain locked. The Heroes will have to cut their way out as the cold mounts.
The grenade plus cold and low pressure in combination means this is equivalent to a pair of simple plus a challenging problem for the group as a whole - around 200/400 shared Xp.
The Centre's Commander and an off-duty controller (see below) will be watching from the control tower. They will see if anyone in the group survives and gets up, or if the device is found and explodes. The Commander will immediately page them over standard com frequencies and will Bluff a very high degree of concern: "What happened? Is anyone hurt? Come to the Control Centre immediately? Can we send out another bus?"

Kelysine Crashland Medj'K'ai Nebula - 1
10
Part 2 - Decisive
Action
The Control Centre and cloud-mining operation is a front for the construction of a new droid factory. The local Separatist undercover cell has developed a new twist: they have stolen the plans and purchased parts and technology to manufacture numerous cheap, Losshaven Engineering Corporation (LEC) worker droids (LWD- series). They have developed a bypass to the droids normal worker functions such that they can be switched to remote brain control and act as combat droids. In remote operation they cannot think for themselves and cannot act as worker droids but can fire on living beings. In worker mode (uncontrolled) they cannot act as combat droids and cannot harm intelligent life (refer to the NPC section for details).
The heroes will not know this yet, but have to make a decision: either continue to the control centre, return to the ship/pods and perhaps try to repair the repulsors and thrusters (if they had the parts), explore the warehouses, investigate the spoil heaps or run elsewhere. The GM could discourage the latter: Where would they go? Climbing the ridge in this cold? Running in the cold, barren moon-wastes? Any lengthy discussion in the cold will be a problem.
The adventure now splits into a number of "strands", each of which could be taken at a different time. The actions in each strand as regards encounters and casualties will have an effect on other strands.
Whilst events may not precisely follow this course, depending on whether or not the Heroes are aggressive, whichever strand is taken the following "Droids and Destruction" section may apply.
Droids and Destruction
If the Heroes return to their ship or pods, the Commander will plea with them to return to the centre for around 10 minutes before finally giving up, accusing them of being pirates on an opportunistic raid, and despatching the group of 4 combat-enabled worker DROIDs (CEWs, see below) in the foyer/reception area to bring them in. Initially, 2 CEWs will be left in the base guarding the secure area and will not be despatched to attack the PC group.
The CEWs will come out onto the moon on foot, attempting to keep to the cover of crates, dirt heaps and (crossing over the connecting road) the warehouses. The freighter's turret lasers will find them a very difficult target (defense modifier +12 for size, -2 for speed = +10 = 19), and will not be able to depress its firing angle enough to hit them once they have reached the warehouses. If the ramp is locked, the CEWs will finally attempt to cut their way into the freighter (it does not have a blaster cannon like the Falcon). If the heroes are in escape pods, the CEWs will have no problems opening them up and waving the Heroes out.
If the Heroes surrender to the CEWs, use the Capture section, below.
However, if the CEWs are destroyed, another 5 minutes will elapse before the Commander will hail the Heroes and tell them to surrender: he is about to destroy their ship/pods in 5 minutes. He will contact them at 2 and 1 minute, then count them down. The Heroes should attempt to flee to the warehouses or to the control centre, perhaps to disable the cannon, as he will begin to fire on the ship exactly when he announced he was going to do so.
Immediately the cannon is destroyed, the Commander will emergency activate two more squads from the reserve in the mine (see Droids, CEWs and Controlling Computers, below).
Part 2 Possible Strands
Strand 1 - Wandering
There is no point just wandering the surface of the moon - if the group does (despite suggestions to the contrary) before dealing with the control centre or investigating the spoil heaps, they will find their ship or pods a pile of slag, having been reduced to nothing by the laser cannon in the control centre. Droid recovery vehicles will be shunting the mess into the heap by the Control Centre. Of course, the uncaring Neimoidians will not have realised that the injured crew were still inside.
The Heroes will be forced to follow one of the other strands.
Strand 2 - Repair the Freighter
If it is still surviving, the Heroes may elect to return to the freighter and attempt some repairs. Again, this is probably not a good idea: the freighter has spare parts for most light or normal damage, and has spare parts for severe damage to the air re-processor and repulsor lifts, but other severely damaged equipment needs parts from elsewhere.
Even when fixed, the repulsors are not strong enough for a successful take-off against the local gravitic influences, and will take weeks to get to the inner systems: the flight to the moon was down a gravity well. The repulsors would also be suicidal for trying to get to Arysine given its appalling gravity, asteroids and the singularity.
There is no other medical equipment aboard the freighter apart from a few medpacs. The manifest will show a wide assortment of goods in the hold and strap-on pods, some of which will be manufacturing items, others tools and others luxury goods: no starship parts!
Strand 3 - Search the Warehouses
The Heroes can search the warehouses. Each are around 25m long, 15m deep, around 7m high to the walls and 10 to the roof. The new warehouses are those away from the main landing pads.
If the Heroes do search the warehouses, the controller will despatch CEWs as per the CEWs
Kelysine Crashland Medj'K'ai Nebula - 1
Page 11
section in Strand 2. This includes destroying their ship/pods.
There are a number of remote-control recovery, loading and building vehicles around the warehouses. All will be de-activated at the present time. Whilst the Heroes could hot-wire them and bypass the central control, they are all designed for spaceport use: none of them have enough power or range to go over the mountain ridge or travel too far across any rough ground (the moonscape).
Older warehouses are simply locked (DC 10, Disable Device) whilst the newer ones have an electronic lock (DC20, Computer Use if datapad and leads are available, or Disable Device if suitable tools are available, Take 10 only).
Each search will take 10m/warehouse. All equipment is crated up, has the MNMC logo on the side and, if legal, is labelled in Neimoidian and freight-tagged (simple chips containing the freight details readable with a separate tag-reader). If illegal, it is just tagged.
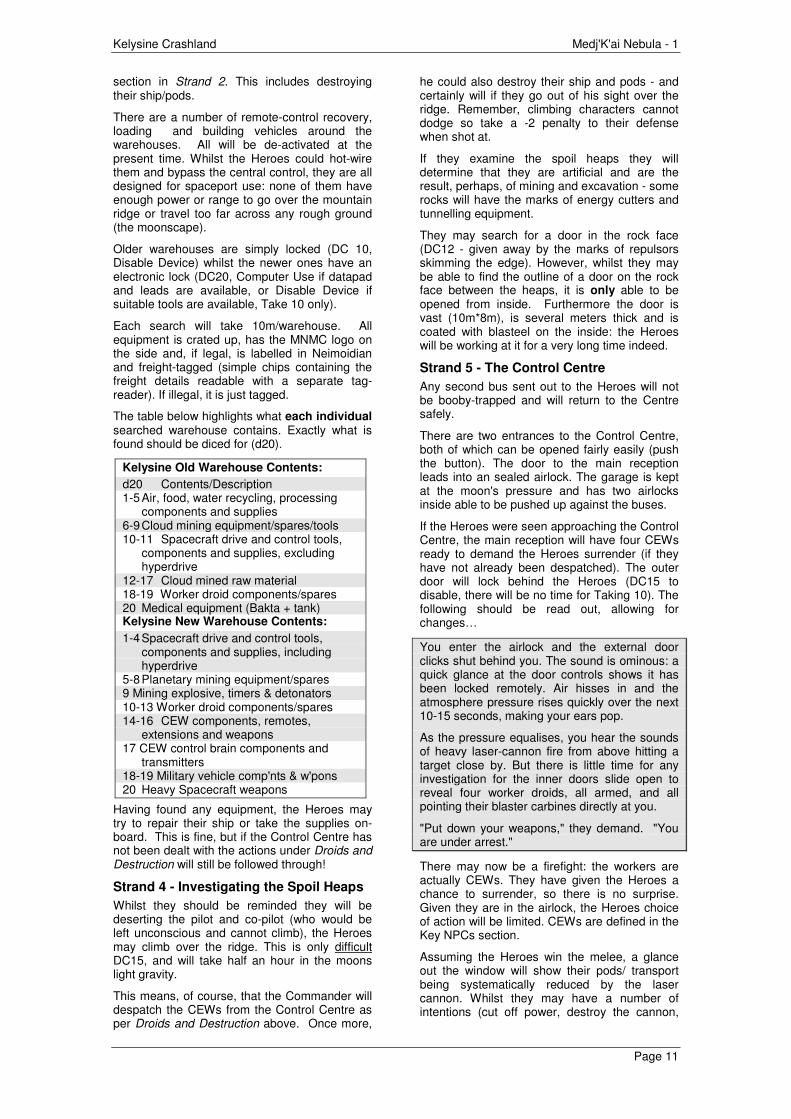
The table below highlights what each individual searched warehouse contains. Exactly what is found should be diced for (d20).
Kelysine Old Warehouse Contents:
d20 Contents/Description 1-5 Air, food, water recycling, processing
components and supplies 6-9 Cloud mining equipment/spares/tools 10-11 Spacecraft drive and control tools,
components and supplies, excluding hyperdrive
12-17 Cloud mined raw material 18-19 Worker droid components/spares 20 Medical equipment (Bakta + tank) Kelysine New Warehouse Contents:
1-4 Spacecraft drive and control tools, components and supplies, including hyperdrive
5-8 Planetary mining equipment/spares 9 Mining explosive, timers & detonators 10-13 Worker droid components/spares 14-16 CEW components, remotes,
extensions and weapons 17 CEW control brain components and
transmitters 18-19 Military vehicle comp'nts & w'pons 20 Heavy Spacecraft weapons
Having found any equipment, the Heroes may try to repair their ship or take the supplies on-board. This is fine, but if the Control Centre has not been dealt with the actions under Droids and Destruction will still be followed through!
Strand 4 - Investigating the Spoil Heaps
Whilst they should be reminded they will be deserting the pilot and co-pilot (who would be left unconscious and cannot climb), the Heroes may climb over the ridge. This is only difficult DC15, and will take half an hour in the moons light gravity.
This means, of course, that the Commander will despatch the CEWs from the Control Centre as per Droids and Destruction above. Once more,
he could also destroy their ship and pods - and certainly will if they go out of his sight over the ridge. Remember, climbing characters cannot dodge so take a -2 penalty to their defense when shot at.
If they examine the spoil heaps they will determine that they are artificial and are the result, perhaps, of mining and excavation - some rocks will have the marks of energy cutters and tunnelling equipment.
They may search for a door in the rock face (DC12 - given away by the marks of repulsors skimming the edge). However, whilst they may be able to find the outline of a door on the rock face between the heaps, it is only able to be opened from inside. Furthermore the door is vast (10m*8m), is several meters thick and is coated with blasteel on the inside: the Heroes will be working at it for a very long time indeed.
Strand 5 - The Control Centre
Any second bus sent out to the Heroes will not be booby-trapped and will return to the Centre safely.
There are two entrances to the Control Centre, both of which can be opened fairly easily (push the button). The door to the main reception leads into an sealed airlock. The garage is kept at the moon's pressure and has two airlocks inside able to be pushed up against the buses.
If the Heroes were seen approaching the Control Centre, the main reception will have four CEWs ready to demand the Heroes surrender (if they have not already been despatched). The outer door will lock behind the Heroes (DC15 to disable, there will be no time for Taking 10). The following should be read out, allowing for changes…
You enter the airlock and the external door clicks shut behind you. The sound is ominous: a quick glance at the door controls shows it has been locked remotely. Air hisses in and the atmosphere pressure rises quickly over the next 10-15 seconds, making your ears pop.
As the pressure equalises, you hear the sounds of heavy laser-cannon fire from above hitting a target close by. But there is little time for any investigation for the inner doors slide open to reveal four worker droids, all armed, and all pointing their blaster carbines directly at you.
"Put down your weapons," they demand. "You are under arrest."
There may now be a firefight: the workers are actually CEWs. They have given the Heroes a chance to surrender, so there is no surprise. Given they are in the airlock, the Heroes choice of action will be limited. CEWs are defined in the Key NPCs section.
Assuming the Heroes win the melee, a glance out the window will show their pods/ transport being systematically reduced by the laser cannon. Whilst they may have a number of intentions (cut off power, destroy the cannon,

Kelysine Crashland Medj'K'ai Nebula - 1
12
storm the control tower), all involve exploring the base.
Captured Heroes
If the CEWs surprise the Heroes, or are not attacked by the Heroes, they will demand the Heroes put down their weapons and surrender. They will then take the Heroes to the surviving senior member of the base crew.
If the Heroes surrender to anyone alive they will be taken into the Centre. The section Enslaved Heroes on page 18 outlines the procedure from then onwards.

Kelysine Crashland Medj'K'ai Nebula - 1
Page 13
Part 3 - The Control
Centre
The Control Centre, mining activity and recently built warehouses all point to one thing: the base has been turned into a front for the construction of a new MNMC construction facility. All the personnel are aware of this fact, but all are well-paid by the TF to be where they are.
The construction has only recently been started. To ensure its secrecy, the Centre is being maintained almost "as was" to be a secret front. It was hoped that, once weathering had set in and given the rare visits the moon had, no-one would think anything strange about the presence of the new warehouses and landing pads.
The cloud mine has been cut off from external contact by the destruction of its communication equipment and all personnel on-board (around 25-30) are now living in slavery under the control of a MNMC Governor, a few guards, and a large number of droids. They are isolated form the outside world by the need for the shield-ships and the shield-station, which is staffed only by droids under the control of the Control Centre. Everything the slaves produce is exported out-system to help the Separatists in their war against the Republic.
The miners are building a huge factory cavern and subterranean administration and storage networks. It is intended that all types of CEWs, as well as ship parts, are able to be manufactured. Of course, currently they are still hollowing out the ridge though all the equipment is ready…
The plans of the control centre (Control Centre Plans in the Kelysine Chaos Plans) should be referred to throughout this section.
Console location
There are computer consoles/connections in various rooms throughout the centre which require them - this includes the maintenance workshops, the medical centre, the power generator, the offices, the commander's own quarters as well as his office in the control tower.
It is possible the Heroes will think of pulling up a set of plans - in which case hand them the smaller copy of the centre' plan in the handouts.
Base Personnel
The base has a full "skeleton" complement of personnel (see Non-Heroes, below). The Commander and two admin staff are Neimoidian the two guards/artillerymen are human, and the three traffic controllers taking turns on duty are Rodian, Human & Neimoidian.
At various monitoring points around the base are maintenance and expert droids. These will not threaten the Heroes: they will just get on with their job.
Personnel location
The control centre's guards will be in the weapon turret, destroying the freighter or pods. Once the ships are destroyed, they will move to their normal station within the secure area. This is marked "Gd" on the plan.
The two admin staff will be in their office (marked). The Neimoidian Traffic Controller is off-duty and asleep in his bunk. Admin staff are marked "Ad", the other Traffic Controller "TC".
In the control tower is the human traffic controller (on-duty), the Base Commander Oy'Sar and the Rodian Controller (criminal) P'Shee. Given they know of the Heroes presence, all will be armed as a precautionary measure
Note: On the control tower plans, command console 'D' is the main remote brain for the CEWs, spaceport droids and for the droid shuttle pilots (see Key NPCs, Droids, CEWs and Remote Brains). If turned off or otherwise deactivated, control of all these droids (including CEWs) is lost and, as mentioned, the mining brain is alerted. Of course, the Commander could be asked to disable it, but he will try to send out an alert to the recently departed TF cruiser to call it back.
CEW Locations
Normal CEW Locations are marked "DS" on the map.
Four CEWs will normally be in the foyer/ reception area. If the Heroes have come in the bus, or have been seen approaching the centre, the CEWs will be expecting the Heroes and waiting for them. If not expecting the Heroes, they will be surprised, especially as their first reaction is their programmed demand that any intruders put down their weapons and surrender (see above).
If the turret is destroyed and the base personnel have had enough time to assemble, activate and march up two 6-CEW replacement squads from the mines (see Droids and Destruction, above), there will be a squad on guard at the base of the turbolift to the control centre and four on guard at the entrance to the secure areas. Otherwise, only two CEWs will be on guard at the entrance to the secure areas.
Key Locations
Medical Centre
This is well-stocked with equipment and Heroes may find it an interesting haven: do not forget about the monitoring cameras, however, which may need to be disabled by the Heroes.
There are 4 military quality, emergency bakta-wrap kits which can be used to heal 1d3+3 WP, usable once every 12 hours but which may damage the users constitution: DC15 Treat Injury to use, Take 10 only possible if there are no outstanding threats. Failure results in the injured character temporarily losing 1d3 points of CON (and accompanying wound total).

Kelysine Crashland Medj'K'ai Nebula - 1
14
Military-grade enhancemenet and pain-supressor drugs (40 doses) can be found which can temporarily restore up to 6VP, usable at most once per day for 4 hours of activity, after which the drugs will wear off. GMs should keep track of VP recovered normally.
There are 4 standard medpacs, plus parts and drugs for making 10 more; 4 medkits and surgical appliances, computers and equipment. A range of other drugs are also present to treat common poisoning, common diseases, and other common ailments such as headaches, stomache disorders, etc.
Power and Exhaust
The plans of the base (or an exploration) will reveal that only one of the exhaust funnels is actually used by the base powers. The other three run to the mines and are exhausts for the intense mining operation.
Power within the base could be shut down - DC10, though this will mean all doors must be opened manually (a Str check vs DC12).
It is possible that some enterprising Heroes will try and enter the mines through the vents. Apart from some huge fans, several layers of armoured mesh, a magnetic air containment shield and a 50m drop to the floor of the cave, this might be a good way of checking up on the mine. Of course if the Heroes actually enter the cavern (emphasise the number of droids who could take them out) then they could be captured. They can discover lots this way, but will be able to do little.
Secure Area
The secure area is guarded by an 10cm thick armoured door which has 120 DP/DR10 - a pair of Jedi should be able to cut through it fairly quickly given a guaranteed "hit" and that light sabres ignore the DR of an object - it is recommended average damage is allowed for (a Take 10 equivalent) each "attack" as the door can neither defend itself nor fight back! The permacrete walls around the other areas have a DR of 8 and 180 WP (assuming 30cm thick). See page 169 in the RCR.
Control Tower
During the fight for the control tower the GM should ensure that one of the missed shots spatters into the sub-space communications panel and destroys the long-distance sub-space comms (slagged). Hologram and local radio links to the cloud mine are still active, as are the ultraboost remote droid controls.
Control of the tower and the computers within it are key to the Heroes further success. Gaining undisputed control of the Control Tower should give the Heroes an extra 100XP each.
The main components of the control tower are the Two main flight control desks, the monitoring station, the general station control and communication banks and, of course, the droid brain in the commanders office (see Key NPCs below).
There is also a CEW remote droid control transmitter disguised within the antenna array on top the shield-station. Whilst it is DC 25 if a Search is made, when heroes suspect it is there, it is DC 30 to Spot when approaching the control centre and just checking for anything out of the ordinary (DMs +2 if suitable Profession @ +5 or greater, or +2 if Pilot is +5 or more and the Spotter has Starship or Spacer feats) . If destroyed the droids on the cloud-mine will revert to isolated (their own) programming.
The monitoring station can be used to show views all round the base, into the mine, around the moon and on-board the shield station, though the quality of the picture from the latter is blurred and fuzzy and can sometimes cut out. It will show 12 CEWs defending the docking bay on the shield-station, including two which are enhanced further as Heavy Restraint CEWs, three shuttles and two shield-ships.
The station control banks can be reprogrammed to alter pass codes, lock/unlock doors, etc, of all the equipment in the station and in the mine. As a result it can also be used to shut down power to the mines secondary exit. They can also be used to find out about the cloud-mine - that it has a large number of droids, four assorted thugs as guards and a human MNMC crony dominating the 25-30 slaves.
Monitoring to the cloud mine itself will be very erratic due to the interference. Whilst frustrating, it could also show that the mine itself cannot contact anyone except through the Shield Station and the Control Centre.
The flight schedules will show that another TF cruiser is not due for another 10 days. Of course, it is possible that the one which left could be recalled by the commander. It will take 6 hours to return but if it returns to find the base overpowered, the shield-station released and the cloud mine free it will make a rapid exit as there is little for it to do. If it is recalled and the Heroes have not completed anything by the time it returns it is worth suggesting they abandon the adventure in one of the shuttles: there is no way they can face the CEWs and power of even a partially-armed MNMC transport/cruiser.
Mining Corridor
The armoured blast doors (only 30cm thick - 360 DPs, DR10) will be locked, of course, and will need to be freed to reveal the corridor. At the end is another large door like the first which leads into the cavern itself.
Two-thirds of the way down is the secured entrance to the mining brain and monitoring centre. This is independently locked, such that it cannot be opened from the Control Tower, and needs a separate code. The door is an armoured door made from metal/blasteel and has 120 DPs DR10 - see p89/169.
This entrance needs a DC25+ Computer Use/Disable Device check to reset or open as per the skill section in the RCR. Only the Base Commander knows the codes and he will need severe persuading - can any Jedi condone life-
Kelysine Crashland Medj'K'ai Nebula - 1
Page 15
threats or torture? Torture will, of course, invoke a Dark Side Point.
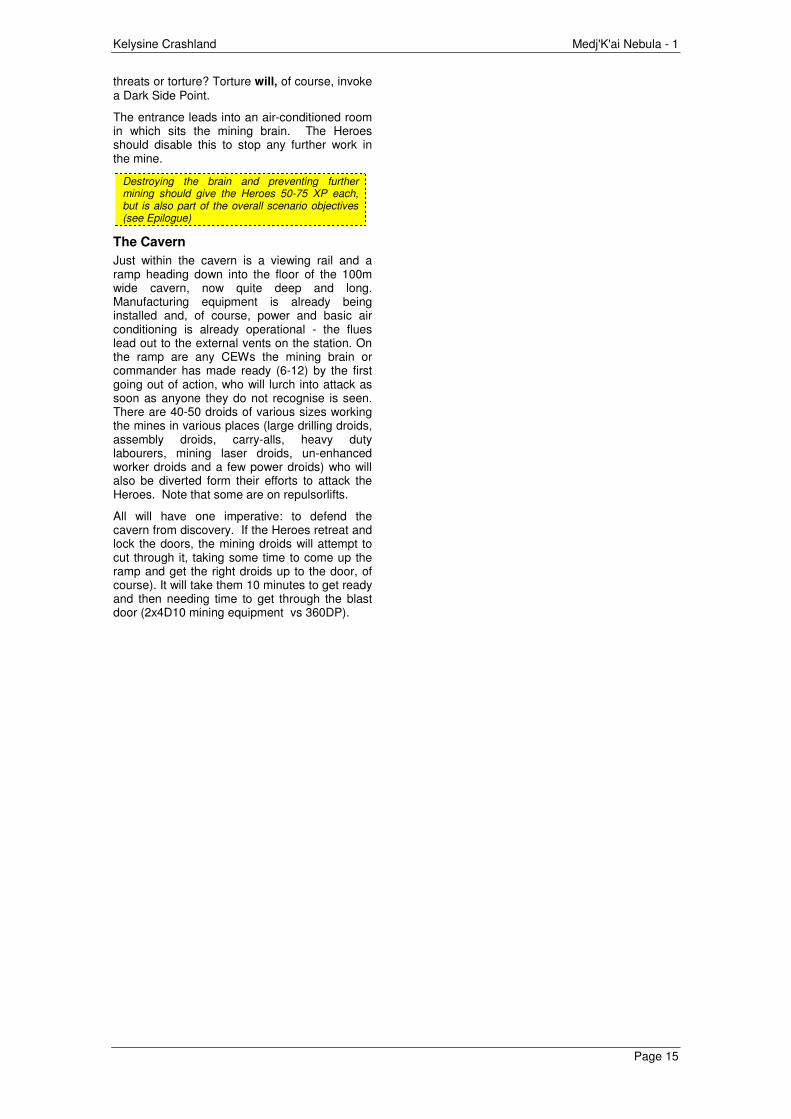
The entrance leads into an air-conditioned room in which sits the mining brain. The Heroes should disable this to stop any further work in the mine.
Destroying the brain and preventing further mining should give the Heroes 50-75 XP each, but is also part of the overall scenario objectives (see Epilogue)
The Cavern
Just within the cavern is a viewing rail and a ramp heading down into the floor of the 100m wide cavern, now quite deep and long. Manufacturing equipment is already being installed and, of course, power and basic air conditioning is already operational - the flues lead out to the external vents on the station. On the ramp are any CEWs the mining brain or commander has made ready (6-12) by the first going out of action, who will lurch into attack as soon as anyone they do not recognise is seen. There are 40-50 droids of various sizes working the mines in various places (large drilling droids, assembly droids, carry-alls, heavy duty labourers, mining laser droids, un-enhanced worker droids and a few power droids) who will also be diverted form their efforts to attack the Heroes. Note that some are on repulsorlifts.
All will have one imperative: to defend the cavern from discovery. If the Heroes retreat and lock the doors, the mining droids will attempt to cut through it, taking some time to come up the ramp and get the right droids up to the door, of course). It will take them 10 minutes to get ready and then needing time to get through the blast door (2x4D10 mining equipment vs 360DP).

Kelysine Crashland Medj'K'ai Nebula - 1
16
Part 4 - Cloud Mine
Captives
The Heroes may discover the cloud-mine situation. However, the following should occur on the monitoring station once they have control of the tower. If need be, it can take place after the Heroes have rested sufficiently to recover from any wounds or to use the military-grade Med-Pacs in the Med-Centre.
The phrasing next depends on whether or not the Heroes have shut down the droid brains - the Control Tower brain also controls droids on the Cloud Mine and the droids and CEWs on the Shield-station.
You recover from your exertions in the control tower, the humming and clicking of the machines around you almost restful, though the destroyed sub-space transceiver control is a little distressing. The displays regularly change, no further alerts come up on the Traffic Control computers and normal traffic can be seen within the system.
You notice a light flash on the monitoring bank and one of the displays changes. A hologram appears, though it is fuzzy, hazy and riddled with interference. It shows a flamboyantly dressed human - his clothes are similar to the Neimoidian - and he carries a bandoleer over his shoulder and a heavy blaster at his hip.
"Oy'sar! What's going on?" he demands. "Haven't you dealt with those refugees yet? I've got a full load! Oy'sar! Get a shuttle down here, right now."
You realise no-one is within the pickup range of the tower's holo-transmitter so he, as yet, has not seen any of you.
If the Heroes have turned off the droid brain, or disabled all its outputs, they will also have disabled the droids on the cloud mine. In which case, he will also demand the following…
"What's going on, anyway? The droids are all dead. We've had to stop production and put the workers in their cells for hours. Oy'sar!"
He will continue to attempt contact every five minutes until someone answers…
The Heroes may elect to talk to him or get Oy'Sar to talk to him. Oy'sar will warn him, threat or no threat (and holding a gun to his head then shooting him is DSP territory ["You would not dare to kill me - you're a Jedi!] - how can a Jedi justify killing a captive under their protection?). Conversation with Heroes will arouse his suspicion, as will Oy'Sar's warning. Either from talking to him, or from the computer, the Heroes will learn he is Gerak-T'shon, the Boss on the mine.
If temporarily duped into accepting that things are okay, Gerak will call back until the droids are switched back on, often insisting he speak to Oy'sar. He will eventually twig that something is wrong, perhaps by Oy'Sar's approach (if Oy'Sar
is brainwashed into co-operation), though the Heroes should be encouraged to be inventive in their dealings with him whilst they debate further moves.
Once alerted, Gerak will sign off, only to reappear 2 minutes later. He will demand to speak to "Someone in charge." If not spoken to he will talk anyway. His conversation - not able to be interrupted - is as follows.
"Okay, whoever you are, listen to me. We have 28 workers down here, all nicely locked away and peaceful in their cells. Think about it. Twenty-eight defenceless slaves, all types. Sulls, Rodies, Humans, snake-heads - you name it we've got it.
"You either send down a shuttle with a disable override to pick us up - that's immediately - or we'll be forced to make cutbacks due to, urrh.. 'economic necessity'. Understand?
"You have ten minutes to answer. If there's no co-operation after that we start optimising our overheads.
"One slave at a time."
He leers and cuts the connection…
The choices are limited - Gerak will do exactly as he says, as any "Sense Motive" check will show.
The Heroes can work out that a cargo shuttle will take 20 minutes to get down from the shield-station to the Control Centre, another 20 minutes back up their, then around 20-30 minutes to get down behind a shield-ship to the cloud mine. They could just go on-board the shuttle, hide themselves in the cockpit, or otherwise use their ship (if it's thruster's are operational).
The timing will give them a morale dilemma. Awarding a Dark Side Point for overly-callous disregarding of the slaves lives could be considered. In some ways, however, the players may find themselves in a lose-lose situation (depending on what has gone before). If they elect to try and save all the salves lives, but let Gerak go, a bonus XP award of around 100 per PC should be considered except for any advocating allowing the prisoners/slaves to die!
After ten minutes, Gerak will contact the Heroes. They will be able to make him delay the executions for up to 30 minutes via Diplomacy, perhaps persuading him that they need to get used to the computer set-up to send down a shuttle. He will not be able to be persuaded any further unless an extremely good roll is made - time for a Force Point anyone?
At the end of the agreed time he will call back and, if there is no reply or he gets the Heroes again, will drag a random hostage into the holopic, expand the view so it can be seen he is by an airlock, force the prisoner into the airlock (throw him in with one of his thugs if necessary) and emergency cycle the lock so that the prisoner will be blown out, and fall to his death amongst the acid-clouds and terrific gravity of

Kelysine Crashland Medj'K'ai Nebula - 1
Page 17
Arysine. I hate this NPC!I He will continue to do so for the next 6 hostages until he realises no-one is coming: at this point he will try other approaches, like building subspace radios out of what parts he has.
The Shield-Station
This consists just of a some holding cargo bays, three docks containing Cob-class Atmospheric Cargo shuttles and two docks containing the shield-ships. All 5 are constantly maintained. The 12 CEWs (see below), if active, are controlled from the control centre.
There is also a CEW remote droid control transmission booster disguised within the antenna array on top the shield-station. Whilst it is DC 25 if a Search is made, when heroes suspect it is there, it is DC 30 to Spot when approaching the array. If destroyed the droids on the cloud-mine will revert to isolated (their own) programming.
The plan of the station is straightforward, if required, as there is but a single office (unused), and a small control room containing five droids monitoring the repulsors, thrusters and overseeing any docking procedures. Otherwise it is just engines, reactor core and docking bays!
The cargo shuttles do not have hyperdrive. They are straightforward, with a pair of remotely-controlled pilot drones (droids) at the controls. Loading is normally done by droid loader. The cockpit door is always locked to prevent any possible chance of slave-miners escaping. Plans are provided should the Heroes wish…
The shield-ships are just huge shield generators which attach themselves to their transport and carry them down to the mine. They generate both types of shield to prevent damage from the extreme atmosphere and from the meteorite particles which are a regular feature of the Arysine sky. Side-views of the shield-ships are available, but a cursory examination will show space for only two - currently specialist drones - in the cockpit and no space within the transport bay unless characters (a) have vaccsuits and (b) are prepared to withstand 2D4+2 DP per round (no save is appropriate) from the remaining corrosives leaking through the shield-ship shields and armour as they penetrate the atmosphere. It should be noted here that the shuttles have a DR10 for their plating.
The Cloud Mine
This was "taken over" about three months ago and placed under Gerak's care. All the crew were enslaved and imprisoned within stripped-down crew quarters: the managerial and guest suites were turned over to Gerak and his thugs after the standard crew quarters were stripped of chairs, luxuries and anything that could be used as a weapon.
This has a docking bay with containment field for the shuttle/shield-ship combination, detention cells (used to be largish quarters for 1-2 miners, now shared by 2 slaves in each). It also has a two staff canteens (actually a bar and a
canteen), a control room, extraction equipment, generator core, thrusters/repulsors, processing plants for extracting the Hfedrium and Tibanna Gas, and a carbonite plant.
If the Moon is overrun
If the Heroes overrun the Kelysine Control Centre and attempt to take over or approach the Cloud Mine, it is unlikely they will get anywhere other than the docking bay, which is clear apart from waiting cargo. Gerak will have seen the shuttle/shield ship coming in and will be waiting with his cronies. As soon as it lands they will run across and open up the hatch, intending to go in and leave - the prisoners will all be left in their cells.
If a firefight/melee ensues, the cronies will hide behind waiting cargo (a full load, remember), flanking Gerak. Their tactics will tend to try and focus on any long-range weapons wielded by any attackers, picking them off first, only then dealing with melee-only attackers. If Gerak dies, his cronies will retreat to the cells, hoping for rescue and pretend to be prisoners, though they will be told on very quickly - the Heroes may have to rescue them though and take them back for justice!
Gerak's Last-Minute Surprise
Gerak will have a last-minute nasty. Given the previous activity, he has rigged and is carrying a remote which he intends to trigger as, or when, he leaves. The remote will explode a thermal detonator in the avionics and life-support sections on the base, slagging them (see Starship damage, above) and thereby killing the slaves as the mine falls into the supergiant: whilst Gerak wishes to save the mine (he is taking a good cut) he does not want the slaves talking. If there is any chance at all, then he will also try to trigger the remote as he dies, accompanied by a suitable curse.
Unfortunately the explosion is too powerful and it will rip through the repulsor and thruster controls too. The Heroes will hear the sound of dying thrusters and the station will tremble as it starts to sink into the atmosphere, thrusters failing…
The atmosphere will rapidly become poisonous. Within 10 minutes the station will become almost uninhabitable, requiring Fort SVs every minute to avoid losing a point of CON. Within 20 minutes the thrusters will finally fail and the city will surrender to the massive gravity of Arysine. Also at this point the station will begin to shake, adding 1 every minute to the difficulty of any Pilot roll required to take off.
The slaves are sealed in 12-15 cabins/cells on the two residential/office levels. Whilst access to the cells/ quarters is easy if Gerak's pass key is used, they will otherwise need to be unlocked by changing the code - DC25+ Computer Use (take 20 possible, 10 minutes at Take 20).
It will take 3-5 minutes to find the cells on the mine, a round per cell to open it (36 seconds) plus a round to move between each (30 seconds), and 5 minutes to get all the prisoners out and up to the docking bay given the state

Kelysine Crashland Medj'K'ai Nebula - 1
18
some of them are in (injured, wounded, battered, weak from starvation and malnutrition). There is no real space for them on the shield-ships: there is space enough for a crew of two - and that's it!
To take off without any hitches with the station shuddering requires a Pilot roll vs a successful Medium-size hazard (the ship/bay and the dock doorway), at DC25 initially classed as almost stationary (DC -8) and perpendicular (DC+0) giving DC16. The roll is repeatable, but take 10 is not possible. Failure means the shield-ship/shuttle fails to leave and may take damage (10D4 - see RCR P221-2). Docking speed will help (DC +0!).
If drones are piloting the ship under the control of the droid brain, their Pilot skill is equivalent to a standard Expert droid at +6.
Given that loading the slaves/miners will take in total over 9 minutes, a single unrestricted Pilot roll is possible. The DC will begin to increase by 1 (one) for each attempt after the first as the stations thrusters begin to fail and become erratic.
One hopes that the Heroes will load all the personnel onto the shuttle and escape "just before" the base falls into the SuperGiant.
Both the fight with Gerak and the final rescue could be seen as "an act of Dramatic heroism" if the Heroes are suitable heroic, potentially allowing for an extra FP. Succeeding in evacuating the slaves will earn the Heroes an extra 300XP.
Enslaved Heroes
If the heroes are captured they will be transferred to the Cloud Mine. If captured on the moon, they will be stripped of weapons and initially held within the medical centre, a secure area with no directly-usable weapons but drugs they can use to provide a measure of healing or surgery on each other. 15-20m later, when a shuttle has arrived, they will be transferred out to Pad 2 to get on the shuttle for transfer to the Cloud Mine to work as slave labour.
The Control Centre crew will try to ensure any Jedi are not obviously harmed, but they will be cautious around Jedi. If any Jedi show signs of using their mind-affecting powers, that Jedi will be tended by CEW's and not living beings.
They will be escorted to the Control Centre's vehicle bay by 4-6 CEWs, Oy'sar and one other, typically the Rodian, P'shee. They will be transferred into a transit bus and ferried out to the waiting shuttle at walking pace, the bus being escorted by the CEWs. They may have to grab a breathing mask from the bus to walk onto the shuttle but the distance will only be around 10m.
On-board the shuttle they will be strapped into their seats and ordered to remain seated. From 2-4 droids will escort them up to the mine via the shield-station and a shield-ship. The cockpit will be securely locked at DC20 Disable Device or Computer Use and will be manned by 2 pilot drones (LWD experts or refer to the RCR). Note
that this is in contrast to most droid anti-pilot programming, but these will be remote-controlled from the Control Centre and will tend to use the autopilot if on their own.
At the cloud-mine, within the containment field on the docking bay, a full squad of CEWs (including a restraint drone) plus two of Gerak's thugs will approach the shuttle and insist the heroes leave. The 2-4 CEWs already on-board will help usher them out. The Heroes will be escorted from the bay by the droids and the thugs, after which the shuttle will be loaded and the droids on-board return to Kelysine.
Initially the Heroes will be escorted to some empty cells within the crew quarters (see crew quarters/cells below). They will be double-assigned, refused any aid and expected to just collapse and do nothing in their "cells". After 3 hours, just before shift change, they will be taken to Gerak by a full squad of CEWs and two of the thugs.
What happens to the Heroes?
GMs are recommended to read the following section "Cloud mine slaves" to get details of what happens to slaves generally.
Do that now.
Welcome back. The PCs, being new slaves, will be assigned to the more demanding physical work. This is mostly the manhandling of new carbonite slabs and crates raised from the processing plants from the carbonite level either into its temporary storage or into the cargo lift and up to the hangar level. The PCs will be herded togetheyr to replace any existing workers and will be told to wait in the carbonite chamber whilst it is fixed.
Guards will typically be one "live" guard plus 2 to 4 combat droids, depending on group size.
However, before this, Gerak will have identified (or asked for volunteers with promises of favours) any technically astute PCs. These he will also assign to the carbonite freezing level with a specific problem: "It doesn't work". None of the guards will have any more information.
Broken Carbonite Freezing plant
The hoist to lift carbonite is no longer working. The actual problem is simple and requires a technician to go up onto the gantry, replace a control slab, free the cable, then go down to the carbonite control desk and reset it (overall, a DC25 task and a subsequent DC15 task, Take 10 possible).
The gantry has a lifting claw, as well as a pipe which pumps gas up from the lower levels into the carbonite freezing pit, plus a moving belt which transports crates up from the lower levels: it is, therefore, a complicated piece of machinery. The lifting claw has some sideways movement (not too much).
It is up to GMs where the PCs and guards are located.
Lighting in the carbonite chamber is, of course, suitably dim.

Kelysine Crashland Medj'K'ai Nebula - 1
Page 19
Cloud Mine Slaves
General Cell Procedure
The thugs will be very cautious with newcomers. They will insist that newcomers stand away from the doors and will open it themselves. Any trouble or show of defiance will mean the thugs will either beat up the prisoner or, if the prisoner shows a great deal of trouble, they will use and order stun blasts for one round. If the stun doesn't work, then the droids will be ordered to switch to blaster bolts on their carbines.
New prisoners are escorted carefully. Once they have been "broken" they will be treated like the rest.
Work, Shift and Patterns change-over
The work the slaves are asked to do is the menial work of running a cloud mine, readily teachable to any new slave. Most of the other work is performed by expert droids, though some droids are starting to break down due to lack of expert staff and suitable maintenance (mainly the labour droids). They will be organised into shifts of up to 20 (minimum 15) who will work either two 12-hour (approximately) or three eight-hour shifts (one on, two off).
Slaves will receive Profession(Slave Labourer) +1 after a week and +2 after a month of work, +3 after 3 months. If they survive they will gain an additional point for each six months they are in captivity up to a maximum of +5 ranks.
Each shift is approximately 12 hours long. At the end of each shift, the slaves on-duty are rallied together by two squads of CEWs, two thugs and occasionally Gerak. They will escorted to one of two canteens on the mine into which they will be locked for 20 minutes and expected to eat from the food processors. The food is poor quality (see below) and they will be monitored by camera whilst in the canteen. It is during the mealtimes that the slaves can talk to each other (if they feel like it: most are badly beaten, depressed and in deteriorating health). During the meal the other shift will be taken from the cells (a cell at a time), collected together and taken down to their duty stations.
When opening cell doors, two CEWs tend to stand in the doorway with a sentient back to one side to supervise. They will always give non-oxygen breathers 5 minutes warning whilst they open the other cells. The cellmates are escorted out onto the tail end of the line containing the other prisoners.
New Slave-Prisoners
When first "welcoming" new prisoners they will be escorted from the shuttle to their cells by a squad of CEWs including a Restraint CEW. Two of the thugs will also escort them, making snide threats and warnings about Gerak.
After a few hours - just before a new work-shift - the prisoners will be taken out of their cells by two thugs and three CEWs. A thug will talk to them first over the cell's com, and ask them to stand away from the door. The door will open and the prisoner will be asked to come quietly
and co-operate: "You co-operate with us; we leave you alone."
If the prisoner tries anything awkward, they will be treated very harshly as a first lesson. If possible they will be knocked unconscious.
In any event, the new slaves will be taken to Gerak and their, in front of all four thugs and a squad of CEWs they will be interviewed as to possible skills and given the rules: "Co-operate and you'll be left alone to work and eat and sleep; make trouble for us, and we'll make a lot of trouble for you." The new slaves will be informed of their work, the shifts and eating. They will be searched and anything possibly usable as weapons, valuables or tools taken: non-oxygen breather's masks and spare filter's/gas canisters will be returned to their owner.
The slaves have been divided into two roughly equal-sized shifts. Incoming heroes could be split of 2-3 to a shift - how the split occurs is random but it is suggested the GM fixes an appropriate split (or none) depending on game style.
Prisoner/Slave Care
This is almost non-existent. Minimal medical care is made available. Food is appalling and only subsistence level: slaves must make a Fortitude save each week vs DC 12+number of weeks onboard or suffer 1 point of CON damage (healable at a rate of 1 point per week if they ever get out).
Any indiscretion on behalf of a prisoner is treated harshly. An indiscretion can mean talking back to the guards; talking whilst on shift about non-work subjects; making a mistake whilst working; and certainly covers trying to escape.
This means most of the slaves are bruised, hurt and are gradually wasting away. As soon as they can carry out a reasonable amount of work again, they are put back into the slave-shifts.
If prisoners are injured - whether or not they came onto the mine injured or were injured in the line of work, they are left to their own (or their cellmates ministrations) or recuperate. A hero may be able to persuade a guard or Gerak to allow additional medical attention.
Crew Quarters/Cells
The cells used for slaves are initially clean, but dusty. All are around4-6m by 6m, have a double bunk and a fixed shelf/desktop, bedsheets, en suite toilet and shower cubicles, but nothing else. Used cells are dirty - unwashed for around 3 months except by their exhausted occupants.
Some cells have alien atmosphere controls so could accept, for example, Kel Dor. Any non-oxygen breathers will be placed in those cells.
All cells are locked and secured from the outside and the inside controls disabled. A DC25 Disable Device roll is required to break the sealed covers and a DC25 Computer Use roll to crack the codes and open the doors from the inside. If no tools or poor tools are used, the DC
Kelysine Crashland Medj'K'ai Nebula - 1
20
is +2. Remember no tools will be available except that which the heroes have smuggled on them or manage to construct during their time on-board.
Tools could be built: a small item of a tool kit worth around 5CR could be smuggled into the heroes rooms each day: normal tool construction rules should be followed with tools worth around 50-100CR being required.
Work Locations
Slaves will not be able to work in the control centre or anywhere where there is a computer console, such as the commander's/ managers lounges or administration areas (which are now vacant). They will be tasked with operating the atmosphere processing machinery, handling the extracted Hfedrium and Tibanna Gas, operating the input and output valves, processing the extracted minerals into usable form, compression the Tibanna Gas into carbonite in the carbon-freezing chamber, protection-crating the Hfedrium, and wheeling the packages into the loading or storage bays.
At no time will a slave be allowed near a loading bay when a shield-ship and shuttle is in dock.
All factory and processing control stations can be monitored from the control core at the topside of the mine, and can be controlled and overridden from the control room: each remote station can feed back information, and accept overrides, but cannot control the central computer (it could be altered if the main computer was altered to receive commands AND the processing station was altered to send commands - DC25 Repair in each case with Computer Use DC25 needed afterwards to hack in to the central computer from the remote station.
Some of the administration areas have shut-down terminals which can be used to retrieve information from the core: they cannot be used to issue control commands, however.
Control Core
This is located right at the top of the Cloud-mine, under the dome. Normally it is staffed by two CEWs plus 6 expert droids who monitor and manage the repulsors and oversee the processing facility. Everything can be controlled by the interlinked computers in the core, ranging from inter-cell comlinks, the electro--magnetic field across the mouth of the hangar bay to the life support and processing plant itself.
Normally slaves are not allowed up into the core. It may be that the Heroes engineer an excuse to do so. To break into the systems without being given a password is a DC25 Computer Use check (take 20 allowed). To find out how to work or operate each subsystem is a DC15 Computer Use check.
If the slaves escape
If all the slaves somehow escape, Gerak will demand the control center send him a shuttle and run to the Hangar with all his surviving cronies and lock himself in. He will station all
surviving CEWs outside the main doors to the hangar to defend it from any attack.
Geraks actions from here will resemble those already outlined in Gerak's Last-Minute Surprise on page 17.
The Heroes and Slaves escape
If the Heroes and slaves manage to escape from the Cloud Mine they really have one of two alternatives: either go down to the Control Centre and try to capture it and Oy’sar (and get back their lightsabers, if Jedi), or just boost for the inner system (most likely if they are seriously wounded).
If they approach the Control Centre, they will have to trick themselves past the controllers to avoid getting shot at by the laser cannon, but once landed they can run through the centre almost as if starting from scratch.
If boosting for the inner system, they have one of two options: send a distress call as soon as they can, that is as soon as they are outside the immense electro-magnetic and gravitational field of Arysine/the Black Hole; or send a distress call when they have got some way into the system.
Losshaven will react by sending out a rescue tug to take on any survivors and get the shuttle back to Haven Port.
As soon as Oy’sar or any survivors on the Control Centre pick up the distress call, they will act by sending a message to the MNMC to pick them up. In order of priority they will try to (i) shut down operations to cover their tracks, (ii) blow up the droid manufacturing cavern, (iii) Wipe the computers of evidence, (iv) destroy the droid brains, (v) load the droids onto the MNMC ship which comes to rescue them, and (vi) load additional personal belongings onto the ship before finally escaping to the MNMC secret system.
This will take time. If the Heroes send messages early (as soon as they escape), the quicker the rescue ships will get to them (using hyperdrive micro-jumps in-system) and the less time Oy’sar will have. Actions (i) to (iii) above will always be done before escape. If an early message is sent, (iv) to (vi) have only a 30-70% chance of happening (depending on how quick they sent it – GM decides) and if item (vi) occurs there is a 50% chance that each important item of personal belongings that it will be taken away by Oy’sar. If the heroes send a distress signal late (or don’t send it) then all their captured equipment will be taken away and lost!
Known Alternatives
It is possible the Heroes will try a variety of other approaches, including activating some of the droids and send a drone- or droid-controlled shuttle and shield-ship down. Gerak, of course, will try and make a getaway in a stolen shuttle. He has clearance to raid a cockpit, will remove any drones and escape - with or without any of his thugs (preferably with).
Kelysine Crashland Medj'K'ai Nebula - 1
Page 21
Epilogue - Wrapping it
up
The Heroes should, of course, ferry the slaves back to freedom on Losshaven - Losshaven Starport - and report the goings-on to the authorities. The shuttle and shield-ships will be reclaimed by a very "red-faced" "independent" MNMC representative on Losshaven who will, of course, insist the Mercantile Combine within the sector knew nothing about the activities of a small breakaway group on Arysine - who they claim were obviously associated with the Separatist (is split real, the Heroes may ask?). They will offer complete co-operation with "due process and law-enforcement agencies" within Losshaven and the surrounding sector. Of course, any follow-up team will not find any records linking the base to the MNMC within the cluster... most of the supplies will remain, as will the mine and internal equipment, but any records and computers will be destroyed and unreadable.
The MNMC's problem, of course, is that if they contest the Heroes' actions then they will be forced to acknowledge the activities in the mine - and thereby associate themselves with the Clone War at large in the galaxy. This does not suit their current aims. However, they will reclaim any obvious items of equipment the Heroes have brought with them (a shuttle, for example!).
The Heroes' activities will be of interest to Tyahnos Moy'inaar, the Neimoidian Sector Manager. The GM may wish to engineer a high-level (or meta-gaming) encounter between him and the Heroes where he obliquely threatens them whilst praising them (perhaps along the lines of "I hope we will not have to meet again in such circumstances. You were brave and very lucky to escape from the rogue elements combat droids, this time."). The MNMC representatives will demand that all the equipment “purchased with their stolen" funds be returned.
Whilst the affair may go out on the holonet, it will not grab much attention from the rest of the Republic. However, the Heroes will be minor local heroes, worthy of a mention on the Losshaven and Keysh'kar news.
Final XP
If the Heroes manage to block the mines and rescue the slaves and get free, they should each receive a bonus of 100-300 XP dependent on role-playing shown. This should be in addition to any XP accumulated throughout the adventure from challenges, etc.
Five Heroes should end up with around 500-800XP after completing the adventure.
Lost Lightsabers
It is possible that any captured Jedi will have their lightsabers taken from them. These will be kept by Oy’sar Moy’inaar in his office. If sufficient time is available when the heroes escape, he
will try to pack the lightsabers (worth anything up to 10,000 Cr each on the Black Market) with his personal belongings (see The Heroes and Slaves escape above for the chance of this) and escape.
This gives a campaign thread: any taken lightsabers will kick up rumours of their availability on the Black Market around Losshaven (for around 10,000Cr). These will eventually be bought by a philanthropist and future sponsor of the Heroes on Keysh’kar, Y’vaath Slaar, ready for Episode 3 when he will hand them back to the Jedi!
Rewards
If the Heroes rescue the slaves and expose or destroy the mine (accidentally or not), there will be a reward and a minor ceremony given by the local Governor on Losshaven. Of course, this will raise their profile a little - which may not be good - but each will receive a share of a 2,500 credit community award for rescuing the slaves. They can turn down the reward (and the ceremony).
There is also a 1,000 credit bounty for capturing P'Shee, an escaped convict. There should be no reward for capturing or slaying Gerak, though the GM may wish to award one. Otherwise, the authorities should take control of Gerak.
If the heroes attend the awards dinner then their reputation on Losshaven will receive a +1 bonus. Elsewhere, even in the Medj'K'ai Nebula, this will not apply due to the local nature of the trouble! They will be put up, for free, for two weeks in the most plush hotel in Losshaven (remember, this is the Outer Rim!) and will have their medical expenses met for two weeks.
Due to the local media, hotel expectations, entertaining and local politico appointments and commitments (local politicians will queue to be holographed with the rescuers), during this period Heroes will not be able to earn money from any profession, or gambling, and will not be able to craft any items (the hotel not putting up with anyone turning their rooms into a workshop).
If the Heroes leave the hotel before this time, they will be able to gain employment for only a week, or have a single weeks gambling. Unfortunately they will be hampered by their temporary fame and will suffer a mod of -3 on employment checks, be able to gain only 50% of normal gambling income, will have to pay for lodgings (normal rates). Items may be able to be crafted as normal, providing the Heroes have the credits and lodgings, and are not hampered by having to earn a living!
The Heroes may be tempted to retain equipment they found in the Control Centre or Mining facilities. The GM should bear in mind that most weapons above simple Blaster Pistols are not legal, though Heavy Blaster Pistols are often acceptable outside the city - whilst a license for Blaster Pistols is officially required, police do not normally check up on the possession of one unless the bearers are committing a criminal act

Kelysine Crashland Medj'K'ai Nebula - 1
22
Success!!
The following summarises the Experience points to be awarded on successful completion of the adventure.
Experience Point Summary Table
Action XP
Putting out the fire onboard the ship ........................................................................... 300 To pilot on successful freighter landing (optional) ...................................................... 25-50 Identifying, surviving and successfully disarming the bus booby-trap ........................ 300 Surviving the bus booby-trap (disarmed or not - adventure bonus)............................ 100 each Gaining undisputed control of the Control Tower........................................................ 100 Disabling the fallback/comms link to the mining droid brain ....................................... 200 Normal CEWs: .......................................................................................................1-2 75 .................................................................................................................................. 3 300 ...............................................................................................................................4-6 400 Mining Brain CEWs ................................................................................................1-2 60 ...............................................................................................................................3-5 300 ...............................................................................................................................6-9 400 Control Centre Guards ...................... As a pair, or defeated in ship-to-turret firefight 150 ..........................................................................................................If they surrender 75 Oy'sar - only if forced to attack.................................................................................... 50-150 Gerak........................................................................................................................... 400 All of Gerak's Thugs (captured or not) ........................................................................ 300 P'Shee........................................................................... If Attacked/killed in a firefight 200 ............................................................................................... Captured (plus bounty) 300 Success bonus for preventing further mining/construction (disabling mining brain?). 300 Success bonus for Blocking the underground mine doors ......................................... 150 Success bonus for rescuing all surviving slaves......................................................... 300-500

Kelysine Crashland Medj'K'ai Nebula - 1
Page 23
Key NPCs
All Heroes have the relevant weapon group proficiencies for the weapons and armour they carry, unless stated otherwise.
Apart from the LWD-series worker droids, all droids on the station have the skills for their own specialisation but are all remotely controlled and directed by one of two droid brains in the control centre and in the mining area being hollowed out for the manufacturing plant.
Standard LWD- series droid
The Losshaven Engineering Corporation Worker Droid (LWD- series) is the standard worker droid in the Medj'K'ai Nebula where ASP- and J9- series cannot normally be afforded. It is basic, capable, general-purpose and cheap. All LWDs come with the standard "no harm to sentients" programming burnt into their circuits..
They are normally equipped with 3-fingered "hands" with an opposable thumb, a vocabulator and a simple local brain. Additional options are heuristics processors.
Standard LWD- walking worker droid Expert 1. Init 0; Def 10; VP/WP 0/10; Spd 8.
Melee: +1 [1D3+1 hand] Equipment: Built-in Vocabulator & Comlink,
10kg Internal storage, DR1 armour due to hard-wearing construction.
Skills: Speak Basic, Speak Binary, Profession(relevant) +1, Computer Use+3, Repair+3 (18 points remaining)
SV Fort 0; Ref 0; Will 1. Feats: Gearhead, Ambidexterity, WGP
(simple weapons) Str 12(+1),Dex 10(0),Con 10(0), Int 10(0),
Wis 8(-1), Cha 8(-1) CC:A
CEWs, Droids and Remote Droid
Brains
Standard CEWs
The Combat-Enabled Worker droids at the base are modified LWD- series droids. Unfortunately, due to the complexity of adding Remote Receivers the average intelligence of the droids collapses as soon as they are under remote control. Standard CEW stats are:
Standard CEW Thug 1. Init -2; Def 10; VP/WP 0/10; Spd 10.
Melee: +2 [1D4+1 hand], Ranged: +1 [3D8/19-20, Blaster Carbine]
SV Fort +2; Ref 0; Will -1. Skills: Speak Basic; Spot +0 Equipment: Vocabulator, Remote
Controlled, Blaster Carbine, Comlink Feats: Ambidexterity, WGP(Simple, Blaster
Pistols, Blaster Rifles) Str 12(+1),Dex 10(0),Con 10(0), Int 6(-2),
Wis 8(-1), Cha 8(-1) CC:A
Each is worth around 75XP as individual simple encounters. 2 or 3 are classed as challenging (300XP), whilst 4-6 are Extreme (400XP).
When not under control of the remote brain, they revert to standard LWD-types including the inhibition on causing damage to intelligent life.
Mining Brain Controlled CEWs
These are similar to the above but with the following changes:
Mining Brain Controlled CEW Thug 1. Init -4; Def 8; VP/WP 0/10; Spd 10. Melee: +2 [1D4+1 hand], Skills: Speak Basic; Spot +0 Equipment: Vocabulator, Remote
Controlled, Blaster Carbine, Comlink Feats: Ambidexterity, WGP(Simple, Blaster
Pistols, Blaster Rifles) Ranged: -1 [3D8/19-20, Blaster Carbine] SV Fort +2; Ref -2; Will -1. Str 12(+1),Dex 6(-2),Con 10(0), Int 6(-2),
Wis 8(-1), Cha 8(-1) CC:A
When controlled by the mining brain CEWs are only worth around 60XP as individual simple encounters. 3 to 5 are classed as challenging (300XP), whilst 6 or more are Extreme (400XP).
Any CEWs transferred from the mine's brain to the Control Centre's droid brain will have standard CEW stats: it is the remote droid brain which determines their capability. Moreover, once controlled and under the CC's brain, the mining brain has those control slots available again.
Heavy Restraint CEWs
These will only be controlled by the Control Centre remote brain. One is attached to each squad on the shield ship.
HREW Heavy Restraint CEW Thug 1. Init -2; Def 10 DR3; VP/WP 0/10;
Spd 10. Melee: +2 [1D4+1 hand] Ranged: +1 [3D8/19-20, Blaster carbine] SV Fort +2; Ref -1; Will -1. Vocabulator, Remote Control, Light Armour,
Blaster Carbine, Restraints Feats: AP(Light), WGP(Blaster Rifles,
Simple weapons) Str 12(+1),Dex 8(-1),Con 8(-1), Int 6(-2), Wis
8(-1), Cha 6(-2) Skills Speak Basic CC:A+
As individual encounters, 75-100XP; two together are a challenging encounter 300XP.
Remote Brains and CEW control
The Control Centre has also been the site for a prototype, long-range transmitter for control of the remote droids. Even so, it requires a booster on the Shield-Station to reach into the Arysine atmosphere. If the transmitter (disguised on the roof of the Control Centre) or booster (on the Shield-Station) is detected and destroyed then control of droids on the Shield-Station and Cloud Mine will be lost: ass mentioned earlier CEWs will revert to standard LWDs.
The base has two remote droid brains and command types which are prototypes of the brains to be used for the CEWs. The concept assumes that groups of up to 12 squads will be

Kelysine Crashland Medj'K'ai Nebula - 1
24
controlled from a single, cheap and easy-to-build control vehicle.
The one in the control tower has a control capacity of 12 units (CUs). Each of the following droid minds/mind-groups which are potentially under its control use a single CU.
• A CEW squad of 6 or up to 6 CEWs engaged in combat or non-standard work
• Flying a shuttle via a drone
• Flying a shield-ship via a drone
• Up to 10 space port or maintenance droids (on Kelysine or on the shield-station) doing normal work
The main droid brain in the Control Centres main tower normally controls:
• Four squads of CEWs as guards on the cloud mine
• Four groups of maintenance/operation droids - two on the Cloud Mine, one on the Shield-station and one in the Control Centre. Control of those on the shield-station and cloud mine are performed via a set of satellites orbiting the moon and giant (this is an expensive cover-up!)
• Two squads - 12 CEWs (two of which are advanced HREW CEWs) - guarding the hangar bay on the shield-station
• The last two CUs are normally free but can be used to control the 0-2 additional squads (6-12) of CEWs within the Control Centre itself.
• Alternatively, the last two CUs are used to fly a shuttle and shield-ship using the simple, remote-controlled, Expert drones, each of which is Pilot+6, Repair +2.
The brain can be switched off totally, of course, though this will alert the mining computer (see below) as there is a fallback/comms link between this brain and the mining brain. This link could be detected if search for (DC 12), but disabling it is extremely difficult - above that expected of the Heroes (Take 10 possible, DC21+, +200XP, if failed remote brain is warned).
Of course the brain can be programmed to drop/collapse control of individual groups of droids once understood (see RCR p80) and the relevant command codes given. These are obtainable from the commander. If the command codes are not available they will have to be overridden and reset, a DC25 feat, with Take 20 is allowed if there is no more threat within the C/C.
It is important to note that the droid brain setup is designed to prevent escape from the cloud mine - the main source of potential trouble with the slaves being annoyed at their status! Any escape on the cloud mine cannot gain control of the shuttles stored at the Shield-station OR gain control of any other droids. The weakness of this plan is that if the Control Centre is taken, then the ingress is relatively easy - but, so the TF figure, they are then in real trouble anyway.
Any CEWs controlled by this brain have the standard CEW specs.
The other droid brain within the mining complex is primarily a mining govorner intended for the droid miners and mining equipment. It has a capacity of 6 and normally controls 10 maintenance droids who maintain (and assemble) the other CEWs, plus 40 other droids of a wide range of types who are mining out the outcrop and beginning to assemble the factory line (droids are transport, ore-carrying, mining moles, labourers, assemblers, welders, polishers, manufacturers, etc). However, if it detects trouble by having its link dropped from the Control Centre, or receives an emergency activation signal, it will divert miners and assemble and ready up to 2 squads of CEWs per hour until it has reached its maximum for control (5 squads). Given it is not a combat computer, the CEWs suffer somewhat from lack of good response and guidance if attacked.
This mine droids controller could also control the droids inside the cavern to attack any invaders with an assortment of mining implements: some of the droids are the size of trucks and have heavyweight drills and mining equipment mounted (have fun!).
If there are no personnel alive then the system will just become automated: the main droid brain will control the CEWs it has to just guard the Control Centre. When they are destroyed the brain will request replacements from the mine. The mining brain will not send any CEWs it assembles outside the mine, though it will have them lined up in the tunnel ready to march out!
Knowledge
The following is information pertinent to subsequent adventures of which some of the crew of the Control Centre are aware.
P'shee, Oy'Sar and other Neimoidians: They are fully aware of the Separatist attack on the Jedi enclave on Keysh'kar. If spared, and persuaded to do so, they can give some information about the razing of the training centre, the destruction of the village around it, and will claim that all bar a single Jedi Padawan died - all that were left were a few villagers who fled into the ice-covered mountains - apart from a single Jedi starfighter which somehow evaded destruction. The Separatists captured and tortured the Jedi Padawan, but allowed her to live so that the message of contempt would get to the Jedi Order.
In addition, the following may also be unearthed, either through taunts, persuasion or Force abilities.
Oy'sar and P'Shee: Both were involved in the attack, saw some of the torture and both know she was placed unconscious, lightsaber and Jedi Robes intact, in a Jedi Starfighter whose navcomp was programmed to automatically jump to Losshaven. But after that, who knows…
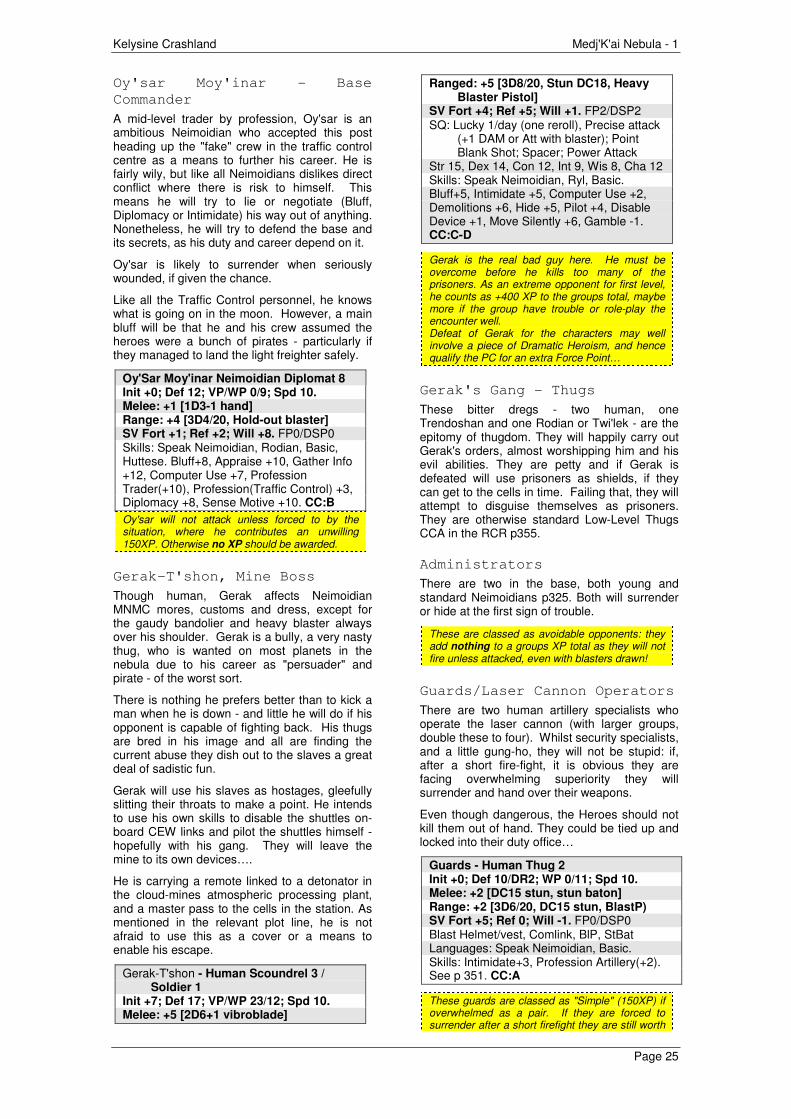
Kelysine Crashland Medj'K'ai Nebula - 1
Page 25
Oy'sar Moy'inar - Base
Commander
A mid-level trader by profession, Oy'sar is an ambitious Neimoidian who accepted this post heading up the "fake" crew in the traffic control centre as a means to further his career. He is fairly wily, but like all Neimoidians dislikes direct conflict where there is risk to himself. This means he will try to lie or negotiate (Bluff, Diplomacy or Intimidate) his way out of anything. Nonetheless, he will try to defend the base and its secrets, as his duty and career depend on it.
Oy'sar is likely to surrender when seriously wounded, if given the chance.
Like all the Traffic Control personnel, he knows what is going on in the moon. However, a main bluff will be that he and his crew assumed the heroes were a bunch of pirates - particularly if they managed to land the light freighter safely.
Oy'Sar Moy'inar Neimoidian Diplomat 8 Init +0; Def 12; VP/WP 0/9; Spd 10. Melee: +1 [1D3-1 hand] Range: +4 [3D4/20, Hold-out blaster] SV Fort +1; Ref +2; Will +8. FP0/DSP0 Skills: Speak Neimoidian, Rodian, Basic, Huttese. Bluff+8, Appraise +10, Gather Info +12, Computer Use +7, Profession Trader(+10), Profession(Traffic Control) +3, Diplomacy +8, Sense Motive +10. CC:B
Oy'sar will not attack unless forced to by the situation, where he contributes an unwilling 150XP. Otherwise no XP should be awarded.
Gerak-T'shon, Mine Boss
Though human, Gerak affects Neimoidian MNMC mores, customs and dress, except for the gaudy bandolier and heavy blaster always over his shoulder. Gerak is a bully, a very nasty thug, who is wanted on most planets in the nebula due to his career as "persuader" and pirate - of the worst sort.
There is nothing he prefers better than to kick a man when he is down - and little he will do if his opponent is capable of fighting back. His thugs are bred in his image and all are finding the current abuse they dish out to the slaves a great deal of sadistic fun.
Gerak will use his slaves as hostages, gleefully slitting their throats to make a point. He intends to use his own skills to disable the shuttles on-board CEW links and pilot the shuttles himself - hopefully with his gang. They will leave the mine to its own devices….
He is carrying a remote linked to a detonator in the cloud-mines atmospheric processing plant, and a master pass to the cells in the station. As mentioned in the relevant plot line, he is not afraid to use this as a cover or a means to enable his escape.
Gerak-T'shon - Human Scoundrel 3 / Soldier 1
Init +7; Def 17; VP/WP 23/12; Spd 10. Melee: +5 [2D6+1 vibroblade]
Ranged: +5 [3D8/20, Stun DC18, Heavy Blaster Pistol]
SV Fort +4; Ref +5; Will +1. FP2/DSP2 SQ: Lucky 1/day (one reroll), Precise attack
(+1 DAM or Att with blaster); Point Blank Shot; Spacer; Power Attack
Str 15, Dex 14, Con 12, Int 9, Wis 8, Cha 12 Skills: Speak Neimoidian, Ryl, Basic. Bluff+5, Intimidate +5, Computer Use +2, Demolitions +6, Hide +5, Pilot +4, Disable Device +1, Move Silently +6, Gamble -1. CC:C-D
Gerak is the real bad guy here. He must be overcome before he kills too many of the prisoners. As an extreme opponent for first level, he counts as +400 XP to the groups total, maybe more if the group have trouble or role-play the encounter well. Defeat of Gerak for the characters may well involve a piece of Dramatic Heroism, and hence qualify the PC for an extra Force Point…
Gerak's Gang - Thugs
These bitter dregs - two human, one Trendoshan and one Rodian or Twi'lek - are the epitomy of thugdom. They will happily carry out Gerak's orders, almost worshipping him and his evil abilities. They are petty and if Gerak is defeated will use prisoners as shields, if they can get to the cells in time. Failing that, they will attempt to disguise themselves as prisoners. They are otherwise standard Low-Level Thugs CCA in the RCR p355.
Administrators
There are two in the base, both young and standard Neimoidians p325. Both will surrender or hide at the first sign of trouble.
These are classed as avoidable opponents: they add nothing to a groups XP total as they will not fire unless attacked, even with blasters drawn!
Guards/Laser Cannon Operators
There are two human artillery specialists who operate the laser cannon (with larger groups, double these to four). Whilst security specialists, and a little gung-ho, they will not be stupid: if, after a short fire-fight, it is obvious they are facing overwhelming superiority they will surrender and hand over their weapons.
Even though dangerous, the Heroes should not kill them out of hand. They could be tied up and locked into their duty office…
Guards - Human Thug 2 Init +0; Def 10/DR2; WP 0/11; Spd 10. Melee: +2 [DC15 stun, stun baton] Range: +2 [3D6/20, DC15 stun, BlastP) SV Fort +5; Ref 0; Will -1. FP0/DSP0 Blast Helmet/vest, Comlink, BlP, StBat Languages: Speak Neimoidian, Basic. Skills: Intimidate+3, Profession Artillery(+2). See p 351. CC:A
These guards are classed as "Simple" (150XP) if overwhelmed as a pair. If they are forced to surrender after a short firefight they are still worth
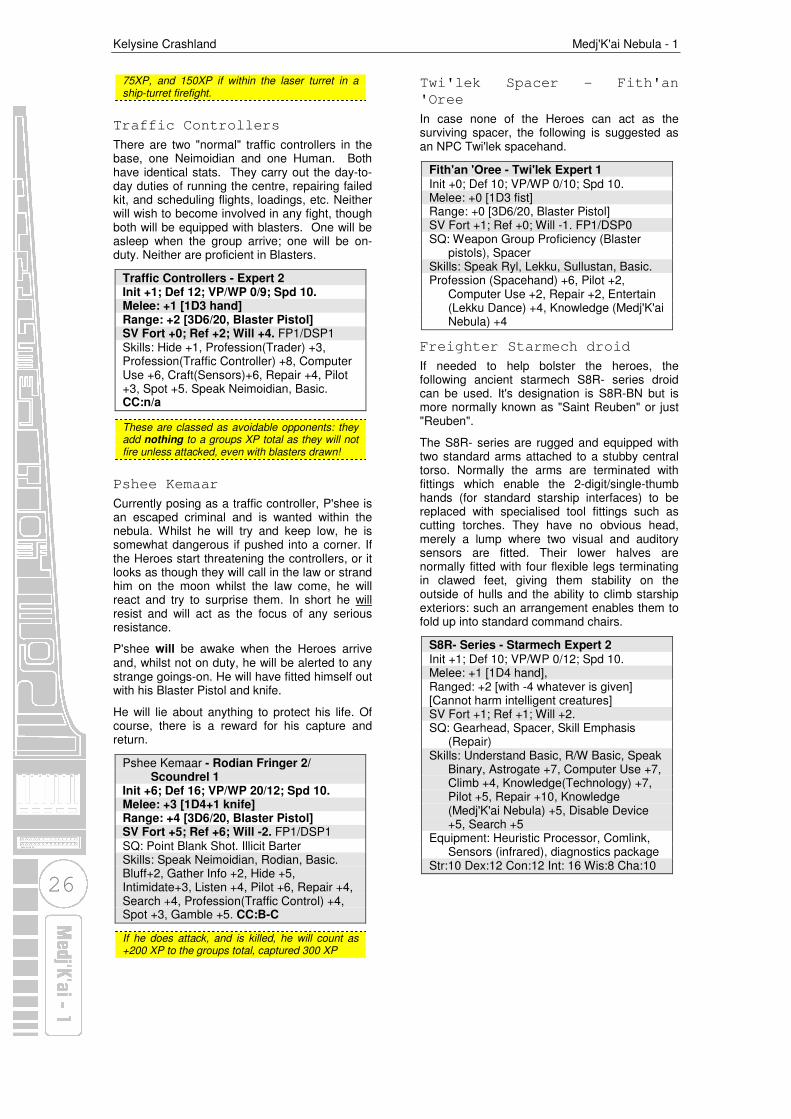
Kelysine Crashland Medj'K'ai Nebula - 1
26
75XP, and 150XP if within the laser turret in a ship-turret firefight.
Traffic Controllers
There are two "normal" traffic controllers in the base, one Neimoidian and one Human. Both have identical stats. They carry out the day-to-day duties of running the centre, repairing failed kit, and scheduling flights, loadings, etc. Neither will wish to become involved in any fight, though both will be equipped with blasters. One will be asleep when the group arrive; one will be on-duty. Neither are proficient in Blasters.
Traffic Controllers - Expert 2 Init +1; Def 12; VP/WP 0/9; Spd 10. Melee: +1 [1D3 hand] Range: +2 [3D6/20, Blaster Pistol] SV Fort +0; Ref +2; Will +4. FP1/DSP1 Skills: Hide +1, Profession(Trader) +3, Profession(Traffic Controller) +8, Computer Use +6, Craft(Sensors)+6, Repair +4, Pilot +3, Spot +5. Speak Neimoidian, Basic. CC:n/a
These are classed as avoidable opponents: they add nothing to a groups XP total as they will not fire unless attacked, even with blasters drawn!
Pshee Kemaar
Currently posing as a traffic controller, P'shee is an escaped criminal and is wanted within the nebula. Whilst he will try and keep low, he is somewhat dangerous if pushed into a corner. If the Heroes start threatening the controllers, or it looks as though they will call in the law or strand him on the moon whilst the law come, he will react and try to surprise them. In short he will resist and will act as the focus of any serious resistance.
P'shee will be awake when the Heroes arrive and, whilst not on duty, he will be alerted to any strange goings-on. He will have fitted himself out with his Blaster Pistol and knife.
He will lie about anything to protect his life. Of course, there is a reward for his capture and return.
Pshee Kemaar - Rodian Fringer 2/ Scoundrel 1
Init +6; Def 16; VP/WP 20/12; Spd 10. Melee: +3 [1D4+1 knife] Range: +4 [3D6/20, Blaster Pistol] SV Fort +5; Ref +6; Will -2. FP1/DSP1 SQ: Point Blank Shot. Illicit Barter Skills: Speak Neimoidian, Rodian, Basic. Bluff+2, Gather Info +2, Hide +5, Intimidate+3, Listen +4, Pilot +6, Repair +4, Search +4, Profession(Traffic Control) +4, Spot +3, Gamble +5. CC:B-C
If he does attack, and is killed, he will count as +200 XP to the groups total, captured 300 XP
Twi'lek Spacer - Fith'an
'Oree
In case none of the Heroes can act as the surviving spacer, the following is suggested as an NPC Twi'lek spacehand.
Fith'an 'Oree - Twi'lek Expert 1 Init +0; Def 10; VP/WP 0/10; Spd 10. Melee: +0 [1D3 fist] Range: +0 [3D6/20, Blaster Pistol] SV Fort +1; Ref +0; Will -1. FP1/DSP0 SQ: Weapon Group Proficiency (Blaster
pistols), Spacer Skills: Speak Ryl, Lekku, Sullustan, Basic. Profession (Spacehand) +6, Pilot +2,
Computer Use +2, Repair +2, Entertain (Lekku Dance) +4, Knowledge (Medj'K'ai Nebula) +4
Freighter Starmech droid
If needed to help bolster the heroes, the following ancient starmech S8R- series droid can be used. It's designation is S8R-BN but is more normally known as "Saint Reuben" or just "Reuben".
The S8R- series are rugged and equipped with two standard arms attached to a stubby central torso. Normally the arms are terminated with fittings which enable the 2-digit/single-thumb hands (for standard starship interfaces) to be replaced with specialised tool fittings such as cutting torches. They have no obvious head, merely a lump where two visual and auditory sensors are fitted. Their lower halves are normally fitted with four flexible legs terminating in clawed feet, giving them stability on the outside of hulls and the ability to climb starship exteriors: such an arrangement enables them to fold up into standard command chairs.
S8R- Series - Starmech Expert 2 Init +1; Def 10; VP/WP 0/12; Spd 10. Melee: +1 [1D4 hand], Ranged: +2 [with -4 whatever is given] [Cannot harm intelligent creatures] SV Fort +1; Ref +1; Will +2. SQ: Gearhead, Spacer, Skill Emphasis
(Repair) Skills: Understand Basic, R/W Basic, Speak
Binary, Astrogate +7, Computer Use +7, Climb +4, Knowledge(Technology) +7, Pilot +5, Repair +10, Knowledge (Medj'K'ai Nebula) +5, Disable Device +5, Search +5
Equipment: Heuristic Processor, Comlink, Sensors (infrared), diagnostics package
Str:10 Dex:12 Con:12 Int: 16 Wis:8 Cha:10
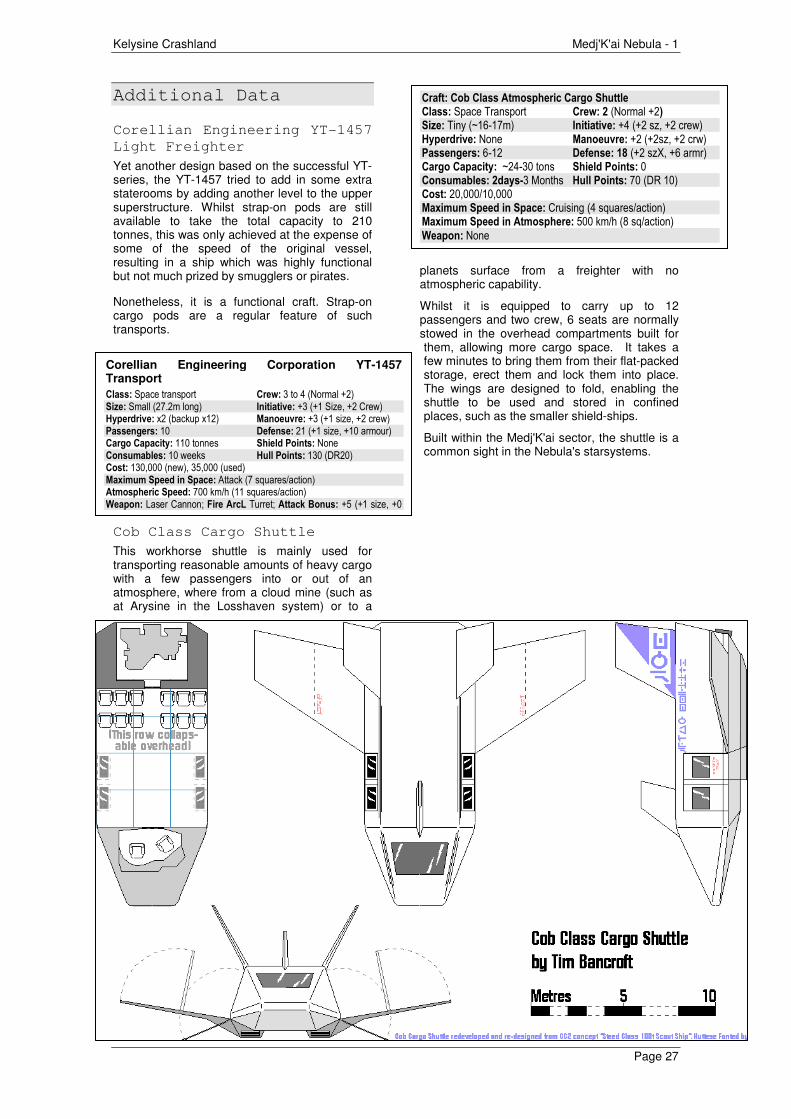
Kelysine Crashland Medj'K'ai Nebula - 1
Page 27
Additional Data
Corellian Engineering YT-1457
Light Freighter
Yet another design based on the successful YT-series, the YT-1457 tried to add in some extra staterooms by adding another level to the upper superstructure. Whilst strap-on pods are still available to take the total capacity to 210 tonnes, this was only achieved at the expense of some of the speed of the original vessel, resulting in a ship which was highly functional but not much prized by smugglers or pirates.
Nonetheless, it is a functional craft. Strap-on cargo pods are a regular feature of such transports.
Cob Class Cargo Shuttle
This workhorse shuttle is mainly used for transporting reasonable amounts of heavy cargo with a few passengers into or out of an atmosphere, where from a cloud mine (such as at Arysine in the Losshaven system) or to a
planets surface from a freighter with no atmospheric capability.
Whilst it is equipped to carry up to 12 passengers and two crew, 6 seats are normally stowed in the overhead compartments built for them, allowing more cargo space. It takes a few minutes to bring them from their flat-packed storage, erect them and lock them into place. The wings are designed to fold, enabling the shuttle to be used and stored in confined places, such as the smaller shield-ships.
Built within the Medj'K'ai sector, the shuttle is a common sight in the Nebula's starsystems.
Corellian Engineering Corporation YT-1457 Transport
Class: Space transport Crew: 3 to 4 (Normal +2) Size: Small (27.2m long) Initiative: +3 (+1 Size, +2 Crew) Hyperdrive: x2 (backup x12) Manoeuvre: +3 (+1 size, +2 crew) Passengers: 10 Defense: 21 (+1 size, +10 armour) Cargo Capacity: 110 tonnes Shield Points: None Consumables: 10 weeks Hull Points: 130 (DR20) Cost: 130,000 (new), 35,000 (used) Maximum Speed in Space: Attack (7 squares/action) Atmospheric Speed: 700 km/h (11 squares/action) Weapon: Laser Cannon; Fire ArcL Turret; Attack Bonus: +5 (+1 size, +0
Craft: Cob Class Atmospheric Cargo Shuttle Class: Space Transport Crew: 2 (Normal +2) Size: Tiny (~16-17m) Initiative: +4 (+2 sz, +2 crew) Hyperdrive: None Manoeuvre: +2 (+2sz, +2 crw) Passengers: 6-12 Defense: 18 (+2 szX, +6 armr) Cargo Capacity: ~24-30 tons Shield Points: 0 Consumables: 2days-3 Months Hull Points: 70 (DR 10) Cost: 20,000/10,000 Maximum Speed in Space: Cruising (4 squares/action) Maximum Speed in Atmosphere: 500 km/h (8 sq/action)
Weapon: None
Kelysine Crashland
Medj'K'ai Nebula
1
Kelysine Crashland: Plans
A supporting document for Kelysine Crashland
Star Wars™ d20™ RCR Adventure for 4-6 1st level characters
By Halfbat

Kelysine Crashland
Contents
Introduction......................................2
Landing area on Kelysine ................3
Kelysine Control Centre Front view..4
Control Centre Layout - General ......5
Control Centre Layout - Focus .........6
Control Centre Layout - Control Tower........................................................7
Cloud Mine ......................................8
Cloud Mine Landing Bay..................9
Cloud Mine Carbonite Freezing Level & Chamber........................................10
Introduction
This document contains floor plan and scenario maps for the Kelysine Crashland adventure. Each map section is meant explicitly for GM-use, but can be disclosed to players when they are aware of the facts or the area defined. Some plans have several versions: one which could be called up on a console to show the layout or plans of the Control Centre (for example) and a second with personnel located which can be used by the GM to plot and mark progress.
Conventions
The information in this document is meant to be for a GMs use only. It is recommended that GMs read right through the scenario before running the adventure. However, some of the information can be read out directly to players, or is of particular importance to GMs.
As a result, the following presentation conventions are used throughout this document.
Information contained within such a dashed, shaded box is capable of being disclosed to characters who research the system on the Holonet or who make a successful Knowledge(Med'K'ai) roll, DC 15. Take 10 is often possible.
Particularly important notes to the GM tend to be put in italics like this. Such instructions refer to key plot moments or to particularly important NPC actions.
Copyright & Disclaimer
This is a role-playing scenario based on, and requiring, the Wizards of the Coast (WotC) Star Wars d20 Roleplaying Game Revised Core Rulebook (RCR). This is not an official publication and is not endorsed by Lucasfilms, LTd, or WotC.
Information referenced within the RCR is Copyright © WotC. STAR WARS ® ™and © 2001 Lucasfilms, Ltd., Title, character and place names protected by trademark laws. Material presented within this document is not for sale and cannot be deemed a contest of the rights and ownership of Lucasfilms, Ltd., or its licensees, including WotC. References to films and plot lines are included for placement purposes only.
The document may not be distributed, reproduced or displayed other than where it is presented without the prior permission of the author. Reproduction with intent of sale, or of actual sale, may be deemed an infringement of Copyright Law.
Original material within this document is copyright the author, Tim Bancroft, also identified as Halfbat. The author can be contacted via email on [email protected].

Kelysine Crashland MMMMMMMMM MMMMMM M M
Landing area on Kelysine
This is to be shown to the players when about to land on Kelysine. Many of the warehouses look extremely new - though age is difficult to determine in such a low weathering environment.
Those along the edge of the large pad (1) and those adjacent to the surfaced road coming from Pad 3 have, perhaps, signs of dust on the roofs and around the footings. The others all have very clean roofs, no lichen, and have signs of recently-set concrete and plasteel around the bases.
The mountain ridge, whilst "low" is very steep - in places only 200m across and, whilst lower in the center, it still retains a minimum height of around 140-160m.

Kelysine Crashland Medj'K'ai Nebula - 1
Kelysine Control Centre Front view
The views of the control centre should be disclosed as necessary to the players. Note that the spacecraft tracking or any remote control is done from a number of remote stations around the moon, though from few satellites as most un-powered satellites (and even many simple powered ones) would soon be destroyed in the turbulence around Arysine.
Key points of interest in this view are the two entrances - one for vehicles (passenger repulsor-mini-buses) and one for people. The height of the main building may mean that a second, low floor could be implemented - or the space just used for storage of solid protection.
Four exhaust chimneys are in use - two directly behind those visible in this view. They are belching out fumes at all times.
And, of course, there is a dual laser cannon turret central-mounted in case of any issues with pirates or opportunistic raiders wishing to get hold of the products of the cloud-mine stored in the warehouses.
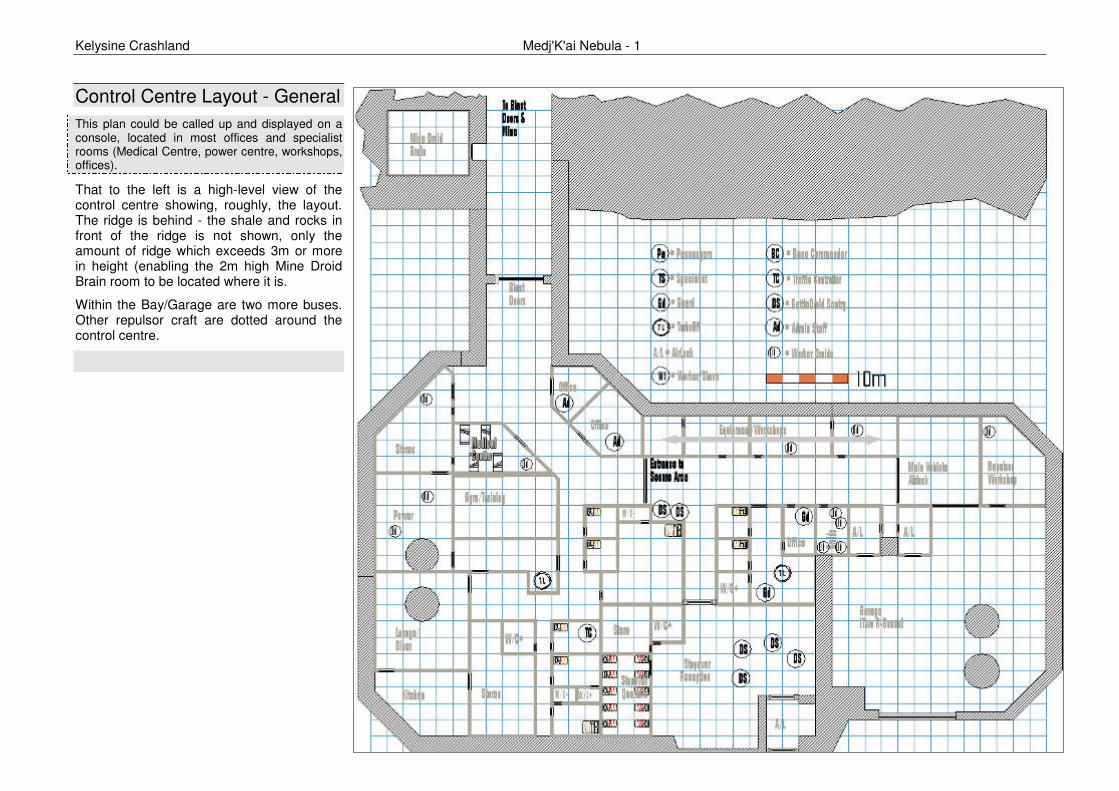
Kelysine Crashland Medj'K'ai Nebula - 1
Control Centre Layout - General
This plan could be called up and displayed on a console, located in most offices and specialist rooms (Medical Centre, power centre, workshops, offices).
That to the left is a high-level view of the control centre showing, roughly, the layout. The ridge is behind - the shale and rocks in front of the ridge is not shown, only the amount of ridge which exceeds 3m or more in height (enabling the 2m high Mine Droid Brain room to be located where it is.
Within the Bay/Garage are two more buses. Other repulsor craft are dotted around the control centre.
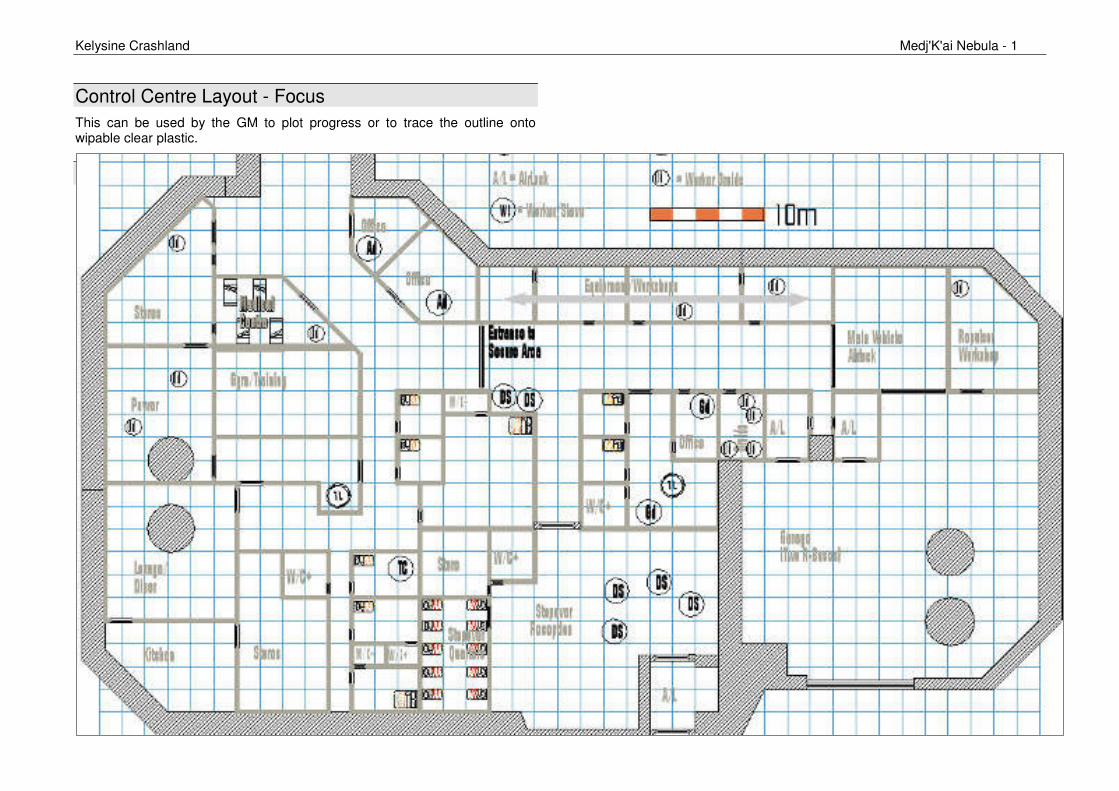
Kelysine Crashland Medj'K'ai Nebula - 1
Control Centre Layout - Focus
This can be used by the GM to plot progress or to trace the outline onto wipable clear plastic.

Kelysine Crashland Medj'K'ai Nebula - 1
Control Centre Layout - Control Tower
The views of the control centre should be disclosed as necessary to the players. A centre on a moon like Kelysine normally has a number of spacecraft tracking systems around the surface of the moon.
This plan shows the normal locations of the personnel: C Commander, Oy'sar Moy'inar; TC Traffic Controller on Duty; P P'shee K'maar facing the Turbolift.
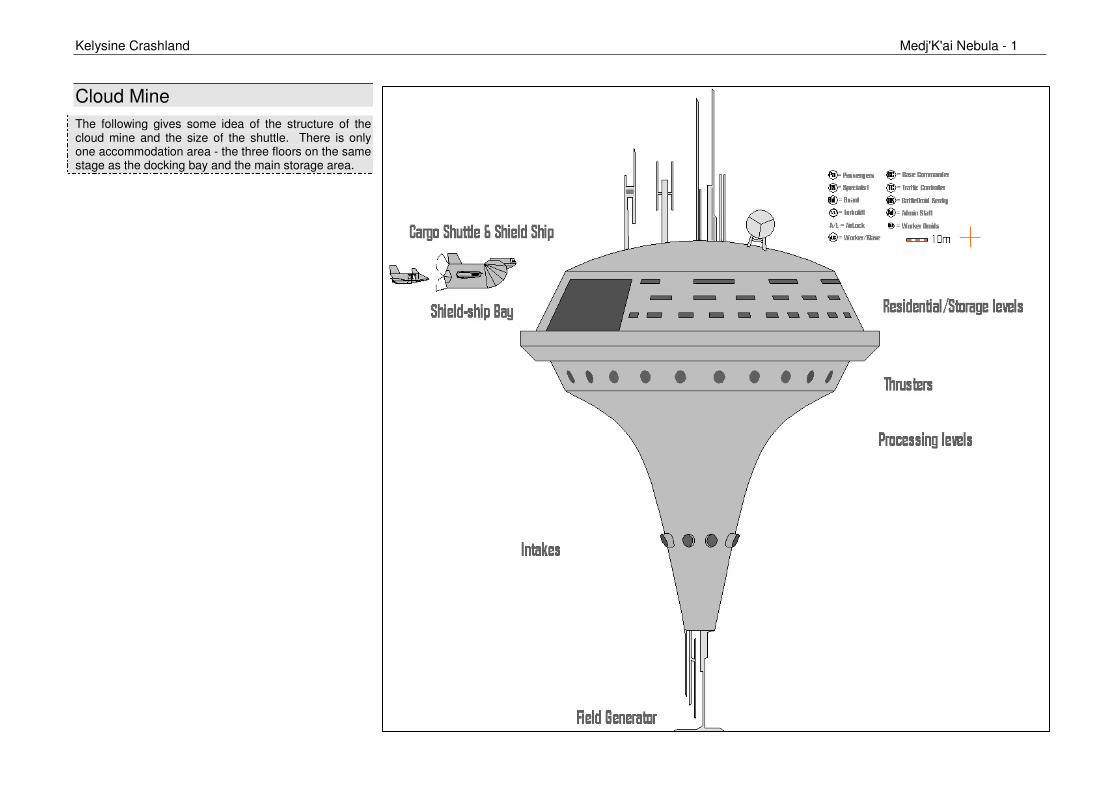
Kelysine Crashland Medj'K'ai Nebula - 1
Cloud Mine
The following gives some idea of the structure of the cloud mine and the size of the shuttle. There is only one accommodation area - the three floors on the same stage as the docking bay and the main storage area.

Kelysine Crashland Medj'K'ai Nebula - 1
Cloud Mine Landing Bay
This is provided as a possible layout of the Landing bay/Shield-ship Bay on the Cloud Mine, for optional GM use. It is likely that some action will take place in the landing bay. It should be borne in mind that the Shuttle stays inside the Shield Ship but that the Shield-Ship has containment fields around two sides.
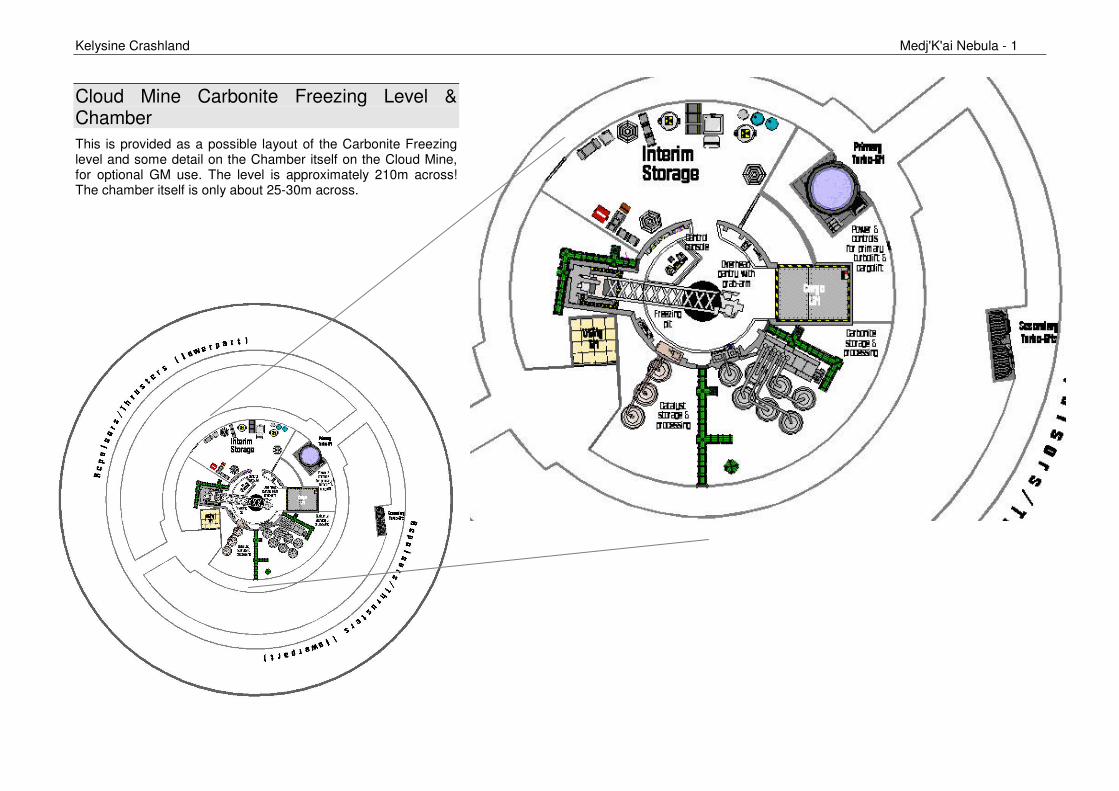
Kelysine Crashland Medj'K'ai Nebula - 1
Cloud Mine Carbonite Freezing Level & Chamber
This is provided as a possible layout of the Carbonite Freezing level and some detail on the Chamber itself on the Cloud Mine, for optional GM use. The level is approximately 210m across! The chamber itself is only about 25-30m across.