meditech training manual - dds learning · web viewdds service coordinators, mrc staff as...
TRANSCRIPT

qwertyuiopasdfghjklzxcvbnmqwertyuiopasdfghjklzxcvbnmqwertyuiopasdfghjklzxcvbnmqwertyuiopasdfghjklzxcvbnmqwertyuiopasdfghjklzxcvbnmqwertyuiopasdfghjklzxcvbnmqwertyuiopasdfghjklzxcvbnmqwertyuiopasdfghjklzxcvbnmqwertyuiopasdfghjklzxcvbnmqwertyuiopasdfghjklzxcvbnmqwertyuiopasdfghjklzxcvbnmqwertyuiopasdfghjklzxcvbnmqwertyuiopasdfghjklzxcvbnmqwertyuiopasdfghjklzxcvbnmqwertyuiopasdfghjklzxcvbnmqwertyuiopasdfghjklzxcvbnmqwertyuiopasdfghjklzxcvbnmqwertyuiopasdfghjklzxcvbnmrtyuiopasdfghjklzxcvbnmqwertyuiopasdfg
MEDITECH Training Manual
ABI & MFP Processes for MRC and DDS
11/19/2013
Pianka, Nancy (EHS)
37 | P a g e

ContentsLogging into MEDITECH:..............................................................................................................................3
Accessing screens and data in MEDITECH:..................................................................................................3
Who:............................................................................................................................................................6
What:...........................................................................................................................................................6
DDS PCIII, MRC Supervisor / Admin.............................................................................................................6
Change Site and Assign Service Coordinator...............................................................................................6
Who:............................................................................................................................................................7
What:...........................................................................................................................................................7
DDS Service Coordinators, MRC Staff as assigned.......................................................................................7
Verify & Update Demographic info.............................................................................................................7
Who:..........................................................................................................................................................13
What:.........................................................................................................................................................13
DDS Service Coordinators, MRC Staff as assigned.....................................................................................13
Review and Update Service Enrollments...................................................................................................13
To View Services:...................................................................................................................................13
Create Additional Service Enrollments..................................................................................................14
End-date Outdated Service Enrollments................................................................................................16
Voiding Service Enrollments that are Errors..........................................................................................17
Who:..........................................................................................................................................................17
What:.........................................................................................................................................................17
DDS Service Coordinators, MRC Staff as assigned.....................................................................................17
Add Waiver Enrollment, POC, and ISP.......................................................................................................17
POC Approval.........................................................................................................................................17
ISP Meeting and Status..........................................................................................................................19
Create the Waiver Enrollment for Enrolled Participants...........................................................................22
Redetermination.......................................................................................................................................24
UMMS Responsibilities:.........................................................................................................................24
DDS and MRC Responsibilities:..............................................................................................................24
Maintaining up-to-date MEDITECH information after transition...............................................................25
39 | P a g e

Case Notes.................................................................................................................................................25
View or Print Existing Note....................................................................................................................26
Amend an Existing Note........................................................................................................................26
Enter a New Note..................................................................................................................................27
Participant Loses or Ends Waiver Eligibility during Waiver Year................................................................30
Participant Dies.........................................................................................................................................31
Viewing/Editing Discharged Consumer’s record........................................................................................31
Providing Access to Records Outside of Caseload / Site............................................................................34
Appendix 1 – Services:...............................................................................................................................35
Appendix 2 – New Program Requests:......................................................................................................37
Appendix 3 - Printing the ABI MFP Programs and Services List.................................................................38
Appendix 4 – Checklists.............................................................................................................................39
Newly Eligible Participant:.....................................................................................................................39
Participant transitions from ‘Pending’ to ‘Enrolled’:..............................................................................39
39 | P a g e

Logging into MEDITECH:1. Click on this link: https://care-services.ehs.state.ma.us/
Tip – Please be sure to use Internet Explorer to access the link above. It has not been tested with other browsers.
2. Log in to the DDS Meditech Citrix Portal with your Citrix user id and current password.
3. Click on the green MEDITECH icon.4. Enter your existing MEDITECH User Name and Password here. Use Tab to move through the fields.
The “Universe” and “HCIS” fields will default in and should not be edited.
Accessing screens and data in MEDITECH:
After you log in to Meditech, the following screen will appear.
39 | P a g e

1. Click on the” CM” Application in order to open” CM Area Management Team menu”. 2. Next, Click on “Operations Desktop”.
3. “Operations desktop” will open.
The Operations Desktop will show you a list of all of the Participants who have been entered into MEDITECH. To work with a participant, you simply highlight the person in the list, and then use the buttons along the right-hand side to view, enter, and edit data.
Your default list of participants will vary based on your role:
Case Manager – your case load is your default list All others – your Custom list is your default list. Use the ABIMFP list to pull in the ABI MFP
individuals.
39 | P a g e

o Click on the ‘Change List’ button and choose “ABI MFP”. The list will take several minutes to compile and will pull in all the ABI MFP individuals to whom you have access.
o If you also have regional responsibilities outside of ABI MFP, you can pull up your Site list – but be warned it will take a very long time to load. You may be better off adding individuals to a Custom List one at a time.
All – if you have access to a Custom list, you can use that list to access participants one at a time. Instructions to use the custom list are included in Appendix 5 at the end of this document.
The UMMS Operations team will be adding participants into MEDITECH once as participants are found eligible for an ABI or MFP waiver. This training manual will walk you through the functions in MEDITECH that will fall under the responsibility of the MRC and DDS teams.
39 | P a g e

Who: What:
DDS PCIII, MRC Supervisor / Admin
Change Site and Assign Service Coordinator
When UMMS Operations team creates the initial record in MEDITECH, a UMMS case manager may or may not be assigned. All newly eligible participants are assigned to the UMMS site “RUMM”. As cases transition to MRC and DDS for case management, it is the responsibility of MRC and DDS to reassign participants to the MRC or DDS sites and MRC and DDS case managers.
1. From the CM Desktop, highlight the participant, and then click on the “Edit Elig” button.
2. From the Patient Tab in ‘Edit Eligibility’, locate the SITE field, and change it to the appropriate site.
RCCW – DDS Central West Region RMMT – DDS Metro Region RNNE – DDS Northeast Region RSSE – DDS Southeast Region RNRC – MRC (Non-Residential)
Save the record.
3. Now, assign a DDS or MRC service coordinator. Click on the SC Values screen from Person Desktop. The SC Values screen in MEDITECH will open, pre-populated with an “ACTIVE” status and may contain the name of a UMMS Case Manager:
39 | P a g e

Active / Inactive field – please do not edit data on this field. Srv Coordinator = You must remove the UMMS Case Manager (if one is listed) and
assign an MRC or DDS Case manager:i. Place your cursor in the Srv Coordinator field and DELETE to remove the
existing name. (If an existing case manager is not assigned, skip this step.)ii. <F9> on your keyboard to pull up a list of Case Managers.
iii. Select the Case Manager from the list.iv. In the effective Date field, enter the date the case transitioned to the Case
Manager.v. <F12> or click SAVE to save your edits.
4. The participant will now show up on the MRC or DDS Case Manager’s caseload list.
Who: What:
DDS Service Coordinators, MRC Staff as assigned
Verify & Update Demographic info
39 | P a g e

When a participant is assigned to your caseload, you should first review the Demographic information to be sure it reflects current information. If it doesn’t, update the info.
1. Highlight the participant on your caseload. Then, click on the ‘Edit Eligibility’ button.
2. The “Edit Eligibility” screen will open. The participant’s demographic information was entered when the record was created and has not been updated since the record was opened. You should review the entered data and update it if it is no longer accurate. Before you change a participant’s address, please create a snapshot of the current
record.i. Click on ‘Snapshot’ button, then ‘Create Snapshot’
Patient tab is selected by default – Many of the fields on this screen are not used. Required fields are listed below and should be reviewed and updated for accuracy:
39 | P a g e

Name – always entered in all caps, with LASTNAME,FIRSTNAME as the format DOB Age – auto-calculated based on DOB. This is the age of the participant at time of initial data
entry and does not reflect Current Age. Current Age is listed in the CM Desktop under the Current Age column.
Address City (Tip: If you enter zip code in “City” field, MT will fill out the city, state and zip appropriately.) Phone Social security Number Site = DDS Region or MRC
Contact tab is used to store contact information for the participant. The Contact tab will default to Primary contacts:
39 | P a g e

Please review the entries and update information on guardians and family members, as well as any legal contacts (HealthCare Proxy, Advocates, Attorneys) in this screen.
If the participant has a guardian, please list the guardian first, in Contact 1. Additional contacts can be entered in Contact 2, and in the ‘Other” tab.
Enter names LASTNAME,FISTNAME If a contact shares an address with someone, even the participant, whom you have already
entered in MEDITECH, type ‘SA’ (for ‘Same As’) in the “Street” field, and you can choose a person whose address you wish to copy.
REL to PR = Relationship to Persono Click on the drop-down list, or use <F9> to pull up a list of options in this field.
Note: you can ignore” Legal Authorized Rep” and “LAR” fields
39 | P a g e

“Other” contacts screen:
Guarantor tab
Guarantor information is required in MEDITECH. For our purposes, the Guarantor is ALWAYS the participant.
This information should be populated when you receive the record in MEDITECH. You should not have to edit this information.
39 | P a g e

Note: Since the Guarantor is always the participant, a link exists between the participant and the guarantor within MEDITECH. Therefore, when you edit the participant’s address in the PERSON screen, you will receive the prompt pictured below to update Guarantor information.
When you see this screen, please click on the OK button, and the Guarantor’s address will be updated.
The “Proc-Dec” tab contains some system-required fields, but those are entered only at time of eligibility and if a person dies. The processes related to discharging a participant who has died are addressed later in this training manual. Please do not edit any of the data on this screen.
39 | P a g e

Once you have reviewed the screens above, click on “Save” button, or use <F12> to save the individual in MT. System will take you back to the CM desktop.
Who: What:
DDS Service Coordinators, MRC Staff as assigned
Review and Update Service Enrollments
Important Note: It had previously been practice for ABI and MFP individuals tracked in other systems to end-date each service enrollment annually and start with a new service enrollment, even though the provider, service, and location had not changed. In MEDITECH, if the person is still receiving the service, you do NOT need to end-date the enrollment and create a new one. Just leave the enrollment open.
When the MRC or DDS Service Coordinator is assigned, the participant may still be a pending participant. You will not see any service enrollments on pending participants.
If the participant has transitioned out of the facility, you should review service enrollments in MEDITECH and update them as needed.
To View Services: To view Service Enrollments, locate the participant in the CM Desktop.
39 | P a g e

Click on the “Plus” Sign next to the participant’s name to expand the list of services.
Other services enrollments may appear as well. Review the services that display. Verify that the following information:
For services that are listed, verify that the start date, provider, address, and service are accurate.
Note any service enrollments that are NOT listed. If the service enrollment is not listed, you must create it in MEDITECH.
Create Additional Service EnrollmentsNote: In addition to services such as “Chore”, each participant must also be enrolled in MRC or DDS Case Management, which is under service “AMCM” in the service listing.
From your CM Desktop, click on the “New Request” button
39 | P a g e

The New Request Screen will open. In the “Service” field, perform a lookup with <F9>, click on the dropdown list, or type in the service number. (See appendix). Skip the “Program Group Criteria” field, and select ALL in the “Program Selection” section.
When you select “All”, a list of all of the programs associated with that service will appear. Click on “Program View” to view the vendor associated with each program.
If the service, provider, and site combination does NOT appear in the list, then contact the DDS Customer Service center to request that the program be added. Use the form in Appendix 2 to submit new program requests.
Place a checkbox next to the service in which you wish to create the enrollment, and then click on the “Register” button.
When you click on REGISTER, a screen will open to enter the Start date. Enter the Start Date and leave all other fields blank. Click “SAVE” or <F12> to save the record.
If you are having trouble determining which program to choose from looking at this screen, please print the Programs and Services Report. See Appendix 3 of this document for instructions.
39 | P a g e

The updated service enrollment will appear under the participant’s name on the CM Desktop.
End-date Outdated Service EnrollmentsAs you review the record in MEDITECH after the case is assigned to MRC or DDS, you may find some services (not the WAIVER service) listed that the participant no longer receives. You must end-date these service enrollments.
Highlight the service that is no longer a current service. Click the OUTCOME button.
The OUTCOME screen will open. <F9> or click on the OUTCOME dropdown list and choose the appropriate outcome. Enter the last date of service in the DATE field. <F12> or click SAVE to end the enrollment.
39 | P a g e

The end-dated enrollment will now appear as COMPLETE in the service listing.
Voiding Service Enrollments that are ErrorsIf you should find that a service enrollment has been entered in MEDITECH for a service that the individual never received, you can void it. Follow the OUTCOME steps above, but choose VOID as the OUTCOME and use ‘t’ for “TODAY” in the date field.
The service will appear in the service listing with a status of VOID. This should only be used if the person never received the service and the enrollment was created in error.
Who: What:
DDS Service Coordinators, MRC Staff as assigned
Add Waiver Enrollment, POC, and ISP
During creation of the initial eligibility record in MEDITECH, UMMS Operations team will enter the LOC Approval screen in MEDITECH. MRC and DDS are responsible for adding additional waiver assurances when the case is transitioned to MRC or DDS.
POC ApprovalThe “POC Approval” screen is equivalent to the ISP approval in ABI MFP terms. The screen is used to record the participant’s approval listing of frequency and duration of the services that a participant receives.
1. From the CM Desktop, highlight the individual and click on the “CDS” button:
39 | P a g e

2. From the list of Customer Defined Screens, highlight the “POC Approval” Screen and click on the “New CDS: button:
3. You will presented with a date field, which allows you to create a new screen each time the ISP for the person changes.
The first time a POC Approval screen is entered into MEDITECH for a participant, it should reflect the following data:
Screen date = date participant signed PCP
39 | P a g e

POC Produced = Y POC Signed = Y Approved by = Name of MRC or DDS Case Manager / Service Coordinator Please ignore the “Converted POC” Date
ISP Meeting and StatusThe “ISP Meeting and Status” screen is required in MEDITECH as it is used in downstream systems. When the participant’s case is transitioned to MRC or DDS, it is necessary to document the Annual ISP Meeting and Status screen.
1. From CM Desktop, highlight the participant, and then click on the “ISP” button.
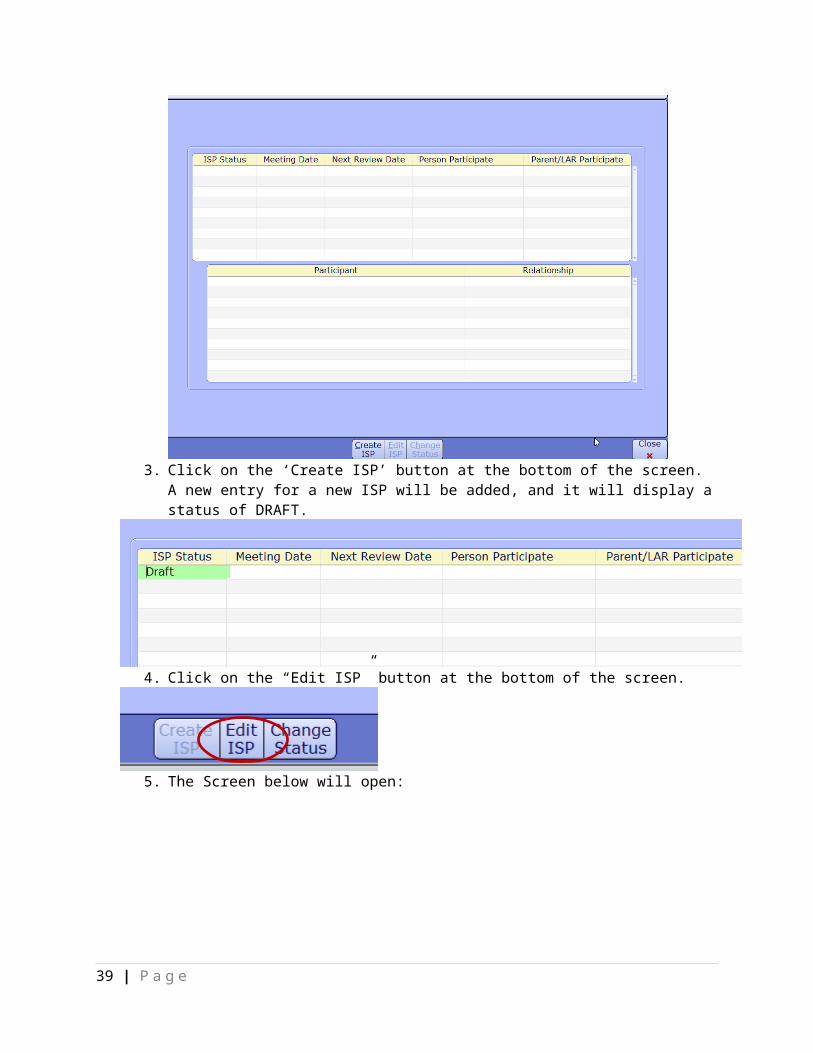
2. The ISP Meeting and Status screen will open.
39 | P a g e

3. Click on the ‘Create ISP’ button at the bottom of the screen. A new entry for a new ISP will be added, and it will display a status of DRAFT.
4. Click on the “Edit ISP” button at the bottom of the screen.
5. The Screen below will open:
39 | P a g e

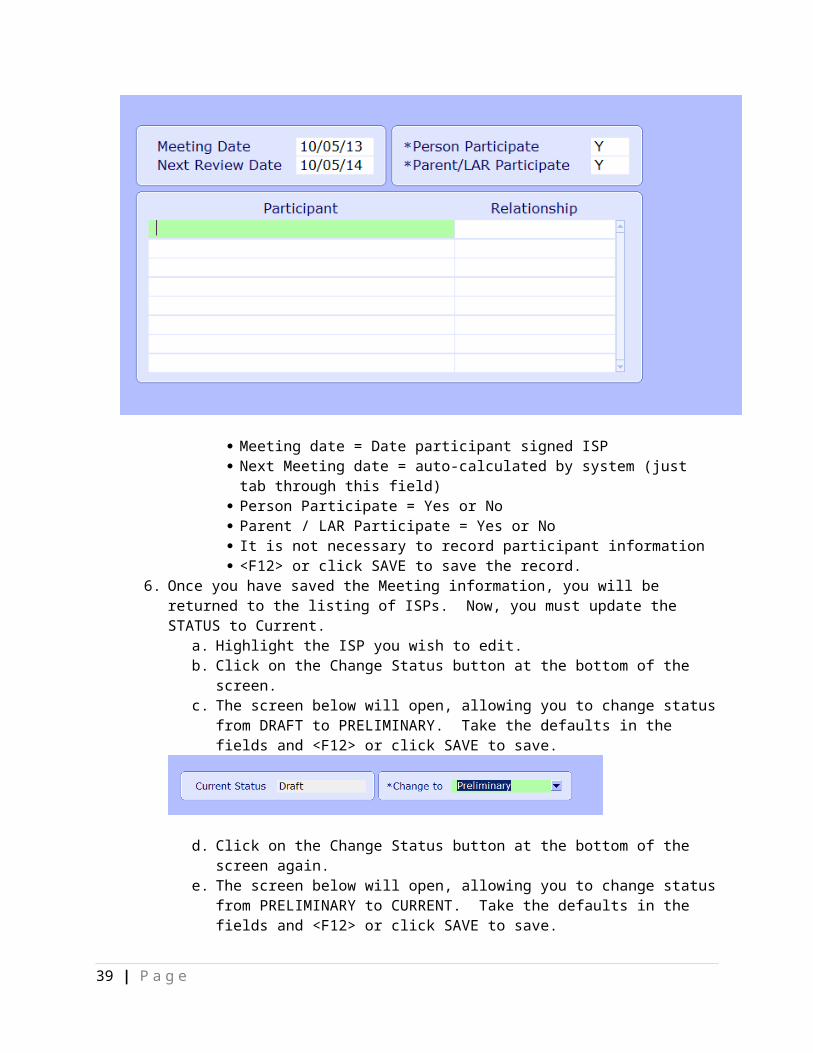
Meeting date = Date participant signed ISP Next Meeting date = auto-calculated by system (just tab through this field) Person Participate = Yes or No Parent / LAR Participate = Yes or No It is not necessary to record participant information <F12> or click SAVE to save the record.
6. Once you have saved the Meeting information, you will be returned to the listing of ISPs. Now, you must update the STATUS to Current.
a. Highlight the ISP you wish to edit.b. Click on the Change Status button at the bottom of the screen. c. The screen below will open, allowing you to change status from DRAFT to
PRELIMINARY. Take the defaults in the fields and <F12> or click SAVE to save.
d. Click on the Change Status button at the bottom of the screen again. e. The screen below will open, allowing you to change status from PRELIMINARY to
CURRENT. Take the defaults in the fields and <F12> or click SAVE to save.
f. The updated ISP Meeting information should now appear with CURRENT status.
39 | P a g e

Create the Waiver Enrollment for Enrolled ParticipantsEach Enrolled Participant should have an enrollment in an ABI or MFP waiver. MRC or DDS will create the waiver enrollment for Enrolled Participants if one does not exist and when the participant is discharged from the facility.
1. From your CM Desktop, click on the “New Request” button
2. The New Request Screen will open. In the “Service” field, type in “WMFPABI”, skip the “Program Group Criteria” field, and select ALL in the “Program Selection” section.
3. When you select “All”, a list of ABI and MFP Waivers will appear. Select the appropriate waiver, and then click on REGISTER.
39 | P a g e

4. When you click on REGISTER, a screen will open to enter the Start date. Enter the Start Date, which is the “Facility Discharge Date” and leave all other fields blank. Click “SAVE” or <F12> to save the record.
i.The waiver enrollment will appear under the participant’s name on the CM Desktop.
39 | P a g e
RedeterminationUMMS Operations will be responsible for updating MEDITECH Eligibility information once Redetermination has been completed annually for participants:
UMMS Responsibilities:Once the re-determination is made, UMMS will update the following information. MRC and DDS staff should not update this information:
1. Update LOC Determination in MEDITECHa. Creates new LOC Determination screen
i. Screen date = Date of Redeterminationii. Meets = Y or N
iii. Determined by = UMMS Clinical Team2. End current waiver enrollment in Meditech.
a. Expand the participant’s list of services, highlight the WAIVER service that is currently enrolled, and click on the OUTCOME button at the bottom of the screen.
i. Outcome1. If participant is no longer eligible, use “INELREDET”.2. If participant is still eligible, use “WAIVEXP”
ii. End Date 1. If person is no longer eligible = Date redetermination made.2. If person is still eligible = Date redetermination made minus one day.
3. If the participant is found waiver eligible then create new enrollment in same waiver.a. Start Date = Date redetermination made.
DDS and MRC Responsibilities:
Scenario 1 – Individual is still eligible for waiver:Once UMMS has updated the LOC Determination and Waiver enrollment, MRC and DDS are responsible for updating the following information at time of Redetermination as appropriate:
1. Create POC Approval Screena. Screen date = date participant signed ISPb. Approved by = Name of Case Manager
2. Annual ISP Meeting and Statusa. Meeting date = Date participant signed ISPb. Next Meeting date=auto-calculated by systemc. Status = Current
3. Review and update Service Enrollments as needed to match ISP services4. Important Note: It had previously been practice for ABI and MRP individuals tracked in other
systems to end-date each service enrollment annually and start with a new service enrollment, even though the provider, service, and location had not changed. In MEDITECH, if the person is still receiving the service, you do NOT need to end-date the enrollment and create a new one. Just leave the enrollment open.
39 | P a g e
Scenario 2 – Individual is no longer eligible for waiver:1. OUTCOME current service enrollments in Meditech:
a. Outcome = ”INELREDET”b. End Date = Date Redetermination Made
2. In SC Values, perform these steps:a. Update Active / Inactive flag to “Inactive”.b. Effective date = Date Redetermination Made
3. Remove the Case Manager. a. Outcome = ”INELREDET”b. Effective date = Date Redetermination Made
4. If individual has moved out of state, open EDIT ELIGIBILITY Screen>>PROC DEC tab>>a. Change Eligibility Status to “ABIMFINEL”b. Effective date = Date Redetermination Made
Maintaining up-to-date MEDITECH information after transitionIn addition to updating information at time of Redetermination, MRC or DDS is also responsible for updating any of the following information as it changes throughout the waiver year for a participant:
Demographic and Contact information – use the EDIT ELIGIBILITY Screeno Before you change a participant’s address, please create a snapshot of the current
record. Click on ‘Snapshot’ button, then ‘Create Snapshot’
Changes in Services with newly signed ISPo Update service enrollments on CM Desktopo Create POC Approval Screen
Screen date = date participant signed ISP Approved by = Name of Case Manager
Changes in Case Management Assignmento Transfer entire caseloads using the “Transfer Caseload” Routine, oro Transfer one case at a time, using SC Values screen.
Annual ISPo Update ISP date in the ‘ISP’ screen (See ISP Meeting and Status section)
Case NotesCase notes should be tracked in MEDITECH’s “Notes” functionality. Writing the notes in MEDITECH makes them available to any staff who can view the record.
To enter, amend, or view a note:
39 | P a g e

From the CM Desktop, highlight the name of the participant. Click on the “Notes” button. The “Notes” screen will open.
Existing notes will appear in a list starting at the top of the screen. You can sort the notes in different order by clicking on the various column headings.
39 | P a g e

View or Print Existing NoteTo View or Print an existing note, place a checkmark next to the note or notes you wish to view or print, and then click the appropriate button at the bottom of the screen.
If you click on Print, you can print ‘All Notes’, ‘Selected Notes’ (prints only those with a checkmark), or a ‘Range of Notes’ (allows you to select a range) by date and note category.
If you click on View, the selected note will be presented to you in View Only format.
Amend an Existing NoteTo add more text to an existing note, place a checkmark next to the note and click on the ‘Amend’ button. As it is not possible to edit or delete a note once it has been saved, this functionality is used to add more information to an existing note. In most cases, it is preferred to enter a new note to update a participant’s record using case notes, but for some instances, an Amend to an existing note is acceptable.
Example: Note entered on wrong participant – amend the note to indicate note entered on wrong participant and it should be disregarded.
The original note will appear in the “Note Text” section; enter the additional information in the “Note Addendum” section.
Enter a New NoteFor reasons related to reporting and consistency, MRC and DDS have identified business rules around what type of notes will be entered on ABI MFP participants, including which Categories and Text should be used.
39 | P a g e

In MEDITECH, a “Category” is used to identify the type of note that is being tracked. The category is used in conjunction with “Canned Text”, which is pre-formatted note text that defaults in questions or guidance to which the user adds information. This training manual has a listing of Category, corresponding Canned Text, and the Business rule for each at the end of this section.
To enter a new note, follow these steps:
1. Click on the ‘Enter’ button.2. When the ‘Enter Note’ screen opens, review the ‘Date | Time’ at the top of the screen.
You can back-date the date / time to accurately reflect when the activity actually occurred. MEDITECH will keep this date / time as the occurrence date and will track the date the note was entered separately.
For example, if you wish to document an ISP discussion that occurred yesterday, enter yesterday’s date in the Date | Time section. MEDITECH will record that as the date of occurrence while maintaining ‘today’ as the date you entered the note.
Your cursor will default to the ‘Category’ field. Use your <F9> key or click on the dropdown list to view the Categories. For ABI and MFP, you should use one of these categories:
o ABIMFPELIG – ABI MFP Eligibility Noteo ABIMFPSTAT - ABI MFP Status Change or Confirmation of Status
39 | P a g e

o ABIMFPISP - ABI MFP ISP / POC Reviewo ABIMFPCONF - ABI MFP CONFIDENTIAL NOTE
After you’ve selected the Category, your cursor will move to the “Note Text” field.o You should use canned text every time you enter a note. This will ensure
that a meaningful, consistent first line of text appears for every note.o To pull in canned text, hit the <F5> key on your keyboard, and then <F9>. A
list of canned text will appear.o The canned text for ABI and MFP participants is listed below. To move
directly to the canned text, in the SEARCH box, type the first letter of the text you wish to use.
CONFID – Additional Note in Confidential Record WABIMFPELI – ABI MFP Eligibility WABIMFPISP – ABI MFP ISP POC WABIMFPSTA – ABI MFP Status Change / Confirmation
o Once the canned text drops into the note, you can answer any questions asked or provide information as guided by the note text.
The chart below provides guidelines of the combinations of Categories and Canned text to use:
Category Canned Text Business Rule
ABIMFPELIG - ABI MFP Eligibility WABIMFPELI - ABI MFP Eligibility
1. Is this related to financial eligibility?
If yes, please describe.
2. Is this related to clinical eligibility?
If yes, please describe.
A case log note must be completed whenever there is
information relevant to eligibility issues/concerns.
ABIMFPSTAT - ABI MFP Status Change or Confirmation of Status
WABIMFPISP – ABI MFP ISP POC
Describe this change of status? (i.e. health decline/improvement; behavioral decompensation; withdrawal from waiver)
How was this information
A case log in this category is used to detail any contacts with
participants or caregivers that relates to the wellbeing or status
of participants. This category can be used to expand upon
information derived from incident reports, from reports of others, or from reports from the
participant themselves that
39 | P a g e

Category Canned Text Business Rule
reported? Face to face; email; phone; otherDid this change of status result in an incident report?
If yes, were the action steps/response determined appropriate for the incident?
Did this change of status result in any service changes? If yes, describe.
If service change resulted, date ISP submitted to PNA?
would not result in an incident report but would represent
information significant to the status or wellbeing of a
participant.
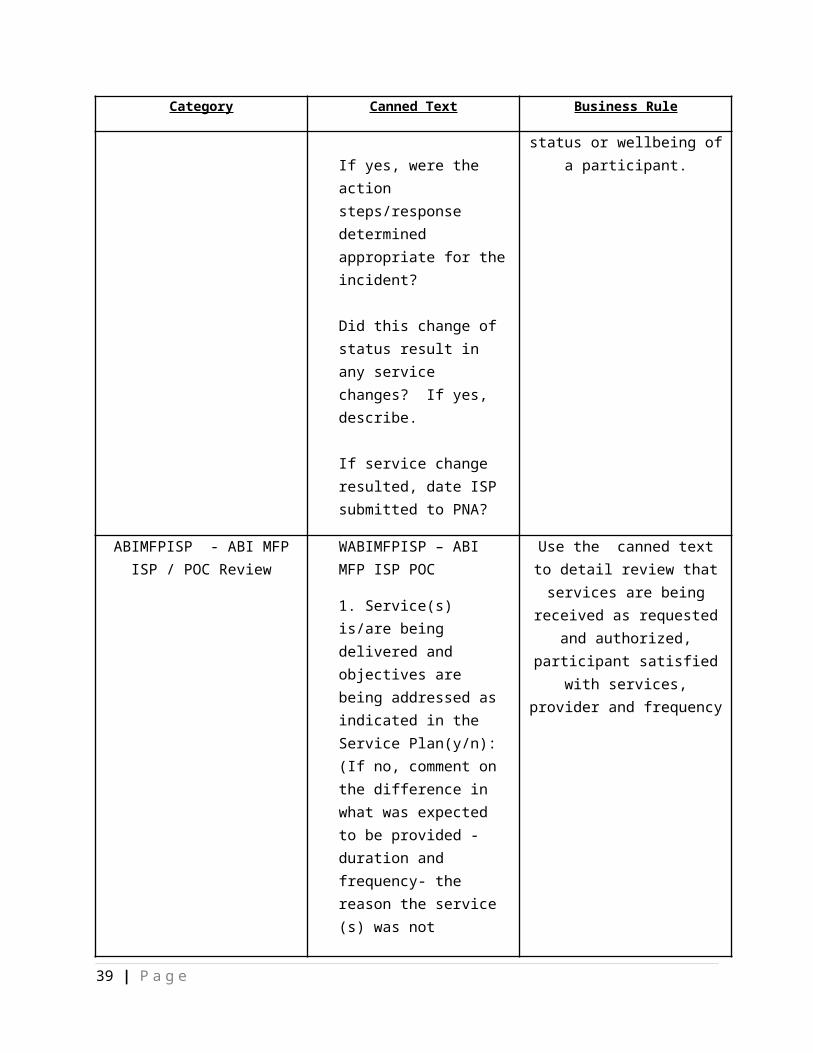
ABIMFPISP - ABI MFP ISP / POC Review
WABIMFPISP – ABI MFP ISP POC
1. Service(s) is/are being delivered and objectives are being addressed as indicated in the Service Plan(y/n): (If no, comment on the difference in what was expected to be provided -duration and frequency- the reason the service (s) was not provided or the objective was not being addressed and the expected plan for follow-up)2. Are there any previously or newly identified health, safety and/or risk issues that are not currently being addressed or need to be addressed (y/n): (If yes, describe issues and plan for follow-up)
Use the canned text to detail review that services are being
received as requested and authorized, participant satisfied
with services, provider and frequency
39 | P a g e

Category Canned Text Business Rule
ABIMFPCONF - ABI MFP CONFIDENTIAL NOTE
CONFID - ADDITIONAL NOTE IN CONFIDENTIAL RECORD
This case log note is used to record the existence of
information secured in the confidential record related to highly confidential or sensitive
clinical, medical or legal related information.
Participant Loses or Ends Waiver Eligibility during Waiver YearIf, during the waiver year (outside of redetermination window), a participant loses waiver eligibility for any reason, MRC or DDS is responsible for updating the following information in MEDITECH:
OUTCOME current waiver enrollment in Meditech .o Outcome = appropriate outcomeo End Date = effective date of triggering event
OUTCOME current service enrollments in Meditech:o Outcome = appropriate outcome (use Out of State if person moved out of state)o End Date = effective date of triggering event.
In SC Values, perform these steps:o Update Active / Inactive flag to “Inactive”.o Remove the Case Manager. Effective date = effective date of triggering event.
If individual has moved out of state, open EDIT ELIGIBILITY Screen>>PROC DEC tab>>Change Eligibility Status to “ABIMFINEL”
Participant DiesIf a participant who has transitioned to MRC or DDS dies, MRC or DDS is responsible for updating the following information in MEDITECH:
Discharge participant from MEDITECH by clicking on the Discharge button.a. Discharge reason = Deceasedb. Effective Date = date of death
2. In SC Values, update Active / Inactive flag to “Inactive”. Remove the SC.3. Open the EDIT ELIGIBILITY Screen>>PROC DEC tab>>Change Eligibility Status to “ABIMFINEL”
Viewing/Editing Discharged Consumer’s recordOnce the person is discharged, he/she disappears from the site list. You can bring the discharged consumer back on your custom list to view/ perform more activities on the record. Follow the following steps to add the consumer to your custom list.
39 | P a g e

1. Open Operations Desktop in MEDITECH.2. After the list of individuals loads, click on ‘Change List’ button (top of screen).
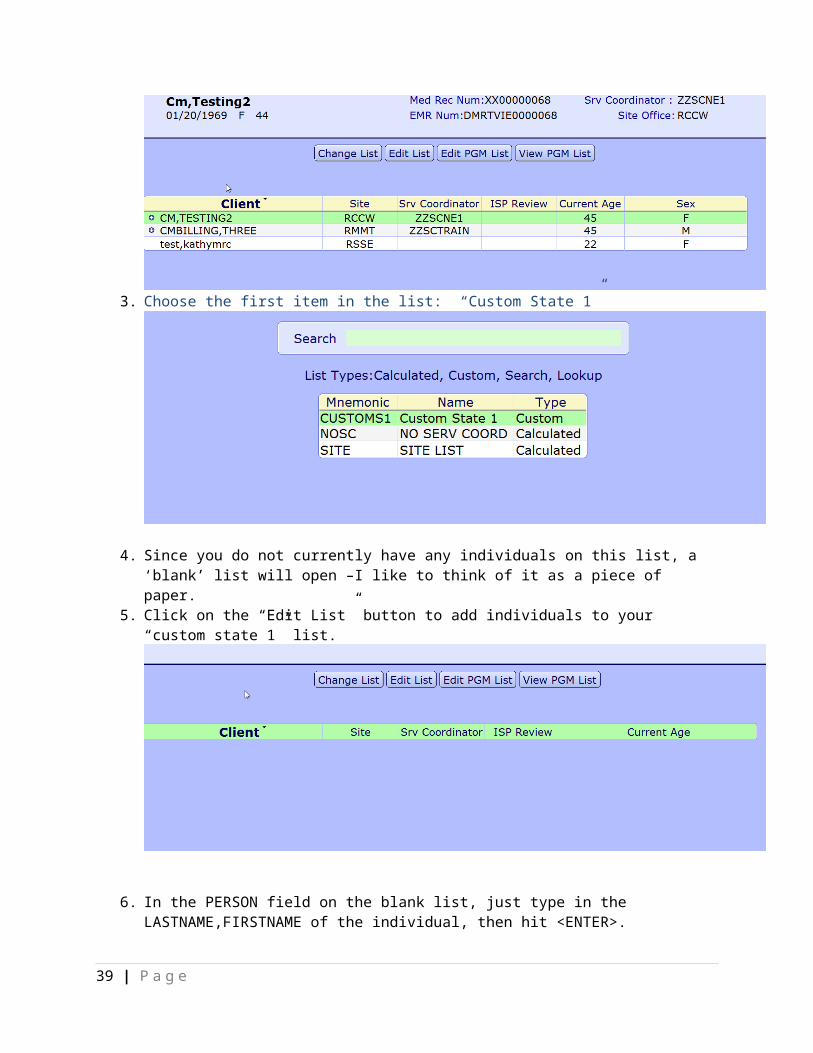
3. Choose the first item in the list: “Custom State 1”
4. Since you do not currently have any individuals on this list, a ‘blank’ list will open –I like to think of it as a piece of paper.
5. Click on the “Edit List” button to add individuals to your “custom state 1” list.
6. In the PERSON field on the blank list, just type in the LASTNAME,FIRSTNAME of the individual, then hit <ENTER>.
39 | P a g e

7. The system will try to find the individual, and will likely warn you that he has been discharged. Just click OK through those prompts and continue as you do want him on your list. (These are just warning messages to make sure you aren’t picking the wrong record).
8. Once the person appears on your list, Click SAVE to file the list, and the person should appear in your MEDITECH screen. EDIT ELIG should be available.
39 | P a g e

9. Once you’ve edited the Proc-Dec screen, you will want to navigate back to your list of individuals:
a. Click on Change List againb. Choose the SITE list.
Providing Access to Records Outside of Caseload / SiteIn MEDITECH, a user’s access to participant records is determined by a user’s assigned site access. Occasionally, a scenario may arise that requires somebody from one site to view the record of a participant who is not assigned to the user’s site. For example, if an individual is moving from one site to another, it may make sense to give the new site the ability to review the record in MEDITECH in advance of the transfer.
To provide access to a participant’s record in MEDITECH to one or more people at a different site, use the Access to Person function, which is available to Supervisors and Management / Operations staff from the menu.
39 | P a g e

When the Access to Person screen opens, enter the participant’s name in the “Person” field (Lastname, Firstname), hit ENTER, and then type in the user mnemonic of the user to whom you wish to grant access.
Click ‘Save’, and then the user will be able to pull this participant onto a Custom List in MEDITECH.
Once the need for access has passed, be sure to remove the Access to Person for the participant. Just reopen the screen and delete the list of users.
39 | P a g e

Appendix 1 – Services (updated for 7/1/14):MFP and ABI Waiver Services
Credentialing Entity
Activity Code Service Description Umass DDS MRC
MFP-RS
Waiver
MFP-CL
WaiverABI-RH Waiver
ABI-N Waiver
MFP Demo
2250 Adult Companion √ X X2500 Adult Companion-SD XzADH Adult Day Health
zADFOSCARE Adult Foster Care (State Plan)2251 Assisted Living Services √ X X2210 Assistive Technology (MFP Demo) X2252 Chore Services √ X X2501 Chore Services- SD X2253 Community Family Training √ X
3164
Day Habilitation (State Plan)Note: If you see a program listed with the appropriate provider, use that program. Otherwise, use the 'WELHAB' program.
2254 Day Services √ X X X X
zDURMEDDurable Medical Equipment (State Plan)
zGROUPAFC Group Adult Foster Care (State Plan)2211 Home Accessibility Adaptations MFP √ X X2209 Home Accessibility Adaptations ABI √ X2255 Home Health Aide √ X
zHOMENURSE
Home Health and Continuous Skilled Nursing (State Plan)
2256 Homemaker √ X X2502 Homemaker-SD X
37 | P a g e
MFP and ABI Waiver ServicesCredentialing Entity
Activity Code Service Description Umass DDS MRC
MFP-RS
Waiver
MFP-CL
WaiverABI-RH Waiver
ABI-N Waiver
MFP Demo
zHOSPICE Hospice (State Plan)2212 Housing Search X2257 Independent Living Supports √ X
2258Individual Support and Community Habilitation √ X X X
2503Individual Support and Community Habilitation-SD X X
zMENTALH Mental Health Supports (State Plan)2259 Occupational Therapy √ X X X X
zOCTHERAPY Occupational Therapy (State Plan)2213 Orientation and Mobility (MFP Demo) X
zORTHPROTH Orthotics/Prosthetics (State Plan)2260 Peer Support √ X X2504 Peer Support-SD X X
zDMAPCA Personal Care Attendant (State Plan)2261 Personal Care Worker √ X X2505 Personal Care Worker-SD X2263 Physical Therapy √ X X X X
zPHYSTHER Physical Therapy (State Plan)2265 Prevocational Services √ X X2274 Residential Family Training X3751 Residential Habilitation √ X X2266 Respite √ X X2267 Shared Home Supports √ X3752 Shared Living - 24 Hour Support √ X X2269 Skilled Nursing √ X X
39 | P a g e

MFP and ABI Waiver ServicesCredentialing Entity
Activity Code Service Description Umass DDS MRC
MFP-RS
Waiver
MFP-CL
WaiverABI-RH Waiver
ABI-N Waiver
MFP Demo
2270 Specialized Medical Equipment √ X X X X2271 Speech Therapy √ X X X X
zSPEECHTHESpeech/Language Therapy (State Plan)
2272 Supported Employment √ X X X X2273 Supportive Home Care Aide √ X2244 Transitional Assistance Services √ X X
2232Transitional Assistance Services (MFP Demo) X
2229 Transportation √ X X X XzTRANS Transportation (State Plan)
2249 Vehicle Modification √ X3713 ABI MFP Occupancy
Tip: For State Plan Services, you can add the name of the vendor (if known) after you create the enrollment. Highlight the enrollment, click on ‘Req Edit’, and type the vendor’s name into the ‘Comment’ field. Be sure to SAVE the screen.
39 | P a g e
Appendix 2 – New Program Requests:1. Residential Habilitation and Shared Living – Please do not submit requests to CSC for ResHab
and Shared Living Services. The MEDITECH BA team will add Residential Habilitation and Shared Living programs to MEDITECH when contacted to do so by the DDS Contracts office. The workflow is below:
a. Regional staff will contact Dorothy Cooper when a new contract has been approved and is ready to be built in MEDITECH.
b. Dorothy will work with the DDS Quality Management team to identify a QE site id.c. Dorothy will send list of programs to build to the MEDITECH BA team.d. BA team builds the programs and contacts Dorothy.e. Dorothy notifies regions that the program is in MEDITECH.
2. State Plan Services – Please do not submit requests to CSC for State Plan services. Instead, use the ‘z’ codes specific in the listing above. To add the name of the vendor, see the ‘Tip’ that follow the services listing
3. For Day services (not Day Hab), if you do not see the specific address of the service delivery for the DAY service, please send it to the DDS Customer Service Center using the form below.
Service (Description and Activity code from list in Appendix 1)
Provider Name Service Delivery Location(Street address, city, state, and zip)
Appendix 3 - Printing the ABI MFP Programs and Services List
1. From your menu, select the option “ABI-MFP Vendor Service Location Report”
37 | P a g e
2. When the filter screen opens, just TAB through each field, taking the defaults that populate in. When you reach the last filter (Active Programs), enter a ‘Y’. This will make sure you only list the active programs.
3. Print the report. The report sorts by vendor. You can use the report to identify address of the provider.
Appendix 4 – Checklists
Newly Eligible Participant:
____1. DDS and MRC Management update site in Meditech and assign SC.
____2. DDS Service Coordinator (or assigned MRC staff) reviews Demographics in Meditech and updates info as needed.
39 | P a g e

____3. DDS Service Coordinator (or assigned MRC staff) creates enrollment in the “ABI MFP Case Management” service (AMCM). Start date should reflect the date the participant was assigned to the Service Coordinator.
Participant transitions from ‘Pending’ to ‘Enrolled’:
_____1. DDS Service Coordinator or assigned MRC Staff creates enrollment in the correct waiver in ‘Services’. Start date should be the date the individual was place out of the nursing facility.
_____2. DDS Service Coordinator or assigned MRC staff creates enrollments in Meditech for services the individual is receiving. Residential services should be for the exact address of the individual’s residential service.
_____3. DDS Service Coordinator or assigned MRC staff adds the POC Approval Screen
_____4. DDS Service Coordinator or assigned MRC staff adds the ISP Meeting and status screen; brings status to “Current”.
39 | P a g e

Appendix 5 – Working with Custom Lists
A Custom list is like a piece of paper – you can add and remove individuals from the list one at a time.
1. If your Custom List is blank, it will appear to you like this:
To add a participant or individual to a blank custom list, simply type the person’s name into the list (Lastname,Firstname), hit the ENTER key, and choose the person from the list of matches.
You can add more than one person onto the list if you like. Click on the ‘Save’ button or <F12> when you have added all the ones you want to add.
2. If you wish to edit a custom list that already has individuals on it, click on the ‘Edit List’ button at the top of the Person Desktop.
3. The white screen listing all the individuals on the custom list will appear. Highlight a person and click ‘Delete’ to remove that person’s name, or follow same steps as #1 to add a person’s name.
39 | P a g e