media used: pro tools first fundamentals of audio
TRANSCRIPT
CHAPTER 3
Importing AudioIn Chapter 2, you created a blank Project into which you created a few new empty tracks. Now it’s time to put some audio clips in your tracks. In Chapter 3, you’ll learn how to import audio into your Project in different ways.
Media Used: Pro Tools First Fundamentals of Audio Production—Chapter 3 (Mambo).ptx, Pro Tools First—Fundamentals of Audio Production—Chapter 3—Audio for Import
Duration: 45 minutes
GOALS
O Learn how to make the best decisions about the kind of audio files to use in your Project
O Learn to import audio to a new track from the FILE menu
O Learn to import audio from your computer’s file browser window
O Learn to import audio using Soundbase
O Learn to search for audio by keyword
20-0549-AVID-ProTools_2pp.indd 85 3/15/21 3:03 PM
Rowman & Littlefiel
d
Sample Curric
ulum Materials
Avid Technology: Pro Tools | First, 2021 edition. ©2021 Avid Technology. All Rights Reserved.
86 Pro Tools | First
Considerations Prior to ImportIn Chapter 1, you learned about sample rates and bit- depth, and how they relate to frequencies and amplitude that can be recorded and played back. Choosing the right kind of audio specs for your Project is important, and something that is best decided early in the production process.
When creating a blank Project or a Project from a template, your sample rate and bit- depth are automatically set. When you convert a Session to a Project, you will have the ability to choose your desired sample rates and bit- depth settings.
Sample Rate and Bit- DepthAs a general rule, larger files will use more CPU and consume more hard drive space. That translates to fewer minutes of audio, and fewer tracks and effects (since your CPU is crunching larger amounts of data). The choices that you make regarding sample rate and bit- depth will affect file size. Here are some pros and cons:
• Regarding sample rates, more is not always better. Consider this: a file with a sample rate of 176.4 kHz includes four times as many samples as a file with an identical length of time, but with a sample rate of 44.1 kHz; meaning that the 176.4 kHz file is four times as large as the 44.1 kHz file (assuming that the bit- depth of both files is the same). Yes, a higher sample rate will give you more accurate higher frequencies, but after a certain point, that difference is inaudible. It’s good advice not to go overboard with your sample rates.
• Choosing the right bit- depth for your Project is an easier choice to make. The two most commonly used bit- depths are 16-bit and 24-bit. At any given sample rate, choosing 24-bit will be 50% larger then choosing 16-bit. That little bit of additional file size will give you significant benefits—16-bit audio falls short of giving you all the dynamic (amplitude) range that a human being can perceive, but 24-bit audio gives you more than enough.
When choosing the sample rate and bit- depth of your Project, don’t feel limited by what the final output will be. In many cases, professionals will record, edit, and mix at sample rates and bit- depths greater than those of their final mix. These higher specs are what often give us better results, even if we will be reducing sample rates and bit- depths when we export our final work.
Audio File FormatsThe next choice to make is the audio files’ format. In all versions of Pro Tools, you have two choices: WAV or AIFF. As a general rule, WAV files are the popular choice, for a number of reasons. First, WAV files are more common than AFF files and are therefore more broadly compatible. Secondly—and this next bit means more to post- production than to music production—the kind of WAV file that Pro Tools uses is called a Broadcast Wave Format (or BWF). These BWF files can include additional information in the file that is useful in professional post- production workflows (in other words, production for some sort of video medium).
WAV and AIFF files are both uncompressed PCM (Pulse Code Modulation) files. As such, there is no difference in sound quality between the two formats.
20-0549-AVID-ProTools_2pp.indd 86 3/15/21 3:03 PM
Rowman & Littlefiel
d
Sample Curric
ulum Materials
Avid Technology: Pro Tools | First, 2021 edition. ©2021 Avid Technology. All Rights Reserved.
Chapter 3 ■ Importing Audio 87
You can import compressed audio formats like MP3 files—Pro Tools will convert the file to the format that you have selected for the Project.
Split Stereo versus InterleavedThe only remaining choice you’ll need to make when converting a Session to a Project is whether your audio files will be Interleaved or not. But what does that mean?
• If the Interleaved check box is left unchecked when you create your Project, clips on stereo Audio Tracks Will refer to two files—one file for the left channel’s output and one file for the right channel’s output.
• If the Interleaved box is checked, clips on stereo Audio Tracks will refer to a single file. That single file will comprise both left and right channels.
The decision on whether to use interleaved files or not will not affect sound quality, hard drive usage, CPU workload, or Pro Tools workflow. The only significant difference—and this applies to Pro Tools and Pro Tools | Ultimate more than it does Pro Tools | First—is the number of files that you will have in your Session’s Audio Files folder. Choosing interleaved files will generally mean that you will have fewer files to keep track of.
Importing AudioThere are a number of different ways that you can import audio into a Pro Tools | First Project. Let’s start with a couple of simple and direct ways:
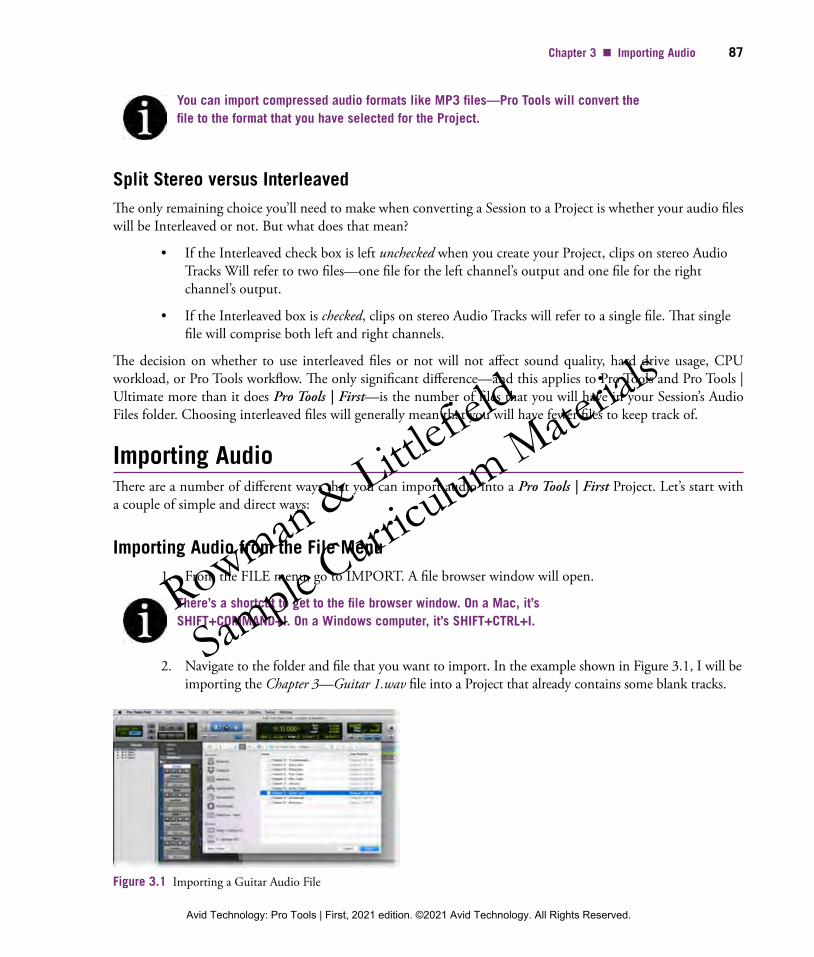
Importing Audio from the File Menu1. From the FILE menu, go to IMPORT. A file browser window will open.
There’s a shortcut to get to the file browser window. On a Mac, it’s SHIFT+COMMAND+I. On a Windows computer, it’s SHIFT+CTRL+I.
2. Navigate to the folder and file that you want to import. In the example shown in Figure 3.1, I will be importing the Chapter 3—Guitar 1.wav file into a Project that already contains some blank tracks.
Figure 3.1 Importing a Guitar Audio File
20-0549-AVID-ProTools_2pp.indd 87 3/15/21 3:03 PM
Rowman & Littlefiel
d
Sample Curric
ulum Materials
Avid Technology: Pro Tools | First, 2021 edition. ©2021 Avid Technology. All Rights Reserved.
88 Pro Tools | First
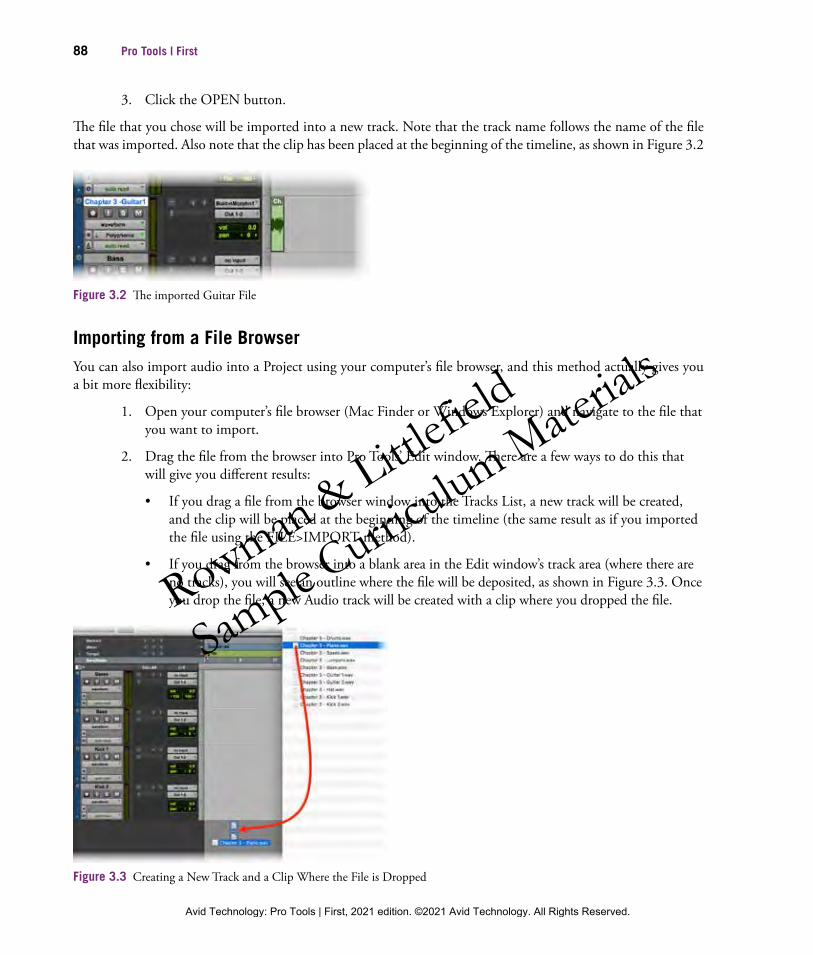
3. Click the OPEN button.
The file that you chose will be imported into a new track. Note that the track name follows the name of the file that was imported. Also note that the clip has been placed at the beginning of the timeline, as shown in Figure 3.2
Figure 3.2 The imported Guitar File
Importing from a File BrowserYou can also import audio into a Project using your computer’s file browser, and this method actually gives you a bit more flexibility:
1. Open your computer’s file browser (Mac Finder or Windows Explorer) and navigate to the file that you want to import.
2. Drag the file from the browser into Pro Tools’ Edit window. There are a few ways to do this that will give you different results:
• If you drag a file from the browser window into the Tracks List, a new track will be created, and the clip will be placed at the beginning of the timeline (the same result as if you imported the file using the FILE>IMPORT method).
• If you drag from the browser into a blank area in the Edit window’s track area (where there are no tracks), you will see an outline where the file will be deposited, as shown in Figure 3.3. Once you drop the file, a new Audio track will be created with a clip where you dropped the file.
Figure 3.3 Creating a New Track and a Clip Where the File is Dropped
20-0549-AVID-ProTools_2pp.indd 88 3/15/21 3:03 PM
Rowman & Littlefiel
d
Sample Curric
ulum Materials
Avid Technology: Pro Tools | First, 2021 edition. ©2021 Avid Technology. All Rights Reserved.
Chapter 3 ■ Importing Audio 89
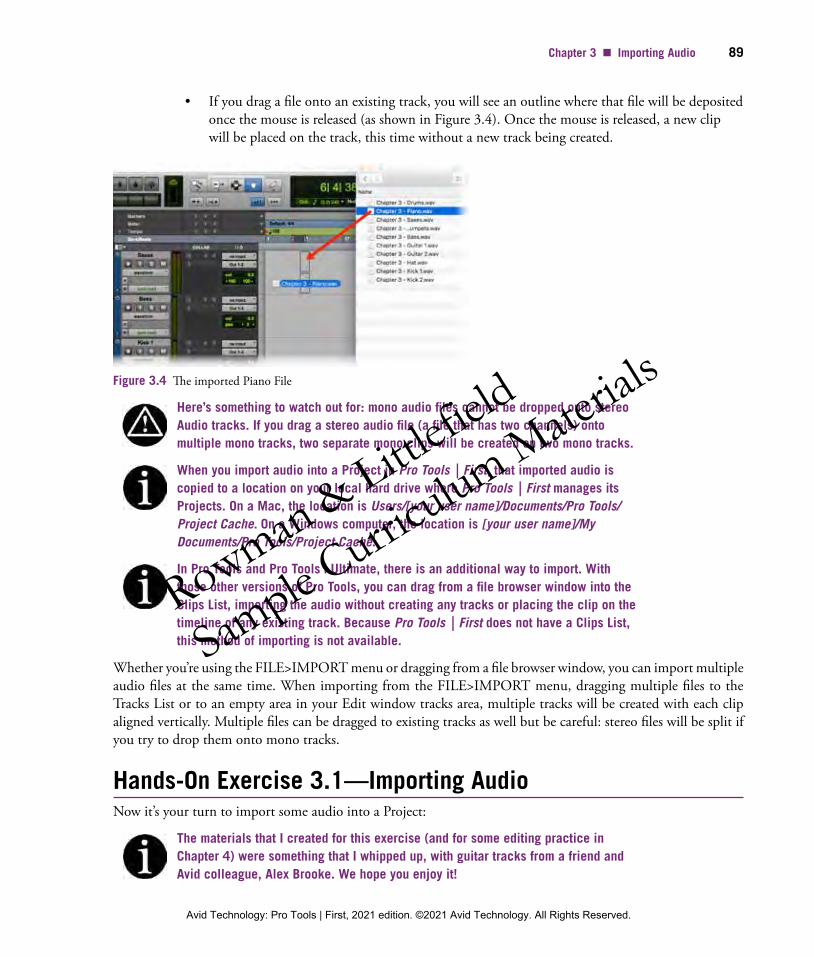
• If you drag a file onto an existing track, you will see an outline where that file will be deposited once the mouse is released (as shown in Figure 3.4). Once the mouse is released, a new clip will be placed on the track, this time without a new track being created.
Figure 3.4 The imported Piano File
Here’s something to watch out for: mono audio files cannot be dropped onto stereo Audio tracks. If you drag a stereo audio file (a file that has two channels) onto multiple mono tracks, two separate mono clips will be created on two mono tracks.
When you import audio into a Project in Pro Tools | First, that imported audio is copied to a location on your local hard drive where Pro Tools | First manages its Projects. On a Mac, the location is Users/[your user name]/Documents/Pro Tools/Project Cache. On a Windows computer, the location is [your user name]/My Documents/Pro Tools/Project Cache.
In Pro Tools and Pro Tools | Ultimate, there is an additional way to import. With those other versions of Pro Tools, you can drag from a file browser window into the Clips List, importing the audio without creating any tracks or placing the clip on the timeline of any existing track. Because Pro Tools | First does not have a Clips List, this method of importing is not available.
Whether you’re using the FILE>IMPORT menu or dragging from a file browser window, you can import multiple audio files at the same time. When importing from the FILE>IMPORT menu, dragging multiple files to the Tracks List or to an empty area in your Edit window tracks area, multiple tracks will be created with each clip aligned vertically. Multiple files can be dragged to existing tracks as well but be careful: stereo files will be split if you try to drop them onto mono tracks.
Hands- On Exercise 3.1—Importing AudioNow it’s your turn to import some audio into a Project:
The materials that I created for this exercise (and for some editing practice in Chapter 4) were something that I whipped up, with guitar tracks from a friend and Avid colleague, Alex Brooke. We hope you enjoy it!
20-0549-AVID-ProTools_2pp.indd 89 3/15/21 3:03 PM
Rowman & Littlefiel
d
Sample Curric
ulum Materials
Avid Technology: Pro Tools | First, 2021 edition. ©2021 Avid Technology. All Rights Reserved.

90 Pro Tools | First
Create a New ProjectFor this exercise, you’re going to convert a Pro Tools session into a Pro Tools | First local project.
1. Launch Pro Tools | First.
OR
1. If Pro Tools | First is already running, click FILE>CREATE NEW.
2. In the Dashboard window, click the CONVERT SESSION button.
3. Navigate to the folder that contains this book’s downloaded exercises and open the Pro Tools First—Fundamentals of Audio Production—Chapter 3 (Mambo) folder. In that folder, there’s a single Pro Tools session file called Pro Tools First—Fundamentals of Audio Production—Chapter 3 (Mambo).ptx. Select that session and click the OPEN button.
4. You will be asked to set up your new Project. Choose these settings:
• Local Storage (Session)
• File Type = BWF (.WAV)
• Sample Rate = 96 kHz (if 96 kHz is not available in your system, choose any other sample rate)
• Bit Depth = 24-bit
• Interleaved = Enabled (checked)
• Backup to Cloud = Disabled (unchecked)
When you’re done, your Project settings should look like Figure 3.5.
Figure 3.5 Settings for Your New Project
5. Click the CREATE button, and your Project will be created.
6. Let’s adjust the Edit window to suit our purposes:
• Hide the Track Collaboration (COLLAB) Edit window View.
20-0549-AVID-ProTools_2pp.indd 90 3/15/21 3:03 PM
Rowman & Littlefiel
d
Sample Curric
ulum Materials
Avid Technology: Pro Tools | First, 2021 edition. ©2021 Avid Technology. All Rights Reserved.
Chapter 3 ■ Importing Audio 91
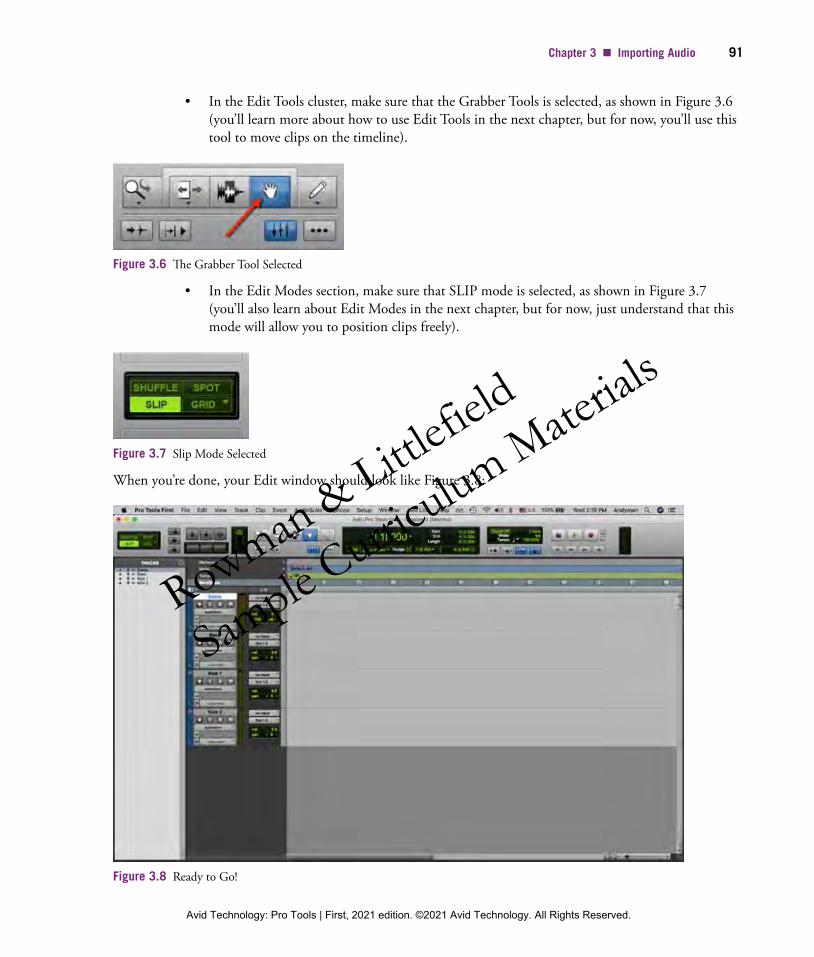
• In the Edit Tools cluster, make sure that the Grabber Tools is selected, as shown in Figure 3.6 (you’ll learn more about how to use Edit Tools in the next chapter, but for now, you’ll use this tool to move clips on the timeline).
Figure 3.6 The Grabber Tool Selected
• In the Edit Modes section, make sure that SLIP mode is selected, as shown in Figure 3.7 (you’ll also learn about Edit Modes in the next chapter, but for now, just understand that this mode will allow you to position clips freely).
Figure 3.7 Slip Mode Selected
When you’re done, your Edit window should look like Figure 3.8:
Figure 3.8 Ready to Go!
20-0549-AVID-ProTools_2pp.indd 91 3/15/21 3:03 PM
Rowman & Littlefiel
d
Sample Curric
ulum Materials
Avid Technology: Pro Tools | First, 2021 edition. ©2021 Avid Technology. All Rights Reserved.
92 Pro Tools | First
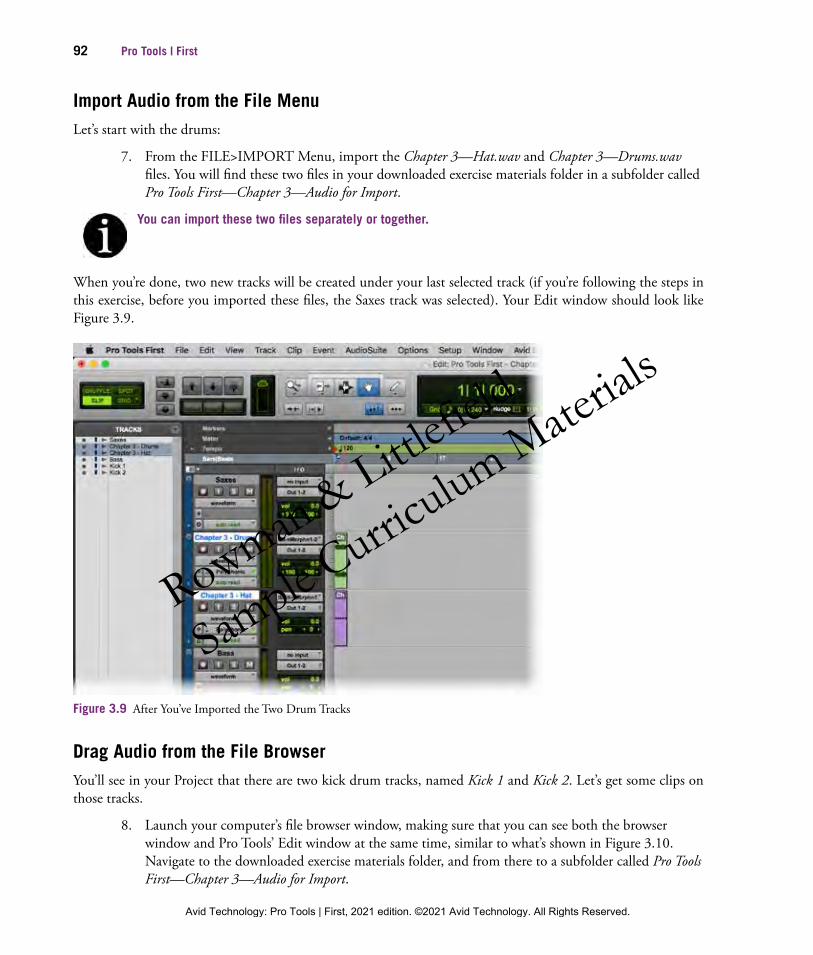
Import Audio from the File MenuLet’s start with the drums:
7. From the FILE>IMPORT Menu, import the Chapter 3—Hat .wav and Chapter 3—Drums .wav files. You will find these two files in your downloaded exercise materials folder in a subfolder called Pro Tools First—Chapter 3—Audio for Import.
You can import these two files separately or together.
When you’re done, two new tracks will be created under your last selected track (if you’re following the steps in this exercise, before you imported these files, the Saxes track was selected). Your Edit window should look like Figure 3.9.
Figure 3.9 After You’ve Imported the Two Drum Tracks
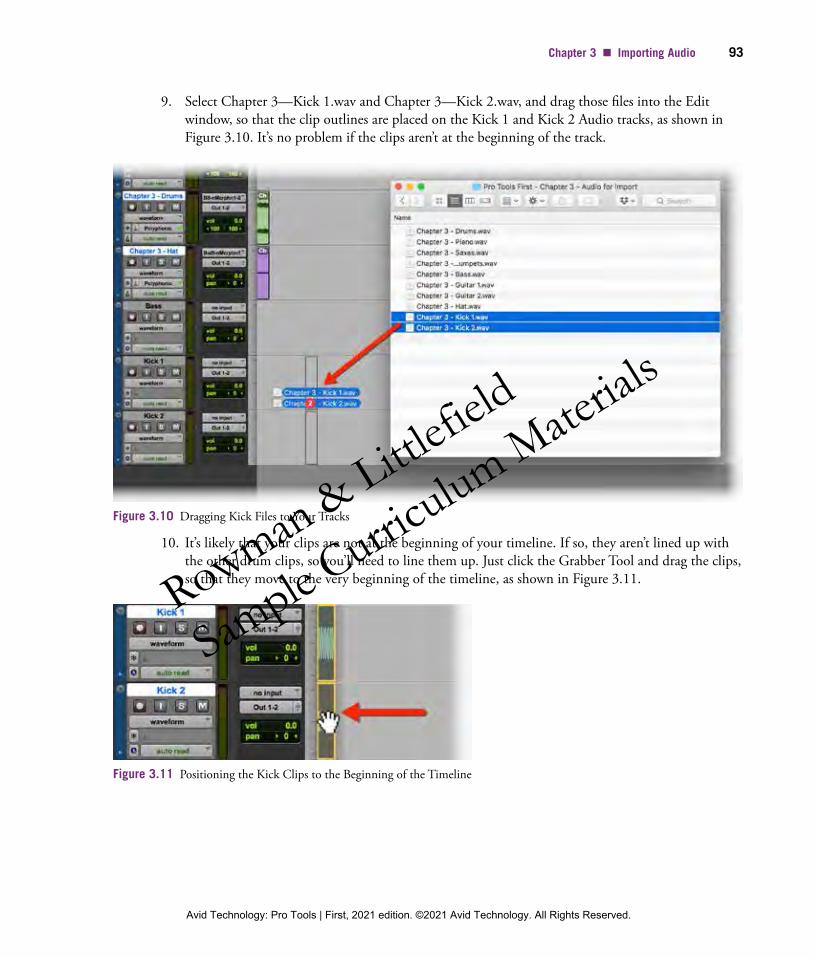
Drag Audio from the File BrowserYou’ll see in your Project that there are two kick drum tracks, named Kick 1 and Kick 2. Let’s get some clips on those tracks.
8. Launch your computer’s file browser window, making sure that you can see both the browser window and Pro Tools’ Edit window at the same time, similar to what’s shown in Figure 3.10. Navigate to the downloaded exercise materials folder, and from there to a subfolder called Pro Tools First—Chapter 3—Audio for Import.
20-0549-AVID-ProTools_2pp.indd 92 3/15/21 3:03 PM
Rowman & Littlefiel
d
Sample Curric
ulum Materials
Avid Technology: Pro Tools | First, 2021 edition. ©2021 Avid Technology. All Rights Reserved.
Chapter 3 ■ Importing Audio 93
9. Select Chapter 3—Kick 1.wav and Chapter 3—Kick 2.wav, and drag those files into the Edit window, so that the clip outlines are placed on the Kick 1 and Kick 2 Audio tracks, as shown in Figure 3.10. It’s no problem if the clips aren’t at the beginning of the track.
Figure 3.10 Dragging Kick Files to Your Tracks
10. It’s likely that your clips are not at the beginning of your timeline. If so, they aren’t lined up with the other drum clips, so you’ll need to line them up. Just click the Grabber Tool and drag the clips, so that they move to the very beginning of the timeline, as shown in Figure 3.11.
Figure 3.11 Positioning the Kick Clips to the Beginning of the Timeline
20-0549-AVID-ProTools_2pp.indd 93 3/15/21 3:03 PM
Rowman & Littlefiel
d
Sample Curric
ulum Materials
Avid Technology: Pro Tools | First, 2021 edition. ©2021 Avid Technology. All Rights Reserved.
94 Pro Tools | First
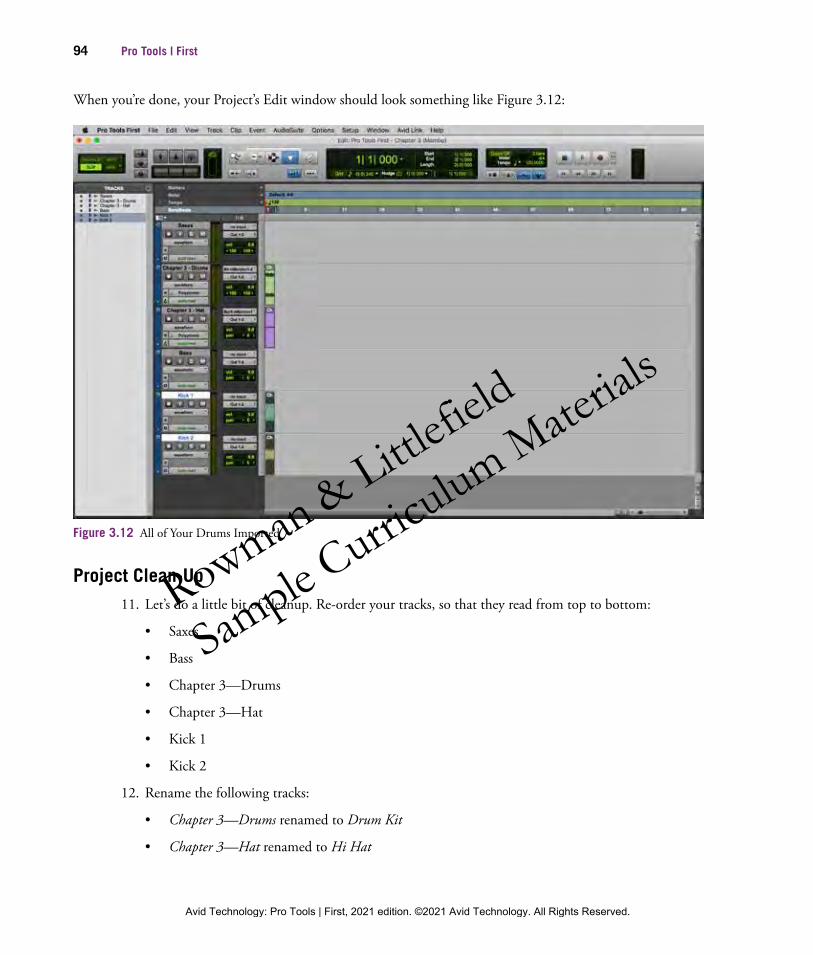
When you’re done, your Project’s Edit window should look something like Figure 3.12:
Figure 3.12 All of Your Drums Imported
Project Clean- Up11. Let’s do a little bit of cleanup. Re- order your tracks, so that they read from top to bottom:
• Saxes
• Bass
• Chapter 3—Drums
• Chapter 3—Hat
• Kick 1
• Kick 2
12. Rename the following tracks:
• Chapter 3—Drums renamed to Drum Kit
• Chapter 3—Hat renamed to Hi Hat
20-0549-AVID-ProTools_2pp.indd 94 3/15/21 3:03 PM
Rowman & Littlefiel
d
Sample Curric
ulum Materials
Avid Technology: Pro Tools | First, 2021 edition. ©2021 Avid Technology. All Rights Reserved.
Chapter 3 ■ Importing Audio 95
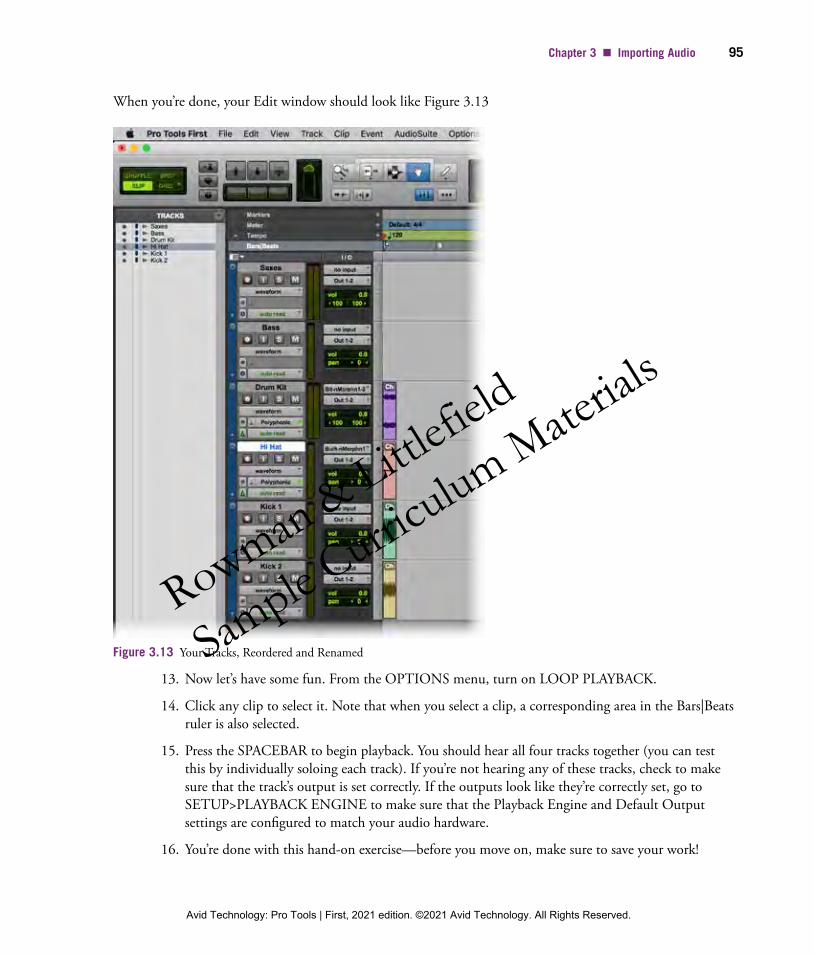
When you’re done, your Edit window should look like Figure 3.13
Figure 3.13 Your Tracks, Reordered and Renamed
13. Now let’s have some fun. From the OPTIONS menu, turn on LOOP PLAYBACK.
14. Click any clip to select it. Note that when you select a clip, a corresponding area in the Bars|Beats ruler is also selected.
15. Press the SPACEBAR to begin playback. You should hear all four tracks together (you can test this by individually soloing each track). If you’re not hearing any of these tracks, check to make sure that the track’s output is set correctly. If the outputs look like they’re correctly set, go to SETUP>PLAYBACK ENGINE to make sure that the Playback Engine and Default Output settings are configured to match your audio hardware.
16. You’re done with this hand- on exercise—before you move on, make sure to save your work!
20-0549-AVID-ProTools_2pp.indd 95 3/15/21 3:03 PM
Rowman & Littlefiel
d
Sample Curric
ulum Materials
Avid Technology: Pro Tools | First, 2021 edition. ©2021 Avid Technology. All Rights Reserved.
96 Pro Tools | First
The Workspace/Soundbase BrowserWhile dragging audio files from your computer’s operating system is certainly one way that you can import audio, searching for the file you want can be pretty painful. For example, if I search for “vocal” in my Mac’s Finder window, I’ll see PDF files, videos, emails—everything with the word “vocal” in it! Fortunately, there’s another way to locate files that’s customized for Pro Tools—the Workspace and the Soundbase.
Think of the Workspace as similar to your computer’s file browser but designed specifically for use within Pro Tools. From the Workspace browser, you can quickly find audio files, sessions, and other Pro Tools- related files without any of the distractions that commonly come with using a generic file browser. The Soundbase browser is a further customized version of the Workspace, set up to easily find audio files and get them into your Project or Session.
In Pro Tools | First, while you don’t have the Workspace available, you have its customized version, the Soundbase. Let’s look at what you can do with it:
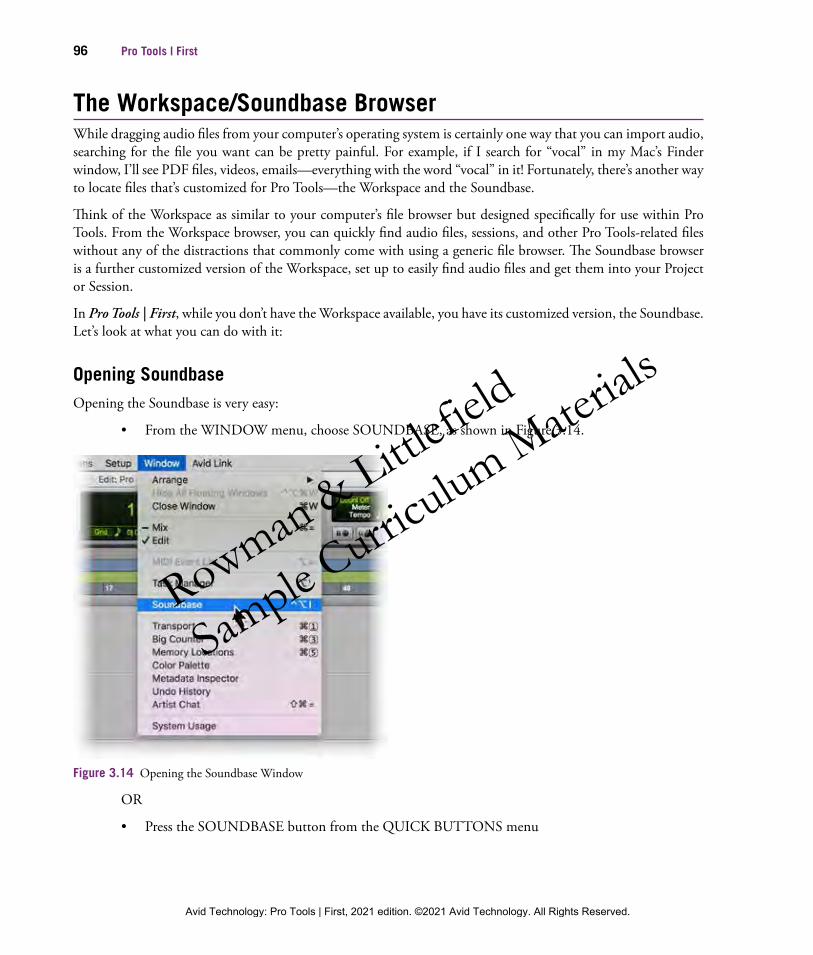
Opening SoundbaseOpening the Soundbase is very easy:
• From the WINDOW menu, choose SOUNDBASE, as shown in Figure 3.14.
Figure 3.14 Opening the Soundbase Window
OR
• Press the SOUNDBASE button from the QUICK BUTTONS menu
20-0549-AVID-ProTools_2pp.indd 96 3/15/21 3:03 PM
Rowman & Littlefiel
d
Sample Curric
ulum Materials
Avid Technology: Pro Tools | First, 2021 edition. ©2021 Avid Technology. All Rights Reserved.
Chapter 3 ■ Importing Audio 97
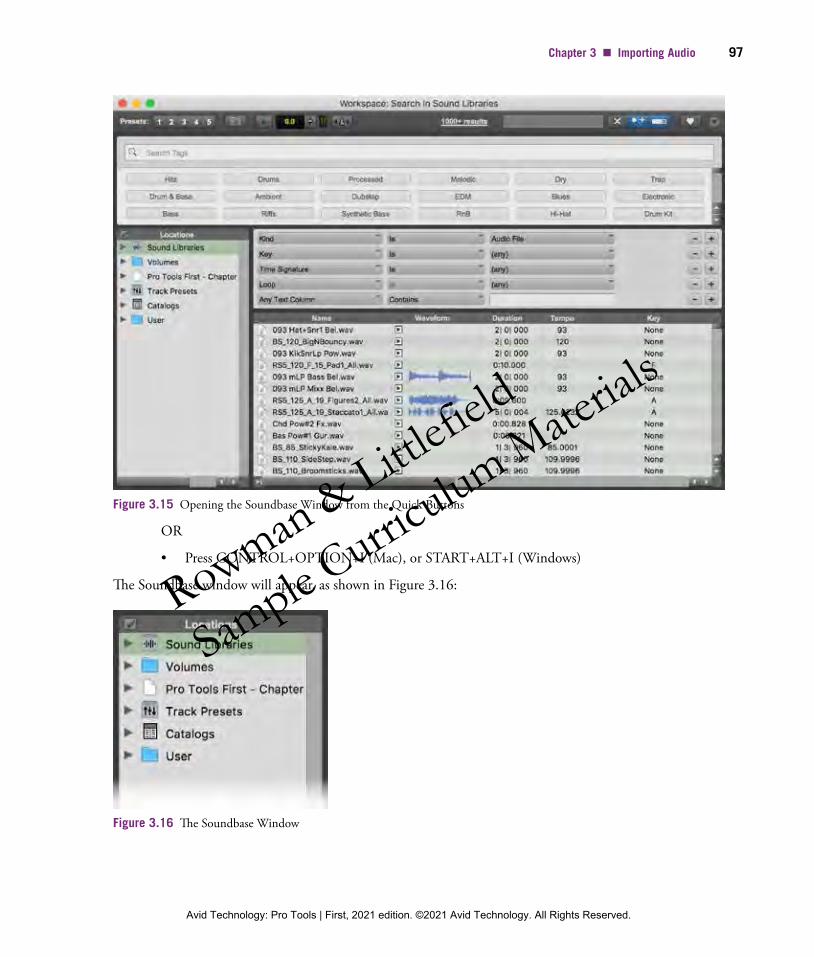
Figure 3.15 Opening the Soundbase Window from the Quick Buttons
OR
• Press CONTROL+OPTION+I (Mac), or START+ALT+I (Windows)
The Soundbase window will appear, as shown in Figure 3.16:
Figure 3.16 The Soundbase Window
20-0549-AVID-ProTools_2pp.indd 97 3/15/21 3:03 PM
Rowman & Littlefiel
d
Sample Curric
ulum Materials
Avid Technology: Pro Tools | First, 2021 edition. ©2021 Avid Technology. All Rights Reserved.
98 Pro Tools | First
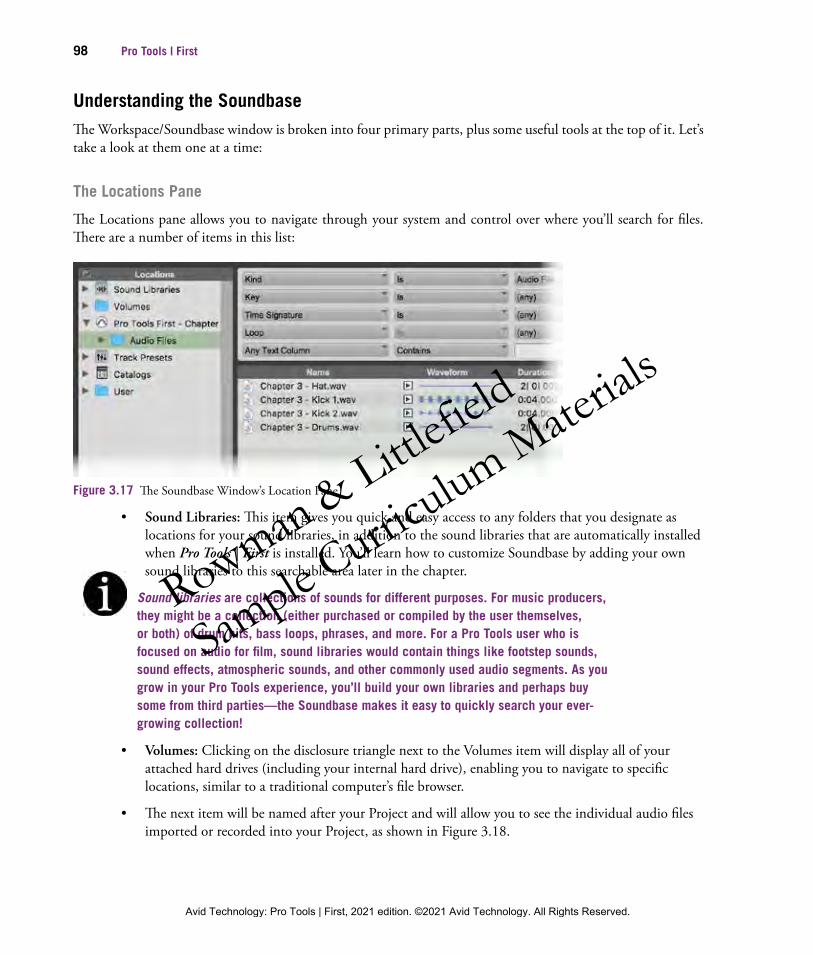
Understanding the SoundbaseThe Workspace/Soundbase window is broken into four primary parts, plus some useful tools at the top of it. Let’s take a look at them one at a time:
The Locations Pane
The Locations pane allows you to navigate through your system and control over where you’ll search for files. There are a number of items in this list:
Figure 3.17 The Soundbase Window’s Location Pane
• Sound Libraries: This item gives you quick and easy access to any folders that you designate as locations for your sound libraries, in addition to the sound libraries that are automatically installed when Pro Tools | First is installed. You’ll learn how to customize Soundbase by adding your own sound libraries to this searchable area later in the chapter.
Sound libraries are collections of sounds for different purposes. For music producers, they might be a collection (either purchased or compiled by the user themselves, or both) of drum hits, bass loops, phrases, and more. For a Pro Tools user who is focused on audio for film, sound libraries would contain things like footstep sounds, sound effects, atmospheric sounds, and other commonly used audio segments. As you grow in your Pro Tools experience, you’ll build your own libraries and perhaps buy some from third parties—the Soundbase makes it easy to quickly search your ever- growing collection!
• Volumes: Clicking on the disclosure triangle next to the Volumes item will display all of your attached hard drives (including your internal hard drive), enabling you to navigate to specific locations, similar to a traditional computer’s file browser.
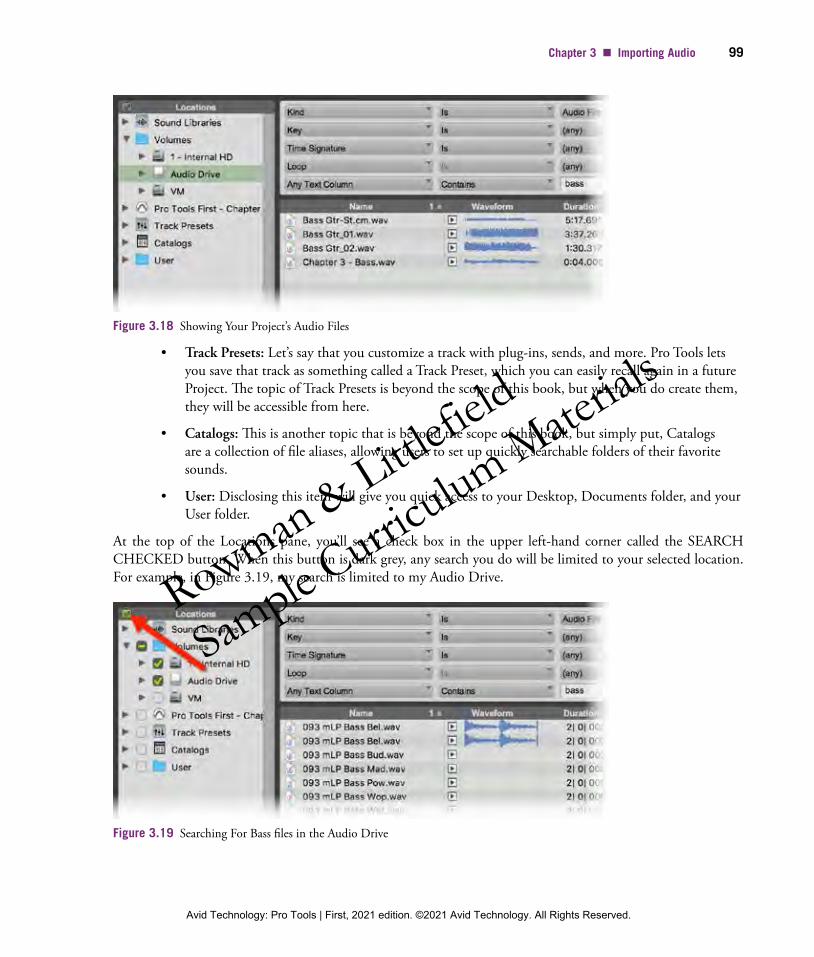
• The next item will be named after your Project and will allow you to see the individual audio files imported or recorded into your Project, as shown in Figure 3.18.
20-0549-AVID-ProTools_2pp.indd 98 3/15/21 3:03 PM
Rowman & Littlefiel
d
Sample Curric
ulum Materials
Avid Technology: Pro Tools | First, 2021 edition. ©2021 Avid Technology. All Rights Reserved.
Chapter 3 ■ Importing Audio 99
Figure 3.18 Showing Your Project’s Audio Files
• Track Presets: Let’s say that you customize a track with plug- ins, sends, and more. Pro Tools lets you save that track as something called a Track Preset, which you can easily recall again in a future Project. The topic of Track Presets is beyond the scope of this book, but when you do create them, they will be accessible from here.
• Catalogs: This is another topic that is beyond the scope of this book, but simply put, Catalogs are a collection of file aliases, allowing users to set up quickly searchable folders of their favorite sounds.
• User: Disclosing this item will give you quick access to your Desktop, Documents folder, and your User folder.
At the top of the Locations pane, you’ll see a check box in the upper left- hand corner called the SEARCH CHECKED button. When this button is dark grey, any search you do will be limited to your selected location. For example, in Figure 3.19, my search is limited to my Audio Drive.
Figure 3.19 Searching For Bass files in the Audio Drive
20-0549-AVID-ProTools_2pp.indd 99 3/15/21 3:03 PM
Rowman & Littlefiel
d
Sample Curric
ulum Materials
Avid Technology: Pro Tools | First, 2021 edition. ©2021 Avid Technology. All Rights Reserved.

100 Pro Tools | First
When you click the SEARCH CHECKED button, it will turn green. Now, you can search multiple locations simultaneously. You can choose the locations that you want to search by clicking the appropriate check box. In Figure 3.20, I am searching in my Audio Drive and my internal hard drive.
Figure 3.20 Searching for Bass files in the Internal Hard Drive and Audio Drive
The Tags Pane
At the top of the window, you’ll see a large section with named buttons. Each of these buttons refers to a tag (something you’ll learn about later in this chapter), which allows you to quickly search for files that are “tagged” with a keyword.
Here’s how you might use this section in a workflow: Let’s say that I want to search for just the right bass file. I’ll click on the button with the word “Bass” as shown in Figure 3.21.
Figure 3.21 Searching for Files That Are Tagged with the Key Word “Bass”
You’ll see in Figure 3.22 that the names on the buttons have changed. What you will now see are all of the remaining searchable tags for any files that are also tagged with the keyword “Bass”, refining your search. Now let’s say that I want a distorted bass, so I’ll click the button with the word “Distorted”.
20-0549-AVID-ProTools_2pp.indd 100 3/15/21 3:03 PM
Rowman & Littlefiel
d
Sample Curric
ulum Materials
Avid Technology: Pro Tools | First, 2021 edition. ©2021 Avid Technology. All Rights Reserved.
Chapter 3 ■ Importing Audio 101
Figure 3.22 Refining the Search . . .
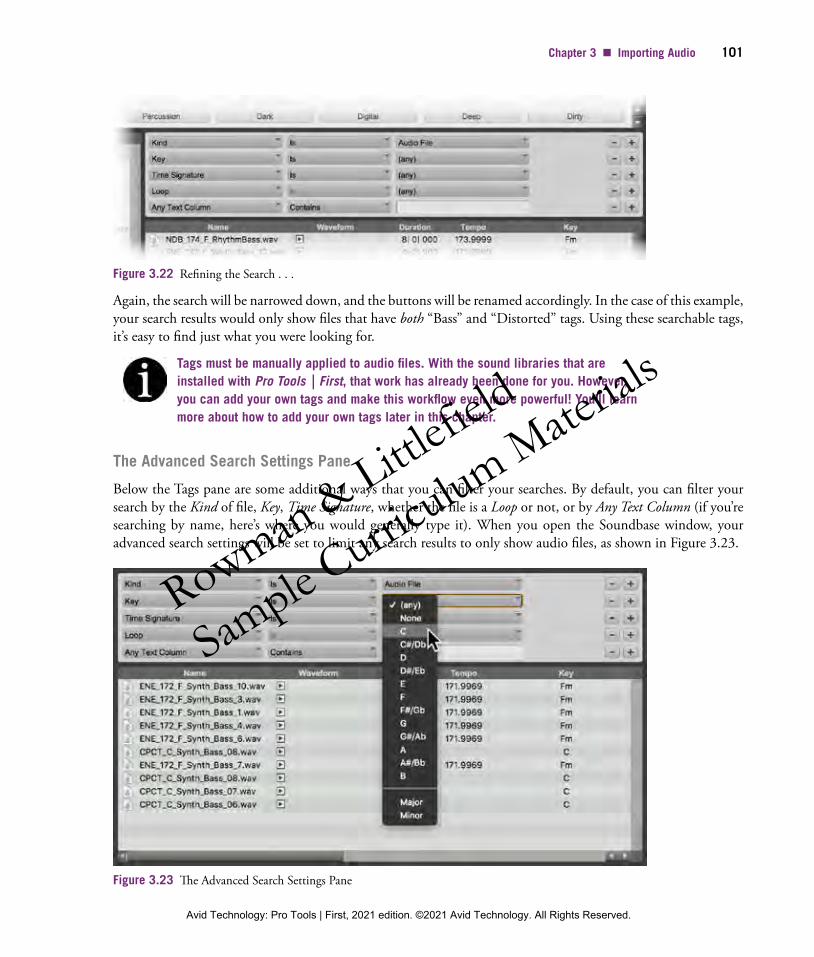
Again, the search will be narrowed down, and the buttons will be renamed accordingly. In the case of this example, your search results would only show files that have both “Bass” and “Distorted” tags. Using these searchable tags, it’s easy to find just what you were looking for.
Tags must be manually applied to audio files. With the sound libraries that are installed with Pro Tools | First, that work has already been done for you. However, you can add your own tags and make this workflow even more powerful! You’ll learn more about how to add your own tags later in this chapter.
The Advanced Search Settings Pane
Below the Tags pane are some additional ways that you can filter your searches. By default, you can filter your search by the Kind of file, Key, Time Signature, whether the file is a Loop or not, or by Any Text Column (if you’re searching by name, here’s where you would generally type it). When you open the Soundbase window, your advanced search settings will be set to limit any search results to only show audio files, as shown in Figure 3.23.
Figure 3.23 The Advanced Search Settings Pane
20-0549-AVID-ProTools_2pp.indd 101 3/15/21 3:03 PM
Rowman & Littlefiel
d
Sample Curric
ulum Materials
Avid Technology: Pro Tools | First, 2021 edition. ©2021 Avid Technology. All Rights Reserved.
102 Pro Tools | First
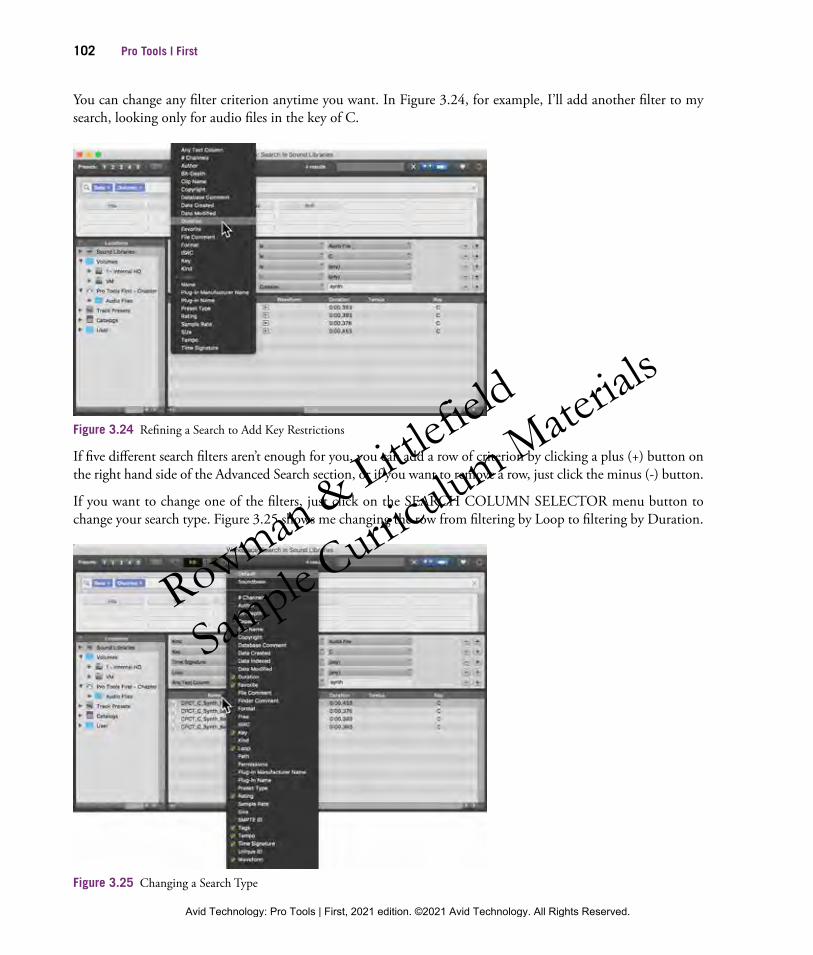
You can change any filter criterion anytime you want. In Figure 3.24, for example, I’ll add another filter to my search, looking only for audio files in the key of C.
Figure 3.24 Refining a Search to Add Key Restrictions
If five different search filters aren’t enough for you, you can add a row of criterion by clicking a plus (+) button on the right hand side of the Advanced Search section, or if you want to remove a row, just click the minus (-) button.
If you want to change one of the filters, just click on the SEARCH COLUMN SELECTOR menu button to change your search type. Figure 3.25 shows me changing the row from filtering by Loop to filtering by Duration.
Figure 3.25 Changing a Search Type
20-0549-AVID-ProTools_2pp.indd 102 3/15/21 3:03 PM
Rowman & Littlefiel
d
Sample Curric
ulum Materials
Avid Technology: Pro Tools | First, 2021 edition. ©2021 Avid Technology. All Rights Reserved.
Chapter 3 ■ Importing Audio 103
The Browser Pane
The Browser pane (directly below the Advanced Search Settings pane) will display the contents of any folder that you navigate to in the Locations Pane, or the results of any search. There’s a lot of information that is shown in this area in addition to file names. For example, in the Waveform column, you will see a graphic representation of the audio’s waveform; in the Tempo column, you’ll see the tempo that the audio was originally recorded at, file comments, and more.
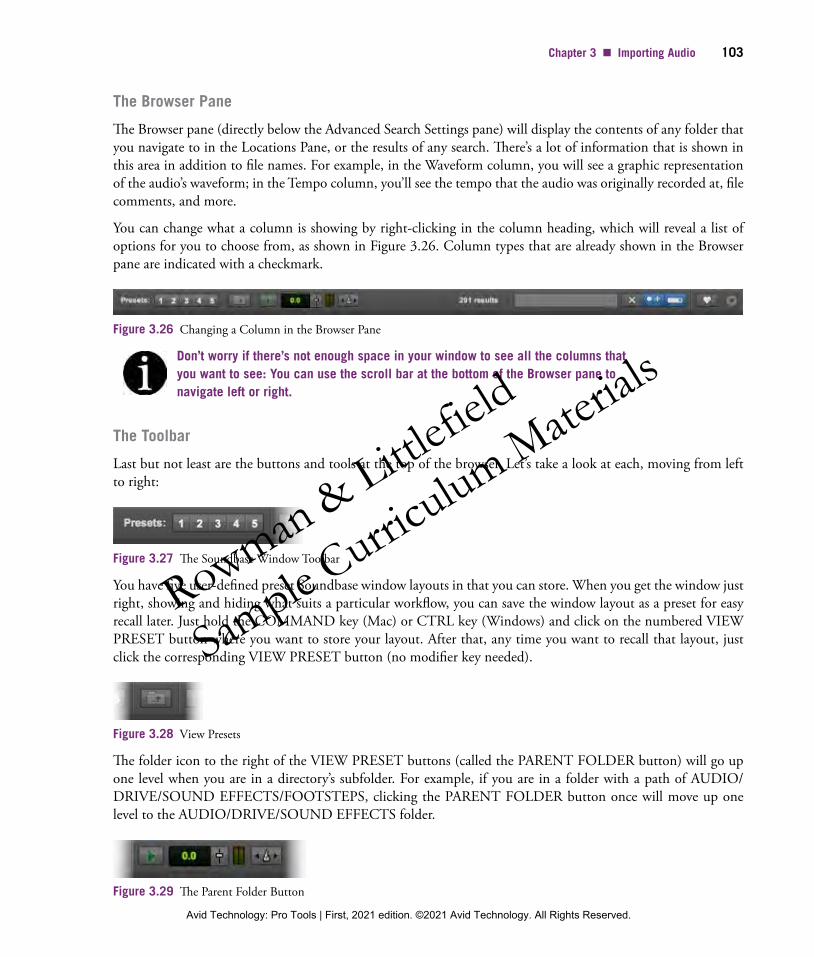
You can change what a column is showing by right- clicking in the column heading, which will reveal a list of options for you to choose from, as shown in Figure 3.26. Column types that are already shown in the Browser pane are indicated with a checkmark.
Figure 3.26 Changing a Column in the Browser Pane
Don’t worry if there’s not enough space in your window to see all the columns that you want to see: You can use the scroll bar at the bottom of the Browser pane to navigate left or right.
The Toolbar
Last but not least are the buttons and tools at the top of the browser. Let’s take a look at each, moving from left to right:
Figure 3.27 The Soundbase Window Toolbar
You have five user- defined preset Soundbase window layouts in that you can store. When you get the window just right, showing and hiding what suits a particular workflow, you can save the window layout as a preset for easy recall later. Just hold the COMMAND key (Mac) or CTRL key (Windows) and click on the numbered VIEW PRESET button where you want to store your layout. After that, any time you want to recall that layout, just click the corresponding VIEW PRESET button (no modifier key needed).
Figure 3.28 View Presets
The folder icon to the right of the VIEW PRESET buttons (called the PARENT FOLDER button) will go up one level when you are in a directory’s subfolder. For example, if you are in a folder with a path of AUDIO/DRIVE/SOUND EFFECTS/FOOTSTEPS, clicking the PARENT FOLDER button once will move up one level to the AUDIO/DRIVE/SOUND EFFECTS folder.
Figure 3.29 The Parent Folder Button
20-0549-AVID-ProTools_2pp.indd 103 3/15/21 3:03 PM
Rowman & Littlefiel
d
Sample Curric
ulum Materials
Avid Technology: Pro Tools | First, 2021 edition. ©2021 Avid Technology. All Rights Reserved.
104 Pro Tools | First
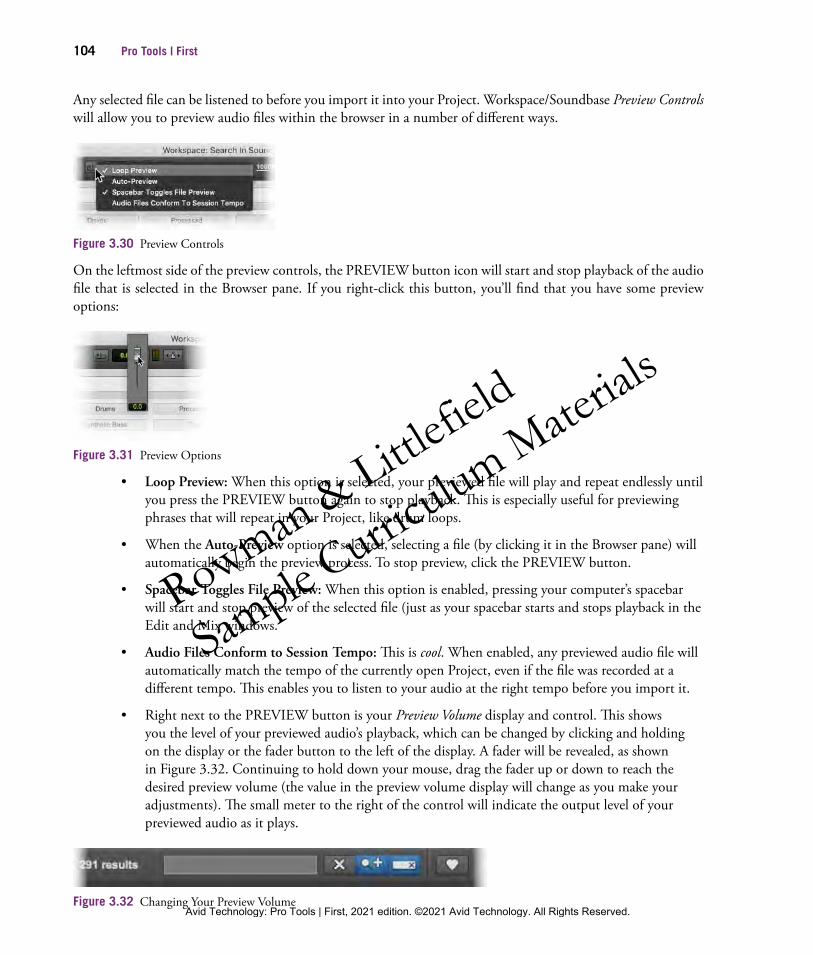
Any selected file can be listened to before you import it into your Project. Workspace/Soundbase Preview Controls will allow you to preview audio files within the browser in a number of different ways.
Figure 3.30 Preview Controls
On the leftmost side of the preview controls, the PREVIEW button icon will start and stop playback of the audio file that is selected in the Browser pane. If you right- click this button, you’ll find that you have some preview options:
Figure 3.31 Preview Options
• Loop Preview: When this option is selected, your previewed file will play and repeat endlessly until you press the PREVIEW button again to stop playback. This is especially useful for previewing phrases that will repeat in your Project, like drum loops.
• When the Auto- Preview option is selected, selecting a file (by clicking it in the Browser pane) will automatically begin the preview process. To stop preview, click the PREVIEW button.
• Spacebar Toggles File Preview: When this option is enabled, pressing your computer’s spacebar will start and stop preview of the selected file (just as your spacebar starts and stops playback in the Edit and Mix windows.
• Audio Files Conform to Session Tempo: This is cool. When enabled, any previewed audio file will automatically match the tempo of the currently open Project, even if the file was recorded at a different tempo. This enables you to listen to your audio at the right tempo before you import it.
• Right next to the PREVIEW button is your Preview Volume display and control. This shows you the level of your previewed audio’s playback, which can be changed by clicking and holding on the display or the fader button to the left of the display. A fader will be revealed, as shown in Figure 3.32. Continuing to hold down your mouse, drag the fader up or down to reach the desired preview volume (the value in the preview volume display will change as you make your adjustments). The small meter to the right of the control will indicate the output level of your previewed audio as it plays.
Figure 3.32 Changing Your Preview Volume
20-0549-AVID-ProTools_2pp.indd 104 3/15/21 3:03 PM
Rowman & Littlefiel
d
Sample Curric
ulum Materials
Avid Technology: Pro Tools | First, 2021 edition. ©2021 Avid Technology. All Rights Reserved.
Chapter 3 ■ Importing Audio 105
• To the right of the preview volume control, the AUDIO FILES CONFORM TO SESSION TEMPO button mirrors the option of the same name that you saw previously in the Preview button menu. You can enable or disable this option by clicking the button—if the button is colored green, the option is enabled.
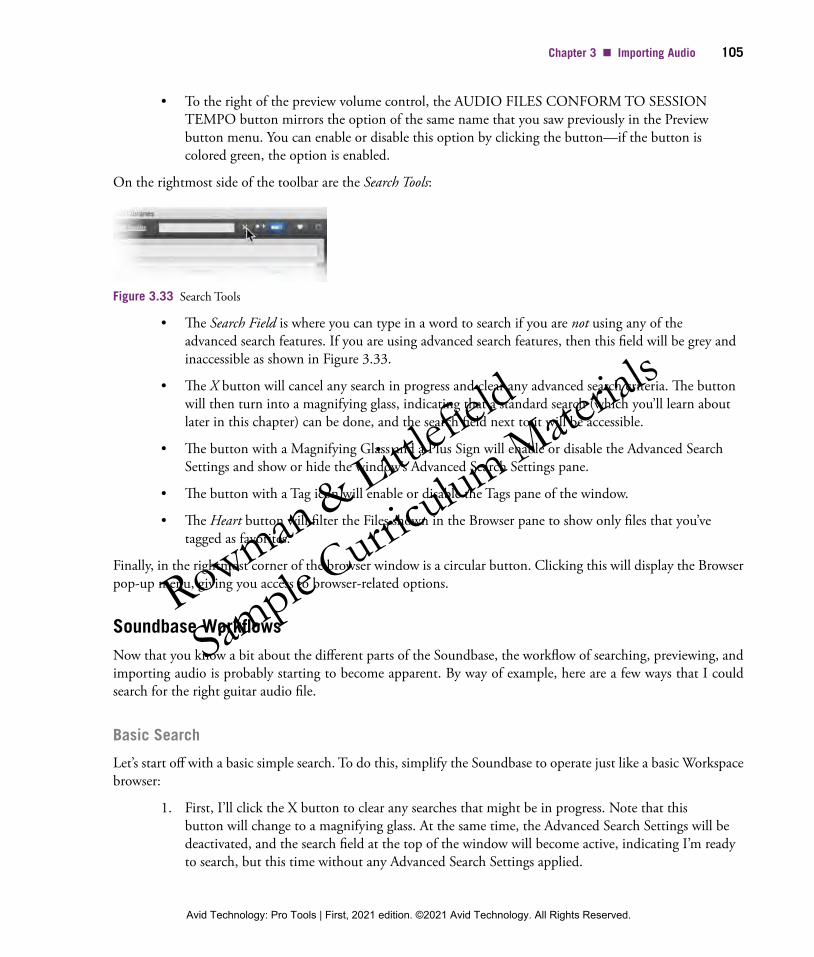
On the rightmost side of the toolbar are the Search Tools:
Figure 3.33 Search Tools
• The Search Field is where you can type in a word to search if you are not using any of the advanced search features. If you are using advanced search features, then this field will be grey and inaccessible as shown in Figure 3.33.
• The X button will cancel any search in progress and clear any advanced search criteria. The button will then turn into a magnifying glass, indicating that a standard search (which you’ll learn about later in this chapter) can be done, and the search field next to it will be accessible.
• The button with a Magnifying Glass and a Plus Sign will enable or disable the Advanced Search Settings and show or hide the window’s Advanced Search Settings pane.
• The button with a Tag icon will enable or disable the Tags pane of the window.
• The Heart button will filter the Files shown in the Browser pane to show only files that you’ve tagged as favorites.
Finally, in the rightmost corner of the browser window is a circular button. Clicking this will display the Browser pop- up menu, giving you access to browser- related options.
Soundbase WorkflowsNow that you know a bit about the different parts of the Soundbase, the workflow of searching, previewing, and importing audio is probably starting to become apparent. By way of example, here are a few ways that I could search for the right guitar audio file.
Basic Search
Let’s start off with a basic simple search. To do this, simplify the Soundbase to operate just like a basic Workspace browser:
1. First, I’ll click the X button to clear any searches that might be in progress. Note that this button will change to a magnifying glass. At the same time, the Advanced Search Settings will be deactivated, and the search field at the top of the window will become active, indicating I’m ready to search, but this time without any Advanced Search Settings applied.
20-0549-AVID-ProTools_2pp.indd 105 3/15/21 3:03 PM
Rowman & Littlefiel
d
Sample Curric
ulum Materials
Avid Technology: Pro Tools | First, 2021 edition. ©2021 Avid Technology. All Rights Reserved.
106 Pro Tools | First
Figure 3.34 Deactivating Advanced Search
2. Next, I will also hide the Tags pane by clicking the TAGS button. At this point, Soundbase has been reduced to a Workspace browser. From this point, searching will be easy.
Figure 3.35 Deactivating the Tags Pane
You might notice at some point that the Browser pane’s color has changed from green to blue. When the rows in that section are green, that’s an indication that a search is in progress. When the rows are blue, that means it’s operating as a basic file browser (but still with the benefits of preview tools, etc.).
3. Type a keyword into the search field.
4. In the Locations pane, choose the volume that you want to search. Note that the results you see in the Browser pane will change according to your search location.
One easy way to search your entire system is to choose “Volumes” in the Locations pane. All attached drives will be included in your search.
Advanced Search
When you search by keyword only, the kinds of results that you’ll see in the Browser pane might be more than what you’re actually looking for. For example, if I search the word “guitar” on my system, I’ll see all kinds of different files, all of which have relevance to Pro Tools in some way, but may not be the kind of file I’m looking for. Fortunately, the Advanced Search options will help you narrow in on exactly what you’re looking for.
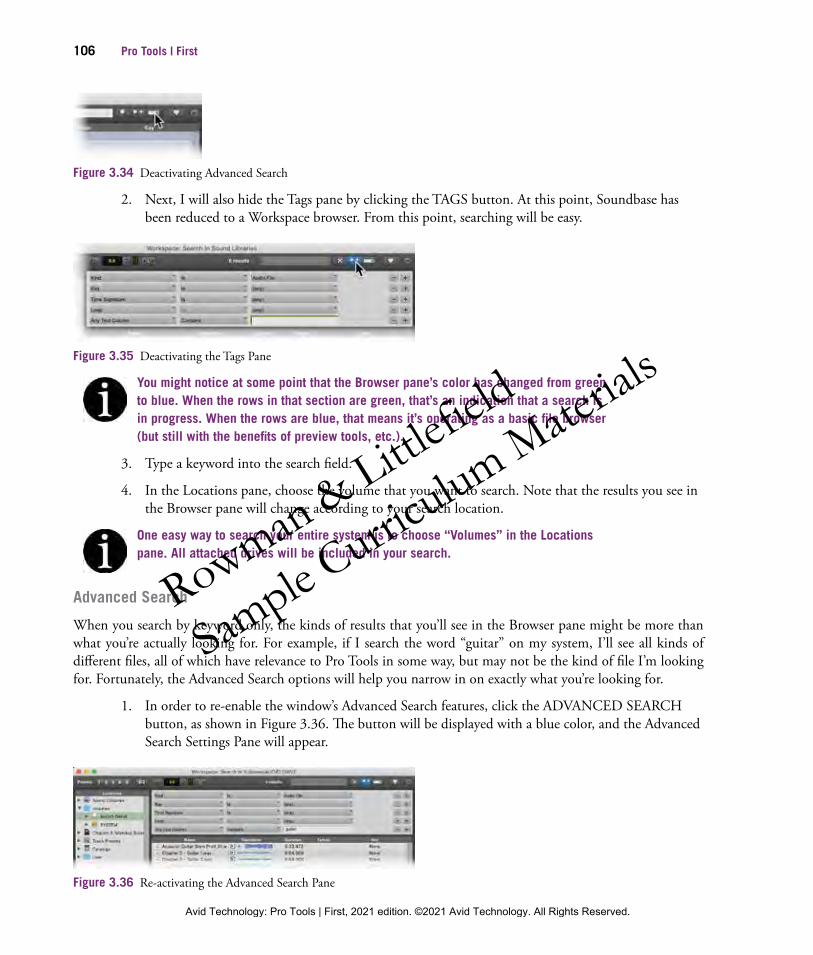
1. In order to re- enable the window’s Advanced Search features, click the ADVANCED SEARCH button, as shown in Figure 3.36. The button will be displayed with a blue color, and the Advanced Search Settings Pane will appear.
Figure 3.36 Re- activating the Advanced Search Pane
20-0549-AVID-ProTools_2pp.indd 106 3/15/21 3:03 PM
Rowman & Littlefiel
d
Sample Curric
ulum Materials
Avid Technology: Pro Tools | First, 2021 edition. ©2021 Avid Technology. All Rights Reserved.
Chapter 3 ■ Importing Audio 107
2. Since I am looking for an audio file, I’ll make sure that in the Advanced Search Settings Pane, in the Kind row, the only type of file that will be included in the results is an audio file (conveniently, this is set by default).
3. By default, the Any Text Column row is at the bottom of the pane. This is a convenient place to type what I’m looking for, in this case, guitar.
The Any Text Column search filter will only show results that have a given word in any of their columns (including comments, Project name, etc.). If you want to limit your search only to files that have that word in their file name, change the Any Text Column search criterion to Name.
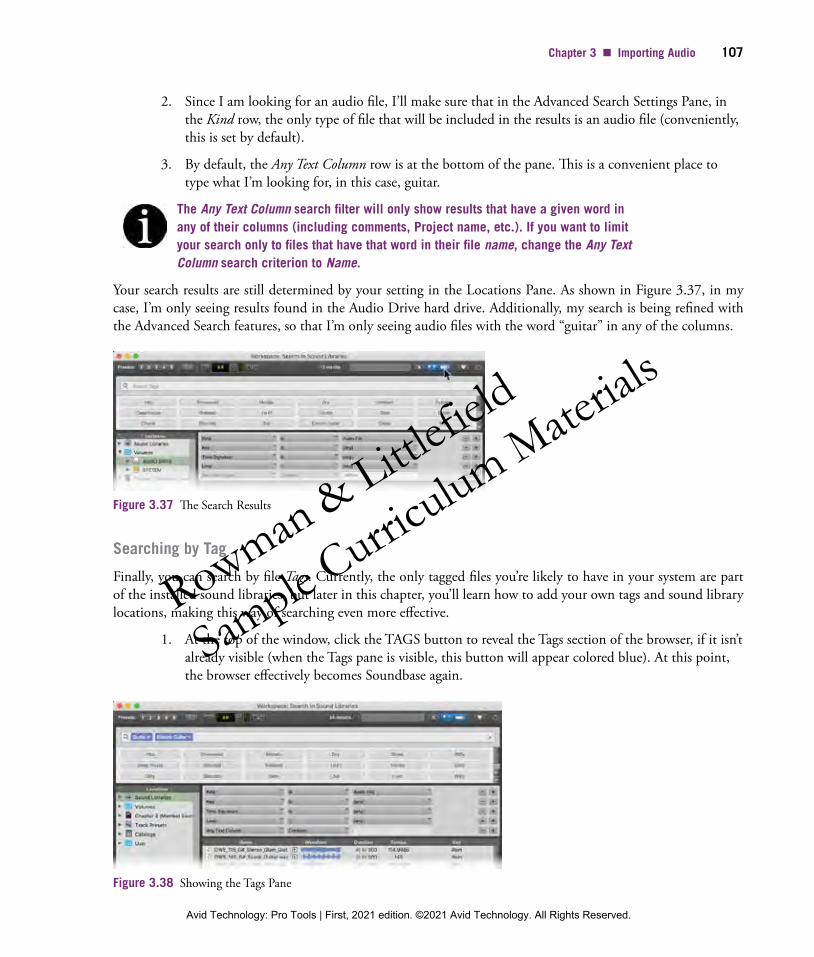
Your search results are still determined by your setting in the Locations Pane. As shown in Figure 3.37, in my case, I’m only seeing results found in the Audio Drive hard drive. Additionally, my search is being refined with the Advanced Search features, so that I’m only seeing audio files with the word “guitar” in any of the columns.
Figure 3.37 The Search Results
Searching by Tag
Finally, you can search by file Tags. Currently, the only tagged files you’re likely to have in your system are part of the installed sound libraries, but later in this chapter, you’ll learn how to add your own tags and sound library locations, making this way of searching even more effective.
1. At the top of the window, click the TAGS button to reveal the Tags section of the browser, if it isn’t already visible (when the Tags pane is visible, this button will appear colored blue). At this point, the browser effectively becomes Soundbase again.
Figure 3.38 Showing the Tags Pane
20-0549-AVID-ProTools_2pp.indd 107 3/15/21 3:03 PM
Rowman & Littlefiel
d
Sample Curric
ulum Materials
Avid Technology: Pro Tools | First, 2021 edition. ©2021 Avid Technology. All Rights Reserved.
108 Pro Tools | First
2. You can start your search in two ways:
• Click the button named for the tag that you want to search (in my case, the GUITAR button)
OR
• Type a keyword that you want to search in the Search Tags field at the top of the Tags Pane. Pro Tools will auto- complete as you type, based upon the tags available.
3. You can further refine your search by adding more tags to the search criteria.
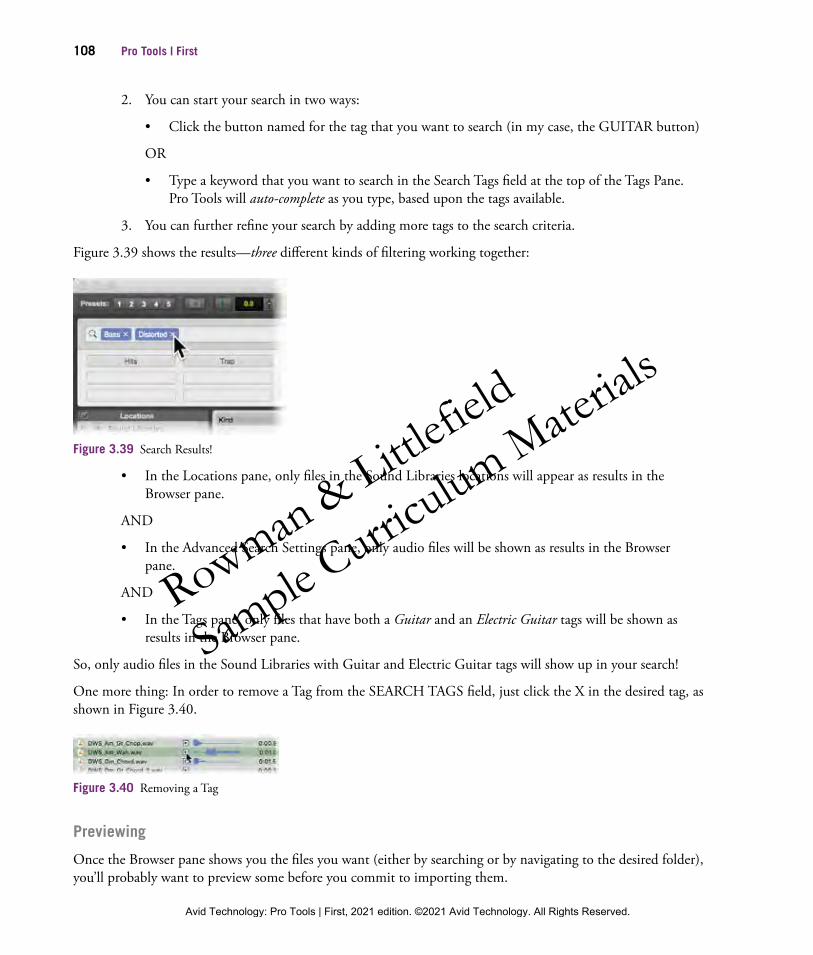
Figure 3.39 shows the results—three different kinds of filtering working together:
Figure 3.39 Search Results!
• In the Locations pane, only files in the Sound Libraries locations will appear as results in the Browser pane.
AND
• In the Advanced Search Settings pane, only audio files will be shown as results in the Browser pane.
AND
• In the Tags pane, only files that have both a Guitar and an Electric Guitar tags will be shown as results in the Browser pane.
So, only audio files in the Sound Libraries with Guitar and Electric Guitar tags will show up in your search!
One more thing: In order to remove a Tag from the SEARCH TAGS field, just click the X in the desired tag, as shown in Figure 3.40.
Figure 3.40 Removing a Tag
Previewing
Once the Browser pane shows you the files you want (either by searching or by navigating to the desired folder), you’ll probably want to preview some before you commit to importing them.
20-0549-AVID-ProTools_2pp.indd 108 3/15/21 3:03 PM
Rowman & Littlefiel
d
Sample Curric
ulum Materials
Avid Technology: Pro Tools | First, 2021 edition. ©2021 Avid Technology. All Rights Reserved.

Chapter 3 ■ Importing Audio 109
1. Select the file that you want to preview.
2. Click the PREVIEW button.
OR
2. Click the small Waveform Preview button (to the left of the waveform waveform), as shown in Figure 3.41.
Figure 3.41 Another Way to Preview from the Start of a File
OR
2. Click at the desired location within the waveform display (as shown in Figure 3.42), and preview will begin at the point where you clicked.
Figure 3.42 Previewing from the middle of a file
Regardless of how you preview your file, your preview will follow the options that are selected in the PREVIEW button menu. Again, to get to this menu, just right- click on the Preview button, or choose the options from the Browser pop- up menu.
As you learned already, you can adjust the volume of your previewed file by adjusting the preview volume controls. Clicking the AUDIO FILES CONFORM TO SESSION TEMPO button will ensure that any musical phrases that you preview will be played in the tempo of your current Project, regardless of their original tempo! These two features are huge timesavers; a computer’s file browser cannot perform these functions.
But the news gets even better. You can preview audio in the Soundbase browser while your Project is playing. For example, you could start a looped selection in your Edit window (the phrase will play repeatedly), and then go into Soundbase. If the AUDIO FILES CONFORM TO SESSION TEMPO button is green, any previewed musical phrase will play back in the same tempo as your Project. It will even wait until the downbeat to start play back, so that your phrases are aligned properly!
Of course, not all audio files are musical phrases, so not all files should change according to the tempo of your Project. Not a problem, though—Pro Tools will analyze the files in your browser before you preview, looking for a recognizable pattern of transients (rapid changes in amplitude, like drum hits). If Pro Tools finds a pattern, it will assume that the file is a musical phrase and can conform it to the Project tempo. If there is no pattern (as would be the case in a single drum hit), Pro Tools will determine that the file is not a musical phrase and will play it at its original speed, regardless of the AUDIO FILES CONFORM TO SESSION TEMPO setting.
In order for this workflow to work the way you want, your Project’s tempo must be set correctly. This is something you will learn more about in Chapter 6, when we talk about MIDI.
20-0549-AVID-ProTools_2pp.indd 109 3/15/21 3:03 PM
Rowman & Littlefiel
d
Sample Curric
ulum Materials
Avid Technology: Pro Tools | First, 2021 edition. ©2021 Avid Technology. All Rights Reserved.
110 Pro Tools | First
Importing
You searched for your audio and previewed a few of your options, and now you’re ready to import your choice into your Project. This process is very similar to importing from your computer’s file browser window.
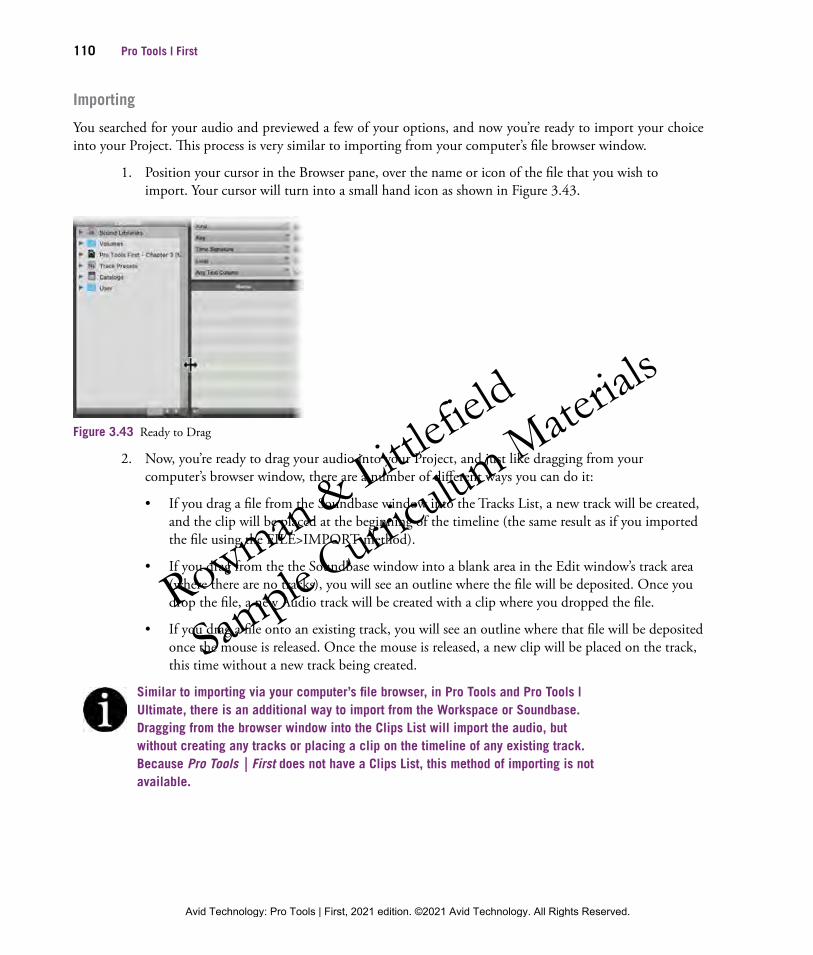
1. Position your cursor in the Browser pane, over the name or icon of the file that you wish to import. Your cursor will turn into a small hand icon as shown in Figure 3.43.
Figure 3.43 Ready to Drag
2. Now, you’re ready to drag your audio into your Project, and just like dragging from your computer’s browser window, there are a number of different ways you can do it:
• If you drag a file from the Soundbase window into the Tracks List, a new track will be created, and the clip will be placed at the beginning of the timeline (the same result as if you imported the file using the FILE>IMPORT method).
• If you drag from the the Soundbase window into a blank area in the Edit window’s track area (where there are no tracks), you will see an outline where the file will be deposited. Once you drop the file, a new Audio track will be created with a clip where you dropped the file.
• If you drag a file onto an existing track, you will see an outline where that file will be deposited once the mouse is released. Once the mouse is released, a new clip will be placed on the track, this time without a new track being created.
Similar to importing via your computer’s file browser, in Pro Tools and Pro Tools | Ultimate, there is an additional way to import from the Workspace or Soundbase. Dragging from the browser window into the Clips List will import the audio, but without creating any tracks or placing a clip on the timeline of any existing track. Because Pro Tools | First does not have a Clips List, this method of importing is not available.
20-0549-AVID-ProTools_2pp.indd 110 3/15/21 3:03 PM
Rowman & Littlefiel
d
Sample Curric
ulum Materials
Avid Technology: Pro Tools | First, 2021 edition. ©2021 Avid Technology. All Rights Reserved.

Chapter 3 ■ Importing Audio 111
Hands- On Exercise 3.2—Importing from the Soundbase BrowserYou now know how to make the best use of the Soundbase. Now, let’s use it to choose the best Guitar part for Mambo.
This exercise assumes that you’ve already completed exercise #3.1. The Project should already have four imported files (Drum Kit, Hi Hat, Kick 1, and Kick 2), and also be in loop playback mode.
Setting Up1. From the WINDOW menu, open the SOUNDBASE.
2. Select any clip in the Edit window and press the SPACEBAR. Since you are in LOOP PLAYBACK mode, your selected area on the timeline will play back repeatedly.
3. In the Soundbase window, navigate to your downloaded exercise file, and from there, to the Pro Tools First—Chapter 3—Audio Files for Import folder
4. Make sure that the AUDIO FILES CONFORM TO SESSION TEMPO button is green, indicating that the option is enabled.
Importing a Guitar Part5. Preview both the Chapter 3—Guitar 1.wav and Chapter 3—Guitar 2.wave files while the loop
plays. If you need to adjust the volume of the preview, you can do that with the Preview Volume controls.
6. Once you’ve chosen your preference, drag the file into the Tracks List, creating a new track with the clip at the beginning of the timeline.
Importing Other Tracks7. Import the Chapter 3—Trumpets .wav file to a new track. If necessary, use the Grabber tool to
position the clip at the beginning of the timeline.
8. Import the Chapter 3—Piano .wav file to a new track. If necessary, use the Grabber tool to position the clip at the beginning of the timeline.
9. Import the Chapter 3—Saxes .wav file to the Saxes Track. Use the Grabber tool to position the clip at the beginning of the timeline.
10. Import the Chapter 3—Bass .wav file to the Bass Track. Use the Grabber tool to position the clip at the beginning of the timeline.
20-0549-AVID-ProTools_2pp.indd 111 3/15/21 3:03 PM
Rowman & Littlefiel
d
Sample Curric
ulum Materials
Avid Technology: Pro Tools | First, 2021 edition. ©2021 Avid Technology. All Rights Reserved.
112 Pro Tools | First
Cleaning UpLet’s build good habits and clean up the Project.
11. Rename the Chapter 3—Guitar (1 or 2) track to Guitar.
12. Rename the Chapter 3—Trumpets track to Trumpets.
13. Rename the Chapter 3—Piano track to Piano.
14. Reorder the tracks to be:
• Saxes
• Trumpets
• Piano
• Guitar
• Bass
• Drums
• Hi Hat
• Kick 1
• Kick 2
15. Once you’ve reorganized your tracks, you’re done with this hands- on exercise. Make sure to save your work before moving on!
Customizing the SoundbaseBefore we leave this chapter, let’s look at some ways that you can customize the Soundbase window and improve your workflow.
Changing the Soundbase WindowLet’s start with a few ways that you can change the look of the Soundbase window:
• When you place your cursor at the boundary between the Locations pane and the Browser pane, as shown in Figure 3.44, it will turn into a double arrow icon. Click and drag this boundary to give you the space you need in either pane.
20-0549-AVID-ProTools_2pp.indd 112 3/15/21 3:03 PM
Rowman & Littlefiel
d
Sample Curric
ulum Materials
Avid Technology: Pro Tools | First, 2021 edition. ©2021 Avid Technology. All Rights Reserved.
Chapter 3 ■ Importing Audio 113
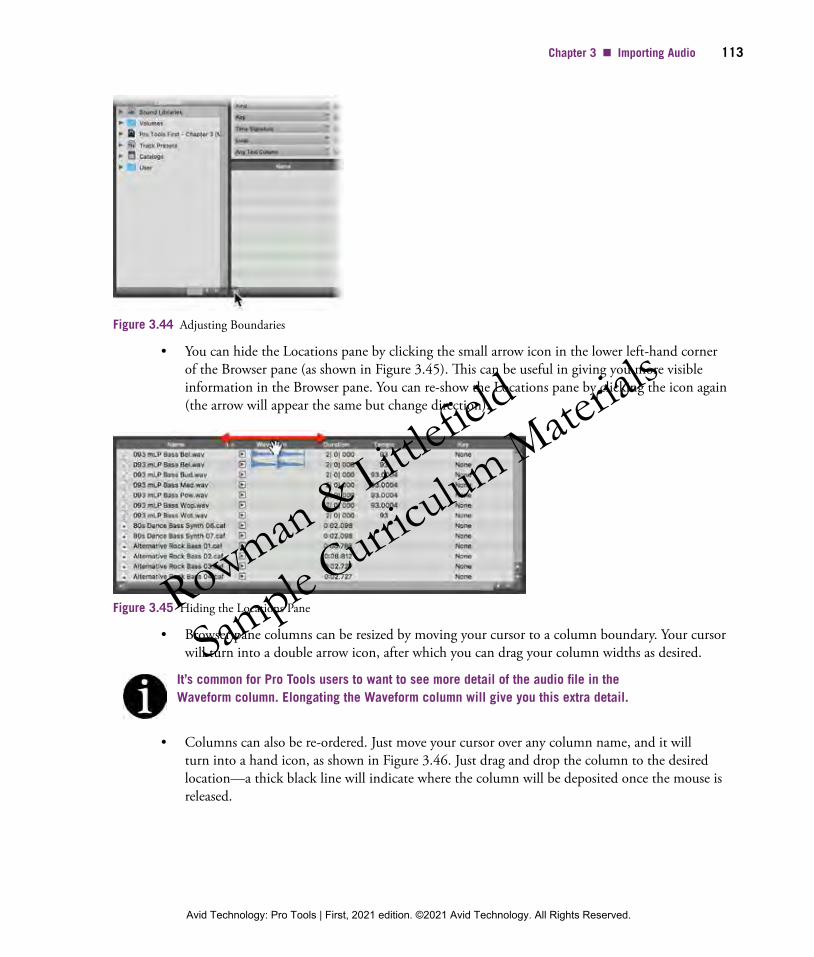
Figure 3.44 Adjusting Boundaries
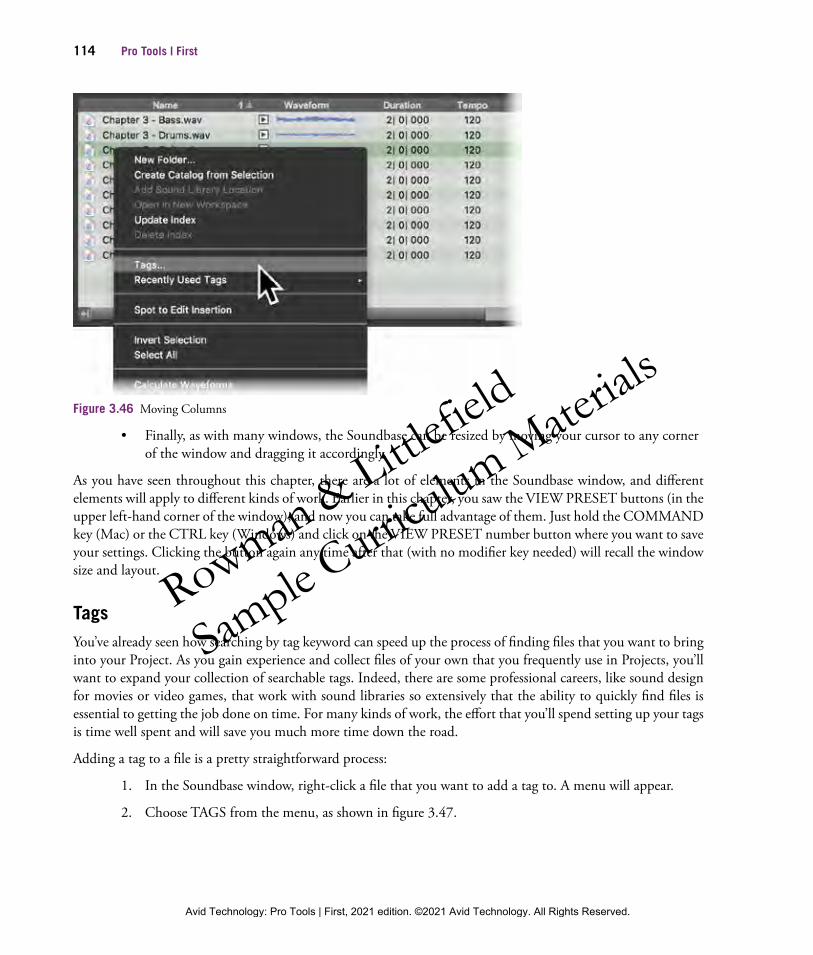
• You can hide the Locations pane by clicking the small arrow icon in the lower left- hand corner of the Browser pane (as shown in Figure 3.45). This can be useful in giving you more visible information in the Browser pane. You can re- show the Locations pane by clicking the icon again (the arrow will appear the same but change direction).
Figure 3.45 Hiding the Locations Pane
• Browser pane columns can be resized by moving your cursor to a column boundary. Your cursor will turn into a double arrow icon, after which you can drag your column widths as desired.
It’s common for Pro Tools users to want to see more detail of the audio file in the Waveform column. Elongating the Waveform column will give you this extra detail.
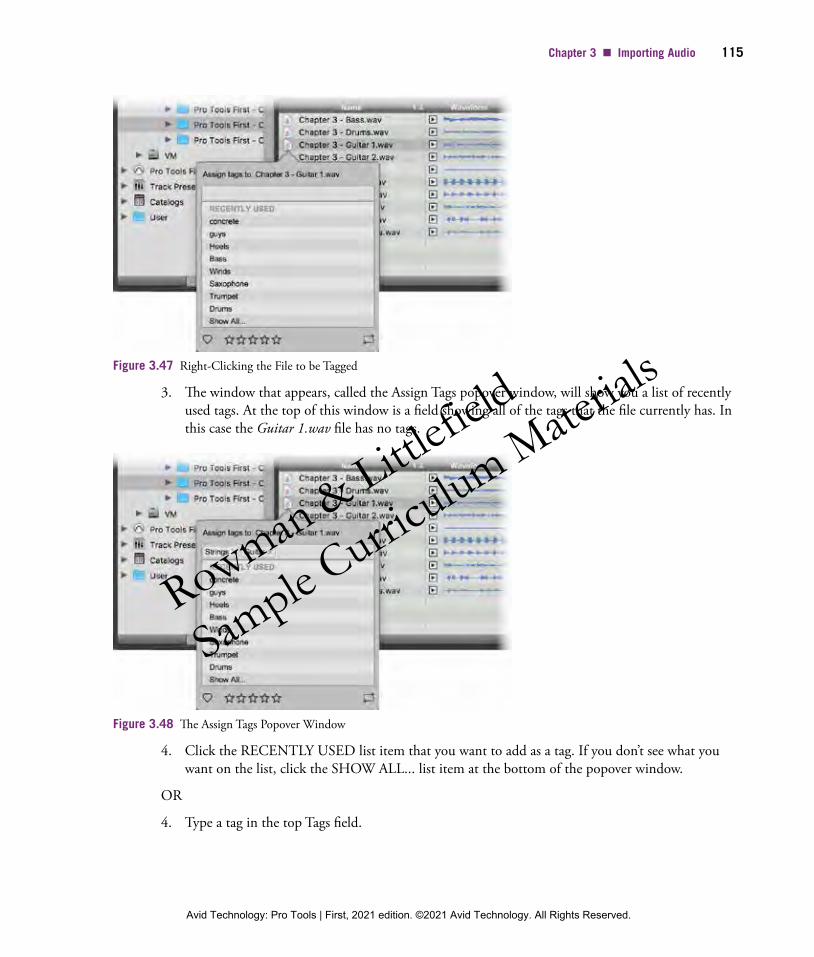
• Columns can also be re- ordered. Just move your cursor over any column name, and it will turn into a hand icon, as shown in Figure 3.46. Just drag and drop the column to the desired location—a thick black line will indicate where the column will be deposited once the mouse is released.
20-0549-AVID-ProTools_2pp.indd 113 3/15/21 3:03 PM
Rowman & Littlefiel
d
Sample Curric
ulum Materials
Avid Technology: Pro Tools | First, 2021 edition. ©2021 Avid Technology. All Rights Reserved.
114 Pro Tools | First
Figure 3.46 Moving Columns
• Finally, as with many windows, the Soundbase can be resized by moving your cursor to any corner of the window and dragging it accordingly.
As you have seen throughout this chapter, there are a lot of elements in the Soundbase window, and different elements will apply to different kinds of work. Earlier in this chapter, you saw the VIEW PRESET buttons (in the upper left- hand corner of the window), and now you can take full advantage of them. Just hold the COMMAND key (Mac) or the CTRL key (Windows) and click on the VIEW PRESET number button where you want to save your settings. Clicking the button again any time after that (with no modifier key needed) will recall the window size and layout.
TagsYou’ve already seen how searching by tag keyword can speed up the process of finding files that you want to bring into your Project. As you gain experience and collect files of your own that you frequently use in Projects, you’ll want to expand your collection of searchable tags. Indeed, there are some professional careers, like sound design for movies or video games, that work with sound libraries so extensively that the ability to quickly find files is essential to getting the job done on time. For many kinds of work, the effort that you’ll spend setting up your tags is time well spent and will save you much more time down the road.
Adding a tag to a file is a pretty straightforward process:
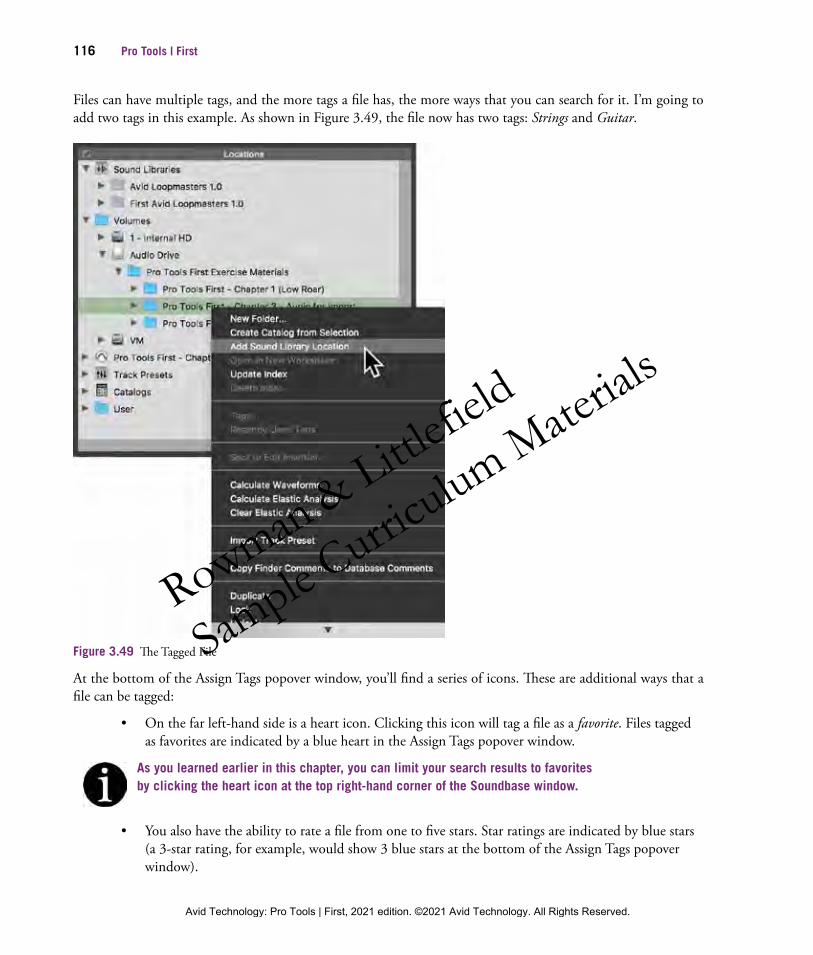
1. In the Soundbase window, right- click a file that you want to add a tag to. A menu will appear.
2. Choose TAGS from the menu, as shown in figure 3.47.
20-0549-AVID-ProTools_2pp.indd 114 3/15/21 3:03 PM
Rowman & Littlefiel
d
Sample Curric
ulum Materials
Avid Technology: Pro Tools | First, 2021 edition. ©2021 Avid Technology. All Rights Reserved.
Chapter 3 ■ Importing Audio 115
Figure 3.47 Right- Clicking the File to be Tagged
3. The window that appears, called the Assign Tags popover window, will show you a list of recently used tags. At the top of this window is a field showing all of the tags that the file currently has. In this case the Guitar 1.wav file has no tags.
Figure 3.48 The Assign Tags Popover Window
4. Click the RECENTLY USED list item that you want to add as a tag. If you don’t see what you want on the list, click the SHOW ALL... list item at the bottom of the popover window.
OR
4. Type a tag in the top Tags field.
20-0549-AVID-ProTools_2pp.indd 115 3/15/21 3:03 PM
Rowman & Littlefiel
d
Sample Curric
ulum Materials
Avid Technology: Pro Tools | First, 2021 edition. ©2021 Avid Technology. All Rights Reserved.
116 Pro Tools | First
Files can have multiple tags, and the more tags a file has, the more ways that you can search for it. I’m going to add two tags in this example. As shown in Figure 3.49, the file now has two tags: Strings and Guitar.
Figure 3.49 The Tagged File
At the bottom of the Assign Tags popover window, you’ll find a series of icons. These are additional ways that a file can be tagged:
• On the far left- hand side is a heart icon. Clicking this icon will tag a file as a favorite. Files tagged as favorites are indicated by a blue heart in the Assign Tags popover window.
As you learned earlier in this chapter, you can limit your search results to favorites by clicking the heart icon at the top right- hand corner of the Soundbase window.
• You also have the ability to rate a file from one to five stars. Star ratings are indicated by blue stars (a 3-star rating, for example, would show 3 blue stars at the bottom of the Assign Tags popover window).
20-0549-AVID-ProTools_2pp.indd 116 3/15/21 3:03 PM
Rowman & Littlefiel
d
Sample Curric
ulum Materials
Avid Technology: Pro Tools | First, 2021 edition. ©2021 Avid Technology. All Rights Reserved.
Chapter 3 ■ Importing Audio 117
You can search by rating in the Advanced Search Settings pane. Just change any column selector button to RATING, and then adjust the additional settings in the row to refine your search.
• You can also tag a file as a loop. This is commonly done for drum loops or other repeating phrases. Just click on the rectangular Loop Icon in the bottom right- hand corner of the Assign Tags popover window (files that are tagged as loops will show this icon in a blue color).
You can limit your search to show only loops by changing the criterion in the Advanced Search Settings pane, in the Loop row, to “Set”.
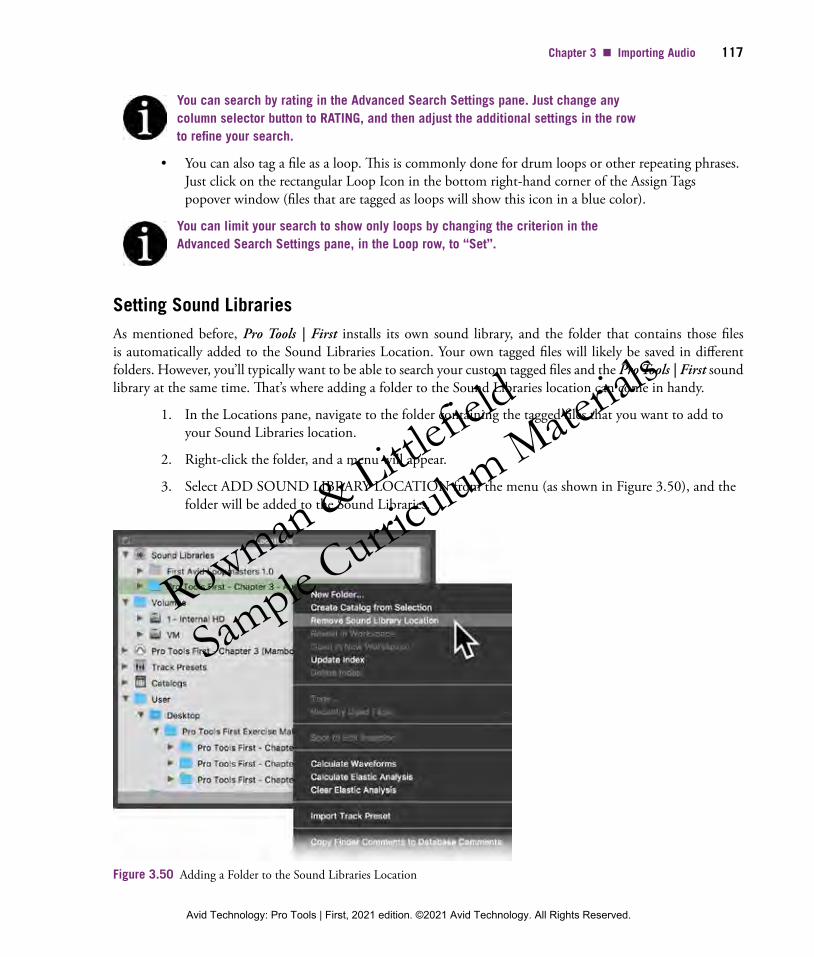
Setting Sound LibrariesAs mentioned before, Pro Tools | First installs its own sound library, and the folder that contains those files is automatically added to the Sound Libraries Location. Your own tagged files will likely be saved in different folders. However, you’ll typically want to be able to search your custom tagged files and the Pro Tools | First sound library at the same time. That’s where adding a folder to the Sound Libraries location can come in handy.
1. In the Locations pane, navigate to the folder containing the tagged files that you want to add to your Sound Libraries location.
2. Right- click the folder, and a menu will appear.
3. Select ADD SOUND LIBRARY LOCATION from the menu (as shown in Figure 3.50), and the folder will be added to the Sound Libraries.
Figure 3.50 Adding a Folder to the Sound Libraries Location
20-0549-AVID-ProTools_2pp.indd 117 3/15/21 3:03 PM
Rowman & Littlefiel
d
Sample Curric
ulum Materials
Avid Technology: Pro Tools | First, 2021 edition. ©2021 Avid Technology. All Rights Reserved.
118 Pro Tools | First
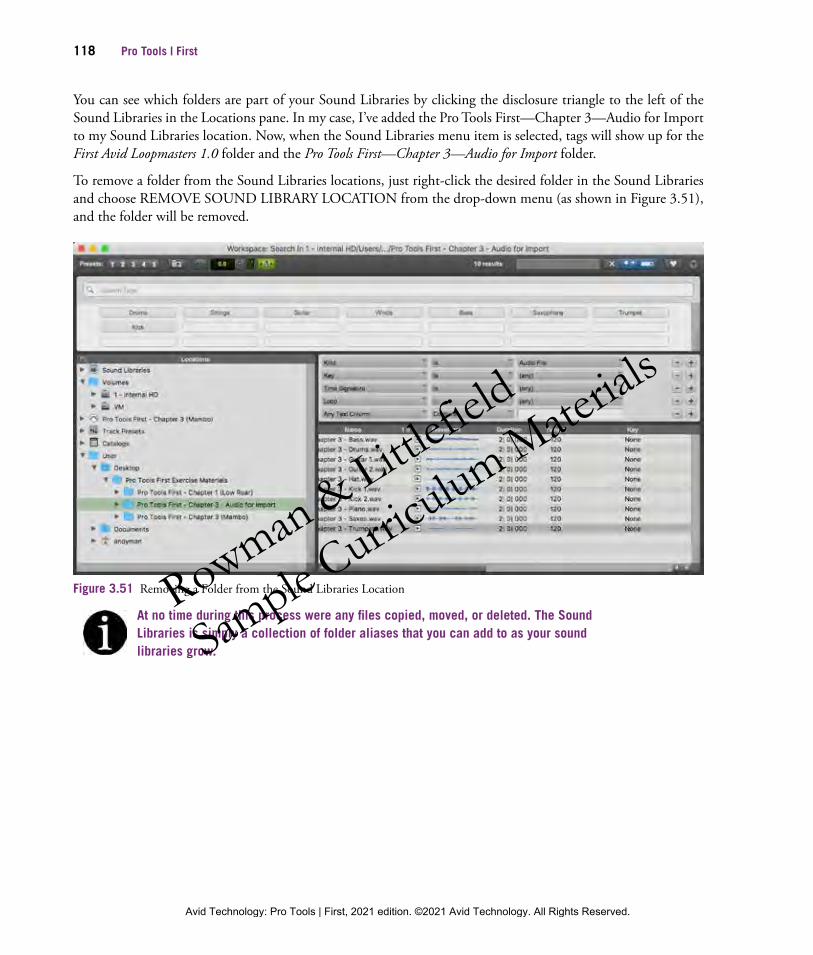
You can see which folders are part of your Sound Libraries by clicking the disclosure triangle to the left of the Sound Libraries in the Locations pane. In my case, I’ve added the Pro Tools First—Chapter 3—Audio for Import to my Sound Libraries location. Now, when the Sound Libraries menu item is selected, tags will show up for the First Avid Loopmasters 1.0 folder and the Pro Tools First—Chapter 3—Audio for Import folder.
To remove a folder from the Sound Libraries locations, just right- click the desired folder in the Sound Libraries and choose REMOVE SOUND LIBRARY LOCATION from the drop- down menu (as shown in Figure 3.51), and the folder will be removed.
Figure 3.51 Removing a Folder from the Sound Libraries Location
At no time during this process were any files copied, moved, or deleted. The Sound Libraries is simply a collection of folder aliases that you can add to as your sound libraries grow.
20-0549-AVID-ProTools_2pp.indd 118 3/15/21 3:03 PM
Rowman & Littlefiel
d
Sample Curric
ulum Materials
Avid Technology: Pro Tools | First, 2021 edition. ©2021 Avid Technology. All Rights Reserved.
Chapter 3 ■ Importing Audio 119
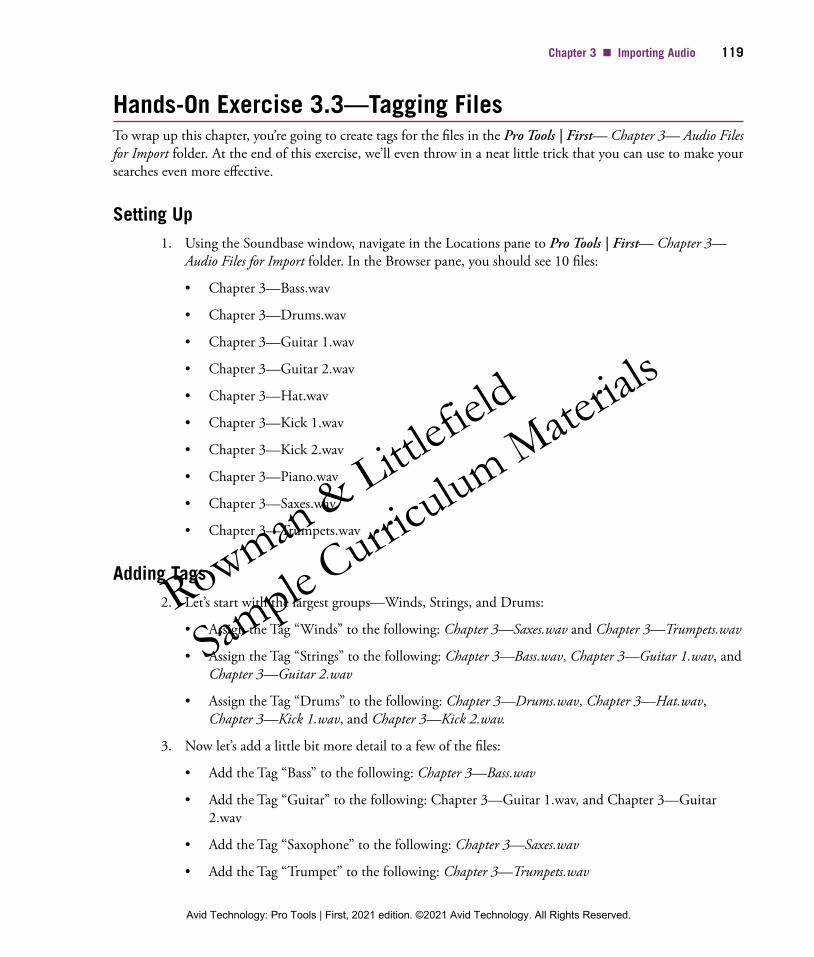
Hands- On Exercise 3.3—Tagging FilesTo wrap up this chapter, you’re going to create tags for the files in the Pro Tools | First— Chapter 3— Audio Files for Import folder. At the end of this exercise, we’ll even throw in a neat little trick that you can use to make your searches even more effective.
Setting Up1. Using the Soundbase window, navigate in the Locations pane to Pro Tools | First— Chapter 3—
Audio Files for Import folder. In the Browser pane, you should see 10 files:
• Chapter 3—Bass .wav
• Chapter 3—Drums .wav
• Chapter 3—Guitar 1.wav
• Chapter 3—Guitar 2.wav
• Chapter 3—Hat .wav
• Chapter 3—Kick 1.wav
• Chapter 3—Kick 2.wav
• Chapter 3—Piano .wav
• Chapter 3—Saxes .wav
• Chapter 3—Trumpets .wav
Adding Tags2. Let’s start with the largest groups—Winds, Strings, and Drums:
• Assign the Tag “Winds” to the following: Chapter 3—Saxes .wav and Chapter 3—Trumpets .wav
• Assign the Tag “Strings” to the following: Chapter 3—Bass .wav, Chapter 3—Guitar 1.wav, and Chapter 3—Guitar 2.wav
• Assign the Tag “Drums” to the following: Chapter 3—Drums .wav, Chapter 3—Hat .wav, Chapter 3—Kick 1.wav, and Chapter 3—Kick 2.wav.
3. Now let’s add a little bit more detail to a few of the files:
• Add the Tag “Bass” to the following: Chapter 3—Bass .wav
• Add the Tag “Guitar” to the following: Chapter 3—Guitar 1.wav, and Chapter 3—Guitar 2.wav
• Add the Tag “Saxophone” to the following: Chapter 3—Saxes .wav
• Add the Tag “Trumpet” to the following: Chapter 3—Trumpets .wav
20-0549-AVID-ProTools_2pp.indd 119 3/15/21 3:03 PM
Rowman & Littlefiel
d
Sample Curric
ulum Materials
Avid Technology: Pro Tools | First, 2021 edition. ©2021 Avid Technology. All Rights Reserved.
120 Pro Tools | First
• Add the Tag “Kick” to the following: Chapter 3—Kick 1.wav, and Chapter 3—Kick 2.wav.
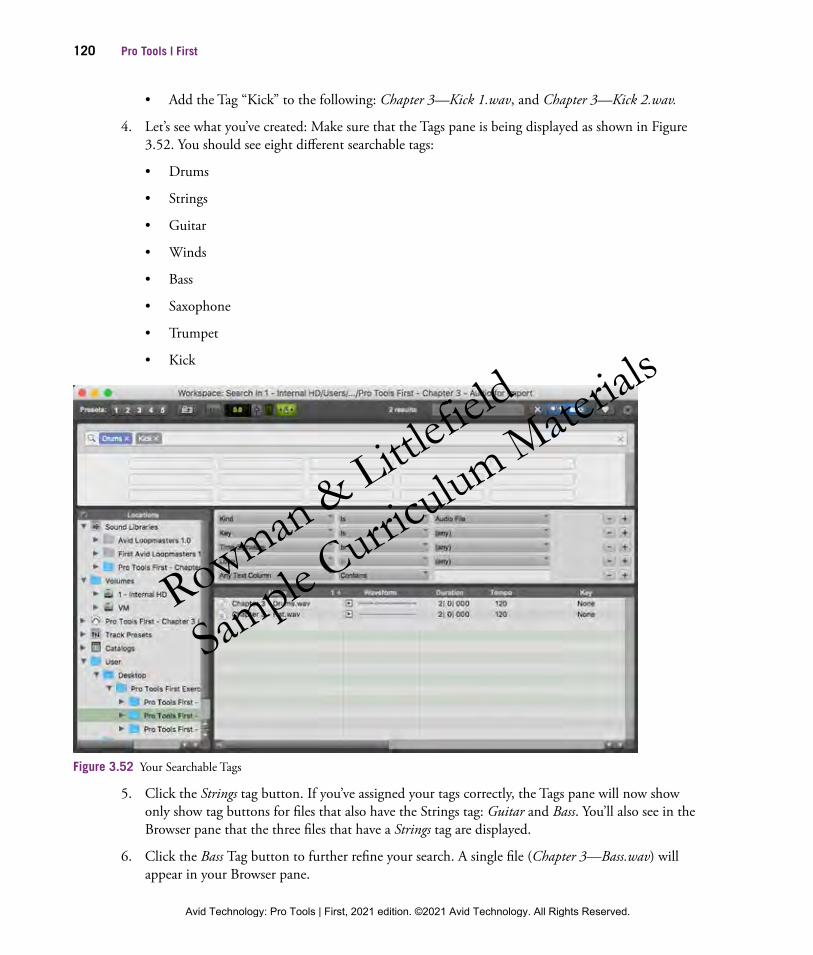
4. Let’s see what you’ve created: Make sure that the Tags pane is being displayed as shown in Figure 3.52. You should see eight different searchable tags:
• Drums
• Strings
• Guitar
• Winds
• Bass
• Saxophone
• Trumpet
• Kick
Figure 3.52 Your Searchable Tags
5. Click the Strings tag button. If you’ve assigned your tags correctly, the Tags pane will now show only show tag buttons for files that also have the Strings tag: Guitar and Bass. You’ll also see in the Browser pane that the three files that have a Strings tag are displayed.
6. Click the Bass Tag button to further refine your search. A single file (Chapter 3—Bass .wav) will appear in your Browser pane.
20-0549-AVID-ProTools_2pp.indd 120 3/15/21 3:03 PM
Rowman & Littlefiel
d
Sample Curric
ulum Materials
Avid Technology: Pro Tools | First, 2021 edition. ©2021 Avid Technology. All Rights Reserved.
Chapter 3 ■ Importing Audio 121
7. Clear your search by clicking X in each tag in the SEARCH TAGS field. All the TAG buttons for this folder will reappear.
A New Way to Search by TagsAt this point, you’ve cleared all of the tags from your search. Here’s the trick that I promised earlier:
8. Click the DRUMS tag button. You’ll see that there is another tag—Kick—that’s associated with at least some of the files that also have the Drums tag.
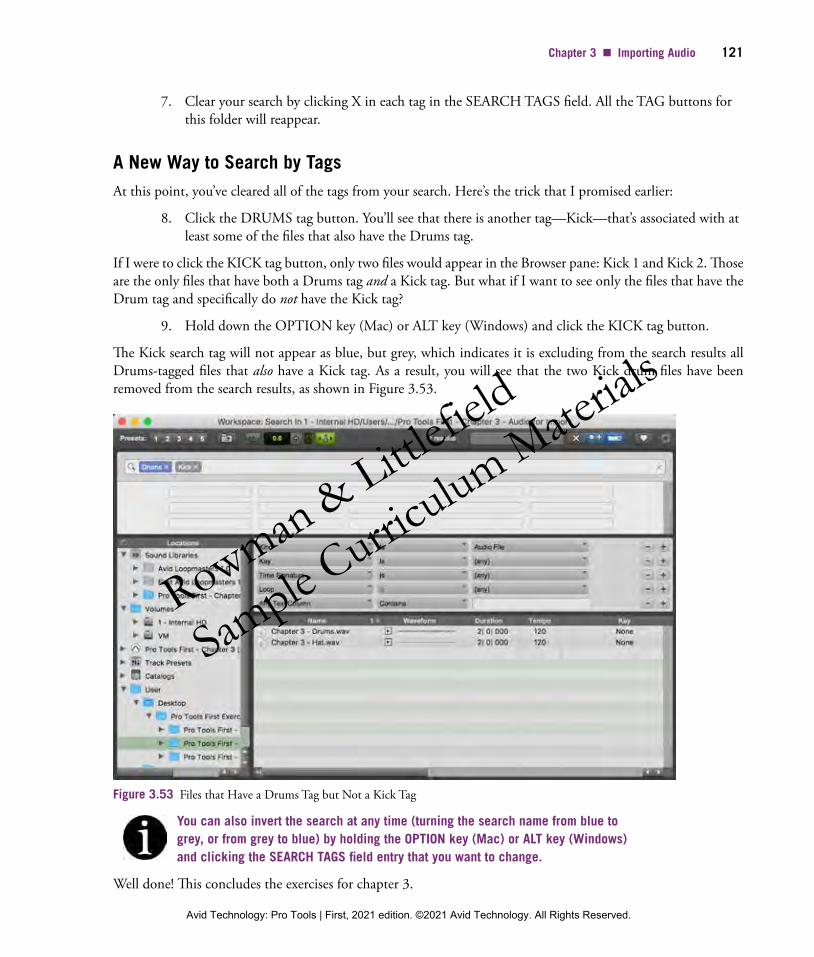
If I were to click the KICK tag button, only two files would appear in the Browser pane: Kick 1 and Kick 2. Those are the only files that have both a Drums tag and a Kick tag. But what if I want to see only the files that have the Drum tag and specifically do not have the Kick tag?
9. Hold down the OPTION key (Mac) or ALT key (Windows) and click the KICK tag button.
The Kick search tag will not appear as blue, but grey, which indicates it is excluding from the search results all Drums- tagged files that also have a Kick tag. As a result, you will see that the two Kick drum files have been removed from the search results, as shown in Figure 3.53.
Figure 3.53 Files that Have a Drums Tag but Not a Kick Tag
You can also invert the search at any time (turning the search name from blue to grey, or from grey to blue) by holding the OPTION key (Mac) or ALT key (Windows) and clicking the SEARCH TAGS field entry that you want to change.
Well done! This concludes the exercises for chapter 3.
20-0549-AVID-ProTools_2pp.indd 121 3/15/21 3:03 PM
Rowman & Littlefiel
d
Sample Curric
ulum Materials
Avid Technology: Pro Tools | First, 2021 edition. ©2021 Avid Technology. All Rights Reserved.
122 Pro Tools | First
Review Questions
1. What two audio file formats are supported? Of the two, which sounds better?
2. What is the difference between interleaved files and non- interleaved?
3. True or False: It is possible to import audio to an existing track in your Project from FILE>IMPORT.
4. What will be the result if a file is dragged from your computer’s file browser window into the Tracks List?
5. What does the small checkbox at the top left- hand corner of the Soundbase’s Locations pane allow you to do?
6. What is a Tag? How can a file be Tagged?
7. The Browser pane is colored blue—what does that mean?
8. The Browser pane is colored green—what does that mean?
9. True or False: An audio file can be previewed at any point in the file (in other words, you don’t have to start your preview at the beginning of the file).
10. When searching by tags, one of the items in the SEARCH TAGS field is colored grey—what does that mean?
20-0549-AVID-ProTools_2pp.indd 122 3/15/21 3:03 PM
Rowman & Littlefiel
d
Sample Curric
ulum Materials
Avid Technology: Pro Tools | First, 2021 edition. ©2021 Avid Technology. All Rights Reserved.