mdm 7.1 console reference guide
TRANSCRIPT

SAP SE • Neurottstrasse 16 • 69190 Walldorf • Germany • +49 6227 74 74 74 • fax +49 6227 75 75 75
SAP NetWeaver
Master Data Management (MDM)
MDM Console
Reference Guide
Release: MDM 7.1 SP19
December 2018

ii MDM Console Reference Guide
© 2018 SAP SE or an SAP affiliate company. All rights reserved. No part of this publication may be reproduced or transmitted in any form or for any purpose without the express permission of SAP AG. The information contained herein may be changed without prior notice. Some software products marketed by SAP SE and its distributors contain proprietary software components of other software vendors. Adobe, the Adobe logo, Acrobat, PostScript, and Reader are trademarks or registered trademarks of Adobe
Systems Incorporated in the United States and other countries. Apple, App Store, FaceTime, iBooks, iPad, iPhone, iPhoto, iPod, iTunes, Multi-Touch, Objective-C, Retina, Safari, Siri, and Xcode are trademarks or registered trademarks of Apple Inc. Bluetooth is a registered trademark of Bluetooth SIG Inc. Citrix, ICA, Program Neighborhood, MetaFrame now XenApp, WinFrame, VideoFrame, and MultiWin are trademarks or registered trademarks of Citrix Systems Inc.
Computop is a registered trademark of Computop Wirtschaftsinformatik GmbH. Edgar Online is a registered trademark of EDGAR Online Inc., an R.R. Donnelley & Sons Company. Facebook, the Facebook and F logo, FB, Face, Poke, Wall, and 32665 are trademarks of Facebook. Google App Engine, Google Apps, Google Checkout, Google Data API, Google Maps, Google Mobile Ads, Google Mobile Updater, Google Mobile, Google Store, Google Sync, Google Updater, Google Voice, Google Mail, Gmail, YouTube, Dalvik, and Android are trademarks or registered trademarks of Google Inc.
HP is a registered trademark of the Hewlett-Packard Development Company L.P. HTML, XML, XHTML, and W3C are trademarks, registered trademarks, or claimed as generic terms by the Massachusetts Institute of Technology (MIT), European Research Consortium for Informatics and Mathematics (ERCIM), or Keio University. IBM, DB2, DB2 Universal Database, System i, System i5, System p, System p5, System x, System z, System z10, z10, z/VM, z/OS, OS/390, zEnterprise, PowerVM, Power Architecture, Power Systems,
POWER7, POWER6+, POWER6, POWER, PowerHA, pureScale, PowerPC, BladeCenter, System Storage, Storwize, XIV, GPFS, HACMP, RETAIN, DB2 Connect, RACF, Redbooks, OS/2, AIX, Intelligent Miner, WebSphere, Tivoli, Informix, and Smarter Planet are trademarks or registered trademarks of IBM Corporation. Microsoft, Windows, Excel, Outlook, PowerPoint, Silverlight, and Visual Studio are registered trademarks of Microsoft Corporation.
INTERMEC is a registered trademark of Intermec Technologies Corporation. IOS is a registered trademark of Cisco Systems Inc. The Klout name and logos are trademarks of Klout Inc. Linux is the registered trademark of Linus Torvalds in the United States and other countries. Motorola is a registered trademark of Motorola Trademark Holdings LLC. Mozilla and Firefox and their logos are registered trademarks of the Mozilla Foundation.
Novell and SUSE Linux Enterprise Server are registered trademarks of Novell Inc. OpenText is a registered trademark of OpenText Corporation. Oracle and Java are registered trademarks of Oracle and its affiliates. QR Code is a registered trademark of Denso Wave Incorporated. RIM, BlackBerry, BBM, BlackBerry Curve, BlackBerry Bold, BlackBerry Pearl, BlackBerry Torch, BlackBerry Storm, BlackBerry Storm2, BlackBerry PlayBook, and BlackBerry AppWorld are trademarks or registered
trademarks of Research in Motion Limited. SAVO is a registered trademark of The Savo Group Ltd. The Skype name is a trademark of Skype or related entities. Twitter and Tweet are trademarks or registered trademarks of Twitter. UNIX, X/Open, OSF/1, and Motif are registered trademarks of the Open Group. Wi-Fi is a registered trademark of Wi-Fi Alliance. SAP, R/3, ABAP, BAPI, SAP NetWeaver, Duet, PartnerEdge, ByDesign, SAP BusinessObjects Explorer,
StreamWork, SAP HANA, the Business Objects logo, BusinessObjects, Crystal Reports, Crystal Decisions, Web Intelligence, Xcelsius, Sybase, Adaptive Server, Adaptive Server Enterprise, iAnywhere, Sybase 365, SQL Anywhere, Crossgate, B2B 360° and B2B 360° Services, m@gic EDDY, Ariba, the Ariba logo, Quadrem, b-process, Ariba Discovery, SuccessFactors, Execution is the Difference, BizX Mobile Touchbase, It's time to love work again, SuccessFactors Jam and BadAss SaaS, and other SAP products and services mentioned herein as well as their respective logos are trademarks or registered trademarks of
SAP SE in Germany or an SAP affiliate company. All other product and service names mentioned are the trademarks of their respective companies. Data contained in this document serves informational purposes only. National product specifications may vary. These materials are subject to change without notice. These materials are provided by SAP SE and its affiliated companies ("SAP Group") for informational purposes only, without representation or warranty of any kind, and SAP Group shall not be liable for errors or omissions with respect to the materials. The only
warranties for SAP Group products and services are those that are set forth in the express warranty statements accompanying such products and services, if any. Nothing herein should be construed as constituting an additional warranty.
SAP SE • Neurottstrasse 16 • 69190 Walldorf • Germany • +49 6227 74 74 74 • fax +49 6227 75 75 75

MDM Console Reference Guide iii
Contents
Part 1: Basic Concepts ......................................................... 13
What is a Master Data Server? ........................................................ 15 MDM Auxiliary Servers................................................................. 16
What is an MDM Repository? .......................................................... 17 MDM Repository Structure ........................................................... 18 Taxonomies ................................................................................. 20 Attributes ...................................................................................... 21 Qualified Tables and Qualifiers .................................................... 22 Product Applications and Application-Based Search ................... 22 Product Families .......................................................................... 23 Product Masks ............................................................................. 24 Data Groups................................................................................. 25 Validations and Validation Groups ............................................... 25 Data Quality and MDM ................................................................. 26
Part 2: Starting MDM Console .............................................. 27
Starting and Exiting MDM Console .................................................. 29 MDM Console Settings File.......................................................... 30 Command Line Arguments .......................................................... 32
MDM Console Main Window ............................................................ 33 Console Hierarchy Pane .............................................................. 33 Objects Pane ............................................................................... 34 Object Detail Pane ....................................................................... 35 Functions Tab .............................................................................. 36 Tables and Fields Tab.................................................................. 37 Status Bar .................................................................................... 37
Configuration Parameters ................................................................ 38 Console Settings .......................................................................... 38 Master Data Server Settings ........................................................ 38 MDM Auxiliary Server Settings .................................................... 38 Repository Properties................................................................... 38 DBMS Settings ............................................................................. 38
Part 3: MDM System Access................................................. 39
Accessing MDM Repositories .......................................................... 41 DBMS Servers ..........................................................................................42 Repository Port Numbers .........................................................................42
Accessing an MDM Repository .................................................... 44 Mounting and Unmounting an MDM Repository......................................46 Connecting to and Disconnecting from an MDM Repository ..................48 Starting and Stopping an MDM Repository .............................................48

iv MDM Console Reference Guide
Part 4: Repository Design .....................................................51
Planning the MDM Repository .......................................................... 53 MDM 7.1 Metamodel Enhancements ............................................... 54 MDM Table Types ............................................................................ 55
Main Tables .................................................................................. 58 Multiple Main Tables .................................................................................59 Lookup [Main] Field Type .........................................................................60
Flat and Hierarchy Lookup Tables ................................................ 61 Taxonomy Lookup Tables ............................................................ 61 Qualified Lookup Tables ............................................................... 62
Multiple Prices and Cross-Reference Part Numbers...............................63 Product Applications and Application-Based Search ..............................68
Valid Tables and Nested Lookups-within-Lookups ....................... 70 Lookup and Non-Lookup Subtables – A Comparison ................... 72 Object Tables ............................................................................... 74 Special Tables .............................................................................. 75 Image Variants Table ................................................................... 76
Configuring the Watermark.......................................................................84 Families Table .............................................................................. 85 Relationships Table ...................................................................... 86
Relationship Types ...................................................................................87 Sibling vs. Parent/Child Relationships .....................................................88 Single- vs. Multi-Table Relationships .......................................................89 Single- vs. Multi-Level Relationships .......................................................90 Hybrid Relationships .................................................................................90 Relationship Qualifiers ..............................................................................91
MDM Data Types .............................................................................. 92 Dimensions and Units ...............................................................................95
Fields vs. Attributes – A Comparison ............................................ 95 MDM Tuples ..................................................................................... 97
What is a Tuple?........................................................................... 98 Tuples and Tables ........................................................................ 98
Single-Valued Tuple Fields ......................................................................99 Multi-Valued Tuple Fields .........................................................................99
Tuples as Custom Composite Data Types ................................. 100 Tuples and Existing MDM Structures ......................................... 100
Qualified Lookups ...................................................................................101 Parent/Child Relationships .....................................................................101 Hierarchical Main Table Entities .............................................................102
Tuples and XML ......................................................................... 103 Tuples and Multi-Table Relationships ......................................... 103 Tuples and Nested Structures .................................................... 104 Sharing Tuple Subrecords .......................................................... 105 Tuples and the Relational Model ................................................ 105 Tuple Terminology ...................................................................... 106 Supported Field Types................................................................ 106 Tuple Workflow ........................................................................... 107

MDM Console Reference Guide v
Part 5: Repository Maintenance ......................................... 109
Working with MDM Repositories .................................................... 111 Creating an MDM Repository ..................................................... 111 Setting Number of Repository Partitions .................................... 116
Repository Partitions...............................................................................116 Modifying Repository Properties ................................................ 117
Photoshop and Photoshop Image Processing ......................................120 Using CSV Format to Import Delimited Text Files .................................121
Deleting an MDM Repository ..................................................... 122 Working with Tables and Fields ..................................................... 124
The Code Property ..................................................................... 124 Working with Tables ....................................................................... 126
Table Properties ......................................................................... 126 Display Fields ..........................................................................................127 Unique Fields ..........................................................................................131 Display Fields, Unique Fields, and Record Operations.........................133 Family Field .............................................................................................134 Alternative Display Fields .......................................................................135
Adding Tables ............................................................................ 136 Deleting Tables .......................................................................... 136
Working with Fields ........................................................................ 137 Field Properties .......................................................................... 137
Required Fields .......................................................................................140 Normalized Fields ...................................................................................141 Sort-Indexed Fields.................................................................................141 Sort Types ...............................................................................................142 Keyword Fields .......................................................................................143 Caching Qualifiers ..................................................................................144 Decimals, Fractions, and Floating Point Precision ................................144 Show Fractions .......................................................................................146 Calculation Fields....................................................................................146 Create Stamp, Time Stamp, and User Stamp Fields ............................147
Adding and Modifying Fields ...................................................... 149 Reordering Fields ....................................................................... 151 Deleting Fields ........................................................................... 151
Working with Tuples ....................................................................... 153 Tuple Properties ......................................................................... 153 Adding and Deleting Tuples ....................................................... 153 Working with Tuple Members..................................................... 154
Adding and Deleting Tuple Members.....................................................154 Reordering Tuple Members ....................................................................155
Part 6: Repository Administration ...................................... 157
Repository Administration Operations ............................................ 159 Appropriating an MDM Repository ................................................. 160 Updating an MDM Repository ........................................................ 161 Verifying an MDM Repository ........................................................ 162

vi MDM Console Reference Guide
Duplicating an MDM Repository ..................................................... 164 Maintaining Master and Slave Repositories.................................... 169
Master/Slave Landscapes .......................................................... 169 Master/Slave Limitations............................................................. 171
Moving Master and Slave Repositories .................................................171 Synchronization Requires Identical MDS Versions ...............................171 Syndication Tracking Information is not Synchronized .........................171
Identifying Master and Slave Repositories.................................. 172 Publication Slaves ...................................................................... 172 Master/Slave-Related Operations............................................... 173 Creating Master and Slave Repositories .................................... 173 Configuring Master/Slave Repositories for SSL.......................... 176 Synchronizing a Slave Repository .............................................. 176 Broken Master/Slave Repositories ............................................. 178 Normalizing a Master or Slave Repository.................................. 179
Backing Up and Restoring a Repository ......................................... 180 MDM Repository Archive and Unarchive .................................... 181
Archiving an MDM Repository ................................................................183 Archive Options Dialog ...........................................................................184 Unarchiving an MDM Repository Over Another Repository..................186 Archive Report ........................................................................................187 Managing Archive Files ..........................................................................187 Dealing with Outdated Archives .............................................................187
MDM Publication Model Archive and Unarchive ......................... 188 Exporting and Importing Schemas.................................................. 190
Exporting an MDM Repository Schema ...................................... 192 Importing an MDM Repository Schema ...................................... 193
Import Schema Dialog at a Glance ........................................................193 Color Coding in the Import Schema Dialog ...........................................194 Comments ...............................................................................................195 Importing the Schema.............................................................................196 Manually Overriding Schema Reconciliation .........................................197
MDM Transport Operations ............................................................ 198 Schema Migration ....................................................................... 198
Commands ..............................................................................................198 Files .........................................................................................................198
CTS+ .......................................................................................... 198 Commands ..............................................................................................198 Files .........................................................................................................199 Errors .......................................................................................................200
Schema Transport versus CTS+ ................................................ 200 Managing Units of Measure ............................................................ 201
Managing Dimensions ................................................................ 201 Managing Units........................................................................... 203
Part 7: MDS Administration................................................. 207
Accessing Master Data Servers ..................................................... 209 Accessing a Master Data Server ................................................ 209

MDM Console Reference Guide vii
Mounting and Unmounting the Master Data Server ..............................210 Starting and Stopping Master Data Servers ............................... 211
Monitoring Master Data Server Activity .......................................... 213 The MDM Console Activities Pane ............................................. 213
Stopping an Activity ................................................................................214 Optimizing MDS Performance........................................................ 215
What is Slicing? ......................................................................... 215 Bulk and Non-Bulk Operations ................................................... 216
Configuring Slicing for Bulk Operations .................................................217 Configuring Slicing for Non-Bulk Operations .........................................217
Slicing and Failure Handling ...................................................... 220 Slicing and Import ...................................................................... 220
MDIS Chunk Size....................................................................................220 Record Checkouts ..................................................................................220 Workflows ................................................................................................221
Optimizing MDM Client Performance ............................................. 222 Notification Filtering.................................................................... 222 Object Cache Size Registry Setting ........................................... 222
Logs, Traces, and Reports ............................................................. 223 Logs ........................................................................................... 223
Log File Types ........................................................................................223 Viewing Log Files ....................................................................................223 Log Message Severities .........................................................................224 Configuring Log Size and Rotation Parameters ....................................224
Traces ........................................................................................ 224 Trace Message Severities ......................................................................225 Filtering Logging of MDS-Related Trace Messages..............................225 Filtering Logging of Auxiliary MDM Server Trace Messages ................225
Performance Tracing.................................................................. 226 Turning Performance Tracing On or Off ................................................226 Configuration File Parameters for Performance Tracing.......................227
Reports ...................................................................................... 228 Report Types...........................................................................................228 Viewing Reports ......................................................................................228
MDS Configuration ......................................................................... 230 Master Data Server Parameters ................................................ 230 MDM Repository Parameters ..................................................... 247 SSL-Related Parameters for a Client MDS ................................ 249
DBMS Settings ............................................................................... 251 DBMS Initialization ..................................................................... 253 MDM DBMS Server Account...................................................... 254 Multiple DBMS Instances ........................................................... 255 DBMS Servers List ..................................................................... 255
Part 8: MDIS Administration ............................................... 259
The Master Data Import Server...................................................... 261 MDIS vs. The Import Manager ................................................... 261

viii MDM Console Reference Guide
What is Streaming? .................................................................... 263 Ports and MDIS .......................................................................... 263
Port Requirements ..................................................................................263 Import File Location ................................................................................264 Port Processing.......................................................................................264 File Aggregation ......................................................................................265 Port Status ..............................................................................................265
File Formats Compatible With MDIS .......................................... 266 Text Formats ...........................................................................................266 Simple vs. Complex XML .......................................................................267
Solutions for Other XML Formats ............................................... 267 XML Files That Split Information Between Header and Body ...............268 SAP R/3 MATMAS XML Files ................................................................269
Virtual Extended Records ........................................................... 269 Using MDIS .................................................................................... 272
MDIS Checklist ........................................................................... 272 Monitoring Import Status From The MDM Console .................... 273
Exception Handling ......................................................................... 274 What Happens When Exceptions Occur?................................... 274
Structural Exceptions ..............................................................................274 Value and Import Exceptions .................................................................274 Port Blocking ...........................................................................................274
Exception Folders ....................................................................... 275 How Do You “Fix” Exceptions? ................................................... 275
MDIS Configuration ........................................................................ 276 Global mdis.ini parameters ......................................................... 276 Repository-Specific mdis.ini parameters..................................... 278 SSL-Related mdis.ini Parameters............................................... 279 Configuring MDIS from MDM Console ....................................... 280 Optimizing MDIS Performance ................................................... 281
Troubleshooting .............................................................................. 282 Import Files Are Not Being Processed by MDIS ......................... 282
Checking Server and Repository Status ................................................282 Checking for Port Problems ...................................................................282 Checking MDIS Configuration Settings..................................................283 Checking for Source File Problems (Structural Exceptions) .................283 Checking for Source File Problems (Incomplete Files) .........................284
Port Has Exceptions ................................................................... 284 Source Fields or Values Not Being Imported .............................. 284 Source File is Too Large to Open in Import Manager ................. 285 Enabling Tracing and Audit Trails in the Import Log ................... 285
Part 9: MDSS Administration .............................................. 287
The Master Data Syndication Server .............................................. 289 MDSS vs. Syndicator .................................................................. 289 Ports and MDSS ......................................................................... 290
Syndication File Location........................................................................290 Multi-Threaded Port Processing .............................................................291

MDM Console Reference Guide ix
Using MDSS .................................................................................. 292 MDSS Checklist ......................................................................... 292 Scheduling Syndications to a Port ............................................. 293 Monitoring Syndication Status from MDM Console........................ 294
MDSS Configuration ...................................................................... 295 Global mdss.ini Parameters ....................................................... 295 Repository-Specific mdss.ini Parameters................................... 297 SSL-Related mdss.ini Parameters ............................................ 297 Configuring MDSS from MDM Console...................................... 297
Troubleshooting ............................................................................. 300 Syndications Are Not Being Executed By MDSS ....................... 300
Verifying Server and Repository Status .................................................300 Checking Port Settings ...........................................................................300 Checking Map Properties and Search Selections .................................301 Checking MDSS Credentials ..................................................................301
Scheduled Syndications Are Not Executed On Time ................. 302 Unchanged Records Are Not Being Suppressed ....................... 302 “Changed” Records Are Not Being Syndicated .......................... 303 Syndication File Is Too Big For MDSS ....................................... 303 Record Data Changes During Syndication................................. 303
Part 10: MDM System Administration ................................ 305
MDM Security Overview................................................................. 306 Master Data Server Security ...................................................... 307 MDM Repository Security .......................................................... 308
MDM User and Role Management ................................................. 310 Users Table................................................................................ 310 Exporting Repository Users ....................................................... 312 Importing Repository Users........................................................ 313 Roles Table ................................................................................ 314
Functional Privileges...............................................................................316 Table and Field Privileges for a Role .....................................................322 Record Constraints .................................................................................325 Performing MDM Operations..................................................................327
Exporting Repository Roles........................................................ 328 Importing Repository Roles ........................................................ 330 LDAP Support ............................................................................ 331 Trusted Connections .................................................................. 335
Additional MDM Tables .................................................................. 336 Connections Table ..................................................................... 336 Workflows Table ........................................................................ 337 Change Tracking Table .............................................................. 338 Links Table................................................................................. 340
URL Syntax .............................................................................................341 XML Schemas Table .................................................................. 342

x MDM Console Reference Guide
Part 11: Multilingual Support .............................................. 343
Introduction ..................................................................................... 345 Multi-Byte Unicode Implementation ............................................ 345 Multi-Layered Data Model........................................................... 346 Language-Centric Views............................................................. 346 Multilingual Repository Metadata................................................ 346 Multilingual Repository Data ....................................................... 347 Multilingual Publishing ................................................................ 347 Multilingual GUI Software ........................................................... 347 Repository Languages and Language Names............................ 347 Multilingual Data and Metadata Elements .................................. 347
Multilingual Basics .......................................................................... 349 Language Layers ........................................................................ 349 Language Inheritance ................................................................. 350 Inheritance Levels ...................................................................... 353
Quick Reference ............................................................................. 354 Multilingual Operations ................................................................... 356
Modifying the Repository Languages ......................................... 357 Changing the Display Name of a Repository Language ............. 359 Modifying Language-Specific Language Inheritance .................. 360 Defining Multilingual Table Names ............................................. 361 Defining Multilingual Field Names .............................................. 362 Defining Multilingual Fields ......................................................... 363
MDM Language Selector Tool ........................................................ 364
Part 12: Remote Systems and MDM ................................... 365
Remote Systems and MDM ............................................................ 367 What is a Remote System? ........................................................ 367 Key Mapping............................................................................... 367 Remote Systems Table .............................................................. 368 [Remote System] and [Remote Key] Fields ................................ 369 Remote System Semantics ........................................................ 370
Ports and MDM............................................................................... 371 What is a Port? ........................................................................... 371 Port Benefits ............................................................................... 371 Ports and the File System........................................................... 372 Ports Table ................................................................................. 372
Editing the Sequence of Inbound Ports .................................................374 Remote System Operations............................................................ 375
Remote Systems Table .............................................................. 375 Key Generation .......................................................................................376
Specifying Key Mapping for a Table ........................................... 377 Specifying Key Mapping for Attribute Definitions ........................ 378
MDM Console Reference Guide xi
Part 13: MDM UOM Manager ............................................... 379
Introduction .................................................................................... 381 Getting Started ............................................................................... 382 Find Functionality ........................................................................... 384 Working with Dimensions ............................................................... 385 Working with Units ......................................................................... 387
Part 14: Data Protection and Privacy ................................. 391
Introduction .................................................................................... 392 Data Blocking and Destruction ................................................... 392
Roles .......................................................................................................392 Main Table Properties.............................................................................393


13
PART 1: BASIC CONCEPTS
This part of the reference guide explains essential concepts that will enable you to make the best use of MDM Console. We recommend that you become familiar with this material before starting to work with MDM servers and repositories.


MDM Console Reference Guide 15
What is a Master Data Server?
A Master Data Server (MDS) is the central hub of an MDM system. It manages access to master data in one or more MDM repositories, which it serves up to various clients across a network.
The various components of an MDM software environment and how they interact with the Master Data Server are described below and illustrated in Figure 1.
• MDM Console. MDM Console allows system managers to administer and monitor MDM servers, and to create, maintain the structure of, and control access to the MDM repositories.
• MDM Clients. MDM clients interact with a Master Data Server to import, access, manage, syndicate, and publish master data. Clients include MDM rich user interfaces such as MDM Data Manager, MDM Import Manager, and MDM Syndicator, as well as customizable interfaces such as iViews and APIs.
• DBMS engine. Master data is stored in a commercial SQL DBMS,
access to which is controlled by the Master Data Server. See the MDM Master Guide and the MDM Product Availability Matrix for information about supported databases.
Figure 1. MDM software environment

16 MDM Console Reference Guide
MDM AUXILIARY SERVERS
In addition to the Master Data Server, an MDM system can include the following auxiliary servers:
• Master Data Import Server (MDIS). Automates import of data into an MDM repository.
• Master Data Syndication Server (MDSS). Automates syndication of data from an MDM repository.
• Master Data Layout Server (MDLS). Processes publication of
master data from an MDM repository.
Each of these auxiliary servers interact independently with a Master Data Server and, like the Master Data Server, can be administered from within MDM Console.
NOTE ►► See “The Master Data Import Server” for more information
about MDIS.
NOTE ►► See “The Master Data Syndication Server” for more
information about MDSS.

MDM Console Reference Guide 17
What is an MDM Repository?
What is an MDM repository? The incorrect or at best incomplete answer is often that a master data repository is simply a database, and also since a SQL-based RDBMS is often used for managing master data.
An MDM repository certainly includes a database of information consisting of text, images, PDFs, and other data about each record, up to millions of records for some repositories. But a master data repository is much more than just a large database, and size by itself does not make a database a master data repository. Rather, it is the richness and complexity of the underlying information itself and the ways it can be searched and published that uniquely characterize an MDM repository.
Moreover, when an MDM repository of product information is published as a catalog, the repository of master data is also a sales tool, which lists the products offered for sale by a vendor and allows potential customers to browse those products in a convenient way. Often, the published catalog is the only point of contact a customer will have with a vendor, which makes the presentation of the product information – the organization and the design of the published catalog – critically important to creating brand recognition and a distinct vendor identity. So a published catalog is also about creating and reinforcing a corporate image.
Hundreds of details, large and small, must be addressed to turn a database into a meaningful master data repository, including:
• Rich master data. Rich structured, master data is the essential lifeblood of a usable MDM repository. For example, an MDM repository of product information must contain much more than basic transactional data consisting of just a part number, a price, and a forty-character description for each product. Master data must include not only fields of information common to all the products in the repository, such as part number and price, but also detailed product specifications (attributes) that may apply to only a subset of the products. Master data should also include rich content such as images, text blocks, and PDFs (for MSDS and other data sheets).
• Classification. Rich master data is not enough. The records need to be organized and classified into a taxonomy consisting of an arbitrary hierarchy of categories and subcategories, the hierarchy may contain any number of levels, and multiple simultaneous taxonomies may coexist in the same MDM repository. And a single category must be able to appear in multiple places within the hierarchy. For example, in an MDM repository of product information, a printer accessories category might be placed under both a printers category and an accessories category.

18 MDM Console Reference Guide
• Product families. A printed catalog of product information provides an excellent model for how information on groups of records within an MDM repository of product information should be organized into product families (also called units, presentations, or modules), which further partition the products in each category into smaller groups of products based upon the values of other fields and/or attributes. In addition to the individual products that comprise the family, a product family includes the family data (such as an image, a descriptive paragraph, and feature bullets) as well as detailed specifications on each of the products arranged into a well-structured tabular layout.
• Product relationships. As a sales tool, a published catalog of product information requires the wide variety of product relationships that are essential for effective selling. Relationships include structural relationships, such as assemblies (a “SKU of SKUs”), kits (a “SKU of non-SKUs”), bundles (a “non-SKU of SKUs”), and matching sets (e.g. nuts and screws), as well as merchandising relationships, such as cross-sells, up-sells, accessories, and consumables. An MDM repository of product information must be able to capture and represent all of these product relationships.
MDM REPOSITORY STRUCTURE
A thorough understanding of the table and data types at your disposal is essential for properly creating and maintaining MDM repositories. This section provides an introduction to these concepts, which will be addressed again later in this guide.
An MDM repository consists of the following tables:
• Main tables. Every MDM repository has one or more main tables. A main table contains primary information about a business object such as a product or supplier. For example, a repository might contain separate main tables for products and business partners. The products main table would include an individual record for each product and individual fields that apply to all products, such as SKU, product name, product description, manufacturer, price, and business partner. The business partner main table would then include an individual record for each partner and individual fields for each piece of information that describes the partner. Most of the time you will be looking at information in a main table.
NOTE ►► When you first create a new MDM repository, MDM
automatically creates a main table named Products.

MDM Console Reference Guide 19
• Subtables. An MDM repository can have any number of subtables. A subtable is usually used as a lookup table to define the set of legal values to which a corresponding lookup field in the main table can be assigned; these tables hold the lookup information. For example, a main table of an MDM repository of product information may include a field called Manufacturer; the actual list of allowed manufacturer names would be contained in a subtable. Only values that exist in records of the subtable can be assigned to the value of the corresponding lookup field in the main table.
DATA INTEGRITY ►► Lookup subtables are just one of the powerful ways that MDM enforces data integrity in an MDM repository. The set
of legal values associated with lookup fields also makes the MDM repository much more searchable, since a consistent set of values is
used across the entire repository.
• Object tables. Object tables, including the Images, Sounds, Videos,
Binary Objects, Text Blocks, Copy Blocks, Text HTMLs, and PDFs tables, are a special type of lookup subtable, where each object table is used to store a single type of object. You cannot store an object directly in a main or subtable field in an MDM repository. Instead, each object is defined or imported into the repository once and then linked to a main or subtable field as a lookup into the object table of that type.
DATA INTEGRITY ►► Object tables eliminate redundant information, since each object appears only once in the MDM repository even if it is
linked to multiple records.
NOTE ►► When you first create a new MDM repository, MDM
automatically creates the single instance of each object table.
NOTE ►► You can also store text blocks directly in a large text field in main and subtable records rather than as a lookup into a text block
subtable if you do not intend to reuse the blocks of text.
• Special tables. Special tables include the Image Variants, Masks, Families, Relationships, Workflows, Named Searches, Tuples, Data Groups, and Validation Groups tables.
NOTE ►► When you first create a new MDM repository, MDM
automatically creates the single instance of each special table.
NOTE ►► The Data Groups and Validation Groups tables do not
appear anywhere in MDM Console.

20 MDM Console Reference Guide
• System tables. System tables appear under the Admin node in the Console Hierarchy and include Roles, Users, Connections, Change Tracking, Remote Systems, Ports, Links, XML Schemas, and Reports, and Logs.
NOTE ►► When you first create a new MDM repository, MDM
automatically creates the single instance of each system table.
NOTE ►► The Logs table is MDM server-specific rather than MDM repository-specific, and appears in the Console Hierarchy under an
MDM Server node after all of the MDM repository nodes.
TAXONOMIES
A taxonomy is a general term for classification scheme. The purpose of a taxonomy is to group like things together into categories, usually based on a set of common, category-specific characteristics, or attributes.
In the context of master data management, a taxonomy is what makes it possible to quickly locate a few specific records – or categories – in a database of thousands, tens of thousands, or even millions of records.
A taxonomy is usually hierarchical, meaning that some categories are subcategories of other categories. (In the MDM system, taxonomy tables are always hierarchical.) Most people are familiar, for example, with at least part of the hierarchical taxonomy used to classify animals, such as vertebrates mammals primates chimpanzees, and so on. Another example that you might experience in your daily life is groceries beverages carbonated decaffeinated. Each level of the hierarchy gets narrower in terms of what it includes.
MDM uses a hierarchical taxonomy of categories to structure master data in an MDM repository. A hierarchical taxonomy is typically represented as a “tree,” as shown in Figure 2.

MDM Console Reference Guide 21
Figure 2. Hierarchical taxonomy tree
ATTRIBUTES
In a taxonomy, every category has its own defining characteristics (in addition to those of every category above it in the hierarchy). For example, in the taxonomy of animals, primates have specific characteristics as well as those of mammals and vertebrates.
In an MDM repository, these characteristics are called attributes, and correspond to fields of information that apply only to some rather than all of the main table records in the MDM repository. For example, voltage might be an attribute that applies to motors but not to gears.
Every taxonomy table has a pool of attributes associated with it. From this pool you can link attributes to one or more individual categories on a category-by-category basis. MDM allows you to manage the pool of attributes associated with a taxonomy table in Taxonomy mode.
In MDM, attributes are associated with – linked to – categories. Attributes then become associated with main table records by assigning records to categories. When you assign a record to a category, it acquires the attributes linked to that category as well as the attributes linked to the parent category and all of the other ancestors of that category through inheritance. Thus, a main table record consists of common fields, inherited attributes, and category-specific attributes. You can modify the attributes themselves as well as the set of attributes linked to any specific category in MDM using Taxonomy mode.
Category
Subcategories

22 MDM Console Reference Guide
NOTE ►► In MDM, an attribute is like a field, but one that applies only
to a subset of the records in the main table. By contrast, a field is part of every record in the main table. If a particular attribute can be applied
to every main table record, then it should be set up as a field in the main table. For example, every record in an MDM repository of
products probably has an item number; therefore “Item Number”
should be defined in the database as a field, and not as an attribute.
QUALIFIED TABLES AND QUALIFIERS
A qualified table is a special kind of lookup table that is extremely versatile. It can be used to efficiently store complex relationships between a main table record and one or more lookup table records that contain various types of additional information.
A qualified table stores a set of lookup records, and also supports qualifiers, database “subfields” that apply not to the qualified table record by itself, but rather to each association of a qualified table record with a main table record. Qualified tables offer self-configuring, out-of-the-box support for multiple prices (including quantity price breaks), cross-reference part numbers, other distributor/supplier/customer-specific information; and product applications.
PRODUCT APPLICATIONS AND APPLICATION-BASED SEARCH
A product application is a particular use of a product. Applications are especially important in certain industries where application-driven product selection is the traditional way to locate products within a large MDM repository of complex product information.
For example, in the automotive parts business, customers typically select parts based not on the category or manufacturer but rather on the particular year, make, model and engine type of the vehicle. There are millions of parts, tens of thousands of different vehicles, and since each part can be used in more than one vehicle, tens of millions of applications. Finally, the use of the part is often further qualified by specific characteristics of the vehicle, such as whether it has air conditioning or is California-equipped.
In an MDM repository, product applications stored in qualified tables can dramatically reduce the duplication of data that has historically plagued most application-based systems. In the automotive example, parts are stored in the main table, the “valid table” of vehicle specifications are stored in the qualified table, and each application of a part to a vehicle is represented by assigning the vehicle specification to the part.
Note that each lookup record in a qualified table is generic, in that it does not include the various conditions that might further qualify the use of the product in that application, even though the particular application may require additional conditions to properly define it.

MDM Console Reference Guide 23
In MDM, these additional conditions are called qualifiers. Qualifiers allow a single lookup record to be used for multiple applications that are basically the same except for the additional conditions, dramatically reducing the number of distinct applications in the qualified table and avoiding a tremendous amount of data duplication.
In the automotive example, qualifiers allow a single vehicle specification record to be used for vehicles that are equipped differently. This eliminates the explosion of vehicle specifications that normally occurs when the additional conditions for each application result in additional – but almost identical – vehicle specification records, as in most existing application-based systems.
TIP ►► With or without product applications per se (or the need for application-based search), a qualified table can also be used to store
any large set of subtable records that contain fields whose values are different for each main table record, such as multiple prices for
different quantities, divisions, regions, or trading partners, cross-reference part numbers, and additional distributor/supplier/customer-
specific information for different distributors, suppliers, or customers.
PRODUCT FAMILIES
When you publish the contents of an MDM repository of product information, records often need to be organized into a more granular structure than that provided by the categories of the taxonomy. This increased granularity often involves grouping main table records based not only on the category but also on other criteria (such as the manufacturer). Product families provide a way of organizing and identifying these groupings.
A product family is a group of main table records that are related by one or more common fields and/or attributes having the same value, and that may also have additional fields of family data, such as an image, a logo, a paragraph of descriptive text, bullets of specifications, and so on.
Product families enable master data to be efficiently published not only to paper, but also to non-paper media such as the Web in a manner that preserves the presentation and organization seen in printed catalogs, with the added benefit of fast, efficient search.
Most master data management systems require that product families (of which there may be thousands) be manually created. Further, they require that main table records be manually added to the families, and also that they be manually moved to a different family if changes in the record result in its no longer belonging to its original family.
NOTE ►► In other systems, a product family may be referred to as a
presentation, a unit, or a module.

24 MDM Console Reference Guide
By contrast, the MDM system uses an innovative approach to structuring, storing, and maintaining product family information that overcomes the shortcomings of other master data management systems. It embodies patent-pending technology that intelligently automates the creation and management of product families, while at the same time preserving family integrity across changes to the family structure, changes to main table records (including adding and deleting records), and even changes to the taxonomy itself.
DATA INTEGRITY ►► Layering the family hierarchy on top of the
taxonomy hierarchy leverages all of the planning and work that went
into developing the taxonomy in the first place.
PRODUCT MASKS
Using MDM product masks, you can slice and dice a single master MDM repository of product information into an effectively unlimited number of custom virtual repositories, dramatically simplifying the maintenance of a single repository targeted at multiple audiences. Each virtual repository can contain a different subset of products from the master, and appears to the user as a completely private repository.
Product masks can be used to create virtual repositories for a variety of purposes – including custom subsets for contract customers and targeted market segments – all driven by a single MDM repository.
Unlike SQL views, product masks impose no performance penalty whatsoever, and are defined at the individual product level rather than the query level. To the user of the MDM system, they appear as simply another dimension of the multidimensional search; on the Web, a mask can be automatically applied to the published electronic catalog upon site entry, so that each user sees only the slice of the MDM repository that you want them to see.
DATA INTEGRITY ►► Product masks allow you to create multiple
custom subset repositories from a single master MDM repository
without duplicating the underlying main table records. This guarantees consistency and synchronization of the data across updates, since
there is never more than one copy of each main table record.
DATA INTEGRITY ►► For proper organization of the records within an MDM repository, a hierarchy lookup field can normally be assigned
only to the value of a leaf node in the hierarchy, and similarly, records
can be assigned only to a leaf node of the Masks hierarchy.

MDM Console Reference Guide 25
DATA GROUPS
As described under “Taxonomies” above, a large MDM repository may contain hundreds of thousands and even millions of main table records, and these records can be organized within MDM into a hierarchical taxonomy of categories and subcategories.
Just as significantly, the same repository may contain tens or hundreds of thousands of images, text blocks, and PDF files. These objects also need to be organized so that it is possible to locate an object or group of objects for linking to a particular record.
In MDM, each object is assigned to a data group when it is first created or imported into the system. A data group is simply a group of objects, and the set of data groups is organized into a hierarchy similar to the taxonomy hierarchy.
Just as the taxonomy hierarchy is used to organize and break the entire collection of main table records into manageable subgroups called categories, the data groups hierarchy is a parallel classification scheme used to organize objects into subgroups called data groups. For example, you might have separate data groups for Product Images, Category Icons, and Manufacturer Logos.
VALIDATIONS AND VALIDATION GROUPS
MDM validations are Excel-like formulas that return a Boolean success or failure result. Validations can reference fields and attributes, perform arithmetic, string, and logical operations, call built-in functions, and even reference other previously defined validations.
Validations are defined and executed within MDM Data Manager. Using MDM validations, you can define complex tests for all types of conditions, and then run those tests against a group of one or more records, all without using a query language.
You can also define category-specific validations as branches of a single validation, and MDM automatically executes the applicable validation based on the value of the category for each record.
Finally, you can assign each validation to one or more validation groups. Each validation group is a set of validations that can be conveniently executed as a group with a single selection rather than forcing you to run each individual validation separately.
DATA INTEGRITY ►► Unlike an Excel formula, a validation expression is token-based, so that you do not have to type field,
attribute, operator, or function names, and can instead select them
from drop-down lists, reducing the potential for typing error.

26 MDM Console Reference Guide
DATA INTEGRITY ►► Validation groups allow you to organize large
sets of related validations, eliminating the likelihood of forgetting to run
any of the individual validations in the group.
DATA QUALITY AND MDM
Despite lacking explicit semantic data quality capabilities, MDM is not only a platform for master data management, but also a platform for data quality. For example, MDM does not have an explicit capability to “standardize part numbers” and yet it has functions that allow you to search in strings, to replace in strings, and so on. From these basic functions, you can build various and powerful standardize part number capabilities.

27
PART 2: STARTING MDM CONSOLE
This part of the reference guide explains how to start and stop MDM Console and describes the various panes and tabs of its main window. It also includes a summary of options for configuring MDM Console, MDM server, MDM repository, and DBMS settings.


MDM Console Reference Guide 29
Starting and Exiting MDM Console
This section gets you up and running as quickly as possible in MDM Console. Before you begin, you need to be sure that the SQL DBMS is up and running and that the MDM software is already installed on your system.
NOTE ►► You can run multiple MDM Console sessions on the same
computer.
To start MDM Console from either the Desktop or the Start menu:
• From the Desktop, double-click the MDM Console icon (shown at left),
or from the Start menu, choose Programs > SAP MDM > MDM
Console. After a few seconds, the MDM Console main window comes
up.
NOTE ►► Once MDM Console has been started, you may still need to perform some or all of the following additional steps before an MDM
repository can be accessed by an MDM client or other clients on the
network:
(1) Mount a Master Data Server (see “Mounting and Unmounting the
Master Data Server”);
(2) Start the Master Data Server (see “Starting and Stopping ”);
(3) Create a new MDM Repository (see “Creating an MDM
Repository”) or mount an existing one (see “Mounting and
Unmounting the Master Data Server”; and/or
(4) Start the MDM repository (see “Starting and Stopping an MDM
Repository”).
To exit MDM Console:
1. Click the close button in the upper right corner of the window, or
choose File > Exit from the main menu.
NOTE ►► If you exit MDM Console without stopping a running MDM
server, the server remains running without the connection to your MDM
Console session.
2. MDM prompts you to ask if you would like to save the list of mounted
servers to an MDM Console Settings file (described in the following
section). Click:
▪ Yes – save the settings and exit
▪ No – exit without saving
▪ Cancel – return to the MDM Console session

30 MDM Console Reference Guide
MDM CONSOLE SETTINGS FILE
Normally, each time you launch MDM Console, you must manually mount one or more MDM servers one at a time (even if you left them mounted when you exited the previous MDM Console session).
However, when you exit MDM Console, MDM allows you to save the list of currently mounted MDM servers to an MDM Console settings file, which then can be used to remount the servers as a group during a subsequent MDM Console session.
NOTE ►► Just as the MDM Console settings file maintains a list of
currently mounted MDM servers that you can use to remount them as a group during subsequent MDM Console sessions, each Master Data
Server maintains a list of currently mounted MDM repositories that persists even after the Master Data Server is stopped that it uses to
automatically remount them as a group each time the Master Data
Server is restarted.
During a subsequent MDM Console session, you can either load the list
from the file using the File > Open command from the main menu, or you can load the list automatically by appending the full pathname of a
specific .mcs file to the command line that launches MDM Console.
NOTE ►► You can save different sets of mounted MDM servers in
different .mcs files, which allows you to define and choose the specific
sets of MDM servers that you want to mount as a group.
To load a specific MDM Console Settings file from within MDM Console:
1. Choose File > Open from the main menu
2. MDM prompts you to save the current mounted settings. Click:
▪ Yes – save the settings and exit ▪ No – exit without saving
▪ Cancel – return to the MDM Console session
3. MDM opens the Windows file Open dialog. Navigate to the desired
folder, select the .mcs settings file you want to load, and click Open.
4. MDM replaces the set of mounted MDM servers with the group of
servers listed in the file.

MDM Console Reference Guide 31
To automatically load an MDM Console Settings file at MDM Console startup:
1. If a Desktop shortcut to MDM Console does not already exist, create
one.
2. In the Shortcut properties of MDM Console Desktop shortcut, add the
following text to the Target field:
-f "full-pathname-of-settings-file.mcs"
3. where full-pathname-of-settings-file is the full pathname of the .mcs file
you want to use when launching MDM Console.
4. When you start MDM Console from the Desktop shortcut, MDM automatically mounts the MDM server(s) that were saved in the
specified .mcs file.
To automatically save an MDM Console Settings file when exiting MDM Console:
1. If a Desktop shortcut to MDM Console does not already exist, create
one.
2. In the Shortcut properties of MDM Console Desktop shortcut, add the
following text to the Target field:
- q
3. When you exit MDM Console, MDM automatically saves the list of
currently mounted MDM servers to the .mcs file.
TIP ►► You can save the list of currently mounted MDM servers to
the current .mcs file at any time by choosing File > Save from the main
menu. You can also use the File > Save As command to save the list to
an .mcs file that you name yourself.
NOTE ►► If you unmount all MDM servers from MDM Console, you
will not be prompted to save changes when exiting MDM Console nor
will the .mcs file be saved automatically.

32 MDM Console Reference Guide
COMMAND LINE ARGUMENTS
For convenience, several “command line” arguments can be used when starting MDM Console from the command line or a Windows shortcut.
The arguments are either “-” switches or arguments to a particular switch, as described in Table 1.
Table 1. MDM Console Command Line Arguments
Argument Description
-f "filepath"
Starts MDM Console and mounts the MDM servers specified in a previously saved MDM Console Settings
(.mcs) file.
Console –f "C:\Desktop\SAP MDM
Servers.mcs"
Can be used with either -x or –q.
-m
<Servername>
Mounts (and starts, if needed) the specified Master Data
Server.
Console –m MyMDM
By also setting Autostart=True in the mds.ini file, you
can start the specified Master Data Server and
automatically start the repositories it has mounted. For
more information, see Table 66. Optional [MDM Server]
Parameters.
-q
Saves the MDM Console Settings (.mcs) file without
prompting when you exit MDM Console.
Console –f "C:\Desktop\SAP MDM
Servers.mcs" -q
Works only with -f but is superseded by -x.
-x
Does not save or prompt you to save the MDM Console
Settings (.mcs) file when you exit MDM Console.
Console –f "C:\Desktop\SAP MDM
Servers.mcs" -x
Works only with -f and supersedes -q.
-h Displays and describes these command line arguments.
NOTE ►► Use CLIX to perform Console operations from the
command line (see help.sap.com/nwmdm71 > CLIX Reference
for more information).

MDM Console Reference Guide 33
MDM Console Main Window
The main window of MDM Console consists of the panes and tabs shown in the numbered callouts of Figure 3.
Figure 3. MDM Console main window
These panes and tabs, listed below, are described in further detail in the following sections and throughout this reference guide:
1. Console Hierarchy pane
2. Objects pane
3. Object Detail pane
4. Functions tab
5. Tables and Fields tab
6. Status bar
CONSOLE HIERARCHY PANE
The Console Hierarchy pane (left pane) contains a tree representing the hierarchy of MDM servers, MDM repositories, and tables. When fully expanded, the tree shows the mounted MDM servers, the mounted repositories on each Master Data server, and the tables within each repository.
NOTE ►► In most cases, you will have only one Master Data Server
and one MDM repository. However, you can simultaneously mount multiple MDM Servers and each Master Data Server can
simultaneously mount and access multiple MDM repositories.
1 2
3
6
4 5

34 MDM Console Reference Guide
OBJECTS PANE
The Objects pane (top-right pane) lists the MDM objects that correspond to the selected node in the tree (i.e. root, Master Data Server, MDM repository, table), with a row for each object and a column for each object property. Use the Objects pane to browse, sort, and select objects for editing or deletion.
Table 2. Nodes in the Console Hierarchy Tree
Selected Node Objects Pane Object Detail Pane
Root MDM Servers Server Detail
Any Master Data Server Repositories Repository Detail
Any MDM repository Tables Table Detail
Any main table Fields Field Detail
Any subtable Fields Field Detail
Image Variants table Variants Variant Detail
Masks table Fields Field Detail
Families table Fields Field Detail
Relationships table Relationships Relationship Detail
Workflows table Fields Field Detail
Named Searches table Fields Field Detail
Tuples table Tuples Tuple Detail
Tuple member Member Fields Member Field Detail
Admin Empty Empty
Roles table Roles Role Detail
Users table Users User Detail
Connections table Connections Connection Detail
Change Tracking Empty Change Tracking Detail
Remote Systems table Remote Systems Remote System Detail
Ports table Ports Port Detail
Links table Links Link Detail
XML Schemas table XML Schemas XML Schema Detail
Dimensions Dimensions Dimension Detail
Reports table Reports Report Detail
Logs table Logs Log Detail
Activities table Activities Activity Detail
Auxiliary Servers MDM Auxiliary
Servers
MDM Auxiliary Server
Detail

MDM Console Reference Guide 35
Selected Node Objects Pane Object Detail Pane
Any Auxiliary Server Repositories Repository Detail
NOTE ►► The type of object displayed in the pane and the name of
the Objects pane itself change as you select each type of node in the
tree, as summarized in Table 2.
OBJECT DETAIL PANE
The Object Detail pane (bottom-right pane, or tab in bottom-right pane for Roles table) contains a two-column grid. The first column is the row header and lists the properties for each object; the second column lists the corresponding values. Use the Object Detail pane to view and edit the properties of the object selected in the Objects pane.
NOTE ►► As you select each type of node in the tree, the name of the Object Detail pane changes to correspond to the type of object
contained in the Objects pane, as summarized in Table 2 above.

36 MDM Console Reference Guide
FUNCTIONS TAB
The Functions tab (tab in bottom-right pane; Roles table only) contains a grid (Figure 4) with a hierarchy of functions (e.g. Add Records, Modify Records, and so on), and for each function, whether the function can be executed or not.
Figure 4. Functions tab for the Roles table
NOTE ►► The functions Data Privacy Specialist and External Auditor
are set to None by default when creating a new role. This is a
changeable setting.

MDM Console Reference Guide 37
TABLES AND FIELDS TAB
The Tables and Fields tab (tab in bottom-right pane; Roles table only) contains a grid (Figure 5) with a hierarchy of tables and fields, and for each one, the type of read-write access granted, and any additional constraints.
Figure 5. Tables and Fields tab for the Roles table
STATUS BAR
The status bar displays the number of objects displayed in the Objects pane.

38 MDM Console Reference Guide
Configuration Parameters
You can configure settings for MDM Console, MDM servers, MDM repositories, and the underlying DBMS server.
CONSOLE SETTINGS
These settings include those that define the graphic layout of your MDM Console main window, which are stored in the Windows registry, and the list of mounted MDM Servers, which are saved in an MDM Console
Settings (.mcs) file and can be loaded from the File menu or on startup
(see “MDM Console Settings File”).
MASTER DATA SERVER SETTINGS
These settings determine how the MDM Server behaves on the machine on which it is installed, independent of the MDM Console on which it is mounted and any DBMS Servers that hold the MDM repository information. They will be the same for this MDM Server regardless of which machine is running MDM Console and which repository is mounted or started. The settings are stored in an operating system independent file (rather than the Windows registry) named
mds.ini. Following installation, and on an occasional basis, you may
need to edit this file (see “MDS Configuration”).
MDM AUXILIARY SERVER SETTINGS
Each auxiliary server (MDIS, MDSS, and MDLS) has its own configuration file which governs its behavior. See “MDIS Configuration” for more information about the MDIS configuration file and “MDSS Configuration” for more information about the MDSS configuration file.
REPOSITORY PROPERTIES
These properties are specific to each MDM repository and will be the same regardless of which Master Data Server mounts and starts the repository and which client accesses it (see “Modifying Repository Properties”).
DBMS SETTINGS
Unlike the Repository Properties, which are specific to a particular MDM repository, these settings are relevant to a particular DBMS Server, and are the same for any Master Data Server that accesses it and for all repositories mounted on it. In general, these settings allow you to configure parameters regarding the DBMS Server’s use of the file system (see “DBMS Settings”).

39
PART 3: MDM SYSTEM ACCESS
This part of the reference guide provides an overview of Master Data Servers and repositories, and the operations for accessing and controlling them.


41
Accessing MDM Repositories
When the selected node in the Console Hierarchy tree is a Master Data Server, the Objects pane (top-right) is titled Repositories and the Object detail pane (bottom-right) is titled Repository Detail.
The Repositories pane contains a grid with a list of mounted MDM repositories, where each repository in the list corresponds to a child of the selected Master Data Server node; to view a repository’s basic properties, select the repository from the Repositories pane.
The basic properties for each MDM repository are listed in Table 3.
NOTE ►► For information about configuring additional repository
properties, see Modifying Repository Properties.
Table 3. MDM Basic Repository Properties
Property Description
Name The MDM repository name.
Description1 The MDM repository description.
DBMS Server The network ID of the DBMS server that is hosting the
repository.
DBMS Type
The DBMS brand:
▪ SQL Server
▪ Oracle
▪ DB2
▪ MaxDB
▪ SAP ASE
▪ HANA (for MDM-SRM only)
Login The login name for the DBMS server.
Password2 The password for the DBMS server.
Port1 The TCP/IP port number on which to connect to the
repository.
Type1
The MDM repository type:
▪ Normal
▪ Master
▪ Slave
▪ Publication Slave
Languages The set of languages used in the MDM repository. For information about adding and changing repository
languages, see Modifying the Repository Languages.

42 MDM Console Reference Guide
Property Description
Status3
The MDM repository status:
▪ Disconnected ▪ Stopped
▪ Starting
▪ Started
▪ Running Remotely
▪ Outdated
▪ Newer than MDM Server ▪ Archiving
▪ Unarchiving
▪ Duplicating
▪ Invalid
▪ Busy
1 Hidden by default in the Repositories pane; unhide to display. 2 Not visible in either the Repositories or Repository Detail panes. 3 Not visible in the Repository Detail pane.
DBMS Servers
The DBMS Server property defines the network identification string of the DBMS instance / machine / server that is used by the DBMS-specific client on the Master Data Server machine to connect to the DBMS. The brand of DBMS on which the repository is running is shown in the DBMS Type property.
NOTE ►► When you mount two MDM repositories with the same
name (but located on different DBMS Servers) on the same Master Data Server, MDM distinguishes them in the Console Hierarchy pane
by appending the name of the DBMS Server in angular brackets to the
repository name (e.g. “repository <server>”).
Repository Port Numbers
The Port property defines the TCP/IP port number that MDM client applications use to connect to the repository. This port number is actually the first of three sequential port numbers used by MDM (e.g. when MDM Console shows port 2345, it will also be using 2346 and 2347). You may change the base port number to any value between 2000 and 9999 in accordance with your preferences or system requirements, so long as you keep in mind that three sequential ports are actually used for each assigned port number. Also, because only one repository can be started on a port at a time, it is recommended to assign each repository its own unique port number.
MDM Console users can assign or edit TCP/IP port numbers from the
Repositories pane and during Mount, Create, Duplicate, and Unarchive repository operations.

MDM Console Reference Guide 43
CAUTION ►► MDM client applications remember the port they used
to first connect to a repository, and, when attempting to connect to that repository in the future, will start whatever repository is currently
running on that port, even if it is not the repository expected by the user. To avoid confusion, assign each repository its own unique port
number and notify client users whenever a repository’s port number
changes.

44 MDM Console Reference Guide
ACCESSING AN MDM REPOSITORY
In order to make an existing MDM repository visible to your MDM Console session, you must first mount it. Once mounted, you can see the repository’s current type and state and perform a number of administrative functions on it.
The type and current state of mounted repositories are indicated in the Repositories pane and by the icon used to represent the repository in the Console Hierarchy tree, as shown in Table 4 and Table 5.
Table 4. MDM Repository Types
Icon1 Type
Normal MDM repository.
Master MDM repository.
Slave MDM repository.
Publication slave MDM repository.
Broken master MDM repository.
Broken slave MDM repository.
Broken publication slave MDM repository.
Undetermined MDM repository type.2
1 Type of MDM repository indicated by color on top of cylinder. 2 Type cannot be determined if repository is busy, disconnected, outdated, or invalid.
Table 5. MDM Repository States
Icon1 State
MDM repository is not connected to MDM Console.
MDM repository is not started.
MDM repository is being started.
MDM repository is started.
MDM repository is started on another MDS (running remotely).
MDM repository is scheduled to stop.
MDM repository is stopped and being duplicated.
MDM repository is stopped and being archived.

MDM Console Reference Guide 45
Icon1 State
MDM repository is being unarchived.
MDM repository is outdated.
Repository version is newer than Master Data Server
MDM repository is invalid.
MDM repository is busy.
MDM repository must be restarted.
MDM repository has a corrupt schema.
1 State of repository indicated by symbol at the lower right of the cylinder.
If a repository’s type is undetermined, its state often indicates the reason why. Suggested solutions for resolving undetermined repository types are listed in Table 6.
Table 6. Solutions for Resolving Undetermined Repository Types
Repository
State Suggested Solution
Busy Refresh MDM Console after the currently running activity
finishes.
Disconnected Connect to the repository.
Invalid Unmount and re-mount the repository.
Outdated Update the repository
Running
Remotely
Stop the repository on the remote Master Data Server or
appropriate it.
CAUTION ►► Appropriating a remotely-running Master Data Server
is potentially dangerous (see “Appropriating an MDM Repository for
more information.
Suggested solutions for resolving repository states Requires Restart and
Schema Corrupt are listed in the table below.
Table 7. Solutions for Resolving Requires Restart and Schema Corrupt
Repository
State Suggested Solution
Requires Restart Stop the repository and start it again.
Schema Corrupt Delete the repository and restore (unarchive) its backup.

46 MDM Console Reference Guide
The MDM Console operations to mount an existing MDM repository, and the various administrative functions that you can perform on a mounted repository, are described in the following sections.
Mounting and Unmounting an MDM Repository
Mount an existing MDM repository in order to access it from a Master Data Server. If your organization has more than one MDM repository, you only need to mount those that are of interest to you.
NOTE ►► An MDM repository can exist on any machine on the
network to which you have access to the underlying DBMS, and any Master Data Server on the network can access and control access to
each MDM repository.
NOTE ►► Each Master Data Server maintains a list of currently mounted MDM repositories that persists even after the server is
stopped and then restarted. When you mount and connect to a Master
Data Server that is already running, you will automatically see from your MDM Console all of the MDM repositories that have already been
mounted on that Master Data Server by any other MDM Console
(including your own MDM Console during a previous session).
NOTE ►► Mounting an MDM repository is a password-protected
operation which requires you to enter the password for the Master Data Server, if you have not already done so during the current MDM
session (see “Master Data Server Security”).
To mount an existing MDM repository:
1. In the Console Hierarchy tree, right-click on the Master Data Server
and choose Mount Repository from the context menu, or select the tree
node and choose Repositories > Mount from the main menu.
2. MDM opens the Mount MDM Repository dialog shown in Figure 6 with
the DBMS Name, Login, and Password fields enabled.
Figure 6. Mount MDM Repository dialog (1 of 2)
3. Select the DBMS Server to which you want to connect from the drop-
down list.

MDM Console Reference Guide 47
4. Enter the appropriate DBMS login (which must have system
administrator privileges) and password for the selected DBMS Server
and click Next.
5. MDM disables the DBMS Server, Login, and Password fields and
enables the Repository Name and Port fields, as shown in Figure 7.
Figure 7. Mount MDM Repository dialog (2 of 2)
6. Select the MDM repository you want to mount from the drop-down list.
7. If necessary, edit the TCP/IP port number in the Port text box.
NOTE ►► See “Repository Port Numbers” for more information about
port numbers.
8. Click Finish to mount the MDM repository.
9. MDM adds a node for the MDM repository to the Console Hierarchy tree as a child of the Master Data Server. The repository status icon
(shown at left) displays a gray lock to indicate that a connection to
repository has not yet been established.
To unmount an MDM repository:
1. In the Console Hierarchy tree, right-click on the MDM repository you
want to unmount and choose Unmount Repository from the context
menu, or select the tree node and choose Repositories > Unmount from the main menu.
TIP ►► If the top-right pane is currently displaying the list of MDM
repositories, you can also right-click on the repository in the grid and
choose Unmount from the context menu.
2. MDM removes the repository node from the Console Hierarchy tree.

48 MDM Console Reference Guide
Connecting to and Disconnecting from an MDM Repository
Once you have mounted an MDM repository, you must connect to it before any further repository operations can be performed.
To connect to a disconnected MDM Repository (gray lock):
1. In the Console Hierarchy tree, right-click on the MDM repository to
which you want to connect and choose Connect to Repository from the
context menu, or select the tree node and choose Repositories >
Connect to Repository from the main menu.
2. MDM opens the Repository Login dialog shown in Figure 8. Enter your MDM user name and password for the selected repository and click
OK.
Figure 8. Connect to Repository dialog
NOTE ►► See “Users Table” for more information about MDM user
names and passwords.
3. Once you are connected to the repository, MDM changes the
repository’s icon in the Console Hierarchy tree to reflect is current type
and state.
4. MDM also populates the Tables and Table Detail panes with table
information for the MDM repository.
To disconnect from an MDM Repository:
1. In the Console Hierarchy tree, right-click on the MDM repository from
which you want to disconnect and choose Disconnect from Repository
from the context menu, or select the tree node and choose
Repositories > Disconnect from Repository from the main menu.
2. MDM changes the repository status icon to a gray lock to indicate that
the repository is now disconnected from the Console.
Starting and Stopping an MDM Repository
Once you have mounted and connected to an MDM repository, it must be started before it can be accessed by clients on the network.
NOTE ►► An MDM repository can be simultaneously mounted by multiple Master Data Servers. When you start the MDM repository on a
particular Master Data Server, it then becomes inaccessible to all other
Master Data Servers that have it mounted.

MDM Console Reference Guide 49
NOTE ►► You can only start one repository on a TCP/IP port at a
time (see “Repository Port Numbers” for more information).
NOTE ►► The structure of an MDM repository cannot be modified
through MDM Console while the repository is started.
NOTE ►► You can set the Master Data Server to automatically start
mounted servers by configuring the autostart option in the mds.ini
file. For more information about the autostart option, see Table 66.
Optional [MDM Server] Parameters.
TIP ►► If you want to modify the structure of an MDM repository while preserving access to the current version, you can duplicate the
repository and give it a new name, or use the same name and move it
to another DBMS machine.
To start a stopped MDM repository (red square):
1. In the Console Hierarchy tree, right-click on the MDM repository you
want to start and choose Start Repository from the context menu, or
select the tree node and choose Repositories from the main menu.
2. Choose whether to start the repository immediately or to update
indices first.
NOTE ►► When you choose Immediate, MDM automatically updates indices that it knows to be out of date as a result of changes you make
to the MDM repository data through MDM Data Manager. However,
when the structure of the repository has been modified through MDM Console, MDM cannot know precisely which indices need to be
updated. In these cases, you should choose Update Indices rather
than Immediate when you start the repository.
3. MDM starts the MDM repository. While the repository is being started,
MDM changes the repository status icon (shown at left) to a blue arrow , and reports the progress of the start in the Status field for the
repository in the Repositories pane.
4. When the starting process is complete, MDM changes the repository
status icon (shown at left) to a green triangle to indicate that the MDM
repository is started.
To stop a started MDM repository (green triangle):
1. In the Console Hierarchy tree, right-click on the MDM repository you
want to stop and choose Stop Repository from the context menu, or
select the tree node and choose Repositories > Stop from the main
menu.

50 MDM Console Reference Guide
2. Choose how long to wait before stopping the MDM repository from the
cascading menu:
▪ Immediate
▪ 1 Minute ▪ 2 Minutes
▪ 5 Minutes
NOTE ►► The non-Immediate choices allow users of MDM client applications time to finish using the MDM repository and exit before the
repository is stopped and no longer available. With the delayed options, each client application receives text messages at five, two,
and one minute before shutdown. When a delayed stop option is
selected, the repository state changes to Stop scheduled and a red
square is added to the repository status icon (shown at left).
3. After the selected wait time, MDM stops the MDM repository and
changes the repository status icon to a red square.
TIP ►► It is usually faster with a large MDM repository to simply stop
the Master Data Server than to stop the repository, although the Stop command is clearly necessary if two or more repositories are started
and you want to stop just one of them.
NOTE ►► Once an MDM repository is stopped: (1) the Master Data Server will no longer serve the repository’s data to any client; (2) any
MDM clients using the repository will be automatically shut down (the delayed options give MDM client users warning that this is about to
occur); and (3) MDM client attempts to connect to it will fail with the
message “The MDM repository is not started”.
To cancel a scheduled stop:
1. In the Console Hierarchy tree, right-click on the MDM repository you
want to stop and choose Stop Repository from the context menu, or
select the tree node and choose Repositories > Stop from the main
menu.
2. Choose Cancel Stop from the cascading menu.
3. MDM changes the repository status from Stop scheduled to Started
Running and changes the repository status icon (shown at left) to a
green triangle.

51
PART 4: REPOSITORY DESIGN
This part of the reference guide describes the data modeling capabilities of MDM. It includes basic procedures for designing and creating a new MDM repository and for creating and modifying tables and fields within a new or existing MDM repository.


MDM Console Reference Guide 53
Planning the MDM Repository
This chapter presents general guidelines for designing an MDM repository. However, there are no hard-and-fast rules, and good judgment is involved nearly every step of the way. Ultimately you will want a repository design that optimizes ease of maintenance (for you) and ease of searching (for your customers). Increased granularity and structure of the data will make it easier to maintain the repository; well thought-out categories and attributes will make it easier to search it.
NOTE ►► Although an MDM repository can be used to store many
types of master data records, for the sake of example this reference
guide describes a product information repository.
Planning the structure of an MDM repository starts with knowing all of the different kinds of information available in your product database that describe the products to your customers.
The total range of information needs to be separated into that which applies to: (1) all product records, regardless of product category; and (2) only certain categories of products. For example, in an MDM repository that contains both tools and furniture, some types of information will apply to all products, such as item number, manufacturer, price, package quantity, and so on. However, much of the information about tools will not apply to furniture, and vice-versa.
Information common to all product records will become the fields of the main table in the repository, while category-specific information will be stored in the category-specific attributes (see “Fields vs. Attributes – A Comparison”).
The initial steps of designing an MDM repository typically include the following:
• Decide which types of records will be stored in the repository’s main table(s).
• List all the fields to be included in the repository.
• Decide what type of data each field will contain.
• Decide which data can be stored in lookup tables or tuples.
• Describe the taxonomy of product categories and the attributes needed to define the categories.
To help your decision-making, the table and data types supported the MDM data model are described in the following sections.

54 MDM Console Reference Guide
MDM 7.1 Metamodel Enhancements
MDM 7.1 has major metamodel enhancements that allow you to create a repository structure that more closely models your master data.
These enhancements include:
• Multiple main tables. Multiple main tables allow multiple business objects (e.g. Suppliers and Products) to reside in a single repository.
• Lookup [Main] field type. Lookups into a main table allow business objects to reference each other (e.g. Products Suppliers).
• Tuple data type. Tuples allow you to define custom composite data
types consisting of a set of multiple fields (e.g. Address).
• Nested structures. Tuples allow you to create deeply nested multi-
level structures (e.g. Address Contact Phone).
• Hierarchy management. Tuples can be used to model arbitrarily complex hierarchical main entity relationships.
• Extended qualifier support. Tuples can be used to create qualified references to the records of any other table.
These enhancements are described further in following sections.
NOTE ►► Nested structures, hierarchy management, and extended
qualifier support are not explicit metamodel enhancements but rather beneficial “side effects” of combining Lookup [Main] and tuple fields in
various ways (see “Tuples” for more information).

MDM Console Reference Guide 55
MDM Table Types
A traditional SQL DBMS stores data in the records and fields (rows and columns) of a collection of flat database tables. All tables have the same rectangular structure in SQL. A SQL database is relational because of the relationships set up between the different tables.
In an relational DBMS (RDBMS), information about a single record can be combined from multiple tables by relating values in matching columns. This helps to eliminate redundant data; beyond that, however, an RDBMS does not support any additional structuring of the data itself.
By contrast, the MDM system supports a variety of different table types that are specifically suited for the particular requirements of storing, organizing, structuring, classifying, managing, and publishing information in an MDM repository (including efficient support for category-specific attributes, which are inherently non-relational).
Table 8. MDM Data Table Types
Table Type Description
Main and subtables
Main1
A main table is a f lat table containing the primary information about a business object. For example, an
MDM repository of product information would include an individual record for each product and an individual field
for each piece of information that applies to all products,
such as SKU, product name, manufacturer, and price.
New MDM repositories include a main table named
Products.
Flat
A flat table has the standard, rectangular SQL structure
consisting of records and fields (rows and columns). A main table in an MDM repository typically contains some
fields whose possible data values are limited and can therefore be selected from a list, rather than entered
manually. For example, a Country field would naturally have a limited set of possible values. These values can be
stored as records in a separate, flat subtable associated
with a Country lookup field in a main table.
New MDM repositories do not include any f lat tables.

56 MDM Console Reference Guide
Table Type Description
Hierarchy
A hierarchy table organizes information in a hierarchy,
where each record is related to a parent record (even if the only parent is the root) and may also be related to sibling
records and/or child records. The main table in an MDM repository typically contains some fields whose data may
be hierarchical in nature. For example, a Manufacturer
field may need to accommodate division and subdivision information for manufacturers. This hierarchical
information is stored in a separate, hierarchy subtable associated with the Manufacturer lookup field in the main
table.
Note that a hierarchy table is useful even when it is flat (i.e. only leaf nodes below the root), because it stores the
ordered sequence of sibling records, allowing you to
override the unordered sequence of values in a flat table
and instead put the values in a fixed order.
New MDM repositories include the following hierarchy
tables: a default taxonomy table, the Masks table, and the
Families table.
Taxonomy1
Pre-defined. A taxonomy is the classification scheme that
defines the categories and subcategories that apply to a
collection of records. Categorizing records enables you to isolate subsets of records for various organizing,
searching, editing and publishing purposes.
A taxonomy table in MDM stores a hierarchy of categories and subcategories and also supports attributes, “subfields”
that apply to particular categories rather than to the entire collection of records. MDM supports multiple simultaneous
taxonomies.
New MDM repositories include a single taxonomy table
named Categories.
Qualified Flat
Subtable. A qualified table in MDM stores a set of lookup records, and also supports qualifiers, “subfields” that apply
not to the qualified table record by itself, but rather to each association of a qualified table record with a main table
record. MDM supports multiple simultaneous qualified
tables.
Qualified tables can be used to support product applications and application-based search, and also to
store any large set of subtable records that contain fields whose values are different for each main table record,
such as multiple prices for different quantities, divisions, regions, or trading partners, cross-reference part numbers,
and additional distributor/supplier/customer-specific information for different distributors, suppliers, or
customers.
New MDM repositories do not include any qualified flat
tables.

MDM Console Reference Guide 57
Table Type Description
Object tables1
Images A single table named Images. Stores image files, where
each image is stored as a record in the table.
Sounds A single table named Sounds. Stores sound files, where
each sound file is stored as a record in the table.
Videos A single table named Videos. Stores video files, where
each video file is stored as a record in the table.
Binary Objects
A single table named Binary Objects. Stores other binary
object files, where each binary object file is stored as a
record in the table.
Text Blocks A single table named Text Blocks. Stores blocks of text,
where each text block is stored as a record in the table.
Copy Blocks
A single table named Copy Blocks. Stores blocks of text interpreted as copy, where each text block is stored as a
record in the table.
Text HTMLs
A single table named Text HTMLs. Stores blocks of text
interpreted as HTML, where each text block is stored as a
record in the table.
PDFs A single table named PDFs. Stores PDF files, where each
PDF is stored as a record in the table.
Special tables1
Image Variants
A single table named Image Variants. Used to define the structure and format of each of the variants for each
image. Each variant is a modified version derived from an
original image; the original image is never modified. This table is managed in the MDM Console and is not visible in
MDM Data Manager.
Families
A single hierarchy table named Families. Used to further partition main table records in each category into smaller
groups based upon the values of other fields and/or attributes. You can associate family data (a paragraph, an
image, bullets) once with a family of products rather than with each individual product, and also define the table
layout of the field and/or attribute data (field order; stack,
vertical, and horizontal pivots; and other display options).
This table is available only in Family mode.
Data Groups2
A single hierarchy table named Data Groups. Stores the
hierarchy of data groups used to break the entire set of objects in the MDM repository into manageable
subgroups.
Relationships A single table named Relationships. Used to define
relationships between records in your tables.
1 Created by default in new MDM repositories. 2 Does not appear anywhere in the MDM Console.

58 MDM Console Reference Guide
NOTE ►► MDM repositories include additional special and system tables which do not directly relate to data modeling. These tables are
described later in this reference guide.
MAIN TABLES
A main table contains the primary information about a business object, such as a product, customer, employee, or supplier. By convention, MDM refers to a repository’s default main table as the Products table. This is a flat table whose fields are common to all products.
For each field in a main table, you must determine how its data should be represented and what data type should be used. This consideration encompasses how to store the data (as numeric values – integers or real numbers – currency, text, images, and so on), whether the field should be single-valued or multi-valued, and whether the field’s values should be entered manually (a normal field), selected from a list of legal values (a lookup field), or included in private subrecords of related information (a tuple field).
A typical Products table might include the following fields:
• Item Number
• Product Name
• Price
• Description
• Category
• Manufacturer
If other descriptive information such as “pipe size” and “paint color” happen to apply to all products in your MDM repository, then they, too, would be candidates for fields in the Products table. However, if “pipe size” and “paint color” are qualities that exist for only some products, then they should be defined as attributes of a taxonomy table and associated with the appropriate product categories.
Thus, the process of determining what information should be represented as fields in the Products table entails sorting out what information should be represented as attributes, as well as the product categories with which each of the attributes should be associated. This category and attribute information is stored in a taxonomy table.

MDM Console Reference Guide 59
Once you have determined the fields of the main table and the attributes of the taxonomy table (which can be defined later and continuously refined over time), you must then determine the set of additional “support” tables you will need, including flat, hierarchy, taxonomy, and qualified lookup tables, along with object tables and tuple definitions.
NOTE ►► Each lookup field in the main table can become a
searchable dimension of the MDM repository.
NOTE ►► Each nested lookup field in a lookup table also becomes a
searchable dimension of the repository.
DATA INTEGRITY ►► When you create any kind of lookup field,
MDM automatically creates implicit primary key and foreign key
matching fields within each of the two tables (the table that contains the lookup field and the lookup table itself), defining the many-to-one
“join” relationship and maintaining referential integrity behind the scenes. The matching fields are hidden, while the value of the lookup
field is the value(s) of the display field(s) of the lookup table record.
Multiple Main Tables
Recall that previous versions of MDM allowed each repository to have just a single main table. This meant that multiple repositories were necessary to store multiple objects, where each repository contained its own duplicate copy of common reference data and it was difficult if not impossible to link records across repositories, as shown in Figure 9.
Supplier repository: Customer repository:
Suppliers ↔ Customers
▼ ▼
Countries Countries
Figure 9. Multiple repositories with one object per repository
By contrast, MDM 7.1 allows each repository to contain as many main tables as necessary, so that multiple business objects (e.g. Suppliers and Products) can reside in a single repository.
As illustrated by Figure 10, multiple main tables within a single repository has two primary benefits:
• Shared reference data. Business objects can share access to
common lookup data (e.g. Customers + Suppliers Countries).
• Object cross references. Business objects can reference each other using a Lookup [Main] field type (e.g. Customers Suppliers).

60 MDM Console Reference Guide
Multi-object repository:
Suppliers ◄► Customers
▼ ▼
Countries
Figure 10. Single repository with multiple objects
NOTE ►► Multiple main tables – and the corresponding ability to store data about multiple objects within a single repository – eliminates
an entire class of “phantom” MDM requirements around the challenges
of cross-repository integration, including cross-repository references,
validations, and exchange of common reference data.
Lookup [Main] Field Type
Lookup [Main] fields allow you to lookup data from a main table into another main table.
This has several benefits:
• Object cross references. Coupled with multiple main tables, objects
can now reference each other (e.g. Customers Suppliers).
• Object self-references. Objects can also recursively reference themselves (e.g. Employees Employees).
NOTE ►► MDM features a data entry control for entering data into a
Lookup [Main] field (see the MDM Data Manager Reference Guide for
more information).
NOTE ►► Lookup [Main] fields are like Lookup [Flat] references to lookup subtables, but without pick lists for data entry and search (since
the number of records in a main table is likely to be substantially
greater than the number of records in a lookup table).

MDM Console Reference Guide 61
FLAT AND HIERARCHY LOOKUP TABLES
A lookup table is used to store values that are shared by many records in other tables, and also to act as a valid table that defines the set of legal values of the corresponding lookup field for data entry and search. For example, a single manufacturer is typically associated with many product records. By storing manufacturer data in a lookup table, you can edit the single copy of a manufacturer’s data to immediately update all records that reference it. At the same time, by defining a lookup field into the manufacturers table, you can constrain the set of legal values of the lookup field to the corresponding set of values for manufacturer in the manufacturers table.
For simple lookup tables, you need to decide whether the lookup values should be stored in a flat table or a hierarchical table, and what subtable fields are needed to store the additional information about each subtable record. For example, the Manufacturer field in the Products table typically should be a lookup field, with the Manufacturer data stored in a lookup table. Furthermore, the Manufacturers lookup table should be hierarchical if, for example, you need to accommodate company divisions.
TIP ►► SAP recommends using the singular for lookup field names
(“Manufacturer”) and the plural for table names (“Manufacturers”).
TIP ►► A hierarchy lookup table is useful even when it is flat (i.e. only
leaf nodes below the root), because it stores the ordered sequence of sibling records, allowing you to override the unordered sequence of
values in a f lat table and instead put the values in a fixed order.
DATA INTEGRITY ►► For proper organization of the records within an MDM repository, a hierarchy lookup field can normally be assigned
only to the value of a leaf node in the hierarchy.
NOTE ►► MDM supports hierarchies with unlimited number of
parent/child levels.
TAXONOMY LOOKUP TABLES
Product categories and subcategories, along with the attributes associated with them, are represented in an MDM repository as a hierarchy in a taxonomy table. A taxonomy table is a special kind of lookup table that provides support not only for a hierarchy of category and subcategory records, but also for category-specific attributes that can be assigned to each category on a category-by-category basis.
By convention MDM often refers to this table as the Categories table. Every product should belong to a category.

62 MDM Console Reference Guide
NOTE ►► A product can belong to at most one leaf-node category.
Whereas the taxonomy table itself and the fields of each of its records are created and defined in MDM Console, the hierarchy of product categories and their associated category-specific attributes are created and managed using MDM Data Manager in Taxonomy mode.
NOTE ►► MDM supports multiple simultaneous taxonomies within a
single MDM repository.
NOTE ►► In repositories with multiple main tables, MDM does not
permit Lookup [Taxonomy] fields in different main tables to look into
the same taxonomy table.
DATA INTEGRITY ►► For proper organization of the records within
an MDM repository, a taxonomy lookup field can normally be assigned
only to the value of a leaf node in the hierarchy.
QUALIFIED LOOKUP TABLES
A qualified table is a special kind of lookup table that is extremely versatile. It can be used to efficiently store complex relationships between a main table product record and one or more lookup table records that contain various types of additional information.
A qualified table stores a set of lookup records, and also supports qualifiers, database “subfields” that apply not to the qualified table record by itself, but rather to each association of a qualified table record with a main table record.
NOTE ►► An MDM repository can have multiple qualified tables.
The recommended structure of the qualified table varies depending on the number of qualified table fields that represent lookup values to the main table, as follows:
• Two or more. Make each a single-valued lookup field of the qualified table and define fields whose values are different for each main table record as qualifiers. The qualified table will contain a record for each combination of lookup values, and will support multi-level search-within-a-search in the qualified lookup search tab in the main table.
• Exactly one. Make it a non-lookup field of the qualified table and define the other fields as qualifiers. The qualified table will contain a record for each lookup value, and will support single-level drilldown search in the qualified lookup search tab in the main table.

MDM Console Reference Guide 63
• None. Define a dummy non-lookup field in the qualified table, define all the other fields as qualifiers, and do not make the dummy field a display field. The qualified table will contain a single dummy record (making it memory efficient) that links to the qualifier values, which will contain the actual subtable information. This approach provides no lookup value selection when specifying the values for the qualified lookup field during data entry, and no validation against subtable values or records, because all the information is stored as qualifiers.
NOTE ►► Since a qualified table with no lookups cannot support
either multi-level search-within-a-search nor single-level drilldown search in the qualified lookup search tab anyway, a parent/child
(main/subtable) product relationship is usually a better approach in this case. The subtable will store the complete records of additional
information (e.g. cross-reference part numbers) that are related to main table product records. This approach also provides no lookup
value selection when defining relationships during data entry, but does provide full validation against existing subtable values and records,
and establishes the traditional one-to-many relationship between main
table records and subtable records (see “Lookup and Non-Lookup
Subtables – A Comparison”).
Qualified tables offer self-configuring, out-of-the-box support for:
• Multiple prices (including quantity price breaks)
• Cross-reference part numbers
• Other distributor-, supplier-, and customer-specific information
• Product applications for application-based search
Each of the different uses of a qualified table is described in the following sections.
Multiple Prices and Cross-Reference Part Numbers
A normal flat or hierarchy lookup table is effective for a single multi-valued lookup field when: (1) the lookup table contains a relatively small number of records compared to the main table; and (2) the lookup table records themselves are standard for every main table record and represent a predefined and relatively fixed set of lookup values, such as a lookup into a list of legal manufacturer names.
However, a qualified table is necessary when the number of lookup table records would otherwise be very large, because each main table record is related not just to the predefined lookup values of the lookup table records but also to one or more additional fields of information that are different for every main table record (such as quantity price breaks, multiple prices for different divisions, regions, or trading partners, or cross-reference part numbers for different distributors or contract customers).

64 MDM Console Reference Guide
In these cases, the fields whose values are different for each main table record should be defined as qualifier fields of the qualified table; the qualified table will then contain an actual record for each of the predefined lookup values or value combinations (such as distributor, contract customer, division, region, or trading partner).
NOTE ►► A qualified table used for multiple prices, cross-reference
part numbers, or other distributor-specific information usually contains
few, if any, lookup fields and multiple qualifiers.
NOTE ►► Qualified table records also provide a way to store
additional distributor/supplier/customer-specific information for each of
multiple distributors/suppliers/customers for each main table record.
NOTE ►► In practice, the use of qualifiers and a qualified table instead of normal fields and a subtable keeps the number of actual
records in the qualified table very small, but since every link between a main table record and an instance of a qualified table record contains
additional information, the number of qualified link table records necessary to store the additional information is very large, often larger
than the number of records in the main table itself.
When used for multiple prices or cross reference part numbers, qualified tables and qualifiers allow you to store a massive amount of potentially sparse data, by eliminating n fields from the main table and replacing them with a single qualified lookup field into a qualified table that has n corresponding records and one or more qualifiers. For example, n price fields, one for each distributor or quantity price break (or worse, each distributor / quantity price break combination) can be replaced with n qualified table records, one for each distributor / quantity price combination, and a qualifier for the price.
Consider first the main table of product records shown in Figure 11 that contains sparse quantity pricing data for each product.
SKU Name 1-9 1-24 1-49 10-24 25-49 50-99
113 Widget $3.51 $3.48 $3.44 $3.40
114 Wrench $8.75 $8.30 $7.99
115 Bearing $5.12 $4.80
Figure 11. Sparse pricing data using normal fields

MDM Console Reference Guide 65
Using a qualifier to store the quantity pricing data, the qualified table would have a single field Quantity and a single qualifier Price, and would contain the quantity records shown in Figure 12.
Pricing:
Quantity [Price]
1-9
1-24
1-49
10-24
25-49
50-99
Figure 12. Qualified table with valid quantity records
A qualified lookup field in the main table would replace all of the quantity price fields, and the pricing data would be stored as qualifier values associated with main table / qualified table links, as shown in Figure 13.
SKU Name Lookup [Pricing]
113 Widget 1-9; $3.51
10-24; $3.48
25-49; $.344
50-99; $3.40
114 Wrench 1-24; $8.75
25-49; $8.30
50-99; $7.99
115 Bearing 1-49; $5.12
50-99; $4.80
Figure 13. Sparse fields replaced by qualified lookup field
NOTE ►► A main table / qualified table link is created only for those
product/quantity combinations for which a price value actually exists.
Now consider the main table of product records shown in Figure 14 that contains one or more cross-reference part numbers for each product.
SKU Name Grainger McMaster Applied Newark
213 Gear G-408 A4Y-227
215 Sprocket 45-680 MA-215 A4Y-285
Figure 14. Cross-reference part numbers using normal fields

66 MDM Console Reference Guide
Using a qualifier to store the cross-reference part number data, the qualified table would have a single field Distributor and a single qualifier Part No, and would contain the distributor records shown in Figure 15.
Part Numbers:
Distributor [Part No]
Grainger
McMaster
Applied
Newark
Figure 15. Qualified table with valid distributor records
A qualified lookup field in the main table would replace all of the distributor cross-reference part number fields, and the part number data would be stored as qualifier values associated with main table / qualified table links, as shown in Figure 16.
SKU Name Lookup [Part Numbers]
213 Gear Grainger; G-408
Newark; A4Y-227
215 Sprocket McMaster; 45-680
Applied; MA-215
Newark; A4Y-285
Figure 16. Part number fields replaced by qualified lookup field
Finally, consider the main table of product records shown in Figure 17 that contains distributor-specific quantity pricing data for each product.
SKU Name Grainger/1 Grainger/10 Applied/1 Applied/25
213 Gear $3.51 $3.28 $3.49 $2.99
215 Sprocket $5.01 $4.80 $5.04 $4.81
Figure 17. Distributor-specific quantity pricing data using normal fields

MDM Console Reference Guide 67
Using a qualifier to store the distributor-specific pricing data, the qualified table would now have fields Distributor and Quantity and the qualifier Price, and would contain the records shown in Figure 18.
Pricing:
Distributor Quantity [Price]
Grainger 1
Grainger 10
Applied 1
Applied 25
Figure 18. Qualified table with valid distributor/quantity records
A qualified lookup field in the main table would replace all of the price fields, and the pricing data would be stored as qualifier values associated with main table / qualified table links, as shown in Figure 19.
SKU Name Lookup [Pricing]
213 Gear Grainger; 1; $3.51
Grainger; 10; $4.28
Applied; 1; $3.49
Applied; 25; $2.99
215 Sprocket Grainger; 1; $5.01
Grainger; 10; $4.80
Applied; 1; $5.04
Applied; 25; $4.81
Figure 19. Pricing fields replaced by qualified lookup fields
NOTE ►► Each qualified table field that becomes a qualifier reduces the level of validation by reducing the number of qualifier table records
and associated set of valid value combinations. For example, in the example above, Price is the only qualifier, so only Distributor/Quantity
combinations that exist among the four records of the qualified table are valid. By contrast, if Quantity were also a qualifier, the qualified
table would have just two records – one for each Distributor – and the
price for any quantity for a valid Distributor would be valid.
These examples illustrate just a flavor of the power of qualifiers and qualified tables. As you can see, the use of qualifiers offers a great deal of flexibility when it comes to restructuring data for more efficient storage and searching within an MDM repository.

68 MDM Console Reference Guide
NOTE ►► When used to store entire records of distributor-, supplier-,
or customer-specific information, qualified tables and qualifiers complement and extend the virtual subset repository capability offered
by product masks, allowing the virtual repository associated with each mask to become a custom virtual repository that contains additional
custom information for each product record.
Product Applications and Application-Based Search
A product application is a particular use of a product. Applications are especially important in certain industries where application-driven product selection is the traditional way to locate products.
With qualified lookup tables, the MDM system features a new data model for product applications that replaces the traditional application-centric view (consisting of a single table of applications) with a product-centric view (consisting of both a main table of products and a qualified table of applications).
In an MDM repository, the list of generic applications is stored in a qualified table, which can itself contain multiple lookup fields for multi -level search-within-a-search from the main table. You can also flag any field of the qualified table to be an application-specific qualifier (subject to the restrictions on qualifier field type). A qualifier applies not to the qualified table record by itself, but rather to the association of the qualified table record with a main table record.
Each record in the qualified table defines a single unqualified application of a product in the main table; the complete set of qualified table records together comprise the entire universe of valid unqualified applications for all of the products in the MDM repository.
Applications provide yet another way to locate products within a large repository of complex product information, so that in addition to drill-down search by manufacturer, category, attributes, keyword, and other traditional criteria, you can also search for products by their application.
For example, in an MDM repository of automotive parts, each part may be compatible with one or more vehicles; these vehicle specifications represent the unqualified applications and appear in the qualified table of valid vehicles (the valid table). You can then search for parts within the repository by the various specifications of a vehicle, such as year, make, model, engine type, and so on.
NOTE ►► A qualified table used for product applications usually
contains multiple lookup fields and multiple qualifiers.
When you link an unqualified application to a product (by assigning the qualified table record to the value of a qualified lookup field in the main table), you can also assign a value to one or more application qualifiers.

MDM Console Reference Guide 69
A qualifier is an additional specification for that particular combination of product and application that further defines the unqualified application.
NOTE ►► You can assign multiple instances of the same unqualified application to a single product, where each instance has a different set
of qualifier values.
Consider the multiple main table records shown in Figure 20 that store application data for just a single automotive part using normal fields.
Part No Year Make Model CA Equip A/C P/B
A2-444 1998 Toyota Celica Yes Yes Yes
A2-444 1998 Toyota Celica No Yes Yes
A2-444 1996 Toyota Celica No Yes Yes
A2-444 1998 Ford Mustang No Yes Yes
A2-444 1997 Ford Mustang No No No
Figure 20. Automotive part and application data using normal fields
Using qualifiers to store the additional application specifications, the qualified table would have fields Year, Make, and Model, and the qualifiers CA Equip, A/C, and P/B, and for the applications above, would contain the records shown in Figure 21.
Vehicles:
Year Make Model [CA Equip] [A/C] [P/B]
1998 Toyota Celica
1996 Toyota Celica
1998 Ford Mustang
1997 Ford Mustang
Figure 21. Qualified table with valid vehicle records
A qualified lookup field in the main table would replace all of the vehicle specification fields, and the application specifications would be stored as qualifier values associated with main table / qualified table links, resulting in the single main table record shown in Figure 22.

70 MDM Console Reference Guide
Part No Lookup [Vehicles]
A2-444 1998; Toyota; Celica; Yes; Yes; Yes
1998; Toyota; Celica; No; Yes; Yes
1996; Toyota; Celica; No; Yes; Yes
1998; Ford; Mustang; No; Yes; Yes
1997; Ford; Mustang; No; No; No
Figure 22. Vehicle specification fields replaced by qualified lookup field
DATA INTEGRITY ►► Using qualifiers to distinguish between
different uses of the same unqualified application: (1) eliminates the need to enumerate every distinct value combination of fields and
qualifiers taken together; (2) in so doing, dramatically reduces the
number of distinct records in the qualified table, making it more useful as a valid table of legal lookup values; and (3) avoids a tremendous
amount of data duplication, especially when rich content (such as
images, text blocks, and PDFs) is added to each qualified table record.
DATA INTEGRITY ►► This innovative data model has the following
advantages: (1) it completely eliminates all duplication of both product
data and application data typical of previous systems; (2) it efficiently enforces validation against the table of qualified table records; (3) it
dramatically reduces memory and storage requirements; and (4) it is radically more efficient for maintenance and searching. For example,
an automotive parts catalog that historically contained over twenty million application records is represented within an MDM repository
with just over one million part records and forty thousand vehicle
specification records.
VALID TABLES AND NESTED LOOKUPS-WITHIN-LOOKUPS
Each of the flat, hierarchy, taxonomy, and qualified lookup table types acts as a valid table that defines the set of legal values of the corresponding lookup field for data entry and search.
Moreover, lookup fields can appear not only in the main table but also within the lookup tables themselves, such as when the Manufacturer field in the main table is a lookup into the Manufacturers table of legal manufacturer names, and the State field in the Manufacturers table is in turn a lookup into the States table of legal two-letter state abbreviations.
NOTE ►► Recall that each lookup field in the main table can appear in MDM Data Manager as a search tab in the Search Parameters pane
in Record mode, and that each nested lookup field in a lookup table appears within the search tab for the main table lookup field, for multi-
level search-within-a-search.

MDM Console Reference Guide 71
DATA INTEGRITY ►► A lookup field with just a single nested lookup
that is the only display field does not require multi -level search-within-a-search (since the set of nested lookup values and the set of lookup
values is identical) and allows you to use a single nested lookup table
to contain the shared set of legal values for more than one lookup field.
A data entry validation problem arises when the main table contains multiple lookup fields that are related and must be restricted to specific value combinations, since the legal value lists offered by individual lookup fields cannot enforce the selection of legal value combinations across the multiple lookup fields.
A more serious problem – one of inaccurate data representation within the repository rather than simply inadequate data entry validation – arises when the main table contains multiple multi-valued lookup fields, since even with careful data entry to avoid the validation problem, each main table record will define all of the value combinations among the multiple values of each of the multiple lookup fields rather than specific value combinations.
In both cases, the solution is to: (1) make each of the multiple lookup fields of the main table a single-valued lookup field of a lookup table, which becomes the valid table whose records will define each valid combination of values for the multiple lookup fields; (2) make each of the lookup table lookup fields a display field; and (3) create a single corresponding lookup field into the lookup table in the main table. Each individual value combination represented by a record of the lookup table can then be explicitly selected as a value for the main table lookup field during data entry, eliminating both the data entry validation problem and, when the main table lookup field is multi-valued, the data representation problem as well.

72 MDM Console Reference Guide
LOOKUP AND NON-LOOKUP SUBTABLES – A COMPARISON
All lookup tables in an MDM repository are subtables, but not all subtables are used as lookup tables. There are a number of subtle differences among the different types of lookup tables, as well as subtables that are not used for lookups, as described below:
• Flat, hierarchy, or taxonomy lookup tables. A flat, hierarchy, or taxonomy lookup table typically contains a relatively small number of lookup records compared to the number of main table records. It is used as a valid table that facilitates data entry and drilldown search, where each lookup table record represents a valid lookup value from which the user can select directly, and the list of lookup values can be limited by main table search results. A flat, hierarchy, or taxonomy lookup table provides full validation against lookup table values and records, since all of the subtable information is stored in the records of the lookup table. The relationship between main table records and flat, hierarchy, or taxonomy lookup table records is typically many-to-one (or perhaps many-to-few, if the lookup field is multi-valued).
• Qualified lookup tables. A qualified lookup table typically contains a much larger number of lookup records compared to a flat, hierarchy, or taxonomy lookup table, but still much smaller than the number of main table records. It too is used as a valid table that facilitates data entry and drilldown search, where each lookup table record often represents a valid combination of nested lookup values from which the user can select directly, or indirectly using the multi-level search-within-a-search of a qualified lookup search tab; however, a qualified table provides only partial validation against lookup table values and records, since some of the subtable information is stored as qualifiers. The relationship between main table records and qualified table records is typically many-to-many.
NOTE ►► Unlike the number of qualified table records, the number of
qualified link table records (where each record corresponds to a main table record / qualified table record link) is typically much larger than
the number of main table records, and the relationship between
qualified table records and qualified link table records is one-to-many. The use of qualifiers creates a two-level relationship (from main table
to qualified table to qualified link table) that eliminates data duplication and dramatically reduces the number of qualified table records, making
the qualified table more usable as a searchable lookup table.

MDM Console Reference Guide 73
• Non-lookup subtables. A flat or hierarchy subtable that is not used as a lookup table but rather as the subtable in a parent/child product relationship (e.g. for the parts records in a “kits and parts” product relationship or for cross-reference part numbers) typically contains a much larger number of records than the main table, and a typical subtable record is referenced only once. The subtable does not define valid lookup values for data entry, is too large to facilitate drilldown search, and its values do not need to be limited by the main table search results; instead, it is typically used to establish the traditional one-to-many relationship between main table records and subtable records (or alternatively, a one-to-many relationship between subtable records and main table records if the parent/child relationship is from subtable to main table).
The relationships between records in the main table, lookup tables, and non-lookup subtables – and the relative number of records in each for a hypothetical MDM repository – are summarized in Table 9.
TIP ►► In practice, an MDM repository can often represent the same
subtable information using either a qualified table or a parent/child
product relationship, each with slightly different effect; choosing the right structure depends on how you intend to search the MDM
repository. For example, if: (1) the subtable records have one or more lookups fields; (2) a portion of the subtable records consists of values
that are shared by the main table records while another portion consists of values that are different for each main table / subtable
record link; or (3) you want MDM to limit main table product records using drilldown search against the subtable records, then use a
qualified table (which reduces the number of subtable records through
the use of qualifiers). Alternatively, if the number of subtable records is very large (larger than the number of main table records), and full
validation against all of the subtable record values is important, then
use a parent/child product relationship.

74 MDM Console Reference Guide
Table 9. Lookup and Non-Lookup Subtable Examples
Example Table Type Main-to-Subtable # of Records
Products Main Table n/a 1,000,000
Countries of Origin Flat Lookup Many-to-one 100
Manufacturers Hierarchy Lookup Many-to-one 2,500
Categories Taxonomy Lookup Many-to-one 5,000
Vehicle Specifications Qualified Lookup Many-to-many 50,000
Vehicle Qualifiers Qualifier One-to-many 20,000,000
Distributors Qualified Lookup Many-to-many 5
Distributor Prices Qualifier One-to-many 2,500,000
Quantity Price Breaks Qualified Lookup Many-to-many 50
Quantity Prices Qualifier One-to-many 5,000,000
Parts (parent/child) Non-Lookup Subtable One-to-many 5,000,000
x-Ref Part Numbers Non-Lookup Subtable One-to-many 2,500,000
OBJECT TABLES
An MDM repository can include very rich content, such as images, text blocks, and PDFs. Images can be used to create a more visual experience, and can be associated with product records, categories, manufacturers, attributes, and even attribute text values. Text blocks can be used to store descriptions, marketing text, and bullets. And PDFs can be used to store PDF documents such as marketing brochures, specification sheets, MSDS information, and so on.
In an MDM repository, these types of “objects” are stored in object tables of the corresponding type. Using an object table allows a single copy of an object to be associated with multiple records. For example, a single image may be linked to several product records within a category, and also to the category itself. Moreover, any change to the object, such as an edit to a text block, needs to be made only once and is immediately reflected in all the associated records.
NOTE ►► When you first create a new MDM repository, MDM
automatically creates the single instance of each object table.
NOTE ►► You cannot add fields to object tables. Instead, object
tables have a predefined and fixed set of fields, as listed in Table 10.

MDM Console Reference Guide 75
Table 10. Predefined Object Table Fields
Property Ta
ble
Bin
ary
Ob
jects
Co
py B
locks
Ima
ge
s
PD
Fs
So
un
ds
Te
xt B
locks
Te
xt H
TM
Ls
Vid
eo
s
Object1 ● ● ● ● ● ● ● ●
Name ● ● ● ● ●
Code ● ● ● ● ● ● ● ●
Description ● ● ● ● ● ● ● ●
Data Group ● ● ● ● ● ● ● ●
Print Size ●
Original Name ● ● ● ● ●
Source ● ● ● ● ●
Original in Repository ● ● ● ● ●
Width ●
Height ●
Format ●
Rotation ●
Cropping ●
CRC of Original ●
Has Thumbnail ●
Is Vector ●
Data Size ● ● ● ● ● ● ● ●
Has Clipping Path2 ●
Resolution ●
1 Object is the object type of the table (e.g. Image, Text Block). 2 Clipping paths are supported for EPS and PSD file formats only.
SPECIAL TABLES
Finally, an MDM repository also includes support for several special and system tables that do not contain traditional fields within the table and/or records within the repository, but rather define additional repository elements and structure, as shown in Table 11.

76 MDM Console Reference Guide
Table 11. Structure Types Defined by the Special and System Tables
Table Type of Structure
Image
Variants
Image variant records consist of a predefined set of fields
and are user-created in MDM Console. Each record defines a particular image variant, including the image size, color
space, output format, cropping, borders, watermarks, Digimarcs, and so on. An image variant is a different version
of the original image based on the specs you define for different publishing purposes. Each image variant is
generated automatically by MDM; the original image is
never modified.
Families1
Family records consist of user-defined fields and are
automatically created and maintained by MDM based on
specifications provided for the Family Hierarchy in Family mode within MDM Data Manager. Each family corresponds
to a single leaf-node record in the Family Hierarchy. In addition to storing family data for the family in each of the
fields you specify for the table, each leaf node family record automatically contains the set of like main table product
records that are members of the family. The family structure
allows you to associate family data once with the family
rather than with each individual product within the family.
Relationships
Relationship records consist of a predefined set of fields and
are user-created in MDM Console. Each record defines a particular product-level relationship, chosen from among
several different basic structural relationship types. Each type of relationship (e.g. parent/child) corresponds to a real-
world product relationship (e.g. assemblies and
components). For each relationship defined in MDM Console, you specify the related products and/or non-
products for each main table product in Record mode within
MDM Data Manager.
Data Groups
Data group records are user-created within MDM Data
Manager using the Edit Data Groups command. Each leaf-
node record is used to break the set of objects in the MDM
repository into manageable subgroups.
IMAGE VARIANTS TABLE
The Image Variants table is a special table with a predefined set of fields, and records that appear in the top-right Image Variants pane of MDM Console. Each record that you add in MDM Console defines a particular image variant, including the image size, color space, output format, cropping, borders, watermarks, Digimarcs, and so on. An image variant is a different version of the original image based on the specifications you define for different publishing purposes. Each image variant is generated based on the original, which is never modified.

MDM Console Reference Guide 77
TIP ►► You can add, modify, and delete image variants just like the
fields of a normal table.
DATA INTEGRITY ►► Image variants allow you to define different
versions of each image for different publishing purposes without ever
modifying the original image.
A variant defines the structure of the image but does not specify if the variant is actually required for a particular image. Instead, each image
lookup field in the repository has a Variants property that allows you to associate one or more variants with the image lookup field, and in so doing, identify which variants should be generated when an image is associated with that particular field.
NOTE ►► When you create a new variant, you only define a template
for how to generate it, but you do not actually create the “bucket” in
which to store the variant until you use the Variants property of an
image lookup field to associate it with that image lookup field.
When you import an image: (1) the original is loaded and stored in the MDM repository and serves as the starting point for any image processing; and (2) a thumbnail is created to serve as a proxy for the original image (primarily for use in MDM clients). If you crop/rotate an image, MDM stores the crop/rotate settings for the image and uses them to immediately generate a new thumbnail to replace the old one. For each variant, all the images associated with that variant will be generated according to the specifications of the variant and the crop/rotate settings stored for that image. MDM tracks the changes to the variant definitions, the variant associations, each image, and the crop/rotate settings for each image, and thus know when the variants need to be regenerated.
The properties for each image variant are listed in Table 12; all of the properties applicable to each format are directly editable in the Variant Detail pane.
NOTE ►► Not all of the variant properties apply to all image formats;
only the common properties appear as columns in the Variants grid.
NOTE ►► The available choices for the Color Space property are
dependent upon the current selection for the Output Format property,
as shown in Table 13.

78 MDM Console Reference Guide
Table 12. Image Variant Properties
Property Description
Name
The variant name (text string).
▪ Original variant = Original; Thumbnail variant =
Thumbnail
Code The image variant code.
Scale Should the original image be scaled (Yes/No)?
Width The maximum width of the scaled variant (integer value).
Height The maximum height of the scaled variant (integer value).
Interchangeable Are the height and width interchangeable (Yes/No)?
Vector Image
How to handle a vector image when generating the variant:
▪ Rasterize
▪ Copy Vector
▪ Original variant = Original; Thumbnail variant = Rasterize
Output Format
The output format of the variant:
▪ Web Optimized [JPEG or GIF based on palette for each
image] ▪ BMP
▪ GIF
▪ PNG
▪ TIFF
▪ JPEG
▪ EPS
▪ Original variant = Original; Thumbnail variant = JPEG
Quality*
The quality of a Web Optimized variant in the JPEG format
or a JPEG variant (integer value between 0 and 100).
▪ Output Format = Web Optimized or JPEG only
BMP
Subformat*
The subformat of a BMP variant:
▪ 16M Colors
▪ 256 Colors
▪ 256 Colors RLE
▪ 16 Colors ▪ 16 Colors RLE
▪ Monochrome Custom
▪ Output Format = BMP only
Interlaced* Is a GIF variant interlaced (Yes/No)?
▪ Output Format = GIF only

MDM Console Reference Guide 79
Property Description
Progressive* Is a PNG variant progressive (Yes/No)?
▪ Output Format = PNG only
Compression
Filter*
The compression filter (integer value between 0 and 4).
▪ Output Format = PNG only
Zlib Level* The ZLib level (integer value between 1 and 9).
▪ Output Format = PNG only
TIFF
Subformat*
The subformat of a TIFF variant:
▪ LZW
▪ Uncompressed
▪ Fax CTTI Group 3
▪ Fax CTTI Group 4
▪ Output Format = TIFF only
DPI* The dots per inch of a TIFF variant (integer value).
▪ Output Format = TIFF only
Progressive*
Is a JPEG variant progressive (Yes/No)?
▪ Output Format = JPEG only
▪ Automatically set to Yes for the Web Optimized format
Quality*
The quality of a JPEG variant (integer value between 0 and
100).
▪ Output Format = JPEG only
EPS
Subformat*
The subformat of an EPS variant:
▪ Binary
▪ JPEG
▪ Output Format = EPS only
Color Space
The color space of the variant:
▪ RGB
▪ CMYK ▪ Grayscale
▪ Black & White ▪ Lab
▪ Original variant = Original

80 MDM Console Reference Guide
Property Description
Palette Type*
The palette type for the variant:
▪ Optimized ▪ Macintosh
▪ Web
▪ Windows
▪ Adaptive
▪ Exact
▪ Perceptual ▪ Selective
▪ Uniform
▪ Custom
▪ Color Mode = RGB Indexed only
Custom
Palette*
The file containing a custom palette (file Open dialog).
▪ Palette Type = Custom only
Color
Reduction
Method*
The color reduction method for the variant:
▪ Optimized
▪ Nearest color ▪ Ordered dither
▪ Error diffusion (Burkes)
▪ Error diffusion (Floyd-Steinberg)
▪ Error diffusion (Stucki)
▪ Color Mode = RGB Indexed only
ICC Profile* The file containing an ICC profile (file Open dialog).
▪ Color Mode = CMYK or Lab Color
Gamma
Correction The gamma correction (real value between 0.20 and 5.00).
Rotation
Should the variant be rotated, and if so, how:
▪ Custom
▪ None ▪ 90° CW
▪ 90° CCW
▪ 180°
▪ Mirrored
▪ 90° CW Mirrored ▪ 90° CCW Mirrored
▪ 180° Mirrored
▪ Original variant = None; Thumbnail variant = Custom
▪ Overrides rotation set for each image unless set to
Custom

MDM Console Reference Guide 81
Property Description
Cropping
Should the variant be cropped, and if so, how:
▪ Custom ▪ None
▪ Pixels
▪ Percent
▪ Clipping Path Bounding Box
▪ Original variant = None; Thumbnail variant = Custom
▪ Overrides crop set for each image unless set to Custom
▪ Clipping Path Bounding Box uses the bounding box of the image’s selected clipping path; if there is no
selected clipping path, no cropping is done.
Left*
The amount to crop off the left border of the original image:
▪ an integer value in pixels (Cropping = Pixels)
▪ a real value from 0.00 and 100.00 percent (Cropping =
Percent)
▪ Cropping <> Clipping Path Bounding Box
Right*
The amount to crop off the right border of the original
image:
▪ an integer value in pixels (Cropping = Pixels)
▪ a real value from 0.00 and 100.00 percent (Cropping =
Percent)
▪ Cropping <> Clipping Path Bounding Box
Top*
The amount to crop off the top border of the original image:
▪ an integer value in pixels (Cropping = Pixels)
▪ a real value from 0.00 and 100.00 percent (Cropping =
Percent)
▪ Cropping <> Clipping Path Bounding Box
Bottom*
The amount to crop off the bottom border of the original
image:
▪ an integer value in pixels (Cropping = Pixels)
▪ a real value from 0.00 and 100.00 percent (Cropping =
Percent)
▪ Cropping <> Clipping Path Bounding Box
Clipping Type*
The type of clipping path cropping:
▪ None – ignore clipping path
▪ Fill – area outside clipping path filled with
color ▪ Transparent – area outside clipping path
transparent
▪ Cropping = Clipping Path Bounding Box
▪ Output Format = GIF or PNG for Transparent

82 MDM Console Reference Guide
Property Description
Matte Color* The matte color (color picker dialog).
▪ Clipping Type = Fill or Transparent
Border Should a colored border be added to the variant (Yes/No)?
Color* The color to add (Color picker dialog).
Horizontal* The number of pixels to color on the top and bottom
(integer value).
Vertical* The number of pixels to color on the left and right (integer
value).
Custom Script Whether to apply a custom Photoshop script (Yes/No)?
Set Name* Name of custom script set (also called Photoshop action
set).
Script Name* Name of custom script (also called Photoshop action).
Watermark
Should a watermark be added to the variant (Yes/No)?
(enables Configure Watermark dialog [Add Watermark =
Yes]).
Watermark
Image* The name of the watermark file (file Open dialog).
Image
Weight*
The percentage weight of the image variant (integer value
between 0 and 100).
Watermark
Weight*
The percentage weight of the watermark file (integer value
between 0 and 100).
Position*
The position of the watermark on the variant:
▪ Scaled and Centered
▪ Tiled
▪ Centered
▪ Left Edge
▪ Right Edge
▪ Top Edge ▪ Bottom Edge
▪ Top Left Corner
▪ Top Right Corner
▪ Bottom Left Corner
▪ Bottom Right Corner
Method*
The method by which the pixels of the watermark image are combined with the pixels of the image to which it is
being applied:
▪ Lighten – lighten the image where the watermark is
applied
▪ Darken – darken the image where the watermark is
applied

MDM Console Reference Guide 83
Property Description
Threshold
Direction*
The method by which the pixels of the watermark image
are combined with the pixels of the image to which it is
being applied:
▪ > – lighten the image where the watermark is applied
▪ < – darken the image where the watermark is applied
Threshold* The percentage of density of the original image above or
below which the application of the watermark is triggered.
Background*
The background color of the watermark image (not really
the background color but rather an indication of whether
the background is darker or lighter than the foreground):
▪ Light – for light-colored backgrounds (ideally white)
▪ Dark – for dark-colored backgrounds (ideally black)
Digimarc Should a Digimarc be added to the variant (Yes/No)?
Year 1*
The start year of the Digimarc notice (4-digit integer
between 1922 and the current year).
▪ Cannot be None if Year 2 is specified
Year 2* The end year of the Digimarc notice (4-digit integer
between 1922 and the current year).
Durability*
The extent to which the Digimarc will remain intact after additional image processing (high durability results in
higher distortion):
▪ Low
▪ Medium
▪ High
▪ Highest
Target
Output*
The intended usage of the image:
▪ Monitor
▪ Web
Content*
A flag to indicate the type of image:
▪ Adult
▪ Normal
Usage*
A flag to indicate permission for others to use the image:
▪ Not Restricted
▪ Restricted
Replace URL* (Yes/No)?
* Not visible in Variant Detail pane unless property applies to setting of parent property.

84 MDM Console Reference Guide
Table 13. Available Color Spaces for Each Output Format
Color Space Ou
tpu
t F
orm
at
Web O
ptim
ized
BM
P
GIF
PN
G
TIF
F /
LZ
W
TIF
F /
Uncom
pre
ssed
TIF
F /
FA
X C
TTI
Gro
up 3
TIF
F /
FA
X C
TTI
Gro
up 4
JPEG
EPS /
Bin
ary
EPS /
JPEG
RGB ● ● ● ● ● ● ● ● ●
CMYK ● ● ● ● ●
Grayscale ● ● ● ● ● ● ● ● ●
Black & White ● ● ● ● ● ● ● ● ●
Lab ● ● ●
NOTE ►► The image processing sequence is: (1) orient (rotate and
mirror); (2) crop; (3) clip out background; (4) scale to desired size (less added borders); (5) execute custom Photoshop script; (6) add
watermark; (7) add borders; (8) correct gamma; (9) add digimarc; (10)
convert to desired color space; and (11) write in desired format.
Configuring the Watermark
When you set the Add Watermark property to Yes, MDM Console makes visible the subproperties associated with the watermark configuration –
Image Weight, Watermark Image, Watermark Weight, Position, Method,
and Background – each of which you must set to properly configure the
watermark.
MDM also enables access to the Configure Watermark dialog shown in Figure 23 that allows you to set each of the subproperties as a group, and to preview the effect of the settings you choose within the dialog by applying the watermark image to a test image.

MDM Console Reference Guide 85
Figure 23. Configure Watermark dialog
TIP ►► To open the Configure Watermark dialog, click the “…”
(browse) button on the far right of the Add Watermark cell, to the right
of the open arrow.
FAMILIES TABLE
The Families table is a special table that contains family records. Like the normal tables, family records consist of fields you specify within MDM Console; however, the records themselves are created and maintained automatically by MDM based on the specifications you provide for the Family Hierarchy in MDM Data Manager in Family mode.
Each family corresponds to a single record in the Family Hierarchy. In addition to storing family data for the family in each of the fields you specify for the table, each leaf node family record stores the set of like main table product records that are members of the family. The family structure allows you to associate family data once with the family rather than with each individual product within the family.
The Field Detail pane for the Families table includes an additional
property for the Family Field. This is the main table lookup field that will be used as the primary partition of main table records into families. In a Family Hierarchy, the Family Field is a taxonomy lookup field.
NOTE ►► When you first create a new MDM repository, MDM automatically: (1) creates the Families table; and (2) sets the Family
Field to the Category taxonomy lookup field of the main table. To add the Families table manually, there must be a taxonomy lookup field in
the main table that can be used as the Family Field (typically the
Category field).
NOTE ►► Only object lookup fields are valid Families table fields.
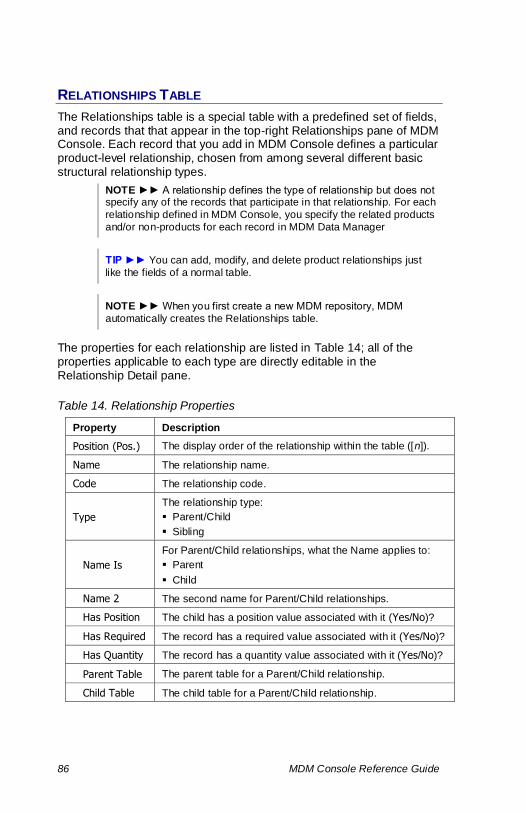
86 MDM Console Reference Guide
RELATIONSHIPS TABLE
The Relationships table is a special table with a predefined set of fields, and records that that appear in the top-right Relationships pane of MDM Console. Each record that you add in MDM Console defines a particular product-level relationship, chosen from among several different basic structural relationship types.
NOTE ►► A relationship defines the type of relationship but does not specify any of the records that participate in that relationship. For each
relationship defined in MDM Console, you specify the related products
and/or non-products for each record in MDM Data Manager
TIP ►► You can add, modify, and delete product relationships just
like the fields of a normal table.
NOTE ►► When you first create a new MDM repository, MDM
automatically creates the Relationships table.
The properties for each relationship are listed in Table 14; all of the properties applicable to each type are directly editable in the Relationship Detail pane.
Table 14. Relationship Properties
Property Description
Position (Pos.) The display order of the relationship within the table ([n]).
Name The relationship name.
Code The relationship code.
Type
The relationship type:
▪ Parent/Child
▪ Sibling
Name Is
For Parent/Child relationships, what the Name applies to:
▪ Parent
▪ Child
Name 2 The second name for Parent/Child relationships.
Has Position The child has a position value associated with it (Yes/No)?
Has Required The record has a required value associated with it (Yes/No)?
Has Quantity The record has a quantity value associated with it (Yes/No)?
Parent Table The parent table for a Parent/Child relationship.
Child Table The child table for a Parent/Child relationship.
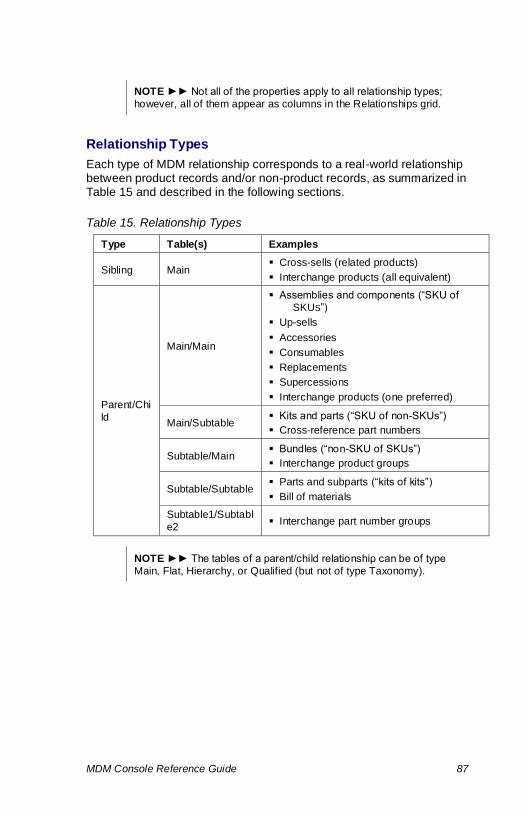
MDM Console Reference Guide 87
NOTE ►► Not all of the properties apply to all relationship types;
however, all of them appear as columns in the Relationships grid.
Relationship Types
Each type of MDM relationship corresponds to a real-world relationship between product records and/or non-product records, as summarized in Table 15 and described in the following sections.
Table 15. Relationship Types
Type Table(s) Examples
Sibling Main ▪ Cross-sells (related products)
▪ Interchange products (all equivalent)
Parent/Chi
ld
Main/Main
▪ Assemblies and components (“SKU of
SKUS”)
▪ Up-sells
▪ Accessories
▪ Consumables
▪ Replacements
▪ Supercessions
▪ Interchange products (one preferred)
Main/Subtable ▪ Kits and parts (“SKU of non-SKUs”)
▪ Cross-reference part numbers
Subtable/Main ▪ Bundles (“non-SKU of SKUs”)
▪ Interchange product groups
Subtable/Subtable ▪ Parts and subparts (“kits of kits”)
▪ Bill of materials
Subtable1/Subtabl
e2 ▪ Interchange part number groups
NOTE ►► The tables of a parent/child relationship can be of type
Main, Flat, Hierarchy, or Qualified (but not of type Taxonomy).

88 MDM Console Reference Guide
NOTE ►► An interchange is an alternate product that can be
substituted for a given product, both of which are main table product records in the MDM repository. If the interchange product records are
all completely equivalent, use a sibling product relationship to represent this information; if one of the group of interchange products
is the “preferred” product, use a parent/child relationship. By contrast,
a cross-reference is an alternate part number for a given product that can be used to find the main table product record but that is not itself a
product record; use a parent/child relationship (main/subtable) to represent this information. (When the cross-reference part numbers
come from a known set of alternate sources, you can instead use a qualified table to represent this information, which improves the ability
to search by the cross reference part number information.)
NOTE ►► Category-level relationships are defined within MDM Data
Manager in Taxonomy mode using matching sets.
NOTE ►► Product-level relationships can be used to store not only relationships between products but also between products and other
records of additional information, establishing the traditional one-to-many relationship between main table records and subtable records.
(See “Lookup and Non-Lookup Subtables – A Comparison” for a
discussion of alternative MDM repository structures.)
Sibling vs. Parent/Child Relationships
MDM supports two basic types of product-level relationships:
• Sibling. A sibling relationship relates a group of main table product records that are equivalent and/or interchangeable from some merchandising or structural standpoint.
NOTE ►► Sibling relationships are symmetric. In other words, if A, B, and C are in a single group of related sibling records, then A is related
to its siblings B and C, B is related to its siblings A and C, and C is
related to its siblings A and B.
• Parent/child. A parent/child relationship relates a group of records that are not equivalent, where one of them is the parent, and the rest of them are the children.
NOTE ►► Parent/child relationships are asymmetric. In other words,
if A, B, and C are in a group of related parent/child records and A is the
parent of B and C, then B is the child of A and the sibling of C, and C is
the child of A and the sibling of B.
Examples of sibling relationships include “cross-sells” and “interchange products.” Examples of parent/child relationships include “assemblies and components” and “kits and parts.”

MDM Console Reference Guide 89
Figure 24 illustrates both a sibling “cross-sells” relationship and an “assemblies and components” parent/child relationship.
Figure 24. Sibling and parent/child relationships
NOTE ►► The siblings in a sibling relationship are like the sibling
children in a parent/child relationship; the sibling relationship itself is
like a parent/child relationship without the parent.
NOTE ►► In the figure above, there could also be a third relationship
called “Products and Accessories” to store more cross-sell information.
Single- vs. Multi-Table Relationships
A sibling relationship always relates main table product records. By contrast, a parent/child relationship can relate records within a single table or between any two tables. Specifically, it can relate: (1) records within the products of the main table (e.g. “products and accessories”); (2) between product records of the main table and non-product records of a subtable in either direction (e.g. “kits and parts” [mainsubtable] or “bundles and products” [subtablemain]); (3) records within the non-products of a single subtable (e.g. “parts and subparts”); or (4) between non-product records of one subtable and non-product records of a different subtable (e.g. “interchange part number groups”).
Figure 25 illustrates two parent/child relationships between tables: a “bundles and products” relationship and a “kits and parts” relationship.
Products:
Bundles: SKU Name
Id Name 101 Washer Parts:
101 Bundle 1 202 Dryer Part No Name
202 Bundle 2 203 Refrigerator 101-01 Drawer
203 Bundle 3 204 Freezer 102-02 Shelf
301 Stove 103-03 Icetray
105 Microwave 204-04 Drum
Figure 25. Two different parent/child relationships

90 MDM Console Reference Guide
NOTE ►► From a relationship-centric standpoint, a parent/child
relationship represents a single relationship among a set of related records. By contrast, from a product-centric standpoint, a parent/child
relationship within a single table (e.g. main/main or subtable/subtable)
in effect represents two distinct relationships for each record: (1) the “parent” relationship of the parent/child relationship in which the record
is the parent (looking “down” at its children); and (2) the “child” relationship of the parent/child relationship in which the record is one of
the children (looking “up” at its parent).
Single- vs. Multi-Level Relationships
A parent/child relationship that relates records between two different tables (e.g. main/subtable, subtable/main, or subtable1/subtable2) is automatically a single-level relationship, in that you can traverse at most once from a parent in one table to its children in the other table.
By contrast, a parent/child relationship within a single table (e.g. main/main or subtable/subtable) can be multi-level, in that you can recursively traverse from a parent to its children, from a child to its children, and so on.
For example, for an “assembly and components” parent/child relationship within the main table of product records, a parent assembly record can be related to child component records, while a component that is itself an assembly becomes a parent that can be further related to child subcomponent records. Similarly, for a “parts and subparts” parent/child relationship within a subtable of parts records, a parent part record can be related to child subpart records, and then further related to subparts of the subparts.
Hybrid Relationships
The sibling and parent/child relationship types described above are the full set of product-level relationships explicitly supported by MDM.
However, if a relationship embodies both sibling and parent/child data, and/or the parent/child data relates records both within the main table and between the main table and one or more subtables, you can create multiple independent product relationships to store the data, and then combine them at the presentation layer into a hybrid relationship.
In this way, individual relationships act as building blocks that can be combined into complex hybrid relationships to represent many different multi-dimensional relationships between product records and/or non-product records, and can be navigated in a variety of ways.
For example, an “interchange” sibling relationship can be combined with a “cross-reference” parent/child relationship (main/subtable) to represent all of the different SKUs and part numbers that can be used to identify and locate a particular product or group of products.

MDM Console Reference Guide 91
NOTE ►► Alternatively, if the same set of cross-reference part
numbers always applies to each of the interchange products, then you can eliminate the need to maintain cross-reference part numbers
individually for each product by replacing the sibling and parent/child relationships above with two parent/child relationships from a subtable
of interchange groups (really, a “super-table”) to: (1) the main table
(the “interchange product groups” relationship); and (2) the part
number subtable (the “interchange part number groups” relationship).
Relationship Qualifiers
A product-level relationship allows you to store any of three additional pieces of information about each related sibling or child record:
• Position. The record’s position in the sequence (parent/child only).
• Required. Whether the record is required (Yes/No).
• Quantity. The quantity of the record (defaults to 1).

92 MDM Console Reference Guide
MDM Data Types
A traditional SQL DBMS has a standard set of relatively simple data types (such as text, integer, and real) that allow you store a single element of unstructured data in each field. Beyond knowing how to accept input of and properly store each type of data, SQL has no real understanding of the internal structure of each data element.
By contrast, an MDM repository supports a variety of compound and structured data types that, like the set of MDM table types, are specifically suited for managing information in a master data repository. The standard SQL data types for fields are shown in Table 16 and the extended MDM data types for fields are shown in Table 17. The data types for attributes, along with their corresponding field data types, are shown in Table 18.
NOTE ►► In the tables below, a bullet (•) in the column labeled “MV” means that the data type can be defined as multi-valued, so that a
single field or attribute can be used to store multiple values.
DATA INTEGRITY ►► Multi-valued fields and attributes make the
structure of an MDM repository dramatically simpler, more compact, and more searchable, by allowing you to store all the values
corresponding to a particular data element in the same place. The alternative requires creating multiple fields or attributes, in some cases
up to a maximum of one field or attribute for each possible value.
Table 16. Field Data Types (Standard SQL)
Data Type SQL
Server Oracle DB2 MaxDB HANA ASE
Text
Text field (<= 500
chars).
Nvarcha
r
Nvarcha
r2
Varch
ar Varchar
Nvarcha
r Nvarchar
Text Large
Text field (>
500 chars).
Text CLOB CLOB Long
Unicode CLOB Text
Integer
4-byte
integer field.
Int Number Int Fixed
(10) Int Int
Real
4-byte real
field.
Real Number Float Float
(16) Real Real
Real8
8-byte real
field.
Real Number Float Float
(38) Real Real

MDM Console Reference Guide 93
Data Type SQL
Server Oracle DB2 MaxDB HANA ASE
TimeStamp
DateTime
field.
DateTim
e Date
Timest
amp
Timesta
mp
Timesta
mp
DateTim
e
Boolean
Two-valued
field.
Bit Number Smalli
nt Fixed (1) TINYINT TINYINT
Table 17. Field Data Types (MDM Extended)
Field Data Type MV Description
Text Normalized
Text field with “special” (non-alphanumeric)
characters removed for searching/sorting (always
displays original).
Name
Text field with internal structure for storing parts of
a name
(prefix, first, middle, last, suffix).
Log
Text Large field with internal structure for managing
multiple timestamped blocks of text within a single
field.
AutoID Integer field that MDM automatically increments.
Currency
Real8 field displayed with a currency symbol.
Note: The maximum field length is 15 characters. MDM will not save numbers that are longer,
irrespective of the maximum number of decimal places set for the Currency field in the MDM
Console.
GM Time TimeStamp field that is adjusted to a particular time
zone.
Measurement ● Real field with an associated unit of measure.
Literal Date TimeStamp field that ignores the time part.
Literal Time TimeStamp field that ignores the date part.
Create Stamp TimeStamp field that MDM automatically sets with
the date/time of record creation.
Time Stamp
TimeStamp field that MDM automatically updates
with the date/time of modification when any of the
fields being tracked are updated.
User Stamp
Text field that MDM automatically updates with
name of user who makes the change when any of
the fields being tracked are updated.

94 MDM Console Reference Guide
Field Data Type MV Description
Mask ●
Virtual field that stores an enumeration of main
table records. It is never displayed but is used for
searching.
Lookup [Flat] ● Field whose value(s) are a lookup into a flat table.
Lookup
[Hierarchy] ●
Field whose value(s) are a lookup into a hierarchy
table.
Lookup
[Taxonomy]
Field whose single value is a lookup into a
taxonomy table.
Lookup
[Qualified] ●
Field whose values are a lookup into a qualified
table.
Lookup [Image] ● Field whose value(s) lookup into the Images table.
Lookup [Text
Block] ●
Field whose value(s) lookup into the Text Blocks
table.
Lookup [Copy
Block] ●
Field whose value(s) lookup into the Copy Blocks
table.
Lookup [Text
HTML] ●
Field whose value(s) lookup into the Text HTMLs
table.
Lookup [PDF] ● Field whose value(s) lookup into the PDFs table.
Lookup [Sound] ● Field whose value(s) lookup into the Sounds table.
Lookup [Video] ● Field whose value(s) lookup into the Videos table.
Lookup [Binary
Object] ●
Field whose value(s) lookup into the Binary Objects
table.
Table 18. Attribute Data Types
Attribute Data
Type
M
V Corresponding MDM Field Type
Text ● Lookup [Flat]
Numeric ● Measurement
Coupled Numeric ● n/a
NOTE ►► In the tables above, a bullet (•) in the column labeled “MV” means that the data type can be defined as multi-valued, so that a
single field or attribute can be used to store multiple values.
TIP ►► A regular Text field is faster than a Text Large field; only use
a Text Large field if you are certain that some values will require over
500 characters.
NOTE ►► Previous versions of MDM allowed a maximum Text field
width of 4000. This has been reduced to 500 due to database storage
and Unicode-encoding issues

MDM Console Reference Guide 95
NOTE ►► A Text Normalized field stores the actual text value, but uses the normalized value for sorting and searching. The normalized
value is an upper-case version of the original with non-alphanumeric
characters removed (includes a-z, A-Z, and 0-9 from original value).
Dimensions and Units
As noted in the tables above, MDM has a compound data type for storing physical measurements that combines a numeric value with a unit of measure. It allows you to associate a physical dimension with a measurement field or numeric attribute, and then to assign to every numeric value a unit of measure chosen from the list of units applicable to that dimension. For more information, see Managing Units of Measure.
FIELDS VS. ATTRIBUTES – A COMPARISON
A main table field is created in MDM Console and applies to all of the records in an MDM repository. By contrast, an attribute is created and linked in MDM Data Manager in Taxonomy mode and applies just to records in categories to which the attribute is linked.
Table 19 highlights the similarities and differences between fields and attributes that affect how they appear and are used within MDM.
Table 19. A Comparison of Fields and Attributes
Field Attribute
General
Created in MDM Console. Created in MDM Data Manager in Taxonomy mode.
Represents a schema change, so the MDM repository must be stopped to add
a field.
Does not represent a schema change; the MDM repository must be started to link an
attribute.
Category-independent; applies to all main table records.
Category-specific; applies just to main table records in categories to which the attribute is linked; cannot be linked to the taxonomy root.
Fields appear in schema order and cannot be hidden in the Record Detail
tab.
Attributes appear in priority order in the Record Detail tab – and can be hidden
entirely – on a per category basis based on the link priority.
Included in both the Records grid and Record Detail tab; always of interest
even with large record sets.
Not included in Records grid; included in Record Detail tab only for the selected
records; generally of interest only when you select a single or several main table records.
Text Values (not limited to a set of specific values)
Text field; used to permit data entry of a unique value for each record.
No corresponding attribute type that permits entry of a unique value for each record.

96 MDM Console Reference Guide
Text Values (limited to a relatively small set of specific values enumerated in advance)
Lookup field into a flat table; pick list forces user to choose from a set of specific lookup values during data entry.
Text attribute (like a “mini” lookup table); pick list forces user to choose from a set of specific text values during data entry.
The lookup table record corresponding to each lookup value can contain any
number of user-defined fields.
Each text value consists of: (1) a fixed-width Text field for the text value itself; (2) a Text
Large field for the text value description; and (3) a single-valued Image field for the text
value image.
Supports both drilldown search and free-form search.
Supports drilldown search; does not support free-form search.
Numeric and Measurement Values
Numeric or measurement field. Numeric attribute with or without a dimension.
Supports free-form search; does not support drilldown search.
Supports drilldown search using a pick list of unique numeric values; does not support free-form search.
Coupled Numeric Values
No field type for representing two-dimensional data.
Coupled numeric attribute; used for representing two-dimensional data.
TIP ►► From a design standpoint, sparseness of data is less
important than whether the data item applies to all main table records
(should be a field) or just some subset (should be an attribute). For example, you may not have a Weight value for every product, but
weight certainly applies to every product and therefore should most
likely be a field.

MDM Console Reference Guide 97
MDM Tuples
An MDM tuple is a basic, all-purpose, data-modeling building block that has many uses and capabilities for structuring and storing MDM data.
NOTE ►► Tuples that include lookups subsume, extend, and
generalize other specialized MDM structures such as qualified lookup
tables and parent/child relationships.
Features and benefits of MDM tuples include:
• Custom types. Defines custom composite data type consisting of a set of multiple fields (a “tuple”).
• Grouping. Groups related fields together into a reusable object; like a table definition (but without an instance of the table).
• Reusability. Unlike a table definition, the named set of fields can be
defined once and reused many times in multiple places.
• Properties. Can attach validations, security provisions and other properties to the tuple definition [NYI].
• Encapsulation. Any change to the tuple structure or to its associated properties is immediately propagated to every usage.
• Composite anything. Complements existing composite types (e.g.
Measurement and Coupled Numeric) with a custom composite type.
• Qualified lookups. Can be used to create a fully qualified reference
from the records of one table to the records of any other table type.
• Parent/child relationships. Can be used to model parent/child relationships with full support for relationship qualifiers.
• Hierarchy management. Can be used to model arbitrarily complex hierarchical main entity relationships, including support for qualifiers.
• XML compatible. Provides a natural way of representing an XML
schema definition and storing the corresponding XML data.
• Referential clarity. Appears as a field in the parent record, exposing the parent/child association between records in multiple tables.
• Nested structures. Stores nested private subrecords that are owned by and do not exist outside of the parent record (i.e. “containment”).
• Deep nesting. Can include a reference to another tuple for arbitrarily
deep multi-level nesting (e.g. Plant > Address > Contact > Phone).
• One-to-many relationships. Tuple reference can be multi-valued
(e.g. multiple addresses > multiple contacts > multiple phones).
NOTE ►► The most notable feature of tuples is that they allow you to
create nested structures, including deeply nested multi-level structures
of arbitrary depth, with a one-to-many relationship at every level.

98 MDM Console Reference Guide
WHAT IS A TUPLE?
Webster’s New Millennium™ dictionary defines tuple as follows:
tuple. noun. 1. in a database, an ordered set of data constituting a record; 2. a data structure consisting of comma-separated values passed to a program or operating system.
Elaborating on (1) as it relates to MDM, a tuple is effectively a record template that groups together and names a set of related fields into a reusable object or type definition that describes or composes a particular object or type.
For example, an Address tuple might consist of the following fields:
Address
Street City State Zip Country
While capturing the simple essence of a tuple, the example above is not particularly illustrative of the extreme versatility of tuples. So let’s start by taking a step back and looking at tuples in the context of tables, and then compare and contrast them with other MDM structures.
TUPLES AND TABLES
Recall that a table is comprised of a set of records, where each record consists of a set of fields. Moreover, the definition of the table gives the table its name, defines the set of fields included in each record, gives each field a name and type, and finally, creates a storage container for each of the records.
Consider the Customers table below, in which each customer has an Id, a Name, and an Address consisting of five additional fields:
Customers
Id Name Street City State Zip Country
In the context of tables, a tuple is like a table without an instance of the table itself; more precisely, the definition of a tuple is like the definition of a table that effectively groups together and names a set of related fields (where each record conforms to that type definition), but without the actual storage container for the records of the table.
And whereas the tuple definition that is implicit in the definition of a table cannot be reused, a tuple can be defined once and reused many times within multiple tables across a repository.
Address

MDM Console Reference Guide 99
Single-Valued Tuple Fields
Note that both table and tuple definitions create a template for the fields of the corresponding table or tuple records, respectively. But whereas you can create and store table records immediately after the table is defined, you can create and store tuple records only after the tuple is subsequently referenced as a field in the definition of a real table.
If we were to redefine the Customers table above using the Address tuple, it might look something like this:
Customers
Id Name Address
Street City State Zip Country
NOTE ►► A single-valued tuple reference does not directly add any
data modeling power to MDM per se. However, it does offer: (1) reusability, so that unlike a table definition, a tuple can be defined once
and reused many times; and (2) encapsulation, so that subsequent
changes to the tuple definition or its associated properties are
immediately propagated to every use of the tuple.
Multi-Valued Tuple Fields
In the example above, the reference to the Address tuple is single-valued. If Address were instead defined as multi-valued, the Customers table could then store multiple Address records per Customer record, creating a one-to-many relationship between Customer records and its private Address records.
Customers
Id Name Address
Street City State Zip Country
NOTE ►► A multi-valued tuple field is like a private table-within-a-table, in that each record of the referencing table can “contain” multiple
tuple records, allowing MDM to express a one-to-many relationship in
a very natural way. Alternatively, if you need a fixed number of instances, you can simply include multiple references to the same
tuple in a single record (e.g. Billing Address and Shipping Address).

100 MDM Console Reference Guide
TUPLES AS CUSTOM COMPOSITE DATA TYPES
Recall that in addition to the traditional SQL data types (e.g. Integer, Text, Date), MDM also supports two predefined composite data types:
• Measurement fields and attributes. Each measurement consists of two components: (1) a numeric value; and (2) a unit of measure.
• Coupled numeric attributes. A coupled numeric attribute is a composite data type that consists of pairs of measurement values.
In the context of these predefined composite data types, a tuple in MDM is just a custom-defined composite data type, where you can create and name a type comprised of a precise set of participating fields.
NOTE ►► Tuples generalize the concept of composite data types
(e.g. coupled numeric tupled anything).
TUPLES AND EXISTING MDM STRUCTURES
MDM has historically included many different data modeling structures, each of which was well-suited and optimized for a different set of data modeling challenges.
Each structure had its own particular – and often unique – properties and semantics around definition, data entry, navigation, and search. And each was relatively rigid and suffered from both a lack of generality and various limitations on when it could be used.
By contrast, the tuple data structure is a basic building block that subsumes, completely generalizes, and dramatically enhances these structures, as summarized in Table 20 and more fully described in the following sections.
Table 20. Tuples vs. Existing MDM Structures
Capability Tuples Qualified Parent/Child Hierarchy Tables
Hierarchical main table entity •
Include qualified information • •
Qualify reference to any table •
Reference records of same table • • •
Reference records of different table • • •
Multi-level nesting • • •
Bidirectional navigation • •
Bidirectional visibility • •
NOTE ►► Since the unique capabilities of each existing structure
cannot be mixed-and-matched, users were often forced to compromise
by choosing an imperfect “best fit” for each data modeling challenge.

MDM Console Reference Guide 101
Qualified Lookups
A qualified lookup allows you to reference the records of a qualified lookup table, and also to further “qualify” the reference by storing additional link-specific information in fields known as qualifiers.
By contrast, including the lookup to what would previously have been the qualified lookup table among the fields of a tuple rather than adding qualifiers to the definition of the lookup table allows you to:
• Extend to all lookup tables the specialized qualifier support
previously offered only by qualified lookup tables.
• Create a qualified reference to any normal lookup table, not just one explicitly and already defined as a qualified lookup table.
• Share the lookup table among different referencing tuple fields, each with a different set of qualifiers.
Finally, in the degenerate case of no applicable table of lookup records, a tuple without lookups can store a set of nested “link-specific” records without forcing the data modeler to create a “phantom” lookup table containing a single record and a single non-qualifier field.
NOTE ►► Tuples generalize the concept of qualified lookup tables
(e.g. qualified lookup qualified anything). And whereas qualified lookup tables support just a single level of nesting, tuples support
arbitrarily deep multi-level nesting (see “Tuples“for more information).
Parent/Child Relationships
Parent/child relationships are extremely flexible and allow you to store references between records of any tables. Like a lookup without pick-list search and data entry, they support several unique features:
• References to records of the same table in addition to those of
another table.
• References to main and other non-lookup subtables that contain a
very large number of records.
• Nested multi-level relationships of arbitrary depth in addition to single-level relationships.
• Bidirectional navigation both from the parent to the child and from the child to the parent.
• Bidirectional visibility of the relationship both from the parent record
and from the child record.
NOTE ►► Despite their flexibility, relationships are hard to navigate
and impossible to search, and can only be qualified with optional
Required and Quantity fields rather than an arbitrary set of qualifiers.

102 MDM Console Reference Guide
By contrast, including one or more lookups into the same or another table among the fields of a tuple provides an alternative for modeling parent/child relationships, and allows you to include link-specific “qualified” information on every pair of related records.
NOTE ►► Tuples are an alternative to parent/child relationships that
add full qualifier support but do not offer the bidirectional navigation nor
bidirectional relationship visibility offered by parent/child relationships.
Hierarchical Main Table Entities
Recall that hierarchy tables within MDM allow you to create parent/child relationships between the records of a single lookup table, and then to create a single- or multi-valued lookup into that table.
However, hierarchy tables offer only limited support for trees rather than arbitrary hierarchies, with specialized and limited semantics (e.g. single parent; no cycles), parent/child relationships only between the same type of entity, and no ability to store link-specific information.
And most importantly, hierarchy tables provide support only for hierarchy lookups rather than for hierarchical main table entities.
By contrast, MDM tuples allow you to model flexible hierarchies and networks, complementing hierarchy lookups and tables with generalized support for hierarchical main table entities.
Specifically, by including one or more lookups into the same or another table among the fields of a tuple, you can express composite and arbitrarily complex relationships between similar and dissimilar business entities and also attach link-specific “qualified” information to every set of related records.
NOTE ►► Tuples generalize the concept of hierarchy management
(trees fully qualified hierarchies and networks) and extend support
for hierarchy lookups to support for hierarchical main table entities.
NOTE ►► You can use either of two alternative approaches to
modeling a hierarchy: (1) include a tuple with a lookup within the primary record (e.g. Org Chart); or (2) create a separate “links” table
with multiple lookups and other fields (e.g. BOM).
NOTE ►► Tuples offer generalized hierarchy support only from a data
storage perspective. However, the specialized hierarchy semantics, functionality, and behavior (e.g. visual UI materialization, tree-view
navigation, hierarchy manipulation, import and export) are NYI.

MDM Console Reference Guide 103
TUPLES AND XML
Whereas XML is notoriously inefficient with respect to storage and searching, tuples provide an efficient way of representing an XML schema definition and storing the corresponding XML data within MDM. In particular, the natural correlation between tuples and XML includes:
• Complex types. The definition of the tuple corresponds to the
complex type definition within an XML schema.
• Repeating nodes. A multi-valued reference to a tuple corresponds to an element that may occur more than once (maxOccurs > 1).
• Hierarchy. The multi-level nested hierarchy of tuple records corresponds to the hierarchy of an XML schema.
TUPLES AND MULTI-TABLE RELATIONSHIPS
In some ways, tuples are really just another manifestation of the traditional primary key / foreign relationship between the records of two tables, where the records of a primary table control the lifetime and ownership of the records in a secondary table.
Specifically, when the records of a secondary table are owned by and private to the records of a primary table, the relationships between the records of the two tables are represented by primary key / foreign key relationships between them.
Consider the Customer/Address relationship from the previous example represented with the traditional relational approach:
Customers
Id Name
Addresses
Cust Id Street City State Zip Country
Unfortunately, the traditional relational approach to representing nested records has two problems: (1) the relationship itself is obscured, since the relationship exists as a foreign key field of the child record rather than as a field of the parent record; and (2) users see a “decomposed” view of all the records of one table or all the records of the other table.
By contrast, tuples manifest this relationship in a way that is more consistent with the semantic rather than relational model, highlighting the relationship between parent records and child tuple subrecords.
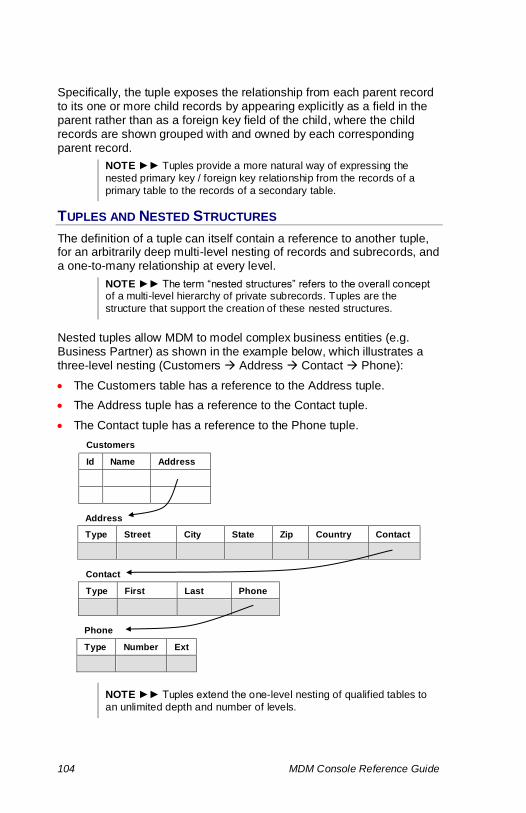
104 MDM Console Reference Guide
Specifically, the tuple exposes the relationship from each parent record to its one or more child records by appearing explicitly as a field in the parent rather than as a foreign key field of the child, where the child records are shown grouped with and owned by each corresponding parent record.
NOTE ►► Tuples provide a more natural way of expressing the
nested primary key / foreign key relationship from the records of a
primary table to the records of a secondary table.
TUPLES AND NESTED STRUCTURES
The definition of a tuple can itself contain a reference to another tuple, for an arbitrarily deep multi-level nesting of records and subrecords, and a one-to-many relationship at every level.
NOTE ►► The term “nested structures” refers to the overall concept of a multi-level hierarchy of private subrecords. Tuples are the
structure that support the creation of these nested structures.
Nested tuples allow MDM to model complex business entities (e.g. Business Partner) as shown in the example below, which illustrates a three-level nesting (Customers Address Contact Phone):
• The Customers table has a reference to the Address tuple.
• The Address tuple has a reference to the Contact tuple.
• The Contact tuple has a reference to the Phone tuple.
Customers
Id Name Address
Address
Type Street City State Zip Country Contact
Contact
Type First Last Phone
Phone
Type Number Ext
NOTE ►► Tuples extend the one-level nesting of qualified tables to
an unlimited depth and number of levels.

MDM Console Reference Guide 105
SHARING TUPLE SUBRECORDS
Typically, each child tuple subrecord is private to the single parent record that owns it. However, if you want to be able to reference each tuple subrecord from multiple parent records, you must explicitly store the tuple subrecords as records in an actual table, and then reference them from the records of the parent table.
The previous example of Customers referencing Addresses would then contain two tables (Customers and Addresses) rather than a Customers table and an Address tuple.
Customers
Id Name Address
Addresses
Type Street City State Zip Country Contact
TUPLES AND THE RELATIONAL MODEL
Recall from earlier sections that tuples are a generalized form of custom composite data types, and that tuples can be used to model various “exotic” data structures, such as flexible hierarchies and networks.
When using tuples to model these data types and structures, however, consider that tuples can model only their data storage aspects but not necessarily their specialized semantics and associated functionality.
For example, a measurement is more than just a composite data type comprised of a numeric value and a unit of measure. In fact, it features built-in support for various semantics, including dimension-specific pick lists of units, unit conversion, sorting across units, unit synonyms, and parsing of inbound string values (e.g. “3 inches”). Similarly, hierarchical structures modeled using tuples require a layer of additional semantics that allow you to conveniently materialize, navigate, manipulate, import, and export the hierarchy.
NOTE ►► In essence, tuples are just a way to access the pure
relational aspects of a relational DBMS, with the added ability to reuse the definition so that the tuple can be used in multiple tables across a
data model. And just as a relational DBMS: (1) does not provide semantics around the relationships it defines, neither do tuples; and (2)
cannot always model data efficiently (and hence the need for other types of databases), so too tuples are not always going to be efficient
(and hence there is a need for other native types)

106 MDM Console Reference Guide
TUPLE TERMINOLOGY
The various terms associated with tuples are defined in Table 21.
Table 21. Tuple Terminology
Term Definition
Tuple A group of related fields.
Tuple definition A named tuple definition (e.g. Address).
Tuple type The named type of a field of type tuple.
Tuple field A field of type tuple that contains tuple records.
Tuple instance The set of tuple records resulting from a tuple field.
Tuple member A member of a tuple.
Tuple record One of the subrecords of type tuple residing in the tuple instance.
Tuple value The set of values comprising a single tuple record.
Multi-valued tuple A multi-valued field of type tuple.
SUPPORTED FIELD TYPES
The field types supported in tuple definitions are shown in Table 22.
Table 22. Supported Field Types in Tuple Definitions
Supported Not Supported
Text / Text Large Normalized Text
Integer / Real / Boolean Log
GMTime / Literal Date / Literal Time Measurement (multi-valued)
Measurement (single-valued) Lookup [Taxonomy]
Lookup [Main] (single and multi-valued) Lookup [Qualified]
Lookup [Flat] (single and multi-valued)
Lookup [Hierarchy] (single and multi-valued)
Lookup [object] (single and multi-valued)
Tuple (single and multi-valued)
Calculated / Assignment
AutoID
CreateStamp / TimeStamp / UserStamp
Currency
TIP ►► You can simulate a multi-valued measurement within a tuple by: (1) defining a tuple with a single-valued measurement field; and
then (2) creating a multi-valued tuple field that references it.

MDM Console Reference Guide 107
TUPLE WORKFLOW
The process of incorporating tuples into an MDM repository consists of the following steps:
1. Add a tuple definition to the repository, as described in “Adding and Deleting Tuples”.
2. Add tuple members to the tuple definition, as described in ”Adding and Deleting Tuple Members”.
3. Add fields of type Tuple to tables in your repository, as described in “Adding and Modifying Fields”.
4. Enter tuple values for your records through an MDM client application such as MDM Data Manager or MDM Import Manager.
NOTE ►► Instructions for populating records with tuple values are not
included in this reference guide; instead, consult the appropriate MDM
client documentation.


109
PART 5: REPOSITORY MAINTENANCE
This part of the reference guide describes how to create and delete MDM repositories, add, delete, and modify repository tables, and add, delete, and modify repository fields.


111
Working with MDM Repositories
The following sections describe the various operations for creating, deleting, and modifying the properties of an MDM repository.
CREATING AN MDM REPOSITORY
When you first create a new MDM repository, MDM automatically creates a repository with the tables and fields shown in Table 23.
Table 23. Default Tables of a New MDM Repository
Type Table Name Notes
Main ▪ Products
▪ Includes a Name field of type Text
▪ Includes a Category field of type Taxonomy [Lookup]
Taxonomy ▪ Categories ▪ Includes a Name field of type Text
Object
▪ Images ▪ Sounds
▪ Videos ▪ Binary Objects ▪ Text Blocks
▪ Copy Blocks ▪ Text HTMLs ▪ PDFs
Special
▪ Image Variants ▪ Masks ▪ Families ▪ Relationships
▪ Workflows ▪ Named Searches ▪ Tuples
▪ Data Groups ▪ Validation Groups
▪ Includes a Name field of type Text ▪ Family Field set to the main table Category field ▪ Includes a Name field of type Text
▪ Includes a Name field of type Text
▪ Does not appear anywhere in MDM Console ▪ Does not appear anywhere in MDM Console
Admin
▪ Roles ▪ Users
▪ Connections ▪ Change Tracking ▪ Remote Systems
▪ Ports ▪ Links
▪ XML Schemas ▪ Reports
▪ Includes an Admin role
▪ Includes an Admin user with all privileges ▪ By default, no changes are tracked
▪ Includes an MDM remote system
Once the new repository is created, you can begin customizing the repository to match your design.
NOTE ►► Creating an MDM repository is a password-protected
operation which requires you to enter the password for the Master Data Server, if you have not already done so during the current MDM
session (see “Master Data Server Security”).

112 MDM Console Reference Guide
To create a new MDM repository:
1. In the Console Hierarchy tree, right-click on a Master Data Server node
and choose Create Repository from the context menu, or select the
tree node and choose Repositories > Create from the main menu.
TIP ►► If the top-right pane is currently displaying the list of MDM
repositories, you can also right-click in the grid and choose Create from
the context menu.
2. MDM opens the Create MDM Repository dialog shown in Figure 26.
Figure 26. Create MDM Repository dialog (1 of 2)
3. Select the DBMS Server for the MDM repository from the drop-down
list.
TIP ►► To reference a SQL Server named instance, append a
backslash (\) and the instance name after the machine name above.
TIP ►► To use Windows authentication, leave the Login empty
(requires the SQL SRVR Allow Windows Authentication Mode
parameter in the Master Data Server Settings file (mds.ini) to be set to
True).
TIP ►► To remove an entry from the drop-down list of DBMS Servers,
make it visible in the closed drop-down control and press Del.
TIP ►► The drop-down list of DBMS Servers includes only those servers that you have previously added to the list and will usually
include for selection all the servers to which you might want to connect.
If the desired server is not in the list, click the “…” (browse) button to open the Select DBMS Server dialog, and select from the list of DBMS
Servers known to MDM. If the desired DBMS Server is not in this list
either, then click the Add button in the Select DBMS Server dialog to open the Add DBMS Server dialog, and select from the list of servers
(or type in a new name in the text entry control at the top of the dialog),
and choose the DBMS type from the drop-down list.

MDM Console Reference Guide 113
4. Enter the appropriate DBMS login (which must have system
administrator privileges) and password for the selected DBMS Server
and click Next.
5. MDM disables the DBMS Server, Login, and Password fields and
enables the Repository Name and Port fields, as shown in Figure 27.
Figure 27. Create MDM Repository dialog (2 of 2)
TIP ►► You can click the Options button to open the Repository Options dialog to: (1) change the number of partitions given to the new
MDM repository from the default currently set for the Default Partitions
DBMS setting; and/or (2) create a subset or schema-only repository
(see “Setting ” for more information about the repository options).
6. Enter the name for the new MDM repository.
NOTE ►► The repository name must begin with an alpha character
and can be as long as the data entry field.
7. If necessary, edit the TCP/IP port number in the Port text box. This would be necessary only if there are multiple MDM repositories, or if
the default port number and/or two numbers following it in sequence are used by some other program on the host computer. Your Network
Administrator can provide an alternate port number, if needed.
8. Click Finish to create the MDM repository.
9. MDM creates the new MDM repository and adds it to the Console Hierarchy tree. The new repository automatically includes the tables
and fields listed in Table 23.
To create a new MDM repository from an MDM archive:
1. In the Console Hierarchy tree, right-click on the Master Data Server on
which you want to restore the repository and choose Unarchive
Repository from the context menu, or select the tree node and choose
Repositories > Unarchive from the main menu.
TIP ►► If the top-right pane is currently displaying the list of Master Data Servers, you can also right-click on the Master Data Server in the
grid and choose Unarchive Repository from the context menu.

114 MDM Console Reference Guide
MDM opens the Unarchive MDM Repository dialog.
Figure 28. Unarchive MDM Repository dialog (server node / 1 of 2)
NOTE ►► The Unarchive MDM Repository dialog from a Master Data Server node is similar to the Create MDM Repository dialog, with the
Port field replaced by the Archive field.
2. Select the DBMS Server for the repository from the drop-down list.
TIP ►► To reference a SQL Server named instance, append a
backslash (\) and the instance name after the machine name above.
TIP ►► To use Windows authentication, leave the Login empty
(requires the SQL Server Allow Windows Authentication
Mode parameter in the Master Data Server Settings file (mds.ini) to be
set to True).
TIP ►► To remove an entry from the drop-down list of DBMS Servers,
make it visible in the closed drop-down control and press Del.
TIP ►► The drop-down list of DBMS Servers includes only those
servers that you have previously added to the list and will usually include for selection all the servers to which you might want to connect.
If the desired server is not in the list, click the “…” (browse) button to
open the Select DBMS Server dialog, and select from the list of DBMS Servers known to MDM. If the desired DBMS Server is not in this list
either, then click the Add button in the Select DBMS Server dialog to
open the Add DBMS Server dialog, and select from the list of servers (or type in a new name in the text entry control at the top of the dialog),
and choose the DBMS type from the drop-down list.
3. Enter the appropriate DBMS login (which must have system
administrator privileges) and password for the selected DBMS Server
and click Next.
4. MDM disables the DBMS Server, Login, and Password fields and enables the Repository Name and Archive fields, as shown in Figure
29.

MDM Console Reference Guide 115
Figure 29. Unarchive MDM Repository dialog (server node / 2 of 2)
TIP ►► You can click the Options button to open the Repository
Options dialog to: (1) change the number of partitions given to the new
MDM repository from the default currently set for the Default Partitions DBMS setting; and/or (2) create a subset or schema-only repository
(see “Setting ” for more information on repository options).
5. MDM places “Type or select a repository name” into the Repository
Name drop-down list. Type the name for a new MDM repository or
select an existing repository from the drop-down list.
NOTE ►► The repository name must begin with an alpha character
and can be as long as the data entry field.
6. Select the archive file from the drop-down list.
NOTE ►► MDM archive files are retrieved from the directory specified
by Archive Dir in the mds.ini file.
7. Click Finish to unarchive the repository.
8. If the repository name already exists, MDM prompts you to confirm that
you really want to overwrite the existing repository. Click Yes to
overwrite the repository.
9. MDM restores the repository from the archive file, overwriting the
existing repository or creating a new repository. While the repository is being unarchived, MDM changes the repository status icon (shown at
left) to two gray dots, and reports the progress of the unarchive in the
Status field for the existing repository in the Repositories pane.
NOTE ►► An existing repository that is not mounted or a new
repository created as a result of the unarchive operation is
automatically mounted prior to the unarchive operation.
10. When the unarchive process is complete, MDM displays a message
dialog indicating whether the unarchive was successful, as shown in
Figure 30.

116 MDM Console Reference Guide
Figure 30. Repository Unarchive Complete dialog
11. To view the report, click Yes. MDM opens the Report Detail dialog to
view the XML report.
SETTING NUMBER OF REPOSITORY PARTITIONS
When an MDM Console operation is about to create a new MDM
repository as a result of a Create, Duplicate, or Unarchive operation, you
can click the Options button in the applicable dialog to specify the number of repository partitions.
Repository Partitions
A repository partition is simply the underlying physical database in which the repository is stored. By default, MDM gives a new MDM
repository the number of partitions currently set for the Default Partitions
DBMS setting (one, two, or four).
You can change the number of partitions by selecting the applicable radio button in the Repository Options dialog.
TIP ►► The Set Default button in the Repository Options dialog lets
you change the default number of partitions created for a repository to
the number selected in the dialog.
Breaking an MDM repository into multiple partitions has two main benefits:
• Different parts of an MDM repository change at different rates. Typically, the Images table changes much more slowly than other tables. You can partition an MDM repository so that different partitions can be assigned to different operating system or DBMS backup schedules.
• As an MDM repository gets larger, multiple partitions allow you to store and backup the different partitions onto different drives and/or machines.
Keep in mind that a single partition eliminates certain risks that multiple partitions have. In particular, a single partition is likely to have one backup set. Having multiple partitions increases the likelihood that, upon backup or restore, you might inadvertently mix non-matching partitions and corrupt the MDM repository. It is especially important to maintain multiple-partition backup sets with care.

MDM Console Reference Guide 117
CAUTION ►► Because orphaned records may be created when
restoring non-matching backup sets from a multi-partitioned MDM repository, it may be safer to have a one-partition repository. The IS
department or System Administrator needs to make this decision.
Table 24 shows the parts of an MDM repository that are placed into each partition, and how each one is named, depending on the number of partitions.
Table 24. Partition Contents and Names
# of Partitions Partition Partition Names1
1 Entire MDM repository repositoryName_Mnnn
2 Main + Thumbnails repositoryName_Mnnn
Originals + Variants repositoryName_Bnnn
4
Main repositoryName_Mnnn
Thumbnails repositoryName_Tnnn
Originals repositoryName_Onnn
Variants repositoryName_Vnnn
1 ”nnn” is a sequence number.
The main database (for SQL Server) or schema (for Oracle or DB2) partition names are derived from the MDM repository name. “Non-filename-friendly” characters (non-alphanumeric characters) are removed to create a base name and the DBMS is examined to determine if that base name already exists. If so, the sequence number in the suffix is incremented. For example, a single-partition MDM
repository named Acme Widgets would be named AcmeWidgets_M000. If a new repository is created on the same DBMS with the name *Acme*Widgets*, the new database/schema would be named AcmeWidgets_M001.
MODIFYING REPOSITORY PROPERTIES
To view and edit repository properties:
1. In the Console Hierarchy tree, right-click on the MDM repository and
choose Properties from the context menu, or choose Repositories >
Properties from the main menu.
NOTE ►► You can modify properties of any mounted repository
(running or stopped).
2. MDM opens the Repository Properties dialog.
3. Click in the Value column for the repository property you want to
change.

118 MDM Console Reference Guide
4. If the Value cell is a drop-down list, select the desired option. If the
Value cell is an edit field, double-click inside the field and replace the
existing value with a new value.
5. Click OK to save any new values and close the dialog.
The properties for each MDM repository are listed in Table 25.
NOTE ►► The default setting for each property is noted in bold.
Table 25. Repository Properties
Property Description
Layouts These properties set the default values for various layout
options within MDM Publisher.
Default unit
The default unit for layout measurements:
▪ inch
▪ point
▪ pica
▪ mm
▪ Q ▪ didot
▪ cicero
Default image
bounding box
width
The default width of the box surrounding images in MDM
Publisher (in pixels). Default is 100.
Default image
bounding box
height
The default height of the box surrounding images in MDM
Publisher (in pixels). Default is 100.
Default image
DPI
The default resolution of images in MDM Publisher (in
dots per inch). Default is 150.
Image These properties set the type of images allowed in the
repository.
Prohibit
Photoshop
images
(Yes/No). Whether Photoshop images are prohibited in
the repository. A Photoshop Image is an image that either prefers or actually requires the use of Photoshop for
processing. Photoshop images include all CMYK images, and those with the following extensions: .ai, .eps, .ept,
.pcd, .ps, .psd.
Use only
Photoshop for
processing
(Yes/No). If Photoshop images are allowed, whether MDM must use Photoshop to process them, or whether it can
instead use another processing engine.
Allow invalid
images
(Yes/No). Whether invalid images are permitted in the repository. An image is invalid if MDM cannot generate a
thumbnail for it.
PDF These properties set the type of PDFs that are allowed
into the MDM repository.

MDM Console Reference Guide 119
Property Description
Allow invalid
PDFs
(Yes/No). Whether invalid PDFs are permitted in the
repository. A PDF is invalid if MDM cannot generate a
thumbnail for it
Matrix Product This property sets Matrix product support for the
repository.
Enable Matrix
product support
(Yes/No). Whether the repository supports the Matrix
product.
Import This property sets import-related properties for the
repository.
Use CSV format
to import
delimited text
files
(Yes/No). Whether standard CSV formatting rules are
applied when importing delimited text files into this
repository.
Skip Unchanged
Records
(Yes/No). If set to Yes, records that are updated by an
import do not receive a change timestamp if their field, cached qualifier, or tuple field data values are not
changed by the import. Import- and syndication-tracking timestamps are also skipped. Skipped records are still
recorded in the Import log.
Note: Attributes, non-cached qualifiers, and key mapping values are not covered by this parameter, and any import
to these data types triggers a record change timestamp, whether the data values in the record actually change as a
result of the import.
Bulk Import Silo (On/Off). Dramatically increases import performance by
optimizing SQL access methods.
Safe Silo Mode
(Yes/No). When the Bulk Import Silo option is set to On, some import operations might not work correctly due to
the way that the silo delays and rearranges database operations. When Safe Silo Mode is set to Yes, the
database silo performs database operations in a safer but
slower way to enable the import job to import successfully.
Expressions use
grapheme based
positions
(Yes/No). Whether expression functions related to string
positions (Length, Left, Right, Find, Mid, etc.) use
grapheme-based positions. If No, these expressions use
code point based positions.
Prepend ‘Copy of’ on
duplicate record
(Yes/No). Whether MDM prepends the text, ‘Copy of’, to
the primary display field values of records copied by the
MDM Duplicate operation.
Maximum Record
Modify Limit
The maximum number of records a user can edit, delete,
check-in, check-out, roll back, recalculate, or merge in a
single operation in the Data Manager or using Java and
.NET API.

120 MDM Console Reference Guide
Property Description
Valid Keyword
Characters
The keyword characters to tokenize when a keyword
field’s Stemmer property is set to None.
Enable Typographic
Sensitivity
Whether to match specially-formatted characters to
versions of the same characters that have different font
properties. For example, whether ¼ should match 1/4 or
™ should match TM.
Demote Errors to
Warnings when
Merging Checked-out
Records
Whether validation errors on checked-out records should
be treated as errors or as warnings. Default behavior is to
treat them as warnings.
Disable Read-Only
fields in Data
Manager
(Yes/No). Whether fields, dialog boxes, and context
menus in MDM Data Manager for which the user has read-only access are disabled. Disabled fields appear
grayed out.
Enable Tracking of
Checked-Out Records
(Yes/No). When set to No, changes to checked-out
records will not be recorded (including roll back operations). When a record is checked in, all the changes
that were made to the checked-out record are recorded:
Multi-value delimiter Separator character for exported values from multi-valued
fields:
▪ comma (,) ▪ semi-colon (;)
▪ pipe (|)
This property is used when exporting repository users and
roles.
Text file field
delimiter
Separator character for exported values from different
fields:
▪ comma (,)
▪ semi-colon (;) ▪ pipe (|)
This property is used when exporting repository users and
roles.
Photoshop and Photoshop Image Processing
Depending upon the settings of the Allow Photoshop Images and Use Only Photoshop for Processing properties, Photoshop may or may not be required for image import to check that the original is a valid image file and to generate the thumbnail. In particular:
• If Allow Photoshop Images is set to No, then Photoshop is not
required; or Yes, then Photoshop Images are allowed in the repository, and how they are handled is dictated by the properties of the image.

MDM Console Reference Guide 121
• If Use Only Photoshop for Processing is set to Yes, then only Photoshop can be used in order to process a Photoshop Image (i.e. no other image processing engine will be used, and if Photoshop does not exist, the thumbnail will not be generated; or No, then if Photoshop is not present, MDM will try to complete the processing with another image processing engine, though it may not be successful (or the results may be of lower quality, as with CMYK images)
• Allow Invalid Images allows an image import to complete without
verification that the original has a valid format or that a thumbnail can be generated for it; useful for allowing image import to occur on any machine regardless of whether Photoshop is present, and then delay the generation of thumbnails until a later time
• Photoshop may also be required by the Image Manager in order to generate image variants, depending on the properties of the image and the variant definition.
MDM requires Photoshop 6.0.1 or later to process Photoshop images (previous versions have many bugs in functionality on which MDM relies).
NOTE ►► Adobe Photoshop does not properly install registry keys for
connectivity via COM. The MDM software detects these registry errors and offers to correct them for you automatically when you perform any
image operations that need to access Photoshop.
Using CSV Format to Import Delimited Text Files
The repository property Use CSV format to import delimited text files determines whether MDM imports delimited text files into the selected repository using standard CSV formatting rules. The property applies to all delimited files being imported into the repository.
When set to Yes, the double-quote character (") is the only character which can be used to enclose data values. The single-quote character (') is treated as any other text character. Also, enclosing a comma or double-quote within a data value is permitted.
For example, when Use CSV format to import delimited text files is set to Yes, the comma-separated values:
'96, 10""", "1"","" 2"","" 3"
are interpreted as:
'96 10" 1, 2, 3

122 MDM Console Reference Guide
When Use CSV format to import delimited text files is set to No, either the single-quote character (') or the double-quote character (") can enclose text. In this case, apostrophes (') or single quotes (') which you want to preserve in a text value must be escaped, otherwise an error or unwanted interpretations may occur.
When set to No, the comma-separated values
'96, 10""", "1"","" 2"","" 3"
would result in a error because MDM would interpret the apostrophe in '96 as an escape character and not find a closing '.
Further, when Use CSV format to import delimited text files is set to No, enclosing characters within a value (such as "1"","" 2"","" 3") is
not supported.
DELETING AN MDM REPOSITORY
You can use the Delete command to permanently delete an MDM repository from the system. Once deleted, the corresponding databases/schemas are completely removed from the DBMS.
NOTE ►► You can only delete mounted, stopped MDM repositories.
NOTE ►► When you delete a repository, SQL Server, Oracle 9, and
DB2 also remove the underlying file storage. With Oracle 8, the Oracle tablespace files must be manually deleted via the operating system; they
are named similarly to the schema partition names, with extension .DBF.
NOTE ►► Deleting an MDM repository is a password-protected
operation which requires you to enter the password for the Master
Data Server, if you have not already done so during the current MDM
session (see “Master Data Server Security”).
CAUTION ►► Deleting an MDM repository is not reversible. If the
repository has been archived, it is possible to recreate it, however (see
“MDM Repository Archive and Unarchive” for more information).
To permanently delete an MDM repository:
1. In the Console Hierarchy tree, right-click on the repository you want to
delete and choose Delete Repository from the context menu, or select
the tree node and choose Repositories > Delete from the main menu.
TIP ►► If the top-right pane is currently displaying the list of MDM repositories, you can also right-click on the repository in the grid and
choose Delete from the context menu.

MDM Console Reference Guide 123
2. MDM prompts you to confirm that you really want to delete the
repository. Click Yes to permanently delete the repository.
3. MDM deletes the repository.

124 MDM Console Reference Guide
Working with Tables and Fields
The following sections describe the various operations for changing the structure of an MDM repository, such as adding, modifying, and deleting tables and fields. These operations are summarized in Table 26.
Table 26. Repository Structure Operations
Operation Description
Add Table Adds a new table to the MDM repository.
Delete Table
Permanently deletes a table from the MDM
repository.
Add Field Adds a new field to the table.
Delete Field Permanently deletes a field from the table.
Reorder Fields Changes the display order of the fields of the table.
NOTE ►► You can only change the structure of an MDM repository
that is mounted and stopped.
CAUTION ►► It is strongly recommended that you duplicate or
backup an MDM repository prior to changing its structure, as described in “Duplicating an MDM Repository”, and “Backing Up and Restoring a
Repository”.
NOTE ►► Adding or deleting tables and fields causes the MDM
repository to automatically update its indices the next time it is started.
THE CODE PROPERTY
Most objects within an MDM repository (e.g. tables and fields) have a Code property that is limited to the following characters:
• A-Z
• a-z
• 0-9
• underscore
When you create the object, MDM automatically generates the Code based on the Name in the main language (e.g. English), replacing all special characters and spaces with underscores. You can also edit the Code within MDM Console.

MDM Console Reference Guide 125
The Code property is non-lingual and allows you to refer to objects in a language-layer independent way. Unlike Name, which is for display purposes and may include non-portable characters, Code is used within the MDM APIs to reference objects, and can also be used in a variety of external contexts (e.g. as a folder name, within XML, and so on).
The objects that have the code property are summarized in Table 27.
Table 27. Code Properties
Object Description
Expression The expression code.
Field The field code.
Image Variant The image variant code
Mask The mask code.
Named Search The named search code.
Port The port code.
Relationship The relationship code.
Remote System The remote system code.
Table The table code.
Tuple The tuple code.
Validation The validation code.
Workflow The workflow code.

126 MDM Console Reference Guide
Working with Tables
When the selected node in the Console Hierarchy tree is an MDM repository, the objects pane (top-right) is titled Tables and the detail pane (bottom-right) is titled Table Detail.
The Tables pane contains a grid with a list of tables in the MDM repository, where each table in the list corresponds to a child of the selected repository node.
TABLE PROPERTIES
The properties for each table are listed in Table 28.
Table 28. Table Properties
Property Description and Constraints
Name
The unique name for the table.
▪ The object, special, and system table names are
reserved
Code The unique code for the table.
Description The table description.
Type
The table type.
▪ Once a table is saved, its Type cannot be changed
▪ All the object tables and all the special tables are added automatically when you first create a new MDM repository
▪ An MDM repository can have at most a single instance of
each object, special, and system table type
Display Field1
The field whose value is used as: (1) the value of a lookup field; (2) the node name in hierarchy trees; and (3) the name of the record in the Product Relationships popup window.
▪ Not available for the object tables or special tables
Unique Fields1
The fields that must contain unique values, or the field combinations whose combined values must be unique.
▪ Not available for the object tables or special tables
Key Mapping Whether to maintain key mapping for the table (Yes/No)?
Attribute Definition Key Mapping 3
Whether to maintain key mapping for attribute definitions
(Yes/No)?
▪ Applies to all attributes in the taxonomy
Hide Table
Whether to hide the table from client applications (Yes/No)?
▪ Available on Masks, Named Searches, and user-created tables

MDM Console Reference Guide 127
Property Description and Constraints
Family Field
The main table lookup field that will be used as the primary partition of main table records into families.
▪ Families table only
▪ Automatically set to the Category taxonomy lookup field of the main table when you first create a new MDM repository
Alternative Display Fields
Fields from lookup tables to be added as family layout items.
▪ Families table only
Attribute Image Variants2, 3 The applicable variants for the attribute images.
Text Value Image Variants2, 3
The applicable variants for the text value images.
Personal Data
Whether to block and destroy personal data for the table
(Yes/No)?
▪ Only available for main table types.
▪ Must have Data Privacy Specialist authorization.
1 Hidden by default in the Tables pane; unhide to display. 2 Does not appear in the Tables pane. 3 Taxonomy tables only
TIP ►► There is no explicit command to modify a table. To modify a table, select it in the Tables pane, move the focus into the Table Detail
pane, and edit those properties that can be changed for the field.
Display Fields
A Display Field for a table is a field whose value is used as:
• the corresponding lookup field value for each record
• the node name for the record in hierarchy trees
• the name of the record in the Product Relationships popup window
• the corresponding tuple record value in a tuple field cell
When a table has multiple display fields, the value that is used for each record is the value combination among the display fields, with each pair of values separated by a comma (,).
NOTE ►► Object tables and special tables do not have Display
Fields.
NOTE ►► Every MDM table type that has a display field: (1) must
have at least one display field; and (2) permits multiple display fields.
TIP ►► For optimal MDM performance and usability, limit the number
of display fields to those required to uniquely identify a record.

128 MDM Console Reference Guide
For example, in a hierarchy table named Manufacturers, you might select the Company Name field as the Display Field. The value of Company Name will then be used as the value for any lookup field into the Manufacturers table, as well as the value of the tree node that corresponds to each Manufacturers record.
NOTE ►► MDM uses one of the display field(s) as the primary display
field for various record operations (see “Display Fields, Unique Fields,
and Record Operations” for more information).
Valid data types for Display Fields are AutoID, Integer, Real, Text, Text Normalized, Lookup [Flat], Lookup [Hierarchy], and Lookup [Taxonomy].
Display fields are also subject to additional rules and constraints based on table type, as summarized in Table 29.

MDM Console Reference Guide 129
Table 29. Display Field Rules and Constraints for Different Table Types
Table Type Rules and Constraints
All Normal and Masks Tables
The Display Field defaults to the Name field that MDM creates automatically when the table is added.
▪ If there is only one display field, it cannot be a lookup.
Flat Tables
The primary display field is implicit; MDM uses: (1) an AutoId display field, if one exists; (2) the first Text display field based on field
ordering; or (3) the first display field based by field ordering.
Hierarchy and Taxonomy Tables
The Name field is used as the primary display field, which cannot be unselected as a display field because a hierarchy or taxonomy table must have at least one fixed-width Text display field.
▪ In hierarchy tables, sibling node names must be unique, and the Name field is used as the unique portion of the node name. In taxonomy tables, you can partition a category by an attribute,
and the Name field is used for the attribute text values that become the names of the new child categories. For this
reason, Name fields on Taxonomy tables must have a minimum width of 30 characters.
▪ With multiple display fields, the Add Sibling, Add Child , and
Rename commands: (1) place you into the Record Detail tab for editing the new record in Hierarchy mode (as if you chose
Add Record); and (2) cannot be performed in Taxonomy mode.
Qualified Tables Must have at least one Display Field that is not a qualifier.
▪ The Display Fields of a qualified table are often lookups.
Object Tables Do not have an explicit Display Field, since the object itself is automatically the display field for the table.
Tuples The Display Field defaults to the Name field that MDM creates automatically when the tuple is added.
Special Tables Special tables other than the Masks table have no Display Field.
NOTE ►► Display fields are ordered as follows: (1) in the order you
add them, if you use the Display Field property in the Field Detail pane;
or (2) in the order in the Display Fields list, if you use the dual-list drop-
down control for multiple-item selection in the Display Fields property in
the Table Detail pane.
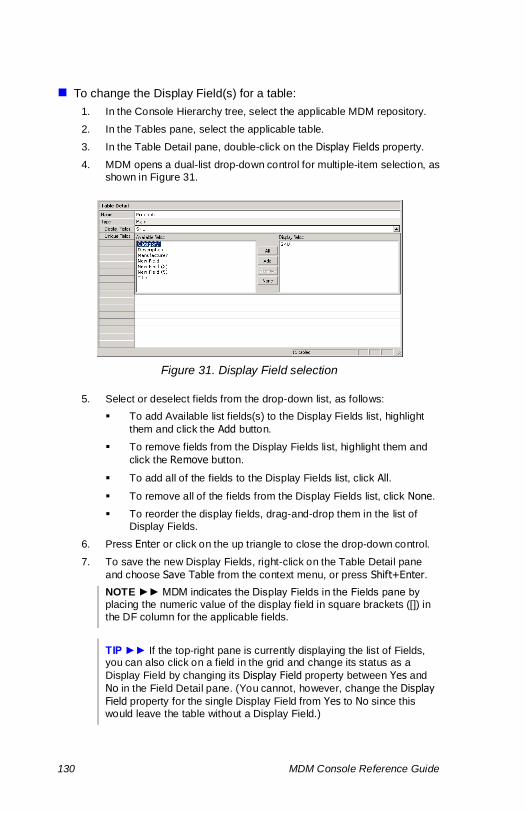
130 MDM Console Reference Guide
To change the Display Field(s) for a table:
1. In the Console Hierarchy tree, select the applicable MDM repository.
2. In the Tables pane, select the applicable table.
3. In the Table Detail pane, double-click on the Display Fields property.
4. MDM opens a dual-list drop-down control for multiple-item selection, as
shown in Figure 31.
Figure 31. Display Field selection
5. Select or deselect fields from the drop-down list, as follows:
▪ To add Available list fields(s) to the Display Fields list, highlight
them and click the Add button.
▪ To remove fields from the Display Fields list, highlight them and
click the Remove button.
▪ To add all of the fields to the Display Fields list, click All.
▪ To remove all of the fields from the Display Fields list, click None.
▪ To reorder the display fields, drag-and-drop them in the list of
Display Fields.
6. Press Enter or click on the up triangle to close the drop-down control.
7. To save the new Display Fields, right-click on the Table Detail pane
and choose Save Table from the context menu, or press Shift+Enter.
NOTE ►► MDM indicates the Display Fields in the Fields pane by
placing the numeric value of the display field in square brackets ([]) in
the DF column for the applicable fields.
TIP ►► If the top-right pane is currently displaying the list of Fields, you can also click on a field in the grid and change its status as a
Display Field by changing its Display Field property between Yes and
No in the Field Detail pane. (You cannot, however, change the Display
Field property for the single Display Field from Yes to No since this
would leave the table without a Display Field.)

MDM Console Reference Guide 131
Unique Fields
A Unique Field for a table is a field that must contain a unique value for each record, or in the case of a Unique Field combination, the field combinations whose combined values must be unique for each record.
For example, in the main Products table, SKU and UPC might each be a Unique Field, and the combination of Manufacturer and Part Number might be a Unique Field combination.
NOTE ►► Object tables and special tables do not have Unique
Fields.
NOTE ►► The uniqueness test is case-insensitive. For example, the
values “ABC-123” and “abc-123” would be considered the same by MDM.
DATA INTEGRITY ►► Even though a unique field generally prevents
more than one record from having the same value (or value
combination in the case of a unique field combination), multiple records are permitted to have the value NULL for the unique field. The reason
for this is that while unique fields are used to distinguish between multiple records, a unique field with the value NULL means the record
has not yet been fully defined, and therefore should not conflict with
other records that are also not yet fully defined.
To specify the Unique Field(s) for a table:
1. In the Console Hierarchy tree, select the applicable MDM repository.
2. In the Tables pane, select the applicable table.
3. In the Table Detail pane, double-click on the Unique Fields property.
4. MDM opens a dual-list drop-down control for multiple-item selection, as
shown in Figure 32.
Figure 32. Unique Field selection

132 MDM Console Reference Guide
5. Select or deselect fields from the drop-down list, as follows:
▪ To add Available list fields(s) to the Unique Fields list, highlight
them and click the Add button.
▪ To remove fields from the Unique Fields list, highlight them and
click the Remove button.
▪ To add all of the fields to the Unique Fields list, click All.
▪ To remove all of the fields from the Unique Fields list, click None.
▪ To reorder the unique fields, drag-and-drop them in the list of
Unique Fields.
6. To require the combination of selected field values to be unique, select
the fields in the Selected fields list and click Combine. The individual
field items are replaced by a single item listing each of the fields
separated by a plus sign (+), as shown in Figure 33.
Figure 33. Unique Fields combination
TIP ►► To undo a Combine, select the combined item and click Split.
7. Press Enter or click on the up triangle to close the drop-down control.
8. To save the new Unique Fields, right-click on the Table Detail pane
and choose Save Table from the context menu, or press Shift+Enter.
NOTE ►► MDM indicates the Unique Fields in the Fields pane by
placing the numeric value of the unique field in square brackets ([]) in the UF column for the applicable fields. Combined fields will have the
same numeric value.
TIP ►► If the top-right pane is currently displaying the list of Fields, you can also click on a field in the grid and change its status as a
Unique Field by changing its Unique Field property between Yes and
No in the Field Detail pane.
Combined unique
fields

MDM Console Reference Guide 133
Display Fields, Unique Fields, and Record Operations
When you add or duplicate a record in the Record Detail tab of MDM Data Manager, or when you add or duplicate a node in its Hierarchy or Taxonomy pane, MDM automatically attempts to populate the Display Field of new records with appropriate values. You have the opportunity to change the values of Write-once fields on a duplicated record immediately after the duplication, before it is saved.
For example, when you use the Add Sibling command in Taxonomy mode to add a new node, MDM automatically names it “New Item (n)” if a sibling node named “New Item” already exists (where ‘n’ is the first available numeric value that will avoid a conflict).
When a table: (1) does not have a fixed-width display field; (2) has multiple display fields; and/or (3) has one or more unique constraints, the rules for automatically populating the Display Field and clearing the fields involved in a unique constraint become somewhat more ornate, as summarized in Table 30.
Table 30. Value Rules for Display Fields and Unique Fields
Field Add Copy Move
Commands
Record Detail Tab Add Record Duplicate Record n/a
Hierarchy Tree Add Sibling Add Child
Copy-and-paste Cut-and-paste Drag-and-drop
Cases (data type, display field, and unique constraint characteristics of field)
If: (1) Text; and (2) primary display field
New Item New Item (n)
(value unique
across siblings)
Copy of value Copy (n) of value
(value unique
across siblings)
value value (n)
(value unique
across siblings)
If: (1) Text; (2) primary display field; and (3) involved in unique constraint
New Item New Item (n)
(value unique
across records)
Copy of value Copy (n) of value
(value unique
across records)
value value (n)
(value unique
across records)
AutoID next (value) next (value) n/a
If: (1) involved in unique constraint other than above; (2) constraint does not contain an AutoID or Text
primary display field; (3) this is the first field in the field
ordering; and (4) no other fields are NULL
NULL NULL value
All other cases NULL value value

134 MDM Console Reference Guide
NOTE ►► A hierarchy or taxonomy table with multiple display fields
will also encounter special behavior when you use the Add Sibling, Add
Child, and Rename commands in Hierarchy and Taxonomy modes.
DATA INTEGRITY ►► The basic rule of thumb is to populate the
primary display field and, if a record is being duplicated, to preserve as many of the values of the original record as possible without violating
any of the uniqueness constraints.
NOTE ►► For Java API applications, MDM automatically clears the
value of any Unique Field of new records when the value violates uniqueness constraints, unless the field is the primary display field or
an AutoID field.
Family Field
The Family Field is the main table lookup field that will be used as the primary partition of main table records into families. You must specify the Family Field as one of the properties of the Families table. In a traditional family structure, this is usually the taxonomy lookup field, although you can use any hierarchical lookup field.
NOTE ►► When you first create a new MDM repository, MDM automatically: (1) creates the Families table; and (2) sets the Family
Field to the Category taxonomy lookup field of the main table. To add
the Families table manually, there must be a hierarchy or taxonomy lookup field in the main table that can be used as the Family Field
(typically the Category field).
NOTE ►► Only the Families table has a Family Field.
To specify the Family Field for the Families table:
1. In the Console Hierarchy tree, select the applicable MDM repository.
2. If it does not already exist, create the Families table (see “Adding
Tables”).
3. In the Tables pane, select the Families table.
4. In the Table Detail pane, double-click on the Family Field property and
select the Family Field from the drop-down list of main table hierarchy
and taxonomy lookup fields.
5. Press Enter or click on the up triangle to close the drop-down control.
6. To save the Family Field, right-click on the Table Detail pane and
choose Save from the context menu, or press Shift+Enter.

MDM Console Reference Guide 135
Alternative Display Fields
The Alternative Display Fields property lets you add values from lookup table fields to an MDM publication without turning those fields into regular Display Fields.
For a lookup table field to be eligible as an Alternative Display Field, a main table lookup field must look in to its table. You can select multiple Alternative Display Fields from among multiple lookup tables. However, object table fields cannot be selected as Alternative Display Fields.
NOTE ►► Only the Families table has Alternative Display Fields.
To specify Alternative Display Fields on the Families table:
1. In the Console Hierarchy tree, select the applicable MDM repository.
2. If it does not already exist, create the Families table (see “Adding
Tables”).
3. In the Tables pane, select the Families table.
4. In the Table Detail pane, click on the button in the Alternative
Display Fields property to open the Edit Alternative Display Fields
dialog, shown in Figure 34.
Figure 34. Edit Alternative Display Fields dialog
5. Right-click in the grid and choose Add Field from the context menu.
6. Click in the new field’s Name column to enter a name for the new
Alternative Display Field.
7. Click in the new field’s Path column and then click on the down-arrow
to select the field you want to add as an Alternative Display Field.
NOTE ►► Click the ‘+’ sign next to a lookup field to view the f ields in
its lookup table.
8. Press Enter or click on the up triangle to close the drop-down field list.
9. To delete an existing Alternative Display Field, right-click on the field
and choose Delete Field from the context menu.
10. Click OK to close the Edit Alternative Display Fields dialog.
11. To save the Alternative Display Fields, right-click on the Table Detail
pane and choose Save from the context menu, or press Shift+Enter.

136 MDM Console Reference Guide
ADDING TABLES
An MDM repository can include any number of main or subtables. You can add and delete tables as required.
To add a new table to an MDM repository:
1. In the Console Hierarchy tree, select the MDM repository to which you
want to add a table.
2. Right-click in the Tables pane and choose Add Table from the context
menu, or click the Add Table toolbar button (shown at left), or press
Ins, or choose Tables > Add from the main menu.
3. MDM adds a table named “New Table” at the end of the table list, and places you into the Table Detail pane to specify the properties of the
new table.
4. Specify the applicable properties, as listed in Table 28.
5. To save the table, right-click on the Table Detail pane and choose Save
Table from the context menu, or press Shift+Enter.
NOTE ►► When you first create a table (other than an object or
special table), MDM automatically: (1) creates a Name field of type
Text; and (2) makes it the Display Field for the table.
DATA INTEGRITY ►► Two tables cannot have the same name or the
same code. If a table named “New Table” already exists, MDM automatically names the new table “New Table (n)” (where ‘n’ is the
first available numeric value that will avoid a conflict).
DELETING TABLES
If you no longer expect to use a table to store information, you can delete it from the list of tables.
CAUTION ►► Deleting a table is not reversible.
To permanently delete a table from the current MDM repository:
1. In the Tables pane, right-click on the table to be deleted and choose
Delete from the context menu, or select the field and click the Delete
Field toolbar button (shown at left), or press Del, or choose Tables >
Delete from the main menu.
2. MDM prompts you to confirm that you really want to delete the table.
Click Yes to permanently delete the table from the MDM repository.
3. MDM deletes the table.
NOTE ►► You cannot delete the main table of an MDM repository.

MDM Console Reference Guide 137
Working with Fields
To view or modify fields on a specific table, select the table in the Console Hierarchy tree. The fields for that table appear in the top-right pane, which is titled Fields. Select a field from the Fields pane to display its properties on the bottom-right pane, which is titled Field Detail.
FIELD PROPERTIES
Field properties that are common to all field types are always visible in the Field Detail pane. Other, type-specific properties are visible in the Field Detail pane only when their corresponding field type is selected in the Type property.
Field properties can be editable, read-only, or disabled, depending on the field type and, in some cases, the values set for other properties. Also, some properties can only be set when a field is created.
Descriptions of all field properties are provided in Table 31.
Table 31. Field Properties
Property Description and Constraints
Common Properties
Position (Pos.)1,2 The display order of the field within the table ([n]).
Name1 The field name.
Code The unique code for the field.
Description The field description.
Type1
The field type.
▪ Becomes read-only after the field is created, except for
Text and Text Normalized types, which can
interchange afterwards.
Required
Enable this field to be marked and/or validated as a
required field (Yes/No)?
▪ See “Required Fields” for more information
Writeable Once
Does the field become read-only after the first save
(Yes/No)?
▪ Value changes to No and property becomes read-only if
Calculated property=Yes
Matrix This property is deprecated in MDM 7.1.
Multilingual Will the field store values in multiple languages (Yes/No)?

138 MDM Console Reference Guide
Property Description and Constraints
Keyword1
How the field will be added to the keyword index:
▪ None – Do not add this field to the keyword index.
▪ Stemmer – Use keyword stemming on this field.
▪ See “Keyword Fields” for more information
Display Field
(DF)1
Is the field a Display Field for the table (Yes/No)?
▪ [n] in the Fields pane indicates the table’s display field order
▪ Can also be set as a table property
▪ See “Display Fields” for more information
Unique Field
(UF)1
Is the field a Unique Field for the table (Yes/No; [n] in
Fields pane)?
▪ Becomes read-only if Multi-Valued property is saved as
Yes ▪ [n] in the Fields pane indicates the table’s unique field
combos ▪ Can also be set as a table property
▪ See “Unique Fields” for more information
Sort Index Add the field’s values to the table’s sort index (Yes/No)?
▪ See “Sort-Indexed Fields” for more information
Calculated
Is the field a calculation (Yes/No)?
▪ Value changes to No and property becomes read-only if
Write Only property=Yes
Calculation The calculation expression for a calculation field.
Type-Specific Properties
Cache
Should the qualifier be cached (Yes/No)?
▪ Enabled when Qualifier property = Yes
▪ See “Caching Qualifiers” for more information
Decimal Places
The number of decimal places to display for the field’s
values.
▪ See “Decimals, Fractions, and Floating Point Precision”
for more information
Default to
Current Date
Use the current local date as the default date value
(Yes/No)?
Default to
Current Time
Use the current local time as the default time value
(Yes/No)?
Default Unit Unit of measure for a Measurement field (from the list of
units corresponding to the selected Dimension).
Dimension Dimension for a Measurement field (from the list of
dimensions).

MDM Console Reference Guide 139
Property Description and Constraints
False Value
String representing the False value for a Boolean field (e.g.
False).
▪ Multilingual in a multilingual repository
Default Value
The default value to use for a Boolean field:
▪ None – NULL
▪ True Value – The True Value property value
▪ False Value – The False Value property value
Image Variants Which variants to generate for images in Lookup [Image]
fields.
Lookup Table
Name of the table which the field looks into to get its
values.
▪ Possible values include all lookup tables in the repository of the type selected as the lookup field type
in the Type property
▪ [New Lookup Table] creates a new, empty lookup table
of the type selected as the lookup field type in the
Type property
▪ Becomes read-only after the field is created
Multi-Valued
Allow the field to store multiple values (Yes/No)?
▪ Becomes read-only after the field is created.
▪ If set to Yes, the Unique Field, Sort Index, and Use
Search Control properties become read-only after the
field is created
▪ Lookup [Qualified] fields are always multi-valued
New Lookup
Table Name
The name for the new lookup table.
▪ Enabled when Lookup Table property = [New Lookup Table]
▪ Value becomes Lookup Table value after the field is
created. ▪ Property disappears when an existing lookup table is
selected as the Lookup Table value and after the field
is created
Qualifier Is this field a qualifier (Yes/No)?
▪ Qualified tables only
Reverse
Navigation
Enable users to see the records which link to a main table
record through this lookup field.
▪ Lookup [Main] fields only

140 MDM Console Reference Guide
Property Description and Constraints
Search Tab
Should the field appear as a search tab for the table
(Yes/No)?
▪ Default is: (1) Yes for lookup fields, lookup qualifiers,
Boolean qualifiers, and tuples; and (2) No for Boolean
fields
Selected Fields
Fields to track for a Time Stamp or User Stamp field (field
list, default = [ALL]).
▪ See “Create Stamp, Time Stamp, and User Stamp
Fields” for more information
Show Fractions Display values as fractions (Yes/No)?
▪ See “Show Fractions” for more information
Sort Type
The type of sort for a Text or Text Normalized field:
▪ Case Insensitive
▪ Case Sensitive ▪ Numeric
▪ See “Sort Types” for more information
Symbol Currency symbol for a Currency field (any character
string).
True Value
String representing the True value for a Boolean field (e.g.
True).
▪ Multilingual in a multilingual repository
Tuple
Name of the tuple which the field looks into to get its
values.
▪ Possible values include all tuples in the repository
▪ Becomes read-only after the field is created
Value Selection
How the lookup field value is to be edited:
▪ Pick list
▪ Mini-search
Width Maximum number of characters for a Text or Text
Normalized field.
1 Property also displayed in the Fields pane. 2 Property only displayed in the Fields pane.
Required Fields
When the Required field property value is set to Yes for a field, you can:
• Ensure that the field contains a value by adding the function REQUIRED_FIELDS to a validation expression. When the validation is performed, this function automatically checks whether required fields have values. See “Validating Records” in the Data Manager Reference Guide for more information.

MDM Console Reference Guide 141
• Display an asterisk (*) by the field name in the Data Manager to indicate that the field must contain a value. See "Identifying Required Fields" in the Data Manager Reference Guide for more information.
NOTE ►► Setting the Required property to Yes does not
automatically validate that the field contains a data value.
Normalized Fields
A normalized field is a special type of fixed-width text field in which certain delimiter characters (i.e. all non-alphanumeric characters) are ignored for the purposes of searching and sorting.
A normalized field (Type=Text Normalized) should be used instead of a fixed-width text field when its contents will contain values that differ in certain delimiter characters only, but should be considered equal for the purpose of searching and sorting. For example, “pn-157” and p/n.157” may be different ways to represent the same value. Ignoring the delimiter characters (‘-‘, ‘/’, and ‘.’) causes these values to both be “pn157” for searching purposes and to compare as equal.
NOTE ►► Keyword fields cannot be normalized.
Sort-Indexed Fields
The Sort Index field property makes a field sortable in the Records grid of the MDM Data Manager and through the API. It accelerates free-form
search for the equals and starts with Text operators, and for the =, <,
<=, >, and >= numeric operators. It also greatly improves matching
speed on Equals matches in the Data Manager’s Matching mode.
However, MDM uses extra memory and processing to maintain the sort index, which can slow down updates and imports significantly on larger repositories. To improve system performance, if you do not need to sort on a particular field, do not make it sortable.
NOTE ►► Turning off sort-indexing for fields in Lookup [Flat] tables
can improve MDM performance, especially when starting a repository.
NOTE ►► Sort-indexing is required for Equals matches in the Data
Manager’s Matching mode.
NOTE ►► Sort-indexing is not supported within the Tuple Editor.
NOTE ►► Some field types are not sortable. These will always have
the property set to None and the property will be disabled.

142 MDM Console Reference Guide
Sort Types
The Sort Type field property tells MDM how to sort values in text and text-normalized fields. When sorting, MDM breaks each value into its numeric, text, and symbolic parts. For example, the value “ABC-001” is
separated as “ABC” + ”-” + ”001” and then sorted according to the sort
type selected.
The various sort types, including examples of their behaviors, are displayed in Table 32.
Table 32. Sort Type Options
Option Description Example
Case Sensitive
▪ Orders lowercase letters prior to uppercase
letters.
▪ Sorts numbers as text.
▪ Does not ignore leading zeros.
▪ Symbols (‘+’, ’-‘, ’.’, ‘D’, ‘E’) not numerically
significant.
▪ Display order: symbols, numbers, text.
.05 mm
.2 mm
002abc9
V
10-ctx
10-CTX
2ABC09D
F130cde
Case
Insensitive
▪ Ignores letter casing.
▪ Otherwise, same as Case Sensitive.
.05 mm
.2 mm
002abc9
V
10-CTX
10-ctx
2ABC09D
F130cde
Numeric
▪ Sorts embedded numbers as unsigned
integers.
▪ Leading zeros are ignored.
▪ Ignores letter casing.
▪ Symbols (‘+’, ’-‘, ’.’, ‘D’, ‘E’) not numerically
significant.
▪ Display order: symbols, text, numbers.
.2 mm
.05 mm
F130cde
2ABC09D
002abc9
V
10-CTX
10-ctx
NOTE ►► The Case Sensitive option is no longer allowed on text-
normalized fields.

MDM Console Reference Guide 143
Keyword Fields
The Keyword field property indicates whether a field’s contents are included in the MDM repository’s built-in keyword search index. This index is used to match words entered in an MDM application’s keyword search parameter to records in the current table.
If the Inxight stemming engine is installed and configured in the mds.ini file, MDM uses this stemming engine to search for keyword matches. Stemming extends the search to plurals, suffixes, and prefixes of the keyword and words that include the same stem as the keyword. If the Inxight engine is not installed and configured, MDM uses the ngrams algorithm for stemming, which is not as broad, but is faster than the Inxight engine.
When a field’s Keyword property is set to None, the field’s values are not added to the keyword index. When set to Stemmer, the field’s values are added to the MDM repository’s built-in keyword search index.
Be aware that it is neither necessary nor recommended to keyword every field on the table. Rather, keyword only those fields which use a small set of unique words across all records (or small relative to the total number of records). A Description field is an example of such a field; even though the total number of words used across all records will be large, the number of distinct words will likely be small. By contrast, you should not keyword a Part Number field because it is likely to contain a different value for every record.
Also, you should not keyword fields which contain information that is so generic that a keyword search returns too many records to be useful.
NOTE ►► You can use the Keyword property to keyword a PDF
lookup field, which adds the contents of PDFs to the keyword index.
NOTE ►► Keyword-indexing is required for Token Equals matches in
the Data Manager’s Matching mode.
NOTE ►► To include lookup field values in a keyword search, keyword-index the lookup field itself. You do not also have to keyword-
index fields in the looked-into table.
NOTE ►► To include values of a specific tuple member in a keyword search, you must keyword-index: (1) the main table tuple field; (2) the
tuple member; and, if the tuple member is nested below other tuple fields, (3) all tuple fields in the path between the main tuple field and
the tuple member.
NOTE ►► Keyword stemming is available on a language-specific
basis for English and other Western and Eastern languages. Please
contact SAP for more information.

144 MDM Console Reference Guide
NOTE ►► See “Keyword Search” in the Data Manager Reference
Guide for more information about searching keyword fields.
Caching Qualifiers
Qualifiers should almost always be cached (have their values stored in
memory) using the Cache field property for each qualifier field.
Caching a qualifier has several distinct advantages over not caching: (1) it dramatically improves search performance; (2) it permits keyword
indexing to be set for the qualifier (using the Keyword field property) to support keyword search of qualifier data; (3) it permits drilldown search by qualifier lookup values even before you have selected a single qualified table record in the qualified lookup field search tab; (4) it permits free-form search by qualifiers (both lookup and non-lookup) when Sort Index is enabled; and (5) it causes the set of qualified links for each record to be filtered based on the qualifier search value (both lookup and non-lookup).
TIP ►► The only reasons for not caching a qualifier is: memory is limited, you do not need to search on lookup values until you have
already selected a qualified lookup record, and the number of qualified
links is huge (e.g. more than 50 million).
NOTE ►► Calculated qualifier fields and qualifiers should always be
cached.
Decimals, Fractions, and Floating Point Precision
MDM handles floating point precision for fields and attributes as follows:
• Decimal storage. Decimal values are saved to the Master Data Server using the number of digits received from the source (MDM
application, API, etc.), up to a maximum of 7 significant digits. (Time
and Frequency attributes support 14 significant digits.)
• Fraction storage. Fractions are saved to MDM as the floating point number closest to the actual value of the fraction (using the precision
of the item’s data type), regardless of the Show Fractions setting.
• Decimal display. MDM displays decimal values using the precision
specified in an item’s Decimal Places properties.
• Fraction display. MDM displays fraction values as either fractions or
decimals, as described in “Show Fractions” below.
• Decimal searches. Decimal values entered in an item’s free-form search cell are limited to the number of decimal places specified in
the item’s Decimal Places property. MDM then matches all records which have item values that round to this search value.

MDM Console Reference Guide 145
• Fraction searches. When a fraction is entered in an item’s free-form search cell, MDM converts the fraction to the floating point number closest to the actual value of the fraction (using the precision of the
item’s data type, not the Decimal Places property) and then matches at this precision, without any rounding.
Examples of MDM behavior related to storing and searching for fractions and decimal values are displayed in Table 33.
Table 33. Fraction and Floating Point Behavior
Action Value Entered Result1
Store 2.3 Stores “2.3” and displays “2.300000”
Store 2 1/3 Stores “2.333333” and displays “2.333333”
Store 2 1/2 Stores “2.5” and displays “2 1/2”
Store 123.45678 Stores “123.4567” and displays
“123.456700”
Search 2.3 Finds “2.295000” to “2.304999”
Search 2 1/3 Finds “2.333333”
1 Assuming field Type = Real, Show Fractions = Yes, and Decimal Places = 6

146 MDM Console Reference Guide
Show Fractions
When the Show Fractions property for a real or measurement field is set
to Yes, MDM applications display some values for that field as fractions and the rest as decimals, regardless of the form in which the values were entered into MDM. All other values are displayed as decimals.
Values which are displayed as fractions are listed in Table 34.
Table 34. Values Displayed as Fractions, By Field/Attribute Type
Field/Attribute Type Values Displayed As Fractions
Real For absolute values from 0 to 999,999, fractional powers of 2 from1/2 to 1/128
(including all numerator values, such as
3/4, 5/16, and 27/64).
Units of measure which
commonly use fractions
(such as inches, gallons, and
acres).
Cups [Volume] For absolute values between 0 and
999,999, fractional powers of 2 from1/2 to 1/128, the “odd” fractions 1/3, 2/3, 1/5, 2/5,
3/5, 4/5, 1/6, and 5/6, and the fractions “1/x” where ‘x’ ranges from 7 to 100 in
increments of 1 (e.g. 1/7, 1/15, and 1/78);
from 100 to 1000 in increments of 50 (e.g. 1/150, 1/250, and 1/500); and from 1000 to
2000 in increments of 100 (e.g. 1/1100,
1/1200, and 1/1300).
Pints [Volume]
Quarts [Volume]
Horsepower [Power
(Apparent)]
NOTE ►► MDM always stores fractions as decimals (see “Decimals,
Fractions, and Floating Point Precision” above for more information).
Calculation Fields
You can indicate that a field should be a read-only calculation field
(highlighted in gray in MDM Data Manager) using the Calculated field
property. When you set the property to Yes, MDM enables the
Calculation field property, which allows you to define a calculation expression for the field so that the value of the field is based on the values of other fields and attributes.
When you double-click on the Calculation cell, MDM opens the Calculation Expression dialog shown in Figure 35.

MDM Console Reference Guide 147
Figure 35. Calculation Expression dialog
You can define and edit the calculation expression associated with a calculation field as described in this section.
To edit a calculation expression:
1. In the Fields pane, select the field whose calculation you want to edit.
2. In the Properties pane, double-click on the Calculation cell to open the
Calculation Expression dialog shown in Figure 35 above.
3. Enter the calculation expression using the keyboard and the toolbar
buttons to enter values, measurements, field names, attribute names,
lookup values, attribute text values, operators, and functions.
4. Click OK to close the Calculation Expression dialog.
5. To save the calculation, right-click on the Properties pane and choose
Save Field from the context menu, or press Shift+Enter.
NOTE ►► See “Validating Records” in the MDM Data Manager Reference Guide for more information about the Calculation
Expression dialog.
NOTE ►► You can define category-specific calculations as branches of a single calculation, and MDM automatically executes the applicable
calculation based on the category for each record.
NOTE ►► You can define category-specific calculations as branches
of a single calculation, and MDM automatically executes the applicable
calculation based on the category for each record.
Create Stamp, Time Stamp, and User Stamp Fields
The Create Stamp, Time Stamp, and User Stamp field types provide a basic “change tracking” capability. All three field types are read-only and are automatically updated by MDM as follows:
• Create Stamp. Set with the date and time when a record is created.
• Time Stamp. Set with the date and time each time any of the fields being tracked are updated.
• User Stamp. Set with the name of the user who makes the change
when any of the fields being tracked are updated.

148 MDM Console Reference Guide
A Create Stamp field applies to the entire record. By contrast, a Time Stamp or User Stamp field tracks the fields specified using the dual-list
drop-down control for the Selected Fields property.
Figure 36. Selected Fields drop-down control
NOTE ►► The default when you select no fields is [All].
NOTE ►► The list of fields from which to select includes the following
virtual fields: (1) field [Attributes] in the main table, which you can use to track changes to the attribute values of a taxonomy lookup field; and
(2) [Mask] in the Masks table, which you can use to track changes to
the set of records in the mask.
TIP ►► The time and user stamp fields record information for just the most recent change, overwriting the information for previous changes.
You can track the entire history of changes along with before and after values using the Change Tracking table (see “Change Tracking Table”
for more information on change tracking).
The changes to the various stamp fields that occur with various events are summarized in Table 35.

MDM Console Reference Guide 149
Table 35. Record Changes and Stamp Fields
Event Create
Stamp Time Stamp User
Stamp
Regular Record Operations
Record is created. Time of
creation
Time of
creation
User of
creation
Change to regular field Unchanged Time of
update
User of
update
Special touch1 of regular field
in Client Unchanged Time of
update
User of
update
Change of regular field Unchanged Time of
update
User of
update
Create of qualified link Time of
creation2
Time of
creation
User of
creation
Multi-record edit of qualified
links
Time of
update3
Time of
update
User of
update
Change of qualifier field Unchanged Time of
update4
User of
update4
Checkout Record Operations
Record is checked out
(original) Unchanged Unchanged Unchanged
Record is checked out
(checked out) Unchanged Unchanged Unchanged
Changes made to checked
out record (see above) (see above) (see above)
Checked out record checked
back in Unchanged Unchanged Unchanged
1 Special touch means updating the field value and then changing it back to original value. 2 Stamp defined as: (1) regular field on qualified record tracks the creation of the qualified
record; or (2) as qualifier field on qualified record tracks the creation of the qualified link. 3 Current implementation deletes and recreates links on each update. 4 Stamp defined as: (1) regular field on main table record tracks all links; (2) regular field on
qualified record tracks the qualified record; or (3) as qualifier field on qualified record tracks
that link. 5 Record marked as changed even if update resulted in no changes to the record’s fields.
ADDING AND MODIFYING FIELDS
A normal MDM table can include any number of fields. You can add a field to a table and modify the properties of existing fields as described in this section. Since the different field types have different properties that define them, the steps for adding and modifying a field differ slightly depending on the type.

150 MDM Console Reference Guide
To add a new field to a table:
1. In the Console Hierarchy tree, select the table to which you want to
add a field.
2. Right-click in the Fields pane and choose Add Field from the context
menu, or click the Add Field toolbar button (shown at left), or press Ins,
or choose Fields > Add from the main menu.
3. MDM adds a field named “New Field” at the end of the field list, and places you into the Field Detail pane to specify the properties of the
new field.
4. Specify the applicable properties of the new field.
5. To save the field, right-click on the Field Detail pane and choose Save
Field from the context menu, or press Shift+Enter.
NOTE ►► When you first create a table (other than an object table),
MDM automatically: (1) creates a Name field of type Text; and (2)
makes it the Display Field for the table.
DATA INTEGRITY ►► Two fields cannot have the same name or the same code. If a field named “New Field” already exists, MDM
automatically names the new field “New Field (n)” (where ‘n’ is the first
available numeric value that will avoid a conflict).
DATA INTEGRITY ►► When you create any kind of lookup field, MDM automatically creates implicit primary key and foreign key
matching fields within each of the two tables (the table that contains the lookup field and the lookup table itself), defining the many-to-one
“join” relationship and maintaining referential integrity behind the scenes. The matching fields are hidden, while the value of the lookup
field is the value(s) of the display field(s) of the lookup table record.
DATA INTEGRITY ►► When you add a lookup field to a table before
you have added the target lookup table to the MDM repository, MDM provides an opportunity to create a new lookup table of the
corresponding type as part of adding the new field. The drop-down list
for the Lookup Table property always includes an entry “[New type Table]” (where “type” is the lookup table type), and if you select it,
MDM automatically creates a table of the corresponding type. If you add an object lookup field (e.g. Lookup [Image]) and the corresponding
object table (e.g. Images) does not already exist, MDM automatically
creates the object table as part of adding the new field.

MDM Console Reference Guide 151
REORDERING FIELDS
It may be useful to change the position (i.e. the display order) of fields in a table to facilitate record editing in MDM Data Manager. The position of a field in a table is shown in the Pos. column of the Fields pane, as shown in Figure 37.
Figure 37. Field position (display order)
To change the display order of fields in a table:
1. In the Console Hierarchy tree, select the table whose fields you want to
reorder.
2. Right-click in the Fields grid and choose Reorder from the context
menu, or choose Fields > Reorder from the main menu.
3. MDM opens the Reorder Field Positions dialog, as shown in Figure 38.
Figure 38. Reorder Field Positions dialog
4. Select one or more fields and drag them to the desired positions in the
list
5. Click OK to close the dialog.
DELETING FIELDS
If you no longer expect to use a field, you can delete it.
CAUTION ►► Deleting a field is not reversible.

152 MDM Console Reference Guide
To permanently delete a field from the current table:
1. In the Fields pane, right-click on the field to be deleted and choose
Delete from the context menu, or select the field and click the Delete
Field toolbar button (shown at left), or press Del, or choose Fields >
Delete from the main menu.
2. MDM prompts you to confirm that you really want to delete the field.
Click Yes to permanently delete the field from the table.
3. MDM deletes the field.
NOTE ►► If MDM cannot delete the field for any reason, it will display
an error message stating why the field could not be deleted.

MDM Console Reference Guide 153
Working with Tuples
When the selected node in the Console Hierarchy tree is the Tuples node, the objects pane (top-right) is titled Tuples and the detail pane (bottom-right) is titled Tuple Detail.
The Tuples pane contains a grid with a list of the tuples defined for the MDM repository, where each tuple in the list corresponds to a child of the Tuples node.
TUPLE PROPERTIES
The properties for each tuple are listed in Table 36, all of them directly editable in the Tuples pane.
Table 36. Tuple Properties
Property Description
Name The tuple name.
Code The unique code for the tuple.
Description The tuple description.
Display Fields1 The tuple members whose values are used as the display value of the tuple field.
1 Every tuple must have at least one display field.
TIP ►► There is no explicit command to modify tuple properties. To
modify a tuple’s properties, select it in the Tuples pane, move the focus
into the Tuple Detail pane, and edit the properties.
ADDING AND DELETING TUPLES
An MDM repository can include any number of tuples. You can add and delete tuples in a repository as described in this section.
To add a new tuple to an MDM repository:
1. In the Console Hierarchy tree, select the Tuple node.
2. Right-click in the Tuples pane and choose Add Tuple.
3. MDM adds a tuple named “New Tuple” at the end of the tuple list, and
places you into the Tuple Detail pane to specify the properties of the
new tuple.
4. Specify the applicable properties, as listed in Table 36.
5. To save the tuple, right-click on the Tuple Detail pane and choose Save
from the context menu, or press Shift+Enter.
NOTE ►► When you first create a tuple, MDM automatically: (1)
creates a Name member field of type Text; and (2) makes Name the
Display Field for the tuple.

154 MDM Console Reference Guide
DATA INTEGRITY ►► Two tuples cannot have the same name or the
same code. If a table named “New Tuple” already exists, MDM automatically names the new tuple “New Table (n)” (where ‘n’ is the
first available numeric value that will avoid a conflict).
To delete a tuple:
1. In the Console Hierarchy tree, select the Tuple node.
2. In the Tuples pane, right-click on the tuple you want to delete and
choose Delete Tuple.
3. MDM deletes the tuple.
CAUTION ►► Deleting a tuple is not reversible.
DATA INTEGRITY ►► MDM does not allow you to delete a tuple that
is in use elsewhere in the MDM repository.
WORKING WITH TUPLE MEMBERS
To view or modify a tuple’s members, select the tuple from the Console hierarchy tree. The tuple’s members appear in the top-right pane, which is titled Member Fields. Select a field from the Member Fields pane to display its properties in the bottom-right pane, which is titled Member Field Detail.
The properties displayed in the Member Field Detail pane vary based on the member's type and are the same properties that appear for the field type in the Field Details pane (see “Field Properties” for more information).
Adding and Deleting Tuple Members
A tuple can contain any number of tuple members. You can add and delete a tuple’s members as described in this section.
To add a new member to a tuple:
1. In the Console Hierarchy tree, select the desired tuple.
2. Right-click in the Member Fields pane and choose Add Member Field
from the context menu, or click the Add Field toolbar button (shown at
left).
3. MDM adds a field named “New Field” at the end of the field list, and places you into the Member Field Detail pane to specify the properties
of the new field.
NOTE ►► Not all field types are supported in tuple definitions (see
“Supported Field Types” for more information).

MDM Console Reference Guide 155
To permanently delete a tuple member:
1. In the Console Hierarchy tree, select the desired tuple.
2. In the Member Fields pane, right-click on the field to be deleted and
choose Delete from the context menu, or select the field and click the
Delete Field toolbar button (shown at left).
3. MDM prompts you to confirm that you really want to delete the field.
Click Yes to permanently delete the field from the table.
4. MDM deletes the field.
CAUTION ►► Deleting a tuple member is not reversible.
NOTE ►► If MDM cannot delete the field for any reason, it will display
an error message stating why the field could not be deleted.
Reordering Tuple Members
It may be useful to change the position (i.e. the display order) of tuple members. The position of a member in a tuple is shown in the Pos. column of the Member Fields pane, as shown below.
Figure 39. Member position (display order)
To change the display order of a tuple’s members:
1. In the Console Hierarchy tree, select the tuple whose members you
want to reorder.
2. Right-click in the Member Fields grid and choose Reorder from the
context menu, or choose Fields > Reorder from the main menu.
3. MDM opens the Reorder Field Positions dialog, as shown in Figure 38.
4. Select one or more fields and drag them to the desired positions in the
list
5. Click OK to close the dialog.


157
PART 6: REPOSITORY ADMINISTRATION
This part of the reference guide presents guidelines for maintaining the integrity of your MDM repositories and using the various mechanisms for backing them up and restoring them.

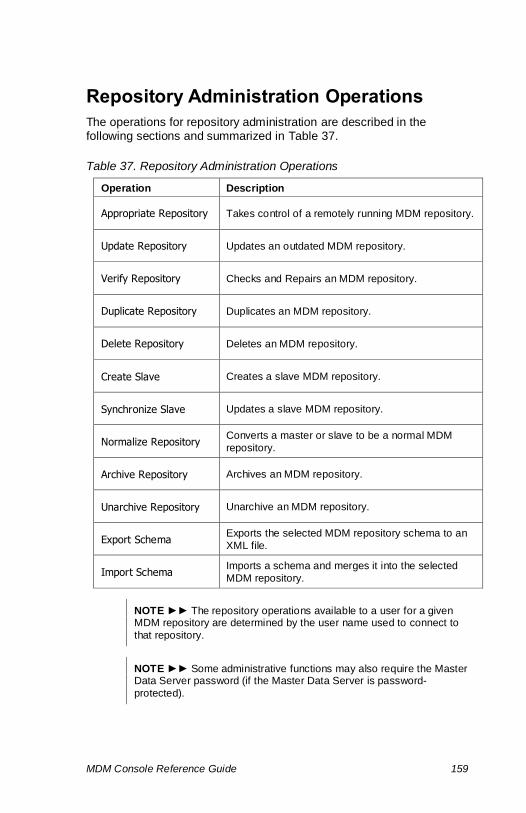
MDM Console Reference Guide 159
Repository Administration Operations
The operations for repository administration are described in the following sections and summarized in Table 37.
Table 37. Repository Administration Operations
Operation Description
Appropriate Repository Takes control of a remotely running MDM repository.
Update Repository Updates an outdated MDM repository.
Verify Repository Checks and Repairs an MDM repository.
Duplicate Repository Duplicates an MDM repository.
Delete Repository Deletes an MDM repository.
Create Slave Creates a slave MDM repository.
Synchronize Slave Updates a slave MDM repository.
Normalize Repository Converts a master or slave to be a normal MDM
repository.
Archive Repository Archives an MDM repository.
Unarchive Repository Unarchive an MDM repository.
Export Schema Exports the selected MDM repository schema to an
XML file.
Import Schema Imports a schema and merges it into the selected
MDM repository.
NOTE ►► The repository operations available to a user for a given MDM repository are determined by the user name used to connect to
that repository.
NOTE ►► Some administrative functions may also require the Master Data Server password (if the Master Data Server is password-
protected).

160 MDM Console Reference Guide
Appropriating an MDM Repository
Although MDM repositories can be mounted on multiple Master Data Servers simultaneously, each repository can only be started by one Master Data Server at a time. Started repositories appear in the
Console with the state Running Remotely (see status icon shown on left)
on all other Master Data Servers on which they are mounted.
Once a repository is stopped by a Master Data Server, it becomes available to all other Master Data Servers. However, if the Master Data Server shuts down while the repository is still started, the repository will remain unavailable even though it is no longer being accessed by that Master Data Server.
You can use the Appropriate command to reset the repository state to stopped, so that is accessible to and can be started or restarted by any Master Data Server.
You should appropriate an MDM repository only if you are certain that no other Master Data Server is using the repository. You can check this by selecting the Master Data Server in the Console Hierarchy tree and looking at the Status field in the Repositories pane in the main window, which shows which other Master Data Server is running the repository.
CAUTION ►► This operation is potentially dangerous, as it takes about a minute for the other Master Data Server to release its
connections to the repository. If you immediately perform an operation on the repository after appropriating it (that is, within a minute or so),
there is a small chance of data corruption as both Master Data Servers can simultaneously access the repository. To be safe, you may want to
wait a minute after appropriating an MDM repository prior to performing
the next operation. This is not an issue if you are appropriating a
repository on the same Master Data Server.
To appropriate a remotely running MDM repository:
• In the Console Hierarchy tree, right-click on the MDM repository you
want to unlock and choose Appropriate Repository from the context
menu, or choose Repositories > Appropriate from the main menu.
TIP ►► If the top-right pane is currently displaying the list of MDM repositories, you can also right-click on the repository in the grid and
choose Appropriate from the context menu.

MDM Console Reference Guide 161
Updating an MDM Repository
An MDM repository becomes outdated when you install an updated version of the MDM software and the updated software requires changes to the underlying schema that MDM uses to store the repository information within the SQL database.
When the new version of MDM requires schema changes in an existing MDM repository, the repository status icon (shown at left) is a gray square, indicating that the repository is outdated.
You can use the Update command to update the schema structure of an outdated MDM repository to the current version of the MDM software.
NOTE ►► Not all MDM updates involve schema changes. To find out
whether the latest release of MDM requires an update to the MDM repository – and if it does, how much time it will take – be sure to read
the release notes that are distributed with the new software.
NOTE ►► You cannot start an outdated MDM repository.
CAUTION ►► It is strongly recommended that you duplicate or
backup an outdated MDM repository prior to updating it, as described in “Duplicating an MDM Repository”, and “Backing Up and Restoring a
Repository”.
When you update an MDM repository, MDM automatically generates a report file, which you can view when the process is complete. (See “Reports” for more information on report files and how to view them at a later time.)
To update an outdated MDM repository (gray square):
1. In the Console Hierarchy tree, right-click on the MDM repository you
want to update and choose Update Repository from the context menu,
or select the tree node and choose Repositories > Update from the
main menu.
2. MDM prompts you to confirm that you really want to update the
repository. Click Yes to update the repository.
3. MDM updates the repository.
4. When the update process is complete, MDM displays a message
dialog indicating whether the update was successful. Click OK to close
the dialog.
NOTE ►► An MDM repository might not update successfully if the
underlying databases have been modified by an application other than
MDM.

162 MDM Console Reference Guide
Verifying an MDM Repository
Over time, the data and the internal structure within an MDM repository can accumulate inconsistencies and various schema, referential integrity, and other logical errors.
You can use the Verify commands to detect and correct these repository
errors. The Verify command has the options described in Table 38.
Table 38. Verify Commands
Option Description
Check
Finds and reports errors in the repository schema but does not
repair them.
▪ You can run Verify > Check on a mounted repository that is
started or stopped.
▪ Run Verify > Check to detect existing constraints for multi-value
referenced tables.
▪ If you check a started repository, it will be locked from being
modified during the operation; checks should be scheduled
with other user activities in mind.
▪ You should always run a Verify > Check after a Verify > Repair.
Some of the other commands automatically run a Verify >
Check before they execute.
Repair
Not only finds and reports but also repairs errors in the repository
schema.
▪ You can only Repair an MDM repository that is mounted and
stopped.
▪ The Repair option runs the risk of destroying data, as when
orphaned records are deleted. It is recommended that you first
run the Check option to reveal which data tables will be
affected by the repair.
▪ Sometimes, you may need to run Verify > Repair multiple times
until either no errors remain or there is no change from the
previous repair, as indicated by the number of errors fixed.
When you verify an MDM repository, MDM automatically generates a report file, which you can view when the process is complete. (See “Reports” for more information on report and how to view them at a later time.)
In the Verify report, errors are denoted by the symbol “$$$” in the left margin. The following types of errors are identified in the report:
• Fatal errors. These will either prevent the Master Data Server from starting the MDM repository or cause it to crash. Examples include missing critical tables or fields, and the use of an undefined lookup record ID.

MDM Console Reference Guide 163
• Non-fatal errors. These may cause the Master Data Server to fail or to run inefficiently. Examples include mismatched field types, incorrect nullability, and incorrect or missing indices.
• Warnings. These are inconsistencies among database definitions that will not necessarily affect Master Data Server operation. An example is an unnecessary field or index.
NOTE ►► Most fatal errors can be fixed automatically by the Verify
command; however, some may require manual repair.
To verify an MDM repository:
1. In the Console Hierarchy tree, right-click on the MDM repository you
want to verify and choose Verify Repository, or select the tree node
and choose Repositories > Verify from the main menu.
TIP ►► If the top-right pane is currently displaying the list of MDM
repositories, you can also right-click on the repository in the grid and
choose Verify from the context menu.
2. Choose the Verify option from the cascading menu:
▪ Check
▪ Repair
DATA INTEGRITY ►► If you select the Check option, MDM marks the
repository as read-only for the duration of the check process, which
does not prevent other users from accessing the repository, but does
prevent them from modifying its contents.
3. If you select Repair, MDM prompts you to confirm that you really want
to repair the errors in the repository. Click Yes to repair the repository.
4. MDM verifies the repository.
5. When the verify process is complete, MDM displays a message dialog indicating the number of errors found and also any warnings, as shown
in Figure 40.
Figure 40. Repository Verify Complete dialog
6. To view the report, click Yes. MDM opens the Report Detail dialog to
view the XML report.
NOTE ►► You can view any of the reports previously generated by MDM by selecting the Reports table under the Admin node in the
Console Hierarchy. See “Reports” for more information.

164 MDM Console Reference Guide
Duplicating an MDM Repository
There are a variety of reasons for duplicating (i.e. copying) an MDM repository:
• Backup. Duplicate an MDM repository as a backup, allowing you to discard subsequent changes and revert to the point of duplication.
TIP ►► If you duplicate an MDM repository to the same DBMS machine as the original, the repository is not secure against hardware
failure, only against user corruption. If your objective is to back up the MDM repository, it is safer to duplicate a repository to a separate
DBMS machine.
• Training. Use the duplicate for training purposes or experimentation
by designers and other MDM repository maintenance personnel.
• Testing. Use the duplicate for testing purposes, to try out new ideas without affecting or endangering the active, online repository.
• Repartitioning. You can create the duplicate with a different number of partitions than the original.
• DBMS server transfer. You can create the duplicate under the control of a different DBMS Server than the original, to move the MDM repository from one DBMS Server to another as part of the duplication.
• DBMS brand transfer. You can create the duplicate under the control of a different DBMS brand than the original, to move the MDM repository from one DBMS brand to another as part of the duplication.
You can use the Duplicate command to duplicate an existing MDM repository, including masked subsets, and schema-only duplicates that contain no records.
NOTE ►► You can duplicate a mounted MDM repository that is either
started or stopped.
NOTE ►► If you duplicate an MDM repository while it is started, it will
be locked from being modified during the operation; therefore,
duplication should be scheduled with other user activities in mind.
TIP ►► Before duplicating an MDM repository, you should run the
Verify > Check command, then run Verify > Repair, and then run Verify
> Check again, to make sure the repository does not contain errors.

MDM Console Reference Guide 165
TIP ►► The structure of an MDM repository cannot be modified while
it is started. To minimize disruption to MDM client users while the repository is stopped for modification: (1) duplicate the repository while
the original remains started; (2) mount and start the duplicate on a different port; (3) make modifications to the duplicate; (4) stop both
repositories; and (5) start the duplicate on the same port the original
repository was using.
TIP ►► When you duplicate a repository from one DBMS instance to another, MDS tries to instruct the two DBMS instances to perform a
whole-table copy. A whole-table copy is very efficient because the target DBMS instance directly contacts the source DBMS instance and
pulls the entire table from it. In order for a whole-table copy to work, however, the source and target DBMS instances must be "known" to
each other. For example, when duplicating from one Oracle instance to
another, the name of the source instance must be in the tsanames.ora file used by the target Oracle instance. If a whole-
table copy cannot be performed, MDS falls back to row-by-row
duplication which can result in much slower duplication times.
NOTE ►► Duplicating a slave repository creates a new slave
repository that shares the same master as the original slave.
NOTE ►► Duplicating a master repository creates a normal
repository.
When you duplicate an MDM repository, MDM automatically generates a report file, which you can view when the process is complete (See “Reports” for more information on reports and how to view them at a later time.)
To duplicate an MDM repository:
1. In the Console Hierarchy tree, right-click on the MDM repository you
want to duplicate and choose Duplicate Repository from the context
menu, or select the tree node and choose Repositories > Duplicate
from the main menu.
TIP ►► If the top-right pane is currently displaying the list of MDM
repositories, you can also right-click on the repository in the grid and
choose Duplicate from the context menu.
DATA INTEGRITY ►► MDM marks the repository as read-only for
the duration of the duplication process, which does not prevent other users from accessing the repository, but does prevent them from
modifying its contents and possibly destroying the integrity of the
duplicate.

166 MDM Console Reference Guide
2. MDM opens a dialog asking whether you want to perform a Verify >
Check operation. Click Yes to verify the repository or click No to
proceed with the Duplicate operation without verifying the repository.
NOTE ►► If the check detects any inconsistencies in the repository, MDM allows you to cancel the duplicate operation and first perform a
Verify > Repair. Click Yes to duplicate the repository without repairing
the errors, or click No to cancel the duplicate operation so that you can
repair the repository.
3. MDM opens the Duplicate MDM Repository dialog shown in Figure 41.
Figure 41. Duplicate MDM Repository dialog (1 of 2)
4. Select the DBMS Server for the duplicated MDM repository from the
drop-down list.
TIP ►► To reference a SQL Server named instance, append a
backslash (\) and the instance name after the machine name above.
TIP ►► To use Windows authentication, leave the Login empty (requires the SQL Server Allow Windows Authentication
Mode parameter in the Master Data Server Settings file (mds.ini) to be
set to True).
TIP ►► To remove an entry from the drop-down list of DBMS Servers,
make it visible in the closed drop-down control and press Del.
TIP ►► The drop-down list of DBMS Servers includes only those
servers that you have previously added to the list and will usually include for selection all the servers to which you might want to connect.
If the desired server is not in the list, click the “…” (browse) button to
open the Select DBMS Server dialog, and select from the list of DBMS Servers known to MDM. If the desired DBMS Server is not in this list
either, then click the Add button in the Select DBMS Server dialog to
open the Add DBMS Server dialog, and select from the list of servers (or type in a new name in the text entry control at the top of the dialog),
and choose the DBMS type from the drop-down list.

MDM Console Reference Guide 167
5. Enter the appropriate DBMS login (which must have system
administrator privileges) and password for the selected DBMS Server
and click Next.
6. If the Master Data Server is password-protected, MDM opens the
Connect to Master Data Server dialog shown in Figure 42 and prompts
you to enter your Master Data Server password. Type the password
and click OK.
Figure 42. Connect to Master Data Server dialog
NOTE ►► If you have already entered the Master Data Server password during your current MDM Console session, you will not be
reprompted. However, if you unmount and then remount the Master
Data Server during the current session, you will be required to reenter
the password.
7. MDM disables the DBMS Server, Login, and Password fields and
enables the Repository Name field, as shown in Figure 43.
Figure 43. Duplicate MDM Repository dialog (2 of 2)
TIP ►► You can click the Options button to open the Repository Options dialog to: (1) change the number of partitions given to the new
MDM repository from the default currently set for the Default Partitions
DBMS setting; and/or (2) create a subset or schema-only repository
(see “Setting ” for more information on repository options).
8. Enter the name for the new MDM repository.
9. Click Finish to duplicate the repository.
10. If the duplicate repository name already exists, MDM prompts you to
confirm that you really want to overwrite the existing repository. Click
Yes to overwrite the repository.

168 MDM Console Reference Guide
11. While the repository is being duplicated, MDM reports the progress in
the Status field for the repository in the Repositories pane. If the repository is stopped, MDM also changes the repository status icon
(shown at left) to two blue dots.
12. When the duplicate process is complete, MDM displays a message dialog indicating whether the duplicate was successful, as shown in
Figure 44.
Figure 44. Repository Duplicate Complete dialog
NOTE ►► The duplicate MDM repository is not mounted
automatically on the Master Data Server after it is created. See “Mounting and Unmounting an MDM Repository” for more information
about mounting MDM repositories.
13. To view the report, click Yes. MDM opens the Report Detail dialog to
view the XML report.
NOTE ►► You can view any of the reports previously generated by MDM by selecting the Reports table under the Admin node in the
Console Hierarchy. See “Reports” for more information.

MDM Console Reference Guide 169
Maintaining Master and Slave Repositories
MDM’s master/slave feature enables “pull-based” replication of MDM repositories. Through this feature, you can create one or more read-only copies of an existing MDM repository. Each copy can be on the same Master Data Server as the original or on a completely different platform in a completely different location.
The original, or master repository, keeps track of all of its subsequent data and schema changes. Each copy, or slave repository, can update itself with these changes by sending a synchronization request to the master, which replies with the updates.
Master/slave repositories can provide a variety of benefits, including:
• Performance boosts. They reduce load and improve performance by distributing read-access requests among multiple servers.
• Data availability. They ensure that repository data is available even
when the master repository is busy.
• Redundancy. They reduce the risk of repository downtime due to
server outages.
• Staging. They allow you to make incremental changes on a “staging” repository and then release the changes only when you are ready.
• Efficient updating. They speed up data synchronization by sending
only repository updates, not entire repositories.
MASTER/SLAVE LANDSCAPES
There are two basic strategies for designing a master/slave landscape. The first is to create a distributed, scale-out architecture. In this landscape, the master repository is located on one physical server and the slave repositories are mounted on separate servers. You can scale out such an architecture infinitely. This architecture is useful for creating regional data-access points and redundant repositories.
Benefits to a distributed landscape include:
• Local access to master data from anywhere in the world.
• Backup repositories available in case of server failures.
• Improved Master Data Server stability due to distributed loads.
NOTE ►► Slave repositories can run on different operating systems
and use different underlying databases than their master repository.

170 MDM Console Reference Guide
A distributed landscape is illustrated in Figure 45.
Figure 45. Master repository with distributed slave repositories
The second landscape strategy is to place both the master and slave repositories on the same physical server. This is useful for creating a staged production environment in which you make ongoing changes to the master repository while ensuring a stable version of your master data is always accessible.
Benefits to a single-server landscape include:
• Requires only a single machine and a single copy of MDM software.
• Allows you to “publish” master data updates on your schedule.
A single-server landscape is illustrated in Figure 46.
Figure 46. Master and slave repositories on a single Master Data Server
NOTE ►► Master/slave-related communications use the standard
MDS port 20005 and do not require a dedicated port. The Master Slave
Port setting in the mds.ini file is deprecated.
MDM Server A
Master/Staging Repository
Slave/Production
Repository
MDM Server B
MDM Server C
MDM Server D
Slave Repository
MDM Server A
Master Repository
Slave Repository
Slave Repository

MDM Console Reference Guide 171
MASTER/SLAVE LIMITATIONS
While a master/slave configuration offers a number of benefits, there are several limitations worth noting:
• Cannot synchronize slaves after moving a master repository.
• Cannot synchronize changes from different versions of MDS.
• Cannot edit description and port properties on slave repositories.
• Syndication tracking information is not synchronized
Moving Master and Slave Repositories
When a slave repository is created, it is given the server location of its master repository. The master repository, however, has no knowledge of its slaves’ locations. For this reason, you can freely move slave repositories to different servers, but moving a master repository is not recommended. Once you move a master repository, its slave repositories can no longer synchronize to it.
If you must move a master repository to a different Master Data Server, it is best to normalize the master repository before the move (see “Normalizing a Master or Slave Repository” for more information about normalizing repositories). Then, once the repository is mounted on the new server, create new slave repositories from it. The new slaves will be able to synchronize to the master at its new location.
Synchronization Requires Identical MDS Versions
All slave repositories should be mounted on hosts running the same version (build number) of MDS software as their master repository. Changes made to a master repository running a different version of the Master Data Server than a slave repository cannot be synchronized by the slave.
When updating your Master Data Server software, it is therefore best to synchronize slave repositories before beginning the update. If you are unable to update master and slave repositories simultaneously, the slave repository can continue to synchronize changes made on the master until it receives changes made on a different version of Master Data Server software than its own. At that point, the slave repository will issue an error message indicating that the slave is operating on a different version of the software than the master.
Syndication Tracking Information is not Synchronized
Slave synchronization does not transfer syndication timestamps from the master repository. As a result, the slave repository, even if normalized, will not suppress unchanged records in a syndication based on syndications which occurred on the master repository.

172 MDM Console Reference Guide
IDENTIFYING MASTER AND SLAVE REPOSITORIES
In the Console Hierarchy tree, the type of an up-to-date, valid, and connected MDM repository is identified by the color of the top of the repository icon. In the Repositories pane, the type of each repository is
displayed as Normal, Master, Slave, or Publication Slave.
Master and slave repositories are identified by the icons and types displayed in Table 39.
Table 39. Identifying Master and Slave Repositories in MDM Console
Icon Type
Master
Slave
Publication slave
To see the name and expected host Master Data Server of a slave repository’s master repository, use the CLIX command repGetMasterInfo. A master repository has no knowledge of its
slave repositories.
PUBLICATION SLAVES
Publication slaves, like ordinary slave repositories, contain read-only copies of their master repository’s master data. Unlike ordinary slave repositories, publication slaves have the ability to store changes related to publications and the publication-related portions of the repository. This feature allows you to offload all publication work from the master repository to one or more publication slave repositories.
By safely separating the distinct duties of master data maintenance from those of publication design, you can improve performance for all MDM-related tasks by preventing unnecessary competition for machine and Master Data Server resources.
NOTE ►► You can also back up and restore the work performed on a
publication slave independently of the rest of the repository (see “MDM
Publication Model Archive and Unarchive”).

MDM Console Reference Guide 173
MASTER/SLAVE-RELATED OPERATIONS
Master/slave-related operations available from MDM Console are described in Table 40.
Table 40. Master/Slave Console Operations
Operation Description
Create Slave Creates a slave based on the selected repository
Synchronize Slave Updates the selected slave repository
Normalize Repository Normalizes the selected master or slave repository
These operations are described in the following sections.
CREATING MASTER AND SLAVE REPOSITORIES
The Create Slave operation automatically turns a normal repository into a master repository. While a master repository can have any number of slaves, each slave repository can have only one master repository.
To issue a Create Slave command, the master repository must be mounted but it does not have to be started. While MDM is creating the slave, the master repository is made “read-only” to prevent other users from modifying the repository and destroying the integrity of the slave.
Other options for adding slave repositories include the Duplicate and
Archive/Unarchive operations. Duplicating an existing slave repository creates a new slave repository which contains the same information and shares the same master as the existing slave. This option can be useful if you have an existing slave and either do not have access to the master repository or do not wish to interrupt the master repository with a
Create Slave operation. See “Duplicating an MDM Repository” for more
information about the Duplicate operation.
The archive/unarchive option is useful when you want to create, distribute, and install multiple slaves across a broad range of different systems. Simply create one slave, archive it, and then distribute the archive file to the various target locations for unarchiving. See “MDM Repository Archive and Unarchive” for more information about archiving and unarchiving MDM repositories.
Because the Duplicate and Archive/Unarchive operations create slave repositories from other slaves instead of the master, it is a good idea to synchronize the original slave to the master repository before undertaking either operation.
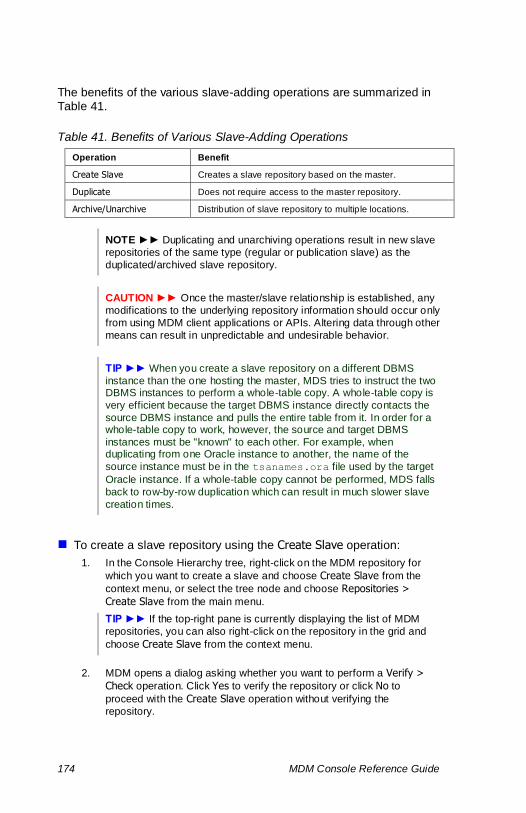
174 MDM Console Reference Guide
The benefits of the various slave-adding operations are summarized in Table 41.
Table 41. Benefits of Various Slave-Adding Operations
Operation Benefit
Create Slave Creates a slave repository based on the master.
Duplicate Does not require access to the master repository.
Archive/Unarchive Distribution of slave repository to multiple locations.
NOTE ►► Duplicating and unarchiving operations result in new slave
repositories of the same type (regular or publication slave) as the
duplicated/archived slave repository.
CAUTION ►► Once the master/slave relationship is established, any
modifications to the underlying repository information should occur only
from using MDM client applications or APIs. Altering data through other
means can result in unpredictable and undesirable behavior.
TIP ►► When you create a slave repository on a different DBMS
instance than the one hosting the master, MDS tries to instruct the two DBMS instances to perform a whole-table copy. A whole-table copy is
very efficient because the target DBMS instance directly contacts the
source DBMS instance and pulls the entire table from it. In order for a whole-table copy to work, however, the source and target DBMS
instances must be "known" to each other. For example, when duplicating from one Oracle instance to another, the name of the
source instance must be in the tsanames.ora file used by the target
Oracle instance. If a whole-table copy cannot be performed, MDS falls
back to row-by-row duplication which can result in much slower slave
creation times.
To create a slave repository using the Create Slave operation:
1. In the Console Hierarchy tree, right-click on the MDM repository for
which you want to create a slave and choose Create Slave from the
context menu, or select the tree node and choose Repositories >
Create Slave from the main menu.
TIP ►► If the top-right pane is currently displaying the list of MDM
repositories, you can also right-click on the repository in the grid and
choose Create Slave from the context menu.
2. MDM opens a dialog asking whether you want to perform a Verify >
Check operation. Click Yes to verify the repository or click No to
proceed with the Create Slave operation without verifying the
repository.

MDM Console Reference Guide 175
NOTE ►► If the check detects any inconsistencies in the repository,
MDM allows you to cancel the Create Slave operation and first perform
a Verify > Repair. Click Yes to proceed without repairing the errors, or
click No to cancel the Create Slave operation so that you can repair the
repository.
3. MDM opens the Create Slave Repository dialog shown in Figure 47.
Figure 47. Create Slave Repository dialog (1 of 2)
4. From the drop-down list in the DBMS server field, select the DBMS
Server on which you want to create the slave repository.
TIP ►► The drop-down list of DBMS Servers includes only those
servers that you have previously added to the list.
5. Enter the appropriate DBMS login (which must have system administrator privileges) and password for the selected DBMS Server
and click Next.
TIP ►► To use Windows authentication, leave the Login empty (requires the SQL Server Allow Windows Authentication
Mode parameter in the Master Data Server Settings file (mds.ini) to be
set to True).
6. MDM disables the DBMS Server, Login, and Password fields and
enables the Repository Name field, as shown in Figure 48.
Figure 48. Create Slave Repository dialog (2 of 2)
NOTE ►► Click the Options button to change the number of partitions given to the slave repository or to create the slave as a publication
slave (see “Setting ” for more information).

176 MDM Console Reference Guide
7. Enter the name for the slave repository.
8. Click Finish to create the slave repository.
9. While the slave repository is being created, MDM reports the progress
of the slave creation in the Status field of the master repository in the Repositories pane. If the master repository is stopped, MDM also
changes the repository status icon (shown at left) to two blue dots.
10. When the slave creation process is complete, MDM displays a message dialog indicating whether the slave creation was successful,
as shown in Figure 49.
Figure 49. Create Slave Repository Complete dialog
11. To view the report now, click Yes. The report can also be viewed later
by selecting the Reports table under the Admin node in the Console
Hierarchy (See “Reports” for more information about viewing reports).
12. The slave repository can now be mounted on a Master Data Server
(see “Mounting and Unmounting an MDM Repository” for more
information about mounting repositories).
NOTE ►► The new slave repository is not automatically mounted.
CONFIGURING MASTER/SLAVE REPOSITORIES FOR SSL
If a master repository is mounted on an SSL-enabled Master Data Server, the Master Data Servers on which its slave repositories are mounted must be configured to communicate securely with the master repository. See “SSL-Related Parameters for a Client MDS” for more information.
SYNCHRONIZING A SLAVE REPOSITORY
Synchronizing a slave repository updates the slave with the latest data and schema changes from its master repository.
You can synchronize a slave repository (including a publication slave
repository) at any time by issuing the Synchronize Slave command from the slave repository.
You can also schedule synchronizations by running the CLIX command repSynchronize from a batch file (see help.sap.com/nwmdm71 >
CLIX Reference for more information).

MDM Console Reference Guide 177
The master repository and the slave repository must both be mounted on running Master Data Servers in order to synchronize, but neither repository needs to be started.
Depending on the type of update required to synchronize the slave with its master, MDM may automatically start or stop the slave repository during the synchronization process. Repository data updates require the slave repository to be started; repository schema updates require the slave repository to be stopped. MDM returns the slave repository to its previous state after the changes are applied.
MDM behavior in these circumstances is summarized in Table 42.
Table 42. MDM Behavior During Slave Synchronization
Slave State Change Required MDM Automatically…
Stopped Data Starts then stops the slave repository
Started Data Keeps the slave repository started
Stopped Schema Keeps the slave repository stopped
Started Schema Stops then restarts the slave repository
There are some limitations to synchronization. Synchronization cannot occur when the master repository is running on a different version of MDM software than the slave repository. Also, slave repositories cannot synchronize to a master repository that has been moved to a different server (see “Master/Slave Limitations” for more information).
A slave repository is, by default, unavailable to users while it is being synchronized. To make a started slave repository available to users while synchronization Is ongoing, you can define a wait period to apply between master changes when launching the synchronization. If the wait period is greater than 0, MDM will make the slave repository available to users for the duration of the wait period after each master change is applied to the slave repository.
When synchronizing records containing Create Stamps or Time Stamps, the stamp times appear on the slave repository as the times when the changes were applied to the slave repository – not when the original changes were made on the master repository. Likewise, any User Stamps on the slave repository are set to the user who issued the synchronization command, not the user who made the original changes on the master repository.
NOTE ►► For schema changes, User Stamps remain the same on
the slave repository as they appear on the master repository.

178 MDM Console Reference Guide
To synchronize a slave repository:
1. In the Console Hierarchy tree, right-click on the slave repository you
want to synchronize and choose Synchronize Slave from the context
menu, or select the tree node and choose Repositories > Synchronize Slave from the main menu.
TIP ►► If the top-right pane is currently displaying the list of MDM repositories, you can also right-click on the repository in the grid and
choose Synchronize Slave from the context menu.
2. If the slave repository is not out-of-synch with its master repository,
MDM opens a dialog notifying you that no synchronization is required.
Click OK to return to the Console.
3. If the slave repository is out-of synch with its master repository, MDM opens a confirmation dialog providing you with details about the
synchronization. To specify a wait time between master changes, enter
the duration in the milliseconds field.
4. MDM displays the synchronization status on a progress bar. When the
synchronization is completed, click OK on the progress bar to return to
the Console.
BROKEN MASTER/SLAVE REPOSITORIES
If a master repository is unable to log a data or schema change made on the repository, it becomes “broken” and stops logging all subsequent changes made on the repository.
Slave repositories are able to synchronize with the master repository up to the point that the logging stopped. After that, the slave repository becomes “broken”, too, to indicate that no further synchronization with the master repository can occur.
When either a master or a slave repository breaks, its repository icon in the Console Hierarchy tree changes to reflect the new state, as displayed in the following table.
Table 43. Identifying Broken Master and Slave Repositories
Icon Type
Broken master repository
Broken slave repository
Broken publication slave repository

MDM Console Reference Guide 179
To “fix” a broken master repository, you must first normalize the repository and then delete and recreate its slave repositories (see “Normalizing a Master or Slave Repository” below for more information).
NOTE ►► By frequently archiving the publication model of a publication slave, you can prevent against catastrophic work loss if
that publication slave breaks (see “MDM Publication Model Archive
and Unarchive” for more information).
NORMALIZING A MASTER OR SLAVE REPOSITORY
Normalizing a master or slave repository changes the repository’s type
from “Master” or “Slave” to “Normal”.
Normalizing a slave repository lets you directly edit the repository but severs the ability to synchronize the repository’s contents with those of its former master. Normalizing a slave repository has no effect on its master repository, which will continue to log changes in anticipation of synchronization requests.
Normalizing a master repository stops the repository from logging synchronization changes and prevents all of its slave repositories from synchronizing to it (an error message is returned by the Master Data Server). Normalizing a master repository does not automatically normalize its slave repositories, however, because in MDM, master repositories have no awareness of their slaves.
Once you normalize a master repository, all of its slave repositories become orphaned. That is, they remain read-only copies of their former master repository but can no longer synchronize their contents to it.
Orphaned slave repositories can be left alone or normalized, but the recommended practice after normalizing a master repository is to simply delete all of its former slaves.
Once a master or slave repository is normalized, it loses all knowledge of its former master/slave status. If you want to re-create a master/slave scenario, you must start over by creating all-new slave repositories (see “Creating Master and Slave Repositories” for more information about creating slave repositories).
A repository must be stopped before it can be normalized.
To normalize a master or slave repository:
1. In the Console Hierarchy tree, right-click on the repository you want to
normalize and choose Normalize Repository from the context menu, or
select the tree node and choose Repositories > Normalize from the
main menu.
2. MDM changes the repository’s Type property in the Repositories pane
to Normal and also changes the repository status icon (shown at left) in
the Console Hierarchy tree to indicate the repository is now normal.

180 MDM Console Reference Guide
Backing Up and Restoring a Repository
MDM Console offers several methods to backup an MDM repository so that it can be recovered if you experience hardware failure or severe MDM repository management error. Some of these methods simply provide redundancy; while others allow offline storage. The available methods for backing up an MDM repository are summarized in Table 44 and include:
• MDM Archive and Unarchive (see the next section for a full
discussion). You can use the MDM Console Archive command to create a DBMS independent backup of the MDM repository that completely encapsulates the repository. The archive file can be copied to offline storage for safekeeping, and used to later restore
the repository using the Unarchive command, either on the same DBMS machine or a different DBMS machine.
NOTE ►► MDM archive files are stored to and retrieved from the
directory specified by Archive Dir in the mds.ini file.
TIP ►► After restoring an MDM repository from an archive, it is
recommended that you use the Update Indices option of the Start
Repository command (see “Starting and Stopping an MDM Repository”
for more information).
• MDM Duplicate. You can use the MDM Console Duplicate
command to simply create a copy of the MDM repository in case the original is corrupted. The repository can be duplicated to a different drive on the same DBMS machine or onto a different DBMS machine (see “Duplicating an MDM Repository" for more information).
NOTE ►► If you duplicate an MDM repository onto the same
machine, you must give the target repository a different name. For
increased safety, choose a different DBMS machine for the duplicate
repository.
• Native DBMS backup and restore. You can, of course, always use the native backup and restore methods provided with your DBMS by invoking the DBMS commands directly. This requires knowing the names of the actual databases (or schemas), as discussed in “Duplicating an MDM Repository".
NOTE ►► In addition to backing up each of the repository partitions, you must also back up the single MDM database/schema that
maintains information on all the MDM repositories.

MDM Console Reference Guide 181
Table 44. Repository Backup and Restore Methods
Method DBMS Platforms Comments
Archive and Unarchive
▪ SQL Server
▪ Oracle
▪ DB2
▪ MaxDB
▪ SAP ASE
▪ SAP HANA (MDM-
SRM only)
▪ Backup saved on the
MDS host machine rather than the DBMS
machine.
▪ Can cross DBMS
platforms.
▪ Number of repository partitions can be
changed.
▪ Results can be written to
external media.
Duplicate
(to a different drive or
from one DBMS to
another)
▪ SQL Server
▪ Oracle
▪ DB2
▪ MaxDB
▪ SAP ASE
▪ SAP HANA (MDM-
SRM only)
▪ Can cross DBMS
platforms.
▪ Number of repository
partitions can be
changed.
▪ Results cannot be
conveniently written to
external media.
Native DBMS
Backup and Restore
(through DBMS)
▪ SQL Server
▪ Oracle
▪ DB2
▪ MaxDB
▪ SAP ASE
▪ SAP HANA (MDM-
SRM only)
▪ Backup stored on the
DBMS machine.
▪ Results can be written to
external media.
MDM REPOSITORY ARCHIVE AND UNARCHIVE
The MDM archiving mechanism allows you to back up your MDM repository in a DBMS- and platform-independent format known as an MDM archive.
You can use the Archive command to backup an MDM repository, and
later use the Unarchive command to restore it from the archive. While you can certainly use the various backup methods provided by the DBMS, an MDM archive offers the following benefits:
• Ease of use. Creating an MDM archive does not require specialized DBMS knowledge and is done using a simple menu command interface from MDM Console.

182 MDM Console Reference Guide
• Segmenting. You can automatically segment an MDM archive into multiple files, each of a maximum file size, for easy offline storage on various media types (including CD-ROM/RW, Zip, and Jazz), and also to avoid the file-size limitations of some operating environments.
• DBMS version independence. The MDM archive is independent of the version of the DBMS, and will always work with MDM even when the underlying DBMS is upgraded to a new release.
• DBMS brand independence. An MDM archive can be unarchived to any DBMS brand supported by MDM, for cross-brand compatibility.
• No repository down time. You can create an MDM archive even while a started repository is being accessed by other MDM users.
• Redundancy. An MDM archive complements the backup methods
offered by the DBMS.
• Location. Each MDM archive is stored on the MDS machine rather
than on the DBMS machine.
NOTE ►► MDM archive files are stored in the directory specified by
the Archive Dir mds.ini parameter.
NOTE ►►You can restore an MDM repository that has been backed up to an MDM archive either by: (1) overwriting an existing repository
with the archive file; or (2) creating a new repository from the archive
file.
NOTE ►► Archiving and unarchiving MDM repositories are password-protected operations which require you to enter the Master Data
Server password, if you have not already done so during the current
MDM session (see “Master Data Server Security”).
NOTE ►► Archiving puts a "read-lock" on the repository during the
duration of the archive operation.
CAUTION ►► Unarchiving over a master repository “normalizes” the
master repository and orphans any slaves it may have, even if the unarchived repository was a master repository itself (see “Normalizing
a Master or Slave Repository” for more information about normalized
repositories).

MDM Console Reference Guide 183
Archiving an MDM Repository
You can back up an MDM repository using the MDM archiving mechanism as described in this section. Only mounted repositories can be archived and the repository can either be started or stopped.
To backup an MDM repository to an MDM archive:
1. In the Console Hierarchy tree, right-click on the MDM repository you
want to backup and choose Archive Repository.
TIP ►► If the top-right pane is currently displaying the list of MDM
repositories, you can also right-click on the repository in the grid and
choose Archive from the context menu.
DATA INTEGRITY ►► MDM marks the repository as read-only for the duration of the archive process, which does not prevent other users
from accessing the repository, but does prevent them from modifying
its contents and possibly destroying the integrity of the archive.
2. MDM opens a dialog asking whether you want to perform a Verify >
Check operation. Click Yes to verify the repository or click No to
proceed with the Archive operation without verifying the repository.
NOTE ►► If the check detects any inconsistencies in the repository,
MDM allows you to cancel the Archive operation and first perform a
Verify > Repair. Click Yes to proceed without repairing the errors, or
click No to cancel the Archive operation so that you can repair the
repository.
3. MDM opens the Archive MDM Repository dialog shown in Figure 50 with a list of the existing archives, and prompts you to enter the name
for the new archive. Either: (1) select one of the names in the list; or (2)
type a new name into the edit control, and then click OK.
Figure 50. Archive MDM Repository dialog

184 MDM Console Reference Guide
NOTE ►► The Options button on the Archive MDM Repository dialog
lets you segment the archive into multiple files and/or restrict the type of records included in the archive (see “Archive Options Dialog” for
more information).
4. If the archive filename already exists, MDM prompts you to confirm
that you really want to overwrite the existing archive file. Click Yes to
overwrite the archive.
5. MDM archives the repository to one or more archive files. While the
repository is being archived, MDM reports the progress of the archive
in the Status field for the repository in the Repositories pane. If the repository is stopped, it also changes the repository status icon (shown
at left) to two blue dots.
6. When the archive process is complete, MDM displays a message
dialog indicating whether the archive was successful, as shown in
Figure 51.
Figure 51. Repository Archive Complete dialog
7. To view the report, click Yes. MDM opens the Report Detail dialog to
view the XML report.
NOTE ►► During an archive, MDM creates a temporary file in the archive directory named <archive name>.a2a.rsv to reserve the
name of the archive file. This file is automatically deleted if the archive succeeds or fails, but if MDS stops before the operation is completed,
the file must be manually deleted before another archive can be
created with the same name.
Archive Options Dialog
By default, the Archive Repository operation stores all of the archived repository’s data in a single file of unlimited size. While this is suitable and appropriate in most cases, MDM provides options for segmenting the archive file into multiple files of a selected maximum size and also for limiting the type of data included in the archive file. These options can be set from the Archive Options Dialog, shown in Figure 52.

MDM Console Reference Guide 185
Figure 52. Archive Options dialog
The maximum file segment size you select should correspond to the maximum size of your external media (if you intend to copy the files to offline storage), or to the maximum file size of the operating system (which is 2 gigabytes under Unix). The default value for this option is
Unlimited (single segment).
The remaining archive options determine the archive’s contents:
• Normal. The entire repository (default option).
• Schema only. Only the repository schema, not its records.
• Subset. Only a subset of repository records.
NOTE ►► The Exclude options withhold Images, Image Variants, PDFs, Sounds, Videos, and Binary Objects table records and
thumbnails from the archive file and should only be used when these
items are not required upon unarchiving the repository.
NOTE ►► The Mask option archives only the subset of records
contained in the selected mask. This option is not supported on
repositories that include tuples.

186 MDM Console Reference Guide
Unarchiving an MDM Repository Over Another Repository
You can overwrite an existing MDM repository with an MDM archive as described in this section.
NOTE ►► You can use this method to unarchive over an existing
MDM repository only if the repository is mounted and stopped.
To unarchive an MDM repository over an existing repository:
1. In the Console Hierarchy tree, right-click on the MDM repository you
want to restore and choose Unarchive Repository.
TIP ►► If the top-right pane is currently displaying the list of MDM repositories, you can also right-click on the repository you want to
overwrite in the grid and choose Unarchive from the context menu.
2. MDM opens the Unarchive MDM Repository dialog shown in Figure
53.
Figure 53. Unarchive MDM Repository dialog (repository node)
NOTE ►► The Unarchive MDM Repository dialog from an MDM repository node is similar to the Create MDM Repository dialog, with
the Port field replaced by the Archive field, and the DBMS Server,
Login, Password, and Repository Name fields disabled.
3. Select the archive file from the drop-down list.
NOTE ►► MDM archive files are retrieved from the directory specified
by Archive Dir in the mds.ini file.
4. Click Finish to unarchive the repository.
5. MDM prompts you to confirm that you really want to overwrite the
existing repository. Click Yes to overwrite the repository.
6. MDM restores the repository from the archive file, overwriting the existing repository. While the repository is being unarchived, MDM
changes the repository status icon (shown at left) to two gray dots, and reports the progress of the unarchive in the Status field for the
existing repository in the Repositories pane.
7. When the unarchive process is complete, you have the option of
viewing a report of the unarchive.

MDM Console Reference Guide 187
NOTE ►► You can view any of the reports previously generated by
MDM by selecting the Reports table under the Admin node in the Console Hierarchy. See “Reports” for more information on the Reports
table.
CAUTION ►► The unarchive process disconnects all users from the
repository that is being overwritten, including the user who issued the
Unarchive command. Users must then reconnect to the repository after the unarchive operation is completed. This ensures all Console users
operate under the user and role permissions of the unarchived
repository, not those of the overwritten repository.
Archive Report
Whenever you create an MDM archive, the Master Data Server creates a file that reports a variety of information about all the MDM archives
present in the Archive directory at that time. The file, named Archive
Summary.xml, contains information such as the time of day when the archive was started, the Master Data Server version, schema version and Verify status, all of which may be helpful for managing archive files.
Managing Archive Files
The Master Data Server creates MDM archives and expects all MDM archives to reside in a single directory on the machine where it is installed. It is up to you to manage this directory from the operating system by moving, renaming, and deleting the archive files or file sets in that directory.
TIP ►► You can change the archive directory by editing the mds.ini
file and changing the value for the key labeled Archive Dir. The Master Data Server reads this value every time an MDM Console user
executes an Archive or Unarchive command, so you can change the
value without stopping and starting the Master Data Server.
When an archive is segmented into a set of files, all the segments must
be present in this directory to perform the Unarchive operation. The
initial file segment always has the filename extension .a2a (.a2p for publication model archives). Thereafter, segment extensions are
numbered sequentially beginning with .a00, .a01, and so on.
Dealing with Outdated Archives
When you use the Unarchive command and then mount the MDM repository that you just unarchived, it may be marked outdated, in which case you must use the Update command to update it (see “Updating an MDM Repository”).

188 MDM Console Reference Guide
NOTE ►► If for some reason, you do not wish to do to update the
unarchived MDM repository, you must instead revert to the earlier version of the MDM software that was used to create the archive in the
first place. This can be determined by examining the archive report.
MDM PUBLICATION MODEL ARCHIVE AND UNARCHIVE
Recall that the MDM Archive and Unarchive operations enable you to backup, restore, and distribute entire MDM repositories. Users working only on publication-related tasks, however, may want to backup, restore, and distribute their work on a more frequent basis and without the overhead of including non-publication information.
To accomplish this, you can backup, restore, and distribute only the parts of an MDM repository used by the MDM Publisher, MDM Layout Server, and MDM Indexer to design and produce publications and publication indexes. These parts are collectively referred to as the repository’s publication model. Like repository archives, publication model archives are platform- and DBMS-independent. Unlike repository archives, publication model archives do not store master data. Instead, a publication model archive contains the following repository information:
• Family object layouts
• Publications, spreads, and presentation objects
• Templates and master pages
• Indexes
The publication model does not include the Family Hierarchy. As a result, when archiving and unarchiving publication models, the Family Hierarchies of the “source” and “target” repositories should be identical . Otherwise, if you unarchive a publication model over a repository with a different Family Hierarchy than that of the archived publication model, only those families shared by both the archived publication model and the target repository will be updated. MDM will not unarchive families from the publication model archive that are not already present on the target repository’s Family Hierarchy,
Similarly, MDM will not unarchive multilingual information for languages that do not exist on the target repository.
Because publication models do not overwrite the target repository’s
schema, the Archive Publication Model and Unarchive Publication Model commands differ from the normal Archive/Unarchive commands in the following ways:
• You cannot create a new repository from a publication model
archive.

MDM Console Reference Guide 189
• You cannot unarchive a publication model onto a master repository.
• You cannot change repository options while archiving or unarchiving.
• The source and target repository schemas must be identical.
Otherwise, the procedures for archiving and unarchiving publication models are exactly the same as those for archiving and unarchiving MDM repositories (see “MDM Repository Archive and Unarchive” for more information about these procedures).

190 MDM Console Reference Guide
Exporting and Importing Schemas
MDM Console allows you to export and import the schema of an MDM repository, which can be useful in a variety of circumstances:
• Schema migration. Migrate a repository structure from one repository to another without changing data in the exported or imported repositories.
• Backup/restore. Backup a repository structure without backing up the data of the repository, and then restore the repository structure without changing any data.
• Automation. Provide an automated mechanism for migrating schema changes from development, to test, and from test to deployment versions of the same repository.
NOTE ►► When you use the schema export and import features of
MDM Console, only the structure will be exported and imported; data,
entries, and objects of the repository will not be transported.
Items included in schema exports and imports are listed in Table 45.
Table 45. Repository Items Included In Schema Exports/Imports
Item Included Notes
Repository Properties
Name
Description •
DBMS Server
Login
Port
Type
Languages •
Table Properties
Name •
Code •
Description •
Type •
Primary Display Field •
Display Fields •
Unique Fields •
Key Mapping •
Attribute Image Variants

MDM Console Reference Guide 191
Item Included Notes
Text Value Image Variants
Alternative Display Fields
Field Properties
Name •
Code •
Description •
Type •
Required •
Writeable Once •
Matrix •
Multilingual •
Sort Index •
Keyword •
Display Field • Indirectly via the table’s Display Fields property
Unique Field • Indirectly via the table’s Unique Fields property
Calculated The Calculation property is included instead.
Calculation • Calculations referencing non-included objects (such as attributes) may not migrate properly.
Sort Type •
Search Tab •
True Value •
False Value •
Default Value •
Symbol •
Lookup Table •
Dimension • Custom measurements are not included.
Default Unit •
Decimal Places •
Show Fractions •
Multi-Valued •
Default to Current Time •
Default to Current Date •
Selected Fields •
Qualifier •
Cache •
Special Tables

192 MDM Console Reference Guide
Item Included Notes
Assignments • Branch values are not supported by schema import/export.
Unique Code value required for each assignment.
Families
Relationships •
Image Variants
Named Searches
Validations • Can include branch values and validation groups.
Unique Code value required for each validation.
Expressions with lookup field values may require a manual step.
Admin Tables
Roles •
Users
Connections
Change Tracking
Remote Systems •
Ports • Port properties not included:
▪ Status [Inbound]
▪ Format [Outbound] ▪ Columns
[Outbound] ▪ Delimiter
[Outbound]
▪ Processing Interval [Outbound] ▪ Next Syndication Date
[Outbound]
▪ Next Syndication Time [Outbound]
Links •
XML Schemas •
Reports
EXPORTING AN MDM REPOSITORY SCHEMA
You can export an MDM repository schema using the MDM schema file export mechanism as described in this section.
When you use the Export Schema command to export an MDM repository schema, it creates an XML schema file that you can use to create a new repository or import and merge into an existing repository.

MDM Console Reference Guide 193
To export the schema of an MDM repository to an XML file:
1. In the Console Hierarchy tree, right-click on the MDM repository whose
schema you want to export and choose Transport > Export Repository Schema from the context menu.
2. In the Save dialog, Click Save to export the schema.
NOTE ►► Schema files are stored in XML format in a user-defined
location using a user-defined filename. The file contains the schema
definition only; no table or field content.
IMPORTING AN MDM REPOSITORY SCHEMA
You can import an MDM repository schema using the MDM schema file import mechanism as described in this section.
When you use the Import Schema command to import an XML schema file, MDM: (1) automatically compares the repository against the inbound schema: (2) displays a dialog that highlights and color-codes the differences according to change operation (Add/Delete/Modify); and (3) allows you to individually accept or reject each change.
NOTE ►► The resulting merged schema dominates the structure of
the repository after import, deleting existing tables and fields from the
repository, and creating tables and fields of the schema.
NOTE ►► MDM detects and allows you with property-level granularity to individually accept or reject: (1) changes to repository, table and
field properties; (2) the addition of tables and fields; and (3) the
deletion of tables and fields.
Import Schema Dialog at a Glance
The Import Schema dialog, shown in Figure 54, consists of three panes: (1) the Repository+Schema pane, which displays a hierarchy showing the target repository schema combined with the inbound schema; (2) the Items pane, which lists every item in the combined schema along with the type of item, the change operation (if any) and whether to accept or reject the schema change; and (3) the Details pane, which lists the properties of the currently selected item (repository/table/field) in the Items pane and whether to accept or reject the property-level changes.

194 MDM Console Reference Guide
Figure 54. Import Schema dialog
NOTE ►► The schema comparison dialog is like a structured visual
diff that provides color-coded change-tracking for each of the schema
elements and the individual properties of each element.
TIP ►► The Items pane includes a column named Node that contains
the number of the corresponding tree node in the Repository+Schema pane. You can sort by the Node column so that the items in the tree
and in the Items pane appear in the same sequence.
NOTE ►► You can Accept or Reject each individual change using the
radio buttons: (1) in the Merge column of the Items pane; and (2) in the Merge column of the Details pane, including the ability to: (3) add
some but not all the fields of an added table; (4) delete some but not all the fields of a deleted table; and (5) accept some but not all the
changes to the set of item properties (for property-level granularity).
Color Coding in the Import Schema Dialog
Import Schema dialog elements are color-coded in the three panes in black, red, magenta, and green, and highlighted in bold, as summarized in Table 46.

MDM Console Reference Guide 195
Table 46. Color Coding in the Import Schema Dialog
Pane Color Description
Repository +Schema
Black No change to common item.
Black No changes to common item (but child nodes have changes).
Red Common item has modifications to its properties.
Magenta Item appears in repository but not in inbound schema.
Green Item appears in inbound schema but not in repository.
Items
Black Common item; no change to accept or reject.
Red Accept change to modify properties of common item.
Magenta Accept change to delete the repository-only item.
Green Accept change to add the inbound schema-only item.
Details
Merge Column
Red Accept change to modify property of common item.
Repository Column
Black Common property value.
Magenta Repository property value.
Schema Column
Black Common property value.
Green Inbound schema property value.
Merged Column
Black Merged common property value.
Magenta Merged property value from repository.
Green Merged property value from inbound schema.
Comments
The Import Schema dialog contains a Comments column in the Items pane and a Comments field in the Details pane. Comments indicate one of the following conditions is present for an item:
• Requires additional steps. The operation will not succeed without manual steps.
• Has data dependencies. The operation may not succeed if data in
the target repository is missing or inconsistent.
• Potential loss of data. Data in the repository may be lost as a result
of accepting this change.

196 MDM Console Reference Guide
Importing the Schema
You can import the inbound schema as described in this section.
To import an XML schema and merge it into an MDM repository:
1. In the Console Hierarchy tree, right-click on the MDM repository into which you want to import the XML schema and choose Transport >
Import Repository Schema.
2. In the Open dialog, select the XML schema file to import and click
Open.
3. In the Import Schema dialog, use the radio buttons in the Merge
column of the Items pane to Accept or Reject changes for each of the
items highlighted in red, magenta, and green.
NOTE ►► MDM will accept the deletion of a table if you accept the deletion of all of its fields, automatically adjusting the table setting as
necessary when you change the setting for one of its fields.
NOTE ►► MDM will reject the addition of a table if you reject the
addition of all of its fields, automatically adjusting the table setting as
necessary when you change the setting for one of its fields.
TIP ►► If some schema items are not matched automatically by MDM
or you do not agree with the item matching determined automatically by MDM, you can manually set and/or override them as described in
the following section.
4. Use the radio buttons in the Merge column of the Details pane to
Accept or Reject individual changes for each of the item properties for
items highlighted in red.
NOTE ►► MDM will automatically adjust the item setting as
necessary when you change the setting for its individual properties.
5. Click OK to close the dialog. MDM merges the schema changes that
you accepted into the MDM repository.
6. Once the transport is completed, connect your MDM Console to the
target repository and accept the request to perform a Verify > Repair operation on the target repository (see “Verifying an MDM Repository”
for more information).
NOTE ►► If you connect to the target directory from a different MDM
Console session, you will need to run the Verify > Repair operation
manually.

MDM Console Reference Guide 197
Manually Overriding Schema Reconciliation
When you use the Import Schema command, MDM attempts to automatically match items from the inbound schema file with items in the existing repository. Generally, it does a good job of identifying matches using several criteria in order of precedence, as follows:
• Compatibility. Incompatible items will never be matched (e.g. a
hierarchy table will never be matched with a flat table).
• Code match. Items with the same Code will be matched.
• Name match. Items with the same Name will be matched.
• Empirical. Depending on their type, remaining items might be matched if there are no better alternatives (e.g. two unmatched languages that refer to the same language and country).
You can also use the Match and Unmatch context menu commands to manually set matches and/or override matches determined automatically by MDM, as described in this section.
NOTE ►► MDM makes no attempt to preserve internal identifiers. If
this is important, you should instead use the Archive/Unarchive or
Duplicate Repository commands.
NOTE ►► Manual matching can have side-effects (e.g. items shown as modified may become identical; when tables are rematched, the
relationships are also rematched). For this reason, you should perform manual matching in the following order: (1) languages; (2) tables; (3)
fields; and (4) relationships.
To manually match an item to another item:
• In the Items pane, right-click on the item you want to manually match,
choose Match from the context menu, and then choose from the
cascading menu of potential matches.
NOTE ►► Match is enabled only if the selected item is currently
unmatched and has at least one compatible unmatched counterpart.
NOTE ►► To manually set or override a language match, select the
repository item in the Items pane (i.e. the root node in the Repository+ Schema pane) and then select and right-click on the language in the
Detail pane rather than the Items pane.
To manually unmatch an item:
• In the Items pane, right-click on the item you want to unmatch and
choose Unmatch from the context menu to cause the single pair of
matched items to become two individual unmatched items.

198 MDM Console Reference Guide
MDM Transport Operations
MDM provides two sets of operations for transporting repository schemas:
• Schema Migration. Includes Export and Import Schema commands.
• CTS+. Includes Export and Import Change File commands.
SCHEMA MIGRATION
Schema migration refers to the pre-existing Export Schema and Import
Schema commands in the MDM Console.
Commands
The Export Schema command creates an XML file of the current
(originating) repository’s entire schema.
The Import Schema command compares the current (target) repository’s schema against the schema contained in the selected XML file. From the Import Schema dialog, the user can see where the current and import schemas differ and choose which of these
differences to apply. Note that the Import Schema command does not replace the existing schema with the import schema. Rather, it allows the user to merge the import schema with the current repository schema.
Schema migration commands do not require that the originating and target repositories share the same underlying schema structure.
Files
The Export Schema command creates a name.xml file in a file location
selected by the user. The Import Schema command opens a name.xml file from a location selected by the user.
CTS+
CTS+ refers to the set of MDM Console commands created to work with the SAP Change and Transport System.
Commands
The Create Transport Reference command creates an XML file of a repository’s schema. This reference schema is identical to the XML file
created by the Export Schema command. Users should create the reference file on the originating repository at a time when the originating and target repositories have identical schemas.
NOTE ►► The Create Transport Reference command should only be
executed once. After the original reference file is created, MDM
assumes responsibility for creating future reference files.

MDM Console Reference Guide 199
The Export Change File command compares the repository’s current schema against the schema contained in its latest reference file. From the Export Changes dialog (similar in appearance to the Import Schema dialog), the user can see where the current schema differs from the reference schema and choose which of these differences to export. The resulting changes file does not contain an entire schema but instead contains only the changes selected from the Export Changes dialog. Changes that are not selected for the current export remain available for future exports.
During normal operation, the CTS+ system will pick up changes files and apply them through the Java API command:
com.sap.mdm.repository.commands.ApplyTransportDeltaCommand
The Import Change File command opens whatever changes file is selected by the user and automatically applies all of the schema
changes contained in the file to the current repository. Unlike the Import
Schema command, the user has no choice of which changes to apply. In
order to execute Import Change File commands, Console users need access to the relevant Transport/Outbound directory.
The Transport Management System command opens a link to the
relevant SAP Transport Management System.
CTS+ commands require that originating and target repositories share the same schema structure.
Files
Transport files are stored in the Master Data Server's transport directories. The mds.ini parameter Transport Dir sets the location of
the root Transport directory. The Transport directory has two subfolders, Outbound and Inbound.
The Create Transport Reference command creates a RepositoryName_XXX_reference.xml file (where XXX represents a sequentially incrementing number) in the Transport/Outbound directory.
The Export Changes command creates a new RepositoryName_XXX_delta.xml file AND a new reference file in the Transport/Outbound directory. The XXX value on the new files is incremented by 1 from the XXX value on the last such files created for the repository.
Each change file should have a matching reference file (e.g. RepositoryName_005_delta.xml file should have a corresponding RepositoryName_005_reference.xml file). However, the opposite need not be true: a reference file will not have a matching changes file until
the “next” Export Changes command is executed.

200 MDM Console Reference Guide
NOTE ►► The CTS+ system assumes that changes files with lower
XXX values should be imported prior to those with larger XXX values.
NOTE ►► MDM will not delete or overwrite existing reference or
change files because MDM does not know when change files are
actually imported by the CTS+ system.
Errors
Error messages appear under the following circumstances:
▪ Export Changes command is issued but no corresponding
reference file is found.
▪ Import Changes command is issued but the current repository ‘s
schema is not compatible with the selected changes file
SCHEMA TRANSPORT VERSUS CTS+
Table 47 describes the basic behavioral differences between schema migration and CTS+ related commands.
Table 47. Differences between Schema Transport and CTS+
Behavior Schema Migration CTS+
Entire schema transported? Yes No
User can choose changes to export? No Yes
User can choose changes to import? Yes No
Requires target repository to be based on same schema as originating repository?
No Yes
File location Determined by user Transport/Outbound

MDM Console Reference Guide 201
Managing Units of Measure
MDM includes a library that contains over 70 different physical dimensions and over 750 different units of measure, along with conversion ratios, synonyms for each unit, and so on. This library features a compound data type for storing physical measurements that combines a numeric value with a unit of measure. This allows you to associate a physical dimension with a measurement field or numeric attribute, and assign to every numeric value a unit of measure applicable to that dimension.
In this library, MDM can convert between different units in a dimension, for comparison and sorting of numeric values with different units. Unit conversion also allows measurement search, which automatically converts typed text values that represent measurements between different physical units, so you can find equivalent measurement values even when the value you type uses a different unit from the measurement stored in the MDM repository. For example, the measurement value “30 inches” stored in the repository can be found as any of: 30”, 30 in, 2 ½ feet, 2-1/2 ‘, 2.5 ft, 2 feet 6 inches, 76.2 centimeters, 762 mm, or 0.762 meter.
You can create and manage additional user-defined physical dimensions and units of measure for an MDM repository to augment the system dimensions and units, and also change some of the properties of system dimensions and units (such as the unit name, symbol, and position). To ensure system integrity, some properties of system units cannot be modified.
DATA INTEGRITY ►► Measurement fields and numeric attributes are 4-byte real fields with the exception of the dimensions Time and
Frequency, which require the additional precision of 8-byte real fields.
MANAGING DIMENSIONS
You can manage the dimensions and units of a repository in the Dimensions window.
To open the Dimensions window, in the Console Hierarchy tree, under
the Admin node, choose Dimensions.
CAUTION ►► You must stop the repository before you add or edit
dimensions.

202 MDM Console Reference Guide
Table 48. Dimension Properties
Property Description
Name The name of the dimension as it appears in MDM applications.
The value must be unique and cannot be left blank.
Convertible Specifies whether measurement values can be converted to the
dimension's universal unit.
The value of this property can be changed only for user
dimensions.
Type ▪ System – Built-in dimensions. You can rename system
dimensions, add and edit their units, and remove user-defined units. You cannot delete system dimensions or their
system units.
▪ User-defined – You can add and delete user-defined
dimensions and their units, and edit all their properties.
▪ Modified System – System dimensions that have been renamed, or whose units have been edited, or had new units
added.
To add a dimension:
1. In the top Dimensions pane, from the context menu, choose Add
Dimension.
MDM creates a new dimension with a single new unit. The default
name “New Dimension (n)” appears in the Dimension Details pane and the new unit appears with the default name "New Unit (n)" in the Units
pane.
2. Edit the default properties as required.
To edit the properties of a dimension:
1. Select the dimension in the Dimensions pane.
2. In the Dimension Details pane, edit property values as required.
For system dimensions you can edit only the dimension name.
If you previously changed the name of a system dimension, you can restore the default name by selecting the Reset checkbox.
3. To save changes, in the Dimension Details pane, from the context
menu, choose Save Changes, or press Shift+Enter.
NOTE ►► When you edit the name of a system dimension, the
Dimension Type changes to Modified System.

MDM Console Reference Guide 203
To delete a user-defined dimension:
1. From the context menu of the dimension, choose Delete Dimension.
The dimension and all its defined units are removed from the
Dimensions pane and deleted from the MDM repository.
NOTE ►► You cannot delete a dimension that contains units that are
in use by a measurement field or attribute value.
MANAGING UNITS
You can add new units to a dimension and edit existing units.
Unit names and symbols must be unique within their dimension, and a unit name cannot be a synonym of another unit name in its dimension.
When a dimension is defined as convertible, unit measurements can be converted to a universal unit for comparison and sorting. All the units in the dimension have defined conversion properties to convert any unit measurement to the universal unit.
The relationship between the conversion properties corresponds to the following conversion function:
Log10 (value + Pre-Offset) x Factor
The universal unit is defined with values 1, 0, and No for the Factor, Pre-offset, and Use Logarithm properties respectively.
Unit properties are described in the following table.
Table 49. Basic Unit Properties
Property Description
Unit Name The name of the unit as it appears in MDM. The unit name must
be unique in its dimension and cannot be blank.
Unit
Symbol*
The characters that represent the unit measurement name when the measurement value is displayed. Include a space before the
symbol if its position is after the numeric value. The unit symbol
must be unique in its dimension.
* This property is called "Suffix" in the MDM UoM Manager.
Position Position of the unit symbol – before or after the numeric value of
the measurement.

204 MDM Console Reference Guide
Property Description
Fraction
Type
Specifies whether values for the unit are displayed as fractions
when the Show Fractions option has been selected for the field
or attribute.
▪ None – Always displays values as an integer or decimal.
▪ Fractions of 2 – For absolute values between 0 and 999,999,
allows fractional display of fractional powers of 2 from ½ to 1/128 (including all numerator values, such as ¾, 5/16, and
27/64).
▪ All Fractions –For absolute values between 0 and 999,999, allows fractional display of fractional powers of 2 (above), the
“odd” fractions 1/3, 2/3, 1/5, 2/5, 3/5, 4/5, 1/6, and 5/6, and the fractions “1/x” where ‘x’ ranges from 7 to 100 in increments of
1 (e.g. 1/7, 1/15, and 1/78); from 100 to 1000 in increments of 50 (e.g. 1/150, 1/250, and 1/500); and from 1000 to 2000 in
increments of 100 (e.g. 1/1100, 1/1200, and 1/1300).
Factor The number by which to multiply a measurement value when
converting to the universal unit for purposes of comparison.
Pre-Offset The value to be added to the measurement value before
multiplying by the Factor.
Use
Logarithm
Specifies whether to take the log base 10 of the measurement
value plus the Pre-Offset before multiplying by the Factor.
In the following example of conversion properties, the universal unit is Celsius.
Table 50. Sample Entries for a Pair of Units
Unit Factor Pre-Offset Use
Logarithm
Celsius 1 0 No
Fahrenheit 0.555555555555556 -32 No
To add a unit to a dimension:
1. Select a dimension in the Dimensions pane. The dimension units
appear in the Units pane.
2. In the Units pane, from the context menu, choose Add.
MDM creates a new unit in the current dimension. The default name,
New Unit (n), is added to the list of units in the Units pane and the
default unit properties appear in the Unit Details pane.
NOTE ►► When you add a unit to a system dimension, the
Dimension Type changes to Modified System.

MDM Console Reference Guide 205
To edit unit definitions:
1. Select a unit in the Units pane.
2. In the Unit Details pane, change the property value for each property
that you want to modify.
When you modify a property of a system unit, the Reset checkbox for the modified property becomes active, and the related Dimension Type changes to Modified System.
The conversion properties (Factor, Pre-offset, and Use Logarithm) cannot be edited for system units or for units in
a dimension that is not convertible.
3. To save changes, in the Unit Details pane, from the context menu,
choose Save Changes, or press Shift+Enter
To restore MDM system unit default values:
1. Select a system unit in the Units pane.
2. In the Unit Details pane, select the Reset checkbox for the properties
whose values you want to restore.
NOTE ►► You can restore default values only for modified system
units, not for user-defined units.
CAUTION ►► This process is irreversible.
To duplicate a unit:
1. In the Units pane, from the context menu of the relevant unit, choose
Duplicate.
2. MDM creates a new unit in the current dimension with the default
name Copy of <unit> (n). The default unit properties are the same as
for the source unit.
3. You can now edit the unit definitions as for any user-defined unit.
To rename a unit:
1. In the Units pane, select the required unit.
2. In the Unit Details pane, in the Unit Name field, edit the name as
required.
To delete a user-defined unit:
1. In the Units pane, from the context menu of the relevant unit, choose
Delete.

206 MDM Console Reference Guide
The unit is removed from the Units pane and deleted from the MDM
repository.
NOTE ►► You cannot delete a unit that is in use by a measurement
field or attribute value.
To view all unit details for a dimension:
1. In the Units pane, from the context menu, choose View Details.
The Units pane displays all the properties of all the units in the
dimension in view-only mode, as shown in Figure 55.
Figure 55. View Details pane
2. To return to editing mode, from the context menu, choose View Details
again.

291
PART 7: MDS ADMINISTRATION
This part of the reference guide contains information about MDM options for configuring the Master Data Server and its underlying DBMS.


MDM Console Reference Guide 209
Accessing Master Data Servers
An MDM Console can simultaneously access multiple Master Data Servers, each of which can access multiple MDM repositories. Similarly, multiple MDM Console instances can access the same Master Data Server and make changes to the same MDM repository.
ACCESSING A MASTER DATA SERVER
When the selected node in the Console Hierarchy tree is the root node (SAP MDM Servers), the top-right Objects pane is titled MDM Servers and the bottom-right Object Detail pane is titled Server Detail.
The MDM Servers pane contains a grid with a list of mounted Master Data Servers, where each Master Data Server in the list corresponds to a child of the SAP Master Data Servers node.
To view a Master Data Server’s properties, select it from the MDM Servers pane. The properties for each Master Data Server are listed in Table 51; none of them are directly editable in the Server Detail pane.
Table 51. Master Data Server Properties
Property Description
Name The Master Data Server name.
SAP Instance The SAP instance number for the Master Data Server.
Version The version of the Master Data Server software.
Port The listening port for the Master Data Server
Status1
The Master Data Server status:
▪ Stopped
▪ Running ▪ Server Inaccessible2
▪ Communication Error2
▪ Start Server Failed2
▪ Invalid2
1 Not visible in the Server Detail pane. 2 To resolve these states, try unmounting and then remounting the Master Data Server.
In order to make a Master Data Server visible to and accessible by your MDM Console session, you must first mount it. Once mounted, a Master Data Server can have several different states, as shown in Table 52.

210 MDM Console Reference Guide
Table 52. Mounted Master Data Server States
Icon State
The server is SSL-enabled. 1
The server is stopped.
The server is running.
The server is in one of the following states:2
▪ Server Inaccessible ▪ Communication Error
▪ Start Server Failed
▪ Invalid
1 The blank part of the lock changes to indicate state of the server (stopped, running, etc.).
2 To resolve these states, try unmounting and then remounting the Master Data Server.
Mounting and Unmounting the Master Data Server
To mount a Master Data Server:
1. In the Console Hierarchy tree, right-click on the root node (SAP MDM
Servers) and choose Mount MDM Server.
2. In the Mount MDM Server dialog, select the Master Data Server you want to mount. If the Master Data Server has not been mounted on
your MDM Console before, type the name or IP address of its host, or
click “…” (browse) to select it from a list.
NOTE ►► If the Master Data Server is configured to listen on non-
default ports, you must type in the port number after the Master Data Server name, using the format ServerName:PortNumber (for
example, ServerXYZ:54321).
3. If the Master Data Server is SSL-enabled, click Secure Connection
and, if missing, enter the paths to the server’s SSL library and key files.
4. If the Master Data Server is not yet running, MDM adds a node for the
Master Data Server to the Console Hierarchy tree. The server status icon displays a red square to indicate that the Master Data Server is
not yet running.
If the Master Data Server is already running, MDM silently performs a
Connect to Master Data Server as part of the mount operation and adds a node for it to the Console Hierarchy tree, along with nodes for
any repositories that may already be mounted on the server. The server status icon displays a green triangle to indicate that the Master
Data Server is already running.
NOTE ►► A password is not required to mount and connect a Master
Data Server to your MDM Console session, even if the Master Data
Server is itself is password-protected.

MDM Console Reference Guide 211
To unmount a Master Data Server:
1. In the Console Hierarchy tree, right-click on the Master Data Server
you want to unmount and choose Unmount MDM Server from the
context menu, or select the tree node and choose MDM Servers >
Unmount MDM Server from the main menu.
2. MDM removes the Master Data Server node from the Console
Hierarchy tree.
NOTE ►► If you unmount a running Master Data Server without
stopping it, the server remains running with its MDM repositories mounted and started even without the connection to your MDM
Console session.
NOTE ►► If you unmount a Master Data Server and then remount it
during the same MDM Console session, you will need to re-enter that Master Data Server’s password in order to perform any server-level
operations.
STARTING AND STOPPING MASTER DATA SERVERS
Starting and stopping a Master Data Server are password-protected operations which require SAP Web Service Authentication.
To start a stopped Master Data Server (red square):
1. In the Console Hierarchy tree, right-click on a Master Data Server and
choose Start MDM Server from the context menu, or select the tree
node and choose MDM Servers > Start MDM Server from the main
menu.
TIP ►► If the top-right pane is currently displaying the list of Master
Data Servers, you can also right-click on the Master Data Server in the
grid and choose Start MDM Server from the context menu.
2. In the pop-up Web Service Authentication dialog, enter your OS user
name and password and click OK.
3. MDM changes the server status icon from the red square to a green
triangle to indicate that the Master Data Server is running.
NOTE ►► When you start a Master Data Server, MDM Console
checks the status of each of its mounted MDM repositories; this check
requires that the corresponding DBMS Servers be up and running.

212 MDM Console Reference Guide
To stop a running Master Data Server (green triangle):
1. In the Console Hierarchy tree, right-click on the Master Data Server
and choose Stop MDM Server from the context menu, or select the tree
node and choose MDM Servers > Stop MDM Server from the main
menu, and then choose Immediate from the cascading menu.
2. In the pop-up SAP Instance Shutdown dialog, select a shutdown type
and click OK.
3. In the pop-up Web Service Authentication dialog, enter your OS user
name and password and click OK.
4. MDM stops the Master Data Server and changes the server status icon from the green triangle to a red square to indicate that the server is
no longer running.

MDM Console Reference Guide 213
Monitoring Master Data Server Activity
You can identify performance bottlenecks on a Master Data Server by monitoring server activities from MDM Console or CLIX.
NOTE ►► For information about CLIX commands for monitoring, see
help.sap.com/nwmdm71 > CLIX Reference.
NOTE ►► You can also use the performance tracing option available
to all MDM servers (see “Performance Tracing”).
THE MDM CONSOLE ACTIVITIES PANE
Clicking a Master Data Server's Activities node in the Console Hierarchy tree opens the Activities pane.
The Activities pane contains a grid with a row for each activity currently occurring on the Master Data Server. The fields in the grid contain details about each activity.
Activity details are described in Table 53.
Table 53. Activity Details
Detail Description
ThreadID The thread ID of the activity.
Application Name The application from which the activity request was made.
User The user requesting the activity.
Host Name The name of the host computer on which the application is running.
Activity The MDM internal protocol and command name of the activity.
Repository The name of the repository on which the activity is being performed.
Start Time The GMT time at which the activity started.
Elapsed Time (ms) The number of milliseconds elapsed since the activity started.
Status Whether the activity is running or waiting for a lock.
Acquired Locks The locks acquired by the activity.
Waiting for Locks The locks which the activity is waiting to acquire so that it can begin.
The information displayed in the Activities pane is a one-time snapshot reported by the Master Data Server. The title bar of the Activities pane displays the Master Data Server time (in GMT) at which the information in the Activities grid was provided.
The information in the Activities pane can be refreshed manually or automatically by right-clicking in the Activities pane and selecting one of the operations listed in the following table.

214 MDM Console Reference Guide
Table 54. Activity Pane Context-Menu Operations
Detail Description
Refresh Updates the information displayed in the Activities grid.
Auto-Refresh Turns on or off continuous updating of the information displayed in the Activities grid.
Selecting an activity in the Activities grid displays its information in the Activity Detail tab. The tab contains the same information as the Activities pane, plus additional information about the locks required for the activity.
The lock information displayed in the Activity Detail tab is described below.
Table 55. Lock Details Displayed in Activity Detail Tab
Detail Description
Server Data Lock Whether the activity is waiting for, or has acquired, a Server Data Lock, and whether the lock is exclusive or shared.
Repository Data Lock
Whether the activity is waiting for, or has acquired, a Repository Data Lock, and whether the lock is exclusive or shared.
Server Sync Lock Whether the activity is waiting for, or has acquired, a Server Sync Lock, and whether the lock is exclusive or shared.
Repository Sync Lock
Whether the activity is waiting for, or has acquired, a Repository Data Lock, and whether the lock is exclusive or shared.
Stopping an Activity
You can stop an existing activity.
To stop an activity:
1. In the Activities pane, right-click the activity that you want to stop and
select Stop Activity from the context menu.
2. Enter your credentials for the repository.
MDM changes the status of the activity in the MDM Console to
Running (Stop Activity is pending) or Waiting
(Stop Activity is pending), then stops the activity.
NOTE ►► Currently this feature is available only for stopping bulk
import operations.

MDM Console Reference Guide 215
Optimizing MDS Performance
When updating records in a repository, the Master Data Server (MDS) write-locks the repository in order to safeguard the integrity of the repository's data. As a result of this lock, other users are unable to access a repository while an update is in progress. For small updates, the lockout period may not be noticeable. For "mass" updates involving thousands of records, the potentially long lockout period required to complete the operation may be impractical if other users require access to the repository during the update. MDM's configurable slicing feature helps optimize performance in these situations.
NOTE ►► See "MDS Configuration" for more information about the
mds.ini parameters described in this section.
WHAT IS SLICING?
To maintain safe and timely updates without sacrificing performance for other users, a balance must be struck between the amount of time MDS devotes to updating a repository and the time it allows for processing requests from other clients while the operation is ongoing.
To optimize this balance, MDM uses the concepts of slicing and wait time. Slicing divides the large set of records in a mass update operation into smaller groups of records, called slices. Each slice is processed independently by MDS as part of the larger operation. Wait time is the time MDS sets aside after processing a slice to respond to requests from other clients. During the wait time, MDS removes the write lock from the repository. Once the wait time expires, MDS renews the write lock as soon as it is available and begins processing the next slice of records in the job. MDS continues alternating between processing slices and waiting for other requests until all the entire update is completed.
NOTE ►► It is possible for MDS to receive a new request during an
operation's wait time which takes longer to complete than the wait time
specified. In such a case, the ongoing operation does not resume until the new request releases its lock, either because it finishes or has
reached its own wait time.
Both the number of records to include in a slice and the length of the wait time can be customized using default configuration parameters in
the mds.ini file.

216 MDM Console Reference Guide
Table 56. Default MDS Configuration Parameters for Slicing
Parameter Description
Default Slice Size Number. The default number of records MDM
includes in a slice. Default is 500.
Default Slice Wait Time MS
Number. The default number of milliseconds MDM waits between slices to receive other
requests. Default is 300.
Generally, the more records in a slice, the more memory is required on the server hosting MDS and the longer the response time becomes for client requests to MDS. Too few records in a slice, however, can make the update process less efficient, as there is some overhead involved in each slice.
Factors to consider when determining optimal slice size include:
• Available memory and processing power on the server hosting MDS
• Capabilities of the underlying DBMS
• The complexity of the target repository’s data model.
Likewise, when configuring wait time, the longer the wait time, the longer the mass update will generally take to complete. The shorter the wait time, the more likely it is that client requests are delayed while the operation is in progress.
NOTE ►► For some operations, additional configuration is required to
enable slicing (see "Bulk and Non-Bulk Operation" below for more
information).
BULK AND NON-BULK OPERATIONS
MDM operations which qualify for slicing fall into two broad categories: bulk and non-bulk, as described in Table 57.

MDM Console Reference Guide 217
Table 57. Bulk v.s Non-Bulk Operations
Operation Type Description
Bulk
Includes the following operations:
▪ Import*
▪ createRecords and modifyRecords API
commands
Non-bulk
Includes the following operations:
▪ Assignments and Validations
▪ Check in*, Check out*, and Rollback
▪ Delete
▪ Recalculate
▪ Record editing in Data Manager
* Checkouts and checkins resulting from an import operation are handled as bulk operations
Configuring Slicing for Bulk Operations
Bulk operations are always sliced. Optional parameters for customizing slice sizes and wait times for bulk operations are described in Table 58.
Table 58. Optional MDS Configuration Parameters for Bulk Operations
Parameter Description
Bulk Operation Slice
Size
Number. The maximum number of records to
include in a bulk operation slice.
Bulk Operation Slice
Wait Time MS
Number. The number of milliseconds to wait in
between bulk operation slices.
If these parameters are not entered in mds.ini or have no values, the default values described in Table 56 are used instead.
Configuring Slicing for Non-Bulk Operations
Unlike bulk operations, non-bulk operations are not sliced unless
configured to do so in mds.ini. The configuration parameters for enabling slicing of non-bulk operations are described in Table 59.

218 MDM Console Reference Guide
Table 59. MDS Configuration Parameters for Enabling Non-Bulk Slicing
Parameter Description
Enable Slicing for Non-
Bulk Operations
True/False. Whether slicing is enabled for any
non-bulk operation.
▪ When set to False, all slicing of non-bulk
operations is disabled.
▪ When set to True, slicing of non-bulk
operations is enabled or disabled based on the setting of each operation's Enable
Slicing parameter.
Enable Assignment
Slicing
True/False. Whether slicing is enabled for the
specified operation when Enable Slicing
for Non-Bulk Operations is set to True.
Enable Checkin Slicing
Enable Checkout Slicing
Enable Delete Records
Slicing
Enable Recalculate
Slicing
Enable Record Edit
Slicing
Enable Rollback Slicing
Enable Validation
Slicing
Enable Block Slicing
Enable Destroy Slicing
Enabling slicing for a non-bulk operation requires two parameters to be set to True in mds.ini: the master Enable Slicing for Non-Bulk
Operations parameter and the operation-specific parameter.
To disable slicing for all non-bulk operations, set the master Enable
Slicing for Non-Bulk Operations parameter to False. This
disables non-bulk operation slicing regardless of the operation-specific parameters.
Optional parameters for customizing the slice sizes and wait times for specific non-bulk operations are described in Table 60.

MDM Console Reference Guide 219
Table 60. Optional MDS Configuration Parameters for Bulk Operations
Parameter Description
Assignment Slice Size
Number. The maximum number of records to
include in an operation slice. Default is 500.
Checkin Slice Size
Checkout Slice Size
Delete Records Slice
Size
Recalculate Slice Size
Record Edit Slice Size
Rollback Slice Size
Validation Slice Size
Block Slice Size
Destroy Slice Size
Assignment Slice Wait
Time MS
Number. The number of milliseconds to wait in between assignment operation slices. Default is
300.
Checkin Slice Wait Time
MS
Checkout Slice Wait
Time MS
Delete Records Slice
Wait Time MS
Recalculate Slice Wait
Time MS
Record Edit Slice Wait
Time MS
Rollback Slice Wait
Time MS
Validation Slice Wait
Time MS
Block Slice Wait Time
MS
Destroy Slice Wait Time
MS
If these parameters are not entered in mds.ini or have no values, the default values described in Table 56 are used instead.

220 MDM Console Reference Guide
NOTE ►► Restarting MDS is not required after changing any slicing-
related parameter in mds.ini.
SLICING AND FAILURE HANDLING
Slicing not only improves MDM responsiveness in multi-user environments, it also minimizes the possibility of a single "bad" record causing an entire update operation to fail. For example, if a mass record edit gets divided into 10 slices, only the slice containing the "bad" record will fail, and the remaining 9 slices will succeed. For more information, see the Data Manager Reference Guide.
NOTE ►► MDM logs contain more information about the reason why
a slice or operation failed (see "Logs, Traces, and Reports" for more
information).
SLICING AND IMPORT
Slicing interacts with several import-related features to improve performance.
MDIS Chunk Size
The MDIS parameter Chunk Size tells MDIS how many records from an aggregated file set to process at a time. Once MDIS processes a chunk of records, it immediately sends this chunk to MDS for import into the repository. When MDS receives the chunk, the default (or bulk
operation, if present) slice settings control how many records from the chunk it should process at a time (several slices may be required to process an entire chunk) and the time to wait between each chunk slice.
You will want to experiment with both chunk and slice settings to achieve optimal import performance for your environment.
NOTE ►►See "Optimizing MDIS Performance" for more information
about Chunk Size and MDIS.
Record Checkouts
If you have configured MDM to check out records automatically upon import, MDS will check out all records in a slice as part of processing that slice.
NOTE ►►Slicing and wait times for checkouts and checkins which
occur as part of an import are governed by bulk operation parameter
settings, not the non-bulk checkin and checkout parameters.

MDM Console Reference Guide 221
Workflows
If you are importing records into a workflow, the workflow is not launched until all slices from an import package have been processed.
An import package refers to the complete set of records received:
• From Import Manager or an Import Records API function; or
• From a set of import files aggregated by MDIS.
NOTE ►►The number of files which MDIS aggregates into an import
package is controlled by a port’s File Aggregation Count property (see
“Ports Table” for more information).
Also, if a workflow job performs a sliceable operation (such as a check in), it is possible for some record slices to succeed and others to fail. In such cases, the records in the successful slices continue to the next step and the records in the failed slices are split into a new job, which is held at the current step in an error state. For more information, see the Data Manager Reference Guide.

222 MDM Console Reference Guide
Optimizing MDM Client Performance
MDM provides the following ways to optimize performance for MDM clients such as MDM Data Manager.
NOTIFICATION FILTERING
Import, workflow, and other operations which affect large groups of records can cause MDS to send large numbers of notifications to MDM clients informing them about the changes. MDM Data Manager automatically filters notifications sent from MDS and only processes those notifications which affect the set of records returned by the current Data Manager search selections. This filtering improves overall Data Manager responsiveness by eliminating the time Data Manager would otherwise spend updating records that the user may not even see.
Additionally, Data Manager has a Retrieve notifications delay in seconds configuration option. This option instructs Data Manager to wait a specified number of seconds after receiving a notification before retrieving the update from the Master Data Server. This can improve Data Manager responsiveness by forcing it to waiting for updates to "pool" on the server rather than process them as they are individually reported.
OBJECT CACHE SIZE REGISTRY SETTING
Not all visible objects can be cached at the same time. If you see a constant reloading of objects in MDM clients, this may be because the
Object Cache Size registry is set too low.
You can use the Object Cache Size parameter in the mds.ini file to adjust the size of the object cache. If the value does not exist, the default of 250 is used.

MDM Console Reference Guide 223
Logs, Traces, and Reports
LOGS
Log messages are intended for a non-technical audience and contain information, warnings, and errors regarding system activity. Log messages are always generated and messages of all severity levels are always recorded.
Each MDM server (MDS, MDIS, MDSS, MDLS) creates and stores its
own set of log files in the usr\sap\<SAPSID>\<instance_name>\log directory.
NOTE ►► The .ini file parameter Log Dir lets you customize the log
file directory location.
Log File Types
The types of log files MDM can generate are described in Table 61.
Table 61. MDM Log File Types
File Type Description
MDS_Audit Contains audit trail information for the Master Data Server.
[Server]_Log Contains log and trace messages for the selected MDM
server.
Viewing Log Files
You can view log files for any MDM server from within MDM Console, as described in this section.
To view a server log file:
1. In the Console Hierarchy tree, select the Logs node that appears
below the desired MDM server (MDS, MDIS, MDSS, MDLS).
2. In the Logs pane, select the log file you want to view.
3. MDM displays the log contents in the Log Detail pane.
NOTE ►► Log file contents contain both log and trace messages.
To filter the display of log and trace messages by severity level:
1. In the Log Detail pane, right-click and select Edit Filter… from the pop-
up context menu.
2. In the Log Filters dialog, select the severities of log and trace
messages to be filtered from display in the Log Detail pane.
3. MDM saves the settings to the local computer and displays only log
and trace messages of the selected severities in future log viewings.

224 MDM Console Reference Guide
Log Message Severities
Each log message is assigned a severity. The severity levels for MDM log messages are described in Table 62.
Table 62. MDM Log Message Severities
Severity Description
Info Normal system activity which requires no follow-up activity.
Warning Further action is required to prevent a future problem.
Error Uncorrected problem occurred which caused a major operation to fail.
Fatal Failure occurred which caused the server to shut down.
Configuring Log Size and Rotation Parameters
By default, the maximum size of an MDM log file is 2 MB. Once a log file reaches this threshold, a new log file is started. The optional .ini file parameter MDM Log Watermark lets you customize the maximum log
file size to your own specifications.
NOTE ►► The minimum size for an MDM log file is 1 MB.
The number of log files an MDM server stores per type is set to 20 by default. Once this limit is reached, MDM deletes the oldest log file of that type from the log directory and starts a new file in its place. The optional .ini file parameter Max Number of Log Files lets you
customize the maximum number of logs allowed to your own specifications.
NOTE ►► MDM always creates at least one log file per log type.
Each of these .ini file parameters must be added to the relevant server’s .ini file. See “Master Data Server Parameters” for more information about these parameters.
NOTE ►► The MDS_Audit log is not affected by the Log
Watermark or Max Number of Log Files parameters. Their
maximum size is always 2 MB and, there is no limit to the number of
audit log files that can be created.
TRACES
Trace messages are intended for support engineers and contain technical output related to internal MDM conditions. Unlike log messages, you can choose to only record trace messages of certain severity levels.

MDM Console Reference Guide 225
Trace messages are recorded to a server’s log file and can be viewed from MDM Console (see “Viewing Log Files” for more information).
Trace Message Severities
Each trace message is assigned a severity level. The severity levels for MDM trace messages are described below.
Table 63. MDM Trace Message Severities
Level Severity Description
0 Debug The most granular coding information.
1 Program Flow Routines and exceptions; corresponds to SAP’s “Path” level.
2 Info “Business logic” information not requiring knowledge of code.
3 Warning Abnormal condition detected which can affect operation results.
4 Error Error detected which prevents an operation from completing.
Filtering Logging of MDS-Related Trace Messages
MDM Console includes a special feature for filtering trace messages
reported from various MDS sub-components. In addition, the User Name
and User Trace Setting properties let you filter trace messages spawned by a specified MDM user’s activities This feature can help SAP support engineers identify and isolate problems on an MDM system.
For each sub-component or user, you can limit the trace messages logged by selecting one of the 5 severity levels described in Table 62 above. MDM then withholds logging trace messages for that sub-component or user if the trace message has a severity level below the level selected.
To filter logging of MDS-related traces:
1. In the Console Hierarchy, right-click on the MDS node and select Trace
Settings… from the pop-up context menu.
2. In the Trace Filter Settings dialog, select a custom severity level in the “Value” column for a sub-component in the corresponding “Property”
column.
3. Click “OK” to dynamically change the severity level filters.
Filtering Logging of Auxiliary MDM Server Trace Messages
By default, only trace messages of severity level “3” and higher are recorded to an auxiliary MDM server’s (MDIS, MDSS, MDLS) log file. The.ini file parameter Tracing Level lets you customize the
minimum severity level recorded to meet your own requirements.

226 MDM Console Reference Guide
NOTE ►► The parameter Tracing Level was removed from
mds.ini in MDM 7.1 SP4, as tracing filters applied through MDM Console and CLIX are saved automatically to mds.ini and reapplied at
MDS startup. The parameter is still used in mdis.ini, mdss.ini, and
mdls.ini, however.
PERFORMANCE TRACING
Performance traces are activity-centric logs which can help identify the activity causing a bottleneck in a specific MDM server (MDS, MDIS, MDLS, or MDSS).
When performance tracing is enabled, for every completed activity on an MDM server, the following information will be provided at the time when the activity is completed (only one log entry will be entered per activity):
• Server Time (current timestamp)
• Thread ID
• User Name
• Protocol Name
• Command Name
• Locks Used (using the same notation as clix mdsMonitor)
• Elapsed Time ms (time since activity started, milliseconds)
• Wait Time ms (time activity spent waiting for required locks
milliseconds)
• Run Time ms (time activity spent after it acquired all locks,
milliseconds)
• Activity Start Time
• Connection (application which initiated the activity)
• Repository Name
• Remote Host (the host which initiated the Activity)
Performance traces are logged to a comma-separated file in the Logs directory of the server which created them. These files are named:
<server name> _PerfTrace@U@<creation date stamp>@<creation time stamp>.csv
where the server name is MDS, MDIS, MDLS or MDSS.
Turning Performance Tracing On or Off
To turn performance tracing on/off for a specific server:
• From within Console, right-click on the server in the Console Hierarchy
tree and choose Performance Tracing to toggle tracing on or off.

MDM Console Reference Guide 227
• From CLIX, use the server-specific PerfTracing command (see
help.sap.com/nwmdm71 > CLIX Reference).
• From a server configuration file, set the Enable Performance
Tracing parameter to True (see below).
NOTE ►► Performance tracing is enabled or disabled for the entire
server only. It cannot be enabled for a specific repository.
Configuration File Parameters for Performance Tracing
You can turn performance tracing on or off and customize logging behavior for a specific Master Data Server (MDS) or auxiliary server (MDIS, MDSS, MDLS) from the server’s configuration file (mds.ini, mdis.ini, mdss.ini, mdls.ini).
The parameters described below are valid for all server .ini files.
Table 64. Configuration File Parameters for Performance Tracing
Parameter Description
Enable Performance
Tracing
True/False. Turns performance tracing for the
server on (True) or off (False).
Performance Tracing
Watermark
Number. The maximum size (in bits) allowed for a performance tracing log file. Default value is
8388608 (8 MB). Minimum value is 1048576
(1 MB).
Performance Tracing Max
Number Of Log Files
Number. The maximum number of performance
tracing log files to allow per server. Default
value is 1000000.
Performance Tracing
Filter Threshold
Milliseconds
Number. The minimum length of total time in milliseconds (elapsed time) that an activity must
last before it is included in the performance
tracing log file. Default value is 1000.
NOTE ►► These parameters are only read at server startup.

228 MDM Console Reference Guide
REPORTS
Unlike logs and traces, reports are both repository-specific and activity-specific. Each MDM repository stores its reports in the
usr\sap\<SAPSID>\<instance_name>\mdm\reports directory.
NOTE ►► The mds.ini file parameter Report Dir lets you
customize the report directory location.
Reports are named using the following format:
[Report Type]@[DBMS Server]@[DBMS Type]@[Repository Name]
@U@[YYMMDD]@[HHMMSS].csv
A new report is created each time a qualifying operation is performed on a repository, and each report’s contents are limited to messages regarding that operation only.
Report Types
MDM report types refer to the specific repository operations that caused the report to be created. MDM creates reports for the following operations only:
• Archive
• Create Slave
• Duplicate
• Import
• Schema Migration
• Syndication
• Unarchive
• Update
• Verify Check
• Verify Repair
Upon completion of any MDM operation that generates a report file, MDM prompts you to immediately view the report.
NOTE ►► For each operation specified in the list above, MDM stores
up to a maximum of 20 reports over all repositories (not per repository). There is no maximum restriction for the size of a report.
These limits are non-configurable.
Viewing Reports
To view a report:
1. In the Console Hierarchy tree, open the repository’s Admin branch and
select the Reports node.
2. In the Reports pane, select the report you want to view.
3. MDM displays the report contents in the Report Detail pane.

MDM Console Reference Guide 229
TIP ►► From the Reports pane header, you can set display
preferences such as the number of messages to show per page, which
columns to view/hide; and whether only errors are shown.

230 MDM Console Reference Guide
MDS Configuration
You can customize MDS settings from within the mds.ini file, located in
the usr\sap\<SAPSID>\<instance_name>\config directory.
The mds.ini file is split into multiple parts: a top section for MDS and separate sections for each MDM repository that has been started on that Master Data Server.
The MDS section lists server-level configuration parameters which are global and affect MDS behavior across all repositories.
Each repository section lists configuration parameters which are specific to that repository only and override the settings in the MDM Server section.
For each section, the mds.ini file includes a default set of standard parameters. In addition to the standard parameters, you can enter optional parameters directly into the various sections of the mds.ini file.
All parameters are case-sensitive and there should be no spaces before or after the equal sign (=) which separates a parameter from its setting. Not all settings must have values, however.
MASTER DATA SERVER PARAMETERS
The first section of the mds.ini file is the global MDS section. All global MDS parameters appear under the following line:
[MDM Server]
The standard [MDM Server] parameters included with the mds.ini file
are described in Table 65.
Optional [MDM Server] parameters, which must be entered manually
in the mds.ini file, are described in Table 66.
NOTE ►► Enter optional parameters exactly as they appear in this
guide and leave no space before or after the equal sign (=).
NOTE ►► If a parameter has a default setting, it is noted in bold.
NOTE ►► Changes made to mds.ini are not logged by MDM. Access
to the file should be limited accordingly.
NOTE ►► Use either # or ; as comment characters at the beginning
of a new line. Use # as an inline comment character.
CAUTION ►► Do not modify the mds.ini file with an editor that locks the file (such as Microsoft Word) while MDS is running, as this can
cause MDS to crash.

MDM Console Reference Guide 231
Table 65. Standard [MDM Server] Parameters
Name Description
MDS Ini Version Number. The default and only valid value
is 1. Replaces XCS Ini Version.
Accelerator Dir String. The directory path for the location
of the Master Data Server index files.
Log Dir
String. The directory path for the location
where MDM log files are stored and
retrieved.
Report Dir
String. The directory path for the location
where MDM report files are stored and
retrieved.
Archive Dir
String. The directory path for the location where MDM archive files are stored and
retrieved.
Distribution Root Dir
String. The directory path for the root of the fixed directory structure where files
associated with the Master Data Server’s
ports are stored and retrieved.
Transport Dir
String. The directory path for the location
where files associated with MDM transport
(CTS+) are stored.
Modifications Dir
String. The directory path for the location where master change log files are stored
and retrieved.
Lexicon Dir
String. The directory path for the location where lexicon information is stored and
retrieved.
String Resource Dir String. The directory path for the location
of the MDM Server string files.
Stemmer Install Dir
String. The directory path for the Inxight
stemming engine installation directory. If
no directory is specified, MDM uses the ngrams algorithm to create an internal
stem.
Wily Instrumentation True/False. Whether Wily Instrumentation
monitoring is enabled.
Wily Instrumentation
Level Threshold
Number. Level of monitoring to perform.
The default value is 10.
Wily Repository Report
Status Interval
The interval, in seconds, for reporting the
status of mounted MDS repositories. The default is 60 seconds. The reported
statuses are Stopped, Starting, Running,
Stopping.

232 MDM Console Reference Guide
Name Description
SLD Registration
True/False. Registers the Master Data
Server with the SAP System Landscape
Directory.
Trusted Connection
Authentication Mode
Specifies the type of authentication
required for trusted connections to the
Master Data Server (MDS). Options are
None, IP, SSL, or Both.
Listening Mode
Unencrypted/SSL/Both. Whether the
Master Data Server accepts unencrypted,
encrypted, or both types of connections.
Service Control Security
Enabled
For descriptions of these parameters, see
"SSL-Related Parameters for a Client MDS".
SSL Enabled
SSL Lib Path
SSL Key Path
Logviewer Format Tracing
True/False. When set to True, MDM
generates MDS trace messages in both its native and AGS/Log Viewer's List formats.
If False, MDM generates messages in its
native format only.
Enable Performance
Tracing
For descriptions of these parameters, see
“Configuration File Parameters for
Performance Tracing”.
Performance Tracing
Watermark
Performance Tracing Max
Number Of Log Files
Performance Tracing
Filter Threshold
Milliseconds
SAP RFC Gateways
String. Comma-delimited list of registered
gateways. Valid formats are <GwHost>:<GwServ>, and
GWHOST=<GwHost> GWSERV=<GwServ>,

MDM Console Reference Guide 233
Name Description
Max Threads Per
Operation
Number or Auto. The maximum number
of threads that a single operation is allowed to use. Default value is Auto,
which automatically limits the number of threads an operation can use to the
number of logical cores on the Master
Data Server host (if the server has more than two cores, the maximum number of
threads MDS will use per operation is
equal to “number of cores – 1”).
This parameter does not limit the total
number of threads used by MDS.
Replaces CPU Count.
Lock Account After
Failed Password Attempts
Number. The number of failed password
attempts to allow before locking the related user account. "0" disables account
locking. The default value is 5.
Lock Account Duration
Number. The number of seconds to lock a user account after the allowed number of
failed password attempts is surpassed. Default value is 1800. “0” releases the
account immediately after locking.
Maximum value is 2147483647.
Minimum Password Length
Number. The minimum number of
characters of an MDM user password. The
default value is 6. This is the lowest
number that you can set as minimum.
If the minimum password length is set to a
value that is equal to or greater than the maximum password length, the allowed
password length will be a fixed value that
is equal to the maximum password length.
For more information about using strong
passwords, see the MDM Security Guide.
Maximum Password Length
Number. The maximum number of
characters of an MDM user password. You can set any value between 13 and
255.
Password Must Contain
Uppercase And Lowercase
Letters
True/False. If set to True, an MDM user
password must contain at least one uppercase letter and one lowercase letter.
Use only for languages that use
uppercase and lowercase.
Password Must Contain At
Least One Digit
True/False. If set to True, an MDM user
password must contain at least one digit.

234 MDM Console Reference Guide
Name Description
Password Must Contain At
Least One Special
Character
True/False. If set to True, an MDM user
password must contain at least one special character, which is any keyboard
symbol that is not a letter or character.
Password Cannot Contain
The User Name
True/False. If set to True, an MDM user's
password must not contain the user's user
name.
Number Of Previous
Passwords That Cannot Be
Reused
Number. The number of recent passwords
to be stored in the user's password history. The user cannot reuse these
passwords. The default is 1, which means only the current password is stored. The
maximum value allowed is 99. SAP
recommends a value of at least 3.
If you decrease the value of this parameter, use the CLIX
repUserResetPassHistory command
to remove the extra passwords in the
history.
Password Expiration Days
Number. The number of days an MDM user’s password is to remain valid, after
which it must be changed. "0" means passwords never expire. The default value
is 90.
Password Expiration
Warning
Number. The number of days in advance
that an MDM user is to be warned their password is about to expire. The default
value is 7.
Disable Read Access to
Repositories That
Require Restart
True/False. If set to True, MDM will deny read access to repositories with the state
"Requires Restart".
Replaces Disable Read Access to
Corrupt Repositories.
MDS Scone
String. The encrypted password for MDM
Console access to this Master Data
Server. Removing it will remove the
password for the Master Data Server.
Log SQL Modifications
True/False. Logs every SQL modification
of the underlying databases. Should be set to True only at SAP request since this
generates a huge amount of rolling log
info and slows the Master Data Server.

MDM Console Reference Guide 235
Name Description
Always Verify DBMS
Connection Before
Executing SQL Statements
True/False. Makes sure that the DBMS
connection is live after being retrieved from the connection pool (and therefore
idle). If the connection has been lost, a message is written to the Server Log and
the connection is restored.
Useful for the small minority of MDM
installations where the network connection between the Master Data Server and the
DBMS is unreliable and frequently lost. Improves reliability but marginally slows
the Master Data Server.
Replaces Extra DBConnection
Validation.
Maximum DBMS Bind Count
Number. The number of bind descriptors
to pre-allocate for queries to the DBMS.
Default is 512. If a greater value is required, MDS will write a message to the
Master Data Server log (in which case, increase the value in 50% increments until
the error message is resolved, up to the limit of 4096). Not applicable to SQL
Server.
SQL Server DBA Username String. DBMS system database name.
Default is MASTER.
Enable Change Stamp
Logging True/False.
Max Notification Threads
Number. Default is 4. The maximum number of threads MDS uses to send
queued notifications to MDM clients.
RELEASE\UseAssert
True/False. Causes errors to Assert,
which logs them to the Assertion*.xml. Valid when the Master Data Server
executable is built in RELEASE mode.
Client Ping Timeout
Minutes
Number. Causes MDM Data Manager to
send a ping to the Master Data Server after the specified number of minutes of
inactivity. Use to keep the socket connection active on networks where
inactive sockets are killed by the system. Default is 0 (no pings). See also
Inactive Client Timeout.

236 MDM Console Reference Guide
Name Description
Inactive Client Timeout
Minutes
Number. Minutes of inactivity to allow from
a client (MDM application, API, service, etc.) before the Master Data Server starts
sending ping packets to the client. Used to clean up dead connections on networks
which kill inactive sockets. If the
connection is alive, the pings succeed and nothing else happens. If the connection is
dead, the ping attempts ultimately fail and the network informs the Master Data
Server that the connection is dead. Default is 0 (disabled). See also Client
Ping Timeout Minutes.
Value Retrieval
Threshold
Number. Limits the total number of data field elements (main table records, text
attributes, and so on) that MDS will
attempt to send back for rich client and MDLS operations that request multiple
records. The formula is number of records * number of fields * number of languages.
If the result exceeds this threshold, MDS
returns a failure. Default is 0 (no limit).
Family Retrieval
Threshold
Number. Limits the total number of Family
data field elements that MDS will attempt to send back for rich client and MDLS
operations that request multiple Family
data records. The formula is number of records * number of fields * number of
languages. If the result exceeds this threshold, MDS returns a failure. Default is
0 (no limit).
Protect Family Nodes
with Locked Data
True/False. When a family node is locked in the Publisher, MDM will reject any
record modification which would result in
that family node being deleted.
Enable Client
Dictionaries
True/False. If the Inxight stemming engine
is installed, you can enable all client
dictionaries shipped with the Inxight engine as a supplement to the
corresponding lexicon (simple union).
Client dictionaries are user-defined lexicons that let you supplement entries in
Inxight’s lexicons to customize the
treatment of specific tokens. For more information about integrating client
dictionaries, see the Inxight user
documentation.

MDM Console Reference Guide 237
Name Description
Restricted Url For
Client Export
String. The location in the file system
where you can save files; for example, for
exported files from Data Manager.
Default: Empty string, meaning there is no
restriction on where the files can be
saved.
Number Of Stemmers Per
Language
Number. To take advantage of multi-threaded processing, MDM “pre-creates”
this number of stemming threads per language. Value should be set to the
anticipated number of clients using the
stemming feature. Default is 2.
Index_Page_Margin Number. Default is 10.
Allow Console to
Retrieve Files
True/False. Allows MDM Console or CLIX
user to retrieve files from the Master Data
Server’s log and report directories.
Default Skip Unchanged
Records
True/False.
This is the global default setting for all repositories. You can only change this
setting per repository through the Console.
For more information about this property,
see Modifying Repository Properties.
Default Bulk Import Silo
True/False.
Increases import performance by optimizing SQL access methods. This is
the global default setting for all repositories. You can change this setting
per repository only through the Console.
For more information, see the section
Modifying Repository Properties.
Default Safe Silo Mode
True/False.
This is the global default setting for all repositories. If set to True when Default
Bulk Import Silo is set to True, the
database silo performs database
operations in a safer but slower way to enable the import job to import
successfully.
You can change this setting per repository
only through the Console.
For more information, see the section,
Modifying Repository Properties.

238 MDM Console Reference Guide
Name Description
Enable Slicing for Non-
Bulk Operations
True/False.
When set to True, slicing is enabled based
on the setting of each operation's Enable Slicing parameter. See “Configuring
Slicing for Non-Bulk Operations”.
TrexDllPath
String. The directory path for the location
of the TREX Client binary files. Must
restart repositories using Update Indices
to send existing PDFs to TREX.
Table 66. Optional [MDM Server] Parameters
Name Description
Allow Console to
Retrieve SysInfo
True/False. Allows CLIX user to retrieve the
contents of the mds.ini, Server*.csv, and
Assertion*.csv files.
Allow Modification of
mds.ini
True/False. Allows mds.ini parameters to be
modified by the “CLIX xs” command.
Autostart
True/False/Number.
When set to True, the Master Data Server
automatically loads all mounted repositories,
except in the following cases:
• The repository is outdated
• The repository is already running elsewhere when the Master Data Server
starts
• The relevant repository section of the
mds.ini file includes the line Autostart=False
When set with a positive number, MDM waits for the specified number of seconds before
loading so that other processes, especially a
DBMS, can fully initialize.
To update indices when loading specific
repositories, add the line Autostart=Update
Indices in the relevant repository sections of
the mds.ini file.
Default Slice Wait
Time MS
Number. The default number of milliseconds
MDM waits between slices to receive other
requests. Default is 300.
Bulk Operation Slice
Size
Optional parameters for slicing for bulk
operations. For more information, see
"Configuring Slicing for Bulk Operations". Bulk Operation Slice
Wait Time MS

MDM Console Reference Guide 239
Name Description
Assignment Slice Size
Optional parameters for slicing for non-bulk
operations. For more information, see
"Configuring Slicing for Non-Bulk Operations".
Assignment Slice Wait
Time MS
Checkin Slice Size
Checkin Slice Wait
Time MS
Checkout Slice Size
Checkout Slice Wait
Time MS
Delete Records Slice
Size
Delete Records Slice
Wait Time MS
Recalculate Slice
Size
Recalculate Slice
Wait Time MS
Record Edit Slice
Size
Record Edit Slice
Wait Time MS
Rollback Slice Size
Rollback Slice Wait
Time MS
Validation Slice Size
Validation Slice Wait
Time MS
Enable Checkin
Slicing
Enable Checkout
Slicing
Enable Assignment
Slicing
Enable Record Edit
Slicing
Enable Delete Records
Slicing
Enable Recalculate
Slicing
Enable Rollback
Slicing

240 MDM Console Reference Guide
Name Description
Enable Validation
Slicing
Matching
Transformation Phase
Slice Size
Number. The number of records in each slice
of the transformation operation in the matching
process. Default is 1200.
Matching
Transformation Phase
Slice Wait Time MS
Number. The time between each
transformation slice operation. It is recommended to set this to 100 ms if there are
locking issues.
Default is 0, which means no slicing.
DBMS Reconnection
Attempts
How many times the Master Data Server
should attempt to reconnect to a DBMS instance when an existing connection is lost.
The wait period between attempts is 3
seconds. Default is 10.
DEBUG\UseAssert
True/False. Causes errors to Assert, which
logs them to the Assertion*.xml. Valid when the
Master Data Server executable is built in
DEBUG mode.
Duplicate
Repositories By Rows
Only
True/False. Master Data Server does not
attempt to duplicate by the whole table method.
Should be set to True if you have a SQL Server DBMS and the tempdb cannot grow large
enough to accommodate the largest table.
Enable Client
Dictionaries
True/False. Allow customized keyword-
stemming dictionaries.
Enable Keyword Search
Performance
Enhancement
True/False. Improves keyword search
performance up to 50% and reduces the number of sub strings for keyword search types
that are displayed in the Search Selections tab
in the Data Manager (depending on the result
set).
Hosts Sharing
Modifications Dir
String. A comma-separated list of the
hostnames in a clustered environment which can host the same Master Repository. All hosts
must have identical Modifications Dir
values.
IBMDB2 Best Block
Size
Number. Number of records the Master Data
Server attempts to insert/modify at a time.
Default is 256.

MDM Console Reference Guide 241
Name Description
IBMDB2 LUW Log LOBs
True/False. Whether MDM creates LOB table
columns with LOGGING on or off.
When set to True, BLOB and CLOB columns are fully logged in the DBMS, allowing normal
roll forward recovery in the case of a DBMS
failure.
When set to False, LOB insertions and updates are faster, but, in case of DBMS failure, you
may be dependent on your last MDM Archive
or DBMS backup.
LOB columns are limited to one gigabyte when
parameter is set to True and two gigabytes
when set to False.
If your repository does not use a lot of LOB data (PDFs, Pictures, Text Large) you will have
little that risks data loss, and also little need for performance improvement, so setting this value
to True is recommended.
Any repository created or unarchived prior to
MDM 7.102 will have NOT LOGGED on LOB columns. To convert such a repository, you
must either duplicate the repository or
Archive/Unarchive it.
Parameter is not available for DB2 on zOS and
i5/OS. For these platforms, LOB columns will
always be LOGGED and limited to 1 gigabyte.
Ignore Mismatched
Images
True/False. Allows repositories to start when
Thumbnails or Originals tables do not match
main data tables. Use with caution. A mismatch usually indicates you are using the wrong
Thumbnails or Originals partitions compared to
the Main partition.
Language Inheritance
Mode for Assignments
0, 1, or 2. "0" disables language inheritance
inside assignments; "1" limits language inheritance to the primary inherited language;
and "2" extends inheritance to the secondary
inherited language.
Language Inheritance
Mode for Calculated
Fields
0, 1, or 2. "0" disables language inheritance for
calculated fields; "1" limits language
inheritance to the primary inherited language; and "2" extends inheritance to the secondary
inherited language.
Language Inheritance
Mode for Validations
0, 1, or 2. "0" disables language inheritance inside validations; "1" limits language
inheritance to the primary inherited language;
and "2" extends inheritance to the secondary
inherited language.

242 MDM Console Reference Guide
Name Description
LOG_REC_MATCH_PERF 0 or 1. Enables (1) or disables (0) performance
log for record matching
Logged-In Role
Maintenance
True/False. Allows role maintenance even when one or more users who are assigned to
the role are logged on; otherwise, the
maintenance of that role is prohibited until all
the users assigned to that role log off.
Max Large Text Length
Number. Maximum bytes read for Text Large
fields during the starting of an MDM repository. If you have Text Large fields that contain more
than this number of characters, you need to increase the number to prevent data truncation.
Data truncation will cause the start to fail. Default is 100000. (See also Number of
Rows Per Fetch.)
Max Number of Log
Files
Number. The maximum number of log files to
keep in the MDS \log dir. After this number is reached, the oldest log file is deleted. (If set to
0, MDS still keeps one log file). Default value is
20.
MaxDB Best Block Size
Number. Number of records the Master Data Server attempts to insert/modify into MaxDB at
a time. Default is 2048.
MaxDB Statement Cache
Size
The number of prepared statements to be cached for the connection for re-use. Accepted
values are 0, Unlimited, or a positive number.
Default is 1000.
MaxDB\Dll
String. Name of the MaxDB Interface Library
(DLL, SO, or SL) for Master Data Server.
Default base name is libSQLDBC76_C. The
extension depends upon the operating system
(e.g. dll for Windows).
MDM Log Watermark
Number. The maximum size (in bytes) an MDM
log file can grow to before a new log file is
started. Value must be greater than 1048576 (1 MB). Default is 2097152 (2 MB). Replaces
ROLLING_LOG_HI.
Multi-threaded
Matching
True/False. Whether to enable multi-threading for record matching tasks. Maximum number of
threads is governed by the Max Threads
Per Operation parameter.
Oracle Best Block
Size
Number. Number of records the Master Data
Server attempts to insert/modify at a time.
Default is 2048.
Oracle DBA Username String. DBMS account (database) name having
system privileges. Default is SYSTEM.
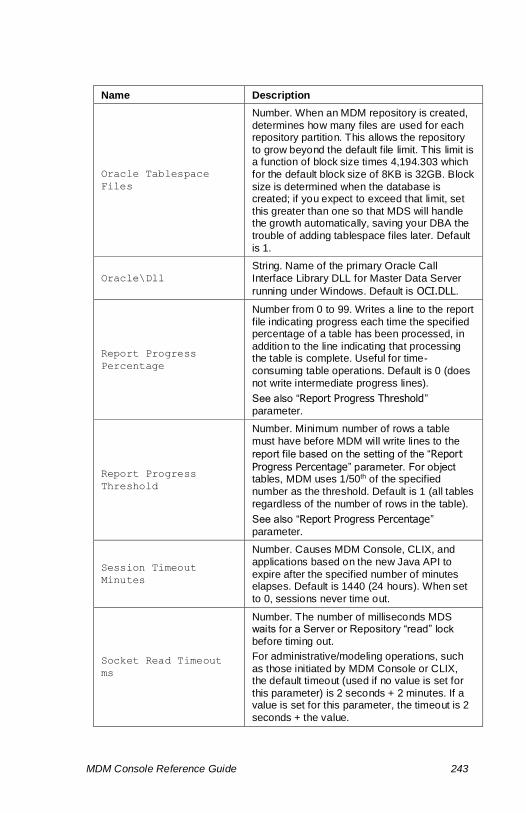
MDM Console Reference Guide 243
Name Description
Oracle Tablespace
Files
Number. When an MDM repository is created,
determines how many files are used for each repository partition. This allows the repository
to grow beyond the default file limit. This limit is a function of block size times 4,194.303 which
for the default block size of 8KB is 32GB. Block
size is determined when the database is created; if you expect to exceed that limit, set
this greater than one so that MDS will handle the growth automatically, saving your DBA the
trouble of adding tablespace files later. Default
is 1.
Oracle\Dll
String. Name of the primary Oracle Call
Interface Library DLL for Master Data Server
running under Windows. Default is OCI.DLL.
Report Progress
Percentage
Number from 0 to 99. Writes a line to the report
file indicating progress each time the specified percentage of a table has been processed, in
addition to the line indicating that processing the table is complete. Useful for time-
consuming table operations. Default is 0 (does
not write intermediate progress lines).
See also “Report Progress Threshold”
parameter.
Report Progress
Threshold
Number. Minimum number of rows a table
must have before MDM will write lines to the
report file based on the setting of the “Report
Progress Percentage” parameter. For object tables, MDM uses 1/50th of the specified
number as the threshold. Default is 1 (all tables
regardless of the number of rows in the table).
See also “Report Progress Percentage”
parameter.
Session Timeout
Minutes
Number. Causes MDM Console, CLIX, and
applications based on the new Java API to
expire after the specified number of minutes elapses. Default is 1440 (24 hours). When set
to 0, sessions never time out.
Socket Read Timeout
ms
Number. The number of milliseconds MDS waits for a Server or Repository “read” lock
before timing out.
For administrative/modeling operations, such
as those initiated by MDM Console or CLIX, the default timeout (used if no value is set for
this parameter) is 2 seconds + 2 minutes. If a value is set for this parameter, the timeout is 2
seconds + the value.

244 MDM Console Reference Guide
Name Description
For data access operations, such as those initiated by MDM Data Manager, the default
timeout (used if no value is set for this parameter) is 2 seconds + infinity. If a value is
set for this parameter, the timeout is 2 seconds
+ the value.
Socket Write Timeout
ms
Number. The number of milliseconds MDS
waits for a Server or Repository “write” lock
before timing out.
Timeout behavior is the same as described for
the Socket Read Timeout ms parameter.
SQL Server Allow
Windows
Authentication Mode
True/False. When the DBMS login field in an
MDM dialog is left empty, MDM will attempt to connect to the specified SQL DBMS as the
Windows user running MDS. That Windows
username must have a sysadmin role and be mapped to the A2i_xCat_DBs database on the
DBMS host machine in order for the
authentication to succeed.
SQL Server Best Block
Size
Number. Number of records the Master Data
Server attempts to insert/modify at a time.
Default is 256.
Transport Manager URL
String. The URL used to launch the Transport
Management System.
Examples:
www.sap.com
http://www.sap.com
Trusted SAP Systems
String. Comma-separated list of trusted SAP
System IDs with an optional colon-separated partnerHostname. Format is
SystemID:partnerHost,
Example:
A66:pwdf4711, A66:pwdf0814, A99,BCD
Wildcards are not allowed.
Use Old Archiving
Method
True/False. Whether the pre-MDM 7.1 SP06
archiving method is used.
Value Retrieval
Violation Terminates
Session
True/False. If set to True, terminates the
session of a client whose record request
caused the Value Retrieval Threshold
parameter value to be exceeded.

MDM Console Reference Guide 245
Name Description
Verify Attribute
Linkage
Nocheck/Check/Relink/Delete. Determines
how Verify > Repair should handle attribute
values that correspond to unlinked attributes. Nocheck does nothing. Check identifies orphan
attribute values. Relink identifies orphan attribute values and relinks the corresponding
attributes. Delete identifies orphan attribute
values and deletes them.
TCP Keep Alive
Enabled
True/False. When set to True, the operating
system's TCP keep-alive option is enabled on
incoming connections. This causes the server to periodically check whether the connection is
still alive. If the client does not respond within a system-defined time interval, the connection is
closed.
Port Scan Delay
Number. The interval in seconds that MDS
scans inbound ports for incoming files. This parameter is read when the repository is
started.
When this parameter is not set, the default is 1 second, which can produce a large number of
system calls when a repository with many ports
is started on the server.
Note: Increasing the scan interval reduces the
number of system calls but delays the
response time for processing automatic
imports.
The range of values that can be set for this
parameter is between 1 (minimum) and 300
(maximum) seconds.
For values below 1, the interval will be set to 1
second. For values above 300, the interval will
be set to 300 seconds.
IBMDB2 BLOB Length
Positive integer. The length of a IBM DB2 BLOB in bytes. The default length is
2147483647. This is two gigabytes minus one byte in bytes. The minimum length is 1. The
maximum length is 2147483647.
IBMDB2 CLOB Length
Positive integer. The length of a IBM DB2 CLOB in bytes. The default length is
2147483647. This is two gigabytes minus one
byte in bytes. The minimum length is 1. The
maximum length is 2147483647.

246 MDM Console Reference Guide
Name Description
IBMDB2 LUW BLOB
Length
Positive integer. The length of a IBM DB2 for
Linux, Unix, and Windows BLOB in bytes. The default length is 1073741824. This is one
gigabyte in bytes. The minimum length is 1. The maximum length is 2147483647, which is
two gigabytes minus one byte in bytes.
IBMDB2 LUW BLOB Not
Logged Length
Positive integer. The length of a IBM DB2 for
Linux, Unix, and Windows BLOB that is not logged in bytes. The default length is
2147483647. This is two gigabytes minus one byte in bytes. The minimum length is 1. The
maximum length is 2147483647.
IBMDB2 LUW CLOB
Length
Positive integer. The length of a IBM DB2 for Linux, Unix, and Windows CLOB in bytes. The
default length is 1073741824. This is one
gigabyte in bytes. The minimum length is 1. The maximum length is 2147483647, which is
two gigabytes minus one byte in bytes.
IBMDB2 LUW CLOB Not
Logged Length
Positive integer. The length of a IBM DB2 for Linux, Unix, and Windows CLOB that is not
logged in bytes. The default length is 2147483647. This is two gigabytes minus one
byte in bytes. The minimum length is 1. The
maximum length is 2147483647.
IBMDB2 ZOS BLOB
Length
Positive integer. The length of a IBM DB2 zOS
BLOB in bytes. The default length is
1073741824. This is one gigabyte in bytes. The minimum length is 1. The maximum length is
2147483647, which is two gigabytes minus one
byte in bytes.
IBMDB2 ZOS CLOB
Length
Positive integer. The length of a IBM DB2 zOS
CLOB in bytes. The default length is 1073741824. This is one gigabyte in bytes. The
minimum length is 1. The maximum length is
2147483647, which is two gigabytes minus one
byte in bytes.
IBMDB2 5OS BLOB
Length
Positive integer. The length of a IBM DB2 5OS
BLOB in bytes. The default length is 2147483647. This is two gigabytes minus one
byte in bytes. The minimum length is 1. The
maximum length is 2147483647.
IBMDB2 5OS CLOB
Length
Positive integer. The length of a IBM DB2 5OS
CLOB in bytes. The default length is
2147483647. This is two gigabytes minus one byte in bytes. The minimum length is 1. The
maximum length is 2147483647.

MDM Console Reference Guide 247
MDM REPOSITORY PARAMETERS
Below the Master Data Server parameters in the mds.ini file are the parameter sets for the individual repositories that have been started by the Master Data Server. Each repository’s parameters appear under the line:
[MDM Server\Databases\RepositoryInfo]
where RepositoryInfo is a concatenation of the repository name, the
DBMS identifier, and the DBMS type.
Repository sections appear in the mds.ini file in the order in which each
repository was first started.
The standard MDM repository parameters included with the mds.ini file are described below.
Optional MDM repository parameters, which must be entered manually in the mds.ini file, are described in Table 68.
NOTE ►► If an MDM repository parameter also appears as an MDM
Server parameter, the MDM repository parameter setting takes
precedence for that repository.
NOTE ►► For more information about entering configuration file
parameters, see “Master Data Server Parameters”.
Table 67. Standard Repository-Specific Parameters
Name Description
Port
Number. The MDS port number used by MDM
clients to communicate with the repository. Value also set in MDM Console. There should be at
least 5 ports separating each repository started
on the Master Data Server.
Login String. The login for the DBMS associated with
the repository.
Password+ String. The encrypted password for the DBMS
login.
Stemmer Language Not used in this version of MDM.
Stemmer Variant Not used in this version of MDM.
Max Large Text
Length
Number. Maximum bytes read for Text Large
fields during the starting of an MDM repository. If
you have Text Large fields that contain more than this number of characters, you need to
increase the number to prevent data truncation. Data truncation will cause the start to fail. Default
is 100000. (See also Number of Rows Per
Fetch.)
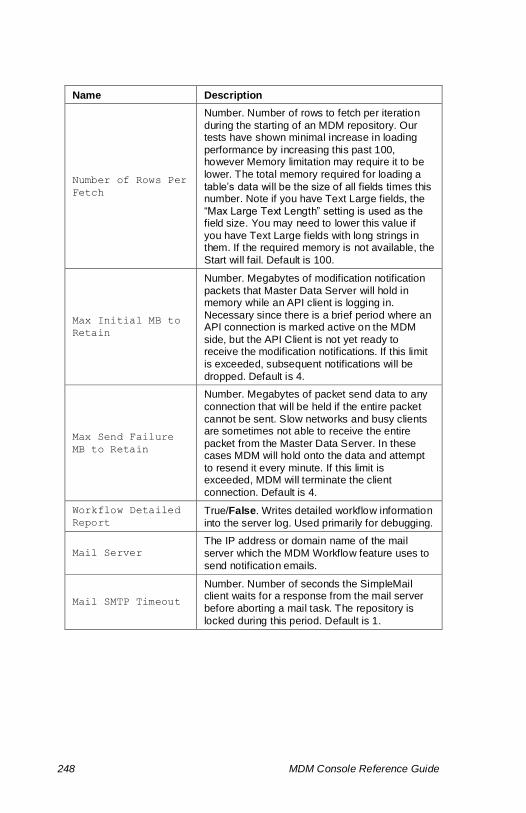
248 MDM Console Reference Guide
Name Description
Number of Rows Per
Fetch
Number. Number of rows to fetch per iteration
during the starting of an MDM repository. Our tests have shown minimal increase in loading
performance by increasing this past 100, however Memory limitation may require it to be
lower. The total memory required for loading a
table’s data will be the size of all fields times this number. Note if you have Text Large fields, the
“Max Large Text Length” setting is used as the field size. You may need to lower this value if
you have Text Large fields with long strings in them. If the required memory is not available, the
Start will fail. Default is 100.
Max Initial MB to
Retain
Number. Megabytes of modification notification
packets that Master Data Server will hold in memory while an API client is logging in.
Necessary since there is a brief period where an API connection is marked active on the MDM
side, but the API Client is not yet ready to receive the modification notifications. If this limit
is exceeded, subsequent notifications will be
dropped. Default is 4.
Max Send Failure
MB to Retain
Number. Megabytes of packet send data to any
connection that will be held if the entire packet
cannot be sent. Slow networks and busy clients are sometimes not able to receive the entire
packet from the Master Data Server. In these cases MDM will hold onto the data and attempt
to resend it every minute. If this limit is exceeded, MDM will terminate the client
connection. Default is 4.
Workflow Detailed
Report
True/False. Writes detailed workflow information
into the server log. Used primarily for debugging.
Mail Server
The IP address or domain name of the mail
server which the MDM Workflow feature uses to
send notification emails.
Mail SMTP Timeout
Number. Number of seconds the SimpleMail client waits for a response from the mail server
before aborting a mail task. The repository is
locked during this period. Default is 1.

MDM Console Reference Guide 249
Table 68. Optional Repository-Specific Parameters
Name Description
Autostart
True/False/Update Indices.
When set to True, the Master Data
Server automatically performs Load
Immediate for the mounted repository
unless Autostart is set to false under the
MDS section.
When set to False, the Master Data
Server does not load the repository even when Autostart is set to true under the
MDS section.
When set to Update Indices, the Master
Data Server updates indices and loads the repository unless Autostart is set to
false under the MDS section.
SSL-RELATED PARAMETERS FOR A CLIENT MDS
Parameters required to connect a Master Data Server as a client to an SSL-enabled Master Data Server must be entered in the “client” mds.ini file under the header:
[MDM Server\Remote Server\<MDSHOST>:portNumber]
where <MDSHOST> is the name of the target SSL-enabled MDS (on
which the master repository is mounted) and portNumber is the
secure listening port for that MDS (for example, myhost:59951).
NOTE ►► For landscapes with master/slave repositories, if a master
repository is mounted on an SSL-enabled Master Data Server, the
Master Data Servers on which its slave repositories are mounted must
be configured to connect securely as a client to the “master” MDS.
Table 69. SSL-Related Configuration Parameters for MDS-as-Client
Name Description
Service Control
Security Enabled
Options are True or False. Must always be
False on UNIX landscape.
SSL Enabled
Specifies if the server connects to MDS on an
unencrypted or SSL port. Options are True or
False.
For the server to establish a secure connection
to MDS, this parameter must be set to True.
If SSL is not enabled on the Master Data Server, ensure that this parameter is set to False

250 MDM Console Reference Guide
Name Description
SSL Lib Path
String. The directory path for the location where the Master Data Server’s SSL Library file is stored.
SSL Key Path
String. The directory path to the Master Data Server’s SAPSSSL.PSE file and the CLIENT.PSE file used for connecting to the
target MDS.
If SSL is not enabled on the Master Data Server, ensure that this parameter is left empty.
NOTE ►► If the installation was done without SSL, these parameters do not appear in the mds.ini file. In this case, you must enter them
manually.
NOTE ►►For more information about configuring MDM servers for
SSL, see the MDM 7.1 Security Guide.

MDM Console Reference Guide 251
DBMS Settings
DBMS settings affect all Master Data Servers which access that DBMS and all MDM repositories mounted on that Master Data Server. In general, these settings allow you to configure parameters regarding the DBMS Server’s use of the file system.
You can use the DBMS Settings command to open the DBMS Settings dialog and change the settings for either: (1) any DBMS Server; or (2) the DBMS Server associated with a particular MDM repository. The dialog contains a grid that enables you to specify default values for each setting.
The settings you can specify for a DBMS Server are listed in Table 70.
Table 70. DBMS Settings
Setting Description
Default Partitions
Specifies the default number of partitions to use whenever you create a new MDM repository (1, 2,
or 4).
DataPath
Specifies the file system location where database files will be created whenever you create a new
MDM repository or unarchive to a new repository
(not overwrite). It does not affect the location of
already existing MDM repositories.
▪ Applies to SQL Server and Oracle only
Log Path
Specifies the file system location where the SQL
Server transaction log file is created.
▪ Applies to SQL Server only
IndexPath
Specifies the file system location where database
index files will be created whenever you create a new MDM repository or unarchive to a new
repository (not overwrite). It does not affect the location of already existing MDM repositories. You
can increase Oracle’s performance by setting this path to a different piece of hardware (drive spindle
and/or disk controller).
▪ Applies to Oracle only
NOTE ►► If any of the settings are unset or blank, the DBMS’s
default location is used.
NOTE ►► Modifying DBMS settings is a password-protected
operation which requires you to enter the password for the Master
Data Server, if you have not already done so during the current MDM
session (see “Master Data Server Security”).

252 MDM Console Reference Guide
NOTE ►► You can change the password of the MDM DBMS Server account from the DBMS Settings dialog by clicking Change Password
(applies to Oracle only).
To open the DBMS Settings dialog to view and edit DBMS Server settings (DBMS Server associated with a particular MDM repository):
1. In the Console Hierarchy tree, right-click on the MDM repository and
choose DBMS Settings from the context menu, or choose Configuration
> DBMS Settings from the main menu.
TIP ►► If the top-right pane is currently displaying the list of MDM
repositories, you can also right-click on the repository in the grid and
choose DBMS Settings from the context menu.
2. MDM opens the DBMS Settings dialog.
3. Click in the Value column of the DBMS Server setting you want to
change. If the Value cell is a drop-down list, select the desired option.
If the Value cell is an edit field, double-click inside the field and replace
the existing value with a new value.
4. Click OK to save any new values and close the dialog.
To open the DBMS Settings dialog to view and edit DBMS Server settings (any DBMS Server):
1. In the Console Hierarchy tree, right-click on a Master Data Server and
choose DBMS Settings from the context menu, or choose Configuration
> DBMS Settings from the main menu.
TIP ►► If the top-right pane is currently displaying the list of Master
Data Servers, you can also right-click on the Master Data Server in the
grid and choose DBMS Settings from the context menu.
2. MDM opens the Select DBMS Server dialog shown in Figure 56.
Figure 56. Select DBMS Server dialog
3. Select the DBMS Server whose settings you want to change from the
drop-down list.
TIP ►► To remove an entry from the drop-down list of DBMS Servers,
make it visible in the closed drop-down control and press Del.

MDM Console Reference Guide 253
TIP ►► The drop-down list of DBMS Servers includes only those
servers that you have previously added to the list and will usually include for selection all the servers to which you might want to connect.
If the desired server is not in the list, click the “…” (browse) button to
open the Select DBMS Server dialog, and select from the list of DBMS Servers known to MDM. If the desired DBMS Server is not in this list
either, then click the Add button in the Select DBMS Server dialog to
open the Add DBMS Server dialog, and select from the list of servers (or type in a new name in the text entry control at the top of the dialog),
and choose the DBMS type from the drop-down list.
4. Enter the appropriate DBMS login (which must have system
administrator privileges) and password for the selected DBMS Server
and click OK.
5. MDM opens the DBMS Settings dialog.
6. Click in the Value column for the DBMS Server setting you want to
change.
7. If the Value cell is a drop-down list, select the desired option. If the
Value cell is an edit field, double-click inside the field and replace the
existing value with a new value.
8. Click OK to save any new values and close the dialog.
DBMS INITIALIZATION
The first time you connect via MDM to a DBMS using the Add DBMS Server dialog, MDM prompts you to enter the DBMS storage paths for the data and index files with the initialization dialog shown in Figure 57.
Figure 57. DBMS initialization dialog
NOTE ►► The directory paths that you supply must already exist
before you click OK, or you will receive an error.
NOTE ►► The first time you connect via MDM to an Oracle DBMS,
MDM provides an opportunity to create a new Oracle account for MDM
access, as described in the next section.

254 MDM Console Reference Guide
MDM DBMS SERVER ACCOUNT
The first time you connect via MDM to an Oracle DBMS, MDM provides an opportunity to create a new Oracle account for accessing and managing MDM repositories.
Specifically, after you invoke the particular MDM command that accesses the DBMS, MDM opens the MDM DBMS Server Account dialog asking if you would like to create a new account, as shown in Figure 58.
Figure 58. MDM DBMS Server Account dialog
To create a new account, click Yes. MDM then prompts you with the Create DBMS Server Account dialog for creating the new account, as shown in Figure 59.
Figure 59. Create DBMS Server Account dialog
NOTE ►► When you invoke the particular MDM command itself to
connect for the first time, MDM requires that you supply a login and password. Here you should provide the standard Oracle SYSTEM
account, or an alternative account with equivalent privileges.
NOTE ►► If you choose not to create a new account, you will be expected to use the standard Oracle SYSTEM account (or the
alternative with equivalent privileges) to access and manage your
MDM repositories.
NOTE ►► You can change the password of the MDM DBMS account
by clicking Change Password in the DBMS settings dialog.

MDM Console Reference Guide 255
MULTIPLE DBMS INSTANCES
When your DBMS (such as Oracle) allows you to run multiple instances (i.e. separate run-time executables), and you have installed such multiple instances, you must take care to tell MDM to store the DBMS files in separate file system locations for each instance.
NOTE ►► The initialization dialog shown in Figure 57 comes up any
time MDM connects to a multi-instance DBMS for the first time.
NOTE ►► When you access the first instance via MDM, you can
accept the default paths. When you then access the second instance,
be sure to enter a Data File Path and Index File Path that are different
from the corresponding paths you specified for the first instance.
NOTE ►► Within a single instance, the Data File Path and the Index
File Paths can be the same.
DBMS SERVERS LIST
The Master Data Server keeps all DBMS Server information in a file
named MDM_list.ini, which is stored in the directory where the Master Data Server executable is located. This file is maintained by interaction with the MDM Console when you create or mount an MDM repository, though it sometimes may be necessary to edit it manually.
The file includes a list of server machine names and their database server types. The following example is provided as a prototype if you need to edit it manually:
[DBMS Server List\Server_1]
Server=DEMO2
Database Server Type=ORACLE
[DBMS Server List\Server_2]
Server=ZHENG
Database Server Type=ORACLE
[DBMS Server List\Server_3]
Server=ZHENG
Database Server Type=SQL_SERVER
The number in the DBMS Server List\Server_x section headings must be sequential beginning with 1 with no repeated or skipped numbers. Each section includes the following two entries that define a specific DBMS Server:
Server=<machine name>
Database Server Type=<Type>

256 MDM Console Reference Guide
To add a DBMS Server entry to the MDM_list.ini file through MDM Console:
1. In the Console Hierarchy tree, right-click on a Master Data Server and
choose Create Repository or Mount Repository from the context menu,
or select the tree node and choose Repositories > Create Repository or
Repositories > Mount Repository from the main menu.
TIP ►► If the top-right pane is currently displaying the list of MDM repositories, you can also right-click on a repository in the grid and
choose Mount or Unmount from the context menu.
2. MDM opens the applicable Create MDM Repository or Mount MDM
Repository dialog like the one shown in Figure 60.
Figure 60. Mount MDM Repository dialog
3. Click the “…” (browse) button to open the Select DBMS Server dialog
shown in dialog. The dialog displays the current list of DBMS Servers.
4. Click the Add button to open the Add DBMS Server dialog. The dialog
displays the current list of machine names in the same domain.
NOTE ►► Many network sites use TCP/IP only as their network
protocol. Since the mechanism for listing machines within the domain is based on Microsoft’s NetBEUI protocol, you will have to manually
edit the MDM_list.ini file if you are not using that protocol.
5. Select a DBMS server from the list or type in a new name in the text
entry control at the top of the dialog box.
• For SQL Servers, type in the actual SQL Server name
• For Oracle or DB2 servers, type in the DB ALIAS name
• For SAP HANA and SAP ASE, type the <server
name:port> (for example, for Sybase, myserv:5000, for
HANA, <server name>:3<instance number>15)
6. Select the DBMS Type from the drop-down list.
7. Click OK.

MDM Console Reference Guide 257
8. MDM adds an entry for the new DBMS host machine to the
MDM_list.ini file and the DBMS Server is now available for mounting or
creating repositories.
To remove a DBMS Server entry from the MDM_list.ini file through MDM Console:
1. In the Console Hierarchy tree, right-click on a Master Data Server and
choose Create Repository or Mount Repository from the context menu,
or select the tree node and choose Repositories > Create Repository or
Repositories > Mount Repository from the main menu.
TIP ►► If the top-right pane is currently displaying the list of MDM
repositories, you can also right-click on the repository in the grid and
choose Mount or Unmount from the context menu.
2. MDM opens the applicable Create MDM Repository or Mount MDM
Repository dialog like the one shown in Figure 60 above.
3. Click the “…” (browse) button to open the Select DBMS Server dialog.
The dialog displays the current list of DBMS servers.
4. Select the DBMS Server you want to Remove from the list and click
the Remove button.
5. MDM removes the entry for the DBMS Server from the MDM_list.ini file and from the list of DBMS Servers available for mounting and creating
repositories.


259
PART 8: MDIS ADMINISTRATION
This part of the reference guide contains a description of the MDM Import Server. The Import Server is a separate MDM application that uses import maps created within the MDM Import Manager to automatically load source data files into a repository.


MDM Console Reference Guide 261
The Master Data Import Server
The MDM Import Server (MDIS) automates the task of importing source data into MDM repositories. It is designed to reduce the processing complexity, resource requirements, and opportunity for user error common to data import tasks.
Driving these benefits are the following MDIS features:
• Port-driven. Simply place an import file in a repository’s inbound port and MDIS processes it automatically.
• Map-based. Each import file is processed according to the pre-
defined import map associated with the inbound port.
• Streaming-enabled. Automatic streaming of text and XML files
reduces resource consumption and results in faster imports.
• File-aggregating. Processing files in batches can improve efficiency and speed total import times.
• Exception-handling. If MDIS encounters an error in a record or file it sets it aside, logs an exception, and continues processing.
MDIS VS. THE IMPORT MANAGER
Both MDIS and the MDM Import Manager can import data from a source file into an MDM repository. However, each has unique capabilities that distinguish it from the other. When each is used to its advantage, the result is an import strategy which provides the most efficient importing of data possible.
The strength of the Import Manager is its connection to the source data, which enables its interactive map-making capabilities. When the Import Manager connects to a source it preloads the entire source file, giving it knowledge of every field and every value in the source data. This “total awareness” is crucial for preparing a complete import map. To help ensure a map is complete, the Import Manager’s Import Status tab alerts users to any discrepancies between source data values and the current map. The user can fix these problems interactively within the Import Manager and save the corrected map before any data is imported.
Preloading an entire source file comes at a price, however. It consumes memory on the computer running the Import Manager and very large source files may exhaust the computer’s available memory.
By contrast, MDIS’s strengths are its scalability and automation.
For scalability, instead of preloading the entire source file into the host machine’s memory as the Import Manager does, MDIS processes records in a stream by loading a record at a time into memory.

262 MDM Console Reference Guide
This streaming technique enables MDIS to process much larger source files than the Import Manager, as the demand for memory on the host machine is not affected by the size of the import file.
In addition to file size, file quantity poses a second scalability challenge. For example, a real-time transactional environment may produce a staggering number of files, each containing only one or two records. To import these files individually through Import Manager would be extremely inefficient. MDIS tackles this problem with a file aggregation feature that processes files systematically in batches rather than as individual files, resulting in faster, more efficient import of data.
As it relates to automation, MDIS requires no user intervention to import files to an MDM repository. Instead, it relies on maps created previously within the Import Manager. Once an import file is placed in the appropriate folder, its data is imported automatically into the MDM repository using the rules of the pre-defined import map. Once a file is processed, MDIS waits for the next file to import. This process continues 24 hours a day, seven days a week, until either MDIS or Master Data Server are stopped.
The trade-off for this scalability and automation is that if discrepancies between the source data and the import map arise, MDIS cannot “fix” these problems by itself. Instead, the “problem cases” can be fixed manually at a later time using the interactive capabilities of the Import Manager. Unlike the Import Manager, however, MDIS can set aside problem records or files and continue importing.
These conceptual and operational differences between the Import Manager and MDIS are summarized in Table 71.
Table 71. Conceptual Differences Between Import Manager and MDIS
Item Import Manager MDIS
Source file location Anywhere Automatic inbound port
Import process Interactive Automatic
Import map state Editable Read-only
Object loaded in memory Entire import file Individual records
Streaming import support No Yes
File aggregation support No Yes
Maximum import file size Limited (50,000 records) Unlimited
Status location Import Status Tab MDM Console/Report file
Error correction prior to import Yes No
Exception handling during import No Yes

MDM Console Reference Guide 263
WHAT IS STREAMING?
Streaming means processing an import file “one record at a time” instead of processing all records in the file at once. In fact, for efficiency, MDIS handles import records in chunks (where a chunk consists of a pre-configured number of records). For all practical purposes, however, MDIS is only “aware” of one record at a time.
NOTE ►► See “Memory Configuration” for more information about
chunk size and processing options.
By employing this streaming technique, MDIS can scale to process any size import file.
Currently, MDIS supports streaming import on text and simple XML files only (see “Simple vs. Complex XML” for more information).
Source files which cannot be streamed are processed as a whole, using the same non-streaming technique as the Import Manager. As with the Import Manager, the performance ramifications of non-streaming imports depend on the size of the import file and the configuration of the machine running MDIS.
PORTS AND MDIS
MDIS is a port-based service. It works exclusively on import files placed in inbound ports on MDM repositories.
Port Requirements
In order for MDIS to process import files from a particular port, the port must meet the requirements specified on Table 72.
Table 72. Port Requirements for MDIS Processing
Property Value
Type Inbound
Processing Automatic
Also, the import map assigned to a port must match the port’s format (e.g. do not assign an import map designed for delimited text files to a port formatted for XML files).
You can configure a port in the Ports table of the MDM Console (see “Ports Table” in the MDM Console Reference Guide for more information).

264 MDM Console Reference Guide
Import File Location
MDIS imports files from the Ready folder of a repository’s inbound port. The Ready folder is part of the following fixed directory structure, located beneath the Master Data Server’s distribution root directory:
root/DBMSinstance_DBMStype/RepositoryName/Inbound/
RemoteSystem/PortName/Ready
where:
• root is the distribution root directory (set in mds.ini).
• DBMSinstance is the network identifier used to specify the DBMS instance name and DBMStype is the four-character identifier for the DBMS type (i.e. MSQL, ORCL, IDB2).
• RepositoryName, RemoteSystem, and PortName are the values entered in the Code property for each item in the MDM Console.
Import files placed into a port’s Ready folder must be compatible with the port’s import map. Because a port has only one import map associated with it, you may have to create multiple ports on a repository to account for various import file types and business cases.
NOTE ►► The name of the import map assigned to a port is
displayed on the Port Detail pane of the MDM Console.
When MDIS finishes an import, it moves the import file from the Ready folder to the Archive folder. The exception to this case is if MDIS encounters a structural error in the import file. In this case, the source file is moved to the StructuralX folder (see “Error Handling” for more information about structural errors).
Port Processing
MDIS runs constantly, scanning a repository’s automatic inbound ports in the sequence defined in the Ports table of the MDM Console (see “Editing the Sequence of Inbound Ports” for more information). When it finds an import file in a port's Ready folder, it automatically imports the file using the port’s associated import map.
If there are multiple files waiting in a port, MDIS imports the files in a first in, first out order, meaning the oldest file in the port is imported first, then the next oldest, and so on. MDIS imports all of the files that were waiting in the port before it imports files from any other port (see also, “File Aggregation”).
If files are added to ports which have already been processed during the current scanning sequence (or if files are added to a port which is currently being imported from), MDIS receives a notification for each new “add” and will re-scan the affected ports at the end of the current sequence, in the order in which the notification was received.

MDM Console Reference Guide 265
After all the ports in the sequence have been scanned, MDIS waits the number of seconds defined in the Interval configuration parameter
before restarting the sequence (see “Global mdis.ini parameters” for more information about the Interval parameter).
Under certain circumstances, MDIS will not process any import files from an inbound port. These circumstances include the following:
• Port is set up for manual processing instead of automatic.
• Port is blocked due to a structural exception (see "Port Blocking" for
more information).
• Port is connected to an Import Manager or other MDIS.
File Aggregation
In certain scenarios, it may be more efficient for MDIS to import files from a port in batches rather than as individual files. For example, if you are generating large numbers of small import files (containing one or two records each), MDIS can import these files faster by processing them collectively than it could by processing each file separately.
NOTE ►► Files which contain large numbers of records are most efficiently processed as individual files. Ports likely to receive such files
should not be set up for aggregation.
The File Aggregation Count property, located on the MDM Console's Port Detail pane, instructs MDIS to import files in batches of the number specified by the property. If the number of files in a folder is ever less than the specified count, MDIS imports the files as their own batch without waiting for more files to be added.
MDIS handles exceptions found in aggregated files in the same manner it handles exceptions found in non-aggregated files (see “Error Handling” for more information).
In cases where a structural exception is found among aggregated files:
• Files already processed are moved to the Archive folder;
• The offending file is moved to the StructuralX folder;
• All files not yet processed remain in the Ready folder;
• The batch count is restarted with the remaining files;
• MDIS may block the port
Port Status
A port’s status is displayed on the Port Detail pane of the MDM Console. There are four possible values for a port’s status:
• Empty. No import files are waiting in the port’s Ready folder.
• Has Data. Import files are waiting in the port’s Ready folder.

266 MDM Console Reference Guide
• Has Exception. Files exist in the port’s ValueX or ImportX folders.
• Blocked. Files exist in the port’s StructuralX folder.
See “Exception Handling” for more information on the Has Exception
and Blocked states.
FILE FORMATS COMPATIBLE WITH MDIS
MDIS can process text (delimited or fixed width) and XML source files. In all cases, the format of the import file must match the format defined for the port to which it is added.
NOTE ►► To import XML files, MDIS requires the associated XML
schema file to be named in the port’s Detail pane in MDM Console.
NOTE ►► To import data from Access or Excel source files, you must use Import Manager instead of MDIS, or else convert the files to XML
or text (delimited or fixed width) formats.
NOTE ►► MDIS does not import records directly from import files but
first transforms them into virtual extended records and imports the transformed versions instead (see “Virtual Extended Records” for more
information).
Text Formats
MDIS supports the following text formats: ASCII, UTF8, UTF16.
In delimited text files, all records must terminate with either a line-feed (LF) or carriage-return/line feed (CR/LF), depending on which platform MDIS is running. On Windows platforms, records must terminate with CR/LF; on Unix, records must terminate with LF.
When a text file is placed in a port for importing, the file’s delimiter or column widths must match the delimiter/column width values defined for the port in the MDM Console (see “Ports Table” in the MDM Console Reference Guide for more information).
NOTE ►► To avoid problems with column name matching, using 7-bit
ASCII for all column header names is strongly recommended.

MDM Console Reference Guide 267
Simple vs. Complex XML
For processing purposes, most XML files are simple or complex. Simple XML files contain no joins between XML segments, as shown in Figure 61.
Figure 61. A simple XML file
In Figure 61, the elements <Part No>, <Manufacturer>, and
<Description> are contained entirely in the segment <Product>.
By contrast, complex XML files contain joins between independent segments of XML, as illustrated in Figure 62.
Figure 62. A complex XML file
In Figure 62, the value of the element <MAN_ID> in the segment
<Product> is populated by a join to the element <MAN_ID> in a separate segment, <Manufacturer>.
MDIS can process complex XML files on 32-bit Windows platforms only. In addition, complex XML files are not candidates for streaming import.
SOLUTIONS FOR OTHER XML FORMATS
While MDIS can, in most cases, import XML files directly into an MDM repository, some XML formats require additional preparation before MDIS can process them efficiently.

268 MDM Console Reference Guide
XML Files That Split Information Between Header and Body
Some XML formats (BMEcat XML, for example) split record information between the header and body segments of the XML file, as illustrated in Figure 63.
Figure 63. An XML file with information split among segments
Figure 63 shows an XML file containing a header and two product records. Each record is contained within its own <CATALOG_ITEM> element. However, the header, <SUPPLIER>, contains additional information which applies to both records contained in the file.
Because record information is split between the <CATALOG_ITEM> and <SUPPLIER> segments, MDIS cannot use streaming import to process the XML file. Instead, it must consume the entire file into memory, as it would a complex XML file. Since there is no common element between these segments, MDIS must also figure out the necessary joins and apply them virtually (see “Records” for more information). As with complex XML files, MDIS can only perform such processing on Windows 32 platforms. Depending on the size of the import file, this effort may be prohibitively expensive in terms of time and processing power.
The most obvious solution to this problem is to re-configure your source file’s XML schema to unite the separated data into a single XML segment. If this is not feasible, alternative solutions include:
• Pre-processing the source file using XSLT; or
• Replicating unique header information in remote systems.
Using XSLT, you can generate XML files which unite the separated data into a single XML segment. However, this solution requires mapping and transformation procedures which occur outside of MDM.

MDM Console Reference Guide 269
Another solution is replicate the header information of your XML files in separate remote systems and then map only the body contents of your XML files to fields in the repository. This solution is worth considering if you use the information in an XML file’s header to uniquely identify the information contained in the XML file’s body. The XML fragment shown in Figure 63 is an example of such a file, as the <SupplierID> value tells MDM which supplier the <Catalog_Item> information belongs to within the repository.
Using the XML fragment shown in Figure 63 as an example, executing this solution requires the following steps:
1. Create a new remote system for each unique header (<SupplierID>) value in your system.
2. Create a map for each new remote system, in which you map only the record (<CATALOG_ITEM>) fields and then hardcode the header (<SupplierID>) value corresponding to that remote system.
3. Create a new port for each remote system/map combination.
4. Route each new import file to the port corresponding to the header (<SupplierID>) value contained in the file.
Both of these solutions are supported by middleware (such as SAP’s XI) and both result in XML files which qualify for streaming import on all supported platforms.
SAP R/3 MATMAS XML Files
Users trying to import MATMAS XML files into an MDM repository may face performance issues when the XML file contains multiple materials.
To solve these issues, the original Material message can be split into five separate XML files, one file for the main import of material information and one file for each of the four qualified lookup fields of the repository. Maps, .XSD files, and ports for handling these additional files are included in the new Materials template repository.
See “Setting Up Material Message Split” in the MDM 5.5 SP06 IT Scenario Configuration Guide for more information about this solution.
VIRTUAL EXTENDED RECORDS
In most cases, MDIS does not import records directly from source files. Instead, it imports a transformed version of the original record called the virtual extended record. This transformation is part of the overall process through which source data is imported into an MDM repository.
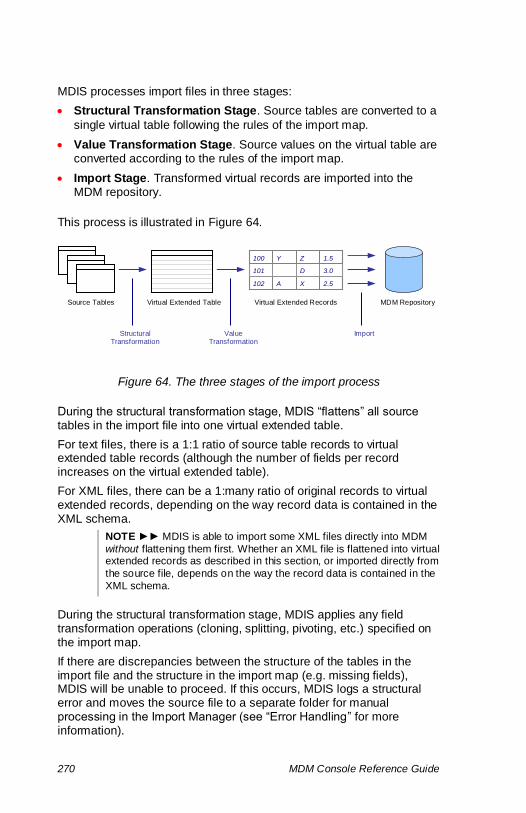
270 MDM Console Reference Guide
MDIS processes import files in three stages:
• Structural Transformation Stage. Source tables are converted to a
single virtual table following the rules of the import map.
• Value Transformation Stage. Source values on the virtual table are converted according to the rules of the import map.
• Import Stage. Transformed virtual records are imported into the MDM repository.
This process is illustrated in Figure 64.
Figure 64. The three stages of the import process
During the structural transformation stage, MDIS “flattens” all source tables in the import file into one virtual extended table.
For text files, there is a 1:1 ratio of source table records to virtual extended table records (although the number of fields per record increases on the virtual extended table).
For XML files, there can be a 1:many ratio of original records to virtual extended records, depending on the way record data is contained in the XML schema.
NOTE ►► MDIS is able to import some XML files directly into MDM
without flattening them first. Whether an XML file is flattened into virtual extended records as described in this section, or imported directly from
the source file, depends on the way the record data is contained in the
XML schema.
During the structural transformation stage, MDIS applies any field transformation operations (cloning, splitting, pivoting, etc.) specified on the import map.
If there are discrepancies between the structure of the tables in the import file and the structure in the import map (e.g. missing fields), MDIS will be unable to proceed. If this occurs, MDIS logs a structural error and moves the source file to a separate folder for manual processing in the Import Manager (see “Error Handling” for more information).
Source Tables Virtual Extended Table
2.5 X A 102
3.0 D 101
1.5 Z Y 100
Virtual Extended Records MDM Repository
Structural Transformation
Value Transformation
Import

MDM Console Reference Guide 271
In the value transformation stage, all transformations (e.g. value mappings, conversions) occur on the records of the virtual extended table, not on the original source records. If MDIS encounters a problem at this stage, it sets aside the virtual extended record containing the error for later manual processing in the Import Manager.
Once all transformations are complete, the virtual extended records are sent from MDIS to the Master Data Server for import into the MDM repository. If any exceptions occur during this import stage, the “problem” virtual extended record is set aside for later manual processing in the Import Manager.

272 MDM Console Reference Guide
Using MDIS
MDIS works with the Master Data Server to import data automatically into existing MDM repositories.
Before you begin using MDIS, you need to be sure that both MDIS and the Master Data Server are running and that the target MDM repositories are started and running.
MDIS CHECKLIST
MDIS is designed for automation. Under normal circumstances, no user intervention is required to import data from a source file into an MDM repository. In order to reach this state of automation, you must first complete the following steps:
1. Use Import Manager to create an import map for the source file.
2. Use MDM Console to create and configure an automatic inbound port on the target MDM repository, and to enter the user name and password for MDIS to use when connecting to the target repository.
3. Make sure that MDIS has been started and that the target repository is started and running.
Once these preliminary steps are complete, the import process consists of the following steps:
1. Put the source file(s) to import into the port’s Ready folder.
2. MDIS picks up the source file and processes it, along with any other files in the folder, according to the MDIS Chunk Size and port File Aggregation Count settings.
NOTE ►► The port is locked during MDIS processing.
3. MDIS sends processed chunks to the Master Data Server for importing.
4. From each chunk, the Master Data Server imports the number of records defined for the Master Data Server’s Import Slice configuration parameter.
NOTE ►► The Master Data Server is locked during record import.
5. MDIS finishes processing the import job on the current port and waits for the next import job to appear on a port.
6. If any exceptions were found, you can use the Import Manager to fix them (see “Exception Handling” for more information).

MDM Console Reference Guide 273
MONITORING IMPORT STATUS FROM THE MDM CONSOLE
MDIS logs the progress and results of each import job it undertakes. These log entries detail each step of the import process and can be monitored from the repository’s Reports table in the MDM Console.
Selecting an Import report in the Reports table displays the report in the Report Detail pane, shown in Figure 65.
Figure 65. Import Report on MDM Console
NOTE ►► The Verbose parameter in the MDIS configuration file
controls how much troubleshooting information is included in the Import log (see “Enabling Tracing and Audit Trails in the Import Log”
for more information).

274 MDM Console Reference Guide
Exception Handling
In an ideal world, all import files would be free of errors. In the real world, however, inconsistencies in file structures and data values can and do occur. Rather than halt the import process entirely when such errors are encountered, MDIS includes a smart exception-handling mechanism which enables it to set aside “problem cases” and continue importing records and files. These problem cases can then be reviewed manually in the Import Manager.
WHAT HAPPENS WHEN EXCEPTIONS OCCUR?
When MDIS encounters an exception, it handles the exception according to its type.
Structural Exceptions
Structural exceptions prevent MDIS from processing any import records in an import file. When a structural exception is found, MDIS moves the
offending import file from the port’s Ready folder to the port’s StructuralX folder. No importing occurs and the port is blocked until the problem is resolved (see “Port Blocking” for more information).
Value and Import Exceptions
Value and import exceptions prevent MDIS from importing a specific record. When such exceptions are encountered, an exception file for the
offending records is copied to the ValueX or ImportX folder, respectively. MDIS then continues processing the import file and all other, non-exceptional records are imported as normal.
NOTE ►► MDIS only logs the first exception it encounters in a record.
Port Blocking
Any port containing a structural exception is blocked by default from any further import activity. Blocked ports are skipped by MDIS and their
names are grayed out in the Port list on the Import Manager’s Connect
to Source dialog. When the structural exception is fixed, the Import Manager unblocks the port and processing resumes as normal (see “How Do You Fix Exceptions?” for more information).
To turn off automatic port blocking, set the port's Block on Structural Exceptions property to No in the Port Detail pane on the MDM Console.
NOTE ►► Turning off automatic port blocking is strongly discouraged because the underlying cause of the structural exception may impact
all import files processed from the port, in which case the exception will
have to be fixed on multiple import files instead of just one.

MDM Console Reference Guide 275
EXCEPTION FOLDERS
Exception files are placed in folders according to their type (ImportX, StructuralX, or ValueX). All exception folders belong to the fixed port directory structure illustrated in Figure 66.
Figure 66. The Exception folder directory structure
A log file in the parent Exception folder points to exception files set aside during a particular import. The StructuralX folder contains the original source files placed in the port’s Ready folder. The ImportX and ValueX folders contain the original source records in which an import or value exception was found.
HOW DO YOU “FIX” EXCEPTIONS?
Exceptions must be fixed manually in the Import Manager before the offending file or record can be imported.
To fix an exception found by MDIS:
1. Open the Import Manager and connect to the MDM repository
containing the port where the exception was found.
2. When the Connect to Source dialog appears, choose the source type
Port and select the appropriate remote system from the drop-down list.
3. In the Port drop-down list, select PortName [Exception] where
PortName is the name of the port containing the exception.
4. The Import Manager loads the first exception file waiting on the port. If
it is a structural exception, the original import file opens. If it is a value or import exception, the original source record containing the exception
opens.
5. Fix the exception according to the Action Items section of the Import
Status tab and save the corrected map.
6. To fix any other exceptions waiting on the port, choose File > Get Next
Source File from the main menu.

276 MDM Console Reference Guide
MDIS Configuration
You can customize MDIS settings from the mdis.ini file, which is located
in the usr\sap\<SAPSID>\<instance_name>\config directory.
The mdis.ini file is split into multiple parts: a top [GLOBAL] section and then a separate section for each MDM repository that has been started on the associated Master Data Server.
The [GLOBAL] section lists configuration parameters which are global and affect MDIS behavior across all repositories.
Each repository section lists configuration parameters which are specific to that repository only and override the settings in the [GLOBAL] section.
For each section, the mdis.ini file includes a default set of standard parameters. In addition to the standard parameters, you can enter optional parameters directly into the mdis.ini file.
All parameters are case-sensitive and there should be no spaces before or after the equal sign (=) which separates a parameter from its setting. Not all settings must have values, however.
GLOBAL MDIS.INI PARAMETERS
The first section of the mdis.ini file is the [GLOBAL] section. All parameters for this section appear under the following line:
[[GLOBAL]]
The standard and optional [GLOBAL] parameters for the mdis.ini file are described in Table 73.
NOTE ►► By default, many of the settings are not populated until
MDIS is started for the first time.
NOTE ►► For more information about entering configuration file
parameters, see “Master Data Server Parameters”.

MDM Console Reference Guide 277
Table 73. Global MDIS Configuration Parameters
Name Description
Version String. The MDM Service Pack version.
Server String. The name or IP address of the Master Data Server on which the target repositories reside.
Interval Integer. The number of seconds MDIS waits after scanning ports before restarting scanning.
Verbose1
Hexadecimal. A troubleshooting parameter used to create tracing and audit trails for an import task in the Master Data Server log. Default is 0x0000.
▪ Verbose OFF: 0x0000 ▪ Verbose ON: 0xFFFF
▪ FI Verbose: 0x0001 ▪ XML Verbose: 0x0002
▪ MAP Verbose: 0x0004 ▪ THRD Verbose: 0x0008
▪ PARSER Verbose: 0x0010 ▪ STRUCTX Verbose: 0x0020
▪ VALUEX Verbose: 0x0040 ▪ IMPORTX Verbose: 0x0080
▪ CHUNK Verbose: 0x0100 ▪ VxR Verbose: 0x0200
MapScanTopToBottom Not used in this version of MDM.
String Resource Dir
For descriptions of these parameters, see their MDS equivalents in Table 65 and Table 66.
Log Dir
Wily Instrumentation
Wily Instrumentation Level
Threshold
SLD Registration
Listening Mode
SSL Lib Path
SSL Key Path
LogViewer Format Loggging
LogViewer Format Tracing
Max Number of Log Files2
MDM Log Watermark2
Enable Performance Tracing
For descriptions of these parameters, see “Configuration File Parameters for Performance Tracing” .
Performance Tracing
Watermark
Performance Tracing Max
Number Of Log Files
Filter Threshold Msec

278 MDM Console Reference Guide
Name Description
Tracing Level
Number. The default “minimum” level of trace messages to be logged by MDS components. Valid
values are 0 (debug), 1 (flow), 2 (info), 3 (warning), 4 (error). May be overidden by values set in the MDM Console’s Trace Settings dialog. The default
value is 3.
1 See Troubleshooting section for detailed setting descriptions. 2 Optional parameter. User must enter entire parameter manually into the mdis.ini file.
REPOSITORY-SPECIFIC MDIS.INI PARAMETERS
Below the [GLOBAL] parameters in the mdis.ini file are the repository-specific parameters. Parameters for a specific repository do not appear in the mdis.ini file until MDIS starts an import to that repository. Then, the repository’s parameters appear under the line:
[MDM Server\Databases\RepositoryInfo]
where RepositoryInfo is a concatenation of the repository name, the
DBMS identifier, and the DBMS type. Repository sections appear in the
mdis.ini file in the order in which each repository was first started.
NOTE ►► By default, many of the settings are not populated until
MDIS is started for the first time.
NOTE ►► For more information about entering configuration file
parameters, see “Master Data Server Parameters”.
Table 74. Repository-Specific MDIS Configuration Parameters
Name Description
Login
String. The login used by MDIS to access the MDM repository. Value copied from the corresponding property in MDM Console
PasswordE
String. An encrypted version of the password used by MDIS to access the MDM repository. Value is encrypted from the Password property value entered in MDM
Console. Do not modify this parameter manually.
Chunk Size Number. How many records to process at a time during streaming import. Default is 5000.
No. of Chunks Processed
In Parallel
Number. The number of chunks processed simultaneously during streaming import. Default is 40.
Force Flattening1
True/False. In most cases, record flattening slows down import performance, so MDIS automatically analyzes files to determine whether flattening should occur. For certain repository types, however, it may be better to
override the automatic determination and always f latten.
Inter-Chunk Delay MS1
Integer. The number of milliseconds MDIS waits between processing chunks of records to allow other clients access to MDS.
1 Optional parameter. User must enter entire parameter manually into the mdis.ini file.

MDM Console Reference Guide 279
SSL-RELATED MDIS.INI PARAMETERS
MDIS can be configured to accept and send encrypted communications via SSL (for more information about setting up SSL for MDM, see the MDM 7.1 Security Guide).
The following parameters are required for accepting incoming encrypted connections, and must appear in the mdis.ini file under the line:
[GLOBAL]
Table 75. MDIS Configuration Parameters for Inbound SSL Connections
Name Description
Listening Mode Unencrypted/SSL/Both. Whether the server accepts unencrypted, encrypted, or both types of connections.
SSL Lib Path String. The directory path for the location where the server’s sapcrypto.dll file is stored.
SSL Key Path String. The directory path for the location where the server’s SAPSSL.PSE file is stored.
Parameters required to connect MDIS to an SSL-enabled Master Data Server must appear in the mdis.ini file under the line:
[MDM Server\Remote Server\<MDSHOST>:portNumber]
where <MDSHOST> is the name of the machine on which the MDS is
installed and portNumber is the listening port for the specified MDS
(for example, myhost:59951).
NOTE ►► The <MDSHOST>:portNumber value in the Remote
Server heading must exactly match the Server value located under
the [GLOBAL] heading in the auxiliary server’s.ini file.
Table 76. MDIS Configuration Parameters for Outbound SSL Connections
Name Description
Service Control Security
Enabled
Options are True or False. Must always be False on
UNIX landscape.
SSL Enabled Specifies if the server connects to MDS on an
unencrypted or SSL port. Options are True or False.
For the server to establish a secure connection to MDS, this parameter must be set to True.
SSL Lib Path The path to the auxiliary server‘s SSL Library file.
SSL Key Path The path to the auxiliary server‘s CLIENT.PSE file
NOTE ►► For more information about entering configuration file
parameters, see “Master Data Server Parameters”.
NOTE ►► Parameters may have to be entered manually.

280 MDM Console Reference Guide
If SSL is not enabled on the Master Data Server, ensure that SSL
Enabled is set to False and that the SSL Key Path is empty.
CONFIGURING MDIS FROM MDM CONSOLE
You can configure some repository-specific MDIS parameters from the MDIS-specific Repository Detail pane. Properties displayed on the Repository pane are described below.
Table 77. MDIS-Specific Repository Properties
Name Description
Name The name of the MDM repository.
DBMS Server The name of the DBMS Server on which the repository is stored.
DBMS Type The brand of DBMS on which the repository is stored.
User The user name MDIS uses to access the MDM repository.
Password The password MDIS uses to access the MDM repository.
NOTE ►► Password values entered in MDM Console are encrypted
and the encrypted version of the password is stored in the PasswordE
parameter in mdis.ini. When you save the new value, MDM updates
the encrypted password in mdis.ini automatically. MDIS uses the new
password value the next time it tries to connect to the repository.
To edit MDIS-specific repository properties from MDM Console:
1. In the Console Hierarchy tree, expand the Auxiliary Servers branch
and select the MDIS node.
2. In the Repositories pane, select the repository you want to edit.
3. In the Repository Detail pane, edit the properties.
4. To save the changes, press Shift+Enter.
NOTE ►► Read-only properties are grayed-out.

MDM Console Reference Guide 281
OPTIMIZING MDIS PERFORMANCE
The Chunk Size and No. of Chunks Processed In Parallel parameters in
mdis.ini help optimize MDIS performance and reduce import times.
The Chunk Size parameter defines the number of virtual extended records to include in a chunk. Typically, the smaller the chunk size the better, as smaller chunks can be processed faster within MDIS and also require less wait time in transactions between MDIS and the Master Data Server. However, setting the chunk size too low can reduce overall performance because there is a fixed overhead per chunk.
The No. of Chunks Processed in Parallel parameter optimizes the way chunks are processed within MDIS. Rather than wait for one chunk to pass through all three processing stages before starting work on the next chunk, MDIS instead moves chunks from stage to stage as each chunk is processed (see “Virtual Extended Records” for more information the processing stages within MDIS). This parameter determines how many chunks MDIS can manage simultaneously, counting one chunk per stage plus chunks queued between stages.
Recommend settings for these parameters are summarized in Table 78.
Table 78. Recommended Settings for Optimal MDIS Performance
Parameter Recommended Value
Chunk Size
50,000
▪ Tweak this value slowly, as the larger the chunk
size, the more memory is consumed by MDIS.
No. of Chunks Processed In Parallel
5 -10
▪ Optimal setting depends on the available
memory and processing power of the machine running MDIS.
▪ Minimum requirements = 4 GB available memory and dual-core processor. Increase value from
5 to 10 in proportion to actual system specifications.
Other tips for optimizing MDIS performance include:
• Using file aggregation when importing large numbers of small files.
• Installing MDIS separately from the Import Manager or MDS.
• Not running any other import, syndication, archive, or data editing operations while a mass import is occurring, as each of these operations locks use of the repository from all other operations.
NOTE ►► Using file aggregation to import files containing more than
just a few records each can actually decrease overall performance due
to the memory required to process large numbers of records.

282 MDM Console Reference Guide
Troubleshooting
This section offers suggestions for solving problems which may be experienced when importing data using MDIS. Be sure to consult it before contacting SAP technical support.
IMPORT FILES ARE NOT BEING PROCESSED BY MDIS
If you notice that source files are not being imported into an MDM repository, the problem likely stems from one or more of the following causes:
• Server or repository status
• Port problems
• MDIS configuration errors
• Source file problems
Checking Server and Repository Status
Before doing anything else, check the following:
• Are both the Master Data Server and MDIS started?
• Is the target MDM repository started?
You can check the status of the Master Data Server (MDS), MDIS, and the target repository from MDM Console. If the servers are not running or the repository is not started, no imports can occur.
Checking for Port Problems
If the servers and repository are started and running, check the port’s Detail pane in MDM Console:
• Is the port type Inbound?
• Is the port’s Processing property set to Automatic?
• What is the port’s status?
MDIS works exclusively on inbound, automatic ports. If the port is set up for outbound or manual processing, MDIS will not process files contained in the port.
If a port’s status is Empty, then no import file is present in the port’s Ready folder (See “Import File Location” for the proper file location).
If the port’s status is Blocked, it means that MDIS attempted to import a file from the port’s Ready folder and encountered a structural exception (see “Port Blocking” for more information). You must fix this exception before MDIS will process any additional files from the port.

MDM Console Reference Guide 283
Checking MDIS Configuration Settings
If the previous steps do not fix the problem, it could be that MDIS cannot
connect to the MDM repository with the User and Password values
provided for it on MDM Console.
MDIS must be able to connect to an MDM repository in order to send
imported records to it. The User and Password values MDIS uses to connect to each repository on a Master Data Server are set in the Repository Detail pane, which can be found by selecting the MDIS node located below the Auxiliary Servers node in the Console Hierarchy tree. If MDM cannot match these credentials to a valid user for the repository, MDIS will not be able to import files to that repository.
You can check for credential errors by opening the MDIS log file, which
is located in the Logs subdirectory of the MDIS installation directory. If the user and password combination are incorrect, an “invalid logon credentials” error will appear in the MDIS log. An “invalid logon credentials” log entry is shown in Figure 67 below.
Figure 67. An invalid login credentials entry in the MDIS log file
Checking for Source File Problems (Structural Exceptions)
If everything seems to be configured correctly, it is possible that a problem with a source file resulted in a structural exception that is blocking the port.
Common causes of structural exceptions include (but are not limited to):
• Mismatch between source file format and port format
• Source XML file requires pre-processing
• Attempted import of incomplete source file
A port’s format is shown in the MDM Console’s Port Detail pane. Any import file in the port’s Ready folder which does not match the port format will cause a structural exception on that port when MDIS attempts to import the file.
In some cases, an XML file may require pre-processing before MDIS can import it (see “File Formats Compatible With MDIS” and “Solutions for Other XML Formats” for more information).
284 MDM Console Reference Guide
Checking for Source File Problems (Incomplete Files)
Be careful when transferring large files to a port’s Ready folder, as MDIS may attempt to import the file before the transfer is complete, which can lead to the following consequences:
• If the file has zero length, MDIS moves it to the Archive folder and adds a warning to the MDIS log. MDIS then continues importing from the port.
• If the file has white space only or is otherwise incomplete, MDIS treats it as having a structural exception and stops importing files from that port.
To prevent this from occurring, try:
• Copying import files first to a temporary folder on the server running MDIS, and then moving the local copy to the Ready folder. This can dramatically reduce transfer time to the Ready folder, limiting the possibility of MDIS importing an incomplete file.
• Using a temporary extension (.tmp or .xml_) for incomplete files in the Ready folder. MDIS will not attempt to import files with these extensions. Then, rename the files with their normal extensions after the transfer is complete.
PORT HAS EXCEPTIONS
MDIS includes a smart exception-handling mechanism which enables it to set aside “problem cases” when importing records and files (see “Exception Handling” for more information). When such a problem case
is discovered, the status of the port is updated to “Blocked” or “Has
Exceptions” in the MDM Console, depending on the severity of the problem.
To learn how to fix exceptions reported on a port, see “How Do You “Fix” Exceptions?”.
SOURCE FIELDS OR VALUES NOT BEING IMPORTED
Some import files may contain fields and data values that were not present in the source file used to create the import map.
Any new or unmapped fields found in an import table will be ignored by MDIS. To import data from these fields, add the fields to the import map by connecting the Import Manager to the new source file and mapping the new source fields to destination fields.
New values found in previously mapped fields are handled according to
the settings of the Default MDIS Handling configuration options in the port’s associated import map (Se the Import Manager Reference Guide for more information).

MDM Console Reference Guide 285
Generally, if you suspect that fields and/or values are not being imported, it is a good idea to open the source file in the Import Manager using the port’s assigned map. Then, go to the Import Status tab and
look at the Action Items section. If it says anything other than, “Ready to Import “, follow the instructions given in order to make the map compatible with the data in the source file.
SOURCE FILE IS TOO LARGE TO OPEN IN IMPORT MANAGER
Import maps must be created in the Import Manager before an import file can be processed by MDIS. However, it is possible that a source file can be too large to be opened in the Import Manager. In this case, create a new source file using a sample (5% - 10%) of the original file records. Connect the Import Manager to this smaller file and use it to create the import map for the larger file.
Once the map is complete, use MDIS to import the original (large) file.
ENABLING TRACING AND AUDIT TRAILS IN THE IMPORT LOG
The Verbose parameter in the mdis.ini file controls how much information is included in the Import log (see “MDIS Configuration” for
more information about the mdis.ini file).
Settings for the Verbose parameter in are described in Table 79.
Table 79. Verbose Parameter Settings
Setting Hexadecimal Description
Verbose OFF 0x0000 Turns off all verbose settings
Verbose ON 0xFFFF Turns on all verbose settings
FI Verbose 0x0001 Adds verbose field information
XML Verbose 0x0002 Adds verbose XML processing information
MAP Verbose 0x0004 Adds verbose field mapping information
THRD Verbose 0x0008 Turns on STRUCTX, VALUEX, and IMPORTX settings
PARSER Verbose 0x0010 Adds XML/text parser audit trail
STRUCTX Verbose 0x0020 Adds structural exception thread audit trail
VALUEX Verbose 0x0040 Adds value exception thread audit trail
IMPORTX Verbose 0x0080 Adds import exception thread audit trail
CHUNK Verbose 0x0100 Adds chunk processing audit trail
VxR Verbose 0x0020 Adds virtual extended record audit trail


287
PART 9: MDSS ADMINISTRATION
This part of the reference guide contains a description of the Master Data Syndication Server. The Syndication Server is a separate MDM application which enables you to automate the syndication process using syndication maps created in Syndicator.


MDM Console Reference Guide 289
The Master Data Syndication Server
The Master Data Syndication Server (MDSS) automates the task of syndicating master data from MDM repositories. It is designed to reduce the processing complexity, resource requirements, and opportunity for user error common to data export tasks, while at the same time ensuring that the most up-to-date versions of your master data are available to systems throughout your organization.
In addition, significant deployment and scalability benefits can also be gained by offloading syndications from the computer running Syndicator to a machine running MDSS.
Driving these benefits are the following key features of MDSS:
• Port-driven. Simply create an outbound repository port and MDSS keeps it populated with the freshest master data.
• Map-based. Each syndication is performed according to the pre-defined syndication map associated with the outbound port.
• Scheduling-enabled. Syndication to each port can occur at the
frequency that works best for you.
MDSS VS. SYNDICATOR
Both MDSS and Syndicator can syndicate records from an MDM repository. However, each has unique capabilities that distinguish it from the other.
The strength of Syndicator is its interactive map-making capabilities. Through its connection to the source MDM repository, you have full awareness of the tables, records, fields, and attributes available for syndication. You can then use Syndicator to customize repository data for syndication to specific remote systems and save this customization to maps for later re-use. Syndicator can also syndicate records “on-demand” to any outbound port on a repository or to any location on your file system.
The strength of MDSS, by contrast, is automation. MDSS requires no user intervention to syndicate records from an MDM repository. Instead, it relies on maps created previously with Syndicator to syndicate records to outbound MDM ports. Syndications are executed 24 hours a day, seven days a week, until either MDSS or MDS are stopped. Alternatively, syndications to ports can be scheduled to occur at desired frequencies.
These conceptual differences between Syndicator and MDSS are summarized in Table 80.

290 MDM Console Reference Guide
Table 80. Conceptual Differences Between Syndicator and MDSS
Concept Syndicator MDSS
Mapmaking Yes No
Syndication execution Manual Automatic
Syndication frequency On-demand Continuous or scheduled
Syndication file location Anywhere Outbound MDM port
PORTS AND MDSS
MDSS can generate syndication files automatically to outbound ports on MDM repositories.
To set up automatic syndications to a port, the port must meet the requirements specified on Table 81.
Table 81. Port Requirements for Automated MDSS Processing
Property Value
Type Outbound
Processing Type Automatic1
Map Name of the syndication map to use with the port
1 For automated Workflow and Java API syndications, set to Manual.
Syndication File Location
When MDSS completes a syndication to a port, it places the syndication file in the port’s Ready folder. The Ready folder is part of the following fixed directory structure, located beneath the Master Data Server’s distribution root directory:
root/DBMSinstance_DBMStype/RepositoryName/Outbound/
RemoteSystem/PortName/Ready
where:
• root is the distribution root directory (set in mds.ini).
• DBMSinstance is the network identifier used to specify the DBMS instance name and DBMStype is the four-character identifier for the DBMS type (i.e. MSQL, ORCL, IDB2).
• RepositoryName, RemoteSystem, and PortName are the values
entered in the Code property for each item in MDM Console.
Because a port can have only one syndication map associated with it, you must create multiple ports on a repository in order for MDSS to syndicate from multiple syndication maps.

MDM Console Reference Guide 291
Multi-Threaded Port Processing
MDSS has been redesigned in MDM 7.1 to improve performance by reducing port-processing delays. MDSS now assigns up to three port-processing tasks to every remote system on a Master Data Server. Each task is dedicated to a specific type of port on the remote system, as described below and summarized in Table 82.
Table 82. Ports Processed by Each MDSS Task Type
Task Type Port Processing Type Port Processing Interval
Automated Automatic Continuous
Scheduled Automatic Hourly; Daily; or Weekly
Manual Manual N/A
NOTE ►► MDSS does not assign a task to a remote system if there
are no corresponding ports for that task type on that remote system.
The Automated task syndicates only to Automatic|Continuous ports. It works in a continuous loop by syndicating to each continuous port on a remote system, on a repository-by-repository basis. After it finishes syndicating to all of a repository’s ports, the Automated task waits the number of seconds specified in that repository’s MDSS Auto
Syndication Task Delay property before continuing.
The Scheduled task syndicates only to Automatic ports with Hourly;
Daily; or Weekly values in their Port Processing Interval properties. Instead of looping, it “sleeps” until a syndication time is due for a port.
NOTE ►► A port’s processing interval and next syndication date and
time are configured on the Port Detail pane of MDM Console (see
“Scheduling Syndications to a Port” for more information).
The Manual task syndicates only to Manual ports which have syndication job requests from a Workflow or API waiting on them. It works in a continuous loop, scanning each Manual port on a remote system for syndication requests to fulfill. Like the Automated task, it works on a repository-by-repository basis. After it finishes syndicating all of a repository’s manual jobs, the Manual task waits the number of seconds specified in that repository’s MDSS Manual Syndication
Task Delay property before continuing.
NOTE ►► If more than one syndication request is waiting on a port,
MDSS fulfills all requests on that port before it resumes scanning.
NOTE ►► See “MDSS Configuration” for more information about the
Auto Syndication Task Delay and Manual Syndication Task
Delay properties.

292 MDM Console Reference Guide
Using MDSS
MDSS can be installed on any machine on a network. It works with the Master Data Server to syndicate data automatically from existing MDM repositories. If MDSS and its associated Master Data Server are installed on the same machine, no further customization needs to be done. If the Master Data Server is located on a separate machine from MDSS, you will need to specify the Master Data Server in the MDSS
settings file, mdss.ini (see “MDSS Configuration” for more information).
Before you begin using MDSS, you need to be sure that both it and the Master Data Server are running and that the source MDM repository is started and running. Directions for these tasks can be found in the MDM Console Reference Guide.
MDSS CHECKLIST
MDSS is designed for automation. Under normal circumstances, no user intervention is required to syndicate data from an MDM repository. In order to reach this state of automation, you must first complete the following steps:
1. Use Syndicator to create a syndication map.
2. Use MDM Console to create an outbound port on the source MDM repository.
3. Associate the syndication map with the port.
4. For automatic ports, set the port’s processing interval and next syndication date/time, as appropriate.
Once these preliminary steps are complete, the syndication process consists of the following steps:
1. MDSS finds the outbound port during its scans of MDS ports.
2. If the port is automatic, MDSS checks the port’s processing interval and, if applicable, its next scheduled syndication date/time. If a syndication is due, MDSS executes the syndication according to the syndication map associated with the port.
If the port is manual, MDSS checks to see if there is a Workflow or Java API request for syndication waiting on the port. If there is, MDSS executes the syndication according to the syndication map associated with the port.
3. MDSS puts the completed syndication file into the port’s Ready folder, schedules the next syndication date and time (if applicable), and searches for the next outbound port.
4. Import the syndication file into your target remote system as usual.

MDM Console Reference Guide 293
SCHEDULING SYNDICATIONS TO A PORT
Using an automatic port’s Processing Interval, Next Syndication Date,
and Next Syndication Time properties, you can schedule syndications to the port on a weekly, daily, hourly, or continuous basis as described in this section.
To schedule syndications to a port:
1. On MDM Console, select an outbound port from a repository’s Ports
table.
2. In the Port Detail pane, make sure that the port’s Processing property
is set to Automatic
3. Select a value from the Processing Interval drop-down list.
4. If you selected a value other than Continuous, enter values for the
Next Syndication Date and Next Syndication Time properties, as
shown in Figure 68.
Figure 68. Scheduling the port’s next syndication date and time
5. Press Shift+Enter to save the port changes.
6. Each time MDSS scans the port, it checks whether a syndication is
due. If the port’s Processing Interval property is set to Continuous or if its Next Syndication Date and Next Syndication Time properties have
passed, a syndication is executed. If not, MDSS continues scanning.
7. After an hourly, daily, or weekly syndication is completed, MDM
automatically updates the Next Syndication Date and Next Syndication
Time values to the next hour/day/week, as applicable.
NOTE ►► If a scheduled syndication does not occur at the time specified on the Port Detail pane, it will be executed as soon as MDSS
scans the “late” port. See “Scheduled Syndications Are Not Executed
On Time” for more information.

294 MDM Console Reference Guide
MONITORING SYNDICATION STATUS FROM MDM CONSOLE
The progress and results of all syndications processed by MDSS can be
monitored from MDM Console by selecting an Export report from a repository’s Reports table. The report is displayed in MDM Console’s Report Detail pane, as shown in Figure 69 below.
Figure 69. Report Detail pane on MDM Console

MDM Console Reference Guide 295
MDSS Configuration
You can customize MDSS settings from the mdss.ini file, which is
located in the usr\sap\<SAPSID>\<instance_name>\config directory.
The mdss.ini file is split into multiple parts: a top [GLOBAL] section and then a separate section for each MDM repository that has been started on the associated Master Data Server.
The [GLOBAL] section lists configuration parameters which are global and affect MDSS behavior across all repositories.
Each repository section lists configuration parameters which are specific to that repository only and override the settings in the [GLOBAL] section.
For each section, the mdss.ini file includes a default set of standard parameters. In addition to the standard parameters, you can enter optional parameters directly into the mdis.ini file.
All parameters are case-sensitive and there should be no spaces before or after the equal sign (=) which separates a parameter from its setting. Not all settings must have values, however.
The standard and custom parameters available for MDSS are described in the following sections.
NOTE ►► By default, many of the settings are not populated until
MDSS is started for the first time.
NOTE ►► For more information about entering configuration file
parameters, see “Master Data Server Parameters”.
GLOBAL MDSS.INI PARAMETERS
The first section of the mdss.ini file is the [GLOBAL] section. All parameters for this section appear under the following line:
[[GLOBAL]]
The standard and optional [GLOBAL] parameters for the mdss.ini file are described in Table 83.

296 MDM Console Reference Guide
Table 83. Global MDSS Configuration Parameters
Name Description
MDM Server Name String. The name of the associated Master Data Server.
String Resource Dir
For descriptions of these parameters, see their MDS equivalents in Table 65 and Table 66.
Log Dir
Default Interface Language
Code
Default Interface
Country Code
SLD Registration
Wily Instrumentation
SSL Lib Path
SSL Key Path
Wily Instrumentation Level
Threshold
LogViewer Format Loggging
LogViewer Format Tracing
Max Number of Log Files1
MDM Log Watermark1
Tracing Level
Number. The default “minimum” level of trace messages to be logged by MDS components. Valid
values are 0 (debug), 1 (flow), 2 (info), 3 (warning), 4 (error). May be overridden by values set in the MDM Console’s Trace Settings dialog. The default
value is 3.
Auto Syndication
Task Enabled True/False. Whether MDSS's automatic syndication task is enabled for all repositories.
Auto Syndication
Task Delay (seconds)
Integer. The number of seconds MDSS’s automatic syndication task waits after syndicating to all ports
associated with a repository. Value copied from the corresponding property in MDM Console.
Listening Mode See “SSL-Related mdis.ini Parameters” for more information about these and other SSL-related mdss.ini parameters.
SSL Lib Path
SSL Key Path
Enable Performance Tracing
For descriptions of these parameters, see “Configuration File Parameters for Performance Tracing”.
Performance Tracing
Watermark
Performance Tracing Max
Number Of Log Files
Filter Threshold Msec
Max Failed Syndication
Reports Per Port The number of failed syndication reports per port to store in the MDSS Log folder. 0 =no limit.
1 Optional parameter. User must enter entire parameter manually into the mdis.ini file.

MDM Console Reference Guide 297
REPOSITORY-SPECIFIC MDSS.INI PARAMETERS
Below the [GLOBAL] parameters in the mdss.ini file are the repository-specific parameters. Parameters for a specific repository do not appear in the mdss.ini file until that repository is started on the Master Data Server. Then, the repository’s parameters appear under the line:
[MDM Server\Databases\RepositoryInfo]
where RepositoryInfo is a concatenation of the repository name, the
DBMS identifier, and the DBMS type.
NOTE ►► Repository sections appear in the mdss.ini file in the order
in which each repository was first started.
Table 84. Repository-Specific MDSS Configuration Parameters
Name Description
User
String. The login used by MDSS to access the MDM repository. Value copied from the corresponding property in MDM Console.
PasswordE
String. An encrypted version of the password used by MDSS to access the MDM repository. Value encrypted
from the corresponding property in MDM Console.
Auto Syndication
Task Delay (seconds)
Integer. The number of seconds MDSS’s automatic syndication task waits after syndicating to all ports
associated with the repository. Value copied from the corresponding property in MDM Console.
Manual Syndication
Task Delay (seconds)
Integer. The number of seconds MDSS’s manual syndication task waits after syndicating all requests from ports associated with the repository. Value copied from
the corresponding property in MDM Console.
SSL-RELATED MDSS.INI PARAMETERS
For information about configuring MDSS for SSL, see “SSL-Related mdis.ini Parameters”, as the same information applies to all MDM auxiliary servers.
CONFIGURING MDSS FROM MDM CONSOLE
Configuration of some MDSS parameters can be performed from the MDSS-specific Repository Detail pane in MDM Console.

298 MDM Console Reference Guide
Figure 70. The MDSS-specific Report Detail pane
Properties displayed on the Repository pane are described in Table 85.
Table 85. MDSS-Specific Repository Properties
Name Description
Name The name of the MDM repository.
DBMS Server The name of the DBMS Server on which the repository is stored.
DBMS Type The brand of DBMS on which the repository is stored.
User The user name MDSS uses to access the MDM repository.
Password The password MDSS uses to access the MDM repository.
Auto Syndication
Task Delay (seconds)
Integer. The number of seconds MDSS’s manual syndication task waits after syndicating all requests from
ports associated with the repository. Default is 0.
Manual Syndication Task Delay (seconds)
Integer. The number of seconds MDSS’s manual syndication task waits after syndicating all requests from ports associated with the repository. Default is 0.
To edit MDSS-specific repository properties from MDM Console:
1. In the Console Hierarchy tree, expand the Auxiliary Servers branch
and select the MDSS node.
2. In the Repositories pane, select the repository whose properties you
want to edit.
3. In the Repository Detail pane, edit the properties.
4. To save the changes, press Shift+Enter.
NOTE ►► Read-only properties are grayed-out.

MDM Console Reference Guide 299
NOTE ►► MDM encrypts the password value for storage in mdss.ini.
NOTE ►► To reset a property to its default value, tick the Inherited
checkbox for that property and press Shift+Enter.
To edit default repository property values from MDM Console:
1. In the Console Hierarchy tree, select the Auxiliary Servers node.
2. In the MDM Auxiliary Servers pane, select the MDSS row.
3. In the MDM Auxiliary Server Detail pane, edit the default property
values.
4. To save the changes, press Shift+Enter.
NOTE ►► Default values are inherited by all repositories with the
Inherited checkbox ticked for that property in the MDSS-specific
Repository Detail pane.
NOTE ►► To reset a property to its “factory default” value (0), tick the
Inherited checkbox for that property and press Shift+Enter.

300 MDM Console Reference Guide
Troubleshooting
This section offers suggestions for solving problems which may be experienced when using MDSS. Be sure to consult it before contacting SAP technical support.
SYNDICATIONS ARE NOT BEING EXECUTED BY MDSS
If you notice that MDSS is not executing syndications to a port, the problem likely stems from one or more of the following causes:
• Server or repository status
• Port settings
• Map properties or search selections
• MDSS configuration errors
Verifying Server and Repository Status
Before doing anything else, check the following on MDM Console:
• Are both the Master Data Server and MDSS started?
• Is the source MDM repository started?
If the servers are not running or the repository is not started, no syndications can occur.
Checking Port Settings
If the servers and repository are started and running, check the port’s Detail pane in MDM Console:
• Is the port type Outbound?
• Is the port’s Processing property set correctly?
• Has the port’s next scheduled syndication date and time not yet occurred?
• Is the port being processed by a Syndicator user or other MDSS?
MDSS scans repositories for outbound ports. Once MDSS finds an outbound, automatic port, it checks the port’s Processing Interval property to see if the specified interval has expired (see “Scheduling Syndications to a Port” for more information). If this interval has not expired, MDSS will not syndicate to the port.
When scanning outbound, manual ports, MDSS will not syndicate records to it unless there is a waiting Workflow job or Java API request.

MDM Console Reference Guide 301
Finally, if an MDSS task scans a port that is already being processed by a Syndicator user or other MDSS, it will wait for this processing to end before performing any syndications to that port – or any subsequent port in the task’s scanning sequence. This can cause delays if a particularly big syndication job is underway.
Checking Map Properties and Search Selections
A map’s properties and/or search selections may effectively suppress all records in a repository from being syndicated. When this occurs, then no syndication file will be generated. To see if this is the case, open the map in Syndicator.
If every record in the Records pane is grayed out, then currently there are no unchanged records in the repository. To syndicate these records anyway, you must disable the map’s Suppress Unchanged Records map property.
If some records in the Records pane are not grayed out, then see if the Suppress Records Without Key map property is enabled. Records suppressed because they lack a remote key do not appear grayed out in the Records pane. You must instead view a record’s key mappings to see if any keys are present for the map’s remote system.
If no records appear in the Records pane, then currently there are not any records in the repository which match the map’s search selections.
One alternate consideration when checking a map is the size of its resulting syndication file. If a map generates a syndication file which is so big that MDSS cannot send it over the network, then naturally it will never appear in the port’s Ready folder (see “Syndication File Is Too Big For MDSS” for more information).
Checking MDSS Credentials
If the previous steps have not solved the problem, verify the following MDSS credentials are correct in the MDSS node located below the Auxiliary Servers node in the Console Hierarchy tree:
• User
• Password
The User and Password values entered for a repository are the login credentials MDSS uses to connect to that repository. If MDSS cannot connect to a repository, make sure that these values are valid.

302 MDM Console Reference Guide
NOTE ►► Password values entered in MDM Console are encrypted
and the encrypted version of the password is stored in the PasswordE
parameter in mdss.ini. Do not modify the PasswordE parameter
directly. Instead, enter a new password value in MDM Console. When you save the new value, MDM updates the encrypted password in
mdss.ini automatically. MDSS the uses the new password value the
next time it tries to connect to the specified repository.
SCHEDULED SYNDICATIONS ARE NOT EXECUTED ON TIME
If you notice that scheduled syndications are not being executed on time, first review “Syndications Are Not Being Executed By MDSS” above.
If none of the issues listed were factors at the time of a scheduled syndication, it is likely that other, local factors are impeding MDSS from completing your syndications on a timely basis. Because MDSS processes ports sequentially, factors which may affect syndication timeliness include:
• Number of ports and repositories on the Master Data Server. There may simply not be enough time for MDSS to scan every port and execute every scheduled syndications in the time specified by a port’s processing interval.
• Size of repository/number of records being syndicated. Because
MDM processes ports sequentially, a large syndication to one port may delay syndications to all subsequent ports.
• Heavy workload on the Master Data Server. Other MDM
operations such as data importing and editing can delay syndication tasks.
• Preset delay between scans. Verify the Auto Syndication Task
Delay setting in mdss.ini is not causing unnecessary delays
between scans.
It may be necessary to adjust your scheduling strategy to accommodate these factors.
UNCHANGED RECORDS ARE NOT BEING SUPPRESSED
In order to suppress unchanged records, the map’s Suppress Unchanged Records property must be enabled (checked) and the
current table’s Key Mapping property must be set to Yes on MDM Console.
Remember also that Syndicator tracks record changes by the map’s remote system. If you syndicate records to one remote system, the records will be considered unchanged on all other remote systems.

MDM Console Reference Guide 303
“CHANGED” RECORDS ARE NOT BEING SYNDICATED
MDM tracks record syndications on the remote system level, not by port or map. As such, the first time a changed record is syndicated to a remote system, MDM considers that record to be “unchanged” for all future syndications to that remote system. For this reason, if you have multiple ports or maps which syndicate to the same remote system, only the first syndication will include the changed records.
SYNDICATION FILE IS TOO BIG FOR MDSS
The size of a syndication file depends on several factors, including:
• The number of output records generated from the syndication map
• The number of fields mapped
• The number of split fields mapped
• The quantity of data in each field mapped
Recall that extra records may be added to a syndication file for each remote key value or qualified link belonging to a repository record, meaning the number of output records in the file can be much greater than the number of repository records selected for syndication. Additionally, the number of mapped fields and the quantity of data in each field can add considerable size, based on your repository data.
For these reasons, a syndication file may become too big for MDSS to send over a network to its proper port folder. Or the file may simply take a long time to process, preventing MDSS from syndicating data to other ports on a timely basis. Both problems can be particularly severe when you are syndicating data from a repository for the first time.
The remedy for this problem is to run the large syndication job once manually from within Syndicator. Then, enable the Suppress Unchanged Records option on the map’s Map Properties tab. This should result in much smaller syndication files being generated in the future, which MDSS is well-suited to process.
RECORD DATA CHANGES DURING SYNDICATION
If records selected for syndication are updated in the MDM repository while a syndication is in progress, records in the syndication file contain either the “old” or “new” data depending on when the record is processed in relation to the data change. If the record is processed before the data change, the syndication file contains the old data. If the record is processed after the data change, the record contains the changed data. If the record is being processed during the data change, the record may contain both old and new data, depending on how much of the record was syndicated before the data change occurred.
NOTE ►► Deleting fields during a syndication may cause the
syndication to terminate with an error.


305
PART 10: MDM SYSTEM ADMINISTRATION
This part of the reference guide contains an overview of MDM security and administration features.

306 MDM Console Reference Guide
MDM Security Overview
MDM supports a multi-level security model that features granular, role-based access not only to functions and data from within MDM client applications but also to the administrative functions of MDM Console itself.
Specifically, MDM Console complements the password-protection of the Master Data Server with role-based access to MDM repository functions and objects, as follows:
• Server level. You can password-protect a Master Data Server to
require that users must first supply a valid password before performing server-level MDM Console functions that require authentication.
• Repository level. Administrative users must first connect to an MDM repository by supplying a valid username/password before performing any repository-level MDM Console function upon it.
In fact, the authentication scheme of MDM Console effectively features four levels of authentication, two at the Master Data Server level, and independently, two at the repository level, as summarized in Table 86.
Table 86. MDM Console Four-Level Authentication Scheme
Authenticated Permitted MDM Console Functions
Server-level authentication (password / all or nothing)
No Master Data Server-level functions that do not require authentication.
Yes All Master Data Server-level functions.
Repository-level authentication (role-based / granular)
No None.
Yes MDM repository-level functions for which privileges granted by role(s).
NOTE ►► The MDM Console authentication scheme allows you to
view and access mounted repositories without requiring server-level authentication, and independently, for each repository, requires role-
based repository-level authentication for granular access to each of the
repository-level MDM Console functions.

MDM Console Reference Guide 307
MASTER DATA SERVER SECURITY
MDM Console features a password authentication feature that controls access to Master Data Servers and to the administrative MDM Console functions related to each Master Data Server.
Password-protecting a Master Data Server is an optional but recommended strategy for securing access to Master Data Server operations.
The Master Data Server operations which require a Master Data Server password are listed in Table 87.
Table 87. Password-Protected Master Data Server Operations
Operation Description
Mount Repository Mounts the selected MDM repository.
Create Repository Creates a new repository on the Master Data Server.
Duplicate Repository Adds a duplicate repository to the Master Data Server.
Delete Repository Deletes a repository from the Master Data Server.
Create Slave Creates a slave repository on the Master Data Server.
Archive Repository Archives a repository on the Master Data Server.
Unarchive Repository Unarchives a repository on the Master Data Server.
DBMS Settings Edits DBMS settings for a repository or Master Data Server.
Log file access Viewing or deleting Master Data Server log files
NOTE ►► Unless you password-protect a Master Data Server, these
administrative functions are available to anyone who mounts the
Master Data Server within MDM Console.
NOTE ►► The MDM Console functions that are available before
connecting at the server level to a password-protected Master Data Server are those that allow you to view and connect to already-
mounted MDM repositories.
NOTE ►► A Master Data Server password is only required once
during an MDM Console session, unless the user unmounts the Master Data Server which clears password authentication for security
purposes.

308 MDM Console Reference Guide
To enable password protection for an unprotected Master Data
Server, or to change your existing Master Data Server password:
1. In the Console Hierarchy tree, right-click on the Master Data Server
whose password you want to set or reset and choose Change
Password from the context menu, or select the tree node and choose
MDM Servers > Change Password from the main menu.
TIP ►► If the top-right pane is currently displaying the list of Master Data Servers, you can also right-click on the Master Data Server in the
grid and choose Change Password from the context menu.
2. MDM opens the Change Password for MDM Server dialog shown in
Figure 71 and prompts you to enter the old password (if one exists) and the new password. Type the old password, type the new
password, type the new password again for confirmation, and click OK.
Figure 71. Change Password for MDM Server dialog
3. MDM sets (or resets) the password for the Master Data Server.
MDM REPOSITORY SECURITY
MDM supports a flexible multidimensional security scheme that provides granular control over which users can access an MDM repository, which functions they can perform, and which tables, fields, and records they can access.
The MDM security scheme includes:
• Users. A user represents an entity that can connect to and access the MDM repository. Each user has a user name and password, and is assigned one or more roles that collectively specify the complete set of privileges for that particular user.
• Roles. Each role specifies a set of privileges that define access settings to each of the MDM repository’s tables, fields, lookup record values, and records, and permissions to perform each of the repository functions. The same role can be assigned to more than one user.
• Privileges. For each repository function, you can either prevent or allow the role to perform the function, and for each table and field, you can grant the role full read/write access or read-only access.

MDM Console Reference Guide 309
NOTE ►► In MDM Data Manager, fields, dialog boxes, and context
menus for which the user has read-only access are disabled by default, and appear grayed out. You can turn off this feature by
changing the value of the Repository Property parameter, Disable Read-Only fields in Data Manager. See Modifying Repository
Properties.
• Constraints. For the Masks table and some lookup tables (those referenced by at least one single-valued lookup field and no multi-valued lookup fields), you can specify the set of masks or lookup values that should be visible and accessible for the role.
Precisely defining each role – and then assigning one or more roles to each user – provides very fine control over who can access an MDM repository and how they can access it.
You define repository security in MDM Console in the following administrative tables, which are located under a repository’s Admin node in the Console Hierarchy tree:
• Roles. Each role in the Roles table defines a set of functional permissions, access privileges, and record constraints that can be assigned to MDM user names.
• Users. Defines the MDM user names that can access the MDM
repository and manages their role assignments.
NOTE ►► Within a SQL-based DBMS, you can use views to precisely
control field- and record-level access by various users. However, views are cumbersome to manage, and more importantly, degrade system
response, often creating severe performance bottlenecks.

310 MDM Console Reference Guide
MDM User and Role Management
Recall that MDM’s multi-level security model supports granular, role-based repository access to functions and data from within MDM client applications. This multi-level security model extends to administrative functions within MDM Console itself.
The MDM Console security scheme includes:
• Users. Repository administrators must connect to an MDM repository with an MDM user name and password before any administrative tasks can be performed in MDM Console.
• Roles. The roles assigned to an administrator’s MDM user name determine which administrative functions are permitted or restricted for that administrator in MDM Console.
• Privileges. Administrative, Schema, and Change Tracking functional groups on the Roles table enable granular control over access to all MDM Console functions.
With these features, you can precisely define limited administrative roles for each of your administrators or administrative tasks. You can then
assign these targeted roles to users instead of the Admin role, which retains full access to all MDM privileges.
USERS TABLE
The Users table stores the MDM user names that can access the MDM repository. When selected from the Console Hierarchy tree (it is a child of the Admin node), the Users table’s records appear in the top-right pane.
All MDM repositories are created with a user named Admin already
added to the Users table. The Admin user name: (1) cannot be modified or deleted; (2) has the initial password, sapmdm; and (3) is assigned the
Admin role.
Each new record that you add to the table defines a new user name and its associated role(s).
To add, modify, or delete users, you need permissions for the corresponding function:
• Add User or Role Object
• Modify User or Role Object
• Remove User or Role Object
The predefined properties for user name records are listed in Table 88; all the properties are directly editable in the User Detail pane.

MDM Console Reference Guide 311
Table 88. User Properties
Property Description
Name The name that is used to connect to the repository. You
can specify a name of up to 30 characters.
Full Name The full name of the user.
Description A description of the user.
Password
The user password (displayed as “********”). The minimum
password length allowed is specified in the Minimal
Password Length mds.ini parameter (default is 5
characters).
User Must
Change
Password
Whether the user must change their password the first time
they log into MDM.
Password Never
Expires
Whether the user will be required to change their password after the number of days specified in the Password
Expiration Days mds.ini parameter (default expiration
is 90 days). The Admin user's password never expires.
Roles The list of roles assigned to the user.
E-mail Address The email address of the user (for workflow notifications).
Reset Account
Lock
Whether to reset the number of failed password attempts
for this user to 0. User accounts are locked after the number of failed password attempts specified in the Lock Account After Failed Password Attempts
mds.ini parameter. Selecting Yes unlocks a locked user
account.
Account Unlock
Time
The time at which the account will be unlocked. The length
of time an account is locked is specified by the Lock
Account Duration mds.ini parameter
Failed Password
Attempts
The read-only number of failed password attempts made
by this user. To reset this number to 0, use the Reset
Account Lock property.
NOTE ►► Users can change their passwords in MDM client
applications by choosing Configuration > Change Password.

312 MDM Console Reference Guide
EXPORTING REPOSITORY USERS
You can export data of users of a specific repository. For each user, the values of the following fields are exported:
• User ID
• Name
• Full Name
• Description
• User must change password
• Password never expires
• Roles
• E-Mail Addresses
• Account locked
• Account unlock time
• Password last change
NOTE ►► User passwords are not exported.
The exported file is saved as a CSV file. By default, MDM exports user information from the repository in ANSI encoding, which can also be opened in Microsoft Excel. If there are foreign characters in the CSV file, it will be saved in UTF8 encoding.
By default, in the exported file, multiple values in a single field are separated by a semi-colon (;), and a comma (,) is used as a field separator. You can change these separators in the Repository Properties table. For more information, see Modifying Repository Properties.
The column titles in the output file are identical to the field titles in MDM Console. If MDM exports in a non-English language (by using the language selector) the foreign language title will be used.
Prerequisites
• User data is exported only from a repository that is mounted
and connected.
• This operation requires execute rights for the function Export/Import Repository Users and Roles.
To export user data from a specific repository:
1. In the Console Hierarchy tree, right-click the required MDM repository
and from the context menu, choose Manage User and Roles > Export Repository Users. This command is also available from the
Repositories menu.
2. In the Save As dialog box, change the default output file name, if
required, and click Save.

MDM Console Reference Guide 313
3. After the export completes, you can open the export file in Microsoft
Excel.
IMPORTING REPOSITORY USERS
You can import data of users to a specific repository. For each user, the values of the following fields are imported:
• Name
• Full Name
• Description
• User must change password
• Password never expires
• Roles
• E-Mail Addresses
For each user, you can also specify whether to perform the following operations:
• Reset Account Lock
• Delete User
Import File Structure
• The import file should be a CSV file with ANSI or UTF-8 encoding.
• The first line in the import file contains the column titles.
• Each line represents a single user.
• The Name column must contain a value. All other columns are optional.
• You can use a file with data that was previously exported, but
non-relevant data is ignored; for example, last password change.
• User names should not include a comma (,).
• None of the columns should include double quotes (“).
• Email addresses must contain an “@” symbol.
• Columns for properties that take only “Yes” or “No” values must not contain any other values.
NOTE: The import process can fail for users with data errors.
NOTE: You can work with ANSI files in Microsoft Excel file and save them
with a .csv extension. If the file is in UTF-8 encoding, Microsoft Excel saves it in UNICODE mode
and converts all column delimiters to tab delimited.
In order for MDM to import the modified file:
1. Open the file in Microsoft Notepad.
2. Find and replace all tab delimiters to column delimiter characters. 3. Save the file in UTF8 format with a .csv extension.

314 MDM Console Reference Guide
Import Process
• User names that do not match any existing user names are
added as new users. Columns with no values are given default values. For example, if there are no values for Roles, MDM creates the user with the Default role.
• New users are created automatically with “User Must Change Password” set to True, regardless of the value in the import file.
• User names that match existing user names are imported and overwrite the existing user information. MDM modifies only the properties that have values in the import file.
• If the value for “Delete User” is “Yes”, the user with the matching user name is deleted from the repository. Any other parameters for the user in the import file are ignored.
• If the import file includes roles that do not exist in the target repository for a user, the user will be imported and the import report will include a message about the non-existing roles.
Prerequisites
• User data is imported only to a repository that is mounted and
connected.
• This operation requires execute rights for the function Export/Import Repository Users and Roles.
To import user data to a specific repository:
1. In the Console Hierarchy tree, right-click the required MDM repository
and from the context menu, choose Manage User and Roles > Import Repository Users. This command is also available from the
Repositories menu.
2. In the dialog box, select the import file, and click Open.
3. In the Temporary Passwords for New Users dialog box, click Generate
Passwords to create a temporary password for each new user. Alternatively, you can enter passwords manually. All new users must
have a password before the import process can start.
4. Click OK. The import process starts.
After the import completes, a report is displayed showing information about
the import operation and the status of each imported user.
ROLES TABLE
The Roles table stores roles that can be assigned to users on the Users table. By default, roles are applicable for all MDM servers and clients. You can restrict role applicability for MDM Windows clients and MDM servers only or for MDM web and API clients only.

MDM Console Reference Guide 315
When selected in the Console Hierarchy tree (it is a child of the Admin node), the Roles table’s records appear in the top-right pane.
The predefined properties for Roles table records are listed in Table 89; all the properties are directly editable on the Role Detail tab.
To add, modify, or delete roles, you need permissions for the corresponding function:
• Add User or Role Object
• Modify User or Role Object
• Remove User or Role Object
Table 89. Role Properties
Property Description
Name The role name
Description A description of the role
Users The list of users associated with the role
Applicable For
Security option to limit role applicability. The options relate
to the client from which the user is connecting to MDS:
▪ All (default) – The role is applicable to all clients from
which the user connects to MDS
▪ MDM Win clients/MDM servers ▪ MDM web/API clients
Note: MDM Win clients/MDM servers category includes
the following MDM clients:
▪ Regular MDM clients: Data Manager, Syndicator, Import
Manager, Console, Image Manager, Workflow Plugins,
Indexer, Publisher, CLIX ▪ Regular MDM servers: MDM Server, Syndication server,
Import server, Layout server
▪ Print API
MDM web/API clients category includes all others, such as,
Java API, enrichment controller, iViews, .NET API, ABAP
API, Web Dynpro, and so on.
Note: If the user attempts to connect using a client for which none of the user's roles are applicable, the user will
not be able to connect to MDS and will receive an error
message.
Additional tabs in the Role Detail pane define a role’s functional privileges, table and field access rights, and record constraints.

316 MDM Console Reference Guide
All MDM repositories are created with two roles already added to the
Roles table: Admin and Default. The Admin role: (1) cannot be deleted; (2) allows unrestricted access to MDM functions, tables and fields, and
records; (3) is assigned to the Admin user; and (4) is applicable for all
MDM clients and servers. Although you can assign the Admin role to as
many users as you like, you cannot modify the Admin role’s access rights.
The Default role: (1) cannot be deleted; (2) initially allows unrestricted access to MDM functions, tables and fields, and records; and (3) is assigned to all new users added to the Users table. You can modify the
Default role’s access rights at any time. The Default role is applicable for all MDM clients and servers.
Each new record that you add to the Roles table defines a new role and lets you assign the role to selected users.
NOTE ►►The Logged-In Role Maintenance setting in the Master Data Server settings file controls whether you can edit roles while users
assigned that role are connected to an MDM repository.
Functional Privileges
The functional privileges for a role are displayed in a hierarchy in the Name column in a grid within the Functions tab, as shown in Figure 72. Each of the functions is associated with a leaf node in the hierarchy, which are organized into groups using the internal nodes.
For each function, you can specify either of the following access settings by selecting from the radio button grid control in the Access column:
• Execute – the function can be executed by the role
• None – the function cannot be executed by the role
Figure 72. Functions tab for the Roles table

MDM Console Reference Guide 317
Using this tab, you can customize permissions for various MDM functions for the role selected in the Roles table.
NOTE ►► The setting of the Functions (default) node determines the
default privilege for new functions that are added to updated versions
of the MDM software.
NOTE ►► The functional privileges assigned to a role in the
Functions tab are constrained by the access privileges assigned to the role in the Tables and Fields tab (see “Table and Field Privileges” for
more information).
TIP ►► You can change the access privileges of all functions
simultaneously by changing the setting of the Functions (default) node.
The groups and functions displayed in the Name column are listed in Table 90; access privileges for each function are directly editable in the Functions pane.
Table 90. Groups and Functions
Group Function
Records
▪ Add records
▪ Modify records
▪ Modify checked out records
▪ Delete records
▪ Merge records
▪ Merge checked out records ▪ Protect records
▪ Unprotect records
▪ Check out records
▪ Check out new records
▪ Check in owned records ▪ Roll back owned records
▪ Check in non-owned records
▪ Roll back non-owned records
▪ Modify join permissions for non-owned records
Images ▪ Modify image print size
▪ Crop and rotate images
Hierarchies
▪ Move nodes within hierarchy
▪ Hide children
▪ Create aliases

318 MDM Console Reference Guide
Group Function
Taxonomies
▪ Add attributes
▪ Delete attributes
▪ Modify attribute properties
▪ Add or delete text values of text attributes
▪ Modify text values of text attributes ▪ Convert attribute type
▪ Split attribute
▪ Merge attributes
▪ Set attribute priority
▪ Modify linked attributes
▪ Reassign attribute ratings ▪ Add matching sets
▪ Delete matching sets
▪ Modify matching sets
▪ Partition
▪ Consolidate children
Families
▪ Synchronize family hierarchy
▪ Modify family data
▪ Modify family partitioning
Layouts1
▪ Modify layout
▪ Rename layout columns
▪ Modify global clone property item pool
▪ Modify root level properties of family tree
Publications1
▪ Create publications
▪ Delete publications
▪ Rename publications ▪ Add publication nodes
▪ Add section nodes
▪ Add internal nodes
▪ Add presentation nodes
▪ Delete publication nodes ▪ Delete section nodes
▪ Delete internal nodes
▪ Delete presentation nodes
▪ Move publication nodes
▪ Rename publication nodes
▪ Split section nodes ▪ Combine section nodes
▪ Modify calculated layout snapshots
▪ Modify section properties
▪ Modify presentation content
▪ Add spreads
▪ Delete spreads ▪ Modify spreads
▪ Shuffle pages in section
▪ Add pages
▪ Delete pages

MDM Console Reference Guide 319
Group Function
▪ Move pages
▪ Add presentations ▪ Delete presentations
▪ Move presentations
▪ Recover presentation items
▪ Add items to snapshot
▪ Delete presentation items
▪ Relocate presentation items ▪ Flow presentations in section
▪ Apply templates
▪ Purge disconnected items from snapshot
▪ Modify publication layout
▪ Modify publication family data ▪ Modify publication records
▪ Modify publication format
▪ Modify branch node recursive MDLS jobs
▪ Modify Publisher document workspace
▪ Modify global publication bookmarks
Publisher Object
Checkouts1
▪ Checkout Publisher objects
▪ Assign Publisher object checkouts
▪ Override Publisher object checkouts
Indexes2
▪ Create indexes
▪ Delete indexes
▪ Rename indexes
▪ Modify index source ▪ Modify index key definitions
▪ Modify index entry redefines
▪ Modify index properties
▪ Modify index styles
▪ Modify index page setup ▪ Add index source
▪ Delete index source

320 MDM Console Reference Guide
Group Function
MDM Data Manager
▪ Modify multiple records
▪ Delete multiple records
▪ Add to mask
▪ Remove from mask
▪ Replace in mask ▪ Modify mask
▪ Import from Excel
▪ Export to text
▪ Export to Excel
▪ Export to Access
▪ Save original to disk ▪ Modify families
▪ Modify layouts
▪ Modify publications
▪ Modify indexes
▪ Save Named Search
▪ Copy from Compare Records dialog
Consolidation and
Distribution
▪ Add import maps
▪ Modify import maps ▪ Delete import maps
▪ Add syndication maps
▪ Modify syndication maps
▪ Delete syndication maps
▪ Edit record key mappings
▪ Import records via Web Dynpro
Administration
▪ Modify repository description
▪ Modify repository languages
▪ Modify repository port2
▪ Modify repository properties ▪ Synchronize slave
▪ Normalize repository
▪ Share repository
▪ Appropriate repository
▪ Compact repository
▪ Repair repository ▪ Truncate change log
▪ Refresh calculated fields
▪ Refresh cache of LDAP server data
▪ Start repository
▪ Stop repository
▪ Configure user dimensions ▪ Stop activity
▪ End connection

MDM Console Reference Guide 321
Group Function
Schema1
▪ Import schema
▪ Export schema
▪ Add table4
▪ Modify table
▪ Remove table
▪ Add field5
▪ Modify field
▪ Remove field
▪ Add schema object
▪ Modify schema object
▪ Remove schema object
▪ Generate or delete Database Views
▪ Export/Import Repository Users and Roles
▪ Add User or Role Object
▪ Modify User or Role Object
▪ Remove User or Role Object
Change Tracking ▪ Set change tracking
Relationships
▪ Add relationships
▪ Delete relationships
▪ Modify Relationships
Matching
▪ Add matching strategies, rules, transformations, and
fields
▪ Modify matching strategies, rules, transformations,
and fields
▪ Delete matching strategies, rules, transformations,
and fields
▪ Execute matches
Workflows ▪ Add records to job
Data Protection
and Privacy
▪ Data Privacy Specialist
▪ External Auditor
1 Functions also require Read/Write privileges on the Publications node in the Tables and Fields tab. 2 Functions also require Read/Write privileges on the Indexes node in the Tables and Fields
tab. 3 Whether the role can modify the TCP/IP port(s) which the repository uses to connect to clients. 4Add Table function also requires Read/Write privileges on the Tables and Fields node in the Tables and Fields tab. 5Add Field function also requires Read/Write privileges on the relevant table node in the Tables and Fields tab.

322 MDM Console Reference Guide
Table and Field Privileges for a Role
The table and field privileges for a role are displayed in a hierarchy in the Tables and Fields tab.
• Each normal table in the repository is represented in the hierarchy by an internal node. Tuples in the table are represented by subnodes. Tuple members and all other fields in the table are represented by leaf nodes.
• Each special table and object in the repository is represented by a single leaf node.
For each node, you can customize access privileges by specifying one of the following access settings in the Access column:
• Read/Write
• Read-Only
When a table or field is created, it inherits the Read/Write access setting from its parent node. If a node's access setting is not changed explicitly, that node continues to inherit the access setting of its parent node. Inherited settings are displayed in italics as shown in the following examples.
In Figure 73, the Products table and its fields inherit the Read/Write access setting from the root Tables and Fields node.
Figure 73. Inherited access settings from root node

MDM Console Reference Guide 323
In Figure 74, the new tuple member, Postcode, inherited the access setting from its parent tuple, Address. When the Address tuple access setting was changed to Read-Only, the Postcode tuple member inherited the Read-Only setting.
Figure 74. Inherited access settings from tuple node
The operations allowed with Read/Write access depend on the type of node selected, as described in Table 91.
NOTE ►► To perform operations allowed by Read/Write permission for a table, field, tuple, or object, a role must also be defined with the
corresponding functional privileges.
Table 91. Access Setting Descriptions by Node Type
Node Access Settings for a Role Determine Whether Users Can …
Root
Add new tables.
If the Root node and all subsequent nodes are set to Read-Only, the role is denied all functional privileges in the repository.
Normal Table
▪ Add and reorder fields in the table.
▪ Add and delete records in the table.
Field
▪ Modify field values.
▪ Delete the field from the table.
Tuple Field
Add and delete tuple records. The access settings for tuples do not affect any schema-level operations on tuples.
Tuple Member
Modify tuple member values. The access settings for tuple members do not affect any schema-level
operations on tuple members.
Special Table Perform record-level operations on the table.
Expressions1 Modify MDM expressions in the expressions editor.
Data Groups Modify the MDM data group hierarchy.

324 MDM Console Reference Guide
Node Access Settings for a Role Determine Whether Users Can …
Publications Modify MDM publications.
Indexes Modify MDM publication indexes.
1 Affects calculated fields, assignments, and validations.
To set table and field privileges:
1. In the Console Hierarchy tree, under the required repository, choose
Admin > Roles.
2. Select the role for which you want to set privileges.
3. In the Tables and Fields tab, configure access settings, as required.
▪ When you change the access setting of the root node, MDM asks
you whether you want to apply the same changes to all tables, fields, and objects in the hierarchy, as shown in Figure 75. If you
choose No, only the root node’s access setting changes.
▪ When you change the access setting of a normal table node, MDM asks you whether you want to apply the same changes to
all fields in the table. If you choose No, only the table node’s
access setting changes.
▪ When you change the access setting of a tuple node, MDM asks
you whether you want to apply the same changes to all the tuple's
members. If you choose No, only the tuple node’s access setting
changes.
Figure 75. Confirm Table and Field Access Setting dialog box
NOTE ►► When you change the access setting of a main table (for example, Products) or taxonomy table (for example, Categories), MDM
prompts you to confirm that you want to apply the same change to the
Families table, as shown in Figure 76. If you choose No, the access
rights will not change for the selected table or the Families table.
Figure 76. Confirm Families Access Setting dialog box

MDM Console Reference Guide 325
Record Constraints
The record constraints for a role are controlled from the Constraints column of the grid within the Tables and Fields tab, shown in Figure 74 above.
Record constraints are selections of masks, named searches, and/or lookup table records that allow you to create virtual subset repositories on a per role basis. Only records that fall within the constrained record set will ever be visible or known to the role.
To specify a constraint, you select the masks, named searches, and/or lookup values that correspond to the records you want to make visible and accessible to the role. In this regard, specifying constraints is like specifying search selections that are always in effect.
Selecting constraints on the Masks table limits the visible record set to records included in the selected mask(s). Any additional named search or lookup table constraints are applied to the records in the selected masks, limiting further which records are visible to the role.
Selecting constraints on the Named Searches table limits the visible record set to only those records that match the search parameters of the selected named search(es). Any additional lookup table constraints will further limit which records are visible to the role.
NOTE ►► Multiple mask selections are considered “OR” combinations, meaning records only have to appear in one selected
mask to be visible, not all selected masks.
NOTE ►► Multiple named search selections are treated as “OR”
combinations, meaning records matching the search parameters in any
selected named search will be visible to the role.
NOTE ►► Whether a record is visible or hidden on a role’s Masks or
Named Searches table does not affect which records are visible to that
role on other tables.
NOTE ►► MDM does not enforce mask or named search constraints when the Masks or Named Searches table is the current table. This
allows users to create their own masks and named searches and to access them afterwards. However, it also exposes the role-
constraining masks and named searches to the user. To prevent users from accessing specific mask or named search records, add a lookup
field to your Masks and Named Searches table and constrain its lookup values to hide or display mask and named search records
accordingly.

326 MDM Console Reference Guide
Selecting constraints on a lookup table limits the visible record set to only those records that have the selected values in their lookup fields or in their lookup hierarchy. Lookup table constraints limit: (1) the set of visible main table records; (2) the set of visible subtable records; (2) the set of visible lookup table values in the Record Detail tab; and (3) the set of visible lookup values in the search tabs.
For example, if a main table, Products, has a field that looks into the Manufacturers table, and the Manufacturers table has a field that looks into the States table, selecting a constraint on the States table will: (1) hide all records on the States table except the record corresponding to the selected value; (2) hide all records on the Manufacturers table except records with lookup field values matching the selected State value; and (3) hide all records on the Products table except records with lookup field values matching the remaining manufacturers on the Manufacturers table. No other state or manufacturer lookup values will appear in the Record Detail tab or in the Search Parameters pane.
NOTE ►► You can only set constraints on tables that are referenced
by single-value lookup or tuple fields. Do not set constraints on a table
that is used for multi-value references.
NOTE ►► Multiple lookup constraints are considered “AND” combinations, meaning only records that remain after all lookup
constraints have been applied will be visible.
Finally, constrained record sets are dynamic. Records which fall into a constrained record set become visible and accessible (or invisible and inaccessible) to a role automatically as they are added, deleted, or modified in the repository.
NOTE ►► It is possible for a user to add or modify a record and then have this record disappear instantly from view, if: (1) the user’s role is
constrained by named searches and the newly added or modified record is outside the search parameters of the constraining searches;
or (2) the user’s role is constrained by masks (new records are not
visible to users constrained by masks). To prevent these scenarios from occurring, roles constrained to masks should not have add record
privileges and roles constrained to named searches should not have
add record or modify record privileges.
For each table for which you can assign constraints, the value in the Constraints column is as follows:
• [ALL] – table not constrained
• [n] – table has ‘n’ constraints selected
NOTE ►► You cannot manually create the [0] case (i.e. ‘n’ equals 0),
which can occur if all selected constraints are replaced or deleted.

MDM Console Reference Guide 327
When you select constraints for a table, the values that you select become the unconstrained (visible) values and the values that you do not select become the constrained (hidden) values. When you add constraints for a table, the set of selected (unconstrained) values always implicitly includes the NULL value.
To select constraints for a table:
1. In the Tables and Fields tab, double-click on the cell in the Constraints
column corresponding to the table you want to constrain.
2. MDM opens a dual-list drop-down control for multiple-item selection. Select or deselect mask, named search, or lookup record values from
the drop-down list or hierarchy, as follows:
▪ To add Available value(s) to the Selected values list, highlight
them and click the Add button.
▪ To remove values from the Selected values list, highlight them
and click the Remove button.
▪ To add all values to the Selected values list, click All.
▪ To remove all values from the Selected values list, click None.
NOTE ►► Available values appear as a list for flat lookup tables and
Named Searches and as a hierarchy for the Masks table and hierarchy
lookup tables.
3. Press Enter or click on the up triangle to close the drop-down control.
4. To save the new constraints, right-click on the Tables and Fields tab
and choose Save Role from the context menu, or press Shift+Enter.
NOTE ►► Logged-in users are not affected by constraint changes
until they log out and log back in.
Performing MDM Operations
The access settings in the Functions tab control the rights to execute a given function (the functions roughly correspond to menu options in MDM Data Manager). Similarly, the access settings in the Tables and Fields tab control rights to each of the tables and fields. This includes the main table, lookup tables, object tables (Images, Text Blocks, PDFs, etc), the Masks table, the Families table, and publications.
To perform an operation, you must have both functional access (the ability to perform the given function), object access (the ability to read/write the object(s) on which the operation is being performed), and record access (pursuant to the record constraints). For example, to add
an image to an MDM repository, you must have the Add Records functional access, and Write access to the Images table. Having only one of those rights is insufficient.

328 MDM Console Reference Guide
NOTE ►► When a user belongs to multiple roles, MDM separately
calculates the rights for each role (based on the functional privileges, the object privileges, and the record constraints), and then combines
the rights of those roles with an OR.
EXPORTING REPOSITORY ROLES
You can export the roles of a specific repository. For each role, the following information is exported:
• Name
• Description
• Applicable For
• Users
• Function Name
• Function Access
• Tables and Fields - Node Type
• Tables and Fields - Node Name
• Tables and Fields - Sub Node Name
• Tables and Fields - Tuple Path
• Tables and Fields – Access
Export File Structure
• The exported file is saved as a CSV file. By default, MDM exports role information from the repository in ANSI encoding, which can also be opened in Microsoft Excel. If there are foreign characters in the CSV file, it is saved with UTF-8 encoding.
• Each role in the exported file consists of more than one line.
The first line for a role contains the property titles and the next line contains the values. Some of the properties such as Users and Function Name are multi-valued and might consist of more than one column.
• The column titles in the output file are identical to the field titles in MDM Console. If MDM exports in a non-English language (by using the language selector) the foreign language title will be used
• By default, in the exported file, multiple values in a single field are separated by a semi-colon (;), and a comma (,) is used as a field separator. You can change these separators in the Repository Properties table. For more information, see Modifying Repository Properties.

MDM Console Reference Guide 329
Export Process
• Constraints on records that can be viewed are not exported.
• MDM exports only properties with non-default values. For example:
o If none of the users were assigned to the role then the “Users” property is not exported.
o If a role has the default access rights in the Tables and Fields tab for one of the tables, values for fields that inherit from the default are not exported. These values are displayed in MDM Console in italics.
• The Tables and Fields information is as a single group. If there
is one non-default value, all the following lines are exported to the export file.
o Tables and Fields - Node Type o Tables and Fields - Node Name o Tables and Fields - Sub Node Name o Tables and Fields - Tuple Path o Tables and Fields – Access
• Function name and Function Access properties: MDM exports only the function names that do not inherit their value from the default value. The entries in functions of roles that inherit their values from the default are displayed in MDM Console in italics.
Prerequisites
• Roles are exported only from a repository that is mounted and
connected.
• This operation requires execute rights for the function Export/Import Repository Users and Roles.
To export roles from a specific repository:
1. In the Console Hierarchy tree, right-click the required MDM repository and from the context menu, choose Manage User and Roles > Export
Repository Roles. This command is also available from the
Repositories menu.
2. In the Save As dialog box, change the default output file name, if
required, and click Save.
3. After the export completes, you can open the export file in Microsoft
Excel.

330 MDM Console Reference Guide
IMPORTING REPOSITORY ROLES
You can import role information to a specific repository. The import file should include only those role properties that you want to change.
Import File Structure
• The import file should be a CSV file with ANSI or UTF-8
encoding.
• The Name column must contain a value as it is used as the unique key for the role.
• The following role properties can be included, but are optional:
• Description
• Applicable For
• Users
• Function Name
• Function Access
• Tables and Fields - Node Type
• Tables and Fields - Node Name
• Tables and Fields - Sub Node Name
• Tables and Fields - Tuple Path
• Tables and Fields – Access
• If you include a column title, there must be a corresponding value.
• Role names should not include a comma (,).
• None of the columns should include double quotes (“).
Import Process
• Role names that do not match any existing roles in the
repository are added as new roles.
• A line with a first column other than the approved ones will be ignored.
• A line with a valid property name must have a valid value. For example, columns for properties that take only “Yes” or “No” values must not contain any other values.
• If the import file includes values for the Users property that do not exist in the target repository for a role, the role will be imported and the import report will include a message about the non-existing users.
• Imported table and field access rights for an existing role are
merged with existing data, and do not replace it. o ‘Tables and Fields - Node Type’ always has values
and refers to the type of MDM object such as “Table”,
“Field”, “Relationships”, “Data Table, and so on.
o ‘Tables and Fields - Node Name’ is the name of the
table/Tuple and is not mandatory for all types.

MDM Console Reference Guide 331
o ‘Tables and Fields - Sub Node Name’ only has values
if it refers to a field, a relationship, tuple fields, or an
image variant.
o ‘Tables and Fields - Tuple Path’ only has values if it
refers to a tuple field.
o ‘Tables and Fields – Access’ always has Read/Write
or Read-Only values.
• Imported execution rights for an existing role are merged with existing data, and does not replace it.
• Other imported information, such as users, replaces existing values.
Prerequisites
• Roles are imported only to a repository that is mounted and connected.
• This operation requires execute rights for the function
Export/Import Repository Users and Roles.
To import roles to a specific repository:
1. In the Console Hierarchy tree, right-click the required MDM repository and from the context menu, choose Manage User and Roles > Import
Repository Roles. This command is also available from the
Repositories menu.
2. In the dialog box, select the import file, and click Open.
After the import completes, a report is displayed.
LDAP SUPPORT
You can use LDAP (Lightweight Directory Access Protocol) within the MDM system to control, configure and distribute user privileges, rights, and access from a single location.
For detailed information about support for LDAP (Lightweight Directory Access Protocol) within the MDM system, including setting LDAP cache, see help.sap.com/nwmdm71 > MDM Security Guide > LDAP
Support.
LDAP contact information and other parameters relevant to MDM are maintained in the secure mds.ini file in a separate section named:
[MDM LDAP]
If the [MDM LDAP] section is absent, LDAP use is disabled. This
section includes the following parameters:

332 MDM Console Reference Guide
Parameter Description
LDAP in Use
Whether MDM should use LDAP. Options are True
or False.
You must stop MDS before changing this parameter, in mds.ini and then restart MDS.
You must run a Verify > Repair operation on all repositories mounted on a Master Data Server after changing the server’s LDAP in Use parameter.
Server
Server Port
LDAP system address (usually a DNS name). The LDAP Server specification can be either a hostname
or an IP address to which MDM attempts to bind; optional Server Port defaults to 389.
Admin DN
Admin
Password
The full distinguished name (DN) and password of an Admin that can search for the user’s full DN.
For backward compatibility with previous releases MDM will construct a missing Admin DN from the following settings: Admin Identifier, Admin Name and Base DN.
MDM does not need to be an administrative user to browse the directory. Just leave both Admin DN and Admin Password blank if directory setting allows anonymous binding.
Base DN
The node from which MDM starts to search in the LDAP server, for example, o=sap,c=US. This node
includes users, groups, and more.
Users Base
DN
To optimize the search, define the subnode under the Base DN from which to start the search for user
information.
Note: If you define both Users Base DN and
Groups Base DN, MDM ignores the Base DN
setting. If only one of them is defined, MDM uses Base DN for the other.
Groups Base
DN
To optimize the search, define the subnode under the Base DN from which to start the search for group
information.
Note: If you define both Users Base DN and
Groups Base DN, MDM ignores the Base DN
setting. If only one of them is defined, MDM uses Base DN for the other.

MDM Console Reference Guide 333
Parameter Description
User
Identifier
The name of the LDAP ID field that will match the value that the user provides as the Username at logon, such as cn or uid.
MDM Roles
Attribute
The name of the LDAP attribute that contains the group assignments, such as memberOf.
MDM Email
Attribute
The name of the LDAP attribute that contains the email addresses that are assigned to users, and is required for workflow. Usually this name is mail.
Fallback in
Use
When set to True, if the LDAP server is not available
or the user does not exist in the LDAP server, MDM will attempt to find user information in the repository. This parameter is relevant only for the login phase and should be used carefully. When using this parameter our recommendation is to set only one user in the repository, which should be read-only since company security should be based on LDAP alone (if Use LDAP=True).
The default is False.
Group
Identifier
The name of the LDAP attribute that identifies groups, such as cn or samAccountName. This field is
mandatory for group mapping algorithms. For more information, see help.sap.com/nwmdm71 > MDM
Security Guide.
Member
Attribute
The name of the LDAP attribute that lists all members of an LDAP group, such as member. This field is
optional. It is used, for example, with LDAP server IBM Tivoli. For more information, see help.sap.com/nwmdm71 > MDM Security
Guide.
Page Size
The number of records sent by the LDAP server per page. Default is 1000.
This value does not need to be changed unless LDAP performance is problematic and you need to retrieve much more than 1000 records per search from the LDAP server.
User Filter
Optional. Use this parameter to improve performance by limiting the user search results to LDAP user records only.
For example, if you set:

334 MDM Console Reference Guide
Parameter Description
User
Filter=&(objectClass=person)(Uid=*)
the additional condition objectClass=person
limits the result set on the LDAP server side to user records only.
This applies to all different search algorithms for users and groups.
Group Filter
Optional. Use this parameter to improve performance by limiting the group search results to LDAP group entries only.
For example, if you set:
Group Filter=groupOfNames=*
the following search is executed:
ldapsearch ... baseDN
(&(groupOfNames=*)(groupIdentifier=MDM RoleName))
"Group Identifier" is the name of the LDAP ID
field that matches the MDM role name, such as cn
or samAccountName.
The additional condition limits the result set on the LDAP server side to specific role records only.
This applies to all different search algorithms for users and groups.
Secure
Connection
to Active
Directory
Specifies whether the MDS connects securely to the Microsoft Active Directory LDAP server. Possible values are True or False.
Note: You can configure a secure connection from MDS to the Active Directory only when MDS is installed on a Windows platform.
User
ObjectType
DN
(Optional) Use this parameter to specify that the user identifier attribute relates to a user. This optimizes the search operation in the LDAP server and limits the search to users only.
For example:
• Active Directory: User ObjectType DN=objectClass=user
• Open LDAP: User ObjectType DN=objectClass=inetOrgPerson

MDM Console Reference Guide 335
Parameter Description
Group
ObjectType
DN
(Optional) Use this parameter to specify that the group identifier attribute relates to an LDAP group. This optimizes the search operation in the LDAP server and limits the search to LDAP groups only.
For example:
• Active Directory: Group ObjectType DN=objectClass=group
Enable Case
Sensitive
Login
(Optional) From MDM 7.1 SP11, you can use this option to cancel the case-sensitive limitation for login to MDM using LDAP.
Note: This limitation was added in MDM 7.1 SP08 and cannot be cancelled in releases SP08 through SP10.
TRUSTED CONNECTIONS
MDM offers a Trusted Connection mechanism for authentication of client connections to MDS. See help.sap.com/nwmdm71 > MDM Security Guide > Authentication of Trusted
Connections for more information.

336 MDM Console Reference Guide
Additional MDM Tables
Additional MDM tables are described in the following sections.
CONNECTIONS TABLE
The Connections table is an MDM system table accessible as a child of the Admin node of the Console Hierarchy tree. Each MDM client application that is currently connected to the selected repository appears as a record in the table, along with the connection time and time since last access, allowing you to monitor connection activity.
Table 92. Connection Properties
Property Description
Name The user name.
Host Name The system on which the MDM client is running.
Application Name The MDM application (e.g. Data Manager, API).
Connection Time The date and time the connection was established.
Last Activity Time The date and time the connection was last accessed.
You can end a repository connection from the following MDM web clients by selecting the application row in the table and choosing End Connection from the context sensitive menu:
• SAP MDM Java API and any related Java API session manager: o SAP MDM Java API>Session Manager>Event Dispatcher
• SAP MDM .NET API and any related .NET API session manager
• SAP MDM WD Framework and related WD configurators: o SAP MDM WD Configurator>Session Manager>Event
Dispatcher o SAP MDM WD Configurator>Metadata Manager>Event
Dispatcher
• SAP MDM iViews Runtime and SAP MDM iViews Runtime >Blob Cache
• SAP MDM COM API
NOTE ►► You can also view and end connections using the CLIX
commands repGetConnections and repEndConnection (see
help.sap.com/nwmdm71 > CLIX Reference for more information).

MDM Console Reference Guide 337
WORKFLOWS TABLE
The Workflows table is a special table that contains workflow records. Like the records of an object table, the records of the Workflows table have a predefined and fixed set of fields. Each workflow record defines a sequence of steps for a group of one or more records. You can view and edit workflow records in MDM Data Manager.
The properties for each workflow are listed in Table 93; none of the properties are editable in the Field Detail pane.
Table 93. Workflow Properties
Property Description
Name The workflow name.
Code The workflow code.
Description A description of the workflow.
Table The table to which the workflow applies.
Workflow The Visio workflow object.
Owner The user who owns the workflow.
Administrators The users assigned as workflow administrators.
Active Whether the workflow is active (Yes/No).
Trigger Actions
The actions that trigger the workflow:
▪ Manual
▪ Record Add ▪ Record Import
▪ Record Update
Autolaunch
Whether or not to automatically launch the workflow job:
▪ None ▪ Immediate
▪ Threshold
Max Records
The maximum number of records that can be added to the
workflow before it is launched automatically.
▪ Autolaunch=Threshold
▪ 0 means do not autolaunch based on record count
Max Time
The maximum amount of time that the workflow can remain
unlaunched before it is launched automatically.
▪ Autolaunch=Threshold
▪ 0 means do not autolaunch based on unlaunched time

338 MDM Console Reference Guide
Property Description
Action on
Complete
Whether or not to archive or delete the workflow job after it
is completed:
▪ None
▪ Archive
▪ Delete
Created The date the workflow was created.
Created By The user who created the workflow.
Modified The date of last modification.
Modified By The user who last modified the workflow.
CHANGE TRACKING TABLE
The Change Tracking table is a system table with a predefined set of fields and records that are not directly visible in MDM Console. Each change record is created automatically by MDM when the value of any field that you are tracking is changed, providing an audit log of changes within the system.
NOTE ►► For each change, MDM records the date, the time, the
user who made the change, the old value, and the new value.
NOTE ►► You can disable tracking of checked-out records, including
roll back operations, in the repository properties. For more information,
see Modifying Repository Properties.
This section describes how to configure change tracking from within MDM Console. Viewing the change records themselves requires the separate Change Tracker application. For more information about the Change Tracker and the information it displays, see the Change Tracker Application Guide.
The change tracking settings for a repository's tables and fields are displayed in the Change Tracking Detail pane. In the pane grid, each normal table is represented by an internal node, and each of its actual or virtual fields by a leaf node. For each field, you can specify whether to track the following types of changes:
• Track Adds – track new field value when a record is added
• Track Modifies – track old and new values when the field is modified
• Track Deletes – track old field value when a record is deleted
Each node type is described in Table 94.
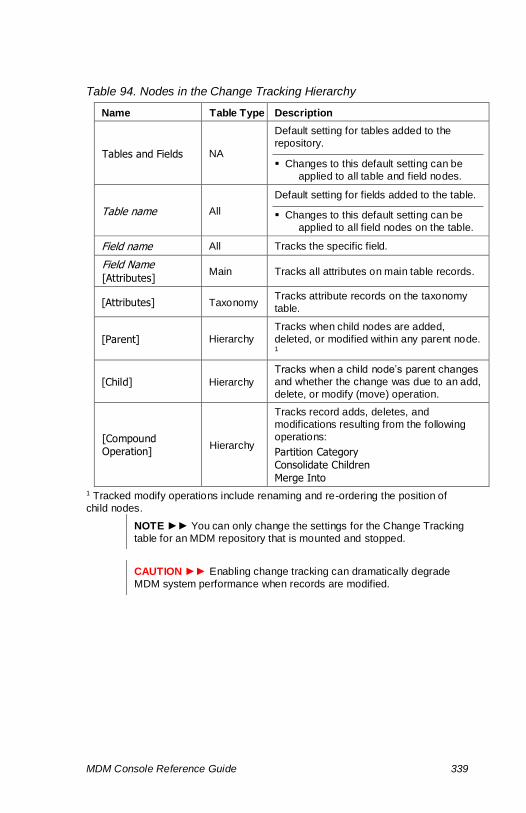
MDM Console Reference Guide 339
Table 94. Nodes in the Change Tracking Hierarchy
Name Table Type Description
Tables and Fields NA
Default setting for tables added to the
repository.
▪ Changes to this default setting can be
applied to all table and field nodes.
Table name All
Default setting for fields added to the table.
▪ Changes to this default setting can be
applied to all field nodes on the table.
Field name All Tracks the specific field.
Field Name [Attributes]
Main Tracks all attributes on main table records.
[Attributes] Taxonomy Tracks attribute records on the taxonomy
table.
[Parent] Hierarchy
Tracks when child nodes are added,
deleted, or modified within any parent node.
1
[Child] Hierarchy
Tracks when a child node’s parent changes
and whether the change was due to an add,
delete, or modify (move) operation.
[Compound
Operation] Hierarchy
Tracks record adds, deletes, and
modifications resulting from the following
operations:
Partition Category
Consolidate Children
Merge Into
1 Tracked modify operations include renaming and re-ordering the position of
child nodes.
NOTE ►► You can only change the settings for the Change Tracking
table for an MDM repository that is mounted and stopped.
CAUTION ►► Enabling change tracking can dramatically degrade
MDM system performance when records are modified.

340 MDM Console Reference Guide
LINKS TABLE
The Links table is an MDM system table with a predefined set of fields, and records that appear in the top-right Links pane of MDM Console. Each record that you add in MDM Console defines a particular URL whose syntax may include placeholders for one or more parameters.
Each URL can be used as the target of an embedded browser in the Web tab of the MDM Data Manager, and can specify either a Web site or a custom application. When you select a record in MDM Data Manager, the Web tab then displays the target web page with any record-specific values automatically passed through in the URL. This provides a completely flexible mechanism for linking records in MDM to the outside world, and passing MDM record or attribute data as parameters within the URL.
NOTE ►► When you first create a new MDM repository, MDM automatically creates the Links table (as a child of the Admin node of
the Console Hierarchy tree).
The properties for each link are listed in Table 107; all of the properties are directly editable in the Link Detail pane.
Table 95. Link Properties
Property Description
Name The link name that appears in MDM Data Manager.
Type
Whether the link applies to records in Record or Hierarchy
mode, or to attributes in Taxonomy mode:
▪ Records – Record and Hierarchy modes ▪ Attributes – Taxonomy mode
URL The target URL (including any parameter placeholders).
NOTE ►► Each URL you add to the Links table is automatically
added to the drop-down list for the applicable configuration option in
MDM Data Manager. Specifically, those of: (1) Type Records appear for the Web Pane URL for Selected Records option; and (2) Type
Attributes appear for the Web Pane URL for Selected Attributes option.
NOTE ►► The URL property has a special syntax for identifying
placeholders for passing parameters to the Web site or custom
application, as described in the next section.

MDM Console Reference Guide 341
URL Syntax
Each URL you define in MDM Console becomes the target of an embedded browser in the Web tab of MDM Data Manager.
In addition, the URL has a special syntax for passing parameters to the Web site or custom application. This syntax allows you to embed and pass MDM table and field values of selected records or attributes for interpretation by the target URL.
The URL syntax supports the parameters described in Table 96.
Table 96. URL Parameters
Parameter Replaced with…
Record / Hierarchy / Taxonomy modes…
<t> Current table id.
Record / Hierarchy modes only
<r> Semi-colon delimited list of selected record ids, prepended with a count.
<rp> Semi-colon delimited list of selected permanent record ids, prepended with a count.
<f:field code> URL-encoded values of the specified field.
<fn:field code> Unencoded values of the specified field.
Taxonomy mode only
<c> The category id.
<a> Semi-colon delimited list of selected attribute ids, prepended with a count
NOTE ►► All of the parameters above can be interpreted by a
custom application; however, only the <f:field code> and
<fn:field code> parameters are likely to be meaningful to the URL of a
typical Web site.
TIP ►► Use <fn:field code> for fields whose values are entire URLs. If a URL value is not entered with proper encoding, however, it may
not display correctly in the Web tab or custom application.
For example, you could automatically send record data as query parameters to Google by defining the following URL record in the Links table:
• Name: MDM Google
• Type: Records
• URL: http://www.google.com/search?hl=en&q=<f:field code>

342 MDM Console Reference Guide
NOTE ►► In the URL above, “field code” is the id of the field of the
current table whose value(s) for the selected record(s) you want to
send to Google.
Then, from within MDM Data Manager, use the Configuration > Options
command to set the value for the Web Pane URL for Selected Records
option to MDM Google, make the Web tab the active tab, and watch
what happens when you click through each of the records.
XML SCHEMAS TABLE
The XML Schemas table is an MDM system table with a predefined set of fields, and records that appear in the top-right XML Schemas pane of MDM Console. Each record that you add in MDM Console identifies a particular XML schema (.XSD) file that can be stored within the MDM repository for use in importing and syndicating master data to and from that repository.
The properties for each XML schema are listed in Table 97; both of the properties are directly editable in the XML Schema Detail pane.
Table 97. XML Schema Properties
Property Description
Name The XML schema name
Filename The name of the XML schema file
URI The URI for the XML schema file
Table 98. XML Schemas Table Operations
Property Description
Add XML Schema Adds an XML schema file to the repository
Delete XML Schema Deletes the XML schema from the repository
Export XML Schema… Exports the XML schema as an .XSD file on the
local file system
NOTE ►► The XML Schemas table is used to populate the list of
XML Schemas available to MDM Import Manager and MDM
Syndicator.

343
PART 11: MULTILINGUAL SUPPORT
This part of the reference guide contains a general overview of multilingual support within the MDM system and a specific description of the multilingual features of the MDM client applications. Multilingual support allows you to store multiple languages of information side-by-side within a single MDM repository.


MDM Console Reference Guide 345
Introduction
MDM multilingual support fully addresses all of the requirements for multiple languages side-by-side within a single MDM repository.
It starts with an end-to-end Unicode implementation that supports both Western and Eastern languages, reflects a data model with multiple language layers that avoids data duplication while ensuring data integrity, and features an innovative user interface that offers flexibility and efficiency during the entry, editing, browsing, and publishing of multilingual data.
Moreover, MDM multilingual support not only accommodates multiple languages, but also all the myriad other dimensions of regionalization, as follows:
• Multiple languages. Each MDM repository can store regional
information for one or more languages, including country-specific versions of the same language (e.g. English [US] and English [UK]).
• Multiple regions. You can also create named regions for multiple instance layers of the same language, for parallel support of regional dialects, expressions, and slang.
• Multiple cultures. Even non-text data often has regional requirements, such as when an image contains a human subject whose ethnicity must accommodate the target audience.
• Multiple regulations. Some requirements have nothing to do with language or culture, but rather with regulatory requirements, such as the restriction in France on showing a photo of a hypodermic needle.
Thus, regardless of the specific requirement, MDM multilingual support makes it possible to efficiently store all of the dimensions of audience-specific information within a single MDM repository.
MULTI-BYTE UNICODE IMPLEMENTATION
Multilingual support adheres to and is implemented using the latest Unicode 4.0 standard, which provides full multi-byte encoding, supports the equivalent of code pages and double-byte languages within a single unified architecture, and continues all the way through and to the underlying DBMS with which MDM interfaces.
An individual MDM repository can store data for an effectively unlimited number of languages, chosen from a list of languages and locales recognized by the system (e.g. English [US] and English [UK]), including both western European and Eastern languages. Each language selection defines not only the language name, but also the underlying character set applicable to that language, the ability to properly display and perform data entry within the foreign character set, and other language-specific details (such as sort order).

346 MDM Console Reference Guide
NOTE ►► Language selection does not trigger language-specific
stemming, decimal or thousands separator, or spell-check dictionary.
MULTI-LAYERED DATA MODEL
Once a repository has been defined as multilingual, MDM implements a “multi-layered” data model to store the multilingual information. Specifically, for each multilingual field, the single instance of each record contains a distinct data bucket for each language, and values can be entered for any or all of the defined languages at any time.
And because each individual record embodies all of the multilingual information for the record, a lookup value (such as a category) or an object (such as a text block) must be linked to and associated with a master data record just once for all languages rather than once for each language, avoiding unnecessary effort and potential for error.
LANGUAGE-CENTRIC VIEWS
Each user of the MDM system sees a “language-centric” view of the repository data and metadata. For example, one user can be entering and editing data in French while a second user is searching and browsing the repository in Japanese.
At the same time, within the language-centric view, a multilingual Language Detail tab within MDM Data Manager provides for multilingual data entry and a side-by-side comparison of the multilingual data.
Finally, the inheritance scheme displays and color-codes data from other language layers for missing data in the current language, with an inheritance ordering for each language during data entry, editing, and browsing, and an inheritance threshold for published catalogs.
MULTILINGUAL REPOSITORY METADATA
Within the multi-layered data model, not only the data but also all of the MDM repository metadata can be stored in multiple languages, for a consistent user experience in each language.
Language-specific metadata includes:
• Table names
• Field names
• Category names
• Attribute names
• Attribute text values
NOTE ►► The MDM repository name itself is non-lingual.

MDM Console Reference Guide 347
MULTILINGUAL REPOSITORY DATA
Within a multilingual MDM repository, data can be stored in multiple languages for the applicable data types, as follows:
• Numeric fields. Naturally, numeric fields do not require a distinct value for each language and are always non-lingual. Meanwhile, MDM measurements are also non-lingual because they leverage MDM’s built-in library of dimensions and units.
• Text fields. A text field can be flagged as non-lingual, so that a
single value is stored and used for all languages (such as for a part number field), or as multilingual, so that you can store a distinct value for each language (such as for a product name field).
• Object fields. Images, text blocks, and PDFs are automatically multilingual. While the need for multilingual text blocks and PDFs is obvious, perhaps not as obvious is the need for multilingual images, which may feature text that must appear in multiple languages, or a human subject of varying ethnicities.
NOTE ►► Boolean fields are non-lingual. However, the underlying
True and False text values, like many lookup table display fields, are
automatically multilingual.
MULTILINGUAL PUBLISHING
The MDM APIs and the library of MDM portlets/iViews both support multilingual Web publishing by providing language-specific access to multilingual repository data, for completely flexible presentation layers in a multilingual environment.
MULTILINGUAL GUI SOFTWARE
Finally, the MDM Win32 tools themselves are multilingual and can be made available with all GUI elements translated into a target language using the MDM Language Selector tool.
NOTE ►► See “Part 8: UI Language Selection” for more information
about how to set the MDM user interface language.
REPOSITORY LANGUAGES AND LANGUAGE NAMES
MDM currently supports nearly 100 languages that are built into the system. Each language consists of: (1) a generic language name; and (2) a two-letter country code enclosed in square brackets ([]).
MULTILINGUAL DATA AND METADATA ELEMENTS
The metadata and data elements of an MDM repository that provide multilingual support are summarized in Table 99.
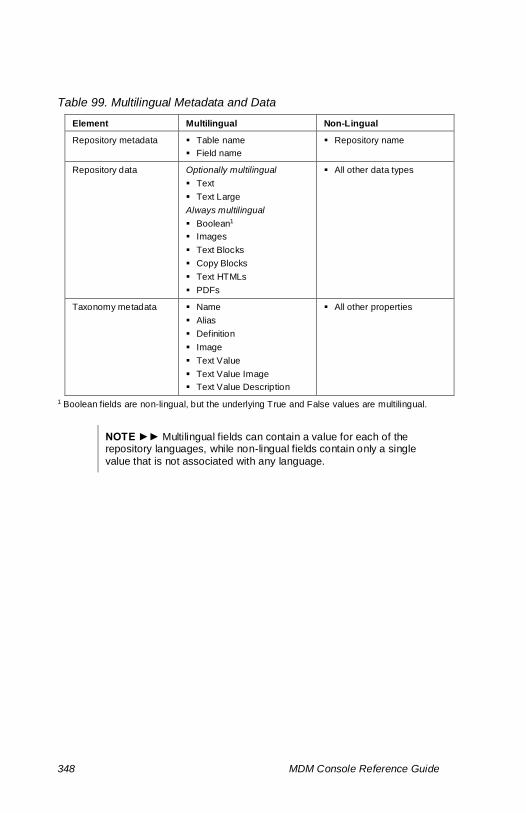
348 MDM Console Reference Guide
Table 99. Multilingual Metadata and Data
Element Multilingual Non-Lingual
Repository metadata ▪ Table name
▪ Field name
▪ Repository name
Repository data Optionally multilingual
▪ Text
▪ Text Large
Always multilingual
▪ Boolean1
▪ Images
▪ Text Blocks
▪ Copy Blocks
▪ Text HTMLs
▪ PDFs
▪ All other data types
Taxonomy metadata ▪ Name
▪ Alias
▪ Definition
▪ Image
▪ Text Value
▪ Text Value Image
▪ Text Value Description
▪ All other properties
1 Boolean fields are non-lingual, but the underlying True and False values are multilingual.
NOTE ►► Multilingual fields can contain a value for each of the repository languages, while non-lingual fields contain only a single
value that is not associated with any language.

MDM Console Reference Guide 349
Multilingual Basics
Basic multilingual concepts are explained in the following sections.
LANGUAGE LAYERS
When you define an MDM repository as multilingual, MDM stores the multilingual data and metadata in multiple language layers, one for each language. A single language repository has a single layer; a multiple language repository has multiple layers.
The best way to understand language layers is to start by considering a typical unstructured approach to storing multiple languages for a field by creating multiple instances of the same field, as shown in Figure 77.
Part Number Product Color (Eng) Color (Fre) Color (Ger)
113 T-Shirt Red Rouge Rot
114 T-Shirt Green Vert Grün
115 T-Shirt Blue Bleu Blau
Figure 77. A typical table with three Color fields for three languages
The table above contains three Color fields side-by-side, one for each language (English, French, and German), and can be successfully used to store the multilingual color data within the table.
Unfortunately, the system would know nothing of the relationship among the fields, so it cannot offer the user a language-centric view of the data, and the user has no way of knowing that the fields are related (except that the field names above have been tagged with the corresponding language). Finally, all the field names themselves exist only in English.
Now consider the MDM approach that uses multiple language layers to represent the multiple languages, as shown in Figure 78.
Figure 78. An MDM table with three language layers
Multiple layers efficiently organize and structure both multilingual data and metadata, with a single Color field above containing multiple data buckets rather than multiple Color fields that are completely unrelated, and multiple language-specific field names for all of the fields.
German
French
English

350 MDM Console Reference Guide
LANGUAGE INHERITANCE
To support convenient user access to multilingual data, MDM client applications provide a language-centric view of data within a multilingual repository, meaning that data is presented from the point of view of a particular language layer at a time. This single language is called the current language, and you select it when you first connect to a multilingual repository with an MDM client application.
NOTE ►► By contrast, you do not choose a language when you first
connect to MDM Console or to an MDM repository within MDM Console. Instead, each repository has a current language, which is the
is the first in the repository-specific language ordering, also known as
the primary language.
NOTE ►► The language-centric view determines not only which
language of data is displayed, but also which language of metadata is
displayed, including table names, field names, and attribute names.
Now consider a multilingual field that is missing data in the current language. In a single-language repository, the value is shown as empty or NULL. However, MDM uses an innovative inheritance scheme to display – and color-code – data from other language layers for data values that are missing in the current language.
The actual value shown depends on the language inheritance defined for the current language. The language inheritance identifies the priority sequence of language layers from which to find a non-NULL value to display when the current language layer is NULL.
NOTE ►► Language inheritance is a type of layer transparency that allows individual data values to “show through” from other language
layers when the current layer is missing data.
Language inheritance is set for each language, and is defined by the administrator as the ordering of all the other languages of the repository, split into: (1) primary inheritance (for languages whose values are close enough to the current language to be acceptable for publishing); and (2) secondary inheritance (for languages whose values are too different from the current language to be acceptable for publishing, but are perhaps useful during data entry and/or translation).
NOTE ►► Whereas inheritance of both metadata and data within
MDM client applications is based on the language-specific ordering for the language you choose when you first connect to the repository,
inheritance of metadata within MDM Console is based on the primary language and the repository-specific language ordering defined for
each MDM repository (see “Modifying the Repository Languages” for
more information on repository-specific language ordering).

MDM Console Reference Guide 351
Thus, for the MDM client applications, there is the current language and two levels of inheritance, color-coded as follows:
• Black. The value is from the current language.
• Green. The value is from a primary inherited language.
• Red. The value is from a secondary inherited language.
NOTE ►► The grids, lists, and trees in the MDM client applications all
use the three-color coding scheme. By contrast, MDM Console uses a two-color scheme with only a single level of inheritance, with table and
field names inherited from language layers other than the primary
language for each repository displayed in green.
NOTE ►► MDM client applications display: (1) actual values from the current language; (2) primary inherited values; and (3) secondary
inherited values. By contrast, a published catalog (e.g. an electronic Web catalog or a printed catalog) is likely to display only: (4) actual
values; and (5) primary inherited values; but (6) hide secondary inherited values, which are displayed in the MDM client applications
only for context during data entry and/or to assist in translation.
Consider a repository with three language layers: (1) English [US]; (2) English [UK]; and (3) German [DE]. Both English values are typically the same, so you can set the value for one version of English and allow the other to inherit it. However, you do not want the English languages to inherit German or vice versa. In this case, inheritance for each language would be as shown in Table 100.
Table 100. Language Inheritance Example for Three Languages
Language Primary Inheritance Secondary Inheritance
English [US] English [UK] German [DE]
English [UK] English [US] German [DE]
German [DE] <none> English [US]; English [UK]
Given the above inheritance, a record with the Size field set to “Small” for English [US] and to NULL for both English [UK] and German [DE] would display and color-code the value from each language-centric view as shown in Table 101.
Table 101. Language-Centric Display Example for Three Languages
Language Actual Value Inherits From Display Value
English [US] Small <actual value> Small
English [UK] NULL English [US] Small
German [DE] NULL English [US] Small

352 MDM Console Reference Guide
The terminology and behavior around inheritance in MDM Console and in MDM client applications are summarized in Table 102.
Table 102. Inheritance: MDM Console vs. MDM Client Applications
Inheritance Item MDM Console MDM Client Applications
Language ordering Repository-specific Language-specific
Actual values Primary language Current language
Levels of inheritance One Two (primary and secondary)
Type of inherited values Metadata only Metadata and data
Color coding Black / Green Black / Green / Red
An example of inheritance in MDM Data Manager is shown in Figure 79.
Figure 79. Inheritance in MDM Data Manager
NOTE ►► MDM Data Manager displays the current language in the
title bar after the MDM repository name. If the language has not been renamed, the language displays as “language [co]” (where “language”
is the language name and “co” is the country name). (See “Changing the Display Name of a Repository Language” for more information on
how to rename a language.)

MDM Console Reference Guide 353
INHERITANCE LEVELS
From a technical standpoint, the value shown for a field is dependent on which language inheritance level is selected in the particular MDM application.
The three inheritance levels and the applications that use them are summarized in Table 103
Table 103. Language Inheritance Levels
Level Description Sorted Results MDM Modules
Actual Use only the current language layer.
Sorted by any non-empty actual value
<none>
Actual or Primary
Use current language layer, or if empty, the first
non-empty primary inherited language layer.
Sorted by any non-empty actual or primary inherited values
(secondary inherited values treated as empty).
▪ Java API
Actual or Any
Use current or primary language layers, or if empty, the first non-empty secondary
inherited language layer.
Sorted by any non-empty value, actual or inherited.
▪ Data Manager
▪ Import Manager
▪ Syndicator

354 MDM Console Reference Guide
Quick Reference
Multilingual features are sprinkled across MDM, including MDM Console and MDM client applications, as summarized in Table 104.
Table 104. Multilingual Quick Reference
Location Description
MDM Console
Console Hierarchy tree
Metadata is color-coded to indicate that a value is either actual or inherited from a language layer other than the
primary language.
Language property / Repository Detail pane
Add, rename, and delete languages, and modify the repository-specific language ordering using the dual-list drop-down control.
Language-specific subproperties /
Repository Detail pane
Modify the language-specific language inheritance using the dual-list drop-down control for each language.
Name property / Table Detail pane
Specify the multilingual names for a table using the multilingual drop-down edit control that replaces the simple edit control.
Name property / Field Detail pane
Specify the multilingual names for a field using the multilingual drop-down edit control that replaces the simple edit control.
Multilingual property / Field Detail pane
Specify whether the field is multilingual; enabled only for
the applicable field types; disabled and set to Yes for object field types.
True Value / False Value / Field Detail pane (Booleans)
Specify the multilingual True / False values using the multilingual drop-down edit control that replaces the simple edit control.
Decimal Places / Show Fractions / Field Detail pane (Measurements)
Specify the multilingual values using the multilingual drop-down control that replaces the simple drop-down control.
MDM Client Applications
Grids, Lists and Tabs
Metadata and data are color-coded to indicate that a value is either actual or inherited from a primary or
secondary language layer.
Title bar Displays the current language after the MDM repository name as “language [co]” (if it has not been renamed).
Language field / Connect to Repository dialog
Specify the current language for the current MDM client session using the drop-down list of repository languages.
MDM Data Manager
Data grid / Record Detail tab
View and edit actual and inherited data using the color coding in the Record Detail tab.
Multilingual data grid / Language Detail tab
View and edit multilingual data using a tab that displays a row for each multilingual data element and column for
each language.

MDM Console Reference Guide 355
Location Description
Show Inherited Values option / Configuration Options dialog
Specify whether to display inherited values in the Language Detail tab using the Show Inherited Language Values option.
Language Layer operator / Free-Form Search tab
Search for missing multilingual data using the language
layer operator, which has a operands for each type of inheritance.
Language field / Add Object dialogs
Import objects into the specified language layer when creating new object records using the drop-down list of
repository languages.
Object lookup field / Language Detail tab
Import objects into the applicable language layer of existing object records using the object lookup field context menu command.
Merge records data grid / Merge Records dialog
Merge object records for different language layers and Copy/Paste objects between language layers when
merging object records.
Languages checkbox and tab / Record mode Export dialog
Export multilingual record data into multiple columns
using the Record mode Export commands.
Record mode Import dialog Import multilingual record data from multiple columns
using the Record mode Import command.
Languages checkbox and tab / Taxonomy mode Export
dialog
Export multilingual attribute data into multiple columns
using the Taxonomy mode Export command.
Taxonomy mode Import dialog
Import multilingual attribute data from multiple columns
using the Taxonomy mode Import command.
MDM Import Manager
Destination Fields grid / Map Fields/Values tab
Map between language-specific source fields and each language layer of a non-lookup MDM multilingual field.
Language column / Destination Fields grid / Map
Fields/Values tab
Identify the applicable language layer for expanded instances of multilingual Text and Text Large fields.
Expand Multilingual Fields option / Configuration Options dialog
Specify whether to expand multilingual text fields into multiple fields in the Destination Fields grid of the Map Fields/Value tab.
Value Mapping Map button / Map Fields/Values tab
Specify whether to populate missing values in the current language layer using the pop-up menu.

356 MDM Console Reference Guide
Multilingual Operations
The following sections describe MDM Console operations for changing the multilingual characteristics of an MDM repository. There are no explicit commands for any of these operations. Rather, the multilingual properties of a repository are modified in the various detail panes, as summarized in Table 105.
Table 105. Multilingual Console Operations
Operation Description
Languages property /
Repository Detail pane Modifies the set of repository languages.
Languages property /
Repository Detail pane
Modifies the display name of a language
defined for a repository,
Languages property /
Repository Detail pane
Modifies the repository-specific language
ordering for a repository.
Language-specific subproperty /
Repository Detail pane
Modifies the language-specific language
inheritance for a language.
Name property /
Table Detail pane Defines multilingual names for a table.
Name property /
Field Detail pane Defines multilingual names for a field.
Multilingual property /
Field Detail pane Defines a field as multilingual.
NOTE ►► The following sections describe only the multilingual
aspects of the MDM Console operations listed in the table above. For a complete description of the operations themselves, see the applicable
section in this guide.
NOTE ►► When you first create an MDM repository, it contains just a
single language by default (English [US]).
NOTE ►► Table names and field names are the metadata values that are multilingual in a multilingual repository schema. By contrast, the
MDM repository name itself is always non-lingual.
TIP ►► After the repository has been created, you can modify the set
of languages and the multilingual properties for the repository, for each table, and for each field, by selecting the object in the applicable object
pane and moving the focus in the corresponding object detail pane.

MDM Console Reference Guide 357
MODIFYING THE REPOSITORY LANGUAGES
An MDM repository can include any number of languages.
The Languages property in the Repository Detail pane, shown in Figure 80, displays the current repository languages in the repository-specific language ordering as a list of languages separated by vertical bars (|).
Figure 80. Languages property
When you create an MDM repository, by default, it contains a single language (English [US]).
You can:
▪ Add repository languages
NOTE ►► Languages should be added only when needed; using a
large number of languages might affect performance.
▪ Remove repository languages
▪ Change the repository-specific language ordering
▪ Change the display names of languages that are used in the
repository
NOTE ►► By default, the name of each language is the language name / country combination (i.e. “language [co]”). (See “Changing the
Display Name of a Repository Language,” for information about
renaming a language.)
To modify the languages in a repository:
1. In the Console Hierarchy tree, select the applicable Master Data
Server.
2. In the Repositories pane, select the required repository.
3. In the Repository Detail pane, double-click the Languages property.
MDM opens a dual-list drop-down control for multiple-item selection, as
shown in Figure 81. The Available Languages list displays the list of
supported languages by the repository. The Selected Languages list
displays the languages that are used in the repository.

358 MDM Console Reference Guide
Figure 81. Repository language modification
4. Modify repository languages as follows:
▪ To add repository languages, highlight them in the Available
Languages list and click the Add button.
▪ To change the display name of a repository language, highlight it
in the Selected Languages list and click the Edit button.
▪ To change the repository-specific language ordering, drag-and-
drop languages in the Selected Languages list.
▪ To remove repository languages, highlight them in the Selected
Languages list and click the Delete button.
5. Press Enter or click on the up triangle to close the drop-down control.
6. MDM prompts you to confirm the changes. Click Yes to confirm.
MDM modifies the repository languages.
NOTE ►► The first language in the repository-specific language
ordering is the primary language for the repository.
NOTE ►► When you add a new language to the repository, MDM automatically: (1) adds the new language to the end of the secondary
inheritance for all other languages; (2) places all other languages in the secondary inheritance for the new language; (3) adds values in the
new language for: (a) those tables whose names are fixed (e.g. the Images and Families tables); (b) those tables and fields with a default
name that has not been changed (e.g. the Products and Categories
tables, and the Name field in each table); and (c) those Boolean values
whose default has not been changed (i.e. True and False).
NOTE ►► When you change the repository-specific language
ordering, MDM immediately refreshes the Console Hierarchy with applicable table names based on the new primary language and/or
inheritance that is based on the new language ordering.
NOTE ►► You cannot delete the last language of a repository.

MDM Console Reference Guide 359
NOTE ►► You can press F2 to rename a language in the Selected Languages list at any time. MDM highlights the language name for
editing. Type the display name for the language and press Enter.
DATA INTEGRITY ►► You can add multiple instances of the same language to the same repository, but two languages cannot have the
same name. If you add a language that already exists and has not been renamed, MDM automatically appends “(n)” to the name of the
language (where ‘n’ is the first available numeric value that will avoid a
conflict).
CAUTION ►► Deleting a language is not reversible.
CHANGING THE DISPLAY NAME OF A REPOSITORY LANGUAGE
Recall that the default name for each language is the language name followed by the two-letter country code in square brackets ([]). For example, the default name for United States English is English [US].
You can change the display name of a repository language as described in this section.
To change the display name for one or more repository languages:
1. In the Console Hierarchy tree, select the applicable Master Data
Server.
2. In the Repositories pane, select the repository whose repository
language(s) you want to rename.
3. In the Repository Detail pane, double-click on the Languages property.
MDM opens a dual-list drop-down control for multiple-item selection
(shown in Figure 81 above).
4. Select the language to rename in the Selected Languages list and click
on the Edit button, or press F2.
5. MDM highlights the language name for editing. Type the new display
name for the language and press Enter.
6. When you are finished renaming languages, press Enter or click on the
up triangle to close the drop-down control.
7. MDM prompts you to confirm the changes. Click Yes to confirm the
modification.
MDM saves the new display name for the language(s).
TIP ►► You can restore the default display name for a language by
selecting it for editing, clearing the value, and pressing Enter.

360 MDM Console Reference Guide
MODIFYING LANGUAGE-SPECIFIC LANGUAGE INHERITANCE
Each language has its own language-specific language inheritance. Directly beneath the Languages property in the Repository Detail pane, in the order the languages are defined for the repository, a subproperty for each language shown in Figure 80 above displays the language inheritance for that language as a list of the other languages separated by vertical bars (|), with a ### separating the sets of primary and secondary inheritance languages.
NOTE ►► The language-specific subproperties appear beneath the
Languages property only for a multilingual repository.
By editing each of the language-specific subproperties as described in this section, you can modify the language-specific language inheritance for each language.
To modify the language-specific language inheritance:
1. In the Console Hierarchy tree, select the applicable Master Data
Server.
2. In the Repositories pane, select the repository whose language-
specific language inheritance you want to modify.
3. In the Repository Detail pane, double-click on the language-specific
subproperty of the Languages property.
4. MDM opens a dual-list drop-down control, as shown in Figure 82.
Figure 82. Language inheritance modification
5. Select or deselect languages from the drop-down list, as follows:
▪ To move languages from primary to secondary inheritance,
highlight them in the Secondary Inheritance list and click the “>”
button.
▪ To move languages from secondary to primary inheritance,
highlight them in the Primary Inheritance list and click the “<”
button.
▪ To move all languages to the Secondary Inheritance list, click the
“>>” button.

MDM Console Reference Guide 361
▪ To move all languages to the Primary Inheritance list, click the
“<<” button.
▪ To reorder the language inheritance within the list of primary or
secondary languages, drag-and-drop them in the applicable list.
6. Press Enter or click on the up triangle to close the drop-down control.
7. To save the new language inheritance, right-click on the Repository
Detail pane and choose Save Repository from the context menu, or
press Shift+Enter.
DEFINING MULTILINGUAL TABLE NAMES
The Name property in the Table Detail pane displays the multilingual table names for each language in the repository-specific language ordering as a list of names separated by vertical bars (|).
In a multilingual repository, MDM replaces the simple edit control for the Name property with the multilingual drop-down edit control. You can use this control to edit the multilingual table names as described below.
To edit the multilingual table names:
1. In the Console Hierarchy tree, select the applicable MDM repository.
2. In the Tables pane, select the table you want to modify.
3. In the Table Detail pane, double-click on the Name property.
4. MDM opens a multilingual drop-down edit control with a row for each
language, as shown in Figure 83.
Figure 83. Multilingual table name modification
5. Edit the table name for each language by tabbing from row to row,
double-clicking or hitting Enter in the Value cell, and editing the name.
6. When you are finished editing the multilingual table names, press
Ctrl+Enter or click on the up triangle to close the drop-down control.
7. To save the new multilingual table names, right-click on the Table
Detail pane and choose Save Table from the context menu, or press
Shift+Enter.

362 MDM Console Reference Guide
DEFINING MULTILINGUAL FIELD NAMES
The Name property in the Field Detail pane displays the multilingual field names for each language in the repository-specific language ordering as a list of names separated by vertical bars (|).
In a multilingual repository, MDM replaces the simple edit control for the Name property with the multilingual drop-down edit control. You can use this control to edit the multilingual field names as described in this section.
To edit the multilingual field names:
1. In the Console Hierarchy tree, select the applicable table within an
MDM repository.
2. In the Fields pane, select the field whose multilingual names you want
to modify.
3. In the Field Detail pane, double-click on the Name property.
4. MDM opens a multilingual drop-down edit control with a row for each
language, as shown in Figure 84.
Figure 84. Multilingual field name modification
5. Edit the field name for each language by tabbing from row to row,
double-clicking or hitting Enter in the Value cell, and editing the name.
6. When you are finished editing the multilingual field names, press
Ctrl+Enter or click on the up triangle to close the drop-down control.
7. To save the new multilingual field names, right-click on the Field Detail
pane and choose Save Field from the context menu, or press
Shift+Enter.

MDM Console Reference Guide 363
DEFINING MULTILINGUAL FIELDS
Recall that only certain data types can be defined as multilingual, while objects (i.e. images, text blocks, and PDFs) are always multilingual. You can define the applicable data types as multilingual as defined in this section.
To define a field as multilingual:
• In the Field Detail pane, set the Multilingual property to Yes.
NOTE ►► The Text and Text Large data types can be optionally
defined as multilingual. The object data types are always multilingual.
NOTE ►► Boolean fields are non-lingual. However, the underlying True and False text values, like many lookup table display fields, are
automatically multilingual. MDM replaces the simple edit control for the True Value and False Value properties with the multi lingual drop-down
edit control.
NOTE ►► Measurement fields are non-lingual. However, the Decimal Places and Show Fractions properties are automatically multilingual.
MDM replaces the simple drop-down control for these properties with the multilingual drop-down control.

364 MDM Console Reference Guide
MDM Language Selector Tool
MDM multilingual support includes the ability to use the MDM Win32 tools with all GUI elements appearing in any supported language.
You can individually set the language for each Windows user on each client workstation using the MDM Language Selector tool, as described in this section.
NOTE ►► The MDM Language Selector tool is completely separate
from MDM Console.
To start the MDM Language Selector tool from either the Desktop or
the Start menu and set the language for the current Windows user:
1. Login to Windows as the user whose UI language you want to set.
2. From the Desktop, double-click the MDM Language Selector icon
(shown at left) or from the Start menu, choose Programs > SAP MDM >
SAP MDM Language Selector.
3. MDM opens the Set User Language Dialog shown in Figure 85.
Figure 85. Set User Interface Language dialog
4. Choose the user interface language from the list of languages and
press OK to close the dialog. MDM sets the language for the user.
NOTE ►► MDM stores the user interface language setting in the Windows registry of the client workstation on which you set the
language for the current user.

365
PART 12: REMOTE SYSTEMS AND MDM
This part of the reference guide contains a general overview of remote systems and MDM, and a specific description of the related features within MDM Console, including remote systems, key mapping, and ports, which allow MDM to synchronize data between itself and other systems.


MDM Console Reference Guide 367
Remote Systems and MDM
MDM has special features that enable it to synchronize data between itself and other systems, as described in the following sections.
WHAT IS A REMOTE SYSTEM?
Any logical system that can supply data to or receive data from MDM is known as a remote system.
MDM can import data from remote systems and create/update master data objects using that data. Master data objects include main table records, subtable records / lookup values, and text attribute text values.
When data is changed in a remote system, the changes can be imported into MDM. Using previously created structural and key mappings, in conjunction with dynamically reconfigurable transformations and mappings, the data is applied to the master data objects. All changes to master data objects are tracked.
At any time, master data objects can then be distributed to all known remote systems through a process known as syndication. This involves determining which master data objects need to be distributed and converting them into a form that the remote system can understand.
NOTE ►► The remote system concept supports a number of features related to consolidation and distribution by bundling all sorts of useful
information related to a particular outside system, including key
mapping, import maps, syndication maps, and various timestamps.
KEY MAPPING
A remote system’s objects are mapped to master data objects within MDM using key mapping. A key mapping maintains the relationship between the remote system’s identifier (or key) for an object and the corresponding master data object in MDM.
A key in MDM is a remote system-specific and object-type-specific unique identifier. Different remote systems can have their own separate collection of keys. Within a remote system, each type or collection of objects can have its own separate collection of keys as well. Key mappings are subject to the requirement that two different objects of the same type from the same remote system cannot have the same key.
Remote system objects of a particular type can map only to MDM objects of a particular type. A key can map to only one MDM object. However, an MDM object may map to multiple keys from the same client system. When an MDM object maps to multiple keys, one of the keys is marked as the default key. The default key is the one that is used when syndicating a reference to the mapped MDM object.

368 MDM Console Reference Guide
For example, for a particular remote system, the two color objects Light Red and Dark Red both map to the MDM object Red. An MDM product object Shirt has a Color attribute set to Red. When this Shirt object is syndicated back to the remote system, the default key is used to choose the value to syndicate from the two objects Light Red and Dark Red.
MDM objects that can be mapped to remote system keys include user-defined table records, attribute definitions, and text attribute text values. Key mapping must be enabled on each collection of objects for MDM to maintain the keys.
REMOTE SYSTEMS TABLE
The Remote Systems table is a system table under the Admin node in the Console Hierarchy in MDM Console. It contains information about all the remote systems known to MDM. You can manually add, modify, and delete remote systems for an MDM repository by editing the remote system records of the Remote Systems table.
The two key properties of a remote system are:
• Name. This is the display name of the remote system that you can choose. The name must be unique for all remote systems for an MDM repository.
• Type. This determines whether the remote system can supply data for import, receive data from syndication, or both.
NOTE ►► Every MDM repository contains a default remote system
named MDM of type Inbound/Outbound that cannot be edited or deleted. This remote system is used for changes originating from all
MDM client applications except the MDM Import Manager and for ad
hoc port-based Import Manager imports and Syndicator exports.
NOTE ►► See “Remote Systems Table” for more information on the
Remote Systems table.
NOTE ►► The MDM Import Manager requires that you identify a
remote system as the source of imported data. You can select the built-in remote system named MDM or any user-defined remote
system of type Inbound or Inbound/Outbound. Key mappings for the
selected remote system will be updated where applicable.
NOTE ►► The MDM Syndicator requires that you identify a remote system as the target of syndicated data. You can select any remote
system defined with type Outbound or Inbound/Outbound. Key
mappings from the selected remote system will be used where
applicable.

MDM Console Reference Guide 369
[REMOTE SYSTEM] AND [REMOTE KEY] FIELDS
MDM uses the remote systems you define in the Remote Systems table to store and maintain key mapping information for each record or text attribute. It does this using a virtual “key mapping” field that you never see in MDM Console or any of the MDM client applications.
This virtual key mapping field is very much like a qualified lookup field into a virtual key mapping qualified lookup table. Each record of the virtual lookup table consists of just two fields:
• [Remote System]. A single-valued Text field that contains the
name of the remote system. This is a normal field.
• [Remote Key]. A single-valued Text field that contains a key value for the corresponding remote system. This is a qualifier field.
In effect, each Remote Systems table record becomes a record of the key mapping qualified lookup table, and each actual key mapping becomes a link of the key mapping qualified lookup field, one per
[Remote System] / [Remote Key] value pair, as illustrated in Figure 86.
SKU Name Lookup [Key Mapping]
213 Widget MDM; 112
CRM; 103
R/3; 55-77
Figure 86. Key Mapping information stored in virtual lookup field
The [Remote System] and [Remote Key] fields are normally not visible in the MDM client applications; however, they do appear in several places in each application:
• MDM Data Manager. Both fields: (1) appear in the File > Export dialogs in Record mode for exporting value pairs; (2) are recognized
by the File > Import dialog in Record mode for importing value pairs;
and (3) appear in the Edit Key Mappings dialogs in both Record mode and Taxonomy mode, for viewing and editing value pairs.
• MDM Import Manager. You choose a [Remote System] when you enter the MDM Import Manager (or you choose one indirectly by
selecting a map), and [Remote Key] appears in the Destination Hierarchy tree, the list of Destination Fields in the Map Fields/Values tab, and the Value Matching lists in the Match Records tab.
• MDM Syndicator. You choose a [Remote System] when you enter the MDM Syndicator (or you choose one indirectly by selecting a
map), and [Remote Key] appears in the list of source fields for syndication. You can also edit key mappings for individual records from within the Syndicator.

370 MDM Console Reference Guide
REMOTE SYSTEM SEMANTICS
Remote systems conform to the following semantics:
• A remote key represents an identifier (key) of an MDM object within a remote system. The remote system that issues the key is known as a remote system.
• A remote system may issue multiple unique keys to represent the same object but may not issue the same key to two different objects. Keys issued by different remote systems do not have to be unique.
• Main table records, subtable records, and text attributes may be
flagged to store remote keys (Key Mapping=Yes) in MDM Console
(for tables) or in Taxonomy Mode (for text attributes).
• No two records within a table and no two text attribute text values
within a text attribute domain may have the same remote key for the same remote system.
NOTE ►► To enforce this uniqueness constraint, if MDM is asked to
associate a remote key that already exists with a different record or text attribute text value, it will remove the key from the original record
or text value before making the new association.

MDM Console Reference Guide 371
Ports and MDM
MDM ports are an integral part of sending and receiving data from remote systems.
WHAT IS A PORT?
With remote systems as a foundation, an MDM port encapsulates all of the configuration and logistical information associated with inbound and outbound processing of data from these remote systems.
In so doing, it simplifies the process of: (1) delivery and consolidation of raw data from remote systems into MDM using the MDM Import Manager; and (2) extraction and distribution of data from MDM to remote systems using the MDM Syndicator.
In each case, the port represents the logical point of contact between MDM and the outside world (e.g. XI or a user of the MDM Import Manager). Within the MDM Import Manager and MDM Syndicator, it represents the physical staging location of data and a logical handle by which to identify all of the encapsulated information.
NOTE ►► Along with simplifying the user interaction, ports also lay the foundation for future automation of the consolidation and
distribution processes within MDM.
PORT BENEFITS
Ports are designed to eliminate inbound and outbound processing complexity and the opportunity for user error by eliminating the need for users to make the following decisions:
Inbound (MDM Import Manager)
• Select the remote system that originated the data.
• Identify the location where source data files are waiting to be loaded.
• Select a source data file.
• Select the applicable MDM Import Manager map.
Outbound (MDM Syndicator)
• Select the remote system that will receive the data.
• Select the applicable MDM Syndicator map.
• Identify the location where data files should be placed for delivery.

372 MDM Console Reference Guide
As manual selections, any of the decisions above can result in an error, which could lead to incorrect or incomplete processing. By eliminating these manual selections, ports reduce the likelihood of errors.
PORTS AND THE FILE SYSTEM
The files associated with ports are stored in a shared file system location with a fixed directory structure beneath a configurable root. The root must be accessible to both MDM and its location is specified in the
mds.ini file. The fixed directory structure beneath the root is as follows:
Inbound (MDM Import Manager)
root/DBMSinstance_DBMStype/RepositoryName/Inbound/
ClientSystem/PortName/Ready
root/DBMSinstance_DBMStype/RepositoryName/Inbound/
ClientSystem/PortName/Archive
root/DBMSinstance_DBMStype/RepositoryName/Inbound/
ClientSystem/PortName/Status
Outbound (MDM Syndicator)
root/DBMSinstance_DBMStype/RepositoryName/Outbound/
ClientSystem/PortName/Ready
root/DBMSinstance_DBMStype/RepositoryName/Outbound/
ClientSystem/PortName/Archive
root/DBMSinstance_DBMStype/RepositoryName/Outbound/
ClientSystem/PortName/Status
where:
• root is the configurable root.
• RepositoryName, ClientSystem, and PortName are the actual names configured in MDM Console (and invalid file name characters are replaced by the percent symbol (%)).
• DBMSinstance is the network identifier used to specify the DBMS
instance name and DBMStype is the four-character identifier for the DBMS type (i.e. MSQL, ORCL, IDB2).
PORTS TABLE
The Ports table is an MDM system table with a predefined set of fields, and records that appear in the top-right Ports pane of the MDM Console. Each record that you add in MDM Console defines a particular port for inbound and outbound processing of MDM data.
NOTE ►► When you first create a new MDM repository, MDM
automatically creates the Ports table (as a child of the Admin node of
the Console Hierarchy tree).

MDM Console Reference Guide 373
Table 107. Port Properties
Property Description
Sequence1 The customizable order in which MDIS processes the automatic inbound ports. The default sequence is the order in which the ports were created.
Name The port name.
Code The port code.
Type
Whether the port can supply or receive data:
▪ Inbound – can only supply for import
▪ Outbound – can only receive from syndication
▪ Becomes read-only the first time the port is saved
Remote System
The applicable remote system.
▪ Drop-down list of remote systems
▪ Limited to remote systems of same type as the port
Map
The applicable map.
▪ Drop-down list of maps for the chosen Remote System
▪ Limited to import maps for Inbound ports; and
syndication maps for Outbound ports
Format1
The format of the source data for Inbound ports:
▪ Fixed Text – fixed width ASCII text files ▪ Delimited Text – delimited ASCII text files
▪ Access – Access files ▪ Excel – Excel files
▪ XML Schema – XML Schema
Columns1
The width of fields in the source table.
▪ Entered as semi-colon delimited list (e.g. 4;7;9)
▪ Use a colon to separate differing header field widths
from data field widths (e.g. 25;50;10:4;7;9)
▪ Format=Fixed Text only
Delimiter1
The delimiter character.
▪ Typed character or “\t” for Tab
▪ Format=Delimited Text only
XML Schema1
The applicable XML schema.
▪ Drop-down list of XML schemas
▪ Format=XML Schema only
Processing Type
The type of processing:
▪ Manual – files processed manually
▪ Automated – files auto-processed by service

374 MDM Console Reference Guide
Property Description
Processing Interval2
The frequency of automated syndications to the port:
▪ Continuous
▪ Hourly ▪ Daily
▪ Weekly
▪ Format=Automatic only
Next Syndication Date2 The next earliest syndication date to the port.
▪ Processing Interval=Hourly, Daily or Weekly only
Next Syndication Time2 The next earliest syndication time to the port.
▪ Processing Interval=Hourly, Daily or Weekly only
File Aggregation Count1 The number of import files to aggregate for batch processing.
Block on Structural Exceptions1
Whether the port is blocked after a structural exception is found in an import file.
Status1
The read-only status of the port:
▪ Empty – port is ready; nothing waiting
▪ Has Data – file waiting
▪ Has Exceptions – file and/or exceptions waiting ▪ Blocked – port is blocked
Active Whether the port is enabled.
1 Available on inbound ports only. 2 Available on outbound ports only.
Editing the Sequence of Inbound Ports
To edit the order in which MDIS processes automatic inbound ports:
1. Right-click on the Ports table and choose Sequence.
2. In the Port Sequence dialog, drag ports up and down the list to achieve the desired sequence (ports are processed in order from the top of the
list) and click OK.
The Sequence column displays the new sequence.

MDM Console Reference Guide 375
Remote System Operations
The following sections describe MDM Console operations for managing the remote systems, key mapping, and ports of an MDM repository, as summarized in Table 108.
Table 108. Remote System Console Operations
Operation Description
Remote Systems table /
Console Hierarchy tree
Manages the set of known remote systems for the
MDM repository.
Key Mapping property /
Table Detail pane
Specifies whether MDM should maintain key
mappings for the table.
Attribute Definition Key Mapping property /
Table Detail pane
Specifies whether MDM should maintain key
mappings for attribute definitions.
Ports table /
Console Hierarchy tree Manages the set of ports for the MDM repository.
REMOTE SYSTEMS TABLE
Each record that you add in MDM Console defines a particular remote system that can supply data to or receive data from MDM.
NOTE ►► When you first create a new MDM repository, MDM
automatically creates a remote system named MDM of type
Inbound/Outbound that cannot be edited or deleted.
To manage the remote systems for an MDM repository:
1. In the Console Hierarchy tree, open the Admin node of the applicable
MDM repository and select Remote Systems.
2. In the Remote Systems and Remote System Detail panes, add,
modify, or delete remote system records.
CAUTION ►► Be careful when deleting a remote system, which will remove all key mappings and change tracking for that remote system.
Adding back the remote system later will not restore the key mappings
and will require them to be created again. It will also cause the first syndication to export all records rather than just the records that have
changed since the previous syndication.
The properties for each remote system are listed in Table 109; all of the properties are directly editable in the Client Detail pane.

376 MDM Console Reference Guide
Table 109. Remote System Properties
Property Description
Name The remote system name within MDM.
Code The remote system code.
Type
Whether the remote system can supply or receive data:
▪ Inbound – can only supply for import ▪ Outbound – can only receive from syndication ▪ Inbound/Outbound – can both supply and receive data
Suppression Mode
When unchanged records are suppressed from syndication:
▪ Remote System – after first syndication to the remote system
▪ Port – after syndication to each port on the remote system
Changing the suppression mode clears all previous syndication
timestamps in the repository, meaning no records will be suppressed from syndication until they have been re-syndicated
under the new suppression mode.
Key Generation
Key generation for new records on the remote system:
▪ None – new records will not have keys
▪ Range – generate keys in the specified range ▪ Qualified Range – generate keys on a per-value basis
From The starting value for Range key generation (integer).
▪ Key Generation=Range only
To The ending value for Range key generation (integer).
▪ Key Generation=Range only
Lookup Table
The lookup field for Qualified Range key generation.
▪ Drop-down list of single-valued lookup fields
▪ Key Generation=Qualified Range only
Qualified Range
From and to values for each lookup table value.
▪ Entered using Qualified Range Key Generation dialog
▪ Displayed as “[NULL]=[10:20]; Cars=[30:40]; …”
▪ Key Generation=Qualified Range only
Used for Exchange
of Personal Data Used for the exchange of personal data.
Key Generation
When a master data object is distributed by MDM to a remote system, and the master data object does not already exist in that remote system, MDM must generate a key that maps the master data object to its matching record in the remote system.
The Key Generation property of the Remote Systems table allows the MDM administrator to specify how keys should be generated.

MDM Console Reference Guide 377
Key generation for new records can be specified as follows:
• None. New records will not have keys.
• Range. MDM automatically generates keys based on values you specify for the From and To properties.
• Qualified Range. MDM automatically generates keys for the specified single-valued lookup field based on values you specify using the Range property.
NOTE ►► Keys are generated at time of syndication.
NOTE ►► The maximum length for generated keys is 18 digits.
NOTE ►► To change the range of existing key values, first set Key
Generation to None to wipe out existing key values and then set it back
to Range and enter the new From and To range values.
You can specify Qualified Range values by selecting the single-valued lookup field from the drop-down list and specifying From and To range values for each lookup table value, as described below.
To specify Qualified Range values for a remote system:
1. In the Clients pane, select the remote system for which you want to
specify the qualified range key generation values.
2. In the Remote System Detail pane, double-click on the cell corresponding to the Key Generation property and select Qualified
Range from the drop-down list of values.
3. In the Remote System Detail pane, double-click on the cell corresponding to the Qualified Range property to open the Qualified
Range Key Generation dialog.
4. Specify a non-overlapped range of from and to values for every single
lookup value and then click OK to close the dialog.
5. Press Shift+Enter to save the changes for the remote system.
SPECIFYING KEY MAPPING FOR A TABLE
You can use the Key Mapping table property to specify whether MDM should maintain key mappings for the records of a table, as described in this section.
To specify key mapping for a table:
1. In the Console Hierarchy tree, select the applicable MDM repository.
2. In the Tables pane, select the table for which you want to specify key
mapping.

378 MDM Console Reference Guide
3. In the Table Detail pane, double-click on the Key Mapping property and
choose whether to maintain key mapping:
▪ Yes – enable key mapping
▪ No – disable key mapping
4. Press Enter or click on the up triangle to close the drop-down control.
5. MDM enables or disables key mapping for the selected table.
CAUTION ►► Be careful when turning off key mapping for a table,
which will remove all key mappings for the records of the table. Turning key mapping back on later will not restore the key mappings and will
require them to be created again.
SPECIFYING KEY MAPPING FOR ATTRIBUTE DEFINITIONS
You can use the Key Mapping table property to specify whether MDM should maintain key mappings for attribute definitions, as described in this section.
To specify key mapping for attribute definitions:
1. In the Console Hierarchy tree, select the applicable MDM repository.
2. In the Tables pane, select the taxonomy table.
3. In the Table Detail pane, double-click on the Attribute Definition Key
Mapping property and choose whether to maintain key mapping:
▪ Yes – enable key mapping
▪ No – disable key mapping
4. Press Enter or click on the up triangle to close the drop-down control.
5. MDM enables or disables key mapping for attribute definitions.
CAUTION ►► Be careful when turning off key mapping, which will remove all attribute definition key mappings. Turning key mapping
back on later will not restore the key mappings and will require them to
be created again.

379
PART 13: MDM UOM MANAGER
This part of the reference guide contains a description of the MDM UOM Manager (Unit of Measure Manager). The MDM UOM Manager is a separate MDM application that allows you to create and manage a list of user-defined physical dimensions and units of measure for an MDM repository (which augment the built-in dimensions and units) and also to override some of the elements that comprise the definition of built-in dimensions and units (such as the unit suffix and fraction display).
From MDM 7.1 SP09, we recommend that you manage dimensions and units of measurement from the MDM Console interface. For more information, see Managing Units of Measure.


MDM Console Reference Guide 381
Introduction
MDM currently includes built-in support for over 70 different physical dimensions and over 750 different units of measure, along with conversion ratios, synonyms for each unit, and so on.
Using this built-in library of dimensions and units, MDM features a compound data type for storing physical measurements that combines a numeric value with a unit of measure. This allows you to associate a physical dimension with a measurement field or numeric attribute, and then to assign to every numeric value a unit of measure chosen from the list of units applicable to that dimension.
MDM’s built-in library then allows MDM to convert between different units, for proper comparison and sorting of numeric values with different units within a list. It also enables measurement search, which automatically converts typed text values that represent measurements between different physical units, so you can find equivalent measurement values even when the value you type has a different unit from how it is stored in the MDM repository. For example, the measurement value “30 inches” stored in the repository can be found as any of: 30”, 30 in, 2 ½ feet, 2-1/2 ‘, 2.5 ft, 2 feet 6 inches, 76.2 centimeters, 762 mm, or 0.762 meter.
The MDM UOM Manager (Unit of Measure Manager) allows you to create and manage a list of user-defined physical dimensions and units of measure for an MDM repository (which augment the built-in dimensions and units). It also allows you to override some of the elements that comprise the definition of built-in dimensions and units (such as the unit suffix and fraction display). Finally, to ensure system integrity, others components of the definition of built-in units cannot be modified.
NOTE ►► The MDM UOM Manager is completely separate from
MDM Console.

382 MDM Console Reference Guide
Getting Started
Before you begin, the MDM UOM Manager needs to connect to an MDM repository. When you launch the MDM UOM Manager, the Connect to MDM Repository dialog opens and prompts you to supply repository connection information, as described in this section.
To start the MDM UOM Manager from either the Desktop or the Start menu and connect to an MDM repository:
1. From the Desktop, double-click the MDM UOM Manager icon (shown
at left) or from the Start menu, choose Programs > SAP MDM > SAP
MDM UOM Manager.
2. When the Connect to MDM Repository dialog appears, fill in the
appropriate connection information.
3. Click OK. After a few seconds, the MDM UOM Manager main window
comes up with the resizable tri-pane screen shown in Figure 87.
Figure 87. UOM Manager main screen
NOTE ►► The contents of the two right panes depend upon your
selection in the left pane.
NOTE ►► The Connect to MDM Repository dialog retains the logon
information entered for the previous connection. The next time you run
the application, you need only click OK to connect.

MDM Console Reference Guide 383
The left pane is the Dimensions Hierarchy pane, which displays a hierarchical tree containing two roots: (1) System Dimensions; and (2) User Dimensions. When you select a particular node in the tree, the MDM UOM Manager behaves as follows:
• Either root. When you select either root in the tree, the two right panes are the Dimensions and Dimension Detail panes, which allow you to work on the definition of a dimension.
• Any dimension. When you select any dimension in the tree underneath either root, the two right panes are the Units and Unit Detail panes, which allow you to work on the units of the dimension.
NOTE ►► Regardless of the selection in the left pane, the upper-right
pane is always a read-only grid whose cells are organized into sortable columns, while the bottom-right pane displays editable information for
the current selection in the upper-right pane.
TIP ►► You may connect to another MDM repository without exiting
the MDM UOM Manager. From the main menu, choose File >
Reconnect to open the Connect to MDM Repository dialog and connect
to a different repository.
NOTE ►► All main menu commands referred to in this document
have equivalent right-click menu functionality.
NOTE ►► To save modifications, click Shift-Enter, or click on another
location outside the detail pane.
NOTE ►► All modifications, except for restoring MDM system units,
are instantly displayed on the MDM UOM Manager screen. However, to refresh the view in MDM Data Manager, you must first stop and
restart the MDM repository.

384 MDM Console Reference Guide
Find Functionality
Find functionality is available from any location within the application and is custom-tailored for use in the MDM UOM Manager. To open the
Find dialog shown in Figure 88, click the Find toolbar button (shown at
left), or from the main menu, choose Edit > Find.
Figure 88. Find dialog
After you type in a search string, the application matches results for names of dimensions as well as names and suffixes of units. In addition, you can search for synonyms, the additional names by which the system recognizes a unit. Use this option to determine whether a synonym already exists in the system, since unit names identical to existing synonyms are not allowed.
NOTE ►► To search for a synonym double click the Search in field to open
the drop-down control, and select Unit. You must select only Exact in the Find
option box and Synonym in the Unit Search box.
To continue searching for the next sequential result that matches the
current string, click the Find Next toolbar button (shown at left), or from
the main menu, choose Edit > Find Next.

MDM Console Reference Guide 385
Working with Dimensions
Dimensions are divided into two types:
• System dimensions. These are the dimensions that are permanently built into every MDM repository along with their system-defined units. Modification of these dimensions is therefore limited: you can edit the dimension name, add and edit units, and remove user-defined units, but you cannot add or remove a dimension to or from this list, or remove system-defined units.
• User-defined dimensions. These are the new dimensions that you can add to augment the list of system dimensions for an MDM repository. You are free to define all of the properties of each user-defined dimension, as well as its list of units, and the properties of each of its units.
Each dimension has the properties shown in Table 110.
Table 110. Dimension Properties
Property Description Value
Name The name of the dimension as it appears in MDM applications.
Typed alphanumeric.
Convertible Whether values are converted among the dimension’s units.
Yes/No (enabled only for user dimensions).
You can manage the system and user-defined dimensions as described in this section.
To add a dimension to the User Dimensions root:
1. Select the User Dimension root in the Dimensions Hierarchy pane.
2. Click the Add toolbar button (shown at left), or from the main menu,
choose Dimension > Add Dimension.
3. MDM creates a new dimension with a single new unit. The default name “New Dimension (n)” is added under the User Dimensions root in
the Dimensions Hierarchy pane.
NOTE ►► To open the list of units, click on the new dimension under
the User Dimensions root.

386 MDM Console Reference Guide
To edit the properties of a dimension:
1. Select the dimension in the Dimensions pane.
2. In the Dimension Detail pane, edit the properties whose values you
wish to change.
NOTE ►► System dimensions with modified names (or to which units
have been added) are highlighted in bold in the Dimensions Hierarchy
tree.
TIP ►► You can use the Esc key before saving modifications to text
fields to revert to the previously saved text.
To remove a user-defined dimension from the Dimensions Hierarchy:
1. Select a dimension.
2. Click the Remove toolbar button (shown at left), or from the main
menu, choose Dimension > Remove Dimension.
3. The dimension and all its defined units are deleted from the MDM
repository.
NOTE ►► You will be unable to remove a dimension that contains
units that are in use by a measurement field or attribute value.
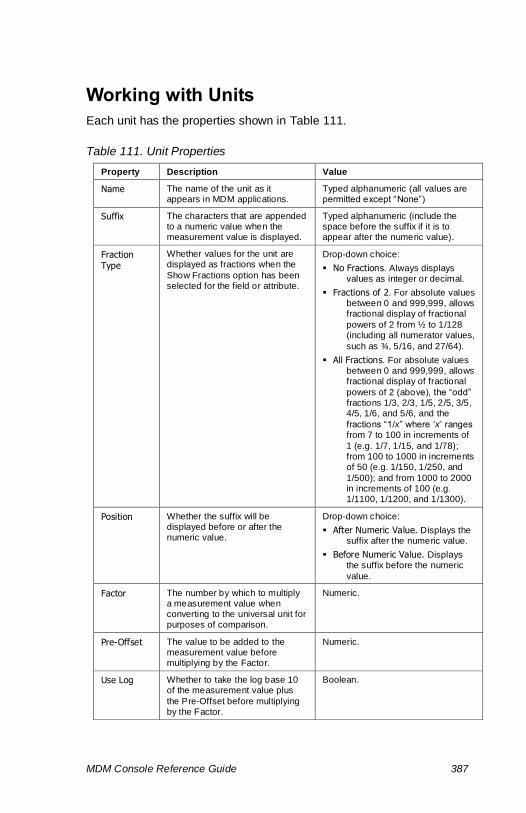
MDM Console Reference Guide 387
Working with Units
Each unit has the properties shown in Table 111.
Table 111. Unit Properties
Property Description Value
Name The name of the unit as it appears in MDM applications.
Typed alphanumeric (all values are permitted except “None”)
Suffix The characters that are appended to a numeric value when the measurement value is displayed.
Typed alphanumeric (include the space before the suffix if it is to appear after the numeric value).
Fraction Type
Whether values for the unit are displayed as fractions when the
Show Fractions option has been selected for the field or attribute.
Drop-down choice:
▪ No Fractions. Always displays values as integer or decimal.
▪ Fractions of 2. For absolute values between 0 and 999,999, allows fractional display of fractional
powers of 2 from ½ to 1/128 (including all numerator values,
such as ¾, 5/16, and 27/64).
▪ All Fractions. For absolute values between 0 and 999,999, allows fractional display of fractional
powers of 2 (above), the “odd” fractions 1/3, 2/3, 1/5, 2/5, 3/5, 4/5, 1/6, and 5/6, and the
fractions “1/x” where ‘x’ ranges from 7 to 100 in increments of
1 (e.g. 1/7, 1/15, and 1/78); from 100 to 1000 in increments of 50 (e.g. 1/150, 1/250, and
1/500); and from 1000 to 2000 in increments of 100 (e.g. 1/1100, 1/1200, and 1/1300).
Position Whether the suffix will be displayed before or after the numeric value.
Drop-down choice:
▪ After Numeric Value. Displays the suffix after the numeric value.
▪ Before Numeric Value. Displays the suffix before the numeric
value.
Factor The number by which to multiply a measurement value when converting to the universal unit for purposes of comparison.
Numeric.
Pre-Offset The value to be added to the measurement value before multiplying by the Factor.
Numeric.
Use Log Whether to take the log base 10 of the measurement value plus
the Pre-Offset before multiplying by the Factor.
Boolean.

388 MDM Console Reference Guide
You can manage the units for a dimension as described in this section.
To add a unit:
1. Select a dimension in the Dimensions Hierarchy pane so that the two
right panes become the Units and Unit Detail panes as shown below.
Figure 89. Units and Unit Detail panes
2. Click the Add toolbar button (shown at left), or from the main menu,
choose Unit > Add Unit.
3. MDM creates a new unit for the current dimension. The default name
“New Unit (n)” is added to the list of units in the Units pane.
To edit unit definitions:
1. Select a unit in the Units pane, and edit its properties in the Unit Detail
pane.
NOTE ►► Unit Name cannot be identical to any existing synonym,
across all dimensions.
NOTE ►► Unit Name and Unit Suffix are unique within a dimension, but can be duplicated among dimensions. A blank value is the only
instance where a duplicate value is allowed for more than one suffix.
2. Double-click the Fraction Type field to open the drop-down control, and
select one of the options to define the fractions setting.

MDM Console Reference Guide 389
3. Double-click the Position field to open the drop-down control, and
select one of the options to define the Suffix position in relationship to
the numeric value.
NOTE ►► The relationship between the remaining fields (Factor, Pre-Offset and Use Log) corresponds to the following function that converts
values to a normalized value for purposes of comparison:
Log10 (value + Pre-Offset) x Factor
These fields are available if the dimension that contains the unit has
been defined as being convertible. Before you begin, define a base universal value and define all other units in relation to this value, as
shown in below.
4. Double-click the Factor field, and enter a factor.
5. Double-click the Pre-Offset field, and enter a pre-offset.
6. Double-click the Use Log field to open the drop-down control, and
choose Yes from the list to use the log base.
Table 112. Sample Entries for a Pair of Units
Unit Factor Pre-Offset Use Log
Celsius 1 0 No
Fahrenheit 0.555555555555556 -32 No
To restore MDM system unit default values:
1. Select a unit in the Units pane.
2. From the main menu, choose Unit > Restore MDM System Unit. All default values for the current unit are restored; the changes are
viewable only after the MDM repository is restarted.
NOTE ►► Only modified system units that appear in red type may be
restored. Units appearing in bold type are user-defined, and are
therefore not restorable.
CAUTION ►► This process is irreversible and any changes you have
made will be irretrievable.


391
PART 14: DATA PROTECTION AND PRIVACY
This part of the reference guide contains a general overview of Data Protection and Privacy (DP&P) within MDM Console.

392 MDM Console Reference Guide
Introduction
MDM Console fully addresses the requirements for the protection of personal data and privacy.
It allows you to maintain personal master data in order to comply with legal requirements regarding the use, retention, and destruction of personal data for information that is maintained in the system.
This includes the blocking of stored personal data after the residence period by limiting the access, and the deletion of personal data (including personally identifiable information) and the destruction of stored personal data after the retention period.
NOTE ►► Use CLIX to perform Console operations from the
command line (see help.sap.com/nwmdm71 > MDM CLIX
Commands for more information).
DATA BLOCKING AND DESTRUCTION
Personal data blocking indication (End of Purpose and End of Retention) is supported in main tables via the property Personal Data.
Roles
Two roles, Data Privacy Specialist and External Auditor, are required to maintain personal data indication, block and unblock, or destroy personal data records.
• Block data – Calculates the block status using the block indicator
and End of Purpose from all relevant systems. This will update
the default ‘MDM’ system with the blocking indication.
• Unblock data – Unblocks records using Data Manager or APIs.
• Destroy data – Deletes all blocked main records where the End
of Retention date has been reached. Note that records that are
referenced from checked out or protected records from other
main tables will be destroyed unless the referenced records are
checked in or unprotected.
These operations are triggered by authorized users:
To block and destroy personal data:
1. Choose DPP > Block Data or Destroy Data and select the Main Table
from the drop-down list.

MDM Console Reference Guide 393
Main Table Properties
The Personal Data property is located in the Table Detail in the main tables only.
Remote systems will be added to the Personal Data Indication field in Data Manager only if Key Mappings is set to Yes, and the remote system is selected for exchanging personal data between MDM and the remote system.