mcquay als / whs / pfs - promklimat.ru ii_sm.pdf · mcquay microtech ii control p lan+driver ......
TRANSCRIPT

Service Manual – Preliminary Version
MCQUAY MicroTech II Control pLAN+Driver
for Modular Chillers
McQuay ALS / WHS / PFS
With screw compressors, 1 to 4 circuits Release of the Manual: 1.0 - 01/05/2001

Service Manual – Preliminary Version MicroTech II Control
Release 1.0 01/05/01 page 2/2
Contents
APPLICATIONS AND FUNCTIONS CARRIED OUT BY THE SYSTEM...........................................................................................3
MASTER/SLAVE SYSTEM ARCHITECTURE.................................................................................................................................4
INPUT/OUTPUT LIST.....................................................................................................................................................................5
AIR/WATER UNIT WITH MAX. 4 SCREW COMPRESSORS MCQUAY ALS / WHS ....................................................................................5 WATER/WATER UNIT WITH MAX. 2 SCREW COMPRESSORS, MCQUAY PFS .......................................................................................6
REGULATION................................................................................................................................................................................7
OUTLET TEMPERATURE REGULATION ...............................................................................................................................................7 CONTINUOUS UNLOADING ...............................................................................................................................................................7
Principles of working: ...........................................................................................................................................................7 Forced Unloading..................................................................................................................................................................10
START-UP OF A SINGLE COMPRESSOR ............................................................................................................................................11 Description of the logic : ........................................................................................................................................................11
START OF THE COMPRESSOR MOTOR .............................................................................................................................................12 Description of the Logic: ........................................................................................................................................................12
LIMITATIONS AT COMPRESSOR START.............................................................................................................................................12 PUMPDOWN................................................................................................................................................................................13 COMPRESSOR ROTATION .............................................................................................................................................................14 CONDENSATION REGULATION........................................................................................................................................................15 CONDENSATION CONTROL WITH CUT ENABLING .......................................................................................................................................16
MicroTech II Reference .........................................................................................................................................................16 Description............................................................................................................................................................................16
ANTIFREEZE REGULATION.............................................................................................................................................................17 ELECTRO-VALVE MANAGEMENT ....................................................................................................................................................18
Working Description ..............................................................................................................................................................18 WATER PRESSURE CONTROL FOR PFS UNITS .................................................................................................................................20 CONTROL LOGIC OF THE COOLING TOWER FOR PFS ........................................................................................................................22
PFS with single compressor:...................................................................................................................................................22 PFS with two Compressors: ....................................................................................................................................................23
CONTROL LOGIC OF THE 3-WAY VALVE FOR PFS UNITS....................................................................................................................23
ALARMS......................................................................................................................................................................................24
GENERAL DESCRIPTION................................................................................................................................................................24 ALARM HISTORICAL......................................................................................................................................................................24 ALARM TABLE .............................................................................................................................................................................25 DRIVER ALARMS ..........................................................................................................................................................................26
PLAN NETWORK.........................................................................................................................................................................27
I/O card address....................................................................................................................................................................27 Terminal address...................................................................................................................................................................28
TERMINAL MANAGEMENT ..............................................................................................................................................................28 Terminal configuration procedure...........................................................................................................................................29 Display of the terminal connection state .................................................................................................................................30

Service Manual – Preliminary Version MicroTech II Control
Release 1.0 01/05/01 page 3/3
Applications and functions carried out by the system Type of controlled units air / water only chiller air / water chiller + heat pump Compressor maximum number Max. 1 compressor for MicroTech II card, with max. 4 MicroTech II card capacity controls Compressor type Screw compressors Compressor call rotation Rotation of all the compressors with FIFO logic Electronic expansion valve management (EXV) Management of the EX7 and EX8 Alco valve. Safety for each refrigeration circuit High pressure (pressure switch) Low pressure (pressure switch) Oil differential pressure switch Compressor thermal Condensation fan thermal High Discharge Temperature on the compressor Phase Monitor Star / Delta Transition Failed Low Delta Pressure between Suction and Discharge System security A serious alarm input (stops the whole unit) , available both in the MASTER and SLAVE unit A flow controller input (stops the whole unit) , available both in the MASTER and SLAVE unit A pump thermal input (stops the whole unit) Remote on/off input without alarm signaling Regulation type Proportional or proportional + integral regulation on the evaporator input probe. Condensation The condensation can be carried out according to temperature or pressure The fans can be managed according to ON/OFF mode Or with a 0/10 V modulating signal Accessories Supervision with RS422/RS485 serial card. EVD driver backup EVBAT battery module.

Service Manual – Preliminary Version MicroTech II Control
Release 1.0 01/05/01 page 4/4
Master/slave system architecture The system is composed of at least two up to four MicroTech IIs connected to the local network of which the first acts as master and the following act as slaves. Master function Temperature regulation All compressor call Manages the system alarms Management of a refrigeration circuit (start, stop, alarms, EXV) Communication possibility with an external supervisor Slave function Management of a refrigeration circuit (start, stop, alarms, EXV) for each card Common functions Both master and slave manage (configuration and regulation) max 2 EVD drivers and consequently max 2 EXV valve each. Regulation probe The thermo-regulation probe have to be connected only to the master MicroTech II. Each MicroTech II card, driver card and terminal are identified with an address. The terminal address is selected via the dip-switches situated on the back of the terminals themselves whereas the address in he I/O cards is always selected via dipswitches placed on a card with MICROTECH IIADR0000 code (without clock option) or MICROTECH IICLKMEM0 (with clock option); this card has to be inserted in the clock plug-in connector. The address dip-switches of the EVD driver are on the back of the front-cover (removable) of the driver itself. The master MicroTech II must have address 1 The MicroTech II slave must have address 2 The driver 1 must have address 3 The driver 2 must have address 4 The driver 3 must have address 5 The driver 4 must have address 6 The local terminal must have address 8 Note : when the unit is ON, all the MicroTech II cards and the drivers must be ON (LED On/Off on the terminal ON for all the units).
• The master unit starts/stops all the units • The slave unit starts/stops itself only. If the slave unit is OFF and master is ON, the slave does not starts. If the slave is ON and t
master is OFF, the slave does not start. • The drivers have no start enabling (are always ON : this does not mean that the driver begins immediately to control because, as
long as the MicroTech II units do not cause at least one compressor to start, the driver continues to receive a 0% request and consequently the valve is kept closed).
Thermoregulation of the whole system
Driver 4
Driver 3
Driver 2
Driver 1
MicroTech II
2 (Slave)
Terminal LCD (4x20)
MicroTech II
1 (Master)
EXV 4 EXV 3 EXV 2 EXV 1

Service Manual – Preliminary Version MicroTech II Control
Release 1.0 01/05/01 page 5/5
Input/output list Below the inputs and outputs are listed as a function of the unit type; a number has been associated to each type of machine. This number is the principal parameter of the program as it identifies the input and output configuration. In this way the configuration of the machine is made very easy because you need only choose the requested input and output list and select the associated number in the program configuration masks. Each of the following pages contains 2 unit types and for each unit the MicroTech II inputs/outputs from master and the inputs/outputs of one of the slave MicroTech IIs are described.
AIR/WATER Unit with max. 4 screw compressors McQuay ALS / WHS Digital inputs
Only Chiller unit MACHINE TYPE “0” N UNIT 1(Master) UNIT 2 (Slave n. 1) UNIT 3 (Slave n. 2) UNIT 4 (Slave n. 3) 1 On/Off by Main Switch On/Off by Main Switch On/Off by Main Switch On/Off by Main Switch 2 Evaporator flow controller (enabling) Evaporator flow controller (enabling) Evaporator flow controller (enabling) Evaporator flow controller (enabling) 3 Remote On/Off N.U. N.U. N.U. 4 Oil Level 1 Oil Level 2 Oil Level 3 Oil Level 4 5 Low pressure pressure switch 1 Low pressure pressure switch 3 Low pressure pressure switch 1 Low pressure pressure switch 3 6 Oil differential 1 (I series only) Oil differential 2 (I series only) Oil differential 3 (I series only) Oil differential 4 (I series only) 7 Phase Monitor (enabling) Phase Monitor (enabling) Phase Monitor (enabling) Phase Monitor (enabling) 8 Double Setpoint N.U. N.U. N.U. 9 Fan thermal 1 circ 1 Fan thermal 1 circ 2 Fan thermal 1 circ 3 Fan thermal 1 circ 4 10 Failed trans. Y/∆ Failed trans. Y/∆ Failed trans. Y/∆ Failed trans. Y/∆ 11 High pressure pressure switch 1 High pressure pressure switch 2 High pressure pressure switch 3 High pressure pressure switch 4 12 Comp.thermal 1 Comp.thermal 2 Comp.thermal 3 Comp. thermal 4 Analog inputs
Only Chiller unit n UNIT 1(Master) UNIT 2 (Slave n. 1) UNIT 3 (Slave n. 2) UNIT 4 (Slave n. 3) 1 Entering water temp. N.U. N.U. N.U. 2 Leaving water Temp. Outlet Cond. Temperature (WHS) N.U. N.U. 3 Cir1 LiqTmpALS / InCnd.Tmp.WHS Cir2 LiqTmpALS / InCnd.Tmp.WHS Cir3 LiqTmpALS / InCnd.Tmp.WHS Cir4 LiqTmpALS / InCnd.Tmp.WHS 4 Comp.1 Oil Temp Comp.2 Oil Temp Comp.3 Oil Temp Comp.4 Oil Temp 5 Oil Diff Transducer Circ 1 Oil Diff Transducer Circ 2 Oil Diff Transducer Circ 3 Oil Diff Transducer Circ 4 6 Setpoint Reset Override Demand Limit Signal/ Voltage/Amps N.U. N.U. 7 Circuit 1 High pressure transducer Circuit 2 high pressure transducer Circuit 3 high pressure transducer Circuit 4 high pressure transducer 8 Compr Capacity Sensor Circ 1 Compr Capacity Sensor Circ 2 Compr Capacity Sensor Circ 3 Compr Capacity Sensor Circ 4
Digital outputs
Only Chiller unit N UNIT 1(Master) UNIT 2 (Slave n. 1) UNIT 3 (Slave n. 2) UNIT 4 (Slave n. 3) 1 Circulation pump N.U. N.U. N.U. 2 Line Contactor comp. 1 Line Contactor comp..2 Line Contactor comp. 3 Line Contactor comp..4 3 Star Contactor comp. 1 Star Contactor comp. 2 Star Contactor comp..3 Star Contactor comp. 4 4 Delta Contactor comp.1 Delta Contactor comp..2 Delta Contactor comp.3 Delta Contactor comp.4 5 N.U. N.U. N.U. N.U. 6 Unloader 1 comp.1 C. Unloader 1 comp.2 C. Unloader 1 comp.3 C. Unloader 1 comp.4 C. 7 Unloader 2 comp.1 S. Unloader 2 comp.2 S. Unloader 2 comp.3 S. Unloader 2 comp.4 S. 8 Circuit 1 condens. Fan 3 Circuit 2 condens. Fan 3 Circuit 3 condens. Fan 3 Circuit 4 condens. Fan 3 9 Liquid Inj. 1 Liquid Inj. 2 Liquid Inj. 3 Liquid Inj. 4 10 Antifreeze heater N.U. N.U. N.U. 11 General alarm cumulat. General alarm cumulat. General alarm cumulat. General alarm cumulat. 12 Circuit 1 condens. Fan 1 Circuit 2 condens. Fan 1 Circuit 3 condens. Fan 1 Circuit 4 condens. Fan 1 13 Circuit 1 condens. Fan 2 Circuit 2 condens. Fan 2 Circuit 3 condens. Fan 2 Circuit 4 condens. Fan 2 Analog outputs
Only Chiller unit n UNIT 1(Master) UNIT 2 (Slave n. 1) UNIT 3 (Slave n. 2) UNIT 4 (Slave n. 3) 1 Condens. fan-speed reg. 1 Condens. fan-speed reg. 2 Condens. fan-speed reg. 3 Condens. fan-speed reg. 4 2 N.U. N.U. N.U. N.U.

Service Manual – Preliminary Version MicroTech II Control
Release 1.0 01/05/01 page 6/6
WATER/WATER Unit with max. 2 screw compressors, McQuay PFS Digital inputs
Only Chiller unit MACHINE TYPE “3” N UNIT 1(Master) UNIT 2 (Slave) 1 On/Off by Main Switch On/Off by Main Switch 2 Evaporator flow controller (enabling) Evaporator flow controller (enabling) 3 Remote On/Off N.U. 4 Oil Level 1 Oil Level 2 5 Low pressure switch 1 Low pressure switch 2 6 Oil differential 1 Oil differential 2 7 Phase Monitor (enabling) Phase Monitor (enabling) 8 Double Setpoint N.U. 9 N.U. N.U. 10 Failed trans. Y/∆ Failed trans. Y/∆ 11 High pressure switch 1 High pressure switch 2 12 Comp.thermal 1 Comp.thermal 2 Analog inputs
Only Chiller unit n UNIT 1(Master) UNIT 2 (Slave) 1 Entering water temp. Ent. condens. temp. 2 Leaving water temp. Outlet Condenser Temperature 3 Liquid Temperature Circ 1 (opt.) Liquid Temperature Circ 2 (opt.) 4 Comp.1 Oil Temp Comp.2 Oil Temp 5 Oil Diff Transducer Circ 1 Oil Diff Transducer Circ 2 6 Setpoint Reset Override Demand Limit Signal 7 High pressure transducer Voltage/Amps 8 Compr Capacity Sensor circ 1 Compr Capacity Sensor circ 2
Digital outputs
Only Chiller unit N UNIT 1(Master) UNIT 2 (Slave) 1 Circulation pump N.U. 2 Line Contactor comp. 1 Line Contactor comp..2 3 Star Contactor comp. 1 Star Contactor comp. 2 4 Delta Contactor comp.1 Delta Contactor comp..2 5 N.U. N.U. 6 Unloader 1 comp.1 C. Unloader 1 comp.2 C. 7 Unloader 2 comp.1 S. Unloader 2 comp.2 S. 8 Circuit 1 condens. Tower fan 3 Circuit 2 condens. Tower fan 3 9 Liquid Inj. 1 Liquid Inj. 2 10 N.U. N.U. 11 General alarm cumulat. General alarm cumulat. 12 Circuit 1 condens. Tower fan 1 Circuit 2 condens. Tower fan 1 13 Circuit 1 condens. Tower fan 2 Circuit 2 condens. Tower fan 2 Analog outputs
Only Chiller unit n UNIT 1(Master) UNIT 2 (Slave) 1 Condens. Tower fan-speed reg. 1 Condens. Tower fan-speed reg. 2 2 N.U. N.U.

Service Manual – Preliminary Version MicroTech II Control
Release 1.0 01/05/01 page 7/7
Regulation
Outlet temperature regulation
CONTINUOUS UNLOADING
Used Inputs: • Inlet Temperature • Outlet Temperature Used Parameters: • Regulation Setpoint • Outlet temperature Regulation Band • Continuous unloading Dead Band Dead-band • Pulse Period • Minimum Pulse Time for solenoid 1 • Maximum Pulse Time for solenoid 1 • Minimum Pulse Time for solenoid 2 • Maximum Pulse Time for solenoid 2 • Enabling to continuous power ramp-up • Time of forced ON for solenoids before compressor start-up Used outputs: • Digital Output n°6 for solenoid 1 • Digital Output n°7 for solenoid 2
Principles of working: Continuous unloading uses 2 solenoids to control screw compressor slide and thus its capacity, control is performed by outlet temperature. Logic of solenoids is selectable by mask, the following table shows the default configuration:
SOLENOID A SOLENOID B COMPRESSOR BEHAVIOR OFF fixed ON Compressor just started o in forced power decrease OFF ON (pulsating) Floating power decrease
fixed OFF fixed OFF Dead band with system in pause ON (pulsating) ON (pulsating) Floating power increase
ON fixed = solenoid is always ON (not pulsating) OFF fixed = solenoid is always OFF (not pulsating) ON = solenoid floats with a trend toward the state of ON fixed OFF = solenoid floats with a trend toward the state of OFF fixed In the graphic is sketched the mode of working of the unload solenoids. Slide moves by pulses of increasing or decreasing time, depending on the system is in the zone of increasing or decreasing power. The only data to be inserted by the user is the Dead Band inside the Outlet temperature Regulation Band, all remaining thresholds will be calculated automatically by the software.
B (setpoint)
Pulse Time
A C D
Outlet temperature Regulation Band
Stop comp with dead-band reg
Floating decrease Dead band
Floating increase
E

Service Manual – Preliminary Version MicroTech II Control
Release 1.0 01/05/01 page 8/8
Logic of the Continuous unloading through the points of the graphic : Compressors will start when temperature will be higher than the upper end of the neutral zone ( Setpoint + band). Consequently compressors will start after point E, and increasing pulses will have the maximal duration. At compressors start discharge is forced for a selectable time. Temperature higher than point E (compressor start): Compressor start is controlled by the values of outlet water temperature, they start in sequence with a selectable interstage requested to reach the full power, increasing power by pulses of maximal duration. After this time compressor is assumed at the top of the power, consequently each device will continue to work at the reached power. Temperature between D and E (zone of floating increase): In that temperature band only the last compressor started will float in increase of power, for an infinite time, unless it reaches full conditions. The remaining compressors keep working on the reached power value. Modulation pulses will have variable duration based on the temperature. Temperature between D and C (neutral zone): In the neutral zone logic remain in stand-by and all compressors keep working on the reached power value. Temperature between C and B (zone of floating decrease) :
• With compressors rotation: all compressors go in stand-by except for the first started, starting to float in decrease with pulses of duration increasing with the temperature decrease.
• Without compressors rotation: all compressors go in stand-by except for the last started starting to float in decrease with pulses of duration increasing with the temperature decrease.
Temperature under point B (compressors shutdown): When temperature falls down point B (regulation Setpoint) compressors start floating in decrease with pulses of maximal duration, the real shutdown arrives after a selectable interstage to assume compressor is arrived at minimum power. Description of the Logic based on Temperature (models without capacity sensor) • On temperature increase : When outlet temperature exceeds point E, the first compressor is starter, floating in increase with maximal pulse
duration. Assumed temperature keeps over point E, increase will continue for a selected time, until we can consider compressor at full capacity. At this point the second compressor will be requested to start, and it will work as described; while the first one will keep working in steady configuration (in theory at 100%). If temperature remains over point E, step by step all compressors will follow in the same way.
• On temperature decrease : Assume all compressors working and at full capacity. When outlet temperature falls down to the zone of floating
increase, since compressors are at full capacity, further power increase is impossible. If temperature keeps falling down it will reach the neutral zone where compressors will maintain a stable working. Falling down again it will reach the zone of floating decrease. Here starts floating in decrease the first or the last compressor started, based on the rotation. Decrease phase will continue for a time selectable until we can consider compressor at zero capacity, next it will be shut down and a phase of decrease will start for a new compressor. If temperature will remain in that zone all compressors will be shut down in the same way.
• Special Cases :
(a) Assume the temperature is over the point E and one compressor is in phase of increase. If temperature falls down to the zone of floating increase, the compressor still not arrived at full capacity will continue increasing its power with a duration of pulses now variable instead of fixed. If temperature continues falling down it will arrive to the neutral zone, where all compressors will work in steady mode, next to the zone of floating decrease where compressor with partial capacity will start decrease. When stopped, one by one the remaining compressors will shut down as described.
(b) Assume the temperature is in the zone of floating decrease, and one compressor is in phase of decrease. If temperature goes up suddenly over point E, that compressor will start decreasing, even if it has needed before to reach the maximal power.

Service Manual – Preliminary Version MicroTech II Control
Release 1.0 01/05/01 page 9/9
In program masks will be selectable : • Output Setpoint of the regulation (User Menu) è Point B • Temperature Band for output regulation (User Menu) è between B and E • Neutral Band to control continuous unloading (User Menu) è between C and D • Solenoid Configuration for the phase of stand-by • Solenoid Configuration for the phase of increase • Solenoid Configuration for the of decrease • Period pulses (Manufacturer Menu). • Max and Min Duration of pulses on solenoids 1 and 2 (Manufacturer Menu). • Time of forced ON of solenoids at compressor start. (Manufacturer Menu) MASTER card controls the effective start and stop of the compressors and the rotation by the ordinary regulation in output; the handling of the relays of unload is done by each SLAVE controlling the continuous unload of the corresponding compressor.
Pulse Period Pulse period Pulse period
Duration Of the pulse

Service Manual – Preliminary Version MicroTech II Control
Release 1.0 01/05/01 page 10/10
Forced Unloading Used inputs:
• Outlet Temperature (B2) • High pressure (B7)
Used Parameters:
• Prevent Threshold of high temperature on discharge • High pressure Threshold • High pressure Differential • Antifreeze temperature Threshold • Antifreeze Differential
Used Outputs • Unload Solenoids
Principles of working : Forced unload avoids the compressor to reach conditions of pressure able to lock it in alarm condition. Compressor is forced to unload when : • high pressure threshold is reached • antifreeze temperature threshold is reached. Hold Phase (hold pressure: standby of compr. by high pressure) During compressor load if pressure reaches a reference value (pprevent), selectable by keypad under manufacturer psw, controller holds compressor at the load currently reached. N.B.: that situation is not an alarm, not even a warning, thus no message will appear on the display, but a symbol will be displayed for Service personnel (see mask information for further details) . Decrease Phase (unloading pressure: pressure warning) If pressure, in spite of the phase of hold pressure, is still increasing until a new reference value (pwarning), selectable by keypad under manufacturer psw, controller will force compressor to unload until a pressure value (pwarning - diff.) will be reached. Also diff is keypad selectable in the same mask of pwarning, under manufacturer psw. N.B.: that situation is a warning, not an alarm, thus no message will appear on the display, but a symbol will be displayed for Service personnel (see mask information for further details) . High pressure Phase (high pressure) When reached the high pressure value, selectable by keypad under manufacturer psw, controller goes in alarm , stops compressor without pumpdown and sends a message of alarm on the display. Logic is described on the following graphics:
high pressure threshold
antifreeze temp threshold
Differential
Differential
High pressure
Outlet Temperature
Service Manual – Preliminary Version MicroTech II Control
Release 1.0 01/05/01 page 11/11
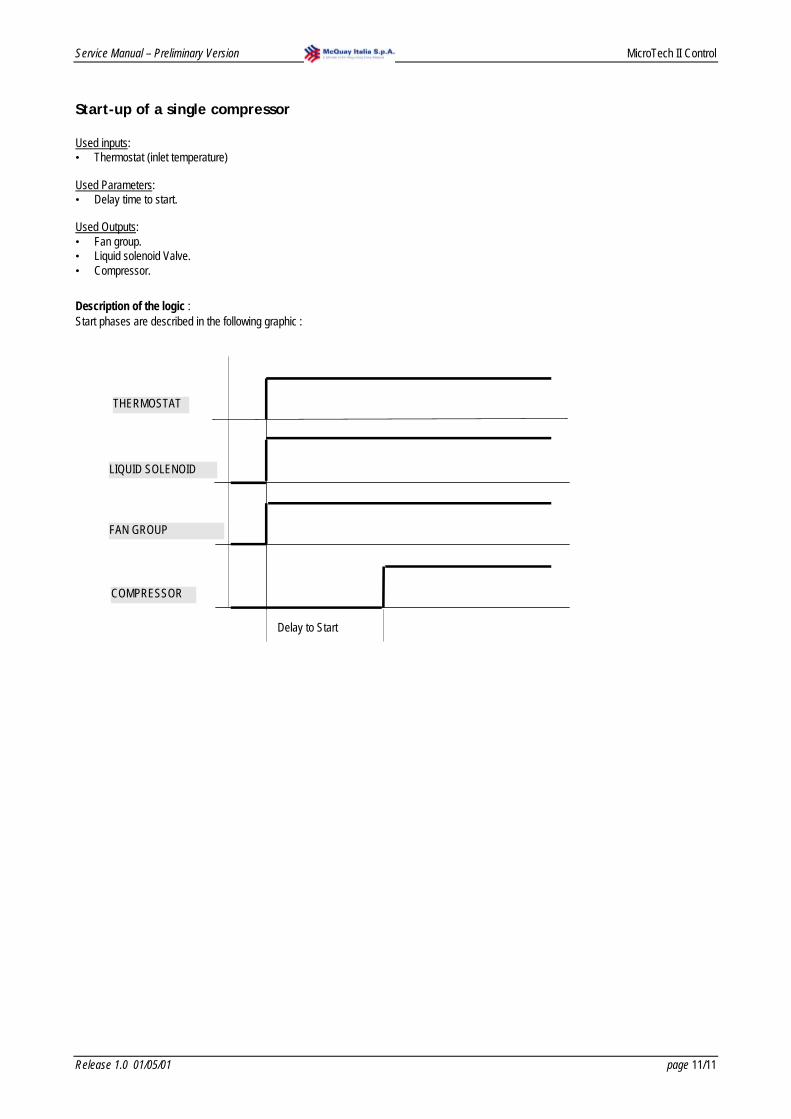
Start-up of a single compressor Used inputs: • Thermostat (inlet temperature) Used Parameters: • Delay time to start. Used Outputs: • Fan group. • Liquid solenoid Valve. • Compressor.
Description of the logic : Start phases are described in the following graphic :
THERMOSTAT
LIQUID SOLENOID
FAN GROUP
COMPRESSOR
Delay to Start

Service Manual – Preliminary Version MicroTech II Control
Release 1.0 01/05/01 page 12/12
Start of the compressor motor Used Inputs: • Inlet Temperature Used Parameters: • Time between star and line • Star pulse duration • Time between star and delta Outputs used : • Contactor Line • Contactor Star • Contactor Delta
Description of the Logic: Motor star is described in the following diagram :
Limitations at compressor start Two kind of limitations at the start are considered, both allow compressor to start with delta contactor by-passing star contactor. Enabling is the same for both in the following cases: 1. When specific values for high and low pressure are over, selectable by mask. 2. When threshold of equalized pressure is over, selectable by mask. In the software this pressure is the average between low and high pressure.
Contactor Line
Contactor Star
Contactor Delta
Time between Line and star
Star Duration
Time between star and delta

Service Manual – Preliminary Version MicroTech II Control
Release 1.0 01/05/01 page 13/13
PUMP-DOWN Management Pump-down function is executed at compressor shutdown. It ends due to the low pressure switch or, in case this faults, for maximal time.
Pumpdown Used Inputs:
• Low pressure transducer Used Parameters:
• Pump-down type • Pump-down enabling by switch with unit off • Pump-down Setpoint in fix mode (disabling) • Pump-down MaxTime
Used Outputs: • Liquid Solenoid Valve
If enabled, pump-down arrives either when compressor stops by logic either when unit is stopped by ON/OFF switch. Its time is selectable and it can end for max time or by pressure switch. In case of alarm stopping the unit or the compressor, pump-down ends immediately.

Service Manual – Preliminary Version MicroTech II Control
Release 1.0 01/05/01 page 14/14
Compressor Rotation The compressor-call rotation causes the hour number and the start-stop number of different compressors to be equivalent. Rotation is carried out according to a FIFO-type logic; this means that the first compressor to start will be the first to stop. As a consequence of this behaviour, remarkable differences could occur in the initial phase as regards the working hours of the various compressors, but at full working such differences will increasingly attenuate. The rotation only involves the compressors , not the capacity controls. Compressor rotation can be disabled using the appropriate parameter. Management without rotation: • Start: C1,C2,C3,C4,C5,C6,...,C16. • Stop : C16,C15,C14,C13,C12,C11,...,C1. Management with FIFO rotation (the first compressor to start will be the first to stop): • Start: C1,C2,C3,C4,C5,C6,....C16. • Stop: C1,C2,C3,C4,C5,.....C16.
Service Manual – Preliminary Version MicroTech II Control
Release 1.0 01/05/01 page 15/15
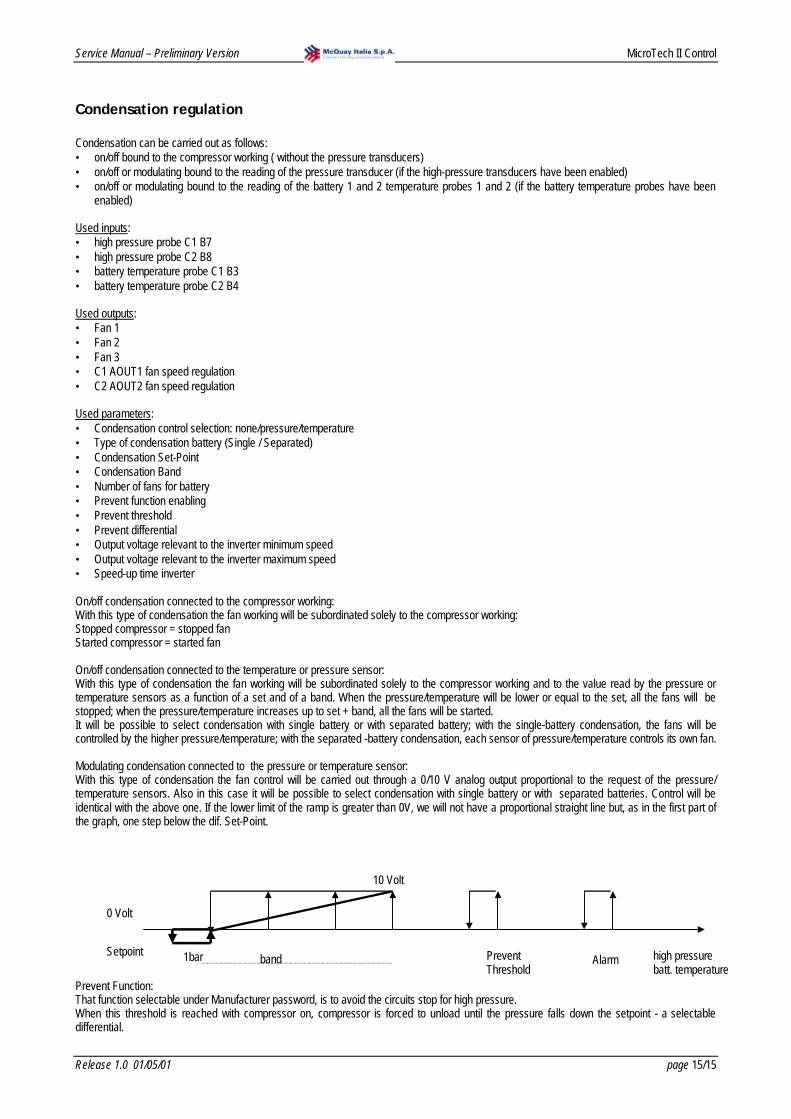
Condensation regulation Condensation can be carried out as follows: • on/off bound to the compressor working ( without the pressure transducers) • on/off or modulating bound to the reading of the pressure transducer (if the high-pressure transducers have been enabled) • on/off or modulating bound to the reading of the battery 1 and 2 temperature probes 1 and 2 (if the battery temperature probes have been
enabled) Used inputs: • high pressure probe C1 B7 • high pressure probe C2 B8 • battery temperature probe C1 B3 • battery temperature probe C2 B4 Used outputs: • Fan 1 • Fan 2 • Fan 3 • C1 AOUT1 fan speed regulation • C2 AOUT2 fan speed regulation Used parameters: • Condensation control selection: none/pressure/temperature • Type of condensation battery (Single / Separated) • Condensation Set-Point • Condensation Band • Number of fans for battery • Prevent function enabling • Prevent threshold • Prevent differential • Output voltage relevant to the inverter minimum speed • Output voltage relevant to the inverter maximum speed • Speed-up time inverter On/off condensation connected to the compressor working: With this type of condensation the fan working will be subordinated solely to the compressor working: Stopped compressor = stopped fan Started compressor = started fan On/off condensation connected to the temperature or pressure sensor: With this type of condensation the fan working will be subordinated solely to the compressor working and to the value read by the pressure or temperature sensors as a function of a set and of a band. When the pressure/temperature will be lower or equal to the set, all the fans will be stopped; when the pressure/temperature increases up to set + band, all the fans will be started. It will be possible to select condensation with single battery or with separated battery; with the single-battery condensation, the fans will be controlled by the higher pressure/temperature; with the separated -battery condensation, each sensor of pressure/temperature controls its own fan. Modulating condensation connected to the pressure or temperature sensor: With this type of condensation the fan control will be carried out through a 0/10 V analog output proportional to the request of the pressure/ temperature sensors. Also in this case it will be possible to select condensation with single battery or with separated batteries. Control will be identical with the above one. If the lower limit of the ramp is greater than 0V, we will not have a proportional straight line but, as in the first part of the graph, one step below the dif. Set-Point. Prevent Function: That function selectable under Manufacturer password, is to avoid the circuits stop for high pressure. When this threshold is reached with compressor on, compressor is forced to unload until the pressure falls down the setpoint - a selectable differential.
Setpoint high pressure batt. temperature
0 Volt
10 Volt
Prevent Threshold
Alarm band 1bar
Service Manual – Preliminary Version MicroTech II Control
Release 1.0 01/05/01 page 16/16
When this threshold is reached with compressor on, fans are forced on until the pressure falls down the setpoint - a selectable differential.
Condensation Control with cut enabling
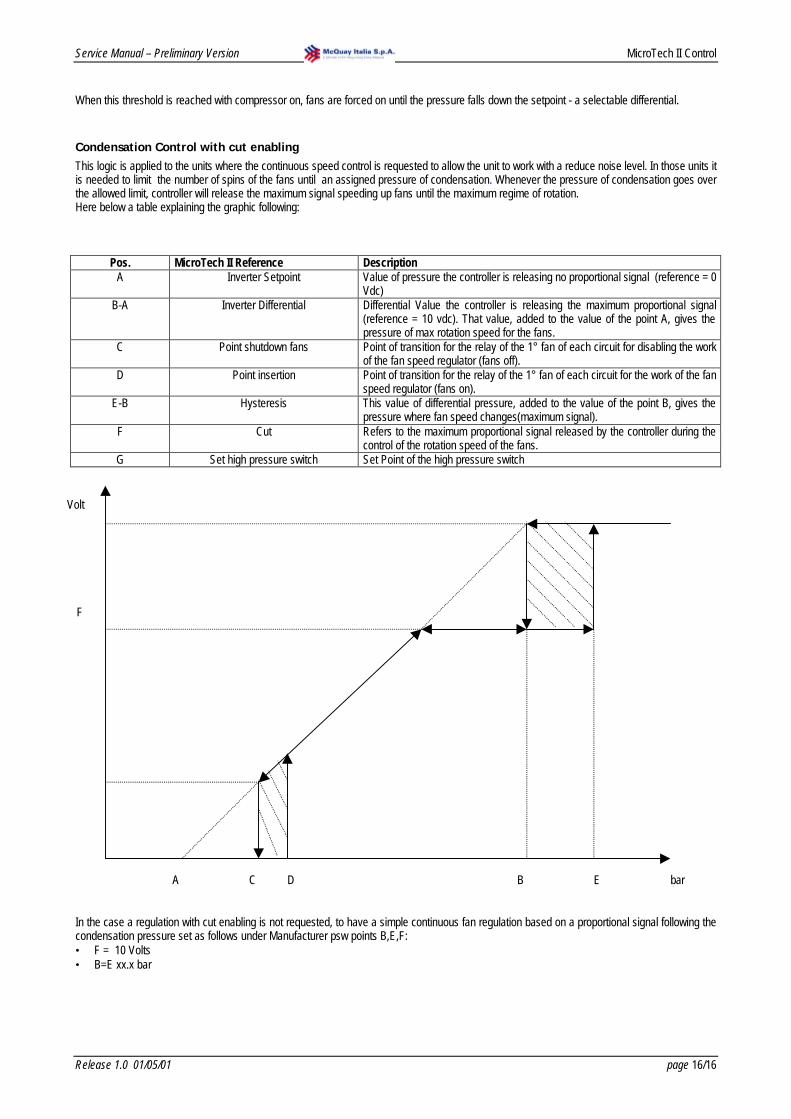
This logic is applied to the units where the continuous speed control is requested to allow the unit to work with a reduce noise level. In those units it is needed to limit the number of spins of the fans until an assigned pressure of condensation. Whenever the pressure of condensation goes over the allowed limit, controller will release the maximum signal speeding up fans until the maximum regime of rotation. Here below a table explaining the graphic following:
Pos. MicroTech II Reference Description A Inverter Setpoint Value of pressure the controller is releasing no proportional signal (reference = 0
Vdc) B-A Inverter Differential Differential Value the controller is releasing the maximum proportional signal
(reference = 10 vdc). That value, added to the value of the point A, gives the pressure of max rotation speed for the fans.
C Point shutdown fans Point of transition for the relay of the 1° fan of each circuit for disabling the work of the fan speed regulator (fans off).
D Point insertion Point of transition for the relay of the 1° fan of each circuit for the work of the fan speed regulator (fans on).
E-B Hysteresis This value of differential pressure, added to the value of the point B, gives the pressure where fan speed changes(maximum signal).
F Cut Refers to the maximum proportional signal released by the controller during the control of the rotation speed of the fans.
G Set high pressure switch Set Point of the high pressure switch In the case a regulation with cut enabling is not requested, to have a simple continuous fan regulation based on a proportional signal following the condensation pressure set as follows under Manufacturer psw points B,E,F: • F = 10 Volts • B=E xx.x bar
bar
Volt
F
A D B E C

Service Manual – Preliminary Version MicroTech II Control
Release 1.0 01/05/01 page 17/17
Antifreeze regulation Used inputs • Output temperature probe Used parameters: • output probe enabling • antifreeze heater Set-Point • antifreeze heater differential • antifreeze alarm Set-Point • antifreeze alarm differential Used outputs: • antifreeze heater Each MicroTech II unit can manage the antifreeze regulation provided that the output temperature probe is connected and enabled. The antifreeze regulation is always energized also when the machine is OFF, both summer working and winter working. Note : the antifreeze alarm on any MicroTech II unit stops the entire machine.
Antifreeze set
Antifreeze diff.
Heater Set
Heater diff.
Antifreeze alarm activation Antifreeze heater activation

Service Manual – Preliminary Version MicroTech II Control
Release 1.0 01/05/01 page 18/18
Electro-valve Management This software is configured to handle only the Electro-valve liquid-injection Used Inputs: Discharge Temperature B4 Used Parameters: Enabling threshold electro-valve differential electro-valve Inihibited Outputs: Economizer solenoid Valve, oil-cooler, liquid-injection
Working Description Electro-valves are activated based on the discharge temperature of the compressor, as showed in the graphic:
Differential (10 ºC)
Discharge temperature of the compressor
Diff. (5 ºC)
Enabling threshold alarm by pressing (120 ºC)
Enabling threshold electro-valve: Liquid injection (85 ºC)

Service Manual – Preliminary Version MicroTech II Control
Release 1.0 01/05/01 page 19/19
Regulation on water/water units chiller only Used inputs : • Evaporator Inlet Temperature • Evaporator Outlet Temperature • Condenser Inlet Temperature • Condenser Outlet Temperature Used Outputs • Compressors • Digital Output n°6 for solenoid 1 • Digital Output n°7 for solenoid 2 Used Parameters: • Unit type Special features of working:
1. Water Pressure Control 2. Tower Control on Condenser Line 3. Three Way Valve Control on Condenser Line

Service Manual – Preliminary Version MicroTech II Control
Release 1.0 01/05/01 page 20/20
Water pressure control for PFS units Used Inputs:
• condenser inlet water temperature • evaporator inlet water temperature.
Used Parameters:
• Setpoint of First Opening in Cold Start • Setpoint of High Discharge Superheat
Used Outputs: • Driver EXV8 Valve • Compressor Output • Liquid injection solenoid
Pre-start: Input values are converted in pressure based on the internal pressure/temperature table. • If the ratio of these pressures is upper than 1,6 the controller will start compressors following the normal start procedure. • If the ratio is lower than 1,6 the controller will start compressors following a logic of “cold” start. Cold Start: Controller opens the expansion valve at 20% (value selectable by keypad) and it starts compressor. Instead of controlling the superheat, MicroTech II checks for compression ratio (absolute discharge pressure / absolute evaporation pressure) opening or closing the expansion valve to maintain that ratio between 2.1 and 2.3. If that ratio goes down 2.1 controller closes the valve, if the ratio goes over 2.3 opens it. Between these values the valve will remain steady (dead band). During the WPC superheat and subcooling will reach very high values but they will be ignored (there is no alarm of low/ high superheat). While evaporator and condenser water temperatures approach design conditions, the value of suction superheat decreases continuously. Cold start can be considered at the end when suction superheat reaches 2°C. A this point control is left to the Alco driver targeting suction superheat around 0,5°C. During cold start the following anomalous conditions can happen: 1. Low suction pressure: If electronic expansion valve closes excessively, to ensure the minimum compression ratio, it is possible the
suction pressure goes down the freeze value. In that case controller will reduce load of the compressor/s until the suction pressure will come back at least at 0°C. In case that situation is not verified, after 120 sec. the controller will shut down 1 compressor in alarm of low pressure. if after this the pressure will remain lower than zero, after further 120 seconds it will stop in alarm also the second compressor. The time of delay will be only 40 seconds if low pressure is equivalent to –10°C.
2. High condenser pressure: During that control it can happen that excessive refrigerant fill the condenser dramatically reducing the exchange surface. In that condition condenser pressure could increase over the maximum allowed. If so, controller will unload following the logic of the pressure of condensation.
3. High discharge superheat: Closing the expansion valve, saturated suction temperature will reduce and of course suction superheat will increase. As a reaction, also discharge superheat will increase. If during the WPC discharge temperature should reach the selected value of 85°C (selectable value), the controller will active a procedure for cooling oil, by enabling the output for the liquid injection solenoid. If
Cold Start
(WPC)
Normal Start (PI)
Valve Closing
Valve Opening
Reverse to WPC
Normal Logic (PI)
Dead Band
Pre-Start 1.6
Cold Start
On Working
2.1 2.3
2.0

Service Manual – Preliminary Version MicroTech II Control
Release 1.0 01/05/01 page 21/21
discharge temperature will keep in going up, controller will stop at 95°C in alarm the corresponding compressor. If otherwise temperature will go down, the controller will disable the liquid injection when that temperature will be lower than the setpoint minus the selected differential.
On working: It can happen that on working temperature of cooling water will decrease excessively for example due to an anomalous control of the cooling tower. In this case the compression ratio could go down the minimum limit of 2.0. The controller will react by controlling the compression ratio as previously described. Compression ratio will be controlled back between 2.1 and 2.3 playing on the control of the expansion valve.

Service Manual – Preliminary Version MicroTech II Control
Release 1.0 01/05/01 page 22/22
Control Logic of the cooling tower for PFS
PFS with single compressor: Used Inputs
• Condenser inlet water Temperature Used Parameters
• Setpoint Insertion Tower Steps • Insertion Differential • Number of Available Tower Steps
Used Outputs • First Step Cooling Tower OD12 • Second Step Cooling Tower OD13 • Third Step Cooling Tower OD08
Control logic must be proportional to the input in the following way: • One step control: the first relay is enabled when reached the value of setpoint + the differential. The relay is disabled when
temperature goes down the setpoint (es. Spt= 30°C ÷ Diff.= 5°C ÷ Tecc.= 35°C ÷ Tdisecc.= 29,9°C)
on off
Stp Stp+diff • Two steps Control: The first relay is enabled when reached the value of setpoint + half differential. The second step is enabled when
reached the value of setpoint + the differential. Steps will be disabled as per the following schematic: on 1° Step off Stp Stp+1/2diff on 2° Step off Stp Stp+diff. • Three steps Control: The first relay is enabled when reached the value of the Setpoint + 1/3 of the differential. The second step is enabled
when reached the value of Setpoint + 2/3 of the differential. The third step is enabled when reached the value of Setpoint + the differential. Steps will be disabled as per the following schematic:
on 1° Step off Spt + 1/3 diff on 2° Step off Spt + 2/3 diff on 3° Step off Spt Spt + 1/3 diff N.B: the number of steps controlling the cooling tower is selectable by keypad under “User” password.

Service Manual – Preliminary Version MicroTech II Control
Release 1.0 01/05/01 page 23/23
PFS with two Compressors: Used Inputs
• Condenser inlet water Temperature Used Parameters
• Setpoint Insertion Tower Steps • Insertion Differential • Number of Available Tower Steps
Used Outputs • First Step Cooling Tower OD12 • Second Step Cooling Tower OD13 • Third Step Cooling Tower OD08
Units with two compressors install two MicroTech II cards connected in network. Each card owns three digital outputs for tower control. Thus the maximum number of steps is six. Control logic is similar to the three steps control, as previously specified. In the case is requested to enable from 4 to 6 steps, the three digital outputs OD12, OD13 and OD08 of the SLAVE card will be enabled. Control logic is as previously specified. Differential is divided per the number of steps (selectable by keypad). Each step is inserted based on the temperature of the inlet water reaching the value of Spt + diff/n°grad.
Control Logic of the 3-way valve for PFS units Used Inputs
• Condenser inlet water Temperature Used Parameters
• Setpoint on Condenser Temperature on the zero voltage scale • Differential of Full Scale
Used Outputs • Analog Signal of Control Valve 0-10V Y0
The control system of the cooling water on the condenser can be done also by a three way bypass valve. That valve, installed by the Customer, can be controlled through a 0-10V analog signal from the output Y0 of the MASTER card. By keypad it is possible to introduce the Setpoint of condenser return water temperature corresponding to an output of 0 volt. More, a temperature differential has to be settled corresponding to a signal of 10 volt. To set the valve, a percentage of minimum valve opening has to be selected (es. 10% corresponding to 1 volt output) and a percentage of maximum valve opening (es. 90% corresponding to 9 volt output). Logic is similar to that of the inverter control on air cooled units. 10 V (100%) % Max valve opening (keypad selectable) % Min valve opening (keypad selectable) 0 V (0%)
Stp (°C) Stp + Diff. (°C)

Service Manual – Preliminary Version MicroTech II Control
Release 1.0 01/05/01 page 24/24
ALARMS
General description The alarms will be divided into three categories : • Only signalling alarms (only display and buzzer signalling, signalling on display, buzzer, alarm relay) • Circuit alarms (deactivate only the relative circuit, signalling on display, buzzer, alarm relay) • Serious alarm (deactivates the entire system , signalling on display, buzzer, alarm relay) Only signalling alarms • Unit maintenance alarm • Compressor maintenance alarm • Damaged or disconnected clock card alarm • Mains-disconnected unit alarm • Driver alarms: driver high pressure, super-heat and absence of valve closing during the last stop (“not closed valve during stop”) Circuit alarm • High pressure/press. contr. alarm immediate compressor stop with manual reset • Lowe pressure alarm delayed at the compressor start immediate full function manual reset • Compressor thermal alarm immediate compressor stop with manual reset • Oil differential alarm delayed at the acquisition with manual reset • Fan thermal alarm immediate fan stop with manual reset • Driver – probe error alarm stop compressor/s of the relative circuit • Driver - motor error alarm stop compressor/s of the relative circuit • Driver - eeprom error alarm stop compressor/s of the relative circuit • Driver - battery malfunct. alarm stop compressor/s of the relative circuit (can be enabled) • Driver – low pressure alarm stop compressor/s of the relative circuit (can be enabled and delayed) Serious alarms • Water flow failure alarm digital outlet delayed at the start and at full function • Evaporator antifreeze alarm probe function in evaporator outlet with operation set and reset differential, with manual reset • Digital input serious alarm unit immediate stop with manual reset The reset of the alarms is executed by pressing twice the alarm button. No driver alarm is of the serious type.
Alarm historical If you use the clock card having the MICROTECH IICLKMEM0 code with eeprom 32K, it will be possible to have a historical of the last 900 alarms being occurred. There are two masks of the alarm historical : one which displays the chiller parameters (setpoint, band, inlet temperature and outlet temperature) stored when an alarm occurs and another one that displays the driver parameters (superheat, pressure, temperature and valve position) stored as soon as an alarm takes place. For each alarm it is possible to store Mask 1 (CHILLER): • Code of the activated alarm • Date and hour of the activation • Regulation setpoint • Regulation band • Inlet temperature • Outlet temperature Mask 2 (DRIVER): • Code of the activated alarm • Date and hour of the activation • Super-heat temperature • Valve position (in “steps”) • Pressure from driver • Temperature from driver The data of this historical remain stored in the eeprom of the above mentioned card.

Service Manual – Preliminary Version MicroTech II Control
Release 1.0 01/05/01 page 25/25
Alarm table Code Alarm Description Compressor
Off Fan Off
Pump Off
System Off
Reset (auto/man)
Delay Enabling
CHILLER AL01 Severe alarm * * * * man no enabling both on
master and slave AL02 Antifreeze alarm * * * man or
auto. (default is “manual”)
no resetting mode can be set by user
AL03 Evaporator pump thermal * * * * man no AL04 Condenser pump thermal * * * * man no AL05 Evaporator flow control * * * man selectable enabling both on
master and slave AL06 Condenser flow control * * * man selectable AL10 Low-pressure pressure switch 1 *Circuit 1 man selectable AL11 Low-pressure pressure switch 2 *Circuit 2 man selectable AL12 High-pressure pressure switch 1 *Circuit 1 man no AL13 High-pressure pressure switch 2 *Circuit 2 man no AL14 Oil-differential pressure switch 1 *Circuit 1 man selectable AL15 Oil-differential pressure switch 2 *Circuit 2 man selectable AL16 Compressor 1 thermal *Comp. 1 man no AL17 Compressor 2 thermal *Comp. 2 man no AL20 Fan 1 thermal * man no AL21 Fan 2 thermal * man no AL22 Fan 3 thermal * man no AL23 High press. transducer 1 *Circuit 1 * man no AL24 High press. transducer 2 *Circuit 2 * man no AL30 Damaged probe B1 * * * * auto. 60 sec. AL31 Damaged probe B2 * * * * auto. 60 sec. AL32 Damaged probe B3 auto. 60 sec. AL33 Damaged probe B4 auto. 60 sec. AL34 Damaged probe B5 auto. 60 sec. AL35 Damaged probe B6 auto. 60 sec. AL36 Damaged probe B7 auto. 60 sec. AL37 Damaged probe B8 auto. 60 sec. AL40 Pump maintenance man AL41 Compressor 1 maintenance man.. AL42 Compressor 2 maintenance man. AL50 Offline unit 1 auto. 30 sec. AL51 Offline unit 2 auto. 30 sec. AL54 Evaporator fan thermal man. AL55 Damaged 32k clock card man. DRIVER 1 AL60 Driver1 – Probe error * Circuit man. selectable AL61 Driver1 – Step motor error * Circuit man. AL62 Driver1 – Eeprom error * Circuit man. selectable AL63 Driver1 – Battery error * Circuit man. selectable Enabling AL64 Driver1 – High pressure man. selectable AL65 Driver1 – Low pressure * Circuit man. selectable Enabling AL66 Driver1 – Super-Heat man. selectable AL67 Driver1 – Valve not closed during stop man. AL68 Driver1 – wait for valve reopening man. AL69 Driver1 – wait for battery recharge man. AL70 Driver1 – wait for eeprom restart man. DRIVER 2 AL80 Driver2 – Probe error * Circuit man. selectable AL81 Driver2 – Step motor error * Circuit man. AL82 Driver2 – Eeprom error * Circuit man. selectable AL83 Driver2 – Battery error * Circuit man. selectable Enabling AL84 Driver2 – High pressure man. selectable AL85 Driver2 – Low pressure * Circuit man. selectable Enabling AL86 Driver2 – Super-Heat man. selectable AL87 Driver2 – Valve not closed during stop man. AL88 Driver2 - wait for valve reopening man. AL89 Driver2 - wait for battery recharge man. AL90 Driver2 - wait for eeprom restart man.

Service Manual – Preliminary Version MicroTech II Control
Release 1.0 01/05/01 page 26/26
Driver alarms The alarms coming from the driver cards also report the indication of the driver that has generated the alarm (in the example : “D:3”) Example: m_Drv_AL60 +--------------------+ ¦AL:066 D:3 U:2¦ ¦ Superheat alarm ¦ ¦ ¦ ¦ ¦ +--------------------+
When an alarm mask appears relative to the driver card, above left the writing “Driver” appears, furthermore, on the right “D :” indicates the driver whilst “U :” indicates the MicroTech II card connected to the driver indicated. In the example, the alarm comes from the driver no. 3 which is connected via pLAN to the MicroTech II card no. 2. This numeration is relative to the allo connection diagram explained above and successively proposed again. Short summary of the driver card alarms • probe error (malfunctioning or failure of the temperature and/or pressure probe) • step motor error (valve motor connection damage) • eeprom error (writing or reading eeprom malfunction) • battery error (battery malfunction) • high pressure on the EXV driver (the operating pressure has exceeded the MOP max. threshold) • low pressure on the EXV driver (the operating pressure has exceeded the LOP min. threshold) • superheat alarm • valve not closed during stop (valve not completely closed after the last blackout) • I wait for valve reopening (warning! I wait for valve complete closing in order to restart correctly) • I wait for battery recharge (warning! I wait for battery recharge) • I wait for eeprom restart (warning! I wait for eeprom restart) (See the mask list at the end of the manual for more information). Furthermore, it is possible to stop the circuit compressor/s when the relative driver reports the alarm “battery error” and/or “low pressure mode for EXV driver” (LOP mode). It is also possible to enter a delay for the last alarm (the default is : alarm enabled with a 0 second delay).
m_manuf_246_Drv +--------------------+ ¦Driver alarms ¦ ¦Stop driver 2 ¦ ¦compressors if in ¦ ¦err. of battery N¦ +--------------------+
thermoregulation probe of all the system
Driver 4
Driver 3
Driver 2
Driver 1
MicroTech II
2 (Slave)
Terminal LCD (4x20)
MicroTech II
1 (Master)
EXV 4 EXV 3 EXV 2 EXV 1

Service Manual – Preliminary Version MicroTech II Control
Release 1.0 01/05/01 page 27/27
pLAN network All the devices connected to the pLAN network are identified through their own address. If the same address is assigned to several units, the network can not operate. Since terminals and MicroTech II I/O cards utilise the same type of addressing, terminals and MicroTech II cards with the same identifier cannot exist. The values selectable for the address range from 1 to 16 as to the terminals and from 1 to 16 with regard to the I/O cards. The overall number of peripherals that can be connected t the network is 16. Actually, maximum combinations can be: 8 terminals + 8 I/O cards 1 terminal + 15 I/O cards etc. The addresses are set up for the terminals through the dipswitches placed on the back, whereas for the I/O cards the network-option card is required.
I/O card address Network-option card (MICROTECH IIADR0000 / MICROTECH IICLKMEM0) The network-option card is available in two versions: only dipswitch and LED Cod.: MICROTECH IIADR0000 dipswitch, LED and calendar clock Cod.: MICROTECH IICLKMEM0 Such card is indispensable for the network operation of the MicroTech II I/O cards, also if only one MicroTech II board is used. The following table reports dipswitch codify for pLAN address from 1 to 16.
Adr Sw1 Sw2 Sw3 Sw4 Sw5 1 ON off off off off 2 off ON off off off 3 ON ON off off off 4 off off ON off off 5 ON off ON off off 6 off ON ON off off 7 ON ON ON off off 8 off off off ON off 9 ON off off ON off 10 off ON off ON off 11 ON ON off ON off 12 off off ON ON off 13 ON off ON ON off 14 off ON ON ON off 15 ON ON ON ON off 16 off off off off ON
Sw1Sw2Sw3Sw4Sw5
OnOff R G V
In the standard application EPSTDEMCHA modular chiller addresses for the MicroTech II units: Unit no.1
Unit no.2 Unit no.3 Unit no.4
1 2 3 4
Service Manual – Preliminary Version MicroTech II Control
Release 1.0 01/05/01 page 28/28
Terminal address Terminal card viewed from behind
1 2 3 4 5
On
Off6 7 8
Conn.
rete locale
Conn.
stampante
Microprocessore
Dip-switch
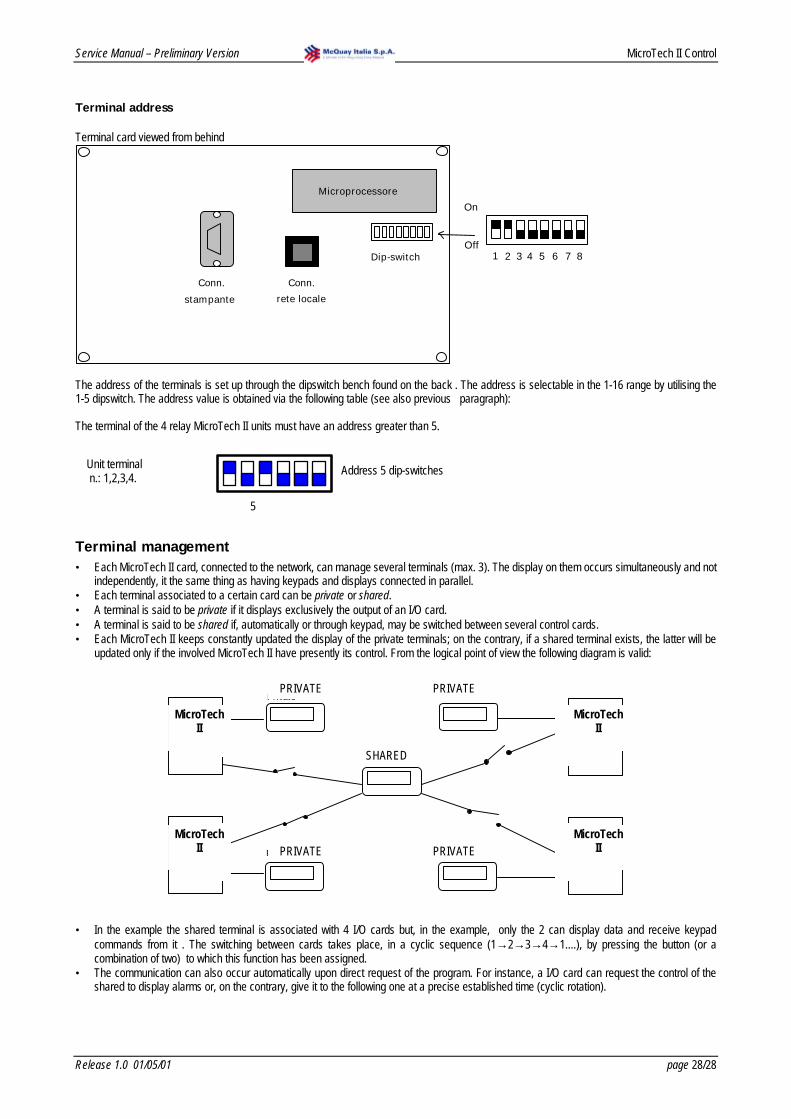
The address of the terminals is set up through the dipswitch bench found on the back . The address is selectable in the 1-16 range by utilising the 1-5 dipswitch. The address value is obtained via the following table (see also previous paragraph): The terminal of the 4 relay MicroTech II units must have an address greater than 5.
Terminal management • Each MicroTech II card, connected to the network, can manage several terminals (max. 3). The display on them occurs simultaneously and not
independently, it the same thing as having keypads and displays connected in parallel. • Each terminal associated to a certain card can be private or shared. • A terminal is said to be private if it displays exclusively the output of an I/O card. • A terminal is said to be shared if, automatically or through keypad, may be switched between several control cards. • Each MicroTech II keeps constantly updated the display of the private terminals; on the contrary, if a shared terminal exists, the latter will be
updated only if the involved MicroTech II have presently its control. From the logical point of view the following diagram is valid:
Privato
Privato
Condiviso
PcO
PcO
PcO
PcO
Privato
Privato
1
2
3
4
• In the example the shared terminal is associated with 4 I/O cards but, in the example, only the 2 can display data and receive keypad commands from it . The switching between cards takes place, in a cyclic sequence (1→2→3→4→1....), by pressing the button (or a combination of two) to which this function has been assigned.
• The communication can also occur automatically upon direct request of the program. For instance, a I/O card can request the control of the shared to display alarms or, on the contrary, give it to the following one at a precise established time (cyclic rotation).
PRIVATE PRIVATE
PRIVATE PRIVATE
SHARED
MicroTech II
Unit terminal n.: 1,2,3,4.
5
Address 5 dip-switches
MicroTech II
MicroTech II
MicroTech II

Service Manual – Preliminary Version MicroTech II Control
Release 1.0 01/05/01 page 29/29
The number and type of terminals is established during the initial network configuration. The relevant data are stored in the EEPROM memory of each single I/O card.
Terminal configuration procedure • The first operation to be performed, when for the fist time a pLAN network is to be started or an I/O is replaced, is the activation of the terminal
configuration procedure. • Before beginning such procedure make sure that each I/O card and each terminal has been given the correct address during the network
design. It is important to remember that the address being set up through the dipswitches is received only if a reset of the device is carried out. Furthermore, you should to carry out a global resetting of all the network devices if you realise that you have chosen the wrong configuration of the addresses (several cards with the same address).
• The configuration procedure has to be activated for each I/O card and must involve all the network terminals. Such procedure can be activated from any terminal, which can also have been timerarily connected only to carry out the configuration operations and removed when finished.
• The operations to be done are the following: Step 1: I/O card selection • The procedure is activated by pressing simultaneously the 0-1-2 buttons for at least 5 sec. (for compatibility, also the 56-Enter buttons carry
out the same function):
T 0 T 1 T 2 T 3 T 4 T 6 T 5
T 8 T 9 T 10 T11 T12 T13T14 T15
On-Off Alarm Enter Up Down • If the display is of the LCD type, the following mask is displayed:
Terminal Adr: nn I/O Board Adr: 12
• The Terminal Adr field fixed and represents the address of the terminal on which you are operating, set up through the posterior dipswitch. • The I/O Board Adr field at first displays the address of the MicroTech II card actually connected to the terminal. If the terminal is not connected
to any MicroTech II card the '--' characters are shown. Through the arrow-buttons it is possible to modify such selection in order to force the connection to another controller. The values displayed during the selection are the addresses of the MicroTech II cards actually being connected to network. If no MicroTech II at the moment is active, it is not possible to change the '--' display.
• By pressing the Enter button you get out of the first phase of the procedure, which resides in the terminal, and you enter the real terminal configuration mask, see step 2.
• If the terminal remains inactive (no button pressed) for more than 15 seconds, it automatically leaves the configuration procedure. Step 2: selection of the associated terminals For LCD displays the displayed masks are:
Terminal Config Press ENTER to continue
Enter
⇓
P:12 Adr Priv/Shared Trm1 02 Sh Trm2 03 Pr Trm3 None -- Ok? No
• In this mask the Enter button moves the cursor from one field to another whereas the arrow-buttons change the current value of the field. The
P:12 symbol in this case indicates that the I/O address-12 card has been selected .

Service Manual – Preliminary Version MicroTech II Control
Release 1.0 01/05/01 page 30/30
• To leave the configuration procedure and store, select the 'Ok ? no' field and with the cursor buttons until 'Yes' appears and then press Enter. To get out without storing, it is necessary to wait for 30 sec without pressing any button.
Display of the terminal connection state • If the terminal shows the state of inactivity of the CPU card of which it is displaying the output, clears completely the display and shows the
message:
I/O Board xx fault
• If the terminal does not receive the message of network synchronisation (token) for more than 10 sec, it clears completely the display and
scows the message:
NO LINK
• this is equivalent to the condition of OFF green LED for the I/O cards. Display of the network state: NetSTAT • In the program there is a procedure, can be activated only in the LCD version, that allows the display in real time the state and type of the
peripherals actually being connected. • Such procedure is activated by the simultaneous pressure of the 0-1-2 buttons (or else Up-Down-Enter) for at least 10 sec. (after the elapse of
the first 5 sec you obviously enter the terminal configuration procedure). The mask displayed is the following:
NetSTATT: xx Enter To Exit
8162432
191725
• The number after T: indicates the address of the terminal on which the procedure is activated, the symbols indicate the type of peripheral (terminal/MicroTech II) and the respective address.
• In the example the network turns out to be composed of MicroTech II cards with address 1, 2, and of 3 terminals with address 3, 4, 15.

Service Manual – Preliminary Version MicroTech II Control
Release 1.0 01/05/01 page 31/31