maxqda 2007 manual
TRANSCRIPT

MAXQDA 2007
Reference Manual
MAX Qualitative Data Analysis
for Windows 2000 and XP
Support, Distribution:
VERBI Software. Consult. Sozialforschung. GmbH Marburg/Germany
Tel.: 0049 (0) 6421/3400730
Fax: 0049 (0) 6421/3400727
www.maxqda.com
MAXQDA is a registered trademark of VERBI Software. Consult. Sozialforschung. GmbH, Berlin/Ger-many; SPSS is a trademark of SPSS Inc.; Adobe Acrobat is a trademark of Adobe Inc.; Microsoft Windows, Word for Windows, Excel, Power Point are trademarks of Microsoft Corp.
All other trademarks are the property of their respective owners, and may be registered in the United States and/or other jurisdictions.
All rights reserved.
© VERBI Software. Consult. Sozialforschung. GmbH, Marburg 2007
© For this handbook: Udo Kuckartz 2007; Translated by John Poppe, Montreal (Canada)
TABLE OF CONTENTS
3
Table of Contents Table of Contents ................................................................................................................... 3 1 Welcome to MAXQDA!...................................................................................................10 2 Information for Users of MAXQDA 2 and winMAX ....................................................11
2.1 Changes from MAXQDA Version 2......................................................................................... 11 2.2 Changes from MAXQDA Version 1 to Version 2 ................................................................... 22
3 Desktop and Menus .......................................................................................................28 3.1 Stepping into MAXQDA........................................................................................................... 28 3.2 The MAXQDA Screen.............................................................................................................. 31 3.3 The Main Menu ...................................................................................................................... 40 3.4 Context Menus in the DOCUMENT SYSTEM Window ................................................................. 42
3.4.1 Toolbar.................................................................................................................... 43 3.4.2 Text Groups and Texts ........................................................................................... 43 3.4.3 The Upper Level ..................................................................................................... 44 3.4.4 The Middle Level: The Text Group......................................................................... 47 3.4.5 The Lowest Level: The Text Document ................................................................. 50 3.4.6 Text Sets ................................................................................................................. 52
3.5 Context Menus in the Window Text Browser ........................................................................ 53 3.5.1 Toolbar.................................................................................................................... 53 3.5.2 Context Menu ......................................................................................................... 54
3.6 Context Menu in the Code System........................................................................................ 57 3.6.1 Toolbar.................................................................................................................... 57 3.6.2 The Upper Level: The Code System ...................................................................... 57 3.6.3 The Level of the Codes and Subcodes ................................................................. 59
3.7 Context Menu in the RETRIEVED SEGMENTS Window ............................................................... 62 3.7.1 Toolbar.................................................................................................................... 62 3.7.2 Context Memo ........................................................................................................ 63

TABLE OF CONTENTS
4
3.8 Managing Tables in MAXQDA ................................................................................................ 66 3.8.1 The Toolbar............................................................................................................. 66 3.8.2 Handling Tables ..................................................................................................... 66 3.8.3 The Table Overview of Coded Segments .............................................................. 72
3.9 Status Bar............................................................................................................................... 73 4 The Document System ..................................................................................................74
4.1 About Texts in MAXQDA ......................................................................................................... 74 4.2 Unicode................................................................................................................................... 75 4.3 Preparing a Text ..................................................................................................................... 75 4.4 Text Files and Embedded Objects......................................................................................... 76 4.5 Text Files and Hyperlinks....................................................................................................... 78 4.6 Importing and Opening Text Files ......................................................................................... 79 4.7 Opening and Editing a Text.................................................................................................... 84 4.8 Creating and Editing Text Documents .................................................................................. 89 4.9 Assigning a Color Attribute .................................................................................................... 91 4.10 Building Text Sets .................................................................................................................. 92 4.11 Reorganizing the Document System..................................................................................... 94 4.12 Wrap and Line Number.......................................................................................................... 94
5 Importing Pre-structured Texts.....................................................................................96 5.1 About Pre-structured Texts .................................................................................................... 96 5.2 Preparing Texts for the Preprocessor ................................................................................... 97 5.3 Import Structured Data as a Table...................................................................................... 101
6 Text Links...................................................................................................................... 104 6.1 Creating and Removing Text Links...................................................................................... 104 6.2 Overview of Text Links ......................................................................................................... 106
7 The Codes ..................................................................................................................... 108 7.1 The Code System ................................................................................................................. 108 7.2 The Toolbar........................................................................................................................... 109

TABLE OF CONTENTS
5
7.3 Creating Codes und Subcodes............................................................................................ 110 7.4 Using the Code Browser to Create Codes........................................................................... 114 7.5 Coding Text........................................................................................................................... 116 7.6 Assigning Colors to Codes ................................................................................................... 122 7.7 Color Coding – The Electronic Way to Highlight Text ......................................................... 125 7.8 Coding by Use of the Toolbar .............................................................................................. 127 7.9 The Code Symbol in the Text Browser ................................................................................ 128 7.10 Undoing the Assignment of a Code to a Segment ............................................................. 132 7.11 Deleting Codes ..................................................................................................................... 133 7.12 Modifying Code References ................................................................................................ 135 7.13 Modifying the Code System................................................................................................. 138 7.14 Copying parts of the Code Tree........................................................................................... 139 7.15 Moving Code References..................................................................................................... 140 7.16 Copying Code References.................................................................................................... 142 7.17 Inserting a New Top Category.............................................................................................. 143 7.18 Splitting up a Code............................................................................................................... 144 7.19 The Weight Scores: Indicating the Relevance of a Segment............................................. 146 7.20 Writing a Short Comment for a Coded Segment................................................................ 149
8 The Memos: Managing Your Ideas ........................................................................... 151 8.1 About Memos ....................................................................................................................... 151 8.2 Creating Text Memos........................................................................................................... 151 8.3 The Toolbar in the Memo Dialog Box.................................................................................. 154 8.4 Memos in the Document System........................................................................................ 155 8.5 Linking Codes to Memos ..................................................................................................... 156 8.6 Code Memos ........................................................................................................................ 158 8.7 Reading and Modifying Memos........................................................................................... 159 8.8 Memos and the Windows Clipboard ................................................................................... 160 8.9 Printing and Exporting Memos ............................................................................................ 160 8.10 The Memo System ............................................................................................................... 161

TABLE OF CONTENTS
6
8.11 Jumping from a Memo to the Text Document.................................................................... 164 8.12 Text Search in Memos ......................................................................................................... 165 8.13 Collection of Memos Linked to the Same Code ................................................................. 166 8.14 Display Options for Memos ................................................................................................. 167 8.15 Viewing Memos of Text Documents and Text Groups........................................................ 168 8.16 Exporting a Selection of Memos ......................................................................................... 168 8.17 Memo Table in Excel and Word........................................................................................... 170
9 Managing Attributes/Variables................................................................................. 171 9.1 About Attributes ................................................................................................................... 171 9.2 The List of Attributes............................................................................................................ 174 9.3 The Data View: Table of Attributes...................................................................................... 176 9.4 Entry of Attribute Values ...................................................................................................... 180 9.5 Renaming and Deleting Attributes...................................................................................... 182 9.6 Exporting the Table of Attributes......................................................................................... 184 9.7 Importing the Table of Attributes into Word or Excel ......................................................... 186 9.8 Importing the Table of Attributes into SPSS....................................................................... 186
10 Retrieving Coded Segments ...................................................................................... 189 10.1 Principles of Text Retrieval: Activation................................................................................ 189 10.2 Activating Text Documents .................................................................................................. 190 10.3 Activating Codes................................................................................................................... 191 10.4 Deactivating all Texts and Codes........................................................................................ 193 10.5 The Retrieved Segments ..................................................................................................... 193 10.6 Hierarchy of Codes in Retrieval ........................................................................................... 200 10.7 Finding Relevant Segments: using Weight Scores............................................................. 202 10.8 Opening the Source Text at the Position of the Coded Segment ...................................... 205 10.9 Overview of Retrieved Segments ........................................................................................ 206 10.10 Printing and Exporting Retrieved Segments....................................................................... 208 10.11 Automatic Coding of Retrieved Segments.......................................................................... 212

TABLE OF CONTENTS
7
11 Lexcial Search.............................................................................................................. 214 11.1 Options for Lexical Search................................................................................................... 214 11.2 Search Results ..................................................................................................................... 217 11.3 Exporting Search Results .................................................................................................... 220 11.4 Auto-Coding Search Results ................................................................................................ 221 11.5 Automatic Coding Focus Groups......................................................................................... 224 11.6 Keyword in Context (KWIC).................................................................................................. 224
12 Selective Text-Retrievals: Using Attributes for Selecting Documents................. 227 12.1 Attributes and Text-Retrieval ............................................................................................... 227 12.2 Results of Activation by Attributes ...................................................................................... 231 12.3 Complex Logical Functions.................................................................................................. 231
13 Analytic Functions: Complex Types of Retrievals................................................... 234 13.1 Co-Occurrences of Codes .................................................................................................... 234 13.2 Ten Different Ways to Analyze Co-Occurrences of Codes.................................................. 239
13.2.1 OR-Combination – Standard Function ................................................................ 239 13.2.2 Intersection .......................................................................................................... 240 13.2.3 Overlapping (Big Picture) ..................................................................................... 241 13.2.4 Only One Code...................................................................................................... 242 13.2.5 Intersection (Set).................................................................................................. 243 13.2.6 Only This Code...................................................................................................... 244 13.2.7 If Outside .............................................................................................................. 245 13.2.8 If Inside ................................................................................................................. 246 13.2.9 Followed By .......................................................................................................... 247 13.2.10 Near ...................................................................................................................... 248
14 Visual Tools: TextPortrait............................................................................................ 249 14.1 Visual Tools in MAXQDA....................................................................................................... 249 14.2 TextPortrait – The Visualization of a Document................................................................. 250 14.3 What Does a TextPortrait Display?...................................................................................... 251

TABLE OF CONTENTS
8
14.4 Options for TextPortrait?...................................................................................................... 252 15 Visual Tools: Codeline................................................................................................. 254
15.1 Codeline – The Sequential View of a Text .......................................................................... 254 15.2 Options for Codeline? .......................................................................................................... 256
16 Visual Tools: Text Comparison Chart........................................................................ 257 16.1 Visual Comparison of Texts ................................................................................................. 257 16.2 Export as a Graphic File....................................................................................................... 258
17 Visual Tools: Code Matrix Browser and Frequency of Codes................................ 259 17.1 Code Matrix Browser............................................................................................................ 259 17.2 Table of Code Frequencies.................................................................................................. 262
18 Visual Tools: Code Relation Browser........................................................................ 265 18.1 Displaying Co-Occurrences of Codes .................................................................................. 265 18.2 Options 266
19 Visual Tools: Crosstabs............................................................................................... 269 19.1 Options 269 19.2 Selection of codes and Attributes ....................................................................................... 271
20 Organizing Teamwork................................................................................................. 274 20.1 Exchanging MAXQDA Projects ............................................................................................. 274 20.2 Type A Teamwork: Using a Common Project File ............................................................... 275 20.3 Type B Teamwork: Exchanging Codes, Memos, and Attributes ........................................ 277 20.4 Exchange of Code References, Memos, and Variables for Text Groups or the Entire
Project 285 20.5 Merging MAXQDA Projects................................................................................................... 287
21 Utilities: Exporting, Printing, Reports, Index, Statistics ......................................... 289 21.1 Projects: Creating, Deleting, and Backing Up..................................................................... 289 21.2 Cleaning Up Your Project ..................................................................................................... 290 21.3 Text Groups and Text Sets: Renaming and Deleting ......................................................... 291

TABLE OF CONTENTS
9
21.4 Text Documents: Renaming and Deleting .......................................................................... 291 21.5 Reports and Documentation ............................................................................................... 292 21.6 Project Overview................................................................................................................... 293 21.7 Index of All Coded Segments............................................................................................... 302 21.8 Frequency of Codes ............................................................................................................. 304
22 Export/Import Features.............................................................................................. 306 22.1 Overview 306 22.2 Exporting the Table of Attributes......................................................................................... 308 22.3 Importing a Table of Attributes............................................................................................ 308 22.4 Exporting the Overview of Coded Segments ...................................................................... 310 22.5 Exporting the Code System ................................................................................................. 312
23 Specials and Options .................................................................................................. 313 23.1 Logbook 313 23.2 Search for a New Update..................................................................................................... 314 23.3 General Preferences............................................................................................................ 314
24 Appendix ....................................................................................................................... 318 24.1 List of Keyboard Shortcut .................................................................................................... 318 24.2 How to Manage Problems ................................................................................................... 319 24.3 Technical Data ..................................................................................................................... 320

1 WELCOME TO MAXQDA!
10
1 Welcome to MAXQDA!
This reference manual provides detailed information about the different functions and procedures of MAXQDA 2007.
There are different ways to navigate through the manual:
The manual begins with a table of contents. Simply click on a chapter’s heading to jump to this chapter.
The manual’s chapter headings are displayed in the left pane of the Acrobat Reader. Simply click on a chapter to bring that chapter into the right pane.
Pressing CTRL+F starts the search function. You can type in a word or character string and Acrobat Reader will search the entire text and display the text passage in which your search term was found.
The best way to display the manual is by setting the zoom factor of Acrobat Reader to a value that is appropriate for your screen.
As a licensed user, you can get support from our support service:
E-Mail: [email protected]
If you find any bugs in MAXQDA, we would appreciate it if you would let us know. We try hard to make our software the best possible and we need your cooperation.
If you would like to know about program improvements and updates, please visit our website:
Internet: www.maxqda.com

2 INFORMATION FOR USERS OF MAXQDA 2 AND WINMAX
11
2 Information for Users of MAXQDA 2 and winMAX
2.1 Changes from MAXQDA Version 2
Users of MAXQDA 2 and MAXQDA 1 will want to know if they can switch to MAXQDA 2007 with-out any problems. This, of course, is the case.
Project files produced with MAXQDA 1 and 2, as well as archive files produced with all winMAX versions since 1998, can easily be imported into MAXQDA 2007.
MAXQDA 2007 will convert the projects into the new format. Depending on the size of a project, this procedure may take some time.
Some completely new functions have been integrated into the new version of MAXQDA, and we have improved and enhanced the previous version. The most important innovations concern these four main areas:
Simplicity: MAXQDA 2007 is even easier to use than its predecessor. The new option of importing texts directly from the Windows Explorer into MAXQDA simply via the drag-and-drop function or the assimilation of the MAXQDA DOCUMENT SYSTEM to the Windows Explorer, which enables you to place new texts directly into the desired position of the text hierarchy, are examples for the advanced simplicity. Drawing hidden functions to the surface is another step towards our goal of achieving the easiest and most intuitive handling possible. Thus, each of the four main windows now has a small toolbar on top where you can click directly on frequently used functions.

2 INFORMATION FOR USERS OF MAXQDA 2 AND WINMAX
12
Visuals: Building on the innovations for visualization introduced in MAXQDA 2, MAXQDA 2007 offers completely new and unique functions. The CODE MATRIX BROWSER and the CODE
RELATIONS BROWSER were the first visual tools introduced in MAXQDA. MAXMaps, the graph-ics add-on module (released in 2005) provided the possibility for qualitative modeling. MAXQDA 2007 now continues on this path and offers three strong innovative tools to visu-ally support your data analysis. It is important to realize that the foundation of the MAXQDA Visuals enables the researcher to freely assign colors to codes. The analytical benefit of the MAXQDA Visuals is linked directly to an anticipatory, meaningful, and well suited choice of colors in respect to a particular code system and a particular analytical interest. Thus, the more appropriately the researcher have chosen the code colors, the richer his or her analyti-cal “harvest” will be in terms of the MAXQDA.
TEXTPORTRAIT visualizes the codings of a text as a meaningful colored picture, allowing a strong visual analysis of the text: Broken down to a 100x100-piece rectangle, the document is “portrayed” as a painting of its codings, maintaining the location and length of their occur-rence throughout the text.
CODELINE also refers to a text document presenting a “codes per paragraphs” diagram for one document. Similar to a score in a musical work, you get a visualization of the sequence of codes throughout the text.
TEXT COMPARISON CHART compares the codings of texts in the sequence of text passages (para-graphs), and thus provides a strong visual impression of differences and similarities in se-lected texts. This technique opens new perspectives, especially for structured texts. Another addition and improvement to the visuals allows for individually mixed colors (more than a thousand), which are applicable to codes. We’ve also introduced a color attribute for texts.
New Functionality: One example would be the new link browser, which gives you comfort-able access to text links and, therefore, completes the tabular overviews in MAXQDA. Fur-thermore, we would like to mention the extended possibilities for editing attributes, which can now be divided into a variable view and a data view (similar to the functionality in SPSS).

2 INFORMATION FOR USERS OF MAXQDA 2 AND WINMAX
13
The newly created extensive RTF support enables you to code even within single cells of word tables.
Unicode: MAXQDA 2007 is the first QDA software that consistently supports Unicode and, therefore, makes it possible not only to edit texts in Japanese, Cyrillic, or Arabic, but also to edit codes and attributes (names and values). The support of Unicode refers to all functions of MAXQDA 2007 which might seem like an insignificant modification at first glance but ac-tually meant the re-writing of thousands of lines of source code.
Here are the new features in detail:
General Functions
A new “Logbook” function allows you to protocol, for example, all work steps in the form of a research diary.
The new function “Search for Updates” checks the MAXQDA website and informs you if your version is not up to date any more. If you agree, the update procedure will be carried out automatically.
Changed main menu: Many basic functions are now accessible not only through the context menus but directly through the upper menu bar. Moreover, a new menu option TEXT was in-serted, which contains the essential functions for the text management, e.g. “Import Text(s),“ “New Text Group,“ or “Print Text.“
The menu option CODES now gives direct access to a lot more functions that could only be reached through context menus or the menu PROJECT > EXPORT before.
The menu option MEMOS has been extended by several new functions. Memo overviews can now be accessed by the following selections: “My Code Memos,” “My Text Memos,” “Memos of the opened Text.”

2 INFORMATION FOR USERS OF MAXQDA 2 AND WINMAX
14
The “Lexical Search“ function has been integrated into the extended ANALYSIS menu, as well as functions which refer to the RETRIEVED SEGMENTS WINDOW, e.g. the tabular overview for the coded segments, the HTML table of the segments, and the option to print and export the coded segments.
The menu option VISUAL TOOLS – already created with the introduction of MAXMaps – has been extended: Besides the tools already available in MAXQDA2, here you will find the new visualization functions TEXTPORTRAIT, CODELINE, and TEXT COMPARISON CHART.
The standard window menus for color selections are available for texts and codes in MAX-QDA and broaden the choice of different colors to more than one thousand.
The following innovations concern the overall functionality of MAXQDA; they are not confined to individual windows:
There is a new “Reset Retrieval Functions“ button in the toolbar, which switches a lot of functions back to default setting, e.g. the retrieval mode will switch to standard, all texts and codes will be deactivated, weighting will be switched off, the selected colors in the selection of coding striped will be set back to „select all colors,” etc.
The activation status of codes and texts is more evident now: The symbols don’t just change from green to red any more, but a small arrow symbol allows for immediate recognition of the activation status, which is also helpful for color blind users.
An extended undo function now allows you to reverse not only coding activities but also op-erations completed in the TEXT BROWSER.
The “Options” menu (PROJECT > OPTIONS) has been significantly extended. New options are, among others:
o The choice to allow or prohibit that a code name is defined twice (even among differ-ent Level 0 codes), depending on the general structure of your code system;

2 INFORMATION FOR USERS OF MAXQDA 2 AND WINMAX
15
o selection of the number of codes to be displayed in the quicklist of the code toolbar;
o no display of the code frequencies behind the codes in the CODE SYSTEM window.
The main windows may be switched from right to left, so that it is possible to code with the text on the left side and the CODE SYSTEM on the right side.
Functions in the “Document System“ Window
The organization of this window has been assimilated to Windows Explorer, so that texts may be assigned to the highest level (“root”) and one does not have to define a text group before importing a text.
Texts may be deleted from the DOCUMENT SYSTEM with the “Del” key.
Unlike the MAXQDA TEXT PREPROCESSOR with its restrictive format requirements, an Excel ta-ble can be imported. This is, for example, especially useful for the analysis of open questions in an interview in MAXQDA 2007.
Texts may contain word tables with multiple lines of texts in their cells. Everything will be displayed correctly and one can code within the cells of the table as well.
Color attributes may be assigned to the text symbols in the DOCUMENT SYSTEM in the same way as you already know it from assigning colors to codes.
The keyboard shortcuts have been extended: Ctrl+M for “Inserting Memo” and Ctrl+T for “Importing Texts” are now available.
Documents in the DOCUMENT SYSTEM may be defined as read-only.
This affects the TEXT BROWSER so that it cannot be switched to the edit mode for selected texts.

2 INFORMATION FOR USERS OF MAXQDA 2 AND WINMAX
16
Functions in the “Text Browser” Window
The right mouse button is now equipped with an extensive context menu: Copy, Cut, Code with a new Code, Code with the last Code, Code In-Vivo, Insert Text Link, Insert External Text Link, and more are accessible options.
External Links, e.g. to websites, photos, PowerPoint slides, etc., may be inserted comfortably using the dialog of the context menu in the Text Browser. External Links will be displayed like hyperlinks in Internet browsers.
The function “Code with Selection” is new; it means to code a text segment simultaneously with multiple codes - namely those that are activated.
The memos are not stuck to a specific line of the document anymore, but may now be moved around via mouse in the memo column.
There are more formatting buttons in the edit mode, e.g. “centered,” “left-aligned,” “right-aligned,” etc.
More options for the selections of displayed coding stripes: Instead of choosing to show “only current user” coding stripes, you may now pick any available user out of a pull-down list, similar to the one which is offered when starting MAXQDA. Thus, you are completely free to choose to see the codings of all users or just of selected ones.
There are two new options in the Code Stripe Control (in the context menu found in the cod-ing margin): In addition to switching selected colors on or off, you may now switch all colors on or off simultaneously.
Line numbering is now available as an option „Wrap and line number;” a sub-menu lets you define the number of characters shown in a line, which defines the line width. The function picks up on what has been possible in winMAX: Each line contains a line number. If, for ex-ample, 40 is the chosen number of characters, a <Return> keystroke is created at that point. Thus, the paragraph number of MAXQDA automatically becomes the line number.

2 INFORMATION FOR USERS OF MAXQDA 2 AND WINMAX
17
Word tables are better presented now and it is possible to code even within in the cells of the table.
The function “Color Coding” has been changed – it now resembles the physical act of high-lighting passages with a text marker. When you move text segments from one color code to another code within your code system, the highlighting will be discontinued.
Each new code will immediately be taken into the quick code list.
Coding
A new code can now be entered very easily: First highlight the text, then use the shortcut Ctrl+W. A window will open and you can type in a code directly.
Code frequencies may now be converted into an attribute. In the context menu of the de-sired code (in the Code System window), you will be offered the option “Transform into an At-tribute.” An attribute (of the numeric type) will then be inserted into the matrix of attributes; the name of the code will be taken over as name for the attribute. If a subcode is trans-formed, only the name of the sub-level is taken over.
Functions in the “Code System” Window
The CODE SYSTEM window has been equipped with a toolbar. The button “New” herein allows you to instantly create and name a new code.
The view of the MAXQDA code system can now be switched from the default tree structure to a linear structure, listing all codes in alphabetical order regardless of their position in the hierarchy. The position will still be visible, as codes which are subcodes will have the higher level codes listed behind them, separated by a backslash (\). The sequence is built up in the same way as in the “Frequency of codes” table.

2 INFORMATION FOR USERS OF MAXQDA 2 AND WINMAX
18
Code colors can now be inherited. When defining a new code, the default setting for the color choice will be “Inherit,” so the code will take over the color of its higher level code. The inherit function can be switched off in the “New Code” dialogue box.
The option “Code to Toolbar” places the code as an icon into the new window “Code Bar,” which can be opened from the context menu of each code in the code system. You may store a set of codes in there and place the window right beside the TEXT BROWSER. Thus, it is easy to code your text with one of the codes listed in the Toolbar, by just highlighting the text segment to be coded and then clicking on the desired code.
In analogy to the text sets, it is now possible to define code sets in the CODE SYSTEM; code sets are displayed in the same way as text sets beneath the actual code system.
When clicking a code strip in the TEXT BROWSER, this particular code in the code system will be highlighted automatically as well as the particular text where the segment is located in the DOCUMENT SYSTEM. These selection bars are now much easier to recognize. The previous light grey color has been changed to a clear blue.
With the shortcut Alt+N, you can create subcodes for the selected code.
Codes and subcodes can be deleted with the “Del” key.
It is now possible not only to copy the complete code tree but also parts of it and paste them, e.g. as subcodes, into another code. The content of the copied codes is not included in this procedure, so only the structure is copied. Thus, it is now very easy to transfer identi-cal subcode structures to as many codes as needed.
Activation by colors: When clicking the filter icon in the upper menu bar of the CODE SYSTEM window, a dialog box will appear, similar to that in the TEXTBROWSER. It is possible to select colors by placing checkmarks into the check fields. Only codes with this color, respectively these colors, will be activated.
Weighting is now adjustable on a scale from 0 to 100.

2 INFORMATION FOR USERS OF MAXQDA 2 AND WINMAX
19
The act of coding out of the CODE SYSTEM window has gained another option: You may now also drag a code from the code tree to the text segments, whereas before you could only drag the marked text to the code.
Coding with multiple codes: You may now use the principle of activation to assign as many codes to a text segment as you’d like. All activated codes are assigned to a segment if you choose the option “Code with Selection” in the context menu of the TEXT BROWSER.
Memo Functions
The memos also gained a small toolbar now on the very top of the memo window. There, you can choose the functions “print” and “export” (as an RTF file), and link or remove codes from the code system to this specific memo. By clicking on a code in the CODE SYSTEM, you can im-port it into the list of selectable codes. As before, all memos linked to a code can also be ac-cessed from each code in the code system (“Overview of Linked Memos”).
You can move memos around in the TEXT BROWSER (keep the left mouse button pressed while dragging the memo to a new position).
Many users will be happy to see that the retrieval results will now be displayed together with their memos in the RETRIEVED SEGMENTS window.
Attributes
The attribute manager has been divided into two views: an attribute view and a data view. The variable view lets you define and select new attributes considerably faster than before.
The data view is now equipped with a toolbar on top, where you can make an HTML table available with one click. There, you will find the visible attributes and attribute values pre-sented in a clear and well organized form. Moreover, from here, you can access the export function as well as the “List of Attribute” view, where you can create and delete attributes.

2 INFORMATION FOR USERS OF MAXQDA 2 AND WINMAX
20
The attribute view is also equipped with a toolbar on the top, where you may create or delete attributes, arrange the table in html format, and access the edit function.
Search Functions
The automatic coding function for search results “Code Results” in the RETRIEVED SEGMENTS window and “Autocode” in the “Lexical Search” have been improved. The entire quick code list is now available for selection in the “Autocode” window.
Search strings may now contain wild card characters (like “*” or “?”).
Visual Tools
CODE MATRIX BROWSER and CODE RELATIONS BROWSER allow you to scroll horizontally without los-ing sight of the left column with the codes.
CODE MATRIX BROWSER and CODE RELATIONS BROWSER have both been equipped with a toolbar on top. Thus, you can easily access some important functions: Export the table as CSV or TXT file, export it as a graphic (bitmap format), and insert in right away into your PowerPoint or other form of presentation. You may also switch the view of the columns from the toolbar.
In addition to the colored rectangular symbols, it is possible to display the values as num-bers in the presentation of the CODE MATRIX BROWSER and the CODE RELATIONS BROWSER.
Three new visual tools, TEXTPORTRAIT, CODELINE, and TEXT COMPARISON CHART, offer new perspec-tive for the analysis. It is possible to jump directly to the corresponding text segments from the presentation in the CODELINE and the TEXT COMPARISON CHART. See also the explanations at the beginning of this list.

2 INFORMATION FOR USERS OF MAXQDA 2 AND WINMAX
21
Text-Retrieval, “Retrieved Segments” Window
The RETRIEVED SEGMENTS window has also been equipped with a toolbar. There you may, for instance, select the presentation as an HTML table or switch to a new tabular view, which will replace the old overview of retrieved segments.
The “Overview of Coded Segments” has been improved significantly. It now presents itself in a new layout with a split window: On top you will find the segment with its entire text and on the bottom, the familiar Excel-style overview. Hence, it is no longer necessary to go back to the RETRIEVED SEGMENTS window in order to get the complete view of a coded segment; rather, you may browse the list segment by segment and immediately gain an overview via the up-per part of the window.
The retrieved text segments will now be displayed side by side with their memos in a new memo column in front of the text; this includes all memos that have been assigned to this coded segment.
A print-out is now available of coded segments with memos (memos behind the text).
The selection of the hierarchy functions (Symbol: Mother/Child), e.g. the option to consider the subcode structure in the complex retrieval functions, has been integrated into the “fx manager.”
The comments of the codings, an option which had been rather hidden before, have been upgraded and may be used as a sort of nickname for coded segments. This is especially useful for the presentation of coded segments in MAXMaps.
Comments (or nicknames), if any, will also appear in the tool tip of the TEXT BROWSER.
The comments will be shifted to the front in the „Overview of Retrieved Segments;” they will be displayed in the first column, so that they catch your eye quickly.

2 INFORMATION FOR USERS OF MAXQDA 2 AND WINMAX
22
Teamwork
The teamwork function is now able to create a detailed protocol of all operations during the teamwork import.
MAXQDA 2007 still allows users of winMAX to continue working with their old data in MAXQDA. Archived files of the winMAX versions since winMAX 1998 (MAR files) can be imported without a problem. Thus, users will still be supported, even if their software is 9 years old.
2.2 Changes from MAXQDA Version 1 to Version 2
For users of MAXQDA Version 1, it’s interesting to read about the major changes that were intro-duced with Version 2 in 2004. Several additions and extensions have been made as well. The most important changes are:
Code Matrix Browser (CMB): a visualization, in the form of a kind of matrix, of the text seg-ments that have been assigned a code. The matrix shows a little square, or cluster, for each text segment that has been assigned a code. The color and size of a cluster show how often the code has been applied. Clicking on a cluster causes the corresponding coded text seg-ment to be displayed in the RETRIEVED SEGMENTS window.
Code Relation Browser (CRB) is a tool similar to the CODE MATRIX BROWSER. The CRB is a visualization of the relations between codes. A table shows how many text segments to which any two codes are attached.
Text Links: text passages can be linked by means of hyperlinks. These are indicated in the same way as a link in an HTML text. Internal links (to other text passages in the MAXQDA project) and external links (to websites) are visually and functionally the same.

2 INFORMATION FOR USERS OF MAXQDA 2 AND WINMAX
23
Exporting in HTML format: it is now possible to export MAXQDA memos, attributes, and coded text segments in HTML format. The data can be displayed in tables by any web browser (e.g. Internet Explorer).
Extended Rich Text Format: an extended RTF format with OLE functions is now integrated into the program. This makes it possible to display JPG and GIF graphics and include hyper-links – clicking on a URL in the text loads the corresponding website in the pre-configured web browser.
User Administration: at the beginning of a session, the MAXQDA user must log in. All pro-gram objects (texts, codes, memos, coded segments) are “stamped” with the time when they were created and with the user name of the person who created them. This information is shown in the attributes table – they are system fields.
Other changes are as follows:
General Functions
After starting the program, a window “Tips and Tricks” appears, offering the user information about useful functions and interesting features of which he or she might not yet be aware.
The status bar at the bottom of the screen now contains many active icons, allowing the user to double-click on an icon and easily change key parameters. For example, by double-clicking the “default code weight score” icon, the default value of 100 can be changed, or by double-clicking the “code weight score” icon, it is possible to set the upper and lower values for the weight score filter. By double-clicking the “subcode” icon, it is possible to set whether or not subcodes are considered in text retrievals. Double-clicking on the “sort” icon allows the user to choose how to sort the retrieved segments.

2 INFORMATION FOR USERS OF MAXQDA 2 AND WINMAX
24
Text functions
“Screen tips” or “tool tips,” which appear when you roll the mouse cursor over the name of a text in the text group window, now contain the size of the text in bytes, the date when the text was imported, the user name of the person who imported the text, and the number of codes and memos applied.
There are now more options for viewing the coded text segments displayed in the TEXT BROWSER. First of all, the user can choose to display only the activated coded text segments. Secondly, only the coded text segments of the current user can be displayed. Thirdly, only the coded text segments assigned a certain color can be displayed. Alternatively, one can choose not to display any codes. This is useful to check the consistency of applied codes, in the case where several researchers assign codes independently of one another. Of course, people should not be able to view each other’s codes.
The text preprocessor makes it possible to enter text names automatically by typing the key word #TEXT. This is useful when a file contains many texts and the user doesn’t want to number them manually.
The screen tips shown for the coded text passages in the display column contain the crea-tion date and the author. These screen tips can be turned on or off in the Options menu. For a researcher working alone on a project, the author information would be of little use since it would always be the same.
Clicking the symbol for a coded text segment in the TEXT BROWSER causes this code to appear at the top of the CODE SYSTEM window.
It is now possible to print the text displayed in the TEXT BROWSER without code information. This option can be selected in the “Print” dialog box.

2 INFORMATION FOR USERS OF MAXQDA 2 AND WINMAX
25
Assigning Codes to Text
Quick creation of new codes: selected text can be assigned a new code by simply pressing the shortcut CTRL+W. A window opens into which you can type the new code name.
Code frequencies can be converted into attributes by selecting the option “Transform into At-tribute” in the shortcut menu for the selected code. A (numerical) attribute with the given code as header is then entered in the attribute matrix. Only the name of the lowest code level is used here.
Attributes resulting from transformed codes are dynamic, any changes to the coded seg-ments cause the associated attribute values to be updated.
Code System
There are screen tips for the codes in the CODE SYSTEM window.
The “Frequency of Codes” table now contains an extra column with the code ID number.
The screen tip for each code shows the creator’s user name and creation date of each code.
There is a greater choice of colors that can be used for the codes.
The default value of the weight score of codes can be changed.
Memo Functions
The paragraph to which each memo is attached is now included when the memos are printed or exported.
Memos can now be entered at any level in the DOCUMENT SYSTEM – at the project level, the text group level, and the level of single texts. The memos can thus be used to contain gen-eral information about the project, a text group, or a single text. For example, a memo can
2 INFORMATION FOR USERS OF MAXQDA 2 AND WINMAX
26
contain meta-information such as the description of the interview situation, the place where the interview was held, etc.
The memo data entry dialog box is the same for text memos and code memos. An icon indi-cates the presence of a memo, just like for codes. Clicking on an icon opens the memos.
In the memo data entry dialog box, it is possible to jump from field to field by pressing the TAB key.
Memo overviews can be exported in HTML format.
A column has been added to the table in the MEMO SYSTEM that indicates the paragraph that the memo was linked to, as long as the memo is a text memo.
Attributes
The attributes table contains two new standard columns: bytes and number of memos.
The attribute matrix can now be exported in HTML format.
Text Retrieval
For the function “Activation by attributes,” it is no longer necessary to re-type a value as the logical condition. Rather, previously defined values are made available in a drop-down list in the “Value” field. This is similar to the entry of attributes in the attributes table.
The printout of the current text shows the presence of memos beside each line of text. If there are several memos for one line of text, only one icon is printed.
The list of retrieved segments (text segments which have been assigned codes) can now be sorted according to their weight score.
It is now possible to export the retrieved segments in HTML format.

2 INFORMATION FOR USERS OF MAXQDA 2 AND WINMAX
27
A new option in the shortcut menu, which can be accessed by right-clicking on “Text Groups” in the DOCUMENT SYSTEM window, allows the user to invert the activation of all texts in the DOCUMENT SYSTEM: previously activated texts are deactivated and vice-versa. Similarly, the codes activated can also be inverted by selecting this option from the shortcut menu of “Code System” in the CODE SYSTEM window.
Analysis Functions
The set of complex text retrieval functions has been simplified. These functions are now available in a new dialog box with detailed visual explanations.
Teamwork
The functions enabling teamwork, that is, the export and import functions, are now accessi-ble not only at the level of individual texts, but also at the text group level and for all texts in the DOCUMENT SYSTEM. Thus, codes and memos can be exported and imported for an individ-ual text, for a group of texts, or for all texts.
There are new teamwork functions allowing the user to import attributes, codes, and/or memos.
When exporting attributes, the attributes can be limited to those of activated texts. If texts have been activated when the option “Export” in the Attributes Manager is selected, the user will be given the choice of whether or not to limit the exported attributes to those of the acti-vated texts – otherwise all attributes are automatically exported.

3 DESKTOP AND MENUS
28
3 Desktop and Menus
3.1 Stepping into MAXQDA
When you start MAXQDA 2007 for the first time, the screen depicted in Fig. 3-1 appears.
Fig. 3-1: Starting MAXQDA
Enter your user name
here.
3 DESKTOP AND MENUS
29
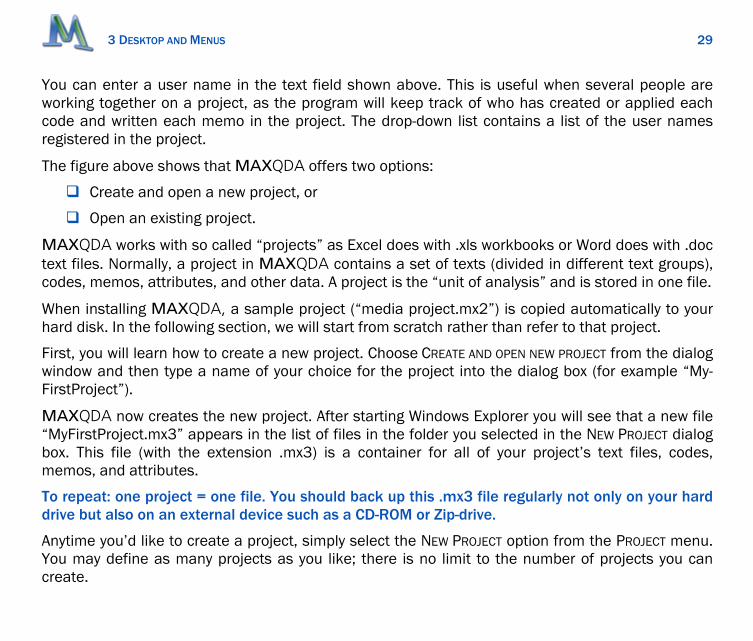
You can enter a user name in the text field shown above. This is useful when several people are working together on a project, as the program will keep track of who has created or applied each code and written each memo in the project. The drop-down list contains a list of the user names registered in the project.
The figure above shows that MAXQDA offers two options:
Create and open a new project, or
Open an existing project.
MAXQDA works with so called “projects” as Excel does with .xls workbooks or Word does with .doc text files. Normally, a project in MAXQDA contains a set of texts (divided in different text groups), codes, memos, attributes, and other data. A project is the “unit of analysis” and is stored in one file.
When installing MAXQDA, a sample project (“media project.mx2”) is copied automatically to your hard disk. In the following section, we will start from scratch rather than refer to that project.
First, you will learn how to create a new project. Choose CREATE AND OPEN NEW PROJECT from the dialog window and then type a name of your choice for the project into the dialog box (for example “My-FirstProject”).
MAXQDA now creates the new project. After starting Windows Explorer you will see that a new file “MyFirstProject.mx3” appears in the list of files in the folder you selected in the NEW PROJECT dialog box. This file (with the extension .mx3) is a container for all of your project’s text files, codes, memos, and attributes.
To repeat: one project = one file. You should back up this .mx3 file regularly not only on your hard drive but also on an external device such as a CD-ROM or Zip-drive.
Anytime you’d like to create a project, simply select the NEW PROJECT option from the PROJECT menu. You may define as many projects as you like; there is no limit to the number of projects you can create.

3 DESKTOP AND MENUS
30
You c an open projects created with the previous versions of MAXQDA by choosing the file type “MAXQDA 2 Projects (*.mx2)” or “MAX.QDA Projects (*.m2k).” The project will be converted auto-matically into the new format and saved as an .mx3 file.
Fig. 3-2: Creating a New Project

3 DESKTOP AND MENUS
31
3.2 The MAXQDA Screen
This section covers the basic menus and options you’ll find in MAXQDA. Here you will learn how to use the toolbars, menus, and more.
Let’s begin by taking a look at the MAXQDA desktop. The menu bar is located directly below the title bar. This menu bar contains pull-down menus for commands associated with “Project,” “Edit,” and so on. The toolbar, directly below the menu bar, contains buttons for quick access to frequently used commands. The coding toolbar, underneath or to the right of the main toolbar, offers functions for coding text segments, for assigning codes to text segments. A “screen tip” or “tool tip,” seen when you roll the mouse cursor over a button, identifies each button on the bars.
Fig. 3-3: Menu bar and toolbars
Beside the main toolbar, MAXQDA possesses two other toolbars that you can switch on and off via the menu option “Windows.”
The toolbar for COLOR CODING offers four icons with different colors for marking interesting texts.
Fig. 3-4: Color-Coding-Bar

3 DESKTOP AND MENUS
32
The toolbar Visual Tools contains six icons for the selection of the different visual tools offered by MAXQDA: TEXTPORTRAIT, CODELINE, TEXT COMPARISON CHART, CODE MATRIX BROWSER, CODE-RELATIONS-BROWSER, and CROSSTABS.
Fig. 3-5: Visual-Bar
The four main windows of MAXQDA are located beneath the toolbars:
Fig. 3-6: The four main windows of MAXQDA
Maximize window
Switch off window
3 DESKTOP AND MENUS
33
DOCUMENT SYSTEM contains a list of all texts and text groups.
CODE SYSTEM contains the codes, i.e. the category system.
TEXT BROWSER is the window where most of the work is done, such as marking text segments and attaching codes, editing text, and writing memos.
RETRIEVED SEGMENTS contains a collection of coded segments, the results of a text retrieval procedure.
All of the four windows have their own toolbar. Here you’ll find features often used, for instance, for exporting and printing data. If you roll the mouse over an icon, a quick info pops up giving you in-formation about the feature.
Functions that are available in different windows always have he same icon, e.g.
– prints the content of the particular window
– exports the content of the window in Rich Text Format
The four windows may be switched on and off independently. Thus, you can find the appropriate ar-rangement for the different tasks you’d like to carry out.
The four windows may be opened or closed in three different ways:
1. Select the Windows option in the menu bar.
2. Click the buttons in the toolbar.
3. Click the “Close” (X) button in the upper right corner of a window.
Each window can also be maximized to full screen by clicking the “Maximize” button in the upper-right corner of the window.

3 DESKTOP AND MENUS
34
Fig. 3-7: Opening and closing the four windows
You may switch the four windows on and off independently of each other, but at least one window has to remain opened.
The buttons located on the toolbar under the menu bar have the following functions:
Fig. 3-8: Overview of the buttons in the toolbar
When coding text segments, we recommend that you work with only the two windows CODE SYSTEM and TEXT BROWSER. You can adjust the size of these two windows by dragging the line between them with the mouse.
Reset Retrieval
Open Project
New Project
Frequency of Codes
Index of coded
segments
Activation by
Attributes
Reset Activations
Attributes
Memo System
Code Matrix Browser
Text-Retrieval
Search
Logbook
Code Relation Browser

3 DESKTOP AND MENUS
35
Fig. 3-9: The width and height of the windows can be adjusted by clicking on the borders and dragging them
By default, the main windows are always arranged in the same way: the DOCUMENT SYSTEM and the CODE SYSTEM appear on the left side of the screen and the TEXT BROWSER and the RETRIEVED SEGMENTS window on the right side. In MAXQDA 2007 you may now change the default setting of the main windows. Go to the menu option PROJECT > OPTIONS to change this property. It is necessary to restart MAXQDA to apply the changes.
All four windows can be maximized to full screen by clicking the MAXIMIZE button in the upper right corner of the window. When you are organizing your CODE SYSTEM (rearranging the sequence, moving a codes to a higher level, etc.), a maximized window gives you a better overview of the CODE SYSTEM (as in the following figure).

3 DESKTOP AND MENUS
36
Fig. 3-10: Maximizing a window
Often when working with text documents, you will want to read coded text passages in their larger context. If so, you only need the windows RETRIEVED SEGMENTS and TEXT BROWSER. Whenever you now click on the text information box in the RETRIEVED SEGMENTS window, the corresponding text will be opened in the TEXT BROWSER window.

3 DESKTOP AND MENUS
37
Fig. 3-11: The optimal windows arrangement when coding

3 DESKTOP AND MENUS
38
Fig. 3-12: The CODE SYSTEM maximized to full screen

3 DESKTOP AND MENUS
39
The TEXT BROWSER window includes the codes sector, a gray area left (or right) of the text document in which codes are displayed. To adjust the width of the codes sector, move the mouse pointer to the top of the line separating it from the text, press the left mouse button, and drag the column to the left (or right) side of the text.
Fig. 3-13: Adjusting the codes sector
You can choose whether or not to display the names of the codes. Clicking on the codes sector with the right mouse button causes a shortcut menu to come up with an option for displaying code names.
Click here and drag for adjusting
the width.

3 DESKTOP AND MENUS
40
3.3 The Main Menu
As is usual in Windows-based programs, the MAXQDA screen includes a main menu bar located directly below the title bar. The menu bar contains drop-down menus containing program com-mands. The toolbar appearing below the menu bar contains buttons for quick access to frequently used commands. On the right side of the toolbar appears the code bar with functions for coding text segments. The toolbar “screen tips” feature displays the names for each button on the toolbar.
Fig. 3-14: Menu bar and toolbar
The drop-down menus of the menu bar offer the following functions:
Project In the Project menu, you can choose to create a new project, open an existing project, or complete other project management functions like printing, exporting, and importing.
Edit Here you will find, as in all Windows programs, options to CUT, COPY, and PASTE text into the Windows clipboard. In MAXQDA, these options are possible only when the TEXT BROWSER window is active. Moreover, you’ll find options like UNDO and UNDO ALL.

3 DESKTOP AND MENUS
41
Text This menu offers options to import texts or to create new texts. You may also create new text groups or print and export the text displayed in MAXQDA’s TEXT BROWSER.
Codes In this menu, you will find functions related to the CODE SYSTEM. You can, for instance, create codes, display a list showing how often each code appears, and display a complete index of all codes. You may also export or import the entire CODE SYSTEM.
Memos In the Memos menu, you can filter memos according to certain selection criteria, and modify, print, and export them.
Attributes In the Attributes menu, you can define new attributes, delete or change existing attributes, and en-ter values for the attributes.
Analysis Here you’ll find all features for analyzing the data, different kinds of text retrieval, as well as lexical search procedures.
The LEXICAL SEARCH option offers a plain-text search of your text documents and memos. You can search for words or strings and perform the automatic coding of text segments. The menu also con-tains an option for listing search strings in their context – “Keyword-in-Context.”
Here you will also find a variety of functions for retrieving texts. Different search functions for find-ing text segments containing one or more codes are offered, for example through logical “And” or “Or” combinations of the codes, or through the search for more than one code within a given quan-tity of text.

3 DESKTOP AND MENUS
42
Visual Tools This menu offers 7 different options for visual analysis. MAXMaps, a tool for creating concept maps and qualitative models, can be found here, as well as the CODE MATRIX BROWSER or the CODE RELATIONS BROWSER and the TEXT COMPARISON CHART. Two other visual tools, TEXTPORTRAIT and CODELINE, offer a case-oriented analysis; they both work for a single text.
Windows Here you find options for opening and closing the four main windows. The toolbars for COLOR CODING and VISUAL TOOLS can also be switched on and off here.
MAXDictio This option is only available when the add-on module MAXDictio has been installed.
? / Help Here you find the reference manual in PDF format and a short introduction to help you take your first steps with MAXQDA. Other menu options bring you to the online tutorial (on the website www.maxqda.com) or let you search for an update of MAXQDA. Here you may also select the lan-guage of MAXQDA. English, Spanish, or German are the options currently available.
3.4 Context Menus in the DOCUMENT SYSTEM Window
The DOCUMENT SYSTEM is like a big container that contains all the text documents of your project. The DOCUMENT SYSTEM in MAXQDA is highly flexible; you may add new documents and remove docu-ments whenever you want.

3 DESKTOP AND MENUS
43
3.4.1 Toolbar A little toolbar is located in the right corner on top of the DOCUMENT SYSTEM. It offers three helpful functions:
Print the DOCUMENT SYSTEM
Export the DOCUMENT SYSTEM (RTF)
Filter documents according to their color attribute
3.4.2 Text Groups and Texts The documents may be arranged in text groups. In MAXQDA 2007, defining text groups is optional. You may also save all your text files in the main folder, the root of DOCUMENT SYSTEM.
For temporary use, you may define TEXT SETS. These sets may contain a collection of texts taken from different text groups.
The DOCUMENT SYSTEM is organized in three different levels:
Project level
Text group level
Text document level

3 DESKTOP AND MENUS
44
Fig. 3-15: The three levels in the DOCUMENT SYSTEM (Texts, Group 1, Text 1 .. 4)
Clicking items at each level with the right mouse button causes a corresponding context menu to appear.
3.4.3 The Upper Level The highest level in the DOCUMENT SYSTEM is the project level. When starting a new project, the DOCUMENT SYSTEM window is empty except for an icon and the word “Texts.” This is the root of the text tree. Click here with the right mouse button to open the context menu.

3 DESKTOP AND MENUS
45
Fig. 3-16: The context menu for the highest level in the DOCUMENT SYSTEM window
The context menu offers the following options:
ACTIVATE ALL TEXTS – activates all the text documents of the project for text searches and text re-trieval.
DEACTIVATE ALL TEXTS – deactivates all the text documents of the project.
ACTIVATION BY ATTRIBUTES – activates and deactivates text documents by forming filter criteria based on pre-defined attributes.
INVERT ACTIVATION – inverts the activation status of text documents: activated texts will be deactivated and vice versa.

3 DESKTOP AND MENUS
46
-----------------------------
MEMO – allows you to enter a project memo.
-----------------------------
OVERVIEW OF CODED SEGMENTS – lists all code references in a spreadsheet-like table.
OVERVIEW OF MEMOS – lists all memos in a spreadsheet-like table.
OVERVIEW OF ATTRIBUTES – lists all attributes in a spreadsheet-like table.
OVERVIEW OF LINKS – lists all text links in a spreadsheet-like table.
-----------------------------
NEW TEXT GROUP – creates a new text group.
SORT TEXT GROUPS – sorts the existing text groups alphabetically.
-----------------------------
CREATE TEXT – creates a new text in the list (with a default name “Text #”). Double-clicking the “Text #” opens it in the TEXT BROWSER window. By switching to EDIT MODE, you can then type in or insert the text with the drag-and-drop function from the Windows clipboard.
IMPORT TEXT(S) – opens a dialog box for importing a single text or multiple texts. MAXQDA only im-ports files in Rich Text Format (RTF). How to prepare the texts is described in Chapter 4.3.
TEXT PREPROCESSOR – allows you to import structured and pre-coded text files (Chapter 5).
IMPORT STRUCTURED TEXT FROM EXCELTEXTS – imports pre-structured texts organized as an Excel table (see Chapter 5).
-----------------------------

3 DESKTOP AND MENUS
47
TEAMWORK EXPORT – starts the teamwork export procedure for the whole project, enabling research group members to exchange data. This option allows a team to share work and makes it possible for several people to work on the same texts simultaneously.
TEAMWORK IMPORT – this is the complementary function to TEAMWORK EXPORT: it imports a previously exported file with codes, memos, and attributes from another PC.
-----------------------------
MAXDICTIO CODER – starts the coder of the add-on module MAXDictio.
In previous versions of MAXQDA, it was necessary to create at least one text group, since every text had to belong to a text group. In MAXQDA 2007, the DOCUMENT SYSTEM is organized like Win-dows Explorer. To better organize your data, you may create text groups (folders), but it’s your choice to do so or not. Anyway, all texts can be moved from one text group to another simply via the drag-and-drop function.
3.4.4 The Middle Level: The Text Group A project can consist of an unlimited number of text groups. A context menu appears when you click on a text group with the right mouse button, and it includes the following options:
ACTIVATE ALL TEXTS – activates all the text documents in the text group for text searches and text re-trieval.
DEACTIVATE ALL TEXTS – deactivates all the text documents in the text group.
SORT TEXTS – sorts the existing texts in the selected text group alphabetically.
-----------------------------
MEMO – allows you to enter a text group memo.

3 DESKTOP AND MENUS
48
-----------------------------
CREATE TEXT – creates a new text in the list (with a default name “Text #”). Double-clicking the text opens it in the TEXT BROWSER window. By switching to EDIT MODE, you can then type in or insert the text with the drag-and-drop function or from the Windows clipboard.
IMPORT TEXT(S) – opens a dialog box for importing a single text or multiple texts. MAXQDA only im-ports files in Rich Text Format (RTF). How to prepare the texts is described in Chapter 4.3.
TEXT PREPROCESSOR – allows you to import structured and pre-coded text files (Chapter 5).
-----------------------------
DELETE TEXT GROUP – deletes an entire text group, including all text documents with their codes and memos.
RENAME TEXT GROUP – allows you to enter a new name for a text group.
-----------------------------
OVERVIEW OF CODED SEGMENTS – lists all code references belonging to the selected text group.
OVERVIEW OF MEMOS – lists all memos of the texts belonging to the selected text group.
OVERVIEW OF ATTRIBUTES – lists all attributes of the texts belonging to the selected text group.
OVERVIEW OF LINKS – lists all text links of the texts belonging to the selected text group.
-----------------------------
TEAMWORK EXPORT – starts the teamwork export procedure for this text group, enabling data to be ex-changed between the members of a research group. This option allows a team to share work and makes it possible for several people to work on the same texts simultaneously.
TEAMWORK IMPORT – this is the complementary function to TEAMWORK EXPORT: it imports a previously exported file with codes, memos, and attributes from another PC.
-----------------------------

3 DESKTOP AND MENUS
49
MAXDICTIO CODER – starts the coder of the add-on module MAXDictio.
Fig. 3-17: The context menu for the middle level in the DOCUMENT SYSTEM window

3 DESKTOP AND MENUS
50
3.4.5 The Lowest Level: The Text Document A context menu is also available on the lowest level of the DOCUMENT SYSTEM, the level of the individ-ual text document. Right-clicking a text name opens a shortcut menu that includes options for that particular text.
Fig. 3-18: The context menu for the lowest level in the DOCUMENT SYSTEM window

3 DESKTOP AND MENUS
51
The following options are available:
ACTIVATE – activates the text document for text searches and text retrieval.
OPEN TEXT – opens the text and displays it in the TEXT BROWSER window. From there, you can edit the text, code text passages, and write memos. A different icon in the DOCUMENT SYSTEM indicates that the text is currently opened.
MEMO – allows you to enter a memo for this text.
COLOR ATTRIBUTE – enables you to choose a color attribute for the text.
READ ONLY – prohibits anyone from making changes to the text, i.e. editing is no longer possible.
-----------------------------
DELETE TEXT – deletes the text with all its codes and memos from the DOCUMENT SYSTEM.
RENAME TEXT – allows you to create a new name for the text.
-----------------------------
OVERVIEW OF CODED SEGMENTS – lists all code references belonging to the selected text.
OVERVIEW OF MEMOS – lists all of the text’s memos.
OVERVIEW OF ATTRIBUTES – lists all of the text’s attributes.
OVERVIEW OF LINKS – lists all of the text’s text links.
-----------------------------
TEXTPORTRAIT – creates a visualization of the text’s codes and code references based on the colors associated with the attached codes.
CODELINE – creates a visualization of the text’s code references by way of a matrix code by para-graphs. Thus, a timeline of the code references is visible.
-----------------------------

3 DESKTOP AND MENUS
52
TEAMWORK EXPORT – starts the teamwork export procedure for this text, enabling data to be ex-changed between the members of a research group. This option allows a team to share work and makes it possible for several people to work on the same texts simultaneously.
TEAMWORK IMPORT – this is the complementary function to TEAMWORK EXPORT: it imports a previously exported file with codes, memos, and attributes from another PC.
-----------------------------
MAXDICTIO CODER – starts the coder of the add-on module MAXDictio.
3.4.6 Text Sets Text sets are temporary groups of texts that are handled in the same way as text groups. The con-text menu that appears when you right-click a text set is the same as that of a text group, with the exception that there is no option to import texts. Text sets maintain only pointers to the texts, not the texts itself. Thus, if you remove a text from a text set, the text still stays in the same location in the DOCUMENT SYSTEM; it will not be deleted.
NEW SET – creates a new text set comprising all activated texts.
SORT SETS – sorts the texts in the selected text set alphabetically.
Text sets have the same shortcut menu options as text groups, with the following additions:
REMOVE SET – deletes the set.
RENAME SET – allows you to create a new name for a set.

3 DESKTOP AND MENUS
53
Fig. 3-19: The shortcut menu for the Text Sets in the DOCUMENT SYSTEM window
3.5 Context Menus in the Window Text Browser
3.5.1 Toolbar The TEXT BROWSER is your main working area: Here you may code text segments, write memos, set links to other documents, and insert external links. Most of the functions can be chosen from the context menu that pops up if you highlight a text segment using the mouse, and then click on it with the right mouse button.

3 DESKTOP AND MENUS
54
The heading line of the TEXT BROWSER displays the name of the text that is currently displayed. There is a toolbar in the right corner of the heading line that gives you access to functions often needed:
PRINT TEXT – enables you to print the displayed text, with or without memos and coding stripes.
Export TEXT – saves the text as a file in RTF format.
COLOR FILTER – enables you to select code references to be displayed in front of the text ac-cording to the colors associated with the codes.
3.5.2 Context Menu If you select text in the TEXT BROWSER and click it with the right mouse button, a context menu ap-pears.
3 DESKTOP AND MENUS
55
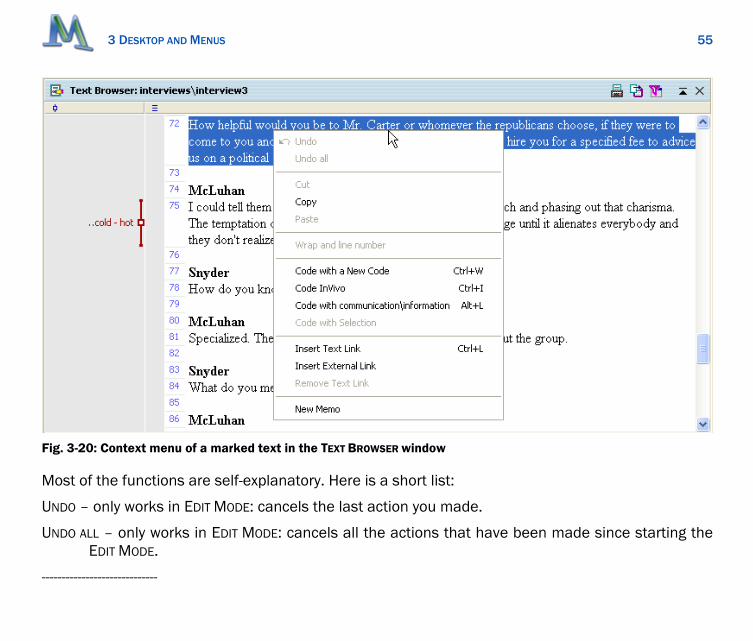
Fig. 3-20: Context menu of a marked text in the TEXT BROWSER window
Most of the functions are self-explanatory. Here is a short list:
UNDO – only works in EDIT MODE: cancels the last action you made.
UNDO ALL – only works in EDIT MODE: cancels all the actions that have been made since starting the EDIT MODE.
-----------------------------

3 DESKTOP AND MENUS
56
CUT– copies the text to the Windows clipboard and deletes it (same as in Windows programs like Word).
COPY– copies the text to the Windows clipboard (same as in Windows programs like Word).
PASTE– inserts text from the Windows clipboard (same as in Windows programs like Word).
-----------------------------
WRAP AND LINE NUMBER– re-formats the text; each line becomes a paragraph and a return key is in-serted at the end of each line.
-----------------------------
CODE WITH A NEW CODE– the marked text will be coded with a new code of your choice.
CODE IN-VIVO– In-Vivo-Coding of the marked segment.
CODING WITH „XXX“– the marked text will be coded with the last code used.
CODE WITH SELECTION– the marked text will be coded with multiple codes (selected before).
-----------------------------
INSERT TEXT LINK– sets an anchor for a new text link (two pieces of text will be connected).
INSERT EXTERNAL LINK – an external link will be inserted (may be a link to graphics, photographs, au-dio, or video files).
REMOVE TEXT LINK– the selected text link will be removed.
-----------------------------
NEW MEMO– inserts a new memo at the specified location.

3 DESKTOP AND MENUS
57
3.6 Context Menu in the Code System
3.6.1 Toolbar The name of the window “Code System” is displayed in the left corner of the CODE SYSTEM’s header. A toolbar is located in the right corner, which gives you access to several frequent functions:
Prints the CODE SYSTEM (as a text file)
Exports the CODE SYSTEM
Inserts a New Code into the list
CODE BROWSER – enables you to create codes and subcodes quickly
COLOR FILTER – selection of codes according to their colors
CHANGE VIEW – displays the CODE SYSTEM as a table instead of hierarchical tree
3.6.2 The Upper Level: The Code System The CODE SYSTEM is displayed in the CODE SYSTEM window. (At the beginning of a project, this window is empty except for the “Code System” entry with the green code symbol.) Clicking this symbol with the right mouse button opens a context menu with options for the top level of the CODE SYSTEM.
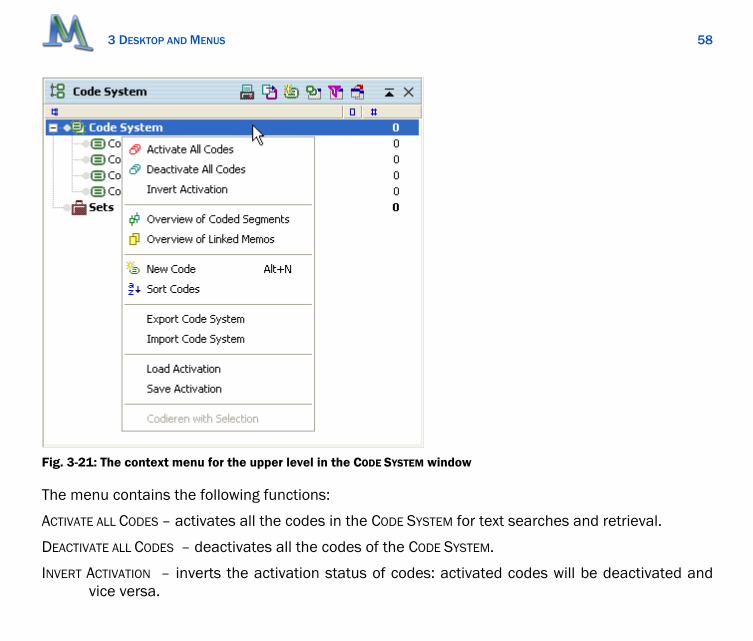
3 DESKTOP AND MENUS
58
Fig. 3-21: The context menu for the upper level in the CODE SYSTEM window
The menu contains the following functions:
ACTIVATE ALL CODES – activates all the codes in the CODE SYSTEM for text searches and retrieval.
DEACTIVATE ALL CODES – deactivates all the codes of the CODE SYSTEM.
INVERT ACTIVATION – inverts the activation status of codes: activated codes will be deactivated and vice versa.

3 DESKTOP AND MENUS
59
-----------------------------
OVERVIEW OF CODED SEGMENTS – lists all code references of the entire project in a table.
OVERVIEW OF LINKED MEMOS – lists all memos linked to codes in a spreadsheet-like table.
-----------------------------
NEW CODE – inserts a new code in the CODE SYSTEM.
SORT CODES – sorts the whole CODE SYSTEM in alphabetical order.
-----------------------------
EXPORT CODE SYSTEM – exports the CODE SYSTEM to an external file.
IMPORT CODE SYSTEM – imports a CODE SYSTEM from an external file.
-----------------------------
LOAD ACTIVATION – loads a previously defined activation status from an external file.
SAVE ACTIVATION – saves the current activation status to an external file.
-----------------------------
CODE WITH SELECTION– the marked segments will be coded with all activated codes
3.6.3 The Level of the Codes and Subcodes To manipulate the CODE SYSTEM on the lower level of the individual codes, a context menu is avail-able that shows up if you right-click on a particular code.

3 DESKTOP AND MENUS
60
Fig. 3-22: The shortcut menu for the lower level in the CODE SYSTEM window
This shortcut menu contains the following options:
ACTIVATE/DEACTIVATE – activates the selected code for text searches and text retrieval. If the code is already activated, it will be deactivated. Subcodes will be activated (or deactivated) at the same time. You can also activate or deactivate the subcodes separately.
CODE – The code will be attached to the currently selected text passage in the TEXT BROWSER window.
3 DESKTOP AND MENUS
61
CODE MEMO – attaches a memo; for instance, one that contains a description of the code.
TRANSFORM INTO AN ATTRIBUTE – creates a new attribute in MAXQDA’s attributes table and gives it the name of the selected code. The code frequencies of the documents are entered in this new column of the attributes table.
INTERSECTIONS – shows a list of codes that intersect with the selected code.
-----------------------------
DELETE CODE – deletes the selected code and all its subcodes from the CODE SYSTEM. Removing a code is like cutting a branch off a tree: by cutting it off, you obviously also remove all the smaller branches and twigs that were attached to this branch. Similarly, all the subcodes of a code and their subcodes are deleted in this process.
RENAME CODE – gives a new name to the selected code.
COPY CODE TREE– the structure below the code (subcodes and subcodes of subcodes) will be copied into the clipboard in order to insert the same subcodes at another location in the code tree.
COPY CODED SEGMENTS – copies the code’s references to text segments to another code. After clicking this option, move the mouse pointer to the target code (that is, the code to which you want to copy the code references). Then, click this code with the right mouse button and the short-cut menu that appears will now contain the option “Insert coded segments from Code ‘x.’” Click on this option to complete the copy procedure. The text segments involved are now coded with both of these codes.
MOVE CODES – shifts the code’s references to text segments to another code. After clicking this op-tion, right-click on the target code (that is, the code to which you want to move the codes), and the shortcut menu that appears will now contain the option “Insert coded Segments from Code ‘x.’” Click this option to complete the move procedure. The text segments con-cerned will now be coded only by the second code, the “target” code. The code from which they were moved will now be empty.

3 DESKTOP AND MENUS
62
-----------------------------
OVERVIEW OF CODED SEGMENTS – opens a spreadsheet-like table containing a list of all the coded text segments belonging to the selected code.
OVERVIEW OF LINKED MEMOS – opens a table listing all the memos linked to the selected code.
-----------------------------
NEW CODE – creates a new subcode under the selected code; the function also assigns a specific color attribute to this code. In the TEXT BROWSER window all segments assigned this code will have a code symbol in the selected color next to them.
SORT CODES – sorts the subcodes of the selected code in alphabetical order.
-----------------------------
CODE TO TOOLBAR – inserts the code into the code toolbar.
CROSSTABS – starts the CROSSTABS procedure for the selected code.
3.7 Context Menu in the RETRIEVED SEGMENTS Window
3.7.1 Toolbar The toolbar in the left corner of the window RETRIEVED SEGMENTS gives access to functions often needed:

3 DESKTOP AND MENUS
63
Prints the list of the RETRIEVED SEGMENTS
Prints the list of retrieved segments together with all memos attached to the segments
Exports the RETRIEVED SEGMENTS as a file in Rich Text Format
Switches to another kind of display, the OVERVIEW OF CODED SEGMENTS
CODE RESULTS – codes all of the segments displayed with a new code of your choice
3.7.2 Context Memo All of the coded text segments retrieved through the activation of codes in the CODE SYSTEM window are shown in the RETRIEVED SEGMENTS window.
Fig. 3-23: Information box for text segments in the RETRIEVED SEGMENTS window
To the left of each text segment, there is an information box showing the text and the paragraph the text segment is taken from, and which code is assigned to it.
There are different options available to you in the RETRIEVED SEGMENTS window. If you left-click on the information box that indicates where the segment comes from, the corresponding text will be loaded into the TEXT BROWSER. If you right-click on the box, you can delete this code or modify the
When you click anywhere on this box using the left mouse button, the original text from which this seg-ment was taken, will be opened in the TEXT BROWSER window at the position of the segment in the text.

3 DESKTOP AND MENUS
64
weight score of the code. When you click with the left mouse button, MAXQDA will automatically highlight the code in the CODE SYSTEM window.
A general shortcut menu is obtained by right-clicking in the gray area on the left side of the RETRIEVED SEGMENTS window.
Fig. 3-24: Open shortcut menu for retrieval functions
This menu (like the ANALYSIS menu in the menu bar) allows you to determine how the coded texts segments are retrieved. The order in which they are retrieved is determined by the choice of the op-tions ORDERED BY TEXT TREE, ORDERED BY CODE TREE, and ORDERED BY WEIGHT. The first option sorts them according to the order of the texts in the Text Tree (as in the DOCUMENT SYSTEM window). ORDERING BY CODE TREE lists them according to the order of the codes in the CODE SYSTEM window. ORDERING BY WEIGHT sorts them according to their weight score.
Click here with the right mouse button
to open shortcut menu.

3 DESKTOP AND MENUS
65
This menu also allows you to retrieve certain segments according to a combination of the codes that had been assigned to the texts. This type of retrieval is based on the relation of the location of the codes assigned to the texts, the relation being determined by the choice of one of ten logical functions. These vary from the simple “or” or “and” functions – the overlapping of texts segments which have been assigned different codes – to more complex operations.
Here is a list of the available options:
TEXT RETRIEVAL – gives the choice of logical function for retrieving coded text segments.
-----------------------------
ORDERED BY TEXT TREE – sorts the coded segments according to their order in the Text Tree.
ORDERED BY CODE TREE – sorts the coded segments according to their order in the Code Tree.
ORDERED BY WEIGHT – sorts the coded segments according to their weight score.
-----------------------------
INCLUDE SUBCODES – includes the subcodes of the codes in the retrieval.
USE WEIGHT FILTER – includes only the coded segments that have a certain weight score.
EDIT WEIGHT FILTER – determines which values are permitted for the weight score.
-----------------------------
OVERVIEW OF CODED SEGMENTS – constructs a spreadsheet-like table containing a list of the coded text segments currently displayed in the RETRIEVED SEGMENTS window.
CODE RESULTS – assigns a new code to the text segments currently in the RETRIEVED SEGMENTS win-dow.

3 DESKTOP AND MENUS
66
3.8 Managing Tables in MAXQDA
3.8.1 The Toolbar Many procedures in MAXQDA use tables like those of a spreadsheet program such as Excel.
All tables have a toolbar below the heading line. According to the functionality of the table, the tool-bar offers a selection of functions often used.
Some of the icons are available in all of the tables, for instance:
HTML TABLE – displays the content of the table as an HTML table. This table can be printed or exported as a file.
EXPORT – Exports the content of the table in Rich Text Format or as tab-delimited TXT file.
Closes the Table
3.8.2 Handling Tables The Fig. 3-25 shows the table of ATTRIBUTES that appears if you select the option EDIT from the ATTRIBUTES menu.
The attributes are listed in the table’s column headers. Some attributes appear in black, some in blue. The black ones are either “internal attributes” of MAXQDA, so-called “system fields,” or at-tributes that have been created by the option “Transform code into an attribute.”
MAXQDA automatically creates the following internal attributes for each text:
Textgroup – the name of the text group

3 DESKTOP AND MENUS
67
Textname – the text name
Creation Date – the date the text was created/imported
Number of coded segments
Number of memos
Author – the name of the user that created (or imported) the text
Bytes – the size of the text in bytes
Fig. 3-25: Working with attributes in a table

3 DESKTOP AND MENUS
68
To simplify their later use in statistical programs like SPSS, the attributes “Textname” and “Textgroup” are written as one word. The width of each column in the table can be changed by sim-ply dragging the little line between the column headers. When you double-click a line separating two headers (the mouse pointer will change into a special symbol for this function), MAXQDA will give the column its optimum width as determined by the longest string found in that particular column.
The sequence of the columns in the window can also be determined by the user. Simply left-click on the column header of the column you want to move, and drag the column to the new location.
When you click any header with the right instead of the left mouse button, a context menu appears. There you find an option to close the column. The shortcut menu also contains the option SELECT FIELDS that contains a list of all the columns of the table, allowing you to open and close them indi-vidually.
Tables can be sorted easily by left-clicking a column header. The table will then be sorted in ascend-ing order. Clicking again changes the sequence to descending order. A little triangle indicates the sort attribute and the selected order.
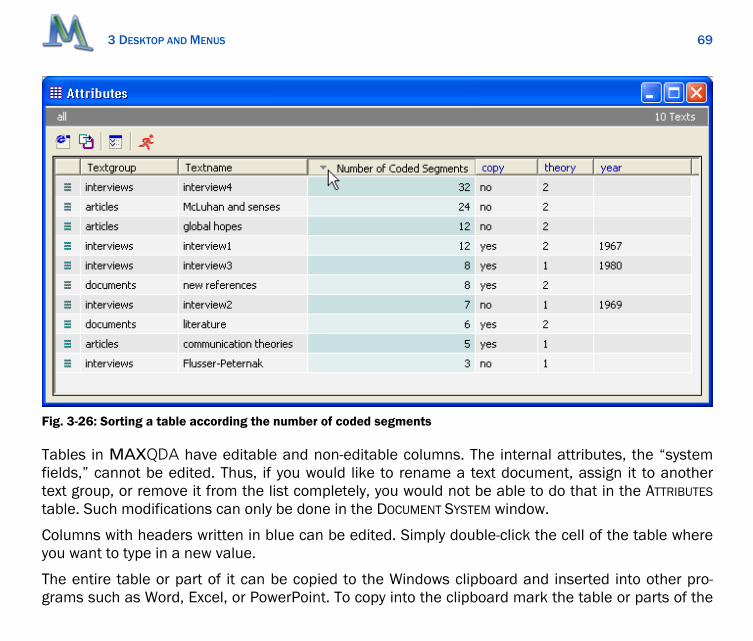
3 DESKTOP AND MENUS
69
Fig. 3-26: Sorting a table according the number of coded segments
Tables in MAXQDA have editable and non-editable columns. The internal attributes, the “system fields,” cannot be edited. Thus, if you would like to rename a text document, assign it to another text group, or remove it from the list completely, you would not be able to do that in the ATTRIBUTES table. Such modifications can only be done in the DOCUMENT SYSTEM window.
Columns with headers written in blue can be edited. Simply double-click the cell of the table where you want to type in a new value.
The entire table or part of it can be copied to the Windows clipboard and inserted into other pro-grams such as Word, Excel, or PowerPoint. To copy into the clipboard mark the table or parts of the

3 DESKTOP AND MENUS
70
table, press CTRL+C, to insert (or “paste”) from the clipboard into Word or another document press CTRL+V.
Table rows are selected as in Excel. To select a single row, simply click anywhere on it, and to select multiple rows press the CTRL key and click on the rows with the left mouse button. To select an area of the table click on the first row, then press the SHIFT key and click on the last row you want to copy.
Selected rows are highlighted in yellow. When you insert them into Excel (by use of CTRL+V or Edit > Paste) the table shows up with the original column headers. In Word, the imported table will look different – the different cells of the table are spaced with tab stops and at the end of each row a “Return” keystroke is inserted.
In MAXQDA, a search function for tables allows you to search for values or strings in selected col-umns of a table. Right-click on the column header of the column you would like to search, choose SEARCH from the shortcut menu, and type in the value or string. MAXQDA will automatically go to the first row containing the search string. If you’re searching for a string or substring not starting at the beginning of a word, the character „*“ has to be typed as the first character of the string.
All tables include context menus that appear when you click an item with the right mouse button. The number of options offered depends on the item clicked.
The following figure shows the options available from the context menu in the table of ATTRIBUTES.
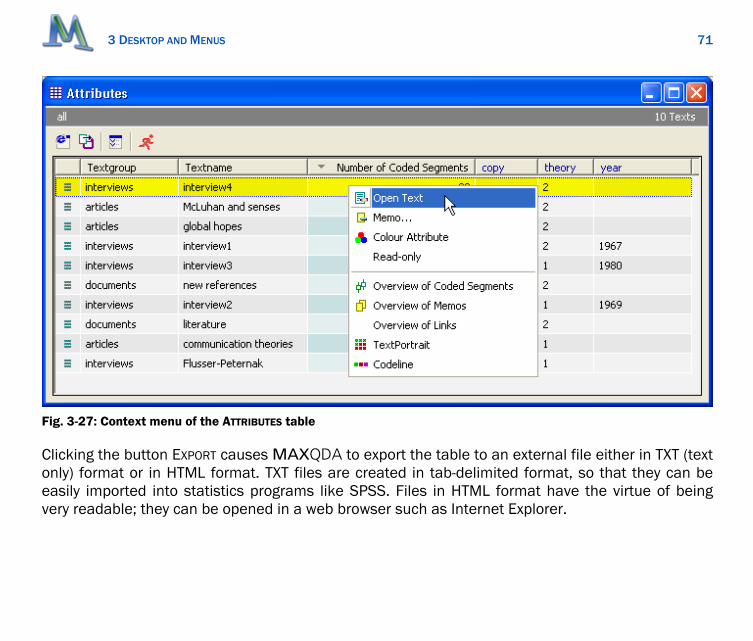
3 DESKTOP AND MENUS
71
Fig. 3-27: Context menu of the ATTRIBUTES table
Clicking the button EXPORT causes MAXQDA to export the table to an external file either in TXT (text only) format or in HTML format. TXT files are created in tab-delimited format, so that they can be easily imported into statistics programs like SPSS. Files in HTML format have the virtue of being very readable; they can be opened in a web browser such as Internet Explorer.

3 DESKTOP AND MENUS
72
3.8.3 The Table Overview of Coded Segments The table OVERVIEW OF CODED SEGMENTS is a special table, since the table is divided into two parts. The lower part displays a list of the code references and the upper part shows the reference fo-cused on in the list as a plain text segment.
Thus, the table combines a list pane and a detail pane. It gives you fast access to browse the RETRIEVED SEGMENTS and to copy parts from it to the Windows clipboard, and it’s also the place to write comments or labels for the segments.
Fig. 3-28: The table OVERVIEW OF CODED SEGMENTS

3 DESKTOP AND MENUS
73
3.9 Status Bar
The MAXQDA status bar is located at the bottom of the screen. The status bar displays a lot of in-formation about the current analysis. This information includes, for instance, the number of texts and codes currently activated, the number of retrieved segments, and the options chosen. Many of the symbols are interactive; thus, clicking a symbol causes a dialog window to appear.
Fig. 3-29: Status bar at the bottom of the MAXQDA screen
Active texts Coded segments
Active codes Default Weight

4 THE DOCUMENT SYSTEM
74
4 The Document System
4.1 About Texts in MAXQDA
With MAXQDA, you can:
Import all kinds of texts in Rich Text Format. It is not necessary to prepare the texts in a spe-cial way, except you want to use the procedures for importing pre-structured texts.
Import rich text files formatted in a special way, like forms, etc.
Create new text by typing the text in via keyboard.
Create a new text by dragging-and-dropping it from other applications or by inserting text from the Windows clipboard.
All texts managed by MAXQDA may be edited. You may correct mistakes, add new parts, or delete parts of the text. This also possible for texts that have been coded already. If you want to treat your texts as documents, you may switch on the read only option. In this case, editing is no longer possi-ble.
When importing a text into MAXQDA, a copy of the text will be imported. The original text files remain unchanged on your hard disk. You may do what you wish with this file: you may delete, modify, or move it to another location on your hard drive. None of these actions effect the file im-ported by MAXQDA. The program controls the text set you are working with completely. Thus, you don’t have to worry about your text files and the risk that they could be changed by “outside sources” with terrible consequences for the work you already have been doing with the project. This is one of the major advances of MAXQDA in comparison to programs like ATLAS.ti, which only work without pointers to the texts instead of importing them in their entirety.

4 THE DOCUMENT SYSTEM
75
4.2 Unicode
MAXQDA 2007 is one of the first QDA software packages that works with Unicode in all parts of the software. Unicode enables you to work in different languages, such as Chinese, Japanese, Ara-bic, etc. And these different languages can be found in within the same texts. Codes and attribute names may be written in theses languages as well.
MAXQDA 007 is a real step forward, since not only the texts may be in a non-European character set – as it is with some other software packages – but also lexical search, in-vivo coding; everything works with texts in any language.
4.3 Preparing a Text
MAXQDA only imports text files formatted in Rich Text Format (RTF). Most word processing pro-grams offer the option to save files in RTF. If you want to import already existing Word .doc files you must first convert them into Rich Text Format.
To do this with Word, just open the text, select the SAVE AS option from the FILE menu and choose the file type “Rich Text Format (*.rtf).”
Fig. 4-1: Saving a text file in Rich Text Format

4 THE DOCUMENT SYSTEM
76
You can import a text into MAXQDA regardless of where the file is located: from your local drive, a floppy disk, or a remote computer in your network.
The use of the RTF format allows you to import texts written in most text-based programs. Before importing a text, one should consider whether one wants to handle certain parts of the text as indi-vidual units. If this is the case, these segments of the text must be formatted as paragraphs, i.e. must be ended with a <Return> keystroke. MAXQDA will then be able to automatically code the text segments (see Chapter 7 for more information).
The most important points to consider when importing RTF files include:
All font attributes are retained (bold, italics, etc.).
Font type and font size are retained.
Most paragraph formatting remains the same (left and right tab stops, for example; not the distance between lines, however).
Embedded objects such as graphics and Excel and PowerPoint objects can also be imported. Since these objects may need considerable disk space, the default option is not to import embedded objects. This can be changed in the PROJECT > OPTIONS menu.
Another important point concerns tables created by Word or other Office programs. MAXQDA 2007 is now able to work with these tables and you can even code text in a single cell of the table.
4.4 Text Files and Embedded Objects
Although the improved RTF handling capabilities of MAXQDA enable the user to import graphics in JPG and GIF format, this capability should be used with some care. MAXQDA converts these graphics into bitmaps, and since the original formats are highly compressed, they may be quite large when converted. Thus, you should only import graphics that are necessary. MAXQDA is not a

4 THE DOCUMENT SYSTEM
77
picture archiving program – a single photograph from a modern digital camera can be a few mega-bytes, and including such pictures can slow down the program significantly. OLE objects can now also be imported by MAXQDA, as long as the corresponding option has been selected (PROJECT > OPTIONS).
That MAXQDA 2007 supports OLE (Object Linking and Embedding) means that “objects,” such as Excel tables, Equation Editor objects, PowerPoint slides, graphics, and photographs, can be em-bedded in the RTF text files. A link is created between the objects and the application in which they were created. To change an embedded object, you simply click the object. It is then opened in the original program, and can be modified. For example, if you click an Excel table, the Excel program is started and the table opened in it – provided the program is installed on your computer, of course. The size of the embedded objects is not unimportant. MAXQDA is designed as a program for quali-tative text and content analysis; thus, it is designed for the optimal analysis of a limited number of texts. It is not a multimedia program, and certainly not a photo archiving program in which you can manage gigabytes of photos.
Hence, while you will not have any problem embedding small graphics, Equation Editor objects, or number-based Excel tables, you can expect problems with pictures or graphics in JPG or GIF format, especially with high resolution photographs from modern digital cameras. These file formats com-press the pictures, which when uncompressed and converted into bitmaps, can comprise several megabytes. A seemingly reasonably sized 500 kB JPG picture can uncompressed be 10 MB. You can find out how large a JPG picture is as an uncompressed bitmap by pasting it into a Word docu-ment and then saving the Word document as an RTF file. Therefore, if you want to include pictures in a MAXQDA project, e.g. pictures of test candidates or locations, you should first convert the pic-tures into bitmaps with a lower resolution, such as that of your computer screen (72 dpi). This file conversion is a relatively simple process possible with most common graphics programs.
You should be careful when embedding objects in your project. The size of the RTF file gives you a good indication as to whether importing it will be successful or cause problems, as will likely be the case with files several megabytes in size. Some care should be taken when assigning codes to em-bedded objects. Embedded objects must be embedded as whole objects. It is not possible to assign

4 THE DOCUMENT SYSTEM
78
a code to only a part of an object, for example to a row or column of an Excel table. Since assigning a code to a text segment or to an object causes a copy of the text segment or object to be made, the assignment causes the memory used to be doubled. This is similar again to the physical proc-ess of cutting out a text segment, gluing it to an index card and filing the card under its code. One way to avoid this doubling of memory is to give the objects captions and to assign the codes to the captions. In this way, you can keep the project small while still allowing easy access to embedded objects when carrying out text retrievals.
4.5 Text Files and Hyperlinks
What a hyperlink is, and what happens when you click one, is something that – thanks to the Inter-net – almost every child understands. RTF files that are imported into MAXQDA can now contain hyperlinks. When you click one, the linked website or HTML file is automatically loaded in your de-fault Internet browser. The linked website can be either in the Internet, on a local network or on the actual computer.
Hyperlinks are made up of something you see: a button, a picture, or a (sometimes underlined) text, and a URL, which contains the location of the file, for example a website. When RTF files are im-ported into MAXQDA 2, the hyperlinks it contains can be seen if you move the mouse pointer over the hyperlink.
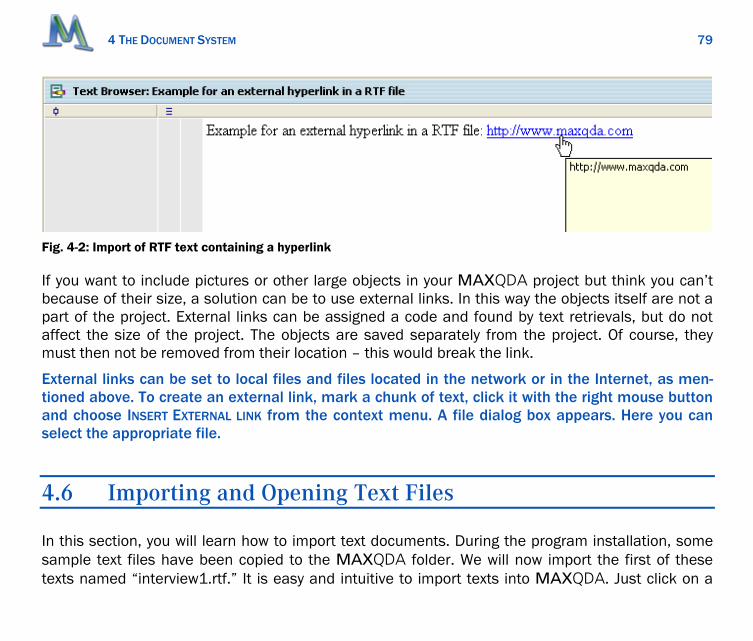
4 THE DOCUMENT SYSTEM
79
Fig. 4-2: Import of RTF text containing a hyperlink
If you want to include pictures or other large objects in your MAXQDA project but think you can’t because of their size, a solution can be to use external links. In this way the objects itself are not a part of the project. External links can be assigned a code and found by text retrievals, but do not affect the size of the project. The objects are saved separately from the project. Of course, they must then not be removed from their location – this would break the link.
External links can be set to local files and files located in the network or in the Internet, as men-tioned above. To create an external link, mark a chunk of text, click it with the right mouse button and choose INSERT EXTERNAL LINK from the context menu. A file dialog box appears. Here you can select the appropriate file.
4.6 Importing and Opening Text Files
In this section, you will learn how to import text documents. During the program installation, some sample text files have been copied to the MAXQDA folder. We will now import the first of these texts named “interview1.rtf.” It is easy and intuitive to import texts into MAXQDA. Just click on a
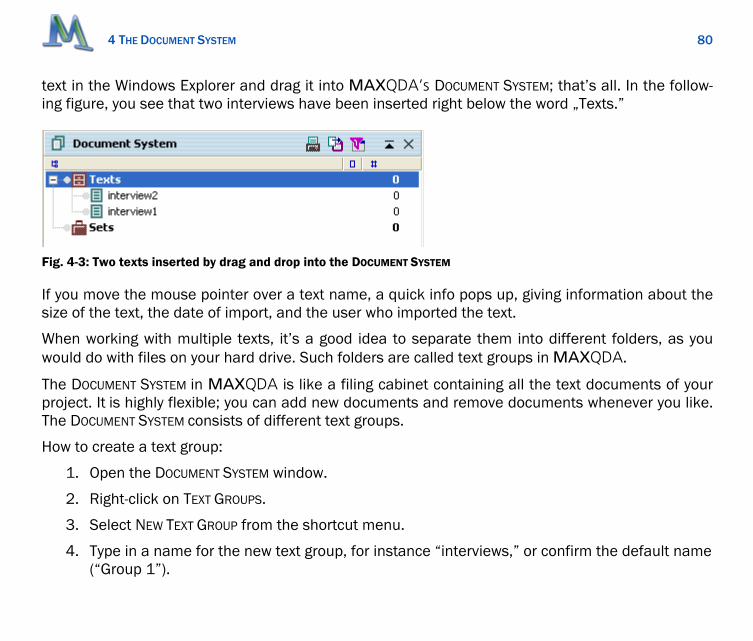
4 THE DOCUMENT SYSTEM
80
text in the Windows Explorer and drag it into MAXQDA’s DOCUMENT SYSTEM; that’s all. In the follow-ing figure, you see that two interviews have been inserted right below the word „Texts.”
Fig. 4-3: Two texts inserted by drag and drop into the DOCUMENT SYSTEM
If you move the mouse pointer over a text name, a quick info pops up, giving information about the size of the text, the date of import, and the user who imported the text.
When working with multiple texts, it’s a good idea to separate them into different folders, as you would do with files on your hard drive. Such folders are called text groups in MAXQDA.
The DOCUMENT SYSTEM in MAXQDA is like a filing cabinet containing all the text documents of your project. It is highly flexible; you can add new documents and remove documents whenever you like. The DOCUMENT SYSTEM consists of different text groups.
How to create a text group:
1. Open the DOCUMENT SYSTEM window.
2. Right-click on TEXT GROUPS.
3. Select NEW TEXT GROUP from the shortcut menu.
4. Type in a name for the new text group, for instance “interviews,” or confirm the default name (“Group 1”).

4 THE DOCUMENT SYSTEM
81
Fig. 4-4: Creating a new text group
In the DOCUMENT SYSTEM, all text groups are symbolized by a special icon (an open index card box). Later on, in the course of your research and data analysis, whenever you want to modify a particular text group, click the text group’s name with the right mouse button and select an option from the shortcut menu. The menu offers, for instance, options for importing and removing text documents.
Click here with the right mouse button to open the
shortcut menu.

4 THE DOCUMENT SYSTEM
82
Fig. 4-5: Working with text groups
Now to import a text into a particular text group (for instance “Interviews”), follow these steps:
1. Click the “Interviews” text group with the right mouse button
2. Choose IMPORT TEXT(S) from the shortcut menu
3. Select the file “Interview1.rtf” located in the MAXQDA folder
MAXQDA allows you to import several texts at the same time, but only if the texts are in the same folder. In the FILE > OPEN dialog box, hold the CTRL key pressed and select the texts by clicking them with the left mouse button. (You are probably already familiar with this way of selecting files from Windows Explorer and Office programs.)
Click here with the right mouse button to open the
shortcut menu.

4 THE DOCUMENT SYSTEM
83
Fig. 4-6: Importing text with the shortcut menu
If the text file is still open in another program, the import procedure will fail and an error message will be given. In this case switch to the other program and close the file before trying to import the text into MAXQDA again.
MAXQDA imports the text(s) and inserts the text name preceded by a green icon just below the text group’s name. MAXQDA inserts the file name as the text name. The name may be changed later on using the RENAME function.
You may also import texts to particular text groups by using the drag-and-drop function. In this case, move the mouse pointer exactly to the text group where you want to insert the new texts. Then let them drop. You will immediately see that new texts have been inserted.

4 THE DOCUMENT SYSTEM
84
4.7 Opening and Editing a Text
In order to work with a text, you have to load the text into the TEXT BROWSER window. You can either:
Double-Click the text in the DOCUMENT SYSTEM or
Move the mouse pointer on the text name in the DOCUMENT SYSTEM and click with the right mouse button. When the shortcut menu appears, choose OPEN TEXT.
Fig. 4-7: Opening a text
In the DOCUMENT SYSTEM, a special icon (sheet with pencil) is used for an opened text. The texts cur-rently active for text retrieval are displayed in a different color (red) and marked by a little red arrow.
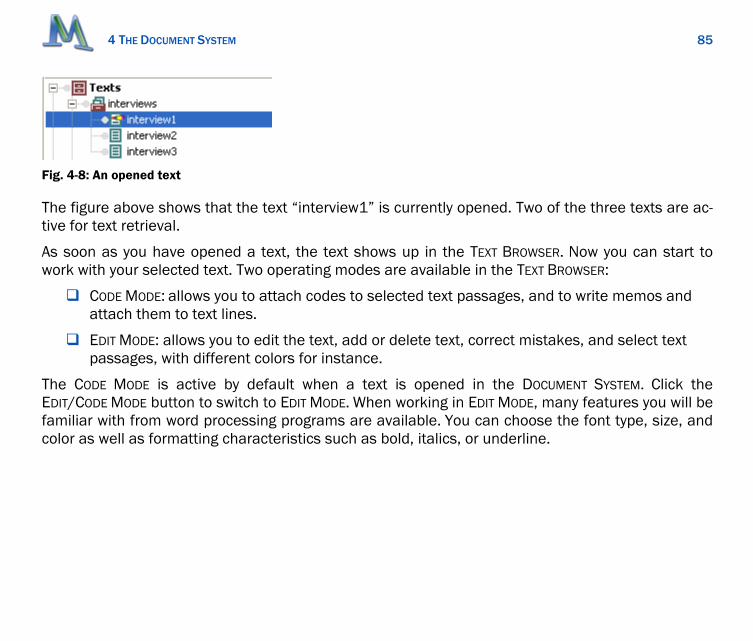
4 THE DOCUMENT SYSTEM
85
Fig. 4-8: An opened text
The figure above shows that the text “interview1” is currently opened. Two of the three texts are ac-tive for text retrieval.
As soon as you have opened a text, the text shows up in the TEXT BROWSER. Now you can start to work with your selected text. Two operating modes are available in the TEXT BROWSER:
CODE MODE: allows you to attach codes to selected text passages, and to write memos and attach them to text lines.
EDIT MODE: allows you to edit the text, add or delete text, correct mistakes, and select text passages, with different colors for instance.
The CODE MODE is active by default when a text is opened in the DOCUMENT SYSTEM. Click the EDIT/CODE MODE button to switch to EDIT MODE. When working in EDIT MODE, many features you will be familiar with from word processing programs are available. You can choose the font type, size, and color as well as formatting characteristics such as bold, italics, or underline.

4 THE DOCUMENT SYSTEM
86
Fig. 4-9: Choosing the EDIT MODE
When you switch back to CODE MODE, the modified text will be saved automatically. The same hap-pens when another text is opened in the DOCUMENT SYSTEM. The formatting buttons and the list of fonts available on your PC are only visible when you are in EDIT MODE.
When working in EDIT MODE you may step back either by clicking the Undo button or selecting the command Undo from the menu option Edit. If you, for instance, have deleted a word or a paragraph, simply click the undo button and the deleted text will appear again. If you click the UNDO ALL option from the EDIT menu, then all changes that have been made since starting the EDIT MODE are can-celed and the text looks exactly the same as when switching into EDIT MODE.
If editing has finished, switch back to CODE MODE. Now all changes are saved and undo is no longer possible.
Although it is possible, you should not code text passages or write memos in EDIT MODE.
Important: UNDO and UNDO ALL are only possible as long as you stay in EDIT MODE. When you switch back to CODE MODE, all changes are saved and become permanent.
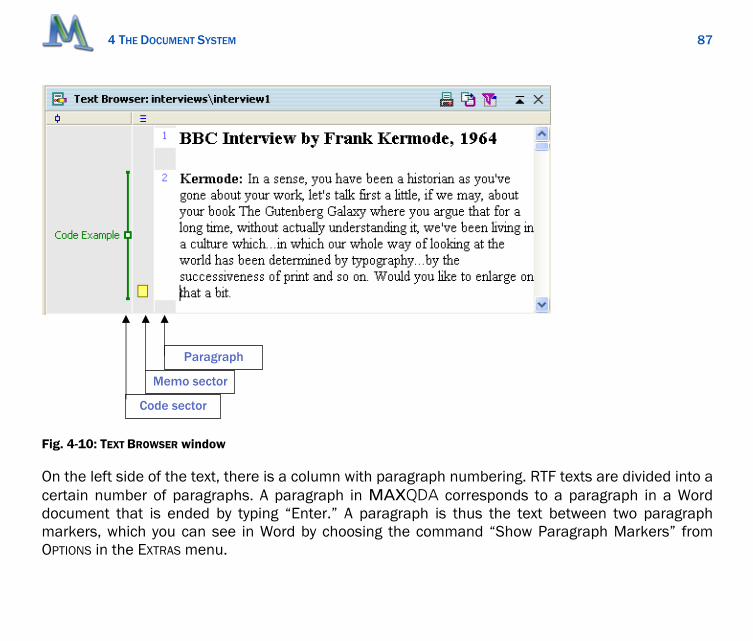
4 THE DOCUMENT SYSTEM
87
Fig. 4-10: TEXT BROWSER window
On the left side of the text, there is a column with paragraph numbering. RTF texts are divided into a certain number of paragraphs. A paragraph in MAXQDA corresponds to a paragraph in a Word document that is ended by typing “Enter.” A paragraph is thus the text between two paragraph markers, which you can see in Word by choosing the command “Show Paragraph Markers” from OPTIONS in the EXTRAS menu.
Paragraph
Memo sector
Code sector
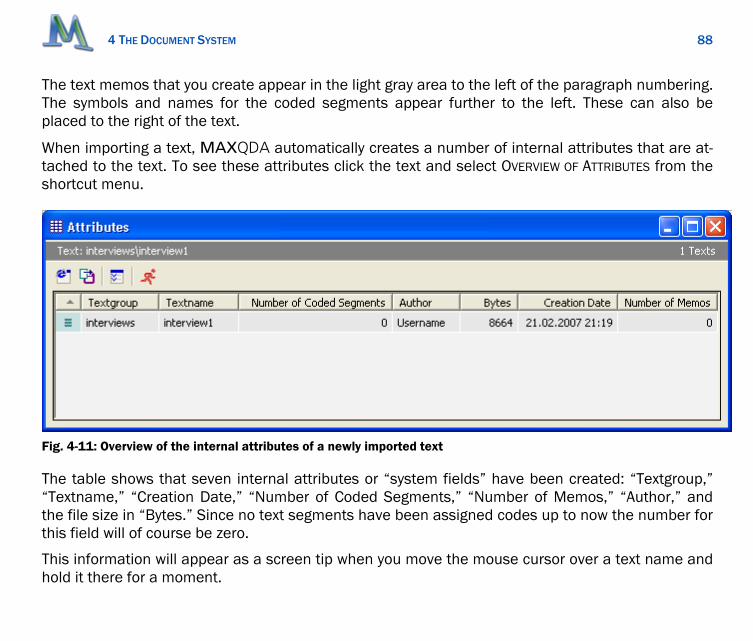
4 THE DOCUMENT SYSTEM
88
The text memos that you create appear in the light gray area to the left of the paragraph numbering. The symbols and names for the coded segments appear further to the left. These can also be placed to the right of the text.
When importing a text, MAXQDA automatically creates a number of internal attributes that are at-tached to the text. To see these attributes click the text and select OVERVIEW OF ATTRIBUTES from the shortcut menu.
Fig. 4-11: Overview of the internal attributes of a newly imported text
The table shows that seven internal attributes or “system fields” have been created: “Textgroup,” “Textname,” “Creation Date,” “Number of Coded Segments,” “Number of Memos,” “Author,” and the file size in “Bytes.” Since no text segments have been assigned codes up to now the number for this field will of course be zero.
This information will appear as a screen tip when you move the mouse cursor over a text name and hold it there for a moment.
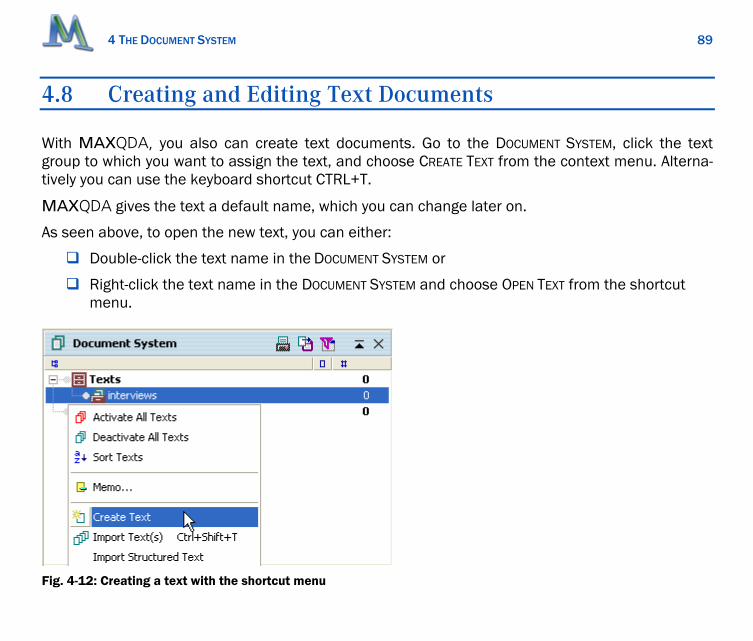
4 THE DOCUMENT SYSTEM
89
4.8 Creating and Editing Text Documents
With MAXQDA, you also can create text documents. Go to the DOCUMENT SYSTEM, click the text group to which you want to assign the text, and choose CREATE TEXT from the context menu. Alterna-tively you can use the keyboard shortcut CTRL+T.
MAXQDA gives the text a default name, which you can change later on.
As seen above, to open the new text, you can either:
Double-click the text name in the DOCUMENT SYSTEM or
Right-click the text name in the DOCUMENT SYSTEM and choose OPEN TEXT from the shortcut menu.
Fig. 4-12: Creating a text with the shortcut menu

4 THE DOCUMENT SYSTEM
90
Now the empty text is loaded into the TEXT BROWSER window. Before you can type in your text, you have to switch from CODE MODE to EDIT MODE.
A more convenient way of creating a text, however, is using the keyboard shortcut CTRL+T. This command creates a new text in the DOCUMENT SYSTEM and opens the text in the TEXT BROWSER. The TEXT BROWSER is set automatically to EDIT MODE, and the cursor is positioned at the beginning of the text.
Whenever you want to modify a text, add a new paragraph, or delete a few sentences, for instance, you have to switch to EDIT MODE.
The CODE MODE is active by default when a text is opened in the DOCUMENT SYSTEM. Click the EDIT/CODE MODE button to switch to EDIT MODE. When working in EDIT MODE, many features you will be familiar with from word processing programs are available. You can choose the font type, size, and color as well as formatting characteristics such as bold, italics, or underline.
When you switch back to CODE MODE the modified text will be saved automatically. The same hap-pens when another text is opened in the DOCUMENT SYSTEM. The formatting buttons and the list of fonts available on your PC are only visible when you are in EDIT MODE.
Fig. 4-13: Toolbar in EDIT MODE
Correcting mistakes in the text or adding and removing text passages can only be done in EDIT MODE. Switch back to CODE MODE when you have completed these tasks. Although it is possible, you should not code text passages or write memos in EDIT MODE.
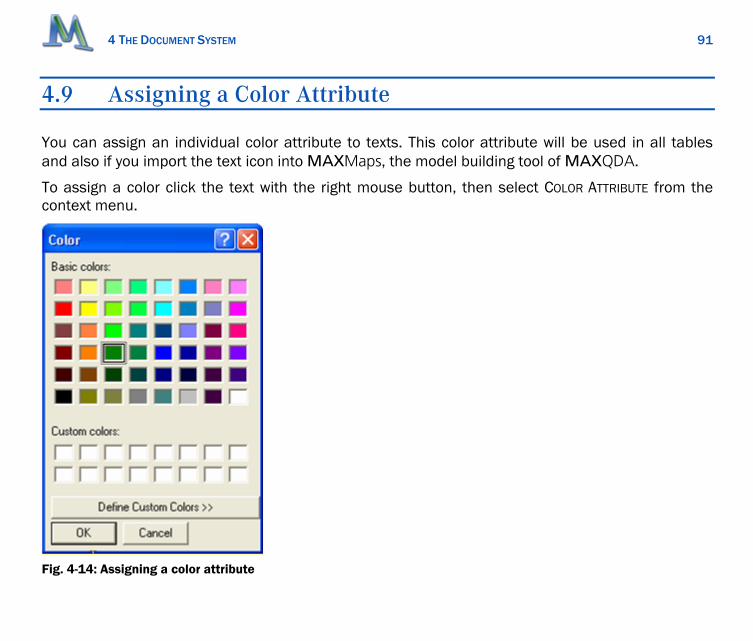
4 THE DOCUMENT SYSTEM
91
4.9 Assigning a Color Attribute
You can assign an individual color attribute to texts. This color attribute will be used in all tables and also if you import the text icon into MAXMaps, the model building tool of MAXQDA.
To assign a color click the text with the right mouse button, then select COLOR ATTRIBUTE from the context menu.
Fig. 4-14: Assigning a color attribute

4 THE DOCUMENT SYSTEM
92
The color can be chosen from a set of 48 standard colors. Moreover, you may mix your own color and use this as the attribute for a particular text. Normally, the offered 48 colors give you enough possibilities for differentiation.
Since the color attributes are listed in many MAXQDA tables in the first column, it’s possible to use them as a sort criterion. Texts with the same color are then grouped together.
Later on, you can change the color attribute whenever you want.
4.10 Building Text Sets
For certain analytical tasks, it is useful to be able to bring texts from different text groups together. This is possible in MAXQDA; such a collection of texts is called a text set. A text set does not con-tain the texts themselves, but rather tags or references to the texts.
A text set is formed in the following manner:
1. Activate the texts you want to include in the text set.
2. Click SETS in the DOCUMENT SYSTEM window with the right mouse button.
3. Select NEW SET.

4 THE DOCUMENT SYSTEM
93
Fig. 4-15: Forming a new text set
MAXQDA then forms a new set with the name “Set 1.” You can click on the name with the right mouse button and choose another that is more appropriate. Text sets are manipulated like text groups; you can activate all the texts in a text set at the same time and use all the options for work-ing with text groups (Codes, Memos, Attributes).
Individual texts can be deleted from a text set or placed in another text set; the easiest way is by using the drag-and-drop function.
When you want to analyze a certain selection of texts, using a text set is a very practical method, allowing you to avoid a more complicated selection procedure. Forming a text set is also an easy way to save the result of a complex activation process.

4 THE DOCUMENT SYSTEM
94
4.11 Reorganizing the Document System
MAXQDA’s DOCUMENT SYSTEM is very flexible and can be reorganized however you want. You are able to:
Rename texts or text groups using shortcut menus
Assign texts to another text group simply by dragging and dropping the text
Remove text groups from the DOCUMENT SYSTEM
Remove texts from the DOCUMENT SYSTEM
Delete a text – of course all memos and code references belonging to the text are deleted, too
Delete a text group – all texts belonging to the text group are deleted, too
If you rename a text or assign it to another text group, the codes and memos will remain un-changed. Of course, if you delete a text, the codes and memos will also be deleted.
4.12 Wrap and Line Number
Sometimes you may prefer to work with a line-numbered instead of paragraph-numbered text.
MAXQDA 2007 now offers an option „Wrap and line number“ available from the context menu in MAXQDA’s TEXT BROWSER. The option only works for texts that do not contain objects like photo-graphs, tables, graphics, or any kind of external links. What will happen if you select this option? MAXQDA will ask you how many characters should form a line. Normally a range of 50 to 70 char-acters is appropriate.

4 THE DOCUMENT SYSTEM
95
The result of the procedure is a line-numbered text with a fixed number of characters per line. As long as the EDIT MODE is switched on, you may step back to the original, paragraph-numbered for-mat, but if you leave the EDIT MODE and switch to CODE MODE or open another text, then the line numbering is permanent and cannot be removed.

5 IMPORTING PRE-STRUCTURED TEXTS
96
5 Importing Pre-structured Texts
5.1 About Pre-structured Texts
Often you may wish to import texts that are structured and pre-coded. Examples for this kind of texts are:
Forms. In this case, text passages should be pre-coded according to the heading field of the form.
Results from data base retrieval, such as a list of reference, should be pre-coded with au-thor, title, abstract, etc.
Answers to open-ended question in survey research – here you may wish to code the an-swers with a question number or an abbreviation of the question.
The PREPROCESSOR and the IMPORT TABLES are functions in MAXQDA that can be very helpful if you are working with numerous texts that are rather short in size. The functions also allow you to use pre-structured text. Importing pre-structured text rather than structuring the text manually in MAX-QDA will save you a lot of work and time.
As an example of this type of text, consider the answers to open-ended questions in questionnaires. Unlike narrative interviews, a text of this kind does not contain thirty or fifty pages but rather only a few lines, perhaps 10 to 15. Often there will be a large number of texts, maybe a few hundred or more. Another characteristic of such a text is that it is pre-structured: certain answers belong to cer-tain questions. The normal method of text transcription and text importation into MAXQDA would make importing the texts a very time-consuming job. Every questionnaire would have to be tran-scribed with a word processing program and saved as a separate file. Attaching a question to its answer as a code to its corresponding text passage would not be possible when importing the text.

5 IMPORTING PRE-STRUCTURED TEXTS
97
Also when working with focus groups, it saves a lot of time to code the text passages with their speakers before importing the text into MAXQDA. The MAXQDA Preprocessor offers a solution for this type of data. With MAXQDA 2007 a new way for preparing structured data has been intro-duced as well: the IMPORT TABLE FROM EXCEL function.
5.2 Preparing Texts for the Preprocessor
The PREPROCESSOR allows one to enter a multitude of texts one after another into a single file. The syntax rules are quite simple. (See Fig. 5-1 for an example)
An identifier must be included as the first line of every text:
#TEXTtextname
The word TEXT must be written in capital letters. As usual in MAXQDA, a name must be given to every text. You can enter any kind of string (up to 32 characters) as a text name – blanks are also allowed. If you enter a text name with more than 32 characters MAXQDA will truncate it automati-cally.
If you do not enter a text name, MAXQDA will automatically enter one for you, in the same way as when a new text is created. The text is given the name “Text xx,” with “xx” increasing by one for every new text. The texts will thus appear in the DOCUMENT SYSTEM in the order in which they were created. This automatic numbering is useful when, for example, you enter the answers to open questions in a partly standardized survey. The answers must then simply be entered in the order of the standardized data in the SPSS file. It is not necessary to enter a name for each text. Both texts will have the same name.
Important: If you make a mistake and use a text name that already has been used, MAXQDA will still import the text. The old text will not be deleted.

5 IMPORTING PRE-STRUCTURED TEXTS
98
#TEXTtextname first Text ... #TEXTtextname second Text ... #TEXTtextname ...
Fig. 5-1: Entering text with the PREPROCESSOR
The actual text transcription starts with the second line, after “#TEXTtextname.” For each new text, the identifier “#TEXTtextname“ must again be inserted in front of the text.
Example
Imagine a pile of questionnaires lying on your desk. Each questionnaire contains one open-ended question. You start the transcription with questionnaire No. 1, beginning with the identification line:
#TEXTtextname
In this case, it would be a good idea to use the questionnaires’ numbers as text names. Thus, your first line would be:
#TEXT1
Then you would start transcribing Interviewee No. 1’s answer.
Before continuing with the next questionnaire (No. 2), a new identification line would have to be en-tered:
#TEXT2

5 IMPORTING PRE-STRUCTURED TEXTS
99
Then you could start transcribing the Interviewee No. 2’s answer.
This procedure would have to be repeated until the answers of all interviewees had been entered. When you were finished, you would save the text file as usual as an RTF (Rich Text Format) file.
To import a text file that has been formatted for the preprocessor, go to the DOCUMENT SYSTEM, right-click on the text group, and then choose TEXT PREPROCESSOR from the shortcut menu.
Fig. 5-2: Importing text with the PREPROCESSOR
The PREPROCESSOR is a very helpful tool for entering a large number of texts, but even more helpful for attaching codes to text passages before the text is imported into MAXQDA-“pre-coding.” When analyzing open-ended questions, a type of transcription is required that attaches the answers to the questions when the text is imported. This is possible with the MAXQDA Preprocessor when the text is formatted according the following rules:

5 IMPORTING PRE-STRUCTURED TEXTS
100
#TEXTGary #CODEquestion2 here follows the answer to question2 #ENDCODE #CODEquestion5 here follows the answer to question5 #ENDCODE #TEXTPeter #CODEquestion2 here follows the answer to question2 #ENDCODE #CODEquestion5 here follows the answer to question5 #ENDCODE #TEXTtextname here follows text no. 3
Fig. 5-3: Set-up of a pre-coded text file for the PREPROCESSOR
A line must appear in front of each pre-coded text segment:
#CODEcodename
The line contains the keyword CODE (it must be written in capitals) and the selected code that you want to attach to the following text passage. After the last line of the pre-coded text passage follows the line:
#ENDCODE
The example in Fig. 5-3 begins with the text “Gary“ consisting of the answers to two open-ended questions that have the names “question2“ and “question5.” You could also abbreviate the codes
5 IMPORTING PRE-STRUCTURED TEXTS
101
to “2“ and “5.” The text lines of “Gary“ are followed by the line “#TEXTPeter.” According to the pre-processor’s syntax rules, this line announces that the answers of the next interviewee by the name of “Peter“ will begin here. In our example, the answer to question2 comes first, but it is not required that the order of transcribed questions be the same as for that of the text “Gary.”
When transcribing your questionnaires with a word processing program like Word, you could use a shortcut like ## instead of always typing the keyword #CODE. After you have finished your transcrip-tion you can replace all ## characters with the keyword #CODE by using the Word “Replace” proce-dure.
Important: There must not be a space between the # symbol and the word “CODE,” which must also be capitalized.
It is also possible to assign a subcode in the PREPROCESSOR. The syntax is as follows:
#CODEcodename\subcodename
You thus enter the path by including a backslash between the code and the subcode. When the file is imported into MAXQDA, the program checks to see if the code and subcode already exist. If not, they are created in the project.
Important: The text preprocessor will not allow you to code a segment twice, that is, with two dif-ferent codes. Whenever a line beginning with #CODE appears, the previous code is automatically closed.
5.3 Import Structured Data as a Table
MAXQDA 2007 offers a new way for importing structured text organized as a table. You may type in your table into Excel in the following way:

5 IMPORTING PRE-STRUCTURED TEXTS
102
The first line contains the code names, the first two columns contain the name of the text group, and the name of the text as they should appear in MAXQDA. The headings of the following col-umns contain the name of the codes that have to be applied to the text segments of the particular column. Then, each line contains the data of a text. In the following table, two texts (T1 and T2) have been entered. Both texts belong to text group “Group1.” The table contains a total of four coded segments, two are answers to “question #1” and the other two belong to “question #2.”
textgroup textname question #1 question #2
Group1 T1 person T1’s answer to question #1
person T1’s answer to question #2
Group1 T2 person T2’s answer to question #1
person T2’s answer to question #2
In most cases, this form of data entry is probably easier and less prone to fault than using the Textpreprocessor. The feature is especially designed for open-ended questions and forms since all parts of the texts have to pre-coded. This is not the case with the Text-preprocessor where you may code only some parts and leave the other ones uncoded.
When you save the table in Excel you have to choose the file type „txt – tab delimited.” Then start the import procedure in MAXQDA by clicking the option „Import structured text from Excel“ on the highest level of the DOCUMENT SYSTEM. This option is not part of the context menus available on the text group level since an input file may contain data belonging to different text groups.
When MAXQDA reads the first data row of the file (which is, in fact, the second row; the first con-tains the codes), the program checks if the text groups – in this case „Group1“ – already exist. If not, the text group will be created. Next the texts „T1“ and „T2“ will be inserted. If the codes „ques-

5 IMPORTING PRE-STRUCTURED TEXTS
103
tion #1“ and „question #2“ do not exist, they will also be created. Next the text segments will be imported and coded according to their position in the table.
You may also use Word, better to say the Word table option, instead of Excel. In this case, before saving the table you have transform it into text by use of the option TABLE > TRANSFORM > TABLE INTO
TEXT. Then save the file in TXT format and import it into MAXQDA as described above.
Like all text files, these files have to closed before the import procedure of MAXQDA is started. MAXQDA will not import texts opened in other programs at the same time.

6 TEXT LINKS
104
6 Text Links
6.1 Creating and Removing Text Links
It is possible to link texts or positions in texts with the help of text links. Text links are used in the same way as hyperlinks in the Internet; they link two texts or positions in texts together. Clicking a text link causes the corresponding text link to be loaded.
In MAXQDA, text segments that are in the same text or in different texts can be linked. To link texts, select at least a single character from a text in the TEXT BROWSER window – normally a word or more is suitable.
Text segments are linked as follows:
1. Select the first text segment (the anchor) and click the blue Text Link symbol in the coding toolbar (or choose the option “insert text link” from the context menu). The selected text now appears blue and underlined.
Fig. 6-1: Button for text links
2. Then select the second text segment. This segment can be either in the same text or in an-other text. Once again, one can select a single character, a word, or several words.
3. Clicking the Text Link symbol a second time will then create the link. Alternatively, click the option “insert text link” from the context menu.
Text link

6 TEXT LINKS
105
If, after the first step, the user decides against creating the link or wants to change the text that had been selected, clicking the TEXT LINK symbol deselects the previous text.
Fig. 6-2: Button to remove last text link
Text links appear underlined and in blue in the TEXT BROWSER. Holding the mouse cursor over the text causes a screen tip to appear with information about the linked text segment: the name of the text and the actual text selected when the text link was made.
Fig. 6-3: A blue, underlined text link with the corresponding screen tip
For this reason, it is sometimes a good idea to select not only a word, but rather a whole sentence or paragraph as the link.
Simply clicking a text link allows one to jump from the text link in the TEXT BROWSER to the linked text. The text containing the link appears at the position of the linked text segment.
To delete a text link, click the link with the right mouse button and choose “Delete Link” from the shortcut menu.
Remove last text link

6 TEXT LINKS
106
6.2 Overview of Text Links
When reading a text, it is easy to identify where text links have been established; however, if you have linked many text segments with each other, it may be difficult to gain an overview. That’s why a new overview table is now available in MAXQDA 2007: the OVERVIEW OF TEXT LINKS. Similar to other overviews like the OVERVIEW OF MEMOS, this overview can be called on different levels of the text tree: for an entire project, for a selected text group or text set, or for an individual text.
The OVERVIEW OF TEXT LINKS is structured in the following way:
anchor (text name) Paragraph preview target (text name) Paragraph preview
Text links are not hierarchical: anchor and target are on the same level. Links have no particular di-rection and are symbolized with a line with arrows on both sides. The overview table lists all links within a text of a text group. Thus, if anchor and target reside in the same text, the link is listed twice in the table. The first listing indicates the starting point in the first column of the table, and the second, the target point.

6 TEXT LINKS
107
Fig. 6-4: Function OVERVIEW OF TEXT LINKS for a project
The Overview of links can be managed in the same manner as the other tables in MAXQDA. You may sort the table according to selected columns in ascending or descending order. Clicking on a link causes MAXQDA to load the text file into the TEXT BROWSER and position the cursor to the se-lected text link.
The figure above shows that the link table has a little toolbar with two icons:
HTML TABLE – displays the table in HTML format.
EXPORT – saves the table in Rich Text Format.

7 THE CODES
108
7 The Codes
7.1 The Code System
One of the main functions of MAXQDA is the “coding” of text segments, that is, the assignment of a code to particular text segments, enabling a systematic content analysis of a text. The codes themselves are simply strings containing up to 64 characters, which are attached to segments of text. Codes are like drawers containing index cards with text passages and keywords. The name of the code is like the label attached to the front of a drawer. What you will find in the drawer is indi-cated here. The label itself has no effect on the contents, so you can attach another label without consequences. Codes can be ordered into a hierarchical structure, a main code having several sub-codes, for example.
The CODE SYSTEM is shown (logically) in the CODE SYSTEM window. At the beginning of a project, this window is empty except for the “Code System” button and a green symbol, both of which open menus when you click on them. MAXQDA’s CODE SYSTEM has the following characteristics:
A code is a string with a maximum of 64 characters consisting of one or more words. A code can contain any character except a backslash “\.”
The number of codes is unlimited.
The hierarchical structure may contain up to ten levels.
Codes are assigned a color.
Codes are assigned an identification number.
The so-called color-codes play a special role. They are like text markers and change the background color of the marked text.

7 THE CODES
109
Fig. 7-1: Switching Subcodes on and off
The CODE SYSTEM is shown as a tree structure on the screen. It looks like the file/folder system in Windows Explorer with which you are likely familiar. A plus or minus sign before the code name in-dicates whether or not a code contains subcodes. You can expand or close the sub-categories by clicking this button.
In MAXQDA the codes and their sequence in the CODE SYSTEM may be organized according to your needs. Just use the drag-and-drop function to change the position of a code in the list. Click the code with the left mouse button, hold the mouse button while moving the code to the new position. Thus, it is easy to rearrange the CODE SYSTEM in a way that is useful for your work.
7.2 The Toolbar
Like the other main windows of MAXQDA, the CODE SYSTEM has a toolbar where you can find the following icons:
Click here to hide/show the subcodes.

7 THE CODES
110
Print the CODE SYSTEM.
Export the CODE SYSTEM as a file in Rich Text Format.
Define a new code.
CODE BROWSER – a different view of the CODE SYSTEM, optimal when defining a series of codes.
COLOR FILTER FOR CODES – activates codes according to their color attributes.
CHANGE VIEW – switches between the hierarchical structure of the CODE SYSTEM and a linear list of codes displayed as a table.
7.3 Creating Codes und Subcodes
Defining a code is like opening a new drawer in which you can put in any number of text segments. The drawer’s label, i.e. the code name, can later be changed without affecting the contents of the drawer. You can also print the CODE SYSTEM or export it.
Besides these functions that can be started by clicking an icon in the toolbar, the CODE SYSTEMs is managed by two context menus. One is available on the highest level at the root of the CODE SYSTEM and the other one on the level of the individual codes.
Let us start with the definition of a new code on the highest level of the CODE SYSTEM. The easiest way to do this is to click the icon „New Code“ in the toolbar:

7 THE CODES
111
Fig. 7-2:Defining a new code by use of the icon New Code
The same function can be called by a context menu. There are two different menus you work with in the window, one for the highest level of the CODE SYSTEM and a second for the lower level codes and subcodes. How to use the CODE SYSTEM will be illustrated by means of the following example. To first create a code on the highest level:
1. Click the word “Code System” (on the top of the list in the CODE SYSTEM window).
2. Select “New Code” from the menu and type in the name of your new code. (For the purpose of this example, name the first code “media” and then a second one “Code Example.”)
3. Newly defined codes are always assigned the first place in the list (whether at the highest level or at any other level). To create a subcode, you click the next higher code in the hierar-chy with the right mouse button and select “New Code” from the menu. Try this now by click-ing on “media” and adding the new subcodes “cold – hot” and “simultaneous world.”
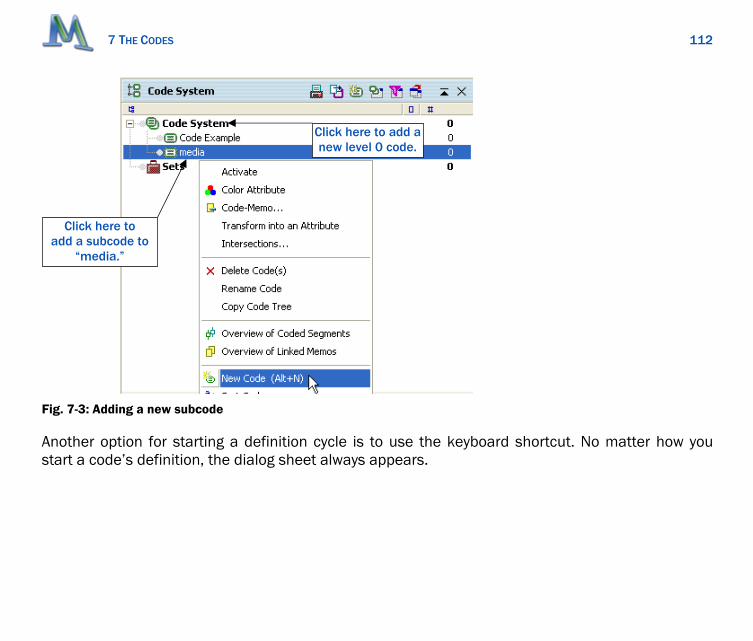
7 THE CODES
112
Fig. 7-3: Adding a new subcode
Another option for starting a definition cycle is to use the keyboard shortcut. No matter how you start a code’s definition, the dialog sheet always appears.
Click here to add a new level 0 code.
Click here to add a subcode to
“media.”
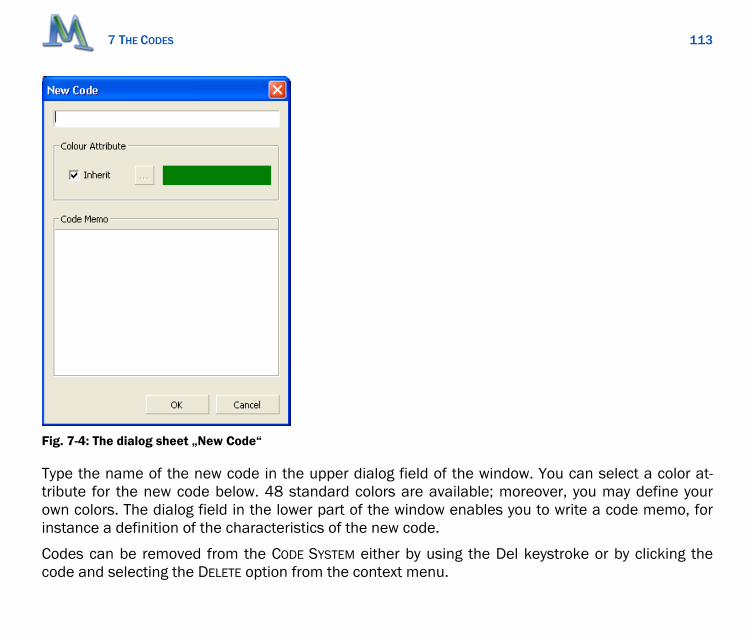
7 THE CODES
113
Fig. 7-4: The dialog sheet „New Code“
Type the name of the new code in the upper dialog field of the window. You can select a color at-tribute for the new code below. 48 standard colors are available; moreover, you may define your own colors. The dialog field in the lower part of the window enables you to write a code memo, for instance a definition of the characteristics of the new code.
Codes can be removed from the CODE SYSTEM either by using the Del keystroke or by clicking the code and selecting the DELETE option from the context menu.

7 THE CODES
114
If you would like to define subcodes, just right-click the parent code and choose the option NEW CODE: Again the same dialog window as mentioned above will pop up. If you want the subcode to have the same color attribute as the main code, just click the checkbox „Inherit.”
Creating subcodes may also be completed using the Alt+N keyboard shortcut or the NEW CODE icon from the toolbar.
If you have entered text into the memo field of the dialog box, a memo icon is displayed beside the new code in the CODE SYSTEM as soon as you close the dialog window.
The order of the codes and subcodes in the CODE SYSTEM can easily be changed using drag-and-drop operations with the mouse. You can also sort them alphabetically by clicking the menu option SORT CODES at the highest as well as at every other level.
You can reorganize the CODE SYSTEM easily: left-click on the code, hold the mouse, and drag the code to the new location. To change a code into a subcode of another code, press the SHIFT key while dragging the code to the new position.
To copy a subcode, that is, to create a second subcode with the same name, press the CTRL key while dragging the code to the new position.
7.4 Using the Code Browser to Create Codes
The CODE BROWSER offers a fast way to define a set of codes or an entire CODE SYSTEM. The function is started by clicking the appropriate icon from the toolbar.
Fig. 7-5: Starting the CODE BROWSER

7 THE CODES
115
Fig. 7-6 shows the dialog window. In the left part of the window the already existing codes are dis-played. The dialog field in the upper right corner is used to type in new codes. You may do this step by step, one after the other. At the end of each code click „Insert“ or press the Return key. Defining subcodes is as easy as defining the codes. Click a code in the list on the left side. This brings the code into the dialog field. Type in a slash (“/“), then the name of the subcode, and press enter.
Fig. 7-6: The dialog sheet CODE BROWSER

7 THE CODES
116
If you’d like to comment on a code or write a detailed memo, you may do this during the same defi-nition cycle, just use the memo field in the left part of the dialog box.
7.5 Coding Text
The smallest segment of text that can be assigned a code is one character. Of course, one would normally select at least one word to assign a code to.
Coding is possible in different ways, however one must always first select the passage of text with the mouse, as in the following diagram:
Fig. 7-7: Selecting a text segment
You can use the coding toolbar above the CODE SYSTEM window to quickly select coding functions.

7 THE CODES
117
Fig. 7-8: The coding toolbar
MAXQDA offers different ways of coding:
Classical Coding: select a text passage and attach an existing code from the CODE SYSTEM
Free Coding: this is the typical style of initial coding in Grounded Theory – a new code will be attached to a text passage
Targeted, selective Coding: Texts will be scanned for a selected code. When a text passage is found that belongs to the selected code, coding will be performed.
In-vivo Coding: The term In-vivo also comes from Grounded Theory and means that words or terms used by the interviewees are so remarkable, that they should be taken as codes. In-vivo coding adds these terms of the respondents as codes and codes the text passage at the same time.
Color Coding: This works like highlighting a text passage in a book with a colored text marker. In MAXQDA, four different colors can be used for color coding; red, green, blue or magenta.
The following section describes in detail how these techniques are used. The different options can be chosen from the context menu that pops up when you select a text passage and press the right mouse button.
1. Classical Coding with the Drag-and-Drop Function
Left-click and hold on the selected text and move the mouse pointer to the name of the code in the CODE SYSTEM. Release the mouse button to assigns the segment to this code, as you can see in the gray column next to the text in the TEXT BROWSER window. The reverse also works, i.e. you can drag the code to the selected text passage.

7 THE CODES
118
Fig. 7-9: Coded text with the code symbol and code name
Example: Select part of paragraph 12 from the text “Interview1” (as shown above), drag it to the code “Code Example” in the CODE SYSTEM, and release the mouse button.
2. Coding with a Code’s Drop-Down Menu
Right-click on the code in the CODE SYSTEM window to which you want to assign the text. Select CODE from the drop-down menu.
3. Coding with Multiple Codes Simultaneously
Activate the code you want to attach in the CODE SYSTEM. Then, with the right mouse button, click in-side the selected text and choose the Option “Code with selection.”

7 THE CODES
119
4. Creating a New Code with Keyboard Shortcuts
An easy way to create a new code, i.e. a code that is not yet listed in the list of codes, is to use the shortcut Ctrl+W. A dialog window will open, and you can type in the name of the new code. The code will be added to the CODE SYSTEM at level 0. If necessary, you can later move the code to another level in the CODE SYSTEM.
Fig. 7-10: Dialog box for entering a new code

7 THE CODES
120
5. Focussed Coding with the Code Button
At the top of the TEXT BROWSER in the coding toolbar is a list of the codes last used. Whenever you assign a new code to a text, the code is added to the list. By clicking on the button to the right of this list (screen tip: “Code”), you assign the selected text to the code presently in the toolbar. This allows you to assign a text segment to a code which has already been created. In this way, you can search the text for a certain topic and quickly code corresponding passages in the text without go-ing through the process of selecting a code each and every time.
6. Coding with the In-vivo Coding Button
Another way of coding is with the so-called IN-VIVO CODING. If you, for example, select the word “global village” and then click on the IN-VIVO CODING button in the toolbar, the word “global village” is added to the list of codes as the code for this short text segment. The shortcut Ctrl+I has the same effect.
Fig. 7-11: The coding toolbar with the Quick List and the In-vivo Coding buttons
When you want to code a whole segment of text with the IN-VIVO CODING function, and not only one or two words, code the one or two words with this function first. Next, select the entire text segment (including the word) and click the CODING button (not the IN-VIVO CODING button!). MAXQDA expands the coded text segment automatically.
7. Color Coding Text
Color coding text is a technique which is especially useful at the beginning of the analysis process. It is similar to the marking of text in a book with a highlighter. It allows you to mark the passages
Code button In-vivo Coding button

7 THE CODES
121
you find particularly interesting when reading through the text for the first time. Before you decide which codes to use and before you start analyzing your text in categories, this technique lets you keep track of what simply seems important. There are four colors with which you can color code: green, blue, red, and magenta.
The purpose of this highlighting function is not simply to change the text’s color– you could do this in EDIT MODE by selecting a different font color for a text passage. Not only does the text change background color, but it is also coded with the name of the color. Thus, all the code functions are available to you when you are working with these segments later on. When going through the text a second time, it will be easier to develop your codes and categories from this basis.
How to color code a text:
1. Click on the option SHOW COLOR CODING BAR from the WINDOWS menu.
Fig. 7-12: SHOW COLOR CODING TOOLBAR
2. Mark the text with your mouse and click on one of the color coding buttons.
Fig. 7-13: Color coding bar

7 THE CODES
122
The text changes background color and is assigned a code, which you can see from the new code symbol next to the text. If you delete the assignment of a color code, not only is the code removed, but the text is changed back to its original color. The same happens when the color code itself is deleted from the CODE SYSTEM– all the text segments change back to their original color.
It is possible to assign several color codes to the same text segment; however, the text can appear in only one color– that of the last code assigned.
Any number of codes can be used in the analysis of a text; the number of text segments you code is also unlimited. You can also code overlapping segments of text or code one segment within an-other code.
Selected segments of text can be copied from one window to another. This is easily accomplished, as in Windows, with the keyboard combination CTRL+C or by choosing the COPY option from the EDIT menu.
Important: MAXQDA will not allow you to assign one single code to the same text segment re-peatedly. In addition, it is not possible to overlap of segments with the same code. If you would like to code a segment with the same code again, but change its size, MAXQDA will automati-cally update the segment size to the newly chosen one, no matter if the new segment is larger or smaller than the previous segment.
7.6 Assigning Colors to Codes
By default, the codes and subcodes in the CODE SYSTEM are green. This is also the normal color for the code symbols displayed in the TEXT BROWSER.
MAXQDA lets you select a specific color attribute for a specific code. Each code symbol (next to a text segment to which this code was assigned) will be this color. Selecting different colors makes it easy to identify where a particular code or subcode has been used.

7 THE CODES
123
To select a color for a code:
1. Move the mouse pointer to the CODE SYSTEM.
2. Right-click on the code.
3. Select the option COLOR ATTRIBUTE from the shortcut menu.
4. Choose an appropriate color. You may choose between 48 pre-defined colors or create your own colors.
Fig. 7-15: Code symbols and names in different colors
The color attribute associated with a code also appears in the symbol beside the code in your CODE SYSTEM.
Fig. 7-14: Select a color for a code

7 THE CODES
124
Fig. 7-16: The CODE SYSTEM with colored codes
The color attribute is also displayed in all MAXQDA tables that contain codes, e.g. in the OVERVIEW OF CODED SEGMENTS table that is available for each text group and each text document. There, the color attribute may be used as a criterion for sorting the table. This is done by clicking on the col-umn header of the column containing the colored icons. Unless you have changed the order of the table’s columns, this column will be the first one in the table.
Fig. 7-17: Color attributes in the first column of the Overview of Coded Segments

7 THE CODES
125
The color attribute plays an important role in all visual tools of MAXQDA. For instance, the TEXTPORTRAIT is based completely on the colors of the codes that are assigned to this particular text. Thus, the selection of colors is an important step: Colors should be assigned according to the kind of analysis that you plan to conduct. For instance, a psychologist could assign red colors to aggres-sive statements and green colors to friendly statements. When analyzing texts in regard to the top-ics mentioned a meaningful association of topics and codes is recommended. Thus, you are able to identify topics and combinations of topics with one glance. When working with focus groups, you should associate the speakers with the different colors, in order to quickly find out when a person is speaking.
7.7 Color Coding – The Electronic Way to Highlight Text
Color coding text is a technique which is useful especially at the beginning of the analysis process. It is similar to the marking of text in a book with a highlighter. It allows you to mark the passages you find particularly interesting when reading through the text for the first time. Before you decide which codes to use and before you start analyzing your text in categories, this technique lets you keep track of what simply seems important. There are four colors with which you can color code: green, blue, red and magenta.
The purpose of this highlighting function is not simply to change the text’s color– you could do this in EDIT MODE by selecting a different font color for a text passage. Not only does the text change background color, but it is also coded with the name of the color. Thus, all the code functions are available to you when you are working with these segments later on. When going through the text a second time, it will be easier to develop your codes and categories from this basis.
How to color code text:
1. Click on the option SHOW COLOR CODING BAR from the WINDOWS menu. 2. Mark the text with your mouse and click on one of the following color coding buttons:

7 THE CODES
126
Fig. 7-18: Color coding bar
The text changes background color and is assigned a code, which you can see from the new code symbol next to the text. If you delete the assignment of a color code, not only is the code removed, but the text is changed back to its original color. The same happens when the color code itself is deleted from the CODE SYSTEM– all the text segments change back to their original color.
It is possible to assign several color codes to the same text segment; however, the text can only ap-pear in one color– that of the last code assigned.
Fig. 7-19: A text passage coded as „GREEN“
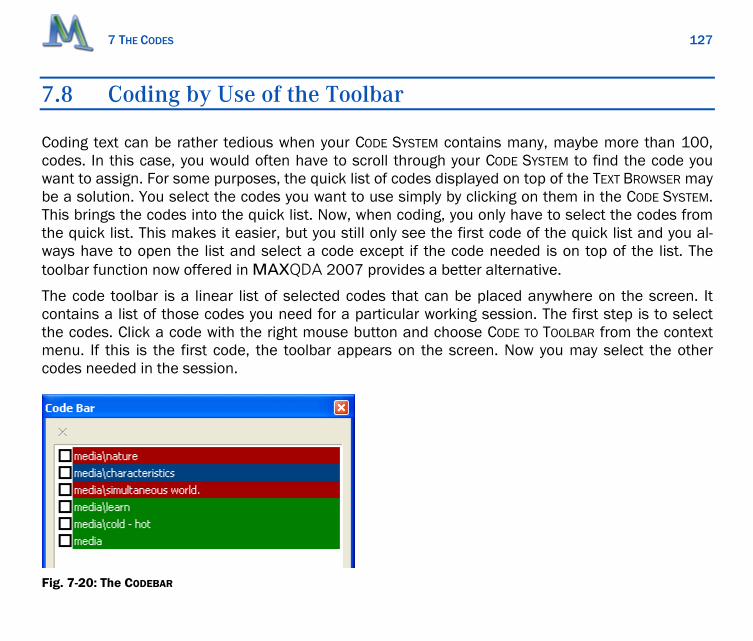
7 THE CODES
127
7.8 Coding by Use of the Toolbar
Coding text can be rather tedious when your CODE SYSTEM contains many, maybe more than 100, codes. In this case, you would often have to scroll through your CODE SYSTEM to find the code you want to assign. For some purposes, the quick list of codes displayed on top of the TEXT BROWSER may be a solution. You select the codes you want to use simply by clicking on them in the CODE SYSTEM. This brings the codes into the quick list. Now, when coding, you only have to select the codes from the quick list. This makes it easier, but you still only see the first code of the quick list and you al-ways have to open the list and select a code except if the code needed is on top of the list. The toolbar function now offered in MAXQDA 2007 provides a better alternative.
The code toolbar is a linear list of selected codes that can be placed anywhere on the screen. It contains a list of those codes you need for a particular working session. The first step is to select the codes. Click a code with the right mouse button and choose CODE TO TOOLBAR from the context menu. If this is the first code, the toolbar appears on the screen. Now you may select the other codes needed in the session.
Fig. 7-20: The CODEBAR

7 THE CODES
128
To remove a code from the list, click into the checkbox in front of the code and then click the sym-bol REMOVE SELECTED CODE – a red cross – just below the title bar.
Assigning codes that are part of the list is now very easy: Select the segment as usual, then simply click on the code you would like to apply. That’s all. In the coding sector in front of the text, you will see immediately that the code has been assigned. If you want to assign more than one code from the list, simply click on the desired codes. One click is enough to attach a code.
If your work is finished, you will no longer need the code bar; you can close it by clicking the CLOSE button in the upper right corner of dialog sheet. The code bar will disappear from the screen. If you need it later on, select the option Code Bar from the main menu Codes. You will see that the code bar still contains all of the codes from your last coding session. The code bar also reappears if you click another code and select CODE TO TOOLBAR from the context menu. Then, the new code appears together with the previously selected codes.
7.9 The Code Symbol in the Text Browser
As soon as you have coded a text segment, the code symbol (the green stripe in the figure below) appears in the gray area next to the text in the TEXT BROWSER. The standard color for this symbol is green, but you can choose another color for any code, causing all the code symbols for this code to appear in this color.

7 THE CODES
129
Fig. 7-21: The screen tip for the code symbol
In the case of a subcode, only the name of the subcode and not the name(s) of the parent code(s) are displayed. When you hold the mouse cursor over a code symbol, a screen tip will appear with information about the code: its weight score, creation date, and author. Clicking on the symbol causes the background of the code in the CODE SYSTEM window to turn gray, so that you can easily find it.
The coding sector can be displayed on the left or right of the text. Simply click on the column header, hold down the left mouse button, and drag the column to the other side of the text.
You can modify the width of the coding column in the TEXT BROWSER by dragging the little line be-tween the columns headers. When you double-click on a line separating two headers (the mouse pointer will change into a special symbol for this function), MAXQDA will give the column the opti-mum width allowed for by the longest string found in the column.

7 THE CODES
130
In MAXQDA, it is possible to select exactly which coded text segments to display in the TEXT BROWSER. Right-click in the gray codes column or click the button “Color Filter” in the toolbar.
Fig. 7-22: Opening the COLOR FILTER for codes
A dialog box appears, from which you can choose to view specific coded text segments:
Only active codes.
Only codes created by the particular user.
Only codes with a specific color attribute.
These options can be combined in any way; the code symbols can also be faded out altogether. In addition, it is possible to choose which elements of the code screen tips to display: title, author, or date.

7 THE CODES
131
Fig. 7-23: The Code Symbol’s shortcut menu
The option to switch off codes with selected colors is particularly useful when you are working in a team with independent coders. In this case, the coders should be defined as codes on the highest level of the code hierarchy and the different coders should use the same code tree organized as subcodes of the coders. Now, while the training the coders, you may hide the visualization of other coders’ work. Later on, they can compare their coding with the coding done by the others.
If you select the PRINT TEXT button from the toolbar on top of the TEXT BROWSER, the text is printed in the same way as you see it; that means that only the codes with selected colors will be displayed.
Right-click in the grey area to open
the menu.

7 THE CODES
132
MAXQDA asks you within the print dialog if you would like to visualize memos and codes. If not, it will merely print the text with paragraph numbers.
7.10 Undoing the Assignment of a Code to a Segment
Clicking on code symbol with the right mouse button causes a shortcut menu to appear, with which the coding of the text segment can be removed.
Fig. 7-24: The Code Symbol’s shortcut menu
If you need to first find the location of a coded segment in a text document, deleting the code in this way may not be very convenient. A better way is to use MAXQDA’s UNDO function. In the coding toolbar on top of the TEXT BROWSER window there is an UNDO button. Clicking on it opens a list con-taining the last codes assigned.

7 THE CODES
133
Fig. 7-25: List of the most recently assigned codes in the UNDO menu
The last code assigned is always on the top of the list.
The number to the right of the code tells you haw many segments had been coded during this par-ticular coding process. If the results of a text search had been coded automatically, it could be that dozens or hundreds of coded segment were created in one coding process.
To undo a particular coding process, simply click on that entry in the list.
7.11 Deleting Codes
To delete a code or subcode, move the mouse pointer to the CODE SYSTEM, right-click on the code and select the option DELETE CODE from the shortcut menu. When you delete a code all of its refer-ences will be deleted, too.

7 THE CODES
134
Fig. 7-26: Deleting a code
Of course nothing from the original text is ever deleted by a code deletion. The DELETE procedure will only be carried out after it is confirmed.
If subcodes are assigned to a code, they will also be deleted. The deletion of codes in the code tree can be imagined as the sawing off of branches from a tree: with a branch you obviously also remove all the smaller branches and twigs which were attached to the branch. Similarly all the subcodes of a code and their subcodes are deleted in this process.
Summary: deleting a code from the CODE SYSTEM removes all code assignments and all subcodes with their assignments.
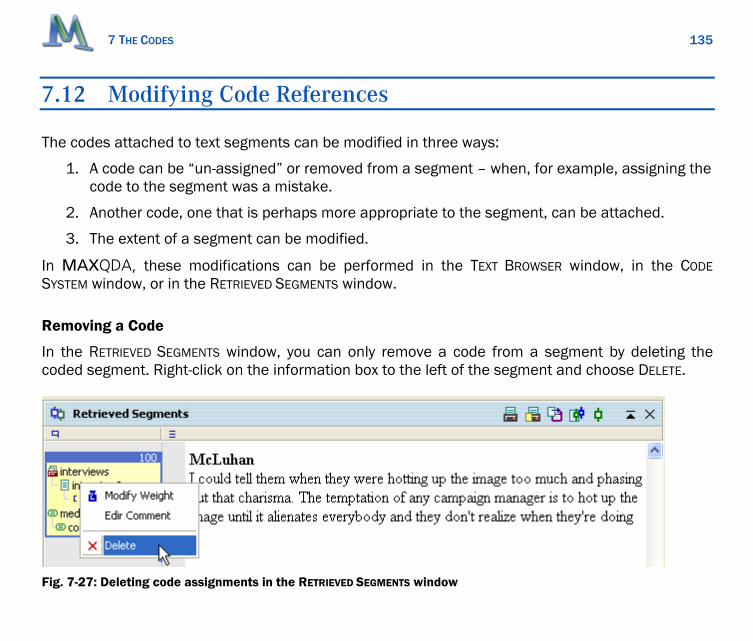
7 THE CODES
135
7.12 Modifying Code References
The codes attached to text segments can be modified in three ways:
1. A code can be “un-assigned” or removed from a segment – when, for example, assigning the code to the segment was a mistake.
2. Another code, one that is perhaps more appropriate to the segment, can be attached.
3. The extent of a segment can be modified.
In MAXQDA, these modifications can be performed in the TEXT BROWSER window, in the CODE SYSTEM window, or in the RETRIEVED SEGMENTS window.
Removing a Code
In the RETRIEVED SEGMENTS window, you can only remove a code from a segment by deleting the coded segment. Right-click on the information box to the left of the segment and choose DELETE.
Fig. 7-27: Deleting code assignments in the RETRIEVED SEGMENTS window

7 THE CODES
136
The same is possible in the TEXT BROWSER, as well as attaching another code. Begin in the same way as for removing a code: move the mouse pointer to the code symbol of that particular coded seg-ment. Right-clicking allows you to choose DELETE from the shortcut menu. To attach another code, click with the left mouse button. This selects the segment, which now looks the same as when you earlier attached the code. Then use one of the different methods for assigning a code to the se-lected segment as described in Chapter 7.5. Another way is to drag the information box from the RETRIEVED SEGMENTS window to the new code in the CODE SYSTEM.
Fig. 7-28: Deleting Code Assignments in the TEXT BROWSER
Be careful when deleting code assignments, as there is no undo function for these procedures.
Coding a Segment with More than One Code
After having coded a segment, the segment remains selected. It is possible to attach more codes to the same segment, simply with the drag-and-drop technique or by right-clicking on the code in the CODE SYSTEM and selecting Code from the shortcut menu. However, to attach more codes later on,
7 THE CODES
137
the segment must first be selected. The easiest way to do this is by clicking on the segment’s code symbol and then selecting the appropriate code.
Another way is to use the option CODE WITH SELECTION that is available in the TEXT BROWSER’s context menu. Activate the codes you want to attach in the CODE SYSTEM. Then, with the right mouse button, click inside the selected text and choose the Option CODE WITH SELECTION.
Replacing a Code
When reviewing your text analysis, you may decide that the wrong code was assigned to a text seg-ment. Or you may decide that the CODE SYSTEM is not precise enough, so it is necessary to expand the CODE SYSTEM and distinguish between different codes. In both cases, you will need to replace one code assigned to a text with another.
1. Click on the code symbol next to the text with the right mouse button. The text that was as-signed the code will be selected
2. Assign the new code to the text
3. Now select the old code and delete it
Extending the Boundaries of a Segment
When listed independently from the original text, a coded segment may be difficult to understand because it is out of context. The segment is probably too small. To extend the segment’s bounda-ries, first click on the code symbol to again select the segment. Then, expand the boundaries of the highlighted text by dragging the mouse over the text to be included in the segment. Then reassign the code to the text, which you can do by simply clicking on the code button again. The code sym-bol will change correspondingly.

7 THE CODES
138
Fig. 7-29: Reselecting the coded segment
7.13 Modifying the Code System
A large part of the work that is done in computer-assisted qualitative data analysis involves codes, their relation to one another, and the process of assigning them to text segments. The hierarchical CODE SYSTEM in MAXQDA allows you to do this kind of work efficiently.
When working with a large number of codes and different hierarchical levels of codes, it might be helpful to switch off the subcodes in order to get a better overview of the CODE SYSTEM.
Changing the order and the structure of the CODE SYSTEM is not difficult. All codes can be moved with the mouse and the drag-and-drop function.
In the following example, the CODE SYSTEM contains four codes (A, B, C, and D).
Click here to highlight the
segment again.

7 THE CODES
139
Fig. 7-30: Moving Codes with the mouse
To bring Code D to the first position in the list, click on the code with the left mouse button, hold down the mouse button, move the mouse pointer to the top of the list, and then drop the code.
To make one code a subcode of another code, you have to use the SHIFT key together with the drag-and-drop function. In the example above, you could make Code B a subcode of Code A by holding down the SHIFT key, clicking on Code B, and moving the Code to A (while keeping the left mouse button pressed).
Code B would then appear as a subcode of Code A. You can do the same with the other codes and also make Codes C and D subcodes of Code A or Code B. To arrange the subcodes of a code in al-phabetical order, right-click on the code and choose SORT CODES from the menu.
7.14 Copying parts of the Code Tree
Sometimes codes contain the same subcodes. Let us suppose you have two codes, “attitudes” and “behavior,” and you want to define the subcodes “politics,” “family,” and “profession” for both of them. MAXQDA saves you from defining these subcodes twice. You start with the definition of the three subcodes; let’s say with “attitudes.” Next you click on attitude and select the option COPY CODE TREE. Finally, you go to “behavior” and choose the option PASTE CODE TREE from the context menu.
Click here, hold down the mouse key and
move code D.
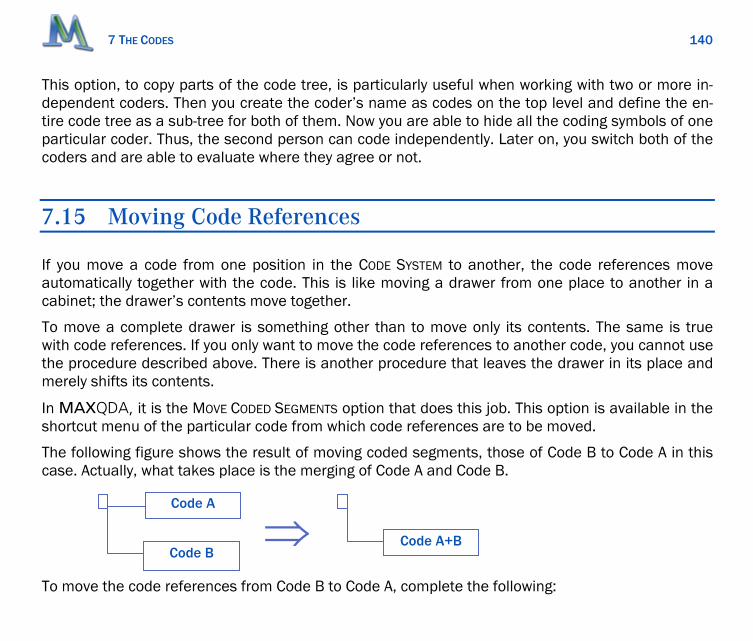
7 THE CODES
140
This option, to copy parts of the code tree, is particularly useful when working with two or more in-dependent coders. Then you create the coder’s name as codes on the top level and define the en-tire code tree as a sub-tree for both of them. Now you are able to hide all the coding symbols of one particular coder. Thus, the second person can code independently. Later on, you switch both of the coders and are able to evaluate where they agree or not.
7.15 Moving Code References
If you move a code from one position in the CODE SYSTEM to another, the code references move automatically together with the code. This is like moving a drawer from one place to another in a cabinet; the drawer’s contents move together.
To move a complete drawer is something other than to move only its contents. The same is true with code references. If you only want to move the code references to another code, you cannot use the procedure described above. There is another procedure that leaves the drawer in its place and merely shifts its contents.
In MAXQDA, it is the MOVE CODED SEGMENTS option that does this job. This option is available in the shortcut menu of the particular code from which code references are to be moved.
The following figure shows the result of moving coded segments, those of Code B to Code A in this case. Actually, what takes place is the merging of Code A and Code B.
To move the code references from Code B to Code A, complete the following:
Code A
Code B Code A+B ⇒

7 THE CODES
141
1. In the CODE SYSTEM, right-click on Code B (from which codes are to be moved).
2. Select MOVE CODED SEGMENTS from the shortcut menu. This transfers the code references to an internal clipboard. (Up to this moment, nothing has really changed in the CODE SYSTEM. The number of coded segments displayed to the right of Code B is still the same.)
3. Then right-click Code A (the target code) and choose MOVE CODED SEGMENTS FROM “CODE A”
from the shortcut menu. MAXQDA asks you to confirm the command before executing it.
Fig. 7-31: Moving Coded Segments

7 THE CODES
142
Code B remains in the CODE SYSTEM until you delete it, but the number of its immediate code refer-ences is now zero. The contents of the “drawer” have been moved to Code A.
However, its subcodes’ code references will not have been moved. Be careful when deleting Code B now, since all subcodes – if there are any – will be deleted too, along with their code references.
Tip: If you want to delete all code assignments but choose to keep the code in the CODE SYSTEM, it is best to create a code named „trash“ and then copy the code references to the “trash.”
7.16 Copying Code References
The function COPY CODED SEGMENTS is similar to the MOVE CODED SEGMENTS function. The only differ-ence is that the code references also remain in Code B – that is to say, they are duplicated. Follow the steps below:
1. Move the mouse pointer to the CODE SYSTEM and right-click on the code from which refer-ences are to be copied (Code B in the example above).
2. Select COPY CODED SEGMENTS from the shortcut menu.
3. This causes the code references to be moved to an internal clipboard. (Up to this point noth-ing has really happened in the CODE SYSTEM. The number of coded segments displayed to the right of Code B is still the same.)
4. Now select the target code (Code A in the example above). Right-click and choose INSERT CODED SEGMENTS FROM “Code A.”
5. MAXQDA then copies the code references; no confirmation is required.

7 THE CODES
143
7.17 Inserting a New Top Category
A common procedure when working with codes is to group previously defined codes under a new, more abstract category, as shown in the next diagram:
MAXQDA’s hierarchical CODE SYSTEM makes it easy to group existing codes under new top-level codes. Reorganizing the CODE SYSTEM can be done at any time during the text analysis process:
1. Define a new top-level code (in the example, the code “new”).
2. Press the SHIFT key and left-click on Code B.
3. Holding down the mouse button, drag Code B to the “new” code.
4. Do the same with Code D.
Code A
Code B
Code C
Code D
Code A
New
Code C
Code B
Code D
Defining a New Top Category

7 THE CODES
144
Fig. 7-32: Grouping codes under a new top category
7.18 Splitting up a Code
Often when working with a CODE SYSTEM, it is desirable to differentiate between elements grouped under one code. In MAXQDA this corresponds to dividing a code in two or more subcodes. For ex-ample, imagine you have created a code named “family” and have assigned text segments, in which an interviewee talks about his family, to this code. Then imagine that it becomes necessary to differentiate between “mother,” “father,” and “brothers and sisters.”
The division of a code in subcodes can obviously not happen automatically, since you must decide which references of the code are to be placed in which subcode. You must read each coded seg-ment and decide which of the subcodes is appropriate. In this case the subcodes will not be exclu-sive since a person can talk about his father and his mother in the same text passage.
Press SHIFT, click on “Code B” and move the mouse to code “new.”

7 THE CODES
145
Codes are divided into subcodes as follows:
1. Activate all text documents.
2. Activate the code “family.”
3. Create the three subcodes under the code “family” in your CODE SYSTEM.
A convenient way to separate the code references into the new subcodes is to bring all the coded segments (in our example with “family”) into the RETRIEVED SEGMENTS window. Then for each of the segments go through the following steps:
1. Read the segment and decide which subcode(s) is appropriate.
2. Click on the information box left of the segment. The text will appear in the TEXT BROWSER with the segment highlighted.
3. Attach the appropriate subcode using the drag-and-drop function.
4. If necessary, repeat for another appropriate subcode.
When you reach the end of the list you will all have worked through all the coded segments and these will have been assigned new subcodes. But all segments will still be coded with the original code “family” too, which is obviously not what you want. To finish the job, you have to delete these code references, which may seem tricky, since now deleting the code “family” would also delete its subcodes – including the three subcodes that you just created.
Mother
Father
Bro + Sis
Code Family Code Family
Before After

7 THE CODES
146
In effect, you need to delete not the code itself but only its references. Since the command “Delete Code References” does not exist in MAXQDA’s CODE SYSTEM, you must make a detour to achieve this result:
1. Define a new code called “trash.”
2. Right-click on the code whose references are to be removed (in this example “family”).
3. Select MOVE CODED SEGMENTS from the shortcut menu.
4. Move the mouse pointer to the code “trash,” click with the right mouse button, and select MOVE CODED SEGMENTS FROM “family.”
5. Delete the code “trash.”
7.19 The Weight Scores: Indicating the Relevance of a Segment
MAXQDA allows you define, for each coded segment, an individual score indicating the relevance of the segment to your research question. These scores are called Weight Scores or Relevance Scores. If you have no need for this additional tool, ignore it. MAXQDA will never ask you for any weight score if you don’t use the option yourself.
Each segment assigned a new code is automatically assigned the default weight score, which is be-tween 0 and 100.
By default, MAXQDA gives a score of 100 to each segment when it is coded.
There are two ways to change the default score:
in the menu PROJECT > OPTIONS
in the status bar at the bottom of your screen, by double-clicking on the DEFAULT WEIGHT SCORE icon and entering a new value in the dialog box

7 THE CODES
147
Fig. 7-33: Changing the default weight using the status bar
The weight score is always listed in the information box in the column next to the text segments in the Retrieved Text Segments window.
As long as you are not using the weight option, nothing will happen to these weight scores. You only will see the mysterious number “100” in the upper right corner of the information boxes displayed on the left of each coded segment in the RETRIEVED SEGMENTS window.
Fig. 7-34: The weight score
Assigning a weight score in the TEXT BROWSER window
To assign a weight score – other than 100 – to a coded segment, move the mouse pointer to the TEXT BROWSER and click on the little square in the middle of the code symbol with the right mouse button. This causes a shortcut menu to appear, with which the text segment’s weight score can be modified.
Double click to change default weight.
Weight Score
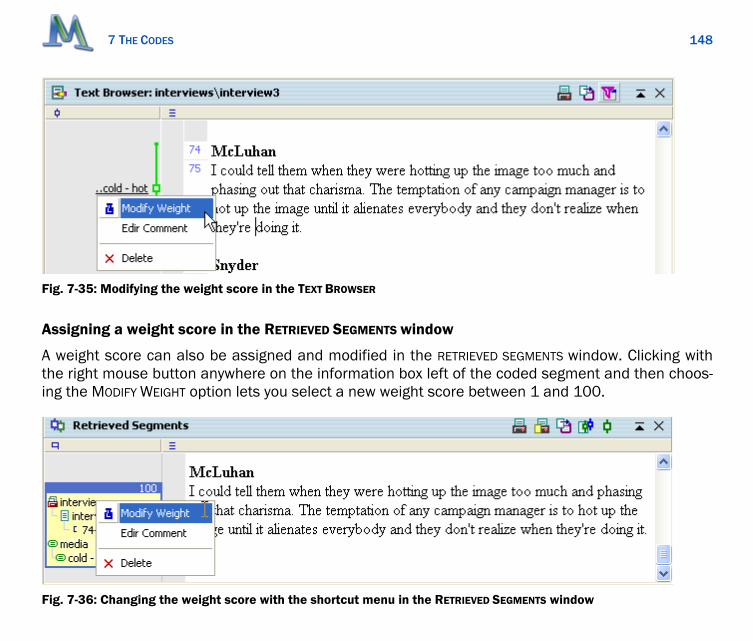
7 THE CODES
148
Fig. 7-35: Modifying the weight score in the TEXT BROWSER
Assigning a weight score in the RETRIEVED SEGMENTS window
A weight score can also be assigned and modified in the RETRIEVED SEGMENTS window. Clicking with the right mouse button anywhere on the information box left of the coded segment and then choos-ing the MODIFY WEIGHT option lets you select a new weight score between 1 and 100.
Fig. 7-36: Changing the weight score with the shortcut menu in the RETRIEVED SEGMENTS window

7 THE CODES
149
The display of the weight score in the upper right corner of the information box will immediately show the new value that you have entered.
Fig. 7-37: Information box with modified weight score
Assigning a weight score in the OVERVIEW OF CODED SEGMENTS windows
Another way to modify weight scores is offered by the OVERVIEW OF CODED SEGMENTS, which can be ac-cessed from different menus in MAXQDA. In these tables you will find a column named Weight. Double-clicking in a cell of this column allows you to modify the weight of that particular coded seg-ment.
If you enter a weight value greater than 100, MAXQDA will automatically reset it to the maximum value of 100.
7.20 Writing a Short Comment for a Coded Segment
You can make an annotation or a comment for each coded segment. This can be a short summary or just a nickname for this text passage. Comments are displayed in the quick info that appears when you move the mouse over the coding symbol in the coding stripes sector.
When you double-click on the little square in the middle of a coding symbol, a dialog field appears where you may enter your comment.
Weight Score

7 THE CODES
150
You can easily see if a comment has been written for a coded segment when you look at the code symbol. Normally the inner part of the little square is white in color, independent of the color of the code symbol. When a comment is attached, the inner square appears in the same color as the outer line of the symbol.
Fig. 7-38: Visualization of a comment: a filled out square symbol
If you import coded segments into MAXMaps, the mapping tool of MAXQDA, the comments are used as labels. Thus, with regard to the creation of maps and models in later stages of your analy-sis, writing meaningful comments can be very important.

8 THE MEMOS: MANAGING YOUR IDEAS
151
8 The Memos: Managing Your Ideas
8.1 About Memos
The MEMO SYSTEM is a tool provided by MAXQDA that allows you to jot down quick notes, to form hypotheses and theories, and to keep track of your ideas. Memos are different from text docu-ments. They are not data, but rather secondary products of the researcher and will often be modi-fied and integrated during the data analysis process. In some methodological approaches of the social sciences, memos play an extremely important role, as in Strauss’ and Glaser’s Grounded Theory, where theory development is centered on them. Strauss and Glaser differentiate between different types of memos like theoretical notes and code notes. To support this differentiation be-tween the different kinds of memos, MAXQDA offers over 10 different memos with different icons.
If you wish to create “free memos” that are not attached either to a particular text nor to a particu-lar code, you can create a dummy text (“free memos”) in the DOCUMENT SYSTEM and attach memos there.
8.2 Creating Text Memos
Text memos can be attached to text lines like post-it notes. If you want to write a memo about the whole text, it is recommended that you attach your memo to the text in the DOCUMENT SYSTEM. To create free memos that are not attached either to a particular text nor to a particular code, you can create a dummy text in the DOCUMENT SYSTEM and attach memos there.
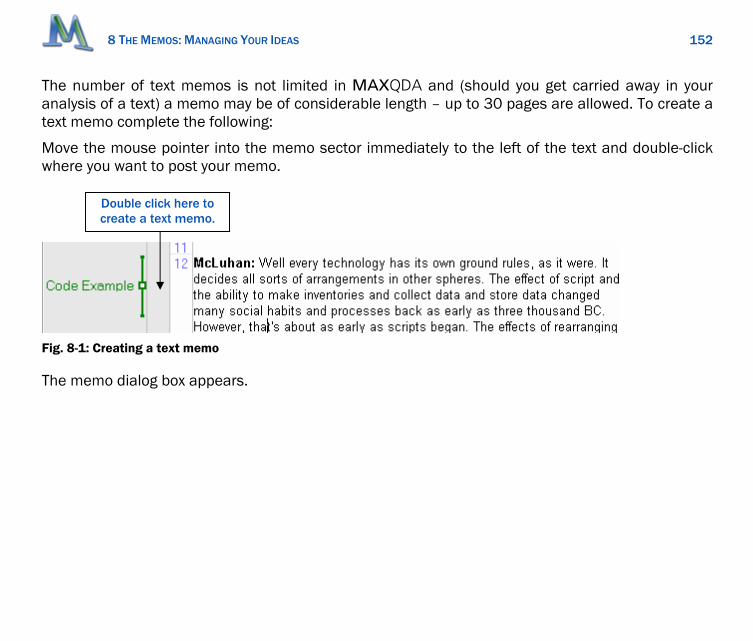
8 THE MEMOS: MANAGING YOUR IDEAS
152
The number of text memos is not limited in MAXQDA and (should you get carried away in your analysis of a text) a memo may be of considerable length – up to 30 pages are allowed. To create a text memo complete the following:
Move the mouse pointer into the memo sector immediately to the left of the text and double-click where you want to post your memo.
Fig. 8-1: Creating a text memo
The memo dialog box appears.
Double click here to create a text memo.

8 THE MEMOS: MANAGING YOUR IDEAS
153
Fig. 8-2: The memo dialog box
Give the memo a title and indicate the author, if desired. (The current user is set by default.) The date is set automatically by MAXQDA. Type your text into the text window in the lower part of the dialog box.
By default, a little yellow icon is chosen as the symbol for memos. But, depending on the type of memo, you may choose another of the ten different memo icons available.
Fig. 8-3: Different memo icons
Select the memo type here.

8 THE MEMOS: MANAGING YOUR IDEAS
154
For instance, if working according to Strauss’ “Grounded Theory” method, you could select the T icon for theoretical memos, the M icon for methodological memos and the ? icon for ideas about theoretical sampling. It is up to the user to define the meaning of the different memo symbols.
The title of the memo will appear when the text is opened in the TEXT BROWSER and the mouse cur-sor is moved over the memo symbol.
Like the text documents, the memos are in Rich Text Format, which means that you can use differ-ent fonts, font sizes, and text colors. The Windows clipboard may be used to copy and insert text (by selecting a passage of text and using the Edit menu or by pressing CTRL+C to copy text into the clipboard, and pressing CTRL+V to insert the clipboard text into the memo).
Click on the Close button when you have finished writing your memo. MAXQDA will then return to the TEXT BROWSER, and there will now be a little yellow icon at the place where you double-clicked to attach the memo.
Text memos are always linked to a particular paragraph in the TEXT BROWSER window. If the text in this paragraph is deleted, whether completely or only partially, the memo will not be deleted at the same time, but rather transferred to a neighboring paragraph.
This feature is designed to avoid the unintentional deletion of memos containing important ideas or hypotheses.
Tip: In MAXQDA 2007, memos may be moved in TEXT BROWSER simply by dragging them with the mouse.
8.3 The Toolbar in the Memo Dialog Box
On top of the memo dialog box, just below the title bar, you will find a little toolbar containing the following functions:

8 THE MEMOS: MANAGING YOUR IDEAS
155
Print out the memo.
Export the memo and save it in Rich Text Format.
Delete the Memo.
Assign codes from the quick list.
Remove the assignment of the selected code.
8.4 Memos in the Document System
Memos can be attached to entries in the DOCUMENT SYSTEM as well. Right-click on the name of the project, text group, or text, and select MEMO from the shortcut menu. The memo dialog box appears in its usual form.
Once created, the memo icon will appear next to the entry in the DOCUMENT SYSTEM. It can be opened with a double-click and modified.

8 THE MEMOS: MANAGING YOUR IDEAS
156
Fig. 8-4: Creating a memo in the DOCUMENT SYSTEM
8.5 Linking Codes to Memos
In some situations, it will be useful to link codes to memos. The selection of a code is made from the quick list of codes. When you click on the LINK TO button in the upper right corner of the Memo dialog box, the quick list appears and you can select the codes you want to link.
As you will remember, the quick list contains the last 20 codes that have been chosen in the CODE SYSTEM. If you want your memo to be linked to a code that is not in the list, you have to first click on the code in the CODE SYSTEM with the left mouse button in order to include it in the list.
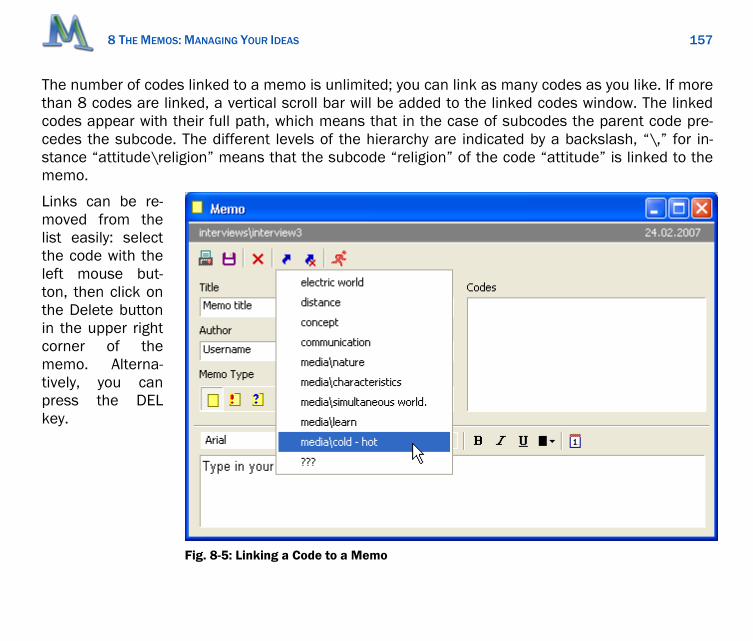
8 THE MEMOS: MANAGING YOUR IDEAS
157
The number of codes linked to a memo is unlimited; you can link as many codes as you like. If more than 8 codes are linked, a vertical scroll bar will be added to the linked codes window. The linked codes appear with their full path, which means that in the case of subcodes the parent code pre-cedes the subcode. The different levels of the hierarchy are indicated by a backslash, “\,” for in-stance “attitude\religion” means that the subcode “religion” of the code “attitude” is linked to the memo.
Links can be re-moved from the list easily: select the code with the left mouse but-ton, then click on the Delete button in the upper right corner of the memo. Alterna-tively, you can press the DEL key.
Fig. 8-5: Linking a Code to a Memo

8 THE MEMOS: MANAGING YOUR IDEAS
158
8.6 Code Memos
MAXQDA also allows you to attach memos to codes. These memos often contain the definition of a code or are used to organize the codes.
Since code memos are part of the CODE SYSTEM, they are managed in the CODE SYSTEM window.
How to create a code memo:
Right-click on the code in the CODE SYSTEM.
Select CODE MEMO from the shortcut menu.
Fig. 8-6: Assigning a Memo to a Code
The procedure is the same as for text memos: you can give the memo a title, enter the author’s name, and select a special memo icon.
When working with code memos, you might want to cite parts of text documents as examples. The easiest way to copy passages of text to a memo is to select the text in the TEXT BROWSER window and drag it into the memo with the mouse.
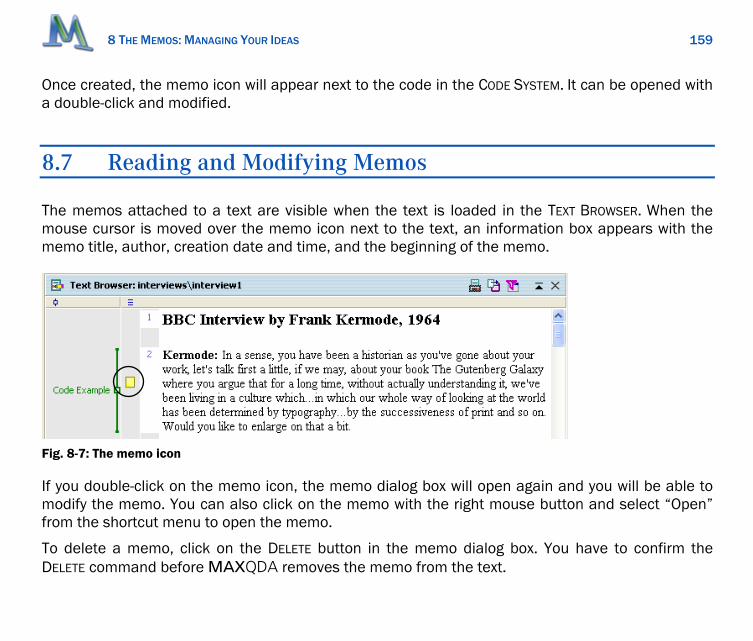
8 THE MEMOS: MANAGING YOUR IDEAS
159
Once created, the memo icon will appear next to the code in the CODE SYSTEM. It can be opened with a double-click and modified.
8.7 Reading and Modifying Memos
The memos attached to a text are visible when the text is loaded in the TEXT BROWSER. When the mouse cursor is moved over the memo icon next to the text, an information box appears with the memo title, author, creation date and time, and the beginning of the memo.
Fig. 8-7: The memo icon
If you double-click on the memo icon, the memo dialog box will open again and you will be able to modify the memo. You can also click on the memo with the right mouse button and select “Open” from the shortcut menu to open the memo.
To delete a memo, click on the DELETE button in the memo dialog box. You have to confirm the DELETE command before MAXQDA removes the memo from the text.
8 THE MEMOS: MANAGING YOUR IDEAS
160
8.8 Memos and the Windows Clipboard
When working with memos in MAXQDA, the Windows clipboard can be used in the same way as with text documents. This makes it easy to exchange text between MAXQDA and word processing programs.
The Windows clipboard may be used in two ways:
Text can be imported into a MAXQDA memo. Select the text in the word processing pro-gram, copy it with CTRL+C to the clipboard, and insert it with CTRL+V into the memo.
Text can be exported from a MAXQDA memo. Select the memo text or a part of it, copy it to the clipboard, and paste it into the word processing document.
8.9 Printing and Exporting Memos
Every kind of memo can be printed or exported to a file in RTF format. To do this, first open the memo in the usual way. The options PRINT and EXPORT can be chosen from the toolbar in the upper left corner of the Memo dialog box.
Clicking on the PRINT button causes the memo to be printed out. A print dialog box is opened and you can choose to print the whole memo or only parts of it. The memo title will be listed at the top of your printout. The author, creation date, and linked codes are listed as well.

8 THE MEMOS: MANAGING YOUR IDEAS
161
Definition of Code Media Code media Author Username Creation Date 01.03.07 Examples of the Code Media: .................................. .................................
Fig. 8-8: An exported code memo
Clicking on the EXPORT button will save the memo to a file in Rich Text Format. You must enter a file name in the Save File dialog box. The exported file contains the same information as the printout.
8.10 The Memo System
The MAXQDA MEMO SYSTEM makes it possible to search, compare and organize all of your memos at the same time. (It is possible to work with the memos of a selected text group, text set, or single text document by right-clicking on the appropriate item in the DOCUMENT SYSTEM window and choos-ing MEMOS from the shortcut menu.) It allows you, for instance, to filter memos according to differ-ent criteria.
To start the MEMO SYSTEM, go to the menu bar and click MEMOS > MEMO SYSTEM.
You can also start the memo system by clicking on the symbol in the main toolbar.

8 THE MEMOS: MANAGING YOUR IDEAS
162
Fig. 8-9: Button for the MEMO SYSTEM
The toolbar on top of the Overview Table gives you quick access to export functions: You may export the memos in Rich Text Format or as an easily comprehensible listing in HTML format.
Fig. 8-10: The toolbar on top of the Overview Table
These two export functions will include the whole memo text. If you only want to export the Overview Table as you see it, you may select all by pressing Ctrl+A, copy it to the Windows clipboard by use of Ctrl+C, and insert it into Excel by use of Ctrl+V.
The MEMO SYSTEM opens a table of your memos in which each row contains one memo. The columns of the table contain the particulars of each memo:
The name of the text document to which the memo is attached (this field is empty in the case of a code-memo).
The name of the code to which the code-memo is attached (this field is empty in the case of a text-memo).
The title of the memo.
The author of the memo.
The creation date and time.
A “Preview” or first few words of the memo text.

8 THE MEMOS: MANAGING YOUR IDEAS
163
As usual in MAXQDA, the columns of the table can be sorted according to any field in the table, either in ascending or descending order. Simply left-click on the header of the column according to which the table is to be ordered.
You can change the order of the columns in the Memos table by dragging any column to another position with the mouse.
Fig 9-8: The MEMO SYSTEM
As in all tables in MAXQDA, you can open and close the different columns of the table individually. Right-click on the column header and select SWITCH OFF from the shortcut menu. The shortcut menu also has the option SELECT FIELDS. This opens a table with a checkbox for each column, allowing you to choose which columns to have open.

8 THE MEMOS: MANAGING YOUR IDEAS
164
You can perform searches in the columns. Searching a column for the string “bird,” for example, causes a search in the column for a cell beginning with “bird“ to be performed. Wildcards can be used as well – entering the search string “*bird” will search the text in every cell in the column for any occurrence of these four characters; words like “thunderbird” would also be found.
The Memo System also lets you search for strings in the memos’ texts.
Only the first 64 characters are displayed in the Preview column of the Memo System. To search the complete memo, you would have to use the Text Search procedure from the menu bar. When searching in the Preview field, all search strings should start with the wildcard character “ *.” Oth-erwise the search string would have to be the first word of the memo text to yield a result.
When browsing through the memos in the Memo System, the columns cannot be modified. To do this, you must double click to open the memo itself.
8.11 Jumping from a Memo to the Text Document
From each memo displayed in MAXQDA’s Memo System, you can jump to the position in the text to which the memo was attached. You need only click on the desired memo with the left mouse but-ton. The source text immediately appears in the TEXT BROWSER positioned exactly at the place where the memo is found.

8 THE MEMOS: MANAGING YOUR IDEAS
165
Fig. 8-11: Jumping from memo to text
This option works only with text memos, of course. If you click on a code memo, the TEXT BROWSER remains unchanged, but the code is highlighted in the CODE SYSTEM. The same happens with memos that are attached to objects of the DOCUMENT SYSTEM (text groups and texts).
8.12 Text Search in Memos
The MEMO SYSTEM allows you to search in the fields: Text, Title, Author, Creation Date, or Preview. The search in the Preview field limits the search of the memo text, which of course is the most im-portant part of a memo, to its first 64 characters. Searching in the complete memo text is only pos-sible with the Text Search procedure - accessible in MAXQDA’s menu bar - or by clicking on the SEARCH button in the toolbar.
The TEXT SEARCH procedure is described in detail in Chapter 11. The only difference: you have to se-lect the option IN MEMOS so that MAXQDA searches there and not in the text documents.
Click here to jump to the text source

8 THE MEMOS: MANAGING YOUR IDEAS
166
Fig. 8-12: Searching in a memo’s text
The result of the Search procedure is a table containing the memos in which the search string or strings were found. Double-clicking on a memo causes it to open.
8.13 Collection of Memos Linked to the Same Code
As described in Section 8.4, codes can be linked to memos in order to indicate what the memo is about. Of course, you can choose a descriptive title for a memo, based on the content of the memo, but to attach codes is a more systematic way to attach more thematic topics than could be formu-lated in a memo’s title.
To find all memos that are linked to the same code:
1. Right-click on the code in the CODE SYSTEM.
2. Select OVERVIEW OF LINKED MEMOS from the shortcut menu.
The result is a table of memos. The table contains all the memos to which the code is attached. As usual, a double-click opens the memo and a single click brings the source text into the TEXT BROWSER window.
The table can be sorted according to its columns and it can be exported to other programs.

8 THE MEMOS: MANAGING YOUR IDEAS
167
Fig. 8-13: Exporting the memo table
8.14 Display Options for Memos
In MAXQDA’s main menu, you will find the option MEMOS with the following functions:
MEMO SYSTEM – opens the overview of memos and displays a list of all memos included in the cur-rent project.
ALL MY MEMOS – displays an overview containing all the memos written by the current user.
MY CODE-MEMOS – displays an overview of all the code memos written by the current user.
MY TEXT-MEMOS – displays an overview of memos attached to text segments that were written by the current user.
MEMOS OF THE TEXT DISPLAYED IN THE TEXT BROWSER– displays an overview of all memos belonging to the text currently opened in the TEXT BROWSER.

8 THE MEMOS: MANAGING YOUR IDEAS
168
8.15 Viewing Memos of Text Documents and Text Groups
The memos belonging to a particular text group, text set, or text document can be viewed in a table. Select the option OVERVIEW OF MEMOS from the shortcut menu that appears when you right-click on a text group, text set, or a text document.
MAXQDA will then open a table similar to the Memo System table containing all the memos at-tached to these text(s). As with the Memo System, it is possible to sort the table, search in the dif-ferent columns of the table, jump to the source text, and also export the table or parts of it to an ex-ternal file or to the clipboard.
8.16 Exporting a Selection of Memos
The result of a search for specific words in memos is a table listing all the memos containing the words. The same type of result, memos in a table, is obtained through a search for linked memos or when viewing the memos attached to a text or text group, as described above.
These tables of memos can be exported, that is saved as a file to be opened with another program. You can save the table in RTF or in HTML format. Click on one of the Export buttons located in the upper left corner of the dialog box, and choose appropriate the format.
The exported RTF file appears as follows:

8 THE MEMOS: MANAGING YOUR IDEAS
169
Title Def Media
Code media
Author Steve
Creation Date 01.03.07
Codes media
Examples for the Code Media: ..................................
Fig. 8-14: An exported memo table in RTF format
Here you see all the information contained in the memo, such as memo title, creation date, and linked codes as well as the memo text itself. The exported RTF file can be opened in your word proc-essing program to add layout features like headers and footers.
If you choose HTML as the export format, MAXQDA creates a table that is immediately opened in your default web browser such as Internet Explorer. The table can then be printed or exported to Excel simply by right-clicking on the table and selecting the option from the shortcut menu.
Fig. 8-15: Result of displaying memos in HTML format
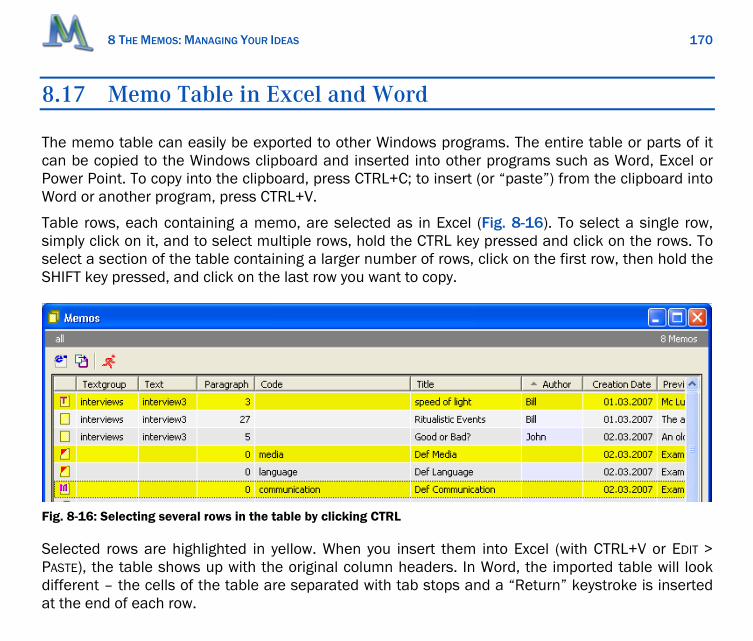
8 THE MEMOS: MANAGING YOUR IDEAS
170
8.17 Memo Table in Excel and Word
The memo table can easily be exported to other Windows programs. The entire table or parts of it can be copied to the Windows clipboard and inserted into other programs such as Word, Excel or Power Point. To copy into the clipboard, press CTRL+C; to insert (or “paste”) from the clipboard into Word or another program, press CTRL+V.
Table rows, each containing a memo, are selected as in Excel (Fig. 8-16). To select a single row, simply click on it, and to select multiple rows, hold the CTRL key pressed and click on the rows. To select a section of the table containing a larger number of rows, click on the first row, then hold the SHIFT key pressed, and click on the last row you want to copy.
Fig. 8-16: Selecting several rows in the table by clicking CTRL
Selected rows are highlighted in yellow. When you insert them into Excel (with CTRL+V or EDIT > PASTE), the table shows up with the original column headers. In Word, the imported table will look different – the cells of the table are separated with tab stops and a “Return” keystroke is inserted at the end of each row.

9 MANAGING ATTRIBUTES/VARIABLES
171
9 Managing Attributes/Variables
9.1 About Attributes
MAXQDA allows you to link a set of attributes (variables) to each document. Since the attributes are linked to text documents and not to text segments, they are called case attributes or case vari-ables: for each case (or document) in your DOCUMENT SYSTEM, there exists one set of attributes. What a case is may vary; it may be a person in the case of an interview study, an observation protocol in the case of a field study, or a biography in the case of biographical research.
These attributes are managed as a table, a rectangular data matrix, in the same way as in statisti-cal programs like SPSS. You can use attributes to save, for instance, the socio-demographic data of your interviewees or data concerning the interview itself. You could also evaluate interviews accord-ing to a particular topic and store the results as attributes.
There is one set of attributes for the whole Project – it is the same for all texts.
Thus, it is not possible to have different lists of attributes for the different text groups of your DOCUMENT SYSTEM. When you begin a project, the list of attributes is nearly empty; only seven inter-nal attributes will have already been defined by MAXQDA. These are:
Textgroup – contains the name of the text group.
Textname – contains the text name.
Creation Date – the creation/import date of the text.
Number of Coded Segments – the numbers of coded segments of the text.
Number of Memos – the numbers of memos of the text.

9 MANAGING ATTRIBUTES/VARIABLES
172
Author – the user who created/imported the text.
Bytes – size of the text in bytes.
For later use in statistical programs like SPSS, the attributes “Textname” and “Textgroup” are writ-ten as one word.
All further attributes have to be created before you can enter attribute values. To create an attrib-ute, open the ATTRIBUTES dialog box by clicking EDIT from the menu option ATTRIBUTES. You also can click on the Attributes button in MAXQDA’s toolbar.
Fig. 9-1: Button for the table of attributes
The number of attributes is not limited; you may add new attributes or remove attributes whenever you’d like. However, MAXQDA is not a statistical program but a software for qualitative data analy-sis and mixed methods approaches, where working with more than 100 attributes is rather un-usual.
MAXQDA 2007 differentiates between two “views” of your data: the “list of attributes” and the “data view.” The “list of attributes” or “variable view” displays a list of your attributes. This is also the place to create new variables. The “data view” displays the data matrix that is organized like an Excel worksheet.
All attributes have to be created before you can enter attribute values. To do this, open the list of attributes by clicking ATTRIBUTES in the upper menu bar.
When you open the attributes dialog box for the first time, the table is not empty – as you would probably expect – since MAXQDA has already automatically created internal attributes or “system fields.” These attributes contain the name of the text group for each text, the name of the text, the creation date, and the number of coded text passages. A total of seven variables have already been

9 MANAGING ATTRIBUTES/VARIABLES
173
defined. Later on, you may identify these variables because of their red symbol listed in the first col-umn of the table. A symbol located in the toolbar of the “List of Attributes” allows you to create new attributes. Another symbol offers to switch to the data view. The column named “to be displayed” allows you to select the attributes to be displayed in the data view. If you work with many attributes the data view may be a bit confusing. Thus, the opportunity to select only the attributes currently needed, can be very helpful.
Fig. 9-2: List of attributes

9 MANAGING ATTRIBUTES/VARIABLES
174
9.2 The List of Attributes
As mentioned above, MAXQDA 2007 differentiates between two “views” of your data: the “list of attributes” and the “data view.”
The “list of attributes” or “variable view” displays a list of your attributes. This is also the place to create new variables.
The “data view displays” the data matrix that is organized like an Excel worksheet.
The toolbar on top of both views contains an icon that enables switching between the two views.
Fig. 9-3: Switching between “list of attributes” and “data view”
The definition of new attributes can be done only in “variable view.” Thus, if “data view” is currently chosen, you first have to switch to “variable view.”
Click here to change the view
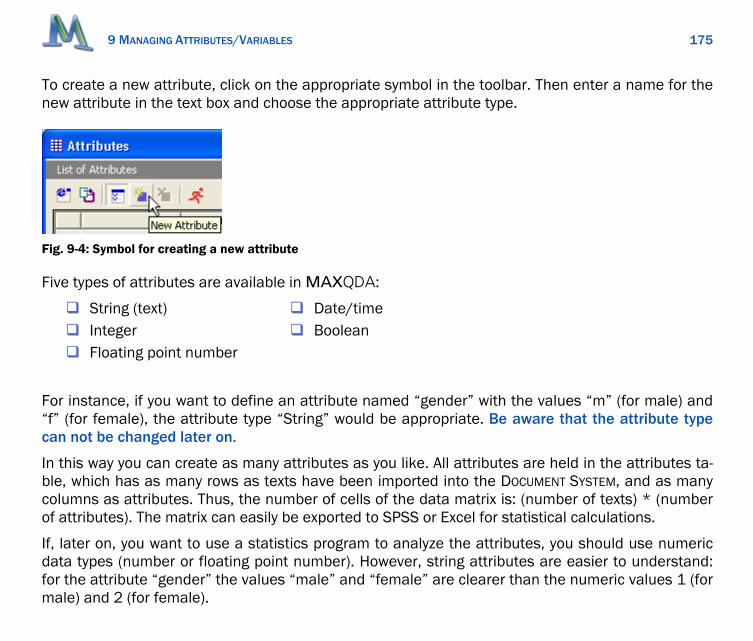
9 MANAGING ATTRIBUTES/VARIABLES
175
To create a new attribute, click on the appropriate symbol in the toolbar. Then enter a name for the new attribute in the text box and choose the appropriate attribute type.
Fig. 9-4: Symbol for creating a new attribute
Five types of attributes are available in MAXQDA:
String (text) Integer Floating point number
Date/time Boolean
For instance, if you want to define an attribute named “gender” with the values “m” (for male) and “f” (for female), the attribute type “String” would be appropriate. Be aware that the attribute type can not be changed later on.
In this way you can create as many attributes as you like. All attributes are held in the attributes ta-ble, which has as many rows as texts have been imported into the DOCUMENT SYSTEM, and as many columns as attributes. Thus, the number of cells of the data matrix is: (number of texts) * (number of attributes). The matrix can easily be exported to SPSS or Excel for statistical calculations.
If, later on, you want to use a statistics program to analyze the attributes, you should use numeric data types (number or floating point number). However, string attributes are easier to understand: for the attribute “gender” the values “male” and “female” are clearer than the numeric values 1 (for male) and 2 (for female).

9 MANAGING ATTRIBUTES/VARIABLES
176
The number of attributes is unlimited; whenever you choose INSERT NEW ATTRIBUTE from the shortcut menu a new attribute is added. Attributes can be removed from the list at any time.
When choosing attribute names, you should plan ahead. MAXQDA allows you to create attribute names up to 64 characters long, and you are not restricted by special syntax rules; i.e. an attribute name can be made up of more than one word and blanks, and special characters like &, %, or § are permitted. However, other programs are not so forgiving, and if you later wish to export the attrib-utes file to another program, you should select attribute names that will be acceptable to these programs. Statistics programs often have very restrictive requirements for names. SPSS, for in-stance, allows only 8-character attribute names.
9.3 The Data View: Table of Attributes
All attributes are held in the ATTRIBUTES table, which has as many rows as texts have been imported into the DOCUMENT SYSTEM. Each column in the table holds one attribute. Thus, the number of cells in the table is (number of texts) * (number of attributes).

9 MANAGING ATTRIBUTES/VARIABLES
177
Fig. 9-5: The table of attributes and its context menu
Attribute names are displayed in the table’s column headers. Some attributes appear in black, some in blue. The black ones are MAXQDA’s “internal attributes,” so-called “system fields.” These fields cannot be edited.
After adding several attributes, the problem may soon arise that only a part of the attributes table can be seen on the screen. You can modify the width of each column in the table simply by dragging the little line between the columns headers. By making the columns smaller you can increase the number of attributes displayed on the screen. When you double-click on a line separating two headers (the mouse pointer will change into a special symbol for this function), MAXQDA will give
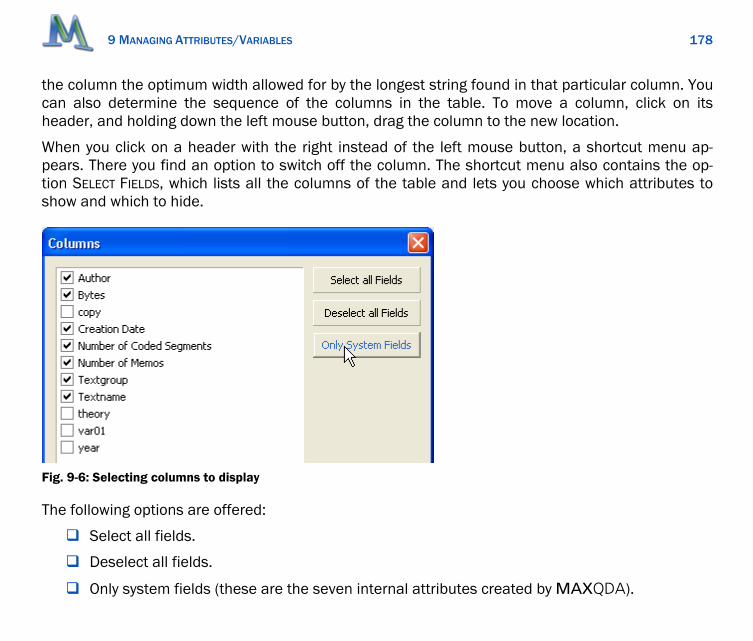
9 MANAGING ATTRIBUTES/VARIABLES
178
the column the optimum width allowed for by the longest string found in that particular column. You can also determine the sequence of the columns in the table. To move a column, click on its header, and holding down the left mouse button, drag the column to the new location.
When you click on a header with the right instead of the left mouse button, a shortcut menu ap-pears. There you find an option to switch off the column. The shortcut menu also contains the op-tion SELECT FIELDS, which lists all the columns of the table and lets you choose which attributes to show and which to hide.
Fig. 9-6: Selecting columns to display
The following options are offered:
Select all fields.
Deselect all fields.
Only system fields (these are the seven internal attributes created by MAXQDA).

9 MANAGING ATTRIBUTES/VARIABLES
179
Or you can manually select the attributes by clicking on the checkboxes.
Tables can be sorted easily by clicking on a column header. Select the attribute that is to determine the sort sequence and click the attribute name with the left mouse button. The values in the list will be sorted in ascending order. Clicking again changes the sort sequence to descending order. A little triangle indicates the sort attribute and whether the values are in ascending or descending order.
Fig. 9-7: Sorting a table according the number of coded text segments

9 MANAGING ATTRIBUTES/VARIABLES
180
9.4 Entry of Attribute Values
Once you have created a new attribute and chosen the appropriate type (string, number, floating point number, date/time, or boolean), you can start to enter attribute values.
There are two ways to enter attribute values:
Move the mouse pointer to the DOCUMENT SYSTEM, right-click on the text document for which you want to enter attribute values, and select OVERVIEW OF ATTRIBUTES. Only the attributes of that particular text document will be listed in the table. Double-click on a cell to enter a value for the attribute.
Select ATTRIBUTES > EDIT from the menu bar. The table that appears contains all the attributes of all the text documents. Double-click on a cell to enter a value for the attribute.
For example, to enter a value for the attribute “gender” in the first row of the table, double-click on the cell of the Attributes table and enter “m” in the case of a male or “f” of a female respondent.
MAXQDA automatically places all of the values previously entered for a particular attribute in a pick list. You can open the pick list by double-clicking on the cell to enable variable entry and then clicking on the little arrow in the right corner of the cell. This lets you select a value from a list in-stead of typing it in again. This is particularly useful if attribute values consist of longer strings such as names, towns, professions, etc. Whenever a new value is entered, it will be inserted into the pick list in alphabetical order.

9 MANAGING ATTRIBUTES/VARIABLES
181
Fig. 9-8: A pick list of strings in the attributes window
Pick lists are less useful when an attribute has many different values (e.g. the exact income of every interviewee). Even if the value was in the pick list, it would be faster to type it in than to search for it. You can stop the program from displaying a column’s pick list by clearing the checkbox LIST OF VALUES in the column header’s shortcut menu.
The values of attributes may also be used as the selection criteria for lexical searches and text re-trieval (see Chapter 12). Take, for example, a researcher who is interested in the motives of women over the age of 40 in going back to work. Supposing that she has defined the attributes “gender” and “age,” she could then select the relevant documents according to these criteria from a large general database.
To see the values of the attributes of a text document, right-click on the text name in the DOCUMENT SYSTEM window and choose OVERVIEW OF ATTRIBUTES from the shortcut menu.

9 MANAGING ATTRIBUTES/VARIABLES
182
9.5 Renaming and Deleting Attributes
Attributes can be given a new name at any time. Switch to “variable view,” then double-click on the variable, and enter the new name.
Fig. 9-9: Renaming an attribute
Double click here to rename the attribute.
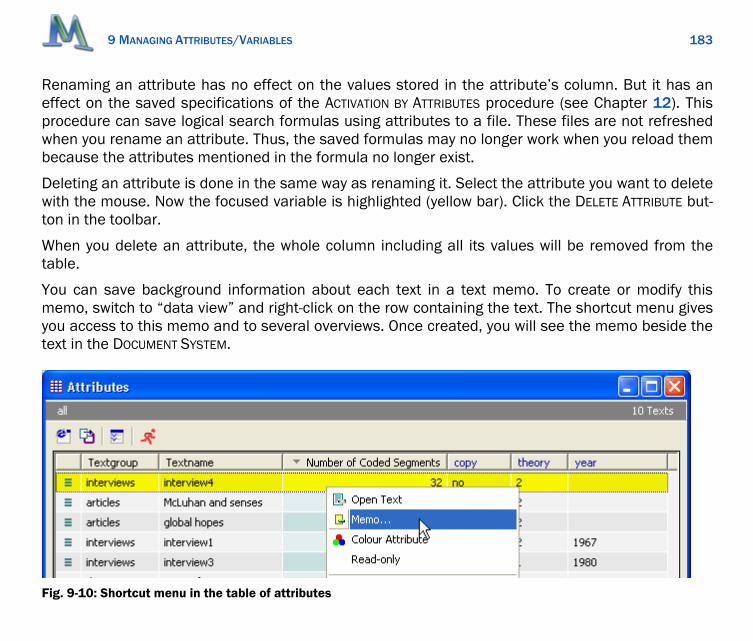
9 MANAGING ATTRIBUTES/VARIABLES
183
Renaming an attribute has no effect on the values stored in the attribute’s column. But it has an effect on the saved specifications of the ACTIVATION BY ATTRIBUTES procedure (see Chapter 12). This procedure can save logical search formulas using attributes to a file. These files are not refreshed when you rename an attribute. Thus, the saved formulas may no longer work when you reload them because the attributes mentioned in the formula no longer exist.
Deleting an attribute is done in the same way as renaming it. Select the attribute you want to delete with the mouse. Now the focused variable is highlighted (yellow bar). Click the DELETE ATTRIBUTE but-ton in the toolbar.
When you delete an attribute, the whole column including all its values will be removed from the table.
You can save background information about each text in a text memo. To create or modify this memo, switch to “data view” and right-click on the row containing the text. The shortcut menu gives you access to this memo and to several overviews. Once created, you will see the memo beside the text in the DOCUMENT SYSTEM.
Fig. 9-10: Shortcut menu in the table of attributes

9 MANAGING ATTRIBUTES/VARIABLES
184
9.6 Exporting the Table of Attributes
The attributes attached to the text documents are not only used to save standardized information which is a part of every document (e.g. the names of interviewers, or the gender of interviewees), but can also be used in MAXQDA as criteria for text retrieval (ACTIVATION BY ATTRIBUTES). Evaluating quantitative attributes, however, is only possible with a statistics program. MAXQDA does not offer any statistical analysis except for that of the frequency of codes.
A rectangular data matrix is created using the values of attributes entered for all texts. The matrix’s column headers hold the attributes; thus, there will be as many columns as attributes. The texts (in our example, the interviewees) are the first column. Hence, the matrix has as many rows as there are texts in the DOCUMENT SYSTEM. Each cell holds an attribute value for the given attribute and text.
Attr. 1 Attr. 2 Attr. 3 ... ... Attr. N
Text A 1 11 6
Text B 2 12 5
Text C 3 23 3
... 1 25 3
... 3 26 2
Text M 0 29 2
Fig. 9-11: Table of attributes
MAXQDA offers different ways to export and import this data matrix. The little toolbar located on top of the table “Attributes” allows you to export your data either as an HTML or TXT file. The HTML file is displayed immediately, and can be saved and then opened in Excel, Word, or statistics pro-grams. The TXT file is written in “tab-delimited format,” a common exchange format that can easily be imported into SPSS or Excel in order to continue with statistical analysis.

9 MANAGING ATTRIBUTES/VARIABLES
185
Fig. 9-12: Exporting Attributes in HTML Format
The same Export function is also available from the main menu when you click on the option ATTRIB-UTES > EXPORT DATA MATRIX. To import this data into SPSS, you need only choose FILE > TEXT DATA. An SPSS “import-assistant” will then guide through the six steps of data import. You only have to mod-ify two preselected options, one is to indicate that the first row contains the variable names and the second change is that only a tab stop separates the variables.
In SPSS Versions 10 to 13, all variable names are limited to eight characters. Variable names ex-ceeding this limit are cut. Special characters like “/,” “?,” or blanks are not allowed and cause SPSS to give a new sequential name to the variable. All attribute names that are not legal names accord-ing to these rules will be replaced by default names given by SPSS. These names are composed of a “v” followed by a sequential number.
The import of a data matrix into MAXQDA is done in a similar way. First, you need to save your data in SPSS or Excel as a TXT file. The first and second variable have to be named “textgroup” and “textname.” These variables are needed to link the text in MAXQDA to the data of the variable ma-trix. Otherwise it would not be possible to identify the text where the data belongs. To import the data matrix, select ATTRIBUTES > IMPORT from the main menu.

9 MANAGING ATTRIBUTES/VARIABLES
186
9.7 Importing the Table of Attributes into Word or Excel
To import the table of attributes (TXT format) into Word or Excel, you have two alternatives:
Insert the table from the Windows clipboard by pressing CTRL+V (of course after having first copied the table to the clipboard in MAXQDA using CTRL+C), or
Open the exported file in Word or Excel.
The first alternative is the easier one. In Excel, the table will appear exactly as in MAXQDA, with the attribute names as column headers. In Word, the table will look different. Actually it is no longer a table but a collection of paragraphs, each paragraph being composed of what was formerly one row in the table in MAXQDA. But in Word it can easily be transformed into a table again, by select-ing the appropriate command from Word’s TABLE menu.
If you have exported the table, you can import it as follows:
In Word, choose the FILE > OPEN menu. In this case, you have to change the file type in the Open File dialog box to a text file .”txt.”
In Excel, choose DATA > EXTERNAL DATA > IMPORT TEXT FILE. Excel guides you through the import procedure. Just remember that MAXQDA’s export file is in tab-delimited format.
9.8 Importing the Table of Attributes into SPSS
In SPSS (Version 11 and higher), you should import the exported file, since SPSS can only import numeric attributes from the Windows clipboard. All the values of string attributes would be auto-matically replaced with empty cells! This is obviously not what you want when importing attributes.
To import your exported file follow these steps:

9 MANAGING ATTRIBUTES/VARIABLES
187
From the SPSS menu bar select FILE > OPEN > DATA and change the file type to TXT. Now SPSS guides you through a 6-step import procedure, the results of which are as follows:
Step 1: The data have no fixed format.
Step 2: The data is in tab-delimited format. The first row of the table contains the attribute
names.
Step 3: Each row represents a case.

9 MANAGING ATTRIBUTES/VARIABLES
188
Step 4: The cells are separated with tabs. Attribute names with more than 8 characters (or special characters) will be modified by SPSS.
Step 5: SPSS now presents a preview of the table.
If it is incorrect, you can go back to Step 4.
Step 6: Click “Finish.”
If the import procedure was successful, the table of attributes will appear exactly as it was in MAX-QDA. Some attribute names may have changed because they were not legal SPSS names. These attributes appear at the same position having a default name beginning with “v.”
Fig. 9-13: MAXQDA table of attributes after being imported into SPSS

10 RETRIEVING CODED SEGMENTS
189
10 Retrieving Coded Segments
10.1 Principles of Text Retrieval: Activation
In MAXQDA, you can search for information in your texts in a variety of ways. One method is to search for particular words or character strings. You may be familiar with this search method from text-processing programs. The principle is basically the same in MAXQDA, with the advantage that you can search many texts simultaneously for the words. A lexical text search finds only those terms that actually appear in the text. Searching with theoretical concepts and subject categories, such as “Helper Syndrome“ in a study of volunteers in social work, will naturally not provide any results. See Chapter 11 for more on this topic.
In this chapter, we will focus on text retrieval based on the prior assignment of codes to relevant passages in the texts. Text segments assigned the same code or a similar combination of codes can in this way be collected and analyzed further. The basis for this retrieval or recovery of coded text segments is the activation of both codes and texts.
MAXQDA’s method of retrieval is simple:
All the text segments contained in the activated text(s) that are coded with an active code are col-lected in the RETRIEVED SEGMENTS window.
All that you need to know in order to start a retrieval procedure is how text and codes can be acti-vated for retrieval.
10 RETRIEVING CODED SEGMENTS
190
10.2 Activating Text Documents
As you already know, all your texts and text groups are displayed in the DOCUMENT SYSTEM. To acti-vate a particular text, you have two alternatives:
1. Click on the text name with the right mouse button. Select “Activate” from the shortcut menu.
2. Press the CTRL key and click on the text name using the left mouse button. (This method, which you may already be familiar with from Windows Explorer or the Microsoft Office pro-grams, allows you to quickly select more than one text.)
The activated names of the texts will be colored red, as usual, and a little arrow will be placed in front of the text.
It would be inconvenient to activate every individual text separately if you wanted to include all the texts in one Text Group. MAXQDA also lets you activate all the text documents of a text group or of the entire DOCUMENT SYSTEM with one single command, by activating the name of the text group or project.

10 RETRIEVING CODED SEGMENTS
191
Fig. 10-1: Activating text documents on different levels of the DOCUMENT SYSTEM
You can always see which texts are currently active for retrieval: they are displayed with a red icon and a little arrow. Other texts remain the default blue-gray.
10.3 Activating Codes
The activation of codes follows the same principle as the activation of text documents. In order to activate a particular code, proceed as follows:
1. To activate one code, click on the code using the right mouse button and select ACTIVATE from the shortcut menu.
2. To activate several codes at once, hold down the CTRL key and select the codes with the left mouse button.
Press Ctrl and click here to activate all texts. Press Ctrl and
click here to activate all texts of the text group.
Press Ctrl and click here to activate this text.

10 RETRIEVING CODED SEGMENTS
192
As with the activation of texts in the DOCUMENT SYSTEM, the color of the codes changes when they are activated: green signifies an inactivated, red (with a little arrow) an activated code.
For example, suppose you want to know what has been said concerning the media (in codes as well as in subcodes) in the interviews 1, 2 and 3. You start by activating the three texts:
Press the CTRL key.
Click on interview1 with the left mouse button → text is active.
Click on interview2 with the left mouse button → text is active.
Click on interview3 with the left mouse button → text is active.
Now all you need to do is activate the code “media” in the CODE SYSTEM.
All of the coded segments retrieved through the selection or activation of certain texts and codes are then shown in the RETRIEVED SEGMENTS window. A summary of the retrieved results is found in the bar at the bottom of the screen:
Fig. 10-2: Summary of retrieved results
In this example, 5 text documents and 6 codes are active, and 8 coded segments have been re-trieved and are displayed in the RETRIEVED SEGMENTS.
Active texts Coded segments
Active codes Default Weight

10 RETRIEVING CODED SEGMENTS
193
10.4 Deactivating all Texts and Codes
If you are finished with one text retrieval and would like to start a new one, the easiest way to deac-tivate all texts and codes is by clicking on the RESET ACTIVATION button in the toolbar next to the ACTIVATION BY ATTRIBUTES button.
Fig. 10-3: Reset button
10.5 The Retrieved Segments
In the CODE SYSTEM, the number of segments to which a particular code has been assigned is always listed to the right of the code. Thus, you always know how many segments would be retrieved if all of the text documents were active. In Fig. 10-4, for example, from all of the text documents exactly 14 segments were assigned the code “McLuhan.”
Fig. 10-4: The total number of text segments assigned to a code

10 RETRIEVING CODED SEGMENTS
194
The display of the number of coded segment per code may be omitted, simply set this option to off in the menu Project > OPTIONS.
All of the coded segments retrieved through the selection or activation of certain texts and codes are shown in the RETRIEVED SEGMENTS window.
Fig. 10-5: List of coded text segments in the RETRIEVED SEGMENTS window
In the upper right corner of the window, a toolbar gives access to frequently used functions:
PRINT THE LIST OF RETRIEVED SEGMENTS – all the retrieved segments are printed together with in-formation about the source.
PRINT RETRIEVED SEGMENTS AND MEMOS – all the retrieved segments are printed together with at-tached memos and information about the source.
Export the retrieved segments as a file in Rich Text Format.

10 RETRIEVING CODED SEGMENTS
195
OVERVIEW OF RETRIEVED SEGMENTS – switches to another view of the retrieved segments. The overview tables contain a list view of the references and a detail view of the segment cur-rently in focus.
CODE RESULTS – all segments of the list will be coded with a new code.
Attention! If you don’t see any text segments in the RETRIEVED SEGMENTS window, it could be be-cause an unwanted logical function is active.
An information box to the left of each text segment shows you which text and paragraph the seg-ment was taken from, and which code was assigned to it.
Fig. 10-6: Text information box
The following information is given in the above example: the segment was taken from paragraph 27 of the text “interview3” from the text group “interviews.” It was assigned the code “media\cold-hot.”
Clicking with the right mouse button on the information box brings up a shortcut menu with differ-ent options. You can delete the coded segment, or modify the weight score. As soon as you click on the information box, the attached code will be highlighted in the CODE SYSTEM window.
If you click anywhere in this box, the original text from which this segment was taken will be opened in the TEXT BROWSER window at the position of the segment in the text.

10 RETRIEVING CODED SEGMENTS
196
Fig. 10-7: A segment’s information dialog box
Fig. 10-8: Changing a segment’s weight score
Text documents can be activated manually as well as automatically, as a function of the values of selected attributes. This procedure is called ACTIVATION BY ATTRIBUTES and is described in Chapter 12.
The presence of a particular code can also be made into a criterion for activation. In order to do this, you must first change the frequency of codes into an attribute by selecting the option TRANS-FORM INTO AN ATTRIBUTE.
If you are working with a large data set and try to activate a large number of texts together with several codes assigned to many segments, the memory cache of your PC may not be large enough to display the hundreds or thousands of segments in the RETRIEVED SEGMENTS window. In this case, reduce your selection either of texts or of codes.
The following sections concern more complex retrieval procedures and the manipulation of the re-sults of your text retrievals. You can conduct more complex searches for text segments that have been assigned more than one code. For example, you could search in a group of interviews for the places where the respondents spoke about their “Personal Motivation” at the same time as they spoke about their “Qualifications.”
Procedures like this are available from the shortcut menu in the main menu bar, which also ap-pears as a shortcut menu when you click the right mouse button in the gray area on the left side of the RETRIEVED SEGMENTS window.

10 RETRIEVING CODED SEGMENTS
197
Fig. 10-9: Shortcut menu for TEXT RETRIEVAL functions
You can choose between 10 different logical functions in order to analyze the co-occurrence of codes (where text segments assigned different codes are found in relation to one another). The de-fault function, the OR function, simply retrieves all the coded segments contained in the active texts to which any of the active codes had been assigned.
Click here with right mouse
button to open the shortcut menu.

10 RETRIEVING CODED SEGMENTS
198
Fig. 10-10: 10 different functions for TEXT RETRIEVAL
The more complex functions, such as INTERSECTION or OVERLAPPING, search for coded segments in re-lation to other coded segments. These are described in detail in Chapter 13.
The second group of options in the ANALYSIS menu let you specify the order of the segments in the window RETRIEVED SEGMENTS. Often the way in which the results of a text retrieval are displayed is important for the question you want to answer. You can choose between three alternatives:
ORDERED BY TEXT TREE: this means that the segments are listed in the same sequence as in the text tree in the DOCUMENT SYSTEM. The list starts with the segments of the first active text in the DOCUMENT SYSTEM, then those of the second active text are given, and so on. Search results in this order would let you compare what one respondent said to different selected topics. For example, given that the first respondent’s answers were contained in one text or interview, followed by a second respondent’s answers in a separate second interview, all of the retrieved segments from the first interview would be listed before those from the second interview.

10 RETRIEVING CODED SEGMENTS
199
ORDERED BY CODE TREE: this means that the segments are listed in the same sequence as the codes in the code tree. All of the segments assigned the same code are listed one after the other.
ORDERED BY WEIGHT: this sorts the coded segments according to the weight that has been as-signed to them.
Fig. 10-11: Choosing the order in which the retrieved segments are displayed
The status bar at the bottom of your screen contains information about the current text retrieval process. The first two icons show the number of texts and codes that are currently active. The third icon from the left displays the number of segments retrieved. The fourth icon shows the default weight score assigned to newly coded segments. The next icon (symbolized by the child figure) tells you if subcodes are considered or left out, and the paperweight icon tells you if the weight option is switched on or off. The following icon (the sheet of paper) gives you information concerning the sort sequence. The last entry in the status bar shows the function that the retrieval is based on, which is assumed in this chapter to be the OR function, but may be changed for complex text retrievals (Chapter 13).

10 RETRIEVING CODED SEGMENTS
200
Fig. 10-12: MAXQDA’s status bar
Of the icons shown above, “Subcodes,” “Weight,” Sort Sequence” and “Retrieval Strategy” are ac-tive: you can click on them and change their properties. The first three work like switches. For ex-ample, retrieved text segments can be sorted in three ways, according to the order of the texts in the DOCUMENT SYSTEM window, the codes in the CODE SYSTEM, or according to their weight. Each time you click on the icon, the segments are resorted according to the next criterion.
10.6 Hierarchy of Codes in Retrieval
The third group of options offered in the Analysis menu (as well as in the shortcut menu from the RETRIEVED SEGMENTS window) deals with integrating subcodes in the retrieval process and with weight scores.
A hierarchical system of codes can be constructed with MAXQDA. The program offers an easy way to make use of the hierarchical structure. Imagine you want to check if there are co-occurrences of Code A and Code B, and Code B has two subcodes, B1 and B2. If you activate these codes, in total four codes would be activated: A, B, B1, and B2. Now, when selecting the INTERSECTION or OVERLAPPING options, MAXQDA will search for text passages where all of the four codes are pre-sent. Obviously this is not what you want, since it is very unlikely that there are segments to which
Active texts
Active codes
Coded segments Subcodes
Default weight Weight filter
Sort sequence
Retrieval Strategy
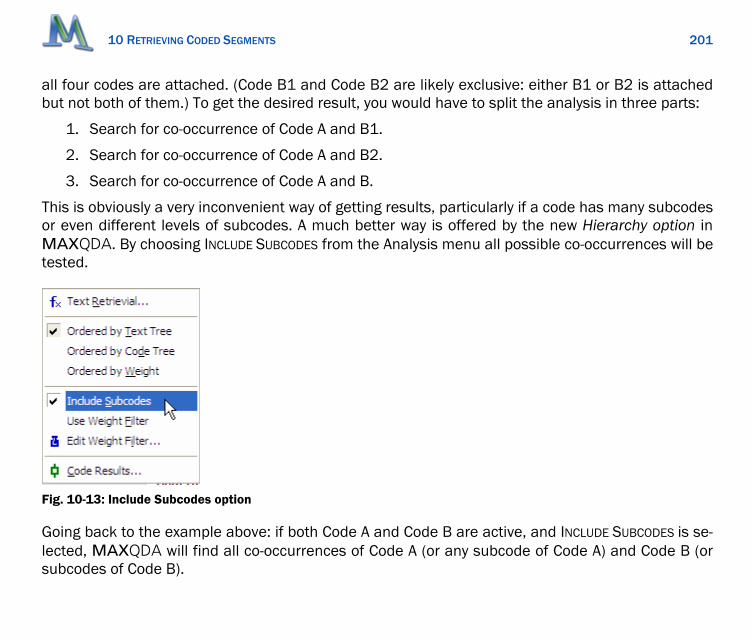
10 RETRIEVING CODED SEGMENTS
201
all four codes are attached. (Code B1 and Code B2 are likely exclusive: either B1 or B2 is attached but not both of them.) To get the desired result, you would have to split the analysis in three parts:
1. Search for co-occurrence of Code A and B1.
2. Search for co-occurrence of Code A and B2.
3. Search for co-occurrence of Code A and B.
This is obviously a very inconvenient way of getting results, particularly if a code has many subcodes or even different levels of subcodes. A much better way is offered by the new Hierarchy option in MAXQDA. By choosing INCLUDE SUBCODES from the Analysis menu all possible co-occurrences will be tested.
Fig. 10-13: Include Subcodes option
Going back to the example above: if both Code A and Code B are active, and INCLUDE SUBCODES is se-lected, MAXQDA will find all co-occurrences of Code A (or any subcode of Code A) and Code B (or subcodes of Code B).

10 RETRIEVING CODED SEGMENTS
202
Whether or not the INCLUDE SUBCODES is switched on can be seen in the status bar at the bottom of screen.
Fig. 10-14: Icon for the subcodes option in the status bar
10.7 Finding Relevant Segments: using Weight Scores
To the left of each segment listed in the window RETRIEVED SEGMENTS, an information box is displayed indicating the origin of the text segment (text group, text, and paragraph number) and its weight score.
Fig. 10-15: The weight score in the information box
For example, the coded segment in the Fig. 10-15 comes from paragraph number 75 of the text “in-terview3” (text group “interviews”) and has a weight score of 100, which is the default value.
All segments that have been coded with the Code or In-vivo function are given the default weight score. This is initially set to 100, but can be modified either by changing the value in the PROJECT >
Subcodes will be included
Weight Score

10 RETRIEVING CODED SEGMENTS
203
OPTIONS menu or by double-clicking on the Default Weight Score icon in the status bar at the bottom of your screen.
Fig. 10-16: Setting default weight score in the status bar
These weight scores can be used for the retrieval process. The user can define a range for the weight scores in order to retrieve only text segments with scores inside of that range.
To include the weight score of coded segments in your search criteria, switch on the USE WEIGHT FILTER option in the ANALYSIS menu.
Fig. 10-17: Use Weight Filter option
Double click to change default weight.

10 RETRIEVING CODED SEGMENTS
204
Next you need to select the range for the weight scores. Select the EDIT WEIGHT FILTER, which is lo-cated just below the USE WEIGHT FILTER option in the menu.
Fig. 10-18: Weight Filter dialog box
This will cause only those segments to be displayed in the RETRIEVED SEGMENTS window whose weight score is within the defined range. The weight filter affects all retrieval functions, including complex functions like INTERSECTION, INSIDE-IF or SURROUNDED BY.
Fig. 10-19: Display of the weight filter in the status bar (Range: 1-75)
The status bar at the bottom of your screen contains information about the texts and codes that are currently active as well as the weight option, symbolized by the paperweight. This icon tells you if the weight filter is active or not, and its range, if it is. In the figure above, the weight filter is active with a range from 1 to 75. This means that only those codes that have been given a weight score up to 75 will be displayed.
Weight filter is active

10 RETRIEVING CODED SEGMENTS
205
10.8 Opening the Source Text at the Position of the Coded Seg-ment
It is possible at any time to jump from a coded text segment in the RETRIEVED SEGMENTS windows to the source text.
To the left of each text segment, you can see from which text and paragraph the segment was taken, and which code was assigned to it.
When examining the results of a text retrieval, you should arrange your desktop as shown in Fig. 10-20. The source text is in the window on the left and on the right you have the RETRIEVED SEGMENTS. Then, whenever you click on a text segment’s information box the source text will appear in the TEXT BROWSER window on the left.
If you click anywhere in this box, the original text from which this segment was taken will be opened in the TEXT BROWSER window at the position of the segment in the text.

10 RETRIEVING CODED SEGMENTS
206
Fig. 10-20: Jumping from a coded text segment to the source text
10.9 Overview of Retrieved Segments
A better overview of the retrieved segments can be obtained if you switch to another kind of display: the „Overview of retrieved segments,” that may be called by clicking an icon in the toolbar of the RETRIEVED SEGMENTS window:
Fig. 10-21: OVERVIEW OF RETRIEVED SEGMENTS Button
This display combines a list view and a detailed view of the retrieved segments. The upper half of the window indicates the text of the segment that is currently selected in the lower part of the win-
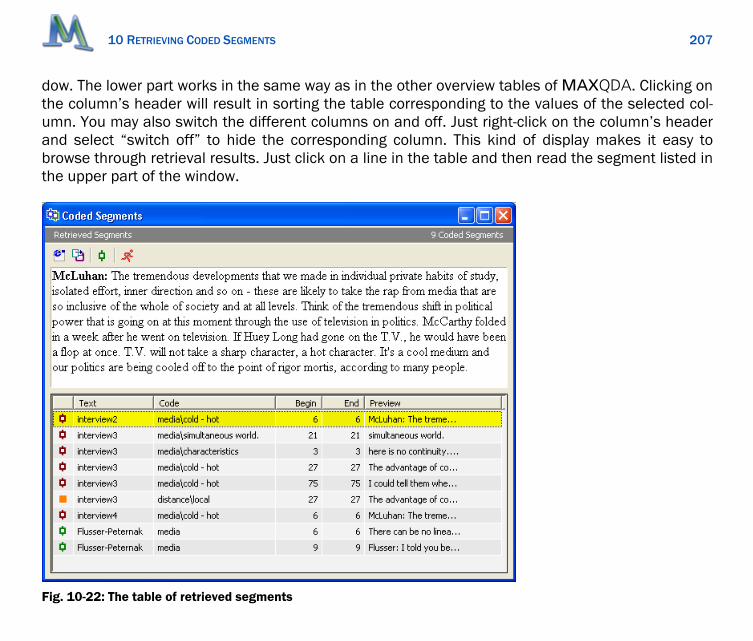
10 RETRIEVING CODED SEGMENTS
207
dow. The lower part works in the same way as in the other overview tables of MAXQDA. Clicking on the column’s header will result in sorting the table corresponding to the values of the selected col-umn. You may also switch the different columns on and off. Just right-click on the column’s header and select “switch off” to hide the corresponding column. This kind of display makes it easy to browse through retrieval results. Just click on a line in the table and then read the segment listed in the upper part of the window.
Fig. 10-22: The table of retrieved segments

10 RETRIEVING CODED SEGMENTS
208
The little toolbar in the upper left corner offers the following functions:
Displays the segments and information about their origins in an HTML table. You may print this table or save it as a file.
Saves the segments and information about their origin as a file in Rich Text Format.
Enables you to code the collection of segments with a new code.
The display as a HTML table is particularly interesting. This gives a very good overview: not only the segment in plain text but all the information around it is listed, for instance the date when the seg-ment was coded and the name of the person who did the coding.
The overview table is also the best place to write comments on your coded segments. You read the segment in the upper window and write your comment below. Just double-click the field for com-ments in the matrix and type in your annotation.
10.10 Printing and Exporting Retrieved Segments
You may export the whole list of retrieved segments to Word, Excel, or an Internet browser. Also, you may export not only the list view, but also the whole text of all retrieved segments together with the information about the segment’s origin. This can be done by selecting the menu option CODES > EXPORT RETRIEVED SEGMENTS from the main menu or by clicking on the corresponding symbol in the toolbar of the RETRIEVED SEGMENTS window. In this case, a file will be saved in Rich Text Format. You may open the file later on in your word processing program.
If you only want to export the list of segments and not the texts itself, the fastest way is to click on the button EXPORT located in the toolbar of the Overview table.

10 RETRIEVING CODED SEGMENTS
209
The display of the retrieved segments is very useful as an HTML table. This export function is also available as a button in the table’s toolbar. The HTML table will be shown directly in your Internet browser. You may also save the HTML file and open it in Excel.
Fig. 10-23: Toolbar of the Overview table “Retrieved Segments”
Tip: Use the button RESET ACTIVATION in the main toolbar of MAXQDA to deactivate all texts and all codes at the same time. If your code system contains many codes, it is a good idea to click this button before starting to activate texts because you don’t need to scroll down the CODE SYSTEM to see if codes are still activated that you won’t include in your next text retrieval.
To print the RETRIEVED SEGMENTS, you may also select PROJECT from the menu bar. Then select RETRIEVED SEGMENTS from the PRINT option. Fig. 10-24 shows an excerpt of such a printout.
Text: interviews\interview3
Weight: 100
Position: 75-75
Code: media\cold - hot
McLuhan: I could tell them when they were hotting up the image too much and phasing out that cha-risma. The temptation of any campaign manager is to hot up the image until it alienates everybody and they don't realize when they're doing it.
Fig. 10-24: Printout of the RETRIEVED SEGMENTS
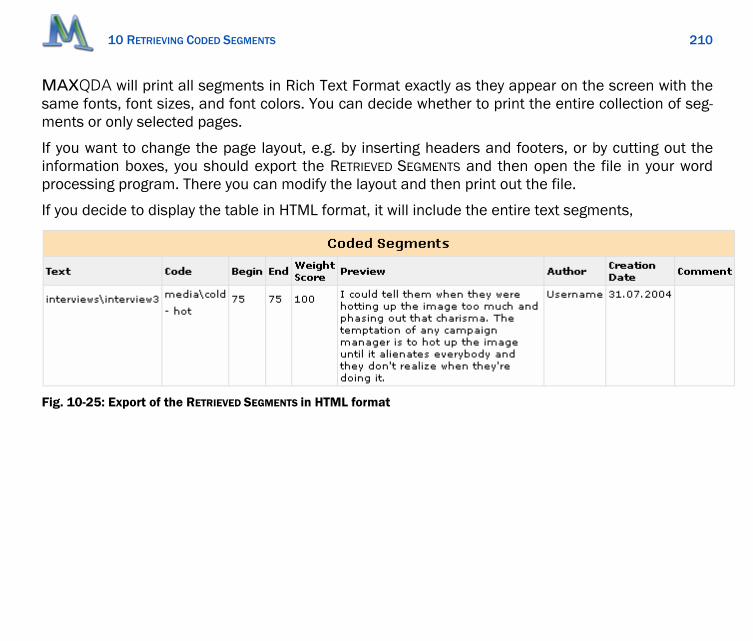
10 RETRIEVING CODED SEGMENTS
210
MAXQDA will print all segments in Rich Text Format exactly as they appear on the screen with the same fonts, font sizes, and font colors. You can decide whether to print the entire collection of seg-ments or only selected pages.
If you want to change the page layout, e.g. by inserting headers and footers, or by cutting out the information boxes, you should export the RETRIEVED SEGMENTS and then open the file in your word processing program. There you can modify the layout and then print out the file.
If you decide to display the table in HTML format, it will include the entire text segments,
Fig. 10-25: Export of the RETRIEVED SEGMENTS in HTML format
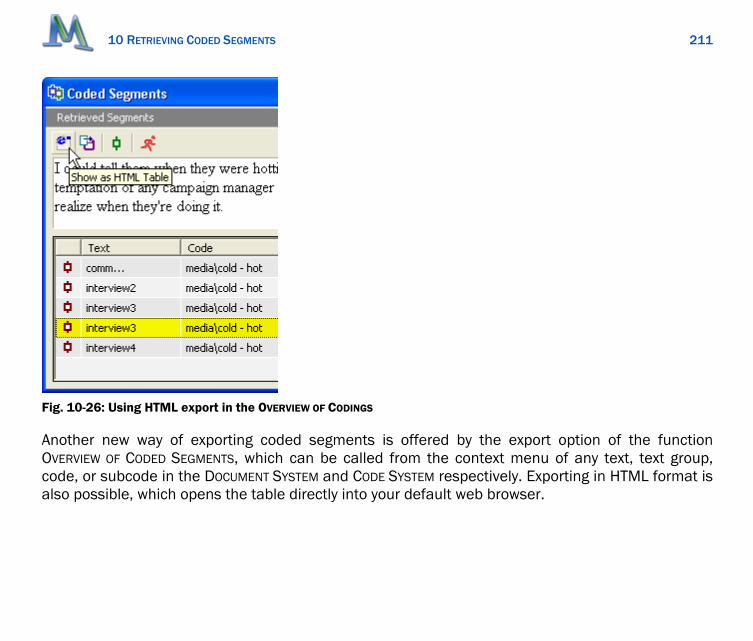
10 RETRIEVING CODED SEGMENTS
211
Fig. 10-26: Using HTML export in the OVERVIEW OF CODINGS
Another new way of exporting coded segments is offered by the export option of the function OVERVIEW OF CODED SEGMENTS, which can be called from the context menu of any text, text group, code, or subcode in the DOCUMENT SYSTEM and CODE SYSTEM respectively. Exporting in HTML format is also possible, which opens the table directly into your default web browser.

10 RETRIEVING CODED SEGMENTS
212
10.11 Automatic Coding of Retrieved Segments
MAXQDA allows you to code all the segments currently displayed in the RETRIEVED SEGMENTS win-dow with a new code. This could be useful in order to save the results of a complex retrieval proce-dure or a lexical search after which you had removed irrelevant text segments, for example.
Since MAXQDA is able to restrict a lexical search procedure to retrieval results, i.e. the segments currently displayed in the RETRIEVED SEGMENTS window, you can continue step-by-step and start searches based on previous results.
To start this “auto-coding” procedure, click the Code results icon in the toolbar (window RETRIEVED SEGMENTS) or select CODE RESULTS from the ANALYSIS window (or from the context menu in the RETRIEVED SEGMENTS window).
The following familiar (from the LEXICAL SEARCH procedure) dialog box appears:
Fig. 10-27: Code Results dialog box
The code that will be assigned to the text segments is the one displayed in the dialog field on top of the pop-up dialog. You can also choose another code from among the codes or subcodes currently available in the list. If you want to attach another code not currently in the quick list, left-click on the code in the CODE SYSTEM. It will appear in the quick list from which you can select it and then assign it to the segments.

10 RETRIEVING CODED SEGMENTS
213
The status bar at the bottom of MAXQDA’s screen tells you the exact number of segments that will be coded. It also contains an icon with the default weight score which is given to newly coded seg-ments. You can change the default weight score by double-clicking on this icon. This score is given to all the segments that will be coded; it is not possible to assign weight scores to segments indi-vidually here. Of course, you can modify the weight score later on (see Chapter 7.19).
The auto-coding procedure can assign a code to many text segments at the same time. MAXQDA will place this operation in the Undo list. Here you find the codes listed together with the number of coded segments that resulted from this particular coding procedure. This lets you correct a mistake easily.
Fig. 10-28: The Undo function’s list of coding procedures

11 LEXCIAL SEARCH
214
11 Lexcial Search
11.1 Options for Lexical Search
The LEXICAL SEARCH functions allow you to carry out lexical searches in your text documents, without having first assigned codes to the material. Lexical searches are thus a way of exploring your texts without spending a great deal of time selecting and coding text.
You can search:
In your text documents.
In your memos.
In the text passages currently displayed in the window RETRIEVED SEGMENTS.
In the currently active.
By limiting the scope of the text search to the currently active texts, you can search in single docu-ments or in a particular text group. You can also restrict the search to texts in function of their at-tributes’ values.
To start the text search procedure, click on the menu option ANALYSIS and then LEXICAL SEARCH or click on the SEARCH button in the MAXQDA toolbar.
Fig. 11-1: The LEXICAL SEARCH button
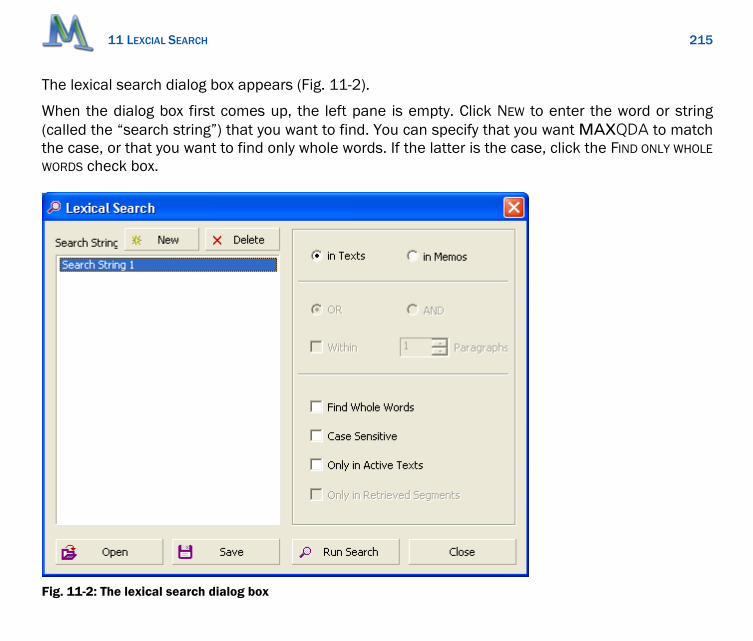
11 LEXCIAL SEARCH
215
The lexical search dialog box appears (Fig. 11-2).
When the dialog box first comes up, the left pane is empty. Click NEW to enter the word or string (called the “search string”) that you want to find. You can specify that you want MAXQDA to match the case, or that you want to find only whole words. If the latter is the case, click the FIND ONLY WHOLE WORDS check box.
Fig. 11-2: The lexical search dialog box

11 LEXCIAL SEARCH
216
Search strings may consist of one word, multiple words, or only of a part of a word. For instance, you may search for “Tom Hanks,” “Hanks,” or only “anks.” Quotation marks are not necessary if a search string consists of more than one word.
Search strings may contain so-called wild card characters. The characters * or ? have the same ef-fect as in search procedures well-known from Windows operating system.
If the character „?“ appears in a search string, MAXQDA finds, for instance, “Hanks” if the search string is “H?nks,” but “Hunks” or “Hinks” would also be found.
The character „*“ stands for multiple characters, e.g. „H*ks“ would find „Hanks“ and also „Hawks.“
A certain beginning of a word is found by use of the character „<.” The search string “<(in-ter)” would find „Interest,” „interesting,” but not „winter.”
A certain end of a word is found by use of „>.” Thus, the string (ks)> would find „Hanks,” „Banks,” and „thanks,” but not “Bankside.”
Click the DELETE button to remove search strings from the list. You can also modify your search strings at any time.
In the right pane of the dialog box, a couple of options for the search procedure are available:
IN TEXTS or IN MEMOS Search in your text documents and/or in your memos.
FIND WHOLE WORDS Search only for strings which are exactly the same as the search string. For example, if you search for “teach,” the string “teacher” will not be included in the search results. If you turn this function off, “teach” would also give you the strings “teacher” or “teaching” as results.
CASE SENSITIVE Search only for strings in which the same letters are capi-talized as in the search string.

11 LEXCIAL SEARCH
217
ONLY IN ACTIVE TEXTS Search only in activated texts. If no texts are activated, there will of course be no results.
ONLY IN LIST OF Retrieved SEGMENTS Search for the string only in the text in the LIST OF Re-trieved SEGMENTS window.
OR/AND COMBINATION For searches with more than one search string. With OR checked: search for texts containing only one of the search strings. With AND checked: search for texts con-taining all of the search terms (their required position with respect to one another can be defined).
WITHIN X PARAGRAPHS For searches for text containing more than one search string (AND is checked). The search strings must be found within “x” number of paragraphs.
Click the SEARCH button to start the search.
In order to spare you the effort of typing in a long list of search strings again and again, MAXQDA can save the search settings. To do this, click on SAVE, enter the name and click on SAVE again. This creates a Search file with the file extension .”sea,” which you can open and continue to use at a later time.
11.2 Search Results
The results of a search are displayed in Fig. 11-3.

11 LEXCIAL SEARCH
218
Fig. 11-3: Table of search results
In the toolbar located on top of the window, the following functions are available:
Exporting the results of the lexical search (HTML format).
Exporting the results of the lexical search (Rich Text Format).
Coding of results with a new code or a code of the CODE SYSTEM.
Options for the export and code procedures.
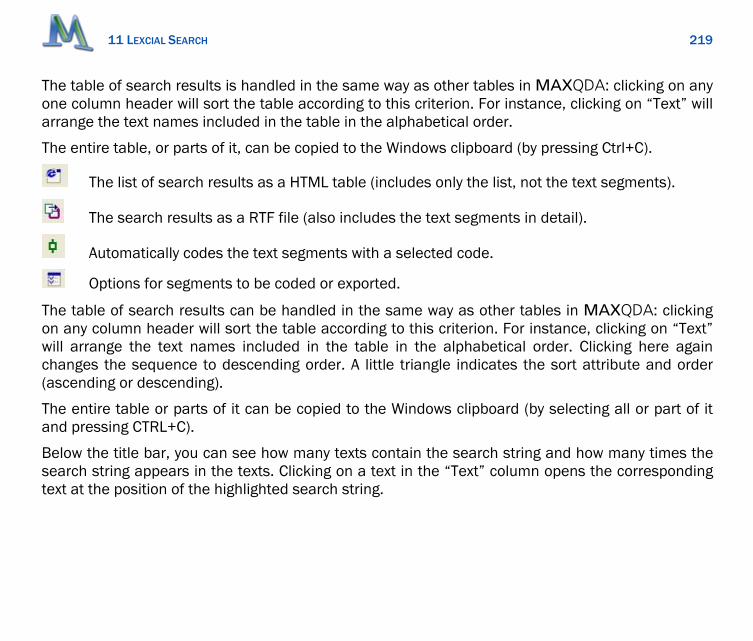
11 LEXCIAL SEARCH
219
The table of search results is handled in the same way as other tables in MAXQDA: clicking on any one column header will sort the table according to this criterion. For instance, clicking on “Text” will arrange the text names included in the table in the alphabetical order.
The entire table, or parts of it, can be copied to the Windows clipboard (by pressing Ctrl+C).
The list of search results as a HTML table (includes only the list, not the text segments).
The search results as a RTF file (also includes the text segments in detail).
Automatically codes the text segments with a selected code.
Options for segments to be coded or exported.
The table of search results can be handled in the same way as other tables in MAXQDA: clicking on any column header will sort the table according to this criterion. For instance, clicking on “Text” will arrange the text names included in the table in the alphabetical order. Clicking here again changes the sequence to descending order. A little triangle indicates the sort attribute and order (ascending or descending).
The entire table or parts of it can be copied to the Windows clipboard (by selecting all or part of it and pressing CTRL+C).
Below the title bar, you can see how many texts contain the search string and how many times the search string appears in the texts. Clicking on a text in the “Text” column opens the corresponding text at the position of the highlighted search string.

11 LEXCIAL SEARCH
220
11.3 Exporting Search Results
The table of search results lets you export the results by clicking on the EXPORT button on the bottom left of the dialog box. The file format is RTF as usual. The file will appear as follows:
interviews\interview3 (7-9) mcluhan McLuhan The hemisphere thing? interviews\interview3 (13-15) mcluhan McLuhan Well okay meaning, is it good for people? ..
Fig. 11-4: Exported search results (Options: +/- 1 Paragraph)
Each search result consists of the name of the text group and text, the number of the paragraph in which the search string was found, and the search string itself. The length of the retrieved text can be determined beforehand. Click on the button OPTIONS.
Fig. 11-5: Options for exporting the search result

11 LEXCIAL SEARCH
221
When exporting the search results you should select the option SENTENCE or PARAGRAPH instead of ONLY SEARCH STRING. Otherwise only the search string would be written in the export file, which doesn’t make much sense.
You can decide how many paragraphs to export:
Paragraph = 0 Only the paragraph that contains the search string will be listed. If the string occurs in the paragraph more than once, the paragraph will still be listed only once. The string will, how-ever, be highlighted wherever it occurs.
Paragraph +/- “x” The paragraph that contains the string will be listed, as well as “x” numbers of paragraphs before and after this paragraph.
If the search string is found several times in the same paragraph and you have chosen the option to code only the search string, then it may happen that the same paragraph will be listed more than once. However, when you select “paragraph” as the unit to list, then the same paragraph will ap-pear only once in the output file.
11.4 Auto-Coding Search Results
Traditional quantitative content analysis works with the technique of automatic coding based on a dictionary. Whenever a word or string is found, an entry is made in a matrix of categories. After scanning a text in this way, the matrix is filled with numbers. The text itself serves no further pur-pose; only the quantitative matrix is then analyzed.
This type of analysis is performed by programs like Textpack or Intext. MAXQDA’s add-on module MAXDictio works in the same way. Automatic coding is a very fast and reliable procedure, but un-fortunately it is very restricted semantically. This is because the analysis is based on single words

11 LEXCIAL SEARCH
222
and strings. Words may, however, have many meanings, and the meaning of a sentence or a para-graph is something other than a collection of separated, unrelated words. For this reason, auto-matic coding is not a usual procedure in interpretive text analysis. But under certain circumstances, and for heuristic reasons, automatic coding procedures may be useful in an interpretive analysis, particularly when analyzing open-ended questions.
In MAXQDA this automatic coding procedure is possible in conjunction with the text search proce-dure. You begin with a text search as described above.
To code the results displayed in the table, you only need to click on the button “Code.” A dialog win-dow opens.
Fig. 11-6: Autocode options
Here you may:
Select a code from the quick list (if your favorite code is not displayed here, just click the code in your CODE SYSTEM).
Choose the size of the segment to be coded (only the search string, sentence, the whole paragraph, or even more).

11 LEXCIAL SEARCH
223
Assign a weight factor to the coded segments.
As soon as you click on the AUTOCODE button, MAXQDA will start the coding procedure. If more than one hit is located in the same segment, this segment will of course only be coded once.
The size of the automatically coded segments depends on the properties chosen in the dialog box.
Here you may choose between the options ONLY SEARCH STRING, SENTENCE, and PARAGRAPH:
ONLY SEARCH STRING means that only the string will be coded (this is similar to coding with the man-ual IN-VIVO button).
SENTENCE means that you code the sentence surrounding the search string.
PARAGRAPH means that the paragraph(s) surrounding the search string are also coded. The exact number can be specified:
Paragraph = 0 Only the paragraph that contains the search string will be coded. If the string occurs in the paragraph more than one time, the paragraph will still be coded only once.
Paragraph +/- “x” The paragraph that contains the string will be coded, as well as “x” numbers of paragraphs before and after this paragraph.
When you view the result in the TEXT BROWSER, the string will be highlighted wherever it occurs.
Automatic coding operations are added to the “Undo” list, allowing you to correct any mistakes easily, no matter how many segments are coded in one operation.

11 LEXCIAL SEARCH
224
11.5 Automatic Coding Focus Groups
When working with focus groups the automatic coding functions can be used to assign the name of the speakers automatically. This only works in a fast and reliable way if you respect some rules for your transcription:
Whenever the speaker changes, start a new paragraph and always use the same notation for the same speaker, for instance „JOHN SMITH:” Make sure that this string never occurs in the text itself. Thus, if someone says “Dear John Smith” only “J” and “S” may be written in capitals. Do not use the Return key inside a speaker’s turn; every turn should be one paragraph!
The automatic coding of speakers will work as follows:
1. Start the Lexical Search procedure.
2. Type in the search string „JOHN SMITH:“
3. Choose the option CASE SENSITIVE.
4. Start the Lexical Search by clicking the button RUN SEARCH.
5. Define a new code „John Smith“ in the CODE SYSTEM.
6. Code all hits, select paragraph= 0 as context to code.
11.6 Keyword in Context (KWIC)
MAXQDA creates a list of the search results obtained as described in the preceding sections. This “KWIC” list can be saved as a file, in which not only the line of text in which the sought-after word, or “hit,” is found, but also the surrounding text is saved, in the form of expanded KWIC listings. The

11 LEXCIAL SEARCH
225
position of every hit in the text, i.e. the paragraph that contains the hit is also listed. The amount of surrounding text, defined as a certain number of paragraphs can be determined. The procedure is as follows:
1. Type in the search string(s) as described in Chapter 11.
2. Select the number of paragraphs to be listed in the dialog field OPTIONS.
3. At this point, you have three ways of forming your KWIC listing:
i.) Click on the EXPORT icon in the toolbar. This will save the results in a file in Rich Text For-mat. This file can subsequently be printed, edited with Word, or imported into other pro-grams.
ii.) Click on the SHOW HTML TABLE icon in the toolbar. This will display the results as an HTML table. This file can also subsequently be printed, edited with Word, or imported into other programs. iii.) Create a new code (for instance named “dummy”), left-click on the code to transfer it to the quick list, and auto-code the search results with this code.
The third method is more flexible, since you can then load the KWIC list into the RETRIEVED SEGMENTS window, check the list, and remove any undesired segments (by right-clicking on the information box on the left of the segment and selecting “Delete” from the shortcut menu).
The final result, the corrected KWIC list, can be printed by selecting the menu option PROJECT > PRINT > RETRIEVED SEGMENTS. It is also possible to export or copy the KWIC list to the clipboard is possible as well.
The KWIC list has the following structure: each hit starts with the information on the text source (text group, text name, and the number of the paragraph containing the hit). The next line indicates the search word or search string that has been found in that paragraph. Finally the text segment itself is listed.

11 LEXCIAL SEARCH
226
Text: females\W-GITAX.txt Weight: 100 Position: 12 - 12 Code: Free codes\business GTA3: Maybe I don't like the crowds on Wembley days. A lot of outsiders make the place untidy. I don't like the intolerance either. Theres a big pocket of that here because the community is so mixed. Theres problems on both sides, but you've just got to face up to it an deal with it haven't you. Also I think the place is a bit run- down. There's a lot of depressed looking streets round here and lots of business premises are empty. Jobs are more scarce, because companies have to be so much more efficient. Cut down waste. I don't necessarily think all this efficiency is a good thing: computers for instance ..... they don't make people happier. They use more paper not less, they make the work harder, less jobs ... wheres the good in that.? We're human beings not ma-chines, thats never going to change. But once that spiral starts you know the rot sets in, companies go out of business, people lose jobs, the neighbourhood goes down hill and the government haven't got the money to do anything about it then have they? Who's to blame for the decay? I know the efficiency drive and competition has a lot to say about that.
Text: males\w-MARIOx.txt Weight: 100 Position: 9 - 9 Code: Free codes\business MA1: I like it because it give me and my family a job. We have a family business which does well and providing I work hard and my family works hard we are Ok. I'm not saying it is easy, but its Ok. …
Fig. 11-7: Excerpt of a KWIC List

12 SELECTIVE TEXT-RETRIEVALS: USING ATTRIBUTES FOR SELECTING DOCUMENTS
227
12 Selective Text-Retrievals: Using Attributes for Selecting Documents
12.1 Attributes and Text-Retrieval
In Chapter 10.2, you learned how to activate text documents manually. MAXQDA also provides automatic activation of text documents. In this case the texts are activated through the selection of the value of one particular attribute or the values of a couple of attributes. Thus, the attributes of a document determine whether or not the document will be selected for retrieval. You can also use codes as a selection criterion. The option TRANSFORM INTO ATTRIBUTE (accessible in the shortcut menu of each code in the CODE SYSTEM window) enters a new column into the table of attributes. For each text, the number of segments coded with that particular code is stored in this column. The new at-tribute is given the name of the code.
Imagine that the three attributes “gender,” “age,” and “school” have been created. You would then be able to select from your data base only men over the age of 55 with a college degree and acti-vate the documents linked to these persons for a lexical search or text retrieval.
In MAXQDA, selection criteria like these can only be formulated in a formalized way by use of the procedure ACTIVATION BY ATTRIBUTES. The syntax of the command language is quite similar to pro-grams like SPSS.
Since ACTIVATION BY ATTRIBUTES is a function that checks all the text documents of a project, the func-tion has to be called on at the highest level in the DOCUMENT SYSTEM. Here you will find the option ACTIVATION BY ATTRIBUTES in the shortcut menu.

12 SELECTIVE TEXT-RETRIEVALS: USING ATTRIBUTES FOR SELECTING DOCUMENTS
228
Fig. 12-1: Starting the ACTIVATION BY ATTRIBUTES in the Text Groups shortcut menu
Another way to start the function is to click on the button ACTIVATION BY ATTRIBUTES in MAXQDA’s tool-bar.
Fig. 12-2: Starting the ACTIVATION BY ATTRIBUTES with the toolbar button
If there are texts that are currently activated, you first have to deactivate them by clicking the RESET ACTIVATIONS button in the toolbar next to the ACTIVATION BY ATTRIBUTES button.
After you have called the Activation by Attributes function, you will see the following dialog box:

12 SELECTIVE TEXT-RETRIEVALS: USING ATTRIBUTES FOR SELECTING DOCUMENTS
229
Fig. 12-3: The ACTIVATION BY ATTRIBUTES dialog box
All logical operations must be formulated as follows:
Attribute Operator Value
If you had entered the strings “m” (male) and “f” (female) as possible values for the attribute “Gen-der,” then you would choose all females with the formula:
Gender = f
Click here to enter a new logical operation.

12 SELECTIVE TEXT-RETRIEVALS: USING ATTRIBUTES FOR SELECTING DOCUMENTS
230
Actually, it is unnecessary to type in the value “f” or “m.” In the dialog field “Value,” there is a pick list containing all the possible values of that particular attribute. Clicking on the little triangle in the right corner of the dialog field opens this list.
Example: in the evaluation of the opinion poll of the Shell Youth Study 2001, the individual reports have already been coded. The attribute “Criticism” was used to input whether or not each individual report had expressed criticism of the study: “Y” if it had, and “N” if not.
In order to now examine the responses of only the people who had expressed criticism, one would enter the following formula in the dialog box:
Criticism = Y
To do this:
1. Click the NEW button. 2. Select “Criticism” from the list of attributes.
You will then see the following appear in the formula box
[Criticism] =
You can then enter a value in the text box on the right side of the ACTIVATION BY ATTRIBUTES dialog box. For this example, enter “Y.”
Attention: MAXQDA is case sensitive!
Since the logical operator “ = ” is most often used, MAXQDA enters it automatically. You can, how-ever, also choose another logical operator from the list, which will then replace the equal sign.
The logical operators in the list mean the following: = the formula is true when the attribute has the value entered. <> the formula is true when the attribute does not have the value entered. < the formula is true when the attribute has a value smaller than the value entered. > the formula is true when the attribute has a value greater than the value entered.

12 SELECTIVE TEXT-RETRIEVALS: USING ATTRIBUTES FOR SELECTING DOCUMENTS
231
In our example, we wanted to select only those people who had expressed criticism, i.e. those by whom this attribute has the value “Y.” Thus, the equal sign is the correct operator.
When numerical attributes are used, MAXQDA automatically enters “0” as default for the value.
12.2 Results of Activation by Attributes
You can start the activation process immediately by clicking the “Activate” button once a formula has been entered correctly,. You will be able to see which texts meet the conditions of the formula, and have therefore been activated, in the DOCUMENT SYSTEM window – they will be red as usual.
In the status bar at the bottom of your screen you can see how many texts met the conditions of the formula. Given that the appropriate codes are activated as well, the texts will be displayed in the RETRIEVED SEGMENTS window.
A text retrieval is carried out at the same time, if codes are active. That is, those text segments coded with an active code and contained in the texts that meet the conditions of the formula are displayed in the RETRIEVED SEGMENTS window.
12.3 Complex Logical Functions
You can also construct a formula combining several operations. The basic unit of such a formula remains the formula in its simple form:
Attribute Operator Value
Any number of these simple formulas can be combined with the logical operators AND and OR.

12 SELECTIVE TEXT-RETRIEVALS: USING ATTRIBUTES FOR SELECTING DOCUMENTS
232
In our previous example, we selected all of the people in the study who had expressed criticism with the formula “Criticism = Y.” If we then want to select only the women who had expressed criticism, we would have to add a second criterion. This we would formulate with the attribute “Gender” and the value “f.” This gives us the second formula “Gender = f,” which we could then combine with the previous formula by means of the logical operator AND. This is accomplished in exactly the same way as with the first simple formula:
1. Click the NEW button.
2. Select “Gender” from the list of attributes.
The following appears in the formula box:
[Gender] =
3. Type “f” in the value dialog box.
MAXQDA automatically selects the logical operator OR. To include AND in your formula instead, click on the AND button. The logical operator in the ACTIVATION BY ATTRIBUTES dialog box will then be switched.
In this manner, you can add as many logical combinations and conditions to your search as you wish. Once the formula is complete, click on ACTIVATE as usual.
The logical operators AND and OR have the following effect on the activation process. A combination of the simple formulas through OR causes the entire formula to be evaluated as true for any text for which at least one of the simple formulas is true. Thus, had you in the above example chosen the logical operator OR, giving the complex formula “Criticism = Y or Gender = f,” the formula would not only be true for the people who had expressed criticism, but also for all women. Thus, the desired results of our search would not be obtained by using OR. We would need to use the operator AND to search for the women who had expressed criticism. The correctly entered formula would appear in the ACTIVATION BY ATTRIBUTES window as follows:
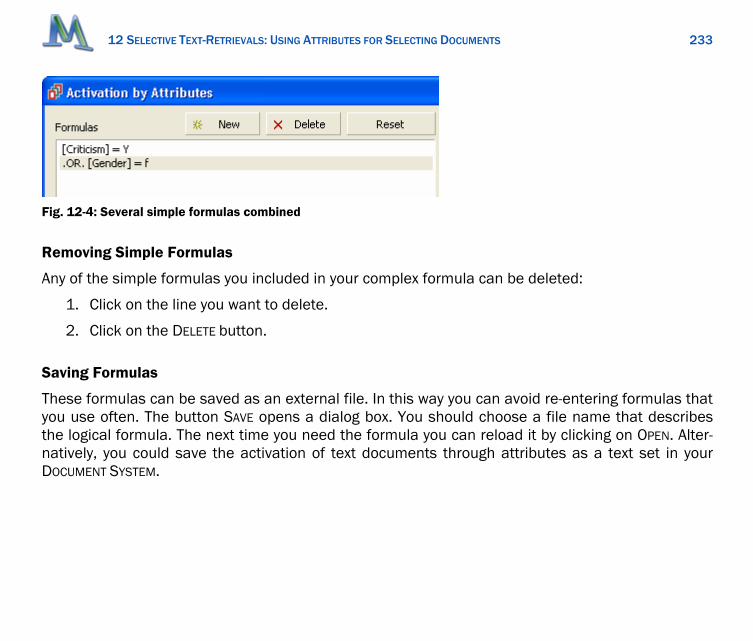
12 SELECTIVE TEXT-RETRIEVALS: USING ATTRIBUTES FOR SELECTING DOCUMENTS
233
Fig. 12-4: Several simple formulas combined
Removing Simple Formulas
Any of the simple formulas you included in your complex formula can be deleted:
1. Click on the line you want to delete.
2. Click on the DELETE button.
Saving Formulas
These formulas can be saved as an external file. In this way you can avoid re-entering formulas that you use often. The button SAVE opens a dialog box. You should choose a file name that describes the logical formula. The next time you need the formula you can reload it by clicking on OPEN. Alter-natively, you could save the activation of text documents through attributes as a text set in your DOCUMENT SYSTEM.
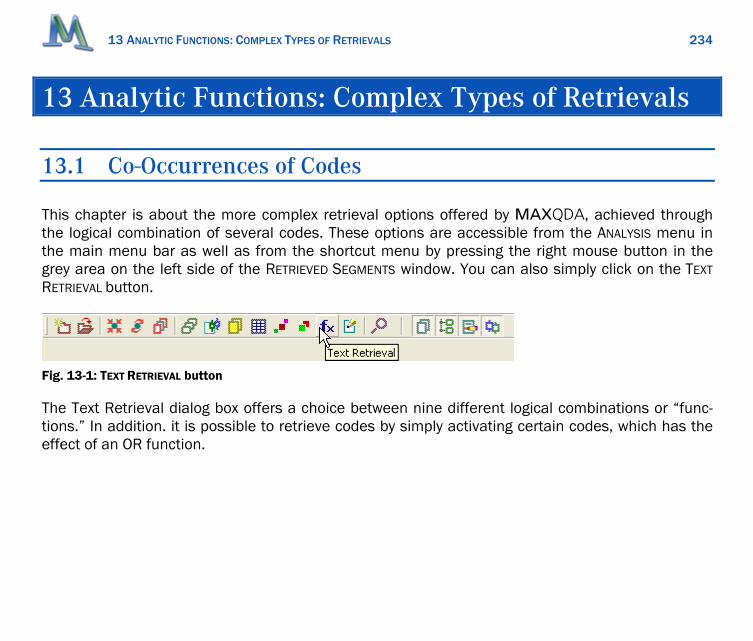
13 ANALYTIC FUNCTIONS: COMPLEX TYPES OF RETRIEVALS
234
13 Analytic Functions: Complex Types of Retrievals
13.1 Co-Occurrences of Codes
This chapter is about the more complex retrieval options offered by MAXQDA, achieved through the logical combination of several codes. These options are accessible from the ANALYSIS menu in the main menu bar as well as from the shortcut menu by pressing the right mouse button in the grey area on the left side of the RETRIEVED SEGMENTS window. You can also simply click on the TEXT RETRIEVAL button.
Fig. 13-1: TEXT RETRIEVAL button
The Text Retrieval dialog box offers a choice between nine different logical combinations or “func-tions.” In addition. it is possible to retrieve codes by simply activating certain codes, which has the effect of an OR function.

13 ANALYTIC FUNCTIONS: COMPLEX TYPES OF RETRIEVALS
235
Fig. 13-2: Shortcut menu for TEXT RETRIEVAL functions
The Text Retrieval dialog box is set up as follows:
The desired function is chosen from the drop-down menu at the top of the window.
The area on the right shows how the selected function works.
The sections A, B, and C allow a selection of the additional codes and parameters that are necessary for the particular function used.
Click here with right mouse button
to open the shortcut menu.
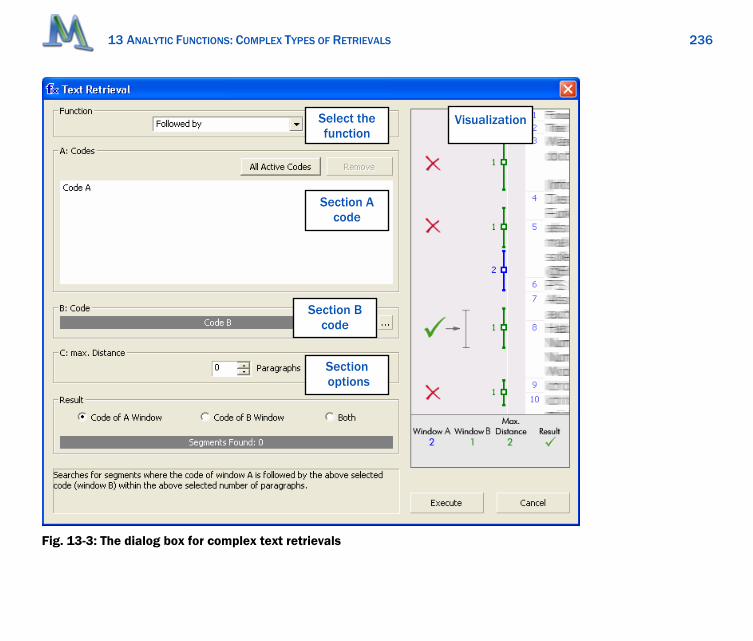
13 ANALYTIC FUNCTIONS: COMPLEX TYPES OF RETRIEVALS
236
Fig. 13-3: The dialog box for complex text retrievals
Visualization Select the function
Section A code
Section B code
Section options

13 ANALYTIC FUNCTIONS: COMPLEX TYPES OF RETRIEVALS
237
The codes used for the retrieval are shown in Section A. It is necessary to first activate the required codes. Then pressing the “All Active Codes” button will place these codes in Section A. The func-tions:
Intersection and
Overlapping
do not require any other parameters. Clicking on “Execute” starts the text retrieval.
Sections B and C are active for more complex functions. Section B contains a code that is to be combined with those in Section A. In Fig. 13-3, for example, a test is being carried out to see if there are text segments coded with the code in Section A followed by segments coded with the code listed in Window B. In Window C, you can determine the maximum distance in terms of paragraphs.
You can choose a code from the quick list (i.e. the list of the codes last used) by clicking on the “…” button in Section B. If the desired code is not in the quick list you can transfer it to the quick list by simply clicking on the code or subcode in the CODE SYSTEM window.
The current function is shown at the bottom of the MAXQDA window in the status bar.
Fig. 13-4: Display of the current text retrieval function
A summary of the 10 logical functions enabling complex retrievals is given in the following table:
Function Description
OR-Combination Lists segments coded with any of the active codes. This is the default function; it is the text retrieval achieved by simply activating codes and texts.
Intersection (“small picture”)
Finds text coded with all of the codes in Section A (small picture). Only text that is coded with all of these codes will be retrieved.

13 ANALYTIC FUNCTIONS: COMPLEX TYPES OF RETRIEVALS
238
Intersection (set) Only lists those text passages where a minimum of x codes of the codes listed in Section A are present. Only text that is coded with these x codes will be re-trieved.
Overlapping (“big picture”)
Finds text coded with all of the codes in Section A. Here, the whole overlapping area (big picture), the text coded with any of the codes, is retrieved.
Only one code Retrieves only text segments containing exactly one of the codes in Section A.
Only this code Similar to “Only one code,” but only for the code selected in Section B. Only lists text segments where the code in Section B but none of the codes in Section A is present.
If inside Retrieves text segments that are coded with the code in Section A and which are completely contained within a segment coded with the code in Section B. Alternatively, larger Section B segments are retrieved. Multiple codes can be se-lected in Section A.
If outside If text segments coded with codes listed in Section A are completely outside of segments coded with the code of Section B, the segments are retrieved.
Followed by If text segments coded with the code(s) in Section A are followed by text seg-ments coded with the code in Window B within a distance of x paragraphs, the segment will be retrieved.
Near If the code in Section A and the code in Section B are within a distance of x paragraphs, then the segment will be retrieved.
Remember to activate the texts you want to search in. Only the default OR function depends solely on the activation of codes in the CODE SYSTEM window. The other complex retrieval functions search for text segments assigned the codes selected in the Text Retrieval dialog box (although it is nec-essary that the codes are activated in order for you to be able to select them in Section A, and that

13 ANALYTIC FUNCTIONS: COMPLEX TYPES OF RETRIEVALS
239
they are in the quick list for their selection in Section B). The codes’ weight scores and the option INCLUDE SUBCODES are integrated in all complex retrieval functions.
MAXQDA always displays how many text segments meet the selected criteria in the status bar at the bottom of the screen.
13.2 Ten Different Ways to Analyze Co-Occurrences of Codes
In this section we will describe the preceding table in greater detail.
13.2.1 OR-Combination – Standard Function What it does: Lists the coded segments of all activated codes.
This simple retrieval function has already been described in Chapter 10.
How to do it:
1. Activate text documents and/or text groups.
2. Activate the codes in the CODE SYSTEM.
No other selection of parameters is necessary or possible. Thus, clicking the option EDIT FUNCTION will show that no check boxes or dialog fields are active; only a description of the function is given.
Whenever you modify your selection in the CODE SYSTEM window, the results in the RETRIEVED SEGMENTS window will be refreshed at the same time. When using this function, the option INCLUDE
SUBCODES is particularly useful. This causes MAXQDA to search in the active texts for subcodes of the active codes as well.

13 ANALYTIC FUNCTIONS: COMPLEX TYPES OF RETRIEVALS
240
13.2.2 Intersection What it does: Finds text referenced by all of the active codes (Sec-tion A in the dialog box). Only the inner intersection (small picture) of all codes will be displayed in the window RETRIEVED SEGMENTS.
How to do it:
1. Activate the text documents and/or text groups.
2. Activate the codes in the CODE SYSTEM.
3. Click on ALL ACTIVE CODES in the dialog box.
No other selection of parameters is needed. Click the button EXECUTE to start the function.
When using this function, the option INCLUDE SUBCODES is particularly useful. This causes MAXQDA to also test for the intersection of sub-codes. The simplest way to select this option is by double-clicking on the subcodes icon in the status bar at the bottom of your screen.
Fig. 13-5: The subcodes icon in the status bar
To see how many intersecting texts segments were found, it is nec-essary to open the Text Retrieval dialog box again (click on the Text Retrieval button again). The number is given in the section “Results.”
Attention! All of the activated codes (Window A of the dialog box) have to be assigned to a text segment for it to be retrieved.

13 ANALYTIC FUNCTIONS: COMPLEX TYPES OF RETRIEVALS
241
13.2.3 Overlapping (Big Picture) What it does: Finds text referenced by all of the active codes. In this case the text displayed in the RETRIEVED SEGMENTS window starts with the beginning of the first segment and ends with the end of the last segment (big picture).
How to do it:
1. Activate text documents and/or text groups.
2. Activate the codes in the CODE SYSTEM.
3. Click on ALL ACTIVE CODES in the dialog box.
No other selection of parameters is necessary.
When using this function, the option INCLUDE SUBCODES is particularly useful. This causes MAXQDA to also test for the intersection of sub-codes.
The OVERLAPPING function works exactly like INTERSECTION. The only dif-ference is the amount of text displayed in the LIST OF SELECED SEGMENTS window.
Attention: All of the activated codes (Window A of the dialog box) have to be assigned to a text segment for it to be retrieved.
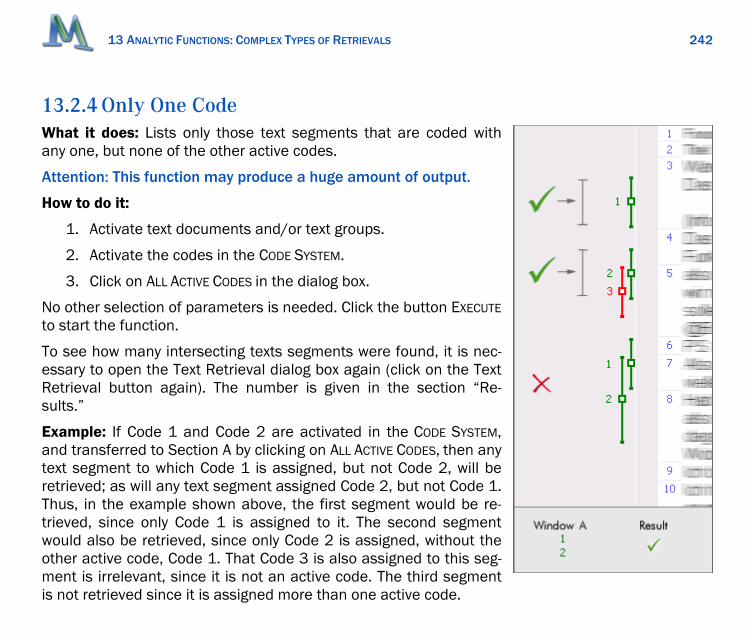
13 ANALYTIC FUNCTIONS: COMPLEX TYPES OF RETRIEVALS
242
13.2.4 Only One Code What it does: Lists only those text segments that are coded with any one, but none of the other active codes.
Attention: This function may produce a huge amount of output.
How to do it:
1. Activate text documents and/or text groups.
2. Activate the codes in the CODE SYSTEM.
3. Click on ALL ACTIVE CODES in the dialog box.
No other selection of parameters is needed. Click the button EXECUTE to start the function.
To see how many intersecting texts segments were found, it is nec-essary to open the Text Retrieval dialog box again (click on the Text Retrieval button again). The number is given in the section “Re-sults.”
Example: If Code 1 and Code 2 are activated in the CODE SYSTEM, and transferred to Section A by clicking on ALL ACTIVE CODES, then any text segment to which Code 1 is assigned, but not Code 2, will be retrieved; as will any text segment assigned Code 2, but not Code 1. Thus, in the example shown above, the first segment would be re-trieved, since only Code 1 is assigned to it. The second segment would also be retrieved, since only Code 2 is assigned, without the other active code, Code 1. That Code 3 is also assigned to this seg-ment is irrelevant, since it is not an active code. The third segment is not retrieved since it is assigned more than one active code.

13 ANALYTIC FUNCTIONS: COMPLEX TYPES OF RETRIEVALS
243
13.2.5 Intersection (Set) What it does: Only lists those text segments that have been as-signed a minimum of x codes of the codes listed in Section A.
How to do it:
1. Activate text documents and/or text groups.
2. Activate the codes in the CODE SYSTEM.
3. Click on ALL ACTIVE CODES in the dialog box.
4. Select the minimum number of required codes in Section C.
To see how many intersecting texts segments were found, it is nec-essary to open the Text Retrieval dialog box again (click on the Text Retrieval button again). The number is given in the section “Results.”
Example:
If Codes 1, 2, 3, and 4 are selected in Section A, and the parameter entered in Section C is 3, then in the example only the third segment will be retrieved. Three active codes must be assigned to a segment for it to be retrieved, and the first segment has only one, the second only two, codes assigned.
Only the intersection of the text assigned all the codes (small pic-ture) will be displayed in the RETRIEVED SEGMENTS window, as was the case for the second function.

13 ANALYTIC FUNCTIONS: COMPLEX TYPES OF RETRIEVALS
244
13.2.6 Only This Code What it does: Similar to the “Only One Code” function, but here the one code is selected in Section B. The text segment may be assigned other codes, except for those selected in Section A.
How to do it:
1. Activate text documents and/or text groups.
2. Select a code in Section B. The code must be in the quick list in order for you to be able to select it. If it is not in the quick list, first click on the code in the CODE SYSTEM.
3. Activate the codes you want in Section A in the CODE SYSTEM and click on ALL ACTIVE CODES.
Example:
Given that you want to find text to which Code 1 is assigned, but not Code 2 or Code 3, you will select Code 1 in Section B and Code 2 and Code 3 in Section A. Only for the first segment in the above ex-ample are the conditions met. For the second and third segments, Code 3 and Code 2 are also assigned respectively; thus, these seg-ments will not be listed in the RETRIEVED SEGMENTS.
This function is similar to the “Only One Code” function, except that here the codes that must not be assigned can be specified.

13 ANALYTIC FUNCTIONS: COMPLEX TYPES OF RETRIEVALS
245
13.2.7 If Outside What it does: If a text segment assigned one of the codes listed in Section A is completely “outside” or separate from text assigned the code in Section B, the segment is retrieved.
How to do it:
1. Activate text documents and/or text groups.
2. Activate the codes in the CODE SYSTEM that you want to select for Section A, and then click on ALL ACTIVE CODES in the dialog box.
3. Select a code in Section B. The code must be in the quick list in order for you to be able to select it. If it is not in the quick list, first click on the code in the CODE SYSTEM Activate text documents and/or text groups.
Example:
You are interested in the passages in which an interviewee de-scribes what he thinks is possible (to which you assigned Code 1), but not when this is in the shortcut of personal wishes (segments to which you assigned Code 2). For the example, Code 1 is assigned to two passages. The first passage is also assigned Code 2; thus, this segment is not retrieved. The second passage is assigned Code 3 as well, but since this is not selected in Section B, that does not affect the situation, and this passage is retrieved.

13 ANALYTIC FUNCTIONS: COMPLEX TYPES OF RETRIEVALS
246
13.2.8 If Inside What it does: Text segments, that are assigned a code in Section A and that are completely contained within a segment assigned the code in Section B, are retrieved. Multiple codes can be selected in Section A.
How to do it:
1. Activate text documents and/or text groups.
2. Activate the codes in the CODE SYSTEM that you want to select for Section A, and then click on ALL ACTIVE CODES in the dialog box.
3. Select a code in Section B. The code must be in the quick list in order for you to be able to select it. If it is not in the quick list, first click on the code in the CODE SYSTEM Activate text documents and/or text groups.
4. Determine what will be retrieved by this function: either text segments assigned the codes in Section A, or the larger seg-ments assigned the codes in Section B. (Or both, which is sel-dom useful.)
Example:
In the example, the Section A code, Code 1, is “inside” or contained completely within the Section B code, Code 2, only in the first case.
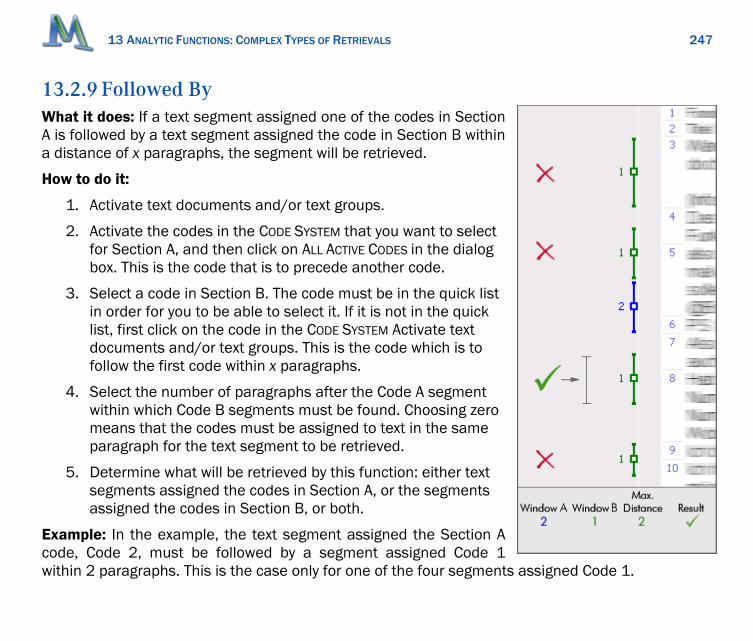
13 ANALYTIC FUNCTIONS: COMPLEX TYPES OF RETRIEVALS
247
13.2.9 Followed By What it does: If a text segment assigned one of the codes in Section A is followed by a text segment assigned the code in Section B within a distance of x paragraphs, the segment will be retrieved.
How to do it:
1. Activate text documents and/or text groups.
2. Activate the codes in the CODE SYSTEM that you want to select for Section A, and then click on ALL ACTIVE CODES in the dialog box. This is the code that is to precede another code.
3. Select a code in Section B. The code must be in the quick list in order for you to be able to select it. If it is not in the quick list, first click on the code in the CODE SYSTEM Activate text documents and/or text groups. This is the code which is to follow the first code within x paragraphs.
4. Select the number of paragraphs after the Code A segment within which Code B segments must be found. Choosing zero means that the codes must be assigned to text in the same paragraph for the text segment to be retrieved.
5. Determine what will be retrieved by this function: either text segments assigned the codes in Section A, or the segments assigned the codes in Section B, or both.
Example: In the example, the text segment assigned the Section A code, Code 2, must be followed by a segment assigned Code 1 within 2 paragraphs. This is the case only for one of the four segments assigned Code 1.

13 ANALYTIC FUNCTIONS: COMPLEX TYPES OF RETRIEVALS
248
13.2.10 Near What it does: If a segment assigned the code in Section A and a segment assigned the code in Section B are within a distance of x paragraphs, then the segments will be retrieved.
This function is similar to the “Followed by” function, only less restric-tive. The order of the two codes is not prescribed – it is not necessary that B comes after A.
How to do it: 1. Activate text documents and/or text groups. 2. Activate the code in the CODE SYSTEM that you want to select for
Section A, and then click on ALL ACTIVE CODES in the dialog box. 3. Select a second code in Section B. The code must be in the quick
list in order for you to be able to select it. If it is not in the quick list, first click on the code in the CODE SYSTEM Activate text docu-ments and/or text groups.
4. Select the number of paragraphs within which a Code A segment and a Code B segment must be found. Choosing zero means that the codes must be assigned to text in the same paragraph for the text segment to be retrieved.
5. Determine what will be retrieved by this function: either text seg-ments assigned the codes in Section A, or the segments assigned the codes in Section B, or both.
Example: In the example, the second, third, and fourth segments meet the criteria. Assuming that the text segments are assigned Code 1 and meeting the criteria is selected as the result, the sec-ond and fourth segments will be retrieved. Alternatively only the third segment, or all three seg-ments could be retrieved.

14 VISUAL TOOLS: TEXTPORTRAIT
249
14 Visual Tools: TextPortrait
14.1 Visual Tools in MAXQDA
MAXQDA offers a variety of innovative visual tools. The most prominent of them is MAXMaps, which is described, in detail, in a separate manual. Moreover, tools for case-oriented and cross-case visualizations are offered.
Case-oriented visualizations display elements and characteristics of an interesting case as a table, diagram, or concept map. Two new case-oriented visualizations are now integrated into MAXQDA 2007: TEXTPORTRAIT and CODELINE.
Three different kinds of cross-case visualization are part of MAXQDA: the Code-matrix Browser, the Code-relations-Browser, and the TEXT COMPARISON CHART (TCC).
All five visual tools can be started via the main menu option VISUAL TOOLS. Both of the case-oriented tools are also integrated, as an option, into the context menu in the DOCUMENT SYSTEM that pops up when you click on a text name.
Additionally, a new toolbar for Visual tools can be displayed (switch the bar on in the menu option WINDOWS).
Fig. 14-1: Visual Toolbar with icons for all visuals

14 VISUAL TOOLS: TEXTPORTRAIT
250
14.2 TextPortrait – The Visualization of a Document
TEXTPORTRAIT is an innovative tool that displays the codes associated with a single text. The basic principle of TEXTPORTRAIT is a bit more complicated than, for instance, the one from CODELINE. The content of a single document will be visualized starting with the first paragraph of the document and ending with the last.
To start TEXTPORTRAIT, choose the option from the menu Visual Tools, select the appropriate icon in the toolbar Visuals, or choose the text you want to visualize directly from the context menu.
Fig. 14-2: The TEXTPORTRAIT icon in the toolbar Visuals
The results of this function are only meaningful if you have made use of the opportunity to assign colors and codes. The visualization of a text can only be fruitful if this association of colors and codes makes sense. Some examples include:
Imagine a psychologist has coded an in-depth interview in a way that categories related to aggression have red colors and categories for quiet and friendly behaviour have green col-ors. Now a TEXTPORTRAIT would show with one look how often the interview shows aggressive behavior and when during the interview this happened.
In biographical research, the particular representations can be chosen for critical life events, thus making it easy to get an idea of the life course of a person and the concentration of critical events.

14 VISUAL TOOLS: TEXTPORTRAIT
251
For thematic analysis, it may be useful to associate different colors to different topics. Now, you can easily see which topics dominate the discussion and which topics are closely re-lated.
14.3 What Does a TextPortrait Display?
A TEXTPORTRAIT shows the sequence of codes for a se-lected text. To better understand what happens, it is use-ful to take a look at the Overview of coded segments for a selected text. All coded segments are listed in this overview. The first column displays the color associated with the code. This is the material that is taken for “painting” the text portrait. Only those colors displayed in the first column of the overview table will appear in the TEXTPORTRAIT. In the overview table, all segments are equal regardless of their size. The TEXTPORTRAIT takes the size of the segments into account and “weights” the color according to the segment’s size.
The color attributes of the codes associated with the text will be displayed in a matrix with 1,200 little squares (ar-ranged in 30 rows, each one with 40 squares). The rep-resentation starts with the first square on the left in the first line, and ends with the last square on the right of the last line. The picture is set up in the same way as a television screen, where an electronic stripe goes along the screen from left to right. All the 1,200 squares are divided up according to the share of the coded segments. If a text would have only one segment
Fig. 14-3: Example of a TEXTPORTRAIT diagram

14 VISUAL TOOLS: TEXTPORTRAIT
252
coded with a blue code, then the TEXTPORTRAIT would be totally blue. If this segment would have been coded with two codes, red and blue, the TEXTPORTRAIT would consist of 600 blue and 600 red squares. If two segments would have been coded (again with red and blue codes) and the first segment would be twice as extensive as the second, the picture would start with 800 hundred red squares followed by 400 blue squares.
Thus, TEXTPORTRAIT displays the structure of texts in terms of codes as a colorful picture. This helps to immediately identify the ground shade of a text, for instance, if emotions have been coded with meaningful colors (aggressive= red, tolerant= green, and so on).
Try out the TEXTPORTRAIT: Select a text of your choice in the DOCUMENT SYSTEM, click on the text with the right mouse button, and choose the option TEXTPORTRAIT. Of course, meaningful results can only be obtained if a sensible assignment of colors to codes has been carried out.
14.4 Options for TextPortrait?
The toolbar on top of the TEXTPORTRAIT window contains three icons:
This option allows you to save the TEXTPORTRAIT as a graphic file in BMP format. Later on, you may insert the graphic into a PowerPoint presentation or into a Word file.
This option lets you choose between the visualization of the entire text or only the coded part of the text. If you choose ENTIRE TEXT and not all text passages have been coded, parts of the picture stay uncolored (white). The size of those uncoded parts of the text relates to the number of white squares in TEXTPORTRAIT. If you switch the option off, then only the coded parts are taken into account.
This option decides on how to display the overlapping of codes. If you select “mixed colors for overlapping codes” and two codes are overlapping, MAXQDA will mix these colors and

14 VISUAL TOOLS: TEXTPORTRAIT
253
display the resulting color in the TEXTPORTRAIT. If the option is switched off, then both colors will be displayed, one after the other.

15 VISUAL TOOLS: CODELINE
254
15 Visual Tools: Codeline
15.1 Codeline – The Sequential View of a Text
CODELINE is a visual function that displays a sequential view of its coded segments. The picture is quite similar to that of a score of a piece of music. The X-axis displays the paragraphs of the text, starting with §1 and ending with the last § of the particular text. The Y-axis displays the codes. The cells of the CODELINE matrix are filled with a colored symbol, if the code has been assigned to the paragraph.
Like TEXTPORTRAIT, CODELINE is also a case-oriented data display and can be started from the context menu of each case; that means each text listed in the DOCUMENT SYSTEM. Alternatively, you may se-lect a text simply by clicking it and then choosing the CODELINE icon from the toolbar for VISUAL TOOLS.
Fig. 15-1: Visual Toolbar
The CODELINE picture offers a fast and comprehensible view of the codes assigned to a text. The diagram is interactive; each paragraph is just one click away. As soon as you click on a symbol in a cell of the matrix, the text passage appears in MAXQDA’s TEXT BROWSER. On the right side of the toolbar, you will find a sliding switch, allowing you to scroll the diagram to the right, but without mov-ing the code names of the Y-axis. The code names are fixed, thus you are also able to see what has been coded for the paragraphs located at the end of the text.

15 VISUAL TOOLS: CODELINE
255
Fig. 15-2: Example of a CODELINE diagram (excerpt)
When analyzing focus groups, the CODELINE can be very helpful. The best way is to define the differ-ent speakers as codes and assign these codes to the paragraphs where the person talks. Now the CODELINE makes it easy to identify the sequence of speakers. One can immediately recognize the relation between subjects and speakers, and also where someone is silent.
Try to use the CODELINE: Click on a text of your choice by use of the right mouse button and create a CODELINE diagram – you will find this option in the context menu of every text.
Unlike TEXTPORTRAIT, the CODELINE tool may also be used if you have not associated different colors to codes. The CODELINE graphics display the color, but if you have not selected colors only green symbols will be displayed. The function of CODELINE is to show where in a text the different codes have been applied and this diagram also makes sense and can be interpreted without color differ-entiation.
What can CODELINE be used for?

15 VISUAL TOOLS: CODELINE
256
CODELINE gives a good overview of the coding and can therefore be used universally.
The diagram may be of use for exploration – just follow a particular code, see when it ap-pears and which other codes appear near it.
The opportunity to display only selected codes enables comparing two or more codes in the course of an interview.
When analyzing focus groups, you may see at a glance which speakers react to each other and what the topics are in relation to the speakers.
15.2 Options for Codeline?
When starting the CODELINE function, a dialog window let’s you choose
To restrict the diagram to the active codes and
To aggregate the displayed codings on the highest level of the CODE SYSTEM, that means not displaying subcodes.
The toolbar on top of the CODELINE window contains the option to save the diagram as a graphic file in BMP format.
Beside the toolbar you find a sliding switch, allowing you to scroll the diagram to the right but with-out moving the code names of the Y-axis. The code names are fixed; thus, you are also able to see what has been coded for the paragraphs located at the end of the text.

16 VISUAL TOOLS: TEXT COMPARISON CHART
257
16 Visual Tools: Text Comparison Chart
16.1 Visual Comparison of Texts
TEXT COMPARISON CHART (TCC) works for several selected texts and belongs to the tools for cross-case analysis. It is somewhat like a combination of TEXTPORTRAIT und CODELINE, which are both designed for an individual text.
TEXT COMPARISON CHART can be started from the menu VISUAL TOOLS OR, alternatively, by clicking the TCC icon from the toolbar for VISUAL TOOLS.
Fig. 16-1: Visual Toolbar
To select the texts to be displayed in the diagram, you must activate them, as usual in MAXQDA.
Otherwise, as the CODELINE diagram, the TEXT COMPARISON CHART displays the texts in the rows of the matrix and not the codes. This makes it possible to compare different texts with each other. The X-axis is the same as in CODELINE, here the paragraphs are displayed beginning with §1.
Each cell of the matrix (= §) shows all the codes that have been applied to the text of the particular paragraph. If a code occurs several times in the same paragraph, it will only be displayed once.
The following diagram explains the basic idea of the TEXT COMPARISON CHART. The diagram contains 10 paragraphs and three texts. Nothing has been coded in the first paragraph.
In Text 2, coding starts in §2 with two blue codes and one red code.

16 VISUAL TOOLS: TEXT COMPARISON CHART
258
1 2 3 4 5 6 7 8 9 10
Text 1
Text 2
Text 3
Fig. 16-2: The principle idea of the TEXT COMPARISON CHART
If several codes with different colors appear in the same paragraph, the space available will be shared between the codes. Generally, the space is fixed to 50 pixels. These pixels will be allocated according to the size of the coded segemets. If exactly the same segment is coded with a green and a red code, then 25 pixels will be colored red and 25 green.
Like in TEXTPORTRAIT, codes and colors must correspond in a meaningful way. Otherwise the diagram only shows where codes have been applied.
The TEXT COMPARISON CHART is particularly useful for the analysis of structured texts. In this case, all the texts have the same number of paragraphs and allow for a direct comparison.
The symbols in the cells of the TEXT COMPARISON CHART are interactive: one click brings you to the text. It will be loaded in MAXQDA’s TEXT BROWSER exactly at the location of the clicked paragraph.
16.2 Export as a Graphic File
This option – available in the toolbar - allows to save the TEXT COMPARISON CHART as a graphic file in BMP Format. Later on, you may insert the graphic into a Powerpoint presentation or into a Word file.
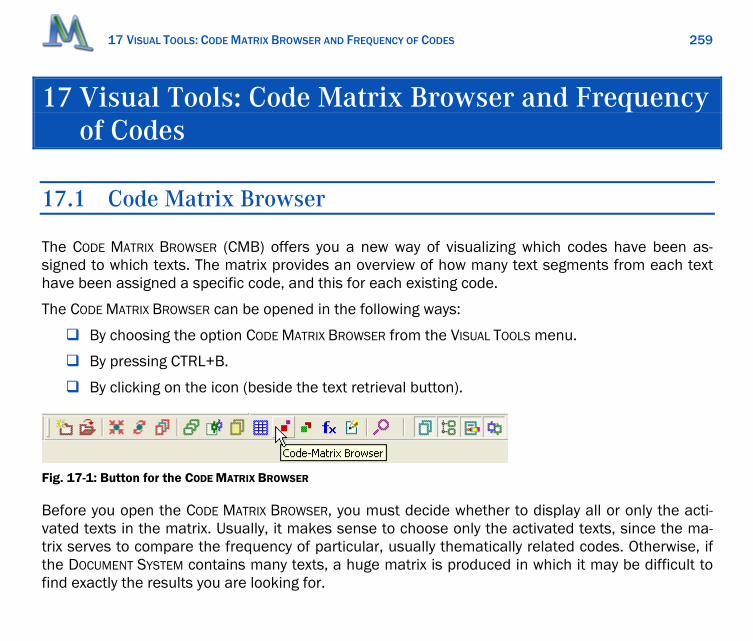
17 VISUAL TOOLS: CODE MATRIX BROWSER AND FREQUENCY OF CODES
259
17 Visual Tools: Code Matrix Browser and Frequency of Codes
17.1 Code Matrix Browser
The CODE MATRIX BROWSER (CMB) offers you a new way of visualizing which codes have been as-signed to which texts. The matrix provides an overview of how many text segments from each text have been assigned a specific code, and this for each existing code.
The CODE MATRIX BROWSER can be opened in the following ways:
By choosing the option CODE MATRIX BROWSER from the VISUAL TOOLS menu.
By pressing CTRL+B.
By clicking on the icon (beside the text retrieval button).
Fig. 17-1: Button for the CODE MATRIX BROWSER
Before you open the CODE MATRIX BROWSER, you must decide whether to display all or only the acti-vated texts in the matrix. Usually, it makes sense to choose only the activated texts, since the ma-trix serves to compare the frequency of particular, usually thematically related codes. Otherwise, if the DOCUMENT SYSTEM contains many texts, a huge matrix is produced in which it may be difficult to find exactly the results you are looking for.

17 VISUAL TOOLS: CODE MATRIX BROWSER AND FREQUENCY OF CODES
260
Fig. 17-2: The CODE MATRIX BROWSER
A toolbar just below the heading gives you access to the following functions:
Export the diagram as a graphic file.
Hide text names in the columns.
Displays short text names.
Displays the full text names.
Switch between the display of numbers and symbols.
Switch between the display of circles and squares.
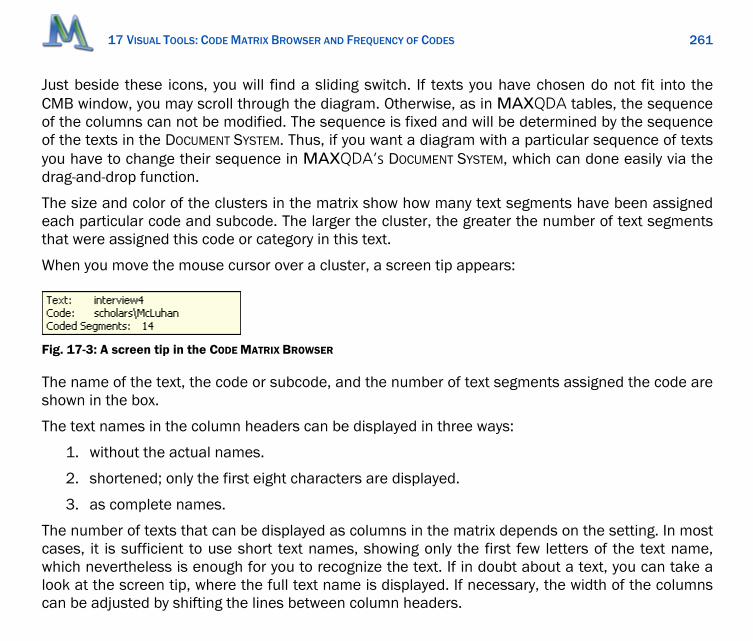
17 VISUAL TOOLS: CODE MATRIX BROWSER AND FREQUENCY OF CODES
261
Just beside these icons, you will find a sliding switch. If texts you have chosen do not fit into the CMB window, you may scroll through the diagram. Otherwise, as in MAXQDA tables, the sequence of the columns can not be modified. The sequence is fixed and will be determined by the sequence of the texts in the DOCUMENT SYSTEM. Thus, if you want a diagram with a particular sequence of texts you have to change their sequence in MAXQDA’s DOCUMENT SYSTEM, which can done easily via the drag-and-drop function.
The size and color of the clusters in the matrix show how many text segments have been assigned each particular code and subcode. The larger the cluster, the greater the number of text segments that were assigned this code or category in this text.
When you move the mouse cursor over a cluster, a screen tip appears:
Fig. 17-3: A screen tip in the CODE MATRIX BROWSER
The name of the text, the code or subcode, and the number of text segments assigned the code are shown in the box.
The text names in the column headers can be displayed in three ways:
1. without the actual names.
2. shortened; only the first eight characters are displayed.
3. as complete names.
The number of texts that can be displayed as columns in the matrix depends on the setting. In most cases, it is sufficient to use short text names, showing only the first few letters of the text name, which nevertheless is enough for you to recognize the text. If in doubt about a text, you can take a look at the screen tip, where the full text name is displayed. If necessary, the width of the columns can be adjusted by shifting the lines between column headers.

17 VISUAL TOOLS: CODE MATRIX BROWSER AND FREQUENCY OF CODES
262
The codes are displayed in the CMB in the same way as in the CODE SYSTEM, in a tree structure simi-lar to that of files in Windows Explorer. Subcodes can be collapsed in the usual way, by clicking the “-“ symbol.
The text segments that have been assigned a particular code can be called up immediately by dou-ble-clicking the cluster. The relevant text is then activated and the text segments appear in the RETRIEVED SEGMENTS window. It is possible to keep the CMB open, allowing one to easily view the contents of different clusters.
In order to save the current view of the CMB, for a publication or a presentation, for example, you must first maximize the CMB and then press the “Print” key to save the screen shot in the Windows clipboard. You can then paste the contents of the clipboard into an Powerpoint slide or Word docu-ment and, thus, incorporate the screen shot into a paper or presentation.
17.2 Table of Code Frequencies
The CODE MATRIX BROWSER can display the underlying frequencies of codes instead of the symbols. In MAXQDA, this kind of display is called “Table of Code Frequencies.” In principle, the table of code frequencies contains the same information as the matrix filled with symbols: how often each code and subcode were assigned to text segments within a particular text, and this for all texts in a pro-ject. The matrix is a code by text matrix and can grow quite large. Usually, if you’d like to analyze the matrix, you would use a statistical package like SPSS and export the data. To see the matrix of code frequencies, you merely have to select the option to show the numbers in the toolbar.

17 VISUAL TOOLS: CODE MATRIX BROWSER AND FREQUENCY OF CODES
263
Fig. 17-4: SHOW VALUES option in the CODE MATRIX BROWSER
This matrix can be exported, just as you see it, meaning that the texts are in the columns and the codes in the rows. If you want to continue with statistical analysis, this kind of matrix is usually not the one that is required. SPSS needs a matrix with text in the rows and not in the columns. To ob-tain the appropriate matrix, you have to use MAXQDA’s export function.
Here, the texts are placed in rows and the codes in columns, however, and the table has as many rows as texts and as many columns as codes and subcodes. The table can, thus be quite large: for 100 texts and 100 codes the table comprises 10,000 cells. This is the reason why the table cannot be opened within MAXQDA – it is only possible to export the file and open it with a statistical analy-sis program.
Here’s how to create the table:
From the PROJECT menu, select the option EXPORT > MATRIX OF CODE FREQUENCIES. You can choose whether to create a table for all the codes or for only the active codes. The latter is recommended if

17 VISUAL TOOLS: CODE MATRIX BROWSER AND FREQUENCY OF CODES
264
there are a lot of codes and only you want to statistically analyze a selection of them. After you have entered a name for the file, it will be saved as a TXT file in the usual tab-delimited format, the cells separated from each other with tab-stops. This file can then be opened with a spreadsheet program like Excel.
The table will appear as follows. Complete text names are in the first column, the text group sepa-rated from the text name with a backslash. The complete code names, codes separated from sub-codes with a backslash, are in the column headers. The cells of the table show how often each code was assigned to text segments in each text.
The following figure shows such a table of code frequencies, opened in Excel.
Fig. 17-5: A table of code frequencies, opened in Excel
If you would like to use SPSS for your statistical analysis, you may have a problem with the text and code names if they are longer than the eight characters that SPSS allows for its attributes. If you don’t want to shorten the text and code names in MAXQDA, creating indecipherable abbreviations, you could first import the table into Excel, change the names there, and then import the table into SPSS.

18 VISUAL TOOLS: CODE RELATION BROWSER
265
18 Visual Tools: Code Relation Browser
18.1 Displaying Co-Occurrences of Codes
A tool similar to the CMB is the CODE RELATION BROWSER (CRB). The CRB is a visualization of the rela-tions between codes. A table shows how many text segments any two codes are attached to. The representation is similar to the CODE MATRIX BROWSER, but in this case, the little squares stand for the number of co-occurrences of codes.
You can open the CRB in different ways:
Via the menu Visual Tools in the main menu.
By clicking the CRB Symbol in the Visual Toolbar.
With the keyboard shortcut CTRL+O.
Fig. 18-1: Icon for starting the CODE RELATION BROWSERS

18 VISUAL TOOLS: CODE RELATION BROWSER
266
18.2 Options
Normally, there is little reason to review all overlapping coded segments, as this would open a huge table for most projects. You can limit the table by activating only those codes and texts you are in-terested in.
The evaluation may take a little while, depending on the size of the texts and the number of se-lected codes.
A table similar to the one shown below will be displayed.
Fig. 18-2: The CODE RELATION BROWSER
The selected codes will be displayed in the form of a (codes)*(codes) matrix. There is a little square at the intersection of every two codes, which indicates how many text segments have been coded with both of these codes. The size of each square indicates the number of coded segments. The screen tip that appears when you move the mouse cursor over a square shows this number.

18 VISUAL TOOLS: CODE RELATION BROWSER
267
Fig. 18-3: Screen tip in the CODE RELATION BROWSER
Double-clicking on a square brings the corresponding segments into the RETRIEVED SEGMENTS win-dow.
The toolbar on top of the CRB gives you quick access to the following options:
Export the underlying data of the CRB diagram as a TXT file (tab delimited) that can be used as an input file for statistical programs.
Export the CRB diagram as graphic file.
No code names will be displayed on the X-axis.
Short: code names are shown in abbreviated form.
Full: full code names are displayed.

18 VISUAL TOOLS: CODE RELATION BROWSER
268
Switch from symbols to numbers.
Switch to the „near“ function instead of intersection.
Choose between circles or squares as symbols.
Option for the definition of the maximum distance for the „near“ function.
Besides these icons, you will find a sliding switch like in the other visual tools. It enables you to scroll down the diagram displayed to the right.
The CRB does not have a print option. You can, of course, still accomplish this by exporting the dia-gram as a graphic file and pasting this into Word or another program, and then printing it there.
Another possibility is to export the table and import it into another program like Excel or Word. In this case, MAXQDA exports the exact number of overlapping segments at each intersection, and not the little squares. The table is saved as a TXT file in tab-delimited format. No matter what option you selected for the code name display, the exported file will contain the full code names as column headers.

19 VISUAL TOOLS: CROSSTABS
269
19 Visual Tools: Crosstabs
19.1 Options
This is a new function integrated into MAXQDA 2007. CROSSTABS has some similarities to the CODE-MATRIX BROWSER, but here no individual text appears in the diagram, rather groups of text. So, this is not a tool for the comparison of individual texts but for the comparison of social groups, for in-stance men and women, or people with different personal background, etc. The grouping is done according to the values of attributes (variables). All attributes from MAXQDA’s attribute list can be used to form a group.
CROSSTABS are a visualization of the relations between attributes and codes. The following example displays the distribution of some codes separated for men and women.

19 VISUAL TOOLS: CROSSTABS
270
Fig. 19-1: A CROSSTABS diagram
To start the CROSSTABS function, click on the icon in the Visual Toolbar. You may also select the option from the menu VISUAL TOOLS.
The toolbar at top of the window offers the following options:
Export underlying data as data matrix in TXT format.
Save the diagram as a graphic file in BMP Format.
Selection for the information to be displayed in the table: you may choose between abso-lute frequencies, row percentage, and column percentage.
CROOSTABS are well suited for the analysis of sub-categories and their distribution in sub-groups of the sample. Imagine you have asked how they prepare for examinations. The different options like reading books, working together with colleagues, etc are defined as codes. Now you may want to

19 VISUAL TOOLS: CROSSTABS
271
compare the different groups. Are female students participating more in training groups? Do male students read more text?
You may compare the percentages of different sub-groups directly.
19.2 Selection of codes and Attributes
For CROSSTABS, you need to select at least one code and an attribute (or more precisely, an attrib-ute’s value).
As usual in MAXQDA, the selection of codes is done via activation.
The selection of attribute values is done in a dialog window that pops-up when you start the CROSSTABS function. The dialog looks similar to the ACTIVATION BY ATTRIBUTES dialog.

19 VISUAL TOOLS: CROSSTABS
272
Fig. 19-2: CROSSTABS window
As soon as you click NEW, the list of attributes appears. Here you may select, in the first step, the attribute, and, in the second step, the interesting attribute values. Each line in the dialog window will result in a column in the CROSSTABS diagram. It is not required that you select all of the attribute values of a particular attribute. You may restrict your choice on the interesting sub-groups.
19 VISUAL TOOLS: CROSSTABS
273
As soon as you click OK, the procedure starts and, after a short time, you will see the resulting ta-ble.

20 ORGANIZING TEAMWORK
274
20 Organizing Teamwork
20.1 Exchanging MAXQDA Projects
MAXQDA makes teamwork easy. Different people working on different computers can analyze the same body of text. Teamwork is possible with MAXQDA in two different ways, depending on how the members of the research team work together.
Type A Teamwork: Different people work with the same master version. They perform online searches, text retrievals, and other kinds of analysis with this master version. But, they do not per-form code and memo procedures simultaneously on the master version. In terms of computer lan-guage: they are able to read from the data but not to write to it. This is because only one master version of the data set exists. More than one team member cannot code a single text at the same time. They can analyze the data but they cannot create new codes or subcodes, new memos, or at-tributes. They have to wait with this type of work until they receive the new master version of the project from their colleague.
Type B Teamwork: The different members of the group divide their work: Team Member A will code text No. 1 through 5, Team Member B will code text No. 6 through 10, and Team Member C text No. 11 through 15. They do their work at the same time and exchange it using external media, a net-work, or the Internet.
Both types of teamwork are supported by MAXQDA. The first type of teamwork is the easier one, since a project file can be exchanged between the different PCs. The research group always works with the same database, but the handicap is that coding and memo procedures in MAXQDA are not possible on more than one PC at a time.

20 ORGANIZING TEAMWORK
275
Type B Teamwork is more complicated, since different versions of the data exist at the same time. This means that a couple of rules have to be defined, and these rules have to be followed strictly by all members of the research team.
20.2 Type A Teamwork: Using a Common Project File
Type A Teamwork is relatively uncomplicated, since MAXQDA writes the whole Project into one, during the teamwork phase, unchanging file with the file extension .mx3 (what we called a master version above). For example, a project named “MarienthalStudy” would be saved as the file “Mari-enthalStudy.mx3.”
This .mx3 file contains all:
texts
codes
memos
attributes
coded segments
text link
external links
maps created with MAXMaps
The file does not contain:
saved search runs
saved logical formulas of the ACTIVATION BY ATTRIBUTES procedure
exported files, for instance attribute ta-bles or memo tables created by an export dialog
saved code trees (MTR Files)
graphic files or photographs belonging MAXMaps
MAXDictio Dictionaries
These .mx3 project files can be exchanged between the members of the team. The files can also be
20 ORGANIZING TEAMWORK
276
sent as e-mail attachments. In this case, the files should be compressed with a data compression program like WinZip.
Supposing that all research group members work with the same text base, the process of data analysis could proceed as follows:
1. Persons A, B, and C have the same text base.
2. Person A codes a text on PC1.
3. Person A sends the MAXQDA project file to Persons B and C.
4. Persons B and C import this project file to PC 2 and PC3.
5. Person B codes a text on PC2.
6. Person B sends the MAXQDA project file to Persons A and C.
7. Persons A and C import this project file to PC 1 and PC3.
In the example above, all three persons would be able to perform text retrievals and lexical searches at any time, but in phase 2, for example, only Person A could code the text.
Whenever such a project file is opened on another PC, the whole study will be imported; the DOCUMENT SYSTEM and the CODE SYSTEM will be constructed in exactly the same way as they were at the moment when the Project file was written.
This way of interchanging data is especially useful for a research team at the beginning of the re-search process. All texts can first be imported into MAXQDA on the same PC. Then the project file is given to the other members of the team. Organizing teamwork in this way guarantees that all team members have the same text groups and the same texts in exactly the same format.

20 ORGANIZING TEAMWORK
277
20.3 Type B Teamwork: Exchanging Codes, Memos, and Attrib-utes
With MAXQDA, it is also possible for team members to work with the same text documents at the same time. Of course, the texts being used by a team member must be imported on his PC, but it is not necessary either that texts be imported in the same order by each team member, nor that on each PC the DOCUMENT SYSTEM contain the same set of texts. But be careful: those texts that are common, that are being used by several team members at the same time, must have an identical structure on each PC – the number of paragraphs and the text itself has to be exactly the same, al-though not the font type, font size, or color. (Thus, it does not matter if a text is formatted in Courier 12 instead of Times Roman 10.)
Nor is it necessary that the CODE SYSTEM be identical, although in a research team, the same codes should be used. It would be rather confusing if different people worked with different codes and category systems.
Imagine that your team wanted to analyze Interview2 and code text segments in it. If you do this on PC1, how will your colleague, working on PC2, get the result? In this case it does not make sense to exchange the entire project. The codes have to be exported on the level of a single text. In MAX-QDA, this is quite simple:
Move the mouse to the particular text (in this example Interview2) in the DocuMENT SYSTEM window, click with the right mouse button, and select EXPORT TEAMWORK. MAXQDA will then copy all codes and memos assigned to this text to a file with the same name as the text in the DOCUMENT SYSTEM.

20 ORGANIZING TEAMWORK
278
Fig. 20-1: Exporting and importing codes and memos
MAXQDA automatically adds the file extension .”mex” (= MAXQDA Exchange).
PC 1
Text 1
Text 2
Text 3
...
Text n
File text2.mex
Teamwork Import
PC 2
Text 1
Text 2
Text 3
...
Text n
Teamwork Export

20 ORGANIZING TEAMWORK
279
Fig. 20-2: Selecting EXPORT TEAMWORK
The EXPORT TEAMWORK procedure can be implemented at three different levels: project, text group, or single text.

20 ORGANIZING TEAMWORK
280
The function always exports all coded segments, attributes, and memos of a selected text. It does not matter if the codes are active or not. It is not possible to export only selected codes or sub-codes.
Files to be exported (.”mex” files) can be sent by e-mail to other team members. It is recommended that you compress or “zip” the files before sending them as attachments.
Import Teamwork
The export file can be imported on any PC where the same text with the same text structure is pre-sent in the DOCUMENT SYSTEM. This works in the same way as Export Teamwork. Click on the text name in the DOCUMENT SYSTEM on PC2. Then, choose IMPORT TEAMWORK and choose the appropriate file in the “Open File” dialog box.

20 ORGANIZING TEAMWORK
281
Fig. 20-3: Starting the IMPORT TEAMWORK function

20 ORGANIZING TEAMWORK
282
Fig. 20-4: Dialog box for IMPORT TEAMWORK
In the dialog box, you can choose whether to import the codes, code references, memos, and/or attributes. By default, everything is imported.
Remember: It is absolutely necessary that the text document into which the codes and memos are imported contains exactly the same text and has exactly the same structure as the exported text.
The following occurs when codes are imported by MAXQDA:
All coded text segments existing before the import procedure remain coded.

20 ORGANIZING TEAMWORK
283
If additional text segments in the imported file are coded with a code common to both texts, these text segments in the destination file are also coded.
Codes and subcodes that were not found in the CODE SYSTEM of the destination file will be created.
Coded segments that already exist will be ignored to avoid the double-coding of a text pas-sage.
To make sure that the import procedure was carried out correctly, it is recommended that you open the text and check the codes. You could also obtain a list of all coded segments and memos by us-ing the OVERVIEW OF CODES and OVERVIEW OF MEMOS procedures.
Importing memos is somewhat more complicated since MAXQDA provides only one memo for ele-ments of the DOCUMENT SYSTEM (project, text groups, texts) and the CODE SYSTEM (codes and sub-codes). If these objects already have memos in your project, then importing new memos will be omitted for the individual elements. Thus, it is important which one of the two files is the source file and which one the import file.
Importing attributes/variables is different: If the import file contains new variables, not defined in your project, they will be created. If the import files contain variables that already exist, then MAX-QDA will update the variable’s values with the imported values.
After completing the import procedure, you should open the text and check if the newly inserted codes and coded segment are appropriate. The Overview of Coded Segments may help in this situa-tion.
The protocol file contains the following information.

20 ORGANIZING TEAMWORK
284
24.02.2007 17:03:06 Codes: Memos Added (Codes): Variables Added: Texts: articles\communication theories Variable Values Updated: theory new name copy year gender Memos Added: Coded Segments Added: media\cold - hot (Paragraphs: 2-5) scholars\Carey (Paragraphs: 6-6) communication\ritual (Paragraphs: 7-10) media\learn (Paragraphs: 7-10) communication\information (Paragraphs: 7-10)
Fig. 20-5: The protocol file of a TEAMWORK IMPORT

20 ORGANIZING TEAMWORK
285
20.4 Exchange of Code References, Memos, and Variables for Text Groups or the Entire Project
With MAXQDA 2007, you may exchange code references, memos, and attributes on the basis of individual texts now also for entire text groups or even the entire project. You should be careful when using this function, since a lot of things will happen and it is difficult to maintain an overview.
It is highly recommended to backup your project before you start the import procedure.
When exchanging data on the level of text groups, the same rules will apply as with individual texts. To start the import function, click not the individual text but the text group or the root of the DOCUMENT SYSTEM, in case you want to import data for different text groups. Then choose the team-work option from the context menu.
As soon as the import procedure has been started, a dialog sheet appears. Here you can link source and target files. MAXQDA presents a list of correspondences, according to text names, that may be modified by the user. Double-clicking the name of the target files opens a list where you can choose between all the text names of the selected text group.

20 ORGANIZING TEAMWORK
286
Fig. 20-6: TEAMWORK IMPORT – options for text groups

20 ORGANIZING TEAMWORK
287
20.5 Merging MAXQDA Projects
Another teamwork feature in MAXQDA is the option to merge two projects. The procedure is called MERGE PROJECTS and causes a project to be added to an opened project:
1. Open the larger of the two projects you want to merge.
2. Click on the menu option PROJECT and choose MERGE PROJECTS from the pull-down menu.
3. An “Open File” dialog box opens. Select the project file that you want to add.
MAXQDA then starts the merging procedure, which may take some time, depending on the size of the two projects.
Project A and Project B must have different project names. The merge function is carried out in the following manner:
All the text groups and their text documents of Project B are inserted in the DOCUMENT SYSTEM of Project A.
All memos of Project B are inserted in the List of Memos of Project A.
All the codes of the two Projects are merged. In the case that a code or subcode does not ex-ist in the LIST OF CODES of Project A, this code is created and inserted in its place in the list.
All attributes and attribute values are merged.
These rules may not seem too complicated. But many questions will arise when you use the func-tion, e.g.
What happens if a text group with the same name already exists in the opened project? The text group will be imported, too. You may rename or remove the text group later.
For all variables that exist in Project A but not in Project B, MAXQDA will define new vari-able values for Project B. Numerical values will be set to zero, string values to blanks.

20 ORGANIZING TEAMWORK
288
All variables existing in Project B but not in Project A, will be created and the variable values for Project A will be set to zero (numeric variables) or blanks (string variables).
If variables with the same name but different variable types exist in the two project files, then both variables will be maintained. When the import procedure is complete, two vari-ables will exist in the resulting project file.
21 UTILITIES: EXPORTING, PRINTING, REPORTS, INDEX, STATISTICS
289
21 Utilities: Exporting, Printing, Reports, Index, Statistics
21.1 Projects: Creating, Deleting, and Backing Up
Creating a New Project:
1. Click the menu option PROJECT.
2. Click NEW PROJECT.
3. Type in a name and choose a folder on your hard drive where you want to save the project.
The project file (with the extension .mx3) holds all of your project’s texts, codes, memos, and attrib-utes.
You should back up this .mx3 file regularly, not only on your hard drive, but also to external media such as CD-ROMs or USB memory sticks.
There is no limit to the number of projects you can create.
Deleting Projects
Deleting a project is accomplished in the same way as deleting any other file – with Windows Ex-plorer, for example. Undoing a deletion is of course also done in Windows; MAXQDA itself does not restore deleted projects.

21 UTILITIES: EXPORTING, PRINTING, REPORTS, INDEX, STATISTICS
290
Renaming Projects
If you want to give another name to a project, use Windows Explorer. MAXQDA does not have a renaming function.
Backup Projects
You will find the option BACKUP PROJECT in MAXQDA’s Project menu. The option is similar to the “Save as” command in Windows programs, but in addition to the normal save procedure, MAXQDA checks if there are deleted items in your project file and removes them completely.
Thus it is recommended that you use this function regularly. If you have deleted a number of texts, codes, and memos during your last work session, the resulting project file will often be smaller.
After successfully backing up your data you should continue your work with the backup version. Click OPEN PROJECT to load the project into your workspace.
21.2 Cleaning Up Your Project
If you delete a text of your project or remove a code or a memo, all these elements stay physically in your database since it would take too much time to clean up your project every time you make modifications to your data.
Thus, a lot of garbage may be collected in your project. Therefore, after deleting many texts, you should take a minute to clean up. Start the function BACKUP PROJECT from the main menu option Pro-ject.
The backup function will remove all elements that have been deleted since your last backup. Usu-ally, the resulting project file will be much smaller than the previous project file. Now you should also copy the new file to your USB memory stick or to a CD-ROM.

21 UTILITIES: EXPORTING, PRINTING, REPORTS, INDEX, STATISTICS
291
21.3 Text Groups and Text Sets: Renaming and Deleting
MAXQDA allows you to rename text groups and text sets. Renaming a text group only modifies its label and has no influence on the codes, memos, or attributes saved together with it.
The RENAME option is available from the shortcut menu that comes up when you right-click on a text group or text set.
Deleting a text group is quite a radical operation, as all texts within the selected text group as well the attached codes and memos are deleted. The DELETE option is also a part of a text group’s short-cut menu. MAXQDA will ask you to confirm the command before the entire text group is removed from the project.
Careful! There is no “Undo” for the “Delete Text Group” function.
Deleting text sets is accomplished in the same way, but to delete a text set is a harmless operation compared to deleting text groups. Text sets are only temporary sets of (individual) texts, which are part of (normally different) text groups. To delete a text set does not cause any of the actual texts to be deleted. Only a link to the text document is removed. You could rebuild the same text set again if you wanted.
21.4 Text Documents: Renaming and Deleting
Individual text documents can also be renamed or deleted. To modify a text name, complete the fol-lowing:
Click with the right mouse button on the text in the DOCUMENT SYSTEM that you want to re-name.

21 UTILITIES: EXPORTING, PRINTING, REPORTS, INDEX, STATISTICS
292
Select RENAME TEXT from shortcut menu.
Type in the new name.
The DELETE TEXT option is similar, but MAXQDA will ask you to confirm the command before the text is deleted.
Careful! There is no “Undo” for the “Delete Text” function.
MAXQDA will delete not only the text but also all of the codes, memos, and attributes attached to the text. Therefore, if you want to keep the ideas written down in your memos, you have to copy them to another memo belonging to another text document in the DOCUMENT SYSTEM. Alternatively, you could create a “dummy text,” i.e. an empty text, and attach the memos to empty text lines there.
21.5 Reports and Documentation
When working with large projects and extensive code systems, it is important to write reports in or-der to keep an overview of your work, particularly if many researchers are working together in a team.
MAXQDA offers a variety of report options:
The Project menu contains the options EXPORT and PRINT: reports of the four main windows can be opened there. If you choose the Export, option the report is written to a file, usually in Rich Text Format. You can later open the file in Word and add additional formatting like headers and footers.
Both functions allow you to make a report of - the DOCUMENT SYSTEM - the CODE SYSTEM

21 UTILITIES: EXPORTING, PRINTING, REPORTS, INDEX, STATISTICS
293
- the text currently opened in the TEXT BROWSER (in which case the attached codes are in-cluded) - the RETRIEVED SEGMENTS together with the assigned memos.
In the windows DOCUMENT SYSTEM and CODE SYSTEM four different overviews are available: the OVERVIEW OF CODED SEGMENTS, the OVERVIEW OF MEMOS, the OVERVIEW OF LINKS and the OVERVIEW OF ATTRIBUTES. Each of these can be displayed on your screen or exported as a table. The dis-played table can be printed by copying it to the Windows clipboard, pasting it into an Word document, and printing it from there. These overview functions produce reports at the level from which they had been selected. When you right-click on a text document and choose OVERVIEW OF CODED SEGMENTS for example, all coded segments belonging to that particular text are displayed. Doing the same with a text group displays all the codes assigned to all the texts of that particular group.
The menu option CODES also offers report functions. You can produce a complete list of all the text segments to which codes are assigned, or a list of the frequency of all codes in the project.
The overview options now allow you to produce reports in HTML format as well. This format is clear and well structured and can be printed out according to your needs.
21.6 Project Overview
The following describes how to find and print or export general information about your project.
How many texts, coded segments, codes, and memos does the project contain?
1. Click on Project from the menu bar.
2. Choose Print.

21 UTILITIES: EXPORTING, PRINTING, REPORTS, INDEX, STATISTICS
294
3. Select the option PROJECT INFORMATION.
MAXQDA prints a report in the following format:
MAXQDA 01.03.2007
Project Information Text Groups 1 Texts 4 Attributes 5 Sets 0 Links 0 Codes 50 Coded Text Segments 223 Memos 11
Fig. 21-1: Project Information
Which text groups including which texts does the project contain?
1. Click on Project from the menu bar.
2. Choose Print if you want to print the report or EXPORT if you want to create an RTF file with the report.
3. Select the option DOCUMENT SYSTEM.
If you choose EXPORT, you must select a file name.
The printout of the DOCUMENT SYSTEM appears as follows:

21 UTILITIES: EXPORTING, PRINTING, REPORTS, INDEX, STATISTICS
295
Text Groups articles communication theories McLuhan and senses global hopes interviews interview1 interview2 interview3 interview4 Flusser-Peternak documents literature new references Sets
Fig. 21-2: Printout of the DOCUMENT SYSTEM
Which individual texts does the project contain? When were they imported, and how many text segments in these texts have been coded?
1. Click on ATTRIBUTES from the menu bar.
2. Select the option EDIT.
3. The table of attributes appears. Each text is represented by one row in the table. You can se-lect which attributes to print or export by clicking with the right mouse button on one of the column headers of the table, choosing “Select Fields,” and selecting the attributes you need. Clicking on ONLY SYSTEM FIELDS limits the table to the text name, the import date, the number of coded segments, the number of memos, the author, and the file size.
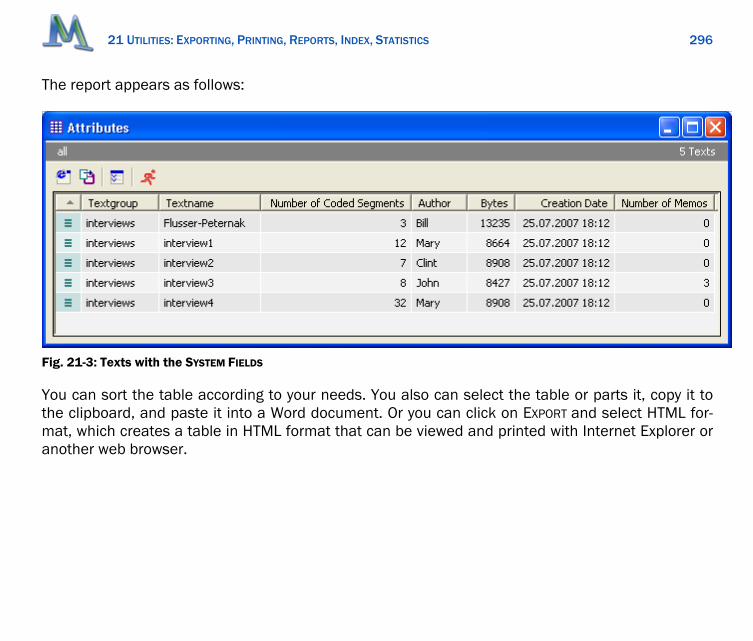
21 UTILITIES: EXPORTING, PRINTING, REPORTS, INDEX, STATISTICS
296
The report appears as follows:
Fig. 21-3: Texts with the SYSTEM FIELDS
You can sort the table according to your needs. You also can select the table or parts it, copy it to the clipboard, and paste it into a Word document. Or you can click on EXPORT and select HTML for-mat, which creates a table in HTML format that can be viewed and printed with Internet Explorer or another web browser.

21 UTILITIES: EXPORTING, PRINTING, REPORTS, INDEX, STATISTICS
297
Fig. 21-4: The text, creation date and number of coded text segments as an HTML file
When was a particular text imported and how many text segments in this text have been as-signed a code?
1. Select the text in the DOCUMENT SYSTEM and click on it with the right mouse button.
2. Choose the option OVERVIEW OF ATTRIBUTES.
3. The table of attributes appears, containing one row for the selected text. You can select which attributes to print or export by clicking with the right mouse button on one of the col-umn headers of the table, choosing “Select Fields” and selecting the attributes you need.
The report looks like Fig. 16-3 except that the table contains only one row.
Which codes and subcodes does the project contain?
1. Choose the option PROJECT in the menu bar.
2. Choose Print if you want to print the report or EXPORT if you want to create an RTF file with the report.
3. Choose CODE SYSTEM.

21 UTILITIES: EXPORTING, PRINTING, REPORTS, INDEX, STATISTICS
298
If you choose EXPORT, you must select a file name.
The print out of the CODE SYSTEM apepars as follows:
Code System media learn simultaneous world. characteristics cold - hot nature communication ritual information Sets
Fig. 21-5: Printout of the CODE SYSTEM
If you wish to have a report similar for the CODE SYSTEM window you will need to take a screen shot:
Press the “Print” key (located on your keyboard to the right of F12), open a Word document (or graphics program), and select EDIT > PASTE. The MAXQDA screen appears as a graphic.
Which codes have been attached to segments of one particular text?
The option OVERVIEW OF CODED SEGMENTS displays a table of the coded segments.
To view the codes of one particular text:
1. Click on the text in the DOCUMENT SYSTEM window with the right mouse button.
2. Choose the option OVERVIEW OF CODED SEGMENTS from the shortcut menu.
3. The table of coded segments appears. You can sort the table according to your needs. For instance, you can sort it by code in order to see when and how often particular topics were

21 UTILITIES: EXPORTING, PRINTING, REPORTS, INDEX, STATISTICS
299
treated during an interview. You also can sort it according to the “Begin” column, which gives you a list of the material in the order in which it was treated during the interview.
You can select the table or parts of the table, copy it to the clipboard, and paste it into Word or Ex-cel.
Fig. 21-6: Overview of the coded segments of the selected text
21 UTILITIES: EXPORTING, PRINTING, REPORTS, INDEX, STATISTICS
300
Printing out a particular text and the codes assigned to it
Sometimes you might want to obtain more detailed information about the coded segments belong-ing to a particular text than an overview table can give you. For example, perhaps you want to check if the segments are correctly coded according to the definition of your codes and subcodes.
You could of course check that on the screen. But maybe you are tired of looking at a computer screen all the time and would prefer to read the text on paper next to a code definition manual.
To print out the text document together with the codes assigned to it, complete the following:
1. Select the text in the DOCUMENT SYSTEM window and open it in the TEXT BROWSER (double-click, or right-click and choose OPEN TEXT).
2. Click on the Print icon in the toolbar of the TEXT BROWSER or select the menu option PROJECT > PRINT and then the option TEXT BROWSER. You will be asked whether or not to print the codes and memos, too. In the above situation you would, of course, want to include them.
This prints the text document. The symbols for the codes appear to the left of the text. If you have Adobe Acrobat installed, you can create a PDF file, in which the code visualizations are displayed as well, as shown in the following figure:

21 UTILITIES: EXPORTING, PRINTING, REPORTS, INDEX, STATISTICS
301
Fig. 21-7: Printout of the text with the attached code symbols
Which individual memos does the project contain?
The Memo-Manager will give you this information:
1. Click Memos in the menu bar and then select Memo System, or click on the Memo System icon in the toolbar.
2. A table containing all text memos and code memos appears.
3. You can switch the different columns of the table on and off. You can also sort the table, e.g. according to the type of memo.
Fig. 21-8: Button for the MEMO SYSTEM
21 UTILITIES: EXPORTING, PRINTING, REPORTS, INDEX, STATISTICS
302
The table can be exported (as a TXT file in tab-delimited format) or copied to the Windows clipboard and pasted in another program.
Which memos have been assigned to a text or a group of texts?
1. Select the text or the text group in the DOCUMENT SYSTEM.
2. Choose the option OVERVIEW OF MEMOS from the shortcut menu.
3. A table containing the text memos appears. You can open or close the different columns of the table. You can also sort the table, for example according to the type of memo.
The table can be exported (as a TXT file in tab-delimited format or as HTML file) or copied to the Windows clipboard and pasted in another program.
Which memos are attached to a particular code?
1. Right-click on the code in the CODE SYSTEM window.
2. Select the option OVERVIEW LINKED MEMOS.
3. A table containing the linked memos will appear. The different columns of the table can be opened or closed, or you can sort the table, according to memo types, for example.
The table can be exported (as a TXT file in tab-delimited format or as HTML file) or copied to the Windows clipboard and pasted in another program.
21.7 Index of All Coded Segments
In MAXQDA, it is possible to list all of the coded segments of a project in a table.
Select INDEX OF CODED SEGMENTS from CODES in the menu bar.
21 UTILITIES: EXPORTING, PRINTING, REPORTS, INDEX, STATISTICS
303
The following table appears. It contains as many rows as the total number of text segments that have been assigned codes. The total number of coded segments, displayed in the upper right hand corner of the table, will be the same as the number of coded segments displayed in the DOCUMENT SYSTEM and in the CODE SYSTEM.
If you click with the left mouse button, on any of the coded segments listed in the table, the corre-sponding text will be loaded into the TEXT BROWSER.
If you click with the right mouse button a shortcut menu comes up, which has options for removing the code or modifying the weight score.
The table can be sorted according to entries in the different columns. You can also search in the Preview field. If you begin your search string with an asterisk “*,” MAXQDA searches the whole preview field for the string – otherwise the string must be at the beginning of the preview to be found.
The table can be exported (as a TXT file in tab-delimited format or as HTML file) or copied to the Windows clipboard and pasted in another program.

21 UTILITIES: EXPORTING, PRINTING, REPORTS, INDEX, STATISTICS
304
Fig. 21-9: Index of Coded Segments
21.8 Frequency of Codes
MAXQDA can compute how often a code has been attached to text segments in a text or text group. The results are shown in a table called the FREQUENCY OF CODES.
Choose CODES in the menu bar and then FREQUENCY OF CODES or click the button in the toolbar.
MAXQDA creates the following table, which contains as many rows as codes and subcodes have been defined.

21 UTILITIES: EXPORTING, PRINTING, REPORTS, INDEX, STATISTICS
305
Fig. 21-10: Frequency of Codes
The column “All Coded Segments” contains the number of segments that are assigned each code in the entire project. Clicking on the column header sorts the table according to how often each code is assigned to segments in the entire project. Thus, you can see which code was used the most, which one second most, and so on.
The column “Active Coded Segments” contains the number of segments in the active texts that are assigned the codes. This allows you to compare different texts or text groups: move the mouse cur-sor to the DOCUMENT SYSTEM and activate different texts or text groups. The frequency table will be refreshed each time, and you can compare the results.
Like other tables, this table can be exported (as a TXT file in tab-delimited format or as HTML file) or copied to the Windows clipboard and pasted in another program.

22 EXPORT/IMPORT FEATURES
306
22 Export/Import Features
22.1 Overview
MAXQDA offers a variety of options for exporting data to other software programs like SPSS or Mi-crosoft Office programs. The following table gives an overview of the different options.
Type of Data Option in MAXQDA Format
Single text document PROJECT > EXPORT> TEXT Only the text is exported, without information about coded segments. Or: Select the text using CTRL+A in the TEXT BROWSER.
RTF
Selected text passage Select text in the TEXT BROWSER window, copy to the Windows clipboard (STRG+C or EDIT > COPY), and then paste in the program (STRG+V or EDIT > PASTE), or use the drag-and-drop function.
Windows clipboard
One or more coded text seg-ments
Select text segment(s) in the RETRIEVED SEGMENTS window and copy and paste using the Windows clipboard.
Windows clipboard
All text segments in the window RETRIEVED SEGMENTS
PROJECT > EXPORT> RETRIEVED SEGMENTS
or select OVERVIEW OF SEGMENTS from the shortcut menu in the RETRIEVED SEGMENTS
RTF HTML

22 EXPORT/IMPORT FEATURES
307
window. Segments can be exported in RTF or HTML format.
Codes of one particular text (Teamwork)
Shortcut menu (right-click) of a text > EXPORT TEAMWORK
MEX (internal format)
Memos Memo System > EXPORT RTF or HTML
Memos of a selected text (Teamwork)
Shortcut menu (right-click) of a text > EXPORT TEAMWORK
MEX (internal format)
Text of a selected memo Copy from Memo System and paste using the Windows clipboard.
Windows clipboard
Table of Attributes (Export) ATTRIBUTES > EXPORT TXT (tab-delimited) or HTML
Table of Attributes (Import) ATTRIBUTES > IMPORT TXT (tab-delimited)
Table of Coded Segments CODES > INDEX OF CODED SEGMENTS > EXPORT or select the table and copy and paste using the Windows clipboard
TXT (tab-delimited), HTML or Windows clipboard
Table of Code Frequencies PROJECT > EXPORT > MATRIX OF CODE FREQUENCIES
TXT (tab-delimited)
Data of the CODE MATRIX BROWSER Code Matrix Browser > EXPORT TXT (tab-delimited)
Data of the CODE RELATION BROWSER
Code Relation Browser > EXPORT TXT (tab-delimited)
Fig. 22-1: Export and Import Options

22 EXPORT/IMPORT FEATURES
308
The features for exporting and importing the attributes table will be explained in more detail in the following section.
22.2 Exporting the Table of Attributes
The attributes belonging to the texts are not only used for saving standardized information associ-ated with each text (e.g. the names of interviewers, or the gender of interviewees), but can also be used as a way of selecting texts to retrieve (Activation by Attributes). Evaluating quantitative attrib-utes, however, is only possible with the help of a statistics program. MAXQDA does not offer any statistical analysis except for the frequency of codes.
To export the attributes table, select the option EXPORT from the menu ATTRIBUTES and enter a file name.
MAXQDA saves the table of attributes in tab-delimited format, with an end-of-line character (<Re-turn> keystroke) inserted at the end of each row. In SPSS, this file can be imported with FILE > OPEN. You will need to select the file type .”txt” in the dialog box. All attribute names that are not legal names for SPSS (e.g. names with more than 8 characters) will be replaced by SPSS default attribute names. Importing the table into an Excel worksheet or an Word document is easier, however, since you only need to copy-and-paste it by means of the Windows clipboard.
If you are planning on exporting your project to SPSS, you should choose attribute names with no more than eight alphanumeric characters (blanks and special symbols may not be used in SPSS).
22.3 Importing a Table of Attributes
Importing a table of attributes can be useful in different situations, for instance:

22 EXPORT/IMPORT FEATURES
309
When analyzing answers to open-ended questions in a questionnaire together with the quan-titative data of the study. In this case, the quantitative data matrix can be imported from an SPSS file and you avoid the waste of time caused by typing in the data again.
When a research team has divided up the work of typing in attribute values and now wants to bring different people’s work together.
When statistical analysis of an exported MAXQDA table has been carried out and you want to use the results of the analysis, such as factor scores or cluster codes, in MAXQDA, per-haps in the ACTIVATION BY ATTRIBUTES procedure.
To start the Import procedure:
1. Choose ATTRIBUTES from the menu bar.
2. Click on IMPORT.
3. Select the file containing the table to be imported in the Windows “Open File” dialog box.
The input file must contain the two attributes “Textgroup” and “Textname” (or ‘textgroup’ and ‘textname’). MAXQDA will use these attributes to determine which data belongs to which text document.
The data will only be imported if the text group and the text name in the imported table match a text group and text name in the DOCUMENT SYSTEM exactly.
If you have already created attributes in your project and attempt to import a table of attributes, MAXQDA proceeds as follows:
All new attributes, that is, attributes contained in the import matrix but not in the project, will be created.
Attributes that already exist in the project will be updated, which means that the data at-tached to them will be overwritten by the data from the import matrix.

22 EXPORT/IMPORT FEATURES
310
22.4 Exporting the Overview of Coded Segments
Exporting the table of CODED SEGMENTS can be useful if you want to complete a classical quantitative content analysis. MAXQDA exports the table as a TXT file in tab-delimited format or as HTML file. Thus, the data can be imported in SPSS or Excel using the same procedure as used to import a ta-ble of attributes (see chapter 9.8).
The table of coded segments is shown in Fig. 22-2.
Fig. 22-2: Table of Coded Segments

22 EXPORT/IMPORT FEATURES
311
This table is available at different levels: for the entire project, for a selected text group, or for a se-lected text document. The table for the entire project is available in CoDES > INDEX OF CODES. The ta-ble has as many rows as there are text segments that have been assigned codes.
The field names (column headers) of the matrix have the following meanings:
Text Contains the complete name of the text as in MAXQDA’s DOCUMENT SYSTEM (format: “text group\text name”)
Code Contains the code and subcode (format: “code\subcode”)
Begin Number of the paragraph in which the coded segment starts
End Number of the paragraph in which the coded segment ends
Weight Score Weight score of the coded segments
Preview The first words of the segment (up to 64 characters)
Author Person who created the coded segment
Creation Date Date and time of creation
Comment A comment for this segment
Click on the Export button in the lower left corner of the table to start the export procedure. A file name is required. You should close the “Preview” field since it is not needed in a statistics program (the SELECT FIELDS option is opened by right-clicking on any column header).
In SPSS, you have a variety of options for analyzing the matrix, for instance the analysis of code se-quences, code patterns, or the correlation of codes.

22 EXPORT/IMPORT FEATURES
312
22.5 Exporting the Code System
It is possible to export the entire code system of one project and import it into another project. This is useful when you want to make use of a code system that you developed in one project in another project, thus sparing yourself the work of typing in all the codes again.
Right-click on “Code System,” the root of the code tree, in the CODE SYSTEM window and se-lect EXPORT CODE SYSTEM.
This will save the code system in a special format as a file with the extension .”mtr.” You can then import this code system into another MAXQDA project with the complementary IMPORT CODE SYSTEM function.

23 SPECIALS AND OPTIONS
313
23 Specials and Options
23.1 Logbook
The LOGBOOK is a new feature in MAXQDA 2007 that enables you to write a research diary. The term logbook is well-known from seafaring – where the skipper writes a daily report of the events and the situation on board into this book. The function of MAXQDA’s logbook is similar: you should write down all critical decision and plans concerning the project and your analysis.
To start the LOGBOOK function, click on the Logbook icon in the main toolbar.
Fig. 23-1: Main toolbar with icon to start the LOGBOOK
The logbook itself has a little toolbar. The symbols are self-explanatory:
You may start a new entry.
You may print the logbook or export the logbook as an RTF file.
Or you may select a font type and font size.
You should always click the NEW ENTRY button before you start typing. When NEW ENTRY is chosen MAXQDA inserts the name of the user, the current date and time; thus, you will always know when you have written the text.

23 SPECIALS AND OPTIONS
314
23.2 Search for a New Update
This is an automatic function that checks the information about new updates on the MAXQDA server. If a version newer than the installed version is found, you will be asked to update. If you agree, the update file will be downloaded and the newer version will be installed automatically.
Since MAXQDA is a rather small program with less than 20 MByte, the download procedure should not take too much time. A few minutes would be the maximum in normal situations. But the exact time is unpredictable since it depends completely on the speed of your Internet connection.
You will find the automatic update function in the main menu option HELP („?“).
23.3 General Preferences
When selecting the option PROJECT > OPTIONS from the main menu, you may set some general pref-erences for the program. Some of the chosen options may require to restart MAXQDA.

23 SPECIALS AND OPTIONS
315
Fig. 23-2: Options window
The following options are available:
23 SPECIALS AND OPTIONS
316
No Erasing without Confirmation
This option is set by default and will cause MAXQDA to ask for confirmation every time you want to delete elements of the project like a text, a text group, or a code.
It is not recommended to switch off this option, but there may be situations when it’s not conven-ient to confirm every deletion of objects.
No Double-entry of the Same Code Name
If this option is set, MAXQDA will not allow you to choose the same code name twice. This also concerns subcodes; thus, two codes cannot have the same subcodes.
Do Not Display Code Frequencies in CODE SYSTEM
The default setting is to display how often a code already has been applied to text segments in the CODE SYSTEM. Some users don’t like to see the numbers, so they can switch it off with this option.
Including Subcodes in Matrix of Code Frequencies
The option PROJECT - EXPORT- MATRIX OF CODE FREQUENCIES produces a data table that contains the number of coded segments for each code for all texts. The matrix can then be analyzed with SPSS or other statistics packages, for instance you may compute a cluster analysis or factor analysis. If you set this option, the code frequencies will be aggregated on the highest level of the codes. Thus, the frequencies of all subcodes will be summarized and assigned to their main code.
Import Objects (Diagrams)
Graphics, in particular photographs, need a lot of space when saved on your hard disk. To avoid that MAXQDA’s project files get bigger and bigger, this option prevents MAXQDA from importing

23 SPECIALS AND OPTIONS
317
objects. All OLE objects found will be skipped. The option only effects the import of text files. If you insert OLE-objects using the Windows clipboard they will still be imported.
All User Settings Will Be Set to Default the Next Time You Exit MAXQDA
This is an option that may help if MAXQDA does not work as you expect it to, but you have no idea where to change that strange behavior. Simply set this option, close MAXQDA, and restart the pro-gram.
DOCUMENT SYSTEM and CODE SYSTEM on the Left Side of the Screen
Some users prefer to see the text on the left side and the CODE SYSTEM on the right side of the screen when coding text. If you choose this option you have to restart MAXQDA to apply the new screen Layout.
Large Font
The font size of the texts displayed in the TEXT BROWSER may easily be changed, but not the font size of the objects displayed in the other windows of MAXQDA. It is necessary to restart MAXQDA to apply this option.
Default Weight
Here you choose the default weight score that is used by MAXQDA when coding text.
Number of Codes in Quick List
The quick list of codes that is displayed in the code bar is set to 20 by default. If you would like more or fewer codes to be displayed, simply change the value in this dialog field.

24 APPENDIX
318
24 Appendix
24.1 List of Keyboard Shortcut
The following shortcuts are available in MAXQDA.
CTRL + T Creates a new text in the DOCUMENT SYSTEM, opening the text in the TEXT BROWSER. The TEXT BROWSER is set to EDIT MODE, and the cursor is positioned at the begin-ning of the text.
Strg + Shift + T Imports Text(s) into the DOCUMENT SYSTEM.
ALT + N Creates a new code in the CODE SYSTEM.
CTRL + W When text has been selected in the TEXT BROWSER, this causes a dialog box to ap-pear, in which the user can enter a new code.
Alt + l Codes a selected piece of text with the code last used.
CTRL + Q Codes the selected text in the TEXT BROWSER with the code that is visible in the codes toolbar.
CTRL + L Creates a new text link in the TEXT BROWSER, letting you link text passages to one another with a hyperlink.
CTRL + I In-vivo codes the selected word or words in the TEXT BROWSER.
CTRL + V Creates a new attribute in the attribute table, when the attribute window is open.
CTRL + B Opens the CODE MATRIX BROWSER (CMB).
CTRL + O Opens the CODE RELATION BROWSER (CRB).

24 APPENDIX
319
24.2 How to Manage Problems
Problem Problem Solution
MAXQDA windows like CODE SYSTEM or DOCUMENT SYSTEM are not displayed properly.
If you cannot correct the problem by closing and re-opening the window or by restarting MAXQDA, then the problem is likely being caused by misleading information in the “MAX-qda2007.ini” file. Contact the MAXQDA support to solve the problem.
You are not able to import a text into the DOCUMENT SYSTEM
Maybe the text is still opened in another program.
You have imported a text but the text is not displayed
You have to open the text! Double-click on the text in the DOCUMENT SYSTEM window.
You want to import a text but a message from MAXQDA says that it cannot be imported.
The text is being used by another program! Switch to that pro-gram, close the file, and try to import it again.
Texts are not displayed in the DOCUMENT SYSTEM or Text Group
You might have switched off a branch of the DOCUMENT SYSTEM. Click on the little plus symbol left of a text group to display all the text documents that belong to the group.
Text Retrieval: you have activated text documents and codes but the window RETRIEVED SEGMENTS remains empty; no coded segments are displayed.
Check if you have chosen the appropriate mode of analysis (Menu Analysis). Perhaps you have accidentally chosen a func-tion like INTERSECTION or FOLLOWED BY. Check if the weight score option is switched on. If it is, you should switch the function off.

24 APPENDIX
320
Codes, which you are sure exist, are not displayed in the CODE SYSTEM.
Maybe you have switched off a branch of the CODE SYSTEM. Click on the little plus symbol left of a code to display all the subcodes that belong to the code.
You have made a mistake and coded a segment that you did not want to code.
Click on the UNDO button in the code bar. A list of the last 20 codes that were assigned will appear. The last code assigned is the first in the list. Simply click on it to undo the code as-signment. Alternatively, you can click with the right mouse button on the Code symbol in the gray area to the left (or right) of the text in the TEXT BROWSER. Then select DELETE from the shortcut menu.
More tips can be found in the HELP menu and also in the support section of MAXQDA’s website (www.maxqda.com). If you are having problems with MAXQDA, don’t hesitate to contact our sup-port service. E-mails can be sent to [email protected].
24.3 Technical Data
Hardware and Software Requirements
Processor: Pentium III or higher, minimum 700 MHz
Operating system: Windows 2000, Windows XP
Memory cache: minimum 256 MB
Screen: minimum 1024 x 768

24 APPENDIX
321
Program Limits
MAXQDA itself only has a few fixed limits. It is rather the amount of memory your computer has and the free space on your hard drive that set the limits. The more RAM your computer has, the more text you can retrieve during a retrieval procedure. The faster your CPU, the faster tasks are accomplished. MAXQDA is based on modern database technology. Thus, normally the program is fast, even if you work with large projects of 5 MB or more.
MAXQDA’s limits
Size of a text document: no fixed limit, but a text size of more than 1 MB is not recommended
Size of a coded segment: maximum 64 KB
Text format: RTF
Number of projects: no fixed limit
Number of text groups: no fixed limit
Number of texts: 99.999
Number of codes: no fixed limit
Levels of the code system: maximum 10
Search strings: generally 64 characters
Numeric data: 10 digits
Number of attributes: no fixed limit, but more than 250 attributes is not recommended
24 APPENDIX
322
File Management
The program maxqda2007.exe will be copied from the setup program into the folder “Program Files\ MAXqda2007\” or into a folder specified by the user in case the default folder name is not accepted.
Subfolders of MAXQDA 2007 are the folders “Examples” and “Manuals.” In “Manuals/Eng,” you will find the manuals in English language. All manuals are in PDF format and can be printed out easily.
MAXQDA uses the following files and file types:
maxqda.ini .ini file
.mx3 MAXQDA 2007 project file
.mx2 MAXQDA 2 project file
.m2k project file from older version of MAXQDA
.loa Logical conditions files (from the ACTIVATION BY ATTRIBUTES procedure)
.sea Saved search specifications files (from the TEXT SEARCH procedure)
.mex Exchange files for team work (MAXQDA Export file) containing the codes and their references, and the memos assigned to text documents
.txt Exported text files (from tables like OVERVIEW OF ATTRIBUTES or OVERVIEW OF CODES)
.rtf Exported text files containing memos, coded segments, etc, in RTF format
.mtr Exported Code trees