matrox rt.x100 xtreme pro · 3 style conventions of this manual other documentation in addition to...
TRANSCRIPT

10884-301-0100
User Guide SupplementApril 19, 2004
Matrox RT.X100 Xtreme Pro

Acrobat® Reader Copyright © 1987-2004 Adobe Systems Incorporated. All rights reserved. Adobe and Acrobat are trademarks of Adobe Systems Incorporated, which may be registered in certain jurisdictions.
• (English) All other nationally and internationally recognized trademarks and tradenames are hereby acknowledged. • (Français) Toutes les autres marques et tous les autres noms déposés reconnus nationalement ou internationalement sont également reconnus par les présentes. • (Deutsch) Alle sonstigen national und international bekannten Warenzeichen und Produktnamen werden hiermit anerkannt. • (Italiano) Eventuali altri nomi di prodotto menzionati in questo manuale sono dei proprietà di rispettivi produttori. • (Español) Por medio del presente se reconocen todas las demás marcas y nombres comerciales reconocidos a nivel nacional e internacional.
Copyright © 2004 Matrox Electronic Systems Ltd. • (English) All rights reserved. • (Français) Tous droits réservés. • (Deutsch) Alle Rechte vorbehalten. • (Italiano) Tutti i diritti riservati. • (Español) Reservados todos los derechos.Disclaimer Matrox Electronic Systems Ltd. reserves the right to make changes in specifications at any time and without notice. The in-formation provided by this document is believed to be accurate and reliable. However, no responsibility is assumed by Matrox Electronic Systems Ltd. for its use; nor for any infringements of patents or other rights of third parties resulting from its use. No license is granted under any patents or patent rights of Matrox Electronic Systems Ltd.Unauthorized recording or use of broadcast television programming, video tape, or other copyrighted material may violate copyright laws. Matrox Electronic Systems Ltd. assumes no responsibility for the illegal duplication, use, or other acts that infringe on the rights of copyright owners.
Matrox Electronic Systems Ltd.1055 St. Regis Blvd., Dorval, Quebec, Canada H9P 2T4Tel: (514) 685-2630 Fax: (514) 685-2853 World Wide Web: www.matrox.com
Trademarks • Marques déposées • Warenzeichen • Marchi registrati • Marcas registradasMatrox Electronic Systems Ltd. ....................................... Matrox®, RT.X100 Xtreme™, RT.X100 Xtreme Pro™, X.tools™,
XtremePreview™Adobe Systems Inc. ........................................................ Adobe®, Encore DVD®, Photoshop®, Premiere®, Premiere Pro®
Canon Inc........................................................................ Canon®
Microsoft Corporation...................................................... Microsoft®, DirectShow®, Windows®, Windows Media®
Panasonic (Matsushita Electric Industrial Co.).................. Panasonic®, DVCPRO™Sonic Solutions ............................................................... Sonic Solutions™, Sonic™, DVDit!® Sony Electronics Inc ........................................................ Sony®, DVCam™
Contents
Chapter 1Using this SupplementAbout this guide ...............................................................................2
Style conventions of this manual .....................................................2
Chapter 2Defining Your Adobe Premiere Pro Settings
Using Adobe Premiere Pro with Matrox RT.X100 Xtreme Pro .........6
A note about running other programs with Adobe Premiere Pro....6
Loading project presets...................................................................6
Setting up your scratch disks .......................................................... 7
Defining your General settings......................................................... 7Selecting your NTSC setup level for analog video..................................8Selecting your codec options for rendering ......................................... 10Selecting your DV-1394 settings ........................................................... 11Selecting your realtime effect settings................................................. 13
Defining your Video Rendering and Audio settings........................ 15
Defining your Capture settings ...................................................... 15
Performing a Premiere Pro export to disk..................................... 19
Performing a Matrox realtime export to disk.................................20
Exporting your Timeline to DV tape ...............................................22Preparing your tapes for recording......................................................22Obtaining a frame-accurate export to tape .........................................22Exporting to DV tape with device control.............................................22Defining your export to tape options ...................................................25
Creating a production in 16:9 format .............................................26
Chapter 3Setting Up Realtime Effects with Adobe Premiere Pro
How to apply a Matrox video transition in Adobe Premiere Pro ...30
How to apply a Matrox video effect in Adobe Premiere Pro .........30
How to organize your Matrox video effects in custom bins .......... 31
A note about nested sequences.................................................... 31
Selecting your speed control method............................................ 31
ii
About Adobe Premiere Pro’s fixed effects.................................... 32Applying a Motion effect......................................................................32Applying an Alpha Adjust effect ...........................................................32
Overview of the color match effect............................................... 34
Creating a color match effect ....................................................... 35Overview of the color maps.................................................................36Performing an auto balance on your target clip...................................36Matching colors from a reference clip to a target clip ......................... 37Fine-tuning your color match effect.....................................................39Using the transport controls ................................................................40
Overview of the color pass effect ..................................................41
Creating a color pass effect.......................................................... 42Viewing and selecting colors ...............................................................43
Creating a color replace effect ..................................................... 45Viewing and selecting colors ............................................................... 47
Overview of the time code effect .................................................. 49
Creating a time code effect .......................................................... 50Customizing your time code effect using the Preview Window ........... 51
What is XtremePreview? ............................................................... 52Adaptive degradation ..........................................................................52Rendering while previewing the Timeline.............................................52
RT.X100 Xtreme Pro realtime rules ............................................... 53Supported graphics formats................................................................53General rule.........................................................................................54Combining effects ...............................................................................54Order of effects ...................................................................................54Restrictions..........................................................................................55
Contents
iii
Chapter 4Using Matrox WYSIWYG Programs
About the Adobe Photoshop plug-in..............................................58How to use the plug-in ........................................................................58Using Photoshop actions with the plug-in............................................59
About the WYSIWYG DirectShow Control Panel ............................60
Configuring the WYSIWYG DirectShow Control Panel ................... 61
Index ....................................................................................... 63
Contents

iv
Your notes
Contents

Chapter 1Using this Supplement
This chapter outlines the contents of this manual, and describes the available RT.X documentation.

2
Cha
About this guideThis document supplements information contained in the Matrox RT.X100 Xtreme Installation and User Guide (May 1, 2003). The Installation and User Guide contains important and useful information on installing and using your RT.X system, and should be considered as your primary source of documentation for your RT.X100 Xtreme Pro.
This User Guide Supplement contains updated information about using new features available with Matrox X.tools for use with Adobe Premiere Pro 1.5. The following topics are covered in this supplement:
• Chapter 2 Defining your Adobe Premiere Pro settings
Explains how to define various settings for using your Matrox RT.X with Adobe Premiere Pro, including specifying your project and export settings.
• Chapter 3 Setting up Realtime Effects with Adobe Premiere Pro
Explains how to set up realtime effects using the Matrox realtime plug-in for Adobe Premiere Pro.
• Chapter 4 Using Matrox WYSIWYG programs
Explains how to use the Adobe Photoshop plug-in so that you can display your Photoshop image on your NTSC or PAL video monitor, and how to use the WYSIWYG DirectShow Control Panel to display clips played back using DirectShow programs on your NTSC or PAL video monitor.
Style conventions of this manualThe following style conventions are used in this manual:
• The names of files, directory paths, and manuals appear in italics. For example:
$ The data is stored in the sample.wav file.
$ The file is located in your C:\Windows\System directory.
$ Please refer to your Adobe Premiere Pro User Guide.
• Menus and commands that you need to choose are displayed in the form Menu > Command. For example, File > Save means click File in the menu bar, then click Save in the menu that appears.
• The names of keys are displayed in small capital bold letters, such as the CTRL key.
• A plus (+) sign is used to indicate combinations of keys and/or mouse operations. For example:
$ CTRL+C means to hold down the CTRL key while pressing the C key.
$ SHIFT+click means to hold down the SHIFT key while you click an item with the mouse.
pter 1, Using this Supplement

3
Other documentationIn addition to this User Guide Supplement, the following RT.X documents are available.
Quick Start GuideYour Matrox RT.X100 Xtreme Pro Quick Start Guide gives you a brief introduction to your new Matrox RT.X100 Xtreme Pro, and shows you how to quickly set up some realtime Matrox RT.X effects in a new Adobe Premiere Pro project.
Installation and User GuideYour Matrox RT.X100 Xtreme Installation and User Guide contains important information on installing your Matrox hardware and software, as well as details on the use of the various Matrox applications and plug-ins. Updated information for using your RT.X100 Xtreme Pro is provided in this User Guide Supplement.
Release NotesAny important last-minute information and operational limitations are included in printed Release Notes.
¦ Note To make sure that you have the latest available software (updates and Service Packs) for your Matrox RT.X system, check the Support section of our web site at www.matrox.com/video/support.
Electronic documentsThe following electronic documents are also available:
• HTML-based online Help installed on your hard drive.
¦ Note To properly view online Help, you must have Microsoft Internet Explorer 4.0 or later (5.0 or later is recommended).
• A PDF version of this manual and other Matrox RT.X documentation is available from the RT.X Support section of our web site at www.matrox.com/video/support.
Style conventions of this manual
4
Cha
Your notes
pter 1, Using this Supplement

Chapter 2Defining Your Adobe Premiere Pro
SettingsThis chapter explains how to define various settings for using your Matrox RT.X with Adobe Premiere Pro. This includes specifying your project and export settings.

6
Cha
Using Adobe Premiere Pro with Matrox RT.X100 Xtreme Pro
All Adobe Premiere procedures and dialog boxes in your Matrox RT.X100 Xtreme Installation and User Guide (May 1, 2003) are for Adobe Premiere 6.5. Many operations in Adobe Premiere Pro are similar to those described in your documentation, but there are a few changes you need to be aware of. The following sections provide important information about using RT.X100 Xtreme Pro with Adobe Premiere Pro.
For more information about using Adobe Premiere Pro, see your Adobe Premiere Pro User Guide.
A note about running other programs with Adobe Premiere Pro
For the best performance, don’t run any other programs at the same time as Adobe Premiere Pro. Screen savers and programs that use a large amount of system memory, such as most paint and compositing applications, can cause problems if you run them at the same time as Adobe Premiere Pro.
Loading project presetsTheMatrox realtime plug-in for Adobe Premiere Pro includes project presets that you can load to immediately apply appropriate RT.X settings.
°To load a Matrox RT.X project preset:1 Start Adobe Premiere Pro. The New Project dialog box appears.
2 From the Matrox DV folder, select the preset that matches the type of project you want to create. For example, if you want to capture clips to DV/DVCAM format and work in a standard 4:3 editing environment, choose Matrox DV and DVCAM Standard.
3 Under Location, specify where you want to save the project on your A/V drive.
4 Under Name, specify a name for your project.
5 Click OK to apply the settings.
¦ Note Your video source is not automatically selected for you when you choose a project preset. You’ll need to specify your required General settings and Capture settings for your project as explained in “Defining your General settings” on page 7 and “Defining your Capture settings” on page 15.
pter 2, Defining Your Adobe Premiere Pro Settings
7
Setting up your scratch disksWhen specifying the location of your scratch disks in Adobe Premiere Pro, make sure you follow the recommendations in your Adobe Premiere Pro User Guide. For example, store your video and audio files on an A/V drive used exclusively for that purpose.
°To specify your scratch disks:1 Choose Edit > Preferences > Scratch Disks.
2 Under Scratch Disks, select an appropriate A/V drive letter for each scratch disk type.
3 Click OK to save your preferences.
Remarks• If you switch your video standard, you’ll have to set up your scratch disks
again.
• To set up DV-1394 device control, choose Edit > Preferences > Device Control.
Defining your General settingsThe Matrox Advanced Settings dialog box has several pages that you can use to specify various settings for editing in Adobe Premiere Pro on Matrox RT.X.
When you select an RT.X project preset, such as Matrox DV and DVCAM Standard, your project’s Editing Mode is automatically set to Matrox RT.X, and the aspect ratio for editing is set accordingly (4:3 for the standard TV screen format, or 16:9 for the widescreen format).
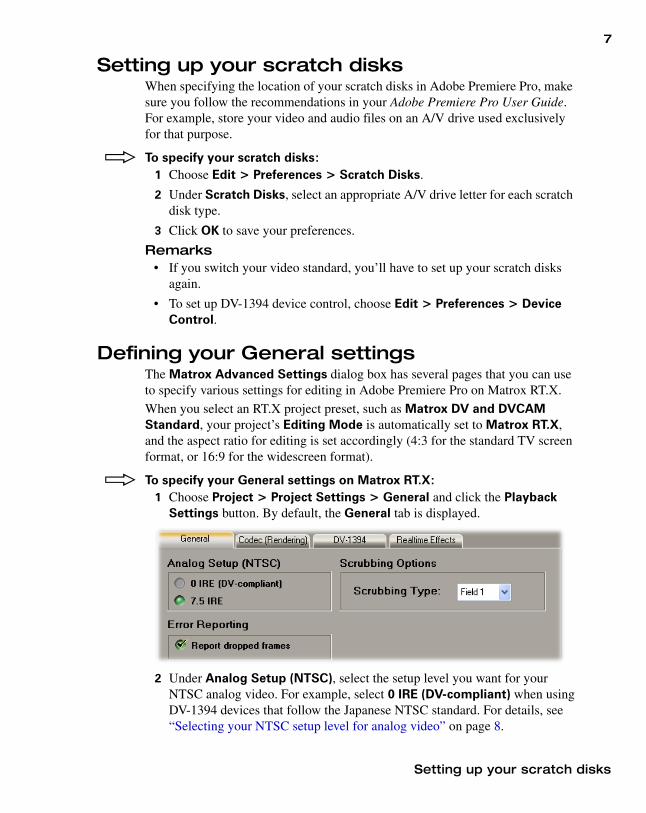
°To specify your General settings on Matrox RT.X:1 Choose Project > Project Settings > General and click the Playback
Settings button. By default, the General tab is displayed.
2 Under Analog Setup (NTSC), select the setup level you want for your NTSC analog video. For example, select 0 IRE (DV-compliant) when usingDV-1394 devices that follow the Japanese NTSC standard. For details, see “Selecting your NTSC setup level for analog video” on page 8.
Setting up your scratch disks

8
Cha
3 Under Error Reporting, select Report dropped frames if you want to be warned each time frames are dropped when you play back video from the Timeline. Otherwise, clear this option.
Remarks$ Once playback of the Timeline has stopped, a red bar will appear over
segments of the Timeline that have dropped frames (even if you don’t select Report dropped frames). To perform a Matrox realtime export to disk or export to DV tape, you must first render the segments identified by the red bar. If you close your project before rendering, the red bar won’t re-appear when you re-open the project.
$ If the Display Mode setting for the Program view of the Monitor window is anything other than Composite Video (for example, you’re displaying Premiere Pro’s vectorscope to analyze your video), you will not receive any dropped frames warnings, even if you’ve selected Report dropped frames. Therefore, when you’ve finished analyzing your video, you should set the Display Mode of the Monitor window back to Composite Video.
4 Under Scrubbing Options, select which field (Field 1 or Field 2) you want to display when scrubbing the Timeline. When you scrub the Timeline, or pause or stop playback on the Timeline, only one field is displayed (except when using the render-play or render-scrub feature as explained in “Rendering while previewing the Timeline” on page 52). If you see a “glitch” in your project when you play it back from the Timeline, but notice that when you scrub on the Timeline to find the glitch, you can’t find it, you may need to switch the field you’re scrubbing over. You can then return to the Timeline and find the problem.
5 Click OK to save your settings and return to the Project Settings dialog box. You can specify additional General settings as explained in your Adobe Premiere Pro User Guide.
Selecting your NTSC setup level for analog videoMost commercial DV cameras that have a 1394 interface follow the Japanese specification for analog NTSC video, where the black level (setup) is 0 IRE. The standard setup level for analog NTSC video in North America, however, is 7.5 IRE.
The black level used for the digital bit stream is the same for both Japanese and North American video equipment. This means that when you capture DV video over the 1394 interface on Matrox RT.X, the video is captured at the correct black level. When you play back the captured clips on your NTSC monitor, however, you may find that the video appears too bright or colors appear to be washed out. This is because the default setup level for the analog output of Matrox RT.X is
pter 2, Defining Your Adobe Premiere Pro Settings

9
7.5 IRE, whereas your DV camera’s analog output uses the Japanese setup level of 0 IRE.
°To change the setup level of your analog NTSC video on Matrox RT.X:1 Choose Project > Project Settings > General.
2 Click the Playback Settings button.
3 Under Analog Setup (NTSC) on the General page, select one of the following setup levels. This affects both the analog video input and output.
$ 0 IRE (DV-compliant) Applies a setup level of 0 IRE. You should select this option only when working with a commercial DV-1394 device that uses the Japanese analog NTSC setup of 0 IRE. For example, if the video appears too bright when you play back DV clips on your NTSC monitor, you can change the setup to 0 IRE to output your DV clips at the correct brightness.
$ 7.5 IRE Applies the standard NTSC setup level of 7.5 IRE.
¦ Note If your DV-1394 device has a different NTSC setup level for input and output, you can switch the setup level as needed before capturing clips or exporting to tape. If you’re not sure which setup level your DV-1394 device uses for input and output, check with your device’s manufacturer.
4 Click OK to return to the Project Settings dialog box. Your new setup level will take effect only after you restart your computer.
Defining your General settings
10
Cha
Selecting your codec options for renderingOn the Codec (Rendering) page of the Matrox Advanced Settings dialog box, you can choose whether or not you want Matrox RT.X to show your render results in Premiere Pro’s Monitor window, as well as select your color space conversion options.
When you render material in your Adobe Premiere Pro project on Matrox RT.X, such as preview files for non-realtime effects, you can determine how you want the chroma information to be processed during the color space conversion that’s performed during the render.
¦ Note The default settings for color space conversion provide good results for most applications. We recommend that you change these settings only when needed for special purposes.
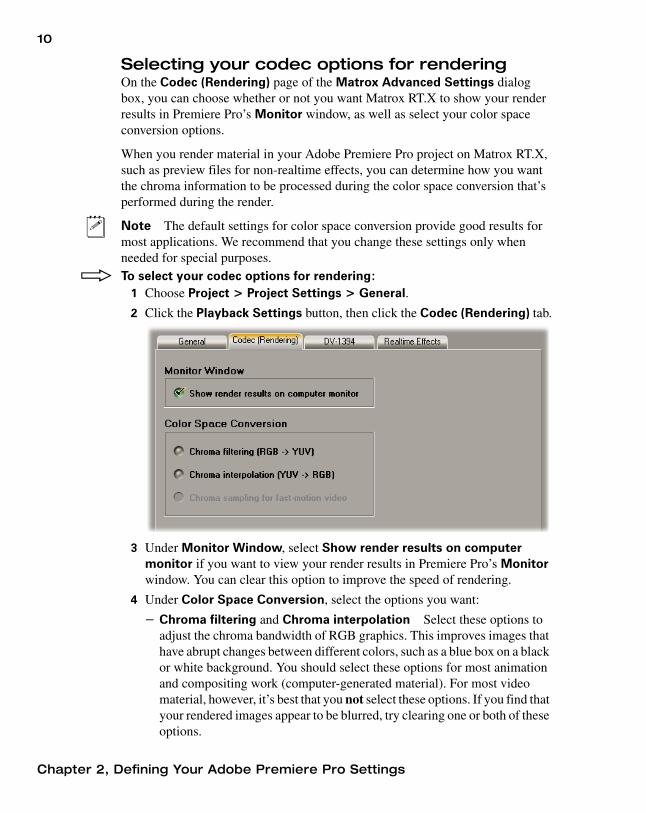
°To select your codec options for rendering:1 Choose Project > Project Settings > General.
2 Click the Playback Settings button, then click the Codec (Rendering) tab.
3 Under Monitor Window, select Show render results on computer monitor if you want to view your render results in Premiere Pro’s Monitor window. You can clear this option to improve the speed of rendering.
4 Under Color Space Conversion, select the options you want:
$ Chroma filtering and Chroma interpolation Select these options to adjust the chroma bandwidth of RGB graphics. This improves images that have abrupt changes between different colors, such as a blue box on a black or white background. You should select these options for most animation and compositing work (computer-generated material). For most video material, however, it’s best that you not select these options. If you find that your rendered images appear to be blurred, try clearing one or both of these options.
pter 2, Defining Your Adobe Premiere Pro Settings

11
$ Chroma sampling for fast-motion video Select this option to help eliminate artifacts such as jagged edges and unwanted lines at the edges of fast-motion video (for PAL video only).
¡ Important When rendering graphics and titles, make sure that Chroma sampling for fast-motion video is not selected, as this option can cause jagged edges to appear in your rendered images.
5 Click OK to return to the Project Settings dialog box.
Selecting your DV-1394 settingsOn Matrox RT.X, you can define various settings for working with DV-1394 devices, such as which DV stereo streams you’d like to capture, and the NTSC time code format of your DV tapes.
°To select your DV-1394 settings:1 Choose Project > Project Settings > General.
2 Click the Playback Settings button, then click the DV-1394 tab.
3 If you want to perform a Matrox realtime export to DV tape, make sure Enable realtime export to tape is selected. Some systems, however, may have problems with the realtime export, such as gray blocks or system sluggishness, in which case you’ll want to clear this option. For details, see “Exporting your Timeline to DV tape” on page 22.
4 Under 1394 Audio Capture, select which DV stereo audio streams you want to capture. If you capture only one DV stereo stream, the audio stream of your stereo clip will be embedded in your .avi file, creating a single interleaved audio and video file. If you choose to capture both DV stereo
Defining your General settings

12
Cha
streams, the second audio stream will be saved to a separate audio file named clipID_2ndStream.wav.
Remarks$ Some DV-1394 devices let you capture only one stereo audio stream. For
more information, consult the documentation that came with your DV-1394 device.
$ When capturing audio over the 1394 interface with certain DV devices (such as Sony or Canon), the left and right channels may be inverted in the resulting file. If this happens, you can select Invert left and right channels to correct this problem.
5 If you have an NTSC system, under Tape Time Code Format, select the format that matches the format on your DV tapes.
6 Under Timeline Playback, select Always output to 1394 if you want to output your Timeline over the 1394 interface to your DV-1394 device whenever you play back the Timeline. Although you’ll be able to preview numerous video and graphics layers with effects on your NTSC or PAL monitor without having to render, these segments that require rendering will display as black video when previewed through your DV-1394 device’s viewfinder.
$ From the Device Format list, choose Matrox DV/DVCAM if you’re using a standard DV device, or Matrox DVCPRO if you’re using a DVCPRO device.
7 Click OK to return to the Project Settings dialog box.
pter 2, Defining Your Adobe Premiere Pro Settings
13
Selecting your realtime effect settingsYou can specify default cropping settings for your realtime Matrox effects, select which Premiere Pro effects you’d like to play back in real time, and determine how you’d like to preview your effects on the Timeline.
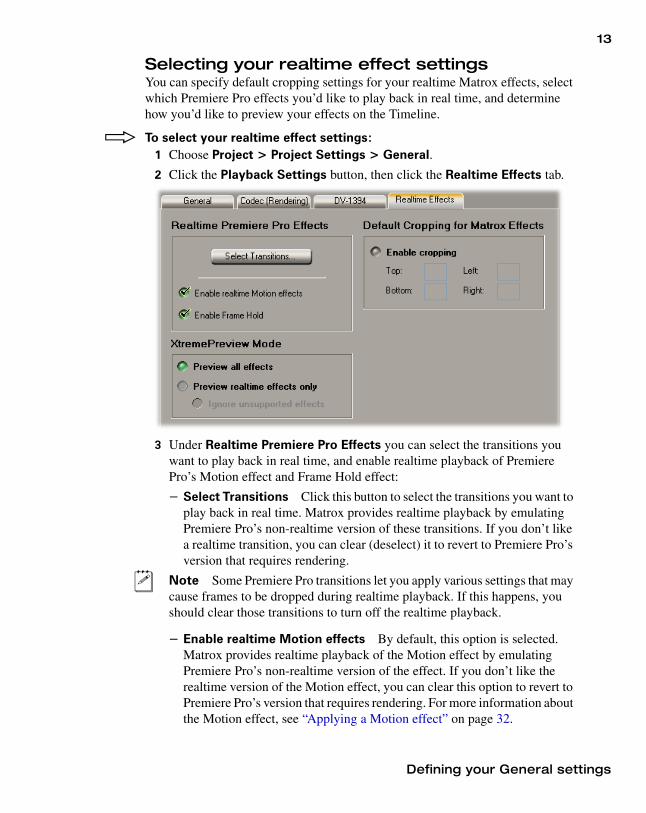
°To select your realtime effect settings:1 Choose Project > Project Settings > General.
2 Click the Playback Settings button, then click the Realtime Effects tab.
3 Under Realtime Premiere Pro Effects you can select the transitions you want to play back in real time, and enable realtime playback of Premiere Pro’s Motion effect and Frame Hold effect:
$ Select Transitions Click this button to select the transitions you want to play back in real time. Matrox provides realtime playback by emulating Premiere Pro’s non-realtime version of these transitions. If you don’t like a realtime transition, you can clear (deselect) it to revert to Premiere Pro’s version that requires rendering.
¦ Note Some Premiere Pro transitions let you apply various settings that may cause frames to be dropped during realtime playback. If this happens, you should clear those transitions to turn off the realtime playback.
$ Enable realtime Motion effects By default, this option is selected. Matrox provides realtime playback of the Motion effect by emulating Premiere Pro’s non-realtime version of the effect. If you don’t like the realtime version of the Motion effect, you can clear this option to revert to Premiere Pro’s version that requires rendering. For more information about the Motion effect, see “Applying a Motion effect” on page 32.
Defining your General settings

14
Cha
$ Enable Frame Hold By default, this option is selected. Matrox provides realtime support of Premiere Pro’s Frame Hold to allow you to freeze on a clip’s In Point, Out Point, or at Marker 0. If you encounter repeated frames when playing back a Timeline containing nested sequences or clips with negative speed changes, you can clear this option. If you clear this option, however, all realtime Frame Hold effects applied to clips on the Timeline will be ignored.
¦ Note If you select Deinterlace in Premiere Pro’s Frame Hold dialog box, your clips will require rendering. The Hold Filters option is not supported on Matrox RT.X.
4 Under XtremePreview Mode, you can choose the method you want to use to preview (play or scrub) your effects on the Premiere Pro Timeline:
$ Preview all effects Lets you preview all video and graphics layers with multiple effects applied, without having to render. If you experience small video and audio glitches when playing certain segments, you may prefer to preview realtime effects only (see below).
$ Preview realtime effects only Lets you preview all realtime Matrox effects and realtime Premiere Pro effects (such as realtime transitions and fixed effects). You can also choose to Ignore unsupported effects, which lets you ignore Premiere Pro’s non-realtime video effects and transitions, as well as unsupported clip settings, such as field processing options applied to a clip. If you don’t ignore these unsupported effects and settings, these segments will appear as a “not yet rendered” (X) graphic when played back from the Timeline. To see your segment with all effects applied, you can use XtremePreview’s render-play feature (ALT+SPACEBAR), or render-scrub feature (ALT+scrub).
For more information about the XtremePreview modes, see “What is XtremePreview?” on page 52.
5 Under Default Cropping for Matrox Effects, select Enable cropping and specify in pixels the default cropping values that you want to be applied each time you create an effect using the Matrox realtime plug-in. For example, if garbage video or black lines appear at the left and right edges of your video, you’ll want to crop these edges so that they’re not visible in your effects. Be aware that your new crop settings will be applied only to subsequent clips you add to the Timeline (that is, clips already on the Timeline won’t be affected).
¦ Note Unless you need cropping to be applied to your clips, make sure that Enable cropping is not selected. This improves system performance.
6 Click OK to return to the Project Settings dialog box.
pter 2, Defining Your Adobe Premiere Pro Settings

15
Defining your Video Rendering and Audio settings
When you select an RT.X project preset, your Video Rendering and Audio settings for editing on Matrox RT.X are automatically set for you.
You can specify additional Video Rendering and Audio settings as explained in your Adobe Premiere Pro User Guide.
¡ Important For the best performance, use only 48 kHz, 16-bits/sample (stereo) audio in Adobe Premiere Pro.
Defining your Capture settingsMatrox RT.X lets you capture your video to DV/DVCAM or DVCPRO format at a fixed data rate of 25 Mb/sec, or to MPEG-2 IBP format at a selected data rate. For example, you can capture to DV/DVCAM or DVCPRO format to create .avi files for use in your Premiere Pro projects, or capture to MPEG-2 IBP format to create MPEG-2 Elementary (.m2v) files for use with the Adobe Encore DVD authoring program.
¡ Important Clips captured to MPEG-2 IBP format are suitable for DVD authoring, but are not supported in your Adobe Premiere Pro projects.
°To specify your settings for capturing material in Adobe Premiere Pro on Matrox RT.X:
1 Choose Project > Project Settings > Capture.
2 From the Capture Format list, select Matrox AVI Capture to capture to DV/DVCAM or DVCPRO format, or select Matrox M2V Capture to capture to MPEG-2 IBP format.
¦ Note DV/DVCAM and DVCPRO video is saved to an .avi file. MPEG-2 IBP video is saved to an MPEG-2 Elementary (.m2v) file.
3 If you selected Matrox AVI Capture, click the Format button, then select your desired capture format from the Format list.
4 If you selected Matrox M2V Capture, click the Format button to configure your MPEG-2 IBP settings. For details on the available settings, see “Selecting your MPEG-2 IBP settings” in your Matrox RT.X100 Xtreme Installation and User Guide.
Defining your Video Rendering and Audio settings

16
Cha
5 To select the audio and video sources from which you want to capture material, click the A/V Inputs button.
6 From the Video Source list, select Composite, S-Video (Y/C), or DV-1394. For example, to capture your composite input to Matrox RT.X, select Composite. To capture material from your DV-1394 device over the 1394 interface, select DV-1394. If you want to capture material from your DV camera or deck using device control over the 1394 interface, you must set up the device control as explained in your Matrox RT.X100 Xtreme Installation and User Guide. If you don’t set up this device control, you can capture your clips by manually controlling your DV-1394 device.
¦ Note If you selected DV-1394 as your video source and you set the Capture Format to Matrox AVI Capture, video will be captured in native DV format over the 1394 interface.
7 If you selected an analog video source, you must also select the audio source from which you want to capture material from the Analog Audio Source list. Your audio source must match your audio input (that is, where you’ve connected the light blue connector labeled TO AUDIO CARD IN on your breakout cable, as explained in your Matrox RT.X100 Xtreme Installation and User Guide. For example, if you plugged the TO AUDIO CARD IN
pter 2, Defining Your Adobe Premiere Pro Settings
17
connection into the Line-In jack (or corresponding jack) on your sound card, choose Line-In from the Analog Audio Source list.
Remarks$ All supported audio sources will appear in the Analog Audio Source list,
but in most cases the recommended source will be the default. If your audio input connection does not appear in the list, you must unplug the TO AUDIO CARD IN connector on your breakout cable and connect it to an audio input on your sound card that appears in the list.
$ If your analog audio source appears with an * beside it in the list, your sound card does not have matching audio inputs and outputs. In this case, choose the audio source with an * that matches your audio input, make sure that your source is playing back audio, and click Advanced Settings. In the provided dialog box, select an Analog Audio Passthrough. If you can hear audio, then you’ve selected the correct analog audio source and passthrough. If you can’t hear audio, try selecting a different analog audio source and/or passthrough.
8 If you selected DV-1394 as your video source, select which DV stereo audio streams you want to capture. If you capture only one DV stereo stream, the audio stream of your stereo clip will be embedded in your .avi file, creating a single interleaved audio and video file. If you choose to capture both DV stereo streams, the second audio stream will be saved to a separate audio file named clipID_2ndStream.wav.
Remarks$ Some DV-1394 devices let you capture only one stereo audio stream. For
more information, consult the documentation that came with your DV-1394 device.
$ When capturing audio over the 1394 interface with certain DV devices (such as Sony or Canon), the left and right channels may be inverted in the resulting file. If this happens, you can select Invert left and right channels to correct the problem.
9 Under Source Type, specify the type of analog equipment you’re using:
$ Consumer-quality Select this if your source device doesn’t have a time base corrector or meet broadcast-quality standards. RT.X will then filter the input signal to increase tolerance for sync pulse instability.
$ Broadcast-quality Select this if your source device is broadcast-quality, such as a device with a built-in time base corrector (TBC). This allows RT.X to digitize the input signal as-is.
10 Under VCR Tracking, the Tight setting gives you the best results with most analog source tapes. When using poor-quality analog tapes, select Looser to improve the video playback, similar to when you adjust the tracking on your home VCR.
Defining your Capture settings

18
Cha
11 Click OK to return to the Project Settings dialog box.
12 To adjust the proc amp settings for the analog (S-Video or composite) video that you’ll be capturing, click the Proc Amps button.
¦ Note Once you’ve captured your video clips, you can apply proc amp changes and other color corrections to your clips on the Timeline using the Matrox color correction effect. For details, see “Applying a pre-created color correction” in your Matrox RT.X100 Xtreme Installation and User Guide.
13 Use the proc amp controls as needed to adjust the incoming analog video signal before starting the capture. To return a control to its factory default setting, click the Def button. You can use the Matrox scopes to analyze your analog signal. For details on how to use the Matrox scopes to check the adjustments you make to the proc amp settings, see “Using the Matrox scopes to analyze your analog video” in your Matrox RT.X100 Xtreme Installation and User Guide.
$ Hue Adjusts the tint of the colors in the image.
$ Saturation Adjusts the saturation (vividness) of the image’s colors.
$ Contrast Adjusts the difference in luminance between the lightest and darkest areas of the image.
$ Brightness Adjusts the level of black in the image.
¡ Important To make accurate adjustments to the color of your video clips, always refer to the picture on your NTSC or PAL video monitor instead of the picture in the Preview Window.
14 Click OK to save your proc amp changes and return to the Project Settings dialog box.
pter 2, Defining Your Adobe Premiere Pro Settings

19
You can specify additional Capture settings as explained in your Adobe Premiere Pro User Guide.
Performing a Premiere Pro export to diskYou can export video from the Timeline to a single DV/DVCAM or DVCPRO .avi file for purposes such as distribution on CD-ROM and publishing on the web. Several software codecs are included with Adobe Premiere Pro so that you can export your video to different formats. Your Matrox RT.X system adds the Matrox DV/DVCAM and Matrox DVCPRO codecs to the ones included with Premiere Pro. Because the Matrox codecs use your RT.X hardware to accelerate rendering, they can export video much faster than when you use a software codec.
¦ Note The Matrox MediaExport plug-in for Adobe Premiere Pro lets you export your project to various web-optimized and MPEG formats. The Matrox Realtime Export to Disk features lets you export your project to a Matrox DV/DVCAM or Matrox DVCPRO .avi file, or an MPEG-2 Elementary (.m2v) file (see “Performing a Matrox realtime export to disk” on page 20).
°To export your Timeline to a Matrox DV/DVCAM or DVCPRO .avi file:1 Depending on whether you want to export your Timeline or only the current
frame from your Timeline, do one of the following:
$ To export all or part of your Timeline, choose File > Export > Movie. Click the Settings button, and from the File Type list, select Matrox RT.X.
$ To export only the current frame from your Timeline, choose File > Export > Frame. Click the Settings button, and from the File Type list, select Matrox RT.X Single-frame AVI.
2 From the Range list, choose an export range, then select additional export options.
3 From the menu on the left side of the dialog box, choose Video.
4 From the Compressor list, select the compression format you want for your exported file.
$ Matrox DV/DVCAM Renders video to DV or DVCAM format.
$ Matrox DVCPRO Renders video to DVCPRO format.
5 From the Pixel Aspect Ratio list, select the setting that matches the aspect ratio of the material you’re editing:
$ D1/DV NTSC (0.9) For NTSC material that uses the standard TV screen format.
$ D1/DV Widescreen 16:9 (1.2) For NTSC material that uses the widescreen 16:9 format.
Performing a Premiere Pro export to disk
20
Cha
$ D1/DV PAL (1.067) For PAL material that uses the standard TV screen format.
$ D1/DV PAL Widescreen 16:9 (1.422) For PAL material that uses the widescreen 16:9 format.
6 If you’re exporting all or part of your Timeline, it’s recommended that you do not select Recompress. This retains the quality of your video. It also optimizes the speed of the export because realtime video segments that have no effects will be copied directly to disk without recompression, assuming that the compression format of your video clips matches the format to which you’re exporting.
7 Choose OK to save your export settings.
Performing a Matrox realtime export to diskYou can use the Matrox Realtime Export to Disk feature to export your Timeline in real time to a DV/DVCAM .avi file, a DVCPRO .avi file, or an MPEG-2 Elementary (.m2v) file. You can use your .m2v files with DVD authoring programs, such as Adobe Encore DVD. In order to perform a Matrox realtime export to disk, you may need a second dedicated export drive. (For more information on dedicated A/V and export drives, see your Matrox RT.X100 Xtreme Pro Release Notes.)
Your realtime effects and other realtime segments will be rendered in real time. Non-realtime effects, however, will not be rendered in real time and must be rendered before performing the export to disk.
If you want to export to a DV/DVCAM or DVCPRO .avi file and your Timeline contains mostly cuts, you should use Adobe Premiere Pro’s Export Movie feature. This is because realtime video segments that have no effects will be copied directly to disk without recompression (that is, faster than realtime), assuming that you do not select Recompress, as explained in the previous section.
¡ Important On most systems, you’ll be able to perform a realtime export to disk. Some systems, however, may have problems with realtime export, such as gray blocks or system sluggishness. For up-to-date information about recommended computer systems and motherboards, please see the RT.X Support section of our web site at www.matrox.com/video/support.
pter 2, Defining Your Adobe Premiere Pro Settings

21
°To export your Timeline to disk in real time:1 Create a preview of your Timeline by pressing ENTER.
2 Choose File > Export > Matrox Realtime Export to Disk.
3 From the Range list, select Work Area to export a selected area of the Timeline, or select Entire Timeline to export your entire Timeline.
4 From the Format list, select DV/DVCAM (.avi) to export to a DV/DVCAM .avi file, DVCPRO (.avi) to export to a DVCPRO .avi file, or MPEG-2 IBP (.m2v) to export to an MPEG-2 Elementary (.m2v) file.
5 If you choose to export to an .m2v file:
a Select Export sequence markers as chapter points if you want your Premiere Pro sequence markers available for use as chapter points with Adobe Encore DVD (version 1.5). Encore DVD may shift your markers by up to 14 frames to comply with the MPEG-2 IBP compression scheme. If needed, you can edit and move the chapter points in your Encore DVD project. For information about using chapter points, see your Adobe Encore DVD documentation.
b Click the Configure button to select your MPEG-2 IBP settings as described in “Selecting your MPEG-2 IBP settings” in your Matrox RT.X100 Xtreme Installation and User Guide.
6 From the Audio list, select one of the following:
$ Uncompressed (.wav) Audio is exported to a separate .wav file. Available only if you’re exporting video to an .m2v file.
$ Uncompressed (embedded in .avi) Audio is exported with your video to the same file. Available only if you’re exporting video to an .avi file.
$ No audio Only video is exported.
7 Beside File Name, click Browse, then specify a drive, folder, and file name for the file(s) you’re exporting. To avoid having dropped frames in your
Performing a Matrox realtime export to disk
22
Cha
exported video, you may need to export to an A/V drive that’s different from the one you use to store your project’s clips.
8 Click OK to begin the realtime export to disk.
Exporting your Timeline to DV tapeYou can export DV material from your Adobe Premiere Pro Timeline to tape using device control over the 1394 interface on Matrox RT.X.
¦ Note On most systems, you’ll be able to perform a realtime export to tape. Some systems, however, may have problems with the realtime export, such as gray blocks or system sluggishness. If this happens, disable the realtime export by clearing Enable realtime export to tape in the Matrox Advanced Settings dialog box as explained in “Selecting your DV-1394 settings” on page 11.
Preparing your tapes for recordingTo use DV-1394 device control, the tape on which you’ll be recording your DV material must contain continuous and consecutive time code. You can stripe your entire tape with time code by recording black video for the duration of the tape. To do this, insert a blank tape into your camcorder, put the lens cap on, then record up to the end of the tape.
¦ Note The format of your DV tape must match the format you’re recording. For example, if you set your DV-1394 device to record in DV/DVCAM format, your tape must be striped entirely in DV/DVCAM format. Mixed format tapes are not supported.
Obtaining a frame-accurate export to tapeIn order to achieve a frame-accurate export to tape, you need to specify various export options. The values you enter for these options depend on the DV-1394 device you are using. Preset values are available for some devices. You can download the latest DV-1394 device presets from the RT.X Support section of our web site at www.matrox.com/video/support. If no presets are available for the device you are using, you will need to do a test export to obtain the correct values. For more information, see “Defining your export to tape options” on page 25.
Exporting to DV tape with device controlTo export your Timeline to tape over the 1394 interface:
1 Make sure your DV device is properly connected, turned on, and that you’ve selected Matrox DV-1394 Device Control in Adobe Premiere Pro’s
pter 2, Defining Your Adobe Premiere Pro Settings
23
Preferences dialog box as explained in your Matrox RT.X100 Xtreme Installation and User Guide.
¦ Note If you’re using a camcorder, switch it to VTR Mode.
2 Load a tape that you’ve striped with time code into your device.
3 Open the project you want to export to tape.
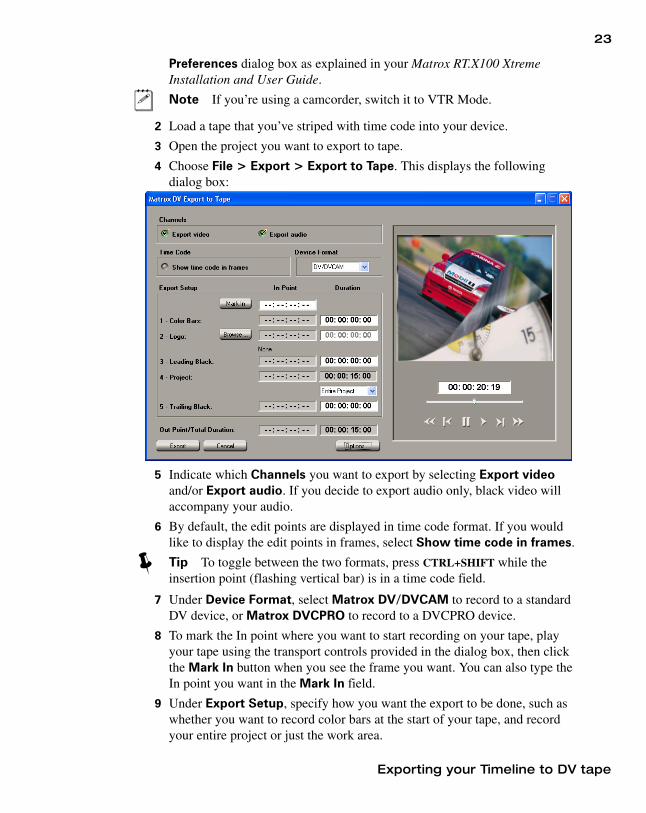
4 Choose File > Export > Export to Tape. This displays the following dialog box:
5 Indicate which Channels you want to export by selecting Export video and/or Export audio. If you decide to export audio only, black video will accompany your audio.
6 By default, the edit points are displayed in time code format. If you would like to display the edit points in frames, select Show time code in frames.
¥ Tip To toggle between the two formats, press CTRL+SHIFT while the insertion point (flashing vertical bar) is in a time code field.
7 Under Device Format, select Matrox DV/DVCAM to record to a standard DV device, or Matrox DVCPRO to record to a DVCPRO device.
8 To mark the In point where you want to start recording on your tape, play your tape using the transport controls provided in the dialog box, then click the Mark In button when you see the frame you want. You can also type the In point you want in the Mark In field.
9 Under Export Setup, specify how you want the export to be done, such as whether you want to record color bars at the start of your tape, and record your entire project or just the work area.
Exporting your Timeline to DV tape

24
Cha
¦ Note You can enter values in the Duration fields only. The In Point fields are automatically adjusted for you based on the values you enter in the Duration fields. Items are recorded on your tape in the order they are listed in the dialog box.
$ Color Bars To add color bars at the start of your recording, enter a duration for the amount of time you want the color bars to be recorded.
¦ Note Color bars are accompanied by a 1-kHz audio tone.
$ Logo To add a logo to your recording, click the Browse button to locate the logo you would like to add, then enter the duration for the logo. The logo must be a full-screen, 32-bit, uncompressed .tga file.
$ Leading Black To add black video to the start of your project, enter a corresponding duration.
10 From the Project list, select Entire Project to export your entire project, or Work Area to export the range marked by the work area bar.
11 To add black video to the end of your project, enter a value in the Duration field for Trailing Black.
12 Click Export to start the export to tape.
¦ Note Non-realtime segments will be rendered by Adobe Premiere Pro before the export.
Keyboard shortcuts
Play L or SPACEBAR
Rewind R
Fast Forward F
Frame Advance right arrow or 2
Frame Reverse left arrow or 1
Stop S or K
pter 2, Defining Your Adobe Premiere Pro Settings

25
Defining your export to tape optionsIn order to achieve a frame-accurate export to tape, you need to specify various export options. The values you enter for these options depend on the DV-1394 device you are using.
¦ Note Not all DV-1394 devices are frame-accurate. For more information, please see the RT.X Support section of our web site at www.matrox.com/video/support.
°To define your export options:1 Choose File > Export > Export to Tape, then click the Options button.
2 From the Preset list, select the model that matches (or most closely matches) the DV-1394 device you are using. This will immediately apply the appropriate export options for that device.
Remarks$ If you’re performing a realtime export to tape, make sure you select an RT
preset, such as Sony DSR-45 NTSC (RT). If you disabled the realtime export (that is, you cleared Enable realtime export to tape in the Matrox Advanced Settings dialog box as explained in “Selecting your DV-1394 settings” on page 11), you must select a Non-RT preset.
$ You can download the latest DV-1394 device presets from the RT.X Support section of our web site at www.matrox.com/video/support. If a preset is not available for your DV-1394 device, you will need to do a test export to obtain the correct values. Once you’ve got the right values, type the name of your
Exporting your Timeline to DV tape
26
Cha
device in the Preset box and click the Save button. Your settings will be saved in the Preset list for future use.
3 Under Offset Times for Recording, specify the appropriate values for your DV-1394 device.
$ The first value delays the playback of your project to allow your DV-1394 device time to start recording. For example, some devices require a delay between the time they receive the record command and the time the project starts playing back from your computer.
$ The second value lets you specify when the command to stop recording should be sent to your DV-1394 device. For example, if your DV deck takes time to stop recording, the stop command must be sent before the end of the project is reached. Alternately, if your deck buffers video prior to recording, the stop command must be sent late.
¡ Important The values under Offset Times for Recording are interdependent. Before changing these settings, you should first do a test export to tape with both values set to zero. If you’re missing frames from the start of your project, specify a delay for the project playback and do another test. Once you’ve set the correct delay to obtain frame accuracy at the start of the recording, you can adjust the other setting as needed to obtain frame accuracy at the end of the recording.
4 If the In point at which the recording starts on your tape doesn’t match the Mark In point you specified for the export, use the value under In Point Adjustment to correct it. For example, if you set your Mark In point to 1:00:20:10 and your deck actually started recording at 1:00:20:12, then you would enter -2.
5 If you have an NTSC system, select the format that matches the time code format on your DV tape.
6 Click OK to save your settings and return to the Matrox DV Export to Tape dialog box.
Creating a production in 16:9 formatWhen editing on Matrox RT.X, you can choose to work with source video that’s been recorded in either the 4:3 standard TV screen format, or the widescreen 16:9 format.
°To create a production in 16:9 format on Matrox RT.X, do the following:1 Record your video onto tape with your camera set to the widescreen 16:9
format. The video will be recorded as horizontally compressed 4:3 video.
2 Start Adobe Premiere Pro and select the appropriate Matrox RT.X widescreen preset (such as Matrox DVCPRO Widescreen). This ensures
pter 2, Defining Your Adobe Premiere Pro Settings

27
that the effects you create on Matrox RT.X will be displayed with the correct proportions when viewed in 16:9 format.
¦ Note When editing in 16:9 format, certain pre-created Matrox organic wipe or mask patterns may appear distorted. For example, circular wipes will appear elongated.
3 Capture your video clips as you normally would. Select the 16:9 display option on your NTSC or PAL video monitor to “unsquish” the video and play it back in widescreen format without distortion.
4 If you create animations, titles, or graphics (including organic wipe or mask patterns) for your production using a program that lets you set the pixel aspect ratio, use the appropriate setting for 16:9 display:
$ On an NTSC system, set the pixel aspect ratio to 1.185.
$ On a PAL system, set the pixel aspect ratio to 1.422.
If you can’t set the pixel aspect ratio, create your image at 853×480 (NTSC) or 1024×576 (PAL). After you’ve created your image, resize only its width to 720. When you resize the image, your text or graphic will appear elongated on your computer screen.
5 Edit your production as you would a standard 4:3 production.
¦ Note Be aware that if your video monitor is displaying in 4:3 format, certain effects may appear elongated because of the horizontal scaling. Setting your monitor to 16:9 will display the effects with the correct proportions.
6 Record your finished production onto tape. Remember that you’ll need a monitor capable of displaying material in 16:9 format to properly view your master tape.
Creating a production in 16:9 format
28
Cha
Your notes
pter 2, Defining Your Adobe Premiere Pro Settings

Chapter 3Setting Up Realtime Effects with Adobe
Premiere ProThis chapter explains how to set up realtime effects using the Matrox realtime plug-in for Adobe Premiere Pro.

30
Cha
How to apply a Matrox video transition in Adobe Premiere Pro
In Adobe Premiere Pro, all of the video transitions can be found in the Video Transitions bin. By default, the Matrox transitions are found in the Matrox folder.
An easy way to create a Matrox transition is to drag the current-time indicator to the point where two clips meet, then drag the desired effect from the Video Transitions bin in the Effects window to the edit point between the two clips. To set up your Matrox transition, click the transition’s icon on the Timeline, then click the Custom button under your transition in the Effect Controls window. This opens the Matrox Effect Setup dialog box.
¦ Note Because Premiere Pro allows you to apply a transition on any track of the Timeline, you may not always get the desired result when applying a Matrox transition to a single clip when there is another clip on a track beneath it. The result may be that the segment is not realtime (such as with a Matrox particle transition), or that the transition doesn’t display correctly (such as with a Matrox page curl transition). In these cases, you should apply a Matrox video effect instead of a transition. Make sure that you apply Matrox transitions between clips on the same track.
How to apply a Matrox video effect in Adobe Premiere Pro
The Matrox realtime plug-in for Adobe Premiere Pro allows you to apply many realtime video effects to your clips. To apply a Matrox video effect to a clip, drag the desired effect from the Video Effects bin in the Effects window onto the clip on the Timeline. By default, the Matrox video effects are found in the Matrox folder.
To set up your Matrox video effect, click the Setup button ( ) beside your effect in the Effect Controls window. This opens the Matrox Effect Setup dialog box.
¥ Tip If you can’t see the Effects window, choose Window > Effects. If you can’t see the Effect Controls window, choose Window > Effect Controls.
pter 3, Setting Up Realtime Effects with Adobe Premiere Pro

31
How to organize your Matrox video effects in custom bins
To organize your Matrox video effects and transitions, you can create custom bins in the Effects window. For example, you can create a bin called Shape Effects to hold the Matrox cube, particle, and sphere effects.
°To create a new custom bin for your effects:1 Click the New Custom Bin icon ( ).
2 Locate the new bin by scrolling down to the bottom of the Effects window, then double-click the name of the custom bin and type in a new name.
3 Drag and drop your favorite video effects into their new bin.
¦ Note Dragging and dropping effects into new custom bins only creates a shortcut to the effect. Your Matrox realtime video effects will still remain in their default location (that is, in the Matrox folder located in the Video Effects bin).
A note about nested sequencesTo avoid frequent updates to the Premiere Pro Timeline, finish editing your sequences before nesting them inside another sequence. This is because when you make changes to a nested sequence, the master sequence in which you’ve nested this sequence must also be updated.
Selecting your speed control methodYou can choose the type of speed control that’s best suited for individual clips in your Premiere Pro projects. By default, the speed control method of each clip on the Timeline is set to Frame Blend Speed Changes, which interpolates between the video fields, and typically works well on standard or slow-paced video and camera pans. If your project contains a series of fast-action clips, however, you may want to change the speed control of these clips to mimic the classic “bob and weave” algorithm found on Betacam machines.
°To change the speed control method for a clip on the Timeline:1 Right-click the clip on the Timeline, and choose Field Options.
2 Select Frame Blend Speed Changes to use the speed control method that’s recommended for standard or slow-paced video and camera pans. For fast-action video, you may get better results by clearing this option.
Remarks• If you’ve increased a clip’s speed to a value from 101% to 199%, you may
experience dropped frames when playing back the clip with Frame Blend Speed Changes selected. This is because of the high demand placed on your system’s CPU. If this happens, clear Frame Blend Speed Changes to
How to organize your Matrox video effects in custom bins

32
Cha
allow your RT.X100 Xtreme Pro to analyze these segments and drop frames systematically to smooth out your fast-motion effect.
• The Frame Blend Speed Changes option is not supported for speed changes over 200%.
About Adobe Premiere Pro’s fixed effectsIn Adobe Premiere Pro, every clip on the Timeline has pre-applied fixed effects. When you select the clip on the Timeline, your fixed effects appear in the Effect Controls window. All fixed effects can be adjusted in the Effect Controls window, as well as the Monitor, Timeline, and Audio Mixer windows. Adobe Premiere Pro’s fixed effects include the Motion, Opacity, and Volume effects. Matrox X.tools provides realtime support for all of Premiere Pro’s fixed effects.
Applying a Motion effectThe Motion effect lets you position, rotate, and scale your clips directly in the Program view of the Monitor window by creating keyframes that contain one or more effect settings for a particular clip. When you select the Motion effect in the Effect Controls window, square handles appear on the clip in the Program view that allow you to adjust the clip’s properties.
The Premiere Pro Motion effect will remain realtime unless you do any of the following:
• Clear the Enable realtime Motion effects option in the Matrox Advanced Settings dialog box. For more information, see “Selecting your realtime effect settings” on page 13.
• Adjust the rotation of a clip with an anchor point applied to it.
• Apply more than two Motion effects in any given segment on the Timeline.
For more information about the Motion effect, see your Adobe Premiere Pro User Guide.
Applying an Alpha Adjust effectIn Adobe Premiere Pro, graphics clips that have an alpha-key channel on any track on the Timeline are automatically alpha-keyed in real time, so you no longer have to apply an Alpha Channel Key to set up a realtime graphics overlay as explained in your Matrox RT.X100 Xtreme Installation and User Guide. Matrox X.tools provides limited realtime support of Premiere Pro’s Alpha Adjust effect to let you ignore the alpha-key channel of a clip on the Timeline to turn off an alpha-key effect.
To apply an Alpha Adjust video effect to a clip, drag the desired effect from the Video Effects bin in the Effects window onto the clip on the Timeline. The Alpha Adjust effect is located in the Keying folder.
pter 3, Setting Up Realtime Effects with Adobe Premiere Pro
33
To set up your effect, click the small triangle to the left of your effect in the Effect Controls window. To ignore the alpha-key channel of a clip, select Ignore Alpha.
¦ Note The Opacity, Invert Alpha, and Mask Only options are not supported in real time.
For more information about the Alpha Adjust effect, see your Adobe Premiere Pro User Guide.
About Adobe Premiere Pro’s fixed effects

34
Cha
Overview of the color match effectYou can use the Matrox color match effect to match colors between two clips (such as skin tone, sky, etc.). The color match effect uses controls similar to the Matrox color correction effect, but it lets you select areas of a reference clip to match to your target clip. You can use color maps to affect the colors globally, or by specific tonal ranges (shadows, midtones, and highlights).
°To match colors between clips:1 Place your reference clip and your target clip in the same Premiere Pro
Timeline sequence.
2 Position Premiere Pro’s current-time indicator at the frame on your reference clip that contains the colors you want to match (you can change this frame if needed in the Matrox Effect Setup dialog box).
3 Apply the Matrox color match effect to your target clip, as you would any other Matrox video effect.
4 Set up your effect as explained in the next section, “Creating a color match effect.”
pter 3, Setting Up Realtime Effects with Adobe Premiere Pro

35
Creating a color match effectWhen you create a color match effect, the Custom Color Match page opens by default:
By selecting Simple edit, all settings are applied for the duration of your clip. This means that you’ll have only one keyframe at the first frame of your clip. If you want to change settings at different frames of the clip, you’ll have to clear Simple edit.
Creating a color match effect

36
Cha
Overview of the color mapsThe color maps let you adjust the balance of colors in your target clip. Depending on which color map you use, you can affect your clip globally, or only the shadows, midtones, or highlights:
� Reference clip color box Shows the selected color you want to match from your reference clip.
� Target clip color box Shows the selected target color that you want to match to the reference color.
� Color map You can drag the crosshair throughout the map to fine-tune your selected target color. For details, see “Fine-tuning your color match effect” on page 39. To return to default values, double-click the crosshair or the color map.
� Color balance values for each axis of the color map (cyan to red, magenta to green, and yellow to blue).
¦ Note If Match to luma levels ( ) is selected while performing your color match, you’ll affect the input and output luminance values as well as the color balance of your clip (by default, Match to luma levels is selected). For more information, see “Fine-tuning your color match effect” on page 39. Select Preserve luminosity to maintain the luminosity (tonal balance) in your clip while changing colors.
Performing an auto balance on your target clipBefore matching colors, you can perform an auto balance on your target clip to automatically apply a color shift to compensate for different lighting conditions.
°To perform an auto balance, do one of the following:$ Click the target clip color box for the tonal range you want to affect
(shadows, midtones, highlights, or global) to display a tracking rectangle in the Preview Window. Resize and drag the tracking rectangle to an appropriate area of your target clip. For example, to balance your clip’s highlights, click the Highlights target clip color box, and place the tracking rectangle over the lightest area of your target clip.
� �
�
�Shadows Midtones Highlights Global
pter 3, Setting Up Realtime Effects with Adobe Premiere Pro

37
$ Click and drag your mouse in the Preview Window over an area that best represents the tonal range that you want to adjust. A tracking rectangle representing the tonal range for your selected area appears, and the auto balance is performed immediately.
¦ Note You’ll see your selected color displayed in the target clip color box, and represented in the color map for the affected tonal range.
Matching colors from a reference clip to a target clip
1 Use the position controls (slider or transport controls) to move through your entire Premiere Pro Timeline sequence to a frame in a reference clip that contains the colors you want to match. You’ll see this image in the Reference Window, and also on your video monitor. By default, the frame displayed corresponds to the position of Premiere Pro’s current-time indicator. For more details on these controls, see “Using the transport controls” on page 40.
¥ Tip If you know the exact time code of the frame in your reference clip, you can enter it in the time code box.
2 To select the color you want to match from your reference clip, do one of the following:
$ Click the reference clip color box for the tonal range you want to affect (shadows, midtones, highlights, or global) to display a tracking rectangle in the Reference Window. Resize and drag the tracking rectangle to select your reference color.
Tracking rectangle
Slider
Creating a color match effect
38
Cha
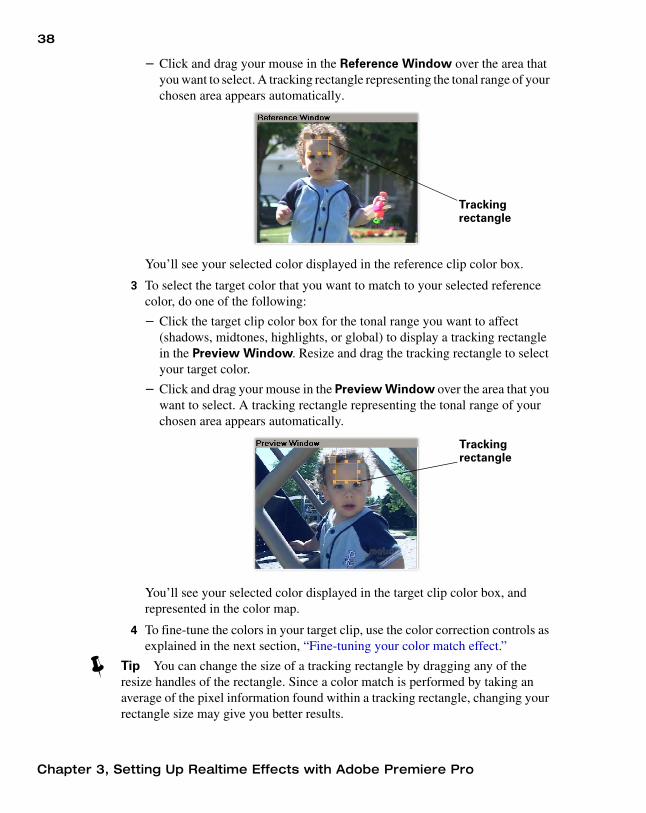
$ Click and drag your mouse in the Reference Window over the area that you want to select. A tracking rectangle representing the tonal range of your chosen area appears automatically.
You’ll see your selected color displayed in the reference clip color box.
3 To select the target color that you want to match to your selected reference color, do one of the following:
$ Click the target clip color box for the tonal range you want to affect (shadows, midtones, highlights, or global) to display a tracking rectangle in the Preview Window. Resize and drag the tracking rectangle to select your target color.
$ Click and drag your mouse in the Preview Window over the area that you want to select. A tracking rectangle representing the tonal range of your chosen area appears automatically.
You’ll see your selected color displayed in the target clip color box, and represented in the color map.
4 To fine-tune the colors in your target clip, use the color correction controls as explained in the next section, “Fine-tuning your color match effect.”
¥ Tip You can change the size of a tracking rectangle by dragging any of the resize handles of the rectangle. Since a color match is performed by taking an average of the pixel information found within a tracking rectangle, changing your rectangle size may give you better results.
Tracking rectangle
Tracking rectangle
pter 3, Setting Up Realtime Effects with Adobe Premiere Pro

39
Fine-tuning your color match effectYou can fine-tune your target clip using the following color correction controls:
• Color maps These controls let you adjust the balance of colors in your target clip (see “Overview of the color maps” on page 36). Drag the crosshair within a color map toward a color you want to increase in your clip, or away from a color you want to decrease. You can also enter values in the text boxes below each color map. Increasing a color by a certain value automatically decreases the opposite color by the same value. For example, if you drag the crosshair towards red, you also decrease cyan by the same amount, as shown in the following diagram:
You can use the global color map to affect your clip from the lightest white to the darkest black. Alternately, you can use one of the following color maps to affect only specific tonal ranges:
$ Shadows Affects the darkest areas of your clip.
$ Midtones Affects the areas with tones between the darkest and lightest areas of your clip.
$ Highlights Affects the lightest areas of your clip.
¥ Tip To return a color map to default values, double-click the crosshair or the color map.
• Proc Amps The processing amplifier (proc amp) controls allow you to adjust different aspects of your clip:
$ Hue Adjusts the tint of the colors in the image.
$ Saturation Adjusts the saturation (vividness) of the image’s colors.
$ Contrast Adjusts the difference in luminance between the lightest and darkest areas of the image.
$ Brightness Adjusts the level of black in the image.
• Luma Input Levels These controls let you fine-tune your clip’s brightness and contrast by changing the luminance value that represents black, white, or gray. Doing so expands or compresses the range of luminance levels in your clip, which increases or decreases your clip’s tonal range.
$ Black Use the slider to define black in your clip.
MAGENTARED
YELLOW BLUE
CYANGREEN
Creating a color match effect
40
Cha
$ Gamma Use this to adjust the midtones in your clip without affecting black or white.
$ White Use the slider to define white in your clip.
• Luma Output Levels These controls let you map the values under Luma Input Levels to any level of black and white. Use the black and white sliders to achieve results such as reducing contrast in your clip, or reversing the luminosity of your clip by setting black to a higher value than white.
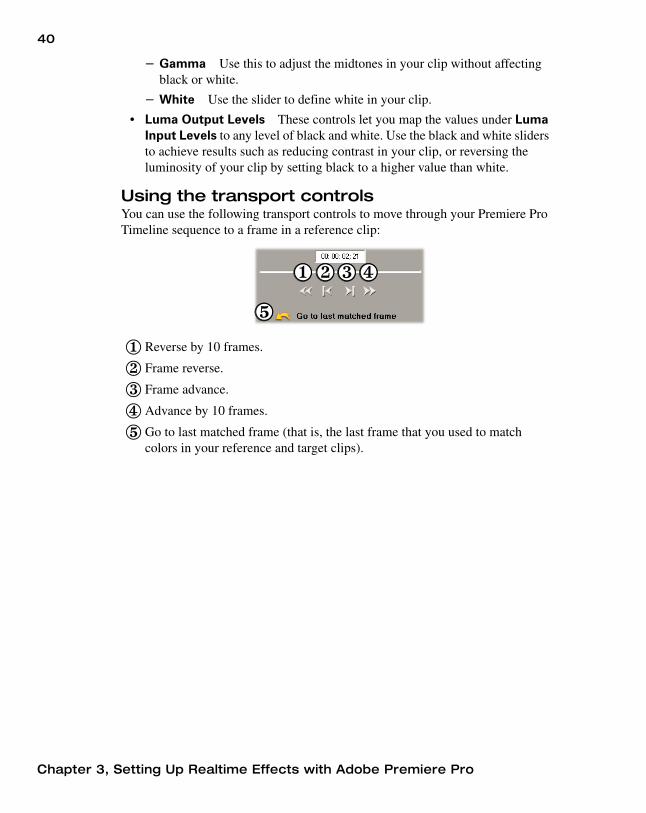
Using the transport controlsYou can use the following transport controls to move through your Premiere Pro Timeline sequence to a frame in a reference clip:
� Reverse by 10 frames.
� Frame reverse.
� Frame advance.
� Advance by 10 frames.
� Go to last matched frame (that is, the last frame that you used to match colors in your reference and target clips).
����
�
pter 3, Setting Up Realtime Effects with Adobe Premiere Pro

41
Overview of the color pass effectYou can use the Matrox realtime plug-in to apply a color pass effect to convert your clip to grayscale, with the exception of one specified color. This can be useful if you want to isolate a single color to make it prominent.
In the following example of a color pass effect, the pink color of the girl’s shirt has been retained, while the rest of the clip has been converted to grayscale:
See the next section for details on setting up your color pass effect.
Pink shirt isolated - rest of clip is grayscale
Overview of the color pass effect

42
Cha
Creating a color pass effectWhen you create a color pass effect, the Custom Color Pass page opens by default:
By selecting Simple edit, all settings are applied for the duration of your clip. This means that you’ll have only one keyframe at the first frame of your clip. If you want to change settings at different frames of the clip, you’ll have to clear Simple edit.
The easiest way to apply your color pass effect is to click and drag in the Preview Window to select a rectangular area containing the color that you want to retain. The tracking rectangle stays visible until you let go of the mouse button. You can also just click on the color you want. The color pass controls are adjusted to reflect your selected color, and you’ll see the results instantly in the Preview Window.
Tracking rectangle
pter 3, Setting Up Realtime Effects with Adobe Premiere Pro

43
You can use the following controls to further refine your color pass effect:
• Color Pass Controls
¥ Tip To see the color selector, you’ll need to change the View to Plot or Map. For more information on the different views, see “Viewing and selecting colors” on page 43.
$ Hue Use this to rotate the color selector around the perimeter of the color spectrum so that you can select a different hue (color) to retain.
$ Saturation Use this to select a color that has a particular saturation value. Pale colors have a low saturation value and are located at or near the center of the spectrum. Vivid colors have a high saturation value and are located at or near the perimeter of the spectrum.
$ Luminance Use this to select a color that has a particular luminance value. A luminance selector in the Luma Plot (Plot view) or Luma Map (Map view) indicates the particular luminance value you’ve selected.
$ Aperture Use this to widen or narrow the aperture of the color selector to increase or decrease the range of colors to be retained.
$ Saturation Threshold Use this to proportionally increase or decrease the region outside of your saturation range. This controls how closely the Saturation value specified must match the retained color before a region is converted to grayscale.
For example, after choosing the color you want to retain, you may find that some areas of the image that have a similar color have also been retained. By adjusting the Saturation Threshold, you can eliminate the color of these areas, so that they’ll become grayscale.
$ Clear color selection Click this to return your clip to the original colors. This can be helpful if you want to choose a different color to retain.
¥ Tip You can apply keyframes to gradually change the retained color over time in your image. In this case, you can use the Toggle Track State button to disable the tracks, so you’ll be able to see your original clip to help you select a new color to retain.
Viewing and selecting colorsThere are three ways of viewing and selecting the color that you want to retain. To switch between the views, you can click the appropriate button, or you can use the following keyboard shortcuts: Q for Output, W for Plot, and E for Map.
• Output This is the default view when you first display the Custom Color Pass page. You can see the result of your color pass effect in the Preview Window.
• Plot Click this to plot the colors and luminance values that are present in the current frame of your clip. The Luma Plot shows each luminance value
Creating a color pass effect
44
Cha
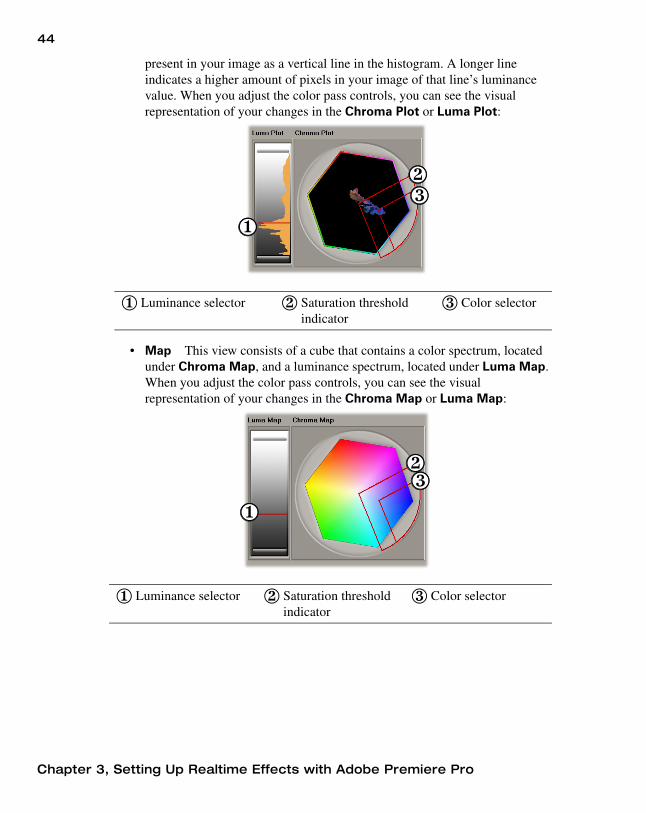
present in your image as a vertical line in the histogram. A longer line indicates a higher amount of pixels in your image of that line’s luminance value. When you adjust the color pass controls, you can see the visual representation of your changes in the Chroma Plot or Luma Plot:
• Map This view consists of a cube that contains a color spectrum, located under Chroma Map, and a luminance spectrum, located under Luma Map. When you adjust the color pass controls, you can see the visual representation of your changes in the Chroma Map or Luma Map:
�
��
� Luminance selector � Saturation threshold indicator
� Color selector
�
��
� Luminance selector � Saturation threshold indicator
� Color selector
pter 3, Setting Up Realtime Effects with Adobe Premiere Pro

45
Creating a color replace effectWhen you create a color replace effect, the Custom Color Replace page opens by default:
By selecting Simple edit, all settings are applied for the duration of your clip. This means that you’ll have only one keyframe at the first frame of your clip. If you want to change settings at different frames of the clip, you’ll have to clear Simple edit.
Creating a color replace effect

46
Cha
°To set up your color replace effect:1 Click and drag in the Preview Window to select a rectangular area
containing the color that you want to replace. The tracking rectangle stays visible until you let go of the mouse button.
The values for the Old Color Selection controls are automatically adjusted to reflect your chosen color.
2 Use the following New Color Selection controls to select your new color:
$ Hue Use this to select the tint of your new color.
$ Saturation Adjusts the saturation (vividness) of your new color.
$ Contrast Adjusts the difference in luminance between the lightest and darkest areas of your clip that match your new color.
$ Brightness Adjusts the level of black in your new color.
3 After selecting and refining your new color, you may need to fine-tune or correct imperfections between the replaced color and the new color with the following Old Color Selection controls:
¥ Tip To see the color selector, you’ll need to change the View to Plot or Map. For more information on the different views, see “Viewing and selecting colors” on page 47.
$ Hue Use this to rotate the color selector around the perimeter of the color spectrum so that you can select a different hue (color) to replace.
$ Saturation Use this to select a color that has a particular saturation value. Pale colors have a low saturation value and are located at or near the center of the spectrum. Vivid colors have a high saturation value and are located at or near the perimeter of the spectrum.
$ Luminance Use this to select a color that has a particular luminance value. A luminance selector in the Luma Plot (Plot view) or Luma Map (Map view) indicates the particular luminance value you’ve selected.
$ Aperture Use this to widen or narrow the aperture of the color selector to increase or decrease the range of colors to be replaced.
Tracking rectangle
pter 3, Setting Up Realtime Effects with Adobe Premiere Pro

47
$ Saturation Threshold Use this to proportionally increase or decrease the region outside of your saturation range. This controls how closely the Saturation value specified must match the replaced color before a region is replaced with your new color.
For example, after selecting your new color, you may find that some areas of the image have a color similar to the color you’re replacing. By adjusting the Saturation Threshold, you can eliminate this color from the replaceable area.
Viewing and selecting colorsThere are three ways of viewing and selecting the color that you want to replace. To switch between the views, you can click the appropriate button, or you can use the following keyboard shortcuts: Q for Output, W for Plot, and E for Map.
• Output This is the default view when you first display the Custom Color Replace page. You can see the result of your color replace effect in the Preview Window.
• Plot Click this to plot the colors and luminance values that are present in the current frame of your clip. The Luma Plot shows each luminance value present in your image as a vertical line in the histogram. A longer line indicates a higher amount of pixels in your image of that line’s luminance value. When you adjust the Old Color Selection controls, you can see the visual representation of your changes in the Chroma Plot or Luma Plot:
• Map This view consists of a cube that contains a color spectrum, located under Chroma Map, and a luminance spectrum, located under Luma Map.
�
��
� Luminance selector � Saturation threshold indicator
� Color selector
Creating a color replace effect

48
Cha
When you adjust the Old Color Selection controls, you can see the visual representation of your changes in the Chroma Map or Luma Map:
�
��
� Luminance selector � Saturation threshold indicator
� Color selector
pter 3, Setting Up Realtime Effects with Adobe Premiere Pro
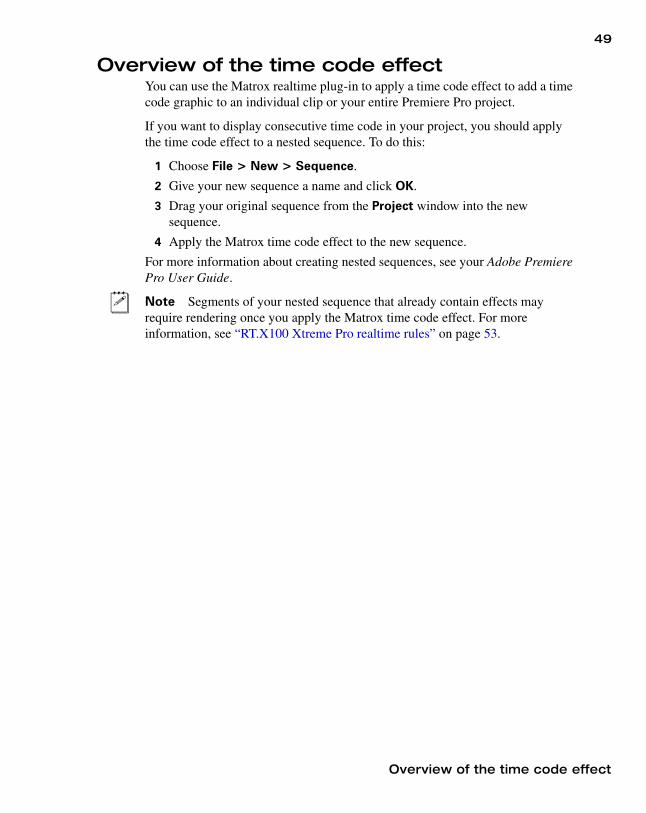
49
Overview of the time code effectYou can use the Matrox realtime plug-in to apply a time code effect to add a time code graphic to an individual clip or your entire Premiere Pro project.
If you want to display consecutive time code in your project, you should apply the time code effect to a nested sequence. To do this:
1 Choose File > New > Sequence.
2 Give your new sequence a name and click OK.
3 Drag your original sequence from the Project window into the new sequence.
4 Apply the Matrox time code effect to the new sequence.
For more information about creating nested sequences, see your Adobe Premiere Pro User Guide.
¦ Note Segments of your nested sequence that already contain effects may require rendering once you apply the Matrox time code effect. For more information, see “RT.X100 Xtreme Pro realtime rules” on page 53.
Overview of the time code effect

50
Cha
Creating a time code effectWhen you create a time code effect, the Custom Time Code page opens by default:
By selecting Simple edit, all settings are applied for the duration of your clip. This means that you’ll have only one keyframe at the first frame of your clip. If you want to change settings at different frames of the clip, you’ll have to clear Simple edit.
You can customize your effect using the following:
• Position
$ X Sets the horizontal position of your time code graphic. Negative numbers move the time code to the left, and positive numbers move the time code to the right.
$ Y Sets the vertical position of your time code graphic. Drag the slider to the right to move the time code towards the top, or drag the slider to the left to move the time code towards the bottom.
• Transparency Use this control to set the transparency of the time code graphic.
• Size Increases or decreases the size of the time code graphic at a fixed aspect ratio.
pter 3, Setting Up Realtime Effects with Adobe Premiere Pro

51
• Time Code
$ Initial Allows you to change the start time of the time code. By default, the initial time code is set to 00:00:00:00. To change the time code, double-click the Initial box to highlight the time code, then type your new time code.
$ Format If you're working on an NTSC system, you can choose to display either Drop frame or Non-drop frame time code.
• Show time code in frames Choose this option if you want to display frame count instead of time code.
¥ Tip You can press CTRL+SHIFT when the cursor is in the Initial time code box to switch between displaying time code and frames.
• Invert color Select this option to invert the colors in the time code graphic (black and white).
Customizing your time code effect using the Preview WindowIn the Preview Window, you can use your left and right mouse buttons to change the Position, Transparency, and Size settings.
The following table shows the available mouse controls for working in the Preview Window:
Action Result
Left mouse button, drag left or right Adjusts X position
Left mouse button, drag up or down Adjusts Y position
Right mouse button, drag left or right Adjusts Transparency
Left and right mouse buttons, drag left or right
Adjusts Size
Creating a time code effect

52
Cha
What is XtremePreview?XtremePreview lets you edit and preview numerous video and graphics layers without having to render. You can preview all sources (including multiple Matrox effects in any order) for the segment you are editing, even if the segment requires rendering (that is, there is a red bar above the time ruler on the Premiere Pro Timeline). In addition, with XtremePreview, many combinations of Matrox effects remain realtime.
Adaptive degradationCertain complex effects or combinations of effects can cause dropped frames when previewing. In these cases, XtremePreview performs an adaptive degradation of the video playback by analyzing the segments and dropping frames systematically. With each subsequent playback, that is, every time you replay the clips during the same work session, the segment progressively becomes smoother.
¦ Note Once playback of the Timeline has stopped, a red bar will appear over the segments that have dropped frames to indicate that these segments will require rendering to perform a Matrox realtime export to disk or export to DV tape. If you close your project before rendering, the red bar won’t re-appear until you play your project again.
Rendering while previewing the TimelineDepending on which XtremePreview mode you chose in the Matrox Advanced Settings dialog box (see page 14), you can use different methods to preview effects on your Timeline. If you are using the Preview all effects mode, when you play or scrub the Timeline, XtremePreview performs an on-the-fly render whenever a non-realtime segment is encountered (that is, an automatic render-play or render-scrub is performed).
When using the Preview realtime effects only mode, segments that include non-realtime effects appear as a “not yet rendered” (X) graphic when played back from the Timeline. In these cases, you can choose to Ignore unsupported effects, which lets you ignore Premiere Pro’s non-realtime video effects and transitions, as well as unsupported clip settings, such as field processing options applied to a clip. To see your segment with all effects applied, you can render-play (ALT+SPACEBAR), or render-scrub (ALT+scrub) the Timeline.
The render-play feature is system dependent (that is, the video quality and frame rate degrade during complex segments). It should, however, provide a good indication of how a segment will look with all effects applied.
Remarks• Adjustments to Premiere Pro’s Program view Quality settings affect
segments on which you are using the render-play feature.
pter 3, Setting Up Realtime Effects with Adobe Premiere Pro

53
• You may notice a small video and audio glitch when your Timeline starts or completes playing certain segments when using the render-play feature.
• The render-play feature does not support shuttling or reverse playback of clips.
• Previewing a clip in the Matrox Effect Setup dialog box always uses the Preview all effects XtremePreview mode. You can, however, manually preview only the current source for the effect you are editing by clicking the Solo Mode button. When using solo mode, you can ALT+drag the Positioner to see the segment with all applied effects.
RT.X100 Xtreme Pro realtime rulesIn your Adobe Premiere Pro projects, you can use various combinations of realtime Matrox RT.X CPU-based effects, hardware-accelerated effects, and Adobe Premiere Pro realtime transitions and fixed effects, all with transparency.
¦ Note Realtime means that you won’t need to render the segment on the Timeline to perform a Matrox realtime export to disk or export to DV tape (that is, there is no red indicator bar above the segment). You’ll still be able to preview segments that require rendering, as explained in “What is XtremePreview?” on page 52.
The Matrox CPU-based effects are color corrections, chroma keys, luma keys, and speed changes applied to a clip. The CPU-based effects can be applied only to video clips in real time. The Matrox hardware-accelerated effects are all the other RT.X effects (such as page curls, particles, Premiere Pro realtime transitions, and fades). The hardware-accelerated effects can be applied to video or graphics clips in real time.
¦ Note This section explains the rules and guidelines you’ll need to follow in order to keep your effects realtime, assuming that you’re using a recommended system, as explained in the Matrox RT.X100 Xtreme Pro Release Notes.
Supported graphics formatsAll full-screen single-frame graphics supported by Adobe Premiere Pro are supported in real time on a Matrox RT.X system. This includes all titling formats that Premiere Pro supports, such as Adobe Title Designer .prtl files. For details on the supported formats, see your Adobe Premiere Pro User Guide.
¥ Tip With XtremePreview, you can pan or zoom larger than full-screen graphics clips, and preview the results in real time.
RT.X100 Xtreme Pro realtime rules

54
Cha
General ruleThe general rule to follow to avoid the red indicator bar when setting up your realtime effects is that in any given segment, you can use up to two video clips (.avi files), and up to four single-frame graphics clips.
Each clip in the segment can have a fade applied to it. A fade can be any one of the following:
• Opacity changes applied to a clip, such as by adjusting the Opacity handles of a clip.
• An Adobe Premiere Pro Cross Dissolve.
• An alpha-keyed graphics clip.
Combining effectsIn any given segment, you can apply the following RT.X effects in real time:
• 1 color correction effect, and
• 1 chroma key or luma key effect, or 1 additional color correction effect, and
• 2 speed changes, and
• at least 1 Matrox hardware-accelerated effect (such as a page curl or a Premiere Pro realtime transition). You may be able to combine more than 1 Matrox hardware-accelerated effect in your segment in real time, depending on the type and complexity of the effects (excluding Matrox effects based on pattern files).
¦ Note Certain complex Matrox effects, such as particles, may not be realtime when applied to a segment containing multiple graphics clips.
Order of effectsThe order in which you apply your RT.X effects is important when you combine effects. When applying multiple RT.X effects to a segment, follow this order:
1 Color correction effect(s).
2 Chroma key, luma key, or Matrox hardware-accelerated effect.
For example, you can apply a page curl to a color correction and not require rendering. If, however, you apply a color correction to a page curl, the clip will require rendering (unless you change the order of the effects).
¦ Note If this order is not followed, you’ll still be able to preview your segment with XtremePreview.
To change the order of effects applied to a particular clip, you can drag and drop effects in Premiere Pro’s Effect Controls window. In the following example,
pter 3, Setting Up Realtime Effects with Adobe Premiere Pro

55
Matrox Page Curls appears after Matrox Color Corrections. Therefore, the clip will remain realtime:
If you want to use Premiere Pro’s nested sequence feature to combine RT.X effects, you must respect the following priority sequence when applying the effects:
1 Color correction effect(s).
2 Chroma key or luma key.
3 Matrox hardware-accelerated effect (such as a page curl, advanced DVE, or Premiere Pro realtime transition).
For example, if your nested sequence includes a chroma key effect, you can apply a Matrox page curl effect to the sequence and it won’t require rendering. If, however, you apply a chroma key effect to a nested sequence that includes a page curl effect, you’ll have to render the sequence. For information on creating nested sequences, see your Adobe Premiere Pro User Guide.
RestrictionsIf you follow the rules listed above, your effects will remain realtime. You will, however, need to render your effects when you do any of the following:
• Select Force render when you set up an effect in the Matrox Effect Setup dialog box.
• Perform a Matrox realtime export to disk or DV tape of a segment that has dropped frames.
• Place effects or clips too close on the Timeline, as explained in the section “How to place your effects to avoid rendering” in the “Setting Up Realtime Effects with Adobe Premiere” chapter of your Matrox RT.X100 Xtreme Installation and User Guide.
¦ Note The Matrox old movie effect (available as an add-on from your RT.X installation CD) follows the same guideline as the Matrox particle effect, that is, leave a gap of at least two seconds between the end of one Matrox old movie effect and the start of the next.
RT.X100 Xtreme Pro realtime rules

56
Cha
• Use a graphics roll, crawl, animation, or non-full screen graphics clip (only full-screen single-frame graphics are supported in real time).
• Apply a Matrox chroma key, luma key, or color correction to a graphics clip.
• Add a non-Matrox effect or transition, such as a non-realtime Adobe Premiere Pro video effect or transition. For details on selecting which Adobe Premiere Pro transitions you want to play back in real time, see “Selecting your realtime effect settings” on page 13.
• Apply any Field Options to a clip (other than Frame Blend Speed Changes), such as Always Deinterlace or Flicker Removal.
• Apply a freeze-frame effect to a clip using the Frame Hold command with the Deinterlace option selected (rendering won’t be required if you clear the Deinterlace option).
¦ Note Non-realtime segments of the Timeline (that is, areas that require rendering) are identified by a red bar above the time ruler.
pter 3, Setting Up Realtime Effects with Adobe Premiere Pro

Chapter 4Using Matrox WYSIWYG Programs
This chapter explains how to use the Adobe Photshop plug-in and the WYSIWYG DirectShow Control Panel.
58
Cha
About the Adobe Photoshop plug-inThe Adobe Photoshop plug-in, together with your Matrox RT.X hardware, lets you display your current Adobe Photoshop image on your NTSC or PAL video monitor. This lets you see the exact color temperature, safe-title area, and any interlaced artifacts in your image as you work.
Only image modes of Grayscale, RGB Color, CMYK Color, and Lab Color are supported in 8 bits/channel or 16 bits/channel. If your image has numerous alpha channels, only the topmost alpha channel in the Channels palette will be displayed on your video monitor.
How to use the plug-in1 Start Adobe Photoshop.
2 Open your image or create a new image file.
3 To display the current image on your NTSC or PAL video monitor, choose File > Export > Matrox WYSIWYG Video Preview. This opens the Matrox Preview Setup dialog box:
¥ Tip We recommend that you use Photoshop actions to apply the Matrox settings. For more information, see “Using Photoshop actions with the plug-in” on page 59.
4 Under Output Size, select the size that you want your image to be displayed on your NTSC or PAL video monitor. For example, select Original to maintain your image’s original size.
¦ Note Images that are larger than full-screen size are always displayed as full-screen on your NTSC or PAL video monitor.
5 Under Render Preview Type, select one of the following options for previewing the rendering of your image on your video monitor:
$ Video and alpha Select this to view your image keyed over a black background
$ Alpha only Select this to view only your image’s grayscale alpha-key (matte) information.
pter 4, Using Matrox WYSIWYG Programs
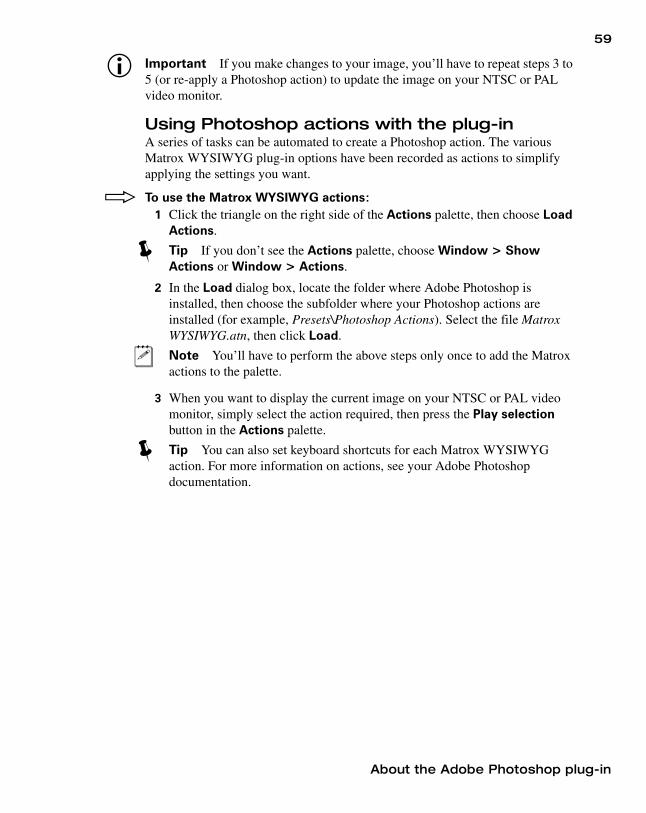
59
¡ Important If you make changes to your image, you’ll have to repeat steps 3 to 5 (or re-apply a Photoshop action) to update the image on your NTSC or PAL video monitor.
Using Photoshop actions with the plug-inA series of tasks can be automated to create a Photoshop action. The various Matrox WYSIWYG plug-in options have been recorded as actions to simplify applying the settings you want.
°To use the Matrox WYSIWYG actions:1 Click the triangle on the right side of the Actions palette, then choose Load
Actions.
¥ Tip If you don’t see the Actions palette, choose Window > Show Actions or Window > Actions.
2 In the Load dialog box, locate the folder where Adobe Photoshop is installed, then choose the subfolder where your Photoshop actions are installed (for example, Presets\Photoshop Actions). Select the file Matrox WYSIWYG.atn, then click Load.
¦ Note You’ll have to perform the above steps only once to add the Matrox actions to the palette.
3 When you want to display the current image on your NTSC or PAL video monitor, simply select the action required, then press the Play selection button in the Actions palette.
¥ Tip You can also set keyboard shortcuts for each Matrox WYSIWYG action. For more information on actions, see your Adobe Photoshop documentation.
About the Adobe Photoshop plug-in

60
Cha
About the WYSIWYG DirectShow Control PanelThe WYSIWYG DirectShow Control Panel lets you display video played back using Windows Media Player, Adobe Encore DVD, and other supported DirectShow applications on your NTSC or PAL video monitor. This gives you a WYSIWYG (What You See Is What You Get) video display for checking how your clips appear on a TV or other interlaced monitor.
The supported file types include: Matrox .avi and .m2v files, as well as Video CD and Super Video CD files (.mpg, .m1v, and .m2v files).
If you’ve connected an S-Video or composite video recorder to your RT.X system, you can record your clips onto tape as they play back on your video monitor.
Remarks• To disable and re-enable the Matrox WYSIWYG DirectShow output to your
video monitor, you must log onto an account on your Windows system that has Administrator privileges. For details, consult the appropriate Microsoft documentation.
• When playing non-interlaced video clips on your video monitor, you may see some flickering in your image that is not present in the image on your computer screen. This is normal.
pter 4, Using Matrox WYSIWYG Programs

61
Configuring the WYSIWYG DirectShow Control Panel
1 To open the WYSIWYG DirectShow Control Panel, click the icon on your Windows taskbar.
¦ Note If you do not see the icon, right-click the taskbar and choose Properties. Clear the Hide inactive icons option, and click OK.
2 By default, the Matrox WYSIWYG DirectShow output to your NTSC or PAL monitor is enabled. Some DirectShow applications, however, may not display the video properly. If this happens, you can disable the display on your video monitor by clicking the Disable button.
¦ Note After choosing Enable or Disable, you’ll need to restart your DirectShow application for the change to take effect.
3 Under Output Size, select the size that you want your video to be displayed on your NTSC or PAL video monitor. For example, select Original to maintain the original size of your clip.
Configuring the WYSIWYG DirectShow Control Panel

62
Cha
4 By default, the Play associated audio (.wav) file option is selected. Some DirectShow programs, such as DVDit! SE, automatically play back associated audio files for video clips. Therefore, if you hear an echo when playing back video on your NTSC or PAL video monitor, you should disable playback of the associated audio file by clearing Play associated audio (.wav) file, and restart your DirectShow application for the change to take effect.
pter 4, Using Matrox WYSIWYG Programs
Index
AAdaptive degradation
definition 52Adobe Encore DVD
displaying project on video monitor 60exporting sequence markers for use with 21
Adobe Photoshop plug-inabout 58displaying clips on video monitor 58using Photoshop actions 59
Adobe Premiere ProAlpha Adjust effect 32applying a Motion effect 32Capture settings 15Export Frame settings 19Export Movie settings 19exporting sequence markers for Encore
DVD 21exporting Timeline to DV tape 22exporting to disk in real time 20fixed effects 32General settings 7loading Matrox project presets 6selecting realtime Premiere Pro
transitions 13setting up scratch disks 7See also Realtime plug-in for Adobe Premiere
ProAlpha Adjust effect
applying in Premiere Pro 32Aspect ratio
See Editing aspect ratioAuto balance
using color match effect 36AVI files
capturing using Adobe Premiere Pro 15exporting using Adobe Premiere Pro 19exporting using Matrox Realtime Export to
Disk 20
CCapturing using Adobe Premiere Pro
specifying settings for 15Chapter points
exporting sequence markers for use as 21Chroma filtering and chroma interpolation
for rendering in Adobe Premiere Pro 10Chroma sampling for fast-motion video
for rendering in Adobe Premiere Pro 11Color match effect
creating 35overview 34performing auto balance 36
Color pass effectcreating 42overview 41viewing and selecting colors 43
Color replace effectcreating 45viewing and selecting colors 47
Color space conversion optionsfor rendering in Adobe Premiere Pro 10
Composite video deviceas source in Adobe Premiere Pro 16
Croppingdefault setting for Matrox effects 14
Custom binsorganizing in Premiere Pro 31
DDirectShow programs
displaying clips on video monitor 60Documentation
about this guide 2other documentation 3style conventions 2
Dropped frames in realtime effectsadaptive degradation with
XtremePreview 52identified on Timeline 8reporting 8

64
Ind
DV-1394 deviceas source in Adobe Premiere Pro 16settings in Adobe Premiere Pro 11
DVD authoringusing sequence markers as chapter points with
Encore DVD 21
EEditing aspect ratio
creating production in 16:9 format 26Encoding
MPEG video using Matrox Realtime Export to Disk 21
Error reportingfor dropped frames during video playback 8
ExportingMatrox clips in Adobe Premiere Pro 19to DV tape using Adobe Premiere Pro 22using Matrox Realtime Export to Disk 20
FFixed effects
applying in Premiere Pro 32Frame Hold
enabling realtime playback 14
GGraphics clips
supported formats 53Graphics overlays
setting up in Adobe Premiere Pro with Alpha Adjust 32
KKeyboard shortcuts
for exporting to tape 24
MM2V files
capturing using Adobe Premiere Pro 15exporting using Matrox Realtime Export to
Disk 20
Markersexporting for use with Encore DVD 21
Matching color between clips 34Matrox Realtime Export to Disk
performing 20Motion effect
applying in Premiere Pro 32enabling realtime playback 13
MPEG-2 Elementary filescapturing using Adobe Premiere Pro 15exporting using Matrox Realtime Export to
Disk 20
NNested sequences
applying RT.X effects to 55editing in Premiere Pro 31
NTSC setup levelselecting for analog video 7, 8
PProc amps
adjusting before capturing analog video 18adjusting using Matrox color match 39
Project presetsloading for Matrox RT.X 6
RRealtime export to disk 20Realtime plug-in for Adobe Premiere Pro
applying a Matrox transition 30applying a Matrox video effect 30color match effect
creating 35overview 34
color pass effectcreating 42overview 41
color replace effectcreating 45
default crop settings 14editing nested sequences 31organizing custom bins 31
ex
65
performing a realtime export to disk 20realtime rules 53selecting realtime Premiere Pro
transitions 13speed control method 31time code effect
creating 50overview 49
Rendering using Adobe Premiere Proselecting color space conversion options 10when you�ll need to render 55
Render-play feature 52Render-scrub feature 52Reporting dropped frames
during video playback 8
SScratch disks
specifying 7Scrubbing types
switching between 8Sequence markers
exporting for use with Encore DVD 21Setup level
selecting for NTSC analog video 7, 8Speed control method
selecting 31S-Video device
as source in Adobe Premiere Pro 16
TTapes
preparing for export to DV tape with Adobe Premiere Pro 22
Time code effectcreating 50overview 49
Titlessetting up in Adobe Premiere Pro with Alpha
Adjust 32supported formats 53
Transitionsapplying realtime 30selecting realtime Adobe Premiere Pro 13
VVideo effects
applying realtime 30
WWAV files
captured audio in Adobe Premiere Pro 11exporting using Adobe Premiere Pro 21
Widescreen formatediting material on Matrox RT.X 26
Windows Media Playerdisplaying clips on video monitor 60
WYSIWYG DirectShow Control Panelconfiguring 61overview 60
XXtremePreview
definition 52selecting mode 14
Index

66
Ind
Your notes
ex