match - tutorial
TRANSCRIPT

Tutorial Handbook

3 Dr. Holger Putz
Tutorial Handbook
Version 2.0

4
Match! – Phase Identification from Powder Diffraction – Version 2 Author: Dr. Holger Putz, Crystal Impact, Bonn, Germany. Copyright © 2003-2013 by CRYSTAL IMPACT Dr. H. Putz & Dr. K. Brandenburg & GbR Kreuzherrenstr. 102 D-53227 Bonn Germany E-mail: [email protected] World Wide Web: http://www.crystalimpact.com All title and copyrights in and to the Match! software, the accompanying printed materials, and any copies of the Software Product, are owned by CRYSTAL IMPACT or its suppliers. All rights reserved. No part of this manual may be reproduced, stored in a retrieval system, or transmitted, in any form, or by any means, without the prior written permission of the copyright owner. The Match! software product is protected by copyright laws and international treaty provisions. Therefore, you must treat the Match! software like any other copyrighted material except, that you may make one copy of the Match! software solely for backup or archival purposes. This software product is provided "AS IS" without warranty of any kind either expressed or implied, including but not limited to the implied warranties merchantibility and fitness for a particular purpose. The entire risk as to the quality and performance of the Software Product is with you. CRYSTAL IMPACT does not warrant that the functions contained in the Software Product will meet your requirements or that the operation of the software will be uninterrupted or error free. Match! version 2 uses the Qt library. Qt is a C++ toolkit for cross-platform application development (copyright (C) 2010 by Nokia Corporation and/or its subsidiary(-ies)). See http://qt.nokia.com for more information. Match! uses the Qt library under LGPL v. 2.1 licensing conditions (http://www.gnu.org/licenses/lgpl-2.1.html). As requested by §4 of this license, Match! uses Qt as a shared library. You can download the source codes of the Qt library from our web server (http://www.crystalimpact.com/download/match/Qt/qt-everywhere-opensource-src-4.7.3.zip). Mac is a trademark of Apple Inc., Cupertino, CA, U.S.A., registered in the U.S.A. and other countries. Microsoft and Windows are registered trademarks of the Microsoft Corp., Redmond, WA, USA.

5 Contents
Welcome!................................................................................................................................................................1 What’s New for Match! 1 Users .......................................................................................................................2 Toolbars and Menus .............................................................................................................................................................................. 2 Runs on Mac, Linux and of course Windows .............................................................................................................................. 2 Batch Processing and Automatics ................................................................................................................................................... 2 Display and compare multiple diffraction patterns ................................................................................................................ 4 Quickly find specific phases/entries .............................................................................................................................................. 4 Instant Usage of Additional Information...................................................................................................................................... 7 Saving of Selection Criteria................................................................................................................................................................. 8 Comfortable Definition of Background ......................................................................................................................................... 9 Improved Zooming and Tracking Facilities ..............................................................................................................................10 Unification of Candidate List ...........................................................................................................................................................11 Manual Adjustment of Individual Amounts for Multiple-‐Phase Samples ....................................................................11 Adjustment of 2theta Shift using the Mouse.............................................................................................................................11 Selection of Colors, Line Styles and Fonts..................................................................................................................................12 x-‐Axis Scaling..........................................................................................................................................................................................12
Software Maintenance .................................................................................................................................... 13 Installing and Running Match! ........................................................................................................................................................13 Installing from Installation DVD-‐R ..........................................................................................................................................13 Installing from Download Package..........................................................................................................................................14
Adjustment of Skill Level...................................................................................................................................................................17 Online Update.........................................................................................................................................................................................17 Uninstalling Match!..............................................................................................................................................................................17 Windows .............................................................................................................................................................................................17 Mac OS X ..............................................................................................................................................................................................17 Linux (32-‐bit)....................................................................................................................................................................................17
Tutorial ................................................................................................................................................................ 18 Simple Example .....................................................................................................................................................................................18
General hints for phase identification from powder............................................................................ 24 Reference Pattern Database ......................................................................................................................... 26 Overview ..................................................................................................................................................................................................26 Reference Database Library.............................................................................................................................................................27 Create a new Reference Database .................................................................................................................................................29 PDF-‐4 or PDF-‐2 ................................................................................................................................................................................30 Old Format PDF-‐2 ...........................................................................................................................................................................32 Create Reference Database From User Data or ICSD/Retrieve...................................................................................34
Select Reference Database................................................................................................................................................................36 Add Reference Database....................................................................................................................................................................36 Rename Reference Database ...........................................................................................................................................................37 Shift PDF-‐2 Reference Database.....................................................................................................................................................37 Delete Reference Database...............................................................................................................................................................37 User Database.........................................................................................................................................................................................38 Overview .............................................................................................................................................................................................38 Creating a User Database .............................................................................................................................................................38
Copyright Issues....................................................................................................................................................................................57 Appendix ............................................................................................................................................................. 58 Controlling the Software using Scripts........................................................................................................................................58 Table of Mouse Button and Key Combinations........................................................................................................................60 Table of Keyboard Shortcuts and Function Keys....................................................................................................................64 Support......................................................................................................................................................................................................67
Index ..................................................................................................................................................................... 68

6

1
Welcome!
This tutorial will give you an introduction to the new version 2 of the Match! software. You will be guided through the most important features of the software, so that you can start using it in your own projects right away. Welcome to the Match! software, version 2! This chapter contains a lot of important information that might help you when using the software for the first time, so please take a little bit of time to fully read it and understand its contents.
First of all, the software maintenance (e.g. installation) is described in the corresponding chapter on p. 13. Once you have setup the software on your machine, please follow the tutorial session on p. 18 where the basic usage of the program is demonstrated.
If you have already used the previous version 1 of the software, you should also have a look at the chapter “What’s New for Match! 1 Users” on p. 2. Here, you can get a quick overview over the major changes between version 1 and 2 of the software. This chapter is also recommended for other users who would like to learn about the advanced features of the software!
If you are an experienced user and would like to get a quick overview on how to operate the software, please have a look at the chapter “Table of Mouse Button and Key Combinations” on p. 60 in the Appendix.
There are two basic keyboard shortcuts you should always keep in mind:
• F1 (Cmd+? on the Mac) will open the online help at the index page, so that you can easily search for information about a given keyword/issue.
• Ctrl+J1 will display a table of all mouse operations and keyboard shortcuts that can be used.
Using these two shortcuts, you should be able to clarify most issues and questions.
1 On the Mac, you have to press Cmd+J instead.

What’s New for Match! 1 Users
Here is a list of the most prominent changes in the new Match! version 2 compared to the previous version. This chapter is especially intended for users of the previous version, but also for most other users who would like to learn about the advanced features of the software.
Toolbars and Menus
First of all, you will notice that most toolbars e.g. for the pattern graphics and candidate list have been replaced by context menus. You can open the corresponding context menus and get access to the commands by right-clicking into the corresponding area of the screen.
Runs on Mac, Linux and of course Windows
Like the previous version, Match! version 2 of course runs on Windows. But in addition, the new version can also be used on Mac OS X and Linux platforms. Fortunately, there is no need to decide in favour of a specific platform when purchasing the software: You will get installation packages for all three platforms, so you can use the software on any platform you like. Of course, multiple installations are only possible within the limitations of the license type (single, site or campus license).
The software was successfully tested on Intel-based Mac OS X (10.5 "Leopard", 10.6 "Snow Leopard", 10.7 “Lion” and 10.8 “Mountain Lion” (Developer Preview)), Linux (Intel 32 bit), Windows XP, Vista, Windows 7 and Windows 8 (Developer Preview).
On Mac OS X and Linux, there is one limitation though, due to the fact that other software accessed by Match! is not available for these platforms: There is no support for the ICDD PDF-4 database as well as the PDF-2 database releases 2005 and later.
Batch Processing and Automatics
Although it may seem a little bit strange to mention this feature right in front, you will notice it more or less right away when you run the software for the first time:
Similar to the previous Match! version 1, Match! version 2 contains several kinds of automatic functions. You can define which steps the program should carry out if another step has been accomplished. For example, you can tell Match! to process raw data automatically immediately after they have been imported.

3
Fig. 1: On this page of the “Options” dialog (which can be opened from the “Tools” menu), you can precisely define in
which order automatic operations shall be carried out.
With the new version, these options have been extended: Match! is now also capable of automatically selecting multiple matching phases (and not just a single one as in version 1), so the program is now (in principle) able to automatically determine the components of a mixture of crystalline phases completely on its own. Well, from practice you will know that there may be cases in which minority phases are not identified with this approach, or that there may be other issues not recognized by the software, of course.
In addition to the option to set the automatic options for each individual step, you can now also select among several so-called "user levels" at the top of the 'Batch' options page of the “Tools/Options”-dialog. The user levels define certain sets of automatic options that have shown to be reasonable. For example, the "Automatic" level lets Match! perform the complete phase identification procedure automatically, while on the "Expert" level you have to run every single step on your own. Of course, you can also save your own batch options settings as new 'user levels'.
By default, Match! will run in the so-called “Beginner” mode. This implies a nearly completely automatic processing of the initial steps: All you have to do is to select the diffraction data file you would like to analyze (you will be prompted automatically for it once the software has been started).
Afterwards, Match! will automatically process the raw data, determine the peaks, and run the search-match calculation. All that remains to do is to select the “matching” phases (e.g. by double-clicking or dragging the corresponding entries from the candidate list on the left-hand side to the Match list to the right), and finally display the report containing e.g. the list of matching phases as well as their arbitrary amounts (e.g. by selecting “View/Report”).

4 Of course, if you are an experienced user who would like to analyze more complicated
samples, that’s certainly not the way you like it. Hence, you can of course disable/modify this "batch" behaviour: In order to do so, please e.g. "cancel" the "File import" dialog (or wait until the calculation has finished), then select "Tools/Options". On the "Batch" tab of the "Options"-dialog, you can now select your skill level: From "Beginner" which is default up to "Expert" where you have to run every single step manually. Of course, you can also select individual batch steps according to your requirements.
Finally, it should also be noted that the new Match! version can be controlled from external programs using a batch script that Match! will follow. The file name of this batch script must be given as a "command line parameter" when the Match! program executable is invoked. More details are given on p. 58 in the Appendix.
Display and compare multiple diffraction patterns
In the previous version of Match!, you could only import one experimental diffraction pattern at a time. With the new version, it is now possible to import additional patterns (by pressing <Ctrl+I>), and to display them on top of the main experimental pattern. For example, this can be useful if you have collected several data sets and would like to use these different patterns to decide if a certain peak is present or not. It is also possible to display a vertical line following the mouse cursor (by pressing <Ctrl+X>), so that you can compare e.g. peak positions very accurately.
Quickly find specific phases/entries
This new feature is extremely useful in a variety of situations:
• Sometimes you already know that one or more phases are present in your sample, and would like to quickly select these phases before getting into the details of determining the remaining phases.
• In other cases you have the suspicion that a certain compound might be present, and would like to quickly view a corresponding reference pattern in order to check it.
• Maybe you would like to quickly find and highlight a certain phase, in order to use it as an internal standard for the correction of 2theta-errors?
• Last but not least this is also a convenient way to quickly display the data sheet of a certain compound.
With the new version, any of these tasks can be accomplished very quickly:
Simply press <Ctrl+F> (<Cmd+F> on the Mac) (or click into the corresponding new field "Find phases/entries" to the right of the toolbar), then type the name, the formula sum and/or the entry number of one or more compounds, and finally press <Return>.
Match! will make sure that the corresponding entries are displayed in the candidate list at the bottom of the screen, and then automatically highlight the best entry for each criterion (e.g. name or formula sum). As a result, the corresponding diffraction patterns will be displayed in the pattern graphics above.

5 At this point, you are now ready to e.g.
• Visually compare the corresponding pattern(s) to the experimental pattern (and/or have a look at the corresponding figure-of-merit values that are calculated automatically).
• Select the corresponding entries as "matching phases" by pressing the <Space> bar.
• Display the data sheet for a certain single entry by pressing <Ctrl+D> (<Cmd+D> on the Mac).
• Correct 2theta errors by using the highlighted entry as an internal standard, simply by pressing <Ctrl+T> (<Cmd+T> on the Mac).
Here is a quick example: Suppose that you have imported your experimental diffraction data, run the raw data processing, and performed a first search-match run, in order to calculate the figure-of-merit (FoM) values of the candidate entries. Now you are ready to perform your actual phase identification. Your screen might look like Fig. 2:
Fig. 2: That’s what the screen looks like having imported and processed the raw data, as well as run the search-match
calculation.
Now, you would like to find and display the diffraction pattern of quartz. In order to do so, simply press <Ctrl+F> on your keyboard (<Cmd+F> on the Mac), type 'quartz', and press <Return>. The best matching 'quartz' entry will automatically be highlighted in the candidate list and displayed in the diffraction pattern (Fig. 3).

6
Fig. 3: Once you have pressed <Ctrl(Cmd)+F> and entered your selection criterion (“quartz” in this case), the best-matching
corresponding entry will automatically be highlighted in the candidate list.
The best matching entry for 'quartz' has already been marked in the candidate list, so you can instantly use it as an internal standard for the correction of the 2theta-error. In order to do so, simply press <Ctrl+T>. The new (corrected) 2theta values of the experimental peaks will be taken into account automatically in all 'views' of the data, resulting for example in an automatic update of the candidate list.
Due to the correction, the overlap between the experimental and the 'quartz' reference pattern has become better, resulting in an increased figure-of-merit (FoM) value for this phase/entry. As a result, it will now be displayed more close to the top of the candidate list (Fig. 4).
Fig. 4: In the candidate list, the best-matching entry corresponding to the criterion “quartz” has been marked automatically.
Now you can easily select the 'quartz' entry as matching: Since it is still marked in the candidate list, simply press the space bar to do so. Once the entry has been transfered to the Match list on the right hand side, the candidate list will instantly be updated, and the next best matching entry (Siderite in this case) will be highlighted (Fig. 5).
7 Fig. 5: The best-matching entry for “quartz” has been selected as “matching”.
In practice, you could now compare and select the next best matching entry as well, simply by pressing the space bar again and so on, until you have identified all phases in the sample.
Instant Usage of Additional Information
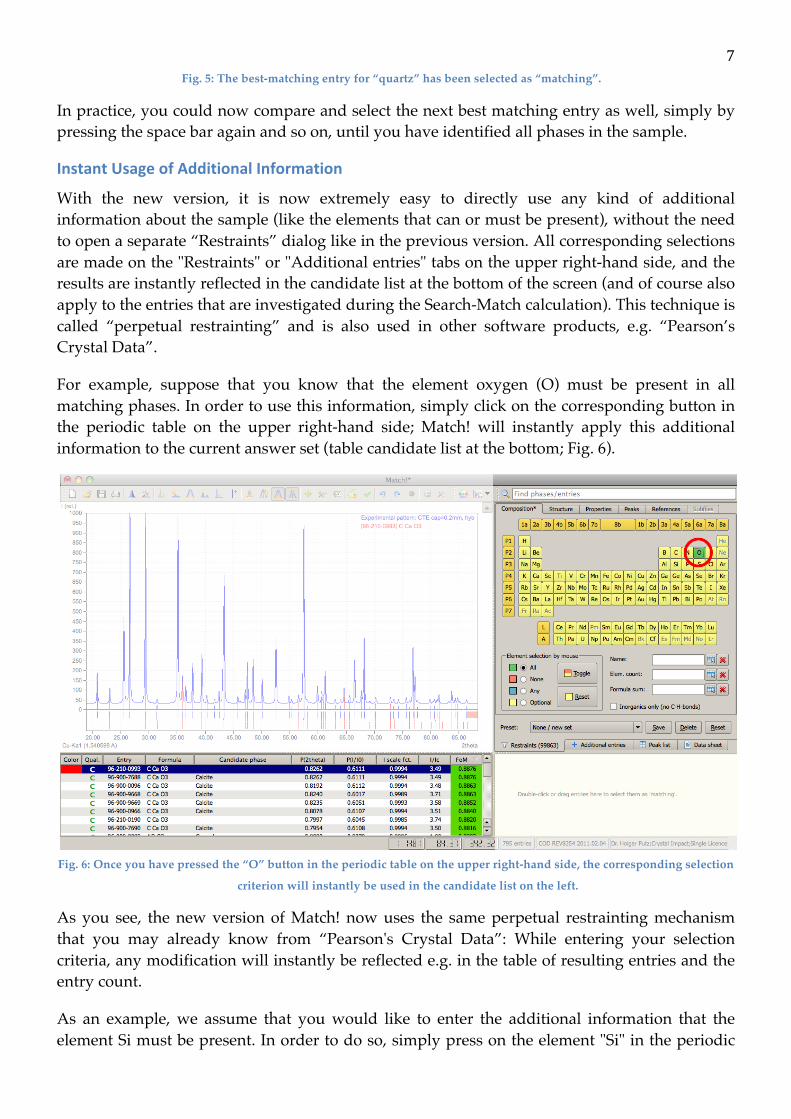
With the new version, it is now extremely easy to directly use any kind of additional information about the sample (like the elements that can or must be present), without the need to open a separate “Restraints” dialog like in the previous version. All corresponding selections are made on the "Restraints" or "Additional entries" tabs on the upper right-hand side, and the results are instantly reflected in the candidate list at the bottom of the screen (and of course also apply to the entries that are investigated during the Search-Match calculation). This technique is called “perpetual restrainting” and is also used in other software products, e.g. “Pearson’s Crystal Data”.
For example, suppose that you know that the element oxygen (O) must be present in all matching phases. In order to use this information, simply click on the corresponding button in the periodic table on the upper right-hand side; Match! will instantly apply this additional information to the current answer set (table candidate list at the bottom; Fig. 6).
Fig. 6: Once you have pressed the “O” button in the periodic table on the upper right-hand side, the corresponding selection
criterion will instantly be used in the candidate list on the left.
As you see, the new version of Match! now uses the same perpetual restrainting mechanism that you may already know from “Pearson's Crystal Data”: While entering your selection criteria, any modification will instantly be reflected e.g. in the table of resulting entries and the entry count.
As an example, we assume that you would like to enter the additional information that the element Si must be present. In order to do so, simply press on the element "Si" in the periodic

8 table on the upper right hand side. The candidate list at the bottom is instantly modified: All
entries for CaCO3 (Calcite) that were present before are now gone, and the number of entries matching your selection criteria (displayed to the right of "Restraints" on the tab control) has been significantly reduced (from 99863 to 7913; Fig. 7).
Fig. 7: After you have clicked on a second element “Si”, only compound containing both Si and O remain in the candidate
list.
In a similar manner, it is also possible to add specific entries to the table of candidate entries (candidate list): Simply click on the tab "Additional entries"; this will bring up a totally equivalent set of tab sheets like the "Restraints" set. You can now define precisely which entries you would like to add to the candidate list even though they do not match the "Restraints" criteria.
Saving of Selection Criteria
If you were frequently using the same restraints (selection criteria) with the previous version 1 of Match!, you will instantly know what this feature is about: With the new version, you can easily save the current selection criteria, and recall them later on with just two mouse clicks. Of course, it is possible to save several sets of selection criteria.
You will find the corresponding control elements at the bottom of the "Restraints" (and also "Additional entries") tab to the right of "Preset:" (Fig. 8).
Fig. 8: Using these buttons at the bottom of the periodic table, you can easily save and recall all kinds of
restraints/additional entry settings.

9 In order to save the current selection criteria, simply press the "Save" button. Afterwards, you have to enter a name using which you can easily identify this set of selection criteria later on ("Silicon compounds" in our example).
Your selection criteria will then be stored in your personal settings (e.g. Windows registry). If another person is using the same computer, he can store his own selection criteria independent from yours (of course assuming that he is using his own account on this machine...).
If you would like to recall a certain set of selection criteria, simply press the "arrow down" button of the combo box to the left of the "Save" button, and select the name of the desired selection criteria from the list that opens.
That's it! The selection criteria that have been loaded will instantly be applied to the table of candidate entries (candidate list), and of course also to the entries that are investigated during the search-match calculation.
Comfortable Definition of Background
Another drawback of the previous version of Match! was the definition of the background: It was not possible to modify the automatically defined background. Although the automatically determined background was appropriate in many cases, sometimes it did not describe the background correctly.
The new version 2 is much more flexible regarding this issue: Like in version 1, the background is first determined automatically during the import of the diffraction data. However, it is then possible to modify the shape of the background curve, simply by dragging around control points of the background curve using the mouse. It is also easily possible to add more control points or delete existing ones just by clicking the right or left mouse button if the mouse cursor is at the corresponding position (Fig. 9).
In order to do so, please make sure that the background curve is currently displayed. You can toggle the displaying of the background curve e.g. by right-clicking in the diffraction pattern and selecting “Background” from the context menu that opens.
When the background is displayed, please note the small squares on the curve. These are the so-called “background control points”. You can shift these points by first moving the mouse on top of them, pressing the left mouse button, and moving the mouse around.
If you would like to add more control points (e.g. in order to be able to model a certain range in the background curve more accurately), you can do so by first moving the mouse to the desired position on the background curve. The mouse cursor will change (a ‘+’ sign will appear on the top left of the cursor); you can now press the left mouse button in order to add a control point at the corresponding position of the background curve.
In order to delete a control point, simply move the mouse cursor on top of it, then press the right mouse button.

10
Fig. 9: As the mouse cursor indicates, you can modify the background control point behind the cursor: In order to shift it,
press the left mouse button, in order to delete it, press the right button.
Improved Zooming and Tracking Facilities
With the previous version 1 of Match!, zooming was easy: Simply select a 2theta range you would like to investigate more into detail, and the software would reduce the diffraction pattern to the corresponding 2theta range and adapt the intensity axis accordingly. Well, this was simple, but not too flexible in fact!
With the new version 2, things have improved a lot: Like in the previous version, you can simply select a certain area in the diffraction pattern graphics using the mouse, and Match! will adapt the graphics accordingly. However, the first big difference is that now not only the 2theta range but also the range on the intensity axis can be selected. In other words, you can draw a rectangle inside your diffraction pattern using the mouse (keeping the left mouse button pressed), and Match! will focus on this area.
Allternatively, you can simply double-click the left mouse button, in order to focus into the area around the current mouse position. Double-click again in order to view the full pattern again.
Another option that is now available is to use the mouse wheel for zooming: Move the mouse cursor to the region in the diffraction pattern you would like to focus on, and turn the mouse wheel away from you in order to focus right into this area (or out again, if you turn the mouse wheel into the opposite direction).
Once you have zoomed into the diffraction pattern, you can shift the pattern by keeping the “Shift” button on your keyboard (or the center mouse button/wheel) pressed while moving the mouse around (the so-called “tracking”).

11 Finally, it is now also possible to exactly define the area (intensity and 2theta) you would like to display. A corresponding dialog is now provided for this purpose (menu “View/Define zoom area…”).
Unification of Candidate List
In Match! version 2, a new function “Unify phases” was introduced. This command (which can be executed either by selecting the corresponding command from the “Entries” menu, or by pressing <Ctrl(Cmd)+U>) checks the candidate list for entries that describe the same phase. If any of these “duplicate entries” are detected, Match! removes all but the best-matching entry for this phase. As comparison criteria, Match! uses the composition as well as the powder diffraction pattern similarity (R-factor).
This command is especially useful if run before the selection of matching phases, in order to prevent multiple entries for a certain phase block the candidate list or even appear in the Match list.
Manual Adjustment of Individual Amounts for Multiple-‐Phase Samples
While in the previous version of Match! the (semi-quantitative) amounts were calculated based on the corresponding automatically determined intensity scale factors of the selected entries, it is now possible to modify these intensity scale factors manually (and hence also the amounts of the individual phases). You can do so in two different ways:
• One option is to mark the phase/entry you would like to adjust the quantity of in the match list on the right-hand side. Afterwards, you can simple move the mouse cursor close to the top of one of the corresponding peaks in the diffraction pattern, press the left mouse button, and keep it pressed while moving the mouse up or down. The amount (intensity scale factor) of the marked entry/phase will now follow the mouse movements: Moving the mouse up (i.e. away from you) increases the amount of the marked phase, while moving the mouse towards you reduces the amount. The amounts of the remaining (non-marked) phases will be adjusted automatically.
• Alternatively, you can mark the phase/entry in the Match list (similar to the previous option), move the mouse cursor in the Match list to the column “Quant. (%)” of the corresponding entry, and use the mouse wheel in order to adjust the amount for this phase.
Adjustment of 2theta Shift using the Mouse
It is now possible to directly adjust the 2theta shift of the experimental diffraction pattern manually using the mouse (in addition to the corresponding function in the “Pattern” menu that was already present in version 1 of the software).
In order to shift the experimental diffraction data on the 2theta (x-) axis, move the mouse into the diffraction pattern graphics, then press the <Ctrl> as well as the <Alt> buttons on your keyboard (<Cmd> and <Alt> on the Mac). The mouse cursor will now change into a vertical line with arrows to the left and right. While keeping the <Ctrl> (<Cmd>) and <Alt> button pressed, turn the mouse wheel away from you in order to shift the experimental data to higher 2theta values, or towards you in order to shift to lower angles. The changes will be
12 automatically applied to the candidate list as well as the peak correlations to reference
diffraction patterns.
In order to restore the original 2theta values, simply press the mouse wheel button.
Selection of Colors, Line Styles and Fonts
In the new version, you can define individual colors and line styles for experimental diffraction data, calculated patterns, reference patterns etc. It is also possible to define the fonts for text labels in the diffraction pattern as well as the dialog elements (texts on buttons, in dialog windows etc.).
All of this can be achieved in the “Colors and line styles” dialog that can either be opened from the “Tools” menu, as well as by pressing the corresponding button in the toolbar. Note that you can make your changes permanent by marking the “Save as defaults” checkbox at the bottom of the dialog.
x-‐Axis Scaling
With the new version, you cannot only select either 2theta or d-values to be displayed on the x-axis of the diffraction pattern graphics, but also 1/d. As usual, you can make this selection on the “Graphics” page of the “Tools/Options” dialog; you can directly open this page either by pressing <Ctrl> + <Alt> + G (<Cmd> + <Alt> + G on the Mac), or by clicking on the corresponding button in the toolbar.

Software Maintenance
Installing and Running Match!
Installing from Installation DVD-‐R
Windows First please check the minimum system requirements:
• Personal Computer with Microsoft Windows XP, Vista, Windows 7 or 8
• 1 GB of RAM
• Hard disk with minimum 300 MB of free disk space
• Graphics resolution of 1024 x 768 pixels (1280 x 800 pixels or more recommended)
Afterwards, simply insert the Match! DVD into your drive and wait until the installation program is run automatically. If nothing happens after a reasonable amount of time, you can also run the installer manually in the DVD's directory "Windows", by double-clicking on the corresponding file.
If you are using Microsoft Vista or Windows 7 as operating system, please note that you need to run the installer (and uninstaller) using administrator rights explicitly. In order to do so, please right-click on the installer file, then select "Run as administrator" from the context menu.
Please note the terms of the "End User License Agreement", which will appear in the second dialog box of the installer!
Once the installation has finished, you can run Match! e.g. by clicking the Windows "Start" button, then on "Match2/Match!". Alternatively, you can run the software by double-clicking on the file "Match!.exe" in the directory where you have installed the program (e.g. "C:\Program Files\Match! 2").
Mac OS X Before you install and run Match!, you should check the following minimum system requirements:
• Mac with Intel processor and Mac OS X 10.5.8 "Leopard" operating system (or later)
• 1 GB of RAM
• Hard disk with minimum 300 MB of free disk space
• Graphics resolution of 1024 x 768 pixels (1280 x 800 pixels or more recommended)
Afterwards, please run the installer in the DVD's directory "Mac_OS_X". Please note the terms of the "End User License Agreement", which will appear in the second dialog box!

14 Once the installation has finished, you can run Match! e.g. by double-clicking on the
corresponding desktop symbol "Match!", or alternatively using the Finder (Folder "Applications/Match2").
Linux (32-‐bit) Before you install and run Match!, you should check the following minimum system requirements:
• Personal Computer with Linux (Intel 32-bit), e.g. openSUSE, Ubuntu, Fedora
• 1 GB of RAM
• Hard disk with minimum 300 MB of free disk space
• Graphics resolution of 1024 x 768 pixels (1280 x 800 pixels or more recommended)
Afterwards, please use the installer in the DVD's directory "Linux". Please copy the installer to some temporary directory on your hard disk, then check that the file access permissions show that the installer file can be executed. If this is not the case, please run the command
chmod a+x Match-2.0-linux-installer.run <Return>
In addition, you need to install the software as "root" (administrator privileges required). In order to do so, either run a "su" command before running the installer (file "Match-2.0-linux-installer.run"), or use "sudo", e.g. by running
sudo Match-2.0-linux-installer.run <Return>
When the installer is running, please follow the instructions on the screen, and note the terms of the "End User License Agreement", which will appear in the second dialog box!
Once the installation program has finished, you can run Match! e.g. by double-clicking on the corresponding desktop symbol "Match!", by selecting "(Computer/)Applications/Other/ Match!", or by running the script "Match.sh" in the directory where the software has been installed (which is "/opt/Match2" by default).
Installing from Download Package
Windows First please check the minimum system requirements:
• Personal Computer with Microsoft Windows XP, Vista, Windows 7 or 8
• 1 GB of RAM
• Hard disk with minimum 300 MB of free disk space
• Graphics resolution of 1024 x 768 pixels (1280 x 800 pixels or more recommended)
In order to install Match!, please download and run the corresponding installer from

15 http://www.crystalimpact.com/match/download.htm
If you are using Microsoft Vista or Windows 7 as operating system, please note that you need to run the installer (and uninstaller) using administrator rights explicitly. In order to do so, please right-click on the installation file you have downloaded, then select "Run as administrator" from the context menu.
Please note the terms of the "End User License Agreement", which will appear in the second dialog box!
Once the installation program has finished, you can run Match! e.g. by double-clicking the file "Match!.exe" in the directory where you have installed the program (e.g. "C:\Program Files\Match! 2"). Alternatively, you can run the software by double-clicking on the corresponding desktop symbol "Match!", or by clicking the Windows "Start" button, then on "Match2/Match!".
Mac OS X Before you install and run Match!, you should check the following minimum system requirements:
• Mac with Intel processor and Mac OS X 10.5.8 "Leopard" operating system (or later)
• 1 GB of RAM
• Hard disk with minimum 300 MB of free disk space
• Graphics resolution of 1024 x 768 pixels (1280 x 800 pixels or more recommended)
In order to install Match!, first please download the corresponding compressed installer file ("Match-2.0-osx-installer.zip") from
http://www.crystalimpact.com/match/download.htm
Once the download has finished, please uncompress the zip-file into some temporary directory, and run the installer e.g. by double-clicking on the corresponding file (you will be asked to enter your administrator password). When the installer is running, please follow the instructions on the screen, and note the terms of the "End User License Agreement", which will appear in the second dialog box!
Once the installation program has finished, you can run Match! e.g. by double-clicking on the corresponding desktop symbol "Match!", or alternatively using the Finder (Folder "Applications/Match2").
Linux (32-‐bit) Before you install and run Match!, you should check the following minimum system requirements:
• Personal Computer with Linux (Intel 32-bit), e.g. openSUSE, Ubuntu, Fedora
• 1 GB of RAM

16 • Hard disk with minimum 300 MB of free disk space
• Graphics resolution of 1024 x 768 pixels (1280 x 800 pixels or more recommended)
In order to install Match!, first please download the corresponding compressed installer file ("Match-2.0-linux-installer.run.zip") from
http://www.crystalimpact.com/match/download.htm
Once the download has finished, please uncompress the zip-file into some temporary directory. Check that the file access permissions show that the file "Match-2.0-linux-installer.run" can be executed. If this is not the case, please run the command "chmod a+x Match-2.0-linux-installer.run".
In addition, you need to install the software as "root" (administrator privileges required). In order to do so, either run a "su" command before running the installer (file "Match-2.0-linux-installer.run"), or use "sudo", e.g. by running "sudo Match-2.0-linux-installer.run".
When the installer is running, please follow the instructions on the screen, and note the terms of the "End User License Agreement", which will appear in the second dialog box!
Once the installation program has finished, you can run Match! e.g. by clicking on the corresponding desktop icon that has been created during the installation, or by running the script "Match.sh" in the directory where the software has been installed (which is "/opt/Match2" by default).
License Installation After you have installed the main software from a download package, the program will run in the evaluation mode, which basically means that it will stop functioning 60 days after the installation. You still need to install your personal license in order to transform the software into the fully personalized, unrestricted version.
In order to do so, simply copy the license file “yourlicense.lic” that you have received by e-mail into the directory where you have installed the program. The directories where the software is installed by default are:
• Windows: C:\Program Files\Match! 2
• Mac OS X: /Applications/Match2
• Linux: /opt/Match2
You may need administrator privileges to perform this task!
Afterwards, please verify again that the license file is really present in the corresponding directory, then run Match!. Your license data should now be displayed at the bottom of the splash screen (at program startup), to the right of the status bar (at the bottom of the program window) as well as in the “About Match!” dialog which can be opened from the “Help” or system menu.

17 Adjustment of Skill Level
By default, Match! will run in the so-called "Beginner" setting, which means that many steps are carried out automatically: Once you have started the software, you will be asked to select a diffraction data file to be imported. Once you have selected it, Match! will automatically run a raw-data processing as well as a search-match.
Of course, you can disable/modify this "batch" behaviour: In order to do so, please e.g. "cancel" the "File import" dialog (or wait until the calculation has finished), then select "Tools/Options". On the "Batch" tab of the "Options"-dialog, you can now select your skill level (from "Beginner" which is default up to "Expert" where you have to run every single step manually). Of course, you can also select individual batch steps according to your requirements.
Online Update
By default, Match! automatically checks the Crystal Impact web server for a more recent version each time it is executed. If a new version is found, you will be informed and guided to the corresponding web page from which you can download the new version.
You can also manually check for a more recent version, simply by selecting the "Check for updates..." command from the "Help" menu. The procedure will be the same as the one described above for the automatic update.
Uninstalling Match!
Windows If you would like to uninstall Match!, please click on the Windows "Start" button, then click on "Programs", and finally select the command "Uninstall Match!" from the "Match! 2" subfolder.
If you are using Microsoft Vista or Windows 7 as operating system, please note that you need to run the uninstaller using administrator rights explicitly. In order to do so, please right-click on the command "Uninstall Match!" in the "Match! 2" subfolder, then select "Run as administrator" from the context menu.
Alternatively, you can also open the "Control Panel" from the "Settings" folder in the Windows "Start" menu. Afterwards, double-click on "Software" (on some operating systems called "Add/Remove Programs) in order to bring up the normal Windows software installation dialog. In the list, please mark "Match! 2", then click "Change/Remove". As soon as the uninstall program has been opened, please click "Ok" in order to remove Match!.
Mac OS X If you would like to uninstall Match!, please double-click on "uninstall" in the "Applications/Match2" folder using the Finder.
Linux (32-‐bit) If you would like to uninstall Match!, please switch over to "root" ("su" or "sudo"), then run "uninstall" in the Match! program directory (e.g. "/opt/Match2/uninstall").

Tutorial
This tutorial will give you an introduction to the new version 2 of the Match! software. You will be guided through the most important features of the software, so that you can start using it in your own projects right away. You are now certainly eager to get things running and start identifying phases with Match!. The sessions in this chapter will show you the most important functions of Match!, enabling you to tackle your own phase identification problems straight away afterwards.
Before you follow the tutorial session described in this chapter, we strongly recommend to restore the default (factory) settings of Match!, just in case you or a colleague have used Match! on this machine/account earlier and changed these settings. In order to do so, please start Match! if it is not already running. Afterwards, select the ”Restore factory settings” command from the ”Tools” menu, which will reset all options to the original ones selected by Crystal Impact. Please accept the suggestion “Save as default” values by pressing “Yes”, in order to make the changes permanent. Match! will now operate exactly like it has just been installed2.
Please note that all tutorial sessions have been carried out using the COD-Inorganics as reference database. If you use another reference database like the ICDD PDF or your own diffraction data, the results may be different!
One additional remark: All screenshots in the Tutorial Handbook have been captured on a Mac OS X system. On other operating systems, their basic contents will be the same, although there may be slightly different window frames.
Simple Example
In this very first tutorial session you will perform a rather simple phase identification exercise. The basic aim of this chapter is to give you a first impression of the basic handling of the software: Pattern import, search-match, phase selection, quantitative analysis, report printing. Let’s start with a very simple example so that you can draw your attention to the usage of Match! rather than to the actual phase identification problem. In fact, all you will have to do is to select the diffraction data file that you would like to analyze; Match! will do the rest.
Here we go: Suppose that you have obtained a high-quality powder diffraction pattern of a mineral sample.
If you have not already done so, please start the Match! software now3. It will display a nearly completely empty screen, as well as a “File/Open” dialog box (Fig. 10).
The Match! screen is divided into four parts: In the large panel on the upper left hand side, the diffraction pattern is displayed. Below, the list of candidate entries (”candidate list“) is placed. On the right-hand side, the dialog elements for the selection of restraints 2 Of course, you don’t have to recreate the index files! On the other hand, please note that the settings concerning the current reference database will not be changed. 3 If you do not know how the install or run the software, please have a look at the chapter “Installing and Running Match!” on p. 13.

19 (like the periodic table) is displayed by default. They may be replaced either by the ”Peak list“ or the”Data sheet“ for the currently marked entry. In the lower right-hand corner, the table of matching entries (the so-called “Match list”) is located.
Fig. 10: Match! has just been started. In its default “Beginner” setting, it opens a dialog in which you can select the
diffraction data file you would like to analyze.
The first thing you have to do is to select the diffraction data file you would like to import. In order to do so, please mark the file “quickstart.rd” in the “Tutorial” subfolder of Match!’s program directory, then press “Open”.
Match! will now run through the following steps automatically:
1) Import the diffraction data from the selected file
2) Process the imported raw data, i.e. strip the alpha2-contribution to the X-ray radiation, smooth the raw data, detect the peaks and finally check/correct a potential 2theta error.
3) Run a search-match calculation.
Your screen should now look similar to Fig. 11.

20
Fig. 11: Match! has run the raw data processing as well as the search-match calculation automatically.
The entry with the best (largest) so-called ”figure-of-merit” has already been marked in the candidate list at the bottom left, so that you can evaluate its agreement with the experimental diffraction pattern in the diffraction pattern on the top left-hand side.
You now have to select the entries that you assume to be present in the sample, based both on the ”figure-of-merit” values as well as the visual inspection of their agreement with the experimental pattern:
As you see, the entry with the best (highest) figure-of-merit belongs to the phase Al2O3 (Corundum). Please note the column ”I/Ic“ on the right-hand side of the candidate list. Here, you can see if the corresponding entry contains the parameter I/Ic required for (semi-)quantitative phase analysis. If you are using the COD as reference database (which is by default installed along with the Match! software), this parameter is available for all entries, since it has been calculated along with the diffraction pattern in the data import process. However, if you are using the ICDD PDF or other reference databases, there may be entries that do not contain the I/Ic parameter, so these entries would not be suitable for semi-quantitative phase analysis.
In order to select the first entry as matching, please press the space bar while the first entry Al2O3 (Corundum) is still marked in the candidate list. Alternatively, you can also double-click on the corresponding entry, or drag the corresponding entry from the candidate list to the Match list on the right-hand side (using your mouse). The selected phase will now be displayed in the Match list on the right.
The remaining entries belonging to the same phase as the selected entry have now vanished, because the corresponding peak intensities are now ”occupied” by the selected phase/entry (Fig. 12).

21
Fig. 12: The first phase (Al2O3, Corundum) has been selected as ”matching”.
There are still several entries left in the candidate list with good (high) figure-of-merit values, so obviously there are more phases present in the sample. The next best-matching entry has already been marked in the candidate list automatically, so you can clearly identify the second phase being Calcite (CaCO3). Again, please press the space bar when the corresponding entry is marked, like you have done before for Corundum. By doing so, you have selected this entry as matching as well.
The next ”unmatched” line in the candidate list belongs to an entry describing the phase Quartz (SiO2). Please compare it visually to the experimental pattern, then press the space bar to select it.
As you see (Fig. 13), the next entry has a rather low figure-of-merit (FoM) value (indicated by the orange-red bar on the right-hand side), so there is little chance that this phase is also present in your sample. Hence, it is highly probable that all (major) phases in the sample have been identified.

22
Fig. 13: The identification of phases in the unknown sample is complete. Note the column ”Quant. (%)” in the candidate list
in which the weight percentage of the matching phases in the sample is given.
At this point the semi-quantitative phase analysis is also completed: Please have a look at the column ”Quant. (%)” in the match list: Here you can see that your sample contains about 61% Corundum (weight-percentage), 22% Calcite and 17% Quartz.
There is nothing left to do but display the report. In order to do so, either press the combination ”Ctrl+R” on your keyboard (“Cmd+R” on the Mac), click the corresponding toolbar button, or select the ”Report” command from the ”View” menu. This will open the dialog window shown in Fig. 14.

23 Fig. 14: Once you have finished selecting the “matching phases” in the candidate list, you should display the Report
providing the detailed results of the analysis.
As you see, the report contains a detailed analysis of your sample. The most important information is given at the top of the “Matched Phases” section: Here, you can see the list of matching phases, i.e. the phases that are most likely to be present in your sample, along with the corresponding arbitrary amounts (based on a semi-quantitative analysis). In our case, the sample consists of 61% Corundum (Al2O3), 22% Calcite (CaCO3) and 17% Quartz (SiO2).
Well, that’s it already! If you like, you can now print or save the report, simply by pressing the corresponding buttons at the bottom of the Report window.
Of course, the example you have just processed is rather artificial, and certainly most “real world’s” phase identification tasks as not so easy to solve. In this context, please note that by default Match! is running using the “Beginner” batch setup, in which as many steps as possible are run automatically. For more advanced users, it is certainly recommended to operate the software more “manually”, i.e. to select a “higher” user level. In order to do so, simply close the report now (press “Quit”), then select the “Options” command from the “Tools” menu (on the Mac, select “Preferences…” from the program menu “Match!” instead). Once the “Options”-dialog is displayed, bring the “Batch” page into front, and select your “user level” in the combo box at the top. In addition (or alternatively), you can select each single step that shall be carried out automatically using the options below. Finally, please do not forget to mark the “Save as defaults” checkbox at the bottom before closing the dialog, in order to make your changes permant.

General hints for phase identification from powder
The most important issue you should keep in mind when using Match! is that the quality of your results strongly depends on the quality of the peak data that are derived from your initial raw data during the so-called "raw data processing" step. For example, if your peak data contain 2theta-errors (e.g. caused by sample displacement or 2theta-shift of the detector), or if there are far too many peaks detected because your raw data contain a lot of noise, you most certainly will get poor results (if any).
The background is that during the first step of the phase identification process (search), only the peak data are compared to the reference database. This is reasonable since the reference databases themselves (like the PDF or the COD) also contain peak data only. Hence, it should be clear that the quality of your peak data is most important to get good results.
What does this mean in practice? Although the determination of the peak data from the raw data can be run automatically using Match!, the computer is still not able to equal the "eye" of an experienced powder diffraction specialist, who is normally much better in distinguishing between noise and peaks. Hence, it is definitely worth while to invest some time in a critical evaluation of the peak data with regard to the raw data. Match! offers several functions which make this procedure as comfortable as possible.
Here are some suggestions for a reasonable workflow:
• Once you have imported the raw diffraction data, you should subtract the alpha2-contribution if necessary (menu "Pattern/Subtract alpha2"). If the pattern looks very rugged, you might also want to run one or two steps of "raw data smoothing (menu "Pattern/Raw data smoothing"), but keep in mind that small peaks might be extinguished if you overdue it, resulting in the potential loss of minority phases.
• If there is a strong background radiation, you should check and probably correct the background curve that was initially determined automatically. In order to do so, first make sure that the background curve is currently displayed in the diffraction pattern, e.g. by selecting the corresponding option from the pattern graphic’s context menu (which can be opened by pressing the right mouse button within the pattern graphics). Afterwards, you can shift the background control points (small squares on the background curve) using the mouse, and/or add more control points. Please have a look at the chapter “Table of Mouse Button and Key Combinations” on p. 60 in the Appendix in order to learn how to modify the background control points using the mouse.
• When the pattern looks all right, run a peak search (menu "Pattern/Peak searching") and/or a profile fitting calculation (menu "Pattern/Profile fitting), in order to get an initial set of peak data.
• Now it is time to closely inspect your data: Zoom e.g. into the left-hand side (low 2theta region) of the pattern, and inspect peaks and their positions while slowly moving to the right (high 2theta region). Match! offers a variety of keyboard shortcuts and mouse operation options for zooming and tracking; please have a look at the corresponding chapter “Table of Mouse Button and Key Combinations” on p. 60 in the Appendix. Add

25 or delete peaks while scrolling through the enlarged pattern, and maybe fit individual peaks to the profile data in order to obtain accurate intensity values.
• Take care that all maxima in the raw data that you estimate as being "real" peaks are "covered" by peaks, while at the same time using as few peaks as possible. Keep in mind that the "empty" spaces between the peaks are as important to exclude non-matching phases as the peaks are important to find the matching ones! Hence, by only using the peaks that you are really certain about, you can increase the separative power of the search-match calculation.
• Once you have investigated the whole pattern and have settled on a set of peaks, check and (if necessary) correct the specimen displacement error as well as the zero point, using the corresponding commands in the "Pattern" menu. Use the histograms to decide on a certain correction value, and do not hesitate to come back and try a different correction if the search-match calculation did not give a reasonable result.
• In order to correct potential 2theta errors, you can also use an internal standard if you know that a certain phase is present in the sample. Simply press <Ctrl+F> (<Cmd+F> on the Mac) (or click into the corresponding field "Find phases/entries" to the right of the toolbar at the top), then type the name, the formula sum or the entry number of the known compounds, and finally press <Return>. Match! will make sure that the corresponding entries are displayed in the candidate list at the bottom of the screen, and then automatically highlight the first entry matching your criterion (e.g. name or formula sum). As a result, the corresponding diffraction pattern will be displayed in the pattern graphics above. You can now adjust the 2theta axis according to the highlighted internal standard, simply by pressing <Ctrl+T> (<Cmd+T> on the Mac).
• At this point, you are now ready to run the search-match calculation, investigate the resulting entries, and select the matching phases.

Reference Pattern Database
Overview
As has already been mentioned in the introduction to this manual, Match! identifies phases in a sample by comparing its powder diffraction pattern to reference patterns of known phases. Hence, it needs a so-called “reference database” in which these reference patterns are provided. Match! is extremely flexible in this context, with several options for obtaining/using a reference database:
• A free-of-charge reference database based on the “Crystallography Open Database” (COD)4 is by default installed automatically along with Match!5; it can be used straight away after the installation. This reference database contains powder diffraction patterns calculated from crystal structure data taken from the “Crystallography Open Database” (COD)4, which itself provides crystal structure data published by the IUCr journals6, the “American Mineralogist Crystal Structure Database” (AMCSD)7, and various other sources. In this context, we would like to thank Pete Strickland (IUCr), Armel Le Bail and Saulius Grazulis (COD), as well as Bob Downs (AMCSD) for their kind permission to download and distribute their data free-of-charge! All entries taken from the COD reference database contain atomic coordinates, based on which the corresponding powder diffraction patterns have been calculated. Besides this, for all entries, I/Ic-values have been calculated, so that a semi-quantitative analysis can be carried out. You can download additional or updated reference databases free-of-charge from http://www.crystalimpact.com/match/download.htm#refdb
• The classical reference pattern database is the so-called “PDF” database provided by the ICDD8. There are several PDF database products available (e.g. PDF-2, PDF-4+, PDF-4/Organics, PDF-4/Minerals), all of which can be used with Match!9. According to our knowledge, the PDF is the largest and most comprehensive source of reference diffraction patterns.
4 http://sdpd.univ-lemans.fr/cod 5 If you are using the normal Match! demo version, only data from the “Inorganics” subset of the COD are installed. You can e.g. download and install the full COD reference database from the Match! web page, or from a Crystal Impact DVD distributed at various meetings, e.g. the ECM- or IUCr-conferences. 6 International Union of Crystallography, 5 Abbey Square, Chester CH1 2HU, United Kingdom. http://journals.iucr.org 7 R.T. Downs, M. Hall-Wallace, ''The American Mineralogist Crystal Structure Database``, American Mineralogist 88, 247-250 (2003). http://rruff.geo.arizona.edu/AMS/amcsd.php 8 International Centre for Diffraction Data, 12 Campus Boulevard, Newtown Square, PA 19073-3273, U.S.A. Phone: +1-610-325-9814; Fax: +1-610-325-9823; E-mail: [email protected], Internet: www.icdd.com 9 Please note that ICDD’s relational database products (PDF-4, PDF-2) are currently only available for the Windows platform. However, on Mac OS X or Linux, you can use the “old” PDF-2 database releases before 2005, if you have a valid licence for it.

27 • You can use an ICSD/Retrieve version released between 1993 and 2002) that you
might have available10. Match! can import the ICSD/Retrieve entries into a normal Match! user database and calculate reference powder diffraction patterns in a single step (p. 40).
• Many users also have diffraction patterns of own compounds that are not (yet) present in the COD or PDF databases. Hence, it is desirable to use these patterns in phase identification in addition to the "normal" patterns. This can be achieved using the so-called “user database” (p. 38).
We have run several tests in order to evaluate the quality of the various reference databases mentioned above:
Compared to using the classical ICDD PDF database, our tests reveal a somewhat diverse performance when using the free-of-charge COD reference patterns: When mineral samples were investigated, the results were generally very good, thanks to the excellent coverage of the AMCSD (which is included in the COD). Even for many samples other than minerals, the correct phases were identified in most cases, however, we found some (few) samples where main phases were not recognized because the corresponding reference patterns were not present in the COD reference database. In all cases, it was no problem to identify all phases when using the ICDD PDF-2 database.
According to our experience, it is optimal to combine the COD database (which basically contains more recent entries) with a user database created from ICSD/Retrieve (which typically contains "older" entries). Using such a combined reference database is the best solution if you do not have a recent ICDD PDF database available!
Hence, if you are investigating mineral or similar samples, you should be fine using the free-of-charge COD reference database. For most other users, it is currently still advisable to either add ICSD/Retrieve reference patterns to the COD database, or use the conventional ICDD PDF-2 or PDF-4 database.
When selecting your reference database, you should always keep in mind that there may be unforeseen phases in your samples, in which case it is extremely useful to have a large pattern database available in which even diffraction patterns of “strange” phases are present.
Reference Database Library
If you would like to apply a different reference database than the one that is installed along with Match! (typically the COD or the “Inorganics” subset of the COD), you first have to add it to the so-called “Reference Database Library”. This is a table (in fact two tables) of all reference databases that are currently available to the user. Each row in the table corresponds to one reference database, for which the name, the number of entries, and the location/path of the database/index files are displayed. There are two tables, one for reference databases that are available to all users, and another one that can only be accessed by the current user (Fig. 15).
10 Of course, you must have a valid licence for ICSD/Retrieve! Please contact FIZ Karlsruhe (Germany) (e-mail: [email protected]) if you are in doubt whether your licence is still valid!

28
Fig. 15: Using the “Reference Database Library”, you can manage the various reference pattern databases on your PC. In this
case, a COD database (REV28212) is installed for all users on this PC (upper table) and has been selected for being used
in phase identification (column "Cur."). Besides this, the PDF-2 Release 2004 is also available for all users. In addition,
there is another COD version (REV22182) that is only available to the current user.
Thanks to the “Reference Database Library”, Match! is capable of handling more than a single reference pattern database at a time: You can switch between all reference databases you have created (i.e. created index files for) while keeping your diffraction data in memory, thus enabling you to compare phase identification results from various reference databases. Of course, it is not necessary to perform a re-indexation of a reference database when switching between them!
The “Reference Database Library” dialog is opened automatically at program start if you did not install a reference database along with Match!. It can also be opened by selecting the “Select Reference Database” command from the “Tools” menu, or by pressing the corresponding
button in the toolbar.
As has already been mentioned, the “Reference Database Library” contains a list of all reference databases that are available for the current user (see below). For each available reference database, the name, the number of entries, and the directory in which it is stored are displayed. The database you are currently using is identified by an “>>>”-arrow to its left.
On a multi-user machine, each user may have individual reference database(s). It is perfectly possible to create a new reference database as a normal (standard) user, i.e. it is not necessary to have administrator privileges for this task. However, please note that a standard user can create reference databases only for himself, while an administrator can create databases also for all users. If a database is available to all users, it is listed in the upper table. Note that databases in this table cannot be modified or deleted by normal (standard) users!
You can manage your reference databases using the buttons at the bottom of the “Reference Database Library” dialog:

29 • Select another reference database for search-match or database retrieval purposes (of
course without the need to perform a complete new indexation!). Please note that the current contents of the candidate list will be updated if you select a new reference database, in order to avoid problems like a certain entry being present in one reference database while missing in another one.
• Create a new reference database (e.g. from an existing Match! user database11, or by importing entry data from cif files or the ICSD11).
• Add a reference database that is stored “ready for usage” in a certain directory11.
• Rename an existing reference database11.
• Shift the position of a classical PDF-2 database that is used in the marked reference database to a new directory.
• Delete an existing reference database.
• Quit the Reference Database Library.
Create a new Reference Database
Match! cannot use pattern sources like the PDF or COD database directly; it requires the presence of so-called “index files”. These files contain sorted extracts of the original data, thus enabling a much faster processing of diffraction pattern comparison and database retrieval tasks. In other words, creating a new reference database basically means to create index files for an existing source database.
If you would like to create a new reference database, please press the “Create” button in the Reference Database Library dialog. This will bring up the “Create Reference Database” dialog in which you can select the source(s) of the reference powder patterns. It is also possible to define a name for the new reference database, and to select the directory in which all files of this new reference database shall be stored (Fig. 16).
11 Not yet available in current beta version!

30
Fig. 16: Using this dialog you can create a new reference database for Match!.
The way how to proceed depends on the kind of database you would like to create index files for; please continue with the corresponding chapter below.
PDF-‐4 or PDF-‐2 Currently, the ICDD PDF-4 and PDF-2 database products are only available for Windows, so you are not able to use them in the Mac or Linux versions of Match!. In the following, we will demonstrate how to use an existing ICDD PDF-4 or PDF-2 database as a Match! reference database on a Windows PC:
Let us assume that you would like to add the ICDD PDF-4+ Release 2010 database (which of course already must be installed on your PC) (the procedure for using the corresponding PDF-2 is the same).
Once you have pressed the “Create” button in the Reference Database Library as just described, Match! will automatically check for available PDF relational database products (like the PDF-4+ or the PDF-2). If at least one PDF RDB is found, the checkbox “ICDD PDF” in the upper part of the dialog will be checked automatically, with the first PDF that has been found already selected in the drop down box below “ICDD PDF”. If you would like to select a different PDF version, you have to click on the drop down box and mark the corresponding line. In our case, we would like to use the PDF-4+/Release 2010, with the corresponding line already having been selected automatically (Fig. 17).

31
Fig. 17: You have selected to apply the ICDD PDF-4+ Release 2010 database MATCH! reference database.
If you like, you can change the name of the new reference database at the bottom of the dialog (deactivate the corresponding “Automatic” checkbox first!), and/or change the location (directory) in which the index files for the new reference database shall be stored. Normally, Match! will automatically create a suitable name and select an appropriate directory.
In case you have administrator privileges, you can also select if you would like to make the new reference database available to all users (or only to you), and if you would like to make it the default Match! reference database for new users on your PC.
Please note that on Windows it is not sufficient to run Match! from an administrator account; you have to explicitly use the command "Run as administrator" (which is available e.g. in the context-menu (click right mouse button)) in order to enable the two options "Create for all users" and "Select as default for all users without own selection"! On Linux, you have to use "su" or "sudo" in order to run Match! with "root" privileges and enable these two options.
Once you have made your selections, press the “OK” button at the bottom to start the creation of the index files. A small window will be display the progress of the indexation (Fig. 18). Due to the large amount of data which have to be read and sorted12, the creation of index files is a rather time consuming process. The procedure may take between about 30 minutes to an hour or even more, depending especially on the drive access and processing speed of your computer. When the indexation has finished, a corresponding message will be displayed. Afterwards, the new reference database will appear in the list of the Reference Database Library, ready for being selected (Fig. 19).
Fig. 18: This window shows the progress of the index file creation.
12 The PDF-4+ Release 2010 contains more than 300,000 entries !

32
Fig. 19: The “PDF-4+ 2010 RDB” reference database is now available in the list for all users
If the new reference database is the only one available in the Reference Database Library, it is selected for being used automatically. Otherwise, you have to select the new reference database manually: Simply mark (click) on the corresponding line in the table, then press “Select”. The licence for the PDF database is checked, then the new reference database is marked as selected, indicated by the “>>>” arrow on the left-hand side of the corresponding line.
You can now leave the Reference Database Library by pressing “Quit” and apply the PDF-4+ reference database in phase identifications and database retrievals.
If you would like to use the PDF-2 or any other current ICDD PDF database product, this can be done in a similar way than the procedure just described for the PDF-4+.
Old Format PDF-‐2 If you would like to use a ICDD PDF-2 database in the old format (i.e. release before 2005) as reference database, you can do so as follows:
Similar to current PDF-2 or PDF-4 versions, you first have to tell Match! that you would like to use an ICDD PDF database, by marking the checkbox ''ICDD PDF`` in the upper part of the “Create Reference Database” dialog. Afterwards, please mark (click on) the line “PDF-2 Release 2004 (or earlier versions)” in the list below “ICDD PDF” (Fig. 20).

33
Fig. 20: You have selected to apply an ICDD PDF-2 database released before 2005 as Match! reference database.
You now have to give the directory in which the PDF-2 database (to be exact: the file named “pdf2.dat” or similar) is stored in the input box below “Location of PDF-2 / NBS*AIDS83 database”. You can easily select this file/directory by clicking on the “...” button to the right of this input line.
A “File Open” dialog will be displayed in which you have to select the file “pdf2.dat” (or similar) in the directory where your PDF-2 database is stored. Afterwards, press “Open” to select the file/directory. A new dialog will open in which you have to explicitly confirm that you have a valid licence for the PDF-2 database you are about to use. If you confirm the validity of the licence, the location of the PDF-2 database file will be displayed in the corresponding input box.
If you like, you can now change the name of the new reference database at the bottom of the dialog (deactivate the corresponding “Automatic” checkbox first!), and/or change the location (directory) in which the index files for the new reference database shall be stored. Normally, Match! will automatically create a suitable name and select an appropriate directory.
In case you have administrator privileges, you can also select if you would like to make the new reference database available to all users (or only to you), and if you would like to make it the default Match! reference database for new users on your computer.
Please note that on Windows it is not sufficient to run Match! from an administrator account; you have to explicitly use the command "Run as administrator" (which is available e.g. in the context-menu (click right mouse button)) in order to enable the two options "Create for all users" and "Select as default for all users without own selection"! On Linux, you have to use "su" or "sudo" in order to run Match! with "root" privileges and enable these two options.
Once you have made your selections, press the “OK” button at the bottom to start the creation of the index files. A small window will display the progress of the indexation (Fig. 21). The

34 procedure will take a few minutes, depending especially on the drive access and processing
speed of your computer. When the indexation has finished, a corresponding message will be displayed. Afterwards, the new reference database will appear in the list of the Reference Database Library, ready for being selected.
Fig. 21: This window shows the progress of the index file creation.
If the new reference database is the only one available in the Reference Database Library, it is selected for being used automatically. Otherwise, you have to select the new reference database manually: Simply mark (click) on the corresponding line in the table, then press the “Select” button at the bottom. The new reference database will be marked as selected, indicated by the “>>>” arrow on the left-hand side of the corresponding line.
You can now leave the Reference Database Library by pressing “Quit”, and apply the PDF-2 reference database in phase identifications and database retrievals.
Create Reference Database From User Data or ICSD/Retrieve As has already been mentioned, it is also possible to use own diffraction patterns or the ICSD/Retrieve database in phase identification. Before you can do so, you have to store/convert the corresponding diffraction patterns and/or crystal structure data sets into a so-called “user database” file (file extension *.mtu), using the so-called “User Database Manager” dialog13.
If you have not already done so, please follow the instructions on p. 38 first, in order to create the mtu-file from your data. Afterwards, please return to this point and continue reading.
The procedure to use an existing user database file (*.mtu) as reference database is pretty similar to the one using an old PDF-2 version: First, you have to tell Match! that you would like to apply a user database, by marking the corresponding option in the middle of the “Create Reference Database” dialog. Afterwards, you have to select the location of the *.mtu file, by pressing the button “Select user database file (*.mtu)” to the right of the corresponding input line “Location:”.
A “File Open” dialog will be displayed in which you have to select the mtu-file in which your user data are stored. Afterwards, press “Open” to select the file/directory and return to the “Create Reference Database” dialog. The location of the mtu-file will now be displayed in the corresponding input box (Fig. 22).
13 You can open the “User Database Manager” directly from the “Create Reference Database” dialog by pressing the “Create/modify user database...” button. Alternatively, the “User Database Manager” can also be invoked from the “Tools” menu.

35
Fig. 22: The Match! user database file based on which a new Match! reference database shall be created has been selected.
If you like, you can now change the name of the new reference database at the bottom of the dialog (deactivate the corresponding “Automatic” checkbox first!), and/or change the location (directory) in which the index files for the new reference database shall be stored. Normally, Match! will automatically create a suitable name and select an appropriate directory.
If you create a new reference database for an existing user database (mtu-file), the selected mtu-file will be copied to the directory in which also the index files are stored. Hence, it does not matter if you change or delete the original user database file later on; this will not affect the reference database. In case you have administrator privileges, you can also select if you would like to make the new reference database available to all users (or only to you), and if you would like to make it the default Match! reference database for new users on your PC.
Please note that on Windows it is not sufficient to run Match! from an administrator account; you have to explicitly use the command "Run as administrator" (which is available e.g. in the context-menu (click right mouse button)) in order to enable the two options "Create for all users" and "Select as default for all users without own selection"! On Linux, you have to use "su" or "sudo" in order to run Match! with "root" privileges and enable these two options.
Once you have made your selections, press the “OK” button at the bottom to start the creation of the index files. A small window will display the progress of the indexation (Fig. 23). The procedure will take a few minutes, depending especially on the number of entries as well as the drive access and processing speed of your computer. When the indexation has finished, a corresponding message will be displayed. Afterwards, the new reference database will appear in the list of the Reference Database Library, ready for being selected.

36 Fig. 23: This window shows the progress of the index file creation process.
If the new reference database is the only one available in the Reference Database Library, it is selected for being used automatically. Otherwise, you have to select the new reference database manually: Simply mark (click) on the corresponding line in the table, then press “Select”. The new reference database will be marked as selected, indicated by the ”>>>” arrow on the left-hand side of the corresponding line.
You can now leave the Reference Database Library by pressing “Quit” and apply the new reference database in phase identifications and database retrievals.
Select Reference Database
In order to select another existing reference database for being used in future search-match and restrainting operations, please mark (click on) the corresponding line in the Reference Database Library dialog. Afterwards, press the “Select” button at the bottom of the dialog. If the selected reference database is a PDF-2 (Release after 2004) or PDF-4 database, the validity of the licence will be checked. Afterwards, the reference database will be marked as selected, indicated by the “>>>” arrow on the left-hand side of the corresponding line.
Please note:
• If your candidate list contains entries when you open the Reference Database Library, it will be updated if you select a different reference database. This is because the entries present in one reference database will most probably not be present in another database.
• The name of the currently selected reference database is displayed in the status bar at the bottom of the Match! window. This name is updated when the Reference Database Library is closed.
Add Reference Database
You can create backup copies of complete reference databases, simply by copying the complete contents of a reference database index directory. The name of a current reference database directory is given in the right-most column in the Reference Database Library dialog.
If you would like to use/restore a backup copy later on, you can simply copy it to an appropriate directory on your computer. Afterwards, click the “Add” button in the Reference Database Library. A “File Open” dialog will be displayed in which you can select the “Match! Reference Database” file (MatchRefDBInfo.mtn) that contains the information required to use the index files in the same directory. Please mark the file “MatchRefDBInfo.mtn”, then press “Open”.
In case you have administrator privileges, you will now be asked if you would like to make the new reference database available to all users (or only to you). Afterwards, the new reference database will appear in the corresponding table of the Reference Database Library, ready for being selected for usage.

37 Rename Reference Database
If you would like to rename an existing reference database, please mark (click on) the corresponding line in the Reference Database Library dialog. Afterwards, press the “Rename” button at the bottom of the dialog, and enter the new name in the input window that is opened. Once you press “OK”, the name of the currently marked reference database will be updated in the Reference Database Library list.
Please note:
• If you are a standard user (i.e. do not have administrator privileges), you can only rename reference databases that are listed in the table “Your personal reference databases”!
• The name of the currently selected reference database is displayed in the status bar at the bottom of the Match! window. This name is updated when the Reference Database Library is closed.
Shift PDF-‐2 Reference Database
If the reference database that is currently marked contains a PDF-2 database in the “old” format, you can shift the corresponding PDF-2 database file to a new location: First move or copy the corresponding file “pdf2.dat” (or similar) to the new location (e.g. using the Windows Explorer or file manager), the press this button, and select the file “pdf2.dat” at the new location. Match! will update the internal reference to this file, so that it knows where to find it when reading data e.g. for displaying them in an entry data sheet.
Delete Reference Database
In order to remove an existing reference database from the current computer, please mark (click on) the corresponding line in the Reference Database Library dialog. Afterwards, press the “Delete” button at the bottom of the dialog. Once you have acknowledged the warning message, you will be asked if you would also like to “physically” remove the corresponding index files. If you answer “No”, you can reactivate the corresponding reference database later on using the “Add” command. Once you press “OK”, the name of the currently marked reference database will be removed from the Reference Database Library list.
If you are a standard user (i.e. do not have administrator privileges), please note that you can only delete reference databases that are listed in the table “Your personal reference databases”!

38 User Database
Overview As has already been mentioned earlier in this manual, phase identification from powder diffraction data generally requires the availabilty of a so-called “reference pattern database”. Up to now, this is the PDF database provided by ICDD in most cases. However, there are also alternative sources of reference patterns, like the COD database delivered with Match!, the earlier ICSD(Retrieve) versions, or even your own diffraction data. The latter is especially appropriate when e.g. new compounds have been synthesized in a laboratory whose diffraction patterns and/or crystal structures have not yet been published.
While the COD reference database can be downloaded “ready-to-use” from the Crystal Impact web page free-of-charge, the ICSD/Retrieve or your own diffraction patterns must be imported into so-called “user database entries” before they can be used with Match!.
The contents of user database entries may originate from a variety of sources:
• ICSD/Retrieve database (released 1993-2002)
• crystal structure data (typically CIF-files)
• own compounds measured on the laboratory diffractometer
• published in the literature
• your colleague's user database
These user diffraction patterns have to be stored in a so-called “user database” (file with extension “*.mtu”) which can then be selected in the “Create Reference Database” dialog (p. 34). In the following, we will demonstrate how a user database (*.mtu-file) can be created using any of the data sources mentioned above.
Creating a User Database The central tool for the creation and maintenance of the user database is the so-called “User Database Manager”. It can be opened either by clicking on the corresponding toolbar button
(in the main toolbar at the top), by selecting the command “User Database Manager” from the “Tools” menu, or by pressing the Create/modify user database...” button in the “Create Reference Database” dialog.

39
Fig. 24: The new user database is still empty.
The user database manager window (Fig. 24) consists of three parts: At the top, there are nine buttons using which the basic actions (e.g. import or adding of entries) can be initiated. Below, in the upper half of the window, is the list of entries currently present. Finally, in the lower part of the window there is a set of so-called “tabsheets” in which the details of any entry marked in the entry list above are displayed and edited. You can switch between the individual tabsheets by clicking on the corresponding tabsheet header.
The first tabsheet (called “Summary”) contains an extract of the database fields on the remaining tabsheets; the data can just be viewed here, but not edited. The second tabsheet “General” contains data required for the description of the phase, like formula sum, chemical name etc. On the third tabsheet “Crystal structure”, crystal structure data can be entered in order to calculate the corresponding diffraction pattern on the subsequent tabsheet “Diffraction pattern”. Here, it is not only possible to calculate and view the pattern, but also to import (or export) diffraction data as peak list files, or to enter the diffraction data manually. Finally, the “Properties / Bibliography” tabsheet provides access to the physical property (e.g. density) as well as bibliographic database fields.
In the following subsections, we will create a small user database in order to demonstrate the various ways in which data can be entered into the database. Once you have entered your data, the modified user database has to be saved to a mtu-file before it actually can be used. You will be asked automatically to save your user database when you leave the User Database Manager dialog by pressing the “Quit” button. Alternatively, you can also press the “Save” button at the top of the dialog window.

40 Calculate Patterns for Crystal Structures Imported from ICSD/Retrieve
If you have a valid licence14 for an ICSD/Retrieve version released between 1993 and 2002, you can create a powerful reference database without additional costs, simply by importing the crystal structure data from the ICSD. During the import procedure, the corresponding powder diffraction patterns as well as the I/Ic values required for quantitative analysis are calculated automatically.
If you would like to do so, please click on the “Import” button at the top of the user database manager; a dialog will be displayed in which you can select if you would like to import entry data either from cif (crystallographic information files), from some other Match! user database (mtu-file), or from the ICSD (Fig. 25).
Fig. 25: In this dialog, you have to select the origin of the entry data to be imported (either CIF-files, MATCH! user database
files or the ICSD).
Please mark the “ICSD/Retrieve” option as in Fig. 25, then press “OK”. You now have to give the directory in which the ICSD/Retrieve database (to be exact: the file “ICSD.NEW”) is stored. A “File Open” dialog will be displayed in which you have to select the file “ICSD.NEW”. Normally, this file is located in the ''INDEX`` subdirectory of your ICSD/Retrieve program directory. Once you have found and marked the file “ICSD.NEW”, please press “Open”.
A new dialog is displayed in which you have to confirm that you have a valid licence for the ICSD/Retrieve version you are about to import (Fig. \ref{refdblib_confirm_ICSD_licence}). The confirmation will be written to a protocol logfile.
Fig. 26: Before you can use/import an ICSD/Retrieve database, you have to confirm that you have a valid licence for it.
14 If you are in doubt whether your licence is still valid, please contact FIZ Karlsruhe (Germany) (e-mail: [email protected]).

41 If you have confirmed that you have a valid licence, a new dialog is displayed in which you can adjust some settings concerning the calculation of diffraction patterns: the radiation type (X-rays or neutron, the wavelength, the maximum 2theta angle, and the maximum number of peaks that shall be included in the database to be created (Fig. 27). Note that this is a convenient method to create a reference database for neutron diffraction data!
Fig. 27: There are several options that can be adjusted for the calculation of the reference powder diffraction pattern, like the
radiation type, the wavelength or the upper 2theta limit.
When you have made your selections (if any), please press “OK”. That's it! The import of the entries from the selected ICSD/Retrieve database will now begin. The progress will be displayed in a small window.
Depending both on the number of entries in the ICSD/Retrieve database as well as the processing speed of your PC, the import procedure may take a day or even longer. When the import has finished, the new entries will be automatically added to the current user database, so they will appear in the Entry list a few seconds later. Any errors that might have occured during the import will be displayed in your text editor.
Once the import has finished, please don't forget to press the “Save” button at the top of the user database manager, in order to save the entries imported from the ICSD/Retrieve to a so-called “user database file” (file extension *.mtu). As has already been mentioned, this user database file can then be selected in the “Create Reference Database” dialog to create a new “ICSD/Retrieve” reference database, probably in combination with the COD reference database that is shipped along with Match!.

42 Calculate Patterns for Crystal Structures Imported from CIF-‐Files
The most convenient way to add entries to a user database is probably the import of crystal structure data from CIF-files, whereupon the corresponding powder diffraction patterns (as well as the I/Ic values required for quantitative analysis) are calculated automatically.
Please click on the “Import” button at the top of the user database manager; a dialog will be displayed in which you can select if you would like to import entry data either from cif (crystallographic information files), from some other Match! user database (mtu-file), or from the ICSD (Fig. 28).
Fig. 28: In this dialog, you have to select the origin of the entry data to be imported (either CIF-files, MATCH! user database
files or ICSD/Retrieve).
Please mark the “cif” option, then press “OK”. A new dialog is displayed in which you have to select the directory from which you would like to import CIF-files15. Please mark the “Tutorial” subdirectory of the Match! program directory (Fig. 29), then press “OK”.
Fig. 29: Here, you have to select the directory in which the CIF-files you would like to import are stored.
Another dialog will open, presenting a list of all CIF-files present in the selected directory (as well as all cif-files from all subdirectories if present). Here, you can actually select the CIF-files you would like to import. Please mark the file “calcite.cif”16, then press “OK”.
Again, a new dialog is displayed in which you can select the origin (e.g. source database) from which the CIF-files has been taken, e.g. the COD or AMCSD. Besides this, you can also adjust some settings concerning the calculation of diffraction patterns: the radiation type (X-rays or 15 The normal “File-Open” dialog cannot be used for this task due to a well-known Windows bug when a large number of files is selected. 16 The CIF-file has been taken from the American Mineralogist Crystal Structure Database (http://www.geo.arizona.edu/AMS/amcsd.php).

43 neutron, the wavelength, the maximum 2theta angle, and the maximum number of peaks that shall be included in the database to be created. Note that this is a convenient method to create a reference database for neutron diffraction data!
In our case, the entry has been taken directly from the original AMCSD, so please mark the corresponding option (Fig. 30) and press “OK”.
Fig. 30: The entry we would like to import has been taken from the AMCSD database.
That's it! Everything else will be handled automatically: A new entry will be created; the data from the CIF-file will be imported into the corresponding data fields, and the diffraction pattern, the density and the I/Ic value will be calculated from the imported crystal structure data. The new entry will be automatically added to the user database, so it will appear in the Entry list a few seconds later17 (Fig. 31).
17 Of course, if the unit cell is large, the calculation of the diffraction pattern may take much longer...

44
Fig. 31: The new entry "Calcite" has been imported from a CIF-file taken from the "American Mineralogist Crystal Structure
Database".
As has already been mentioned, it is possible to select more than a single CIF-file for being imported at a time, e.g. by keeping the <Shift> or <Ctrl> button pressed while you click on the individual file names. In this case, all selected files will be imported automatically one after the other. If you import more than a single CIF-file at a time, a report of warnings and errors is displayed when the last file has been imported, compared to the import of a single CIF-file in which case any warnings and errors are reported directly. The “import of multiple CIF-files” functionality is rather powerful; it has been used by Crystal Impact to create the COD reference database containing about 177,000 entries from the COD CIF files.
Import of Diffraction Data Another common way to add diffraction data to a Match! user database is the import of the corresponding peak data files. Currently, three peak data file formats are supported:
• Stoe peak files (*.pks)
• Philips/PANalytical peak data files (*.udi)
• Endeavour peak list files (2 columns: 2theta/d intensity; *.dif)
Of course, peak data files normally do not contain a lot of additional information (e.g. the composition), so we have to enter these data manually. We will start with the diffraction pattern import and enter the phase information afterwards.
Suppose that you have a diffraction pattern of the mineral Aragonite available in the Philips/PANalytical peak data format (aragonite.udi), and you would like to include the data from this file into your user database. This is a rather simple task:
Make sure that the “User Database Manager” is displayed, then click on the “Add” button at its top in order to add a new entry. The “General” tabsheet will be activated automatically, with

45 the cursor in the first input field “Sample name”. However, we will import the diffraction data first and enter the phase information details afterwards, so please click on the “Diffraction pattern” tabsheet header in order to bring the corresponding tabsheet into front (Fig. 32).
Fig. 32: The "Diffraction pattern" tabsheet is still empty.
Afterwards, please click on the “Import” button to the left of the peak data table. A dialog will open in which you have to select the diffraction data file you would like to import. Please mark “Philips/PANalytical Peak data (*.udi)” as “File type” at the bottom of the dialog, then select the file “aragonite.udi” in the “Tutorial” subdirectory of the Match! program directory (e.g. “C:\Program Files\Match2\Tutorial”). Finally, please press “Open”. The diffraction data are now present in the “Diffraction pattern” tabsheet; they are displayed both as diffraction pattern picture as well as peak list (2theta oder d-values/Intensities) in the table to the right (Fig. 33).

46
Fig. 33: Your “Aragonite” diffraction pattern has been imported from the file “aragonite.udi”.
All that remains to do is to enter the phase information on the “General” tabsheet, so please activate this tabsheet now. Afterwards, please enter “Aragonite” as the “Sample name”, then press <Tab> to advance to the “Formula sum” input field. Enter “Ca C O3” (mind the blank characters between the elements!). Afterwards, press <Tab> to advance. Enter “Calciumcarbonate” as “Chemical name”, press <Tab> again, and give “Aragonite” as mineral name.
Finally, you might want to mark the quality of the data. In our case, the diffraction pattern is really excellent, so please click on “* (excellent)” in the “Quality” box on the lower left-hand side. Afterwards, press the “Save changes” button at the bottom of the tabsheet.
That's it! Your diffraction data entry has been added to the user database, as can be seen from the entry list above (Fig. 34).
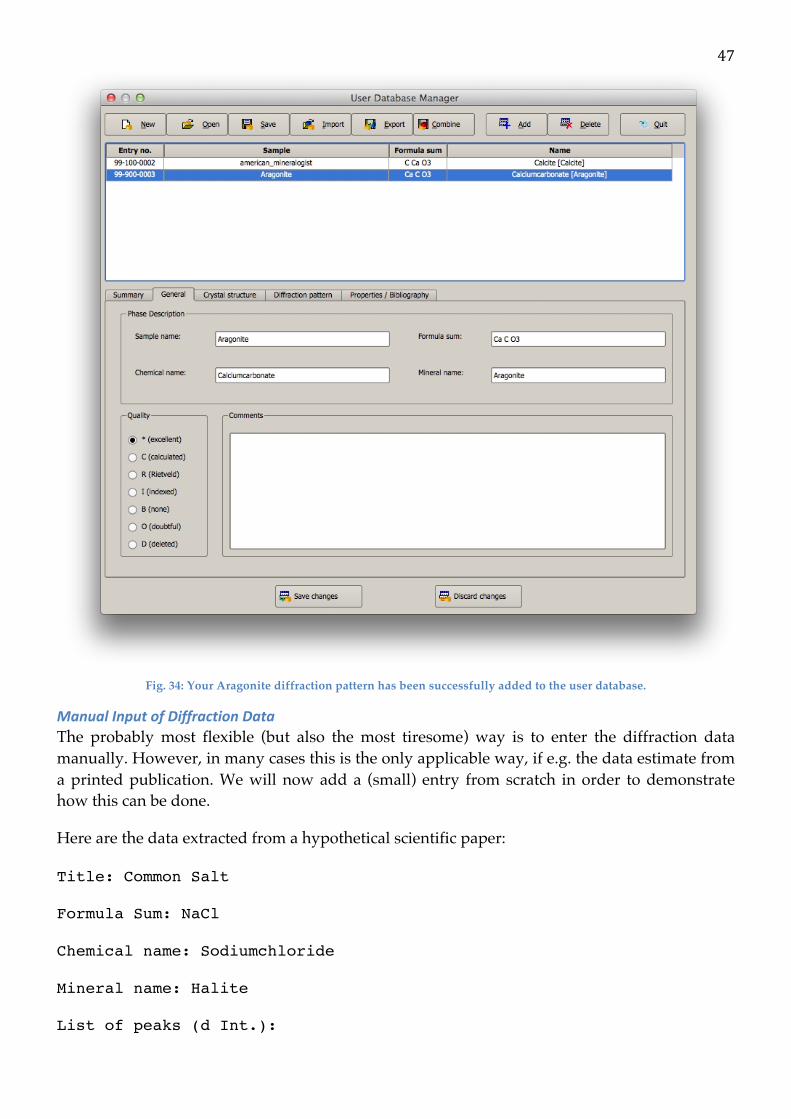
47
Fig. 34: Your Aragonite diffraction pattern has been successfully added to the user database.
Manual Input of Diffraction Data The probably most flexible (but also the most tiresome) way is to enter the diffraction data manually. However, in many cases this is the only applicable way, if e.g. the data estimate from a printed publication. We will now add a (small) entry from scratch in order to demonstrate how this can be done.
Here are the data extracted from a hypothetical scientific paper:
Title: Common Salt
Formula Sum: NaCl
Chemical name: Sodiumchloride
Mineral name: Halite
List of peaks (d Int.):

48 3.2447 82.5
2.8100 1000.0 1.9870 616.9 1.6945 17.7 1.6224 186.5 1.4050 76.8 1.2893 7.9 1.2567 192.4 1.1472 134.3 1.0816 8.1
We will now enter this minimal data set into the user database. Please click on the “Add” button at the top of the User Database Manager window, in order to add a new entry to the user database. The “General” tabsheet will be activated automatically, with the cursor in the first input field “Sample name”.
The four database fields at the top of the “General” tabsheet grouped as “Phase Description” are used later on to identify a certain entry in the Result list, so it is worth while to enter reasonable data here. In our case, we will enter the publication title as sample name, so please type “Common Salt” (of course only the text between the quotation marks, not the quotation marks themselves!) and press <Tab> in order to advance to the next field “formula sum”.
Here we will enter the composition NaCl; however, it is important to insert a blank character between the elements according to the CIF- or PDF-standard. Hence, please enter “Na Cl” and advance to “Chemical name” by pressing the <Tab> key again.
Please enter “Sodiumchloride” as chemical name, then advance to the “Mineral name” field (<Tab>) and enter “Halite”. Finally, set the “Quality” to “* (excellent)” by clicking on the corresponding radiobutton to the left. Your screen should now look similar to Fig. 35.

49
Fig. 35: The Sodiumchloride data on the "General" tabsheet have been filled in.
The only data extracted from the paper which have not yet been entered so far are the diffraction data, so please click on the “Diffraction pattern” header to bring the corresponding tabsheet into front. You will enter the d-values of the peak, so please make sure that you click on the “d-values” radio button in the bottom left corner first.
Afterwards, please click on button “Add” below the peak data table on the right-hand side, enter the d-value of the first peak (3.2447), then press <Tab> to advance to the second column “Int.”. Please enter the corresponding intensity value (82.5), then press <Return> in order to finish the input of the first peak. The peak will appear in the diffraction pattern to the left of the table.
In the same way, you can now enter the data of the second peak (2.81, 1000.0) right away. Please do so, and do not forget to press the <Tab> key in between to advance to the next field ! The second peak will also appear in the diffraction pattern; your screen should now look like Fig. 36.

50
Fig. 36: The data of the first two peaks have already been entered.
Please enter the peak data of the remaining eight peaks now in the same manner as above.

51 Fig. 37: All peak data have now been entered; the new entry has been saved.
So far, the data have been input but not yet saved to the database (the entry is not yet present in the list at top of the User Database Manager window). In order to do so, please click the “Save changes” button at the bottom of the User Database Manager; your entry will now appear in the entry list at the top. Your screen should now look similar to Fig. 37.
The entry numbers for the user database are assigned automatically according to the new ICDD PDF numbering scheme; they cannot be changed by the user. The entry numbers depend on the origin of the data. If the entry has been imported from the COD, the entry number is calculated as 960000000 + COD file number + 1, e.g. the COD cif file 9000000.cif gets the entry number 96-900-0001. If the entry has been imported from the ICSD, the entry number is calculated as 980000000 + ICSD Collection Code (COL), e.g. the ICSD entry with COL=68860 gets the entry number 98-006-8860. Entries that have been entered manually start with the entry number 99-900-0000.
Manual Input of Crystal Structure Data If a publication does not contain the powder diffraction pattern of a compound but the crystal structure data, you can enter them instead and calculate the diffraction pattern from these data afterwards. We will add a new entry “Quartz” in order to demonstrate how to do this.
The data extracted from the scientific paper are:
Title: alpha-quartz
Formula Sum: SiO2
Chemical name: Silicondioxide
Mineral name: Quartz
Crystal structure data:
Crystal system: trigonal
Space group: P 32 2 1
Unit cell: a= 4.914 c = 5.405 alpha = 90.0 gamma = 120.0
Atomic coordinates: Si 0.4698 0.0000 0.6667 O 0.4145 0.2662 0.7856
Reference: G. Smith, L.E. Alexander, Acta Cryst. 16(6), 462 (1963)
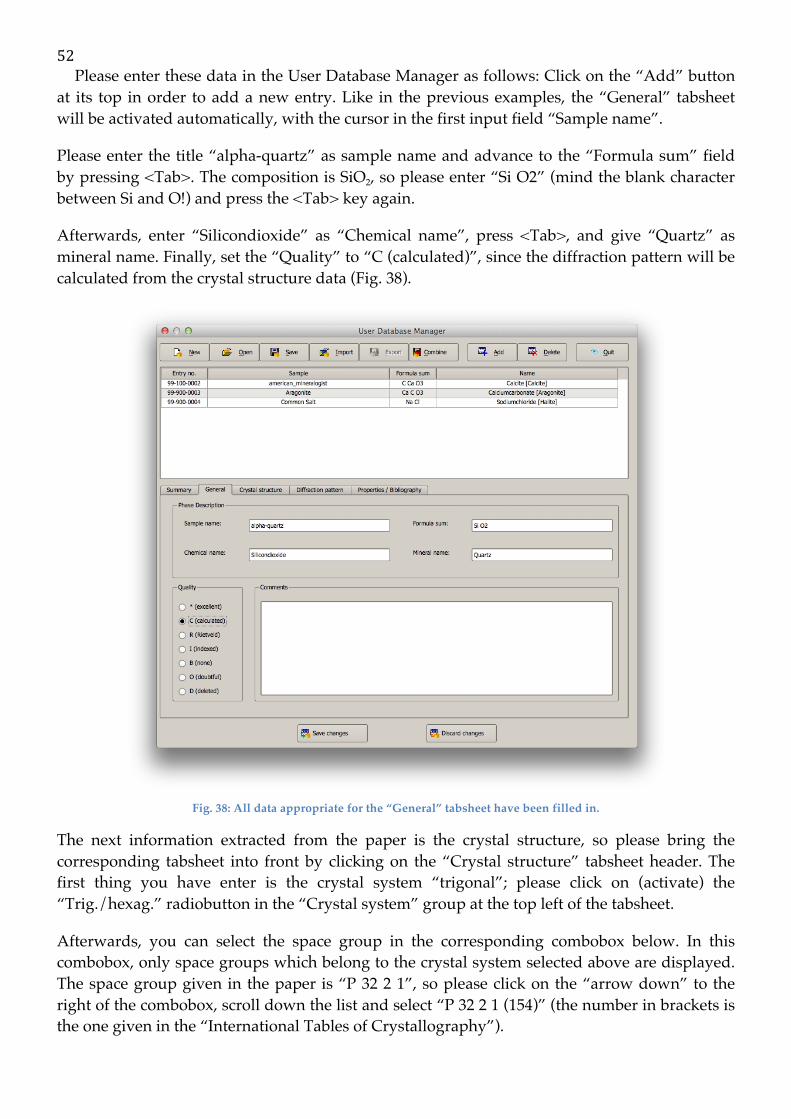
52 Please enter these data in the User Database Manager as follows: Click on the “Add” button
at its top in order to add a new entry. Like in the previous examples, the “General” tabsheet will be activated automatically, with the cursor in the first input field “Sample name”.
Please enter the title “alpha-quartz” as sample name and advance to the “Formula sum” field by pressing <Tab>. The composition is SiO2, so please enter “Si O2” (mind the blank character between Si and O!) and press the <Tab> key again.
Afterwards, enter “Silicondioxide” as “Chemical name”, press <Tab>, and give “Quartz” as mineral name. Finally, set the “Quality” to “C (calculated)”, since the diffraction pattern will be calculated from the crystal structure data (Fig. 38).
Fig. 38: All data appropriate for the “General” tabsheet have been filled in.
The next information extracted from the paper is the crystal structure, so please bring the corresponding tabsheet into front by clicking on the “Crystal structure” tabsheet header. The first thing you have enter is the crystal system “trigonal”; please click on (activate) the “Trig./hexag.” radiobutton in the “Crystal system” group at the top left of the tabsheet.
Afterwards, you can select the space group in the corresponding combobox below. In this combobox, only space groups which belong to the crystal system selected above are displayed. The space group given in the paper is “P 32 2 1”, so please click on the “arrow down” to the right of the combobox, scroll down the list and select “P 32 2 1 (154)” (the number in brackets is the one given in the “International Tables of Crystallography”).

53 Once you have selected crystal system and space group, you can enter the unit cell constants. Depending on the crystal system and space group selection, only a few parameters have to be entered. In our case, please enter “4.914” for a and “5.405” for c.
You are now ready to enter the atomic parameters: Please click on the “Add” button below the atomic parameters table on the right-hand side, enter “si” and press <Tab>. The cursor will advance to the next column “X”. Enter “0.4698” for x, press <Tab>, then “0.0” for y (<Tab>), and finally “0.6667” for z. There is no information given about the isotropic displacement factor Bi and the site occupation factor “Occ.”, so please press <Enter> to finish the input of the first atom’s parameters.
Now the coordinates of oxygen have to be entered: Please press “Add” below the atomic parameters table, then give “o” as element, “0.4145” as x, “0.2662” as y, and “0.7856” as z. Finally, press <Enter> to finish the input of the atomic parameters (Fig. 39).
Fig. 39: The complete crystal structure description has been entered: crystal system, space group, unit cell constants and
atomic parameters.
Now that the crystal structure information is complete, we can advance to the diffraction pattern calculation: Please click on the “Diffraction pattern” tabsheet header, then press the “Calculate” button. After a short moment, the diffraction pattern will be displayed (Fig. 40). Note that the I/Ic value required for semi-quantitative phase identification has also been calculated automatically.

54
Fig. 40: The powder diffraction pattern (as well as the I/Ic value and the density) has been calculated from the crystal
structure data you have entered.
Finally, you have to enter the bibliographic data: Please select the “Properties / Bibliography” tabsheet, click in the input line to the right of “Authors”, and enter “G. Smith, L.E. Alexander”. Afterwards, press <Tab> two times to advance to the “Journal” input line, and type “Acta Cr”. Your input will be automatically expanded to the next matching journal name. Once you have typed the “r“, the correct journal “Acta Crystallographica (1,1948-23,1967)” will be displayed.
Please press <Tab> two times (the CODEN will be set automatically to “ACCRA9”) to advance to the “Volume” input line, then enter “16(6)”. Press <Tab> again, and enter “462” as “Page(s)”. Finally, advance to “Year” (<Tab>) and give “1963”.
At this point, you have entered all data extracted from the scientific paper; your tabsheet should now be equivalent to Fig. 41.

55
Fig. 41: You have successfully entered the bibliographic data; besides this, the density has been calculated from the given
crystal structure data.
All that remains to do is to actually add the entry data to the user database. Like in the previous examples, this is achieved by clicking the “Save changes” button at the bottom of the tabsheet. The new entry will be added to the entry list at the top.
Add Entries from other User Databases If you are more than one Match! user in an institution, it is reasonable to share the own reference diffraction patterns, or, in other words, the user database entries. Match! is able to append another user's user database entries to your own. In fact, this is a rather simple task:
Simply copy your colleague's user database file (*.mtu) to your computer, then click the “Import” button at the top of the User Database Manager window. A dialog will be displayed in which you can select if you would like to import entry data either from cif (crystallographic information files) or from some other Match! user database (mtu-file). Please mark the “mtu (Match! user database)” option (Fig. 42), then press “OK”; a “File Open” dialog will be displayed.
For your convenience, we have prepared a (small...) user database in the “Tutorial” subdirectory of the Match! program directory, so you can import it right away.

56
Fig. 42: In this dialog, you have to select the origin of the entry data to be imported (either CIF-files, MATCH! user database
files or ICSD/Retrieve).
Please select the file “colleague-database.mtu” in the “Tutorial” subdirectory of the Match! program directory (e.g. “C:\Program Files\Match2\Tutorial”). Afterwards, please press “Open”.
A message will appear indicating that 9 entries have been imported. Once you acknowledge by pressing “OK”, the new entries will appear in the entry list (Fig. 43).
Fig. 43: The 9 entries from your colleague's user database have been added to your user database.
Please note that new entry numbers are assigned automatically to the entries imported from your colleague's user database. It is not possible to keep your colleague's entry numbers when importing; this is necessary in order to avoid duplicates.

57
Copyright Issues
With Match!, it is perfectly possible to use data from various sources (e.g. ICSD/Retrieve or cif-files downloaded from the internet) as sources for creating an own reference pattern database. However, please note that before doing so, you have to check if this does not violate the copyright of the original data! Crystal Impact shall not be liable for any copyright violations of Match! users! In order to prevent copyright violations, user databases created by Match! can only be used/read on PCs on which the same Match! licence is installed.
If you know about potential sources of reference data that might be interesting for other users, please contact Crystal Impact (p. 67)!

Appendix
Controlling the Software using Scripts
You can run a batch script e.g. from within Match! by selecting the corresponding command from the “File” menu. Here is a sample batch script that contains all of the commands that are currently available. You can create the corresponding file using any conventional text editor and save it e.g. as “batchscript.mbf”:
MATCH!_2_BATCH
set_default_wavelength(1.541874)
set_default_abscissa(2theta)
import("/Users/putz/Match/Samples/quickstart.rd")
!import_answerset("/Users/putz/Documents/ergebnis.mta")
!add_peak(26.62,1000.0,0.15)
strip_K_alpha2
!import_background(“/Users/putz/Match/Samples/quickstart_background.bac”)
subtract_background_automatic
smooth_exp_raw_data
find_peaks_normal(0.1,40.0,1)
!find_peaks_profile(0.1,96.0,1)
!correct_2theta_shift_automatic
!correct_2theta_spec_displ_automatic
!correct_2theta_shift(-0.14)
!correct_2theta_spec_displ(0.001)
!automatic_raw_data_processing
internal_standard(961011173)
!selection_preset("Silicon compounds")
search-match
!add_entry(96-900-7499)
!unify
!mark_first_entry
!import_selection_criteria("/Users/putz/Documents/selcrit.mss")
!select_matching_automatic
!select_first_entry_as_matching
!finish
!set_sample_id("TestID")
!set_sample_date_time("02.12.2010, 15:12 Uhr")
!view_report
!save_peak_residuals("/Users/putz/Documents/residuals.dif")
!save_document("/Users/putz/Documents/testdoc.mtd")
!close
!export_pattern_graphics("/Users/putz/Documents/pattern.jpg",JPG,1024,768,false)
!export_profile_data("/Users/putz/Documents/testprofile.dat")
!export_background("/Users/putz/Documents/testbackground.dat")
!export_entry_data(96-900-7499,"/Users/putz/Documents/entry_969007499.txt",TXT)

59 !export_reference_pattern(96-900-
7499,"/Users/putz/Documents/entry_969007499.pks",PKS)
!export_resultslist("/Users/putz/Documents/resultslist.pdf",PDF)
!export_matchlist("/Users/putz/Documents/matchlist.htm",HTML)
!print_pattern_graphics(1024,768,1)
!print_peaklist
!print_entry_data(96-900-7499)
Note that the lines beginning with a ‘!’-character are comments and not run as commands.

Table of Mouse Button and Key Combinations
A variety of operations can be carried out directly in the diffraction pattern graphics using the mouse. In some cases, it is also necessary to keep one or the other button pressed on your keyboard, in order to invoke the appropriate command. Here is an overview what you can do inside the diffraction pattern using your mouse.
Note: If the mouse cursor or program does not react as expected, please make sure that the diffraction pattern graphics gets the input focus, simply by clicking into the diffraction pattern (at a position without any objects). Afterwards, please try your operation or mouse action again.
Please note that you have to replace “Ctrl” by “Cmd” if you are using a Mac!
Effect/purpose Cursor position in pattern graphics
Keyboard button(s)
Cursor shape
Mouse action
Background mod.: shift control point
Control point (small square) in background curve (must be visible!)
-
Press left button and keep it pressed while moving the mouse
Background mod.: delete control point
Control point (small square) in background curve (must be visible!)
-
Press right button in order to remove the background control point below the mouse cursor
Background mod.: add control point
Background curve (must be visible!)
-
Press left button to add a new background control point below the mouse cursor
Mark single peak Peak below its top (must be visible!)
-
Click left button to mark the peak below the mouse cursor; marks at other peaks will be removed
Mark selected peaks Peak below its top (must be visible!)
Ctrl
Click left button to mark the peak below the mouse cursor, in addition to the peaks that are already marked
Shift peak on 2theta axis Peak below its top (must be visible!)
-
Click right button and keep it pressed while moving the mouse to the left or right
Mark range of peaks To the left of the left-most peak in the range
Ctrl
Press the left button, then move the mouse to the right until you have

61 Effect/purpose Cursor position in
pattern graphics Keyboard button(s)
Cursor shape
Mouse action
selected the range of peaks you would like to mark
Mark single peak Top of a peak (must be visible!)
-
Click left button to mark the peak below the mouse cursor; marks at other peaks will be removed
Mark selected peaks Top of a peak (must be visible!)
Ctrl
Click left button to mark the peak below the mouse cursor, in addition to the peaks that are already marked
Add peak Anywhere Ctrl
Click right button to add a peak at the current cursor position
Shift peak on 2theta axis Peak below its top (must be visible!)
-
Click right button and keep it pressed while moving the mouse to the left or right
Modify peak intensity and/or position
Top of a peak (must be visible!)
-
Click right button and keep it pressed while moving the mouse in any direction
Select range(s) to be excluded Anywhere Alt
Press the left button, then move the mouse to the right until you have selected the range you would like to exclude from FoM calculations
Delete range exclusion mark Inside a range marked to be excluded (grey background color)
-
Press the right mouse button inside a range marked to be excluded in order to re-use this range (delete the exclusion marking / grey background color)

62 Effect/purpose Cursor position in
pattern graphics Keyboard button(s)
Cursor shape
Mouse action
Zoom (select range) Anywhere -
Click left button at the position where you would like to start selecting your zoom range, and keep it pressed while moving your mouse, until you have selected the desired zoom range, then release the button
Zoom Anywhere -
Move the mouse cursor to a point you would like to zoom into, then turn the mouse wheel away from you to zoom right into this position (or vice versa)
Zoom Anywhere - Any Double-click the left button at the position you would like to zoom into (only applicable if fully zoomed out; see below)
Zoom out Anywhere - Any Click the right button to open the context menu, then select “Full pattern” or “Previous zoom”
Zoom out Anywhere - Any Double-click the left button
Tracking (shifting of the zoom range)
Anywhere Shift
Once you have zoomed into the pattern, press the Shift button on your keyboard or the mouse wheel, and keep it pressed while moving the mouse around
Vertical line at mouse cursor position
Anywhere Ctrl+X Any Press <Ctrl+X> to toggle the display of a vertical line at the cursor position, e.g. to compare peak

63 Effect/purpose Cursor position in
pattern graphics Keyboard button(s)
Cursor shape
Mouse action
positions
Zero point shifting Anywhere Ctrl+Alt
While keeping the Ctrl and Alt button pressed, turn the mouse wheel to shift the positions of exp. peaks and raw data along the 2theta-axis
Adjustment of difference plot size/height
2theta/d-axis -
Move the mouse cursor to the 2theta- or d-value axis (x-axis) (mouse cursor will change), press the left mouse button, and move the mouse away from you to open/increase the size of the difference plot (or vice versa)
Adjust intensity scaling factor manually
Top of a peak of an entry marked in the match list
-
Move the mouse cursor to the top of a peak of the entry that is currently marked in the match list (mouse cursor will change), then press the left mouse button, and keep it pressed while moving the mouse up or down to adjust the intensity scaling factor (-> quantity) of the corresponding selected phase

Table of Keyboard Shortcuts and Function Keys
Many of the most common commands and procedures in Match! can also be invoked by pressing certain buttons on your keyboard. These so-called shortcuts are quite useful to speed up your work with Match!, especially if you know them by heart. Here is a list of all keyboard shortcuts in Match!.
Please note that you have to replace “Ctrl” by “Cmd” if you are using a Mac!
Button(s) Effect Menu command
Ctrl+A Automatic raw data processing Pattern/Automatic/Autom. raw data proc.
Ctrl+B Clear the current selection criteria (restraints) Search/Reset restraints/additional entries
Ctrl+C Correct zero point error (2theta shift) Pattern/Correct zero-point error
Ctrl+D View entry data sheet of the entry that is currently marked in the candidates- or match list
View/Data sheet
Ctrl+E Load entry by giving its entry number (equivalent to Ctrl+F)
Entries/Load/add entry
Ctrl+F Find and display the best entry for the selection criteria you have entered
Search/Find phase/entry(s)
Ctrl+G Find next (to be applied after having used “Find” (Ctrl+F)); find the next best entry in the candidate list for your selection criteria
Search/Find next
Ctrl+Shift+G Find previous (to be applied after having used “Find” (Ctrl+F)); find the previous entry for your selection criteria
Search/Find previous
Ctrl+I Import (another) diffraction pattern file Pattern/Insert/overlay…
Ctrl+J Display mouse operations and keyboard shortcuts in online help
Help/Keyboard shortcuts and mouse operations
Ctrl+K Peak searching using conventional method (second derivative)
Pattern/Peak searching/Peak search
Ctrl+L View tabular summary of all experimental and reference pattern peaks
View/Peak list
Ctrl+M Run a new search-match calculation Search/Search-Match
Ctrl+N Create new (empty) Match! document / session
File/New

65 Button(s) Effect Menu command
Ctrl+O Open/read Match! document from file, or import first diffraction pattern file
File/Open
Ctrl+Shift+O Directly define the matching entries, by loading the corresponding entry numbers from a Match! answer set file (*.mta). This is especially helpful if series of similar samples have to be investigated.
File/Import/Predefined phase selection
Ctrl+P Open the “Print” dialog where you can select what you would like to print
File/Print…
Ctrl+Q Close Match! File/Quit (Mac: Match!/Quit)
Ctrl+R Display phase analysis report View/Report
Ctrl+S Save current session (Match! document) File/Save
Ctrl+T Shift the experimental pattern on 2theta axis in order to obtain the best peak overlap with the reference pattern currently marked in the candidate list (internal standard)
Entries/Internal standard
Ctrl+U If there is more than a single entry for a certain phase present in the candidate list, remove all but the best matching entry (FoM) for each phase
Entries/Unify phases
Ctrl+W Finish Match!, i.e. run the finishing actions defined on the “Batch” page of the Tools/Options dialog
File/Finish
Ctrl+X Toggle the displaying of a vertical line at the mouse cursor position inside the diffraction pattern (e.g. for peak position comparison)
View/Pattern/Cursor position
Ctrl+Y Redo last undo operation Edit/Redo
Ctrl+Z Undo last operation/command Edit/Undo
Del Delete the currently marked item(s), e.g. peaks or candidate list entries
Edit/Delete
F1 Open help window Help/Index
F2 Increase peak search sensitivity Pattern/Peak searching/ Increase sensitivity

66 Button(s) Effect Menu command
F3 Decrease peak search sensitivity Pattern/Peak searching/ Reduce sensitivity
F4 Optimize peak searching sensitivity, in order to obtain the best overlap between experimental and calculated pattern
Pattern/Peak searching/ Optimize sensitivity
F5 Perform profile fitting Pattern / Profile fitting / Profile fit
F6 Enable/disable fitting of 2theta values during profile fitting
Pattern / Profile fitting / Fit 2theta
F7 Enable/disable fitting of intensity values during profile fitting
Pattern / Profile fitting / Fit intensity
F8 Enable/disable fitting of FWHM values during profile fitting
Pattern / Profile fitting / Fit FWHM
Ctrl+Alt+A Open dialog in which the individual automatic raw data processing steps can be configured
Pattern / Automatic / Configure…
Ctrl+Alt+G Open dialog in which the options for the diffraction pattern graphics can be adjusted
Tools / Diffraction pattern options…
Cursor up/down Move the line mark in the candidate list up/down (if it has the input focus)
-
Space Select current entry in candidate list (if it has the input focus) as “matching” (i.e. move it to the match list)
Entries / Select as matching
Shift If you have zoomed into the pattern previously, you can now move the visible diffraction pattern section around (tracking) simply by moving the mouse
-
Shift+Del Delete all peaks in the current experimental pattern
Peaks / Delete all peaks

Support
In case of trouble when using Match!, please pay attention to the following hints:
• If you do not know how to operate in a dialog window, carefully read all information in the window. Make sure that you understand the meaning of the buttons, input fields, lists, etc. Look at the way several functions are grouped into frames and read the frame titles, too.
• Press the F1 key (<Cmd+?> on the Mac) in order to open the online help, and examine the context sensitive help text. Especially read the items mentioned under Note: and See also: Check the help jumps, too, which are underlined like links in a web browser.
• Look for appropriate keywords in the Help Index, and use the free-text search facility of the online help.
• If you do not find a command, use the Help Index (Index tab on the Match! Application Help window) to get an alphabetic list of search items.
• Visit the Match! web page at:
http://www.crystalimpact.com/match/update.htm
This page offers the latest versions of online help files, sample files, and software patches for the executables.
• If this page does not give you an answer, or if the trouble is caused by an error in the software (a ”bug”), send an e-mail to [email protected]
Or – if you are not connected to the internet – send a fax to: ++49-228-9813644
or write to:
Crystal Impact GbR Kreuzherrenstr. 102 D-53227 Bonn Germany Please describe how the bug can be reproduced as detailed as possible, and attach possibly required files (e.g. diffraction data)!

68
Index
1 1/d scaling .................................................................................................. 12
2 2theta error correction ......................................................................... 65 2theta shift correction........................................................................... 64 2theta shifting ........................................................................................... 63 2theta shifting using mouse................................................................ 11 2theta value fitting .................................................................................. 66
A add background control point ........................................................... 60 add diffraction pattern .......................................................................... 64 add reference database ..................................................................29, 36 add user database entries .................................................................... 55 additional entries........................................................................................8 adjustment of phase quantity............................................................. 11 adjustment of skill level ........................................................................ 17 administrator user .................................................................................. 28 advanced user level ................................................................................ 23 AMCSD reference data........................................................................... 26 amounts of the phases........................................................................... 23 answer set file (*.mta) ........................................................................... 65 Appendix ..................................................................................................... 58 automatic operation ............................................................................... 18 automatic raw data processing ......................................................... 64 automatic raw data processing options......................................... 66 automatic steps......................................................................................... 23 Automatics.....................................................................................................2
B background control point
delete ...................................................................................................... 60 insert....................................................................................................... 60
background correction.......................................................................... 24 background definition/modification .................................................9 background modification ..................................................................... 60 backup reference database.................................................................. 36 Batch Processing.........................................................................................2 batch scripts............................................................................................... 58 batch steps.................................................................................................. 23 Beginner mode.............................................................................................3 Beginner user level ................................................................................. 23 button usage .............................................................................................. 60
C calculate diffraction pattern ........................................................40, 42 calculation of density ............................................................................. 43 calculation of I/Ic..................................................................................... 43 calculation of powder diffraction pattern..................................... 51 CIF import ................................................................................................... 42 CIF-‐import error report ........................................................................ 44 clear restraints.......................................................................................... 64 close Match!................................................................................................ 65 COD reference database........................................................................ 26 color............................................................................................................... 12 control points for background ..............................................................9 copy reference database....................................................................... 36
Copyright........................................................................................................4 copyright of data ...................................................................................... 57 correct zero point .................................................................................... 64 correction of 2theta error .................................................................... 65 Create for all users ................................................................... 31, 33, 35 create new document............................................................................. 64 create new reference database.......................................................... 29 create reference database.................................................................... 29 create user database............................................................................... 34 create user reference database.......................................................... 34 criteria saving...............................................................................................8 crystal structure data input................................................................. 51 cursor position.......................................................................................... 65 cursor up/down ....................................................................................... 66
D data inspection.......................................................................................... 24 data quality................................................................................................. 46 data sheet viewing................................................................................... 64 database creation .................................................................................... 29 database for user patterns................................................................... 38 database indexing.................................................................................... 29 database library........................................................................................ 27 database name .......................................................................................... 31 database selection ................................................................................... 29 decrease peak search sensitivity ...................................................... 66 default program directory ................................................................... 16 define zoom area...................................................................................... 11 delete all peaks ......................................................................................... 66 delete background control point ...................................................... 60 delete marked item(s) ........................................................................... 65 delete reference........................................................................................ 37 delete reference database.................................................................... 29 density calculation .................................................................................. 43 determine peaks....................................................................................... 64 Diamond .........................................................................................................2 dif-‐files.......................................................................................................... 44 diffraction data (manual input)......................................................... 47 diffraction data import into UDB ...................................................... 44 diffraction pattern calculation ............................................ 40, 42, 51 diffraction pattern graphics options ............................................... 66 diffraction pattern import.................................................................... 64 directory of index files........................................................................... 31 display peak list........................................................................................ 64 display Report ........................................................................................... 65 download reference databases.......................................................... 26
E Edit/Redo.................................................................................................... 65 Edit/Undo ................................................................................................... 65 empty spaces ............................................................................................. 25 Endeavour peak data files.................................................................... 44 enlarge peak search sensitivity ......................................................... 65 entry data sheet viewing ...................................................................... 64 entry is matching ..................................................................................... 66 entry loading by number...................................................................... 64 entry numbers........................................................................................... 51 erase all peaks........................................................................................... 66 erase background control point ........................................................ 60 erase marked item(s)............................................................................. 65 erase reference ......................................................................................... 37 error report for CIF-‐import................................................................. 44

69 exit Match! .................................................................................................. 65 Expert mode..................................................................................................4
F find entry by name or number........................................................... 64 Find next...................................................................................................... 64 find peaks .................................................................................................... 64 Find previous............................................................................................. 64 Find specific phase/entry .......................................................................4 finishing steps ........................................................................................... 65 fitting of 2theta values........................................................................... 66 fitting of FWHM values.......................................................................... 66 fitting of intensity values...................................................................... 66 fitting of profile/raw data .................................................................... 66 FIZ Karlsruhe......................................................................................27, 40 fonts............................................................................................................... 12 full pattern .................................................................................................. 62 fully automatic operation..................................................................... 18 function keys.............................................................................................. 64 FWHM value fitting ................................................................................. 66
G graphics options....................................................................................... 66
H help window .............................................................................................. 65 hints............................................................................................................... 24
I I/Ic .................................................................................................................. 26 I/Ic calculation.......................................................................................... 43 ICDD contact information .................................................................... 26 ICDD PDF database ................................................................................. 26 ICDD PDF numbering scheme ............................................................ 51 ICDD PDF-‐2................................................................................................. 30 ICDD PDF-‐2 database indexing.......................................................... 32 ICDD PDF-‐4................................................................................................. 30 ICSD.NEW.................................................................................................... 40 ICSD/Retrieve ....................................................................................27, 34 ICSD/Retrieve import ............................................................................ 40 import answer set for phase selection ........................................... 65 import diffraction pattern.................................................................... 64 import error report................................................................................. 44 import of CIF-‐files.................................................................................... 42 import of colleague's user database ................................................ 55 import of diffraction data into UDB................................................. 44 import of ICSD/Retrieve....................................................................... 40 increase peak search sensitivity ....................................................... 65 index files .................................................................................................... 29 indexing of database(s)......................................................................... 29 insert background control point ....................................................... 60 insert diffraction pattern...................................................................... 64 inspection of data .................................................................................... 24 installation of license file...................................................................... 16 installing Match!....................................................................................... 13 intensity of peak....................................................................................... 61 intensity value fitting ............................................................................. 66 internal standard correction .............................................................. 65 introduction ...........................................................................................1, 18 IUCr reference data................................................................................. 26
K keyboard shortcuts ................................................................................. 64
L layout of the main window.................................................................. 18 library for reference databases ......................................................... 27 license installation .................................................................................. 16 line at mouse cursor ............................................................................... 65 line at mouse position............................................................................ 62 line styles..................................................................................................... 12 Linux.................................................................................................................2 Linux installing and running........................................................14, 15 load diffraction pattern......................................................................... 64 load entry by number ............................................................................ 64 load Match! document ........................................................................... 65 location of index files ............................................................................. 31
M Mac OS X .........................................................................................................2 Mac OS X installing and running ................................................13, 15 main window layout............................................................................... 18 manual background definition........................................................... 24 manual input of diffraction data ....................................................... 47 mark entry as matching ........................................................................ 66 mark peak ............................................................................................60, 61 mark peak range ...................................................................................... 60 Match! program directory.................................................................... 16 matched phases ........................................................................................ 23 matching entry selection ...................................................................... 66 MatchRefDBInfo.mtn.............................................................................. 36 mineral samples ....................................................................................... 27 mouse button usage................................................................................ 60 mouse cursor position........................................................................... 65 mouse position ......................................................................................... 62 mouse shifting on 2theta axis............................................................ 11 mouse tracking ......................................................................................... 62 mouse wheel .......................................................................................11, 60 multiple diffraction patterns .................................................................4 multiple phase entry unification....................................................... 65 multiple user environment.................................................................. 28
N name of reference database .........................................................31, 37 neutron diffraction...........................................................................41, 43 new background control point .......................................................... 60 new document........................................................................................... 64 new reference database.................................................................29, 36 next/previous entry in candidate list ............................................. 66 Nokia Corporation......................................................................................4 numbering scheme for entries........................................................... 51
O old PDF-‐2 database indexing .............................................................. 32 online help .................................................................................................. 65 online update............................................................................................. 17 open Match! document.......................................................................... 65 open new document ............................................................................... 64 optimize peak searching sensitivity ................................................ 66 Options dialog ...................................................................................... 3, 23 options for automatic raw data processing.................................. 66 options for diffraction pattern graphics ........................................ 66 Overview ..................................................................................................... 26
P PANalytical peak data files .................................................................. 44 path for Match! installation................................................................. 16 path of index files..................................................................................... 31

70 pattern graphics options .......................................................................66
pattern import .......................................................................................... 64 PDF database ............................................................................................. 26 PDF database purchase information............................................... 26 PDF entry numbers................................................................................. 51 PDF-‐2 ........................................................................................................2, 30 PDF-‐2 database (<release 2005) indexing ................................... 32 PDF-‐2 database indexing...................................................................... 32 PDF-‐4 ........................................................................................................2, 30 peak detection sensitivity optimization ........................................ 66 peak intensity ............................................................................................ 61 peak list viewing ...................................................................................... 64 peak marking......................................................................................60, 61 peak range selection............................................................................... 60 peak removal ............................................................................................. 66 peak search sensitivity .......................................................................... 65 peak searching .......................................................................................... 64 peak shifting........................................................................................60, 61 perpetual restrainting ..............................................................................7 phase selection (predefined).............................................................. 65 phase unification...................................................................................... 11 phases in sample...................................................................................... 23 Philips/PANalytical peak data ........................................................... 44 pks-‐file .......................................................................................................... 44 position of peak .................................................................................60, 61 powder diffraction pattern calculation........................... 40, 42, 51 powder pattern database ..................................................................... 27 predefined phase selection.................................................................. 65 Preferences dialog................................................................................... 23 previous/next entry in candidate list ............................................. 66 print ............................................................................................................... 65 print Report................................................................................................ 23 profile fitting.............................................................................................. 66 program directory................................................................................... 16
Q Qt library ........................................................................................................4 quality mark............................................................................................... 46 quantitative analysis .......................................................................23, 26 quantity adjustment ............................................................................... 11 quit Match!.................................................................................................. 65
R range of peaks selection ....................................................................... 60 raw data fitting ......................................................................................... 66 raw data import........................................................................................ 64 raw data processing (automatic)...................................................... 64 raw data processing options............................................................... 66 read Match! document........................................................................... 65 redo................................................................................................................ 65 reduce multiple phase entries............................................................ 65 reduce peak search sensitivity........................................................... 66 reference database creation................................................................ 29 reference database download............................................................ 26 Reference Database Library................................................................ 27 reference database name ..............................................................31, 37 reference database selection .......................................................29, 36 reference database updates ................................................................ 26 Reference Pattern Database................................................................ 26 remove all peaks ...................................................................................... 66 remove background control point ................................................... 60 remove marked item(s) ........................................................................ 65 remove reference..................................................................................... 37 remove reference database................................................................. 29 rename reference..................................................................................... 37 rename reference database................................................................. 29 Report ....................................................................................................23, 65 Report printing ......................................................................................... 23
Report saving............................................................................................. 23 reset selection criteria........................................................................... 64 restore reference database.................................................................. 36 restraints ........................................................................................................7 restraints clearing ................................................................................... 64 restraints saving..........................................................................................8 R-‐factor......................................................................................................... 11 run search-‐match..................................................................................... 64 running Match! ......................................................................................... 13
S save document/session ........................................................................ 65 save Report................................................................................................. 23 saving of selection criteria......................................................................8 screen layout.............................................................................................. 18 scripts ........................................................................................................... 58 search peaks............................................................................................... 64 search-‐match ............................................................................................. 64 Select as default for all users... ............................................ 31, 33, 35 select as matching ................................................................................... 66 select peak range ..................................................................................... 60 select reference database..............................................................29, 36 select user level ........................................................................................ 23 select zoom range.................................................................................... 62 selection criteria clearing..................................................................... 64 selection criteria saving...........................................................................8 semi-‐quantitative analysis............................................................23, 26 shift peak ..............................................................................................60, 61 shift zoom range....................................................................................... 62 shifting on 2theta axis .......................................................................... 11 shifting of 2theta axis............................................................................. 63 shortcuts...................................................................................................... 64 show Report............................................................................................... 65 simple example......................................................................................... 18 skill level...................................................................................................... 17 standard for correction of 2theta error ......................................... 65 standard user............................................................................................. 28 start Match! ................................................................................................ 13 start search-‐match .................................................................................. 64 Stoe peak file.............................................................................................. 44 support ......................................................................................................... 67
T tips and tricks............................................................................................ 24 toggle fitting of 2theta ........................................................................... 66 toggle fitting of FWHM .......................................................................... 66 toggle fitting of intensities ................................................................... 66 tracking .................................................................................................10, 62
U udi files ......................................................................................................... 44 undo............................................................................................................... 65 unification of candidate list ................................................................. 11 unify phases ............................................................................................... 65 uninstall Match!........................................................................................ 17 updating Match!........................................................................................ 17 updating reference database s ........................................................... 26 user database.............................................................................. 27, 34, 38 user database import ............................................................................. 55 User Database Manager ........................................................................ 34 user level .........................................................................................3, 17, 23 user license installation ........................................................................ 16
V vertical line at mouse cursor .............................................................. 65

71 vertical line at mouse position........................................................... 62 view data sheet ......................................................................................... 64 view peak list............................................................................................. 64 view Report ................................................................................................ 65
W wavelength for pattern calculation...........................................41, 43 wheel usage (mouse) ............................................................................. 60 window layout .......................................................................................... 18 Windows installing and running................................................13, 14 workflow ..................................................................................................... 24
X x-‐axis scaling.............................................................................................. 12
X-‐ray diffraction ................................................................................41, 43
Y yourlicense.lic ........................................................................................... 16
Z zero point correction ............................................................................. 64 zero point shifting ................................................................................... 63 zoom (select range) ................................................................................ 62 zoom area.................................................................................................... 11 zoom out ...................................................................................................... 62 zoom range shifting ................................................................................ 62 zooming........................................................................................................ 10 zooming using mouse wheel............................................................... 62