master the brachial plexus: in 5 easy...
TRANSCRIPT
Written by: Trevor Lohman DPT
Illustrated by: Dennis Breese
Olivia Martinucci
Master The Brachial Plexus: In 5 Easy Steps

Brachial Plexus
© Copyright 2014 by Trevor A. lohman
All rights reserved. This book or any portion thereof
may not be reproduced or used in any manner whatsoever
without the express written permission of the publisher
except for the use of brief quotations in a book review.
www.AandPonline.comi

Brachial Plexus “Lorem ipsum dolor sit amet, donec ornare vitae.”
– Leo Venenatis
What is the Brachial Plexus?
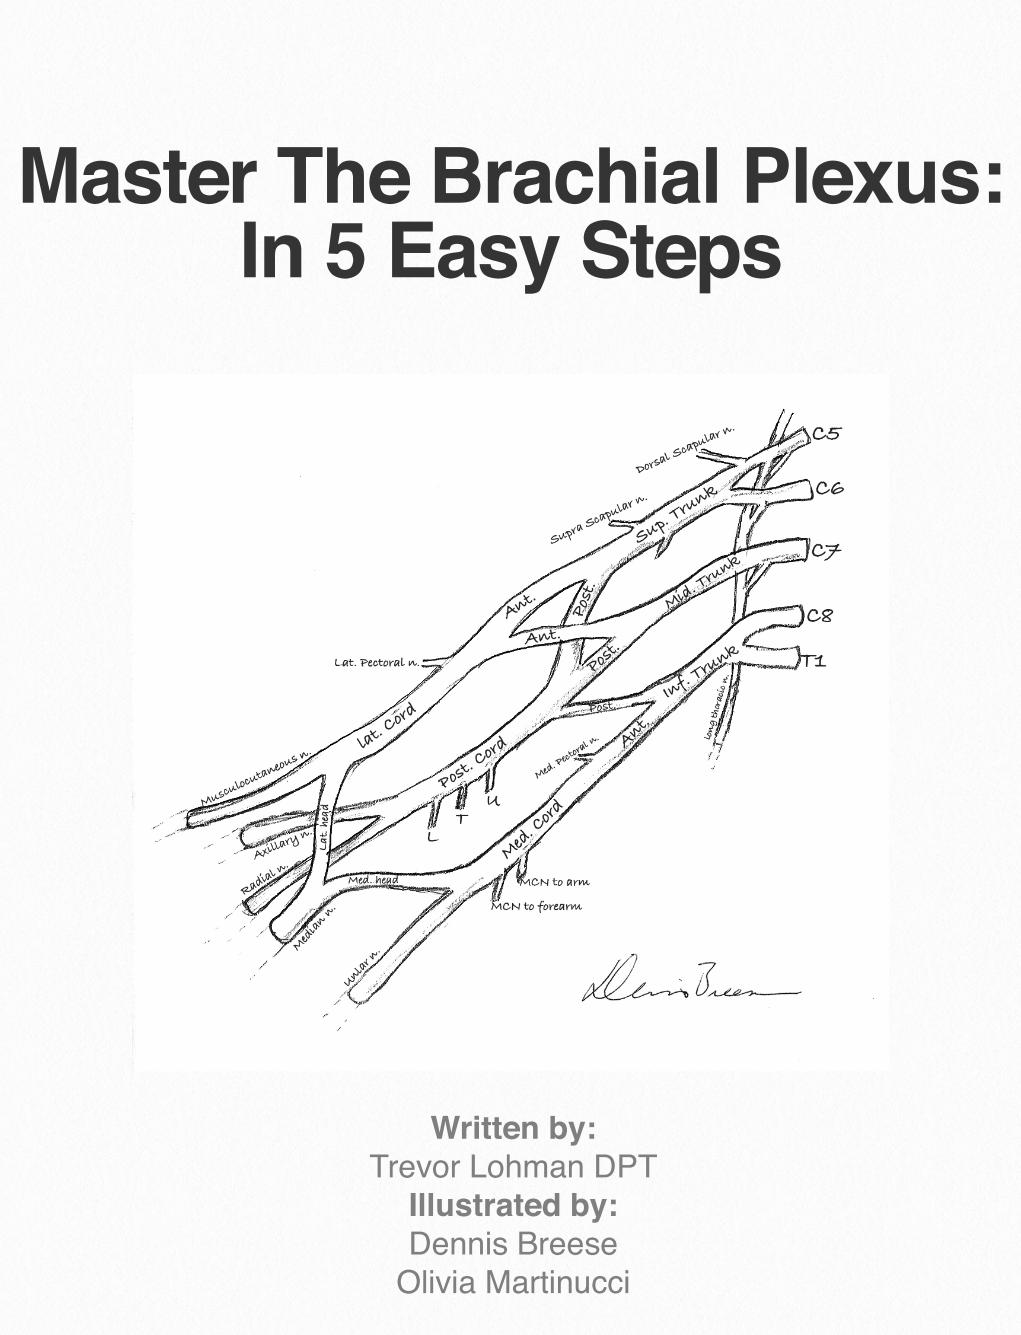
While intimidating at first glance, you will find the Brachial Plexus to be one of the more interesting peripheral nervous sys-tem structures found in the body. By ana-lyzing the structure of the anatomical term “Brachial Plexus” we see that brachial means pertaining to the arm, and plexus means network. Put simply, this is exactly what the brachial plexus is. A network of nerves innervating the musculature of the upper extremity while simultaneously relay-ing sensory information to the central nerv-
ous system. The brachial plexus is the link between the spinal cord and the muscula-ture and sensory receptors of the upper quarter.
This neural network originates from the spi-nal nerves exiting the intervertebral foram-ina of the cervical region of the vertebral column. Specifically from the C5, C6, C7, C8, and T1 nerve roots. After exiting these intervertebral foramina and traveling dis-tally towards the clavicle, these neural
3
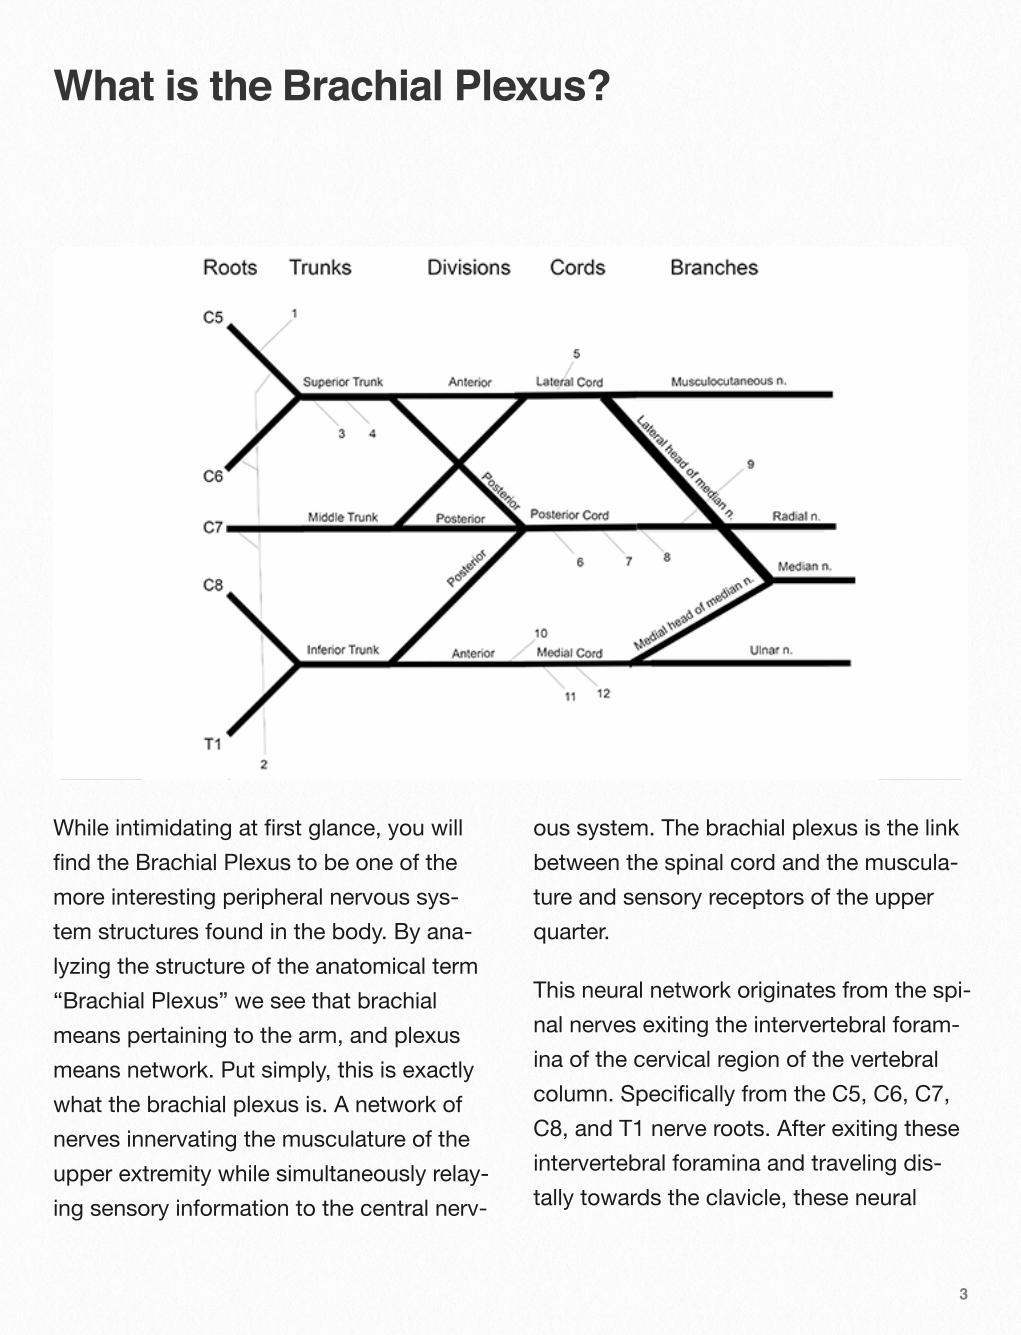
structures branch and merge repeatedly as they travel down the upper extremity forming the “network” of nervous struc-tures that we will be drawing on the pages to follow. It will be your goal to learn the names and locations of each component of this neural network. It will seem difficult at the outset, but by breaking the brachial plexus down into its aggregate compo-nents: roots, trunks, divisions, and branches, it will be much simpler to mas-ter.
The picture on the following page is only a diagram of this complex structure. While it may not look identical to the brachial plexus you will be studying on cadavers, you will find it to be an incredibly useful study aide. Once you master the ability to draw the brachial plexus, you will have mastered the ability to name all of its com-ponents and their locations. Then you sim-ply need to apply this mental map to the cadavers in lab.
There are of course differences between each cadaver, but the basic structure of the brachial plexus will be remarkably simi-lar to the “map” you see on the previous page. This is why we will dedicate the next several pages to mastering the ability to draw and label this diagram.
We have broken the drawing of the bra-chial plexus down into five simple steps. One step dedicated to each of the basic regions of the brachial plexus. First we will draw the roots, then the trunks, then the divisions, then the cords, and lastly we will add the branches. Remembering the order of this progression can be simplified with the follow mnemonic device:
“Randy Travis Drinks Cold Beverages”
As we continue, pay careful attention to how the components of the brachial plexus relate to one another. In lab, you may not be able to find a particular struc-ture, but with a knowledge of how these neural structures relate to one another, you may be able to use the more easily found structures, to work backwards and identify certain components that you are struggling to locate.
Your journey towards Brachial Plexus mas-tery is about to begin. The next page serves simply as a structure bank. Soon you will know the location of each of these structures. For now, simply admire the vol-ume of material you will soon master and continue on to Chapter 2: How to Draw the Brachial Plexus. Good Luck!
4
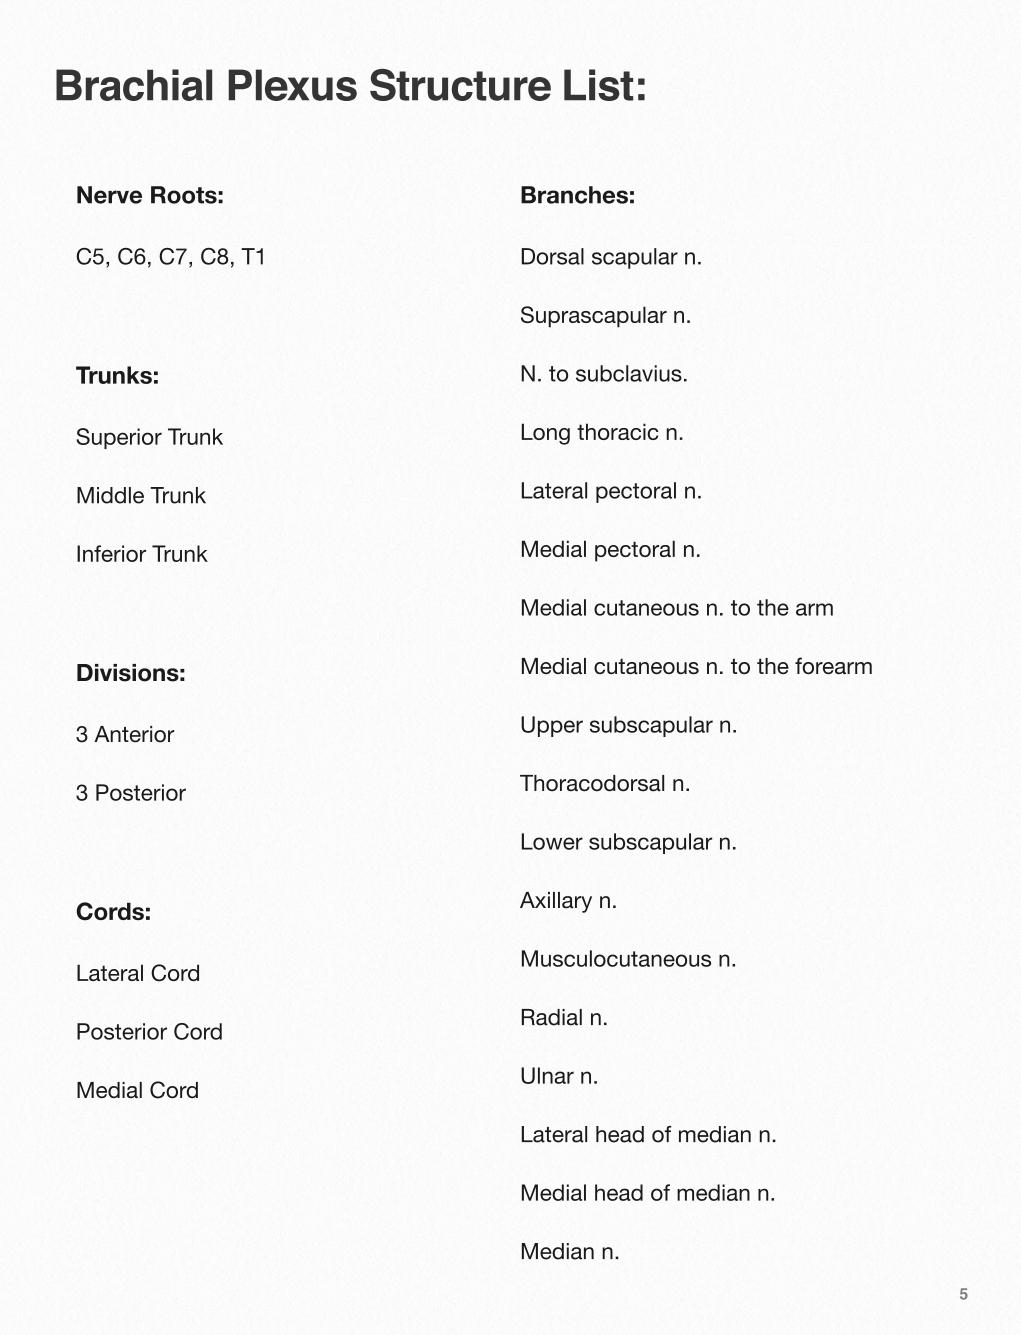
Brachial Plexus Structure List:
Nerve Roots:
C5, C6, C7, C8, T1
Trunks:
Superior Trunk
Middle Trunk
Inferior Trunk
Divisions:
3 Anterior
3 Posterior
Cords:
Lateral Cord
Posterior Cord
Medial Cord
Branches:
Dorsal scapular n.
Suprascapular n.
N. to subclavius.
Long thoracic n.
Lateral pectoral n.
Medial pectoral n.
Medial cutaneous n. to the arm
Medial cutaneous n. to the forearm
Upper subscapular n.
Thoracodorsal n.
Lower subscapular n.
Axillary n.
Musculocutaneous n.
Radial n.
Ulnar n.
Lateral head of median n.
Medial head of median n.
Median n.5

How To Draw The Brachial Plexus (5 steps)
Step 1: Roots C5-T1
Start by drawing roots C5-T1. These nerve roots give rise to the entire brachial plexus.
It is through these roots that all motor and sensory information to and from the upper extremity travel. These roots, also known as ventral primary rami or spinal nerves, serve as the link between the spinal cord and the plexus of nerves that innervate the upper extremity.
After exiting the intervertebral foramen, nerve roots C5 and C6 quickly merge to
form the superior trunk. C8 and T1 n. roots merge to form the inferior trunk, while the C7 n. root does not merge and becomes the middle trunk as we move distally away from the spinal cord.
6
How To Draw The Brachial Plexus
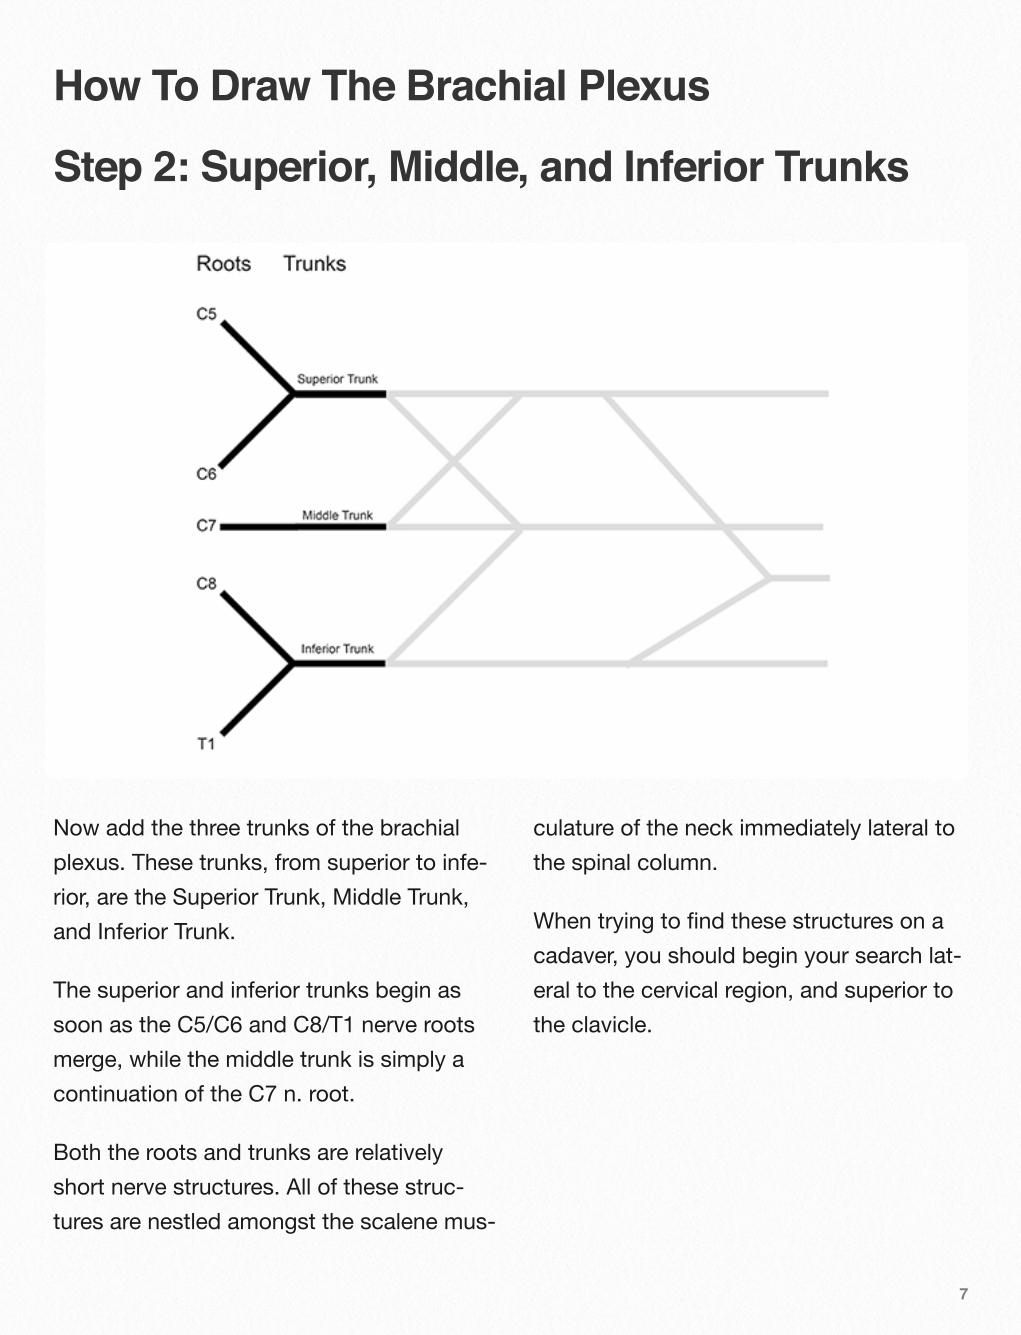
Step 2: Superior, Middle, and Inferior Trunks
Now add the three trunks of the brachial plexus. These trunks, from superior to infe-rior, are the Superior Trunk, Middle Trunk, and Inferior Trunk.
The superior and inferior trunks begin as soon as the C5/C6 and C8/T1 nerve roots merge, while the middle trunk is simply a continuation of the C7 n. root.
Both the roots and trunks are relatively short nerve structures. All of these struc-tures are nestled amongst the scalene mus-
culature of the neck immediately lateral to the spinal column.
When trying to find these structures on a cadaver, you should begin your search lat-eral to the cervical region, and superior to the clavicle.
7
How To Draw The Brachial Plexus
Step 3a: Posterior Divisions
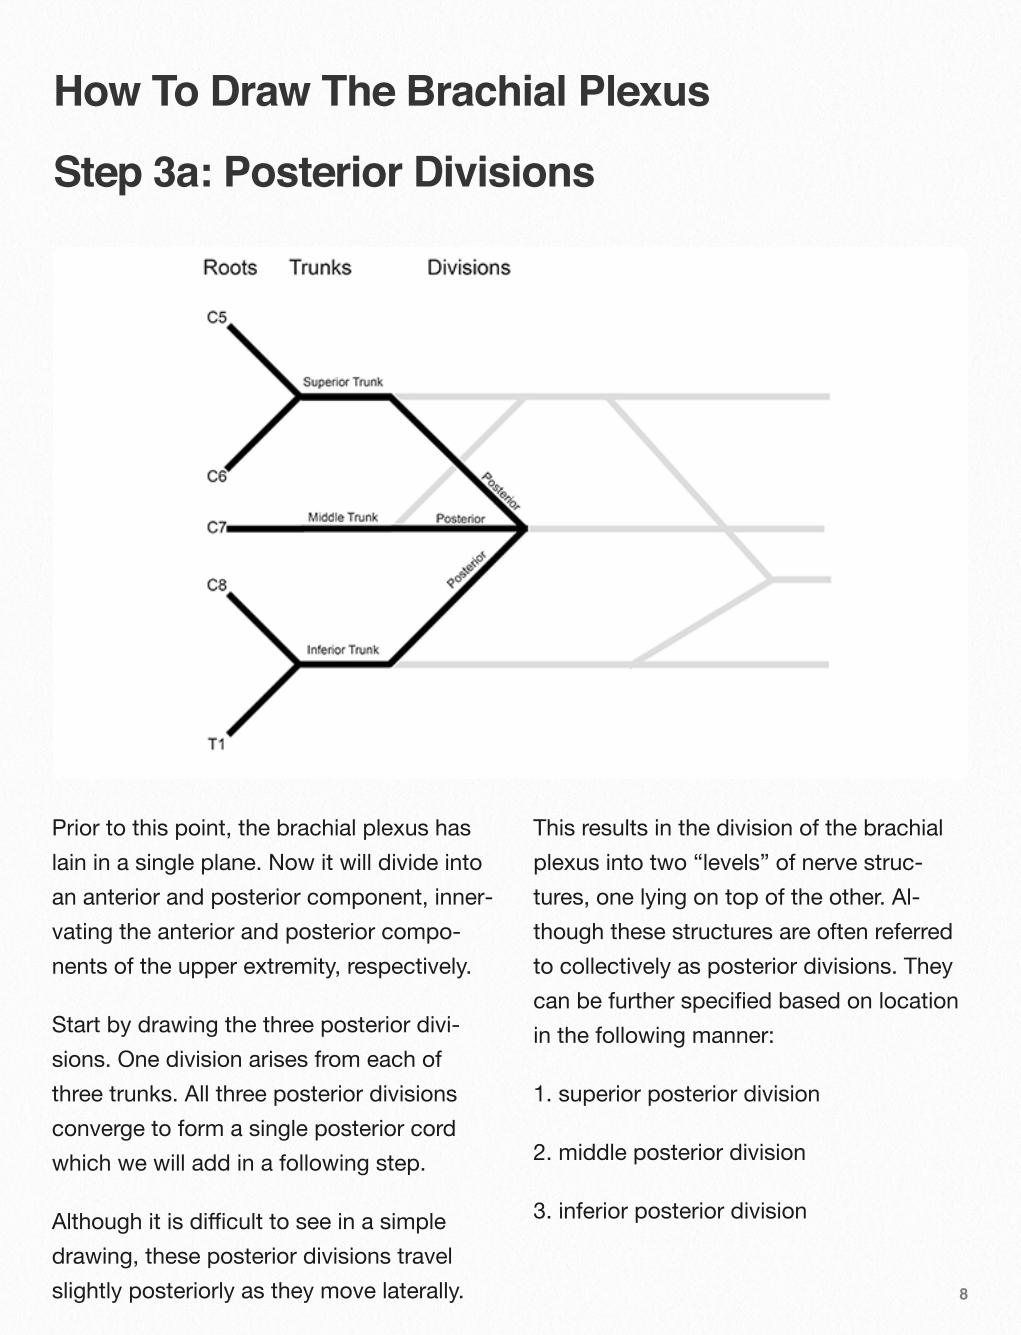
Prior to this point, the brachial plexus has lain in a single plane. Now it will divide into an anterior and posterior component, inner-vating the anterior and posterior compo-nents of the upper extremity, respectively.
Start by drawing the three posterior divi-sions. One division arises from each of three trunks. All three posterior divisions converge to form a single posterior cord which we will add in a following step.
Although it is difficult to see in a simple drawing, these posterior divisions travel slightly posteriorly as they move laterally.
This results in the division of the brachial plexus into two “levels” of nerve struc-tures, one lying on top of the other. Al-though these structures are often referred to collectively as posterior divisions. They can be further specified based on location in the following manner:
1. superior posterior division
2. middle posterior division
3. inferior posterior division
8
How To Draw The Brachial Plexus
Step 3b: Anterior Divisions
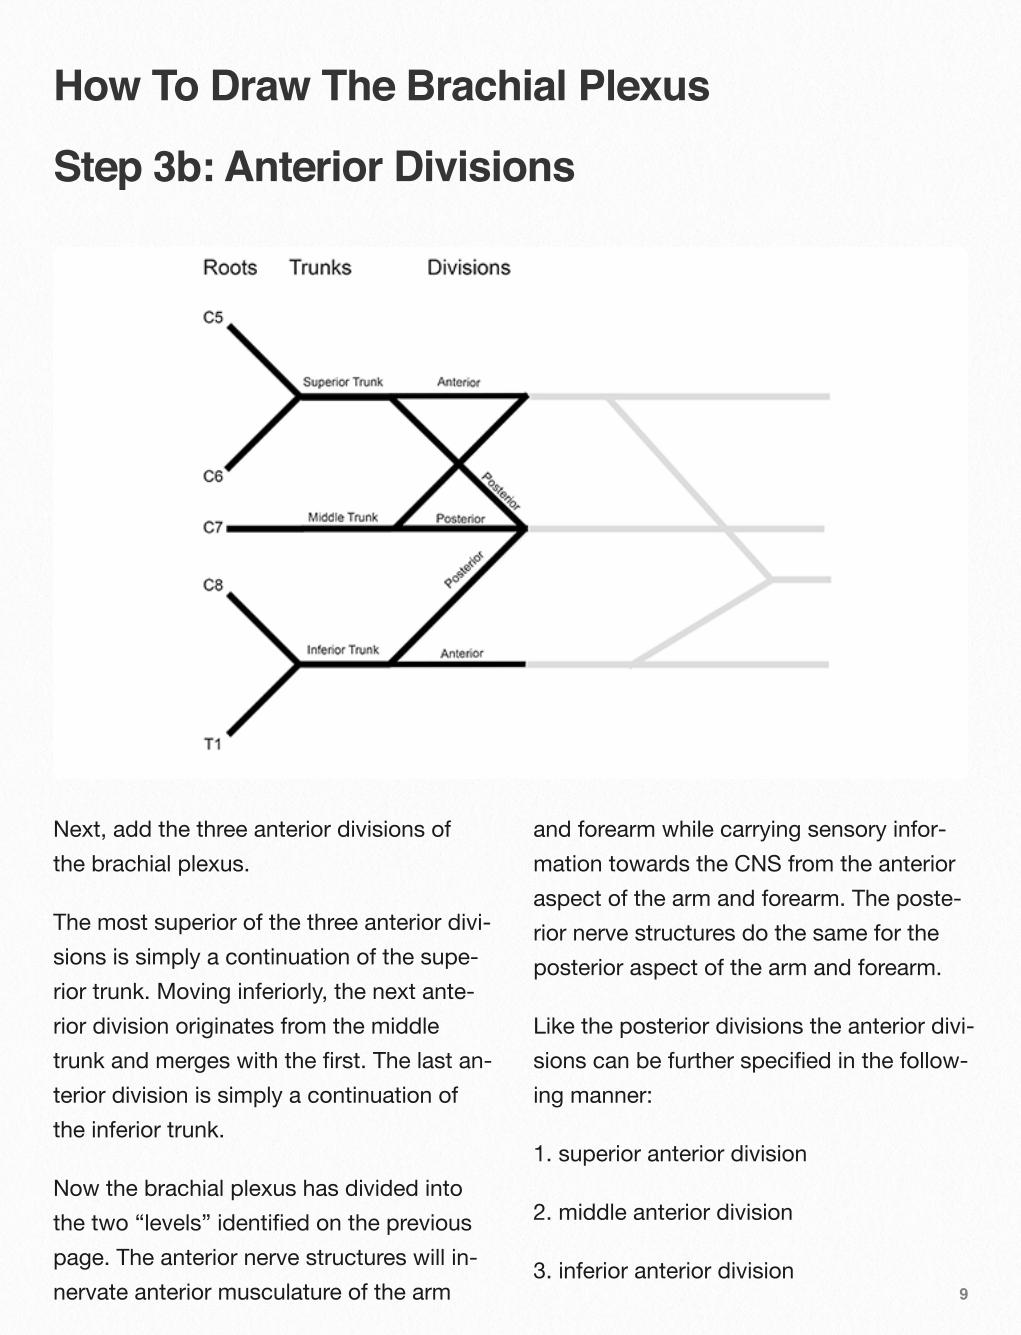
Next, add the three anterior divisions of the brachial plexus.
The most superior of the three anterior divi-sions is simply a continuation of the supe-rior trunk. Moving inferiorly, the next ante-rior division originates from the middle trunk and merges with the first. The last an-terior division is simply a continuation of the inferior trunk.
Now the brachial plexus has divided into the two “levels” identified on the previous page. The anterior nerve structures will in-nervate anterior musculature of the arm
and forearm while carrying sensory infor-mation towards the CNS from the anterior aspect of the arm and forearm. The poste-rior nerve structures do the same for the posterior aspect of the arm and forearm.
Like the posterior divisions the anterior divi-sions can be further specified in the follow-ing manner:
1. superior anterior division
2. middle anterior division
3. inferior anterior division9
How To Draw The Brachial Plexus
Step 4: Lateral, Posterior, and Medial Cords
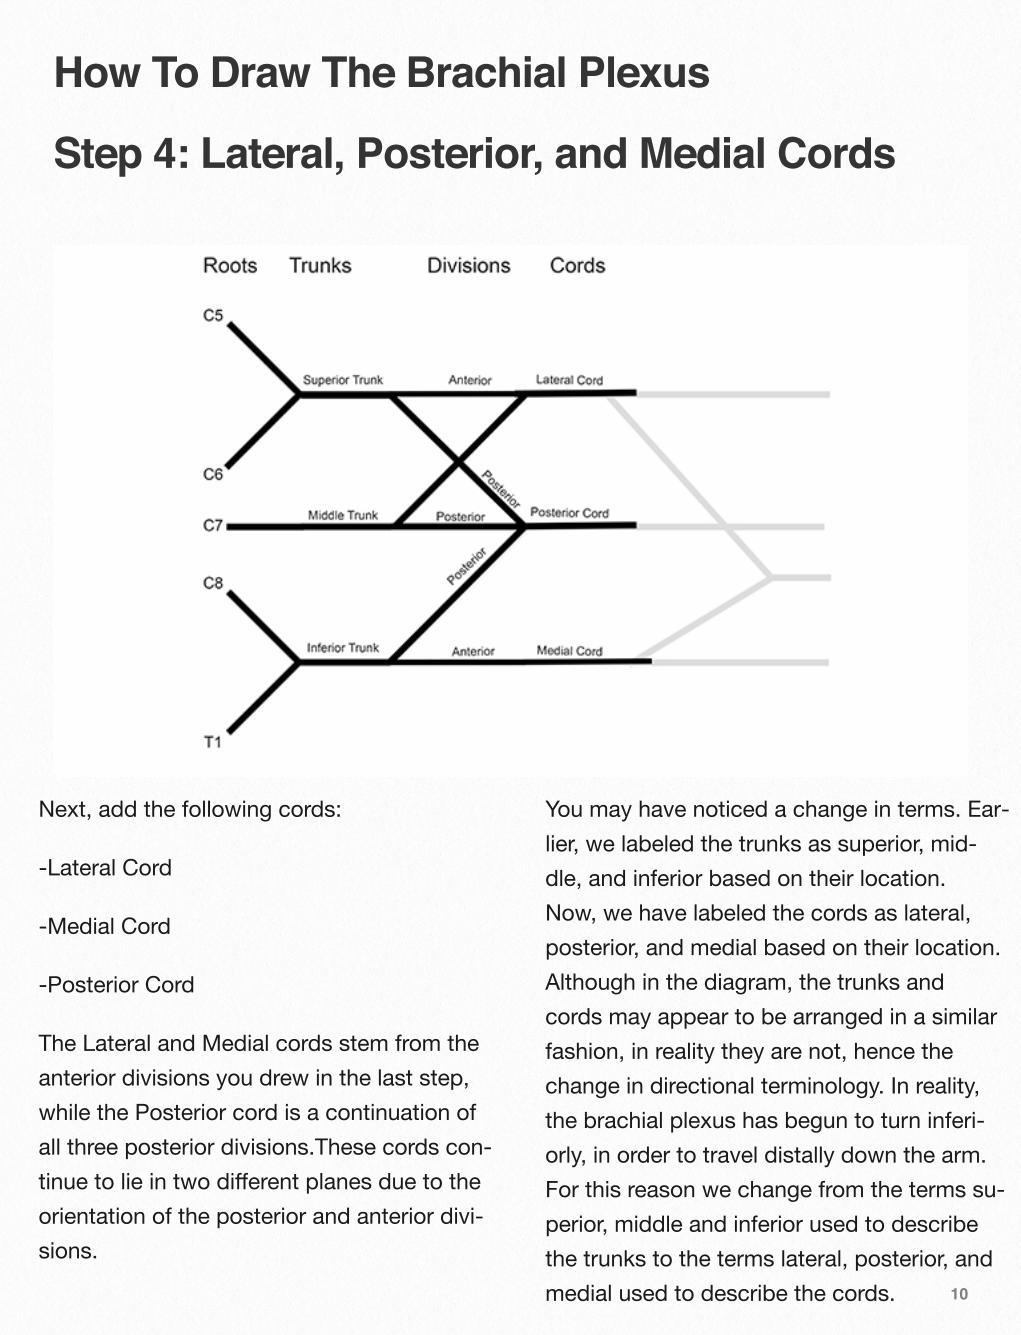
Next, add the following cords:
-Lateral Cord
-Medial Cord
-Posterior Cord
The Lateral and Medial cords stem from the anterior divisions you drew in the last step, while the Posterior cord is a continuation of all three posterior divisions.These cords con-tinue to lie in two different planes due to the orientation of the posterior and anterior divi-sions.
You may have noticed a change in terms. Ear-lier, we labeled the trunks as superior, mid-dle, and inferior based on their location. Now, we have labeled the cords as lateral, posterior, and medial based on their location. Although in the diagram, the trunks and cords may appear to be arranged in a similar fashion, in reality they are not, hence the change in directional terminology. In reality, the brachial plexus has begun to turn inferi-orly, in order to travel distally down the arm. For this reason we change from the terms su-perior, middle and inferior used to describe the trunks to the terms lateral, posterior, and medial used to describe the cords. 10
How To Draw The Brachial Plexus
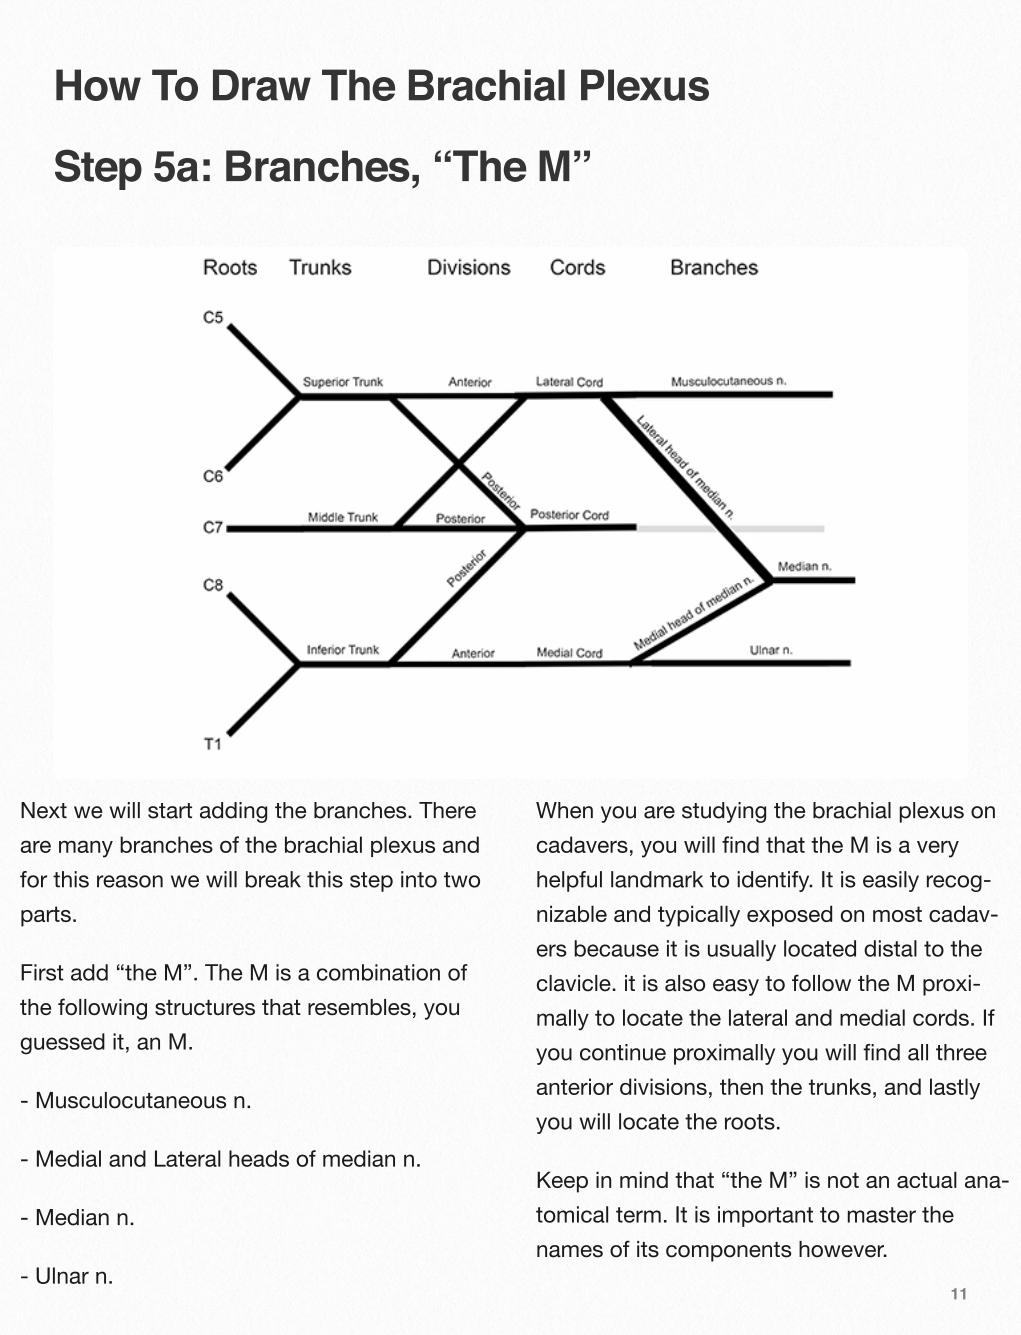
Step 5a: Branches, “The M”
Next we will start adding the branches. There are many branches of the brachial plexus and for this reason we will break this step into two parts.
First add “the M”. The M is a combination of the following structures that resembles, you guessed it, an M.
- Musculocutaneous n.
- Medial and Lateral heads of median n.
- Median n.
- Ulnar n.
When you are studying the brachial plexus on cadavers, you will find that the M is a very helpful landmark to identify. It is easily recog-nizable and typically exposed on most cadav-ers because it is usually located distal to the clavicle. it is also easy to follow the M proxi-mally to locate the lateral and medial cords. If you continue proximally you will find all three anterior divisions, then the trunks, and lastly you will locate the roots.
Keep in mind that “the M” is not an actual ana-tomical term. It is important to master the names of its components however.
11
How To Draw The Brachial Plexus
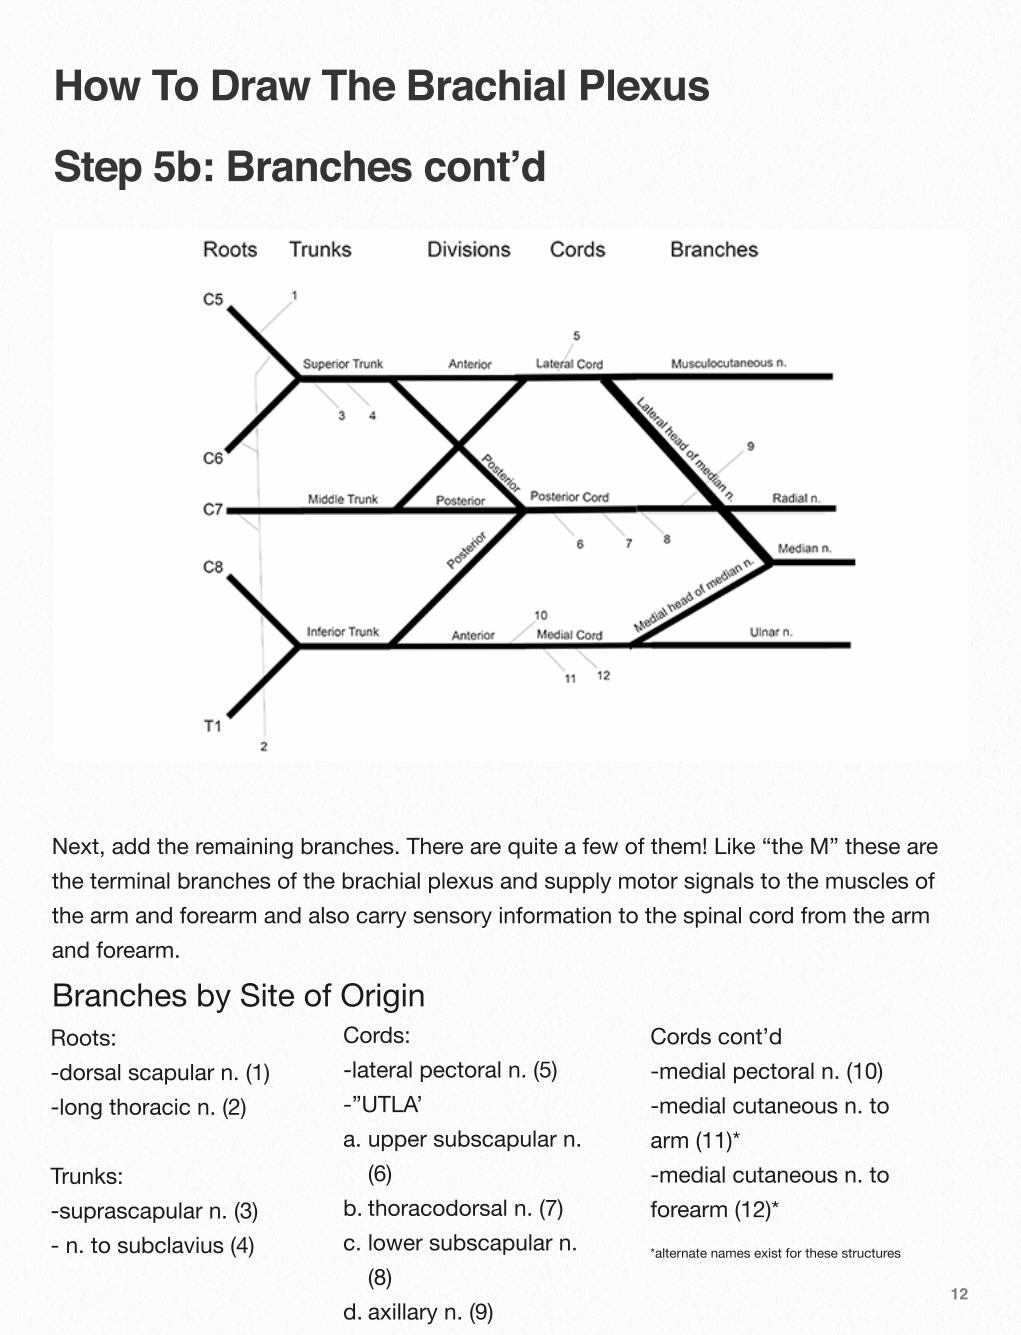
Step 5b: Branches cont’d
12
Branches by Site of OriginRoots:-dorsal scapular n. (1)-long thoracic n. (2)
Trunks:-suprascapular n. (3)- n. to subclavius (4)
Cords:-lateral pectoral n. (5)-”UTLA’a. upper subscapular n.
(6)b. thoracodorsal n. (7)c. lower subscapular n.
(8)d. axillary n. (9)
Cords cont’d-medial pectoral n. (10)-medial cutaneous n. to arm (11)*-medial cutaneous n. to forearm (12)*
Next, add the remaining branches. There are quite a few of them! Like “the M” these are the terminal branches of the brachial plexus and supply motor signals to the muscles of the arm and forearm and also carry sensory information to the spinal cord from the arm and forearm.
*alternate names exist for these structures

All Done!
Great! You’ve drawn the brachial plexus. That is a great first step. Once you’ve mas-tered drawing and labeling the brachial plexus from memory you need to make sure you can apply your knowledge to the cadav-ers and models in the lab.
Although you may or may not be tested on your ability to draw or label the brachial plexus on an exam, a knowledge of how the structures relate to one another is vital. The best way to gain this knowledge outside of lab is by drawing and labeling this picture.
You will find that the brachial plexus isn’t quite so nicely arranged in the body as it is in this image. You will often only be able to locate a handful of structures immediately. However, if you have a knowledge of how the structures relate to one another, finding a handful of structures easily is all you need. Then you can use your knowledge of how these structures relate to one another to trace backwards and find the other compo-nents of the brachial plexus.
You can do it!
13
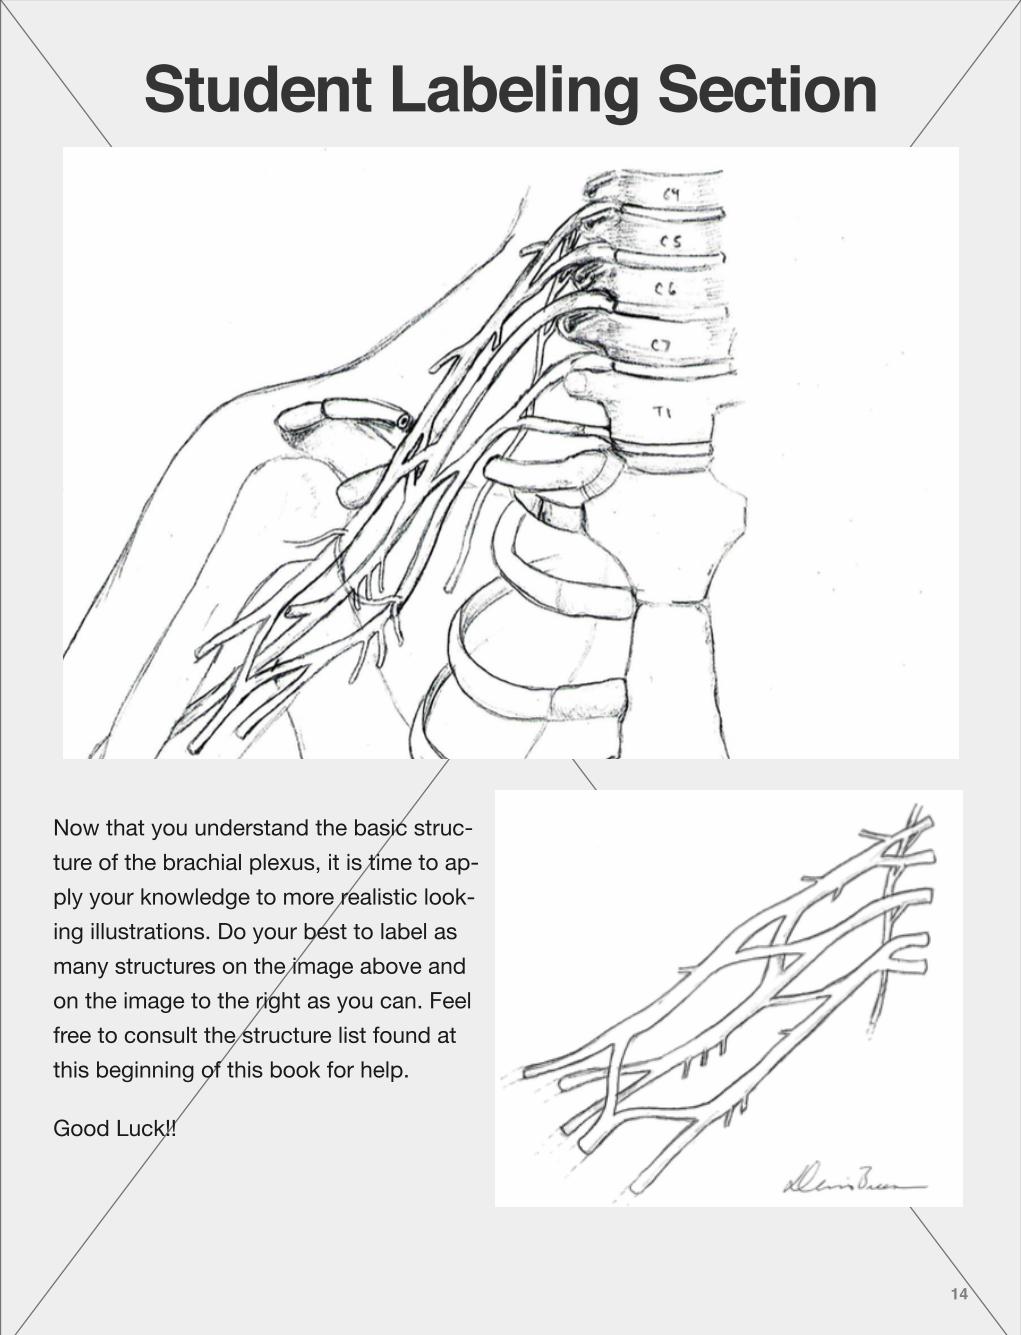
Student Labeling Section
Now that you understand the basic struc-ture of the brachial plexus, it is time to ap-ply your knowledge to more realistic look-ing illustrations. Do your best to label as many structures on the image above and on the image to the right as you can. Feel free to consult the structure list found at this beginning of this book for help.
Good Luck!!
14