marshall stealth receiver manual - western sporting
TRANSCRIPT
OWNER’S MANUAL

Stealth Tracking Receiver
OWNERS MANUAL
2
Contents:
Introduction................................................................ 3
Getting Started ........................................................... 4
In the Field - A Quick Tutorial ................................ 10
Frequently Asked Questions ................................... 14
Advanced Telemetry ................................................ 20
Radio Propagation ................................................... 25
Tracking Strategies .................................................. 31
Warranty .................................................................. 35

Introduction
Your new Stealth is a high-performance telemetry receiver designed for maxi-
mum performance and ease of use in the field. It features the simplicity and
durability of analog controls coupled with technological advances in internal
circuitry to achieve the best possible performance during years of heavy field
use. You’ll find that its high sensitivity and sharp directionality will exceed that
of any other tracking receiver you have ever used.
The patented three-element yagi antenna is a complete, one-piece design that is
mounted directly to the receiver casing. It collapses down into a very small size for
convenient storage and travel. The machined aluminum housing has been
engineered to provide perfect balance in the hand, and travels as a compact unit
that fits snugly into a holster worn around the waist while walking. You can also
slide it into our premium, wool-lined leather holster that clips to the saddle for
operations off horseback.3

Stealth Tracking Receiver
OWNERS MANUAL
4
Getting StartedYour new Receiver was thoroughly tested prior to shipping and comes to you
ready for immediate use. The first thing to understand is how to deploy the
collapsible yagi antenna.
1Remove the receiver from
whatever carrying case you are using
(hunting bag, holster or carrying
case) and hold it in front of you with
the pistol grip.
Push forward on the rear of
the sliding channel. The spring-
loaded elements will instantly flip out
into the open position. Warning: to avoid
injury be sure to keep a careful distance from your
face or others when performing this procedure.
2
3Lift the center elements up
and out of their slots one at a time
and let the spring action pull them
out into position.
First, remove your receiver from
your field holster or backpack.
Second, push forward on the
rear of the sliding channel to
release the spring-loaded
elements out into postiion.
Next, lift the ends of the driven
elements, one at a time, up and
out from their notched holders.
They will pop out into their
correct postiions.

5
Folding Up The AntennaSimply reverse the process. It may require some effort at first, but with prac-
tice, you can learn to do it in a few seconds every time.
1. Retract the front bracket by sliding it all the way toward you.
2. Fold the center elements, one at a time, toward you and lifting them slightly up
and into their slots on the rear bracket.
3. Rotate one of the front elements toward you while bringing the rear one
forward to hold it and snap the rear element into its slot on the front bracket.
Do the same on the left side. This operation is best done with one hand.
4Reach out and pull the front element bracket forward to fully extend the
sliding channel into its locked position. You now have the maximum
performance of a full three-element yagi.
Finally, pull the director elements out forward until they
click at their extended postition. The yagi is now fully
extended and ready for use.

Stealth Tracking Receiver
OWNERS MANUAL
6
Front Panel viewAll operational controls are found on the front panel. For nighttime use, a small
red LED illuminates the entire panel so the controls can be seen and used
without adversely affecting your night vision.
The speaker slots are facing you on the front panel for maximum sound while you
adjust the controls to search for a signal. But your very best results when searching
for weak signals will be when using headphones plugged in to the “Phones” jack
found on the right side of the panel. Using headphones is also a great idea since you
can hold the receiver high above your head for the best reception.

7
Receiver Controls
Trigger Switch: Turn the receiver on first, using the Gain knob. Then, the
button on the pistol grip can be clicked on and off while tracking to conserve
power.
Gain Knob: Use this to adjust the volume of the sound. Experienced users go easy
on the volume, keeping it as low as possible while still being able to hear the
transmitter signal clearly. High volume drains the battery faster and makes
pinpointing the signal more difficult.
Channel Selector: Use the Channel Selector to switch to a different transmitter.
A channel is a specific frequency band, 10 kilohertz wide. You can use more than
one transmitter at a time as long as they are on different channels. Your Stealth has
100 channels.
Frequency Chart: Some transmitters specify a frequency rather than a channel
number. The chart on the bottom of the receiver gives the center frequency of each
channel, and the corresponding channel on the receiver.
Fine Tune Knob: After choosing the right channel, you must tune to your
transmitter’s unique frequency. As you get tuned in you will hear a beeping sound
(the signal) coming from the transmitter. When you are tracking a very weak signal,
it is important to tune carefully to get the best performance from the receiver.
Always remember: Tune to the pitch or tone that gives the loudest volume.
Range Switch (Near/Far): This switch performs the important function of
cutting down signals that are too close and strong (it’s also called an attenuator.) All
you have to remember is this: Switch it to the position that gives the weakest signal
you can comfortably work with. Normally, when tracking a faint signal, keep it on
Far. And when you’re finally close, and the signal starts “booming” making it harder
to pinpoint, switch to Near.
Signal Strength Meter (S-Meter): This meter indicates how strong the signal is.
As you point the antenna directly at the transmitter, or get closer to it, the meter
will read higher. If the needle is hitting the right side, turn down the volume. The
signal strength meter is an accurate supplement to your ear in judging which
bearing gives the strongest signal.

Stealth Tracking Receiver
OWNERS MANUAL
8
Headphone Jack: When tracking a weak signal you’re better off using
headphones since they help shield out the noise of wind and passing cars,
making it make it easier to concentrate and identify a weak signal. They also
allow you to hold the receiver up high above your head where it will get a better
signal while still hearing your best sound. High-quality, cupping headphones do
the best job of keeping out extraneous noise and can be ordered from Marshall.
They are invaluable in airplanes. Your receiver uses a standard 1/8 inch, stereo
or mono plug.
External Power Plug
This plug on the back of the receiver allows you to use an external power source,
such as a cigarette lighter adapter from your vehicle. Any power source of 6 to 12
volts will work. Do not use rechargeable batteries. The External Power Plug will
not recharge the batteries inside the receiver.
Caution: Do not leave the power adaptor plugged in while jump-starting your
car or you will damage the receiver.
Batteries
A red warning light comes on when the batteries need to be replaced (It is normal
for this indicator to flash briefly as the receiver is turned on and off.) Operation
with low batteries may give poor sound quality and erratic results.
Changing Batteries: The receiver uses two 9 volt batteries. Ordinary
alkaline batteries may be used, but for extended life and less weight, use
the more expensive 9 volt lithium batteries. Change the batteries by
removing the thumb screw on the battery case (found on the bottom front
of the receiver) and removing the cover.
Caution: This receiver is much more water-resistant than other makes in
terms of field use during bad weather, but it is not water-proof! But if acci-
dentally immersed in water, it may fail and need to be repaired.

9

Stealth Tracking Receiver
OWNERS MANUAL
10
In The Field – A Quick Tutorial
Basic TrackingThe best way to become familiar with your receiver is to use it outside. Turn
on a transmitter and place it about 100 yards away. Set the Range Switch to
medium. Adjust the Tuning Knob until you hear a clear beeping tone from the
transmitter. Adjust the volume up or down to a comfortable level, but not too loud.
Hold the receiver in front of you at eye level with the elements horizontal. Now,
rotate your body 360°, keeping the receiver in the same position. Can you hear
the volume of the beep change as you turn around? Was it strongest when you
pointed it at the transmitter? This is the basic technique of telemetry: Scan the
horizon with the antenna until you get the strongest signal. That will generally
be the direction that will take you to the transmitter (that’s not always the case,
though; see the next chapter for more about this.)

11
Vertical vs. HorizontalNow, point the receiver at the transmitter again and rotate the antenna until the
elements are vertical. Did the strength of the signal change? In most cases, one
orientation will be stronger than the other. This is important: Make it a habit
to rotate the receiver from horizontal to vertical every time you use it at a new
location to hear and see which orientation is stronger.
Practice:1. Have someone hide the transmitter in a difficult spot and see if you can
find it. You can make a game out of this. (Thousands of ham radio
enthusiasts actually conduct competitive transmitter hunts in major cities
on Saturdays.) Or, put the transmitter on a person, give them a head start,
and see if you can track them down while moving.
2. Hang the transmitter on a wooden object or a string and drive away
with your receiver (don’t set it on the ground, though; transmitters always
perform poorly laying directly on the ground.) See how far you can go
before losing the signal. Try tuning in the signal when it is very weak.
Experiment with all the controls and see what effect on the signal they
have at a distance. Learn what the signal should sound like at known
distances.
Stealth Tracking Receiver
OWNERS MANUAL
12
In the FieldWhen you’re ready to use the system in the field, tune in the signal just before
letting your bird or dog go. That ensures you’ll be ready with the best signal instead
of having to try to locate it in the rush of the moment when the animal first be-
comes lost.
A few pointers on tuning:
• Set the Filter Switch on Wide until you are experienced with the
receiver.
• Tune the receiver for the loudest sound after the transmitter is on
the animal and has reached the outside air temperature. This is
because the frequency of the transmitter can change when you put
it on the animal. More importantly, all transmitters will drift with
changes in temperature. If you tune up in a warm truck and take it
into bitter cold, the frequency will probably change significantly.

13
••••• If you tune in while the transmitter is sitting next to you on the car
seat, the signal will be so powerful that your receiver may pick it
up on incorrect channels. If you mistakenly tune in on the wrong
channel the signal may sound fine in the car, but will be quickly lost
when the transmitter is far away. To avoid this, set the Range
Switch on Near while tuning anywhere near the transmitter.
Try locating your bird or dog several times for practice. Experiment with
holding the receiver antenna vertically and horizontally while watching the
position of your animal. Use the system many times until you feel confident in
finding the transmitter quickly with your receiver. When your bird or dog is
lost is not the time to be learning how to use telemetry.

Stealth Tracking Receiver
OWNERS MANUAL
14
Frequently Asked Questions
Why does my receiver pick up all my transmitters at the
same time? They’re on different channels.Extremely strong signals will get through even the most powerful filters in a
receiver. If you have transmitters on adjacent channels transmitting right around
you, you might hear a popping or thumping sound from them. This can be a
distraction when you’re trying to pick up a very weak signal from a lost animal.
The solution is to turn off the transmitters around you while you track a lost animal.
If you’re just tuning up, switching the Range Switch to Near will help to remove the
unwanted signals.
I lost the signal and tried to tune it in. I couldn’t get it again.If you lose the signal, don’t panic and tune all over the dial. It’s essential not to lose
the correct tuning. The signal may have drifted, but not much. So if you really think
the signal may have drifted, just turn the tuning knob very slightly and search for the
signal by scanning the horizon 360º. Count the clicks on the Fine Tune knob as you
search. The small detents (or clicks) will help you remember where the original
setting was. If you don’t find it, you’re out of range. Turn the Tuning Knob back
where it was when you last heard the signal and go to higher location and try again.
I could only pick up a transmitter a half a mile away.This usually happens because the transmitter is putting out a weak signal. The range
of transmitters varies tremendously, depending on where they are. A transmitter on
the ground may go less than half a mile, especially if the antenna is pointing stright
at you.
If the transmitter is putting out a good signal, the problem is almost always im-
proper tuning of the receiver. It’s possible to tune to a tone that sounds like your
transmitter, but is actually at the wrong frequency (or even on the wrong channel!) It
will sound fine when you’re right next to the transmitter, but when you get in the
field it becomes weak (This can happen on any receiver.)

15
To avoid this, set your receiver on Near when you tune up – this removes all but
the real, genuine signal you want to tune to. And stand a short distance away
when you tune in.
Also, if you have the Filter Switch on Narrow, be sure to tune precisely to the
loudest tone. This requires some practice and a steady hand. The Narrow Filter is
the key to getting the best range. With it, your Marshall receiver will deliver range
as good if not better than any other telemetry receiver on the market. But like any
high performance piece of equipment, if you use it incorrectly, the performance can
be degraded.
What is the single most important thing to do if I absolutely
don’t want to lose my bird or dog?Put a backup transmitter on the animal. The second transmitter can be a smaller one,
or perhaps one with longer battery life (a good combination would be one ex-
tremely powerful transmitter that you can use the first few days, and another that
lasts a long time, in case you don’t find it right away.) Just remember this: if your
animal has a working transmitter, you can almost always find it. It may take hiring a
plane to fly over the area, but eventually you can find it if you’re patient and there is
a signal.
I’m not exactly certain what direction the transmitter is. Am
I doing something wrong?Getting the sharpest bearing to your transmitter saves a lot of searching (that’s why
Marshall receivers use a full size, three element yagi antenna). But even a three
or five element yagi has a fairly broad forward response (see the chart later on.)
The following, easy technique can help you get a more accurate bearing.
Instead of trying to find the strongest signal, try to find two points on either side
of it. Scan to both sides of the maximum signal and notice the points on the
horizon where the signal drops 1 unit on the S-Meter. Your best bet is that the
transmitter is halfway between those two points.
By the way, the wrong setting of the Range Switch could cause this problem,
too. See the following question.

Stealth Tracking Receiver
OWNERS MANUAL
16
Why is the Range Switch necessary? My other receiver
didn’t have one.It’s not that loud signals will hurt the receiver. It’s simply a matter of keeping
your receiver optimally directional (to be able to pinpoint). Without this switch it
would be difficult to track and get a direction of a strong signal up close.
If the signal is very strong and you don’t switch down to Near, the receiver will
not point out the right direction very precisely. This is because the signal is
strong enough to bypass the antenna altogether and go straight into the receiver.
The antenna, the only thing that gives you directionality, is effectively disabled.
The strong signal also saturates the receiver, making all signals sound equally
loud.
Marshall receivers use precisely machined, solid aluminum cases to shield out
these unwanted signals, but the Range Switch is still needed. Your Marshall
receiver employs a sophisticated active attenuator circuit, which other receivers
don’t have, and that’s how it can take you to within a few feet of your trans-
mitter! Marshall receivers have unequalled performance up close. You just have
to flip the switch, keep your volume down and listen carefully.

17
How can I tell how far away my transmitter is?One of the biggest challenges in telemetry is determining distance. There is no
scientifically sound way of getting the distance from a transmitter signal. You can
easily be deceived by a loud signal from a transmitter very far away. However, there
are a couple of tricks to estimating it:
Distance Technique #1: Let’s assume you are receiving a strong signal
with the Range Switch on Far. Now flip the switch from Far to Near.
If the signal remains strong, it means you are fairly close to the trans
mitter.
With a strong signal, here are typical ranges to a transmitter near the
ground:
Near ............................. Less than 500 feet
Far ........................................Over 500 feet
The above table is only an example; you won’t get the same results. It
depends on your transmitter, the terrain, and many other factors. But over
time you’ll get a feel for the distance these Range settings represent
with your transmitter and terrain.
Distance Technique #2: Just take a reading on the S-Meter and
then proceed in the direction of the transmitter until the meter reads
twice as much. You will have covered approximately half the distance
to your target. This only works with direct line-of-sight signals of the
same polarization and gives only an approximation. Still, it could save
you from driving miles out of your way. Adjust the Volume Knob
during the first reading so the meter reads about a third of full scale here
it is likely to be the most linear.)

Stealth Tracking Receiver
OWNERS MANUAL
18
What is a kHz and a MHz?These are measurements of frequency. Every transmitter has a unique fre-
quency that makes it distinguishable from all others. Fortunately, a receiver can
tune into a single frequency at one time and reject all the others.
The basic measure of frequency is the hertz. It represents one cycle or vibration
per second. A kilohertz (kHz) is a thousand cycles per second, and a megahertz
(MHz) is a million cycles per second.
An AM broadcast station is fairly low in frequency, perhaps .7 MHz, while an
FM station is much higher, say at 105 MHz. Your telemetry operates at a still
higher frequency, such as 216.055 MHz. Thus, a single short pulse from your
transmitter is made up of several hundred million electro-magnetic vibrations.
The kilohertz unit is usually used in telemetry to measure the difference between
frequencies. For example, if you had a second transmitter at 216.070, it would be
15 kHz higher than the one mentioned in the previous paragraph. Each of the
channels on your Marshall receiver covers a range of 10 kHz.
My Marshall receiver doesn’t tune in as “broadly” as the
other receiver I’m used to. What’s wrong?Your Marshall receiver may tune “quicker” than some other receivers. If so, it’s
probably because it covers more frequency spectrum on each channel, in order
to give more coverage. It’s a feature, not a problem. Just turn the Tune Knob a
little more slowly than you’re used to. If you tune across a signal slowly you’ll
hear the pitch go from high to low until the sound is so low it disappears. If you
keep turning the knob the sound will return, this time going from low to high.
This is normal.
Is there an easier way to get the receiver in and out of the car.It’s a lot easier if you push the sliding channel closed, partially collapsing the
antenna. However, don’t forget to extend it when using the receiver in order to
get maximum performance from the antenna.

19
How can I use my Marshall receiver with my car top
antenna? It’s got a different plug.Marshall receivers use high reliability, lightweight SMB connectors. Call to order
a short adapter that will fit the larger BNC connectors used on some other
antennas. You can plug in to the car top antenna and click on the receiver to
monitor signals while driving, then switch back to the yagi when close enough
to get out.

Stealth Tracking Receiver
OWNERS MANUAL
20
Advanced TelemetryThe Marshall Stealth Receiver is easy to use successfully for almost all occa-
sions. But there are those times when you will stretch it to its limits. It will be
worth your time to read this section and learn a few more techniques. First we
cover some theory on how radio waves work which is essential to understand if
you want to find your bird or dog when it is really lost.
Transmitter Patterns
The one thing telemetry transmit-
ters all have in common is the
antenna. The wire commonly used
on transmitters is known as a
short end-fed dipole. With this
kind of antenna most of the
energy radiates from the side. It’s
called broadside radiation and the
pattern looks like a donut, as in
this diagram.
The same radiation comes from
short helical antennas. Little
energy comes from the end of the
antenna, so when the antenna is
pointed right at you, you get the
worst possible signal.
When attached to the body of a dog, the dog’s body acts as part of the antenna
and alters this pattern in unpredictable ways. The pattern then will not look like
a donut, but maybe more like a partly inflated beach ball. There simply is no
flexible antenna that radiates equally in all directions.
Hint: When your bird or dog is out of sight, the donut pattern can tell
you much about its movements. Listen for the signal fading in and out as
the it moves around, alternately pointing the antenna toward and broad-
side to you. You can also tell when the antenna is near the ground or
vegetation by changes in the strength of the signal and the frequency.
21
Polarization
Radio waves are electromagnetic, exactly the same as light. When your animal is
lost you’re literally seeing it, with different eyes. The miracle is that the trans-
mitters used in telemetry emit such small power, a few thousandths of a watt.
Picking up that tiny signal is equivalent to seeing a dim, blinking flashlight miles
away in daylight. Listening to your receiver is like looking through a telescope:
you can look but one direction at a time, but your visibility is high.
You know from using sunglasses that sunlight is somewhat polarized (rotate
them 90 degrees to eliminate glare on the surface of a river). Radio waves are
strongly polarized. Polarization has to do with the alignment of the magnetic and
electric fields that make up the wave. When the transmitter antenna is vertical
we say the waves are vertically polarized, and when it’s laying on its side they
are horizontally polarized.
The thing to remember is that your receiving antenna should be oriented the
same way as your transmitter antenna. This is important with weak signals.
Your antenna will work poorly if it’s oriented the wrong way, as much as ten
times worse. With a dog, the best orientation could be somewhere between
vertical and horizontal, maybe at 60º from horizontal.
Rule #1: When tracking a weak signal, always try both orientations
first! Stay with the orientation that gives the strongest signal. This cannot
be emphasized strongly enough. It is easy to develop a preference for which
way to hold your antenna, but in doing so you will miss the boat half the time.
Try them both and remember that your animal can change positions at any time.
It may seem that polarization doesn’t matter once you have a nice strong signal.

Stealth Tracking Receiver
OWNERS MANUAL
22
Not quite so. The yagi antenna’s directionality is somewhat sharper if you hold
it horizontally.
Radiation from the end of the transmitter antenna (around the hole of the donut) has
elements of both vertical and horizontal polarization. And after a signal has been
reflected it loses its polarization altogether (it actually becomes elliptically
polarized, with equal elements of vertical and horizontal polarization). The same
loss of polarization can occur after the wave travels through obstacles such as
vegetation.
Hint: Absence of polarization can be a clue. Suppose you’re in a canyon and
get a strong reading from a canyon wall. Either your transmitter’s up there,
or it’s a reflection off the canyon wall from somewhere else. Before climb-
ing, check the polarity of the signal. If it’s a reflection, the strength won’t
change much as you rotate the yagi around its axis.
Yagi Pattern
The Stealth Antenna is a form of directional antenna called a yagi. It receives
signals better in one direction than in others, and that’s the only way you’ll find
your animal when it’s out of sight. Listening to the strength of the signal alone is
almost useless, unless you have a lot of time to travel. You need a bearing. The
yagi also has gain, picking up weak signals better as if it were amplifying them.
It can pick up a far away transmitter when other antennas would get nothing.
A yagi can best be described by its radiation pattern. It always has a distinct
forward lobe in the favored direction. The width of the forward lobe is its
beamwidth, the range over which the antenna picks up strong signals as you
scan across the horizon. A sharper beamwidth allows you to pinpoint the
direction to your animal more precisely, like a spotlight compared to a flood-
light.
Yagis also pick up signals in other directions besides forward. The back and
side lobes can confuse your ability to determine the direction to your animal.
The strength of the forward lobe relative to the back is known as the front-to-
back ratio, a higher ratio being better.

23
Rule #2: Whenever you take a new bearing with your yagi, scan
the entire horizon first, all 360 degrees. Otherwise you could find
yourself following the back lobe, going exactly the opposite direc-
tion from your animal.
The Stealth antenna provides the best combination of gain and sharp pattern
possible in a 3 element yagi. Your Marshall receiver can be used with other
antennas in addition to the Stealth Antenna. A car-mounted 5 or 7 element yagi is
an excellent antenna for long distance telemetry. Here is the theoretical pattern of
your Marshall Stealth Antenna:
Yagi TipsDon’t bend the elements and don’t touch them while using it. Keep it away from
other objects, especially cars and other people. Don’t substitute other lengths of
coax. The gain of your antenna can change if you raise it up or down, so keep it
at a fixed height as you scan (higher is generally better.)
In spite of the above guidelines, a yagi is very forgiving. It will almost always
guide you directly to your lost animal, hopefully awaiting your appearance.
Omni-directional antennas
These antennas pick up equally well in all directions. You should use one in your
vehicle when moving to the next point where you’ll take a bearing. Hearing the
signal from your animal can tell you if you’re going in the right direction and
warn you if you’re about to lose the signal.
Stealth Tracking Receiver
OWNERS MANUAL
24
Hint: If the signal starts getting weak you know to stop and take a
bearing with your yagi. At least then you’ll know what point of the
horizon your animal just disappeared behind, a vital piece of information.
The omni-directional antenna is also useful when you lose the signal altogether.
Hook it up and drive around in widening circles around where you think the
animal should be until you hear something.
The most common omni-directional antenna is probably a magnetically mounted
whip (shown below). It should be in the center of the vehicle roof, as the roof
forms a key component of the antenna. Whip antennas are usually 1/4 wave-
length long. A 5/8 wavelength whip has even more gain.
Be aware that the vertical whip is
vertically polarized. That can be a
big disadvantage if your
transmitter’s antenna is horizontal
and the signal is weak.

25
Radio PropagationRadio waves normally travel in straight lines, but like light, they can also play tricks.
Unless you do your hunting on an utterly flat, dry, treeless plain, you will experi-
ence all of the deceptions below:
Reflections
Radio waves reflect under many conditions and the result is always an illusion.
You think the transmitter is behind the point of reflection, but it isn’t so.
Suppose, for example, you pick up the signal coming from the side of a mountain.
You spend hours climbing to the place only to find no transmitter there. It never was
there. What you saw was the reflection of the transmitter’s signal from another
valley. You’re comforted by the fact that without a reflection you would have gotten
no signal at all.
Radio waves reflect off any surfaces that conduct electricity, including the follow-
ing:
• Metal is the ideal reflector. Reflections from your nearby vehicle
can easily give you a false reading and the steel in a building can
scatter your signal in every direction. Put a few buildings together
and you have a major problem.
• Water is another good conductor. Radio waves will bounce off the
surface of a lake like light off a reflecting pool.
• Hills and mountains reflect, but their properties will depend on
the nature of the material in them, particularly the moisture they
hold; wetter structures reflect better. Most natural structures will
givesignificant reflections.
• Live trees reflect radio waves, but dry wood does not. A forest
can scatter the signal in many directions. Any green plant more
than a meter in size can do it.

Stealth Tracking Receiver
OWNERS MANUAL
26
Radio reflections occur just like with a mirror, in that the angle the wave comes
out is the same as the angle going in. A flat surface will reflect the signal in only
one direction (the concept behind the flat, angular surfaces of Stealth aircraft),
while a rounded surface will reflect in many directions, and most natural
surfaces behave like that. Multiple reflections are possible and a signal may
funnel a long distance down a canyon through successive reflections.
Fences & Wires
A power line or fence wire can really mix things up. The fence picks up your
transmitter’s signal, like an antenna, and the signal races down the wire and re-
radiates. Your receiver picks up false signals which will most likely be horizontally
polarized. The effect is worst when your animal is right next to the wire.
Checkerboard Patterns
When you are near the animal you may experience checkerboard patterns
(technically known as interference patterns.) If you plotted the strength of the
signal near your transmitter, it would look something like a round checkerboard.
One spot is strong, while a few feet away you get little signal.
Checkerboard patterns occur when the signal reaches your receiver over two
different paths, one being line-of-sight and the other usually a reflection off the
ground. When the two signals combine they complement each other in certain
spots, nullifying each other in others.
When the transmitter is close: The checkerboard effect is most pro-
nounced when your animal is off the ground in a tree, especially when the
transmitter antenna is pointing at you. Checkerboard patterns can weaken the
signal in the direction of the animal while it remains strong in some other false
direction. It can throw you off by exactly ninety degrees!

27
Don’t rely on signal strength alone to find the animal, especially up close,
because you could have just moved into one of the low signal pockets. Instead,
rely on the directionality provided by your antenna. Don’t get too close. Circle
where you think the animal is. Use vertical polarization, since ground doesn’t
reflect vertical waves well.
When the transmitter is distant: The checkerboard effect simply makes
the signal stronger in some spots. Therefore, when you’re trying to pick up a
very weak signal, always move around and try to get the signal at several spots
within a 15 foot radius.
Terrain Absorption
As radio waves pass through objects they diminish in strength. The effect is
most noticeable in wooded areas where vegetation saps the strength of your
signal. The further it goes through a forest the greater the loss. Fog, clouds,
snow and rain also absorb radio waves, lowering your transmitter’s range. Your
Marshall system, between 173 and 220 mHz, avoids the absorption problems
that are more pronounced at higher frequencies.
Radio Shadows
The biggest obstacle to radio waves is the earth itself. The range of a telemetry
system is limited first and foremost by the horizon. The curvature of the earth
creates a circular area around the transmitter where you can pick up the signal,
the so-called line-of-sight radius. The actual radius depends on the elevation of
both the transmitter and the receiver.
This diagram can give you an idea of the line-of-sight distance. To use it
compute the distance for the height of the transmitter and your own height
separately, then add them together. For example, if your transmitter was on a hill
25 feet high and your receiver was 8 feet high, the line-of-site distance would be
11 miles (7 + 4 miles).
You can see that if your transmitter is on flat ground and you are standing on
the ground, the range can be just a few miles. Irregularities like hills reduce the
line-of-sight to even less than what it would be if the earth were smooth. Every
kind of terrain produces “radio shadows”. As you move around you can go in

Stealth Tracking Receiver
OWNERS MANUAL
28
and out of shadows, even picking up a signal much further away from a spot
where you picked up no signal.
The key to getting the best range from your receiver is altitude. High spots are
least likely to be in a shadow. If you’re not getting a good signal, the first thing
to do is get higher. Driving to the top of a hill or climbing a water tower can
dramatically increase your transmitter’s range.

29
Hint: When tracking a weak signal, hold your antenna as high as you
can reach instead of keeping it at eye level. Standing on your vehicle will
also boost the signal significantly.
Stealth Tracking Receiver
OWNERS MANUAL
30
Diffraction
Radio waves can bend around objects. Diffraction works best around metal
edges in buildings, but also happens with hills, trees and mountains. Diffraction
increases the range of your transmitter in hilly country, because the signal bends
over the crest of the hills.
This means your transmitter’s range is not determined strictly by the above line-
of-sight chart. Diffraction allows some of the signal to “hug the earth” and go
further than the strict horizon, tapering off gradually as you go beyond it. A
transmitter beyond a hill or in a deep ravine would be undetectable if it weren’t
for diffraction around the edges. A powerful transmitter can use diffraction to
punch a signal beyond the line-of-site limit.
Diffraction around trees combined with reflections can create complex patterns
within the forest. You should hold your antenna horizontally in a forest because
trees produce mostly vertical interference.
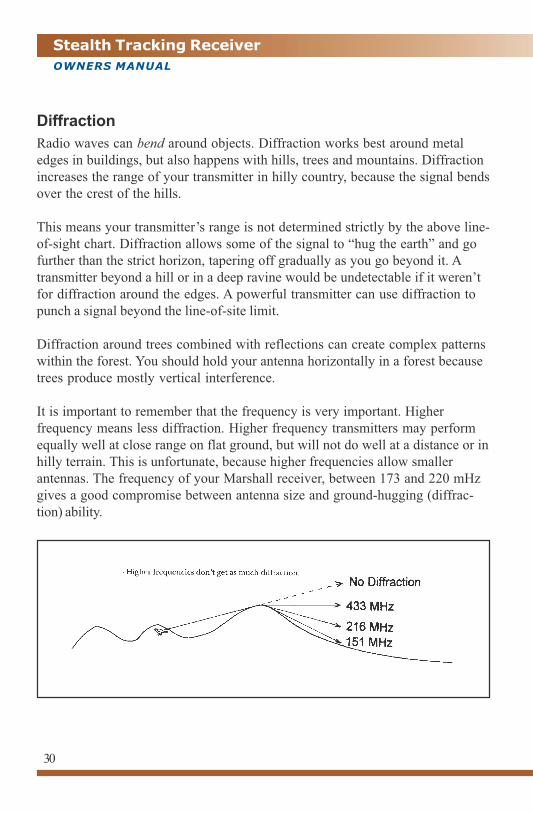
It is important to remember that the frequency is very important. Higher
frequency means less diffraction. Higher frequency transmitters may perform
equally well at close range on flat ground, but will not do well at a distance or in
hilly terrain. This is unfortunate, because higher frequencies allow smaller
antennas. The frequency of your Marshall receiver, between 173 and 220 mHz
gives a good compromise between antenna size and ground-hugging (diffrac-
tion) ability.

31
Tracking StrategiesThe Marshall receivers and transmitters are the finest available to telemetry
users. While good equipment helps, good technique is equally important when
your animal is really lost. Most of the time you’ll find it absolutely no problem,
but there are those times when you’ll want every advantage possible. Here are
some techniques that can help:
Before starting
Always check your transmitters for a strong antenna connection and for any kind of
corrosion on the battery contacts. Test your transmitter’s battery with a battery
tester or use a new one. The battery is the most likely component in your system to
fail. Also, test your receiver batteries and have spares ready. Turn on the transmit-
ters and attach to the animals. After waiting for the transmitters to reach the outside
air temperature, select the channel of each transmitter and adjust the tuning for the
optimal (loudest) sound.
The Initial Bearing
When you first lose the animal, use your receiver immediately to acquire the signal.
You may not be able to run back to the vehicle; the receiver should be with you
and ready. Try to determine the animal’s direction through your last visual
contact and by considering its past behavior. A strong signal indicates you have
line-of-sight conditions. A sudden weakening of the signal indicates the animal
has just gone over a hill.
Whatever you do, don’t lose the signal. While driving use an omni-directional
antenna on your vehicle roof. Stop frequently to take new bearings, depending
on how far away the animal is and on your confidence in your estimating its
direction and speed. Your goal is to keep within range of the animal until you have
an indication it has halted, through the activity sensor on the transmitter or the
lack of change in the signal.
Each time you take a bearing always scan a full 360°radius first to find the peak
response. Remember that every yagi has a certain response 180° from the peak
and if you’re not careful you could go in exactly the wrong direction. To get the
most precise bearing, turn the volume down so you get no signal except on the
peak.

Stealth Tracking Receiver
OWNERS MANUAL
32
If the signal is weak, rotate the yagi around it’s boom to find the best polariza-
tion, vertical or horizontal. If both polarizations are about equal, the signal could
be coming from a reflection off a hill or mountain or could be diffracting over a
hill. If you suspect you have a reflection, try to figure out where the transmitter
would be if it is in the direction of the bounce (remember that radio waves
reflect off a surface exactly the way light waves do in a mirror; the incoming
angle equals the outgoing angle.) Check for a weaker signal coming from the
true direction to the transmitter masked by some obstacle.
As you move the yagi across the horizon, is the peak response sharp or broad?
A broad response may indicate a reflection or diffraction over an obstacle. As
you drive away does the signal drop off rapidly? This may indicate the transmit-
ter is low or is behind an obstruction rather than high.
Note whether there are any wires or fences in the vicinity, or other obvious
objects the signal could be reflecting from. The signal can travel many miles
along wires. Also remember the signal intensity on your S-Meter for compari-
son with the next reading you take.
Triangulation
After you take your first bearing, the natural tendency is to go straight in that
direction toward the transmitter. And if you have a pretty good idea where the
transmitter is that’s not a bad idea. However, usually you will end up taking a lot
of extra measurements that way because you lack information about the
transmitter’s distance. If the signal is weak it doesn’t always mean the transmit-
ter is far away.
Another approach is triangulation. Instead of moving directly toward where
you think the transmitter is, you move closer and sideways. By taking only two
bearings you can theoretically pinpoint the exact location of the transmitter: at
the intersection of the two lines. You probably can’t follow the line to the
transmitter directly anyway because of roads and obstacles or the need to stay
on high ground, so take advantage of that fact.

33
For triangulation to work, you have to remember the line of the previous
bearing. You can do that mentally by noting two landmarks on that line as you
take the bearing. Note a landmark behind the transmitter and another behind
you. When you take the next bearing you’ll know that the transmitter should be
somewhere on the line connecting the two landmarks. Proceed toward the point
of intersection, but again offset to a third point. You’ll end up rapidly closing in
on the transmitter in a spiral.
If you lose the signal altogether:
Go to high ground that looks down on where you expect the transmitter to be.
If that doesn’t help try high ground on the other side of where you expect the
transmitter to be or that looks over the horizon in the direction the animal was
headed. If you have no clue where the animal is, drive in widening concentric
circles around where you last saw it, as closely as roads will permit. If you have
an omni-directional antenna put it on and keep your receiver on. When you are
on a hilltop, the best location for getting a weak signal is usually slightly in front
of the peak, though you can get a better 360°radius from the top.
The ultimate way to get up high is to hire an airplane and circle the area, using a
yagi antenna mounted on the wing struts, pointing at an angle downward. Be
sure to use good headphones in a plane. You’ll need a long piece of antenna coax
with the right connectors on each end.

Stealth Tracking Receiver
OWNERS MANUAL
34
Getting Hot
When you’re close to the transmitter, it’s tempting to rush in to find the bird or
dog. However, you will do well to keep taking frequent bearings to avoid
overshooting its location. You may have come to this spot based on a reflection
while the main signal was obscured by an obstacle. Once you’re past the
obstacle the real signal may actually be behind you. So continue to take 360°
readings as you proceed closer.
Before setting out on foot, make sure you’re within walking distance. You’ll
waste a lot of time if you leave your vehicle prematurely. Triangulation will give
you a good clue how close you are, or you can use the S-Meter technique
described above.
Reduce your receiver volume and switch to Medium or Near range as you get
close. Don’t remove your antenna as you may do with other receivers. The
Stealth Receiver has exceptional shielding that maintains sharp directionality
even when you walk to without a few feet of the transmitter.
Continue triangulating, circling around the apparent location at a distance and
taking multiple bearings. Then just walk to where they all intersect. Look out for
reflections from fences and other metal objects, which will be much stronger
when you’re close to the transmitter. If the transmitter antenna happens to be
pointing at you you’ll get the weakest signal while the strong broadside radiation
may reflect off nearby objects giving much stronger signals in those directions.
The Desert Hard Case protects
your equipment.

35
WarrantyMarshall Radio Telemetry warrants that its receivers will be free from defects of workmanship and
materials for ONE YEAR from date of purchase. If your receiver is defective return it to your distributor
and we will repair or replace it and return it free of charge. However, we will not be responsible for
damage from misuse or normal damage incurred during use. Under no circumstances will Marshall
Radio be responsible for damages or loss beyond the value of the receiver itself, including the loss of an
animal or lost time. The complete unit must be returned, transportation prepaid, to a Marshall Radio
authorized Service Center.
ServiceIf something is wrong with your receiver, whether under warranty or otherwise, please do the following:
In the USA and Canada:
Call 801-936-9000 and talk to Marshall Radio Telemetry’s Customer Service department. We will first
try to determine the nature of the problem over the telephone and, if necessary, give you instructions on
how to return the unit for repair, including an RMA number. Do not return products without calling first.
Everywhere else:Contact your authorized distributor for assistance and information about returning the unit for repairs.

Stealth Tracking Receiver
OWNERS MANUAL
(800) 729-7123(801) 936-9000
www.marshallradio.com