marilyn i. walker performing arts - brock university · marilyn i. walker school of fine &...
TRANSCRIPT

Brock UniversityFaculty of Humanities
Marilyn I. WalkerSchool of Fine &Performing Arts
VISUAL ARTS DEPARTMENT WOODSHOP SAFETY CONDUCT
Arnold McBay
Visual Arts Department Facilities Technician Visual Arts Department
Marilyn I. Walker School of the Fine & Performing Arts Brock University
[email protected] Telephone: 905 688-5550
Extension: 5046 Dept. cell: 905 321-8599
Office: MW413A
Updated September 2016 Workshop hours: Monday – Fridays: 10:00 am to 8:00 pm Saturdays: Noon to 5:00 pm TABLE OF CONTENTS 1) General Woodshop Rules 2) Personal checklist 3) Machinery Safe Operation Guide 4) Injury/Emergency Response 5) General stretcher building points 6) Fast & Easy stretcher build method 7) Gallery Quality stretcher build method 8) Air compressor and air nailer and staple-gun use 9) Notes on disciplinary actions 10) Hours of access

2
1) STRETCHER BUILDING PROTOCOL & GENERAL WOODSHOP RULES Stretcher protocol: ~ painting students may only build two stretchers at a time in the workshop. This means students must cut and assemble their stretchers in one work session. ~ if a student wishes to build more than two stretchers they must first take a full 1 hour break, then they may resume building a third and/or fourth stretcher (if the workshop is available). ~ students are not allowed to pre-mill pine then store the pine for later assembly. ~ lumber from the workshop is not allowed to be stored in any Visa studios. General Woodshop rules: ~ You MUST attend a safety seminar prior to using any power equipment or hand tools. ~ Working alone in the Cutting Room (Rm. 411A) is NOT permitted, all milling is to be done in teams of two. Students caught working alone in the cutting room will lose their workshop privileges for the balance of the school year. ~ All stretchers are to be built in the Stretcher Assembly room (Rm. 411). Stretchers are to be built outside of class-time. Stretcher building in a studio or during class-time is only permitted with instructor’s permission. ~ All safety equipment & guards must be used/worn by all persons in the Cutting & Assembly rooms at ALL times (and when assembling stretchers in the studio). ~ No more than 4 people are allowed to work in the Woodshop at ANY time. ~ No more than 4 people are allowed to work in the Stretcher Build room at ANY time. ~ All tools MUST be returned to their proper storage location. ~ You must clean up after yourself. Failure to comply with these rules will result in the loss of your woodshop privileges. * On comfort levels with power equipment: If you feel ANY significant level of fear in using the power tools you are NOT to use the power equipment. See the Instructor or Visa Facilities Technician for tutelage. If you are still uncomfortable with the power equipment, stretchers can be built just as quickly with hand tools. See your instructor for a demonstration on this process. 2) PERSONAL SAFETY CHECKLIST ~ Long sleeves rolled up. ~ Loose clothing and jewelry removed. ~ Long hair is to be tied back. ~ Open-toed shoes are not recommended in the workshop or cutting room. ~ Listening to music via iPods or smartphones while working in the workshop or cutting room is prohibited at all times. ~ Notify the Instructor or Visa Studio Technician immediately of damaged equipment, tools or safety equipment. This applies as well to hand tools as well.

3
~ Do not operate saws if on medication that make you drowsy, drugs or alcohol. ~ Do not cut wood pieces smaller than 20 cm (8 inches) in length. ~ Do not reach around or behind a saw blade while in operation. ~ NEVER RUSH. Saws cut better and are safer with a smooth approach. ~ NEVER lift guard or move stock while blade is still in motion. ~ Clear obstructions and debris from floor area around your work space. The most common cause of injury in a woodshop are mishaps due to sawdust, and debris on the floor or project materials left in bad places resulting in a fall. ~ Do not stack wood to be cut vertically anywhere. Wood is to be laid on a flat surface. ~ Close Cutting Room door. Closing door allows dust collection to run more efficiently. 3) MACHINERY SAFE OPERATION GUIDE ~ All guards, push sticks and safety gear in place, blade set to the correct height and angle and all measurements and guides set PRIOR to power up. ~ Turn on dust collection unit prior to operating table or chop saws. TABLESAW & CHOP SAW GENERAL CHECKLIST ~ Allow motor to come up to full speed prior to cut. ~ Hold wood firmly (but not to the point of straining) against the fence. ~ Keep proper footing and balance at all times. ~ Shut off power to saw and dust collector when done. ~ Clean or sweep bench and floor area before you leave and deposit sawdust in bin. CHOP SAW SPECIFIC CHECKLIST ~ Keep one hand on trigger switch and handle and use the other hand to hold the wood against the fence. ~ Keep hands clear of blade, at least 6" away from blade when it is moving. TABLE SAW SPECIFIC CHECKLIST ~ Use push-sticks to push wood when hand is within one foot of the moving blade and make sure you have pushed the wood all the way through the blade. ~ Your partner does not pull the stock off of the tablesaw until it has cleared the blade. ~ Keep hands away from blade and out of the danger area painted orange. * note on table saw use: make sure that your left hand holds the wood down and does not push the wood through the blade. It should act as only a guide/brace. THINGS YOU SHOULD NOT DO ON TABLE OR CHOP SAW ~ Do not operate saw if on medication that make you drowsy, drugs or alcohol. ~ Do not cut wood pieces smaller than 20 cm (8 inches) in length. ~ Do not reach around or behind the saw blade while in operation. ~ NEVER RUSH. Saws cut better and are safer with a smooth approach. ~ NEVER lift guard or move stock while blade is still in motion.

4
Notes on hand tools: ~ Mitre box and saw: when using the hand saw and mitre box start your cut with minimum pressure. Keep your fingers clear of the saw blade. ~ Utility blades: always work with a fresh blade, when snapping off the blade dispose of the old one in the “sharps” receptacle. Always cut away from yourself. ~ Use of dremels, drills, jigsaws and sanders: always wear safety glasses and hearing protection when using this equipment. Keep fingers and power cord clear of the drilling/cutting/grinding area. Use of any power tools is only allowed once you have received training from either the VFT or your instructor. 4) INJURY/EMERGENCY RESPONSE TWO TYPES OF INJURY SITUATIONS ~ minor injuries ~ urgent care emergency injuries Note: in the event of any injury (minor or urgent) all work must stop in both the cutting and build rooms. Anyone not assisting with the injury must clear the room Emergency injury/situation ~ immediately notify security by pressing the red Emergency Alarm button that is located between the door and the power panel (east wall), (note: there is also another emergency alarm button located in the build room beside the telephone). ~ kill power to machinery using the red & yellow master power switch between the door and the power panel. ~ if possible notify VFT and instructor. ~ render assistance to injured person. In the case of a minor injury ~ kill power to machinery using the master power switch beside the power panel. ~ tend to the injured person. (If you need assistance in rendering care contact staff, faculty or security prior to tending to an injury). ~ notify VFT, instructor or security. General note re. assistance wi. injury: ~ should you require assistance with a minor injury and you are unable to find an instructor or the VFT please contact the MIWSFPA security detachment at ext. 3200 using the emergency telephone located to the left of the door in the Stretcher Assembly room. 5) GENERAL STRETCHER BUILDING POINTS Important points ~

5
~ When gluing two surfaces only apply a light smooth layer of glue to one surface. ~ Use straight pieces ~ Measure twice....cut ONCE! ~ Use the square when building all corners ~ Use glue on ALL joints and braces ~ Always brace with 12" masonite corner braces, (you may switch down to 6"
corners on stretchers smaller than 24") ~ Install a cross brace when any dimension exceeds 30" ~ Set tablesaw blade for a height exceeding the stock it is cutting by approx. 1/2" Do Not ~ Use warped wood. If a six or eight foot piece of stock is straight but has a
shallow and uniform bow in it (twists make the wood useless for the perimeter of the stretcher) it can be used for smaller pieces or braces
Do Not ~ Don’t stretch your canvas until the glue has set for six hours. Do Not ~ Use nails smaller than 1 1/2” on the corner joints 6) Quick & Easy stretcher building method: A 3'x 4' stretcher is used as an example because it requires a cross-brace. ~ construction involves milling the wood followed by assembly using a frame building jig. The canvas bevel ~ Select 5 pieces of 1" x 2" pine (The fifth piece is for your brace and is cut down to measure after you have joined your stretcher & braced the corners). Cutting the bevel requires that you: ~ set the saw blade to a 22 to 25 degree angle with the crank on the lower left side. Adjust the fence so the blade only removes the top right corner of the stock as shown below. ~ feed the wood (with the 2” surface flat on the table) through the blade, when your hands get to the table top switch to the push stick, when the stock has cleared the blade let your partner pull the wood clear of the guide.
6
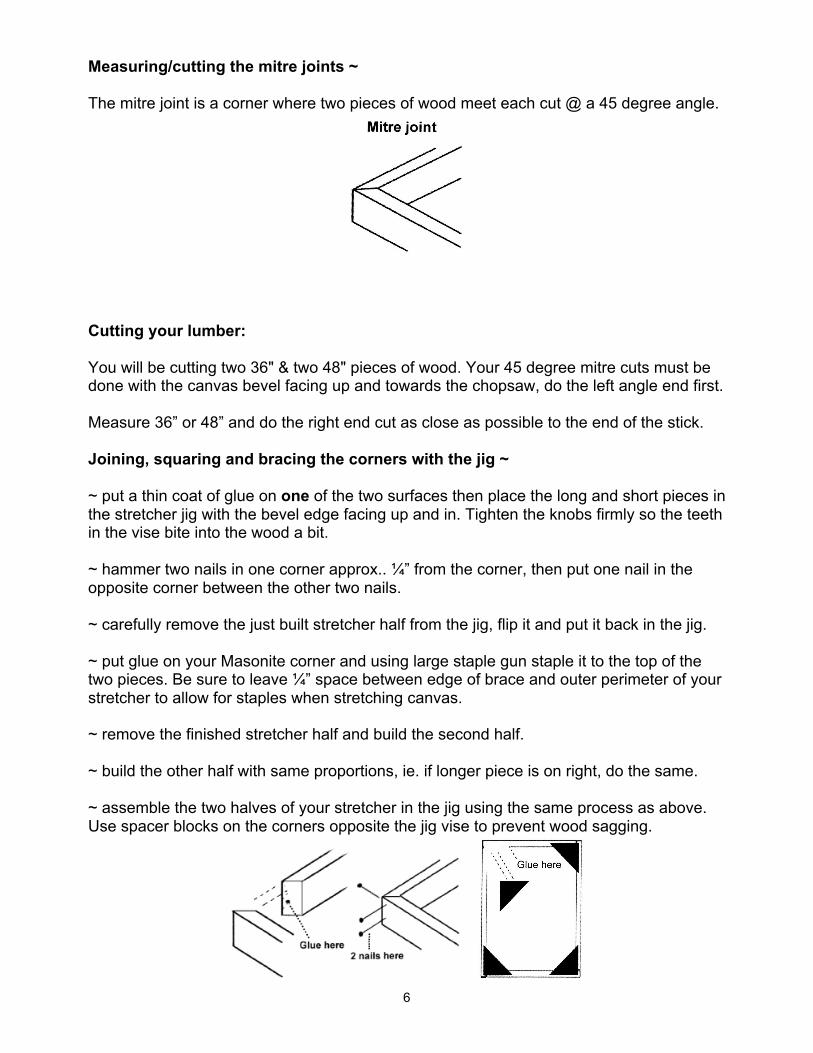
Measuring/cutting the mitre joints ~ The mitre joint is a corner where two pieces of wood meet each cut @ a 45 degree angle.
Cutting your lumber: You will be cutting two 36" & two 48" pieces of wood. Your 45 degree mitre cuts must be done with the canvas bevel facing up and towards the chopsaw, do the left angle end first. Measure 36” or 48” and do the right end cut as close as possible to the end of the stick. Joining, squaring and bracing the corners with the jig ~ ~ put a thin coat of glue on one of the two surfaces then place the long and short pieces in the stretcher jig with the bevel edge facing up and in. Tighten the knobs firmly so the teeth in the vise bite into the wood a bit. ~ hammer two nails in one corner approx.. ¼” from the corner, then put one nail in the opposite corner between the other two nails. ~ carefully remove the just built stretcher half from the jig, flip it and put it back in the jig. ~ put glue on your Masonite corner and using large staple gun staple it to the top of the two pieces. Be sure to leave ¼” space between edge of brace and outer perimeter of your stretcher to allow for staples when stretching canvas. ~ remove the finished stretcher half and build the second half. ~ build the other half with same proportions, ie. if longer piece is on right, do the same. ~ assemble the two halves of your stretcher in the jig using the same process as above. Use spacer blocks on the corners opposite the jig vise to prevent wood sagging.

7
Cross bracing ~ ~ measure the inner distance between the two longest sides close to the corner, then cut a 1" x 2" piece to fit. ~ cross braces MUST be cut accurately. ~ measure and mark where your cross bar is to be nailed and glue the ends of the brace. Stand stretcher on its side and with the 2" side of the brace flush to the back surface put two nails in from the top, carefully flip to the other side and repeat.
Oversize stretchers Stretchers 4' x 5' and larger need two braces. You will cut out a recessed notch in the centre of each brace so they will interlock when installed. ~ begin by measuring then cutting for the braces, DO NOT install them. ~ measure the notch location on each brace so they can interlock across the rear of the stretcher. With a tape measure and square measure & mark the exact mid point of each brace. Then measure and draw a line 7/8" from each side of the center line. ~ next measure downwards on the 3/4" side of the brace and draw a line 3/8" long, then connect these lines.
~ once the notch is marked, using the mitre box cut the notch lines using the hand saw. ~ with grooves cut place the brace in the bench vise 1¾” side facing up. Insert the edge of a blade screwdriver and twist firmly, this will release the wood for your groove. ~ while in the vise clear the channel of debris using a chisel. The channel must be clear of all excess wood so the two braces can cleanly interlock. Safety note: When using the chisel always make sure you are cutting away from yourself.

8
Cross brace with channel removed.
Installing your cross braces ~ Installing the cross braces is done in the same manner as previously outlined with one exception: ~ install the first brace with notch out area facing towards rear of stretcher. ~ with first brace installed put the second brace in place and check for fit. If the fit is not quite lined up simply enlarge the notch out area on the brace not yet installed. Corner bracing your cross braces ~ ~ install one large square brace across the junction point of the cross braces (or two triangles). Place a wood spacer on the floor (a scrap of 1" x 2" will do) for the braces to rest on then using glue and 1" brad nails, hammer the brace into place. ~ finish off by installing the rest of the corner braces. Your finished and fully braced oversize stretcher should look like this:
Notes: * let the glue set up for a minimum of 6 hours before stretching your canvas. ** on cutting masonite braces: For your convenience the Stretcher Assembly shop is stocked with pre-cut masonite triangles for bracing your corners. ~ You may NOT cut the 1' triangles using ANY of the power equipment. You may cut them down with a utility knife. Using a metal ruler & utility knife (and a fresh blade) score the masonite diagonally twice on both sides of the masonite. Line the scores with the edge of a table and firmly press down and the Masonite will break neatly along the score line.

9
Section 7) Gallery Quality stretcher building method
1) Cut 6’ lengths to desired lengths.
2) Images A & B. set table saw blade angle to 22 to 30 degrees and cut bevel edge for the top of your stretcher. The flat surface above the beveled edge should be approx. 1/8”
3) Image C. Glue & nail one piece of pine (cut to matching length) to the piece of pine you have milled the bevel cut on.
4) When nailing the two pieces of pine together leave
3” between edge of wood and first/last nail as we don’t want to saw through the nails with the chop saw when doing mitre cuts. SEE Image D.
5) With your two pieces of pine glued and nailed
together set chop-saw to 45 degrees and cut the left mitre angle.
6) measure from the left mitre cut to the dimension of
your stretcher 7) set chop-saw to opposite 45 degrees.
8) Image D. if building a rectangular stretcher make
sure you assemble frame correctly. Both halves which will be assembled into the finished stretcher should be identical if you stack them on top of each other with the bevel edge up.
9) Image D. using a square and glue match your first
two stretcher sticks, join two halves with staples in along the junction point of the two mitre cuts. Image E. Put two nails on one corner, and a third on the opposite corner between the other two.
10) repeat the same process for the second pair of
sticks. You will have two L shaped halves. 11) Image E. using the square and glue match the two
stretcher halves together using the same staple and nail method along the mitre cuts.
12) cut one piece of Masonite for each corner.
13) using glue and nails put one Masonite corner on
the inside of each corner.
Note: install bracing if any dimension exceeds 20”
A. 1/8” B.
C. nail make sure this is flush!
D. *3” between nail and corner. E. 1 nail 2 nails

10
Section 8) Air Compressor/nailgun use ~ prior to using the compressor and nailguns students must take part in a safety seminar. ~ there is a zero tolerance policy for careless use of the equipment. Abuse and misuse of the equipment will result in permanent loss of your cutting room and power equipment privileges for that academic year. No exceptions will be made. Procedure: ~ you must wear eye protection whenever using the nailgun or air stapler. ~ the air hose(s) must be kept well clear of the nailing. ~ always point the nailgun away from yourself. The gun should always be facing towards the floor, even while loading. ~ hands/fingers that are bracing the stock must be clear of the area in which the nail is being fired. They should be three times the nail length away from exit point of gun. ~ inspect the areas to receive nails for knots and avoid nailing these areas. ~ once the compressor is switched off and unplugged drain the air out of the compressor. ~ never rush your work with the air stapler or nailer. This is both very unsafe and increases the possibility of misfires and frustrating jams. Section 9) Notes on disciplinary actions The following safety infractions will result in an automatic loss of cutting room privileges for the balance of the academic year: ~ working alone in cutting room ~ working in cutting room on weekends without Student Monitor ~ abuse or misuse of equipment or any form of horse-play Temporary suspension of cutting room privileges will result in the following cases: ~ failure to clean up or put tools away ~ incorrect or unsafe conduct of any form. 10) Hours of access Cutting room hours of access: ~ Mon to Fri: 1pm to 5pm & 6 to 7:45pm ~ stretchers may be built during class only with the permission of the instructor Stretcher build room hours of access: ~ Monday – Friday: 10am to midnite. ~ Saturdays: Noon to 5pm. Students must sign in with security first. ~ stretchers may be built during class only with the permission of the instructor You have 24/7 access to your studios, the only space you do not have after-hour access to is the Visa Woodshop. Only Visual Arts Department students are allowed in Visa spaces after hours.