mares icon hd colour dive computer instruction manual · pdf fileicon hd dive computer 4 1.2...
TRANSCRIPT

Instruction Manual
Color Dive Computer

Icon HD Dive Computer
2
• TABLE oF conTEnTS
1 InTroDucTIon 31.1 Glossary 31.2 operatinG moDes 41.3 turninG on iCon HD anD main menu 41.4 reCHarGeable battery 4
1.4.1 CHarGinG tHe battery 41.4.2 ConneCtinG iCon HD to a pC 5
1.5 sCreen ConfiGuration options 51.6 button operation 51.7 in Case of emerGenCy (iCe) 51.8 mountinG anD pairinG of tHe tank moDule (optional) 61.9 turninG off iCon HD 7
2 MEnuS, SETTIngS AnD FuncTIonS 72.1 pre-DiVe 72.2 settinGs 7
2.2.1 set DiVe 72.2.1.1 moDe 72.2.1.2 p faCtor 82.2.1.3 altituDe 82.2.1.4 Gas inteGration 82.2.1.4.1 Color CoDinG for pressure ranGes 82.2.1.5 Water 92.2.1.6 linkeD map 92.2.1.7 Display 92.2.1.8 auDible alarms 92.2.1.9 unControlleD asCent 92.2.1.10 erase Desaturation 9
2.2.2 set Computer 92.2.2.1 lanGuaGe 92.2.2.2 time 92.2.2.3 units 92.2.2.4 briGHtness 92.2.2.5 lCD aDjustment 92.2.2.6 baCkliGHt timer 102.2.2.7 DeClination 102.2.2.8 Compass Calibration 10
2.2.3 about iCon HD 102.3 DiGital Compass 10
2.3.1 settinG a bearinG 102.4 loGbook 102.5 DiVe planner 112.6 maps anD pHotos 11
2.7 button loCk 113 DIvIng wITH Icon HD 11
3.1 a feW WorDs about nitrox 113.2 alarms 11
3.2.1 asCent rate 113.2.2 moD/ppo2 123.2.3 Cns = 100% 123.2.4 misseD DeCompression stop 12
3.2.4.1 misseD DeCo stop moDe 123.2.5 loW tank pressure (if optional tank moDule is useD) 133.2.6 loW battery 13
3.3 Display information 133.3.1 extenDeD anD profile Display 133.3.2 Compass 15
3.4 VieWinG maps DurinG a DiVe 153.5 after tHe DiVe 153.6 DiVinG WitH more tHan one Gas mixture 16
3.6.1 settinG more tHan one Gas 163.6.2 sWitCHinG Gas 173.6.3 speCial situations 17
3.6.3.1 sWitCHinG baCk to a Gas mixture WitH loWer oxyGen ConCentration 173.6.3.2 submerGinG beloW tHe moD after a Gas sWitCH 173.6.4 ttr WHen DiVinG WitH more tHan one Gas mixture 17
3.6.5 loGbook for DiVes WitH more tHan one Gas mixture 17
3.7 bottom timer moDe 183.7.1 DiVe Violation inDuCeD bottom timer moDe 18
4 TAkIng cArE oF Icon HD 184.1 teCHniCal information 184.2 maintenanCe 18
4.2.1 replaCinG tHe battery in iCon HD 194.2.2 replaCinG tHe battery in tHe tank moDule 19
4.3 Warranty 194.4 Warranty exClusions 194.5 HoW to finD tHe proDuCt serial number 19
5 DISpoSAL oF THE DEvIcE 19

3
• 1 InTroDucTIon
1.1 gLoSSAry
AIR: air dive
ASC:total ascent time, the time it takes to perform the ascent from your current depth to the surface in a decompression dive, including all decompression stops and assuming an ascent rate of 10m/min or 33ft/min.
AVG: average depth, calculated from the beginning of the dive.
CNS: Central nervous system. Cns% is used to quantify toxic effects of oxygen.
DESAT: Desaturation time. the time needed for the body to eliminate the nitrogen taken up during diving.
D-TIME: Dive time, the whole time spent below a depth of 1.2m/4ft.
FAST: excessively rapid ascent
Gas integration: the feature in icon HD to include tank pressure information in its calculations and to display it on the computer screen.
Gas switching: the act of changing from one breathing gas to another.
Max depth: maximum depth attained during the dive.
MOD:maximum operating Depth. this is the depth at which the partial pressure of oxygen (ppo2) reaches the maximum allowed level (ppo2max). Diving deeper than the moD will expose the diver to unsafe ppo2 levels.
Multigas: refers to a dive in which more than one breathing gas is used (air and/or nitrox).
Nitrox: a breathing mix made of oxygen and nitrogen, with the oxygen concentration being 22% or higher.
NO-FLY: minimum amount of time the diver should wait before taking a plane.
No deco time:this is the time that you can stay at the current depth and still make a direct ascent to the surface without having to perform mandatory decompression stops.
o2: oxygen.
o2%: oxygen concentration used by the computer in all calculations.
P Factor:personalization factors, which allow the user to select between the standard decompression algorithm (p0) and an increasingly more conservative one (p1, p2).
Pairing: the act of establishing a coded rf communication between icon HD and a dedicated device, such as a tank module.
ppo2:partial pressure of oxygen. this is the pressure of the oxygen in the breathing mix. it is a function of depth and oxygen concentration. a ppo2 higher than 1.6bar is considered dangerous.
ppo2max: the maximum allowed value for ppo2. together with the oxygen concentration it defines the moD.
Switch depth: the depth at which the diver plans to switch to a higher oxygen concentration mix while using the multigas option.
SURF INT: surface interval, the time that has elapsed since the end of the dive.
Timer: a stopwatch, for example to time certain legs of the dive.
TTR: time to reserve, it is the time that a diver can spend at the current depth before reaching the tank reserve.

Icon HD Dive Computer
4
1.2 opErATIng MoDES
the functions of the icon HD computer can be grouped into three categories, each corresponding to a specific mode of operation:
• surface mode: the computer is dry on the surface. in this mode you can change settings, review your logbook, use the dive planner, see remaining desaturation after a dive, download to pC and much more;
• dive mode: the computer is at a depth of 1.2m/4ft or more. in this mode, icon HD monitors depth, time, temperature and performs all decompression calculations; dive mode itself can be broken down into 4 sub categories: - pre-dive (icon HD is on the surface but
actively monitoring ambient pressure, so that it can begin to calculate a dive the instant it is submerged below 1.2m/4ft);
- dive- surfacing (icon HD is on the surface at
the end of a dive; dive time calculation is halted but if the diver submerges within three minutes the dive is resumed including the time spent on the surface; this for instance would allow a diver to surface momentarily to set a bearing towards the boat, then submerge again and swim towards the boat);
- post-dive (after the three minutes of surfacing mode, icon HD closes the logbook and reverts to a display showing desaturation time, no-fly time and surface interval; this lasts until the desaturation and the no-fly time both have been reduced to zero);
• sleep mode: the computer is on the surface after 1 minute without operation (10 minutes from pre-dive mode). though the computer appears to be turned off completely, it is still active. icon HD computes tissue desaturation and checks the ambient pressure once every 20 seconds for uninterrupted monitoring of the environment.
1.3 TurnIng on Icon HD AnD MAIn MEnu
to start the computer, press any button. the screen will show the main menu. think of this as the home page of your new dive computer. this is where it all starts.
once in the main menu, you will see the familiar look of an icon-based user interface. from the top left, in sequence, there are:
- DIvE: puts icon HD into pre-dive mode;- SETTIngS: in here you can set your nitrox,
choose your language and much more;
- coMpASS: from within this menu you can use the compass while on the surface, for instance to set a bearing which you will call up later on in the dive to navigate towards a wreck;
- LogBook: review your dives in numeric and graphic format. icon HD’s memory is able to hold complete information for the last 100 hours of diving, at a 5s sampling rate;
- pLAnnEr: plan your next dive;- MApS: view all maps uploaded to your
icon HD;- pHoToS: view all images uploaded to your
icon HD;- BuTTon Lock: lock the buttons so that the
battery is not accidentally drained during travel.
1.4 rEcHArgEABLE BATTEry
icon HD uses a lithium-ion rechargeable battery. a full charge allows you to do up to 5-7 hours of diving, depending on the usage of the high intensity on the backlight and the temperature of the water. the display alerts you of the status of the battery. the four possible situations are described as follows:
- a solid green battery symbol means icon HD has between 70 and 100% charge;
- a partially filled green battery symbol means icon HD has between 35 and 70% charge, still enough for safe diving
- a partially filled yellow battery symbol means icon HD has between 25 and 35% charge. if icon is between 25 and 35% charge upon being turned on, the following display appears, urging you to charge the battery.
you should recharge icon HD at the earliest opportunity, but you can bypass this screen by pressing . you should be able to do one 1-hour dive in temperate waters with a “yellow” battery.
- a partially filled red battery symbol means icon HD has between 0 and 25% charge. this is not sufficient to ensure a safe dive hence the computer is disabled from functioning. upon turning on icon HD, you see the following display.
the exact level of the battery charge can be viewed in the ABouT Icon HD menu.
in the event that the charge drops below 35% during a dive, the message Low BATTEry will appear on the display. When you see this message, you should consider starting the procedure for a safe ascent as there may not be enough charge to continue diving.
wArnIng
- starting a dive with less than 35% charge can cause the computer to fail during the dive. recharge the battery as soon as you notice this message.
- When the computer has not been used for a long time, we recommend that you check the battery power and recharge it if necessary.
- temperature can noticeably affect battery performance. a low battery warning may appear when diving in cold waters even if you think that the battery should have sufficient charge.
- it is advised that you charge the battery if you intend to dive in cold water.
the rechargeable battery has a life time of approximately 500 charging cycles. please contact your authorized mares dealer if you need to replace it.
1.4.1 cHArgIng THE BATTErythe battery takes about 4 hours to charge from completely empty to completely full when using the adapter that came with the computer. it can take up to 8 hours when using a standard adapter as not all adapters feed the same current to the usb port. to charge the battery, use the special clip and the usb cable, connecting it either directly to a power supply or to the usb port of a pC.
When connecting directly to a power outlet, you will see a screen indicating the current battery status and the symbol of a power plug indicating that it is under charge. When the battery is fully charged, the percentage indication is replaced by the symbol of a lightning bolt.

5
1.4.2 connEcTIng Icon HD To A pcto connect icon HD to a pC or macintosh computer, use the dedicated clip and the usb cable. once connected, icon HD will show the usb symbol on the display.
1.5 ScrEEn conFIgurATIon opTIonS
in dive mode, icon HD displays data in one of two pre-configured screen lay-outs: EXTEnDED and proFILE.
- in EXTEnDED the display presents all the information in the form of numbers, with minimal graphic aid. by pressing , you can call up additional information;
- in proFILE the display presents no deco time and depth in digital format, in addition to a graphic representation of the dive profile which is updated every 20 seconds. by pressing , you can call up additional information.
During the dive you can switch freely between EXTEnDED and proFILE by pressing and from either one it is possible to call up the digital compass. the compass display contains depth and no deco (or total ascent time in case of decompression) information as well.
icon HD also has a bottom timer mode, with a corresponding BoTToM TIMEr configuration, in which the computer acts as a digital depth gauge and does not perform any decompression calculation.
1.6 BuTTon opErATIon
icon HD has four buttons. these buttons allow you to access menus and change settings while in surface mode. During the dive they switch displays, call up the compass or the map function, and allow to display further information on the computer screen. the function of each button is identified by an icon placed just above the button itself. in certain circumstances, for instance when erasing a set bearing in the digital compass or when calling up the gas switch function during a multigas dive, a button can perform two tasks, depending on whether it is pressed and released or pressed and held for one second.
: access coMpASS mode
: switch from EXTEnDED to proFILE mode and vice versa
: view additional information
: return to reduced information
: view map of dive site (if stored in memory)
: press - set bearing; press and hold - erase set bearing (coMpASS mode)
: call up stop watch (coMpASS mode)
: hides stop watch (coMpASS mode)
: activate stop watch (coMpASS and BoTToM TIMEr mode)
: press and hold: call up gas switch menu (if applicable)
: back to main menu (from pre-dive)
1.7 In cASE oF EMErgEncy (IcE)
icon HD allows you to enter information about yourself, such as name, contact information, emergency number, insurance policies and allergies. this information is entered via the pC software Dive organizer. alternatively, it can also be entered via the Divers’ Diary mac software. the first line of the iCe is displayed in the upper left corner of the main menu.
Icon HD Dive Computer
6
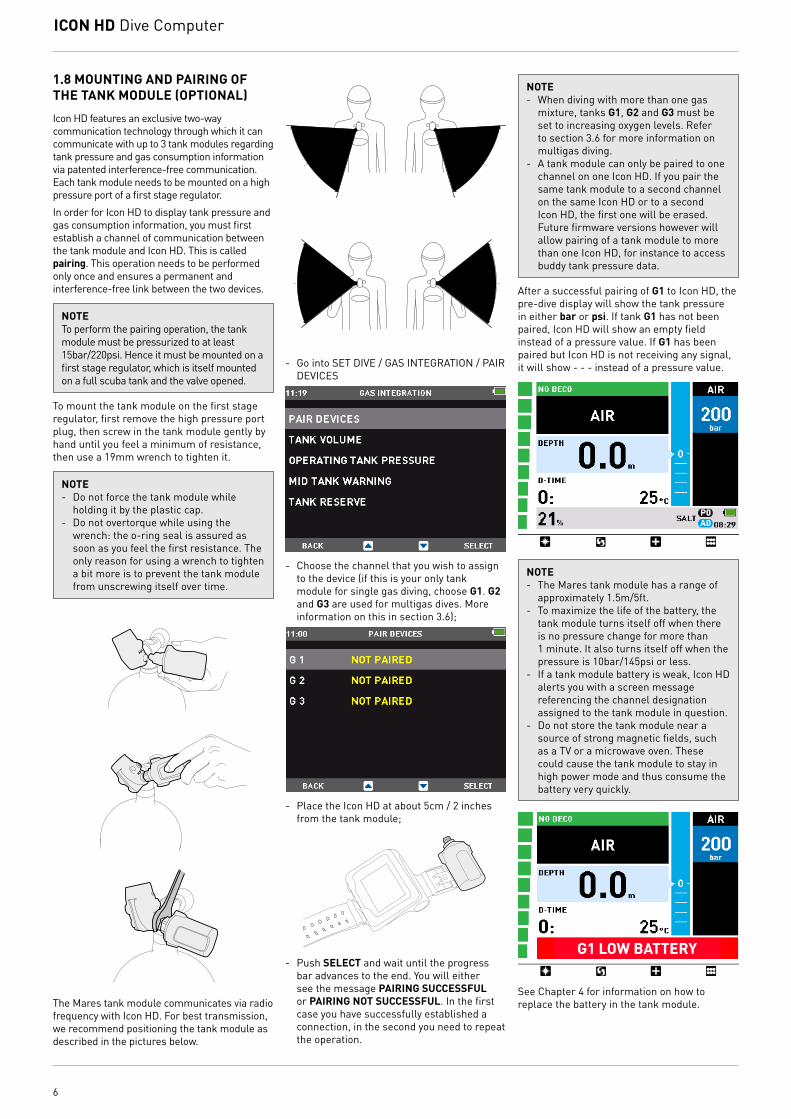
1.8 MounTIng AnD pAIrIng oF THE TAnk MoDuLE (opTIonAL)
icon HD features an exclusive two-way communication technology through which it can communicate with up to 3 tank modules regarding tank pressure and gas consumption information via patented interference-free communication. each tank module needs to be mounted on a high pressure port of a first stage regulator.
in order for icon HD to display tank pressure and gas consumption information, you must first establish a channel of communication between the tank module and icon HD. this is called pairing. this operation needs to be performed only once and ensures a permanent and interference-free link between the two devices.
noTEto perform the pairing operation, the tank module must be pressurized to at least 15bar/220psi. Hence it must be mounted on a first stage regulator, which is itself mounted on a full scuba tank and the valve opened.
to mount the tank module on the first stage regulator, first remove the high pressure port plug, then screw in the tank module gently by hand until you feel a minimum of resistance, then use a 19mm wrench to tighten it.
noTE- Do not force the tank module while
holding it by the plastic cap. - Do not overtorque while using the
wrench: the o-ring seal is assured as soon as you feel the first resistance. the only reason for using a wrench to tighten a bit more is to prevent the tank module from unscrewing itself over time.
HP
HP
HP
HP
HP
HP
HP
HP
HP
the mares tank module communicates via radio frequency with icon HD. for best transmission, we recommend positioning the tank module as described in the pictures below.
- Go into set DiVe / Gas inteGration / pair DeViCes
- Choose the channel that you wish to assign to the device (if this is your only tank module for single gas diving, choose g1. g2 and g3 are used for multigas dives. more information on this in section 3.6);
- place the icon HD at about 5cm / 2 inches from the tank module;
- push SELEcT and wait until the progress bar advances to the end. you will either see the message pAIrIng SuccESSFuL or pAIrIng noT SuccESSFuL. in the first case you have successfully established a connection, in the second you need to repeat the operation.
noTE- When diving with more than one gas
mixture, tanks g1, g2 and g3 must be set to increasing oxygen levels. refer to section 3.6 for more information on multigas diving.
- a tank module can only be paired to one channel on one icon HD. if you pair the same tank module to a second channel on the same icon HD or to a second icon HD, the first one will be erased. future firmware versions however will allow pairing of a tank module to more than one icon HD, for instance to access buddy tank pressure data.
after a successful pairing of g1 to icon HD, the pre-dive display will show the tank pressure in either bar or psi. if tank g1 has not been paired, icon HD will show an empty field instead of a pressure value. if g1 has been paired but icon HD is not receiving any signal, it will show - - - instead of a pressure value.
noTE- the mares tank module has a range of
approximately 1.5m/5ft.- to maximize the life of the battery, the
tank module turns itself off when there is no pressure change for more than 1 minute. it also turns itself off when the pressure is 10bar/145psi or less.
- if a tank module battery is weak, icon HD alerts you with a screen message referencing the channel designation assigned to the tank module in question.
- Do not store the tank module near a source of strong magnetic fields, such as a tV or a microwave oven. these could cause the tank module to stay in high power mode and thus consume the battery very quickly.
see Chapter 4 for information on how to replace the battery in the tank module.

7
1.9 TurnIng oFF Icon HD
icon HD turns off automatically after 1 minute without operation when in surface mode and after 10 minutes without operation when in pre-dive mode. from the main menu, you can also turn it off manually by selecting the BuTTon Lock icon.
• 2 MEnuS, SETTIngS AnD FuncTIonS
this chapter describes in detail all menus, setting and functions of the icon HD dive computer.
2.1 prE-DIvE
use this menu to put icon HD into the ready-to-dive mode. this will ensure that icon HD starts to monitor the dive as soon as a depth of 1.2m/4ft is reached. if you start the dive without putting icon HD into pre-dive mode, icon HD will switch into dive mode automatically but with a delay of up to 20 seconds from immersion.
noTE- if you remain in pre-dive for longer than
10 minutes without pressing any button, icon HD will switch off.
- it is recommended to put icon HD into pre-dive before submerging. not doing so can lead to a delay of up to 20s in icon HD monitoring the dive.
2.2 SETTIngS
icon HD’s SETTIngS menu allows you to access functions or to change settings. once inside this menu, you will see three submenus: SET DIvE, where you can set parameters pertaining to the dive, SET coMpuTEr, where you can set parameters pertaining to the computer, and ABouT Icon HD, where you can find information about your particular icon HD and also statistics about the dives carried out with the computer.
Here below is a brief description of each menu.
MENU Description
SET DIvE
moDe
allows you to choose between air, nitrox and bottom timer mode. in case of nitrox, here is where you set the o2% and ppo2max.
p faCtor
allows you to choose between the standard algorithm (p0) and an increasingly more conservative one (p1, p2).
altituDe
allows you to set the algorithm into altitude mode when diving in mountain lakes.
Gas in teGration
allows you to synchronize your icon HD with optional tank modules and to define all parameters concerning gas integration (tank volume, operating tank pressure, tank reserve and more).
Water allows you to choose between salt and fresh water.
linkeD mapallows you to select a map which you can call up on the display during the dive.
Display
allows you to set the default display (extenDeD or profile). this is the display that icon HD begins the dive with, and that which it reverts to in case of an alarm or warning message.
auDible alarms
allows you to turn on or off all audible alarms of icon HD.
unControlleD asCent
allows you to turn off the dive violation due to uncontrolled ascent. this is for dive instructors only, who may find themselves in such a situation because of their teaching requirements.
erase Desat
allows you to reset the nitrogen saturation to zero, thereby erasing the effects of a previous dive. this is only for people who plan to lend their computer to another diver who has not performed a dive within the last 24 hours.
MENU Description
SET coMpuTEr
lanGuaGe
allows you to set the language for the user interface, all menus and warning messages during the dive.
time allows you to set the date and time.
units allows you to choose between metric (m, °C, bar) and imperial (ft, °f, psi) units
briGHtnessallows you to set the maximum brightness of the backlighting.
lCD aDjustment
allows you to compensate in case of display distortion.
baCkliGHt timer
allows you to set the time interval after which the display goes from maximum backlight to low power backlight.
DeClination
allows you to compensate between magnetic north and geographic north in the digital compass.
Compass Calibration
allows you to recalibrate the compass.
2.2.1 SET DIvE
2.2.1.1 MODEin this menu you define the type of gas you will be breathing during the dive (AIr or nITroX, including MuLTIgAS). you can also set icon HD to BoTToM TIMEr, in which case icon HD will show only time, depth and temperature: it will not carry out any decompression calculation and it will not show any warnings and alarms.
use and to highlight your choice, then press SELEcT to activate it. AIr is the equivalent of setting nITroX to 21% and a ppo2max of 1.4bar.
When selecting nITroX, you are taken to a submenu in which you can define the percentage of oxygen in the mixture (o2%) and the maximum value of oxygen partial pressure (ppo2max) for up to three breathing mixes. the maximum possible value for the ppo2max is 1.6bar. most training agencies recommend not to exceed a value of 1.4bar.

Icon HD Dive Computer
8
once inside this menu, use and to change the o2%, and watch how this affects the maximum operating depth (moD). then press nEXT to move on to the ppo2max and use and to change the value, again noticing how this affects the moD. press SET to save and exit the menu. note that you can press BAck after having set the o2% to save and exit skipping the ppo2max setting.
wArnIng
- Diving with nitrox may only be attempted by experienced divers after proper training from an internationally recognized agency.
- before every dive and after changing the tank, you must make sure that the set oxygen concentration in icon HD corresponds to the oxygen concentration in the tank. setting the wrong oxygen concentration can lead to serious injury or death.
this is also the menu where you would be setting your decompression gases if you dived with more than one gas. see chapter 3.6 for more information about diving with more than one gas.
2.2.1.2 P FACTORicon HD allows you to set an additional personal safety factor for those circumstances in which you want to be especially cautious, such as after a long period of inactivity or when planning a strenuous dive. in this menu you can choose between the standard algorithm (p0), a more conservative version (p2) or an intermediate one (p1).
noTEthe choice of p FAcTor will be reflected in the dive planner.
2.2.1.3 ALTITUDEatmospheric pressure is a function of altitude and of weather conditions. this is an important aspect to consider for diving, because the atmospheric pressure surrounding you has an influence on uptake and subsequent release of nitrogen. above a certain altitude, the decompression algorithm has to change in order to account for the effect of the change in atmospheric pressure. When diving in a mountain lake, find out what the altitude is and choose the altitude range in icon HD within the four available options:
- A0: from sea level to approximately 700m/3300ft;
- A1: from approximately 700m/2300ft to approximately 1500m/4900ft ;
- A2: from approximately 1500m/4900ft to approximately 2400m/7900ft;
- A3: from approximately 2400m/7900ft to approximately 3700m/12100ft;
- We do not recommend diving at altitudes above 3700m / 12100ft. if you do, set icon HD to BoTToM TIMEr and find appropriate altitude dive tables.
wArnIng
Diving in mountain lakes without first setting icon HD to the proper altitude setting can cause severe injury or death.
2.2.1.4 GAS INTEGRATIONthis menu contains five submenus. the first one allows you to pair the tank modules to the icon HD. please refer to section 1.8 for the description of the pairing process.
the second menu, TAnk voLuME, allows you to set the size of the volume of the tank, individually for g1, g2 and g3. this parameter is important for a correct evaluation of your gas consumption in l/min or cu ft /min. Default setting is 12l for metric system and 80 cubic feet in imperial. for the imperial setting it is paramount that you also set the correct operating tank pressure, since the size of the tank is referenced to this pressure.
the third menu, opErATIng TAnk prESSurE, is where you define the nominal fill pressure of your tanks. this can be set individually for each tank (g1, g2 or g3). this value is used to scale the graphic tank representation in proFILE view but also to define the pressure ranges for color coding (described in section 2.2.1.4.1). When the units are set to ft/°f/psi, this value is important because together with the tank volume it allows icon HD to correctly evaluate your gas consumption in cu ft/min. Default values are 200bar and 3000psi.
the fourth menu, MID TAnk wArnIng, is the value at which icon HD triggers a half tank warning. this can be set individually for each tank (g1, g2 or g3). it can be set anywhere between 80 and 200 bar / 1100 and 3000 psi. this value is also used in the definition of the pressure ranges for color coding as described below. Default values are 100bar and 1500 psi.
the fifth and last menu, TAnk rESErvE, is the value at which an alarm is triggered because you should always be at the surface before reaching this level. furthermore, this value is used to calculate the TTr value (see section 3.2.5 and 3.3.1). this can be set individually for each tank (g1, g2 or g3). Default values are 50bar and 750psi.
2.2.1.4.1 COLOR CODING FOR PRESSURE RANGESin addition to a numeric value for the tank pressure, icon HD uses color coding for an immediate at-a-glance tank pressure visualization. in EXTEnDED and coMpASS view, the color is applied to the background of the field containing tank pressure information, whereas in proFILE view, the color is applied to the inside of the tank pictogram. the pressure range from operating tank pressure to empty tank is split into 5 ranges, from BLuE to grEEn to yELLow to orAngE to rED. the ranges are so defined:
BLuE: the upper half between opErATIng TAnk prESSurE and MID TAnk wArnIng (default value: above 150bar / 2250psi)
grEEn: lower half between opErATIng TAnk prESSurE and MID TAnk wArnIng (default value: between 150bar / 2250psi and 100bar / 1500psi)
yELLow: upper half between MID TAnk wArnIng and TAnk rESErvE (default value: between 100bar / 1500psi and 75bar / 1000psi)

9
orAngE: lower half between MID TAnk wArnIng and TAnk rESErvE (default value: between 75bar / 1000psi and 50bar / 750psi)
rED: below TAnk rESErvE (default value: below 50bar / 750psi)
2.2.1.5 WATERyou can set the computer for fresh water or salt water calibration, depending on where you intend to dive. setting the wrong water type entails an error in depth measurement of approx 3% (i.e. at a depth of 30m/100ft, a computer set to salt water will show 29m/97ft in fresh water whereas a computer set to fresh water will show 31m/103ft in salt water). note that this does not affect the proper functioning of the computer, since the computer performs all of the calculations based purely on pressure measurements.
2.2.1.6 LINkED MAPin this menu, you can select a map which you can later on call up during the dive.
noTEif you do not select any map, the corresponding button will be disabled during the dive.
2.2.1.7 DISPLAYin this menu you can set your preferred display lay-out, choosing between EXTEnDED and proFILE. icon HD will start the dive with the chosen display and revert to it in presence of an alarm. you can, however, switch between display modes at any time during the dive by pressing .
2.2.1.8 AUDIbLE ALARMSin this menu you can disable audible alarms.
wArnIng
Disabling audible alarms can lead you into potentially dangerous situation and could result in serious injury or death.
2.2.1.9 UNCONTROLLED ASCENTan uncontrolled ascent is defined as one in which a speed of 12 m/min / 40ft/min or higher was maintained over more than two thirds of the way up. this applies to dives deeper than 12m/40ft only. in such an event, due to the potential of harmful bubble formation, icon HD locks the computer for 24 hours in order to prevent you from diving again. in this menu, you have the option to disable the locking up of the computer in the event of an uncontrolled ascent.
wArnIng
- an uncontrolled ascent increases your risk of decompression sickness (DCs)
- this feature is intended for very experienced divers only, such as dive instructors, who take full responsibility for the consequences of turning off this function.
2.2.1.10 ERASE DESATURATIONicon HD allows you to reset the desaturation in the computer. any tissue saturation information from a recent dive will be reset to zero and the computer treats the next dive as a non-repetitive dive. this is useful when the computer is loaned to another diver who has not dived in the last 24 hours.
wArnIng
Diving after having reset the desaturation is extremely dangerous and is very likely to cause serious injury or death. Do not reset the desaturation unless you have a valid reason to do so.
once inside the menu, you will see a graphic representation of the loading in all tissues of the decompression calculation. to prevent accidental desaturation reset, you must enter the security code once you decide to proceed with the reset. the security code is 1234.
after entering the security code you will get a confirmation of the successful completion of the operation.
2.2.2 SET coMpuTEr
2.2.2.1 LANGUAGEin this menu you can set the language for the user interface and for alarm messages during the dive.
2.2.2.2 TIMEthis menu allows you to set the time format, time and date.
2.2.2.3 UNITSyou can choose between metric (depth in meters, temperature in °C, tank pressure in bar) and imperial (depth in feet, temperature in °f, tank pressure in psi).
2.2.2.4 bRIGhTNESSthis menu allows you to change the brightness of the display in the high power mode (see section 2.2.2.6) to adapt to various levels of light conditions. upon entering this menu, a sliding bar appears across the display. use and to set the brightness level.
2.2.2.5 LCD ADjUSTMENTthis menu allows you to optimize the display. use and and observe how the test display is affected.

Icon HD Dive Computer
10
2.2.2.6 bACkLIGhT TIMERicon HD has a permanently backlit color display. in order to optimize the life of the battery, there are two levels of light intensity in dive mode: a low power mode, in which the display is still readable but the intensity is dimmed, and a high power, the intensity of which is defined with the BrIgHTnESS setting at 2.2.2.4. Whenever you push a button, icon HD switches from low power to high power intensity. in this menu, you can choose the duration of the high intensity interval between 10 seconds and 1 minute in 10-second intervals. you can also set it to ∞ in which case the backlight in icon HD is permanently set to high intensity.
noTE- the backlight consumes battery energy:
the longer the backlight stays on high intensity, the less your battery charge will last.
- if the Low BATTEry warning is activated, high intensity backlight will be disabled and the display will remain on low power.
2.2.2.7 DECLINATIONDepending on the exact location on the planet, there can be a deviation between true north and magnetic north. any compass will always show magnetic north, so via this menu you can set a value for the so-called declination that will make the compass show true north instead.
2.2.2.8 COMPASS CALIbRATIONthe digital compass in icon HD is calibrated from the factory and does not require, under normal circumstances, any further maintenance. in certain instances, however, such as after exposure to extremely intense magnetic fields, it may be necessary to recalibrate the compass to ensure its accuracy. if you notice an obvious deviation in the indication of the compass, access this menu and perform the calibration as described below.
first you must enter the security code, 1234. then the following image will appear on the display.
now hold icon HD horizontal to the surface and perform one slow counter clockwise circle. once you have finished the circle, the calibration is completed.
2.2.3 ABouT Icon HDthis submenu provides various information about the hardware and software of your icon HD . it also lists information about the use of the dive computer, such as longest dive, deepest dive, total number of dives and total dive time. in addition, you can revert to the original settings configuration via the FAcTory rESET option (this option is not available while there is remaining desaturation in the computer). the option FAcTory MAInTEnAncE is for use by authorized personnel only.
2.3 DIgITAL coMpASS
icon HD has a tilt-compensated digital compass which can be used at almost any inclination. the compass can be called up at any moment during the dive and it can also be used on the surface. this menu allows you to use the compass on the surface and also to set a bearing for reference during your next dive.
the number shown in the middle of the compass rose represents the bearing, between 0 (north) and 359.
2.3.1 SETTIng A BEArIngWith you can set a reference bearing. this is useful for instance if you are on a boat and there is a landmark on the shore that you can use for alignment to reach a specific spot on that dive site. press and a dot will appear to indicate the set bearing. additional symbols will appear as well: squares at 90 degrees, triangles at 120 degrees and two parallel lines at 180 degrees, as an aid in navigation for square, triangular and reciprocal courses. the number at the bottom represents the deviation of the direction you are pointing at with reference to the set bearing.
once underwater, align the dot with the arrow and start swimming in that direction. if you press again, the new bearing will override the one in memory. if you press and hold you erase the bearing.
2.4 LogBookicon HD can record the profiles of approximately 100 hours of diving, at a sampling rate of 5 seconds. the information can be transferred to pC via the Dive organizer software or to a mac via the Divers’ Diary software. in addition, icon HD can show most of the information directly on the display. on the main page of the logbook you will see a listing of all dives, including date, depth and dive time. When applicable, the following icons are shown as well.
: nitrox dive
: Decompression dive
: bottom timer dive
: Dive violation
by pressing SELEcT you will access the details of the dive, and from here you can access the depth and temperature profile of the dive itself.

11
2.5 DIvE pLAnnEr
this function allows you to scroll through the no decompression limits, automatically taking into account the current residual saturation of the tissue compartments from a preceding dive. the times shown when scrolling the no decompression limits take into account the information entered under the SETTIngS submenu: altitude, personal safety factor, air, or in the case of nitrox, the values for the oxygen percentage and its maximum partial pressure. for each depth, the display shows the corresponding no deco time expressed in minutes. if nitrox mode is selected, the maximum depth shown in the planner is limited by the moD.
noTEthe dive planner is enabled only if either AIr or nITroX mode is set.
2.6 MApS AnD pHoToS
these menus allow you to view all the maps and pictures that have been uploaded via Dive organizer or Divers’ Diary to your icon HD. any file in jpeG format can be uploaded to icon. note that only the files listed as maps can be selected for the LInkED MAp function described in section 2.2.1.6.
icon HD’s memory can hold approximately 50 between maps and pictures.
2.7 BuTTon Lock
this function allows you to lock the buttons so that the computer is not turned on inadvertently. this is very useful for instance while travelling to a dive site, since otherwise icon HD might unintentionally drain the battery before the dive.
to lock the buttons, press and hold SELEcT for one second from the main menu, or press it normally when the BuTTon Lock icon is highlighted. this will blacken the display.
to unlock the buttons, press the left button followed by pressing the right button. the main display now reappears.
• 3 DIvIng wITH Icon HD
3.1 A FEw worDS ABouT nITroX
nitrox is the term used to describe breathing gases made of oxygen-nitrogen mixes with an oxygen percentage higher than 21% (air). because nitrox contains less nitrogen than air, there is less nitrogen loading on the diver’s body at the same depth as compared to breathing air.
However, the increase in oxygen concentration in nitrox implies an increase in oxygen partial pressure in the breathing mix at the same depth. at higher than atmospheric partial pressures, oxygen can have toxic effects on the human body. these can be lumped into two categories:
- sudden effects due to oxygen partial pressure over 1.4bar. these are not related to the length of the exposure to high partial pressure oxygen, and can vary in terms of the exact level of partial pressure they happen at. it is commonly accepted that partial pressures up to 1.4bar are tolerable, and several training agencies advocate maximum oxygen partial pressures up to 1.6bar.
- long exposure effects to oxygen partial pressures over 0.5bar due to repeated and/or long dives. these can affect the central nervous system, cause damage to lungs or to other vital organs.
icon HD keeps you safe with respect to these two effects in the following ways (as long as it is set to either AIr or nITroX):
• against sudden effects: icon HD has an moD alarm set for a user-defined ppo2max. as you enter the oxygen concentration for the dive, icon HD shows you the corresponding moD for the defined ppo2max. the default value of ppo2max from the factory is 1.4bar. this can be adjusted to your preference between 1.2 and 1.6bar. please refer to section 2.2.1.1 for more information on how to change this setting. if icon HD is set to AIr, the ppo2max is set to 1.4bar by default.
• against long exposure effects: icon HD “tracks” the exposure by means of the Cns % (Central nervous system). at levels of 100% and higher there is risk of long exposure effects, and consequently icon HD will activate an alarm when this level of Cns% is reached. icon HD also warns you when the Cns level reaches 75%. note that the Cns% is independent of the value of ppo2max set by the user.
3.2 ALArMS
icon HD can alert you of potentially dangerous situations. there are six different alarms:
- ascent rate alarm;- exceeding a safe ppo2/moD;- Cns =100%; - missed decompression stop;- low tank pressure;- low battery during the dive.
wArnIng
When in gauge mode, all warnings and all alarms are oFF aside for the low battery alarm.
noTE- alarms are both visual and audible, as
described in detail below.- if you are in coMpASS mode when an
alarm is triggered, icon HD will revert to the chosen default computer display (EXTEnDED or proFILE) in order to properly display the message related to the alarm.
- ascent rate alarm has priority over other alarms if they are triggered simultaneously.
3.2.1 AScEnT rATE as soon as depth decreases icon HD activates the ascent rate control algorithm and displays the calculated value both numerically and graphically.
wArnIng
a rapid ascent increases the risk of decompression sickness.
if icon HD determines an ascent rate of 10m/min / 30ft/min or higher, the fast ascent alarm is triggered: an audible alarm goes off, the arrows on the left side bar turn red and the message SLow Down is displayed at the bottom of the screen. this persists until the ascent rate is reduced to 10m/min / 30ft/min or less.
if the ascent rate exceeds 12m/min / 40ft/min at a depth below 12m / 40ft, the message on the screen changes to unconTr. AScEnT . if a speed in excess of 12m/min / 40ft/min is maintained for two thirds or more of the depth at which the alarm was first triggered, icon HD considers it a dive violation and the display will show vIoLATIon - AScEnT
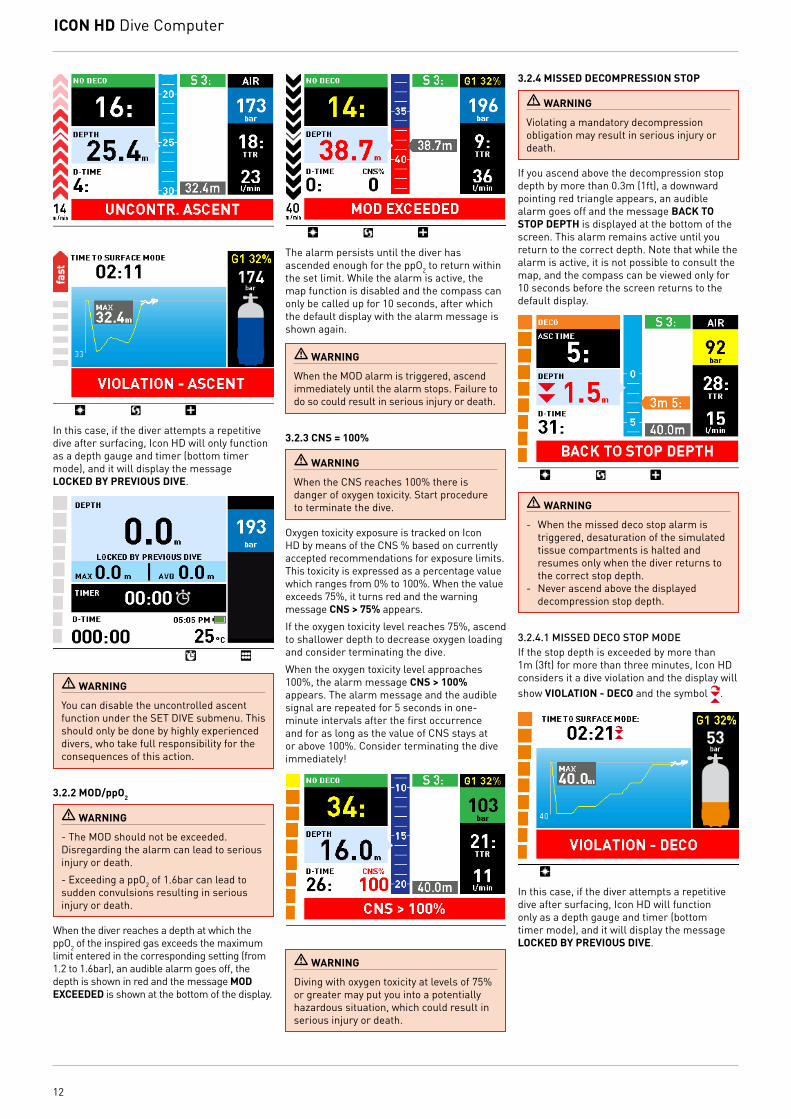
Icon HD Dive Computer
12
in this case, if the diver attempts a repetitive dive after surfacing, icon HD will only function as a depth gauge and timer (bottom timer mode), and it will display the message LockED By prEvIouS DIvE.
wArnIng
you can disable the uncontrolled ascent function under the set DiVe submenu. this should only be done by highly experienced divers, who take full responsibility for the consequences of this action.
3.2.2 MoD/ppo2
wArnIng
- the moD should not be exceeded. Disregarding the alarm can lead to serious injury or death.
- exceeding a ppo2 of 1.6bar can lead to sudden convulsions resulting in serious injury or death.
When the diver reaches a depth at which the ppo2 of the inspired gas exceeds the maximum limit entered in the corresponding setting (from 1.2 to 1.6bar), an audible alarm goes off, the depth is shown in red and the message MoD EXcEEDED is shown at the bottom of the display.
the alarm persists until the diver has ascended enough for the ppo2 to return within the set limit. While the alarm is active, the map function is disabled and the compass can only be called up for 10 seconds, after which the default display with the alarm message is shown again.
wArnIng
When the moD alarm is triggered, ascend immediately until the alarm stops. failure to do so could result in serious injury or death.
3.2.3 cnS = 100%
wArnIng
When the Cns reaches 100% there is danger of oxygen toxicity. start procedure to terminate the dive.
oxygen toxicity exposure is tracked on icon HD by means of the Cns % based on currently accepted recommendations for exposure limits. this toxicity is expressed as a percentage value which ranges from 0% to 100%. When the value exceeds 75%, it turns red and the warning message cnS > 75% appears.
if the oxygen toxicity level reaches 75%, ascend to shallower depth to decrease oxygen loading and consider terminating the dive.
When the oxygen toxicity level approaches 100%, the alarm message cnS > 100% appears. the alarm message and the audible signal are repeated for 5 seconds in one-minute intervals after the first occurrence and for as long as the value of Cns stays at or above 100%. Consider terminating the dive immediately!
wArnIng
Diving with oxygen toxicity at levels of 75% or greater may put you into a potentially hazardous situation, which could result in serious injury or death.
3.2.4 MISSED DEcoMprESSIon STop
wArnIng
Violating a mandatory decompression obligation may result in serious injury or death.
if you ascend above the decompression stop depth by more than 0.3m (1ft), a downward pointing red triangle appears, an audible alarm goes off and the message BAck To STop DEpTH is displayed at the bottom of the screen. this alarm remains active until you return to the correct depth. note that while the alarm is active, it is not possible to consult the map, and the compass can be viewed only for 10 seconds before the screen returns to the default display.
wArnIng
- When the missed deco stop alarm is triggered, desaturation of the simulated tissue compartments is halted and resumes only when the diver returns to the correct stop depth.
- never ascend above the displayed decompression stop depth.
3.2.4.1 MISSED DECO STOP MODEif the stop depth is exceeded by more than 1m (3ft) for more than three minutes, icon HD considers it a dive violation and the display will show vIoLATIon - DEco and the symbol .
in this case, if the diver attempts a repetitive dive after surfacing, icon HD will function only as a depth gauge and timer (bottom timer mode), and it will display the message LockED By prEvIouS DIvE.

13
3.2.5 Low TAnk prESSurE (IF opTIonAL TAnk MoDuLE IS uSED)When icon HD is used in conjunction with the bidirectional tank module, you will not only have tank pressure information clearly visible on the display, but also an estimate of the time you can still spend at the depth you are at, based on the current gas consumption, before reaching the tank reserve. this is called TTr – time to reserve.
When during a decompression dive icon HD calculates a TTr which is inferior to the total ascent time, it triggers a Low TAnk prESSurE alarm. We strongly suggest initiating an ascent when this situation arises, in order to avoid running out of breathing gas during the decompression stop.
additionally, when the tank pressure reaches the value specified under TAnk rESErvE, the message TAnk rESErvE rEAcHED is displayed on the screen for 10 seconds.
3.2.6 Low BATTEry
wArnIng
Do not start a dive if the Low BATTEry message is displayed on the screen on the surface. the computer may fail to function during the dive and this could lead to serious injury or death.
if icon HD detects that the battery power level is getting low, it will show the message Low BATTEry on the display. in a Low BATTEry situation, the map function is disabled, as well as audible signals, and the backlight is reduced to a low - power safety level (readability of the display is ensured). you can still access the compass, but the Low BATTEry message will reappear after 10s.
wArnIng
When this warning appears, you should stop the dive, safely, without delay.
if the battery is completely drained during or right after a dive, icon HD will lose the nitrogen loading information in the tissues, and hence it will calculate the next dive wrongly. Do not dive for 24 hours following a dive in which the battery was completely drained.
in addition to monitoring the status of its own battery, icon HD also monitors the status of the battery in all tank modules paired to it, and alerts you when a battery is low and should be replaced. the message g1 (or g2 or g3) Low BATTEry is displayed on the screen in 4 second intervals.
3.3 DISpLAy InForMATIonupon immersion, if icon HD was set to pre-dive, it will immediately start monitoring the dive. otherwise, it will turn on automatically within 20 seconds of having reached a depth of 1.2m/4ft.
With icon HD you have a choice of how the information is presented on the display. this is described in the next sections.
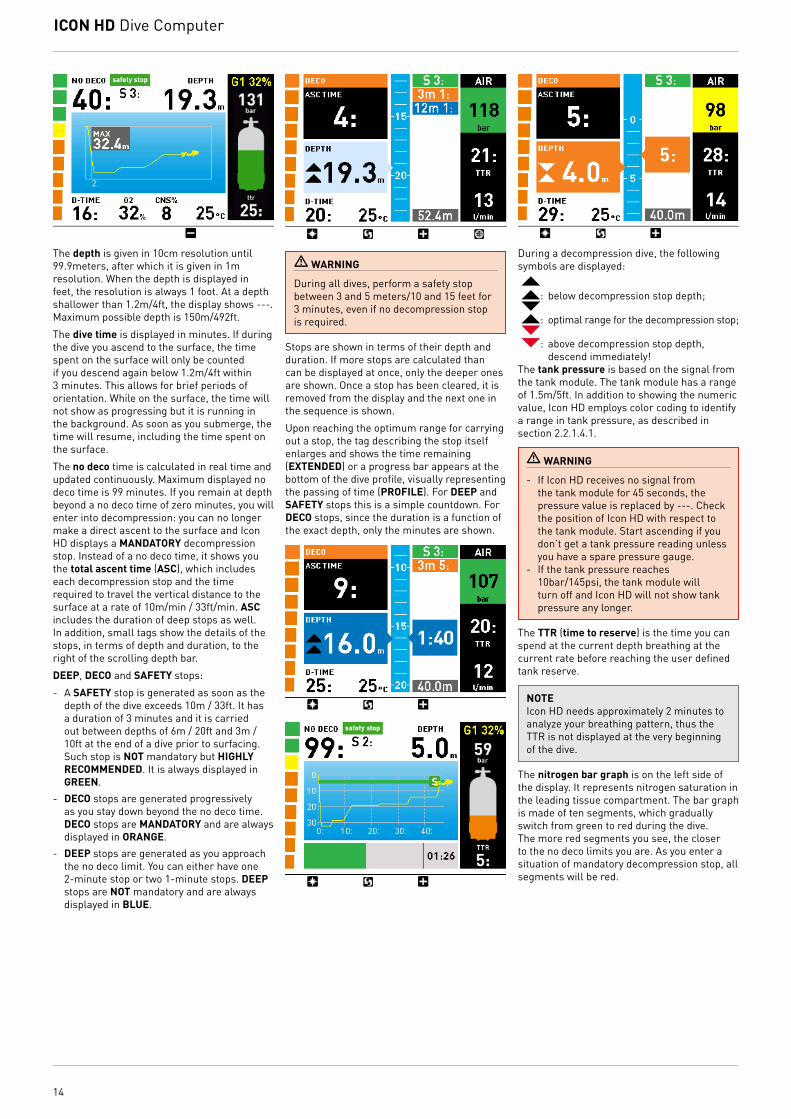
3.3.1 EXTEnDED AnD proFILE DISpLAy
the EXTEnDED display presents dive information in a prevalently numerical format. more specifically, the following information is displayed:
- no deco time (total ascent time in case of decompression dives)
- current depth- dive time- temperature- description of gas in use- tank pressure (if tank module is in use)- ttr (time to reserve, if tank module is in use)- gas consumption in l/min or cu ft/min
normalized to the surface (if tank module is in use)
- scrolling depth bar- nitrogen bar graph- ascent/descent speed, both numerical and
in terms of a bar graphupon pressing , Cns%, the average depth, time of day, battery status, p factor and altitude settings are displayed as well. in addition, to the right of the depth scroll bar, the maximum depth, the safety stop and, if present, the deep stops are listed in sequence.
the proFILE display presents dive information in a prevalently graphic format. more specifically, the following information is displayed:- no deco time (total ascent time in case of
decompression dives)- current depth- dive profile updated every 20 seconds (in
case of decompression this includes the ascent profile) including horizontal lines representative of all stops
- description of gas in use- tank pressure (if tank module is used)- tank fill level (if tank module is used)- ttr (time to reserve, if tank module is used)- nitrogen bar graph- ascent/descent speed, both numerical and
in terms of a bar graph
upon pressing , the dive time, Cns% and temperature are displayed as well. in case of decompression, when pressing the display zooms in into the details of the ascent and tags individually identifying up to the three deepest stops are included.
Icon HD Dive Computer
14
the depth is given in 10cm resolution until 99.9meters, after which it is given in 1m resolution. When the depth is displayed in feet, the resolution is always 1 foot. at a depth shallower than 1.2m/4ft, the display shows ---. maximum possible depth is 150m/492ft.
the dive time is displayed in minutes. if during the dive you ascend to the surface, the time spent on the surface will only be counted if you descend again below 1.2m/4ft within 3 minutes. this allows for brief periods of orientation. While on the surface, the time will not show as progressing but it is running in the background. as soon as you submerge, the time will resume, including the time spent on the surface.
the no deco time is calculated in real time and updated continuously. maximum displayed no deco time is 99 minutes. if you remain at depth beyond a no deco time of zero minutes, you will enter into decompression: you can no longer make a direct ascent to the surface and icon HD displays a MAnDATory decompression stop. instead of a no deco time, it shows you the total ascent time (ASc), which includes each decompression stop and the time required to travel the vertical distance to the surface at a rate of 10m/min / 33ft/min. ASc includes the duration of deep stops as well. in addition, small tags show the details of the stops, in terms of depth and duration, to the right of the scrolling depth bar.
DEEp, DEco and SAFETy stops:
- a SAFETy stop is generated as soon as the depth of the dive exceeds 10m / 33ft. it has a duration of 3 minutes and it is carried out between depths of 6m / 20ft and 3m / 10ft at the end of a dive prior to surfacing. such stop is noT mandatory but HIgHLy rEcoMMEnDED. it is always displayed in grEEn.
- DEco stops are generated progressively as you stay down beyond the no deco time. DEco stops are MAnDATory and are always displayed in orAngE.
- DEEp stops are generated as you approach the no deco limit. you can either have one 2-minute stop or two 1-minute stops. DEEp stops are noT mandatory and are always displayed in BLuE.
wArnIng
During all dives, perform a safety stop between 3 and 5 meters/10 and 15 feet for 3 minutes, even if no decompression stop is required.
stops are shown in terms of their depth and duration. if more stops are calculated than can be displayed at once, only the deeper ones are shown. once a stop has been cleared, it is removed from the display and the next one in the sequence is shown.
upon reaching the optimum range for carrying out a stop, the tag describing the stop itself enlarges and shows the time remaining (EXTEnDED) or a progress bar appears at the bottom of the dive profile, visually representing the passing of time (proFILE). for DEEp and SAFETy stops this is a simple countdown. for DEco stops, since the duration is a function of the exact depth, only the minutes are shown.
During a decompression dive, the following symbols are displayed:
: below decompression stop depth;
: optimal range for the decompression stop;
: above decompression stop depth, descend immediately!
the tank pressure is based on the signal from the tank module. the tank module has a range of 1.5m/5ft. in addition to showing the numeric value, icon HD employs color coding to identify a range in tank pressure, as described in section 2.2.1.4.1.
wArnIng
- if icon HD receives no signal from the tank module for 45 seconds, the pressure value is replaced by ---. Check the position of icon HD with respect to the tank module. start ascending if you don’t get a tank pressure reading unless you have a spare pressure gauge.
- if the tank pressure reaches 10bar/145psi, the tank module will turn off and icon HD will not show tank pressure any longer.
the TTr (time to reserve) is the time you can spend at the current depth breathing at the current rate before reaching the user defined tank reserve.
noTEicon HD needs approximately 2 minutes to analyze your breathing pattern, thus the ttr is not displayed at the very beginning of the dive.
the nitrogen bar graph is on the left side of the display. it represents nitrogen saturation in the leading tissue compartment. the bar graph is made of ten segments, which gradually switch from green to red during the dive. the more red segments you see, the closer to the no deco limits you are. as you enter a situation of mandatory decompression stop, all segments will be red.

15
During a surface interval, the segments will gradually turn from red to green as icon HD tracks the offgassing of your tissues.
Ascent/descent rate: in presence of a depth change in excess of 80cm / 3ft, icon HD calculates the corresponding ascent or descent speed and displays it on the left side of the display, both numerically and via an arrow bar which, for the duration of the ascent or descent, replaces the nitrogen bar graph. each arrow in the arrow bar represents approximately 2m/min / 6ft/min speed. these arrows turn red for speeds in excess of 10m/min / 33ft/min.
3.3.2 coMpASS
During the dive you can access the compass by pressing from either EXTEnDED or proFILE display. in coMpASS mode, the top row of the display retains information on no deco time (or total ascent time in the case of decompression dives), depth and tank pressure (if tank module is in use). the left margin of the screen depicts, as usual, the nitrogen saturation bar graph or the ascent rate.
With , you can set a reference bearing. a dot will appear to indicate the set bearing. additional symbols will appear as well: squares at 90 degrees, triangles at 120 degrees and two parallel lines at 180 degrees, as an aid in navigation for square, triangular and reciprocal courses. the number at the bottom represents the deviation of the direction you are pointing at with reference to the set bearing. if you press again, the new bearing will override the one in memory. if you press and hold you erase the bearing.
by pressing , the top row is split in two and a stop watch appears in the lower row. use
to activate the stop watch. every time you press , the stop watch restarts from 00:00. by pressing , the top row goes back to full size but the stop watch keeps running in the background, if activated.
noTEthe display remains in compass mode until you press or until an alarm is triggered, in which case the display reverts to the mode set in SET DIvE/DISpLAy for better visualization of the alarm message itself.
3.4 vIEwIng MApS DurIng A DIvE
to call up the map selected under SET DIvE/LInkED MAp, press . the map will remain on the display for 10 seconds, after which the screen reverts to dive information. you can press to return to the main screen before the 10 seconds have elapsed.
noTE- in the event of an alarm, icon HD
automatically switches back to the main computer information.
- the map is static, and does not change as you swim during the dive.
3.5 AFTEr THE DIvE
upon returning to the surface, icon HD first goes into the so-called surfacing mode. this mode allows you to resume your dive after a brief period of orientation. the screen shows a 3-minute countdown, a profile of the dive, your maximum depth, dive time, average depth and, for nitrox dives, the Cns% at the end of the dive. When used with the optional tank module, the screen shows the tank pressure as well.
if you submerge again before the 3-minute countdown is over, the dive time will resume from where it left off, including the time spent on the surface. if you do not submerge before the end of the countdown, icon HD considers the dive finished, records the data to the logbook and reverts to the so-called post-dive mode.
the post-dive screen shows the following information:

Icon HD Dive Computer
16
- the remaining desaturation time (DESAT TIME): this is calculated by the decompression model in the computer. any dive started while there is remaining desaturation on your computer is considered a repetitive dive, meaning that icon HD accounts for the pre-existing nitrogen load in your body.
- the no-fly time (no-FLy TIME): this is the time during which an exposure to the reduced pressure inside the cabin of an airplane could cause decompression sickness. icon HD employs, as recommended by noaa, Dan and other agencies, a standard 12-hour (no-deco non-repetitive dives) or 24-hour (deco and repetitive dives) countdown. Hence you may find a situation in which the desaturation time is shorter than the no-fly time. this is simply the consequence of the desaturation time being calculated by the algorithm based on the actual dive profile, while the no-fly time is an accepted standard in the diving industry. since the real effect of flying after diving has never been fully investigated, this approach fits with our philosophy.
wArnIng
flying while icon HD displays no-FLy can result in serious injury or death.
- the surface interval (SurF. InT.): this is displayed from the moment the dive is closed (3 minutes after surfacing) for as long as there is remaining desaturation or no-fly time on the computer.
the screen also shows the main data of the last dive: max depth, temperature, dive time, average depth, Cns%, maximum ascent rate, initial, final and differential tank pressure.
in addition, the left bar graph shows the calculated nitrogen load in the leading tissue. you can use this to gauge your progress in getting rid of nitrogen as the surface interval grows. icon HD continues to perform decompression-related calculations (nitrogen release), for as long as there is desaturation or no-fly time left. this is indicated by a red blinking leD.
3.6 DIvIng wITH MorE THAn onE gAS MIXTurE
wArnIng
- Diving with more than one gas mixture represents a much higher risk than diving with a single gas mixture, and mistakes by the diver may lead to serious injury or death.
- During dives with more than one gas mixture, always make sure you are breathing from the tank that you intend to breathe from. breathing from a high oxygen concentration mix at the wrong depth can kill you instantly.
- mark all your regulators and tanks so that you cannot confuse them under any circumstance.
- before each dive and after changing a tank, ensure that each gas mixture is set to the correct value for the corresponding tank.
icon HD enables you to use up to three gas mixtures during the dive (air and nitrox only). the three mixtures are labeled g1, g2 and g3 and must be in ascending order of oxygen content, i.e. g1 has the lowest oxygen concentration, g2 an intermediate value, and g3 has the highest oxygen concentration of the three. two or more tanks can also be set to the same oxygen concentration. if you are diving with only two mixtures, you will be utilizing tanks g1 and g2. the depths at which the various gases are allowed is indicated graphically using different shades of blue:
- g1 bottom gas: dark blue; - g2 travel gas: light blue; - g3 deco gas: sky blue.icon HD can show the tank pressure of each tank if the corresponding first stage regulator is equipped with a mares tank module, paired as described in section 1.8. note that icon HD can be programmed and used for diving with more than one gas mixture whether you use tank modules for each or not.
noTEyou can set all the gases to the same oxygen percentage.
wArnIng
it is not possible to switch to a gas at a depth at which the oxygen partial pressure for that gas is greater than the set maximum value.
3.6.1 SETTIng MorE THAn onE gAS the characteristics of the gases must be entered in the computer before the dive. it will then be your responsibility to tell icon HD which gas is currently being used during the various phases of the dive.
noTE- if you dive using just one gas, select g1
and deselect the other two. - for dives with two gases, select g1 and
g2 and deselect the third. - When enabling g2 and g3, you must first
define g2 and then g3.- you cannot activate g3 without first
having activated g2.- g2 cannot have an oxygen percentage
higher than g3.- if you set g2 to oFF, g3 will
automatically be set to oFF also.- the moD for g2 and g3 is the switch
depth for the corresponding gas. this is what icon HD uses for its calculation, alarms and suggested switch points.
- setting a tank to oFF does not affect the pairing of the corresponding tank module.
to use multiple gases, you will need to enable the gases and set the oxygen percentage and the ppo2max for each one, as described in the picture sequence below. keep in mind that the moD for g2 and g3 is the depth at which icon HD will prompt you to perform the gas switch (see section 3.6.2 below).

17
3.6.2 SwITcHIng gASDuring nitrox dives with the gas switching function enabled, the third button from the left has two functions, indicated by a double icon:
• brief pressure: displays the additional information screen .
• prolonged pressure (1 second): displays the gas switch screen .
icon HD always begins the dive with g1, which has the lowest percentage of oxygen. When during the ascent you reach the depth corresponding to the moD of g2, icon HD sounds an audible signal and displays the message gAS 1 -> gAS 2 at the bottom of the screen.
noTE- icon HD will allow the change only if
the depth is shallower than the moD corresponding to the set ppo2max.
- icon HD will not allow the gas switch if you are deeper.
- the message at the bottom of the screen remains only for 20 seconds. you can however call up the gas switch screen at any time, and switch to another gas as long as your depth allows the gas to be activated.
- the same process is repeated when you approach the moD for g3 with the message gAS 2 -> gAS 3.
- if you have set g1, g2 and g3 and have not switched from g1 to g2, once you reach the moD for g3 the display will prompt the message gAS 1 -> gAS 3
at this point, by holding down for 1 second , the gas switch screen will appear: this shows the set gases, with the currently active one indicated by a yellow arrow.
noTEyou can reach this screen at any time during the dive, for instance to check on the tank pressure and the planned switch point of g2 and g3.
press to scroll through the available gases, then press to activate it. the decompression calculation will reflect the switch in breathing gas. in addition, the display will now show the symbol of the new gas and its oxygen concentration.
noTE- you can select another gas using , if
permitted at that depth.- you can exit this mode without changing
the gas by pressing .- if there is only one gas set, the computer
will not enter this menu.
3.6.3 SpEcIAL SITuATIonS
3.6.3.1 SWITChING bACk TO A GAS MIxTURE WITh LOWER OxYGEN CONCENTRATIONthere may be situations in which you have to switch back to a gas with lower oxygen concentration than what you are currently breathing. this can happen for instance if you want to descend deeper than the moD for the current gas, or if for instance you have run out of gas in G3 during the decompression. to do so, simply press and hold to call up the gas switch screen. use to choose another gas, then press to activate it.
3.6.3.2 SUbMERGING bELOW ThE MOD AFTER A GAS SWITCh if after having switched to a gas mixture with a higher oxygen concentration you inadvertently drop again below the moD for that mixture, the moD alarm will immediately go off. either switch back to a gas mixture suited for that depth, or ascend above the moD for the gas mixture you are breathing from.
3.6.4 TTr wHEn DIvIng wITH MorE THAn onE gAS MIXTurEicon HD determines the ttr based on your breathing pattern, the tank pressure for the gas you are currently breathing, and the decompression time calculated for that gas only. it does not account for tanks other than what you are currently breathing from, hence your actual autonomy may be higher. for this reason the ttr alarm becomes simply a 10-second warning when more than one gas is set.
3.6.5 LogBook For DIvES wITH MorE THAn onE gAS MIXTurEfor dives carried out with more than one gas mixture, icon HD adds information on oxygen concentration, initial, final and differential pressure for all gases used. on the dive profile, switch points are shown on the time line.

Icon HD Dive Computer
18
3.7 BoTToM TIMEr MoDE
When icon HD is set to BoTToM TIMEr mode, it will only monitor depth, time, tank pressure and temperature, and will not carry out any decompression calculation. maximum displayed dive time in gauge mode is 999 minutes and 59 seconds. you can only switch to bottom timer mode if the computer is completely desaturated. all audible and visual alarms, other than the low battery alarm, are turned off.
wArnIng
Dives in gauge mode are performed at your own risk. after a dive in bottom timer mode you must wait at least 24 hours before diving using a decompression computer.
During a dive in gauge mode, the following information is displayed:
- current depth- max depth- average depth- stopwatch- dive time- temperature - time of day- battery status- tank pressure- in case of an ascent: ascent speed (in m/min
or ft/min).
the stop watch is reset by means of . upon pressing and holding the same button, the gas switch display is called up. the only result of switching gas mixtures in bottom timer mode is that the pressure of the newly chosen tank is displayed instead of the current one.
3.7.1 DIvE vIoLATIon InDucED BoTToM TIMEr MoDEthe following violations can occur during an air or nitrox dive:
- uncontrolled ascent. - missed deco stop.in case of a violation, icon HD will restrict the use of air and nitrox mode for 24 hours, and will only allow operation in bottom timer mode, continuously displaying the message LockED By prEvIouS DIvE.
• 4 TAkIng cArE oF Icon HD
4.1 TEcHnIcAL InForMATIon
operating altitude: - with decompression – sea level to
approximately 3700m/12100ft- without decompression (gauge mode) – at
any altitude
Decompression model: rGbm mares-Wienke (10 tissues)
Depth measurement:- max displayed depth: 150m/492ft- resolution: 0.1m until 99.9m and 1m at
depth deeper than 100m. resolution in ft is always 1ft
- temperature compensation of the measurement between -10 °C to +50 °C / 14 °f to 122 °f
- accuracy from 0 to 80m/262ft: 1% ±0.2m/1ft
Temperature measurement:- measurement range: -10 °C to +50 °C /
14 °f to 122 °f- resolution: 1 °C / 1 °f- accuracy: ± 2 °C / ± 4 °f
Digital compass:- resolution: 1°- accuracy: ± 1° + 5% of tilt angle (example: at
50° tilt, accuracy is ±3.5°)- tilt angle: up to 80°- refresh rate: 1s
clock: quartz clock, time, date, dive time display up to 999 minutes
oxygen concentration: adjustable between 21% and 99%, ppo2max range between 1.2 and 1.6bar
Logbook memory: over 100 hours of dive profile at 5-second sampling rate
operating temperature: -10 °C to +50 °C / 14 °f to 122 °f
Storage temperature: -20 to 70 °C / -4 to 158 °f
Display:- Diagonal: 2.7”- technology: tft- resolution: QVGa 320*240- Colors: 256000- brightness 420cd/m²- mineral glass
power supply: • icon HD:
- lithium-ion rechargeable battery, with battery charge indicator
- operating temperature- discharging: from -10 to +50 °C / 14 to 122 °f- charging: from 0 to 45 °C / 32 to 113 °f- battery duration from one charge: approx
5-7 hours of diving. actual battery duration depends on the usage of the high intensity backlight and the water temperature
- lifetime of the battery: approx 500 charging cycles
• tank module:- Cr123- battery life: 150-200 dives. actual battery
life depends on the number of dives per year, the length of each dive and the water temperature.
4.2 MAInTEnAncE
the tank pressure gauge and the parts of this product used to measure tank pressure should be serviced by an authorized mares dealer every other year of after 200 dives (whichever comes first). in addition, the depth accuracy should be verified every two years. aside from that, icon HD is virtually maintenance free. all you need to do is rinse it carefully with fresh water after each dive (avoid any chemical products) and charge the battery when needed. to avoid possible problems with your icon HD, the following recommendations will help assure years of trouble free service:
- avoid dropping or jarring your icon HD;- do not expose icon HD to intense, direct
sunlight;- do not store icon HD in a sealed container,
always ensure free ventilation.
noTEif you notice signs of moisture on the inner wall of the mineral glass, take your icon HD immediately to an authorized mares service center.
wArnIng
the mineral glass is not exempt from scratches resulting from improper use.
wArnIng
Do not blow compressed air onto icon HD, because it could damage the pressure sensor area.

19
4.2.1 rEpLAcIng THE BATTEry In Icon HDicon HD uses a rechargeable battery, so it may be necessary to replace it after approximately 500 charging cycles. the battery should only be replaced in a center authorized by mares. mares declines all responsibility for any damage caused by replacing the battery.
noTEDispose of the old battery properly. mares adopts a policy of respect for the environment, and urges use of the appropriate separated waste collection services.
4.2.2 rEpLAcIng THE BATTEry In THE TAnk MoDuLE
wArnIng
We recommend having the battery of the tank module replaced by an authorized mares dealer. the change must be made with particular care in order to prevent water from seeping in. the warranty does not cover damages due to an improper placement of the battery.
wArnIng
- never touch the metal surface of the battery with bare fingers. the two battery poles must never be short circuited.
- a leaking tank module cap may lead to the destruction of the tank module by water seeping in or cause the tank module to switch off without prior notice.
- always open the tank module in a dry and clean environment.
- only open the tank module to replace the battery.
1
2
4
53
1. remove the tank module from the Hp port of the first stage regulator.
2. Dry the tank module with a soft towel.3. remove the 2 screws (5) with a phillips
screwdriver.4. Carefully remove the tank module cap (1).5. Carefully remove the tank module cap o-ring
(3) be careful not to damage the sealing surfaces.
6. remove the battery (2) by holding it on both sides. Do not touch the contacts or the electronic parts.
wArnIng
if you notice traces of seeping water, damages or other defects on the o-ring, do not use the tank module for further dives. take it to an authorized mares dealer to be checked.
7. always insert a new o-ring when you replace the battery and dispose the old o-ring. make sure that the new, lubricated o-ring is in perfect condition, and that o-ring, o-ring groove and the sealing surface of the tank module and tank module cap are free of dust and dirt. if necessary, clean the parts with a soft cloth. fit the o-ring in the o-ring groove.
8. Wait for 30 seconds, then insert the new battery. ensure that the “+” side is facing away from the base of the tank module. the tank module can be damaged if you do not insert the battery correctly.
9. the tank module will now perform an automatic test and switch into ready mode after 60 seconds.
4.3 wArrAnTy
mares products are guaranteed for a period of two years subject to the following limitations and conditions:
the warranty is non-transferable and applies strictly to the original purchaser.
mares products are warranted free from defects in materials and workmanship: components that, upon technical inspection, are found to be defective, will be replaced free of charge.
mares s.p.a. declines all responsibility for accidents of any kind that result from tampering or incorrect use of its products.
any products returned for overhaul or repairs under warranty, or for any other reason, must be forwarded exclusively via the vendor and accompanied with a proof of purchase slip. products travel at the risk of the sender.
4.4 wArrAnTy EXcLuSIonS
Damage caused by water seepage resulting from improper use (e.g. dirty seal, battery compartment closed incorrectly, etc.).
rupture or scratching of the case, glass or strap as a result of violent impact or blows.
Damage resulting from excessive exposure to elevated or low temperatures.
Damage caused by the use of compressed air to clean the dive computer.
4.5 How To FInD THE proDucT SErIAL nuMBEr
to see the product serial number, enter the SETTINGS submenu, go to AbOUT Icon hD using the central buttons, and press SELECT.
this number should be noted on the warranty certificate in the package. the serial number is also found on the icon HD packaging.
• 5 DISpoSAL oF THE DEvIcE
Dispose of this device as electronic waste. Do not throw it away with regular rubbish.
if you prefer, you can return the device to your local mares dealer.

mares s.p.a. - salita bonsen, 4 - 16035 rapallo - italy - tel. +39 01852011 - fax +39 0185201470www.mares.com
code
442
0079
8 -
reV
b -
0.0
00-
12/1
1 -
artb
ook
7584
/11
algorithm
Deep stops