march 25, 2014 katerina michalickova the research ... · 1 unix introduction march 25, 2014...
TRANSCRIPT

1
Unix introduction
March 25, 2014
Katerina Michalickova
The Research Computing Services Group
www.uio.no/hpc

2
Table of Contents 1. About this tutorial.................................................................................................................................. 3
2. Login into tutorial machine ................................................................................................................... 3
3. Command line ....................................................................................................................................... 4
3.1. Shell ............................................................................................................................................... 4
3.2. Navigating the file system – ls, pwd, cd ........................................................................................ 5
3.2.1. Command options ................................................................................................................... 5
3.2.2. Home directory ....................................................................................................................... 7
3.2.3. File ownership and permissions .............................................................................................. 6
3.2.4. Learn about the machine ....................................................................................................... 17
3.3. Moving about in the directory tree - cd.......................................................................................... 7
3.4. Managing your files and directories – mkdir, cp, mv, rm, rmdir ................................................... 9
3.4.1. Practise the commands ............................................................................................................ 9
3.5. Editing your files .......................................................................................................................... 12
3.5.1. Display a contents of a file – cat, more, less ......................................................................... 13
3.5.2. Edit a file - nano .................................................................................................................... 13
3.5.3. Some useful commands - diff, grep, sort, uniq ..................................................................... 15
4. Programs and parameters .................................................................................................................... 18
4.1. Computer program ....................................................................................................................... 18
4.2. New program? .............................................................................................................................. 18
4.3. Executing a program .................................................................................................................... 18
4.4. PATH ............................................................................................................................................ 19
4.5. Program options ........................................................................................................................... 19
4.6. Managing command output ......................................................................................................... 21
4.6.1. Paging though output ............................................................................................................ 21
4.6.2. Pipeline.................................................................................................................................. 21
4.6.3. Redirecting standard output .................................................................................................. 22
4.6.4. Redirecting standard input .................................................................................................... 22
4.6.5. Standard streams ................................................................................................................... 22

3
1. About this tutorial Scientists often need to work with command line tools, organize files and move about the file system
efficiently using the command line environment. This tutorial is meant to prepare command line
beginners for this task. We will concentrate on learning to navigate around the file system, manage
files and run programs.
2. Login In this tutorial, we are going to use a Linux machine called “freebee.abel.uio.no”. This system can be
used by all UiO students and staff.
1. Make sure you are connected to a network. Open a command line tool on your laptop. For
windows use Putty (http://www.putty.org/).
2. Before you log into the tutorial machine, you have to have a username and password. UiO
students and staff can use their UiO credentials, others can ask the instructor for a guest
account.
3. Log into freebee.abel.uio.no
Windows:
Open Putty and type “freebee.abel.uio.no” in the host name dialog box. Press “Open”. New
window opens and you will be prompted for a password.

4
MacOS or Linux:
Use ssh command (secure shell) to log into freebee. Type “ssh [email protected]”.
You will be prompted for a password.
4. When you log in you should see the following:
3. Command line
3.1. Shell
When you login into freebee, you find yourself in a “shell” (in our case the “bash shell”). Shell
provides an interface between you and the operating system of the computer. The “$” sign is the
prompt and that is where you type commands. Commands are executed by pressing “Enter” at the end.
“Command-line interfaces are often preferred by more advanced computer users, as they often provide
a more concise and powerful means to control a program or operating system.” Wikipedia

5
3.2. Directory listing
People used to graphical interfaces usually open some sort of a file manager to navigate the directories
and files on their machine. In the next sections, we will learn how to do the same using command line.
To see the contents of a current directory, type “ls” (list) at the prompt. The command displays a
simple list of files and directories. This output gives no details about the listed items though. The next
section introduces ways to modifying the command behavior.
3.2.1. Command options
The behavior of the command ls can be changed by using options (or switches or flags). Below, you
see the output of “ls -l”. The option “-l” tells the list command to display each file/directory on a
separate line in a “long” format. Typically, unix commands can be used with multiple flags. To learn
about options available, use “man command” (e.g. for ls, type “man ls“).
Note: The command “ls -l” is often shortened to “ll” for convenience.

6
3.2.2. File ownership and permissions
The output of “ls –l” above produces extra information. From the left:
permissions
number of hard links (can be safely ignored for now)
user name of the owner
group that owner belongs to
file size
date of last modification
file/directory name
File ownership and permissions provide control over actions performed on files and directories. In the
above caption the owner is “katerim” and the group is “users”. The first 10 characters on each line
specify permissions (or access rights). Files (and directories) can be read (r), written into (w) or
executed (x).
The permission statement consists of 10 positions: -rwxrwxrwx. The first position is reserved for a
directory sign (d). Ordinary files have just a “-” sign. The next three rwx triads specify permissions
for the owner, group and everyone else. Each triad holds rwx permissions always in the same order.
For example, in –rwsrwxrwx statement all permissions are set and all users can read, write into and
execute a file. In -rw------- statement, the file can only be read and written to by the owner.
7
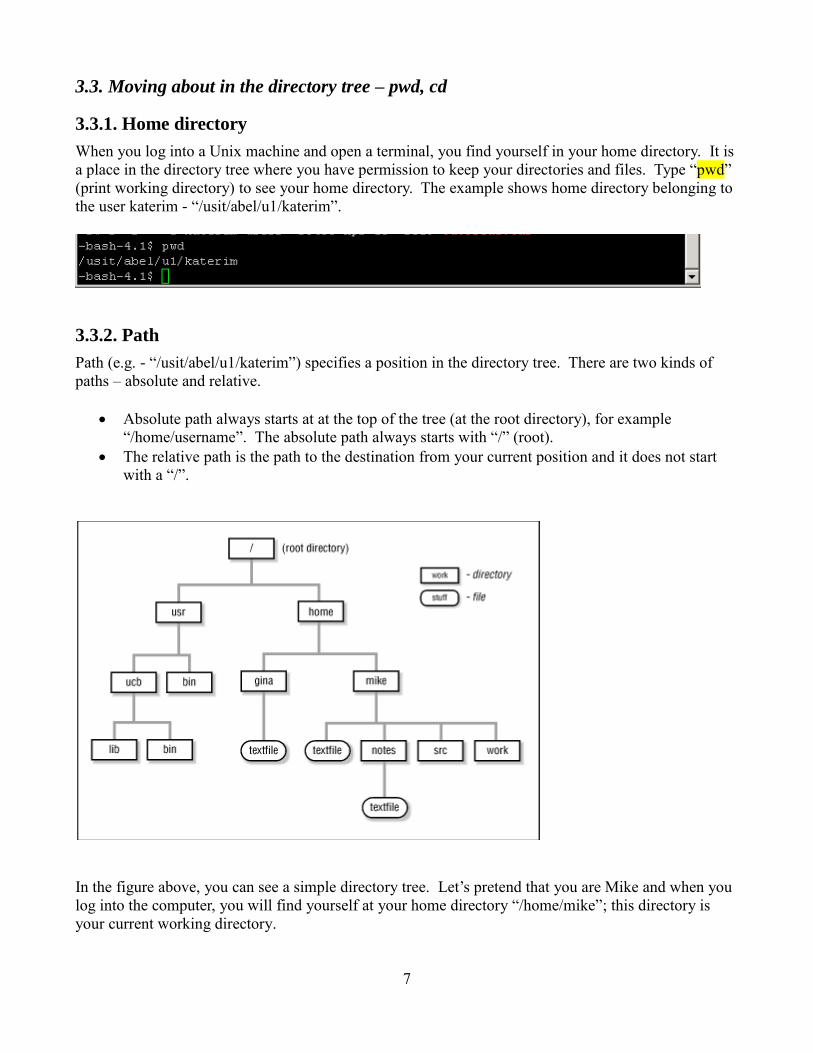
3.3. Moving about in the directory tree – pwd, cd
3.3.1. Home directory
When you log into a Unix machine and open a terminal, you find yourself in your home directory. It is
a place in the directory tree where you have permission to keep your directories and files. Type “pwd”
(print working directory) to see your home directory. The example shows home directory belonging to
the user katerim - “/usit/abel/u1/katerim”.
3.3.2. Path
Path (e.g. - “/usit/abel/u1/katerim”) specifies a position in the directory tree. There are two kinds of
paths – absolute and relative.
Absolute path always starts at at the top of the tree (at the root directory), for example
“/home/username”. The absolute path always starts with “/” (root).
The relative path is the path to the destination from your current position and it does not start
with a “/”.
In the figure above, you can see a simple directory tree. Let’s pretend that you are Mike and when you
log into the computer, you will find yourself at your home directory “/home/mike”; this directory is
your current working directory.

8
If you want to change working directory to directory called “work”, you will type “cd work”
(cd stands for change directory). By doing so you used the relative path. The way to express
this operation using absolute path would be “cd /home/mike/work”. In this example, using the
relative paths was a more convenient way of accomplishing the task.
Consider changing directory to the “lib” (bottom left) starting from “/home/mike”. The relative
path command would be “cd ../../usr/ucb/lib” while the absolute path would look like this “cd
/usr/ucb/lib”. Here, using the absolute path is easier.
3.3.3. Special notations
There are few special notations to remember when navigating the directories.
Typing “cd ../” will take you one directory level up (from “/home/mike” to “/home”).
The sign “./” means current directory (“cd work” is the same as “cd ./work”).
Typing “cd” anywhere will get you to your home directory.
You can use “~” in the path to substitute for your home directory (e.g. “cd ~/work” is the same
as “cd /home/mike/work”).
Typing “cd -” will send you back where you just came from. E.g. you start at
“/home/mike/src”, then “cd /home/usr”. When you need to go back to “/home/mike/src”, type
“cd -”.
3.3.4. Autocompletion
Autocompletion means you do not have to type full file/directory name. If the fragment of the name
you have just typed is unique, pressing TAB key will complete the name. This reduces typing and
errors dramatically.
Consider that you (Mike) made a directory called “results_2503” in “/home/mike/data”. Two months
later, you want to check the blast results. In your home directory, you start typing “cd data/results…”
and then you cannot remember the date of the experiment. To see all result directories, use
autocompletion.
When you have typed “cd data/results_” press the “Tab” key. If there is exactly one matching name, it
will complete automatically. If there is more than one match, all relevant options will show when you
press Tab second time.
3.3.5. Wild cards
Wildcards are symbols “*” and “?”. They can be used in pattern matching. For example, “ls results_*”
produces a list of items beginning with “results_”.
In general, “?” matches exactly one character, while “*” matches any string of any length including an
empty one.
9
3.4. Managing your files and directories – mkdir, cp, mv, rm, rmdir
In this section, we will learn how to create, copy, move and delete directories and files. Here is the list
of the key commands:
Make a directory – mkdir
Remove directory – rmdir
Copy file – cp
Move file – mv
Delete file - rm
3.4.1. Practise the commands
This section is a hands-on exercise. We’ll set up a space for your tutorial and manipulate files to get
comfortable with using the command line. Read the text carefully and try to replicate the highlighted
commands. The screen captures demonstrate every command needed to replicate the exercise.
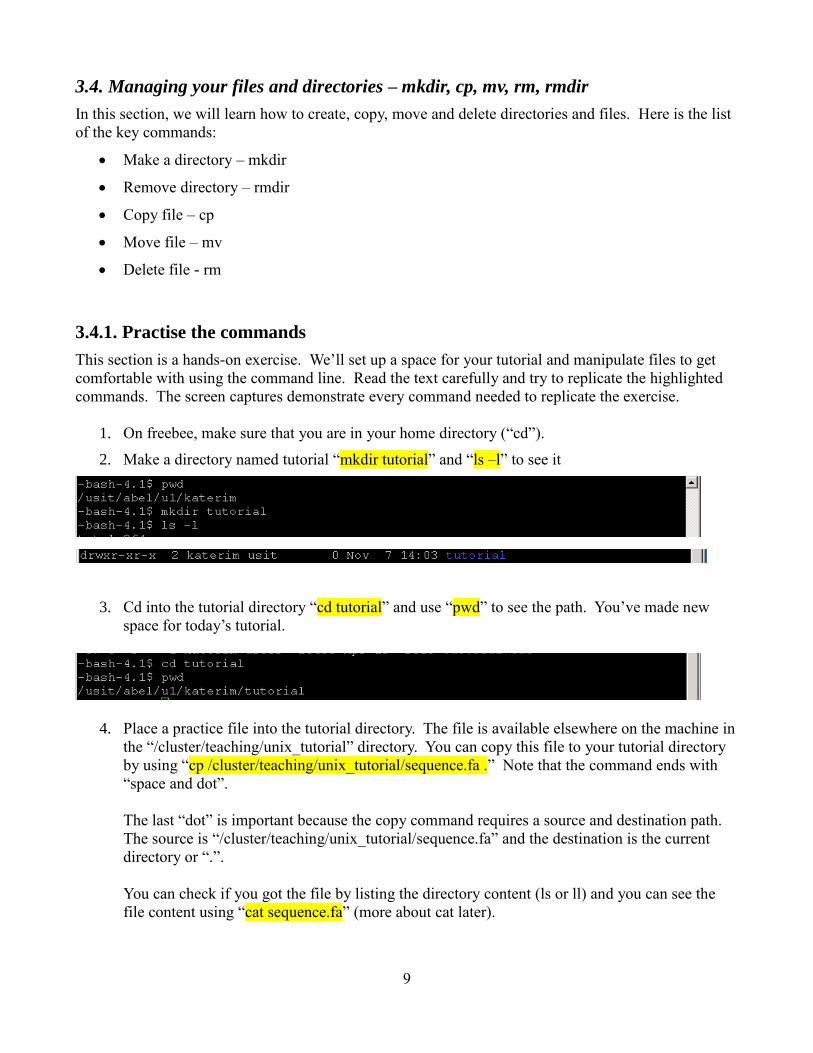
1. On freebee, make sure that you are in your home directory (“cd”).
2. Make a directory named tutorial “mkdir tutorial” and “ls –l” to see it
3. Cd into the tutorial directory “cd tutorial” and use “pwd” to see the path. You’ve made new
space for today’s tutorial.
4. Place a practice file into the tutorial directory. The file is available elsewhere on the machine in
the “/cluster/teaching/unix_tutorial” directory. You can copy this file to your tutorial directory
by using “cp /cluster/teaching/unix_tutorial/sequence.fa .” Note that the command ends with
“space and dot”.
The last “dot” is important because the copy command requires a source and destination path.
The source is “/cluster/teaching/unix_tutorial/sequence.fa” and the destination is the current
directory or “.”.
You can check if you got the file by listing the directory content (ls or ll) and you can see the
file content using “cat sequence.fa” (more about cat later).

10
5. To practise copy command some more, make a backup of the sequence.fa file. Type “cp
sequence.fa sequence_copy.fa”. List the directory content to see what happened. The contents
of the original file were copied to a new one and the directory now contains two files.
6. After looking at the directory listing, you decide that the sequence_copy.fa is informative
enough and you that you want to change the name. This can be done using the mv command
(or move). Type “mv sequence_copy.fa sequence_orig.fa”. As with the copy command, the
move command requires target and destination paths.
7. In the tutorial directory, make a subdirectory “backup” and place your backup file there. Type
“mkdir backup” and “mv sequence_orig.fa backup/”. Check what you did by “ll backup/”.
Note: this is the first time we use the list command with an path. The directory listed is the one
specified by the path.

11
8. We have learned to manipulate individual files. In the next steps, we’ll try to manipulate whole
directories.
Let’s pretend that this is not the only tutorial you are attending today and you realize that you
don’t want to have many tutorial directories in your home area. You want to make one
directory called “learning” in your home and then move the existing tutorial directory (and all
its content) into learning. We’ll proceed cautiously, first we copy the files and if all is right, we
delete the original ones.
Return to your home directory (remember a simple “cd” will do). Type “mkdir learning”. Use
the copy command to replicate the entire contents of the tutorial directory tree by typing “cp –a
tutorial/ learning/”. Examine your action by using the list command. Note: we used “-a”
option for the copy command. The –a option turns on recursive mode and preserves all
properties of the files copied.
9. We made sure that the all files were copied, we can delete the original “~/tutorial” directory and
its contents. There is a fast way to do this, but for the sake of the tutorial, we start deleting in
steps. From you home directory, type “rm tutorial/backup/sequence_orig.fa” to get rid of you
original sequence backup. Check the outcome by “ls –l tutorial/backup”. Next, get rid of the
original backup directory by “rmdir tutorial/backup/”. Check the outcome by “ls –l tutorial/”.
As said, it is possible to delete the whole directory subtree using one command. This is to be
used with caution. Type “rm –ri tutorial/”. The –r option turns on recursive mode, the tutorial
directory and all its contents will be removed. As this could be dangerous, I added –i option
that turns on interactive mode. See in the capture below how this works. The command asks
the user to agree with each delete first.

12
10. An alternative way of viewing your files and directories is using the “tree” command. Type
“cd” and “tree learning” to see the whole directory tree so far.
3.5. Editing your files
There are two types of files on your computer.
text files are human-readable (e.g. FASTA sequences)
binary files contain many more special characters and not easily readable (e.g. a computer
program)
The command “file” returns information about the file type. Type “file learning/tutorial/sequence.fa”
to see an output for a text file. Type “file /bin/ls” to find the type of the list command to see an
executable or binary type.

13
3.5.1. Display a contents of a text file – cat, more, less
There are several commands for displaying the content of a file:
cat
less
more
Use all three to view the contents of sequence.fa file by typing “cd learning/tutorial”, “more
sequence.fa”, “less sequence.fa” and “cat sequence.fa”. You will notice that the less command behaves
differently than the others. In case of larger files, it allows scrolling up and down. Most importantly it
allows searching. Type “q” to quit the less command. Cat command has more functionality and is often
used for concatenating contents of files.
If you have a very large file and only want to check a part of it, use “head” and “tail” command. These
commands accept an option that specifies a number of lines to be displayed.
3.5.2. Edit a file - nano
From the available shell text editors, we will use nano. Change directory to ~/learning/tutorial and start
a simple text editor by typing “nano sequence.fa”. You will see the contents of the file and also simple
menu options on the bottom. You can navigate the text using arrow keys. The basic operations are
“ctrl O” to save and “ctrl X” to quit the editor. When saving or exiting, you are asked to confirm the
operation with “Enter”. Open the editor and try out the basic operations |(listed below - source
http://mintaka.sdsu.edu/reu/nano.html). As an exercise, add some mock text (preferable protein
sequences) at the end of the file. Here is an example:
>gi|1111|gb|AA2322|liase
DELSLNKISADTTDNSGTVNQIMMMANNPEDWLSLLLKLEKNSVPLSDALLNKLIG
>gi|2222|gb|AA5657|dehydrogenase
LKLEKNSVPLSDALLNKLIGRYSQA

14
Help
^G Nano help (^X to return to edit mode)
Navigation
^A move to beginning of line
^E move to end of line
^Y move down a page
^V move up a page
^_ move to a specific line (^_^V moves to the top of the file, ^_^Y to the bottom)
^C find out what line the cursor is currently on
^W search for some text.
Saving and Exiting
^O save contents without exiting (you will be prompted for a file to save to)
^X exit nano (you will be prompted to save your file if you haven't)
^T when saving a file, opens a browser that allows you to select a file name from a list of
files and directories
Editing
Insert new text at the current cursor position just by typing the text in.
Delete:
^D delete character currently under the cursor
BackSpace delete character currently in front of the cursor
^K delete entire line
^\ search for (and replace) a string of characters

15
Cut and paste
^K does not delete lines permanently; the most recent set of deletions are stored in a buffer. These lines
may be re-inserted at the current cursor location using ^U. This may be used to simulate cut and paste:
Repeatedly use ^K until all of the text you want to move has been deleted.
Move to the line that you want to insert the text at, and use ^U.
Note that pressing ^U more than once will cause multiple copies to be inserted. This is particularly
useful if you want to copy text:
Repeatedly use ^K until all of the text you want to copy has been deleted.
Press ^U immediately to put a copy back in its original location.
Move to the line that you want to copy the text to, and use ^U.
3.5.3. Manipulate file content - diff, grep, sort, uniq
“Diff” is used for comparing file contents (text and binary). Type “diff sequence.fa
backup/sequence_orig.fa” to compare the sequence file and the backup that you made earlier. All
modifications that you introduced using nano (and saved) will show.

16
“Grep” is used to find a pattern in a file. Type “grep “LIGR” sequence.fa” and if the pattern is found,
the whole line from the target file is shown in the output.
Note: if the pattern does not contain any white space or special characters, you can skip the quotes.
Grep has many useful options, for example “–i” turns on text insensitive mode (“grep –i ligr
sequence.fa” produces the same result as “grep LIGR sequence.fa”).
Sorting of the file content is done using the “sort” command. Type “sort sequence.fa ”. Examine the
output, as expected the sequence was sorted alphabetically by lines. Note: -n option enables numerical
sorting, sorting by column (and much more) is also possible
To use the “uniq” command that removes repeated lines from a file. To demonstrate this, we have to
edit the sequence.fa file. Open the file in nano and add some lines, make sure that some of the lines are
the same (they do not have to be very long). Type “sort sequence.fa | uniq” and examine the content.
The repeated lines have been omitted.

17
3.6. Little extra - get your bearings
This section is for the more curious of you. When you log into a new machine, it might be useful to get
some basic information about this computer. What is the name of the machine? Type “hostname”.
What operating system is this? Type “uname -a”. To find out what is your user name type “whoami”.
The information about the cpus and memory is stored in /proc/cpuinf and /proc/meminfo respectively.
The tutorial machines is called freebee.abel.uio.no, it is a Linux machine and has 32 cpus and 64GB or
RAM.

18
4. Programs and parameters
4.1. Computer program
A computer program is sequence of instructions written to perform a specified task. Computer
programs can be separated into the system software and application software. System software is
responsible for running your computer while application packages are used, for example, for data
analysis.
Each program consists of a source code written in a programming language. Some languages (C or
Fortran) require compilation to produce an executable binary program. Scripting languages (such as
Python or Perl) are executed using an interpreter during the run-time.
4.2. New program?
This section applies mostly for Unix. When you download a program, read instructions carefully to see
if you have a binary code, source code that requires compilation or perhaps a script that requires an
interpreter.
In case of a binary code, it is essential that you get a package that was compiled on the same
computer platform as you intend to use. Binaries differ for different flavors of Unix and also
for different versions of Windows and MacOS. It is customary to offer various platform
binaries when a package is distributed in this manner.
When you download a source code, you have to compile it. Compilation in general requires a
compiler, the open source versions are called gcc, g++ and g95 (for C, C++ and Fortran
respectively). Proprietary compilers are produced e.g. by Intel. Before you compile, look for
instructions in the source code (or online).
Programs written in a scripting language require an interpreter such “perl” or “python” (open
source and easily installed on various platforms). No compilation is required, the source code is
executed as is using an interpreter.
4.3. Executing a program
Check the permissions associated with the file that holds your program. No program will run without
the executable (“x”) permission being set. The program is made executable using “chmod a+x”
command (this make the program executable for all users). Executable program is executed by typing
its name including the absolute or relative path. Path has to be specified even in the case when the
program is in your current directory, the you call your program with “./program_name”.
You can call your program from any directory on your machine using just its name and no path
(similarly to Linux commands) when the system knows where to find it. The system will always find
the program if it is installed in a directory that is included in the “PATH” variable.
19
4.4. PATH
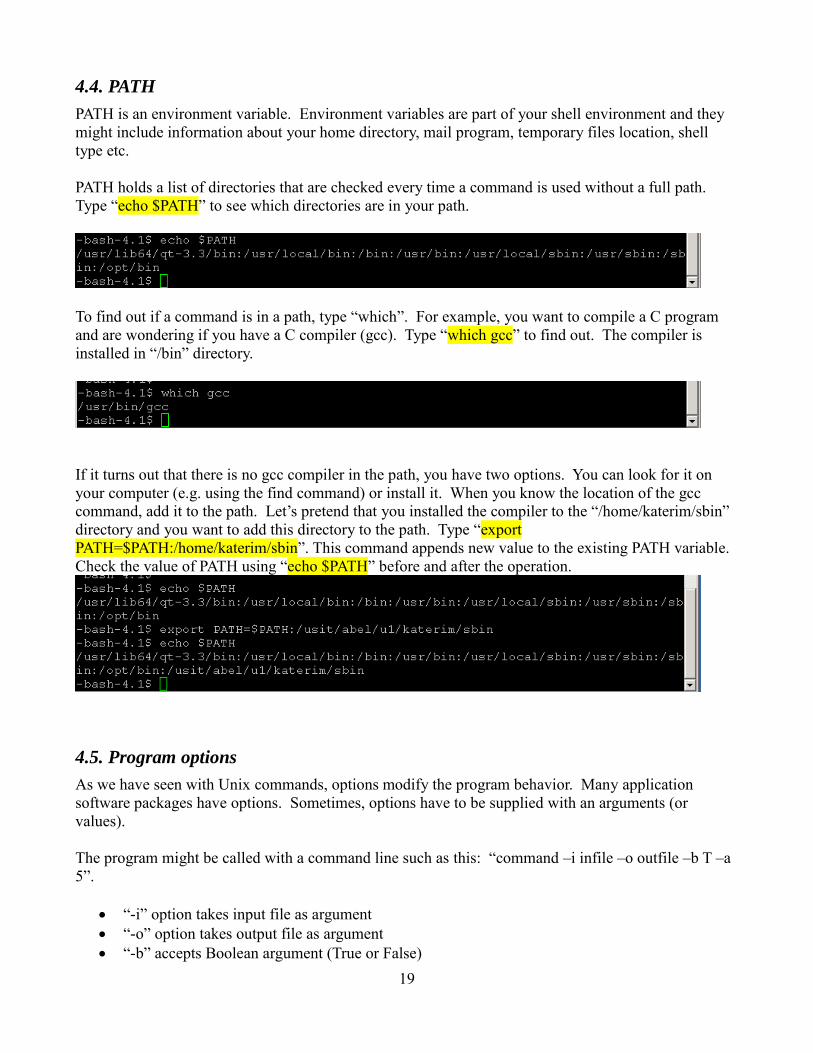
PATH is an environment variable. Environment variables are part of your shell environment and they
might include information about your home directory, mail program, temporary files location, shell
type etc.
PATH holds a list of directories that are checked every time a command is used without a full path.
Type “echo $PATH” to see which directories are in your path.
To find out if a command is in a path, type “which”. For example, you want to compile a C program
and are wondering if you have a C compiler (gcc). Type “which gcc” to find out. The compiler is
installed in “/bin” directory.
If it turns out that there is no gcc compiler in the path, you have two options. You can look for it on
your computer (e.g. using the find command) or install it. When you know the location of the gcc
command, add it to the path. Let’s pretend that you installed the compiler to the “/home/katerim/sbin”
directory and you want to add this directory to the path. Type “export
PATH=$PATH:/home/katerim/sbin”. This command appends new value to the existing PATH variable.
Check the value of PATH using “echo $PATH” before and after the operation.
4.5. Program options
As we have seen with Unix commands, options modify the program behavior. Many application
software packages have options. Sometimes, options have to be supplied with an arguments (or
values).
The program might be called with a command line such as this: “command –i infile –o outfile –b T –a
5”.
“-i” option takes input file as argument
“-o” option takes output file as argument
“-b” accepts Boolean argument (True or False)

20
“-a” accepts integer arguments
Knowing the options and the type of arguments they accept is necessary to constructing a command
that will run a program. Often, typing “-h” or “--help” after the command shows the available options
and expected arguments.
On the freebee (and on the computer cluster Abel) you can use a module command to manage you path.
Use “module load blast+” to modify your path so the blast+ program is available.
Type “blastp -h” (a program from the blast+ suite) to see what options are available for the blastp
program.
21
4.6. Managing command output
Unless specified by a program option, results of a computation are shown onto the screen (or to
standard output). When the output is large, this is not very useful. This section deals with redirecting
the program output.
4.6.1. Paging though output
If you want to see the output on the screen but it is too large to fit, use “command | less” construct. The
first page of the command output appears and the process stops. Use the arrow keys to move up and
down the output. Type “blastp -help | less” to try this out. Upon examining the blastp options closely,
you can see that not all of them are needed. Many are already set to reasonable defaults.
4.6.2. Pipeline
Pipeline utility takes an output of a command and passes it to a second command as an input. This is
accomplished using the “|” pipe sign between commands. This is utility can be used to string together
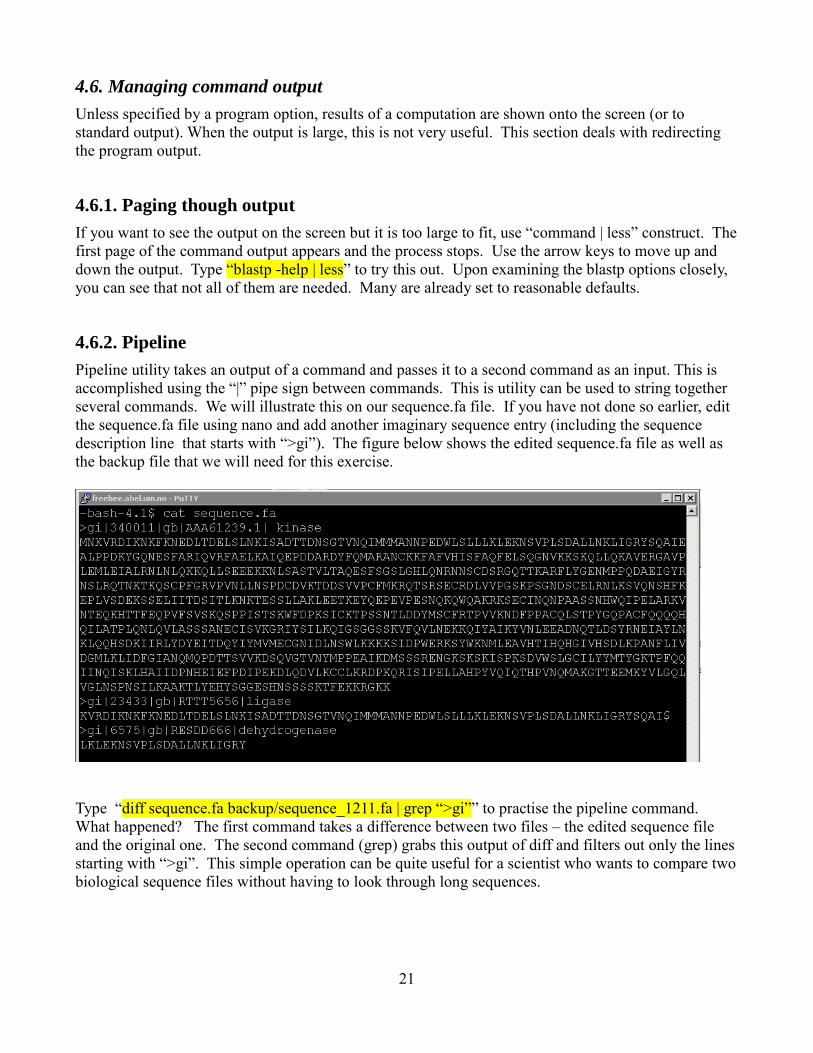
several commands. We will illustrate this on our sequence.fa file. If you have not done so earlier, edit
the sequence.fa file using nano and add another imaginary sequence entry (including the sequence
description line that starts with “>gi”). The figure below shows the edited sequence.fa file as well as
the backup file that we will need for this exercise.
Type “diff sequence.fa backup/sequence_1211.fa | grep “>gi”” to practise the pipeline command.
What happened? The first command takes a difference between two files – the edited sequence file
and the original one. The second command (grep) grabs this output of diff and filters out only the lines
starting with “>gi”. This simple operation can be quite useful for a scientist who wants to compare two
biological sequence files without having to look through long sequences.
22
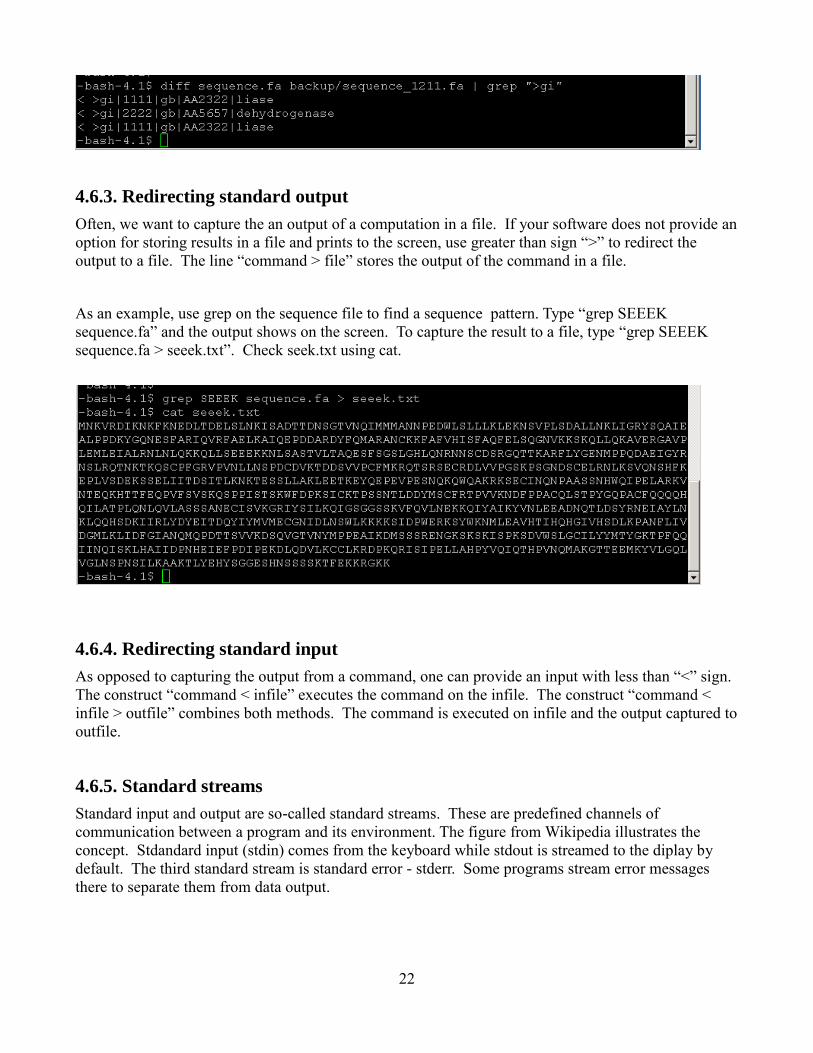
4.6.3. Redirecting standard output
Often, we want to capture the an output of a computation in a file. If your software does not provide an
option for storing results in a file and prints to the screen, use greater than sign “>” to redirect the
output to a file. The line “command > file” stores the output of the command in a file.
As an example, use grep on the sequence file to find a sequence pattern. Type “grep SEEEK
sequence.fa” and the output shows on the screen. To capture the result to a file, type “grep SEEEK
sequence.fa > seeek.txt”. Check seek.txt using cat.
4.6.4. Redirecting standard input
As opposed to capturing the output from a command, one can provide an input with less than “<” sign.
The construct “command < infile” executes the command on the infile. The construct “command <
infile > outfile” combines both methods. The command is executed on infile and the output captured to
outfile.
4.6.5. Standard streams
Standard input and output are so-called standard streams. These are predefined channels of
communication between a program and its environment. The figure from Wikipedia illustrates the
concept. Stdandard input (stdin) comes from the keyboard while stdout is streamed to the diplay by
default. The third standard stream is standard error - stderr. Some programs stream error messages
there to separate them from data output.

23
During your work, you might see constructs like “command > log 2 > &1”. What does this mean? On
the command line, one can use &0 to refer to stdin, &1 to stdout and &2 to stderr. Using this notation,
the above expression redirects the program output to the “log” file. The “2 > &1” at the end of the
expression redirects the standard error (2) to standard output (&1). This way the user is going to be
able to examine the program output as well as possible errors in the “log” file.