mapping the new command line interface to the … the new command line interface to the previous...
TRANSCRIPT

Copyright © 2016 Forcepoint. All rights reserved. | 1
Mapping the New Command Line Interface to the Previous V-Series Appliance Manager
V-Series Appliances A Visual Primer for the Version 8.3 CLI
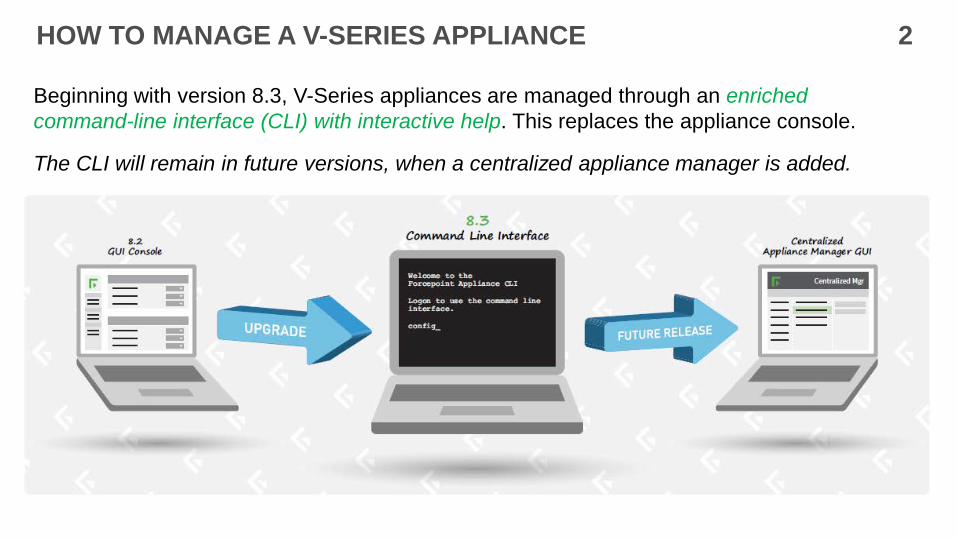
HOW TO MANAGE A V-SERIES APPLIANCE 2
Beginning with version 8.3, V-Series appliances are managed through an enriched command-line interface (CLI) with interactive help. This replaces the appliance console.
The CLI will remain in future versions, when a centralized appliance manager is added.
Content Gateway manager remains the same as in prior versions.

HOW TO MANAGE A V-SERIES APPLIANCE 3 This short presentation shows how to access the CLI, and maps the former single-appliance console to the new CLI commands.
CLI Syntax example:
(config)# set interface ipv4 - -interface <c|n|p1|p2|e1|e2>
[- -ip <ipv4 address>]
[- -mask <ipv4_netmask>]
[- -gateway <ipv4_address>]
[ ] optional parameter
< > list of approved
values for a parameter
| separator

TO ACCESS THE COMMAND LINE INTERFACE (CLI) 4
To manage the V-Series appliance with the CLI, select your preferred CLI access method, and then log on: Use PuTTY or similar tool on a Windows server (iTerm or similar on Mac) to access the CLI. Connect to the IP address of the C interface Use port 22 Select SSH (enabled by default) Use your admin credentials to log on You now have admin privileges
Or, attach a keyboard and monitor directly to the appliance.
Or, connect to the appliance via serial port or KVM. Serial port settings: 9600 baud, 8 bits, no parity
Or, use the Virtual Console feature of the DELL Remote Access Controller (iDRAC). After logon, for assistance with a specific CLI command, enter ? or type help. Use the Tab key for command completion.

HOW TO LOG ON TO CONTENT GATEWAY MANAGER 5
The new appliance logon page in Version 8.3 is used only to access Content Gateway Manager. To reach the Content Gateway logon page, open a browser. Enter the IP address of the C interface.
New Content Gateway logon page Former logon page
Content Gateway manager remains the same as in prior versions.

GETTING HELP WITH CLI COMMANDS 6 Use the help command to access CLI help information at any time. # help # help show # help show log
Use the Tab key to auto-complete command words, or to display a list of available words or phrases to complete a command. Use the question mark (?) to display help information for the current command path without pressing Enter and without losing the current input. # ? # show ? # show system ?
Use the up arrow key to display the previous command.

CLI MODES 7
The CLI has 3 modes. You start out in view mode. view – displays status and settings. Also accesses the other 2 modes. config (contains all view commands) – changes settings and enables/disables options diagnose – performs troubleshooting; handles system and network test commands
Mode selection To move to config mode: (view)# config (re-enter admin password) To move to diagnose mode: (view)# diagnose To return to view mode: (config)# exit or (diagnose)# exit To exit from the CLI: (view)# exit You cannot move from config directly to diagnose or vice versa.
To bump another admin Only one admin can work in config mode at a time. To bump the admin who is currently working in config mode: (view)# clear session - -config
This moves that person to view mode.

CLI PASSWORD 8
To change the password for the admin account, you need the current one. (config)# set account admin - -password
Password requirements Must be 8 to 15 characters in length and include: At least one uppercase character At least one lowercase character At least one number At least one character in this set: ( ! # % & ' ( ) * + , - . / ; < = > ? @ [ ] ^ _ { | } ~
Password recovery options Go to http://www.forcepoint.com and select Documentation > Forcepoint Appliances. See the CLI Guide section on Basic account management.

MAPPING THE V-SERIES MANAGER TO THE NEW CLI 9 See slides 10 – 12 See slides 13 – 23 See slides 24 – end
Status
Configuration
Administration
A complete CLI Guide is online.

STATUS > GENERAL 10
General Appliance status
(config)# show appliance status
(config)# show email (config)# show network-agent (config)# show proxy (config)# show web
Appliance restart / shutdown (config)# restart appliance (config)# shutdown appliance
Module restart (config)# restart email (config)# restart network-agent
(config)# restart proxy (config)# restart web

STATUS > GENERAL (continued) 11
General Module Stop / Start
(config)# stop email (config)# start email (config)# stop proxy (config)# start proxy (config)# stop web (config)# start web (config)# stop network-agent
(config)# start network-agent

STATUS > CPU AND MEMORY / DISK USAGE / BANDWIDTH 12
CPU and Memory (config)# show cpu use Ctrl+C to quit (config)# show mem use Ctrl+C to quit
Disk usage
(config) # show diskio offers a choice of modules
(config) # show diskspace shows all partitions
Network bandwidth
(config) # show bandwidth shows each enabled interface; updates every 5 seconds; use Ctrl+C to quit

CONFIGURATION > SYSTEM / TIME / DATE / HOST / DESCRIPTION 13 Stop all services before you reset system time and date. See slide 10.
(config)# show appliance info
(config)# show system timezone (config)# set system timezone - -zone <zone_name> - -index <zone_index>
(config)# show system ntp (config)# set system ntp - -status <on|off>
(config)# set system ntp - -server <server1>, <server2>,<server3>
(config)# show system clock (config)# set system clock - -date <yyyy/mm/dd> - -time <hh:mm:ss>
(config)# show system host (config)# set system host - -name <name> - -description <description>

CONFIGURATION > NETWORK INTERFACES (IPV4) 14 Show current interface for one module
(config)# show interface info [- -module <app | email | proxy |
web | network-agent>]
Show unused physical interfaces (config)# show interface unused
Enable or Disable an interface (config)# set interface status - -interface <e2 | p2 >
< - -enabled | - -disabled >
Configure IPv4 interfaces (config)# set interface ipv4 - -interface <c|n|p1|p2|e1|e2>
- -ip <ipv4 address>
[- -mask <ipv4_netmask>]
- -gateway <ipv4_address>
(config)# delete interface ipv4 - -interface <n|p1|p2|e1|e2>
- -status <enabled|disabled>

CONFIGURATION > NETWORK INTERFACES (IPv4 continued) 15
Configure appliance DNS settings (config)# set interface dns [- -dns1 <ipv4_address>]
[- -dns2 <ipv4_address>]
[- -dns3 <ipv4_address>]
[- -module <email|network-agent|proxy>] Omit module if configuring appliance DNS
Delete appliance DNS settings (config)# delete interface dns [- -dns-server <dns2 | dns3 >]
[- -module <email|network-agent|proxy>]
Omit module if deleting appliance DNS
Display bonded interfaces (config)# show interface bond Bond interfaces (config)# set interface bond [- -mode <active-standby|load-balancing>] Remove bonding (config)# set interface unbond

CONFIGURATION > NETWORK INTERFACES (IPv6) 16 IPv6 interfaces
(config)# set interface ipv6 - -interface <c|n|p1|p2|e1|e2>
[- -status <enabled | disabled>]
[- -ip <ipv6_address>]
[- -prefixlen <integer>]
[- -gateway <ipv6_address>]
(config)# delete interface ipv6 - -interface <c|n|p1|p2|e1|e2>
DNS settings configured for IPv4 are automatically applied TRITON AP-EMAIL does not support IPv6

CONFIGURATION > ROUTING (STATIC IPV4) 17 Display a table of configured static IPv4 routes
(config)# show route
Add a static route in IPv4 format (config)# set route --dest <ipv4_address>
--interface <c|p1|p2|e1|e2>
--mask <ipv4_netmask>
--gateway <ipv4_address>
Delete a single IPv4 static route (config) # delete route --dest <ip_address>
--mask <ipv4_netmask>
--interface <c|p1|p2|e1|e2>
--gateway <ipv4_address>

CONFIGURATION > ROUTING (Static IPv4 continued) 18 Export IPv4 static routes Do these in sequence shown:
1. Define a remote storage location: (config)# set filestore --alias <alias_name>
--type <ftp|samba|tftp>
--host <ip_address>
--path <share_directory>
[--user <user_name>]
[--port <port>]
2. Export all IPv4 static routes (config)# save route --location <filestore_alias>
Note: To export IPv6 static routes, set up a filestore alias_name and then
(config)# save route6 --location <filestore_alias>

CONFIGURATION > ROUTING (Static continued) 19 Add or delete one or more IPv4 static route definitions via a text file
load route
- -file <file_name>
- -location <filestore_alias>
- -action <add|del> (Web only) Add or delete one or more IPv6 static route definitions via a text file
load route6
- -file <file_name>
- -location <filestore_alias>
- -action <add|del>

CONFIGURATION > ROUTING (Component IPv4) 20 Show table of configured component routes
(config)# show component_route
Configure traffic from appliance component to be routed through the C Interface. Dest is the subnet address for which traffic will be routed.
(config)# set component_route --dest <ipv4_address>
--mask <ipv4_netmask>
--module <proxy|email>
Delete routing between appliance component and C interface.
(config)# delete component_route --dest <ipv4_address>
--mask <ipv4_netmask>
--module <proxy|email>

CONFIGURATION > ALERTING SETUP (Monitoring) 21 Display SNMP monitor server information (config)# show snmp config
Enable or disable SNMP monitoring (config)# set snmp service
--status <on|off>
Configure SNMP v1 monitoring (config)# set snmp v1
--community <name>
Configure SNMP v2c monitoring (config)# set snmp v2c
--community <name>
See the CLI Guide for full details about SNMP v3 monitoring

CONFIGURATION > ALERTING SETUP (SNMP Traps) 22 Display SNMP trap server status and version (config)# show trap config
Display table of SNMP trap events and settings (config)# show trap events
Save SNMP trap events settings for editing or use 1. Define a remote storage location: (config)# set filestore --alias <alias_name>
--type <ftp|samba|tftp>
--host <ip_address>
--path <share_directory>
[--user <user_name>]
[--port <port>]
2. Save trap settings (config)# save trap --location <filestore_alias>
[--default]

CONFIGURATION > ALERTING SETUP (SNMP Traps continued) 23 Enable or disable SNMP traps (config)# set trap service
--status <on|off>
Load SNMP trap events settings from a file (config)# load trap
--location <filestore_alias>
--file <name>
Send a test trap to verify communication (config)# test trap event
Configure SNMP v1 traps for alerting (config)# set trap v1
--community <name>
--ip <ip_address>
--port <port>
See the CLI Guide for details about SNMP v2c and v3 traps

ADMINISTRATION > PATCHES 24 Display available appliance upgrades (config)# show upgrade
--list
--history
--status
Download or upload an upgrade file (config)# load upgrade
[- -file <filename>]
[- -location <file location>] Run without parameters to see a list of choices
Display status of upgrade file download (config)# show download --file <filename> Cancel, pause, resume download (config)# cancel download
--file <filename>
(config)# pause download
--file <filename>
(config)# resume download
--file <filename>
Install upgrade file (config)# install upgrade --file <upgrade_file> [--force <upgrade_file]

ADMINISTRATION > HOTFIXES 25 View available appliance hotfixes (config)# show hotfix list
[--id <hotfix_id>]
[--module
<app|web|proxy|email>]
Download or upload a hotfix to appliance (config)# load hotfix
- -id <hotfix id>
- -file <name>
- -location <alias>
Display status of hotfix download (config)# show download hotfix
--file <filename>
--id <hotfix id>
Show hotfix history (config)# show hotfix history

ADMINISTRATION > HOTFIXES (Continued) 26 Stop, pause, or resume download (config)# cancel download hotfix [--id <id>]
[--file <filename>]
(config)# pause download hotfix [--id <id>]
[--file <filename>]
(config)# resume download hotfix [--id <id>]
[--file <filename>]
Install hotfix (config)# install hotfix [--id <hotfix_id>]
Remove hotfix (config)# delete hotfix [--id <id>] [--file <filename>]
Uninstall hotfix (config)# uninstall hotfix [--id <hotfix_id>]

ADMINISTRATION > PROXY SETTINGS 27 Display the current internet proxy information (config)# show internet_proxy
Configure the proxy interface that the appliance will use to contact Forcepoint servers for hotfixes and upgrades (config)# set internet proxy --ip <ip address>
--port <port>
[--user <username>]
[--password <password>]
Delete the current internet proxy information (config)# delete internet_proxy

ADMINISTRATION > BACKUP UTILITY 28 View available backups (config)# show backup list
--location
<local | filestore_alias>
Display configured backup schedule (config)# show backup schedule
Create a full appliance backup now 1. Define a remote storage location: (config)# set filestore --alias <alias_name>
--type <ftp|samba|tftp>
--host <ip_address>
--path <share_directory>
[--user <user_name>]
[--port <port>] 2. Create backup (config)# create backup now
<local | filestore_alias>
[--desc “<description>”] -–type <full|email|web>

ADMINISTRATION > BACKUP UTILITY (continued) 29 Define a schedule of automated backups (config)# create backup schedule --location
<local|filestore_alias>
--freq
<daily|weekly|monthly>
--day <Mon|Tue|Wed|Thu|
Fri|Sat|Sun>
--date <integer>
--time <hh:mm>
--type <full|web|email>
Cancel all scheduled backups (config)# cancel backup schedule
Delete all backup files in a specific location or delete one file (config)# delete backup [--file <file_name|all>]
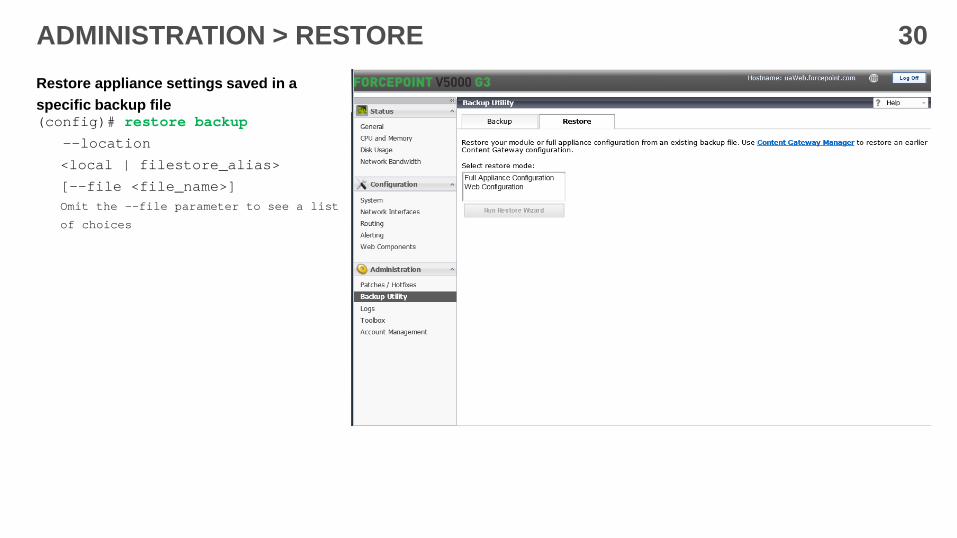
ADMINISTRATION > RESTORE 30 Restore appliance settings saved in a specific backup file (config)# restore backup --location
<local | filestore_alias>
[--file <file_name>] Omit the -–file parameter to see a list
of choices

ADMINISTRATION > LOGS & CONFIGURATION SUMMARY 31 Create a configuration summary for Technical Support analysis
1. Define a remote storage location: (config)# set filestore --alias <alias_name>
--type <ftp|samba|tftp>
--host <ip_address>
--path <share_directory>
[--user <user_name>]
[--port <port>] 2. Create configuration summary (config)# save configsummary --location
<filestore_alias>
Display a list of log file types (config)# show log typelist --module <app|all>] App means list the file types for the entire appliance. All means list file types for the modules.

ADMINISTRATION > LOGS (continued) 32 Display last “n” lines of the appliance log file
(config)# show log lastline
--line <integer>
--type <audit|module|system>
--module <app|email|proxy|
web|network-agent>
Display data as it is appended to the appliance log file (config)# show log realtime --filter <string>
--type <audit|module|system>
--module <app|email|proxy|web|
network-agent>
--timeout <integer>

ADMINISTRATION > LOGS (continued) 33 Configure when log files are to be archived
(config)# set log archive
--type <system|audit|email|
network-agent|web>
--size <integer|string|
--freq <weekly|monthly|yearly>
Display log file archiving settings (config)# show log archive
--type <system|audit|email| network-agent|web>
Zip the log file and move it to a remote filestore (config)# save log
--module <all|app|email|
network-agent|proxy|web>
--type <all|audit|module|system>
--location <filestore_alias>
See slide 31 for filestore definition command.

ADMINISTRATION > TOOLBOX 34 Custom block pages are described in the online AP-WEB API Guide Enable or disable remote CLI access via SSH. (config)# set access ssh
--status <on|off> Display whether remote CLI access via SSH is enabled (config)# show access ssh
--status

ADMINISTRATION > ACCOUNT MANAGEMENT 35 Change the account password (config)# set account admin --password
You will be prompted to enter the new password.
Define an email address for admin account password recovery (config)# set account email --address <address>
Display the SMTP server settings used with admin email address, (config)# show account smtp
Define an SMTP server for admin account password recovery (config)# set account smtp --host <location>
--port <port>
--user <name>
Test the email address for password recovery (config)# send test_email

ADMINISTRATION > ACCOUNT MANAGEMENT (continued) 36 Delete the password recovery email address (config)# delete account email
Delete SMTP settings (config)# set account smtp --address <address>
Display Technical Support account access or activity history (config)# show account tech-support --status
(config)# show account tech-support --history
The two parameters cannot be used at the same time. Enable or disable access for Technical Support (config)# set account tech-support --status <on|off>

ADDITIONAL COMMANDS 37
All commands in this Visual Primer, plus additional commands that do not map to a previous console screen, are described in the TRITON Appliances CLI Guide for version 8.3. The CLI Guide is at the Support website under Documentation > Forcepoint Appliances.