map intelligence for obiee installation guide ii
TRANSCRIPT
Map Intelligence for OBIEE Installation Guide ii

Map Intelligence for OBIEE Installation Guide iii
TM
Map Intelligence for OBIEE Installation Guide iv
CONTENTS
GETTING STARTED ............................................................................................................................ 4
Before Beginning the Installation ............................................................................................... 4
ENABLING THE SESSION OF OBIEE 11.1.X .......................................................................................... 5
INSTALLING THE MI CLIENT FOR OBIEE ............................................................................................. 6
Starting MI Client for OBIEE ....................................................................................................... 15
Start MI Client for OBIEE through the Programs List ............................................................... 15
Run MI Client for OBIEE as a Service ............................................................................... 16
Running the MI Client for OBIEE configuration console ......................................................... 17
Stopping MI Client for OBIEE ................................................................................................. 18
Uninstalling MI Client for OBIEE ............................................................................................ 18
TROUBLESHOOTING ........................................................................................................................ 19
CLIENT LOGIN ISSUES................................................................................................................ 19
GLOBAL SETTINGS ISSUES ......................................................................................................... 19
LAYER ISSUES ........................................................................................................................... 19
DASHBOARD ISSUES ................................................................................................................. 20
MAP RENDERING ISSUES .......................................................................................................... 20
APPENDIX MAP INTELLIGENCE MANUALS AND GUIDES .................................................................. 21

Map Intelligence for OBIEE Installation Guide 4
GETTING STARTED
This is a guide for ins talling the Map Intelligence Client for OBIEE .
BEFORE BEGINNING THE INSTALLATION
Ensure that the fo llowing is s et up and available before insta ll ing the MI Client for OBIEE:
Verify that there is ample local disk space present (a pproximately 35 Mb is required).
Verify that the following is setup and available on the target machine:
o Windows s ystem (NT, 2000, XP , W i n do w s Se rv e r 2 003 )
o Internet Ex plorer 6.0 or hig her
o OBIEE 11.1.X
o Java D evelopment Kit (JD K) 1.5 or higher
Map Intelligence for OBIEE Installation Guide 5
ENABLING THE SESSION OF OBIEE 11.1.X
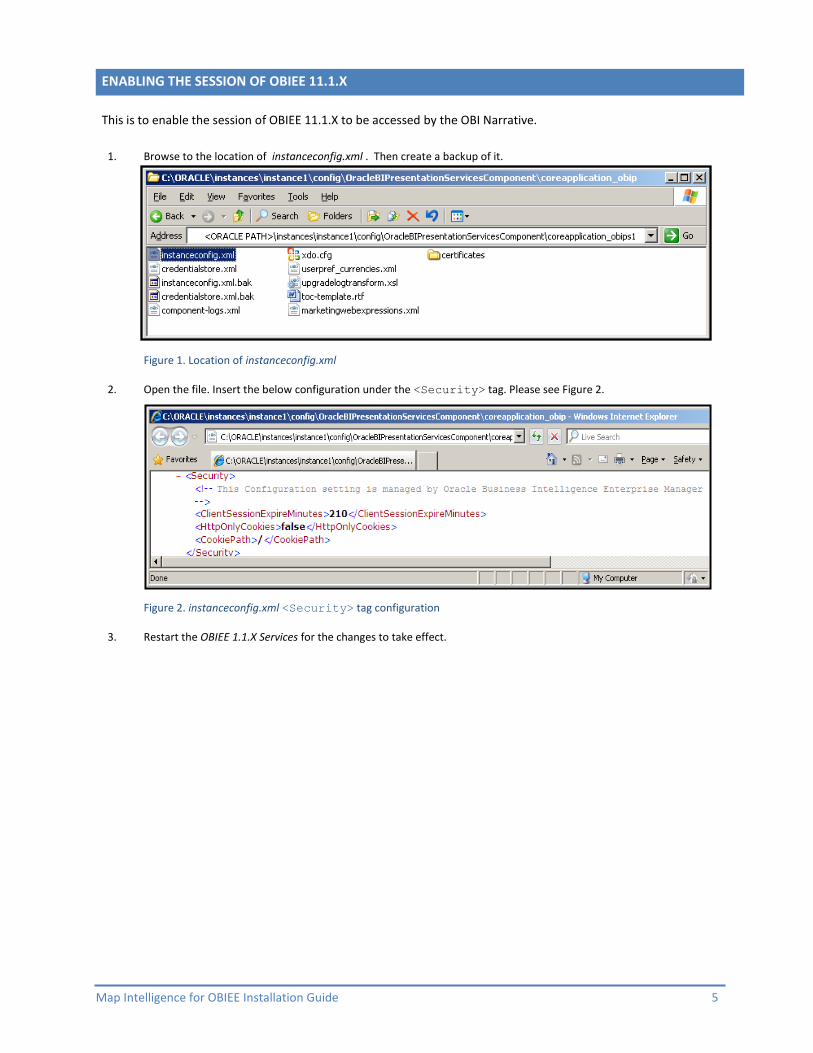
This is to enable the session of OBIEE 11.1.X to be accessed by the OBI Narrative.
1. Browse to the location of instanceconfig.xml . Then create a backup of it. Figure 1. Location of instanceconfig.xml 2. Open the file. Insert the below configuration under the <Security> tag. Please see Figure 2.
Figure 2. instanceconfig.xml <Security> tag configuration 3. Restart the OBIEE 1.1.X Services for the changes to take effect.
Map Intelligence for OBIEE Installation Guide 6
INSTALLING THE MI CLIENT
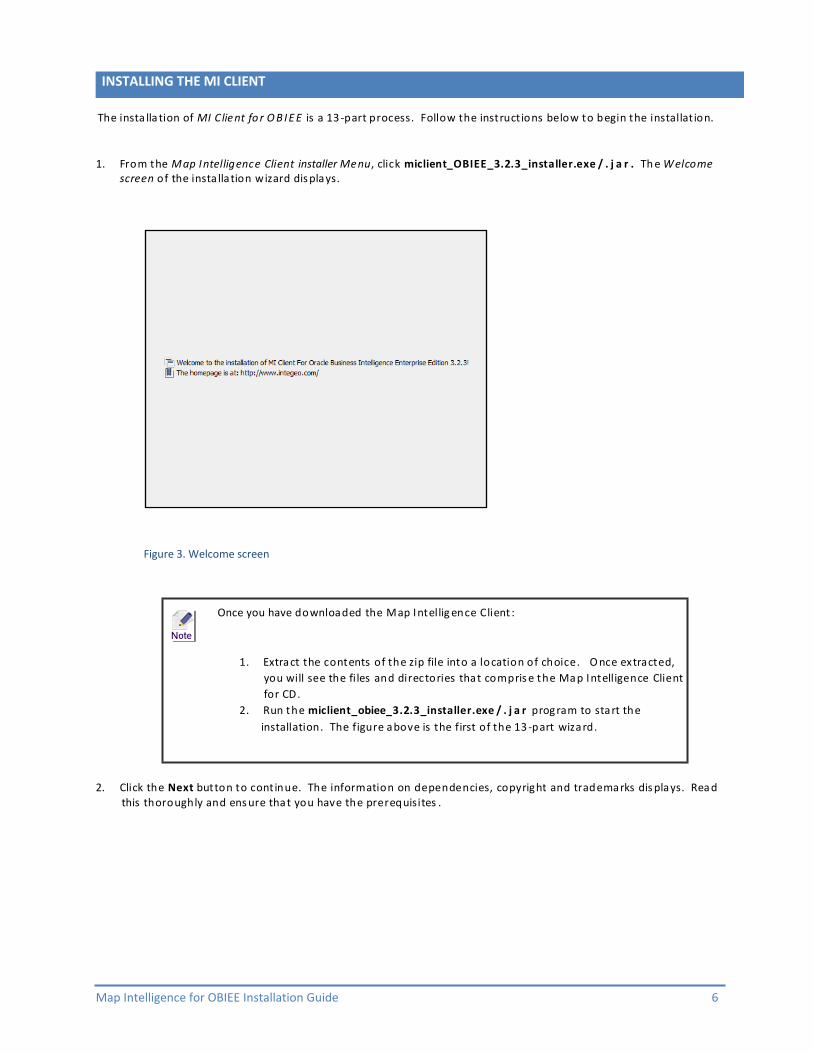
The insta lla tion of MI Client fo r O B I E E is a 13 -part process. Follow the instructions below to begin the installat ion.
1. From the Map Intelligence Client installer Menu, click miclient_OBIEE_3.2.3_installer.exe / . j a r . Th e Welcome screen of the insta lla tion wizard dis plays.
Figure 3. Welcome screen
Once you have downloaded the Map Intellig ence Client :
1. Extract the contents of the zip file into a location of choice. O nce extracted,
you will see the fi les and directories that compris e the Map Intelligence Client
for CD.
2. Run the miclient_obiee_3.2.3_installer.exe / . j a r prog ram to start the
installation. The figure above is the first of the 13 -part wizard.
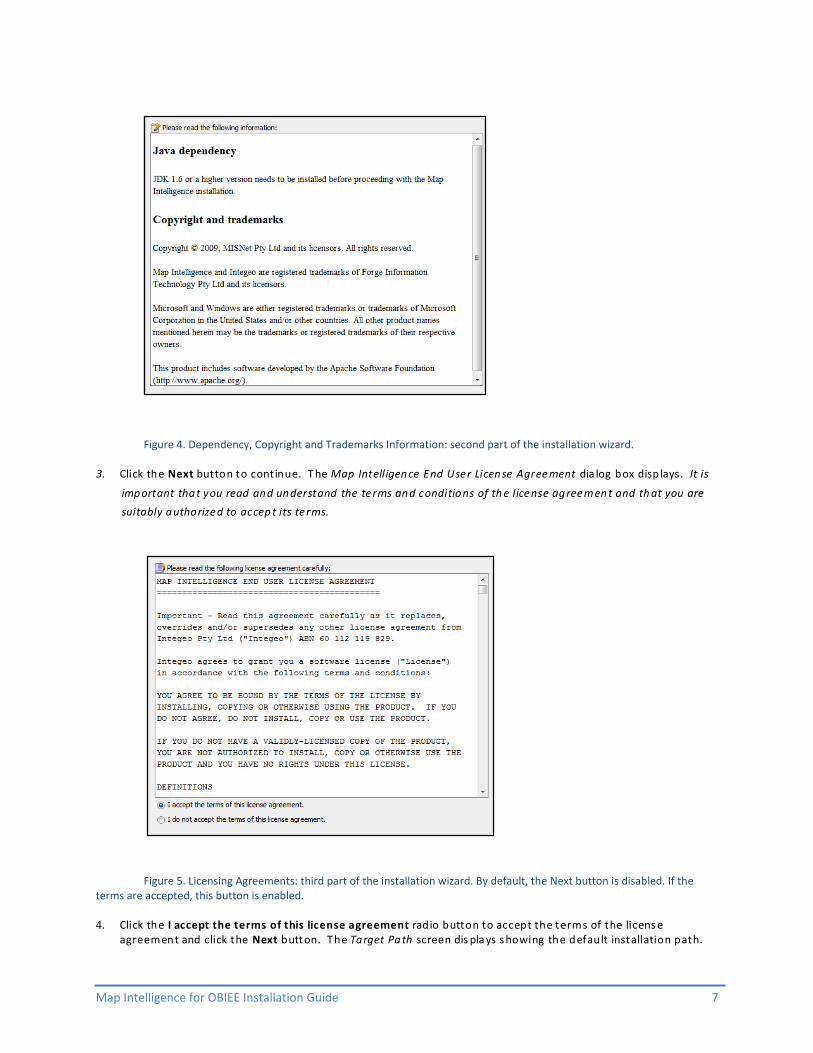
2. Click the Next button to continue. The information on dependencies, copyright and trademarks dis plays. Rea d
this thoroughly and ens ure that you have the prerequisites .
Map Intelligence for OBIEE Installation Guide 7
Figure 4. Dependency, Copyright and Trademarks Information: second part of the installation wizard.
3. Click the Next button to continue. The Map Intelligence End User License Agreement dia log box disp lays. It is
important that you read and understand the terms and conditio ns of th e license agreemen t and th at you are
suitably authorized to accep t its terms.
Figure 5. Licensing Agreements: third part of the installation wizard. By default, the Next button is disabled. If the terms are accepted, this button is enabled.
4. Click the I accept the terms of this license agreement radio button to accept the terms of the licens e
agreement and click the Next button. The Target Path screen dis plays s howing the default installation path.
Map Intelligence for OBIEE Installation Guide 8
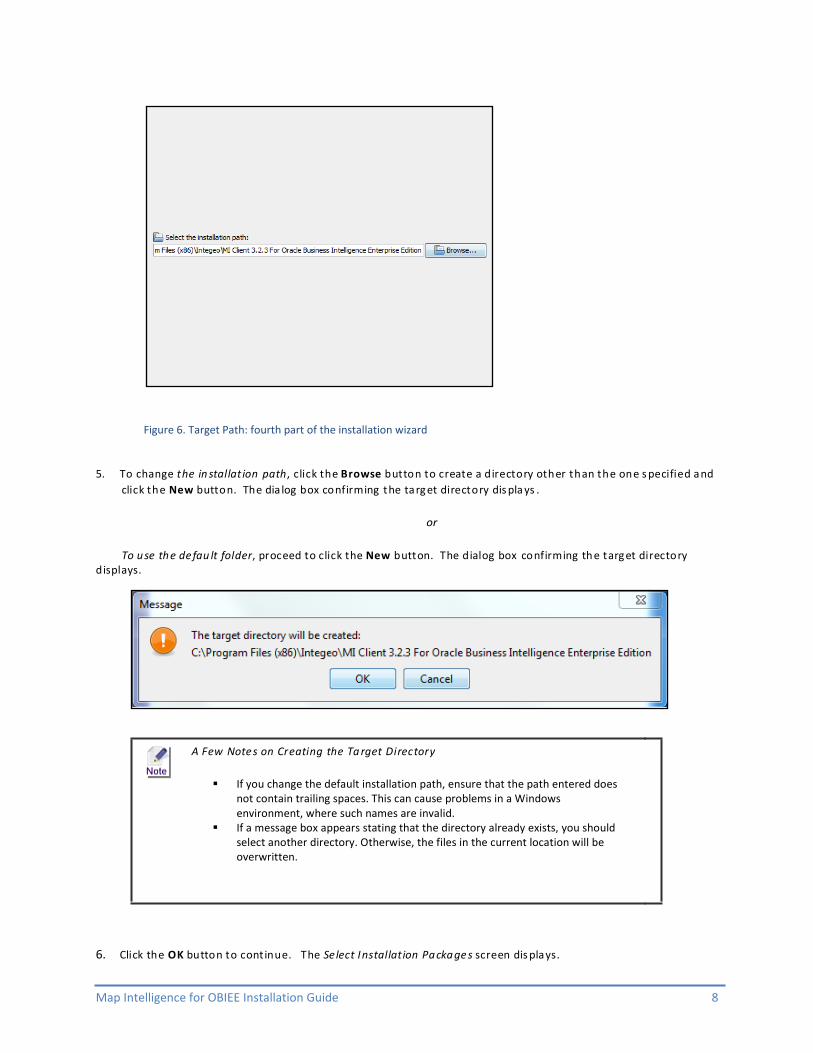
Figure 6. Target Path: fourth part of the installation wizard
5. To change the in stallat ion path, click the Browse button to create a directory other than the one s pecified and
click the New button. The dia log box confirming the targ et directory dis pla ys .
or
To use the defau lt folder, proceed to click the New button. The dialog box confirming th e targ et directory displays.
A Few Notes on Creating the Ta rget Directory
If you change the default installation path, ensure that the path entered does not contain trailing spaces. This can cause problems in a Windows environment, where such names are invalid.
If a message box appears stating that the directory already exists, you should select another directory. Otherwise, the files in the current location will be overwritten.
6. Click the OK button to continue. The Select Installation Package s screen dis plays.
Map Intelligence for OBIEE Installation Guide 9
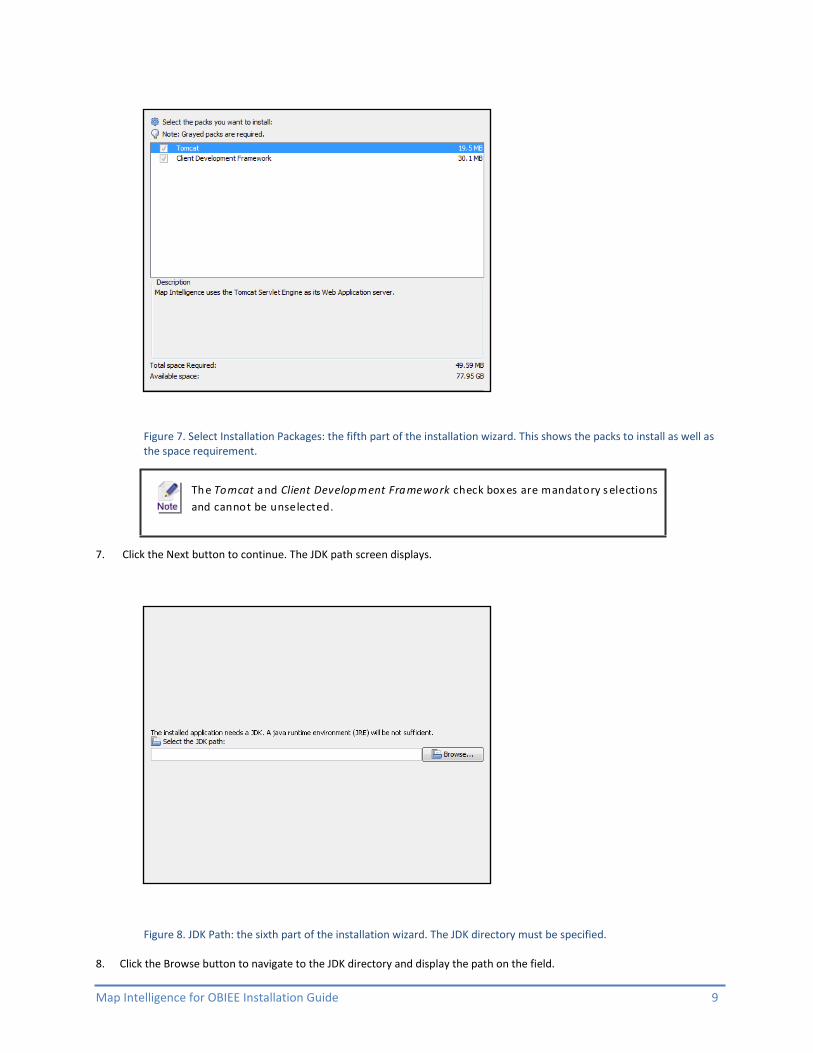
Figure 7. Select Installation Packages: the fifth part of the installation wizard. This shows the packs to install as well as the space requirement.
Th e Tomcat and Client Development Framework check box es are mandatory s elections
and cannot be unselected.
7. Click the Next button to continue. The JDK path screen displays. Figure 8. JDK Path: the sixth part of the installation wizard. The JDK directory must be specified.
8. Click the Browse button to navigate to the JDK directory and display the path on the field.
Map Intelligence for OBIEE Installation Guide 10
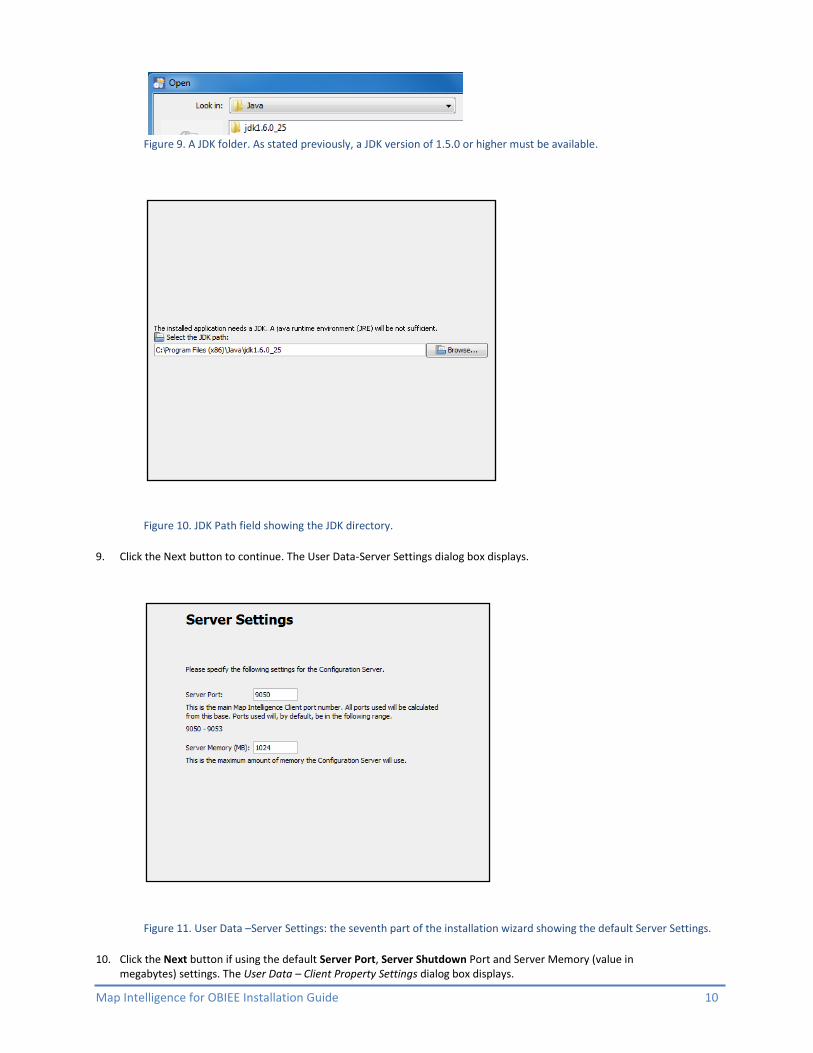
Figure 9. A JDK folder. As stated previously, a JDK version of 1.5.0 or higher must be available.
Figure 10. JDK Path field showing the JDK directory. 9. Click the Next button to continue. The User Data-Server Settings dialog box displays.
Figure 11. User Data –Server Settings: the seventh part of the installation wizard showing the default Server Settings.
10. Click the Next button if using the default Server Port, Server Shutdown Port and Server Memory (value in
megabytes) settings. The User Data – Client Property Settings dialog box displays.
Map Intelligence for OBIEE Installation Guide 11
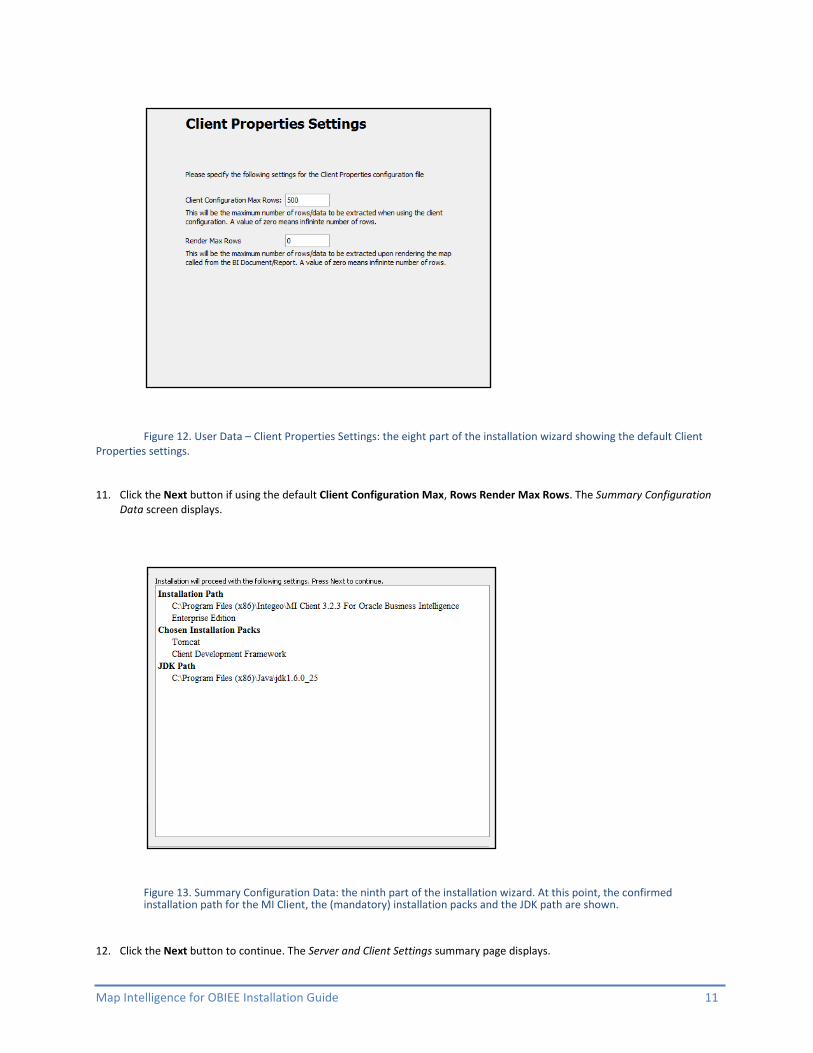
Figure 12. User Data – Client Properties Settings: the eight part of the installation wizard showing the default Client Properties settings. 11. Click the Next button if using the default Client Configuration Max, Rows Render Max Rows. The Summary Configuration
Data screen displays.
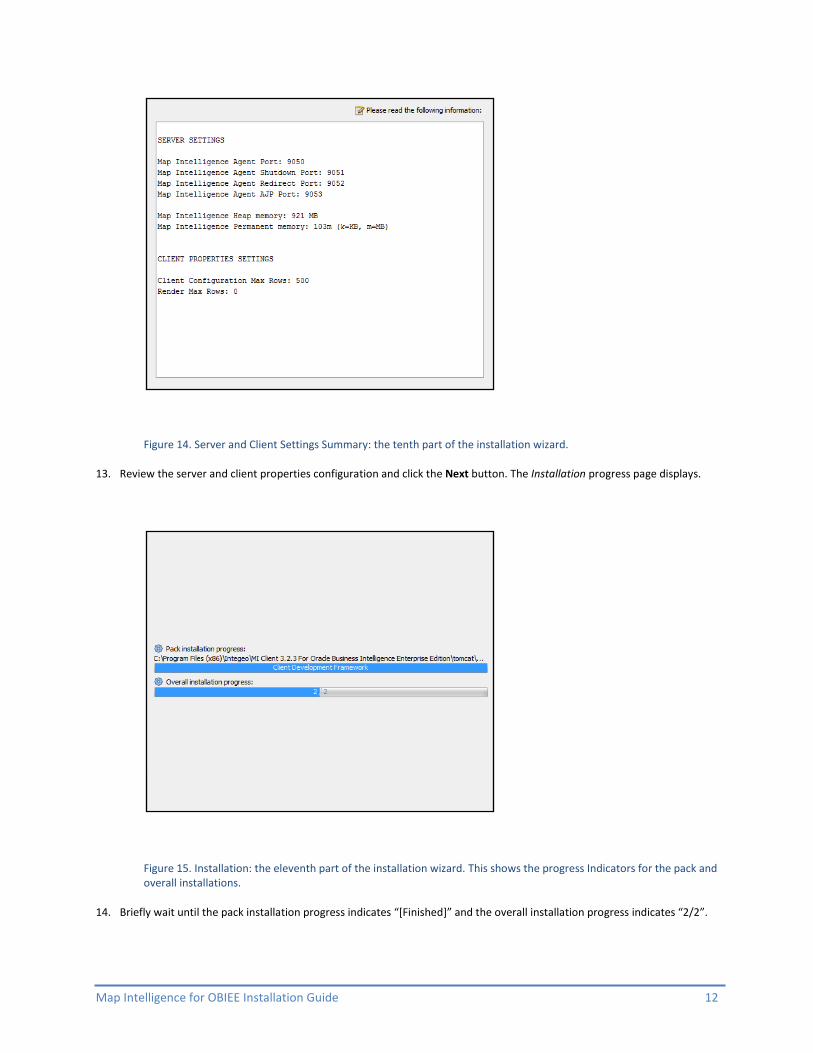
Figure 13. Summary Configuration Data: the ninth part of the installation wizard. At this point, the confirmed installation path for the MI Client, the (mandatory) installation packs and the JDK path are shown.
12. Click the Next button to continue. The Server and Client Settings summary page displays.
Map Intelligence for OBIEE Installation Guide 12
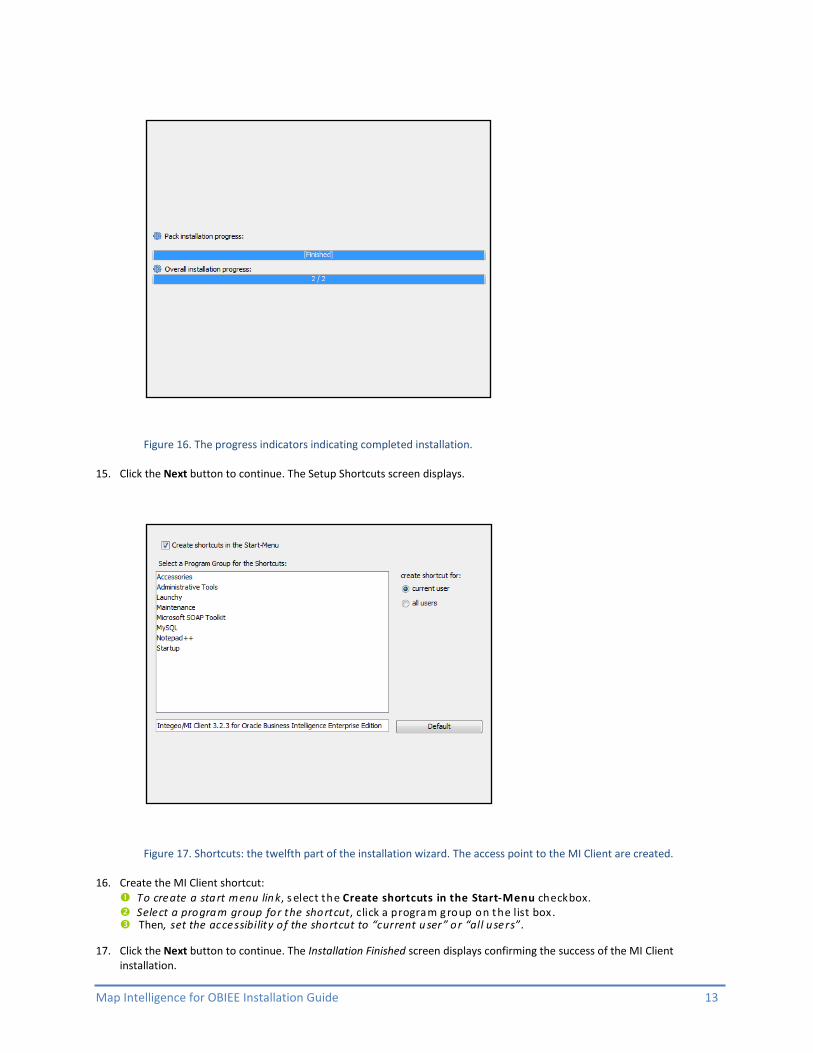
Figure 14. Server and Client Settings Summary: the tenth part of the installation wizard. 13. Review the server and client properties configuration and click the Next button. The Installation progress page displays.
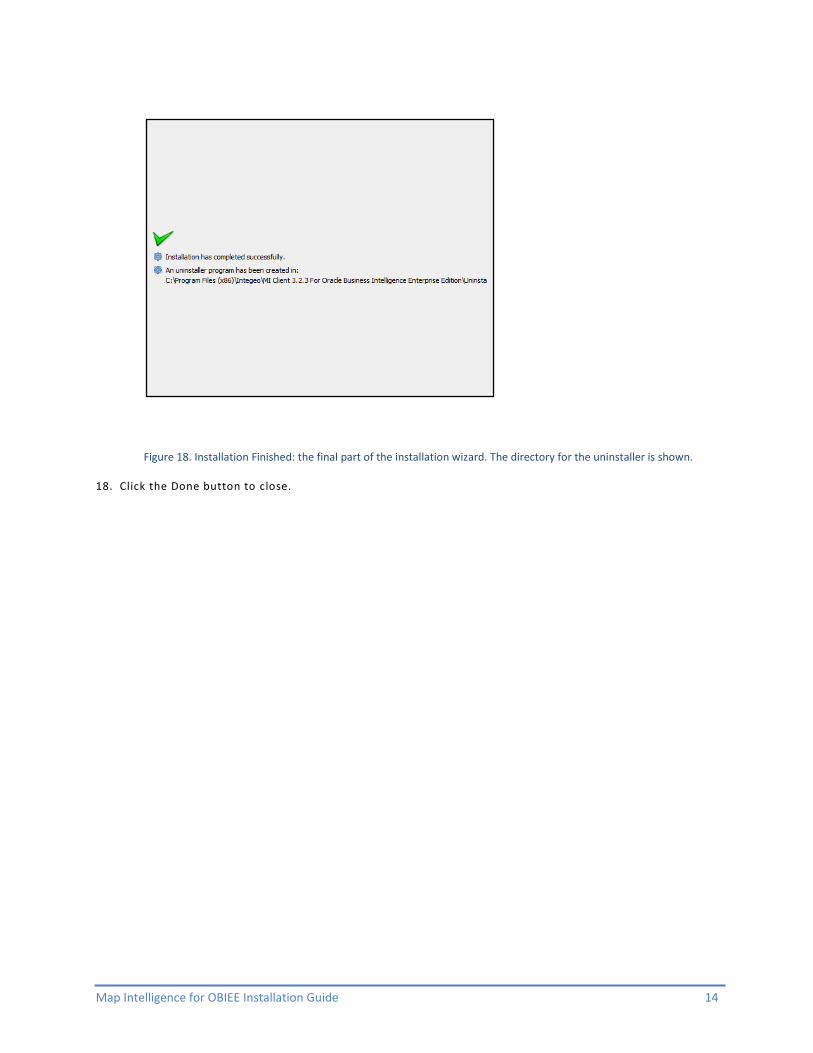
Figure 15. Installation: the eleventh part of the installation wizard. This shows the progress Indicators for the pack and overall installations. 14. Briefly wait until the pack installation progress indicates “[Finished]” and the overall installation progress indicates “2/2”.
Map Intelligence for OBIEE Installation Guide 13
Figure 16. The progress indicators indicating completed installation. 15. Click the Next button to continue. The Setup Shortcuts screen displays. Figure 17. Shortcuts: the twelfth part of the installation wizard. The access point to the MI Client are created.
16. Create the MI Client shortcut:
To create a start menu link, s elect the Create shortcuts in the Start-Menu checkbox. Select a program group for the sho rtcut, click a program g roup on the list box. Then, set the accessibility of the shortcut to “current u ser” o r “all users” .
17. Click the Next button to continue. The Installation Finished screen displays confirming the success of the MI Client installation.
Map Intelligence for OBIEE Installation Guide 14
Figure 18. Installation Finished: the final part of the installation wizard. The directory for the uninstaller is shown.
18. Click the Done button to close.
Map Intelligence for OBIEE Installation Guide 15
STARTING MI CLIENT FOR OBIEE
Ways to Start the MI C lient for OBIEE . After the s uccessful ins tallation, there are two ways to run MI Client fo r
OBIEE.
throug h the Prog rams List
by running the start MI C lient as a service
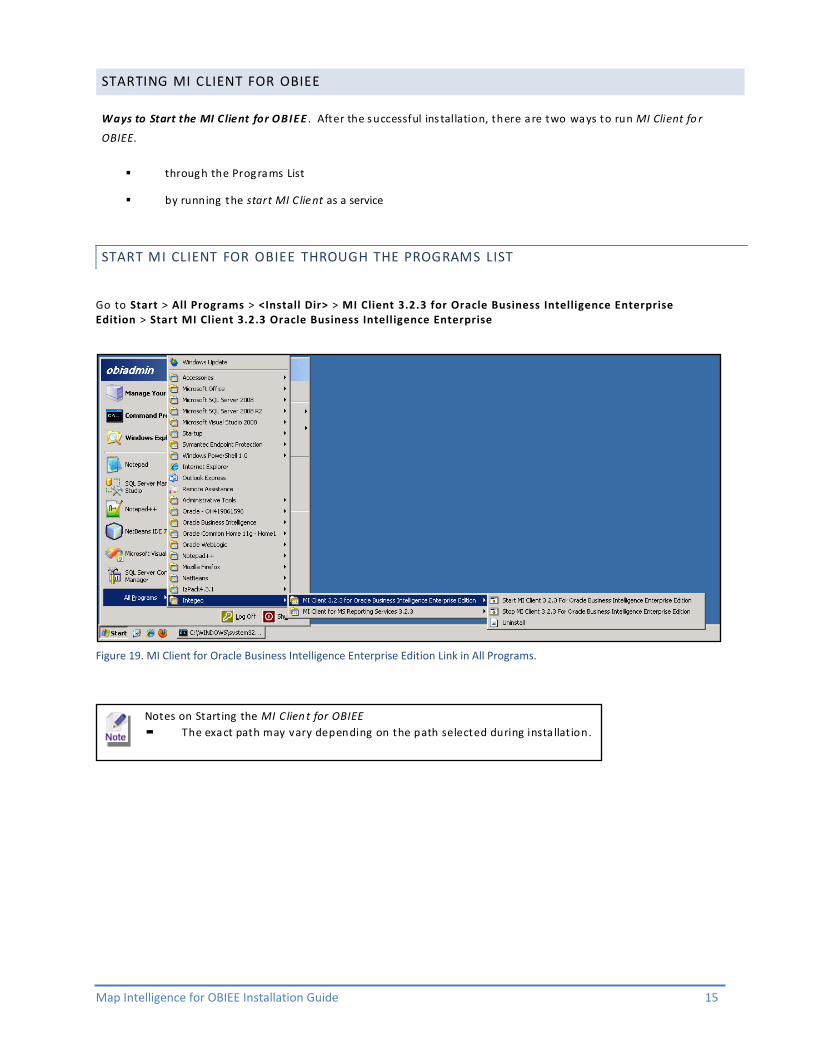
START MI CLIENT FOR OBIEE THROUGH THE PROGRAMS LIST
Go to Start > All Programs > <Install Dir> > MI Client 3.2.3 for Oracle Business Intelligence Enterprise Edition > Start MI Client 3.2.3 Oracle Business Intelligence Enterprise Figure 19. MI Client for Oracle Business Intelligence Enterprise Edition Link in All Programs.
Notes on Starting the MI C lien t for OBIEE
The exact path may vary depending on the path selected during insta llat ion.
Map Intelligence for OBIEE Installation Guide 16
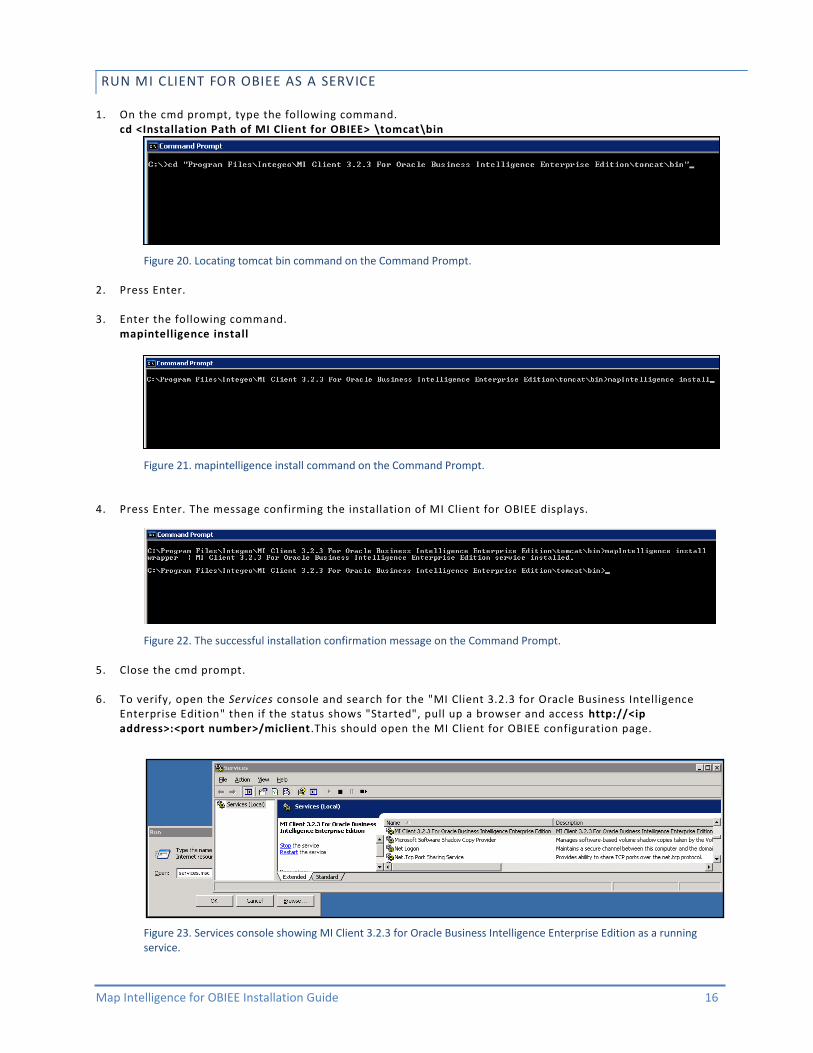
RUN MI CLIENT FOR OBIEE AS A SERVICE
1. On the cmd prompt, type the following command. cd <Installation Path of MI Client for OBIEE> \tomcat\bin
Figure 20. Locating tomcat bin command on the Command Prompt. 2. Press Enter.
3. Enter the following command.
mapintelligence install
Figure 21. mapintelligence install command on the Command Prompt. 4. Press Enter. The message confirming the installation of MI Client for OBIEE displays.
Figure 22. The successful installation confirmation message on the Command Prompt.
5. Close the cmd prompt.
6. To verify, open the Services console and search for the "MI Client 3.2.3 for Oracle Business Intelligence Enterprise Edition" then if the status shows "Started", pull up a browser and access http://<ip address>:<port number>/miclient .This should open the MI Client for OBIEE configuration page.
Figure 23. Services console showing MI Client 3.2.3 for Oracle Business Intelligence Enterprise Edition as a running service.
Map Intelligence for OBIEE Installation Guide 17
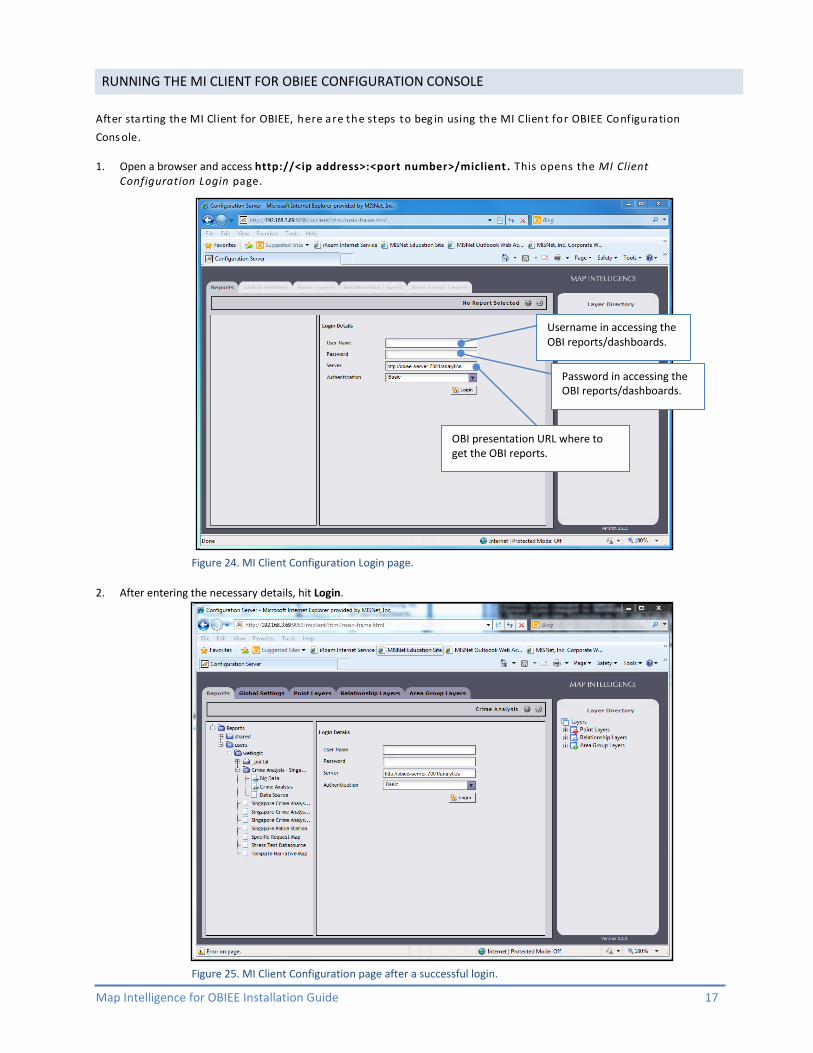
RUNNING THE MI CLIENT FOR OBIEE CONFIGURATION CONSOLE
After starting the MI Client for OBIEE, here are the steps to beg in using the MI Client for OBIEE Configuration
Cons ole. 1. Open a browser and access http://<ip address>:<port number>/miclient. This opens the MI Client
Configuration Login page.
Figure 24. MI Client Configuration Login page.
2. After entering the necessary details, hit Login.
Figure 25. MI Client Configuration page after a successful login.
Username in accessing the OBI reports/dashboards.
Password in accessing the OBI reports/dashboards.
OBI presentation URL where to get the OBI reports.
Map Intelligence for OBIEE Installation Guide 18
STOPPING MI CLIENT FOR OBIEE
Go to Start > All Programs > <Install Dir> > MI Client 3.2.3 for Oracle Business Intelligence Enterprise Edition > Stop MI Client 3.2.3 Oracle Business Intelligence Enterprise . Refer to the previous figure(figure 19).
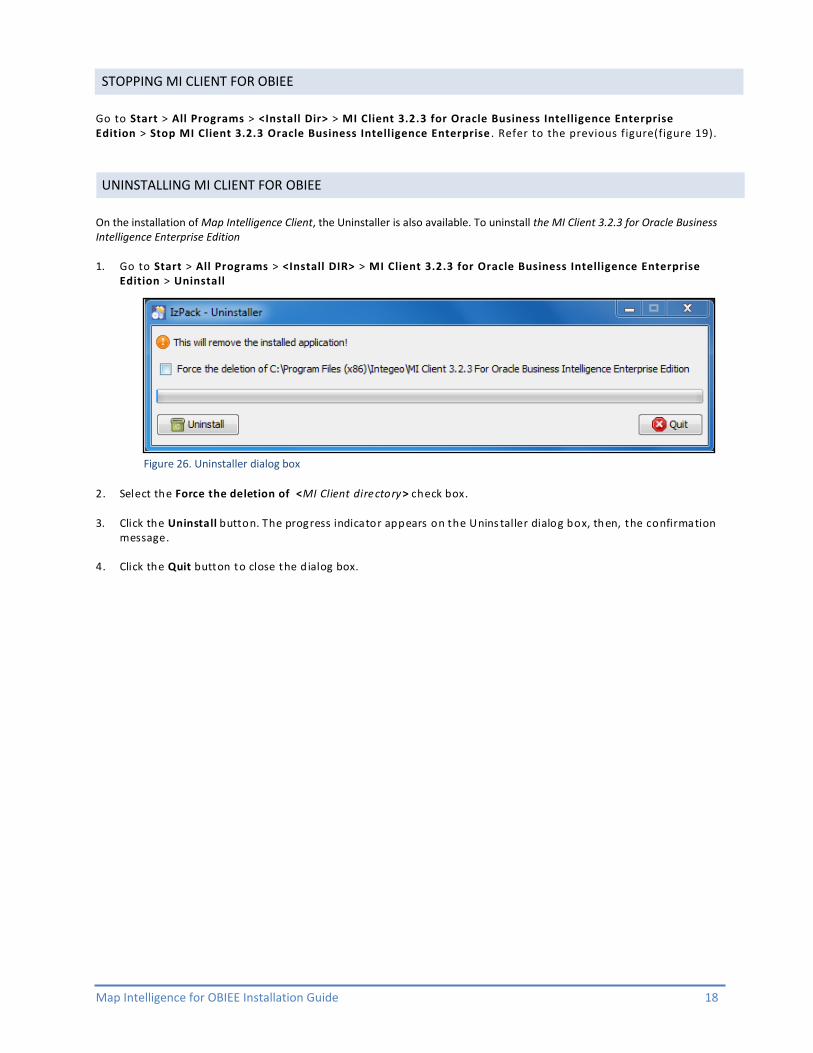
UNINSTALLING MI CLIENT FOR OBIEE
On the installation of Map Intelligence Client, the Uninstaller is also available. To uninstall the MI Client 3.2.3 for Oracle Business Intelligence Enterprise Edition 1. Go to Start > All Programs > <Install DIR> > MI Client 3.2.3 for Oracle Business Intelligence Enterprise
Edition > Uninstall
Figure 26. Uninstaller dialog box
2. Select the Force the deletion of <MI Client directory> check box.
3. Click the Uninstall button. The progress indicator appears on the Unins taller dialog box, th en, the confirmation
message.
4. Click the Quit button to close the d ialog box.
Map Intelligence for OBIEE Installation Guide 19
TROUBLESHOOTING
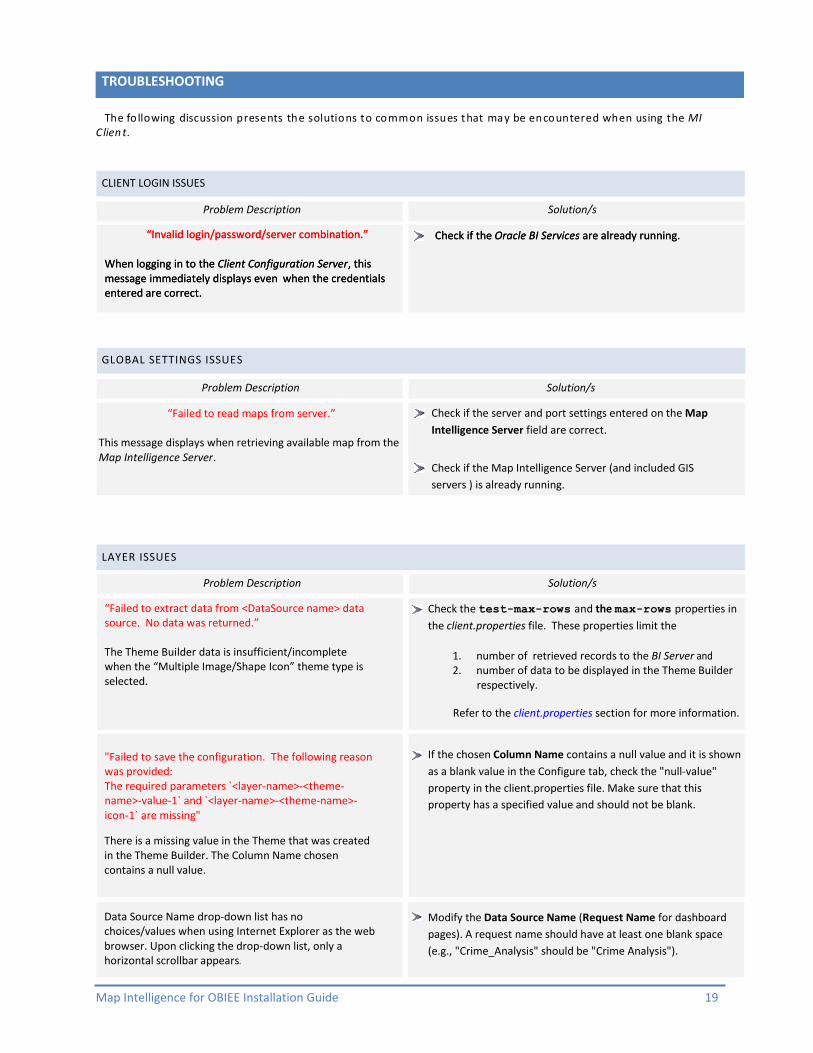
The fo llowing discussion presents the solutions to common issues that may be encountered when using the MI Clien t.
CLIENT LOGIN ISSUES
GLOBAL SETTINGS ISSUES
LAYER ISSUES
“Invalid login/password/server combination.”
When logging in to the Client Configuration Server, this message immediately displays even when the credentials entered are correct.
Check if the Oracle BI Services are already running. “Invalid login/password/server combination.”
When logging in to the Client Configuration Server, this message immediately displays even when the credentials entered are correct.
Check if the Oracle BI Services are already running.
“Failed to read maps from server.”
This message displays when retrieving available map from the Map Intelligence Server.
Check if the server and port settings entered on the Map
Intelligence Server field are correct.
Check if the Map Intelligence Server (and included GIS
servers ) is already running.
Problem Description Solution/s
Problem Description Solution/s
Problem Description Solution/s
“Failed to extract data from <DataSource name> data source. No data was returned.”
The Theme Builder data is insufficient/incomplete when the “Multiple Image/Shape Icon” theme type is selected.
"Failed to save the configuration. The following reason was provided: The required parameters `<layer-name>-<theme- name>-value-1` and `<layer-name>-<theme-name>- icon-1` are missing"
Check the test-max-rows and the max-rows properties in
the client.properties file. These properties limit the
1. number of retrieved records to the BI Server and 2. number of data to be displayed in the Theme Builder
respectively.
Refer to the client.properties section for more information.
If the chosen Column Name contains a null value and it is shown
as a blank value in the Configure tab, check the "null-value"
property in the client.properties file. Make sure that this
property has a specified value and should not be blank.
There is a missing value in the Theme that was created in the Theme Builder. The Column Name chosen contains a null value.
Data Source Name drop-down list has no choices/values when using Internet Explorer as the web browser. Upon clicking the drop-down list, only a horizontal scrollbar appears.
Modify the Data Source Name (Request Name for dashboard
pages). A request name should have at least one blank space
(e.g., "Crime_Analysis" should be "Crime Analysis").
Map Intelligence for OBIEE Installation Guide 20
DASHBOARD ISSUES
MAP RENDERING ISSUES
Problem Description Solution/s
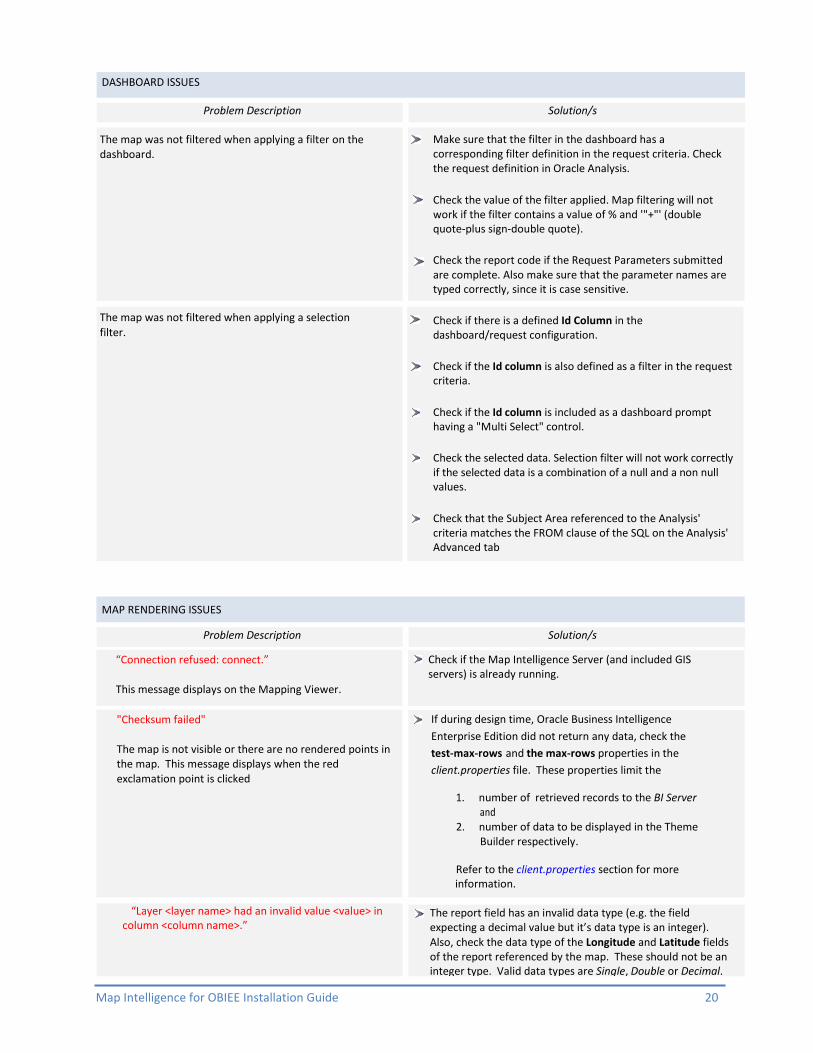
The map was not filtered when applying a filter on the dashboard. The map was not filtered when applying a selection
filter.
Make sure that the filter in the dashboard has a corresponding filter definition in the request criteria. Check the request definition in Oracle Analysis.
CCheck the value of the filter applied. Map filtering will not work if the filter contains a value of % and '"+"' (double quote-plus sign-double quote).
CCheck the report code if the Request Parameters submitted are complete. Also make sure that the parameter names are typed correctly, since it is case sensitive.
CCheck if there is a defined Id Column in the dashboard/request configuration.
CCheck if the Id column is also defined as a filter in the request criteria.
CCheck if the Id column is included as a dashboard prompt having a "Multi Select" control.
CCheck the selected data. Selection filter will not work correctly if the selected data is a combination of a null and a non null values.
CCheck that the Subject Area referenced to the Analysis' criteria matches the FROM clause of the SQL on the Analysis' Advanced tab
Problem Description Solution/s
“Connection refused: connect.” This message displays on the Mapping Viewer.
Check if the Map Intelligence Server (and included GIS servers) is already running.
"Checksum failed" The map is not visible or there are no rendered points in the map. This message displays when the red exclamation point is clicked
If during design time, Oracle Business Intelligence
Enterprise Edition did not return any data, check the
test-max-rows and the max-rows properties in the
client.properties file. These properties limit the
1. number of retrieved records to the BI Server and
2. number of data to be displayed in the Theme Builder respectively.
Refer to the client.properties section for more information.
“Layer <layer name> had an invalid value <value> in column <column name>.”
The report field has an invalid data type (e.g. the field expecting a decimal value but it’s data type is an integer). Also, check the data type of the Longitude and Latitude fields of the report referenced by the map. These should not be an integer type. Valid data types are Single, Double or Decimal.

Map Intelligence for OBIEE Installation Guide 21
APPENDIX MAP INTELLIGENCE MANUALS AND GUIDES
Product documentation for Spectrum Spatial for Business Intelligence, including Map Intelligence SP and the clients are located here:
support.pb.com/spectrum
All documentation can be found under the Solution Guides section of the Product Documentation.