manual user usb mixer dmx-4dl.owneriq.net/f/f51eed2f-4935-4054-ad16-b5e164dcd863.pdf · dmx-4 usb...
TRANSCRIPT
DMX-4 USB Mixer
User Manual
DMX-4 USB Mixer User Manual
1
Antex Electronics Corporation 19821 Hamilton Avenue Torrance, California 90502 www.antex.com
Copyright © 2008 Antex Electronics Corporation. All Rights Reserved. No portion of this manual may be reproduced without prior written consent from Antex Electronics. Part number 9000-2489-7006 Rev B.
FCC Compliance Statement for United States Users This equipment has been tested and found to comply with the limits for a Class B device, pursuant to Part 15 of the FCC Rules. In order to maintain compliance with FCC regulations, shielded cables must be used with this equipment. Operation with non-approved equipment or unshielded cables is likely to result in interference to radio and TV reception. Changes or modifications made to this equipment not expressly approved by Antex Electronics could void the user’s authority to operate the equipment.
IMPORTANT SAFETY INSTRUCTIONS
• Read Instructions – Read all Safety Instructions before operating equipment.
• Retain Instructions – Save these instructions for future reference.
• Heed Warnings – All warnings and these instructions should be adhered to.
• Follow Instructions – All operating and use instructions should be followed.
• Cleaning –Do not use liquid or aerosol cleaners. Use a damp cloth for cleaning.
DMX-4 USB Mixer User Manual
2
• Attachments – Do not use attachments not recommended by the manufacturer as they may cause hazards.
• Water and Moisture – Do not use this product near water – for example near a bathtub, wash bowl, kitchen sink, out in the rain or in a room where moisture is likely to occur.
• Accessories – Do not place on an unstable surface (cart table or tripod) where tipping is a possibility.
• Ventilation – Install unit in well ventilated area where self generated heat may escape. Bookcases or cabinets should have proper venting to allow heat to escape.
• Power outlet – A properly grounded wall outlet must be used. Do not use a plug adapter that bypasses the three-terminal ground plug. Unplug the unit during a lightning storm or when not being used for prolonged periods.
• Cord Protection – Route your power cords and other connecting cables out of traffics way so as not to be walked on or traveled over by carts wheels, or a tripping hazard may occur. Do not place items on top of or against the cord so as to pinch the cord.
• Overloading – Do not overload wall outlets, extension cords, or integral convenience receptacles as this can result in a risk of fire or electrical shock.
• Object and Liquid Entry – Never push objects of any kind into this product through openings as they may short-out parts that could cause a fire. Never spill liquid of any kind on the product.
• Servicing – Do not attempt to service this product yourself; there are no customer serviceable parts
DMX-4 USB Mixer User Manual
3
inside. Refer all servicing to qualified service personnel.
• A product and cart combination should be moved with care. Quick stops, excessive force, and uneven surfaces may cause the product and cart combination to overturn.
• Damage Requiring Service – Unplug this product from the wall outlet and refer servicing to a qualified service person under the following conditions:
a. When the power-supply cord or plug is damaged.
b. If liquid has been spilled, or objects have fallen into the product.
c. If product has been exposed to rain or water.
d. If the product does not operate normally by following the operating instructions. Adjust only those controls that are covered by the operating instructions as an improper adjustment of other controls may result in damage and will often require extensive work by a qualified technician to restore the product to its normal operation.
e. If the product has been dropped or damaged in any way.
f. When the product exhibits a distinct change in performance – this indicates a need for service.
• Replacement Parts – When replacement parts are required, be sure the service technician has used replacement parts specified by the manufacturer or that have the same characteristics as the original part. Unauthorized substitutions may result in fire, shock, or other hazards.
DMX-4 USB Mixer User Manual
4
• Safety Check – Upon completion of any service or repairs to this product, ask the service technician to perform safety checks to determine that the product is in proper operating condition.
• Heat – The product shall be situated away from sources such as radiators, heat resistors, heat registers, stoves, or amplifier that produce heat.
DMX-4 USB Mixer User Manual
5
General description: The DMX-4 is a 4 channel microphone preamplifier with 4 analog to digital converters (A/D). The DMX-4 connects to a PC via a USB 2.0 connection so that audio can be recorded onto the PC’s hard drive. There are 2 configurable monitor outputs, which can be independently set to be a mix of any combination of the 4 input channels. The monitor outputs can be used to connect to a PA system or for video/teleconferencing. All level adjustments are solid state; there are no mechanical knobs on the unit. Level adjustments are made by moving virtual slider controls in the Antex Mixer Program running on the PC. This allows for settings to be stored and retrieved as a “scene”. Also, if the PC connected to the DMX-4 is connected to a LAN, adjustments can be made from a remote computer somewhere on the LAN. The microphone inputs are professional balanced XLR connectors. The differential input impedance is 2K. Phantom power of +14 volts can be turned on under control of the Antex Mixer Program. Phantom power is connected through a 1K resistor on each line. In “microphone” setting, all 4 inputs have a gain range of +10dB to +85dB. Note that 65dB of gain is done in the analog circuitry, and the additional 20dB is done in the digital domain. As you increase the gain on any input, the level of this audio will get louder in the monitor output and in the recording level. However, once you exceed 65dB, the recording level will continue to increase, but the audio in the monitor output will not increase any further. Input channels 1 and 2 have a
DMX-4 USB Mixer User Manual
6
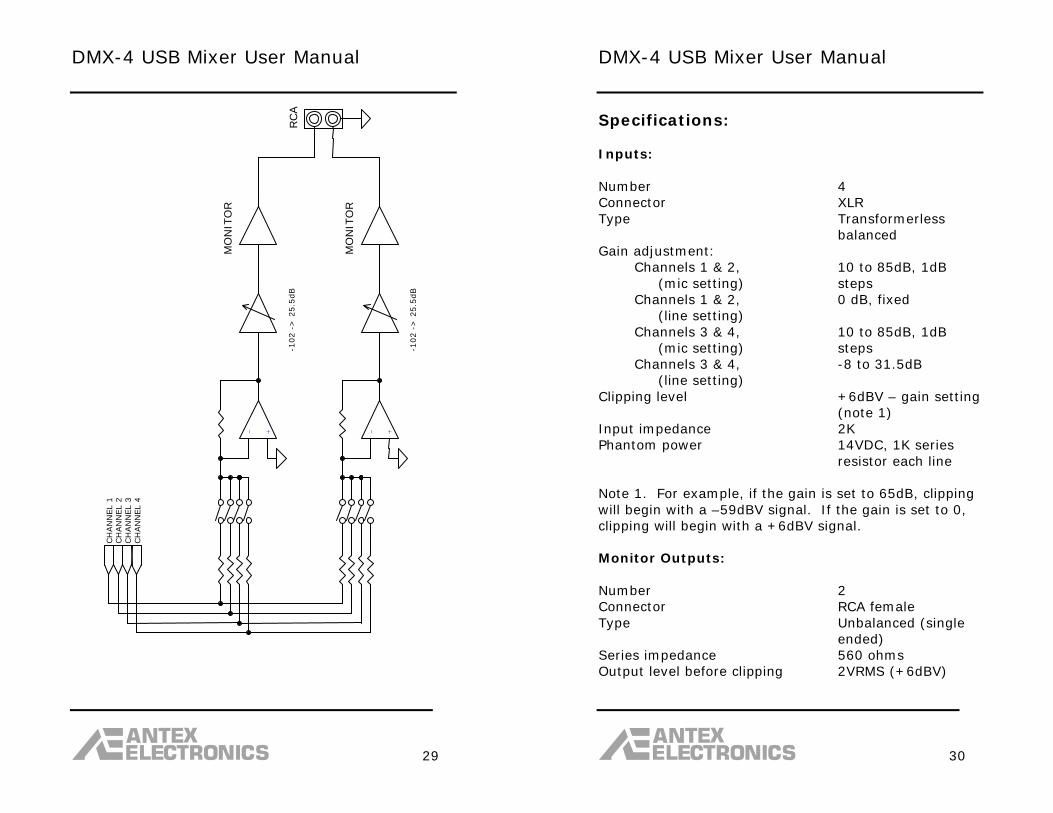
fixed gain of 0dB in “line” setting. Inputs 3 and 4 have an adjustable gain of –8 to +31.5dB in “line” setting. (Although the circuitry is capable of a lower gain setting than –8dB, the setting is limited in the Antex Mixer Program to –8dB so that it is not possible for the analog circuitry to go into clipping before the A/D.) The monitor outputs are single ended RCA jacks, capable of a 2VRMS signal (+6dBV). The level adjustment range is from –102dB to +25.5dB. The output has a 560 ohm internal series resistance to protect it from short circuits to ground. The equipment that the monitor output is connected to should have an input impedance of 2K or greater. The A/D converter sample rate can be set to 8, 11.025, 12, 16, 22.05, 24, 32, 44.1, or 48KHz. This allows for optimization between file size and audio fidelity. All 4 inputs are digitized separately, and 4 tracks may be recorded to hard disk. The inputs may be mixed in any combination to the 4 record channels using the Antex Mixer Program. On your PC, the 4 record channels are accessed as 2 stereo Wave Devices. Record channels 1 and 2 are left and right of Wave Device 1, respectively, and record channels 3 and 4 are left and right of Wave Device 2. Power input to the DMX-4 can be from +5 to +15 VDC. Power consumption is about 5 watts. The unit is supplied with a 9V international wall adapter, but can also be powered by battery packs or from an automobile accessory plug (“cigarette lighter”). The power indicator LED changes gradually from green at 12 volts to red at 5 volts so the user can note a color shift on battery power when the battery gets low.
DMX-4 USB Mixer User Manual
7
What’s a ”dB” and why should I care? Throughout this manual, the term “dB” is used. This stands for decibel. You may think, “but I just want to record a legal proceeding. I don’t want to be a recording engineer. Why should I care about this?” Although dB’s may seem complicated mathematically: dB = 20 x log(signal level/reference signal level) Using dB’s gives you a better feel for how changing the volume will sound to your ears. For example, if you increase the output of your stereo amplifier from 1/10 of a watt to 1 watt, this seems like a small change, only 9/10 of a watt. If you increase the output from 4 watts to 40 watts, this seems like a real big change. However, in both cases you are increasing the output by 10dB, and surprisingly, in both cases it will sound to you like the music only got twice as loud. Negative dB’s means quieter. –10dB sounds half as loud. Positive dB’s means louder. +10dB sounds twice as loud. 0dB means no change in the loudness when referring to a slider setting. For VU meters, 0dB is the maximum level. Severe distortion occurs above 0dB. Installing the Software - XP
• The Antex Mixer Program requires Microsoft .NET Framework 2.0. If you do not have this installed on your computer, the InstallShield will stop. To
DMX-4 USB Mixer User Manual
8
check first if you have this on your computer already, click the “Start” button on the lower left of your computer screen. Click “Control Panel”, then “Add or Remove Programs”. When the program list is populated, scroll down and see if there is “Microsoft .NET Framework 2.0”. If not, open Internet Explorer and go to :
http://www.microsoft.com/downloads/details.aspx?displaylang=en&FamilyID=0856eacb-4362-4b0d-8edd-aab15c5e04f5 (Or, you can go to http://microsoft.com and type “.NET Framework 2.0” in the Search box.) Follow the instructions to download and install .NET Framework 2.0.
• Go to www.antex.com and download the latest software driver for the DMX-4. The installation process is fairly straightforward, using the InstallShield.
• Run the “Setup.exe” program. • The first dialog box will say “Preparing to
Install…” • On the second dialog box, click “Next”.
DMX-4 USB Mixer User Manual
9
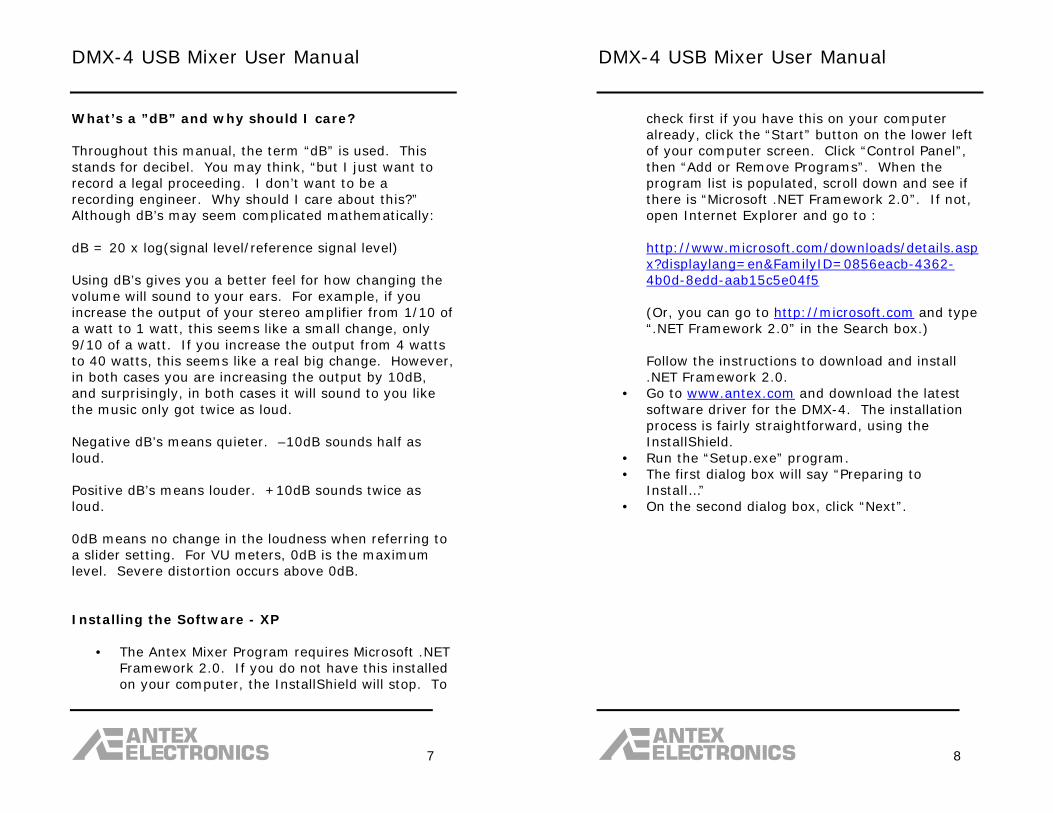
Enter the User Name and Organization, click “Next”.
DMX-4 USB Mixer User Manual
10
Unless you need to change the destination folder, click “Next”. The next dialog box will say “Ready to Install the Program”. Click “Install”. After the program has been installed, the dialog box will say “InstallShield Wizard Completed”. Click “Finish”.

DMX-4 USB Mixer User Manual
11
Make sure either the USB cable is unplugged, or power is removed from the DMX-4. Then click “OK”.
If you see a dialog box like the one above, click “Continue Anyway”.
DMX-4 USB Mixer User Manual
12
Make sure the USB cable is plugged in and the DMX-4 is powered up. Click “OK”.
Click the “No, not this time” option (this is NOT the default), then click “Next”.
DMX-4 USB Mixer User Manual
13
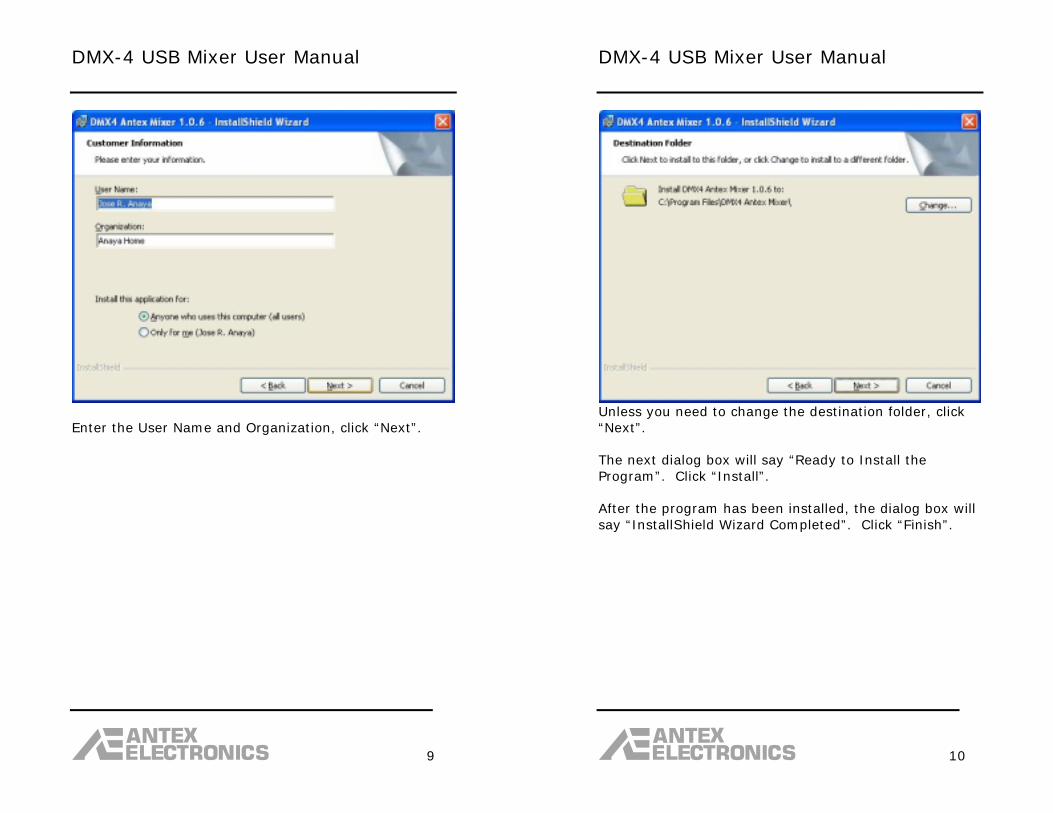
The “Install the software automatically (Recommended)” should be selected. Click “Next”.
After the driver is loaded, click “Finish”.
DMX-4 USB Mixer User Manual
14
The New Hardware Wizard will open again, this time to load the audio driver. Select the “No, not this time” option (this is NOT the default), then click “Next”.
The “Install the software automatically (Recommended)” option should be selected. Then click “Next”.
DMX-4 USB Mixer User Manual
15
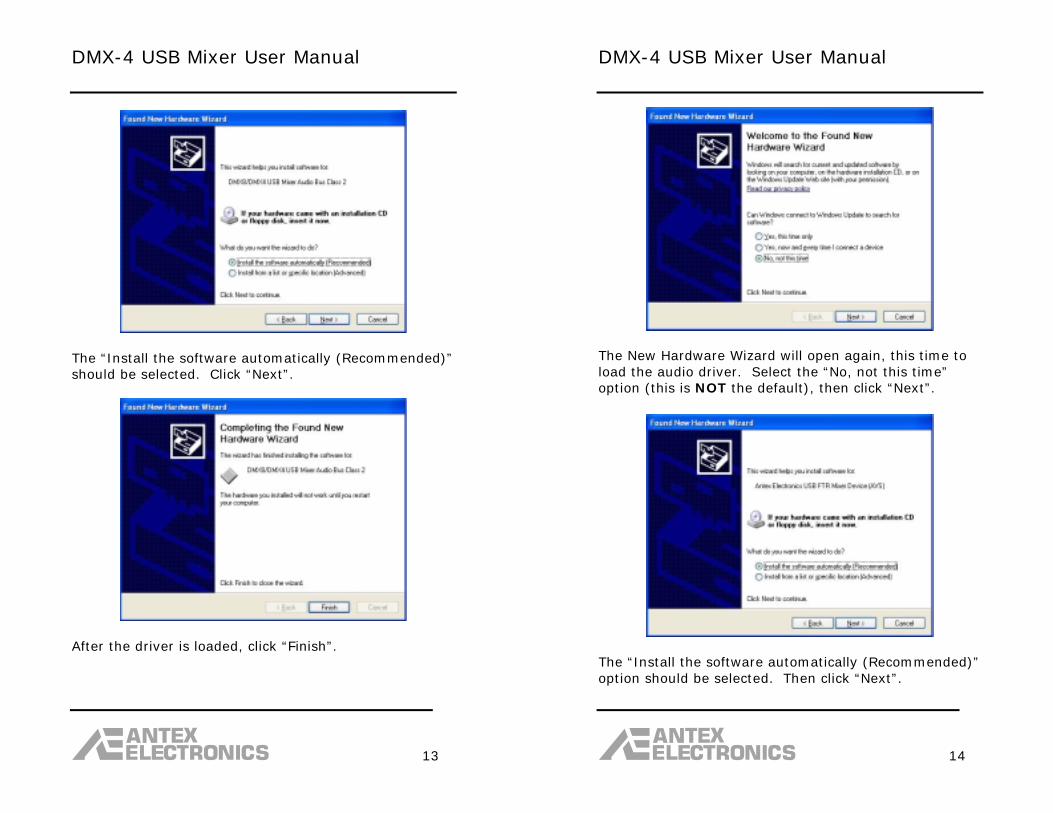
After the driver has loaded, click “Finish”.
If you get a message asking if you want to restart your computer, click “Yes”. After the computer restarts, the installation is complete. There should be a shortcut on your desktop for the Antex Mixer program.
DMX-4 USB Mixer User Manual
16
Installing the Software - Vista
• Go to www.antex.com and download the latest software driver for the DMX-4. The installation process is fairly straightforward, using the Installshield.
• Run the “Setup.exe” program. • The first dialog box will say “Preparing to
Install…” • On the second dialog box, click “Next”.
Enter the User Name and Organization, click “Next”.
DMX-4 USB Mixer User Manual
17
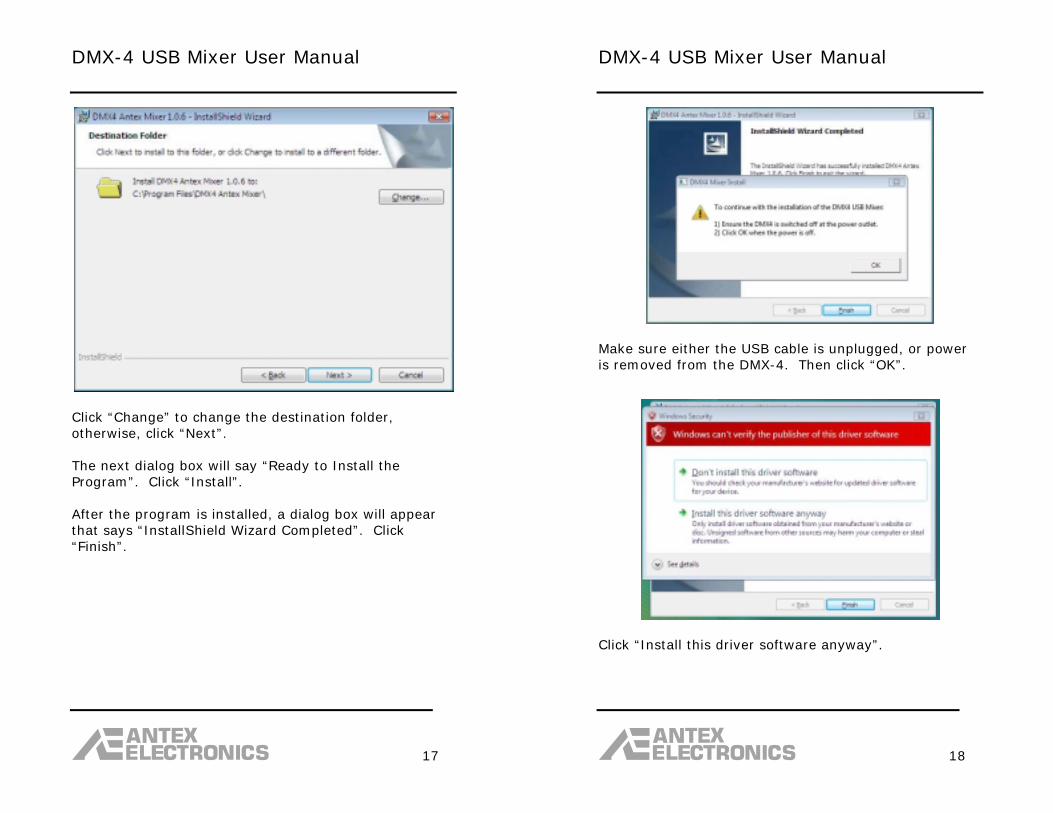
Click “Change” to change the destination folder, otherwise, click “Next”. The next dialog box will say “Ready to Install the Program”. Click “Install”. After the program is installed, a dialog box will appear that says “InstallShield Wizard Completed”. Click “Finish”.
DMX-4 USB Mixer User Manual
18
Make sure either the USB cable is unplugged, or power is removed from the DMX-4. Then click “OK”.
Click “Install this driver software anyway”.
DMX-4 USB Mixer User Manual
19
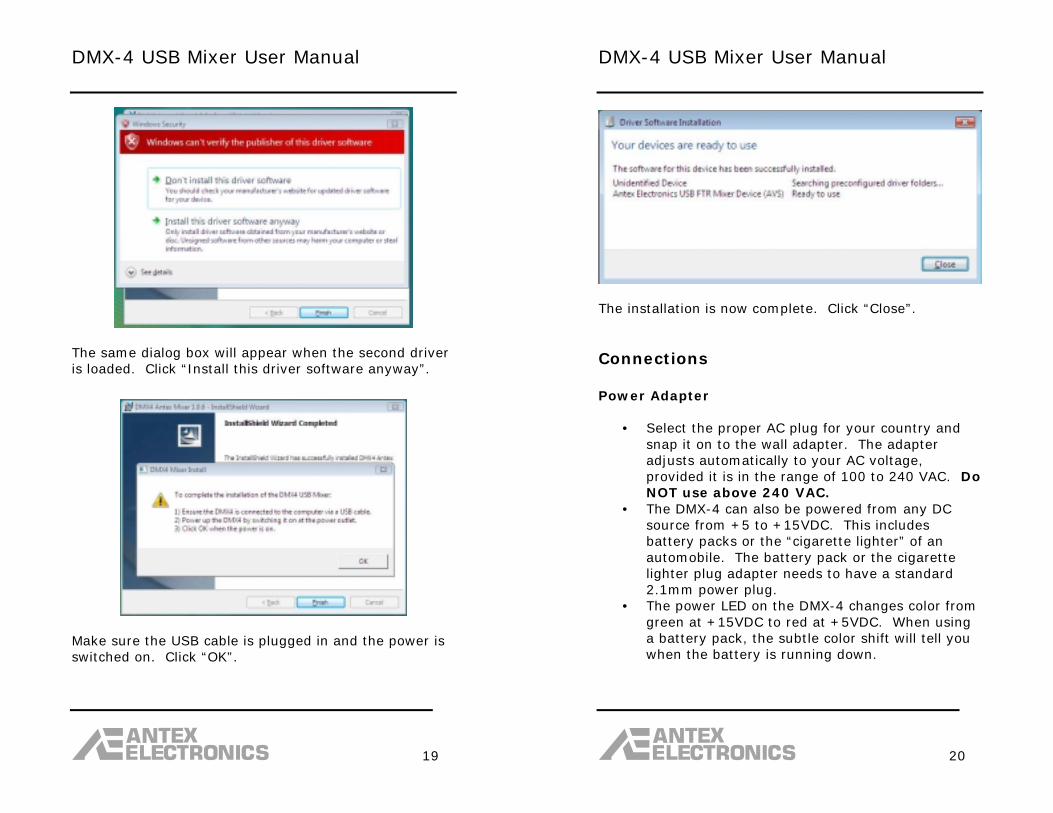
The same dialog box will appear when the second driver is loaded. Click “Install this driver software anyway”.
Make sure the USB cable is plugged in and the power is switched on. Click “OK”.
DMX-4 USB Mixer User Manual
20
The installation is now complete. Click “Close”. Connections Power Adapter
• Select the proper AC plug for your country and snap it on to the wall adapter. The adapter adjusts automatically to your AC voltage, provided it is in the range of 100 to 240 VAC. Do NOT use above 240 VAC.
• The DMX-4 can also be powered from any DC source from +5 to +15VDC. This includes battery packs or the “cigarette lighter” of an automobile. The battery pack or the cigarette lighter plug adapter needs to have a standard 2.1mm power plug.
• The power LED on the DMX-4 changes color from green at +15VDC to red at +5VDC. When using a battery pack, the subtle color shift will tell you when the battery is running down.

DMX-4 USB Mixer User Manual
21
USB Connection
• The USB specification limits the length of the USB cable to 5 meters (about 16 feet), therefore the DMX-4 should be placed near the computer. The cable supplied is 6 feet long.
• The USB port on the computer must be USB 2.0 or higher (“high speed”). The device will not work on USB 1.1.
• Plug directly into one of the computer’s USB ports. Do not go through a hub.
• Note that the USB cable plugs into the DMX-4 with the beveled side (and the molded USB logo) facing down.
Input Connections
• Dynamic or electret condenser microphones can be used with the DMX-4. Dynamic microphones generally have lower output levels and require the input gain sliders to be set higher. Electret condenser microphones require phantom power, which can be turned on in the Antex Mixer Program. Electret condenser microphones generally require a minimum of 9 to 12 volts for phantom power. Condenser microphones that require 48 volts will not work with the DMX-4.
• The DMX-4 inputs are balanced, which provides better noise and hum rejection. However, we recommend not running the microphone cables near computers, monitors, transformers or other equipment which may cause humming or buzzing in the audio. Balanced connections may be run long distances.
• Line level devices, such as video conferencing systems or telephone line interfaces may be
DMX-4 USB Mixer User Manual
22
connected to the DMX-4. Note that inputs 1 and 2 do not have gain adjustments in Line setting, the gain is fixed at 0dB. If the line level device has an output level control, this can be used to adjust the recording level. If the device does not have an output level control, then it would be better to connect it to inputs 3 or 4, which do have gain adjustment in Line setting.
• To connect unbalanced (single ended) devices, use an appropriate cable, such as XLR male to RCA male. These cables connect pins 1 and 3 of the XLR together, which grounds one of the 2 balanced inputs. We recommend keeping unbalanced connections to about 6 feet maximum.
Monitor Connections
• The monitor outputs are unbalanced (single ended) line level (2VRMS max). They are intended to connect to telephone line interfaces, video conferencing systems, or PA amplifiers.
• The loudness level of the monitor output can be adjusted with the slider control in the Antex Mixer Program.
• Use caution when connecting this or any other device to the public telephone network. Do not put too loud a signal level into the phone line. This could damage telephone equipment and/or be painfully loud to the person on the other end of the phone line.
• Any combination of the 4 inputs may be independently routed to the monitor outputs using the Antex Mixer Program. When connecting someone by phone, the caller would
DMX-4 USB Mixer User Manual
23
typically receive a mix of all inputs except him or herself.
DMX-4 USB Mixer User Manual
24
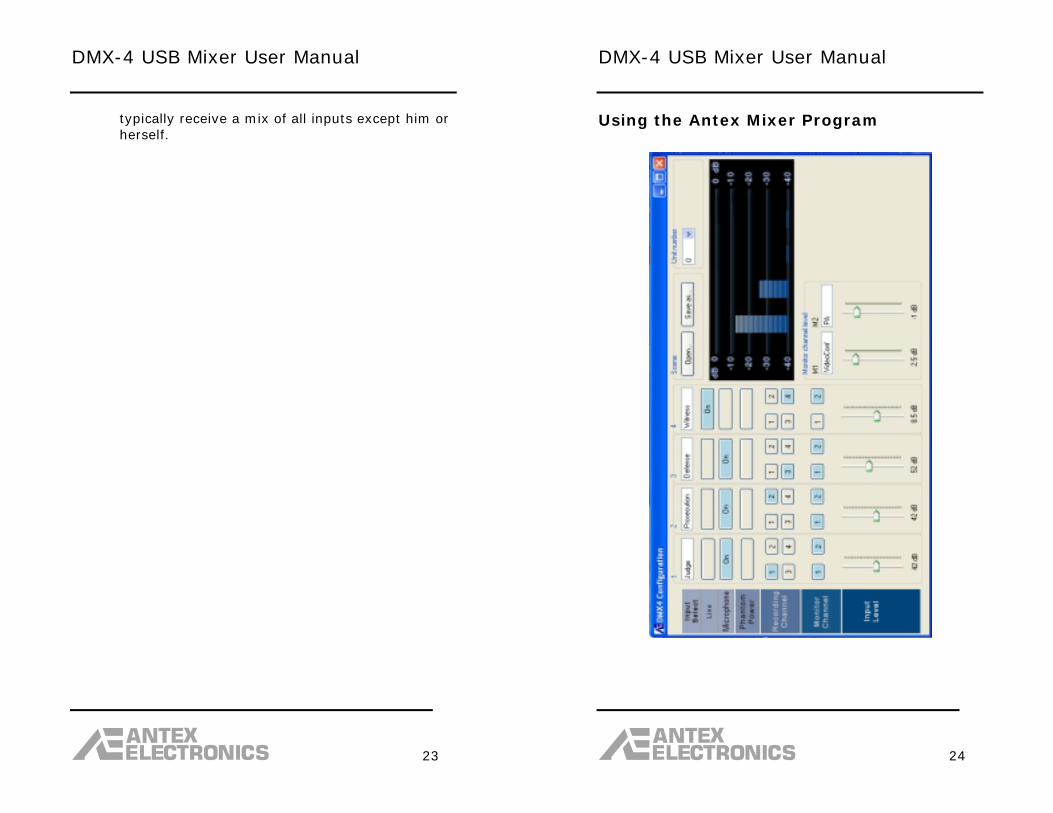
Using the Antex Mixer Program
DMX-4 USB Mixer User Manual
25
Adjusting the Recording Level Having the proper recording level is essential to making good, intelligible recordings. If the level is too low, the recording will contain a lot of hiss when it is played back loud enough to hear. If the level is set too high, loud sounds or speech will “clip” and the sound will be distorted. Clipping occurs when the level of the signal being digitized exceeds the maximum level of the analog to digital converter. In cases of severe overload, the recording of the second channel in a stereo pair may be affected. Channels 1 and 2, and channels 3 and 4 are paired. The VU meters in the Antex Mixer Program are used to adjust the recording level. Note that the meters are only active when a recording program is monitoring or recording. As a rule of thumb, speak at a normal level into the microphone. Adjust the Input Slider on the Antex Mixer Program until the VU meter peaks are in the –15 to –20dB range. This should give adequate “headroom” for loud sounds. Recording Mix Matrix The recording mix matrix can be used to route any combination of inputs to any of the 4 record channels. This is done by clicking on the record channel number buttons associated with each input, using the Antex Mixer Program. Each input has 4 buttons for record channels 1 through 4. Click on the button with the mouse to toggle it on or off; blue means on, gray means off.
DMX-4 USB Mixer User Manual
26
Monitor Mix Matrix Any input may be routed to either or both of the monitor outputs. This is done by clicking on the monitor number buttons associated with each input, using the Antex Mixer Program. Each input has a button for monitor 1 and monitor 2. Click on the button with the mouse to toggle it on or off; blue means on, gray means off. Phantom Power Phantom power is required for condenser microphones. It is not required for dynamic microphones and should be turned off when using dynamic microphones, although it will usually not harm them. Phantom power must be turned off when using line level devices and can cause damage. For this reason, the Antex Mixer Program will automatically switch off Phantom Power when “Line” is selected. Click on the “Phantom Power” button with the mouse to toggle it on or off; blue means on, gray means off. Line and Microphone The “Line” and “Microphone” buttons select the type of input you are connecting to the DMX-4. The difference is the signal level and the amount of gain required. Microphones have a low signal level and require higher gain. When “Microphone” is selected, the gain can be adjusted from +10dB to +85dB with the slider control. (See the section “Adjusting the Recording Level”.) The slider control will affect the level of the audio in the recording and in the monitor output, if the particular input is routed to that monitor. Note however, that the monitor output level will stop increasing once the slider is up past +65dB. This is because the gain above 65dB
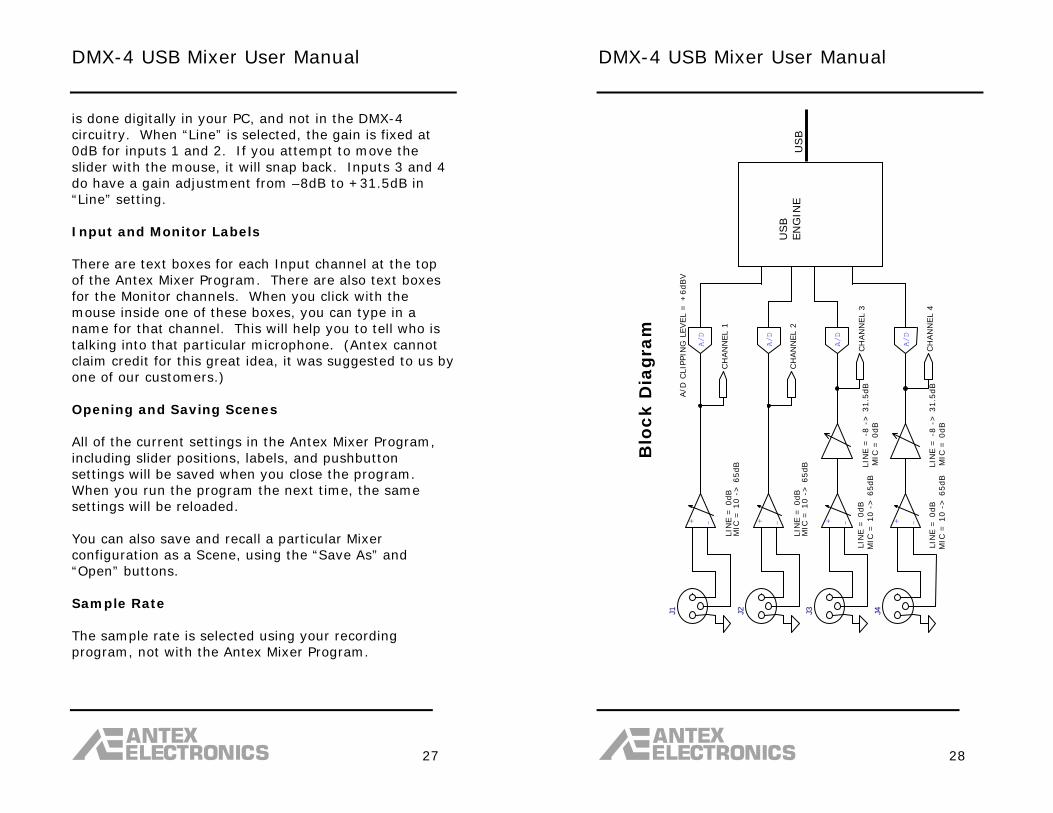
DMX-4 USB Mixer User Manual
27
is done digitally in your PC, and not in the DMX-4 circuitry. When “Line” is selected, the gain is fixed at 0dB for inputs 1 and 2. If you attempt to move the slider with the mouse, it will snap back. Inputs 3 and 4 do have a gain adjustment from –8dB to +31.5dB in “Line” setting. Input and Monitor Labels There are text boxes for each Input channel at the top of the Antex Mixer Program. There are also text boxes for the Monitor channels. When you click with the mouse inside one of these boxes, you can type in a name for that channel. This will help you to tell who is talking into that particular microphone. (Antex cannot claim credit for this great idea, it was suggested to us by one of our customers.) Opening and Saving Scenes All of the current settings in the Antex Mixer Program, including slider positions, labels, and pushbutton settings will be saved when you close the program. When you run the program the next time, the same settings will be reloaded. You can also save and recall a particular Mixer configuration as a Scene, using the “Save As” and “Open” buttons. Sample Rate The sample rate is selected using your recording program, not with the Antex Mixer Program.
DMX-4 USB Mixer User Manual
28
A/D
LIN
E =
-8 -
> 3
1.5
dB
LIN
E =
0dB
A/D
J3
A/D
+ -
CH
AN
NEL
3
USB
LIN
E =
-8 -
> 3
1.5
dB
+ -
J1
CH
AN
NEL
4
MIC
= 1
0 -
> 6
5dB
CH
AN
NEL
1
MIC
= 1
0 -
> 6
5dB
+ -
MIC
= 1
0 -
> 6
5dB B
lock
Dia
gram
CH
AN
NEL
2
+ -
MIC
= 1
0 -
> 6
5dB
A/D
CLI
PPIN
G L
EVEL
= +
6dBV
LIN
E =
0dB
J2
USB
EN
GIN
E
A/D
LIN
E =
0dB
MIC
= 0
dB
LIN
E =
0dB
MIC
= 0
dB
J4
DMX-4 USB Mixer User Manual
29
CH
AN
NEL
1
RCA
MO
NIT
OR
+-
MO
NIT
OR
CH
AN
NEL
3
+-
-102 -
> 2
5.5
dB
CH
AN
NEL
4
-102 -
> 2
5.5
dB
CH
AN
NEL
2
DMX-4 USB Mixer User Manual
30
Specifications: Inputs: Number 4 Connector XLR Type Transformerless
balanced Gain adjustment:
Channels 1 & 2, 10 to 85dB, 1dB (mic setting) steps
Channels 1 & 2, 0 dB, fixed (line setting)
Channels 3 & 4, 10 to 85dB, 1dB (mic setting) steps
Channels 3 & 4, -8 to 31.5dB (line setting)
Clipping level +6dBV – gain setting (note 1)
Input impedance 2K Phantom power 14VDC, 1K series
resistor each line Note 1. For example, if the gain is set to 65dB, clipping will begin with a –59dBV signal. If the gain is set to 0, clipping will begin with a +6dBV signal. Monitor Outputs: Number 2 Connector RCA female Type Unbalanced (single
ended) Series impedance 560 ohms Output level before clipping 2VRMS (+6dBV)
DMX-4 USB Mixer User Manual
31
Gain adjustment -102 to +25.5dB THD+N -84dB (note 2) Note 2. A weighted. Test conditions: Test signal of –30dBV amplitude input into microphone input. Input gain slider set to +30dB, Monitor gain slider set to 0dB. A/D converters: Type Cirris Logic CS5361, 24
bit Sample Rates 8, 11.025, 12, 16,
22.05, 24, 32, 44.1, and 48KHz
THD+N (-30dBV input) 90dB (Note 3) THD+N (-60dBV input) 65dB (Note 3) Note 3. A weighted. Microphone gain adjusted for –1dB below full scale input to A/D. Power: Input range +5VDC to +15VDC Power consumption 5 watts Protection Reverse polarity and
overvoltage clamping with self resetting fuse
Physical: Size 7 inches x 4.6 inches
x 1.8 inches Weight 1 pound for unit, <
0.5 pounds for power adapter
DMX-4 USB Mixer User Manual
32
Technical Assistance
Technical assistance with this product is available from Antex via:
email: [email protected] Web: www.antex.com Phone: (310) 532-3092, ext 18 or 33, 7AM to 5PM PDT
12 Month Limited Warranty
Antex Electronics Corporation (the Company), warrants to the original purchaser of this product that should this product or any part thereof, under normal use and conditions, be proven defective in material or workmanship within 12 months of the original date of purchase, such defect(s) will be repaired or replaced with new or reconditioned product (at the Company’s option) without charge for parts and labor.
To obtain repair or replacement within the terms of this Warranty, the product is to be delivered with proof of warranty coverage (i.e. dated sales receipt), specification of the defect(s), and transportation prepaid to the Company at the address shown below.
This Warranty does not extend to the elimination of externally generated static or noise, to correction of antenna problems, to costs incurred for installation, removal or reinstallation of the product, or damage to other components.
This Warranty does not apply to any product or part thereof which, in the opinion of the Company, has suffered or been damaged through alteration, improper installation, mishandling, misuse, neglect, accident, or by removal of any factory applied markings. THE EXTENT OF THE COMPANY’S LIABILITY UNDER THIS WARRANTY IS LIMITED TO THE REPAIR OR REPLACEMENT PROVIDED ABOVE, AND, IN NO
DMX-4 USB Mixer User Manual
33
EVENT, SHALL THE COMPANY’S LIABILITY EXCEED THE PURCHASE PRICE PAID BY PURCHASER FOR THE PRODUCT.
This Warranty is in lieu of all other express warranties or liabilities. ANY IMPLIED WARRANTIES, INCLUDING AN IMPLIED WARRANTY OF MERCHANTABILITY, SHALL BE LIMITED TO THE DURATION OF THIS WRITTEN WARRANTY. ANY ACTION FOR BREACH OF ANY WARRANTY HEREUNDER INCLUDING ANY IMPLED WARRANTY OF MERCHANTABILITY MUST BE BROUGHT WITHIN A PERIOD OF 12 MONTHS FROM DATE OF ORIGINAL PURCHASE. IN NO CASE SHALL THE COMPANY BE LIABLE FOR ANY CONSEQUENTIAL OR INCIDENTAL DAMAGES FOR BREACH OF THIS OR ANY OTHER WARRANTY, EXPRESS OR IMPLIED, WHATSOEVER. No person or representative is authorized to assume for the Company any liability other than expressed herein in connection with the sale of this product.
Some states do not allow limitations on how long an implied warranty lasts or the exclusion or limitation of incidental or consequential damage so the above limitations or exclusions may not apply to you. This Warranty gives you specific legal rights and may also have other rights, which vary from state to state.
Antex Electronics Corporation 19821 Hamilton Avenue Torrance, CA 90502 (310) 532-3092