manual turning 802dsl bpmmp 1112 en en-us
TRANSCRIPT

8/13/2019 Manual Turning 802Dsl BPMMP 1112 en en-US
http://slidepdf.com/reader/full/manual-turning-802dsl-bpmmp-1112-en-en-us 1/120
anual Machine Plus Turning ___________________
___________________
___________________
___________________
___________________
___________________
___________________
___________________
___________________
SINUMERIK
SINUMERIK 802D slManual Machine Plus Turning
Programming and Operating Manual
Valid for
Control system Software versionSINUMERIK 802D sl T/M 1.4 SP7
11/20126FC5398-6CP10-3BA0
Foreword
Description 1
Software interface 2
Turning On, ReferencePoint Approach 3
Setting-up 4
Manual machining 5
Machining the machiningstep program manually 6
Messages 7
Appendix A

8/13/2019 Manual Turning 802Dsl BPMMP 1112 en en-US
http://slidepdf.com/reader/full/manual-turning-802dsl-bpmmp-1112-en-en-us 2/120
Siemens AGIndustry SectorPostfach 48 4890026 NÜRNBERGGERMANY
Order number: 6FC5398-6CP10-3BA0Ⓟ 08/2013 Technical data subject to change
Copyright © Siemens AG 2009 - 2012.All rights reserved
Legal information
Warning notice system
This manual contains notices you have to observe in order to ensure your personal safety, as well as to preventdamage to property. The notices referring to your personal safety are highlighted in the manual by a safety alertsymbol, notices referring only to property damage have no safety alert symbol. These notices shown below aregraded according to the degree of danger.
DANGER
indicates that death or severe personal injury will result if proper precautions are not taken.
WARNING
indicates that death or severe personal injury may result if proper precautions are not taken.
CAUTION
indicates that minor personal injury can result i f proper precautions are not taken.
NOTICE
indicates that property damage can result if proper precautions are not taken.
If more than one degree of danger is present, the warning notice representing the highest degree of danger willbe used. A notice warning of injury to persons with a safety alert symbol may also include a warning relating toproperty damage.
Qualified Personnel
The product/system described in this documentation may be operated only by personnel qualified for the specifictask in accordance with the relevant documentation, in particular its warning notices and safety instructions.Qualified personnel are those who, based on their training and experience, are capable of identifying risks andavoiding potential hazards when working with these products/systems.
Proper use of Siemens products
Note the following:
WARNING
Siemens products may only be used for the applications described in the catalog and in the relevant technicaldocumentation. If products and components from other manufacturers are used, these must be recommendedor approved by Siemens. Proper transport, storage, installation, assembly, commissioning, operation andmaintenance are required to ensure that the products operate safely and without any problems. The permissibleambient conditions must be complied with. The information in the relevant documentation must be observed.
Trademarks
All names identified by ® are registered trademarks of Siemens AG. The remaining trademarks in this publicationmay be trademarks whose use by third parties for their own purposes could violate the rights of the owner.
Disclaimer of Liability
We have reviewed the contents of this publication to ensure consistency with the hardware and softwaredescribed. Since variance cannot be precluded entirely, we cannot guarantee full consistency. However, theinformation in this publication is reviewed regularly and any necessary corrections are included in subsequent
editions.

8/13/2019 Manual Turning 802Dsl BPMMP 1112 en en-US
http://slidepdf.com/reader/full/manual-turning-802dsl-bpmmp-1112-en-en-us 3/120
Manual Machine Plus Turning
Programming and Operating Manual, 11/2012, 6FC5398-6CP10-3BA0 3
Foreword
SINUMERIK documentation
The SINUMERIK documentation is organized in the following categories:
● General documentation
● User documentation
● Manufacturer/service documentation
Additional informationYou can find information on the following topics at www.siemens.com/motioncontrol/docu:
● Ordering documentation/overview of documentation
● Additional links to download documents
● Using documentation online (find and search in manuals/information)
Please send any questions about the technical documentation (e.g. suggestions forimprovement, corrections) to the following address:
My Documentation Manager (MDM)
Under the following link you will find information to individually compile OEM-specificmachine documentation based on the Siemens content:
www.siemens.com/mdm
Training
For information about the range of training courses, refer under:
● www.siemens.com/sitrain
SITRAIN - Siemens training for products, systems and solutions in automation technology● www.siemens.com/sinutrain
SinuTrain - training software for SINUMERIK
FAQs
You can find Frequently Asked Questions in the Service&Support pages under ProductSupport. http://support.automation.siemens.com

8/13/2019 Manual Turning 802Dsl BPMMP 1112 en en-US
http://slidepdf.com/reader/full/manual-turning-802dsl-bpmmp-1112-en-en-us 4/120
Foreword
Manual Machine Plus Turning
4 Programming and Operating Manual, 11/2012, 6FC5398-6CP10-3BA0
SINUMERIK
You can find information on SINUMERIK under the following link:
www.siemens.com/sinumerik
Target group
This publication is intended for programmers, planning engineers, machine operators andsystem operators.
Benefits
With the Programming and Operating Manual, the target group can develop, write, test anddebug programs and software user interfaces.
In addition, it enables the target group to operate the hardware and software of a machine.
Standard scope
This documentation only describes the functionality of the standard version. Extensions orchanges made by the machine tool manufacturer are documented by the machine toolmanufacturer.
Other functions not described in this documentation might be executable in the control. Thisdoes not, however, represent an obligation to supply such functions with a new control orwhen servicing.
For the sake of simplicity, this documentation does not contain all detailed information aboutall types of the product and cannot cover every conceivable case of installation, operation, ormaintenance.
Technical Support
You will find telephone numbers for other countries for technical support in the Internet underhttp://www.siemens.com/automation/service&support
EC Declaration of Conformity
The EC Declaration of Conformity for the EMC Directive can be found on the Internet at:
http://support.automation.siemens.com
Here, enter the number 15257461 as the search term or contact your local Siemens office.

8/13/2019 Manual Turning 802Dsl BPMMP 1112 en en-US
http://slidepdf.com/reader/full/manual-turning-802dsl-bpmmp-1112-en-en-us 5/120
Manual Machine Plus Turning
Programming and Operating Manual, 11/2012, 6FC5398-6CP10-3BA0 5
Contents
Foreword ...................................................... ............................................................................................. 3
1 Description................................................................................................................................................. 7
1.1 Control and display elements.........................................................................................................7
1.2 Error and status displays ...............................................................................................................8
1.3 Key definition of the full CNC keyboard (vertical format) ...............................................................9
1.4 Key definition of the machine control panel .................................................................................11
2 Software interface.................................................................................................................................... 13
3 Turning On, Reference Point Approach......................... .......................................................................... 15
3.1 Entry to the "Manual Machine Plus" operating area ....................................................................15
3.2 Reference point approach............................................................................................................17
4 Setting-up ................................................................................................................................................ 21
4.1 Measuring tools............................................................................................................................21
4.2 Limit stops ....................................................................................................................................24 4.2.1 Setting and activating/deactivating limit stops .............................................................................24 4.2.2 Turning against a stop .................................................................................................................26
4.3 Setting the workpiece zero...........................................................................................................28 5 Manual machining.................................................................................................................................... 31
5.1 Fundamentals of manual machining............................................................................................31
5.2 Display and operator control optios in the main screen for "Manual Machine Plus" ...................32 5.2.1 Toggling the display .....................................................................................................................35 5.2.2 Machining with the handwheels...................................................................................................36 5.2.3 Setting the increment weighting for the handwheel .....................................................................36 5.2.4 Machining with axis direction switch ............................................................................................37 5.2.5 Spindle advance/reverse .............................................................................................................38 5.2.6 Tool change .................................................................................................................................39 5.2.7 Changing the feedrate/spindle value ...........................................................................................41
5.2.8 Changing the feedrate/spindle type .............................................................................................42 5.2.9 Change the speed limitation for constant cutting rate .................................................................44
5.3 Manual machining with machining types .....................................................................................45 5.3.1 Axis-parallel traversal...................................................................................................................45 5.3.2 Manual taper turning ....................................................................................................................46 5.3.3 Manual radius turning ..................................................................................................................47 5.3.3.1 Radius turning type A...................................................................................................................49 5.3.3.2 Radius turning type B...................................................................................................................49 5.3.3.3 Radius turning type C ..................................................................................................................50
5.4 Manual machining using cycles (functions) .................................................................................51 5.4.1 Principle operating sequence.......................................................................................................51

8/13/2019 Manual Turning 802Dsl BPMMP 1112 en en-US
http://slidepdf.com/reader/full/manual-turning-802dsl-bpmmp-1112-en-en-us 6/120
Contents
Manual Machine Plus Turning
6 Programming and Operating Manual, 11/2012, 6FC5398-6CP10-3BA0
5.4.2 General parameters .................................................................................................................... 54 5.4.3 Manual drilling centered.............................................................................................................. 55 5.4.4 Manual thread tapping ................................................................................................................ 58 5.4.5 Manual grooving/parting.............................................................................................................. 61 5.4.5.1 Groove cycle - single................................................................................................................... 61 5.4.5.2 Groove cycle - multiple................................................................................................................ 64 5.4.5.3 Parting cycle - single ................................................................................................................... 66 5.4.5.4 Multiple tapping ........................................................................................................................... 67 5.4.5.5 Extended grooving ...................................................................................................................... 68 5.4.5.6 Multiple extended grooving ......................................................................................................... 71 5.4.6 Manual thread cutting.................................................................................................................. 73 5.4.6.1 Thread cutting ............................................................................................................................. 73 5.4.6.2 Thread recutting .......................................................................................................................... 77 5.4.6.3 Thread shaving after thread cutting ............................................................................................ 79 5.4.7 Roughing cycles.......................................................................................................................... 80
5.4.7.1 Roughing cycle A ........................................................................................................................ 81 5.4.7.2 Roughing cycle B ........................................................................................................................ 84 5.4.7.3 Roughing cycle C ........................................................................................................................ 87 5.4.7.4 Roughing cycle D ........................................................................................................................ 90 5.4.7.5 Roughing cycle E ........................................................................................................................ 92 5.4.7.6 Roughing cycle F ........................................................................................................................ 95 5.4.7.7 Roughing cycle, free contour: ..................................................................................................... 96 5.4.7.8 Execute a roughing cycle.......................................................................................................... 100
6 Machining the machining step program manually.................................................................................. 101
6.1 Tool change in the machining step program............................................................................. 105
6.2 Teach In .................................................................................................................................... 107
6.3 Simulate machining................................................................................................................... 110
6.4 Executing the machining step program..................................................................................... 112
7 Messages ..................................................... ......................................................................................... 115
7.1 Messages.................................................................................................................................. 115
A Appendix................................................................................................................................................ 117
A.1 Overview of documentation....................................................................................................... 117
Index...................................................................................................................................................... 119

8/13/2019 Manual Turning 802Dsl BPMMP 1112 en en-US
http://slidepdf.com/reader/full/manual-turning-802dsl-bpmmp-1112-en-en-us 7/120
Manual Machine Plus Turning
Programming and Operating Manual, 11/2012, 6FC5398-6CP10-3BA0 7
Description 1
1.1 Control and display elements
Operator control elements
The defined functions are called up via the horizontal and vertical softkeys. For a description,please refer to this manual:
Figure 1-1 CNC operator panel

8/13/2019 Manual Turning 802Dsl BPMMP 1112 en en-US
http://slidepdf.com/reader/full/manual-turning-802dsl-bpmmp-1112-en-en-us 8/120
Description
1.2 Error and status displays
Manual Machine Plus Turning
8 Programming and Operating Manual, 11/2012, 6FC5398-6CP10-3BA0
1.2 Error and status displays
LED displays on the CNC operator panel (PCU)
The following LEDs are installed on the CNC operator panel.
The individual LEDs and their functions are described in the table below.
Table 1- 1 Status and error displays
LED Significance
ERR (red) Serious error, remedy through power OFF/ON
RDY (green) Ready for operation
NC (yellow) Signoflife monitoring
CF (yellow) Reading from/writing to CF card
References
You can find information on error description in the SINUMERIK 802D sl Diagnostics Manual

8/13/2019 Manual Turning 802Dsl BPMMP 1112 en en-US
http://slidepdf.com/reader/full/manual-turning-802dsl-bpmmp-1112-en-en-us 9/120
Description
1.3 Key definition of the full CNC keyboard (vertical format)
Manual Machine Plus Turning
Programming and Operating Manual, 11/2012, 6FC5398-6CP10-3BA0 9
1.3 Key definition of the full CNC keyboard (vertical format)

8/13/2019 Manual Turning 802Dsl BPMMP 1112 en en-US
http://slidepdf.com/reader/full/manual-turning-802dsl-bpmmp-1112-en-en-us 10/120
Description
1.3 Key definition of the full CNC keyboard (vertical format)
Manual Machine Plus Turning
10 Programming and Operating Manual, 11/2012, 6FC5398-6CP10-3BA0
Hot keys
In the part program editor and in the input fields of the HMI, the following functions can be
carried out with certain shortcut keys on the full CNC keyboard:
Shortcut key Function
<CTRL> and <C> Copy selected text
<CTRL> and <B> Select text
<CTRL> and <X> Cut selected text
<CTRL> and <V> Paste copied text
<CTRL> and <P> Generates a screenshot of the actual screen andsaves the image on CompactFlash Card(customer CF Card) under "screen802dsl.bmp "
<CTRL> and <R> HMI restart
<CTRL> and <S> Data backup in case of backlight failure
The series start-up archive (Drive/NC/PLC/HMI)is exported with the most recent data onto theCompactFlash card with the name"802Dslibn.arc".
<ALT> and <L> Toggling between only upper case letters andupper and lower case letters
<ALT> and <H> or <HELP> key Call help system
<ALT> and <S> Switch-in and switch-out the Editor for Asiancharacters
8/13/2019 Manual Turning 802Dsl BPMMP 1112 en en-US
http://slidepdf.com/reader/full/manual-turning-802dsl-bpmmp-1112-en-en-us 11/120
Description
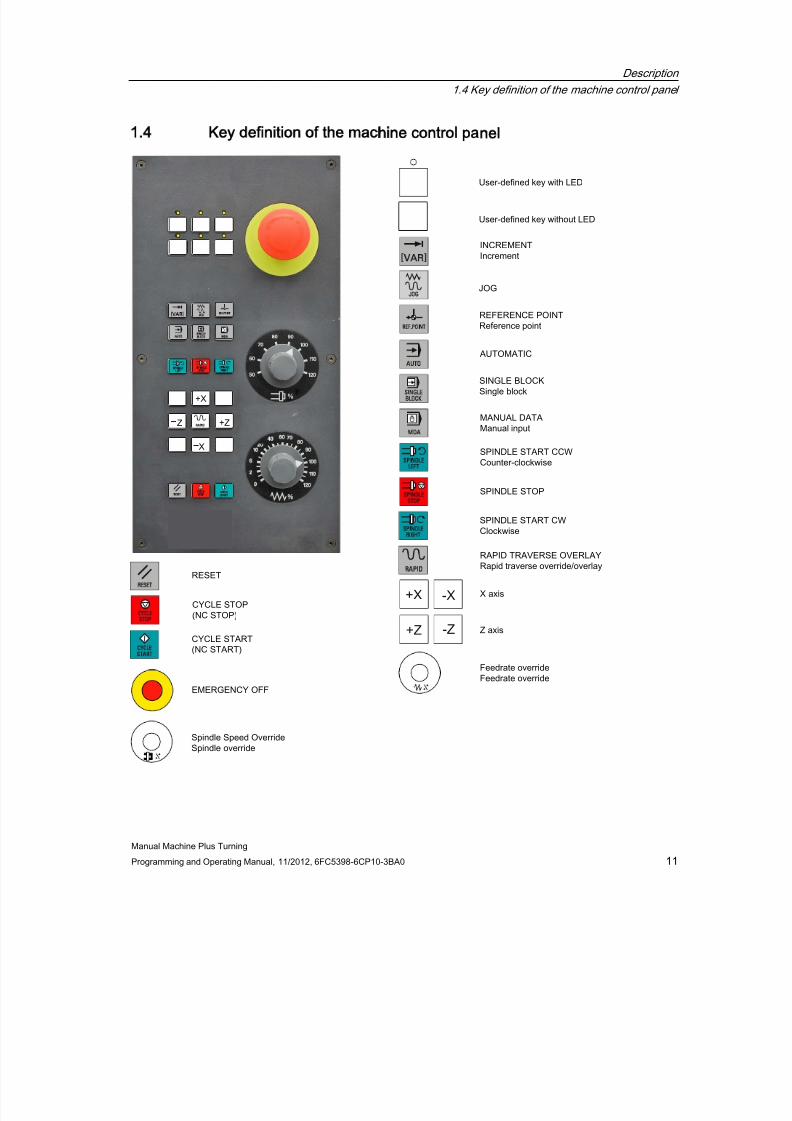
1.4 Key definition of the machine control panel
Manual Machine Plus Turning
Programming and Operating Manual, 11/2012, 6FC5398-6CP10-3BA0 11
1.4 Key definition of the machine control panel

8/13/2019 Manual Turning 802Dsl BPMMP 1112 en en-US
http://slidepdf.com/reader/full/manual-turning-802dsl-bpmmp-1112-en-en-us 12/120
Description
1.4 Key definition of the machine control panel
Manual Machine Plus Turning
12 Programming and Operating Manual, 11/2012, 6FC5398-6CP10-3BA0
Note
This documentation assumes an 802D standard machine control panel (MCP). Should youuse a different MCP, the operation may be other than described herein.

8/13/2019 Manual Turning 802Dsl BPMMP 1112 en en-US
http://slidepdf.com/reader/full/manual-turning-802dsl-bpmmp-1112-en-en-us 13/120
Manual Machine Plus Turning
Programming and Operating Manual, 11/2012, 6FC5398-6CP10-3BA0 13
Software interface 2
This Programming and Operating Manual focuses primarily on the software interface of the"Manual Machine Plus" system.
For descriptions of the software interface for the SINUMERIK 802D sl control system, pleaserefer to the SINUMERIK 802D sl Turning Programming and Operating Manual.
See Sections:
● Screen layout
● Standard softkeys
● Operating areas
● Help system

8/13/2019 Manual Turning 802Dsl BPMMP 1112 en en-US
http://slidepdf.com/reader/full/manual-turning-802dsl-bpmmp-1112-en-en-us 14/120
Software interface
Manual Machine Plus Turning
14 Programming and Operating Manual, 11/2012, 6FC5398-6CP10-3BA0

8/13/2019 Manual Turning 802Dsl BPMMP 1112 en en-US
http://slidepdf.com/reader/full/manual-turning-802dsl-bpmmp-1112-en-en-us 15/120
Manual Machine Plus Turning
Programming and Operating Manual, 11/2012, 6FC5398-6CP10-3BA0 15
Turning On, Reference Point Approach 3
3.1 Entry to the "Manual Machine Plus" operating area
Operating sequences
Note
The operating area "Manual Machine Plus" runs only in Siemens mode, and not in ISOmode.
Proceed as follows to open the "Manual Machine Plus" application:
Note
If the controller has already been preconfigured to "Manual Machine Plus" by the machinemanufacturer, items 1 to 3 can be ignored in the following description. The operating area"Manual Machine Plus" is activated once the controller has been started up.
If you have not yet executed a reference point approach, you will be in the operating modeReference point approach (see Fig. Reference point approach) after start-up.
1. The NC boots into the JOG REF operating mode of the NC basic machine.
2. Select the JOG operating mode.
The interface can be seen in the screenshot below:
Figure 3-1 "Position" operating area

8/13/2019 Manual Turning 802Dsl BPMMP 1112 en en-US
http://slidepdf.com/reader/full/manual-turning-802dsl-bpmmp-1112-en-en-us 16/120
Turning On, Reference Point Approach
3.1 Entry to the "Manual Machine Plus" operating area
Manual Machine Plus Turning
16 Programming and Operating Manual, 11/2012, 6FC5398-6CP10-3BA0
3. You can access the "Manual Machine Plus" area by clicking on softkey "Manual":
NoteIf you have not yet executed a reference point approach, the JOG REF operating modewill be reselected automatically when you press the "Manual" softkey.
Figure 3-2 Reference point approach
4. The operating area "Manual Machine Plus" can be exited with the "CNC" softkey, afterwhich the operating area of the NC basic machine is active again.
Note
The manual machine cannot be exited in the "Execute cycles" and "Execution window"screen forms of the stepping program.
General operating information
If a screen (e.g. for the "thread tapping" function) contains input fields, then you can editthem as follows:
● Select the input fields using the <cursor keys>.
● Enter data using the <numeric keys>.
● Accept the data using the <INPUT key>.
● Use the <Tab key> to switch between the input fields and the selection box during theopening and saving of files.
● If you do not want to accept an input value,then exist the corresponding field using<Cursor key> or change the screen form. Do not press the <INPUT> key.

8/13/2019 Manual Turning 802Dsl BPMMP 1112 en en-US
http://slidepdf.com/reader/full/manual-turning-802dsl-bpmmp-1112-en-en-us 17/120
Turning On, Reference Point Approach
3.2 Reference point approach
Manual Machine Plus Turning
Programming and Operating Manual, 11/2012, 6FC5398-6CP10-3BA0 17
Note
The pictures in the parameterization screenforms depend on the setting of the machine databy the machine manufacturer, i.e. display of the tool position before or behind the center ofrotation with regards to the turret head.
3.2 Reference point approach
Functionality
The axes have not yet approached their reference points (see screenshot below).
Figure 3-3 Reference point approach
The "Reference point" window displays whether the axes are referenced.

8/13/2019 Manual Turning 802Dsl BPMMP 1112 en en-US
http://slidepdf.com/reader/full/manual-turning-802dsl-bpmmp-1112-en-en-us 18/120
Turning On, Reference Point Approach
3.2 Reference point approach
Manual Machine Plus Turning
18 Programming and Operating Manual, 11/2012, 6FC5398-6CP10-3BA0
Requirement
The following requirements must be fulfilled:
● There must be no NC alarms pending!
-> Clear any that are pending by pressing the "Reset" softkey.
● All machine axes must be in a position from which the reference point can be reached ina positive traversing direction.
-> In manual mode, use the handwheels to move the axes to the appropriate position infront of the reference point.
DANGER
Before starting the reference point approach or switching off the machine, be sure tomove the machine slide to a position from which the reference point can be approached
in a positive axis direction.
If the machine manufacturer has not fitted an axis limit switch, there is a risk of amechanical collision if the axis is on the wrong side of the reference cam before the startof the reference point approach.
Operating sequence
1. Select the <JOG> operating mode.
Figure 3-4 Main screen for "Manual Machine Plus"

8/13/2019 Manual Turning 802Dsl BPMMP 1112 en en-US
http://slidepdf.com/reader/full/manual-turning-802dsl-bpmmp-1112-en-en-us 19/120
Turning On, Reference Point Approach
3.2 Reference point approach
Manual Machine Plus Turning
Programming and Operating Manual, 11/2012, 6FC5398-6CP10-3BA0 19
2. Select handwheel increment weighting using the <INCREMENT> key.
Figure 3-5 Handwheel increment weighting 100 INC
The current setting will appear on the top left of the screen (e.g.: 100 INC).
3. Then use the handwheel to move the axes to a position from which they can approachthe reference point in a positive direction.
CAUTION
In this operating state, the axes can be moved only by means of the handwheel.Traversing the axes using the axis traversing switch is inhibited. The spindle cannot bestarted in this operating state.
4. Select the <JOG REF> operating mode.
5. Using the axis direction key, start the X axis in the positive direction (X+).
The reference point for the X axis is then approached automatically.
The axis stops automatically when it has completed this process.
The symbol appears in the display in front of the axis name.

8/13/2019 Manual Turning 802Dsl BPMMP 1112 en en-US
http://slidepdf.com/reader/full/manual-turning-802dsl-bpmmp-1112-en-en-us 20/120
Turning On, Reference Point Approach
3.2 Reference point approach
Manual Machine Plus Turning
20 Programming and Operating Manual, 11/2012, 6FC5398-6CP10-3BA0
6. Repeat step 5 for the Z axis.
NoteThe axes must be referenced in this sequence, i.e., the X axis first, followed by the Zaxis. No other sequence will be accepted by the controller.
You have now referenced both axes.
Figure 3-6 Reference points reached
7. Select the <JOG> operating mode.
You are in the "Manual Machine Plus" operating area.

8/13/2019 Manual Turning 802Dsl BPMMP 1112 en en-US
http://slidepdf.com/reader/full/manual-turning-802dsl-bpmmp-1112-en-en-us 21/120
Manual Machine Plus Turning
Programming and Operating Manual, 11/2012, 6FC5398-6CP10-3BA0 21
Setting-up 4
4.1 Measuring tools
Functionality
You can measure tools manually in the "Manual Machine Plus" operating area. In this case,the manual tool measurement function accesses the tool list data.
Note
You can access the tool list by pressing the operating area key <OFFSET/PARAM> andsoftkey "Tool list".
Literature
Further methods of handling tools and tool offsets are described in the "SINUMERIK 802D slTurning Programming and Operating Manual".
DANGER
Notice: An uncalibrated or incorrectly calibrated tool can lead to dimensional errors or toincorrect cutting values. If the values entered are very different from the actual tool values,there is a risk that the tool may break or the mechanism or workpiece may be damaged.
Requirement
Load the tool beforehand or enter the tool number in the "T" field. After confirming the input,a dialog will prompt you to press the <NC Start> key. If the <NC Start> key is pressed, thetool will be changed.
CAUTION
First approach a machine position where the tool change can be performed without danger.

8/13/2019 Manual Turning 802Dsl BPMMP 1112 en en-US
http://slidepdf.com/reader/full/manual-turning-802dsl-bpmmp-1112-en-en-us 22/120
Setting-up
4.1 Measuring tools
Manual Machine Plus Turning
22 Programming and Operating Manual, 11/2012, 6FC5398-6CP10-3BA0
Operating sequences
Proceed as follows to measure the tool for the X axis of the loaded turning tool.
1. Press the "Meas. tool" softkey. The following screen appears:
Figure 4-1 Measure a turning tool
2. Press the "X" softkey.
The screen for measuring the X axis (L1) appears.
3. Check that the current tool number appears in the display field for the tool, since thecalibration operation will relate to this tool.
4. Carefully "scratch" a workpiece by an X handwheel infeed when the spindle is turning.5. Move the slide slightly (without changing the X position) along the Z axis (longitudinal
turning) with the handwheel.
6. Switch the spindle off.
7. Enter the diameter measured on the workpiece in entry field "d1".
8. Accept the value by pressing the <INPUT> key.
The controller then automatically calculates the corresponding tool offset (in the radius)and displays this as value "L1" in the screen form.
CAUTION
If you exit the screen form at this point, the new offset will not take effect.

8/13/2019 Manual Turning 802Dsl BPMMP 1112 en en-US
http://slidepdf.com/reader/full/manual-turning-802dsl-bpmmp-1112-en-en-us 23/120
Setting-up
4.1 Measuring tools
Manual Machine Plus Turning
Programming and Operating Manual, 11/2012, 6FC5398-6CP10-3BA0 23
9. Press the "Set length" softkey.
The modified tool offset for the selected tool is applied in the X axis. Provided that the
"scratch position" in the X axis has not been moved, the measured diameter is nowdisplayed as the actual position in the position display of the tool measurement screen.
Figure 4-2 Measurement of turning tool in X axis completed
10. Press the "Z" softkey.
The screen for measuring the Z axis appears.
The Z axis can be measured in the same way as the X axis.
When measuring the tool in the Z axis, you may define a distance between the workpiece
and the turning tool tip in input field "a1" to avoid surface damage on the workpiece.
11. To return to the main screen for "Manual Machine Plus", select softkey "Abort".
8/13/2019 Manual Turning 802Dsl BPMMP 1112 en en-US
http://slidepdf.com/reader/full/manual-turning-802dsl-bpmmp-1112-en-en-us 24/120
Setting-up
4.2 Limit stops
Manual Machine Plus Turning
24 Programming and Operating Manual, 11/2012, 6FC5398-6CP10-3BA0
4.2 Limit stops
Functionality
Limit stops are used to stop the axes in a specific position.
If an axis stops in the limit stop position, it cannot be moved again until the triggering limitstop is reset.
By setting the limit stops, in the "Manual Machine Plus" operating area, it is possible to turnsimple shoulders (including tapers) without the need for any further cycle parameterization.
Supplementary conditions
● The limit stop position is always an absolute dimension, which in turn always correspondsto the position in the absolute actual value display on the "Manual Machine Plus"interface. A relative limit stop position is not possible.
● A limit stop position can be entered/accepted only when the axes are stationary.Otherwise, an error message appears.
4.2.1 Setting and activating/deactivating limit stops
Functionality
In the main screen "Manual Machine Plus" limit stops can be entered into the input fields "-X/-Z/+X/+Z".
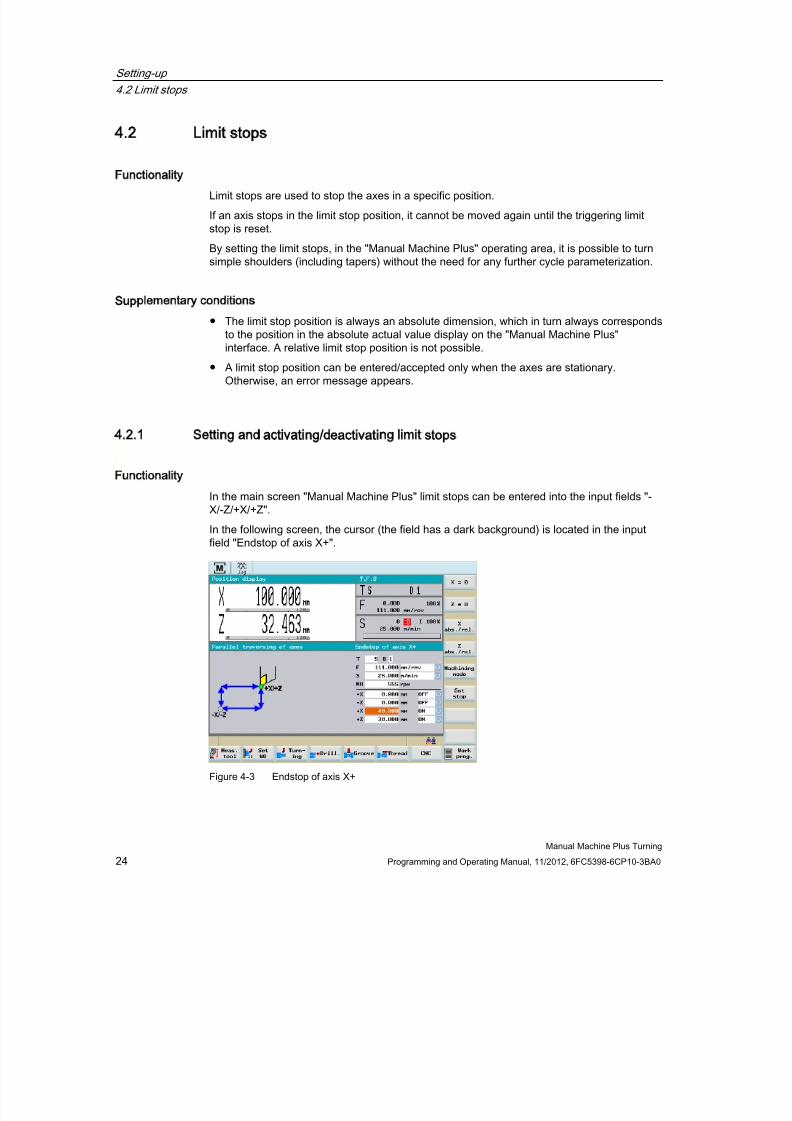
In the following screen, the cursor (the field has a dark background) is located in the inputfield "Endstop of axis X+".
Figure 4-3 Endstop of axis X+

8/13/2019 Manual Turning 802Dsl BPMMP 1112 en en-US
http://slidepdf.com/reader/full/manual-turning-802dsl-bpmmp-1112-en-en-us 25/120
Setting-up
4.2 Limit stops
Manual Machine Plus Turning
Programming and Operating Manual, 11/2012, 6FC5398-6CP10-3BA0 25
Parameter
Parameter Description
ON The limit stop is activated.
OFF The limit stop is deactivated.
- X Negative absolute position of the limit stop of the X axis.
The axis stops automatically if:
• The limit stop is active.
• The specified axis traverses in the negative direction and reaches the absolute limit stop position.
+X Positive absolute position of the limit stop of the X axis.
The axis stops automatically if:
• The limit stop is active.
• The specified axis traverses in the positive direction and reaches the absolute limit stop position.
-Z Negative absolute position of the limit stop of the Z axis.
The axis stops automatically if:
• The limit stop is active.
• The specified axis traverses in the negative direction and reaches the absolute limit stop position.
+Z Positive absolute position of the limit stop of the Z axis.
The axis stops automatically if:
• The limit stop is active.
• The specified axis traverses in the positive direction and reaches the absolute limit stop position.
All of the limit stops are set in the following screen.
Figure 4-4 All limit stops set

8/13/2019 Manual Turning 802Dsl BPMMP 1112 en en-US
http://slidepdf.com/reader/full/manual-turning-802dsl-bpmmp-1112-en-en-us 26/120
Setting-up
4.2 Limit stops
Manual Machine Plus Turning
26 Programming and Operating Manual, 11/2012, 6FC5398-6CP10-3BA0
Operating sequences
You can use the following methods to enter a limit stop position:
● Direct position entry:
– Select the input field of the relevant limit stop with the <Cursor keys>.
– Now use the <Numeric keys> to enter the absolute position you require.
– Press the <INPUT> key to accept the value.
● Accepting the current actual position:
– Select the input field of the relevant limit stop with the <Cursor keys>.
– Traverse to the required position using the axis direction switch (e.g. <-Z> or <+X/-X/+Z>).
– Press the "Set limit stop" softkey.
The current actual position of the relevant axis is transferred to the input field.
Activating/disabling limit stops
The limit stops are activated/de-activated individually using the <SELECT> key.
You can select between ON and OFF.
4.2.2 Turning against a stop
Example:
The following example explains the operating principle of limit stops using the axis directionkeys.
You can also use the handwheel to perform the machining operation.
Task
The following shoulder with a finishing allowance of 0.2 mm must be turned:
● 100 mm in the Z direction
● 50 mm final diameter in the X direction
The end face starts at 0 mm int he Z direction. The blank diameter is 70 mm.

8/13/2019 Manual Turning 802Dsl BPMMP 1112 en en-US
http://slidepdf.com/reader/full/manual-turning-802dsl-bpmmp-1112-en-en-us 27/120
Setting-up
4.2 Limit stops
Manual Machine Plus Turning
Programming and Operating Manual, 11/2012, 6FC5398-6CP10-3BA0 27
Operating sequences for infeeding to stop
1. Position the axes in front of the workpiece (e.g., X +75 mm/Z +5 mm).
2. Check the machining technology data.
3. Set the following limit stops:
– -X at 50.4 mm
– -Z at –99.8 mm (due to finishing allowance)
– +Z at +5 mm
4. Delete the limit stop for +X; it is not required.
5. Start the spindle.
6. Using the handwheel, infeed to the 1st depth of cut in the X direction.
7. Start machining in the Z axis in the negative direction using the axis direction switch.When the limit stop position in Z –99.8 mm is reached, the Z axis stops automatically.
The message "Limit stop –Z reached" is displayed.
8. Switch-out the axis direction switch.
9. Using the handwheel, retract the tool from the workpiece in the X direction.
10. Using the axis direction switch and rapid traverse override, move the tool in a positive Zdirection towards the workpiece until the axis stops.
The message "Limit stop +Z reached" is displayed.
11. Switch-out the axis direction switch.
12. Using the handwheel, infeed to the next depth of cut in the X direction.
13. Start machining in the Z axis in the negative direction using the axis direction switch.
Repeat the procedure until the depth of rough cut is reached.
The message "Limit stop -X reached" is displayed as the tool is fed in.
Once this cut has been completed, adjust the limit stops to the finished dimension,provided that the axes are positioned in front of the workpiece.
Operating sequences for adjusting to finished dimension
1. Adjust the limit stops to the finished dimension: -X to 50.0 mm/-Z to –100.0 mm2. Using the handwheel, infeed in the X direction until the "Limit stop -X reached" message
appears.
3. Start machining in the Z axis in the negative direction using the axis direction switch.
When the limit stop position in Z –100.0 mm is reached, the Z axis stops automatically.
The message "Limit stop –Z reached" is displayed.

8/13/2019 Manual Turning 802Dsl BPMMP 1112 en en-US
http://slidepdf.com/reader/full/manual-turning-802dsl-bpmmp-1112-en-en-us 28/120
Setting-up
4.3 Setting the workpiece zero
Manual Machine Plus Turning
28 Programming and Operating Manual, 11/2012, 6FC5398-6CP10-3BA0
4. Switch-out the axis direction switch in the Z direction and start in the positive X direction(finishing the end face).
5. Switch-out the axis direction switch in the X direction as soon as the tool tip leaves theworkpiece.
4.3 Setting the workpiece zero
Functionality
The “Set the workpiece zero" function can be used to specify the reference point formachining the workpiece.
Typical application/procedure:
1. Parameterize all the machining steps (cycles) for the workpiece in relation to a “virtualzero point” (e.g., an end face).
2. Clamping the blank
3. Scratch the relevant surface which corresponds to the "virtual zero point".
4. Use the "Set WO" function, adapt the workpiece coordinate system to the parameterizedmachining operation.
Make sure that the axis does not exit from the approached position.
Additional information
The following operations are performed automatically when you select softkey "Set WO":
● The work offset is automatically calculated according to the current axis position in thelongitudinal axis (Z), entered in the NC memory for the basis offset and activated.
● This will also set the position displayed for the longitudinal axis (Z) to 0.000, as thisalways corresponds to the workpiece coordinate system.
● If the workpiece zero is reset, the value “0.000” will automatically be entered in the NCmemory for the basic offset. The workpiece coordinate system display will change toreflect this.
DANGER
Notice: Setting the "workpiece zero" affects the absolute machining position of allmachining steps that have been parameterized in the controller!! -> All machining stepswill now be performed in relation to the zero point that has just been set!!
Setting/resetting the workpiece zero without due care and attention can result in seriousdamage to the tool, workpiece or machine!!

8/13/2019 Manual Turning 802Dsl BPMMP 1112 en en-US
http://slidepdf.com/reader/full/manual-turning-802dsl-bpmmp-1112-en-en-us 29/120
Setting-up
4.3 Setting the workpiece zero
Manual Machine Plus Turning
Programming and Operating Manual, 11/2012, 6FC5398-6CP10-3BA0 29
Operating sequences
Press the "Set WO" softkey in the main screen for "Manual Machine Plus".
Figure 4-5 Set workpiece zero point
This screen displays the currently programmed Z value of the basic work offset.
The setting options in this screen are selected with softkeys. The softkey meanings are asfollows:
This function is used to set the “workpiece zero”.
The workpiece coordinate system of the longitudinal axis (Z) displays the value "0.000".
The required work offset is computed automatically and stored in the appropriate place in theNC.
This function resets the work offset that is currently stored on the NC. -> The value “0.000” isentered in the basic offset memory location. However, all other offsets and the active tooloffset remain unchanged.

8/13/2019 Manual Turning 802Dsl BPMMP 1112 en en-US
http://slidepdf.com/reader/full/manual-turning-802dsl-bpmmp-1112-en-en-us 30/120
Setting-up
4.3 Setting the workpiece zero
Manual Machine Plus Turning
30 Programming and Operating Manual, 11/2012, 6FC5398-6CP10-3BA0

8/13/2019 Manual Turning 802Dsl BPMMP 1112 en en-US
http://slidepdf.com/reader/full/manual-turning-802dsl-bpmmp-1112-en-en-us 31/120
Manual Machine Plus Turning
Programming and Operating Manual, 11/2012, 6FC5398-6CP10-3BA0 31
Manual machining 5
5.1 Fundamentals of manual machining
Note
Please refer to the SINUMERIK 802D sl operating instructions for a description of therelevant commissioning requirements.
Functionality
You can perform the following machining operations manually:
● Axis-parallel traversal
● Taper turning
● Radius turning
● Drilling - centered
● Tapping
● Groove cycles/Parting
● Thread cutting
● Rough turning of contours
Fundamentals
The following operations must be performed before manual machining can proceed:
● Axes referenced
● Tools measured
● Limit stops set
● Set workpiece zero point

8/13/2019 Manual Turning 802Dsl BPMMP 1112 en en-US
http://slidepdf.com/reader/full/manual-turning-802dsl-bpmmp-1112-en-en-us 32/120
Manual machining
5.2 Display and operator control optios in the main screen for "Manual Machine Plus"
Manual Machine Plus Turning
32 Programming and Operating Manual, 11/2012, 6FC5398-6CP10-3BA0
5.2 Display and operator control optios in the main screen for "Manual
Machine Plus"
Functionality
Note
If the controller has already been preconfigured to "Manual Machine Plus" by the machinemanufacturer, the operating area "Manual Machine Plus" is activated once the controller hasbeen started up. If you have not yet executed a reference point approach, you will be in theoperating mode Reference point approach after start-up.
You can reference the axes in the Siemens standard user interface as well as in theoperating area "Manual Machine Plus".
You have referenced the axes and pressed the "Manual" softkey in the "Position" operatingarea. The following screen represents the main screen of the "Manual Machine Plus"operating area.
Figure 5-1 Main screen for "Manual Machine Plus", position display absolute
Note about the position display in the main screen for "Manual Machine Plus"● Absolute position display active:
The position value displayed in the large-size font is the absolute position. No additionalvalue is shown.
● Relative position display active (see following diagram):
The position value displayed in the large-size font is the relative position. The positionvalue displayed next to it in the small-size font is the absolute position.

8/13/2019 Manual Turning 802Dsl BPMMP 1112 en en-US
http://slidepdf.com/reader/full/manual-turning-802dsl-bpmmp-1112-en-en-us 33/120
Manual machining
5.2 Display and operator control optios in the main screen for "Manual Machine Plus"
Manual Machine Plus Turning
Programming and Operating Manual, 11/2012, 6FC5398-6CP10-3BA0 33
Controlling the axes and spindle
In manual machining mode, the axes and spindle can be controlled by the following
methods:● The compound slide rest is controlled by:
– Handwheels (Page 36) for the X and Z axes, or
– Axis direction switch (Page 37)
● The spindle is controlled by:
– Spindle direction of rotation switch (Page 38)
Values displayed in the position display and T, F, S
Figure 5-2 Main screen for "Manual Machine Plus", position display relative
Displayed values Meaning
In front of axis letters+/-
• Current traversing direction of axes
S value/S type % • The programmed value for either the spindle speed (rev/min) or the cutting rate (m/min)
The display corresponds to the settings for the machining technology data.
• Current position of the spindle override switch in %.
F value/F type % • Programmed feed value
in either "m/min" or "mm/Rev", depending on the settings for the machining technology data.
• Current position of the feedrate override switch in %.
T value • Tool number of the tool used
D value • Tool offset applied
INC value • Handwheel pulse weighting setting

8/13/2019 Manual Turning 802Dsl BPMMP 1112 en en-US
http://slidepdf.com/reader/full/manual-turning-802dsl-bpmmp-1112-en-en-us 34/120
Manual machining
5.2 Display and operator control optios in the main screen for "Manual Machine Plus"
Manual Machine Plus Turning
34 Programming and Operating Manual, 11/2012, 6FC5398-6CP10-3BA0
Displayed values Meaning
• Feed stop as a result of:
– Feedrate override at position 0%.
– An alarm is active which prevents the axes from moving.
• Spindle status
– Spindle counter-clockwise
– Spindle stop
– Spindle clockwise
Machining and technology data
You must enter the machining technology data in the following input fields:
Figure 5-3 Display box from main screen "Manual Machine Plus", entry of machining technologydata
The machining technology data are as follows:
Parameter Description
T Tool number of the used tool (only for use of a manual tool-changer system)
F Feedrate with choice of units mm/min (time feed) and mm/rev (revolutional feed),
S Spindle type with choice of units rev/min (constant spindle speed) and m/min(constant cutting rate),
MR Speed limitation for constant cutting rate
-X-Z
+X
+Z
Positions of the limit stops, the limit stops can be activated using the toggle field"ON/OFF"
CAUTION
Generally speaking, the relevant machining technology data must be entered beforestarting manual machining.

8/13/2019 Manual Turning 802Dsl BPMMP 1112 en en-US
http://slidepdf.com/reader/full/manual-turning-802dsl-bpmmp-1112-en-en-us 35/120
Manual machining
5.2 Display and operator control optios in the main screen for "Manual Machine Plus"
Manual Machine Plus Turning
Programming and Operating Manual, 11/2012, 6FC5398-6CP10-3BA0 35
DANGER
Notice: When constant cutting rate (G96) is selected, the maximum permissible spindlespeed, corresponding to the fitted tool chucking device must be entered in the input fieldMR (spindle speed limitation)!
Failure to pay sufficient attention to this point can lead to serious damage as a result of thechucking device speed being exceeded.
5.2.1 Toggling the display
Functionality
In the position display screen you can edit the displayed values using the vertical softkeys.
Figure 5-4 Main screen for "Manual Machine Plus"
Softkeys
Change the display to "relative position display" and "reset" the display in the X axis.
Change the display to "relative position display" and "reset" the display in the Z axis.
Toggle the display between "absolute position display" and "relative position display" in the Xaxis.
Toggle the display between "absolute position display" and "relative position display" in the Zaxis.

8/13/2019 Manual Turning 802Dsl BPMMP 1112 en en-US
http://slidepdf.com/reader/full/manual-turning-802dsl-bpmmp-1112-en-en-us 36/120
Manual machining
5.2 Display and operator control optios in the main screen for "Manual Machine Plus"
Manual Machine Plus Turning
36 Programming and Operating Manual, 11/2012, 6FC5398-6CP10-3BA0
Switching between the following operating modes:
● Traversing the axes parallel to the axis
● Taper turning
● Radius turning
The parameters for the machining type are displayed in the main screen of the "ManualMachine Plus".
The current actual position of the relevant axis is transferred to the selected input field (-X/-Z/+X/+Z).
5.2.2 Machining with the handwheels
Functionality
The handwheels for the X and Z axis are not mechanically connected to the feed screws.Electronic pulse generators mounted on the handwheels generate the information needed bythe controller to execute the required traversing movement.
The handwheels are only active when the axis direction switch is in the zero position or theindividual axis control keys are disabled.
The distance traversed per handwheel pulse depends on the increment weighting setting.
CAUTION
If the handwheel increment weighting is set to "0" or if the feedrate override weighting is inthe "0" position, the handwheels are disabled.
5.2.3 Setting the increment weighting for the handwheel
Functionality
Set the increment weighting from the Increment weighting machine control panel.
If you are unable to adjust the increment weighing, it will be because the controller's internalmode is incompatible with this process.
Press the <JOG> key once to resolve the problem.
8/13/2019 Manual Turning 802Dsl BPMMP 1112 en en-US
http://slidepdf.com/reader/full/manual-turning-802dsl-bpmmp-1112-en-en-us 37/120
Manual machining
5.2 Display and operator control optios in the main screen for "Manual Machine Plus"
Manual Machine Plus Turning
Programming and Operating Manual, 11/2012, 6FC5398-6CP10-3BA0 37
DANGER
Notice: An incorrect increment weighting setting can result in damage to the workpiece, tooland machine!
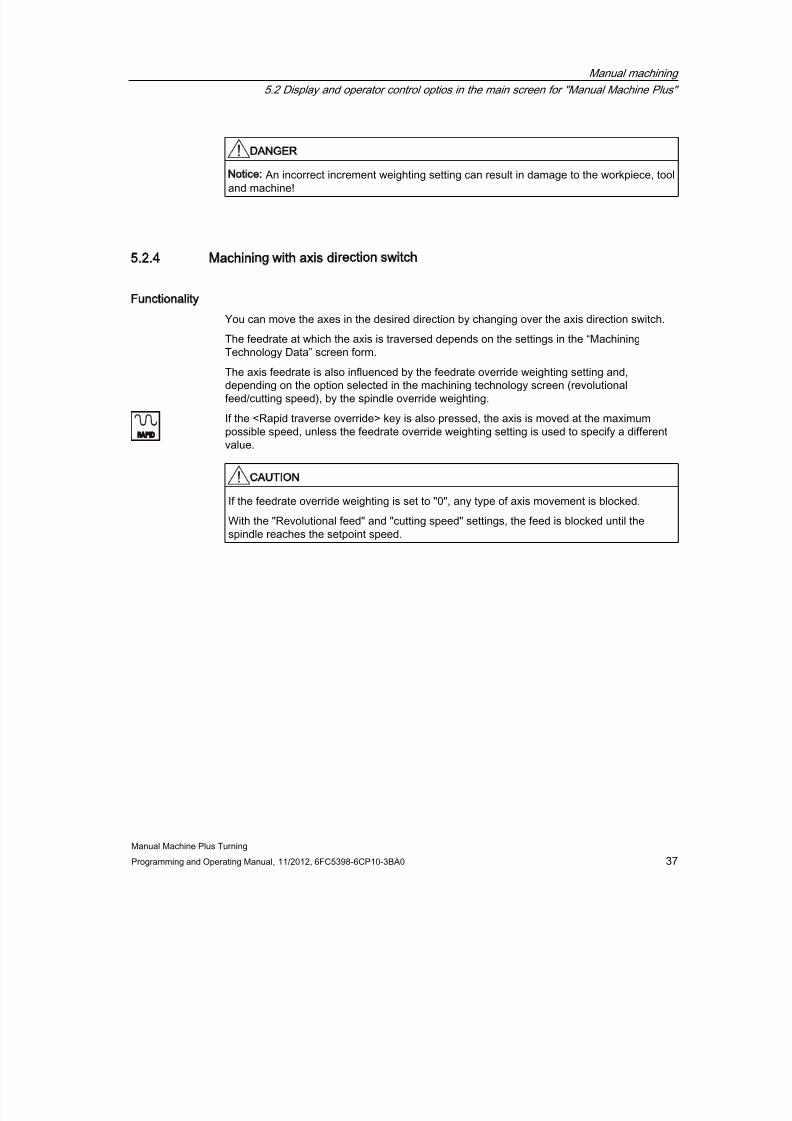
5.2.4 Machining with axis direction switch
Functionality
You can move the axes in the desired direction by changing over the axis direction switch.
The feedrate at which the axis is traversed depends on the settings in the “MachiningTechnology Data” screen form.
The axis feedrate is also influenced by the feedrate override weighting setting and,depending on the option selected in the machining technology screen (revolutionalfeed/cutting speed), by the spindle override weighting.
If the <Rapid traverse override> key is also pressed, the axis is moved at the maximumpossible speed, unless the feedrate override weighting setting is used to specify a differentvalue.
CAUTION
If the feedrate override weighting is set to "0", any type of axis movement is blocked.
With the "Revolutional feed" and "cutting speed" settings, the feed is blocked until thespindle reaches the setpoint speed.

8/13/2019 Manual Turning 802Dsl BPMMP 1112 en en-US
http://slidepdf.com/reader/full/manual-turning-802dsl-bpmmp-1112-en-en-us 38/120
Manual machining
5.2 Display and operator control optios in the main screen for "Manual Machine Plus"
Manual Machine Plus Turning
38 Programming and Operating Manual, 11/2012, 6FC5398-6CP10-3BA0
5.2.5 Spindle advance/reverse
Functionality
NOTICE
Start spindle
The spindle value should be checked before starting the spindle (e.g. when changing thetool).
The last value set is active (this depends on the machinery construction OEM).
You start the spindle in the appropriate direction (spindle advance / reverse) by changing
over the spindle direction switch:
CAUTION
The spindle cannot be started, unless the chuck guard switch is enabled. -> Close thechuck guard!
DANGER
Notice: Do not alter or adjust the chuck guard/chuck guard switch.
When the spindle is switched off, it brakes and comes to a halt. If a spindle brake is fitted, itis applied. If there is no spindle brake or it is switched off, the spindle can be rotated freelyonce it has stopped.
The programmed spindle speed can be controlled by means of an appropriate spindleoverride switch setting (e.g., 50 %).
8/13/2019 Manual Turning 802Dsl BPMMP 1112 en en-US
http://slidepdf.com/reader/full/manual-turning-802dsl-bpmmp-1112-en-en-us 39/120
Manual machining
5.2 Display and operator control optios in the main screen for "Manual Machine Plus"
Manual Machine Plus Turning
Programming and Operating Manual, 11/2012, 6FC5398-6CP10-3BA0 39
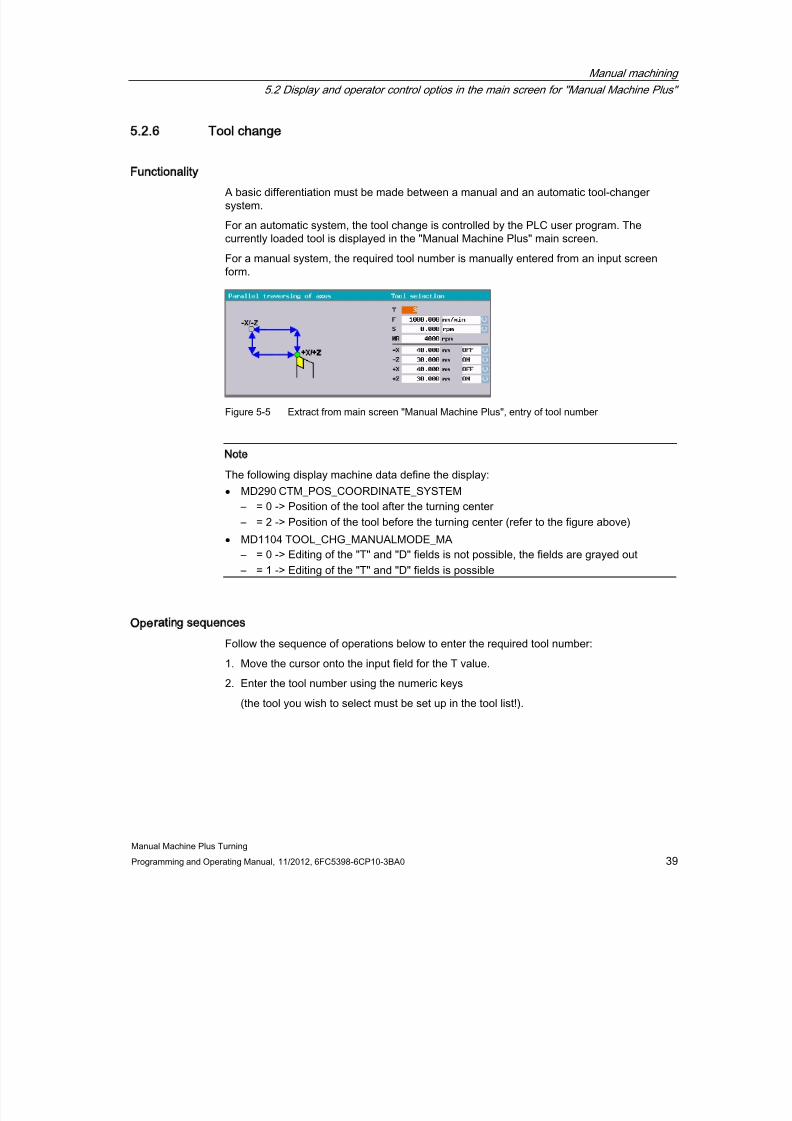
5.2.6 Tool change
Functionality
A basic differentiation must be made between a manual and an automatic tool-changersystem.
For an automatic system, the tool change is controlled by the PLC user program. Thecurrently loaded tool is displayed in the "Manual Machine Plus" main screen.
For a manual system, the required tool number is manually entered from an input screenform.
Figure 5-5 Extract from main screen "Manual Machine Plus", entry of tool number
Note
The following display machine data define the display:
• MD290 CTM_POS_COORDINATE_SYSTEM – = 0 -> Position of the tool after the turning center
– = 2 -> Position of the tool before the turning center (refer to the figure above)
• MD1104 TOOL_CHG_MANUALMODE_MA – = 0 -> Editing of the "T" and "D" fields is not possible, the fields are grayed out
– = 1 -> Editing of the "T" and "D" fields is possible
Operating sequences
Follow the sequence of operations below to enter the required tool number:
1. Move the cursor onto the input field for the T value.
2. Enter the tool number using the numeric keys
(the tool you wish to select must be set up in the tool list!).

8/13/2019 Manual Turning 802Dsl BPMMP 1112 en en-US
http://slidepdf.com/reader/full/manual-turning-802dsl-bpmmp-1112-en-en-us 40/120
Manual machining
5.2 Display and operator control optios in the main screen for "Manual Machine Plus"
Manual Machine Plus Turning
40 Programming and Operating Manual, 11/2012, 6FC5398-6CP10-3BA0
3. Accept the tool number by pressing the <INPUT> key.
The following information text with the corresponding tool number is displayed:
Figure 5-6 Tool change with NC Start
Acknowledge this information text using the "Cancel" softkey.
4. Press the <NC-Start> key.
The tool change is changed.
Please note the following for a manual tool change:
● The real tool change on the machine (tool relocation) is finished.
● The appropriate tool number (tool offset) must be communicated to the control by makinga manual entry.
CAUTION
A new tool number may be selected only if all axes and the spindle are stationary.
DANGER
Notice: The tool number entered in the T value field must correspond to the tool loadedinto the machine! Otherwise, the tool will have to be recalibrated (see also section"Measuring tools"). An uncalibrated or incorrectly calibrated tool can lead to dimensionalerrors or to incorrect cutting values.

8/13/2019 Manual Turning 802Dsl BPMMP 1112 en en-US
http://slidepdf.com/reader/full/manual-turning-802dsl-bpmmp-1112-en-en-us 41/120
Manual machining
5.2 Display and operator control optios in the main screen for "Manual Machine Plus"
Manual Machine Plus Turning
Programming and Operating Manual, 11/2012, 6FC5398-6CP10-3BA0 41
5.2.7 Changing the feedrate/spindle value
Changing the operating sequence, feed rate "F"/ spindle value "S"
Follow the sequence of operations below to enter the required feedrate or spindle value:
1. Position the cursor on the input field for the value (see screenshot below) in the mainscreen for "Manual Machine Plus".
Figure 5-7 Main screen "Manual Machine Plus", entry of feedrate value "F"
2.
Edit the programmed value using the numeric keys.3. Press the <INPUT> key.
The value is activated.
CAUTION
The F value (feed rate) or the S value (spindle) can only be changed if all axes and thespindle are stationary.

8/13/2019 Manual Turning 802Dsl BPMMP 1112 en en-US
http://slidepdf.com/reader/full/manual-turning-802dsl-bpmmp-1112-en-en-us 42/120
Manual machining
5.2 Display and operator control optios in the main screen for "Manual Machine Plus"
Manual Machine Plus Turning
42 Programming and Operating Manual, 11/2012, 6FC5398-6CP10-3BA0
5.2.8 Changing the feedrate/spindle type
Changing the operating sequences feedrate type "F"
By pressing the <Cursor keys>, you go to the display field which contains the currentlyprogrammed feedrate type (on dark background).
Figure 5-8 Type of feedrate
By pressing the toggle key <SELECT>, you can choose one of the following feedrate types:
● Time feed (mm/min)
If time feed is selected, the axes are moved at the speed entered in this field (mm/min)(unless rapid traverse override is activated). It can be influenced by the feedrate overrideswitch setting.
The time feed is only possible for a constant spindle speed.
● Rotary feedrate (mm/rev)
In "Spindle speed + revolutional feedrate" or "Const. cutting speed + revolutionalfeedrate" mode, the value entered in this field determines the axis speed (unless rapidtraverse override is activated). It is influenced directly by the feedrate override weightingsetting and indirectly by the spindle override weighting setting.

8/13/2019 Manual Turning 802Dsl BPMMP 1112 en en-US
http://slidepdf.com/reader/full/manual-turning-802dsl-bpmmp-1112-en-en-us 43/120
Manual machining
5.2 Display and operator control optios in the main screen for "Manual Machine Plus"
Manual Machine Plus Turning
Programming and Operating Manual, 11/2012, 6FC5398-6CP10-3BA0 43
Changing the operating sequences spindle type "S"
By pressing the <Cursor keys>, you go to the display field which contains the currently
programmed spindle type (on dark background).
Figure 5-9 Spindle type
By pressing the toggle key <SELECT>, you can choose one of the following spindle types:
● Constant spindle speed (rpm)
This value defines the programmed spindle speed for machining with "Spindle speed +
Time feed" or "Spindle speed + Revolutional feedrate".The constant spindle speed is achieved only if no speed reduction is programmed bymeans of spindle override weighting or with spindle setting data.
● Constant cutting rate (m/min)
Cutting speed input value for machining with "Cutting speed + revolutional feedrate". Thespindle speed is adjusted to the machining diameter of the workpiece so that uniformcutting conditions are achieved.
Since the spindle would (in simple mathematical terms) have to rotate at an "infinitelyhigh" speed at the rotational center point in this mode, this speed is limited in the spindlesetting data by the input value "MR".
The constant cutting speed can also be influenced by means of the feedrate and spindleoverride weighting settings.
CAUTION
The feedrate or spindle type can only be changed if all axes and the spindle arestationary.

8/13/2019 Manual Turning 802Dsl BPMMP 1112 en en-US
http://slidepdf.com/reader/full/manual-turning-802dsl-bpmmp-1112-en-en-us 44/120
Manual machining
5.2 Display and operator control optios in the main screen for "Manual Machine Plus"
Manual Machine Plus Turning
44 Programming and Operating Manual, 11/2012, 6FC5398-6CP10-3BA0
5.2.9 Change the speed limitation for constant cutting rate
Change the speed limitation operating sequences
When a constant cutting rate (G96) is programmed, the maximum permissible spindlespeed, corresponding to the fitted tool chucking device must be entered in the input field"MR" (spindle speed limitation)!
DANGER
Spindle speed limitation
Failure to pay sufficient attention to this point can lead to serious damage as a result of thechucking device speed being exceeded.
1. Position the cursor on the input field for the value in the "Manual Machine Plus" mainscreen.
Figure 5-10 Speed limitation input
2. Edit the programmed value using the <Numeric keys>.
3. Press the <INPUT> key.
The value is activated.
CAUTION
The value may be changed only when all axes and the spindle are stationary.

8/13/2019 Manual Turning 802Dsl BPMMP 1112 en en-US
http://slidepdf.com/reader/full/manual-turning-802dsl-bpmmp-1112-en-en-us 45/120
Manual machining
5.3 Manual machining with machining types
Manual Machine Plus Turning
Programming and Operating Manual, 11/2012, 6FC5398-6CP10-3BA0 45
5.3 Manual machining with machining types
5.3.1 Axis-parallel traversal
Functionality
The axis-parallel traversal is used for the simple cutting on the workpiece or for positioningthe axes.
If you move the axis direction switch, the control then moves the X and Z axes accordingly.
Operating sequences1. You can access the "Parallel traversing of axes" function via the main screen "Manual
Machine Plus".
2. If a different machining mode is active, press the "Machining mode" softkey until "Paralleltraversing of axes" is displayed.
Figure 5-11 Main screen for "Manual Machine Plus"

8/13/2019 Manual Turning 802Dsl BPMMP 1112 en en-US
http://slidepdf.com/reader/full/manual-turning-802dsl-bpmmp-1112-en-en-us 46/120
Manual machining
5.3 Manual machining with machining types
Manual Machine Plus Turning
46 Programming and Operating Manual, 11/2012, 6FC5398-6CP10-3BA0
5.3.2 Manual taper turning
Functionality
The "Manual taper turning" function is intended for the simple production of taperedworkpieces.
For the machining type "Taper turning" you need to enter an angle (taper angle α). The angleinput rotates the controller’s internal coordinate system according to the angle value.
When you move the axis direction switch, the controller then uses the angle input tointerpolate (and simultaneously traverses) the X and Z axes accordingly.
The programmed axis feed then applies to the path being traversed and not to thecorresponding axis.
If tapers with defined end points are to be turned, the use of limit stops is a helpful addition tothis function.
Note
The desired taper is traversed only by means of an axis direction switch or axis directionkeys of the machine control panel depending on the machine equipment.
A traversal using the handwheels is not possible!
Operating sequences
1. You can access the "Manual taper turning" function in the main screen for "ManualMachine Plus".
2. Press the "Machining mode" softkey until "Taper turning" is displayed.
Figure 5-12 Taper turning

8/13/2019 Manual Turning 802Dsl BPMMP 1112 en en-US
http://slidepdf.com/reader/full/manual-turning-802dsl-bpmmp-1112-en-en-us 47/120
Manual machining
5.3 Manual machining with machining types
Manual Machine Plus Turning
Programming and Operating Manual, 11/2012, 6FC5398-6CP10-3BA0 47
3. The input field for the taper angle "α" is immediately displayed on a dark backgroundwhen the machining mode is selected. You must enter the angle using the <Numerickeys>.
A positive angle value rotates the coordinate system in traverse direction X+.
A negative angle value rotates the coordinate system in traverse direction X-.
4. The entered value is immediately accepted using the <INPUT> key.
The taper angle remains active until you exit the "Taper turning" by pressing the "Machiningmode" softkey.
5.3.3 Manual radius turning
Functionality
The "Manual radius turning" function is designed to simplify the machining of inside andoutside radii.
The positions of the axes at the time that machining is selected form the starting point for theradii to be traversed.
When you move the axis direction switch, the control then uses the input values tointerpolate (and simultaneously traverse) the X and Z axes accordingly.
The programmed axis feed then applies to the path being traversed and not to the
corresponding axis.
Note
The desired radius is traversed only by means of an axis direction switch or axis directionkeys of the machine control panel depending on the machine equipment.
A traversal using the handwheels is not possible!
Operating sequences
1. You can access the "Manual radius turning" function in the main screen for "ManualMachine Plus".
2. Press the "Machining mode" softkey until "Taper turning" is displayed.
8/13/2019 Manual Turning 802Dsl BPMMP 1112 en en-US
http://slidepdf.com/reader/full/manual-turning-802dsl-bpmmp-1112-en-en-us 48/120
Manual machining
5.3 Manual machining with machining types
Manual Machine Plus Turning
48 Programming and Operating Manual, 11/2012, 6FC5398-6CP10-3BA0
Figure 5-13 Radius turning
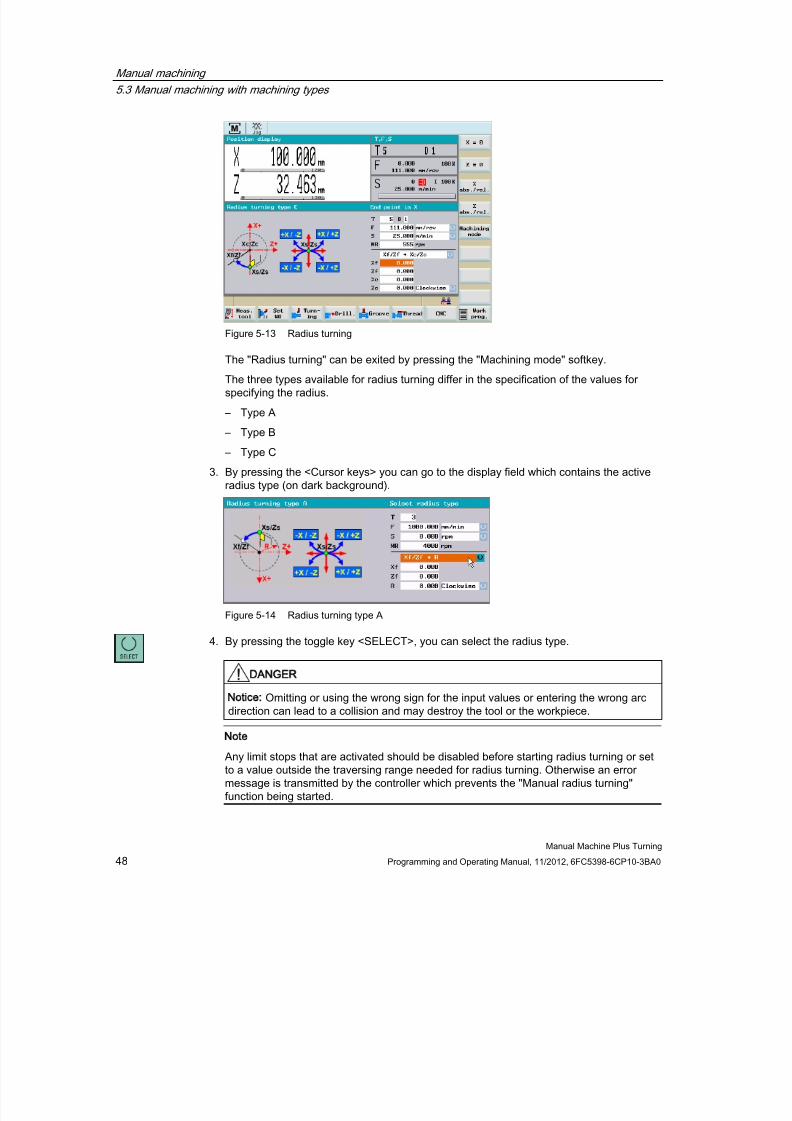
The "Radius turning" can be exited by pressing the "Machining mode" softkey.
The three types available for radius turning differ in the specification of the values forspecifying the radius.
– Type A
– Type B
– Type C
3. By pressing the <Cursor keys> you can go to the display field which contains the active
radius type (on dark background).
Figure 5-14 Radius turning type A
4. By pressing the toggle key <SELECT>, you can select the radius type.
DANGER
Notice: Omitting or using the wrong sign for the input values or entering the wrong arcdirection can lead to a collision and may destroy the tool or the workpiece.
Note
Any limit stops that are activated should be disabled before starting radius turning or setto a value outside the traversing range needed for radius turning. Otherwise an errormessage is transmitted by the controller which prevents the "Manual radius turning"function being started.

8/13/2019 Manual Turning 802Dsl BPMMP 1112 en en-US
http://slidepdf.com/reader/full/manual-turning-802dsl-bpmmp-1112-en-en-us 49/120
Manual machining
5.3 Manual machining with machining types
Manual Machine Plus Turning
Programming and Operating Manual, 11/2012, 6FC5398-6CP10-3BA0 49
5.3.3.1 Radius turning type A
For the radius turning type A, the radius to be machined is specified by the end point, the
radius and the machining direction.
Figure 5-15 Radius turning type A
Parameter
Parameter Description
Xf This input value describes the position of the circle end point in the X axis. The inputvalue is evaluated as absolute position (in the diameter).
Zf This input value describes the position of the circle end point in the Z axis. The inputvalue is evaluated as absolute position.
R This input value describes the radius to be traversed.
Counterclockwise/Clockwise This toggle field selects whether a circle must be traversed in the clockwise orcounterclockwise direction.
5.3.3.2 Radius turning type B
For the radius turning type B, the radius to be machined is specified by the center, theradius, the opening angle and the machining direction.
Figure 5-16 Radius turning type B

8/13/2019 Manual Turning 802Dsl BPMMP 1112 en en-US
http://slidepdf.com/reader/full/manual-turning-802dsl-bpmmp-1112-en-en-us 50/120
Manual machining
5.3 Manual machining with machining types
Manual Machine Plus Turning
50 Programming and Operating Manual, 11/2012, 6FC5398-6CP10-3BA0
Parameter
Parameter Description
Xc This input value describes the position of the circle center in the X axis. The inputvalue is evaluated as absolute position (in the diameter).
Zc This input value describes the position of the circle center in the Z axis. The inputvalue is evaluated as absolute position.
R This input value describes the radius to be traversed.
α This input value describes the opening angle of the radius to be traversed.
Counterclockwise/Clockwise This toggle field selects whether a circle must be traversed in the clockwise orcounterclockwise direction.
5.3.3.3 Radius turning type CFor the radius turning type C, the radius to be machined is specified by the center, the endpoint and the machining direction.
Figure 5-17 Radius turning type C
Parameter
Parameter Description
Xf This input value describes the position of the circle end point in the X axis. The inputvalue is evaluated as absolute position (in the diameter).
Zf This input value describes the position of the circle end point in the Z axis. The inputvalue is evaluated as absolute position.
Xc This input value describes the position of the circle center in the X axis. The inputvalue is evaluated as absolute position (in the diameter).
Zc This input value describes the position of the circle center in the Z axis. The inputvalue is evaluated as absolute position.
Counterclockwise/Clockwise This toggle field selects whether a circle must be traversed in the clockwise orcounterclockwise direction.

8/13/2019 Manual Turning 802Dsl BPMMP 1112 en en-US
http://slidepdf.com/reader/full/manual-turning-802dsl-bpmmp-1112-en-en-us 51/120
Manual machining
5.4 Manual machining using cycles (functions)
Manual Machine Plus Turning
Programming and Operating Manual, 11/2012, 6FC5398-6CP10-3BA0 51
5.4 Manual machining using cycles (functions)
5.4.1 Principle operating sequence
Functionality
You can perform the following functions manually:
● Drilling centric
● Tapping
● Groove cycles/Parting
● Thread cutting
● Rough turning of contours
When manually machining these functions, the operating sequence is essentially executed inthe same way.
Requirement
The following requirements must be fulfilled before you can execute the functions:
● The spindle is rotating in the correct direction.
Note
Parts can be machined manually only by a spindle started in the correct rotationaldirection. An error message is otherwise displayed.
DANGER
Notice: In machining operations, a spindle rotating in the wrong direction can causeserious damage to the tool, workpiece or machine!
-> Check the direction of rotation of the spindle before pressing NC start
● Any axis position from which the workpiece position to be machined can be approached
without risk of collision.● All parameters for the cycles are correctly assigned.

8/13/2019 Manual Turning 802Dsl BPMMP 1112 en en-US
http://slidepdf.com/reader/full/manual-turning-802dsl-bpmmp-1112-en-en-us 52/120
Manual machining
5.4 Manual machining using cycles (functions)
Manual Machine Plus Turning
52 Programming and Operating Manual, 11/2012, 6FC5398-6CP10-3BA0
Operating sequences
1. Select the function (e.g. "Drilling " > "Tapping") in the main screen of the "ManualMachine Plus".
2. Parameterizing the function.
Figure 5-18 Example of input fields
Note
A detailed parameter description of each function can be found in the relevant sections.
The following softkeys will support you with the parameterization and execution offunctions:
The actual position value of the relevant axis is transferred to the parameter input fieldswhen you press this softkey. The input field must be selected with the cursor keys,otherwise the error message "This value cannot be accepted" is displayed whenaccepting the axis position.
This softkey takes you back to the main screen.
If you have edited any values, the following prompt window appears:
Figure 5-19 Cycles prompt text
Your inputs are accepted when you press the "OK" softkey.
Your inputs are discarded when you press the "Abort" softkey.

8/13/2019 Manual Turning 802Dsl BPMMP 1112 en en-US
http://slidepdf.com/reader/full/manual-turning-802dsl-bpmmp-1112-en-en-us 53/120
Manual machining
5.4 Manual machining using cycles (functions)
Manual Machine Plus Turning
Programming and Operating Manual, 11/2012, 6FC5398-6CP10-3BA0 53
3. The function was parameterized (e.g. thread tapping).
Activate the function using the "OK" softkey.
The following execute screen appears:
Figure 5-20 Example of executing a machining operation
The current machining status is displayed in the center of the execute screen. This statuscould be one of the following:
– Machining not started
– Machining active
– Machining aborted – Machining interrupted
– Machining finished
In the example, the text "Machining not started" is displayed.
4. Start machining using the <NC-Start> key.
The machining operation on the workpiece is executed.
Note
Press the <NC-Stop> key if you want to interrupt the machining operation. The selecteddirection of the spindle rotation continues to be activated.
By pressing the key <NC stop>, the operating mode JOG is automatically changed, i.e.you can traverse the axes manually. By continuing the execution with <NC start>, theinterruption point is approached again and execution of the program is continued.
5. If machining was terminated (e.g. "Machining completed"), then the execution screen canbe exited using the "Cancel" softkey.
See also
Messages (Page 115)
8/13/2019 Manual Turning 802Dsl BPMMP 1112 en en-US
http://slidepdf.com/reader/full/manual-turning-802dsl-bpmmp-1112-en-en-us 54/120
Manual machining
5.4 Manual machining using cycles (functions)
Manual Machine Plus Turning
54 Programming and Operating Manual, 11/2012, 6FC5398-6CP10-3BA0
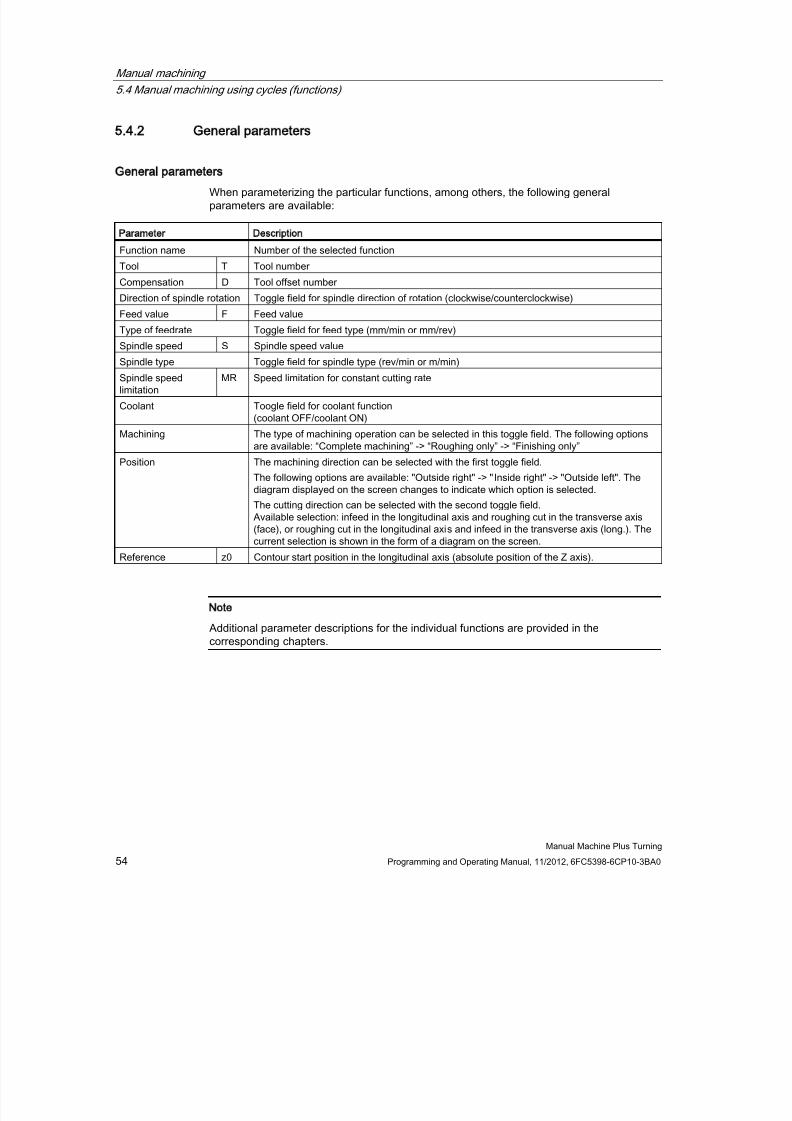
5.4.2 General parameters
General parameters
When parameterizing the particular functions, among others, the following generalparameters are available:
Parameter Description
Function name Number of the selected function
Tool T Tool number
Compensation D Tool offset number
Direction of spindle rotation Toggle field for spindle direction of rotation (clockwise/counterclockwise)
Feed value F Feed value
Type of feedrate Toggle field for feed type (mm/min or mm/rev)Spindle speed S Spindle speed value
Spindle type Toggle field for spindle type (rev/min or m/min)
Spindle speedlimitation
MR Speed limitation for constant cutting rate
Coolant Toogle field for coolant function(coolant OFF/coolant ON)
Machining The type of machining operation can be selected in this toggle field. The following optionsare available: “Complete machining” -> “Roughing only” -> “Finishing only”
Position The machining direction can be selected with the first toggle field.
The following options are available: "Outside right" -> "Inside right" -> "Outside left". The
diagram displayed on the screen changes to indicate which option is selected.The cutting direction can be selected with the second toggle field.Available selection: infeed in the longitudinal axis and roughing cut in the transverse axis(face), or roughing cut in the longitudinal axis and infeed in the transverse axis (long.). Thecurrent selection is shown in the form of a diagram on the screen.
Reference z0 Contour start position in the longitudinal axis (absolute position of the Z axis).
Note
Additional parameter descriptions for the individual functions are provided in thecorresponding chapters.

8/13/2019 Manual Turning 802Dsl BPMMP 1112 en en-US
http://slidepdf.com/reader/full/manual-turning-802dsl-bpmmp-1112-en-en-us 55/120
Manual machining
5.4 Manual machining using cycles (functions)
Manual Machine Plus Turning
Programming and Operating Manual, 11/2012, 6FC5398-6CP10-3BA0 55
Optional parameter, gear stage preselection
In the input fields for the relevant manual machining, e.g. thread tapping, it is possible to pre-
select the gear stage (see screenshot below).
Figure 5-21 Gear stage preselection
If a gear unit is installed on the machine, you can select the gear stage using the <SELECT>key.
Note
The selection of the gear stages can be changed by the following general machine data:• $MN14512 USER_DATA_HEX[31]
– 1's digit -> Number of selectable gear stages
– 10's digit -> = 1 -> With selection of "Automatic gear stage selection"
5.4.3 Manual drilling centered
Functionality
The "Manual drilling centered" function is designed to produce deep-hole drill holes in theturning center. Before you start the cycle, you must position the tool in such a way that it canapproach the programmed Z initial position without risk of collision. The function itself willposition the tool on the center of rotation.

8/13/2019 Manual Turning 802Dsl BPMMP 1112 en en-US
http://slidepdf.com/reader/full/manual-turning-802dsl-bpmmp-1112-en-en-us 56/120
Manual machining
5.4 Manual machining using cycles (functions)
Manual Machine Plus Turning
56 Programming and Operating Manual, 11/2012, 6FC5398-6CP10-3BA0
Operating sequences
You can access the drilling cycle overview by pressing the softkey "Drilling" in the basicscreen for "Manual Machine Plus".
Figure 5-22 Drilling cycle overview - "Center drilling" selected
You can access the "Manual center drilling" function by pressing the softkey "Center drilling"in the drilling cycle overview.
Alternatively, you can select "Center drilling" with <Cursor keys> and activate with the inputkey.
Figure 5-23 Drilling centric

8/13/2019 Manual Turning 802Dsl BPMMP 1112 en en-US
http://slidepdf.com/reader/full/manual-turning-802dsl-bpmmp-1112-en-en-us 57/120
Manual machining
5.4 Manual machining using cycles (functions)
Manual Machine Plus Turning
Programming and Operating Manual, 11/2012, 6FC5398-6CP10-3BA0 57
Parameter
Parameter Description
Reference z0 Start position for the drill hole in the longitudinal axis(absolute position of Z axis)
Drilling depth l Enter the depth of the drill hole to be created, taking the start position for the drill hole("Refer. z0") as the starting point. The drilling direction is always towards the chuck andcannot be reversed.
Max. infeed Max Maximum infeed value for the first infeed in the longitudinal axis
Min. infeed Min Minimum infeed value in the longitudinal axis, which must be observed for the final infeed.
Degression factor f Degression factor: the value by which the second and all subsequent infeeds in thelongitudinal axis are multiplied. The following general rule applies: An input value greaterthan 1 increases the infeed depth with each infeed, an input value of less than 1 reduces itwith each infeed. To switch off degression, enter 1 (or 0) here.
Dwell time t Dwell time on reaching the drilling depth
Return traveldistance
R Return travel distance in the longitudinal axis for chip breaking. This parameter is notdisplayed if "deswarfing" is selected.
Chip breaking / Deswarfing With this toggle field you can select between machining with "chip breaking" or"deswarfing". With "chip breaking", on reaching the corresponding infeed depth the tool isretracted in the longitudinal axis by a defined value (chip breaking) before the next infeed.With "deswarfing" on the other hand, the tool is withdrawn from the drill hole on reaching thecorresponding infeed depth. The next infeed then continues as usual. The current selectionis shown as a graphic in the left-hand section of the screen. If "deswarfing" is selected, novalue is shown for the "return travel".
Drilling
The machining sequence is as follows:
1. Starting from the current axis position, the tool is traversed to the cycle start point in thelongitudinal axis. This is calculated internally from the value for the "Reference z0"parameter (taking into account the clearance distance).
2. The transverse axis is positioned to the center of rotation.
3. The first infeed in the axial axis (as defined in the "Infeed Max." parameter) is thenperformed.
4. The subsequent traversing movement in the axial axis depends on whether "chipbreaking" or "deswarfing" has been selected. With "chip breaking" the tool is retracted in
the longitudinal axis by the value set in the "return travel" parameter; with "deswarfing"the longitudinal axis is positioned at the cycle start point.
5. The subsequent infeeds in the longitudinal axis are always calculated in the same way:new infeed value = last infeed value x factor + return travel value The new infeed value ismonitored to ensure that it complies with the value for the "Infeed Min." parameter. If theinfeed value is below the minimum infeed, this value is imposed, provided that the drillingdepth allows it. The calculation is followed by the infeed in the longitudinal axis.

8/13/2019 Manual Turning 802Dsl BPMMP 1112 en en-US
http://slidepdf.com/reader/full/manual-turning-802dsl-bpmmp-1112-en-en-us 58/120
Manual machining
5.4 Manual machining using cycles (functions)
Manual Machine Plus Turning
58 Programming and Operating Manual, 11/2012, 6FC5398-6CP10-3BA0
6. Infeed motion and "chip breaking/deswarfing" then alternate until the drilling depthspecified in the "Length I" parameter is reached.
7. Once the required drilling depth is reached, the waiting time specified in the "Dwell t"parameter begins.
8. At the end of this waiting time, the tool is traversed to the cycle start point in thelongitudinal axis.
See also
Principle operating sequence (Page 51)
General parameters (Page 54)
5.4.4 Manual thread tapping
Functionality
The "Manual thread tapping" function is designed to produce internal threads in the turningcenter, either with a compensating chuck or in a rigid tapping operation.
Before you start the cycle, you must position the tool in such a way that it can approach theprogrammed Z initial position without risk of collision. The function itself will position the toolon the center of rotation.
The machining feedrate is calculated from the programmed spindle speed and the threadpitch. This feedrate might not be the same as the programmed feedrate!
If you have selected "cutting rate" as the spindle type, the value set for the maximum spindlespeed with G96 or the value for the maximum spindle speed is applied for thread tapping.(because the thread is tapped in the turning center, i.e. X=0)
DANGER
Notice: If "Time feed" is selected in the “Machining technology data” screen, in order for thepitch to be calculated correctly, the spindle override weighting must be set to "100%".Otherwise, the tapping tool or workpiece may be damaged!!
->Prior to NC start, check that the spindle override weighting is set to 100%

8/13/2019 Manual Turning 802Dsl BPMMP 1112 en en-US
http://slidepdf.com/reader/full/manual-turning-802dsl-bpmmp-1112-en-en-us 59/120
Manual machining
5.4 Manual machining using cycles (functions)
Manual Machine Plus Turning
Programming and Operating Manual, 11/2012, 6FC5398-6CP10-3BA0 59
Operating sequences
You can access the drilling cycle overview by pressing the softkey "Drilling" in the basicscreen for "Manual Machine Plus".
Figure 5-24 Drilling cycle overview - "Tapping" selected
You can access the "Manual tapping" function by pressing the softkey "Tapping" in thedrilling cycle overview.
Alternatively, you can select "Tapping" with <Cursor keys> and activate with the input key.
Figure 5-25 Tapping

8/13/2019 Manual Turning 802Dsl BPMMP 1112 en en-US
http://slidepdf.com/reader/full/manual-turning-802dsl-bpmmp-1112-en-en-us 60/120
Manual machining
5.4 Manual machining using cycles (functions)
Manual Machine Plus Turning
60 Programming and Operating Manual, 11/2012, 6FC5398-6CP10-3BA0
Parameter
Parameter Description
Reference z0 Start position for the drill hole in the longitudinal axis(absolute position of Z axis)
Drilling depth l Enter the thread length here. The tapping direction is always towards the chuck and cannotbe reversed. The choice of "left-hand or right-hand thread" depends on the direction ofrotation of the spindle and the thread tapping tool.
Lead s Enter the thread pitch here.
With compensating chuck /Rigid tapping
Depending on the manufacturer, you can select as to whether the machining is carried-outwith or without compensating chuck.
Tapping operation
The machining sequence is as follows:
1. Starting from the current axis position, the tool is traversed to the cycle start point in thelongitudinal axis. This is calculated internally from the value for the "Reference z0"parameter (taking into account the clearance distance).
2. The transverse axis is positioned to the center of rotation.
3. The controller then waits (at the cycle start point) for the next zero mark of the spindleencoder in order to start the axis movement in the longitudinal axis (defined thread startpoint).
4. When the thread length (end point) is reached, the spindle and longitudinal axis change
direction and withdraw the tapping tool from the drill hole again.5. The longitudinal axis then stops at the cycle start point and the spindle changes direction
again. The spindle is now running in the direction in which it was originally started.
See also
Principle operating sequence (Page 51)
General parameters (Page 54)
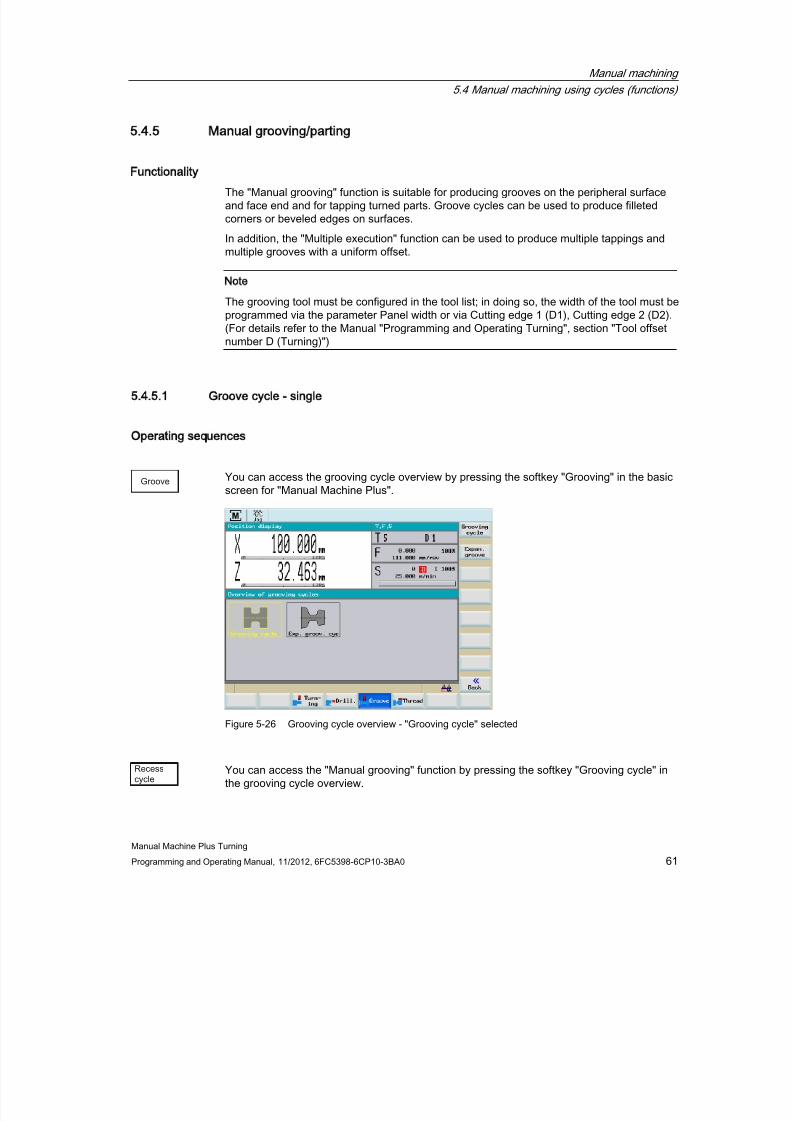
8/13/2019 Manual Turning 802Dsl BPMMP 1112 en en-US
http://slidepdf.com/reader/full/manual-turning-802dsl-bpmmp-1112-en-en-us 61/120
Manual machining
5.4 Manual machining using cycles (functions)
Manual Machine Plus Turning
Programming and Operating Manual, 11/2012, 6FC5398-6CP10-3BA0 61
5.4.5 Manual grooving/parting
Functionality
The "Manual grooving" function is suitable for producing grooves on the peripheral surfaceand face end and for tapping turned parts. Groove cycles can be used to produce filletedcorners or beveled edges on surfaces.
In addition, the "Multiple execution" function can be used to produce multiple tappings andmultiple grooves with a uniform offset.
Note
The grooving tool must be configured in the tool list; in doing so, the width of the tool must beprogrammed via the parameter Panel width or via Cutting edge 1 (D1), Cutting edge 2 (D2).
(For details refer to the Manual "Programming and Operating Turning", section "Tool offsetnumber D (Turning)")
5.4.5.1 Groove cycle - single
Operating sequences
You can access the grooving cycle overview by pressing the softkey "Grooving" in the basic
screen for "Manual Machine Plus".
Figure 5-26 Grooving cycle overview - "Grooving cycle" selected
You can access the "Manual grooving" function by pressing the softkey "Grooving cycle" inthe grooving cycle overview.

8/13/2019 Manual Turning 802Dsl BPMMP 1112 en en-US
http://slidepdf.com/reader/full/manual-turning-802dsl-bpmmp-1112-en-en-us 62/120
Manual machining
5.4 Manual machining using cycles (functions)
Manual Machine Plus Turning
62 Programming and Operating Manual, 11/2012, 6FC5398-6CP10-3BA0
Alternatively, you can select "Grooving cycle" with <Cursor keys> and activate with the inputkey.
Figure 5-27 Outer groove
Figure 5-28 Inner groove

8/13/2019 Manual Turning 802Dsl BPMMP 1112 en en-US
http://slidepdf.com/reader/full/manual-turning-802dsl-bpmmp-1112-en-en-us 63/120
Manual machining
5.4 Manual machining using cycles (functions)
Manual Machine Plus Turning
Programming and Operating Manual, 11/2012, 6FC5398-6CP10-3BA0 63
Parameter
Parameter Description
Reference z0 Starting position for the groove. The edge of the groove facing the chuck is alwaysspecified here. The value to be entered is the absolute position in the longitudinal axis(Z axis).
Groove width l1 This value is the groove width, which together with the value for "Reference z0"specifies the absolute position of the edge of the groove on the side of the groovefacing away from the spindle. If the groove width setting is the same as the tool width,and "0" is assigned to the parameters "Edge F1" and "Edge F2" (selection between"Chamfer CHF" and "Radius RND), the tapping function is activated.
Diameter d Starting diameter for the groove. The value to be entered is the absolute position in thetransverse axis (X axis).
Groove depth t This value is the groove depth which together with the value for "Diameter d" specifies
the absolute position of the base of the groove.Chamfer/radius F1 Depending on the option selected, this value forms either an input radius (display
"Radius RND") or an input chamfer (display "Chamfer CHF") of less than 450 on bothsides of the groove. You can toggle between RND / CHF using the toggle key. An inputvalue of 0.0 switches this function off.
Chamfer/radius F2 Depending on the option selected, this value forms either a radius (display "RadiusRND") or a chamfer (display "Chamfer CHF") of less than 450 on both sides of thegroove as the transition to the base of the groove. You can toggle between RND / CHFusing the toggle key. An input value of 0.0 switches this function off.
Max. infeed depth m1 Enter the maximum infeed depth for roughing during grooving. The cycle’s internalinfeed calculation ensures that this input value is not exceeded during machining.
Finishing allowance m2 Finishing allowance perpendicular to the contour.
Outer groove/innergroove
In this toggle field you can select whether an internal or an external groove is required.The selection is indicated by a diagram on the screen.
Groove cycle - single
The machining sequence is as follows:
1. Starting from the current axis position, the first calculated groove position is approached(diagonally) in both axes, taking into account the clearance distance and finishingallowance.
2. Execute the depth infeeds as a roughing motion in the transverse axis (X axis): eachinfeed depth is calculated internally so that firstly the setting "m1" is not exceeded and
secondly the infeed distance is kept uniform until the base of the groove is reached(taking into account the final machining allowance). After each infeed, the tool is retractedby the clearance distance for chip breaking.
3. When the base of the groove is reached for the first time, the tool is withdrawn from thematerial at the programmed feedrate.

8/13/2019 Manual Turning 802Dsl BPMMP 1112 en en-US
http://slidepdf.com/reader/full/manual-turning-802dsl-bpmmp-1112-en-en-us 64/120
Manual machining
5.4 Manual machining using cycles (functions)
Manual Machine Plus Turning
64 Programming and Operating Manual, 11/2012, 6FC5398-6CP10-3BA0
4. This is followed by the width infeed in the longitudinal axis: the width offset is calculatedinternally, taking into account the tool width (length "l2") and the groove width (length "l1")so that the machining is as uniform as possible.
5. Depth infeeds are then alternated as roughing motion and width offset until the entiregroove contour has been cleared. The only difference between the first depth infeed andthe others is that when the base of the groove is reached, the tool is retracted by theclearance distance and then moved out of the groove in rapid traverse.
6. Finishing is started immediately after the roughing operation. The entire contour istraversed from both sides to the center of the base of the groove at the feedrate specifiedin the “Technology Data” screen before the start of the cycle.
7. Finally, the original position of the axes before the start of machining is approacheddiagonally.
See also
Principle operating sequence (Page 51)
General parameters (Page 54)
5.4.5.2 Groove cycle - multiple
Functionality
Note
The "Multiple groove" function supplements the "Single groove" option. This function can beused only if all the parameters for the "Groove cycle - single" function have been assigned!
As soon as you position the cursor in any of the input fields in the multiple grooves area ofthe screen, the display changes from single groove to multiple grooves:
Figure 5-29 Groove cycle - multiple

8/13/2019 Manual Turning 802Dsl BPMMP 1112 en en-US
http://slidepdf.com/reader/full/manual-turning-802dsl-bpmmp-1112-en-en-us 65/120
Manual machining
5.4 Manual machining using cycles (functions)
Manual Machine Plus Turning
Programming and Operating Manual, 11/2012, 6FC5398-6CP10-3BA0 65
Parameter
Parameter Description
Distance l3 Groove offset in the longitudinal axis (Z axis): This input value determines the offsetbetween several identical grooves during production. The direction of the groove offsetbetween the individual grooves is always towards the chuck.
Number n Number of grooves to be produced. Entering "0" or "1" here has the same effect: A singlegroove is produced. When you enter a value of ">1", the appropriate number of grooves ismachined. The input value in parameter "Length I3" defines the necessary offset.
DANGER
Notice:When you are machining multiple grooves, make sure that there is sufficientclearance from the spindle as measured from starting position "Reference z0" to allow allparameterized grooves to be machined. There is otherwise a risk of collision between thetool and the chuck!
-> Check the plausibility of the input values before pressing NC start
Multiple grooves
The machining sequence is as follows:
1. Starting from the current axis position, the first groove is produced as described under
"Groove cycle - single".2. The starting point for the next groove is then approached in the longitudinal axis (X axis),
taking into account the clearance distance. The offset is always in the direction of thespindle (chuck).
3. Another complete groove is then machined (as described under "Groove cycle - single").
4. Groove machining and offset in the axial axis then alternate until the number of groovesspecified in the "Number n" parameter has been produced.
5. On completion of the final groove, the original position of the axes before the start ofmachining is approached diagonally.
See also
General parameters (Page 54)
Principle operating sequence (Page 51)

8/13/2019 Manual Turning 802Dsl BPMMP 1112 en en-US
http://slidepdf.com/reader/full/manual-turning-802dsl-bpmmp-1112-en-en-us 66/120
Manual machining
5.4 Manual machining using cycles (functions)
Manual Machine Plus Turning
66 Programming and Operating Manual, 11/2012, 6FC5398-6CP10-3BA0
5.4.5.3 Parting cycle - single
Functionality
The "Single parting" function is a subfunction of the "Groove cycle - single" function
Operating sequences
You activate the "Single parting" function by assigning the following parameters in the screenfor "Groove cycle - single":
Parameter Description
Groove width l1 Groove width "I1" must be identical to the tool width for the parting function.
Chamfer/radius F1 This value must be deactivated with a setting of 0.0 for parting.
Chamfer/radius F2 This value must be deactivated with a setting of 0.0 for parting.
Note
The chamfer/radius parameters must be set to "0", otherwise the cycle cannot calculate thecontour and displays an error message ("Groove form not defined correctly").
PartingThe machining sequence is as follows:
1. Starting from the current axis position, the first calculated parting position is approached(diagonally) in both axes, taking into account the clearance distance.
2. Execute the depth infeeds as a roughing motion in the transverse axis (X axis): eachinfeed depth is calculated internally so that firstly the setting "m1" is not exceeded andsecondly the infeed distance is kept uniform until the base of the groove (parting depth) isreached. After each infeed, the tool is retracted by the clearance distance for chipbreaking.
3. When the base of the groove is reached, the tool is withdrawn from the material at theprogrammed feedrate.
4. Finally, the original position of the axes before the start of machining is approacheddiagonally.
8/13/2019 Manual Turning 802Dsl BPMMP 1112 en en-US
http://slidepdf.com/reader/full/manual-turning-802dsl-bpmmp-1112-en-en-us 67/120
Manual machining
5.4 Manual machining using cycles (functions)
Manual Machine Plus Turning
Programming and Operating Manual, 11/2012, 6FC5398-6CP10-3BA0 67
5.4.5.4 Multiple tapping
Functionality
The "Multiple parting" function is a subfunction of the "Groove cycle - multiple" function.
Operating sequences
You activate the "Multiple parting" function by assigning the following parameters in thescreen for "Groove cycle - multiple":
Parameter Description
Groove width l1 Groove width "I1" must be identical to the tool width for the "multiple parting" function.
Chamfer/radius F1 This value must be deactivated with a setting of 0.0 for "multiple parting".
Chamfer/radius F2 This value must be deactivated with a setting of 0.0 for "multiple parting".
Note
The chamfer/radius (CHF/RND) parameters must be set to "0", otherwise the cycle cannotcalculate the contour and displays an error message ("Groove form not defined correctly").
Multiple tapping
DANGER
Notice: When multiple parting is selected, make sure that there is sufficient clearance fromthe spindle as measured from starting position "Reference z0" to allow all parameterizedparting operations to be performed. There is otherwise a risk of collision between the tooland the chuck!
-> Check the plausibility of the input values before pressing NC start!
The machining sequence is as follows:
1. Machining takes place in the same way as for machining of "multiple grooves". The onlydifference lies in the fact that this is a "parting" rather than a "grooving" operation.
2. Finally, the original position of the axes before the start of machining is approacheddiagonally.

8/13/2019 Manual Turning 802Dsl BPMMP 1112 en en-US
http://slidepdf.com/reader/full/manual-turning-802dsl-bpmmp-1112-en-en-us 68/120
Manual machining
5.4 Manual machining using cycles (functions)
Manual Machine Plus Turning
68 Programming and Operating Manual, 11/2012, 6FC5398-6CP10-3BA0
5.4.5.5 Extended grooving
Operating sequences
You can access the grooving cycle overview by pressing the softkey "Grooving" in the basicscreen for "Manual Machine Plus".
Figure 5-30 Grooving cycle overview - "Extended groove" selected
You can access the "Extended grooving" function by pressing the softkey "Extended groove"in the grooving cycle overview.
Alternatively, you can select "Extended groove" with <Cursor keys> and activate with theinput key.
Figure 5-31 Extended external groove

8/13/2019 Manual Turning 802Dsl BPMMP 1112 en en-US
http://slidepdf.com/reader/full/manual-turning-802dsl-bpmmp-1112-en-en-us 69/120
Manual machining
5.4 Manual machining using cycles (functions)
Manual Machine Plus Turning
Programming and Operating Manual, 11/2012, 6FC5398-6CP10-3BA0 69
Figure 5-32 Extended internal groove
Figure 5-33 Face groove
Parameter
Parameter Description
Reference z0 Starting position for the groove. The edge of the groove facing the chuck is alwaysspecified here. The value to be entered is the absolute position in the longitudinal axis(Z axis).
Groove width l1 This value is the groove width, which together with the value for "Reference z0"specifies the absolute position of the edge of the groove on the side of the groovefacing away from the spindle. If the groove width setting is the same as the tool width,and "0" is assigned to the parameters "Edge F1" and "Edge F2" (selection between"Chamfer CHF" and "Radius RND), the tapping function is activated.
Diameter d Starting diameter for the groove. The value to be entered is the absolute position in thetransverse axis (X axis).

8/13/2019 Manual Turning 802Dsl BPMMP 1112 en en-US
http://slidepdf.com/reader/full/manual-turning-802dsl-bpmmp-1112-en-en-us 70/120
Manual machining
5.4 Manual machining using cycles (functions)
Manual Machine Plus Turning
70 Programming and Operating Manual, 11/2012, 6FC5398-6CP10-3BA0
Parameter Description
Groove depth t This value is the groove depth which together with the value for "Diameter d" specifies
the absolute position of the base of the groove.Chamfer/radius F1 Depending on the option selected, this value forms either an input radius (display
"Radius RND") or an input chamfer (display "Chamfer CHF") on the first side of thegroove. You can toggle between RND / CHF using the toggle key. An input value of 0.0switches this function off.
Chamfer/radius F2 Depending on the option selected, this value forms either a radius (display "RadiusRND") or a chamfer (display "Chamfer CHF") on the first side of the groove as thetransition to the base of the groove. You can toggle between RND / CHF using thetoggle key. An input value of 0.0 switches this function off.
Chamfer/radius F3 Depending on the option selected, this value forms either a radius (display "RadiusRND") or a chamfer (display "Chamfer CHF") on the second side of the groove as thetransition to the base of the groove. You can toggle between RND / CHF using thetoggle key. An input value of 0.0 switches this function off.
Chamfer/radius F4 Depending on the option selected, this value forms either an input radius (display"Radius RND") or an input chamfer (display "Chamfer CHF") on the second side of thegroove. You can toggle between RND / CHF using the toggle key. An input value of 0.0switches this function off.
Max. infeed depth m1 Enter the maximum infeed depth for roughing during grooving. The cycle’s internalinfeed calculation ensures that this input value is not exceeded during machining.
Finishing allowance m2 Finishing allowance perpendicular to the contour.
Externalgroove/internalgroove/planar tochuck/planar fromchuck
In this toggle field you can select the type of groove machining required whereby therespective selection is displayed in a diagram on the screen.
Contour angle A0 This input value specifies the angle of the incline where the groove is to be executed.
Flank angle 1 A1 This input value determines the inclination of the first groove flank.
Flank angle 2 A2 This input value determines the inclination of the second groove flank.
Dwell time at recessbase
dt Here you can enter the dwell time of the tool on the groove base.
Variable retraction path VR This value determines the variable retraction path from the contour. This value must beentered without sign (incremental).
Extended grooving
The machining sequence is as follows:
1. Starting from the current axis position, the first calculated groove position is approached(diagonally) in both axes, taking into account the clearance distance and finishingallowance.
2. Executing the depth infeeds in the form of a roughing movement: each infeed depth iscalculated internally so that firstly the setting "m1" is not exceeded and secondly theinfeed distance is kept uniform until the base of the groove is reached (taking intoaccount the final machining allowance). After each infeed, the tool is retracted by theclearance distance for chip breaking.
3. When the base of the groove is reached for the first time, the tool is withdrawn from thematerial at the programmed feedrate.

8/13/2019 Manual Turning 802Dsl BPMMP 1112 en en-US
http://slidepdf.com/reader/full/manual-turning-802dsl-bpmmp-1112-en-en-us 71/120
Manual machining
5.4 Manual machining using cycles (functions)
Manual Machine Plus Turning
Programming and Operating Manual, 11/2012, 6FC5398-6CP10-3BA0 71
4. Now the width infeed is executed: the width offset is calculated cycle-internally, takinginto account the tool width and the groove width (length "l1") so that the machining is asuniform as possible.
5. Depth infeeds are then alternated as roughing motion and width offset until the entiregroove contour has been cleared. The only difference between the first depth infeed andthe others is that when the base of the groove is reached, the tool is retracted by theclearance distance and then moved out of the groove in rapid traverse.
6. Finishing is started immediately after the roughing operation. The entire contour istraversed from both sides to the center of the base of the groove at the feedrate specifiedin the “Technology Data” screen before the start of the cycle.
7. Finally, the original position of the axes before the start of machining is approacheddiagonally.
5.4.5.6 Multiple extended grooving
Functionality
Note
The "Multiple extended grooving" function supplements the "Extended grooving" option. Thisfunction can be used only if all the parameters for the "Extended grooving" function havebeen assigned!
As soon as you position the cursor in any of the input fields in the multiple grooves area ofthe screen, the display changes from single groove to multiple grooves:
Figure 5-34 Multiple extended grooving

8/13/2019 Manual Turning 802Dsl BPMMP 1112 en en-US
http://slidepdf.com/reader/full/manual-turning-802dsl-bpmmp-1112-en-en-us 72/120
Manual machining
5.4 Manual machining using cycles (functions)
Manual Machine Plus Turning
72 Programming and Operating Manual, 11/2012, 6FC5398-6CP10-3BA0
Figure 5-35 Face groove
Parameter
Parameter Description
Distance l3 Groove offset: This input value determines the offset between several identical groovesduring production.
Number n Number of grooves to be produced. Entering "0" or "1" here has the same effect: A singlegroove is produced. When you enter a value of ">1", the appropriate number of grooves ismachined. The input value in parameter "Length I3" defines the necessary offset.
Multiple grooves
The machining sequence is as follows:
1. Starting from the current axis position, the first groove is produced as described under"Extended grooving".
2. The starting point for the next groove is then approached taking into account theclearance distance.
3. Another complete grooving cycle is then executed (as described under "Extendedgrooving").
4. Groove machining and offset then alternate until the number of grooves specified in the"Number n" parameter has been executed.
5. On completion of the final groove, the original position of the axes before the start ofmachining is approached diagonally.

8/13/2019 Manual Turning 802Dsl BPMMP 1112 en en-US
http://slidepdf.com/reader/full/manual-turning-802dsl-bpmmp-1112-en-en-us 73/120
Manual machining
5.4 Manual machining using cycles (functions)
Manual Machine Plus Turning
Programming and Operating Manual, 11/2012, 6FC5398-6CP10-3BA0 73
5.4.6 Manual thread cutting
Functionality
The "Manual thread cutting" function provides a wide range of options for producing,remachining and recutting longitudinal, tapered and face threads.
They can be single-start or multiple-start threads.
Note
Any limit stops that are activated should be disabled before starting thread cutting or set to avalue outside the traversing range needed for thread cutting.
5.4.6.1 Thread cutting
Operating sequences
You can access the "Manual thread cutting" function by pressing the softkey "Thread" in themain screen for "Manual Machine Plus".
Figure 5-36 Longitudinal external thread

8/13/2019 Manual Turning 802Dsl BPMMP 1112 en en-US
http://slidepdf.com/reader/full/manual-turning-802dsl-bpmmp-1112-en-en-us 74/120
Manual machining
5.4 Manual machining using cycles (functions)
Manual Machine Plus Turning
74 Programming and Operating Manual, 11/2012, 6FC5398-6CP10-3BA0
Figure 5-37 Longitudinal internal thread
Figure 5-38 Face thread
Figure 5-39 Taper external thread

8/13/2019 Manual Turning 802Dsl BPMMP 1112 en en-US
http://slidepdf.com/reader/full/manual-turning-802dsl-bpmmp-1112-en-en-us 75/120
Manual machining
5.4 Manual machining using cycles (functions)
Manual Machine Plus Turning
Programming and Operating Manual, 11/2012, 6FC5398-6CP10-3BA0 75
Figure 5-40 Taper internal thread
Parameter
Parameter Description
Reference z0 Start position for the thread in the longitudinal axis (absolute position of the Z axis).
Thread length l Enter the length of the thread to be created, taking the start position for the thread("Reference z0") as the starting point. The thread cutting direction is selected by pressingthe "Feed direction" softkey and is indicated in the diagram by means of an arrow. The
choice of whether to produce a left-hand or a right-hand thread depends purely on thestarting direction for the spindle.
Diameter Start d1 Start position for the thread in the transverse axis (absolute position of the X axis in thediameter). This value applies in the reference point.
Diameter End d2 End position for the thread in the transverse axis (absolute position of the X axis in thediameter).
Lead s Enter the required pitch in mm/rev.
Depth t This parameter is used to set the thread depth. The infeed direction and infeed depthdepend on other parameters ("Intern Extern." and "Linear Degres." softkeys; "Angle"parameter).
Note: If the value of the displayed machine date 1108 equals 1 (requirement for automatically
calculating the thread depth) and the input field "t" equals 0, then the thread depth "t" will beautomatically calculated and entered when you enter the pitch value.
The following applies to all male threads:
• a thread pitch of 1 mm results in a thread depth of 0.613 mm
The following applies to all female threads:
• a thread pitch of 1 mm results in a thread depth of 0.541mm
The thread depth is adjusted according to an increase or reduction in the pitch value.
Infeed angle w Infeed angle; this specifies the angle of infeed during machining. A negative value causesan alternating infeed.

8/13/2019 Manual Turning 802Dsl BPMMP 1112 en en-US
http://slidepdf.com/reader/full/manual-turning-802dsl-bpmmp-1112-en-en-us 76/120
Manual machining
5.4 Manual machining using cycles (functions)
Manual Machine Plus Turning
76 Programming and Operating Manual, 11/2012, 6FC5398-6CP10-3BA0
Parameter Description
Max. infeed depth
Min. infeed depth
m1 Enter here the maximum or minimum infeed depth for roughing. The cycle-internal infeed
calculation ensures that this entry value is not exceeded or falls short during thread cutting.Input of a minimum infeed depth is possible only with degressive infeed.
Note: The input field for the minimum infeed depth is displayed only if you have selected"Degressive infeed".
Finishingallowance
m2 Finishing allowance
Thread run-outpath
r
Longitudinal internal thread/longitudinal external thread/face thread/
taper external thread/taper internal thread
In this toggle field you can select whether an internal or an external thread is required. Theselection is indicated by a diagram on the screen.
To chuck/From chuck
You can select the machining direction of the thread using this toggle field.
Linear infeed/Degressive infeed
This function key is used to switch between "linear infeed" and "degressive infeed". "Linearinfeed" means that roughing always takes place at a constant depth of cut, and the internalinfeed calculation is designed so that the value for the "max. infeed depth" (m1) is notexceeded during the entire thread cutting operation. "Degressive infeed" on the other handmeans that the volume of cut is kept constant throughout the entire thread cutting operation.In this case too, the value for "max. infeed depth" (m1) is observed throughout the entireoperation.
Number of thread starts The number of thread starts is defined here.
Softkey
This softkey is used to select remachining or thread recutting (thread repair).
Thread cutting
The machining sequence is as follows:
1. Starting from the current axis position, the start position for the thread (d1/z0) isapproached in rapid traverse.
2. This is followed by infeed by the first depth of cut.
3. The controller then waits for the next zero mark from the spindle encoder in order to startthe axis movements (longitudinal axis and/or transverse axis) (depending on the threadgeometry).
4. Once the end position for the thread has been reached in both axes, the tool is withdrawnfrom the workpiece in rapid traverse.
5. The start position for the thread is then approached in the longitudinal and transverseaxis in rapid traverse, observing a clearance distance.
6. Infeed to the next depth of cut.

8/13/2019 Manual Turning 802Dsl BPMMP 1112 en en-US
http://slidepdf.com/reader/full/manual-turning-802dsl-bpmmp-1112-en-en-us 77/120
Manual machining
5.4 Manual machining using cycles (functions)
Manual Machine Plus Turning
Programming and Operating Manual, 11/2012, 6FC5398-6CP10-3BA0 77
7. Wait for the next marker pulse from the spindle encoder to start the axes...
This process continues until all cuts have been completed. An additional finishing cut to
smooth the thread is then performed and the start position for the thread is approached inthe longitudinal and transverse axes.
8. There is now a choice of 2 options:
– Machining is now complete and the "Execute" screen can be closed with the "Abort"softkey.
– If you wish to continue machining the thread, e.g. if thread finishing is required, pressNC Start again.
See also
Principle operating sequence (Page 51)
General parameters (Page 54)
5.4.6.2 Thread recutting
Functionality
The "Thread recutting" function is a subfunction of "Manual thread cutting". It can be used torecut a thread or to continue machining the thread on a workpiece that has been unclampedin between.
In order for "Thread recutting" to proceed correctly, the appropriate values have to beentered in the "Thread Cutting" screen form.
Operating sequences
Note
The "Thread recutting" function uses the entry values from the "Thread Cutting" screen form.This screen form must therefore have been completed in order for thread cutting to proceedcorrectly.
You can call the thread recutting function with softkey "Thread repair".The following screen form appears:

8/13/2019 Manual Turning 802Dsl BPMMP 1112 en en-US
http://slidepdf.com/reader/full/manual-turning-802dsl-bpmmp-1112-en-en-us 78/120
Manual machining
5.4 Manual machining using cycles (functions)
Manual Machine Plus Turning
78 Programming and Operating Manual, 11/2012, 6FC5398-6CP10-3BA0
Figure 5-41 Thread recutting
The values displayed for start of thread, end of thread and axis position relate to the type ofthread selected.
Longitudinal and taper thread ≤ 45° (Z axis)
Face and taper thread ≤ 45° (X axis)
All values displayed on this screen form are for information only; it is not, therefore, possibleto alter them directly.
Execute thread recutThe following requirements must be fulfilled before you can recut a thread:
● Appropriate values must already have been entered in the "Thread Cutting" screen format this point.
● The screen above is displayed.
● The spindle must be stationary (switched off) and must already have been synchronized,in other words, it must have been turned through at least one full revolution since thecontroller was last powered up. Otherwise, an error message appears when the threadangle is accepted.
● Now use the handwheels to traverse the axes until the thread cutting tool can be
threaded into the existing thread.● Carefully introduce the tool into the thread. The "Axis position" shown on the screen must
be between the values for "Thread initial p." and "Thread end point".
● Press the softkey "Accept angle". The current spindle angle is now converted into theappropriate starting angle offset for thread cutting. The starting angle that is nowdisplayed corresponds to the angle that will subsequently be used as the starting angleoffset for machining a right-hand or left-hand thread.

8/13/2019 Manual Turning 802Dsl BPMMP 1112 en en-US
http://slidepdf.com/reader/full/manual-turning-802dsl-bpmmp-1112-en-en-us 79/120
Manual machining
5.4 Manual machining using cycles (functions)
Manual Machine Plus Turning
Programming and Operating Manual, 11/2012, 6FC5398-6CP10-3BA0 79
● Using the handwheels, move the axes into a position from which the start of the threadcan be approached safely.
● Press the softkey "OK" and the following screen appears:
Figure 5-42 Execute thread recut
The rest of the thread cutting process is exactly the same as that described for "Manualthread cutting".
The only difference is that thread cutting is not started with the marker pulse from the spindleencoder but with the angle that was calculated in the previous screen for "thread repair"(thread recutting) as the "start angle offset".
5.4.6.3 Thread shaving after thread cutting
Functionality
At the end of each thread cutting operation, you can choose to continue machining thethread, i.e., to perform shaving. Thread shaving can be performed either with or without anadditional infeed, in which case it is merely a "smoothing cut".
Operating sequences
The following query is displayed at the thread end:
"Should the threads be recut?"
Softkeys
If no thread recut is necessary, confirm the prompt with "Cancel".
To perform a thread recut, confirm with "OK".

8/13/2019 Manual Turning 802Dsl BPMMP 1112 en en-US
http://slidepdf.com/reader/full/manual-turning-802dsl-bpmmp-1112-en-en-us 80/120
Manual machining
5.4 Manual machining using cycles (functions)
Manual Machine Plus Turning
80 Programming and Operating Manual, 11/2012, 6FC5398-6CP10-3BA0
You can then select the infeed type using the following softkeys:
Pressing this softkey means that an additional cut is executed at the same infeed depth as
the previous cut when you press <NC-Start> (additional "thread smoothing").When this softkey is selected, the tool will be fed in by the amount entered in the "Val. f.Feed" field next time the NC Start key is pressed. The thread is machined accordingly in thenext cut.
This softkey is used to enter the infeed value for subsequent machining. On pressing thekey, the corresponding entry field (already on dark background) is displayed in the screenform shown below to enable you to enter the value.
Press the <INPUT> key as usual to accept the value.
Figure 5-43 Enter infeed
After pressing the "With Feed" or "Without Feed" softkey, press NC Start to start machiningan additional cut.
If you do not wish to do this, exit the "Execute Thread" screen by selecting softkey "Abort"without executing an NC start.
5.4.7 Roughing cycles
Functionality
The roughing cycles (integrated in the control) are the easiest way of producing commonparaxial cutting contours. They are defined by setting particular input parameters in theappropriate screen forms.
The contour can be machined using the following position of the contour:
● "Outside right"
● "Inside right"
● "Outside left"
Roughing either be "Longitudinal" or "Face".

8/13/2019 Manual Turning 802Dsl BPMMP 1112 en en-US
http://slidepdf.com/reader/full/manual-turning-802dsl-bpmmp-1112-en-en-us 81/120
Manual machining
5.4 Manual machining using cycles (functions)
Manual Machine Plus Turning
Programming and Operating Manual, 11/2012, 6FC5398-6CP10-3BA0 81
Operating sequences
Starting from the main menu for "Manual Machine Plus" you can reach the roughing cyclefunctions via softkey menu "Turning".
Figure 5-44 Turning cycle overview - Roughing cycle A selected
The following roughing cycles can be used via the vertical softkey bar or by selecting via<Cursor keys>:
● Roughing cycle A - simple stepped contour
● Roughing cycle B - expanded stepped contour with beveled edges
● Roughing cycle C - expanded stepped contour with rounding
● Roughing cycle D - single radius
● Roughing cycle E - single taper
● Roughing cycle F - Face and longitudinal turning
● Roughing cycle - free contour
5.4.7.1 Roughing cycle A
Functionality
The function "Roughing A" is used to produce a simple stepped contour (step), with theoption of working the transitions to adjacent faces as a radius or chamfer.
Operating sequences
You can access the turning cycle overview by pressing the softkey "Turning" in the basicscreen for "Manual Machine Plus".

8/13/2019 Manual Turning 802Dsl BPMMP 1112 en en-US
http://slidepdf.com/reader/full/manual-turning-802dsl-bpmmp-1112-en-en-us 82/120
Manual machining
5.4 Manual machining using cycles (functions)
Manual Machine Plus Turning
82 Programming and Operating Manual, 11/2012, 6FC5398-6CP10-3BA0
In the softkey menu "Turning", press the softkey "Roughing cycle A".
Alternatively, you can select "Roughing cycle A" from the turning cycle overview with
<Cursor keys> and activate with the input key.
Figure 5-45 Roughing cycle A, position "Outside right"
Input fields
The input fields in the "Roughing A" screen form have the following meanings:
Parameter Description
Length l Enter the length of the "step" to be produced, taking the contour start position("Reference z0") in the axial axis (Z axis) as the starting point.
Diameter d1 Outside diameter of the "step" to be machined in the radial axis (absolute position ofthe X axis in the diameter).
Diameter d2 Inside diameter of the "step" to be machined in the radial axis (absolute position of theX axis in the diameter).
Chamfer/radius F1 Depending on the option selected, this value forms either a transition radius (display"RND") or a transition chamfer (display "Chamfer CHR" or "Chamfer CHF") of less than450 between the end face and the inside diameter of the "step". You can togglebetween RND / CHR / CHF using the toggle key. An input value of 0.0 switches thisfunction off.
Two types of dimensioning are possible with the chamfers:
• in the case of chamfer CHR, the value specifies the width of the chamfer in thedirection of the movement,
• in the case of chamfer CHF, the value corresponds with the length of the chamfer.

8/13/2019 Manual Turning 802Dsl BPMMP 1112 en en-US
http://slidepdf.com/reader/full/manual-turning-802dsl-bpmmp-1112-en-en-us 83/120
Manual machining
5.4 Manual machining using cycles (functions)
Manual Machine Plus Turning
Programming and Operating Manual, 11/2012, 6FC5398-6CP10-3BA0 83
Parameter Description
Chamfer/radius F2 Depending on the option selected, this value forms either a transition radius (display
"RND") or a transition chamfer (display "Chamfer CHR" or "Chamfer CHF") of less than450 between the end face and the inside diameter of the "step". You can togglebetween RND / CHR / CHF using the toggle key. An input value of 0.0 switches thisfunction off.
Two types of dimensioning are possible with the chamfers:
• in the case of chamfer CHR, the value specifies the width of the chamfer in thedirection of the movement,
• in the case of chamfer CHF, the value corresponds with the length of the chamfer.
Chamfer/radius F3 Depending on the option selected, this value forms either a transition radius (display"RND") or a transition chamfer (display "Chamfer CHR" or "Chamfer CHF") of less than450 between the end face and the inside diameter of the "step". You can togglebetween RND / CHR / CHF using the toggle key. An input value of 0.0 switches this
function off.Two types of dimensioning are possible with the chamfers:
• in the case of chamfer CHR, the value specifies the width of the chamfer in thedirection of the movement,
• in the case of chamfer CHF, the value corresponds with the length of the chamfer.
Max. infeed depth m1 Enter the maximum infeed depth for roughing. The internal infeed calculation ensuresthat the infeed is as uniform as possible throughout the roughing operation. This entryvalue represents the maximum value possible and is therefore not exceeded.
Finishing allowance m2 Finishing allowance in the X axis (m2x)Finishing allowance in the Z axis (m2z)
The following possibilities exist for the position of the geometry:
Figure 5-46 Roughing cycle A, position "Inside right"

8/13/2019 Manual Turning 802Dsl BPMMP 1112 en en-US
http://slidepdf.com/reader/full/manual-turning-802dsl-bpmmp-1112-en-en-us 84/120

8/13/2019 Manual Turning 802Dsl BPMMP 1112 en en-US
http://slidepdf.com/reader/full/manual-turning-802dsl-bpmmp-1112-en-en-us 85/120
Manual machining
5.4 Manual machining using cycles (functions)
Manual Machine Plus Turning
Programming and Operating Manual, 11/2012, 6FC5398-6CP10-3BA0 85
Figure 5-48 Roughing cycle B, position "Outside right"
Input fields
The input fields in the "Roughing B" screen form have the following meanings:
Parameter Description
Length l1 Enter the length of the "step" to be produced, taking the contour start position ("Referencez0") in the axial axis (Z axis) as the starting point.
Length l2 Interpolation point position, which defines the position of the additional contour interpolation
point in the longitudinal axis (Z axis).Diameter d1 Outside diameter of the "step" to be machined in the radial axis (absolute position of the X
axis in the diameter).
Diameter d2 Interpolation point diameter, which together with the "Interpolation point position l2"parameter defines the position of the interpolation point in the radial axis (absolute positionof the X axis in the diameter), allowing beveled faces to be produced within a "step".
Diameter d3 Inside diameter of the "step" to be machined in the radial axis (absolute position of the Xaxis in the diameter).
Chamfer/radius F1 Depending on the option selected, this value forms either a transition radius (display "RND")or a transition chamfer (display "Chamfer CHR" or "Chamfer CHF") of less than 450 between the end face and the inside diameter of the "step". You can toggle between RND /CHR / CHF using the toggle key. An input value of 0.0 switches this function off.
Two types of dimensioning are possible with the chamfers:• in the case of chamfer CHR, the value specifies the width of the chamfer in the direction
of the movement,
• in the case of chamfer CHF, the value corresponds with the length of the chamfer.

8/13/2019 Manual Turning 802Dsl BPMMP 1112 en en-US
http://slidepdf.com/reader/full/manual-turning-802dsl-bpmmp-1112-en-en-us 86/120
Manual machining
5.4 Manual machining using cycles (functions)
Manual Machine Plus Turning
86 Programming and Operating Manual, 11/2012, 6FC5398-6CP10-3BA0
Parameter Description
Chamfer/radius F2 Depending on the option selected, this value forms either a transition radius (display "RND")
or a transition chamfer (display "Chamfer CHR" or "Chamfer CHF") of less than 450 between the end face and the inside diameter of the "step". You can toggle between RND /CHR / CHF using the toggle key. An input value of 0.0 switches this function off.
Two types of dimensioning are possible with the chamfers:
• in the case of chamfer CHR, the value specifies the width of the chamfer in the directionof the movement,
• in the case of chamfer CHF, the value corresponds with the length of the chamfer.
Chamfer/radius F3 Depending on the option selected, this value forms either a transition radius (display "RND")or a transition chamfer (display "Chamfer CHR" or "Chamfer CHF") of less than 450 between the end face and the inside diameter of the "step". You can toggle between RND /CHR / CHF using the toggle key. An input value of 0.0 switches this function off.
Two types of dimensioning are possible with the chamfers:
• in the case of chamfer CHR, the value specifies the width of the chamfer in the directionof the movement,
• in the case of chamfer CHF, the value corresponds with the length of the chamfer.
Max. infeed depth m1 Enter the maximum infeed depth for roughing. The internal infeed calculation ensures thatthe infeed is as uniform as possible throughout the roughing operation. This entry valuerepresents the maximum value possible and is therefore not exceeded.
Finishingallowance
m2 Finishing allowance in the X axis (m2x)Finishing allowance in the Z axis (m2z)
The following possibilities exist for the position of the geometry:
Figure 5-49 Roughing cycle B, position "Inside right"

8/13/2019 Manual Turning 802Dsl BPMMP 1112 en en-US
http://slidepdf.com/reader/full/manual-turning-802dsl-bpmmp-1112-en-en-us 87/120
Manual machining
5.4 Manual machining using cycles (functions)
Manual Machine Plus Turning
Programming and Operating Manual, 11/2012, 6FC5398-6CP10-3BA0 87
Figure 5-50 Roughing cycle B, position "Outside left"
See also
General parameters (Page 54)
Principle operating sequence (Page 51)
5.4.7.3 Roughing cycle C
Functionality
The function "Roughing C" is used to produce a special cutting contour, with a filletedtransition between the inside and outside diameter of the contour. Other chamfers or radiicannot be included.
Operating sequences
You can access the turning cycle overview by pressing the softkey "Turning" in the basicscreen for "Manual Machine Plus".
In the softkey menu "Turning", press the softkey "Roughing cycle C".
Alternatively, you can select "Roughing cycle C" from the turning cycle overview with<Cursor keys> and activate with the input key.

8/13/2019 Manual Turning 802Dsl BPMMP 1112 en en-US
http://slidepdf.com/reader/full/manual-turning-802dsl-bpmmp-1112-en-en-us 88/120
Manual machining
5.4 Manual machining using cycles (functions)
Manual Machine Plus Turning
88 Programming and Operating Manual, 11/2012, 6FC5398-6CP10-3BA0
Figure 5-51 Roughing cycle C, position "Outside right"
Input fields
The input fields in the "Roughing C" screen form have the following meanings:
Parameter Description
Length l1 Enter the end point of the contour in the axial axis here, taking the contour start position("Reference z0") in the axial axis (Z axis) as the starting point.
Length l2 End point of filleting in the longitudinal axis (Z axis).
Length l3 Start point of filleting in the longitudinal axis (Z axis).Diameter d1 Outside diameter of the "step" to be machined in the radial axis (absolute position of the X
axis in the diameter).
Diameter d2 Inside diameter of the "step" to be machined in the radial axis (absolute position of the Xaxis in the diameter).
Radius r This entry value determines the size of the filleting, the center of the circle being calculatedinternally. It is located on the imaginary line that is central and "normal" (90o) to theimaginary connecting line between points "l2/d1" and "l3/d2". The choice of whether thecenter point is on the side of the contour facing towards or away from the turning center isdetermined by the "convex/concave" function key setting. If the radius entered is too small,an error message will be displayed during machining (after NC start) since the contourcannot be produced in this case.
Convex/concave This toggle key is used to specify on which side of the contour the circle center point shouldbe located. The circular machining direction, and hence the appearance of the finishedcontour, is adjusted accordingly.
Max. infeed depth m1 Enter the maximum infeed depth for roughing. The internal infeed calculation ensures thatthe infeed is as uniform as possible throughout the roughing operation. This entry valuerepresents the maximum value possible and is therefore not exceeded.
Finishingallowance
m2 Finishing allowance in the X axis (m2x)Finishing allowance in the Z axis (m2z)

8/13/2019 Manual Turning 802Dsl BPMMP 1112 en en-US
http://slidepdf.com/reader/full/manual-turning-802dsl-bpmmp-1112-en-en-us 89/120
Manual machining
5.4 Manual machining using cycles (functions)
Manual Machine Plus Turning
Programming and Operating Manual, 11/2012, 6FC5398-6CP10-3BA0 89
The following possibilities exist for the position of the geometry:
Figure 5-52 Roughing cycle C, position "Inside right"
Figure 5-53 Roughing cycle C, position "Outside left"
See also
General parameters (Page 54)
Principle operating sequence (Page 51)
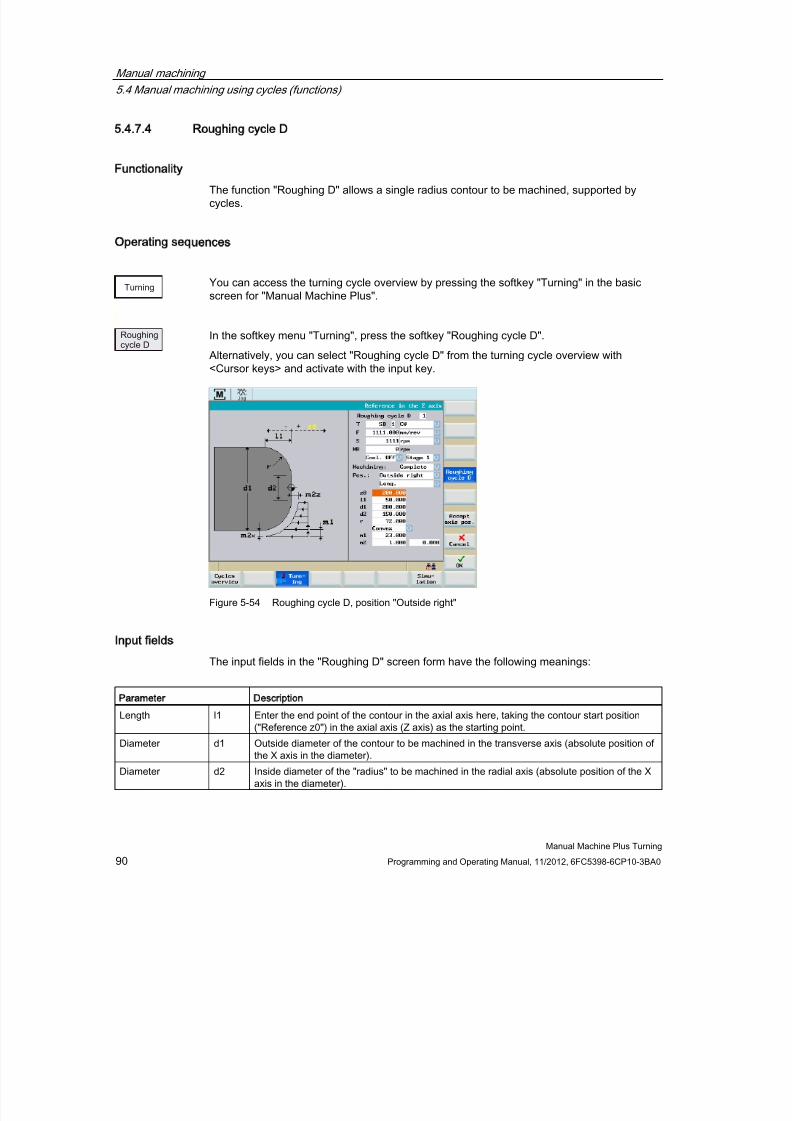
8/13/2019 Manual Turning 802Dsl BPMMP 1112 en en-US
http://slidepdf.com/reader/full/manual-turning-802dsl-bpmmp-1112-en-en-us 90/120
Manual machining
5.4 Manual machining using cycles (functions)
Manual Machine Plus Turning
90 Programming and Operating Manual, 11/2012, 6FC5398-6CP10-3BA0
5.4.7.4 Roughing cycle D
Functionality
The function "Roughing D" allows a single radius contour to be machined, supported bycycles.
Operating sequences
You can access the turning cycle overview by pressing the softkey "Turning" in the basicscreen for "Manual Machine Plus".
In the softkey menu "Turning", press the softkey "Roughing cycle D".
Alternatively, you can select "Roughing cycle D" from the turning cycle overview with<Cursor keys> and activate with the input key.
Figure 5-54 Roughing cycle D, position "Outside right"
Input fields
The input fields in the "Roughing D" screen form have the following meanings:
Parameter Description
Length l1 Enter the end point of the contour in the axial axis here, taking the contour start position("Reference z0") in the axial axis (Z axis) as the starting point.
Diameter d1 Outside diameter of the contour to be machined in the transverse axis (absolute position ofthe X axis in the diameter).
Diameter d2 Inside diameter of the "radius" to be machined in the radial axis (absolute position of the Xaxis in the diameter).

8/13/2019 Manual Turning 802Dsl BPMMP 1112 en en-US
http://slidepdf.com/reader/full/manual-turning-802dsl-bpmmp-1112-en-en-us 91/120
Manual machining
5.4 Manual machining using cycles (functions)
Manual Machine Plus Turning
Programming and Operating Manual, 11/2012, 6FC5398-6CP10-3BA0 91
Parameter Description
Radius R This input value determines the size of the radius, the center of the circle being calculated
internally. It is located on the imaginary l ine that is central and "normal" (900) to theimaginary connecting line between points "(Z0-l1)/d1" and "Z0/d2". The choice of whetherthe center point is on the side of the contour facing towards or away from the turning centeris determined by the "convex/concave" function key setting. If the radius entered is toosmall, an error message will be displayed during machining (after NC start) since thecontour cannot be produced in this case.
Convex/concave This toggle key is used to specify on which side of the contour the circle center point shouldbe located. The circular machining direction, and hence the appearance of the finishedcontour, is adjusted accordingly.
Max. infeed depth m1 Enter the maximum infeed depth for roughing. The internal infeed calculation ensures thatthe infeed is as uniform as possible throughout the roughing operation. This entry valuerepresents the maximum value possible and is therefore not exceeded.
Finishing
allowance
m2 Finishing allowance in the X axis (m2x)
Finishing allowance in the Z axis (m2z)
The following possibilities exist for the position of the geometry:
Figure 5-55 Roughing cycle D, position "Inside right"

8/13/2019 Manual Turning 802Dsl BPMMP 1112 en en-US
http://slidepdf.com/reader/full/manual-turning-802dsl-bpmmp-1112-en-en-us 92/120
Manual machining
5.4 Manual machining using cycles (functions)
Manual Machine Plus Turning
92 Programming and Operating Manual, 11/2012, 6FC5398-6CP10-3BA0
Figure 5-56 Roughing cycle D, position "Outside left"
See also
General parameters (Page 54)
Principle operating sequence (Page 51)
5.4.7.5 Roughing cycle E
Functionality
The function "Roughing E" allows a single taper contour to be machined, supported bycycles.
Operating sequences
You can access the turning cycle overview by pressing the softkey "Turning" in the basicscreen for "Manual Machine Plus".
In the softkey menu "Turning", press the softkey "Roughing cycle E".
Alternatively, you can select "Roughing cycle E" from the turning cycle overview with<Cursor keys> and activate with the input key.

8/13/2019 Manual Turning 802Dsl BPMMP 1112 en en-US
http://slidepdf.com/reader/full/manual-turning-802dsl-bpmmp-1112-en-en-us 93/120
Manual machining
5.4 Manual machining using cycles (functions)
Manual Machine Plus Turning
Programming and Operating Manual, 11/2012, 6FC5398-6CP10-3BA0 93
Figure 5-57 Roughing cycle E, position "Outside right"
Input fields
The input fields in the "Roughing E" screen form have the following meanings:
Parameter Description
d1, d2,... The dimensioning type can be selected in this toggle field.
The following options are available:
"d1,d2,l1" -> "d1,l1,angle" -> "d2,l1,angle" -> "d1,d2,angle(d1)" -> "d1,d2,angle(d2)"
The selection is indicated in the diagram displayed on the screen.
Length l1 Enter the length of the taper to be produced, taking the contour start position ("Referencez0") in the axial axis (Z axis) as the starting point.
Diameter d1 Outside diameter of the taper to be machined in the transverse axis (absolute position of theX axis in the diameter).
Diameter d2 Inside diameter of the taper to be machined in the transverse axis (absolute position of theX axis in the diameter).
Angle α Angle of the taper to be machined.
The reference point is either d1 or d2 depending on which dimensioning type is selected.
Max. infeed depth m1 Enter the maximum infeed depth for roughing. The internal infeed calculation ensures thatthe infeed is as uniform as possible throughout the roughing operation. This entry value
represents the maximum value possible and is therefore not exceeded.Finishingallowance
m2 Finishing allowance in the X axis (m2x)Finishing allowance in the Z axis (m2z)
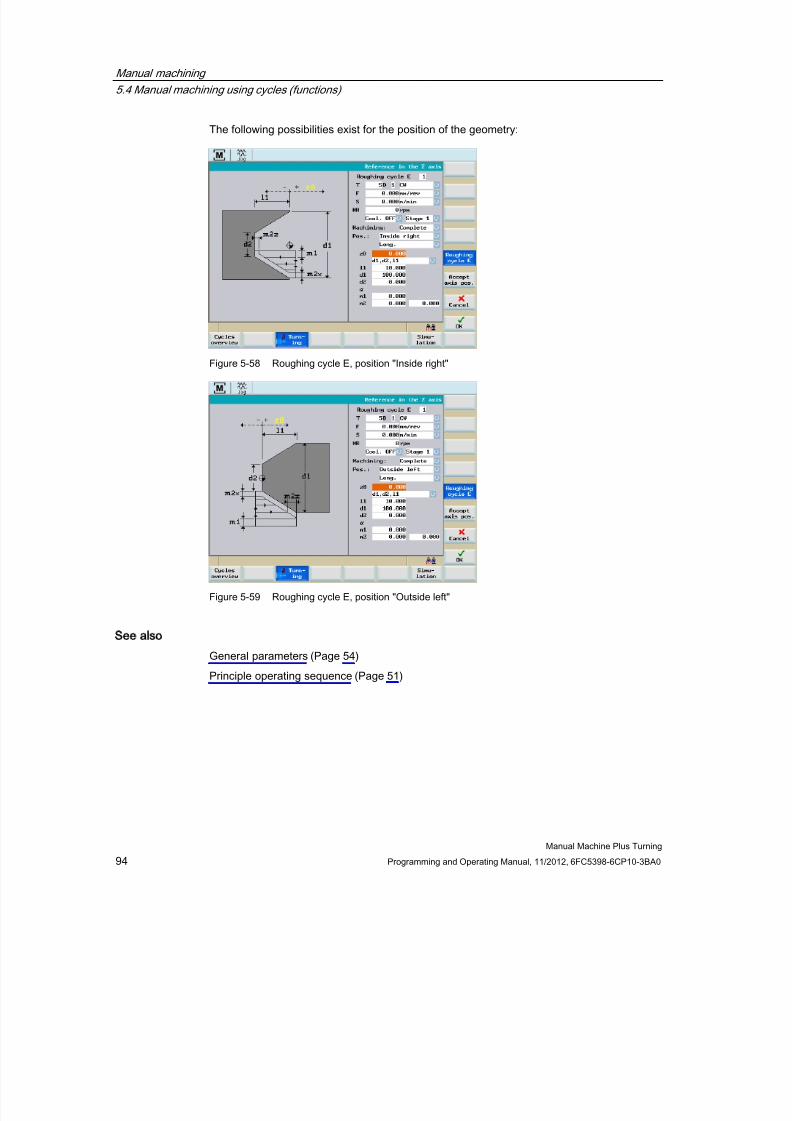
8/13/2019 Manual Turning 802Dsl BPMMP 1112 en en-US
http://slidepdf.com/reader/full/manual-turning-802dsl-bpmmp-1112-en-en-us 94/120
Manual machining
5.4 Manual machining using cycles (functions)
Manual Machine Plus Turning
94 Programming and Operating Manual, 11/2012, 6FC5398-6CP10-3BA0
The following possibilities exist for the position of the geometry:
Figure 5-58 Roughing cycle E, position "Inside right"
Figure 5-59 Roughing cycle E, position "Outside left"
See also
General parameters (Page 54)
Principle operating sequence (Page 51)

8/13/2019 Manual Turning 802Dsl BPMMP 1112 en en-US
http://slidepdf.com/reader/full/manual-turning-802dsl-bpmmp-1112-en-en-us 95/120
Manual machining
5.4 Manual machining using cycles (functions)
Manual Machine Plus Turning
Programming and Operating Manual, 11/2012, 6FC5398-6CP10-3BA0 95
5.4.7.6 Roughing cycle F
Functionality
The function "Roughing F" allows cycle-supported production of an end face (cuttingdirection "Planar") or of a peripheral surface (cutting direction "Longitudinal").
Operating sequences
You can access the turning cycle overview by pressing the softkey "Turning" in the basicscreen for "Manual Machine Plus".
In the softkey menu "Turning", press the softkey "Roughing cycle F".
Alternatively, you can select "Roughing cycle F" from the turning cycle overview with <Cursorkeys> and activate with the input key.
Figure 5-60 Roughing cycle F, position "Outside right"
Input fields
The input fields in the "Roughing F" screen form have the following meanings:
Parameter Description
Length l Enter here the length of the end face to be cut, taking the contour start position("Reference z0") in the longitudinal axis (Z axis) as the starting point.
Diameter d1 External diameter of the end face to be cut (absolute position of the X axis in thediameter).
Diameter d2 Internal diameter of the end face to be cut (absolute position of the X axis in thediameter).

8/13/2019 Manual Turning 802Dsl BPMMP 1112 en en-US
http://slidepdf.com/reader/full/manual-turning-802dsl-bpmmp-1112-en-en-us 96/120
Manual machining
5.4 Manual machining using cycles (functions)
Manual Machine Plus Turning
96 Programming and Operating Manual, 11/2012, 6FC5398-6CP10-3BA0
Parameter Description
Max. infeed depth m1 Enter the maximum infeed depth for roughing. The internal infeed calculation
ensures that the infeed is as uniform as possible throughout the roughing operation.This entry value represents the maximum value possible and is therefore notexceeded.
Finishing allowance m2 Finishing allowance in the X axis (m2x)Finishing allowance in the Z axis (m2z)
The following option is available for the position of the geometry:
Figure 5-61 Roughing cycle F, position "Outside left"
5.4.7.7 Roughing cycle, free contour:
Functionality
The cycle "Free contour" is used for the input and for the processing of an arbitrary contourpath.
Operating sequences
You can access the turning cycle overview by pressing the softkey "Turning" in the basicscreen for "Manual Machine Plus".
In the softkey menu "Turning", press the softkey "Free contour".

8/13/2019 Manual Turning 802Dsl BPMMP 1112 en en-US
http://slidepdf.com/reader/full/manual-turning-802dsl-bpmmp-1112-en-en-us 97/120
Manual machining
5.4 Manual machining using cycles (functions)
Manual Machine Plus Turning
Programming and Operating Manual, 11/2012, 6FC5398-6CP10-3BA0 97
Alternatively, you can select "Roughing free contour" from the turning cycle overview with<Cursor keys> and activate with the input key.
Figure 5-62 Roughing contour input, position "Outside right"
Parameter Description
d0 Outside diameter of the shaft to be machined in the transverse axis (absolute position of theX axis in the diameter).
m2x Finishing allowance horizontal to the contour.
m2z Finishing allowance perpendicular to the contour.
m1 Enter the maximum infeed depth for roughing. The internal infeed calculation ensures thatthe infeed is as uniform as possible throughout the roughing operation. This entry valuerepresents the maximum value possible and is therefore not exceeded.
NAME If an external contour has been selected, the path to the contour program is shown here.
Specification for transverseaxis
The selected specification is displayed.
Softkeys
The "Cycle overview" function lists all free contours contained in the machining stepprogram.

8/13/2019 Manual Turning 802Dsl BPMMP 1112 en en-US
http://slidepdf.com/reader/full/manual-turning-802dsl-bpmmp-1112-en-en-us 98/120
Manual machining
5.4 Manual machining using cycles (functions)
Manual Machine Plus Turning
98 Programming and Operating Manual, 11/2012, 6FC5398-6CP10-3BA0
Figure 5-63 Free contour - overview
To select, place the cursor on the appropriate line and press the "OK" softkey.
It is also possible to assign a contour of an external contour subroutine to the cycle.
Figure 5-64 Add external contours
The "External contours" function opens a dialog box with which the contour subroutine can
be selected. The "OK" softkey function links the selected program with the cycle.
The function branches to the contour input.
Note
Only contours listed in the cycle overview can be machined. External contours cannot bemachined.

8/13/2019 Manual Turning 802Dsl BPMMP 1112 en en-US
http://slidepdf.com/reader/full/manual-turning-802dsl-bpmmp-1112-en-en-us 99/120
Manual machining
5.4 Manual machining using cycles (functions)
Manual Machine Plus Turning
Programming and Operating Manual, 11/2012, 6FC5398-6CP10-3BA0 99
Figure 5-65 Machining window for free contours
First, define the contour starting point.
References
The function "Machine contour" is described in detail in the SINUMERIK 802D sl TurningProgramming and Operating Manual in the chapter "Part programming; Free contourprogramming, ... Define a start point".
Rather than the auxiliary chart, the function displays the entered contour section.
Figure 5-66 Graphic view of a contour section

8/13/2019 Manual Turning 802Dsl BPMMP 1112 en en-US
http://slidepdf.com/reader/full/manual-turning-802dsl-bpmmp-1112-en-en-us 100/120
Manual machining
5.4 Manual machining using cycles (functions)
Manual Machine Plus Turning
100 Programming and Operating Manual, 11/2012, 6FC5398-6CP10-3BA0
5.4.7.8 Execute a roughing cycle
Rough cutting
Starting from the current axis position, the rough cutting sequence is as follows:
1. Diagonal approach to the start position calculated in the cycle in both axes.
The safety clearance and finishing allowance are taken into account.
2. Infeed in the infeed axis (transverse axis or longitudinal axis, depending on whether"Face" or "Longitudinal" was selected).
The infeed is calculated within the cycle as follows:
– The input value "m1" is not exceeded.
–
The infeed quantity is guaranteed to remain constant until the unmachined contour isreached (taking finishing allowance into account).
3. Execution of the paraxial roughing motion in the cutting axis until the unmachined contouris reached.
The finishing allowance is taken into account.
4. Withdrawal from the material in the infeed axis by the infeed distance.
5. Retraction by the clearance distance below 450 in both axes.
6. Return in the cutting axis to the start position calculated in the cycle.
7. New infeed in the infeed axis by the infeed depth calculated in the cycle.
All roughing cuts are performed one after another, as described above.
Finish cutting
When the final rough cut is completed, the contour is finish cut with the following motions:
1. Traverse in the infeed axis to the finished dimension for the contour, corrected by theclearance distance.
2. Infeed in both axes (below 450) to the contour start point.
3. Execution of the finishing motion along the parameterized contour.
4. Retraction by the clearance distance below 450 in both axes.
5. Return in the cutting axis to the start position calculated in the cycle.
6. Finally, the original position of the axes before the start of machining is approacheddiagonally.
See also
Principle operating sequence (Page 51)

8/13/2019 Manual Turning 802Dsl BPMMP 1112 en en-US
http://slidepdf.com/reader/full/manual-turning-802dsl-bpmmp-1112-en-en-us 101/120
Manual Machine Plus Turning
Programming and Operating Manual, 11/2012, 6FC5398-6CP10-3BA0 101
Machining the machining step program manually 6
Functionality
The "machining step program" function can be used to define a list containing an optionalsequence of machining cycles.
This list can then be automatically machined step by step.
The controller can store a maximum of 390 steps.
Operating sequences
Figure 6-1 Entry into the machining step program
You can access the screen for input into the list by pressing softkey "Work prog." in the mainscreen for "Manual Machine Plus".
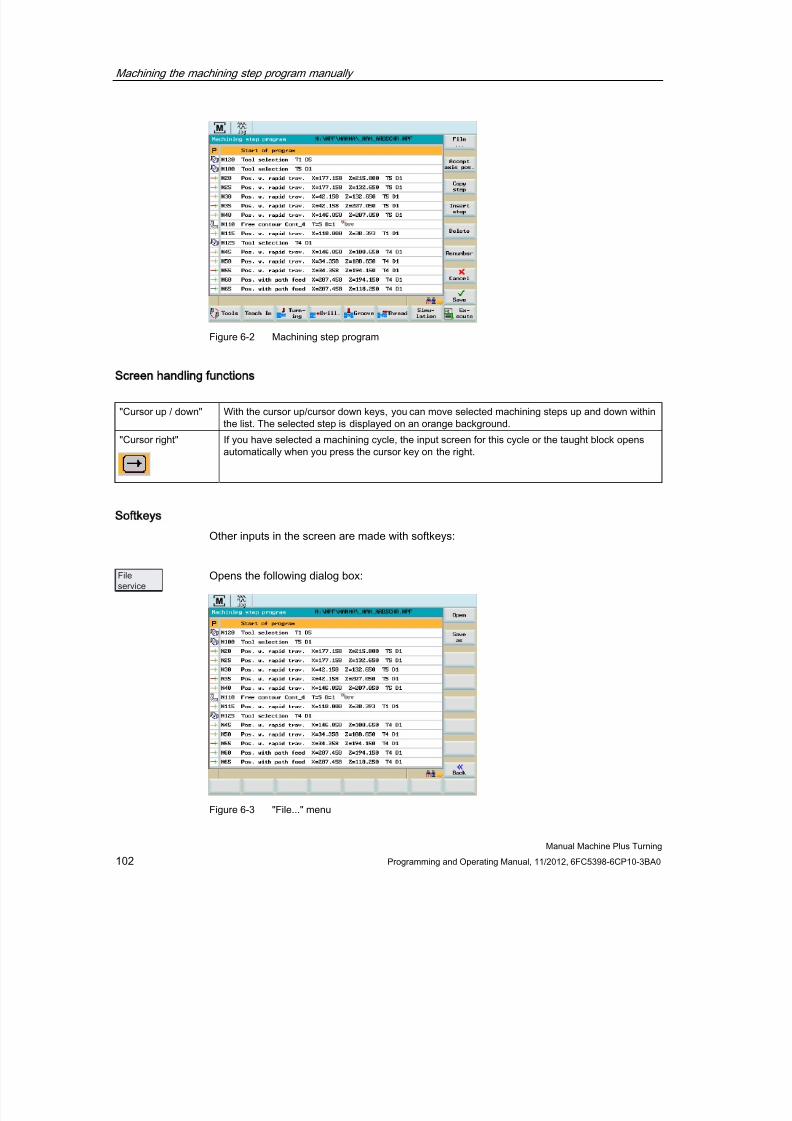
8/13/2019 Manual Turning 802Dsl BPMMP 1112 en en-US
http://slidepdf.com/reader/full/manual-turning-802dsl-bpmmp-1112-en-en-us 102/120
Machining the machining step program manually
Manual Machine Plus Turning
102 Programming and Operating Manual, 11/2012, 6FC5398-6CP10-3BA0
Figure 6-2 Machining step program
Screen handling functions
"Cursor up / down" With the cursor up/cursor down keys, you can move selected machining steps up and down withinthe list. The selected step is displayed on an orange background.
"Cursor right" If you have selected a machining cycle, the input screen for this cycle or the taught block opensautomatically when you press the cursor key on the right.
Softkeys
Other inputs in the screen are made with softkeys:
Opens the following dialog box:
Figure 6-3 "File..." menu

8/13/2019 Manual Turning 802Dsl BPMMP 1112 en en-US
http://slidepdf.com/reader/full/manual-turning-802dsl-bpmmp-1112-en-en-us 103/120
Machining the machining step program manually
Manual Machine Plus Turning
Programming and Operating Manual, 11/2012, 6FC5398-6CP10-3BA0 103
Displays a dialog used to open an existing machining step program or create a new
machining step program.If the file is not located in drive N (NC storage), ensure that the external medium is notremoved during the machining.
A save dialog appears.
Returns to the menu for the machining step program
Figure 6-4 Machining step program
This function inserts a positioning block at the current machine axis position in the selectedmachining step.
This function deletes the currently selected machining step.
To interrupt the function "Machining step program" press "Cancel".
This softkey returns you to the main screen for "Manual Machine Plus".
If you have changed any values, a prompt window informs you accordingly.
Press "OK" to save the values
Press "Cancel" to discard the settings.
The machining step program is saved.
This softkey returns you to the main screen for "Manual Machine Plus".

8/13/2019 Manual Turning 802Dsl BPMMP 1112 en en-US
http://slidepdf.com/reader/full/manual-turning-802dsl-bpmmp-1112-en-en-us 104/120
Machining the machining step program manually
Manual Machine Plus Turning
104 Programming and Operating Manual, 11/2012, 6FC5398-6CP10-3BA0
Inserting a tool change into the program.
Change into the dialog box for tool change (Page 105).
Inserting a traversing block in the program.
Inserting a roughing cycle in the program.
Change into the dialog box for roughing cycles (Page 80).
Inserting a drilling cycle in the program.
Change into the dialog box (Page 55) for the drilling cycles (Page 58).
Inserting a groove/cutting cycle into the program.
Change into the dialog box for the groove/cutting cycles (Page 61).
Inserting a thread cycle
Change into the dialog box for the thread cycles (Page 73).
Change into the dialog box for machining simulation (Page 110).
The selected step program is saved by pressing the "Execute" softkey.
This softkey opens the screen form in which the machining (Page 112) step program isactually executed:
The softkey function changes from "Execute" to "Exec. here" by pressing the <ETC> key.
By pressing the softkey "Exec. here" the function changes into the screen form inwhichMachining (Page 112) should be realized.
In this case, the machining step program is executed from the current cursor position in themachining step program (marked step in the program).

8/13/2019 Manual Turning 802Dsl BPMMP 1112 en en-US
http://slidepdf.com/reader/full/manual-turning-802dsl-bpmmp-1112-en-en-us 105/120
Machining the machining step program manually
6.1 Tool change in the machining step program
Manual Machine Plus Turning
Programming and Operating Manual, 11/2012, 6FC5398-6CP10-3BA0 105
6.1 Tool change in the machining step program
Functionality
You add a tool change step to the machining step program.
If the value of the display machine data 361 (USER_MEAS_TOOL_CHANGE) is 1, the toolnumber can be specified manually. Otherwise the controller saves the active tool asmachining step in the step program.
Operating sequences
You have opened a machining step program.
1. Move the cursor to the machining step after which the tool should be changed.
Figure 6-5 Machining step programmed opened
2. Press the "Tools" softkey.
A list with all tools created in the NC will be displayed.
Figure 6-6 Tool selection for tool change

8/13/2019 Manual Turning 802Dsl BPMMP 1112 en en-US
http://slidepdf.com/reader/full/manual-turning-802dsl-bpmmp-1112-en-en-us 106/120
Machining the machining step program manually
6.1 Tool change in the machining step program
Manual Machine Plus Turning
106 Programming and Operating Manual, 11/2012, 6FC5398-6CP10-3BA0
The fields "T" and "D" contain the active tool and the active cutting edge number,respectively.
3. To select the tool, enter the tool number and the cutting edge number in the input fields"T" and "D", respectively.
- OR -
Use the <Tab key> to change to the list and position the cursor on the appropriate tooland press the <INPUT> key to confirm the selection.
The selected tool is copied into the "T" input field.
4. If the tick is set in the "G75" field (approach fixed point), the controller travels to a storedfixed point during execution of the part program before the tool is changed.If the tool change is performed manually, approach a point beforehand at which the toolcan be changed without the risk of collision.
5. Press "Transfer".
Figure 6-7 Tool change in the machining step program, confirmation
6. Press "Cancel" to confirm the message.
The active tool is inserted into the step program as a machining step.
Figure 6-8 Tool change in the machining step program

8/13/2019 Manual Turning 802Dsl BPMMP 1112 en en-US
http://slidepdf.com/reader/full/manual-turning-802dsl-bpmmp-1112-en-en-us 107/120
Machining the machining step program manually
6.2 Teach In
Manual Machine Plus Turning
Programming and Operating Manual, 11/2012, 6FC5398-6CP10-3BA0 107
Note
If the tool change is to be performed without travelling to a fixed point, travel to a safemachine position beforehand and save this point as work step in the step program.
6.2 Teach In
Functionality
Using this function, an approached axis position can be directly entered into a specifictraversing block.
Operating sequences
1. You can reach the "Teach In" function in the machining step program by pressing the"Teach In" softkey.
Figure 6-9 Selecting the "Teach In" function

8/13/2019 Manual Turning 802Dsl BPMMP 1112 en en-US
http://slidepdf.com/reader/full/manual-turning-802dsl-bpmmp-1112-en-en-us 108/120
Machining the machining step program manually
6.2 Teach In
Manual Machine Plus Turning
108 Programming and Operating Manual, 11/2012, 6FC5398-6CP10-3BA0
The controller switches to the manual machining screen forms of axis-parallel turning,taper turning and radius turning.
Figure 6-10 Executing "Teach In" - axis-parallel roughing machining mode
2. Traverse to a position that is to be taught-in and press "Save block".
Figure 6-11 "Save block" menu
3. You can save the position with path feed.

8/13/2019 Manual Turning 802Dsl BPMMP 1112 en en-US
http://slidepdf.com/reader/full/manual-turning-802dsl-bpmmp-1112-en-en-us 109/120
Machining the machining step program manually
6.2 Teach In
Manual Machine Plus Turning
Programming and Operating Manual, 11/2012, 6FC5398-6CP10-3BA0 109
4. You can save the position with rapid traverse.
After the control acknowledged the action with a screen message (e.g.: "The block was
inserted as N20"), a new position could be traversed to and this in turn taught-in using"Save block".
Figure 6-12 Closing "Teach In"
5. Exit the "Teach In" mode using the function "Finish Teach In".
The menu returns to the machining step program.
The cursor is at the last block that was entered (refer to the following screen shot).
Figure 6-13 Machining step program "Teach In" ended
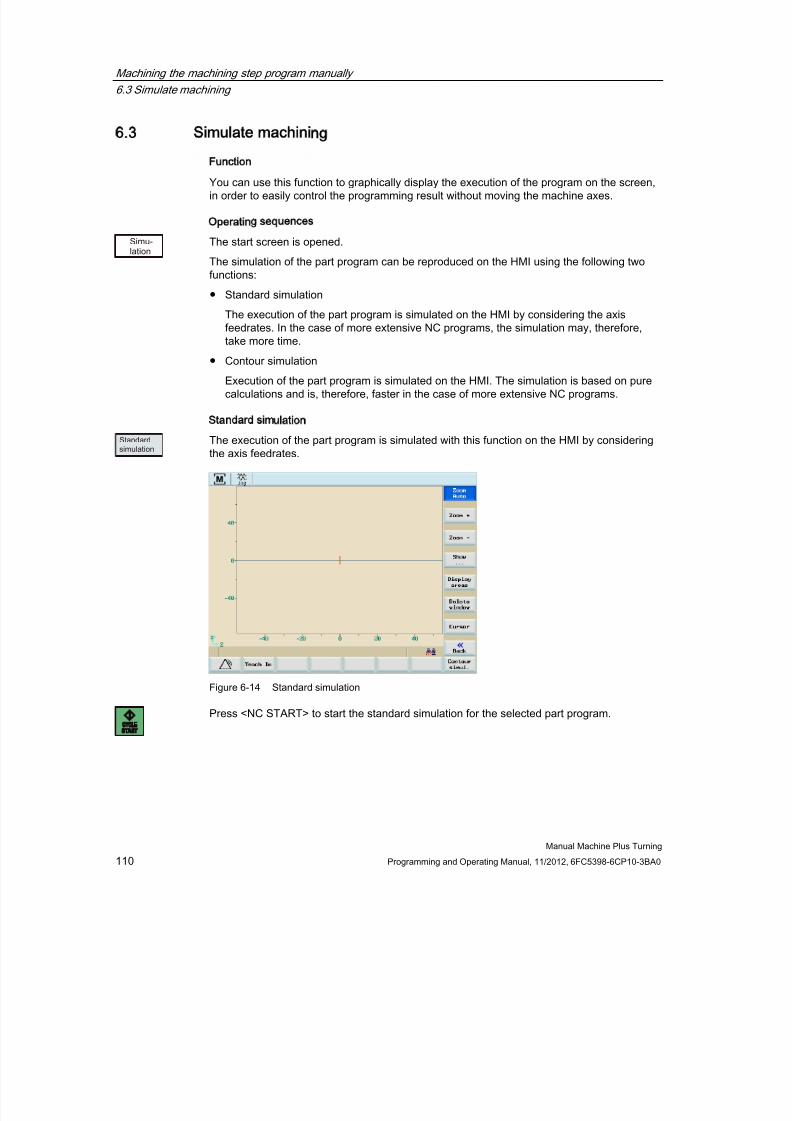
8/13/2019 Manual Turning 802Dsl BPMMP 1112 en en-US
http://slidepdf.com/reader/full/manual-turning-802dsl-bpmmp-1112-en-en-us 110/120
Machining the machining step program manually
6.3 Simulate machining
Manual Machine Plus Turning
110 Programming and Operating Manual, 11/2012, 6FC5398-6CP10-3BA0
6.3 Simulate machining
Function
You can use this function to graphically display the execution of the program on the screen,in order to easily control the programming result without moving the machine axes.
Operating sequences
The start screen is opened.
The simulation of the part program can be reproduced on the HMI using the following twofunctions:
● Standard simulation
The execution of the part program is simulated on the HMI by considering the axis
feedrates. In the case of more extensive NC programs, the simulation may, therefore,take more time.
● Contour simulation
Execution of the part program is simulated on the HMI. The simulation is based on purecalculations and is, therefore, faster in the case of more extensive NC programs.
Standard simulation
The execution of the part program is simulated with this function on the HMI by consideringthe axis feedrates.
Figure 6-14 Standard simulation
Press <NC START> to start the standard simulation for the selected part program.

8/13/2019 Manual Turning 802Dsl BPMMP 1112 en en-US
http://slidepdf.com/reader/full/manual-turning-802dsl-bpmmp-1112-en-en-us 111/120
Machining the machining step program manually
6.3 Simulate machining
Manual Machine Plus Turning
Programming and Operating Manual, 11/2012, 6FC5398-6CP10-3BA0 111
Contour simulation
Execution of the part program is simulated with this function on the HMI.
Figure 6-15 Contour simulation
The selected part program is started for the contour simulation.
Simulation of individual cycles
Note
If the simulation is used to test a single cycle, the display area is divided into the traversingmovements and technology data columns. The technology data cannot be changed insimulation mode.
Figure 6-16 Simulation of a single cycle - standard simulation

8/13/2019 Manual Turning 802Dsl BPMMP 1112 en en-US
http://slidepdf.com/reader/full/manual-turning-802dsl-bpmmp-1112-en-en-us 112/120
Machining the machining step program manually
6.4 Executing the machining step program
Manual Machine Plus Turning
112 Programming and Operating Manual, 11/2012, 6FC5398-6CP10-3BA0
Figure 6-17 Simulation of a single cycle - contour simulation
References
A description of further operating options for a simulation can be found in the
"Programming and Operating Manual SINUMERIK 802D sl Turning".
6.4 Executing the machining step program
Functionality
Figure 6-18 Machining step program
In the "Machining step program" function, you can toggle between the horizontal softkeyfunctions "Execute" and "Exec. here" using the <ETC> key.
The two functions change from the "Machining step program" into that screen form in whichthe actual machining step program is to be executed:
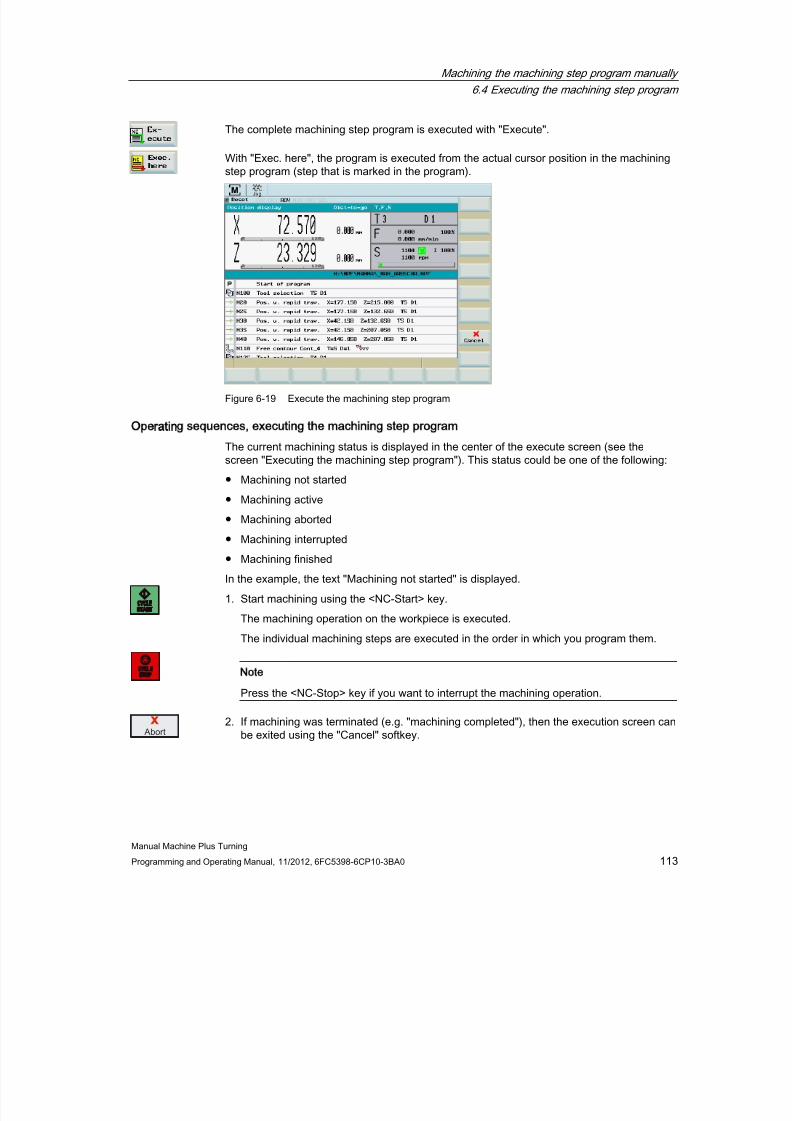
8/13/2019 Manual Turning 802Dsl BPMMP 1112 en en-US
http://slidepdf.com/reader/full/manual-turning-802dsl-bpmmp-1112-en-en-us 113/120
Machining the machining step program manually
6.4 Executing the machining step program
Manual Machine Plus Turning
Programming and Operating Manual, 11/2012, 6FC5398-6CP10-3BA0 113
The complete machining step program is executed with "Execute".
With "Exec. here", the program is executed from the actual cursor position in the machiningstep program (step that is marked in the program).
Figure 6-19 Execute the machining step program
Operating sequences, executing the machining step program
The current machining status is displayed in the center of the execute screen (see thescreen "Executing the machining step program"). This status could be one of the following:
● Machining not started
● Machining active
● Machining aborted
● Machining interrupted
● Machining finished
In the example, the text "Machining not started" is displayed.
1. Start machining using the <NC-Start> key.
The machining operation on the workpiece is executed.
The individual machining steps are executed in the order in which you program them.
Note
Press the <NC-Stop> key if you want to interrupt the machining operation.
2. If machining was terminated (e.g. "machining completed"), then the execution screen canbe exited using the "Cancel" softkey.
8/13/2019 Manual Turning 802Dsl BPMMP 1112 en en-US
http://slidepdf.com/reader/full/manual-turning-802dsl-bpmmp-1112-en-en-us 114/120
Machining the machining step program manually
6.4 Executing the machining step program
Manual Machine Plus Turning
114 Programming and Operating Manual, 11/2012, 6FC5398-6CP10-3BA0
Note
The individual machining steps are performed with the currently programmed direction ofspindle rotation! This need not coincide with the position of the spindle direction switch orwith the spindle direction selected with the spindle keys!
8/13/2019 Manual Turning 802Dsl BPMMP 1112 en en-US
http://slidepdf.com/reader/full/manual-turning-802dsl-bpmmp-1112-en-en-us 115/120
Manual Machine Plus Turning
Programming and Operating Manual, 11/2012, 6FC5398-6CP10-3BA0 115
Messages 7
7.1 Messages
Functionality
The meanings of the messages listed below differ from those given in the general"SINUMERIK Diagnostics Guide":
10631 +X limit stop reached10631 +X limit stop reached
10631 -Z limit stop reached
10631 +Z limit stop reached
PLC alarm messages are specially configured for the "Manual Machine Plus" system in theshipped version of the "Manual Machine Plus" software.
The following list of PLC alarm messages applies, unless the machine manufacturer hasdefined an alternative or additional list of errors.
700000700001
700002 REFERENCE POINT ON X AXIS NOT REACHED
700003 REFERENCE POINT ON Z AXIS NOT REACHED
700004
700005
700006
700007 POSITION OF SPINDLE DIRECTION SWITCH IS ILLEGAL
700008 INCORRECT SPINDLE DIRECTION ACTIVATED
700009 NO VALID SPINDLE/FEED TYPE
700010 RUNTIME MONITORING JOG SELECTION PROGRAM
700011 SPINDLE OVERRIDE NOT 100%
700012 SPINDLE NOT SWITCHED ON
700013 FEED OVERRIDE = 0%
700014 WITH/WITHOUT FEED?
700015 DIRECTION CANNOT BE REVERSED IN THREAD
700016 DRIVE NOT READY
700017 I2/T ALARM FROM I/RF MODULE
700018 MOTOR OVERHEATING

8/13/2019 Manual Turning 802Dsl BPMMP 1112 en en-US
http://slidepdf.com/reader/full/manual-turning-802dsl-bpmmp-1112-en-en-us 116/120
Messages
7.1 Messages
Manual Machine Plus Turning
116 Programming and Operating Manual, 11/2012, 6FC5398-6CP10-3BA0
700019 COOLANT TOO LOW
700020 LUBRICANT MOTOR OVERHEATING
700021 LUBRICANT TOO LOW700022 TURRET HEAD MOTOR OVERHEATING
700023 PROGR.TOOL NO. > MAX.TOOL NO. ON TURRET HEAD
700024 802D MACHINE CONTROL PANEL DEFECT
700025 BRAKE IS RELEASED FOR MOTOR OPTIMIZATION
700026 NO CHECKBACK FROM TURRET HEAD
700027
700028
700029
700030

8/13/2019 Manual Turning 802Dsl BPMMP 1112 en en-US
http://slidepdf.com/reader/full/manual-turning-802dsl-bpmmp-1112-en-en-us 117/120
Manual Machine Plus Turning
Programming and Operating Manual, 11/2012, 6FC5398-6CP10-3BA0 117
Appendix A
A.1 Overview of documentation

8/13/2019 Manual Turning 802Dsl BPMMP 1112 en en-US
http://slidepdf.com/reader/full/manual-turning-802dsl-bpmmp-1112-en-en-us 118/120
8/13/2019 Manual Turning 802Dsl BPMMP 1112 en en-US
http://slidepdf.com/reader/full/manual-turning-802dsl-bpmmp-1112-en-en-us 119/120
Manual Machine Plus Turning
Programming and Operating Manual, 11/2012, 6FC5398-6CP10-3BA0 119
Index
A Axis direction switch, 37 Axis-parallel traversal, 45
C Contour list, 97 End face, 95 Peripheral surface, 95 cutting rate, 43
D D value, 33 Drilling centric, 55
E Cutting F, 95 Error displays, 8
F F value/F type, 33 Feedrate type, 42
G Gear stage preselection, 55
Groove cycle - multiple, 71 Grooving, 61
H Handwheels, 36 Hot keys, 10
I INC value, 33
L LED displays on the CNC operator panel (PCU), 8 Limit stop position, 24 Limit stops, 26
M Machine contour, 99
Machining step program, 101 Simulation, 110 Teach In, 107 Tool change, 105
Manual Machine Plus, operating area, 32 Manual softkey, 16 Multiple tapping, 67
O Operator control and display elements, 7
P Parting, 66 Cutting F, 95 Position display, 32
R Radius turning, 47 Radius turning type A, 49 Radius turning type B, 49
Radius turning type C, 50 Reference point, 19 Reference point approach, 17 Revolutional feedrate, 42 Roughing cycle A, 81 Roughing cycle B, 84 Roughing cycle C, 87 Roughing cycle D, 90 Roughing cycle E, 92

8/13/2019 Manual Turning 802Dsl BPMMP 1112 en en-US
http://slidepdf.com/reader/full/manual-turning-802dsl-bpmmp-1112-en-en-us 120/120
Index
S S value/S type, 33
Spindle, 38 Spindle speed, 43 Spindle speed limitation, 44 Spindle type, 43 Spindle value, 41 Status displays, 8
T T value, 33 Taper turning, 46 Tapping, 58
Thread cutting, 73 Thread recutting, 77 Time feed, 42 Tool change, 40 Tool measurement, 21 Travel direction, 33 Traverse axes, 18