manual - teamviewer 3 · table of contents table of contents 1 introduction ..... 1
TRANSCRIPT

Revision TV3.5-3895-g
Manual - TeamViewer 3.5
Table of Contents
Table of Contents
1 Introduction ................................................................................................................................................... 1
1.1.1 About TeamViewer ........................................................................................................................... 1
1.1.2 New in version 3.5 ............................................................................................................................. 1
1.1.3 About this manual ............................................................................................................................. 1
2 Installation ...................................................................................................................................................... 2
2.1 TeamViewer related downloads ............................................................................................................ 2
2.1.1 TeamViewer ...................................................................................................................................... 2
2.1.2 TeamViewer Quick Support .............................................................................................................. 2
2.1.3 TeamViewer Manager ....................................................................................................................... 3
2.2 Installing TeamViewer ........................................................................................................................... 3
2.3 Configure TeamViewer to start with Windows® ................................................................................... 4
2.3.1 Differences between application and service ................................................................................... 4
2.3.2 How to configure TeamViewer to run as a service ........................................................................... 5
2.4 License Activation .................................................................................................................................. 6
3 Main windows ................................................................................................................................................ 7
3.1 TeamViewer main window .................................................................................................................... 7
3.2 QuickSupport main window .................................................................................................................. 8
4 Connections .................................................................................................................................................... 9
4.1 Basics ..................................................................................................................................................... 9
4.2 Connecting to a partner......................................................................................................................... 9
4.3 Access control ...................................................................................................................................... 10
4.3.1 Overview Access control ................................................................................................................. 10
4.3.2 Access mode for the current session .............................................................................................. 11
4.3.3 Access Control Details ..................................................................................................................... 12
4.3.4 Detailed setting configuration for the Access Control .................................................................... 13
4.3.5 Custom settings ............................................................................................................................... 14
4.3.6 Dependency between Access Control and security settings ........................................................... 14
4.4 Using aliases ........................................................................................................................................ 16
4.5 Remote Control ................................................................................................................................... 17
4.5.1 The remote window ........................................................................................................................ 17
4.5.2 Remote window actions .................................................................................................................. 18
4.5.3 Server control actions ..................................................................................................................... 21
4.6 Presentation ........................................................................................................................................ 22
4.6.1 Presentation actions ....................................................................................................................... 22
4.7 File transfer .......................................................................................................................................... 24
4.7.1 The file transfer window ................................................................................................................. 24
4.7.2 File transfer actions ......................................................................................................................... 25
4.7.3 The file transfer log file ................................................................................................................... 25
4.8 VPN connection ................................................................................................................................... 26
4.8.1 Examples for the usage of TeamViewer VPN .................................................................................. 26
4.8.2 Premises .......................................................................................................................................... 26
4.8.3 Starting VPN connection ................................................................................................................. 26
4.8.4 Actions in the VPN - TeamViewer window ...................................................................................... 27
5 Miscellaneous Functions ................................................................................................................. 28
5.1 Chat ..................................................................................................................................................... 28
5.2 Session recording ................................................................................................................................. 28
Table of Contents
5.3 LAN Connections ................................................................................................................................. 29
6 Options ......................................................................................................................................................... 30
6.1 General tab .......................................................................................................................................... 30
6.2 Dialog Proxy Settings ........................................................................................................................... 31
6.3 Remote control tab.............................................................................................................................. 31
6.4 Custom Settings Dialog ........................................................................................................................ 33
6.5 Presentation tab .................................................................................................................................. 34
6.6 Security tab .......................................................................................................................................... 35
6.7 Custom invitation tab .......................................................................................................................... 36
6.8 Advanced tab ....................................................................................................................................... 37
6.9 Dialog TeamViewer-Server .................................................................................................................. 38
6.10 Connections Info .................................................................................................................................. 38
6.11 QuickSupport Options ......................................................................................................................... 39

TeamViewer - Introduction
page 1 of 39
1 Introduction
1.1.1 About TeamViewer
TeamViewer is a simple, fast and secure remote control application. You can use TeamViewer for
the following scenarios:
Give ad-hoc remote support to colleagues, friends or customers.
Administer Windows® server and workstations (you can configure TeamViewer to run as
a Windows® system service – so your computer is reachable even before you are logged
in to Windows®).
Share your desktop for online-presentations or collaboration.
TeamViewer can communicate across firewall barriers and proxies without any need for special
configurations!
1.1.2 New in version 3.5
Sessionrecording: You can record your session on your local computer as movie and play
it back later on. Hence you have a proof of what you did on the remote computer.
Access Control: You can preset how the remote computer will be accessed. Distinction
can be made between the modes Full Access, Confirm all, View and show, Custom
settings or no connections allowed. These modes can be determined for outgoing and
incoming connections separately.
VPN: You can establish a VPN connection to the remote computer. That way it is
possible, for example, to work with remote databases on your local machine.
Remote Reboot: The remote computer can be restarted directly from the TeamViewer
session. Furthermore you can reboot in safe mode and also reconnect if your partner is
using the QuickSupport.
TeamViewer options can be imported and exported now. If you have predefined a set of
individual options you can use them easily for any other computer.
1.1.3 About this manual
This manual describes the use of TeamViewer. Please report errors in this manual to

TeamViewer - Installation
page 2 of 39
2 Installation
2.1 TeamViewer related downloads
2.1.1 TeamViewer
This is the full version of TeamViewer. You can use this module to connect to partners and to
accept incoming connection requests. (This version of TeamViewer is free for non-commercial
use).
TeamViewer main window
2.1.2 TeamViewer Quick Support
This is a "single EXE application". You run this application without any installation and therefore
without the need for Windows® administrator rights. You can accept incoming requests but
cannot start any outgoing requests.
Typically you'll give this module to your customers.
You can build a customised version (with your own logo and welcoming text) of TeamViewer
QuickSupport in the download section of our homepage.

TeamViewer - Installation
page 3 of 39
TeamViewer QuickSupport
2.1.3 TeamViewer Manager
TeamViewer Manager is a database application which stores your partners details. Additionally
the software logs the session time, so it can be used for invoicing for example.
2.2 Installing TeamViewer Start the setup-file you downloaded - a wizard leads you through the installation steps:
1. Welcome screen
Click on Next to continue the installation process.
2. Licence agreement
Read the licence agreement, check I accept the terms in the licence agreement if you
agree, click on Next to continue.
3. Choose usage
Select install TeamViewer and click on Next.
4. Start TeamViewer automatically
Activate the checkbox Start TeamViewer automatically with Windows® if you want to
start TeamViewer as a Windows® system service. You can find further information in the
chapter Start TeamViewer with Windows®.
5. TeamViewer VPN
Activate the checkbox Use TeamViewer VPN, if you would like to extend your local area
network (LAN) over the internet. You can find further information in the chapter 4.8 VPN
connection.
6. Choose installation location
Choose your destination folder for the installation and click on Next to continue.
7. Choose start menu folder
Choose the start menu folder into which the TeamViewer shortcuts should be placed.
Click on Install to start the installation.
8. Installation complete
Click on Next to continue.
9. Completing the TeamViewer setup wizard
Click on Finish to close the wizard.

TeamViewer - Installation
page 4 of 39
NOTE to 4: The option Start TeamViewer automatically with Windows® is not available on
Windows® 98, NT and Windows® ME computers.
NOTE to 5: The option Use TeamViewer VPN is only available for Windows® 2000 and higher.
General NOTE: Some options may only be available if you have Windows® administrator
privileges.
2.3 Configure TeamViewer to start with Windows®
2.3.1 Differences between application and system service
You can setup TeamViewer as a Windows® Service either during the installation procedure or
later in the options. This chapter discusses the differences between running TeamViewer as a
regular application and running TeamViewer as a Windows® system service:
When running TeamViewer as a Windows® application:
You will have to start TeamViewer manually if you want to give remote support, receive
remote support, or make an online-presentation.
If you quit TeamViewer your machine is no longer reachable.
By default TeamViewer creates a new session password whenever you start it (you can
configure a fixed password in the security settings). Your computer is only reachable for
persons you have given the password. Since the password changes with each start, a
person that has connected to your PC before is not able to connect again until you give
them your new password. So nobody can get permanent control over your PC.
This is the default mode and is perfectly suitable for most situations.
When running TeamViewer as a Windows® system service:
TeamViewer will run during your whole Windows® session.
TeamViewer will be installed as a Windows® system service - so your computer is
reachable even before you log in to Windows®.
You setup a permanent password for authentication.
Your computer is reachable whenever your computer is started.
This mode is e.g. perfect for servers you want to reach when nobody is on the remote
side. It is also the best mode if you need the ability to restart the remote machine and
reconnect with TeamViewer afterwards.

TeamViewer - Installation
page 5 of 39
2.3.2 How to configure TeamViewer to run as a Windows® system service
If you didn't configure TeamViewer to run automatically with Windows® during the setup you
can do this anytime later by executing the following steps:
1. Start TeamViewer
2. On the Extras menu, click options
3. Switch to the General tab
4. Activate the option Start TeamViewer with Windows® in the Startup section.
5. Enter and confirm a password.
6. Click on OK and restart your computer
Your computer is now reachable after a reboot.
NOTE: Instead of restarting the computer you can also start the TeamViewer system service
manually in the services snap-in of your computer management console.
NOTE: A TeamViewer service is always running under Windows® Vista. Do not quit this service
manually! This service is used to optimize TeamViewer for Windows® Vista.

TeamViewer - Installation
page 6 of 39
2.4 Licence Activation You can use the free version of TeamViewer for non-commercial use. For commercial use buy a
licence at our shop (http://www.teamviewer.com/licensing/index.aspx), and activate
TeamViewer afterwards with your licence key.
To activate your TeamViewer licence:
1. Start TeamViewer
2. Run the command Extras | Activate Licence
3. Enter your licence code
4. Click on Activate Licence
Your TeamViewer licence is now activated.
License Activation window.

TeamViewer - Main windows
page 7 of 39
3 Main windows
3.1 TeamViewer main window
The TeamViewer main window is separated into 2 sections:
Wait for session
In this section you find your TeamViewer-ID and the session password. Give this data to your
partner and he can connect to your computer.
Create session
In this section you can enter your partners ID if you want to initiate a connection.
Choose your TeamViewer mode here:
Remote Support
For remote control and desktop sharing.
Presentation
To show your desktop to a partner.
File Transfer
To transfer files from or to your partner’s computer. (You can also start the file transfer
option later during remote support).
VPN
Establish a VPN connection to your partner.
TeamViewer main window

TeamViewer - Main windows
page 8 of 39
3.2 QuickSupport main window TeamViewer QuickSupport is an executable file. The application only needs to be downloaded
and executed by your partner. No installation or administrator privileges are required. You can
also host this application on your webpage.
TeamViewer QuickSupport
For accessing the QuickSupport options please click on the gear wheel symbol in the top right
hand corner of the QuickSupport window (for details please see chapter 6.11 QuickSupport
Options.)

TeamViewer - Connections
page 9 of 39
4 Connections
4.1 Basics If you compare a phone call with a TeamViewer connection, the phone number is equivalent to
the TeamViewer ID which always stays static.
Computers which run TeamViewer will receive a unique number for the identification. This ID will
be generated automatically with the first start of TeamViewer on your computer and doesn´t
change anymore. Your ID is absolutely independent of your IP address by the way.
4.2 Connecting to a partner This chapter describes how to connect to a partner either by using TeamViewer at both sites or
using TeamViewer QuickSupport on your partner’s site.
To connect to a partner:
1. Start TeamViewer on your computer.
2. Ask your partner to start TeamViewer or TeamViewer QuickSupport.
3. Ask your partner for his ID and the session password (both displayed on his
TeamViewer).
4. Enter the Partner-ID in the ID field in the Create session section.
5. Choose your connection mode:
Remote support
Enables Desktop Sharing and Remote Control.
Presentation
Shows your desktop to your partner.
File transfer
Starts the file transfer window (you can also start a file transfer later in Remote
support mode).
VPN
Establishes a VPN connection to the desired computer.
6. Click on Connect to Partner.
The TeamViewer Authentication dialog opens.
7. Enter the session password.
You are connected to your partner’s computer.
The authentication dialog

TeamViewer - Connections
page 10 of 39
4.3 Access control
4.3.1 Overview of Access control
The TeamViewer Access control allows you to configure the actions which TeamViewer caries out
during a remote session.
(This chapter is aimed almost exclusively to professional IT service providers. If you don´t use
TeamViewer professionally you can skip chapter 4.3. completely.)
There are 4 access methods:
Full access
You can directly control all of the other computers settings. Actions such as file transfer
can also be carried out instantly.
Confirm all
At the beginning of the session you are solely allowed to view your partners desktop. All
further access has to be granted by your partner.
View and show
You may only view and indicate things to your partner on his desktop by sending a
mouse pointer. Remote control of the partner´s workstation is not possible with this
setting.
Custom settings
You can configure your access settings individually.
Examples for frequent use cases:
You would like to constrain your access flexibly: For remote supporting customers with
which you have a trustworthy relationship or for the access of your own workstations
you can choose Full access. For sensitive customers you can switch to the confirm all
mode.
The Windows® administrator defines special custom settings and locks them in
TeamViewer. Perfect for use in call- or support- centres where the supporters shouldn´t
be able to use all possibilities of TeamViewer.
You can define the access mode in the options menu in the security tab. The default setting is
Full Access.
You also can define another access mode directly in the TeamViewer Authentication dialog
before the connection.

TeamViewer - Connections
page 11 of 39
4.3.2 Access mode for the current session
How to choose the access mode for the current remote session:
1. In the Authentication dialog please click on the icon to enter the Access Control.
2. The access control panel expands and offers you further options.
3. Choose the desired mode from the drop-down menu and click on Log On to start your
session.
In the authentication window you can choose
the access mode for the current session.
In the Confirm all mode you can only perform further
actions if your partner confirms them.
In the Remote control tab you can choose
the standard mode for the Access control.

TeamViewer - Connections
page 12 of 39
NOTE: If you don´t choose a certain option for the access control the standard setting which is
defined in your TeamViewer options (remote control tab) will be used.
4.3.3 Access Control Details
With the access modes from above you can control a set of settings. This chapter explains which
settings are defined and what this means for your connection:
How can I find out which permissions I have on the remote computer?
1. Choose the access mode as described above.
2. Click on the underlined word Access Control.
The Access Control Details window will show up.
The Access Control window shows the precise
impact of the chosen mode.

TeamViewer - Connections
page 13 of 39
4.3.4 Detailed setting configuration for the Access Control
The following settings can be controlled with the Access Control:
Remote control
Sets the circumstances under which remote control is possible:
Allowed
After confirmation
Denied
File transfer
Sets the circumstances under which file transfer is possible:
Allowed
After confirmation
Denied
VPN connection
Regulates whether a VPN connection can be established or not:
Allowed
After confirmation
Denied
Disabling remote input
Determines whether you can block your partner´s input during a remote session:
Allowed
After confirmation
Denied
On every session start
Control remote TeamViewer
Determines whether you can control the remote TeamViewer during a remote session:
Allowed
After confirmation
Denied
Changing sides
Determines under which circumstances a the change of sides is possible:
Allowed
Denied

TeamViewer - Connections
page 14 of 39
4.3.5 Custom settings
The Full Access, Confirm all, View and show modes are appropriate for the most usage cases. In
the Custom settings mode you can define own access rights individually. For further information
please see chapter 6.3 Remote control tab.
4.3.6 Dependency between Access Control and security settings
With the outgoing Access Control you determine which possibilities you have after connecting to
a remote computer or an administrator defines this for the supporters.
As counterpart for the outgoing Access Control you can adjust in the security tab of the options
menu the incoming Access Control.
Example of use: You purchase TeamViewer and would like to have a uniform possibility for your
IT employees to give remote support. You would like to configure TeamViewer so that your
clients have to confirm actions such as file transfer or remote control of their machines. To do so
please choose Confirm all for the outgoing Access Control.
If the customer and the supporter have determined different rights (e.g. supporter has outgoing
Full Access, but the partner has chosen Confirm all for the incoming connections) the lowest right
will be chosen.
Examples:
You have chosen Full Access for the outgoing Access Control but your connection partner
has chosen Confirm all for the incoming connections. You won´t be able to remotely
control the partners machine without him confirming it.
You have chosen View and show outgoing and your partner has Full Access as incoming
access mode. You can only View and show things on the partners screen.

TeamViewer - Connections
page 15 of 39
In the security tab you can determine the incoming Access Control.
The discrepancy between the outgoing Access Control
for the local machine and incoming Access Control
for the remote machine will be shown in a window.
NOTE: QuickSupport was developed for the spontaneous and straightforward support session. If
you connect to a QuickSupport only you can determine Access Control rights on your local
machine.

TeamViewer - Connections
page 16 of 39
4.4 Using aliases The combo box ID in the Create session area saves the last 20 partner IDs. You can assign an alias
to each ID.
To assign an alias to your partner ID:
1. Choose an ID in the combo-box ID.
2. Click on the hyperlink ID.
The Edit ID alias window opens.
3. Enter an alias in the Alias field and click on OK
The ID field displays the alias and the ID in brackets.
Field ID with partner ID Assigning an alias Field ID with alias

TeamViewer - Connections
page 17 of 39
4.5 Remote Control
4.5.1 The remote window
This chapter discusses your possible actions and options within TeamViewer when you are
already connected to a partner. For help on establishing a connection please see Connecting to a
partner.
In the remote control window you can control your partner’s computer as if you were sitting in
front of it. You can use your keyboard and your mouse for controlling your partner’s computer.
The TeamViewer remote window.

TeamViewer - Connections
page 18 of 39
4.5.2 Remote window actions
In the title bar of the remote window either the partner’s name or ID is displayed. There is a
toolbar under the title bar with buttons for the following actions:
Close connection
Quits the current connection and closes the remote window.
Request remote control
If you don´t have the authorization for remote controlling the partner´s computer
you can ask for permission by clicking on this button.
File transfer
Opens a file transfer window which allows you to transfer files from and to your
partners computer.
Actions
Switch sides with partner
Click on this button to change the direction so you partner can control your
computer.
Ctrl Alt Delete
This button sends a ctrl alt delete command to the remote computer. Please note,
that this button is only available if your partners TeamViewer runs as a Windows®
system service.
Remote reboot
Log off
Log off from the system or switch user.
Reboot
Restart the remote computer
Reboot in safe mode
Restart the remote computer in safe mode with network drivers
Disable remote input
Deactivates mouse and keyboard input on the remote machine.
Show black screen
Switches the partner´s screen to black so that the partner can´t see what is done
on his computer.

TeamViewer - Connections
page 19 of 39
View
Quality
Auto select
Adjusts quality and speed automatically to the available bandwidth
Optimize speed
Optimizes the speed of the connection, the quality will be reduced - ideal for
remote control
Optimize quality
Optimizes the quality - ideal for presentations.
Custom settings
Activates the quality mode custom settings.
Edit custom settings
Opens the Custom settings window in which you can determine quality
settings by yourself.
Scaling
Original
The partner´s screen is transmitted in original resolution. If your partner has a
higher resolution than your local workstation, you can navigate with the
scrollbar.
Scaled
If your partners screen has a higher resolution, the screen will be scaled down.
Full Screen
If you have the same resolution on both sides this setting will be most suitable.
Active monitor
Show monitor n
Shows the respective monitor of your partner.
Show all monitors
If you partner has multiple screens, you have the possibility to display them all
simultaneously.
Select single window
Allows you to select a single window on the remote machine. A cross-hair
cursor appears, click on the title bar of a remote window. Afterwards only
this window is transferred to your screen.
Show full desktop
Click on this button to show the remote computers whole desktop again.
Refresh
Forces a screen refresh for cases when the automatic refresh doesn´t work.
Show remote cursor
With this option you can show or hide your partner´s cursor.

TeamViewer - Connections
page 20 of 39
Extras
Record
With this menu option you can record your session as a movie (please see chapter
5.2 session recording)
Start
Starts recording your partner´s screen.
Pause
Pauses recording your partner´s screen.
Stop
Stops recording your partner´s screen.
VPN
You can find more information about TeamViewer VPN in the chapter 4.8 VPN
connection.
Start
Starts the VPN connection.
Stop
Stops the VPN connection
Status...
Opens the status window, in which you can see for example the IP address
of the virtual network.
Chat
Starts a chat session.
Connection window
Opens the Connection Info window.

TeamViewer - Connections
page 21 of 39
4.5.3 Server control window actions
The Server Control window
On the side of the partner that is receiving remote support, a small window (the server control
window) offers several options:
Close Connection
Quits the current connection.
Extras
Chat
Opens a chat session.
Switch sides with partner
Toggles the direction, so your partner can control your PC. (This Button only
appears if you previously clicked on Switch sides with partner) - by changing the
direction once you allow your partner to change the direction again later.
Connection Info
Opens the Connection Info window (please see 6.10 Connection Info)
Note: To use Windows® Shortcuts on the remote machine press Scroll-Lock on your local
keyboard.

TeamViewer - Connections
page 22 of 39
4.6 Presentation In presentation mode your desktop is transferred to your partners PC. A little control window
gives you control over the presentation session:
The Presentation Control Window.
4.6.1 Presentation window actions
Close Connection
Quits the current connection and closes the remote window.
Extras
Connections Info
Opens the Connection Information window.
Chat
Opens a chat window.
Switch sides with partner
Toggles the direction, so you can see your partner’s desktop.
Pause presentation
Freezes your monitor so you can do things on your desktop your partner
should not see.
Disable Remote Input
This is the default mode. Your partner can only view your desktop. Your
partner’s mouse clicks are transferred as red dots to your monitor - so your
partner can highlight interesting points of your presentation.
Remove wallpaper
Removes your wallpaper so that a faster connection can result.
Show single window
Allows you to select a single window. Afterwards only this window is
transferred to your partner’s screen. A crosshairs cursor appears, click on the
title bar of a local window. Afterwards only this window is transferred to your
partner. Please note, that the full desktop is transferred again, if you close the
window.
Select whole desktop
Click on this icon to show your whole desktop again (only available if you
previously clicked on Show single window).
Quality
Auto select
Adjusts quality and speed automatically to the available bandwidth
Optimize speed

TeamViewer - Connections
page 23 of 39
Optimizes the speed of the connection, the quality will be reduced - ideal
for remote control
Optimize quality
Optimizes the quality - ideal for presentations.
Custom settings
Activates the quality mode custom settings.
Edit custom settings
Opens the Custom settings window in which you can determine quality
settings by yourself.
Monitor
Show monitor n
Shows the respective monitor of your partner.
Show all monitors
If you partner has multiple screens, you have the possibility to display them
all simultaneously.

TeamViewer - Connections
page 24 of 39
4.7 File transfer
4.7.1 The file transfer window
The File Transfer window allows you to send files to and receive files from your partner’s
computer. There are two ways to start the file transfer window:
1. Click on the Open File Transfer Icon in the remote window.
2. Choose the File transfer mode when starting the connection.
The file transfer dialog allows you to send and receive files and folders.

TeamViewer - Connections
page 25 of 39
4.7.2 File transfer actions
In the file transfer dialog you see your file system on the left and your partner’s file system on
the right side. There are a few buttons to control the file transfer operations:
Refresh (Hotkey: F5) Refreshes the current folder.
Delete (Hotkey: del) Deletes the selected files or folders.
Create a new folder Creates a new folder.
Browse to parent folder (Hotkey: Backspace) Moves to the parent folder.
Browse to drives (Hotkey Ctrl+Backspace) Moves to the drives view. You can also reach special Windows® folder such as documents and desktop here.
Send (Hotkey F11) Sends the selected files and folders to the remote machine.
Receive (Hotkey F11) Transfers the selected files and folders from the remote machine to the local machine.
Rename To rename a file or folder click once on an already selected item to make the name editable
4.7.3 The file transfer log file
On your partner’s site all file system operations are logged to a log file window.
The file transfer log dialog lists all file system
operations on the remote computer.

TeamViewer - Connections
page 26 of 39
4.8 VPN connection With the VPN option you can establish a virtual private network between you and your partner.
Two computers that are connected with VPN are in a common network. You can access the
network resources of the other computer and accordingly your partner also can access the
resources of your own local machine.
4.8.1 Examples for the usage of TeamViewer VPN
You can print out something on the remote computer
You can use an application locally on your machine which accesses a remote database by
having a VPN connection to the remote database server.
Start an RDP session to the remote computer
Make peripheral devices (e.g. printer) and files in your local network accessible for external
partners
In the support case access remote databases from your local frontend (e.g. SQL-Server
Management Studio).
4.8.2 Premises
The premise for the use of TeamViewer VPN is that TeamViewer is installed on both sides with
the option “TeamViewer VPN”.
NOTE: You don´t need TeamViewer VPN for remote controlling the partner PC or transferring
files. Professional IT staff will know the possibilities and advantages of this connection.
NOTE: If you connect to the remote PC with TeamViewer VPN, both computers are in a common
virtual network. If you need to communicate with further computers located in the partners
network, you have to set static IP routes. In order to do so advanced skills in administering
Windows® networks are essential.
4.8.3 Starting a VPN connection
How to establish a VPN connection:
a. Establish a connection as explained in chapter 4.2 Connecting to a partner (choose VPN)
b. Another option is to click during the remote support session on the menu item Extras, then
VPN and Start.
In both cases the VPN - TeamViewer window will open.

TeamViewer - Connections
page 27 of 39
4.8.4 Actions in the VPN - TeamViewer window
In the VPN - TeamViewer window you have the following options:
In the Active VPN connection drop-down menu you can chose in the case of multiple
connections which connection you would like to be shown.
If you click on the Close connection button you can close the chosen connection.
In the Status section you can see your IP address and the IP address of your partner.
In the Actions section you can test the VPN connection:
o The Test ping button sends a ping signal for testing the network
o The Share files via Explorer button opens the Windows® explorer with access to the
remote files. (Please consider that you may have to authenticate yourself on the remote
computer.)
The VPN - TeamViewer windows.

TeamViewer - Miscellaneous Functions
page 28 of 39
5 Miscellaneous Functions
5.1 Chat The Chat window allows you to chat with your partner. You can start a chat session by clicking on
the Open chat button in the remote window or the server control window.
The TeamViewer chat window
5.2 Session recording During the session you have the possibility to record your remote session as movie. The
recording is executed in TeamViewer´s own .tvs file format. For this reason it is ensured that the
file is unchangeable and also can be used for purposes of revision.
To record a session:
1. Click in the Extras menu | Record | Start to begin the session recording.
2. To finish the recording please click on Extras | Record | Stop, or just close the remote
session.
A window will ask where you would like to save your file.
To play-back a recorded session:
1. Click in the menu Extras and Play recorded session...
2. The window Open file will appear.
3. Chose the desired file.
The movie will be played back in TeamViewer.
Note: If you double-click the TeamViewer .tvs file in the Windows® explorer TeamViewer will be
started automatically and you can play it back.
NOTE: If you would like to record all your sessions, please choose Extras / Options / Advanced /
Automatically start SessionRecorder when beginning remote control session.

TeamViewer - Miscellaneous Functions
page 29 of 39
5.3 LAN Connections Connections in the local network can alternatively be initiated via the IP address (the machine
name). Therefore you have to configure TeamViewer to accept incoming LAN connections.
To activate incoming LAN connections:
1. Click on Extras | Options | General
2. Activate the Accept incoming LAN connections option in the Connection area.
To connect to a computer in the local network
1. Enter the IP address in the ID field.
2. In other respects follow the steps as described in Connecting to a partner.
TeamViewer main window with IP address.

TeamViewer - Options
page 30 of 39
6 Options
6.1 General tab The General tab offers some basic settings:
General
Your Display Name
Enter your name or company name here. This text is displayed in the title bar of the
remote control window and in your partner´s chat window.
Startup
Start TeamViewer with Windows®
TeamViewer starts automatically with Windows® and is that way executed directly
after the start of Windows® and before the Windows®-Login.
Minimize to tray menu
Minimizes TeamViewer to the system tray (info area of the taskbar) instead of to the
taskbar.
Password
If you enter a password in the Password field, then this password is required instead
of the automatically generated session password to get access on your computer.
You have to enter a password in this field if you have activated the option Start
TeamViewer with Windows® on the General tab.
Connection
Accept incoming LAN connections
Accepts incoming LAN connections on port 5938 (see 5.3 LAN connections)
Proxy Settings...
Opens the proxy settings dialog.

TeamViewer - Options
page 31 of 39
The General tab offers you various settings.
6.2 Dialog Proxy Settings In most cases the default setting (Use web browser proxy settings) will be suitable. You can
use custom settings, for example, if you have not configured the proxy settings in your
browser.
No proxy
Use this setting if you are directly connected to the internet.
Use web browser proxy settings
Use this setting if you are behind a proxy and the proxy settings are already
configured in your browser (Internet Explorer or Firefox ).
Use manual proxy
Use this setting to manually enter your proxy settings.
In the Proxy Settings dialog you can configure
access to the internet if you have a proxy server..
6.3 Remote control tab The Remote Control Tab offers settings for the TeamViewer Remote Support mode. The settings
in this dialog have an impact on all Remote Support Sessions.

TeamViewer - Options
page 32 of 39
Display
Quality
You may choose between:
Optimize speed (default setting - best possible speed at acceptable quality)
Optimize quality
Auto select
Custom Settings
Remove remote wallpaper
Removes the remote desktop background during the session.
Access Control (outgoing)
Full Access
This option allows you to have immediate access to all functions of your computer.
Confirm all
You can initially only look at the desktop of the remote computer. For further actions
your connected partner has to agree.
View and show
You can look at the desktop of the remote computer but you can not operate on it.
Custom Settings
The Configuration button offers you the possibility to define individual settings and
therefore to disable different features completely, to allow after confirmation or to
permit from the beginning of the session.
No outgoing connections allowed
No outgoing connections are allowed.
See also access control for the features you can activate!
In the Remote control tab you can predefine the settings for the
remote session.

TeamViewer - Options
page 33 of 39
In the details dialog of the Access Control you can
define settings for the following session.
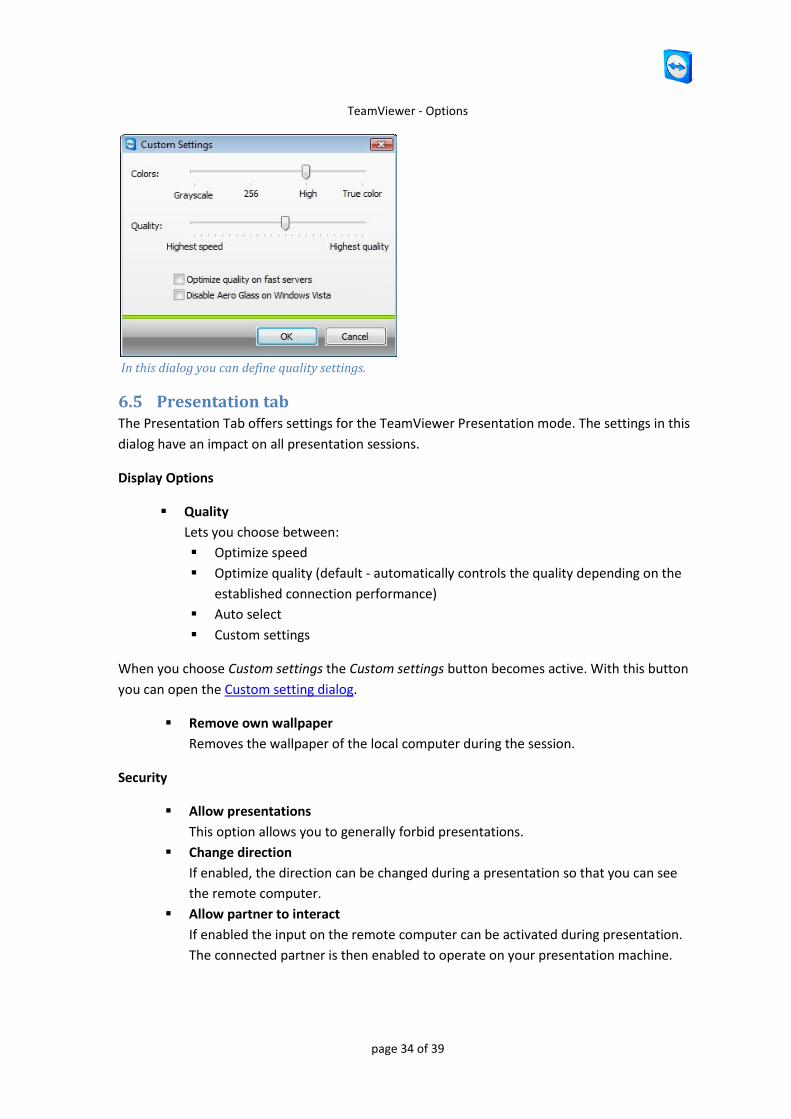
6.4 Custom Settings Dialog The custom settings dialog is only available if you choose Custom settings in the quality drop-
down menu of the display settings. You can specify your custom settings here.
Colors
You can set the color depth that should be transferred. More colors need more
bandwidth so you can increase performance by choosing fewer colors.
Quality
You can set the quality level here. A lossy compression is used to reduce the data
traffic when you move the slider to the left. This slider is only active if you set the
color slider to High or True Color.
Optimize Quality on Fast Servers
When enabled this option may increase performance on fast servers with good
network bandwidth. This option is disabled by default because it may result in high
CPU-usage on the remote computer (when giving remote support) or on the local
computer (when making presentations).
Disable Aero Glass on Windows®Vista
Disables Aero Glass on Windows® Vista remote computers to improve performance.
TeamViewer - Options
page 34 of 39
In this dialog you can define quality settings.
6.5 Presentation tab The Presentation Tab offers settings for the TeamViewer Presentation mode. The settings in this
dialog have an impact on all presentation sessions.
Display Options
Quality
Lets you choose between:
Optimize speed
Optimize quality (default - automatically controls the quality depending on the
established connection performance)
Auto select
Custom settings
When you choose Custom settings the Custom settings button becomes active. With this button
you can open the Custom setting dialog.
Remove own wallpaper
Removes the wallpaper of the local computer during the session.
Security
Allow presentations
This option allows you to generally forbid presentations.
Change direction
If enabled, the direction can be changed during a presentation so that you can see
the remote computer.
Allow partner to interact
If enabled the input on the remote computer can be activated during presentation.
The connected partner is then enabled to operate on your presentation machine.

TeamViewer - Options
page 35 of 39
Single window mode
When you enter the title of the window into the Window Name field only that window will be
transferred in presentations. You do not have to enter the complete name of the window - initial
letters will be sufficient. Even during a running presentation you will be able to choose the
presentation via the Single Window button and reduce it to one single window.
Default monitor
You can choose your default monitor for presentations here. (Only available if your local
computer has multiple monitors).
In the presentation tab you can define the options for your
online presentation.
6.6 Security tab The settings on the security tab allow the configuration of security-critical settings.
General
Changes require administrative rights on this computer
When this checkbox is selected the security tab and the Startup options on the general
tab are only available for users with Windows® administrator rights.
Disable TeamViewer shutdown
When enabled, TeamViewer is minimized to the system tray if the Exit command during
the session is executed or if you close the TeamViewer main menu.
Access Control (Incoming)
Full Access
Your connection partner obtains full access on the local computer immediately.

TeamViewer - Options
page 36 of 39
Confirm all
First of all your connection partner is able to view your desktop. You have to confirm
advanced operations.
View and show
Your connection partner is able to view your desktop but not to control it.
Custom settings
You may define custom settings with the Configure button and hence you are able to
disable different features, to allow them by confirmation or to allow them from the
beginning of the session.
No incoming connections allowed
There are no incoming connections allowed.
Please read chapter 4.3 Access Control for detailed information.
In the security tab you can define security settings.
6.7 Custom invitation tab The custom invitation tab provides you with the possibility to invite your business partner quickly
and uncomplicated by e-mail to a remote support session.
Subject
Here you can change the subject heading of your invitation mail.
Invitation message
Here you can set the default message of your invitation mail individually. After
confirmation with the Test invitation button the invitation mail will be generated in your
e-mail application. You can then send the e-mail directly from this application. By clicking
Reset the default invitation mail will be restored.

TeamViewer - Options
page 37 of 39
6.8 Advanced tab On the Advanced tab you can set up advanced settings for your TeamViewer application.
General:
Temporarily save connection passwords.
Session passwords will be saved by default to enable the immediate resumption of the
connection. After the shut down of TeamViewer the passwords are no longer saved. Via
this option you can completely prevent the saving of passwords.
Show your partner's cursor
The cursor of your partner will be displayed.
Show black screen
If you disable the your partner's input the screen of the remote computer is additionally
disabled.
Automatically Session Recording
Session Recording starts immediately when beginning a session.
Event logging
If enabled, TeamViewer writes all errors and events into a log file.
Connection logging
If enabled, TeamViewer writes the information for all outgoing connections into a log
file. This option has to be enabled when you are using the TeamViewer Manager.
You can open the log file folder by clicking Extras within the TeamViewer main menu and
then clicking Open log files.
Network:
Enable UDP
TeamViewer attempts to establish fast UDP connections. You should only disable this
feature when connection interruptions occur.
TeamViewer Server
Opens the Team Viewer Server dialog.
Import / Export Options
Here you can export your TeamViewer settings into a configuration file (*.ini). This makes a quick
adoption of predefined settings possible.
How to export your settings:
1. Click on Export
2. A window for saving the configuration file opens. Choose a location to save the file and
click on save.

TeamViewer - Options
page 38 of 39
How to import your settings:
1. Click on Import
2. A window for opening the configuration file appears. Choose a configuration file and click
on open.
6.9 Dialog TeamViewer-Server In the TeamViewer window you can define a fixed server.
In the Homeserver window you can enter the necessary
informations for connecting to your own TeamViewer server.
NOTE: Please enter a server here only if the TeamViewer support staff requests you to do so!
6.10 Connections Info The Connection Info dialog informs you about the current connection data.
Access control
In the Access Control area the effective settings of the access control for the current connection
are displayed.
Information
Connection type
Informs you about the type of the connection
Duration
Informs you about the duration of the session.
Traffic
Informs you about the amount of data transferred.
Display
Informs you about the screen resolution und the colour depth.
Version
Informs you which TeamViewer version your connection partner has.

TeamViewer - Options
page 39 of 39
The connection Info window will
display your access priviledges.
6.11 QuickSupport Options In the QuickSupport Options window you can define settings for the TeamViewer QuickSupport
module.
You can access this dialog by clicking on the gearwheel icon in the top right-hand corner of the
TeamViewer QuickSupport screen.
Eventlog
Eventlog
If enabled TeamViewer QuickSupport writes to an eventlog. This log may help when
searching for errors in support cases.
Open log files
Opens the Windows® folder in which the log file is stored.
Proxy-Settings
Please see chapter 6.2 Dialog Proxy Settings.