manual pulsar 128 adapter 1 - · pdf filechapter 6 software installation for windows me...
TRANSCRIPT

Manual Pulsar 128 Adapter 1
Congratulations on purchasing the „Pulsar 128 Adapter“ an extremely compact system for connecting yournotebook, laptop or PC to ISDN with a minimum of effort. You are now equipped to use your computer as amultifunctional ISDN terminal.
All rights reserved. No part of this manual may be reproduced without the written permission of BAUSCHDATACOM. Although the greatest care was taken in compiling the texts in this manual, it is never possible torule out mistakes entirely. The publishers and authors can accept no legal responsibility or liability forincorrect data or their consequences. The publishers welcome suggestions on how to improve the manualand are glad to be informed about any mistakes.
Note on trade marks
MS-DOS, Microsoft and Windows are registered trade marks of the Microsoft Corporation. IBM, PC, PC-XT,PC-AT and OS/2 are registered trade marks of the International Business Machines Corporation.
2 Manual Pulsar 128 Adapter Contents
1 Foreword ........................................................................................................................................................................................4
2 Scope of delivery...........................................................................................................................................................................5
3 Performance features...................................................................................................................................................................6
4 Startup.............................................................................................................................................................................................7
4.1 Technical requirements.....................................................................................................................................................7
4.2 Hardware installation........................................................................................................................................................74.2.1 Installation of „Pulsar 128“ ........................................................................................................................................7
4.3 S0 interface ............................................................................................................................................................................7
5 Software-Installation for Windows 98.....................................................................................................................................9
5.1 Installing the CAPI driver................................................................................................................................................95.1.1 Installation of plug & play Pulsar 128 Adapter......................................................................................................95.1.2 Configuration of the Pulsar 128 Adapter...............................................................................................................10
5.2 The PULSAR 128 CAPI 2.0 RAS driver under Windows 98.............................................................................. 135.2.1 Functions.....................................................................................................................................................................135.2.2 Installation of the Capi 2.0 RAS driver for Windows 98....................................................................................135.2.3 ISDN Configuration ..................................................................................................................................................14
5.3 Driver Update ................................................................................................................................................................... 16
5.4 Uninstalling the Driver................................................................................................................................................... 16
5.5 PPP- Access to InternetServiceProvider.................................................................................................................... 17
5.6 Setting up a Multilink connection................................................................................................................................ 21
6 Software-Installation for Windows ME................................................................................................................................ 22
6.1 Installing the driver......................................................................................................................................................... 226.1.1 Installation of plug & play Pulsar 128 Adapters ..................................................................................................226.1.2 Configuration of the Pulsar 128 Adapter...............................................................................................................24
6.2 The CAPI 2.0 RAS driver under Windows ME....................................................................................................... 276.2.1 Functions.....................................................................................................................................................................276.2.2 Installation of the Capi 2.0 RAS driver for Windows ME..................................................................................276.2.3 ISDN Configuration ..................................................................................................................................................29
6.3 Capi- Driver Update........................................................................................................................................................ 30
6.4 Uninstalling the Driver................................................................................................................................................... 30
7 Software installation for Windows 2000 .............................................................................................................................. 31
7.1 Installing the CAPI driver............................................................................................................................................. 317.1.1 Installation of plug & play Pulsar 128 Adapters ..................................................................................................317.1.2 Configuration of the ISDN-Adapter.......................................................................................................................32
7.2 The PULSAR 128 CAPI 2.0 RAS driver under Windows 2000 ......................................................................... 347.2.1 Functions.....................................................................................................................................................................347.2.2 Installing the CAPI 2.0 RAS driver under Windows 2000.................................................................................347.2.3 Configuration of call numbers for RAS.................................................................................................................37
7.3 CAPI Driver update ........................................................................................................................................................ 38
7.4 Uninstalling the Driver................................................................................................................................................... 38
8 Software installation for Windows NT.................................................................................................................................. 40
8.1 Functions of the NT-Drivers ......................................................................................................................................... 408.1.1 Functions of the CAPI-Driver..................................................................................................................................408.1.2 Functions of the Capi 2.0 RAS Driver...................................................................................................................40
8.2 Installation with activated plug & play support....................................................................................................... 41
8.3 Installation with the setup-program of CD-ROM................................................................................................... 42
8.4 Manual installation.......................................................................................................................................................... 438.4.1 Installation of the CAPI-Driver...............................................................................................................................43

Manual Pulsar 128 Adapter Contents 3
8.4.2 Installing the Capi 2.0 RAS driver..........................................................................................................................468.4.2.1 Simultaneous installation of the Capi 2.0 RAS driver and the Windows NT network support ...............468.4.2.2 Installing the PULSAR 128 Capi 2.0 RAS driver with activated network support...................................498.4.2.3 Part 2 – Installing the Capi 2.0 RAS driver.......................................................................................................50
8.4.3 Configuration..............................................................................................................................................................548.4.3.1 Changing the resource settings ...........................................................................................................................548.4.3.2 Configuration of call numbers for RAS.............................................................................................................57
8.4.4 Driver update..............................................................................................................................................................588.4.5 Uninstalling the Driver software .............................................................................................................................598.4.6 Internet access via the Dial-Up Network using InternetServiceProvider as example ....................................618.4.7 General information...................................................................................................................................................65
9 Important terms.......................................................................................................................................................................... 66
10 Technical support.................................................................................................................................................................. 69
4 ManualPulsar 128 Adapter - Foreword
1 Foreword
This manual describes installation and operation of the following ISDN adapters from BAUSCH DATACOM:
• Pulsar 128 PCMCIA adapter
These ISDN controllers enable your computer to access the ISDN. Using these controllers, you can transferdata of any kind (text documents, pictures, programs) from your computer to any other computer and viceversa.
Thanks to the high transmission rate of 64 kbit/s per B-channel, you save not only time but also money. BothB-channels can be used simultaneously for data transmission to achieve a maximum transmission rate of128kbit/s.
Powerful and user-friendly application programs are available for all ISDN services. The CAPI interface(CAPI = COMMON ISDN API), a software interface standardized by Deutsche Telekom AG and othermanufacturers, facilitates the flexible use of previously installed ISDN applications.Both the CAPI 1.1, profile A and CAPI 2.0 standards are supported. The CAPI driver automatically detectswhich CAPI version is required by the application software.
Manual Pulsar 128 Adapter - Scope of delivery - 5
2 Scope of delivery
•• ISDN-Adapter
•• connection cable
•• CD-ROM with the following software:
- CAPI driver software for the DSS1 protocol
- CAPI 2.0 RAS driver
Supported Operating Systems:- Windows 98- Windows ME- Windows 2000- Windows NT from 4.0
•• Software for office communication e. g.: data transmission, fax G3/G4, answering machine(CD-ROM)
•• This manual

6 ManualPulsar 128 Adapter Performance features -
3 Performance features
• Suitable for ISDN basic rate interface and PBXs with a DSS1 interface.
• The ISDN adapter is approved according to the effective regulations
•• The ISDN Adapter fulfils the emitted interference requirements specified in EN 55022:1994Class B
•• Compliance with the interference immunity requirements specified in EN 50082-1:1992
•• Application and programming interface COMMON ISDN API version 1.1, profile A andversion 2.0
•• Supported B channel protocols: ISO 8208 (ETS 300 075/300 079), X.75, X.25, file transfer intransparent mode, HDLC transparent, T.70, T.90, T.30, bit transparent (for fax and voiceappliances), BTX
•• Supported D channel protocol: DSS1
•• Two data channels are supported (B channels)
•• Driver software for the European DSS1 protocol
•• Supported operating systems: Windows 98, Windows ME, Windows 2000 and Windows NT 4.0
•• Supports the plug & play standard
•• The Pulsar 128 supports PCMCIA standard
Manual Pulsar 128 Adapter - Startup /Software Installation for Windows 98 7
4 StartupThis chapter describes how to install your Pulsar 128 Adapter.
4.1 Technical requirements
The following system requirements must be fulfilled for the Pulsar 128 Adapter:
•• An IBM-compatible PC or laptop (486 CPU or higher)
•• Windows 98, Windows ME, Windows 2000 or Windows NT from 4.0 operating system
•• A 486 CPU and 16 MB RAM for fax applications. We recommend a Pentium CPU or higher foroptimum performance
•• For the Pulsar 128 the PC must have a PCMCIA interface according to the PCMCIA standard 2.0.
4.2 Hardware installation
4.2.1 Installation of „Pulsar 128“
Installing the hardware is easy. Insert the „Pulsar 128“ in a vacant PCMCIA slot in your computer andconnect it with the supplied SO connection cable to the ISDN slot.Should you have any problems or questions, please contact your computer vendor.
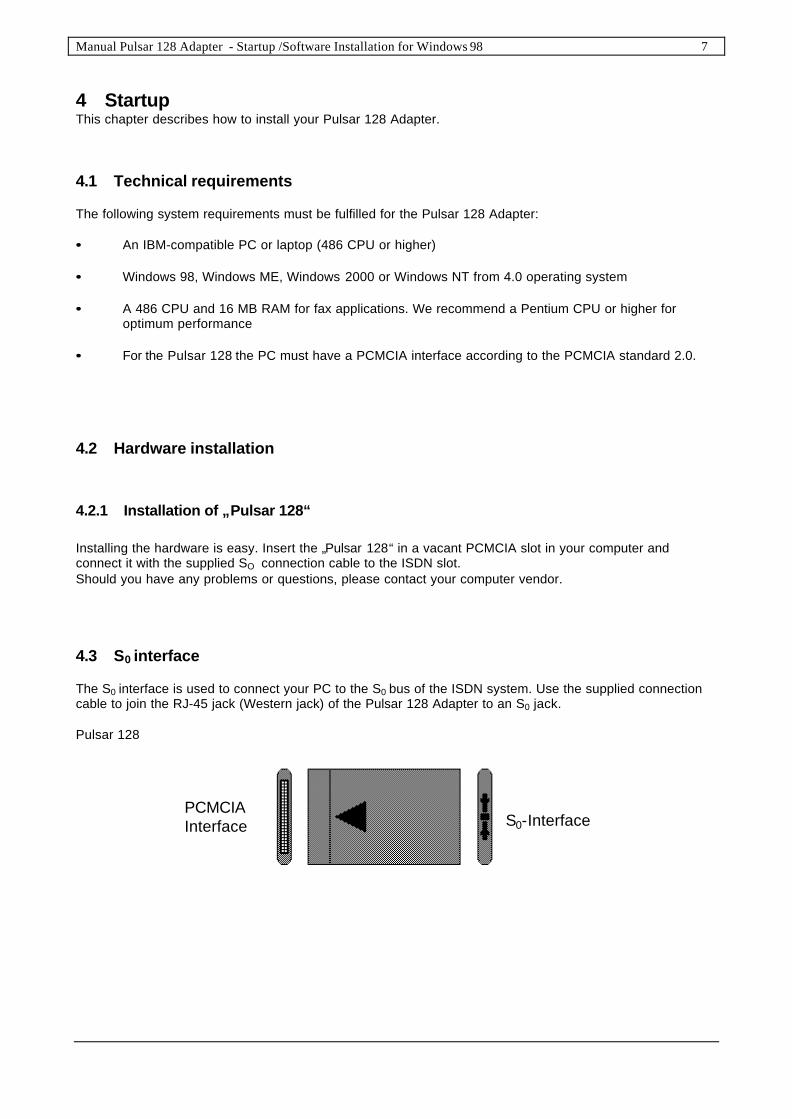
4.3 S0 interface
The S0 interface is used to connect your PC to the S0 bus of the ISDN system. Use the supplied connectioncable to join the RJ-45 jack (Western jack) of the Pulsar 128 Adapter to an S0 jack.
Pulsar 128
S0-Interface PCMCIA Interface

8 ManualPulsar 128 Adapter Performance features -
The following chapters describe the software installation for the various operating system (or user interfaces)that are supported by the Pulsar 128 Adapter.Select the section concerning the operating system (or user interface) on which the Pulsar 128 Adapter willbe installed and configured.
Chapter 5 Software installation for Windows 98
Chapter 6 Software installation for Windows ME
Chapter 7 Software installation for Windows 2000
Chapter 8 Software installation for Windows NT 4.0
Manual Pulsar 128 Adapter - Startup /Software Installation for Windows 98 9
5 Software-Installation for Windows 98
5.1 Installing the CAPI driver
After you have installed your Pulsar 128 Adapter as described in Section 4.2.1 you can begin with thesoftware installation for Windows 98.
These ISDN adapters like are plug & play adapters, i. e. Windows 98 automatically identifies the adapter asa new hardware component. If you use „Pulsar 128“, please note that the adapter must be plugged in!
Windows 98 interactively guides you through the installation. Have ready your Windows 98 CD, you willpossibly need it.
5.1.1 Installation of plug & play Pulsar 128 Adapter
• After start of your computer the message “New hardware component found” appears. Select“Search for the best driver for your device (recommended)” and insert the installation CD-ROMsupplied.
• In the next window click “Specify a location” and “X:\Win_9x” confirm with <Next>.• Confirm the request for restart with <Yes>
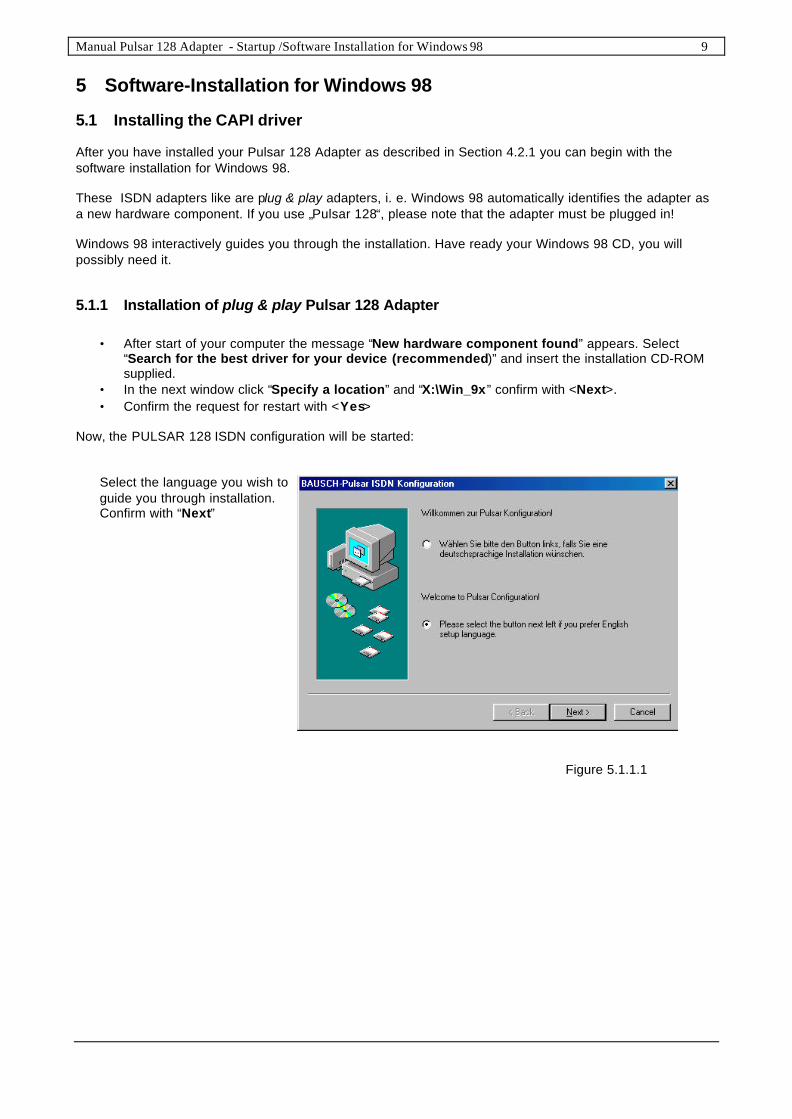
Now, the PULSAR 128 ISDN configuration will be started:
Select the language you wish toguide you through installation.Confirm with “Next”
Figure 5.1.1.1

10 Manual Pulsar 128 Adapter - Startup /Software Installation for Windows 98
In the next dialog box select thecomponents for your Pulsar 128Adapter.
Figure 5.1.1.2
Confirm with <Finish>.
Now, your Pulsar 128 Adapter is installed
5.1.2 Configuration of the Pulsar 128 Adapter
Note:If your Pulsar 128 Adapter is already installed you can configure the adapter subsequently by selecting„Start/Programs/ PULSAR ISDN/Configuration“ on your Windows-desktop.
General settings:
D-channel-protocol: This field is to
fix the signalling protocol: (DSS1)
Test mode: This field is to selectthe testmode when starting the driver.Standard: Adapter
Figure 5.1.2.1
Manual Pulsar 128 Adapter - Startup /Software Installation for Windows 98 11
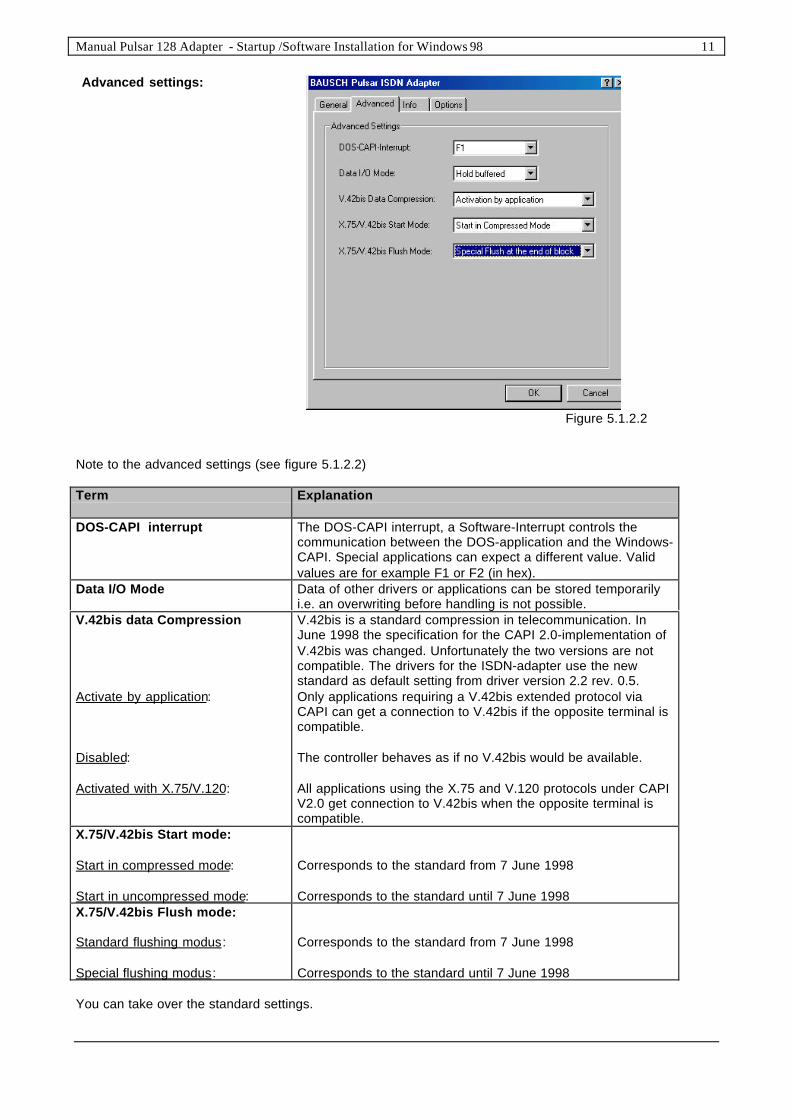
Advanced settings:
Figure 5.1.2.2
Note to the advanced settings (see figure 5.1.2.2)
Term Explanation
DOS-CAPI interrupt The DOS-CAPI interrupt, a Software-Interrupt controls thecommunication between the DOS-application and the Windows-CAPI. Special applications can expect a different value. Validvalues are for example F1 or F2 (in hex).
Data I/O Mode Data of other drivers or applications can be stored temporarilyi.e. an overwriting before handling is not possible.
V.42bis data Compression
Activate by application:
Disabled:
Activated with X.75/V.120:
V.42bis is a standard compression in telecommunication. InJune 1998 the specification for the CAPI 2.0-implementation ofV.42bis was changed. Unfortunately the two versions are notcompatible. The drivers for the ISDN-adapter use the newstandard as default setting from driver version 2.2 rev. 0.5.Only applications requiring a V.42bis extended protocol viaCAPI can get a connection to V.42bis if the opposite terminal iscompatible.
The controller behaves as if no V.42bis would be available.
All applications using the X.75 and V.120 protocols under CAPIV2.0 get connection to V.42bis when the opposite terminal iscompatible.
X.75/V.42bis Start mode:
Start in compressed mode:
Start in uncompressed mode:
Corresponds to the standard from 7 June 1998
Corresponds to the standard until 7 June 1998X.75/V.42bis Flush mode:
Standard flushing modus:
Special flushing modus:
Corresponds to the standard from 7 June 1998
Corresponds to the standard until 7 June 1998
You can take over the standard settings.

12 Manual Pulsar 128 Adapter - Startup /Software Installation for Windows 98
Register card „Info“:
The register card „Info“ contains besides data regarding copyright, program and the address of the producerthe opportunity to check the directory & version of the drivers.When you click „driver versions“ a short list of all drivers installed or to be installed appears.
Register card „Options“:
The register card „Options“ enables you to choose the language. In addition, the initial settings of the drivercan be re-established with the button <Set Default…>.
After you confirmed this configuration with <OK> you will be asked for restart. Confirm with <Yes> to takeover these amendments in the system.

Manual Pulsar 128 Adapter - Startup /Software Installation for Windows 98 13
5.2 The PULSAR 128 CAPI 2.0 RAS driver under Windows 98
The CAPI 2.0 RAS driver provides you with access to the Internet e.g. with the Microsoft Internet Explorerwhich you can find on the installation CD-ROM delivered with the adapter. The driver also allows you toconnect to Windows NT or Windows 95/98/ME/2000 computers by means of RAS (Remote Access Services)or Dial-Up Networking.
5.2.1 Functions
• Supports WAN functions (Wide Area Networking) in Windows 98
• Connects to Internet providers via Windows 98 Dial-Up Networking
• Supports Multilink PPP connections for channel bundling to double the transmission capacity(up to 128 kbps)
• RAS (Remote Access Services) for connections to Windows 95/98/ME/2000 and Windows NTcomputers
• Subscriber numbers can be specified for incoming and outgoing calls
• Compatible with non-proprietary remote terminals
5.2.2 Installation of the Capi 2.0 RAS driver for Windows 98
In order to fulfil the above functions the Capi 2.0 RAS driver must be installed. To do so you need thePULSAR 128 and your Windows CD ROM.
• Insert the PULSAR 128 CD into the right drive. Now the installation program will be started.• Click “Language” and <Next>• In the next dialog box mark “Capi-RAS driver” and confirm with <Install>• Now the register card “Network” will be opened. Select <Add>, “Adapter”, <Add>.
Click the button “Have Disk” and select inthe next dialog box the following path:Example for installation from CD-ROMdrive D:D:\CAPIRAS\WIN9X
Confirm with “OK”.
Figure 5.2.2.1

14 Manual Pulsar 128 Adapter - Startup /Software Installation for Windows 98
Mark “CAPI 2.0 RAS driver” andclick “OK” twice.
Figure 5.2.2.2
5.2.3 ISDN Configuration
Select the Switch-protocol foryourISDN-adapter
Confirm with <Next>
Figure 5.2.3.1
In this dialog box you can selectyour call number(s) and SPID(Service Profile ID)
Confirm with “Next” andfollow the instructions
Figure 5.2.3.2

Manual Pulsar 128 Adapter - Startup /Software Installation for Windows 98 15
Now you are asked to insert your Windows 98 CD.Click <OK>.Should the message “Cannot find Capiras.sys” appear insert again PULSAR 128 CD-ROM and enter thepath
Example for installation from CD-ROM drive D:D:\CAPIRAS\WIN9X
Confirm the following prompt for restart with „Yes“.
Now the PULSAR 128 Capi 2.0 RAS driver is completely installed!
16 Manual Pulsar 128 Adapter - Startup /Software Installation for Windows 98
5.3 Driver Update
You can update the driver software of your Pulsar 128 Adapter as follows:
� Open the „Device manager“ by selecting „Control Panel“ from the „Start/Settings“ menu anddouble-clicking the „System“ symbol.
� Click the „Device manager“ tab in the „System Properties“ dialog box and select „Viewdevices by type“
� Select „Bausch-Pulsar“ and click the <Remove> button. Click <OK> to confirm.� Restart your computer by clicking <Yes>.� After restart the „New Hardware Found“ dialog box appears.� Now install your new driver.
5.4 Uninstalling the Driver
If you want to remove the driver software for the Pulsar 128 Adapter proceed as follows:
1. First remove the CAPI 2.0 RAS driver:
� Open the „Device manager“ by selecting „Control Panel“ from the „Start/Settings“ menu anddouble-clicking the „System“ symbol.
� Click the „Device manager“ tab in the „System Properties“ dialog box and select „Viewdevices by type“
� Mark “CAPI 2.0 RAS driver” in the field “Network adapter” and click the <Remove> button.� Click <OK> to confirm.
2. Remove the driver as follows:
� Open the „Device manager“ by selecting „Control Panel“ from the „Start/Settings“ menu anddouble-clicking the „System“ symbol.
� Click the „Device manager“ tab in the „System Properties“ dialog box and select „Viewdevices by type“
� Mark the “Bausch-Pulsar adapter…” in the field “Bausch-Pulsar” and click the <Remove> button� Confirm with <OK>� In the next dialog box “PULSAR ISDN-configuration” mark “PULSAR ISDN configuration “
and click the <Uninstall> button. Confirm with <OK> and restart Windows 98.
The drivers for the Pulsar 128 Adapter are now removed!
Manual Pulsar 128 Adapter - Startup /Software Installation for Windows 98 17
5.5 PPP- Access to InternetServiceProvider
Have ready your InternetServiceProvider Access data you will need them.
The PPP-Access to InternetServiceProvider enables you to access the Internet without theInternetServiceProvider decoder. When you start the Internet browser a connection to the Internet will beestablished without calling InternetServiceProvider.
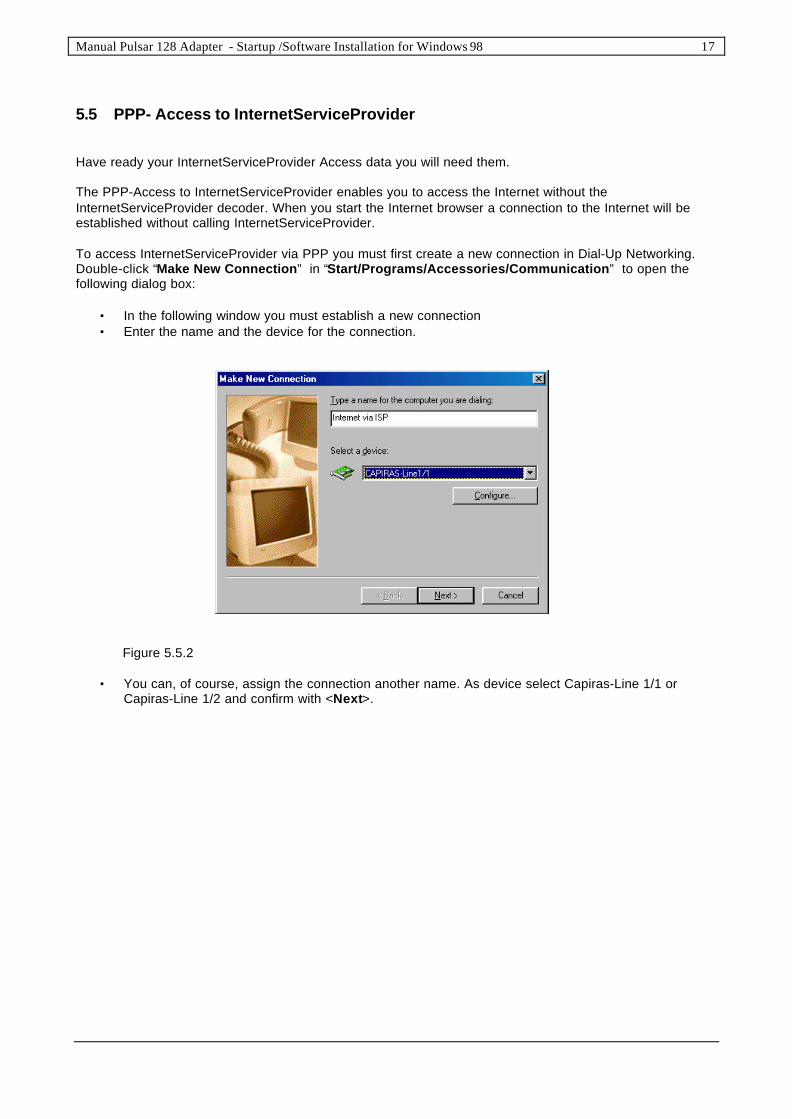
To access InternetServiceProvider via PPP you must first create a new connection in Dial-Up Networking.Double-click “Make New Connection” in “Start/Programs/Accessories/Communication” to open thefollowing dialog box:
• In the following window you must establish a new connection• Enter the name and the device for the connection.
Figure 5.5.2
• You can, of course, assign the connection another name. As device select Capiras-Line 1/1 orCapiras-Line 1/2 and confirm with <Next>.
18 Manual Pulsar 128 Adapter - Startup /Software Installation for Windows 98
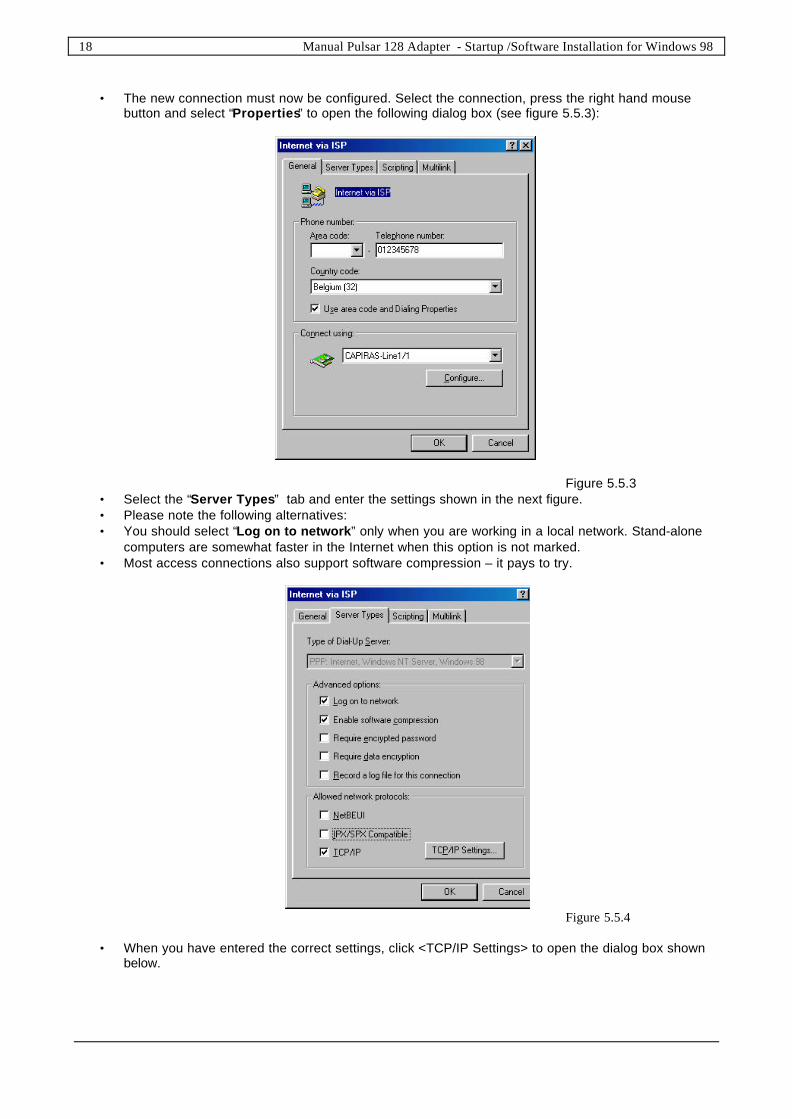
• The new connection must now be configured. Select the connection, press the right hand mousebutton and select “Properties” to open the following dialog box (see figure 5.5.3):
Figure 5.5.3• Select the “Server Types” tab and enter the settings shown in the next figure.• Please note the following alternatives:• You should select “Log on to network” only when you are working in a local network. Stand-alone
computers are somewhat faster in the Internet when this option is not marked.• Most access connections also support software compression – it pays to try.
Figure 5.5.4
• When you have entered the correct settings, click <TCP/IP Settings> to open the dialog box shownbelow.

Manual Pulsar 128 Adapter - Startup /Software Installation for Windows 98 19
Note:InternetServiceProviders works with IP addresses assigned by the server. Any IP addresses definedhere will be invalid.The “Name server address” is supplied when the connection is made, i.e. it does not have to bedefined.IP header compression should be selected.
Figure 5.5.5
Please refer to your Microsoft documentation for information on other settings and options.
The new connection is now configured, with the exception of the actual InternetServiceProvider access data.You will find the access data in the order confirmation for your InternetServiceProvider line. This data mustbe specified when you set up the connection for the first time.
Figure 5.5.6
• Double click “Internet via ISP” in “Dial-Up Networking” to open the “Connect To” dialog box.
20 Manual Pulsar 128 Adapter - Startup /Software Installation for Windows 98
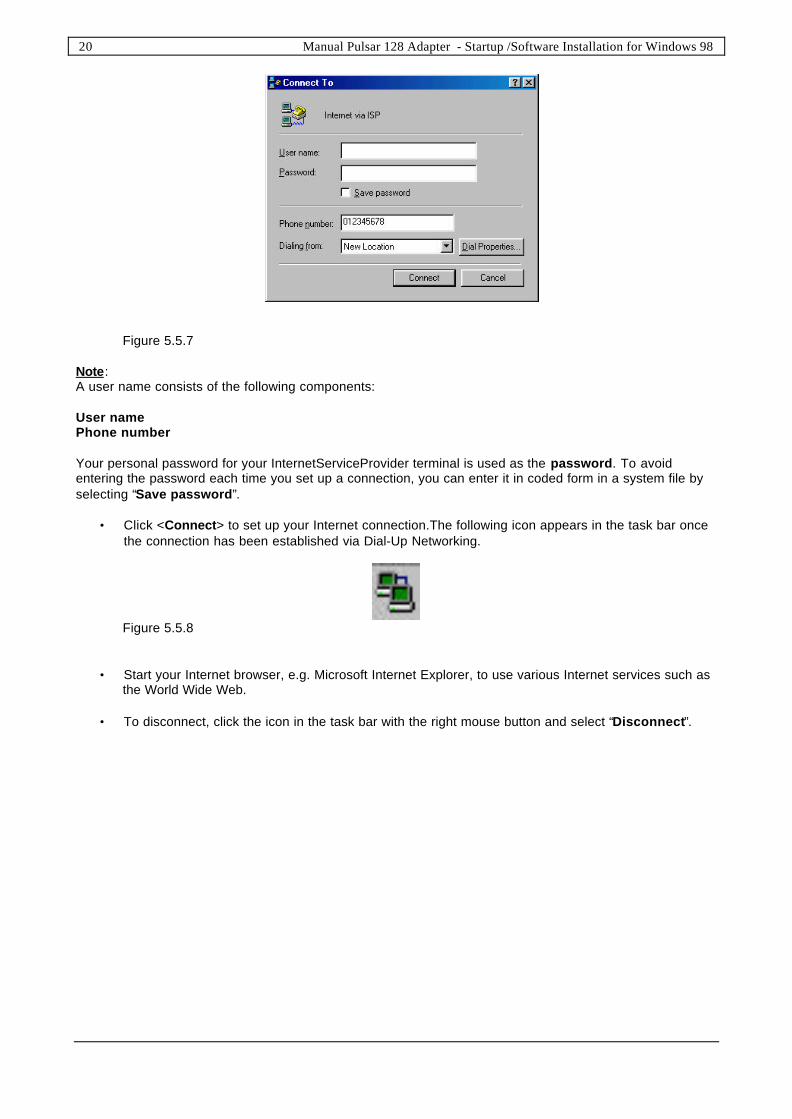
Figure 5.5.7
Note:A user name consists of the following components:
User namePhone number
Your personal password for your InternetServiceProvider terminal is used as the password. To avoidentering the password each time you set up a connection, you can enter it in coded form in a system file byselecting “Save password”.
• Click <Connect> to set up your Internet connection.The following icon appears in the task bar oncethe connection has been established via Dial-Up Networking.
Figure 5.5.8
• Start your Internet browser, e.g. Microsoft Internet Explorer, to use various Internet services such asthe World Wide Web.
• To disconnect, click the icon in the task bar with the right mouse button and select “Disconnect”.

Manual Pulsar 128 Adapter - Startup /Software Installation for Windows 98 21
5.6 Setting up a Multilink connection
The PULSAR 128 Capi 2.0 RAS driver supports multilink PPP. This allows you to bundle the two ISDN userchannels, doubling the speed of transmission to 128 kBit/s.
Channel bundling only works, however, if the remote terminals also support this function.
To configure outgoing Multilink connections under Windows 98, open “Dial-Up Networking”. In the “Dial-UpNetworking” folder you will find the “Make New Connection” symbol as well as symbols for all theconnections previously created.
• Double-click “Make New Connection” to define a connection to the remote terminal of your choice.Once you have created the connection or if the folder already contains the desired connection formultilink access, click the connection symbol with the right hand mouse button.
• Select the “Properties” menu option. A dialog box appears with several tabs.
• Click the register card “Multilink” to open the following dialog box.
Figure 5.6.1
• Click “Use additional devices” .• Click <Add> and select the second CAPI-RAS line. Enter the call number for the multilink
connection.• Confirm with <OK>.

22 Manual Pulsar 128 Adapter- Startup/Software Installation for Windows ME
6 Software-Installation for Windows ME
6.1 Installing the driver
After you have installed your Pulsar 128 Adapter as described in Section 4.2.1 you can begin with thesoftware installation for Windows ME.
These Bausch Datacom Pulsar 128 Adapters are plug & play adapters, i. e. Windows ME automaticallyidentifies the adapter as a new hardware component. If you use „Pulsar 128“, please note that the adaptermust be plugged in!
Windows ME interactively guides you through the installation. Have ready your Windows ME CD, you willpossibly need it.
6.1.1 Installation of plug & play ISDN adapters
• On start of your computer the following message appears: “New hardware wizard found”. Select”Specify a location (advanced)”. Insert the installation CD-ROM delivered with this adapter. Click“Next”. Choose “D:\Win_Me
• Confirm the request for restart with <Yes>.
After restart the PULSAR 128 ISDN configuration appears:
Select the language you wish to guide youthrough configuration.Confirm with <Next>
Figure 6.1.1.1
Manual Pulsar 128 Adapter - Startup /Software Installation for Windows ME 23
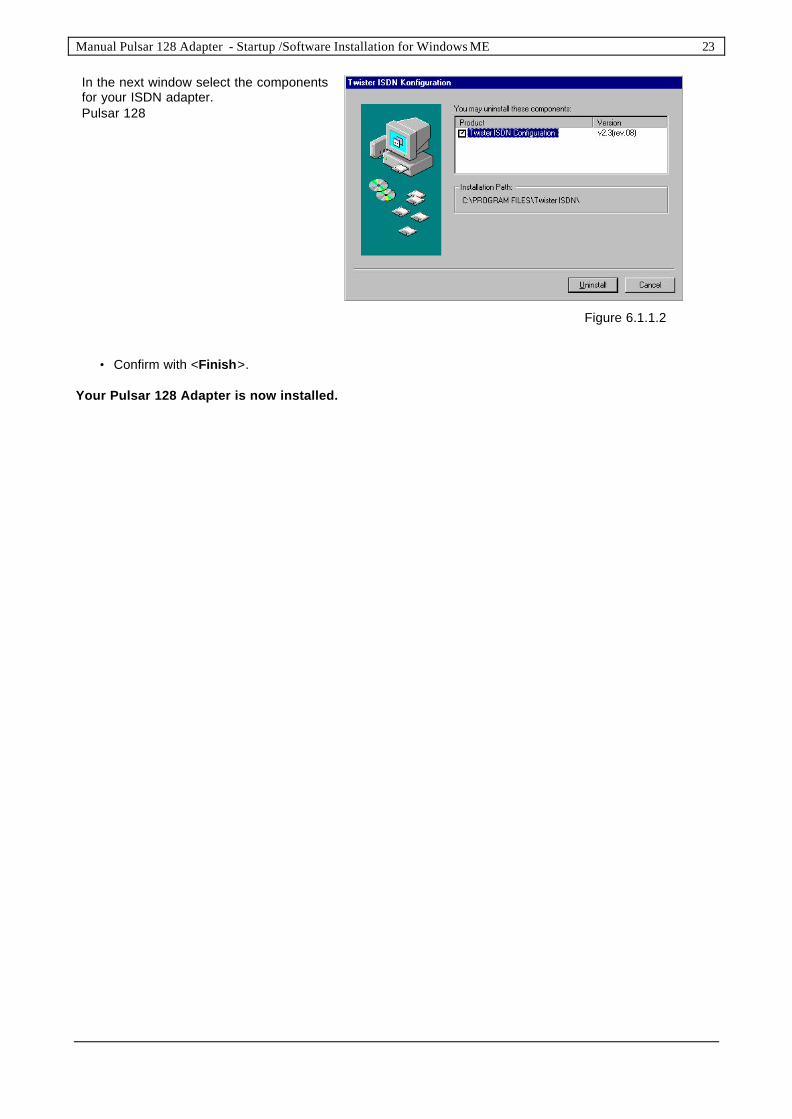
In the next window select the componentsfor your ISDN adapter.Pulsar 128
Figure 6.1.1.2
• Confirm with <Finish>.
Your Pulsar 128 Adapter is now installed.

24 Manual Pulsar 128 Adapter- Startup/Software Installation for Windows ME
6.1.2 Configuration of the Pulsar 128 Adapter
Note:If your Pulsar 128 Adapter is already installed you can configure the adapter subsequently by selecting„Start/Programs/ PULSAR 128ISDN/Configuration“ on your Windows-desktop.
General settings:
D-channel-protocol: This field is tofix the signalling protocol: (DSS1)
Test mode: This field is to select testmode when starting driver.Standard: adapter
Figure 6.1.2.1

Manual Pulsar 128 Adapter - Startup /Software Installation for Windows ME 25
Advanced settings:
Figure 6.1.2.2
Term Explanation
DOS-CAPI interrupt The DOS-CAPI interrupt, a Software-Interrupt controls thecommunication between the DOS-application and the Windows-CAPI. Special applications can expect a different value. Validvalues are for example F1 or F2 (in hex).
Data I/O Mode Data of other drivers or applications can be stored temporarilyi.e. an overwriting before handling is not possible.
V.42bis data Compression
Activate by application:
Disabled:
Activated with X.75/V.120:
V.42bis is a standard compression in telecommunication. InJune 1998 the specification for the CAPI 2.0-implementation ofV.42bis was changed. Unfortunately the two versions are notcompatible. The drivers for the PULSAR 128 ISDN-adapter usethe new standard as default setting from driver version 2.2 rev.0.5.Only applications requiring a V.42bis extended protocol viaCAPI can get a connection to V.42bis if the opposite terminal iscompatible.
The controller behaves as if no V.42bis would be available.
All applications using the X.75 and V.120 protocols under CAPIV2.0 get connection to V.42bis when the opposite terminal iscompatible.
X.75/V.42bis Start mode:
Start in compressed mode:
Start in uncompressed mode:
Corresponds to the standard from 7 June 1998
Corresponds to the standard until 7 June 1998X.75/V.42bis Flush mode:
Standard flushing modus:
Special flushing modus:
Corresponds to the standard from 7 June 1998
Corresponds to the standard until 7 June 1998
You can take over the standard settings.
26 Manual Pulsar 128 Adapter- Startup/Software Installation for Windows ME
The register card “Info”
The register card “Info” contains notes on copyright- and programm versions, the address of themanufacturer as well as the opportunity to check the file & version of the drivers.When you click “driver versions” you will get a short info about all drivers which are installed or have to beinstalled.
The register card “Options”
In this register card you can select the operation language. In addition, the driver settings can be rechangedto their originial when clicking the button “Original settings”.
After clicking <OK> you will be asked for restart. Confirm with <Yes> to adopt the changes.

Manual Pulsar 128 Adapter - Startup /Software Installation for Windows ME 27
6.2 The PULSAR 128 CAPI 2.0 RAS driver under Windows ME
The CAPI 2.0 RAS driver for Windows ME provides you with access to the Internet e.g. with the MicrosoftInternet Explorer which you can find on the installation CD-ROM delivered with the adapter. The driver alsoallows you to connect to Windows NT or Windows 95/98/ME/2000 computers by means of RAS (RemoteAccess Services) or Dial-Up Networking.
6.2.1 Functions
• Supports WAN functions (Wide Area Networking) in Windows ME
• Connects to Internet providers via Windows ME Dial-Up Networking
• Supports multilink PPP connections for channel bundling to double the transmission capacity(up to 128 kbps)
• RAS (Remote Access Services) for connections to Windows 95/98/ME/2000 and Windows NTcomputers
• Subscriber numbers can be specified for incoming and outgoing calls
• Compatible with non-proprietary remote terminals
6.2.2 Installation of the Capi 2.0 RAS driver for Windows ME
In order to fulfil the above functions the Capi 2.0 RAS driver must be installed. To do so you need thePULSAR 128 and your Windows ME CD ROM.
• Insert the PULSAR 128 CD into the right drive. Now the installation program will be started.• Click “Language” and <Next>• In the next dialog box mark “CAPI-RAS-driver” and confirm with <Install>• Now the “hardware-assistant” will be opened.• Click <Next> and “No, I want to select the hardware from a list”• Confirm with <Next>• Mark “Network adapter” and click <Next>
Figure 6.2.2.1

28 Manual Pulsar 128 Adapter- Startup/Software Installation for Windows ME
Select the button “Have disk” and enter thefollowing path in the next window:Example for installation from CD-ROM driveD:D:\CAPIRAS\WINMEConfirm with “OK”
Confirm with “OK
Figure 6.2.2.2
Mark “CAPI 2.0 RAS driver” and click <OK>
Figure 6.2.2.3

Manual Pulsar 128 Adapter - Startup /Software Installation for Windows ME 29
6.2.3 ISDN Configuration
Select the Switch-protocol for yourISDN-adapter
Confirm with <Next>
Figure 6.2.3.1
In this dialog box you can selectyour call number(s) and SPID(Service Profile ID)Confirm with “Next” and follow theinstructions
Figure 6.2.3.2
Confirm the following prompt for restart with „Yes“.
Now the PULSAR 128 Capi 2.0 RAS driver is completely installed!

30 Manual Pulsar 128 Adapter- Startup/Software Installation for Windows ME
6.3 Capi- Driver Update
You can update the driver software of your Pulsar 128 Adapter as follows:
� Open the „Device manager“ by selecting „Control Panel“ from the „Start/Settings“ menu anddouble-clicking the „System“ symbol.
� Click the „Device manager“ tab in the „System Properties“ dialog box and select „Viewdevices by type“
� Select „PULSAR 128 ISDN Adapter......“ and click the <Remove> button. Click <OK> to confirm.� Restart your computer by clicking <Yes>.� After restart the „New Hardware Found“ dialog box appears.� Now install your new driver.
6.4 Uninstalling the Driver
If you want to remove the driver software for the Pulsar 128 Adapter proceed as follows:
1. First remove the CAPI 2.0 RAS driver:
� Open the „Device manager“ by selecting „Control Panel“ from the „Start/Settings“ menu anddouble-clicking the „System“ symbol.
� Click the „Device manager“ tab in the „System Properties“ dialog box and select „Viewdevices by type“
� Mark “CAPI 2.0 RAS driver” in the field “Network adapter” and click the <Remove> button.� Click <OK> to confirm.
2. Remove the CAPI driver as follows:
� Open the „Device manager“ by selecting „Control Panel“ from the „Start/Settings“ menu anddouble-clicking the „System“ symbol.
� Click the „Device manager“ tab in the „System Properties“ dialog box and select „Viewdevices by type“
� Mark the “ISDN adapter…” in the field “PULSAR 128 ISDN adapter” and click the <Remove>button� Confirm with <OK>� In the next dialog box “PULSAR 128 ISDN-configuration” mark “PULSAR 128 ISDNconfiguration for…”
and click the <Uninstall> button. Confirm with <OK> and restart Windows 98.
The drivers for the Pulsar 128 Adapter are now removed!
Manual Pulsar 128 Adapter - Startup /Software Installation for Windows 2000 31
7 Software installation for Windows 2000
7.1 Installing the CAPI driver
After you have installed your Pulsar 128 Adapter as described in section 4.2.1 you can begin with thesoftware installation for Windows 2000.
These Bausch Datacom ISDN adapters are plug & play adapters, i. e. Windows 2000 automatically identifiesthe adapter as a new hardware component.If you use Pulsar 128, please note that the adapter must be plugged in!
Windows 2000 guides you through installation. Have ready your Windows 2000 CD you will possibly need itfor installation.
7.1.1 Installation of plug & play ISDN adapters
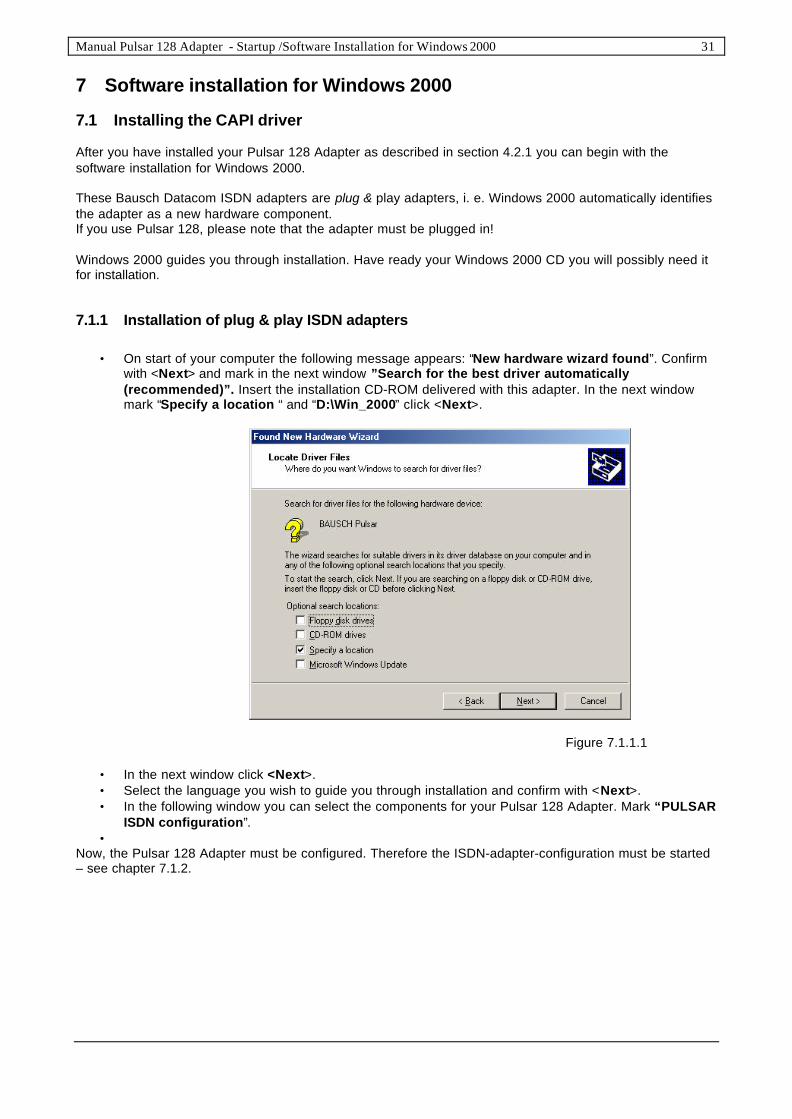
• On start of your computer the following message appears: “New hardware wizard found”. Confirmwith <Next> and mark in the next window ”Search for the best driver automatically(recommended)”. Insert the installation CD-ROM delivered with this adapter. In the next windowmark “Specify a location “ and “D:\Win_2000” click <Next>.
Figure 7.1.1.1
• In the next window click <Next>.• Select the language you wish to guide you through installation and confirm with <Next>.• In the following window you can select the components for your Pulsar 128 Adapter. Mark “PULSAR
ISDN configuration”.•
Now, the Pulsar 128 Adapter must be configured. Therefore the ISDN-adapter-configuration must be started– see chapter 7.1.2.
32 Manual Pulsar 128 Adapter- Startup/Software Installation for Windows 2000
7.1.2 Configuration of the ISDN-Adapter
Note:If your Pulsar 128 Adapter is already installed you can start ISDN configuration by selecting„Start/Programs/ PULSAR ISDN configuration“ on your Windows-desktop.
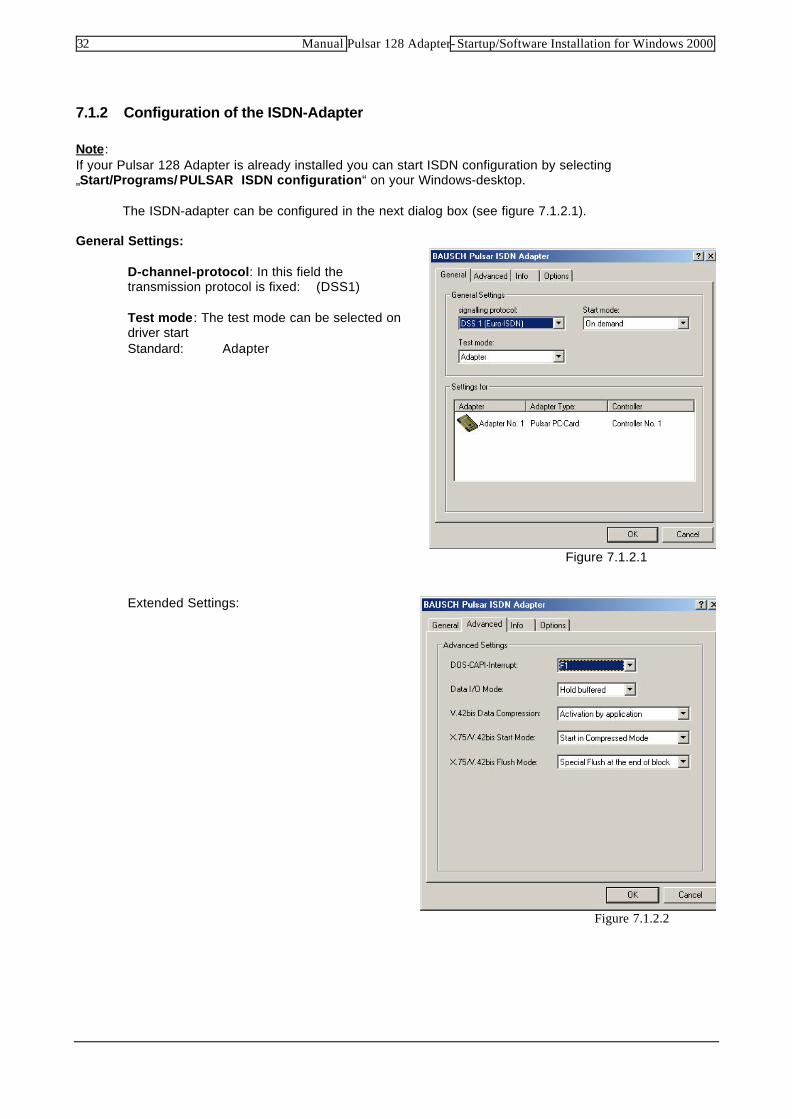
� The ISDN-adapter can be configured in the next dialog box (see figure 7.1.2.1).
General Settings:
D-channel-protocol: In this field thetransmission protocol is fixed: (DSS1)
Test mode: The test mode can be selected ondriver startStandard: Adapter
Figure 7.1.2.1
Extended Settings:
Figure 7.1.2.2

Manual Pulsar 128 Adapter - Startup /Software Installation for Windows 2000 33
Note (see figure 7.1.2.2)
Term Explanation
DOS-CAPI-Software interrupt The DOS-CAPI-Interrupt, a Software-Interrupt controls thecommunication between the DOS-application and the Windows-CAPI. Special applications can expect a different value. Validvalues are for example F1 or F2 (in hex).
Data I/O Mode Data of other drivers or applications can be stored temporarilyi.e. an overwriting before handling is not possible.
V.42 bis data compression
Activation by application:
Deactivated:
Activated at X.75/V.120:
V.42bis is a standard compression in telecommunication. InJune 1998 the specification for the CAPI 2.0-implementation ofV.42bis was changed. Unfortunately the two versions are notcompatible. The drivers for the ISDN-adapter use the newstandard as default setting from driver version 2.2 rev. 0.5.Only applications requiring a V.42bis extended protocol viaCAPI can get a connection to V.42bis if the opposite terminal iscompatible.
The controller behaves as if no V.42bis would be available.
All applications using the X.75 and V.120 protocols under CAPIV2.0 get connection to V.42bis when the opposite terminal iscompatible.
X.75/V.42bis Start mode:
Standard in compressed mode:
Standard:
Corresponds to the standard from 7. June 1998
Corresponds to the standard until 7. June 1998X.75/V.42bis Flush mode:
Standard:
Special Flush at block end:
Corresponds to the standard from 7. June 1998
Corresponds to the standard until 7. June 1998
Normally you can take over the standard settings.
� Confirm your entry with<OK>
Your Pulsar 128 Adapter is now ready for use.
34 Manual Pulsar 128 Adapter- Startup/Software Installation for Windows 2000
7.2 The PULSAR 128 CAPI 2.0 RAS driver under Windows 2000
The Capi 2.0 RAS driver for Windows 2000 enables you to access the Internet e. g. with the MicrosoftInternet Explorer. The driver also allows you to connect to Windows NT or Windows 95/98/ME/2000computers by means of RAS (Remote Access Services) or Dial-Up Networking.
7.2.1 Functions
� Supports WAN functions (Wide Area Networking) in Windows 2000
� Connects to Internet providers via windows 2000 Dial-Up Networking
� Supports Multilink PPP connections for channel bundling to double the transmission capacity(up to 128kbps)
� RAS (Remote Access Services) for connections to Windows 95/98/2000 and Windows NTcomputers
� Subscriber numbers can be specified for incoming and outgoing calls
� Compatible with non-proprietary remote terminals
7.2.2 Installing the CAPI 2.0 RAS driver under Windows 2000
For the above mentioned functions the Capi 2.0 RAS driver has to be installed. Therefore you need thePULSAR 128 CD-ROM and the Windows 2000 CD:
For installation please proceed as follows:
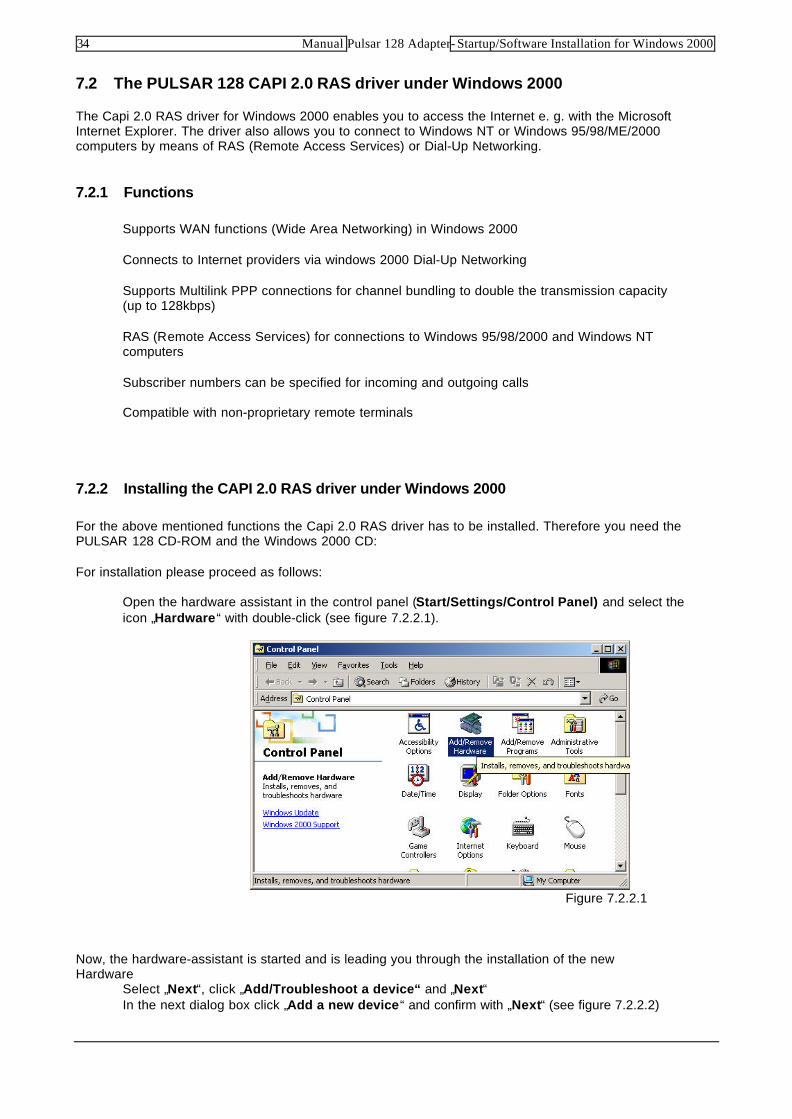
� Open the hardware assistant in the control panel (Start/Settings/Control Panel) and select theicon „Hardware“ with double-click (see figure 7.2.2.1).
Figure 7.2.2.1
Now, the hardware-assistant is started and is leading you through the installation of the newHardware� Select „Next“, click „Add/Troubleshoot a device“ and „Next“� In the next dialog box click „Add a new device“ and confirm with „Next“ (see figure 7.2.2.2)
Manual Pulsar 128 Adapter - Startup /Software Installation for Windows 2000 35
Figure 7.2.2.2
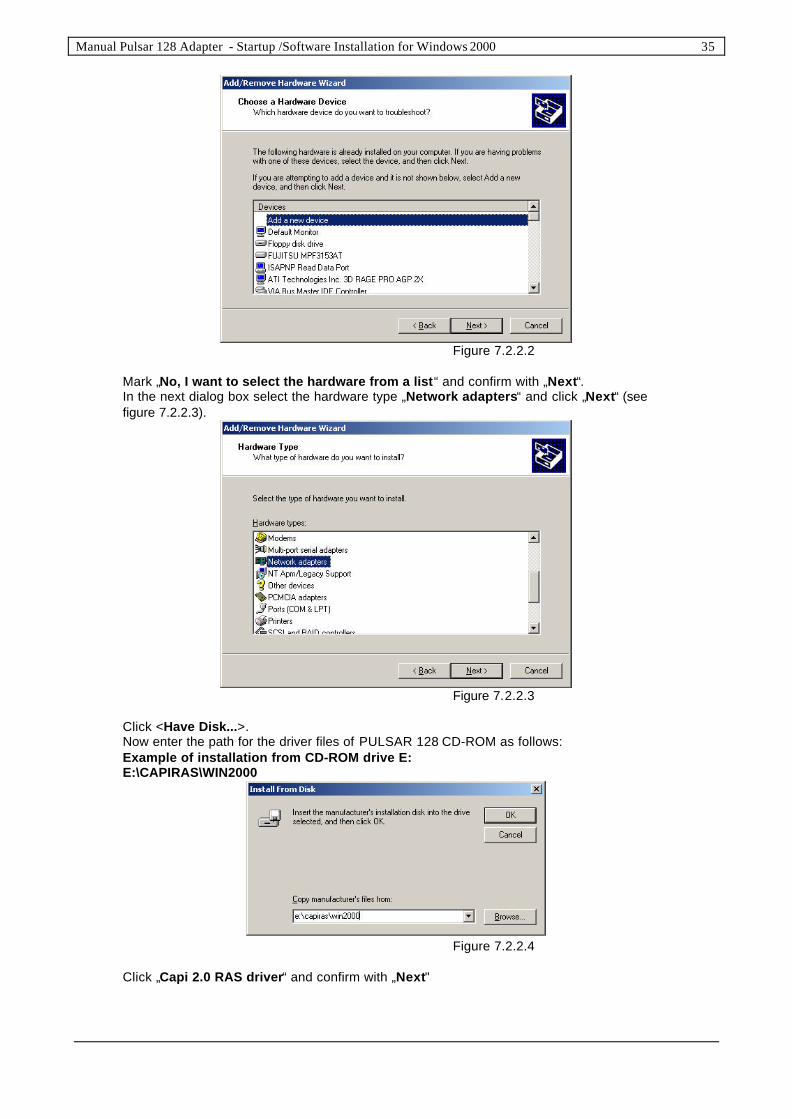
� Mark „No, I want to select the hardware from a list“ and confirm with „Next“.� In the next dialog box select the hardware type „Network adapters“ and click „Next“ (see
figure 7.2.2.3).
Figure 7.2.2.3
� Click <Have Disk...>.� Now enter the path for the driver files of PULSAR 128 CD-ROM as follows:
Example of installation from CD-ROM drive E:E:\CAPIRAS\WIN2000
Figure 7.2.2.4
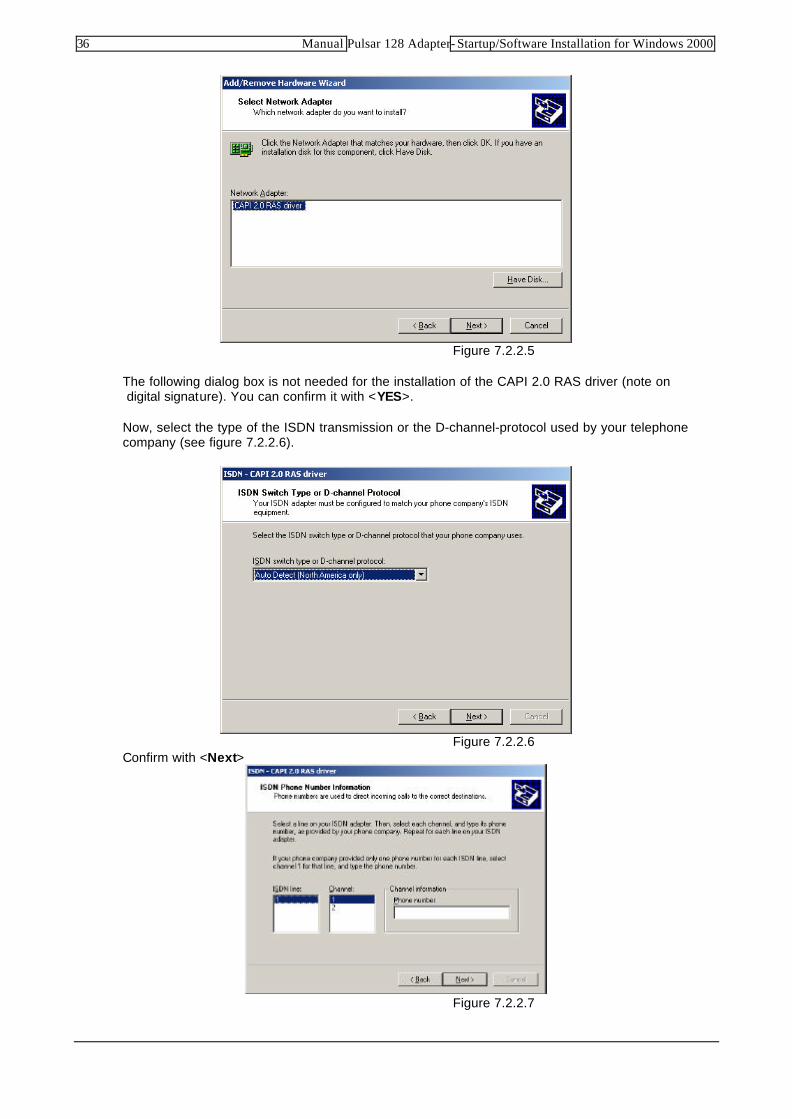
� Click „Capi 2.0 RAS driver“ and confirm with „Next"
36 Manual Pulsar 128 Adapter- Startup/Software Installation for Windows 2000
Figure 7.2.2.5
� The following dialog box is not needed for the installation of the CAPI 2.0 RAS driver (note on digital signature). You can confirm it with <YES>.
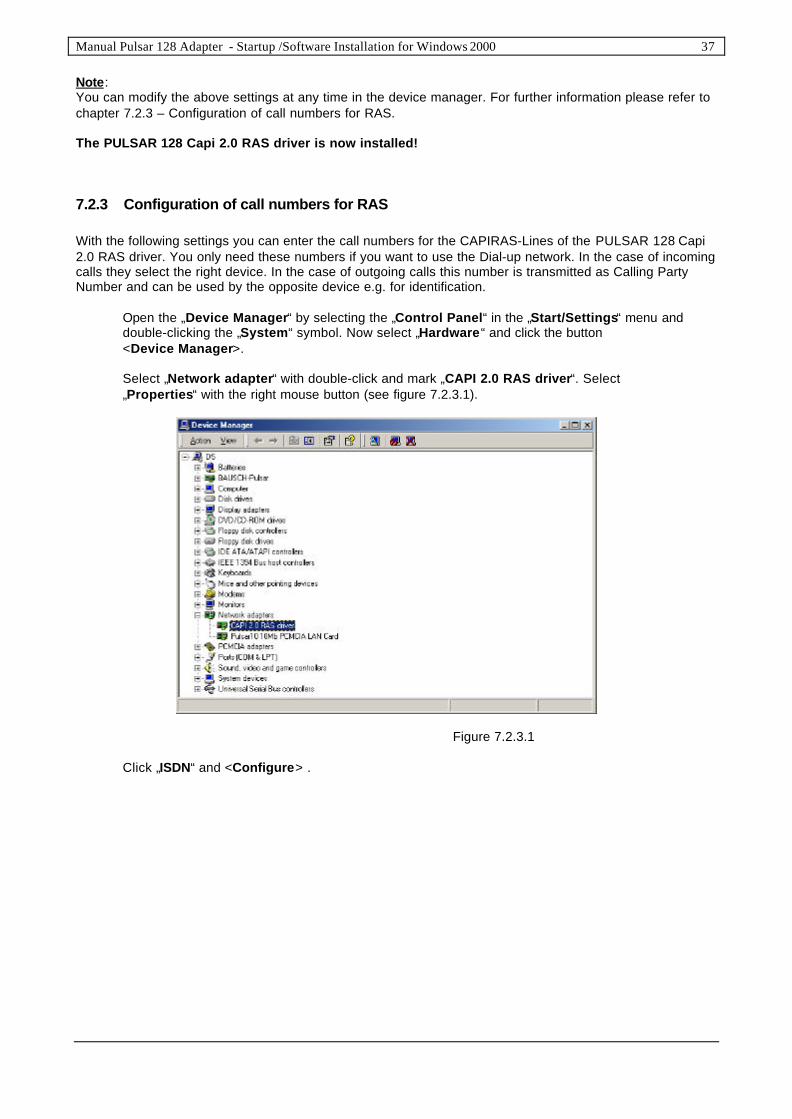
� Now, select the type of the ISDN transmission or the D-channel-protocol used by your telephonecompany (see figure 7.2.2.6).
Figure 7.2.2.6� Confirm with <Next>
Figure 7.2.2.7
Manual Pulsar 128 Adapter - Startup /Software Installation for Windows 2000 37
Note:You can modify the above settings at any time in the device manager. For further information please refer tochapter 7.2.3 – Configuration of call numbers for RAS.
The PULSAR 128 Capi 2.0 RAS driver is now installed!
7.2.3 Configuration of call numbers for RAS
With the following settings you can enter the call numbers for the CAPIRAS-Lines of the PULSAR 128 Capi2.0 RAS driver. You only need these numbers if you want to use the Dial-up network. In the case of incomingcalls they select the right device. In the case of outgoing calls this number is transmitted as Calling PartyNumber and can be used by the opposite device e.g. for identification.
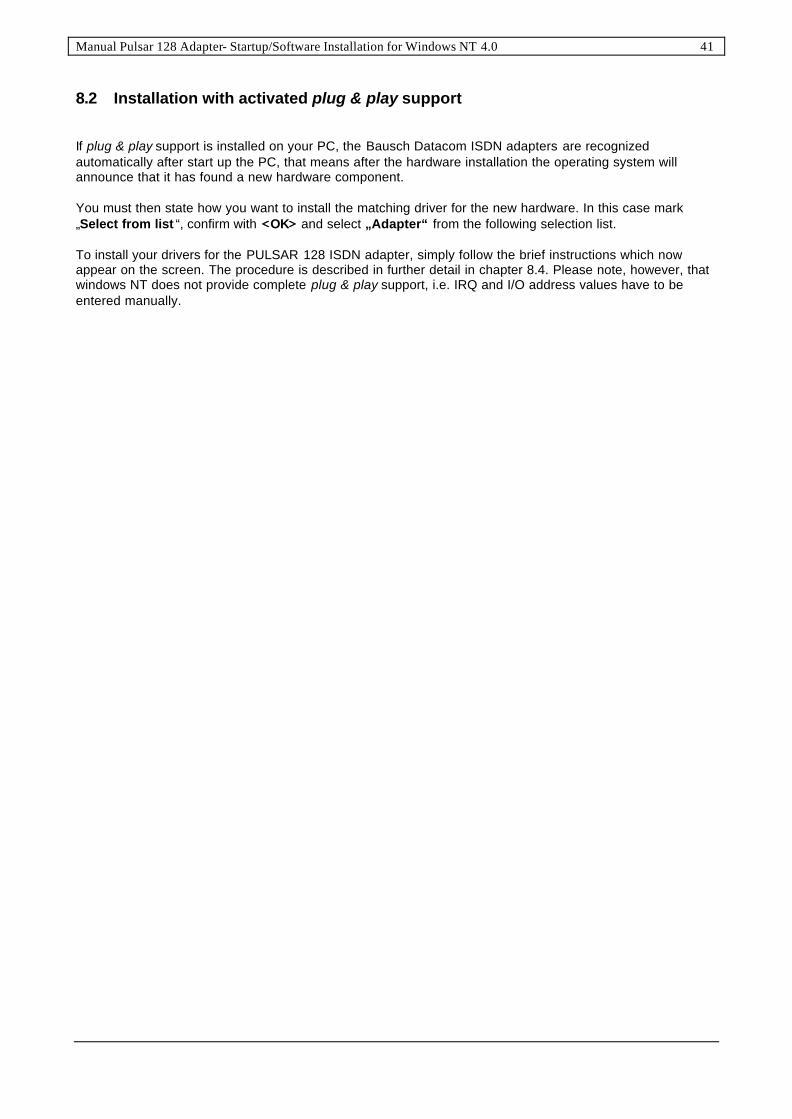
� Open the „Device Manager“ by selecting the „Control Panel“ in the „Start/Settings“ menu anddouble-clicking the „System“ symbol. Now select „Hardware“ and click the button<Device Manager>.
� Select „Network adapter“ with double-click and mark „CAPI 2.0 RAS driver“. Select„Properties“ with the right mouse button (see figure 7.2.3.1).
Figure 7.2.3.1
� Click „ISDN“ and <Configure> .

38 Manual Pulsar 128 Adapter- Startup/Software Installation for Windows 2000
Figure 7.2.3.2� The first call number (B-Channel 1) in this dialog box corresponds to CAPIRAS-Line 1 and the
second CAPIRAS-Line 2.
Figure 7.2.3.3
Confirm with <OK>
7.3 CAPI Driver update
You can update the driver software of your Pulsar 128 Adapter as follows:
� First remove your driver as described under chapter 7.4.� Now install the actual drivers as described under chapter 7.
7.4 Uninstalling the Driver
1. First remove the CAPI 2.0 RAS driver as follows:
� Open the „Device manager“ by selecting „Control Panel“ from the „Start/Settings“ menu anddouble-clicking the „System“ symbol.
� Click „Hardware“ in the „System Properties“ dialog box and open the „Device manager“ withdouble-click.
� Select „View devices by type“.� As „Network Adapter“ select the „CAPI 2.0 RAS driver“ and click the <Uninstall> button.� Click <OK> to confirm.
2. Proceed as follows to remove the CAPI driver:

Manual Pulsar 128 Adapter - Startup /Software Installation for Windows 2000 39
� Open the „Device manager“ by selecting „Control Panel“ from the „Start/Settings“ menu anddouble-clicking the „System“ symbol.
� Click „Hardware“ in the „System Properties“ dialog box and open the „Device manager“ withdouble-click.
� Select „View devices by type“.� Select „PULSAR 128 ISDN Adapter......“ and click the <Uninstall> button.� Click <OK> to confirm.� In the next dialog box „PULSAR 128 ISDN configuration“ mark „PULSAR 128 ISDNconfiguration
for...“ and click <Uninstall>. Confirm with <OK>.� Restart your computer.
The driver for the Pulsar 128 Adapter is now removed!

40 Manual Pulsar 128 Adapter- Startup/Software Installation for Windows NT 4.0
8 Software installation for Windows NT
Before you start to install the software for the Pulsar 128 Adapter under Windows NT4.0, please install yourISDN adapter as described in section 4.2.1.
Now you can start to install the software under Windows NT 4.0. Please close all-programs opened. Haveready your Windows NT 4.0 CD, you will possibly need it.
Note.It is recommended to install the current Service Pack for NT.
8.1 Functions of the NT-Drivers
8.1.1 Functions of the CAPI-Driver
CAPI drivers form the interface between the communication application and your ISDN adapter. Theyprovide you with access to the ISDN system and enable you to use its various services and features.PULSAR 128 CAPI drivers support CAPI 2.0 for 16 bit and 32 bit applications.
You can thus choose from a variety of communication options depending on the function of the ISDNapplication program connected to the standardized ISDN-CAPI interface.
For example:
• Sending any type of data (text, pictures, programs) directly from one computer to another• Sending and receiving Group 3 and 4 facsimiles (telefax)• Connecting up to ISDN mailbox systems• Using the computer as an automatic answering machine• Accessing several channels simultaneously• Evaluating call numbers and service information• Connecting up to online services such as InternetServiceProvider, AOL or CompuServe
8.1.2 Functions of the Capi 2.0 RAS Driver
The CAPI 2.0 RAS driver for Windows NT4.0 will be installed in addition to the CAPI drivers. With the CAPI2.0 RAS driver you can use Remote Access Services (RAS) or the Dial-Up Networking to access theInternet. At the same time it also permits connections to Windows NT or Windows 95/98/ME/2000computers.
• Support of WAN functions (Wide Area Networking) under Windows NT
• Connection to Internet providers via the Windows NT Dial-Up Networking
• Support of Multilink PPP connections for channel bundling and hence double the transmissioncapacity (up to 128 kbps)
• Remote Access Services (RAS) for connections to Windows 95/98/ME/2000 and Windows NTcomputers
• Connection to different terminals at the same time (Workstation NT 4.0 – only outgoing calls)
• Specifiable call number for incoming and outgoing calls
• Compatibility with other manufacturers of remote terminal
• Simple installation and configuration
Manual Pulsar 128 Adapter- Startup/Software Installation for Windows NT 4.0 41
8.2 Installation with activated plug & play support
If plug & play support is installed on your PC, the Bausch Datacom ISDN adapters are recognizedautomatically after start up the PC, that means after the hardware installation the operating system willannounce that it has found a new hardware component.
You must then state how you want to install the matching driver for the new hardware. In this case mark„Select from list “, confirm with << OK>> and select „Adapter“ from the following selection list.
To install your drivers for the PULSAR 128 ISDN adapter, simply follow the brief instructions which nowappear on the screen. The procedure is described in further detail in chapter 8.4. Please note, however, thatwindows NT does not provide complete plug & play support, i.e. IRQ and I/O address values have to beentered manually.
42 Manual Pulsar 128 Adapter- Startup/Software Installation for Windows NT 4.0
8.3 Installation with the setup-program of CD-ROM
The driver software for windows NT 4.0 is easy to install using the setup program on the supplied CD-ROM.With detailed help texts the setup program guides you interactively through the various installation steps.
To carry out the installation, insert the PULSAR 128 CD-ROM in the drive. Provided the autorun function isnot deactivated on your PC, the setup program will start up automatically. If it is deactivated, please start thefile SETUP.EXE directly from the CD directory.
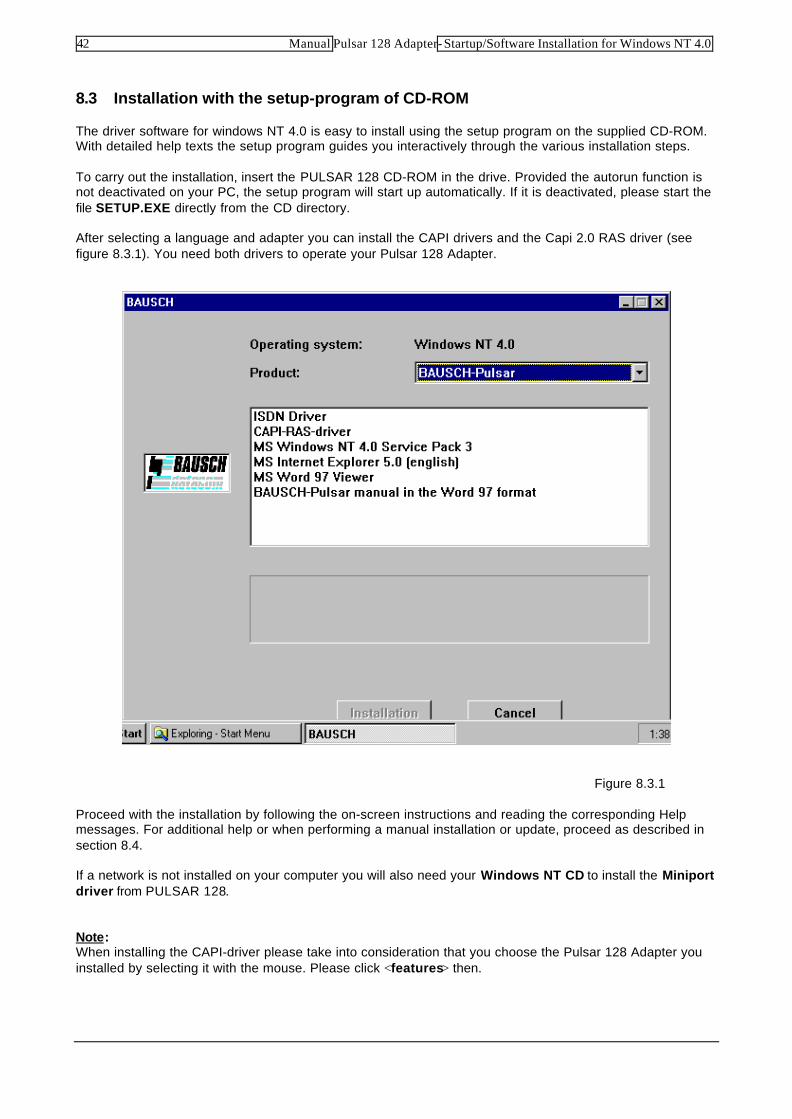
After selecting a language and adapter you can install the CAPI drivers and the Capi 2.0 RAS driver (seefigure 8.3.1). You need both drivers to operate your Pulsar 128 Adapter.
Figure 8.3.1
Proceed with the installation by following the on-screen instructions and reading the corresponding Helpmessages. For additional help or when performing a manual installation or update, proceed as described insection 8.4.
If a network is not installed on your computer you will also need your Windows NT CD to install the Miniportdriver from PULSAR 128.
Note:When installing the CAPI-driver please take into consideration that you choose the Pulsar 128 Adapter youinstalled by selecting it with the mouse. Please click <features> then.
Manual Pulsar 128 Adapter- Startup/Software Installation for Windows NT 4.0 43
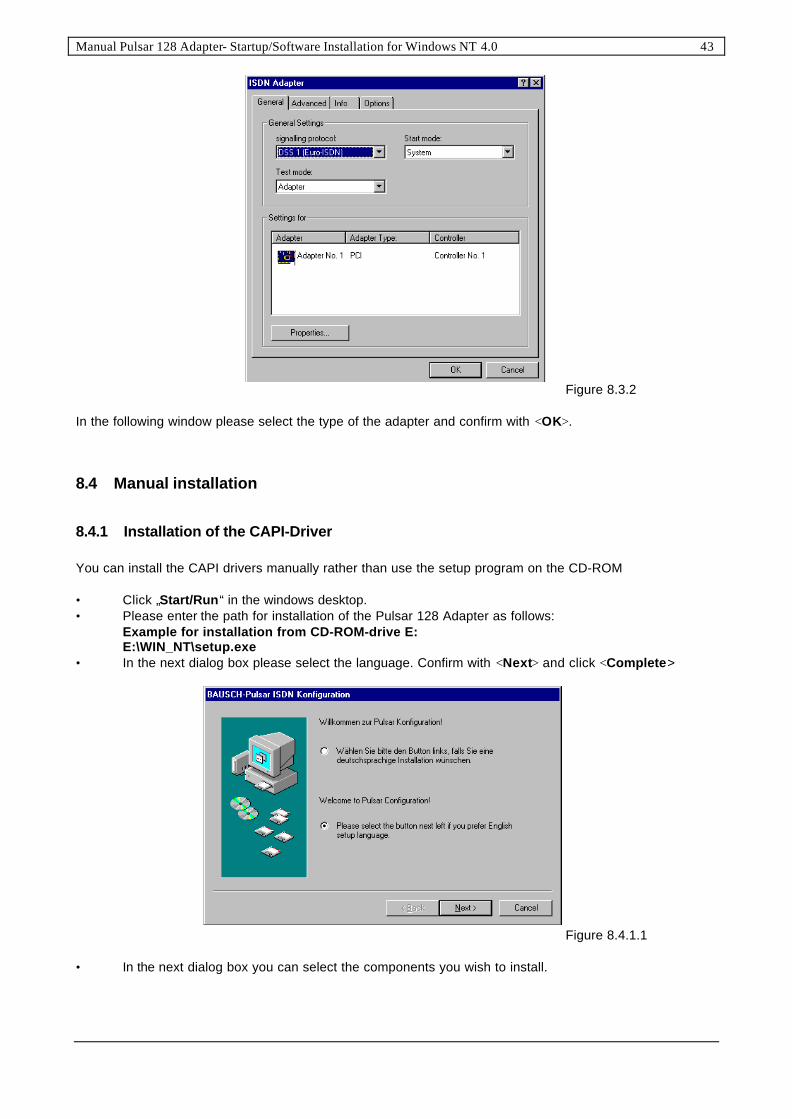
Figure 8.3.2
In the following window please select the type of the adapter and confirm with <OK>.
8.4 Manual installation
8.4.1 Installation of the CAPI-Driver
You can install the CAPI drivers manually rather than use the setup program on the CD-ROM
• Click „Start/Run“ in the windows desktop.• Please enter the path for installation of the Pulsar 128 Adapter as follows:
Example for installation from CD-ROM-drive E:E:\WIN_NT\setup.exe
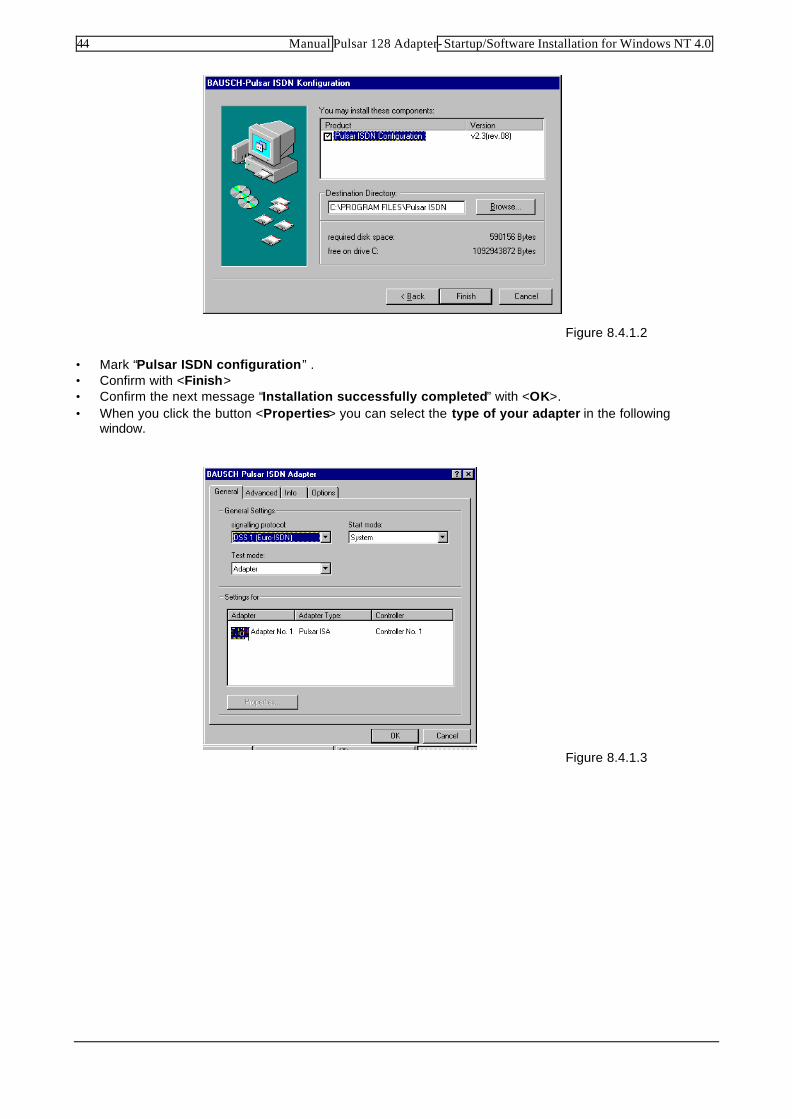
• In the next dialog box please select the language. Confirm with <Next> and click <Complete>
Figure 8.4.1.1
• In the next dialog box you can select the components you wish to install.
44 Manual Pulsar 128 Adapter- Startup/Software Installation for Windows NT 4.0
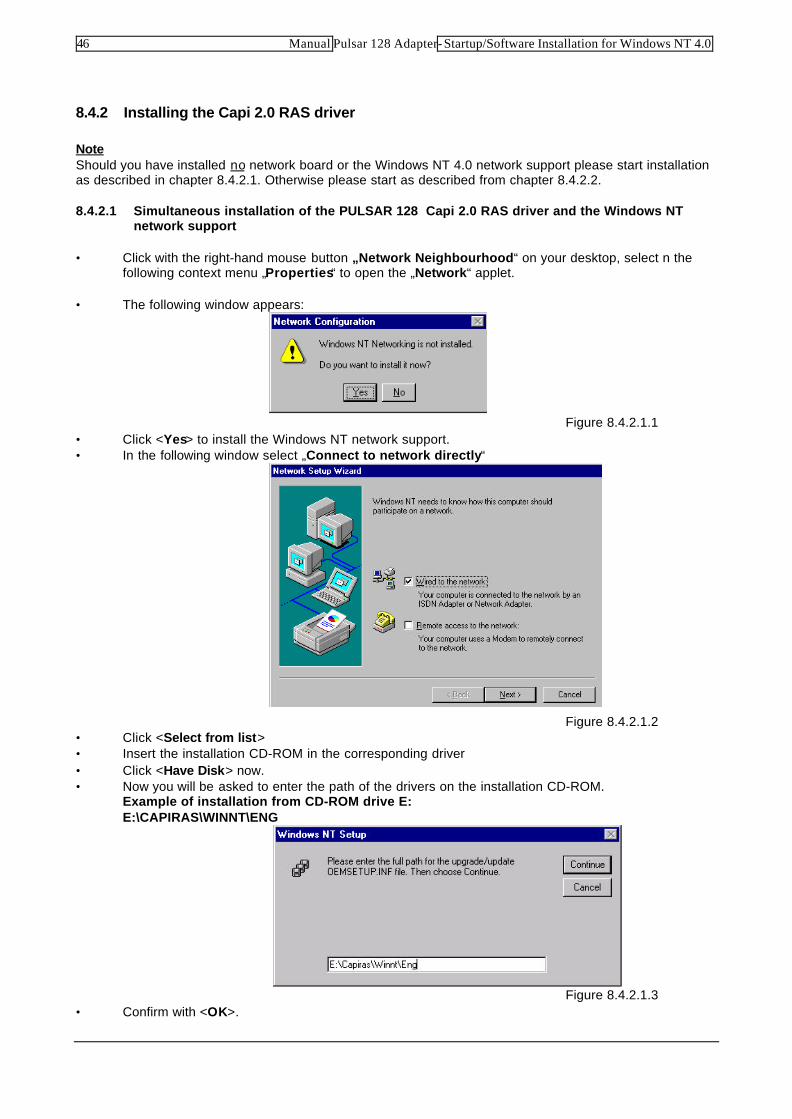
Figure 8.4.1.2
• Mark “Pulsar ISDN configuration” .• Confirm with <Finish>• Confirm the next message “Installation successfully completed” with <OK>.• When you click the button <Properties> you can select the type of your adapter in the following
window.
Figure 8.4.1.3

Manual Pulsar 128 Adapter- Startup/Software Installation for Windows NT 4.0 45
Figure 8.4.1.4
Caution:Please check whether the interrupt as well as the I/O address displayed on your computer are assigned. Ifso, please try other unassigned values. Under “Start/Programs/Windows NT diagnosics”, (register card“Resources”) the values can be displayed.
• Confirm with <OK>
• Click <Yes> to restart your computer now.
After restart of Windows NT 4.0 the Pulsar 128 Adapter is ready for operation.
Caution:Check whether the PCMCIA drive and the Pulsar 128 Adapter have the same IRQ and I/O-address. Select“Start/Settings/System Control” and click the icon “PC-card (PCMCIA)” then. Now mark your Pulsar 128Adapter and click <Properties>. When you click “Resources” you will see the IRQ and the I/O-address.These settings must conform to those of the installed Pulsar 128 Adapter.
46 Manual Pulsar 128 Adapter- Startup/Software Installation for Windows NT 4.0
8.4.2 Installing the Capi 2.0 RAS driver
NoteShould you have installed no network board or the Windows NT 4.0 network support please start installationas described in chapter 8.4.2.1. Otherwise please start as described from chapter 8.4.2.2.
8.4.2.1 Simultaneous installation of the PULSAR 128 Capi 2.0 RAS driver and the Windows NTnetwork support
• Click with the right-hand mouse button „Network Neighbourhood“ on your desktop, select n thefollowing context menu „Properties“ to open the „Network“ applet.
• The following window appears:
Figure 8.4.2.1.1• Click <Yes> to install the Windows NT network support.• In the following window select „Connect to network directly“
Figure 8.4.2.1.2• Click <Select from list>• Insert the installation CD-ROM in the corresponding driver• Click <Have Disk> now.• Now you will be asked to enter the path of the drivers on the installation CD-ROM.
Example of installation from CD-ROM drive E:E:\CAPIRAS\WINNT\ENG
Figure 8.4.2.1.3• Confirm with <OK>.

Manual Pulsar 128 Adapter- Startup/Software Installation for Windows NT 4.0 47
Figure 8.4.2.1.4
• Click <OK> to install the supplied CAPI driver.• Click <Next>.• In the following applet select the network protocol for the internet access via the dial-up network.
Chapter 8.4.6 shows an example of the configuration for an internet access via the„dial-up network“
Figure 8.4.2.1.5• Click <Next>
Figure 8.4.2.1.6
• Click <Next> in order to adopt the displayed settings.• In the following window you will be asked to enter the path for the installation of the
Windows NT drivers
Example of installation from CD-ROM drive E:E:\i386

48 Manual Pulsar 128 Adapter- Startup/Software Installation for Windows NT 4.0
• Confirm with <Continue>.
Figure 8.4.2.1.7
• If figure 8.4.2.1.8 appears insert PULSAR 128 CD-ROM into the corresponding drive and click<OK>.
Figure 8.4.2.1.8
• Follow the instructions now.
• The installation assistant for CAPI 2.0 drivers will now be started.
Figure 8.4.2.1.9
• Click <Next>• Continue installation from chapter 8.4.2.3
Manual Pulsar 128 Adapter- Startup/Software Installation for Windows NT 4.0 49
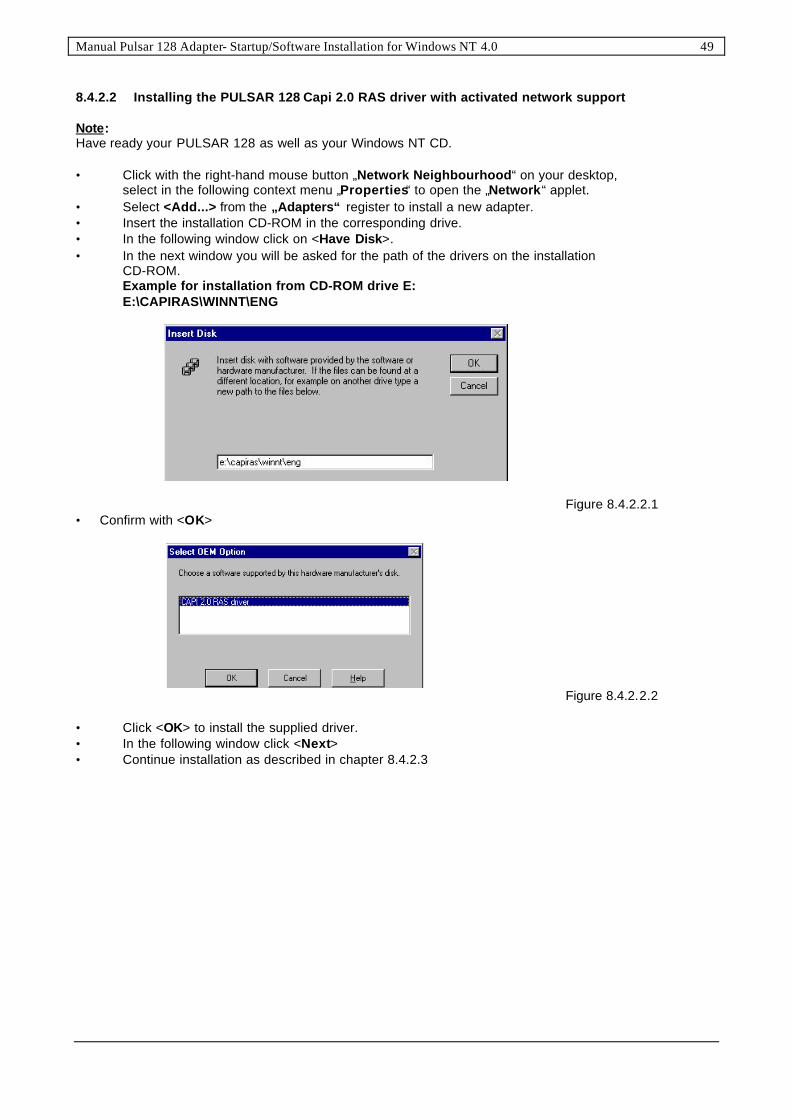
8.4.2.2 Installing the PULSAR 128 Capi 2.0 RAS driver with activated network support
Note:Have ready your PULSAR 128 as well as your Windows NT CD.
• Click with the right-hand mouse button „Network Neighbourhood“ on your desktop,select in the following context menu „Properties“ to open the „Network“ applet.
• Select <Add...> from the „Adapters“ register to install a new adapter.• Insert the installation CD-ROM in the corresponding drive.• In the following window click on <Have Disk>.• In the next window you will be asked for the path of the drivers on the installation
CD-ROM.Example for installation from CD-ROM drive E:E:\CAPIRAS\WINNT\ENG
Figure 8.4.2.2.1• Confirm with <OK>
Figure 8.4.2.2.2
• Click <OK> to install the supplied driver.• In the following window click <Next>• Continue installation as described in chapter 8.4.2.3
50 Manual Pulsar 128 Adapter- Startup/Software Installation for Windows NT 4.0
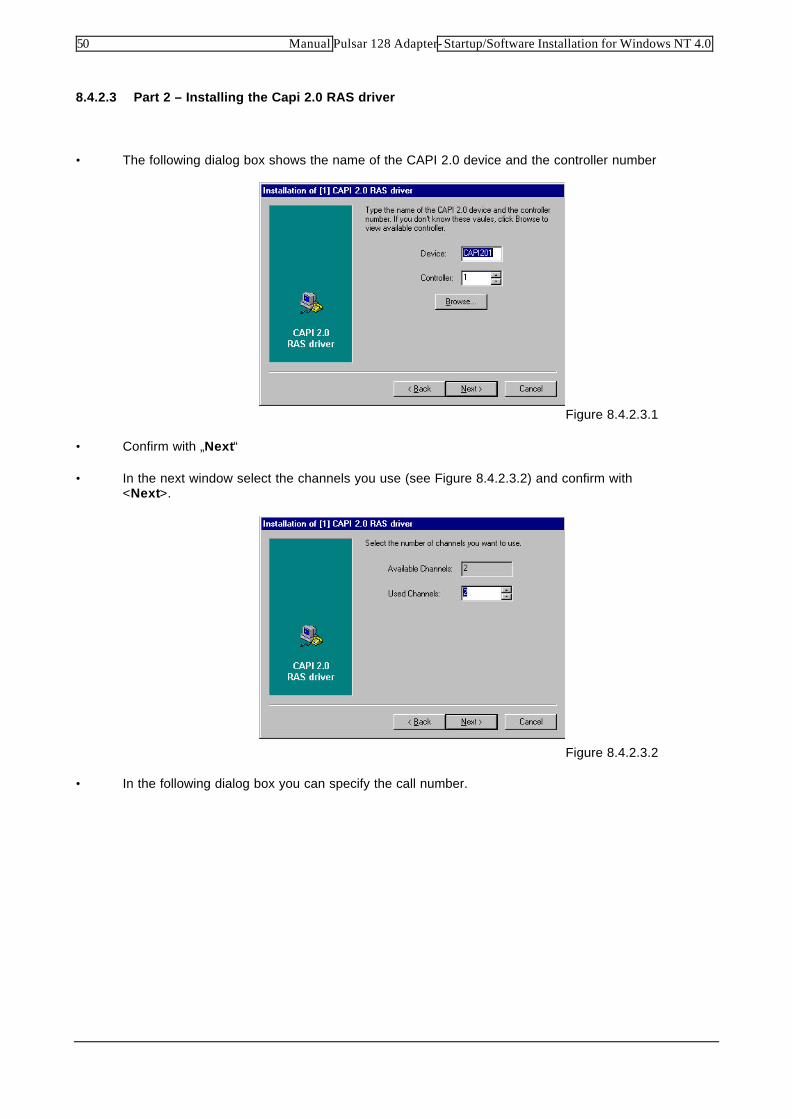
8.4.2.3 Part 2 – Installing the Capi 2.0 RAS driver
• The following dialog box shows the name of the CAPI 2.0 device and the controller number
Figure 8.4.2.3.1
• Confirm with „Next“
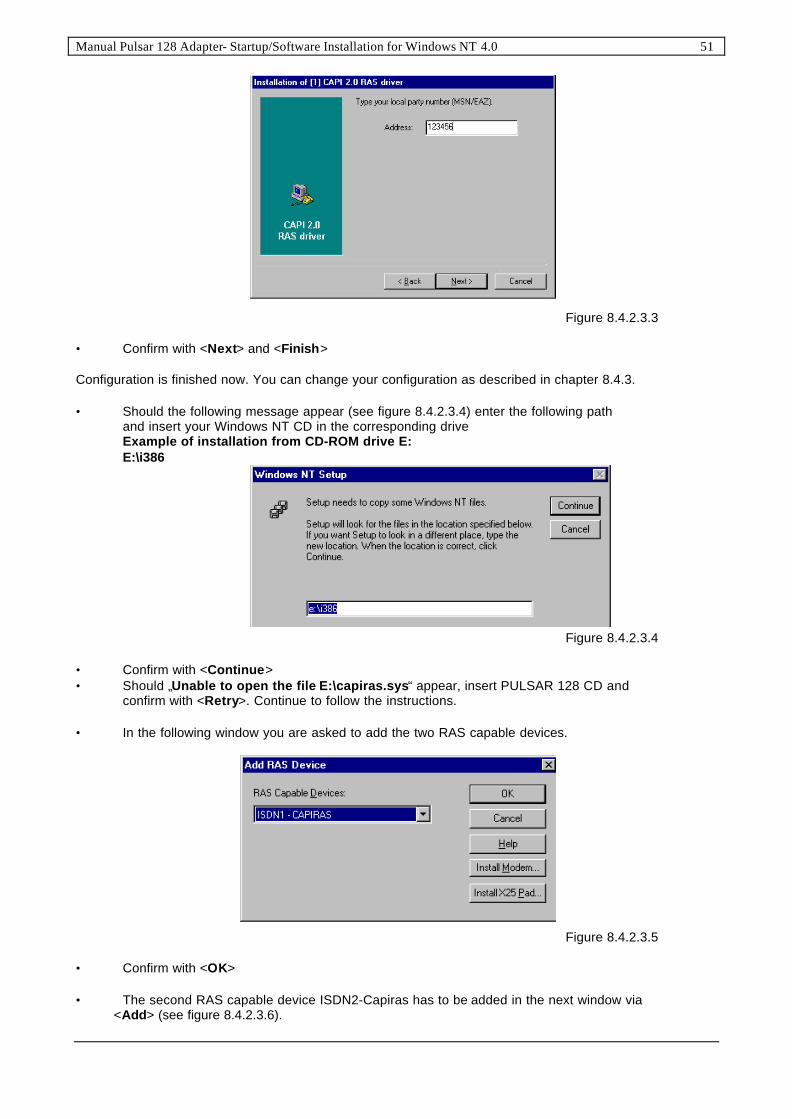
• In the next window select the channels you use (see Figure 8.4.2.3.2) and confirm with<Next>.
Figure 8.4.2.3.2
• In the following dialog box you can specify the call number.
Manual Pulsar 128 Adapter- Startup/Software Installation for Windows NT 4.0 51
Figure 8.4.2.3.3
• Confirm with <Next> and <Finish>
Configuration is finished now. You can change your configuration as described in chapter 8.4.3.
• Should the following message appear (see figure 8.4.2.3.4) enter the following pathand insert your Windows NT CD in the corresponding driveExample of installation from CD-ROM drive E:E:\i386
Figure 8.4.2.3.4
• Confirm with <Continue>• Should „Unable to open the file E:\capiras.sys“ appear, insert PULSAR 128 CD and
confirm with <Retry>. Continue to follow the instructions.
• In the following window you are asked to add the two RAS capable devices.
Figure 8.4.2.3.5
• Confirm with <OK>
• The second RAS capable device ISDN2-Capiras has to be added in the next window via <Add> (see figure 8.4.2.3.6).

52 Manual Pulsar 128 Adapter- Startup/Software Installation for Windows NT 4.0
Figure 8.4.2.3.6
• With <Configure> you can specify whether the specific channel is to be used for incomingand/or outgoing connections.
Note:Under Windows NT Workstation it is not possible to specify incoming calls for two RAS-compatibledevices.
• Use the <Network...> button in „Remote Access setup“ to move to „Network configuration“(see figure 8.4.2.3.7), which you can adapt to meet your individual wishes. Then confirm with <OK>.
Figure 8.4.2.3.7
• Now you will be asked to insert the Windows NT CD into the corresponding drive.Enter the following path:Example for installation from CD-ROM drive E:E:\i386
Figure 8.4.2.3.8• Confirm with <Continue> and follow the instructions.

Manual Pulsar 128 Adapter- Startup/Software Installation for Windows NT 4.0 53
Figure 8.4.2.3.9
Confirm the above dialog box with <Yes> to restart the computer.
After restart you can check in the „Device manager“ - it is started by selecting the „Control Panel“ from the„Start/Settings“ menu and double-clicking the „System“ symbol – whether the CAPI-drivers weresuccessfully installed (Figure 8.4.2.3.10).
Figure 8.4.2.3.10
Note:Plug & play is only partially supported by Windows NT. Consequently, the IRQs and I/O addresses displayedunder „Start/Programs/Administrative Tools (Common)/Windows-NT Diagnostics“ (register card„Resources“ ) are not always complete. It is possible, therefore, for a value to be assigned even though it isnot marked in the diagnosis as being used.Hence if you fail to start the driver, please try other unassigned resources.

54 Manual Pulsar 128 Adapter- Startup/Software Installation for Windows NT 4.0
8.4.3 Configuration
8.4.3.1 Changing the resource settings
The resource settings of the ISDN adapter can be changed subsequently if e.g. some other hardwarecomponent needs its resources.
• Start the configuration program as follows:Select „Start/Programs/ PULSAR 128 ISDN/Configuration“ in the Windows Desktop.The following window appears:
Figure 8.4.3.1.1
Note to Figure 8.4.3.1.1
Register Card „General“
Signalling protocol: This field is to fix the transmission protocol (DSS1).
Start mode: The time for the driver start can be fixed.Boot: The driver is started during different times of booting.System (Settings)AutomaticOn demand: Driver can be started by selecting the „Device Manager“
in the „Control Panel“.Disabled: Driver will not be started.
Test mode: You can choose the test mode during driver start. The access to the register of D- and B-channel-controller, Chiptiming and the interrupt will always be checked.When „Adapter+S0“ is selected an additional D-channel-test during initialisationof the driver will be started for the following elements: Info 4, TEI-Assignment as wellas activation and deactivation of D-channel shift 2.Should one of the tests fail a message appears and the driver will not be started.Note: Should the D-channel-test fail please contact your network operator.
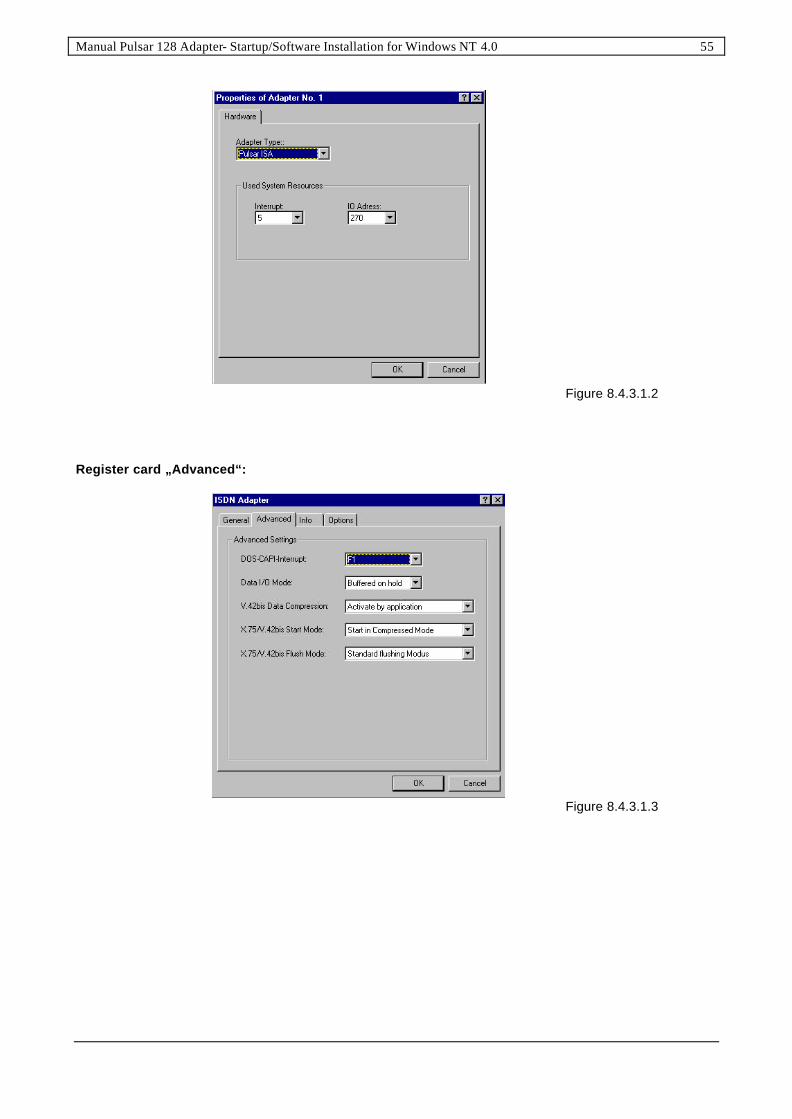
• After marking the adapter in the above window with the mouse click <Properties>.
• You can now use the selection list to change your requirements for the particular Adapter typeand Recourse type (Interrupt and I/O range).
Manual Pulsar 128 Adapter- Startup/Software Installation for Windows NT 4.0 55
Figure 8.4.3.1.2
Register card „Advanced“:
Figure 8.4.3.1.3

56 Manual Pulsar 128 Adapter- Startup/Software Installation for Windows NT 4.0
Note (see figure 8.4.3.1.3)
Term Explanation
DOS-CAPI-Interrupt The DOS-CAPI-Interrupt, a Software-Interrupt controls thecommunication between the DOS-application and the Windows-CAPI. Special applications can expect a different value. Validvalues are for example F1 or F2 (in hex).
Data I/O Mode Data of other drivers or applications can be stored temporarilyi.e. an overwriting before handling is not possible.
V.42bis data compression
Activate by application:
Disabled:
Activated with X.75/V.120:
V.42bis is a standard compression in telecommunication. InJune 1998 the specification for the CAPI 2.0-implementation ofV.42bis was changed. Unfortunately the two versions are notcompatible. The drivers for the PULSAR 128 ISDN-adapter usethe new standard as default setting from driver version 2.2 rev.0.5.Only applications requiring a V.42bis extended protocol viaCAPI can get a connection to V.42bis if the opposite terminal iscompatible.
The controller behaves as if no V.42bis would be available.
All applications using the X.75 and V.120 protocols under CAPIV2.0 get connection to V.42bis when the opposite terminal iscompatible.
X.75/V.42bis Start mode:
Start in uncompressed Mode:
Start in compressed Mode:
Corresponds to the standard from 7. June 1998
Corresponds to the standard until 7. June 1998X.75/V.42bis Flush mode:
Standard flushing Modus:
Special flushing Modus:
Corresponds to the standard from 7. June 1998
Corresponds to the standard until 7. June 1998
Register card „Info“:
The register card „Info“ contains besides data regarding copyright, program and the address of the producerthe opportunity to check the directory & version of the drivers.When you click „driver versions“ a short list of all drivers installed or to be installed appears.
Register card „Options“
The register card „Options“ enables you to choose the language. In addition, the initial settings of the drivercan be re-established with the button <Set Default…>.
After you confirmed this configuration with <OK> you will be asked for restart. Confirm with <Yes> to takeover these amendments in the system.
Your ISDN-Adapter is ready for use after Windows NT4.0 is restarted!

Manual Pulsar 128 Adapter- Startup/Software Installation for Windows NT 4.0 57
8.4.3.2 Configuration of call numbers for RAS
In the case of RAS connections via PULSAR 128 CAPI 2.0 driver, a call number for incoming and outgoingcalls can be configured for each device. The procedure is as follows:
� Start the „Network Dialog Window “ by clicking the right-hand mouse button on the „NetworkNeighbourhood“ icon of your Windows desktop and selecting the option <Properties> in thefollowing context menu.
� In the register „Adapter“ select the line „CAPI 2.0 RAS driver“ and then click <Properties>.The window „Properties of CAPI 2.0 RAS driver“ is then opened (see figure 8.4.3.2.1).
Figure 8.4.3.2.1
� Select the register card „local call number“. You will get then the following window:(see figure 8.4.3.2.2).
Figure 8.4.3.2.2

58 Manual Pulsar 128 Adapter- Startup/Software Installation for Windows NT 4.0
� Enter your call number. If it is applied for the service feature, a „sub address“ can be enteredin this box. Should you wish your call number not to be shown to the opposite terminal activate„Do not show to opposite terminal“.With the button <Add> you can enter more call numbers and sub addresses.With the button <Process> you can change the call numbers for incoming calls when they aremarked with the mouse.With the button <Cancel> you can cancel marked call numbers.
� Confirm with <OK>.
� Click <Close> to leave the register „Adapter“.
� Confirm the prompt for restarting the computer by clicking <Yes>.
8.4.4 Driver update
You can update the driver software of your Pulsar 128 Adapter as follows:
� Start the dialog box „Network“ by clicking with the right mouse button „Network environment“of your Windows desktop and selecting <Properties> in the following menu. When you click„Adapter“ all adapters installed appear.
� Select „CAPI 2.0 RAS driver“ and confirm with „Update“.� In the dialog box „Windows NT-Setup“ please enter the drive and the path of the file
OEMSETUP.INF
Example for installation from CD-ROM drive EE:\capiras\WINNT\eng
Figure 8.4.4.1
� Confirm with <Next> to proceed with installation.
Note:Close the „Network“-applet of Windows NT 4.0 and confirm the request for restart with <YES> so that yourISDN adapter is ready for use.
After restart of Windows NT 4.0 the Pulsar 128 Adapter with the actual driver is ready for use!

Manual Pulsar 128 Adapter- Startup/Software Installation for Windows NT 4.0 59
8.4.5 Uninstalling the Driver software
1. First remove the CAPI 2.0 RAS driver as follows:
� Select „Network environment“ with the right mouse button from your Windows desktop andclick „Properties“.
� Now select the „Adapter“ register card in the dialog box „Network“.
� Select the „CAPI 2.0 RAS driver“ and press the <Remove> button.
� Click <OK> to confirm.
� Click the <Close> button in the „Adapter“ register card.
� Confirm the prompt for restart with <Yes>.
2. Proceed as follows to remove the CAPI driver:
� Select the „Control Panel“ from the „Start/Settings“ menu of your Windows NT 4.0 desktop.
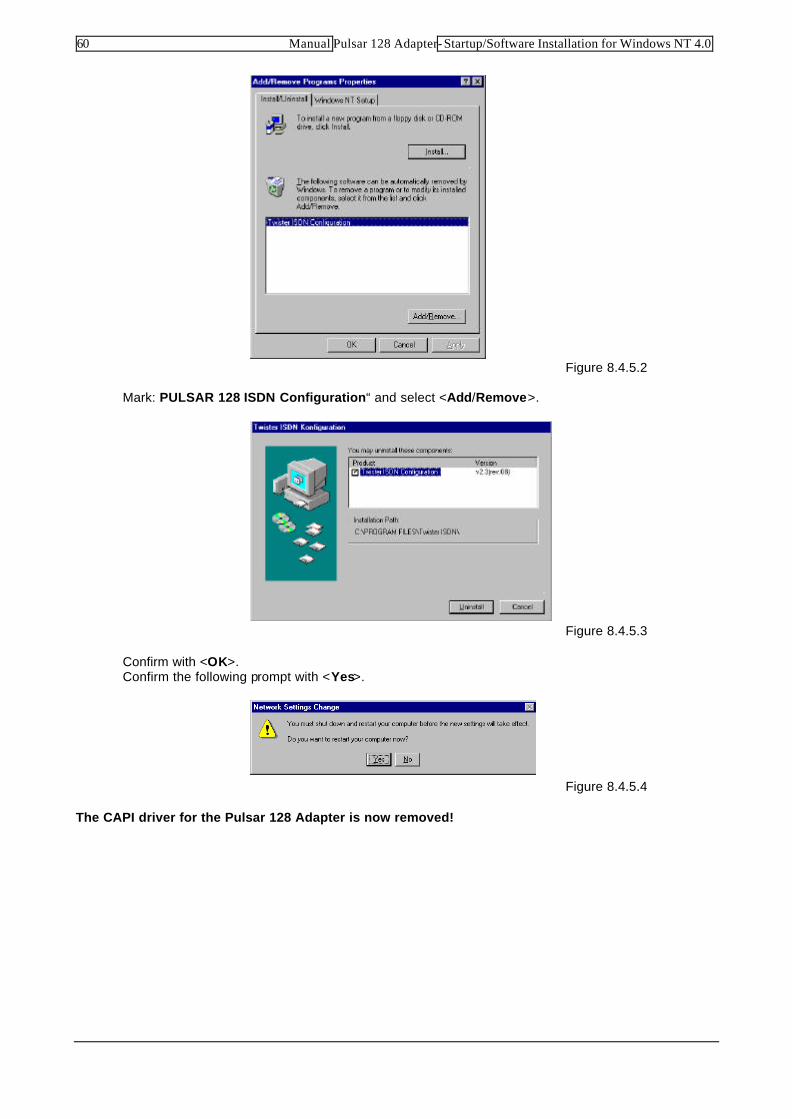
� Double-click on the icon „Software”
Figure 8.4.5.1
� Mark „PULSAR 128 ISDN configuration for Win NT 4.0“ and select <Add/Remove> button.
60 Manual Pulsar 128 Adapter- Startup/Software Installation for Windows NT 4.0
Figure 8.4.5.2
� Mark: PULSAR 128 ISDN Configuration“ and select <Add/Remove>.
Figure 8.4.5.3
� Confirm with <OK>.� Confirm the following prompt with <Yes>.
Figure 8.4.5.4
The CAPI driver for the Pulsar 128 Adapter is now removed!
Manual Pulsar 128 Adapter- Startup/Software Installation for Windows NT 4.0 61
8.4.6 Internet access via the Dial-Up Network using InternetServiceProvider as example
The Windows NT Dial-Up Network enables you to set up connections to an Internet service provider. Thenecessary steps for obtaining access to the Internet are described below using the example ofInternetServiceProvider via PPP. To log-in with a different Internet service provider, please follow hisrecommendations and change the parameters accordingly.
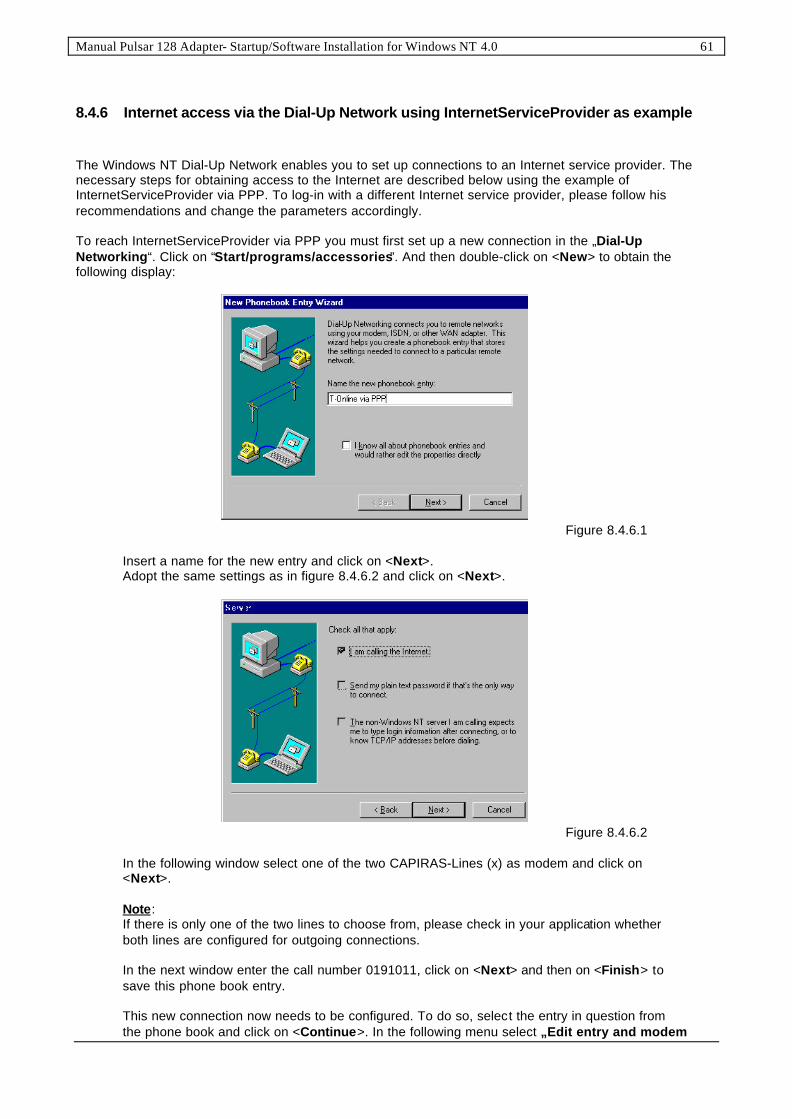
To reach InternetServiceProvider via PPP you must first set up a new connection in the „Dial-UpNetworking“. Click on “Start/programs/accessories”. And then double-click on <New> to obtain thefollowing display:
Figure 8.4.6.1
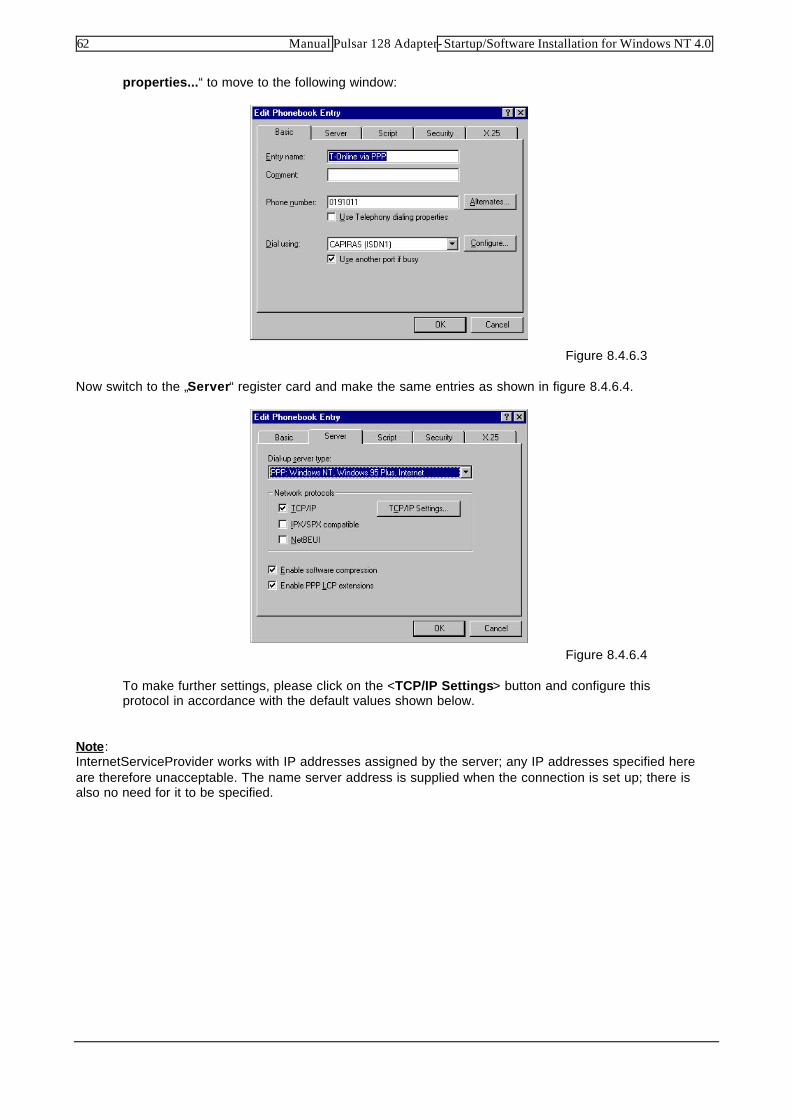
� Insert a name for the new entry and click on <Next>.� Adopt the same settings as in figure 8.4.6.2 and click on <Next>.
Figure 8.4.6.2
� In the following window select one of the two CAPIRAS-Lines (x) as modem and click on<Next>.
Note:If there is only one of the two lines to choose from, please check in your application whetherboth lines are configured for outgoing connections.
� In the next window enter the call number 0191011, click on <Next> and then on <Finish> tosave this phone book entry.
� This new connection now needs to be configured. To do so, select the entry in question fromthe phone book and click on <Continue>. In the following menu select „Edit entry and modem
62 Manual Pulsar 128 Adapter- Startup/Software Installation for Windows NT 4.0
properties...“ to move to the following window:
Figure 8.4.6.3
Now switch to the „Server“ register card and make the same entries as shown in figure 8.4.6.4.
Figure 8.4.6.4
� To make further settings, please click on the <TCP/IP Settings> button and configure thisprotocol in accordance with the default values shown below.
Note:InternetServiceProvider works with IP addresses assigned by the server; any IP addresses specified hereare therefore unacceptable. The name server address is supplied when the connection is set up; there isalso no need for it to be specified.
Manual Pulsar 128 Adapter- Startup/Software Installation for Windows NT 4.0 63
Figure 8.4.6.5
Confirm both windows with <OK> in order to return to the „Dial-Up Networking“.
Note:Should the assistant for new telephone book entries not be started automatically, a new telephone bookentry will immediately be made up, which must then be configured according to figure 8.4.6.3 ff. Pleasecheck subsequently if the option „Accept any authentication including clear text“ is activated in theregistry „Security“.
The new connection is now fully configured apart from the actual InternetServiceProvider access data, whichyou will find in InternetServiceProvider´s written confirmation of order. These data have to be entered oncewhen you set up your first connection.
Click on <Dial>in the „Dial-Up Networking“ to move to the dialog window „Connect toInternetServiceProvider via PPP“.
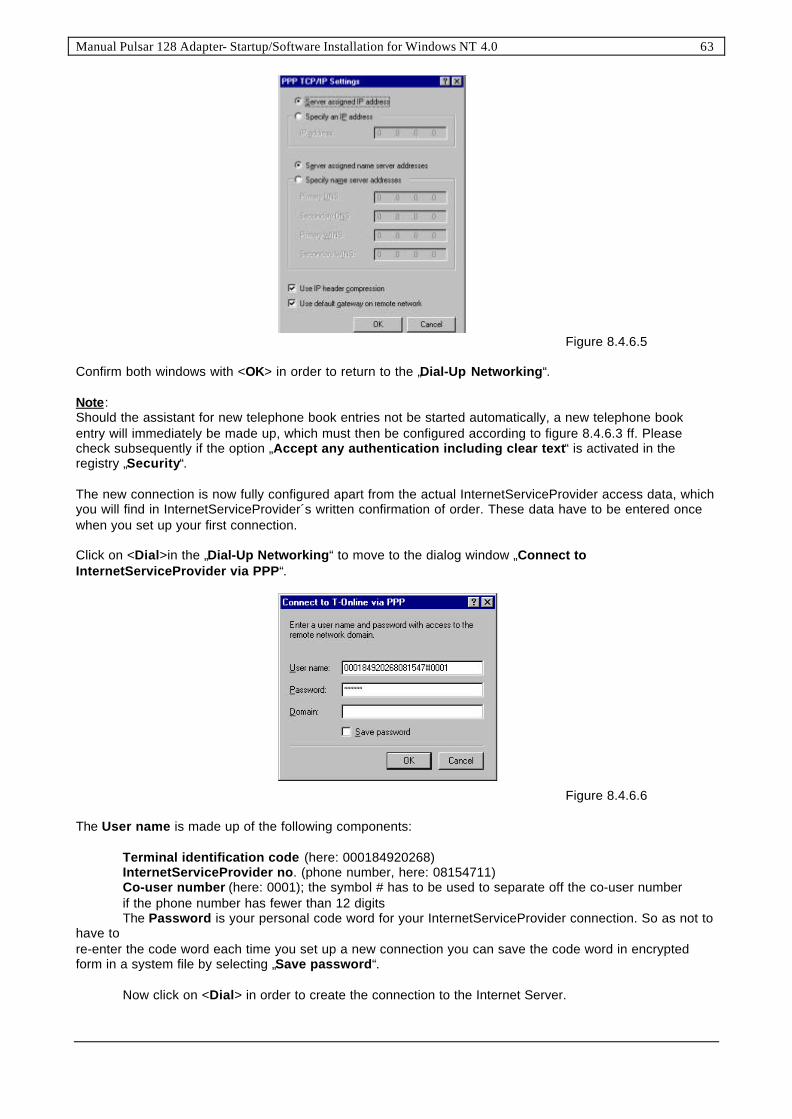
Figure 8.4.6.6
The User name is made up of the following components:
� Terminal identification code (here: 000184920268)� InternetServiceProvider no. (phone number, here: 08154711)� Co-user number (here: 0001); the symbol # has to be used to separate off the co-user number
if the phone number has fewer than 12 digits� The Password is your personal code word for your InternetServiceProvider connection. So as not tohave tore-enter the code word each time you set up a new connection you can save the code word in encryptedform in a system file by selecting „Save password“.
� Now click on <Dial> in order to create the connection to the Internet Server.

64 Manual Pulsar 128 Adapter- Startup/Software Installation for Windows NT 4.0
The following icon in the task bar shows an existing dial-up networking connection:
Figure 8.4.6.7
If you start your Internet Browser now, such as e.g. the Microsoft Internet Explorer, you can use internetservices like the World Wide Web via the existing connection.
In order to disconnect the connection again, click on the icon in the task bar with the right-hand mousebutton and select the connection to be terminated under the point „Disconnect“.

Manual Pulsar 128 Adapter- Startup/Software Installation for Windows NT 4.0 65
8.4.7 General information
Note:If you have any problems requiring help from our Technical Support, please go through the following stepsfirst in order to obtain essential details of the driver version and resource assignment being used with yourISDN adapter:
� Start the „Network“ Dialog Window by clicking the right-hand mouse button on the „NetworkNeighbourhood“ icon of your windows desktop and selecting the option <Properties> in thefollowing context menu.
� Now select „Adapter“ register card; all the installed network adapters are displayed.
� Mark „PULSAR 128 ISDN-Adapter...“ and click on the <Properties> button to obtain the resourcesettings.
To find out your driver version choose “Start/Programs/ PULSAR 128 ISDN Configuration” on theWindowsdesktop.Now change into the register “Info” and click on the button <driver versions>. Now all driver-files anddirectories are listed.

66 Manual Pulsar 128 Adapter – Important terms
9 Important terms
Term Explanation
1TR6 protocol National D channel protocol of Deutsche Telekom AG (National ISDN)
Accelerator Pack With this program it is possible to run all Windows applications withnetworking capabilities via ISDN. It provides the support required by aprogram to initialize remote connections, e.g. with a modem.
Basic rate interface ISDN subscriber connection with two user channels (B-channel with64,000bit/s) and a control channel (D-channel 16,000 bit/s).A basic connection is offered as a multiple device orsystem connection. The interface of the BRI line (basic rate interface)to the subscriber is the S0 interface.
B channel ISDN transmission channel (also called basic channel or user channel) viawhich the user data is transported at a transmission capacity of 64,000bit/s.
Baud Baud (abbreviation:Bd) is the measurement unit of the telegraph speed (1Bd = 1 signal element per second), i.e. the frequency of status changes in atransmission channel per second. The unit baud is not identical with thetransmission speed measured in bit/s.The telegraph speed can only beequated with the transmission speed for signals which have only two states(e.g. ISDN).
CAPI COMMON ISDN APPLICATION PROGRAMMING INTERFACESoftware interface between hardware driver and application. Any applicationprograms with CAPI support can be run on hardware that is supported byCAPI.
Calling Party Number This is the caller´s own number which is transmitted with the outgoing calland can be used by the remote terminal for identification purposes (inaddition to the user´s name and password). In case of incoming calls it is thecall number of the remote terminal.
CCITT Comité Consultatif International Télégrafique et Téléfonique.International commission for norms and standardization based in Geneva.(Newer designation ITU-T)
D-Channel ISDN signaling channel (also called control channel) through which controlinformation (e.g. call setup and disconnect information) is transported at atransmission rate of 16,000bit/s for basic rate lines or 64,000bit/s for primarymultiplex lines.
Dial-up network Subsystem of Windows 95, Windows 98, Windows 2000 and Windows NTwith which the user can access a remote network via the telephone network(e.g. access to the internet).
DSS1 protocol Standardized European D channel protocol (Euro-ISDN)
EAZ Endgeräteauswahlziffer = terminal selection digitA single digit appended to the subscriber number which is allocated to aGerman ISDN subscriber (1TR6) by Deutsche Telekom AG. Can be used toselect devices on the S0 bus.
EAZ-MSN Mapping Assignment of an MSN to an EAZ.
EFT Euro file transferFile transfer method based on European Standard ETS 300 075.
Manual Pulsar 128 Adapter – Important terms 67
Application programs from different manufacturers can communicate witheach other provided they support the ETS 300 075 protocol. In CAPI thisprotocol is defined by ISO 8208.
FOSSIL Fido/Opus/SEAdog Standard Interface Layer.The FOSSIL driver converts modem commands into a form which isintelligible for the CAPI interface. An ISDN adapter can then be accessedlike a modem by a number of communications programs (e.g. Telix,Telemate, Terminate or Crosspoint).
HDLC High-level Data Link Control. Bit-oriented synchronous transmission controlprocedure for protected data transmission.
I/O address Input/Output addressA peripheral unit (e.g.: „Pulsar 128“) is selected (e.g. for data exchange)with the help of an I/O address. An I/O address is to be assigned to only oneperipheral unit or there will be conflicts between devices on the computer.
Internet The biggest computer network in the world
IRQ Interrupt RequestIRQ is a signal (or a line) used by a peripheral device (e.g. „Pulsar 128“) totrigger a hardware interrupt on the CPU. An interrupt request is used, forexample, on the „Pulsar 128“ to control the exchange of data between it andthe CPU. An IRQ is to be assigned to only one peripheral unit or there will beconflicts between devices on the computer.
LAN Local Area Network. A network which is restricted to a building or thepremises of a company.
Mailbox An electronic mail system or bulletin board system (BBS).Mailboxes are automatic message systems which are used by the users asa communication forum (for exchanging messages). Program andinformation libraries on the most varied topics are offered in many mailboxesand free software to download is often provided.
MSN Multiple Subscriber NumberMultiple-digit subscriber numbers which are allocated to Euro-ISDN users(DSS1).In the area covered by Deutsche Telekom AG the Euro-ISDN subscriber isassigned 3 subscriber numbers.
Multilink Connection Channel bundling, i.e. both user channels are used together in ISDN toachieve a transmission rate of 128kbit/s.
NDIS Network Driver Interface Specification.Permits the use of several network cards in a single computer.
P&P With the Plug & Play standard it is possible to install a newPnP hardware without manual configuration. The Plug & PlayPlug & Play component of the operating system (e.g. Windows 95) or the Plug & Play
manager of the BIOS adapt the I/O address and IRQ to the new hardware.No manual configuration by the user is necessary.
PPP Point-to-Point Protocol.Standard protocol which can be used to set up network connections viaISDN or modem.
Server In a network it is the computer which makes certain services available toother computers.
68 Manual Pulsar 128 Adapter – Important terms
Service indicator SIN is used to distinguish between devices which are connected to the sameISDN bus.Examples: SIN1 analog telephony
SIN2 a/b servicesSIN4 fax group 4SIN 7 64kbit/s data transferSIN9 teletex or telex
TAPI TELEPHONY APPLICATION PROGRAMMING INTERFACE.The TAPI interface in Windows 95/98/2000 and Windows NT4.0 allowsWindows applications to control any communications devices via a unifiedinterface for telephony functions.
TCP/IP Transmission Control Protocol/Internet ProtocolA protocol family originating from the Internet.
WAN Wide Area Network.Networks which, unlike locally restricted networks, cover large distances.
X.75 Transmission protocol for telematics services in ISDN. The transmission rateof the protocol is 64kbit/s. X.75 is the standard protocol for access tomailboxes.

Manual Pulsar 128 Adapter – Important terms 69
10 Technical support
In case of urgent need for action, you can also reach our technical bilingual English/German support serviceper telephone:
Customer hotline: