manual of therapeutic stomatology of... · of teeth, root canals structure, classification of...
TRANSCRIPT
MINISTRY OF HEALTH CARE OF THE REPUBLIC OF BELARUS VITEBSK STATE ORDER OF PEOPLES` FRENDSHIP MEDICAL UNIVERSITY DEPARTMENT OF GENERAL
DENTISTRY WITH PROSTHETIC DENTISTRY COURSE
Vinogradova T.G. .
Manual of therapeutic stomatology
(for students 2 courses of faculty of training of foreign students of dental faculty in English) Part II
Vitebsk, 2016

2
УДК616.31(035)=111 ББК56.61я73 V70 The reviewer of the manual by : S.P. Rubnikovich, Head of the Department of Prosthetic Dentistry BelMAPO, MD, Professor. S.A. Naumovich, MD, Professor Minsk State Medical Institute at the Department of Prosthetic Dentistry.
T.G. Vinogradova V70 Manual of therapeutic stomatology, part II / T.G.Vinogradova - Vitebsk:VSMU,2016-133p.
Confirmed and recommended for edition by the Central educational- methodical Council of Vitebsk State Medical University in March 2016, the protocol number №9.
УДК616.31(035)=111 ББК56.61я73
© T.G.Vinogradova ,2016 © «Vitebsk state medical university»,2016

3
Contents Introduction ........................................................................................................... 5 Topic:Tooth deposits. Types of tooth deposits, emergency reasons. Indication of tooth deposits. OHIS index, its definition and interpretation. .............................. 6 Topic : Subjects and means of individual hygiene of an oral cavity. Toothbrushing methods. ...................................................................................... 10 Topic : Methods of professional removal of tooth deposits. Stomatologic tools for removal of tooth deposits. Standardization. Removal of tooth deposits by means of hand tools. ............................................................................................ 23 Topic : Chemical and hardware ways of removal of tooth deposits. Evaluation test of removal of tooth deposits. ........................................................................ 27 Topic : Endodontics. Structure of a coronal cavity and root Canals of various groups of teeth. .................................................................................................... 29 Topic : Endodontic tools, its appointment. Principles of standardization. Work technique. ............................................................................................................ 45 Topic : Opening and disclosure of a coronal pulp cavity in teeth of the upper jaw. ...................................................................................................................... 57 Topic : Opening and disclosure of a coronal pulp cavity in mandible teeth. ..... 64 Topic : The characteristic of the devitalizing tools. Structure, imposing technique, action mechanism. Mistakes and complications when imposing of the devitalizing tools. ................................................................................................ 70 Topic : Instrumental processing of root canals (training in a technique of amputation and extirpation, endodontic processing of root canals). Reference technique and technique of the balanced forces. ................................................. 73 Topic : Expansion of root canals by a technique of "Step Back" and "Crown Down". ................................................................................................................. 81 Topic : Medicamentous processing of root canals. Characteristic of medicines. Working off of techniques of medicamentous processing: by means of wadded turundas, the adsorbing pins, the endodontic of needles. Ways of neutralization of contents of almost impassable root canals. ..................................................... 84 Topic : The characteristic of the sealing materials used for filling of root canals. ............................................................................................................................. 89 Topic : Methods of sealing of root canals. Sealing of root canals various sealing materials (manual and machine by methods). ..................................................... 93 Topic : Methods of sealing of root canals. Technique of one pin. ...................... 96

4
Topic : Methods of sealing of root canals. Technique of sealing of root canals by method of lateral condensation. .......................................................................... 97 Topic : Determination of effectiveness of sealing of the root canal. Mistakes and complications at endodontic treatment. Ways of elimination and prevention. . 100 Topic :Preparation of supragingival part of a root and unsealing of root canals for pin designs. .................................................................................................. 106 Topic : Preparation of tooth under a cast stump pin tab. Manufacture of a cast stump pin tab by a direct method. ..................................................................... 109 Topic : Manufacture of a simulated stump with use of anchors. ...................... 111 Topic : Pin teeth (across Richmond, Ilyina-Markosyan, Ahmedov). Manufacture of prime pin tooth. Features of manufacture of pin designs on multirooted teeth. ........................................................................................................................... 116 Topic : Manufacture of a provisional bridge-like artificial limb. Ways and fabrication stages. .............................................................................................. 121 Topic : The adhesion bridge-like artificial limbs. Methods and fabrication stages. ................................................................................................................ 124 List of references ............................................................................................... 129 List of used pictures .......................................................................................... 131
5
Introduction In this part of the manual on a therapeutic stomatology (Part II) training manuals intended for preparation for classes and examinations of students enrolled in English 2 courses of the Faculty of Dentistry, the issues and important topics, one of the most in dentistry -endodontics. Endodontics is the largest and most complex section of Dentistry, Endodontics (Latin endodontics.) - A branch of dentistry that studies the structure and function of endodontic (complex of tissues, including the pulp and dentin, which are connected to each other morphologically and functionally), methodology and techniques of manipulation in the cavity of the tooth at trauma, pathological changes in the pulp, periodontal and other various indications. This is the science of anatomy, pathology and treatment methods of tooth cavities and root canals (endodontic). The manual begins with a look at quite a few important issues in dentistry such as dental hygiene concepts, methods and tools for cleaning the mouth, hygiene control procedures. This is followed by consideration of section endodontics, here begins with a description of the study and some of the important issues anatomist-topographical features of the structure of the coronal cavity all groups of teeth, root canals structure, classification of endodontic instruments, processing techniques and root canal filling using the latest technology in endodontics. Materials in endodontics. The final part deals with the methods and recovery technology supragingival tooth structure using different types of pins and posts teeth. All material is presented concisely and available for students' understanding, all questions and compact at the same time completely covered. This guide will make it easy to study and learn the material the students that need further learning process and apply this knowledge in their practice.

6
Topic:Tooth deposits. Types of tooth deposits, emergency reasons. Indication of tooth deposits. OHIS index, its definition and interpretation. PLAQUE. Currently, dental deposits are considered on a par with other biofilms, covers various tissues of the human body and play most of the physiological role. Oral cavity compared with a tropical coral reef - both in one and in another biotope warm, humid and a lot of food, which provides ideal conditions for the prosperity of many living organisms. Average natural purpose of dental plaque - the physical and bacteriological protection from exogenous colonization of pathogenic oral flora. But in certain situations, for example, due to the conditions of the oral cavity, or poor oral hygiene person, there are adverse changes in the biochemistry, the composition and structure of dental plaque, which makes them pathogenic properties. Classification of dental plaque International Classification of Diseases (ICD-DA, WHO, 1995) K03.6 Deposits [accretions] on teeth - deposits (rise) in the teeth. K03.60 Pigmented film (black, green, orange) - pigmented film (black, green, orange). K03.61 Due to tobacco habit - the habit as a result of tobacco use. K03.62 Due to betel-chewing habit - the habit of chewing betel due. K03.63 Other gross soft deposits (Materia alba) - more abundant relative soft Proposition (white matter). K03.64 Supragingival calculus - supragingival stone. K03.65 Subgingival calculus - subgingival stone. 6 K03.66 Dental plaque - plaque. K03.68 Other specified deposits on teeth - unspecified deposits on teeth. K03.69 Deposit on teeth, unspecified - unspecified deposits on the teeth. According to the localization: • supragingival • subgingival The structure and properties: • cuticle • soft dental plaque: - Pellicle - Dental plaque - Soft plaque - Food waste • dense dental plaque

7
The enamel surface of the tooth to erupt is covered with an organic membrane, which is called the cuticle. Its thickness is about 1 micron. Immediately after the eruption of the tooth wears the cuticle, preserved only in the cervical area. Naked cuticle loss after the enamel is surrounded absorbs oral fluid and its components on the surface. Therefore, the composition of the pellicle repeats mineral and organic content of the oral fluid. The pellicle found the remains of microbial cell membranes, but active microflora in it. The first layers are detected 20 minutes after cleansing the surface of the pellicle. Pellicle formation begins with the interaction of acidic groups salivary glycoproteins with Ca2 + ions enamel, while the major groups of glycoproteins are reacted with phosphate hydroxyapatite. Puff pellicle structure determines the difference of the charges in the bowels and on the surface, which gives the properties of semi-permeable membrane pellicle. Pellicle differentiates flows macro- and microelements of enamel and enamel, ensuring its trophism, maturation and remineralization. On the other hand, it plays the role of an accomplice pellicle caries, since the uneven surface of its outer layer organizes selective attachment of microorganisms (S. sanguis adhesion increases and decreases - S. salivarius), and glycoproteins and minerals pellicle used for microbial growth medium. Pellicle always present on all tooth surfaces in contact with saliva, but being thin and transparent, can be detected only by means of natural (food, tobacco) and artificial (chromogenic bacteria resin and tar dye components drugs) dyes. Dental plaque - translucent soft non-mineralized substance adjacent to the pellicle. Mechanisms of formation of dental plaque: 1. Initial colonization 2. Rapid bacterial growth 3. Secondary colonization During the initial stages of colonization occurs attachment of microorganisms to the pellicle: Step 1. electrostatic interaction between the protein pellicle and surface structure of microbial cells. The role played by the first settlers in the norm representatives protective microflora (S. Mitis, S. Sanguis, S. Intermedius, S. oralis) .But in the situation associated with the risk of tooth decay, they can get ahead of S. Mutans. Step 2. Mechanical attachment of microbial cells to the pellicle by special membrane protrusions (pili) 3. Stage. Create irreversible chemical bonds in proteins and the surface of the microbial cell surface glycoprotein pellicle. About 50% of the total number of microorganisms that form plaque have caries labile young persons of S. Mutans, it is facultative anaerobes. Very important is the ability of S. Mutans to the processing of carbohydrates, which final product is lactic acid.

8
After 12-24 hours from the start of microbial attachment of the second phase: the bacteria - Pioneers isolated plaque matrix substances that stimulate an active reproduction of microorganisms adjacent environment begins "rapid growth of bacteria." Microbial plaque grows in breadth and upward, increasing their biomass at the end of the first half days. It is called mature or late plaque. If within 2-3 days of plaque is not destroyed by its internal environment becomes more anaerobic. It starts the update phase. Biochemistry plaque depends on the oxygen in its deeper layers, so after 48 hours in the plaque increases the proportion of obligate anaerobes capable of production of cytotoxic substances and plaque can acquire properties less pathogenic for hard tissues of the tooth, but dangerous for periodontal health. Soft plaque - a loose, porous substance consists mainly of processed food residues and water. Plaque can be quite voluminous, but it does not have the structural organization and reliable mechanisms with the underlying layers of compounds, therefore, are not strong. The waste products of the microflora of plaque irritate the gum tissue, causing halitosis. If there is a soft plaque on the enamel surface for a long time, it condenses and organizes close ties with the plaque, pellicle and securely together with them on the tooth. Thick plaque food dyes can stain in yellow brown tones, sometimes - dark brown (smokers), green (chlorophyll using chromogenic bacteria) or black (with the participation of chromogens, or in the presence of iron) color. Plaque is the basis for the formation of supragingival stone, which is formed by impregnating the plaque oral liquid minerals. For the detection of dental plaque is used: - Inspection, - Inspection after drying the tooth surface air jet - Sounding - Examination after coloring Staining is necessary to detect dental plaque. Plaque can be seen without staining, but this procedure helps to accurately account for the amount of fat and more convincingly to discuss with the patient the level of hygiene of his orifice. Most of the dyes used nonspecific react with any organic substrate: Matrix plaque bacterial cells remains of food, components of saliva, oral mucosa, vermilion border, the skin, etc. An exception is fluorescein sodium, which becomes visible (yellow) only in those areas where the sorbed dye layer to form a significant, i.e. in areas with dental plaque and only under ultraviolet light through special filters. There are red (erythrosine, magenta) blue (methylene blue, gentian violet) Brown (Bismarck Brown, pp Schiller-Pisarev) dyes and mixtures thereof.

9
There are "double" indicators, combining and malachite green, erythrosine, which, depending on the age and the pH of plaque or stain it red (fresh patina) or blue (old plaque) color. From an aesthetic point of view, it is important to distinguish between persistent and non-persistent dyes. It includes unstable p-ry containing the compounds of iodine (Lugol solution, pp Schiller-Pisarev), because they are volatile, coloring disappears after 10-20 minutes. This is useful in cases where the diagnosis is assumed only dental plaque and motivation of the patient, but not hygienic procedure. To conduct professional oral hygiene or for training individual tooth brushing is advisable to use resistant dyes. The dyes to detect plaque. 1. The solution Schiller-Pisarev: Composition: Potassium Iodide - 2.0 g iodine crystal - 1, 0 g. distilled water - 40.0 ml staining method plaque: applique cotton ball. Mechanism of staining: Iodine + glycogen polysaccharides = yellow-pink color. 2. Lugol solution: Potassium iodide - 2.0 g crystalline iodo - 1, 0 g, distilled water - 17 ml. A method and mechanism are the same as in the previous dye. 3. Lugol solution with glycerol: Potassium iodide - 2.0 g crystalline iodo - 1, 0 g, Glycerin - 94.0 g distilled water - 3 ml. 4. Methylene blue: - 1% aqueous solution, Movement: sorption: blue-blue color. 5. The ink tablet: - Erythrosine red, Method: chew the tablet. Movement: sorption: dirty red. 6. 6% alcohol solution magenta primary: magenta main - 1, 5 g, 70% ethyl alcohol - 25 ml. Staining method: 15 drops in a glass of water of 0.75%, an energetic orificewash for 30 seconds, the excess dye is removed by rinsing the orifice with water. Movement: sorption: color from pink to crimson. The index score hygienic condition of the oral cavity. For the evaluation of the index hygienic condition of the orifice is used many indexes. Most common among them are OHI-S (JC Green, JR Vermillon, 1964) and PLI (Sylness, Loe H., 1964). Defining Index OHI-S is carried out by a dental probe. Evaluate the buccal surface of the teeth 16 and 26, lip 11 and surface 31, lingual face 36 and 46 in

10
the presence of hard and soft dental deposits, wherein the teeth should not be decayed. To study the probe is set parallel to the axis of the tooth, and start to promote it zigzag movements from the occlusal surface to the neck, marking the level at which there is a plaque. The following assessments: 0 - no plaque; 1 - Plaque covering less than 1/3 of the tooth surface; 2 - Plaque covering 1/3 to 2/3 of the tooth surface; 3 - plaque covering more than 2/3 of the tooth surface. Plaque index (DI-S) is calculated as follows: The sum of the 6 teeth DI-S = ----------------------------------- 6 Indicator 0,0-0,6 points to good oral hygiene, 0,7-1,8 - satisfactory and 1,9-3,0 indicates poor hygienic condition. Tartar evaluation index (CI-S) is also carried out as plaque: 0 - no stone; 1 - supragingival stone on the third surface of the tooth; 2 - 2/3 supragingival stone surface of the crown, or some parts of the subgingival stone; 3 - supragingival stone covering more than 2/3 of the tooth surface and gingival stone encircles the neck of the tooth. Plaque index was calculated by the same formula as plaque. OHI-S = DI-S + CI-S Evaluate simple hygiene index (OHI-S) for the following values: 0-0.6 good oral hygiene; 0.7-1.6 satisfactory; 1.7-2.5 unsatisfactory; Over 2.6 - poor oral hygiene. Topic : Subjects and means of individual hygiene of an oral cavity. Toothbrushing methods. Oral hygiene Health (Gr. Hygiene - healing, bringing health) - a branch of medical science that studies the effect of environmental factors on human and develop the optimal requirements for the implementation of human life. For dentists oral hygiene - the science and practices that reduce the amount of dental plaque to a level safe for fabric teeth and periodontal marginal. There are individual oral hygiene and professional. Under the personal oral hygiene understand the activities that a person spends on their own, usually at home. Methods for cleaning teeth: Standard Test Method for brushing teeth. Dentition conditionally divided into several segments: molars, premolars (if any) and the front teeth on each side. (Turns 4-6 segments). Teeth cleaning is carried out at not closed tooth rows. Brush at an angle of 45 degrees to the surface of the tooth. Begins to clean the buccal surface of the teeth of the maxilla left (segment 1), which operate sweeping brush 10 movement, then gradually extend to all other segments (10 movements for each segment).

11
After that, clean the palatal surfaces of the upper teeth, passing through the segments from left to right, making each segment of 10 sweeping motions. The next step is cleaning teeth cleaning chewing surfaces of molars and premolars. Cleaning is carried out by scraping movements of the chewing surface in the direction of orifice. It is necessary to make movements 10-15 on each side. In the mandible, tooth brushing is carried out in the same sequence. First, on the buccal and lingual and then at the end on the chewing surface of the teeth (from left to right). When cleaning the palatal surfaces of the upper incisors and the lingual surfaces of the lower brush is perpendicular to the dentition. The procedure for cleaning must end massage the gums, which is carried out at the serried ranks of dental toothbrush in a circular motion with the capture of the teeth and gums, moving from left to right. Method Leonard. The toothbrush is a perpendicular to the surface of the teeth, producing a vertical movement in a direction away from the gum to the crown of the tooth. Vestibular surface of the teeth cleaned at dental serried ranks, palatal - if not closed, chewing movements clean the brush back and forth. This method avoids damage to the gums. Bass Method. Bristles angled 45 degrees to the axis of tooth, partly penetrate the gingival sulcus and interdental space. Clean the vestibular and oral surfaces of the teeth produce vibrating motion without movement of the bristle ends. The chewing surfaces of pure movement back and forth. This method allows you to thoroughly clean the cervical area of molars. FONES method. When serried ranks of tooth brush bristles positioned perpendicular to the vestibular surface of the teeth, perform a circular motion. Speaking and chewing surfaces of your teeth cleaned by the same movements when not closed tooth rows alternately on the upper and lower jaw. This method is used in patients who do not have periodontal disease. Method Reiten. (1970) The brush is placed parallel to the axis of the tooth at the beginning and at 90 degrees to the axis of the tooth at the end of the movement. Produced roll off traffic from the gum to the crown. The chewing surfaces of teeth purified brush movement back and forth. Method Smith Bella. (1948)

12
Toothbrush set perpendicular to the chewing surface. Motion toothbrush repeat movements when chewing food: pushing and rotating, the brush head moves to the gum, slides over it and move on to the next tooth. Stillman method. (1933) Toothbrush set at an angle of 45 degrees to the axis of the tooth and maximize press down on the gingival margin to the visible anemic gums. Then it held a weak rotational movement to restore blood flow in the gums of the site. The lingual surfaces of the teeth are cleaned, placing the brush parallel to the axis of the tooth. Chewing surfaces clean movements, directed perpendicular to the plane of occlusion. Method Charter. (1922) Toothbrush set at an angle of 45 degrees to the gingival margin. Carry out a circular, shaking and vibrating motion to the bristles penetrate into the interdental space. This method is recommended for massaging the gums. This method is used for the prevention of recurrence after treatment of inflammatory periodontal disease: gingivitis, periodontitis. Means and items of hygiene, for the "cleaning" between the teeth are called - intradental. They help to protect against tooth decay on the contact surfaces of the teeth where a toothbrush can not penetrate. Also, do not give intradental funds deposited plaque and prevent inflammation of the dental papilla. Hygiene of oral cavity are divided into major and minor Key: - Toothbrushes; - Dental floss (dental floss). Utilities: - The toothpicks; - Brushes; - Irrigators; - Brush for language. Toothpaste - a complex multi-component system for cleansing, deodorizing and providing a favorable prophylactic and therapeutic effects on the tissue of the tooth. Basic ingredients that are currently used in toothpastes, are as follows: abrasives binders, wetting agents, blowing agents, flavored, preservatives,

13
dyes. This complex may also contain active additives. Toothpastes, depending on their composition can be divided into hygienic and curative and preventive (anti-inflammatory and anti-caries). The main components of hygienic toothpastes are abrasives, gelling and foaming components as well as dyes, fragrances, and substances enhancing palatability paste. Abrasive material - this is the main ingredient in toothpaste, which provides cleaning and polishing action. The most important requirements for abrasion: chemical inertness, low adsorption capacity with respect to other components of a toothpaste good wettability, well controlled abrading capacity with respect to tooth enamel. Currently used as an abrasive, precipitated calcium carbonate, or chalk, silica, insoluble phosphates, aluminosilicates, and certain other compounds. Chalk is the most traditional abrasive dentifrice. It provides good quality of cleaning the tooth surface. Another undoubted advantage of chalk is its availability and low cost. Disadvantages include chalk inevitable interaction of fluoride ions present in the toothpaste, with free calcium ions, which leads to the formation of insoluble calcium fluoride and uncontrolled decrease in the concentration of active fluorine. Furthermore, natural chalk can not be used as an abrasive for children's toothpaste, due to its high abrading ability. Here are the maximum allowable index value RDA (Radioactive Dentin Abrasion) - enamel abrasion index according to ISO 11609 - toothpastes, for various social and age groups: toothpaste for children - 20-30, pastes for adults - 80-100, paste smoking - 120-150. RDA values toothpastes, which contain a variety of abrasives: Chalk - 60-250, SiO2 - 10 - 150 Al2O3 - 120 - 150 Ca2P2O7 - 90-125. Thus, the minimum value of the RDA for chalk is much higher than the maximum value of RDA, allowed in toothpastes for children.

14
Control systems make it difficult to chalk abrasiveness foreign impurities inevitably present in the natural limestone - the feedstock for the production of chemically precipitated chalk. Calcium also interacts with the Cretaceous surfactants forming part of pastes and reduce their activity. Modern chemical technology offers an alternative to the Cretaceous as abrasives in fluoride toothpaste synthetic silica. Silica meet all safety requirements for food and pharmaceutical products are well compatible with all other components of toothpastes, does not reduce the activity of preparations and fluorinated surfactants, antibacterials, vitamins and other supplements. In addition, the synthesis of silica by a controlled structure provides a material with a narrow particle size distribution, which allows the development of toothpastes originally schedule their abrasiveness. In toothpastes widely used foaming agents, particularly surfactants. Depending on the type and quantity of surfactant may be toothpastes foaming or not foaming. The most effective foaming paste. They have a high cleaning power, easy to wash away the remnants of food, well remove plaque. Hygiene toothpastes have only a cleansing and refreshing effect. Until recently, this group of funds broadly representative domestic paste "orange", "Mint", "Kharkiv", "Family", "Olympus", "phosphine", "Laika", "Artek" and children's toothpastes "Moidodyr" "Children", "Berry", "Strawberry" and others. Currently made pasta «Vita-hygienic." Therapeutic and prophylactic toothpastes have a preferential effect on the tissue of the tooth, periodontal and oral mucosa. Accordingly, part of which is intended for use in the prevention of tooth decay, and part - in the treatment of periodontal disease and mucosa. Anticaries toothpastes. Modern ideas about the origin and development of dental caries identified the main properties of toothpastes for caries prevention: the ability to strengthen the mineralized dental tissues and prevent the formation of plaque. The success achieved by the introduction of the toothpastes fluorine, phosphorus, calcium, and antibacterial agents. One of the leading methods of caries prevention is the enrichment of fluoride toothpaste. In many developed countries, 95-98% of produced toothpastes contain fluoride. As a source of active fluorine is used in toothpastes sodium monofluorophosphate, sodium fluoride, and components thereof, aminofluorides.

15
Research caries preventive action toothpastes have shown that regular use of them decreases the growth of tooth decay in children by 15-35%. According to the National program of prevention, the active fluoride toothpaste should not be less than 500 ppm for preschoolers and varies from 1,000 to 1,500 ppm in the paste to the adult population. Of the fluorine compounds are used in toothpastes, sodium monofluorophosphate, sodium fluoride, tin, indium, organic fluorine compounds - amingidroftoridy, quaternary ammonium fluorides. The optimum fluorine content of the toothpaste - 1000 ppm - provides NaMFP 0.76%, or 0.24% NaF, 0.4% or SnF2, or 0.15% aminofluorides. If you paste more than 500 ppm of fluoride required to specify: do not use for children younger than 2 years; prevent ingestion in children under 6 years. The need to use the optimal amount of fluoride due to the possibility of fluorosis and enamel opacities at very high concentrations. In order to enhance dental hard tissues, and their recovery in the toothpastes used mono- and di-substituted phosphates, salts of calcium, sodium and calcium glycerophosphate, calcium gluconate, zinc oxide. So, toothpaste "Pearl" and "Arbat" contain calcium glycerophosphate. It is known that, applied topically, it helps to strengthen the mineral lattice calcified dental tissues, and activates the processes of remineralization. The composition of paste intended to affect the periodontal tissue and oral mucosa administered biologically active substances - chlorophyll compounds, extracts and herbal extracts, enzymes, trace elements, mineral salts and vitamins. Salt toothpaste beneficial effect on the mucous membrane, improve circulation, metabolism, prevent the formation of soft plaque. The high concentration of salts in the pastes is enhanced outflow of fluid from the inflamed gums and has some analgesic effect. To salt toothpaste is "balm", which includes curative brine known for its healing properties Kuyal'nitskogo estuary, "Pomorin" that contains brine Pomorie estuaries. Flavors and foaming properties of salt pastes are different, but they all have a slightly salty and good cleaning action. For toothpaste, used in the treatment of stomatitis, is "Boroglitserinovaya", which actively influences the fungal flora of the orifice. Toothpastes "Berry", "Amodent" provide an antiseptic effect. In the treatment of fungal stomatitis can be successfully applied toothpaste "Propolisovaya."

16
Soda toothpastes. Soda has traditionally been used by dentists for the treatment of certain diseases of the oral cavity. Soda toothpaste is neutralized with acid, maintain a normal pH, reduce inflammation of the gums, effectively clean the teeth. The most famous toothpaste "Blend-a-med soda bikorbanat", "Aquafresh soda bikorbanat", "Colgate soda bikorbanat", "Silk Becking soda", "Unident Becking soda", "Dental Dream Becking soda", "Mildfresh Becking soda "No domestic counterparts. Toothpastes for sensitive teeth. Pastes contain potassium, helps to eliminate the symptoms of hypersensitivity hard tissues on contact with cold, hot, sweet, sour stimuli. The effect of potassium salts is enhanced when formulated pastes are administered drugs that strengthen the tooth enamel (fluoride, calcium glycerophosphate, hydroxyapatite). Examples of toothpastes for sensitive teeth can serve as a "Sensodin-F", "Sensidin-S", "Oral-B Sensitive", "Aquafresh Sensitive", "Elmeks Sensitive", "el-ce med Sensitive", "Elka Dent Sensitive -3 "," Lacalut Sensitive "," Biodent Sensitive "," Sensigel "," Elgiflyuor "no domestic counterparts. Toothpastes with the addition of herbs. Herbal extracts and essential oils are used by a wide variety of biologically active substances in their composition. This alkaloids, glycosides, volatile, saponins, vitamins, flavones and flavonoids, enzymes, trace elements, hormone and other substances. Toothpaste "Forest", "Eureka", "chlorophyll", "Emerald", as well as pasta, which contain derivatives of the plant world - "Ira", "daisy", "Biodont", "new", "Nutcracker" "Asa", "Vitosha-F» with chamomile extract, "Health" with sage extract, "Health" with an extract of calamus, "Health" with chamomile extract have a favorable effect on the oral mucosa and periodontal: suspend bleeding gums, promote cessation suppuration and reduce inflammation, improve metabolic processes in periodontal tissues and oral mucosa. Whitening toothpastes. Almost all major manufacturers have in their assortment a whitening toothpaste. Examples: "Colgate sensational purification active oxygen", "Aquafresh whitening", "el-ce med Brilliant Weiss", "Blend-a-med healthy white with microbeads." Manufacturers recommend whitening toothpastes for daily use. As the active components in these pastes are used peroxy compounds, and their content is strictly limited to cosmetic directives of the European Union: hydrogen peroxide - not more than 0.1%. The mechanism of action of these pastes is as follows: Reinforced abrasion (along with the silica used calcium carbonate, sodium, aluminum oxide (microgranules), characterized by a greater degree of abrasion); action of peroxide compounds and acids: calcium peroxide, citric acid; effect of pyrophosphate that prevent the formation of plaque.

17
It is important to distinguish whitening toothpastes from bleaching systems such as "New Weis", "Dental White", "Rembrandt," "Opalescence". Bleaching systems typically comprise 10-30 times more peroxide compounds (hydrogen peroxide, carbamide peroxide) may contain chlorine compounds prohibited for use in toothpastes. Children's toothpastes. The vast majority of children's toothpaste - fluorinated. According to WHO recommendations, children's toothpaste should not contain flavoring fragrances, as children from 2 to 6 years old swallow when brushing your teeth up to 70% paste, children from 7 to 14 years - 30%. Moreover, there is evidence of the appearance of mild fluorosis in children with uncontrolled use of fluoride toothpaste in the first years of life. Therefore, on the packaging of children's fluoride toothpaste, be sure to indicate that the use of such pastes for children under 6 years old is held under the supervision of adults. Apply with a brush on a small amount of paste necessary. Examples of children's toothpastes: Children's toothpastes without fluoride are recommended for children 2 to 6 years old, living in regions with high concentration of fluoride in drinking water or in the stages of learning brushing teeth "putts", "Silk fo Kids", "Bambino", "JUST pho Kids." Children toothpaste containing fluoride 500-1000 ppm used in children 6 to 12 years old: "Blend-a-med Blandy Gel", "Tera honey Junior", "Kolodent Junior F", "Dream Children," "Vitosha-F ", "Snow White". Children's toothpaste with fluoride content of 1000-1500 ppm applied 12 years: "Blend-a-med Junior Gel", "Colgate Junior Gel", "Pepsodent Kids" children's toothpaste firm "Linda", "Good morning", " Good evening, "the company" Aroma ". Exhibit pronounced antimicrobial antiseptic paste with special additives, which are introduced for preservation against toothpastes microflora and reduce the activity of the latter in the oral cavity. Triclosan - a drug with a clearly marked antibacterial effect. Triclosan is characterized by high efficiency at low concentrations, a wide spectrum of action, lack of negative impact on human health. In toothpaste triclosan is widely used since the mid-1980s. not only as anti-bacterial, but also as an anti-inflammatory agent («Denta Vit», «Health triclosan"). Chlorhexidine - is used in dentistry for more than two decades and is recognized by experts as the main chemical means to combat plaque. It refers to surfactants of the cationic type, a broad spectrum antibacterial activity, low toxicity to humans and a pronounced ability to bind to plaque and mucous membranes. Its range of effects including Gram-positive and Gram-negative bacteria, yeasts and

18
some lipophilic dermatomitsetami viruses antimicrobial activity is membrane-active character. The preparation has the ability to adsorb on negatively charged surfaces such as the cell walls of bacteria, the enamel surface, and the contact with saliva and oral mucosa, which retains its antibacterial effect within a few hours. A relatively new form in dentistry are dental gels, which combine the properties of a solid and a liquid. Features of the structure of the gel allow to include in its composition even chemically incompatible substances. Gels with a high fluorine content is used in applications for prevention of caries, with the optimal number - dentifrice. Cleansing action gels are expressed at less than toothpastes. High anticaries effect they have due to the diffusion of substances from the gel into the saliva and from the saliva - in the teeth. By means of gels are «Fluodent», «Elgifluor», «Fluocaril», «Profluorid geele», «Lawefluor», «Elmex». For hygienic oral care in the prevention of dental diseases can be used toothpaste. These tools eliminate the unpleasant odor, so they tend to be used as a rinse after eating or brushing your teeth. ("Ideal", "Eucalyptus", "freshness", "Peppermint", "flora", "Lemon"). For a water-alcohol solution which they are based, added various kinds of flavors (vanilla, scented oils, etc..). The chewing gum. Mandatory condition - the lack of sugar. It is not recommended to chew food, as it stimulates the production of gastric juice, which contributes to irritation of the gastric mucosa. You can use a limited amount of time after a meal - 10 minutes. Chewing gum increases salivation and thereby improves the cleaning of the surface of the teeth plaque, has a deodorizing effect. However, remember that frequent chewing can lead to hypertrophy of the masticatory muscles. The toothbrush is the main tool for removing microbial plaque from the teeth and gums. Currently, there are many models of toothbrushes. Each consists of a toothbrush handle and working parts - head to the bushes planted in her bristle. Available types of toothbrushes different shape and dimensions of the heads, arrangement, density, length and quality of the bristles, the size and shape of the handles. For making use different bristle fiber. Natural bristles is within the fiber cavity rough edges not rounded tips, it is difficult to clean from bacteria, has a high degree of abrasion. Synthetic bristle (nylon 612 taypecs) without a cavity within the fiber has a smooth lateral surface, rounded ends, has antistatic properties which do not allow the fluff deposited on the fiber does not injure the periodontium. Synthetic bristle brush is characterized by a low degree of wear and lasts longer.

19
The size of the toothbrush chosen individually. The working part of the brush should capture 2.5 tooth length and in width approximately equal to the height of the crown. Adult - 22-28mm length, width 10-13mm. For children - 20mm length, 10mm width. The effectiveness of the use of toothbrushes and correct individual selection depends on the so-called rigidity of the brush fields. There are 5 degrees of hardness of toothbrushes: a very tough, hard, medium hard, soft, very soft. Very soft brushes are designed for children at the stage of learning oral hygiene. Soft - for patients with the presence of acute inflammation of the oral mucosa and periodontal tissue. High degree of hardness - for patients with pathology of hard tissues of the tooth caries and non-carious origin and with chronic periodontal disease. Hard brushes are designed for people with healthy teeth and periodontitis. It is very hard - for patients using metal prostheses. Abroad, this classification is somewhat different: 1. Soft - Soft - for people with diseases of the hard tissues of the tooth and the mucosa. 2. High rigidity - Medium- for all. 3. Hard -Hard-to beneficiaries of prosthetics and / or having an increased tendency to form plaque and calculus. It should be remembered that it is very hard and stiff brush if used improperly can injure gums and abrade the hard tissues of the tooth. Brushes soft and medium hardness are most effective as their bristles are more flexible, clear gingival sulcus and better penetrate the interdental spaces. Very soft brush is recommended to use in treatment of periodontal disease (after curettage and other surgeries), when the state of the gum does not allow a vigorous brushing of the teeth, but it can result in the formation of pigmented spots on the teeth. Consequently, the normal state of periodontal and tooth brushes recommended soft and medium hardness. Currently available in the brush bristles with different quality in different parts of the head in the center it is more rigid, the edges -soft. These brushes are well cleaned teeth and gingival margin, without damaging it. Hard and soft bristles

20
may alternate along the working part of the brush: with the hard shorter than the soft hook that reduces the risk of injury to the mucous membrane of the gums. An important role in the design of the brush has a frequency and shape bush planted in the form bundles. It is estimated that less than bushes, the better cleanability. Bush planted in the form bundles parallel forms - the most simple and effective. Often produce with a thick brush bush planted in the form bundles, which hampers their hygienic maintenance, and also reduces the cleaning effect on the proximal surfaces of teeth. Widely advertised abroad (Germany, Norway) mutually inclined bush planted in the form bundles (V-shaped). However, studies have shown that the V-shaped landing Cousteau has no significant advantages over the parallel (Sagrmacs R., 1974). Also frequency bush planted in the form, there is a concept "chaircut brush fields and bushes." Most modern brush has a toothed surface in which the bristles in the brush boundary sit lower than central. This configuration allows the focal length of the bristles get into tight interdental spaces, but if the bristles are stiff, the cleaning power have only the central bristles, as they are not flexible and do not allow lateral bristles touch the tooth surface during brushing. E.A. Fanning (1967) believes that well remove plaque without damaging the mucous membrane of the gums, soft bristle brush with a smooth surface chaircut. On sale are contoured brush surface of the brush fields. Special clinical studies have shown that the use of these brushes can be traumatic, as when cleaning the entire burden falls to a small number of speakers of a bundle of bristles. Brush handle is usually made from propylene, corresponds to the size and anatomical shape of the palm for convenient retention. Care toothbrush and its replacement Toothbrush easily contaminated, so it must be kept absolutely clean. After brushing should be rinsed under running water and carefully cleaned of food debris, plaque and toothpaste. Keep it should be so that it can dry well, for example, in a glass head up. This significantly reduces the amount of microbes in the brush and the bristles retain their rigidity and form. Do not stack the brush in a closed case. As soon as signs of wear bristle brush should be replaced, because its cleaning power becomes insignificant. Studies have shown that regularly used toothbrush bristle imitation must be replaced every 1-2 months. As a result of extensive clinical observations were observed difference in cleaning and abrasiveness properties of artificial and natural bristle (Kardel R. Et. Al. 1971). According to our observations, the quality of the dentifrice and do not affect the shape of the toothbrush handle. Electric Toothbrushes The electric toothbrush head automatic movement (vibrating or rotating) are carried out by the motor,

21
situated in its handle. The frequency of movement of the electric toothbrush is quite high, about 50 movements 1. Relevance Electric toothbrush in oral hygiene today estimated differently. Studies have shown that electric toothbrushes have special advantages. However, the smaller the patient is informed about the technique of brushing your teeth when using a simple brush, the more benefits they revealed in the application of an electric toothbrush. Electric toothbrush due to the effect of novelty stimulates the desire, especially in children who regularly look after their teeth. Automatic movement of the brush free the patient from the need for proper motion, which by the way, often unknown to him. In this regard, the use of an electric toothbrush may be recommended for children, the disabled or patients with poor dexterity (skill). In modern models of electric toothbrushes have a sensor that shuts off the engine at higher safe level of pressure in order to prevent injury the gums and dental necks. However, even a thorough adherence to the rules of oral hygiene using a toothbrush does not allow to achieve qualitative pellicle cleaning the side surfaces of the teeth and between the teeth, so you need to use in addition to a conventional toothbrush other means: dental floss (dental floss), toothpicks, special toothbrushes, interdental stimulants. Dental floss - floss - applicable to all, used to cleanse the proximal surfaces of the teeth. Dental floss (dental floss) are designed for a thorough removal of plaque from hard-to-proximal surfaces, as well as the removal of food debris stuck between the teeth. Flossie consist of the finest nylon or other polymer fibers, connected by mechanical twisting or gluing. Flossie available in packages that exclude contamination inside the thread used. Packages specified length, thickness and other characteristics of the yarns. The main components of dental floss are microcrystalline wax (if the thread voskovannaya) OMAT glycerin, hydrogenated castor oil, saccharin or saccharin acid or mint flavoring agent, and a number of components. 3.2.1. Classification floss The shape of the cross-sectional shape: - Round - Flat (flat threads and interdental tape) Round thread recommended for patients who have wide gaps between teeth. The flat yarns are designed for those who have teeth closely contact with each other. Interdental tape - is a broad thread audio than in its composition does not differ from the floss. Interdental tape is approximately three times wider than dental floss. The interdental tape intended for cleaning teeth with large gaps (diastema, tremmy). Surface treatment: - Waxed

22
- Unwaxed Waxed thread have a high sliding ability to easily penetrate into the interdental spaces, durable against rupture and pulping. Waxed thread recommended for patients with tight interproximal contacts with a large number of seals. Unwaxed yarns have better cleaning power as compared with waxed, as using lose shape. This provides greater contact with the surface of the tooth. The fibers effectively remove plaque from interproximal space. Unwaxed pitey advantage is the possibility for the consumer to determine the quality of cleaning the characteristic creaking of the floss clean the tooth enamel. In the presence of impregnation. -without impregnation - Impregnated Flossie impregnated with therapeutic and prophylactic compositions have in addition to cleaning, the additional effect due to the properties of the drug: strengthens tooth enamel in remote places (sodium fluoride) inhibit the growth of pathogenic microflora (chlorhexidine), dezodiruyut (menthol), and others. By destination. - For personal use - For use in the dental office Terms of use dental floss 1. From the tape is pulled to 30-40 cm of floss. 2. Most of the floss is wound on the middle finger of his left hand. 3. The rest of the floss is wound on the middle finger of his right hand so that the thread gap between the fingers was about 10 cm long. 4. Floss pull the index finger and thumb and gently introduced into the gap between the teeth. 5.Chistitsya tooth surface moves toward the cutting edge (chewing surface) 6.snizu up for the lower jaw, 7.sverhu down to the upper jaw. tooth. 8.After this floss under the gums derived from, but not removed from the interdental spaces. 9. In the same way to clean the surface of the adjacent tooth. 10. After cleaning, the floss is output from between the teeth. 11. The procedure is repeated on all the teeth. 12. The exhaust section of floss is wound on the middle finger of his right hand. 13.S finger of his left hand while unrolling the new section of the thread. After cleaning, the floss is output from between the teeth. 14. Just remember one thing: part of the skin, cleanse one contact surface of the tooth, it must not be used again. 40 cm is enough for it.

23
Topic : Methods of professional removal of tooth deposits. Stomatologic tools for removal of tooth deposits. Standardization. Removal of tooth deposits by means of hand tools. Professional oral hygiene - a system of science-based treatment and prevention activities carried out by medical personnel, aimed at improving the organs and tissues of the oral cavity, as well as on the prevention of the onset and progression of dental diseases. Before you proceed with the occupational health, it is necessary to hold antiseptic. Antiseptic orifice (rinse or irrigation) is a mandatory procedure before and after the removal of dental plaque. Among the chemical substances used as preservatives can be used: - Oxidizing agents (0.5 - 1.5% hydrogen peroxide, 0.1% aqueous solution of potassium permanganate); - Halogens (1% aqueous solution iodinol); - Detergents (0.02 - 1% ethonium, 0.05% chlorhexidine digluconate, 0.025% decamethoxin); - Phenolic antiseptics (Listerine, triclosan); - Nitrofuran derivatives (0.02% furatsilin, 1: 25000 furazolidone); - Heavy metal salts (0.25% copper sulfate, zinc lactate). In addition, you can use conditioners («Plax», «Healing Balm" and others) and tincture of herbs (calendula, chamomile, St. John's wort, and others.) With an alcohol content of up to 7%. Next step: anesthesia. Removing pain sensitivity is conducted in accordance with the indications and contraindications. For this purpose, use a local application, infiltration or conduction anesthesia. Pain relief allows the doctor to more carefully and efficiently perform purification procedure teeth. For application anesthesia can be used 10% lidocaine spray, gel or ksilonor lidoksor and so on. D. Infiltration and conduction anesthesia drugs most often performed on the basis of 4% articaine with adrenaline, mepivacaine 3% or 2% lidocaine. Removing dental plaque may be carried out by various methods: chemical, manual, electro-mechanical, rotating tools for corner or a special tip, as well as with a surgical laser. The effectiveness of the professional removal of dental plaque depends on the knowledge and manual skills of the doctor from his integrity and experience. The basic principles of the removal of dental plaque: a) a detailed medical history of somatic diseases; b) determination by the probe and special colorants kind of dental plaque (soft or hard), their number and location (supragingival or subgingival); c) choose adequately the means and method for removing dental plaque; d) requires a good light;

24
d) should be followed in accordance with the ergonomic position of the doctor-patient assistant; e) the right to fix the tools, use appropriate intra- and extraoral support, protect surrounding tissue from damage; g) take into account the principles of systematic and consistent removal of dental plaque, to cover all surfaces of the teeth of the selected group; h) in accordance with the diagnosis to assign a specific date subsequent visit for the prevention and maintenance therapy. For softening density mineralized dental plaque and partial removal of it, using a number of chemicals, usually acids. There are special types of medications or Detartrol ultra Depuration Solution, which are applied to the tooth surface for 30-60 seconds, then washed away and tartar is removed by the usual method. Manual removal of dental plaque. There are special toolkits for manual removal of dental plaque, which include different types of instruments, the main ones are: periodontal probes sickle scalers, hooks, curette Gracey, excavators, files, chisels. Using probes detect periodontal pockets, their length and depth, detect tartar, overhanging edges of fillings and crowns, the presence of cavities. To remove tightly bound to the tooth scalers used stones, hooks (or universal curette), excavators, files and chisels. Gracey curette - are thinner and tools intended for finishing the surface of the tooth, namely the root surface for smoothing and removal of granulation tissue. A distinctive feature of the scaler and hook (universal curettes) of Gracey curettes is the angle between the front surface and the bottom third of the rod. For hooks and scaler angle is 90, and for curettes Gracey - 70. The distinctive feature of the scaler tip of the tool is sharp, while the hooks and curettes have a rounded end. Files (rasps, files) are rarely used because of the difficult adaptation to the uneven surface of the tooth and limited tactile sensations. These tools have a circular or oval base with a plurality of cutting edges. Designed for scraping the mineralized deposits, sometimes they are used to remove the overhanging edges of fillings and dentures. Excavators have only one cutting edge. The blade of the excavator is at an angle of 100 degrees and the handle is bent at an angle of 45 degrees. They are effective for use on a flat surface of the root. Bits are designed to remove plaque from the proximal surfaces of the teeth, especially the closely spaced, where the use of other instruments is difficult. The tool has two cutting edges chamfered at an angle of 45 degrees. The chisel is introduced from the front surface of the pusher movement and clean stone in the interdental spaces. Manipulation is carried out at a strictly horizontal position of the patient because of the risk of aspiration. In the exercise of professional removal of supra- and subgingival dental plaque must be used correctly and accurately sharpened tools. The acuteness of the hand tool, you can visually identify if the cutting edge is the working part of

25
reflecting visible light from a lamp, it needs sharpening. If you use a blunt instrument the doctor presses on him too, cement or deforming the dentin of the root. Furthermore, it should comply with an adequate angle between the tool and the work surface roots: it should not be less than 45 degrees or above 90 degrees, as this will depend on the efficiency of removal of dental plaque. Depending on the depth of marginal periodontal tissue damage and the number of dental plaque in one session can be treated with one to four quadrants. Carrying out the procedure to be consistent: the tool moves to the next tooth surface only after the treatment of the surface, moving slowly from tooth to tooth particular quadrant. Grinding and polishing of teeth. After the removal of dental plaque and electromechanical hand tools root surface is sufficiently rough, which promotes more rapid fixation of bacterial plaque. Therefore, after the instrumentation should be grinding and polishing. It is not always possible to completely remove all the dental plaque with hand tools and electro. The most remote places on the surface of the teeth are grooves on the root surface, deep intraosseous pockets, furcation, the concave surface of the teeth. In these areas, shows the use of fine grain diamond burs, special elections PERIO-PRO (Busch), and EVA-angle handpieces (1000-1500 rpm). In addition, tools such as periopoliry (P.Romhild, Mikrona), which represent a system for smoothing and polishing of the root surface. Periopolir - a contra-angle handpiece, which is inserted into a tool for removing dental plaque type curette. For scaling and smoothing the root surface, a special tip (Profin® Directional System), which uses a special nozzle. The nozzles can be used as a polishing plastic nail files of different sizes. Together with the abrasive paste, they are introduced into the interdental space and a reciprocating motion amplitude of 1.2 mm, free-surface of the tooth from plaque. Overhanging edges of fillings, crowns, inlays, the excess material in the gingival region - the most common causes of inflammation in periodontal tissues. As a rule, the removal of a number of difficulties. To facilitate this process can be applied nozzle Profin Lamineer®, because this system provides a variety of additional Files for polishing, finishing and polishing in interproximal and subgingival areas of the tooth and root surfaces. Tools for polishing the tooth surface. After the removal of supra- and subgingival dental plaque and smoothing the root surface polishing is carried out. The aim is to provide smooth polish tooth surfaces by eliminating the retention points. The smooth surface of the tooth can be achieved by using special rubber cup, end brush, polishing strips, dental floss and polishing pastes. Soft rubber cup may be of different shape: hollow protrusions (ribs), with jumpers, back spiral projections on the inner or outer surface, and also have a different stiffness: soft, medium hard rigid. Polishing of surfaces of teeth
26
produced at a rotational speed 2000-5000 rpm. Rubber cup is pressed against the tooth in such a way that its edge unbent and it penetrates into all recesses and subgingival area of the teeth. For the polishing of occlusal surfaces is convenient to use rotating brushes with polishing paste. You can not use the brush in the subgingival region. Polishing interproximal surfaces produced by coating aluminum oxide polishing strips, dental floss, or flat strips with a polishing paste, polishing rubber cones for the dental handpiece, floss. A good clean and polish the tooth surface can be achieved by using the tip of the SET. Prophy-Leader. To remove non-mineralized dental plaque apply professional toothpastes (CCS paste, Cleanicdent (Hawe Neos Dental), Detartrine (Septodont), Detartrine fluor (Septodont), Detartrine Z (Septodont), Magnasil (Young), Nupro (Dentsply), Prophylactic Past ( Pro¬ducts Dentaries), Protect (Butler), Pro-xyt RDA 36 (REA 4) (Vivadent), Proxyt RDA 7 (REA 2) (Vivadent), Rembrandt (Butler), Remot (Lege Artis), Sitsalicine (Pierre Rolland ), Polident (VladMiVa). For polishing the tooth surface after removal of dental plaque using a low abrasive paste, and to remove pigmented plaque is advisable to apply highly, moderately and paste. As abrasive therein generally used silica, zirconium oxide, zirconium silicate, pumice powder, calcium phosphate. Polishing paste may contain not contain fluorine. Without fluoride paste used to polish teeth before their encapsulation, formulation seals made of composite materials. For ease of use available SingleDose (single dose) polishing pastes or paste is placed in the annular clamp on the thumb. The most modern machines for cleaning the surfaces of the teeth are air-abrasive system (hand-blaster). The main representatives of: Air-Flow (EMS), Prophyflex (KaVo), Prophy-Jet Cavitron (provided with the exhaust system of the fence powder (Dentsply), ProphyEST (Geosoft Pro). Indications hand-blasters: - Polishing of the tooth surface after scaling; - Cleaning of the tooth surface before fixing brackets; - Quality cleaning fissures of the chewing surface; - Removing deposits from stained tooth surface (plaque smoker, etc.); - Cleaning of the surface enamel before sealing fissures; - Treatment of cavities for better adhesion of the enamel to the restorative materials. Irrigation oral antiseptics completed the professional removal of dental plaque. After the removal of dental plaque doctor should monitor the quality of the event with a probe, mirror and air spray. Consistently and accurately on all surfaces visible each tooth treated and, if necessary, a second removal of dental plaque at the same or a return visit. Fluoride prevention. This step is very important in the process of occupational health, as after polishing the surface of the enamel layer is removed, enriched with fluoride. The tooth surface must be covered with fluorine-containing drugs:

27
Du-raphat (Woelm), Duraphat (Colgate), Bifluorid 12 (VOCO), Fluocal (Septo-dont), Fluor Protector (Vivadent), Fluoridin (VOCO), Ftorlak (Russia) Belak F (VladMiVa).
Topic : Chemical and hardware ways of removal of tooth deposits. Evaluation test of removal of tooth deposits. Electro-mechanical removal of dental plaque. There are three main types of electromechanical instruments: acoustic (pneumatic) scalers; magnetostrictive ultrasonic scalers and piezoelectric ultrasonic scalers. At the heart of the ultrasound removal of dental plaque is the use of the following mechanisms: mechanical treatment, irrigation, cavitation, acoustic turbulence. Pneumatic scalers are of low frequency and operate in the range of 3000 to 8000 cycles per second. These tools work with compressed air, which is fed from the turbine of the dental unit. This type includes tips KaVo SONICflex LUX, MicroMega Air ScalerR, Titan-SR. Acoustic instruments provide elliptical vibrational movement of the tool tip, making all the active surface of the nozzle. Manual pressure on the tip should be very easy, because the nozzle is pressed firmly against the surface of the tooth dampens operating vibration. Magnetostrictive devices (Dentsply Kavitron, Simplifay Systems, Inc., Sonatron; PERIOgin Odontoson) operate in the range of 18,000 to 45,000 cycles per second with the mandatory water-cooled. Inside the tip of the tool is a plurality of plane metal plates with a certain orientation or ferromagnetic core, which can expand and contract under the influence of a magnetic field generated by passing an electrical current. The vibrational motion apex nozzle range from linear to circular and allow all the surfaces (side, rear, front) to be active. Piezoelectric scalers (Pieson Master, system 402 (EMS), Amdent US 30, Pro-Select, Suprasson P-Max, etc.) Are in the range of 25,000 to 60,000 cycles per second and as a magnetostrictive devices require water cooling. To cool the tool may be used not only distilled water but also pharmacologically active ingredients such as chlorhexidine digluconate, furatsilin, hydrogen peroxide and others. The principle of reproduction based on stretching vibrations of the crystals in the field of alternating current (piezoelectric effect). The movement of the working part of the tip or linear reciprocating, making active, only two sides of the nozzle. In addition, it should be remembered, the more pressure on the tip, the less efficient operation of the instrument. Modern instruments for professional oral hygiene is the system Vector. It allows you to: carefully remove supra- and subgingival dental plaque, effectively irrigate the periodontal pockets, destroying bacteria and endotoxins from the root surface, to carry out gentle polishing of the surface of the teeth, dentures and implants, periodontal pocket.Vector deepithelialization surface (Durr-Dental) - Ultrasound is device with an oscillation frequency of about 25,000 Hz having various types of tips and nozzles. Special tip with a metal ring ensures no

28
movement of the nozzle in the horizontal plane and in a vertical (along the axis of the tooth). The tool works exactly linear, parallel to the tooth surface without rotation and oud-ditch. The Vector system in metal and flexible tools of the modified polymers. Metal tools are designed to remove plaque and micro-dissection, and carbon - for gentle removal of supra- and subgingival plaque from the surface of the cement root implants. Removing over-and subgingival dental plaque is almost painless. The method of application is similar to the Vector system with ultrasonic scalers. If necessary, for the treatment of the tooth surface can be used grinding and polishing slurry (hydroxyapatite particles with a grain size of about 10 microns), which is served in the pulsating emission nozzle. Carborundum abrasive-containing slurry (grain size 40-50 mm) is used for the preparation of dental hard tissues. When the ultrasonic scaler is recommended: 1 before work through skip water for 2 minutes to wash; 2. The need to use a mask and goggles to protect; 3. The use of adequate cooling; 4. to carry out quality control of hand tools; 5. The shape and size of the nozzles must conform to the contours of the tooth surface to be treated; 6. The tool for removal of dental plaque is necessary to carry back and forth parallel to the surface of the tooth with a light hand pressure. Laser systems. In recent years, in medical practice, have been widely used laser devices. The restorative dentistry could be used erbium and neodymium lasers (with wavelengths from 1064 nm to 2900 nm). The principle of operation is based on the effects of laser ablation (evaporation area of tissue to a predetermined depth) and vaporisation (evaporation of water). The most optimal data from the erbium laser (Er: YAG laser). For removal of dental plaque apply different length nozzles in accordance with the depth of the periodontal pocket. Operating mode with detection allows for treatment in those areas where dental plaque found. Tissue after laser treatment relatively sterile. Hand-blaster very effectively removes dental plaque and plaque from hard to reach areas of the tooth that is carried out by feeding a mixture of water and sodium bicarbonate under pressure on the tooth surface. Note that hand-blasters used exclusively for cleaning enamel, because the effects of air-powder mixture of cement and root dentin, periodontal tissue and also gives rise to serious defects of hard and soft tissues. Do not use hand-blasters in fillings made of composite materials. Hand-blasters use is contraindicated in patients with sodium-free diet, with severe diseases of the respiratory tract in patients with infectious diseases (hepatitis, HIV), pregnant women and patients receiving affecting electrolyte balance medications. Chemical means for removing dental plaque have been widely used since the beginning of the last century. Sulfuric acid was used, and later - hydrochloric

29
acid, nitric acid, trichloroacetic acid, lactic acid, ammonium hydrogen fluoride, ftorglyutsinsernuyu acid. In view of the possible harmful effects on the hard tissue of the tooth acid dissolution method mineralized dental plaque not widely used. However, now firmly fixed to soften mineralized dental plaque before their final disposal, especially on movable teeth, apply a number of chemicals, mainly acid. Often, for the simultaneous staining of tartar and antiseptic action in such compositions is added iodine. Depuration Solution (Products Dentaires, Switzerland) contains in its composition hydrochloric acid (20%), iodine (0.5%), chloroform (20%). Detartrol ultra (Septodont) comprises concentrated hydrochloric acid (20%), iodine (0.75%), chloroform (20%). Softening gel production VladMiVa (Russia) is made on the basis of natural polysaccharide and also contains acid. For the dental plaque the softening compositions have also been proposed, including ZN hydrochloric acid (1.7), a saturated solution of hydroquinone (10), ascorbic (0.1) (DG Myaskovsky., 1978), and 50% trichloroacetic lactic acid. Preparations applied to the surface of mineralized dental plaque with a cotton swab or applicator for 30-60 seconds. (Sometimes longer), then washed and tartar is removed by conventional methods. Topic : Endodontics. Structure of a coronal cavity and root Canals of various groups of teeth. Endodontics- section restorative dentistry, considering the therapeutic manipulation of nature in tooth cavities, root canals and adjacent tissues in diseases of the pulp and apical periodontitis. This is the science of morphology of tissues contained in the pulp cavity and root canals (endodont), as well as surrounding tooth (periodontal); features of the emergence and current pathological processes in the pulp and periodontium, diagnostic methods and treatment. Objectives: 1. mechanical cleaning of root canals 2. Preparation for sealing Tasks: 1. Remove the pulp from root canals, or its dissolution 2. Remove predentin infected with root canal walls 3. The machining of the root canal, the final preparations for sealing 4. The pharmacological treatment of root canals From a clinical point of view is isolated as the concept of Endodontics (pulp-apical complex) - a complex of tissues, including the apical periodontitis, the bone tissue in the periapical region, pulp and predentin about pulp inner dentin layer, which are connected to each other morphologically, functionally and clinically.

30
Tooth cavity (cavum dentis). Her crown of (cavum coronale) in its structure follows the anatomical shape of the tooth crown and root canal shape - the shape of the roots of teeth. Tooth cavity communicates with periodontitis through the main root canal and additional root canals. Opening up additional Canals mainly in the apex or in the middle third of the root, as well as in the field of bifurcation (in the molars). In addition to knowledge of the anatomy of different groups of teeth is necessary to consider age-related changes in the structure of the cavity of the tooth, as well as the impact of pathological processes in its state. Tooth cavity in temporary teeth of children is quite big, broad canals and apical openings. Throughout a person's life shape and size of the cavity changes as a result of plastic odontoblast activity - dentin builders. Often the elderly crown of the tooth cavity is reduced in size, and sometimes disappears. The orifices of canals and Canals themselves become narrowed. The root canal is divided into Konev, middle and apical (apical) part. The root portion, usually the most extensive, adjoins directly to the orifices of the Canals. In the apical part there are various options for the canal structure: its restriction, apex bend, branching (ramificatsion), the lateral position of the apical foramen, merging multiple Canals, unclosed apical hole, physiological or pathological root resorption. In practice, endodontics, referring to the apex of the tooth root and the root canals, identified a number of clinical and anatomical concepts. Radiological tip root- most distant from the crown portion of the tooth root on the radiograph. Anatomical tip (anatomical apical foramen) - a place of a root canal out to the surface of the tooth root. If the anatomical apical foramen is located on the top of the root, then we say that the anatomical and radiological apex coincide. However, in most cases, due to the curvature of the apical part of the root canal, anatomical apex is on the side of the root surface at a distance of 0.5-1 mm from a radiological apex.
Fig.1 Types of apexes.

31
Physiological tip (physiological apical foramen) - a site of physiological narrowing of the root canal at a distance of 0.5-2 mm from the anatomic apex. Physiological tip is the boundary between the root pulp and periodontal tissues. Important from a practical point of view is the presence of small branches from the root canal, usually in the apex. These branches form in the apical delta apex and called the deltoid branches. They usually depart at an angle from the trunk and can end blindly or communicate with periodontitis. Additional Canals are located in the middle or the cervical portion of the root, called Pulp-periodontal anastomoses. Unbranched root canal have only 33% of the roots of teeth. 50% of roots have only one branch, and the remaining 17% - multiple branching. Histologically endodontist consists of a mineralized portion (dentine) and non-mineralized portion (pulp) and functional - anatomical system called "pulp - dentin". The structure of dentin includes: • odontoblasts with their processes, • dentinal tubules, • peritubular dentin, • intertubulyarny dentin • whipcord dentin. Fabric pulp is loose connective tissue. Along with odontoblasts in its composition includes as fibroblasts that replace and protective cells. As the largest population of cells, fibroblasts appear in the active and inactive form and produce, in particular, preliminary stages, and extracellular matrix collagen. Replacing cells of undifferentiated mesenchymal cells referred to in form indistinguishable from fibroblasts. They replace both odontoblasts and protective cells and take over their function. Currently, nine distinguished 9 types of buildings root canals (Fig.2,tab.1): Type I structure - the presence of a root canal, which begins at the bottom of the pulp chamber and continue to the root apex. This type of root canal is most common in the central upper incisors. Type II - is represented by two root canals, which open at the bottom of the pulp chamber, and near the top of the root, they merge into a common lumen and end one apical foramen. This structure is most often are the root system of the lower incisors and upper premolars.

32
III type structure - at the bottom of the pulp chamber and the orifice opens one single root canal during root canal bifurcates common in the lower third of the root into two independent Canals, which are then at the apical portion and newly combined total open apical aperture. Such a configuration is seen in side groups teeth IV type- characterized presence of two independently-reaching root canals in one root, which in the apex opening two separate apical foramen. This type of root canals are lower molars, premolars and lower incisors. For endodontic treatment is fairly simple anatomical situation V type - the presence of a single canal within the same root, but near the apex common canal is divided into two independent stroke. This type often I observed the lower premolars. In some clinical situations it can be difficult to handle both the branches to the apical foramen. VI type of structure - opens two Canals at the bottom of the pulp chamber of the tooth, which are roughly in the middle of the root length are combined into a common canal and then again divided into two independent course and opened two apical foramen. This structure is a complex system of Canals for processing and a complete cleaning of the entire root canal lumen. VII type - has the following structure: a root canal begins at the bottom of the pulp of the tooth chamber, then tapers to the middle of the root as an hourglass, then it is divided into two independent Canals, which are in the apical part of the re-united in a common canal, and directly from the apex again branch out and opened two apical foramen. This type is very complicated and there is in the teeth of the lower jaw side groups. VIII type - is characterized by the presence of 3 independently-reaching root canals in one root. This type of structure is very simple and is found in various morphological groups of teeth. However, the frequency of the spread of this type is not very large. Type IX - 3 characterized by having root canals throughout which are then combined into a single canal. This type is found in the third molars.
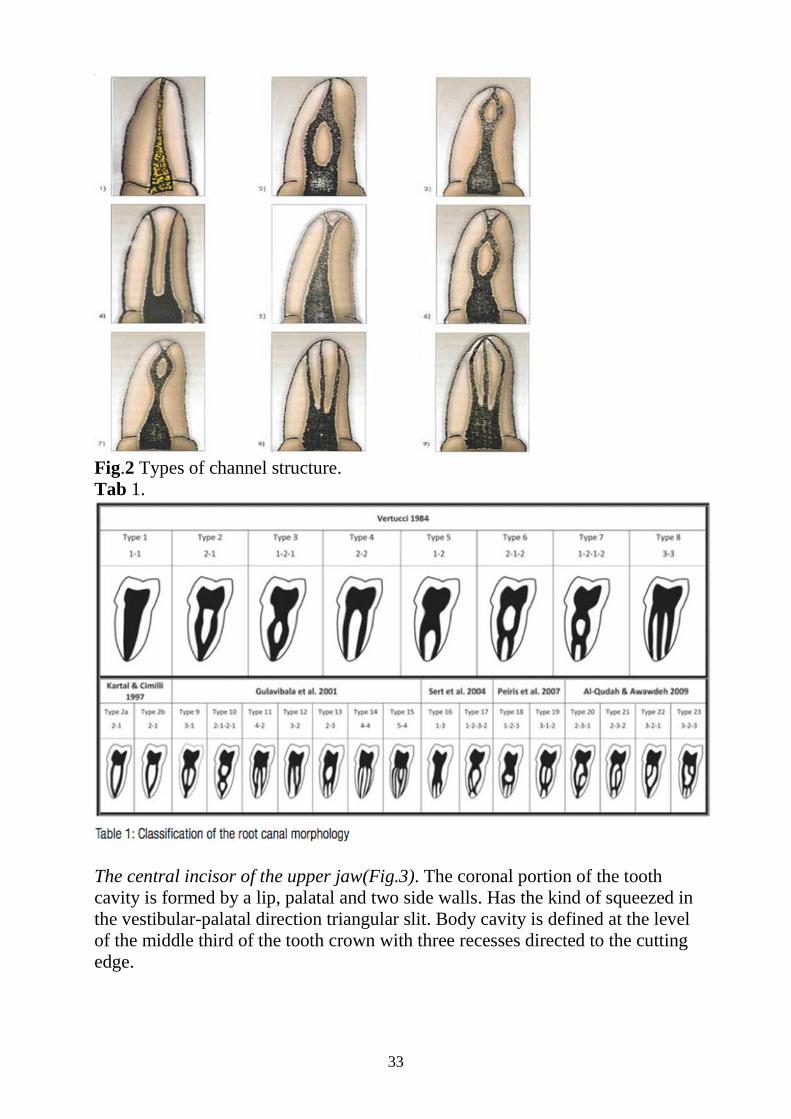
33
Fig.2 Types of channel structure. Tab 1.
The central incisor of the upper jaw(Fig.3). The coronal portion of the tooth cavity is formed by a lip, palatal and two side walls. Has the kind of squeezed in the vestibular-palatal direction triangular slit. Body cavity is defined at the level of the middle third of the tooth crown with three recesses directed to the cutting edge.

34
Fig.3 The central incisor of the upper jaw Towards the top coronal cavity narrows and becomes a single root canal. Canal central incisor of the upper jaw wide, in cross-section - a rounded shape. The average tooth length 25mm (23,5-25,5mm). It has one root canal, and 1 in 100% cases. Note: The canal is 75% direct. If it is rejected, the most in the vestibular or distal direction. There is a narrowing of the wellhead, which is often hard to find. The lateral incisor of the upper jaw(Fig.4). The coronal portion of the tooth cavity has the form of a triangle, widest part is located in the neck of the tooth. tooth cavity defined by the Code of the middle third of the crown line, has three recesses directed to the cutting edge, respectively his hillocks. The canal is compressed laterally, somewhat narrower than in the central incisors. A cross section of the canal extends in the vestibular-palatal direction and has an oval shape. Often, the tip of the root and root canal is slightly curved in the palatal direction. The 1% additional canal occurs.
Fig.4 The lateral incisor of the upper jaw The average tooth length 23mm (21-25mm), 1 root canal preferably 1 to 99% of cases. Note: The canal is only 30% direct.

35
In 50% of the canal is deflected distally. There is a marked narrowing of the wellhead. Canine of the upper jaw(Fig.5). Tooth cavity has a spindle shape. At the level of the middle of the crown cavity expands, and it is small at the neck. Then the tooth cavity without visible boundaries goes into a root canal. In cross-section it has the form of an oval, elongated in the bucco-palatal direction.
Fig.5 Canine of the upper jaw Often the root and root canal at the apex are bending in the lateral or palatal direction. The longest teeth an average of 27mm (24-29,7mm), is always 1 and 1 root canal. Note: direct root canal occurs in 40% of cases, distal deviation of its - in 32% and 13% in the vestibular. The central incisor of the lower jaw(Fig.6). The cavity of the tooth resembles a triangle. Body cavity of the tooth is located close to the cutting edge. The coronal portion of the cavity smoothly into the root canal. Since the root of the tooth is compressed in the mediolateral direction, tooth cavity in cross-sawing has an oval or slit-like shape. The canal is narrow, often poorly passable. The average length of 21mm (19-23mm) 1 co-root and 1 canal in 70% of cases, the root of 1 and 2 Canals in 30% of cases.
Fig.6 The central incisor of the lower jaw Notes: The two Canals, which are located in the vestibular-oral direction, a frequent phenomenon in the lower incisors. Well the sealed one canal on the X-ray masks unfound in the apparent progression of periapical pathology. Note that the lingual canal is located quite close to the lingual surface. Therefore, the

36
access cavity to capture the lingual canal, should go down to the neck of the tooth. If one canal, its shape in the apical third of the slit-like, if two - round The lateral incisor of the lower jaw(Fig.7). tooth cavity is somewhat larger cavity central incisor tooth. Canal oval, elongated in the vestibular-lingual direction-NII. The main difference from that of the central incisor, lateral incisor that the wider canal, the two Canals are often found - lingual and vestibular. The average size of 22mm (20-24mm) in 67% and 1 1 root canal 20% - 2 and the root canal 2, 13% - 2 root converging at the apex.
Fig.7The lateral incisor of the lower jaw Notes: the development of the access cavity should be considered vestibular-axis of the first, second, third and mesio-axial tilt in the second and third lower teeth. Vestibular-axial tilt and pronounced curvature of the vestibular surface can lead to the inclusion of access to the cavity of the cutting edge of the lower front teeth. Canine of the mandible(Fig.8). The cavity of the tooth, as a tooth itself, a spindle shape. The vault has a recess, respectively, cutting the Mount. At the level of the middle of the crown cavity expands. The greatest size it reaches the neck of the tooth, a smooth transition to the root canal. A cross section of the canal has an oval shape, is compressed in the mediolateral direction. Often the two Canals found - buccal and lingual. The average length of 26mm (23,3-28,5mm), 1 co-root and 1 canal in 94% of cases 1 and 2, the root canal of 6%.

37
Fig.8 Canine of the mandible Notes: direct root canal and can produce a curvature in the apical part laterally to 20% and / or labial 7%. The canal in the orifice and the middle third of the oval and compressed in the mesial-distal direction. canal axis as that of the lower incisors, passes through the cutting edge, particularly in the elderly, which may require the inclusion in the access cavity. The outlines of the access cavity elongated in the direction of gingivitis-incisorial. The first premolar of the upper jaw(Fig.9). The coronal tooth cavity is compressed in the anteroposterior direction, the slit is shaped elongated in the bucco-palatal direction. It distinguish set tooth cavity, a bottom and four walls. Body cavity located on the neck of the tooth level, has two tabs, respectively buccal and palatal Mount. Buccal protrusion is expressed more. The bottom of the cavity of the tooth has a saddle shape and is significantly higher neck of the tooth under the gum. Along the edges of the bottom of the cavity of the tooth located orifice buccal and palatal canals funnel shape. Canals impassable, but palatal canal wider, straight, buccal - a narrow, curved.

38
Fig.9 The first premolar of the upper jaw In 2.6% of cases occur three Canals: two cheek (front and rear), and one palatal. The average length of 21mm (19-23mm), and has two root canal 2 in 79% of cases, one root canal, and in 18%, 3 of the root canal 3 and 3%. Note: The most common variant of the tooth meets the two diverging roots up to 60%. Single rooted version with one or two, ending with one apical opening Canals found 18%. The bottom of the cavity of the tooth is often significantly lower neck. This does not change its position with age due to the deposition of secondary dentin. The second premolar of the upper jaw(Fig.10). The coronal cavity of the tooth cavity resembles the first premolar, compressed in the anteroposterior direction, it is shaped slit elongated in bucco-palatal direction. Body cavity located on the neck of the tooth level. The coronal cavity without sharp boundary passes in a straight line, a well-traversed the root canal, the orifice of which is located in the center of the cavity. In 24% of cases of the second upper jaw premolar is often two Canals (palatal and buccal), and which can be opened to connect one or two apical holes. The average length of 22mm is 56% in one canal and one root, 42% - 2 2 and the root canal, a 2% - 3 3 and the root canal.

39
Fig.10 The second premolar of the upper jaw Note: in all the manuals main option A5 is represented as a single-canal and single rooted tooth. However, canal 2 is observed in almost half of cases. This fact is underestimated and is a cause of serious, do not fit in the radiological picture, complications. According to Ingle et al. (1985) one or two Canals, one terminating apical hole found in 75% of cases. in other cases, to the separate Canals are in the tooth. The curvature of the canal on the mount type is observed in 21%, distal deviation Corp. - 27% As and B4 - low position of the bottom of the pulp chamber. The first premolar of the mandible(Fig.11). The coronal tooth cavity oval, tapering in the anteroposterior direction. In the cavity of the arch, there are two depressions greater corresponds to a larger buccal Mount, less - lingual. The largest size of the cavity is observed below the neck of the tooth. Gradually tapering the tooth cavity becomes a passable canal. There may be two Canals (lingual and buccal), and which can be opened to connect one or two apical holes. The average length of 22mm (20-24mm), is the root of 1 and 1 canal in 74% of cases, or 1 root and 2 Canals converging at the apex in 26% of cases.
Fig.11 The first premolar of the mandible Note: The occlusal surface because of mild lingual protuberance sharply inclined lingual. which may lead to perforation of the buccal root surface when

40
not simply finding the pulp chamber. Well defined buccal horn. Pulp chamber and canal oval, squeezed in mesial-distal direction. The curvature of the apical part of the distal most side (57%). Note that quite often there are class IV Weine Canals. By Valued (1978) such a variant occurs in 24% of cases. The second premolar of the mandible(Fig.12). The coronal tooth cavity round shape. The roof of the cavity, there are two uniform recesses respectively buccal and lingual Mount. Gradually tapering cavity of the tooth crown goes to one well-traveled canal. The average length of 22mm (20-24mm), in 97% of cases, is the root of 1 + 1 canal, 3% - 1 root and 2 Canals.
Fig.12 The second premolar of the mandible Note: The pulp chamber and root canal oval squeezed in the mesial-distal direction. Canal Direct, can not have a bend in the distal apical third 40%, and / or vestibular 10%. Apical foramen including It may be in the 3 mm from the apex. Given the small slope of the distal portion of the distal tooth and root curvature, should form the cavity access with mesial displacement. A cavity in the tooth expressed wellhead constriction. The first molars of the upper jaw(Fig.13). The crown of the tooth cavity, repeating the shape of the crown, distinguished vault cavity floor and four walls (buccal, palatal, front and rear). A cross section of the tooth cavity has a diamond shape. Body cavity is located on the border of the upper and middle third of the tooth crown has recesses respectively chewing mounds. Larger cavities corresponds to a larger anterior buccal protuberance. The bottom of the cavity of the tooth is slightly convex and is located on the neck of the tooth at or slightly above it, below the gumline.
Fig.13The first molars of the upper jaw

41
At the bottom of the tooth cavity of the orifice has three root canal anterior buccal, and palatal distobuccal which combine to form a triangle. The base of the latter is formed by a line connecting the orifice buccal canals, and the top - palatal. The longest palatal canal is usually a straight, well-traveled, oval. Cheek Canals are narrow, crooked, it is usually difficult for tooling. Often, the anterior buccal root has a fourth canal. Normally it has a narrow orifice, difficult to access for tooling. In some cases, it is isolated, and sometimes in the apex merges with the main canal and ends with one apical foramen. The average length of 22mm (20-24mm) has 56.5% of the cases 3 and 3, the root canal, in 42.5% - 3 and 4 of the root canal, a 2% - 4 and 5, root canals. As a rule, the fourth canalorifice is located on the line connecting the orifice of the buccal and palatal canal at a distance from the buccal 1.5-2mm. Note: the pulp chamber has a triangular rather than rectangular shape, the corners of which form a orifice of the canal. The bottom is convex. If there is a fourth canal, it is located in the buccal-mesial root. In 70% of cases, these Canals are connected to the apex. The longest straight palatal canal, but in 55% of cases in the apical third of the buccal side is deflected. Buccal, distal canal is the shortest, has a distal direction. In the trifurcation additional Canals are observed in 18% of cases. Access cavity should be formed in the mesial half crown. The second molars of the upper jaw(Fig.14). There are 4 variants of the structure of the tooth cavity, respectively, 4 variants of its anatomical shape of the crown. The most common of the 1st and 4th options for the structure of the tooth cavity. 1st option cavity structure follows the shape of the cavity of the first molars of the upper jaw. 2nd and 3rd variants occur more rarely. Hollow teeth in these cases has a diamond shape, elongated in the anteroposterior direction. The orifice of the canal converge and are located almost on a straight line. tooth cavity Body of the 2nd version has four recesses respectively four mounds.
Fig.14 The second molars of the upper jaw Front buccal groove is more pronounced. Body cavity in the 3rd embodiment has three recesses corresponding to the three mounds, front buccal groove and is most pronounced.

42
The 4th version of the structure of the tooth cavity has a triangular shape, respectively three hillocks form the chewing surface. Body cavity projected onto the neck of the tooth level and has three recesses corresponding to hillocks. Front buccal groove is more pronounced. The bottom of the cavity of the second molar tooth of the upper jaw is located above the level of the neck of the tooth. Root canal three: two buccal (front and rear), one palatal. Palatine canal a good pass, buccal narrow, curved, often have side openings. The average length of 21mm (19-23mm). Typically, a three tooth root canal 3 and 65% of the cases 3 and 4 of the root canal in 35% of cases. Note: tooth cavity repeating pattern above the first upper molar in a slightly different quantity. If the bottom of the orifice of the canal formed U6 nearly isosceles triangle with the apex at the palatal, then U7 obtuse triangle formed Sometimes molars meziodistal narrow in the direction of the orifice of the canal crown located on the same line. There uniform bending of all the Canals. Third molars of the upper jaw. The coronal tooth cavity is variable in structure, as well as the tooth itself. Often resembles the shape of the cavity of the tooth of the first and second molars of the upper jaw with three Canals (two buccal and one lingual). There may be more than three root canals. Often Canals are merged into one. Due to the nature of the structure and poor access third molar presents special difficulties in endodontic treatment. The average length of 18mm (16-20mm). The size and shape of roots and canals are not permanent, their number can vary from 1 to 4-6. The first molar of the lower jaw(Fig.15). The coronal cavity of the tooth has a vault, floor and four walls (buccal, lingual, front and rear). Body cavity located between the middle and lower third of the crown of the tooth and has five recesses respectively five mounds of chewing surfaces. Front buccal groove is most pronounced. The bottom of the tooth cavity has a rectangular shape elongated in the anterior-posterior direction, with a convex surface.
Fig.15 The first molar of the lower jaw Located at the level of the neck of the tooth, or slightly lower. At the bottom of the tooth cavity has a orifice of three root canals. In the front two root canal, the

43
rear - one. Sign in front buccal canal is directly under the hill of the same name. The entrances to the front lingual and rear Canals are located underneath the longitudinal fissure separating the buccal and lingual cusps. The orifice of the canal form a triangle with the apex at the rear orifice of the canal. The front Canals are narrow, especially buccal front. The rear canal is a good pass. Often the tooth has four Canals, two of which are located in the anterior root, while the other two - in the back radically. The orifice of the canal, in this case form a quadrangle. The average length of 22mm (20-24mm) has usually 2 or 3 of the root canal in 65% of cases, 29% - 4 Canals, 6% - 2 canal. Note: the pulp chamber is in the medial 2/3 of the crown, has a trapezoidal shape with a mesial wider than the distal portion. The bottom chamber is convex and is located below the neck of the tooth. The orifice of the mesial-buccal canal is at the tip of the corresponding protuberance. The orifice of the mesial-lingual canal is located between the hill and the relevant central occlusal groove. The orifice of the distal canal is projected almost crossing occlusiol furrows. The square shape of the pulp chamber indicates the need to find a second distal canal. Mesial canals often (84%) have distal curvature. Mesial-lingual canal is slightly larger in diameter and straighter than the mesial-buccal. The second mandibular molars(Fig.16). Tooth cavity resembles form tooth cavity of the first molar of the mandible. Yet the body has a cavity four recesses respectively four mounds on the chewing surface.
Fig.16The second mandibular molars Compared with the mandibular first molar tooth cavity has a smaller size and distance between the orifices of the root canal is less due to convergence anterior and posterior root. The average length of 21mm (19-23mm), has 13% of cases 2 and the root canal 2, 77% - 2 and 3 of the root canal, a 10% - 2 and 4, the root canal. Note: all the provisions given in the notes to the N6. It applies to H7. The orifice of the mesial canals H7 can start from a common slot-like opening. Both the lower molars have a significant tilt in the lingual side of an almost horizontal position of occlusal surfaces. This sometimes leads to perforation of the tooth on the lingual side. The third molar of the lower jaw. The cavity of the tooth on the structure is variable, follows the shape of the tooth. Often resembles the structure of the

44
tooth cavity of the first or second molar of the lower jaw. However, the number of Canals is not constant due to the variety and number of root distribution. Often the roots grow together to form a single canal. The average length of 18mm (16-20mm). Roots in most cases 2, but they often merge into one conical. However, the size and shape of the roots are not constant. There are age-related features to change the structure of the pulp and the coronal pulp. The pulp of the tooth is loose connective tissue that fills the tooth cavity and root canals. The pulp of the tooth is composed of cells and the intercellular substances - basic material and fibrous structures. Connective tissue pulp but different from other connective tissues in the body by the presence therein of odontoblasts sites, and lack of mast cells. The root portion of the pulp with age becomes more fibrous, with fewer cells than the crown of the pulp. The coronal portion of the pulp is dominated by diffuse, and the root of the - Beam collagen. With age in the dental pulp is developing sclerosis of blood vessels, often reaching the sharp degree in individuals 35 years and older. With age, the hyaluronic acid content is reduced in the walls of blood vessels and fibrous structures. These two factors significantly degrade the exchange conditions in the pulp tissue. In the pulp of teeth in 40-year-olds and older patients are multiple foci of calcification, they often grow large or interconnected in a solid calcified conglomerates, which are partially or completely fill the cavity of the tooth and a root canal. Reducing the size of the cavity of the tooth, and the obliteration of the orifice of the root canal endodontic treatment difficult for patients. With age, the pulp of the tooth will be worse to resist infections and other stimuli. Tab.2Features of the structure and the number of channels of all groups of teeth Teeth Average
length of tooth (mm.)
Average length of tooth (mm.)
Average length of tooth (mm.)
Top central cutter 23 1 (100%) 1. Laterialny Canals
infrequently Top side cutter 22 1 (99.9%) 2. Apical delta often
Top canine 27 1 (99.9%) 3. Prisheechny narrowing
Top first premolar 21 1 (19%)
2 (80%) 1. Lateral Canals infrequently

45
tooth 3 (1%) Top second premolar tooth
22 1 (90%) 2 (9%) 3 (1%)
2. Apical delta often
Top first molar tooth 21 2 (15%)
3 (85%)
3. The apical part of a root is often bent nebno.
Top second molar tooth 20
1 (1%) 2 (19%) 3(80%)
1. Lateral Canals infrequently
Lower cutters 21-22 1 (100%) 2. Apical delta infrequently
Lower canine 26 1 (98%) 2 (2%)
1. Lateral Canals infrequently
Lower first premolar tooth
22 1 (100%) 2. Apical delta infrequently
Lower second premolar tooth
22 1 (100%)
3. Concavity on a mezialny surface of a root
Lower first molar tooth 21 2 (98%)
3 (2%) 1. Lateral Canals infrequently
Lower second molar tooth
20 3(1%) 2 (84%) 1 (15%)
2. Apical delta infrequently
Topic : Endodontic tools, its appointment. Principles of standardization. Work technique. The standardization of endodontic instruments used for the treatment and root canal filling, carried out in accordance with the requirements of the ISO Technical Committee. The basis of the ISO classification tool on the following characteristics: • Material of the working part; • the type of shank and the handle; • working length of the tool; • diameter of the tool; • type of instrument. WORKING OF MATERIAL Steels use biologically inert oxidized chromium-nickel steel for the manufacture of endodontic instruments. Maximum cutting efficiency and resistance to

46
deformation has a steel powder obtained by atomization into fine vacuum. This technology eliminates the ingress of micro volumes of air into the material, which ensures the formation of a homogeneous metal structure. Depending on the application of cutting edges percentage composition of the alloy components and types of additives vary. However, all the steel grades used for the manufacture of endodontic instruments, should ensure the established ISO strength values (angle deviation) and flexibility (bending moment) of the working part of the tool. Nitinol Developed in the early 1990s, a nickel-titanium alloy with 55 and 60% nickel is widely used for the manufacture of endodontic tools. Nitinol has a low bending moment and a low modulus of elasticity, which is reflected in the so-called "memory effect" - the ability to recover its original shape when significant strains. Nitinol instruments are made only by milling, which somewhat reduces the efficiency of the cutting edges canal expanders . Experimental studies have shown that the use of NiTi instruments to avoid the formation of ledges, perforations and undesirable alignments in the apical part of the root, but in some clinical situations that require the use of preformed tools (processing of additional Canals), nitinol tools ineffective. SHANKS AND HANDLES The shank serves to lock the tool in the clamping endodontic dental handpiece apparatus, and to retain the finger in manual use. Typically, the shank includes information on size and type of instrument. Tool size indicated by the color code or the number of circular scratches, tool type markings used special characters ISO There are many criteria that allow for the classification of instruments:. It is their long, flexible, form part of working, a way of actuation (manual machine), etc. However, the main one of them should be considered the appointment. On this basis the tools are divided into 5 groups: 1. In order to expand the orifice of the canal 2. To extract 2. To pass the root canal 3. To expand the root canal 4. To determine the size of the canal 5. For the filling of the root canal It should be noted that this division is rather arbitrary, as many tools can be used to perform various operations. standardization of endodontic INSTRUMENTATION Main characteristics of endodontic instruments defined standards. Most countries in the international ISO 36, 30, and apply national standards, for example, the ADA, and DIN. The ISO standard regulated shape, profile, length, thickness, limiting manufacturing tolerances, the minimum mechanical strength

47
and other characteristics of the conventional endodontic instruments installed sizes for color coding and marking the graphical symbols for different types of tools. The main element of the endodontic instrument - a metal rod with the working part. International Standard ISO regulates its parameters. The main characteristics of an endodontic instrument according to the following parameters are standard: - The total length of the metal rod can be 21, 25, 28 or 31mm (the most common tools with 25mm rod length), the length of the working part - always 16mm; - The diameter of the tip of the working part of the instrument is calculated as the projection of the cone of the working part of a plane passing through the top of the tool and perpendicular to its median axis. The diameter of the working part (thickness) is one of the most important characteristics of an endodontic instrument, expressed in hundredths of a millimeter and is denoted by the ISO number. For example, № 35 means that the diameter of the working tip of the tool is 0.35 mm. In addition, the standard provides for color coding of this parameter, for example, the tool number 35 will have a green handle.( Fig.17)
Fig.17Classification of endodontic instruments according to ISO Tab.3Color coding thickness endodontic Tool according to ISO Color of the handle of the tool on ISO № pink 06 gray 08 violet 10 white 15,45,90 yellow 20, 50, 100 red 25,55,110 blue 30, 60, 120 green 35, 70, 130 black 40, 80, 140

48
Taper of the working part of the ISO standard should be constant. It is 0.02 mm / mm or 2%. This means that for each millimeter of length of the working part of the tool diameter increased by 0.02 mm. It should be noted that currently there tools taper 04,06,08,10,12%. - Standard provides a graphical notation types of tools symbols. It will be appreciated that the symbols do not correspond to the cross sectional shape of the working part; Match the character and the type of instrument Tab.4 Classification tools by symbols
TOOLS FOR EXPANSION orifice Root Canal Tools to expand the orifice of the root canal Gates Glidden(Fig.18) - Dril narrow working part teardrop shape on a long thin rod. The length of the working part of the rod 15-19 mm. Available in a series of 6 sizes (1-6) with a combination of 050; 070; 090; ON: 130; 150. The size marked on the adapter ring (1-6). Designed to work with angle handpiece at low speed.

49
Fig.18Gates Glidden Largo (Peeso-Reamer) - Dril (Figure 19). Working with the extended part that goes into a rigid rod. The length of the working part of the rod 15-19 mm. Available in a series of 6 sizes with a combination of 070; 090; 110; 130; 150; 170.
Fig.19Largo Lengthening the working part of the tool can be used not only to expand the orifice of the canal, but also for the passage of the straight part of the upper third of the canal, palatal canals of upper molars and distal Canals of lower molars. «Beutelrock Reamer B2» - the original kanalorasshiritel company VDW. Compared with other instruments of similar purpose feature is the cylindrical shape of the working part. The tool is made of stainless chromium steel by twisting a flat blade having two cutting surfaces. It is very sharp and aggressive tool. It should only be used to process straight coronal and middle portions of the root canal. Given the very high efficiency of cutting tools, working with him should be with great care and only at low speed (450-800 rev / min). Do not use tools for curved Canals, since in this case the wall increases the risk of perforation or fracture of the tool due to the fact that its end portion can not follow the curve of the canal. «Beutelrock Drill reamer BI» company VDW - orifice spreader root canal - in contrast to other endodontic instruments are machined from solid material like

50
steel forest. It has a working part plamevidnoy shape with four cutting edges that narrows to the top of the instrument. This instrument also has the flexibility, however applicable only in the straight part of the canal. The tool is used in the corner with the tip of a small speed - from 800 to 1200 rev / min. Compared with kanalorasshiritelem «Beutelrock Reamer B2" the tool is less aggressive. It is designed to create and enhance access to the root canals. «Orifice Opener» (orifice spreader root canal) -has four-sided, tapering to the top of the working part, is available in three sizes. The manufacturer - the company «Maillefer». This hand tool for expanding wellhead thirds of the root canal. «Orifice Opener MB»(Fig.20) - reminiscent of the previous tool, but has a bullet-shaped working part covered with diamond powder. This handheld tool. Producer firm «Maillefer».
Fig.20Orifice Opener MB TOOLS FOR PASSING ROOT CANAL To pass the root canal used Dril Reamer(Fig 21,22). They are characterized by flexibility and high cutting performance instrument faces. This is largely due to a step of cutting the elongated faces. K - Reamer Dril (Dril Kerr) - produced twenty sizes: 0.08, 0.010, 015, 020, 025, 030, 035, 040, 045, 0.50 to 0.90, in accordance with ISO standards.

51
Fig.21Reamer
Fig.22 K FlexoReamer - is very flexible, which is associated with a change in pitch of the helix. Dril increased flexibility available in a series of 6 sizes of standard length. Their use is indicated for the curved Canals. K FlexoReamer Golden Medium - sized intermediate tool. Designed for a smooth transition to the next size. Available in a set of tools with a diameter of 0.12, 0. 17, 0.22, 0.27, 0.32, 0.37. Their use is almost completely eliminates the jamming of the tool and the formation of ledges in the canal. K-Reamer forside - is used for the passage of very fine Canals, especially the molars, while difficult, opening the orifice. The kit includes 18 tools with a diameter of 0.066, 0.08, 010 and 015 of the working part 15-18 mm long. «K-Reamer Deepstar» - a set of tools for unsealing the root canal. It includes a set of truncated K-reamers (15 and 18mm) with a sharp, aggressive tip. The set contains 18 tools: K-reamers ranging in size from number 20 to number 60, and two «Orifice» type tool. "The Pathfinder" (Pathfinder) is the original development company "Kerr". The compression tool has a tip, the minimum taper, sharpened cutting edges and high flexibility. It is made of stainless steel «Pathfinder» is intended for the passage narrowed root canals. Represented by the symbol "P" on the handle. Its thickness corresponds to the number 09 at ISO. A similar structure and the appointment of a "C + file", manufactured by «Maillifer / Denteply». This tool tip pressure testing pyramidal shape and polished surface increased flexural strength. Available in "C + File" in three sizes (number 08, 10, 15) and three variants of the working length (18, 21, 25mm). «Pathfinder CS» - is a company developing "Kerr". It is made of carbon steel, which gives it high strength and improved cutting ability. Due to the properties of the steel and reducing the length of the working part of reducing the risk of

52
bending or breaking the tool. Minimal taper ensures maximum transfer of pressure on the working part of the axis on the pointed tip of an aggressive tool, so «Pathfinder CS» is especially useful when passing the narrow, curved and strongly calcified root canals. The long handle provides tactile control while working in the root canal. «Pathfinder CS» is available in two sizes: K1 corresponds to the number 07; K2 - number 09 for ISO. TOOLS FOR REMOVAL OF PULP Broach(Fig.23,24) (ekstirpatsion needle) is used
Fig.23 at the initial stage of endodontic treatment for the removal of the pulp of the tooth during vital extirpation and mortalnoy. When immersed in a root canal instrument applied in a spiral pointed spikes pressed against the axial rod, facilitating the penetration of the smooth working of the tool to the desired depth in the canal. With a single turn of the instrument 360 ° spikes reliably capture pulp fibers, providing a one-stage full evacuation of soft tissue. Broach is not intended for treatment of the root canal walls, and therefore the force necessary to dispense with the introduction instrument into the canal to prevent jamming of the working part. ISO standards permit sterilization broach, however, due to the complexity of the work of purification broach re not used.
Fig.24 Broach TOOLS FOR EXPANSION Root Canal «Rasp»(Fig.25) - a tool for expansion of root canals, made of high-strength steel. The tool has the form "rat's tail". We rasp 50 has a strong little teeth disposed at an angle to the main axis. Available in a set of 7 tools. The top of the rasp is rounded and has no teeth, which allows him to move easily along the walls of the root canal, following its bends. Movement in the canal back and forth and sawing.
Fig.25Rasp K-Fi1e(Fig.26,27) (drill Kerr) - is characterized by the fine pitch of the cutting edges that distinguishes it from K-Reamer. In accordance with the standard, it

53
produced a series of 21 sizes, with long working part 21, 25, 28, 31mm.
Fig.26File
Fig.27 K-Flexo Fi1e - flexiblecanal expander used for the expansion of thin and curved canals. The set of six sizes: 0.15, 020, 025, 030, 035, 040, a working part 21, 25, 31 mm in length. K-Flexo Fi1e Golden Medium - flexible canal-extender intermediate size. The tool is used to smooth transition from one tool to the next size. Available in 6 sizes: 0.12, 0.17, 0.22, 0.27, 0.32, 0.37 of the working part 21, 25, 31 mm in length. K Fi1e nitifeex(Fig.28) - is used for the passage of a very twisted (up to 90º) and subtle Canals. This tool has a non-aggressive (blunt) tip and increased flexibility, as it is made of a nickel-titanium alloy. According to a standard issued 10 sizes: 015, 020, 025. 030, 035, 040, 045, 050, 055, 060, a working part 21, 25, 31 mm in length.
Fig.28K Fi1e nitifeex Hedstroem file(Fig.29) - Hedstrema drill is intended to equalize the root canal walls. Produced in accordance with the ISO 20 standard sizes from 08 to 0140 and a length 21, 25, 28, 31 mm. The tool can not do rotational movements performed only reciprocating.
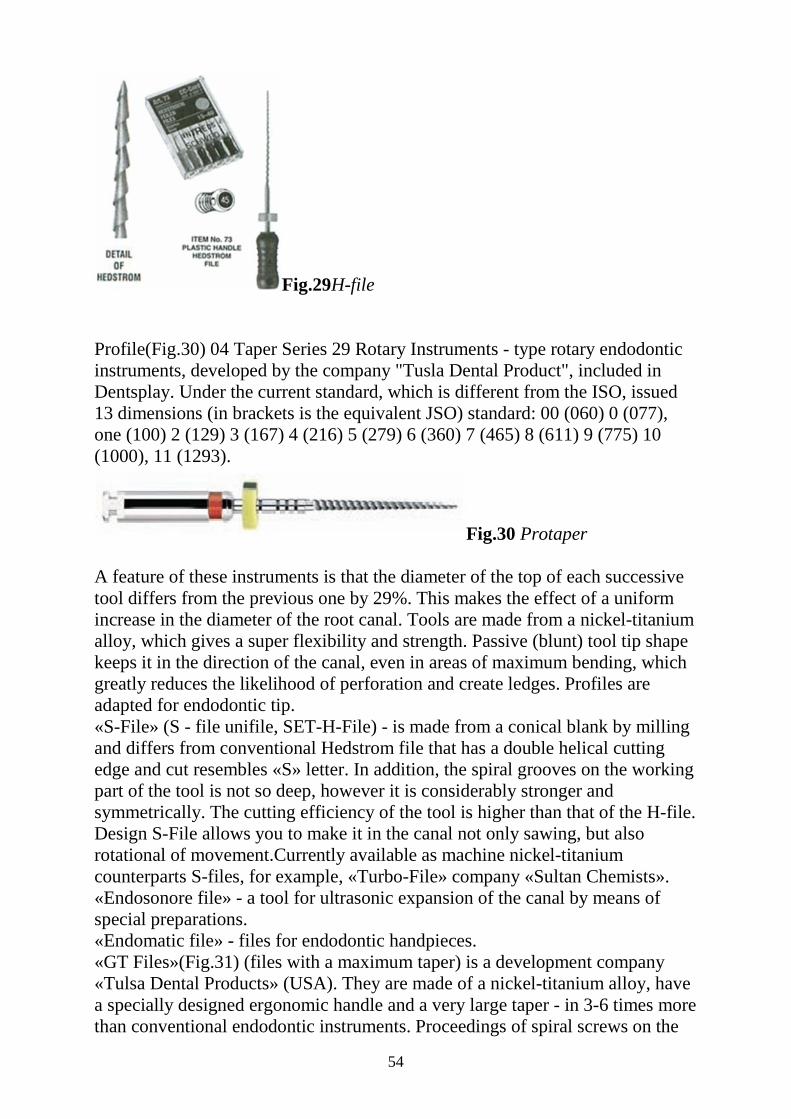
54
Fig.29H-file Profile(Fig.30) 04 Taper Series 29 Rotary Instruments - type rotary endodontic instruments, developed by the company "Tusla Dental Product", included in Dentsplay. Under the current standard, which is different from the ISO, issued 13 dimensions (in brackets is the equivalent JSO) standard: 00 (060) 0 (077), one (100) 2 (129) 3 (167) 4 (216) 5 (279) 6 (360) 7 (465) 8 (611) 9 (775) 10 (1000), 11 (1293).
Fig.30 Protaper A feature of these instruments is that the diameter of the top of each successive tool differs from the previous one by 29%. This makes the effect of a uniform increase in the diameter of the root canal. Tools are made from a nickel-titanium alloy, which gives a super flexibility and strength. Passive (blunt) tool tip shape keeps it in the direction of the canal, even in areas of maximum bending, which greatly reduces the likelihood of perforation and create ledges. Profiles are adapted for endodontic tip. «S-File» (S - file unifile, SET-H-File) - is made from a conical blank by milling and differs from conventional Hedstrom file that has a double helical cutting edge and cut resembles «S» letter. In addition, the spiral grooves on the working part of the tool is not so deep, however it is considerably stronger and symmetrically. The cutting efficiency of the tool is higher than that of the H-file. Design S-File allows you to make it in the canal not only sawing, but also rotational of movement.Currently available as machine nickel-titanium counterparts S-files, for example, «Turbo-File» company «Sultan Chemists». «Endosonore file» - a tool for ultrasonic expansion of the canal by means of special preparations. «Endomatic file» - files for endodontic handpieces. «GT Files»(Fig.31) (files with a maximum taper) is a development company «Tulsa Dental Products» (USA). They are made of a nickel-titanium alloy, have a specially designed ergonomic handle and a very large taper - in 3-6 times more than conventional endodontic instruments. Proceedings of spiral screws on the

55
working parts - the back, so the rotation in the canal virtually eliminates the possibility of jamming, and broke off the instrument. At work «GT-file" is moving into the canal without rotating to the end, it is screwed into the canal at 0.5-5 revolutions counterclockwise until it jammed in the dentin. Then the image is rotated with a rigid pressure apical clockwise by 90 ° -180 °, while a click is heard, indicating the cutting of dentin. Then, the file is screwed back into the dentin and again rotates clockwise. Thus the canal is made throughout the treatment. Described canal treatment method is called the "principle of balanced forces."
Fig.31 GT-files Another way to use «GT-files" is as follows. The file with the effort turned in a canal in a clockwise direction. Periodically, it is removed to clear the sawdust from the dentine. This method of canal processing is implemented in the system «GT Rotary Files». «GT-files" allow to produce a complete mechanical processing canal is only one instrument (typically 10-14 "standard" instruments). Total produced four manual «GT-file" with the taper 06, 08, 10 and 12. The tool selection is made depending on the anatomical structure of root and root canal. Tab.5 Taper«GT-file» Indications 06 Very narrow and / or curved canals 08 The lower incisors, upper lateral incisors, premolars
multiroot, the front Canals of the lower molars, upper molars buccal Canals
10 Palatine Canals of the upper molars, lower molars back Canals, single rooted premolars, canines, upper central incisors
12 Wide Canals Orifice Shapers - tools that have a large taper from 5 ° to 8 ° low working length (19mm). Designed for the safe preparation of direct and slightly curved portion of the canal, and the presence in an assortment of six instruments P 6,5,4,3,2,1 tops with a diameter of 0.80; 0.60; 0.50; 0.40; 0.30; 0,20mm respectively allow

56
us to consistently expand the Canals from the orifice to the apical foramen, using a technique «Crow Down». Continuous improvement of endodontic instruments, what is happening in recent times, is aimed at the realization of a long-standing dream endodontists all over the world to establish a universal and ideal for the preparation of files with a minimum number of their species. The appearance and the further evolution of nickel-titanium rotary files led to the creation of new conceptual tools Pro Taper. These tools are not in conflict with the concept of profiles 04, 06 and Jeet others. They perfectly complement the previous range, with a special purpose a singular complex preparation for traditional instruments, highly calcified, curved and «S-shaped" Canals (V.B.Dzhonson 2001.). Benefits ProTapers: - Patented progressive cone shape file has improved flexibility and exceptional cutting performance, which is especially important when working in narrow or severely curved canals. - There are few tools for the preparation of the cone over the entire length of the canal. - During Prо Тареr capture a small part of dentin from the root canal walls, reducing torsional stress and "fatigue" file, thereby preventing the possibility of breakage. - three-sided, convex cross-section tools, reduces the contact between the file and dentine of the root canal. - Specially designed tip guide. Design features that provide benefits The emergence of new tools Pro Taper made revolutionary changes in the procedure for the preparation of the root canal. Basic series includes 3 tools for the formation of the coronal part of the root canal 3 and the tool for final preparation. TOOLS FOR SIZING CANAL Root needle (round and faceted) is used to determine the cross-canal and faceted for making cotton turundas with the introduction of the drug into the canal. Available in five sizes. Depth round is available in three sizes. In addition, the verifiers are available in a set termafilov, since the definition of canal dimensions necessarily at sealing termafilom. To determine the working length of the root canal using research or diagnostic tools - the root of the needle and special endodontic ruler. Root needles (smooth broashes) are divided into smooth, with circular cross section and faceted - Miller needle.
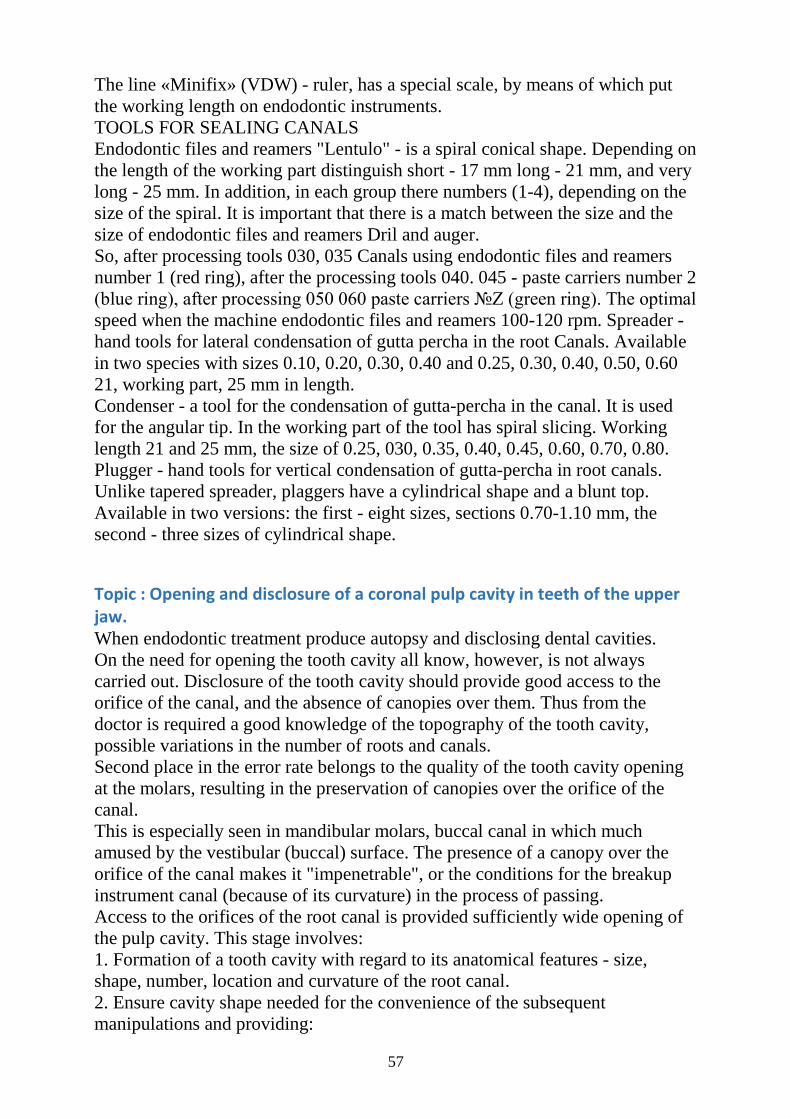
57
The line «Minifix» (VDW) - ruler, has a special scale, by means of which put the working length on endodontic instruments. TOOLS FOR SEALING CANALS Endodontic files and reamers "Lentulo" - is a spiral conical shape. Depending on the length of the working part distinguish short - 17 mm long - 21 mm, and very long - 25 mm. In addition, in each group there numbers (1-4), depending on the size of the spiral. It is important that there is a match between the size and the size of endodontic files and reamers Dril and auger. So, after processing tools 030, 035 Canals using endodontic files and reamers number 1 (red ring), after the processing tools 040. 045 - paste carriers number 2 (blue ring), after processing 050 060 paste carriers №Z (green ring). The optimal speed when the machine endodontic files and reamers 100-120 rpm. Spreader - hand tools for lateral condensation of gutta percha in the root Canals. Available in two species with sizes 0.10, 0.20, 0.30, 0.40 and 0.25, 0.30, 0.40, 0.50, 0.60 21, working part, 25 mm in length. Condenser - a tool for the condensation of gutta-percha in the canal. It is used for the angular tip. In the working part of the tool has spiral slicing. Working length 21 and 25 mm, the size of 0.25, 030, 0.35, 0.40, 0.45, 0.60, 0.70, 0.80. Plugger - hand tools for vertical condensation of gutta-percha in root canals. Unlike tapered spreader, plaggers have a cylindrical shape and a blunt top. Available in two versions: the first - eight sizes, sections 0.70-1.10 mm, the second - three sizes of cylindrical shape.
Topic : Opening and disclosure of a coronal pulp cavity in teeth of the upper jaw. When endodontic treatment produce autopsy and disclosing dental cavities. On the need for opening the tooth cavity all know, however, is not always carried out. Disclosure of the tooth cavity should provide good access to the orifice of the canal, and the absence of canopies over them. Thus from the doctor is required a good knowledge of the topography of the tooth cavity, possible variations in the number of roots and canals. Second place in the error rate belongs to the quality of the tooth cavity opening at the molars, resulting in the preservation of canopies over the orifice of the canal. This is especially seen in mandibular molars, buccal canal in which much amused by the vestibular (buccal) surface. The presence of a canopy over the orifice of the canal makes it "impenetrable", or the conditions for the breakup instrument canal (because of its curvature) in the process of passing. Access to the orifices of the root canal is provided sufficiently wide opening of the pulp cavity. This stage involves: 1. Formation of a tooth cavity with regard to its anatomical features - size, shape, number, location and curvature of the root canal. 2. Ensure cavity shape needed for the convenience of the subsequent manipulations and providing:

58
a) open access to the orifices of the canals; b) as far as possible - a direct approach to the apical foramen; c) the formation of a sealing technique applied; g) the possibility of full control over the direction of expanding tools. 3. Removal of the remaining carious dentin and restoration residues. 4. Toilet cavity(cleansing).Fig.32
Fig.32Phases of endodontic treatment Trepanation of the tooth crown is carried out in accordance with the topographic anatomy of the tooth known to and confirmed by the diagnostic X-ray diffraction. Trepanation of the upper front teeth begin, usually with an oral surface. During the opening of the cavity of the lower incisors, often dual-canal, in order to find the orifice of the vestibular canal often have to remove part of the cutting edge. Trepanation premolars performed in the middle of the crown of molars - in the mesial part of the chewing surface. At this point, conventional burs (fissure with rounded apex or back conic), fixed in a high speed handpiece. Before trepanation and in the process it is necessary to palpate the alveolar bone in the root of the tooth to be guided in the root location and the direction of its canal. After opening the cavity of a tooth or in the presence of her message to the root cavity for a full disclosure of the pulp chamber should be used endodrills. In the
59
formation of the cavity is not desirable to use a round burr, at work with which it is difficult to accurately determine the direction of its movement. The cavity of the tooth is considered to be properly disclosed and executed, if provided with a smooth transition in her wall cavity or a burr hole, and free access to the orifices of all root canals. You can use the endodontic excavators, differing from the usual large portion of the working length of the tooth cavity to the toilet. estuaries search is carried out using hand endodontic probes of different shapes. In the case of the orifices of the canals finding difficulties can use radiographic techniques, staining, or the introduction of sodium hypochlorite. Knockout carried out by the buccal or lingual tooth wall. With sufficient light transmission canalorifice bones are contoured in the form of dark spots. When painting the orifices of special indicators of root canals are used, or caries indicators, like the first chemical composition. In the absence of both indicators can be used liquid plaque. After making the dye into the cavity of the tooth and rinsing indicator is retained in the orifices of the canals in the form of corresponding color dots. Sodium hypochlorite is a bit heated and injected into the cavity of the tooth. Within minutes of rapid gassing occurs, whereupon the liquid becomes transparent and a careful examination can detect the formation of tiny bubbles in the orifice of each canal. If you find the orifice of the canal is difficult, even with a very deep dissection (which happens when the obliteration of the pulp cavity and the orifices of the canals), to prevent perforation and validate boron direction can be carried out X-rays, removing boron from the tip and fixing it with cotton balls in a cavity in a position to it was in when dissection. Removal of the soft tissues is performed using canal broach. The tool should be introduced only in the straight part of the canal and not deeper than 2/3 of the canal length. Open the cavity of the tooth - to create a message point of cavities and tooth cavity or create access to the tooth cavity at one point. By the opening of the cavity of the tooth can cause progression of the caries process. Message cavity with the cavity of the tooth can be determined by sensing. Expand the cavity of the tooth - a tooth cavity to remove a set to create access to the root canals. The cavity of the tooth at the same time can not be expanded and deformed, but the sides and bottom of the tooth cavity must be sufficiently foreseeable.

60
Fig.33Anatomical and topographical structure of the root canals of the teeth of the upper and lower jaw Opening and oral disclosure of each group of teeth tooth have their own characteristics. Most often, these manipulations generate through a cavity. But sometimes there is a need for trepanning bits intact teeth. Cavities dissect all the requirements. Tooth cavity is opened round bur number 1 or a thin probe tip. At the same time there is a feeling of "falling" in a tooth cavity. The incisors and canines of the upper jaw (Fig.34) in the presence of cavities on the contact surfaces (III and IV classes) they are transferred to the palatal or lingual surface, and then reveal the tooth cavity. If you have a cavity in the cervical region or in intact teeth tooth cavity is opened from the palatal or lingual surface.

61
Fig 34. The incisors and canines of the upper jaw Trepanation of the tooth crowns are produced with a turbine drill diamond or boron carbide. Trepanning crown in the center of the middle third of its surface. It is unacceptable trepan blades with cutting edges, which can lead to breakup buccal and lingual walls. Trepanation intact crown lateral incisors of the upper jaw to produce the palatal surfaces in the area of the blind holes (fovea caecum). With the opening of the tooth cavity perpendicular to the direction of boron palatal or lingual surface. Then, during the opening of the cavity of the tooth, boron direction of change in the direction parallel to the axis of the tooth. The premolars of the upper jaw(Fig.35) tooth cavity opening produced in the area of the bottom of the cavity, which is located close to the pulp. At the same time cavities class II transferred to the chewing surface.
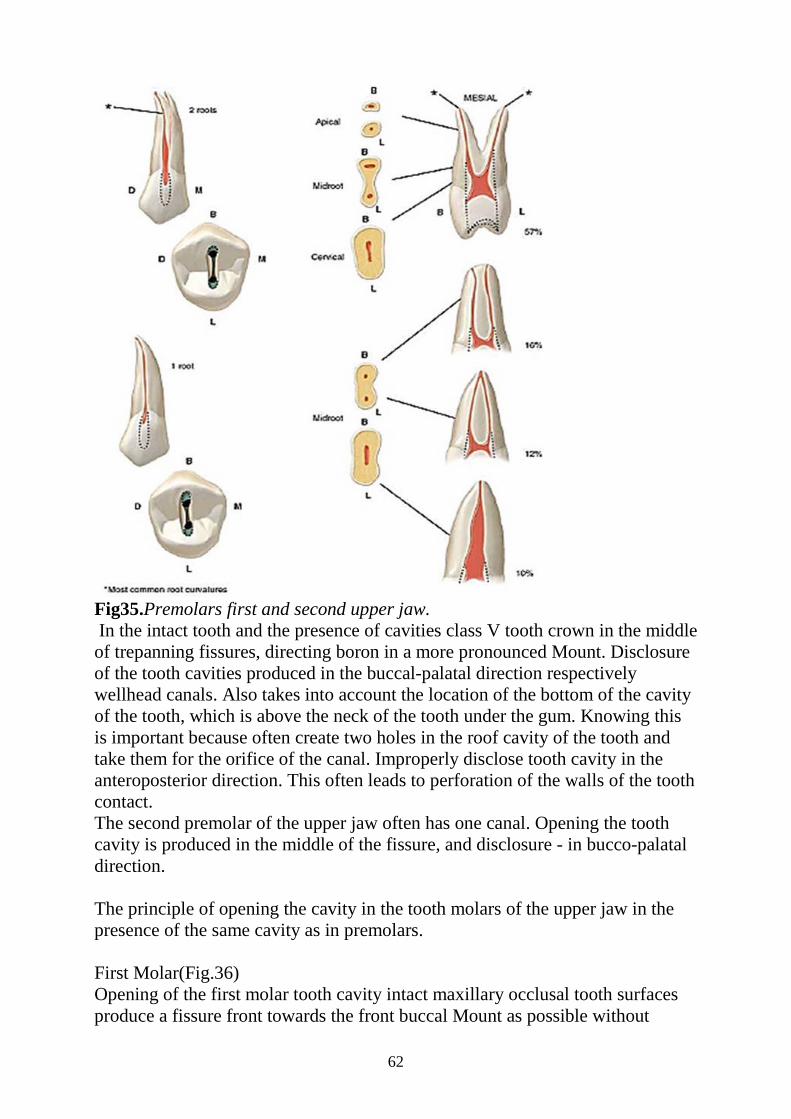
62
Fig35.Premolars first and second upper jaw. In the intact tooth and the presence of cavities class V tooth crown in the middle of trepanning fissures, directing boron in a more pronounced Mount. Disclosure of the tooth cavities produced in the buccal-palatal direction respectively wellhead canals. Also takes into account the location of the bottom of the cavity of the tooth, which is above the neck of the tooth under the gum. Knowing this is important because often create two holes in the roof cavity of the tooth and take them for the orifice of the canal. Improperly disclose tooth cavity in the anteroposterior direction. This often leads to perforation of the walls of the tooth contact. The second premolar of the upper jaw often has one canal. Opening the tooth cavity is produced in the middle of the fissure, and disclosure - in bucco-palatal direction. The principle of opening the cavity in the tooth molars of the upper jaw in the presence of the same cavity as in premolars. First Molar(Fig.36) Opening of the first molar tooth cavity intact maxillary occlusal tooth surfaces produce a fissure front towards the front buccal Mount as possible without

63
affecting the platen, connecting the front and rear buccal palatal cusps. With a significant substitution of dentin deposition in the tooth cavity opening it can make towards the widest palatine canal. Disclosure of the tooth cavities produced in the buccal-palatal direction boron respectively buccal and palatal orifices of canals.
Fig.36First Molar Second molar(Fig.37) The greatest difficulties arise with the opening and disclosing dental cavities second and third molars of the upper jaw. Be aware of the four variants of the structure of crowns second molars, which in some cases extend in the anteroposterior direction by analogy with the bumps.
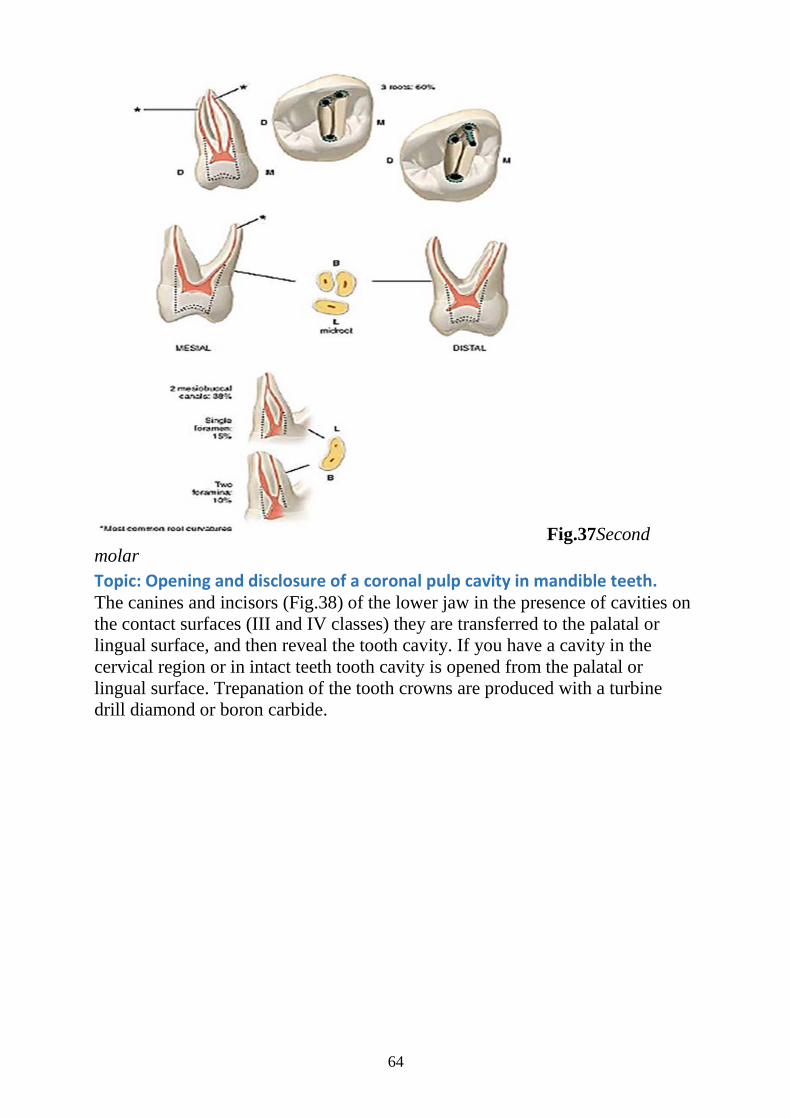
64
Fig.37Second molar Topic: Opening and disclosure of a coronal pulp cavity in mandible teeth. The canines and incisors (Fig.38) of the lower jaw in the presence of cavities on the contact surfaces (III and IV classes) they are transferred to the palatal or lingual surface, and then reveal the tooth cavity. If you have a cavity in the cervical region or in intact teeth tooth cavity is opened from the palatal or lingual surface. Trepanation of the tooth crowns are produced with a turbine drill diamond or boron carbide.

65
Fig.38 The canines and incisors of the lower jaw Trepanning crown in the center of the middle third of its surface. It is unacceptable trepan blades with cutting edges, which can lead to breakup buccal and lingual walls. Trepanation intact crown lateral incisors of the upper jaw to produce the palatal surfaces in the area of the blind holes (fovea caecum). With the opening of the tooth cavity perpendicular to the direction of boron palatal or lingual surface. Then, during the opening of the cavity of the tooth, boron direction of change in the direction parallel to the axis of the tooth.
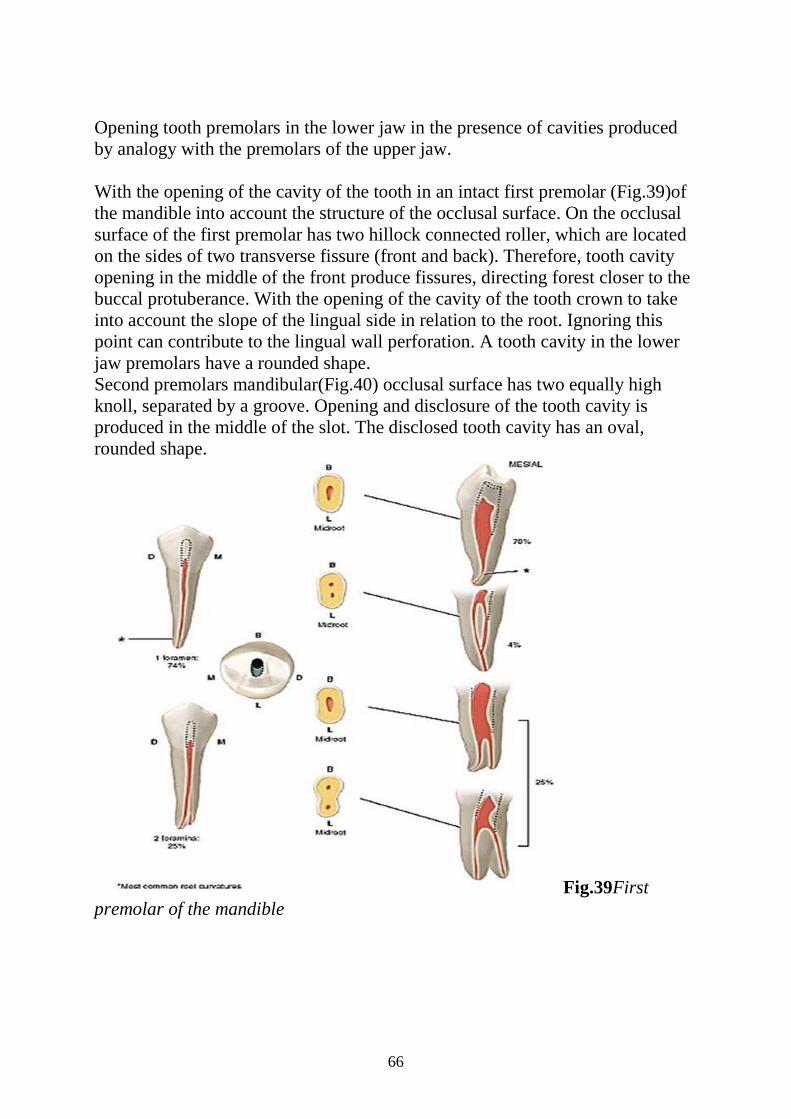
66
Opening tooth premolars in the lower jaw in the presence of cavities produced by analogy with the premolars of the upper jaw. With the opening of the cavity of the tooth in an intact first premolar (Fig.39)of the mandible into account the structure of the occlusal surface. On the occlusal surface of the first premolar has two hillock connected roller, which are located on the sides of two transverse fissure (front and back). Therefore, tooth cavity opening in the middle of the front produce fissures, directing forest closer to the buccal protuberance. With the opening of the cavity of the tooth crown to take into account the slope of the lingual side in relation to the root. Ignoring this point can contribute to the lingual wall perforation. A tooth cavity in the lower jaw premolars have a rounded shape. Second premolars mandibular(Fig.40) occlusal surface has two equally high knoll, separated by a groove. Opening and disclosure of the tooth cavity is produced in the middle of the slot. The disclosed tooth cavity has an oval, rounded shape.
Fig.39First premolar of the mandible

67
Fig.40Second premolars mandibular Opening the tooth cavity(Fig.41) intact lower molars produce in the middle third of the longitudinal fissure towards the front of the cheek Mount, after opening the disclosure is carried out focusing on the well-traveled canal -distal. When a tooth cavity obliteration can produce its opening towards the distal canal. Disclosure of the pulp cavity of the lower molars are produced in the anterior-posterior direction. Disclosure of the tooth cavity in the bucco-lingual direction is a mista
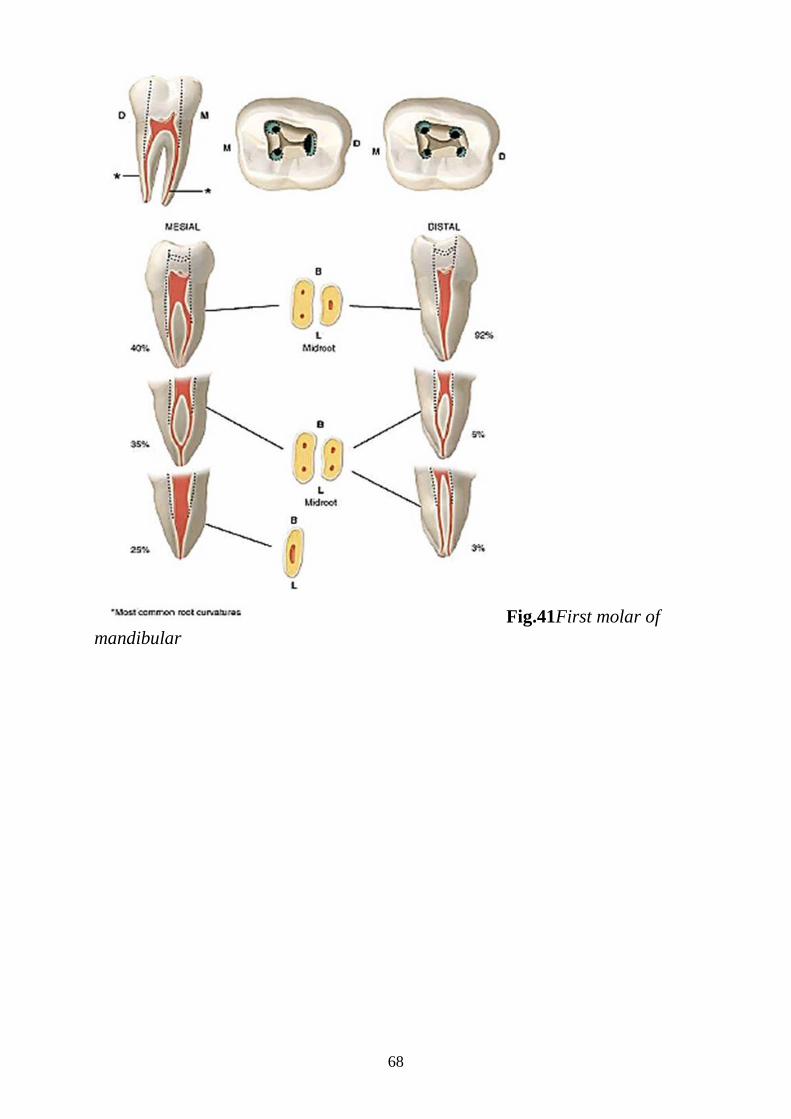
68
Fig.41First molar of mandibular
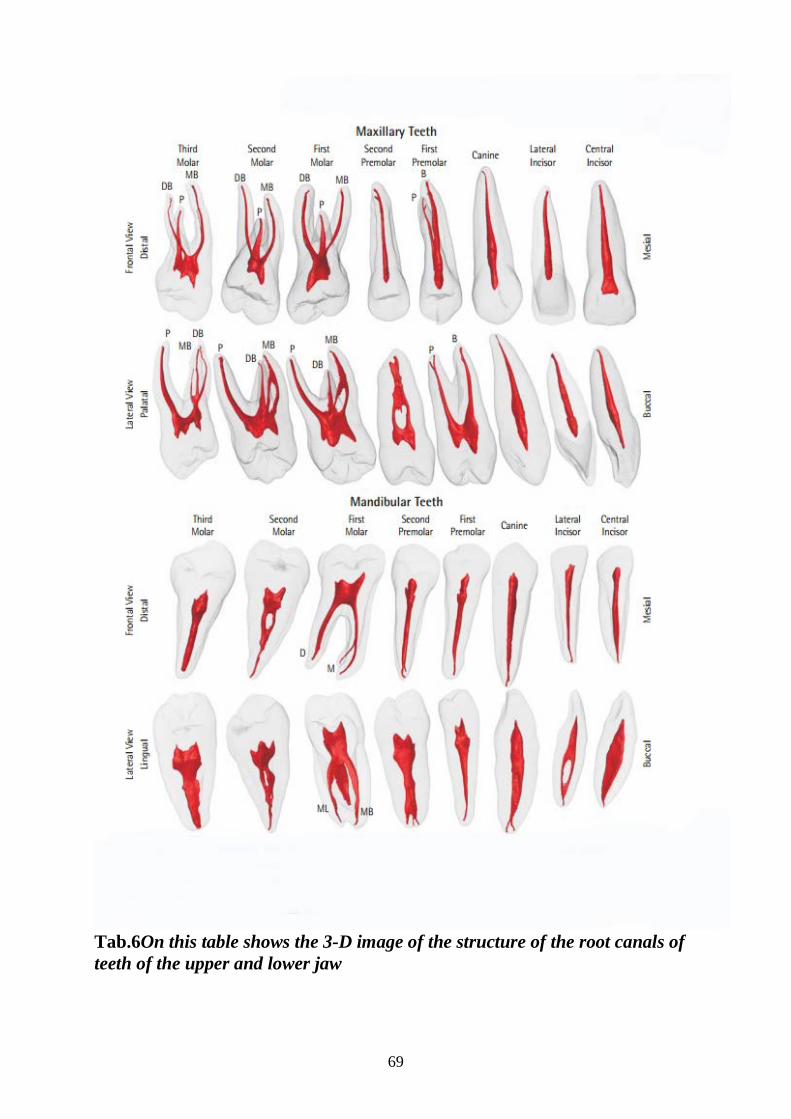
69
Tab.6On this table shows the 3-D image of the structure of the root canals of teeth of the upper and lower jaw

70
Topic : The characteristic of the devitalizing tools. Structure, imposing technique, action mechanism. Mistakes and complications when imposing of the devitalizing tools. In the treatment of pulpitis sometimes necessary devitalization (necrotic) pulp. Although it should be noted that is considered more appropriate treatment of pulpitis under anesthesia in one visit - the method of vital extirpation. Currently used two methods of dental pulp devitalization: application devitalizing pastes and electrochemical pulp necrosis. Extirpation - removal of the root section of the pulp. Pulp extractor is a toothed tool that looks like a rasp. The size of teeth having a small mobility and arranged at an acute angle toward the handle, is equal to half the diameter of the rod. When immersed in a root canal tapered prongs are pressed against the rod to facilitate its penetration into the pulp tissue. When fading out, the instrument canal of the teeth pulp tissue or capture detritus, removing them. vital extirpation The most common in the world practice the method of treatment of pulpitis is the method of vital extirpation. Coronal and root pulp is removed under anesthetic without the use of tools devitalizing. Local anesthesia (infiltration, wires) is carried out using local anestetinov mainly such as 2% lidocaine solution, 3-4% solutions anesthetics articain group mepivocain. By groups anesthetics lidocaine and articain added vasoconstrictors (epinephrine, norepinephrine, and others.) To increase the duration of action and reducing the amount of anesthetic administered. After anesthesia dissect a cavity, and in the case of intact trepanning tooth crown of the tooth. Opening and disclosing dental cavities are analogous amputation techniques. After the extirpation of the canal is exposed to mechanical and medical treatment, dried, hermetically sealed to the top. The defect of dental hard tissues is restored permanent seal. The method is usually conducted in a single visit, which is the reason for its popularity. non-vital extirpation The method of treatment of pulpitis vital extirpation similar with the only difference that the removal of the pulp is carried out after its preliminary devitalization (necrotic). Treatment is carried out at least two visits. In the first visit to the doctor's actions are similar to actions performed during the method of non-vital amputation. During the second visit held disclosing tooth cavity, amputation, extirpation of pulp, mechanical pharmacological treatment of root canals, fillings and their imposition of a permanent seal. The method is used when it is impossible to use local anesthesia, or for other reasons. Advantages of the method lies in the fact that excludes the existence of a viable pulp in microcanals and deltoid branches, decreasing the risk of bleeding from the apical hole, push the tool and the filling material beyond the apex hole. DEVITALIZATION PASTE
71
For devitalization of the tooth pulp is used or arsenious or paraformaldehyde paste. Arsenious paste includes in its membership: I. Arsenic trioxide exerted on the pulp necrotizing action. We describe the three main mechanisms of action of local toxic arsenic anhydride: - Direct cytotoxic effects associated with blockade of cytochromes, which leads to a violation of the processes of cellular respiration and cell death; - denaturation proteins in contact with arsenical anhydride; - Arsenic synapses blockade of sympathetic nerve fibers, resulting in a breach of vascular tone, expanding their blood stasis and thrombosis. This leads to the cessation of blood circulation in the pulp. 2. The local anesthetic (usually dicain) for fast relief of pain. 3. A strong antiseptic (thymol, carbolic acid, camphor) to suppress the microflora in the tooth cavity, preventing the spread of microorganisms in deeply lying tissues, disinfecting pulp dentinal tubules and delta ramifications. 4. Binders (tannin) is added to the arsenious paste to increase the duration of its validity. These pastes are used long-acting, if the patient can not attend a reception in the next two days. Basic rules imposing arsenous paste: - Arsenious paste is recommended to apply for an autopsy pulp horn. Sometimes allowed the imposition devitalization paste on unopened pulp. However, in this case, the gain increases the risk of pain due to swelling of the pulp and increase the pressure in the cavity of the tooth; MEANS FOR dental pulp devitalization to reduce the risk of "leakage" of components arsenous paste through the edge gap between the walls of the cavity and the temporary material, it is necessary to impose devitalization paste so that the distance between it and the edge of the cavity is not less than 2 mm . This is especially important when the requirement or interdental gingival localization of the cavity where the increased probability of getting arsenic anhydride to the mucosa, which may lead to "burn arsenic" or "arsenic necrosis" gingival margin and deeply lying tissues; the amount of arsenous paste required for devitalization of the pulp of a tooth, the same size as the head of spherical boron №1 (dose of arsenic anhydride - 0,0006-0,0008 g); MEANS FOR dental pulp devitalization - On top of arsenious paste is applied a small cotton swab soaked in the anesthetic solution and pressed; - Cavity without pressure bandage is sealed from the aqueous dentin; - Timing overlay "standard" arsenous paste: in the incisors, canines, premolars - 24 hours, in the molars - 48 hours. Depending on the particular composition of the timeline overlay devitalization pastes are subject to change. In this issue should be guided by the recommendations of the manufacturer. Paraformaldehyde paste is designed for devitalization and pulp mummification. Paraformaldehyde (paraformaldehyde, trimer trioxymethylene) is the

72
polymerization product of formaldehyde. At high concentrations it causes tissue necrosis, and has a bactericidal effect. The advantage of paraformaldehyde paste before Arsenous is softer action: it does not cause irritation of the periodontal. pulp devitalization occurs after 6-8 days. Superimposed paraformaldehyde paste by the same rules as that of arsenic. An example of paraformaldehyde paste can serve as a preparation «Caustinerf fort sans arsenic» company «Septodont». The company «Septodont» produces three drugs for devitalization dental pulp: - «Caustinerv arsenical»; Caustinerv rapide »; - "Caustinerv protection without arsenic» - «Caustinerv fort sans arsenic». Devitalization pulp listed drugs based not only on necrotic, but also on sclerosis pulp. Due to this, even if the microtubules or more branches of root canals and pulp tissue remains, after the application of the "Caustinerv" sclerotic and it is aseptically processed. Electrochemical necrosis of the pulp If in the course of endodontic treatment of pulpitis canal can not pass, devitalization pulp unclimbed part of the canal can be performed using electrophoresis trans canal10% alcoholic solution of iodine. Equipment of this procedure is quite simple. Pre-sealed well walkable canals. Then, at the orifice of the canal is not passed is superimposed a small cotton swab dipped in 10% alcohol solution (tincture) of iodine, the active electrode is immersed in it (the cathode), which is a solid copper wire in PVC insulation. The end of the electrode must be cleaned of insulation 2-3 mm. The tampon is isolated from the oral environment sticky wax. Passive electrode (anode) is applied on the forearm. The procedure must be conducted under anesthesia. The need for this is dictated by the fact that pain sensitivity while maintaining the strength of the current can not be established, sufficient full necrosis of the pulp. Amperage - 3 mA (no less!). The duration of treatment - 15 minutes. After the first procedure of changing the cotton swab with the tincture of iodine, it is immersed in an electrode filled with sticky wax and at the same visit is the second procedure. The patient is then sent to the dentist for further treatment. MEANS FOR dental pulp devitalization Necrosis of the pulp in this case is due to electrochemical processes occurring at the cathode (the formation of alkalis that cause deep collicvatsion burns and necrosis of the pulp). It should also be borne in mind that the long-term disinfection this procedure does not ensure the content of the canal impassable. Therefore, after the pulp necrosis electrochemical impregnation is not required distal portion pulp depoforez hydroxide or calcium-copper. The advantage of electrochemical pulp necrosis before using devitalization pastes - an opportunity to reduce the number of visits, as necrotic pulp for 35-40 minutes, and in the first visit, you can proceed to the content of impregnation is not traversed part of the root canal.
73
Topic : Instrumental processing of root canals (training in a technique of amputation and extirpation, endodontic processing of root canals). Reference technique and technique of the balanced forces. Amputation - a partial removal of the pulp (crown), hysterectomy - complete removal of the coronal and root pulp. The mechanical and pharmacological treatment of root canals performed to remove infected dentine layer. Stages instrumentation of root canals: 1. Typically, the primary examination of the patient in need of endodontic treatment is carried out x-ray - a diagnostic radiograph (X-ray or intraoral contact orthopantomogram). The objectives of the primary X-ray examination: assess the state of dental hard tissues and apical periodontitis, to obtain information about the anatomical features of the tooth, the number of roots and canals, the degree of curvature of the root canal, the estimated length of them. Based on the findings the diagnosis is formulated and planned treatment plan. 2. Anesthesia. Painless all medical diagnostic procedures is a prerequisite for the efficiency of the dental treatment. In the treatment of pulpitis, when the canal is vital, inflamed, painful pulp sharply, holding full anesthesia required. In the treatment of periodontitis sometimes anesthesia is not mandatory, as in this case endodontic instruments are within the root canal, and are not in contact with living tissues. However, if the patient prefers to spend treatment with anesthesia or painful manipulations are planned, for example, filling "Termafilom" canal should make adequate anesthesia. The most commonly used in restorative dentistry introducer or infiltration anesthesia injection solutions of local anesthetics (articaine, lidocaine, novocaine) with the addition of vasoconstrictors (epinephrine, norepinephrine). In some cases, resorting to general anesthesia - anesthesia. However, when planning treatment iodine anesthesia should be borne in mind that high-quality processing and filling the root canal - a long and labor-intensive, so should only be performed under general anesthesia painful manipulation: the disclosure of the cavity of the tooth, the pulp extirpation, extractions. Then close the teeth bandages and end treatment at follow-up visits. 3. Isolation of the tooth from saliva. Endodontic manipulation should be carried out in compliance with all the rules of aseptic and antiseptic. This is especially important due to the fact that the apex of the root epithelial barrier is absent and microorganisms coming through the apical foramen, immediately enter into the internal environment. It is
74
established that an oral liquid entering the canals leads to a further increase of the risk of infection and the development of inflammatory complications. The best means of isolation tooth during endodontic treatment is a rubber dam. A cofferdam can not only isolate the tooth from the oral fluid, but also provides soft tissue retraction, improves visibility of the surgical field, prevents the accidental endodontic instruments and other foreign bodies in the airways and gastrointestinal tract of the patient. In some countries, the use of rubber dam during endodontic manipulation is considered mandatory. In Russia, the use of rubber dam wide distribution has not yet received. Therefore, to isolate the tooth from saliva in most cases, use a cotton or cotton rolls. 4. Disclosure of the tooth cavity (create endodontic access), amputation of the coronal pulp. This manipulation is a very important and often determines the success of the treatment. Her goal - the creation of a good access to the orifices of the root canal. Disclosure of the pulp cavity is carried out in several stages: A. Preparation of cavities. At this stage, it removed all the tissue affected by caries process, as well as "old" fillings. B. Formation of the burr hole - a cavity that provides convenient and easy access to the root canals. Location burr hole is determined by the topographic anatomy of the tooth and does not depend on the location of cavities. Incisors and canines reveal (trepanning) by the middle of the lingual surface closer to the cutting edge. On chewing teeth - molars and premolars - burr hole should be located roughly in the center of the chewing surface. B. Opening of the pulp chamber. Thin fissure or round bur creates a point message to the cavity formed by the cavity of the tooth. This operation allows you to specify the topography and the height of the arch of the tooth cavity. G. Disclosure tooth cavity and amputation of the coronal pulp. Fissure bur excised "roof" of the cavity of the tooth, thus, as a rule, is removed and the coronal pulp. Currently available special endodontic burs, reducing the risk of damage to the bottom of the coronal cavity and the occurrence of perforation. They have an elongated working part of the tip and non-aggressive. Amputation of the coronal pulp produced with boron in the tooth cavity of the disclosure, the fragments are not removed excavating slurry is then removed. If the crown of the tooth is destroyed before the gingival margin or below the gum level, prior to the manipulation in root canals is necessary to restore the gingival wall of the filling material (GIC or composite) to a height of 2-3 mm above the level of the gingival margin. This operation allows you to facilitate endodontic treatment and prevent the gum potent substances. Disclosure of the tooth cavity is one of the most important stages of endodontic treatment.

75
The main criterion for the proper disclosure of the tooth cavity - endodontic instruments must be free, without bending to enter into all root canals. The walls of the burr hole must move into the walls of the coronal cavity smoothly without ledges and steps in the process of opening the cavity of the tooth should not be damaged her bottom. 5. Detection and expansion of the orifices of the root canal. To "find" the orifices of the root canal is necessary a good knowledge of topographic anatomy of the teeth, proper disclosure of the tooth cavity, enabling visual control. It is also important practical experience of the doctor. Typically orifices detection canals is performed using a sharp dental probe. In complex cases, it is the bottom of the cavity of tooth coloring solution of a dye - magenta, methylene blue, etc. It should also be aware of the variability of the number of roots and canals in different people. After finding the orifice of the canal is made of an extension if needed. Feasibility of this manipulation is dictated by the fact that in the area of the orifice of the canal, there is usually a natural anatomic constriction. To expand the orifice of the canal used tools «Gates Glidden», «Orifice opener», «Orifice Shaper» and others. Drills and similar tools with an aggressive tip for this purpose use is undesirable. In addition to eliminating the restriction in the orifice of the canal, as a result of this phase in the bottom of the tooth cavity created by the funnel-shaped recess facilitating the introduction of endodontic instruments canal. If the canalorifice wide enough, then further expand it at this stage of endodontic treatment is not necessary. 6. Passage of the root canal and the definition of the working length. Before the start of this stage determine the approximate length of the root canal. Ways to determine the estimated (approximate) length of the canal, there are several. We will look at the most common ones. A tabular method. There are various average lengths of teeth and roots. However, individual variations may reach 3-5 mm, so this method is only used to determine the approximate length of the canal. B. Anatomical method. As is known, the ratio of length to the crown of the tooth root is approximately equal to 1: 2 (v canines - 1: 2.5). However, this method is approximate and insufficiently reliable. It is also used only for the approximate determination of the canal length. B. Determination of the estimated length of the canal for diagnostic radiographs. Sometimes approximate canal length can be determined by X-ray diagnosis. However, it should be remembered that the radiographic image is a shadow of the tooth and in most cases does not reflect its true length. By combining the above methods, determine the approximate length of the canal and mark on the instrument silicone disc. Tool for passage canal - K-reamer, K-file or pasfinder - should be thin, it is selected such that it freely without friction
76
on a wall included in the canal. To reduce the risk of jamming and broke off a tool is required to use the gel endolubricant. Then proceed to the passage of the root canal. During this manipulation using other methods to estimate the approximate length of the canal. G. electrometric method. During the passage of the canal depth of penetration of the tool is monitored by the apex locator, which captures changes in electrical resistance of tissue when the instrument promotion in the canal and removing it by the tip of the root. The accuracy of determining the position of the apical foramen during electrometric method ranges from 60 to 97% depending on the apex locator design, the measurement conditions and a number of other factors it is difficult to account. Therefore, this method only gives an idea of the approximate length of the root canal. D. tactile method. With slow and careful promotion tool in the canal is its jamming in normal apical constriction. This wedging doctor having a certain experience, can feel the tactile, but say with full confidence that the tool is jammed in the apical hole is impossible. Therefore, tactile method is also useful only for approximate determination of the canal length. E. The method is based on the patient's subjective feelings. If the treatment is carried out without anesthesia, and no destructive changes, the tools in the breeding of the tip of the patient usually feels slight prick in the apex. This test can also be used to determine only the estimated length of the canal. By combining and comparing the data of these methods, determine the approximate length, fix it on instruments locking wheels and proceed to the next stage of treatment. It should be mentioned that in the process it is not necessary to use all of these techniques. The authors of these lines, for example, in most cases, to determine the approximate length of the table and use tactile ways, sometimes, very rarely, - anatomical and electrometer. 7. Determination of the working length(Fig.42). Working length is the distance from any reference point on the crown of the tooth to the physiological apex. The most accurate, objective and reliable method of determining the working length is the production of X-ray diffraction measurement of the tooth to the canals introduced in endodontic instruments.

77
Fig 42.Determination of the working length. It is important that the working length of the removal of live pulp should be 1.5-2 mm less radiographic root length, and when you remove devitalized heavily infected pulp - 1 - 1.5 mm less than the length of the X-ray root. Upon receipt of questionable results, measuring X-ray should be repeated. 8. Manual (instrumental) and pharmacological treatment of root canals. Typically, this step is called the extension of the root canal. The main objectives of the machining of the root canal are: Removal of infection within the root canal system; Removal of the pulp or decay; Giving root canal necessary forms; Increasing the effectiveness of the use of drugs. Produced careful treatment of all 3 levels of the root canal (cervical, middle, apical) in order to create optimal retention to fix the filling material. The root canal should be enlarged enough throughout. When root canal treatment of the apical foramen can not be expanded. Over-processing apical zone gives a sharp inflammation from periodontal tissue with the subsequent formation of gaps and the root resorption, which subsequently lead to persistent chronic inflammation of these tissues. The appearance of blood in the processing of the apical part of the evidence of the expansion of the apical foramen and is considered a complication, which occurred without taking into account the working length. For the machining of the root canal can be used by hand or machine (rotating) tools, as well as their combined use. Classification of hand tools: to expand the orifice of the canal for the passage of the canal, for the expansion of the canal, the canal filling. To pass the root canal: K-Reamer, K-Flexoreamer, K-Flexoreamer Golden medium, K-Nitiflex. The firm has developed tools Kerr system (K-tools). Depending on the purpose of K-tools are divided into three groups: K-Reamer By-Example - for the passage of the canal; K- file - to expand the canals; K- hendstrem K (H) file - for smoothing unevenness of the canal walls. Tools for the passage of a flexible duct as the workpiece has on its sectional shape of a triangle. Files - less flexible as to have a sectional shape of a quadrangle. In addition, the screw pitch file is smaller than the reamer, in the
78
first case provides better removal of dentine from the walls, and in the second (from the reamer) - the best canal permeability. To expand the root canal: H-file, S-file H-file has a round billet and created a circular cutter cutting, which is ground off the canal wall when moving it up and down with the necessary leaching dentinal filings. With the help of this tool are aligned walls and removal of the infected dentin. The rotary tool is made of a nickel-titanium alloy has a greater taper, and flexibility for the mechanical processing canals with full rotational movement. Rotary tools requires a special equipment. All rotary tools existing today can be divided into tools having active, passive and semi-active cutting edges. Active tools: active cutting edges when introduced into the canal and rotation without effort actively cut dentin and quickly pass canal. RaCe File Active cutter RaCe File with a negative angle of 30 degrees, cut dentin effectively and quickly. The depth of the grooves is 60% of the external diameter of the tool. HERO Active tool HERO has a negative cutting angle of 20 degrees. It is distinguished by great torsional strength, but it is more susceptible to cyclic fatigue. Pro Taper Active Tool Pro Taper Convex triangle with negative cutting angle of 35-40 degrees. The only tool having a different taper within a single tool. Designed to handle impassable and silnoizognutyh canals. The basic set consists of 6 tools. Group rasshiryayushih (Sx, S1, S2) and a group forming tool (F1, F2, F3). There are also manual and ProTaper. Quantec Quantec - the only semi-active tool; Smaller chamfers radial, deep grooves, allowing to accommodate a larger sawdust; but the tool has an asymmetrical design concerns dentin only 2 surfaces (perhaps the canal axis offset), roughly polished, exposed to cyclic fatigue. Passive tools: Symmetric have three points of contact with the tooth, radial chamfer not allow actively cut dentin, the tip of the instrument in the form of a bullet (in Maillefer company's tools - a form of a bat). Profile

79
The smaller the area of contact Profile tool to tooth structure, enables canal processing to bend up to 90 degrees by a modified (blunt) tip. Profile is highly resistant to cyclic fatigue. The tool has a taper of 4%, 6% and 8% instead of 2% for the K-file. U-shaped canal provides a good evacuation of the contents of the root canal at the time of preparation. GT system has a rounded tip, a greater number of grooves in the apical part. K3 The extremely high torsional strength; Rough treatment of the surface on the side of the cross section wrapped face. Although manufacturers of different applications, with appropriate training, the doctor can produce excellent processing canal with any of these instruments. There is no perfect tool, which has some advantages and disadvantages of lacking. Rules for working with rotary tools optimum rotation speed is in the range of 250-500 rev / min; Do not exceed the speed of rotation allowed for this type of instrument. The tool should be introduced into the canal and the conclusions drawn from it in a state of revolution. It is impossible to stop the rotational movement of the tool at maximum immersion. During root canal preparation in addition to the rotational motion of the tool must perform the movement up and down without significant effort. Preparation canal must be combined with the lubrication paste type Glide, RC-prep and EDTA. When a tool change canal should be washed with a solution of sodium hypochlorite. Rotary tools are used with special endodontic tips that can be of different types: mechanical (rotating) and vibration (sound, ultrasound). The techniques of preparation (machining) of root canals The standard method (apical box); «Step back"; «From the crown down"; Balanced force; Combined 9. Filling of the root canal. This stage - the most important and crucial, because it is high-quality and reliable sealing of the root canal obturation ultimately ensure the success of endodontic treatment. There are strict requirements for the quality of canal filling. • root canal must be sealed using primary solid materials combined with hardening pastes (endogermetics). The most effective methods are the method of lateral condensation of gutta-percha and sealing thermoplastic gutta-percha (eg,

80
"Thermafil" system). Allowed one filling canal paste, but this technique is not reliable enough. • Root seal must tightly fill the entire lumen and positioned at the top of the physiological, ie, short of radiographic apex of 1 - 1.5 mm. 10. X-ray quality control of root canal filling. Control X-ray is a testament to the quality of endodontic treatment. With its help, check the completeness of root canal obturation, a perfect seal material to the canal walls, the absence of inclusions, air bubbles in the thickness of the filling material. A standardized method This technique provides an introduction to the canal to its entire working length of the tool successively increasing size. The canal extends as far as the edges of the tool appear white dentin chip. Treatment then continues increasing file sizes of 2-3 size, but not less than number 25-. - After the canal depth measurements of the input file (reamer, K-file) minimum size (10-20) for the whole length of the canal; - The canal instrument made of rotation (0.5 turns clockwise or 120-180 ° clockwise and counter-clockwise (factory hours); - With sawdust tool is removed from the canal, clean, check the status of the instrument; - Produce a phased expansion of the entire working length, which is controlled by the silicone stopper (Stopera); As a result, preparation canal assume constriction stress generated as a result of 4-5 files at the same depth. Technique "apical box" for effective lateral condensation of gutta-percha. Methods of balanced forces For used specially modified instruments designated as K-files. Flexible tools flexorimers, flexofiles also used. After determining the working length of the tooth, and file matching the diameter of it is introduced into the canal until it stops. Tool with little effort rotated clockwise 120-180º (no more than one revolution), and applying pressure to the file in the apical direction to fix it at a given depth, at 360 º rotated counterclockwise (in the opposite direction). It is important that the pressure on the file to be such that it rotates at the same level (not removed). The file is then withdrawn together with the dentin from the canal, it is purified and washed canal. Thus processing to produce the entire canal length not reaching 1-1.5 mm apical constriction. There are basic rules for the manual handling of canals: 1. Mandatory definition of the working length. 2. Prefer technology-winding watch clock.
81
3. The smaller the angle of rotation, the lower the risk of broken off tool. 4. If jammed tools necessary to take it out of the canal, after turning it slightly counterclockwise. 5. The tool after working canal must necessarily be cleared of chips (usually a 3% solution of hydrogen peroxide). 6. After passing the tool to the entire working length should begin scraping sawdust from the canal walls. 7. Turning to the larger number the instrument can only be qualitative development of a smaller number. 8. After each tool needs to return to a more subtle number to release the apical part of the sawdust. 9. Compulsory work in the canal with substances containing EDTA ( "Canal +», «RC-prep», «-glide canal" and others). The use of these drugs provides a disclosure orifices dentinal tubules and root canal instrument in the passage. 10. Mandatory periodic washing to remove dentinal shavings and organic substances by means of endodontic syringe and needle. 11. The visual inspection instrument is required before and after using it in the canal. 12. Work in the canal should be no excessive force. 13. Always use a sterile instrument for each canal. Topic : Expansion of root canals by a technique of "Step Back" and "Crown Down". METHOD OF CANAL EXPANSION smaller size to large - Step Back(Fig.43) Conventionally, the expansion of the root canal can be divided into three stages: processing coronal (orifices) (3-5 mm), central and apical (apical) (2-3 mm.) Parts. To expand the orifice of the root canal using Glidden Qates, Larqo, which create a funnel-shaped extension. If they do not, for these purposes you can use the spherical boron number 3 with a long handle. Expansion of the central part of the canal is made in a specific pattern. Begin the process of auger Kerr (K-file) of the same size as the Drill (By-Example), which completed the passage. Pre rubber stopper is set to this length. Assume that the tooth length 20 mm and thickness used auger drill 015. Then take the following dimensions - 020 and treated with the same canal length - 20 mm. Movement should be as winding watch hours, without much stress. After that, go back to the original thickness of the canal 015. After wetting EDTA is treated with the drug auger canal 025 to the original length. After removing the auger, and together with it and dentine chips returned to the instrument 020, which eliminates the blocking of the apical opening dentinal filings. Rounding out the treatment of the root canal file 025 at a depth of 20 mm. After that, the procedure is somewhat different: in the file 030 put the rubber stopper on 17-18 mm, and treated with the canal prior administration of EDTA and washing the drug canal. Then, returning to the size of 025 was treated at a canal depth of 20 mm.

82
Fig.43 The following files are 035, with a rubber stopper at the length of 15-16 mm, treated with canal and re-held auger 025 to a depth of 20 mm. Subsequently, the file handle canal 040 and 025 are returned to the size of a depth of 20 mm. Since the canal is processed to the required tool size - 050 - 060, while maintaining the size of the apical part of the canal - 0.25. As a result of this technique, acquired root canal wall stepped shape. To align the walls of the canal are treated Hedstrem file or rasp, that allows you to create the shape of a cone-shaped funnel from the orifice to the top. In operation, the dust removed from the dentinal canal EDTA, 3-3.5% sodium hypochlorite solution and 3% hydrogen peroxide. Special mention should be working with a file Hedstrem. This is a very effective and reliable tool when used properly. Movement in its use must be scraping from the top to the orifice of the canal. After rotating half a turn or turn back the tool output, thus removing the wall irregularities. When using these tools is very important to always wash dentinal filings. Disclosure of the apical opening. This is the final stage of expansion of the canal. It should first be noted that this step is necessary in the presence of destructive changes in the bone tissue in the root tip. Disclosure apex produce manually. To this end, it is best to use a drill or a drill size of 008 - 010. The rubber stopper is set to 1.5-2.0 mm. longer working length of the tooth, where the expansion of the canal was made. It is mandatory in the preparation of

83
EDTA input canal. After that, the rotational movement produced reamer with minimal pressure. METHOD OF CANAL EXPANSION smaller size to large - Step Back Conventionally, the expansion of the root canal can be divided into three stages: processing coronal (orifices) (3-5 mm), central and apical (apical) (2-3 mm.) Parts. To expand the orifice of the root canal using Glidden Qates, Larqo, which create a funnel-shaped extension. If they do not, for these purposes you can use the spherical boron number 3 with a long handle. Expansion of the central part of the canal is made in a specific pattern. Begin the process of auger Kerr (K-file) of the same size as the Dril (By-Example), which completed the passage. Pre rubber stopper is set to this length. Assume that the tooth length 20 mm and thickness used auger drill 015. Then take the following dimensions - 020 and treated with the same canal length - 20 mm. Movement should be as winding watch hours, without much stress. After that, go back to the original thickness of the canal 015. After wetting EDTA is treated with the drug auger canal 025 to the original length. After removing the auger, and together with it and dentine chips returned to the instrument 020, which eliminates the blocking of the apical opening dentinal filings. Rounding out the treatment of the root canal file 025 at a depth of 20 mm. After that, the procedure is somewhat different: in the file 030 put the rubber stopper on 17-18 mm, and treated with the canal prior administration of EDTA and washing the drug canal. Then, returning to the size of 025 was treated at a canal depth of 20 mm. The following files are 035, with a rubber stopper at the length of 15-16 mm, treated with canal and re-held auger 025 to a depth of 20 mm. Subsequently, the file handle canal 040 and 025 are returned to the size of a depth of 20 mm. Since the canal is processed to the required tool size - 050 - 060, while maintaining the size of the apical part of the canal - 0.25. As a result of this technique, acquired root canal wall stepped shape. To align the walls of the canal are treated Hedstrem file or rasp, that allows you to create the shape of a cone-shaped funnel from the orifice to the top. In operation, the dust removed from the dentinal canal EDTA, 3-3.5% sodium hypochlorite solution and 3% hydrogen peroxide. Special mention should be working with a file Hedstrem. This is a very effective and reliable tool when used properly. Movement in its use must be scraping from the top to the orifice of the canal. After rotating half a turn or turn back the tool output, thus removing the wall irregularities. When using these tools is very important to always wash dentinal filings. Disclosure of the apical opening. This is the final stage of expansion of the canal. It should first be noted that this step is necessary in the presence of destructive changes in the bone tissue in the root tip. Disclosure apex produce manually. To this end, it is best to use a drill or a drill size of 008 - 010. The rubber stopper is set to 1.5-2.0 mm. longer working length of the tooth, where the expansion of the canal was made. It is mandatory in the preparation of

84
EDTA input canal. After that, the rotational movement produced reamer with minimal pressure. The orifice of the canal is filled with sodium hypochlorite, followed by «npe-Gateg-dissection" file 35 is introduced into the canal until it stops, and its length is fixed. The optimal treatment of this size tool to a depth of 16mm. If a file of this size can not be entered, introduced smaller. Performs processing file to its free movement in a canal on a fixed length. It works just the tip of the instrument, so the instrument is allowed to turn two turns without pressure. Then, for the same length of wire processing burs type Gate -Glidden №1 and №2 (up to Boron size 80). After that, the canal to stop the input file 30, its length is fixed, and the portion of the canal develop. Then, the processing to produce an accessible (to the level) the length of the file 25 and then lower - to achieve the working length of the canal. Before reaching the expected working length (3 mm) is carried out its exact definition. After passing through the canal is performed again for the rest of the working length of the operation, but since the size of the instrument is not 30, and 40. In this case, the apical portion to be expanded to a larger size. The procedure was repeated again with the file 50 and so on until the apical part is not designed to line the walls 25. The size of the H-file 30-35. An exemplary sequence of work with tools of different sizes 35 (the way that best - 16mm) - 30 (all the way) - 25 (all the way) - 20 (all the way) - 15 (all the way). Assuming that the size of the tool 15 has reached the working length, the sequence of further work: 40 (all the way) - 35 (all the way) - 30 (all the way) - 25 (all the way). If the tool 25 reaches the full-length instrumental treatment can be stopped - if not, repeat again with size 50. Topic : Medicamentous processing of root canals. Characteristic of medicines. Working off of techniques of medicamentous processing: by means of wadded turundas, the adsorbing pins, the endodontic of needles. Ways of neutralization of contents of almost impassable root canals. Drug treatment of the root canal is one of the stages of endodontic treatment, during which made irrigation canal antiseptic solution in order to destroy microorganisms present in the lumen, parietal branches and dentin. Drug treatment of the root canal is done using special root metal needles, which are wound on a small piece of cotton wool impregnated with an antimicrobial agent, with the pins of paper soaked in antiseptic or by washing through a syringe with endodontic needle. Medications used in endodontics, can be divided into several groups: 1) local anesthetics; 2) for applying treatment material gaskets in order to maintain the vitality of the tooth pulp;

85
3) drugs for necrotic dental pulp; 4) liquid for medical treatment (washing) of root canals; 5) preparations for antiseptic dressings; 6) means of chemical expansion of root canals; 7) the means to stop the bleeding from the root canal; 8) means for drying the root canal; 9) preparations for the temporary filling of root canals; 10) drugs for the unsealing of root canals; 11) materials for permanent filling of root canals; 12) the substance for impregnation content bad passable root canals. In endodontics for medical treatment and irrigation of root canals are usually strong antiseptics are used. The substances used for the medical treatment of root canals must comply with the following requirements: 1) have a bactericidal effect on microorganisms Association located in root canals; 2) to be harmless for the periapical tissues; 3) does not have a sensitizing effect on the body; 4) does not cause the emergence of resistant forms of microorganisms; 5) to provide fast action and penetrate deep into the dentinal tubules; 6) does not lose its effectiveness in the presence of organic substances; 7) does not have an unpleasant smell and taste; 8) clean the lumen of organic residues facilitate their evacuation from the canal; 9) be chemically stable and retain activity during prolonged storage. There are several ways drug treatment canals: 1) Antiseptic turundas using cotton wrapped around the needle root and moistened with a solution of the drug; 2) the antiseptic treatment using pins paper wetted with a solution of the drug; 3) washing the root canal of the drug solution endodontic syringe through a special needle. The latter method is the most effective. Rinsing canal from the syringe needle through the endodontic follows. 1. The tooth to be treated insulated rollers placed near saliva ejector, which quickly remove the washing solution with the decay products. 2. Flushing canal is made through a special endodontic needle. Endodontic needle - thin, long, have a blunt tip and side holes for fluid supplied under pressure without It fell into the periapical area and go outside in the wider areas of the canal and, heading into the pulp chamber, provided at the same time to have effect. The tip
86
of the needle should be positioned at 3-5 mm from the apical foramen, to reduce the risk of removing the top of the solution. Before the introduction of the needle into the canal it is bent to the desired angle and locking disk wear, to control the depth of immersion into the canal. 3. The antiseptic solution introduced into the syringe passage under slight pressure. Total rinsing of the root canal during endodontic treatment is necessary to 10-20 ml of antiseptic solution. Thus antiseptic bactericidal effect, is leaching out of the canal of necrotic tissue disintegration products dentinal shavings, including in areas inaccessible to machining. 4. Prior to the filling of canal recommended rinsed with distilled water to remove residual antiseptic solution and dried with paper points. Next, consider the group of drugs that are most frequently used for medical treatment of root canals. chlorine-containing drugs The mechanism of action: in contact with the tissues of the chlorine gas is released which acts in the lumen of the canal and dentinal tubules and their contentsdecontamination destroying organic residues. Chlorine-containing drugs have antibacterial, deodorizing neck and mild bleaching action. They are active against most bacteria, fungi and viruses. Do not have a toxic effect on periodontal tissue. The most effective and popular drug in this group is sodium hypochlorite (NaOCl). It is a good solvent living, chemically fixed and necrotic tissue has a bactericidal action. At the same time, there is a possibility of irritating action, so in the clinical setting should be used with caution. Suitable sodium hypochlorite in an aqueous solution concentration of 1 to 5%. By repeatedly washing the root canal using a syringe with endodontic needle. For processing a single canal is required 10.5 ml. Sodium hypochlorite solution is prepared in hospitals in the special installations and manufactured by different companies in the form of ready-stabilized formulations. The "Parcan" manufactured by «Septodont» can cite as an example. This solution of 3% sodium hypochlorite solution stabilized with a high degree of purification. He produced in bottles of 250 ml. "Parcan" meets all the requirements that apply to solutions for washing canals.

87
Other common drugs of this group are 2% solutions of chloramine-T and chloramine. Hydrogen peroxide In endodontic treatment for drug and washing the root canals applied 3% aqueous solution of hydrogen peroxide (H2O2). Mechanism of action. In contact with tissue, hydrogen peroxide decomposes to water and atomic oxygen. Effervescence helps mechanical canal cleaning of necrotic tissue and dentin filings due to foaming and oxygen has a bactericidal effect. Further, hydrogen peroxide has hemostatic properties and is used to stop bleeding after the removal of pulp. However, hydrogen peroxide, unlike sodium hypochlorite, has the property of not dissolving the organic necrotic tissue and, therefore, recommended alternate endodontic use of these agents for washing canals, the more that occurs between these two solutions vigorous reaction with evolution of chlorine and atomic oxygen. As a result, the quality of medical treatment of the root canal is greatly improved. iodine preparations The most popular drug in this group is iodinol. He is a product of the iodine connection to the polyvinyl alcohol. It has a dark blue color. The drug has a bactericidal and fungicidal action, stimulates the protective forces of the periodontal tissues and accelerates their reparative regeneration. By connecting a polyvinyl alcohol active iodine is gradually released, providing prolonged therapeutic action. In addition, it reduced irritant effect of iodine on the fabric. The endodontic iodinol drug used for treating root canals, and also as an indicator of the purity of the root canal, as in contact with media containing the decomposition products of tissue, pus and discolors it. Another drug in this group - yodonat - is an aqueous solution of a surfactant with iodine. It contains about 4.5% of iodine. It has bactericidal and fungicidal action. Preparations nitrofuran series Substances of this group have a broad spectrum antiseptic action, including against organisms resistant to other drugs. They also possess antiexudativ effect, have a stimulating effect on phagocytosis.

88
For rinsing root canals using 0.5% solution furatsilina, 0.1-0.15% solutions furadonina, furagin and furazolidone. Quaternary ammonium compound Quaternary ammonium compounds - this cationic detergents, eye-binding, bactericidal and bacteriostatic effect on asporogenous bacteria and yeast-like fungi. For rinsing root canals in endodontic treatment at change-aqueous solutions of these drugs in this group: 0.1% solution dekamina, 0.15% strength solution decametoxine. Used abroad 1% solution of benzalkonium chloride and 1% cetylpyridinium chloride (Biosept). Urea Urea (urea) is an effective antiseptic. It is able to dissolve necrotic tissue. The product is non-toxic and well tolerated by living tissues. In combination with sulfonamides and antibiotics Urea enhances their local effect. Root canal using a 30% aqueous solution of urea and 10% carbamide peroxide solution in anhydrous glycerin. Chelation Another group of chemicals that are currently successfully used in endodontics are chelators (chelates). The most widely applied products based on mintetrauksusnoy ethylenediamine acid (EDTA). Formulations of EDTA in the presence of sodium hypochlorite as an oxidant and act as a lubricant (lubricant) for the canal, as well as contribute to its expansion hemomehanicheskomu. They effectively mineralized dentin softened, facilitating the passage, and clean formation of the canal walls, particularly the root dentine. The combined use of sodium hypochlorite and EDTA effectively removes the smear layer and disinfect dentin walls. Removal of the amorphous layer and dentinal filings during tooling promotes good cleaning of the walls and creates the conditions for a better fit any filling materials. In practice, the most often used Endodontics 15% EDTA disodium salt in a neutral solution. The drug is available as a liquid or gel. The use of liquid consistency of the drug can successfully resolve blocking dentinal root canal filings, to remove the smear layer. When this drug should contact the canal walls at least 2-3 min. However, several studies reported that the isolated use of EDTA, sodium hypochlorite, without in any case did not provide the complete removal of the smear layer. This explains the feasibility of the combined use of these drugs during endodontic treatment. Proteolytic enzymes

89
The proteolytic enzymes are an effective means for the treatment of periodontitis. They are able to selectively break down necrotic mass, thin the exudate and blood clots, improve the outflow from the source of inflammation, not causing harm to living tissues. In addition, proteolytic enzymes stimulate phagocytosis destroy bacterial toxins, anti-inflammatory and anti-edematous action. Canals are used for washing solutions of trypsin, chymotrypsin, pancreatin, as well as immobilized enzymes and profezima imozima. It should be remembered that the use of enzymes for drug treatment (washing) canal use of antiseptics, alcohol ether is contraindicated, since proteolytic enzymes are inactivated by these drugs.
Topic : The characteristic of the sealing materials used for filling of root canals. For the filling (obturation) root canals can be used different materials and technologies. Temporary filling materials for closing the root canal are different not hardening paste. They can be administered for a period of from 1 day to several months. These substances have different therapeutic effects and should definitely be replaced by the permanent filling materials. Constant filling materials used in the final stage of root canal treatment. The purpose of this procedure can be considered, and the maximum sealed space filling of the root system after its chemical and mechanical processing. The ideal filling material for root canals must meet the following criteria: 1. To provide a reliable seal the entire root canal system in its entirety. 2. To be non-toxic and have good biocompatibility. 3. Do not irritate the periodontal. 4. shrinkable canal. It is desirable that it is slightly increased in volume when introduced into the canal or during curing. 5. bacteriostatic effect, or at least do not support the growth of bacteria. 6. It is easy to be sterilized before use. 7. To be radiopaque. 8. Do not change the color of the tooth. 9. If necessary, easily removed from the canal. 10. Have sufficient for comfortable work curing time. 11. Do not dissolve in the interstitial fluid. 12. Have good adhesion to dentin and filling material. According to the modern classification, for the canal filling materials are divided into the following groups:

90
1. Plastic: - Not hardening; The active component of these materials may be calcium hydroxide, antibiotics, sulfonamides, metronidazole, antiseptics, corticosteroids. These filling materials should possess properties osteotrophic, antibacterial, antiseptic and anti-inflammatory. Disadvantages not hardening plastic filling materials not solidify in the canal permeable to tissue fluids, absorbed in the canal, do not provide a hermetic isolation from periodontal root canal lumen. Excipients such materials are: zinc oxide, terra alba, petrolatum, glycerin, flavor oils. Not hardening filling materials are used for the temporary filling of canals for the treatment of periodontal disease, and the prevention of re-infection of treated canal. The action of the active ingredient (depending on composition) may last from several days to two months 2. - Hardening. Zinc phosphate cements (phosphate cement unifas et al.). Restrictions apply due to the short period of plasticity. Pastes based on zincoxiedeugenol (Zincoxiedeugenol, eodent, endometazon, estezon, tublisil). Pastes based on calcium hydroxide and / or tricalcium phosphate, hydroxyapatite (Biocalex, Selapex, Apex, Vitapex). Pastes based on epoxy resins and synthetic (Intradont, AN-26, AN-plus, Topps). Pastes based on resorcinol-formaldehyde (Rezodent Pyorfenan, Phoredent, neotriozinc) Used in multi-rooted teeth due to tooth stain properties. Glass ionomer cements (Cetac-Endo, Endion, stiodent). Do not have a wide application. 2. Primary solid. Further, endodontic filling material for root canals divided into two types: 1. Fillers (from the English «to fill» -. Fill, seal) - endodontic filling materials, intended to fill the lumen of the root canal. Fillers create volume root fillings, reduce shrink and provide it to fill the entire volume of the root canal. As fillers primary solid materials used - pins, as well as some hardening paste. a) gutta-percha. As part of the pins for root canal filling contains about 20% gutta- percha, about 66% zinc oxide as a filler, about 11% of sulphate metal salts to impart radiopacity pins and about 3% plasticizers (resins and waxes). Words A. Hill «In terms of convenience, flexibility and security is peerless" (1848) and relevant at the moment. Gutta-percha exists in several forms:

91
- Two crystalline (alpha at a temperature of 37 ° C and at 44-60 ° C beta): - Amorphous melted; b) the pins: anchor; titanium; silver; fiberglass; gold. 2. Siler (endosealant) (from the English «to seal» -. Seal, seal) - hardening material for filling the spaces between the pins and the walls of the root canal. Siler provide hermeticism root fillings. Siler used in combination with primary solid materials. Some hardening of paste can be used as a sealer (with pins), and as a filler (for a root canal filling paste without pins). Sealers based on calcium hydroxide have an osteogenic effect on periapical bone and tooth cement, accelerating the formation of a "cement plug", they do not have irritating properties zincoxiedeugenol cements and are less soluble in tissue fluids. These include: CRCS (calcibiotic root canal sealer), which is unstable in a humid environment; SealApex (Kerr), expanding on solidification; Apexit (Vivadent). By sealer based polymers and resins include the AH-26 and AH Plus (based on bisphenol-A-epoksigeksametilentetramina to include powdered silver), ThermaSeal, TopSeal. Polyketone derivative Diaket (3M ESPE, Germany) hardens quickly (about 7 min), forming insoluble complexes and maintains tightness root fillings; due to a high final hardness canal unsealing difficult if necessary. Composition most existing containing zinc oxide sealers based on the formula Rickert (zinc oxide - 42% stabelitovaya resin - 27% subcarbonate, bismuth - 15%, barium sulfate 15% - sodium borate 5 Anhydrous - 1% (to increase the setting time), eugenol) . TubliSeal, Wach's Cement, RC2B, Spad quickly harden in the cavity of the tooth under the influence of moisture and temperature, but washed out of the canals. Containing zinc oxide sealers with medication additives, such as N2 (Hager & Werken, Germany), Endomethasone N (PharmaDental, Germany), Cortisomol (Satelec, France) did not meet the biological requirements of modern endodontics. Ionomer cement Ketac-Endo (3M Espe, Germany), Endion (Voco, Germany) have good biocompatibility and high density, but easy to absorb water, which may cause microleakage in root fillings edges; high final hardness makes it difficult to unsealing the root canal. Methyl methacrylate-based sealer Hydron (Hydron, Canada) possesses high cytotoxicity partially resorbed, shrinks in a dry environment, thereby reducing the tightness seal root. Currently, the sealer is not recommended for use.

92
Polydimethylsiloxane derivatives RSA-RoeckoSeal (Roecko, Germany), GuttaFlow (Coltene / Whaledent, Switzerland) are materials based on A-silicone (silicone, obtained by the reaction speed of polymerization). It is composed of grains of gutta-percha, silver nanoparticles. The material is a combination of gutta-percha and sealer, and is available in capsules, compound to be delivered with a special gun. Siler based gutta Kloroperka N-O (N-O Therapeutics, Norway) contains organic solvents (eucalyptus oil, chloroform, xylene). The cytotoxic properties of chloroform and xylene are seen as critical, and the volatility of the components of the material causes a disturbance of the root fillings leak. Siler EndoRez polyesters based composite material is based on dual cure UDMA, it can be used without a primer. The width of the edge of the gap at sealing EndoRez twice higher than that when filling using AH Plus. When comparing the performance of adhesion to the canal walls among EndoRez materials, Diaket and AH-26, the best results were obtained with AH-26. Antibacterial properties have EndoRez absent. Epiphany / Resilon is the cement for the adhesive cementation. EpiphanySealer a plastic dual-cure with the addition of calcium hydroxide, which provides for the displacement of the pH to 11 bacteriostatic effect of matter. Polymerization is terminated without exposure to light after 25 minutes. In this case, the pH remains neutral. In a humid environment due to the release of calcium ions hidroxiedidionov and pH may increase again. Siler is the bonding material for the pins. Before the root canal obturation prerequisite is to remove the smear layer of dentin formed as a result of the preparation, and strict adherence to the irrigation protocol for the purification of the dentinal tubules. Not harden paste, as noted above, are absorbed in the canal, do not provide long-term, reliable obturation of the apical foramen, so they should not be used for permanent sealing of the canal. However, they are effective as a means for the temporary sealing of the canals. Plastic materials are called solidifying endo or sealer. They are divided into several groups: 1. Zinc phosphate cements. 2. Preparations based on zinc oxide and eugenol. 3. The materials based on epoxy resins. 4. Polymeric materials containing calcium hydroxide. 5. Glass ionomer cements. 6. Preparations based on resorcinol-formalin resin. 7. The materials based on calcium phosphate. Temporary filling of root canals Temporary root canal filling is carried out to influence the centers of destruction in the periapical tissues and the effects on pathogenic microflora system macro
93
and micro tooth canal. For temporary root canal filling pastes used not harden having therapeutic effects: 1.Pasty on the basis of antibiotics and corticosteroids - "Septomixin forte» (Septodont). 2.Pasty based on metronidazole, which inhibits anaerobic microflora of root canals "Grizanol» (Septodont). 3.Pasty of calcium hydroxide, which, due to its high alkaline (pH about 12), has a bactericidal effect, destroying necrotic tissue, stimulates osteoarthritis, and dentino- cementogenesis ( "Endokal», Septodont). 3. The paste containing calcium hydroxide and iodoform. With this combination, bone-seeking provides a powerful effect and antiseptic effect ( «Vitapex», J.Morita, «Metapex», Meta Biomed Co.) Topic : Methods of sealing of root canals. Sealing of root canals various sealing materials (manual and machine by methods). Root canal obturation - a dense filling its cavity sealing and additional materials tap to end the message with periodontal tooth cavity (removing his focus of infection and irritation), healing foci of chronic inflammation in the bone to form a cement plug in the apical opening. Before the root canal obturation is expedient to remove its walls smear layer of dentin that formed as a result of preparation. This procedure may be effected using acid - citric, phosphoric, lactic acid or EDTA. The canal should be disinfected and dried. METHODS root canal obturation The following methods of root canal obturation: 1) cold guttapercha points: - Method of one of the pin (can not be applied in the clinic as a result does not meet the quality criteria obturation); - Lateral condensation (seal) of gutta-percha and its modifications; 2) chemically plasticized gutta cold with the use of special solvents and oils; 3) heated gutta-percha: - Vertical condensation (seal) gutta-percha; - Gutta-percha obturation fragmented; - Lateral-vertical condensation (seal); - Thermo-mechanical seal and the use of gutta-condenser; - Ultrasonic plasticized gutta-percha;

94
4) termoplastifitsirovannoy gutta-percha: - Injection syringe or the use Ultrafil system; - The use of a two-phase gutta-percha; - Obturation adhesive materials. Methods of sealing paste is as follows. Prior to obturation of the root canal thoroughly dried using dry sterile cotton turundas or turundas moistened with alcohol and ether. Thus prepared canal is lubricated eugenol or oily liquid which is a solvent in which the kneaded paste. This provides an easier promotion of the paste to the apical hole and prevents the formation of air pockets in the apical part of the canal. Then the root to the tip of the needle with a blunt end or drillbors introduced into the canal portion of the first paste and using a plugger or cotton turundas pushing it to the root apex. Introduction and subsequent condensation of portions is continued until complete obturation of the canal. For canal filling pastes great importance for their consistency. Pastes should not be too thick or too liquid should not crumble, but at the same time they must have a certain plasticity. To fill the apical part of the canal obturation and narrow root canals prepared paste liquid consistency. Wide canals sealed a thick paste. Excess paste over the mouth of the root canal is recommended to push into the canal with a cotton ball. It provides high-quality canal to fill the entire length. Sealing canal overlay finish fillings, pre-clearing the sides and bottom of the tooth cavity filling material residues. It is desirable to isolate the pasta from the permanent seal gaskets and dentin aqueous phosphate cement. If the mouth of the root canal area filled with toothpaste, a small, then apply the gasket from the aqueous dentin and phosphate cement is inappropriate, since in this case, the paste will not affect the fixation of the seal. Exceptions are fillings made of composite materials. They require pre-insulation paste packing materials, as oil pasta (especially clove oil) polymerization processes violate composites. Filling pastes can be applied in all cases, the treatment of teeth with caries complicated. Especially shows the use of pastes in poorly passable, narrow and curved root canals and in the presence of a foreign body in the canal. The main advantage of pastes is that they are easily introduced into the canal, and optionally also easily removed therefrom. Sealing canals phosphate cement or its analogues (visphat, adgezor, unifas et al.) Is advantageously carried out in a single rooted teeth with broad, well-passable canals. To take two canal sealing cement portion. The first portion is kneaded liquid to take over cement trowel trailed behind him in the form of threads. Cement is a good consistency envelops the canal wall. A second crop more densely kneaded and introduced into the canal after its apical part is filled with a liquid phosphate cement.
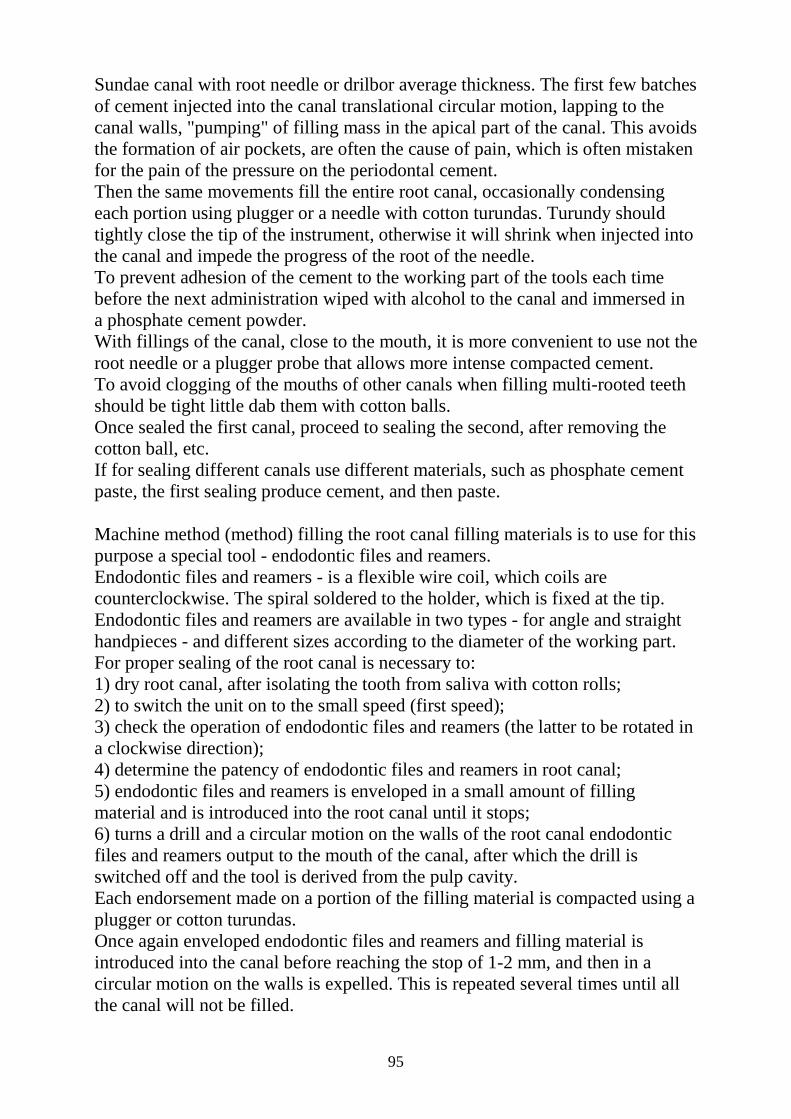
95
Sundae canal with root needle or drilbor average thickness. The first few batches of cement injected into the canal translational circular motion, lapping to the canal walls, "pumping" of filling mass in the apical part of the canal. This avoids the formation of air pockets, are often the cause of pain, which is often mistaken for the pain of the pressure on the periodontal cement. Then the same movements fill the entire root canal, occasionally condensing each portion using plugger or a needle with cotton turundas. Turundy should tightly close the tip of the instrument, otherwise it will shrink when injected into the canal and impede the progress of the root of the needle. To prevent adhesion of the cement to the working part of the tools each time before the next administration wiped with alcohol to the canal and immersed in a phosphate cement powder. With fillings of the canal, close to the mouth, it is more convenient to use not the root needle or a plugger probe that allows more intense compacted cement. To avoid clogging of the mouths of other canals when filling multi-rooted teeth should be tight little dab them with cotton balls. Once sealed the first canal, proceed to sealing the second, after removing the cotton ball, etc. If for sealing different canals use different materials, such as phosphate cement paste, the first sealing produce cement, and then paste. Machine method (method) filling the root canal filling materials is to use for this purpose a special tool - endodontic files and reamers. Endodontic files and reamers - is a flexible wire coil, which coils are counterclockwise. The spiral soldered to the holder, which is fixed at the tip. Endodontic files and reamers are available in two types - for angle and straight handpieces - and different sizes according to the diameter of the working part. For proper sealing of the root canal is necessary to: 1) dry root canal, after isolating the tooth from saliva with cotton rolls; 2) to switch the unit on to the small speed (first speed); 3) check the operation of endodontic files and reamers (the latter to be rotated in a clockwise direction); 4) determine the patency of endodontic files and reamers in root canal; 5) endodontic files and reamers is enveloped in a small amount of filling material and is introduced into the root canal until it stops; 6) turns a drill and a circular motion on the walls of the root canal endodontic files and reamers output to the mouth of the canal, after which the drill is switched off and the tool is derived from the pulp cavity. Each endorsement made on a portion of the filling material is compacted using a plugger or cotton turundas. Once again enveloped endodontic files and reamers and filling material is introduced into the canal before reaching the stop of 1-2 mm, and then in a circular motion on the walls is expelled. This is repeated several times until all the canal will not be filled.

96
With a wide aperture apical deducing danger exists an excess amount of material in the periodontal tissue. To avoid this complication, it is recommended to fill the area with the help of the root apex of the root of the needle and the plugger material thicker consistency than when working with endodontic files and reamers. It is advisable to check the quality of the end of the sealing closure of the apical opening via X-ray, and then seal up remainder of the endodontic files and reamers. Topic : Methods of sealing of root canals. Technique of one pin. Method of one (central) core pin. This technique in some guides called "standardized method". This method uses the principle of combining root canal filling paste with a single pin. However, it should be noted that when it is necessary to perform root canal preparation with the establishment of apical conical shape. The next step is the selection of the gutta-percha pin. It is necessary to make every time, despite the fact that the gutta-percha pins correspond tools and standards are of the same color code as the standardization of gutta percha is less accurate than the metal tools standardization. Selection of the size of the main gutta-percha pin is carried out visually tactile way to the X-ray control. The sequence of actions with the following. Take the gutta-percha pin corresponding to the size of the last instrument (maximum diameter), which produces the canal processing. It is a mark may bend, respectively, of the working length of the tooth. Then prepared a pin inserted into the canal to the level produced. This pin must achieve the narrowing and stop progress. If the pin moves deeper mark corresponding to the working length of the tooth, and does not meet the stop, then this indicates the output pin of the apical aperture. In this case, the size is taken next pin and its selection is repeated again. Possible and the second option - the shortening of the pin to 1.5-2 mm (when cutting the top of the pin diameter becomes large), followed by the fitting. Thus, the correspondence of the pin is checked by sampling. X-ray inspection method matching pin is the most reliable and is performed after the visual-tactile fit. The picture shows the pin should be positioned 1 mm short of the apex. If the X-ray revealed the passage of the pin by the tip of the root, it means that the dissection was incorrectly defined length. This pin, as indicated above, should be replaced or cut from its tip end to stop at the subsequent check physiological narrowing. It is unacceptable to extract the pin to the level of the root apex, as it will close the gap tightly apical part of the canal, what is its main purpose. After adjusting the length of the pin is carried out to re-radiological control if necessary. The pin should fit snugly to the canal walls, and its progress should be limited to the apical stop. Sometimes the main pin does not get to the place, although it is the same size as the last tool used to expand the canal. This is possible if:

97
tool used to expand the root canal was not introduced to the entire working length; 2) instrument while working was not turned in a clockwise direction at the final stage (no advance); 3) in the canal remained dentinal shavings and debris dentin; 4) in the canal are protrusions that prevent advancement of the pin. Success can be achieved: 1) re-processing canal, and the file should rotate freely in the canal; 2) using a pin on the smaller size. Some authors propose to reduce the thickness of the pin by rolling it in a cold state with a spatula on a glass plate. After fitting the pin is removed from the root canal, after noting its level of immersion into the canal. Sometimes it is possible to cut off the pin on the level of the depth of immersion. Dry the canal. Before filling of the canal dried absorbent paper pins. Re-introduction of fresh pins provides drying. After that, the canal introduced into the pin and start preparing for the next stage. Mixing and application of the paste to the sealing canal. On a plate dripping 1-2 drops of liquid, take a powder and knead the pasta according to the manufacturer's instructions. The material should have a creamy consistency, and reach for the pin when it is in the 2-2.5 cm apart. Making a paste can be made by hand, turning the file or reamer anticlockwise. However, increasingly using endodontic files and reamers, which rotate in a clockwise direction by hand or using a drill, working on the most low speed. When dealing with the use of powerful rotational tip there is a risk of pushing the sealing paste for the tip of the tooth root. To avoid this, strictly, to: 1) endodontic files and reamers did not go beyond the apical hole; 2) rotation of the endodontic files and reamers in the canal after its inoperative, was short (less than 1), with a slight delay in the root portion of the canal. This mode allows you to endodontic files and reamers entirely fill the canal paste. The introduction of gutta-percha pin. After the introduction of the paste duct fitted gutta-percha pin is immersed in the same paste and slowly introduce it into the canal until it stops, which should correspond to the level on the pin. Typically, the pin takes its place freely. It is not to be feared for ejecting paste root apex as the pin does not act as a piston. As the slow progress of the pin pushes the paste forward and pushes it over the top of, and distributes it to the canal, forcing the excess in the tooth cavity.
Topic : Methods of sealing of root canals. Technique of sealing of root canals by method of lateral condensation. The technique of cold lateral condensation of gutta-percha is a simple, relatively cheap and at the same time very effective. Suffice it to say that this method in advanced dentistry is sealed about 80% of the root canals.

98
The essence of the method is that the root canal is filled with gutta-percha pin tightly coupled with hardening paste. This achieves a very reliable closure of the apical foramen and full filling the entire lumen of the root canal. Methods of sealing. 1. Selection of the main gutta-percha pin (Master-point). This step is the same as in the method one pin . Standard gutta-percha pin is taken of the same size as the final endodontic instrument that was treated with the apical part of the canal (Master-file), and fit is in a canal. The difference is that the method of lateral condensation must ensure that the pin is reached physiological 1mm tip. Such a "power reserve" avoids exit of the pin in the periapical tissue in the process of condensation of gutta-percha in the canal. There are three methods (test) for fitting the main shaft in the root canal. 1. Visual test. On pin annotation 1 mm smaller than the working length. Then the pin inserted into the root canal up to this mark. If the pin can be pushed deeper, then either the apical hole was originally wider or was perforated in the course of treatment tool canal. In this case, the pin is taken larger initial pin or shortened by 2 mm (the diameter of the tip is increased). Thus, the trial and error method, a pin is fitted as long as it is not located in the desired position. 2. Tactile test. Gutta-percha pin is the same size as the master file is introduced into the root canal is less than 1 mm of working length. If the pin is chosen correctly, then at a distance of 3-4 mm from the top of the physiological have to make some effort to further advance the pin. When fading out the pin of the canal must also be felt his "seizure". This criterion is in the dental literature termed «step back» (pulling out, pulling out). If the pin is freely move without resistance in the canal, you should take a pin of larger size or shorten the original pin. 3. The X-ray test. The X-ray test is conducted after an indicative selection of the main shaft visual and tactile methods. This is done with intraoral X-ray contact fit is main pins inserted into the canals. Radiological assessment of the post in the root canal is the most accurate and reliable method. In order to improve the adaptation of the pin in the apical part of the root canal tip of the pin before the fit, you can moisten the solvent gutta-percha ( «Guttasolv», Septodont). Then the pin is introduced into the canal to the working length, making small vertical movements. At the same time the pin tip, softened solvent is deformed and takes a head start apical part of the root canal. After that, the pin is removed from the canal and start sealing. After the fit of the main shaft is a mark on it, fixing the length to which it should be introduced into the root canal. 2. Selection of the spreader.

99
Spreader (side seal) selected the same size as the Master-file, or to one size larger, so as not to go beyond the apical opening. Working spreader length should be 1-2 mm shorter than the working length of the canal. 3. Introduction to endosealant canal. Material is introduced into the canal K-file or reamer K endodontic files and reamers to a level apical foramen and is evenly distributed over the walls of the canal. In carrying out this procedure to fill the canal tightly paste is not recommended: using endodontic files and reamers enough per serving, using hand tools - two or three servings. 4. Introduction of the main shaft to the canal. Pre fit is main pin covered with filling material and slowly injected into the canal to the working length. To prevent air embolism canal make several reciprocating movements of the pin within the canal. 5. The lateral condensation of gutta-percha. The root canal is administered selected earlier spreader. This tool makes movements similar winding watch wristwatch. The depth of introduction - 1-2 mm smaller than the working length. This pushed the gutta- percha to the canal wall. Spreader is left in the canal for 1 minute to pin managed to adapt to the applied pressure.
Fig.44Lateral condensation of gutta-percha Do not apply significant force in moving the spreader in the canal, as this may lead to fracture of the tooth root. 6. Removing the spreader and the introduction of an additional pin. Spreader is slowly eliminated from the canal rotary movements and immediately replaced by an additional pin. Additional selected pin of the same size or smaller size than the spreader. Before the introduction of the pin into the canal pre-lubricated endosealant. 7. The lateral condensation of gutta-percha, spreader removal and introduction of the second additional pin.
100
If the introduction into the canal spreader is difficult, it takes a smaller tool size. Spreader at this stage is selected in such a way that it was introduced into the root canal to 2-3 mm less than the spreader was introduced in the previous step. Produced lateral condensation of gutta-percha, the introduction of the following additional pin. The operation is repeated until the complete obstruction of the canal, ie, up until the spreader not penetrating into the canal ceases. Usually 4-5 pins required to fill a single canal. Do not go directly to the use of thin and thin spreader additional pins - this makes the sealing process more time-consuming and laborious without improving quality. 8. Removal of excess gutta-percha and pastes(Fig.45). Speakers from the mouth of the canal of the pins are cut off by a heated tool. The root filling is sealed (condensed) into the mouth of the canal. Endosealant Surplus removed with a cotton ball.
Fig.45Removal of excess gutta-percha and pastes 9. X-ray quality control of filling. 10. The imposition of bandages. Imposing permanent filling should be postponed for 1-3 days before full curing paste in the root canal. Especially important to respect this condition in the subsequent use of intracanal anchor pins. Topic : Determination of effectiveness of sealing of the root canal. Mistakes and complications at endodontic treatment. Ways of elimination and prevention. The assumption errors paramount professional and ethical (the lack of knowledge and manual skills) and ethical (negligence, indifference to their duties) problems. At each stage of endodontic treatment may occur errors - a consequence of poor quality of work in the preparation of the tooth crown and root canals - that leads to the development of complications. In various clinical situations and in the implementation phases of the endodontic treatment, the doctor may allow a number of errors, which result in the following complications:

101
- Perforation of the tooth, which occurs when non-compliance with the rules and principles of the coronal and root of the tooth preparation (do not account for his symptoms in 3 projections); - Change the color of the tooth crown, which is due to the improper disclosure of the tooth crown (after treatment of pulpitis, even with high-quality canal obturation), ie by partial removal of the roof of the pulp chamber;.. - Broke off the tool and perforation of the root canal - they occur in underdeveloped access to the root canal, making it difficult to work with endodontic instruments; - Poor quality filling canal, which may be in violation of the art of preparation of the root canal at all levels when you do not take into account the slope, curvature and position of the bifurcation; - After fillingpain - when they appear inadequate antiseptic and instrumental treatment of the root canal, which leads to a re-infection of the canal; - The lack of diagnostic X-ray, and failure to use apex locator, which leads to poor quality of obturation of the canal; - Unfavorable endodontic prognosis - a violation of the implementation techniques obturation canal sealer, gutta-percha, and underestimation of ecosystem condition of the oral cavity. Errors in the diagnosis stage, • Incorrect diagnosis. • Incorrect interpretation of radiographs. • Incorrect definition of the working length of the tooth. Basic errors at the stage of treatment: • Overlay devitalizing funds not open cavity of the tooth. • Closing devitalizing means oil dentin • Overdose devitalizing funds for an amount of time • Incomplete disclosure of the tooth cavity (the presence of overhanging edges) • Thinning of the wall of the tooth crown and root canal • Uneven access to the formation of root canals (the tool is included in the root canal, twisting in the crown of the tooth cavity) • Perforation of the cavity wall • Perforation of the cavity bottom • Perforation of the root canal walls • Lack of mechanical treatment of the root canal • Break off the instrument in the root canal • Inconsistent use of endodontic instruments • Inadequate use of drugs with the canal processing • The use of air jets on drying canal • Wrong choice of filling material for filling canal • CanalNot sealing

102
• Excessive removal of the filling material for the apical opening Errors and associated complications arising for endodontic treatment stages can be divided into the following groups: 1. Most emerging perforations of the walls and bottom of the tooth cavity all with little knowledge of the topography of the structure of the problematic tooth roots (roots of the front of the lower and upper molars buccal roots, the root of the upper second incisor with the curvature of 300 and more). The most common complications arise in the absence of direct access to the root canal mouths, the wrong choice of endodontic tool and the wrong use of this tool. Perforation bottom tooth cavity occurs when excessive expansion of the mouths of the root canal and when you try to find them in the sclerosed canals. Perforation of the side wall of the cavity does not pose great danger. The perforation can be detected directly during endodontic treatment "fails" tool, a sharp pain sensation of the patient, intense bleeding from the perforation. Touching a sharp instrument in the perforation site causes stabbing pain. In the presence of lateral perforations observed slight bleeding. It often happens that the "fresh" perforation is not diagnosed. After some time, its presence will become obvious: first formed granulation tissue, then there is the decline of bone tissue and the development of destructive forms of periodontal disease with the formation of granulomas andcystogranuloma. Most often, the "old" accidental perforation detected on radiographs. The perforations of the side walls of the cavity at the same time remove the seals by sealing. Perforation of the bottom cavity of the tooth is removed after root canal filling: stops bleeding from the perforation (moxibustion phenol, resorcinol, or with a hot plugger), sealed with amalgam, glass ionomer, composite. Large perforations closed in the same manner as with closing small perforations or disconnection produce roots hemisection in one of the roots of upper molars or premolars of the mandible. 2. Perforation of the root canal walls occurs when incorrect tooling (tool axis does not coincide with the axis of the root canal). Most often this complication occurs when using the machine or tool drilbora large caliber, as well as the lack of disclosure of the tooth cavity without tools provide direct access to the canal. When extending curved canals it is advisable to use tools with a blunt tip of a nickel-titanium alloy (profiles) that have great flexibility. Processing canals, it does not apply excessive force. If there are signs of jamming tool, you need to turn it a few times in the opposite direction, and then continue to expand, but it should be aware of and comply with the limits of rotation of each endodontic instrument and do the maximum number of revolutions. To avoid punching can only be produced with constant monitoring of movements. It is necessary to control the direction of the instrument in the canal by means of X-rays. To do this in the canal in its entire depth of the root needle is introduced, which is fixed with a cotton swab. When the pain during the expansion of the canal is necessary to stop the expansion and to check the position of the instrument in the canal by means of X-rays. The soreness may

103
appear in place of the tool in the wall of the canal, where the planned perforation or at the apex. When perforation of the root canal wall is observed bleeding which stops just as in the tooth cavity perforation. In the case of root perforation hampered conditions for further expansion of the canal. After detecting the perforations necessary to carry out electrophoresis of potassium iodide at once, or, even better, depoforez copper-calcium hydroxide once, followed by sealing of the false travel silver amalgam or composite. Avoid contact with the sealing mass through a perforation in the periodontium. When punching the wall or floor of the molar perforation closed composite. 3. Break off endodontic instrument in the canal is due to the lack of direct access to the root canal; violation of sequence of application of endodontic instruments; lack of control over the state of the tool (changing the structure of coils, wornpre-sterilizedinstruments); excessive pressure on the tool during a manual or mechanical processing; the introduction of the instrument to a considerable depth, wedging it, and then broke off occurs; canal expansion simple tip; Tool rotation only clockwise (there is a rapid and in-depth implementation of it, and as a result, broke off); dry operation canal; haste in the work. In the case of expanding the instrument broke off in the canal should try to remove fragment. If the tool end extends from the mouth of the canal, its beak-shaped grip pliers or a small eye with forceps after drilling a small round bur dentin around him. If the end of the fragment is below the mouth, then apply the domestic set consisting of forceps with narrow jaws, collet pliers and hog-Trepanier. When you break off the instrument deep into the canal canal expandable with EDTA, then injected into the canal and produce them to broach the rotational movement. If the fragment is not possible to deduce, make an attempt to "pass" the canal next to the tool fragments. On failure, the electrophoresis drugs or depoforez. When fading fragments of the apex incision performed on the gums, jaw trepanation of the bone fragments and extract it through a burr hole or radiectomy. To prevent the tool broke off doctor should observe the following rules: - Use only high quality instruments of nickel-titanium alloy (profiles); - Only use sharp instruments; - Closely monitor the instruments during and after work to identify the strain; - Comply with the angles of rotation of tools; - Endodontic instruments used in strict sequence without "skipping" through a resolution; - Do not use tools with a bend at an acute angle; - Do not use tools, rusty or baked in the fire; - Only operate the tool in a moist environment. 4. Education ledge in the root canal can occur due to the lack of direct access to the root canal, so that the tool is directed to the apex is not a straight line. In curved canals used straight or too thick, not enough curved instruments. In the formation of the step the doctor feels that the tool tip rests against the barrier and
104
goes no further. The tool is not jammed and is free to rotate. To eliminate the step is necessary to make an X-ray, then a thin drilbor drill or bent at an angle, is introduced into the canal on the wall opposite the ledge and advance the tool to the next apex. Then the vertical movements of a thicker tool (rasp) grind canal, pressing the blade tool to the ledge. 5. Aspiration or swallowing of the tool takes place in the case of fixing a bad instrument or careless, inattentive operation physician. When involuntary movements of language tool can fall out and fingers during inhalation or swallowing movements to get into the bronchi or the esophagus. The doctor must be constantly aware and take precautions - never one tool can not be left in the tooth without a lock, do not be distracted by conversations with colleagues, and never for a moment to release the tool from the hands. Dentist in such cases must immediately contact an audiologist or a surgeon. set location finding tools, and choose a method of treatment on the basis of x-ray up to the surgery, if the instrument is in one place for 3-8 days. 6. The development of subcutaneous emphysema face and neck may occur when drying of the root canal treatment tool after the compressed air with great force by means of air guns. With the flow of air into subcutaneous tissue through the open apical foramen fall microorganisms infecting tissue, which can lead to serious consequences, until mediastinitis. Therefore, dry air can only be impassable or earlier lead sealed canals. 7. Stimulation of periodontal potent drugs: high concentrations of formaldehyde, silver nitrate, etc. In addition, drug treatment canals in most cases is carried out not jet solution and turundy. Drying of the root canal is done turundy rather than drill pins. The application of these outdated methods advance cause complications during treatment or in distant time. Clinically, this complication appears diffuse pain mainly when biting on a tooth. In such cases, the canal should leave the drug without irritating the periodontium (eugenol, enzymes, etc.). 8. Poor-quality root canal filling is observed at: - Resorcinol-formalin application method, the components which are irritating to the tissue, causing a sensitization treatment does not provide a guaranteed; - Filling with a paste, does not guarantee the reliability of the root canal obturation, because there is no method of controlling the amount of injected paste; - Canal filling phosphate cement that does not provide its reliable obturation; - Obstruction of the root canal due to the curvature, the presence of deposits, additional canals, lack of access to the root canal mouth, neglecting information on the availability of additional canals, the lack of a complete set of endodontic instruments, non-possession of methods of instrumental treatment of root canals, lack of control of its passage (working length of the tooth - this is the criterion that you need to know when the tooth dissection, drug processing, preparation and filling of the central pin);

105
- Breeding filling material for the tip of the root causes for a long time, pain when biting on a filled tooth and the appearance of a fistula, through which you can remove excess material curette spoon. Incomplete filling of the root canal after a given period after sealing the cause complications such as acute inflammation. To solve the question of whether treatment of the tooth needs to be done to re-radiograph. Repeated treatment is indicated: the ineffectiveness conducted treatment in destructive changes in the progression of bone structures, with broken off tool in a canal in the presence of the perforations, at partial obturation of the root canal and the presence of destructive changes in bone tissue. In the event that the canal сonstruction pastes problem is solved simply by removing the paste from the canal. Considerably more difficult to remove solidified material from the canal (resorcinol-formalin paste, phosphate cement, and others.). It is necessary in such cases to know the limits of their technical capabilities. If the canal is sealed only on 1/2 - 1/3, it managesunsealing . In the presence of single rooted teeth canals sealed phosphate cement for 2/3 or 1/2 length, it is preferable to carry out resection of the root apex. Multi-rooted teeth with a bad lead-sealed hardening materials, root canals, crooked, narrow back when the impossibility of their treatment of electrophoresis, depoforeza and frequent exacerbations are subject to removal or hemisection. One of the methods that open up new possibilities, if necessary, re-treatment is a method depoforeza. 9. serious complications is to hit the filling material in the mandibular canal. This leads to compression of the nerve trunk, numbness of the skin of the chin and admaxillary soft tissue. Prognosis is poor, as all treatments do not give the desired effect. The only appropriate treatment in this case is an electrophoresis lidazy gingival mucosa. In the absence of effect - removal of foreign body from the canal. 10. Push the filling material in the maxillary sinus is due to anomalies of the teeth relationship with the maxillary sinus inflammatory purulent processes in periodontal and thinning of the sinus bottom wall, with rough pushing the filling material through the canal. canal depth gauge measurement, X-ray control, accurate work is avoid making similar mistakes. 11. Complications can occur when incorrect diagnosis, as a result of an incorrect assessment of radiographs when the normal anatomical structures as a result of inaccurate projections are superimposed on top of the root and taken for pathological focus. To make a mistake is not trepan crown, it is necessary to examine the clinical condition of the tooth. Errors occur when applied to the X-ray mental foramen on the root apex of the first and second premolar of the mandible, and incisive hole is projected on the root of the central incisor of the upper jaw. Even more blunder allowed in reading radiographs, taking the pathological formation of germ zone are not fully formed the apex of the tooth root.

106
PREVENTION OF COMPLICATIONS IN ENDODONTICS Endodontic treatment is carried out on the testimony, and the choice of method depends on the specific diagnosis classification respectively. Presumptive diagnosis: 1. Acute and chronic forms of pulpitis (pulp irreversible condition), or devital vital extirpation. 2. Acute and chronic forms of apical periodontitis. endodontic treatment steps include: - Endodontic coronal tooth preparation, taking into account traits in 3 projections and anatomical parameters; - Endodontic root dissection (instrumental and pharmacological treatment of canals, taking into account the characteristic features of the 2nd and 3rd tooth projections); - Select the appropriate endodontic instruments and antiseptics for use in the canal at various levels; - Selection of coronal-apical or apical-coronal techniques for mechanical processing canals; - Determination of the length of root canals; - Selection of Sillery, and methods of using gutta-percha (lateral and vertical condensation); - Quality obturation of the root system throughout the controlled X-ray; - The restoration of the anatomical tooth shape (a kind of restoration). In practice, it is important in the performance of milestones in endodontics: - X-ray picture to make preparation; - Comply with the maximum angle of rotation of the tool in the canal: K-reamers - 180º, K-files - 90º, with narrow curved canals of the angle of rotation is recommended to be reduced to 20-30º. H-files can not be rotated; - In terms of use of gels for the expansion of the root canal; - Timely weeding out unsuitable tools. Assessment of the quality of endodontic treatment and prognosis is carried out by clinical and radiological features. Topic :Preparation of supragingival part of a root and unsealing of root canals for pin designs. One of the prevention of the formation of defects and deformations of dentition is the preservation of the roots of teeth, suitable for prosthetics. Using the root - this is the last opportunity to simulate the natural interdental space. It should also be noted the special importance of preserving the roots of teeth to prevent the formation of terminal dentition defect. For effective treatment of damaged tooth crown successfully used all kinds of Pin design, the most "ancient" of which are pin-teeth. By the crown of the tooth defect, which may replace the orthopedic designs include the IDOS)destruction of values when the index destroyed occlusal surface (IDOS)> 0.8 in cases where: • preserved gingival portion of the tooth crown above the level of the gingival margin to 3.0 mm;

107
• saved hard tissues of the tooth at the gingival margin; • hard tissues of the tooth are destroyed below the level of the gingival margin to 1/4 of the root length (if greater destruction removes the root of the tooth). In most cases, the reason for the complete destruction of the tooth crown are the complications of caries, more rarely - injury. To a significant or complete destruction of the tooth crown lead non-carious lesions of dental hard tissues: increased blurring, dysplasia, hereditary disorders of tooth development. Underestimating the importance of preventive recovery of the tooth crown in the presence of the root (root) in daily dental practice leads to unnecessarily remove them. This makes it inevitable resorption of interdental septa and reduced functionality periodontal neighboring tooth extraction. In addition, the destruction of tooth crowns leads to morphological and functional changes of dental system: deformation of dentition (the convergence of adjacent teeth, dentoalveolar elongation in opposing teeth), bite deformation, dysfunction of the masticatory muscles and temporomandibular joints. For these reasons, the restoration of the tooth crown is not only therapeutic measures but also prophylactic. In such cases, along with the fact that the orthopedic treatment enables use preserved with periodontal tooth crown completely destroyed, it restores the integrity and unity of the dentition, eliminates the need for healthy teeth manufacturing bridges. To recover significantly or completely destroyed tooth crown is used Pin design: • Pin teeth; • Pin stump construction (cast copings with a pin and then manufacture them artificial crown). Indications and contraindications to the use of pin structures General indications for use pin designs: • restoration of the tooth crown with complete or substantial absence of its destruction (IDOS)> 0.8); • anomalies of position of the front teeth when it is impossible orthopedic treatment (in this case the tooth depulping and cut off his crown to a level that is required for the selected pin design); • a support element of a bridge; • in combination with other elements of splinting teeth with periodontal diseases. The indications for the choice of pin design (the pin tooth or artificial crown on the stump pin tab) are determined according to: • from a group dental supplies (single or multi-rooted); • the nature of the occlusal relationships; • the degree of preservation of the supragingival tooth crown and root tissue destruction level in relation to the gingival margin. General contraindications to the use of pin structures: • obstruction of root canals; • short roots with thinning of the walls; • pathological changes in the periapical tissues;

108
• atrophy of bone tissue of the alveolar bone or alveolar part at the root of 3/4 or more; • destruction root more than 1/4 of its length; • a defect from the root wall equal to or greater than 1/4 of its length. When planning a pin design should take into account a number of clinical conditions, in particular the root state, which must meet specific clinical requirements: • be sustainable, as part of the root, protruding over the gingival margin, - solid, with no signs of caries; • be sufficiently strong wall (thickness of 1.0 mm for the lower incisors and has not less than 2.0 mm - for the remaining teeth); • rise above the gingival margin or, at least, to be on his level; • not be curved over 2/3 of its length, starting from the enamel-cement border; • root length ratio to the length of the restored crown part must be at least 1,5 ÷ 1,0; • the root canal must be sealed by at least 1/3 of length in the apical part with complete obturation apical opening; • periodontal should be deprived of signs of acute or chronic inflammation. If there changes, near the apical if they are not extensive nature, the absence of fistula and good sealing of the root apex acceptable prosthetic pin design; with significant lesions of periodontal prosthesis root apex can be carried out after the resection of the root of the tooth and strengthen transdental implant; • stump roots should be free from gum . The absence of these conditions is a contraindication to the use of pin structures and serves as the basis for the removal of the tooth root. In addition, the indications for the removal of the roots of teeth are: • atrophy of bone tissue of the tooth hole stage III-IV; • destruction root more than 1/4 of its length; • cases where the preservation of the root does not improve the conditions for the prosthesis; • common chronic disease of unknown etiology. In the case of underestimating the contraindications to the use of pin structures may be different immediate or long-term complications, perforation of the root development of acute periodontitis marginal periodontitis. Classification pin designs: Pin design are classified according to the following principles: 1) The elasticity: elastic, not elastic; 2) material: ceramic, metal, fiber (synthetic fiber); 3) for fixing: passive, active; 4) for other purposes: for restoration of the stump, for the reinforcement of the filling material. In turn, the root pin for flexible manufacturing material are glass fiber and carbon (C-positions); not elastic - ceramic and metal (standard (inlay-core) and copings (onlay-core)).

109
Anchor Root pins (positions) are blocked, semi-active and active according to the method of fixing. Passively latched Pin design: metal copings; ceramic root pins; Standard smooth metal root pins; carbon (not visible in the ultraviolet), and fiberglass. Resilient pins have the following advantages: - Biocompatible with tooth tissues; - Reduce stress, riving the load on the root of the wall; - Create a monolithic structure with hard tooth structure and composite cement; - Allow you to restore the tooth stump or spend renovating in one visit; - Modulus of elasticity of the fiber is equal to the module of elasticity of the dentine of the root; - No corrosion or discoloration; - Provide a highly aesthetic result of the restoration due to the proximity indicators of light and conductivity to that of the tooth structure. - Simply removed when needed. Despite the wide variety of pin structures, they all require a standard tooth preparation: - Previously the root canal should be obturated quality (sealed) - Root wall should be thick enough (at least 2mm) - Root canal unsealing the pin to a depth of 2/3 of the length of the canal, so that was 3-4mm sealed canal in the apical third - Special scanner used, giving the root canal cylindrical or conical shape.
Topic : Preparation of tooth under a cast stump pin tab. Manufacture of a cast stump pin tab by a direct method. Cast Stump Pin tab - it's construction, which is made by injection and consists of two parts: the part of the pin, which is fixed on the cement in the root of the tooth and of the stump - part, which is fixed directly to the crown. Copings is made of different metals (casting) or zirconia (by milling). Copings used for the destruction of strong teeth and allows the physician to make and fix the crown even for the remainder of the tooth root easily. Collapsible Pin tab is used to restore the tooth with two or more roots, not folding tab - for single-root teeth. It consists of the stump and the pin, allowing to simulate the coronal part of the tooth, and then at her own crown is fixed. Dignity copings - is its ability to be a great support for the whole of the bridge, as well as for a single crown. Indications cast pin tabs :. 1) significant defects of teeth crowns as a result of tooth decay or injury ;. 2) abnormal abrasion of hard tooth tissue ;. 3) the provisions of the front teeth abnormalities in adults, it is not possible to carry out orthodontic treatment ;. 4) Strengthening the abutment, which is not able to withstand functional load after the manufacture of the coating structure. Contraindications to the use of cast pin tabs :.

110
1) teeth mobility III, and in some cases II and degree of pathological processes due ;. 2) the lack of a tooth root to form a full length of the pin tabs ;. 3) The teeth were resected before the tops of the roots ;. 4) teeth with curved roots and impassable canals. Manufacturing of molded pin tabs carried out in sequence :. patient examination and determination of indications; preparation of the tooth and the root canal; modeling cast pin tabs; Preparation of tabs structural material; fit is, and lock pin tab for cement; manufacturing coating structure. patient survey conducted using general and special methods of investigation. Radiological determine the state of periodontal tissues supporting the teeth and the entire dentition. Learn the status of each abutment separately, size and topography of the roots. Patency of the root canal using clarify sighting of X-rays. Plaster diagnostic models of jaws allow to specify relation of dentition in all phases of articulation, conduct the appropriate measurements and to determine the scope of preparations for dental system for orthopedic treatment. The preparation of the tooth root canal and begin to remove the softened dentin, hard tissue excision necessary to continue to proceed to the formation of the bed for the pin. Canal preparation should start with opening the mouth and canal expansion. Expansion of the canal should be under the control of X-rays. In the preparation of the root canal and determining the length and thickness of the pin must be considered average parameters of root canals. In the preparation of the tooth root canal to consider the thickness of its walls. Most thick walls have fangs, and then in descending order of the central incisors and lateral. On the wall of the lower jaw of the central and lateral incisors have almost the same thickness. The thickness of the root canal walls increases with age. Reducing the diameter of the root canal is approximately equal to the amount of increase in the thickness of the two opposite walls. Thicker wall anterior teeth have roots on the oral surface. After the expansion of the canal in its mouth should be established so-called amortization cavity elliptical shape in the vestibular-oral direction depth 2,5--3,5 mm and a width of 1.5-2.5 mm, which allows you to improve the fixation of the cast pin tabs and excludes it rotation.

111
Fig.46Stages of root canal preparation by pin Some experts recommend creating depreciation cavities of various shapes -. Square, rectangular, etc. However, mathematical calculations show that the creation of any form with sharp corners increases the voltage (in these angles), contributing to spalling on this site, so the most favorable is a damper cavity elliptical shape. When forming(Fig.46) the optimal length of the pin (root length 2/3) to create an amortization cavities extend only a few recommended canal (1 to 3 mm), depending on group level and location of the teeth. After preparing the hard dental tissues begin to modeling cast pinned tabs. Well proven itself for this purpose domestic wax "Lavaks". Use wax, heated over a flame or in a water bath by pulling one end until a spear shape. Thus prepared wand modeling wax is introduced under pressure into the tooth canal, and the surplus is cut at the occlusal surfaces of adjacent teeth. Then the model stump of the tabs, creating a form,which must have abutment after preparation under / proper crown. Upon completion of modeling in the thickness of the wax on the stump of the tooth axis of the composition is administered at 1-2 mm heated metal pin about 1 cm long (usually it orthodontic wire), which must be cooled after the consolidation of a jet of cold water. The wax composition of the Output tab with forceps over the back of the metal pin efforts on the axis of the tooth. Then the finished reproduction is given to the dental laboratory to replace the wax on the metal. At the stage of fit is necessary to polish the roughness on the cult of the tab and specify the interocclusal distance with teeth-antagonists on the thickness of the coating upcoming construction. Reduction should conduct or other interventions on the part of the pin (root) tab is not allowed. With proper preparation of the abutment and the observance of the laboratory technology of casting metal tab should be freely introduced into the root canal and fit snugly to the hard tissues of the abutment. When fixing a cast pin tabs on the cement should strictly observe the necessary rules. It is necessary to carefully degrease, disinfect, dry root canal, and only then with the help of endodontic files and reamers introduce cement into the canal. On the stump and part of the pin facing towards the root cement is applied. tab is introduced into the canal, tightly clutching the abutment to cement harden. For the production of the coating structure necessary to begin not earlier than one day. Unlike conventional tabs only metal alloys used for manufacturing pin. Topic : Manufacture of a simulated stump with use of anchors. Anchoring pegs (standard metal pins) is a small screw with a head or no head, which is made of titanium or another metal with a coating, which prevents corrosion. Alloys for root posts can be divided into two groups: the first - alloys, which can be corroded (nikelhrom, cobalt chrome, stainless steel), the second -

112
alloys in which corrosion is questionable (titanium alloys, precious metal alloys (gold, platinum).
Fig.47Types anchors Structures anchor 1. The head (coronal section).(Fig.47) Usually has a cylindrical or conical shape with a retention points (grooves) on the side surface. Sometimes the head has an additional recess to give it the maximum similarity with a natural tooth. Structurally pin head shape is formed such that its surface area is increased, - thereby provides better retention when the composite restoration of a tooth crown defect. 2. Arm (support member). Used to support on the dentin of the tooth root, which can significantly improve the stability of the construction to the side chewing loads. 3. The shank (inside the root portion). Essential for all secure the pin structure in the canal of the tooth, as well as to ensure uniform distribution of masticatory forces at its root. The surface of the liner can be made smooth, can have annular grooves, or screw threads. Typically, the shank has the shape of a cylinder or cone. By way of retention anchors are subdivided into active, strengthens the root canal on the principle of screws (self-tapping), passive, representing the smooth rod is retained in the root canal by means of cement, and semi-active, or passive tapped, t. E. Strengthened by the principle of the bolt . The choice of fixings depends on several factors. Active anchors provide more than passive retention at equal length, but create much more splitting time and weaken the tooth root. The active anchor is not recommended for use in elderly patients. At the root canal walls in older patients is deposited a thick layer of weakly mineralized dentin and predentin, t. E. Tissue is not possible to achieve good retention pin. Semiactive anchors have better retention than passive, and almost do not weaken the roots of teeth. These disadvantages include a more complicated procedure of root canal preparation by pin, which requires a more sophisticated and accurate tool that makes the structure of the tooth and strengthen the procedure more expensive. The main criterion for selection of the pin is its shape. The shape of pin-pin structure portion may be cylindrical (parallel walls) and conical (with a convergent-walled portion to apical). Taper pin more accurately follows the
113
shape of the tooth root, so the root wall, prepared by a pin, has approximately the same thickness all over. Cylindrical pins considered the most simple and best retention have equal length when compared with the taper, but their shape does not coincide with the shape of the tooth root, thereby increasing the risk of perforation. It is shown, primarily for massive and short roots. In taper pins there is a reduction of retention with increasing taper angle They are adapted morphologically and the pressure at the apex is less significant when cementing. Cylinder conical pins - pins intermediate type. They are more stable than conical, and less load root dentine. Stages of tooth restorations with the anchor pin General rules for the preparation of the root canal by a pin structure are as follows: Do not delete the apical 4-5 mm of the filling material and seek to significantly expand the root canal. With the deepening of the root canal by more than 11-12 mm (from the mouth), it is difficult to align the cutting tool and can cause excessive expansion of the root canal with the weakening of the walls of the root, as well as increases the risk of lateral perforations. On an X-ray of the restored tooth superimposed slide pins profiles, respectively, that you want to pin selected. The development of a root canal performed burs, reamers, corresponding to the diameter of selected anchor pin. For screw-in pins the difference between him and the drill is about 0.1-0.4 mm, the drill is always less than the pin. This inverse relation to passive pins. The bed for the head of the anchor pin to create a root Facer. Calibrator checked the location of the anchor pin. After removal of dentine chips produced threading in the root canal selected pin mounted in a special key. Done half a turn clockwise a quarter - against. The thread is cut neatly, all the way, without creating excessive pressure on the walls of the root to prevent the root splits. The root canal is washed, disinfected, dried, using endodontic files and reamers is filled with cement. Anchor pin coated with cement and screwed into the root. It is advisable to make the first turn counterclockwise to pin captured thread. Excess cement is removed and the coronal part is reduced amalgam, composite or glass ionomer materials. Giving the correct form of the supragingival tooth facilitated the use of matrices and caps. If provided coverage restored tooth artificial crown, after hardening of the material it is made of the tooth preparation for an artificial crown. The use of anchor pins lined composite, glass ionomer materials for the restoration of the crown of the tooth is effective for subsequent coating of porcelain crowns as well as the use of stump tabs in this case, less aesthetically pleasing because of the possible-through metal stump. The pin is fixed in the tooth root and creates an artificial skeleton to restore and strengthen teeth. The length of the metal pin to be half or 2/3 of the root length and width equal to the width of the tooth wall. The width of the walls of the tooth should be less than 1mm. Methods cementation metal pin: - Root canal unsealing the required length using a tool for the treatment of mouth or canal scan; - The creation of a place in the scan head and the body of the pin;

114
- Selection and fitting pin (control the correctness of the choice of the pin is carried out with the help of x-rays or computed radiography); - Drug treatment and drying of the mouth of the root canal; - Kneading fixing material and incorporate it into the root canal using endodontic files and reamers. Most often used for fixing pins glass ionomer cements (waterless system) and special cements for fixing the anchor pins (Core-flo, Core max); - Fixing pin in the root canal by screwing. The danger of this procedure is that the metal pin is screwed into the root and generates a voltage therein. This eventually leads to the formation of cracks in the root canal and split as during the cementation process as well as during chewing. Furthermore, in practice, some drawbacks have been identified in the interaction of the pin, namely: - The lack of firm connection at the metal-cement-dentin; - The lack of aesthetics in the reduction of the front group of teeth; - The difficulty in removing the pin from the canal; - corrosion of metal. The main drawbacks of anchor pins are: - Wedging effect on the root wall; - The possibility of metal corrosion and resulting loss or tooth root. The advantages of this type of pins are: - The ability to withstand heavy chewing load; - Active mechanical retention by the thread. During cementation canal important is the interaction of materials such as a pin, composite for the restoration of the stump, and composite for the cementation of root dentin. If they have different chemical and mechanical indications, i.e. not biocompatible , the combination of these materials causes high stress concentration, destroying tooth tissue. It was necessary to achieve a homogeneous system (monoblock) listed materials that can be integrated with each other and have the same biomechanical performance. Perfect pin for this purpose should have a modulus of elasticity as in dentin. Recent studies have confirmed that only the elastic pins have such flexibility as the structure of the tooth itself. This led to the generation of the third pins. (coal) Carbo fiber pins are made of glass fiber and glass fiber carboxylic arranged horizontally and immersed in a special factory methods in the epoxy plastic matrix, which is 36.6 percent of the total weight of the pin. Carbon and glass fibers are reinforcing element, they are continuous and constant voltage. The fibers are arranged along the major axis. This longitudinal fiber structure ensures uniform distribution of loads on the dental hard tissue. Chewing load fully accepted and distributed, preventing their accumulation in the root, which significantly reduces the risk of radicular fracture. Features and advantages of fiberglass and carbo fiber pins: - Modulus of elasticity close to the dentin, which prevents root fracture; - The surface of these pins is not smooth because of the fibers, which facilitates adhesion of the composite micromechanical;
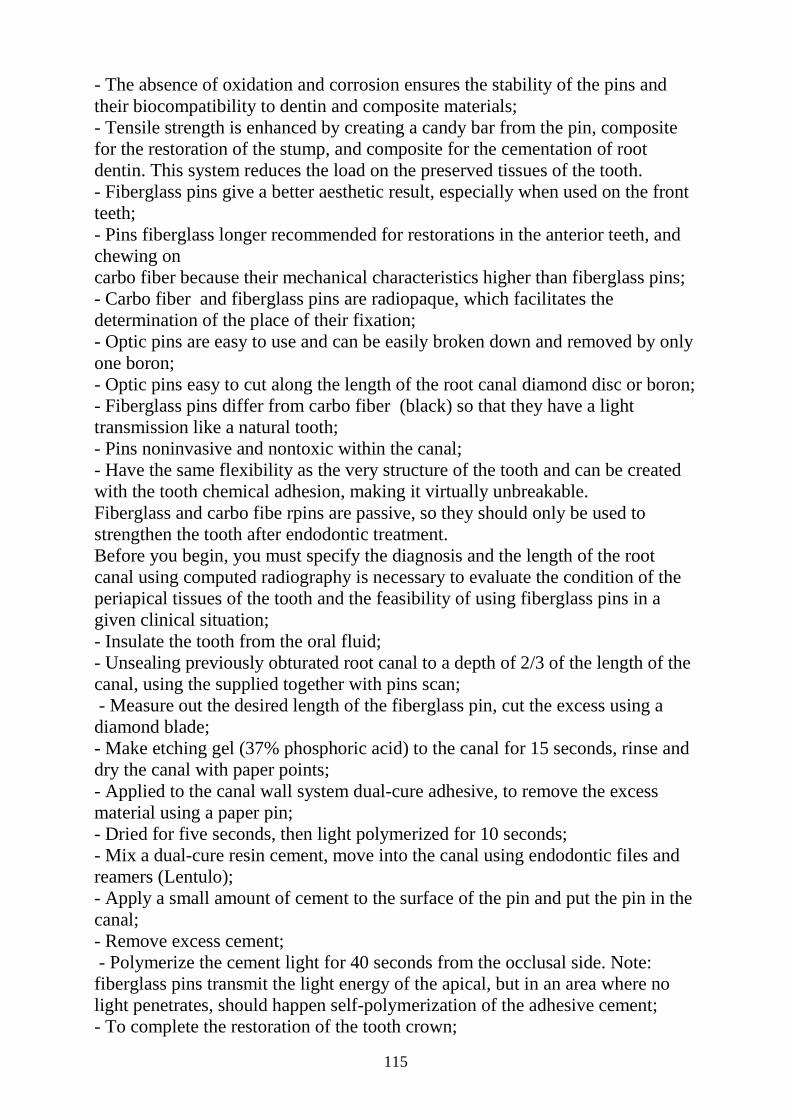
115
- The absence of oxidation and corrosion ensures the stability of the pins and their biocompatibility to dentin and composite materials; - Tensile strength is enhanced by creating a candy bar from the pin, composite for the restoration of the stump, and composite for the cementation of root dentin. This system reduces the load on the preserved tissues of the tooth. - Fiberglass pins give a better aesthetic result, especially when used on the front teeth; - Pins fiberglass longer recommended for restorations in the anterior teeth, and chewing on carbo fiber because their mechanical characteristics higher than fiberglass pins; - Carbo fiber and fiberglass pins are radiopaque, which facilitates the determination of the place of their fixation; - Optic pins are easy to use and can be easily broken down and removed by only one boron; - Optic pins easy to cut along the length of the root canal diamond disc or boron; - Fiberglass pins differ from carbo fiber (black) so that they have a light transmission like a natural tooth; - Pins noninvasive and nontoxic within the canal; - Have the same flexibility as the very structure of the tooth and can be created with the tooth chemical adhesion, making it virtually unbreakable. Fiberglass and carbo fibe rpins are passive, so they should only be used to strengthen the tooth after endodontic treatment. Before you begin, you must specify the diagnosis and the length of the root canal using computed radiography is necessary to evaluate the condition of the periapical tissues of the tooth and the feasibility of using fiberglass pins in a given clinical situation; - Insulate the tooth from the oral fluid; - Unsealing previously obturated root canal to a depth of 2/3 of the length of the canal, using the supplied together with pins scan; - Measure out the desired length of the fiberglass pin, cut the excess using a diamond blade; - Make etching gel (37% phosphoric acid) to the canal for 15 seconds, rinse and dry the canal with paper points; - Applied to the canal wall system dual-cure adhesive, to remove the excess material using a paper pin; - Dried for five seconds, then light polymerized for 10 seconds; - Mix a dual-cure resin cement, move into the canal using endodontic files and reamers (Lentulo); - Apply a small amount of cement to the surface of the pin and put the pin in the canal; - Remove excess cement; - Polymerize the cement light for 40 seconds from the occlusal side. Note: fiberglass pins transmit the light energy of the apical, but in an area where no light penetrates, should happen self-polymerization of the adhesive cement; - To complete the restoration of the tooth crown;

116
Topic : Pin teeth (across Richmond, Ilyina-Markosyan, Ahmedov). Manufacture of prime pin tooth. Features of manufacture of pin designs on multirooted teeth. Pin teeth - a fixed prosthesis which completely change the crown of the tooth and secured in the canal by a pin. Pin teeth are distinguished according to their purpose, structure, and method of manufacturing the material from which they are made. Pin constructs that serve only to replace the natural tooth crowns, restorative called. Pin teeth with which strengthened other structures fixed prosthesis - bearing. Often the teeth are pin-like recovery and support. By design Pin teeth are divided into monolithic and composite. According to the method of manufacture - on cast and soldered. According to the material of which are made - for metal, plastic, porcelain and lined. Metallic and non-metallic parts of the pin teeth are connected by cement, solder directly (Pin plastic teeth). By strengthening the principle at the root of the teeth are divided Pin: - on the teeth, which rest part of the crown or the protective plate to the outer surface of the root; - Teeth that rely protective plate on the outer surface of the prepared root and cover ring to the gums protruding part of the root; - Teeth reinforced not only on the outer surface of the root, but also to the internal walls of the canal. There are common clinical and technical rules applicable to the tooth root: • should protrude above the gum, or be on the same level with it (this requirement is relative, as in other cases, you should choose a different design); • be sustainable in the hole; • in the apex of the root should not be inflammatory changes in periodontal tissues; • the root wall should be of sufficient thickness and should not be affected by caries or other disease process; • not be curved over 2/3 of its length, taking into account the enamel-cement compound; • Have a circular bunch intact; • Root length should at the root refers to part of 2: 1; • root canal must pass over a length not less than the height of the crown; • the root canal must be sealed at least 1/3 of the apical aperture. The absence of these conditions is a contraindication for the manufacture of pin structures. Glow tooth ring for Richmond(Fig.48).

117
Fig.48Richmond This construct is an artificial tooth with an outer ring and a pin soldered thereto. Ring (gold), covering the root, it prevents cracking under load. The edge of the ring is advanced under the gum to a depth of 0.5 mm, to the other side of the ring facing the crown of the tooth, the protective plate soldered to the root. Perforated plate, it is passed through the pin in the canal, then at the root plate and the pin soldered. To the resulting Kappa with a pin and solder made of artificial crown part of the tooth, and then on his side of the vestibular attached aesthetic porcelain veneer. Manufacturing stages: 1. Prepare the root. 2. Preparation of the root circle size. 3. The fit of the ring and pin. 4. Preparation of imprint with the ring and the pin and production model. 5. Fit of a mouthguard with a pin. 6. Preparation of impressions and casting models with mouthguard. 7. Making Crowns. 8. Fixing denture in the oral cavity. Prepare a tooth so that the root above the level of the gums by 1.5 mm. a loop of wire of 0.4 mm diameter (bindrat) is used to measure the circumference of the root: removing from the root, it is cut, straighten the wire and the resulting length of the gold plates (900 samples) cut a strip of the desired length and width. With the help of pliers strips make a ring whose edges are abutted, solder solder 750 and fit is to the root. Contoured edges on the neck of the tooth and
118
advance under the gum to 0.5 mm. For mouthguard to the ring solder pin gold plate of gold. Then, the prints produced and cast model kappa. Their gypsum occludator and made a crown design chosen physician. Glow with the tab on the tooth L.V.Ilina-Markosyan(Fig.49) consists of a wire pin and cast cube-shaped tabs,
Fig.49L.V. Ilina-Markosyan which prevents rotational movement of the tooth, a root canal seals from getting saliva. The features of this design are the nature of the root preparation, preparation of the cavity under the Modeling tab, and the latter with a protective cap. The protruding part of the root to grind the gum level, and then at the mouth of the canal creates a prepared cavity of the cube-shaped for the tab with an edge of 3-4 mm, smooth walls and a flat bottom. The tab is modeled by the direct method of wax "Lavaks" by pressing the softened wax, and then heated pin fit is 1.2-1.5 mm thick, is introduced into the canal through the wax composition. The free end of the pin is flattened and bent at an angle. Checking the accuracy of the fit of the tabs to the walls of the cavity, it is given in the casting. During the second visit fit is tab with a pin. Then, the prints obtained with the pin and tab and cast model, determine the color of the plastic and the dental laboratory in the manufacture of the pin ends of the tooth. At the last stage of clinical tooth carefully fit is antagonists and fixed to the cement in the oral cavity. Metal crown with plastic lining and pin at A. Akhmedov(Fig.50).

119
Fig.50 A. Akhmedov This design is especially useful when the gingival portion of the preserved crowns. manufacturing stages: 1. Preparation of the tooth crown. 2. Preparation of casts of both dental arches. 3. Production of stamped crowns. 4. The fit of the pin and the crown in the clinic. 5. Preparation of the cast and color definition of the future of plastic cladding. 6. Spike tooth in the laboratory and the pin, making the lining. 7. Polishing. 8. Ready fit is tooth with a pin in the mouth and fixed to the cement. Method for manufacturing crowns A. Akhmedov is not complicated. tooth root dissect compliance with the rules under the full stamped crown. Tooth stump supports a snug fit and the crown margin should necessarily be raised above the level of the gums. In the dental laboratory made crown stamped and given to the clinic. Doctor fit is crown in the mouth and makes it 2 round bur with perforation of the vestibular and oral side. After oral perforation introduced fit is pin stainless steel wire, and get print. Then, define the color of plastic. In the laboratory, a model is cast, the pin is soldered to the crown, and on the vestibular side window cut out. Because wax is modeled facet, gypsum in the cuvette and the wax is replaced by plastic. Polish, grind and give a clinic. After the fit in the mouth and the necessary correction crown fixed on cement. Contraindications. Contraindications for prosthesis bayonet teeth include: 1) poor quality canal filling; 2) short or twisted roots; 3) the destruction of deep roots under the gum; 4) the pathology of the bite; 5) multiroot teeth; 6) the emergence of pathological roots of mobility after resection of their tops or periodontal diseases. Making pin tooth was conducted under the simplified procedure. The pin was carried out clasps wire and coronal part of fit is headset plastic teeth. Components of fixed between a self-hardening plastic and ready micro prosthesis strengthened in the root canal by means of phosphate cement. Many authors propose a technique of simultaneous manufacture of wire pin

120
teeth in the clinic. These constructions are combined so that they do not require complex equipment, methods for their manufacture is simple and of short duration, achieved aesthetic effect. Indications for the manufacture of pin design on multiroot teeth • roots must be sustainable, the resorption of the alveolar walls should not exceed half the length of the roots; have a greater length than the height of the future crown; • the root wall should be thick enough (at least 2 mm) to withstand chewing pressure transmitted through the pins and projecting portion - hard, not affected by caries; • the canals (if possible) should be sealed 2/3 length; • apical third canals are sealed must be hardening filling material, and periodontal deprived signs of acute or chronic inflammation. In multi-rooted teeth, where it is planned fixation cast stump a few pins, the canals are shallower. At the same time the upper molars to the core, the longer pin is used palatal root canal, for additional pins at length - the canals of the medial and distal buccal roots. At the lower molars to the main shaft of the distal root often used canal for additional pins - medial root canals. Before the production, pinned tabs need to determine which of the canals will be a major, and what (or what) - optional. As a general, you can use a well-traveled canal (sealed almost 2/3 length), which will include the main pin, monolithically connected to the tab body. Additional pins will pass through canals in the body and enter the tab additional (optional) canals. Manufacturing of construction, when monolithically connected to the stump part pins are included in the more narrow canals, and rolling pin - in a wide. In the manufacture of a pin to the upper molars tab under the main pin is usually prepared palatine canal for additional pins - buccal or vice versa. In most clinical cases in the roots of lower molars front canals are parallel to each other. Pin tab will then consist of two primary pins connected to the body and outside the front canals, and an additional pin entering the rear root canal. Simulation of pin tabs carried out on the model of super plasters modeling wax or using the Build ash-free plastic. In modeling the structure of one of the canals of wax (or two canals if they are parallel) can be enhanced from ashless plastic pin. In such cases, one of the canals introduced modeling wax and form part of the stump. The other canal (s) through a wax model of the stump is introduced in advance fit is pin (pins) of the ash-free plastic. The resulting composition is derived from the model series: first - an additional pin (pins), then - wax Stump part of the main pin. The canal (s) for further pin (pin) in the wax body tab administered graphite rod or a refractory mold material, which is removed after casting. Then fit is cast a pin tab stump model: stump with the first main pin, and then - through the canal (s) in the body of the tab introducing an additional pin (pins).

121
Besides the traditional indirect method of manufacturing a stump pin tabs in clinical practice using the direct method for restoring damaged coronal part of multi-rooted teeth with anchor pin tabs. For their production using anchor pins - standard inserted into the root pins of different designs of metal alloys, glass transition of carbon fiber, aluminum oxide, zirconium oxide or lithium disilicate-ceramic. Generally, anchor pins consist of leaf-bearing part - and intracanal head portion. When using metal anchor pins in the preparation of root canals perform additional manipulation - their calibration using calibration drill. After application of the fixing material on the part of the pin inserted the root it is introduced into the canal and placed in the desired position. After all the pins start to the formation of the Stump designs using composite chemical or dual-cure. Stump of the attached form required for the production of the corresponding artificial crown design. This option is recovery of the tooth crown is useful for a subgingival tooth retaining walls.
Topic : Manufacture of a provisional bridge-like artificial limb. Ways and fabrication stages. Requirements for a provisional prosthesis (PP) • They (PP) should: - To provide insulation from the tooth tissue temperature effects and precise fit, excluding the boundary seepage; - In order to avoid correction or alteration of a permanent restoration to ensure the stability of tooth position, precluding its displacement; - Ensure full chewing function and thereby prevent the development of neuromuscular imbalance in the TMJ; - Provide accurate marginal fit. Inflammation caused by the overhanging edges of the PP can cause proliferation, recession and bleeding when removing the impression or permanent cementation of restoration; - To withstand chewing load without damage and displacement. Broken provisory bridge can only enhance mobility abutment teeth; - Match the color of the preserved teeth and provide a good aesthetic result. • PP should not interfere with the sanitary treatment of the oral cavity. If the gum tissue to remain healthy while using PP, it reduces the likelihood of problems during the cementation of permanent restoration. VARIETY PROVISORY PROSTHESES DEPENDING ON THE METHOD TERMS AND THEIR MANUFACTURING Provisory prostheses can be produced clinical-laboratory and clinical methods. Depending on the timing of production of PP may be the kind of direct prosthetics (ie. N. "Immediate dentures", made up teeth preparation of clinical and laboratory methods) and early

122
prosthetics (dentures made in one session immediately after the preparation of teeth in the clinical setting). Polymeric materials used for the manufacture provisory prostheses When using clinical and laboratory fabrication method PP used acrylic plastic hot curing "Sinma M" (powder - A fluorine-containing graft copolymer; fluid - a mixture of acrylic monomers and oligomers). In the manufacture of PP in clinical settings (one visit) using polymethyl methacrylate (PMMA), and BIS-acrylic composite (organic matrix silanized filler). For polymeric materials used for the manufacture of provisional prosthesis clinical methods must meet the following requirements: • no toxic effects on tooth pulp and surrounding tissue; • materials polymerization should occur without an exothermic reaction; • Minimal shrinkage of materials during their polymerization (volumetric shrinkage should not exceed 3%); • a compression resistance; • original texture of the material should have a low viscosity; • Materials must have a long plastic phase; • Ensure a smooth shiny surface after polymerization; • match the color replaceable tooth; • Materials must ensure ease of operation (packaging, dosage, workability, etc.). METHODS OF MANUFACTURING PROVISORY PROSTHESES CLINICAL LABORATORY METHOD FOR PRODUCING provisionally PROSTHESES Clinical and laboratory method involves the direct production of PP plastic hot polymerization ( "Sinma-M" and others.) In a laboratory. Stage 1. The doctor gets to the teeth preparation work and support the patient impressions. If necessary (in cases where the pattern can not be matched in position on the basis of the centric tooth signs) registers central occlusion. Stage 2. According Reprints made plaster models that are fixed in occluder or articulator. At the working plaster model sharp cutting tool (eye scalpel) or dental rotary engraving tool runs teeth imitating their preparation (formation of a tooth stump in the form of a truncated cone, removing the gypsum layer on the artificial crown thickness). Stage 3. In the simulation model is performed engraved design of the prosthesis with subsequent replacement wax wax prints on plastic by molding a plastic dough molding and subsequent hot plastics polymerization. Processing, grinding and polishing of the plastic a provisional prosthesis. Stage 4. The doctor at the clinic carries out preparation of the teeth, the fit, compensation and relocation of previously manufactured prostheses using plastics chemical or dual-cure.
123
CLINICAL (ODNOSEANSNYE) METHODS OF MANUFACTURING Provisory prostheses using matrix technology Clinical methods involve the production of PP in a single visit. For this purpose, a commonly used clinical practice manufacturing techniques PP matrix. As auxiliary materials used to manufacture matrices used silicone, and thermoplastic materials alginate and celluloid caps and kappa ( "strips"). Production of PP with preserved anatomical shape of the tooth In cases where the anatomical shape of the tooth to be prosthetic, not broken (tooth changed in color) or restored filling material, it is advisable to use as a template silicone or alginate impressions. To do this, before the preparation of the tooth or group of teeth alginate or silicone impression material and the impression is obtained after removal from the oral cavity is performed with scissors removing interdental jumpers that facilitate its subsequent re-imposition on prosthetic bed. After preparation of the tooth is filled with impression material and the polymer is reintroduced into the oral cavity for a time specified in the polymeric material for use instructions. After removing the impression from the mouth prosthesis is removed from the print, or is removed from the prepared tooth and held his treatment. Production of PP was partially edentulous Partial absence of teeth, the use of a matrix PP manufacturing technologies possible: - Direct method (manufacturing matrix directly in the mouth); - Indirect method (making for a plaster model of the matrix). Direct method for manufacturing a silicone matrix is used in the absence of one tooth. To temporarily remedy the defect dentition standard plastic teeth of the sets used for dentures, which grind in considering defect dentition and occlusal relationships. Fixing a plastics tooth is carried out using Block-out Resin The procedure was repeated. Prior to preparation of the abutment teeth get the impression using alginate or silicone impression materials. After receiving the print artificial tooth is removed, the preparation is carried out of the abutment teeth. Make a provisional prosthesis on previously Impression (matrix) in the above-described technology. If the defect is 2-3 dentition of missing teeth (for a group of front teeth up to 4 incisors), preference should be given to the indirect method for the manufacture of matrices. Prior to preparation of the abutment teeth prepared anatomical prints, which are made in the office of the plaster model. On a working model in place of missing teeth set of plastic teeth Headset for dentures with occlusal view of the relationship between the dental arches. After setting dental gypsum models get a second impression. After preparation of the abutment teeth in second clinical impression is used as a template for the production of PP.

124
Production of matrix indirect way can be performed in a dental laboratory in parallel with the doctor at the clinic operational manipulation on preparation of the abutment teeth. This method enables to produce PP in a single visit and thus save time doctor and patient. Known methods for manufacturing bridges with PP techniques of engraving prints Prior to preparation of the abutment teeth get a working print. In the resulting imprint is removed mapping oral vestibule some distance of 2-3 mm from the necks of the remaining teeth, which simplifies the re-introduction of the print, and with the help of cutting tools create grooves in the impression material in place of missing teeth. Then spend preparation of the abutment teeth, fill material for print and injected PP imprint on the prosthetic bed tissue. Upon completion of the polymerization time stamp structural material is removed from the mouth, PP separated from the impression material and its processing is carried out. It should be noted that this method requires a considerably time consuming, ie. K. Engraved virtually impossible to print in accordance with the anatomical shape of the missing teeth and maintaining dental occlusal relationships between rows. Along with the impression materials as the templates for making of provisional crowns may be used thermoplastic materials ( "LuxaForm", DMG, Germany, base wax), however, it should be remembered that they are not able to accurately display prosthetic tissue and do not have elastic properties. Provisory prosthesis manufactured using matrix technology provides individual form and maintain the position of the teeth, existing prior to preparation, and practically do not require revision. Patients can be easily adapted to the data structures. Topic : The adhesion bridge-like artificial limbs. Methods and fabrication stages. The adhesive bridge consists of a base part, which can be cast in the form of crustacean, scaly or perforated lining,portion crowns without grooves, single- and double-armed support-retaining clasps, clasp wide multi-unit and other elements. The intermediate part may be combined, i.e. metal or ceramic composite liner.

125
Fig.51 Preparation teeth for denture adhesive
Fig.52Positioning glass in the prepared cavities in the manufacture of denture adhesive on the chewing teeth
Fig.53Ready denture adhesive

126
Fig.54,55Preparation of anterior teeth by adhesive prosthesis and positioning glass in the
prepared cavities on frontal teeth
INDICATIONS FOR USE THE DESIGN IS DEVELOPED AB Developed construction adhesive bridge is shown for use in patients to remove the unit included defects of dentition in the lateral section (III Kennedy class). Graduate design of the AB, as well as other non-removable prosthesis is indicated for permanent occlusion. to support the teeth Requirements: - Abutment teeth should be intact; - Abutments must be stable; - Exposure of the roots of the abutment teeth should be no more than 1/4 of the root length; - At the abutment teeth must be expressed anatomical and morphological features; - The abutment teeth should be of sufficient height to position them on the retaining elements. To strengthen the structure on the abutment teeth can be used fixing materials of various groups, including photopolymer and dual-curing. Structural features of the model developed by the AB increase adhesion area between the supporting teeth, the AB and the material and allow to fully produce polymerization of the fixing material. The steps of manufacturing the AB: There are two ways of manufacturing and laboratory AB direct (indirect) methods(Fig 51-55). 1. Evaluation of possible locations in this particular location of the adhesive construction. Determination of color, transparency, shape future artificial tooth. Shoe professional toothpaste containing no fluoride. 2. Preparation of the abutment teeth. 3. Sawing abutment teeth in notches or cavities retention space under the beam (fiberglass) for the adhesive fastening structures. The side that is chewing teeth, cutting location depth should reach the middle of the crown (1-2mm deep

127
cavities), in the front teeth located at the contact points. Length - to the proximal shaft (with the exception of lateral teeth - over the middle of the crown). 4. If the abutment teeth intact (natural) without the need to dissect cofferdam to control the level of the gums (not reach 1 mm). 5. After preparation of the abutment teeth isolated cofferdam while clips are recorded as deep as possible. Sawing space for beams support beam 6. Determination of the length of the beam. For this purpose we use a piece of foil or strips. On valves are 2 pieces of glass (one is placed closer to the buccal surface, the other - to the lingual or palatal). Can be used as additional support fiberglass pins, especially important is the use in the posterior teeth. The most suitable fittings impregnated fiberglass, glass fiber such great fit. 7. In the absence of molars, construction reinforced fiberglass pin while it is placed closer to the guide vestibular cusps. If we restore the front portion, the glass fibers to be stacked "house" - a taut thread, while the other like - would sag. The space between the glass fiber strands in the future is filled with opaque material. 8. Abutments etchant of phosphoric acid, enamel - 15 seconds, then without washing put on dentin for another 30 seconds. Washing with water and drying of the teeth to slightly moist dentin. 9. Application of the bond (dental adhesives), if the first layer is instantly absorbed, immediately apply a second layer to impregnate the dentin, held for 30 seconds and blow up the lamp illuminates with diffused light flux. 10. To isolate the dentine immediately on both abutment Apply thin layer of liquid photopolymer. After blowing out the dentin shade are making photopolymeric material, and condensing the first well, if necessary, be laid fiberglass closer to the guide pin and hillocks condensing together with the mass of material. The next stage is lighted portion of the material. Then laid fiberglass strip closer to the lingual cusps to the dentin layer tone hardening. Each illuminated strip coat with liquid photopolymer material for smoothing various roughness. On the created structure is laid thin layer of dentin material and condensing the next strip of fiberglass. To cut this design takes the form of a triangle, and then after exposure also greased with liquid photopolymer. 11. The next step is completely rebuilding abutment teeth with the application of dentine and enamel layers. 12. Do the thresholds (coupling) on the site of the future points of contact surface enamel shade of photopolymer material, as it were enveloping fiberglass construction.

128
13. Prepare a rigid matrix of brass, which shall be rounded, edges rest on the sills and bottom - very tightly against the gum until the light blanching. The position of the matrix fix wooden wedges. Wedges also reserve space for future subgingival papilla. 14. Now you are ready to create an artificial tooth. The first layer of the artificial tooth we put opaque tooth color, approximately 2/3 of the tooth length, carefully condensing in the space between the matrix and the fiberglass. 15. Then reduced sequentially vestibular wall, lingual or palatal, contact points and the chewing surface. 16. Remove the rubber dam and proceed to the polishing surface of the adhesive bridge. Particular attention should be paid to the surface, which faces the gums, strips must be carefully smooth over the entire inner surface of the adhesive bridge, especially the "clutch".

129
List of references 1. Dental Hygiene, 4th Edition Theory and Practice.Darby & Walsh, (4),
282-290, 21 Mar 2014
2. "Supragingival calculus: formation and control". Critical Reviews in Oral Biology and Medicine 13 (5): 426–441. 2002
3. "Periodontal microbial ecology". Periodontology 2000 38 (1): 135–187. 2005.
4. "Neanderthal medics? Evidence for food, cooking, and medicinal plants entrapped in dental calculus". Naturwissenschaften 99 (8): 617–626. 2012.
5. "Calculus removal and the prevention of its formation". Periodontology 2000 55 (1): 167–188. 2011.
6. "Phototargeting oral black-pigmented bacteria". Antimicrobial Agents and Chemotherapy 49 (4): 1391–1396. 2005.
7. Grant, DS, Stern IB Periodontics, 6th Edition, CV Mosby and Co. St. Louis 1988.
8. "Periodontal Disease and Systemic Health | Perio.org". perio.org. Retrieved 13 April 2015.
9. Curtis, Jeannette (13 November 2007). "Effective Tooth Brushing and Flossing.". WebMD. Retrieved 2007-12-24.
10. Robinson, Peter; Deacon, Scott A; Deery, Chris; Heanue, Mike; Walmsley, A Damien; Worthington, Helen V; Glenny, Anne-Marie; Shaw, Bill C (2005). Robinson, Peter, ed. "Manual versus powered toothbrushing for oral health". Cochrane Database Syst Rev (2): CD002281.doi:10.1002/14651858.CD002281.pub2. PMID 15846633.
11. "Does Water Fluoridation Affect the Pits and Fissures of the Tooth, the Area Where Most Cavities Occur? Healthy Teeth For A Lifetime". 13 November 2007. Retrieved 14 December 2007
12. Bader, Jim (2005). "Insufficient evidence to understand effect of routine scaling and polishing". Evidence-Based Dentistry 6 (1): 5–6.
13. Beirne, Paul V; Worthington, Helen V; Clarkson, Jan E (2007). Beirne, Paul V, ed. "Cochrane Database of Systematic Reviews". Cochrane Database Syst Rev (4): CD004625.
14. Mark Burhenne DDS. "How Often Should I Go to the Dentist for a Teeth Cleaning?". Ask the Dentist.
15. "Better Information. Better Health". Web MD. 12 November 2007. Retrieved 2007-12-24
16. Smith AJ, Dickson M, Aitken J, Bagg J. Contaminated dental instruments. Journal of Hospital Infection 2002 (in press).
17. Ricucci, D. and Langeland, K. (1998) Apical Limit of Root Canal Instrumentation and Obturation, Part 2. Histological Study. International Endodontic Journal, 31, 394-409.
18. Vertucci, F.J. (2005) Root Canal Morphology and Its Relationship to Endodontic Procedures. Endodontic Topics, 10, 3-29.

130
19. Vertucci, F.J. (1984) Root Canal Anatomy of the Human Permanent Teeth. Oral Surgery, Oral Medicine & Oral Pathology, 58, 589-599.
20. Gulabivala, K., Aung, T.H., Alavi, A. and Ng, Y.-L. (2001) Root and Canal Morphology of Burmese Mandibular Molars. International Endodontic Journal, 34, 359-370
21. Gonzalez-Plata, R.R. and Gonzalez-Plata, E.W. (2003) Conventional and Surgical Treatment of a Two-Rooted Maxillary Central Incisor. Journal of Endodontics, 29, 422-424.
22. Hess, W. (1925) The Anatomy of the Root-Canals of the Teeth of the Permanent Dentition, Part 1. William Wood and Co., New York.
23. Vertucci, F.J. and Gegauff, A. (1979) Root Canal Morphology of the Maxillary First Premolars. Journal of American Dental Association, 99, 194-198.
24. BURNS, R.C.: Access openings and tooth morphology. In Cohen S., Burns R.C. eds.: Pathways of the pulp, 3rd ed., The C.V. Mosby Company, 1984, pp. 118-174.
25. HESS, W.: The anatomy of the root canals of the teeth of the permanent dentition. John Bale Sons and Danielsen, London, 1925
26. Problems in endodontics: etiology, diagnosis and treatment.M. Hulsman, & E. Schafer,2009,p. 173-293
27. INGLE, J.I.: Endodontics. Philadelphia. Lea & Febiger, 1967, p. 153. 28. Serene TP, Adams JD, Saxena A. Nickel-Titanium instruments:
applications in Endodontics. St. Louis: Ishiaku EuroAmerica; 1995. 29. Peters OA. Current challenges and concepts in the preparation of root
canal systems: A review. J Endodon 2004; 30:559-97. 30. Hülsmann M, Peters OA, Dummer PMH. Mechanical preparation of root
canals: shaping goals, techniques and means. Endod Topics 2005;10:30-76.
31. Spili P, Parahos P, Messer HH. The impact of instrument fracture on outcome of endodontic treatment. J Endodon 2005; 31:845-50.
32. Yared GM, Bou Dagher FE, Machtou P. Influence of rotational speed, torque and operator’s proficiency on ProFile failures. Int Endod J 2001;47-53.
33. Bössler C, Peters OA, Zehnder M. Impact of lubricant parameter on rotary instrument torque and force. J Endodon 2007; 33:280-3
34. Berutti E, Angelini E, Rigolone M, Migliaretti G et al. Influence of sodium hypochlorite on fracture properties and corrosion of ProTaperrotary instruments. Int Endod J 2006;39:693-9.
35. Sonntag D, Peters OA. Effect of prion decontamination protocols on Nickel-Titanium rotary surfaces. J Endodon 2007; 33:442-6
36. Leeb J. Canal orifice enlargement as related to biomechanical preparation. J Endodon 1983;9:463-70.
37. Walker RT. A practical guide to pulp canal therapy. 5.Canal obturation. Dent Update 1984: 11: 9–16.

131
38. Brayton SM, Davis SR, Goldman M. Gutta-percharoot canal fillings. An in vitro analysis. Oral Surg OralMed Oral Pathol 1973: 35: 226–231.
39. Sakkal S, Weine FS, Lemian L. Lateral condensation:inside view. Compend Contin Educ Dent 1991: 12:796–802.
40. Schilder H. Filling root canals in three dimensions. Dent Clin North Am 1967; 11: 723–744.
41. European Society of Endodontology. Consensus report for the European Society of Endodontology on quality guidelines for endodontic treatment. Int Endod J 1994;27: 115–124.
42. Newsome PR, Youngson CC Complications of pin placement. A survey of 429 cases. Br Dent J 1987; 163: 375–378. | Article |
43. Wilson NH The pattern of usage of dentine pins. Eur J Prosthodont Restor Dent 1996; 4: 137–139.
44. Dummer P M H, Edmunds D H. Root canal retainedrestorations: 2. Prefabricated post and core systems —
(ii) Threaded posts. Dent Update 1990; September: 286-289. 45. Edmunds DH, Dummer PM H Root canal retained restorations revisited.
Dent Update 1993 January/February 14–19. List of used pictures 1. http://www.endoexperience.com/library_2.html 2. http://www.columbia.edu/itc/hs/dental/endo/client_edit/lectures/Instru
ments.html 3. http://dentallecnotes.blogspot.com.by/2011/09/instruments-used-in-
endodontic.html 4. http://www.everychina.com/m-niti-endodontic-files 5. http://intranet.tdmu.edu.ua/data/kafedra/internal/stomat_ter/classes_stu
d/en/stomat/ptn/Propaedeutics%20of%20Therapeutic%20dentistry/2%20year/10.%20Endodontics%20-%20its%20objectives%20and%20goals.%20.htm
6. http://www.slideshare.net/emailym/grossman-13-preview-endodontics 7. http://www.dentapreg.com/Dentists/Resources/Education/Articles-
(2)/Image-left-text-right-(4) 8. http://www.rpcendo.com/45va9r1lkl7/Modulo3/PDF13.pdf 9. http://pocketdentistry.com/9-root-canal-filling/

132
Учебное издание
Виноградова Татьяна Григорьевна
Manual of therapeutic Stomatology
( partII)
Пособие
Технический редактор И.А.Борисов
Компьютерная верстка Т.Г.Виноградова
Корректор В.Г.Букатая
Подписано в печать_____Формат бумаги 64X84/16 Бумага типографическая №2.Гарнитура____.Усл.печ.листов___
Уч.изд.л.___.Тираж____экз.Заказ№___
Издатель и полиграфическое исполнение УО «Витебский государственный медицинский университет».ЛП№02330/453 от 30.12.2013
Пр.Фрунзе,27,210023,г.Витебск