manual of reforestation and erosion control for the philippines
TRANSCRIPT

MICROFICHE REFERENCE LIBRARY
A project of Volunteers in Asia Manual of Reforestation and Erosion Control for the PhilIppines
compiled by H.J. Weldelt
Published by: German Appropriate Technology Exchange (GTZ) Dag-Hammarskjold-Weg 1 D-6236 Eschborn 1 FEDERAL REPUBLIC OF GERMANY
Available from:
same as above
Reproduced by permission.
Reproduction of this microfiche document in any form is subject to the same restrictions as those of the original document.

I

Eschbom I976

Foreword
Centuries of misuse for lack of knowledge on the proper conservation of our forest resources has led to the ,denudation of over five million hectares of our forest lands causing severe erosions. These are mostly located in critical watershed areas of our principal rivers, thus, making reforestation and erosion control of utmost importance.
The training in reforestation and erosion control in our country is there- fore, timely and relevant to the current natlonal development program launched under the leadership of President Ferdinand E. Marcos. This program has become a major project of our government and it has to succeed if we want to achieve national progress.
This MANUAL ON REFORESTATION AND EROSION CONTROL for the Philippines, the first of its kind ever published, will serve as a guide and a valuable reference for foresters and for those engaged in reforestation and erosion control in the country. It is the product of the joint efforts and coope- ration between the Philippine counterparts and the German consultants sent by the German Agency for Technical Cooperation (GTZ):
The book itself, is by no means complete but definitely is an answer to the lack of reference books well adopted to Philippine conditions and serves as a monument to the most productive relationship between the German Agency for Technical Cooperation (GTZ) and the government of the Republic of the Philippines through its Bureau of Forest Development.
JOSE VIADO Acting Director
Bureau of Fores: Development

CONTENTS
Page
Foreword
Preface of the Authors
PART I
INTROIWCTION TO PHILIPPINE FORESTRY
Th. Hoenninger
1. Geographical S+.tuation
1.1 General remarks ................................. 1.2 Luzon ............................................ i 1.3 Visayan Islands .................................. 5 1.4 Mindanao and Sulu Islands ........................ 6
2. Philippine Soils
2.1 General remarks . . . . . . . . . . . . . . . . . . . . . . . . . . . . . . ...* 8 2.2 Alluvial deposits . . . . . . . . . . . . . . . . . . .."........... 9 2.3 Soils originating from shales and sandstone .I.... 9 2.4 Volcanic tuff . . . . . . . . ..*.*....................... 10 2.5 Soils derived from andesite, basalts, and
agglomerates .a..................................* 10 2.6 Limestone soils . . . . . ..~~.............~........... 11
3. Climatic Conditions
3.1 The rainfall pattern ............................. 12 3.2 Variations of rainfall ........................... 13 3,3 (11 imat;- types 7 A ----..-w* G ................................... IL,
3.4 Temperature variations ........................... 15 3.5 Typhoons or tropical cyclones .................... 15
VII
Page
4. Natural Forest Types ................................. 18
4.1 Dipterocarp forests .............................. 19 4.2 Molave forest .................................... 21 4.3 Mant-v-v~~.r~ ft-w-c+c ----Y-Y ................................. LL
4.4 Beach forest ..................................... 22 4.5 Pine forest ...................................... 23 4.6 Mossy forest ..................................... ?7
5. Management of Natural Forests
5.1 Selective logging in dipterocarp forests ......... 25 5.2 Management of pine forests under the Tree
Seed Method ....................................... 37
6. Reforestation ........................................ 28
References .............................................. 33
PART II
ESTABLISHMENT, MAINTENANCE AND PROTECTION OF FOREST PLANTATIC'TS
H. J. Weidelt
1. Planting Sur\ey, Planting Plan, Plantation Records and Maps
1.1 The planting survey .............................. 37 1.2 The planting slan ................................ 38 1.3 Plantation records ............................... 40 1.4 Plantation maps .................................. 41
2. Ecological Aspects for the Choice of Tree Species
2.1 Climatic factors ................................. 43 2.2 The edaphic factors .............................. 46
3. Ecological Notes -n Some Reforestation Species ....... 51
4. The Objectives of Reforestation and the Choice of Tree Species ......................................... 63
4.1 Production of sawnwood ........................... 64 4.2 Production of pulpwood ........................... 65 4.3 Production of fuelwood ........................... 67 4.4 Poles and piles for local consumption ............ 68 4.5 Production of "minor" forest products ............ 4.6 Planting for erosion control .....................
772"
4.7 Protection and improvement of watersheds ......... 72 4.8 Shelterbelts ..................................... 73 4.9 Tree planting for beautification ..;..........= ... 75
VIII

Page 5 . Mixed and Pure Plantations
6.
7.
8.
9.
10.
.
11.
12.
13.
14.
1C AJ.
5.1 Arguments in favor of mixed plantations ........ 5.2 Arguments in favor of pure plantations ......... 5.3 Types of mixtures ..............................
Spacing of Forest Plantations ......................
6.1 Aspects to be considered in spacing ............ 6.2 Recommended spacing for sume reforestation
species ........................................
Supervision dnd Timing of Reforzstaticn Work
7.1 Supervision .................................... 7.2 Timing of plantation work ......................
Site Preparation for Field Planting
8.1 Site preparation by complete removal of the vegetation .....................................
8.2 Site preparation by partial removal of the vegetation .....................................
General Considerationson Tree Plantinq Techniques
9.1 Quality and size of planting stock ............. 9.2 Size of planting holes ......................... 9.3 Depth of rooting horizon ....................... 9.4 Protection of roots during planting ............ 9.5 Correct planting depth .........................
Tree Planting Techniques and Tools
10.1 Planting of potted seedlings .................... 10.2 Planting of bare root seedlings : ................ 10.3 Stump planting .................................
Planting of Wildlings ..............................
Direct Seeding .....................................
Replacement of Failures ............................
Reforestation on Adverse Sites
14.1 Dry sites and adverse southern exposure ........ 14.2 Rocky sites .................................... 14.3 Coastal sands .................................. 14.4 Swampy sites ................................... 14.5 Steep slopes ................................... 14.6 Planting in high grass .........................
Taiiiigya Piantations, a Possible Solution of the Kaingin Problem
70 79 80
82
83
84
87 90
92
93
96 97 97 98 98
100 104 109
111
113
116
118 120 120 121 121 122
15.1 Forms of the taungya system . . . . . . . . . . . . . . . . . . . . 123 15.2 Conditions for successful taungya . . . . . ..I...... 124 15.3 The taungya agreement r......................... 125 15.4 Some common agricultural crops suitable for
taungya planting . ..I........................... 127 15.5 Planning and organization of taungya projects . . 129
IX

Page
16. Improvement of Overlogged Areas by Enrichment Planting
16.1 Methods of enrichment planting . . . . . . . . . . ..C...... 130 16.2 Planting stock and suitable species . . . . . . . . . . . . 133 16.3 Tending operations . . . . . . . . . . . . . . . . . . . . . . . . . . . . . 134
_ 16.4 The cost of line enrichment . . . . . . . . . . . . . . . . . . . . 134 16.5 Advantages and disadvantages of line enrichment . 135
17. Some Practical Guidelines for Fertilizer Application in Young Plantations
17.1 The role of the main plant nutrients and their sources . . . . . . . . . . . . . . . . . . . . . . . . . . . . . . . . ...*.... 136
17.2 Type of fertilizer . . . . . . . . . . . . . . . . . . . . . . . . . . . . . 137 17.3 Method of' application . . . . . . . . . . . . . . . . . . . . . . . . . . 138 17.4 Quantity to be applied . . . . . . . . . . . . . . . . . . . . . . . . . 139 17.5 Indications for fertilizer application in
plantations . . . . . . . . . . . . . . . . . . . . . . . . . . . . . . . . . . . . 140
12%. The Control of Weeds, Climbers and Undesirable Trees
le.1 Weed control ................................... 141 18.2 Climber cutting ................................ 145 18.3 Removal of undesirable trees ................... 146
19. Pruning as a Measure of Stand Improvement . . . . . . . . . . 148
19.1 The process of natural pruning . . . . . . . . . . . . . . . . . 149 19.2 Artificial pruning in conifer plantations . . . . . . 150 19.3 Correction of growth forms in hardwood plantations 153
20. The Basic Principles of Thinning Plantations
20.1 Thinning of young stands . . . . . . . . . . . . . . . . . . . . . . . 158 20.2 Thinning of older plantations . . . . . . . . . . . . . . . . . . 159 20.3 Numerical guides for thinning . . . . . . . . . . . . . . . . . . 160 20.4 The relation between thinning intensity, volume
production and financial return . . . . . . . . . . . . . . . . 162
21. Forest Fire Control
21.1 Fire causes .................................... 165 21.2 The development and behavior of a forest fire 166 21.3 Preventive measures .............................. 169 21.4 Fire detection ................................. 171 21.5 Organization of fire control ................... 172 21.6 Fire suppression ............................... 173 21.7 Equipment for fire fighting .................... 176
22. Prevention of Fungus Diseases in Forest Plantations . 177
23. Prevention of Insect Calamities
23.1 Common insect pests in forest plantations ..I... 181 23.2 Natural control factors against insect calamities. 189
24. Rodent Control in Plantations . . . . . . . . . . . . . . ..CC.... 19.3
24.1 Poisoning . . . . . . . . . . . . . . . . . . . . . . . . . . . . . . . . . . . . . . 194 24.2 Repellents . . . . . . . . . . . . . . . . . . . . . . . . . . . . . . . . . . . . . 195 24.3 Other protective measures . . . . . ..I.............. 195

Page
25. Conflicts Between Forestry and Cattle Ranching
25.1 Aspects of damage by cattle ranching . . . . . . . . . . . . 196 25.2 Possible solutions . . . . . . . . . . . . . . . . . . . . . . . . . . . . . . 198
References . . . . . . . . . . . . . . . . . . . . . . . . . . . . . . . . . . . . . . . . . . . . . . . 199
1.
2.
3.
PART III
ELEIIlEN’I’ARY COMPASS SURVEYING AKJ MAPPING
J. Gumayagay and S. Festin
Compass Surveying and Recording of Field Data . . . . . . . 207
Mapping Scale, Flotting of Field Notes and Tracing the Sketch * , . . . . . . . .
2.1 The map scale . . . . . . . . . . . . . . . . . . . . . . . . . . . . . . . . . . . 218 2.2 Plotting of field notes . . . . . . . . . . . . . . . . . . . . . . . . . 218 2.3 Tracing the sketch . . . . . . . . . . . . . . . . . . . . . . . . . . . . . . 221
. The Close Traverse
3.1 The sketch with technical description . . . . . . . . . . . 222 3.2 Correcting error of closure . . . . . . . . . . . . . . . . . . . . . 224 3.3 Arcta determination of a close traverse . . . . . . . . . . 227
Appendix: Ccnventional abbreviations used in field sketches . ..f............................................ 228
PART IV
NURSERY TECHNIQUES
G. Seeber
1. Nursery Establishment and Layout
1.1 Types of forest nurseries ....................... 231 1.2 Selection of nursery site ....................... 232 1.3 Preparation and layout of the nursery area ...... 235 1.4 Fencing the nursery site ........................ 238 1.5 Buildings and similar facilities ................ 240 1.6 Tools and materials ............................. 241
2. Installation of the Irrigation System
2.1 Consideration about water quantity . . . . . . . . . . . . . . 242 2.2 Water sources . . . . . . . . . . . . . . . . . . . . . . . . . . . . . . . . . . . 243 2.3 Types of pumps L................................. 245 2.4 Conveyance and distribution of irrigation water . . 247
XI

Page
3. Sowing . . . . . . . . . ..I....... . . . . . . . . . . . . . . . . . . . . . . . . . . . 249
3.1 The correct sowing time ......................... 250 3.2 Preparation of seedbeds ......................... 251 3.3 Preparation of seedboxes and greenhouse
benches ......................................... 254 3.4 Sowing techniques ............................... 256
4. Production :Df Nursery Plants by Cuttings ............ 262
4 .i Suitable species ................................ 263 4.2 Propagation beds ................................ 263 4.3 Sources of cuttings ............................. 264 4.4 Preparation of cuttings ......................... 265 4.5 Treatments to promote root formation ............ 266 4.6 Planting of cuttings ............................ 266 4.7 Care of cuttings during the rooting process ..... 267 4.8 Potting of the young offspring plant ............ 267
5. Transplanting in Open Beds
5.1 Preparation of seedlings . . ..*................... 268 5.2 Trarrsplanting tools and techniques . . . . . . . . . . . . . . 269
6. Raising of Container Plants (Potting)
6.1 Types of containers ............................. 273 6.2 Potting soil .................................... 277 6.3 Potting techniques .............................. 280
7. Care and Maintenance of Seedlings
7.1 Watering ........................................ 283 7.2 Mulching ........................................ 288 7.3 Shading ......................................... 290 7.4 Protection from strong rains .................... 296 7.5 Weed control .................................... 297 7.6 Root pruning .................................... 302 7.7 Hardening-off ................................... 305
8. Preparation of Planting Stcck for Field Planting
8.1 Culling and grading of nursery plants ........... 307 8.2 Bare root seedlings ............................. 309 8.3 Stumps .......................................... 313 8.4 Earthballed plants .............................. 314 8.5 Potted p?.ants ................................... 315
9. Soil - its Characteristics and Proper Management in the Forest Nursery
9.1 Mineral soil particles .......................... 316 9.2 Texture classes ................................. 317 9.3 Soil structure and pore space ................... 318 9.4 Humus ........................................... 319 3.5 Soil organisms .................................. 320 9.6 Soil reaction ................................... 322 9.7 The role of plant nutrients and deficiency
sy;nptoms ........................................ 325
XII

Page
9.8 Commercial fertilizers ......................... 328 9.9 Preparation of compost ......................... 333 9.10 Green manuring ................................. 336
10. Prevention and Control of Pests anti Diseases
10.1 Introduction ................................... 338 10.2 Methods of plant -protection .................... 339 10.3 Preventive measures ............................ 341 10.4 Names, terms and groups of pesticides .......... 344 10.5 Application of pesticides
5.1 Seed treatment ................... . ............. 346 5.2 Soil fumigation ................................ 347 5.3 Soil drenching ................................. 347 5.4 Spraying ....................................... 348 5.5 Application of dusts and granules .............. 354
10.6 Precautionswhen Handling Pesticides ............ 356
13.7 Steam Sterilization of Soil .................... 359
10.8 Some Common Pests and Diseases
8.1 Diseases ....................................... 361 8.2 Nematodes ...................................... 364 8.3 Mites .......................................... 365 8.4 Insects ........................................ 366 8.5 Snails and slugs ............................... 372 8.6 Rodents - rats and mice ........................ 373 8.7 Birds .......................................... 374
Appendix I : Addresses of important producer and supplier firms for agricultural chemicals . . . . . . . . . . . 375
Appendix II : List of some common pesticides available in the Philippines . . . . . . . . . . . . . . . . . . . . . . . . . . . . 376
Appendix III: Sume useful conversion factors and equivalents for pesticide application . . . . . . . . . ..*...... 385
References .*............*.....................*......... 387
PART V
EROSION CONTROL
K. Unkel and D. Endangan
1. Kinds of Erosion
1.1 Erosion by natural forces and human interference . . . . . . . . . . . . . . . ..I................. 393
1.2 Wind erosion . . . . . . . . . . . . . . . ..I................. 394 1. 3. Gravity erosion . . . . . . . . . . . . . . . ..I.............. 394 1.4 Water erosion ..I............................... 395
XIII

Page
2. Factors Affecting Erosion
2.1 Painfall characteristics . . . . . . . . . . . . . . . . . . . . . . . . . 400 2.2 Topographic characteristics af the watershed . . . . . 401 2.3 Physical soil properties . . . . . . . . . . . . . . . . . . . . . . . . . 403 2.4 Chemical soil properties ..s................... . . 405
3. Human Interference as the Main Cause of Flosion
3.1 Logging and fuelwood cutting ..................... 407 3.2 Kaingin making ................................... 408 3.3 Forest fires a.nd grassland burning ............... 408 3.4 Improper range management ........................ 409 3.5 Road cuts ........................................ 410 3.6 Improper disposal of mining waste ................ 410 3-f Improper drainage ................................ 410
4. The Effects of Erosion
4.1 Deterioration of farm land ....................... 411. 4.2 Increase of floods ............................... 411 4.3 Reduced water supplies ........................... 412 4.4 Silting-up of reservoirs, canals and rivers ...... 412 4.5 Destruction of buildings, roads and other
communication lines .............................. 412
5. Preventive Measures Against Erosion .................. 413
5.1 Educational campaigns ............................ 414 5.2 Fire prevention and control ...................... 414 5.3 Fencing .......................................... 414 5.4 Proper land use .................................. 414 5.5 Proper range management .......................... 415 5.6 Restrictions on kaingin making ................... 416 5.7 Restrictions on logging in critical areas ........ 417 5.8 Proper road construction and maintenance ......... 418
6. Elements of Engineering Structures
6.1 Masonry .......................................... 419 6.2 Concrete ......................................... 419 6.3 Gabions .......................................... 420
7. Plants and Other Materials for Biological Engineering
7.1 Plants for soil stabilization .................... 424 7.2 Preparation of cuttings .......................... 427 7.3 Grass sods ....................................... 428 7.4 Bitumen emulsion ................................. 428 7.5 Anchoring pegs ................................... 429
8. Preparation of Slope Stabilization Sites and Layout of Drainage
8.1 Preparations . . . . . . . . . . ..I........................ 430 8.2 Drainage ..I...................................... 431
XIV

Page 9. Vegetative Methods of Slope Stabilization
9.1 Planting and Sowing . . . . . . . . . . . . . . . . . . . . . . . . . . . . 435 9.2 Brush cover (German: "Spreitlage") . . . . . . . . . . . . . 436 9.3 Bench brush layers (French: "Cordon",
German: "Buschlage") . . . . . . . . . . . . . . . . . . ...*..... 441 9.4 Wattling . . . . ..-a.......................*........ 446 13.5 Slope stabilization with fascines . . . . . . . . . . . . . . 449 9.6 Sodding . . . . . . . . . . . . . . . . . . . . . . . . . . . . . . . . . . . . . . . . 452 9.7 Mulching and bitumen emulsion . . . . . . . . . . . . . . . . . . 453 9.8 Slope stabilization by hydro-seeding . . . . . . . . . . . 455
10. Solid Retaining Walls and Combined Methods of Slope Stabilization . . . . . . . . . . . . . . . . . . . . . . . . . . . . . . . . 456
10.1 Riprap or dry stone walls ...................... 457 10.2 Retaining walls of concrete or masonry ......... 457 10.3 Gabions for slope stabilization ................ 458 10.4 Riprap interplanted with cuttings .............. 459 10.5 Pole structure (German: "Krainerwand") ......... 459 10.6 Slope stabilization with worn-out tires ........ 460
11. Gully Stabilization
11.1 Improvement of the catchment area . . . . . . . . . . . . . . 462 11.2 Stabilization of the gully head . . . . . . . ...*..... 463 11.3 Stabilization of gullies belonging to the
natural drainage system . . . . . . . . . . . . . . . . . . . . . . . . 465 11.4 Reclamation of gullies not belonging to the
natural drainage system . . . . . . . . . . . . . . . . . . . . . . . . 470
12. Contrcl of Riverbank Erosion . . . . . . . . . . . . . . . . . . . . . . . 473 12.1 Temporary and emergency measures . . ..I.......... 474 12.2 Methods depending mainly on sprouting brushwood . . 476 12.3 Riverbank stabilization by planting . . . . . . . . . . . . 483 12.4 Solid structures . . . . . . . . . . . . . . . . . . . . . . . . . . . . . . . 484
13. Shelterbelts, their Function and Layout ..I......... 487
Appendix I: Expression of gradient . . . . . . . . . . . . . ...*.... 490
References . . ..I......................................... 491
PARTVI
FOREST TREE SEED
G. Seeber and A. Agpaoa
1. Sources of Forest Tree Seed
1.1 Introduction ................................... 495 1.2 Seed certification ............................. 496 1.3 Seed origin .................................... 498

Page
2. Seed Collection
2.1 Timing of seed collection ........................ 503 2.2 How to judge the maturity and quality of
the fruit ........................................ 504 2.3 Tools for seed collection ........................ 506 2.4 Methods of seed collection ....................... 307
3. Extraction of Seed 3.1 Seeds which are sown as a fruit '.tself ........... 509 3.2 Fruits which open when dry ....................... 509 3.3 Pods which do not open easily .................... 510 3.4 Pine cones ....................................... 510 3.5 Treatment of small fleshy fruits ................. 511 3.6 Treatment of large fleshy fruits ................. 511 3.7 Extraction of kaatoan bangkal seed ............... 511
4. Storage of Seed
4.1 Longevity of seed . . . . . . . . . . . . . . . . ‘........I . . . . . 512 4.2 Atmospheric factors affecting seed storag:? "I..... 513 4.3 Methods of seed storage . . . . . . . . . . . . . . . . . . ,.....I" 515
5. Shipment of Seed
5.1 Packing of dry seeds ............................. 517 5.2 Moist seed packing ............................... 517
6. Protection of Seeds From Rodents and Insects
6.1 Rodents .......................................... 518 6.2 Insects .......................................... 519
7. Treatments to Hasten Germination . . . . . . . . . . . . . . . . . . . . . 520 7.1 Cold water treatment ............................. 521 7.2 Alternating soaking and drying ................... 521 7.3 Hot water treatment .............................. 521 7.4 Chemical treatments .............................. 521 7.5 Scarification .................................... 522 7.6 Nicking and similar methods ...................... 522 7.7 Complete removal of the seed coat ................ 523 7.8 Burying of seed in the ground .................... 523 7.9 "White anti'treatment of teak seed ............... 523 710 "Fire treatment" ................................. 524
8. Quality Assessment of Tree Seed and Germination Tests . . 524
8.1 Size and weight of seed .......................... 525 8.2 Determination of purity .......................... 525 8.3 Determination of viability ....................... 526
9. The Tree Percent and Estimates of Seed Requirements . . 530
Appendix: Seed size and seed weight of some forest trees . . 532
References . . . . . . . . . . ..*l'....**.*.**.**..**......-....." 534
XVI

Index to
Index to
Page
PART VII
INDEX TO COMMON AND SCIENTIFIC NAMES
Common Names ................................. 539
Scientific Names ............................ 547
PART VIII
SUBJECT INDEX 555
XVII

PREFACE OF THE AUTHORS
The layout of this book originates from lectures held by the
authors during a six years training programme at the PHILIPPINE-
GERMAN TRAINING CE-NTER FOR REFORESTATION AND EROSION CONTROL at
Baguio City sponsored under the Technical Assistance Programme
of the Federal Republic of Germany.
The tr,aining programme had been designed as a refresher course
for the field personnel of the BUREAU OF FOREST DEVELOPMENT, main-
ly on the ranger level, and emphasis was more on the practical
side.
Special effort was made to adapt useful procedures developed in
temperate couneries to tropical and especially Philippine con-
ditions. As a result we feel, that the procedures described in this book may also be of interest to foresters of other tropical
countries with related problems.
The authors have to acknowledge gratefully the cooperation of
Mr. Herminio Boado who typed the final draft of this book in a
non-stop effort and the patience of Mr. Conrad0 Consul and
Mr. Julius Unciano in the preparation of the numerous illustrations.
THE AUTHORS

PART I
INTRODUCTION TO PHILIPPINE FORESTRY
TH. HOFJNNINGER

Chapter 1:
GEOGRAPHICAL SITUATION
L.1 General Remarks --
The entire Pacific Basin from Kamchatka south to Japan, Taiwan,
the Philippines, Indonesia and on through New Zealand owes
much of its development to a vast and exceedingly complex series of stress lines, along which faulting, folding, and
volcanic and earthquake activity have taken place.
The most important fault line lies across North Central Luzon. It crosses the Bicol Peninsula, continues southward through the mountains of Eastern Mindanao. A belt paralleling this fault line is marked by many of the highest elevations in the
Philippines as well as by numerous active volcanoes. A less
pronounced fault line runs from SW to NB connecting Borneo
and SW Luzon through the 400 km long island of Palawan. Still
another reaches from Northeast Borneo through the Sulu Islands
into the tail-like Zamboanga Peninsula.
Much of the present day pattern of island distribution and of
local mountain building has resulted from the fact, that the
Philippines is situated in a zone of convergence of several
Pacific mountain building zones. Pronounced recent movement along these lines is demonstrated by the limestone consisting
of coral, which is now lying at considerable elevations on
numerous islands in such diverse locations as Palawan, Mindanao,
Cebu and Northern Luzon.
The archipelago consists of 7,100 islands, of which only 2,773
have names. The northernmost point, Y'Ann Isle is situated
3

125 km from Taiwan, the southernmost point, Saluag Island is
only 55 km from Borneo. The total land area of the Philip-
pines is 300,000 square kilometers. The irregular coastline
stretches 17,400 km, twice as long as the coastline of the
United States of America.
Luzon, the largest island, is larger than Portugal. Mindanao,
the second largest island, is larger than Austria, and Samar,
the third largest island, exceeds the size of Cyprus.
The highest mountain of the Philippines is Mt. Apo (2955 m)
in Mindanao. The lowest spot in the world is the "Philippine
Depth", situated east of Mindanao. It is 11,500 meters deep, and the Mt. Everest, the highest Mountain of the world, could
easily be submerged in it.
1.2 Luzon
The mountain ranges of Central and Northern Luzon form the
outline of an upright "Y" with an outlier parallel to the main
arm of the Y on the west coast, the Zambales Mountains. Along the east coast the mountains border directly the Pacific Ocean
and leave only small patches of level land consisting mostly of Tertiary and Quarternary sediments. The mountains collect- ively known as Sierra Madre extend with only one break (south-
west of Baler) from the Quezon Memorial park in the south to
Cape Engafio in the extreme northeast.
Situated parallel to the west coast of northern Luzon are the
mountains of the Cordillera Central, while their western out-
liers are known as the 110~0s Mountains. The Cordillera like
the Sierra Madre has a core composed mainly of basic rock
types of the Mesozoic period. However, a significant portion of the middle section consists of Tertiary volcanic formations.
North of Luzon are the- Babuyan and Batanes Islands. Here a
complex mixture of volcanic activity and reef building has
created an environment as forbiding and fascinating as any
in the Archipelago.
4

In the Zambales Mountains, the central and northern portions are cobmposed of complex Mesozoic formations, while the south-
ern and highest portions consist of Tertiary volcanic material.
In addition to acting as a transportation barrier, these moun-
tains lie directly athwart the southwest monsoon and intercept
considerable rainfall. Consequently there are heavy diptero-
carp forests on the windward slopes and more open forests on
the lee slopes.
Plains of Central and Northern Luzon. The Central Plain of
Luzon east of the Zambales Mountains extends unbroken from
Laguna de Bay to the Lingayen Gulf. It has once been occupied
by the sea, and is now covered by marine sediments. The sur-
face cover consists mainly of volcanic tuff. From this flat of Quarternary deposits extinct volcanoes rise abruptly re-
sembling inselbergs. Mount Arayat is the highest and rises
in a beautifully, symmetrical cone. A second large plain is found between the Sierra Madre and the Cordillera Central,
the Cagayan Valley. Its rolling surface suggests that erosion
played a part in its origin.
Southern Luzon_ is composed of a complex series of peninsulas
marked by many fault lines and numerous exposures of ultra-
basic basement rocks. Between the six still active and nu- merous dormant volcanoes are spread broad areas of almost
level Tertiary and Quarternary volcanic deposits which have
resulted in very fertile soils. In this region Mt. Mayon is
probably the most symmetrical and beautiful volcano in the
world.
1.3 Visavan Islands.
The southeast trend of the Bicol Peninsula continues through-
out the islands of Samar and Leyte. The other large islands,
however, like Cebu, Negros, Panay and Palawan show trend
lines towards the southwest.
Mindoros backbone is a broad anticlinal ridge of Mesozoic
rock with mountains rising up to 2500 meters. Samar shows
a mature hilly landscape with little really flat land on the
I 5

hill tops or the valley bottoms. Leyte is separated from
Samar by the narrow San Juanico Strait and bisected by the
main Philippine fault line. Cebu has large areas of steep
slopes and severe erosion, yet it is one of the most dense-
ly populated islands, Massive beds of Tertiary limestone
are exposed at the surface and many features of a carst
top&aphy , such as sink holes and underground stream chan-
nels, are present. Negros, the fourth largest island, is
dominated by four volcanic mountains. From their eruptions
fertile plains have built up. In Bohol Tertiary and Quarter- . nary limestone and coral with carst features abound. Under-
ground drainage give the island a much more arid appearance
than the rainfall data would suggest. In Panay the folded
mountains of Mesozoic basement rock along the boundary of
Antique act as an effective wooded barrier for rainfall and
transportation to the well populated agricultural plain in
the east.
The elongated island of Palawan is forming a bridge between
the Philippine Archipelago and Borneo. That a land connect-
ion between the two islands has exis,ted in the past is indi- cated by the fact, that flora, fauna and fossil remains from
Palawan are more closely related to those from Borneo than to
those from other islands in the Philippines.
1.4 Mindanao and Sulu Islands.
Mindanao, the second largest island of the Philippines shows
the greatest variety of physiographic development. In this
island one can find high, rugged, faulted mountains, almost
isolated volcanic peaks, high rolling plateaus, and broad,
level, swampy plains.
The mountains of Mindanao can conveniently be grouped into
five ranges, which enclose nine active volcanoes. Parallel- ing the remote and forbidding east coast from Surigao de1
Norte to Cape Augustin is one range of mountains. A second
range extends in north-south direction west of the Agusan
River from the Camiguin Island volcano to Tinaca Point with
two other active volcanoes, one of them Mt. Apo. A third
6

range of complex mountains with six active volcanoes is found
southeast of the Lanao Lake. Finally a fourth range of volcanic
mountains runs parallel to the coast of South Cotabato.
Another important geographical feature of Mindanao is the series
of upland plateaus in Bukidnon and Lanao de1 Sur. These plateaus
are composed of basaltic lava flows interbedded with ash and vol-
canic tuff. Near their edges at several points spectacular water
falls (Maria Christina, Abad Santos) drop the the narrow coastal
plain.
Mindanao has two large plains situated in the valleys of the
Agusan River and the Mindanao River in Cotabato Province. The latter is in full agricultural development and may compete with
Central Luzon.
The Basilan and Sulu Islands extend over 300 kilometers and form
a natural series of stepping stones between Borneo and Mindanao.
Probably during the Pleistocene these islands, too, formed a land
bridge across which man as well as animals and plants moved to
the Philippines. The hilly interior portions of these islands
are mainly of volcanic origin, the coastal areas composed of up-
lifted coral limestone.
This brief account of the geographical situation of t1.e Philippin
has been adapted from the works of CHOINSKI (1967), FISHER (1967)
ROBEQUAIN (1964) and ZAIDE (1970).
#es
7

Chapter 2:
PHILIPPINE SOILS
2.1 General remarks
Soil formation results from the action of climate, natural
vegetation and soil organisms upon a diversity of parent materials. Where land has been stabLe over long geological
periods, the soils Lend to lose the character of their parent
material and assume the kharacteristics of their environment.
Where soils are youthful, as in the case of most Philippine soils, they tend to show strong ivlfluences of their geologi-
cal parentage. Therefore the parent mzkerial may serve as a basis for soil classification, until more complete and detail- ed information becomes available (Table 1).
Parent material Area Percent of
Alluvial deposits 4.5 mil. ha Shale and sandstone 4.4 mil. ha Volcanic tuff O-6 mil. ha Andesite, basalt, agglomerates 6.2 mil. ha Limestone 3.8 mil. ha Complex 4.1 mil. ha Rough mountain soils 5.6 mil. ha Unsurveyed 0.4 mil. ha
15
15
2
21
13
14
19
1
Table 1: Parent material of Philippine soils )Source: BUREAU
OF SOILS, MANILA)
8

2.2 Alluvial deposits
All the fertile plains in the Philippines consist of alluvial
deposits and are heavily populated. The f i n e textured
alluvial soils like clay loams and clay are generally utilized
for irrigated rice. The main areas are situated in Central
Luzon, the Cagayan Valley and the flats of the Mindanao River.
Alluvial soils of coarse texture are used for sugar-
cane, maize, abacca, coconut and tobacco. These soils have
a very good permeability, but are usually of low fertility
because of rapid leaching. This type of soil is found in
Tarlac and Pampanga, Negros and Cotabato.
There are also limited a,eas with alkaline soils usually
with a poor drainage. In Cotabato cotton and sorghum is
grown on these soils.
2.3 Soils oriqinating from shales and sandstone
In the Philippines soils originating from shales are more
common than those from sandstone. Their color usually is
black or dark brown and in most cases they have to be clas-
sified as clays. When wet these soils are plastic or sticky,
in dry condition they become hard and crack.
The profile depth depends largely on the hardiness of the
parent material. The surface often shows a rolling relief.
The permeability is generally low, and tnere is usually a
high rate of run-off resulting in heavy erosion where the
soil is not covered by forests. Heavy clay soils of this
type originating from shales and related material are found
to a limited extend in the Sierra Madre, Catanduanes, South-
ern Negros, South Cotabato and Surigao.
As a general rule these soils are less fertile than those
originating from limestone.
9

2.4 Volcanic tuff
This parent material is the product of geologically recent
eruptions of volcanoes. It is found‘in the provinces sur-
rounding Manila, in Albay and to a limited extend in Occiden-
tal Negros. Soils developed from volcanic tuff have a
rather fine texture and a highly plastic consistency. The
color varies from gray to brown or black depending on the
type of soil minerals and the content of organic matter. On
alkaline sites of this type, the plants often 'show symptoms
of chlorosis, probably caused by unavailability or limited
solubility of iron and magnesium.
In some places volcanic soils are subject to severe erosion.
2.5 Soils derived from andesite, basalts, and aqqlomerates
A relatively large area of soil has developed from igneous
rocks of volcanic origin like basalts, andesite and agglo-
merates. . Soils of this type are mainly found in the uplands
and are in some areas still covered with forests.
Where the parent material had been very resistant to weather-
ing, these soils tend to be quite shallow and carry only a
meager vegetation. Often their fertility is low due to a low
base status of the parent material or due to neavy leaching.
Often these soils lack all the important plant nutrients like
nitrogen, phosphorus and sometimes potassium.
Where they are deeply weathered, we generally encounter later-
itic soils or latosols. Lateritic soils are characterized by
leaching of silica and bases and an accumulation of iron and
aluminum hydroxides in the upper horizon. If the process of
laterization has progressed to a point, where the ratio be-
tween iron and aluminum hydroxides and silica oxide is greater
than ;2. we would speak of laterites. Soils that have not
reached that point yet, but are subjected to laterization are
called latosols or lateritic soils. Laterization only takes
place in a hot and humid climate in soils with a pa-value
below 7. In the initial stages of laterization the color of
10

the soil can be brownish or yellowish, but takes on a red
hue later due to the presence of Fe203 hydrates.
Lateritic soils have a stable columnar or prismatic structure
and have a high infiltration capacity. In contrast to their favorable physical structure however, they are deficient in
most important plant nutrients, particularly phosphorus and bases. Since they typically have a low pH-value, phosphorus is hardly available, and the bases like calcium, magnesium, potassium are leached easily. For agricultural use heavy applications of lime are required on these soils.
Latosols are typical for rain forest areas. When used for shifting cultivation they lose their fertility very quickly.
2.6 Limestone soils
Soils developed from limestone are very common and they are
found in areas from the northernmost part of Luzon down to
the southernmost part of Mindanao. They are most prevalent, though, in the Visayan Islands. The parent material is main- ly Tertiary coral. The coralline rocks appear in great masses and outcrops are very widespread. The formation generally does not show any stratification. The coral
skeletons are often well preserved.
Many limestone soils are quite shallow with a soil depth of
only 15 to 50 centimeters showing only an A/C profile, while the B-horizon is often absent.
Sometimes also soils of a purplish red color similar to
laterites are found in thick layers on top of limestone or between rocky limestone outcrops‘, as can be seen near Baguio. It is difficult to understand, however, how thick layers of
soil can be derived from rocks consisting of almost pure Cal-(
cium carbonate. MOHR and VAN BAREN (1959) suggest, that the red soil found over limestone in many tropical countries
possibly originates from windborne material and only to a
small part from the underlying limestone.
11

The native vegetation of limestone soils in the Philippines
is composed of the Molave-Narra Association as still pre-
served in Fuga Island, the northern part of Sierra Madre
Mountain (Callaoj, and a few other places. Steep limestone
formations with their thin soil cover are easily eroded and
should be left under a forest cover.
For the assessment of soil profiles and the edaphic require-
ments of reforestation species consult Part 2, Chapter 2 and
3 of this book.
Chapter 3:
CLIMATIC COhE)ITIONS
3.1 The rainfall pattern
On a map of isohyets showing the average annual rainfall, several areas of extremely high precipitation are noticeable:
- the coast of Luzon, east of the crest of the Sierra Madre Range,
- the east coast of the island of Samar and Southern Leyte,
- the east coast of Mindoro, - Misamis Occidental.
These areas receive heavy orographic rainfall during the win-
ter period, when the northeast monsoon dominates. In addition
to heavy orographic rainfall, the coastal region from Samar
12

to the North receives a good share of rainfall from typhoons.
Much of the island of Mindanao shows rainfall of over 250
centimeters annually. The high rainfall in Mindanao, other than the orographic rainfall on the east coast, is primarily
due to two factors. First, this is the area over which the intertropical rain front lies for the greatest period of time.
Second, Mindanao is an island large enough to give rise to
convectional cells which produce local precipitation at al-
most all seasons of the year.
There are some places in the Philippines, that show markedly
lower annual rainfall than the surrounding areas:
The Central Plain of Luzon with averages between 1500 and 2250 mm annual rainfall lies in a double rain shadow. During
the southwest monsoon the Central Plain is shielded by the
Zambales Mountains, which lie directly to the west of the plain. During the northeast monsoon the Central Plain is
sheltered by the Sierra Madre situated to the east.
The east coast of Cebu is also protected from both monsoons.
During the southwest monsoon it lies in the shadow of the
highlands of Negros and the mountains of Cebu itself. During
the northeast monsoon it is shielded by the highlands of Leyte.
In addition the northeast monsoon winds, when they do reach
Cebu, very often blow parallel to the coast; thus, they are
not cooled and little rain is derived from them.
In Zamboancla City the annual rainfall averages only 1100 mil- limeter s , because the city is somewhat shielded by the island of Basilan and also the Zamboanga Mountains.
Dadiangas (General Santos) lies in a pocket almost completely
surrounded by mountains and is sheltered from prevailing winds
in several directions.
3.2 Variations of rainfall.
A factor of considerable importance is the reliability of rain-
fall from year to year. The average deviation from normal
rainfall appears to be in the order of 14 percent. This figure
13

is relatively low, and much lower than in other monsoon coun-
tries. The variations appear to be least in the interior of
Mindanao, and relatively high in Samar, and Southern and
Central Luzon.
Extreme variations from 60 to 100 percent have been observed
in Baguio City, Samar and Surigao. These variations are all
surplus of rainfall, not deficits and coincide with years of
extraordinary typhoon activity. So areas deriving a good
part of their precipitation from typhoons or from the north-.
east trade winds show relatively high variations from year
to year. Areas deriving much of their rainfall from the south-
west monsoon or from the South Pacific trades show moderate
variation.
Areas particularly in the south, deriving their moisture large-
ly from the intertropical front, also show relatively small
variations in their rainfall pattern.
3.3 Climatic types.
The classification of climatic types in the Philippines is based on differences in the rainfall distribution throughout the year, the presence or absence of a dry season and of a
maximum rain period due to the combined influence of topogra-
phy and wind direction.
Firet F/De: two pronounced seasons, dry season from November to April, wet during the rest of the year. The controlling
f8ctor is topography. The localities of this type are shield-
ed from the northeast monsoon and even in good part from the
trade winds by mountain ranges, but are open only to the
southwest monsoon and cyclonic storms.
*Second Tvpe: No dry season with a very pronounced maximum rain period from November to January. These regions are situated
along or very near the eastern coast and sheltered neither from the northeast monsoon and trade winds nor from cyclonic
storms l
14

Third Type: seasons not very pronounced, relatively dry from
November to April and wet during the rest of the year. The
maximum rain periods are not very pronounced, too, with a
short dry season lasting only from one to three months. These
localities are only partly shielded from the northeast monsoon
and subject to frequent cyclonic storms.
Fourth Type: Rainfall more or less evenly distributed through-
out the year.
3.4 Temperature variations.
The Philippines extend over a latitudinal distance of over
1500 km and yet, within this broad expanse, we encounter re-
latively small temperature variations. Aparri in the extreme north of Luzon and Jo10 in the Sulu Islands have nearly the
same maximum, average and minimum temperatures.
Aparri 30.4OC max. 22.8 0 C min. 26.3OC average
Jo10 30.89C max. 22.7O C min. 26.6OC average Baquio 23.1°C max. 15.0° C min. 18.2OC averaqe
Table 2: Maximum, minimum and average temperatures of Aparri, Jo10 and Baguio.
Differences in temperatures in the Philippines are mainly due
to differences in elevation, as demonstrated in Table 2.
Aparri and Jo10 are situated at sealevel, Baguio City at 1500 m elevation.
3.5 Typhoons or tropical cyclones (9,13,141.
Typhoons carry excetionally great amounts of moisture, are
responsible for between one quarter and one third of the total
Fhilippine rainfall, and have set world records for rainfall
over short periods of time. The world's record 24-hour rain-
fall was recorded during a typhoon at Baguio City, between
noon of July 14 and noon of July 15 in 1911, when 1170 mm of
rain literally flooded the city. In addition to heavy rains,
typhoons are accompanied by high winds, which over coastal
areas often reach 200 km per hour and cause heavy damage to
buildings, crops and forests.
15

no0 1zr” PZbO ---- __
I D
maximum rainfall
Type 3: Seasons not very pronounced, but
I_Tvpe 4: Rainfall more $!
- --- .-- --
- -. - _ -. - _ -. -- _
.- -_ _ __
I- 7 w 3 $ @co w- u
i
a’
6”
ii
ln cn w -I
W
d OS-. 4-r
f’g’l: CLIMATE fYAP OF THE PHIl.IPPINES 16

Typhoons originate usually in the area of the Caroline or Marshall
Islands. They are vast low pressure systems which in the northern
hemisphere are accompanied by a counter clockwise whirl of winds
gradually spiraling towards the vortex. Violent updrafts and
convergence cause rapid cooling of the marine tropical air masses
and heavy precipitation results. Cloud cover is normally quite
dense within a 500 km radius, but the central eye or the vortex
of the storm is usually marked by an area three to five kilometers
in diameter where the sky is clear and where calm prevails. These
storms usually move toward the west or northwest, but as they
approach the continent, they generally swing to the north and even-
tually die out as they are forced toward the northeast in the west wind drifts.
The typhoor seascn last in the Philippines generally from July
to November, although someGmes storms occur during other months.
Typhoons most often touch the Philippines between the southern
tip of Samar and Northern Luzon (See map).
17

Chapter 4:
THE NATURAL FOREST TYPES -
There are over three thousand species of trees in the Philippines
that can reach diameters of 30 cm or more. However, at the present
stage of utilization only about 70 species find their way to the
market. Seventy five percent of the annual cut consists of dip-
terocarp species. commonly referred to as the lauan family or
Philippine mahogany. The species that make up the bulk of the volume are white lauan, apitong, red lauan, followed by mayapis,
mangasinoro, bagtikan, palosapis, almon, tanguile and yakal (3).
Based on their species composition the Philippine forests are
generally classified into six types (15):
1. Dipterocarp forest,
2. Molave forest,
3. Pine forest,
4. Mangrove forest,
5. Beach forest,
6. Mossy and high mountain forest.
Most of the original forest types have been altered fundamentally
through human action such as logging, grazing, shifting cultivation,
or have been cleared for agricultural crops. Up to now-there is no map available showing the present distribution of forest types.
The following table is only an estimate of the area still occupied
by each type.
18
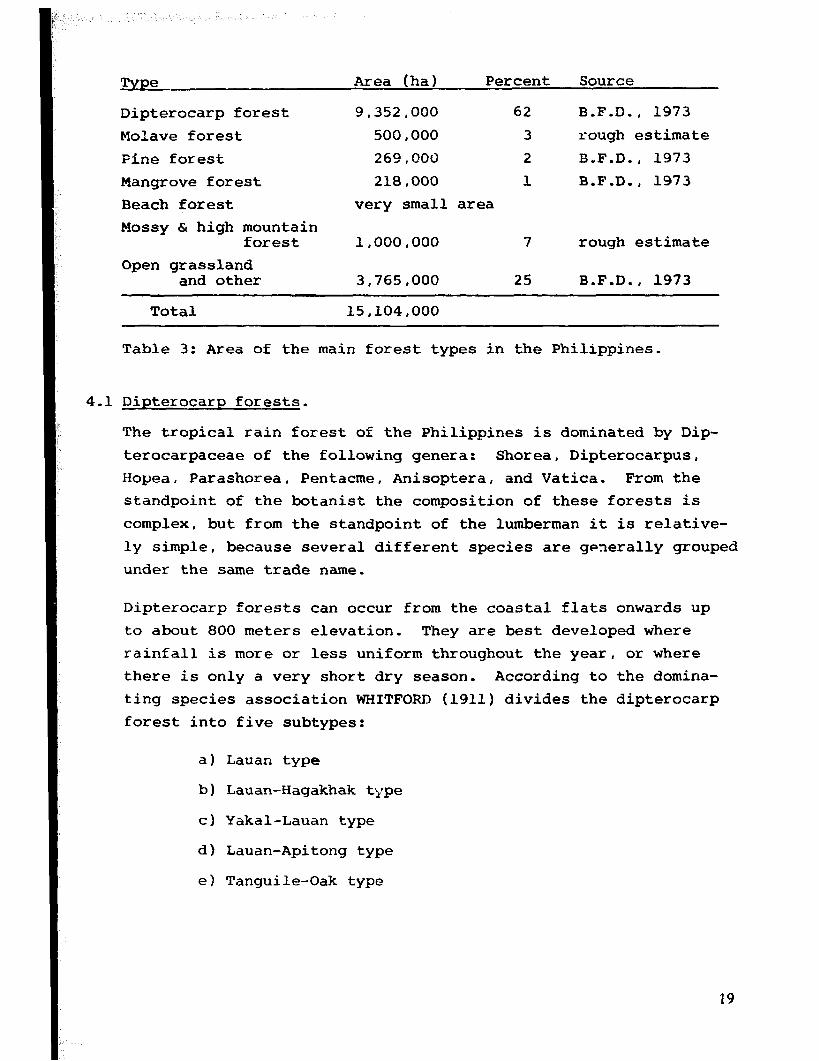
Type Area (ha) Percent Source
Dipterocarp forest 9,352,ooo 62 B.F.D., 1973
Molave forest 500,000 3 rough estimate
Pine forest 269,000 2 B.F.D., 1973
Mangrove forest 218,000 1 B.F.D., 1973
Beach forest very small area
Mossy & high mountain forest 1,000,000 7 rough estimate
Open grassland and other 3,765,OOO 25 B.F.D., 1973
Total 15,104,000
Table 3: Area of the main forest types in the Philippines.
4.1 Dipterocarp forests.
The tropical rain forest of the Philippines is dominated by Dip-
terocarpaceae of the following genera: Shorea, Dipterocarpus,
Hopea. Parashorea, Pentacme, Anisoptera, and Vatica. From the
standpoint of the botanist the composition of these forests is
complex, but from the standpoint of the lumberman it is relative-
ly simple, because several different species are generally grouped
under the same trade name.
Dipterocarp forests can occur from the coastal flats onwards up
to about 800 meters elevation. They are best developed where
rainfall is more or less uniform throughout the year, or where
there is only a very short dry season. According to the domina-
ting species association WHITFOPD (1911) divides the dipterocarp
forest into five subtypes:
a) Lauan type
b) Lauan-Hagakhak type
c) Yakal-Lauan type
d) Lauan-Apitong type
e) Tanguile-Oak type
19

Lauan Lauan-Apitong Yakal-Lauan Lauan-Hagakhak
Dipterocarps 252 m3 116 m3 80 m3 55 m3
Others i4 52 73 28
Total Volume 266 m3 168 m3 153 m3 83 m3 per hectare
Table 4: The volume per hectare of dipterocarps and other species from sample plots in 4 subtypes of the dipterocarp forest taken by WHITFORD (1911). Note: WHITFORDs conversion factors were corrected.
a) Lauan type:
In the true lauan type the relative proportion of dipterocarps
and the commercial volume is usually higher than in any other
type.. It represents the most valuable commercial forest in the
Philippines (see table 4).
Because of a dense canopy, the true lauan type is relatively free from undergrowth. The shade is so dense, that regeneration of
light demanding species has no chance. This type reaches its
best development in low elevation extending only to an altitude of about 300 to 400 meters. On favorable sites this type re-
generates easily after logging. The second growth is usually dominated by white lauan and mayapi s mixed in the earlier stages after logging with a large number of gubas, which are eventually
shaded out.
b) Lauan-Apitonu type: Where thereis a pronounced dry season, the
lauan type is replaced by the lauan-apitong type, which also
occupies only lower elevations. The canopy of this type is more open allowing more undergrowth.
c) Yakal-lauan type finds its best develcpment in regions where the
dry season is short. Regarding the soil it prefers low coastal hills of volcanic origin- This type has a slight deciduous ap- pearance during the driest part of the year. Another association where yakal is less dominant, however, is found along streams and the slopes of ravines.
20

d) Lauan-hasakhak ty= is restricted to areas where the water
level is near the surface. In composition it differs from
the previous type mainly by the presence of hagakhak (Dip-
terocarpus warburqii) and a much larger number of codominant
species of other families. During the rainy season, the
soil in large areas is too wet for the best development of
many species. These factors reduce the volume of timber per
hectare as compared with forest types growing in more stable areas (Table 4).
e ) Tanquile-oak type covers the areas extending from the upper
limits of the lauan and the lauan-apitong type to the lower
limits of the pine or mossy forest types, from 400 to 500
meters above sea level up to 800 to 900 meters. The rain- ‘fall is more evenly distributed throughout the year, and the
relative humidity is constantly higher than in the adjacent
forests of lower altitudes. In the lower transition zone one may find scattered specimens of dipterocarps belonging
to the forest types bordering below. Many of the species in this type also occur much dwarfed in the mossy forests
higher up.
4.2 Molave forest.
The molave forest occurs in regions with a very distinct wet
and dry season. They are typical for the limestone soils in
the coastal areas, which are usually quite shallow and exces-
sively drained. During the dry season, there is often the impression of semi-arid conditions. A number of trees in the
molave association shed their leaves every year during the dry
season.
Molave itself is a short boled, ragged tree, but has a very
durable and valuable wood, which is in high demand. The forests
are open with a few dominant trees far apart. Besides molave
there are often kalantas, ipii, supa, narra, camagon, banuyo,
tindalo and other valuable timber trees associated in this
type.

Since the sites of these forests are easily accessible, most
of the original forests have been destroyed by exploitation.
A relatively well preserved molave forest can still be seen
in the narrow coastal plain west of the Zambales Mountains.
Other remains are said to exist still in the lime stone hills
of the northern end of the Sierra Madre Range.
During the Spanish period ships built of molave maintained
the historic Manila-Acapulco galleon trade for nearly two-and-
a-half centuries.
4.3 Mangrove forests.
Mangrove forests occur along the tidal flats at the mouths
of streams and along the shores of protected bays. The stands
are composed of eight species of the bacauan family (Rhiao-
phoraceae), which once were the principal source of tanbark, cutch and dyebark, but now mainly produce charcoal. Where utilization had been intensive, api-api (Avicennia officina- lis) becomes more and more dominant, because its sprouts
easily.
Further upstream, where the water is not so brakish any more,
nipa palm may form extensive and dense stands, which are a
major source of roofing material in coastal areas.
The mangrove forests are practically clear of undergrowth.
The stilt roots are as high as 3 meters. The leaves of all
species are hard and leathery. The seeds are distributed by the tides until they find a suitable lodging place. Virgin areas show surprisingly large stands of poles and trees. In
thickly populated areas, the forest has degraded to such an extend that it produces now only firewood. Many mangrove swamps have been cleared for fishponds.
4.4 Beach forest.
This type is found on sandy beaches above the high tide limits
where the original form of vegetation had been left undisturbed.
Since these are very favorable sites for settlements and coco-
nut plantations, little of the original beach forest is left.
22

Typical beach forest associations include Pandanus, large
specimens of bitaog (Calophyllum inophyllum), talisay often
in groups, stands of agoho on sandy flats near the mouths
of rivers, dufigon-late and others.
4.5 Pine forest.
There are two species of pines found in the Philippines form-
ing pure stands: Benguet pine (Pinus insularis) and Mindoro
pine (P. inerkusii) . While Benguet pine forests form extensive
stands in the mountains of Northern Luzon, the Mindoro pine occupies only an estimated 5-6000 ha in two isolated areas in
Northern Zambales and Northern Mindoro. The altitudinal range
of Benguet pine extends from about 700 m onwards to about
1800 meters. The two known Mindoro pine forests occupy an
area mainly between 100 and 500 m elevation.
Because of their silvicultural characteristics (Part 2, Chapter
3 of this book) the Mindoro pine has practically no economical
importance in the Philippines. The Benguet pine, however, is planted now all over the islands. The growth outside the natural range of this species is sometimes higher than :n the
Mountain provinces of Northern Luzon.
Heiqht Diameter Volume over 7 cm Benguet Province 14-18 m 12-15 cm 150 m3 per ha
Hukidnon Province 25-27 m 20-23 cm 400 m3 per ha
Table 5: Growth of Benguet pine, age 20 years, spacing 2 x 2 m.
The natural pine stands are generally quite open and subject to frequent fires. Only along creeks one can find some broad- leaved vegetation. Where fire protection can be enforced, natural regeneration appears easily. The management of natural
pine forests is described in Chapter 5.
4.6 Mossy forest.
The mossy forest is found above the tanguile-oak type. In Northern Luzon on southern slopes and dry ridges it is replaced
23

naturally by Benguet pine. The ecology of this forest type
is characterized by a relatively low temperature, high and
uniform humidity in form of rain and fog throughout the year,
short duration of sunshine and strong winds.
A striking feature of the flora are the numerous epiphytes consisting of mosses, Liverworts, ferns and orchids in great variety and also tittle-shaped myrmecodias. The trees are generally of medium height and short boled. Typical genera
are Podocarpus, Dacrydium, Quercus, and Eugenia.
The mossy forest is of little commercial value, but important
as a protection forest. A great portion of it in Northern Luzon has been cleared for vegetable farming. A relatively well preserved mossy forest can still be seen in the moun-
tain range between Banaue and Bontoc.

Chapter 5:
MANAGEMENT OF NATURAL FORESTS
Philippine forestry has two distinct aspects namely the
management of the natural forests, and reforestation and erosion control of denuded areas. Since this book is primarily devoted to the latter, management of natural
forests is treated here only very briefly.
Of the different forest types of the Philippines, only the
dipterocarp forest and the pine forest are under special
systems of forest management based on the concept of sus-
tained yield.
5.1 Selec':ive loqqinq in dipterocarp forests (12). -..
The main objective of the Philippine system of selective
logging in the tropical rain forest is to retain an adequate
number of undamaged and healthy residuals to be utilized in
the next cutting cycle or later, which one tries to achieve by marking the residual stand before logging. According to
the official logging instructions laid down in the HANDBOOK ON SELECTIVE LOGGING, the main phases can be described as
follows:
a) Determination of markinq goal. For any particular setup (area covered from one spar tree) the marking goal for re-
siduals is either 60% of the number of healthy trees in the
20-70 cm diameter classes, or if there are more trees in and . over the 80 cm diameter class than below, then 40% of all trees over 20 cm diameter. This distinction is made to allow
25

a reasonable number and volume of commercial trees to be re-
tained in areas which are heavily stocked with large trees.
The marking goal is computed from a 5% sample inventory using
circular 0.1 ha plots (r=18 m). In this pre-marking sample
inventory all commercial trees are recorded by species and
diameter class.
b) Tree markinq: This involves trees to be retained as residuals,
and those to be cut. Trees marked as residuals are numbered
consecutively with paint and are recorded individually by
number, species, diameter, height up to first branch and volume.
Marking is continued until the marking goal is reached and the
whole set up is covered. Residuals should not be marked
- on cableways radiating from the spar tree, which have to
be kept as narrow as possible,
- on log landings which should not have more than 40 m radius
for the largest setups,
- in the fall direction of trees marked for felling.
Marking for felling is carried out at the same time, and all merchantable trees over the minimum diameter limit (70 cm),
that are not needed to make up the marking goal, are marked
with a vertical arrow on the side of the felling direction.
C) Residual inventory after logging. This is the physical exam-
ination and count of the marked residuals left in a setup after logging. The inventory crew will go over the logged setup,
examine each marked tree to judge, whether it is healthy, sub- standard or damaged. All unaccounted or lost trees are noted. Unmarked healthy residuals are all recorded and numbered con- secutively, but they shall not be used to replace damaged marked trees.
The residual inventory has three main objectives. One is to determine the extend and cause of damage done on the residuals
to make the necessary corrections. The second objective is an appraisal of residual growing stock as a basis for silvicultural
treatment and management. The third objective is to provide the
26

necessary information to compute fees to be paid by the con-
cessionaire for the damaged trees.
d3 Timber stand improvement: After the logging operation is com- pleted the forest is left behind with an open canopy and ex-
posed soil, which favors the invasion of undesirable tree
species and climbers suppressing seedlings, saplings and poles
of desirable species.
The first silvicultural treatment is to be applied 5 to 10
years after logging. Many foresters agree, that no tending should be attempted during the first 5 years because of the
difficulty of entry and the heavy growth of climbers.
Stand improvement operations at this stage include:
- cutting, girdling and poison-girdling of undesirable trees,
- climber cutting,
- thinning, where natural regeneration is too dense.
For more detailed information consult the HANDBOOK ON SELECTIVE
LOGGING.
5.2 Manaqement of pine forests under the Seed Tree Method.
Within the concession areas khe pine forests of Northern
Luzon are generally managed under the seed tree method. This
involves clear-cutting the area leaving only a few seed bearers.
After the new stand is established, the seed trees may be re-
moved in a second cut or left for the next rotation.
The number of trees to be left as seed bearers should be be-
tween 16 and 20 trees per hectare as suggested by CALEDA (10~.
cit. NICHOLSON, 1970). Only large, straight-boled trees with
thin branches and large crowns are to be selected. Since the
quality of the mother trees will be reflected in the offspring, they should be carefully selected. An even distribution of
seed trees would interfere too much with logging, therefore
NICHOLSON suggests to mark the seed trees in 4-5 groups of not
more than 4 trees, per hectare. The dispersal-range of pineS
is quite wide and natural regeneration can be expected over
the whole area.
27

After logging the success of the natural regeneration depends
largely on effective fire protection. Where regeneration is
inadequate, it can be supplemented by planting.
Successful regeneration of Benguet pine by the seed tree method can be observed in the Bobok Concession east of Baguio City.
Chapter 6:
REFORESTATION
The creation of the "Inspection General de Montes" in 1863 by the
Spanish government was the formal beginning of a forest service
in the Philippines. This agency undertook a study of the Philip-
pine forest resources, and laid down the regulations for opening
of virgin,lands and cutting of timbers. Many comprehensive laws were subsequently passed imposing also replanting, but until the
turn of the century not much had been accomplished in the im- plementation of these laws.
After the United States had succeeded Spain, forestry received more serious attention. The war had hardly ended in 1900, when
a forestry bureau was organized under US-military government,
which established the base for the forestry practices that we have today.
28

"Most authorities trace reforestation work to have begun in 1910
with the establishment of the Forest School at Los Bafios. The original school site consisted of grass and brushland. The students cleared the ground and then planted seedlings in con- nection with their Silviculture Class. Practical methods of planting cogonal areas were tried, and the species suitable for planting were determined. By 1916 approximately 600 species were tried in the nursery and the plantation of the school. This
first attempt for the recovery of grassland paved the way for
the establishment of the Makiling Reforestation Project 1937"
(CTJNANAN, 1968,Reforestation Monthly).
Modest reforestation outside Los Banes began in 1916 when the government appropriated the sum of 10,000 Pesos for reforesta-
tion of badly eroded government land in Cebu, where the second
reforestation project was established. In 1919 t'ree new pro- jects were opened, namely: (1) Arayat, (2) Ilocos, which is the
forerunner of the present Caniaw Project and (3) Zambales, which
is now known as Magsaysay Reforestation Project.
New funds enabled the Bureau of Forestry to open the Cinchona
Plantation at Impalutao and three other projects up 1931. The period from 1916-1936 may well be called the pilot planting
period, since the trial plantations of that period laid down the foundation for more extensive reforestation in the years to come.
The years 1937 to 1941 were a period of full-scale reforestation,
since periodic appropriations in substantial amounts enabled the
government to open new reforestation projects. Qualified person- nel were employed in conducting planting surveys to determine the
areas needing immediate planting and to gather data for a long-
range planting plan. A special office was created under the Director of Forestry for the "round-the-clock" inspection of all
new reforestation projects. Prior to the second world war, there were 35 projects in operation, covering a total area of 535,000 hectares. The total area of the forest nurseries was 24 hectares with average annual capacity of 17 million seedlings. Before World War 11'28,000 hectares were already planted.
Tile war brought tremendous destruction on the reforestation areas.
29

During the Japanese occupation, the people in the vicinities
sought refuge in the reforestation projects and made clearings
to produce staple crops for their subsistence. Furthermore,
considerab'c plantations and nurseries were damaged because of
military operations. Only 15 percent or 4000 hectares of the
pre-war plantations survived the war.
The funding problems for reforestation of the post-war years
were partly solved, when Congress passed Republic Act 115 in 1947.
Through this act a separate fund was constituted into which every
concessionaire had to pay the amount of PO.50 on each cubic meter
of timber from the first and second*group, and 80.40 on timber of
the third and fourth group cut and removed from any public forest
for commercial purposes.
To pursue a vigorous reforestation programme, the Reforestation
Administration was created as a separate government agency under
the Department of Agriculture and NBtural Resources in 1960. This
signalled the transfer of responsibility of reforestation of ap-
proximately 5 million hectares from the Bureau of Forestry to the
new agency.
After the creation of the Reforestation Administration in 1960
replanting of denuded areas was speeded up, and the annual rate
of reforestation never sank below 10,000 hectares. It even reached 35,422 hectares in 1963.
In 1973 about 182,000 hectares of plantations were maintained by
the Bureau of Forest Development. There are now 91 reforestation
projects, 3 cooperative nurseries and 2 experimental nurseries all
over the country compared to 57 reforestation projects in 1966
when the agency was founded. Of the 91 reforestation projects 46 are in Luzon, 31 in the Visayas and 14 in Mindanao.
The declaration of martial law on September 21, 1972 has resulted
in the restructing of the Philippine political system and is re-
flected in the reorganization of several government agencies. The
Presidential Decree No. 1 and the letter of instruction No. 3 dated November 1, 1972 was issued to merge the Bureau of Forestry, the ReForestation Administration and the Parks and Wildlife Ljffice
into the new BUREAU OF FOREST DEVELOPMENT.
xl

, 1 rd
I aem I
I G-3’ I
LEGEND ---a--
Regional Offices BFD,
Regions I - XI
Training Center Baguio
City, Sub-Training Center
Magat (Luzon) equipped b]
the Federal Republic of
Germany
Reforestation Projects
equipped by the Federal
Republic of Germany
1 1 me- Lab 1 I Lxe la** I
Fig. 2: Distribution of reforestation projects in the Philippines (1974).
31

The policy of this new office encourages tree farming and in-
dustrial plantations as well as large scale rehabilitation of
denuded watersheds, which are now exclusively under the juris-
diction of the Bureau of Forest Development.-
32

REFERENCES
(1) ALGUE, J., 1958, The climate of the Philippines
Dept. of Commerce and Labor, Washington
(2) BARRERA, A., 1963, Soils and natural vegetation. Manila
(3) BUREAU OF FOREST DEVELOPMENT, 1973, Philippine Forestry
Statistics, Manila
(4) BUREAU OF SOILS, 1967, Reconnaissance soil survey report. Manila
(5) CHOINSKI, W.F., 1967, The Philippines. Longmanns Green, London
(6) FISHER, C., 1964, T'>p Republic of the Philippines. London
(7) MOHR, E.C.J. and VAN BAREN, F-A., 1959, Tropical soils
The Hague, London, New York
(8) NICHOLSON, D-I., 1970, Forest Management. Technical Report
No. 3 Demonstration and Training in Forest,
Forest Range, and Watershed Management. Report
prepared for the Government of the Philippines.
FAO, Rome
(9) RIEHL, H,>, 1954, Tropical Meteorology. McGraw-Hill Book COmp.
New York
(10) ROBEQUAIN, C., 1964, Malaya, Indonesia, Borneo and the
Philippines Longmanns Green, London
(11) ROSELL and MAMISAO, 1965, The agricultural soils of the
Philippines Journal of the Soil Science Society
of the Philippines
(12) SIAPNO, ., 1970 Handbook on selective Logging, Bureau of
Forestry. Manila
(13) TREWARTHA, G-T., 1967, An introduction to climate
McGraw-Hill Book Company. New York
(14) WATTS, I.E.M., 1955, Equatorial weather. University of London
(151 WHITFORD, H-N., 1911, The forests of the Philippines.
Bureau of Forestry. Manila
(16) <>,IDE, F.G., 1970, Republic of the Philippines. Manila
33

PART II
ESTABLISHMENT, MAINTENANCE AND PROTECTION OF FOREST PLANTATIONS
H.J. WEIDELT

Chapter 1:
PLANTING SURVEY, PLANTING PLAN, PLANTATION RECORDS AND MAPS
Each reforestation project requires a detailed plan, which
assures the continuity of the reforestation work inspite any
changes of staff. The plan has to indicate clearly the ob-
jectives of the reforestation project and how these objectives
are to be achieved (67).
In the absence of systematic planting plans the results of
reforestation are bound to be patchy and erratic. Any large scale reforestation prcgramme must be based on planting sur-
veys, planting plans, proper plantation records, and a simple and efficient reporting system.
1.1 The plantinq survey
The planting survey is the basis for the planting plan and is
the first to be taken up, when a new reforestation project is
started. Since the procedure described by TOUMEY and KORSTIAN (1967) is widely known in the Philippines, a modified version
of their methods more adapted to Philippine conditions is re-
commended here:
The project area is crossed at several different places taking
advantage of roads and trails and any views one can have from
higher points, Recording of data should be as detailed as
possible without using sophisticated survey instruments. Map-
ping is done in form of field sketches with the help of a
box compass and by pacing, or even by estimates only. The
field report on a planting survey should normally cover the
following items:
37

(a) A general description of the topographical features of
the project area including the main ridges, streams,
rivers, roads and trails‘
(b) A brief history of the area regarding past fires,kaingin,
timber cutting, etc.
(c) Location and boundaries of the areas to be planted should
be indicated on available base maps, or a rough field
sketch must be prepared, which allows an estimate of the
area. For details consult Part III,
(d) Subdivision of the area into compartments with neat bound-
aries following the topographical features and differences
in silvicultural treatment. The compartment boundaries
are marked later by border stones or posts with painted
numbers,
(e) The soil conditions should be indicated by symbols for
every compartment or subcompartment (deep, medium, shallow,
rocky, sandy soil, marshy depression, fertile alluvial
soil, major landslides, ravines, light, medium, heavy erosion, etc.):
(f) The species suggested for every compartment or subcompart-
ment are to be marked in the field sketches,
(g) Description of existing vegetation, regeneration of de-
sirable species, type of ground vegetation (incl. grasses, species, height),
(h) Select' ion of sites for nurseries and subnurseries.
No distinction is made here between intensive and extensive
planting surveys, because it does not have much significance in current practices.
1.2 The plantinq plan
All important information obtained in the planting survey
should be incorporated into a concise planting plan. This plan must include:
(a) A general description of the entire project area including
location, range of altitude, topography, soil conditions,
38

history, present vegetation, origin:1 forest types, informq-
tion on fire, kaingin, grazing, pasture leases and other
hazards, landownership and possible claims.
(b) A general description of the climate, including data on the
monthly distribution of rainfall of the nearest meteorologi-
cal station.
(c) Objectives of the reforestation project, which may be water-
shed protection, erosion control, production of timber,pulp-
wood, fuelwood, minor forest products, etc.
(dS Subdivision of the area into compartments and subcompartments
according to topography, differences in site conditions, and
a different choice of species. Compartment areas range from
10 to 30 hectares, the average is about 20 hectares. Compart-
ments usually are smaller in the mountains.
The subdivision into compartments is absolutely necessary for
control and reference purposes.
(e) A tabular compilation of all compartments and subcompartments
with designation <numbers for compartments, small letters for
subcompartments), area, species, spacing, quantity of seed or
seedlings required.
(f) Necessary improvements of the road and trail systems.
(g) Nursery plan for main and subnurseries, which includes the
location, the area, and the number of seedlings to be raised
each year.
(h) A discussion of the area not recommended for planting with
supporting reasons (too wet, dense brush, already adequately
stocked, needed for other purposes, etc.)
(i) Maintenance of the plantations during the first 5 years, in-
cluding weeding, tending, fertilizer application, fire lines.
(j) A time schedule, according to which the different compartments
are to be planted stating priority areas within the project.
(k) Equipment and supplies required.
(1) A detailed estimate of the expenditure for each year.
(m) Appendix of maps.
39

The planting plan should cover at least a period of 5 years
and must be prepared sufficiently ahead to allow enough time
for seed collection and raising of nursery stock.
If a number of years has passed since the time of the plant-
ing survey, a brief inspection of the area should be made to
consider any changes which might have occured.
Planting plans for different projects can be summarized into
a more general plan for a region. The regional plan should
have a list of priority projects.
1.3 Plantation records
A pre-requisite of good management is that proper records on
all plantations or compartments are maintained in every re-
forestation project.
For each plantation (compartment or subcompartment) a special
registration sheet is maintained, on which all important
events and data are recorded. This register has to be up- dated constantly.
According to FAO recommendation (28) the plantation register
or plantation index card should contain the following in-
formation:
- Designation of plantation, compartment or subcompxtment,
- Area
- Species and seed soxce,
- Spacing
- Date of planting, estimated number of seedlings, size and quality of planting stock,
- Date of replanting, number of seedlings, size and quality of planting stock,
- Events and date of occurance, such as fire, insect attack,
tending operations, inventories, survival counts, thinnings, etc.

Compartment: 9 Itogon Reforestation Project
Species: Benguet pine Oriqin: Bobok Concession
Area: 18 hectares Spacinq: 2 by 2 meters
Planted: October 1969, 45 000 seedlings, bare root, 12 cm.
Replanted: July 1970, 30 000 seedlings, potted, 18 cm. July 1971, 7 000 seedlings, potted, 27 cm.
Events in the plantation:
March 1970: 5 hectares burnt May 1971: Survival 78 %
May 1970: Survival 33 % July 1971: Replanted 1970:
r-
Replanted Nov. 1971: Ring weeding Octcber 70: Ring weeding May 1972: Survival 84%
Table 1: Plantation index card.
1.4 Plantation maps
In every reforestation project there should be base maps avail-
able of the entire project area, preferably at a scale of 1 : 10,000. Maps at a scale of 1 : 20,000 would show the planta-
tion areas too small. If the map supplied by the Central
Office in Manila is too small, a special request must be made for enlargement. Base maps contain only the important geo-
graphical features like roads, rivers, creeks, buildings and settlements, and other important landmarks as tie points. Most
important is that all aboundaries of compartments and subcom-
partments are printed on the maps for control and reference
purposes. Without the subdivision of the project area into
compartments no efficient control is possible. All reporting has J-o be done by compartments, so that any figure reported can be easily checked in the field later.
Progress of reforestation is indicated by using a different
color for every species. In a more advanced stage the dif- ferent age classes (class I: l-10 years, class II: 11-20
years, etc) can be shown by different shades of the same
color. For the main reforestation species the same colors
shoclld be used throughout the country.
A number of such base maps should be available in every re-
forestation project to be able to record different features
41

S.C. Sb
C.6
Leqend: Scale l:lO,OOO
-Highway ---- Compartment boundary (trails)
=Dry weather road . . . . . ..Subcompartment boundary
w Geographical feature, which is not a compartment boundary
Fig. 1: Project map (base map)
42

I
of the project, of the project, whenever required, whenever required, as for example the extent as for example the extent of fires, of fires, distribution of species, distribution of species, progress of planting work progress of planting work, future plantation areas by years, priority areas, extent of future plantation areas by years, priority areas, extent of
erosion, etc. erosion, etc.
Most important is the map showing the extent of plantations. Most important is the map showing the extent of plantations.
This map must be updated every year at the end of the plant- This map must be updated every year at the end of the plant-
ing season, ing season, and a copy is submitted to the Central Office and a copy is submitted to the Central Office in Manila to update the master copy. Without any maps of the in Manila to update the master copy. Without any maps of the
project area a proper management is not possible. project area a proper management is not possible.
Chapter 2: Chapter 2:
ECOLOGICAL ASPECTS FOR THE CHOICE OF TREE SPECIES ECOLOGICAL ASPECTS FOR THE CHOICE OF TREE SPECIES
The main ecological factors, The main ecological factors, which decide whether a species which decide whether a species will be able to succeed on a site, are climate and soil con- will be able to succeed on a site, are climate and soil con-
ditions. ditions.
.A 2.1 Climatic factors Climatic factors
If we would consider the climatic factors influencing tree If we would consider the climatic factors influencing tree
growth on a worldwide basis, growth on a worldwide basis, we would have to deal with a we would have to deal with a great number of climatic features such as among others the great number of climatic features such as among others the
.
43

occurrence of frost and snow, variations of relative humidity,
daily and seasonal temperature variations, etc. But here we
have to consider only the Philippines and can limit ourselves
to only those basic climatical features, which show significant
variations within the country, and allow us a more simple and
practical approach.
a) Rainfall:
- The total annual rainfall helps us to classify a site by
one figure only in dry (below 50 inches), moist (50 - 100
inches), and humid (over 100 inches). The disadvantage is,
that this does not say much about the moisture conditions
throughout the year, because the rainfall can be very un-
evenly distributed.
- The monthly distribution of rainfall gives us an indication of the length of the wet and dry season, and therefore has
more significance than the total annual rainfall. An at-
tempt of a classification and a suggestion of suitable tree
species is made below:
(A) Dry season less than 4 months *): Anthocephalus chinensis, Eucalyptus deglupta, Albizzia falcata, Octomelis sumatrana, Hevea brasiliensis,
(B) Dry season 4 to 6 months *): Swietenia macrophylla, Tectona grandis, Pterocarpus indicus, Pterocarpus vidalianus, Gmelina arborea, Toona calantas, Leucaena leucocephala In hiqher elevations:
Pinus insularis, Eucalyptus spp., Alnus maritima,,
(C) Dry season 6 months or more 2): Vitex parviflora, Gliricidia sepium, Psidium guava, Anacardium occidentale,
l
) A month is considered as dry, when the rainfall is below 50 mm
44

- Rainfall types accordinq to the official classification of
the'philiopines do not lend themselves easily for classifi- cation of forest sites, because in the rainfall types II,
III and IV (see Part I) rainfall can be expected in prac-
tically every month of the year, and the same group of
species (group (A) above) can be planted in all three'cli-
matic types. All species requiring a seasonal wet and dry climate would have to be listed summarily under type I rain-
fall (groups (B) and (C) above).
It should be noted, however, that the classification at- tempted above is only a broad guideline for the choice of
tree species, which may have to be modified locally because of changes in soil conditions, adverse exposure, changes in
altitude, and other factors.
b) Temnerature:
Inspite of the wide extent of the country the change of la-
titude does not have so much influence on the temperature
to affect the choice of tree species significantly. Tem- perature variations from one place to the other in the
Philippines are mainly due to changes in altitude (21).
The commonly accepted gradient is 0.5OC per 100 meter rise
in elevation. For example the difference in elevation be- tween Baguio and Binga is about 1000 meters, we therefore can
expect, that the temperature in Binga is 1000 x 0.5 = 5o c
above the temperature prevailing in Baguio. 100
This difference of !S" C has already a great effect on the growth of tree species. While in Binga teak, narra, molave,
kalantas and other lowland species can still be grown and
bear seeds, they would usually not thrive in Baguio. 600 to 700 meters above sealevel seems to be the upper limit for
most lowland tree species in Luzon,
45

2.2 The edaphic factors:
The most importznt soil characteristics influencing tree
growth are the depth of the soil, the humus content, the
permeability, the moisture regime, the content of rocky
material, the nature of the subsoil, the availability of
nutrients and the p&value. Assessment of these character-
istics is generally part of the planting survey and can -ex-
cept the last two items- be determined by inspection of a
soil profile. But even without making a chemical analysis
we can draw some conclusions about the availability of nutrients and even the pB-value from the ground vegetation,
the presence of humus, the thickness of the A-horizon, the
soil structure and the color.
If the special technical terms for a‘soil description are
not known. a free description of what is actually seen
should be made. A simple guide for a profile assessment is
given below:
(a) General information: Location of the profile,
topography of the profile site,
geological information, if available,
climatic conditions,
vegetative cover, dominant species,
local soil names, if any.
(b) Estimate of the soil fertility is generally not difficult
by considering the natural vegetation
found at the profile site. For site
classification purposes it is rezom-
mended to develop a system of indi-
cator plants, which are characteristic
for special soil conditions.
(c) Depth of soil: less than 30 cm. - shallow
30 to 100 cm. - medium
100 to 200 cm. - deep
over 200 cm. - very deep
(d) Moisture at time of profile description:
dry: color becomes darker, when water is added,

fresh: color does not change, when water is added,
moist: if sample is pressed by hand, water will show,
wet: if sample is pressed by hand, water will run out.
(e) Usual heiqht of water table taking into account the weather
conditions.
(f) Drainaqe: Terms generally used in profile description are
excessive (in sandy soils),
free (for "normal" soils),
imperfect (often in slightly compacted soils with a high clay fraction)
impeded (often in lower horizons of clay soils, where the soil is compacted, and in profiles situated in a depression)
(g) Seoaration of the Profile into horizons:
O-horizon: undecomposed or semi-decomposed litter,
A-horizon: characterized by the presence of soil humus. The color is general- ly darker than the underlying B-horizon ("topsoil").
B-horizon: The horizon of mineral soil be- tween the A-horizon and the underlying parent material ("subsoil" 1.
C-horizon: The parent material, mostly un- decomposed rocks and other mate- rial, where the soil forming process has not yet started.
If within the A,B, and C horizon significant
differences in color, texture, etc. occur, a
further subdivision in line with the conven-
tional symbols used in soil science should
be attempted. Each horizon is described separately indicating its depth. Example:
0 - 15 cm. A-horizon: . . . 15 - 120 cm. B-horizon: . . . below 120 cm. C-horizon: -..
47

me following items (h-n) must be described for each horizon
separately:
(h) Color: The description should be as specific as possible,
for example: dark reddish brown, light
yellowish brown, mottled grey and red
brown, etc. . Compare also the color with
the horizon below and above: lighter or
darker.
(i) Texture class: refers to the distribution of fine and coarse
particles in the soil. The main texture
classes can be easily determined by field
characteristics (33):
Sand: A wet sample does not stain the hands,
Loamy sand: slightly sticky, but does not
allow to be formed into a stick of cigarette
thickness,
Sandy loam: makes a sound, when rubbed be-
tween the fingers close to the ear. Allows
to be formed into a stick of cigarette size.
Loam: Allows to be formed into a doll with
arms and legs. Rubbing between the fingers
makes a very light sound only.
Clay loam: Sample allows to be formed into
a fragile string. No sound when rubbed be-
tween fingers.
Clay: highly plastic and slippery when
handled. Allows to be formed into a thin
string.
(j) Skeleton percent:Estimate of the proportion of coarse particles
(over 2 mm) in the soil. Also a description
of their nature is required:"approximately
20% skeleton consisting of platelike stones
with an average size of 2 - 3 cm."
(k) Soil structure: Sometimes more clearly pronounced in old
profiles or road cuts, in a fresh profile
the structure becomes more obvious, when

Blocky
a shovel of soil is thrown on the ground and
the soil breaks up into aggregates. Descrip-
tive terms commonly used are plate-like,
prismatic, blocky (very common), granular or
crumb structure (A-horizon), or "no visible
structurel.
Prismatic Plate like Granular or crumb structure
Fig. 2: Types of soil structures.
(1) Compaction: terms commonly used in soil profile description are:
for dry soils: loose, friable, firm, very
firm, cemented, for moist soils: sticky,
non-sticky, plastic.
(m) Root penetration: use a free description:"many fine roots,
isolated strong roots, horizon well penetrated
by roots" etc.
(n) Presence of soil fauna: earth worms, termites, ants, mice or
others.
To assess these soil characteristics a profile pit of about 1.5 m
depth is dug on a representative site avoiding places, which are
not really characteristic of the area like ridges, small depres-
sions, vicinity of creeks and rivers etc.. Sometimes road cuts
provide a very large and deep soil profile that one can save
the labor for digging a pit.
On table 1 (next page) some tree species had been suggested for
some typical soil types. This brief outline, however can pro- vide only some basic ideas when selecting a tree species and does
not eliminate the necessity to conduct trial plantations, whenever
a new species is introduced to a region.
49

SOIL
e-l 2
dry rocky ridges
% z rocky soil with high tn skeleton content
8, (d
ery shallow soils
6 sandy soils near
E seashore I .
g red and brown soils 0 originating from Lu limestone
mldeep and well drained sjlowland soils
uo _I
soils with impeded ,drainage 3 B 0 grassland soils under iii I- cogon
DRY SEASON LESS THAN 4 M. DRY SEASON 4-6 MONTHS 0F'Y SEASON MORE THAN 6 M.
alibangbang, guava alibangbang, guava molave, akleng parang molave, akleng parang
Gmelina arborea, bagras, casoi, guava, molave, Moluccan sau, ipil-ipil, akleng parang, ipil-ipil
molave, casoi, guava, ' akleng parang,
kalantas,
akleng parang akleng parang -
agoho, bitaog, talissai, agoho, bitaog, talissai agoho, kamachile, aroma aroma, kamachile
1
kaatoan bangkal, bagras Moluccan sau, Para rubber . Gmelxiia arhreG
kalantas, narra, molave Gmelina arborea, ipil- ipil
teak, narra, mahogany, Gmelina arborea, lumbang ipil-ipil, Honduras pine
~ molave, kakawate .
kalantas, molave, Eucalyptus citriodora (?I
-
Gmelina arborea, narra and many 'others
forest species and. fruit trees
Eucalyptus robusta, banaba, Eucalyptus ro- banaba, busta, Casuarina glauca
Eucalyptus robusta, Casuarina glauca
Benguet pine, Eucalyptus Benguet pine, Alnus, Benguet pine, SPP., Alnus maritima Eucalyptus saligna, Eucalyptus camaldul@nsis
E. grandis, Cryptomeria japonica, try also Cunninghamia konishii
and Chamaecyparis formosensis
Table 2: SUGGESTED TREE SPECIES FOR SOME TYPICAL SITE CONDITIONS

Chapter 3:
ECOLOGICAL NOTES ON SOME REFORESTATION SPECIES IN THE PHILIPPINES
1) Acacia farnesiana. Aroma
This large spiny shrub is native to South America, but now wide-
ly distributed throughout the tropics. The tree is very common along the West coast of Luznn and M+clAmrr\ and iilallr m_.... A. -Y-Y other places. It was seen growing very well on coastal sands and may have good prospects for degraded and sandy sites in low
elevation and for erosion control purposes. Due to its long spines it is not very attractive as fuelwood or fodder, which
is a big advantage in some places.
2) Aqathis philipoinensis. Almaciga
Almaciga is a large tree with a wide distribution throughout
the Philippines on moist, but well drained mountain slopes at elevations from about 300 to 1500 meters. It is not allowed to cut almaciga, because it yields a valuable resin known as copal.
Because of short viability the propagation by seed is difficult.
The usual method of propagation is by wildlings, which can be
found in great numbers under the mother trees, after the ground
vegetation has been cleared. The young seedlings benefit from a light shade and are well suited for underplanting or enrich-
ment planting. Almaciga requires a moist, well drained site
with a humid atmosphere (forest environment) with only a short
dry season, and does not seem to be suited for open grassland.
51

3) Albizzia falcata. Moluccan sau
A fast growing tree from the Indo-Malayan region. It grows well
up to elevations of about 600 meters in Luzon, in Mindanao it
can be grown also at higher elevations as in Cinchona Reforesta- tion Project, Bukidnon. Albizzia falcata does best on a variety
of soils, but best growth rates are obtained on good forest
soils.
The tree is liable to wind damage and therefore should not be
planted in the typhoon belt, where the branches are easily
stripped off by strong winds. Albizzia falcata performs a
useful function as a nurse crop, wherever light shade is re-
quired to raise more delicate species by underplanting.
Large commercial plantations of this species can be seen at
the concession of the Nasipit Lumber Company in Agusan, Mindanao, where a mean annual increment of about 30 cu. m per ha is ob- tained an average sites and over 50 cu. m on good sites. Local
yield tables are available.
4) Albizzia lebbekoides. Kariskis
A small tree with a wide distribution throughout the Philip-
pines. Suitable for planting on dry and rocky sites.
5) Albizzia procera. Akleng-parang
This tree is common in regions with a pronounced dry season,
namely the 110~0s Provinces, and is often encountered in open secondary forest. Since the tree is able to grow on very shal- low soil, it may be a very useful species for difficult sites. The wood, although of small dimension, can be used for many purposes.
6) Aleurites SW.
Aleurites trisperma (bagilumbang) is indigenous only to the Philippines, while A. moluccana (lumbang) has a very wide natural distribution and had been established in plantations
throughout the country. In the Nasipit Lumber Concession lumbang is planted at a commercial scale in combination with
cattle ranching. The climatic and soil requirements of both species are not very specific.
52

A third species, Aleurites fordii, which yields the tung oil,
has been recently introduced in the Philippines (Magat Refo-
restation Project) and is supposed to grow well on dry sites.
7) Alnus maritima (?I. Japanese Alder
This medium sized tree is suitable for elevations above 600
meters. It grow.s well on landslides and degraded soils and
therefore performs a useful function in erosion control as
long as the site is not too dry.
8 ) Anthocephalus chinensis (syn, A. cadamba). Kaatoan Banglcal
A fast growing pioneer tree of the rainforest area, which
sometimes appears in masses where the soil had been dis-
turbed by construction of logging roads.
The ecological requirements of this species are uniform rain-
fall, moist and well drained forest soils and full light.
Planting therefore is only recommended in type II rainfall
areas without a pronounced dry season. Plantations in the
drier parts of Luzon have all failed, while on favorable
sites in Mindanao a mean annual increment of 50 cu m /hectare and more had been recorded.
9) Bauhinia malabarica. Alibangbang
This and other species of the genus have only value as orna-
mentals and can be tried in groups for beautification on dry
ridges and other dry and rocky sites.
10) Calonhvllum inophyllum. Bitaog
Common throughout the western Pacific region near seashcres.
The species is suitable for planting on coastal sands, but
due to the slow growth Casuarina equisetifolia is generally preferred. Other species of this genus thrive also in inland
plantations in drier places.
11) Casuarina spp. Agoho
Two species of this genus, Casuarina equisetifolia and C. .
rumphiana are native in the Philippines, while a third
species C. montsna was introduced from Australia. 53

- Casuarina equisetifolia: a pioneer on fresh deposits along
rivers and along the sea coast. The species is recommended
for planting on coastal sands and degraded sites in the
lowland.
- Casuarina rumphiana: native in the moist mountain forests
of the Philippines at elevations around 1000 meters. It is
a beautiful tree, but apparently not often cultivated.
- Casuarina montana (syn. C. junghuniana): Most of the agoho
planted at higher elevations seems to be C. montana (?).
The species is very hard to distinguish from C. equiseti-
folia. Because of the ecological differences, however, the
distinction of the two species is important:
C. montana
Twigs ("needles") 8-10 teeth at each node
Fruits ("cones") more truncate, smaller 5-6 whorls of fruit cells 8-10 cells in a whorl
12) Crvptomeria iaponica. Japanese Cypress
C. equisetifolia
5-8, mostly 7 teeth at each node
more elliptic, larger
7-8 cells in a whorl
Some old specimens are found around 'Icaguio as ornamentals, but
they do not look very vigorous. Cryptomeria likes a deep, moist and well drained soil and is suitable only for higher
elevations. A plantation established at Mt. Data at about
2500 m was growing well until burnt 1973. Seedlings showed slow progress during the first two years in the field, but
then put on rapid growth. In the mountainous parts of Agusan young plantations showed extremely fast growth. The question
of the proper provenance is very important for Cryptomeria japonica, In neighboring Taiwan the YOSHINO provenance from Central Japan gave best results. Provenance tests for the Philippines are recommended.
13) Dipterocarps.
Most species of this very large and important family re-
generate naturally easily on undisturbed or slightly disturbed
forest soils. Their artificial regeneration, however, is difficult. The seed years are irregular'and the seed has only
a very short viability.
54

Plantations have been established successfully by underplant-
ing with wildlings of white lauan and bagtikan (Malaybalay
Reforestation Project, Mindanaoj, because all dipterocarps
require shade in their early juvenile stage. Most attempts of
planting them in open plantations have failed.
If dipterocarps are considered for planting at all, trials
should be conducted on forest soils under shade in regions with more or less evenly distributed,rainfall. For details on
planting dipterocarp wildlings and enrichment planting with
dipterocarps see Chapter 11 and 16.
14) Endospermum peltatum. Gubas
The frequency of this medium to large tree increases in over-
logged dipterocarp forest, where gubas can be considered a secondary species- .__ .S-ipen it is ir: high demand for matchsticks and matchboxes, it is already planted in some places. The tree seems to be best suitedfor fresh forest soils in areas with more or less evenly distributed rainfall. The seeds require a special treatment to break or avoid dormancy (PCAR, 1975).
15) Eucalyptus camaldulensis.
This species is widely distributed all over Australia, includ-
ing some areas with very low rainfall. Plantations of E. camaldulensis have been established successfully under various
climatic conditions in many tropical and subtropical countries.
Trial plantations at elevations above 600 meters in Luzon were
quite successful. At lower elevations trial plantations of this species had been a total failure in some places and a success in others. Therefore small trial plantings are re- commended before starting any larger plantation in lower ele-
vation. It should be noted here, that most Eucalyptus species
are very sensitive to weed competition, and may require a care-
ful site preparation. This may be one of the reasons for fail-
ure in some places.
A provenance test with 50 Australian provenances of this
species was conducted by the Training Center in 1972 at the
Binga plantation site. The result so far has been, that
55
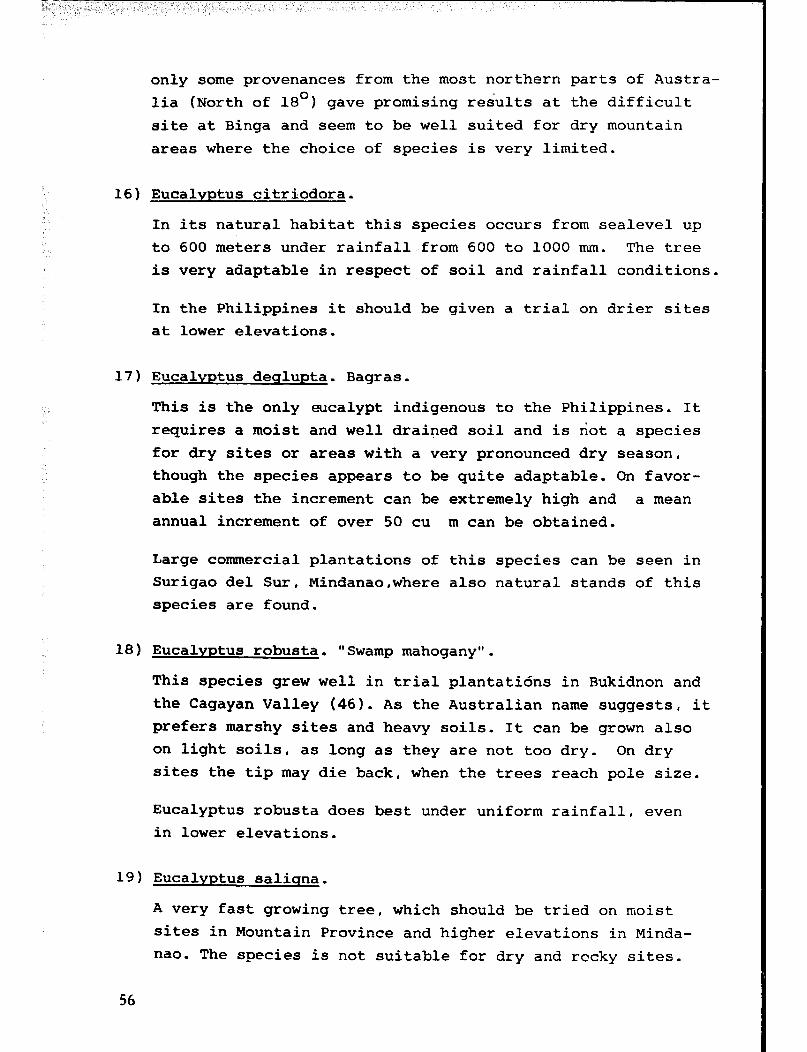
only some provenances from the most northern parts of Austra-
lia (North of 18O) gave promising results at the difficult
site at Binga and seem to be well suited for dry mountain
areas where the choice of species is very limited.
16) Eucalyptus citriodora.
In its natural habitat this species occurs from sealevel up
to 600 meters under rainfall from 600 to 1000 mm. The tree
is very adaptable in respect of soil and rainfall conditions.
In the Philippines it should be given a trial on drier sites at lower elevations.
17) Eucalyptus deglupta. Bagras.
This is the only eucalypt indigenous to the Philippines. It
requires a moist and well drained soil and is not a species
for dry sites or areas with a very pronounced dry season,
though the species appears to be quite adaptable. On favor-
able sites the increment can be extremely high and a mean annual increment of over 50 cu m can be obtained.
Large commercial plantations of this species can be seen in Surigao de1 Sur, Mindanao,where also natural stands of this species are found.
18) Eucalyptus robusta. "Swamp mahogany".
This species grew well in trial plantations in Bukidnon and
the Cagayan Valley (46). As the Australian name suggests, it
prefers marshy sites and heavy soils. It can be grown also
on light soils, as long as they are not too dry. On dry sites the tip may die back, when the trees reach pole size.
Eucalyptus robusta does best under uniform rainfall, even in lower elevations.
19) Eucalyptus saliqna.
A very fast growing tree, which should be tried on moist sites in Mountain Province and higher elevations in Minda-
nao. The species is not suitable for dry and rocky sites.
56

~~- I
Very sensitive to weed competition. Some specimen trees can
be seen around Baguio as ornamentals.
20) Eucalyptus qrandis.
The tree is very similar to Eucalyptus saligna and also re-
quires a moist and well drained soil at elevations above
600 meters. It is not suitable for dry sites. Very sen-
sitive to weedcompetition. There may be natural hybrids
with the former species,
21) Gliricidia sepium, Madre de Cacao, Kakawati.
This species was introduced from Central America and is very
common in the Philippine lowlands up to about 600 meters
elevation. It can be easily established on dry and poor
sites by cuttings, and therefore is very useful for erosion
control at lower elevations. It is also a good nurse crop
capable of improving the soil conditions because of the high nitrogen content of its leaves (49).
22) Gmelina arborea. "Melina", Yemane (Mindanao).
A species with roughly the same natural distribution as teak stretching from India to Indochina.
Gmelina has grown well in the Philippines under a variety of site conditions, and has become the favorite of many forest-
ers. Due to its good early growth it can generally cope
with the weeds with little or no assistance. The tree is
quite adaptable to different rainfall conditions and can be
planted in all four rainfall types of the Philippines. How- ever, regarding soil conditions, the species is quite de-
manding. According to LAMB (1968) Gmelina not only requires
good drainage, but also a high base status. Ample available
nitrogen is probably essential for vigorous growth of Gmelina.
On difficult sites the tree is shortlived, sometimes dying
without apparent cause already at the age of about 10 years.
In a trial plantation in Binga the trees grew well during
the first 2 years but then height growth stopped almost
57

58
completely. On favorable sites the tree lives up to 40 years
and can attain diameters of 60 to 80 cm (41).
23) Leucaena leucocephala. (Syn. L. glauca) Ipil-ipil.
An introduced tree from Mexico and Central America, which is
already naturalized in the Philippines.
Once established the tree grows and regenerates easily at
elevations below 600 meters and occasionally is seen above
1000 meters. It prefers the moist and more fertile lower
slopes and does not like acid soils. Regarding rainfall
ipil-ipil is quite adaptable, but does not do well on very
dry sites with southern exposure.
Leucaena can be grown from seed or cuttings and coppices
well, therefore it may be a useful species for erosion con-
trol at lower elevations. In Laguna Province it is managed
under a coppice system to provide fuelwood for the Greater
Manila Area. On Java/Indonesia it is a very important nurse
crop in all taungya plantations, where it is sown in lines
between teak and other species. The young trees are lopped
frequently to provide mulch for improving the soil conditions.
In a test with 104 strains of Leucaena leucocephala conducted
at the Hawaii Agricultural Experiment Station a strain from
Mexico had been outgrowing all other strains (9) and had been introduced to the Philippines recently as "giant ipil-ipil".
24) Mancifera indica. Mango
This very common fruit tree grows easily and fruits at ele-
vations up to about 600 meters in Luzon on a variety of soils
and succeeds also on rather dry sites. Planted on favorable sites around forest plantations the wide cro_wned mango trees
will shade out grasses and provide an effective fire break.
25) Pinus caribaea var. hondurensis.
This is one of the few pine species besides P. merkusii and
perhaps P. oocarpa, which can be grown successfully at lower
elevations in the tropics.' In a 7 years trial plantation north
of Raguio the species was outgrowing the native P. insularis.

26) Pinus insularis (svn. P. khasva). Benguet Pine
This species is indigenous to the mountains of North Luzon
and should be used for all grassland sites at elevations
above 800 meters. At lower elevations the trees tend to
exhibit a very poor shape and slow growth. The poor shape at lower elevations could possibly partly be attributed to
increased shoot borer attack.
At Malaybalay Reforestation Project, Mindanao, an old plan-
tation of very tall and straight pines can be seen at 600
meters elevation, but up to 1970 these trees produced little
or no viable seed.
27) ginus merkusii. Mindoro Pine
The tree occurs naturally in the Philippines in two small
isolated areas in NW Mindoro and the Zambales Mountains.
Very little planting has been done with this species in the
Philippines so far, because the seed is difficult to get, it has a short viability and the seedlings are delicate and
slow growing.
An additional disadvantage of the Philippine provenances of
this species is, that they have a "grass stage", which does not occur in the provenances of North Sumatra and increases
the weeding costs considerably.
For lower elevations it may be worthwhile to try the Atjeh
strain from North Sumatra.
28) Pinus oocarpa.
Seedlings planted near Baguio have shown growth rates simi-
lar to the indigenous Pinus insularis,
WORMALD (19691 recommends trial planting with P. oocarpa v. ochoteranai at elevations below 1000 meters.
29) Pithecolobium dulce. Kamachile
A medium sized tree from tropical America, now widely dis-
tributed and naturalized in the Philippines. The species is
59

able to grow on dry sites and coastal sands, suitable for
erosion control in low elevations, source of tannin.
30) Psidium quaba. Guava
Besides bearing edible fruits guavas are very hardy, deep
rooted, and drought resistant, they can be planted on ex-
treme sites on southern slopes and rocky ridges, where al-
most nothing else would grow. Once fully established, they
cannot be eradicated easily and survive grass fires.
31) Pterocarpus indicus. Narra
Most of the original narra forests near the coasts are al- ready destroyed by kaingin, cleared for agriculture, or
altered by heavy timber cutting. According to WHITFORD
(1911) narra is found throughout the Philippines, principal-
ly in regions where the dry season is not pronounced, nearly
always occupying places on flat coastal plains behind man-
grove swamps or very scattered along streams in the low
hills near the coast. Very rich narra stands were also
found in the Cagayan Valley.
Though the tree appears to be quite adaptable to dry sites,
it may not reach the quality here required for sawn timber
due to excessive forking and, as a result, short boles.
32) Pterocarpus vidalianus. Prickly Narra
The Philippine national tree. It is distinguished from P. indicus mainly by the prickly fruit, the site requirements
are the same as for Pterocarpus indicus.
33) Samanea saman. Raintree, Monkey Pod, “Acacia”
This tree has been introduced probably by the Spaniards from
Central America. It is frequently encountered in towns and along roads at elevations below 600 meters. The wood is in
high demand for the wood carving industry.
Site requirements are not very specific, but the tree seems i;O be most suited for moist, but free draining sites in the
lowlands with a pronounced dry season.
60

34) Sesbania qrandiflora, Katurai
This very useful small tree occurs naturally throughout the
Indo-Malayan region up to Northern Australia. It is cul- tivated now in most tropical countries. The flowers can be
eaten as a vegetable, the leaves serve as fodder for milk
cattle, an extract of the barks is prepared as a medicine
against bowel complaints, the wood is used as fuel.
In the lowland of the Philippines and Java the tree is a
cbmmon sight in moist places along rice fields and near
homes. It is also found sometimes as a pioneer in abandon-
ed kaingins.
35) Swietenia macrophylla, Large Leaf Mahogany
This species has proved to be one of the most successful
trees for reforestation in the Philippines as long as it
was not attacked by the shoot borer. It thrives under rain- fall from 1500 to 5000 mm. and a dry season up to 5 months.
In a moist climate the trees are taller and growing faster,
but the quality of the dry area mahogany is superior. Maho-
gany is essentially a tree of lower elevations and should
not be planted above 600 meters in Luzon.
In respect of soil requirements the species is quite adapt-
able and on rather shallow as well as deep alluvial soils.
Shoot borer attack (Hypsipyla robusta) is often serious es-
pecially on good sites and can perhaps be reduced by grow-
ing mahogany in mixtures or under a light shelter of Albiz-
zia falcata to avoid the formation of long sapy shoots, which
are of special attraction to the insect (6). Where shoot borer attack cannot be controlled other species must be chosen.
36) Swietenia mahoqani. Small Leaf Mahogany
This species is able to grow on drier sites than Swietenia macrophylla, but the growth rate is slower.
61

37) Tectona qrandia. Teak
Teak has been widely planted on grassland sites throughout
the country. The great advantage of this species is, that
it can be easily raised in the nursery, easily established
in the field by stumps and sprouts after grass fires.
However, the rate of growth and the form of the trees are
generally very poor in most plantations. It is not clear,
whether this is a question of the site (degraded grassland!)
or of unsuitable seed origin. Provenance tests with good
Thai and Indian provenances including the famous Nilambur
Teak from South India or Malabar provenances are suggested.
The value of teak in plantations with purely protective
functions in dry areas is doubtful, since teak is deciduous
and may take a very long time to suppress the grasses to a
degree, where groundfires cannot do any harm (67).
Teak is a very demanding species and should be confined to rich, well drained soils, which are often really agricul- tural soils and should not be planted on dry rocky slopes.
38) Toona calanta!!. Kalantas
This species is found scattered throughout the Philippines
on a variety of sites: along small streams in the molave
forest, on flood plains in the lauan-hagachac forest (661,
on dry slopes in the 110~0s Region, in the rain forest of
Palawan, the Visayas and Mindanao. This wide distribution
shows, that the species must be quite adaptable to different
soil and rainfall conditions. At the Caniaw Reforestation
Project in Ilocos Sur it is planted at a large scale on dry
rocky slopes, On moist and fertile sites the plantations are
liable to shoot borer attack like most Meliaceae. Preventive
measures are described in Chapter 23.
Since the species yields a useful timber, is easy to raise
and can be planted bare root, it should be given more atten- tion.
62

39) Vitex parviflora. Molave
Usually a small to medium sized tree of very ragged shape
and a crooked and fluted bole, but of very high value, be-
cause of its resistant timber. According to WHITFORD (1911)
the tree was once widely distributed throughout the islands,
especially on low coastal hills, usually on limestone, but
may also occur on vulcanic rocks and other sites.
It is suitable for very dry and rocky sites with southern
exposure, but due to its slow growth it had been rarely
planted at a larger scale.
When selecting a tree species for a planting project, we
must in the first place always consider the species which
grow best under the given ecological limitations. The
second consideration then is which of the possible species
serves best the purpose of the plantation and gives us the
maximum benefit. Since the ecological aspects have already
dealt with in the two previous chapters, the purpose of
tree planting will be analysed here more in detail-

Objectives for planting trees can be one or several of the
following:
1) Production of sawnwood, veneer and plywood,
2) Production of pulpwood,
3) Production of fuelwood,
4) Production of poles and piles for local consumption,
5) Production of "minor forest products" like rubber, fibers, tannin, resin, fruits, etc.
6) Erosion control,
7) Protection and improvements of watersheds,
8) Shelterbelts,
9) Beautification.
When making our choice, we should try to find a species,
which serves not only one, but several of the above listed
objectives to cope with the multiple-use functions of the
forest.
4.1 Production of sawnwood
When the main objective of a plantation will be to produce
sawnwood, we have to consider, that the trees we plant to-
day, will be harvested only after 30 to 100 years. The
problem for the forester is to predict, what will be re-
quired by the market a long time ahead. Inspite of all
future technical developments, increa.sed comp~titinn from
other materials, and a noticible trend towards composite
wood products, foresters generally are convinced, that there
will always be a demand for good quality sawnwood. CHAMPION
and BBASNBT (1958) recommend general utility timbers as a
safer investment in the long run than special purpose timbers
with increased competition from other materials.
Another point, which has a bearing on the choice of tree
species, is the necessity to concentrate on relatively few species, after the stage of species trials has passed. The
trade and the wood based industries always want large quan-
tities of the same product. Small quantities even of a very
64

useful species, to which the trade is not yet accustomed,
from an isolated plantation may be very difficult to sell
in most cases. The tropics are very rich in timber trees,
and there is the danger for the enthusiastic forester to
plant too many species. Of course also the other extreme of large monocultures with all the risks involved has to be
avoided. If the existing species satisfy the demand, tnere
will be no need to introduce unpredictable exotics. In the
Philippines so far the species, which make up the bulk of
industrial plantations, can be counted almost on one hand.
If a new species is to be introduced to a region, trial
plantations have to be established, which should cover at
least l/3 or better % of the proposed rotation, before one
can embark in any lager operation. Observations in the nur-
sery and early plantation stage are not enougn.
Under Philippine conditions the following species may be
considered for sawnwood production in plantations:
Swietenia macrophylla Gmelina arborea Tectona grandis Albizzia falcata Pinus insularis Eucalyptus deglupta Pterocarpus indicus and P. vidalianus
Plantations of these species may become more and more im-
portant for the sawnwood supply in future, as the remaining
dipterocarp forests will be depleted.
4.2 Production of aiii~ood.
The present annual paper consumption of the Philippines is
about 0.4 million tons. The increase in consumption during the last decade hae been about 7% annually, and the con-
sumption had doubled since 1961 (1):
The consumption of paper is intimately linked to the stand-
ard of living or the per capita income. The higher the
standard of living and the educational level, the more the
people consume papet; and paper products. There is more demand for 'books, newspap&s, magazines, writing paper. The increamd consumption of goods leads to a higher consumption of wrapping
65

and packing materials. With the rising standard of living
combined with a high population growth of 3.4% annually, we
can predict a sharp increase in paper consumption, and there-
fcre increased need for pulpwood plantations. Still quite
a large proportion of the pulp and paper needed is imported,
but these imports are regressive. Imported is also still a
large portion of the long fiber pulp, which is blended with
short fibers to produce strong paper grades or kraft paper.
In the Philippines out of 3800 woody species,about 200 are
suitable for pulp (1) especially
- Benguet pine (Pinus insularis) - Moluccan sau (Albizzia falcata)
- Kaatoan bangkal (Antocephalus chinensis)
- Bagras (Eucalyptus deglupta)
- Yemane (Gmelina arboreal
Besides these species, which are already planted at a large scale for pulpwood, the Forest Products Research Institute
at Los BaRos recommends also a long list of others (52).
Some of these, which have a potential for plantations, are
African tulip (Spathodea campanulata), Binuang (Octomelis
sumatrana), gubas (Endospermum peltatum) and luctub (Dua- banga moluccana).
In a recent work ESCOLANO et al. (1974) have investigated
kraft pulping of a number of non-commercial hardwoods, some
of which like Toog showed fiber length over 1.6 mm, but may p3eBepr+, ,nil\ricwlt*9rSl A4 CC4 A**1 La -1 for r,a=g ~~~*~~tf~i*r Me w-h u* -**-h”YL**G”
In a pulpwood'plantation, considerations about stem form, branchinese and taper play only a secondary role. The main
aim is to produce quantity measured by volume and weight,
because about 4-6 tons of wood are required to produce one
ton of pulp. The following aspects therefore have to be con- sidered already in the planning stage:
- Since a pulp mill requires very large quantities of wood
for economical operation, dry areas where trees are grow- ing slow are unsuitable for pulpwood production. Water
must be available in large quantity, because about 40 cu.
I& of water are needed for one ton of pulp.

- Pulpwood is bulky, the value per unit is not as high as
logs. Therefore pulpwood cannot be produced in remote
areas. The plantations have to be situated as close to
the pulp mill or a motorable road as possible and must
be concentrated to reduce transportation cost. Small, widely scattered plantations are a great handicap for the
development of any wood based industries (26).
- The species usually planted for pulpwood are fast grow-
ing. The pulp mill therefore has to be planned simul-
taneously with the planting programme. After 8 to 10 years we can expect the first pulpwood to be harvested
and there must be a mill to utilize it.
- The number of species planted in a pulpwood plantation
project should be limited, because pulping of a hetero- geneous mixture of hardwoods is still difficult. From the silvicultural point of view, however, the project is
more safely founded, when several species are planted, and large monocultures are avoided. Usually a compromise has to be made between the silvicultural aspects on one
side and technical and economical on the other, which could result, for example, in a block mixture of different species and age classes.
4.3 Production of fuelwood.
In the Philippines fuelwood still continues to be important
for the lower income groups, especially in the rural areas: The f-u&-woo8 demand of the Greater maniia area is met by the
ipil-ipil plantations of Laguna. In Central Luzon heavily
pollarded rain trees and katurais provide fuelwood in pure-
ly agricultural areas without remains of forest. According
to estimates about one half of the worlds wood conumption
of 2.5 billion cu.m. is still consumed as fuelwood. With the
present energy crises the demand for fuelwood is likely to increase.
As pointed out by CHAMPION et BFG&NET (1958) wood as a fuel
has the great advantage over all other sources of energy, except hydrbelectric, that, properly managed it is perma-
nently self-renewing, and can 'be produced almost everywhere
67

where land and moisture is available. The great disadvantage,
however, is that fuelwood is quite bulky in respect to its
calorific value, and costs for transport and handling are
therefore relatively high. In most cases it would not be
economical :a transport felling waste from the logging areas
to the centers of consumption. Where it can be expected, that
a demand for fuelwood is likely to continue, special planta-
tions of easy growing species managed under a coppice system
may be the'best solution.
When selecting the species one should take into account the
calorific value as well as silvicultural factors. One should
not only select a species, that grows fast, but also one
which regenerates easily naturally by seeds or coppice. Most
fuelwood plantations in the tropics have been established
with legumes. For the Philippines ipil-ipil, kakawate or
Cassia siamea appear to be most suitable. Species, which
have to be replanted after each cutting cycle are unsuitable
for fuelwood plantations, except, if they are especially adapted to a site, where nothing else would grow.
In the Philippines the most common species for fuelwood
plantations is ipil-ipil. Most of the ipil-ipil sold in
Manila comes from the Los BaEos area, where extensive plant- ations of this species can be seen. The rotation there is
only 2-5 years. Land reasonably stocked with ipil-ipil pro-
duces about 4000 bundles per hectare per rotation(301, which
would be equivalent to about 6-10 cu. m. staked per year.
The "giant fpil-ipil" probabiy would produce much more.
4.4 Poles and piles for local consumption.
Foresters should always bear in mind the needs of the local
people to assure their cooperation. In rural areas there is
usually quite a high demand for piles and poles for simple
construction and fences. The lower the income in a certain
part, the more the people use roundwood and less sawnwood.
With rising income the roundwood consumption will fall and
is replaced more and more by sawnwood.
68

In forest areas there will be no need for making special
plantations to satisfy this demand for poles and small wood.
The always present secondary forest will provide enough
material. Where we have closely spaced plantations for
timber production, the thinnings can often be sold to meet
the demand for poles (16).
If permanent difficulties in the supply exist for an area,
bamboo plantations would be highly appreciated by the local
population, since bamboos rank among the most useful and versatile forest products. Due to its ease in working and its availability bamboo is used in the Philippines for al-
most every purpose wood is used in temperate countries (30).
Bamboo is used for house construction in many areas, serves
as water container, or pots for raising tree seedlings, split boho is woven into a coarse matting called "sawale" used for walls and partitions in houses, or it can be used for fish
traps or fences. During the Vietnam War deadly traps were constructed only of bamboo and vines to be triggered off by
unwary soldiers, the "balatec" made of bamboo is still in use to trap wild boar in some places.
Bamboo also can be a source for long fiber pulp like in
Sulawesi (Indonesia). The technical difficulty to a certain extent still is the high silica content which destroys the
knives of the pulping machines.
Of the 17 erect species of bamboo found in the Philippines,
the three species most widely used are (30):
- Kawavan (Bambusa spinosa): This spiny variety is the most commonly used bamboo in the Philippines due to its strength and durability. It is thick walled with internodes of 40 to 60 cm and can attain a height of 25 m and a culm dia-
meter of 20 cm. Kawayan had been introduced to the Philip- pines a long time ago, possibly from Indonesia.
- Kawavan-kilinq (Bambusa vulqaris): This species occurs
now all over the tropics and is considered a pantropical
species. It is difficult to decide, where it is native
and where it was introduced by man. The height is less
than Bambusa spinosa, and the culms have a thinner diameter
and thinner walls. Where it occurs, it is extensive1.y UtillBBd;
69

- Boho (Schizostachvum lumampao): This thinn-walled species
is widely distributed in lower hill forests and covers
extensives areas in the foothills of the Mountain Pro-
vinces in Luzon.
It is easily understood, that a properly managed bamboo
grove near a village would be of great value to the com-
munity. Larger bamboo plantations could be the basis of raw
material for a number of industries.
Propagation of bamboo is done by root cuttings or root suck-
ers, with some species also stem cuttings are successful.
Seed years occur only at long intervals, after which all the
bamboo over a wide area dies. If there is a seed year, this
opportunity for mass propagation should be utilized to raise
potted bamboo seedlings. For further information on bamboos
consult MCCLURE (1966).
4.5 Production of "minor" forest products.
The number of trees in the Philippines, which yield other
products than wood, is very vast. But here we want to deal
only with some species, which are cultivated
for their special products. These products are often termed
"minor" forest products.( although they can be very im-
portant for the local economy, and their value per unit of
area may in some cases even exceed the value of wood product- ion. Some examples for forest trees, which are cultivated
in the Philippines for other products than wood, include
- Para Rubber (Mevea brasiliensis). The largest commercial plantations in the Philippines are found in Mindanao and
Basilan Island. Commercial firms plant now only high yielding varieties, which have to be grafted. Their yield is several times higher than that of the wild tree.
- Cinchona spp. yield the alkaloids quinine, cinchonine and
quinidine. A bitter extract of the bark is also used for
the manufacture of tonic water. Cinchona species are
native to Peru and Ecuador and have since long been used for the cure of malaria, For cultivation they require a humid mountain climate.

A 225 hectare plantation was started already in 1929 near
Malaybalay in Bukidnon at an elevation of about 1500 meters,
known today as the Cinchona Reforestation Project.
- Lumbanq (Aleurites moluccana). The kernels yield the lang
oil, which is used to make paint, varnish, linoleum and wood
preservatives,
- Almaciqa (Aqathis philip~:!~~ensis,.syn. A. alba). A large tree
with broad needles belonging to the Araucariaceae. It pro-
duces a resin known as Manila Copal in the international
trade. The best quality copal comes from Palawan and Quezon
Province. Almaciga is widely distributed in the humid hill
forests of the Philippines, Artificial regeneration of this
species is mainly by wildlings, because the seeds have a very
short viability.
- Pili (Canarium ovatum). This tree yields two valuable pro-
ducts: the famous pili nut and the Manila elemi, a resin
used for the manufacture of varnish. The pili nut is a de-
licacy known especially from the Bicol Region, where the
tree is cultivated. Canarium ovatum belongs to the Burse-
raceae and attains a height of about 35 meters and a dia-
meter up to one meter.
- Buri Palm (Corypha elata). The largest of all Philippine
palms. It yields the buntal fiber used for the manufacture
of fine hats in Central Luzon. The fiber is extracted from
the petiole of the immature leaf. The sap is used to make
tuba, an alcoholic drink. The trunk contains starch, which
can be extracted. The leaves are used ext&sively for making baskets and mats, The buri palm occurs all over the Philip-
pines and is cultivated locally. After flowering the palm dies.
Besides these few examples of minor forest products given
above, there is also a vast number of edible fruit-bearing
species worth cultivating on favorable micro sites along
creeks within forest plantations and along trails. A coxnpre-
hensive annotated list of edible fruit-bearing tree species had been compiled by Prof. Jacalne (1960). Ruite gathered from plantation areas may improve the diet of the local po-
pulation and stimulate their interest in protecting the
plantation from fire.

4.6 Plantinq for erosion control.
For erosion control not only trees but also shrubs, grasses
and other plants, which can provide vegetative cover, can
be used. Very often the native flora of the project area
contains very useful species for erosion control, which
should be given a test, even if these species are considered
weeds and have never been propagated before. The require-
ments for suitable species are
- the species must be able to succeed on degraded sites,
- it should have a deep and wide spread root system,
- it should be able to improve the soil conditions by
producing plenty of litter, or should be able to fix
atmospheric nitrogen in symbiosis with nitrogen fixing
bacteria,
- for many methods of erosion control (brush covera, etc.) only species, which sprout from cuttings can be employed,
- the species must be able to withstand draught followed
sometimes by superabundance of water,
- a rapid development is desirable to achieve the protect-
ion quickly,
- the species should ga\z some economical returns like lumber, fuelwood, edible fruits or other useful
products.
Epecies, -which proved to be very aiii i&ie fw~ trlope stabiii-
zation in Mountain province, were Mexican sunflower (Helian-
thus sp.), Lantana (Lantana camara), and Japanese alder
(Alnus maritima). For lower elevations bamboos and legumes
like kakawati (Gliricidia sepium) and ipil-ipil (Leucaena
leucocephala) are recommended.
4.7 Protection and improvement of watersheds.
The main objective of most reforestation projects in the
Philippines so far is the establishment of protection for- estx,many of which have important functions in delicate
watershed areas.
72

Reforestation generally is the best way of conserving soil
and water in mountainous catchment areas. A forest cover
raises the water storage capacity of a watershed and mini-
mizes silting of reservoirs. The requirements for species
suitable for the -protection and improvement of degraded
watersheds are basicly the same as those listed for erosion
control. In most cases we shall find it difficult, if not
impossible, to select a species, which meets all the desir-
able requirements listed above, The best solution would
therefore generally be a mixture of several species (pre-
ferably by groups), which are complementary in their bene- ficial effects on the watershed.
It must be kept in mind, that only in special cases it is
justified to establish a forest with only protective func-
tions, which gives no direct economic returns. Under restrict-
ed utilization and special management also a forest in a
watershed can yield timber and other forest products.
Very few quantitative data exist on the effect on the hydro-
logical cycle of different tropical tree species: how much
rainfall they intercept, how much water they consume for their own transpiration, how they influence the water re- taining capacity of the soil. Species, which are deciduous
like teak, narra, Gmelina are likely to consume less water
for transpiration during the dry season than evergreen
species. This may be a point to be considered in low rain-
fall areas, where springs may dry up, if the watershed is
under evergreen forest.
4.8 Shelterbelts
The reduction of wind velocity on both sides of a shelter-
belt consisting of several lines of trees and shrubs can
result in decreased destruction on,homes, gardens and ag-
ricultural crops, and increases the yield from the protected fields. The value of a shelterbelt is the higher, the more
valuable the land or the crops it protects. In the typhoon
belt of the Philippines, where extreme wind velocities of
about 200 km-/h. are to be expected almost every year, Well
73

maintained shelterbelts would possibly reduce some of the
damages. It can be expected, that the loss of productive
area through the shelterbelts will be more than compen-
sated by their benefits.
The choice cf suitable species depends on what grows best
under the ecological conditions of the area. Within these
limitations desirable characteristics are (16):
- wind firmness,
- rapid developanent,
- ability to coppice,
- economic value,
In many tropical countries casuarinas and eucalypts es-
pecially Eucalyptus camaldulensis, have been successfully
planted for sheiterbelts. In the Philippines also legumes
like ipil-ipil and kakawati would be useful. Most effective
is a mixture of medium to tall trees in the center and small trees and shrubs on the outside of the belt, so that
the shelter belt assumes a triangular cross-section. As a
rule of thumb in planting a shelterbelt one uses l/3 seed-
lings of tall to medium trees and 2/3 shrubs and small
trees.
A main ahelterbelt should not have less than five rows of
trees or shrubs planted at a close spacing of about 1 by
1 meter. When the trees are grown up, and do not provide
protection in the lower sections any more, some trees may
be cut. After coppicing the full protection is re-estab-
lished. The trees cut can be used as fuelwood. If no coppice
can be obtained, overgrown shelterbelts must be underplanted.
A slightly permeable shelterbelt, which absorbs part of the wind energy, has proved to be more effective than a solid barrier, which only diverts the wind. The depth of the area
protected depends on the height of the trees. A noticible decrease of wind velocity can be felt on the lee as far as
15-20 times the tree height. Also on the windward side a
alight reduction of the wind velocity can be noticed a
8hort distance before the ahelterbelt.

Fig. 3: Reduction of wind velocity by a shelterbelt (After GANGULY and KAUL, 1969,.modified)
The interval between the shelterbelts where high wind velo-
cities are to be expected, should be about 100 meters, under
ordinary conditions about 200-300 meters.
4.9 Tree planting for beautification.
Foresters are responsible for about 50 percent of the
Philippine land surface. Consideration of amenity aspects is one of their duties, especially in the vicinity of towns and cities. iore and more foresters willingly or unwillingly
are getting engaged in beautification programmes, which have
become important public issues in some places. Often forest-
ers are asked for their expert advise to recommend suitable
species. A brief list of common ornamental trees and shrubs,
-which are quite robust and grow on a variety of climate and
soil conditions, are listed below:
a) Trees with briaht flowers
Bottle brush (Calistemon lanceolata), Banaba (Lagerstroemia speciosa), Dap-dap (Erythrina vsriegata), Fire tree (Delonix regia), African Tulip (Spathodea campanulata), Calachuchi (Plumeria acutifolia), Alibangbang (Bauhinia spp.) Jacaranda (Jacranda mimoseifoliaf, Pink and yellow flowering Cassias (C. fistula, C- specta- bilis, C. siamea),
b) Trees with beautiful foliaqe or needles
Norfolk pine (Araucaria excelsa) Japanese cypress (Cryptomeria japonica) Cupressus fragrans, C. lus$&anica,. Malaalmaciga(Podocarpus blknei) Igem (Podocarpus javanicus)

Arbor-vitae (Thuja orientalis), Pitogo (Cycas rumphii, C. circinalis), Silverdollar (Eucalyptus cinerea), Silky oak (Grevillea robusta), Agoho (Casuarina equisetifolia), Balete (Ficus spp.).
Palms
Buri palm (Corypha elata), Betelnut palm (Areca catechu), Pugahan (Caryota cumingii), MacArthur palm (Actinophloeus macarthuri) Dwarf coconut palm (Cocos nucifera), Tikal (Livistonia spp.), Royal palm (Roystonia elata),
c) Shrubs with briqht flowers or colorful foliaqe
Poinsettia (Euphorbia pulcherrima,), Gumamela (Hibiscus spp.), Yellcw bell (Solandra hartwegii), Cailiandra haematocephala Baston de San Jos&(Cordyline terminalis) Bougainvillea, several shades, Sampaguita (Jasminum sampac), Gardenia jasminoldes, Lantana (Lantana camara), and many others
For more species consult ORNAMENTAL PLANTS OF THE PHILIPPINES by :,L, STEINER,
Fig. 4S Beautification along a road wltn 4 tree ana 4 snrub species. l 4raucaria excelsa, OCupressus sp., QAgoho, OBottle brush APoiGettia, AYellow lantana,, AHibiscus, A Baston de san Jose
76

The arrangement of trees and shrubs has to follow the rules of
modern landscaping as an "expressive, harmonious, and refined
imitation of nature" (23). Emphasis is on group planting with irregular spacing within the groups.
The ground plan of groups or the relative position of the
individual trees and shrubs has to be varied as much as possible.
There may be single trees neighboring small groups of the same
species, but an intimate mixing of single trees and shrubs of different species has to be discouraged.
Symmetry and any quasi-symmetrical arrangements as well as
planting of straight lines especially along paths has to be
avoided as much as possible, because it looks unnatural and awkward.
If only a small space is available mainly shrubs and only a few
trees should be chosen.
77

Chapter 5:
MIXED AND PURE PLANTATIONS
Virgin forests in tropical countries are nearly always
composed of a heterogeneous mixture of a great number of
species. Pure natural stands are frequent in the cooler
regions of the northern hemisphere. In reforestation a
decision must be made frequently, whether a pure or a mixed
stand would be best suited for the site and the objective
of the plantation. Therefore we have to analyse the pros and contraa of mixed and pure plantations in some detail.
5.1 Arcuments in favor of mixed plantations
a) Mixed stands appear to be more natural, especially in
the tropics, where pure natural stands are rare.
b) A mixed stand is possibly more resistant against pests
and diseases. It is well accepted, that extensive pure
and even-aged stands can promote mass reproduction of
forest insects and infestation by fungus diseases.
c) Mixed stands are perhaps better able to make full use of the site, especially if the crown region consists of light
demanders and the lower strata of shade bearers. The same applies to the root zone, where shallow and deep rooted species can take up nutrients from different soil layers.
d) By a skillful group mixture the variations of the plan-
ting site can be better utilized, because for each of the
varying site conditions the proper species can be selected,
which is perhaps the strongest argument for mixed plan-
tations.

e) Where planting of trees has only protective functions a
mixe plantation with species complementary in some res-
pects may be more effective than a pure plantation. While
some species are deep rooted, others improve the soil by
plenty of litter, others may yield useful products. All
these benefits are indispensible in a protection forest,
but usually cannot be obtained from one species alone.
5.2 Arguments in favor of n u r e plantations
a) Pure stands are easier to handle from the technical and
silvicultural point of view. If in a mixed stand the components are not extremely well suited for each other,
without the constant interference by a skillful silvi-
culturist and proper thinning the more aggressive species
will eventually take over, and the final result will be a
pure or almost pure stand. To maintain an artificial mix-
ture up to maturity requires much silvicultural skill.
b) It will be of advantage for the logging operation, if
there is only one species, and the entire crop can be
harvested at the same time. The logging operation be-
comes very complicated, when different rotations have to be adopted for the components of the mixture, and felling
damages would be unavoidable.
c) If the plantation is established for the purpose of pulp-
wood production with a very short rotation, there would
be no point to start with a mixture.
d) Inspite of all biological arguments in favor of mixtures,
long term increment studies in Europe have shown clearly,
that mixtures generally do not produce more than pure stands (69).
Summing up the arguments in favor of mixed and pure plan-
tations we see, that the points in favor of mixed planta-
tions are more of a biological nature, while those for pure
stands consider more practical and economical aspects.
79

5.3 Tvpes of mixtures
Inspite of all arguments against mixtures there are many
cases, where a mixed plantation presents the best solution,
but is essential to adopt the right type of mixture. The
following possibilities exist:
a) Intimate or sinole tree mixture: Mixing by single trees
requires the greatest judgement in the selection of the
species for the mixture, In general, height growth must
be similar, if all the species are expected to get along
with each other. In practice this seldom works out well.
Distributing a number of species uniformly over the plan- ting area has to be strongly discouraged. The greater the
the number of species in a mixture, the greater is the
uncertainty of the ultimate result (64).
b) Mixina by lines: Establishment of a mixed plantation by
alternate lines of different species has generally the same disadvantage as single tree mixtures. It will also
lead to a struggle for survival of species with possibly
different growing characteristics, in which the weaker
will finally be eliminated by the more aggressive.
If one wants a line mixture to be maintained up to the
end of the rotation, it would be more advisable to mix
the species by several lines alternating, so that a
number of lines takes "group character".
c) Grout mixtures: In most instances even-aged mixtures are
best obtained by group mixtures. As a rule of thumb the
minimum diameter of the group area should be one tree
length (about 30 meters). On the upper side there is no
limit for the size of the "group" in the mixture, the
different species may even occupy a whole subcompartment
or compartment, and may take the character of separate stands. A skillful group mixture based on the ecological
requirements of its components is the best way to utilize the varying site conditions within the plantation area.
Technical problems arise generally in the supervision of
planting group mixtures. It is not sufficient to point
out the area for each species vaguely to the laborers,
80

but to have it demarcated temporarily by pegs or poles and to issue very clear instructions. The presence of a forest-
er or foreman during planting is necessary.
d) Block mixtures: This is a compromise combining some of the
advantages of a mixed with those of a pure stand. The blocks
have an area of one or several hectares, which is sufficient
to allow economic harvesting methods. Adjacent blocks can
have different species or a substantially different age.
Since many pests and diseases show a marked preference for
certain age phases, mixing different age phases by blocks
could possibly increase the pest resistance of the forest,
where mixing different species is not possible. Block mix-
ture should be considered in planning large pulpwood plan-
tations.
e) Mixture bv underplantinq: In this case light demanders are
underplanted with shade bearing species or species, which
require shade in their juvenile stages.
Examples: Benguet pine underplanted with dipterocarps (Malay-
balay Reforestation Project, Bukidnon, Mindanao), or pines
underplanted with Alnus maritima, which is a very compala-
table mixture. In areas where mahogany is heavily attacked
by the mahogany shoot bcrer (Hypsipyla robusta) a light over-
head shade would avoid the formation of long aapy terminal
shoots, which are of special attraction to the insect,
According to BEESON (1961) under a light canopy the attack
would be considerably less than in the open. Albizzia falcata,
which casts a very light shade, planted a few years ahead,
would probably be the best solution. The trees can be poi-
soned or girdled, when no longer- needed. Necessary thinnings
must always be carried out, before any underplanting
is undertaken.
f) Temporary mixtures: There are instances where a mixture is
intended only for a limited time as in the mixed taungya
plantations of teak and Leucaena leucocephala in East Java.
Here, teak is sown in alternate lines with Leucaena, which
is lopped every year before flowering to provide mulch rich
in nitrogen and to protect the bare soil from erosion.
81

When the teak plantations form a closed canopy, the Leucaena is
eventually shaded out. Generally the objective of a temporary
mixture is that the temporary component of the mixture serves
the better development of the more valuable species.
Chapter 6:
SPACING OF FOREST PLANTATIONS
There are great variations of spacing in forest plantations in
different parts of the world. Limba (Terminalia superba) in West Africa is often planted 8 by 8, or even 10 by 10 meters,
which means 100 to 156 trees per hectare. On the other extreme in Germany there used to be a spacing in pine and beech plan-
tations of 0.25 by 1.3 meters, which amounts to more than
30,000 seedlings per hectare.
In the Philippines r;lost species are planted at a spacing of
2 by 2 meters regardless the purpose of the plantation. But here we want to give now some more thought to this question.
82

6.1 Aspects to be considered in spacinq:
a) The site conditions: On good sites the seedlings can be
wider spaced than on poor sites, because of faster growth
they soon form a closed canopy and make full use of the
site potential. On the other hand, by planting at a wide spacing on an adverse site, the trees would take a long time to form a close canopy and to utilize the site fully.
b) The objective of the plantation: For the production of
good quality sawnwood, especially with coniferous species, one has the choice between close spacing to avoid the for-
mation of strong branches, or a wider spacing combined with artificial pruning. Which to adopt depends mainly on
economical conditions such as labor wages, demand for
poles, appreciation of better timber quality, etc.
In pulpwood plantations generally no thinning is carried
out, branchiness plays only a secondary role, planting
therefore is done at the final spacing.
If planting is for protective purposes, it will be es-
sential, that the plantation closes up as quickly as
possible, consequently spacing should be close. The same applies to fire breaks, which are planted close to shade out grasses quickly,
c) The urowinc characteristics of the species: Spacing should
be modified according to the growth rate, tendency to
branch and the ability to survive under field conditions. Species, which grow fast in their early stages can be
spaced much wider than slow growing species. Trees with a natural tendency to branch like narra (Pterocarpus in- dicus), should be planted closely, if timber of good
quality is wanted.
d) Market conditions: Where poles from thinnings can be sold
at a profit or at least at the cost of their removal,close . spacing has silvicultural advantages. If it is uncertain,
whether any thinning would be carried out at all, it would
be safer to plant at a wider spacing.
83

6.2 Recommended snacinq for some reforestation species:
pines 2x2
mahogany 2x2
teak, good sites 2x2
medium sites 1.5 x 1.5
Gmelina arborea
good sites 3x30r4x4
average sites 2by2 ipil-ipil 1x1
narra 1.5 x 1.5
Moluccan sau kaatoan bangkal
I
3x3or
other fast growing 4 by 4
on fertile sites
Eucalyptus, fast growing 3 x 3
Eucalyptus, others 2x2
mulberry (for sericulture) 0.5 x 2 m or 1 x 1 m
Snecial plantations
plantation in high grass 3 x 1.5 taungya plantations 3 x 1.5
enrichment planting 10 x 3 or 15 x 3
seed orchards 6x6
6.3 Swcing arrangements
Besides the aspect of "distance" between the plants we also
have to consider different spacing methods or spacing arrange- ments.
a) Suuare method of spacinq: This kind of spacing is most
common.
Fig. 5: Square method of spacing.

b) Cline plantinq:
0 A A A A 0
Fig. 6: Line planting or rectangular spacing method.
Planting is done in lines, where g is the distance within the
line and b between the lines. This method is applicable for
planting in high cogon or talahib, where the cost for strip brushing can be reduced by adopting a wider spacing between
the lines and a closer spacing within the lines, e.g. 3 by
1.5 meters.
Spacing between within Seedlings Running meters Rel. cost of lines lines per ha. to be "brushed" "brushing"
2.0 m. 2.0 m. 2500 5000 100 %
2.5 m. 1.6 m. 2500 4000 80 %
3.0 m. 1.5 m. 2222 3333 66 %
Table 3: Relation between spacing and relative cost of "brushing".
For planting on steep slopes every other line is started the
distance of a/2 to the right (or left) so that the formation
of straight lines running up and down the slope is avoided.
c) Euuilateral snacinq: This method is rarely employed in re-
forestation. Theoretically a possible advantage may be a better utilization of the crown space. Equilateral spacing
is useful for planting hedges of two or more rows.
Fig. 7: Equilateral spacing
85
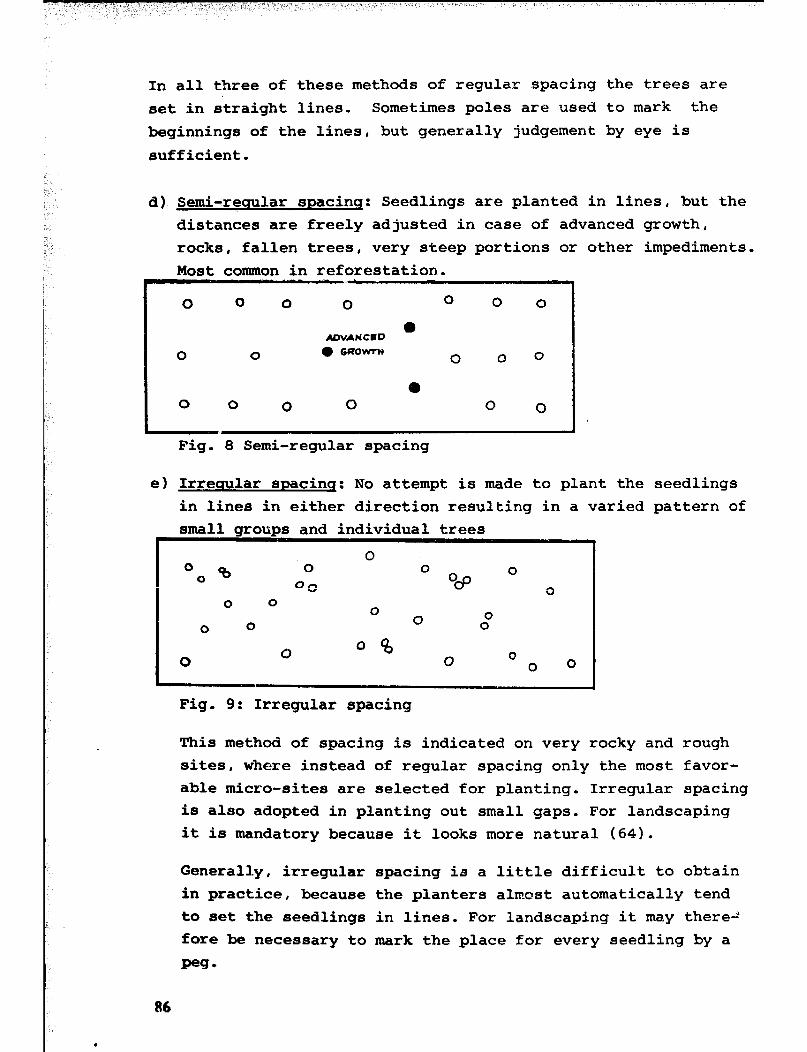
In all three of these methods of regular spacing the trees are
set in straight lines. Sometimes poles are used to mark the
beginnings of the lines, but generally judgement by eye is
sufficient.
d) Semi-reoular snacinq: Seedlings are planted in lines, but the
distances are freely adjusted in case of advanced growth,
rocks, fallen trees, very steep portions or other impediments.
Most common in reforestation.
0 0 0 0 0 0 0
a ADVANCED
0 0 @ 6-mx 0 00
0
0 0 0 0 0 0
Fig. 8 Semi-regular spacing
e) Irreuular soacinq: No attempt is made to plant the seedlings
in lines in either direction resulting in a varied pattern of
small groups and individual trees
0 0
0% 0
*2 OOoo O o 0 0
0 0 0 0 00
0 O 0 0 0 0 0 0
Fig. 9: Irregular spacing
This method of spacing is indicated on very rocky and rough
sites, where instead of regular spacing only the most favor-
able micro-sites are selected for planting. Irregular spacing
is also adopted in planting out small gaps. For landscaping
it is mandatory because it looks more natural (64).
Generally, irregular spacing is a little difficult to obtain
in practice, because the planters almost automatically tend
to set the seedlings in lines. For landscaping it may there-'
fore be necessary to mark the place for every seedling by a
peg.
86
.

7.1
The main disadvantages of irregular spacing are difficulties
in the organization and supervision, detecting and replanting
of failures.
Chapter 7:
SUPERVISION AND TIMING OF REFORESTATION WORK
Supervision.
For successful reforestation close supervision is essential.
Under the present system of short term rotation of labor em-
ployed in many projects not too much practical knowledge and
responsibility can be expected from most laborers. The forest-
ers and foremen in charge of a reforestation projsct are re-
quired to spend at least some time, if not the entire day
with their laborers in the field during planting to guarantee
efficient work. The foremen must watch, that
- the working hours are followed strictly,
- the appointed laborers are also doing their share in the field,
- proper planting techniques are employed and holes are made deep enough,
- hauling of seedlings can keep up with planting,
- correct spacing $8 maintained,
- the roots of bare root seedlings are not exposed to the open longer than necessary,
87

- useless plants are discarded, - the planting tools are in good working condition,
- no portion of the area is left out unless it is too steep or not suited otherwise,
- the rules for prevention of accidents are strictly followed.
The pakyaw system which means to allot a certain number of
seedlings to each laborer for a day telling him, that he can
go home when all are planted, has to be discouraged strongly. The results in most cases have been very disqppointing. The
success of planting depende too much on the quality of the
work, which would suffer in that case.
How to oraanize a plantinq team.
a) In ordinary field nlantinq the available labor force is to
be divided into foreman, plant hole diggers, planters, plant
haulers. Where very small seedlings are to be planted, hole
digging and planting is done in one operation by one man.
How many people are assigned to each particular task depends
on the local conditions. Where holes are easily dug more planters than diggers have to be assigned. On difficult sites
this ratio may be reversed.
In the mountains one foreman should not be given more than 12
men plus those assigned for hauling, because to supervise a
greater number of men effectively on steep slopes becomes too
difficult for one man alone to handle. On more or less level
sites this number can be increased to a maximum of about 18
to 20,
b) On a slone planting generally should follow the contours. To avoid accidents by falling rocks it should be arranged, that
the leadman starts digging the holes on the uppermost line,
the n&t follows on the lower line by always allowing the
upper man to be one planting hole ahead. The planters follow
the diggers in the same manner. With large number of laborers however, this arrangement requires a lot of discipline and is
hard to enforce in practice,
88

w SLOPE
< A 0 0 Q 0 0 0 0
< A 0 0 0 0 0 0
i A 0 0 0 0 0
4 A 0 0 0 0
1 SWPU
Fig. 10: Proper distribution of a small number of laborers on a slope.
cj On very steep slopes with many loose stones and boulders it
has been found safer and more practical to have all men work-
ing in one line proceeding from a contour trail directly up the slope. If no one is left behind, because he is working
much slower than the others, this arrangement would be much safer, especially when a large number of people is employed. Wearing of helmets must be made obligatory for everyone work-
ing on steep slopes. Planting will follow in the same manner after digging of holes has been completed on a particular
slope. For small seedlings digging and planting is done by the same-man,
I T T T T .T T T T AAAAAA AA 0 0 0 0 0 0 0 0 Sof=E 1 SWPli
Fig. 11: Distribution of a larger number of laborers on a steep slope with many loose stones and boulders.
d) In replanting and Plantinq on very difficult sites it is more
practical that planting is completed in one operation by the
same man (one man work unit): the same person carries the
container with the plants, digs the hole and sets the seed-
lings.
89

There is a general rule for everyone, who has to organize
workers: always assign as few men as possible to any par-
ticular task. The more people one assigns to a job, the less
will be the output per person. While some work, others will
be watching only or act as entertainers. There could also be
delays, because they are working dependent on each other. The maximum output per person one would get, if only one
person is assigned to a particular task, provided the nature
of the job does not require two or more, for instance, when
the load to be carried is too heavy for one man alone.
Generally three men will produce only a little more than two; if one assigns more, the output per person will generally
sharply decline.
For psychological reasons it is usually preferred to have at
least two persons working on a parti,xlar task, because most
laborers will willingly accept any job provided they have a
"c 0 m p a n i 0 n".
7.2 Timina of plantation work.
Another condition for successful plantations is proper timing.
A time schedule based on the local climate has to be divised,
which sets the date for starting and the deadline for com-
pleting each operation. This time schedule is usually drawn
up in form of a bar chart. It is essential that it serves not
only for decoration of the office, but is strictly followed
in the field. This implies, that all necessary preparations
for timely termination have to be made well in advance. The
key operations, which have to be carried out at the right time, are
a) Seed collection depending on ripening date,
b) Collection of top soil at the beginning of the dry season,
C) Orderina of supplies and equipment. if possible, 6 months
in advance,
d) Sowinq: When selecting the optimum date the basic consider-
ations are the time it takes to produce a plantable seedling
and the beginning of the planting season. If the time needed
90

to produce adequate seedlings is 8 months, and field planting
starts at the end of May and goes up to the end of August,
sowing has to be done during October, November,and December.
Seedlings sown later under these conditions will not have the
size for field planting for the next planting season, and are
already at the moment of sowing condemmed to be "left avers".
e) Site Preparations: Under clear felling systems, where burning of felling waste is attempted, burning has to be completed before the first rains.
f) Field nlantinq: The optimum time to start planting is when
enough rain has fallen to moisten the top 15 to 20 cm tho- roughly. According to WORMALD (1969a) it is safe to start
planting when the rainfall of a preceeding 7 days period
reaches 60 mm.
Failures in plantations can be very high, when planting is
done after the optimum planting time. If the seedlings get a
late start, their roots will not be able to reach layers, which retain sufficient moisture during the dry season. Fail-
ures because of planting too early are usually less common.
g) Weedinu and tendinq operations must be carried out before the
seedlings have suffered from suppression by weeds. If weeding
is delayed too much, the seedlings may not be able to survilrie a sudden exposure and die after weeding. If weeding is total- ly neglected, they will die from suppression, which takes a little longer, but is also certain.
h) Replacement of failures must 'be carried out at the optimum
planting time, i.e. the beginning of the rainy season, before the new plantations are started.
i) Construction of fire lines has to be carried out at the begin-
ning of the dry season.
For the termination of each of these operations a definite period
has to be fixed. Especially in plantilrg the proper timing has to be observed strictly. In Benguet Province the optimum time is May/June to August. The survival of September plantings is already very low and can drop according to experiments to mere 20 percent.
91

Chapter 8:
SITE PREPARATION FOR FIELD PLANTING
To classify the various methods of site preparation, we can
set up the following system:
1. Site preparation by c o m p 1 e t e removal of the
vegetation
a) by felling and burning,
b) by slashing only,
2. Site preparation by p a r t i a 1 removal of the
vegetation
a) by clearing of strips, b) by clearing of patches,
8.1 Site nrenaration by complete removal of the vegetation
a) bv felling and burninq: Site preparation by felling
and subsequent burning is practical in some cases to
replace overlogged foresf or secondary brush by plan- tations. All vegetation is cut and allowed to dry. It is burnt just before the first rains are expected.
Usually this method would be too expensive, if carried
out by daily paid labor. But the cost for clearing
can be avoided, if there are contractors available who
would clear the area free of charge in exchange far
being allowed to cultivate field crops there for two or three years. After the crops have been harvested,
trees can be planted (taungya system).
The main advantage of establishing a plantation on a
completely cleared and burnt site are a rapid develop-
92

ment of the plantation, because of little competition
from weeds and a good supply of plant nutrients through
the ashes. The weeding expenses are generally less than
in those methods, where the vegetation was only partially
cleared.
The disadvantage of this method will usually be the high
cost for clearing, if no taungya farmers are available
who do the job free.
Some foresters object to the use of fire for clearings,
but in this case the fire is employed as a silvicultural
tool, which is efficient and economical at the same time. After all, the area is only burnt once before the esta-
blishment of the plantation, which will not be repeated
on the same plot until the next rotation. Clearing and
burning fs used in many Asian countries, where teak and
other valuable species which are sensitive to weed com-
petition are planted to replace secondary brush and over-
logged forests.
b) Site prewration bv slashinq only, can give acceptable
results, where exploitation comes to an almost complete
utilization or where pure plantations are harvested. The
remaining herb and brush cover is slashed to keep it down
for the start of the plantation. This very simple and
cheap method of site preparation can only be employed,
where the natural herb and brush cover is very light, or
where extremely fast growing species are planted.
Under the conditions of the Philippine rain forest, where
weed growth is extremely fast, the following tree species may have a chance to compete with the weeds on a slashed
site: kaatoan bangkal, bagras, Moluccan sau, binuang, and
some others of fast growth, But a close watch has to be
given to the plantation, which means frequent weeding and
climber cutting.
8.2 Site Drewration by p a r t i a 1 removal of the veuetation
a) bv clearina of strips. !Phis is the standard procedure in
grassland planting, where the grass is more than 1 meter
93

94
high. Usually the cogon is cut on strips about 1 meter wide at I
intervals of 2 to 3 meters (from center to center). The plants
are set on small cultivated patches (about 40 by 40 cm), on
which all rhizomes have been removed.
q x BRUSHED I LINE
HGH GRASS
I BRUSHED
cl X CA IM. q X LINFi
I
El cultivated patches, about 30-40 cm. square, on which most of the cogon rhizoms should be removed.
Fig. 12: Line brushing and spacing in high grass.
When direct seeding in grassland is attempted, it is not enough
just to cut the grass, but to cultivate a strip 50 - 100 cm wide,
on which the seed can be sown. Where rotary tillers are avail-
able, this strip cultivation is done by machine.
Clearing strips of forest vegetation is practiced in so-called
"enrichment planting" 0r"line enrichmentll to introduce valuable
timber trees in degraded secondary brush or where natural re- generation has failed. Strips about 2-5 meters wide aTe cleared at intervals of 10 to 20 meters. In the remaining untouched por-
tion only those trees are poisoned or girdled which cast heavy
shade on the lines. The lines are planted with selected tall
seedlings of shade tolerant species of the dipterocarp family
or mahogany. For more information on this technique see Chapter 16.

b) Site Preparation by clearinq of patches. Clearing of patches instead of clearing lines in grassland can mean
a considerable saving of labor. But it has some disad- vantages. Where the grass is very tall the planters
will find it very hard to move from one plot to the next.
Also the supervision of the work will be greatly impeded,
the same applies to weeding and replanting of failures.
For these reasons, under the ordinary 2 by 2 meter spacing
the seedlings are planted on brushed strips. If for some reason a very wide spacing is adopted, for example 4 by
4 meters or more, then patch clearing would be indicated,
On sites, where the ground vegetation is below about 1 meter,
generally no clearing or site preparation before planting is
necessary. Here it is generally sufficient to uproot the grasses
around the seedling with the hoe when digging the planting hole.
95

Chapter 9:
GENERAL CONSIDERATIONS ON TREE PLANTING TECHNIQUES
In reforestation we have to compromise usually between very
elaborate methods, which may give a higher survival in the field, but are not economical, and cheap and crude methods,
which may result in poor survival. Our aim must always be
a successful plantation at lowest cost.
9.1 Quality and size of plantina stock.
One should only use carefully selected seedlings for field
planting. Plants which do not meet the requirements should
remain in the nursery for some more time or be discarded,
Among carefully culled seedlings there will be less failures.
Beating up failures always proves to be more expensive than
first planting. Usually it costs less to produce a seedling
in the nursery, than to plant it in the field, especially in
the mountains with long hauling distances on steep slopes.
It is waste of effort and funds to plant for example pines
of only 2 or 3 inches in heavy plastic containers. On
difficult sites taller plants with a well developed root
System show a better survival and require less weeding. They
may be slightly more expensive to produce and slightly more
expensive to plant, but are more economical in the long run.
However, it is not only the height that matters, but also the
top/root ratio and the stem diameter. Especially under a wide
spacing the quality of the planting stock is of utmost im- portance for the future development of the stand..
For more information on desirable quality of planting stock consult Part IV.
96

, 9.3 Depth of rooting horizon.
Benguet pine .......... 9 to 12 inches
Mindoro pine .......... 6 to 9 inches
Alnus maritima ........ 12 to 18 inches
Teak .................. 18 to 24 inches, cut back to 1 inch stump
Mahogany, bare root ... 30 to 40 inches
potted ...... 9 to 12 inches Narra, bare root ...... 30 to 40 inches
potted ...... 9 to 12 inches
Moluccan sau .......... 12 to 18 inches
Kaatoan bangkal ....... 12 to 18 inches Eucalypts ............. 12 to 18 inches Gmelina arborea ....... 18 to 24 inches
Table 4: Desirable height of planting stock (67).
9.2 Size of Planting holes.
The planting hole must be deep enough to allow the tap root
to hang down vertically without bending its tip. If the tap
root is too long, it would be better to shorten it a little than tc, bend it. Large plants suffer more from transplant shock than smaller ones and must be planted in a way that
their roots assume again their natural position, which means
digging a relatively large planting hole. For small seedlings
with a few and still flexible roots a small planting hole may
be sufficient. Although older seedlings are growing faster when planted in a large pit, economic considerations put a limit to the size of the planting hole (64). It must be realized, however, thAt a large planting hole with plenty of refilled soil helps root development, results in higher
initial growth, and greatly increases the survival rate es- pecially on dry sites (64).
The seedlings must be planted in a way that the roots can
reach soil layers, which retain sufficient moisture during the dry season and enable the plant to survive. This can be achieved by digging a deep planting hole and loosening
the soil at the bottom of the hole to facilitate root pene-
tration. Stones blocking the way into lower soil horizons
have to be removed.
97

The depth where sufficient moisture is available all the year
round depends not only on the climate, but also on the water
holding capacity of the soil, the soil cover, the exposure
and other factors.
9.4 Protection of roots during plantinq.
One should never expose the roots of bare root seedlings to
the open longer than necessary. For bare root planting this
is one of the most important planting rules, berhaps more
important than the plantinq technique itself. It has to be strictly avoided, that the roots and rootlets dry out during
careless transport, prolonged and faulty storage, and badly
organized and poorly supervised planting. Experiments have
clearly shown, that seedlings whose roots had been exposed
to the sun for only a few minutes can already be seriously
affected. When planting bare root seedlings the planter has to carry the seedlings in a container especially designed to
protect the roots, or he has to wrap them in wet cloth. One
should never assign a plant distributer as Lione with potted
seedlings.
9.5 Correct plantinq depth.
When coniferous seedlings are planted too deep, especially in heavy soil, early growth is slow and the plant
assumes a stunted appearance. The reason for this is the dor-
mancy or death of the old roots and the development of a new
root system just below the surface. Through the dead roots of
the old root system a fungus might enter, which can cause the
death of the tree years later (64).
However, it is recommended also for coniferous seedlings,
especially in light soil to give some allowances for the
soil to settle and for surface erosion around the seedlings
which almost always occurs during tropical rain showers.
Most broadleaved species can be planted considerably deeper
than their original position, which has the advantage, that
the root system will not be exposed, if some soil is washed
away by heavy rains,
98

a. Correct position of the root collar
Fig. 13: The effect 1962)
b. Seedling planted too deep
c. One or two years later: the old roots are dead, new roots developed
root
of deep planting (after TOUMEY &.XORSTIAN,
Chapter 10:
TREE PLANTING TECHNIQUES AND TOOLS
Classification of planting methods:
1, Planting of potted seedlings,
2, Planting of bare root seedlings,
a) Methods, in which the plant hole is made by removing
the soil from the hole and piling it up on the sides,
b) Methods, in which the hole is made by a thrust of a
planting bar or a notching spade,
c) Methods, in which the soil is only lifted without digging a hole,
d) Fully mechanized planting'with planting machines.
3. Stump planting.
10.1 Planting of potted seedlings.
Potted seedlings are raised in individual containers, which
usually have to be removed before planting. The containers
most in use are plastic bags, followed by boho pots, old
tin cans and veneer pots.
The use of containers is little practiced in temperate
countries, where mainly bare root planting stock is used in the field. All field planting in Central Europe for example is carried out during spring or autumn, when the
seedlings still or already are in a resting stage. All
broadleaved species are without leaves at this time, and
there are hardly any transpiration losses. The young
100

seedlings of most tropical timber trees do not have such an
absolute resting period. Therefore the best way to succeed in field planting for most species is by planting potted
stock.
a) Tools
- Plantinq hoes: Various types of planting hoes are in use. They vary in the shape, length and width of the blade, the length of the handle, and the angle by which the blade is attached to the blade. The most universal planting tocilof all the tools tested was the oval blade planting hoe (fig.
14a). It weighs about 1200 grams, the blade is reinforced
by a midrib. The oval blade is to be preferred to a blade with a straight edge, because it penetrates the soil more easily without being damaged. For rocky soil also a sturdy, narrow blade with a straight edge was found useful (fig.l4b),
but it proved to be unsuitable for grassland with a dense
mat of rhizoms.
a) Oval blade planting hoe suitable for most sites
b) Narrow blade c) Hoe with a broad planting hoe straight edge, for rocky sites unsuitable for
tree planting
Fig. 14: Types of planting hoes.
101

For the planting operation itself also
a light short handled planting hoe can
be employed similar to the Reissinger
model planting hoe used at the Train-
ing Center in Baguio. (fig. 15).
All planting hoes must be sharpened
from time to time with a file to keep
them in optimum working condition.
Fig. 15: Reissinger model planting hoe
- Motor Plant hole drillers. Most earth drillers are operated by a chainsaw motor. Therefore, where a chainsaw is avail- able, relatively small extra expenses are involved for the
purchase of the driller.
Two types are available:
Spiral drillers, ordinary type, deposits about 2/3 of the soil around the hole, sizes from 15 to 30 cm
diameter (fig. 16a),
Frame drillers, the soil is only loosened and mixed, but
remains in the drill hole, easier to hand-
le than a spiral driller.
a)
Fig. 16: Motor plant hole driller with chain- saw motor. a) spiral driller, b) frame driller.
102
An advantage of the motor drillers is the deep hole they
produce, which helps root development and root penetration
into greater depth and might increase the survival rate on
dry sites. Motor drillers are also useful for setting fence
posts.
A disadvantage is that their operation requires two men and
is somewhat tiring without achieving significantly more than
manual labor. The use of motor driller has its limitations
on rocky soils and steep slopes.
- German circular spades were found useful for planting on
loose forest soils without many stones. They are also suit-
able for lifting ear%h balled seedlings and wildlings.
The plantino technique: Just before planting, after the hole has been prepared, the seedling is removed from the container. Care is to be taken not to break up the earthball. Plastic bags can be easily torn open or cut with a small knife, after
the soil has been compacted slightliy by pressing it gently.
Also removing the boho cylinder generally does not require.
any tools, because at planting time it may be disintegrating
already. But when removing a seedling from a metal can with-
out proper slits, very often the earthball breaks into pieces and the whole effect of planting potted seedlings is gone.
When placing the earthball into the planting hole the upper
part of the ball should be level or slightly deeper, but
never higher than the surrounding soil surface. After planting,
the soil around the seedling is thoroughly tamped to fill all
air spaces between the ball and the sides of the planting hole
to avoid interruptions in the capillary system. Where rain- fall is critical, a light depression is formed around the tree
as a catchment to promote infiltration of rain water. Finally
some mulch is deposited around the seedling in form of grass
or litter to reduce evaporation and to avoid hardening of the
top layer.
The accomplishment for planting potted seedlings per man day
varies according to site condition and the size of the pots
103
between 100 and 150 seedlings per man, without considering
the time for hauling the seedlings to the planting site.
I c) Advantaqes and disadvantaqes of potted seedlinqs:
The main advantages are:
- potted seedlings have a higher chance of survival under
adverse conditions,
- the root system is only little disturbed in&the planting
operation,
- planting need not to follow transport of the seedlings im-
mediately, the seedlings can be stored for some time at the planting site, provided that they are kept under a light
shade and are watered.
The disadvantages compared to bare root planting are mainly W
the higher costs:
- for the purchase and preparation of the containers,
- for transportation and hauling, because a considerable
quantity of soil has to be transported,
- to secure good potting soil is a problem in some places and
involves additional cost.
10.2 Plantinq of bare root seedlinqs.
Bare root planting is done in the Philippines with more re-
sistant species on favorable sites. Species, that are common- ly planted bare root are narra, molave, kalantas, ipil-ipil, AXnus, Para rubber. There are some species, which are often planted potted, but on favorable sites survive well as bare
root seedlings such as Benguet pine (planted bare root on Mt.
Data) and mahogany. For bare root planting many different tools and methods have been developed. A number of the older methods were very elaborate and are not practiced any longer.
There is a tendency now towards more simplified and crude
methods to make tree planting more economical with only a slight sacrifice in the survival rate. Here only those me- thods will be described more in detail which can be applied
under Philippine conditions.
104

a) Plantinq, in which the plant hole is duq by removinq the soil
from the pit and pilinq it up on the sides.
This is the most common method for planting bare root seed-
lings in tropical countries. Usually planting hoes as des-
cribed above are used, but also motor plant hole drillers and
other implements can be employed.
Plant holes are dug at least 20 to 25 cm deep, the soil is
piled on the sides without scattering it too much. The plant-
er who follows the digger, carries enough seedlings for one line with him. The roots of the seedlings have to be covered with a moist cloth all the time. The plant is set with the help of a small planting hoe like the Reissinger Model used
in the Training Center. One can also use the hands to fill back the soil and sort out green grass and stones. Afterwards
the soil is tamped firmly with the heels or the back of the
planting hoe.
The daily accomplishment varies according to site conditions
and the size of th2 planting stock from 200 to 300 seedlings
per man.
The planting technique using the oval blade planting hoe in combination with the Reissinger hoe appears to be the most
universal planting technique for Philippine conditions. 90th
tools can be used for planting bare root and potted seedlings
on almost any type of soil.
b) Plantinq methods, in which the plantinq hole is made by a
thrust of a plantinq bar or a notching spade.
This group includes planting methods, in which the opening is
made by thrusting an iron bar or a heavy notching spade into
the ground pressing the soil to the sides and producing a
cone or wedge shaped hole. After the roots of the seedlings had been inserted to the required depth, the hole is closed
by a second thrust of the planting bar or with the help of a
small planting hoe.
- Plantina with planting bars. In many places, 6 to 7 feet long
planting bars with an iron or hardwood tipor made of solid
105

iron are still in use. It should be noted, that a stick for
planting (digging stick) was the first agricultural tool develop-
ed by mankind and was already used in the Neolithic Age. Under
special conditions this tool can be very effective and is still
widely used in many tropical countries.
The original form of a planting bar is a tool similar to a spear.
More developed forms have a T-handle and a foot rest to be able
to use the feet when pushing the planting bar into theground
(Fig. 17) (20).
The planting bar is thrust vertically into the soil and then
withdrawn. The seedling is inserted in the opening so that
the roots hang downwards. The tool is thrust into. the soil
again in a slanting position a few inches from the original
spot in a way, that the lower points of the openings come to-
gether. It is then moved forward firmly pressing the soil
against the roots of the seedling. If the planting bar is
not properly inserted for the second thrust, the lower part of the planting hole will remain open.
Planting bars Notching spade
Fig. 17: Planting bars and notching spades.
This method is useful for stumps and very small seedlings and
can be employed on light soils only.
106

- Planting with a notchinq spade. Tools of this kind were seen occasionally in the tool rooms of reforestation projects, but
they were obviously rarely used. Several types of notching spades have been designed to overcome the small openings made
by planting bars. Notching spades have a wedge shaped blade and have a weight of about 3000 grams. The spade is thrust
vertically into the soil opening a v-shaped cleft. After the
seedling had been inserted, the opening is closed with the foot or a second thrust of the notching spade a few inches
besides the first one. With notching spades slightly larger seedlings can be planted than with planting bars. On heavy
soils this method will generally be a total failure.
Under Philippine conditions the use of notching spades is not
recommended, because
- the soil is compacted at all sides of the openings, which
makes root penetration difficult,
- the roots are crowded together in a small hole or pressed
into in a single plane, sometimes the holes are so small,
that the roots may bend upwards,
- there are limitations on heavy soils and regarding the
size of seedlings,
- the use of notching spades is very tiring because of their
weight.
c) Plantinq methods, in which the soil is only lifted without
diqqinq a hole.
These methods for planting bare root seedlings have become
more and more popular with foresters in Europe, after it had
been realized, that even by relatively crude planting methods good results can be achieved, The two most widely used me- thods are:slit planting with the oval blade planting hoe and
L-slit planting with the axe-hoe.
Slit plantinq with the oval blade planting hoe. After the
vegetation had been cleared on a patch or strip the hoe i8 thrust to the full length of the blade into the soil. The
handle is moved upwards with a light pull to create an Opening
107

for the roots, then the handle is moved downwards to produce
the slit. The worker makes a step forward, until he is able
to look into the slit.
The plant is swung as deep as possible into the opening by
the left hand (while the right is pressing the handle down)
and pulled up, until the root collar is level with the soil
surface.
The seedling is kept in this position and the handle is
pivoted on the knee to move it out of the slit. Finally the
soil is carefully tamped with the foot (Fig- 18 a).
It is also possible, that two men work dependent on each other
(two men work unit): one is handling the hoe, t'he other carries
the container with the seedlings, sets the plants and tamps
the soil (Fig. 18 b). The achievement of the two men work
unit is sligh%ly less than that of one man working alone.
a: one man work unit, b: two men work unit Fig. 18: Slit planting with the oval blade planting hoe
(drawn after LOYCKE, 1963)
Slit planting with the oval blade planting hoe is considered
to be one of the fastest planting methods for bare root seed-
lings on suitable sites. Under favorable conditions a man' can plant 100 seedlings per hour. Trimming of the roots be- fore planting is very important. This method can be used for seedlings up to about 25 cm above root collar. The fact that
the plants are planted in a slanting position has no effect
on their survival, and they will straighten up very soon.

The method can only be recommended for loose soils and re-
latively small seedlings, and may not be suitable for refor- estation of wasteland and degraded grassland.
t-slit planting with the axe hoe. This is a further develop- ment of the ordinary slit planting technique to overcome the
narrow planting holes. A special hoe with an axe blade on top had been designed for this method. The plant hole is made
by one stroke of the axe followed by one of the hoe (47). In
Germany this method is considered to the most advanced and
economical planting method for bare root seedlings. Under Philippine conditions the value of this method, however,
appears to be doubtful, and therefore it is not described here
in detail.
3) Fully mechanized planting with plantinq machines.
Up to now fully mechanized planting has no application in the
Philippines and is mentioned here only to complete the list
of bare root planting techniques,
The machines developed for this purpose are generally drawn
by a tractor. A plough opens a furrow, into which the plants are set by a device, which regulltes the spacing. The only manual labor required is to feed the seedlings into this
spacing device. After the plants have been set, the furrow is closed by two plough blades or two wheels with tilted axles passing along both sides of the furrow pressing the soil
firmly against the roots of the seedling.
Planting machines can operate only on more or less level ground
with not too many impediments. A well known planting machine
is the FINNFORESTER, which under average conditions can plant
about 4,500 seedlings per day, under favorable conditions up to 12,000.
3 Stump Plantinq.
Planting of stumps is only known in tropical countries. With
some species a higher survival rate can be expected from stumps than from bare root seedlings (7). The main reason for the
109

success of stump planting is the reduction of transpiration
losses by removal of the shoot.
A stump is produced from a seediing 2 to 3 feet high. After
lifting the plant from the nursery bed the stem is cut 1 inch
above the root collar. Tap root and side roots are also short-
ened. The length of the stem portion retained has no effect on
the growth. With long stumps, however, there is a tendency to
produce more than one shoot. A diameter between 12 and 15 mm
is generally considered the optimum for teak stumps. For Gme-
lina arborea LAMB (1973) recommends 12 - 25 mm diameter at root
collar with one foot of the tap root and 3-5 cm of the shoot left.
When the stump is too thin, it has only little reserves and only
a short shoot is produced. All stump planting should be carried
out just before or right after the beginning of the rainy season,
so that the plants are well established, when the dry months start.
For planting stumps very crude planting techniques can be used,
and very often only a pointed stick or a planting bar is employed.
When planting with a hoe, the slit method is generally adequate.
On burnt over areas where no further site preparations are re-
quired a man can plant 100 stumps per hour. In grassland where the rhizoms have to be removed, the average achievement is only 30 to 35 stumps per hour without the time needed for strip brush-
ing.
The main advantages of stump planting are
- Reduction of transpiration losses, - Stumps are easy to transport,
- Storage for a week or so is possible without harm,
- They are cheap to plant, be employed,
because crude planting techniques can
- Stumps can already be planted just before the rainy season,
- For some species survival of stump planting is higher than bare root planting.
Species, that successfully can be planted by stumps include ac- cording to LETOURNEUX (1957) Tectona grandis, Gmelina arborea,
110

Lagerstroemia speciosa, Albizzia procera, Alstonia scholaris,
Cassia fistula, Cassia siamea, and others. In the Philippines only stump planting of teak and in a few projects of Gmelina
arborea is popular, but experiments are recommended for stump planting of other species.
Chapter 11:
PLANTING OF WILDLINGS
Planting of wildlings is practiced with species, which are dif- ficult to raise in nurseries, because their seeds have only a very short viability. Species often planted as wildlinga include almaciga (Agathis alba), and dipterocarpe as white lauan (Pentacme
contorta), bagtikan (Parashorea plicata), Mayapis (Shorea sguamata)
and others.
The following practice is recommended: the seedlings are lifted
with a ball of earth and potted on the spot in the forest. They are then kept in a temporary nursery under light shade for re-
covery for 3 to 6 months, before they are planted in the field.
Even with proper techniques the survival of dipterocarp wildlings
usually is not very high. There are casualties when the wild-
Pings are potted, and then later when they are planted in the field.
111

An overall survival of only 50 percent is not uncommon. From
experiences in Malaysia it appears, that younger wildlings show
a better survival rate than older ones. However, they should
not be potted before the cotyledons have fallen. The optimum
time for potting is when the first real pair of leaves has
fully developed. If the wildlings are too old, they will suffer
from the transplant shock and mortality will be very high after
potting.
Bagtikan (Parashorea plicata) White Lauan (Pentacme contorta)
Height of wildling Survival Height of wildling Survival
0 - 20 cm 88 % O- 20 cm 56 %
20 - 40 cm 74 % 20 - 40 cm 52 %
40 - 60 cm 74 % 40 - 60 cm 24 %
60 - 80 cm 66 % 60 - 80 cm 10 %
80 -190 cm 40 % 80 - 100 cm 2%
Tab. 5: The survival of directly transplanted dipterocarp wild- lings of different size classes. The plants were mud-puddled and stored for one week before planting (MAURICIO, 1957).
The wildlings should be transplanted to the field, before they
have reached a height of about 40 cm. If they are taller, the
rate of survival drops sharply as experiments with white lauan
and bagtikan have shown (50).
Planting of dipterocarp wildlings has justification in enrichment
plantings, where the following rotation may be based on natural
regeneration again. If planting of wildlings is considered on a large scale, it would be worthwhile to clear the ground vegeta- tion and do some soil working under selected mother trees, just
before the seed falls. In many cases the regeneration will spring up as dense as in a nursery seed bed. This method gave excellent results in Java for the regeneration of Aqathis loranthifolia.
112

Chapter 12:
DIRECT SEEDING
Direct seeding is the oldest method of artificial regeneration
and was practiced as early as the 14th century by the"fir sowers
of Nuremberg" (Bavaria), the first historical record of artifi- cial regeneration of forest trees. Later direct seeding had been more and more replaced by planting which for most species
gives better results. But there are still a number of species,
which are easily propagated by direct seeding because they
- produce plenty of seeds,
- grow fast in the early stages,
- have large seeds with plenty of reserves,
- produce a long tap root at an early age, - have seeds with a high germinative capacity, that can be main-
tained well under ordinary conditions.
Species, which have been successfully established in the Philip-
pines by direct seeding, include ipil-ipil, lumbang, bagilumbeng,
akleng-parang, casoi, teak and Cassia siamea.
Methods of direct seedinq:
- Sowing on cultivated patches 1 to 3 feet in diameter is ap-
plicable for larger seeds, which are sown at a wider spacing
e-g- lumbang, casoi.
- Sowing on cultivated strips 2 to 4 feet wide is usually prac-
ticed with finer seeds such as ipil-ipil, which are sown more
densely
- Broadcasting the seed without soil working gives good results
only under very favorable conditions (moist sites, loose Soil,
not too much ground vegetation). There is a possibility, that
113

. the seeds are already intercepted by the grasses and do not
even reach the ground.
- Broadcasting the seeds from planes can be successful only
under very favorable conditions.
Generally direct seeding gives acceptable results only, when
soil working was carried out to facilitate root penetration. It
is also important, that the seeds are covered with a soil layer
1 to 2 times the thickness of the seed and, if possible, with a
light mulch. To ensure establishment during the rainy season,
direct sowing must be carried out at the very beginning of the
rains, so that the seedlings are already strong enough to survive
the heavy monsoon rain later in the year. The success depends on
so many unforeseen factors, that it is strongly recommended to
conduct small scale experiments first before embarking in any
larger operation.
The quantity of seed needed can be estimated from the number of
viable seeds per pound, but ample allowance has to be given for
losses through birds, rodents and insects. In the Los Bafios area
7 to 8 gantas of ipil-ipil seed are sown per hectare (1 ganta = 3 liters).
There are some chemicals available to treat the seeds before sow-
ing to make the seed less attractive to rats and birds or even
poisonous like red lead powder (1 kg. red lead powder for 8 kg of seed).
To insure even distribution of seeds, the quantity of seeds for one line across the area must be measured in a tin can or similar
container as a guide.
Advantaqes of direct seedinq:
- For direct seeding no nurseries are required.
- Direct seeding is more flexible, it does not depend on the availability of nursery stock.
- The shock of transplanting is avoided.
- Species, which produce a long tap root at an early stage, are
generally difficult to transplant. Direct seeding is likely to
114

give better results in those cases.
- Due to a greater density in direct seeding (if successful),
the quality of the future timber stand may be better.
Disadvantaoes of direct seedinq:
- Sometimes the total costs of establishment are higher than
planting, because of higher weeding expenses. The initial
cost may be lower, but the total cost of establishment must include also weeding expenses, which in direct seeding can be very high.
- Poor survival of seedlings, if conditions are not very favorable, because they cannot be watered as in a nursery.
If the seedlings cannot reach soil layers, which keep suf-
ficient moisture during the dry season, an initial success
may turn into a complete failure.
- Many of the seeds and young seedlings become victims of
rodents, birds and insects, from which they could be protected
in the nursery.
- The success is very uncertain, because it depends on many unpredictable factors.
11s

Chapter 13:
REPLACEMENT OF FAILURES
Even with most careful pianting techniques there will always be a number of seedlings, which do not survive. Causes of death can be
- injuries from transport,
- unforeseen dry spell after planting,
- damage by insects or rodents,
- improper planting techniques, - suppression by weeds,
- poor quality of planting stock,
- trampling by livestock,
- effect of dry season.
Replanting or "beating up" such failures is always more expensive than first planting. The cost per seedling may double or triple. Therefore it is necessary to decide carefully, whether replanting
is required or not based on a small sampling check to estimate
the failure.
As a very crude guide for sampling it is suggested, that in areas
below 2 hectares every 5th line, and above 2 hectares every 10th
line is sampled, It is advisable to use two counting machines:
one marked "survival", the other "failure", If counting machines
are not available, the results can be recorded on tally sheets by dots and lines:
116

12 3 4 5 6 7 8 9 10 . . . . . .
Example: l l l * l * - L:C:IImEI
1.i ncI No- Survivors I Failures -a*.- -.--
2 I!ommm64:. 63 III 0 7 pPm$lfx1$1mla . . 4
12 9
17 Btnn$l&ara31: 55 m: 13 . 22 Blep$1$ImxI 58 m 10 27 HlzKEWImpP:: 64 :. 3
Total 376 + 47=423 d
47 x 100 = 11 % failure 423
Replacement will be necessary only, if the overall percentage of
failure is above 20 percent, but only where at least two succes-
sive seedlings have failed. If the overall rate of failure is
below 20 percent, replanting will be carried out only where the
failures are heavily concentrated (see tally sheet).
For replanting,the best available seedlings are selected and
planted at the beginning of the rainy season, at the optimum
planting time.
To avoid, that unnecessary time is spent in walking and search- ing,all operations of replanting are done by the same man (one
man work unit):
- detecting the failure, - digging a new planting hole,
- planting the seedling.
There may be need for more than one replanting on the same area during the first years of the plantation. But where after two
replanting operations the area still is not adequately stocked,
the planting procedures should be revised for improvements, or another species must be chosen for the site.
.

Chapter 14:
REFORESTATION OF ADVERSE SITES
The areas provided for reforestation generally are those
sites, which are not fit or not wanted or agriculture. For
obvious reasons the production of food is given priority
to forestry. Only in very rare cases the site offers ideal
conditions for tree planting. Most sites alloted for re- forestation are adverse in one or the other respect, which
may include:
- dry sites or adverse southern exposure
- rocky and shallow soils
- coastal sands
- swampy sites
- steep slopes
- high cogon or talahib
14.1 Dry sites and adverse southern exposure.
Difficult sites of this sort can be encountered in almost
every reforestation project in the Philippines. The most important rules for planting on a dry site are:
a) On dry sites potted plants generally give better results
than bare root seedlings. The pot size for dry sites should be as large as possible to provide a good start
for frhe seedling.
bj The planting stock should be of the best available quality,
that means that only seedlings of optimum size with a well
developed root system are to be planted, The root system
muat be able to reach layers, which retain sufficient
moisture during the dry season.
118

Chapter 14:
REFORESTATION OF ADVERSE SITES
The areas provided for reforestation generally are those
sites, which are not fit or not wanted or agriculture. For
obvious reasons the production of focd is given priority
to forestry. Only in very rare cases the site offers ideal
conditions for tree planti,.g. Most sites alloted for re-
fore*tGtion are adverse in oni?! or the other respect, which
xnq include:
- dry sites or adverse southern exposure
- rocky and shallow soils
- coastal sands
- swampy sites
- steep slopes
- high cogon or talahib
14.1 Dry sites and adverse southern exposure.
Difficult sites of this sort can be encountered in almost
every reforestation project in the Philippines. The most
important rules for planting on a dry site are:
a) On dry sites potted plants generally give better results than bare root seedlings- The pot size for dry sites
should be as large as possible to provide a good start
for-the seedling.
b) %e planting stock should be of the best available quality,
that means that only seedlings of optimum size with a well
developed root system are tr, be planted. The root system
must be able to reach layers, which retain sufficient
moisture during the dry season.
118

c) On dry sites it is very important, that a large and deep
planting hole is prepared with plenty of refilled soil to
stimulate the root development and facilitate root pene-
tration into deeper soil layers.
d) Where rainfall is scarce, it may be of advantage to form a
basin around the seedling to catch as much water as possible.
In humid areas the formation of such a basin might lead to
accumulation of water and cause the death of the seedling
for lack of oxygen at the roots.
e) On tall broadleaved species young sapy shoots and part of the foliage must be trimmed to reduce transpiration, until the
seedling is well established. Heavy transpiration losses
othe.rwise can lead to the death of the seedling.
f) Mulching with grass or leaves greatly reduces evaporation from the soil surface around the seedling and prevents harden-
ing of the surface soil.
g) In extreme cases delicate and newly planted seedlings are
shaded by fern fronds and branches to prevent heavy trans-
piration.
h) It is essential on dry sites that planting is carried out at
the beginning of the rainy season, which is the optimum plant-
ing time.
Sturdy seedling
Leaves and tlhoot trimmed
mulch deposit
potted seedling deep planting hole
complete fertilizer
loose soil at the bottom
Fig. 19: Planting technique for dry sites.
119
I

-- B ii Application of a table spoon of complete fertilizer contain-
ing nitrogen, phosphorus and potassium has a very positive
effect on the development and the draught resistance of the
seedling.
14.2 Rockv sites.
Very often the nature of the site is the result of erosion.
Sometimes only the topsoil is washed away, sometimes the
subsoil has gone too, leaving an almost bare rock behind.
Some soi? .night still remain in the cracks between the
boulders. The possibilities for planting depend very much
on 'the nature of the underlying rock, the exposure, the
gradient and the climate, Some sites appearing impossible
at the first glance, may have some cracks and soil pockets
able to support trees. Very often the site appears more rocky than it really is because of the many stones accu-
mulated on the surface after the soil has been washed away.
Only by local experience it can be judged, whether the site
would be able to support trees (15).
Where subsoil is left, contour trenching may be helpful in
reducing run-off and increasing infiltration of rain water.
Instead of regular spacing the seedlings are set on the best
available spots. When the plant hole is refilled all stones
must be sorted out. On an extremely degraded site applica-
tiori'of a table spoon of complete fertilizer would provide
a good start for the seedlings.
14.3 Coastal sands.
There are very few species, which can be considered for planting on coastal sands. The most suitable species seem to be agoho (Casuarina eguisetifolia), talisai (Terminalia
catappa),aroma (Acacia farnesiana) and the rather slow grow-
ing bitaog (Calophyllum inophyllum). Only tall plants at
least 50 cm high should be used. They are planted in large
and deep planting holes with some good soil as refill. Around
the tree a deep basin has to be formed to catch as much rain
water as possible. It is important, that planting is done
120

right at the beginning of the rainy season. Where i*, is possible3 a weekly watering of about 5 liters per plant
during the first dry season would greatly increase the
survival of the seedlings on coastal sands.
14.4 Swampy sites.
Planting is done on mounds or ridges to minimize the period
during which the seedlings are submerged during floods and
to improve the aeration of the root system. Species to be considered for swampy sites are banaba (Lagerstroemia
speciosa) and Eucalyptus robusta (Austr. "Swamp mahogany"), 1 and Casuarina glauca.
Fig. 20: Planting on a swampy site
The most favorable planting time for very wet and swampy
sites which are submerged during the rainy season would
be the end of the rains, so that the seedlings are well established before the next wet season starts.
14.5 Steep slopes.
On steep slopes a small horizontal platform has to be pre- pared where the planting hole will be dug (see fig. 23,
'!POW) .
121

\
Fig. 21: Planting on a steep slope
In. extreme cases safety ropes have to be used, which are
tied around the waist of the planters. To avoid accidents
from falling stones, the laborers should not be allowed to
work one below the other and wear helmets. The one working
above must be always one planting hole ahead (See also
chapter on supervision and organization).
14.6 Plantina in hiqh grass.
Where the grass cover does not reach more than two or three
feet, planting is not very difficult. In high grass the
seedlings are usually planted on. cleared strips. For each individual plant a small patch of &out 50 cm in diameter
is hoed and as many rhizomes as possible are removed before
planting. The succ~zss of the plantation depends to a high
degree on subsequent weedings.
TO reduce the weeding expenses on cogon land, only tall
plants should be used. The application of complete ferti-
lizer (one table spoon per seedling) would not add too much
to the cost of the plantation, but helps to overcome the
weed competition.
To save costs for line cutting, it is recommended to adopt
a wider spacing between the lines than within the lines.
BARNARD (1956) even recommends :>pacing between the lines double the distance within the lines. A 1.5 x 3.0 m spacing
would amount to 2222 seedlings per hectare as compared to
2500 seedlings under 2 x2 m spacing.
122

Chapter 15:
TABNGYA PLANTATIONS, A POSSIBLE SOLUTION OF THE KAINGIN PROBLEM
15.1 Forms of the taunqya system.
The word "taungya" originally in Burmese means "field in the hills" or in Philippine language a kaingin, When BRANDIS, a German botanist and forester employed in the
Indian Forest Service, saw the vast Imperata areas created by the hill tribes in Burma through shifting cultivation,
he started a scheme to turn them into teak plantations. The
tribal people were given a piece of land and were allowed
to clear and to cultivate it for two years. The only con- dition was, that before abandoning the plot they had to plant it with teak stumps provided by the Forest Department
(35).
This was about 100 years ago. The original form of tzungya
has been improved and the term taungya is now known arl over
the tropics as a combination of agriculture and fores,try.
The principles of taungya farming are SC.11 the same as a century ago, when it started in Burma. A certain area, generally situated in a forest reserve, is a3loted to indi-
vidual families. The farmers are allowed to cut, burn and
cultivate the land under the limitations stipulated in the
taungya agreement. The trees are planted either in the first or second year or after all agricultural crops hatie
been harvested. Important is that the trees are planted
before the area has turned into grassland. In plaoes of acute
land shortage, the farmers may even accept to weed the plan-
tation during the first year.
123

Today taungya is widespread in Africa, India and some count-
ries in Southeast Asia. In the Philippines a modification
of taungya on a voluntary basis is practiced at the tree farming projects of the PAPER INDUSTRIES CORPORATION OF THE
PHILIPPINES (PICOP) at Bislig, Mindanao. Farmers who have
titled land of atxst 10 hectares within 100 kilometers
of the paper mill can participate in the project. "The
scheme,is to devote 20 % of the farmers, total landholding
to food and livestuck production and the remaining 80% to
fast growing, shortrotation pulpwood trees. Intercrop-
ping of food crops between the newly planted trees can also
be done to provide supplemental food or cash income" (PICOP
information pamphlet 1974). The paper mill with a daily
capacity of 430 t guaranties to buy all the pulpwood at
prevailing market prices. The Development Bank of the
fiilippines is granting loans of F lOOO.- per hectare for
the development of the free farms. The main species planted
SO far is Albizzia falcata, managed under an 8 years rotation.
The seedlings are provided by the company at a cost of PO.10
at nursery site or P 0.15 at plantation site, and have to be
paid for when the first pulpwood is sold.
Another special form of taungya is reported from the Zam-
bales Mountains, where according to Director JOSE VIADO the
Aetas are allowed to clear and cultivate a patch of forest
under the condition, that they plant it afterwards with
Lumbang (Aleurites moluccana). The BUREAU OF FOREST DEVELOP-
MENT guaranties the Aetas to buy all the Lumbang nuts they
harvest from their I'ownO@ trees. For this reason it is also
within the interest of the Aetas to protect the stands.
15.2 -_Conditions for successful taunuva
a) Land shortage. There has to be a certain land hunger,
only then the farmers will accept the limitations imposed
on their usual kaingin practice by the taungya agreement.
In very densely populated areas the forest authorities
have a very strong position , and the farmers may be will-
ing in addition to planting and tending the trees to pay
124

a certain amount for the use of the land. In other parts the forest department may have to pay a substantial pre-
mium for a successful plantation to stimulate the farmers
interest in the trees. In very thinly populated areas it may be impossible to find taungya farmers at all.
b) Legal basis. The second condition for successful taungya
is a suitable legal basis. It is quite possible -and has happened often before- that a group of people had been given an area for clearing and cultivation under a taungya
agreement, and later refused to abandon the land claim- ing it as their own. They may find the help of a local politician to support their case. It is essential there- fore that any taungya agreement is based on a w r i t- ten contract. Even then there is the danger, that land, which has proved to be suitable for agriculture, *#ill be claimed as "alienable and dfsposible".
15.3 The tacnqva acfreement
The following items among others have to be reglemented in a taungya contract:
a) Duration of the agricultural period. Under normal condi-
tions this period should not be extended beyond t3o years.
Otherwise the soil will be depleted of plant nutrients
too much and the growth of the trees will be retarded.
In drier areas, where the soil is not so,heavily leached, three years may be permissible, if the farmers refuse to sign for two years only. Farmers, who are used to cul- tivate the soil until it is completely exhausted, often
would refuse to abandon the area after two years, if this
was not fixed in the contract.
b) Plantino and treatment of the trees has to be reglemented in detail in the agreement, because naturally the farmers have not the least interest in a successful tree planta- tion. They might even cut back the trees where they in-
terfere with their crops. It has to be decided, if the
trees are to be planted in the first or second year, or
125
I
or after the field crops have been harvested. Also the
spacing of the seedlings has to be subject of the contract,
and weeding during the first year.
c) The kind of field croE the farmer is allowed to cultivate has
to be made part of the contract. If the trees are planted
together with the field crops, those crops which because of
their size would suppress the seedlings as sugar cane, maize or cassava have to be limited or forbidden. A limitation
would be, if a certain distance between the rows or indivi-
dual plants is prescribed. There are also crops, which might
promote diseases of the trees. It had been observed, that
pines planted on old fields, where root crops like cassava
had been cultivated before, suffered severely from heart rot.
d) The size of the lot for each family has to be settled, which
depends also on how far the farmers have other sources of in-
come. According to several investigations in normal kaingin
practice the area cultivated annualiy is only 0.2 to 0.3 hec-
tares per head. A family of five cultivated only an average
of 1.0 to 1.5 hectares, as long as only subsistence farming
is practiced. Since only manual labor is employed in kaingin
making, the area th+ farmer can cope with has a definite limit.
3n steep slopes 0.3 hectares may be the absolute maximum,
while under very favorable conditions the farmer may be able
to manage 0.5 hectares. In planning a taungya project 0.3
hectares per working person may be a safe figure to start with.
e) Reslementation of fees, premiums and penalties. To avoid, that
any feeling of ownership develops, it is desirable, that the
farmer pays at least a nominal fee for the utilization of the
land. But there may be also cases, where the forester has to pay the farmer for planting the trees.
Very important is a premium for a successful plantation to
Btimulate the farmers interest in the trees. Also penalties
for bad planting or damaging the trees on purposes have to be
made part of the contract.. The hardest penalty would be the
exclusion of the farmer from any future taungya planting.
126

For the utilization of fuelwood in connection with
taungya it is advisable to ask the farmer to pay a
nominal fee to avoid that forest rights would develop.
15.4 Some common aqricultural crops suitable for taunqya plantinq (35).
a) Upland rice is a typical crop of the Asian kainginero.
In contrast to the irrigated or wet rice it is cultivated
in kaingins, and is the staple parts of the Philippines.
crop in the less developed Upland rice is grown for example
by the Mangyans of Mindoro, the Ilongots of Nusva Vizcaya or some hill tribes of Mindanao. Both, t';le wet and the dry rice, are varieties of Oryza sativa. The yield of upland rice is much less than what is obtained from the
varieties grown in irrigated fields.
Upland rice is more demanding regarding the soil fer- tility than corn or cassava. Therefore a fresh kaingin gives only about two consecutive harvests of rice, then
it must be abandoned or planted with a less demanding
crop like cassava or camote.
For taungya planting upland rice is very suitable, becau8e
it does not reach the height of most other crops.
b) Maize or corn is a crop cultivated already in ancient
times by Central American Indians. Numerous breeds of maize are now cultivated all over the tropics and sub-
tropics, and the southern part of the temperate zone. Because of its size, planting of maize has to be restricted
in taungya plantations, wherever it is planted together with the tree seedlings. A distance of at least 1.5 meters from the seedlings is to be maintained which means that
the lines of maize must be at a minimum 3 meters apart.
cl Camote or sweet potatoe (Ipomoea batatas) lean be cultivqbjd from moderate altitudes onwards up to 1500 meters or higher.
Propagation is by cuttings, which are planted during moi8t
weather conditions. The tubers mature after 4-5 months, when the leaves turn yellow.

Camote is suitable for taungya planting provided care is taken,
that the creepers do not suppress the seedlings.
d) Cassava (Manihot utilissima) is a member of the Euphorbiaceae
and had been intr&:ced from South America, where more than
hundred varieties of this species are cultivated. Sc,ne of
these varieties contain prussic acid, which has to be removed
by washing the pulp before preparation of the cassava meal.
The non-poisonous varieties can be prepared the same as camote.
Propagation of cas8ava is by stem cuttings. Also in exception-
ally dry years it gives adequate yield and is aWe to grow on
very poor soils, which have been depleted of plant nutrients
by previous cultivation. The experienced kainginero therefore
plants cassava at the end of the agricultural period, while
during the first and second year more demanding crops like up-
land rice or maize Bre planted.
The tubers mature 6-12 months after planting according to
variety and can remain in the field for some years to form a
reserve for times of starvation. In spite of the many ad-
vantages for the farmer, there are some objections against the
use of cassava in taungya plantations:
- eassava grows very fast and may suppress the seedlings,
- it deplete8 the soil of nutrients more than any other crop,
- the tubers are loosely arranged around the stems, digging
them up might destroy the seedlings,
- it wad observed, that caeaava will promote the attack of
heart rot (Fames annosus), if aseociated with conifers.
The disadvantages can be minimized, if some restrictions in
the taungya contract limit plantins of cassava. For example:
prescribing a late time for planting (second year) and allow only a wide epacing (3 meters) or restricting it to the outer
border of the plot only. By planting fast growing tree species
like Gmelina arborea suppression of the seedlings can be avoided.
e) Gabi or Taro (Colocasia eeculenta) is a herbacious plant with
large arr$w ahaped leaves belonging to the family of Araceae.
'pbia plant is coxauonly cultivated all over South East Asia.
128

As the hygromosphic habit already suggests, gabi requires moist site conditions. The plant is shade tolerant and can grow under a canopy of trees. If not planted too dense, it may be a suitable taungya crop. At a leter stage it may even benefit from the shade of the trees.
There are many more crops suitable for taucgy? planting. What restricts their use is mainly their size and dense foliage by which the plants suppress the tree seedlings.
15.5 Plannina and oraanization of taunqva projects.
Taungya on a large scale requires very careful planning, because the forester-in-charge carries a great deal of responsibility for the well-being of the families concerned. It is advisable to start at a small scale with some selected and reliable farmers from the casual labor force, who usual- ly are kaingineros anyhow. There must be field staff avail- able with sufficient authority to control the limitations imposed by the taungya agreement. The field staff is also responsible for the distribution of the plots for each in- dividual family and the denaarkation of boundaries. Complaints will generally arise from those farmers, who get less favor- able sites, It is therefore necessary to study the area carefully before making the subdivision. After enough local experience had been obtained with a few farmers, the project can be expanded.
According to FAO (Technical Report No. 9, 1971) in the
Philippines 80,000 hectares of forest land are destroyed by kaingin annually which involves about 120,000 families. If only a portion of these farmers can be engaged in a taungya agreement, the area reforested annually could be increased significantly.

Chapter 16:
IMPROVEMENT OF OVERLOGGED AREAS BY ENRICHMENT PLANTING
Enrichment planting means the introduction of valuable
species in forest areas, where economical species are lack-
ing, The long term goal of enrichment planting often is to improve the species composition in a way, that natural re-
generation methods can be adopted in the next rotation. The
methods of enrichment planting had been eveloped by French
foresters (1.4) and are extensively practiced in the former
French overseas territories in West Africa and Indochina.
Areas to be considered for enrichment planting include:
- Overloaqed areas, where seedbearers as well as rsgenera- tion of economicai species are absent or inadequate. If
regeneration is sufficient or not has to be determined
by diagnostic sampling methods.
- Secondary forest after shifting cultivation, where there
is usually only a low proportion of desirables in the
earlier stages of the succession.
- Areas naturally poor in desirable species, but with a
potential for valuable timber trees.
16.1 Methods of enrichment plantinq
The common form of enrichment practiced today is line enrich-
ment. Enrichment by irregularly spaced groups had been aban-
doned because of difficulties in control and retracing the
groups fcr tending operations.
When conducting enrichment planting over extensive tracts of
rain forest, not always an experienced forester can be on the
130

spot. It is essential therefore to issue clear and simple instructions to the workers, which can be followed mechani- cally.
Several modifications of line enrichment had been carried out with success (16) of which only two will.be discussed below.
Line enrichmen? with shade tolerant species.
At intervals of lo-20 meters strips 2 meters wide are cleared of all vegetation. Larger trees on these strips are poisoned with sodium arsenite or a hormon arboricide (2,4,5-T). All desirablesare spared. For most favorable light conditions it is recommended, that the lines run in East-Wejt direction.
On both sides of the 2 meter strip the lower stratum, which includes trees up to about 15 meters, is felled by chains-tw or poisoned in a zone 5 meters wide. In the middle stratum (trees of 15 to 25 m approximately) only occasionally a tree with excsptionally dense foliage is poisoned or girdled.
If a distance of 20 meters between the lines (from center to center) is adopted, there still remains a zone of 8 meters of untouched forest inbetween. For more intensive enrichment it can be considered to reduce the distance between the line8 to 15 or even 10 meters, so that the untouched 8 m zone in the center wili be omitted,
completely cleared up to 15 m cleared
* Fig. 22: Line enrichment with shade tolerant species.
131

Planting is done on lines at a spacing of 3 to 5 meters according to species and size of planting stock. This amounts
20 1oc - 165 plants per hectare.
this modification of line enrichment is recommended to be
tried with dipterocarps, which require partial shade during
their early stages. The high shade provided by the taller
trees in the 5 meters zone on both sides of the lines will
also help to reduce the growth of the weed species and climbezs.
b) Line enrichment with liqht demanding species.
For the light demanding species of the Meliaceae family like
mahogany the first method would not provide enough light,
and CATINOT (1365) suggests the following modification:
All vegetation is cleared on lines 5 meters wide at intervals
of 20 meters from center to center, In the remaining zone
between the lines all trees higher than 15 meters (which
roughly corresponds to a dbh of 15 cm) are cut, girdled or
poisoned, except the desirables.
While in the first method mainly the understorey is removed,
in the second modification more light is obtained by removing
the higher trees. For more intensive enrichment the distance between the lines can be reduced to 10 m.
TREES HWiCR THAN I3 m.
REMOVAL OF ALL
TRL'E~ filetim THAN Id m.
COMPLETELY COMPLE TEL-f CLEARPXJ CLEARED
Fig- 23: Line enrichment with light demanding species.
132

16.2 Plantinq stock and suitable species.
A species, which has already proved its value in enrichment
planting, is mahogany (Swietenia macrophylla). Since it is also one of the most succesrrul reforestation species in
the Philippines, it should be given preference where the
shoot borer permits its cultivation (FAO, 1970).
The dipterocarps are more problematic, because of the short
viability of their seed and sometimes poor survival, when
transplanted. With improved techniques these difficulties
may be overcome. Successful line enrichment with diptero- carps on an experimental scale can be seen in the concession
area of the Bislig Bay Lumber Company in Mindanao. Of the large number of dipterocarps only the faster growing species
like Bagtikan (Parashorea‘plicata), White Lauan (Pentacme
contorta), Apitong (Dipterocarpus grandiflorus), Mayapis (Shorea squamata) and others are recommended.
Because of the small number of plants, these must be of the
best quality available, balled or potted. Saplings or strip- lings have an advantage over the weeds because of their size.
But tall balled wildlings taken directly from the forest
generally suffer too much from the transplant shock and
generally show poor survival rates.
The best method is to collect the dipterocarp wildlings with
a small ball of soil right after the first true pair of
leaves has developed. They are potted and then kept in a nursery under partial shade, until they have reached planting size.
Since the number of plants is only 100 to 165 per hectare,
it would add very little to the costs to apply some complete
fertilizer (12/24/12 or 14/14/14) by mixing it with the soil
of the planting hole. A small quantity of 20 to 30 grams.
per tree according to size would have a great effect on the
initial growth and enable the seedlings to cope better with
the rapidly developing weed species. From observations it
appears, that fertilizer application also would enable the
trees to put on good growth, even if the light conditions
are not very favorable.
133

16.3 Tending operations.
The most decisive factor for the success of line enrichment
are the tending operations during the first 5 or 6 years:
- weed control, especially during the first two years, - poison girdling of all undesirable trees overtopping the
lines, especially when the seedlings become older and more light demanding,
- systematic cutting and poisoning of undesirable secondar\? vegetation on the lines,
- climber cutting whenever necessary.
It is absolutely essential, that the required funds for these tending operations are guaranteedat the time of planting,
otherwise the funds spent for the establishment are spent in
vain, Here lies one of the most common reasons for the fail-
ure of enrichment planting.
For the removal of undesirable tree growth the use of chem-
icals is now a well established procedure in tropical sil-
viculture (28,701. There is the choice between the very poisonous, but highly effective and cheap sodium arsenite and the non-toxic hormon based weed killer 2,4,5-T (For
more information on arboricides consult Chapter 18.3).
16.4 The cost of line enrichment.
The cost of line enrichment for a 20 meter spacing between the
lines can be estimated as follows (CATINOT, 1965, modified):
1. Year: Selection of area, marking of blocks man days/ha and lines, 2 Clearing of lines, poisoning of trees between lines, 11 digging of planting holes 3 production of planting stock 5 planting and replanting, incl. transport of planting stock 4 weeding 2
2. Year: Weed control, climber cutting, further poisoning 3
3, Year: 4to - - 3 4. Year: -dto.- 3 5. Year: -dto.- 3 6. Year: -dto.- 3
Total 42
134

In addition about 5 lbs wr^ sodium arsenite (about-50 cen-
tavos per lb ) and some fertilizer are needed, the value
of which will hardly exceed P 15 per hectare. This sums up to roughly 1435 per hect.r.rc (based on a daily wage of
P 10) including the cost of the seedlings and the main-
tenance during the first 6 years. About 2/3 of this amount are needed during the first year.
16.5 Advantages and disadvantaqes of line enrichment.
a) Enrichment planting offers a possibility to bring un-
productive forest areas into production again, and pro-
vides a chance for natural regenerkition in the following
rotations.
b) Enrichment planting ,?r=ivides an opportunity for re-intro-
duction of valuable dipterocarps, which cannot grow in
the open in their early stages.
c) In line enrichment with mahogany there is often less
shoot borer attack than in open plantations (40). The possible explanation is that through side and partial
overhead shade the formation of long sapy shoots is
avoided, which make the tree attractive for the insect.
It is also possible, that the forest environment has a positive effect on the life cycles of the natural enemies
of the shoot borer.
The main difficulty in enrichment planting generally is to
prevent the lines from closing up from the sides and to keep
climbers and pioneer vegetation down. Assistance has to be given sometimes several times a year up the age of 6 years.
Considering the success of line enrichment in other tropical
countries it would be definitely worthwhile to give it a
wide scale trial in the overlogged areas of the Philippine rain forest.
135

Chapter 17:
,SOME PRACTICAL GUIDELINES FOR FERTILIZER APPLICATION IN
_YOUNG PLANTATIONS‘
Numerous experiments carried out in temperate and tropical
countries have shown, that a considerable increase of height
growth and volume production can be obtained through ferti-
lizer application. A significant effect can already be achieved by relatively small quantities applied in the pro-
per way.
17.1 The role of the main plant nutrients and their sources.
a) Nitrosen (N): Because the atmospheric nitrogen cannot be
used directly by higher plants, the available N comes
mainly from the following sources:
- Mineralization of humus,
- Nitrogen conveyed by rain and thunderstorms,
- Nitrogen-fixing bacteria living in the root nodules
of some trees.
Since humus is very unstable under tropical conditions,
nitrogen is in short supply in most tropical soils.
Nitrogen is an important element in nucleic acids,- chlo-
rophyll and proteins, and so determines the production of vegetative matter, including leaves, needles and wood.
b) Phosphorus (Pl: Though the total phosphorus content of
organic and anorganic compounds in the soil is usually
relatively high, the quantity of dissolved phosphate-ions
136

C ) Potassium (K): Potassium is part of soil minerals, name-
ly feldspars and micas, but it does not become part of' . organic compounds. Potassium among other functions in-
creases the osmotic pressure in the cells, favors the
uptake of water and opposes wilting. With other words,
it increases the draught resistence of plants (5).
available for the plants, however, generally is quite
low. Especially in acid soils most of the phosphorus is
rigidly tied up in metal compounds and not available to
the plants.
Phosphorua is an important element in the nucleo-proteids
and in form of phosphatic acids controls the energy meta-
bolism in the plants. The fundamental biochemical pro-
cesses of photosynthesis are not possible without the
action of phosphoric acids (5). Application of phosphorus
has marked influence on diameter growth and lignification
of tissues-
d) Calcium (Ca): Calcium is found in various combinaticns
in rock and soil minerals. By adding lime we! can in-
crease the pH-value of the soil. If the pH-value is too
low, the availability of phosphorus would be affected,
If it is too high, it would affect the uptake of iron and
magnesium.
e) Maqnesium (Mq) and Iron (Fe): Magnesium and iron are the central components of chlorophyll and are required in
considerable quantities by all green plants. Magnesium
is also essential as a regulator for a number of biochemi-
cal processes in the plant.
17.2 Tvpe of fertilizer.
Because generally nitrogen and phosphorus are in short SUP
ply in most tropical soils, best results were obtained with a well balanced.complete fertilizer containing nitrogen, phosphorus and e'ome potassium. In most cases the me of complete fertilizer is to be prefe‘rred to the.application Of
137
a single nutrient. If only one nutrient is applied, the in-
creased growth would lead also to an increased uptake of
those nutrients, which were n o t supplied by the treat-
ment. This may cause deficiency of these other nutrients
which is known as the "dilution effect" (5).
The three or sometimes four numbers printed on fertilizer bags
indicate the contents of primary nutrients in the sequence
nitrogen - phosphorus and potassium. The fourth number some-
times found indicates the magnesium content. Combinations
recommended for forestry &rposes are 12-24-12, 14-14-14,
12-12-12 or similar types. Some fertilizers also contain trace
elements such as iron, manganese, boron, copper, zinc, molyb-
denum and others, which are needed only in minute quantities.
17.3 Method of application.
Because of the wide spacing commonly used in the plantations
an individual application generally is most economical. For
the first application it is recommended, tha,: the fertilizer
is mixed with the soil at the bottom of the planting hole. This
method is to be preferred to a top dressing after planting,
because the fertilizer would not be washed away easily by
heavy rains and cannot be taken.up by shallow rooting weeds.
All subsequent applications, if any, are done in form of a
top dressing. The fertilizer is strewn by hand on a radius, which is probably penetrated by the roots ("drip line"). If
this radius is chosen to large, the weeds will benefit un-
necessarily. For the same reason all weeds in the vicinity Of the seedling must be uprooted and used as mulch, mere cut-
ting would not be sufficient. Care must be taken that a high concentration of the fertilizer does not get in direct con-
tact with the root collar. Young teak seems to be parti- cularly sensitive and may be easily killed that way.
A fertilizer dressing combined with soil working around the
seedling can give very good results, if done properly. Soil
working would help the infiltration of the fertilizer into
the soil and increase aeration. The cost of application, however, is higher and there is the possibility of damages to the root system.
138

All fertilizer application must be carried out during the
main growing season. A very favorable time is right at the
beginning of the rains, or towards the end of the rainy
season, when it is already too late for planting, but the
growth of many tree species reaches a maximum. During the
peak of the rainy season fertilizer application would'pro-
bably interfere too much with the ongoing planting work.
17.4 Quantity to be applied.
The effect of different quantities of fertilizer on the in-
crement follows the well known input-output curve and may be
illustrated by the following experiment:
p’s” I
Bo
60
1
so
20
-
-
lc
J
assumed effect of fertilizer
assumed increment fertilizer
n- original height
l-L 604 (a) Effect on height
growth
assumed effect of fertilizer
assumed increment without fertilizer
t-
original diameter
36. WC. 60 6. (b) Mz;:; on diameter
Fig- 24: The effect of different doses of complete fertilizer (12/24/12, plant hole application) on Eucalyptus camaldulensis 11 months afterthe application. Binga.

Considering the effect on h e i g h t increment the most
significant effect against control (Wno fertilizer") was achieved by the 10 gram treatment without any additional increase with higher doses.
For the diameter increment at root collar also the 10 gram
application resulted in the most significant increase. 20 gram per?eedling, however, showed a greater effect, but the additional increase was only small, for the 30 gram treatment the additional increase w&s less still.
The quantity applied should result at least in the malor
portion of "possible" increment. In the above example some-
thing between 10 and 20 gram per seedling according to the availability of fertilizer would be the proper dose. The quantity of 20 grams of complete fertilizer per seedling is also in line with recommendations of GUSSONE (1964) for European tree species. For larger seedlings, of course, the optimum quantity would be higher.
If 2500 seedlings per hectare are treated with a 20 gram
application,.50 kg (one bag) will be needed per hectare.
Based on the prices of 1974 this would cost about 100 Pesos. For application as a surface dressing without soil working
about 1 man day is required per hectare, with soil working
about 3 man days are needed. To save costs, fertilizer
application should be combined with weeding.
17.5 Indications for fertilizer application in plantations.
- On sites, where deficiency symptoms occur (5,37),
- Sites, which are degraded by erosion and where the A-horizon had been washed away entirely,
- Poor sites, indicated by a meager ground vegetation,
- In plantations of fast growing timber species, if after economic analysis fertilizer application would result in higher financial net returns,
- On dry sites application of complete'fertilizer would result in a deeper root system and increased draught
resistence (effect of K) (27).
140

- Sites with a strong weed competition. Here the fertili- zer must be applied in a way to give advantage to the trees
without favoring the surrounding weeds.
- In enrichment planting, where only very few trees per hec- tare are planted fertiiizer appiication would possibly
compensate for light deficiency and enable the seedlings
to cope better with the weed species.
Chapter 18:
THE CONTROL OF WEEDS, CLIMBERS AND UNDESIRABLE TREES
18.1 Weed Control.
a) General considerations
The more hot and humid the climate, the more weeding opera-
tions have to be carried out. In the humid parts of Eastern Mindanao three or four weeding operations during the first
year are not uncommon, while in Northern Luzon one or two
weedings during the first year would be sufficient. In some
places no weeding at all may be required. The number of
weeding operations has to be increased, where small and poor
planting stock was used for field planting.
141

A common mistake in weeding is that too much of the vegetation
is cleared around the plants. It should be borne in mind, that
the grasses and herbs growing near the seedling may also have
Some beneficial effects on its development- The seedlings
might indeed benefit from a light shade, provided they are not
suppressed. A light weed competition at an early stage might
reduce the formation of strong side branches having a similar
effect as close spacing. Besides this the grasses perform a
useful function as a soil cover and protection' from erosion.
Not more vegetation than absolutely necessary should be cut
("ring weeding"). The grass cut is placed as a mulch around
the seedling to reduce evaporation and check the new growth of weeds.
For light demanders more clearing is-required than for shade
tolerant species which do not suffer so much from weed com-
petition. There are species, however, which are very sensi-
tive to any weed competition like teak and most eucalypts. In
these cases just cutting the weeds may no. be enough, but it
may be necessary to eleminate competition in the root zone by
uprooting the weeds and doing some cultivation around the seedling.
Care must be taken to avoid sudden exposure of plants, which
have alreadv been suppressed by weeds. Here only the overtop-
ping weeds.are cut, leaving a side shade. It should be care-
fully studied, if any "brushing" is necessary at all during the first year, because the grasses in'many cases will dry up
anyhow. On steep slopes it often happens, that wilting grasses
form a complete blanket on top of the seedlings, which must be
removed as early as possible.
Any weeding must be done early enough, before the seedlings are
suppressed and consequeMzly may suffer severely from sudden exposure. Proper timing of weeding therefore is a decisive factor for the success of the plantation.
b) Tools for weedinq.
- Bolos, there are many local modifications of this useful tool. For weeding in high cogon and talahib a modification of the
142

ordinary bolo with an elongated blade and an elongated hand-
le called tab& in Ilocano has proved to be very handy. Since
laborers all over the country are used to work with bolos,
no new introductions hand tools for weeding are recommended
for ordinary field conditions.
a) cl
Fig. 25: Weeding tools: a) Tab&s, b) sickle, c) weed tramp- lers, d) motor weed cutter with chainsaw motor.
- Motor weed cutters are already found in some reforestation
projects. They are driven by a small gasoline motor (chain-
saw motor), which operates a circular saw attached to a long
handle. Where a chainsaw or a motor plant hole driller is
already available, the weeding attachment may be a useful addition. The machine has proved,to be .quite useful in
clearing high cogon, runo, talahib and other sharp edged
grasses as well as brushes.
- Weed tramnlers consist of a pair of frames of oval shape,
which are attached to the shoes, The weeds are not cut, but
simply pressed down by the weight of the body, which weakens
them more than cutting. Their effectiveness should be tried
under Philippine conditions. The job must be assigned to a
heavy person.

Possibilities of chemical weed control in plantations.
Because of the high cost of labor chemical weed control had
become very popular with foresters in Europe and the United
States. The ideal weed killer required for forest planta-
tions should have the following characteristics:
- effective against Imperata, not necessarily kill it, but
retarding its growth,
- harmless for conifers and broadleaved species,
- the use must be cheaper than manual labor,
- the chemical should not be poisonous to man or livestock,
- after the desired result had been obtained, the chemical
should desintegrate without any residual effect on the ecosystem.
Up to now there is no herbicide available, which meets all
these 5 reguirements. In recent years DOWPON with the active
ingredient DALAPON had been used with good success in temper- ate countries to kill grasses with rhizoms. It is taken up
by roots and leaves of the grasses and in lower concentra-
tions does not affect most forest trees. From some small
scale experiments it appears, that DOWPON is also effective
against cogon to some degree, which resists most selective
herbicides. But more tests are needed regarding
- the compalatability with different tree species, - the optimum time for application,
- the quantity required per unit of area,
- the economical analysis of the costs compared to ordinary brushing.
Preliminary tests, however, have shown, that the quantities
required to weaken cogon are so high, that also most forest trees are affected (68), and the cost of the chemical will in
met cases exceed the cost of manual labor. The prospects of
chemical weed control in forest plantations therefore at pre-
Sent are not very favorable. For more information on the dif-
ferent types of chemical weed killers see Part IV.
144

18.2 Cl- elser cuttinq. -
C riber cutting is a very important tending operation in t 2 moist and humid regions of the Philippines. Severe
infestation of climbers can completely cover and deform small trees of sapling size. The control of climbers is often more of a problem than the control of herbaceous weeds and grasses. Because of buried and surviving seeds there are generally more climbers on a forest soil than on a grassland site. Most climbers however, are very light demanding, they disappear as soon as the plantation forms a closed canopy and the conditions for their germination become unfavorable.
Fig. 26: Freeing a tree from climbers with a Y-shaped stick (after HENGST, 1954)

When a tree is completely covered by creepers, one has to
use a y-shaped stick and push the vine up. By pulling it
down one would easily break the branches or the top of the
tree. The vines thus removed from the tree are not cut -
they would sprout again- but curled up and deposited at the
base OF the tree. This weakens their vigor more than cut-
ting (34). With very persistant climber specie3 it is re-
commended to spray the curled up climber with a 2 % solution
of 2,4,5-T, a hormon-based arboricide, to prevent any
sprouting.
A climber, which is a very serious pest in Mindanao and
Mt. Makiling is Uoko (Mikania scandens). Another species which is hard to control is bikal (climbing bamboo), which
can form impenetrable thickets suppressing any young tree
growth especially in a more seasonal climate. In the humid
parts of Mindanao, bulacan (Merremia peltata) is often a big problem.
18.3 Removal of undesirable trees.
Undesirable tree growth under 6 cm diameter can be easily cut with the axe or the bole. If larger undesirables have
to be removed, this can be done by chainsaw or girdling. Nowadays the use of chemical tree killers had been found
more economical and effective, because not all tree species
can be killed by girdling alone or would coppice after cut- ting.
For the preparation of enrichment planting and timber stand
improvement two chemicals are widely in use in tropical countries: sodium arsenite and 2,4,5-T. The latter is sold under different trade names (TORMONA or TORDON). Their main
characteristics can be compared as follows:
Sodium arsenite 2,4,5-T
anorganic poison, hormon based arboricide
highly toxic to human if pure, low toxididity to men 8&i animals, and animals
146

sodium arsenite 2,4,5-T
highly effective for most acts slower, does not kill all specie; species, very economical, more expensive, when diluted in
diesel oil,
10 % (by volume) solution 3 % mixture with diesel oil, with
in water, water less effective,>
If sodium arsenite is to be used, very strict safety measures
have to be adopted, because it is a very dangerous poison. For
further information on handling sodium arsenite consult FAO,
Technical Report No. 3 on Forest Management (1971) or Malayan Forest Record No. 23. Al30 the use of 2,4,5-T requires all the
safety precautions normally used in handling poison. 2,4,5-T normally is not toxic to human beings and animals, but it may
contain dioxine as an impurity, which is one of the most danger-
ous poisons known and toxic in minute quantities.
Methods of application
- 2,4,5-T applied with a paint brush on the bark around the tree
has a lethal effect on most trees provided that the bark is
dry and the zone painted is wide enough so that it cannot be
bridged by callus formation. More hardy species must be girdled first.
- The poison is applied by pouring a small quantity of it into
a continuous frill of overlapping cuts made with a bolo around
the tree trunk. The chemical is carried in a dispensing can of 2-3 liters with a long spout and a tight fitting cap and is
poured into the frill. This method is very effective against
very resistant species like all latex bearing trees (Moraceae,
Sapotaceae).
- Application in notches is practical for small trees and large
trees with high buttresses or irregular trunks. It is also .
possible to fill the dry crystals of sodium arsenite directly into the notches.
147
The advantaues of -ison girdlinq
- cheaper than cutting, the savings can be 20 % or more,
- for sprouting species more effective than cutting,
- the tree poisoned does not cause damage in the regeneration by
falling, but is disintegrating slowly, the branches fall one
by one,
- there is no sudden opening created, which has silvicultural advantages,.
Chapter 19:
PRUNING AS A MEASURE OF STAND IMPROVEMENT
Almost all trees have branches. There are very few exceptions only in the tropics like for example palms and younger indivi-
duals of malapapaya. Branches are necessary to carry and support the-leaf surface of the tree essential for assimilation of carbo- -hydrates and growth, but wood with ingrown branches is considered
defectiv'e and of inferior quality.
Xn@own living branches are less bar-mful than dead onces which
may cause defects and.holes in the 3umber. Artificial pruning should therefore be directed more towards the removal of . dry branches than of the green ones.

19.1 The nroces3 of natural oruninq.
The extent to which the lower branches die depends largely on the stand density. As soon as a closed canopy is formed, the growth of the branche3 below the canopy decreases and they finally turn dry. The time in which the canopy closes and the branch is shaded influences to a certain degree the diameter the branch can reach. Natural pruning therefore is best in close even-aged stands without prominent indivi- duals. Keavy branching is sometimes observed on good sites, while the same species on poorer sites shows less branching (611.
The branchiness of the individual tree depends also on gene- tical factors. We can sometimes observe, that the branching pattern of the mother tree repeats itself in the offspring in a-very similar way.
Tropical pines, like Benguet pine often show normal branch- ing at higher altitudes, while at lower elevations the banches grow almost as fast as the terminal shoot resulting in trees without commercial value (example: Benguet pine near Magat, Nueva Vizcaya). Increased shoot borer attack at law elevation may be only part of the explanation.
The great disadvantage of natural pruning is, that the dying branch doe3 not fall for some time. When the branch is dead, it may take years until it is weakened by fungi and insects and finally falls by the action of wind or rain. The activity of fungi is very important for natural pruning. Where the branch wood is protected from decay by a high resin content, natural pruning is delayed. By keeping a conifer plantation dense, we can only influence the thickness of the branches, but not the falling of the dead branches (61).
With most broadleaved species it is different. Here general- ly dead branches decay very quickly and are dropped. A denss- canopy usually is all that is required to obtain clear bdeS- Artificial pruning in broadleaved stands generally is not carried out as systematically as in conifer plantations. Pruning here is more of a corrective nature as part of the early tending operations (removal of forks, etc.)
149

19.2 Artificial pruning in conifer plantations.
a) General considerations:
Systematic pruning of entire plantations is a very costly
operation. It must be considered, that the expenditure for
pruning has to be compounded at current interest rates up
to the end of the rotation. Pruning can only be economical,
if the increase in value of pruned timber is higher than
the compounded cost for pruning.
In the Philippines at present, pruning of conifers may only
be indicated in some of the commercial plantations intended
for lumber production in long term concessions, where the
investor also is in a position to derive the benefits from
his investments later.
Another consideration is, that the cylinder of clear wood
put on after pruning must be thick enough to be of any value. The part of the stem containing knots should be
limited to the innermost core of about 10 cm. The expected
coating of clear wood should be at least 10 cm thick. Prun-
ing is therefore economical in the b e s t stands only.
It is not advisable for example to prune the heavily branch-
ing pines at low elevatien, from which never any timber of
good quality can be expected.
fir iw- lT - _
. 27: Proportion of clear wood after pruning.
According to fig. 27 a log of 30 cm diameter, which had been pruned as a young tree of 10 cm diameter contains 89 percent
of clear wood.
150

b)
Conifer plantations are usually pruned in tnree successive
stages following the natural development of the crown, until
in the third and last stage the tree is pruned up to about 6
or 8 meters. To p&ne higher than one can reach from the
ground, is rarely indicated, because the-cost of pruning is
progressive at higher levels. Also because of lower increment
at higher levels, the output of clear boards can hardly be
increased. Generally the most valuable portion of a tree are
the lower 6 to 8 meters, which may account already for about
2/3 of the total value.
Since pruning is not yet a standard procedure in the Philip-
pines, as an example the South African pruning instructions
for pines may be quoted:
1, Staue: When the stand reaches a top height of 6 meters, all
trees except forked and suppressed individuals are
pruned up to 2,50 meters.
2. Staqe: When the tree reaches a top height of 9 meters, all stems which are left after the first 'thinning, are
pruned to half their height.
3. Staue: When the top height reaches i2 to 15 meters, 375 well
formed stems per hectare are selected and pruned up
to 6,50 meters.
Tools for pruninq.
- A light pruning saw with fine teeth, which can be attached
to a handle or bamboo pole of varying length according to
the pruning stage. While for the first stage only a.short
handle is required, for the second stage we already need a
pole of about 4,5 m length.
Of all the various models of pruning saws tested at the
Training Center the HENGST model gave the best results, it cuts on pull o&y (Fig. 28).
- Indispensable for pruning are protection glasses to protect
the eyes from falling saw dust and small branches. .TheSe
"glasses" are preferably made of celluloid or a sdlet
material, but not glass.
151

Fig. 28: Pruning saw (HENGST Model) with extension poles.
c) Pruninq technique
The branches to be removed are cut directly at the stem with
a clean cut. Care must be taken, that the bark below the cut
is not injured, which would cause resin pockets in the lumber
later. No splinters should remain at the lower side of the cut, because this would delay occlusion and may cause defects in the trunk. Generally only dry branches are removed in pruning of conifers. If occasionally some green branches are
cut, this would not have much effect on the tree or the in-
crement, as long as not a major portion of the green crown is removed.
d) Advantaaes of mxninq:
- The financial advantage of pruning depends largely on how much timber free of knots and branches is appreciated,
- Pruning of conifers admits a wider spacing and heavier
thinning without a decrease in the quality of the timber. But it is only economical on good sites, where a first class timber crop can be expected, and the increment of clear wood
after pruning is sufficient to justify the expenses.
- Some foresters emphasize, that by low pruning the danger of
crowri fires in conifer plantations is somewhat reduced. The
dry branches cut can be piled up where they cannot cause
danger in a ground fire as was demonstrated in a small scale
at the Bobok Concession.
152

19.3 Correction of growth forms in hardwood plantations.
The correction of growth forms is a very important stand
improvement operation in the early stages of a hardwood
plantation. The cost usually is very small compared to
the increase in timber quality. Since only a portion of
the trees receives treatment preferably at an early stage,
the expenses are only a fraction of the costs as compared
to pruning conifer plantations.
a) Removal of forks: This particularly important for species,
which have a natural tendency to fork like narra (Pterocarpus
-. indicus). But also in all the other species forks must be
treated as early as possible. After a greater diameter had
been reached, no corrections can be made any more for the
danger of fungus infections. Besides true forks also branches,
which form an abnormally small angle with the trunk have to be
removed, because they almost inevitable will cause defects in the timber, after the branch has died (Fig. 29).
Fig. 29: The effect of forks and branches which form a small angle with the trunk: water enters the pockets after the brtinohss have decayed and causes defects (drawn after HENGST, 1954)
153

The fork is cut directly at the stem, as long as its diameter
is below about 4 cm. For larger forks the same procedure as
for large branches is recommended (see below). Forks of over
about 8 cm generally cannot be removed from forest trees any-
more.
In young plantations cutting of forks is only a matter of a
few hours. The treatment should be repeated at least 2 times.
The first treatment is recommended before the plantation
reaches 2 meters in height, the second when the top height
reaches about 6 meters. In the first treatment pruning shears
are the main tools (Fig. 30) for the second stage a pruning
saw attached to a bamboo pole (Fig. 28).
(a)
Fig. 30: Pruning shears: (a) Model "LOEWE" for thin branches (b) Model "WALDTEUFEL" for branches up to 6 cm diameter.
The commercial value of a tre,e forking right above the ground
is much less as compared to a tree where all the increment had been conentrated on one trunk only. As stated before,
the major portion of the value of a plantation normally is
constituted in the lower 6 to 8 meters. If we can eliminate
forking that portion, we would increase the timber value of
the plantation considerably.
b) Removal of abnormally stronq branches.
Trimming a tree with abnormally strong branches back to normal
shape is carried out in three cuts, as illustrated in Fig. 31.
154

1 Fig. 31: Proper moval of strong branches (8).
re-
E we attempt to cut the branch directly with one cut, there would
4 always the danger, that the branch goes off with a piece of
nrk inflicting serious injuries to the tree. It is very import-
It I that the branch is cut directly at the stem. Leav- 1g a stump, which grows into the tree, would cause very serious ?fects in the timber (Fig. 32).
g. 32: Cutting of branches: a) too much of the branch is left b) improper cutting angle, c) cutting through the branch swelling causes a very large wound, o&y the outer PPargin of the swelling should be slightly touched by the cut, d) proper cut (drawn after HENGST, 1954)
155

For European timber species it is known through experiments up to
which maximum diameter a green branch can be cut safely without
risking fungus infection. Similar experiments as a basis for
tending instructions are recommended for the Philippines. With a
species like teak with a wood very resistant to rot, a larger
diameter can be pruned than with a softer and easier rotting
species. The scars of teak branches of 4 cm diameter pruned in
Binga were completely occluded by callus formation after 12 weeks.
TO avoid, that the cut is exposed for a long tim and risking
fungus infec.tion, the work should be carried out during the main
growing season. The application of tree wax is usually not done in fore& plantations, Only for valuable ornamental trees a mix-
ture of bitumen and creosote is recommended for protecting large cuts.
Fig. 33: Proper trimming of abnormally strong branches. (drawn after HENGST, 1954)
156

When branches are too thick for pruning already or the species is very delicate, the branch is not cut directly at the stem,
but about 3 feet away. Cutting only a portion of the branch
has the effect of reducing a strong branch to secondary im-
portance. The remaining portion of the branch must still be
long enough to fall by its own weight, once the branch is
dead and decaying. Leaving stumps of about 30 cm as can be often seen is a serious mistake and will cause defects in the
timber. The cut has to be conducted right behind a bud point-
ing downward or sideward. Cuts made behind buds pointing up-
ward would stimulate forking (HFNGST, 1954).
a) Treatment of poorly shaped trees: A forester is quite often
confronted with teak plantations of poor shape due to fire,
grazing and illegal fuelwood cutting resulting often in
crooked trees, multiple leaders, and heavy branching. The best remedy is to cut back those trees directly above the
ground. The reserves of the root stock will produce within
a year a straight branchless shoot several meter8 high. A
few weeks after cutting one has to remove all but the strong-
est shoot from every root stock. A similar treatment is also given to leaning trees.
1) Treatment of wolf trees. Wolf trees are individuals, which show abnormally fast growth combined with excessive branch-
ing. In very young plantations these can be directly removed
without harm. At a later stage it is preferable from the
silvicultural point of view, that they are only heavily pruned
and their top is cut. If we remove them completely at a late stage, we would create a large opening, into which the neigh-
bors would extent strong branches. A large opening at a late stage may also be the starting point for wind fall.
137

20.1 Thinninq of young stands.
Chapter 20:
THE BASIC PRINCIPLES OF THINNING PLAN'PATICNS
When we start a pine plantation we plant commonly at a
spacing of 2 by 2 meters, which amounts to 2500 seedlings
per hectare. In the final stand after 60 years or so the
number of trees reaching maturity is only 250 to 500 per hectare. All the rest of the initial number, about 80 to
90 percent, will have died through natural causes or had
been eleminated by successive thinnings. The aim of thin-
ning is to correct the course of nature in the elemination
of individuals and to retain only the best stems up to maturity.
All the undesirable individuals are removed at an early
stage of the plantation, which at first may be part of the
tending operations, later, when the diameter has reached
salable size, is part of thinning.
!Phis negative selection is also called refining,
which means to remove impurities from a mixture (18). Re-
fining is the contrast to liberation of the
best stems at a later stage, The individuals to be removed
in the refining operation are:
- Individuals of undesirable species, - Trees, which show abnormal tendency to fork,
- Wolf trees, - Trees, which are defective otherwise,
158

Thinning must start as soon as crown competition sets in to
provide enough growing space for the remaining crop. If thin-
ning is delayed, the plantation would become stagnant. The
struggle for survival can be very prolonged with shade toler-
ant species. In dense stands of light demanders, the weaker individuals succumb quickly and only the most vigorous survive.
Mechanical thinninq: In young overcrowded plantations and
natural regeneration, very often a so-called mechanical thinning is carried out as. long as the individuals are not
yet well differentiated in respect of height growth and
diameter (61). The objective is merely a regulation of spacing, where extensive plantations are to be treated,
and where only untrained labor is available.
According to circumstances, in mechanical thinning, for
example, every second or third line or tree within a line
is removed, or in natural regeneration a minimum distance between trees is prescribed. Deviation from the prescribed spacing is only tolerated in exceptional cases where an
obviously good individual would have to be removed in favor
of an inferior one.
20.2 Thinning of older pltitations.
For a given species, each site has a certain potential in- crement. The objective of thinning is to concentrate this
potential increment on the best trees only by removing the
competition of inferior neighbors. The trees of the lower stratum, which do not compete much in getting a share of
the potential increment, are generally spared in thinning as a useful ground cover. In most cases their timber value does not cover the cost of removal.
While in young stands we have selected the inferior indivi-
duals to be cut, we now change our point of view and make a
positive selection instead. We select the best trees and cut those, which compete with them in the crown region. This is
also known as "liberation cutting" (18). So, only a tree will be removed, if a better substitute will really profit

..from the additiopal root and crown space.
When marking the trees for felling we always have to look
at the situation ir, the canopy, not at the spac.ing on the
ground. All the increment of a tree depends on a well de-
veloped crown, because this is the place, where the carbo-
.h@rates; the elements of wood, are produced. To develop
a healthy crown capable of high increment, it is important,
that thinninga are carried out early enough. If thinnings
have been delayed, many species would not respond to addi-
tional growing space at a later age. One important prin-
ciple of thinning is therefore "early - moderdte - often".
Species which are able to make use easily of-additional
growing space by extending their branches into the newly
crhated openings, those can be thinned more heavily, e.g.
Gnmlina arborea and Albizzia falcata on good sites.
The edges of the plantation have to be kept as dense as pos- sible to maintain a favorable "forest" climate in the interior
of the stand.
A situation often faced when marking trees for thinning is
that there may be two trees of equally superior quality
growing closely together on a relatively small area. Ob-
servations under natural conditions have shown, that the
increment of both of them may not be reduced, as long as
there are possibilities for lateral expansion. In this
exceptional case the two trees can be treated as a "thin-
ning unit" without losing increment.
20.3 Numerical guides foe thinninq.
In many countries exact instructions exist -sometimes as
part of the yield tables - how much to remove and how much
&O retain in thinning operations at different ages. These
inst&tions are sometimes based on the basal area, some-
$imes only on 'the number of trees per hectare, or even the
average distance between the trees.
a) Where growth is very uniform thinning instructions may
be based only on the number ofitrees per hectare to be

retained at the respective ages, perhaps differentiated for different site classes. But this would imply, that the plant- ation area is known and the trees are counted, or the number of trees per hectare has to be transformed into average dis- tance between the remaining trees. As an example the thinning schedule for slower and fast growing'pines in South Africa may be quoted:
Thinnins schedule for s 1 o w e r orowino pines in South Africa
Site Class I
Age Stems/ha 0 1265 9 700
14 500 20 275 25 225 40 Final felling
Site Class II Site Class III
Age Stems/ha Age Stems/ha
: 1265 700 0 7 1265 700 13 500 13 350 18 275 20 200 23 225 60 Final felling 50 Final felling
Thinnina schedule for fast growing pines in South Africa
Site Class I
Age Stems/ha 0 1265 8 750
14 500 20 325 25 250 30 Final felling
Site Class II Site Class III
Age Stems/ha Age Stems/ha 0 1265 0 1265 6 750 6 750
12 500 14 375 18 325 20 250 23 250 50 Final felling 40 Final felling
Table 6: Thinning schedule for pines in South Africa based on the number of trees per hectare (SCOTT, 1960).
bj Another numerical guide for thinning used in Germany and other countries is the basal area, which is a good indicator of the stand density. The basal area has to be kept wall below the possible maximum, otherwise the diameter increment will be re- duced or becomes stagnant. Only by cutting some trees the selected remainders will put on new increment, until the max- imum basal area is built up again.
cj In some countries the relation between top height (the height of the 100 highest treesj to average distance is used as a guide for thinning. This is based on-the assumption, that
161

higher trees require a wider spacing, Thinning ii&&Xi&ions for Pinus merkusii in Indonesia according to COOLING (1968) are based on an average spacing of 22 % of the top height.
20.4 The relation between thinninq intensity, volume production and financial return.
A logical indicator of the thinning intensity is the basal area. If we assume the basal area without thinning as 100 percent, then
light thinning would be 90-95 percent medium thinning heavy thinning
70-90 percent 50-70 percent
The question is now, which of the four possibilities gives us the maximum volume and which the maximum financial return or both.
For illustration the results of a thinning experiment with Pinus radiata, Penola Forest Reserve, South Australia are quoted here (43):
Trees per ha age 17 age 24 age 30 before
age 36 age 38r after th.
No thinning 2161 2161 2043 2006 1917 1892 light thin. 2211 1247 765 620 496 496 medium thin.. 2100 988 610 511 366 366 &eaw thin. 2124 773 553 425 245 245
Table 7: Reduction of the number of stems per hectare by suc- cessive thinnings in a Pinus radiata plantation planted 1923 at an initial spacing of 2.10 by 2.10 m, site class IV, first thinning at the age of 17 years (after LEWIS, 1962).
While under natural conditions in this case without thinning still 88% of the trees remain at the age of 38 years; under heavy thinning, however, their number is reduced to a mere 12 % (but of considerably larger diameter).
162

(cbm per ha1 of thinningd
value up tc 38 yrs. (Australiar
value of the age of 38
-Pounds) years
3 A 5 Ns thinning L. 1571 L.148 light thin. 311 L. 1909 L.808 medium thin. 344 L. 2016 L-946 heavy thin, 461 L. 1941 L.988
Table 8: Volume and value production at a rotation age of 38 years under different thinning intensities. The net present value (column 5) considers cost of establishment, main- tenance and logging at an interest rate of 5% (Faustmann formula) and is based on current royalty rates (after LEWIS, 1962).
790 790 911 911 899 899 873 873
t t Tntal rrnl rrmc T”-- *-B-v.- Cumulative
Total volume (column 2, table 8;: The volume produced by the un- thinned stand is considerably less than the thinned plots. Because of the high density of the unthinned plots many stems can reach only diameters below 10 cm which is too low for general industrial use and therefore is not considered in the volume computations. The differences in total volume production between the ligh, medium and heavily thinned plots are not significant. The results of this experiments show, that thinning within reasonable limits does not have a significant effect on volume production, which also is in line with findings in Europe (69).
Total volume of thinninas (column 3, table 8): The figures show that in the lightly thinned plot about l/3 of the volume, and in the heavily thinned plot about * of the volume is obtained from thinnings.
Cumulative value (column 4, table 8): The cumulative values of the thinned-plots differ significantly from the value of the un- thinned plot. This has two reasons: first, the average diameter of the timber from the thinned plots is higher and therefore com- mands a higher price. Second, by thinning we remove the inferior trees and concentrate the potential increment of the site on the best individuals, which raises the average quality of the stand and the value.
-N&z present
163

Net w&sent value (column 5, table 8): The net present value considers compound interests from the time on when the yields are actually obtained, but deducts all costs (establishment, maintenance, logging) also at compound interest. The figures clearly show the advantage of heavy thinning, because high yields are obtained already at an early date.
Besides resulting in higher value production, thinning also increases the resistance of the stand against windfall. But cutting of trees has to start at an early age of the plantation and has to be carried out gradually, A sudden opening at a later age could have the contrary effect and promote wind damages. Also the resistance against pests and diseases is increased in a properly thinned plantation, because there are not so many dead and dying trees.

Chapter 21:
FCREST FIRE CONTROL
The effective control of forest fires is one of the greatest problems of the reforestation programin the Philippines. Especially areas with a seasonal climate are hard hit by forest fires almost every year. According to the annual report of the former Reforestation Administration for the fiscal year 1969/70 a total area of 3300 hectares was burnt, 1970/71 rd. 1400 hectares were reported burnt (58).
21.1 Fire causes
- Burnina of pastures: Cattle owners set fires in cogonal pastures annually-.&o burn the old cogor, and induce new growth, which is palatable for their cattle, while the old and dry cogon cannot be eaten. Burning of pasture land is practiced throughout the tropics and may be one of the most frequent fire causes in forest areas.
- Incendarism: It had been reported frequently, that forest fires were intentionally caused out of personal grudge against the forestry personnel. Laborers, who were laid off, were said to have started sometimes forest fires out of revenge.
- Escaned kaingin fires may be another very frequent cause
of fire. Burning of kaingins is generally done at the peak of dry season, when the danger of forest fires is highest, Espe'cially on slopes the kaingin fires often get out of control easily and destroy neighboring forest land.'
165

- Carelessness: Many forest fires are started out of care-
lessness from abandoned camp fires, cigarettes, burning
of trash and other causes. Very- often playing children
are involved. .
- Liuhtninq: A fire caused by lightning is theoretically possible, but rare in practice. When there is lightning generally it will be followed by rain, which would ex-
tinguish the sparks.
21.2 The development and behavior of a forest fire
If an inflammable material is heated and oxygen is added, a
fire will start. The ignition temperatures for some fuels
are as follows (32):
- Dry paper 132OC
- Pine shavings 227OC
- Average forest fuel 293OC - Heavy logs 578OC
By radiation from the flames the neighborhood is heated and
the fire will progress. Where grasses or litter are already
dry, only little heat is necessary to evaporate the remain-
ing moisture and allow the fire to spread. When the flames are able to reach the bark of the trees or the needles of
the lower branches, the ground fire may develop into a crown fire. In young pine stands the crown fire is the usual case. In middle aged stands there is no crown fire without a steadily progressing ground fire to pre-
pare the crown region of the uplift of the fire. A crown fire
causes a strong upward movement of air (convection column),
which sometimes takes sparks high up and deposits them .far
ahead of the fire front. New spot fires may be started that way. A black smoke, whose color is due to charcoal particles,
usually indicatesa great number of sparks (44).
From the place of origin the fire spreads in all directions,
but only the edge of the area is burning, beyond this edge only some stumps and thick branches are still on fire. The depth of the fire front may be only one or two feet.
166

If the ground is level and the weather is calm, the fire will
spread more or less evenly in all directions. If there is wind,
the fire will progress fast in wind direction, against the wind
however, the progress will be slow. The result generally is a
fire area of elongated shape with a curved front line. 1 j
l WIND DIRIZCTION
Fig. 34: Spreading of a forest fire
The front of a forest fire progresses with a speed of 200 to
1200 meters per hour, large fires burning uphill may reach 2000
meters per hour. On level ground the normal speed is below 500
meter’s (44). Uphill the progress is very fast, downhill quite
slow. A slight down slope can reduce the speed already consider&
ably.
The intensity of a forest fire depends on the type of vegetation,
and atmospheric conditions.
a) Veqetation: Most easily a fire can spread in a plantation with a
massive cover of dried up grasses. After the plantation has form-
ed a close canopy and shaded out the grasses, the fire hazard is reduced. For dangerous localities it is desirable therefore to
chose a species, which is able to shade out grasses very early.
The more fuel is available in a place, the higher will be the fire intensity, especially, if the fuel is concentrated and
highly inflamable. This is often the case in areas which had
been successfully protected from fire for two or three years and have built up a thick cover of dry grasses.
A middle aged conifer plantation with many dry branches down to
the ground can still be destroyed by fire, even if the grass cover
is very thin. Though most conifers tire very susceptible to fire
167

in their younger stages, they may develcp a thick bark when older and become quite fire resistant. According to LIZARD0 and CALBDA (1959) pines over 13 cm dbh have a fair chance to survive a medium grass fire.
Diameter Survival cm. d.b.h. Percent below 4 0
4 0 5 12 6 21 7 16 8 22 9 12
10 16 11 16 12 26 13 61 14 85 15 89 16 100
Table 9: Survival of Benguet pine in a medium grass fire (45)
Plantations of deciduous broadleaved species with a thick ground cover of dry leaves are more liable to be destroyed by fire than a plantation of evergreen species. A dense, slight- ly moist, plantation of broadleaved species with a scarce ground vegetation will hardly ever catch fire.
b) Atmosnheric conditions (temperature, rel, humidity, wind): The effects of temperature and humidity on the intensity of a forest fire are closely interrelated. With rising temperature in the morning the relative humidity of the air will drop, reaching a minimum in the early afternoon. At this time also the fuel is dried up and the fire danger is highest. During the night, however, the relative humidity increascswith fall- ing temperature and the fuel absorbs moisture, which reduces
the fire intensity. Fire danger is high on southern and south- western slopes, especially when the relative humidity drops below 5i) percent.
The effect of wjnd on the fire intensity is that it adds more
oxygen - A strong fire always creates its own air movement by
168

sucking in fresh air, consuming its oxygen and releasing the heated air in a convection column. On a slope usually an uphill wind wiil develop.
After having outlined fire causes, the development and be- havior of a forest fire, we have to deal with the actual fire control. Four phases can be distinguished (32):
- Preventive measures, - Detection of fires, - Organization of fire fighting, - Suppression of forest fires.
21.3 Preventive measures. This is the most important phase in fire control. It includes
a) Education: Fires caused by carelessness can be prevented by starting a well planned education campaign as undertaken by the U.P. Forestry Extension Office through the mass media radio, television, press, and lecturing on the benefits of forest conservation and the dangers of forest destruction. Involvement of teachers and school children is very import- ant. Signs and post%rs with slogans have to be put up. Special film shows combined with lectures must be arranged for the communities (25).
b) Involvement of the community: A possibility would be to set up a non-fire bonus system. Where no fire occurs during the year, the barrio or the barangay will be given a certain amount for community projects. For the government forests this bonus system still needs the legal approval. Private companies- have adopted it already with success. Some govern- ment foresters practice an indirect bonus system by giving employment for a certain number of days to people from barrios where there was no fire.
C) Burnina nermits:.Kainginzros'and pasture owners have to be requested to obtain a burning permit from the fire guard or district office. This permit is valid only for the day and
169

area indicated, so that the necessary precautions can be taken to avoid that the fire will spread into neighboring plantations.
d) Strict law enforcement and the heavy punishment oi the offenders can only be the last resort. Since it is easy to put fire on a plantation, but very"hard to catch' the offenders, strict en- forcement of forest laws may not be very effective.
e) Separation of forestry and qrazinq: See chapter .25 Part II and chapter 5.5 Part V.
f) Construction and maintenance of a forest road system.
Besides for effective management, an adequate road system is essential for transporting the fire fighters to any part of the area within reasonable time, after the outbreak of a fire was reported. A good road system also opens up the possibility to use a f 0 r e s t fire t r u c k, a vehice especial- ly qipped to deal with forest fires.
At present many places in the critical Binga-Ambuklao Water- shed.for example,can only be reached after many hours of ex- hausting hikes.
g) Measures t o reduce the fire hazard in plantations.
There are several species, which are able to sprout after a fire like teak, guava, some eucalypts and some legumes which should be given preference on dangerous sites. Pines are very sensitive to fire in their young stages, but become quite fire resistant once they are older and have developed a thick bark.
Large plantations of inflammable pines must be broken up by fire breaks consisting of less inflammable species with a dense foliage. As minimum width of these fire breaks 10 to 20 meters 2s suggested. The distance in between depends on judgement. It should be closer up and down the slope than along the contour. To shade out grasses quickly fire breaks are planted more closely than ordinary plantations,
170

Once established these fire breaks need no maintenance in
contrast to fire lines. In the Pinus merkusii plantations
of Sumatra extensive artificial fire breaks of Macadamia
hildebrandii (Proteaceae), which form a very dense canopy,
are effectively employed. If there are natural fire breaks
like creeks with a moist type of evergreen vegetation, these
must be carefully preserved. It is also advisable to estab-
lish fire breaks of broadleaved species, along roads passing
through the plantation areas.
Another measure to reduce fire damage are fire lines. These
fire lines are strips about 10 meters wide on which all in-
flammable vegetation is to be cleared at the beginning of
the dry season. The effectiveness of fire lines is disputed
among foresters. They may be able to stop a ground fire,
but they are easily crossed by sparks. Fire lines are laid
out in strategic positions, where the fire would burn with less intensity like along roads, ridges, creeks, etc.
21.4 Fire detection
It is not reliable to assume, that the people living in a certain area will report the outbreak of a forest fire to
the fire guard or the district office. Therefore it is
essential during the dry season to appoint fire guards and
to have fire patrols. These fire guards have to be super-
vised closely to be efficient in their duties.
Where large areas have to be guarded, it is advisable to
construct watch towers at prominent places, from where wide
areas can be overlooked. Because of frequent typhoons these fire look-outs must be quite solid. The uppermost platform
must have windows on all sides. At the center of the room
the so-called fire finder is erected, which consists of a
dial with a 360° subdivision and a sighting device. If the
fire guard notices smoke at a certain bearing, he will contact
the district office or any place responsible by phone or radio.
The message must contain the designation of the watch tower, the bearing of the fire, the estimated distance from the tower
171

and the probable intensity of the fire. When two fire guards report the same fire, the exact location of the fire can be
determined on a map.
Fig. 35: Location of a forest fire on a map, after the fire had been reported from two different lookouts.
21.5 Orqanization of fire control.
Every-district office and project office should have a plan
what to do, when a fire is reported. Instructions about the technical details of fire fighting are to be given to
the staff every year at the beginning of the dry season.
Arrangements should be made with the army to help in exten-
sive forest fires. The alarm plan must be hung visible in the office and include also the telephone numbers of the
nearest police station, nearest forest office, army head- quarters and hospital.
Vital equipment needed for fire fighting must be ready at
any time. This includes:
- a vehicle with sufficient gasoline,
- fire swatters, sharp bolos, spades, grub hoes,
- water bags for drinking water.

- a first aid kit eguipped for burns, cuts, Smoke poisoning, snake bites,
- helmets
Red arrows must be prepared to show the way to the meeting place. A person with organizing talent is to be appointed as the fire boss.
21.6 Fire Sunnression
There are several possibilities to attack a forest fire.It is up to the fire boss to decide on the proper method.
a) Direct attack A direct attack from the front is only possible in smaller forestafires progressing with low speed. If they are larger and progressing fast, a flank attack may be more.advisable. For very intensive fires burning uphill an indirect attack would be the safest.
In direct attack the.flames are extinguished with the help of long handled fire swatters or, if not available, with branches.. Intensive fires are first cooled and weakened by throwing mineral soil into the flames. The first aim in attacking the fire front is to create a gap. The second step is to widen this gap on both sides. Without actual experience one does not realize, how the flames will collapse on both sides of a gap only one meter wide (44). Attacking the front at first sight often appears to be impossible be- cause of strong heat, smoke and sparks. But when the wind changes the direction or the fire passes an area with le88
fuel, there may be chances for a frontal attack (44).
The use of fire swatters or branches in a frontal attack on a ground fire is.more effective, when several persons beat the fire simultaneously in a rhythm. When the heat radiation of the-fire does not permit to get close enough, soil will be thrown to suffocate the flames. Most effective is when several persons throw their load simultaneously to the 8-e spot. The bare places, from where the'soil was taken can Serve
173

as a fire line (44).
Where backsprayers and water are avaslable the frontal attack
is easier. The water spray is directed against the base of
the fire on the ground. The steam will cut off the oxygen
suPPlY= After the fire has been weakened by spraying, the
rest is done by throwing soil or beating with branches. Water
is used only where it is most urgently needed.
b) Defense measures or indirect attack
Defense measures include the construction of fire lines well
before the advance of the fire front. Already existing fire
lines have to be widened, if they are suitable, or new ones
must be laid out at strategic points. New defense lines are
preferably constructed on ridges, roads, trails, creeks, or
other natural fire breaks. In flat country bulldozers can
be used for rapid construction of defense lines.
DE FENCE LINE
Fig. 36: Defence line with counter fire
In the beginning it may be sufficient to have a width of about 50 cm, but the line must be strengthened later when there is
time. The more intensive the fire, the faster its progress,
the wider the defence line has to be. On steep slopes a wide
fire line is required.
When organizing the fire fighters for defense line construct-
ion, there are two possibilities:
- Each man is responsible for a complete section,
174

- Each man gets only a 3 m section to complete, then the
whole team shifts to another section.
AU vegetation on the fire line is cut and placed outside
about five meters away. There must be constant patrolling for weak points and eventual spot fires developing from sparks
beyond the line.
Sometimes forest fires had been successfully controlled with
the help of a backfire, which can only be started from a fire line before the fire front. It is allowed to burn
slowly in the direction of the main fire. If the counterfire has been successful, it soon will get into the suction of the main fire and approach the fir e front with increasing velo- city. When both fires meet, they die off due to lack of fuel.
In practice a counterfire often has increased the damage,
because it got out of control, AU the people working on the fire front have to be notified, before a counterfire is
started, that they will not be trapped between two fires.
Very often backfires have jumped the fire lines or have
escaped control at the flanks. While theoretically a counter-
fire seems to be the right thing to do, in practice it proved
to be difficult.
c) MoDpinq UP a forest fire
After the team is in control of the fire, all the burning re-
mains have to be extinguished very thoroughly until no embers
are left on the burnt over area. The mop up includes:
- separation of burning fuels,
- cover burning fuel with soil,
- strengthen fire lines,
- stay with the fire until all sparks are out.
After the mop up has been completed, a guard should stay be- hind to watch for any new outbreak. The man left behind should
be equipped with all necessary tools, food and water. Very often there is a new outbreak of the fire the following day . about noon, when a fresh breeze is coming up. It has often
175

happened, that the second fire did more damage than the first. Therefore adequate guarding of the burnt over area for one or two days is very important.
21.7 Eouiument for fire fiqhtinq
a) Fire swatters with flexible steel blades mounted on long handle8 (200 cm) are used to exting&?hLlight grass or ground fires. They,are more effective than pine branches, but a little heavy and difficult to use on steep slopes.
Fig. 37: Fire swatter
b) Bolo: A sharp bolo should be carried by every man pro- ceeding to the fire site. It is used to chop down branches to be employed as fire swatters, to clear fire lines and trails.
c) Shovels and hoes are only to be taken to the fire site where conditions permit their use.
d) Backpack IWKIP can: The tank contains 20 liters of water. The water is used only where it is most urgently needed: in frontal attack to create a'gap, to break up fire con- centrations, in mopping up remaining embers.
e) Containers for drinkinq water are equally important than the rest of the tools. Minimum 2 liters per person, better more.
f) First aid kit equipped to deal with cuts, burns, snake bites, etc. The first aid kit is the responsibility of the team leader. All medicine must be fresh and clean, and be replaced from time to time.

Chapter 22:
PREVENTION OF FUNGUS DISEASES IN FOREST PLANTATIONS
In contrast to temperate regions until now there were relatively few reports from tropical countries, that a fungus disease had become a serious calamity. The reason may be the heterogeneous composition of tropical forests, which had been a safeguard so far. But the trend now in tropical countries is also towards large even-aged stands for mass production of lumber and pulpwood. These extensive even-aged plantations often consisting of exotic specie8 replacing the native heterogeneous tropical forest may
cause a breakdown of'the environmental resistance, and increased incidents of fungus epidemics can be expected to occur in future.
Fungus attack on forest trees can have many manifestations:
- Damninu-okf" of young unlignified seedlings is found in moist, overcrowded seed beds or seed boxes (for more in- formation see Part IV, NURSBRY TECHNIQUES).
- Heart rot
- Rusts
- Root rot
is caused by fungus attack of the central tissue of
a stem, which is very common in overmature trees. Entry occurs through dead roots, dead branches or major stem injuries (Fomes,Ganoderma).
are caused by fungi of the order URODINALES. For their complete development many species need alter- nate hosts, e.g. the bamboo rust found on Dendro- calamus strictus needs the presence of Randia 8pp. (Rubiaceae) as an alternate host.
is caused by fungus infection of the root System and is responsible for the death of many tree8
17?

without a visible sign from outside (Armillaria mellea,Ganoderma spp.,Poria spp. and many others).
- Blights and mildews are caused by fungus attack on the needle or leaf surface. (Dothistroma, Botrytis)
Of the numerous parasitic fungi found in tropical Asia, the fol- lowing three are quite common and have economical importance:
- Armillaria mellea: This fungus is common in almost all the forest regions of the world, and attacks conifers and broad- leaved species. BROWNE (1968) describes the species as follows:
The fungus commonly exists as a saprophyte in forest soils but, once established on dead wood, it can become an active and virulent parasite. It spreads mainly by means of black, shoe- string-like rhizomorphs and enters living trees and shrubs through their roots or even through sound bark. The principal symptoms are thick layers of white mycelium between the dead bark and the wood and the presence of the characteristic black rhizomorphs. The foliage of the host becomes pale and thin, and conifers exude considerable quantities of resin. The fungus causes a fibrous white rot, in conifers usually confined to the sapwood, but in dicotyledonous trees often affecting the whole heartwood near the base of the bole and extending upwards in a conical column. The disease is favored by high humidity and is particularly dangerous where young conifer plantations have been established soon after the clearing of old, natural, broadleaved forest. The assessment of susceptability of different tree spe- cies is complicated by environmental factors and by the fact that the pathogen appears to exist in the form of a number of strains of varying virulence.
- Ganoderma lucidum (syn, Fomes lucidus): Also this species is a cosmopolitan parasite found in most temperate and tropical forest regions. It is essentially a wound parasite of broadleaved trees and found less frequently in conifers. Recorded hosts include ac- cording to BROWNE (1968): Acacia auriculiformis, Albizzia falcata Albizzia procera, Aleurites moluccana, Anacardium occidentale, Cassia javanica, Cassia siamea, Casuarina equisetifolia, Delonix regia, Eucalyptus citriodora, Mangifera indica, Pterocarpus
178
indicus, Samanea saman, Tamarindus indica. The fungus invades
the trees through the roots, especially trees with reduced
vitality, and causes a white soft decay in the lower part of
the stem. The sporophore, which often appears only after the
tree had been killed, is blood-red in color and has a varnish-
like crust (11).
Dothistroma pini (Pine needle blight) is found in temperate as
well as tropical regions. The disease only infects pines,
which show varying resistance depending on species. Infection
is most severe in dense overcrowded nursery beds, especially
in a humid climate, but the infestation can also spread to young
plantations. Characteristic symptoms are chlorosis and necrosis
of the needles, especially of the lower branches. The needles wither towards their tips, the basal part remaining green, and the lower needles of a shoot die first, producing a shaving
brush appearance. Growth may be considerably retarded or even halted, in heavy infections the mortality of young trees may be
high (11).
In the Philippines infestation with Dothistroma pini was observed
in seedlings of Benguet pine at the Pacdal Nursery, but rarely
in young trees of sapling size. P. caribaea seems to be quite susceptible to blight especially in a humid climate.
Preventive measures.
It is a well accepted fact among plant pathologists, that it
is much easier and cheaper to prevent a fungus disease than to
cure it. In forestry where a relatively cheap raw material is
produced under extensive management, a chemical fungus control in the field would be impossible. This situation is quite dif- ferent from agriculture where a very unnatural and artificial
balance is maintained by extensive use of chemical pesticides.
This is also true to some degree for forest nurseries. but for
plantations a chemical control of fungus diseases generally is
uneconomical, We therefore have to rely almost entirely on
preventive measures.
- Site requirements of the species must be properly observed.
It is well known, that species outside their optimum habitat,
179

where growth is somewhat affected,are more susceptible to
diseases.
- Planting a tree sp,ecies in dense and extensive artificial
stands, greatly increases the risk of forest diseases. Fungi
and insects, which occur only sporadically in a mixed natural
forest now multiply enormously because of a vast food supply.
Diseases, which affect only sick and dying trees in a mixed
forest (secondary diseases), may turn to healthy individuals
and become-primary pests. For effective prevention it is not
necessary to establish only mixed plantations, because
they have silvicultural disadvantages, but rely on species mixtures by blocks, which do not exceed a certain size. Mixing different age classes - not necessarily different species -
would also greatly reduce the risk of a mass infestation, be-
cause some fungus diseases have a marked preference for certain
age phases.
- Breeding and propagation of resistant provenances or strains
would be a long term project, but offers the best way of pre- venting forest diseases in the long run.
- Careless logging practices often cause serious injuries to the
residual stand. These injuries are often the entrance for
fungi which may destroy the entire stem. The official logging
instructions (Handbook on Selective Logging, Bureau of Forestry)
stress very much the importance of this point.
- An afiplication of a complete fertilizer with trace elements,
did in some cases improve the resistance against fungus dis-
eases in plantations and nurseries.
- There are a number of fungi belonging to the group of Urodinales
(rusts), which only thrive on alternate hosts. If we destroy the other host plant in the vicinity of the plantation, the
fungus cannot complete its life cycle. Many rusts with alter- nate hosts have been identified in temperate countries. In
the tropics, however, the rather complicated relationship be- tween the different stages of the fungus and alternate hosts
are not yet fully known for many species. As an example for a heteroecious rust from tropical Asia the bamboo rust (Dasturella
divina) may be quoted, which depends for ii 9 complete life cycle
180

besides bamboos on the presence of Randia SPQ., shrub8 be- longing to the Rubiaceae.
- Where old natural rain forest had been cleared for conifer plantations, heavy attack of Armillaria mellea was often observed. Where the attack is extreme other species which offer more resistance must be selected.
Chapter 23:
PREVE,NTION OF INSECT CALAMITIES
23.1 Common insect pests in forest plantations
During recent years there have been more and more reports from different parts of the Philippines, that plantations have been attacked by insects. For example: the mahogany shoot borer has heavily infested mahogany plantations in Nueva Vizcaya, Eastern Mindanao and elsewhere, bark beetles are destroying pines in the Mountain Provinces and the Cagayan Valley, termitesare eating newly planted seedlings, defoliators have stripped teak plantations in Nueva Vizcaya.
181

Research on tropical forest entomology is still in the begin- ning. Of the many hundreds of harmful forest insects the
biology of only a small number had been investigated so far. In the context of this book only a few species, which have
economical significance in the Philippines, can be described.
a) Bark beetles A bark beetle identified as Ips interstitialis, which is na-
tive to Central America and the West Indies, has become estab-
lished in the Philippines after the second world war (11) and
is causing extensive damage to Pinus insularis in the Mountain
Provinces. Reports about serious outbreaks, which resulted in
the death of many trees came from Itogon Reforestation Project, Ambuklao area, the Bobok Concession, Lagangilang Reforestation Project the Cagayan Valley and other places (13). The insect produces many generations a year and a large population is built up rapidly. The beetle is polygamous and the gallery pattern comprises a central nuptial chamber with in the average four radiating mother galleries and larval feeding tunnels.
Nuptial chamber
Entrance hole, pointing downward
Mother galleries
Larval feeding tunnel
Pupal cell with exit hole
Pig. 38: Typical gallery pattern of bark beetle
Bark bretles are essentially secondary pests, which in the first place attack trees, which had been weakened physiologi- cally after a forest fire or an unusually long dry spell. After the beetles have multiplied in those trees, they may also attack healthy individuals. The same can happen, when
182

the beetles multiply in logging debris, which soon dries up and
forces them to search for other sources of food.
Control
A chemical control of bark beeties on living trees is impossi-
ble, we therefore have to concentrate our efforts on preventing
an outbreak.
Since trees, which have suffered in a forest fire or long draught, are of magic attraction to the insect, fire prevention would be a very important preventive measures against mass propagation of
Lark beetles.
Also the site requirements of Benguet pine should be carefully
observed and it should not be planted on very dry sites, where
the trees offer little resistance towards the insect.
If attack on isolated pines is observed, these should be cut
immediately. It was observed in Consuelo Reforestation Project, that beetles and larvas of Ips interstitialis (?) were dead
within a few days after cutting the trees, which could be ex-
plained by the exposure to high temperatures. The beetles do
not seem to transfer to a new tree, after their host has been
felled. In high elevations, however, it may be necessary to
debark the logs.
Clean logging practices can minimize bark beetle attack in
logging areas. In Germany where bark beetle8 can be a serious problem, all coniferous logs have to be debarked right after
felling. A minimum requirement would be to transport felled
coniferous logs right after felling to the saw mill site or
log pond.
b) Teak defoliator-. (Hyblaea puera) (6).
The teak defoliator has a very wide natural distribution ranging
from Pakistan, the entire Indo-Malayan Region to New Guinea in-
cluding the Philippines.
Description
The moth has a span of 30 to 40 mm, the forewing shows variable
183

shades of grey, brown and red with suffused band8 of darker color. The hind-wing is dark brown with a curved orange band, which is sometimes broken up into patches. The larva, which reaches a size
of 30 to 35 mm, is at first greenish with a dark head, but later
become darker with a varying pattern of stripes (6).
Biolouy: During the day the moths are hiding in dark places. At night they fly and migrate considerable distances. Mating takes place 2-3 days after emerging from the pupa. The female deposits
500 to 600 eggs on the lower side of young folia'ge.
The larva cuts out patches of the leaves, leaving behind a skel- eton of the coarser veins only, young leaves are consumed entire-
ly. In the later stages the larva prepares a shelter by folding
over part of the leaf and spinning silk to tie the leaf together. The older larva8 consume all soft tissue, so that finally only the midrib and the stiffer side veins remain (the teak skeleton- iZer in contrast produce8 a finer pattern).
Pupation takes place in a leaf fold strongly spun together. If
not enough leaf material is left, the larva may descend on a silk thread to find new foliage or reach the ground.
Duration of life cycle:
Egg ....... 2 - 4 days Larva ...... 8 -17 days Pupa ....... 5 -13 days
The moth has a life span of about 3 months. In a warm climate
there can be up to 15 generations a year(6).
Asnects of damaae: The pattern of damage in a plantation generally is irregular. There are groups of trees or individuals, which are
completely defoliated, while their neighbors are spared entirely.
The intensity of infestation also varies with age. In India ac- carding to BEESON (1961) the infestation reaches a maximum in teak plantations of 20 to 30 years, but decreases thereafter
rapidly, which coincides with observations in the Philippines.
184

Though the trees are generally not killed by the defoliator, the increment is greatly reduced. The damage is more serious where young foliage had been destroyed, and not so serious, where de- foliation occurred toward8 the end of the growing season, because the leaves would be dropped anyhow. An almost 100 percent de- foliation WaS observed by the'author in 1973 at the Magat Re- forestation Project.
Possible ways of control: Chemical control is impracticable, we therefore have to rely on biological and silvicultural control measures. The natural vegetation of the teak area should be part- ly preserved, because it is important for the life cycle of some of the predators and parasites of the teak defoliators. The mixed natural vegetation contains a number.of shrubs and trees. which are the host plants of other defoliators (which do not attack teak). These defoliators on the other side are hosts Gf parasites, which also destroy the teak defoliator. For conditions in India there exists a list of tree and shrub species, which are import- ant for the life cycles of defoliator parasites and therefore considered desirable. This list include8 species of the following genera, which are al80 found in the Philippines: Caesia, Lagerstroemia, Bauhinia, Rugenia, Ficus, Grewia, Hibiscus, Ala- tonia, Albizzia, Melastoma, Solarium, MOrUS, Mangifera.
There are also species, However, which serve as alternate food plants for the teak defoliator and sustain a large number of in- dividuals during the time teak has no leaves. These species are considered to be undesirable near teak plantations. In this li8t BEESON (1961) include8 Gmelina arborea, Lantana camara and species of the following genera: Macaranga, Dolichandrone, Oroxylon, Premna and Vitex.
The best prevention against a widespread attack of the teak de- foliator would be the preservation of the natural vegetation along creeks, streams and other sites but eleminating the alter- nate host plants, where this is possible. In a larger teak area this natural barrier against infestations should occupy not less than l/5 of the tgtal area. The effectiveness of such natural reservoirs of parasites may be reduced. When abnormal weather
185

conditions cause a breakdown of the natural control factors and vaor the outbreak of a mass infestation.(6).
c) Teak Skeletonizere (Pvrausta machaeralis, svn. Hapalia macha- eralis) (63: The natural distribution of this insect coin- cities more or less with that of the teak defoliator.
Description: The moth has a wing span of 19 to 26 mm, the fore- wing is yellowish with zigzag markings of varying color. The hind-wing is pale with a reddish or yellowish marsinal line. The pattern and the color of the markings are very variable and can differ in different seasons. The larva, which can attain a length of 22 to 25 mm, is at first light green and turns brown or purplish later. The anal claspers or false legs are conspicuous (6).
Biology: A remarkable feature in the population of this insect is, that the females by far outnumber the males. The moths hide during the day in the undergrowth or dead leaves on the ground. Mating takes place the night after mergence from the pupa. About 250 eggs are deposited starting l-4 days after mating during a period of about one week. The eggs are deposited on both sides of the leaves. The lifespan of the moth is only about one month. The larvas hatch after 3 days and feed under a pztective cover of silk. All tissue between the network of veins is consumed leaving only a fine skeleton.
The later stages of Pyrausta machaeralis use a silken shelter with an escape hole, which enables them to retreat immediately to the other side of the leaf in case of danger. Pupation takes place in a thick shelter webb with an emergency exit on one side.
Duration of life cycle (6):
Bgg . . . . . . . . . . . . . 3-4 days Larval period . ..12-14 days Pupal period . . . . 5-7 days Pre-oviposition
period . . 3-4 days Total 23-29 days
186
Aspects of damas: The eggs are deposited on all types of teak
leaves, on the tender young leaves as well as the older ones.
The larvas are very active and make their own choice after
hatching. But in contrast to Hyblaea puera the larva of Pyraus- ta machaeralis are able to survive on old brittle leaves, there-
fore they are still found at the end of the growing season,when
H. puera is already absent. During the main growing season both insects are often found in association. Regarding the age classes the teak skeletonizer has the same preference as the teak defo-
liator (6). Control measures: the same as for the teak de- foliator.
d) Mahouanv shoot borer (Hypsipyla robustal
The mahogany shoot borer is a very important insect throughout
the tropics of the Old World and does extensive damage to tim-
ber trees of the Meliaceae family. In the Philippines notably Swietenia macrophylla and Toona calantas are affected.
Description: The moth reaches a size of 26 to 42 mm, the fe-
males being larger than the males, forewing brownish with a black design, hind-wing whitish and pale. The larva, which often changes color during its development reaches a size of
20 to 30 mm.
Aspects of Damaue: The attack is commonly noticed on saplings
and pole size trees, when the terminal shoot becomes dry and dies back. The result of repeated die-back is the formation
of a bushy crown, which retards the height growth and cripples
the tree. When the trees become older, they will be forked
and branchy. The insect has a marked preference for vigerous-
ly growing trees of sapling or pole size with sapy terminal
shoots.
The eggs are deposited at the new undeveloped leaves near the
tip. The larva feeds at first at the epidermis of the shoot,
until it finds a suitable spot to enter. Once established in
the shoot it excavates a tunnel in the pith, which may reach
60 cm in length. Sometimes a larva might even attack more
than one shoot. On the entire length of the tunnel the shoot
dies and breaks off. Within the tunnel the larva constructs
187

partitions of silk at intervals, which prevent entering of pre-
dators, parasites and rain water (6,19).
Possible Control: Since the larva is-well protected inside the
shoot, chemical control cannot be effective. Cutting and des-
troying of infested shoots is also difficult in large planta-
tions. Again this leaves only preventive measures.
It had been observed, that especially young vigorously growing
trees with sapy terminal shoots had been attacked. This was
sometimes the case, where mahogany was planted on very fertile
sites resulting in very vigorous height growth. Older trees,
however, beyond pole size, which do not produce long terminal
shoots any more, are only seldom attacked. On these observa-
tions the preventive measures are based:
It is important not to stimulate the growth of mahogany in the
early years by fertilizer application. On very fertile sites a light shade of Albizzia falcata planted a few years'ahead
would prevent the formation of long terminal shoots, and render
the plants less attractive to the shoot borer. Where infesta-
tion is severe BEESON (1961) recommends a close spacing to re-
duce the development of vigorous lateral branches, which other-
wise may be attacked as well. Also mixed planting with ipil- ipil (Leucaena leucocephala) in alternate rows could reduce
Hypsipyla infestation, because the faster growing ipil-ipil provides a beneficial lateral and overhead shade.
From experience in West Africa it appears, that enrichment
plantings of Meliaceae on cleared lines in secondary forest
suffered less from shoot borer attack than open plantations (40).
e) Pine shoot moth
The scientific identity of the pine shoot moth has not yet
been established. The insect, which is considerably smaller than the mahogany shoot borer, causes serious and wide spread damage to Benguet pine (13). Infestation takes place mainly during the dry season, between December and May. The infested shoots become limb on the length of the tunnel, then turn
brown and fall off. The effect of repeated attack is,
188

that the pines become very bushy, height growth is retarded, and the trees are crippled. Not only the terminal, but also
all lateral shoots can be attacked. Infestation is most
severe in pines below 5 meters in height.
From observation it appears, that infestation can reach 100
percent, where Benguet pine is planted below its natural
lower limit of distribution, which is about 800 meters above sealevel. The extremely poor shape of Benguet pine planted
around 300 to 500 meters above sealevel (Binga, Magat, Laga-
ngilang) can perhaps at least in part be attributed to the
pine shoot moth.
The best way of preventing the infestation therefore is to
observe the altitudinal limit of Benguet pine and not to
plant it on sites lower than 700 to 800 meters in Luzon.
23.2 Natural control factors auainst insect calamities (6,191.
The population density of noxious forest insects is subject
to wide fluctuations. Animal populations in general have a
tendency to be in balance with their environment. If the environmental conditions change, the density of the insect population will change too.
Though many of the forest insects have a tremendous repro-
duction potential, their abundance does not grow without limits. There are natural control mechanisms which inhibit
unlimited growth of the insect population. Such natural control mechanisms are for example:
- limited food supply
- host resistance
- climatic factors
- diseases, parasites and predators
All these factors combined constitute.the environmental re-
sistance against the outbreak of a pest. If any of these mechanisms fails, we may have to face a calamity.
(a) Limited food supply: In a natural forest the food situa-
tion for a specialized insect is not very favorable for
. 189

mass propagation. The insect has to cover some distance from
one host tree to the next, while it is exposed to predators.
The discovery of new host trees, after the supply in one place is exhausted, may present physical difficulties. It may also
not be easy to find a mate on widely scattered host plants.
The trees even of the same species may belong to different
age phases. But many of the important forest insect have a
marked preference or even depend on a certain phase of the
host. All these factors contribute to the resistance of a
heterogeneous forest.
In a dense pure stand without ground vegetation the conditions
are just opposite. The insects will encounter a vast concent-
rated food supply without having to waste energy in searching
for food and can.multiply enormously. The poorly developed ground vegetation will be unable to support many parasites and
predators, which could keep the insect population at bay.
b) Host resistance: Most trees offer at least some resistance to
insect attack. Some species may simply not be palatable to
the insect, others may contain substances, which deter certain pests, others again may be resistant as long as they are in
good physiological conditions. If healthy pines are attacked by bark beetles, these will be often drowned in a flow of resin. Only after a healthy tree has been weakened by repeated attacks,
the insects finally are able to enter. Trees, which have suffer-
ed physiologically and especially those, where the cambium is
already in a state of slight fermentation, exert a magical
attraction to some borers. Trees which exude latex (Moraceae, Sapotaceae) easily repel insects entering through the bark. Generally woods with a high lignin content are quite resist-
ant against termites, those with a low lignin content most susceptible (6).
An indirect resistance to defoliators is also found in teak,
which is able to produce a second set of leaves during the
same season, after the first had been destroyed, as could be observed during the defoliator outbreak at Magat, 1973.
190

c) Climatic conditions: Also the normal climatic conditions
have their part in the environmental resistance against a
pest. We can feel this clearly in years with exceptional
weather conditions, which can often be the ultimate cause for the mass reproduction of destructive insects. Exceptionally
dry and hot years may lead to an increase of insects, which
are not frequent in normal years. The insects may be able to complete their life cycles faster than normal because
of higher temperatures, the hosts may offer less resistance
due to draught, losses in the insect population from heavy rains may be reduced parasites may not find their optimum
conditions, all factors combined may lead to an outbreak of
epidemic proportions,
d) Diseases parasites and predators play a very important role
to keep the population of noxious insects low. The number of
the natural enemies of insects is very high, and biological
control is mainly the activation of these diseases, parasites
and predators. The most important groups according to BEESON
(1961) are:
- Fungus diseases: For example, a parasitic fungus, which is
important for the biological control of tine Coconut beetle
(Oryctes rhinoceros) ,is the green muscardine fungus
(Metarrhizium anisopliae). Beauveria bassiana often kills Hoplocerambyx spinicornis, a cerambycid beetle that does serious damage to dipterocarps.
- Virus diseases in insects are also known as polyhedral diseases.
In the caterpillars of Hyblaea puera this is characterized by
complete disintegration of the larval tissues which turn into
a liquid containing millions of polyhedral particles.
- Parasites of importance include mainly wasps of the Ichneumo-
noidae and Braconidae. Both large groups of Hymenoptera are well represented in the Philippines. Their hosts include larvae
and pupae of Lepidoptera and sometimes wood boring Coleoptera.
The eggs are deposited on the host, the larvas feed outside or inside the host and pupate later inside the body or the cocoon
of the dead host.
191

Because of their high reproduction potential these wasps have
a very important function in the natural control of lepidop-
terous pests such as the teak defoliator.
- Predators: There are numerous insects preying on other insects,
they also play their part in the environmental resistance
against mass reproduction, namely mantids ("walking stick"),
dragon-flies, certain wasps, some Coleoptera, spiders, and
perhaps most imwrtant because of their number, some species
of ants. One group of ants, the Ponerinae, has specialized on
insects entirely.
Almost all species of birds, even the graminivorous species
feed on insects.at least during part of the year when feeding
their offspring. Nestling consume more than their own weight
in insects every day.
In Europe a pair of titmice (Parus major), a little bird simi-
lar to the Philippine titmouse (Parus elegans), which breeds
twice a year and feeds entirely on insects, with its offspring
is estimated to consume 100 kg of insects during one year.
Inspite of the huge quantities of insects devoured by birds
their importance in natural control should not be overestimated as pointed out by BEESON. While the parasites like Ichneumonoidae
and Braconoidae are able to multiply along with the mass repro-
duction of noxious insects, the density of the r e s i d e n t
bird population cannot increase quick enough, and may be power-
less to check the violent fluctuations in the occurrance of
insects.
Usually a mass propagation of insects is followed by an increase
of diseases, parasite& and predators, which will finally gain
control and keep the noxious insects down for some time. But
then with the number of hosts diminishing, the parasites and
predators also become less and the insect population can built up
L again. So*the cycle of mass propagation recurs presenting an oscil-
lating curve. A chemical control at the height of an epidemic is
generally not recommended, because apart from the high cost, it
192

only prolongs the natural course of the epidemic and kills
the useful parasites and predators as well.
For more information on forest insects and their control in
tropical Asia consult BEESON (1961) on whose work this chapter
is partly based.
Chapter 24:
RODENT CONTROL IN PLANTATIONS
Rodents can be a serious menace to plantations especially
where a new species had been introduced. Damages are usual- ly high on warm southern slopes with a thick cover of dry
grasses.
The rat or mouse often eats at the base of the seedling either killing it by girdling or bringing it to fall and
then eating the green shoots and leaves.
It was observed that especially species that were newly in-
troduced to an area become easily the victim of rodents. In
Binga during the heavy infestation of 1970/71, rodent'damage
was observed,on mango, nangka, alibangbang, kalantas and
occasionally even on pines.
193

As insect populations, also the rodent population is subject
to violent fluctuations. The reasons.are not yet fully underr
stood.
Possibilities of rodent control:
24.1 Poisoninq: Where only an isolated plantation of limited ex-
tent is to be protected, poisoning may not give the desired
result,in the long run because of new invasion from surround-
ing areas. Poisoning therefore generally works better on a
larger scheme, where also cost per unit of area is lower.
There are two groups of rat poison available: acute poisons like zinc-phosphide and c h r o n i c poisons such as Coumatetralyl or Chlorophacinone, which is known under
the trade name Racumin.
Acute poisons are generally used in the initial stage of
rodent control to knock down a high rat population. But the
rats soon develop a bait shyness, because the animals die
right after feeding on the poison. For forestry purpose the chronic poisons such as Racumin seem to be preferable.
Racumin which contains 0.5% active poison is mixed with corn grit("binlid" or "pegpeg") at a rate of 75 g to one kilogram of grit.
Containers or baiting stations: To avoid damage to livestock and to protect the bait from rains, the poisoned bait is
placed in se-called baiting stations. V&y convenient are bamboo tubes at least 12 cm wide, which had been prepared
by cutting half of the dividing internodes on both ends as
illustrated below.
After the containers have been half filled.with the bait,
they are placed on supporting sticks about 4 cm above the
ground. To make them more enticing to the rodents, they are covered with dry grass as a camouflage. The location is marked with a guide pole. The average distance between the baiting stations should be about 50 m, but slightly
closer towards the edges of the plantation. The baits have
194

to be inspected once a week, and consumed bait is to be re-
placed. It takes 3-4 days for the rats to die after feeding
on the poison.
LEVEL OF POISON BAIT WHEN FULL
. .
Fig. 39: Placing of baiting stations in the field
24.2 Repellents: Where only a few seedlings have to be protected,
repellents may be quite effective without having to start
a poisoning campaign. Repellents can be prepared from a mixture of cows urireor cows blood, slaked lime, coarse
sand and a bright dye (blue or yellow). This mixture, which
is harmless for the seedlings, is painted to the stem with
the help of a double brush during dry weather.
24.3 Other protective measures: Protecting the lower stem of the
endangered species seernsto work quite well, because some of
the rodent species apparently do not climb. A suitable and cheap protection would be split bamboo tubes about 25 cm
long where the internodes had been removed. The two halves
of the tube are placed around the seedling and tied together
with string (fig. 40).
195

Fig. 40: Rodent protection with a bamboo tube
Chapter 25:
CONFLICTS BETWEEN FORESTRY AND CATTLE RANCHING
25.1 Aspects of damaqe by cattle ranchinq
The Philippine rules for land classification specify, that
land over 18 percent slope is to be declared as permanent
forest or forest reserve, but pasture leases can be granted for land up to 50 percent slope. This implies, that on land
between 18 and 50 percent slope both forms of land-use have
to exist side by side, and there is bound to be a conflict of interests between forestry and range management. In prac-
tice, however, in addition grazing is found on slopes even
196

ceding 50 percent extending well into the domain of the pro-
-ion forests.
damage done by the grazing animals themselves is generally
Ll compared to the damage done by pasture burning. Since : pastures consist of cogon (Imperata cylindrica and I.
Ltata), they are burnt annually to induce fresh growth of &able young shoots. This practice is not found only in the Lippines, but common throughout the tropics.
damage done to forests and watersheds by the annual fires
zeds the meager returns from meat production several times,
&use many areas have only a carrying capacity of one cow for
actares or even iess.
:he pine region of Northern Luzon the impact of the fires
Iinating mainly from pastures can be clearly seen. All the
lg natural regeneration and a few of the large trees are
ted each year. As a result the stands have become very open lave disappeared completely. While on the other side it is zly, that the natural regeneration of Benguet pine is favored
occasional fires exposing the mineral soil, a n - a 1 fires will definitely destroy it.
lared to the damage byc‘fires, the damage by browsing is re- iveiy Small; a.S illrrg Z-9 ye+= dr? r\-Qt =P.ter k5.e Qennn Goats YbZ**T.
most destructive eating almost everything. They are able to
:h relatively high into the trees, when the ground vegetation lepleted. cows * carabao and horses do much harm by trampling luse of their weight.
41: Pattern of browsing trails in overgrazed pasture land in the hills
grazed slopes with too many animals show a definite honey
1 pattern of browsing trails visible from a distance. In
197

these trails the water accumulates, and they become the
starting point for erosion.
25.2 Possible solutions.
a) All pasture licensees should be required to fence their
pastures and adopt a system of rotational grazing.
b) Burning of pastures in forest areas is to be strictly pro-
hibited. Pasture licensees outside the forest areas have
to obtain a burning permit and are required to construct
fire lines. The licensee is to be held responsible for any
fire spreading from his pasture into plantations or other
forest areas.
c) Grazing and forestry have to be separated because of their
conflicting interests. In neighboring Taiwan no grazing is
permitted in forest areas. In C. Europe, where forests were
suffering under the burden of traditional grazing rights,
the separation was accomplished during the 19th century. As a long term policy goal the same is suggested for the Philip-
pines.
As a first step a revision of all existing 3636 pasture leases
(figure of 1972) is suggested to investigate, if they realiy
meet the requirements set forth in the Philippine forest laws.
Ail leases on uns-citable land must be offered a transfer to
more suitable areas or cancelled.
d) The remaining pastures have to improved in a way that they
do not need burning. This is possible by introducing valuable
African forage grasses such as Pennisetum purpureum, Panicum
maximum and others. Another possibility would be the culti-
vation of leguminous trees such as ipil-ipil (Leucaena leu- cocephala) and its giant variety or catiirai (Sesbania grandi-
flora), whose foliage is nutritious and provides excellent.
forage. "Tree pasture" would be suitable ifor beef and milk cattle likewise. For more information on this subject con-
sult Chapter 5.5, Part V of this book.
198

(21
(31
(4)
(5)
(61
(7)
(8)
(9)
(10)
(11)
ANDRES, P.P., 1969, Pulp and paper industry in the Philippines.
Reforestation Monthly VIII (4-S), Manila
ANDRES, P.P., 1969, Field planting methods and techniques.
Reforestation Monthly XIII (g-lo), Manila
ANDRES, P-P., 1970, Approaches to our reforestation problems. Reforestation Monthly IX {lo-12), Manila
BARNARD, R.C., 1956, A manual of Malayan silviculture for
inland lowland forests. Part IV: Artificial regeneration. Research Pamphlet No. 14, FRI, Kepong, Malaysia
BAULE, H. et FRICKER, C., 1970, The fertilizer treatment of Forest Trees BLV. Munchen
BEESON, C.F.C., 1961, The ecology and control of the forest insects of India and the neighbouring countries. Govt. of India, N. Delhi
BINUA, T-M., 1969, Stump and seedling planting of teak in Cebu
and Bohol. Reforestation Monthly VIII (7-S), Manila
BINUA, TM., 1970, A primer on tree surgery.
Reforestation Monthly IX (4-S), Manila
BREWBAKER, J.L., PLUCKNETT, D.L., GONZALES, V., 1972
Varietal variation and yield trials of Leucaena
leucocephala (Koa Haole) in Hawaii. Hawaii Agric. Exp. Station, Research Bull. 166
BROWN, H-W., 1920, Minor products of Philippine forests.
Manila, 2 Vols.
BROWNE, F.G., 1968, Pests and diseases of forest plantation
trees. Clarendon Press, Oxford, 1330 pages
199

(12)
(13)
(14)
(15)
(16)
(17)
(18)
(19)
(201
(21)
(22)
(23)
224)
(25)
200
BUREAU OF FORESTRY, 1970, Handbook on Selective logging.
2nd Ed. Manila
CALEDA, A.A. et VERACION, V.P., 1960, New insect pests of
Benguet pine. Philipp. Journal of Forestry XVI
(l-2), Manila
CATINOT, R., 1965, Sylviculture tropical en for& dense
africaine. Bois et For& Tropigues, No. loo-104
CHAMPION, H.G. et GRIFFITH, A.L., 1960,.Manual of general
silviculture for. India, New Delhi
CHAMPION, H-G. et BRASNET, N-V., 1958, The choice of tree
species. FAO For-.?stry Development Paper No. 13, Rome
COOLING, E.N.G., 1968, Pinus merkusii, Commonwealth Forestry Institute Oxford
DAWKINS, H.C., 1958, The management of natural tropical high
forest with special reference to Uganda. CFI, Oxford
DEBACH, P., 1970, Biological control of insect pests and
weeds. Chapman and Hall Ltd., London
DEICHMANNN, V. Von, 1967, No@es sabre sementes e viveiros
florestais, Curitiba/Brasil
DELIZO, T-C!., 1964, Forest nursery and plantation handbook
for the Philippines U-P. College of Forestry Los Baiios
DOMINGO, I-L., 1966, Survival and growth of Moluccar sau
in Mt. Makiling as affected by planting, spacing and
kind of planting materials. Forestry Leaves 17 (2-3)
DOWNING, A-J., 1859, Theory and Practice of landscape gardening. 6th Ed., Funk and Wagfialls, New York
ESCOLANO, J.O., NAVARRO, J-R., VISPERAS, R-V., 1974
Kraft pulping of some Philippine non-commercial
hardwoods. The Philippine Lumberman, July 1974
FONTANILLA, F., 1969, Minimizing forest fires through extension services. Reforestation Monthly IX (4-5), Manila

(26) FOOD AND AGRICULTURE ORGANIZATION OF THE UNITED NATIONS,
1967, An international review of forestry and forest
industries. Unasylva XXI (86/87), Rome
(27) FOOD AND AGRICULTURE ORGANIZATION OF THE UNITED NATIONS,
1970, Fertilizers and their use. Rome
(28) FOOD AND AGRICULTURE ORGANIZATION OF THE UNITED NATIONS,
1971, Demonstration and training in forest, forest
range, and watershed management. Technical Reports
No. l-7, 9, 10
(29) GANGULY, J.K. et KAUL, R.N., 1969, Wind erosion control Indian Councel of Agricultural Research, Tech. Bul.
No. 20 New Delhi
(30) GOOCH, W-L., 1953, Forest industries of the Philippines.
Bureau of Forestry and United States Mutual Security
Agency Manila
(31) GOOR, A.Y., 1963, Tree planting practices for arid zones. FAO Forestry Development Paper No. 16, Rome
(32) GOZE, R. et BRIONES, R., 1970, Forest Fires: protection and
control mimeographed, Bureau of Forestry
(33) GUSSONE. H-A., 1964, Faustzahlen fiir die Dxiiingung in Walde.
(guide lines for fertilizer application in forests)
(34) HENGST, X., 1954, Praktische Kultur-und Jungwuchspflege
(the practice of tending) Schriftenreihe "Waldarbeit
leicht gemacht" Heft 9
(35) HESMER, H., 1966, 1970, Der kombinierte land- und forstwirt-
schaftliche Anbau. Part I: Tropisches Afrika, Part II:
Tropisches und Subtropisches Asien. Wissenschaftliche
Schriftenreihe des BME No. 8 6 17, Bonn
(36) JACALNEi, D.V., 1960, Edible fruit bearing trees of the
Philippines. Forestry Leaves XII (1)
(37) JUNG et RIEHLE, Beurteilung und Behebung von Ernarungsetg-
rungen bei Forstpflanzen.
(38) KIMBALL, E., 1969, Critical fire control problems threaten
Cordillera, Zambales Mountains. Reforestation Monthly
VIII (3)
201

(39)’
(401
(41)
(42)
(43)
(44)
(45)
(46)
(47)
(48)
(49)
(50)
(51)
(52)
(53)
(54)
KURATORIUM FUR WALDARBEIT UND FORSTTECHNIK, 1971, Chemische Kulturund Jungwuchspflege mit Herbiziden. Forstar-
chiv 42 (5)
LAMB, A.F.A., 1972, Tropical pulp and timber plantations.
Paper No. 46, 7th World For. Congr. Buenos Aires.
LAMB, A.F;A., 1973, Gmel.na arborea. Series: Fast growing
timber trees of 7che lowland tropics. Oxford
LETouRliEux, c., 1957, Tree planting practices in tropical
Asia. FAO Forestry Development Paper No. 11, Rome
LEWIS, N.B., 1962, Some effects of thinning on value product-
ion. Australian Forestry 26 (1)
LIEBENEINER, E., 1968, Bek&npfung von Waldbranden, Moor-
brgnden, Heidebrbnden. Kohlhammer Verlag Stuttgart
LIZARDO, L. et CALEDA, A.A., 1959, Survival of pines in
grass fires. Bureau of Forestry Research Note No. 51,
Manila
LIZARDO, L., 1960, Results of trial plantings of Eucalyptus
in the Philippines. Philippine Journal of Forestry
XVI (l-2)
LOYCKE, H-J., 1963, Die Technik der Forstkultur. BLV Munchen
MCCLURE, F.A., 1966, The Bamboos
MACMILLAN, H.F., 1956, Tropical planting and gardening.London
MAURICIO, F.P., 1957, A preliminary study on the behavior of
wild dipterocarp geedlings when transplanted in the
forest. Philipp. Journal of Forestry 13 (3-4)
METRO, A., 1955, Eucalypts for planting. FAO Forestry and Forest Products Studies No. 11, Rome
MONSALUD, M.R., 1968, Traditional and new uses of Philippine
woods. Forestry Leaves XVIII (3)
MONSALUD, M.R. 1971, Possible solution to kaingin problems.
The Philippine Lumber Man, April 1971
MiiLLER, R., 1959, Grundlagen der Forstwirtschaft. Hannover
202

(55)
(56)
(57)
(58)
(59)
(60)
(61)
(62)
(63)
(64)
(65)
(66)
(67)
(68)
(69)
(70)
PARRY, M.S., 1956, Tree planting practices in tropical Africa.
FAO Forestry Development Paper No. 8, Rome
PHILIPPINE COUNCIL FOR AGRICULTURAL RESEARCH (PCAR), 1975,
Philippines recommends for the production of fast
growing hardwoods. Los Bafios
PRESIDENTIAL COMMITTEE ON WOOD INDUSTRIES DEVELOPMENT, 1971,
Philippine forestry and wood industries development.
Agr. Inf. Div., Manila
REFORESTATICN ADMINISTRATION, 1968-1971, Annual Reports No.
9-11 Manila
SABADO, E., 1969, An annotated bibliography of forest tree
diseases in the Philippines. Bureau of Forestry,
Occasional paper No. 33 .
SCOTT, C.W., 1960, Pinus radiata. FAO Forestry and Forest
Products Studies No. 14, Rome
SMITH, D.M., 1962, The practice of silviculture. New York
STEINER, M.L., Philippine ornamental plants. Manila
SURI, P.N., 1959, Tree planting practices in temperate Asia.
FAO Forestry Development Paper No. 14, Rome
TOUMEX, J.W. et KORSTIAN, C-F., 1967, Seeding and planting
in the practice of forestry. 3rd Edition
VIADO, J., 1970, Problems and policies on forest conservation.
Reforestation Monthly IX (l-3), Manila
WHITFORD, H.N., 1911, The forests of the Philippines.
Manila, 2 Vols.
WORMALD, T.J., 1969, A nursery handbook for the Philippines.
Reforestation Administration, mimeographed
WORMALD, T.J., 1969, Experiments undertaken in cooperation
with the Reforestation Officer. Ref. Administration,
mimeographed
WIEDFMANN, E., 1951, Ertragskundliche und waldbauliche
Grundlagen der Forstwirtschaft. 3 Parts
WYATT-SMITH, J,, 1963, Manual of Malayan silviculture for
inland forests. Malayan Forest Record No. 23,2 Vols.,
Kuala Lumpur
203

P A R T III.
ELEtMENTARY COMPASS SURVEYING AND MAPPING
J. GUMWAGAY and S. FESTIN
Chapter 1:
COMPASS SURVEYING AND RECORDING OF FIELD DATA
Basic knowledge of forest surveying and mapping is indispen-
sable for efficient planning and management in reforestation,
like in any field project in forestry.
The first step in the establishment of a reforestation project
is the planting survey, after which a map has to be prepared. Only after an adequate survey the area can be divided into
blocks and compartments or sub-compartments. As the project progresses, a series of surveys are carried out for planning
and management purposes.
For all such survey works, the forestry box compass is of very practical use. In special cases, a more precise instrument
has to be used, but where a compromise between speed and ac-
curacy is acceptable, the Bureau of Forest Development has
adopted the forestry box compass as a standard surveying in-
strument.
The following guide, which deals solely with elementary compass
surveying and mapping, is intended for use in refresher courses.
It is based mainly on the Manual of Procedure of the former
Bureau of Forestry.
a) General orientation:
Consult a land classification (L.C.) map or .any forestry map
to get an idea about the location of the area to be surveyed.
Determine at least two possible tie points, preferably forest . zone corners or natural land marks like junctions of rivers,
207

mtqhv S/GWT i -l
Fig. 1: The Forestry Box Compass
208
-covaw

roads or trails shown in the map. Sketches of adjacent areas previously surveyed, if any, are likewise useful references.
b) Index numbers:
Each survey conducted has to be assigned an index number for
reference purposes. Get the allocation of index numbers from the District Forester, Forester in Charge or Officer in Charge
who must always keep records of index numbers issued to or
used by personnel under them.
c) Tie Points:
Before starting to survey, orient yourself with the area and locate your tie points. As a general practice, a survey must
start from a point known in the map and later on tied to another
as a check of accuracy. For that matter, if a survey starts from a point unknown in the map, it has to be tied to at least
two known points.
d) Field notes:
Start supplying the information needed in the field note cover
and in the field note itself: the rest upon completion of the
survey (see fig. 2). As a rule, recording of field data starts from below. At the bottom of the field note, write station 1
and its description. Example: Molave, 30 ems diameter, at the
junction of Balincaguin River and Mapitpit Creek, Bo. Villa-
corta, Mabini, Pangasinan: or Corner 4, Alienable and Dispos-
able Block I, L.C. Project No. 10, Olongapo, Zambales.
e) Recordinu of compass bearinq:
Occupy station 1, facing in the direction of station 2. Hold
the compass steady in both hands with elbows pressed against
the body. Then sight station 2 by pointing the front sight
of the compass (see Fig. 1) to the station observed. When the needle stops oscillating, read the bearing quickly to the
nearest degree. Record the compass reading under the column provided for, in line with station l-2. In using the compass,
see to it that it is free from the effect of magnetism due to
iron objects carried by yourself or in nearby surroundings.
209

svryy af Trail and L.C. line
+ Ca. 3 A.dLZ. Mock- I. hjcot NO.
15-D. Dmdu&cui. Etahan = Molwe 30
cm.. Ecbs+ lank of Lmqan Cmck.
ta t3Mian 275/19 = s3.on (
southtnnko$Tubodcrtak
Provinccd tfMual
l.Oca.tiOn Irkni+&y
i
%mlupihan
bo q Banekcd
i
f?agedea- ra: L. coirimIs
BY Ccmpossman
I
G&n, sfadha or pa&g 2SM.
OiledoubbpacL mh-
nsbuments mad m% cm’Po8s
hmbsr of kilometevx wrveyad 2.115
3ate i!
19 --: I
FOREST’ STATION
INDLX No. 270
(back oi field Notes Cover)
Fbmmcs of.. ...................... ShdNo2 ....
sulltc!y of ............ Iran ...................
To.. ................ Dota:. ...... . 19.. .... . , . . . . . - _ _ . . Ch dwbla PQCG . . _ _ .mh...
14-15 u23C a-14 N 12 E
7-10 td 6 W 120
7-9 D- f. 300
1-2 h’78E I IO0 I I
Ia ~&&an. Sat& 3 A40 SLoch I m-g. ua. m-0 of
Fig. 2: Survey field notes

To check the accuracy of the compass reading, get the "back
bearing" upon reaching station "2" or the station observed.
f) Field sketch
Examine carefully the general direction of the survey and
start sketching at the back of the field note cover by
placing a dot as station "1" on the side opposite 2ne general
direction of the survey. Orient the sketch such that the
upper portion, as in a map, denotes the North direction. As
you proceed to the next station, take note and draw care-
fully the vegetative covers, improvements and natural land
marks you come across. In the sketch, show by arrow, the
direction of roads, trails and flow of streams, the bearings
of which must also be taken so that these details can be in-
dicated accurately in plotting the field notes.
Show the approximate extent of different vegetative covers by
light lines (Fig. 3 and 4) and indicate them by conventional
abbreviations as listed below:
Cultivated - - - - - - - - - - Cult.
Open or grass land - - - - - - Opn.
Brush land - - - - - - - - - - Br. Kaingin ----------Kgn.
Non-commercial forest - - - - NCF. CommercFal fore& - - - - - - CF.
For more conventional abbreviations see Appendix.
g) Measurinq and recordinq of distances:
Measure the horizontal distance and record it under the column
provided for, and in line with station 1-2. In the absence of
a tape or chain, a rope with a meter graduation can be used.
For rough surveys, measuring of distance may be done by pacing.
Forest Officers should have their own standard "double-paces".
When measuring a distance on a slope, take the horizontal dis- tance by "breaking chain" or from a slope reduction table. Map
distances are projections of horizontal ground measurements.
In the field sketch, draw line "l-2", at a convenient scale
in a direction following more or less the bearing of the line.
211
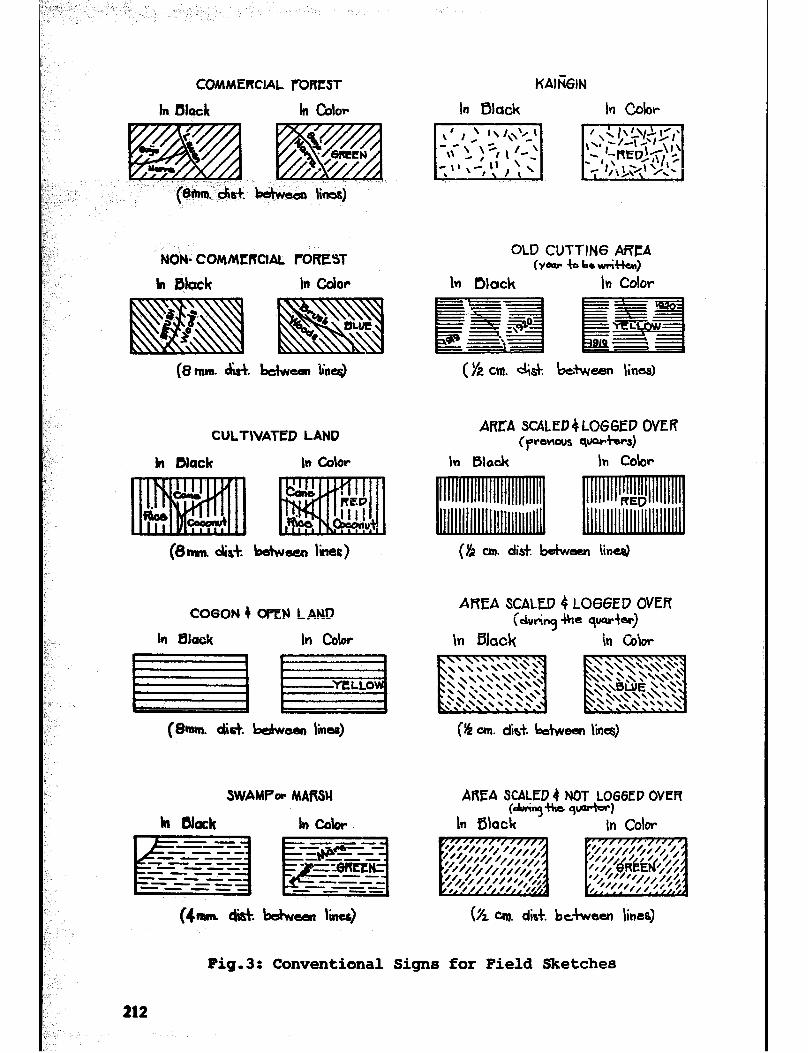
COMMERCIAL l’-ORCST
h black In Color
NON- COMMCRCIAL f”OREST
h Black In color
(8m~n. h-k bciwem be$
CULTIVATED LAND
h black In chlor
(8mm c4o-k bdwsur liner)
COGON 4 W‘EN LAND
In Ulach in cokw
lizzil (&tn. diS+.
SWAMPe MARSU
h black in c&v m-
--- ----
----
Y
-r-m- - ---
---- w- ---
-=-x7= z: -
KAli&IN
In Black In Color
OLD CUTTING AREA (yeur A- bc+wriClcn)
In black In Color
(j$! CM. 4& bctwW \in68)
ARfA SCALED4 LQG6ED OVER (prowus su4-rS)
In Black In Color
($2 Cm. disk bubeem lines)
AREA SCALED 8 LOtSED OVER C&I&~ -Ibe q’w”isrj
\n Sack in G&r
(L an. dis+. bc~tvveef~ line6)
AREA SCALED 4 NOT LO66EP OVER (ak;ng+)Ic q-w
\n fflock In Color
(Yz ~rrr. dir+. behmeo lima)
Fig.3: Conventional Signs for Field Sketches
212

WAGON ROADS
HORSE TRAIL............=======
PATH or TRAIL. . . . . . . . . . ..e----*.__-+----*
SURVEY LINE............)
Established corners.....m
Stations................0
PATROL ROUTES
wagon.. . . . . . . . +l,+H1+
Foot .......... ; , ;
Track ...... ..-
RAILROADS Track ..... ...+
Proposed ---HH.HH
TELEGRAPH or TELEPHONE LINE. . . . . . . . . ..TTTTTT
BRIDGE (in general)....
FORD...................
DAM....................
CANAL or DITCH.........----- SAWMILL PORTABLE............-
AQUEDUCT or WATER PIPE.............---- ----
COAST and BEACH......
LAKES and PONDS . ..---4&
INTERMITTENT LAKES...>+$$+$+ *..-- HUD
SPRINGS and SINES....
RIVERS (!
sTR:AMs
CREEKS
‘\ RVEYED)....- -
, \ Under 5 ms. ! Wide . . . . . . . qJA-9
Over 5 ms. /' lr10 Fordable --•qy=-
l .
Over 5 ms. not fordabl
FALLS................ B
RAPIDS...............
INTERMITTENT RIVERS..z:::9
RIVERS or CREEKS NOT SURVEYED.........= - ----y+
CONTOUR SYSTEMS ......
TOWNS ............... .3@i::&c
BARRIOS..............-Il x5 s*L?pj ma
SITIOS............... /2~=-"\,-'-"--
LOGGING CAMP ft 0 . . . . . . . . . . . . . . . .
FOREST CAMP .I............... A
SAWMILL STATIONARY..........Ir.
Fig.3 (continued):Conventional signs for field sketche8
211

WATER POWER MILL........ f-r* t b*
ARTESIAN WELL.............UmAw
FOREST DISTRICT HEADQUARTnZS.@
FOREST STATION...............@
\I/
FIRE WARDEN STATION.......... F /I\
PATROLMAN STATION............'; fl\
FOR SCALE 1:100,000
WINDMILL................ -l%d
MINES
-EXPERIMENTAL NuRSERY*........~I
PERMANENT NURSERY......... L'
SILVICAL EXPERIMENT...... mml
QUARRIES 1.1 I....
MINE PROSPECT.............. m
COAL OUTCROP ................. ()
MINE ENTRANCE ...............
BENCH MARK with el'evation...B
LIGHTHOUSE .................. *
ANCHORAGE ...................
BUILDING..................d &MI
cHuRcI-I- . . . . . . . . . . . . . . . . . . . . . . . . b
CEMETERY.................... “,Efi I
BUREAU of LANDS LOCATION MONUMENT... . . . .BLLM Nalo
m. Post (PROVINCIAL mci or NATIONAL)..... 1
PROVINCIAL BOUNDARY....r, o
SUB-PROVINCIAL BOUNDARY...............* a
MUNICIPALITY or TOWNSHIP...............o o
PRIVATE STATE LINES....
VALUATION SURVEY LINES..................\ II
COOPERATIVE WATERSHED...~~~-
BURNED AREA............ ~~~~~~~~
FIRE LINE..............+++++
FENCES (in general).....-
BOUNDARY of
ALIEN. or DISP.
m-m OLO LINE
i
TIMBERLAND
FOREST RESERVE
h----o NEW Lb&
Fig. 3 (continued)= Conventional signs for field sketches
214

Commercial and Non- Commet-cial Forest
8mm. CM. beiwetn lines)
Non- Commercial and Brush
(8mm. d& bdwcan has)
CT or Open Land and
(8 mm. ht. b&mat, limes)
O~UI Ltmd and Cultivated
mm. CM between Ike)
Non- Comnrercial and COF or Open land
(8 mm. did. behwetn tines)
Fig. 4: Conventional Signs for Mixed Vegetative Cover
215

Then indicate the details traversed.
Repeat the process as you proceed to succeeding stations.
Sketching proceeds as the survey progresses. When the first
sheet of field note is filled up, continue recording the data
on another sheet, and continue sketching at the back of the
first sheet of field note.
h) Corner points:
Enclose with a square, each station established as corner, in the field note as well as in the sketch. Opposite such a sta- tion, under column "note", place the description of the corner, indicating its relative location with respect to any physical
feature nearby like, "Benguet Pine, 50 ems., on top of ridge"
or%FB cylindrical concrete monument, 15 cm-diameter, east
bank of river? Each tree designated as corner should be
legibly marked in chisel. or timber crayon, without causing
much injury, indicating the objective of the survey, the corresponding index number and station number as illustrated
below:
Ps. - Pasture survey
515 - Survey index number 10 - Station number
Fig. 5: Corner point established on a tree.
This tree has to be marked also with the marking hatchet used
by the forest officer performing the survey.
216

i) "Side - shots":
For accuracy in taking details encountered in the survey,
side-shots have to be made. To make a side-shot, occupy a
convenient station,then get the bearing and distance of the
point being surveyed. Where measuring the distance is too
inconvenient or impractical, determine the relative location
of that point or feature by "triangulation", which is done
by taking the bearings of this point from two stations con-
veniently located. When the bearings are plotted, the inter-
section is identical to the point sighted.
j) Larue surveys:
As a rule, change the index number and renew the numbering of
stations starting again from "1" when the distance surveyed
reaches approximately six kilometers, so that the survey when
plotted, can be well accommodated in the standard size of
plotting paper which is 23 x 30 centimeters. For that matter,
several index numbers may be needed to complete a survey pro- ject. After plotting, the individual surveys are compiled to-
gether in the same sheet of mapping paper of convenient size.
217

Chapter 2:
MAPPING SCALE, PLOTTING OF FIELD NOTES AND TRACING THE SKETCH
2.1 The Mar, Scale.
Ground measurements have to be reduced in size or else they
cannot be accommodated on paper, hence, the necessity of
scale in mapping. The scale shows the map as a projection
in proportion to its actual size on the ground. It is only
through the reduction at a certain scale that maps of
convenient size can be produced.
In forestry the scales most commonly used are 1: 5,000,
1: 10,000 and 1: 20,000. 100 meters in the field are re- presented on a map:
1:5,000 1:10,000 1:20,000
2cm 1Cm 0.5 cm
2.2 Plottina of field notes.
For each index number or survey, use 23 x 30 cm cross-section
paper l Select an appropriate scale so that when plotted, the
survey is well contained on the paper, and all important de-
tails can be indicated clearly. The scale of 1:20,000 is generally used in forestry, except in really small surveys where smaller scales have to be used to allow space for im-
portant details. The smaller the scale, the bigger the re- sulting map of a certain ground measurement.
Always consider the top of the plotting paper as north.
Place a temporary mark on the upper right hand corner in-
218

dicating the north and the scale adopted to avoid confusion.
Before starting to plot, examine the field notes and the field sketch to determine the length and the general direction of the
survey. This will enable one to plot the sketch more or less at
the center of the paper by starting on the side opposite the
general direction of the survey.
Mark the station by a dot on the piotting paper. To plot a line
with the bearing in the NE or SE direction, place the base line
of the protractor towards the East: reverse the position, if the
bearing is in the NW of SW direction. Adjust the position so
that the intersection of the horizontal o-p-o line and the ver-
tical p-90° line or point p of the protractor coincides with the
station marked by a dot on the plotting paper. The graduations
of the plotting paper will serve as guide in adjusting the pro-
tractor to the desired position.
Fig. 6: Protractor
Depending on the general direction of the line to be plotted,
read the bearing from the:
1st quadrant - - when in the NE direction 2nd It - - I@ Ia It SE II
3rd II . _ _ I) II II SW II
4th II _ _ II II II m I,
219 I

Then mark the reading or bearing by a light dot, called "guide
dot". With the "0" graduation of the millimeter scale over
station 1, and its edge tangent to the "guide dot", plot the
distance between stations "1" and "2" according to the scale
adopted. The procedure is repeated until all the stations of
the survey are plotted. Indicate the stations established as
corners of the area surveyed by enclosing them with squares.
Also plot the tie points, and connect them with tie lines,
preferably to the nearest corners of the area surveyed. In-
dicate their bearings and distances with respect to such corners. If the tie points are too far that plotting them is
impractical, show their relative locations by tie lines, also
indicating their bearings and distances.
In indicating the important details traversed by the survey,
refer to the sketches at the back of the field notes. Show the
different vegetative covers by light lines and identify them
by abbreviations in accordance with the standard conventional signs. Never use colored pencils on the plotting paper.
Place the title of the survey at a convenient space, preferably
on the upper right hand corner of the plotting paper.
D-16, Forest Station
Survey of Index No.
Located in So.
MU. e Bo.
, Prov.
-
Surveyed by (Name & Title) ' (Date)
Plotted by , (Name & Title) (Date)
Tracedby (Name & Title) ' (Date)
Instrument used:
Distances by:
No. of Kilometers surveyed:
Scale: Area in Hectares:
220

Under "Legend" indicate the different vegetative covers and
natural land marks or improvements shown in the sketch, in
accordance with the standard conventional signs adopted by
the Bureau of Forest Development.
2.3 Tracinq the sketch
Use a tracing paper of the same size as the cross-section
paper used in plotting. Trace the sketch exactly as plotted
with all the details, except that the vegetative covers have
now to be indicated by colored pencils in accordance with the
standard conventional signs adopted by the Bureau of Forest Development as follows:
- Conrmercial Forest - green diagonal lines, approximately 45O from SW to NE;
- Non-Conunercial Forest - blge diagonal lines, approximately 45 from NW to SE:
- Cultivated land - red ve&;;ical lines;
- Grass, cogon or open land - yellow horizontal lines;
- Non-commercial forest
mixed with brushland
or pure brushland - blge diagonal broken lines, approximately 45 from NW to SE
- Marsh or Swamp - green horizontal broken lines,
- Kaingin - red broken lines at random
If the survey is made in a reforestation project or on a forest
station level, at least 3 copies of the tracing have to be pre-
pared and submitted as follows: the original together with the
field notes to the Central Office; one duplicate copy to the
Regional Office and the District Office concerned. One
copy is retained for the records of the project office or the
forest station.
221

Chapter 3:
THE CLOSE TRAVERSE
If the survey made to delimit a tract-of land ends at the same point where it started, the resultant survey line or
loop produced is called a close traverse. A close traverse
survey is made to determine the actual shape, size and ex-
tent of an area, as well as its relative location with
respect to points or important land marks known in the map
for various purposes.
3.1 The sketch with technical description
Aside from the sketch produced by tracing the plotting, a
sketch with technical description has to be prepared for
each close traverse survey. The technical description is a
tabular statement consisting of the bearings and distances
between corners, description of corners, as well as the
bearings, distances and description of tie points. While
the tracing of the sketch as plotted goes with the field
notes, each copy of the report on the close traverse must
be accompanied by a sketch with technical description. This
sketch is the main basis of the report.
The following items must be considered in the sketch to show
the relative location of the area:
- The nearest forest zone or land classification (L.C.) corners;
- Adjacent or nearby areas under forestry permits or leases,
or at least some of their corners,
- In delicate cases, the ordinate and coordinate lines under
which the area falls.
222

SKETCH SHOWING
The area under Ps. A. No. 116 of Mr. Alfonso Rodriguez
Located in:
Sitio: Dagdagupan
Barrio: Villacorta
Municipality: Mabini
Province: Pangasinan
Surveyed by: For. J. Mariano Date: Jan. 4-5, 1972
Plotted by: For. J. Mariano Date: Jan. 8, 1972
Compiled/Traced by: For. J. Mariano Date: Jan. 8-9, 1972
P.M.D. Used: Index No. 515, Mabini Reforestation Project,
Mabini, Pangasinan
Scale: l:lO,OOO
Approx. Area: 19 Has.
.’ Alien. Md hp. 25
f Pa. A. No. IQ
block II I of A. Badao
L.C *oj-+ IJo. 10 A. uo. I&- - \
-of A. Rodriguet-
Legend:
Cogon land-,,,,,, Logging road ____- •::z'=S=~
Brushland-,,,,,,, Creek -___--__- y
Fig. 7: Field Sketch (Technic&description next page)
223

JWC QEARIu~ # h6T CORNCR ~~scRIPTIOU 3 COfWCRS Na BARN
l-2 “=I WSf*t, 250 Ma. i * M&~ve, soan4.,Ch 27, AID b1k.P L.C. fir& KJ Mot+i phny.
II-3 S7S-E, 210 MI. 2 9 2 AWsng %-cmg,no ama., car 0 fk A. No. 112 d 4. 8anlap
3-4 3 lo%, ISO Mr. 3 v 3 Dub&, PO arms., Gm 7, R. A. No. II2 ti A. Bonlaa
4-0 s.32eu, 245m. 4 =I& "hall 4 oakn&, NC& bank af Craok n5
S-6 S.10’ w, as Ms. 5 k ~-yy~, a5 ma., m fed- of hill
SW 6-7 U- W \mMs. 6
I 8 Pabapk, 60 m., CCW. IO, Fb. L.A NO. I20 bf .S. I%so~Q~
7-0 uzrw lrs#n 7 9 Q soka+, 35 cm, jUsdiO~ d Creek afkl loggi~ rmd
0-i ti N’ e 2sa MS. 8 -% - 014-0, 30 MIS., car. a R. L- A. ~0.120 d S . PCSQ~
Corner 1 is identical with corner 27, A & D Block II L.C.
project No. 10 of Mabini, Pangasinan
Fig. 7 (continued): Technical description of survey.
Adjust the boundary of the sketch if the following conditions
exist:
- If a portion of the close traverse falls inside an alien-
able and disposable block, or when in conflict with exist-
ing forestry permit or lease: and
- If the area happens to be close to an alienable and dis-
posable block or to areas under forestry permit or lease,
to avoid narrow strips or small patches of vacant areas.
The boundary can be adjusted simply by selecting common
corners with the adjoining alienable and disposible block or
areas covered by a permit or lease.
Indicate the details and legends-in the same manner as in the
tracing of the original plotting.
3.2 Correctina error of closure
When plotted, a close traverse seldom closes due to errors in
taking the bearings and in measuring the distances between
stations. The gap or difference in distance and direction pro-
duced after plotting the survey is called the error of closure.
224

af
Figure 8 below is the sketch of a proposed pasture area which
did not close by a distance represented by x.
Fig. 8: A close traverse survey with error of closure
In correcting the error of closure, station 1 remains a fixed
point because in a survey, there is normally no error of closure incurred at the point of beginning. The rest of the stations will have to be adjusted either forward or backward depending
on whether the last station falls short of, or overshots the
first station when plotted. In the foregoing illustration, stations 2 to 11 will have to be moved backward. The error of closure in each station maybe determined either by the diagram
method or by computation.
The Diagram Method
I 2 3 4
Fig. 9: The correction diagram
With the same scale used in plotting, draw a straight horizon-
tal line AB, the length of which equals the total length of
the traverse. Points A and B, therefore, correspond to sta-
tions 1 to 11, respectively. On this line, lay off stations
2 to 10, from point A at intervals equal to their respective
distances as plotted. At point B, errect a perpendicular line
225

equal in length to the error of closure, X in Fig. 8. In the
diagram this is line BC or U-11'.
Then draw line AC. From points 2, 3, 4, 5, 6, 7, 8, 9, and 10,
errect perpendicular lines up to line AC. These lines, e.g.
2-2n, 3-3:, etc., determine the distances at which the stations
will have to be adjusted in order to close the traverse.
b) Bv computation
Multiply the error of closure by the distance of a particular
station from station 1, then divide the product by the total
length of the close traverse. The quotient equals the error
of closure in such a station, or the distance at which it has
to be adjusted.
Example: A close traverse has a total length of 2,500 meters.
When plotted, it did not close by 50 meters. Compute for the
error of closure in station 5, assuming the distance is 800
meters from station 1.
Solution: 50 ms. X 800 ms. = 16 meters 2,500 ms. - Error of closure in
station 5
The process is repeated with the rest of the stations, except
the first and the last stations.
c) Correction of plotted traverse:
The figure in solid line below is a reproduction of the tra-
verse as plotted. From stations 2, 3, 4, 5, 6, 7, 8, 9, and
10, draw downward, light lines parallel to line X, the line
representing the error of closure. Along these parallel lines,
the stations are moved backward according to their respective correction distances as determined in the correction diagram
or as computed. The adjusted stations, points 2', 3,' etc. in the figure below, are then connected by a broken line which
now represents the close traverse as corrected.
The corrected traverse is the basis in making the sketch with
technical description. However, stations not considered as
corners are omitted,
I 226

Fig e 10: Correcting the error of closure
3.3 Area deterrrrination of a close traverse.
a) Planimeter method: A planimeter is a mathematical engineer-
ing instrument for the rapid determination of areas of plane
surfaces. It consists mainly of three parts: a ploe arm, a
tracer arm and a carriage which supports a vertical wheel
equipped with a graduated scale and a vernier and a register-
ing dial. It works by setting and adjusting the instrument
besides the sketch and tracing the boundary of the traverse
by the tracer point. The reading at the registering dial is
multiplied by a constant conversion factor depending on the
scale to obtain the area of the close traverse.
b) Determination of area by computation: This method is convenient
when the traverse has the shape of square, rectangle or triangle
and the area can be computed with the help of the standard
formulas. A polygonal traverse has to be subdivided into more
simple geometrical forms tg which the standard formulas can be applied.
c) BY countinq the squares on cross-section paper: The field notes
are plotted on standard size cross-section paper at a scale of
1:5,000 or 1:2,000 depending on the importance of details. If
the scale is 1:5,000 and the size of the squares is 0.5 by 0.5
cm, 16 squares would make one hectare. Then portions of squares
are estimated and their aggregate area is computed and added to
the area of the whole squares to compute the entire area of the traverse. This method of area computation is most commonly
used in forest surveys in the Philippines.
227

Appendix
Conventional abbreviations used in field sketches.
TRIANGULATION POINT ------ Art.
HOMESTEAD APPLICATION UNDER PUBLIC LAND ACT--------- H.A.
LEASE APPLICATION UNDER PUBLIC LAND ACT--------- L.A.
S'?LE APPLICATION UNDER PUBLIC LAND ACT--------- S,A*
FREE PATENT APPLICATION---F.P.A.
FOREST CLAIM-------------- F.C.
PRIVATE WOODLAND REGISTRA- TRATION APPLICATION----P.W.R.A.
PRIVATE WOODLAND REGISTRATLON----------- P.W.R.
BATHING ESTABLISHMENT---- Be.
CGMMUNICATION STATION SITE-Cs.
COMM, SITE FOR RADIO, WIRELESS OR TELEVISION STA m------------------ Cs.-Rd.
COMM. SITE FOR TELEPHONE STA.-------- Cs.-Te
KAINGIN----------------- Kgn.
LIME and CHARCOAL KILN-- Lck.
LOG POND ----------w---- LP.
LOGGING CAMP SITE ------ Lc.
LUMBERYARD ---------w-- LY*
RI~-OF-WAy------------ Rw.
TREE F~a-------------- Tf.
TREE FARM-COFFEE PLANTATION----Tf.-Cp
TREE FARM - LUMBANG PLANTATION--Tf.-Imp.
TREE FARM - CITRUS PLANTATION--Tf.-Ct.
TREE FARM - MEDICINAL PLJJNTATION--Tf.-Mp
TREE FARM - RUBBER P-LANTATION--Tf.-Rp
TREE FARM - CACAO PLANTATION--Tf.-Cc
VEGETABLE GARDEN----------Vg.
WOODLAND LEASE -----------Wl.
RESIDENCE ----------------Rs,
SANATORIUM ---------------Sn.
PRIVATE CAMP -------------PC*
TIMBER DEPOT -------------Td.
SAWMILL SITE ------------SS*
HOTEL SITE ---------.-----Hs.
SALT WORKS ---------------s.w.
PASTURE ------------------ps.
NIPA-BACAUAN PLANTATION---ND.
FISHPOND -----------Fp.
LICENCES ----------------- L.
TIMBER LICENCE AGREEMENT -------------T.L.A.
ORDINARY TIMBER LICENCE-O.T.L.
ORDINARY MINOR LICENCE--0.M.L
COMMUNAL FOREST ----------Cn.F.
COMMUNAL PASTURE ---------Cn.Ps.
228

PART IV
NURSERY TECHNIOUES
G. SEEBER

Chapter 1:
NURSERY ESTABLISHMENT AND LAYOUT
1.1 Types of forest nurseries
According to the duration of their use, forest nurseries can be classified into two types: permanent nurseries and tem-
porary nurseries (91,
a) Permanent nurseries: A permanent nursery is established where
a demand for a large number of plants is likely to continue
for a number of years. The site should be accessible by road and centrally located within the reforestation area.
Permanent nurseries have several advantages. Because of their long lifespan it is possible to put up installations
such as office building, storage shed, soil shed, watering
system etc., which greatly increase the efficiency, but are
not economical in a temporary nursery.
Since "the farmer's footsteps are the best manure for the farm", the daily inspection by the forester-in-charge will
insure a high productivity of the nursery and good quality
planting material.
b) Temporary nurseries: The area of a temporary nursery is small, only a limited number of plants is raised for a certain plan-
tation area. To avoid transport difficulties it is establish-
ed near the planting site. After that particular area has
been planted, the nursery will be abandoned.
The maintenance of a temporary nursery is relatively expensive.
Failures are frequent due to inadequately trained workers and
insufficient supervision. But, inspite of these disadvantages,
231

the establishment of a temporary nursery is advisable, where
a relatively small area inaccessible by vehicles has to be
reforested.
1.2 Selection of nursery site
The important factors to consider in the selection of a nur-
sery site are: water supply, size and ownership of the area,
location, accessibility, slope, site cover and soil condition
(9).
a) Water supply: The most imprtant aspect in the selection of
a forest nursery site is the availability of water through-
out the year. The adequacy of water supply should be deter-
mined at the end of the dry season. It is often during this
period that the water supply runs low and the nursery also
consumes the greatest quantity of water (9).
The quantity of water required depends upon the size of the
nursery, kind of soil, the species, the number of seedlings
to be raised, and the irrigation method employed. Much
water, for example, is needed in sandy soils,, which have a
low water holding capacity. Gmelina, molave, narra, teak,
eucalypts, agoho consume less water than kaatoan bangkal,
Moluccan sau, mahogany or dipterocarps. Flooding and furrow=
irrigation (through earth canals)are possible only where
there is ample water supply: overhead-irrigation (through
pipes) consumes much less water.
b) Size and ownership of the area: The nursery area should be
wide enough to accomodate the seedbeds and transplant beds
(potbeds), which are necessary to produce the required num-
ber of seedlings. In addition,there should be sufficient
apace to accomodate an office, greenhouse, nursery shed with
soil compartments and similar facilities including an area for expansion.
The area needed for the nursery beds depends also on the
species, which have different spacing requirements. Benguet
Pine Seedlings, for exampl-. -efY’ rnllch less space than c
I
232

eucalypts and other broadleaved species (See chapter on trans-
planting: "Spacing of Transplants").
In calculating the nursery area needed one has to take into
account
- the annual plant production goal,
- the proper spacing of these plants in the transplant bed
or potbed,
- the area needed for paths, roads, irrigation ditches
and buildings plus some allowance for future expansion,
- the time the seedlings have to remain in the nursery, which may vary from 3 to 10 months, but hardly ever ex-
ceeds one year.
The nursery should always be located on land owned by the
government, so that the forester-in-charge is free in his
decisions concerning the layout and construction of build-
ings.
For temporary nurseries, however, it is also possible to rent
an appropriate area for a certain period, e.g. rice lands in
the immediate vicinity of the planting site, Rice fields
would suit the purpose very well, because water is usually
not a problem, the area is level and the soil conditions
are favorable.
c) Location: As much as possible a forest nursery should be
centrally located within the planting area, so that the
planting stock need not to'be transported over long distances.
Especially bare root seedlings suffer in long transit. Potted
seedlings are better protected, but they are very bulky.
Stumps are the easiest to transport, but only a few species
can be grown from stumps. Where the road system is good.it may
be even possible to supply several reforestation projects from one large production nursery.
The nursery site should be protected from typhoons and par-
ching winds during the dry season, but on the other hand
must receive full sunlight. A low shelterbelt consisting of
ipii-ipil or madre de cacao would in many cases be of great
233

help. The question, whether the nursery should have the
same elevation as the plantation site is not important, as
long as the species grows well on the selected area.
d) Accessibility: If the selected site is not located at a na-
tional highway or public road, it should at least be possible
to construct a feeder road, where jeepneys and small size
pick-ups can pass. Furthermore, arteries of roads or at
least graded trails should radiate from the nursery to the
plantation area to ease the transport of planting stock and
as an aid in fire control (9).
e) Topoqraphy: The nursery site should be level. On level land
all nursery operations are carried out more easily and eco-
nomically, and it is possible to employ agricultural machine-
ry and implements like tractors and plows.
On light sandy soil the site can be completely level, because surplus water will drain quickly into the soil. For average
soil conditions (sandy loam, loam) a gentle slope of 1 to 2 percent is recommended to permit sufficient drainage.
But unfortunately, there is not always level land available for forest nurseries, since most reforestation projects are located in mountainous areas. Thereforeiin many cases ter- races have to be constructed, which is expensive and makes
moving of materials and plants within the nursery laborious.
f) Ground cover: The kind of ground cover influences to a cer- tain degree the cost of establishment. Often the area is covered with cogon, which has to be removed including the rhizoms as well as tree stumps and big stones. Where a bulldozer is available, second growth forest can be cleared at moderate cost, except the rhizomes and roots, which have to be removed by hand.
The vegetative cover is a good indicator of the fertility
and average moisture conditions of a site.
234

g) Soil conditions: If only potted plants are to be produced
the soil of the potbeds can be of rather low quality, be-
cause the roots will be confined to the potting soil inside
the container. But there must be a place nearby, where good
potting soil can be collected.
Where mainly bare root seedlings or stumps shall be raised,
the soil should have favorable physical and chemical proper-
ties and contain a high proportion of organic matter. When
a nursery site is chosen, the physical characteristics like
friability, depth, soil structure and texture are more im-
portant aspects than the chemical composition of the soil.
Chemical soil properties can be more easily corrected than
the physical conditions of unsuitable soils like for example
clays.
Most desirable are sandy loams or loamy sands, preferably with a high humus content and a pH value between 5.5 and
6.5. The greater the depth of uncompacted light soil, the
better its drainage. Pure sand, stony soils or clay must
be avoided.
1.3 Preparation and layout of the nursery area
a) Clearinq of the land: If the existing vegetation consists
of second growth forest, the procedure will be: cutting
the trees, clearing the brushes, drying and burning the
shrubs and herbs, or better, using the softer organic
material for compost, removal of stumps, roots and big
stones. When a bulldozer can be employed, the work can
be accomplished much cheaper than with hand labor. If no machinery is available, a pulley-block should be used for
pulling down the trees and uprooting them at the same time.
Tall trees around the nursery site should be felled to avoid
shading and damages during typhoons. .
On grassland the procedure is similar: the grass is burnt during the dry season; roots and rhizoms are dug up and
carefully removed by hand.
235

b) Soil working and layout of beds on level land: Clearing of
the area is followed by digging the soil, breaking up lumps
of earth, removing any remaining stones,and by raking to
level the surface.
The soil can also be loosened by ploughing or by a rotary
hoe. Ploughing should not be deeper than 30 cm to avoid
burying the topsoil. To level the surface one can employ a
harrow drawn by a horse or carabao. With a disc-plough loo-
sening the soil and levelling the surface can be accompl;.sh-
ed at the same time.
If mounds or depressions have to be levelled, first the top-
soil is removed from the area and set up in heaps. It is
replaced after the exposed subsoil has been levelled.
The shape of the nursery area can be square or rectangular.
The first would minimize the length of the fence. For easier
management, however, the rectangular shape is preferred be-
cause of longer working lines. But often there is no choice,
and one has to comply with the topography.
After soil working and levelling the area is permanently di-
vided by roads and crossroads or paths into blocks, which
consist of a certain number of beds. When the nursery has
the ideal shape of a rectangle, it will be of advantage to
divide the nursery in longitudinal direction by a centre
road wide enough for vehicles.
The main road is dug out 10 to 15 cm deep. The topsoil ob-
tained hereby can be used to fill up uneven places on the
adjoining land.
The size and layout of the blocks and beds depend on the
kind of irrigation system to be installed. For overhead ir- rigation and watering by sprinkling cans; the beds should
have a length of about 20 to 30 m (long working lines, fa-
vorable work economy) and a width of 1 meter. Where flood-
ing or furrow irrigation is practiced, one has to construct
main canal and head ditches. In this case the beds should not be longer than 10 mete&s to ensure equal distribution
of the irrigation water.

After the layout the blocks are durably labeled by numbers
painted on wooden posts.
Where small soil working machines are to be employed the
crossroads should have almost the same level as the nursery
beds, so that the area can be worked uninterruptedly with-
out turning by simply lifting the machines when crossing.
But at present there are no nurseries in the Philippines lar-
ge enough to justify full mechanization of sowing, transplan-
ting, weeding and cultivation. Problems connected with the
planning of such nurseries will therefore not be discussed.
The minimum area required for a partly mechanized nursery,
in which mainly soil working and irrigation is mechanized,
is about one hectare, For full mechanization a minimum of about 10 hectares is required.
c) Nursery layout on slopinu sites: Bench terraces, as known in
the Philippines for th e cultivation of rice and vegetables, cross the slopes in a series of earthen platforms following
the contour (5). The terrace walls can be of earth covered with grasses, but better consist of dry stone walls (riprap), in exceptional cases of hollow blocks.
The width of the terrace platform depends on the gradient.
The steeper the slope, the narrower the platform and the
higher the terrace wall. The height of a riprap wall should not exceed 1.50 meters. Considering the width of the ter- race, one also has to take into account the number of nursery
beds and paths to be accomodated. It is advisable to draw a cross section of the proposed terrace in correct scale in-
cluding the beds and paths. As much as possible, one should divide the slope better into a few wide than into many small terraces.
The terraces should be slightly sloping inward (about 1 %I,
so that the run-off is collected in a shallow ditch along the
base of the inside wall, from where the water is conducted
into the main drainage canal.
237

.- t--A?? lNCtJN At-ION.
r_v - --. , :: J CROSS SIZCTION
- I
FiZONI- VIEW’
Fig. 1: Terraced nursery with dry stone walls
In constructing a terrace all topsoil should be saved. By
no means should topsoil be covered with infertile subsoil.
The first terrace is started at the foot of the slope using
the topsoil of the second terrace for the beds. Upwards the
work will proceed in the same manner (5).
As soon as the terrace is cut out of the slope, the steep
part is immediately protected by a dry stone wall with a
slight inclination towards the slope. The terrace will still
grow in height by surface soil obtained from levelling the
adjoining upper terrace. The top and corners of riprapped
terrace walls should be solidified with cement.
Apart from the main road the terraces have to be connected
by small paths suitable for wheelbarrows.
1.4 Fencinqthe nursery site
Galvanized interlinked wire netting is well suited for perma-
nent nurseries, because it is durable and gives good protec- tion. The use of barbed wire should be avoided. Split bam-
boo or thorny branches of kamachile or aroma can be employ-
ed as fence material in temporary nurseries.
238

The fence posts should be of durable wood like teak, kamachile or molave, or made of concrete. Galvanized iron pipes set in concrete foundations are also useful. Length of the posts 2.20 to 2.50 meters.
Wooden posts must have a diameter of 10 to 15 cm and be impreg- nated with a wood preservative to increase their durability. Before treatment the posts are pointed. Treatment with wood pre- servatives is particularly important for the section in contact with the soil. The following three methodsare recommended for fence posts:
- Brush treatment: After the bark has been peeled off, the posts are dried under the sun. This will cause many shrink splits on the wood surface. Then the posts are painted with the preser- vative by using a brush, or the preservative solution is applied . with a sprayer. Painting the ground section of the post with coal tar is also a cheap and effective protection.
- Did treatment: The posts are placed in a drum filled with a preservative solution (5-10%). They remain there for some time until the chemical has penetrated sufficiently into the wood.
- Osmose treatment: Timber with a high moisture content is treat- ed with a water soluble preservative in paste form (e.g. Wol- manit salt). It penetrates into the wood gradually by molecular or ionic movement. This process is only possible with freshly cut posts. OSMOL powder is mixed with water until a paste is obtained, which is applied to the posts just after the bark has been removed. The treated posts are placed in a ditch, which is covered with cogon grass and sealed with earth to prevent drying and to keep the developing vapors within the ditch. After 4-8 weeks the osmose paste will have penetrated sufficiently, so that the posts can be taken out, dried and used.
The posts are placed 3-4 meters apart and driven 50 to 70 cm deep into the ground. Corner posts and other places of stress are braced. The wire netting has to be first tightened with a wire stretcher, before it is fixed with staples to the posts and with wooden pegs to the ground. Gates are constructed at convenient points.
239

Where desiccating winds prevail during the dry season, it
is advisable to plant hedges around the nursery to reduce
the wind velocity near the ground. Suitable species are
ipil-ipil, madre de cacao, katurai, lantana, agoho. The
hedges must be trimmed from time to time that they remain
dense and look orderly.
1.5 Buildinas and similar facilities
The buildings should be constructed at the center of the nursery to facilitate supervision and reduce working and
transport distances. This center should be accessible by cars and trucks with enough space that the vehicles can turn.
- Office, tool room: In most reforestation projects there
is a main building with the office, the quarters for the
forester-in-charge, and a guest room. This main build-
ing should also have a dry tool room, where all hand tools can be stored. Smaller tools are placed on shelves,
the long-handled tools arranged neatly on special hangers
or stands.
Quarters: For better supervision and management it is
desirable that the forester-in-charge resides within the
nursery compound. For the same reason skilled appointed
personnel, like plant propagators and nursery farm fore-
man, should have their homes near or at the nursery. Bunk
houses are necessary, if the nursery is located far from
any settlement.
- Storaqe room: Some kind of storage room provided with
shelves and racks is necessary for all kinds of chemicals,
fertilizers, cement, shading mats and their supports, wire
netting, lumber, etc.
- Workshop: A small workshop is very useful for the repair of machinery, equipment and tools. On rainy days seed
boxes and shading mats can be made here. The workshop
should be furnished with a work bench, an anvil and a tool
box equipped or carpentry, masonry, plumbing and mechanical work.
240

- Seed pr,ocessing and storing facilities: Furthermore, fa-
cilities should be provided for drying and extrac%ng
seeds, such as a plain concrete floor in the open, or a
wooden floor in an airy room, which can also serve as a
storage room for seeds.
- Greenhouse: For raising delicate seedlings often a green-
house is required. Its sides consist in the lower half
of stone walls and in the upper half of wooden posts with
mosquito screen in between, The roof is made of corruga-
ted fiber glass sheets. Inside, there are concrete ben- ches with side curbs about 20 cm high which are filled
with soil.
- Garaoe or machine shed: For vehicles, tractors, ploughs,
harrows and similar large implements a shelter has to be
constructed to protect them from rain when not in use.
- Soil shed: In nurseries where potted seedlings are to be
produced a soil shed with separate compartments for top-
soil, sand, manure and compost is a necessary installa-
tion. Sufficient space must be provided that soil mix-
ing and potting can be carried out under the shelter
throughout the year.
- Compost compartments: One should not forget to provide a
place to produce compost. Four to five compost compart-
ments (1 x 1.5 x 4 m) made of hollow blocks with removal
boards in front will make a practical compost plant (See "Preparation of compost").
1.6 Tools and materials
A forest nursery must be equipped with all the tools, imple-
ments and materials required for the management of a nursery.
It would be wrong to save money by not buying the tools need- ed. Not only the kind of equipment, but also the number and
quantity of tools and materials should be adequate. There
should be always some tools in reserve, which can be used
immediately when the ones in use break down.
After use, tools and equipment should be well cleaned, dried,
and stored in the tool room or in a shed. Metal parts must
241

be greased or oiled to protect them from rusting. From time
to time a general inspection should take place, the dust and
rust removed, hoes, bolos and axes sharpened, handles check- ed,and so on.
Apart from the common tools, a reforestation project should be provided with the following equipment:
- Ph-meter to test the acidity of the soil;
- Raingauge to keep rainfall data for the project area;
- Binoculars for judging the maturity of tree seed, for
forest protection and supervision of the project;
- Ganta measure, set of measures 1000 cc., 500 cc., 250 cc., 50 cc., or a measuring glass:
- Balance with weight set.
Chapter 2:
INSTALLATION OF THE IRRIGATION SYSTEM
2.1 Considerations about water quantity
The water requirements and the availability of water should
already have been taken into account, when the site for the nursery was selected. If the water supply becomes critical towards the end of the dry season, it is recommended to in- Stall an overhead irrigation system by conducting the water
242

to the nursery through pipes and distribute it over the seedlings as a fine spray. Water losses and water consump- tion will be far less than in surface irrigation through open earth canals.
2.2 Water sources
Possible water sources for a nursery are surface water, flowing as in a spring, creek or river, or standing as in a pond or lake. Or, irrigation water is obtained as ground water from a well.
a) Surface water: The water level, particularly of surface wa- ter, is generally affected by the seasons. To increase the quantity of water at the nursery disposal at times of short- age, it is advisable to built a cement tank (about 2 x 2 x 1 m) around the spring or to construct a dam across the creek. The tank or dam is filled with water during times of low consumption, for instance during night time, so that there will be enough water for irrigation in the morning. If an intermittent creek is t&tilized as a water source,a storage dam or pond would solve the problem. Such a system of dams and ponds (fishponds), which are filled up during the rainy season, has been established at the Magat Refore- station Project.
b) Ground water: Sometimes only little water is needed, because the nursery is small or the climatic conditions are favorab- le. In this case it might' be cheaper to dig a well right in the nursery compound than to get the water from other possibly far-away sources,
c) Wells: Only in exceptional cases all the irrigation water required for the nursery might be obtained from a deep well, . which is a much more reliable water source than surface water, but it involves a considerable investment.
Self-made wells can be dug where the water table is not deeper than 6 meters. A sealed well is filled up with gra- vel and sand after the pipe has been placed in the ground
243
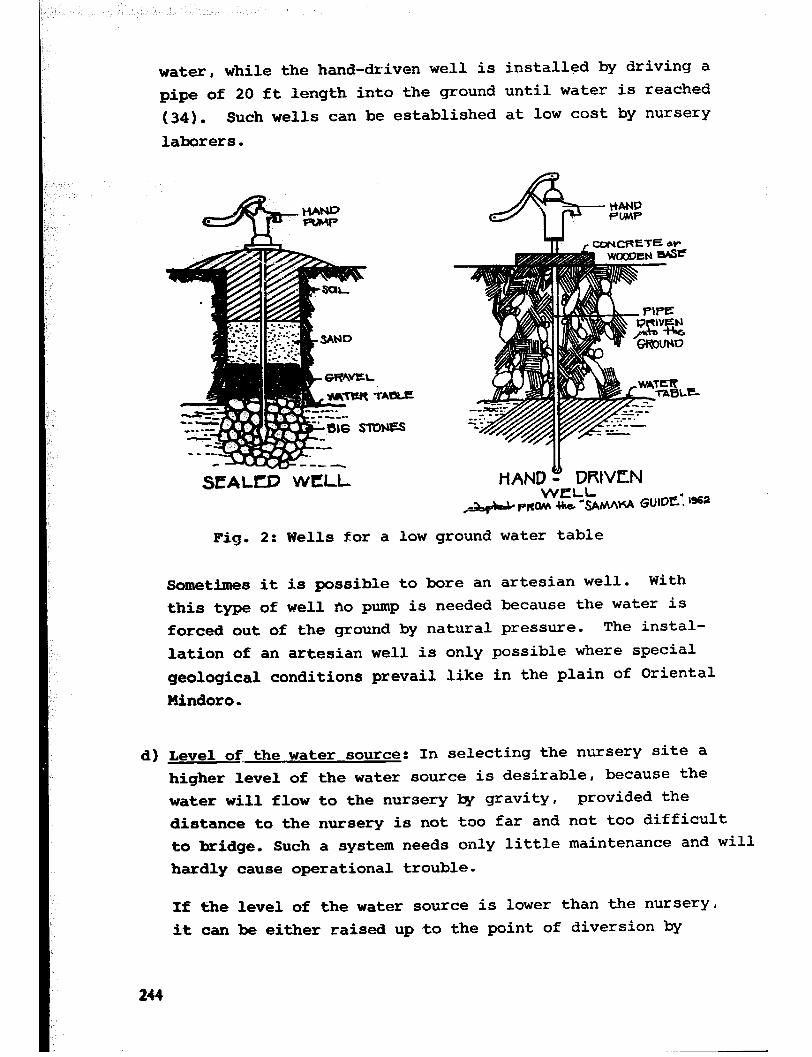
water, while the hand-driven well is installed by driving a
pipe of 20 ft length into the ground until water is reached
(34). Such wells can be established at low cost by nursery
laborers.
SCALD WCLL
Fig. 2: Wells for a low ground water table
Sometimes it is possible to bore an artesian well. With
this type of well no pump is needed because the water is
forced out of the ground by natural pressure. The instal-
lation of an artesian well is only possible where special
geological conditions prevail like in the plain of Oriental Mindoro.
d) Level of the water source: In selecting the nursery site a
higher level of the water source is desirable, because the water will flow to the nursery w gravity, provided the
distance to the nursery is not too far and not too difficult
to bridge. Such a system needs only little maintenance and will hardly cause operational trouble.
If the level of the water source is lower than the nursery,
it can be either raised up to the point of diversion by
244

building a dam across the creek or river, or the water will have to be elevated with a pump, usually into reservoirs, from where it can be distributed over the nursery by gravity. It could also be pumped with small hand-pumps from shallow wells directly into sprinkling cans, or with turbine pumps immediately into oscillating or rotary sprinkler systems.
2.3 TYES of DUllIDS
The type of pump to be selected depends on the quantity of water needed, the pressure desired, and the depth of the water table. A simple hand piston pump is installed over self-dug wells. A centrifugal pump forces the water out- ward at a right angle to the axis. This kind of pump can be employed only where the suction is not more than 6 meters, which is also the limit for piston and rotary pumps.
Propeller pumps and turbine pumps are able to pump water from a deeper level. They are highly efficient, have a great capacity and develop all the pressure required for high pressure overhead sprinkling systems. Although their installation is expensive, in special cases it may pay to employ them.
Pumps usually have their own motor except those operated by wind mills. As there is generally no electricity in the re- forestation nurseries, the engine can be of the gasoline or diesel type. Diesel engines are recommended for heavier units (40 HP or more). Ueeful are centrifugal or rotary pumps that can be attached to the power take-off shaft of small two-wheeled multi-purpose tractors, if such tractors are employed in the nursery.
A special kind of pump operated by the water power of a river or creek is the so-called waterbuck. Where water must be elevated from a creek to a higher located nursery!. its installation is very practical (no engine, no fuel).
245

h-i? -
HAND PUMP
r IFsir ROlARr PUMP
NULTI- rUr(K)St
TURbJNE PUMP WATER BUCK “”
Fig. 3: Types of pumps for nurseries (partly adapted from '*Irrigation and Drainage Principles and Practices"
U.P. College of Agr., 1967)
246

2.4 Conveyance and distribution of irriqation water
Only in rare cases the irrigation water is obtained from a
well within the nursery compound and pumped to an elevated
water reservoir or directly to a high pressure overhead ir-
rigation system. Usually the water source is located at
some distance, from where the water is conveyed to the nur- sery and distributed over the land through channels or
pipes by gravity.
a) Conveyance of irriqation water through canals: Conveyance
channels are mostly simple earth canals, which are cheap and
easy to construct. They can, however, only be recommended where ample water supply is available throughout the year,
because much water is lost through seepage and evaporation.
This system is used to water seedbeds and transplant beds
by flooding or furrow irrigation. In the layout the fol- lowing points have to be considered:
Very few earth materials will withstand water flow veloci-
ties greater than 5 feet per second (39). Therefore the
gradient of the canals can only be slight. For steep gra- dients the water has to be conveyed through pipes.
Fig. 4: Layout of flood irrigation
247

Excessive weed growth in and around the c.anals is undesirable.
The canals might get clogged and weed seeds are carried into
the nursery. Where the waker reaches the nursery a strainer has
to be installed and inspected and cleaned regularly. Sometimes
"flumes@ have to be built to conduct the water across depres-
sions (39).
Within the nursery the water is channeled from the main canal into the head ditches, which run along the front sides of
flood beds and furrow beds. The head ditches may be dug into
the ground or made of wood, metal sheets or concrete with built-
in distribution outlets for each floodbed or irrigation furrow.
The latter, though more expensive, are far more satisfactory in
the long run than earth ditches.
In earthen head ditches, the outlets can be simpl-9 closed with
soil or mud. Better aye short metal or bamboo tubes with metal
checks inserted at each flood bed or furrow to be irrigated.
Where the head ditch is higher than the irrigation furrow, the
water can be made to flow by suction through a bent rubber hose
with one end submerged into the water of the head ditch.
b) Conveyance of the irriqation water through pipes: Where the
water supply is limited, the water is usually conveyed and
distributed through pipes to avoid seepage and transpiration
losses. Also in a steep topography the use of pipes has ob-
vious advantages over canals.
Potted seedlings are better watered by overhead irrigation
(sprinkling) than by flooding, because with surface irrigation
the roots tend to grow quickly out of the containers azd penet- rate into the soil. Even in nurseries where most of the beds
are watered by flooding and furrow irrigation, some water faucets
are additionally needed for greenhouse management and the tending
of more delicate plants.
The main pipes should be at least 2 inches wide. For temporary
nurseries bamboo pipes may be sufficient.
Hydrants with faucets are located at convenient points in the nursery. If possible, every part of the nursery should
240

be within reach of a 3O-meter hose. The hydrants can be con-
nected with perforated pipes, which transform the water into
a spray. Such pipes are laid out on the ground or raised
about 1 meter above. They can be installed permanently or
designed as portable systems provided with quick coupling
devices.
The kind of sprinkling system that can be employed depends on the operating pressure in the pipe. Low-pressure systems,
such as spraying nozzles or perforated pipes, reguire at
least 15 psi. Oscillating and rotary sprinklers are h$gh-
pressure systems;theycan be operated only with a water pree- sure of 30 psi or more. The natural water pressure might be
sufficient for the operation of a high-pressure overhead ir-
rigation system, if the water source is located well above
the nursery,and the main pipes have a diameter of not less
than 2 inches. Otherwise,the necessary pressure would bave to be developed artificially by pumps.
Chapter 3
SOWING
Sowing is one of the most important nursery operations. 1te
success or failure may decide, whether the nursery will be
able to supply on time the required number of plants and whether the goal of the reforestation plan can be accomplfshd-
249

3.1
a)
b)
cl
d)
The correct sowinq time
Lonqevity of seed: If seeds can be safely stored, a sowing
date should be chosen that will promise plants of optimum
size at the beginning of the rainy season. Seed, that
guickly loses its viability, must be sown immediately after
collection. In this case, one does not have any choice with
regard to the sowing time.
Local climate: Sowing has generally to be timed in such a way,
that seedlings are ready for planting in the field just at the
beginning of the rainy season. For regions with a uniform
rainfall no special timing of sowing is necessary.
Time needed to qrow plantable stock: To determine the correct
month for sowing one has to take into account the time re-
quired to raise plantable seedlings. This varies with the
species, the climatic conditions and the way the nursery is
managed.
Each tree species has its own pre-germination period. Eucalypts
and agoho germinate already after 4 days, Benguet pine and
Albizzia appear after about 2 weeks, while teak or lumbang
need 1 - 2 months unless germination is hastened. After
germination and transplanting fast growing species like
Albizzia falcata, Gmelina, kaatoan bangkal will be ready
for planting after 3 - 4 months in the nursery, while others take much longer, like narra, mahogany or Benguet pine.
In raising potted plants one has to consider that the seedlings show a balanced top/root ratio at planting time. If seed is sown too early, the plants are likely to become top-heavy and have a low chance of survival in the field.
Determination of correct sowinq time: To determine the ideal sowing time one counts back from the beginning of the rainy season the number of months required to raise adequate
planting stock. For example: In localities of climatic region I, Benguet pine seedlings are planted in June/July. Germination and time in seedbed takes about one month; 7 - 8
250

months are needed to let the seedlings grow up to a height
of 15 to 20 cm, that is a total of 8-9 months. Assuming that
the ideal planting time is June, sowing consequently has to be carried out in September/October (43).
Based on the particular climate sowing schedules for the lo-
cally important tree species should be prepared for each re- forestation project.
e) Phasina of sowinq: With larger amounts of seed not all should
be sown at once. Sowing should be phased over 6-8 weeks with
one week intervals. This is particularly recommendable where seedlings have to be potted or transplanted. If all seed of a large seed lot is sown at once, one may have a hard time catching up with potting (43).
3.2 PreDaration of seedbeds
a) Soil workinq: After the nursery has been cleared of the pre- vious crop of seedlings, the land is thoroughly worked by
digging it with a spade or digging fork. Where the area is large and level a small tractor with soil working attachments
or a carabao-drawn plough can be employed.
While turning the soil with a spade, lumps of soil are broken
up, and stones, roots and rhizomes removed. As soon as a strip about l-meter wide has been worked over, it is raked and level-
led, Nobody should step on the loosened soil anymore.
b) Soil conditions for sowinq: If the soil in the seedbed does not
meet the necessary requirements for sowing, it can be improved
by screening and by adding sand and humus.
At the time of sowing, the soil of the seedbeds should be slightly moist or damp. By working it in this condition one can obtain a most favorable soil structure. During rainy
season the soil in the open is usually too wet for sowing medium-sized or fine seeds. If such seed has to be sown during this period and no greenhouse is available, some kind of tern-
porary shelter has to be erected over the seedbed. For larger
seeds no shelter is needed.
251

c),Lininq out seedbeds: The necessary equipment are planting
lines and measuring sticks. Plastic strings fastened to
50 cm long wooden stakes would make good planting lines.
Measuring sticks 1.40 m long with marks at 10 cm intervals
are used to measure simultaneously the width of the bed and
that of the adjoining path.
MEASURING STJCK
XX MARKING
NURSERY BEDS
-
7---* or THE PLASTIC SrnlMG 30M.
F’LANflN6 LINE WI-!%
WOODEN PEGS
Fig, 5: Implements for lining out seedbeds
d) Layout of seedbeds for overhead waterinq: Their width is 1 m tiith a 40 an path in between. For convenience of work the width of 1 m should not be exceeded. The bed surface should be level and only slightly elevated above the path (5-10 cm) with a low earth embankment along the margin of the bed to
prevent the irrigation water from running off and washing away soil, seed or mulch.
M’- iii&ii- . sEcDE=D 4.
7nP VIEW
252 Fig. 6: Raised aeedbed for overhead irrigation

This type of seedbed is suitable for fine and medium-sized'
seed,and is usually newly laid out after every cultivation
period. The difference in level between the paths and the
beds can usuallg- be achieved by compacting the soil along
the planting lines with the weight of the body. If this
does not seem to be enough, some soil can be removed from
the path with a shovel and placed on the adjoining beds:
The beds can be curbed on their sides to protect their 'bar-
ders. Useful for this purpose are wooden planks treated
with a wood preservative and kept in place by pegs or curved
iron bars. Instead of boards, also thick and straight bam- b.00 poles are sometimes used. Because of their irregular shape the use of stones as curbing material is not advisa-
ble. The cracks in between provide a gooC anchoring ground
for grasses with rhizomes and other weeds. Hollow blocks or solid concrete curbs are exsenslve, but durable. They also have the advantage that -tight fitting protective plastic or mesh wire frames can be placed on top.
d) Layout of seedbeds for furrow irriqation: The width of these
beds must be less than for overhead watering to facilitate
water infiltration from the sides. Depending on t&3.l con- ditions the recommended width between furrows is only 40 to
60 cm. The furrows are 10 to 15 cm deep, and must not be wider than 30 cm, just wide enough to-'be used as a path when
dry. IRRIGATION DlrCH
r o+!!+J DfmM WATER I
SIDE view (CROSS secslON~
wmt HllTEu
TOP VIIW
Fig. 7: Furrow irrigation 253

This type of seedbed has the advantage that the soil surface
will not be disturbed by incoming water. This makes them
suitable for the propagation of species with small seeds.
e) Layout of floodbeds: They have the same dimensions as the
seedbeds for overhead irrigation, but their cross section
is directly reversed. The paths are elevated and the seed-
bed area is depressed, The surface must be level with a
slight inclination from the water inlet towards the far end
of the bed. The length of the bed should not exceed 10 me-
ters to ensure an even distribution of water. Flood beds
are only suited for species with larger seeds like teak, Gmelina, mahogany, narra, lumbang.
tRRlGATK?N DITCH
SIDE VIfrW W?OSS SECTION)
Fig. 8: Layout of floodbed
3.3 Preparation of seedboxes and qreenhouse benches
Tree species with fine seeds, which after germination deve- lop into delicate seedlings, should be propagated in seed- boxes or greenhouse benches. It is much easier there to treat the soil successfully against nematodes and fungi, and
to maintain favorable growth conditions than it would be in
open seedbeds. Where greenhouse facilities are lacking, the seedboxes can be placed in the open on a bench under a
254

This type of seedbed has the advantage that the soil surface
will not be disturbed by incoming water. This makes them
suitable for the propagation of species with small seeds.
e) Layout of floodbeds: They have the same dimensions as the
seedbeds for overhead irrigation, but their cross section
is directly reversed. The paths are elevated and the seed-
bed area is depressed. The surface must be level with a
slight inclination from the water inlet towards the far end
of the bed. The length of the bed should not exceed 10 me-
ters to ensure an even distribution of water. Flood beds are only suited for species with larger seeds like teak,
Gmelina, mahogany, narra, lumbang,
JRRJGATJON DJTCH
SIDE VIIY%’ (CROSS SECTtON
Fig. 8: Layout of floodbed
3.3 Preparation of seedboxes and greenhouse benches
Tree species with fine seeds, which after germination deve- lop into delicate seedlings, should be propagated in seed- boxes or greenhouse benches. It is much easier there to treat the soil successfully against nematodes and fungi, and
to maintain favorable growth conditions than it would be in
open seedbeds. Where greenhouse facilities are lacking, the seedboxes can be placed in the open on a bench under a
254

protective roof. The legs of this bench should be set in
cans with water to prevent the seed or seedlings from being
attacked by ants (34).
Fig: 9: Bamboo bench for seedboxes sheltered under cogon roof
a) Construction of seedboxes: The convenient size of a seedbox
can range from.30 x 35 cm to 35 x 40 cm with a depth of 10
to 13 cm. If it is Larger, it becomes too heavy.
For the construction one takes 1-2 cm boards. The bottom
must have plenty of drainage holes with a diameter of about
7 mm, so that water can enter when the box is placed in a
basin, and excess water can drain off, but no soil would run
through the openings. For greater durability the seedbox is
treated with a wood preservative.
to QI I
Fig. 10: Measurements of the seedboxes made at the Training Center in Baguio
b) Preparation of soil mixture: Considering the usually fine
nature of the seed a soil of similar fine texture has to be
the basic component of the fill. Good topsoil with the cha-
racteristics of a sandy loam screened through a fine wire mesh would be a suitable material. To improve its proper-
tie.3 one can add screened compost and sharp river sand.
255

For an average topsoil the recommendation is: 3 parts topsoil,
3 parts compost, 1 part river sand.
The soil mixture should be sterilized to eradicate whatever
harmful organisms it might contain (fungi causinq damping-
off, nematodes, weed seeds). A self-made steam sterilizer,
as described in Chapter 10 of this section, has been found effective and convenient for this purpose.
C) Fillins of seedboxes and greenhouse benches: Seedboxes and
greenhouse benches to be filled must be clean and dry, and
should have been sprayed with a fungicide (e.g. Agallol).
While seedboxes do net need any drainage layer, greenhouse
benches are filled with a bottom layer of small sharp stones,
a medium layer of coarse sand, and a top layer of a steriliz-
ed soil mixture t shown in Fig. 11.
Fig. 11: Greenhouse bench with drainage layer
When placing them in the bench or box the soil materials are
constantly levelled and slightly pressed down with a board or
trowel to ensure equal settling. For the same reason seedboxes
should be repeatedly lifted and dropped. The final surface level should be about 1 cm below the rim.
3.4 Sowinq techniques
a) Broadcast sowing: is employed for fine seeds like those of
kaatoan bangkal (401, the eucalypts, bottlebrush, cypress, alder, agoho, African tulip, kalantas, banaba, Benguet pine. The advantage of broadcast sowing is a greater uniformity of the seedlings and a higher output per area as compared with
drill sowing. However, the seed should not be broadcasted
too thickly over the bed surface, so that the seedbeds will
256

not be overcrowded later and each seedling will be provided
with adequate growing space.
If fine seeds are sown out of an envelope or so, they are
likely to fall in clusters. A better way is to take one
"pinch" of seed or seed/sand mixture between forefinger,
thumb and middle finger. By holding the hand about 5-10 cm
above the soil surface and rubbing the fingers slowly, the
seed is allowed to escape little by little. The hand moves
from one end of the seedbox to the other covering the area
systematically. To achieve a correct and completely even
distribution of fine seeds requires some experience (4).
For sowing kaatoan bangkal, th,-: seed sf which is brown like
the soil, it is recommended to add some fine white sand as
a filler to facilitate even distribution and to avoid too
dense germination.
b) Drill sowinq: This is the general practice for sowing medium-
sized or large seeds such as lumbang, teak, mahogany, narra,
Gmelina, ipil, tindalo, akle. Benguet pine is also often
srdrt in rows.
Sowing in drills allows root pruning, which is particularly
important where plantable seedlings are raised -without trans-
planting. Weeding and cultivation will be facilitated, because
efficient weeding tools can be employed between the drills.
Also lifting the seedlings will be more convenient. For all
this kind of handwork the drills should extend crosswise
over the bed surface. At last, the total number of seedlings
in the nursery can be more easily estimated.
If the seeds are sown in drills, cultivation, root pruning and lifting can also be carried out by machines. Drill sow-
ing is therefore the precondition fcr the complete mechani-
zation of a forest nursery. In that case the drills run
lengthwise, parallel to the paths.
Normally the distance between and within the drills is chosen
according to the space requirements of the seedlings up to
transplanting. Where the transplanting of seedlings befoze
257

field planting is not iFtended, as often practiced with teak,
Gmelina and other species with large seed, the distances must
be wider. There should be at least 20 cm room between the
rows to allow the employment of the long-handled light weed-
ing hoe. If after germination the seedlings turn out to
grow too dense within the row, their stands should be thin-
ned and the surplus seedlings transplanted.
The depth of the drills depends on the size of the seed and
the condition of the soil. Large seed requires narrow but
deep drills, while fine seed needs broa;4 and shallow drills.
The drills can be deeper in sandy than in heavy soils.
Suitable tools for placing the drills are drill marker, mark-
ing board and drill roller (33,371.
- Drill markers: can be employed for
the large seeds of some broad-
leaved species. Their teeth are
20 cm or more apart. Four or five drills are produced at a time by I pulling the tool lengthwise or
crosswise over the seedbed. Fig. 12: DriU marker
- Marking boards: With them as well as with the drill rollers
the drills are pressed instead of drawn, which is more
favorable especially for smaller seed. All seeds will lie
in an even horizontal line, and a
close contact beeween seed and soil DRlLLS
is established. Marking boards are RIJ*l CROlWISti
made by nailing small slats with a
rectangular or triangular cross HANDLE
section to the lower side of two
parallel boards with handles. The
implement is placed across tha +-IoDClvc ---j seedbed and the slats pressed into the soil. The depth of the rills ' Fig. 13: Marking board depend on the pressure applied.
Marking boards permit accurate and rapid work.
258

Drill roller: It consists of a
hardwood cylinder as long as
the width of the bed (usually
1 m). When the rills shall run
lengthwise, a number of slats
(rattan) are nailed on its
circumference and spaced at the
desired drill distance, When
the drill shall run across the
seedbed, 1 m slats are nailed
at the desired spacing around the roller. Drill rollers are
very effective and permit rapid
work. The! xoller should net be
too light to exert adequate
pressure on the soil surface.
LEN6TH WISE y)Y
DRILLS RUN CROSS CROSSWISE SECTIOl+~
Fig. 14: Drill rollers
In drills the seed is distributed by hand similar to the
methcd described for broadcast soling. So-called seeding
troughs have been designed to facilitate an even distribution
of finer seed. The various types
are all alike in principle and
consist of V-shaped troughs as
long as the bed is wide. A measuring glass holding the
qrzantity of seed for a single
drill is used to fill the
trough, in which the seed is
evenly distributed by hand: Wfth one kind of seeding trough the
bottom can be opened to release
the seeds into the drills, others have to be turned.
Fig. 15: Seeding troughs
Large seeds are placed individually into the loose and friable soil. There may be no need to make drills. Mahogany is placed
on edge with the wings all pointing in the same direction. The
usual practice with dipterocarps, which have large wings corn--
pared to the size of the nut, is to push the nut into the soil
259

at an angle, until it is just below the surface. Large seed should be sown in a position, it would also assume in nature
(4).
c) Sowina directly into pots: The purpose is to-save transplant-
ing costs. This method can be practiced only with seed of
high germination capacity and is quite common in raising Benguet pine. The containers are filled with soil and the seed is sown with the help of a dibble.
With seed of 75% germination or better only one seed per pot
is sown. After 3 weeks the blanks are resown. If the ger- mination percent is between 50 and 75 one should sow two seeds
F pot- If more than one seed germinates, one can be pulled
out and planted to a blank pot. If the germination percent is below 9% pot seeding is not recommended (43).
A better way of pot sowing for Benguet pine would be to sow only the viable seeds, one in each pot. The viable seeds can be distinguished from the rest by soaking the seeds for 24
hours in water. After that time they will swell and start
germinating.
d) Coverinq after sowinq: Broadcasted seed in seed boxes or greenhouse benches is covered with a thin layer (l-3 mm) of
a sterilized sand/humus/soil mixture. By placing the soil in a small hand screen with a fine mesh and rubbing it care-
fully with the fingers one can achieve a fine and even cover-
ing of the seeds. The cover is slightly tamped with a small tamping board to establish good contact between seed and soil.
For seedbeds in the open, basically the same procedure is adopted. The depth of the cover should be more or less the same as the diameter of the seed or range from one to two
times its smallest diameter. The soil used for covering should be loose, friable and of fine texture. Pure sand is recommend- ed for pine seed to prevent damping off. In this case a light shade is necessary to avoid overheating (43). In broadcast seed- ing the soil cover is screened over the seedbed with a large
screen with a 5 mm mesh. The sieve should have the same length
260
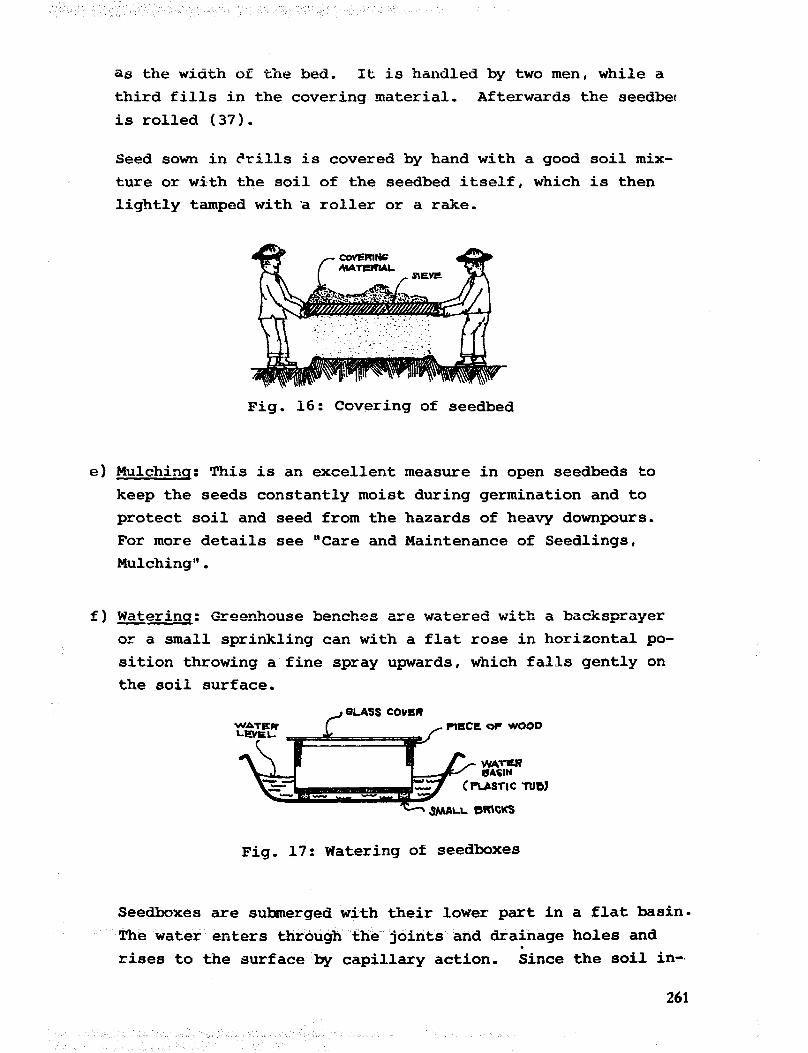
as the width of the bed. It is handled by two men, while a third fills in the covering material. Afterwards the seedber
is rolled (37).
Seed sown in drills is covered by hand with a good soil mix-
ture or with the soil of the seedbed itself, which is then
lightly tamped with a roller or a rake.
Fig. 16: Covering of seedbed
e) Mulchinq: This is an excellent measure in open seedbeds to
keep the seeds constantly moist during germination and to
protect soil and seed from the hazards of heavy downpours.
For more details see "Care and Maintenance of Seedlings,
Mulching".
f) Waterinq: __ G=enhouse benches are watered with a backsprayer
or a small sprinkling can with a flat rose in horizontal po-
sition throwing a fine spray upwards, which falls gently on the soil surface.
SLASS COVER nscc or ~000
Fig. 17: Watering of seedboxes
Seedboxes are submerged with their lower part in a flat basin=
The water enters through the joints and drainage holes and . rises to the surface by capillary action. Since the soil in-
261

side the seedbox becomes saturated with moisture, fratering may be
necessary only once or twice a week. Only clear rainwater or tap
water directly from a well or spring is used to avoid infestation
of the sterilized soil with fungi causing damping off.
Chapter 4:
PRODUCTION OF NURSERY PIANTS BY CUTTINGS
Apart from sowing, nursery plants can also be propagated by asexual methods like layering, marcotting or cuttings. While
layering is applicable only for low branching shrubs and
marcotting is a time consuming technique carried out on standing
fruit trees and ornamentals, propagation by cuttings is a possi- ble,way of plant production also in a forest c&ursery.
Cuttings are sections of roots, stems, branches or twigs gathered from suitable mother trees or shrubs. They are placed with part of their length into a suitable rooting medium to induce the
formation of roots at the basal end irnd the development of buds
and leaves on the upper portion. A cutting will thus grow into a new individual plant.
However, although simple and suited to the propagation of tree species, exclusive propagation by cuttings cannot be recommended for large-scale reforestation programmes, because
the production cost per plant is relatively high, the
262

rooted cuttings are often less robust than seedlings, and it
may be difficult to secure enough branch wood to prepa;, cut-
tings in sufficient quantity.
On the o&her hand, since asexual propagation methods ensure,
that the offspring will pos:;ess exactly <he sdme genetitya?
characteristics as the parent plant, propagation by cuttin.Ja
is inevertheless employed in all cases, where a specific geno-
type shall be preserved like in tree improvement programs
or in the propagation of ornamentals and fruit trees with
certain desirable traits. There are also some species which
are very difficult to propagate by seeds, but grow easily from cuttings.
4.1 Suitable species --
Species that can
paper mulberry (171, mulberry, Gmelina arborea, African tu-
lip, kakawati, ipil-ipil, Cryptomeria japonica, as well as
many ornamentals like Hibiscus, Euphorbia, Cordyline, Lan-
tana, Bougainvillea, Plumeria, Cestrum, Calliandra, Nerium and many others.
4.2 Propaqation beds
be easily propagated from cuttings include
A propagation bed for cuttings has to provide excellent
environmental conditions that are not only favorable for the
formation of new roots, but also for all the other life pro-
cesses within the newly developing plant. These environmen-
tal factors are proper aeration (oxygen supply), adequate
moisture content of the rooting medium as well as a high
relative humidity of the atmosphere, good light conditions
and a favorable air temperature (not higher than 27OC).
A bed for cuttings can be established in the open. It should
be framed on all four sides with durable boards or concrete.
The width should not be more than 1 m. For the more diffi-
cult species a greenhouse is to be preferred.
The rooting medium should be of light, loose nature with plenty of pore spaces to allow good aeration and to drain

off excess water. It is essential that the rooting zone is
well supplied with oxygen, and yet has a certain water hold-
ing capacity. The rooting medium should also contain the
basic plant nutrients, especially nitrogen.
For the majority of species coarse sharp river sand mixed
with sterilized old compost at a ratio of 2:1 or 1:l would
make a good medium. Species that root easily can be simply set in loamy sand, Clean sharp river sand, which has been freed from organic matter and soil by washing, is a good
medium fa: conifers.
A high relative humidity around the cutting is necessary to
reduce transpiration to a minimum, especially with hard-to- root species which have retained their leaves. The humi- dity can be maintained by covering the propagation bed with
a fitting plastic frame. Propagation beds with a plastic cover need to be moderately shaded to avoid overheating.
By installing an automatic intermittent misting system one
can keep the humidity permanently high without needing a
protective cover. By cooling the leaf surface transpiration will be further reduced, so the cuttings can be exposed to
direct sunlight. This has the advantage that the leaves can fully assimilate, which has a stimulating effect on root formation. The installation of such a misting system, how- ever, is quite expensive and only possible where there is electric current.
4.3 Sources of cuttinas
Cuttings are best obtained from young vigorous mother trees.
The younger the mother plant, the faster the formation of
new roots (15).
The quick appearance of the adventitious roots depends to a large degree on the quantity of carbohydrates stored in the
tissues of the cuttings. Lateral shoots and side branches contain more starch than terminal shoots, more of it is found
at the base of a branch than at its tip. Little carbohydrat- es are generally accumulated in a succulent shoot being in a stage of rapid growth (15).
264

For broadleaved species the best cutting material are there-
fore the young, but sufficiently matured and lignified side
branches with a diameter ranging usually from 5 to 10 mm.
The branches are removed from the parent tree with pruning
shears or a pruning saw with a clear sharp cut, and divided
further into handy pieces. To prevent fungiis infection of
the mother tree the wound can be treated with grafting wax
(4 parts resin, 2 parts beeswax and one part of tallow mix-
?C-: and melted in a metal contaiiler) (9)*
Broadleaved species that grow easily from cuttings are
stripped of their leaves to reduce transpiration losses.
Species that can only be rooted with difficulties must keep
their leaves, because the assimilates and growth hormun*>s
produced in there will have a stimulating effect on root
formation.
Cuttings from narrow-leaved evergreen conifer species like
Chamaecyparis, Thuja, Juniperus, Cupressus, Cryptomeria are
either taken as terminal shoots with a small section of older
wood at their base or as side twigs torn from the stem re-
taining a small slice of fully matured wood from the stem,
a so-called "heel". A short cut below the branch would en- sure, that the mother tree is not damaged too much. With the exception of Cryptomeria all these species are difficult
to root.
Great care has to be taken, that the cutting material will not lose its freshness and'dry out, which can easily happen
with leafy cuttings. During transport they are therefore bundled and covered with wet newspaper or sacks. The cut- tings should be prepared and planted on the same day.
4.4 Preparation of cuttinqs
From the collected bran&wood, cutticgs are prepared by Prneclr-rltt;A.* * -- "-IYIUCCIIII> it into sections of 15 to 20 cm, Large leaves
of 'leafy cuttings are somewhat reduced in t'leir size in or-
der to economize in spacing.
265

It has been found out by experience that the.presence of leaf
buds induce rooting, while flower buds have a retarding effect.
To stimulate rooting flower buds should therefore be removed(l5).
The cuttings are then bundled agaln and placed upright with
about half their length in water to keep them fresh until
they are planted.
4.5 Treatments to promote root formation
- Wounding: The formation of roots at the basal end of the cutting can be stimulated by wounding the lower 2 cm on opposite sides, either by cutting vertically through the
cambium or by slicing off strips of bark with some ad- hering wood.
- Rooting hormones: They induce the cuttings to root earlier and to produce more roots. The more common active ingred-
ients of these chemicals are indolebutyric acid and alpha- naphtalene-acetic acid. The marketed products are either
formulated as powder (Rootone, Hormodin, Seradix, Wurzelfix) or as liquid (Shell A.N.A.A.).
Rooting hormone in powder form is applied by moistening the
lower part of the cuttings and dipping them into the powder.
Excess powder is carefully shaken off. The liquid formula-
tions are diluted in water as prescribed by the manufactur-
er and the cuttings placed into the solution 12-24 hours
before planting.
- Plant nutrients: HARTMARN and KESTER (1968) observed that rooting will also be promoted, when the rooting medium con-
tains organic and inorganic nitrogeneous compounds and boron.
- Punaicides: It is also believed, that fungicides like
Perbam or Captan (Orthocide 50) do not prevent only fungus infections, but also have a certain stimulating effect on root development.
4.6 PLantins of cuttinqs
After the rooting medium has been moistened the cuttings are
planted either vertically or in slanting position covering
266

about 3/4 of their length. Care must be taken that they are
not planted upside down. In that case they would not root.
After planting the soil is slightly tamped and watered.
4.7 Care of cuttinqs durinq the rootinq process
Delicate cuttings are placed under a plastic frame cover.
Several times a day the bed is sprayed or sprinkled with a
fine rose. On sunny days the propagation bed with the plas-
tic cover must be shaded (50 to 70% shade) to avoid over-
heating,and the plastic cover must be lifted a little to
allow aeration.
After two to four weeks leafy cuttings will produce new
shoots, or buds will appear on the bark surface of bare cut-
tings. At the same time callus will develop at the basal
end of the cutting, whit% is an irregular mass of cells in
various stages of lignification. Although, frequently, the first roots appear through the callus, root and callus for-
mation are independent processes, which usually take place at the same time (15).
Where only sand was used as a rooting medium, most cuttings
at this stage will benefit from a liquid application of a
complete fertilizer. Plastic cover and shade are gradually
removed as well as the intervals between the waterings and sprayings lengthened to harden the growing plant,
The care of the developing cuttings has to adjust to the
constant change of weather conditions. With easy rooting species propagation by cuttings may be successful even with-
out a plastic cover and without so much care, especially
during the rainy season. .
4.8 Pottinq of the young offsprins plant
The cuttings are ready for potting when the roots have reached
a length of about 3-5 cm. The plants must be handled with
great care, because the roots are quite brittle and easily
break off. After transplanting they are treated like or- dinary seedlings. Where required multiple leaders are cut
leaving the strongest shoot. 267

C
Chapter 5:
TRANSPLANTING IN OPEN BEDS
Transplanting is the transfer of seedlings from seedboxes,
greenhouse beds or open seedbeds to transplant beds or con- tainers in order to provide each seedling with adequate
space to grow and develop (9).
5.1 Preparation of seedlinss
Seedlings are ready for transplanting when the first side
roots appear and the stem tissues have hardened. At that
time the seedlings have a height of 2-5 cm above-ground
with a root 5-10 cm long.
Seedlings to be transplanted should be fresh and turgid,
i.e. their vessels filled with water. This is achieved by
watering them well the day before they are taken out from
the seedbed. However, the time the seedlings are lifted,
the soil should be only moist, not wet.
In lifting the seedlings from the seedbed one must be care-
ful not to damage their shoots or roots. They should be rather "eased" out of the soil than pulled up. A pointed stick or a trowel are useful tools for this purpose.
If the taproots or side roots are already too long, they should be pruned with a knife or pruning shears. Very long and soft roots can be shortened by clipping them off with
the fingernails just before transplanting. Only as many
seedlings as can be planted within one hour or so are lift-
ed and root-pruned at a time to avoid their drying out.
268

A suitable bunch of prepared seedlings is placed into a flat
tin lined with moist soil, sack clot:. or moss, thereby cover-
ing their roots with the same moisture holding material. All
the time between lifting and transplanting, the roots must
be constantly kept moist. If on a hot, cle;Ir, windy day the roots are exposed for even only 3 minutes, they will dry vlp
becoming unable to supply the seedling any more with water and nutrients. Neither should the seedling be "mud-puddled"
or filled in containers filled with water, as this washes
the fine soil particles away and lumps the roots together.
Soil that naturally adheres to the hair rootlets facilitates
a better establishment of the seedling in the new soil of
the transplant bed or pot.
5.2 Transplantinq tools and techniques
a) Transplant beds: are prepared for the production of bare-root
seedlings and stumps. After the nursery area has been tho- roughly worked, the transplant beds are laid out as described
for seedbeds according to the irrigation method practiced.
More often than seedbeds, transplant beds are laid out as floodbeds.
b) Spacinq of transplants: The seedlings should be set as wide
apart as to provide sufficient growing space up to the time
of field planting. This depends on the growth rate and the
light requirements of the species and the kind of planting
material to be raised (bare-root plants or stumps). Light
demanders as pines, agoho or eucalypts need wider spaces
than shade tolerant species as mahogany. The distance be-
tween the rows, however, should not be less than 20 cm, so
that a light weeding hoe can be employed. Within the row,
the seedling are placed usually between 5 cm (narra) and
20 cm (teak) apart.
The implements usually employed to obtain equal spacing of
seedlings and straight rows are transplanting Enes and trans-
plant boards. Transplanting lines have knots or iron balls
as space markings usually at 10 cm intervals and should be
equipped with an attached winding-up apparatus. They either
consist of nylon or stranded galvanized wire.
269

FWWLANTIN6
em4 wrrH IFroN aaus lNDl C&TIN6 T))E DlS-I’-ANCE 88 THE SeEoLIN Q!i
EEt4
A transplant board is as long as the width of ths bed and as
broad as the desired distance between the rows. It is used
where the rows run across the transplant bed. The distance
between the seedlings is indicated by notches.
TRANSPLANT BOARD Kw
CROSSWISE TF?ANSPLANTJ+=
Fig. 18: Transplanting line and transplant board
c) Transplantinq methods: In transplanting we can distinguish
the dibble method, where a separate hole is produced for
each plant, and the trench or furrow method.
The seedlings should be placed in the transplant bed in a
natural upright position, the same way they have been? grow-
ing in the seedbed. The roots too have to regain their na-
tural position without being bent or twisted. It is ad-
visable to plant the seedlings slightly deeper than they
have grown before to allow the soil to settle.
d) Dibble transplantinq: The dagger-shaped dibble is usually
made of wood and about lo-30 cm long. Its cross section
may be round or triangular with a diameter that can range
from 1 to 4 cm depending on the size of the seedlings. It . is mainly used for transplanting smaller seedlings.
The hole is produced by pushing the dibble vertically into
the soil and prying it back and forth. When the transplant is inserted with the left hand in proper position, the hole
is closed by thrusting the dibble again into the soil near
the seedling pushing the soil into the opening. The soil
around the seedling is then levelled and firmed with the hands.
270

Big seedling8 that already have a root system top large for
the relatively small dibble hole are transplanted with a
trowel. With the right hand the trowel is driven vertically
into the soil and pulled towards the operator. The seedling is inserted behind the trowel as deep as the roots will
reach and then raised a little to straighten them. Now the trowel is withdrawn, and the soil filled back into the open-
ing I compacted and levelled with the knuckles and fingertips
of both hands.
9) DIBELE MADEOI= STEEL
-werl wrrtl i+~NDLE AND
BI-ADF RPWIIH~ A RIQHT ANBLE
Fig. 19: Tools for hole (dibble) transplanting
There is also a handy transplant "hoe" (Fig. 19 d) operated
in a way similar to the slit planting technique described in
Section 2, Chapter 10 of this book.
e) Trench or furrow transplanting: Transplanting in trenches is
less expensive than dibble planting where the soil is loose
and a narrow spacing within the rows is adopted. The tren- ches, which can run lengthwise or crosswise over the bed, are made with trenching sparles or hoes.
When the rows shall run lengthwise, the trench is opened
along a transplanting line by two laborers starting from
both ends of the row and working towards the middle of the
transplant bed. Hereby the men step on walking boards to avoid compacting the soil. When crosswise trenches are to be opened, the 2 laborers stand on the adjoining paths and
work along a transplant board towards the centre.
- Usins a trenchinq spade: The trenching spade, which
consists of a plain steel blade or of a wooden blade covered with iron sheet , is used by thrusting it vertica&ly
271

into the soil and moving it back and forth to open up a
trench about 6 cm wide. The next thrust is made aside to
the previous one to produce a continuous trench. The planter
immediately follows the trench maker by setting the plants
at the marked intervals of the planting line. The trench is
closed by filling the soil back by hand and firming it care-
fully around the seedling. The trenching spade can only be
used on loose, sandy soil entirely free from roots and stones.
In heavier soil it becomes difficult to force this tool into
the ground, and the walls inside the trench become SCI com-
pacted, that it will be hard to crumble the soil when the
furrow is closed. This method is especially suited for
smaller seedlings (33).
,usino a transplant hoe: In loamy soil the furrow is made with
a broad-bladed hoe. It is thrust into the soil along a trans-
plant line or transplant board and pulled towards the laborer formina a small wall of earth in front of him.
a) TRENCHlN6 SPADES 6)TRENCHiNG t-m
Fig. 20: Tools for trench (furrow) transplanting
The side of the furrow just along the planting line or board
should be as vertical as possible to ensure an upright
position of the transplant. For that reason the handle of
the transplant hoe is attached at an angle of 110 - 120°. The plants are set at the desired intervals and the soil
is filled back by hand and firmed down. Because of the
deeper trenches that can be produced with the hoe this
method allows transplanting of larger seedlings (33).
272

f) Care of the transplant beds: After transplanting the beds have to be watered and shaded. The shade can be removed as soon as the seedlings resume growth. Repeated cultivation with a light weeding hoe or mulching would reduce soil eva- poration and keep the bed surface in desirable condition.
Chapter 6:
RAISING OF CONTAINER PLAN!PS (POTTING)
For better survival many reforestation species and ornamen- tals are raised in a container with an earth bal.'~ surround- ing their roots. The advantage is that in field ;?lanting the root system is hardly disturbed and survival and growth
especially on difficult site& is better than with bareroot seedlings.
However, the production costs for potted seedlings are much higher than for bareroot plants. The forester-in-charge has to investigate carefully, what kind of planting material is actually required in his particular project. It would be a waste of funds to raise potted seedlings, where bare-root plants can be set out with the same success.
6.1 Tynes of containers
There are various types of containers in use for raising potted seedlings. The type to be selected depends mainly on the
273

availability and the cost. The dimension and material de-
termines the weight and the quantity of soil at the disposal
of the plants. For mass production one should use contain-
ers holding not more than 500 cc, larger containers are re-
commended only for ornamental plants and for special pur-
poses. The appropriate size of the pot must be chosen ac-
cording to the desired final size of the planting material
to be produced. All containers should have drainage holes
to allow the excess water to drain off.
Pots most commonly used in Philippine nurseries are plastic
bags, boho pots and tin cans. Veneer pots are produced where waste veneer can be obtained from a local veneer plant.
a) Plastic (polvethylene) baus: have several advantages and can be ordered in suitable sizes. The most common dimensions are given below together with the approximate amount of soil they
can hold:
- 3" layflat x 6" long 250 cc (generally too small)
- 4" layflat x 6" long 500 cc (very useful size)
- 6" layflat x 6" long 1000 cc
- 6" layflat x 8" long 1300 cc for ornamentals
-53;" layflat x 9" long 1300 cc / or fast growing broadleaved species
Plastic bags are relatively cheap, provided large quantities
are ordered. They are light and can easily be carried to
nurseries that are accessible only by foot trail.
Depending on their size plastic bags should have 12 to 24 drainage holes, which are usually punched with an ordinary office puncher or with a hollow chisel. It is not advisable to pierce the holes with a pointed stick or nail. When placing a large order the manufacturing firm should be re-
quested to deliver the bags prepunched.
The plastic material must be sufficiently strong with a
gauge not less than ,002 . Very thin material often does not last until field planting and becomes brittle through sun and rain
274

A possible disadvantage of plastic containers is that they
cannot be bundled for easy transportation as boho pots, nor
can they stand by themselves on a level surface.
b) Boho pots: The containers are prepared by cutting the poles
into sections of about 15 to 20 cm. The inner diameter of the poles should be at least 4 cm. Cutting the bamboo poles into short pieces can be facilitated by placing them on a
sawbuck. While one hand holds a measure, which indicates
the length of the boho pot, the pieces are cut off with a
bow saw with fine teeth.
I MlZASURC MhDE
DF?AlfdABE HOid? b-JNCHED INTO THE CENTER W-I-H A BOLO
Fig. 21: Preparation of boho pots
As far as possible the cuts are made in such a way that a
node will be at either end of the pole sectLon to form the
bottom of the pot. In the center of this base a drainage
hole is punched with a bolo. Sections of correct length
without nodes can be utilized by tamping one inch of soil at the lower end of the cylinder to form a kind of bottom.
c) Tin cans: Tin cans of various sizes can be collected at gar-
bage places or from restaurants, hospitals and the like.
Although tins can usually be obtained without difficulty and
at a low cost, their preparation will be quite costly and
275

time consuming, A disadvantage in the nursery is that they easily heat up to harmful degrees, which micjht through in-
creased soil evaporation cause a quick drying.
All this makes them unsuitable for mass production. For special purposes, however, like for the propagation of fruit trees or ornamentals to be distributed to the public, large
tin cans are useful and may still hold their place.
FENCE WIRE mMN /
/PN CANS
Fig. 22: Sterilization of tin cans
To kill or neutralize all harmful substances left in the
tins they are burned over a fire. For this purpose some wire mesh is put on top of some iron supports, under which
the fire will be lit. The tins are turned with a bamboo pole from time to time until they turn grey or black.
Through burning the tins also become soft and rust quickly, so that they can be easily cut or broken to remove the
Fig. 23: Devices for the preparation of tin cans
276

earthball at planting time. The bottom and sides are pro-
vided with slits for drainage. These slits should be long
enough and arranged in a way, that the tin can easily be
taken apart at planting time by cutting the remaining por-
tion between the slits with a bolo. The preparation of
tins is facilitated by devices shown in fig. 23,
d) Veneer tubes: The use of veneer tubes is very recommendable
where cheap waste veneer can be obtained from nearby ply-
wood mills. The veneer sheets, usually 1-2mm thick, are
cut with a special cutter into pieces of the required size.
The standard size for a plant pot is 35 x 20 cm with the
grain parallel to the 20 cm edge. The tubes are formed by
wrapping the veneer around a wooden cylinder of 5-8 cm dia-
meter and fastening the ends with a stapler.
When a soft organic material like veneer is used for pots,
planting will be facilitated, because the containers need
not to be removed before planting but can be allowed to rot
in the ground.
Fig. 24: Manufacture of veneer pots
6.2 Potting soil
a) The supply of potting soil: in adequate quality and quantity
is one of the main problems in raising potted plants consider-
ing that for the production of 1 million seedlings about 500
cubic meters of potting soil are required. 277

Where the services of a dump truck are available, soil can
be obtained from distant places. If the soil, however, has
to be brought in by wheelbarrows there should be a good
source of topsoil close to the nursery.
Good topsoil is generally found only under forest where it
is taken from the upper 15-30 cm. Before collection the
topsoil is examined on the spot. Its physical condition and
humus content can be judged by the earthball test and by
thorough inspection. It should have the characteristics of
loam or sandy loam, its reaction should range between pH 5.5
and 6.5 (slightly acidic). Topsoil with a pH value of over
7 should not be taken, because it would be very difficult
and costly to lower the soil reaction. If the pH value is
too low, it can be raised by adding lime.
The topsoil is screened at its source through a coarse sieve
with a % inoh mesh fitted to a wooden frame of appr. 1.00
by 1.50 m in size to exclude roots and stones. The screen
is set up with an inclination of about 45O, and the soil is
thrown with a shovel against the wire mesh. It is also pos-
sible to hang the sieve under a tripod scaffolding or truss.
Fig. 25: Screening of topsoil
b) Soil shed: After screening the topsoil is transferred to the
soil shed, where it is stored until it is needed. At the beginning of the rainy season there should always be a suffi-
cient amount of topsoil stored in the shed to last for the
time when it is too wet to collect soil in the open. In addition, there should be all the time an adequate supply of coarse river sand and compost at hand, so that poor topsoil
278 Can be improved.

A soil sk" or potting shed is a very important installation
and shou be constructed in every nursery where potted
plants z A to be grown. It can be a simple shelter made of
bamboo pioles and thatched with cogon or palm leaves. For a
more durable structure one can use 2" by 2" timber and cor-
rugated iron sheet. There should be 5 spacious compartments
for topsoil, sand, compost, ready mixed potting soil and
empty containers. The soil compartments can be constructed
of wooden planks, or better, of hollow blocks reinforced
with iron. Under the same shed there must be enough space
for soil mixing, screening, potting, etc. There should also be a water tap nearby. It is very important that the soil shed can be reached by motor vehicles for unloading soil.
Fig. 26: Soil or potting shed
c) Imorovement of oottinu soil: Topsoils of clayey as well as
those of sandy nature are not favorable for potting. Clayey
soils tend to become compact and then absorb water only slowly. When the pots are irrigated from above by sprink- ling, the water will often hardly moisten the upper 5 cm,
while the lower portions in the container usually remain dry.
But since their water holding capacity is high, they easily
become too wet during rainy periods. Clay soils can be im-
proved by adding sand and compost.
Sandy soils also have their disadvantages. They have a low
water holding capacity and easily dry out. They can heat
279

up quickly under the sun, which, besides scorching the stem
tissues, will accelerate soil evaporation. The main disad-
vantage of sandy soils is, that the earthball will quickly
crumble and fall apart, when the container is opened during
field planting. Although their unfavorable nature can be
amended by mixing them with loam and compost, outspoken san-
dy soils should better be avoided.
There is no ready formula for mixing the ideal potting soil,
because the quality of the topsoil, which is the basic com-
ponent, can vary considerably. Topsoil which already has
all the desirable properties may not need to be improved at
all. The suitable mixing proportions have to be found by
J test and experience, For an average topsoil one can try the
following mixture (43):
6 parts forest topsoil,
1 part sand,
- 1-3 parts compost,
- 2-4 heaped tablespoons of a complete fertilizer (N,P,K)
per 5 gallon cans of soil.
The components have to be all thoroughly mixed. A cement mixing machine is useful, where large quantities of potting
soil have to be prepared.
6.3 Pottinu techniuues
a) Pottina Place: Potting has to be carried out under shade,
either in the potting shed or under movable or pez,manent
f
WI-W PO-l-TEQ MEDDLINGS U
-- TWO LAdOFfERS
!“DRt(\Ws AT 4 rnTTING TAElr -
Fig. 27: Potting table

high shade scaffoldings erected directly over the pot beds.
The potting shed should be furnished with potting tables
containing a larger compartment for the potting soil and
two smaller ones on either side for the empty and filled
pots. On each potting table two laborers can work together
facing each other and sitting conveniently on a kind of
stool.
TAMPER b) Fillinu the containers: Boho
cylinders and veneer tubes,
that do not have a bottom, are
filled at first only to a
he,ight of about 3 cm. With the help of a round piece of
wood the bottom soil layer is
compacted, after which the pot
Fxg: 2'3: Filling a veneer pot is filled up and the seedling
planted.
Layflat plastic bags can
or bamboo funnel. With bag is opened and the po
opposite end-
6ALvAtmED
be conveniently filled with an iron the pointed end'of the funnel . the htting soil filled in throuuh the
Fig: 29: Funnel for filling plastic bags
c) Large and small seedlinqe:The technique of potting is slight-
ly different according to the size of the seedlings.
With large seedlings, first, the bottom of the bag is filled with potting soil. Then, while the left hand holds the seedling at the correct level, the right hand fills soil around the roots up to the rim of the container.
Small seedlings are potted.the following way: The container
is filled up to the rim with potting soil, into which a hole

is made with a dibble. The hcle must be large enough to ac-
comodate the roots of the seedling. This technique is es-
pecially suitable for agoho, bottle brush or eucalypts, which
are generally potted as very small seedlings.
d) Potbeds: After potting, the seedlings are transferred to
shaded pot beds (Fig. 30).
Fig. 30: Transferring the seedlings to shaded potbeds
Those seedlings potted under high shade erected over the
whole pot bed area or under a movable shade, which is moved
as the potting proceeds, will be placed right away into the
pot bed.
"Pot beds" are constructed by fitting curbs to the ground
along both sides and at the ends of the bed as already des-
cribed for seedbeds. In the absence of curbs small earth
mounds would also provide the necessary support for the
pots.
Pots containing small seedlings of slow growing species are
usually crowded together. Containers with large seedlings
of fast growing species must be given some spacing to avoid
the formation of long etiolated stems, which may not be able
to support their own weight. For a firm standsthe pots are
buried with their lower portion in the ground.
e) Care after pottinq: The pot beds are watered immediately af-
ter transplanting and shaded for some time. The shade should
be gradually removed when the seedlings have established themselves and thrive.
282

After some weeks the pot beds are checked and pots with with-
ered seedlings are taken out. Potting soil and pots are
saved and stored in the soil shed. The remaining pots with seedlings are arranged according to size.
Chapter 7:
CAPE AND MAINTENANCE OF SEEDLINGS
During their stay in the nursery, apart from weed and pest control and fertilizer application, the transplanted seed-
lings require watering, shading, mulching, sometimes thin-
ning, soil cultivation, root pruning and finally hardening- off before field planting.
7.1 Waterinq
Moisture in the root zone is needed to maintain vital life
processes of the plant organism like transpiration, which
causes the circulation of the sap stream transporting plant
nutrients and assimilates and has a cooling effect on the
leaf surface. Water is also needed for the formation of carbohydrates in the photosynthetic processes. It is im-
portant, that the daily rates of water consumption and water
absorption are balanced. Xf water is consumed at a faster
rate than the roots are able to supply, the leaves will
start wilting, and, if this continues, the plant will die.
283

In the nursery this equilibrium between water consumption
and water absorption can be established by either reducing
the rate of transpiration (shading of newly germinated or
transplanted seedlings) or by maintaining an appropriate
level of soil moisture by irrigation, where rainfall is in-
sufficient. In addition,one can lessen water losses through
evaporation by mulching, soil working, and improving the
waterholding capacity of the soil.
There are two basic ways of irrigation: surface irrigation
and overhead irrigation. The layout of irrigated nursery
beds has been described in Chapter 2.
a) Surface irriqation: The water flows on the soil surface to
percolate vertically (flooding) or horizontally (furrow
irrigation) into the soil, until it reaches the roots of
the seedlings.
In "flood irrigation" the water is directed from a main ditch
into the flood beds, where it is allowed to cover the whole bed
area for some time until it has thoroughly percolated into
the root zone. Under suitable conditions (ample water sup- ply, large seeds, sturdy seedlings or transplants) flood- ing is a practical and time saving irrigation method, thotlgh
it can have some undesirable effects. Fine sediments might be left on the bed surface after the water has tiisappeared
clogging the soil pores and forming a crust. Weed seeds may accumulate on the'beds, when the irrigation water on the way
to the nursery passes through grassland. If the watx stands for too long in the beds, aeration of the soil may b& hampered. In flood beds that are too long and not complete- ly level the quantity of water received by individual seed-
lings may differ greatly. If the bed level is sloping too much, fast flowing water may cause erosion (9):
In furrow irricration the water does not cover the entire bed
surface, hut flows in furrows between the rows of seedlings or between the raised seedbeds or transplant beds from where
it percolates horizontally into the spil. This method has the advantage of causing no sediment nor any disturbance on
284

the bed surface. Water can stand in the furrows for a long-
er time than would be suitable for flood beds.
b) Overhead irriqation: Watering from above should be carried
out in a way that no water accumulates on the soil surface,
i.e. that not more water is applied than the soil can im-
mediately absorb to avoid the formation of a crust, sedi- \
mentation, compaction and erosion. The nozzle of the sprayer or the rose of the sprinkler must be constantly kept in
move (4). Regarding the size of the droplets we can dis- tinguish between spraying (fine droplets) and sprinkling
(coarse droplets).
Snravinq: The water is dispersed as a fine mist that settles
gently onto the leaves of seedlings and the soil surface.
Spraying is the correct way of watering delicate seedlings
in their early stages. Spraying implements are the dif- . ferent types of hydraulic pressure sprayers used in pest
control, like syringes, knapsack sprayers or high pressure sprayers.
Sprinklinq: means the application of water in a form resem- bling raindrops (9). Various implements and devices serve as sprinkling gear.
WATERI& Cm
KEROSENE CAN SHALL SPRIUC(LIbJ~ CAN
CONVERTED \NTo WTW WJ8lZON?4L IVOZLLE
A WATERIN CAM -1-0 WATER cq%\c4~E SEEDLINGS.
Fig, 31: Types of watering cans
USIW 4 BUCKET YOI<E
The ordinary type of watering can is used for transplants
or potted seedlings. Its rose should have fine openings to
obtain a fine sprinkle, which does not compact the soil
285

surface. Carrying water cans is facilitated by a bucket
yoke (see fig. 31). The cans are filled from a faucet or
better filled by dipping them in a concrete basin construc-
ted in front of the hydrants to save time.
Sprinkling can be facilitated by using a rubber hose. How-
ever, since the jet, as it comes out of an open hose is
too strong and too compact and damages seedlings and soil
structure, the hose end must be equipped with an adjusta-
ble nozzle or a rose. There are also special sprinkling attachments,which can be fitted to the hose by a quick
coupling device. Controlling the jet by just holding the thumb over the hose is n0t.a good practice.
SPRlNlUslN6
ATTACHMINT
PRODUCINB 4
F4F-J L\KE SPRA’C
c QUICK Q3F’LlNG DEWCF
HOSE
hAN0l.F AND WHEE6
Fig. 32: Adjustable nozzle, sprinkling attachment, hose reel with wheels
Automatic rotary sprinklers, oscillators or perforated pipe systems can be installed, where the water pressure is suf- ficiently strong (30 psi or more). The spray produced can
cover several nursery beds. The water will already be ab- sorbed by the soil, when after one rotation the spray re- turns. With permanent over head sprinkling installations only a switch has to be turned to water whole nursery com-
partments at once. A minor disadvantage is that the paths between the beds, if not cemented or paved, become muddy.
c) Considerations about water requirements: There is no fixed rule about the intervals between waterings and the quantity of water required, because this depends on many variable factors like weather conditions, species, soil conditions,
286

age of plants, etc. The correct watering schedule for a
nursery can only be determined through careful observation
and experience (4,131.
Correct watering supplies the seedling with just enough
water for unrestricted growth. Well watered seedlings
look healthy and vigorous. Excessive watering results in
tender, overgrown, succulent plants, sometimes of a yello-
wish color. Insufficient watering becomes obvious through
wilting and stunted growth. However, the slight wilting
of young leaves during the middle of the day, when trans-
piration is highest, is quite normal and does not cause any harm (4).
The quantity of water required for transpiration varies with
the species. Legumes, eucalypts, agoho, teak, molave, Benguet
pine need less water than kaatoan bangkal, gubas or diptero-
carps, for example. Naturally, rain forest species have a higher rate of transpiration than those indigenous to the
molave forest.
The water requirements depend also on the seedling's size
and stage of development. Small seedlings just past the germination stage want small quantities of water at frequent
intervals. Larger seedlings need more water for adequate growth. Their roots extend down to deeper soil layers, where moisture is kept for a longer time. They must therefore be watered less often, but amply and thoroughly.
With surface irrigation the soil is generally well saturated
with water. Sprinkling and spraying sometimes does not supply
the quantity of water the seedlings need. The moistening of the soil surface can be misleading. What counts is, how much water percolated into the root zone. Especially with potted planting stock one has to check after watering, whether the root zone really received enough moisture. Often the edges of the beds receive much less water than the center portions.
Soils differ greatly in their water holding capacities.
Ideal are soils that quickly absorb water and are capable
287

of storing a large quantity of water available to the plants,
but allow drainage of excess water. Friable sandy loams rich
in-humus with a good crumb structure can absorb water like a
sponge. They need to be watered less often.
Sandy soils are able to absorb quickly plenty of water, but a
great portion of it will drain into deeper layers, where it
will be out of reach for the seedlings, Nursery plants on
sandy soil therefore require frequent waterinys.
Loamy soils can absorb only a comparatively small amount of
water at a time, but the water holding capacity is high.
Since water percolation in loamy soils is slow, they must
be subjected to irrigation water for a longer time.
Weather conditions also strongly influence water requirements.
When transpiration and evaporation are high on hot and sunny
days, naturally the plants need more water than during cloudy
weather. Desiccating winds during the dry season also increase . water requirements. Seedlings should be watered in the early
morning or late afternoon, but not during the middle of the day,
when high water losses through evaporation cannot be avoided.
It is the responsibility of the foreman to decide every morning
which of the nursery beds have to be watered, and to mark them
with a bamboo peg with a painted red top to avoid that watering
is done mechanically.
7.2 Mulchinq
Mulching in nursery practice means covering the bed surface
with a 0.5-2 cm layer of organic material. This reduces eva-
poration of soil moisture and shields the soil surface from sun, wind and the impact of raindrops. Like a sponge a mulch
cover can quickly absorb plenty of water, which then passes slowly into the soil.
Mulching avoids high soil temperatures generated on the bed
surface by the intense tropical sun, which might affect the root collars of young seedlings. It also provides protection
from rain preventing surface and splash erosion and the for-
mation of a soil crust.
288

Soil organisms like bacteria, fungi, earthworms quickly mul-
tiply and start decomposition within the mulch and the upper
soil layer. The activities of the organisms cause benefi-
cial changes in the structure of the upper soil layer im-
proving hereby aeration and the water absorbing and water
holding capacity of the soil.
The following materials can make a suitable mulch:
- Grass, rice straw and rice husk are widely used mulching
materials, because they can be easily obtained in most
places. One should never use grasses that bear ripe
seeds.
- Compost and partly decomposed forest litter make an ex-
cellent mulch. They should be used wherever they can be
produced or obtained. Very desirable is compost, which not only absorbs and holds moisture, but also supplies
the soil at the same time with humus and nutrients.
- Sawdust can be used as mulch, provided it does not come
fresh from the sawmill. Before use, it must be composted or piled in a thin layer for about one year in the open,
so that harmful components e.g. acids, resins, latex, tan-
ning substances will either be neutralized by decomposi-
tion or washed out. Sawdust, when incorporated in the
upper soil layer, loosens heavy soils and increases the
water holding capacity of sandy soils.
- Tissue paper or newspaper are sometimes employed as a
mulch cover for fine seeds of Caguarina, Alnus, Eucalyptus,
Cryptomeria broadcast in open seedbeds. After germination
the plumule pierces the paper mulch and continues growing.
Grasses and straw are chopped coarsely with a bolo on a wood-
en block and spread in a thin layer on top of the beds. When
a seedbed sown with fine seed is to be covered, the mulch layer should not exceed 0.5 cm . For larger seeds like those
of teak, mahogany, narra it can be thicker. In transplant
beds the mulch is spread between the rows of seedlings.
Potted seedlings could be mulched too, but this would be time
consuming and costly.
289
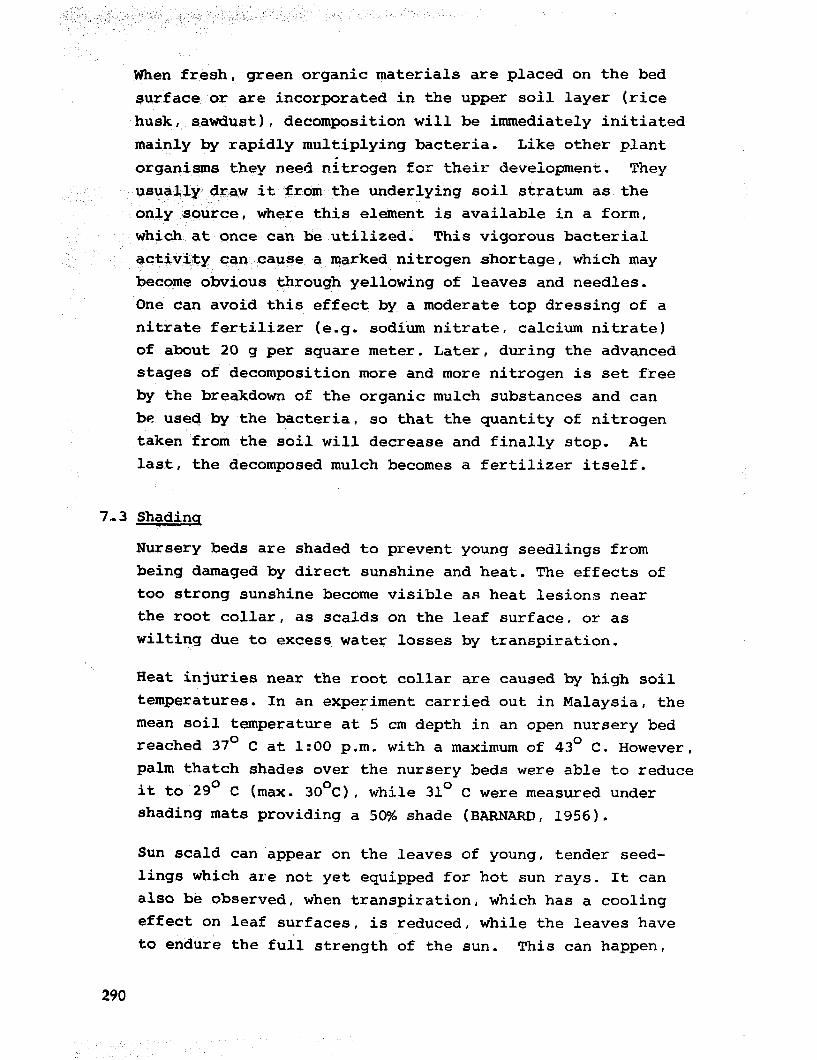
When fresh, green organic materials are placed on the bed
surface or are incorporated in the upper soil layer (rice
husk, sawdust), decomposition will be immediately initiated
mainly by rapidly multiplying bacteria. Like other plant
organisms they need nitrogen for their deveiopment. They
usually draw it from the underlying soil stratum as the
only source, where this element is available in a form,
which at once can be utilized. This vigorous bacterial
activity can cause a marked nitrogen shortage, which may
become obvious through yellowing of leaves and needles.
'One can avoid this effect by a moderate top dressing of a
nitrate fertilizer (e.g. sodium nitrate, calcium nitrate)
of about 20 g per square meter. Later, during the advanced stages of decomposition more and more nitrogen is set free
by the breakdown of the organic mulch substances and can
be used by the bacteria, so that the quantity of nitrogen taken from the soil will decrease and finally stop. At
last, the decomposed mulch becomes a fertilizer itself.
7..3 Shadinq
Nursery beds are shaded to prevent young seedlings from
being damaged by direct sunshine and heat. The effects of too strong sunshine become visible as heat lesions near
the root collar, as scalds on the leaf surface, or as wilting due to excess water losses by transpiration.
Heat injuries near the root collar are caused by high soil
temperatures. In an experiment carried out in Malaysia, the mean soil temperature at 5 cm depth in an open nursery bed
reached 37O C at 1:00 p.m. with a maximum of 43O C. However, palm thatch shades over the nursery beds were able to reduce
it to 29O C (max. 30°C), while 31° C were measured under shading mats providing a 50% shade (BARNARD, 1956).
Sun scald can 'appear on the leaves of young, tender seed-
lings which are not yet equipped for hot sun rays. It can
also be observed, when transpiration, which has a cooling
effect on leaf surfaces, is reduced, while the leaves have
to endure the full strength of the sun. This can happen,
290

when sunlight touches delicate leaves immediately after a
rainfall. They cannot yet fully transpire, because the sur-
rounding atmosphere is still saturated with moisture.
Wilting occurs when the water losses by transpiration cannot
immediately be replaced. This is often the case with newly
transplanted seedlings, which have yet to establish them-
selves and to develop new hair roots.
Shading is required usually only during the most delicate
growth stages, which is during and shortly after germination
and after transplanting. Afterwards the seedlings should be
given all the light they can tolerate without harm, because
sunlight is necessary for optimal photosynthesis, and the
plants must be fit to bear the full sunlight, when planted
in the field.
However, exposing them to more light has to be done gradual-
ly= The light intensity can be increased by using mats which
provide more light and by extending the period of exposure
progressively. Seedlings, that have germinated under shade,
or those that show already signs of etiolation are likely to
suffer a serious setback, if they would be exposed too
suddenly.
Experience in proper shading can be obtained only by closely
observing the physiological reactions of the plants to en-
vironmental changes regarding their exposure to sunlight.
One also needs some intuition for the light requirements of
the plants.
In nursery practice it is common to distinguish between high shades and low shades.
a) Hiqh shades: are erected high enough that a laborer can move freely below in upright position. The superstructure of high shades, which often are a permanent installation, is built of poles or wooden posts about 2 m apart and connected at the
top with girders. When seedlings are to be shaded, shading
mats or screens can be placed on top of the scaffolding.
251

sHADIt SCKEEN
Fig. 33: High shade constructed of bamboo poles
The laborers can carry out all kinds of nursery work under
high shade, Seedlings can be potted here and placed imme- diately into the prepared pot beds. When the plants are to
be watered or weeded, no shading mat has to be removed.
But high shades also have some disadvantages. The shading intensity cannot easily be modified and adjusted to chang-
ing weather conditions because of the height of the scaf-
folding.
Another difficulty arises where the bed rursin east-west direction. Here,one has to have also a screen on the sou- thern side, particularly from October to March,when the sun
is low.
b) Low shades: In contrast to high shades the cover of low shades is spread on some kind of supports only 30-50 cm
above the ground. Only the bed area is covered, the paths are spared. Low shades can be quickly spread and removed according to the changing weather conditions and light re-
quirements of the seedlings. Therefore low shades should
be given preference to high shades.
292

r
Fig. 34: Low shade with temporary supports (cross section through pot bed)
It is but a slight disadvantage that the shade mats must be removed
when the seedlings are to be watered or weeded. Water applied on top of the shade mat as a sprinkle might be transformed into heavy
drops I which compact the soil and dislodge the seedlings. However,
during torrential rains the shading mats should be spread to pro-
vide some protection.
The supports for the shading mats can be either installed perma-
nently or used as temporary supports, which can be removed easily
when reguired. A permanent support is constructed of pegs driven
into the ground and slats nailed on top of them. Instead of slats one can use straight bamboo poles tied to the pegs with vines.
This kind of support is applicable only to pot beds that do not
require soil working,
Very practical are supports made of iron bars. They are stuck, pushed
or driven into the ground temporarily, as long as the seedlings are to be shaded. Their tops have the form of a semi-circle or open
rectangle, into which bamboo poles are placed (fig. 35).
Cb-EIQ CM. caixsBAR
t@LDS tH)T SUPFoRr AT THE CollRslC~
Ll3mL.
Fig. 35: Temporary supports for shading mats made of steelbar
293

c) Shadina mats: should become the common shading cover in for-
est nurseries, though their manufacture will be more expen-
sive than just getting some palm leaves or cutting some
ferns and grasses. But in the long run, the use of shading
mats will save money and prove to be more adequate. .
Shading mats can easily be spread and quickly rolled up again
when required. The degree of shading can be further modified
according to the increasing demand for light or the growing
hardiness of the seedlings by exchanging mats that provide
much shade (60-75% shade) for others allowing more light to
pass (e.g. 40-5096 shade).
of Shading mats can conveniently be made bamboo (boho) poles.
With a bow saw the bamboo is cut into pieces of 1.20-1.30 m
length considering that the shading mat must be slightly
wider than the nursery bed. With a bolo the bamboo pieces
are split into slats 15-20 mm wide, which are smoothed by
planing their sides and cutting the edges of the internodes. Another good material is runo.
SHADING MAT MADE OF 5AM600 SUADlNG WIT MADE OF RUN0
SLATS PROVIDING 67% SHADE STALKS PROVIUINB 50% SHADE
Fig. 36: Shading mats
The slats are connected with nylon string (wire, abaca fibre,
pack string), whereby some space is left between each slat.
The width of the slats and the space left in between deter-
mine the degree of shade the mats will provide. A mat made Of 20 mm wide slats with spaces of 20 mm in between permits
50% of the light to pass. If 20 mm slats are tied at 10 mm
294

intervals, a 67% shade will be provided. Shading mats should
not exceed 5 m, longer mats are too heavy and inconvenient to
handle.
d) Shading screens are made of interwoven bamboo or runo, or co-
gon stalks held together by runo sticks. The light perme-
ability of self-made shade screens can similarly be modified
by putting the slats closer together or wider apart. They
should have a convenient size (more or less 100 by 150 cm)
so that they can be manipulated without difficulty.
PALM LEAFLET6 OR COGON STALKS INTERWOVEN BAM600 SLAT\S HELD IN PLACE BY RUN0 R0D.S
Fig. 37: Types of shading screens
Shade screens can be placed horizontally on high or low sup-
ports like shading mats, or they are set up in a slanting
position facing south, which is of advantage during the
time from October to April when the sun is low in the nor-
thern hemisphere. Beds shaded this way are also easily
accessible for watering, pest control, weeding, etc..
Fig. 38: Setup of a shade screen in slanting position
295

7.4 Protection from strong rains
The very high rainfall intensities in the Philippines make
protection against rain a special issue in nursery work.
Rain can wash away the soil cover exposing newly sown or
germinating seed. Exposed seed often does not germinate,
uncovered germinating seed will wither and dry up. Broad-
casted small seeds can be swept by excess water off the bed
surface or washed into dense patches. Some seed may be
buried by sediments from higher portions so that the plum-
ule is unable to penetrate.
Heavy raindrops can knock young seedlings to the grsund.
Splash erosion may cause their stems to be clad and girded
with "soil pantsIr. Under full sunshine this soil mantle can
heat up to injurious levels.
The impact of falling raindrops breaks down the porous
structure of cultivated soils impeding water infiltration
and gaseous exchange. On drying the soil surface tends to
form a crust.
There are several ways to prevent the damage, at least in part.
a) Shelters and protective covers: The shelter of a greenhouse
would be the most ideal place to grow fine-seeded species
during their delicate seedling's stage up to the time of
transplanting. Where this facility is lacking one should erect at least a shelter with a roofing of fibre glass or
strong plastic-sheet (gauge 0.003 or 0.004) fastened to a
voeden frame, under which a table-like structure with the
seedboxes is placed.
Permanent seedbeds can be protected too during heavy rains
with plastic sheets fastened to a portable frame. The cover
has to be immediately removed after the rain to avoid the
built-up of high temperatures.
To a certain degree shading mats can also mitigate the im-
pact of heavy rains, An excellent practice is to put a
296

polyethylene sheet of appropriate width between two shading
mats. Some stones are placed on top to keep everything in
place should gusty winds come up. Other types of protection
like high shading sheds can be designed according to needs
and available funds.
b) Proper layout of nursery beds: To minimize erosion the nur-
sery area should be level or should have only a slight gra-
dient. Where the site is sloping, the land must be levelled
by the construction of terraces. Run-off usually accumlates between the raised nursery beds and flows towards the lower
ends of the paths. From here it should be conducted into stable ditches and canals.
7;5 Weed control
Weeds compete with the seedlings for nutrients, water and
light. If they are not removed in time, this competition will turn into suppression of the nursery plants, because
the weeds are usually more vigorous and grow faster.
a) Kinds of weeds: The most cumbersome weeds are grasses or
dicotyledonous plants that grow from a rootstock. They creep and spread by means of underground stems and rhizomes.
If such a weed is cut off at the ground surface, it will
sprout again and continues growing from the carbohydrates
stored in its root tissues. These "root weeds” must be re-- moved with their rhizomes and eradicated as soon as they
appear.
The elimination of weeds which propagate only by seeds
("seed weeds") is much easier, because their root system will die, when the shoot is cut with a weeding tool.
b) Prevention of weed infestation: As much as possible one
should prevent dispersal of weed seeds in the nursery. Un-
fortunately, most weeds produce seeds prolifically, which
are easily dispersed by wind and water, and are also brought in through mulch and manure.
297

No weeds should be allowed to flower and fruit along paths and
roads, on unused parts of the nursery, or in its immediate sur-
roundings. Grassy areas should be regularly cut and trimmed,
free compartments are better cultivated with an agricultural or
green manuring crop. This improves the soil, keeps the weeds
down and makes proper use of the fallow period.
A tall thick hedge around the nursery can keep out much weed
seed, which would otherwise be brought in by wind. Irrigation
water running in open canals passing through weed infested
areas must be filtered through a fine mesh wire screen before
it is distributed in the nursery. Grasses or other organic
matter to be used as mulch or fqr compost should be free from
weed seeds.
Nursery land infested with rhizomes (Imperata) must be thorough-
ly worked. sometimes two times, and all rhizomes carefully re-
moved before the beds are laid out. Adjoining grassland must
be lined with concrete curbs reaching at least 20 cm deep into
the ground, so that no rhizomes can penetrate into the culti-
vated land. The walls of terraces should not be stabilized
by grasses but with a dry stone wall (riprap) and the rims
capped with concrete. Irrigation canals within the nursery
should be of concrete too, otherwise a vigorous weed flora
would develop along their banks-
Soil in seedboxes and greenhouse beds can easily be kept free
of weeds by steam sterilization.
.
c) Mechanical weed control bv hand: When the nursery is cleared
of all rhizomes, from then on weeds can only propagate by seeds.
All newly appearing weeds should be eradicated shortly after
their germination. Under no circumstances should the weeds be allowed to grow tall oppressing nursery plants and sending
their rhizomes deep into the ground. A small weed seedling can be removed with hardly any effort, but to dig up large
weeds is expensive and time consuming. It is obvious that
under these conditions weeding has to be repeated more often.
A regular turn of 2-3 weeks depending on the local climate
298

and soil conditions will generally be sufficient to catch up
with the newly germinated weeds, and the nursery will always look clean.
Pulling out the weeds by hand is rather costly and should be
limited to seedbeds, where the seeds have been broadcast, orto weeds germinating within the drills, where they cannot be
reached with a weeding hoe. Also weeds growing on contain- ers have to be pulled out bt( hand. In weeding seedbeds and transplant beds by hand the laborers should sit on a small
weeding stool, which is more comfortable and convenient than squatting.
The optimum soil'conditions for weeding are met, when the
soil is neither wet nor dry, but just slightly moist.
MADE OF
w4ll3.t SMALL
mpt HAND CUL7lb’AlOU
Q TOOL FOR
t
B I+AnO- HOE
GULT\V~TIN~
POTTED StoCk
Fig. 39: Tools to aid hand-weeding of firmly rooted weeds.
In transplant beds and in seedbeds, which produce stock for field planting with sufficient space between the lines, weed-
ing is carried out with a light, long-handled weeding hoe. It consists of a small, thin blade of good steel and a thin long handle,and can be easily be manufactured by a local
mechanic shop. The tool, however, is unsuitable for the eradication of tall, deep rooting weeds.
299

Fig. 40: Types of light weeding hoes
Small weeds are uprooted by hoeing and cultivating the upper
2-3 cm of soil between the rows of seedlings or by simply
scraping the soil surface 1-2 cm deep with short strokes.
The beds should be cultivated that way every 14 days. Except
for some weeds growing within the rows of plants no weed
must be pulled out by hand any more. The beds should be
cultivated when the sun shines, so that the uprooted weeds
will dry up quickly.
Light longhandled weeding hoes can be operated only, if the
distance between the rows of seedlings is not less than
20 an . The hoes have a width of lo-13 cm, an allowance of
3-4 cm on either side is necessary to avoid plant injury.
Compared with the usual practice of weeding in squatting
position with a bolo, the use of a light weeding hoe offers
several advantages: Because of the light weight of the tool
and the upright working position, the work will be less tire-
some and the laborers can maintain their working speed through-
out the day. One laborer can manage to keep at least 0.5 ha
of nursery area permanently clean. There is no problem with catching up with tall weeds. The weeds are eradicated be-
fore they start oppressing the plants. Soil crusts are re- gularly broken up and the surface soil loosened, thereby

also reducing the evaporation of soil water. Although the
beds are worked every two weeks, this method is cheaper than
the ordinary practice of eradicating the weeds when they are
already tall.
d) Mechanized soil cultivation and weed control: In large,
level nurseries motor cultivators, tillers and rotary hoes,
self-propelled or attached to a tractor can be used for
weeding and cultivating transplant beds, provided the rows
of seedlings run lengthwise. There are cultivators, which can work only one strip between two rows or those that work
the width of the transplant bed at once. Multiple-purpose
“implement carriers" belong to the second group. Their wheels run on the paths on both sides of the transplant
bed, while the rotor-hoes work the soil between the rows
(25).
In the large nurseries in Europe and the United States
motor-operated cultivators have largely replaced hand-tools.
In the Philippines the introduction of these machines ap-
pears not so urgent. They would have to be imported, are expensive and can be used economically only on largf, level
areas.
e) Chemical weed control: The relatively high cost of mechani-
cal weeding and shortage of forest workers forced forestry
in Northern Europe and the United States to look for weed-
ing methods, that would save money and labor. Inspired by
successful chemical weed control in agriculture forest re-
search institutes in those countries have been working in-
tensively on this subject during the past two decades. It
was found that certain herbicides are capable of reducing
weeding expenses also in the forest nursery, provided the
necessary precautions are observed and appropriate tech-
niques of application employed (14).
The problem is still to find herbicides that are easy to
apply and act selectively destroying only the weeds with-
out harming the seedlings. It appears, that up to now weed
killers that are strictly selective, have yet to be developed.
301

Most herbicides can also affect the seedlings adversely, es-
pecially when higher doses are applied, which are necessary
to kill persistent weeds.
In the Philippines herbicides are expensive, and it is often
difficult to obtain them in the provinces, while on the
other hand a large labor force is looking for employment at
relatively low rates. Special equipment is needed, and the
laborers have to be thoroughly trained on the subject be-
fore they can be allowed to work with weed killers. There
is always the danger that forest seedlings are damaged by
an overdose or careless application. Under the present con-
ditions, the use of herbicides cannot be recommended in
Philippine forest nurseries. Weeds in the nursery can still
easily be controlled by using the light weeding hoe, which
should remain the standard weeding practice.
7.6 Root pruninq
Root pruning as a measure of tending and maintenance of nur-
sery plants cuts the lower portion of the root system, par-
ticularly the tap root, to stimulate root ramification and
the formation of a compact root system, while the seedling
is still growing in the nursery.
This treatment is of great importance when seedlings are
raised in the seedbed without transplanting. But also in
transplant beds root pruning is desirable. Seedlings in- tended for "stumps" are not root pruned.
The term root pruning is also applied for cutting back tap
roots and long lateral roots of bare root seedlings after
they have been lifted from the nursery bed. This work is described in Chapter 8.
a) The objective of root pruninq: The seedlings of most tree
species tend to send down quickly long tap roots to deeper soil layers, where water is likely to be more easily and permanently available. Naturally root growth is concen-
trated more on the tap root than on lateral roots. When the
seedlings are lifted, much of the tap root has to be cut to
302

facilitate field planting. What remains is rather unsatis-
factory: a root system with a spindle-like main root and
very few lateral roots, which will not be able to meet the
water requirements of the plant.
Good quality plants have a compact, well ramified root
system with many root hairs. The condition of the root
system, in particular that of its absorbing surface, the hair rootlets, through which water and nutrients are taken
up, determines to a large extent, whether a seedling will
survive field planting or not.
Pruning stimulates root ramification and makes the root
system to become compact and fibrous rather than long and
thin (10). It was found, that Mahogany seedlings started ' to develop two or more new roots within two weeks at the
point where they had been cut, and many new roots above this level (ASIDDAO and JACALNE, 1958).
As root pruning retards the growth of the tip and at the
same time stimulates root growth, it improves the shoot/
root ratio of the plant. The best plants are those, which
have a relatively small top and a large fibrous root system.
Such seedlings have a small transpiring surface, but many
hair rootlets to absorb water and nutrients. Their survival
in the field is markedly better than that of unpruned seed-
lings (10).
b) Root oruninu in transplant beds: While the seedlings remain
in place, the roots are cut underground with a sharpened
spade or bolo. The pruning level should not be too deep nor too shallow ranging from 10 to 30 cm below the soil
surface depending on the species and the size of the
seedling.
The spade is thrust into the soil towards the center line
of a row at an angle of about 45O starting approximately as
far away from the seedling as the intended pruning depth.
The spade must be well-sharpened. Vertical cuts between the seedlings are to shorten long lateral roots (10).
303

PKUNJN6 OF THE TAPROOT
1
SHARP SPADE
PRUNING OF LATERAL ROOTS WITHJN THE mW
F'J. 41: Root pruning in a transplant bed
Small seedlings growing in loose, friable soil can also be
root pruned with a bolo. The bolo is thrust into the soil at one end of the row and slid all along to the other end by
moving it guickly up and down with short strokes. Turning around this process is repeated on the other side of the row (10).
C) Root pruning of potted seedlinus: Some time after potting the roots of potted seedlings tend to grow through the drain-
age holes of the containers and penetrate into the ground of
the pot beds. These roots must be cut from time to time,
usually every two months.
The pot is lifted and @aced back after the roots growing out
of the container have been cut with pruning shears. The
"shocking" method just tears the roots that have already
grown into the ground.
ifooT PRUNING WITH ‘* 3HOCKIN6” ROOT PRUNING
F’RlJNlNB SHEAR.5 WI-I-H TROWEL
Pig. 42: Root pruning of potted seedlings
304

It is also possible to avoid root pruning of potted seedlings
altogether by placing the pots on a plastic sheet or a cement-
ed surface. Another method places the pots on a slightly
raised wire screen to avoid a direct contact with the soil.
However furnishing all pot beds with such floorings is rather
expensive.
c CEMENT
PLOWtINe
WIRE MESH CEMENT- FLOORIN PLASTIC SHEET
Fig. 43: Potted seedlings placed on mesh wire, cement tiering or plastic sheet to avoid root pruning
As a rough guideline, root pruning is to be carried out about 2-3 months before field planting, so that the plant is aLle to replace the loss by developing new lateral roots. If it is carried out too early, new tap roots may develop.
Since root pruning reduces the water absorbing surface of the
root system,it should be carried out on a cloudy day when
transpiration is low. If signs of wilting occur afterwards, the plants must be shaded and watered.
7.7 gardening-off
When the seedlings are set out, they will abruptly leave the
favorable environment of the nursery and have to grow under
the hard conditions of the field. To accustom the seedlings to this new situation they are subjected to a little "rougher"
a treatment one or two months before field planting.
Hardened seedlings of desirable quality are not succulent, but
have firm lignified tissues, they are not weak, spindly or
oversized, but have a sturdy, stocky, well developed crown
with vigorous, healthy leaves or needles, and a compact root
system with many fine, fibrous, lateral roots. The top/root
ratio is well balanced. The following treatments should be
applied:
305

a) Reduction of irriqation water: A month or two before field
planting the amount of water that has been usually applied
to the plants is progressively reduced. By this treatment
shoot growth will be delayed and the plant tissues will
harden, so that the seedlings can withstand dry spells after
planting without having their tops killed back.
b) Cut-off of fertilizer apolications: Generally no more ferti-
lizer is applied after the initial dose, which has been mixed
with the potting soil or worked into the transplant bed before
transplanting. An overhead application of complete fertilizer
may be necessary for species that need a long time to grow in- to plantable size. But no nitrogen fertilizer should be applied within two months before field planting, because nitrogen would
cause the development of soft succulent tissues.
c) Exposure to full sunliqht: Seedlings should be given all the
light they can tolerate. After transplanting and potting the seedlings have to be shaded for a while. But as soon as they
have recovered and commenced growth, they should be progres-
sively exposed. At least one month before field planting the seedlings must be accustomed to full light.
d) Cuttinq back of shoots: Sometimes seedlings become oversized because of improper timing of the sowing date, over-fertiliza-
tion, or as "left-over stock" due to lack of funds during plant-
ing time. Aside from root pruning, a possible remedy for broad- leaved species is cutting part of the shoots some time before
field planting, while the seedlings are still in the nursery. This is preferable to trimming the shoots after lifting, because the plants will overcome the "cutting shock" better under the
more favorable conditions of the nursery. Shoot pruning should be carried out together with root pruning in one operation. It
cannot be applied to conifers.
During the hardening stage the reaction of the plants must be well observed with a kind of intuition or instinct to do the
right thing, not too much and not too little. Hardening starts
slightly, but the treatments are gradually intensified without
harming the seedlings. The changes must not come abrupt,but subtle
.
306

Chapter 8:
PREPARATION OF PLANTING STOCK FOR FIELD -PLANTING
8.1 Culling and grading of nursery plants
Nursery stock of low quality and in poor condition should not
be used as planting material. The money spend for planting
will probably be wasted to a large extend. Foor seedlings do
not have the reserves to overcome transport and "planting
shock". The few survivors, the condition of which may be also substandard, grow slowly and must be weeded and tended
for a longer period than faster growing plants of good quality. All losses have to be replaced at higher cost. It
is more economical to plant just a small area, but to do it
only once using quality plants. In judging the quality of
planting stock, the following points should be considered (26):
a) Health: The planting material should be free from diseases
and insect infestation. Discolorations of the leaves or needles
or a weak, etiolated crown can indicate improper treatment in
the nursery, nutrient deficiency or infested roots. The plants
should also be free from mechanical injuries and lesions, es- pecially on the stem. Slight injuries can be remedied by
trimming and root pruning.
b) Freshness: Wilted or half dried-up plants are useless, they
will not survive. Before lifting, the seedlings should be
thoroughly watered, so that their cells will be filled with
moisture. After lifting they should be immediately trimmed,
packed and carefully protected from sun and wind to reduce
water losses by transpiration and evaporation.
307

c) Root system: The root system should be compact without a long
tap root, but with many fibrous lateral rootlets. A compact
root system can be accomodated more easily in the planting
hole :' The more fibrous roots are present in the root system,
the better the immediate take up of moisture and nutrients
on the planting site.
d) Crown: Like the root the crown should also have a compact re-
gular shape with many side branches. Of importance is the
diameter of the stem. It should be relatively thick and
woody. Robust plants are much heavier than etiolated plants
because of a larger stem diameter. In sturdy plants more re- I serve food is stored, which enables the seedlings to overcome
I the planting shock more easily and to develop quickly new
root hairs. To grow seedlings in the transplant beds with I
well-shaped crowns and sturdy stems it is essential to pro- I
vide them with the necessary space. I
e) Ton/root ratio: The best general criterion of plant quality
is the ratio between shoot and root length. This ratio should
be well balanced. In general, the larger the root system com-
pared to the crown, the better the quality of the plant. Set
out in the field, such a plant will resume growth sooner than
top-heavy plants, which usually will first die back. The die-back of the shoot of misproportioned seedlings is a kind
of natural balancing of the top/root ratio. However, water
losses can be so much during this process, that the seedling
may not survive at all.
f) Size and aqe: The specific conditions of the plantation site
require seedlings of a certain size. On dry sites and places
with much grass competition larger seedlings are preferred.
Undersized seedlings are discarded or retained in the nursery,
until they are large enough for field planting. Oversized broadleaved seedlings have to be trimmed.
The Size of a seedling is usually correlated to its age, al-
though there can be variations from nursery to nursery and
season to season the to soil quality, nursery management and
308

weather conditions. Where nursery plants differ much in
size, it is advisable to grade them to facilitate packing,
transport and planting.
8.2 Bare root seedlinus
a) Liftinq: is the removal of bare root seedlings from the seed-
bed 33: transplant bed. It requires careful planning and
good organization. Only as many seedlings should be lifted
at once as there are laborers for culling, grading, trim-
ming, pruning, mud-puddling and packing. Although the
roots should not be exposed at all, it cannot entirely be avoided, but the exposure should not be longer than absolute-
ly necessary. '
The soil of the nursery beds should be moist (not wet), so
that the seedlings will be turgid, lifting will be eased
and root damage avoided. With dry soils the most important
and valuable parts of the root system, the hair rootlets are
easily torn off.
LIPTING WADE
Fig. 44: Digging fork and lifting spade
Suitable tools for lifting are digging fork and lifting spade,
which are designed to avoid root damage. Large plants grow-
ing in heavy soil are better lifted with an ordinary sharp
spade.
After the plants have been eased out of the soil with the
help of a digging fork and a light pull on the shoot, loose
soil is carefully shaken off leaving only fine particles of
earth adhering naturally to the rootlets.
309

b) Trimminq and pruninq of roots and shoots: Long tap roots and
long lateral roots, which are difficult to accomodate in the
planting hole and likely to be curled, are pruned with a
clear cut. Damaged roots receive the same treatment. The
work is demonstrated in Fig. 45.
ROOT PRUNING
EACH lNDlvlOUAL
PLANT WITH PRUNING WEARS
ROOT PRUNING SEVERAL SEEDLJNSS
AT ONCE
WI-I-J-I scuioRs
WITH RdLO c-IN _--- -._ W&EN EXOCH
ROOT - (ADAPTED FROM LOYCKE
Fig. 45: Root pruning of bare root seedlings
The loss of root substance has to be compensated by pruning
parts of the shoot accordingly. The crown must not trans- pire more water than the roots can absorb. Furthermore, a
great portion of the stem usually consists of soft, not
yet lignified tissues with young only slightly cutinized
leaves, which will transpire much water. This soft part of
the stem should be cut back. As soon as the plant has es-
tablished itself in the field, the stem will sprout again
and develop a new leader. Or, with large leaved species
sometimes one half of each leaf is cut, but this is a rather
costly method. Shoot pruning can only be carried out with
broadleaved species.
c) Mud-puddling: The objective of mud-puddling is to protect
the roots of bare root seedlings from desiccation between
lifting and field planting.
A hole about 50 cm in diameter and 30 cm deep is dug. Pul-
verized loamy soil (no clay) together with some decomposed
cowdung is filled into the hole up to 3/4 of its depth.
Whenever necessary a soil insecticide can be added. Water
is poured in and the soil is stirred, until it has the
310

consistency of a wet paint. After having been pruned and
trimmed, the seedlings are dipped in bundles with their
roots into the mud. The mud coating, however, is only thin
and does not replace careful handling and packing of bare
root seedlings. It has been experienced, that conifers do
not respond well to mud-puddling, because their roots re-
quire much oxygen (2).
d) Packinu and transport: The kind of packing can be modified
according to the prevailing weather conditions, the trans-
port distance, and the time the seedlings have to stay in
transit. The roots have to be particularly well protected, when the weather is hot and dry and the distance to the
planting site very long.
Bare root seedlings are bundled and packed by 10,20 or 50
plants per bundle depending on weight and site. Around the
roots some moisture retaining material as wet grasses, leaves, chopped rice straw or saw dust is placed. In mountainous
regions moss is an excellent material. It should be collect-
ed well in advance of the planting season, sun-dried and
stored in sacks. Before use the moss is soaked in water,
excess water squeezed out by hand, and the moss "fluffed up”.
The seedlings with the moisture retaining material are
wrapped in wet burlap sacks. Two bundles of seedlings can
be accomodated in one wrapping, the roots facing each other
in the middle of the bale (Fig. 46).
GUNNY SPCKINC
BANANA t’cax ETHYLENE KEROSENE
SHEATHS IWG CAN
Fig. 46: Wrapping and packing of seedlings
311

Other wrapping materials are 'banana sheaths, large leaves or
grasses. The seedlings can also be packed in kerosene cans,
buckets, pails or, what is very common, in bamboo baskets
lined with moist grass or moss.
Hauling seedlings to the planting site over long distances,
especially in the mountains,often involves hard labor. Where-
ver possible carabaos and horses should be employed for this
kind of work.
Seedlings which have to be transported over long distances
by truck are loaded on a rack especially constructed on the
loading platform of the vehicle allowing the transportation
of several layers of seedlings. It is very important that
the seedlings are protected from desiccating wind during
the drive by a closed tarpaulin. The plants must be water-
ed during transit whenever necessary.
e) Heelina-in: The term is applied, when bare root nursery
stock is temporarily set in moist soil under shade to keep
it fresh until it can be used for planting. Heeling-in at
the planting site may become necessary, when the weather
condition suddenly turns unfavorable for planting or a big
load of seedlings cannot be planted at once. Seedlings
should not be left in the packages for more than two days.
Generally heeling-in should be avoided. The plants will
suffer, if the heeling-in place is not really moist and
shady. In any case bare root planting material should not
remain heeled in for more than a week.
Fig. 47: Heeling-in
312

The following technique is generally adopted: Under a shade tree a trench is dug with a hoe, shovel or spade in loose,
well drained, but moist soil. On one side of the trench, which should be slightly sloping, the plants are individual- ly arranged in up-right position. The roots i*re then'cover- ed with soil taken from the opposite side of the trench hereby
creating room for the next row of plants. The roots are covered up to their root collar and the soil is firmed with
the hands before the next row of seedlings is plazed. A
wooden peg marks every 100th seedling to facilitate.counting.
During dry weather the seedlings have to be watered (26).
8.3 Stumps
Stumps are seedlings of which most of the shoot and more or
less all lateral roots have been cut back, so that only a
short piece of the main root is left. Stump planting is only possible with some broadleaved species with a high
regenerative capacity. The best known example is teak, but planting stumps of narra, mahogany, ipil, African tulip,
Gmelina arborea has also been tried successfully.
Seedlings intended for stumps are raised at a wide spacing
with or without transplanting - to attain a diameter at the root collar of 1 - 2.5 an . They are lifted with a digging fork or simply pulled out. Seedlings that have not yet reached the desired diameter can be left in the bed for some more time.
The stem is severed about 2 cm (Gmelina 5 cm) above the root
collar with a slanting cut. If a longer part of the shoot is left, the stump may produce several sprouts. The lateral roots are shortened to about 2-5 cm, with teak they are re-
moved entirely. The main root is also shortened to a length of 15-25 cm .
After they have been mud-puddled the stumps are wrapped in
bundles of equal number in teak or banana leaves.
Stump planting has considerable advantages, because stumps are easier to transport and to handle than bare root seedlings.
31,'

One man can carry 600-700 stumps from the nursery to the
planting site. They are harder and can tolerate even ship-
ments of two to three weeks without damage provided they
are well packed. On favorable sites twice the number of
stumps as compared to bare root plants can be planted in a
day, thus reducing planting costs. Generally the survival
of stumps is better than that of bare root plants. Unfor-
tunately, the number of species that can be planted by
stumps is quite limited (6).
8.4 Earthballed plants
Earthballed plants are lifted with a ball of earth around
their roots from the nursery bed or the forest (wildlingsj.
Like the planting of potted stock, this method disturbs the
root system only little provided the earthball does not
fall apart.
The preparation of balled stock is expensive and time con-
suming. Much care is needed to preserve the earthball. Often each ball has to be wrapped separately to prevent it
from breaking and drying out. The use of balled plants in
the Philippines is therefore limited only to large ornamen-
tal shrubs and trees, and to the use of wildlings.
The soil making up the earthball should not be dry and of
loose texture like that of sandy soils. Loamy soils make
good earthballs. Balling is only possible when the soil is
moist and has some consistency. The balling methods differ with
regard to the size of the plant:
- Ballinq of small plants: Small plants can be cut out of the soil with a bolo or a spade. With a bolo a circular
Fig. 48: Balling small seedling with a garden spade
314

cut is made around the seedling, which then can be lifted with a cone-shaped piece of soil. With a garden spade on- ly four cuts are necessary and the seedling can be lifted
with an earthball in the shape of an inverted pyramid.
also circular spades (see Section 2, Chapter 10) are use-
ful tools for balling. For transport the balled seedlings are placed tightly together on a plant tray.
- Balling larqe plants: At a distance from the stem necessary
to preserve most of the root system a circular trench is
dug around the plant until the earthball is laid free.
Still in the earth-hole, the ball is wrapped with gunny sacks, plastic foil, leaves, grasses or similar material and tied with a string or with fibers.
Fig. 49: Balling of young tree (adapted from DELIZO, 1964)
8.5 Potted plants
Potted stock does not need much preparation, provided hard-
ening measures, particularly root pruning was carried out
in time. After a thorough watering, the pots are taken
from the pot bed and placed in upright position in bamboo
baskets or wooden boxes, or on racks constructed on the load-
ing platform of a motor vehicle. Plants in boho pots, veneer
tubes or tins can be bundled together in convenient numbers.
315

Chapter 9:
SOIL - ITS CHARACTERISTICS AND PROPER MANAGEMENT
IN THE FOREST NURSERY
Soil can be defined as the weathered upper layer of the earth's
crust that is capable of supporting plant growth. Within this
"upper layer" above the more or less unweathered parent mater-
ial two horizons can be distinguished: the subsoil and the
surface soil or topsoil.
The surface soil comprises the uppermost 20-30 cm of the soil
profile. It usually has a darker color than the underlying
subsoil because of the accumulation of humus. When we speak
about "the soil" of a forest nursery, we commonly refer only
to the surface soil of the seedbeds or transplant beds or to the topsoil used for potting.
As a medium for raising tree seedlings the soil performs four functions: It serves to anchor the roots, supplies water to
the plants, contains air for their breathing, and furnishes
the minerals for plant nutrition (21).
9.1 Mineral soil particles
a) Minerals and elements: Soil consists mainly of a mixture of
inorganic particles of various sizes. These particles are
composed of minerals like quarts, feldspar, orthoclase, hornblende or secondary clay minerals like kaolinite,
montmorillonite and illite, which in turn are compounds of
various elements like silicon (Si), aluminium (Al), calcium (Ca), magnesium (Mg), sodium (Na), phosphorus (P) and iron (F). Some
elements are important plant nutrients.
316

b) Size of soil particles: Referring to their size the soil
particles are generally classified as follows:
- Stones more than 20 mm
- Gravel 2 - 20 mm
- Coarse sand 0.2 - 2lnm
- Fine sand 0.02 - 0.2 Imn
- Silt 0.002 0.02 mm
- Clay less than 0.002 mm
c) Physical properties of soil particles:
- Stone, sand and gravel will not change at all when sub- jected to moisture. They do not expand when wet, nor
shrink when dry. Their water holding capacity is low.
Water can infiltrate fast because of the large spaces
between the particles. Nutrients are easily leached.
Gravel and sand, however, form the skeleton of soils and
facilitate drainage and air movement.
- Silt actually constitutes a kind of micro-sand. Since the
fine particles lie close together, there is little space
in between, aeration is therefore poor. The water holding
capacity is higher than that of sand, but still low com-
pared to clay.
- Clay expands and becomes sticky when wet. On drying it
shrinks and becomes hard and cloddy. The water holding
capacity of clay soils is high, but much water is held so
tightly that it is not available to plants. Because of
their relatively large surface area clay minerals have the
capacity to absorb plant nutrients and prevent them from
being washed out. This explains why the presence of clay
minerals is important for sustained soil fertility.
9.2 Texture classes:
The term soil texture refers to the relative proportions of different size classes in a representative soil sample.
The following texture classes can be distinguished:
a) Sands: At least 70% of their weight consists of gravel and of
coarse or fine sand, the rest may be clay or silt. A sandy
soil with at least 90% sand is simply called sand, one with
a lesser sand fraction termed loamy sand. 317

The physical properties of sands can be improved by the ad-
dition of humus and of soil with a high proportion of clay.
b) Loams are a mixture of sand, silt and clay particles. The
sand content ranges from 30 to 50 percent, the clay fraction
is less than 40 percent, the rest is silt. According to the
proportion of sand, silt and clay within these ranges we can
distinguish sandy loam, loam, silt loam and clay loam.
- Sandy loam and loam are favorable soils for raising tree
seedlings. They have the desirable qualities of both sand and clay without exhibiting their undesirable proper-
ties such as low water holding capacity on one hand and
stickiness, compactness, slo*w water take-up and poor aera-
tion on the other.
- Silt loam and clay loam have to be improved by adding sand
and humus in adequate quantities, if they are to become
good nursery soils, otherwise they would be too heavy.
cl Clays are soils, in which more than 40% of their weight con-
sists of particles below 0.002 mm. Clay soils are hard to work and cultivate. They become sticky and puddled when wet
and hard when dry. After a heavy rainfall the pore spaces
of the surface are clogged and most of the rain water runs
off. In dry condition the surface forms a crust and cracks.
The plumules of germinating seeds have difficulties in push-
ing through this crust.
Clays are not suitable for nursery soils and should be avoided
by all means.
For the identification of the different texture classes see PLANTATION TECHNIQUES, Chapter 2.
9.3 Soil structure and pore space
Between the solid particles, the minerals and organic matter, there are small spaces, the soil pores, which are filled with
water and air. In addition, soil contains a teeming popula- tion of fungi, bacteria and animals. In an ordinary silt
318

loam garden soil with optimum conditions for plant growth
solid particles make up on.ly one half of the volume, while
the other half consists of pores.
A)RE SPACE SOLlD WMpONEN-rS
Fig. 50:Pore space and solid components in a good garden soil
There are larger and smaller pores. Large pores (larger than 0.6 mm) are necessary for good drainage and aeration, small
pores (smaller than 0.6 mm) for the water supply. In small pores through capillary action water moves in any possible
direction to soil zones with a lesser moisture content.
For plant growth it is essential that the soil has a structure
with large and small pores at the same time. Ideal nursery soil shows a crumb or granule structure, wherein minerals and
humus particles form aggregates that are relatively water-stable
and leave many pores of various sizes. The formation of a crumb structure is encouraged mainly by the presence of humus,
earthworms and micro-organisms.
9.4 Humus
Humus originates mainly from plant substances. In the presence of moisture and fresh plant tissues the micro-organisms, es-
pecially fungi and bacteria, multiply manifold. In digesting the carbohydrates of the plant tissues (sugar, starch) they
take up oxygen and release carbondioxide (C02), water and
energy (heat). This decomposition of organic matter, that generates heat at the same time, can somehow be compared with a slow burning process. The remaining "ashes" are inorganic
compounds and humus.
319

Humu& is a dark-colored, amorphic mass of very fine decom-
posed organic particles that has very favorable physical
properties. Humus colloids do not stick together like clay.
Whether wet or dry, humus will always be in a loose, fluffy
condition. Its water holding capacity is very high.
The ability of humus colloids to absorb nutrients is far
higher than that of clay minerals, because humus colloids
are much smaller in size than clay particles and therefore
have a greater absorbing surface.
Furthermore, humus colloids have the tendency to unite with clay particles to form water-stable crumbs, that will not
disintegrate during rainfall or when the nursery beds are watered.
Unfortunately, under tropical conditions humus aggregates are
not very stable. The hotter and more humid the climate, the
less humus is generally found in the soil. On some lowland sites the humus appears to "mineralize" mainly by the action
of certain bacteria almost as quickly as it is formed. Rain
forest soils therefore often have only a very poorly developed
A-horizon. In higher elevations, however, where temperatures
are lower, humus apeears to be more stable. A thick A-horizon
can be found in some places under mossy forest above 1000 m.
Under the conditions of the tropical lowland the humus con-
tent of a nursery soil has for this reason to be constantly
replaced by the addition of compost or similar organic matter.
9.5 Soil organisms
A vast number of small organisms inhabit the soil. The more
important groups are earthworms, fungi, bacteria and acti- nomycetes.
a) Earthworms: Minerals and organic matter passing through their
digestive tracts are transformed into aggregates with a very
favorable structure and rich in available plant nutrients.
The holes in the soil produced by earthworms increase aeration and dra'nage. Soil of deeper layers is brought to
320

----
b ) Soil funai decompose all kinds of organic materials. Cellu-
lose, starch, gums and lignin readily succumb to their attack.
Moulds are numerous especially in higher elevations with low-
er temperatures, while bacteria dominate under the hot tropi- cal conditions of the lowland.
.
the surface and vice versa. Earthworms like moisture. They
can usually be found in great numbers in loams with a high
humus content.
By forming a symbiosis known as mvcorrhiza some fungi grow
within and around the roots of trees. Both partners benefit
from this association: the fungus draws carbohydrates from the tree, while the tree in turn is provided with nutrients and water (28).
Some tree species like pines, in particular Pinus merkusii, cannot grow beyond the early seedling's stage where the symbiotic fungi are lacking. In these cases the nursery soil has to be inoculated with soil obtained under established
pine trees, or tall .balled seedlings with mycorrhiza around their roots are planted at 1 m intervals in the transplant
beds to provide the newly planted seedlings with the bene-
ficial fungus. Mycorrhiza soil to be used for inoculation will remain active during transport, when it is kept moist
and packed in plastic bags. It should be brought into con- tact with the roots of the seedlings as fast as possible.
The mycorrhiza soil is either added to the potting mixture
or worked into the transplant beds after it has been thinly
spread over them.
c) Actinomvcetes: Pxcept bacteria no other micro-organisms are
so numerous in the soil as actinomycetes. They liberate nutrients, especially nitrogen, by decomposing complicated organic compounds.
d) Bacteria: are single cell organisms, the simplest and small-
est forms of plant life known. They multiply just by division.
Under favorable conditions (moisture, warmth, presence of or-
ganic material) large populations rapidly build up.
321

Besides the break-up of all kinds of organic materials, which
also includes the mineralization of humus, soil bacteria are
responsible for three basic chemical transformations essential
for plant nutrition (27):
- Nitrification: Nitrogen in the form of ammonium (NH4) is
changed into nitrate (N03), which can be taken up by plants:
- Sulfur oxydation: Sulphur is made available out of com-
plicated sulphur compounds;
- Nitroqen fixation: Some bacteria are capable of binding
some of the elementary nitrogen of the atmosphere with
other elements, so that it can be taken up by plants.
Some of the nitrogen-fixing bacteria are active only in
the root nodules of certain species like legumes and alders,
others live freely in the soil.
9.6 Soil reaction
Soil moisture is not merely pure water, but actually a so-
lution of salts and minerals. It can have an acidic, neu-
tral or alkaline reaction. ahe
The soil reaction is expressed
by pH value. The following graduation is used:
pH value
less than 4
4-s 5-6 6-7
7 7-a
more than 8
Soil reaction
very acidic
acidic
moderately acidic
slightly acidic
neutral
slightly alkaline
alkaline -
a) Determination of pH - value: By a simple test using red and blue litmus paper one can find out, whether a soil is acidic,
neutral or alkaline. Two clean glasses are partly filled
with a soil sample, that has been screened and divided into two portions. Distilled water or rain water is added, while
a red litmus paper is placed in one glass and a blue paper
in the other. After one hour the papers are checked:
322

b if the papers did not change color - neutral reaction; the blue paper became red - acidic reaction;
the red paper became blue - alkaline reaction.
jwever, the litmus paper test as described above does not
:ovide the desired information about the actual degree of
:idity, the pH value of the soil. This can be easily de-
xmined with a color indicator (pH-meter). It is cheap,
isy to handle and provides fairly accurate results.
A lull PfwPPJNG /-I \
SPOON FOR TAWNQ ,mE SOIL SAMPLE
Lg. 51: Color - indicator to determine the pH value of soils
color indicator consists of a small spoon for taking soil
tmples, a dripping bottle filled with indicator liquid and
white plate with a circular depression, which extends into
small furrow (see fig. 51). On the plate there is a scale
ith colors, which range f.rom red to blue-green indicating
ie numbers of the respective pH values. A soil sample is Laced in the depression on the plate, and indicator liquid
lded. After three minutes one side of the plate is lowered little, so that the liquid, which usually will have changed
3 color, will run into the furrow along the color chart.
I comparing the colors the pH value can be determined.
litable ranqe of pH value for tree seedlinqs: Neither very
:id nor alkaline soils are suitable for the propagation of
xest tree seedlings. Where the soil reaction is very zidic, or alkaline, certain plant nutrients and trace Lements are either leached or become insoluble.
323

- Acid and very acidic soils (below pH 4.5) are low in ex- changeable calcium and magnesium, and lack most of the
important plant nutrients like nitrogen, phosphorus,
potassium, sulphur and the trace elements (copper, zinc,
boron). Only iron and manganese are available. Fungi
are not much affected by acidity, but bacteria and ac-
tinomycetes cannot thrive under such conditions. Toxic
side effects may occur through the development of organic
acids.
- Alkaline soils,the other extreme, with a pH value above 7
also have their problems. Although soil bacteria and
actinomycetes can develop freely and nitrogen, potassium and sulphur together with calcium and magnesium will be
readily available, there is often a distinct shortage of
phosphorus, iron, manganese, copper, zinc and boron.
- A moderately to sliqhtly acidic reaction (pH 5.5 to.6.5)
represents the most favorable condition. Within this
range all the vital elements are available to the plants,
provided these elements are not lacking at all. There is
a slight difference in the pH range repuired by pines and
broadleaved species. Most pines prefer a soil reaction
between pH 5 and 6, broadleaved species generally like it a little less acid, somewhat between pH 5.5 and 7.
c) How to modify an unfavorable soil reaction: Since most forest
seedlings thrive best in the intermediate pH range of 5-7,
it may become necessary to adjust the soil reaction of a
nursery soil. As much as possible one should however avoid soils that differ markedly from the desirable pH range. It is generally easier to raise the pH value than to lower it
- Raising the pH value: The pH value of soils can be raised by adding lime or fertilizers that reduce acidity such as
sodium nitrate, calcium nitrate, or basic slag.
- Lowering the PH value: We can change an alkaline or neutral
soil reaction by the application of acid forming ferti-
lizers such as ammonium sulfate, ammonium nitrate and urea.
324

All these are nitrogen fertilizers, and care must be taken
not to over-fertilize the seedlings with nitrogen. A
chemical very effective in lowering the pH value is flower
of sulfur.
No definite recommendations can be made regarding the amount
of lime or fertilizer to be applied to yield the desired
change in soil reaction, since the buffering of soils, i.e.
the resistance to a change in soil reaction, is quite varia-
ble. By treating a small area with different amounts and by
determining the pH value again after a few weeks, one has
to find out the quantity required to achieve the desired
results.
9.7 The role of plant nutrients and deficiency symptoms
a) Plant nutrients: are chemical elements that are taken up with the soil water by the roots and serve as promoters cf various vital life processes in the plant organism like photosynthesis,
cell division, flowering, fruiting, etc.. According to the
quantity required by the plants they can be grouped into
primary nutrients (nitrogen, phosphorus, potassium), secondary
nutrients (calcium, magnesium, sulphur) and micro-nutrients or trace elements (iron, copper, zinc, manganese, boron,
chlorine, molybdenum, cobalt).
- Nitroqen, among other functions, is part of the chlorophyll,
of proteins and nucleic acids. It has a strong influence on vegetative. growth.
Where the supply of nitrogen is insufficient, plants become dwarfed and stunted with leaves of light green or yellowish
color (without darker veins). However, too much available nitrogen in the soil delays the maturing and hardening of
the tissues. The plants remain soft and succulent and be- come susceptible to diseases.
- Phosphorus is responsible for flowering and fruiting, which
absolutely depend on it. Viable seeds cannot develop with-
out the presence of phosphorus. It also encourages root
growth, particularly the development of lateral and fibrous
rootlets, and increases the general resistance of the plant against diseases.
325

b 1
Lack of phosphorus results in grey-green to bluish-green
spots and blotches on the leaves of broadleaved species.
The needles of conifers remain short and are of red-violet
color. Flowering and the development of fruits and seeds
will be unsatisfactory.
- Potassium increases the plumpness of seed kernels,regu-
lates the water content of the plant tissues and increases
resistance against drought.
Potassium deficiency becomes obvious when the leaves of
seedlings look dry and scorched along the margins. Pine
needles start drying from the tip.
- Calcium is important for the moderation of acidic soil re-
actions. The symptoms of calcium deficiency are very com-
plex, because soils lacking calcium are usually acidic at
the same time. This in turn makes many nutrients except iron and manganese unavailable to plants. Too much cal-
cium results in an alkaline reaction, which is equally un-
favorable, because it will cause a shortage of phophorus
and many trace elements.
- Maqnesium is a central component of the chlorophyll. Its deficiency in broadleaved species can be detected when
yellow spots appear all over the leaf, while green seams
remain along the veins. The needles of coniferous species turn yellowish from the tips.
- Iron promotes respiration and the formation of chlorophyll.
Shortage in available iron turns leaves and needles yellow
with the ribs and veins remaining green up to the finest
ramification, which resembles much the deficiency signs typical for magnesium.
Measures in case of deficiency symptoms: Although a nutrient deficiency can be latent without obvious symptoms, it will usually be noticed when the seedlings remain stunted and
their leaves are discolored. These hunger symptoms should not be mistaken for diseases (18).
The first thing to do is to check the pH value. If the soil turns out to be very acid or alkaline, the shortage may be
326

due to the fact that certain nutrients, though present in the
soil, are not available for the plant. In that case only the
pH value need to be changed.
If, inspite of an accurate soil reaction, the seedlings con-
tinue to show deficiency signs, one has to find out which
element is most urgently needed. However, identifying dis-
colorations of the leaves may be difficult, when symptoms
typical for the deficiency of one specific nutrient are
superimposed by other signs of malnutrition. Since the lack-
ing element is sometimes hard to determine, one could try a
compost dressing or a careful application of'complete fer-
tilizer as a kind of trial-and-error method.
However, the cost of fertilizer application can be cut down
by applying more pointedly only the actually missing elements.
To be able to choose the type ofasingle or mixed fertilizer
that exactly meets the nutrient requirements,it is recommended
to have a sample of the nursery soil tested at the Soil Labo-
ratory of the Bureau of Forest Development in Manila. The
soil test shows the distribution of the mineral soil par-
ticles according to size, determines the pH value and reveals
which nutrients are needed for optimum growth.
c) Takinq soil samples for analysis: The soil sample should re-
present the average conditions of the nursery. If one part
of the nursery differs markedly from the rest in the charac-
teristics of its soil, it will be advisable to take a sepa-
rate sample.
For fairly uniform nurseries a composite soil sample may re- present best the average conditions. With a spade a V-shaped cut with a depth of about 20 cm is dug and a slice about 2 cm
thick is taken. The edges of the slice are trimmed with a
knife on both sides of the spade blade, so that a strip of soil about 2 cm wide is left. From a mixture of lo-20 such
samples collected at random over the whole nursery area about
500 grams are tzlken for analysis.
327

9.8 Commercial fertilizers
Application of commercial fertilizer replaces mainly the three
primary nutrients: nitrogen, phosphorus and potassium. There
are also special fertilizers that contain micro-nutrients
(21,27).
The kind and amount of nutrient element in fertilizers is shown
in the analysis printed on the fertilizer bag. The first figure indicates the percentage (by weight) of nitrogen available in
the fertilizer, whereas the second and third figure show the
percentages of phosphorus and potassium respectively.
While the figure for nitrogen indicates exactly the proportion
by weight of the pure element N, there are two ways of express-
ing the content of phosphorus and potassium (21). Formerly the contents of P and K were expressed only as phosphorus pentoxide
P205 and potassium oxide K20. But nowadays, it has been fre- quently practiced to use also for these nutrients figures that
indicate the relative amount of the pure elements. The conversion
factor from percent P205 to P is 0.44, that for changing percent K20 into K is 0.83. For example a 12-24-12 fertilizer according
to the old designation (N-P 0 2 5-K20) would be called now 12-10.5- 10. It is usually printed on the fertilizer bag which designa- tion is used.
Fertilizers should be stored in a dry room. Some fertilizers
such as nitrates and urea are hygroscopic. They attract moist- ure, especially under the humid conditions of the tropics,
which causes the fertilizer to dissolve. To keep the fertilizer
bags dry they should be placed on a wooden platform made of
scantlings or thick boards.
a) Nitrosen fertilizers: The following types are commonly sold:
Sodium nitrate NaN03 16 56 N Ammonium sulphate (~4)2SO4 21 % N
Ammonium nitrate NH4N03 33 % N
Calcium nitrate Ca(N03j2 15 % N
Urea CC(m4)2 45 % N
Nitrogen is taken up by plants in the form of ammonium (NH4),
but more often as nitrate (N03). The ammonium ion is absorbed
328

by humus and clay particles, whereas the nitrate ion moves
with the water and is easily leached. Ammonium is converted
continously by soil bacteria into nitrate.
If nitrogen is urgently needed by the seedlings, one should
apply a fertilizer containing nitrate, like sodium nitrate,
ammonium nitrate or calcium nitrate as a top dressing. They are given in small doses to avoid losses through leaching.
Ammonium fertilizers like ammonium sulfate and urea supply
nitrogen for a longer period. Ammonium sulfate and urea
increase the soil acidity, sodium nitrate and calcium nitrate
reduce it. Nitrogen fertilizers can be applied as a surface
dressing because they dissolve easily and are then carried
down into the root zone.
Generally, one should be careful not to over-fertilize the
seedlings with nitrogen. The result would be weak and succu-
lent plants susceptible to diseases. No nitrogen fertilizer
should be applied later than two months before field planting.
b) Phosphorus fertilizers: The following types are available:
Single superphosphate Ca(H2P04)2 + CaS04 16-20 % P205
Triple superphophate Ca(H2P04)2 46 % '2'5 Basic slag 16-20 % P205
Ammophos NH4H2p04 48 % P205 + 11% N
Phosphorus is absorbed by the plants in much smaller quantities
than nitrogen and potassium. Often very little of this element is present in thcsoil in a 'rorm that is available to plants.
In very acidic or alkaline soils phosphorus becomes part of chemical compounds that cannot be dissolved. The most suit-
able soil reaction for the absorption of phosphorus is the
range between pH 6 and 6.5.
Contrary to nitrogen, phosphorus is tightly held by clay par-
ticles and cannot be leached out. If phosphorus is applied
as a surface dressing, it may be fixed there without reach-
ing the root zone,where it is actually needed. Phosphorus
fertilizers should therefore be worked into the soil of
nursery beds or mixed with the potting soil before sowing or
transplanting. 329

,
c) Potassium fertilizers: The following types are available:
Potassium sulfate K2S04 contains 50 % K20
Sulphate of potash-magnesia K2S04+MgS04 25 % K20
Potassium chloride KC1 60 % K20
Potassium nitrate K2N03 44 % K20
Potassium is not as easily leached as nitrate, but also not as
tenaciously absorbed as phosphate. Potassium fertilizers should
therefore be applied more or less the same way as phosphates. High concentrations of potassium fertilizers near roots or seeds
can cause damage.
Potassium chloride must be applied several weeks before sowing
or transplanting, so that the harmful chloride ion will be
leached already when the planting or sowing starts.
d) Mixed and complete fertilizers
One has the choice of using complete fertilizers of many differ-
ent formulas. The different compositions have been prepared to
suit the nutrient requirements of agricultural crops like vege-
tables or rice. Common formulas (according to the N-P205-K20
analysis) are 16-20-0, 12-24-12, 14-14-14, 12-12-12, 10-5-20,
5-20-5, 5-10-16. For forestry purposes generally fertilizers are
recommended with a relatively large proportion of phosphorus.
Mixed and complete fertilizers are manufactured to facilitate
fertilizer application where two or all three primary nutrients
are deficient, They are more expensive than the single nutrient
fertilizers. The convenience of applying complete fertilizers
should not lead to their indiscriminate use without investiga- ting what nutrients are actually needed.
Complete fertilizers should not be broadcast over the land, but worked into the root zone. Potting soil can be enriched with 30-50 grams of a complete fertilizer for every 10 liters.
One could produce one's own complete fertilizer by mixing single
nutrient fertilizers in the form of pellets in desired propor- tions. But care must be taken not to bring ammonium fertilizers
together with fertilizers containing lime to avoid losses of
330

e
nitrogen, which would escape as gaseous ammonia. Superphos-
phates should not be put together with lime, as the phosphates
would combine with the lime to from insoluble compounds.
Hygmcopic fertilizers like nitrates and urea are mixed only
shortly before use, as they tend to form lumps.
) Calcium fertilizers
Lime is the common calcium fertilizer. We can distinguish
three types: ground limestone, burned lime and slaked lime.
- Ground limestone is the most widely used lime fertilizer.
It is available as calcium carbonate CaC03 or dolomite
CaMg(C03)2. Ground limestone is mild and not caustic.
- Burned lime or calcium oxide CaO: By subjecting limestone to considerable heat in a kiln the calcium carbonate is
converted into calcium oxide, which is rather caustic.
- Slaked lime or calcium hydroxide Ca(OH)2 is produced by
adding water to burned lime. It is caustic and unpleasant to handle.
Since ground limestone, especially in the dolomitic form, dissolves but slowly in the soil, it is important that only finely pulverized limestone with improved solubility is used.
Calcium carbonate is mild; it can be worked into the soil shortly before planting or sowing without any adverse effects
on seeds or seedlings.
The neutralizing effect of burned and slaked lime is higher
than that of ground limestone. However, because of their caustic properties. these two kinds of lime are generally more preferred in the preparation of compost.
With lime the pH value of acidic soils can be easily raised. However, it should be applied with caution. It is necessary to check the soil reaction with a pH-meter before and after
application. A relatively higher amount of lime is required
for well buffered soils with a high humus content to achieve
the desired change. There is always the danger of overliming. Never should the pH value be raised, above 6.5.
331

Apart from "liming" we can supply the soil with calcium by
using single nutrient fertilizers which in addition to the
primary nutrient also contain calcium, like calcium nitrate
or basic slag.
f) Maqnesium fertilizers: The more acidic the soil, the less
magnesium is available to the plants. The use of dolomitic
limestone, which contains both lime and magnesium, can cor-
rect a magnesium deficiency as well as raise the pH value
of the soil. Magnesium can also be added in the form of a
special magnesium fertilizer such as sulphate of magnesia or sulphate of potash-magnesia.
g) Sulnhur fertilizers: Sulphur can be provided in sufficient . quantities together with the primary nutrients by using one
of the f,lllowing fertilizers: ammonium sulphate (23 % S), superphosphate (12 % S) or potassium sulphate (18 % S). The
use of elemental sulphur (flower of sulphur) with its acid
forming properties is recommended when sulfur is needed in
soils with too high a pH value.
h) Fertilizers supplyinq micronutrients: are ferrous sulphate
(iron), copper sulphate, zinc sulphate, borax (boron), sodium
molyhdate (molybdenum) and muriate of potash (chlorine);
furthermore so-called chelates, which are complex organic
compounds of iron, zinc, manganese and copper.
Trace elements should be only applied after the pH value has
been checked and corrected. In alkaline soils many micronut- rients (iron, manganese, copper, zinc, boron) would become unavailable to plants.
The mentioned fertilizers are either worked into the soil or
dissolved in water and sprayed onto the leaves. Since only very little of the micronutrient is needed, small quantities
of the chemical will cause already satisfactory results. The limits between deficiency and excess are rather narrow.
332

9.9 Preparation of compost
a) Compost, as a humus fertilizer, not only improves the physical soil properties and stimulates the activity of the soil organ-
isms, but also adds all the nutrient elements needed by the
plants in balanced quantities (9).
Since under tropical conditions humus mineralizes at a fast
rate, it has to be replaced from time to time. It is a great
advantage, that compost need not to be bought in the market like
commercial fertilizers, but can be produced in the nursery with- out much cost by using mainly organic waste materials. In rare
cases bat guano, another excellent humus fertilizer, can be ob- tained from caves in the vicinity of reforestation projects.
Compost is well decomposed organic matter of all kinds (grasses,
weeds, waterhyacinths, sunflowers, rice straw, rice hull, ve- getable re;n,s.ins, kitchen wastes, sawdust: forest litter like
twigs, leaves, needles, chopped left-over seedlings: farm manure) (20).
- Weeds and grasses used for compost prodtiction should not
bear seed, because not all weed seeds loose their germina- tive capacity during the decomposition process.
- Farm lnanure is probably the most valuable raw material for
the preparation of compost. If no farm, corral, or slaugh- ter house are nearby, one should try to gather carabao or cattle droppings from the fields or grazing areas.
The bulk of farm manure derives from cattle. Cattle manure
is very mild, because the fodder has been chewed twice and
digested in the long intestinal tract of the cattle into
very fine particles. Although of lesser qualities,the manures of horses , pigs and chicken are very valuable too.
Never should fresh farm manure be used in the nursery. Be-
fore use,it should be decomposed in a compost pile.
- Woody materials such as fine twigs, sawdust and chopped
left-over seedlings yield a very good humus. But these
substances decompose slowly due to their high lignin
content.
333

b) In pilinq up the orqanic material good garden soil rich in
microbes has to be added in little amounts to inoculate the
pile with soil organisms. Compost piles are usually set up
in layers. For example: a layer of organic mass is spread
about 30 cm thick on the ground and covered by 2-5 cm of
good garden soil: which is followed by another layer of
organic material, and so forth. The quality of the compost
can be increased by partly using farm manure. Sawdust
should not be set up in layers, but mixed thoroughly with
fine good soil or chicken manure to hasten its decomposition.
Since in the first phase of decomposition much oxygen is
needed by the microorganisms, the compost materials should be piled up loosely with ample air space in between. For the
same reason the pile should be only moist inside, not wet.
An indication that the decomposition ("burning") process
is going on properly, is the generation of considerable heat (about 40-50°C) in the compost pile soon after it has been set up.
c) Additives to hasten decomposition: Apart from oxygen the soil organisms consume nitrogen. To hasten their activities nit- rogen can be added in the form of manure and wastes of the
meat market or slaughterhouse. If such materials are not available, commercial nitrogen fertilizers like calcium nitrate or ammonium sulfate should be sparsely dispersed over
each layer of organic material.
During the process of decomposition organic acids are set
free, which in turn may affect the microbes. These acids can be neutralized by adding some lime (slaked lime Ca(OH)2
or calcium carbonate CaC03) to the compost layers. To pre-
vent nitrogen losses care must be taken, that lime and
nitrogen containing ingredients including manure are not placed together.
Ashes (derived from wood, rice straw, etc.) are a valuable
admixture to the compost pile, because they contain many
plant nutrients and trace elements, and also counteract acids.
33-1

d) Comuost pile: The organic materials can be set up on level
ground as compost pile with a trapezoidal cross section. The
length of the pile may be 3-10 m, its height 1.00 - 1.30 m.
The pile is covered thinly with good soil and a grass mulch
on top and sides. Wide bamboo tubes with pierced internodes
can be placed along the center of the pile to provide ad-
ditional aeration.
e) Compost pit: It is not advisable to dig a compost pit, be-
cause it easily gets filled with water druing the rainy season.
Furthermore, aeration in a pit is poor, and it is difficult
to manipulate the materials when the compost is to be tended.
A shallow pit, however, is a useful place where the daily organic wastes can be dumped until enough material has ac-
cumulated to set up the real pile. But this pit must not
be used for general garbage disposal (e.g., tin cans, bot- '
tles, plastic material, etc.).
f) Compost compartments: A good method for compost making is to build several compartments (1.00 to 1.20 m high, 1.00 to
1.50 m long) made of hollow-blocks, preserved boards, inter- linked wire netting or bamboo poles. There should be some space between the follow-blocks or boards to allow aeration.
COMPOST PILES PUT C)PRGIW) COMPCW- COMPARTMENT Af?RATlON
Fig. 52: Compost piles and compost compartments
335

The compartments should be constructed near a driveway, so
that the materials can be brought in by vehicle. The front-
side consists of preserved boards, which are held in place
by two angle irons attached to each side of the wall. The
boards can easily be removed when the compost is to be
turned, or when it is ready for USC.
In operating such a '*compost plant" the first compartment
is filled with organic material. When tne first stage of
decomposition is over (after l-2 months) the partly decom-
posed material is transferred to the second compartment,
and the first is refilled again. This is repeated until
the compost is ripe for use.
g) Treatment of compost: The compost pile has to be well tended,
if the final product is to become good compost. The materials . have to be loosened, mixed and repiled two to four times at
intervals of 3-6 months depending on the kind of organic sub-
stances and the climatic conditions. The right tool for work-
ing the pile is the manure fork.. The compost pile is stirred
the first time about three months after it has been set up
to allow fresh oxygen to get into it.
Another important point is to control the moisture inside the
pile. During all stages of ripening the compost should be
slightly moist, but neither dry nor stturated with water as
this interferes with the activity of the microbes. It is
therefore recommended to erect a roof (cogon, palm leaves,
corrugated iron sheet) over the pile to protect it from heavy
rainfall and intensive sun. A favorable moisture content can
then be maintained by sprinkling the pile from time to time.
9.10 Green manurinq
Green manuring implies working of undecomposed green plant tis- sue into the soil to enrich it with humus and nitrogen. An
ideal green manuring plant should produce a large quantity of
organic mass in a short time, and that on poor soil. Legumes
are generally preferred because of their nitrogen fixing abilities (27). The green manuring plant should be resistant against fungus attack and damage from excessive rainfall
(7,27,33).

It is difficult to find a crop species with all those desir-
able characteristics. Under lowland conditions one should
try mung0 bean (Phaseolus aureusj, soybean (Glycine masj,
tapilan (Phaseolus calcaratusj, cowpea (Vigna sinensis).
kudzu (Pueraria phaseoloidesj and Crotolaria juncea. All
these species have been tried already in the Philippines
with varying success for the improvement of agricultural
land. Lupinus spp. and horsebeans might be suitable for
* higher elevations above 1000 m .
30 to 60 kg of seed per hectare (depending on the species)
is broadcast over well prepared land and worked into the
soil at a shallow depth with a rake or harrow. On newly
opened land or where legumes have not yet been grown, the
inoculation of the seed with nitrogen-fixing bacteria may
be necessary. Broadcasting of soil from a field with legumes
would serve the same purpose.
One has to be cautious in choosing the right season for
sowing green manuring crops. The end of the rainy season with still occasional rainfalls seems to be the most suit-
able sowing time.
If the soil to be improved is very poor in nutrients, an
application of about 50 kg per hectare of a complete fer-
tilizer is recommended right after sowing. The treatment may be repeated one month later if necessary.
Just before flowering, the green manuring plants are cut and plowed or dug under. A small part of the area is saved for the production of seed to be used in further soil improvements.
337

Chapter 10:
PREVENTION AND CONTROL OF PESTS AND DISEASES
10.1 Introduction
Reforestation programs can be successfully carried through
only, if the tree seedlings raised in the nursery are robust
and healthy. Diseased or weakened seedlings having suffered under the attack of various pests are hardly in a condition to overcome the hazards of the planting site.
Unfortunately, the warm and humid climate of the tropics is rather favorable for the development of pests and diseases.
Insects can quickly build up huge populations during warm
and dry periods, when the favorable climatic conditions fa- vor a rapid sequence of short life cycles. During the rainy season the high relative atmospheric humidity provides ex-
cellent conditions for fungus diseases. Rains and high tem- peratures often shorten the effectiveness of pesticides, so that repeated treatments may become necessary.
Apart from that, nurseries with their artificial ecological balance (wide bed areas planted densely with seedlings of
just one species and of uniform size) offer per se favorable conditions for pests. This is particularly true for the greenhouse, which in addition keeps out atmospheric factors
(e.g. rain) that could check pest populations.
Thus, the control of pests and diseases in the nursery is an important, sometimes cumbersome task, which requires atten- tiveness and responsibility on the part of the personnel.
335

10.2 Methods of plant protection
Destructive agents can be fended off or exterminated by me-
chanical, chemical or biological control measures (16).
a) Mechanical and physical protection measures: For a long time
mechanical devices and techniques, and heat were the only
means known to kill pests. This included: collecting bee- tles and caterpillars from the leaves and needles by hand;
squashing insect eggs, leaf rollers, aphids between fingers;
heating and steam-sterilizing of soil: catching rodents with
traps; covering seedbeds with a frame of mosquito wire mesh
to keep out rodents, birds and insects.
b) Plant protection with chemicals: Between 1930 and 1940 plant protection experienced a real breakthrough when the insecti-
cidal properties of DDT and HCH (Lindane) were discovered.
From this turning point, intensive research work led to the synthesis of a number of highly effective chemicals like the
organic fungicides (Ferbam, Zineb, Maneb, Captan) and in- secticides composed of organophosphorus compounds (Malathion,
Mevinphos, Basudin, Metasystox, Dipterex) or carbamates
(Mipcin). Plant protection seemed to be no problem anymore.
However, after some time, when the impact and long term con- sequences of repeated pesticide application became fully
evident, the formerly so optimistic view about chemical
plant protection had to be revised. While the new fungi- cides as a whole turned out-to be rather unpoisonous and and unprobl;ematic (except the mercury compounds), there are
unfavorable side effects with amost all insecticides (16).
Many insecticides are extremely poisonous to humans (e.g. Parathion, Endrin, Phosdrin) as well as to domestic animals, game and bees. These chemicals also wipe out beneficial parasites and predators, which as the natural enemies of the pests help to keep their populations at low levels.
The persistent chlorinated hydrocarbons (DDT, Lindane) have
an adverse effect on the ecology, because they will not
disintegrate under normal atmospheric and biotic conditions.
339

I DDT is taken up through the nutrient cycle and accumulated in
the fat tissues of humans, mammals and fish. The prolonged use
of the same chemical has also often resulted in resistant
strains of pests.
Yet, we are not in a position to protect our nurseries complete-
ly without chemical pest control. Whenever there is a massive
attack of pests or a disease spreading rapidly over the beds, we can prevent further damage only by using pesticides. The loss of
seedlings, that would occur otherwise, cannot be afforded.
Plant pathologists are trying nowadays to discover new pesticides
that are less toxic to humans, show a somewhat selective action
and exterminate otherwise resistant species. There are now
special acaricides like Thiovit, which are effective against
spiders and mites but harmless to insects and nontoxic to humans.
The active ingredients Metasystox (Bayer) or Dimethoate, also
called systemic insecticides, are quickly absorbed through the
roots and leaves, thus remaining toxic only to sucking insects like aphids, Insecticides with the active ingredient DDVP
(Bayer-Dedevap, Shell-Maladrin) quickly disintegrate after ap-
plication, so that beneficial parasites after hatching will not
be affected any more. Malathion (Esso) is a similar chemical
compound as Endrin or Parathion and equally effective, but less
poisonous to humans. Bayrusil (Bayer) claims to be effective
against otherwise resistant pest species. Pyrethrum, an extract
of the flower of Chrysanthemum cineriaefolium has a rapid knock-
down effect on aphids and chewing insects, but is of low toxicity
for marmnals. Besides, it quickly disintegrats after application.
Except for seed dressing, soil fumigation or sterilization and
the prophylactic spraying of insecticides in the greenhouse
at regular intervals, one should not apply pesticides without considering, whether there is any pest to be killed at all.
Control measures should be initiated only, if some pests or diseases pose an actual threat. Observe the damage level. It might not always be necessary to apply radical pesticides
against pests that have a low population density or whose
damages have no economical consequences.
340

c) Bioloqical pest control: The endeavor in finding out new
insecticides not poisonous to mammals and with selective
action bore fruit, when scientists tried to make use of the natural enemies of insects like predators, parasites or
diseases. Particularly the artificial dissemination of in-
sect pathogens like polyhedral viruses, bacterioses and
mycoses that selectively eliminate certain pest species
proved to be successful. Such a biological preparation is
for example Thuricide (Shell) composed of Bacillus
thuringiensis.
10.3 Preventive measures
~~ employing preventive measures it is often possible to
avert the spreading of diseases and the occurrence or
build-up Of pest pOpUlatiOnS, and thereby avoid expensive
control operations.
For the outbreak of a pest a combination of three factors
must be present: an infective pathogen, a favorable en- vironment, and a susceptible plant (1). When we keep the
nursery clean, take prophylactic control measures and raise robust, vigorous, well nourished but hardy seedlings, we create conditions that are not favorable for pest devel- opment.
a) Cleanliness in the nursery: Mortalities among seedlings
have to be constantly removed. If death was caused by diseases the infected plants should be burned. Seedlings perished because of physiological disorders and weeds are deposited in compost piles.
All kinds of garbage, trash and rubbish, broken pieces of glass, old tin cans, paper and plastic materials are thrown into the garbage pit, which is dug somewhere at the edge of the nursery compound.
Especially in the greenhouse cleanliness is a necessity. As
a prophylactic control measure it is advisable to spray its interior with an insecticide (e.g. Malathion, Bayrusil, Thiodan, Basudin) at four-week intervals concentrating on
341

the hiding places of cockroaches and other pests. For the
same reason no soil should be used in the greenhouse, that
has not been sterilized.
Seed of species susceptible to damping off can be soaked in
disinfectant solutions (merthiolate, formal 'ehyde) to kill
harmful organisms on the seed suface, or the are treated
with a dressing of organic mercury compounds
damping off can be added to the water into 9
combined with
an insecticide (e.g. Bayer-Ceresan). A fungicide against ich the seed-
boxes are to be dipped.
Plants to be brought into the greenhouse hav/e to be care-
fully inspected for diseased parts or pest i b festation. The
mosquito wire mesh, which usually makes up tihe upper por-
tion of the greenhouse side walls, has alway'e to be intact.
b) Avoidina conditions that favor diseases: The growth of
disease pathogens is promoted by high air humidity combined
with lacking air circulation. Such conditions are found in
too densely sown seedbeds or in transplant beds where the
seedlings were spaced too narrowly. Heavy shading for a
longer period should be avoided, because it reduces air
circulation. Limited growth space and lack of sunlight also
weaken the plant and soften its tissues rendering it more
susceptible to diseases. Watering in the late afternoon
increases air humidity during the night, particularly at the
stem base near the ground. A soil reaction above pH 7, as well as an overdose of nitrogen or an application of manure that is not well rotten will promote the occurrence of dam-
ping off diseases.
c) Production of viqorous plants: Usually one can see from its outer appearance, whether a plant thrives well or suffers under deficiencies or maltreatment. The common physiological disorders that indicate injury or disturbed functions of the
plant organism and at the same time reveal inadequate nursery
techniques are listed below (1). These symptoms should not be mistaken for diseases.
342

d)
I
- Sunscald: Grey blotches, which later turn whitish, dry out and become brown and brittle. They can appear on leaves of transplantedseedlings when rainy and cloudy weather is abruptly followed by a hot, bright spell, or when shades have been removed too suddenly without transition.
- Etiolation: Small pallid green leaves, slender elongated stem: plants have a tendency to lodging: caused by over- shading.
- Wiltinq: A temporary shortage of soil moisture causes leaves and shoots to loose their turgidity, to become flabby and droop. In serious cases they do not recover but dry up.
- AphYxiation(oxvqen deficiency) of the roots: Unhealthy looking, pale green leaves caused by excessive watering, e.g. when floodbeds remain permanently flooded for several weeks. The fibrous roots decay, toxic substances may appear in the root zone through the activity of anaerobic microorganisms.
- Soft, succulent shoots and leaves: usually caused by an overdose of nitrogen.
- Chlorosis and signs of malnutrition: See Chapter 9.7 .
- Twisted or deformed shoots of dicotyledonous plants can be an indication of careless use of weedkillers. After the application of herbicides sprayers should be cleaned thoroughly with activated charcoal.
Such malfunctions of vital plant organs weaken the whole plant organism and render it highly susceptible to the
attack of pathogens and pests. It is beyond question that these manifestations of inadequate nursery practices must be remedied at once.
Early detection of diseases and pest attack: Pests and diseases can be detected in their early stages of develop-
ment only by constant observation and alertness. The man in charge has to check the plants in his nursery daily on ab- normalities, malformations or discolorations. It is not enough to have occasionally an overall look over green nur- sery beds. Instead, seedlings growing in different parts of the nursery have to be closely examined. Only through this practice one can detect diseases and pests before they spread OL build up to dangerous dimensions.
343

This daily inspection is particularly important with newly
germinated delicate seedlings, because the time lapse be-
tween the first signs of the disease and its devastating
spread over the whole bed area is usually very short. With
tiny seedlings it is sometimes difficult to detect insect
damage. The minute stem which is usually left over by the
insect, can hardly be recognized with the naked eye. Much
damage may have been caused when the gradual disappearance
of seedlings finally becomes obvious.
10.4 Names, terms and qroups of chemical pesticides
A vast variety of agricultural chemicals for pest control is
offered in the market nowadays. Every year new brand names
and active ingredients appear and will be advertised. The
following terms serve to group and classify these chemicals
and provide clues on their composition and action (12).
a) Pesticide is the general term for all chemicals that kill or
suppress harmful1 plant or animal organisms. We can distin-
guish the following groups: fungicides, nematocides, acari-
tides (against spiders and mites), insecticides, rodenticides,
molluscicides (against snails and slugs), bird repellents,
herbicides.
b) Brand or trade names: The different pesticide manufacturers are
turning out products which may contain all exactly the same
active ingredient, but have different trade names. For example,
Dithane M-22 (Rohm & Haas), Plantineb 80 (Hoechst), Manebio
(Union Sales), Maneb 80 % (Bayer) and Polyram M (BASF), all
these fungicides have the same active ingredient: Maneb.
C) Active inuredient: This is the effective component in a pest- icidal preparation. The active ingredients are mostly complex
chemical compounds with scientific names too complicated for
practical use. They are therefore commonly known by short
names or abbreviations. For example: the chemical compound
dichlorodiphenyldichloroethane is known DDT, or, zincethy-
lenebisdithiocarbamate as Zineb. The active ingredient and
its concentration are shown on the label of the pestlc;lde
container. 344

d) Pesticide formulations: Pesticides are sold in either solid
or liquid form. We can distinguish the following formulations:
- Emulsifiable concentrate (E.C.): The active ingredient is
part of an oily liquid, which additionally contains an
emulsifying agent. It is emulsified in water and usually
applied as spray. Insecticides formulated this way are
generally rather poisonous to humans because of the high
concentration of the active ingredient.
- Wettable powder (W.P.):.The pesticide is formulated as a fine powder to be mixed with water and to be applied as
a spray. It contains wetting and dispersing agents, so
that the minute particles will disperse and suspend well.
Wettable powders are safer for tender foliage than the
emulsifiable concentrates and pose less hazards to the
persons applying them.
- Dust: With this ready for use formulation the active com-
pound is mixed with finely ground talc or clay (concent-
ration 1 - 2.5%); application with dusters.
- Granules are a practical formulation for soil treatments:
application by hand.
e) Snrav additives or adiuvants (stickers and spreaders): are added to pesticide sprays to improve their effectiveness and
to prevent wastage. Often the marketed products already con- tain both components.
- A sticker will cause the spray particles to adhere better
to the surface of leaves and needles, so that they will
not be washed off too quickly by rain or irrigation water.
- A spreader (dilutant, wetting agent, detergent) is recom-
mended, when leaves or needles with hairy or waxy surfaces
and plants infected with mildew are to be treated especial-
ly with wettable powder formulations. The wetting agent
prevents the formation of droplets that hesitate to spread and tend to roll off. Instead,it causes the spray to spread readily over the leaf surfaces covering them with an .uni- form film.
345

A rather comprehensive list of pesticides available in
the Philippines with their active ingredients, trade
names, formulations and indications is supplied in the appendix of this chapter.
10.5 Application of pesticides
10.5.1 Seed Treatment:
As a preventive measure seed can be treated immediately before it is sown to avoid damages and losses that might
be caused later by fungi, soil insects, rodents and birds.
To eliminate harmful organisms on the seed surface the
seed can be soaked in solutions of Merthiolate or Chlorox
(sodium hypochloride). Immersing the seed in 0.1 % For- maldehyde (4 - 1 teaspoon of 40 % Formaldehyde to 1 liter of water) would also kill whatever germs exist inside the seed (15).
More effectiv? are treatments that provide a protective coating. Suitable chemicals are mixed with the seed lot
at the prescribed rate as dust, liquid (add sticker) or as a special slurry preparation (thick suspension). The slurry treatment generally gives the best results. To
provide effective protection the coating must be suffi- ciently thick. The chemical will diffuse into the soil
and disinfect a zone around the seed, in which germina- tion and early growth can take place undisturbed.
The chemical and, if required, a sticker is added to a small quantity of seed which has been placed in a contain- er. The receptacle is shaken until the coating is satis- factory. For large quantities of seed it is useful to employ rotating barrels (tumblers) or cement mixing machines.
Very effective chemicals for the treatment of seed before
sowing are the organo-mercury compounds (Ceresan, Semesan, Tillex). Their use can, however, become hazardous to the seeds as well as to the user, if they are not applied with

utmost care. Useful non-mercuric fungicides are Ferbam,
Thiram, Chloranil, PCNB (Brassicol, Terrachlor), Captan.
If the attack of soil insects (termites) seems likely,
one of the following insecticides can be added to the
dressing: Lindane, Heptachlor, Aldrin, Dieldrin. Ready
fungicide-insecticide preparations are also commercially
available. Bird repellents like minium or red lead,
Morkit and Anthraquinone have been successfully used in
the US for protecting pine seeds from birds.
10.5.2 Soil fumigation:
This is another prophylactic technique, which is mainly
applied in open nursery beds and eliminates adverse soil
organisms such as soil fungi, nematodes, soil insects, weed
seeds and rhizomes in one single operation. Whether formu-
lated as gas, liquid or granules, soil fumigants disintegrate
soon after application and produce toxic fumes that penetrate
the soil killing. all living organisms present.
Soil fumigants are not cheap (except Shell D-D), and in the
isolated reforestation projects it may be difficult to ob-
tain them. Often their application is rather complicated,
since provisions have to be made that the toxic fumes will
not escape from the soil prematurely, but on the other hand,
no trace of the usually phytotoxic fumigant will be left
when the treated bed is to be sown or planted. Some of the
chemicals (particularly Chloropicrin and Methylbromide) are
extremely poisonous to humans. This explains why soil
fumigation as a rule should only be carried out by specially
trained personnel observing elaborate precaution measures
(11,35,42).
Small quantities of soil for seedboxes and greenhouse ben-
ches should generally be disinfected by steam sterilization only (see chapter 10.7).
10.5.3 Soil drenchinq:
Soil is soaked or wetted with a pesticidal liquid to control damping-off diseases, soil insects and termites. It should
be slightly moist when the treatment is started.
347

10.5.4 Snrayinq:
Most insect&cides and fungicides are applied by sprayers. We
can distinguish between air blast sprayers and hydraulic
pressure sprayers (23,29).
a) Air blast sprayers: utilize a high velocity air stream or
blast to break up the liquid into very fine mistlike drop-
lets (0.05 - 0.15 mm) and to blow them towards the affected
348
Usually the chemical solution is distributed evenly over
the area to be treated at a rate of 2-4 liters per m2 by
using a sprinkling can with a rose at its spout. With
delicate seedlings a sprayer would be more suitable.
As a prophylactic measure against damping-off, fungicides
like Captan (Orthocide 50), Dexon, PCNB (Brassicol, Terra-
chlor) or organo-mercury compounds (Ceresan, Agallol) are sprinkled over the bed shortly before sowing followed by
another application lo-15 days later. The same technique
with shorter intervals is applied when the seedlings show already signs of the disease. The mercury-based fungicides
have to be applied cautiously, since their continuous use
may result in soil poisoning.
Lindane, Chlordane (only pre-planting treatment), Heptachlor,
Aldrin, and Dieldrin are suitable chemicals against soil in-
sects and termitps. After application the soil is worked 10
to 20 cm deep. The usual concentration is 2-5 tablespoons
per 5 gallon can. Termites require about % liter Chlordane,
Dieldrex 15 or Aldrex 2 per 5 gallon can and a drenching rate
of about 4 liters per square meter.
To control soil insects in transplant beds the insecticidal
liquid can also be poured directly out of the spout of a
sprinkling can (without rose) into 3 cm deep furrows along
the rows of seedlings at the rate of approximatiely 0.5 liters
per meter.
Another possibility to get rid of soil insects is to produce
holes (3 cm diameter, lo-15 cm deep) with a wooden peg at
regular int,rvals of 20 cm on the bed surface, into which
the liquid is poured at a rate of 150 cc per hole.

plant. Examples of this type are the "flitgun" and the motor-
powered knapsacksprayer.
- "Flitsun": This is probably the simplest spraying instrument. It is cheap and practical in the greenhouse, but too small
and not effective enough for the nursery. By operating its piston air pump an air blast is produced, which at the same
time injects some spray liquid from the reservoir into the air stream either inside or outside the pump cylinder.
- Motorpowered knapsacksnraver: The motor propels a fan that
produces a strong air stream (velocity 120 m/ set), which blows into the open through a relatively wide flexible rub-
ber hose. The chemical flows from the tank through an ad- justable valve and enters the air stream at the mouth of the
rubber hose.
ADJUSTABLE DtlWUR6E
‘* FLITGUN”
MOTOR- POWERED ‘KNAPSACK
SPRAYI%
Fig. 52: Flitgun and motorpowered knapsacksprayer, both operate according to the principle of air blast sprayers
This way of pesticide application is also called concentrate or
low volume spraying, because much less water is needed (only about l/10) as compared to hydraulic sprayers. Since the amount of pesticide remains the same, a ten times higher concentration
will be obtained. Advantages: reduced water requirements, speeding up of spraying operations, less wastage of pesticides. However, the motorpowered knapsacksprayer can be recommended only
for large nurseries.
349

Fig. 53: Double action plunger pump
- Automatic compression sprayer: There are shoulder-carried
and back-carried models. Bofore this type of sprayer can be operated one has to produce the required working-pres-
sure of approx. 70 lbs per square inch by pumping air with a built-in air piston pump into the interior of the tank.
350
b) Hydraulic pressure sprayers: The spray liquid is forced with
pressure through a nozzle, which breaks it up into fine drop-
lets. These droplets are larger than the fine mist produced
by the air blast sprayers. Since relatively much water is
needed, this technLque is also called "thorough coverage" or
high volume spraying. It is the "normal" way of spray applica- tion and all recommendations of the producers on the labels
of pesticide packages concerning spray liquid concentrations
refer to this method,
In the average reforestation project hand-operated pressure
sprayers, especially the knapsack sprayers, are the most useful
spraying implements, They are relatively inexpensive, easy to
operate and to maintain, but nevertheless fully meet the needs
of the project. Apart from pest control, they are often employed
for other purposes like watering delicate seedlings or applying
wood preservatives. Some common models are listed below:
- Bucket spraver with double action plunger pump: The feeder
pipe is either connected with a shoulder-carried plastic
container, or its suction end, to which a strainer has been
fastened, is placed in a bucket containing the spray liquid. This model is useful for the greenhouse and for small nur-
series.

With this type of sprayer no pressure must be produced
anymore during the spraying operation. The tank is fill- ed up only to one half of its volume, the rest is reserved for compressed air. There is a red mark on the tank wall indicating the upper limit of the liquid level. Essential
accessories on top of the sprayer are a safety valve and a manometer showing the highest admissible -working pres-
sure. The spray is controlled by pressing down and re- leasing the lever of a trigger control cock, which is mounted between rubber hose and spray tube.
Fig. 54: Compression sprayer
Compression sprayers are useful in the greenhouse and in small nurseries. However they are relatively expensive,
heavy, inconvenient to carry and have a relatively small filling volume.
- Hand-operated knapsack sprayers: The necessary working
pressure is produced during the spraying operation by moving a pump lever,which is either mounted overhead or
Fig. 55: Knapsack sprayer . with from Lambrecht, 1967)
SCWEMTIC
CRO63* SECTION
diaphragm pump (Adapted
351

protrudes from the bottom of the tank. As illustrated in
fig. 55 and 56 the available models are either equipped
with a diaphragm pump or with a piston pump.
MoD8L wln4 PLEmN
PUMP OulSlot:
SCHEMATlC
cmss fEcrlctu
Pig. 56: Knapsack sprayers with piston pumps (Adapted from
Lambrecht, 1967)
Both are useful and practical sprayers for the average type
of reforestation nursery. Preferred are light weight models
made of plastic and aluminium with a tank volume of 10 - 15 liters and an operational pressur$50 - 80 psi.
c) Nozzles are always found at the tip of the spray tube of
hydraulic pressure sprayers. They have the task to trans- form the spray liquid into fine droplets and to uniformly
distribute them. The higher the working pressure, the finer the size of the droplets.
The most widely employed nozzle type for pest control pur-
poses is the swirl spray nozzle. The spray is formed by
propelling the liquid through the screw threads of a whirl- ing pin before it is forced through a small hole in the
nozzle cap into the open. A lmore sophisticated design has exchangeabie whirlpins and orifice disks with holes of different sizes, so that droplet size, delivery and the angle at the top of the spray cone can be modified.
Other types of nozzles are the impact nozzle, where a high
velocity jet strikes a smooth surface, and the flat fan nozzle (Teejet, Fanjet), where an oblong orifice produces
352 a fanlike spray (useful for herbicide application). -

d) Preuaration of spray solution:
- Containers and liquid measures needed:
kerosene can (5 gallons = 19 liters) - or better - plastic pail with marks indicating the liters:
one liter tin can:
small 40 cc measuring cup (plastic) with 10 cc graduation, obtainable from pesticide dealers, if not available
tablespoon and teaspoon.
- Concentration of the spray liquid should be strictly in
accordance with the prescriptions of the manufacturer.
There is also often a note on the label concerning the
compatibility of the chemical with other pesticides, i.e. usually whether insecticide and fungicide can be sprayed
together in one operation.
- Use of wettable powders: To avoid the formation of lumps
first some water is added to the measured quantity of
wettable powder in a small container. Water and powder
are agitated with a small wooden stick until they become a thin paste, which is then stirred into the required amount of water in a pail or kerosene can. Only clean
water should be used to prevent the nozzle from clogging.
A spray liquid prepared from wettable powder is a suspen- sion. The tiny solid particles of the powder do not dis-
solve in water, but remain suspended for some time and
then slowly sink to the bottom of the container. The
spray liquid has therefore to be agitated from time to time, if not used up immediately after preparation.
- Use of emulsifiable concentrates: The required volume of E.C. is simply stirred into the needed amount of water. The spray liquid, an emulsion, has a milky appearance.
- Addition of stickers and spreaders: Where the spray liquid remains in droplets on waxy, hairy or powdery
leaf surfaces, a spreader should be added, so that a good coverage is obtained. The dosage recoxnended is
generally 1 teaspoon per 5 gallon can, for low volume sprays more. To find out the correct dosage one haa to observe the pattern of the spray deposit.
353

During rainy periods it is advisable to add a sticker to
prevent fast wash-off. Recommended are usually 3 table- spoons per kerosene can.
e) Application of spray-t Al1 affected parts cf the plant should
be thoroughly covered. Rirect the spray also upward ta hit the underside of the foliage.
To make sure that the spray residuals will remain on ihe
leaf 'surface for some time one should take care, that the seedlings to be treated are dry, and that spraying is car- ried out well ahead of a bad weather front to al.lQw the
spray to dry up before the rains start.
On the other hand, spraying emulsifiable concentrates during
the hot hours of the day should be avoided because of in-
creased danger that delicate leaves may get damaged, and that
the operator is harmed by the inhalation of poisonous fumes.
f) Maintenance tf sprayinq equipment: After use sprayers should
be thoroughly cleaned. Use warm water together wii;h Borne Tide
or another detergent. Rinse the sprayer repeat&J./d with warm water and pump it empty to flush out whatever dirt water and
corrosive spray materials might be left, Then, aJ1 valves are
opened for draining, the sprayer is dried insxdr? ar,d outside with a rag and turned upside down, so that any remaining
water will either drain or evaporate., when the e'pr.'c'lyer is likely not to be used for a longer time grease or oil. al.1
metal parts and valve balls, but refrain from doing so with plastic or rubber materials (381.
10.5.5 ADDlication of dusts and qranules
a) Durrtinq er&mentt The ' - ilz>nG: I szmpL.est UUD u.ug %iilpLWTient consists of a tin can with fine holes .in the bottom, or of a nyl.on stocking pulled over an open tin,
More effective are small hand dusters. An air blast pro-
duced by operating an air piston pump or by squeezing rub- ^.. her bellwe passes the dust container and emits the raised
354

dust clou3 through a small flared nozzle. The models de-
picted in fig. 57 are available at Pharmaceutical Indus-
trLes, Zueliig Bldg., Buendia Ave., Makati.
KNOB pint.
CKQZZLE CONTlNER
"'PiLVOR-K" “BOBEW- K "
Fig. 57: Hand dusters (Fa. Birchmeier)
A further improvement is the blower duster. Here the dust cloud is blown out of the duster nozzle by a continuous air
stream generated through a built-in hand-rotated fan,
The knapsack motorduster is basically the same implement as the knapsack motorsprayer, which with some additional ex- changeable accessories can be quickly turned into a motor-
duster. Rarely needed in the forest nursery, but perhaps
useful in plantations in regions where water supply is scarce.
b) Dustinct the foliage of affected seedlinns: Compared to spray-
ing,dusting has some disadvantages. Because of the sen- sit: -fit\. .a. I of the dust particles to wind and their quick being
washed ot^f the leaf surfaces by rain, it is only possible where fair weather cnndft~~pe.s rnne+-==++-:r ----r=; 7 --*- ‘““‘I~ y* G.Ui.&. Besides ,
the d,.“C UU” c particles have very littie adnesive properties, so
that in any case the treatment will have to be repeated after a short time. Dust formulations to be applied on foliage
generally contain only l-2.5 % of the active ingredient and
are relatively expensive because of the high proportions of
carrier material needed. However, where water supply is a
problem, dusting is a practical way of pesticide application,
since dust is a ready-to-use material.
355
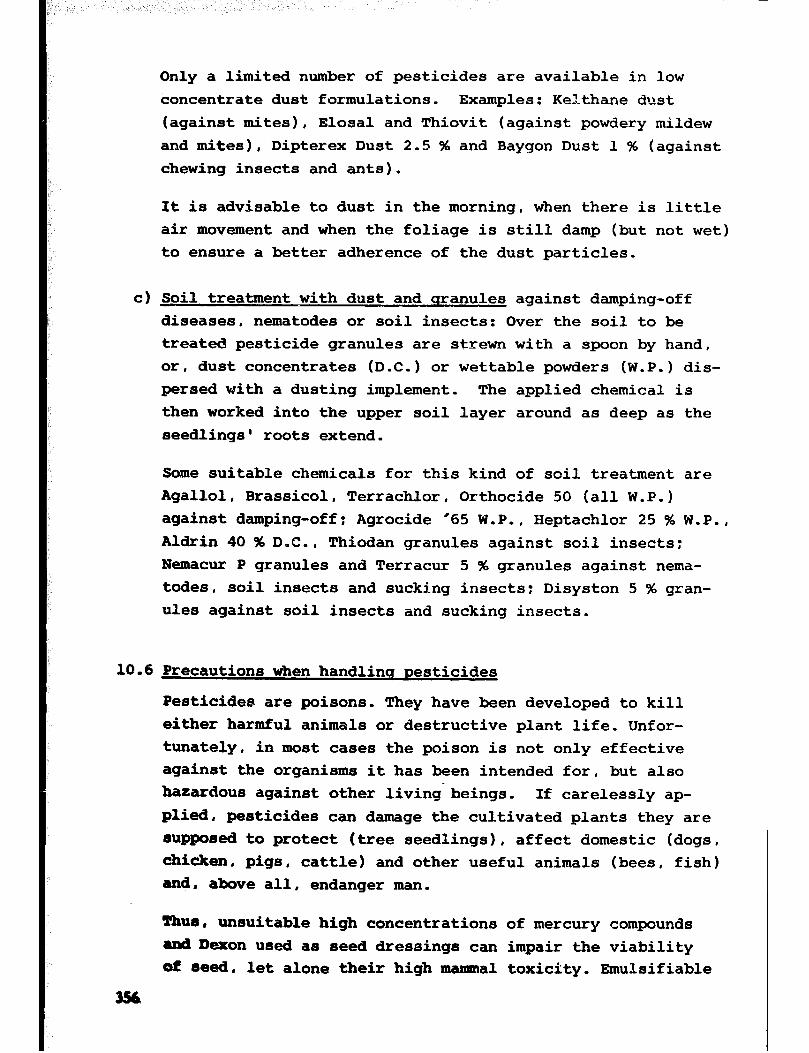
Only a limited number of pesticides are available in low
concentrate dust formulations. Examples: Kelthane dust
(against mites), Elosal and Thiovit (against powdery mildew
and mites), Dipterex Dust 2.5 % and Baygon Dust 1 % (against
chewing insects and ants).
ft is advisable to dust in the morning, when there is little
air movement and when the foliage is still damp (but not wet)
to ensure a better adherence of the dust particles.
c) Soil treatment with dust and qranules against damping-off
diseases, nematodes or soil insects: Over the soil to be
treated pesticide granules are strewn with a spoon by hand,
or, dust concentrates (D-C.) or wettable powders (W-P.) dis-
persed with a dusting implement. The applied chemical is
then worked into the upper soil layer around as deep as the
seedlings' roots extend.
Some suitable chemicals for this kind of soil treatment are
Agallol, Brassicol, Terrachlor, Orthocide 50 (all W.P.)
against damping-off: Agrocide '65 W.P., Heptachlor 25 % W-P.,
Aldrin 40 % D-C., Thiodan granules against soil insects:
Nemacur P granules and Terracur 5 % granules against nema-
todes, soil insects and sucking insects: Disyston 5 % gran-
ules against soil insects and sucking insects.
10.6 Precautions when handlinq pesticides
Pesticides are poisons. They have been developed to kill
either harmful animals or destructive plant life. Unfor-
tunately, in most cases the poison is not only effective
against the organisms it has been intended for, but also hazardous against other living-beings. If carelessly ap- plied, pesticides can damage the cultivated plants they are
CrUpposed to protect (tree seedlings), affect domestic (dogs,
chicken, pigs, cattle) and other useful animals (bees, fish)
and, above all, endanger man.
'chum, unsuitable high concentrations of mercury compounds ti Dexon used as seed dressings can impair the viability @f seed, let alone their high mama1 toxicity. Emulsifiable

. I concentrates can cause leaf burn, especially if applied dur-
ing the hot hours of the day. Most nematocides are also
phytotoxic; a safety period has to be observed before any-
thing can be sown or planted. Persistent organochlorine
compounds like DDT and Endrin imperil grazing cattle and
goats. Rat poison baits would like-wise cause the death of
dogs and pigs. Since bees are insects too, most insecti-
cides will kill them. Minor quantities of Endrin, Endosul-
fan, Heptachlor or Captan led into rivers or ponds will al-
ready be sufficient to exterminate whole fish populations.
Some of the materials are extremely poisonous or otherwise
detrimental to humans and are likely to be fatal if swal-
lowed, inhaled or absorbed through the skin. Because of their high toxicity insecticides with the active ingredi-
ents DDT, Endrin, Parathion (E605), Methylparathion, Azin-
phosmethyl (Gusathion), EPN, Demeton (Metasystox) and
Phosdrin should not be used any more in reforestation nur-
series. The nematocides (soil fumigants) Chloropicrin,
Methylbromide, D-D, EDB should be applied only by epecial-
ly trained personnel.
Although, as a whole, the other commonly used pesticides
listed in the appendix are somewhat less toxic to mammals
than the above-mentioned chemicals, one has to be by no
means less careful in their application. Each new formu-
lation undergoes rigid testing before it is produced in
large amounts and sold to the public. The findings are
recorded on the package labes, which should bc meticulous-
ly read before a pesticide is bought or used. The label
usually informs on the chemical's compostzion, the percent-
age of active ingredient it contains, crop species to be
protected and the respective pests that can be controlled,
the adequate spray concentrations and techniques of appli- cation; it also contains warnings. precaution measures and
recommendations for the physician in case of poisoning (e.g.
the administering of antidotes).
There is no need to strees, that the direction3 for use On
the label should be conscientiously followed. Two transgres- sions are quite common. First, when preparing the spray
357

solution the philosophy: "little is good, more is better"
leads to higher' concentrations than permitted and probably
to damage and injury, at least to waste of money and mate-
rials. Secondly, the notion, that the warnings and recom-
mended precaution measures are likely to be highly exag-
gerated.
Whenever pesticide3 are handled observe the following gen-
eral precaution rules (16):
- Avoid to wet the baxe skin (hands) with the spray solu- tion, but under no circumstances should there be any contact with the liquid concentrates of insecticides. Especially Lindane BHC i Aldrir? Di.eldrir,, D,az;Lwm would be quickly absorbed through the skin.
- When working with pesticides it is generally r:-~Iz~mil-ie:tdec3 to wear a hat and protective tiermn cx cotton clothing, It should cover the whoie body and fit tightly around neck and wrists. The hands should i>o protected by put' ting on leather or rubber gloves. Slippers are no ade- quate footwear. Use instead canvas basketball-shoes or rubber boots. As additionai protection against pesticj.tie sprays t it is advisable to generally wear goggles and a face mask, even if the label actually does not call for it.
- Do not smoke (eat, drink) and chew (chewing gum) while applying pesticides.
- Spray or dust in the morning or late afternoon. Avoid the hot hours of the day.
- Always spray in the same direction as the air current (moving forward with the current or backward against the current). Do not spray on windy days. See to it, that no other persons are hit by the spray drift.
- After work has been finished, clean sprayer aiid n:.xi.ng containers thoroughly. Any leftover amount of the spray liquid should not be kept in some container, but powed into a hole dug in the ground in a place where it will not contaminate rivers, ponds or the ground water. Never throw empty containers or surplus pesticides into river.- beds or ponds. Change and wash the protective clothing. Wash hands and face with soap in running water; better take a bath.
- Empty carton packages have to be burned (keep away from the smoke). pesticides bottles broken and cans crushed, SO that they can never be used any more for other purposes. The broken remnants of the containers have to be ;;afcly disposed and buried in the garbage pit.
- Pesticides must be kept in their original package. All pesticides are stored under lock and key away From food
358
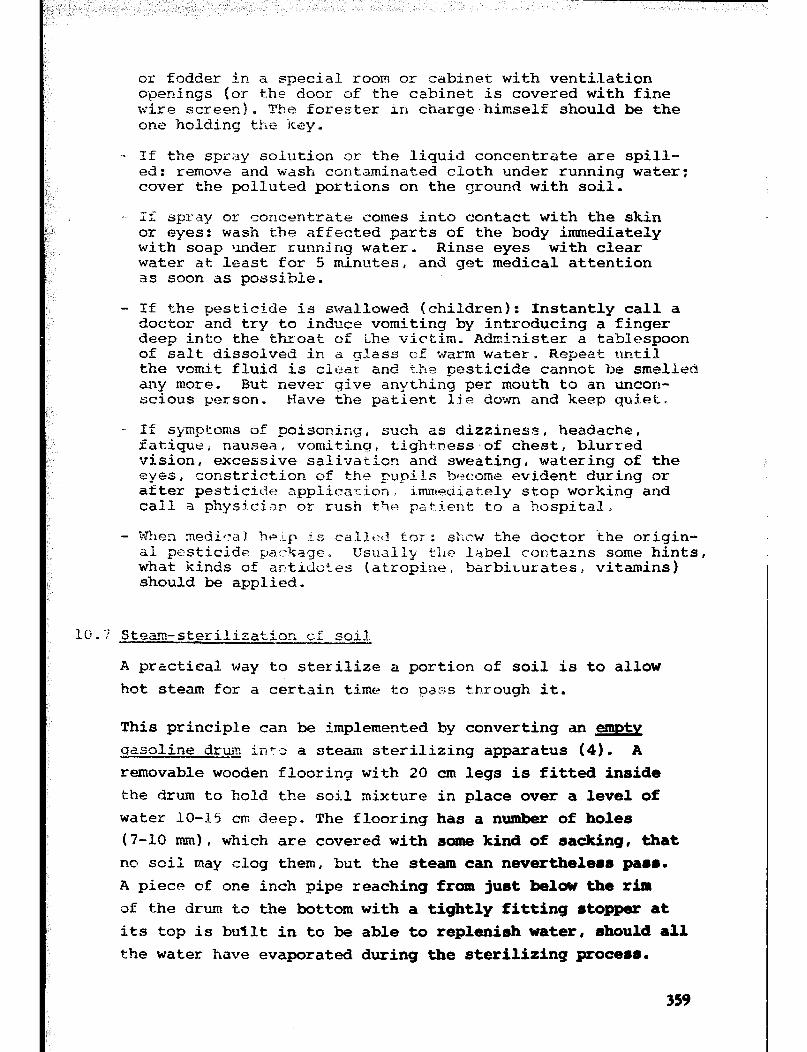
or fodder in a special room or cabinet with ventilation openings (or the door of the cabinet is covered with fine wire screen). The forester in charge himself should be the one holding the irey.
- If the spray solution or the liquid concentrate are spill- ed: remove and wash contaminated cloth under running water; cover the polluted portions on the ground with soil.
_ If stray or concentrate comes into contact with the skin or eyes: wash the affected parts of the body immediately with soap lmder running water, Rinse eyes with clear water at least for 5 minutes, and get medical attention as soon as possible.
- If the pesticide is swallowed (children): Instantly call a doctor and try to induce vomiting by introducing a finger deep into the throat of Lhe victim. Administer a tablespoon of salt dissolved in a glass of warm water. Repeat until the vomit fluid is clear and the pesticide cannot be smelled any more. But never give anything per mouth to an uncon- scious person. Have the patient lie down and keep quiet..
__ If symptoms of poisoning, such as dizziness, headache, fatiquel nausea, vomiting, tightness.of chest, blurred vision, excessive salivation and sweating, watering of the eyes, constriction of the pupils b-come evident during or after pesticide applicatiion, immediately stop working and call a physician or rush the p~t.j.ent to a hospital.
- Vhen medira! heip i E called to: : show the doctor the origin- al pesticide .pa::kagc. ususlly t11e label contains some hints, what kinds of antiltotrcss (atropine, barbiturates, vitamins) should be applied.
Steam-sterilization CT soil
A practical way to sterilize a portion of soil is to allow
hot steam for a certain time to paas through it.
This principle can be implemented by converting an empty sasoline drq in+.= a steam sterilizing apparatus (4). A removable wooden flooring with 20 cm legs is fitted inside the drum to hold the soil mixture in place over a level of water 10-15 cm deep, The flooring has a number of holes (T-10 mm), which are covered with some kind of sacking, that no soil may clog them, but the steam can nevertheless pass. A piece of one inch pipe reaching from just below the rim of the drum to the bottom with a tightly fitting rrtopper at its top is bu%lt in to be able to replenish water, rrhould all
the water have evaporated during the sterilizing procem.
359

. The drum is placed over a hearth improvised from bricks or
hollow-blocks, and filled with the topsoil /humus /sand mix-
ture. The fill should not be compacted, so that the steam
can easily penetrate. Finally, a wooden or metal cover is
placed on top of the drum. After a fire has been lit under
the drum the water starts boiling, and the hot steam gener-
ated will penetrate through the soil.
This steam penetration should go on for about one hour. Af-
ter that,all harmfull soil organisms will have been exter-
minated provided the steam maintained a temperature of about 80" C. Higher temperatures and a longer sterilization
tire can have unfavorable side effects, particularly with
soil mixtures containing partly decomposed organic matter.
Due to the guick breakdown of organic substances they can
lead to an adverse oversupply of nitrogen and micro-nutrients
(esp. manganese) and to the formation of toxic compounds
(HARTMANN and KESTEK, 1968).
Fig. 58: Cross section through steam-sterilizing apparatus
WOO-H- E Mm146 Wllw HOLSS
Another possibility is to heat the soil in open vats or on
galvanized iron sheets over a fire. But only a small quan-
tity of soil can be treated this way at a time. A less
effective method is to just pour hot water over the soil
to be treated.
360

10.8 Some common pests and diseases
10.8.1 Diseases
Occuring on nursery plants can be caused by fungi, bacteria
or viruses (1).
Fungi are small plants lacking chlorophyll and conductive
tissues. While most of them live on dead organic material,
some are parasitic by nature depending solely or partly
on the living tissues of a host plant. The body of the
fungus is called mycelium, the branches or filaments of the mycelium are called hy@--d~. Fungi reproduce by means of spores. The majority of diseases in the nursery are
caused by fungi.
- Bacteria are very small microscopic plants consisting of
single cells. They invade the vessels of the host plant, where they multiply and spread. Under moist, warm con- ditions this process can be very rapid.
- Viruses are submicroscopic entities with the propertiesjii
of chemical molecules, which cause disturbances in the normal functions of the cell (1). They multiply by in-
ducing host cells to form more'viruses. Virus diseases are very hard to control. Fortunately they constitute no problem in the nursery.
a) Diseases on roots and stems: Radicles and hypocotyls of germinating seed as well as the roots and stems of young
tree seedlings can be infected by a variety of different
soil borne fungi (e.g. Rhizoctonia, Pythium, Fusarium,
Botrytis). The symptoms caused by the fungi are quite simi-
lar in appearance and are known as root rot, stem rot, but
more generally as damping off. In the pre-emergence type of the disease the radicle is already attacked as soon as it develops, the seedling will thus be killed before it appears at all. Usually the seedling emerges, but shortly after, roots and stem become discolored, soft, watersoaked, black and brown with the stem base constricted (wire stem).
Since the mushy, girdled stem base cannot support the crown
any ilore, the seedling will fall over on the soil, wither and
die.
361

Particuiarlv ~g$s<~i’“t< +, I ” e 5 tc? daqing-off arc germinating seeds
and young seedlings of %r--c?e spxies like Benpet pine, agoho;
bottlebrush, Eucaiyptzs, kaaccan bangkal and seedlings of
similarly delirste nature.
With damping-off it is particulariy important to observe pre-
ventive measures, Eigh air humidity around the seedlings is
avoided by not sowing too densely. by thinning of dense sow-
ings , correct spacing of transplants, keeping the beds free
from weeds, using only half shade; watering in the morning,
so that the bed surface can dry up till evening. Good soil
drainage is essential too. The soil reaction should range
between pE 7 .a~d pli 6: Do not fertilize with lime or coll?l?i%r- ciai Per~?ilizers Ph;?,;r r3isa the pIi value, and with c0mp0st.
W~&i& is not completely rotten (decomposed)- Be careful with
nitro~3;en fez-t-ih.zat.ic-,ti to svaj d the deveiopment of succI!.~ent
tiasui?s, tlas:der: t?te seedlings by exposing them to full sun-
light as soon as possible. In full sunlight fungi cannot
thrive because of t-h~ prevalence of detrimental UY-rays.
Because of these reasons rather sow Bengaet pine ir, the open
than under sheiter.
Recommendable are aisr? prcphylactic measures Iike sc~il steri-
lization through heat (see 10.71, soil fumigation (see 10.5.2),
drenching the soil with suitable fungicides (see 10.5.3),
soaking of seed in a disinfectant solution or dressing seed
with a protective coating (see 10.5.4), watering seedboxes in
basins where fungicides like Orthocide 50 (Captan) or Brassi-
co1 (PCNB) have beer1 added. Steam sterilization should be the
rule where soils are to be used in the greenhouse.
It is relatively difficult to control the disease once it has occurred. The usual treatment consists of sprinkling the soil of seedbeds repeatedly with a fungicide solution or dusting it
with suitable wettable powders (10.5.5).
b) Diseases on leaves and shoots can be easily detected through
typical discolorations and malformations. Common infections are:
- POwdav mildew: (Peronoepora, Oidium): Leaves and shoots are covered with a white powdery mycelim. The infected leaves
becomebrown anddry.
362

- downy mildew (Pexonospora, Phytophtora j: staz-ts wXth pale, yellow, chlorotic spots on the JI~FEX auxface of the koaves, which later become greyish to dark brazer?. sJ.rgiy1 Qyr&Qus-;l '.T..A y ca, downy greyish-blackish mildew rq~ccliu~ devaJo~s on the corresponding area on the lower s~rfacre~
- Rust Uromyces, (Melampsora, Puccinia) : These need al--
ward.
- Leaf bli&t. _ leaf- rot (various funqi arid 'ti,acteria) : GencraL rapid browning of leaves and brancfres~
- Leaf spst, blotch, scab (Cercospora, Mternaria, CL~dosporiu~: Kthe leaves appear irregularly shaped dark brown or black spots son\etimes with a distinct yeL3.w ~ckp. The spots en- large to patches, until finally the leltivos ~itbex sncX drop.
I - Needle ,ge species (~~~hode~~~~~~ et al,): Smak~, black! elongated or rounded Eru:CS-ig bodies appear as spots on the needles. Later the needles turn red or brown and drop. Only the newly emerging needles of the shooi- will. 5e left on the Se@dliRg*
To lessen the dangqr of infection one should avoid shady, damp
conditions in nursery beds witk no air circulation,as well as the overfertilization of seedYAnga with nitrogen.
MQSt clE thf? m~~~~~~~e~~ diSC%Se~i CXI shoots and leaves (needles)
can be controlled by capper fungicides or by the new organic
fungicidzs k; <th t&z active ingredients Ferbam, Maneb, Zineb,
and by Captan and Difolatan, Sulfur formulations (Elosal, Thiavit) and Uincscap (Karathane) have been specifically devel-
czped against powdery mildew, pepper fungicides have been found
to give the relatively best results against leaf blight or wilt
caused by bacteria.
I L'
I
I 363
!:_

10.8,‘2 &matodes
Besides bacteria and fungi there are other organisms of microscopical size that can injure seedlings, but which belong to the animal kingdom, the nematodes or “eelworms”(
They are minute (ranging in size from 0.3 mm. to 2 mm.), slender, transparent worms, usually not visible without using a magnifying glass. Their mouth parts have - -
the form of a stylet (an italian dagger, where the slender blade springs out from the handle and automatically snaps into position), with which they pierce and puncture the cell walls of living or dead plant tissues.
Most nematodes‘are harmless and help to break down organic aratter. Some however are dangerous plant parasites attack- ing roots, 'stem8 or foliage. Apart from the mechanical injury there are secretions released from the mouth,which often cause malformation8 and swellings. Nematode in- fested seedling8 are likely to become additionally af- flitted with diseases. Parasitic nematodes are generally polypbagoulr, i.e., they feed on a variety of plant species.
In the forest nursery, eepecially the root-infesting spe- cie8 can become troublesome. Root 8ystems showing the following symptoms are usually infested with nematodes (1):
- Root knots or root qalls: Swells, thickened sections and malformation8 of the roots are caused Iq the root- knot nematode (Meloidogyne: the female is typically pear-shaped). In 1968 Glori and Poetrado found, that 93% of 8ix month8 01'6 kaatoan bangkal seedlings sampled at randan at the Montalban Reforestation Experimental Nursery were heavily infested with this parasite.
- Short. 8tubby root branches: without the usual hair rootlets are caused by the stubby-root nematodes Wrichodorus). Attacked root tips stop growing but 8well and enlarge in size. Frequently, affected roots produce numerous lateral roots (excessive root branch- ing), which in turn will again be attacked by the nematodes,
- Root lesions: Discolored and often collapsed portions r of roota are caused by the lesion nematode8 (Pratylenchus), which live and feed witbin the roots. Together with Thea. 8econdary fungi and bacteria will help in the canpaete breakdown of whole parts of the root system.
I
364
'r;: ~ ~~

The above-ground symptoms of root nematode infestations are The above-ground symptoms of root nematode infestations are not so typical. not so typical. The plants lack vigour and remain stunted, The plants lack vigour and remain stunted, leaves are reduced in size and show signs of nutrient de- leaves are reduced in size and show signs of nutrient de- ficiency (chlorosis, yellowing); excessive leaf drop, ficiency (chlorosis, yellowing); excessive leaf drop, wilting and dieback will occur during dry spells. wilting and dieback will occur during dry spells.
Nematodes are hardy pests, Nematodes are hardy pests, which are not so easy to control. which are not so easy to control. It is doubtful, whether a rotation of tree species can keep It is doubtful, whether a rotation of tree species can keep the population down, the population down, since nematodes usually do not have any since nematodes usually do not have any choice species. choice species. Flooding nursery beds for several weeks or Flooding nursery beds for several weeks or months before sowing or transplanting will kill the nematodes months before sowing or transplanting will kill the nematodes by depriving them of air. by depriving them of air. Soil to be used for seedboxes and Soil to be used for seedboxes and greenhouse benches is usually steam-sterilized (see 10.7). greenhouse benches is usually steam-sterilized (see 10.7). Nursery beds in the open can be fumigated (see 10.5.2). Most Nursery beds in the open can be fumigated (see 10.5.2). Most nematocides, except those on organophosphorus basis like nematocides, except those on organophosphorus basis like Nemacur P and Terracur P, are however toxic to plants, so that they can only be applied to uncultivated soil.
10.8.3 Mites
Belong to the spider-class (Arachnida), which like the in- sect-class (Hexapoda) is part of the phylum Arthropoda of the animal kingdom (29). They have four pairs of legs, no atennae, jaws or eyes, nor any body segment. Because of their small size, they are hard to detect. Some are so minute, that a magnifying glass is needed. The spider mites or red spiders are visible on the leaves as small, some- times translucent specks of yellowish, reddish or brownish color often rapidly moving under a fine web usually on the underside, where they are sheltered together with their eggs and larvae, Mites suck and extract the chlorophyll from the leaves.
5
Infested foliage becomes tippled with silvery pale green or yellowish spots. From short distance it has the appear- ance of lxing covered with dust. Frequently the edges of the leaves curl. Later the whole leaf kmxxnee silvery, reddish or bronze. Many of the injured leaves drop.
Mites became dangerous peste, especially in fruit bxhardr, after the widespread use of persistent chlorinated hydra-

L1 carbons like DDT, which used to kill all their natural
:t enemies. Mites can be controlled by systemic
ng -insecticides consisting of organo-phosphorus com-
punds like Malathion, Diazinon (Basudin), Demeton (Meta-
stox), Disyston, as well as by special acaricides.
them to fly* With some species, es-
pecially of the sucking types, the wings, body segments
ntirely missing or have been reduced to
very small Size. Most insects undergo a metamorphosis.
They start as egg, from which a larva or nymph hatches,
The lairva ends up as pupa, out of &xi& the adult insect or imago emerges, while the nymph gradually becomes big-
ger until it has reached the final adult stage (29).
According to their habits and the pecularities of the in-
flicted damage insect pests occuring in the forest nursery
can be arranged into the following groups (16):
a) Suckinci insects belong to the ordars Thysanoptera (Thrips),
Homoptera (jassids, psyllids, aphids, whiteflies, scale insects, mealy bugs) and Hemiptera (Ixqs) n They injure
nursery plants by piercing the cuticula and sucking the
sap, often frcm the underside of the leaves. The upper surface &xxxs~es spittled with silvery, yellow spots. After
an obvious deformation the whole leaf finally turns yellow
and drops. Most of the following species also spread . vlruse& r
rim are minute slender insects with their wings
fringed with long hairs,
- Leafhomers Cjassids): size more or less 6mm, wedge-
shaped, often brilliantly colored, very actively flying and jumping. The nymphs lack wings, are very small, pale and hard to detect.

: 26 .I)
‘,, :” ,,y :
3 ,. ‘,, ‘ ‘:
- Ps\lllids: size 3 m tennae * - -
m, brown j v:.~lbCw r;r black, two short an- _* in rront of the e~es~ resex"ri2.e leafhoppers,
- fSphids are small soft-bzxkie~~ inset;7t.;j 0-E greelz, ycllrJw I brown or black color with cl sair of sacret;ing tubes at thtls end crf the abdomen. ‘2% fz;, '21"Q&Cq- c. * al-koots ‘ flower buds OY OP; i:he
in eclonies along ycsuny underside of k?ke foliage *
Uqs: small permanently mobile insects dusted all over with white wax &xm. midribs and at :eae
They live in colonies along the and s,t.em joints.
- Stink buss, 'le.& buqs, lace buqs: sma.3.L to medium sized mj flattened insects of various colors, On their basal half the front wings are thick and stiffened, other half is abr-uptly
the
back, khinner and over3.apping when folded
. . .
Sucking insects can be be~:t controlled by applying systemic in- secticides i&Ietasystox, Disyston), Endosulfan (Thiodan, Endox), Giazinun (Basudin) ~ Malathion, Bayrusil and Sevin are similar- ly effective.
b) Free livinq chewinq insects feed on leaves and shoots of nur-
scry plants ^ They can eaeiSy be detected, yrasshDppers and locustti (Orthopteraj, beet
(Coleoptera) as well as the larva of butter (Le,pfdoptera ) snd sawflies ~~~Kl~~~~~~te.ra~ e
- BeetLes and weevils: are well sclerotize e-a-e"--‘-‘--- ent sizes and colors (The size ranges fr * !etle over medium-sized Japanese and 3e De
su
Wi
sn
tme big May beetles and weevils) with strong, hard fore- ngs and membraneous hindwings. .outLike mout'nparts.
Weevils hwe prolonged Unlike moths and butterflies the
adults eat plant substances. Their larvae, which often Ied OR roe,Ls or Piwe in plant tissues (stems, leaves), are own as orubs_
This group compz
.les and weevils
,flies, moths
!d insects of difli om the kiny flea ,af beetles up to
:iaes
‘er-
fe
km 2 -,--.--
- Butterflies, mokhs, sawflies; do not harm plants. larva, .that causes the d=e,
It is the
as caterpillars (especia-- The larvae are commonly known . .
^_. . * atter- Ilies), defoliators,
lly the hairy larvae of tne D skeletonizers, leafworms, cutworm8
367
-_
1, ‘_ , J , i ,’
\’ .* I ,

I.*, I-
(the naked varieties: the greyish, brownish kinds hide in the soil during the day and attack voraciously at night),
because their cen-
Nowadays, all these pests can be easily controlled with the various effective insecticides available in the local markets
loopers (characteristic way of moving, ter legs are missing), armyworms (march in columns from plant to plant) or hornworms (large larvae with a slender horn projecting from the rear end).
(see appendix), notably
- against grasshoppers and locusts: Lindane, Chlordane, Hep- tachlor, Al&in:
'- against beetles and weevils: Lindane, Aldrin, Dieldrin, Endosulfan (Thiodan, Endox), Diazinon (Basudin), Malathion, Dipterex, DDVP, Zectran (Baygon), Sevin (Vetox 85):
I; - against caterpillars: same as beetles; additionally Thuricide,
Dipel.
I I,
?
,:/
c) Leafrollers, leaftiers, webworms: Some small leafworms and cat- erpillars do not move freely in the open, but wrap leaves around themselves (leafrollers) or tie leaves and shoots to- gether for shelter (leaftiers), which at the same time also provides food. For the same reason webworms build a dense protective nestlike web around the infested foliage with each web containing a number of worms.
Due to the protective coverings these pests cannot be directly hit by insecticide sprays. Useful are therefore insecticides that either produce toxic vapors passing through the tyings and webs like HCH (Lindane) and DDVP (Dedevap, Maladrin) or those having a long lasting residual effect, such as Aldrin, Dieldrin, Malathion, Leybacid 50, Baygon, Sevin (Vetox 85), . apart from the systemic formulations on the basis of Demeton (Metasystox), Di-Syston and Methomyl.
d) Leaf miners, borers, qall insects are even better protected from poisonous sprays, because they live and feed inside the plant. They are best controlled by systemic insecticides or those with a certain systemic action like Malathion and Basudin. Their economical significance in the Philippines is not great, though.
368

I( ;,‘.y,,- : /6”:: ,:., j ‘̂ I A,: ‘““J‘) _ ,,- ‘4 ...‘~~ ‘“. .;y‘;- d:, 3: g ,.J( j * .:, ‘: j ,. ”
;) .~ -/. ,il I._ ,. ,;
e) Soil inhabitins insects: There are insects that spend a por- tion of their life cycles in the soil, where they may cause damage to the roots of seedlings.
- cutworms are hairless greyish or brownish larvae of cer- tain moths, which hide in the ground during the day and feed on roots, dae).
leaves and shoots during the night (Noctui- Cutworms got their name, because they often cut off
young seedlings at the base and eat them up. The short erect leftover stem of the seedling can be detected only by close examination. mediately.
When touched the worms curl up im-
- Grubs: This term is applied to the larvae of the May bee- tles and June bugs (Scarabaeidae). They have a white body with a brown head and 6 prominent legs, and can
' reach a length of 4 cm. The hind part is smooth and shiny with dark body contents showing through the skin. The larvae of certain weevils (Curculionidae) are also white with a brown head, but smaller and without legs. All grubs feed on roots.
- Rootworms: whitish, slender, long,
cylindrical worms, 3-9 mm with tiny legs and brownish heads. As larva of the
leaf beetles (Chrysomelidae) they feed on roots and tunnel through roots and stems.
- Wireworms are the destructive larvae of the click-beetles (Elateridae), which have the ability to snap into the air when placed on their back. The worms are hard, dark brown, smooth and wire-like, and vary in length from 12-40 mm.
Soil inhabiting insects are more difficult to detect and to control than the free living species. Soil to be used in the greenhouse should generally be sterilized to eradicate any existing soil insects. Since this is not possible in open nursery beds, seedlings have to be carefully observed instead. If attack is suspected, some seedlings should be uprooted to check their roots and the surrounding soil.
Suitable insecticides against soil inhabiting insects are those, that groduce poisonous fumes, such as Lindane, Chlor- dane, Heptachlor, Aldrin, Dieldrin. They are applied either as a soil drench or in form of pellets or dust. To avoid all those above-mentioned organo-chlorine compounds, Bayer deve- loped a most promising soil insecticide in granule form: Terracur P, which is an organo-phosphorus compound. Cutworms, which also feed above-ground, can additionally be controlled by spraying Malathion, Endosulfan, Diazinon, Leybacid or Sevin-
369

f) Ants, termites, cockroaches, powder post beetles: These insects
are rarely attacking any tree seedlings, but can become a nui-
sance and cause considerable damage in nursery buildings, in
which timber and bamboo have been used, as well as in storage
rooms, greenhouses and storage sheds.
- Ants: (Ord. Hymenoptera, Fam. Formicidae) live in COlOnieS
with distinct social castes. Generally noticed are the wingless workers, which are all sterile females. They for- age for food and take care of the queens. The queens (the egg-laying females) together with the eggs, the helpless maggot-like young and the pupae remain in the underground nest. At certain times winged males and females are pro- duced, which will swarm and form a new colony. After mating the males die.
Apart from being a nuisance because of their painful bites,
many ant species attack tender, newly germinated seedlings or
attend to aphids, mealy bugs or scale insects to obtain sweet
honeydew, of which they are fond of. They thus promote the
build-up and spreading of populations of these sucking insects.
' Ants can be controlled by dusting or spraying the paths and
infested areas with Aldrin, Dieldrin, Chlordane, Heptachlor
or Baygon. A better method is to locate the nest by following the line of foraging workers back to the place, from where
they are coming, and intoxicate it with a strong insecticidal
liquid. Once the queen is dead, all other forms will also perish. If the nest cannot be located, one can also place
poison baits (Baygon baits or baits made of bran and Dipterex) '
in the pathway. Slow acting insecticides are preferred, so
that the ants will carry the baits to their nest and feed the
queen and the young with them.
- Termites: (Ord. Isoptera) are small to medium-sized yellow- ish or whitish insects, ants" or "anay".
in the Philippines known as "white Termites differ from true ants in not
having a slender waist. Their pattern of social organiza- tion, however, is similar, as there is a queen, which lays the eggs, a male (king) and numerous workers and soldiers. Contrary to the ants there are only three development stages: eggs, nymphs and adults.
Among the different termites the soil-inhabiting (subterranean)
species can become particularly troublesome. Their nest is al- ways found in the ground, no external mounds are erected. Places
aboveground, where the workers carry out their destructive
370

activities are connected through burrows and runways w + j] ;:
nest. Termites gnaw wooden materials from the inside 1~. ing
long tunnels and galleries. Because of their hidden way of
living the destruction can remain undetected for quite a time.
Termite control aims at breaking the contact between the ter-
mite colony in th e soil and the timber structure and woodwork
of the building. Houseposts should be placed on concrete
foundations, which should surpass the ground level by about
30 to 40 cm. A thin sheet of metal (galvanized iron) between
foundation and timber provides some additional protection by
definetely preventing any secret connections.
In case of termite attack, but also as prophylactic measure,
the soil around the foundations is made impassable by drench-
ing it with Chlordane, Aldrin, Dieldrin and Heptachlor with
concentrations recommended by the manufacturer. Infested
wood is painted with oily emulsions containing the mentioned
termiticides, or, these liquids as well as dust formulations
are injected into holes drilled into the inhabited area. Ter-
mite control will become difficult and more expensive, once the pests have established themselves in the building.
- Powder post beetles (Fam. Ptinidae, Lyctidae, Anobiidae: in the Philippines called "bokbok") are small, brownish, elong- ate, hard-shelled beetles, which lay their eggs in the pores of wood. The larvae, small white grubs with a big head, mine the wood and pack their tunnels with fine flour- like powder. After pupation the adult beetles eat their way to the surface making "shot-holes".
Powder post beetles are dangerous destroyers of woody materials
and structures, such as stored boards and lumber, seedboxes, boho pots, shading mats. They reveal themselves through the
shotholes and the woodpowder ejected from there, usually after considerable damage has been caused already.
Infested wood can be treated (brushed) with an emulsion of Chlordane and deodorized kerosene. Shading mats will be pro-
tected from infestation, if they are sprayed with Chlordane, Heptachlor, Diazinon, Leybacid or Baygon prior to the long
times of storage during the rainy season.
- Cockroaches: (Ord. Orthoptera, Fam. Blattidae) These brown-
ish-black or tan, shiny, flat-bodied, beetle-like insects,
371
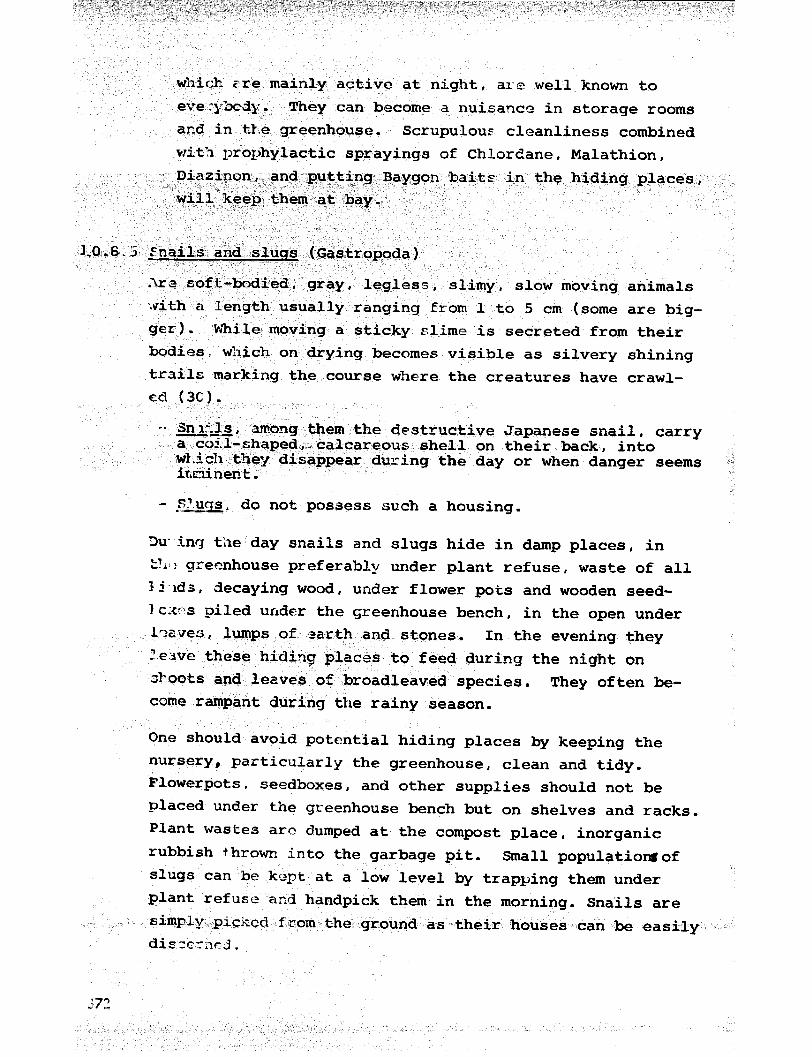
which cre mainly active at night, are well known to
eve: : ybc dy . They can become a nuisance in storage rooms
ar_d in the greenhouse. Scrupulous cleanliness combined
with prophylactic sprayings of Chlordane, Malathion, with prophylactic sprayings of Chlordane, Malathion,
which cre mainly active at night, are well known to
eve: : ybc dy . They can become a nuisance in storage rooms
ar_d in the greenhouse. Scrupulous cleanliness combined
'In 0 P e--:*- --3 J,U.O. 3 enacts ana 2 Qucrs (Gastropoda)
:Ara sof 't-bodied, gray, legless, slimy, slow moving animals
with a length usually ranging from 1 to 5 cm (some are big-
ger) - While moving a sticky slime is secreted from their bodies, which on drying becomes visible as silvery shining
trails marking the course where the creatures have crawl-
ed (3G).
Diazinon, and put .ting Baygon bait E in the hiding places,
will keep them at bay.
-- Sn,ij.+s , among them the destructive Japanese snail, a coil-shaped, calcareous shell on their back, into
carry
wl.ich the-y disappear during the day or when danger seems irxx-inent.
- S?.uqs, do not possess such a housing.
Du-inq t:le day snails and slugs hide in damp places, in k?ik ! greenhouse preferably under plant refuse, waste of all Ii.~ds, decaying wood, under flower pots and wooden seed- ?C;WS giled urlder the greenhouse bench, in the open under
lwves , lumps of earth and stones. In the evening they Leave these hiding places to feed during the night on
&oots and leaves of broadleaved species. They often be- come rampant during the rainy season.
One should avoid potential hiding places by keeping the
nursery, particularly the greenhouse, clean and tidy.
Flowerpots, seedboxes, and other supplies should not be placed under the greenhouse bench but on shelves and racks.
Plant wastes arc dumped at the compost place, inorganic
rubbish thrown into the garbage pit. Small populationsof slugs can be kept at a low level by trapping them under
plant refuse and handpick them in the morning. Snails are
simpiy picked from the ground as their houses can be easily
disccrnc3.

-The-applicstior. of {metaldehyda) baits is the adequate --countermeasure ,xgainst heavy infestations. Snail pellets
can be broadcaskect over tlid entire area at the rato of about 20-33 w:lets per square meter, or, if snails or
7; slugs invade: tie nursery bzd rsgularly at night from the ; ,;., $. ". outside, thr:y can be distributed in strips along the bor- 5 ,- n' : tier lines to s,:rve 53 pr-tzctfon zone. 7: pz :, $. d :. t p lOi8.6 Rodel:ts‘- ruts ind mice c, -- :~ T The prix.;e k;cirgt of rats and mice in the forest nlxsery 1. $y is s?orEd XL newly sown tree -seed, particularly lage I -, and t.~edi;p -c: ,.,zr.l seed and seed ri?h in 3fa:cL or qily
,_ subsxncss (2.1. kasoi). But as ormrivorx animals ro- dents also rzl-ah tender seedlings.
" I: i
I ,, :
Rat:; aI4 mic-? c'ig unc?~rground tunnel systems, which are often found Fn tlykes iknd in the elevated separations betweer f 1ooUects. I:I the evening they leave the bur- rows or other hiding places, and start moving around for food. Apart from the holes and the caused damage, their presence i'3 further revealed through droppings, foot prints and runways.
Although a nurser :' cat might be a beneficial helper in keeping the nursery free from rodents, the best prevention is a clean nursery with clean surroundings tnd no idle fallow compartments full with grass. Wire screen covers placed over the seedbeds provide a certain protection. The same is said about seed-dressings using a coating of Lindane, Aldrin or Dieldrin. Snap traps (two sizes available) baited with coconut meat or other palatable tidbits from kitchen wastes will be useful, if the trouble is caused by only a few of the pests.
_’
I’ b ”
But in general, the application of slow acting coumarine or warfarin poison baits is the most promising method of rodent control, especially in cases of severe attack. The baits need to be sheltered since they are similarly toxic to humans as well as to domestic animals, but also to protect them from rain. The shelters can be made of
373

$b .,.; >,
y$*,f ,. : . : ., +.:,,‘:,)! ,A’ .I _I .~/ .; _,I ,. ,” , -~ _ > _’ II ,,, ‘.
~_ -7
k
1.. I-, wood, I I vanized iron.
bamboo, cogon or talahib grass, banana sheath, gal-
sheet or diagonally cut small kerosene cans.
These baiting stations have also a certain luring effect.
i. I 10.8.7 Birds 4, t/r k,- __,, / I F-' Tree seed sown in open beds is frequently eaten by birds. P !' It is important to cover the sowings carefully, so that :" "9 g I birds will not be attracted by exposed kernels and start i 1‘ searching for the still hi dden seed. Seedbeds can be
I. temporarily protected by planting narrow strips of tin- I, I foil fastened I- j 1. foil will be
to blil
: to a stick all over the bed area. The tin- moved by the slightest current causing it
nk in the sun and to produce a rattling sound that scares the birds away.
.o ward off birds consists of coating the seed
line seed) with a bird repellent like read lead (minium), Morkit or Anthaquinone (see 10.5.1).
Another way t
(especially p
Covering the seedbeds with old fishing nets or fine wire netting nailed to a wooden frame is perhaps the safest way of protecting sowings in the open from birds (33,43)=
,

ADDRESSES OF IMPORTANT PRODUCER AND SUPPLIER FIRMS FOR AGRICULTURAL CHEMICALS IN THE PHILIPPINES APPENDIX I
'- I
I,
Hoechst Philippines, Inc.: Corner Pioneer & Reliance Str., Man- daluyong, Rizal
Marsmann and Co., Inc. : Buendia Ave., Makati, Rizal (Distri- butor of Sandoz products)
Ed. A. Keller &I Co., Ltd.: 2723 Pasong Tamo Ext., Makati, Rizal (Distributor of CIBA products)
Warner, Barnes & Co,,Ltd.: Makati (Distributor of ICI products)
Macondray and Co., Inc. : Filipinas Life Building, Makati
P. E. Zuellig, Inc. : Buendia Ave., Makati
Shell Chemicals Inc. : 1330 Roxas Boulevard, Manila
Dow Chemical Pacific,Ltd.: Sikatuna Bldg., Ayala Ave., Makati
Rohm and Haas (AmPi Chemical Corp.) : Sikatuna Bldg., Ayala Ave., Makati
Union Carbide Phil., Inc.: Ayala Ave., Makati
Planters Products : Makati
Engro = Esso Standard Fertilizer & Agricultural: Chemical Co., Inc. (Phil.) 215 Buendia Ave., Makati, Rizal
Pharmaceutical Industries: Zuellig Bldg. Buendia Ave., Makati (Distributor of Geigy products; suppliers of Hudson and Birchmeier spraying and dusting equipment)

Active Ingredient Trade Name, Fo~.--~----- elation hnufacturer SUPP slier Remarks I
1. E%m&cides I copper~~chlorid~ e Vitigran Blue 58%, W.P. Hoechst
Shell Cop1 )E?L: Fungicide, Against diseases on leaves and shoots,
Shell W.P.
particularly those caused by bacteria: 1 I Cupravit, W.P. Bayer
copper + Zineb Copper Lonacol, W.P. Bayer - ditto - :I ‘I
sulfur Blosal 80X, elemen kal Hoechst I
AimrueaiI3la s*r19 powdery mildew, mites:
-.m”-* Y*“*r ‘UT au**
Thiovit 80%, elemental Marsmann dispersible sulfur
’
L_, I
r,;\:, -x ,<‘ .._- , . “/ ^_' LIST OF SCME.CCMMON.:PESTICIDES AVAILABLE IN THE PHILIPPINES : ., , : ‘ I ._ ., APPENDIX 11
"' 1 ,( " __ I -,bi' '.. I, , -% :3
Ferbam (iron)
Zineb (zinc]
Carbamate; W-P.
Shell Zineb 65, W.P. Zinebio, W.P. Zineb 70, W.P. Antracol, W.P. Parcate C, 'W.P.
Niagara Ferbam, Zineb and Maneb (dithiocarbama- tes, organic fungicides) are excellent
Shell new compounds against diseases on Union Sales shoots and leaves: Ferbam also used as Warner Barnes seed dressing: Bayer Dupont
Maneb (manganese) Dithane M-22, W.P 1 . Rohmand Haas Plantineb 80, W.P. Hoechst I Manebio, Q 1-P. Union Sales
I .a m Maneb 80%, w-r. -- --
Polyram M, W.P. Bayer BASF
Maneb + Zineb
Thiram, !PMTD
-~-
Oil thane M-45, W.P. -- Manzate 200, W-P,
Arasan, W.P.
Rohm and Haas Dupont
Macondray good for seed dressings: as soil drench against damping off: against rust:
W-P ~---

A$tkvel Xr@$edient: J!rade' Name, ,Formulation .uIIY*YIhYA TL i ,." Supplier I, ~;~";,: I,. I- / ,,'__l_" , I ti- _ -W.---d- u---v--
> ,; ,. I J :. :,. " ..( _::y *. _,.. _(.<,.. :~, . . I-* / a~&~e&z. -1,. &&nu~+& ~2 . ,-' z- I-,'. *;: .,,-;:', >" /
Remarks ------
i _ o~&j&&cury .': Cexeimn L/M, W.P.
commtids - - Macondray
Tillex, W.P. seed dressing and soil disinfectant:
Zuellig against damping off: phytotoxic, not ~ : Agallol, W.P. Bayer to be used as leaf snrav: verv uoiso-
SGmesari, 0iJ.P.
.' Chlprq& Spergon, W.P. '. d%?NH (Pentachloro- Br ~asdicol, W.P. - \ , I " ',-.;;&q~~~ - ,. " net) Tekrachlor, W.P. '^A_
‘I Dinoc& L i Karakhane 25%, W.P.
_-
Dexon Dexon, ,W.P. . .
I&or&ray
US-Rubber
Hoechst Shell
E8gO
Bayer
nous: to be handled &t&‘care? *
seed dressing:
as soil drench against damping off and root rot; long lasting;
specially against powdery mildew and mites: poisonous;
seed and soil fungicide: against dam- ping off and root rot; very poisonous if
Ca@v3n Orthocide 50, W. ,P.
Difolatan Difolatau x-4, W.P.
Chevron
Macondray
excellent funaicides aaainst dampinU off and foliage diseases; seed p;o--
I I
tectants: misonous, uarticularlv to I fish:
I Formaldehyde Fa mmlin, concentrated dqagstores seed and soil disinfectant.
solution
2. lbmatocides and Soil Fu&aants
QIlOrOpicrin Picfume, E.C. DOW Teargas: extremely poisonous to hu- mans; to be applied only by trained personnel: as nematocide not as good as D-D: weed seeds, soil insects, soil fungi:
e mthylbrmide + y cuoropii!rin
Dowfume MC 2, gas IPathofum, Trizone)
DOW extremely poisonous: complicated ap- plirytion technique: effective against nematodes, soil insects, weed seed, soil fungi:

Remarks
_ -
Dow nematodes, soil insects: very poiso- --.-- -
D-D, B.C. Shell -; ). . . badly smelling, very effective nemato- ne ‘ Telone,‘E.C. Macondray cidet soil insects; relatively cheap: . .. .:: ,, ) . . 3-4 weeks waiting time after treat-
5.. ment: very poisonous: very irritating ,:;,r- ::I i .- .,._ +c-. " : < /hL;,e < . -i.
to the eyes and mucous membranes: *qj .;.: 1 I_"' it' --.'I'> c: m . ..Vd~'. 'E.C. (' ., Lsso, Macondray nematodes, some.soil fungi, germinat- + :. .' .* ing weed seeds, soil insects; poiso- , :‘ noust
D!JH~ Myione, W.P. or Union Carbide nematodes, granules
soil fungi, weed seed, soil insects; convenient application; pois.
'. baeomet Basamid, granules BASF nematodes, soil insects, weed seed,
soil fungi: convenient and relatively safe application;
DBCP (DibMmo&hloro- Ntwnagon, granules Shell ,. propane) Pumazone, granules
nematodes, damping off: very poisonous Macondray
_i I All the above-mentioned materials are phytotoxic: I they are suitable only for preplanting treatments.
: ;f<, Organophd&iorue
compound8 Zinophos, granules Zuellig
.( .: Nemaphos, granules Nematodes, soil insects: extremely
Nema&r P, granules Zuellig poisonous: Bayer nematodes,
Terracur P, granules soil insects: poisonous:
Bayer recommendable. --- ----.----.- a,- ---se-
9. Acaricides -cI-
Binapacryl
Dicofol ,/_ / <d _--
Morocide, W.P.
Keltham) E.C. Kelthane, Dust -_ '_ -. ,_
I--Y W.-w-.---
Hoechst Also against powdery mildew:
Rohm and Haas specifically against mites:
--- -.--- ----

,~~ , I I .I- - w--w-- em___1 -*s-p- >_’ ,.
-- .--
. M,w..,c,-‘L...a-s..
Active Ingredient Trade Name, Formulation '=allULQULUL eL Supplier Remarks
c s----.----.- -- I --we- L.--w- -----L-I-.--.-- ---------w- .----,-m----
a- Acaricides - continue" m- Sulfur Elosal
persuue surur Thiovit, elemental dis- Marsmann
persible sulfur
, elemental dis- Hoechst 1-1 _ --_-aE--- also against powdery mildew: I
Dinocap Karath ane 25%, W.P. -
Esso same as above; poisonous. -----.-.---a---- ---..-._---.-.---.--.---
4, Insecticides ---TV -w -.-.----------- w-w -
1) Oraan_ochlorine conmounds: these are insecticides of related composition, action: DDT a-&xkinioul
but quite different in their
Chlordane, Heptachlor, with great care. AU
Aldrin, Dieldrin are go d not be used any more, because of their hazardous-side effects: Lindane,
od against soil inhabiting insects, but must be handled rang this group only Endosulfan can be recomended as general purpose insecticide.
I DD!l! DDT 25%, E.C.
Resitox 25%. E.C. Esso Shell
Very persistent insecticide: relative- ly untoxic to mammals, but accumulation I
DDD (TDB)
HCH, Lindane I- - -. (Gamma BHC)
Rhotha ne WP 50, W.P.
Lindane 20%, B.C. Agroctde' 65, W.P.
in the fat tissues: worldwide danger; very poisonous to fish: because of its persistence not to be used any more: I
slightly less effective and toxic than DDP: because of its persistence also not to be used any more:
Rohm and Haas
Esso Warner Barnes
fumigant, quick action, short residual effect; soil inhabiting insects, beet- les, stem borers, leafhoppers, leaf miners, leafrollers, grasshoppers, mites: rapidly absorbed through the skin: very irritating to the eyes and mucous membranes:
Chlordane Chlordane 75%, E.c. Esso, Marsmann, Chlordane, Heptachlor, Aldrin and Diel- Planters drin are nerve poisons with good re-
sidual effect: they are especially ef-
- fect: they are especially effective

*x..x.,\^ ,.I ,~, .,, ,;., \ / _LN* ,* ( ,lijl ^_ \ ,) ,. ,- I :
-. _-.
.::.;‘c.-‘, _. i I . . ( _ :-
-.I ,,;, -\ Manufacturer .' A+++) Ini+c&it ?rade,,Rame, Formulation Supplier Remarks w:. .- a---- -- 8 _ Insecticides -, AA-C: mwarl -
, -Heptachlor I u.ya.r**ru=u -
Reptachlor 2B. B.C. iientachlor 25%, W.P.
tin 40%, D.C., W.P. Aldrejr 2, E.C.
Planters ESSC /-PO
Shell Shell
against ants, termites, roaches, soil Jnsects, lcafminers and grasshoppers; with the exception of Chlordane these chemicals are very poisonous:
Dieldrin Dieldrex 15, E.C. Shell
Endrin
Endosulfan _
.,
Bndrin 19.5, E.C. Esso long residual action: extremely poiso- Bndrin 19.5%, E.C. Planters nous, also against fish: therefore not Endrin 2%, granules ES80 recommendable:
Thiodan, E;C. Hoechst general purpose insecticide: especial- Thiodan, W-P., granules Hoechst ly effective against sucking insects; Endox 35%, B.C. Planters moderately poisonous to mammals, safe
to honey bees: very poisonous to fish; recommendable,
b)'Crqano&~s&orus~unds: among these chemicals are some preparations that are extremely poisonous to humans. TheFhave howxr the decided advantage of being detoxified very ragidly in animal tissues. This makes them preferable to the organochlorine compounds. Within this group Diazinon (Basudin), Malathion and Bayzusil are recommendable as general purpose insecticides.
Pa.rathiQn FolidoP E605, E.C. Bayer Relatively short residual action, but extremely poisonous to humans; the use of goggles, gloves, face mask and pro- tective clothing is mandatory: broad spectrum insecticide against all kinds of sucking and chewing insects: not recommendable because of its high to- xicity:
Guthion, Azinphos- Gusathion AbO%, E.C. Bayer long lasting residual and penetrative methyl action; extremely poisonous: because
of this not recommendable:
EPN BPiJ 300, E.C. Macondray long lasting effect: very poisonous; general purpose insecticide: but not recormnendable because of its high to-
I ” . . : . - . .
xicity:

,r7 ,,._,. )_ ,.I:I ~,,~T;*-~,;,.:: (? ~, , ., >I- _ -, ,_ :_,“, /‘S ^-pT- .:: ~,,. ._,., .,.>I 1 - - -/- ---.-
.S+ve Ffqqd&en,t .I----
Trade,IQme 1 Formulation C3rrC..a--rr =nuLau;-=r I
,,. .- Supplier Remarks , ---.~---~- I ---y----y' +I+.---- -.-I.-- -- - - _c_-- .--.a- -- m.- w----B.- ._ Insect&ides ,-'continued -
Methyl 'Parathion Folidol 556, ‘E.C. '. -Efetacide 400., E.C.
Bayer short residual action; very poisonous:
‘Mepaton 50, E.C. Bayer broad spectrum insecticide: however,
Methyl Fosferno, E.C. Pharm. Ind. Warner Baznes
preference should be given to less
+Endrin Meptox 50, E.C. she1 I
poisonous preparations;
+HCH + Mevinphos
-2 -,2--- - -a -- I
Telothion, B.C. Mepha%@, B.C. Resitox '210, E.C.
V-B ml 1. I ShL,
Shell Shell
U1QZAIlOil Basudin 20, E,C. Pharm. Ind. .- - --8 effective for more or less 10 days de- w. I t Geigy I penalng on the weather conditions: .- -- - consi aerably less poisonous than me- ----L% 2 -- - --neral purpose in- thy1 pazarruon; ge.
secticide, recomendable:
Esso, Cyanamid recommendable general purpose insect- -- - mm---- m .- - _ I ,- Malathion
Dipterex
Malathion 57%, E.C.
Dipterex 2.5%, Du mt
warner Barnes iczaet gooa reslduai action: relative ly untoxic: one of the safest of all insecticides: but toxic to bees and fish;
Dedeva!
?tithion
Maladran L, 1z.c.
Bayer
Bayer
for dusting the foliage against chew- ing insects, where the availability of water to prepare the spray solution is a problem:
highly uslatile, shortlived, fast act- . . ._ -- I Shell ing insecticide; especially in aero-
sols and baits; for the quick knock- down of free living insects (flies) and of thoee having infested stored products (seed storage):
Lebaycid 50, B.C. Bayer long residual action: controls a wide range of chewing and sucking insects: reconraended:
c .-. ,
myzla8il 2% E.C.
)'
Bayer short residual action: effective against resistant insect varieties; recommendable new insecticide.
----

. : :$&~>y&&&*,~~; )' '. , T+de Name, Formulation Manufal cturer
Slpp--. lier Remarks :. . . __ 'I )i _,l *_ ‘.'.,,C I, ",.,‘$*v 7;; I. : ";;"' ,--\ 2 I '; .I .' ^. I I .,
absorbed and tranelocated to various plant parts when applied to seeds, ro@zb,-'8tMs or leaves: therefore not suitable for vegetable productiol t&r$cqted, no weatheking of the spray cover, beneficial predatory inset high t&city to humans systemic insecticides should be handled with ul nursery, particularly against sucking insects and mites.
Demeton Metasystox, E.C. Bayer
I; all plant organs are in- zts are spared: because of their tmost care: useful in the forest
Very poisonous:
I
.wr.?v*:--v-- ---~----- -.-. =-------- Disveton 5%. granules
m&h-l L-ate-90, W.P.
Monocrotophoa Azodrin 168, B.C.
Phosdrin Phosdrin 1.5. E.C.
Baver -* absorbed hv the roots: residual action for 6-8 WA-. ---~ it verv effective against leafhoppers, aphidc -3, mites, wireworms: application wHho ---- --- --- - tut water: because of it's granule structure relatively safe:
Dupont , Macondray
absorbed by the roots; aphids, thrips, leafhoppers, leafminers; very poison-
Shell
Shell
ous :
very poisonous:
short residual action: auick knock- down of the pests; extremely poison- ous: because of this not to be used in the forest nursery:
related to Parathion
Terracur P 5%, granule+3
Bayer against stemborers, sucking insects and soil insects: very poisonous, bu because of its granule structure re- latively safe to handle:
9) 'Carbamates: new useful organic insecticides with broad spectrum action; rapidly detoxified and eli- minated from animal tissues.
Zectran Baygoi ‘20%, E.C. Baygon l%, Bust Baygon, W.P.
Bayer Bayer Bayer
Recommendable general purpose insect icide with longlasting effect;
^ .,.,:.
,t
I-
-

- ‘. “)\
~c+e &jcedient Trade Name, Formulation Manufacturer Supplier Remarks
Insecticides - continued.- !arbaryl Vetox 85, W-P.
Sevin 85, W.P.
8IPc Etrofolan 50, W.P. Mipcin 50, W.P.
Shell Esso
Bayer Planters
recommendable general purpose insect- icide with low mmnal toxicity:
same as above.
B&&&.eal Prenaratione: Very safe in their application: specifically developed for the household and re#tim/e gardt$n.*ere safety is given top priority: might be less effective in the forest nursery.
Bacillus :hIIriIIgienSiS
Thuricide Oipel
Shell Slow action: short residual effect; Abbott Labora- against larvae and caterpillars: tories,. Manda- qplication immediately after the luyong first pests have been observed: safe
to humans and domestic animals;
?yreth&n + Vapona
Shelltox Pyredrin
Shell Shell
short residual effect: rapid knockdown: against chewing and sucking insects: nontoxic.
i. )lo~h8cicideS
+ calcium arsenate
Snail killer 8.2%, pellets
-1 4%, pellets
htaldehyde Xetadex SO%, D.C. Warner Barnes For preparing baits against slugs and snails:
ES80 to be applied at the early stage of attack: also effective against cut- WOX-IIkS:
Bayer same a8 above.
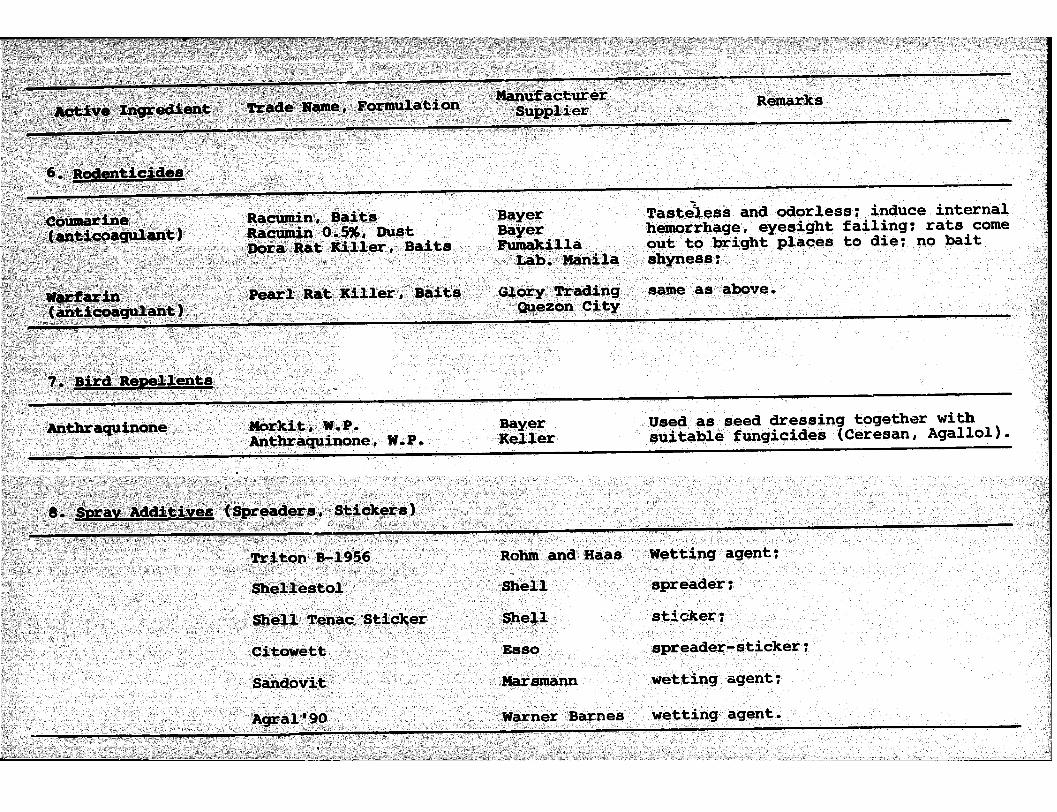
bam+mirr Rai 4-a naunr Tast&ess and odorless: induce internal I norrhaue. eve8iaht faillna: rats c
.~ YYX - --- Bayer hex-----_-,-. -------a. - - -- dome Fumakilla out to brighi*places to die; no bait
Lab. Manila shyness:
Pearl Rat Killer, Bait8 Gl0Y-y Trading same as above. Que: zon City
!
7. Bird ReRe!llents T_
Used as seed dressing together with suitable fungicides (Ceresan, Agallol). I
Agral.90
Esso spreader-sticker:
Marsmann wetting agent; .
Warner Barnes wetting agent.
: -~ I -- ,^ . I "A

I‘ SOWi USEFUL CONVERSION -- ---~ - ~~~ FACTORS AND EQUIVALENTS POR PESTICIDE I APPLICATI0N APPBNDIX III
I I L
D i- ̂ , 1. Weiuht: 1 g = 0.035 02 " 1 oz (ounca) = 28.35 g ':: b, 1 kg '= 35.27 OS 1 lb ! ,_. = 2.2 lb
= 453.6 g = 16 oz
: i I: g : p t. '2. Len&h: 1 cm = 0.3937 in 1 in = 2.54 cm 1. _ lm = 39.37 in 1 ft = 12 in I 3 : 3.281 ft = 1, 30.48 cm i = : i 1.0936 yd 1 yd = 3 ft I = 91.44 cm
3. Area: 1 cm2 = 1 = 6.45 cm2 :_ : 1 -2
0.155 sq.in sq.in
k in, 1.1’ 1 acre I 1, II _ -_ -
-A 111 = 10.76 8q.ft 1 1 ha
sq.ft = 2.47 acres
= 144 8q2in = 929 cm
= 0.4047 ha
4. Volume: 1 1 = 33.8 fl.oz 1 fl.02 = 29.57 cc = 1.0567 qt = 0.264 gal
1 pt (pint! f M3f;loz
art) = 32 fl,oz 1 gal = 2 pt
=4qt
946 cc = 8 pt
!, = = 3.785 1
1 qt (fw
1 ganta =31 1 cavan = 25 aanta i a--- --
I
5. J&$&t and liauid ecruk yalente of common containers I 1 1 teaspoon = 5 cc I
6 teaspoon = 1 fl.02 1 tablespoon = 10 cc lsmallmilkcan = approx. 6 fl.oz
'>' = approx. 170 cc 1 San Miguel Beer bottle = 330 cc 1 large kerosene can = 5 gal
f 10 1 - Ail * i : 1 ordinary pail = approx.101
1 rounded tablespoonful -= ( approx. 4.5 g (wettable powder) '~
1 I I-
385 j,*, i; . . ( _. !. ,

,& I ‘( _ I ,. ^‘._ _ ” ’ !: *. I
1 1" I 6. Eauivalents for dilutins emulsifiable concentrates in water
4 tablespoons per kerosene can = 1 qt 100 gal per 2 tablespoons per kerosene can = 1 pt per 100 gal
= 125 cc per 100 1 = 1 tablespoon :xr 10 1
kblespooa per kerosene CTI = % teaspoon per gallon 1 ti
1 ti = 0.6 cc per liter
ablespoon per gallon = 2.5 cc per liter 1 teaspoon per gallon = 1.25 cc per liter
7. Eauivalents for dilutinu wettable powder in water
PC 5 tablespoons (roumied)
33: kerosene can = 1 lb per 100 gal = 1 tablespoon per gallon = 12gper-101 -
8- Ecnrivalents for soil treatment (sprays, dusts, granules)
1 pt per acre = 1.17 1 per hectare 11 per ha = O-85 pt per acze P lb per acre = 1.12 kg per hectare lkg per ha = 0.89 lb per acre
= 0.1 g per sq.m
1 at (atmos$here)
1 psi
10. Tenmerature
= 1 kg per cm2 = 14.223 psi (pounds/sq. = 0.07 at
Conversion OCelsius into OFahrenheit
+ +32 or (1.8 x OC, + 32 Conversion OFahrenheit into oCelsius
,-+x 5 s (OF -32) x 0.556
in)
306
I " : I-

REFERENCES
1.
2.
3.
4.
5.
6.
7.
8.
9.
10.
11.
12.
13.
14.
15.
AGRIOS, G.N., 1969, Plant pathology. Acadezdc Press, New York. ANDRES. P.R., 1969, Field planting methods anr? techniques.
Reforestation Monthly Vol. XIII, Nos. 9 & 10. ASIDDAC, F., et JACALNE, D.V., 1958, Response of mahogany
seedlings to underground root pruning. The Filipino Forester, Vol. IX & X.
BARNARD, R-C!., 1956, A manual of malayan silviculture for low- land forests; part IV, artificial regeneration. Malayan Forest Service, Kuala Lumpur.
BENNETT, H.H., 1955, Elements of soil conservation. Second edition, McGraw-Hill Book Company, Inc. New York
BINUA, T-M.. 1969, Stump and seedling planting of teak in Cebu and Bohol. Reforestation Monthly. Vol. VIII, Nos. 7 & 8.
VON BLANCKENBURG, P., et CREMER, H-D., 1971, Handbuch der Landwirtschaft und Ern&hrung in den F&wick- lungslsndern. Verlag Eugen Ulmer, Stuttgart.
BRUMM, F., et MEHLISCH, K., 1964, Der Baumschulbetrieb. Verlag Eugen Ulmer, Stuttgart.
DFLIZO, T.C., 1964, Forest nursery and plantation handbook for the Philippines. U.P. College of Forestry, Los BaRos.
DOMINGO, J.L., 1964, Quality, survival and growth of planting stock as affected by underground root-pruning. Technical Bulletin No. 1, U.P. College of Forestry, Los Bafios.
GALO, J-G., 1959, Control of damping off of Benguet pine (Pinus insularis Endl.) in seedbeds with Dow- fume MC-2 and Formaldehyde. Phil. Jour. of For., Vol. 13, Nos. 3-4.
GLASS, E.H., et al., 1968, A manual of pesticides. U.P. College of Agriculture, Los B&OS.
GCCR, A.Y., 1963, Tree planting practices for arid zones, FAO, Rome.
GUNTHER, G., und WACHENDCRF, R., 1966, Chemische Unkrautbekbp fung in der Forstwirtschaft. BLV, Miinchen.
BARTKAN'N, H.T., KESTER, D.E., 1968, Plant propagation. Prentice Hall Inc., Englewood Cliffs, New Jersey.
387

16. HEDDERGOTT, H., 1971, Crop protection guide. Landwirtschafts- verlag GmbH, Hiltrup.
17. JACALNE, D-V., 1959, Reproduction of paper mulberry (Broussoneti; papyrifera Vent.) by root sprouts. Phil. Jour. of For. Vol. 15, Nos. 1-4.
18. JUNG, J., et RIEHLE, G., 1969, Beurteilung und Behebung von ErnZhrungsst&ungen bei Forstpflanzen. BLV, Munchen.
19. KNOTT, et DEANON, 1967, Vegetable production in Southeast Asia. U.P. College of Agriculture, Los Banes.
20. RONEMANN, E., 1968, Neuzeitliche Kompostbereitung. Waerland- Verlagsgenossenschaft EGmbH, Mannheim.
21. KOHNKE, H., 1966, Soil science simplified. Balt Publishers, Lafayette, Indiana.
22. KRikSMANN, G., 1964, Die Baumschule. Verlag Paul Parey, Hamburg.
23. LAMPRECHT, W., 1967, Forstschutztechnik. BLV, Mtinchen.
24. LETORNEUX, C., 1957, \'reee planting practices in Tropical Asia. FAO, Kome.
25. LOYCKE, H.J., MATTHIES, F., DOSTEL, D., 1968, Rationalisierung des Pflanzgartenbc"ri-Ses durch Mechanisierung. Landwirtschafts-Ve;lag GmbH, Hiltrup.
26. LOYCKE, H.J., 1963, Die Technik der Forstkultur. BLV, Miinchen.
27. LYON, T.L., irUCKMAN, H.O., BRADY, N.C., 1952, The nature and properties of soils. Fifth edition, The Mac- millan Company, New York.
28. MCGRAW-HILL Yearbook of Science and Technology 1969.Mycorrhizae.
29. METCALF, R.L., 1962, Destructive and useful insects. Agricul- tural Experiment Station, University d Californea, Riverside.
30. MORTENSEN, E., et BULLARD, E-T., 1966, Handbook of tropical and sub-tropical horticulture. Department of State, Agency for International Development, Washington, D.C..
31. NELSON, K.S., 1967, Flower and plant production in the green- house. Ohio State University, Columbia, Ohio.
32. POSTRADO, B.T., et GLORI, A.V., 1968, Root-knot nematode: potential threat to kaatoan bangkal. Research Note No. 2, Sept. 1968, Reforestation Adminis- tration, Quezon City.
33. RUPF, SCH&EIAR, ZEYHER, 1961, Der Forstpflanzgarten. BLV, Miinchen.
34. 8AMAKA SERVICE CENTER, 1962, The samaka guide to homesite f SrEiiig . Manila.
35. SMITH, R-S., et BEGA, R.V., 1966, Root disease control by fumigation in forest nurseries. Plant Disease Reporter, Vol. 50 No. 4., U.S. Forest Service.
388

SURI, P-N., et SETH, S.K., 1959, Tree planting practices in temperate Asia. FAO, Rome.
TOUMEY, J.W., et KORSTIAN, C.P., 1942, Seeding and planting in the practice of forestry. Third edition, New York.
U-P. COLLEGE OF AGRICULTURE, 19?0, Rice production manual. Los Bafios.
U.P. COLLEGE OF AGRICULTURAL ENGINEERING, 1967, Irrigation and drainage principles and practices, Los Bafios.
U.P. COLLEGE OF FORESTRY, 1970, How to raise kaatoan bangkal. Forestry Popuiar Bulletin&.4, Los Bathos.
VALIENTE, G.C., 1970, Potting machine for polyethylene plasttc bags. Reforestation Monthly Vol. IX. Nos. 6‘7 & 8.
VOLGER, cm.. 1362, Verfahren dtir Bodenentseuchung und ihre Bedeutung fur die Anzucht von Forstpflanzen. J.D. SauerlZnder's Verlag, Frankfurt.
WORMALD, T-J,, 1969, A nursery handbook for the Philippines. Manila
389

PART V
EROSION CONTROL
K. UNKEL and D. ENDANGAN

Chapter 1:
KINDS OF EROSION
1.1 Erosion bv natural forces and human interference
a) Geoloqical erosion takes place without human interference. Steep and high mountains formed by geological processes mil-
lions of years ago have been smoothened and worn down by
natural forces throughout the ages. By chemical and phy- sical action the rocks withered, the debris and fine mate-
rials were carried down by gravity or flowing water to form
plains with fertile soils or to fill up vast deposits in
the ocean. The process of geological erosion is slow and
changes are hardly visible within the life time of human
beings. Geological erosion is still in progress practical- ly everywhere, but most pronounced in recent geological for- mations. Old landscapes -old in a geological sense- have already acquired some kind of stability and show smooth
topograp-hical features. In younger formations, which
the Philippines are mainly composed of, a dynamic process
of change is still going on and the landscape responds even
to a slight disturbance by man with violent erosion.
b) Accelerated erosion is mainly the result of man's activity.
When we use the conunon term "erosion" we generally refer
to this man-made erosion. It is responsible for landslides and floods, loss of fertile soil and soil nutrients, silt-
ing up of reservoirs, damaging roads and other communication
lines. Due to erosion, vast areas, which had been known as
granaries before, turned into steppes or even deserts.
According to the active force, we can distinguish: Wind
erosion, gravity erosion and water erosion.
393

1.2 Wind erosion - .-
In wide plains of low rainfall wind erosion is quite common.
There, steadily blowing winds loosen the soil particles and
transFxt them to other places. The higher the wind velocity,
the larger the particles that can be dislodged.
Wind erosion is a problem in the prairies of the Middle West
of the USA, in x'* rth Africa and the Middle East, but hardly
in Southeast Asia.
1.3 Gravity erosion
Gravity erosion is the movement of soil due to its own weight.
When the movement is slow, we speak of a "soil creep", when
it is sudden, we call it a "landslide'.
a) Soil creep occurs on steep slopes. The movement is so slow,
that it is hardly perceptible. The entire mass of soil moves
downhill as a unit without any evidence of clefts or cracks
on the surface. A high content of water in the soil favors
creeping by increasing the weight and acting as a lubricant.
The lubricating effect of water is particularly evident where
there is an impermeable layer beneath.
b) Landslides can be common in regions of steep and precipitous
slopes. In a landslide great masses of soil and rocks sud-
denly rush down leaving behind large wounds in the landscape,
which may widen by subsequent landslides and get cut up by
gullies. The debris is piled up at the base of the slope
and may cause obstruction of water ways, destroy roads, bridges, houses or farm lands. The occurance of landslides
can have the following reasons:
- Increased weight of soil after prolonged and heavy rainfall,
- Faulty drainage, which also can cause gullies,
- Undercutting along stream banks,
- fiaad cuts, which often remove the support for large soil masses,
- Cutting of trees, whose tap roots might have served as an anchorage to keep the soil in place,
394

- Earthquakes,
- Internal movements in the geological formation.
The danger of landslides is increased where the geological
strata show unfavorable directions (Fig. 1).
Fig. 1: (a) Unfavorable directions of geological strata in- creased by a sharp transition to the bedrock, (b) and (c) favorable directions of geological strata.
1.4 Water erosion
Water is the most active force that can cause erosion. We can
distinguish the following forms: Raindrop or splash erosion, sheet erosion, sill erosion, gully erosion, river bank erosion I and bank erosion in stagnant xaters.
a) Raindrop or splash erosion: In contrast to erosion caused by flowing water, raindrop erosion has a more smoothening or levelling effect, which can be demonstrated by drops falling into a sandpile. If a raindrop hits a level surface vertically, the finer soil particles Htill uniformly splash in all directions.
But where the raindrops hit a slope, most of the soil particles will be dislodged downward. Thus, over longer periods large quantities of soil will be transported downhill (BENNET, 1955).
RAINDROP RAINDROP
Fig. 2: Dislodging of soil particles by splash era&m QII a level and sloping surface (After BEMMET, 19%).
395
Furthermore, the kinetic energy of falling raindrops destroys
the crumb structure of the surface soil by breaking up the
soil aggregates. The loosened particles form a puddled layer
of surface mud, which will clog the pores. This reduces in-
filtration, and thereby increases run-off and erosion.
b) Sheet erosion: is the removal of soil in thin layers from the
surface due to surface flow. The process is generally slow
and hardly visible, but when it becomes apparent, it will be
often too late and much of the fertile soil will have been
lost already. Usually, sheet erosion is increased by splash
erosion, after the impact of the raindrops has loosened the
soil particles from their moorings.
The disappearance of one cubic meter of soil every week on a
hectare of land will hardly be noticed, but if that continues
for 60 years, this would mean the loss of not less than one
foot of topsoil. No wonder that the fertility of the land
will fade because of the continuous losses of topsoil and soil
nutrients.
Splash erosion alone just moves quantities of soil downhill to
the base of the slope, it does not transport the soil further.
Surface flow, however, on reaching the foot of the slope
carries the soil away as suspension. Generally, splash and
sheet erosion join forces and are responsible for removing large quantities of fertile topsoil (BENNET, 1955).
c) Rill erosion: Due to irregularities of the soil surface the
water is often forced to concentrate in small and shallow
canals, which is where rill erosion starts. The flowing water
loosens the soil particles, lifts them up and transports them away. The more water is concentrated in these rills, the
higher will be the erosive power. Rill erosion can be smooth-
ened by tilling or ploughing, provided the rills are not deep-
er than one foot.
d) Gullv erosion is similar to rill erosion and can be consider- ed it8 advanced stage. Gullies are formed when many rills
join, which will increase the volume and the erosive power of
the water flow. Unlike rills they cannot be levelled by
396
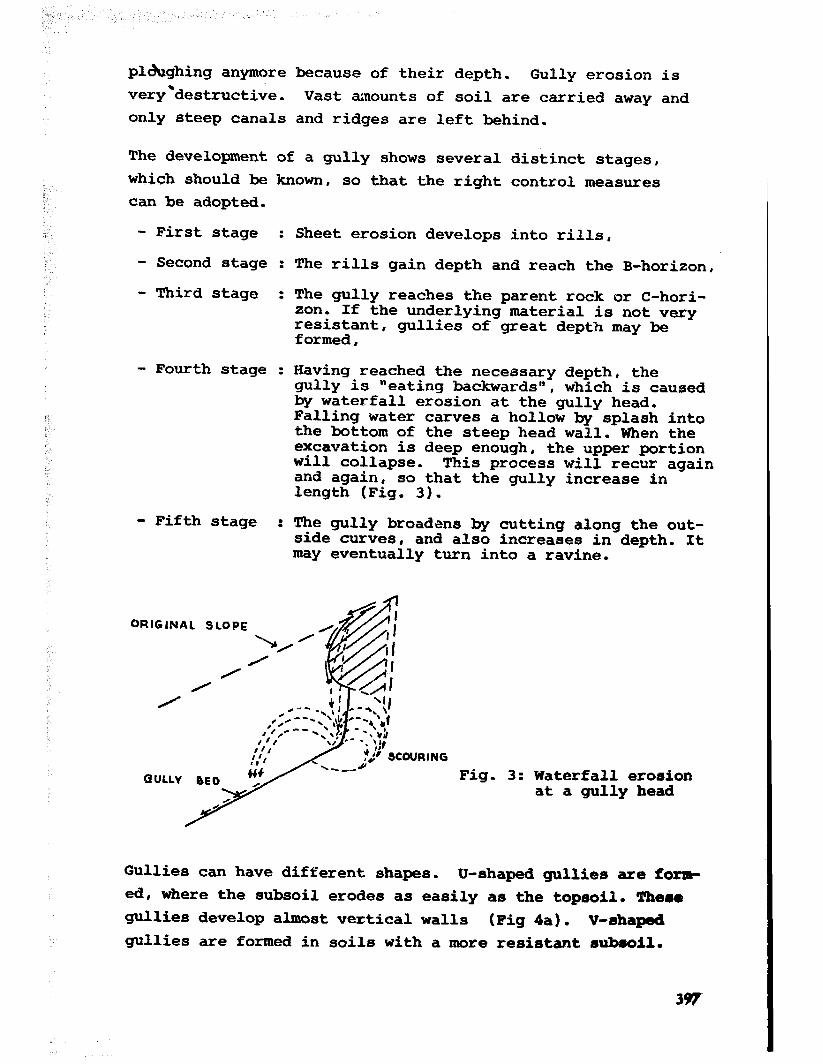
pl&ghing anymore because of their depth. Gully erosion is
very'destructive. Vast amounts of soil are carried away and only steep canals and ridges are left behind.
The development of a gully shows several distinct stages,
which should be known, so that the right control measures
can be adopted.
- First stage ; Sheet erosion develops into rills,
- Second stage : The rills gain depth and reach the B-horizon,
- Third stage : The gully reaches the parent rock or C-hori- zon. If the underlying material is not very resistant, formed,
gullies of great depth may be
- Fourth stage : Having reached the necessary depth, the gully is "eating backwards", which is caused by waterfall erosion at the gully head. Falling water carves a hollow by splash into the bottom of the steep head wall. When the excavation is deep enough, the upper portion will collapse. and again,
This process will recur again so that the gully increase in
length (Fig. 3).
- Fifth stage : The gully broadlens by cutting along the out- side curves, and also increases in depth. It may eventually turn into a ravine.
ORIGINAL SLOPE
GULLY BED ;4 ,,
Fig. 3: Waterfall erosion at a gully head
Gullies can have different shapes. U-shaped gullies are form- ed, where the subsoil erodes as easily as the topsoil. Them
gullies develop almost vertical walls (Fig 4a). V-shaped
gullies are formed in soils with a more resistant 8ub80i.l~
397

This is the most common form of gully in the Philippines and
elsewhere (Fig. 4b). A combination of both can be observed
in soils with a very resistant layer below the surface. In that case, the gully has a rather trapezoidal shape, because
the water erodes more along the banks (Fig. 4~).
(a) U-shaped gully
Topsoil ..:
:... . . . . . - . . . . . . . . . Subsoil as resistant than topsoil as topsoil
fc) Trapezoidal gully
Fig. 4: Shapes of gullies
A classification of gullies according to their size is given
by BENNET (1955):
rills : less than 1 foot deep, small gullies . less than 3 feet deep, medium gullier: : 3 to 15 feet deep, large gullies : 15 to 30 feet deep, ravines : more than 30 feet deep.
e) River bank erosion: River banks are eroded by flowing water scouring along the banks. The extent of erosion on a river
s
s - SC~IJRING D- DEPOSITS
s
WATER+-= == - -
Under - cutting along outside curve---- +
Fig. 5: Scouring and deposition along a meandering stream 398

bank depends on the velocity and the direction of the flow.
Generally we can observe erosion on the outside of a bend
and deposit of materials on the inside bends (Fig. 5).
The material transported by flowing water is called sediment.
It can be carried in three ways, as:
- Suspension: Sediment that remains suspended in water with-
out contact with the stream bed is called suspension. It
is carried far, because just a slight turbulence will keep
it suspended.
- Saltation : When soil particles and small stones bouncing along the stream bed and touch the ground in short inter-
vals, we speak of saltation.
- Bed load: Sediment that moves in almost constant contact
with the stream bed is called bed load. The material is of ',
larger size and cannot be lifted by the current. It is
just rolled or pushed along the stream bed.
When and wherever the velocity and the carrying capacity of
the stream flow decreases, the sediments will fall out. At
first the bed load is deposited, then the materials carried
by saltation, and finally the suspended particles. On cut river banks, zones of finer and coarser materials can there- fore often be distinguished, which sometimes correspond to
the annual fluctuations of the river due to wet and dry
seasons.
f) Bank erosion in staunant waters: can be observed along banks or shores of lakes or canals and along the sea. Serious bank
erosion is causedby rolling waves undercutting the banks.
The damage is increased during strong winds and typhoons.
Along narrow water ways strong waves can also be generated
by motor vessels.
399

Chapter 2:
FACTORS AFFECTING EROSION
Without the interference of man and his livestock there would
be hardly any noticeable erosion, except geological erosion,
which is a natural process. A dense vegetative cover protects
the soil surface from the impact of the rain drops and keeps
it in place. However, accelerated erosion will occur as soon
a8 the protecting vegetation is destroyed. The progress of
erosion depends mainly on the following factors: rainfall,
topagraphy b soil properties and vegetative cover.
2.1 Rainfall characteristics
a) Total annual rainfall: Because of the direct relationship be-
tween the annual rainfall and the amount of run-off, the
height of the annual rainfall may give some indication about
erosion problems; But the total annual rainfall does not
permit any conclusions about the length of the wet and dry
8eamon# though their duration is most important for plant
growth.
b) Monthlv distribution of rainfall has a bearing on erosion in
two ways: it affects the development of the vegetation, and
gives some indications about the rainfall intensity. To il-
lustrate this let us consider two extremes:
- Place A: rainfall more or less evenly distributed, no month receives less than 150 millimeters (Eastern Mindanao).
- Place B: rainfall is concentrated on five months, which may receive as much as 1000 millimeters monthly mainly brought by typhoons (Baguio).

While in place A the uniform distribution of rainfall permits
a luxuriant vegetation throughout the year, which protects
the soil from erosion, the ground vegetation in place B dries
up due to the prolonged dry season, and may be subject to
fire in many places. Here, the rains will hit a poorly pro-
tected surface at the beginning of the wet season. And, be-
cause of the seasonal rainfall the vegetation is not as high-
ly developed as in a humid climate. It is therefore easy to understand, that in a pronounced seasonal climate with con-
centrated high rainfall, erosion problems are more severe than under constantly humid conditions.
cl Rainfall intensity is one of the important factors that di-
rectly affect erosion. It is expressed in millimeters or inches per hour, Rain causes little erosion as long as the rainfall intensity does not exceed the infiltration capacity
of the soil. But there will be increased run-off and in- creased erosion, if more rain falls than can immediately in- filtrate into the soil. Rains of high intensity also damage the structure of the surface soil by releasing silt and clay
particles that clog the pores. The hammerlike action of the raindrops breaks down the crumb structure with its intricate
pore sytem, and so reduces the infiltration capacity.
Fortunately, storms of high intensity usually last only for
short periods and generally cover relatively small areas. But
if they last long and cover large areas, the erosion damage
may be considerable and devastating floods may occur like the
fiotid in North and Central Luzon in 1972. In most parts of the Philippines rainfall of high intensity has to be expected
during the typhoon season between July and October.
2.2 Tomoraphic characteristics of the watershed
The watershed or catchment is the total area that drains into
a certain water way. Since it is the catchment or part of
it that receives the rainfall, the damage caused by erosion
will depend on the size and configuration of the watershed
area, The characteristics of the catchment must,therefore,
be studied in detail before any large-scale erosion control
or watershed protection work is commenced.
401

a) Size of the catcbment: The larger the catchment the higher
is the run-off. In the field and on a map it is usually not
difficult to define the boundaries of a watershed by studying
the topography or contour lines of the area.
Fig. 6: Delineation of a catchment according to contour li?es
b) Length of the slope: On long slopes there is usually an ac-
cumulation of water towards the base. Conducting this water safely downhill over long distances is one of the main prob-
le!lB. Rarely are there stable natural waterways well dis-
tributed over the slope to collect the run-off. If there are any, they must be strictly protected and not be made part of
a kaingin. For that reason Philippine Forest Law protects
the vegetation 50 meters above the highest water level on
both sides of natural water courses that are more than 5 m wide. For the safe conduct of the run-off waterways in farmland have been successfully lined with grass. It retards the flow and protects the bottom and the banks from scouring.
C) Gradient of the slone: The steeper the slope the higher are
the velocity and the erosive power of the run-off. As the aurface flow concentrates into streams and channels, it de-
velops turbulences, which in turn considerably increase the carrying and scouring capacity of the current.

Under normal conditions the approximate transporting capacity
would be as follows:
0.3 km/h
0.5 km/h 0.7 km/h
1.0 km/h
2.0 km/%
3.0 km/h
fine clay
fine sand
coarse sand
fine gravel
pebbles up to about 2.5 cm
smaller stones up to about 5 cm.
Flow loaded with sediments that are carried by saltation or
as bed load, has a strong abrasive action like sandpaper.
2.3 Physical soil properties
a) Soil texture refers to the proportion of fine and coarse par-
ticles in the soil. The following texture classes or soil classes are generally recognized: Sand, loamy sand, sandy
loam, loam, silt loam, clay loam, clay. They can be easilx determined by field characteristics. For details consult Fart 2, Chapter 2 of this book.
From clay to sand we can observe an increase in infil- TAtion
capacity, but a decrease in resistance against erosion. Loam,
which is listed in the center of the following scale has a
favorable combination of both.
Soil class Infiltration capacity inches / hour
Loamy sand 1-2
Loam 0.5 - 1 Silt loam 0.3 - 0.6 Clay loam 0.1 - 0.2
Table 1: Infiltration capacity of different soil classes (KOHEKE and BEBTRAED, 1959)
Other important aspects, which influence the growth of ve- getation are the water holding capacity of the texture clas-
ses and the actual availability of water to plants. The total
quantity of water a soil can absorb is called "field capacity", which differs considerably according to soil type (see below).
403

Out of this a certain portion of water will not be available
to the plants, because their roots cannot overcome the high
osmotic, capillary and adhesive forces, by which the moist-
ure is held in the soil. This lower limit of the soil water
content for plant life is the "wilting point", which differs
with the soil classes. Only the difference between the field
capacity and the water content at the wilting point constitutes
the amount of available water.
Soil class Field capacity Wiltinq point Available water
Fine sand 1.5 inches/foot 0.5 inches/foot 1.0 inch/foot
Loam 3.2 1.2 2.0
Clay 3.9 2.5 1.4
Table 2: Field capacity, wilting point and available water for the main soil classes
Of the three main soil classes, it is in loam where the avail-
ability of water is highest. Especially in critical rainfall
areas, loam and closely related texture classes therefore of-
fer the most favorable conditions for the development of
vegetation,
On the other hand, soils with a high field capacity like clay
soils become very heavy when their saturation point is reached
and so may become liable to landslides or soil creep. The dan-
ger is aggravated where the soil has been dumped, which re-
sults in pores with an increased volume.
b) Soil structure refers to the arrangement of individual soil
colloids into aggregates of certain shape and size. The fol-
lowing terms are commonly used to describe the various
structure types:
- plate-like: The natural cracking is markedly horizontal:
c-n in clay soils, which are rich in kaolinite,
primnatfc: The cracking is pronounced in vertical direction. This structure develops in the B-horizon of heavy clay soils,
especially in a dry climate,
- blocky: Horizontal and vertical cracking are equally well developed. The shape of units is irregular, which results
404

in structural aggregates with sharp edges and smooth faces.
The sizes of the units range from 1 to 50 mm . This is the
most common structure type found in Philippine soils.
- qranular or crumb structure: The particles are more rounded
with a size of 1 to 10 mm . Of all structure types, the
granular structure can harbor the largest volume of air and
water. The permeability of soils with such a structure is
very high. They are therefore less liable to erosion as
long as the rainfall is not excessive. The crumb structure
is most pronounced in A-horizons with a high humus content.
- amorphic: Without visible structure; in pure clay soils.
2.4 Chemical soil properties
Apart from their influence on plant growth, chemical soil pro-
perties have a direct bearing on the stability of the soil
structure and the resistance the soil offers against erosive forces.
For example, the content of organic matter influences the for-
mation of stable humus aggregates visible as crumb structure
with a favorable infiltration capacity. Iron oxides are at
least partly responsible for the favorable physical proper- ties of lateritic soils, in which they are dominant, by
binding soil colloids into stable aggregates with a large pore
volume.
While calcium and magnesium ions also have a favorable in-
fluence on the soil structure, a concentration of sodium ions
may cause the breakdown of any soil aggregates because of the high dispersing power of this element. Soils, with a high sodium content may be highly plastic and are very unstable
when in contact with water. These soils pose great difficult-
ies for stabilization, particularly when dumped,
2.5 1
A dense vegetative cover provides the best protection against
erosion, The denser and more complex it is, the more complete
the protection.
405

- A vegetative cover particularly a canopy of trees and shrubs,
not only prevents the raindrops from striking the ground di-
rectly, but is also able to break their kinetic energy.
- Vegetation is constantly adding organic matter to ,he soil
and increases its water absorbing capacity by improving the
soil structure.
- Decaying roots of trees and shrubs leave numerous galleries
in the soil, which increase infiltration.
- Roots bind the soil and prevent it from being washed away.
The effectiveness of the vegetation, however, varies according
to its density and composition. Whether a grass cover or a for-
est is more effective to prevent erosion, depends largely on the
conditions of the land and the way both types of land-use are
managed (see table 3).
Sandy clay loam, Southern Piedmont Fine sandy loam, Northeast Texas
Land-us? Slope Tons/Ha/Year Land-use Slope Tons/Ha/Year
Virgin 10 % 0.005 Forest 12.5 % 0.124 forest Grass 10 94 0.76 Grass 16.5 X 0.012
Agricultural Agricultural rotation 10 w 37.26 rotation 8.75 % 42.5 . Cotton 10 77.11 Cotton 8.75 % 57.30 Bare around 10 % 163.41 Cotton on subsoil 162.0
Table 3: Annual soil losses by erosion under different soil covers for two localities in the U.S. (After BERNET, 1955)
AS shown in table 3 the annual soil loss under a forest is in both
cases below 0.2 tons per hectare, under grass below 1 ton per hec- tare. Soils under agricultural crops in contrast are much more
liable to erosion, which can amount to 77 tons in a cotton field,
or even to 162 tons where cotton is planted on subsoil.
Good and well managed ipas,*cure land not subjected to annual fires
ie much less liable to erosion than a poor and open pine forest.
On the other side, an intact virgin forest with several strata
of vegetation usually has a much higher protection value than even
the best grassland.

Pure pine forests do not appear to offer the best possible
protection from erosion for various reasons. Pine stands
generally have a light canopy, intercept little rainfall,
and their litter does not improve the soil. Furthermore,
their ground vegetation consists mainly of grasses, which
are susceptible to fire. Pine forests can only form an ef- fective ground cover when they have an understorey of broad-
leaved species.
Chapter 3:
HUMAN INTERFERENCE AS !l!HE MAIN CAUSE OF EROSION
3.1 Louuina and fuelwood cuttinq
Excessive logging and fuelwood cutting has to be made respon-
sible for the forest destruction over large areas in the
Philippines.
Logging for mining timber has been blamed for the denudation
of wide areas in the Binga-Ambuklao watershed. The situation is aggravated by improper logging practices, which destroy
the ground vegetation by skidding.
407

In the dry 110~0s region, the high demand for fuelwood for
curing tobacco accelerated forest destruction with the con-
sequence that mountains and hills became susceptible to
erosion, and land and water resources deteriorated.
3.2 Kainqin makinq
In the Philippines, according to FAO estimates (Technical
Report on Shifting Cultivation), about 80,000 hectares are
destroyed annually by kaingin. The kainginero usually enters
the forest areas after they have been opened up by the logger.
Kaingin is especially harmful in densely populated areas,
where the farmers can only allow a very short resting period
between successive fellings. After each cycle the secondary
vegetation becomes more degraded and offers less protection
against erosion. Finally only grasses will grow. In that
stage the kainginero cannot make a living from the land any
more, so that it may be utilized as a meager pasture subject
to annual fires.
If the pressure on the land is very high, even the steepest
slopes of 100% or more would be cultivated. Where the fields are
large and the crops cultivated not very protective, heavy erosion
will be unavoidable. Also the strips adjacent to rivers are not
spared, because they offer the most fertile land.
3.3 Forest fires and crrassland burninq
Forest fires are a problem in seasonal climates and are es- pecially destructive in forests with a ground cover of dry
grasses. After most of the ground vegetation and smaller
trees have become the victim of grass fires, erosion damages are greatly increased.
Vast areas are deliberately burnt over by cattle ranchers every
year at the peak of the dry season, when all grasses are dried
uP and are most inflammable. The ‘objective is to get rid of the
old cogon (Imperata cylindrica), which is not palatable to the cattle, and to induce fresh growth suitable for forage. Thus,
at the beginning of the raining season the rains will hit a Poorly protected surface.
408

However, annual fires favor Imperata more than any other grass
species, all the better fodder grasses will eventually disap-
pear. Since in every grass fire vast amounts of nitrogen are
lost, the site degrades constantly. The A-horizon, usually al-
ready guite thin, is reduced even more and may completely dis-
appear, which increaseSthe danger of erosion.
3.4 Improper ranue manaqement
Three basic mistakes in range management can be commonly ob-
served: premature grazing, overgrazing, and continuous grazing.
a) Premature urazinq: Very often the cattle is allowed to graze
when grasses and palatable herbs are just sprouting. If the
young shoots are grazed off right after their formation, they cannot contribute anything for the build-up of the plant- For
the formation of the first shoots the plants depend largely
on their root reserves. Only after having grown for some tLme the plant is in a position to contribute carbohydrates
for its own increase, If the grazing is not restricted during the first weeks of the rainy season, the root system of the
fodder grasses will become weaker and weaker and may eventually
die.
b) Overcrazinq: In overgrazed pastures the vegetative cover will
soon be destroyed. Furthermore, browsing paths occur, on which the soil will be compacted by the trampling of livestock.
These paths are typical for overgrazed pastures and often be-
come the beginning of rill &d gully erosion, or even of land-
slides on steep slopes.
C) Continuous orazinq affects the pasture in several ways. When the animals graze the pasture more than once a month, the re-
moval of the new leaves tends to weaken the root stock of the plant, so that there may not be sufficient roots to hold the soil particles together against the erosive power of the run-
off. As the grasses are not allowed to mature and to seed,
they gradually disappear leaving behind but a few unpalatable
species.
409

3.5 Road cuts
In steep slopes road cuts are very often the beginning of
erosion. High cuts above and dumps of the excavated mate-
rial below the road areveryvulnerable. The danger is often increased by improper drainage.
3.6 Improper disposal of mininu waste
is quite a problem in Northern Luzon. These dumps with their steep slopes are liable to heavy erosion during the rainy
season, and large quantities of sterile material are washed into the rivers rendering the water unsuitable for any use.
3.7 Improper drainage
A large number of erosion cases like gully formation and land-
slddes can be traced back to improper drainage and careless
discharge of accumulated rainwater from roads or buildings
with a large roof surface. With the high rainfall intensities the disposal of the run-off is one of the important aspects to be taken care of in planning any construction. Since most construction work is carried out during the dry season, pro-
visions for the safe drainage of large quantities of run-off
are often forgotten.

Chapter 4:
THE EFFECTS OF EROSION
4.1 Deterioration of farm land
When the fertile top soil containing the badly needed humus
is washed away from the fields, the less fertile subsoil is exposed, which generally does not respond well to fertilizer
and gives only meager harvests.
With the top soil, also large quantities of plant nutrients are lost. If an attempt would be made to replace these loss-
es with commercial fertilizer, the costs would probably run
into millions of pesos every year.
After the land has been cut up by gullies, mechanized culti-
vation becomes very difficult. At this stage the farmer may decide eventually to abandon the land.
Not only the scouring of top soil threatens the fields, but
they may also be buried under debris and sediments coming
from denudated hills. Under geological erosion, soil is grad-
ually washed down to form fertile alluvial deposits. But when
this erosion turns into accelerated erosion, together with
the top soil large quantities of gravel, sand and boulders
and infertile subsoil are carried along. Deposits of this
kind on agricultural fields may render them unsuitable for cultivation, and also destroy irrigation facilities.
4.2 Increase of floods
Whenever rain falls on a forested watershed, part of the rain
is intercepted by the various strata of the vegetation before
it reaches the ground. The raindrops trickle down through the leaves of the top and middle storey, through the ground flora
and along the stems of trees and shrubs. On reaching the ground
they are absorbed by the layer of decomposed and semi-decomposed
litter, which acts like a sponge and is capable of taking up large guantities of water. In the absence of vegetation, however the raindrops strike the soil with full force. There will be nothing to hold back excessive run-off, which will accumulate
411

in the rivers and cause floods.
4.3 Reduced water supplies
Under forest conditions we have an optimum of water infiltra-
tion into the soil. The water is stored and will be gradually
released throughout the year. This regulating effect is very important in regions with pronounced wet and dry seasons. Un-
der the ideal conditions of a forest watershed springs will
yield water throughout the dry season. Rivers originating
from eroded watersheds, in contrast, often dry up during this
time, while during the rainy season they may just yield a mud- dy run-off.
We have to admit that a forest cover also consumes large guan-
tities of water by transpiration and evaporation. For that
reason the total run-off from a watershed without vegetation
may be even higher than from a forest. The main advantage of
the vegetation, however, is the regulating and purifying ef- fect on the run-off.
4.4 Siltinu-uo of reservoirs, canals and rivers
Another serious effect of erosion is the sedimentation of water
reservoirs. By sedimentation with silt and debris the storage capacity of the dams is greatly reduced. Soon the point may be
reached where they do not serve their purpose any longer, and
the enormous expenses for their construction and for the in-
stallation of the power plants do not give the expected returns.
Excessive silting has reduced the expected lifespan of the Am-
buklao dam, for example, from 62 years to 32 years.
The gradual silting-up of any reservoir is a natural phenomenon due to unavoidable geological erosion, but the rate is very slow and is estimated at only a few meters in a hundred years.
Sedimentation can also become a problem in irrigation canals by reducing their diameter or clogging the water courses- Due to
sedimentation navigable streams and harbors start shoaling and
can only be made navigable again by expensive dredging operations.
4.5 Destruction of buildings, roads and other communication lines
Landelides and other forms of erosion are a very serious problem
412

in mountain areas. After a heavy rainfall often whole sections
of a road rush down or are buried by soil masses. The same may
happen to railways, telephone and power lines.
Villages and buildings situated on vulnerable spots are sometimes
damaged by landslides, mud flow and avalanches of rubbles and boulders, very often causing casualties among the inhabitants.
The high pressure on residential land forces more and more people
to build their houses on steep slopes or other unsuitable land,
where they are generally considered as squatters. With the high
population growth, the‘pressure on residential land is likely to
increase in future.
Chapter 5:
PREVENTIVE MEASURE AGAINST RROSION
Indirect measures of erosion control are preventive by nature.
In general it is much cheaper to prevent than to repair the
damages of erosion. Prevention of damages is therefore the
most important phase in erosion control.
413

5.1 Educational campaiqns
As many people do not know the dangers of erosion, an educa-
tional campaign is the first step of erosion control. In such
a campaign, age-old customs may have to be changed. There
should be seminars for teachers in rural schools, who will
impart their knowledge later to the children. Press, radio
and television also play an important role in such a campaign.
The Forestry Extension Department of the University of the Philippines is very active in this field and can give the
necessary guidance and assistance.
5.2 Fire prevention and control
This is the most important preventive measure against erosion.
Especially during the dry season a strict fire control must
be organized and maintained. Regions with well pronounced
wet and dry seasons are more endangered regarding fire and
erosion than those with higher precipitations well distributed
throughout the year. For more details see Part 2 of this book.
5.3 Fencinq
If grazing and browsing are responsible for destroying the
ground vegetation in an area of limited extent, suitable en- closures to avoid intrusion of livestock can be a good solu-
tion. The enclosure should not be too large in order to have
a better control and not to inconvenience the local people,
so as not to lose their cooperation.
5.4 Proper land use
Proper land use based on the capability of the land is very
important in preventing erosion. In the Philippines land use in this connection is mainly regulated by the provisions
of the Land Classification Law, which sets a maximum gradient for its main forms:
- For agricultural purposes only land with a gradient below
18 % can be released as alienable and disposible under
certain conditions from the public domain.
414

- All land of the public domain 18% in slope and over is
declared as permanent forest or forest reserve regardless
of the condition of the vegetative cover.
- On suitable land up to a maximum gradient of 50% pasture
leases or permits can be granted.
- Land with a gradient of over 50% can only be utilized for
forestry.
It would be very important in this respect to decide also on
a maximum gradient for commercial forests, above which the
utilization of timber would have to be restricted, In extreme
cases forests should have exclusively protective functions.
5.5 Proper range manaqement
The term "range" is generally applied to a natural, non-ir-
rigated grassland, which provides fodder for livestock or wild animals. The grassland can be a fire climax,naturally, or as the result of human activities. The term "forest range" refers to more or less open forest land used for grazing. Erosion can be minimized there by proper range
management practices listed as follows:
a) Prescribed burninq: According to recommendations of the p,c.w.I.D. (P~~E~IDFWJTIAL cO~ITEE ON WOOD INDUSTRIES
DEVELOPMENT), burning, if practiced at all, should be
carried out under a permit system, that would require fire-
free intervals of at least three years and a provision
which prohibits the burning of more than 25% of the range
unit in a single year.
If exercised at all, burning should be limited to the begin-
ning of the dry season, when the fire would not be so very
intensive. Until the beginning of the rainy season the ground would then have regained a cover of grasses Protecting
the surface.
b) Pasture rotation: The pasture has to be subdivided into --
agement units, which are successively grazed under a rest-
rotation system. By this system overgrazing can easily be
avoided. 41s

c) Pasture improvement: Up to now the Pasture Land Act prohibits
the cultivation.of the pasture perr.lit area, and has prevented
many good ranchers to introduce valuable fodder plants that
require cultivation. A change of these regulations has been recommended by the P.C.W.I.D. Though pasture land can have a
gradient of up to 50%, species requiring intensive cultivation
can only be grown on suitable, less steep sites adopting care- ful soil conservation practices.
The following grass and legume species can be recommended for
upgrading of pasture land provided that the principles of soil
conservation are also taken into account:
- Grasses: Rhodes Grass (Chloris gayana),
Dallis Grass (Paspalum dilatatum),
Kikuyu Grass (Pennisetum clandestinum);
- Legumes: Hyacinth bean (Dolichos lablab),
Kudzu (Pueraria phaseoloides),
Centrosema (Centrosema pubescens),
Perennial lespedeza (Lespedeza cuneata),
Crotolaria spp.,
Ipil-ipil (Leucaena leucocephala).
5.6 Restrictions on kainqin makinq
Since the kaingin system is the means of livelihood for about
120,000 families in the Philippines and a change is not like-
ly to occur soon, we have to find means to prevent the damages
caused to soil and water resources. The following possibili- ties exist:
416
Resettlement of tribal minority groups and squatters in critical erosion areas to other areas classified as alien- able and disposible (difficult for traditional tribal
communities).
Creation of employment opportunities to divert the people
from kaingin making (e.g. reforestation).
Continuing census of all occupants of the public forest and
their approximate location to check new immigration into
the area. All kaingineros entering the area after the census can be evicted according to R.A. 2701 (P.C.W.I.D., 1972).

- The kainginero is required to obtain a kaingin permit
from the nearest representative of the BFD, who could
impose restrictions depending on the case.
- No kaingin permit is to be issued for very steep slopes.
The permit should contain an allowable maximum gradient,
beyond which kaingin making shall be prohibited.
- No kaingin permit is to be issued for land adjacent to
water courses. For water courses of 5 meters and over in
width a strip of 50 meters of natural vegetation has to
be left untouched on both sides.
- Kaingineros in forest reserves or permanent forest areas
are required to adopt the taungya system (for details
consult Part 2, Chapter 15 of this book).
- Strips of natural vegetation should be maintained between
kaingins. I
- The development of a permanent agriculture by terracing
sloping land, by irrigation and by fertilizer and manure
application has to be promoted wherever possible by the
government agencies concerned.
5.7 Restrictions on loauinq in critical areas
As mentioned in paragraph 5.4, no logging or any cutting of
wood should be permitted above a certain gradient. Forests in those areas should be given only protective functions, be-
cause once destroyed they often cannot be replaced. The maxi-
mum allowable gradient for commercial forest depends on the erodibility of the soil, the vegetative cover and the climate. Extreme care is indicated in utilizing forests above settle- ments. The importance of forest protection along water courses
has already been stressed.
In critical areas clear cutting must be generally avoided.
Where the soil is less liable to erosion the area of the in-
dividual clear cut should be limited at least. From the view
of soil conservation, careful selective logging is preferable to any clear cutting.
Careful logging practices must be enforced to protect the re-
maining vegetative cover. Skidding of logs is to be avoided,
417

while cableways should be kept narrow and logging debris must
be prevented from clogging drainage canals.
5.8 Proper road construction and maintenance
Excessive erosion often starts along roads. The following
points should be considered to prevent damage:
- Extensive earth movements in unstable or steep slopes must
be avoided. The gradient of cuts and dumps should not ex-
ceed the natural angle of repose, which depends on the
type of material:
fine sand -1 :2 to 1 : 1.7 loamy sand -1 : 1.7 to 1 : 1.4
loam, clay - 1: 1.5 to 1 : 1 For dumps a lesser gradient is permitted than for cuts.
- On cut and fill slopes one has to establish an effective
vegetative cover immediately after road construction
(for details consult Chapter 9).
- Faulty drainage is often the cause of gully erosion washing
away sections of the road. Particularly in slopes, a pro- per drainage is indispensable. To divertthe water from its
surface, the road has to have a camber or gradient against
the hill side, where it is collected in ditche~"%nducied
safely through culverts into stable waterways. The outlets of culverts must be made safe against erosion. Unstable gullies'below culverts must be stabilized.
- Proper road maintenance, too, contributes to erosion pre- vention. It is essential, that the road surface is kept graded and sloped against the hillside to get the rain-
water quickly off the road. Clogged ditches and culverts must be constantly cleared and kept open. Immediately after every typhoon there should be an inspection to repair the damages in their initial stages.
418

Chapter 6:
ELEMENTS OF ENGINEERING STRUCTURES
6.1 Masonry
Masonry in a broad sense is employed for retaining walls and
for the construction of weirs and checkdams. One can use
natural stones, bricks or hollow blocks. Since the latter two are quite expensive, natural stones are most commonly used for masonry work in erosion control. The selected stones should be firm, not withered (so-called "dead rocks")
compact, and without cracks. Stones originating from igneous rocks are generally more durable than those from sedimentary
formations.
Masonry can consist of @'dry" stone walls also called "riprap- ping" or stone walls built with mortar. Mortar is prepared
by usually mixing clean, river sand (without loam and organic material) with cement at a ratio, ranging from 1:3 to 1:5
depending,on the purpose. Under natural conditions mortar hardens in a few hours , but it will obtain its full compres- sive strength only after approximately 3 to 4 weeks.
6.2 Concrete
Concrete is used for the construction of retaining walls,
weirs and for bank stabilization. For 'more stability con- crete is often reinforced with steel bars. Gravel used in concrete should not contain stones of more than 7 cm dia-
meter. The following tables give the proportions of the,
mixture and the quantity of cement required for concrete
of different mixing ratios.
419

Kind of concrete Water content Cement Sand Gravel (percent) (ratio by weiqht)
Compressed concrete for retaining walls 4-7 1 : 2 :3 Compressed concrete for wing walls, weirs 4-7 1 :2:2
Table 4: Proportion of cement, sand and gravel in concrete mixtures.
Ratio ka Cement / cu. m concrete
1:l 900 1:2 630 1:3 460 1:4 350 lt5 300 1:6 250 1:7 225 1:8 200 1:9 175 1:lO 150 1:12 125
Table 5: Quantity of cement required for concrete of different mixing ratios.
Concrete reinforced with iron requires more water. Compressed concrete is processed by compacting layers of 15 to 20 cm,
particularly the corners and edges of the concrete mass with
a stamper. Special cements (so-called hydraulic cements) are employed for construction works in water. Ordinary concrete structures should not get in contact with water until complete-
ly hardened.
The disadvantage of masonry and concrete structures in anti-
erosion works is that they are very inflexible. Once damaged, they are not easy to repair.
6.3 Gabions
is the term for large rectangular wire crates that are filled
with stones and employed in erosion control techniques which have been developed in Italy. They have some significant ad- vantages over solid structures:
. m : Gabiones bend without breaking, and in contrast
to concrete or masonry with mortar do not crack. This can be an important aspect with regard to unevenly sinking
420 foundations and the pressure in slopes.

- permeable : Gabion structures are permeable and do not
need an extra drainage system.
- economical : Usually they are cheaper to construct than
other solid engineering structures. They may become ex-
pensive only where stones are not available in sufficient
quantity.
Gabions can be used in flowing water and for land reclamation
along shores, for retaining walls, gully stabilization, etc..
They mainly serve as hydraulic structures.
a) Construction: Since ready-made imported gabions are very ex-
pensive and hardly available, wire crates have to be construct-
ed from locally available mesh wire. The wire should be heavi-
ly galvanized to insure a long life span. For stabilization and reclamation work in coastal waters plastic-coated wire
is used for better protection against corrosion. The diameter
of the wire should not be less than 2.5 mm: recommended are
2.8 or 3.0 mm.Gabions can be divided by so-called diaphragms
to increase their stability and to prevent the internal move-
ment of the stone fill.
For a gabion of 2 x 1 x 1 meter the following material is required:
1 piece of mesh wire 4 x 2 m = 8 sq. m,
2 pieces of mesh wire 1 x 1 m = 2 sq. m,
12 m iron rod 0.5-0.7 cm diameter,-
approximately 10 m wire for sewing.
[
I __ .m-*
At first the 4 m piece of mesh wire is spread on the ground.
Then, the two smaller pieces are connected with the main body
one meter from either end as shown in fig. 8. To strengthen
the gabione an iron rod is fixed around the edges of the main
mesh wire body and tied together where its two ends meet. TO . steady the gabion during filling*would be also possible to
use thin bamboo or wooden poles as a substitute,should funds
be lacking to buy the iron rod. These poles should not be
too thick, so as not to leave large hollows in the gabion after they have decayed.
421

MAIN MESH WlrE 6OoY -
---_--
ATTACHED SIDES
------
IRON ROD
-----
Fig. 7: Construction of a gabion
Zabions can also be manufactured from ordinary wire. The procedure requires some skill and experience and is des-
cribed in detail by GUPTA and DALAL (1967).
Mxmblinq of crabions: For better handling gabions are usual-
ly delivered flat-folded: Cn a level spot near the construc-
Lion site they are opened, their sides folded up and the edges sewn together firmly with wire, which must be looped
:wice through every mesh opening along the edges. It should me as strong as the mesh wire of the gabion.
XI - Bottom
I, III - Sides
Iv - Cover
A-B - Diaphragm
V - Ends
Fig. 8: Gabion openea
'illinq: It must be observed that the gabion does not lose Its shape. Therefore double strands of wire are stretched uxoss the box and single wires tied diagonally at the edges.
?or better support these wires should be looped around at
.east two meshes (Fig, 9). Without the cross-ties the gabion Lends to adopt the shape of a sausage.

Fig. 9: Stabilization of a gabion by cross ties
The stones for the filling should be larger than the size of
the meshes. The front of the gabion requires more riF=apping, whereas for the back or inner side a rough filling may be
sufficient. If there are not enough stones, the center can also be filled up with gravel (fig. 10).
Gabionc filled with bigger material at the outoidc finer msterisl in the mid&
0% bione Filled with large material ProM side riprepped
Fig. 10: Filling of a gabion
After filling,the cover of the gabion is bent down, pulled
tied with the help of a crowbar and sewn along the front edge and the sides. Most structures (retaining walls, check- dams, etc.) require several gabions, which are connected
likewise by strong galvanized wire.
423
Chapter 7:
PLANTS AND OTBER MATERIALS FOR BIOLOGICAL ENGINEERING
7.1 Plants for soil stabilization
Sinceadense vegetation cover is the best protection against
erosion, effective control techniques include to a large ex-
tent the use of living plants. Apart from being very effec-
tive vegetative measures of erosion control are very economi-
cai and are well within the scope of forestry work.
A single isolated plant can hardly prevent erosion, only the
complete vegetation gives the desired protection. Whenever
a vegetative cover is to be reestablished, the plants or cut-
tings must be set dense enough,or be able to close up quick-
ly to form soon a protective blanket, which should consist
of a mixture of trees, shrubs and some grasses.
In general, practically all plants are useful for a protective
cover. However, plants to be used for erosion control should
meet one or more of the following requirements:
- Ability to grow on degraded and eroded sites:
- Rapid development of the roots and the parts above-ground in order to provide the required protection very soon:
- Deep and widespread root system for good anchorage in the subsoil. But also a dense shallow root system can never- theless have a favorable "matting effect";
- Dense and wide-spreading crowns to form soon a close canopy;
- Base of establishment, preferably by cuttings, stumps or bare root seedlings. For live structures only species can be employed that sprout easily from cuttings;
- High production of litter to improve the site. Some species, especially legumes, are in a position to add considerable quantities of nitrogen to the soil tnrough symbiosis with nitrogen-fixing bacteria;
424

- Ability to withstand the physical stress of falling stones and soil avalanches:
- Ability to survive when temporarily submerged. This is an important requirement for species to be used in stream bank stabilization. In addition, such species must be flexible without breaking in a strong current.
Suitable plants should be selected among the local species
growing most vigorously in the area by considering the above-
mentioned quality specifications. It is quite possible to use even species, which have never been cultivated before, but offer desirable characteristics.
In temperate zones willows (Salix spp.) are the standard
species used in erosion control. This genus is represented in the tropics for example by Salix tetrasperma in Southern Asia and Salix humboldtiana in South America, Both species have not yet been tested in the Philippines.
Some promising species growing in the Philippines are listed
below. Many of them have been tested already successfully
in slope and bank stabilization.
a) Trees:
- Japanese alder (Alnus maritiina): Very suitable fast grow- ing species for medium and high elevations with strong root system and dense crown, root nodules with nitrogen- fixing bacteria; capable of improving degraded soils: unsuitable for dry sites.
- Inil-inil (Leucaena leucocephala): Can be propagated by cuttings: nitrogen-fixing bacteria; suitable for lowland sites, where it replaces*Alnus maritima in mixture with other species.
- Madre de Cacao (Gliricidia sepium): Propagation by cut- tings: nitrogen-fixing bacteria: grows on dry sites: together with ipil-ipil a very useful species for anti- erosion work in low elevations.
- Tibiq (Ficus nota): A useful tree for gully and bank stabilization: deep and widespread root system; in the beginning slow growing; only for moist sites.
- Paper mulberry (Broussonetia papyrifera): For higher elevations: propagation by cuttings.
- Benquet pine (Pinus insularis): Has quite a deep root system, but does not form a dense canopy: in mixture with other species suitable for higher elevations.
425

- Kamachile (Pithecolobium dul.ce): Very dense and deep reach- ing root system: modest soil requirements; excellent for gully and bank stabilization in lower altitudes.
b) Shrubs:
- Guava (Psidium guava): Very modest soil requirements, able to grow on practically all sites; very dense and widespread root system.
- Lantana camara: Quite adaptable even to poor sites, deep root system, propagation by cuttings.
- Nauclea SPD - A shrub growing on the driest sites, even in clefts of r&ks on southern slopes; seed ripens in March/ April: frequent in the Binga/Ambuklao area.
- Trompet Tree (Datura albaj: More of a shrub than a tree: fast growing, poisonous: propagation by cuttings; for medium and high elevations only.
- Mexican Sunflower (Helianthus tuberosusj: Forms shrubs with lignified stems; sprouts easily and grows rapidly: the most useful brush species for biological engineering in the medium and higher elevations.
- Dumanay (Homonoia riparia): A medium-sized shrub found in the beds of creeks and streams or along their banks: useful for river bank stabilization, survives flooding: slow growth: propagation by cuttings.
- Maquey (Agave cantala): Very draught resistant, provides cover for degraded soils; propagation by suckers or the viviparous embryos of the inflorescence (bulbils).
c) Vines:
- Kudzu (Pueraria thunbergiana, syn. P. hirsuta): For erosion control this species is considered the best of all the kudzus: propagation mainly by cuttings, because seed pro- duction is generally low: perennial.
- Pueraria nhaseoloides (syn. P. javanica): is more used as a fodder plant and for lower elevations: perennial.
- Centrosema (C. pubescens): A fast growing vine; shade resistant, perennial and quite tolerant of dry sites.
- Perennial lesnedeza (Lespedeza cuneata): An excellent cover plant, even on badly eroded sites; draught resistant.
- Li~~i~cuna nigricans) : A perennial vine thriving well on : seed can be collected in February/March; the
leaves are very itchy.
d) Bamboos:
- Kawavan (Bambusa spinosa): spiny bamboo, up to 25 m high.
- Kawayan - kilinq (Bambusa vulgaris): smaller than kawayan.
- Boho (Schizostachyum lumampao): up to 10 m high, very camnon. 426

e) Grasses: --
- Weeping Love Grass (Eragrostis curvula): This species has been introduced from Southern Africa to other tro- pical countries with a well pronounced wet and dry season; it is widely used for erosion control in Japan and Taiwan, particularly for hydro-seeding: an advantage is that this grass does not dry up completely during the dry season.
- Bermuda Grass (Cynodon dactylon): Equally suitable for dry and moist sites: stolon-forming, excellent soil cover particularly for banks and waterways: propagation usually by .planting stolons or by sodding.
- Kikuvu Grass (Pennisetum clandestinum): As a native of the highlands of East Africa this stolon-forming grass can only thrive under somewhat moist conditfons; the species has a dense root system and be propagated by planting stolons or small sods; widely used for erosion control in Taiwan.
There are other species of trees, shrubs, vines and grasses
that can be selected from the local flora. Especially the pioneer vegetation during the first stages of the succession
on abandoned kaingins, fresh landslides etc. may contain a number of suitable plants for erosion control with a wide
ecological amplitude.
7.2 Preparation of cuttings - --
Cuttings of different sizes are indispensable in biological
engineering. They can be of different length and can be
planted vertically or in a more slanting position. Experi-
ments have shown, that a strong cutting planted in an almost horizontal position (Fig. 11) gives the best result.
ALMOST HORIZ VERTICALLY- SLANTIN
Fig. 11: The development of cuttings
427

The cuttings must be planted deep enough in the soil. At
least three quarters of the length should be covered by
soil,on drier sites better four fifth. If too much of the
cutting is exposed, it is liable to dry out. Cuttings
must be absolutely fresh when planted. Therefore the fol-
lowing rules should be strictly observed:
- Cut the brush wood just before it is used.
- Remove all leaves and unlignified shoots after cutting.
For sunflower remove only 15-25 cm of the soft tip.
- Transport the material uncut to the construction site.
Protect it with leaves against drying up.
- When possible store the material in water or at least
under shade. Cover it with leaves and sprinkle it with
water from time to time.
- Prepare the cuttings just before planting.
- Use healthy material only.
Biological engineering requires large quantities of brush
wocd. Where there are supply difficulties, it is recommended
to establish a special nursery with multiplication beds to
meet the demand. The output of brushwood can be increased
by fertilizer application and irrigation, if required.
7.3 Grass sods
Grass sods are not often used in erosion control. They are obtained from sites with a dense grass cover. Grass sods are usually 4 to 7 cm thick and cut in squares of approxi-
mately 30 by 30 p..i or larger. Sometimes they are prepared in strips with a width of 25 to 30 cm. For better handling and to avoid drying up the strips are rolled. It must be avoided that the sods dry up during transport and storage.
7.4 Bitumen emulsion
For stabilization of fresh road cuts bitumen is used as a
25% emulsion, which means that the commercial 50% emulsion
has to be mixed with water at a ratio of 1:l. Bitumen

emulsion, which is a by-product of crude oil processing, is
also called "cold asphalt". Its ingredients are bitumen,
water and an emulsifier. Coal tar cannot be used in soil
stabilization because of its toxicity to plants.
7.5 Anchoring peqs
Wood used in biological engineering should have the necessary durability to withstand decay long enough until the vegetation
is well established. This is of particular importance on moist
sites, in gullies and along river banks, where the wood may be
subjected to frequent wetting and drying. The use of wood
preservatives is generally out of puestion.
Pegs used in live structures should have a diameter of not
less than 6 cm. They must be driven in deep enough and should
still respond under the last stroke. This means that the peg moves deeper at least 1 to 2 cm under the last stroke without
vibration or springing back. If the peg hits a stone or other obstacle, it will not get the necessary mooring. In that case another spot nearby has to be tried. Pegs can be driven in either vertical or perpendicular to the slope. The first is
easier, the second provides a better anchorage.
Pegs can also be made from sprouting material, so that they
will take roots. In that case the top, which generally is
damaged by hammering, has to be sawn off.
Hooked pegs for "nailing" are made of forked branches. AS their polarity will be changed, sprouting cannot be expected.
Fig. 12: Preparation of "hooked" pegs
429

Pegs are driven into the ground preferably with a mallet or
wooden hammer (weight about 3 kg) instead of a sledge hammer,
because the impact of steel on wood may destroy the tops of
the pegs.
Chapter 8:
PREPARATION OF SLOPE STABILIZATION SITES AND LAYOUT OF DRAINAGE
Before starting the actual soil stabilization work by either
live or combined structures, some preparations are indispen- sable. These preparations may be more time consuming and
expensive than the stabilization work itself.
8.1 Prenarations
All loose big stones and boulders must be removed from the
slope surface. If they roll down later, they cause damage in the already established structures. All suitable stones are collected for riprapping the most vulnerable spots. Then,
all grates and ridges are smoothened or levelled and rills
and gullies filled up with soil, if necessary supported by riprapping. Large gullies have to be stabilized and may
then become part of the drainage system.
430

Very important is a proper transition in the upper part of
the slope. Most landslides tend to form a steep or almost
vertical wall in the upper portion. If the soil is not
carved off for a smooth transition, more soil will constant-
ly break away in this area. Trees standing very close the edge and particularly those, whose roots are already partly
exposed must be cut.
PORTION TO BE
8.2 Drainaae
a) Diversion canals: Their purpose is to prevent surface run-off fromentering the area to be stabilized and to divert it into
stable waterways without creating new gullies. However, they are only required, where one has to cope with high quantities of run-off.
If there are no stable natural waterways, one has to dig a
trench and stabilize it with tar paper, old barrels cut in
halves, grass sods, riprap, fascines or the like. These canals should have a trapezoidal cross section with the sides sloping
1:l. Often, a stabilized gully is made part of the drainage
system (see Chapter 11).
b) Subsoil drainage on slopes can be achieved by culverts or closed conduits laid out in trenches 30 to 80 cm deep and 30 to 40 cm wide. They must decline towards the outlet for better flow. There are several drainage types depending on the conditions and the availability of material.
431
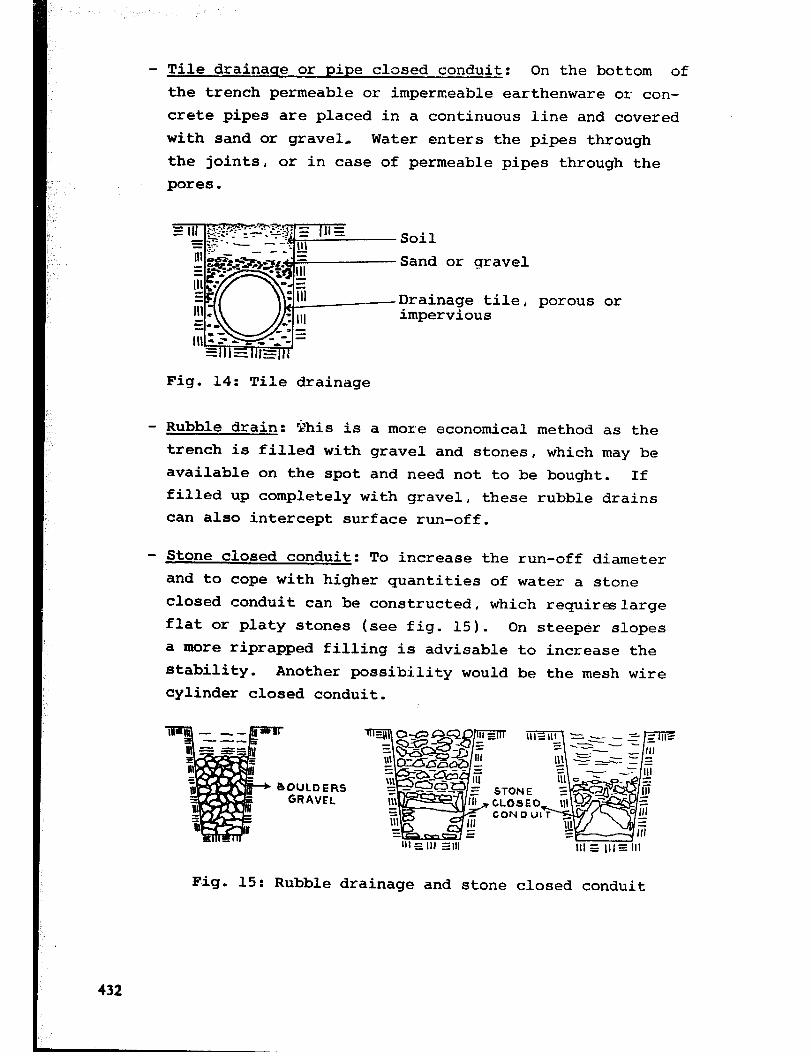
- Tile drainaqe or pipe closed conduit: On the bottom of
the trench permeable or impermeable earthenware or con-
crete pipes are placed in a continuous line and covered
with sand or gravel, Water enters the pipes through
the joints, or in case of permeable pipes through the
pores.
Soil
Sand or gravel
Drainage tile, impervious
porous or
Fig. 14: Tile drainage
- Rubble drain: This is a more economical method as the
trench is filled with gravel and stones, which may be
available on the spot and need not to be bought. If
filled up completely with gravel, these rubble drains
can also intercept surface run-off.
- Stone closed conduit: To increase the run-off diameter and to cope with higher quantities of water a stone
closed conduit can be constructed, which requirwlarge
flat or platy stones (see fig. 15). On steeper slopes a more riprapped filling is advisable to increase the
stability. Another possibility would be the mesh wire
cylinder closed conduit.
Fig. 15: Rubble drainage and stone closed conduit
432

- Temporary drainaqe: In the absence of stones or tiles also less durable materials as poles, boards and fascines can be employed in a temporary drainage. For details of con- struction see fig. 16.
TO BE FlLLEO WITH GRAVEL SAND IN -
SOIL
SMALL LOGS APART B\
BOARDS
OR FAS ’ PEGS PLACED
BOARDS PLACED TRIANGULARLY
CROSSWISE
Fig. 16: Temporary drainage
Culverts are laid ouch -.,ith a slight gradient along the con- tours with an outlet into a stable waterway. More common, however, is a diagonal or vertical layout; sometimes y-shaped culverts are constructed.
Fig. 17: Drainage layout in a road cut
c) Terracinq for better drainaqe: For the stabilization of longer slopes, terraces 10 to 30 meters apart depending on the gra- dient have been found quite helpful in reducing erosion damages. They should be 1 to 2 m wide and laid out along the contour with a slight inclination towards the slope. Furthermore, the terraces must have a slight gradient towards a stabilized waterway to conduct the intercepted surface run-off safely intO
the general drainage system. One can use them ae path6 when working in the slope.
433

/ (a) Cross section (b) Front view waterway
Fig. 18: Drainaps on a terraced slope
When the preparatory work is finished and the question of
drainage has been solved, which is of special importance in
long slopes, the actual stabilization work with seedlings,
cuttings or brushwood can start.

Chapt<>r 9:
VEGETATIVE METHODS OF SLOPE STABILIZATION -
In erosion control there is generally the choice between ve- getative measures and solid structures of stone and concrete,' or a combination of both. In this book emphasis is more on vegetative measures, because they are '
- widely applicable and adaptable, - economical, - effective, -. as durable as concrete if properly done and maintained, - easy to repair, - in harmony with the natural environment.
It must, however, be kept in mind that purely biological meas- ures have their limitations on very steep slopes, where only solid structures may provide the desired protection and stability.
9.1 Plantinu and sowinq
On slopes with more stable soils and a lesser gradient, an ordinary plantation may be sufficient to hold the soil in place. However, depending on the erodibility of the site, spacing must be closer than in conventional plantations. An average spacing of 0.6 to 1.0 meter would be adequate for most cases.
To avoid surface erosion around the seedling, the planting plots should have a decline against the hill. Mulching is also important.
435

The species selected should meet one or more of the require-
ments listed in Chapter 7.1. Since it may not be possible
to find a species having all those desirable characteristics,
one generally has to decide on a mixture of trees, shrubs and
grasses whose components are complementary in one or the other
respect. Planting is done in groups and clusters,intimate
or single tree mixtures are to be avoided.
It may not be possible to reclaim completely degraded areas
with one generation of trees alone. Often a less demanding,
but site improving nurse crop is planted ahead. Afterwards
more valuable, but generally also more demanding species are
introduced by under- or interplanting, when the site conditions
have improved. A species often used as a nurse crop is ipil-
ipil (Leucaena leucocephala), under certain conditions also
pines may be useful.
In semi-arid areas seedlings are often planted along contour
trenches, which are like narrow terraces sloping slightly
against the hill. Their objective is to intercept surface
run-off and promote infiltration of the scarce rain water.
The method, however, cannot be recommended for high rainfall
areas like the Philippines.
9.2 Brush cover (German "Spreitlaue")
This method, which in English is also known as "matting"
(BENNET, 19551, has quite a number of modifications.
a) Becruired materials and tools:
- Materials: Sprouting brushwood: pegs, sprouting or not,
60-80 cm long; wire, gauge 2 mm.
- Tools: Sledge hammer, or mallet, (wooden hammer)ca'3 kg:
bolos or pruners: a pair of pliers: shovels or spades.
416

b) Method of construction:
At first pegs, about 60 to 80 cm long, are prepared and driven in about 20 cm deep in lines along the contour; distance with-
in the lines about 1 meter, between the lines 1 to 2 meters,
depending on the gradient of the slope and the length of the
brushwood. Then the hrushwood is spread with the butt end
pointing downslope without leaving any uncovered spots.
Afterwards, the pegs are horizontally connected by wire and
further driven in, which presses the brushwood firmly to the ground. It may be necessary to cut some notches at the end of pegs to prevent the wires from slipping off.
Soil to be carved off utilized for cover
Thin soil cover Brushwood
Pegs 60-80 cm long connected by wire.with other pegs in the same row. Pegs can be driven in perpendicularly to the slope or vertically.
Construction of brush cover
On steep slopes, it is sometimes difficult to keep the brush-
wood in place before installing the wires. There are two
techniques to facilitate the work:
- The pegs can be connected before the brushwood is
spread, so that the wire keeps the rods in place. Later
the pegs are driven in deeper so as to press the brushwood
firmly to the ground. 43?
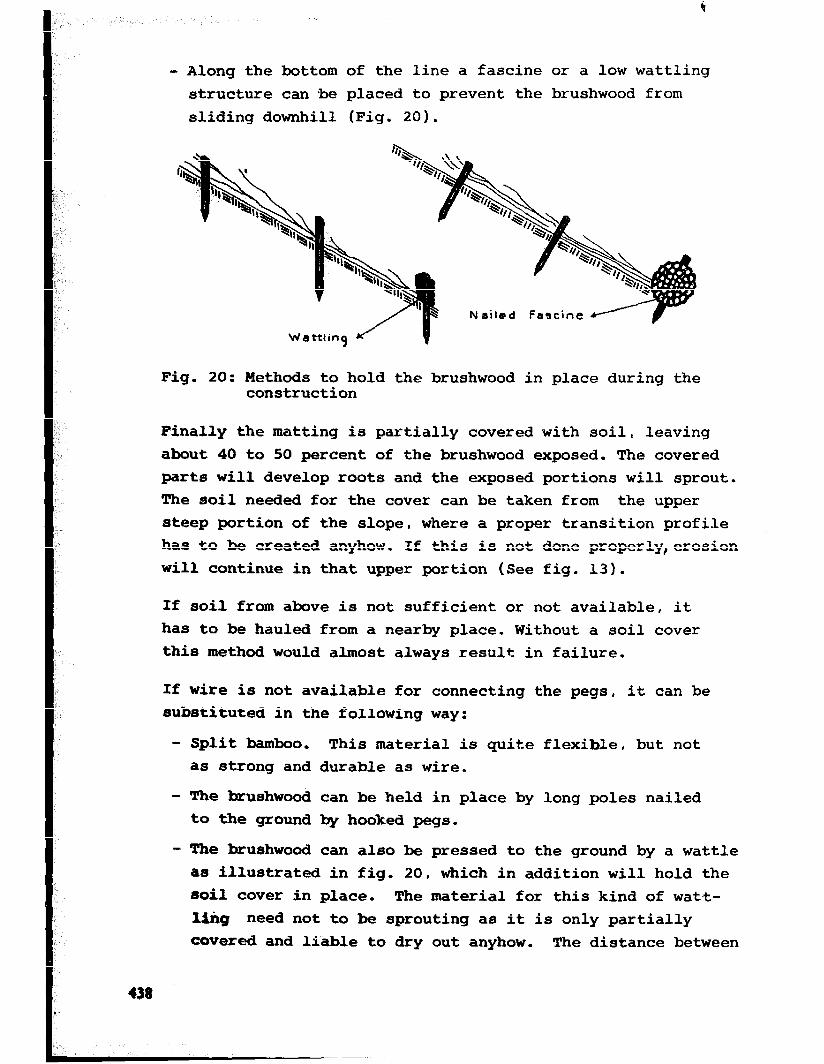
- Along the bottom of the line a fascine or a low wattling
structure can .be placed to prevent the brushwood from
sliding downhill (Fig. 20).
Nailed Fsbcine
Fig. 20: Methods to hold the brushwood in place during the construction
Finally the matting is partially covered with soil, leaving
about 40 to 50 percent of the brushwood exposed. The covered
parts will develop roots and the exposed portions will sprout.
The soil needed for the cover can be taken from the upper
steep portion of the slope, where a proper transition profile has to be created anyhow. If this is not done properly,erosion will continue in that upper portion (See fig. 13).
If soil from above is not sufficient or not available, it
has to be hauled from a nearby place. Without a soil cover
this method would almost always result in failure.
If wire is not available for connecting the pegs, it can be
substituted in the following way:
- Split bamboo. This material is quite flexible, but not as strong and durable as wire.
- The brushwood can be held in place by long poles nailed
to the ground by hooked pegs.
- The brushwood can also be pressed to the ground by a wattle
as illustrated in fig. 20, which in addition will hold the soil cover in place. The material for this kind of watt- liiq need not to be sprouting as it is only partially
covered and liable to dry out anyhow. The distance between

the pegs within the row and between the rows should be rather
narrow to compensate for the lesser strength of this structure.
Fig. 21: Instead of using wire the brushwood is kept in place by wattling
To provide better growing conditions particularly on dry
sites, the brush cover should be mulched with grass or leaves.
Immediate fertilizer 'application after the construction is
not recommended as the fertilizer may be washed out before the roots are developed.
Several modifications of the brush cover method have been
worked out:
- Modification 1: To economize with brushwood, it is also
possible to cover only portions of the slope in strips or
bands,which should follow the contour. Between these bands,which are called "mattresses", seedlings or cuttings are planted (Fig. 22).
Their width should be between one and two meters. The
distance between the mattresses depends on the steepness
and the erodibility of the slope. On very erodible slopes they are constructed in shallow trenches about 15 cm deep. In this case we speak of "sunk mattresses" .(Fig. 23),
439

Sprouting
Fig. 22: "Mattresses" (Standard method)
Seedlings or cuttings
Fig. 23: "Sunk mattrasses"
- Modification 2: In the absence of sprouting material, any kind of available brushwood, even dead branches can be
used as a soil cover. The brushwood is tied to the slope in the same way as described above. Afterwards cuttings are planted-densely through the brush cover. A soil cover
is not required. This method is also called "dry brush cover", which can also be constructed in the form of a mattress.

Cuttinas -A. bJit
Non-sprouting -7 -z A\\1
/ Brushwood
\ .
B)
Cuttings
Fig. 24: (a) Ordinary dry brush cover, (b) dry brush cover as mattresses
c) Advantages snd disadvantages:
- Advantaoes: The brush cover is probably the most stable
of all live structures. Immediately after the construction it will resist almost all stresses of erosion. Therefore, it can be recommended for steep slopes, unstable soils, and
for regions with a high rainfall intensity (typhoon belt).
Due to the cover of soil and mulching material it does not
dry out easily.
- Disadvantages: A disadvantage of this method is the high quantity of brushwood and labor required. To economize, the mattress modification may be given preference.
9.3 Bench brush layers (French: Cordon, German: Buschlage)
This method is very old and common in Central Europe. It was originally developed in France, but later improved in Austria
and Germany.
441

a) Required tools and materials:
- Materials: Sprouting brushwood in pieces of at least 0.8
meters length; for modifications tall seedlings; fertilizer,
if available.
- Tools: Hoes, spades or shovels, bolos or pruners.
b) Method of construction:
In contrast to the brush cover method and other slope stabili-
zation methods, the work for the bench brush layers begins at the base of the slope and proceeds uphill. At the base of
the slope, the first bench is dug with a depth of 50 - 120 cm with an inward inclination of about 25O. The brushwood iS
spread on the benches with the butt ends pointing inwards.
For better anchorage the branches should be placed crosswise.
Branchy and forked brushwood serves the purpose better than
straight rods. The excavated soil from the next upper bench is used to cover the brushwood. This is the reason why the work has to start at the base of the slope. After refilling, the soil is carefully tamped. Fertilizer is applied by broad- casting before refilling the benches.
/
Brushwood placed crosswise
Fig. 25: Bench brush layers (standard method)
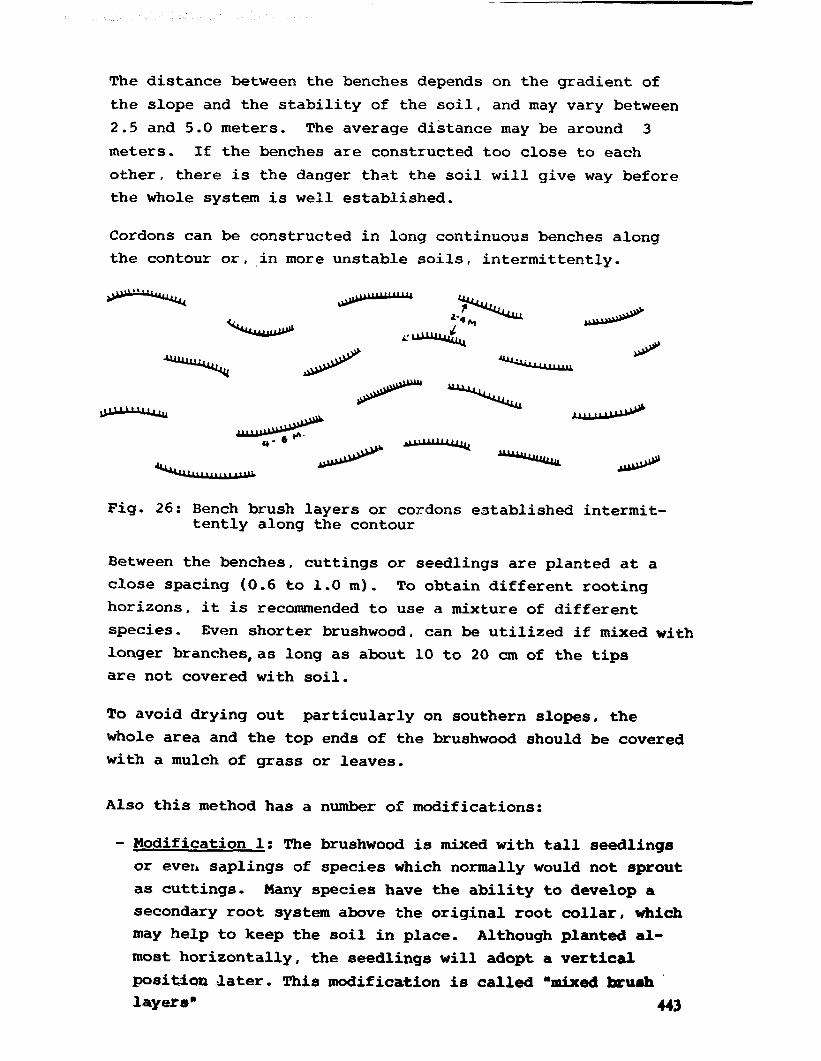
The distance between the benches depends on the gradient of
the slope and the stability of the soil, and may vary between
2.5 and 5.0 meters. The average distance may be around 3
meters. If the benches are constructed too close to each
other, there is the danger that the soil will give way before
the whole system is well established.
Cordons can be constructed in long continuous benches along
the contour or, in more unstable soils, intermittently.
Fig. 26: Bench brush layers or cordons established intermit- tently along the contour
Between the benches, cuttings or seedlings are planted at a close spacing (0.6 to 1.0 m). To obtain different rooting horizons, it is recommended to use a mixture of different species. Even shorter brushwood, can be utilized if mixed with longer branches,as long as about 10 to 20 cm of the tips
are not covered with soil.
To avoid drying out particularly on southern slopes, the
whole area and the top ends of the brushwood should be covered
with a mulch of grass or leaves.
Also this method has a number of modifications:
- Modification 1: The brushwood is mixed with tall seedlings
or even saplings of species which normally would not sprout
as cuttings. Many species have the ability to develop a secondary root system above the original root collar, which
may help to keep the soil in place. Although planted al- most horizontally, the seedlings will adopt a vertical posit-i-on ,Jater. This modification is called "tieid bmsh 1ayarrP u3

all seedlings and brushwood
Fig. 27: Brushwood mixed with tall seedlings or saplings
- Modification 2 adopts elements of the brush cover method by using pegs and wire to fasten the brushwood to the benches, which are also covered by soil afterwards. Through the pegs and wire the structure gains additional strength,
which may be necessary for more unstable soils (Fig. 28). Rarely used.
Brushwood \
- Modification 3 is designed for the stabilization of dumps and larger road fills. The stabilization work is carried out simultaneously with the dumping of soil. After dump- ing the first layer of soil, brushwood of 2-4 meter is laid out crosswise. Then the next lay&r of soil is dumped leaving about one fourth of the brushwood exposed. The dumped soil must be well compacted with a stamper or, if available, with a vibration compacter. The vertical distance
Fig. 28: Cordon with pegs and wire
444
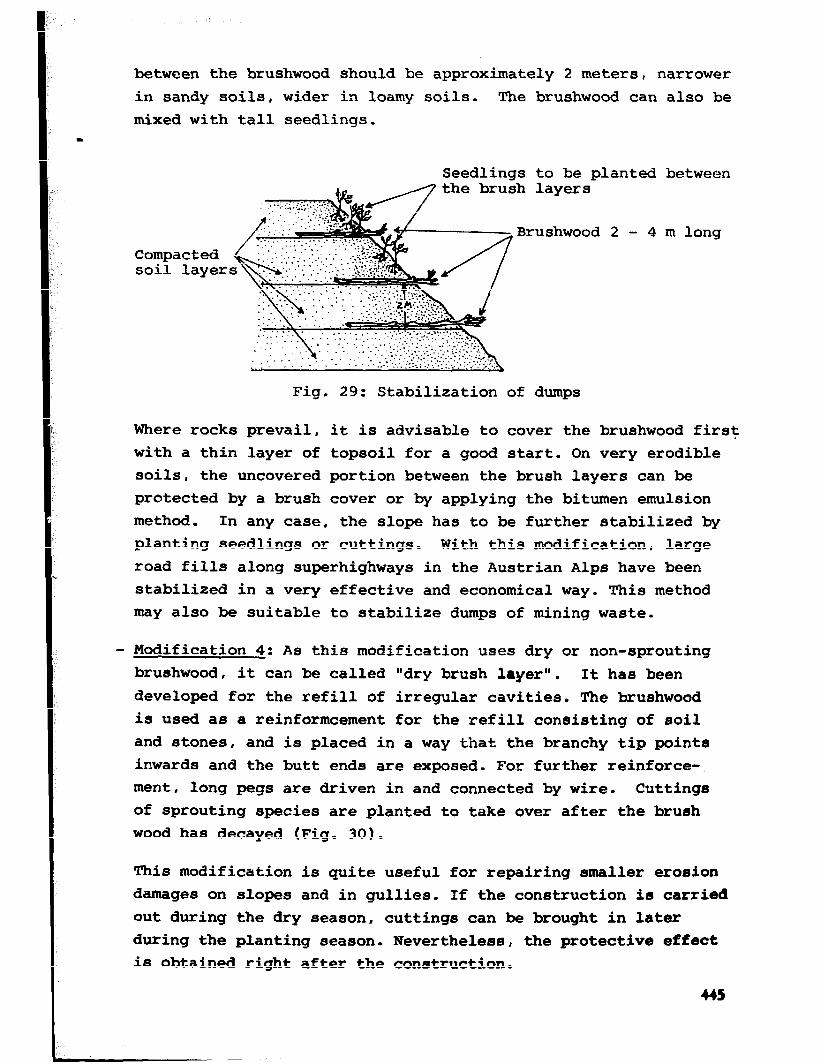
between the brushwood should be approximately 2 meters, narrower
in sandy soils, wider in loamy soils. The brushwood can also be
mixed with tall seedlings. I
Seedlings to be planted between the brush layers
Brushwood 2 - 4 m long
. . , . . . : . . ..i. ,. : . *::::_
Fig. 29: Stabilization of dumps
Where rocks prevail, it is advisable to cover the brushwood first
with a thin layer of topsoil for a good start. On very erodible soils, the uncovered portion between the brush layers can be
protected by a brush cover or by applying the bitumen emulsion
method. In any case, the slope has to be further stabilized by planting seedlings or cuttings. With this modification, large
road fills along superhighways in the Austrian Alps have been
stabilized in a very effective and economical way. This method
may also be suitable to stabilize dumps of mining waste.
- Modification 4: As this modification uses dry or non-sprouting
brushwood, it can be called "dry brush layer". It has been developed for the refill of irregular cavities. The brushwood
is used as a reinformcement for the refill consisting of soil
and stones, and is placed in a way that the branchy tip points inwards and the butt ends are exposed. For further reinforce-
ment, long pegs are driven in and connected by wire. Cuttings of sprouting species are planted to take over after the brush
wood has decayed (Fig. 30).
This modification is quite useful for repairing smaller erosion
damages on slopes and in gullies. If the construction is carried out during the dry season, cuttings can be brought in later during the planting season. Nevertheless, the protective effect is obtained right after the construction.
443

Soil and
stones
Brushwood with butt ends - 20 cm exposed
1 hr ~ Cuttings planted in between
Levelling pole indicate desired
Fig. -30: The use of non-sprouting brushwood as described under modification 4
c) Advantases and disadvantaqes
- Advantaqes: The brushwood is well protected against drying
out. Only a small quantity of brushwood, which can be of
irregular form, is required. Besides brushwood and ferti- lizer, no other material is needed. The progress of the
work is quite fast. Failures are relatively rare. This method is considered by European erosion control experts
as one of the best and most economical.
- Disadvantaqes: Since the soil surface between the benches
is not welJ protected as compared to the brush cover method,
sheet and rill erosion can occur in the beginning. This
could be reduced by covering the intervals between the
benches with mulch after the seedlings have been planted.
In loose and dumped soils which are not yet compact enough,
digging the benches may cause small landslides. On those sites, brush covers should be given preference.
9.4 Wattlinq
a) Recwired tools and materials
- Materials: Pegs (70 to 90 cm long, diameter approximately
4-6 cm): rods, long, straight and flexible of a sprouting species: cuttings, 40 to 60 cm long.
- T001st Bolos or strong pruning shears: big hammer or mallet
(wooden hammer); planting hoes, shovels and a crowbar.

b) Method of construction: Wattling consists of interwoven fences
of brushwood in shallow trenches. In a shallow trench approxi-
mately 25 cm deep, pegs are driven in 50 to 70 cm apart, be-
tween which straight rods of sprouting species like runflower,
ipil-ipil, kakawati are woven. The rods must be interwoven
in a way that the butt ends are bent down into the soil (or
will be covered by soil) and their upper portions exposed
(Fig. 31 c). It is also possible to insert cuttings in the
wattling structure (Fig. 31 b).
A) Cross section
B) View from above
Rods P$gs C) Side view
Fig. 31: Construction of sunk wattling
Finally, the trenches are refilled with the excavated soil,
leaving the upper part of the wattling structure exposed. Be-
fore refilling the trenches, one can apply fertilizer. On
sites with a southern exposure, a mulch cover will help to
keep the moisture and favor sprouting.
447

Wattling8 can be constructed in continuous lines or intermit-
tently along the contour. Another technique is the so-called
diagonal wattling with lines crossing the slope in a rhomboid
pattern. This method is quite common for the stabilization
of road cuts in Germany.
The distance between wattlings depends on the stability of
the soil, but should not be less than 2 meters. The intervals
can be planted with seedlings or cuttings of suitable species.
- Modification: Instead of using living branches, one can also use any kind of non-sprouting material. This modifi- cation is called "dry wattling". In this case, there is no need to observe the polarity of the rods or to have the butt ends covered with soil. The trenches can be much shallower.
A dry wattling does not depend for its construction on the
rainy season. It can be constructed any time, but has to be planted with seedlings and cuttings during the planting
season.
c) Advantages and disadvantaqes:
- Advantaqes: Due to the retaining ability of the wattlings, the soil is kept well in place. Protection is obtained usually right after the establishment. When constructed diagonally, wattling8 are very stable and large erosion
can hardly occur.
- Disadvantages: Only long straight and flexible rods can be used. If the structures are not buried deep enough, they may be washed out and damaged by surface runoff. The con- struction of wattlings in trenches is quite difficult.
Since too much of the brushwood is generally exposed, sprout-
ing may not be satisfactory.
U8

9.5 Slope stabilization with fascineq
The use of fascines for slope stabilization is not very common nowadays. Their main use lies more in river bank stabilization.
a) Required tools and materials:
- Materials: Brushwood of sprouting species, wire, hooked pegs.
- Tools: Hoes, shovels, hammer or mallet, bolos or pruners, axe, pair of pliers, and a bow saw.
b) Bundlins of fascines: Fascines are bundles of long and dense brushwood of varying length. For slope stabilization, the length of the fascines should not exceed 3 meters, otherwise they would become too heavy to handle as the weight of a fas- tine with a length of 1 meter and a diameter of 25 centimeter is 13 to 14 kilograms.
The bundles should form a straight cylinder. Top and butt ends must be arranged in a way to get a cylindrical shape, the polarity does not matter.
There are two methods of bundling:
- Guide frame: A guide frame is prepared by two parallel rows of pegs 35 cm apart. Pieces of wire 1 meter long are placed across on the ground before the brushwood is piled up. After filling, the brushwood is bundled. Finally, both ends of the fascine are trimmed (Fig. 32).
Pegs 50 cm apart
I J Wire for bundling the facine
Brushwood 1
Fig. 32: Construction of a fascine
449

- Bundlina press: For the manufacture of large numbers of fascines, the use of a "fagot binder's press" or "fagot
bundling press" is recommended, The device lookssimilar to a saw buck and consists of poles driven crosswise in
the ground as illustrated in fig. 33 and tied together
by wire.
Fig. 33: Fagot bundling press
For bundling, the brushwood is compressed with a simple device called binding chain as illustrated in Fig. 34.
The binding chain is placed below the bundle and both
handles are first pressed upwards and then downwards,
This work is done by two men, while a third person takes care of the wiring as the brushwood is compressed. Final- ly, both ends of the fascine are properly trimmed.
1. 2.
i Y 2
T i :
I
Fig, 34: Pressing of fascines with a binding chain

Method of construction: After the usual preparation, trenches with a depth of about $ the diameter of the fascine are dug to prevent underscouring by surface run-off and drying out of the brushwood. The fascines are placed in the trench and "nailed" or anchored firmly in the ground with hooked pegs. The fascines can also be anchored by pegs driven in along both sides. The opposite pegs are connected by wire.
Trench for placing the fascine
"Nailed" fascine
Fig. 35: Slope stabilization by fascines
After the fascines have been laid out and nailed, the trenches are filled with soil, and the fascines buried to about one half or two thirds of their diameter. Fertilizer application and a mulch cover would improve the growing conditions.
Fascines can be built in a continuous line or intermittently as described above. Also a diagonal layout is possible. me intervals between the rows depend mainly on the gradient. BERRY i1956) suggests the following intervals:
451

Slope Interval between fascines No. of fascines per 100 sq.m (surface distance) (1.5 m long, 30 cm diam.)
o-loo Open brushwood supported by cuttings, no fascines ll-2o" 3.00 m 20 21-30' 1.50 m 36 31.4o" 1.20 m 47 41.5o" 1.00 m 51 over 50° retaining walls
Table 6: Intervals between fascines on slopes of different gra- dient (According to BERRY, 1956)
- Modification: If not enough sprouting brushwood is avail- able, the fascines can be made of non-sprouting material. The brushwood should not have diameters over 5 centimeters. The method of construction is the same as described for the standard method. Protection is first achieved by the fascines. Later, when the fascines have decayed, the seedlings and cuttings planted in the intervals will take over.
c) Advantaqes and disadvantaqes
- Advantaqes of fascines: Very easy to establish, fast pro- gress of work, relatively low cost. A mechanical protect- ion is already obtained right after the establishment.
- Disadvantages: Fascines require large quantities of brush- wood. They are liable to dry out, only a small portion of the brushwood will sprout, therefore "dry" fascines are to be preferred. But they are quite low and, therefore, hard- ly able to intercept much rolling material.
9.6 Soddinq
may sometimes be considered for the stabilization of small slopes particularly in residential areas. The difficulty in wing this old and efficient method usually is the supply of a sufficient quantity of good quality sods.
Before placing the sods, the slope has to be well smoothened. The work startsat the base of the slope. It is essential that
452

the sods have a good contact with the soil. This is achieved
by clapping the sods with a sod flap or a handy piece of wood.
At last, a thin cover of good topsoil(and some fertilizer) is
applied, and the sodding is watered thoroughly.
,I ,I ,I 1' "
I, h" b 11 I,
0 II 0
Fig. 36: "Nailing" of sods on a steep slope
On steep slopes and along river banks, the sods are kept in
place by short wooden pegs 20-30 cm long, 2-3 cm thick. In river bank stabilization, the sods are sometimes covered by mesh wire. After completion, the sodding should not be step- ped on for 3 to 4 weeks.
In very steep slopes with a gradient of over 45: the sods
are put in layers, either perpendicular to the slope or horizontally. Because of the high consumption of sods this modification is employed only in special cases, particular-
ly for inlets or outlets of culverts.
The advantage of sodding is that the protection is obtained
right after the establishment. It is, however, often dif- ficult to obtain sods in sufficient quantity. The main
application of this method is for landscaping, gardening
purposes, and stream bank stabilization.
9.7 Mulchina and bitumen emulsion
In the original method developed in U.S.A. a mixture of bitumen,
water,seed, fertilizer, chopped grass or straw and good top- soil were applied to the slope simultaneously in one operation with a powerful seeding gun mounted on a truck while a mixing device prevents sedimentation during spraying.
453

The bitumen acts as a kind of glue binding mulch, seeds, fer-
tilizer and soil particles together. Evaporation from the
soil suicface is reduced, and an excellent micro-climate
favors the germination of the seed. If the work has been successful, the vegetation soon forms a close blanket taking
over the protection when the straw mulch starts to decompose.
The method was modified in Europe, SO that simple backsprayers could be used.
After the usual preparation like levelling and removal of
loose stones, the slope is covered with grass or straw in full
length or chopped in pieces of about 5 cm. The grass cover is
thoroughly wetted by soaking before it is spread, or by sprinkling afterwards. On the grass mulch, a seed mixture is broadcast together with complete fertilizer. The quantity of seed required per square meter is 40 to 50 grams consisting of a suitable mixture of trees, shrubs, herbs and grasses.
The same quantity of fertilizer is added.
Then the bitumen emulsion is applied with an ordinary sprayer,
the same type as used for spraying insecticides. The quantity of bitumen emulsion (50 %) needed per square meter is about 0.25 liters mixed with the same quantity of water, so that
finally a 25 % mixture is applied. Mixing the emulsion is done just before spraying to avoid coagulation and clogging of the sprayer nozzle. The commercial bitumen emulsion must be always stored in airtight containers to avoid hardening.
Bitumen emulsion mixed with water must be used within one or
two hours and cannot be stored longer.
During the work, the areas to be stabilized should not be stepped on. Therefore ladders must be used from which a strip l-5 m wide can be covered ; then they are moved to another strip. The work must be conducted during good weather, because it takes three to four hours for the emulsion to harden complete-
ly and to provide a stable coating. Rainfall after this time would net affect the work anymore.
,

9.8 Slope stabilization bv hydro-seedinq
In another modification of the original mulching method, in-
stead of bitumen emulsion a polymere dispersion, e.g. CURASOL
is used. Sometimes small quantities of natrium alganate like
AGRICOL are added (l-2 grams per square meter). The mixture
consisting of seed, fertilizer, binder chemical, and sometimes mulching material is directly applied to the slope in one process with a special "hydra-seeder". In contrast to the original method this mixture does not contain soil. With extension hoses also spots in some distance from the road can be reached.
After spraying the water will evaporate or seep into the soil.
The finely distributed particles will harden under mutual con-
tact and bind the soil in a porous three-dimensional net-like pattern. The stability is determined by the quantity of mate-
rial used. The depth of the soil which is stabilized depends
mainly on the quantity of water added and how the diluted components of the mixture were absorbed by the soil.
This method has been successfully used in Japan for spraying
inaccessible places from helicopters.

Chapter 10:
SOLID RETAINING WALLS AND COMBINED METHODS OF SLOPE STABILIZATION
Vegetative methods of slope stabilization have their limitations
on slopes over 50°. If the slope is steeper, it requires solid
retaining walls. But because of their high costs in material
and Babor, they should be limited to places where their con-
struction is justified by their function.
For increased stability against pressure from the slope, the
front must be slightly inclined, while the back is vertical.
For different types of retaining walls the following inclination
is recommended:
dry stone wall - 1:1/3 to 1:1/4
masonry 1:1/4 to 1:1/5
concrete 1:1/5 to 1:1/20
The thickness of the wall on top depends on the material and
the height of the wall. The following suggestions apply to
\' .fetaining walls 1 meter high:
dry stone wall - 0.50 meters
masonry 0.40 meters
concrete 0.30 meters
Higher walls reqbire greater thickness. The foundation must
be deep enough to avoid sinking. As a rule of thumb, founda-
tions of dry stone walls should have a width of about two
thirds of the height. Since revetments are not so much exposed
to the pressure of the slope and serve more to prevent a fur-
ther weathering of rocks and of stable soils on steep slopes,
they need not to have the same thickness as the retaining walls.
4%

10.1 Riprap or dry stone walls
are a very common and traditional technique W ::sabill;.ze
terraces and steep slopes which are not too high. Sometimes
riprap serves more as a revetment than as a retaining wall.
A special drainage is not required, since riprap walls are
self-draining.
In the construction, the joints are broken like in ordinary
masonry. The largest stones are reserved for the founc?ation
and the lower portions of the wall. It is imporLant that after each layer of stones soil is filled behind And firmly
compacted, otherwise the wall would collapse in the first heavy rainfall.
10.2 Retaininq walls of concrete or masonry
are seldom used in forestry fieldwork. Their main function is to protect buildings or other valuable installations. Very important is a drainage within and behind the wall. This is generally achieved by piling stones and gravel behind the
wall to absorb the press'ure of the slope and collect the
drainage water. To conduct the accumulated water through the wall, some drain pipes or holes ("weep holes") are built in.
Stone piling
Foundation
Fig. 37: Solid retaining wall with drainage holes and stone piling
457

10.3 Gabions for slope stabilization
are becoming more and more popular in Europe. For this purpose, the gabion elements can be combined in many dif- ferent ways. It is possible to stabilize the base of a slope with only one row of gabions, or to arrange them in
terrace formation as shown in fig. 38 b. Especially the first type of structure should always have a slight incli-
nation towards the slope. In structures with a height of two or more elements, the gabion units must be solidly connected by wire,
Fig. 38: a) Gabion with an inclination towards the slope:
b) Gabionsin terrace formation.
In the following, methods of slope stabilization are de- scribed that are a combination of plants,mainly cuttings, and a more or lees durable structure. Very often the latter serves only to protect and keep the soil in place,
until the vegetation is fully established. Sometimes the vegetation only reinforces or strengthens the solid structure.
450

10.4 Riprap interplanted with cuttings
Riprap retaining walls and revetments can be reinforced by
interplanting them in the joints with cuttings of suitable
species. The length of the cuttings depends on the thick-
ness of the riprap. Planting must be deep enough to avoid
drying up. Only 2-3 cm of the cuttings should be exposed
outside the wall. Sometimes grasses are planted in the
joints, especially in the stabilization of river banks.
Fig. 39: Riprap interplanted with cuttings
10.5 Pole structure (German: Rrainerwand)
Though expensive because of the high consumption of polea, this method may bs of some value where stones are not'avail- able and an urgent stabilization is required.
For the construction one needs poles of sufficient length with a diameter of 10 to 15 cm, The first pole is placed lengthwise along the base, Then strong posts with a dia- meter not less than 12 cm are laid out perpendicular to the base pole 1 to 2 meters apart. In the intervals cuttings or seedlings are planted in a slanting position. Thenext pole is laid again lengthwise 10 to 15 cm inward on top of
the perpendicular poles. The same promdure is repeated until the desired height id obtained. For better anchorage the
459

poles can be notched at the joints. If the construction takes place during the dry season , planting of cuttings can follow during the next rainy season.
Poles placed lengthwise \-
A &&Seedlings
Interplanted cuttings
Fig. 40: Pole structure
10.6 Slope stabilization with worn-out tires
For environmental considerations the disposal of worn-out tires is often a problem. Using old tires for slope sta- bilization may be a good way of disposal, achieving some
benefit at the same time without impairing the environment and violating aesthetic values too much. The parts of the tires exposed can becamouflaged by vegetation.
Worn-out tires can be used effectively for retaining walls as shown in fig. 41.
Gradient .A max. 1:0.6 '
(al Cro as section (b) Front view Pig. 41 Retaining wall made of worn-out tires
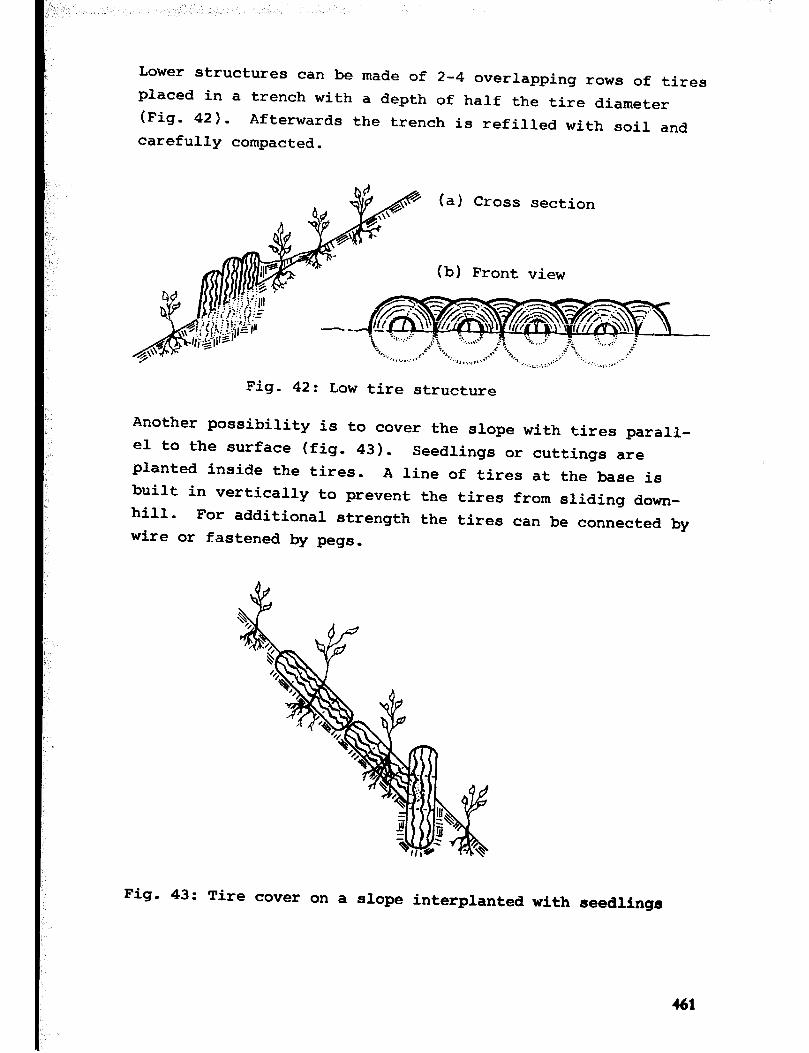
--
Lower structures can be made of 2-4 overlapping rows of tires placed in a trench with a depth of half the tire diameter (Fig. 42). Afterwards the trench is refilled with soil and carefully compacted.
(a) Cross section
(b) Front view
Fig. 42: Low tire structure
Another possibility is to cover the slope with tires parall- el to the surface (fig. 43). Seedlings or cuttings are planted inside the tires. A line of tires at the base is built in vertically to prevent the tires from sliding down- hill. For additional strength the tires can be connected by wire or fastened by pegs.
Fig. 43: Tire cover on a slope interplanted with seedlings
461

Chapter 11:
GULLY STABILIZATION
usually originate from concentrations of flowing
water on the soil surface. They can start from livestock
trails in overgrazed pastures, faulty drainage from roads,
neglected rills and furrows in farm lands, logging trails,
log landings, clogged drainage canals, etc.
Gully formation is hastened by heavy rainfall, when large
quantities of run-off attain a high velocity and increased erosive power. The different shapes of gullies have been
discussed in Chapter 1.
In gully erosion control the following phases can be dis- tinguished:
- Txnprovement of the catchment area of the gully to reduce
and regulate the quantity of run-off;
- Stabilization of the gully head to prevent the gully from
"eating backwardtg;
- Safe conduct of water through the gully, if it is part of
the natural drainage system:
- Reclamation of the gully area, where it is not part of
the natural drainage system.
11-l Inmovement of the catclment area
If the cause of gully formation is a denuded watershed with
its accelerated run-off, re-establishment of the vegetative
cover would be the appropriate measure to take. The area must be planted with shrubs and trees to improve the soil
condition, increase infiltration and reduce surface run-off.
442

11.2 Stabilization of the oully head
In serious cases, the absorbing capacity of the catchment
can be increased by "contour bunding". Contour bunding is the construction of low earth dams along the contour, behind
which the water can gradually infiltrate into the soil. Itis
designed more for pastures and agricultural land, but may
also be useful for other purposes.
If the gully does not belong to the natural drainage system
and stabilization is attempted by planting only, the run-off
entering the gully head has to be intercepted by a diversion
canal, This canal is dug above the gully head at a distance of once or twice the depth of the gully. It should have a trapezoidal crossection and must be designed wide enough to
conduct maximum rainfall. Precautions must be taken that not a new gully develops from the diversion canal, which
should be checked after every typhoon.
Where the gullies are part of the natural drainage system,
sometimes otily temporary diversion canals are dug. In this case the gully head is stabilized in a way that the yully
cannot enlarge by waterfall erosion (see fig. 3) anymore
when water enters.
To stop the gully from eating back, the gradient of the
gully head is first reduced to about 45O. The surface of the
gully head is then stabilized by any of the following methods:
- A brush cover well anchored to the ground is the most
recommendable vegetative method (see Chapter 9.2).
- Sodding may be possible in grassland, where sods are
available. The sods tist be "nailed" to the surface.
- Riprap interplanted with cuttings is also a very recom-
mendable method to stabilize a gully head. The lay-out
of the riprap should be concave to concentrate the water
in the middle. An apron at the bottom is essential to
prevent scouring (see fig. 441.
463

Apron
Paved entrance canal (if necessary)
Apron
Riprqped step at the gully head
Fig- 44: Stabilization of a gully head by riprap
- Pole structure: In the absence of stones also a pole structure can be employed for the gully head. It should be laid out in V-shape to concentrate the water in the center. An apron must
be constructed below and a canal above at the intake (fig. 45).
Water
Poles
Apron Bank
\ \
View from above
Water Cuttings
q /- Cross section 4%!f
Fig. 45 Gully head stabilization by a pole structure
- Solid structures for gully head stabilization can be made
riprap, gabions, masonry or concrete. The construction can ?f
be in the form of an arch as shown in fig. 46. If it is
necessary to concentrate the run-off above the gully head, there should be wing walls of earth or riprap. The flow is conducted through a water-spill or notch and falls down
t0 the bottom of the gully bed, which is protected by an apron.

Notch (cemented)
-Wing wall
Fig. 46: Gully head stabilization by a solid structure with wing walls (view from above).
1.3 Stabilization of crullies belonqinq to the natural drainace system
After improvement of the catchment and stabilization of the gully head, the gully bed has to be treated to prevent further deepening and widening. This is achieved mainly by various types of checkdams and so-called "ground ties".
The purpose of a checkdam is to reduce the gradient and break the velocity of the flow. Through checkdams the water is con- ducted safely from a higher to a lower point without causing erosion at the gully bed. The waterpools behind the dams pro- mote the percolation of water into the soil. Checkdams still serve their purpose even when they are completely silted up by reducing the gradient inside the gully.
For gullies which are part of the natural drainage system, only checkdams with a long life-span are suitable. They should be constructed in places where the bed is narrow and the banks are firm. Curves or sites within or just below gully junctions must be avoided.
Gradient 0-4O Checkdam
Fig. 47: Spacing of checkdams
465

In an ideal case, checkdams should be spaced in such a way that the bottom of the upper checkdam is level with the top of the next lower one. In a steep gully this is difficult to achieve because too many checkdams would be required. If the section between two successive checkdams cannot be made level, the gra- dient should at least not exceed 5 percent.
The height of the dams influences their spacing. There is the I alternative of constructing a few high or many low dams on a certain gradient. High checkdams have to resist a greater pres- sure than low ones and, therefore, are more liable to damages. While concrete or masonry dams can be built at any height, dry stone or brushwood dams should be low. Under normal conditions, the height of a checkdam should not exceed 1 meter.
Checkdams must be well anchored in the ground and particularly in the banks to prevent underscouring and scouring between the dam and the banks. The flow is directed through a water-spill or notch in the center of the dam. Below the dam, where the water hits the gully bed, a protective apron must be constructed. For additional strength the checkdam is filled up to the notch with soil on the up-stream side.
According to the material used the following types of checkdams can be distinguished:
a) Stone checkdams are most commonly used in gully control and are generally constructed as a dry stone wall. At first the gradient of the gully banks is reduced to about 4S" or 1:l. Then a foun- dation 30 to 50 cm deep extending well into the banks is dug. The soil is piled up-stream to be used later for the re-fill. The largest stones are placed in the bottom layers. The joints in successive layers are broken according to the usual rules of riprap.
Soil from the foundation
Foundation Checkdam with steps
Fig. 48: Dry stone checkdams
466

At first, a foundation extending well into the banks is dug. The brushwood, sprouting or non-sprouting, is placed between two rows of pegs driven-in 40 cm apart across the gully bed. The distance between the rows should be 0.80 to 1.0 meter for gullies up to 5 meters in width. The brushwood is packed firm- ly and the two rows of pegs are tied together by wire. On top a notch of about half the span of the dam is spared.
467
Larger checkdams can be constructed with steps in front (fig. 48 b), In every layer cf stones a step of 15 to 20 cm is left on the down-stream side, so that the width is reduced from base to top. The advantage is saving of stones and that the flow is gradually conducted down to the apron.
For large dams two wing walls with appropriate foundations are often constructed at the upper side to force the flow into the water-spill or notch and prevent it from damaging the banks. The wing walls should form an angle of about 30° with the banks. For small checkdams wing walls are not required.
In the center of the "crown" a notch of concave shape is to be spared, which must be wide enough to cope with peak run-off- Generally a length of half the span of the dam and a depth of 20 to 30 cm are considered appropriate. For the notch, large flat stones are reserved that cannot be washed away.
When large quantities of run-Jff are expected, it is advisable to use some concrete for the notch and the crown of the dam,
or to cover everything with a wire netting. 'Below the dam an apron has to be constructed with stones. On the up-stream side
the dam has to get an earth fill for greater strength. Finally, the structure is supplemented by planting seedlings and cuttings of suitable species with a dense and wide spread root system like banaba or tibig, or creepers like kudzu or Centrosema along the banks.
b) Brushwood checkdams are only temporary and are constructed in areas where stones are not available.

Brushwood placed across
Posts 40 cm apart
Apron View from above‘
Flow
&Z$!%$&-~;s;;r~onnected
cz-r-Iwo""
Fig. 49: Brushwood checkdam
On the lower side of the dam, branchwood is placed lengthwise to provide an apron preventing scouring by overflow. It is very importa1.t that these temporary structures are supplemented by cuttings and seedlings, which can take over when the brushwood has decayed.
c) Pole checkdams: Where other materials are scarce, checkdams may be constructed of poles or strong branches. Some of the
Gradient of the bank 1:l
Poles pl ,Apron
aced acr 'OS5
Cross section
Piled earth
Longitudinal section
460
Fig. 50: Pole or log checkdam

poles have to be erected as uprights at intervals of about
60 centimeters to keep the horizontal poles in place. The
central posts are taken down to notch level, while the others
reach the height of the checkdam. Below the checkdam some
poles are placed lengthwise to form the apron.
The horizontal logs are nailed or tied to the uprights by
galvanized wire. A structure of this type may last for a
few years. It is hoped, that after its decay the vegetation
will finally control the expansion of the gully.
d) Solid checkdams: Where it is justified checkdams can also be
constructed of concrete, masonry or gabions. These materials
allow much higher structures than the ones described above.
e) Gratinu dams: They vaguely resemble pole checkdams, but they
have a different function. The objective of grating dams is not to reduce the gradient inside the gully, but only to hold
back coarse debris. They are constructed of poles which are nailed horizontally to strong vertical posts. Between the horizontal poles intervals of about 10 cm are left to allow
water and finer sediments to pass.
f) Ground ties: The sections between the checkdams can be
stabilized by "ground ties", which consist of cuttings planted between two logs placed across the gully bed. The
sprouts will effectively reduce the velocity of the flow.
Cross section
Fig. 51: Ground tie with sprouting brushwood
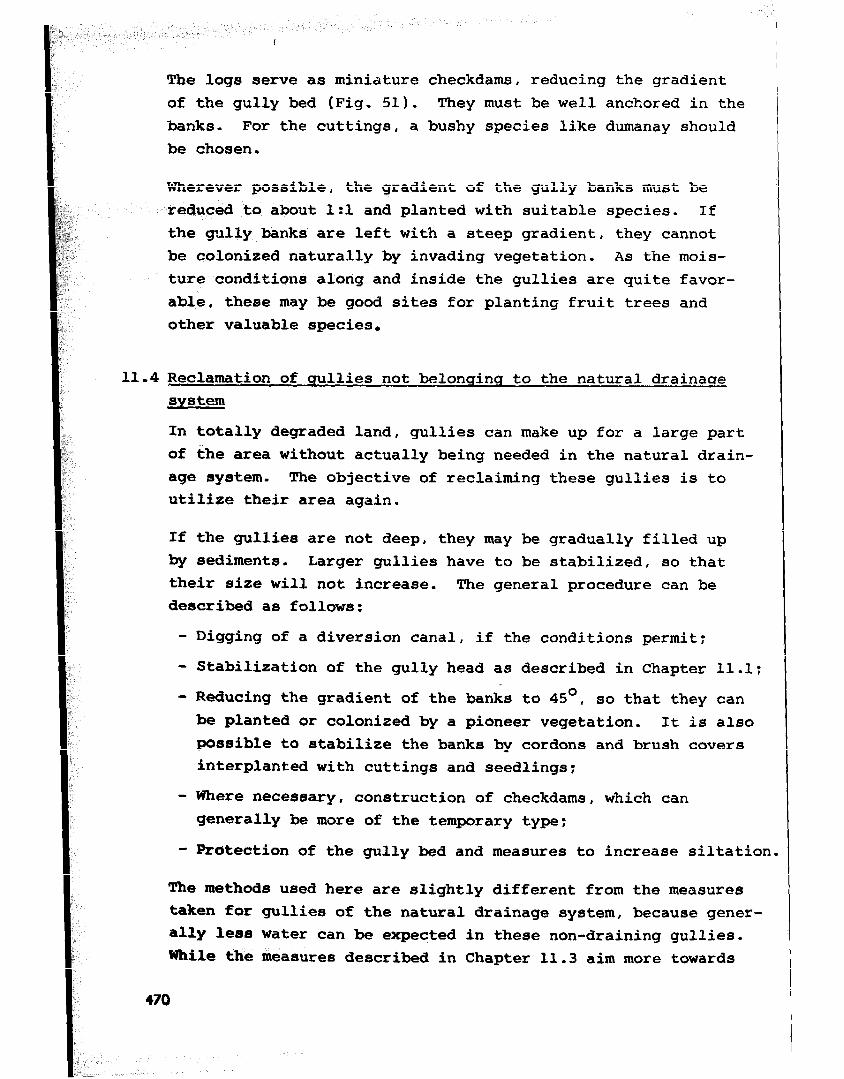
The logs serve as miniature checkdams, reducing the gradient of the gully bed (Fig. 51). They must be well anchored in the banks. For the cuttings, a bushy species like dumanay should be chosen.
Wherever possible, the gradient of the gully banks must be reduced to about 1:l and planted with suitable species. If the gully banks are left with a steep gradient, they cannot be colonized naturally by invading vegetation. As the mois- ture conditions along and inside the gullies are quite favor- able, these may be good sites for planting fruit trees and other valuable species,
11.4 Reclamation of sullies not belonoinq to the natural drainage system
In totally degraded land, gullies can make up for a large part of the area without actually being needed in the natural drain- age system. The objective of reclaiming these gullies is to utilize their area again.
If the gullies are not deep, they may be gradually filled up by sediments. Larger gullies have to be stabilized, so that their size will not increase. The general procedure can be described as follows:
- Digging of a diversion canal, if the conditions permit:
- Stabilization of the gully head as described in Chapter 11.1;
- Reducing the gradient of the banks to 45', so that they can
be planted or colonized by a pioneer vegetation. It is also possible to stabilize the banks by cordons and brush covers interplanted with cuttings and seedlings:
- Where necessary, construction of checkdams, which can generally be more of the temporary type:
- Protection of the gully bed and measures to increase siltation.
The methods used here are slightly different from the measures
taken for gullies of the natural drainage system, because gener- ally lese water can be expected in these non-draining gullies.
While the measures described in Chapter 11.3 aim more towards

the reduction of flow velocity by checkdams, here the main pur- pose is to increase sedimentation to fill up the gully gradually. Checkdams, even permanent ones, may also be constructed where flow is still expected.
Typical measures for the reclamation of non-draining gullies include brush combs and plugging of gullies.
a) Brush combs: Their function is to reduce the velocity of the flow and "comb out" the sediments, silting up.
so that the gully is gradually
In contrast to bench layers the brushwood is placed more ver- tical. At first trenches,which should follow the contour,are dug 40 to GO cm deep across the gully bed and the banks.
Seen from above the layout will be more or less u-shaped (fig.
52). The brushwood, which must be of a sprouting species, is placed upright and tightly together on the down-stream sic'e of the trench. For greater stability some thin poles are placed hori- zontally along the butt ends of the brushwood. Afterwards the trench is refilled and tamped.
View from above
Cross section Brushwood 50-70 Cm lon
-@h $ soil used for re-fill
7 IIf ~Trench 40-50 cm deep
Thin poles placed horizontal
Fig. 52: Construction of "brush combs"
471

b) Pluqqinq of gullies: Smaller gullies of less than one meter in depth can often be stabilized by plugging them with brush- wood. It is laid out lengthwise in the gully,and an anchor- age is generally not required, except in steep gullies. The brushwood must be bushy and need not be of a sprouting species. The velocity of the flow will be reduced and the gully gets filled up with sediments.
BANK LLVEL
Fig. 53: Plugging of smaller gullies
472

Chapter 12:
CONTROL OF RIVERBANK EROSION
Riverbanks have special erosion problems as the water level often changes and causes greater parts of the banks to be exposed, which generally are bare of vegetation. The most severe kind of erosion is caused in streams carrying bed- load. Most vulnerable are the outside curves, where the flow is scouring and undercutting the banks. At the inside curves we usually can observe a deposition qf sediments.
The methods developed to repair and prevent erosion damages along riverbanks can be divided into four main groups:
- Temporary and emergency measures,
- Methods depending mainly on sprouting brushwood,
- River bank stabilization by planting,
- Solid structures.
Human interference destrcying the vegetation along the banks must be stopped. According to the Philippine Forest Law, a strip 50 meters wide has to be preserved on both sides of water courses more than 5 meters wide.
To reduce extreme fluctuation of the water level and heavy sedimentation, it is essential that the catchment area is properly managed. Therefore all kinds of river bank sta- bilization have to begin with the improvement of the catch- ment area.
473

12.1 Temporary and emergency measures
The methods described in this chapter have to be considered only as first aid to stop erosion along riverbanks during floods until more durable and effective measures can be taken.
a) "Rauhbaum" method: Dense and well branched trees or tree tops are placed along the bank with the butt ends pointing upstream and anchored by strong pegs and wire or ropes. The posts to which the trees are tied must be anchored firmly in the riverbed, if necessary with a brace (fig. 55). To protect longer banks several rows of bushy trees have to be placed in a shingle-like formation.
The function of the trees is to reduce the velocity of the flow along the banks. During floods the "Rauhbaum" method may be the only possible measure that can be adopted.
llapsed portion
Fig. 54:Temporary protection of a collapsed riverbank by the Rauhbaum method.
Fig. 55: Anchoring of tree in the Rauhbaum method

b) Temporary qroynes (German: Rauhbaumbuhnen): This method is used in wide and shallow riverbeds or brooks. With the help of groynes the direction and velocity of the current, and partly the deposition of sediments can be influenced.
Groynes pointing upstream increase sedimentation, those point- ing downstream direct the flow to the other bank, those per- pendicular to the current serve more for bank protection. As a genera: rule the distance between groynes should be one to two times their effective length.
pointing downstream perpendicular to the flow
Pointing upstream
Fig. 56: Layout of groynes
vrEw J=ROM DOWNSTREAM CROSS SECTION
Fig. 57: Construction of temporary groynes
Temporary groynes are installed by driving posts of a dia-
meter not less than 15 cm into the riverbed. Trees or crowns of trees are placed horizontally on the upstream side of the
posts and anchored firmly. To resist floods, the poets must be reinforced by supports or braces (fig. 57).
475

c) Plusqinu of riverbanks: This technique is recommended for
undercuti banks. Dense crowns or brushwood ,s piled up along
the eroded portions and held in place by a row of pegs. To
avoid that the brushwood is lifted and carried away during
floods, the pegs are driven-in in a slanting position (fig.58a).
The necessary protection can also be provided by a mesh wire
fence, behind which the brushwood is piled up (fig. _C8b).
(a)
Slanting PC, ',
(b)
Mesh wire fence
Brushwood \
Fig. 58: Plugging of eroded banks
12-2 Methods dependinq mainly on sproutinq brushwood
While in the temporary measure described above any type of
brushwood can be used, the following more permanent struc- tures depend mainly on sprouting brushwood, sometimes in
combination with other materials.
a) Brushwood aroynes (German: Buschbautraversen) made of sprouting brushwood can only be constructed during low water, when the riverbed adjacent to the area to be pro-
tected is above the water line and permits soil working.
The method is widely employed in Europe and is considered
economical and effective.
The effect of a series of groynes is the sedimentation of successively smaller material behind the groynes in the
direction of the streamflow due to the reduction of velo-
city. By a correct placement of the groynes it is also
possible to change the direction of the current (see also
Chapter 12.1 b). 476

(a) Cross section
Soil from excavation
(b) View from above I Original bank 1 I
Bank after erosion I
Fig. 59: Construction of groyne with sprouting brushwood
From the damaged bank to the original or desired bank line a trench is dug 30 to 40 cm deep and wide with a triangular cross section. The excavated material is piled downstream beside the trench to give a wider bearing surface to the brushwood. Then brushwood of 1 to 1.5 m length is tightly packed without leaving any holes or weak points. Afterwards the brushes are covered at the butt ends with a thin layer of topsoil, on top of which stones are placed in a riprap pattern, so that the soil is not washed away at high water level. Special protection is needed for the head of the groyne, which is exposed to the current. Brushwood has to be carefully arranged around it and protected by large stones (Fig. 59 b) (according to PRiiCKNRR, 1965, modified).
Fig. 60: Arrangement of groynes in a straight river section and in a curve.
477

A modification uses a mesh wire cylinder of 30 to 40 cm dia- meter filled with stones or gravel to hold the brushwood in place until it is firmly rooted, Sturdy pegs will prevent that the cylinder is rolled away by strong current. In rivers and streams with a strong current and a heavy bedload longer groynee must be protected by a wooden fence in front of the heads (see fig. 61).
Wooden retaining fence
Poles 10 cm
Post 15 cm
Fig. 61: Protection of groynes by a wooden fence
For groynes all kinds of easily sprouting shrub species can be used, but they must be able to survive prolonged inunda- tion during high water. Riverean species growing naturally within the stream bed or along the banks are most suited. If none are available, also ipil-ipil or madre de cacao may be tried. Salix tetrasperma, native from India to Malaysia in medium altitudes, may be worthwhile trying in the Philippines.
If there is only little sedimentation, additional groynes have to be constructed between the old ones. After the spaces be- tween the groynea have been silted up, the area is planted with suitable tree and shrub species.
Brushwood groynes are effective and cheap, since,only local material used, but are applicable only in wider streams and rivers.
478

b) Riprar, with cuttinqs: After the bank has been smoothened and the gradient reduced to 45O, a shallow trench for the founda- tion is dug at the base of the bank. Riprap is carried out in the usual way, but above the low water line cuttings are plarxted in the joints. For better growing conditions the joints are filled with topsoil, The height of the pavement
should reach at least medium water level, in very vulnerable banks up to high water level. Above the riprap a well anchored brush cover is established.
m ______c- ----------
Between HW and MM brushcover or riprap
Mpq-----------
Foundation
Fig. 62: Streambank stabilization with riprap interplanted with cuttings.
It is also possible to use a mesh wire cylinder filled with stones or gravel as a foundation. The cylinder, which should have a diameter of 30 to 40 centimeters, is placed in a shal-
low trench at the base of the bank.
In contrast to groynes this method is also applicable in nar-
row streams and creeks with steep banks. It can resist a high stream velocity dragging along a heavy bed load.
A disadvantage is the high demand for sharp edged stones for
the pavement and the higher cost of labor involved.
c) Combined stone and brushwood piling (German: Rauhpackunu): This
method is recommended for protecting and repairing the collaps-
ed sections of the outside curves of streams with a high velo-
city and a high sediment carrying capacity.
479

. Between the damaged bank and the original or desired bank line, stones and strong branches of sprouting species are piled, where- by the brushwood is placed in a more horizontal position. For better strength and anchorage strong posts are driven in first. In the inner part of the pile some topsoil is added to provide
better growing condition for the brushwood. The gradient of the
piling should not be steeper than 4S" and its height reach at
least medium water level, where the bank is very vulnerable,
high water level.
Collapsed bank
Fig. 63: Combined stone and brushwood piling
In a modification of the above method, which is called "Steinwurf" in German, the brushwood is planted in a more vertical position. The butt ends may be either below the water line or covered with
soil, Stones are piled up in between, until only about 50 cm of, the brushwood remain exposed. The gradient of the piling must be less than in the original method. The brushwood reduces the
stream velocity, so that the spaces between the stones will soon be silted up with sediments.
ollapped bank
Fig. 64: Stone piling interplanted with brushwood

. d) Brush covers (German:Spreitlaqe&): The basic technique has
been described in Chapter 9.2. Forriver bank stabilization this method can only be applied above the low water line (LW).
The lower part of the bank from the river bottom to the low
water level needs special protection to prevent undercutting
especially along outside curves.
At first the gradient of the slope is reduced to 4S". At the base of the bank a shallow trench 15 cm deep and 25 cm wide
is dug (Fig. 65 A), along which dense brushwood is laid out perpendicular to the current with the butt ends pointing to-
wards the slope (B). Then, the brush cover As arranged on the bank with a slight slant downstream in such a way that
the butt ends also rest in the trench (C).
Fasci-- n
Fig. 6: : River bank stabilization with brushcover and fascines (according to RR&XNER, 1965)
481

.”
On top of the butt ends of both"layers of brushwood a fascine (D) with a diameter.of 20 to 30 cm and a length of at least 3 m
is firmly nailed with hooked or straight pegs, which are driven
80 cm deep into the river bed at intervals of 1 meter (El. The
stability of the structure depends largely on these pegs. Final-
ly the brushwood on the bank is fastened by wire and pegs (F)
and covered partly with soil.
In a similar method several fascines are piled at the base of
the bank and no brushwood is used in front.
The base can also be protected by a stone piling (fig. 661, a
mesh wire cylinder filled with stones (fig. 67) or a log struct-
ure (fig. 68).
Brush cover
Fig, 66 Fig. 67
Fig. 68
482

-
12.3 River bank stabilization by planting In most cases planting alone is sufficient to stabilize banks of water courses with a more or less permanent water level, slow flowing lowland rivers, irrigation canals, and lakes.
(a) Narrow river bed
(b) Wide river bed
---a-_ -Mw L
-LW
ee's between and MW
Fig. 69: Planting of trees and shrubs along a river bank
Certain rules have to be followed when river banks are to be stabilized by planting:
- In the zone from low to medium water level usually only shrubs are allowed. The selected species must be able to survive prolonged inundation and must be flexible enough not to break in the current.
- In the adjoining zone from medium to high water level also mainly shrubs are planted, which occasionally are mixed with trees. In narrow stream or river beds, trees below the high water level would reduce the run-off dia- meter and so may increase the stream velocity and cause erosion.
483

- Trees preferably mixed with shrubs are planted above the
highest water level.
- The shores of lakes and very slow flowing rivers can also
be protected by reeds, and below the water level by aquat-
ic plants, sometimes established within a stone piling.
- Sodding is a good way to stabilize banks where sods are
easily available. But usually the supply is a problem
and much labor is involved.
12.4 Solid structures
Solid or permanent structures .for river bank protection in-
clude weirs, permanent groynes, spurs and retaining walls. The design of these structures sometimes requires consider-
able engineering skills and often the services of a profes-
sional engineer. However, their construction may occasional-
ly become the work of foresters, who have specialized in
watershed management.
a) Weirs: Their main purpose is to break the stream velocity
and to conduct the water safely from a higher to a lower
level. By weirs the current can be forced into the desired
course because the water has the tendency to pass the weir
in perpendicular direction (fig, 70). In the ideal case the weirs should be spaced in a way that the water level
of the lower weir is level with the bottom of the upper one.
Fig. 70: Breaking the direction of the flow by weirs
404

Weirs can be constructed with concrete, masonry or gabions. The
foundation in the river bed and the embankment must be deep
enough to prevent underwashing and scouring. The dimensions depend on the run-off quantity, its fluctuations and the shape of the river bed. The waterspill can be rectangular or concave.
Water spill
-Foundat
(a) Front view Original bed
Weir /!IYJ
(b) Cross section
Fig. 71: Construction of weirs
b) Solid aroynes can be constructed with concrete, masonry, ga-
bions or in riprap. Sometimes also so-called "rock sausages" are used, which are galvanized mesh wire cylinders filled
with stones and anchored firmly in the ground by strong
posts,
Groynes are placed on the slope of the bank. Their upper end should be higher than the medium water level. At low water
level only the head of,the groyne will be under water (fig.72).
For the arrangement of groynes see fig. 56, 60 and 61. (a) Side view
Groyne
(b) Cross section
AprooGrr
(c) Head of‘groyne (from above) Fig. 72: Construction of a solid groyne
485

Downstream below the groynes an apron must be placed to avoid
underwashing. The head of the groyne needs special protection
and has to be surrounded by an apron.
c) Spurs are very similar to groynes. However, they are shorter
and generally point downstream or perpendicular to the current.
Like groynes they can be constructed with concrete, masonry,
or riprap reinforced by a wooden frame.
d) Retaininu walls: Their construction has already been described
in Chapter 10. For river bed stabilization retaining walls can
be made of gabions , mesh wire cylinders filled with stones,. concrete or masonry. A dry stone wall (riprap) can only be considered as a revetment. Retaining walls must reach the high water level.
e) Ground ties can serve as miniature weirs to prevent erosion in
smaller stream beds.
Poles or logs of durable species are placed across the river
bed after it has been levelled. Both ends must penetrate into
the banks at both sides. The log is held in place by a row of
pew t which also should prevent underwashing. Instead of a pole or log, also a "rock sausage" can be taken.
Pig. 73: Construction of a ground tie
Like a plantation all kinds of river bank stabilizations need
some maintenance after their establishment. All smaller damages
must be repaired immediately before getting worse, Obstacies in
a narrow bed must be removed before they will cause damage.
486

Chapter 13:
SHELTERBELTS, THEIR FUNCTION AND LAYOUT
Shelterbelts are strips of vegetation consisting of a mixture of
trees, shrubs and vines with the aim to protect valuable cropland from destructive winds. Besides this, they have other benefits, which compensate for the loss in productive area:
- Shelterbelts reduce the wind velocity on both sides. The
effect can be felt 15 times the height of the belt in the lee
and about 5 times the height of the belt on the windward side.
A reduction of wind velocity would minimize wind erosion on
light soils.
- On hills shelterbelts with their dense vegetation act as buffer strips intercepting surface run-off and reducing water
erosion,
- Shelterbelts laid out or preserved along creeks or streams
can also serve as a bank protection.
- Shelterbelts may improve the micro-climate by reducing
evaporation and provide good growing conditions ,to crops
which require a calm atmosphere. ‘\
- For shelterbelts one can use trees and shrubs yieldi?ng minor
forest products or even fruit treqs.
- Shelterbelts improve the appe&ance of a landscape, especially.
if a few bright flowering ornamen$als are ad&d to the mixture.
Shelterbelts must be dense in,their lower part, whereas the middle
and upper par;ts should be more open. A completely impermeable wind barrier is aerodynamically unsound, because it would came
whirlwinds in the lee and eliminate the protective effects. The
upper part should allow the wind to pass, reducing its velocity
by only "combing the wind".
40-Y

(a) Dense shelter
(b) Shelterbelt, irregular and open in upper part
--+B- wind velocit
Fig. 74: Wind behavior in dense (a) and open (b) shelterbelts.
A shelterbelt should consist of approximately 65% shrubs and 35%
trees, which are further subdivided into about 15% tall and 20%
medium sized trees. The seedlings are planted in groups of 2-7 plants of the same species. Large trees are planted in small clusters, small trees and shrubs in larger groups. The following species are suggested for shelterbelts: .
- Tall trees: agoho, narra, teak, Gmelina arborea, molave,
antipolo, kaimito, santol, sampaloc.
- Medium trees: kamachile, casoi, mabolo, banaba, ipil-ipil, madre de cacao, Cassia spp., akleng-parang.
. - Shrubs, and bamboos: lantana, sunflower, aroma, boho, kawayan,
kawayan-kiling.
There are many other suitable species. They must be wind resist- ant and should not have very heavy crowns.

Shelterbelts consist of 1 to 5 rows. Broader belts are preferred
for the main skeleton system across the main wind direction at a
distance of 300-400 meters. Smaller belts, consisting l-3 rows, can be planted in between, either parallel or perpendicular to the main
belts.
X
X
x
Y
X
X
x
X
x
X
X
Y
x
X
0 QJ@
X X
X 0 0 % 0 0 0
0 x 0 0
X X
6 % x al x 0 0 Y X
0 x %O% x
CD Tall tree 0 Medium sized tree X Shrub, vine Fig. 75: Planting schemes for shelterbelts with 5,3,2 and 1 row
(from left to right)
X CD X X
X 0 X X
X 0 x x 0
X x % aI
X X X
x
% xQx X x
X x
E X %
II
0 % 0
0
X xox x
x % 0
X
X
X
x
x
X
x
X
X
X
x
X
x
x
aI x
6 0 0 X
0 X
0 x
x x
x
QD 0
0 X
X 0
1
0 X
0 x 0 x
On sloping land, where shelterbeli.ts also act as buffer strips to reduce erosion, the main belts should follow more or less the contour lines. The distance between the belts should be less than on flat land. Secondary belts should preferably be established on non-agricultural land along water ways or traffic lines t0 minmze the 10s~ of productive area.
489

EXPRESSION OF GRADIENT Appendix I
Percent Degrees Deureas Percent 1 2 3 4 5 6 7 8 9
:1" 12 13 14 15 16 17 18 19 20 25 30 35 40 45
;i 60 65 70 75 80 85 90 95
100
490
O"34' lo 9' 1°43' 2O18' 2O52' 3O26' 4O 4O34' so 9' 5O43' 6O17' 6O51' 7O24' 7O58' 8O32' go 5' go39 '
lOO12' lOO45' llOl9' 14O 2' 16O42' 19O45 ' 21°48' 24O14' 26O34' 28O49 ' 30°38' 33O 1' 3s" 36O52 38O40' 40°22' 42O 43O32' 4s"
1 2 3 4 5 6 7 8 9
10 11 12 13 14 15 16
ii 19 20 21 22 23 24 25 26 27 28 29
z: 32 33 34 35 36 37
ii 40 41 42 43 44 45
1.8 3.5 5.2 7.0 8.8
10.5 12.3 14.1 15.8 17.6 19.4 21.3 23.1 24.9 26.8 28.7 30.6 32.5 34.4 36.4 38.4 40.4 42.5 44.5 46.6 48.8 51.0 53.2 55.4 57.7 60.1 62.5 64.9 67.5 70.0 72.7 75.4 78.1 81.0 83.9 86.9 90.0 93.3 96.6
100.0
Ratio (tan) Deqrees (rounded) 2:0.25 76 1:0.5 63 1:l 45 1:1.5 34 1:2 27 1:2.5 22 1:3 18 1:3.5 16 1:4 14 Note: The first figure refers to the height, I the second to the hori- I zontal distance: I

BEGEMANN, W., 1971 Umweltschutz durch GewZsserpflege. DRW-Verlagsgesellschaft, Stuttgex
BENNET, H-H., 1955, Elements of soil conservation. 2nd. Ed. McGraw-Hill Book Co., New York
BERRY, M.J., 1956, Erosion control in Bukit Bakar Kelantan. Malay Forester 19(l)
BRADE-BIRKS, S-G., Good soil. The English University Press, London CREMER, H.D. and VON BLANKENBURG, P., 1971, Handbuch der Land-
wirtschaft und Ernshrung in den EntwicklungslZndern. Vol. 2, Verlag Eugen Ulmer, Stuttgart
DIMPFLMEIER, R. and SCHWEIGER, H., 1970, B?jschungsbegrtinung mit Gras-und Gehijlzsamen. Allgemeine Forstzeitschrift (25)25
F.A.O., 1959, Tree planting practices in temperate Asia. F.A.O. Foreatry Development Paper No. 14, Rome
F.A.O., 1962, Forest influences. Studies No. 15, Rome
F-A-O. Forestry and Forest Products
F-A-O., 1963, Tree planting practices for arid zones. F.A.0, Forestry Development Paper No, 16, Rome
F.A.O./U.N.D.P., 1971, The Philippines. Technical Reports No= 6, 7 & 9, Rome
FRIEMER, w., Griin ist Trumpf, Handbuch fur die Erhaltung einer geeunden Landschaft. Eigenveraag
HENTZE, a. and TIMM, J., Waeserbau. - B.G. Teubner, Stuttgart HUBER, R., 1967, Das Wasser. Verlag Hallwag, Bern JAPANESE FORESTRY AGENCY, Soil conservation in Japan. Tokyo KIRWALD, E., 1958, Heilung von Bodenwunden. Eugen Ulmer, Stuttgart KIRWALD, E., 1964, Gew%saerpflege, Miinchen KLAUSING, O., 1972, Vegetation&au an Gewgssern.
Hessische Landeaanstalt fiir Umwelt, Wieebaden

KOHNKE, H., 1966, Soil science simplified. Balt Publiahers, Lafayette, Indiana
KOHNKE, H. and BERTRAND, A.R., 1959, Soil conservation. McGraw-Hill Book Co., New York
KRONFELIHER-KRAUS, G., 1930, Uber Offene Wildbachsperren. Mitt. d. Forstl. Bundes-Versuchsanstalt, Wien
PRESIDENTIAL COMMITTEE ON WOOD INDUSTRIES DEVELOPMENT (PCWID), 1971, Philippine forestry and wood industries development. Manila
PRtiCKNER, R., 1965, Die Technik des Lebendverbaue, Osterreichischer Agrarverlag, Wien
REICHSLEITUNG DES ARBEITSDIENSTES, 1934, Handbuch der Arbeitstech- nik. Reichekuratcrium fur Wirtschaftlichke't, Leipzig
SAMAKA SERVICE, 1962, The Samaka guide to home site farming. Samaka Service Center, Manila
SCHIECHTL, H-M,, 1958, Grundlagen der Griinverbauung. SCHMALZ, 1969, Die Bedeutucg des Waldes fur den Wasserkreislauf.
Forstarchiv (40) 7/8, Hannover STALLINGS, H-H., 1957, Soil conservation. Prentice-Hall, Inc.,
Englewood Cliffs, N.J. STRELE, G., 1950, Grundriss der Wildbazh- und Lawinenverbauung.
Springer Verlag, Wien TSE-CHEN SHENG and HAN KANG, Windbreaks in Taiwan.
Chinese-American Joint Commission on Rural Reconstruction, Taipeh
WEBER, 1971, Der Forstbetriebsdienst. BLV, Mtinchen WEIDELT, H.-J., 1971, Methods of slope stabilization by vegetation.
Reforestation Monthly 10(17/18), Manila
492

PART VI
FOREST TREE SEEDS
G. SEEBER and A. AGPAOA

Chapter 1:
SOURCES OF FOREST TREE SEED.
.
1.1 Introduction
Tree seed may be obtained from private seed collectors, from the Central Seed Store, from neighboring reforestation pro- jects, or from own collection within the project area.
The collector is paid for the quantity of seed he has gather- ed according to the price per unit that was agreed upon. Be- fore the collection starts, the Forester-in-Charge and the collector sign a contract regarding the price per unit, the quality of the collected seed, the stands and mother trees where the seed is to be gathered, and other specific condi- tions get by the Forester-in-Charge.
To find a just unit price the forester must know the quanti- ty of seed a man is able to collect psr day. This may vary
with the intensity of seed production, distances between mother-trees, topography, etc.. Generally it is cheaper to buy seed from a private contractor than to collect it with project personnel.
Private collectors must be supervised that they collect the seed from the indicated stands and superior mother trees on- ly, and observe all the other conditions of the contract. There is a tendency, that the seed will be collected from stunted trees with low spreading branches, because they are easier to climb. But stunted, branchy trees usually have undesirable genetical qualities, so that no seeds should be obtained from them,
In most cases, however, the forester has to look for a suit- able seed source within his reforestation project or the
I 495

vicinity. This would have the following advantages (81:
- Seed collection can be properly supervised:
- If the seed is collected from a superior stand, one can also expect a similar performance on a nearby planting site:
- Only mature seeds are collected; . - Proper treatment of seeds after collection can be assured:
- The storage of seed can be better controlled.
If the quantity bought from private collectors and gathered by own project personnel is not sufficient, a request for additional seeds must be made to the Central Seed Store well in time,
1.2 Seed Certification
The objective of seed certification is to make forest tree seed of good quality (pure, viable, genetically superior), true to variety, and with records of origin available to forestry.
The International Seed Testing Association and the Interna- tional Crop Improvement Association have recommended minimum standards for certified seed, not only for forest tree seed, but also for many agricultural crops (12,19,20). In some countries, as in Germany and Great Britain, these standards are fixed by law and controlled by government agencies. Ac- cording to these standards forest tree seed can be graded into the following classes (20):
Grade Specifications Preference rating
Certified Seed from genetically superior trees a) proven by progeny tests
in zones where trees 1 will be planted;
b) proven by progeny tests outside planting zone, 2 but in a locality with similar climatic and geographic features:
4%

- classes of tree seed - continued -
Grade Specifications Preference rating
Selected Tree Seed Not progeny tested, but seed was colleCted from rigidly selected trees 3 or stands from localit- ies with similar climatic and geographic features;
Source-identified Not progeny tested, but Seed from natural stands and
successful plantations 4 of known geographic origin;
Seed of Question- Neither source certified able Origin nor selected. 5
Up to now no classification for Philippine forest tree seed is in use and consequently no certified forest tree seed is available. Seed obtained from the Central Seed Store will be accompanied by a certificate indicating only the germin- ation capacity and the number of seedling that can be ex- pected to be raised from 1 liter of seed (Seed Issue Cer- tificate) (33).
As a first step towards seed certification seed should be accompanied by the following information written inside and outside the packages or containers:
- Species: local name and scientific name;
- Date of collection: .
- Place of collection: reforestation project, sitio, barrio, municipality, province:
- Altitude and climatic region:
- Mother tree or seed collection area;
- Treatments, if any: refrigerator storage, dusting with insecticides:
- Purity percent, if known:
- germinative capacity, if known.
497

1.3 Seed Oriain
a) Geographical variations
The importance of seed origin in collecting tree seed was recognized initially by European foresters during the 19th century. Most European countries and the USA now have en- acted laws regulating the distribution of forest tree seed. It is specified by law, that the origin of seeds must be shown on all seed lots marketed.
Seed origin is important, because differences often exist between individuals of a species growing in separate areas of the natural habitat. In any one environment the indivi- duals of a species are subject to natural selection, that eliminates unfit plants and results in the preservation of those adapted to that particular environment. Therefore, members of a particular species growing in one locality may differ markedly in some of their hereditary character- istics from members of the same species growing elsewhere (12). There can be geographical variations regarding the rate of growth, form of the trunk, branching habit, resis- tance to cold, drought, insect attack and fungus diseases.
The selective influence of the environment applies especial- ly to species with a wide natural habitat such as some Eucalyptus and pine species or teak.
Teak is a very typical example of a tropical tree species with a wide natural habitat resulting in many distinct geo- graphical races or provenances (19). The different races of teak can be distinguished by botanical characteristics such as size and color of leaves, color and structure of the bark, straightness of the trunk. The teak races of Northern Thailand and Northern Burma are known for their straight boles. Teak from India is generally more branchy, although the teak from Nilambur, South India has excellent straight and round trunks. In the Philippines, teak plant- ed in most reforestation projects is rather branchy and stunted. The introduction of new races from Thailand or South India might improve this situation.
498

The different provenances also vary in their ecological re-
quirements. Teak of Northeast Thailand can grow on almost
pure calcareous soil. It has a fine grained wood and is
highly prized in the timber trade. Teak of Northwest Thai- land (Chiengmai) tolerates compact and heavr soil. Proven- ances from Northern Thailand and Northern Burma have fairly high moisture requirements, while teak from India tolerates
longer and more severe dry seasons.
For a successful reforestation work therefore the origin of seed has to be taken into account. Failures, as well as poor yields, may occur, if seed is used from trees growing in an environment entirely different from the reforestation area. Preference should be given to seeds erom regions with climate and soil conditions similar to those of the planting site. For that reason, the so-called seed collec- tion zones have been established in some European countries and in the USA to ensure, that only suitable seed is used.
b) Individual Variations - Selection of Mother Trees (20)
Besides the geographical variations, there are also indivi- dual variations between the trees growing within a particu- lar geographical range or even within a stand. These va- riations are also largely of genetic nature, that means they are hereditary. The appearance of a mother tree is a good indication for the expected quality of its offspring. Chances are good, that seedlings being raised from seed of forked or crooked seed trees will also be forked or crook- ed, although the outer (phenotypical) appearance can be influenced by the environment. For instance, a tree of poor shape growing on a difficult site may have good gene- tic properties. Unless trial plantings, or better, progeny test8 are conducted, we do not know exactly, what the ge- nefical qualities of a mother tree are. However, seed from a mother tree of excellent form and growth (plus tree) will most likely yield a higher percentage of trees with favor- able form and growth rate than seed from a tree of poor characteristics.
499
,

Visible important traits of mother trees to be selected for seed collection are stem form, branching habits,growth rate and resistance against diseases and adverse climatic con- ditions.
Stem form:
- Apical dominance is the tendency of trees to maintain a single dominant stem throughout the crown. Conifers should maintain a straight single stem for more than 80% of their total height, for broadleaved species 60% is acceptable.
- Straiqhtness of the stem is one of the easiest character- istics to evaluate, but, nevertheless, one of the most important.
- Roundness is desirable especially for veneer logs, but also to a certain degree for sawn timber and pulpwood. Elliptical logs are likely to contain a high proportion of undesirable tension and compression wood. Fluted stems have a high percentage of waste in the saw mill. A way to determine the roundness of a stem is to measure the largest and the smallest d.b.h. with a caliper.
Branchinq:
- Diameter of branches:
- Number of branches:
- Anale between branch and stem: Branches, which form a small angle with the stem are likely to cause timber de- fects later. Preferred are trees with more or less hori- zontal branching.
- Tendencv towards enicormic branchinq becomes more appar- ent in open stands.
Growth Rate:
- Heicrht and diameter are the best criteria to compare growth rates. In even-aged stands it is easy to rate growth on the basis of the crown position. Dominants should rate "high", codominants "acceptable", and in- termediates "low".
500

Eesistance against diseases and adverse climatic conditions can be to a certain degree hereditary. If for example all trees but one in a stand are affected by a particu- lar disease, there is a chance, that this tree was spared because of some genetical quality, which may be also pre- sent in part of the offspring.
C) The genetical value of seeds from different sources
The value of any seed source is best determined by a progeny test, i.e. by judging the performance of the young planta- tions raised from its seed. This takes considerable time, but gives a clear indication which seed source would provide the relatively best trees (12). Natural stands generally yield pure seed of the local provenance, while in plantations there can be cross-pollination from outside sources. The quality of seed gathered from plantations, where all poorly shaped individuals have been removed in early thinning ope- rations, is expected to be higher than if such thinnings are not carried out.
Seed gathered only from selected mother trees or plus trees may be expensive, but will result in better plantations ha- ving characteristics similar to the parent trees. Even in the offspring of plus trees, however, there can be indivi- duals with poor genetical characteristics, because ef cross- pollination with pollen coming from undesirable parent trees. If the mother trees, however, are of excellent quality, the number of poor individuals in the offspring is generally quite small.
One further measure to improve the genetical quality of forest seed and to eliminate the contamination from outside sources is the establishment of seed orchards. Mature scions of plus-trees are grafted on vigorous seedlings that will flower and bear fruit already a few years after grafting. TO avoid self-pollination, which results in poor seed quality, scions of at least 12 to 15 plus-trees are selected. All trees obtained by vegetative propagation from one plus-tree have the same genetical characteristics as the mother tree
501

and are called "clones". In selecting a suitable area for the establishment of a seed orchard, it is important that the species to be propagated does not occur in its vicinity, to avoid contamination from the outside. The different clones are planted intimately mixed at a wide spacing. The trees are not allowed to grow tall, so that seed can be easily harvested from them.

Chapter 2:
SEED COLLECTION
2.1 Timinu of Seed Collection
Seeds or fruits should be collected, when they are mature. Immature seed has a low germination capacity and may not keep well in periods of storage. On the other side the seed or fruits must be harvested before they deteriorate.
The beat time for harvest is immediately after the seed be- came mature, especially when it is wind disseminated or eat- en by birds and rodents. The time the seeds are scattered after maturity varies with the species. The wind-dissemina- ted pine seeds, for instance, remain in the cones quite long before they will be released.
Usually it is better to harvest, before the fruits become excessively dry. Collecting during the early morning hours with high humidity will minimize scattering of seeds. The fruits of Kaatoan bangkal (Anthocephalus chinensis) are eaten by ants, they should therefore be collected immediately af- ter falling.
The first fruits falling are often wormy, abortive or other- wise inferior. It has been observed, that the first fruits of Dipterocarp species that fall upon ripening are usually defective. Collecting should therefore be delayed, until the greater portion of the fruit has fallen (8).
Species, that retain their unopened fruit on the tree for some time after maturity like Benguet pine and Mindoro pine, can be harvested at any time before the seeds are diseemi- nated.
503

Uneven ripening is another problem with some species. Some seeds become completely mature and drop, while others on the same tree are only partly developed. Mindoro pine (Pinus merkusii) is such a case. The ripening period of Mindoro pine cones is very protracted. lasting from January to July in Zambales. At any one time during this period the current crop of cones on one tree will display all stages of ripe- ness. The result might be inevitably, that some green or immature cones are harvested (34).
It is important to have an idea about the approximate time the seed ripens to be able to make the necessary preparations and have the tools in order. The exact time of rr.?ening va- ries a little from year to year and from locality to locality for the same species. At southern extremes of a species' range or at lower elevations ripening may be ahead compared to a more northern latitude and higher elevations. The har- vesting time for seed of the different tree species varies greatly throughout the Philippines. Prof. ?lELIZO published an exact list containing the ripening time for about 250 Philippine tree species growing on the College of Forestry Campus in Los BaRos (7). In another publication the same author recorded the seed availability of about 130 tree species throughout the country (8). According to his com- pilation seed of narra (Pterocarpus indicus) is available in the month of
January in Nueva Ecija February La Union April Masbate May Ticao June Bulacan, Sorsogon July Tarlac July/August Laguna September Rizal, Mindoro
It is recommended to set up a calendar for each project in- dicating the month of seed maturity for all important species.
2.2 How to judqe the maturity and quality of the fruit
To rely only on average ripening dates may not be sufficient..
5Q4

We might come too late for species that hold their seed only a few days after maturity like Eucalyptus. Fruits and seeds should therefore be judged by personal inspection, when the presumptive time of seed collection approaches. The seed collector must be able to recognize when the fruit is mature.
After harvest, when the fruits are dried up for storage or ship- ment, it is often difficult to determine by outside appearance of the fruit, whether or not they have been collected in immature condition. Dried immature teak, narra, talisai and bitaog fruits do not differ from mature ones (8) l
The quality of the fruit or seed should also be examined on the spot by cutting a few seeds with a knife to see, if they are in- fested by insects. This prevents the collector to take seed from a source with empty, unsound, pest-infested seed.
As the seeds mature, they lose their soft, milky condition and become firm. Cutting a pine cone will show, whether the seeds are still white and milky or already brown and firm.
Certain fruits dry up, like the pods of legumes and the capsules of ei-lralypts and mahogany. Fleshy fruits become soft when ripe like Gmelina arborea, molave, and edible fruits like mango, jack- fruit, mabolo, santol.
An easily recognizable characteristic of ripeness is the change of color of the fruit, because in the ripening process the chlo- rophyll of the epidermis breaks down and other colors appear. The pods of the fire tree turn from green to dark brown, the fruit of Gmelina arborea from green to yellow, the drupe of molave from almost white to dark brown.
The cones of coniferous species, however, can already contain ma-
ture seeds, while their external appearance must not necessarily have changed. Actually they should be collected in "green" con- dition with their scales closed. When left on the tree until they become dry and change their color, it would be too late for collection, because the cones would have opened already to re- lease their seeds. The maturity of closed cones suitable for collection can only be assessed by a cutting test.
505

2.3 Tools for Seed Collection
a) Ecfuinment for climbing trees
- Climbins irons with spikes are useful for climbing trees without branches in the lower portion of the bole.
- Safety belts or ropes shall protect the climber from fall- ing off the tree. A safety belt consists of a girdle, which is strapped around the waist, and a rope fastened to it, One end of the rope carries a hook, which can be hook- ed to a ring, after the rope has been placed around the trunk of the tree. In the tropics safety belts must be made of canvas, leather would quickly rot. They should be kept in good condition, because the life of the climber depends on them.
- Ladders are useful for collecting fruits or seeds from small trees, or help to reach the lower branches of taller trees. They can be made of light metal or wood. Prefer- able are models that fold or are extendible to facilitate transportation. Good and light ladders can be built by using bamboo poles for the side rails and hardwood for the rungs.
b) Tools for detachins fruits
- Extension pruners and similar implements: A long-handled extension pruner will enable the seed collector to reach even the furthest ends of the branches from his position in the crown, and there, detach the fruits or cut off the fruit-bearing branch without much difficulty. At times, the extension pruner enables the seed collector to reach fruits from the ground.
- "Cone pickers" are long-handled hand-shaped tools that serve well for breaking off pine cones. One of the "fingers" of the tool points towards the collector and allows him to draw near fruit-bearing branches. If this tool is not available, a useful substitute can be made from a hooked branch.
- Short-handled cutting tools such as bolos, pruning shears and pruning saws are useful to cut fruit-bearing twigs within reach.
506

c) Containers: E'ruits and seeds are first placed in handy small containers or receptacles, and then emptied into larger con- tainers for shipment. Tarpaulins, plastic sheets or a can- vas are sometimes spread under the seed trees to facilitate the collection of seeds or fruits from the ground. They also serve for drying the seeds before shipment.
2.4 Methods of Seed Collection
a) Collectinq from the qround: is only possible with large fruits that fall to the ground shortly after maturity. They should be picked up soon after falling to avoid deteriora- tion and damage by insects and rodents, The fruits of the following species are usually gathered this way:
- h-w, fleshy fruits: kaatoan bangkal, katmon, kamagong, santol, pangi;
- medium-sized fruits with hard kernel: lumbang, baguilum- bang, Gmelina, teak, talisai, kalumpit, bitaog, pili:
- larqe pods: fire tree, rain tree, antsoan, sampalok, ipil, tindalo, dapdap:
- larue capsules: mahogany, kalumpang;
- lame winaed fruits: narra, dipterocarps.
b) Collectinq from standinq trees: Small seeds or fruits have to be collected from standing trees. These include the following:
- small berries or druues: malapapaya, molave:
- minute seeds in capsules: Eucalyptus species, botitlebrush;
- lequminous species, which open their pods on the tree: ipil-ipil, Moluccan sau, kamachile, tanglin:
- small, winaed, wind-disseminated seed: Benguet pine, Mindoro pine, Japanese alder, agoho, lanete, dita, African tulip, balsa, kalantas, banaba.
There are few people who can climb, and are willing to col- lect seeds from tall trees because af the risk involved. The common equipaent are climbing irons. %A the Philippines mom
50;

seed collectors climb barefooted or with the help of a rope, which ties both feet together and presses them against the trunk of the tree. All the tools needed are fastened to the safety belt at the back or pulled up by a string after the climber has reached the crown.
For the use of climbing irons the following instructions are given (13).
- Checking of eguipment: spikes of the climbing irons,safety belt, rope;
- Decide on the climbing route when still on the ground, es- pecially for the branchy crown region:
- Climb calmly with regular movements, make short steps:
- Hit the trunk with the spikes of the climbing iron in a slanting direction from above;
- Always use three points for a hold (2 feet and 1 hand or 1 foot and 2 hands);
- Do not press the upper part of the body and the knees against the trunk of the tree;
- In ascending the tree avoid dead branches and resin spots, break dry branches;
- When detaching fruits, have a safe stand by fastening the safety belt;
- Do not climb when it rains, when it is windy, or in dark- ness; also not when you are exhausted or tired,
c) Collectinu from felled trees: Collecting seed from felled trees is the common practice for Benguet pine in Northern Luzon. As long as the cones are only taken from good mother trees, there are no objections against this cheap and con- venient method.
508
Chapter 3:
EXTRACTION OF SEED
The seeds of most tree species are enclosed in a fruit, from which they have to be extracted before shipment, storage or
sowing. Seeds from fleshy fruits must be extracted immedi- ately after collection.
If newly gathered fresh fruits of nearly all species are piled up or-left undisturbed in sacks or cans, some heating and losses of viability will occur almost certainly. Pine cones left in a sack for more than three or four days often mould. Although moulding of the cone does not injure the seed, it makes extraction more difficult, because the scales will not open easily after'drping.
Extraction of seed should be carried out at the central nur- sery of a reforestation project, where all the facilities for
extraction, cleaning, drying and storage are concentrated, and where the work can be properly supervised. All the records concerning origin, quantity, date of collection and subsequent distribution and use of the seed are also kept here.
Regarding the extraction procedures, fruits can be divided in- to the f&&lowing groups:
3.1 Seeds;which are sown as a fruit itself: This group includes teak, narra, dipterocarps. The coverings of teak can be re-
moved by rubbing the seed lightly over a screen or between the hands. By winnowing, the coverings can be separated from the seed.
3.2 Fruits, which 0-n when dry: This refers to the fruits of Eucalyptus species, Japanese alder, kalantas, mahogany,
509

banaba, ipil-ipil, agoho, Moluccan sau, kamachile. The fruits of these trees are spread in shallow layers on a dry surface like concrete floor, sawale mat, galvanized iron sheet, canvas or flat trays. Drying should not be forced by exposing the seed for a long time to direct sunlight, because the seeds may be damaged by overheating. Drying will be faster, if the layers are occasionally turned or stirred. Arrangements must be made to protect the seed from sudden rains. Large movable trays with a plywood bottom and legs are very suitable for drying large quantities of seed. When the weather turns unfavorable, they can be quickly moved under a shelter.
After the pods have opened, the seed will fall out. They can be easily cleaned by screening and winnowing. Pods and other fruits which do not readily release their seeds can be filled into a sack, which is then slightly beaten and tossed around. For every seed size one needs one screen with a mesh larger than the seeds to sort out the large impurities, and another one with smaller openings, which allow only the fine impuri- ties to pass. Light matter can be removed by winnowing the seed on a tray.
3.3 Pods which do not open easily: Indehiscent hard pods, which are difficult to open, are found on the following species: Fire tree, rain tree, golden shower, antsoan, kupang. The pods of these species must be opened up with a bolo, and the seeds picked out individually. The pods of the rain tree are sweet and relished by termites. If they are piled in a dark place, after some time only the clean seeds will be left behind.
3.4 Pine cones (1,11,32): The cones of Benguet pine and Mindoro Pine require more heat and a longer time to open than pods and capsules of broadleaved species. They should thlxefore be exposed to full direct sun in thin layers on a w<re screen with a canvas below to catch the falling seeds. The drying racks are raked every day to accelerate drying and to free the seeds- The wings are removed from the seeds by rub- bing them lightly over a screen or by filling them in a sack
510

and bea'iing them with a soft flail until the wings are de- tached. Afterwards the wings are removed by winnowing.
3.5 Treatment of small fleshy fruits: Small fleshy fruits like molave are dried in a shaded place. To prevent fermentation they are spread in a thin layer and turned at least once a day. In drying the pulpy eatocarp shrivels surrounding the seeds with a protective cover. In this condition the seeds can be sown or stored.
3.6 Tre&tment of larqe fleshy fruits: This group includes the fruits of lumbang, bagilumbang, dao, pili, duhat, kamagong, The seeds are extracted right after collection to avoid fermentation and heating. Pulp and seeds can be separated by malzeration. The fruits are filled into barrels or cans with water. After a day or two the pulp becomes soft. The fruits are then mashed carefully with a kind of tamper with- out crushing the seeds. When plenty of water is added the pulp will rise to the surface, while the seeds aink to the bottom. If only a small quantity of seed is wanted, it can be removed directly from the fruit. This applies particu- larly to edible fruits with large single seeds.
3.7 Extraction of kaatoan banqkal seed: Because of their minute size a special technique is required to extract the seeds from the fleshy fruit of kaatoan bangkal. The outer por- tion of the fruit, which contains the very fine seeds, is rubbed lightly against a Jz inch wire mesh. Then the pulp with the seeds is placed on a screen box with l/16 inch mesh, While pouring water over the pulp and rubbing it carefully with the hands, the seeds together with the fine pulp will pass the screen 2nd drop into a water-filled container below. The seeds will sink to the bottom of the container, while the fine pulp remains afloat. If the floating pulp still contains seed, it will be returned to the screen box, and the separation procedure will be repeat- ed. Afterwards the seeds are air-dried, impurities can be removed by winnowing (221,
511

Chapter 4:
STORAGE OF SEED
It would be ideal, if seeds are sown soon after their col- lection, This would be the way followed by nature. How- ever, to do so is not always possible or convenient in practice. The date of sowing has to be timed, so that plan- ting stock of proper size is available at the beginning of the planting season. Therefore it is important to know, how seeds can be stored without much loss of viability.
4.1 Loncrevitv of seed: The rapidity by which seed:, lose their viability after collection depends on the grade of ynaturity, on the species, and the conditions during storage. Seeds to be stored should be mature. Immature seeds deteriorate quickly during storage,
There are great differences in the longevity of seeds of the different tree species. Seeds with a hard impermeable seed coat, which protects the emixyo from moisture and restricts the gaeeous exchange, can be stored very long. Seeds of Indian lotus buried for 250 gears in Manchuriaa peat bogs germinated perfectly when the impermeable seed coats were cracked (12).
Long-lived seeds do generally not germinate readily after maturity and after falling from the mother tree, but remain in the soil for some time until germination takes place. Often certain pretreatment8 have to be applied to overcome this dormancy (see chapter 8).
Acwding to their longevity under normal atmospheric con- ditions the following three groups of species can be dis- t.iaguSohe&
sl2
- Short-lived: Almaciga, binuang, most dipterocarps, mala- almaciga, champaca, mango:
- Seeds, which retain their viability for 3-6 months: Kaat- oan bangkal, mahogany, Gmelina arborea, Japanese alder, agoho, Mindoro pine, kalantas:
- Seeds, which retain their viability for one year or lonqer: Moluccan sau, narra, Benguet pine, Eucalyptus species, rain tree, Cassia, banaba, teak, ipil-ipil, akleng parang.
3.2 Atmospheric factors affectinq seed storaqe
Seeds represent a dormant stage in the development of the plant. However, during this stage, life procasses do not entirely cease. Respiration and transpiration still go on, though at a very slow pace. The more intense these life processes are, the more the viability of the seed will b2 lessened. Successful seed storage requires, that transpl- ration and respiration are reduced to the lowest possible degree. The following atmospheric factors regulate the internal life processes of the seed and r':ust be considered in seed storage: temperature, moisture, light, and oxygen.
a) Temperature: All seed keeps better at relatively low tempera- tures. Low temperature reduces respiration and transpiration, and compensates to some extent the adverse effect of a higher moisture content. However, seed stored in the cold and sub- sequently moved to a warmer place loses rapidly its viability. Fluctuating temperatures are more unfavorable than a higher average temperature.
Dry seeds are able to survive temperatures below the freezing point, and, if the moisture content is continously kept low, can be stored for many years in a refrigerator. Besides maintaining viability, low temperature storage automatically preventsinsect damage.
b) Moisture: Moisture has a greater influence than temperature on maintaining the viability of stored seed. Seed to be
513

stored has to be sufficiently dry to prevent heating and moulding (12). A moisture content of about 6% is abolt the optimum for prolonged storage, because transpiration is then at its lowest, A slightly higher moisture content is allow- able, if the temperature is close to the freezing point. There are a few species, especially fruit trees, such as jack-fruit, mabolo, Chico, lose their viability, L
guava, pomelo, mango, which will if t e moisture content becomes too
low. Seed of these species must therefore be stored at temperatures near the freezing point.
The moisture content of seed varies with the relative humi- dity of the surrounding atmosphere. This fluctuating rela- tive humidity can be harmful for sensitive seed in storage.
In practice, it is difficult to measure or determine the moisture content of seed without laboratory equipment. In the field, air-drying under the sun is a safe and simple way to reduce the moisture content before the seeds are sealed in a container. Pine seed can go into storage immediately after cleaning, because it has undergone thorough drying already in the process of extraction.
In sealed containers a permanently low moisture content can be maintained, if desiccating chemicals, like calcium oxide (CaO) or silica gel (silica oxide in the form of pellets, SiO,), are added to the seed lot (1). Both chemicals are available in drug-stores. They should be applied with cau- tion, so that the moisture content will not be reduced be- low the critical point. In an experiment, 17 grams Ca.0 have been found to be the correct amount for 100 grams of pine seed, which had been stored for 15 years at -4OC. Some- times charcoal is used as a substitute.
c) Liqht: According to studl?s in India and Indonesia some tree species like akleng parar,g, golden shower and ipil-ipil ger- minate best in full light (19). Thus, it can be assumed that liqht generally stimulates the life processes of seed, which should therefore be stored in the dark (26).
514

d) Oxvqen: The uptake of oxygen by the plants is called res- piration. Respiration causes the oxydation (or burning) of reserves stored in the seed. To reducevthe quantity of oxygen avaiiable for the stored seed, the containers should be filled completely and closed airtight. Rxperiments have shown, that the viability of para rubber seed was prolonged by storage in 45% carbon dioxyde.
4.3 shads of Seed StoraqE
Proper storage should protect (be seed from all factors that cause loss of viability during the interval between seed col- lection and sowing. These factors are the same that induce germination: high temperature, moisture, light, and oxygen. Besides this, the seed has to be prorrected from fungi and insects. Seed storage should therefore be carried out and take place
- at low temperature,
- under permanently low humidity,
- in the dark,
- in airtight containers.
a) Storaqe without temperature control: Seeds with a hard seed coat can be stored in the open or in sack3 without losing much viability for a number of months. This kind of storage is possible for teak, narra, Cassia species, Acacia species, lumbang, bagiluxnbang, fire tree, ipil-ipil, bitaog, akle, langil, supa and pili.
Fine, less resistant seed should be stored in sealed plastic bags or in airtight containers with a tightly fitting screw cap such as glass jars, bottles and cans. This kind of storage is recommended for Gxnelina arborea, Japanese alder, agoho, Eucalyptus species, kalantas, Benguet pine and banaba.
For mahogany JACALNE (19553 recommends mixing the seeds with powdered charcoal and storing them in closed cans buried 40 cm under the ground in a shady place. By this method the seeds will not lose much of their viability, if they are not stored for a longer time than 4 months.
515

b) Storaqe at low temperatures: All less resistant seeds keep their viability much longer when stored at temperatures between 2 and 5OC and with a moisture content between 6 and 10% (for exceptions see chapter 4.2). Whether cold storage is economical, depends on the length of the intended stor- age and on the difficulty to maintain viability under nor- mal temperatures. Generally, cold storage is recommended for storage periods over one year, except for the hard coat- ed seeds listed under 4.3 a). The reiluired iow temperatures are produced by refrigerators or special cooling machines in seed storing chambers. The latter demand expensive equip- ment, but are necessary wherever much delicate seed is hand- led for a long-range reforestation program. Seed removed from cold storage must be sown immediately, otherwise it would deteriorate very soon. To avoid condensation of water, containers taken from c:ald storage must be brought to room temperature before they are opened. Cold storage is recom- mended for delicate seed such as Mindoro pine, kaatoan bang- kal, almaciga and Chinchona. Mindoro pine can be expected to have lost all viability within 8 months when stored at room temperature. When kept at approximately 2OC, its ger- minative capacity will not deteriorate at all up to 14 months after collection (34). Kaatoan bangkal keeps viability in a refrigerator for 2 years (22).
514

Chapter 5:
SHIPMENT OF SEED
Loss of viability, while the seed is in transit, is mainly due to exposure to high temperatures and changes in moist- ure content. Very little can be done to regulate the tem- perature during transit. Some protection can be provided by insulating the seed lot with wood wool, paper, or simi- lar materials. Moisture changes can be avoided by using plastic bags or seaied containers.
5.1 Packins of Dry Seeds
Most seeds are shipped fn dry condition. Delicate fine seed of agoho, bottlebrush, kaatoan bangZ%ai, Alnus and Mindoro pine keeps best in transit when shipped in airtight containers 01 sealed in pliykstic bags with a small quantity of a desicca- tins chemical. %or small long-lived seeds like Eucalyptus and Benmet pi.-.e a strong cloth bag would be sufficient. The seed contalqers have still to be wrapped in strongpacking paper or placed into another more solid container like a cardboard box.
All long-lived hard coated seeds can be shipped in sacks. Despite their longevity such seeds should not be placed while in transit near boilers of ocean going vessels or other ex- cessively hot places. A note written on the sack should prevent any such carelessness.
5.2 Moist Seed Packinq
This packing method is applied to short-lived seed like that of almaciga, para rubber and the dipterocarps (81, The seed is mixed with a moisture holding medium like moss, coconut fiber or sawdust, that has been moistened and then squeezed
517

&Y* Pulverized charcoal has also proved to be a suitable packing medium. Almaciga packed in moist charcoal (200 grams water per 1 kg of charcoal, about 3/4 liter pulverized char- coal per 1 kg of seed) retained a viability of 50% after 4 weeks (21).
The seed together with the moist (not wet) packing medium is placed in alternate layers in a wooden box with perfora- ted sides to aliow ventilation. The interior of the box is lined out with burlap to prevent the seeds from falling through the holes (8). The seed must be sown immediately after arrival.
Chapter 6:
PROTECTION OF SEEDS PROM RODENTS AND INSECTS
6.1 Rodents
Where damage of I* odents is likely to occur, the seed must be stored in closed rooms with a wire netting over the ventila- tian openings. When it is stored in the open under a shel- ter, the storage compartments should be lined with a l/4 inch wire netting. Seed kept in solid containers, like glass jars or cans, is well protected from rodents. Apart from preventive
518

measures damage by rodents can be controlled by using traps and rat poison baits.
6.2 Insects
Some insects attack the seed while the fruits are still on the tree. This is very often the case with legumes. Harvest- ing is therefore recommended as soon as the seed becomes mature. Infested seeds can be separated by immersing the whole seed lot in water. The infested seeds will float on the surface.
Other insects, particularly weevils, attack harvested seed in storage. Even storage in closed containers does not provide complete protection, because some insects complete their full cycle inside the seed. A single living insect enclosed with the seed in the receptacle may cause a large portion or even the entire seed lot to be destroyed.
Insecticides against seed-eating insects can be applied by fumigation. Fumigation will not lessen the germinative capa- city, if applied to really dry seeds. Fumigants can therefore only be applied to seeds that withstand drying. Carbon bisulphide is one of the common fumigants. Since it forms a gas heavier than air, the liquid is placed in a small dish or plate on top of the seed, from where the developing fume8 will penetrate the seeds. The container must be kept tightly closed. A concentration of 1.8 grams carbon-bisulphide per loo liters is recommended.
Methyl bromide is commonly used as a fumigant at quarantine stations. Tests have demonstrated the efficiency of methyl bromide fumigation at a rate of about 1.5 grams per 100 liters for 3 hours. No larvae survived this treatment, while un- treated lots were infested by 40 76. Germination of the fumi-
gated seed was satisfactory.
Paradichlorbenzene crystals commonly employed for the control of cloth moths are also very effective without impairing seed viability (1).
519

Chapter 7:
TREATMENTS TO HASTEN GFzRMINATION
Seeds of the species listed below need a long time to ger- minate because of inherent dormancy and an almost impervious seed coat, which insulates the seed from its environment: teak, lumbang, baguilumbang, pili, talisai, bitaog, akle, langil, aroma, cutchtree, ipil, tindalo, Cassia species and supa I
With these species, it does not only take long until the first seedling appears, it will also take a long time until the last viable seed has germinated. This generally results in uneven sizes of seedlings and in an undesirably long ex- posure of sections of the bed surface.
520
A simple and practical way to protect seed against insect attack is to spray the sacks from outside with insecticides or to "dust" the seeds in the containers with an insecticide in powder form.

Different pretreatment methods have been tried to hasten the germination of refractory tree seeds. Generally, the aim of such treatments is to overcome the inherent dormancy through the softening or breaking of the hard seed coat, so +k=+ .rr.Gn+*--- and oxygen can enter to induce germination. b..U c .U"IY GUI e
7.1 Cold Water Treatment
The seeds are soaked in tap-water of ordinary temperature until they have enlarged their size. This treatment is re- commended after the seed has been nicked.
7.2 Alternatinq Soakins and Drvinq
This method is sometimes applied to teak seed. The seed is soaked for 24 hours in running water, then spread out under the sun to dry, soaked again and so forth for about 2 weeks (19). In Thailand, after scarification (see below) or ant treatment alternate soaking and drying was applied to teak as an additional treatment, but with shorter intervals: 4 times soaking and 3 times drying, each for 30 to 45 minutes (5).
7.3 iiot Water Treatment
Is applied especially to leguminous species to soften their horny seed coats. The seeds are immersed in boiling water, which has just been taken off the fire, or boiling water is poured over the seeds (26). The volume of water should be 5 to 10 times that of the seeds to keep the temperature of the water high as long as possible (34). The water with the seeds is left to cool, while the seeds are stirred re- peatedly to remove the gelatinous skin (19).
7.4 chemical Treatments
Despite comparatively good results, pretreatment of seed with chemicals has not gained wide acceptance. The reasons are that the chemicals are expensive and not always available in the market, and, that the use of acids requires skill and carefulness on the part of the personnel (15).
521

Sulnhuric acid (H2S04) has been employed to corrode thick seed coats. The ler.~??. of the t-ime the seedt: have to be sub- mer&i ii P <he acid depends on the nature of the seed coat. The prcqress of the acid treatment must be constantly watched. The treatment must be stopped, when the seed coat is paper- thin (8).
Ethyl-alcohol (C2H50H) and methyl-alcohol (CH30Hj of 90 to 100 percent have been found to stimulate germination of hard- coated seeds when soaked for 2 to 5 hours. Alcohol does not soften the testa, but penetrates the minute fissures, which water cannot enter unless alcohol precedes it (26).
7.5 Scarification
This method aims to thin or abrade the horny testa to facili- tate water absorption and permit gaseous exchange. Scarifi- cat‘ion can be tried by grinding the seeds individually (large seeds like lumbang) or by running them through a scarifier.
A number of scarifiers have been developed. One model consists of a vertical galvanized iron cylinder, in which a disk lined with sandpaper rotates on a steel siraft about 4 inches above the bottom also lined with sand paper. Through a feeder pipe, seed is filled into the space between the rotating disk and the bottom of the cylinder. !Fhe "mill" is motor-driven with a rotation speed of 500 to 900 rotations. per minute. Scarifiers of this type are used in Thailand for the pretreatment of teak.
7.6 Nickinu and Similar Methods
Nicking means cutting the testa just enough to expose a small portion of the cotyledon. It is an appropriate method to treat large legume seed like ipil, tindalo, akle, supa, and other seed of similar nature. It is also the fastest method to de- termine the viability of these species (8).
Ipil seed is nicked at each end and a third time opposite to the point where the seed was attached to the pod (hilum). With a knife a small piece of the seed coat is chipped off without damaging the cotyledons. The nick opposite the hilum is very
522

important. Otherwise the cotyledons might be held together by a cap of the seed coat and the plumule would be unable to emerge. After treatment the seed is sJaked in water for 24 hours,and then irmixdiately sown.
7.7 Gomplete Removal of the Seed Ca&
Has been found to hasten the germination of bitdog seed markedly. Germination started already 22 days after sowing as compared with 57 days for untreated seeds, and lasted on- ly 39 days as compared to 53 days without treatment (14). The germination of mango is also more uniform, when the testa is removed. The hard seed coat of tambulian has even to be cracked with a hammer (2).
7.8 @Wing of Seed in the Ground
Lumbang seed is dried after collection for three days under the sun. It is then placed alternately with ordinary garden soil in a container and covered with cogon. The container is put in the open and sprinkled with water every morning. After a week the shells of the seed begin to crack (8).
In India a similar technique is employed for teak. A square pit 80 cm deep and 1 m wide, which has been dug in well drain- ed soil, is filled with water, When the water has disappear-
ed, the sides are lined with teak leaves. The seed is soaked for 48 hours in direct sun, then placed into the pit in al- ternate layers with teak leaves, and finally covered with a 20 cm layer of earth. The seed, which is watered every day, is left in the pit for about 10 days before it is sown (19).
7.9 "White.Ant Treatment" of Teak Seed
According to BRYNDUM (1966), teak seed was spread on the ground in a 5 cm thick layer immediately after collection at the edge of a teak plantation and covered with cardboard. After about 5 weeks the testa of the seeds had been removed by white ants, Before sowing the seed was subjected to al- ternate wetting.and drying (3 times 45 minutes each).
523

7.10 "Fire Treatment"
Lumbang seed can be treated the following way (14, 28): The nuts are spread evenly on the ground and covered with a 3 cm thick layer of dry cogon grass which is set on fire. As soon as the grass is burned, the seeds are placed into cold water. The quick change of temperature will cause the seed coat to crack.
Also the following modification is known: The lumbang nuts are sown in a seedbed at co rrect - spacing with only half their dia- mete= in the zoil. A layer of cogon is spread over the seed- bed and set on fire. After burning, the seedbed is sprinkled with water, and the seeds are pushed 2 cm deep into the ground and watered thoroughly.
Chapter 8:
QUALITY ASSESSMENT OF TREE SEED AND GERMINATION TESTS
All seed of a slightly doubtful or unknown quality should be tested before sowing or distribution. This applies especially to larger seed lots and seed, which has been stored for a long
524

8.1 Size and weiqht of seed
Relatively large seeds are usually of higher quality than smaller seeds. They possess a greater germinative power and produce more vigorous seedlings. In East Java, for example! only teak seed is sown that does not pass a 14 mm screen.
Often the provenances of a species differ in the average size of their seed. In this case, the seed size cannot be taken as a quality measure.
Fresh, fully developed, ripe seed is heavier than immature or very old seed. Generally, heavier seed has also a higher germinative energy. Clean seed is usuallyheavier than seed mixed with impurities (except sand), because these impurities. mainly wings, scales and similar matter,are lighter than the seed.
8.2 ,petermination of purity
The purity test determines the proportion by weight of pure seed in a seed lot. A purity percentage of 90 means that on- ly 90% of the weight of the seed lot consists of pure seed, the remaining 10% are impurities. In a seed lot, the heavier foreign matter usually settles to the bottom while the light- er materials like fragments of leaves, wings, cone scales, etc. accumulate at the top. In order to get a representative sample, the following procedure is recommended:
The lot to be sampled is thoroughly mixed and placed on a flat surface forming a cone-shaped pile, The pile is carefully divided into four .approximately equal parts. The process is repeated by similarly dividing one of the quarters until the original quantity of seed is reduced so much, that a proper sample is obtained. For small seeds 25 grams may be suffi- cient, for larger seeds up to 500 grams are required.
After weighing, the sample is spread on a sheet of white paper to facilitate the separation of seed and impurities. As im- purities we consider pieces of broken and damaged eeedc~ with less than one half of their original size, wings leaves, pieces of bark, twigs, '* saal, sand, stonee, chaff, etc. (1). After
; 525

weighing either the pure seeds or the impurities,the purity percent can be calculated.
Generally‘seed should be clean, but a certain amount of im- purities is admissible in fill seeds, The kind and amount of impurities generally tolerated varies with the species and depends on the expense and difficulty involved in cleaning the seed. All seeds that are easily separated from foreign matter are usually clean, but the purity percentage is cor- respondingly low for seed that is difficult to separate. Pine seed is easily cleaned and should therefore be pure. Seed of Eucalyptus is usually mixed with plenty of tiny chaff from the capsules, which is difficult to separate from the seeds, because it is of about the same size.
8.3 Determination of viability
a) Inspection and cutting test: A number of seeds, preferably a multiple of hundred&is counted from a representative sample. The seed kernels are opened for inspection by cutting them with a sharp knife into halves. A sound kernel is firm, plump and has a sweet smell, the color is usually white. Rotten seed has a foul, rancid odor, is shrivelled and the cotyledon is usually discolored. Spots in the endosperm or in the em- bryo and abnormal.softness indicate loss of viability. All seeds, in which the kernels have failed to develop,are "blind". A'withered embryo or endosperm generally is a sign of overdrying. Endosperms or cotyledons in old seed gradual- ly lose their white color and fresh appearance, the embryos shrivel and only partially fill the cavities. For this in- spection, a hand lense would be very useful.
The percentage of healthy seeds gives a good indication of the germinative capacity of the examined seed lot.
The cutting test is particularly useful for a quick assessment Of the viability of a seed lot,especially of larger seeds. Experiments with ipil-ipil, banaba and ipil have shown a close co*relation between the results of cutting tests and the actual germinative capacity. It was found out, however, that the prOPDrtiOn of"healthy seedsWin a cutting test was 10 to 20 per-
526

cent higher than the number that actually germinated (14).
b) Germination tests: During the germination test the selected seed sample is placed under optimal environmental conditions of temperature, moisture, light and oxygen (air) to induce germination. Since the food for the early growth is stored in the seed (cotyledons or endosperms respectively), it is not necessary for germination tests to have a particularly fertile ;roil as germination medium. Any material or medium, which provides moisture, warmth and air in close contact with the seed, can be used. Thus, humus, good garden soil or even pure sand would make suitable germination media.
Similarly useful is cotton (cloth test). A long piece of flannel or cotton cloth is spread on a plate in such a way that one end of the flannel can be suspended into a recep- tacle filled with water. The cloth will then constantly be kept moist by capillary action. The seeds to be tested are spread on the cloth and covered by a second piece of cotton. The same arrangement can be employed with blotting paper.
A more simple method is the use of a gunny sack. The seeds are spread on half of the sacks' surface, while the other half is folded over. From time to time the sack is sprink- led with water to maintain moisture.
Being subjected to favorable germination conditions the viable seeds of the sample under test will soon begin to germinate. The germinating seeds are constantly removed, the daily totals listed in a prepared form.
Germination tests have the disadvantage of requiring a cer- tain time, usually l-3 weeks or longer, depending on the species. They are seldom continued until all viable seeds have germinated. When the bulk of the seeds has already been removed. the test will be closed, and the viability of the yet ungerminated seeds estimated by a cutting test.
c) Germinative energy: Not only the percentage of viable Seed8 in a seed lot is of interest, but also the course of germina- tion.
52t

After sowing, t.?ere will be always a lapse of time until the first seed germinates fpre-germination period). When germination starts, the seeds do not germinate all at once. At first only a few seed- lings appear, then the bulk of them germinates, and finally some late-comers show up. Seeds of Benguet pine, for example, start germinating one week after sowing, and most of the viable seeds will have germinated within another week. The germination of 300 seeds, two years old, sown in a seed box was recorded as follows:
Fount of aerminated seeds
Sowing date: June 6, 1971
Germination: Date
June 11, 1971 12 13 14 15 16 17 18 19
Number 4
20 32 60 50 21 10
9 6
20 4
Total: 216
60 *
g SO *
!! g 40.
t z 30.
ii a
% PO’
ts t IO ’
I JUNE 4 5 6 7 I 0 IO iI IS? I3 I4 IS 16 17 If I2 20 21
: SERMINATIVE PERpD ENER6Y - 1 p PREB~;~lN&-rlQb 9 I
I 0 I ,
The course of germination of 2-year old Benguet pine seed
Eucalyptus shows about the same pattern of germination as Benguet pine, though the pregermination period is shorter. A steep para- bola, like that shown above, is favorable, because the seed bed will be guickli covered by even-sized seedlings.
On the other hand, species like teak, lumbang and some legumes take a long time until the first seedling appears (2-4 weeks), and it may also take a long time until the last viable seed has germinated, sometimes several months. The reason probably is inherent dormancy and an impermeable seed coat. If the germination of these species is recorded graphically, the para- bola will be flat covering a long period.
?'Or the nursery this has serious disadvantages. The first 'seedlings can develop without competition and suppress those,
528

which germinate later, unless they are constantly transplant- ed. To avoid this, pretreatments as described in chapter 7 have to be employed.
Delayed germination can be the characteristic of the tree species, but it may also be caused by a decrease of vigor. The late germinating seeds often are not as fresh or heal- thy, nor do they have as much food reserves as the others. Most like!,, they will not develop into seedlings as robust as the first ones to germinate.
If only vigorous, healthy seedlings are to be planted in the field, we should not count on these "stragglers". They would be rejected anyway when the planting stock undergoes culling. We can actually utilize only those seedlings that have germi- nated within a certain "reasonable" time, the "germinative energy period". It terminates with a rapid and constant falling off in daily germination. The percentage OI seeds germinated during this period is expressed by the "germina- tive energy:' which is lower than the germinative capacity.
529

Chapter 9:
THE TREE PERCENT AN0 ESTIMATES OF SEED REQUIREMENTS
Inspite of all devotion, skill and care some of the seedlings will die after germination during their stay in the nursery due to adverse weather conditions, attack of fungus, nematodes, insects and rodents, or an inherent weakness of the embryo. The number of seedlings that is eventually produced is much smaller than the germinative capacity or the germinative energy would indicate. For calculating the quantity of seed needed to raise a certain number of seedlings one has to use lower figures.
The percentage of healthy seedlings fit for field planting, V&hich can be expected from a given quantity of seed,is called tree percent. A tree percent of 50 means, that from a sample of 100 seeds only 50 wiil develop into plantable seedlings.
For example, Benguet pine with 9096 germinative capacity may have a germinative energy of 80% and a tree percent of 60. Mahogany with a germinative capacity of 70% may have a tree percent of 50. As a general rule tree percent and germinative energy or germinative capacity are much closer together for species with larger seeds theyi for species with small seeds.
The tree percent not only lags behind the germinative energy, but decreases progressively with deteriorating seed quality. The lower the germinative energy, the greater the gap between the proportion of seeds that germinate and those which grow into plantable seedlings. Therefore,low grade seed is much less valuable than the standard germination tests point out. On the other hand, the higher the seed quality the nearer the tree percentage corresponds with the results from the germina- tion tests.
530

To illustrate this, the out-put of seedlings of two seed sam- ples with different germinative capacity and tree percent are compared:
- Benguet pine Number of seeds per liter .I... 30 000 Purity percent . . . . . . . . ..I..... 95% Germinative capacity . . . . . . . ..e 90% Tree percent l................. 60% Number of seedlings/liter of seed = 30 000 X -95 X -60
= 17 100 seedlings
- Benguet pine Purity percent . . . . . . . . . . . . ..I. 95% Germinative capacity . . ..I..... 60% Tree percent . . . . . . . . . . . . . ..I.. 30% Number of seedlings/liter of seed = 30 000 X .95 X -30
= 8 550 seedlings
The most viable seed is generally the fully matured, fresh seed. Here not only the germinative capacity is highest, but almost all viable seed will develop into robust, vigorous seedlings. Not so with seed of weakened viability because of gathering before maturity, improper handling after collection, too long or inadequate storage, or injurious pretreatment to hasten germination. Its germinative capacity is not only lower than that of fresh seed, but the viability of the seeds actually germinating is impaired. Frequently the embryo is weak, does not develop normal roots, and soon dies. Or, a thin, poor seedling appears, but is likely to be destroyed by fungus diseases or insects because it lacks resistance.
The tree percentage, therefore, is the most valuable indica- tion of seed quality for the practical nursery man. He can use it together with the purity percent and the number of seeds per liter or per kilo to calculate the number of plantable seedlings that he can expect to raise from a kilo or liter of seed under average nursery conditions. It is recommended that data on tree percentages for the important reforestation species are made available for nursery men.
531

SEED SIZE AND SEED WEIGHT OF SOME FOREST TREES APPENDIX
Most of the following data were derived from counts made by the RESEARCH DIVISION of the BUREAU OF FOREST DEVELOPMENT and from various FAO publications (11,19,21,24,33).
Species Seeds/kilo Seeds/liter
Acacia auriculaef ormis
Acacia catechu Acacia farnesiana Agathis philippinensis Albizzia acle Albizzia falcata Albiezia julibrissin Albizzia lebbek Albizzia procera Aleurites moluccana Aleurites trisperma Alnus maritima Anthocephalus chinensis Anacardium occidentale Baubinia acuminata Bauhinia monandra Bauhinia purpurea Bischofia javanica Bombycidendron vidalianum Callistemon lanceolata Calopbyllum inophyllum Cassia fistula Cassia javanica Cassia siamea Cassia spectabilis Casuarina equisetifolia
with wings without wings
63 000 49 000 32 000 - 35 000 not available 10 000 - 12 000 not available
6 000 - 8 000 2500 240 450
42 000 27 000 - 34 000 160 000 130 000 - 139 000
7000 - 9000 no data no data 20 000 no data 60 no data 70 120 000 22 000
2 600 000 1 500 000 150 no data
no data 8 800 no data 4 200
4 100 3 600 no data 1 900 no data 1 500
19 000 000 7 600 000 no data 78
5 500 5 600 8 400 7 600
35 000 - 37 000 23 900 no data 27 500
770 000 no data
130 000 700 000 300 000
6 400 112 000
1 500
Caauarina montana (w/o wings) no data Ceiba pentandra 19 000 Cryptomeria japonica 300 000 Detlonix regia 2000
532

Species Seeds/kilo Seeds/liter
iospyros discolor no data racontomeion dao no data ndoapermum peltatum no data eucalyptus camaldulensis ? 300 000 ucalyptus deglupta 23 000 000 ucalyptus grandis 12 000 000 ucalyptus robusta 7 000 000 ucalyptus saligna 1 000 000 ucalyptus tereticornis 6 600 000 ragraea fragrans 5-6 Mill. liricidia sepium no data melina arborea 1 800 evea brasiliensis no data ntsia bijuga no data ,agerstroemia speciosa 160 000 - 230 000 eucaena glauca 22 000 iichelia champaca 10 000 lchroma pyramidale no data tctomelis sumatrana ca. 3.5 Mill. 'ahudia rhomboidea no data Qrashorea plicata no data karkia javanica 1 000 - 1 200 bentacme contorta no data 'inus Ansularis 55 000 - 63 000
'inus merkusii %thecolobium dulce bterocarpus indicus iamarkea saman iindora supa ipathodea campanulata
40 000 5 500 - 8 800 1 200 - 1 300 4 400 - 7 700
no data no data
Wetenia macrophylla with wings 1
without wings 600 - 2 000
3 500 880 - 990 Yamarindus indicus
!sctona grandis, cleaned 1 not cleaned
500 - 2 000 1 000
24 'erminalia catappa !oona calantas 280 000 - 420 000 ritzx parviflora, dried 19 000
130 900
9 800 3 000 000 6 800 000
no data 3 700 000 5 800 000 3 300 000
no data 3 000
880 - 960 130 190
10 000 17 000 - 19 000
no data 104 000
no data 180
29 no data
23 26 000 - 34 000 average 30 000
18 000 no data
110 4 500
600 5 600
90 200 840
300 - go0 170
no data 100 000 11 000
533

REFERENCES
1. 2.
3.
4. 5.
6.
7.
8.
9.
10.
11.
12.
13.
14.
15.
16.
17. 18.
19.
20.
21.
BALDWIN, H.I., 1955, Handling forest tree seed. FAO, Rome BARNARD, R.C., 1969, A manual of Malayan silviculture for
lowland forests. Part IV: Artificial Regeneration, Kuala Lumpur
BINUA, T.M., 1962, Modern practical techniques and economi- cal practices of reforestation, Forestry Leaves 13 (21, Los BaRos
BROWN, W.H., 1935, The plant kingdom. Ginn & Co., Boston BRYNDUE'I, K., 1966, The germination of teak. Nat. Hist. Bull.
of the Siam Society Vol. 21 (122), Bangkok Buszewicz, G., 1969, Problems and rewards in processing and
storing seed. Journal of Forestry 63 (21, London DELIZO, T.C., 1962, Seed production forecast for the Mt.
Makiling College Forest of the College of Forestry. For. Leaves 13 (2)
DELIZO, T.C., 1964, Forest nursery and plantation handbook for the Philippines. U.F. College of Forestry, Los Bairos
DOMINGO, J.L., 1968, How to raise Albizzia falcata. For. Fop. Bull. 1, U.P. College of Forestry, Los Bafios
FAO, 1959, Pine cone drying rack. Forestry Equipment Notes, Rome
GOOR, A.Y., 1963, Tree planting practices for arid zones. FAO, Rome
HARTMAN, H.T. et KESTER, D.E., 1959, Plant propagation. Prentice Hall, Inc. Eaglewood Cliffs, N.J.
ISSLEIB, G., 1964, Unfallverhctung beim Besteigen von Waldbgumen. Allg. Forst Zeitschrift 19 (12/13), Miinchen
JACALNE, D.V., 1955, Summary of some germination studies in the Division of Forest Investigation. Phil. Journal of Forestry 11 (3 & 41,
JACALNE, D.V., 1959, Further study on hastening the germination of akle seed. Fhil. Journal of Forestry 15 (l-4)
JUNI, A-A., 1962, Better trees for tomorrow. For. Leaves 14 (1 & 2)
KRiiSSMANN, G., 1964, Die Baumschule, Paul Farey, Hamburg LEROY, J., 1962, Recommendations for successful storage of
tree seed. Tree Planters Notes No. 55, US Forest Service
LETOURNEUK, c., 1957, Tree planting practices in tropical Asia. FAO, Rome
LIMSTROM, G.A., 1965, Interim forest tree improvement guides for the Central States. US Forest Service
MAGINI, E. et TULSTRUF, N.F., 1955, Tree seed notes. FAO, Rome
534

22. MONSALUD, M.R. et LOPEZ, F.R., Kaatoan bangkal (Anthocephalus cadamba miq.). Mimeographed, Los BaRos
23. PAA; N.F. et GERABDO, J., 1967, Silvicultural characteristics of kaatoan bangkal. For. Leaves 13 (1 & 2), Los Ba%os
24. PARRY, M.S., 1956, Tree planting practices in tropical Africa. FAO, Rome
25. RATANAKOSES SURAPAT, 1967. Storing of teak seed. Thai-Danish Teak Improvement Center, Maehuat, Thailand
26. Rayos, J.A., GLORI, C.V., ESTEBAN, I.D., 1964, Vital informa- tion on seed handling with emphasis on reforestation. Lumberman 10 (1), Manila
27 . REFORESTATION ADMINISTRATION, Annual report 1968/69, Manila 28. REFORESTATION ADMINISTRATION, Planting instructions for some
forest trees in the Philippines. Mimeographed, Manila 29, RUPF, H., SCH&HAR, S., Zeyher, M., 1961, Der Forstpflanzgarten,
Miinchen 30. SURI, P.N. and SETH, S.K., 1959, Tree planting practices in
temperate Asia. FAO, Rome 31. TADEO, C.B., 1962, Silvicultural characteristics of bagtikan
(Farashorea plicata). Lumberman 8 (6), Manila 32. TOUME?, J.W. et KORSTIAN, C.F., 1942, Seeding and planting in
the practice of forestry. 3rd. Ed., New York 33. WORMALD, T.J., 1969, A nursery handbook for the Philippines.
Reforestation Administration Manila, mimeographed. 34. WORMALD, T.J., 1969, Experiments undertaken in cooperation
with the Research Officer. Reforestation Administra- tion Manila, mimeogr.
535

PART VII
INDEX TO COMMON AND SCIENTIFIC NAMES

a) INDEX TO COMMON NAMES
Acacia (Raintree), Samanea saman (Jacq.) Merr., 60, 67, 179, 507, 510, 513, 533
African tulip, Spathodea campanulata Bca.~~. i 66, 75, 256, 263, 313, 507, 533
Agoho, Casuarina equisetifolia Forst., 23, 50, 53, 54, 74, 76, 120, 178, 232, 250, 256, 269, 287, 289, 362, 488, 507, 509, 513, 515, 517, 532
Agoho de1 Monte, Casvarina rumphiana Mig., 53, 54
Akle, Albizzia acle (Blanco) Merr., 257, 515, 520, 522, 532
Akleng-parang, Albizzia rlrocera (Roxb.)Benth., 50., 52, lil, 113,-178, 185, 488, 513, 514, 532
Alibangbang, Bauhinia malabarica Roxb., 50, 53, 75, 185, 193
Almaciga, Agat:?is philippinensis Warb., syn- A. alba (Lam.) Foxw., 51, il, 111, 513, 516, 517, 5187532
Almon, Shorea almon Foxw., 18, 19
Alupag, Euphoria didyma Blanc0
Amugis, Koordersiodendron pinnatum (Blanco) Merr.
Anabiong, Trema orientalis Blume
-=g # Diospyros pyrrhocarpa Mig.
Anipai (Tapilan), Phaseolus calcaratus Roxb., 337
Antipolo, Artocarpus blancoi (Elm.) Merr.
Antsoan& Cassia javanica L., 75, 178, 185, 488, 507, 510, 513, 515, 520,532
Antsoan-dilau, Cassia spectabilis L., 75, 185, 488, 513, 515, 520, 532
Anubing, Artocarpus cumingiana T&z.
Api-api, Avicennia officinaiis Linn., 22
Apitong, Dipterocarpus grandiflorus Blanco, 18, 19, 20, 133
Aranga, Homalium foetidum (Roxb.) Benth.
Arbor vitae, Thuja orientalis L., 76, 265
Aroma, Acacia farnesiana (L.) Willd., 50, 51, 120, 238, 488, 515, 520, 532
Bagilumbang, Aleurites trisperma Blanco, 52, 113, 507, 511, 515, 520, 522, 532
Bagras, Eucalyptus deglupta Blume, 44, 50, 56, 65, 66, 93, 533
Bagtikan, Parashorea plicata Brandis, 18, 19, 111, 112, 133, 533
Bakauan, Rhizophora candelaria DC. Rhizophora mucronata Lam., 22
Balete, Ficus spp. Linn., 76, 185
Balitbitan, Cynometra ramiflora L.
Balsa, Ochroma pyramidale Cav. ex. Lam., syn. 0. lagopus SW., 507, 533
Barnbang, Bauhinia acuminata L., 532
Bamboos, Bambuseae, 72, 238
Banaba, Lagerstroemia speciosa (L.) Pers., 50, 75, 111, 121, 185, 256, ..167, 488, 507, 509, 513, 515, 526, 533
Bangkal, Nauclea orientalis L., 426
539

Bangkal, southern Nauclea junghuhnii (Mig.) Merr., 426
Banlag, Xylopia ferruginea Baill.,
Banuyo Wallaceodendron celebicum Koord., 21
Baston de San Jose, Cordyline terminalis Kunth., 76, 263
Batau (Hyacinth bean), Dolichos lablab Linn., 416
Batete, Kingiodendron alternifolium (Elm) Merr. & Rolfe
Batitinan, Lagerstroemia piriformis Koehne
Benguet pine, Pinus insularis Endl., syn. P. khasya Royle, 23, 24, 44, 50, 58, 59, 65, 66, 81, 97, 104, 149, 179, 182, 183, 188, 189, 197, 232, 250, 256, 257, 260, 269, 287, 362, 374, 425, 503, 507, 508, 510, 513, 515, 528, 530, 531, 533
Bermuda grass, Cynodon dactylon (L.) Pers., 427
Betelnut palm; Areca catechu finn., 76
Betis, Madhuca betis (Blanco) Ma&h. & Merr.
Bikal, Schizostachyum diffusum (Blanco) Merr., 146
Binuang Octomelis sumatrana Mig., 44, 66, 93, 513, 533
Bitanghol (Palomaria de Monte), Calophyllum blancoi Bl. 6 Fr.
Bitaoa. Cal&hyllum inophyllum L., 23, 50, 53, 120, 523,532
505, 507, 515, 520,
Boho, Schizostachyum lumampao (Blanco) Merr
Boton . , 70, 275, 426, 488
Barringtonia asiatica (L.)Kurz Bottlebrush
Callistemon lanceolatus DC.& 75, 76, 256, 362, 507, 517, 532
Bougainvillea
Bulacan, Merremia peltata, 146
Buria Corypha elata Roxb., 71, 76
Bunya pine, Araucaria bidwillii Hook
Caimito (Star apple), Chrysophyllum caimito Linn. 400
Camagon (Mabolo, Kamagong), Diospyros philippinensis (Desr.) Gurke Diospyros discolor Willd., 21. 488, 505, 507, 511, 514, 533
Camote (Sweet potatoes), Ipomoea batatas, 127
Cafia fistula (GoldeGhower), Cassia fistula L., 44, 75, 111, 160, 185, 480, 510, 513, 514, 515, 520, 532
Cashew (Casoi), Anacardium occidentale L., 44, 50, 113, 178, 193, 373,
Casoi (Cashew), Anacardium occidentale L., 44, 50, 113, 173, 193, 373, 480, 532
Cassava, Manihot utilissima, 126, 127, 128
CeZFosema, Centrosema pubescens BentIr., 416, 426, 467
Champaka, Michelia champaca L., 513, 533
Chico, Manilkara zapota (L.) Van Royen, 514
China-fir, Cunninghamia konishii Hayata, 50
Coconut palm, COCOS nucifera Linn., 76
Cogon, Imperata cylindrica Beauv., J. exaltata Broncm., 85, 94, 118, 123, 142, 144; 165, i97;234, 279, 298, 408, 409
Conifers, 144, 149, 306, 326, 500 505
Corn (Maize), Zea mays L., 126, 127
Cowpea, Bougainvillea spectabilis Willd., 76, 240, 263 Vigna sinensis (Linn.) Savi,
337
540

Cutchtree, Acacia catechu (L-F.) Willd., 515, 520, 532
Dalingdingan, Hopea foxworthyi Elm., 19
Dallis grass, Paspalum dilatatum Poir., 416
Dao, Dracontomelon dao (Blanco) Merr. & Rolfe, 511, 533
Dapdap, Erythrina variegata Linn., var. orientalis (L.) Merr., 75, 507
Dipterocarps,(Philippine mahogany) Dipterocarpaceae, 18, 19, 20, 54, 81, 94, 111, 133, 135, 191, 232, 259, 287, 503, 507, 509, 513, 517
Dita, Alstonia scholaris (L.) R. Br., 111, 185, 507
Duguan, Myristica philippensis Lam.
Duhat, Sysygium cumini (L.) Skeels, 511
Dumanay Homonoia riparia Lour., 426, 470
Dufigon, Tarrietia sylvatica Merr.
Dufigon-late, Heritiera littoralis Dryand., 23
Durian, Durio zibethinus Murr.
Elephant grass, Pennisetum purpureum Schum., 198
Eucalypts (Gum trees) Eucalyptus spp. Benth. and Muell. 44. 50, 74, 84, 97, 142, 232, 233, 250, 256, 269, 287, 289, 362, 498, 505, 507, 509, 513, 515, 517, 526, 528
Firetree. Delo& regia (Boj.) Raf., 75, 178, 505, 507, 510, 515, 532,
Fringon, Bauhinia monandra Kurz., 185, 532
Gabi (Taro) Colocasia esculenta, 128
'aardenia, Gardenia jasminoides Ellis, 76
Giant ipil-ipil, Leucaena leucocephala (Lam.) de Wit, 58, 68
Gisok, Shorea astylosa Foxw., 19
Gisok-gisok, Hopea philippinensis Dyer,19
Golden shower (Caiia fistula), Cassia fistula L., 44, 75, 111, 160, 185, 488, 510, 513, 514, 515, 520, 532
Gubas, Endospermum peltatum Me=., 55, 66, 287, 533
GuGea grass, Panicum maximum Jacg.,198
Gumamela, Hibiscus spp. Linn. 76, 185, 263
Guava, Psidium guajava L., 44, 50, 60, 426, 514
Hagakhak, Dipterocarpus warburgii Brandis, 19, 20, 21
Himbabao, Alleanthus luzonicus (Blanco) F. Vill.
Hyacinth bean (Batau), Dolichos lablat Linn,, 416
Igem, Podocarpus imbricatus, syn. P. javanicus, 75
Ilang-ilang, Cananga odorata (Lam) Hook. f. &Th.
Ipil, Intsia bijuga (Colebr.) 0. Ktze. 21, 257, 313, 507, 520, 522, 526, 533
Ipil-ipil, Leucaena leucocephala (Lam.) de Wit,Syn. L. glauca, 44, 50, 58, 67, 68, 72, 74, 81, 84,104, 113, 114, 188, 198, 233, 240, 263, 416, 425, 436, 447, 478, 488, 507, 509, 513, 514, 515, 526, 533
541

Jacaranda, Jacaranda mimosaefolia D. Don, 75
Jackfruit (Nangka), Artocarpus heterophylla Lam., 193, 505, 514
JaDanese alder, Alnus maritima Nuttall, 44, 50, 53, 72, 81, 97, 104, 256, 289, 322, 425, 507, 509, 513, 515, 517, 532,
Japanese cypress, Cryptomeria japonica (L-F.1 D. Don., 50, 54, 75, 256, 263, 265, 289, 532
Jatoba, Hymenaea courbaril L.
Junipers, _._ Juniperus spp., 265
Kaatoan bangkal, Anthocephalus chinensis (Lamk.) Mig., 44, 50, !53, 66, 84, 93, 97, 232, 250, 256, 257, 287, 362, 364, 503, 507, 511, 513, 516, 517, 532
Kakauati (Madre de cacao), Gliricidia sepium (Jacq.) Steud., 44, 50., 5'7, 68, 72, 74, 233, 240, 263, 425, 447, 478, 488, 533,
Kalachuchi, Plumeria acuminata Ait., 75, 263
Kalantas , Toona calantas Merr. Rolfe, 21, 44, 45, 50, 62, 104, 193, 256, 507, 509, 513, 515, 533
Kalumpang, Sterculia foetida L., 507
Kalumpit Terminalia edulis Blanco, 507
Kamachile, Pithecolobium dulce (Roxb.) Benth., 50, 59, 238, 239, 426, 488, 507, 509, 533
Kamagong (Camagon, Mabolo), Diospyros phUippinensis (Desr.) Gurke, discolor Willd., 21, 488, 505, 507, 511, 514, 533
Kamatog, Erythrophloeum densiflorum Merr.
Kaong, Arenga pinnata (Wurmb.) Merr.
Kapok, Ceiba pentandra (L.) Gaertn.,532
Kariskis Albizzia lebbekoides (DC) Benth., 52
Kassod tree (Siamese Acacia) Cassia siamea Lam., 68, 75, 111, 113, 178, 185, 488, 513, 515, 520, 532
Katmon, Dillenia philippinensis Rolfe, 507
Katurai, Sesbania grandiflora (Linn.) Pers., 61, 67, 198, 24Q
Kawayan, - Bambusa spinosa Roxb., 69 - 426, 488
Kawayan-kiling, Bambusa vulgaris Schrad., 69, - 426, 488
Kikuyu grass, Pennisetum clandestinum Hochst, 416, 427
Kudzu, Pueraria phaseoloides (Roxb.) Benth., 337, 416, 426, 467
Kudzu, Pueraria thunbergiana Benth., syn. P. hirsuta Schneider, 426, 467
Kupang, Parkia javanica (Lam.) Merr. 510, 533
Lanete, Wrightia laniti (Blanco) Merr., 507
Lamio, Dracontomelon edule (Blanco) Skeels
Lafigil Albizzia lebbek (L.) Benth. 515, 520, 532
Lantana, Lantana camara Linn., 72, 76, 185, 240, 263, 426, 488
Lanutan, Bombycidendron campylosiphon Warb.
Legumes, Leguminosae, 68, 287, 322, 336, 337, 416, 424, 505, 519, 521, 528
Lespedeza, perennial Lespedeza cuneata G. Don 416, 426,
Limba, Terminalia superba
Lipai, Mucuna nigricans (Lour.) Steud., 426
542

Loktub, Duabanga moluccana, 66
Lumbang # Aleurites moluccana (L.) Willd., 40, 52, 71, 113, 124, 178, 254, 257, 5077511, 515, 520, 522, 523, 524, 528, 532
Lumbayao, Tarrietia javanica Blume
Mabolo (Camagon, Kamagong), Diospyros philippinensis (Desr.) Gurke, Diospyros discolor Willd., 21, 488, 505, 507, 511, 514, 533
MacArthur palm, Actinophloeus macarthurii (H. Wendl.) Becc., 76
Macopa, Eugenia javanica Lam., 24, 185
Madre de cacao (Kakauati), Gliricidia sepium (Jacq.) Steud., 44, 50, 57, 68, 72, 74, 233, 240, 263, 425, 447, 478, 488, 533
Maguey I Agave cantala Roxb., 426
Mahogany, Swietenia spp., 81, 84, 94, 97, 104, 133, 135, 187, 188, 232,250, 254, 257, 259, 269, 289, 303,313, 505, 507, 509, 513, 515, 530
Mahogany, large leaf, Swietenia macrophylla King, 44, 50, 6l, 65, 533
Mahogany, small leaf, Swietenia mahogany Jacq., 50, 61
Maize (corn), Zea mays L., 126, 127
Malaalmaciga, Podocarpus blumei Endl., 75, 513
Malaanonang, Shorea polita Vid., 19
Malakaturai, Cassia multijuga Reichb., 75, 185, 488, 513, 515, 520
Malakmalak, Palaquium philippinensis (Perr.) C. B. Rob.
Malapapaya, Polyscias nodosa (Blume) Seem., 507
Malaruhat, Cleistocalyx operculatus Merr. & Perry
Malugai Pometia pinnata Forst.
.
Maluncrav, Moringa oleifera Lam., 240
Manggachapui Hopea acuminata Merr., 19
Manggasinaro, Shorea philippinensis Brandis, 18, 19
Manggis, Koompassia excelsa Faub.
Mmgo, Mangifera indica L., 58, 178, 185, 193, 505, 513, 514
Martinez's palm, Martinezia caryotaefolia HBK.
Mayapis, Shorea squamata Dyer, 18, 19, 111, 133
Melastoma family, Melastomataceae, 185
Melina (Yemane), Gmelina arborea (Linn.) Roxb., 44, 50, 5J, 65, 66, 73, 84, 97, 110, 111, 127, 160, 185, 232, 250, 254, 257, 258, 263, 313, 488, 505, 507, 513, 515, 533
Mexican cypress, Cupressus lusitanica Mill,, 75, 76, 256, 265
Mexican sunflower, Helianthus tuberosus L., 72, 426, 428, 447, 488
Mindoro pine, Pinus merkusii Jungh. & De Vr., 23, S9, 97, 162, 171 321, 503, 504, 507, 510, 513, 516, 517, 533
Molave , Vitex parviflora Juss., 21, 44, 45, 50, p-‘, 104, 185, 232, 239, 287, 488, 505, 507, 511, 533
Moluccan sau, Albizzia falcataria (L.), Back., 50, 52, 61, 65, 66, 81, 84, 93, 97, 124, 178, 185, 232, 250, 507, 509, 513 532
Mulberry spp., g;us spp. Tournef., 84, 185,
Mulberry family, Moraceae, 190
Mung0 bean, Phaseolus aureus Roxb., 337
543

Nangka (Jackfruit), titocarpus heterophylla Lam., 193, 505, 514
Narek, Balanocarpus cagayanensis Foxw.
Narig, Vatica manggachapui Blanco, 19
Narra Pterocarpus spp., 21,44,45,50, 60, 73, 83, 84, 97, 104, 232, 250, 254, 257, 269, 289, 313, 488, 504, 505, 507,509,513,515
Narra, prickly, Pterocarpus vidalianus Rolfe, 60, 65
Narra, smooth Pterocarpus indicus Willd.,
-60, 65, 153, 179, 533 Nato,
Palaquium luzoniense (P.-Villd.) Vid.
Nipa palm, Nipa fruticans Wurmb., 22
Norfolk Pine Araucaria excelsa (Lamb.1
oaks * Qxmxus spp., 24
Oleander Nerium indicum Mill., 263
Oliva, Cycas revoluta Thmb.
Palmera, Chrysalidocarpus lutescens H. We&l.
Palms, Palmae, 76
Palomaria de1 Monte (Bitanghol), Calophyllum blancoi BL. St Fr.
Palosanto, Triplaris cumingiana Fisch. 6' Mey.
Palosapis, Anisoptera thurifera (Blanco) Blume, 18, 19
Pandans (Screw pines), Pandanus spp. L.F., 23
Pangi, Pangium edule Reinw., 507
PangnZUI Lithocarpus bennettii (Mig.) Rehd.
5u
Paper mulberry, Broussonetia papyrifera (L-1 Vent., 263, 425
Para rubber Hevea brasiliensis (HBE.) Muell.-Arg., 44, 50, 70;104, 515. 517, 533
Philippine-mahogany (dipterocarps) Dipterocarpaceae, 18, 19, 20, 54, 81, 94, 111, 133, 135, i!il, 232, 259, 287
Pili, Canarium ovatum Engl., 3, 507, 511, 515, 520
Pili family, Burseraceae, 71
Pines, Pinus spp., 84, 193, 324, 498, 503, 505, 509, 514, 526
Pingka-Pingkahan Oroxylum indicum (Linn.) Vent., 185
Pitogo, Cycas rumphii Mig., C. circinalis, 76
Poinsettia, Euphorbia pulcherrima Willd., 76, 263
Pomelo, Citrus maxima (Burm.) Merr.,514
PotOtail, Bruguiera sexangula (Lour.) Poir.
Powder puff shrub, Calliandra haematocephala Rush. 76
Pugahan, Caryota cumingii Lodd., 76
Purple Bauhinia, Bauhinia purpurea L., 532
Quinine, :z;;a spp., Linn., 29 -'
Raintree (Acacia), Samanea saman (Jacq.) Merr., 60; 67, 179, 507, 510, 513,
Randia, Randia macrantha DC., 177, 181
Red Lauan Shorea negrosensie Fem., 18, 19

ed palm, Cyrtostachya lakka Becc.,
hodes Grass, Chloris gayana Kunth., 416
imas, Artocarpus communis J.R. & G. Forst.
,oyal palm, Roystonia e1ata (Bart.) Harper, 76
.uno, Miscanthus sinensis Anders,, 294, 295, 484
ampaguita, Jasminum sampac (L-1 Ait.,
lampalok (Tamarind) Tamarindus indica L., 179, 488, 507, 533
;anto1, Sandoricum koetjape Merr., 488, 505, 507
ianto family Meliaceae, 62, 187
laraca, Saraca declinata Mig.
icarlet plume, Euphorbia fulgens Karw., 263
icrew pines (Pandans) Pandanus spp. L-F., 23
Siamese Acacia (Kassod tree) Cassia siamea Lam., 68, 75, 111, 113, 178, 185, 488, 5.13, 515, 520, 532
iiar, Peltcphorum pterocarpum (DC.) Back.
;ilky oak, Grevillea robusta A.Cunn.,76
;ilverdollar, Eucalyptus cinerea, 76
ilash pine (Honduras pine) Pinus caribea Morelet, var. hondurensis Loock, 50, 58, 179
ioybean, Glycine max (Linn.) Merr., 337
Spanish cedar Cedrela odorata L.
;tar apple (Caimito), Chrysophyllum cainito Linn., 488
iugarcane (Tuba), Saccharwn officinarum L., 126
;un hemp, Crotolaria juncea L.
;upa Sindora supa Merr., 21, 515, 520, 522, 533
Swamp mahogany Eucalyptus robusta Sm., 50, 56, 121, 533 -
Taiwan Red Cypress Chamaecyparis formosensis Matsum. 50, 265
Talahib, Saccharum spontaneum L., subsp. tndicum Hack., 85, 118, 142
Talisai, Terminalia catappa L., 23, 50, 120, 505, 507, 520
Taluto, Pterocymbium tinctorium (Blanco) Merr.
Tamarind (Sampalok), Tamarindus indica L., 179, 488, 507, 533
Tambulian, Eusideroxylon zwageri 523
Tanghas, Myristica elliptica Wall.
Tanglin, Adenanthera intermedia Merr., 507
Tanguile Shorea polysperma (Blanco) Merr., 18, 19, 21, 23
Tapilan (Anipai), Phaseolus calcaratus Roxb., 337
Teak, Tectrrna grandis L., 44, 45, 50, 62, 65, 73, 81, 84, 97, 110, 111, 113, 123, 138, 142, 156, 157, 181, 185, 186, 187, 190, 232, 239, 250, 254, 257, 258, 269,,207, 289, 313, 400, 498, 499, 505, 507, 509, 513, 515, 520, 521-523, 525, 520, 533
Tiaong, Shorea agsaboensis, 19
Tibig, Ficus nota (Blanco) Merr., 185, 425, 467
Tikal, Livistona spp. Linn., 76
Tindalo, Afzelia rhomboidea Vid., syn. Pahudia rho&idea (Blanco) Prain , 21, 257, 507, 520, 522, 533
545

Tiwi, Dolichandrone spathacea (L-f.1 K. Schum., 185
Toog , Combretodendron guadrialatum, 66
Trumpet tree, Datura alba Nees, 426
Tuai, Bischofia javanica Blume, 532
Tuba (Sugarcane) Saccharum officinarum L., 126
Tukang-kalau, Aglaia clarkii Merr.
Tung oil tree, Aleurities fordii Hemsley, 53
Uoko, Mikania scandens, 146
Upland rice Oryza sativa L., 127
Urung Fagraea fragans Roxb., 533
Vidal's lanutan, Bombycidendron vidalianum (Naves) Merr. & Rolfe, 532
Weeping love grass, Eragrostis curvula, 427
White lauan, Pentacme contorta (Via.1 Merr. & Rolfe, 18, 19, 20, 111, 112, 133, 533
White nato, Pouteria macrantha (Merr.) Baehni
Willows, Salix spp. Linn., 425, 478
Yakal, Shorea gisok Foxw., 18, 19, 20
Yellow bell, Solandra hartwegii No. E. Brown, 76
Yemane (Melina), Gmelina arborea (Linn.) Roxb., 44, 50, 57, 65, 66, 73, 84, 97, 1107111, 127, 160, 185, 232, 250, 254, 257, 250, 263, 313, 488, 505, 507, 513, 515, 533
546

b) INDEX TO SCIENTIFIC NAMES
Acacia auriculiformis A. Cunn.a Alleanthus luzonicus (Blanco), 178, 515, 532 F.-Vill.
Acacia catechu (L-F.) Willd., Himbabao, Cutchtree, 515, 520, 532 Alnus maritima Nuttall,
Acacia farnesiana (L.) Willd., Aroma, 50, 51,
Japanese alder, 44, 50, 53, 7;
5z 120, 238, 488, 81, 97, 104, 256, 289, 322,
515, 520, 425, 507, 509, 513, 515, 517, Actinophloeus macarthurii (H.Wendl.) 532
Becc., MacArthur palm, 76
Adenanthera intermedia Merr., Tanglin, 507
Afzelia rhomboidea Vid.,(syn. Phudia rhomboidea (Blanco) Prain), Tindalo, 21, 257, 507, 520, 522, 533
Agathis loranthifolia, 112 Agathis philippinensis Warb.
(syn. A. alba (Lam.) Foxw.) AGaciga, 51, 71, lil, 513; 516-518, 532
Agave cantala Roxb., Maguey, 426
Aglaiaclarkii Merr., Tukang-kalau,
Rlbizzia acle (Blanco) Merr., Akle, 257, 515, 520, 522, 532
Rlbizzia falcataria (L.) Back., Moluccan sau, 50, 52, 61, 65, 66, 81, 84, 93, 97, 124, 178, 185, 232, 250, 507, 509, 513, 532
Rlbizzia lebbek (L.) Benth., Lafigil, 515, 520, 532
Ubizzia julibrissin Durazz., 185, 532
Plbizzia lebbekoides (DC.) Benth., Kariskis, 52
Plbizzia procera (Roxb.) Benth., Akleng-parang, 50, 52, 111, 113, 178, 185, 408, 513, 514, 532,
Aleurites fordii, Hemsley, Tung oil tree, 53
Aleurites moluccana (L.) Willd., Lumbang, 50, 52, 71, 113, 124, 178, 254, 2577507 511, 515., 520, 522, 523, 524, 520, 532
Rleurites trisperma Blanco, Bagilumbang, 52, 113, 507, 511, 515, 520, 522, 532
Alstonia scholaris (L.) R. Br., Dita, 111, 185, 507
Anacardium occidentale L., Casoi (Cashew), 44, 50, 113, 178, 193, 3?3, 488, 532
Anisoptera thurifera (Blanco) Blume, Palosapis, 18, 19
Anthocephalus chinensis (Lamk.) Mig. ‘ Kaatoan bangkal, 44, 50, 53, 66, 84, 93, 97, 232, 250, 256, 257, 287, 362, 364, 503, 507, 511, 513, 516, 517, 532
Araucariaceae, 71 Araucaria bidwillii Hook,
Bunya pine Araucaria excelsa (Lamb.) R.Br. ,
Norfolk pine, 75, 76 Areca catechu Linn.,
Betelnut palm, 76 Arenga pinnata (Wurmb.) Merr. ,
Kaong Artocarpus blancoi (Elm.)Merr.,
Antipolo, 488 Artocarpus cumingiana T&z.,
Anubing Artocarpus communis J.R.& G.Forst
Rimas Artocarpus heterophylla Lam.,
Jackfruit (Nangka), 193, 505,, 514
Avicennia.officinalis Linn., Api-api;* 22
Balanocarpus cagayanensis Foxw., Narek
Bambusa spinosa, Roxb., Kawayan, 2, 426, 488
Bambuseae, Bamboos, 72, 238
547

Bambusa vulgaris Schrad., Kawayan-kiling, 69, 426, 488
Barringtonia asiatza (L.)Kurz, Boton,
Bauhinia acuminata L., Bambang, 532
Bauhinia malabarica Roxb., Alibangbang, 50, 53, 75, 185, 193
Bauhinia monandra Kurz., Fringon, 185, 532
Bauhinia purpurea L., Purple Bauhinia, 532
Bischofia javanica Blume, Tuai, 532
Bombycidendron campylosiphon Warb., Lanutan
Bombycidendron vidalianum (Naves), Merr. & Rolfe Vidal's Lanutan, 532
Bougainvillea spectabilis Willd., Bougainvkllea, 76, 240, 263
Broussonetia papyrifera (L.)Vent., Paper mulberry, 263, 425
Cassia siamea Lam., Kassod tree (Siamese Acacia), 68, 75, 111, 113, 178, 185, 488, 513, 515, 520, 532
Cassia spectabilis L., Antsoan-dilau, 75, 185, 488, 513, 515, 520, 532
Casuarina equisetifolia Forst., Agoho, 23, 50, 53, 54, 74, 76, 120, 178, 232, 250, 256, 269, 287, 289, 362, 488, 507, 509, 513, 515, 517, 532
Casuarina glauca Sieber ex Mig., 50, 121
Casuarina montana Leschen. ex Mig., 53, 54, 532
Casuarina rumphiana Mig., Agoho de1 Monte, 53, 54
Cedrela odorata L., Spanish cedar
Ceiba pentandra (L.) Gaertn., Kapok, 532
Centrosema pubescens Benth., Centrosema, 416, 426, 467
Bruguiera sexangula (Lour.)Poir. Pototan,
Burseraceae, Pili family
Calliandra haematocephala Rush., Powder puff shrub, 76
Callistemon lanceolatus DC., Bottlebrush, 75, 76, 256, 362, 507, 517, 532
Calophyllum blancoi Bl. & Fr., Bitanghol (Palomaria de Monte),
Calophyllum inophyllum L., Bitaog, 23, 50, 53, 120, 505, 507, 515, 520, 523, 532
Cananga odorata (Lam) Hook. f. &Th. Ilang-ilang
Canarium ovatum Engl., Pili, 71, 507, 511, 515, 520
Caryota cumingii Lodd., Pugahan, 76
Cassia fistula L., Golden shower (Cafia fistula), 44, 75, 111, 160, 185, 400, 510, 513, 514, 515, 520, 532
Cassia javanica L., Antsoan, 75, 178, 185, 408, 507, 510, 513, 515, 520, 532,
Caseia multijuga Reichb., Malakaturai, 75, 185, 488, 513, 515, 520
Cestrum spp., Linn., 263 Chamaecyparis formosensis Matsun
Taiwan Red Cypress, 50, 265 Chloris gayana Kunth.
Rhodes Grass, 416 Chrysalidocarpus lutescens H.Wer
Palmera Chrysanthemum cineriaefolium, 34 Chrysophyllum caimito Linn.,
Star apple (Caimito), 488 Cinchona spp. Linn.,
Quinine, 29, 70, 516 Citrus maxima (Burm.) Merr.,
Pomelo, 514 Cleistocalyx operculatus Merr.,
& Perry, Malaruhat,
,Cocos nucifera Linn., Coconut palm, 76
Colocasia esculenta, Gabi (Taro),'128
CombretodendronFadrialatum, Toog, 66
Cordyline terminalis Kunth., Baston de San Jose, 76, 263
Corypha elata Roxb., Buri palm, 71, 76
Crotolaria juncea L., Sun hemp
Crotolaria spp., Linn.,337, 416 Cryptomeria japonica (L.F.)D.Don
Japanese cypress, 50, 54, 75, 256, 263, 265, 289, 532
1.
Cunninghamia konishii Hayata, China-fir, 50
Cupressus fragrans, 75, 76, 256, 265
Cupressus lusitanica Mill., Mexican Cypress, 75, 76, 256, 265
Cycas revoluta Thunb., Oliva
Cycas rumphii Mig., C. circinalis, Pitogo, 76
Cynodon dactylon (L.) Pers., Bermuda Grass, 427
Cynometra ramiflora L., Balitbitan
Cyrtostachya lakka Becc., Red palm
Dacrydium spp., 24 Datura alba Nees
Trumpet tree, 426 Delonix regia (Boj.) Raf.,
Firetree, 75, 178, 505, 507, 550, 515, 532
Dendrocalamus strictus Nees, 177 Dillenia philippinensis Rolfe,
Katmon, 507 Diospyros philippinensis (Desr.)
Gurke Diospyros discolor Willd.,
Mabolo, (Camagon, Kamagong), 21, 488, 505, 507, 511, 514,533
Diospyros pyrrhocarpa Mig., Anang
Dipterocarpaceae, Philippine mahogany (diptero- carps), 18, 19, 20, 54, 81, 94, 111, 133, 135, 191, 232, 259, 287
Dipterocarpus warburgii Brandis, Hagakhak, 19, 20, 21
Dipterocarpus grandiflorus Blanco, Apitong, 18-20, 133
Dolichandrone spathacea (L.f.)K. Schum., Tiwi, 185
Dolichos lablab Linn., Batau (Hyacinth bean), 416
Dracontomelon dao (Blanco) Merr. & Rolfe, Dao, 511, 533
Dracontomelon edule (Blanco) Skeels, Lami
Duabanga moluccana, Loktub, 66
Durio zibethinus Murr., Durian
Endospermum peltatum Merr., Gubas, 55, 66, 287, 533
Eragrostis curvuJ~a, Weeping love grass, 427
Erythrina variegata Linn., var. orientalis (L.) Merr., Dapdap, 75, 507
Erythrophloeum densiflorum Merr., Kamatog
Eucalyptus camaldulensis Dehn., 50, 55, 74, 139, 533
Eucalyzus cinerea, Silverdoliar, 76
Eucalyptus citriodora Hook, SO,%, 178
Eucalyptus deglupta Blume, Bagras, 44, 50, 56, 65, 66, 93, 533
Eucalyptus grandis (Hill) Maiden so,%, 533
Eucalyptus robusta Sm., Swamp mahogany, 50, 56, 121, 533
Eucalyptus saligna Sm.,50, 56, 533 Eucalyptus spp., Benth. and Muell.
Eucalypts (Gum trees), 44, 50, 74, 84, 97'; 142, 232, 233, 250, 256, 269, 287, 289, 362, 498, 505, 507, 509, 513, 515, 517, 526, 528
Eucalyptus tereticornis Sm., Eugenia javanica Lam.,
Macopa, 24, 185 Eusideroxylon zwageri,
Tambulian, 523 Euphorbia fulgens Karw.,
Scarlet'pPume,:263 Euphorbia pulcherrima Willd.,
Poinsettia, 76, 263 Euphoria didyma Blanco,
Alupag
Fagrea fragans Roxb., 533 Urung, 533
Ficus nota (Blanco) Merr., Tibig, 185, 425, 467
Ficus spp. Linn., Balete, 76, 185
549

Gardenia jasminoides Ellis, Gardenia, 76
Gliricidia sepium (Jacq.)Steud Madre de Cacao (Kakauati), 44;58, 57, 68, 72, 74, 233, 240, 263, 425, 447, 478, 488 533
Glycine max (Linn.) Merr., Soybean, 337
Gmelina arborea (Linn.) Roxb., Melina (Yemane), 44, 50, 57, 65, 66, 73, 84, 97, 110, nl, 127, 160, 185, 232, 250, 254, 257, 258, 263, 313, 488, 505, 507, 513, 515, 533
Grevillea robusta A. Cunn., Silky oak, 76
Grewia spp. Linn., 185
Helianthus tuberosus L., Mexican sunflower, 72, 426, 428, 447, 488
Heritiera littoralis Dryand., Dufigon-late, 23
Hevea brasiliensis (HBK.) Muell. =Gf. I Para rubber, 44, 50, 70, 104, 515, 517, 533
Hibiscus spp. Linn., Gumamela, 76, 185, 263
Homalium foetidum (Roxb.)Benth. Aranga
Homonoia riparia Lour., Dumanay, 426, 470
Hopea acuminata Merr., Manggachapui, 19
Hopea foxworthyi Elm., Dalingdingan, 19
Hopea philippinensis Dyer, Gisok-gisok, 19
Hymenaea courbaril L., Jatoba
Imperata cylindricic Beauv.,J. 'exaltata Brongn., qogon, 85, 94, 118, 123, 142, 144, 165, 197, 234, 279, 298, 408, 409
fntsia bijuga (Colebr.)O.Ktze. Ipil, 21, 257, 313, 507, 520, 522, 526, 533
Ipofaoea batatas, Camote (sweet potatoes), 127
550
Jacaranda mimosaefolia D-Don, Jacaranda, 75
Jasminum sampac (L.) Ait., Sampaguita, 76
Juniperus spp., Junipers, 265
Kingiodendron alternifolium (Elm.) Merr. & Rolfe, Batete
Koompassia excelsa Faub., Manggis
Koordersiodendron pinnatum (Blanco) Merr., Amugis
Lagerstroemia piriformis Koehne, Batitinan
Lagerstroemia speciosa (L.)Pers., Banaba, 50, 75, 111, 121, 185, 256, 467, 488, 507, 509, 513, 515, 526, 533
Lantana camara Linn., Lantana, 72, 76, 185, 240, 263, 426, 488
Leguminosae, Legumes, 68, 287, 322, 336,337 416, 424, 505, 519, 521, 528
Lespedeza cuneata G. Don, Lespedeza, perennial, 416, 426
Leucaena leucocephala (Lam.)de Wit, syn. L. glauca, Ipil-ipil, 44, 50, 58, 67, 68, 72, 74, 81, 84, 104, 113, 114, 188, 198, 233, 240, 263, 416, 425, 436, 447, 478, 488, 507, 509, 513, 514, 515, 526, 533
Leucaena leucocephala (Lam.)de W Giant ipil-ipil, 58, 68
Lithocarpus bennettii (Mig.)Rehd Pangnan
Livistona spp. Linn., !&kal, 76
Lupinus spp., Linn., 337
Macadamia hildebrandii, 171 Macaranga spp. Thouars, 185 Madhuca betis (Blanco) Macbh. 61
Merr., Betis

Mangifera indica L., Mango, 58, 178, 185, 19% 505, 513, 514
Manilkara zapota (L.) Van Royen, Chico, 514
Manihot utilissima, Cassava, 126, 127, 128
Martinezia caryotaefom HBK., MartinezCs palm
Melastomataceae, Melastoma family, 185
Meliaceae, Santol family, 62, 187
Merremia peltata, Bulacan, 146
Michelia champaca L., Champaka, 513, 533
Mikania scandens, Uoko, 146
Miscanthus sinensis Anders., Rune, 294, 295, 484
Moraceae, Mulberry family, 190
Moringa oleifera Lam., Malungay, 240
Morus spp. Tournef., Mul"berry spp., 84, 185, 263
Mucuna nigricans (Lour.)Steud., Lipai, 426
Myristica elliptica Wall., Tanghas
Myristica philippensis Lam., Duguan
Nauclea junghuhnii (Wig.)Merr., Bangkal, southern, 426
Nauclea orientalis L., Bangkal, 426
Nerium indicum Mill,, Oleander, 263
Nipa fruticana Wurmb., Nipa palm, 22
Ochroma pyramidale Cav.=.Lam-, syn. 0. lagopus Sw., Balsa, 507, 533
Octomelis sumatrana Mig., Binuang, 44, 66, 93, 513,533
Oroxylum indicum (Linn.)Vent., Pingka-pingkahan, 185
Oryza sativa L., Upland rice, 127
Palaquium luzoniense (F.-Villd.) Vid., Nato,
Palaquium philippinensis (Perr.) C. B. Rob., Malakmalak.
Palmae, Palms, 76
Pandanus spp. L-f., Pandans (Screw pines), 23
Pangium edule Reinw., Pangi, 507
Panicum maximum Jacq., Guinea grass, 198
Parashorea plicata Brandis, Bagtikan, 18, 19, 111, 112, 133, 533
Parkia javanica (Lam.) Merr., Kupang, 510, 533
Paspalum dilatatum Pair., Dallis Grass, 416
Peltophorum pterocarpum (DC.) Back., Siar
Pennisetum clandestinum Hochst, Kiktiyu grass, 416, 427
Pennisetum purpureum Schum., Elephant grass, 198
Pentacme contorta (Via.) Merr. & Rolfe, White lauan, 18, 19, 20, 111, 112, 133, 533
Phaseolus aureus Roxb., Mung0 bean, 337
Phaseolus calcaratus Roxb., Tapilan (Anipai), 337
Pinus caribea Morelet, var. hondurensis Loock, Slash pine (Honduras pine), 50, 58, 179
Pinus insularis Endl., syn. P. khasya Royle, 23, 24, 44, 50, 58, 59, 65, 66, 81, 97, 104, 149, 179, 182, 183, 188, 189, 197, 232, 250, 256, 257, 260, 260, 269, 287, 362, 374, 425, 503, 507, 508, 510, 513, 515, 517, 528, 530, 531, 533
Pints merkusii Jungh. & De Vr., Mindoro pine, 23, 59, 97, 162, 171, 321, 503, 504, 507, 510, 513, 516, 517, 533
Pinus oocarpa, 58, 59 Pinus radiata D. Don, 162 Pinus spp.,
Pines, 84, 193, 324, 498, 503, 505, 509, 514, 526

Pithecolobium dulce (Roxb.)Benth., Saccharum spontaneum L. subsp. Kamachile, 50, L;9, 238, 239, 426, 488, 507, 509, 533
Plumeria acuminata Ait., Ka2achuchi, 75, 263
Podocarpus blumei Endl., Malaalmaciga, 75, 513
Podocarpus imbricatus, syn. P. javanicus, Igem, 75
Podocarpus spp., 24 Polyscias nodosa (Blume) Seem.,
Malapapaya, 507 Pometia pinnata Forst.,
Malugai Pouteria macrantha (Merr.)Baehni,
White nato Premna qp. Linn., la5 Psidium guajava L.,
Guava, 44, 50, 60, 426, 514 Pterocarpus indicus Willd.,
Narra, smooth, 60, 65, 153, 179, 533
Pterocarpus vidalianus Rolfe, Narra, prickly, a, 65
Pterocarpus spp., Narra, 21, 44, 45, 50, 73, 83, 84, 97,
60, 104, 232, 250, 254,
257, 269, 289, 313, 488, 504, 505, 507, 509, 513, 515
Pterocymbium tinctorium (Blanc0 Merr., Taluto,
1
Pueraria phaseoloides (Roxb.) Benth., Kudzu, 337, 416, 426, 467
Pueraria thunbergiana Benth., syn. P.hirsuta Schneider, Kudzu, 426, 467
Randia macrantha DC., Randia, 177, 181
Rhizophora candelaria DC., Rhizophora mucronata Lam.,
Bakauan, 22 Roystonia elata (Bart.)Harper
Royal palm, 76
Saccharum officinaruxn L., Tuba (Sugarcane), 126
indicum Hack., Talahib, 85, 118, 142
Salix spp. Linn., Willows, 425, 478
Samanea saman (Jacq.) Merr., Acacia (Raintree), 60, 67, 179, 507, 510, 513, 533
Sandoricum koetjape Merr., Santol, 488, 505, 507
Sapotaceae, Chico family, 190
Saraca Saraca declinata Mig.,
Schizostachyum diffusum (Blanco) Merr., Bikal, 146
Schizostachyum lumampao (Blanco) Merr., 7tJ, 275, 426, 488
Sesbania grandiflora (Linn.)Pers., Katurai, 61, 67, 198, 240
Shorea agsaboensis, Tiaong, 19
Shorea almon Foxw., Almon, 18, 19
Shorea astylosa Foxw., Gisok, 19
Shorea gisok Foxw., Yakal, 18-20
Shorea negrosensis Foxw., Red Lauan, 18, 19
Shorea philippinensis Brandis, Manggasinoro, 18, 19
Shorea polita Vid., Malaanonang, 19
Shorea polysperma (Blanco) Merr. Tanguile, 18, 19, 21, 23
Shorea squamata Dyer, Mayapis, 18, 19, 111, 133
Sindora supa Merr., Supa, 21, 515, 520, 522, 533
Solandra hartwegii N-E-Brown, Yellow bell, 76
Solar-nun spp., Linn., 185 Spathodea campanulata Beauv.,
African tulip, 66, 75, 256, 263, 313, 507, 533
Sterculia foetida L., Kalumpang, 507
Swietenia macrophylla King, Mahogany, large leaf, 44, 50, 61, 65, 533
Swieteza mahogany Jacq., Mahcgany, small leaf, 50, 61
Swietenia spp., -
Mahogany, al, 84, 94, 97, 104, 133, 135, 187, 188, 232, 250, 254, 257, 259, 269, 289, 303,313, 505, 507, 509, 513, 515, 530,
552

Wallaceodendron celebicum Koord., Banuyo, 21
Wrightia laniti (Blanco) Merr-, Lanete, 507
Xylopia ferruginea Baill., Banlag,
Syzygium cumini IL.1 Skeels, Duhst, 511
Tamarindus indica L., Tamarind (Sampalok), 179, 488, 507, 533
Tarrietia javanica Blume, Lumbayao,
Tarrietia sylvatica Merr., Dufigon,
Tectona grandis L., Teak, 44, 45, 50, 62, 65, 73, 81, 84, 97, 110, 111, 113, 123, 138, 142, 156, 157, 181, 185, 186, 187, 190, 232, 239, 250, 254, 257, 258, 269, 287, 289, 313, 488, 498, 499, 505, 507, 509, 513, 515
Terminalia catappa L., Talisai, 23, 50, 120, 505, 507, 520
Terminalia edulis Blanco, Kalumpit, 507
Terminalia superba, Limba
Thuja orientalis L., Arbor vitae, 76, 265
Toona calantas Merr. Rolfe, Kalantas, 21, 44, 45, 50, 62, 104, 193, 256, 507, 509, 513, 515, 533
Trema orientalis Blume, Anabiong
Vatica manggachapui Blanco, Narig, 19
Vigna sinensis (Linn.1 Savi, * Cowpea
Vitex parviflora Juss., * _Nolaue. 21; 44; $5, 50; 63; ---, 104, 185, 232, 239, 287, 488, 505, 507, 511, 533,
Zea mays L., Corn (Maize), 126, 127
Triplaris cumingiana FischAMey., Palosanto
553

---- 1
P A R T VIII
SUBJECT INDEX

Acaricides, 340, 344, 378, 379 Actinomycetes, 321, 324 Active ingredient, pesticides,
344‘ 345, 355 Agallol, 256, 348, 356, 377, 384 Agglomerates, 8, 10 - Aldrin, 347, 348, 356, 368, 369,
370, 371, 373, 379, 380 Alluvial deposits, 8, 9 Aluminium hydroxide, 10 Alpha-naphtalene-acetic acid,
266 Ammonium, 328, 329, 330, 331
, nitrate 324, 328, 329 sulfate 324, 328, 329, 332, 334
Analysis, nutrient elements on fertilizer bag, 138, 328, 330
, soil, 46-49, 327 Andesite, 8, 10 Anthraguinone, 347, 374, 384 Ants, 192, 356, 370, 380 Aphids, 339, 340, 367, 370, 382 Aphyxiation (Oxygen deficiency of
roots), 343 Apron, erosion control, 463, 464,
466, 468, 485 Arboricides, 131, 134, 146, 147 Armillaria mellea, 178, 181 Armyworms, 368 Asexual propagation, 262-267, 501,
502
Bacillus thuringiensis, 341, 383 Backfire, 175 Bacteria, 289, 319, 321, 322, 324,
329, 361, 363, 376- Bacterizs, 341 Baiting stations for rodent
control, 194, 374
Balled plants, 103, 111, 112, 314, 315
B&o plantations, 69, 70 rust (Dasturella divina),
180 Bank erosion, 398, 399,
4r - 402,
473 - 486, Ba~sta~ization, rivers,
streams, lakes, 419, 425, 426, 449, 453, 473 - 486
Bar chart, 9F Bare root seedlings, 98, 104,
118, 235, 269, 309 - 313 Basal area, 160, 161, l= Basalt, 7, 8, 10 Bases, leacIi*gof, 10, 11 Basic slag, 324, 329, 332 Basudin, 339, 341, 367, 368,
380, 381 Baygon,T6, 368, 370, 371, 372,
382 Baesil, 340, 341, 367, 380,
381 Bea forest, 18, 19, 22 Beautification, 75 - 77, 86,
453, 487 Beauveria bassiana, 191 Bed load, 399, 403, 473, 479 Bedrock, 395 Beetles, 181, 182, 190, 191,
192, 339, 36r371, 379 Bench brush layers, 441 - 446, a
470 Binlid, 194 Birds, 114, 115, 192, 346, 374,
384 repellents, 344, 347, 384
Bitumt& emulsion, 428, 429, 445, 453-454
Blmtx78, 179, 363 Blotch; 363
9, 100, 103, 275,281
554

-
Borers, insects, 368, 379, 382 Boron, 138, 266, 324, 325, 332 Botrytis, 178, : jl, 363 Braconidae, 291, 192 Branchiness, 66, 83, 148, 149,
154, 155, 157, 187 - 189, 500 Brand names of pesticides, 344,
376 - 384 Brassicol, 347, 348, 356, 362,
377 Bracast sowing, 113, 256, 257,
260 Browsing trails, 197, 409, 414 Brush combs, erosion control,
471 Brush covers, 436 - 441, 463,
479, 481, 482 Brush layers, 441~446, 470 Buffering of soils, 325, 331 Bugs, 367, 370 Buildings, project nursery,
240, 241 Buntal fiber, 71 Burning of pastures, 165, 197,
198 Burning permits, 169, 198, 415 Butterflies, 367
Calcium, 137, 316, 324, 325, 326, 331, 332, 405
carEate, 11, 331, 334 nitrate, 324, 328, 329, 332, 334
Calculation with forest tree seed, 530-533
Canals, drainage, 431, 462, 463, 470, 483
irrigation, 236, 243,'247, 248, 252-254, 284, 298 -
CaPtan, 266, 339, 347, 348, 357, 362, 363, 377
Carbamates, 339, 382, 383 Care and maintenance of seed-
lings, 283 - 306 Carrying capacity of flow, 399,
402, 403, 479, 480 Catchment area, 73, 401-403, 462,
'463. 473 Caterpillks, 181-g, 339, 367,
368, 383 - Cattle ranching, 196-198, 408,
408, 409, 414-4r - Cement, 238, 240, 419, 420, 456,
457
Cement mixing machine, 280, 346 Cerambycid beetle, 191 Ceresan, 342, 346, 348, 377,384 Checkdams, 243, 245, 42Oy423,
465-469, 470, 471 Chxtr 332 Chlordane, 348, 368-372, 379 Chlorinated hydrocarbons,Fst
control, 339, 357, 365, 369, 379, 380
Chsinc325, 332 Chloropicrin, 347, 357, 377 Chlorosis, 10, 343, 326, 331,
332, 365 Chlorox, 346 Choice of tree species for
reforestation, 43-77 Circular spades, 103, 111, 314 Clays, 9, 235, 279, 317, 318,
329, 403-405, 418 - Clear - cutting, 27, 417 Clearing of patches and strips
for planting, 93-95, 131 Climate map of the Philippines,
16 Climatic conditions, 12-17, 43, --
90, 160, 250, 338, 400 Climatic types, 14, 45, 250 Climber cutting, 93, 134, 145 Climbing trees for seed col-
lection, 506 - 508 Clones, 502 Close traverse, surveying,
222 - 227 Cobalt, 325 Cochroaches, 342, 371, 372, 380 Coconut beetle (Oryctes rhinoceros),
191 Combined structures, erosion
control, 456 - 472 Commercial fertilizers, 328-333 Commercial plantations, 70, 150 Compass surveying, 207-228 m- Complete fertilizer, 120, 133,
135, 137, 180, 267, 280, 327, 330, 331, 337, 411, 417, 439, 442, 447, 451, 453, 454
Compost, 241, 255, 278, 280, 289, 331, 333-336, 362
Concessions,-i>erm. 150 Concrete, 4&, pz0, 456, 457,
464, 467, 485 Conduits, 431 Cone picker, 506 Conifer plantations, 149, 150,
151, 158, 167, 178 CoxinG, potting, 273-277
558

Containers, preparation of pesti- tidal liquid, 353, 386
, seed collection,507 seed storage and seed
shipment: 514-518 Contour trenches, 120, 433, 434,
436, 463 Conversion factors, 385, 386 Convection column, 13, 166, 169 Copal, 51, 71 Copper, 138, 324, 325, 332
fungicides, 363 Coppice system, 68, 74 Cordons (French), erosion
control, 441-446, 470 Corner points, surveying, 216,
220, 222 Coumarine baits, 194, 373, 384 Counterfire, 175 Crop species, 124, 126, 127,
408, 411, 487 - - Cross-pollination, 501, 502 Culling of nursery plants, 96,
307 - 309 Cuitivation, nursery beds, 257,
273, 284, 299, 300, 301 Culverts, 418, 43r433, 453 Curbing of nursery beds, 253,
282, 298 Cuttings, 72, 127, 128, 262-m,
424-426, 427, 428, 440341, 445, 447.452,458~460, 464, 468-470, 479
Cutting cycle, 68 test, 505, 526
Cutworms, 367, 368, 369 Cyclones, tropical, 14-17, 73,
171, 233, 418, 441, 463
Damping - off, 177, 256, 260, 262, 342, 347, 348, 356, 361-362, 376, 377, 378
Dazraa divina, (see bamboo rust)
DDT, 339, 340, 344, 357, 366, 379
DeGposition of organic material, 289, 290, 319, 320, 334, 336
Deficiency symptoms on plants, 325-327, 342, 365
Defoliators, 181, 183-185, 190, 367, 368
Dessicators for seed storage, 514, 517
Diagnostic sampling, 130
Diameter growth, 137, 139, 140, 161, 500
Diazinon, 366-369, 371, 372, 380, 381
Dieback, 187, 363, 365 Dieldrin, 347, 348, 368,~ 371,
373, 379, 380 Dilution effz, 138 Dipterex, 339, 356, 368, 370,
381 Dizrocarp forests, 5, 18, 19,
25, 54, 65 wildlings, 112, 133
Direct seeding, 94, 113, 114, 115
Diseases, control of, 177, 179, 325, 326, 329, 338, 361-363, 376, 377
Disyston, 356, 366-368, 382 Dolomite, 331, 332 Dormancy in seed, 512, 520-524,
528 Dothistroma pini (Pine needle
blight), 178, 179 Dowfume, 377, 378 Dowpon, 144
Earthworms, 289, 319, 320 Ecological aspects and factors,
choice of tree species,43-45 Economic returns, 73, 162 Edaphic factors, choice of tree
species, 46-50 Emulsifiable concentrate, 345,
353, 354, 356 Endosulfan, 357, 367, 368, 369,
379, 380 Endrin,T9, 357, 380, 381 Enrichment planting, 84, 94,
130-135, 141 EGaGt, 385, 386 Erosion, accelerated, 393, 411
, effects of, 411-413 ' factors affecting
400 - 407 # geological, 393, 411 , gravity, 394, 395 * gully, 394, 396-398,
409, 411, 418, 430, 431 , man-made, 393, 407-4-10 I raindrop, 395, 396,406,
412 * rill, 396, 397, 398,
409, 430 , river banks, 398, 399,
402, 473~486,487 --
559

Erosion, sbl;et, 396, 397 # splash, 395 , water, 395-399 , waterfall, 397, 463 , wind, 73. 394, 487-489 , control, 25, 72, 81,
393-492 Etiolation, 291, 307, 343 Evaporation, 103, 119, 284, 288,
301, 307, 412, 487 Extension pruners, 506
Forest plantations, 63-87 products, "minor", 51,
70, 71 reserve, 196, 415, 417 types, 18 - 24, 62
Formaldehyde, 342, 346, 377 Frames, protective, over nursery
beds, 253, 264, 267, 29-$ 339, 373
Fruit trees, 71, 263. 276. 487 Fuelwood, 58, 67, 72; 74, 127,
157, 407, 408
Fascines, 431, 433, 438, 449 - 452, 481
Fungi, 153, 156, 177-180, 151, 254, 265, 289, 319,321, 324, 347, 361-363
FaFgrowing species, 66, 67, Fungici.G,36, 266, 339, 342,
344, 346, 347, 348, 362, 363, 83, 113, 124, 140, 500 376 - 377
Faustmann formula, 163 ti?w-ixgation, 232, 236, Feldspar, 137, 316 247, 248, 253, 284 -m Fencing, nursery site, 236,
238 - 240
Fences,' pasture land, 414
piles and poles for Gabions, 420-423, 458, 464, 68, 69 485, 486
Ferbam, 266, 339, 347, 363, 376 Gall insects, 368 Fertilizer application, nursery, Ganoderma lucidum, 177, 178
306, 324, 327, 329-332 Garbage disposal, 335, 341 --- plantations Genetical quality of seed, 405, ,
136 - 140 498 - 502 Fertilizers, 137, 240, 324, Genotype, 263
328 - 337 Geographical situation of the Fiber glass, 241, 296 Philippines, 3-7 Fiber, long for pulp, 66, 69 Germination of seed, 512, Field capacity of soil, 403, 404 520-524, 526-529 -w Field notes, surveying, 209, 210, GexnaOn tests, 527-529, 530
218-221, 222 Germinative capacity, 113, 250, Field planting (see planting) 260, 497, 503-505, 512-520, Field sketches, surveying, 211-215, 527-531
221, 222-224, 228 energy, 525, 527-529, Financial return, 162 530 Fire, 23, 62, 71, 152, 157, 165~ Girdling of trees, 81, 94, 134,
176, 182, 197, 408, 409, 414, 146, 148 415 Gradient, conversion table of,
Fire breaks, 83, 170, 171, 174 490 control, 165-176, 234 Grading of nursery plants, 307, lines, 91, 171, 174,175,198 308 swatter, 172, 173, 176 Grafting, 501,
First aid kit, 173, 176 , wax, 265 Flitgun, 349 Granules, pesticides formulated Flooding, 232, 236, 247, 248, as, 345, 356, 369
254, 269, 284, 343, 365, 373 Grasshoppers, 367, 368, 379, 380 FlGs, 248 - Grassland sites, 62, 94, 95, 101, Fodder grass, 198, 409, 415, 416 109, 110, 114, 122, 123, 193, Fames, 128, 177, 178 1967198, 235, 408, 414-416 Forage grasses, 198, 409, 415, 416 Grazing, 18, 157, 170, 196-198 -- Forests, management of natural, 409, 414-416
25 - 27

I Gravel, 423. 4r 317, 403, 411, 419, 42n,
Greenhouse, 241, 248, 251, 254-256, 261, 296, 338, 341, 342, 347, 348, 365, 369, 372
Green manuring8 298, 336, 337 Ground ties, erosion control, 465,
469, 470, 486 Grzh hormones, 265, 266 Groynes, 475, 476, 477, 484-486 Grubs, 369 Gully erosion, 394, 396-398, 409,
411, 418, 430, 431- - Gully stabilization, 418, 421,
425, 426, 429, 430, 445, 462- 472
Handling of pesticides, 356-359 Hapalia macheralis (see teak
skeletonizer) Hardening-off, 305-306, 329, 362 Heart rot (Fomemus), 128, 177 Hedges, 85, 240, 298 Heeling-in of bare root seedlings,
312, 313 Heptachlor, 347. 348, 356, 357,
368~371, 379, 380 Herbicides, 144,301, 302, 343 History of reforestation work in
the Philippines, 28-32 Hornblende, 316 Hornworms, 368 Hoplocerambyx spinocornis, 191 Humidity, relative, 168, 178,
179, 338, 342, 362, 363, 514 Humus, 46, 136, 316, 319, 2,
331, 333-337, 405, 406 Hyblaea puera (see teak defo-
liator) Hydrological cycle, 73 Hydro-seeding, 427, 445, 455 Hypsipyla robusta, (see Mzgany
shoot borer)
Ichneumonoidae, 191, 192, 339-341 Igneous rocks, 10 Implement carriers, 301 Increment, 139, 140, 152, 159,
160, 163 Index number, survey, 209, 217,
I 218
Indolebutyric acid, 266 Industrial plantation, 32, 64-66,
158-164
Infiltration capacity of soil, 10, 11, 120, 289, 317-320, 401, 403, 405, 406, 412, 436, 462
Insect calamities in plantations natural control factors, 189-l
Insecticides, 339-341, 345, 347, 348, 357, 366-372, 379-383, 51
Insects, 114, 115, 18m9c339, 346, 356, 366-372319
Inventory, rxdx, 26 Ips interstitialis (bark beetle)
182, 183 Iron, 10, 137, 138, 316, 324,
325, 326332, 405 IrrigatG, nursery, 232, 236,
242-m, 252-254; 269, 283-288 298, 306
--
Isoptera (see termites)
Jassids, 366
Kaingin, 11, 18, 123-129, 130, 165, 169, 402, 408,416, 44, -- 427
Karathane, 363, 377, 379 Kelthane, 356, 378
Land classification, 196, 207, 222
Landscaping, 75-77, 86, 453, 487 -- Landslides, 394, 395, 404, 409,
412, 413, 425, 427, 431 Land-use, forms of, 196, 211,
406, 411, 414, 415 Lateritic soils, 10, 11, 405 Latosols, 10 Lauan forest, 19, 20 Lauan-Apitong forest, 19, 20 Lauan-Hagakhak forest, 19, 20,
21, 62 Lead, red, 114, 347, 374 Leafhoppers, 366, 379, 382 Leaf miners, 368, 379, 380, 382
rollers, 339, 368, 379 tiers, 368
Leafworms, 367, 368 Liberation cuttings, 158, 159 Lifting of bare root seedlings,
257, 268, 307, 309 Light demanding species, 81,
132, 142, 269
561

Lime, fertilizer. 278, 330, 33i, 332, 334;362
Limestone, 3,6,7,8,2, 21, 331, 332
LiGe, 339, 347, 348, 368, 369, 373, 379
Line brushinr94 enrichment, 94, 130-135
Liquid measures, pest control, 353, 386
Litmus paper, 322, 323 Live structures, erosion
control, 429, 430, 435-455, 476 - 482
Loam, 48, 234, 272, 280, 288, 318, 403, 404, 418, 445
Lo= sands, 48, 235, 314, 317 Locusts, 367, 368 Logging, 18, 25-27, 68. 79, 180,
183, 407, 408, 417, 418, 462 Longevity of seed, 250, 512, 513, Loopers, 368 Low volume spraying, 349 Lumbang oil, 71
Maceration, seed extraction, 511 Machinery, agricultural, in the
nursery, 234, 237, 240, 241, 245, 251, 257, 301
Magnesium, 137, 316, 324, 325, 326, 332,405
MaGanchoot borer (Hypsipyla robusta)
Malathion, 339, 340, 341, 366, 367-369, 372, 380, 381
Maneb, 339, 344, 363,376 Manganese, 138, 324, 325, 326,
332, 360 Mangrove forest, 18, 19, 22 Manila copal, 51, 71 Manila elemi, 71 Mantids, 192 Manure, 241, 298, 333, 334,
342, 417 Map, climate of the Philippines,
16 - , plantation, 41 - , project, 42 - , reforestation projects
in the Philippines, 31 Mapping, 207 - 228 Marcotting, 262 Marine sediments, 5 Marking of trees, liberation
cuttings, 160
562
Marking of trees, selective logging, 25
Masonry, 419, 420, 456,457, 464, 485
Matting, erosion control, 436-441, 481, 482
Mattresses, erosion control, 439-441, 481, 482
Measures,weight, length,area, volume, conversion factors, 385, 386
Measuring containers, 242, 259, 353, 386
stick, layout of nursery beds, 252
Mechanization of nursery work, 237, 257, 301
Mercury compounds, 339, 342, 346, 348, 356, 377
Merthiolate, 342,346 Mesh wire cylinder, erosion
control, 482, 485, 486 Mesozoic period in the
Philippines, 4, 5, 6 Metaldehyde, 373, 383 Metarrhizum anisopliae (Muscard-
ine fungus) Metasvstox, 339, 340, 357, 366,
367: 368, 382 Methylbromidr347, 357, 377,
519 Mice, 114, 115, 193-195, 346,
373, 374, 518,?ii9- -m Micro-nutrients (see trace
elements) Mildew, 178, 345, 362, 363, 376,
378, 379 MiEalTil particles, 316, 317 Minium, 347, 574 Misting system in the greenhouse,
264 Mites, 365, 366, 376-379, 382 Mixed pEta=ns, 67, 73, 74,
z-8& 180, 436, 443, 487-489 Moisture control. seed storaae
and shipment, 513, 515, 51% 518
Molave forest, 12, 18, 19, 21 287
Molluscicides, 344, 383 Molybdenum, 138, 325, 332 Monsoon, 5, 12-15, 114 Morkit, 347, 374, 384 Mossy forest, 18, 19, 23 Mother tree, 27, 112, 149, 263,
264, 495, 497, 499-501, 512 Moths, 188, 367 - -

Moths balls, 519 Mould, 363 Mud-puddling, 269, 310, 311, 313, Mulching, 81, 103, 114, 119, 138,
261, 273, 284, 288 - 290, 297, 335, 435, 439, 441, 4ZK 447, 451; 453.- 454 -
MultiplGtiofieds for cuttings 428
Muscardine fungus (Metarrhizum anisopliae), 191
Mycorrhiza, 321 Mycoses, 341
Natural forests, management, 25 - 28
types, 18-24 Natural regenerition of forests,
94, 112, 130, 159, 1.97 Needle cast, 363 Nemacur P. 356. 365. 378 Nematocides, 344, 357, 365, 377,
378 Nezodes, 254, 256, 347, 356,
364, 365, 377, 378 NeGreGt auex63, 164 Nitrate, 328, 3291 3301 331 Nitrification, 322 Nitrogen, 10, 120, 136, 138,
266, 324, 325, 32r329, 331, 334, 336, 342, m, 363
fixation, 72, 136, 322, 336, 337, 324, 325
shortage, fresh mulch, 290
Notching spade, 105, 107 Nozzles, dusters, 355
hydraulic pressure spray&s, 352
watering hose, 286 Nursery'beds, layout of, 252-254,
269, 297 layout, 231-248, 253,
254, 298 plants, quality of, 96,
118, 303, 305, 307-309 - site,
-- selection of,
232 - 235, 242 Nutrient deficiency, 138, 140,
325 - 327 Nutrient elements for plants,
46, 136, 137, 316, 325 - 337
Offspring, 27, 149, 263, 499-502 Organo-chlorine compounds, pest
control, 339,357,365, 379; 380
Organa-mercury cornpOUnds, pest control, 333, 342, 346, 348, 356, 377
Organo-Gsphorus compounds, pest control, 339, 365, 366, 369, 378, 380, 381
Ornamentals,- 7!& 76, 263, 273, 276, 314, 487 -
Orthocide 50, 266, 339, 347, 356, 357, 362, 363, 377
Oryctes rhinoceros,(ser coconut beetle)
Osmol powder, 239 Overlogged areas, improvement of,
130 - 135
Packing and transport of planting stock, 98, 307, 311-313
Packyaw system, 88 Paper production, 65, 66, 124 Parasites on insect pests, 191,
192, 339 - 341 Parent material, 8, 10 Parus elegans (Philippine
titmouse), 192 Pasture land, 165, 1996-198, 406
408, 409, 41F Patches for F-
Z1636T i%ting and sowing, _
95, 113' Pegs t erosion control, 429, 430,
436-453, 474, 476, 47'731- Permanent forest, 196, 415, 417
nurseries, 231 Pest control, 338 - 384 Pesticide application, 346-356,
385, 386 Pesticides, 179, 338-341, 344-
346, 356-359, 375-384 producer and supplier
' firms, 375-384 pH-meter, 242, 323, 331 pH-value, 10, 11, 46, 137, 235,
278, 322-325, 326, 327, 329, 331, 332,342, 362
PhGtype, 499-502 Philippines, climatic conditions,
12-17 geographical situa-
tion, 3 - '7 Philippine soils, 8 - 11 Phosphorus, 10, 120, 136 - 138,
316, 324, 325, 326,328, 329, -- 330
Physiological disorders in nursery plants, 342, 343
Pine forest, 18, 19, 23, 25, 27, 158, 197, 407
563

Pine needle blight (DOthiS- troma pini), 178, 179
shoot moth, 188 Pbanimeter, 227 Plantation records, 40, 41 Plantations, establishment,
63 - 135
165 - 198' protection,
134, 136 1 tending, 91, 130, 164
Plant hole, 97, 98, 102, 103, 105 - 109, 119, 120
L Planting, difficult sites, 88-90, 118-122
lines, 252 plan, 38 shock, 97, 112, 133,
305 - 308
92 - 9; site preparation,
spacing between seedlings, 82 - 87
stock, 96, 97, 307 - 315
survey, 37, 46, 207 techniques, 96 - 111,
118 - 122 time, 90, 91, 250 work organization,
87 - 90 Plant nutrients, 46, 136, 137,
325 - 337 Plastic bags for potting, 100,
103, 274, 281 Plotting of field notes,
surveying, 218 - 221 Plus tree, 499, 501 Poles, productidn of, 68-70, 83 Pole structure, erosion control,
459, 460, 464, 482 Polyhedral diseases, 191 Potassium, 120, 137, 138, 324,
325, 326, 328, 330 PotbedsT82, 293- Pots, 69. 100. 103. 118,
27j - 281 - - Po-d a, seedlings, 100 - 104,
118, 2358.248, 2x 25r 289, 304, 305, 315
Potting~41~67~73-283 soil, 235, 277-280, 329
Powder post beetles, 371 Precautions when handling
pesticides, 356-359 Predators, 191, 192, 339, 341 Pregermination period, 250, 512,
520-524, 528
Preservatives, wood, ?l, 239, 255
Pretreatment of seed to hasten germination, 250, 512, 520-524, -- 529, 531
Preventive measures, erosion, 413 - 418
, forest fire, 169, 170
pests and diseases, 179 - lil, 189 - 193, 341 - 344, 346, 362, 372
, weeds in the nursery, 297, 298
Prophylactic measures, pest control in the nursery, 340, 341, 346, 347, 362, 371, 372
Protection forest, 72, 79, 417 of plantations, fire,
pests, cattle, 165 - 198 Protective shelters over nursery
beds, 253, 264, 267, 296, 297 339, 373
Protractor, surveying, 219 Provenances, 62, 180, 498 - 502,
525 Prunners# extension, 506 Pruning in plantations, 83,
148 - 157 Psyllids, 367 Pulpwood plantations, 65 - 67,
79, 81, 83, 124 Pumps for irrigation, 245, 246,
249 Pure stands, 67, 78, 79, 180, 190 Purity percent, tree seed, 525 Pyrausta machaeralis (see teak
skeletonizer) Pyrethrum, 340, 383
Quality of nursery plants, 96, 118, 303, 305, 307 - 309
Quality of seed, 524-53r Quinine, 70
Rain, damage in the nursery by, 288, 296, 297, 336
Rainfall pattern, 12-17, 44,45, -- 394, 400 - 401, 404
Rainfalrtotla';i-annual, 44, 400 types 14, 45, 250
Rain forest, 11, 19, 93, 1?7, 180, 181, 189, 287
564

1
Range management, 196-198, 409, 414 - 416
Rat control (see rodent control) References, Philippine Forestry,
33 Plantation Techniques
109 - 20;
387 - 389 Nursery Teshnigues,
, Erosion Control, 491, 492
, Tree Seed, 534, 535 Refining of young stands, 158 Reforestation, objectives, 25,
63 - 77 , adverse sites,
118 - 122 Reforestation projects, map, 31 Reforestation, tree species,
51 - 63 Reforestation work in the
Philippines, history, 28-32 Regeneration, natural, 94, 112,
130, 159, 197 Reissinger hoe, 102, 105 Replanting of failures, 91, 95,
96, 116 Residual inventory, dipterocarp
forests, 26 Retaining walls, 419, 421-423,
456-461, 484, 486 RezRzs, 459, 463, 479, 484,
486 Rill erosion, 396, 397, 398,
4Q?, 430 Riprapping, 227, 238, 298, 419,
423, 430, 431, 456-s, 463, 464, 466, 467, 477, 479, 486
River banks, erosion control of, 394, 398, 399, 402, 419, 425, 426, 429, 449, 453, 473 - 486, 487
Riverean species, 478 Road cuts, 394, 410, 418, 428,
433, 444, 445 Road system. 170, 171, 1?4,
233, 234, 412, 418, 462 Rock sausages, erosion control,
482, 485, 486 Rodent control, 114. 115,
193 - 374, 384, 195, 518, 344, 519 346, 373,
Rozfoction, treatments to promote, cuttings, 266
Rooting horizon, 97 - 99 hormones, 265, 266 medium, cuttings,
262, 263, 264, 267
Root nodules, 136, 322 protection during planting,
98, 269, 311, 312 Root pruning, after lifting,
106, 268, 302, 307, 310 , tending measure,
257, 302,-305 Root rot, 177, 361, 377 Rootworms, 369 Rotation of stands, 68, 79,
150, 163 Rotor tillers, 94, 236, 301 Royalty rates, 163 Rubber, 70 Rubble drain, 432 Run-off, 120, 396, 402, 410,
412, 431, 433, 436, 451, 4t=2 - 464, 467, 483, 485, 487
Rust, 177, 180, 363, 376
Saltation, 399, 403 Sampling, diagnostic, natural
regeneration, 130 Sampling of failures in young
plantations, 116, 117 Sampling, seed testing, 525, 526 Sand, 234, 235, 241, 255, 258,
260. 278, 279, 280, 288, 314, 317; 403, 404, 411, 418; 420, 432. 445
Sands; coastal, 118, 120 Sand stone, 8, 9 Sandy loam, 234, 235, 255,
288, 318 Saplings, 133, 145, 443 Sawdust, 289, 334 Sawflies, 367 Sawnwood, production of, 64,
83, 500 Scab, 363 Scale insects, 367, 370 Scarification of seed, 522 Secondary forest, 69, 92, 130,
234, 235 Sedimentation, 399, 403, 411,
471 - 473, 475, 476, 478, 480 Seedbeds, 247, 252-254, 296,
299. 342, 374.; Seedboxes, 240, '254-E, 261,
296. 298, 342:x7, 362, 365 Seed certificati,on, 496, 497 Seed collection, 90, 495, 496,
499, 501, 502,; 503 - 508, 509 Seed dressings, ;lr 34c342,
346, 356, 362; 373, 374, 376, 377
565

Seed extraction, 241, 509-511 Seeding, direct (field), 94,
113 - 115 Seed maturity, 242, 503 - 505,
512, 525 Seed orchards, 84, 501, 502
origin, 498 - 502, 509 quality, 524 - 531 quantity, 114, 530-533 shipment, 497, 505, 509,
51'7 - 518, 531 --sizr525, 532, 533
sources, 495 - 502 storage, 241, 381, 497,
505, 509, 512 - 516, 518, 519, 524, 531 -
viability, 71, 113, 260, 497, 503-505, 512-520, 527 - 531
weight, 525, 532, 533 Seed years, bamboo, 70 Selective logging, 25-27 Self-pollination, 501 Sevin, 367, 368, 369, 383 Shade tolerant species, 81,
131, 142 Shading, 260, 264, 267, 273,
282,-284, 290 - 295, 306, 342, 343, = -
mats, 240, 291, 294, 296, 371
screens, 295 Shale, 8, 9 Sheet erosion, 396, 397 Shelterbelts,- -~75, 233,
487 - 489 - ShaersTer nursery beds,
251, 253, 255, 264, 267, 296; 297; 339; 373.
Shming cultivation, 11, 18,
408, 122-l&, 416, 165, 169, 402,
417, 427 ShzinGf potted seedlings,
304 Shoot borer, 61, 62, 81, 135,
149 ShI;;; pruning, 188, 306, 307,
Silt, 317, 318, 403 Siltation, 470-473, 475-478,
.480 Site classes, 43-50, 161, 162 Site conditions, with regard
to field planting 50, 83, 86, 88 - ii8
90, 101, 103, 1047 - 122
SicpreEation for field planting, 91, 92-95
566
Skeletonizers, 186, 187, 367 368
Skeleton percent in soils, 48 Slope reduction table, 211 Slopes, erosion control, 402,
403, 408, 409, 415 - 418, 424-472, 489 --
, nursery, 237, 238 , plantations, 85, 103,
118, 121, 122, 142, 165, 167, 168, 174. 193. 196
slugs; 372; 373; 383 Slurry treatment, 346 Snails, 372, 373, 383 Sodding, 427, 428, 431, 452,
453, 463, 48c SoXim arsenite, 134, 135,
146, 147 nitrate, 324, 328, 329
Soil analysis, 327 Soil classification, 8-12,46-49,
317-318, 403-405 creep, 394, 404, 413 crust, 288, 300, 318 description, soil profile
in the field, 46 - 49 drenching, 347, 348, 362,
369, 376, 377 fumigation, 340, 347, 362,
365, 377, 378, 379 - iriGtsT 346, 347, 348,
356, 369, 377, 378, 379, 380, - 382
- ,management in the nursery, 234, 251, 255, 256, 277-280, 316-337
mixing, 241, 255, 256, 260, -- 280
orsanisms, 49, 289, 319, 320-322, 334
pores, 49, - 318, - 319, 396, 396, 404, 405
profile, 11, - 46, 47 140, 397, 405
reaction, 10, 11, 46, 137, 235, 278, 322-325, 326, 327, 329, 331, 331,342, 362
shed, 2r 278-279 structure, 46, 48, 49, 235,
251, 288, 289, 318, 319, 396, 404, 405, 406 - -
So= o=he Philippines, 8-12 Solid structures, erosion control,
435, 456-472, 464-470, 473, 484-486
Sowing,field, 94, 113-115 , nursery, 90, 249-262, 362

Spacing of forest plantations, 82-87, 94, 120, 126, 130-134, 152, 159-164, 435
Spacing of transplanted seedlings in the nursery, 269, 282, 342, 362
Species (see tree species) Splash erosion, 288, 395, 396 Spray additives, 345, 353, 384 Spraying, 174, 285, 287,
454 348-z,
Spray liquid, preparation of, 353, 354
Spreaders,' spray liquid, 345, 353, 384
Sprinkling, 236, 245, 246, 249, 261, 285, 286, 287, 348
spurs, erosion control, 486 Stand imprcjvement, 27, 248-164 Stemborers, 368, 379, 382 Sterilization of soil. 256. 298.
339, 340, 342, 347,-359;360, 362, 365, 369
Sticker, spray liquid, 345, 346, 353, 354, 384
Stream banks (see river banks) Striplings (see saplings) Strips for planting and sowing,
93, 94, 113, 131, 132 Stumps, 62, 106, 109, 110, 122,
235, 269, 302, Subsoil, 47,
31_2; 3iz- ’ 316,: 397,411
Sucking insects, 366, 381, 382, 383 -
367, 380,
Sulphur, 322, 324, 325, 332 Sunscald, 290, 343 Superphosphate, 329, 331, 332 Surveying, 207-228 Survey, planting, 37, 38, 46 Survival rate, nursery plants,
103, 104, 111, 112,-1i5, 116, 117, 250, 273, 307-309, 530, 531
Syac insect&&, 3410, 36r 368, 382
2,4,5-T (see arboricides) Tab&s, 143 Tanguile-Oak forest, 19, 21, 23 Tap root, 97, 113, 115, 302-305,
310 Taungya plantations, 58, 81, 84,
92, 123-129, 417 Teak dxlmor, (Hyblaea puera),
133-185, 187, 191, 192 -- Teak skeletonizer (Pyrausta
machaeralis, syn. Hapalia macher- alis), 186-187
Temperature, atmosphere, 15, 45, 168, 290
Temperature control during seed storage and seed shipment, 513, 515-517
Temperature, soil, 288, 290 Temporary mixtures, 81, 82
nursery, 111, 231, 233, 238
Tending, nursery plants, 283-306, 329-333, 341-344
<plantations, 91, 130, 136-164
Termites, 181, 190, 347, 348, 370, 371, 380, 510
Terracernursery, 234, 297, 298
Terracing, erosion control, 433, 434, 436, 458
Terracur P, 356, 365, 369, 378, 382
Texture class (see soil texture) Thinning, plantations, 69, 79,
81, 158-164 -- , seedbeds, 258, 362
Thiodan, 341, 356, 367, 368,380 Thiovit, 340, 356, 363, 376,379 Thrips, 366, 382 Thuricide, 341, 368, 383 Tie points (lines), surveying,
207, 209, 220, 222 Timber quality, 83, 115, 148-157,
187-189, 498-502 trees, 51-62, 65, 94,
130-135 stand improvement (see
stand improvement) Tin cans, pots, 100, 103, 275-277. Tires, slope stabilization, 460,
461 Titmouse (Parus spp.), 192 Tool room, 240, 241 Tools and implements, nursery,
241, 242, 252, 258, 259, 270-272, 275, 276, 278, 281, 285, 286, 299, 300, 304, 309, 310
-t plantations
weeding, pruning, 'fire control) 142, 143, 151, 152, 176
planting, 101, 102, 105, 106: 108
, pest control, 349-352, 355, 360
seed collection and extraction, 506, 507, 509-511
Top/root ratio of nursery plants, 250, 303, 305, 308
567

Topsoil, 47, 90, 236, 238, 241, 255, 278, 316, 396, 397, 411, 453, zz, 477
Trace elements, 138, 324, 325, 326, 332, 334, 360
TractorTO9, 234, 241, 245, 251, 301
Trade names of pesticides, 344, 376-384
Transpiration, 73, 119, 283, 284, 287, 288, 290, 305, 307, 412
Transplant beds, 247, 269, 289, 299, 301, 302, 303, 304, 342, 348
Transplanting in open beds, 250, 251, 257, 268-273, 302
Transport of-axng stcck, 233, 234, 311-314
Traverse, close, surveying, 222-227
Tree farming, 32, 65-67, 124 killers (see arboricides) marking, liberation cuttings,
160
25, 26 R selecti.ve logging,
Tree percent, 530-531 poisoning, 81, 94, 131, 134,
146-148 -m Tree species, fast growing, 66,
67, 83, 113, 124, 140. 500 Tree-species ior reforestation,
43-77 Trial plantations, 65 Triangulation, surveying, 217 Trimming, roots, 108, 268, 302,
307, 310 Tshoots, 188, 306, 307,
310 strong branches,
plantaLons, 156, 157 Typhoons, 13, 14, 15, lG, 17,
73, 171, 233, 418, 441, 463
Underplanting, 81, 130-135 Undesirable trees in plantations,
158-162 Urea, 324, 328, 329, 331 Urodinales (see rust)
Value, thinning operations, 163, 164
Vegetation, ground cover, 112, 113, 167, 175, 190, 211, 234, 405-4m 411, 412, 4iz417, 424-429, 470, 473, 483, 484, 487-489
Vegetative propagation, 262-267, 501, 502
Velocitv of flow, erosion control, 247, 599, 402;462, 471, 472, 475, 476, 479, 480, 483, 484
Veneer pots, 100, 277, 281 Viability of seed, 113, 250,
260, 497, 503-505, 512-520, 526,-529, 531
Virus diseases, 191, 341, 361 Volcanic tuff, 5, 7, 8, 10 Volume production of timber,
66, 67, 83, 136, 139, 140, 162, 163, 500
Water absorbing capacity of soils, 10, 11, 120, 289, 317-320, 401, 403, 405, 406, 412,3c462
Waterbuck, 245, 246 Waterfall erosion, 397, 463 Watering, 261, 268, 273,283-s,
342, 343X50-352, 362- Watershed, 32, 72, 197, 401-403,
411, 412 Water-spill, 464, 466, 467, 485 Water storage capacity of soils,
73, 287, 288, 317-320 Water table, 46, 243 Waterways, 398, 399, 402, 412,
417, 431, 433, 473-486, 487, -- 489
Wattling structures, erosion control, 438, 439, 446-452
Webworms, 368 Weed control, chemical, 144, 301,
302, 343 , nursery, 257, 258,
273, 297-302, 341, 359, 362 m- plantations, 91,
93, 115. 122, 126, 133, 134, 138, 141-144-
Weed sex,x8, 256, 284, 297, 298, 333, 347, 377, 378
Weevils, 367, 519
568

“.
1 Weirs, 419-423, 484, 495 Wells, nursery, 243, 244 Wettable powder, 345, 353, 356 Whiteflies, 367 Wildlinas. 51. 71. 103.
112, i33, 3i4 -- -. &,
Wilt, -en WiltinN Wiltin'
505
g, 137, 291, 343, 365 g point, 404
Wind, 15, 52, 73-75, 157, 164, -- 167, 168, 174, 233, 240, 288, 297, 355, 394, 487-489 --
Wireworms, 369, 382 Wolf trees, treatment of,
157, 158 Wood preservatives, 71, 239,
255, 350
Yakal-Lauan forest, 19, 20 Yield table, 52, 16C
Zinc, 138, 324, 325, 332 Zineb, 339, 344, 363, 376
569