manual - killerfish gameskillerfishgames.com/.../atlantic-fleet-manual-107.pdf · atlantic fleet is...
TRANSCRIPT

- 1 -
Manual v1.07 by
Paul Sincock Ph.D. & Michael Allers
June 3 2015 Game Version 1.07
Atlantic Fleet is not "Free Software". It contains no advertisements or in-app purchases.
Support development by purchasing a legal copy of the game.
© 2015 by

- 2 -
Table of Contents
INTRODUCTION................................................................................... 3
1. COMBAT ......................................................................................... 4 1.1 Controls ............................................................................................................4 1.1.1 Camera & Views - 3D World...............................................................................4 1.1.2 Movement.......................................................................................................6 1.1.3 Gunnery .........................................................................................................8 1.1.4 Torpedoes..................................................................................................... 11 1.1.5 Air Strikes and Aircraft.................................................................................... 13 1.1.6 Carrier Air Operations ..................................................................................... 15 1.1.7 Anti-Submarine Warfare.................................................................................. 16 1.2 Tactical Map..................................................................................................... 20 1.3 Ship Details and Damage Report ......................................................................... 22 1.4 Ending Combat................................................................................................. 24 1.4.1 Disengaging .................................................................................................. 24 1.4.2 Withdrawing and Scuttling Ships ...................................................................... 25
2. PLAYING ATLANTIC FLEET................................................................26 2.1 Single Battle .................................................................................................... 26 2.1.1 CUSTOM BATTLE............................................................................................ 27 2.2 Campaign ........................................................................................................ 29 2.3 Battle of the Atlantic Dynamic Campaign.............................................................. 31 2.3.1 Atlantic Map .................................................................................................. 32 2.3.2 War Summary ............................................................................................... 33 2.3.3 Zones........................................................................................................... 35 2.3.4 Ports ............................................................................................................ 36 2.4 Shipyard.......................................................................................................... 38 2.5 Ship Rank and Experience.................................................................................. 40
3 SINGLE BATTLE: HISTORICAL MISSIONS............................................41 3.1 Sinking Courageous .......................................................................................... 41 3.2 Action off Haisborough Sands ............................................................................. 41 3.3 Battle of the River Plate ..................................................................................... 41 3.4 Sinking of Glowworm......................................................................................... 41 3.5 Action off Lofoten ............................................................................................. 42 3.6 Sinking the Glorious .......................................................................................... 42 3.7 Hunt in the Western Approaches ......................................................................... 42 3.8 Convoy SC-7.................................................................................................... 42 3.9 Action off Plymouth........................................................................................... 42 3.10 Christmas Convoy ........................................................................................... 43 3.11 Convoy HX-106 .............................................................................................. 43 3.12 Sinking Pinguin............................................................................................... 43 3.13 Battle of the Denmark Strait ............................................................................. 43 3.14 Swordfish Attack Bismarck ............................................................................... 44 3.15 Bismarck Night Action...................................................................................... 44 3.16 Sinking the Bismarck ....................................................................................... 44 3.17 Sinking Atlantis............................................................................................... 44 3.18 Kormoran versus Sydney ................................................................................. 44 3.19 Sinking of Barham........................................................................................... 45 3.20 Sinking Python ............................................................................................... 45 3.21 Convoy PQ-13 ................................................................................................ 45 3.22 Escorting Edinburgh ........................................................................................ 45 3.23 Battle of the Barents Sea ................................................................................. 46
- 3 -
3.24 Convoy TM-1.................................................................................................. 46 3.25 Les Sept Iles .................................................................................................. 46 3.26 Battle of the North Cape .................................................................................. 46 3.27 Ile de Batz ..................................................................................................... 47 3.28 Ile de Vierge .................................................................................................. 47 3.29 Action off Brittany ........................................................................................... 47 3.30 Action off Bergen ............................................................................................ 47
4 GAME OPTIONS / HELP .....................................................................48
5 APPENDICIES ..................................................................................50 5.1 FAQ ................................................................................................................ 50 5.2 Data ............................................................................................................... 52 5.2.1 Torpedoes..................................................................................................... 52 5.2.2 Aircraft & Payloads ......................................................................................... 52 5.2.3 Ship Repair Times .......................................................................................... 53 5.3 Glossary & Abbreviations ................................................................................... 54 5.4 Credits ............................................................................................................ 55 5.5 Contact Us....................................................................................................... 55 5.6 Release Notes .................................................................................................. 56
Introduction Atlantic Fleet is a turn-based tactical and strategic simulation of the Battle of the Atlantic during World War II. If this is your first time playing Atlantic Fleet, we recommend having a read through this manual and then beginning play with some Single Battles to get a feel for combat and practice gunnery skills. The Battle of the River Plate and Convoy HX-106 (playing Germany in both) Single Battles make for some excellent initial practice.

- 4 -
1. Combat 1.1 Controls
1.1.1 Camera & Views - 3D World Tap any ship in the 3D world to focus camera on it. Player aircraft are automatically focused on once launched. Pinch to zoom. Drag to pan camera. Camera may be panned below water.
Default 3D view (1) Camera Follow On/Off On: Camera will follow all ship movement and weapons/attacks to their target. Off: Camera remains stationary at current position or in the case of player aircraft, remains with the aircraft.
(2) Tactical Map Provides a top down overview of the current battle. Provides access to Options and in-game manual. Provides access to Special Commands for leaving combat or scuttling ships. See section 1.2 Tactical Map for more details. (3) Active Player Ship Information Tap ship name to focus camera back to player ship.
- 5 -
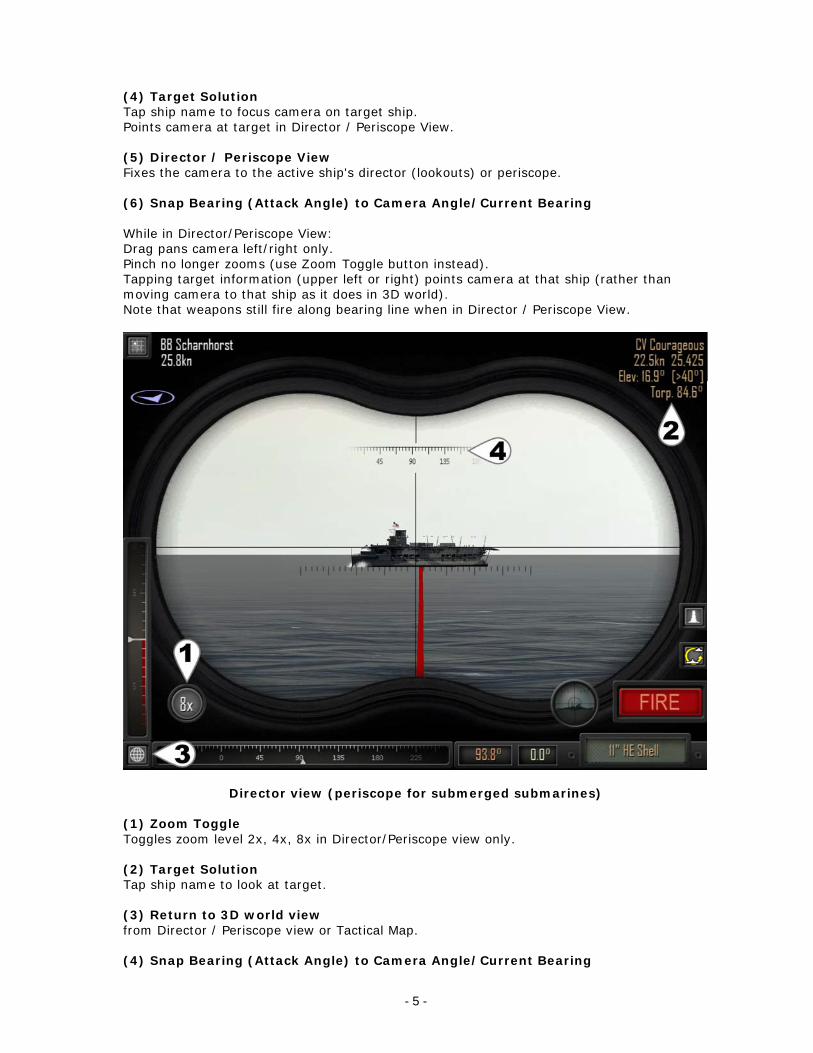
(4) Target Solution Tap ship name to focus camera on target ship. Points camera at target in Director / Periscope View. (5) Director / Periscope View Fixes the camera to the active ship's director (lookouts) or periscope. (6) Snap Bearing (Attack Angle) to Camera Angle/Current Bearing While in Director/Periscope View: Drag pans camera left/right only. Pinch no longer zooms (use Zoom Toggle button instead). Tapping target information (upper left or right) points camera at that ship (rather than moving camera to that ship as it does in 3D world). Note that weapons still fire along bearing line when in Director / Periscope View.
Director view (periscope for submerged submarines) (1) Zoom Toggle Toggles zoom level 2x, 4x, 8x in Director/Periscope view only. (2) Target Solution Tap ship name to look at target. (3) Return to 3D world view from Director / Periscope view or Tactical Map. (4) Snap Bearing (Attack Angle) to Camera Angle/Current Bearing

- 6 -
1.1.2 Movement Atlantic Fleet is a turn-based game. Each turn, both sides move and take an action with each of their ships before the other side then takes their turn. Movement always comes before the action and only a single action is available per ship per turn. Some Special Actions during movement or using Fleet mode prevent an action that turn. To move your ship: 1. Set telegraph (speed). 2. Set rudder angle. 3. Select a Special Action. 4. Select Single Ship or Fleet mode. 5. Tap Move.
Default 3D view (underwater) (1) Telegraph Tap upper half to increment speed Tap lower half to decrease speed.
Ships have inertia. Making a dramatic change in speed will take several turns for the ship to reach the new speed. If you want to 'brake' swiftly, set telegraph to BACK.
(2) Rudder Set rudder angle. Grayed out when rudder damaged.
- 7 -
(3) Special Actions / Depth Rudder Angle Red box shows current rudder angle. Tap green Action button to cycle through special actions 1. None 2. Smoke (warship only, lays smoke screen, no attack). 3. Surface (submarine only, decreases depth by one). 4. Dive (submarine only, increases depth by one). Smoke prevents another action for that turn by the ship laying smoke. Smoke for 3 consecutive turns may allow the ship to Disengage. Smoke prevents targeting if blocks line of sight. Submarines can travel at the following depths: 1. On the Surface (can fire deck gun and torpedoes) 2. Periscope Depth (can fire torpedoes) 3. Shallow 4. Deep 5. Very Deep Using the Surface action increments the depth of the submarine by one, so a submarine at deep depth (4) would move to shallow depth (3). A submarine at Periscope Depth (2) would surface and travel on the ocean surface itself (1). Using the Dive action decreases the depth of the submarine by one, so a submarine at deep depth (4) would move to very deep depth (5). A submarine traveling on the ocean surface (1) would dive to periscope depth (2). (4) Single Ship / Fleet Movement Mode Single Mode allows current ship to move and then attack. Fleet Mode moves all remaining ships using the current Telegraph and Rudder settings (no Special Action applied to other ships). Fleet Mode can quickly close distances or move merchant convoys. Fleet Mode skips the Attack Phase of all ships moved as a group.
Fleet Mode can be used to quickly get into position at the start of an engagment.
Attack individually with your larger ships, then use fleet mode to quickly move any smaller ones as a group.
Fleet Mode can be used to quickly move a convoy.
(5) Move Executes movement with rudder, telegraph (speed) settings and any Special Action. (6) Disengage Appears when the active ship is able to leave combat. See section 1.4.1 for more information about disengaging ships.

- 8 -
1.1.3 Gunnery Gunnery in Atlantic Fleet is fully controlled by the player using information provided by the crew of the active ship. It is relatively easy to get started with and start landing some hits, but can be difficult to master and landing consecutive hits on a ship laying smoke at long range can be quite the challenge! To fire guns: 1. Select type of shells/guns to fire using the Action Button. 2. Select target for firing solution. 3. Set bearing (attack direction). 4. Set gun elevation. 5. Fire guns.
Gunnery View (1) Action Button / Gun Settings (1a) Red number shows current gun bearing (attack angle). (1b) Green number shows current gun elevation (distance). Tap green Action button to cycle attack options: 1. AP Shells (primary guns) 2. HE Shells (primary guns) 3. AP Shells (secondary guns if applicable) 4. HE Shells (secondary guns if applicable) 5. Star Shell (illumination round available in low light conditions)

- 9 -
Star shells can only be fired by 8" guns or smaller. Star shells increase visibility range and increase Target Solution accuracy against lit targets. A star shell lasts for 2 turns.
Always use HE (High Explosive) shells against unarmoured targets such as Merchants, Destroyers, Corvettes and Submarines.
Always use AP shells againsts targets with armour greater than about half of the shell's calibre.
(2) Bearing Line (Attack Direction) Line extending from ship shows direction weapons aimed. Not all guns can fire in all directions and sometimes damage to a gun may make it unable to fire that turn. The bearing line will change colour based on whether the currently selected guns can fire in that direction: Red current weapon can fire in current direction Gray current weapon cannot fire in current direction (3) Adjust Bearing (Attack Angle) Adjust bearing (attack angle) until bearing line points at an enemy ship. Tap and drag the slider to adjust. Tap bearing display button (3a) to snap bearing to camera direction.
Tapping the bearing display (3a in previous image) will snap the bearing line to the camera's durrent direction. Use this to quickly bring your guns onto a target, then fine tune the angle as per (3) above.
(4) Set Target Tap to set closest ship intersected by aiming line as current target. - Target set and information displayed in upper right, see (5) below. - No Target: no ship was found along current attack direction. - Smoke: a smoke screen blocks line of sight.
Use the Tactical Map (see Section 1.2) to target a ship behind a closer ship.
(5) Target Solution The target solution shows information about the current target. Note that damage to directors (Spot) and RADAR decreases the accuracy of the target solution. The following information is shown in the Target Solution: + Turns spent tracking target (max 5) BB Ship Type Bismarck Ship Name 25.0kn Speed in knots 20,118 Range in yards Elev: 15.6° Estimated elevation of primary guns to hit target [25.4°] Estimated elevation of secondary guns to hit target With each turn tracking a target, the solution becomes more accurate as the target has been observed for a longer time. For each turn spent tracking that target an additional "+" symbol is displayed next to target's name, up to a maximum of 5.

- 10 -
Remember that the Target Solution is only an estimate. Weather, time of day, visibility, smoke screens, damage to your ship's directors/RADARs and switching between targets all impact the accuracy of the solution data.
If a director/RADAR is damaged, try turning your ship to bring another director/RADAR onto the target.
(3) Fine tune bearing (attack angle) Compensate for wind (if wind effects shells option is enabled). Tap and drag the slider to adjust. Tap bearing display button to snap bearing to camera direction. (6) Adjust Elevation (firing distance) Examine Target Solution (5) and Splash History (9) for estimated elevation to target and compensate for wind (if wind effects shells option is enabled). Tap and drag the slider to adjust. Turns red when elevation reaches the limits of gun. Gun elevation limits vary by gun and are historically based. Gun barrels will stop moving at their limit once the slider turns red. (7) Wind Meter Deeper blue = stronger wind. Wind may effect flight of shells and should be compensated for if this option is enabled. Wind also determines the direction of smoke screens.
(8) Fire Fires selected guns using set bearing (attack direction) and elevation.
(9) Splash History Tap to turn on / off splash history. Indicates whether last salvo fired at target was long, short or straddled / hit. Automatically adjusts for movement of ships between turns. White numbers indicate yards long or short of target. Coloured numbers indicate elevation of last shot. See Tactical Map for a more detailed shot history.
The splash history always indicates if and by how much you may need to adjust your elevation for the current turn.
An elevation which hit last turn may be indicated as "short" this turn if both ships have moved farther apart.
An elevation which hit last turn may be indicated as "long" this turn if both ships have moved closer together.

- 11 -
1.1.4 Torpedoes Torpedoes are devastating weapons which strike a ship below the waterline and can cause extensive damage and flooding. They are much slower than other weapons and usually take multiple turns to reach their target. Note that torpedoes "de-spawn" if they overshoot their target and there are no other targets that could possibly be hit. Torpedo speed and range vary based on type (submarine, surface ship or aerial) and navy and are historically based. See Appendix 5.2.1. To make a torpedo attack: 1. Select torpedoes using the Action Button. 2. Select target for firing solution. 3. Set bearing (attack direction). 4. Mark one or more torpedo bearings. 5. Fire torpedoes.
Torpedo Attack View (1) Action Button / Torpedo Settings (1a) Red number shows current bearing (attack angle). (1b) Green number shows estimated range to target based on the Target Solution. Range indicator turns red if range shorter than arming distance (~1000 yards) or farther than torpedo range. Tap green Action button to cycle additional attack options.

- 12 -
(2) Bearing Line (Attack Direction) Line extending from ship shows direction weapons aimed. Not all torpedoes can fire in all directions and sometimes damage to a torpedo room or launcher may make it unable to fire that turn. Red current weapon can fire in current direction Gray current weapon cannot fire in current direction Green marked direction for a torpedo salvo (3) Adjust Bearing (Attack Angle) Adjust bearing (attack angle) until bearing line points at an enemy ship. Tap and drag the slider to adjust. Tap bearing display button (3a) to snap bearing to camera direction.
Tapping the bearing display (3a in previous image) will snap the brearing line to the camera's durrent direction. Use this to quickly bring your guns onto a target, then fine tune the angle as per (3) above.
(4) Set Target Tap to set closest ship intersected by bearing line as current target. Use Tactical Map to target ships behind others. Target information displayed in upper right. "No Target" - no ship found on current bearing. "Smoke" - a smoke screen blocks line of sight.
Use the Tactical Map (see section 1.2) to target a ship behind a closer ship.
(5) Target Solution The target solution shows information about the current target. Note that damage to directors (Spot) and RADAR decreases the accuracy of the target solution. The following explains the information shown in the Target Solution: + Turns spent tracking target (max 5), zero in this example MS Ship Type Type C3 Ship Name 17.3kn Speed in knots 5,034 Range in yards. Torp. 350.3° Estimated bearing to fire torpedo in order to hit target With each turn tracking a target, the solution becomes more accurate as the target has been observed for a longer time. For each turn spent tracking that target a "+" symbol is displayed next to the target's name up to a maximum of 5.
Remember that the Target Solution is only an estimate. Weather, time of day, visibility, smoke screens, damage to your ship's directors/RADARs and switching between targets all impact the accuracy of the solution data.
If a director/RADAR is damaged, try turning your ship to bring another director/RADAR onto the target.
(3) Fine tune bearing (attack angle). Tap and drag the slider to adjust. Tap bearing display button to snap bearing to camera direction.

- 13 -
(6) Mark Torpedo Bearing Shows the number of torpedoes able to fire along current bearing. Tap to set bearing for a torpedo to be fired. May be tapped multiple times (adjusting bearing in between) to set a spread of torpedoes. Once a torpedo bearing has been marked, it cannot be unmarked. The only way not to fire along a marked bearing is to not take a torpedo attack action this turn. (7) Fire Fires torpedoes along each of the marked bearings.
1.1.5 Air Strikes and Aircraft Air strikes can be made using either land or carrier based aircraft. Land-based air strikes may be performed by any ship. Carrier air strikes may only be performed by carrier launching the aircraft and require multiple turns to set up as outlined in section 1.1.6. To make an air strike attack: 1. Select Air Strike using the Action Button. 2. Tap target ship. 3. Set attack point along length of ship. 4. Set attack direction. 5. Launch Aircraft. 6. Dive/Drop Payload.
Aircraft Attack View

- 14 -
(1) Action Button / Air Attack Settings (land-based aircraft) Left panels show aircraft load out and type. Number above aircraft type = number available. Tap green Action button to cycle through attack options. (2) Aircraft Attack Marker Shows the angle and position of the incoming air attack. Tap enemy ship to place marker over it. Adjust angle and position using the Adjust Attack Angle and Adjust Attack position sliders as mentioned above.
If the active ship already has a target, simply tap the Target Solution to set the attack marker onto that target or use the Tactical Map to target any ship.
(3) Adjust Attack Location Tap and drag the slider to adjust point along length of target ship which aircraft will attack.
For aerial torpedo attacks, set the attack location 0.5-1.5 ship lengths ahead of the target, depending on speed, in order to "lead" your attack.
(4) Adjust Attack Angle Tap and drag the slider to adjust angle from which aircraft will attack.
Try to find an attack angle that minimises your aircraft's exposure to anti-aircraft fire. Avoid passing close to any other enemy ships.
(5) Wind Meter Deeper blue = stronger wind. Wind always effects payloads dropped by aircraft and should be compensated for.
(6) Launch Air Strike Automatically focuses camera onto your incoming aircraft. Once the aircraft is in the air: Dive Puts attacking aircraft into a dive for an attack run. Not all aircraft need to dive before releasing their payload.
Release Payload Payloads are historical and not all aircraft can carry all payloads. See Appendix 4.2.2 for aircraft and payloads available.
Cancel Air Strike "X" button in the top right corner will cancel an air strike. An air strike that is cancelled or fails to drop payload is available for attack again on a subsequent turn.

- 15 -
1.1.6 Carrier Air Operations Unlike land-based aircraft, carrier aircraft are not already in the air at the start of combat and are launched, attack and are recovered as part of air operations. Air operations are suspended under the following conditions: 1) carrier is on fire 2) flight deck is damaged or destroyed Aircraft carriers can perform air operations in 4 steps. Each step requires a full turn by tapping the "Launch" Button.
1) Ready wing, selecting aircraft type and payload. Moves wing from hangar to flight deck. Hangar (4) = Wing of 4 Bombers currently in hangar.
1b) Unready wing (optional). Returns a wing on the flight deck back to hangar. Flight Deck (4) = Wing of 4 Bombers currently on flight deck.
2) Launch wing Moves wing from flight deck to air. Flight Deck (4) = Wing of 4 Bombers currently on flight deck.
3) Air Strikes Attack target as described above in section 1.1.5. One air strike per turn. 4/4 = air strikes available / wing size

- 16 -
4) Recover wing Moves wing in air back to hangar. 0/4 = air strikes available / wing size. A wing may be recovered prior to all aircraft being spent. Requires the flight deck to be clear. Only one wing may be on the flight deck at any time. Air Ops will be suspended due to fires or excessive damage, but aircraft already in the air may continue to attack. Only the carrier launching aircraft can perform attacks with those aircraft. All aircraft carriers carry a Fighter and Bomber wing. Wing Size: 2 Escort Carrier 4 Aircraft Carrier
Combat Air Patrols Any unused carrier aircraft in the air will automatically defend against enemy aircraft. Fighters with no payload are best at shooting down enemy aircraft. Fighters with a payload have a moderate chance. Bombers have the lowest chance of shooting down enemy aircraft.
1.1.7 Anti-Submarine Warfare Enemy submarines can be sunk by aircraft, gunfire, torpedoes as well as a variety of specialised anti-submarine weapons: depth charges, hedgehog and squid. Anti-submarine weapons are only available on Destroyers (DD) and Corvettes (DC). These ship types are called escorts. Attacking submarines with gunfire, torpedoes or aircraft is performed as outlined in section 1.1.3, section 1.1.4, section 1.1.5 above. With the following exceptions: 1) A submerged submarine cannot be targeted in the 3D world. Instead, open the tactical map and target the sonar contact. This means that the attacking ship must have working sonar equipped. 2) Torpedoes fired at a submerged submarine automatically have their running depth adjusted to be deeper. However torpedoes cannot run deeper than periscope depth. Depth Charges Depth charges are explosives dropped or fired from a surface vessel which explode at a set depth. They have a relatively small "kill radius" meaning one has to explode quite close to a submarine in order to damage or sink it. This "kill radius" decreases with depth due to the increase in water pressure. The depth to explode is automatically set based on the nearest enemy submarine.

- 17 -
To make an anti-submarine attack using Depth Charges: 1. Move over the enemy submarine, placing it a little behind the attacking vessel. 2. Select Depth Charge using the Action Button. 3. Tap FIRE to release a grid of depth charges.
Depth Charge Attack (1) Action Button Tap to cycle to Depth Charge. (2) Sonar Contact Marker Sonar contact showing position of enemy submarine. (3) FIRE Drops a grid pattern of depth charges behind the ship. Depth charges automatically explode around the depth of the nearest enemy submarine. Hedgehog - Allies Only Hedgehog is a forward firing ring of mortars which explode only on contact. This weapon was developed later in the war by the allies and is available on Destroyers (DD) and Corvettes (DC). Squid - Allies Only Squid fires as a staggered ring of mortars which explode above and below the desired depth to generate a massive shockwave with a large "kill radius". Like depth charges, this "kill radius" also decreases with depth due to the increase in water pressure. This weapon was developed later in the war by the allies and is available on some Corvettes (DC). The depth to explode is automatically set based on the nearest enemy submarine.

- 18 -
To make an anti-submarine attack using Hedgehog or Squid: 1. Move towards the enemy submarine. 2. Line up the red circle (shows where weapon will fall) onto the green sonar contact marker. 3. Select Hedgehog or Squid using the Action Button. 4. Tap FIRE to fire the mortars.
Hedgehog (or Squid) Attack (1) Action Button Tap to cycle to Hedgehog (or Squid). (2) Anti-Submarine Weapon Zone Red area indicates hedgehog (or Squid) deployment zone. (3) Sonar Contact Marker Sonar contact showing position of enemy submarine. Note the overlap with anti-submarine weapon deployment zone. (4) FIRE Fires the anti-submarine weapon into the deployment zone. Hedgehog mortars explode on contact with a submarine. Squid mortars automatically explode at the depth of the nearest enemy submarine.
Diving deep can help protect against Depth Charges and Squid, but the increased water pressure will crush your submarine very quickly if it takes a hit!

- 19 -
Never approach a submarine at periscope depth from the front! It could fire torpedoes.
Fire guns at a periscope and attempt to drive a submarine deeper before closing in to attack. At longer range the submarine might disengage but at closer range there is a much better chance of establishing strong sonar contact to prevent it escaping.
Sonar Disruption Underwater explosions from depth charges or squid disrupt the water around them and interfere with sonar. This gives the submarine being attacked a chance to break sonar contact and automatically disengage next turn.

- 20 -
1.2 Tactical Map The Tactical Map provides an overview of the battle and can be used to set targets, navigate between various ships and view a detailed history of up to the last 6 shots fired. Tap any ship to select it. Selecting a ship will set it as the target of the currently active ship. When in attack phase (after movement) white bearing line shows attack direction to target.
Tactical Map View (red lighting due to combat occurring at night)
Icon Colours: White Active player ship for the current turn Blue Allied ship Red Axis ship Gold RADAR contact Green Sonar contact (or aircraft spotted submarine) Gray Disengaged ship Black Sunk ship (1) Help, Options and Special Commands Menu See section 1.4.2 below. (2, 3) Zoom Map Out/In Zooms map between 1x and 128x. (4) Centre Map Places currently selected ship in centre of map.
- 21 -
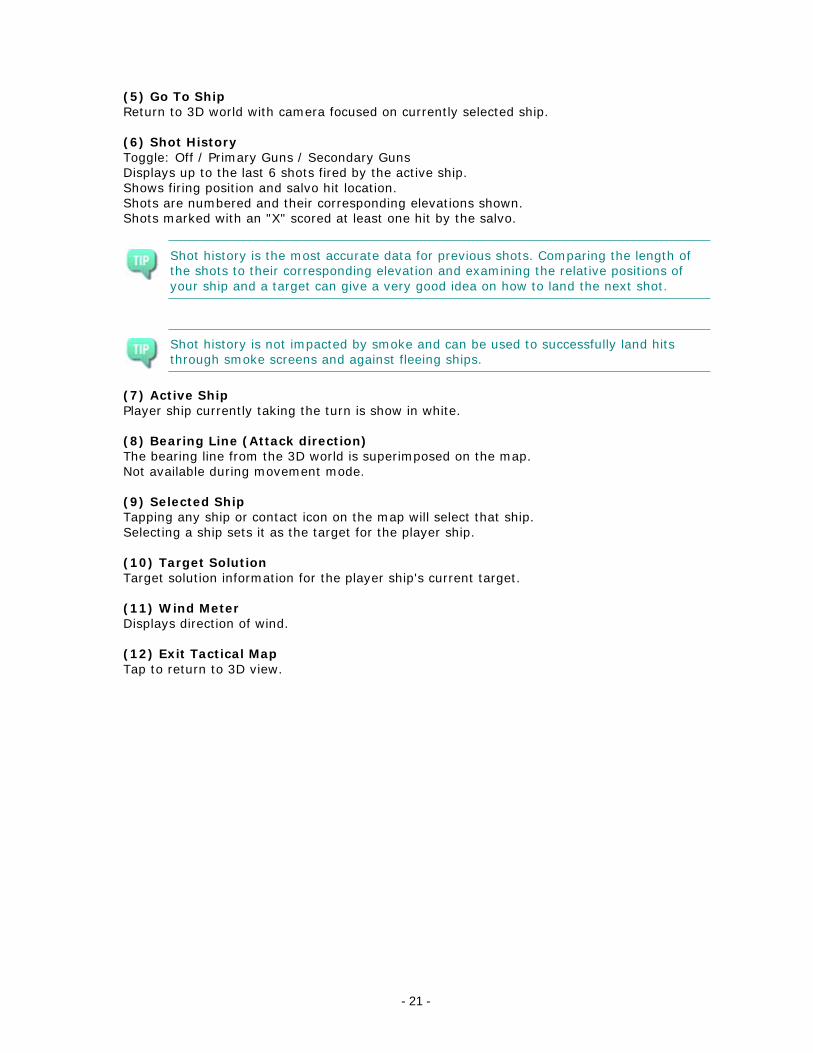
(5) Go To Ship Return to 3D world with camera focused on currently selected ship. (6) Shot History Toggle: Off / Primary Guns / Secondary Guns Displays up to the last 6 shots fired by the active ship. Shows firing position and salvo hit location. Shots are numbered and their corresponding elevations shown. Shots marked with an "X" scored at least one hit by the salvo.
Shot history is the most accurate data for previous shots. Comparing the length of the shots to their corresponding elevation and examining the relative positions of your ship and a target can give a very good idea on how to land the next shot.
Shot history is not impacted by smoke and can be used to successfully land hits through smoke screens and against fleeing ships.
(7) Active Ship Player ship currently taking the turn is show in white. (8) Bearing Line (Attack direction) The bearing line from the 3D world is superimposed on the map. Not available during movement mode. (9) Selected Ship Tapping any ship or contact icon on the map will select that ship. Selecting a ship sets it as the target for the player ship. (10) Target Solution Target solution information for the player ship's current target. (11) Wind Meter Displays direction of wind. (12) Exit Tactical Map Tap to return to 3D view.

- 22 -
1.3 Ship Details and Damage Report Tap the ship currently targeted by the camera to open the damage report. Not available for enemy ships if No Enemy Damage Reports option is on.
Damage Report and Ship Information (1) Ship Information Displays ship name, class, experience rank and speed (far right). Experience Rank Display shows a 1-5 star rating of rank as well as gray/green bar showing progress to next rank. (2) Ship Statistics Displays ship weapons, armour, displacement, maximum speed and how many aircraft it carries. (3) Ship Ammunition Shows the remaining number of each weapon type for the ship. Aircraft and anti-submarine weapons are always available as long as the flight deck or anti-submarine weapons are not damaged. (4) Toggle subsystem damage report on/off. (5) Subsystem Damage Report Subsystems of a ship may be knocked out for several turns or destroyed. Damage control crews automatically attempt to repair each damaged subsystem each turn. However some specific subsystems as well as destroyed subsystems cannot be repaired.

- 23 -
Gray No damage - system is operational. Yellow Lightly damaged. Orange Moderately Damaged. Red Destroyed, cannot be repaired. (repair in port for Battle of the Atlantic Campaigns) The effects of subsystem damage are outlined below: Propulsion Decreased speed of ship. Hits to the rear (propellers and shafts), middle (engine room and boilers) and funnel of a ship can impact propulsion. Cannot be destroyed. Steering Cannot adjust rudder during movement. Cannot be destroyed. Pumps Greatly increases flooding and chance to sink. Cannot be repaired. Main Spot / RADAR Decreases accuracy against targets in any direction. Fore Spot / RADAR Decreases accuracy against targets forward of the ship. Aft Spot / RADAR Decreases accuracy against targets to the rear of ship. Sonar Cannot detect submerged submarines. Submarines can no longer detect ships if below periscope depth. Aircraft Suspends carrier air operations. Turret / Deck Gun Gun can no longer move, reload or fire. Secondary Guns (port and starboard) All secondary guns on damaged side no longer move, reload or fire. Torpedo (port, starboard, fore and aft) Torpedo launcher (or room) can no longer reload or fire. ASW (Anti-Submarine Weaponry) Cannot deploy depth charges, hedgehog or squid. Pressure Hull (submarines only) The amount of damage the hull of a submarine has taken. Cannot be repaired. Anti-Aircraft Decreased effectiveness of shooting down enemy aircraft. Cannot be repaired in battle.

- 24 -
1.4 Ending Combat Combat automatically ends when: - all player ships sunk, scuttled or disengaged - all enemy ships sunk, scuttled or disengaged - player withdraws all ships from combat
1.4.1 Disengaging Disengaging allows a ship to leave combat. However disengaging is not automatic and a surface ship must spend several turns taking evasive action and be traveling at a minimum of 10 knots. An option is available to set a minimum distance of 25,000 yards to nearest hostile ship for any surface vessel to disengage.
The 25,000 yds option is useful to prevent inferior enemies from disengaging under smoke screen. However, you should also set Longer Start Range then; otherwise you can hardly disengage if your force is inferior.
A button allowing a ship or submarine to disengage will appear during the movement phase when the following criteria are met: Warships: Must lay smoke for 3 turns and be moving at least 10 knots in order to disengage. (Optional) Must be > 25,000 yards from a hostile vessel if this option is enabled.
Submarines: May disengage if submerged and far from escorts. Diving deeper increases ability to disengage. Depth charges and squid disrupt sonar increasing the chance for submarines to disengage after an attack.
Merchants: Cannot disengage.
Deliberately damage a target's propulsion by hitting the engine room/boilers, propellers and shafts in order to delay or prevent it from being able to disengage.

- 25 -
1.4.2 Withdrawing and Scuttling Ships From the tactical map you can enter the Options/Help and Special Commands menu by tapping on the "?" button in the bottom left.
Options/Help and Special Commands Menu (accessed from the Tactical Map) Withdraw all Ships This command appears only when no enemy ships can attack. Either they are merchants or are warships laying smoke and in the process of disengaging. Withdrawing all ships immediately ends combat. Scuttle "Current Ship"/SCUTTLE all ships These commands are always available and will deliberately sink either the currect active ship or all player controlled ships in combat. *** WARNING: Scuttling ships in Campaign and Battle of the Atlantic modes removes those ships from your fleet. Lost ships may be re-purchased in Campaign mode, but are lost permanently in Battle of the Atlantic mode. ***

- 26 -
2. Playing Atlantic Fleet Atlantic Fleet is a turn based naval tactical and strategic simulation depicting the tonnage war of the Battle of the Atlantic. Three game modes are available: 1. Single Battles (including Custom Battles and Training Missions). 2. Campaign 3. Battle of the Atlantic In version 1.07, a series of Training Missions have also been added to assist new players with learning the various aspects of the game.
2.1 Single Battle Single Battles are stand alone historical scenarios where player ships do not acquire experience or ranks and Renown is not earned. Aside from CUSTOM BATTLE, all mission parameters are preset with the exception of choosing which navy to play. 1. Tap mission of interest to select it. 2. Tap Next. 3. Tap Navy flag to select faction to play. 4. Tap Attack to begin mission.
Single Mission Selection

- 27 -
(1) Mission List Tap and drag to scroll through missions. Tap a mission to select it. (2) Mission Briefing (3) Mission Location (4) Go to ship Listing Here you can see the lists of ships for the battle, weather and time conditions. For Historical Missions, only the Navy being played and setting Player 2 on/off can be adjusted. (5) Back to Main Menu
2.1.1 CUSTOM BATTLE The first Single Mission is a scenario editor for setting up to 10 vs 10 ships in battle. Adjust weather, time, ships on each side and number of land-based aircraft (aircraft type payload assigned randomly). Select initiative (which navy acts first) and a navy to control. AI may be disabled to allow multiplayer on the same device.
CUSTOM BATTLE Editor

- 28 -
(1) Weather Tap to cycle to desired weather conditions for the battle. (2) Time Tap to cycle to desired time of day for the battle. (3) Toggle AI / Player 2 Tap to toggle Player 2 on or off. Both players use the same device.
(4) Add a ship from each faction's Shipyard to the battle. See Shipyard for more information. Duplicates of the same ship are allowed. (5) Remove highlighted (yellow) ships from corresponding navy's list. Tap listed ships to toggle highlight. (6) Toggle number of land-based aircraft available per navy (max 10) and set payload. Aircraft type and payload can be toggled by tapping the textual destription. Aircraft not available in combat if time set to Night. (7) Set Initiative Tap to assign which navy takes the first turn. (8) Set Navy Tap to assign which navy to play as. (9) Begin the Battle (10) Return to Mission Selection List.

- 29 -
2.2 Campaign In Campaign mode, you'll take on the role of the Admiral of a Task Force. Your goal will be to sink enemy shipping and use the Renown earned to buy ships and build up your fleet. However your resources are limited. There are over 2 million Renown points to be earned per campaign which makes building up your fleet fairly easy, but any ships lost will have to be re-purchased and battles become very difficult in the late stages. Thus it is possible to run out of Renown and fail a campaign. Campaigns are a series of 50 missions increasing in difficulty and are saved separately for each navy. Games are saved automatically at the end of each battle and whenever purchasing a new ship or releasing a ship from command. Goal Sink enemy shipping to earn Renown points in order to purchase more and better ships as well as replace those lost in action. Rules Maximum player fleet size is 10 ships. Maximum player ships in battle is 3. Player ships sunk are removed from fleet (may be re-purchased). Cannot own duplicates of the same ship. Renown is earned for warships, submarines and merchants sunk. Earn in zone 50 to win the campaign. Scores: at least 33% of tonnage sunk for that zone. at least 66% of tonnage sunk for that zone. 100% of tonnage sunk for that zone. Repeating a zone will generate Renown only if the outcome is greater than the current highest previous attempt. Due to limited Renown it is possible to lose a campaign.
Don't spend all your Renown on powerful expensive ships too early! If they are sunk the lost Renown can leave you in a very bad situation. Always keep enough Renown in reserve to field at least 3 destroyers or submarines at a time.
Initiative, weather, zone locations and time of battle are randomly assigned to each zone at the creation of a new campaign. Land-based air strikes are available in zones with air cover. The Campaign Mission list is similar to Single Battles and displays the current best score ranging from to . Tap a mission to begin it. At least must be earned on a mission to unlock the next mission and remember; Renown is only earned if a mission score is greater than any previous best score.

- 30 -
Campaign Mission (1) Player Fleet Lists player owned ships. Highlighted (blue or red) ships are readied to enter the next battle. Player fleet is listed on the side corresponding to the faction being played. Tap Player Ships to toggle Highlights: Gray Unassigned Blue Allied ship assigned to battle Red Axis ship assigned to battle Yellow Marked for removal from fleet Up to 3 player ships can be assigned to enter battle. (2) Shipyard Enter the Shipyard to purchase new ships with Renown points. See Shipyard for more information. (3) Examine Ships Displays ship statistics. On the ship information panel: >>> Examine next ship. <<< Examine previous ship. Tap anywhere on screen to exit ship information panel.

- 31 -
(4) Remove Ships Removes highlighted (yellow) ship/s from player navy. Tap listed ships to toggle highlight. Released ships may be re-purchased. (5) Battle Location The location of the battle influences which navies might have land-based air attacks available. A location must be near land occupied by a particular faction for a chance to have land-based air attacks during the battle. (6) Enemy Ship List Enemy ships listed on the side corresponding to the faction not being played. (7) Attack Begin the battle. At least one player ship must be highlighted for battle (blue or red). Tap player ships in list to toggle highlights. (8) Back to Campaign mission list
While it might be easy to earn a lot of Renown in the early to middle stages of the campaign beware! The later missions can become extremely hard and you may find yourself replacing a lot of sunk ships.
2.3 Battle of the Atlantic Dynamic Campaign Turn-based tactical and strategic simulation of the tonnage war that was the Battle of the Atlantic during World War II. Your goal is to protect (or destroy) merchant shipping as it brings valuable war materials to Britain across the Atlantic. Unlike the regular Campaigns, the Battle of the Atlantic is fully dynamic and evolves over time into a very unique experience. Be prepared to think, be adaptable and make sacrifices to keep the war in your favour. Campaigns for each navy are saved separately. Games are saved automatically at the end of each battle and whenever purchasing a new ship or releasing a ship from command. Goal Sink enemy warships and submarines to earn Renown points in order to purchase more and better ships. Allies - Protect merchants carrying war materials across Atlantic. Axis - Sink allied merchants preventing delivery of war materials. Rules Maximum player fleet size is 20 ships. Maximum player ships in battle is 10. Any ship sunk is permanently removed from campaign. Cannot own duplicates of the same ship. Renown earned for warships and submarines sunk (not merchants). Merchant ships sunk do not provide Renown points, but instead go to the tonnage tally (see War Summary). Land-based air strikes sometimes available in zones with air cover.
- 32 -
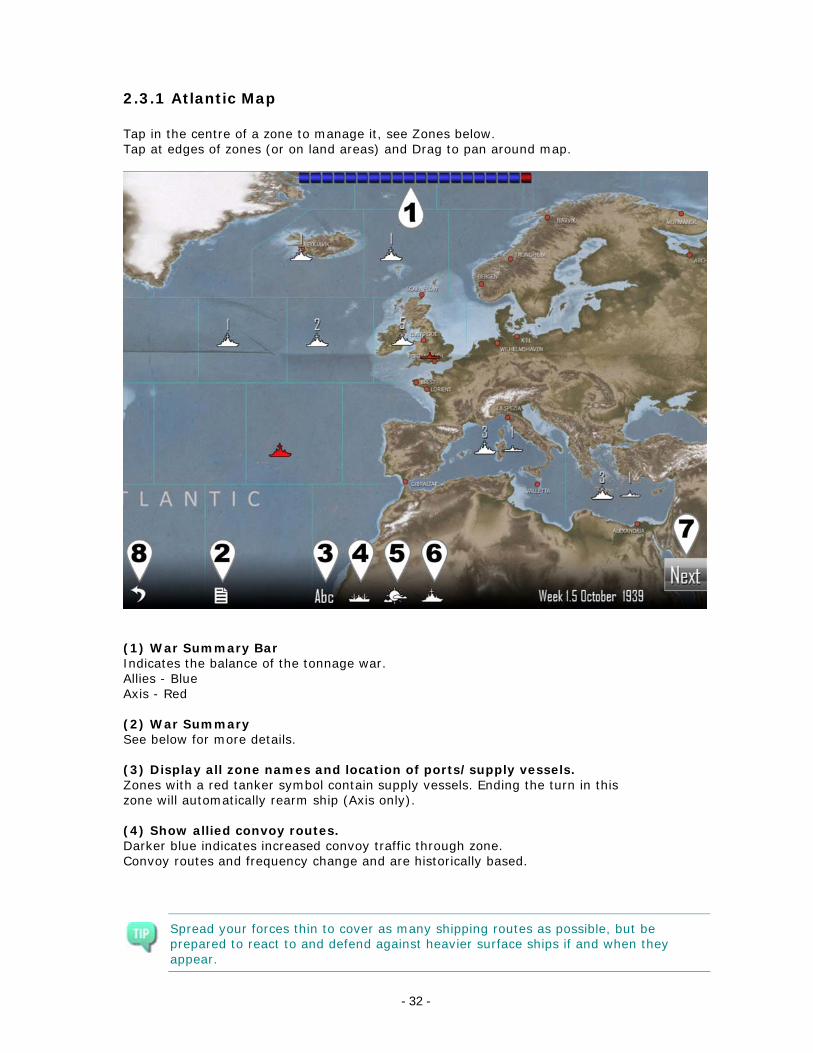
2.3.1 Atlantic Map Tap in the centre of a zone to manage it, see Zones below. Tap at edges of zones (or on land areas) and Drag to pan around map.
(1) War Summary Bar Indicates the balance of the tonnage war. Allies - Blue Axis - Red (2) War Summary See below for more details. (3) Display all zone names and location of ports/supply vessels. Zones with a red tanker symbol contain supply vessels. Ending the turn in this zone will automatically rearm ship (Axis only). (4) Show allied convoy routes. Darker blue indicates increased convoy traffic through zone. Convoy routes and frequency change and are historically based.
Spread your forces thin to cover as many shipping routes as possible, but be prepared to react to and defend against heavier surface ships if and when they appear.

- 33 -
(5) Zone Weather Ranges from clear to snow storms. Follows meteorological patterns of the Atlantic with Westerlies, Trade Winds and seasonal changes. Poor weather decreases detection of enemy ships in the same zone. Impacts maximum visibility for combat in that zone.
Use bad weather as cover to move about the map with less chance of detection.
(6) Show number of player warships and submarines in zone. Default view for every turn. Shows the number of player warships and submarines in each zone. Warships and submarines act independently in combat. If an encounter occurs in a zone containing both warships and submarines, either all the warships or all the submarines will engage the enemy. Enemy warships or submarines encountered in a battle or from an event during the last turn are shown in red (Axis) or blue (Allies) to indicate their activity in that zone. (7) Next Turn Each campaign turn = ~3.5 days (8 turns per month). After each player turn the following happens: - Enemy ships move. - Combat may occur in zones containing warships/submarines of both factions. - Events (non-merchants may be damaged, but not sunk by events). Events include: attacks on unescorted merchants, submarine attacks on unescorted warships, air attacks against shipping and naval bases. Merchant tonnage sunk during events count towards the tonnage tally of the war (see War Summary below). Warships and submarines cannot be sunk by events, but they can be damaged. This damage is permanent until repaired in a port.
(8) Return to Main Menu
2.3.2 War Summary Shows overall status of the tonnage war, all warship and merchant tonnage sunk to date and a roster of all player ships and their locations. Since merchant vessels sunk in combat (or events) do not earn Renown, their tonnage is applied to the War Summary instead. Britain may come to terms from mid-late 1940 onwards where war materials become crucial for her to win the "Battle of Britain". Going forward, if at least 300,000 tons of allied merchants per month is consistently sunk, Britain may withdraw from the war and Germany wins the Battle of the Atlantic. 700,000 tons required once the United States enters war. Britain may win the Battle of the Atlantic if over 150,000 tons of Axis Naval shipping is sunk and Axis forces fail to sink at least one third their current goal (100,000 tons before the US enters the war and ~230,000 tons after). In the case of a draw, the Allies will eventually launch the Normandy invasion and ultimately win that game since enough war materials have arrived to re-take Europe. Once the Battle of the Atlantic is ended, a victory (or defeat) screen is shown and the campaign can not progress past that turn as it is over.

- 34 -
War Summary View (1) Navy Roster Lists all player ships, damage status and their location. Tap a ship to select it. (2) Examine Selected Ship Displays ship statistics. On the ship information panel: >>> Examine next ship. <<< Examine previous ship. Tap anywhere on screen to exit ship information panel. (3) Go to zone of selected ship Opens the zone containing the currently selected ship. (4) Return to Atlantic Map

- 35 -
2.3.3 Zones Tap the centre of a zone on the Atlantic Map manage it. Tap again to open the Port if that zone contains them (see Ports below). Zones adjacent to the current zones are also highlighted. Moving Ships To move ships between zones: 1. Tap ships on list to toggle highlight (blue for allies, red for axis). 2. Tap an adjacent zone (large blue circles) to move highlighted ships into it. 3. Adjacent zone now becomes the managed zone and ships are moved into it. Ships may only move once per turn. Ships that have moved this turn cannot be highlighted and are listed in dark gray.
Zone Management (1) War Summary Bar Indicates the balance of the tonnage war. Allies - Blue Axis - Red (2) Examine Ships Displays ship statistics. On the ship information panel: >>> Examine next ship in zone. <<< Examine previous ship in zone. Tap anywhere on screen to exit the ship information panel.

- 36 -
(3) Select / Deselect All Toggle to select all or deselect all ships in zone. Ships that have already moved this turn cannot be selected. (4, 5, 6, 7) See section 2.3.1 on Atlantic Map for a description of these. (8) Next Turn Each campaign turn = ~3.5 days (8 turns per month). After each player turn the following happens: - Enemy ships move. - Combat may occur in zones containing warships/submarines of both factions. - Events (non-merchants may be damaged, but not sunk by events). Events include: attacks on unescorted merchants, submarine attacks on unescorted warships, air attacks against shipping and naval bases. Merchant tonnage sunk during events count towards the tonnage tally of the war (see War Summary below). Warships and submarines cannot be sunk by events, but they can be damaged. This damage is permanent until repaired in a port. (9) Return to Atlantic Map
2.3.4 Ports Ports allow buying and releasing of ships as well as repair and rearming. To open port management: 1) Tap a zone on the Atlantic Map to manage it. 2) If the zone has a port, tapping the zone again (gray circle in centre) will enter the port. OR 3) Tap the port icon at the bottom left. The port icon automatically appears whenever managing a zone that has a port for your faction.
Port Icon Display Zone Names and Port Locations Icon Tap the Display Zone Names and Port Locations Icon to determine which zones contain a port for your faction. Re-supply Vessels (Axis only) When playing Axis (Germany), several zones contain re-supply vessels. These zones are marked with a red tanker icon. Moving any ship into such a zone will automatically replenish all shell and torpedo ammunition.
Re-supply Vessel icon

- 37 -
Port View (1) Ships in Zone Tap ships to highlight (yellow). (2) Ships currently being repaired and rearmed Tap ships to highlight (orange). Status indicates the number of turns until work on the ship is complete. Once complete the ship becomes active and is released back into the zone. Bombing raids by enemy air forces can cause delays to repairs. Number of turns required to repair/rearm based on ship size and damage amount. (3, 6) Examine ship statistics & damage for ships in zone or under repair. On the ship information panel: >>> Examine next ship on list. <<< Examine previous ship on list. Tap anywhere on screen to exit ship information panel. (4) Select / Deselect All Toggle to select all or deselect all ships in zone of port. (5) Repair / Rearm Ships Sends highlighted ships (yellow) from the list of ships in zone to the repair list. Tap ships in zone list (left) to toggle highlight. Numbers indicate turns required for ships in repair list. Ships are automatically released to the zone once repaired/rearmed.

- 38 -
(7) Release ships from command. Removes any highlighted ships (yellow/orange) from command. Released ships can be re-purchased at a later time. (8) Shipyard Opens the shipyard to examine and purchase additional ships. See Shipyard section 2.4 below for more details. (9) Return to zone management.
2.4 Shipyard Displays a view of the selected ship class, information about it and a list of available ships for that class. To purchase a ship / add it to combat: 1. Tap <<< or >>> to move to desired ship class. 2. Tap the name of the individual ship on "Available Ships" list. 3. Tap Add Ship / Buy Ship for Renown.
Shipyard View In cases where there are over 50 members of a class, tap the ">>>" which appears next to "Available Ships" view them.

- 39 -
(1) Next / Previous Ship Class (2) Individual ships available for that class Tap highlight any ship (green). (3) Buy Ship (4) Availability Date In Battle of the Atlantic mode, some ships are not available until a certain date. (5) Leave Shipyard Depending on the game mode being played, the following rules apply when using the Shipyard: Single Battle – CUSTOM Battle Adding a ship costs no Renown. Any ship, including merchants may be added to the battle. Duplicates of the same ship may be added. Campaign Purchasing a ship costs Renown. Merchants cannot be purchased. Already owned ships are not listed under available ships. Battle of the Atlantic Purchasing a ship costs Renown. Merchants cannot be purchased. Already owned or sunk ships are not listed under available ships. Some ship classes are unavailable until a specific date. Battle of the Atlantic: Hedgehog and Squid Upgrades November 1942: Hedgehog available to Allied Destroyers and Flower/Temptress/Action Class Corvettes. September 1943: Squid available to Allied Castle Class Corvettes. Hedgehog and Squid are added automatically to newly purchased ships. Repair/Rearm to refit existing ships with these weapons. These weapons are automatically installed on Campaign and CUSTOM BATTLE ships.

- 40 -
2.5 Ship Rank and Experience Experience earned is equal to the displacement of any enemy ships sunk. Experience earned is shared by all ships participating in the battle, including sunk ships. All experience and rank is lost if ship is sunk. Single Battles do not earn experience. Battles not earning any Renown still generate experience for the participating ships. Experience Rank Display The current rank of a ship can be seen when examining the Ship Details/Damage Report screen, see section 1.3. Tons of shipping required per rank: 1 20,000 2 40,000 3 60,000 4 80,000 5 100,000 Bonuses earned by rank: Rank 1 2 3 4 5
Damage Reduction 2% 4% 6% 8% 10%
Extinguish Fires 2% 4% 6% 8% 10%
Magazine Explosion -2% -4% -6% -8% -10%
Subsystem Repair 1% 2% 3% 4% 5%
Aircraft Durability 2% 4% 6% 8% 10%
Anti-Aircraft 2% 4% 6% 8% 10%

- 41 -
3 Single Battle: Historical Missions 3.1 Sinking Courageous 17 September 1939 While on anti-submarine patrol in the Western Approaches HMS Courageous is spotted and stalked by U-29. Historical Outcome: Courageous - Sunk Withdrawal of carriers from anti-submarine patrols.
3.2 Action off Haisborough Sands 7 December 1939 After a successful mine laying operation, two German destroyers turn towards home and encounter a Royal Navy patrol. Historical Outcome: Jersey - Heavy damage
3.3 Battle of the River Plate 13 December 1939 Raiding the South Atlantic since the start of hostilities, the Graf Spee has finally been cornered by three cruisers. Historical Outcome: Graf Spee - Scuttled Exeter - Heavy damage Ajax - Medium damage Achilles - Light damage
3.4 Sinking of Glowworm 8 April 1940 The invasion of Norway is underway and sailing alone, HMS Glowworm encounters a destroyer and the Admiral Hipper. Historical Outcome: Glowworm - Sunk Admiral Hipper - Medium Damage

- 42 -
3.5 Action off Lofoten 9 April 1940 In poor weather, the twins Scharnhorst and Gneisenau come under attack from HMS Renown and her destroyer screen. Historical Outcome: Gneisenau - Medium damage Renown - Light damage
3.6 Sinking the Glorious 8 June 1940 The twins Scharnhorst and Gneisenau strike back when they encounter HMS Glorious and her escorts. Historical Outcome: Glorious - Sunk Acasta - Sunk Ardent - Sunk Scharnhorst - Medium Damage
3.7 Hunt in the Western Approaches 17 October 1940 German destroyers sortie out to hunt convoys off the coast of Brest. When spotted by a British air patrol, the convoys are diverted and Force F is rapidly mobilised to intercept. Historical Outcome: Z10 Hans Lody - Light damage Z20 Karl Galster - Light damage
3.8 Convoy SC-7 18/19 October 1940 Convoy SC-7 from Sydney to Liverpool suffers constant and coordinated wolf pack attacks during the crossing. On this night five u-boats close in. Historical Outcome: 16 Merchants Sunk
3.9 Action off Plymouth 29 November 1940 Operating out of Brest, German destroyers harass local shipping during night attacks. Spotting distant gun flashes a British patrol steams to investigate. Historical Outcome: Javelin - Heavy damage

- 43 -
3.10 Christmas Convoy 25 December 1940 After successfully sneaking through the Denmark Strait, Hipper patrols convoy routes for two weeks without sighting a target. Her luck changes on Christmas Day when she encounters convoy WS5A containing troop ships headed for the Middle East. Historical Outcome: Berwick - Heavy damage
3.11 Convoy HX-106 8 February 1941 Scharnhorst and Gneisenau encounter convoy HX-106 from Halifax to Liverpool, but it is escorted by the battleship HMS Ramillies. The Germans have been ordered not to engage enemy capital ships. Historical Outcome: German Ships - Disengage
3.12 Sinking Pinguin 8 May 1941 At sea since 15 June 1940, the auxiliary cruiser Pinguin has been raiding and laying mines for a total 154,710 tons of enemy shipping sunk or captured. HMS Cornwall picks up the distress call from Pinguin's latest victim, "British Emperor", and steams north to investigate. Historical Outcome: Pinguin - Sunk Cornwall - Medium damage
3.13 Battle of the Denmark Strait 24 May 1941 Bismarck and Prinz Eugen are attempting to break through into the Atlantic to wreak havoc on allied shipping. Only HMS Hood and HMS Prince of Wales are in a position to intercept them. Historical Outcome: Hood - Sunk Prince of Wales - Medium damage Bismarck - Light damage

- 44 -
3.14 Swordfish Attack Bismarck 26 May 1941 HMS Sheffield shadows the Bismarck and with daylight fading and in almost impossibly bad weather, Swordfish bombers from the HMS Ark Royal launch their torpedo attack. Historical Outcome: Bismarck - Medium damage Sheffield - Light damage
3.15 Bismarck Night Action 26/27 May 1941 During the night British destroyers manage to detect and intercept the damaged Bismarck as she attempts to reach France for repairs. Historical Outcome: Cossack - Light damage Zulu - Light damage
3.16 Sinking the Bismarck 27 May 1941 Crippled and outnumbered, the Bismarck prepares for her final battle against impossible odds. Historical Outcome: Bismarck - Sunk Rodney - Light damage
3.17 Sinking Atlantis 22 November 1941 Atlantis has sunk 145,960 tons of merchant shipping since her raid began on March 31, 1940. While re-supplying U-126, the British cruiser HMS Devonshire closes in. Historical Outcome: Atlantis - Sunk
3.18 Kormoran versus Sydney 19 November 1941 The auxiliary cruiser Kormoran is operating in the Indian Ocean and has sunk or captured 68,270 tons of allied shipping. Off the coast of Western Australia, HMAS Sydney investigates the Kormoran, currently posing as the Dutch merchant "Straat Malakka". Historical Outcome: Sydney - Sunk Kormoran - Scuttled

- 45 -
3.19 Sinking of Barham 25 November 1941 HMS Barham, Queen Elizabeth and Valiant, along with their destroyer escort, are underway near Alexandria when intercepted by U-331. Historical Outcome: Barham - Sunk
3.20 Sinking Python 1 December 1941 The re-supply ship Python is in the middle of refueling and re-supplying U-126 when HMS Dorsetshire appears. Historical Outcome: Python - Scuttled
3.21 Convoy PQ-13 29 March 1942 Arctic convoy PQ13 is en-route from Iceland to Murmansk, Russia when three German destroyers sail out to intercept. Historical Outcome: Z26 - Sunk Trinidad - Heavy damage Eclipse - Heavy Damage Z25 - Light damage
3.22 Escorting Edinburgh 2 May 1942 While escorting convoy QP11, HMS Edinburgh (carrying 4.5 tons of Soviet gold) is hit by two torpedoes from U-456. Crippled and under tow, Edinburgh comes under attack from destroyers two days later. Historical Outcome: Edinburgh - Sunk Z7 Hermann Schoemann - Sunk Foresight - Heavy damage Forester - Heavy damage Z25 - Medium Damage

- 46 -
3.23 Battle of the Barents Sea 31 December 1942 Convoy JW51B is sailing to Kola Inlet when intercepted by multiple German forces. Historical Outcome: Achates - Sunk Z16 Friedrich Eckoldt - Sunk Onslow - Heavy damage Admiral Hipper -Heavy damage Obdurate - Light damage Obedient - Light damage
3.24 Convoy TM-1 9 January 1943 Convoy TM1 consisting of tankers sailing from Trinidad to Gibraltar is attacked by wolf packs. Historical Outcome: 7 Tankers Sunk
3.25 Les Sept Iles 23 October 1943 The blockade runner Munsterland and her escorts sail out from Brest. Historical Outcome: Charybdis - Sunk
3.26 Battle of the North Cape 26 December 1943 Scharnhorst and her escort are searching for arctic convoys to attack. After sending her escort south to scout, the now alone Scharnhorst is cornered by two British forces. Historical Outcome: Scharnhorst - Sunk Norfolk - Medium damage Duke of York - Light damage

- 47 -
3.27 Ile de Batz 26 April 1944 After laying mines in the English Channel, three torpedo boats are intercepted by an Allied patrol. Historical Outcome: T29 - Sunk Ashanti - Medium damage Huron - Light damage Athabaskan - Light damage Haida - Light damage T24 - Light damage T27 Light damage
3.28 Ile de Vierge 28 April 1944 After protecting a mine laying operation in the English Channel, Allied escorts detect enemy contacts. Historical Outcome: Athabaskan - Sunk T27 Sunk T24 Light damage
3.29 Action off Brittany 9 June 1944 An allied patrol intercepts enemy ships in the English Channel. Historical Outcome: Z32 - Sunk Tartar - Medium damage Z24 - Medium damage Eskimo - Light damage Haida - Light damage
3.30 Action off Bergen 28 January 1945 The 4th flotilla has been ordered to vacate the arctic. Allied intelligence intercepts these orders and two light cruisers are sent to intercept. Historical Outcome: Z31 - Medium damage Diadem - Light damage Mauritius - Light damage Z34 - Light damage Z38 - Light damage.

- 48 -
4 Game Options / Help Game Options can be accessed from the Main Menu by tapping on "Options / Help". In addition, they can be accessed via the Special Commands Menu of the Tactical Map see section 1.4.2. Here you can adjust sound and music volume, camera sensitivity as well as various difficulty and realism settings. In addition, the Help section can be accessed from the Options page and contains 12 chapters describing the various aspects of the game.
Options Page By default, all options are off. Turning them on makes the following changes: Longer Start Range Increases starting distances by approximately 20%. Limited Visibility Based on weather and time of day, you can only see so far. Ships outside this range will be RADAR contacts (or sonar) and can't be seen in the 3D world. Typical ranges are from ~6000yd at night to ~40,000yd on a clear day. Ship Disengage > 25,000yds Surface ships cannot leave combat (after laying smoke for 3 turns) unless they are at least 25,000 yards from the nearest hostile ship.

- 49 -
No Enemy Damage Report Tapping an enemy ship will give you the name and statistics, but not tell you which subsystems are currently damaged or destroyed. 50% Renown Earned When playing a Campaign or Battle of the Atlantic, only half the Renown points are earned. Dud Weapons Approximately 4% of all shells, torpedoes and bombs do not explode on impact. Wind Effects Player Shells Shells fired by player ships now drift in the direction of the wind. Both direction and strength of the wind must now be manually compensated for by the player. Enemy Gunnery: Normal (Elite) Increases the accuracy of enemy gunfire. Battle of the Atlantic Options: Difficulty: Normal (Hard) Increases the number of enemy ships on the map and increases the amount of merchant tonnage sunk by events (decreases event merchant tonnage if playing Germany). Sunk Ships Recycled by Enemy Allows the enemy to resurrect sunk ships and eventually put them back into battle. This is particularly useful for increasing the difficulty when playing the Royal Navy to compensate for the lower number of German ships available. Graphics Settings: Ocean: Detailed (Simple) Toggles the ocean complexity between the detailed wave surface to a simplified plane. May improve performance on some lower-end devices. Does not affect the title page and requires a battle restart. Underwater: Detailed (Simple) Toggles the underwater graphics to turn on/off light shafts, caustic effects and particles. May improve performance on some lower-end devices. Requires a battle restart.
- 50 -
5 Appendicies
5.1 FAQ 1. Ships just disappear in combat! How am I supposed to sink them? Ships can leave combat if they meet the Disengage criteria, see section 1.4.1. While we agree that this is not realistic, it allows the game to move along as it would be boring waiting for a ship to sail to the edge of the map for it to leave combat. Consider turning on the Ships Disengage > 25,000yd option in order to force a surface ship to be at least 25,000 yards from the nearest hostile ship before it can leave combat. Also ability to disengage also adds an additional challenge. If you want to drive off an enemy, you can. If you want to sink an enemy, you will need to deliberately target the propulsion systems to prevent it from escaping. Shots that you might have otherwise just targeted the magazines with... 2. Gunnery is too hard! Why is it so difficult to land hits? The Target Solution is only an estimate, it can often be wrong so just use it as a guide. Be sure to use the Splash History (section 1.1.3) and Tactical Map Shot History (section 1.2). They are powerful tools that can give you a lot of information about how to plan your next shot. Using the Splash History can land hits about 80% of the time. It tells you whether the last elevation you fired at will be long, short or on target this turn. Adjusting elevation 1.5 to 2 degrees is usually enough to bring the shot into the next category and once in the "green zone" only minimal adjustments should be necessary. 3. Where are the ship upgrades like Pacific Fleet had? Instead of upgrades, there are now hundreds of ships to choose from and you now have to replace ships as they are lost giving the opportunity to buy new ships that suit your needs. Want a destroyer with good guns? Buy a Tribal. Want a destroyer with excellent torpedoes? Buy a J,K,N Class. A few automatic upgrades occur during the Battle of the Atlantic for Hedgehog, Squid and Barracuda dive bombers. 4. When is a game saved so that I can leave and resume later? Single Battle: never. Campaign: after each battle and after purchasing or releasing any ships. Battle of the Atlantic: after each battle, after purchasing or releasing any ships and at the end of each campaign turn. 5. Why are torpedo bombers so hard to use? The enemy just sails past aerial torpedoes... Aerial torpedoes usually run over several turns to their target. This means you don't have to get too close to the enemy ship before dropping (although allied torpedoes do have a fairly short range). Most importantly make sure to set the aircraft attack marker 0.5-1.5 ship lengths in front of the target so it target sails into the torpedo. Remember you can adjust both the angle of the attack and the point along the ship's path you wish to strike, see section 1.1.5.

- 51 -
6. Depth Charges and Hedgehogs do nothing, how do they work? Tap the FIRE button to launch an anti-submarine attack. 7. Why are campaigns so easy, I have lots of Renown and nothing to spend it on? Save it! The later levels become very difficult and you will need it to replace lost ships. It is possible to lose a campaign due to being unable to replace your ships. Still too easy? There's an option to reduce Renown rewards by 50% for both Campaign and Battle of the Atlantic modes. 8. Why don't I earn Renown for sinking ships in the Campaign? Renown is earned only when the score is higher than any other previous attempt for that mission. In cases where a previous high score exists, only the difference of the current higher score and the previous score is earned. 9. Why don't I earn Renown for sinking ships in Battle of the Atlantic? Renown is earned only for enemy warships and submarines sunk, not merchants. Merchant tonnage instead goes to the War Summary tally and is used to determine how the war is progressing, see section 2.3.2. 10. Why do aircraft attack my own ships? Why is the aircraft attack marker on my ship? By default the aircraft attack marker initially appears on the ship launching the attack. If your ship already has a target, simply tap the Target Solution. OR Go into the Tactical Map, tap a target then tap the Go To Ship button to target any ship. 11. Why won't ships sink? I've hit them so many times... Atlantic Fleet does not use hit points, but actual buoyancy physics. This means you have to hit the ship near the water line in order for water to flood it. Multiple hits away from the waterline cause damage, but cause very little flooding. Also be aware of counter flooding. Try to avoid hitting a ship on both sides or at both ends. Concentrate on one side or one end to capsize it or force the ship under. Finally, use the right tool for the job. Small calibre guns or HE shells won't penetrate heavy armour. 12. Why do torpedoes or shells pass through ships? There is no "friendly fire". 13. Why can't I progress in my Battle of the Atlantic Campaign I keep getting the same screen every time I press "Next"? The ending criteria have been met for that campaign and it is finished, see section 2.3.2.

- 52 -
5.2 Data
5.2.1 Torpedoes Arming distance: ~1000 yd Note that under this distance, a torpedo will not arm and be a dud. Torpedo data below indicates torpedo type, speed in knots, maximum range in yards and the approximate yards traveled per turn. Royal Navy: Aerial 18" Mark XIV 33kn 3500 yd 1060 yd/turn Surface 21" Mark IX 35kn 14,000 yd 4000 yd/turn Submarine 21" Mark VII / VIII 41kn 7,000 yd 1707 yd/turn Kriegsmarine: Aerial H6 24kn 6500 yd 2708 yd/turn Surface G7a 40kn 8,750 yd 2187 yd/turn Submarine G7a 40kn 8,750 yd 2187 yd/turn
5.2.2 Aircraft & Payloads Land Based Aircraft: Lancaster: 1 x 14,000 lb Grand Slam bomb Liberator: 6 x 500 lb Bomb Liberator: 6 x Depth Charges Liberator: 8 x FFAR Liberator (US): 6 x 500 lb Bomb Liberator (US): 6 x Depth Charges Sunderland: 6 x 500 lb Bomb Sunderland: 6 x Depth Charges Fw200 Condor: 10 x 500 lb Bomb Fw200 Condor: 2 x Hs293 (homing glide bomb) Dornier Do217: 1 x Torpedo Dornier Do217: 6 x 500 lb Bomb Dornier Do217: 2 x Hs293 (homing glide bomb) Dornier Do217: 1 x FritzX (homing glide bomb, armour piercing) Ju87 Stuka: 1 x 500 lb, 4 x 100 lb All fighter aircraft DIVE then ATTACK. The Ju87 Stuka and Barracuda are very steep actual "dive bombers", while the other aircraft have shallow dives. All land based heavy bombers level bomb with the following exceptions: Allied rocket attacks: shallow dive then rocket. Dornier with bombs: shallow dive then bomb.

- 53 -
Carrier based Aircraft: Avenger (US): 4 x 500 lb bomb Avenger (US): 4 x Depth charge Avenger (US): 8 x FFAR Barracuda: 1 x Torpedo Barracuda: 6 x 250 lb bomb Barracuda: 4 x Depth Charges Seafire: (none) can strafe ships with guns Seafire: 3 x 250 lb Bomb Swordfish: 1 x Torpedo Swordfish: 3 x 500 lb Bomb Swordfish: 4 x Depth Charges Swordfish: 8 x FFAR Wildcat (US): (none) can strafe ships with guns Wildcat (US): 3 x 250 lb Bomb Barracuda replaces Swordfish at some date in dynamic campaign and is a full dive bomber as opposed to shallow dive of swordfish. Carrier aircraft (fighters) with "none" payload act as a Combat Air Patrol. They are best at shooting down incoming enemy aircraft. Can still be used in strafing attacks.
5.2.3 Ship Repair Times Table shows the number of turns required to repair/rearm ships of various sizes with various damage amounts. Damage: None Light Medium Heavy Small 1 2 3 4 SS, DD, TB, DC Medium 2 4 6 8 CL, CVE, HK Large 3 6 9 12 CA Very Large 4 8 12 16 BB, BC, CV

- 54 -
5.3 Glossary & Abbreviations
AAA Anti-Aircraft Armament
AP Armour-Piercing shell, best used against armour thickness > 50% shell calibre
ASW Anti-Submarine Warfare
BB Battleship
BC Battlecruiser
BotA Battle of the Atlantic
CAP Combat Air Patrol, carrier-based fighters constantly in the air vs. enemy aircraft
CA Heavy Cruiser
CL Light Cruiser
CV Aircraft Carrier
CVE Escort Carrier
DC Corvette
DD Destroyer
Dud Not exploding shell, bomb or torpedo warhead
Elev Elevation (Target Solution suggested gun elevation to hit target)
FFAR Forward Firing Aircraft Rocket
HE High-Explosive shell, best used against lightly or unarmoured targets
HH Hedgehog, forward firing anti-submarine mortar
HK Hilfskreuzer, German auxiliary cruiser / merchant raider
KM Kriegsmarine, German navy
Kn Knot, unit of nautical speed
MS Merchant Ship
lb Pound, unit of weight
RN Royal Navy
SS Submarine, U-boat (German submarine)
t Tons of water displaced (also called displacement or tonnage of a ship)
TB Torpedo Boat
TDC Torpedo Data Computer
Torp. Torpedo Bearing (Target Solution suggested bearing to fire torpedo)
TT Torpedo Tubes, either launcher or torpedo room
yd Yard, unit of length

- 55 -
5.4 Credits Programming and Design Paul Sincock Ph.D. Artwork and Design Nils Dücker 2D Art and Visual Effects Przemek Starkiewicz Additional Art Olof Kjolstad Music Composed by Aleksi Aubry-Carlson Sound Effects Tapio Liukkonen Technical Assistance by Mark Hessburg from Wolves of the Atlantic http://www.wolves-of-the-atlantic.com/ Special Thanks to Michael 'Rayydar' Allers Chris Amundson
5.5 Contact Us Need help, want to chat with other players or provide feedback? Visit us at: http://killerfishgames.com/ https://www.facebook.com/pages/Killerfish-Games/297301143813883 https://www.youtube.com/user/PacificFleetDev
© 2015 Killerfish Games Atlantic Fleet is not "Free Software". Support quality games by purchasing them.

- 56 -
5.6 Release Notes Version 1.07 General: Fixed crash on startup for Galaxy S3 and a few other devices. Training Missions: Added 7 training mission tutorials to teach the basics of the game. Improved button sensitivity for some devices. New options for simple ocean and underwater graphics. Fixed several audio sources not using volume setting: ship sinking sounds, fires, star shells, lightning/thunder. Game Modes: Custom Battle: can now select land based aircraft and payload. Fixed typo in briefing 25. Campaign: if have 10 ships in fleet, tapping shipyard button now takes you to the shipyard, but throws an error if you try to purchase more ships. Force AI on for campaign and BotA to prevent data corruption and player controlling both sides in these modes. Game now saves after each BotA battle. Added "BotA Over" message when meeting the end game criteria in BotA mode. Increased tonnage sunk in events when playing German BotA games. Increased frequency of encounters in early war months. Corrected BotA ammo amounts after battle to account for ammo still in loaded guns/torpedo tubes. BotA Persistent Data overhauled, ensured damage, subsystems KO'ed and ammo are persistent across battles, when viewed in ship info panels as well as reapplied in next combat. Added new condition to BotA campaign end: threshold of 150k of KM naval tons must be also sunk for Allies to win. Shipyard: Fixed a bug which broke the Shipyard in Custom Battles. Tapping through shipyard ships can no longer increase brightness of ships. Can no longer buy ships before their availability dates in BotA. Can no longer purchase multiples of the same ship in BotA/Campaigns once all ships in class were bought. Ships: Fixed Atlantis name displaying as Pinguin. Scharnhorst damage report now shows secondary guns. Added damage decals to Renown turrets. Modified Bismarck, Scharnhorst and Tribal turret train angles. Removed sonar from Revenge class damage report. Modified Bismarck, Scharnhorst and H39 buoyancy parameters making them easier to sink. Turn radius increased for larger ships. Decreased Torpedo Defense System efficiency to 70%. Bismarck turret armour display changed form 17 to 14". Removed sonar and depth charges from Elbing Class TB. Fixed typo in Deutschland class for secondary guns. Scharnhorst secondary guns now displayed correctly. Fixed gun train angles on HK classes. Combat: Touching the bearing adjustment while marking a torpedo direction now works. Firing a torpedo too deep and getting error no longer subtracts that torpedo. Glide bombs (Hs293 and Fritz X) with no Target Solution no longer break the game. Anti-aircraft now decreases as ship takes damage. Fixed glitch where Bogue Fighter (none) launch, generated a swordfish up high. Put "floating" bombs back inside avenger with bomb load out. German torpedo bombers can no longer fly through ships. Fixed a bug where wind was not applied to dropped aircraft ordnance.

- 57 -
Targeting a ship by tapping Solution in top right now displays the air attack marker over it correctly. Increased bomb damage ~20%. Increased size of sonar/submerged target markers. Greatly decreased submerged submarine damage by gunfire. Decreased submarine flood rate to decrease sudden movements on sinking. Squid now correctly damages submerged submarines. Torpedo hits no longer damage ship superstructure. Corrected torpedo damage to smaller vessels. Improved conditions for AI and player submarines to leave combat. Ramming submarines does less damage to the surface vessel. AI submarines dive sooner when escorts approach. Anti-submarine weapons now have FIRE button instead of DONE. Fixed AI carriers launching planes when heavily damaged/on fire. Ships that can launch an air attack now see submerged vessels as "Submerged Contacts" on Tactical Map. These contacts do not generate a Target Solution and Deep and Very Deep vessels cannot be spotted in this manner. Decreased overall AAA efficiency by ~30%. AAA damage now based on superstructure only, not entire ship. Fixed several cases where canceling aircraft could increment number of aircraft in air by 1. Decreased aircraft attack run length ~25% Carriers more resilient to having flight deck knocked out. Fixed Sunderland depth charge timing could break turn cycle. Chance for fires increased and always happen after secondary explosions. Widened the bearing line for better visibility. Normalised turn radii for Fleet mode so recent turn radii edit no longer causes smaller ships to turn harder and break the formation. Can now lay smoke with all ships using Fleet movement mode. Ships now use secondary batteries correctly. Improved AI decision making for disengaging. Improved AI target selection. Modified KM and RN disengage parameters. KM flees sooner than RN. Removed enemy AI maneuvering at battle start, AI is on immediately and fires/attacks from the first turn.