manual kaltura through blackboard · 2020-03-13 · recorded kaltura captures can be placed in your...
TRANSCRIPT

1
Manual Kaltura through Blackboard Instructor manual
Version 1.7, March 2020 (Updated screenshots/terminology and added Kaltura Capture)
Applications management Blackboard, Student and Educational Affairs (SEA), Leiden University
Table of Contents Kaltura Capture ....................................................................................................................................... 3
Log in to Blackboard ................................................................................................................................ 3
My Media ................................................................................................................................................ 3
Introduction My Media ....................................................................................................................... 3
My Media: Add New ................................................................................................................................ 6
Add New: Media Upload ..................................................................................................................... 6
Add New: Webcam Recording............................................................................................................. 9
Add New: YouTube ............................................................................................................................ 10
Add New: Video Quiz ......................................................................................................................... 13
My Media: Actions ................................................................................................................................ 14
Actions: Publish ................................................................................................................................. 14
Actions: Delete .................................................................................................................................. 15
Actions: Edit Quiz .............................................................................................................................. 16
Actions: Analytics .............................................................................................................................. 16
My Media: Edit .................................................................................................................................. 18
My Media: Delete .............................................................................................................................. 18
Kaltura within a Blackboard course ....................................................................................................... 19
Embedding a video in Content .......................................................................................................... 19
Embedding a video in Discussion Board ............................................................................................ 25
Assignments: video for instruction.................................................................................................... 30
Assignments: Handing in a video ...................................................................................................... 34
Media Gallery ........................................................................................................................................ 35
Availability ..................................................................................................................................... 35
Introduction to Media Gallery ....................................................................................................... 36
Actions: Edit ................................................................................................................................... 36
Actions: Analytics .......................................................................................................................... 37
Views ............................................................................................................................................. 38
Add Media ..................................................................................................................................... 38

2
Approving videos of students ........................................................................................................ 39
Comments and likes in the Media Gallery .................................................................................... 40
Error messages ...................................................................................................................................... 41

3
Kaltura Capture Kaltura Capture can be used to make recordings of your computer’s desktop and is a way to record
your lectures in case you are not able to do a live lecture. You can, for example, have a PowerPoint
presentation running while Kaltura Capture is running. Since Kalture Capture also records audio, you
can add the audio part of the lecture as well.
Though Kaltura Capture is available thought the Kaltura integration within Blackboard, Kaltura
Capture works best by using it as described by following the guide listed below:
https://blogs.library.leiden.edu/fb-video/docs/manual-videoportal-university-leiden/kaltura-
capture/
Recorded Kaltura Captures can be placed in your Blackboard course by following the steps described
In the section ”Kaltura within a Blackboard course”
Log in to Blackboard 1. Go to https://blackboard.leidenuniv.nl/
2. Log in with your standard ULCN name and password.
My Media
Introduction My Media Below, all options in My Media are explained in short. How to use these options in detail is explained
per option after the introduction.
1. On the My Institution page there is a link to the program ‘My Media’. Click this link.
2. In My Media there is an overview of all videos you have uploaded. If you have not used
Kaltura before this overview will be empty.
3. At the top, you see the pull down menus that you can use to browse in My media. Above it is
the search field.

4
4. On the top right hand side you will see 5 buttons. The one on the upper right is the refresh
button. This updates the overview with the latest changes ( if any).
5. The button “Add New.” Is used to add new videos in different ways. With Media Upload you
can upload video footage as a file. With Webcam recording you can record a video with a
webcam. With YouTube you can select a YouTube video to add to My Media. With Video
Quiz you can add questions to your video.
6. On the far right you see the button Actions. Here two options
are available: Publish and Delete. With Publish you can make
a video available for a course. With Delete you can remove a
video from My Media.
NOTE: When you remove a video from My Media it will
automatically be removed from all locations you have made it available to. For instance: if
you remove a video that you have used in an assignment it will no longer be available for
that assignment. If that is too radical, there is a possibility to transfer ownership of the video
to somebody else. Please consult the chapter on Advanced Settings of the Video portal
manual for this.
5
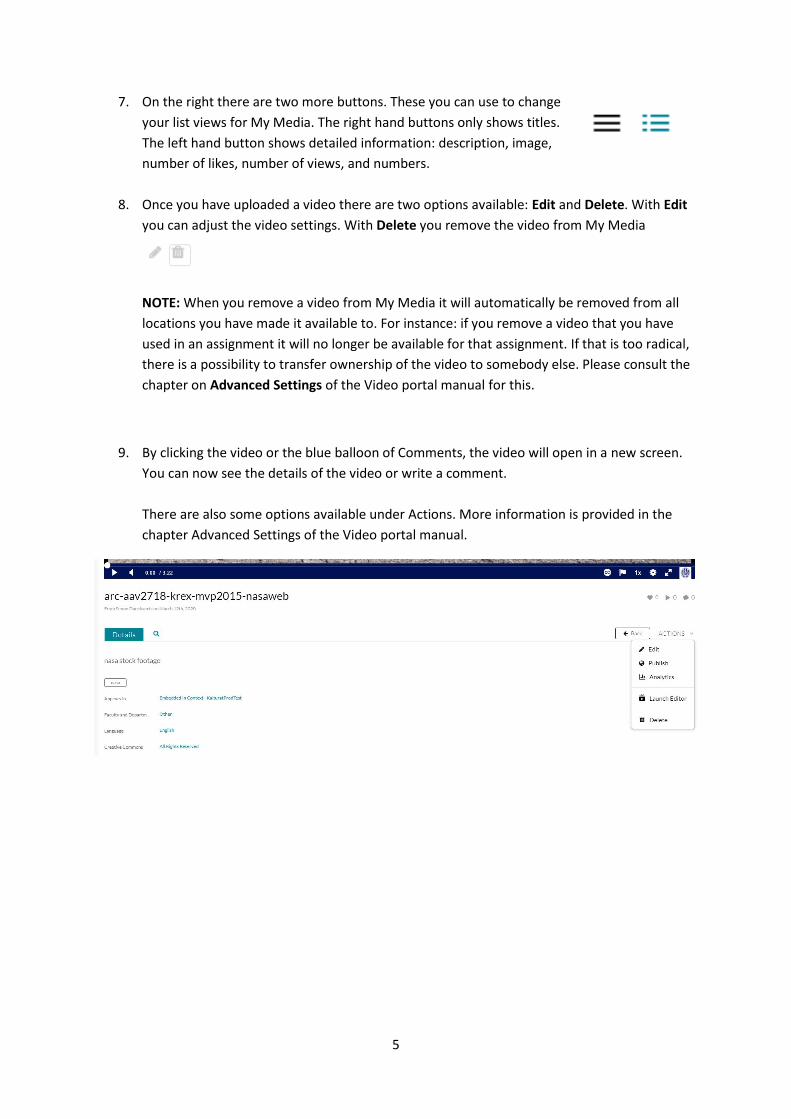
7. On the right there are two more buttons. These you can use to change
your list views for My Media. The right hand buttons only shows titles.
The left hand button shows detailed information: description, image,
number of likes, number of views, and numbers.
8. Once you have uploaded a video there are two options available: Edit and Delete. With Edit
you can adjust the video settings. With Delete you remove the video from My Media
NOTE: When you remove a video from My Media it will automatically be removed from all
locations you have made it available to. For instance: if you remove a video that you have
used in an assignment it will no longer be available for that assignment. If that is too radical,
there is a possibility to transfer ownership of the video to somebody else. Please consult the
chapter on Advanced Settings of the Video portal manual for this.
9. By clicking the video or the blue balloon of Comments, the video will open in a new screen.
You can now see the details of the video or write a comment.
There are also some options available under Actions. More information is provided in the
chapter Advanced Settings of the Video portal manual.

6
My Media: Add New
With this button you can add new videos in different ways. With Media Upload you can upload video
footage as a file. With Webcam recording you can record a video with a webcam. With YouTube you
can select a YouTube video to add to My Media. With Video Quiz you can add questions to your
video.
Add New: Media Upload
Make sure you have the video you wish to upload available as a file.
1. Go to My Media.
2. Click Add New.
3. Select Media Upload.
4. Click in the next screen on: Choose a file to upload.

7
5. A separate window will open in which you can search for the video. Select the video and click
Open.
6. Wait until the file has been uploaded completely. When the upload is successful the
following message will appear.
7. Fill out the fields below the message. The name is automatically generated. You can edit the
name if you wish. The fields Name and Description are required.
8. In the field Tags you can indicate key words that describe this video. Select faculty, language,
and areas of interest.

8
9. Indicate at Creative Commons and Rights who owns the video copyright.
Creative Commons: https://creativecommons.org/share-your-work/licensing-types-
examples/
10. Click Save at the bottom of the page.
11. The green message indicates that the video is now available in My Media. By clicking on Go
To My Media you will get an overview. To make the video available for a course you select
Published.

9
12. Select the course you wish to make the video available for. Click again on Save.
13. A message will now appear to inform you that the video is
added to the Media Gallery for that course. By clicking on Go
To Media you will get an overview. You can continue by
clicking one of the tabs at the top of the page (for instance:
My Institution).
Add New: Webcam Recording For this you need the Flash browser plug-in.
1. Go to My Media.
2. Click Add New.
3. Select Webcam Recording.

10
4. A new screen will open (see below). By turning on your webcam and clicking the button
Allow you can make a recording.
Add New: YouTube First select the YouTube video you wish to add to the course environment. Make sure you have the
URL available.
1. Go to My Media.
2. Click Add New.
3. Select YouTube.
4. Select the URL of the video you wish to make available.
5. Copy the URL into the text field. The URL will automatically change into a code

11
6. Click Preview.
7. On the right the video will appear. Below you will see the video details.
8. The fields Name and Description are already filled out with the YouTube information. You
can edit these fields if you wish. These fields are required.
9. When you scroll down the page you will see more fields. In the field Tags you can write the
key words that describe this video. Select faculty, language, areas of interest.
10. Indicate in Creative Commons and Rights who owns the video copyright. In general the video
copyright for a YouTube video will be available below the explanation on the website.
Creative Commons: https://creativecommons.org/share-your-work/licensing-types-
examples/

12
11. Click Save.
12. The “green” message indicates that the video is now available in My Media. By clicking on Go
To My Media you will get an overview. To make the video available for a course you click on
Published.
13. Select the course you wish to make the video available for. Click again on Save.

13
14. A message will now appear which will indicate that you have added the
video to the course’s Media Gallery.
15. You can continue by clicking on Go To Media. You will enter an overview of your video.
Add New: Video Quiz With an interactive video quiz (IVQ) it is possible to let the viewer answer some questions while
playing the video. First choose and watch the video to whom you want to add your questions.
Consider which questions (and answers) you want to add to the video. Make sure you also have
feedback or a tip available to adjust to the question.
1. First upload the video of your choice (see chapter My Media: add new).
2. Go to My Media.
3. Click Add New.
4. Click Video Quiz.
5. Click the Select button next to the video you want to use to make your quiz.
6. Fill in the (required) fields and/or adjust the settings to your preferences.

14
7. To add questions to your video, click on the timeline (1) at the bottom of the screen and
press the Add a Question button (2) on the video to add a question at this time index.
My Media: Actions To use Actions you first have to select the correct video(s). You do this by ticking the checkbox on the
left of the video.
Actions: Publish With this option you make the video available in (one of) your courses
1. Go to My Media and select the video.
2. Click Actions.
3. Select Publish.

15
4. Click Publish.
5. You might get a message stating you need to complete all the required fields. In this case
press Edit and make sure these are all entered correctly.
6. You can now see your courses. Select the course in which you want to make the video
available.
7. Click Save. At the top of the page you will see a message that the video is now available for
the selected course.
8. Below you can also see that the video is published
and for which course. Click Back to return to My
Media.
Actions: Delete NOTE: When you remove a video from My Media it will automatically be removed from all locations
you have made it available to. For instance: if you remove a video that you have used with an
assignment it will no longer be available for that assignment. If that is too radical, there is a
possibility to transfer ownership of the video to somebody else. Please consult the chapter Advanced
Settings of the Video portal manual for this.
1. Go to My Media.
2. Click Actions.
3. Select Delete.

16
4. When you select the Delete option you always will get the question if you are sure about the
removal. Click Delete again to remove the video. Click Cancel if you change your mind.
5. If you get a “You are not allowed to delete this media” message, your video might still be
published somewhere.
Actions: Edit Quiz
With these options you can change the preferences for your quiz and the quiz itself.
1. Go to My Media
2. Click on the title of the video
3. Click on the button Actions under the video and choose Edit Quiz. See My Media: Add new
for more info.
Actions: Analytics
With this option you can view the statistics of your videos.
1. Go To My Media.
2. Click on the title of the video.

17
3. Click Action under the video and choose Analytics. Wait until the page is loaded. If you have
made a quiz, here you can find the answers of the students to your questions.

18
My Media: Edit On the right of each video you will find the Edit button. With this you can view and adjust the video’s
default settings. For a detailed explanation of this option you can consult the chapter Advanced
Settings of the Video portal manual. After you have made your changes click Save and then Go To
Media to return to the main window.
My Media: Delete
NOTE: When you remove a video from My Media it will automatically be removed from all locations
you have made it available to. For instance: if you remove a video that you have used with an
assignment it will no longer be available for that assignment. If that is too radical, there is a
possibility to transfer ownership of the video to somebody else. Please consult the chapter Advanced
Settings of the Video portal manual for this.
At the right of each video you will find the Delete button. With this you delete the videos one by one.
If you wish to remove more than one video at a time you can best use Actions | Delete.
When you select the Delete option you always will
get the question if you are sure about the removal.
Click Delete again to remove the video. If you are not
sure you can click Cancel.

19
Kaltura within a Blackboard course
1. Go to the Courses tab at the top of the page.
2. Here you will see an overview of the courses for which you are registered. Click the course you
wish to review.
Embedding a video in Content 1. Click Content in the menu on the left.
2. Click Build Content. Select Kaltura Media in the drop down menu.

20
3. If you want to select a video from the videos which are now shown, go to step 16.
4. Click Add New on the right. You can choose what you want to upload here. Choose Media
Upload to upload a file from your pc, and follow the steps below. For information on
Webcam Recording , YouTube and Video Quiz, please refer to My Media sections in this
manual.
5. In the next screen, click Choose a file to upload.
6. A new window will open, where you can select your video. Select the video and click Open.

21
7. Wait until the file has been uploaded. If the upload was successful, this notification will be
shown:
8. Fill out the fields beneath the notification. Name will be filled out automatically. You can
adjust it if needed. Name and Description are both mandatory.
9. For tags, fill out keywords which describe your video.
10. Select the faculty, language, and interest areas.
11. Indicate the copyrights of the video at Creative Commons and Rights.
Creative Commons: https://creativecommons.org/share-your-work/licensing-types-
examples/

22
12. Click Save at the bottom of the page. A notification will be shown at the top of the page:
13. Click Go to My Media at the bottom of the page.
NOTE: The video is not yet available in the course.
14. Click the Pencil icon on the right to select a video.
15. You can now add text to the text pane. Fill out the fields and click Save.

23
16. From the My Media tab, press the “</> Embed” icon on the right of the video you want to
embed in the course.
17. Enter a title and description and press Submit.

24
18. Your video is now embedded into your course.

25
Embedding a video in Discussion Board 1. Click Discussions in the menu on the left
2. Click Create Forum.

26
3. In the toolbar there is a button Mashups. Click this and select Kaltura Media.
4. A new window will open. If you wish to select a video from the options that are available to
you now go to step 10. If you wish to create a new file you go to step 6.
5. Click Add New in the top right hand side. Here you can select
what you wish to upload. Select Media Upload to upload an
existing file and follow the steps below. To use the options
Webcam Recording , YouTube and Video Quiz you can consult
the chapter My Media in this manual.
6. A new window will open. Click Choose a file to upload.

27
7. Select the video you wish to upload and click Open.
8. Wait until the file has been uploaded completely. When the upload is successful the
following message will appear:
9. Fill out the fields below the message. The name is automatically generated. You can edit the
name if you wish. The fields Name and Description are required information.
10. In the field Tags you can indicate key words that describe this video.
11. Fill out the faculty, language, and areas of interest.
28
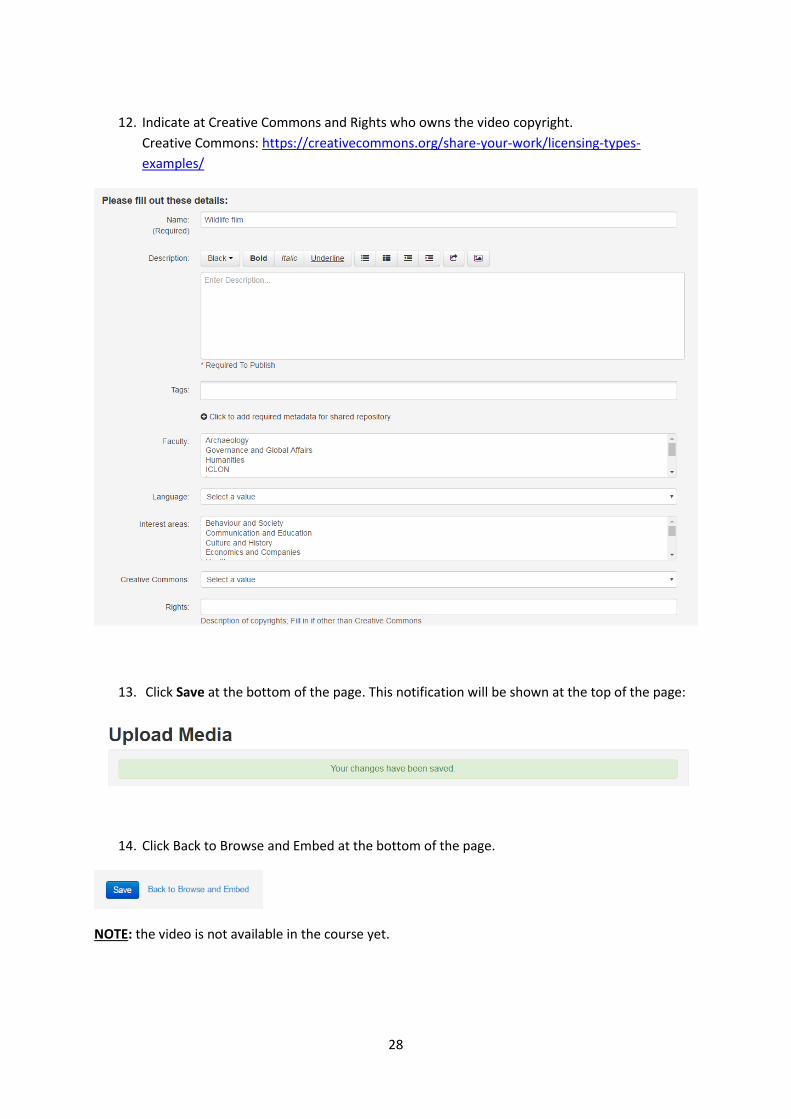
12. Indicate at Creative Commons and Rights who owns the video copyright.
Creative Commons: https://creativecommons.org/share-your-work/licensing-types-
examples/
13. Click Save at the bottom of the page. This notification will be shown at the top of the page:
14. Click Back to Browse and Embed at the bottom of the page.
NOTE: the video is not available in the course yet.

29
15. Choose the video you wish to upload and click </>Embed.
16. You will now see your video in the “Description” field. You may also add or adjust the text in
the text pane. Fill out the other fields as needed and click Submit on the right. A new forum
will now be shown in the overview, with the video in it.
To create a thread, click the existing forum and then “Create thread”. The steps after that are the
same as those above.

30
Assignments: video for instruction
1. Click Content in the menu on the left (or another option within which you would like to place
an assignment).
2. Click Assessments and then Assignment in the drop down menu.

31
3. If your Instructions text pane looks like this, please click the arrows on the right:
4. Click the button Mashups in the toolbar and select Kaltura Media.
5. A new window will open. If you wish to select a video from the available options, you go to
step 10. If you wish to create a new file you go to step 6.
6. Click Add New on the right. You can now choose what you would
like to upload. Choose Media Upload to upload an existing file and
follow the steps below. If you want to use the options Webcam
Recording , YouTube and Video Quiz, please go to My Media in this
manual.

32
7. Click Choose a file to upload in the next screen.
8. A new window will open. Select the video you wish to upload and click Open.
9. Wait until the file has been uploaded completely. When the upload is successful the
following message will appear.

33
10. Fill out the fields below the message. The name is automatically generated. You can edit the
name if you wish. The fields Name and Description are required information.
11. In the field Tags you can indicate key words that describe this video.
12. Select faculty, language, and areas of interest.
13. Indicate at Creative Commons and Rights who owns the video copyright.
Creative Commons: https://creativecommons.org/share-your-work/licensing-types-
examples/
14. Click Save at the bottom of the page. This notification will be shown at the top of the page:
15. Click Back to Browse and Embed at the bottom of the page.

34
NOTE: the video is not available in the course yet
Select the video you wish to upload and click </>Embed.
16. You will now see the video in the field Instructions. You can also add/adjust text in the text
pane. Fill out the other fields as needed and click on Submit on the right.
17. A new assignment will now be shown in the overview, with the video in it.
Assignments: Handing in a video If you want students to hand in a video assignment, please use Pitch2Peer instead. If you don’t want
to make use of peer review, please select the ‘Submisson only’ option in your Pitch2Peer assignment.
Please note! Pitch2Peer is only used in some faculties. Please ask your faculty support for the
situation at your faculty.

35
Media Gallery The Media Gallery can give you an overview of all videos within your course.
Availability
You can make the Media Gallery available to your students as follows.
1. Go to the course.
2. In the menu on the left, click the plus sign at the top and then click Tool Link.
3.
Select Media Gallery in the drop down menu. For Name fill in
Media Gallery as well.
4. Click Submit.

36
5. Media Gallery will now be shown in the menu. If you click
the arrow to the right of the menu button, you can select
Show Link. This will make the Media Gallery available to
students.
Introduction to Media Gallery
If you click the menu button Media Gallery, this will take you to this page:
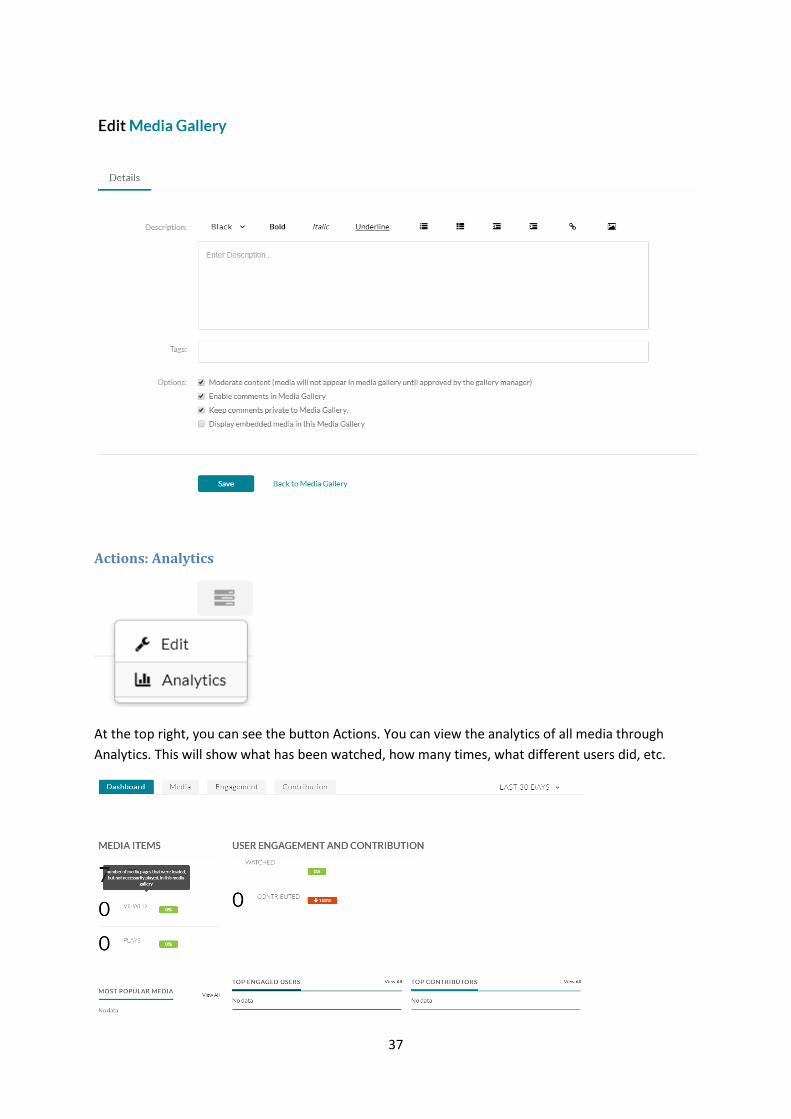
Actions: Edit
At the right top, you can see the button Actions. You can adjust the settings of the Media Gallery
through Edit. For example, you can add a description or tags, determine whether all media should be
checked by you or another instructor before publishing, and determine whether comments are
allowed. To save the settings, click Save and then Back to Media Gallery.
37
Actions: Analytics
At the top right, you can see the button Actions. You can view the analytics of all media through
Analytics. This will show what has been watched, how many times, what different users did, etc.

38
Views
Below Actions, on the left there are three buttons. With these you can determine how you want to
view the videos on your screen. The different views are displayed below. By clicking the plus signs
next to or below the videos you can see more information about the videos.
NOTE: If you delete a video from My Media, it is automatically deleted from all places where you
have embedded the video. For example: if you delete a video from My Media which has been
embedded in an assignment, the video will no longer be available in the assignment. You can also
pass on the ownership of a video. More information can be found in the chapter Advanced Settings
of the Video portal manual.
Add Media
You can add videos to the Media Gallery through Add Media. If you click Add Media klikt, a new
screen will be opened:
You can see all videos which are in My Media on the left side. These are videos which are available to
you to directly publish in the course. The checkmarks on the left indicate whether the video is
already available in the Media Gallery of this course. If there is no checkmark yet, you can add the
video to the Media Gallery like this:
1. Check the video.
2. Click Publish at the right top.
3. You will now automatically go to the Media Gallery. You will now be able to see the video
which you have just added.
You may be able to see ‘Shared Repository’ at the left top. These are videos which have been shared
with you through Kaltura. You can also publish these videos in the Media Gallery, in the same way as
explained above.

39
You can also publish a video in the MediaGallery which is not available in My Media yet. To do this,
you go to Add New at the right top.
You can now choose what you want to upload. Choose “Media Upload” to upload an existing file.
Choose Webcam Recording to record a new video with your webcam. Choose YouTube to select a
video from YouTube for publishing. Please refer to My Media in this manual for more information.
Approving videos of students
Students can also add videos to the Media Gallery if you have made the Media Gallery available.
However, you have to approve the video before it will be available to other students. You will receive
an email if a student has uploaded a video to the Media Gallery. You can then watch the video in the
course and indicate whether you want the video to be published.
1. Go to the course in Blackboard.
2. Go to Media Gallery through the menu on the left.
3. You will see “1 Pending” at the left top. Click this to be able to see the student’s video.
4. You are able to watch the video by clicking it. You can then indicate on the right whather you
want to add the video to the Media Gallery (Approve) or not (Reject).

40
Comments and likes in the Media Gallery
Below each video tile there are three icons. The heart indicates the number of likes, the eye the
number of views and the text balloon the number of comments.
By clicking on the blue text balloon comment icon you open the video in a new screen and view it. In
this window you can add a like or a comment yourself. The like button is in the left bottom corner
below the video. On the bottom right you can return to the Media Gallery. At the bottom you can
read other people’s comments and add responses yourself.

41
Error messages
This message can appear while uploading a video. It indicates that the selected video does not have
the correct file form.
1. Make a copy of the video and save it to your PC. Try to upload this copy.
2. Convert the video to a different video file format.