manual for using of template file for gpa...
TRANSCRIPT

Manual for using of Template File for GPA Calculations
By:
Dr Jamaludin Bin Omar Department of Electrical Engineering
College of Engineering Universiti Tenaga Nasional
29 March 2005
This manual is intended to be used with the latest version of the template files, which were modified and upgraded on 5 January 2005. The template files are for students to use.

Manual for Using of Template File for GPA Calculations
Page 1
1) Introduction to the template files The template files for calculation of GPAs were developed for Degree and Diploma students. The template file for Degree students is called Kira GPA Template Degree Student.xls, while for Diploma students the template file is called Kira GPA Template Diploma Student.xls. The main difference between them is that there is no calculation for Core CGPA in Kira GPA Template Diploma Student.xls but the calculation for Core CGPA is implemented in Kira GPA Template Degree Student.xls. This manual will describe how to use Kira GPA Template Degree Student.xls. Similar procedures apply to Kira GPA Template Diploma Student.xls also. Basically, there are three (3) worksheets inside the Kira GPA Template Degree Student.xls file, as shown in the following figures. There are: i) GPA Calculation worksheet (Figure 1).
Most GPA calculation activities are done within the GPA Calculation worksheet. Data are manually entered into this worksheet. Primary data required to be entered into the GPA Calculation worksheet are Semester, Subject Code and Grade. Other data are ID and Name of the student, credit transfer given, indication of core subjects (when required), and also indication of whether any subject taken in a particular semester is replacing the same subject taken in previous semester.
Figure 1: GPA Calculation worksheet. ii) GPA History worksheet (Figure 2).
GPA History worksheet summarises student’s GPAs achievement according to semesters. Data inside this worksheet are copied automatically from the GPA Calculation worksheet. There is also information about Analysis of Grades obtained by the student throughout his/her study.
iii) NonCore Lists worksheet (Figure 3).
NonCore Lists worksheet contains a list of Non-Core Subject as defined and used by the Online Student Records (OSR). A known list of the subjects is given here. User may add new subjects to this list when necessary. Formulas in the GPA Calculation worksheet will refer to this list in order to determine whether a particular subject entered into this worksheet is a Core Subject or otherwise. The

Manual for Using of Template File for GPA Calculations
Page 2
default is that any subject not listed in the NonCore Lists worksheet is a Core Subject. However, user may overwrite this decision when necessary.
Figure 2: GPA History worksheet.
Figure 3: NonCore Lists worksheet.

Manual for Using of Template File for GPA Calculations
Page 3
User (i.e. student) can enter data into the template file manually. User should have the information in hardcopy, i.e. from his/her result slips, and he/she can enter the required data manually, cell by cell. Note: User can enter data on selected columns only on the GPA Calculation worksheet. The columns are coloured yellow and brown in the GPA Calculation worksheet, and they are clearly marked with instructions at the top of the worksheet. 2) Steps for entering data into the GPA Calculation worksheet. In order to enter primary data (i.e. Semester, Subject Code and Grade) into the GPA Calculation worksheet, the steps are as follows. 2.1) Open template file for calculation of GPA (ie. Kira GPA Template Degree Student.xls) Run Excel. Click File, click Open, locate the appropriate template file, click Kira GPA Template Degree Student.xls for the filename. {Use either Kira GPA Template Degree Student.xls for Degree students or Kira GPA Template Diploma Student.xls for Diploma students}. Click on GPA Calculation worksheet. Replace ID No. & Name of the Student on cell C10 with the appropriate ID Number and Name of the student. Save the file using a new filename, preferably with a combination of ID and name. (Click File, Save As, and give the filename as required). For example: If ID No. is EE00007 and Name of the Student is Another Student then the filename is EE00007 Another Student.xls. Refer to Figure 4.
Figure 4: Replacing ID & Name of the student.

Manual for Using of Template File for GPA Calculations
Page 4
2.2) Enter data for Semester, Subject Code and Grade into the GPA Calculation worksheet Click on the GPA Calculation worksheet. See Figure 5. Click one of the cells on column Semester indicating a particular semester subjects are taken. Enter the semester when a group of subjects are taken. Each same semester is indicated by the same colour, either green or blue. A group of subjects taken in the same semester are entered in the same semester, so that the GPAs for that particular semester will be calculated correctly. Click one of the cells on column Subject Code indicating a particular semester a subject is taken. Enter all subject codes taken within the same semester, one by one. Click one of the cells on column Grade indicating a particular semester when subjects are taken. Enter grades for respective subject codes taken in the same semester.
Figure 5: Data for Semester, Subject Code and Grade are entered into the GPA Calculation worksheet. After steps mentioned above are performed, values for GPA, CGPA and Core CGPA for that particular semester will be calculated automatically. The values are also summarized in the GPA History worksheet. See Figure 7. Steps mentioned above are then repeated until all relevant data for Semester, Subject Code, and Grade are entered into the GPA Calculation worksheet. See Figure 6. As a reminder: Data for Subject Code and the corresponding Grade taken at the same semester are copied into the same area of either Green or Light Blue colours respectively.

Manual for Using of Template File for GPA Calculations
Page 5
Figure 6: Entering more data into the GPA Calculation worksheet.
Figure 7: The GPA History worksheet is updated as data are entered into the GPA Calculation worksheet.

Manual for Using of Template File for GPA Calculations
Page 6
2.3) In order to calculate Core CGPA, user may (but very rarely) be needed to indicate whether any subject taken is a “Core” subject. For engineering programs (i.e. BEEE, BEPE, BME and BCE), all subjects offered by Colleges other than IKAL are considered as Core subject in the Core CGPA calculation. User may be required to indicate whether a subject is a Core subject or otherwise when he/she had entered a Subject Code which is not a standard seven (7) characters code (that comprised 4 alphabets and 3 numbers) with the last number indicates the credit hour of that particular subject. This is especially required when users are doing simulation using the template file (refer to step 2.4). User will be prompted with a “?” by the program when a non-standard Subject Code is entered, where after that user may indicate whether that subject is a Core subject or otherwise by entering “Y” or “N” on the specific cell on column Core? Y/N
Click on GPA Calculation worksheet. Click a cell on column Core? Y/N for a chosen subject with “?” sign on it, as shown in Figure 8. Enter “Y” if the subject is Core subject, otherwise enter “N” or leave the cell blank. Repeat this procedure until all subjects are marked as Core subjects or otherwise.
Figure 8: Indicating whether a subject is Core subject or otherwise.

Manual for Using of Template File for GPA Calculations
Page 7
2.4) After all relevant data for Semester, Subject Code, and Grade are entered into the GPA Calculation worksheet (with GPA, CGPA and Core CGPA for all semesters are calculated automatically), user may need to simulate or predict the effect of the taking subjects in the following semester towards his/her GPA, CGPA and Core CGPA.
Select cell for the next semester. Refer to Figure 9. Enter Semester data. User may put anything on this column, such as “Simulation” etc. Enter any subject code on a relevant cell on column Subject Code. One number on the right of subject code entered indicates credit hour for that particular subject. Input several subject codes to achieve the total credit hour required. Subject code used may be an arbitrary code but with the correct number indicating the credit hour of that subject, or a valid subject code used to simulate the result when that subject is used to replace previously taken subject (in particular subjects within the first 40 credit hours). See also step 2.6. Enter grade for the corresponding simulated subject on column Grade. Also indicate whether it is a Core subject (see step 2.3). Grade for subjects in the simulated semester can be changed accordingly until the desired CGPA or Core CGPA is achieved.
Figure 9: Simulation to get CGPA of 3.70 Appropriate conclusions can be made based on the simulation done for the following semester.

Manual for Using of Template File for GPA Calculations
Page 8
2.5) There is a provision given to students to replace bad grade (especially for failed subject) achieved in the first 40 credit hours of their study at UNITEN (Note: For 5-year Engineering programs). The student can repeat the subject with bad grade in the following semesters (but not necessarily in the semester immediately after the subject was taken) and had the previous grade replaced (where the previous grade is not counted in CGPA and Core CGPA calculations). The template file was designed to handle this sort of case also.
User needs to enter data on relevant columns in the area marked “Replacing 40 CH subject”. Select the row for the subject replacing previously taken subject. Refer to Figure 10. Put an “R” on the column indicated by Enter “R” for Replacing Subject. Enter subject code of the replaced subject on column Replaced Subject Code. Enter grade for the previous subject to be replaced on column Old Grade. Repeat as required. Make sure that subject was taken during the first 40 credit hours at UNITEN, where the total credit hours taken include also any Credit Transfer units given to the student (refer to step 2.6 below). However, subject taken during the first 40 credit hours can only be replaced once.
Figure 10: Entering data for replacing previous subjects.

Manual for Using of Template File for GPA Calculations
Page 9
2.6) Entering the number of Credit Transfer given to the student Enter the number of Credit Transfer given to the student, if any, into cell A10 in the GPA Calculation worksheet (below Credit Transfer box). With this information, the numbers in column Total Credit in the GPA Calculation worksheet will be updated accordingly. User may use these numbers to determine all subjects taken during the first 40 credit hours. Refer to Figure 11.
Figure 11: Values in Total Credit (in magenta coloured cells) are changed according to the value put into Credit Transfer cell (i.e. Cell A10). These values can be used to determine all subjects taken during the first
40 credit hours.

Manual for Using of Template File for GPA Calculations
Page 10
3) Using GPA History worksheet User may use the GPA History worksheet to get a rough idea about his/her current status/progress in the study. He/she can easily track history and progress of GPA achieved semester by semester. From the Analysis of Grades in the GPA History worksheet, user may easily identify his/her strength, what grade he/she scored most and what is the range of expected final CGPA. Refer to Figure 12 and 13.
Figure 12: High achiever � scored mostly grade A, no grade below B-.
Figure 13: Medium range achiever � scored mostly grade B-, scored all grades.

Manual for Using of Template File for GPA Calculations
Page 11
4) Printing the information User may need to print information available in the template file, in particular information from the GPA Calculation and GPA History worksheets. User may do this by selecting the required information, setting it as a Print Area, and then printing it. Before that, user may need to setup the printer for printing. 4.1) Setting up the printer 4.1.1) Setting up the printer for printing the information from the GPA Calculation worksheet Click the GPA Calculation worksheet. Click File, click Page Setup, select appropriate settings. Refer to Figure 14. For printing the information from this worksheet, it is suggested that the following settings are used: Orientation � Potrait Scaling � Fit to: 1 page(s) by 2 tall OR Fit to: 1 page(s) by 1 tall Scaling depends on how many rows are required for printing the data (i.e. refer to the number of the last row on left column on the worksheet when the required data are selected, see Figure 28). Use 1 tall if the number of rows is 75 or less, otherwise use 2 tall. Click OK.
Figure 14: Page Setup for the printer used for printing data from the GPA Calculation worksheet.

Manual for Using of Template File for GPA Calculations
Page 12
4.1.2) Setting up the printer for printing the information from the GPA History worksheet Click the GPA History worksheet. Click File, click Page Setup, select appropriate settings. Refer to Figure 15. For printing the information from this worksheet, it is suggested that the following settings are used: Orientation � Landscape Scaling � Fit to: 1 page(s) by 1 tall Click OK.
Figure 15: Page Setup for the printer used for printing data from the GPA History worksheet.

Manual for Using of Template File for GPA Calculations
Page 13
4.2) Printing the information 4.2.1) Printing the information from the GPA Calculation worksheet Click the GPA Calculation worksheet. Select area for the required information to be printed. The area is usually from cell A1 until the last row for the semester where data was entered or available. Refer to Figure 16 � the last cell is AB77. In this example, the number of the last row on left column on the worksheet (refer to section 4.1.1 above) is 77. So it is suggested that we use 1 tall in Page Setup because 77 is approximately 75. Click File, click Print Area, click Set Print Area to set the selected area (previous step) as area where information will be printed from. Refer to Figure 17. Click File, click Print… (Figure 18) and then response appropriately in order to print the information selected.
Figure 16: Selecting Print Area for the information from the GPA Calculation worksheet.
Manual for Using of Template File for GPA Calculations
Page 14
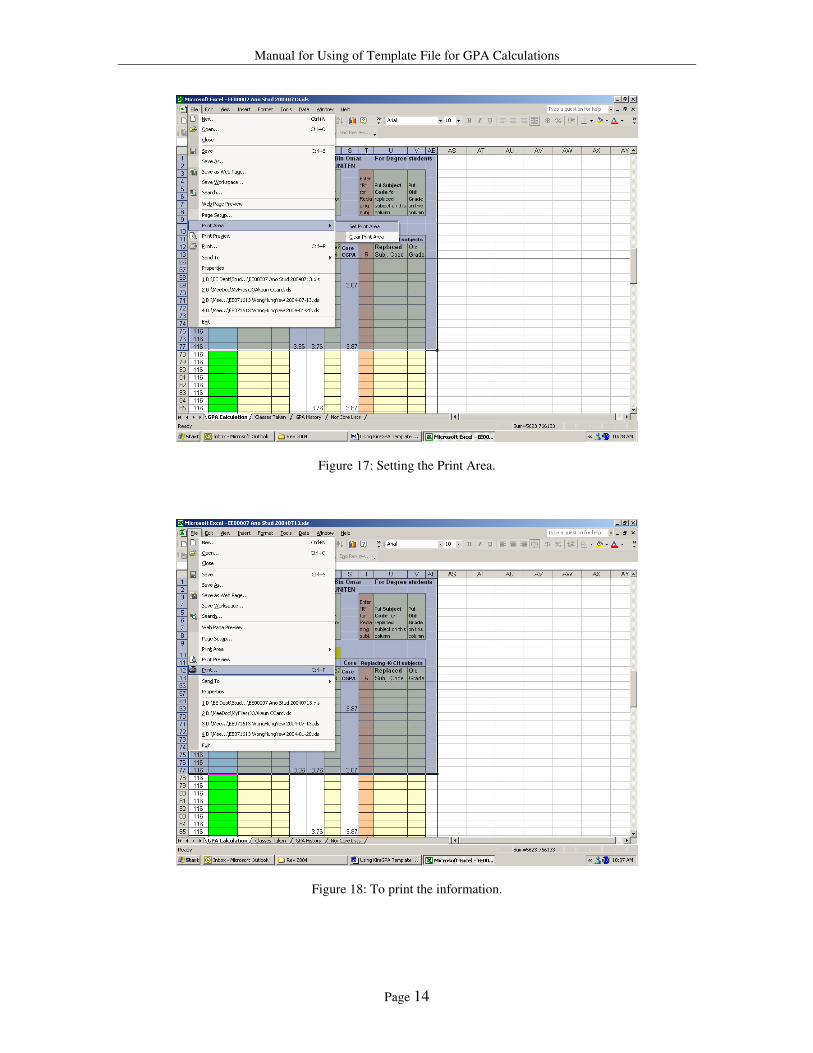
Figure 17: Setting the Print Area.
Figure 18: To print the information.
Manual for Using of Template File for GPA Calculations
Page 15
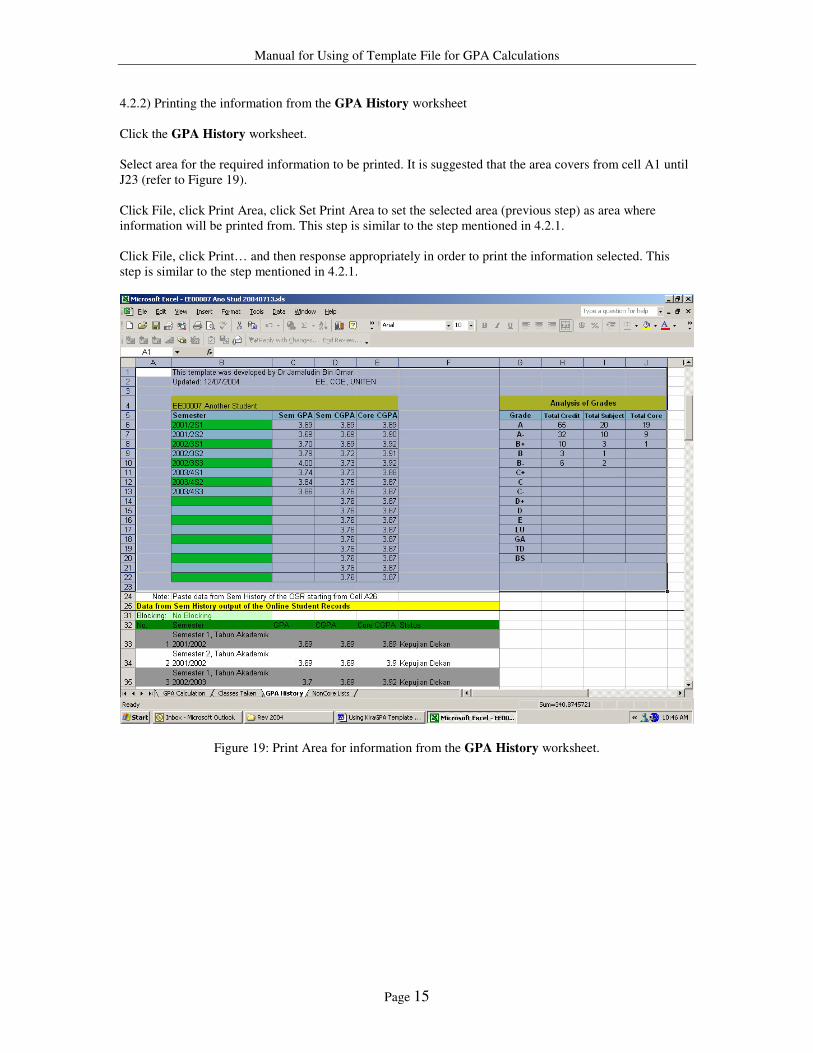
4.2.2) Printing the information from the GPA History worksheet Click the GPA History worksheet. Select area for the required information to be printed. It is suggested that the area covers from cell A1 until J23 (refer to Figure 19). Click File, click Print Area, click Set Print Area to set the selected area (previous step) as area where information will be printed from. This step is similar to the step mentioned in 4.2.1. Click File, click Print… and then response appropriately in order to print the information selected. This step is similar to the step mentioned in 4.2.1.
Figure 19: Print Area for information from the GPA History worksheet.

Manual for Using of Template File for GPA Calculations
Page 16
5) Need help? Further help in using the template file correctly and effectively can be obtained from the author. User can call or send email or fax to the author, as follows:
Phone: 03-89287271 Fax: 03-89212116 Email: [email protected]
Feedback and suggestions for improving the template files are welcome.