manual for series printer - artemis printers · adopts two ink cartridges. this manual is mainly...
TRANSCRIPT

Manual for 1601 Series Printer
ARTEMIS PRINTERS - model 1601

Chapter 1 preface Thanks for choosing our ‘1601 series’ printer. This manual helps you to know our products better. Reading this manual helps you to deal with the problems in the process of installation. 1601 is a high quality printer, it can use water based ink or eco solvent ink. Four color types: cyan (C), magenta (M), yellow (Y) and black (K), each color adopts two ink cartridges. This manual is mainly described the 1601 printer’s operation and maintenance. Please read this manual and have a general understanding about how to manipulate this machine. Installation Notice

The special character of this machine as below: ① DX7 print head can print high quality picture, and it can do a high speed print. ② DX7 print head has 1440 nozzles (180 nozzles x 8 rows), the highest print precision is 360 x 2880 DPI ③ Convenience keys on board: It can provide a quick operation. ④ Adjustable start printing place: It can start from everywhere of the platform. It’s economical. ⑤ Check printing information: You can see the printing information from LCD display. ⑥ High speed transmission interface: USB 2.0 ⑦ Take up system can promise continuous printing: It guarantees the long media’s printing. ⑧ Print head height adjustment: The height of print head can adjust within 2mm----5mm. ⑨The press roller can prevent the media from up warping.

Chapter 2 Introduction
This manual can help you quickly understand our products. When you have problems in installation, you can look up to this manual. This manual includes the following: How to correctly operate the printer? The detailed instructions of controlling software. The detailed instructions of Main Top. The daily maintenance of the printer. In order to safely and correctly use the printer, the printer has passed strict inspection before leaving factory. We have labeled relevant remarks on the machine. Please read the manual before operating machine.
……Warning: This means potential danger. If it can be avoided, it can ①
cause damage of different degrees or data loss. ……Attention: This means an command which should be abide by so as ②
to reduce print problem. ……Indication: This means useful information t③ o printer.
1.1 Safety of Power Source Attention: Please correctly link ground wire for the safety of people and
machine. This printer should be installed by qualified technician. A、Power Supply: One way AC 50Hz 220V (±10%) 2200W (Maxi) 100W
(Printing) B、According to different countries and regions, it may use 110V or 220V AC Power. C、Connect the equipment to a proper grounded socket. Please avoid the
socket being put in the same circuit with these equipments which are frequently changed between On and Off (such as air-conditioning、copy machine).
D、Avoid using wall-board switch or automatic time-setting socket E、Put the computer system far away from the source of electromagnetic, such
as loudspeaker、cordless telephone set. F、Do not use power wire which has been destroyed. G、If additional power wires are used, please keep in mind that the total
ampere rating of the equipment which has been inserted the additional wire can’t surpass its specify ampere rating. Besides, the total ampere rating of all the equipments which use the wall board socket can’t surpass the specify ampere rating of the wall board socket.
H、Do not try to repair the printer by yourself. Please turn to technicians as

soon as possible when the machine has problems.
1.2 Cautions for Operation of Printer A、Please always use power switch to close the printer. Before power supply
being cut off, please do not pull out the power plug or other relevant data link.
B、Please do not put the tools or other things on the machine’s printing platform or cover plate so as to avoid damage caused by not cleaning up in time before functioning.
C、Please make sure that the print carriage has been fixed in the initial position before moving the printer.
1.3 Cautions for Installment and Working Environment A、Please put the printer in stable and horizontal place. If the printer is tilted or
has certain angle, it may can’t function normally. B、Please set aside enough room around the printer so that it ventilates normally. C、Please put the printer near the wall socket so that it is easy to put in and pull
out plug. D、Please avoid using printer in place where the humidity and temperature are
easy to change dramatically. Please avoid the direct sunshine、strong light and heat source.
E、Working Environment: temperature: 18℃-29℃, humidity:50%-80%.In order to put the machine into the best condition, please equip the room with air-conditioning、thermometer and hygrometer.
F、The printer must be far away from strong interference radiation source. H、We recommend to equip the machine with UPS and power stabilizer(>3000W).
1.4 Cautions for using and position of Ink A、Please put the ink out of the reach of children. Do not let children drink ink or
touch cartridge. B、If ink splashes into skin, please use soap and water to wash. If ink splases
into eyes, please use clean water to wash at once. C、Do not shake ink bottle in order to avoid ink leakage. D、When ink bottle has been used after a certain time(usually two months), it
must be completely cleaned up and dryed by airing. Please pay attention to cleanliness when use new ink bottle in order to ensure print quality.
E、Ink should be stored in shady and cool place and avoid direct sunshine.

F、Use dedicated inks. Specification of the machine
Item Technical Parameter Type 1601 Series
Print Model The Japan’s latest seventh micro
piezoelectric print head(Eco Solvent Print Head)
Print Head
Quantity One Ink’s Color 2x4 C/M/Y/K Ink’s Type Dx7’s exclusive inks Ink
Ink Injection Auto Production Model 15m2/h Precision Model 11.6m2/h Speed High-precision
Model 6.2m2/h
Heating Dryer Out Dryer (option) Heat and Dryer
Heating Temperature Normal 60 OC, Suggestion 40 OC-60
OC Media Size Depend on machine’s type Media Type Depend on machine’s type Media
Media Transmission Automatic feeding system
Print Head Cleaning Auto cleaning device, Auto scraping ink device
Interface USB
Working Environment Temperature: 18OC~29OC, Humidity: 50~80%
Power 50HZ, AC220V
Dimension Length x Width x Height (mm): 2330x410x1180
Note: The above print head may have error because of different computers and different media. Please be subjected to the practical speed.

Chapter 3 Introduction and preparation
3. 1 Introduction to Equipment 1601 piezoelectric printer: some spare parts are optional, such as take up system. 1, Operation boars: the keys on the board which can operate the machine, LCD display which can show the setting value etc. 2, Paper press pole: which can lift and drop the press roll, so to fix or loosen the media. 3, Working platform: the printed media will through this platform. 4, Waste ink box: it collects the wasted ink. 5, Take up system: 6, Bracket: it used to support the whole machine. 7, Beam: it used to fix the bracket. 8, Carriage: it used to install print head
The machine’s front picture
1, Ink cartridge: each ink cartridge has different color ink.
2, Feeding system 3, USB connector: it connect the machine with computer 4, Power socket

The machine’s back picture
3.2 Installation of 1601 Printer First: Open the wooden case. Remove the foam package and dust cover. Release the binding strips of accessories. Take out the packing list and check the contents. Second: Installation brackets Take out the right and left brackets and place them on the ground steady. Fix the upper and lower beams between the right and left brackets with bolts. The installation is as the picture.

Ready to Install
The finished installation picture

Third: Installation of Main machine Lift the main machine with forklift, place it on the brackets in the right direction. Fix it on both sides of it by the bolts. As shown in the installation picture.
3.3 1601 Series Printer Installation of Ink Ink is kept in vacuum bag. Caution: 1. Please keeps the ink out of the reach of children. 2. If the ink splashes into eyes, please use clean water to flush at once. Notes: 1. Please use the clean fluid accompanied with the machine to clean the ink tubes. 2. It is recommended to use the ink under 18℃-28℃. 3. Please keep the ink in shade place under room temperature. Avoid
high、low temperature and sunshine. 4. When ink bottle is open, please use the ink as soon as possible. It is
not proper for long-term store. 5. If ink is found freezing in low temperature, you should let it dissolving
in normal temperature and put aside for several hours, then you can use it.
6. If ink splashes into hands or clothes, please clean it as soon as possible.
7. Don’t try to analyze cartridge. 8. Ink is chemicals, please properly handle with the empty bottle、scrap
cartridge and waste ink in case of bringing about pollution to the environment.
9. When install ink, please avoid pulling out ink bag so as to decrease its loss.
10. Please use the designated ink, do not use with other brand’s ink.

11. When add ink, please don’t shake ink bottle. Add ink when machine isn’t working. We should add slowly in case of bubble.
12. Move the cover before add the ink. Pour the ink into corresponding ink boxes, and put the cover to prevent the dust entering the box.
3.4 Installation of 1601 Series Printer Print Head


1601 Series printer’s print head has 8 dampers, see the above pictures.
First, connect the ink refill tube with the ink bag, then insert the ink bag into the print head. Consult the introduction of “equipment management/ ink station adjustment” to adjust the position of print head and ink station, then click the “Pumping Ink’ in the software, the ink will be absorbed into the print head.
3.5 Adjustment of the distance between print head and media According to the thickness of different media, the height of print head holder can be adjusted. The best distance between print head and media is 1mm. Proper adjustment can be according to the flatness of media in case that the print head grazes the media and destroy the print effect. But large distance shouldn't surpass 2.5mm。The way of adjusting the print head: Screw off the bolts as arrow points, the move the yellow shank to adjust the height of the cart, choose the best height, then fixed the bolts. As the picture shows: Note: when adjust the height of carriage, first, screw off No.2 bolts and no. 3 bolts, then adjusting no.1 suspension rod to a good position, at last to screw down No. 2 and No. 3 bolts.

3.6 1601 Series Printer’s proper Way to Connect Computer
1. Computer’s configuration:
CPU:P4 double cores 2.0G or above
RAM:2GB or above
Hard disk :160G or above(at least 40G free space for MainTop)
Main board:Use famous brand main board like Asus, Gigabyte etc.
DVD room::1 pcs
Display::VGA recommended
Operation system: Windows XP or above 32 Byte 2.Connect computer and printer by USB line. Open the computer and printer, the computer will display there is a new hardware connected. This new hardware is the drive software for main board of 1601 printer. After install this software, the computer can actively control the printer. Shown as the picture:

Choose “Install from a list or specific location (Advanced)”, and press “Next”
Choose “Install from a list or specific location (Advanced)” , and click “Next”, come to the following window:

Choose “Search for the best driver in these locations”, select “Include this location in the search”, click “Browse”, and choose the corresponding driver, then click “next”, until the final signal shows “finish”. Open “my computer”---“device manager” ----“universal serial bus controller”
If the computer didn’t show the ”Artemis1601” as above picture shows, that means the driver didn’t install successfully.
3.7 1601 printer’s absorbing setting 1, Use pin tube to absorb the ink from ink cartridge to dampers, ink should be account for 3/4 of the whole damper. 2, Choose “menu”----“absorbing setting” ------“print head home place” adjust the print head’s physical position. 3, Screw off the fixed bolts of ink station then adjust ink station’s front and rear position. Through step 2 and step 3 to adjust the ink station in the same position with capping. 4, Adjust the height of seal pipe to make capping in a appropriate position. 5, Adjust the position of blade to make blade in a appropriate position. 6, Choose “menu”---“cleaning”---“absorbing”, until there is no bubble in the tube, then press “ok” button to stop absorbing. 7, If you think the absorbing is not so strong, you can choose “menu”---“system setting”-----“cleaning strength”, 8, Choose “menu”----“system setting”----“splash time”, is setting a proper splash time. 9, Choose “test/ delete”----“print head tests”, testing the condition of print head. 10, Repeat step 2-9, and till print perfect lines.
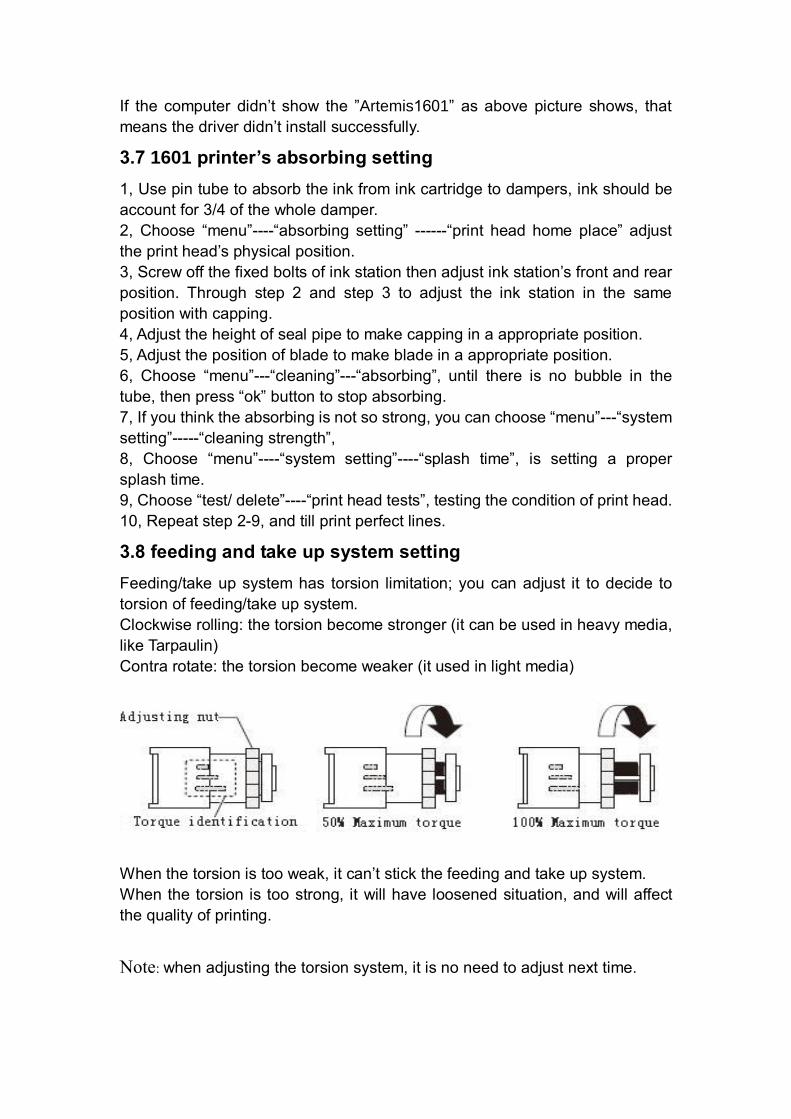
3.8 feeding and take up system setting Feeding/take up system has torsion limitation; you can adjust it to decide to torsion of feeding/take up system. Clockwise rolling: the torsion become stronger (it can be used in heavy media, like Tarpaulin) Contra rotate: the torsion become weaker (it used in light media)
When the torsion is too weak, it can’t stick the feeding and take up system. When the torsion is too strong, it will have loosened situation, and will affect the quality of printing.
Note: when adjusting the torsion system, it is no need to adjust next time.

3.9 Adjustment The front steps have been adjusted, and then you can adjust the parameter of the machine. 1, Horizontal adjusting: adjust the physical position of print head 2, Step adjusting: setup each “pass’s working precision. 3, Bidirectional adjusting: 4, Set colors on nozzle: adjust the print nozzles position

Chapter 3 Operation specification
一 LCD Display
Note: when printing, click “connect” then you can clean the print head.
When printing, the “test/delete” button can delete the printing.

The specification and setting of menu The black background menu is the first level menu, and the yellow background is second level menu, and the pink background is third level menu, all the function menu see as follow picture: 1. Menu and submenu The menu has 7 submenus, they are: PrintingSet, NozzleCleaning , Adjustment, AbsordingSetting, HeatSetting, SystemSetting, VersionInfo.
2, Print setting and its submenu There are 4 submenus under print setting menu; they are polish, bidirection print, and auto sizing and ink types. Polish: the up and down button can choose “polish” menu, and the lift and right can choose” on” or” off”, then click “ok” button to open or turn off it. Bidirectional print: the up and down button can choose “bidirectional print” menu, and the lift and right button can choose “single” or “double”, then click “ok” button to open bidirectional print function. Auto sizing: the up and down button can choose “auto sizing” menu, and the lift
MENU
PrintingSet
NozzleCleaning
Adjustment
AbsordingSetting
HeatSetting
SystemSetting
VersionInfo
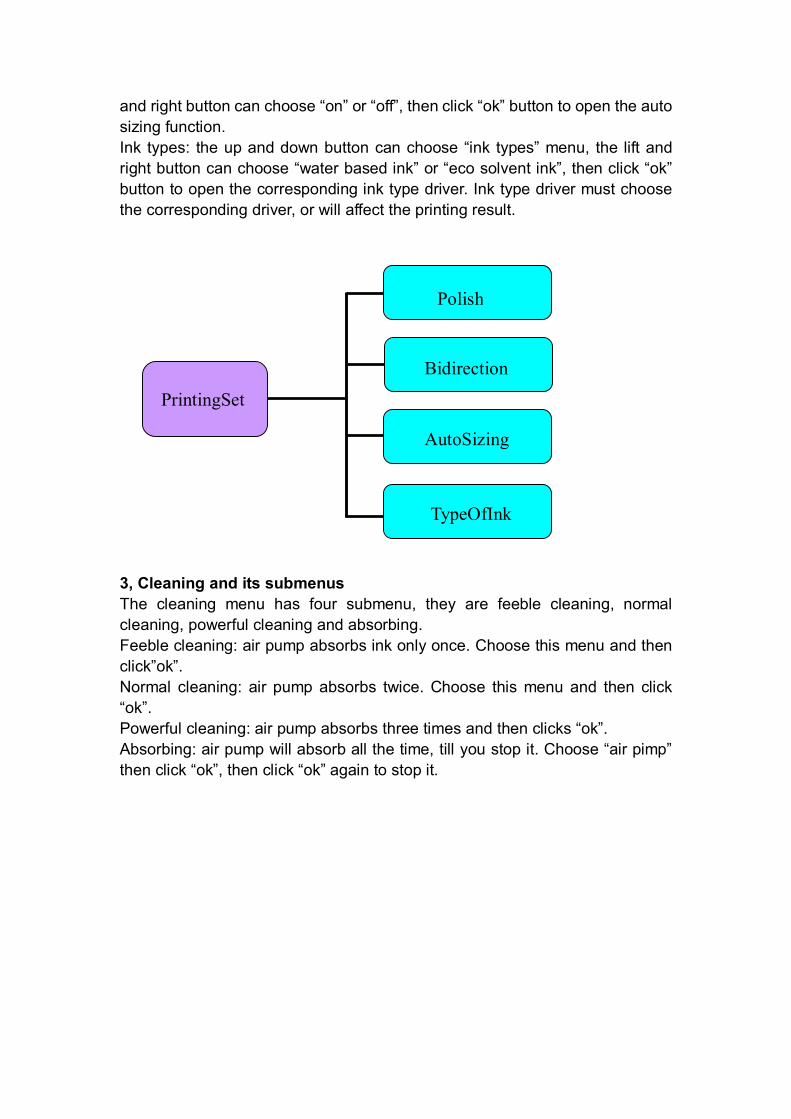
and right button can choose “on” or “off”, then click “ok” button to open the auto sizing function. Ink types: the up and down button can choose “ink types” menu, the lift and right button can choose “water based ink” or “eco solvent ink”, then click “ok” button to open the corresponding ink type driver. Ink type driver must choose the corresponding driver, or will affect the printing result. 3, Cleaning and its submenus The cleaning menu has four submenu, they are feeble cleaning, normal cleaning, powerful cleaning and absorbing. Feeble cleaning: air pump absorbs ink only once. Choose this menu and then click”ok”. Normal cleaning: air pump absorbs twice. Choose this menu and then click “ok”. Powerful cleaning: air pump absorbs three times and then clicks “ok”. Absorbing: air pump will absorb all the time, till you stop it. Choose “air pimp” then click “ok”, then click “ok” again to stop it.
PrintingSet
Polish
Bidirection
AutoSizing
TypeOfInk

4, Adjusting and its submenu There are four submenus under adjusting, they are: horizontal adjusting, step adjusting, bidirectional adjusting and verticality. Horizontal adjusting: adjust the print head’s horizontal physical position. Choose this menu then click “ok”, and then it will print a testing picture, see as following picture: the black line will overlap yellow line.
Step adjusting: adjust the media step. Choose this menu then click “ok”, it will print a testing picture, see as following picture. The testing line must be in the same line on “0”position.

Bidirectional adjusting: click the “ok” button under bidirectional adjusting menu, then it will print testing lines, see as following picture, the testing line must be in the same line on “o” position, the DX7peinter just adjust the “bidirection”, the variety dot change should adjust “changeable bidirection” and “bidirection”.
Verticality: adjust each nozzle’s ink print position, then click “ok” button, and will print a testing line picture, see as following: the testing line should in the same line on “0” position.

5, Absorbing setting and its submenus There are four submenus under absorbing menu: they are home place, Seal Rubber Height, blade height and blade position. Home place: adjust the print head’s lift and right position made it suitable with the absorbing. The front and rear position should adjusted through moving ink station position, then choosing the proper parameter and click “ok”. Seal Rubber Height: adjust the height of absorbing, then choosing the proper parameter and click “ok” Blade height: adjust the height of blade, then choosing the proper parameter and click “ok”. Blade position: adjust the blade’s front and back position, then choosing the proper parameter and click “ok”.
6, Heating setting and its submenu Heating setting has three submenus, they are: front heat, middle heat and rear

heat. Front heat: adjust the temperature of the machine, choosing the proper temperature then click “ok”, when the temperature is 0, and click “ok” means turn off heat. Middle heat: adjust the temperature of the machine, choosing the proper temperature then click “ok”, when the temperature is 0, and click “ok” means turn off heat. Rear heat: adjust the temperature of the machine, choosing the proper temperature then click “ok”, when the temperature is 0, and click “ok” means turn off heat.
7, System setting and submenu System setting has four submenus, they are splash time, cleaning strengthen, total printing and system recovery. Splash time: adjust the splash time, usually it should be within 6----10. Cleaning strengthens: adjust the cleaning strengthens, it usually should be within 40----60. Total printing: it shows the total printing area. System recovery: it will recover the default values.
8, versions Versions: it shows company’s information. .

Chapter 5 the Introduction of MainTop
5.1 Installation of RIP (MainTop) Software 1, Installation Insert the software CD into the CD ROM, PC will show the following dialogue window
Click the “Maintop DTP” and start to install

Choose installation path
Press “OK” to finish

5.2 Net printing Set Installation finished. Enter “Start”—“Program”—“Maintop DTP”---“Maintop print management”
In “Maintop Management”, click Management—Config port—Config TCP/IP port
In TCP/IP window, add port in TCP/IP window. Enter IP 127.0.0.1, check RAW

port is 9100, Press “OK”, Show as following picture:
After finish installation, insert Maintop USB security key and open the software to continue.
5.3 Setting printer
5.3.1 Open software and click “File”---printer Setup

5.3.2 It shows following dialogue window
5.3.3 Click “Install Maintop printer”, will show following window

5.3.4 Select “Artemis” in “printer type”, Select RJ6-180E in the “Name”
5.3.5 Set “Default printer” after select RJ6-180E. Printer setting is finished.

5.4 Operation Software 5.4.1 Create new file: Open software—File—Create new file
5.4.2 Set the paper size in the dialogue of “ Creat new file” window., Press enter.

5.4.3 Load new picture: File—Import picture
5.4.4 Choose the picture to print in “Import graph File”, open it.
5.4.5 Select picture and click right

5.4.6 Show as following window, adjust the size of picture and adjust the Height, Width, Outer spacing, Portion.
5.5 Print the picture:

5.5.1“File”---“Print
5.5.2 Click “print settiing”,enter the “Setting before printing”

Choose the correct dpi according to the paper type show as the red line. First, choose the wanted dpi, second, choose the correct paper acording to dpi. Click OK
5.5.3 There are two print modes. ① RIP print: Select FILE in the Print port option

Press “OK”, click “Print to File”. Save file (*.prn)

5.6 Other Options 5.6.1 Auto Redeem: When the printed size is not as same as the designed, you can choose this option.. It is in the Printing Option, click Auto Redeem.

5.6.2 Ink volume adjustment: When the printed color is not as same as the designed, choose Auto Color adjustment in Print Option..
5.6.3. Tips: If you have any other questions, please refer to MainTop

specification.
Chapter 6 Working Process The working process like below: 1, Turn on or off the power 2, Equip the media 3, Heat setting 4, Setting the home place 5, Test printing 6, Print the picture
turn on or off the power Open the power: the machine’s main power should be opened then open the machine Turn off the power: turn off the machine’s power.
equip the media Choosing the media you want to print, and then install it.
heating setting If you want to heat the media, just open the button. The heat and fan will be open at the same time.
setting the home place Moving the carriage to the home place, then click “ok”
五, print testing Choosing “testing or delete”---- “print testing”, click “ok” it will print the testing picture, if the print head in a perfect condition, it will print a perfect picture, or you can adjust it through cleaning the print head.
六, print the picture Open the Maintop software, connect the computer with the machine, then setup the picture you want to print, and then click “print”, it will print the perfect picture as you wished. When printing you want to suspend it, just click “connect”, then click “cancel” to continue printing. When printing you want to stop it, just click “connect” then choosing “cancel printing” and click “ok”. Or you can click “testing or delete” to choose “delete the printing” and click “ok”. When printing you wants to adjust the step, you can click up and down to adjust.

When printing you wants to adjust the bidirection, you can click left and right to adjust.
Chapter 7 Guide for Maintenance
7.1 Machinary Maintenance
Should monthly add the lithium lubricant in slippery block of the rail till the lubricant spills over from the space between slippery block and rail.
Note: This operation must use special lubricant injector, should not use other devices.
A: Lubricant injector
B: Injection hole

Note: This operation must use special lubricant injector, it should not use other devices.
.
Other suggestions: 1. Asynchronism and synchronization should use same operation 2. Devices with two rails should add lubricant of sartorius and light lubricant between wheels and two rails. Add the lubricant one time every week. 3. Other parts will be used according to the actual operation condition. a : Pressing beam for pressing the cloth b: Belt bearing for speed reduction c: Main bearing
Addition:
There are following shortcut keys for easy operation
←: Move print head holder to the left
→: Move print head holder to the right
↑ : Paper quit
↓ : Feed paper