manual for greenhouse cost calculator - usda ars the greenhouse and define the size and shape of...
TRANSCRIPT

from
Version 1.1
1

Setup Requirements 3Installation 3
If you already have a copy of Virtual Grower 3If you do not have a copy of Virtual Grower: 3Uninstalling Virtual Grower 1.1 3Repairing a Virtual Grower 1.1 Installation 4
Main Page 5Edit Site 6Energy Curtains 6Advanced Options 6
Heating Schedule 8Its Day When The Sun Is Up 9Its Day When I Say It Is 9Constant Temperature 9Custom Schedules 9
Costs 10Generating a Report 11
Additional Options from the Drop-Down Menus 12Export --> Custom Schedules 12Import -> Greenhouses 12Import --> Custom Schedules 12Analysis 12Units: 13Help 14
Some Assumptions of Virtual Grower 1.0 15Weather at a location 15Greenhouse isolation 15Humidity 15
Errors? Questions? Problems? Suggestions? 15Appendix 1: Fuel energy content used in Virtual Grower 1.1 16Appendix 2: Energy curtain assumptions 17Appendix 3: U-values for materials 19Appendix 4: How the maximum BTU output is calculated 20Appendix 5: Calculating Energy Flow 21
Conduction 21Convection 21Totaling Heat Loss 21Heat Gain by Solar Radiation 22Net Heat Change in the Greenhouse and Heating Costs 22Using Energy Curtains 22
Appendix 6: Correction factors used in Virtual Grower 23
2
Setup RequirementsVirtual Grower 1.1 is only compatible with computers running Microsoft
Windows 98, ME, 2000, XP or later. Additionally, the computers must have the Microsoft .NET Framework version 2.0 in order to run the program. If you are interested in running future versions of Virtual Grower on another operating system, please send a note to our group at <[email protected]> so we can take that into consideration.
Installation
If you already have a copy of Virtual GrowerIf you already have a previous version of Virtual Grower installed on your
computer, Virtual Grower 1.1 will automatically upgrade it for you. Just follow the normal installation instructions below to perform the upgrade. All of your pre-existing greenhouse saved files will remain intact and will still be available in the new version. However, saving any greenhouses with the new version makes them un-readable in an older version since many new features have been added. This would only be a problem if you reverted to using an older version of Virtual Grower after you had installed the latest version of the software.
If you do not have a copy of Virtual Grower:To install Virtual Grower 1.1, insert the CD into your CD-ROM drive. On
most computers, the installation program will run automatically. If it does not, navigate to 'My Computer,' open the CD-ROM and run the program called 'Setup.exe.'
The setup program first checks to see if your computer has the Microsoft .NET framework version 2.0. If it does not, you will be asked if you would like to download the framework from Microsoft. If you have an Internet connection, choose to do so and allow the framework to be installed. Depending on your Internet connection, this could take anywhere from five to twenty minutes. Once the framework is installed (or if it was already installed), the setup program will guide you through the installation of Virtual Grower 1.0. Usually, the default options will work fine and you will only have to click 'Next' a few times.
If you do not have an Internet connection available and still need the Microsoft .NET Framework, navigate to 'My Computer,' right-click the CD-ROM drive, and run the program called 'dotnetfx.exe.' Follow the instructions to install the framework and then repeat the Virtual Grower installation steps above.
After the installation has completed, an icon will be added to your desktop and to your start menu labeled 'Virtual Grower.' Open either of these to run the program.
Uninstalling Virtual Grower 1.1If you would like to uninstall Virtual Grower 1.1, go to your start menu and
open the Control Panel. When the panel opens, find and open the icon named, 'Add and Remove Programs.' Toward the bottom will be an entry for Virtual Grower. Highlight it and click the 'Remove' button on the right. This will
3

completely remove the program from your computer but will not delete your saved greenhouses. Also, uninstalling Virtual Grower will not remove the Microsoft .NET Framework. It is advisable to leave the framework on your computer since many programs are starting to require it. However, if you would like to remove it, follow the same instructions as above but look for an entry called “Microsoft .NET Framework version 2.0” instead. You may have to close programs that are currently running and/or restart your computer after removing the framework.
Repairing a Virtual Grower 1.1 Installation If for some reason your installation of Virtual Grower 1.1 becomes dam
aged or will no longer run properly, insert the Virtual Grower 1.1 CD and run the Setup program (or just run the setup.exe program if you downloaded it). When the installer asks if you’d like to repair or remove Virtual Grower 1.1, choose ‘Repair,’ click ‘Continue’, and follow the remaining instructions. This will reverse problems associated with installing older versions of Virtual Grower on a computer that already has Virtual Grower 1.1 installed.
4
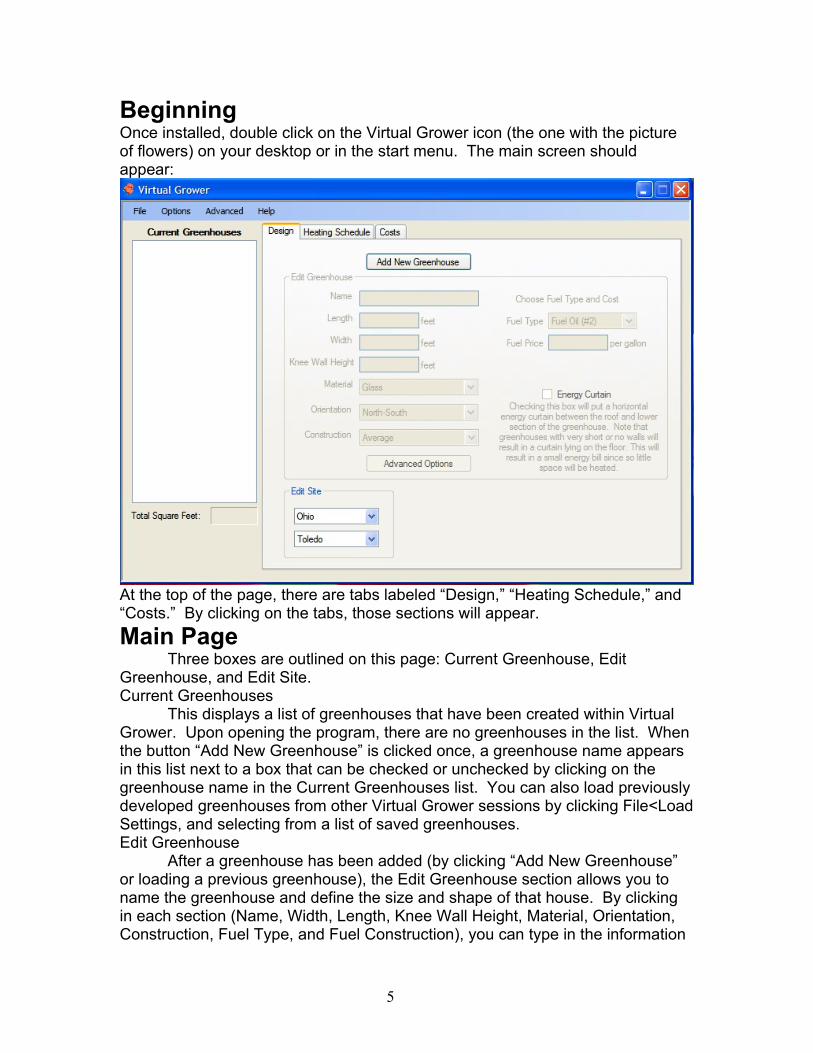
BeginningOnce installed, double click on the Virtual Grower icon (the one with the picture of flowers) on your desktop or in the start menu. The main screen should appear:
At the top of the page, there are tabs labeled “Design,” “Heating Schedule,” and “Costs.” By clicking on the tabs, those sections will appear.Main Page
Three boxes are outlined on this page: Current Greenhouse, Edit Greenhouse, and Edit Site.Current Greenhouses
This displays a list of greenhouses that have been created within Virtual Grower. Upon opening the program, there are no greenhouses in the list. When the button “Add New Greenhouse” is clicked once, a greenhouse name appears in this list next to a box that can be checked or unchecked by clicking on the greenhouse name in the Current Greenhouses list. You can also load previously developed greenhouses from other Virtual Grower sessions by clicking File<Load Settings, and selecting from a list of saved greenhouses.Edit Greenhouse
After a greenhouse has been added (by clicking “Add New Greenhouse” or loading a previous greenhouse), the Edit Greenhouse section allows you to name the greenhouse and define the size and shape of that house. By clicking in each section (Name, Width, Length, Knee Wall Height, Material, Orientation, Construction, Fuel Type, and Fuel Construction), you can type in the information
5

specific for that greenhouse. For example, if you have several greenhouse zones and some are gutter connected poly houses, you may name the initial greenhouse Zone 1, and define the dimensions (in feet) of your greenhouse and (also in feet) the height of your knee wall. If you do not have a knee wall, enter 0. You can choose the material of your greenhouse from the drop-down list next to the Material section. This assumes that the entire greenhouse, other than the knee wall, is made of that material. Orientation allows you to choose the N-S or E-W orientation (based on the length of the greenhouse) of your greenhouse, while Construction refers to the tightness of your greenhouse construction (loose, average, tight, and double layer). Fuel Type allows you to select the type of fuel used to heat that greenhouse while Fuel Cost allows you to input the cost of that fuel. Clicking on the “Advanced Options” button (see “Advanced Options” section below to learn about that section) allows you to further modify each of those parameters to, for example, allow for different greenhouse materials for roof and sidewalls. See Appendix 1 for a list of fuels available for use within Virtual Grower.Edit Site
In this box, you can select a state and city at which you can construct your greenhouses. The default settings are Toledo, Ohio. Selecting a state will load cities corresponding to that state. Not all cities within a state are represented, so choose one that is closest to you if your city is not represented. For example, in the state of Ohio, a user in Bowling Green would choose the city of Toledo since Bowling Green is not currently in our database.
By selecting a city and state, a historical database for typical weather at that location is loaded, which gives typical values of temperature, light, and cloud cover, for example, for each hour over the course of 12 months. This weather information was obtained from the National Renewable Energy Laboratory website (http://rredc.nrel.gov/). It is important to note that the weather information is not average values for a period of time, but typical or representative values for that date and time. Energy Curtains
There is a box on the main page that allows you to click on or off an “energy curtain”. Advanced Options
After clicking on the “Advanced Options” button, the following screen should appear:
6

This page allows you to change roofing, siding, and knee wall materials from a pre-determined material list as a whole and for each side, independently. Additionally, you can change the sidewall and center heights, greenhouse style, and if a gutter-connected greenhouse is being constructed, choose the number of spans within the structure. Note that if you are designing a gutter-connected house, the width to be entered is for each span, post to post, not the width of the entire house. Heater efficiency can also be changed on this page. The purpose of this is not to predict exactly what your particular heater efficiency might be, but
7
rather to see the impact that small differences in heater efficiency may have on the overall system efficiency.
At the bottom of this screen is a picture of the greenhouse type you are constructing. This does not mean all greenhouses are gutter connected. The greenhouse will only be gutter connected if the number of spans (top box in the Dimensions section) is greater than one.
Once the settings are completed to your satisfaction for this greenhouse section, you can either click “OK” at the bottom of the screen or choose a different greenhouse section or zone to modify from the drop-down panel next to “Name”. When “OK” is clicked, you should return to the main page.
When finished with building your greenhouse, save the greenhouse setting from the Main page. This enables you to reload your greenhouse in other Virtual Greenhouse sessions. Exiting out of the program at any point will result in a prompt to ask you if you would like to save your settings.
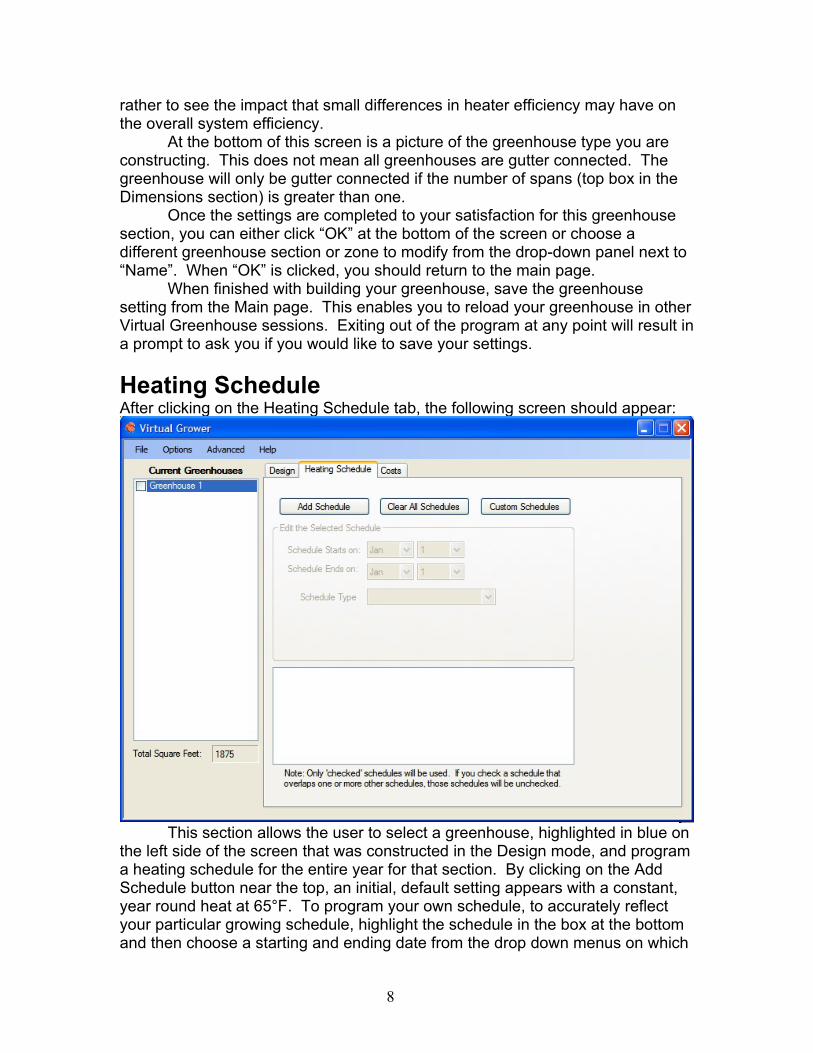
Heating ScheduleAfter clicking on the Heating Schedule tab, the following screen should appear:
This section allows the user to select a greenhouse, highlighted in blue on the left side of the screen that was constructed in the Design mode, and program a heating schedule for the entire year for that section. By clicking on the Add Schedule button near the top, an initial, default setting appears with a constant, year round heat at 65°F. To program your own schedule, to accurately reflect your particular growing schedule, highlight the schedule in the box at the bottom and then choose a starting and ending date from the drop down menus on which
8

the heat will be activated for that greenhouse. In the “Schedule Type” drop down menu, a list of No Heating, Its Day When The Sun Is Up, Its Day When I Say It Is, and Constant Temperature allows for four pre-determined heating types. The function of each selection is:No HeatingGreenhouse is not heated so no cost is calculated for that house.Its Day When The Sun Is UpThe daytime temperature setpoint is activated when the sun comes up, based on your location in the country. When the sun is not up, the night temperature is maintained. In this selection, the thermoperiod matches the natural photoperiod or light period.Its Day When I Say It IsThe daytime temperature is set to specific time period in the day. This time period does not change from one day to the next.Constant TemperatureThe temperature is the same, day and night, during the time period that is defined.Custom SchedulesAlternatively, click on the Custom Schedules button or choose Custom Schedules in the Advanced drop down menu from the top of the window
Choosing this option results in the appearance of the following window:
9

By clicking on the “Add New Schedule” button, hourly temperatures of 65°F are defaulted into the list of temperatures on the right of the window. Clicking in each window, you can change the specific temperature set point for each hour of each day. The value in this section is that you can program DIF or DIP treatments for certain crops or certain times of the year. Before clicking the OK button, name the schedule in the Schedule Name box (upper right). This will save that schedule and allow you to have that schedule for future greenhouse designs.
The program allows you to have complex, realistic scheduling for entire greenhouses, but currently, does not permit subdividing of greenhouse sections with temporary partitions as is a common practice in greenhouse production. This feature will be added in future versions of Virtual Grower.
To change greenhouses, click to highlight a different greenhouse from the Current Greenhouse list on the left. Once all greenhouses have been scheduled to your satisfaction, costs can be calculated for your greenhouses.
CostsClicking on the Costs section should result in a screen similar to this:
10

The actual screen you see will depend on your location (city and state chosen from the main page), and number and name of greenhouses in your modeling session.
On the right half of the screen, a list of the months, total monthly heating costs, costs per square area, a list of the lowest temperature in that month, yearly totals for costs and costs per area. Furthermore, a “maximum BTU output required” box is shown, which can be used to help predict the size of heaters needed to heat the greenhouse(s) selected for analysis. Note that if more than one greenhouse is selected on the left of the window, this box will predict the maximum BTU output for the total of all selected greenhouses. See the Appendix 4 on how the maximum BTU output is calculated. The cost estimator will not calculate costs until one or more greenhouses are selected (with a check in the box next to the greenhouse name) and a heating schedule is assigned to the checked greenhouses. The costs displayed by month will then reflect the greenhouse structure, size, materials, and style as well as the heating schedules and fuel types for those greenhouses.
Generating a ReportClicking on this button brings up another window with the current settings (greenhouse design considerations, fuel types, etc.). You can select and copy this information to another word processing program to keep track of multiple scenarios easily or you can save this report by clicking on the save report button. The file saved is a .txt file that can be opened up in most word processing applications.
11

Additional Options from the Drop-Down MenusExport --> Custom Schedules
This tool allows you save any custom schedules that Virtual Grower is using to a separate file. This can then be used to retrieve those schedules if they ever get deleted or changed and also allow you to share custom schedules with other Virtual Grower users.
To use it, on the main menu, click 'File,' then 'Export,' and finally 'Custom Schedules.' A window will pop up asking you to choose a file name and location for your custom schedules file. Type a name in the box and choose an appropriate folder and then click 'Save.' All of your custom schedules will now be coped to the new file.
Import -> GreenhousesThis tool allows you to load previously saved greenhouses into Virtual
Grower, just like the normal 'Load Settings' function. However, instead of replacing any greenhouses that you are currently working on, the import function will add them to the list. For example, if you had a saved greenhouse file with two greenhouses in it and were working on two others, importing the saved file would add two greenhouses to the list for a total of four. Saving your settings will save all the greenhouses to a new file, not to the ones you have imported from. Also note that any custom schedules associated with the greenhouses in the import file will also be added to Virtual Grower's custom schedule list.
To use it, on the main menu, click 'File,' then 'Import,' and finally 'Greenhouses.' A window will pop up asking you which file you would like to import greenhouses from. You can choose from any saved greenhouse files you've made from Virtual Grower. Find the file you would like, select it, and click 'Load.' The greenhouses from that file will then be added to the list.
Import --> Custom SchedulesThis tool allows you to use custom schedules you or someone else has
made previously in Virtual Grower. By importing a 'Custom Schedules' file, all of its saved schedules will be added to Virtual Grower's list of custom schedules and will be immediately available for use in any of your greenhouses. Note that once custom schedules have been imported, they will be on Virtual Grower's list until you delete them, even if you restart the program. This means that you only need to import any given set of schedules once, so long as you don't delete them.
To use it, on the main menu, click 'File,' then 'Import', and finally 'Custom Schedules.' A window will pop up asking you which file you would like to import schedules from. You can choose from any exported custom schedules files made by Virtual Grower. Find the file you would like, select it, and click 'Load.' The schedules saved in that file will then be added to the list.
Analysis
12
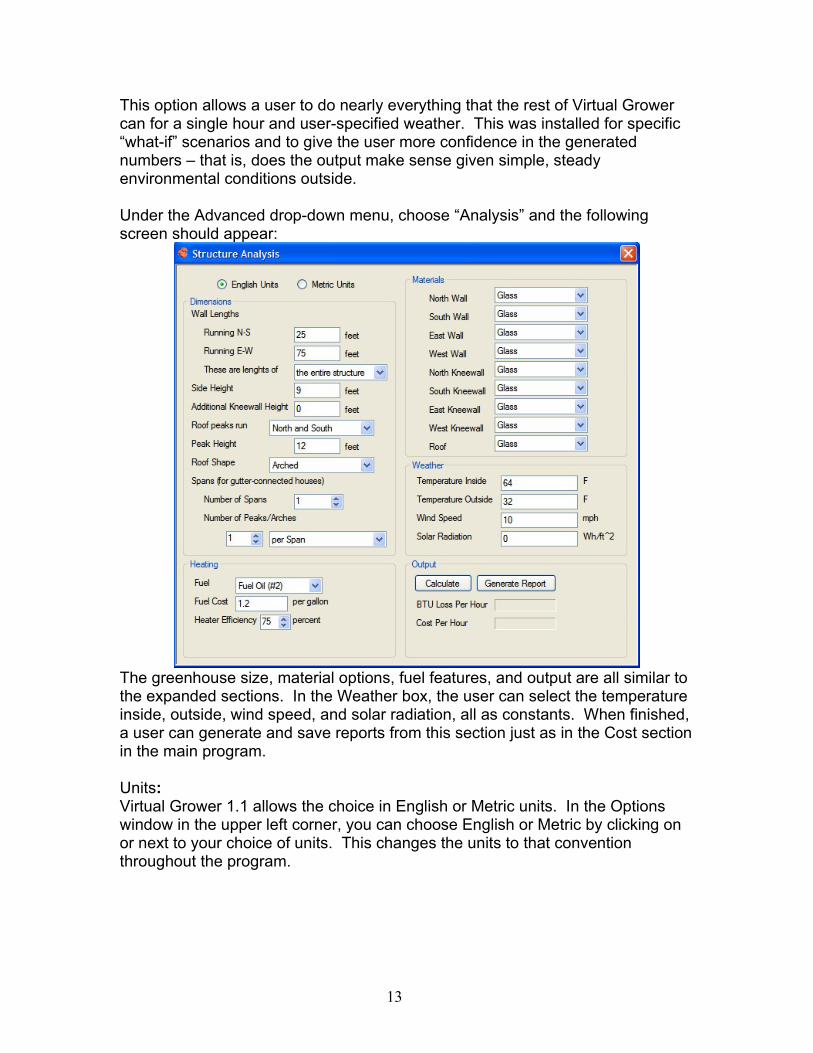
This option allows a user to do nearly everything that the rest of Virtual Grower can for a single hour and user-specified weather. This was installed for specific “what-if” scenarios and to give the user more confidence in the generated numbers – that is, does the output make sense given simple, steady environmental conditions outside.
Under the Advanced drop-down menu, choose “Analysis” and the following screen should appear:
The greenhouse size, material options, fuel features, and output are all similar to the expanded sections. In the Weather box, the user can select the temperature inside, outside, wind speed, and solar radiation, all as constants. When finished, a user can generate and save reports from this section just as in the Cost section in the main program.
Units:Virtual Grower 1.1 allows the choice in English or Metric units. In the Options window in the upper left corner, you can choose English or Metric by clicking on or next to your choice of units. This changes the units to that convention throughout the program.
13

Help
An electronic version of this manual can be found in the Help window as well as credits, acknowledgements, and other useful references.
14
Some Assumptions of Virtual Grower 1.0Weather at a locationThe weather information is not average values for a period of time, but typical or representative values for that date and time. This means that at your location, The month of January used in the program is from 1974 and the month of February is from 1982. Those years were chosen because they represent “typical” months at that location.Greenhouse isolationCurrently, each greenhouse is treated as a stand-alone structure with no shared walls with other houses or structures. This would influence heat loss or gain and potentially have a significant impact on the overall costs of heating your greenhouse ranges.HumidityCurrently, all calculation are assuming dry air. This assumption greatly shortens the calculation time, but ignores issues such as latent heat (evaporation and condensation) and changes in humidity outside the greenhouse causing changes inside the greenhouse.
Errors? Questions? Problems? Suggestions?Contact us ([email protected]). This is a work in progress and with your help, we can improve Virtual Grower and it can better suit your needs. Please give us feedback – WE WANT TO HEAR FROM YOU!
15

Appendix 1: Fuel energy content used in Virtual Grower 1.1
Fuel Type Energy (btu) Unit for energetic amountFuel Oil #2 138,500 GallonFuel Oil #4 145,000 GallonFuel Oil #6 153,000 GallonNatural Gas 100,000 ThermPropane 92,500 GallonHard Coal 26,000,000 TonSoft Coal 24,000,000 TonElectricity 3,412 kWhMethane 1,000 ft3Methanol 57,000 GallonLandfill Gas 500 ft3Butane 130,000 GallonEthanol 76,000 GallonKerosene 135,000 GallonWaste Oil 125,000 GallonBiodiesel 120,000 GallonGasoline 125,000 GallonSoft Wood 12,500,000 CordHard Wood 21,000,000 CordHogged Wood 18,000,000 TonSawdust (green; 45% moisture)
9,000,000 Ton
Sawdust (dry) 16,000,000 TonWood Chips 7,600,000 TonBark 9,750,000 TonWood Pellets (10% moisture) 16,000,000 TonRubber Pellets 33,000,000 TonPlastic 19,000 lbCorn Shells 16,000,000 TonCorn Cobs 16,500,000 Ton
Values were obtained from Bartok, J.W. Jr., 2005, floriculture fact sheet from U Mass Extension: http://www.umass.edu/umext/floriculture/fact_sheets/greenhouse_management/jb_fuels.htm
16

Appendix 2: Energy curtain assumptions
The energy curtain feature of Virtual Grower is an approximation that does not rely on a constant offset or “fudge factor” created by changing the energetic properties of the roof by a constant amount. We have attempted to place a division between the upper and lower sections of a greenhouse in software and treat the greenhouse as two parts if a curtain is in place rather than one greenhouse with different heat loss/gain characteristics.
Conceptually, we consider that a greenhouse is losing heat at night from the roof and sides if the inside temperature A is less than the outside temperature Z.
If an energy curtain is added, the greenhouse is still losing heat from the sides and the roof. However, since the volume of greenhouse above the energy curtain is not actively being heated, there is another heat flow from the lower section to the upper section such that the temperature inside the lower part A is higher than the temperature of the upper section B.
17

If the temperature in the lower section is maintained at the setpoint, the temperature in the upper section will reach an equilibrium between outside temperature Z and maintained temperature A, which will depend on A and Z as well as the thermal properties of the roof and energy curtain as well as the sizes of the roof and energy curtain. Mathematically, this is:
1) Heat Loss through the Roof = AR ∙ UR ∙ (B – Z)
2) Heat Loss over the Curtain = AC ∙ UC∙ (A – B)
When AR is the area of the roof, UR is the U-value of the roof material, AC is the area of the energy curtain, and UC is the U-value of the energy curtain. To get the temperature above the curtain to stabilize, the amount of heat gained through the curtain from the heated greenhouse below and the amount of heat lost to the outdoors must be equal:
3) AR ∙ UR ∙ (B – Z) = AC ∙ UC∙ (A – B)
Solve for B:
4) (AR ∙ UR ∙ B) - (AR ∙ UR ∙ Z) = (AC ∙ UC∙ A) - (AC ∙ UC∙ B)
5) (AR ∙ UR ∙ B) + (AC ∙ UC∙ B) = (AC ∙ UC∙ A) + (AR ∙ UR ∙ Z)
6) B ∙ (AR ∙ UR + AC ∙ UC) = (AC ∙ UC∙ A) + (AR ∙ UR ∙ Z)
7) B = ((AC ∙ UC∙ A) + (AR ∙ UR ∙ Z))/(AR ∙ UR + AC ∙ UC)
Since A, Z, AR , UR , AC , and UC are known, B can be calculated (see Appendix 3 for U-values of materials). In Virtual Grower, the energy flows are calculated every hour based on the historical database for each location so B changes each hour based on the outside temperature (and if there are any custom schedules used for that greenhouse).
CAUTION:This calculation does not take into account the energy flux from radiation and air exchange (or leakage). Energy losses from these two components may be large and would cause the assumptions used in the energy curtain calculations for Virtual Grower 1.1 to over-estimate the impact of having energy curtains. Furthermore, we continue with the assumption of dry air for all air/heat fluxes and do not factor in the impact of heat storage of the ground and materials.
The energy curtain feature is only activated at night, which is based on your location in the country and not by heating schedule. Functionally, the curtain acts as if it snaps shut and is very tight throughout the night then snaps open at dawn.
18

Appendix 3: U-values for materials
Material U-value (Btu hr-1 °F-1 ft-2)Glass 1.13Double-layered glass 0.65Fiber glass 1.00Single polyethylene 1.15Double polyethylene 0.70Bi-wall polycarbonate 0.65Bi-wall acrylic 0.65Concrete Block 0.51Poured Concrete 0.75Insulated Concrete 0.13Energy Curtain 0.50
Values were obtained from Bartok, J.W. Jr., 2005, floriculture fact sheet from U Mass Extension: http://www.umass.edu/umext/floriculture/fact_sheets/greenhouse_management/jb_fuels.htm
19

Appendix 4: How the maximum BTU output is calculated
This feature from the Costs tab is designed to assist in boiler or heater sizing. Simply, the value reported is the largest heat loss rate for your greenhouse design, location, and heat schedule.
The program can calculate the heat loss for a greenhouse for every hour in a year or other selected time frame based on your heating schedule. After calculating heat flow for each hour, the largest number is reported. This number is also based on the number of greenhouses selected, so if more than one greenhouse was designed in the design phase, the maximum BTU output reported is assuming if all selected greenhouses are run off a single heater/boiler. When using this feature, remember that the values are based on TYPICAL weather at that location and does not estimate very cold weather events (i.e. a cold snap or inversions). Therefore, you may need to add more BTU to “size up” your boiler for the greenhouse to account for those events. This decision is based on the weather and also the grower’s risk tolerance for extreme weather events.
20

Appendix 5: Calculating Energy Flow
There are two basic equations that Virtual Grower uses to calculate energy flow through a greenhouse. One is for conduction, the transfer of heat through the structure of the greenhouse, and the second is for convection, the transfer of heat by mixing warm greenhouse air with cooler outside air. When calculating the heat loss for any greenhouse structure, both of these equations are taken into account, at least to some degree.
The particular equations we used are from Aldrich and Bartok, 1994, Greenhouse Engineering, NRAES publication 33, and are outlined below:
ConductionTo calculate conduction over any greenhouse surface, four values are
used; the temperatures on either side of the surface (usually the temperature set point of the greenhouse and the current temperature outside), the area of the surface, and a constant known as the U-value of the surface material (See Appendix 3 for U-values). The U-value represents a typical amount of heat energy that will cross a certain area of the material, per degree difference between the inside and outside temperatures. By multiplying these values together, the amount of heat per hour that is lost to that surface can be found. For example, if a small greenhouse was set to 65ºF and the outside temperature was 45ºF, a 100 ft2 sheet of glass with a U-value of 1.13 BTU/ft2 -ºF-hour, then the amount of heat lost over the sheet of glass would be:
(65ºF - 45ºF) · 100 ft2 · 1.13 BTU/ft2 -ºF-hour = 2260 BTU/hourLastly, this value can be multiplied by a correction factor to account for the effects of wind. See Appendix 6 for a list of the correction factors used.
ConvectionTo calculate convection for any particular greenhouse, four values are
used; the temperatures on the inside and outside of the greenhouse, the volume of air within the greenhouse, and a correction factor representing the relative leakiness of the greenhouse structure. By multiplying the difference between the two temperatures by the volume and the correction factor, an estimate of heat loss can be obtained. For example, if the temperature outside was 45ºF, the temperature inside was maintained at 65ºF, the volume of the greenhouse was 5000 ft3 and the greenhouse was assumed to have an average 'leakiness' (correction factor = 0.0216 BTU/ft3-ºF-hour), the amount of heat lost per hour due to convection would be:
(65ºF - 45ºF) · 5000 ft3 · 0.0216 BTU/ft3-ºF-hour = 2160 BTU/hourAs with conduction, a correction factor to account for the effects of wind can be applied – see Appendix 6.
Totaling Heat LossTo find an estimate of the heat energy lost for an entire structure,
conduction is calculated for each wall, each portion of the kneewall, and for the
21
roof, and convection is calculated for the whole structure. Adding the results together gives us our estimate.
Heat Gain by Solar RadiationFor every location in Virtual Grower, there is a database of expected solar
radiation which can be used to find an estimate of how much heat the greenhouse will gain from the sun. For our estimate, we simply multiply the amount of light energy hitting per square foot of ground space by the total footprint of the greenhouse. This ignores the effects of reflection, diffusion, latent heat, but does take into account typical cloud cover for that day of the year. As a result, the estimate will be somewhat high.
Net Heat Change in the Greenhouse and Heating CostsUsing the above calculations, Virtual Grower calculates the net amount of
heat energy leaving or entering the greenhouse. This is simply done by adding the total heat lost to conduction and convection to the heat gained by solar radiation. If the result is negative, i.e., the greenhouse is cooling off, the number of BTUs lost is assumed to be the number of BTUs added to the greenhouse by its heaters, to keep it at its current temperature. If the number is positive, it is assumed that the greenhouse is being cooled somehow and that no fuel is being burned to heat the structure.
To calculate a cost for heating the greenhouse, the number of BTU's being lost is divided by the amount of heat gained from burning one unit of fuel (whichever fuel is selected), adjusted for the given heater efficiency. This gives us the amount of fuel needed to keep the greenhouse up to temperature. Finally, the cost to heat the structure is calculated by multiplying the units of fuel burned by the cost per unit specified for that greenhouse.
Using Energy CurtainsWhen an energy curtain is being used in a greenhouse, the amount of
heat lost to the structure is calculated somewhat differently. Refer to Appendix 2 for an explanation for how this is done.
22

Appendix 6: Correction factors used in Virtual Grower
Correction factor Conditions Value Wind speed for conduction and convection
wind < 15 mph 115 mph < wind < 20 mph 1.0420 mph < wind < 25 mph 1.0825 mph < wind < 30 mph 1.1230 < wind 1.16
Leakage (air exchanges per hour)
Very 1.375Somewhat 1.188A little 1.000Not at all 0.630
Values were obtained from Bartok, J.W. Jr., 2005, floriculture fact sheet from U Mass Extension: http://www.umass.edu/umext/floriculture/fact_sheets/greenhouse_management/jb_fuels.htm
23