manual del router abit
TRANSCRIPT

1

2
ContentsIntroduction ............................................................................................................................. 4
Section One Product Overview ............................................................................................. 5
1.1 Product Features ................................................................................................................... 5
1.2 Specification........................................................................................................................... 5
Section Two Hardware Installation ................................................................................... 7
2.1 Panel layout ............................................................................................................................ 7
2.1.1 Front panel ........................................................................................................................ 7
2.1.2 Rear panel ......................................................................................................................... 8
2.2 System Requirements ........................................................................................................... 8
2.3 Installation Environment ....................................................................................................... 8
2.4 Hardware Installation Steps .................................................................................................. 8
Section Three Quick Installation Guide .............................................................................. 9
3.1 TCP/IP configuration .............................................................................................................. 9
3.2 Quick Setup wizard .............................................................................................................. 10
3.3 Operation Mode .................................................................................................................... 17
Section Four Configuration Guide .................................................................................. 18
4.1 Login ..................................................................................................................................... 18
4.2 Wireless Setting ................................................................................................................... 18
4.2.1 Wireless Status ................................................................................................................ 19
4.2.2 Wireless Basic settings .................................................................................................... 19
4.2.3 Repeater settings ............................................................................................................ 20
4.2.4 Virtual AP settings ........................................................................................................... 21
4.2.5 WDS Settings .................................................................................................................. 22
4.2.6 Advanced Settings........................................................................................................... 22
4.2.7 Access Control ................................................................................................................ 23
4.2.8 WPS Settings .................................................................................................................. 23
4.3 TCP/IP Setting ...................................................................................................................... 24
4.3.1 LAN Status ...................................................................................................................... 24
4.3.2 WAN Status ..................................................................................................................... 25
4.3.3 LAN Interface Setup ........................................................................................................ 26
4.3.4 WAN Interface Setup ....................................................................................................... 26
4.4 Firewall ................................................................................................................................. 27
4.4.1 IP/Port Filtering ................................................................................................................ 27

3
4.4.2 MAC Filtering ................................................................................................................. 28
4.4.3 URL Filtering .................................................................................................................. 28
4.4.4 Port Forwarding ............................................................................................................. 29
4.4.5 DMZ............................................................................................................................... 30
4.5 Management ......................................................................................................................... 31
4.5.1 QoS ................................................................................................................................. 31
4.5.2 DDNS Setting .................................................................................................................. 32
4.5.3 Time Zone Setting ........................................................................................................... 33
4.5.4 Denial of Service ............................................................................................................. 33
4.5.5 Log .................................................................................................................................. 34
4.5.6 Upgrade Firmware ........................................................................................................... 34
4.5.7 Save/Reload settings ....................................................................................................... 35
4.5.8 Password setup ............................................................................................................... 35
Appendix FAQ ................................................................................................................. 36

4
IInnttrroodduuccttiioonn
Wireless broadband router is a hybrid design product which combines Ethernet technology and wireless access into a single stand-alone unit. The device allows you to take advantages of both mobility and fast connection. All PCs whenever on wireless LAN or Ethernet LAN can share files, printers and other network resources. Moreover, all users can share single account of Internet access by having this device connect to a DSL/Cable modem.
It complies with IEEE 802.11n (Draft 2.0) standards, supports up to 150Mbps (1Tx-1Rx) wireless connection speed, adopting MIMO technology to ensure a good performance, stability and coverage to bring you an enjoyable new experience. Its wireless data transmission rate can be 3 times better and coverage 4 times better than a normal 802.11b/g router. It is a high performance and cost-effective solution for Home and Small office.
The router provides multiple security protection, which can protect the wireless access security effectively. It is easy to install and configure with user friendly interface. For better application of the router functions, please read this user manual carefully.
Package List
Open the box carefully, check the contents listed below:
Wireless Broadband Router Power adapter User Manual UTP LAN Cable
TThhaannkk yyoouu ffoorr ppuurrcchhaassiinngg AABBIITT WWiirreelleessss--NN BBrrooaaddbbaanndd RRoouutteerr.. TThhiiss uusseerr gguuiiddee
wwiillll aassssiisstt yyoouu wwiitthh tthhee iinnssttaallllaattiioonn pprroocceedduurree
NNoottee:: IIff aannyy ooff tthhee lliisstteedd ccoonntteennttss aarree ddaammaaggeedd oorr mmiissssiinngg,, pplleeaassee ccoonnttaacctt tthhee rreettaaiilleerr
ffrroomm wwhhoomm yyoouu ppuurrcchhaasseedd tthhee WWiirreelleessss RRoouutteerr ffoorr aassssiissttaannccee

5
SSeeccttiioonn OOnnee PPrroodduucctt OOvveerrvviieeww
1.1 Product Features
Complies with IEEE 802.11n; 802.11g; 802.11b standard for 2.4GHz Wireless LAN.
Supports PPPoE, Dynamic IP, and static IP broadband functions
Supports UPnP, DDNS, static routing list.
Wi-Fi protected setup (WPS) set your security with a push button.
Supports virtual server, special application and DMZ host
Supports 64/128-bit WEP encryption and WPA-PSK, WPA2-PSK security
Built-in firewall, supports IP, MAC, URL filtering which flexibly controls access and time
Built-in DHCP server
Supports WMM for improved audio and video signals
Supports configuration file backup and restore
Supports QoS bandwidth control
Supports remote/local web management
1.2 Specification
Standard IEEE802.11n current draft, IEEE 802.11g, IEEE 802.11b
IEEE 802.3, IEEE 802.3u, IEEE 802.3x
Protocol CSMA/CA, CSMA/CD, TCP/IP, ICMP, NAT, PPPoE, DHCP, PPTP, UDP, NAT, DNS,
DDNS, VPN
Port LAN 4*100BaseTX (Auto MDI/MDIX)
Port WAN 1*100BaseTX (Auto MDI/MDIX)
RF Frequency 2.4~2.4835GHz
Data Rate
11n: 150/135/121.5/108/81/54/40.5/27/13.5Mbps
130/117/104/78/52/39/26/13Mbps
72/65/58.5/52/39/26/19.5/13/6.5Mbps
11g: 54/48/36/24/18/12/9/6Mbps
11b: 11/5.5/2/1Mbps
Receive
Sensitivity
135M: -68dBm@10% PER
54M: -68dBm@10% PER
11M: -85dBm@8% PER
6M: -88dBm@10% PER
1M: -90dBm@8% PER

6
Channels
1-11 (North America)
1-13 (General Europe)
1-14 (Japan)
Transmission Technology BPSK, QPSK, CCK and OFDM (BPSK/QPSK/16-QAM/ 64-QAM)
Antenna Type 1*2.4GHz Dipole Antenna(1TX*1RX)
Operation Mode Standard Access Point; Wireless WAN mode (Client Mode Wireless), WDS, WPS
Wireless Security
SSID Enable/Disable; MAC Address, IP and URL Filter; 64/128/152-bit WEP
Encryption
WPA/WPA2/WPA-PSK/WPA2-PSK (AES/TKIP) Encryption
RF power
11g:14-16dbm
11b:17-19dbm
11n:13-15dbm
Chipset RTL8196C
LED 1*Power, 1*CPU Status,1*Wireless, 1*WAN, 4*LAN
Management Local/Remote Web-based configuration
Operating
Temperature 0 ~ 40℃
Storage -40 ~ 70℃
Humidity 5 ~ 95% non-condensing
External Power
Adapter
Input 100V~240V
Output DC5V, 1A;

7
SSeeccttiioonn TTwwoo HHaarrddwwaarree IInnssttaallllaattiioonn
2.1 Panel layout
2.1.1 Front panel
The front panel of the 11N Wireless Router consists of several LED indicators, which is designed to indicate connections.
LED indicators:
Led Name Action Description
Power off no power
on power on
CPU off the router has a hardware error
flashing the router is working properly
WLAN off wireless function is disabled
flashing wireless function is enabled
WAN /LAN1, 2,
3, 4
off there is no device connected to the corresponding port
on there is a device connected to the corresponding port
flashing there is an active device connected to the corresponding port

8
2.1.2 Rear panel
2.2 System Requirements
Broadband Internet Access Service (DSL/Cable/Ethernet) One DSL/Cable modem that has an RJ45 connector (you do not need it if you connect the router
to Ethernet) Each PC on the LAN needs a working Ethernet Adapter and an Ethernet cable with RJ45
connectors TCP/IP protocol must be installed on each PC Web browser, such as Microsoft IE 5.0 or later, Netscape Navigator 6.0 or later
2.3 Installation Environment
Not in direct sunlight or near a heater or heating vent Not cluttered or crowded. There should be at least 2 inches (5cm) of clear space on all sides of
the router Well ventilated (especially if it is in a closet) Operating temperature: 0℃~40℃ Operating Humidity: 5%~90%RH, Non-condensing
2.4 Hardware Installation Steps
Before you install the router, you should connect your PC to the Internet through your broadband service successfully. If there is any problem, please contact your ISP. After that, please install the router according to the following steps. Don't forget to pull out the power plug and keep your hands dry.
Power off your PC(s), Cable/DSL modem, and the router. Locate an optimum location for the router. The best place is usually near the center of the area in
which your PC(s) will wirelessly connect. The place must accord with the Installation Environment Requirements.
Adjust the direction of the antenna. Normally, upright is a good direction. Connect the PC(s) and each Switch/Hub on your LAN to the LAN Ports on the router. Connect the DSL/Cable Modem to the WAN port on the router. Connect the AC power adapter to the AC power socket on the router, and the other end into an
electrical outlet. The router will start to work automatically. Power on your PC(s) and Cable/DSL modem.

9
SSeeccttiioonn TThhrreeee QQuuiicckk IInnssttaallllaattiioonn GGuuiiddee
After connecting the 11N Wireless Router into your network, you should configure it. This chapter describes how to configure the basic functions of your 11N Wireless Router. These procedures only take you a few minutes. You can access the Internet via the router immediately after successfully configured.
3.1 TCP/IP configuration
The default IP address of the Wireless Router is 192.168.1.1, and the default Subnet Mask is 255.255.255.0. These values can be seen from the LAN. They can be changed as you desire, as an example we use the default values for description in this guide.
Connect the local PC to the LAN ports on the router. There are then two means to configure the IP address for your PC.
Configure the IP address manually
1. Set up the TCP/IP Protocol for your PC(s).
2. Configure the network parameters. The IP address is 192.168.1.xxx ("xxx" is from 2 to 254), Subnet Mask is 255.255.255.0, and Gateway is 192.168.1.1 (The router's default IP address)
Obtain an IP address automatically
1. Set up the TCP/IP Protocol in "Obtain an IP address automatically" mode on your PC(s)

10
2. Power off the router and PC(s). Then turn on the router, and restart the PC(s). The built-in DHCP server will assign IP addresses for the PC(s).
Now, you can run the Ping command in the command prompt to verify the network
connection between your PC(s) and the router. Click Start -> Run, type the command “cmd”, then click OK, Open a command prompt, and type ping 192.168.1.1, and then press Enter.
If the result displayed is similar to that shown in the top of figure, the connection between your PC and the router has been established.
If the result displayed is similar to that shown in the top of figure, it means that your PC has not
connected to the router. Please check it following these steps:
1. Is the connection between your PC and the router correct?
2. Is the TCP/IP configuration for your PC correct?
3.2 Quick Setup wizard
With a Web-based (Internet Explorer or Netscape® Navigator) utility, the 11N Wireless Router is easy to configure and manage. The Web-based utility can be used on any Windows, Macintosh or UNIX OS with a web browser.
NNoottiiccee:: TThhee 11//22//33//44 LLEEDDss ooff LLAANN ppoorrtt oonn tthhee rroouutteerr aanndd LLEEDDss oonn yyoouurr PPCC''ss aaddaapptteerr sshhoouulldd
bbee lliitt
NNoottiiccee:: If the router's IP address is 192.168.1.1, your PC's IP address must be within the
range of 192.168.1.2 ~ 192.168.1.254, the gateway must be 192.168.1.1

11
Connect to the router by typing http://192.168.1.1 in the address field of web browser.
After a moment, a login window will appear similar to that shown in Figure. Enter admin for the
User Name and Password, both in lower case letters. Then click OK or press the Enter key.
Click System Status, the will appear.
NOTE:
If the above screen does not prompt, it means that your web-browser has been set to a proxy. Go to Tools Menu>Internet Options>Connections>LAN Settings, in the screen that appears, cancel the Using Proxy checkbox, and click OK to finish it.
If the User Name and Password are correct, you can configure the router via the web browser. Please click the Setup Wizard link on the left of the main menu and the Setup Wizard screen will appear.

12
Click Setup Wizard, the Setup Wizard will appear.
The router supports three modes: gateway, bridge, wireless ISP. You can setup different modes to
LAN and WLAN interface for NAT and bridging function.

13
Click Next, Time Zone Setting will appear. You can select the time zone what you need.
Click Next, LAN Interface Setup will appear. In this page, you can set IP address, Subnet Mask.
IP Address: Enter the IP address of your router in dotted-decimal notation (factory default: 192.168.1.1).
Subnet Mask: An address code that determines the size of the network. Normally use 255.255.255.0 as the subnet mask.
NNoottiiccee:: All PCs’ Subnet Mask is the same with router in you LAN.

14
Click Next, WAN Interface Setup will appear. In this page is used for configure the parameters for Internet network which connects to the WAN port of your Access Point.
WAN Access Type: Here you can select the access method to static IP, DHCP, PPPoE or PPTP by click the item value of WAN Access type.
If you choose PPPoE, the router will automatically receive the IP parameters from your ISP without needing to enter any parameters.
User Name and Password - Enter the User Name and Password provided by your ISP.

15
If you choose DHCP, the router will automatically receive the IP parameters from your ISP without needing to enter any parameters.
If you Choose PPTP, the Static IP settings page will appear, shown in the figure.
You can get IP Address Subnet Mask, server IP Address, User Name and Password from your ISP. If you Choose Static IP, the Static IP settings page will appear, shown in figure.
IP Address: This is the WAN IP address as seen by external users on the Internet (including your ISP). Enter the IP address into the field.
Subnet Mask: The Subnet Mask is used for the WAN IP address, it is usually 255.255.255.0
Default Gateway: Enter the gateway into the box if required.
DNS: Enter the DNS Server IP address into the boxes if required.
Click Next, Wireless Basic Settings will appear.
NNoottiiccee:: The IP parameters should have been provided by your ISP.

16
【This page is used for configure these parameters】
Band: Indicates the current mode 2.4GHz (B+G+N), 2.4GHz (G+B), 2.4GHz (B)
Mode: Default is AP; you can select Infrastructure Client or AP
SSID: Enter a value of up to 32 characters. The default SSID is CD-R KING, but it is recommended
strongly that you change your networks name (SSID) to a different value.
Channel: This field determines which operating frequency will be used. It is not necessary to change
the wireless channel unless you meet interference problems with another nearby access point.
Click Next, Wireless Security Settings will appear. This page allows you to setup the wireless
security. Turn on WEP or WPA by using Encryption Keys could prevent any unauthorized access to
your wireless network. You can select Open, WEP, WPA-PSK, WPA2 -PSK.
Click Finished to finish the configuration
WPA-PSK:Provides TKIP (Temporal Key Integrity Protocol) or AES (Advanced Encryption Standard).
NNoottiiccee:: If you change the parameters of wireless, the router will reboot automatically.

17
The default is TKIP mode
WPA2-PSK: WPA2-PSK (Wi-Fi Protected Access Version 2) provides higher security than WEP (Wireless Equivalent Privacy) and WPA (Wi-Fi Protected Access)
3.3 Operation Mode
Gateway (Default) In this mode, the device is supposed to connect to internet via ADSL/Cable Modem. The NAT is enabled and PCs in LAN ports share the same IP to ISP through WAN port. The connection type can be setup in WAN page by using PPPOE, DHCP client, PPTP client or static IP.
Bridge: In this mode, all Ethernet ports and wireless interface are bridged together and NAT function is disabled. All the WAN related function and firewall are not supported.
Wireless ISP: In this mode, all Ethernet ports are bridged together and the wireless client will connect to ISP access point. The NAT is enabled and PCs in Ethernet ports share the same IP to ISP through wireless LAN. You must set the wireless to client mode first and connect to the ISP AP in Site-Survey page. The connection type can be setup in WAN page by using PPPOE, DHCP client, PPTP client, L2TP client or static IP.

18
SSeeccttiioonn FFoouurr CCoonnffiigguurraattiioonn GGuuiiddee
4.1 Login
After you login successfully, browser will show administrator WEB. On the left is navigation. It contains: Systems Status, Setup Wizard, Operation Mode, Wireless, TCP/IP, Firewall, Management, ect.
4.2 Wireless Setting
It contains Wireless Basic settings, Repeater settings, Virtual AP settings, WDS Settings, Advanced Settings, Access Control and WPS

19
4.2.1 Wireless Status
This page shows the current status and some basic settings of the device. You can check system Information, Repeater Interface Information, WLAN Interface Information.
4.2.2 Wireless Basic settings
This page is used for configure the parameters for wireless LAN clients which may connect to your Access Point. Here you may change wireless encryption settings as well as wireless network parameters.

20
WEP (Wired Equivalent Privacy, a basic encryption method, usually encrypts wireless data using a
series of digital keys (64 bits or 128 bits in length). By using the same keys on each of your wireless
network devices, you can prevent unauthorized wireless devices from monitoring your transmissions or
using your wireless resources. Select Mixed WEP to enter the following window
Security: From the drop-down menu select the corresponding security encryption modes.
WEP: Set the WEP key with the format of ASCII and Hex. You can enter ASCII code (5 or 13 ASCII
characters. Illegal character as “/” is not allowed.) Or 10/26 hex characters.
4.2.3 Repeater settings

21
This page is used for configure the parameters for wireless LAN clients which may connect to your Access Point. Here you may change wireless encryption settings as well as wireless network parameters.
Mode: Default is AP
SSID: Enter a value of up to 32 characters. The same name (SSID) must be assigned to all wireless devices in your network. The default SSID is repeater, but it is recommended strongly that you change your networks name (SSID) to a different value.
Channel: This field determines which operating frequency will be used. It is not necessary to change the wireless channel unless you notice interference problems with another nearby access point.
4.2.4 Virtual AP settings
This page shows and updates the wireless setting for multiple AP.

22
4.2.5 WDS Settings
Wireless Distribution System uses wireless media to communicate with other APs, like the Ethernet
does. To do this, you must set these APs in the same channel and set MAC address of other APs which
you want to communicate with in the table and then enable the WDS.
4.2.6 Advanced Settings
These settings are only for more technically advanced users who have a sufficient knowledge about wireless LAN. These settings should not be changed unless you know what effect the changes will have on your Access Point.

23
4.2.7 Access Control
If you choose Allow Listed, only those clients whose wireless MAC addresses are in the access control list will be able to connect to your Access Point. When Deny Listed is selected, these wireless clients on the list will not be able to connect the Access Point.
4.2.8 WPS Settings
WPS (Wi-Fi Protected Setup) can easily and quickly establish the connection between the wireless
network clients and the device through an encrypted way. The users only enter PIN code or press
RST/WPS button on the panel to configure it. On the left Wireless setting menu, click WPS to enter the
next screen.
This page allows you to change the setting for WPS (Wi-Fi Protected Setup). Using this feature could
let your wireless client automatically synchronize its setting and connect to the Access Point in a minute
without any hassle.

24
WPS: To enable or disable WPS function. The default is “disable”.
Self-PIN Number: The effective key generated by AP automatically.
Push-Button Configuration: Provide two ways: PBC (Push-Button Configuration) and PIN code.
PBC: Select the PBC or press the RST/WPS button on the front panel of the device for about one second (Press the button for about one second and WPS indicator will be blinking for 2 minutes, which means the WPS is enabled. During the blinking time, you can enable another device to implement the WPS/PBC negotiation between them. Two minutes later, the WPS indicator will be off, which means the WPS connection is completed. If more clients are added, repeat the above steps.
Client PIN Number: If this option is enabled, you need to enter a wireless client’s PIN code in the field and keep the same code in the WPS client.
4.3 TCP/IP Setting
4.3.1 LAN Status
This page shows the current status and some basic settings of the device. you can check system
Information, LAN Interface Information
MAC Address: The physical address of the router, as seen from the LAN. The value can't
be changed.
IP Address: Enter the IP address of your router in dotted-decimal notation (factory default:
192.168.1.1).
Subnet Mask: An address code that determines the size of the network. Normally use
255.255.255.0 as the subnet mask.
DHCP: You can select None, Client, Serve. The router is set up by default as a DHCP (Dynamic Host
Configuration Protocol) server, which provides the TCP/IP configuration for all the PCs that are

25
connected to the router on the LAN.
DHCP Client Range: This field specifies the first of the addresses in the IP address pool.
4.3.2 WAN Status
This page shows the current status and some basic settings of the device. You can check system Information, WAN Interface Information.
MAC Address: The physical address of the router, as seen from the LAN. The value can't be changed.
IP Address: Enter the IP address of your router in dotted-decimal notation (factory default: 192.168.1.1).
Subnet Mask: An address code that determines the size of the network. Normally use 255.255.255.0 as the subnet mask.

26
4.3.3 LAN Interface Setup
This page is used for configure the parameters for local area network which connects to the LAN port of your Access Point. Here you may change the setting for IP address, subnet mask, DHCP, etc.
4.3.4 WAN Interface Setup
This page is used for configure the parameters for Internet network which connects to the WAN port

27
of your Access Point. Here you can select the access method to static IP, DHCP, PPPoE or PPTP by click the item value of WAN Access Type.
4.4 Firewall
4.4.1 IP/Port Filtering
This table is used for restrict certain types of data packets from your local network to Internet through the Gateway. Use of such filters can be helpful in securing or restricting your local network.
IP/Port Filtering: If you choose 'White list', only those clients whose IP addresses are in the list will be able to connect to your Access Point. When 'Blacklist' is selected, these IP Addresses on the list will not be able to connect the Access Point.
IP Address Range: Input the IP address range for the rule
Port Range: Input the filter port, for example 20-220
Protocol: You can select both TCP and UDP
Current Filter Table: The list of port filter.

28
4.4.2 MAC Filtering
Entry in this table is used to restrict certain types of data packets from your local network to Internet through the Gateway. Use of such filters can be helpful in securing or restricting your local network
MAC Filtering: If you choose 'White list', only those clients whose MAC addresses are in the list will be able to connect to your Access Point. When 'Blacklist' is selected, these MAC Addresses on the list will not be able to connect the Access Point.
MAC Address: Type the MAC Address, for example: 78:44:76:3F:2D:C5
Current Filter Table: The list of MAC filter.
4.4.3 URL Filtering
URL Filtering is used for deny LAN users from accessing the internet. Block those URLs which
contain keywords listed below.
URL Filtering: If you choose “Whitelist”, only those URL Addresses are in the list will be able to
connect to your Access Point. When “Blacklist” is selected, these URL Addresses on the list will not

29
be able to connect the Access Point.
URL Address: Input the URL address for the rule, click Apply Changes.
4.4.4 Port Forwarding
Entry in this table allows you to automatically redirect common network services to a specific machine behind the NAT firewall. These settings are only necessary if you wish to host some sort of server like a web server or mail server on the private local network behind your Gateway's NAT firewall.
Port Forwarding: select it to enable
IP Address: The IP Address of the PC running the service application
Protocol: The protocol used for this application, either TCP, UDP, or both (all protocols supported by the router).
Port Range: The numbers of External Ports. You can type a service port or a range of service ports (the format is XXX – YYY, XXX is Start port, YYY is End port).
Current Port Forward Table: Port forward services already list.
30
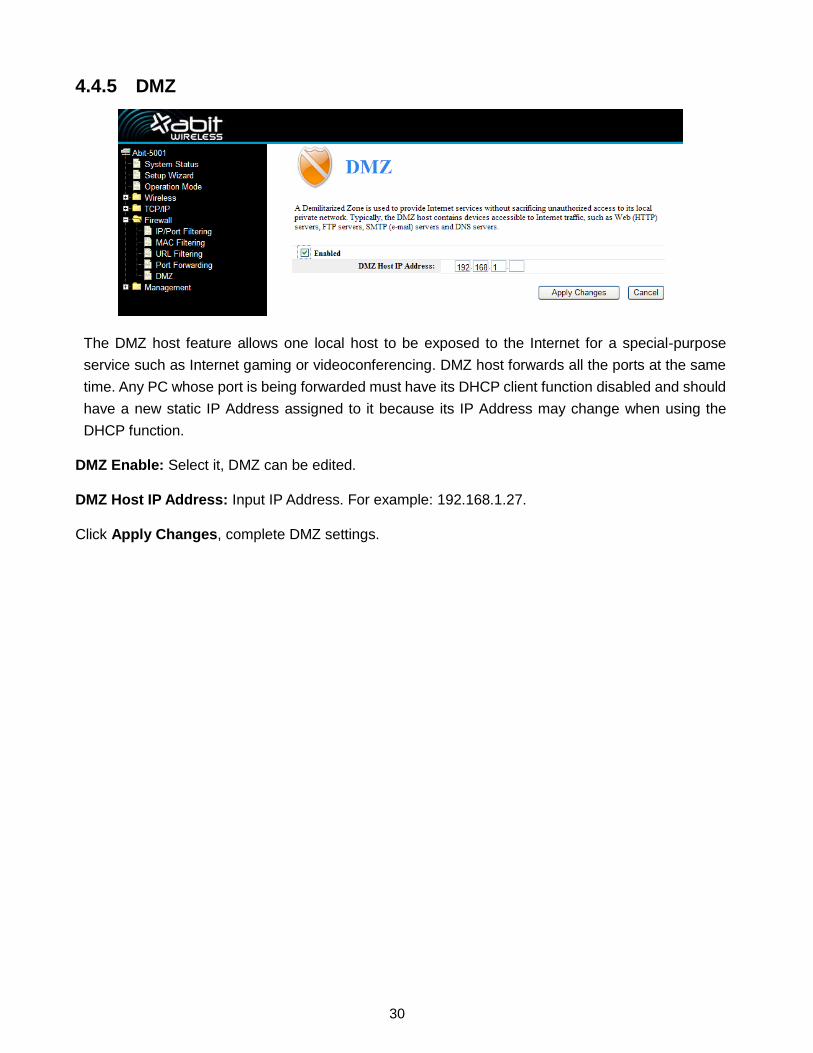
4.4.5 DMZ
The DMZ host feature allows one local host to be exposed to the Internet for a special-purpose
service such as Internet gaming or videoconferencing. DMZ host forwards all the ports at the same
time. Any PC whose port is being forwarded must have its DHCP client function disabled and should
have a new static IP Address assigned to it because its IP Address may change when using the
DHCP function.
DMZ Enable: Select it, DMZ can be edited.
DMZ Host IP Address: Input IP Address. For example: 192.168.1.27.
Click Apply Changes, complete DMZ settings.

31
4.5 Management
4.5.1 QoS
Note: If you add any QoS rules, the DoS function will have no effect.
This page is used for help users configure the parameters of QoS.
The Maximum Bandwidth provided by ISP: Indicate the network max bandwidth for up and down data stream
Direction: Direction of data stream, Up stream means data go out the LAN, Downstream means go in the LAN
IP Address Range: The IP address of the PC in LAN
Mini Rate & Max Rate: The minimum & maximum rate you assign to the IP
Bandwidth sharing: The way to share bandwidth
Enable: Enable or disable this rule

32
4.5.2 DDNS Setting
Dynamic DNS is a service that provides you with a valid, unchanging, internet domain name (an URL) to go with that (possibly ever changing) IP-address. DDNS lets you assign a fixed host and domain name to a dynamic Internet IP Address. It is useful when you are hosting your own website, FTP server, or other server behind the router. Before using this feature, you need to sign up for DDNS service providers such as www.DynDNS.org or www.TZO.com. The Dynamic DNS client service provider will give you a password or key.
To set up DDNS, follow these instructions below:
1. Type your Service Provider.
2. Type the User Name for your DDNS account.
3. Type the Password for your DDNS account.
4. Domain Name: the domain names are displayed here. Click Apply Changes to logout the DDNS service.

33
4.5.3 Time Zone Setting
You can maintain the system time by synchronizing with a public time server over the Internet.
Current time: Type the date and time.
Time Zone Select: Select your local time zone from this pull down list.
Enable NTP client update: select it; you can get the time from NTP.
NTP Server: Select a server from list.
Click Apply Changes and get the time from Internet if you have connected to Internet.
4.5.4 Denial of Service
A "Denial of Service" (DoS) attack is characterized by an explicit attempt by hackers to prevent

34
legitimate users of a service from using that service.
Enable DoS Prevention: Select it, you can modify DoS Prevention.
Enable Source IP Blocking: You can input source IP Blocking time
Click Apply Changes, DoS will take effect.
4.5.5 Log
This page is used for set remote log server and show the system log 4.5.6 Upgrade Firmware

35
This page allows you upgrade the Access Point firmware to new version. Please note, do not power off the device during the upload because it may crash the system
4.5.7 Save/Reload settings
This page allows you save current settings to a file or reload the settings from the file which was saved previously. Besides, you could reset the current configuration to factory default.
4.5.8 Password setup
This page is used for set the account to access the web server of Access Point.

36
AAppppeennddiixx FFAAQQ 1. How do I configure the router to access Internet by ADSL users?
(1) First, configure the ADSL modem configured in RFC1483 bridge model.
(2) Connect the Ethernet cable from your ADSL modem to the WAN port on the router. The telephone cord plugs into the Line port of the ADSL modem.
(3) Login to the router, click the “TCP/IP settings” menu on the left of your browser, and click "WAN Interface" submenu. On the WAN page, select “PPPoE” for WAN Connection Type. Type user name in the “User Name” field and password in the “Password” field, finish by clicking “Connect”.
(4) If your ADSL lease is in “pay-according-time” mode, select “Connect on Demand” or “Manual” for Internet connection mode. Type an appropriate number for Time to avoid wasting paid time. Otherwise, you can select “continuous” for Internet connection mode.
2. How do I configure the router to access Internet by Ethernet users?
(1) Login to the router, click the “TCP/IP Settings” menu on the left of your browser, and click "LAN Interface" submenu. On the WAN page, select “DHCP” for "Client", finish by clicking “Apply Changes”.
(2) Some ISPs require that you register the MAC Address of your adapter, which is connected to your cable or DSL modem during installation. If your ISP requires MAC register, login to the router and click the "TCP/IP Setting" menu link on the left of your browser, and then click "LAN Interface", if your PC’s MAC address is proper MAC address, type your PC’s MAC address will fill in the "Clone MAC Address" field. Or else, the format for the MAC Address is XX-XX-XX-XX-XX-XX. Then click the “Apply Changes" button. It will take effect after rebooting.
3. I want to use Net meeting, what do I need to do?
(1) If you start Net meeting as a sponsor, you don’t need to do anything with the router.
(2) If you start as a responsor, you need configure Virtual Server or DMZ Host.
(3) How to configure Virtual Server: Login to the router, click the “Forwarding” menu on the left of your browser, and click "Port forwarding" submenu. On the "Port Forwarding" page, enter “1720” into the blank below the “Service Port”, and your IP address below the IP Address, assuming 192.168.1.169 for an example, remember to click “Apply changes”.
(4) How to enable DMZ Host: Login to the router, click the “firewall settings” menu on the left of your browser, and click "DMZ" submenu. On the "DMZ" page, click “Enable DMZ” radio and type your IP address into the “DMZ Host IP Address” field, using 192.168.1.169 as an example, remember to click "Apply Changes”.
4. The wireless stations cannot connect to the router.
(1) Make sure the "Disable Wireless LAN Interface” is not select.
(2) Make sure that the wireless stations' SSID accord with the router's SSID.
(3) Make sure the wireless stations have right KEY for encryption when the router is encrypted.
(4) If the wireless connection is ready, but you can’t access the router, check the IP Address of your
wireless stations.

37
Contenido
Introducción ..............................................................................................................................
Sección Uno Resumen del producto ......................................................................................
1.1 Características del producto ...................................................................................................
1.2 Especificaciones ......................................................................................................................
Sección Dos Instalación del Hardware ...............................................................................
2.1 Disposición del Panel ..............................................................................................................
2.1.1 Panel Frontal .......................................................................................................................
2.1.2 Panel Trasero ......................................................................................................................
2.2 Requerimientos de Sistema ....................................................................................................
2.3 Ambiente de instalación ..........................................................................................................
2.4 Pasos para la instalación del Hardware .................................................................................
Sección Tres Guía de instalación rápida ..............................................................................
3.1 Configuración TCP/IP ..............................................................................................................
3.2 Asistente de instalación rápida ...............................................................................................
3.3 Modo de operación ..................................................................................................................
Sección Cuatro Guía de configuración ..............................................................................
4.1 Iniciar sesión ............................................................................................................................
4.2 Ajuste Inalámbrico (Wireless) .................................................................................................
4.2.1 Status del Wireless ..............................................................................................................
4.2.2 Ajustes básicos del Wireless ...............................................................................................
4.2.3 Ajustes del repetidor ............................................................................................................
4.2.4 Ajustes de AP Virtual ...........................................................................................................
4.2.5 Configuración WDS .............................................................................................................
4.2.6 Configuración Avanzada ......................................................................................................
4.2.7 Control de Acceso ...............................................................................................................
4.2.8 Configuración WPS .............................................................................................................
4.3 Configuración de TCP/IP .........................................................................................................
4.3.1 Status LAN ..........................................................................................................................
4.3.2 Status WAN .........................................................................................................................
4.3.3 Configuración de la Interface LAN .......................................................................................
4.3.4 Configuración de la Interface WAN ......................................................................................
4.4 Cortafuegos (Firewall) .............................................................................................................
4.4.1 Filtrado IP/Port ....................................................................................................................

38
4.4.2 Filtrado MAC .......................................................................................................................
4.4.3 Filtrado URL ........................................................................................................................
4.4.4 Reenvío de puertos .............................................................................................................
4.4.5 DMZ ....................................................................................................................................
4.5 Administración .........................................................................................................................
4.5.1 QoS .....................................................................................................................................
4.5.2 Configuración DDNS ...........................................................................................................
4.5.3 Configuración de Zona Horaria ............................................................................................
4.5.4 Negación de Servicio ...........................................................................................................
4.5.5 Registro ...............................................................................................................................
4.5.6 Mejora del Firmware ............................................................................................................
4.5.7 Configuración de Guardar/Recargar ....................................................................................
4.5.8 Configuración de Contraseña ..............................................................................................
Apéndice Preguntas frecuentes……………………………………………………

39
INTRODUCCIÓN
Gracias por adquirir el router de banda ancha ABIT Wireless-N. Esta guía para el usuario le
asistirá en los procesos de instalación.
El router de banda ancha inalámbrico es un producto de diseño híbrido que combina tecnología
Ethernet y acceso wireless (inalámbrico) en una misma unidad. Éste dispositivo le permite tomar
ventaja tanto en movilidad como en una rápida conexión. Todas las computadoras, tanto en Wireless
LAN como en Ethernet LAN pueden compartir archivos, impresoras y otros recursos de la red. Por
otra parte, todos los usuarios pueden compartir una misma cuenta de acceso a internet al tener
conectado el dispositivo a través de un Cable Modem DSL.
Cumple con los estándares IEEE 802.11n (Draft 2.0), Soporta hasta 150Mbps (1Tx-1Rx) de
velocidad de conexión inalámbrica, adoptando tecnología MIMO para asegurar un buen
funcionamiento, estabilidad y cobertura para brindarle una nueva experiencia agradable. Su tasa de
transmisión de datos inalámbricos puede llegar a ser 3 veces mejor que un router normal de
802.11b/g, y su cobertura puede ser hasta 4 veces mayor. Es una solución efectiva de alto desempeño
para su hogar u oficina.
El router provee múltiples sistemas de protección, los cuales permiten proteger la seguridad del
acceso inalámbrico de manera efectiva. Es muy sencillo de instalar y de configurar a través de una
interfaz amigable. Para una mejor aplicación de las funciones del router, favor lea este este manual
cuidadosamente.
Contenido del empaque
Abra la caja cuidadosamente y chequee el contenido listado a continuación:
Router Inalámbrico.

40
Adaptador de Corriente DC.
Cable Ethernet.
Manual de Usuario.
NOTA: Si alguna pieza del contenido listado se encuentra dañada o desaparecida, favor contactar
a la tienda donde adquirió el router de banda ancha inalámbrico para mayor asistencia.
SECCION UNO - RESUMEN DEL PRODUCTO
1.1 Características del producto
Cumple con los estándares IEEE 802.11n; 802.11g; 802.11b para 2.4Ghz LAN Inalámbrico.
Soporta PPPoE, Dirección IP dinámica y estática para funciones de banda ancha.
Soporta UPnP, DDNS, listado de enrutamiento estático.
Configuración de Wi-Fi protegido (WPS) establece su seguridad a través de un botón.
Soporta servidor virtual, aplicaciones especiales y host DMZ.
Soporta 64/128-bit de cifrado WEP y seguridad WPA-PSK, WPA2-PSK.
Cortafuegos integrado, soporta dirección de IP, MAC, Filtrado URL el cual controla
flexiblemente el acceso y el tiempo.
Servidor DHCP integrado.
Soporta WMM para señales de audio y video mejoradas.
Soporta configuración de respaldo de archivos y restauración.
Soporta control QoS de ancho de banda.
Soporta administración web remota y local.
1.2 ESPECIFICACIONES
Estándar IEEE802.11n current draft, IEEE 802.11g, IEEE 802.11b
IEEE 802.3, IEEE 802.3u, IEEE 802.3x
Protocolo CSMA/CA, CSMA/CD, TCP/IP, ICMP, NAT, PPPoE, DHCP, PPTP, UDP, NAT, DNS,
DDNS, VPN
Puertos LAN 4*100BaseTX (Auto MDI/MDIX)
Puertos WAN 1*100BaseTX (Auto MDI/MDIX)

41
Frecuencia RF 2.4~2.4835GHz
Tasa de Datos
11n: 150/135/121.5/108/81/54/40.5/27/13.5Mbps
130/117/104/78/52/39/26/13Mbps
72/65/58.5/52/39/26/19.5/13/6.5Mbps
11g: 54/48/36/24/18/12/9/6Mbps
11b: 11/5.5/2/1Mbps
Sensibilidad de
recepción
135M: -68dBm@10% PER
54M: -68dBm@10% PER
11M: -85dBm@8% PER
6M: -88dBm@10% PER
1M: -90dBm@8% PER
Canales
1-11 (Norteamérica)
1-13 (Europa)
1-14 (Japón)
Tecnología de
transmisión BPSK, QPSK, CCK y OFDM (BPSK/QPSK/16-QAM/ 64-QAM)
Tipo de antena 1*2.4GHz Antena Dipolo (1TX*1RX)
Modo de operación Punto de acceso estándar; Modo WAN Inalámbrico (Modo cliente inalámbrico),
WDS, WPS
Seguridad inalámbrica
Habilitar/Deshabilitar SSID; Dirección MAC, Filtros IP and URL; 64/128/152-bit
Cifrado WEP
WPA/WPA2/WPA-PSK/WPA2-PSK (AES/TKIP) Cifrado
Potencia RF
11g:14-16dbm
11b:17-19dbm
11n:13-15dbm
Chipset RTL8196C
LED 1*Power, 1*CPU Status,1*Wireless, 1*WAN, 4*LAN
Administración Configuración web basada en Local/Remoto
Temperatura de
operación 0 ~ 40°C
Almacenamiento -40 ~ 70°C
Humedad 5 ~ 95% no condensada
Adaptador de corriente
externo
Input 100V~240V
Output DC5V, 1A;
SECCION DOS - INSTALACIÓN DEL HARDWARE

42
2.1- Disposición del panel
2.1.1 – Panel Frontal
El panel frontal del router inalámbrico 11N consiste de varios indicadores LED los cuales están
diseñados para indicar las conexiones.
Indicadores LED
Nombre del LED Acción Descripción
POWER Apagado Apagado
Encendido Encendido
CPU Apagado El router tiene un error de hardware
Intermitente El router funciona correctamente
WLAN Apagado Función inalámbrica desactivada
Intermitente Función inalámbrica habilitada
WAN /LAN1, 2, 3, 4
Apagado No hay dispositivo conectado al puerto
Encendido Hay un dispositivo conectado al puerto
Intermitente Hay un dispositivo activo conectado al puerto
2.1.2 Panel Trasero
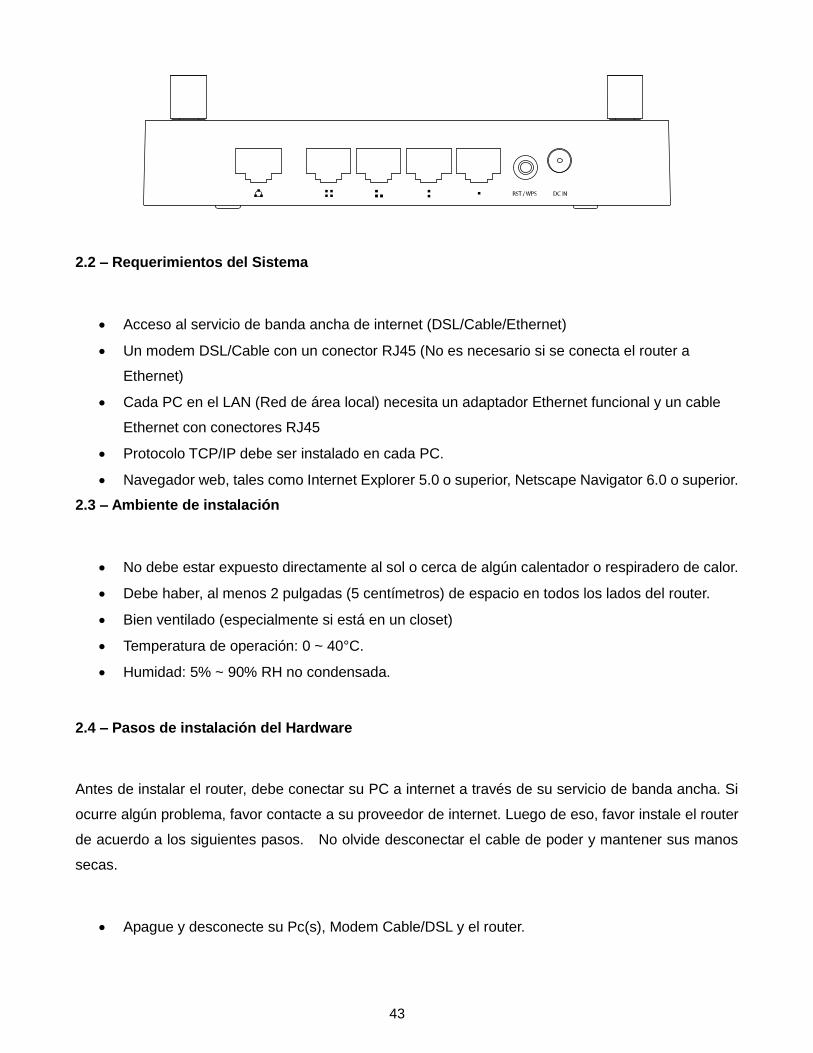
43
2.2 – Requerimientos del Sistema
Acceso al servicio de banda ancha de internet (DSL/Cable/Ethernet)
Un modem DSL/Cable con un conector RJ45 (No es necesario si se conecta el router a
Ethernet)
Cada PC en el LAN (Red de área local) necesita un adaptador Ethernet funcional y un cable
Ethernet con conectores RJ45
Protocolo TCP/IP debe ser instalado en cada PC.
Navegador web, tales como Internet Explorer 5.0 o superior, Netscape Navigator 6.0 o superior.
2.3 – Ambiente de instalación
No debe estar expuesto directamente al sol o cerca de algún calentador o respiradero de calor.
Debe haber, al menos 2 pulgadas (5 centímetros) de espacio en todos los lados del router.
Bien ventilado (especialmente si está en un closet)
Temperatura de operación: 0 ~ 40°C.
Humidad: 5% ~ 90% RH no condensada.
2.4 – Pasos de instalación del Hardware
Antes de instalar el router, debe conectar su PC a internet a través de su servicio de banda ancha. Si
ocurre algún problema, favor contacte a su proveedor de internet. Luego de eso, favor instale el router
de acuerdo a los siguientes pasos. No olvide desconectar el cable de poder y mantener sus manos
secas.
Apague y desconecte su Pc(s), Modem Cable/DSL y el router.

44
Localice una ubicación óptima para el router. El mejor lugar es usualmente cerca del centro
del área en la cual su PC se conectará inalámbricamente. El lugar debe corresponder con las
condiciones del Ambiente requeridas para la instalación.
Ajuste la dirección de la antena. Normalmente, hacia arriba es la mejor dirección.
Conecte la(s) PC(s) y cada interruptor en su LAN (red de área local) a los puertos LAN del
router.
Conecte el modem Cable/DSL al puerto WAN del router.
Conecte el adaptador de corriente al enchufe de corriente AC en el router, y el otro extremo en
una fuente de energía. El router se encenderá automáticamente.
Encienda su(s) PC(s) y el Modem Cable/DSL
SECCIÓN TRES - GUÍA DE INSTALACIÓN RÁPIDA
Luego de conectar el router inalámbrico 11N a su red, usted ahora debe configurarlo. Este capítulo
describe como configurar las funciones básicas de su router inalámbrico 11N. Estos procedimientos
sólo le tomarán unos minutos. Usted podrá acceder a internet a través del router inmediatamente
luego de configurarlo satisfactoriamente.
3.1 - Configuración TCP/IP

45
La dirección de IP predeterminada del router es 192.168.1.1, y la máscara de subred predeterminada
es 255.255.255.0. Estos valores pueden ser visualizados desde LAN. Pueden ser cambiados cuando
desee, como ejemplo utilizamos los valores predeterminados en esta guía.
Conecte su PC a los puertos LAN en el router. Hay, entonces, dos maneras de configurar la dirección
IP de su PC.
Configurar la dirección IP manualmente
1. Establezca el protocolo TCP/IP para su(s) PC(s).
2. Configure los parámetros de la red. La dirección IP es 192.168.1.xxx ("xxx" va de 2 a 254), la
Máscara de subred es 255.255.255.0, y la entrada es 192.168.1.1 (La dirección IP predeterminada del
router).
Obtener la dirección IP automáticamente
1. Establezca el protocolo TCP/IP en el modo “Obtain an IP address automatically” en su(s) PC(s).
2. Apague la(s) PC(s) y el Router. Luego encienda el router y reinicie la(s) PC(s). El servidor DHCP
integrado asignará una dirección IP para las PC(s).
Ahora puede correr el comando PING en el “Command Prompt” para verificar la conexión en red entre
su(s) PC(s) y el router. Presione Start -> Run, escriba el comando “cmd” y luego presione OK. Abra un
“command prompt” y escriba ping 192.168.1.1, luego presione ENTER.
Si el resultado mostrado es similar al que se muestra en la figura superior, la conexión entre su(s)
PC(s) y el router ha sido exitosamente establecida.

46
Si el resultado mostrado es similar al que se muestra en la figura superior, significa que su(s) PC(s) no
se ha conectado con el router. Favor verifíquelo siguiendo los próximos pasos:
1. ¿Es la conexión entre su PC y el router correcta?
NOTA: Los indicadores LEDs 1, 2, 3, 4 de los puertos LAN del router y los indicadores LEDs en su PC
deben estar encendidos.
2. ¿Es correcta la configuración TCP/IP para su PC?
NOTA: Si la dirección IP del router es 192.168.1.1, la dirección IP de su PC debe estar entre el rango
de 192.168.1.2 ~ 192.168.1.254, la entrada debe ser 192.168.1.1.
3.2 – Asistente de instalación rápida
Con una utilidad basada en web (Internet Explorer o Netscape Navigator, Mozilla Firefox, Google
Chrome), el router inalámbrico 11N es sencillo de configurar y administrar. La utilidad basada en web
puede ser utilizada en ambiente Windows, Macintosh o UNIX OS con un navegador web.
Conéctese al router escribiendo http://192.168.1.1 en el campo de dirección de su navegador web.
47
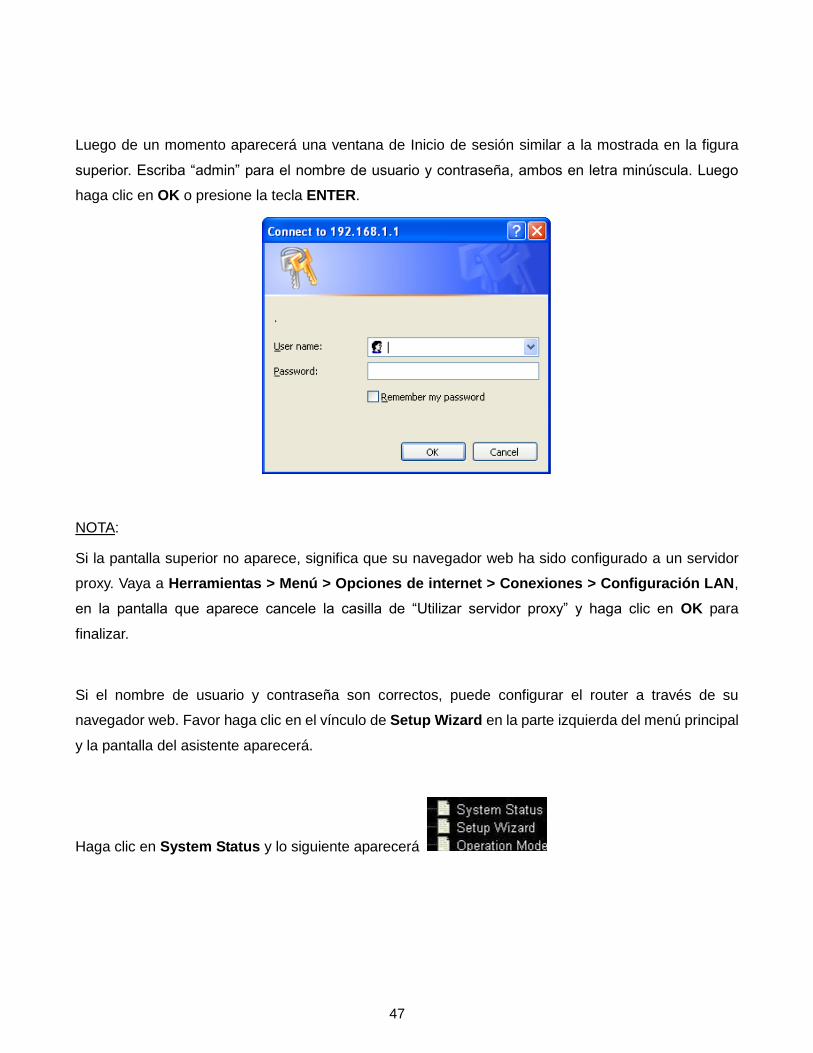
Luego de un momento aparecerá una ventana de Inicio de sesión similar a la mostrada en la figura
superior. Escriba “admin” para el nombre de usuario y contraseña, ambos en letra minúscula. Luego
haga clic en OK o presione la tecla ENTER.
NOTA:
Si la pantalla superior no aparece, significa que su navegador web ha sido configurado a un servidor
proxy. Vaya a Herramientas > Menú > Opciones de internet > Conexiones > Configuración LAN,
en la pantalla que aparece cancele la casilla de “Utilizar servidor proxy” y haga clic en OK para
finalizar.
Si el nombre de usuario y contraseña son correctos, puede configurar el router a través de su
navegador web. Favor haga clic en el vínculo de Setup Wizard en la parte izquierda del menú principal
y la pantalla del asistente aparecerá.
Haga clic en System Status y lo siguiente aparecerá

48
Haga clic en Setup Wizard, el asistente de configuración aparecerá.
El router soporta tres modalidades: Gateway, Bridge, Wireless (Entrada, puente e ISP inalámbrico).
Usted puede configurar diferentes modos de interfaz LAN, WLAN para NAT y función de puente.
49
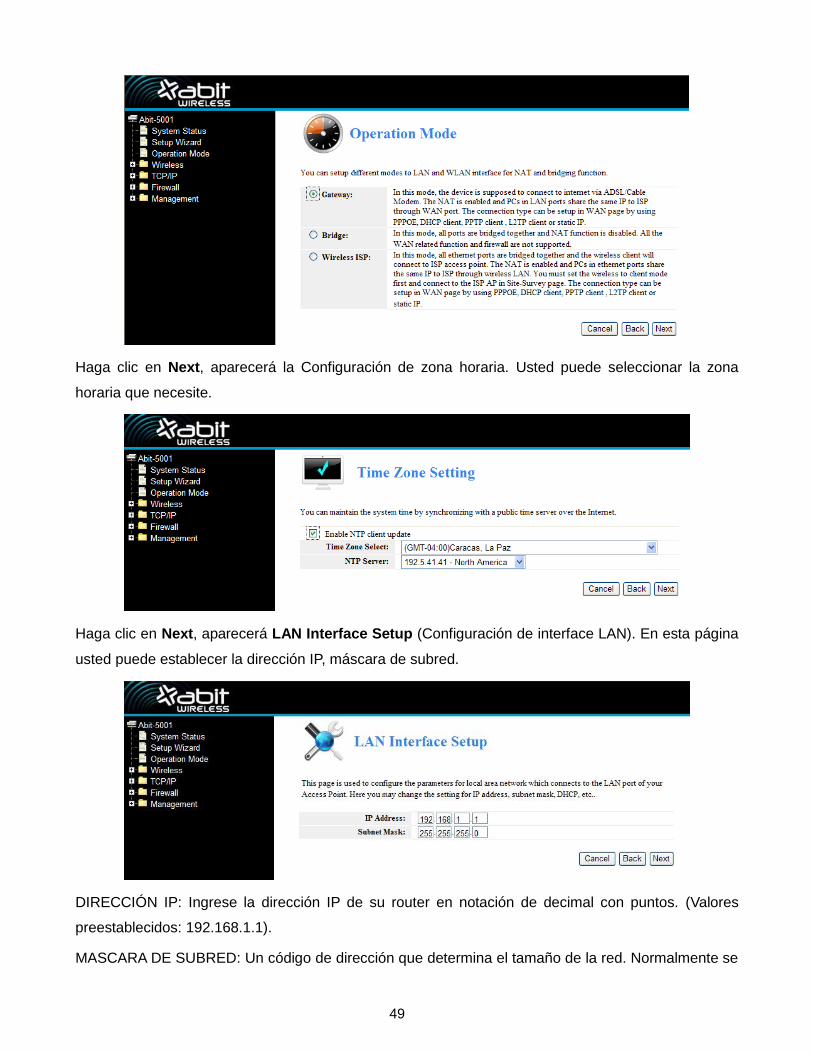
Haga clic en Next, aparecerá la Configuración de zona horaria. Usted puede seleccionar la zona
horaria que necesite.
Haga clic en Next, aparecerá LAN Interface Setup (Configuración de interface LAN). En esta página
usted puede establecer la dirección IP, máscara de subred.
DIRECCIÓN IP: Ingrese la dirección IP de su router en notación de decimal con puntos. (Valores
preestablecidos: 192.168.1.1).
MASCARA DE SUBRED: Un código de dirección que determina el tamaño de la red. Normalmente se

50
usa 255.255.255.0 como máscara de subred.
NOTA: Todas las máscaras de subred de sus PCs deben ser la misma con el router en su red de área
local (LAN)
Haga clic en Next, aparecerá WAN Interface Setup (Configuración de interface WAN). Esta página es
utilizada para configurar los parámetros de la red de internet la cual se conecta al puerto WAN de su
punto de acceso.
WAN Access Type (Tipo de acceso WAN): Aquí puede seleccionar el método de acceso a IP estática,
DHCP, PPPoE o PPTP haciendo clic en el valor del ítem del WAN Access Type.
Si selecciona PPPoE, el router automáticamente recibirá los parámetros IP de su proveedor de
servicios de internet (ISP) sin necesidad de ingresar ningún parámetro.
User Name and Password – Ingrese el nombre de usuario y contraseña dado por su proveedor de
servicios de internet (ISP).

51
Si selecciona DHCP, el router automáticamente recibirá los parámetros IP de su proveedor de
servicios de internet (ISP) sin necesidad de ingresar ningún tipo de parámetros.
Si selecciona PPTP, la página de configuración de IP estática aparecerá como se muestra en la figura.
Usted puede obtener dirección IP máscara de subred, dirección IP de servidor, Nombre de usuario y
contraseña de su proveedor de servicios de internet (ISP). Si selecciona Static IP (Dirección IP
estática), la página de configuración de IP estática aparecerá como se muestra en la figura.

52
NOTA: Los parámetros IP deben haber sido dados por su proveedor de servicios de internet.
DIRECCIÓN IP: Esta es la dirección IP WAN vista por usuarios externos en internet (incluyendo su
proveedor de servicios de internet). Ingrese la dirección IP en el campo.
MÁSCARA DE SUBRED: La máscara de subred es utilizada para la dirección IP WAN. Usualmente es
255.255.255.0.
ENTRADA DETERMINADA: Ingrese la entrada en la casilla de ser requerido.
DNS: Ingrese el IP del servidor DNS en las casillas de ser requerido.
Haga clic en Next, aparecerá Wireless Basic Settings (Configuración Básica del Wireless).

53
(Esta página es utilizada para configurar estos parámetros)
Band (Banda): Indica el modo de corriente 2.4GHz (B+G+N), 2.4GHz (G+B), 2.4GHz (B)
Mode (Modo): El modo predeterminado es AP; usted puede seleccionar Infrastructure Client o AP
(Cliente de infraestructura o Punto de Acceso).
SSID: Ingrese un valor de hasta 32 caracteres. El SSID predeterminado es CD-R KING, pero es
altamente recomendado que se cambie el nombre de la red (SSID) a un valor diferente.
Channel (Canal): Este campo determina la frecuencia operativa a utilizar. No es necesario cambiar los
canales inalámbricos a menos que encuentre problemas de interferencia con otros puntos de accesos
cercanos.
Haga clic en Next, aparecerá Wireless Security Settings (Configuración Básica Inalámbrica). Esta
página le permite establecer la seguridad de la red inalámbrica. Encienda la WEP o WPA utilizando
las teclas de cifrado. Esto ayuda a prevenir cualquier acceso no autorizado a su conexión en red
inalámbrica. Puede seleccionar Open (Abierto), WEP, WPA-PSK, WPA2 -PSK.
Haga clic en Finished, para terminar la configuración.

54
NOTA: Si cambia los parámetros del wireless, el router se reiniciará automáticamente.
WPA-PSK: Provee TKIP (Protocolo temporal de clave integrada) o AES (Cifrado avanzado
predeterminado). El predeterminado es modo TKIP.
WPA2-PSK: WPA2-PSK (Acceso protegido a Wi-Fi versión 2) provee una mayor seguridad que la
WEP (Privacidad equivalente inalámbrica) y WPA (Acceso protegido inalámbrico)
3.3 Modo de operación
Gateway (Entrada): (predeterminada) En este modo, el dispositivo debe conectarse a internet a través
del modem Cable/DSL. El NAT está habilitado y los puertos LAN de la(s) PC(s) comparten las mismas
direcciones IP con el proveedor de servicios de internet a través del puerto WAN. El tipo de conexión
puede ser establecido en la página WAN utilizando clientes PPPOE, DHCP, cliente PPTP o dirección
de IP estática.
Brigde (Puente): En este modo, todos los puertos Ethernet e interface inalámbrica son direccionados

55
en conjunto y la función NAT está deshabilitada. Todas las funciones relacionadas con WAN y
cortafuegos no son admitidas.
Wireless ISP (Proveedor de servicios de internet inalámbrico): En este modo, todos los puertos
Ethernet son direccionados en conjunto y el cliente inalámbrico se conectará al punto de acceso de su
proveedor de servicios de internet. El NAT está habilitado y los puertos de acceso de la(s) PC(s)
comparten las mismas direcciones IP con el proveedor de servicios de internet a través de LAN
inalámbrica. Debe establecer el wireless en “modo cliente” primero y conectarse a la página de
encuesta local de su proveedor de servicios de internet. El tipo de conexión puede ser establecido en
la página WAN utilizando clientes PPPOE, DHCP, Cliente PPTP, Cliente LT2P o dirección IP estática.
SECCION CUATRO - GUIA DE CONFIGURACIÓN
4.1 Iniciar sesión
Luego de iniciar sesión satisfactoriamente, el navegador le mostrará el administrador WEB. En la parte
izquierda está “Navigation”. Contiene: System Status, Setup Wizard, Operation Mode, Wireless,
TCP/IP, Firewell, Management, ect (Estado de sistema, Asistente de configuración, Modo de
operación, Wireless, TCP/IP, Cortafuego, Administración, etc).

56
4.2 Configuración inalámbrica
Contiene Wireless Basic Settings, Repeater Settings, Virtual AP Settings, WDS Settings, Advance
Settings, Access Control and WPS (Configuración Inalámbrica Básica, Ajustes del Repetidor, Ajustes
de AP Virtual, Ajustes WDS, Ajustes Avanzados, Control de Acceso y WPS.
4.2.1 Estado del wireless
Esta página muestra el estado actual y algunos ajustes básicos del dispositivo. Puede chequear la
información de sistema, información de la interface del repetidor, información de la interface WLAN.
4.2.2 Ajustes básicos del wireless
Esta página se utiliza para configurar los parámetros de los clientes LAN inalámbricos que se pueden
conectar a su Access Point (Punto de Acceso). Aquí puede cambiar tanto la configuración de cifrado
del wireless como los parámetros de su red inalámbrica.

57
Wired Equivalent Privacy (Privacidad equivalente con cable) WEP, un método básico de cifrado,
usualmente cifra datos inalámbricos utilizando series de claves digitales (64 bits o 128 bits en
longitud). Al utilizar las mismas claves en cada una de sus dispositivos de red inalámbricos, se puede
prevenir la intrusión de dispositivos de red inalámbricos no autorizados, monitorear las transmisiones o
utilizar diferentes recursos de red inalámbricos. Seleccione Mixed WEP (WEP mixto) para entrar en la
siguiente ventana.
Security (Seguridad): Sobre el menú desplegable, seleccione los correspondientes modos de
seguridad de cifrado.
WEP: Establezca la clave WEP con el formato de ASCII y HEX. Usted puede ingresar al código ASCII
(5 o 13 caracteres ASCII. Caracteres como “/” no son permitidos) o también a través del código HEX
10/26 caracteres.
4.2.3 Configuración del repetidor

58
Esta página es utilizada para configurar los parámetros de clientes inalámbricos LAN los cuales se
pueden conectar a su punto de acceso. Aquí usted puede cambiar la configuración del cifrado
inalámbrico y los parámetros de red inalámbrica.
Modo: Predeterminado es AP.
SSID: Ingrese un valor de hasta 32 caracteres. El mismo nombre (SSID) debe ser asignado a todos los
dispositivos inalámbricos de su red. El nombre (SSID) predeterminado es “repeater” pero es altamente
recomendado que se cambie el nombre de la red (SSID) a un valor diferente.
Channel (Canal): Este campo determina la frecuencia operativa a utilizar. No es necesario cambiar los
canales inalámbricos a menos que encuentre problemas de interferencia con otros puntos de accesos
cercanos.
4.2.4 Configuración virtual AP

59
Esta página muestra y actualiza la configuración wireless para múltiples AP (Puntos de Acceso).
4.2.5 Configuración WDS
Wireless Distribution System (Sistema de distribución inalámbrica) (WDS) utiliza medios inalámbricos
para comunicarse con otros APs, tal y como hace el Ethernet. Para realizar esto, usted debe
establecer estos puntos de acceso en el mismo canal y establecer la dirección MAC de los demás
puntos de acceso con los que desea comunicarse y luego habilitar el sistema de distribución

60
inalámbrica (WDS).
4.2.6 Opciones Avanzadas.
Estos ajustes son únicamente para usuarios más técnicamente avanzados ya que deben poseer
suficiente conocimiento acerca de LAN inalámbrico. Estos ajustes no deben ser modificados a menos
que se conozcan los efectos que ocasionarán sobre su punto de acceso.
4.2.7 Control de acceso

61
Si usted selecciona Allow Listed (Lista permitida), únicamente esos clientes cuyas direcciones
inalámbricas MAC se encuentran dentro de la lista de control son los que se podrán conectar a su
punto de acceso. Cuando selecciona Deny Listed (Listado denegado), dichos clientes inalámbricos en
la lista no podrán conectarse al punto de acceso.
4.2.8 Configuración WPS
WPS (Configuración de Wi-Fi protegido) puede fácil y rápidamente establecer la conexión entre los
clientes de red inalámbrica y el dispositivo a través de vías cifradas. Los usuarios deben únicamente
ingresan un código PIN o presionar el botón RST/WPS en el panel para configurarlo. En el menú de
configuración “Wireless” ubicado en la parte izquierda, haga clic en WPS para ingresar en la próxima
pantalla.
Esta página le permite cambiar la configuración para el WPS (Configuración de Wi-Fi protegido).
Utilizar esta opción le permite a sus clientes inalámbricos automáticamente sincronizar sus ajustes y
conectarse al punto de acceso en un minuto sin ningún tipo de inconvenientes.
WPS: Habilita o deshabilita la función WPS. Lo predeterminado es “deshabilitado”
Número de Auto-Pin: La clave efectiva generada automáticamente por AP.
Configuración del pulsador: Provee dos maneras: PBC (Configuración del pulsador) y código PIN.

62
PBC: Seleccione PBC o presione el botón RST/WPS en el panel frontal del dispositivo por un segundo
(presione el botón durante un segundo y el indicador WPS estará titilando por alrededor de 2 minutos,
lo que significa que el WPS está habilitado). Mientras el indicador esté titilando, usted puede habilitar
otro dispositivo para implementar la negociación WPS/PBC entre ellos. Dos minutos más tarde, el
indicador WPS se apagará, lo que significa que la conexión WPS ha sido completada. Si desea añadir
más clientes, repita los pasos indicados anteriormente.
Numero PIN de cliente: Si esta opción es habilitada, usted necesitará ingresar un código PIN para los
clientes inalámbricos y mantener el mismo código en el cliente WPS.
4.3 Configuración TCP/IP
4.3.1 Estado de LAN
Esta página muestra el estado actual y algunas funciones básicas del dispositivo. Usted puede
chequear la información del sistema y la información de interfaz LAN.
Dirección MAC: La dirección física del router, vista por la red de área local (LAN). El valor no puede
ser modificado.
Dirección IP: Ingrese la dirección IP de su router en notación decimal con puntos (Valores de fábrica:
192.168.1.1)
Máscara de subred: Un código de dirección que determina el tamaño de la red. Normalmente se
utiliza 255.255.255.0 como máscara de subred.
63
DHCP: Puede seleccionar None, Client and Serve (Ninguno, Cliente, Servir). El router está
establecido predeterminadamente como un servidor DHCP (Protocolo de configuración dinámica de
host), el cual provee la configuración TCP/IP para todas las PCs conectados al router en la red de área
local (LAN).
Rango de clientes DHCP: Este campo especifica la primera de las direcciones en el conjunto de
direcciones IP.
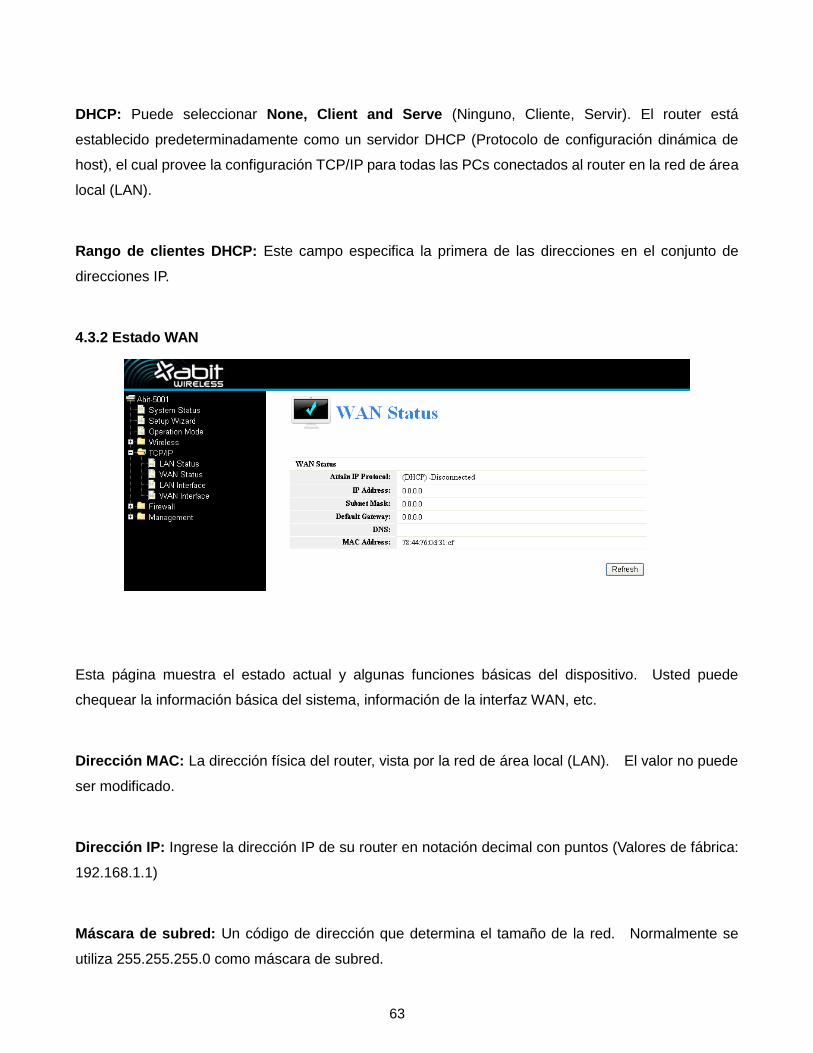
4.3.2 Estado WAN
Esta página muestra el estado actual y algunas funciones básicas del dispositivo. Usted puede
chequear la información básica del sistema, información de la interfaz WAN, etc.
Dirección MAC: La dirección física del router, vista por la red de área local (LAN). El valor no puede
ser modificado.
Dirección IP: Ingrese la dirección IP de su router en notación decimal con puntos (Valores de fábrica:
192.168.1.1)
Máscara de subred: Un código de dirección que determina el tamaño de la red. Normalmente se
utiliza 255.255.255.0 como máscara de subred.

64
4.3.3 Configuración de la interfaz LAN
Esta página es utilizada para configurar los parámetros de la red de área local, la cual se conecta al
puerto LAN en su punto de acceso. Aquí usted podrá cambiar la configuración de la dirección IP,
máscara de subred, DHCP, etc.
4.3.4 Configuración de la interfaz WAN

65
Esta página es utilizada para configurar los parámetros de la red de área local, la cual se conecta al
puerto WAN en su punto de acceso. Aquí usted puede seleccionar el método de acceso a Dirección de
IP estática, DHCP, PPPoE o PPTP haciendo clic en el ítem del tipo de acceso WAN.
4.4 Cortafuegos
4.4.1 Filtrado IP/Puerto

66
Esta tabla es utilizada para restringir cierto tipo de paquetes de datos desde su red local hasta internet
a través de una entrada. El uso de dichos filtros puede ser de gran beneficio para asegurar o restringir
su red local.
IP/Port Filtering (Filtrado IP/Port): Si selecciona “White List” (Lista blanca), sólo aquellos clientes
cuyas direcciones IP se encuentren en la lista podrán conectarse a su punto de acceso. Cuando
selecciona “Black List” (Lista negra), las direcciones IP que se encuentren en dicha lista no podrán
conectarse a su punto de acceso.
IP Address Range (Rango de dirección IP): Ingrese el rango de dirección IP para la regla.
Port Range (Rango de puerto): Ingrese el puerto del filtro, por ejemplo 20-200.
Rotocol (Protocolo): Puede seleccionar tanto TCP como UDP.
Current Filter Table (Tabla de filtrado actual): La lista de los puertos del filtro.

67
4.4.2 Filtrado MAC
Las entradas en esta tabla son utilizadas para restringir cierto tipo de paquetes de datos desde su red
local hasta la internet a través de una entrada. El uso de dichos filtros puede ser de gran beneficio para
asegurar o restringir su red local.
MAC Filtering (Filtrado MAC): Si selecciona “White List” (Lista blanca), sólo aquellos clientes cuyas
direcciones MAC se encuentren en la lista podrán conectarse a su punto de acceso. Cuando
selecciona “Black List” (Lista negra), las direcciones MAC que se encuentren en dicha lista no podrán
conectarse a su punto de acceso.
MAC Address (Dirección MAC): Ingrese la dirección MAC, por ejemplo: 78:44:76:3F:2D:C5.
Current Filter Table (Tabla de filtrado actual): La lista de filtros MAC.
4.4.3 Filtrado URL

68
El filtrado URL es utilizado para denegar el acceso a internet a ciertos usuarios de su red de área local
(LAN). Bloquee aquellos URLs que contengan las palabras claves listadas a continuación.
URL Filtering (Filtrado URL): Si selecciona “White List” (Lista blanca), sólo aquellos clientes cuyas
direcciones URL se encuentren en la lista podrán conectarse a su punto de acceso. Cuando
selecciona “Black List” (Lista negra), las direcciones URL que se encuentren en dicha lista no podrán
conectarse a su punto de acceso.
URL Address (Dirección URL): Ingrese la dirección URL, haga clic en Apply Changes (Aplicar
cambios).
4.4.4 Port Forwarding (Reenvío de puertos)
Las entradas en esta tabla le permiten redirigir automáticamente servicios comunes de la red hacia
una máquina específica detrás del cortafuegos NAT. Estos ajustes son sólo necesarios si desea
hospedar alguna especie de servidor, tipo un servidor web o servidor de correo electrónico dentro de

69
su red local privada, detrás del cortafuegos de entrada NAT.
Port Forwarding (Reenvío de puertos): Seleccione esta opción para activarlo.
IP Address (Dirección IP): La dirección IP de la PC que ejecuta la aplicación de servicio.
Protocol (Protocolo): se refiere al protocolo utilizado para esta aplicación, ya sea TCP, UDP o ambos
(todos los protocolos permitidos por el router).
Port Range (Rango de puertos): se refiere a los números de puertos externos. Usted puede ingresar
a un servicio de puertos o a un rango de puertos de servicios (el formato es XXX – YYY, XXX es el
puerto de Inicio, YYY es el puerto de FIN).
Current Port Forward Table (Tabla actual de reenvío de puertos): Lista de servicios de reenvío de
puertos.
4.4.5 DMZ
La característica de hospedaje DMZ permite a un host local ser expuesto a internet con un propósito
de servicio especial tal como jugar en internet o videoconferencia. El hospedaje DMZ reenvía todos los
puertos al mismo tiempo. Cualquier PC cuyo puerto ha sido reenviado, debe tener su función de
cliente DHCP desactivada y debe tener una nueva dirección IP estática asignada ya que su dirección
IP puede cambiar cuando se utiliza la función DHCP.
DMZ Enable (Habilitar DMZ): Seleccione esta opción y el DMZ puede ser editado.
DMZ Host IP Address (Dirección IP del host DMZ): Ingrese una dirección IP. Por ejemplo
192.168.1.27.
Haga clic en “Apply Changes” (Aplicar Cambios), complete la configuración DMZ.
4.5 Administración

70
4.5.1QoS
NOTA: Si usted añade alguna regla QoS, la función DoS no tendrá efecto.
Esta página es utilizada para ayudar al usuario a configurar los parámetros QoS.
Máximo ancho de banda provisto por su ISP: Indica el máximo ancho de banda para la subida y
bajada de flujo de datos.
Dirección: Dirección del flujo de datos. La subida de flujo se refiere a los datos salientes de su red de
área local (LAN). Bajada de flujo significa datos entrantes a su red de área local (LAN).
Rango de dirección IP: La dirección IP de su PC en la red de área local (LAN).
Tasa mínima y tasa máxima: La tasa mínima y máxima que usted le asigna a su dirección IP.
Ancho de banda compartido: se refiere a la forma de compartir el ancho de banda.
Habilitar: Activar o desactivar esta regla.
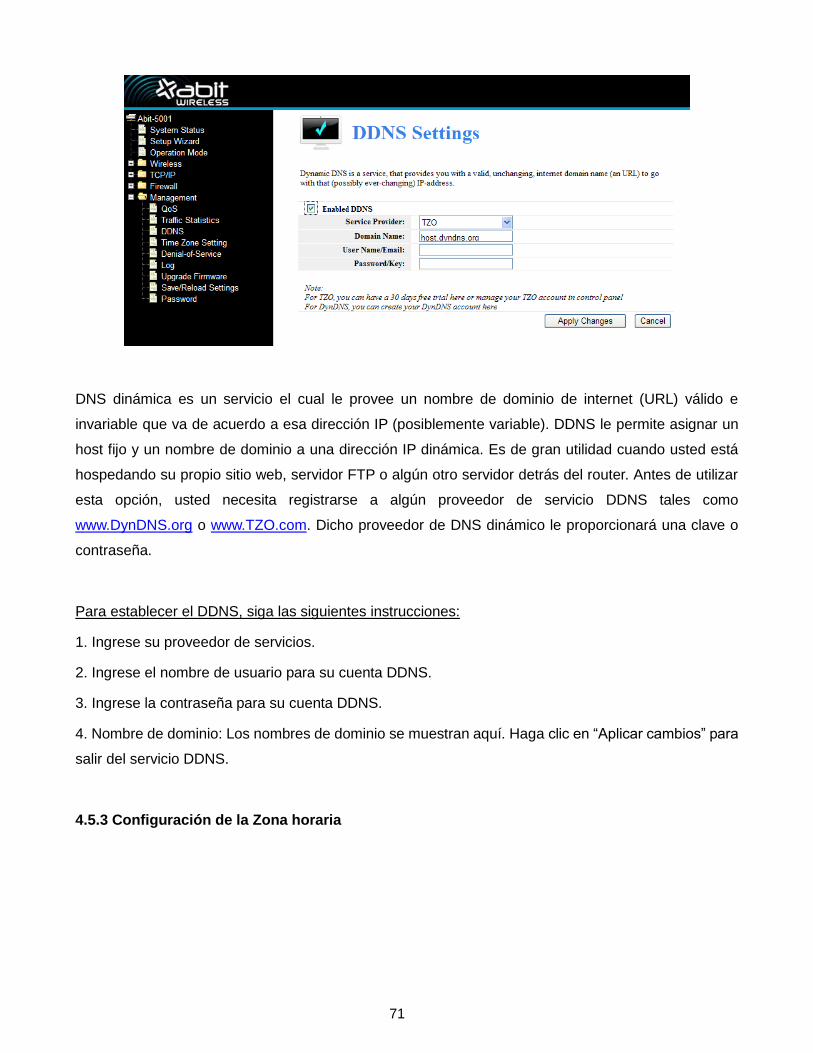
4.5.2 Configuración DDNS
71
DNS dinámica es un servicio el cual le provee un nombre de dominio de internet (URL) válido e
invariable que va de acuerdo a esa dirección IP (posiblemente variable). DDNS le permite asignar un
host fijo y un nombre de dominio a una dirección IP dinámica. Es de gran utilidad cuando usted está
hospedando su propio sitio web, servidor FTP o algún otro servidor detrás del router. Antes de utilizar
esta opción, usted necesita registrarse a algún proveedor de servicio DDNS tales como
www.DynDNS.org o www.TZO.com. Dicho proveedor de DNS dinámico le proporcionará una clave o
contraseña.
Para establecer el DDNS, siga las siguientes instrucciones:
1. Ingrese su proveedor de servicios.
2. Ingrese el nombre de usuario para su cuenta DDNS.
3. Ingrese la contraseña para su cuenta DDNS.
4. Nombre de dominio: Los nombres de dominio se muestran aquí. Haga clic en “Aplicar cambios” para
salir del servicio DDNS.
4.5.3 Configuración de la Zona horaria

72
Usted puede mantener la hora del sistema sincronizándolo con un servidor público a través de
internet.
Current Time (Fecha actual): Ingrese la fecha y hora.
Time Zone Select (Selección de Zona horaria): Seleccione su zona horaria local del menú
desplegable.
Enable NTP Client Update (Habilitar actualización de cliente NTP): Seleccione esta opción, usted
podrá obtener la fecha a través de un NTP.
Servidor NTP: Seleccione un servidor de la lista.
Haga clic en “Apply Changes” (Aplicar cambios) y obtenga la fecha desde internet si usted está
conectado.
4.5.4 Negacióndeservicio

73
Un ataque de “Denial of Service” (negación de servicio) (DoS) está caracterizado por el intento
explícito de intrusos (hackers) para prevenir que los usuarios legítimos de un servicio sean capaces de
utilizar dicho servicio.
Enable DoS PRevention (Habilitar prevención DoS): Seleccione esta opción, usted podrá cambiar
la prevención DoS.
Enable Sourse IP Blocking (Habilitar el bloqueo de fuente IP): Puede ingresar la hora de bloqueo
de la fuente IP.
Haga clic en “Apply Changes (Aplicar cambios) y la negación de servicio surtirá efecto.

74
4.5.5 Log
Esta página es utilizada para establecer un servidor log remoto y mostrar el log del sistema.
4.5.6 Upgrade Firmware (Mejora del firmware)
Esta página le permite mejorar el firmware del punto de acceso a una nueva versión. Favor tome en
cuenta, no apague el dispositivo durante el proceso de descarga ya que puede ocasionar daños en el
sistema.

75
4.5.7 Save/Reload settings (Configuración de Guardar/Recargar)
Esta página le permite guardar la configuración actual en un archivo o volver a cargar los ajustes en un
archivo guardado anteriormente. Además, usted puede resetear la configuración actual a la
configuración por defecto de fábrica.
4.5.8 Configuración de contraseña
Esta página es utilizada para establecer la cuenta de acceso al servidor web a través del AP.
APENDICE / PREGUNTAS FRECUENTES
1. ¿Cómo configuro el router para acceder a internet a través de usuarios ADSL?

76
(1) Primero, configure el modem ADSL configurado en modo puente RFC1483.
(2) Conecte el cable Ethernet de su modem ADSL al puerto WAN en el router. El cable del teléfono se
enchufa en la línea de puerto del modem ADSL.
(3) Inicie sesión en el router, haga clic en el menú “TCP/IP Settings” (Configuración TCP/IP) en la
parte izquierda de su navegador y haga clic en el submenú “WAN Interface” (Interfaz WAN). En la
página de WAN, seleccione PPPoE para tipo de conexión WAN. Ingrese el nombre de usuario y la
contraseña en sus respectivas casillas, finalice haciendo clic en “Connect” (Conectar).
(4) Si su contrato ADSL está en modo “Pay-According-Time” (pago de acuerdo a tiempo),
seleccione “Connect on Demand” (Conectar cuando se requiera) o “Manual” (Manual) para el tipo
de conexión a internet. Ingrese un número de tiempo apropiado para evitar desperdiciar el tiempo
pagado. De otra forma, usted puede seleccionar modo “Continuous” (Continuo) para el tipo de
conexión a internet permanente.
2. ¿Cómo configuro el router para acceder a internet a través de usuarios Ethermet?
(1) Inicie sesión en el router, haga clic en el menú “TCP/IP Settings” (Configuración TCP/IP) en la
parte izquierda de su navegador y haga clic en el submenú “WAN Interface” (Interface WAN). En la
página de WAN, seleccione “DHCP” como “Client” (Cliente), finalice haciendo clic en “Applay
Changes” (Aplicar cambios).
(2) Algunos proveedores de servicios de internet requieren que registre la dirección MAC de su
adaptador, la cual se obtiene al conectar su Cable o modem DSL durante la instalación. Si su
proveedor requiere el registro MAC, inicie sesión en el router y haga clic en el menú de “TCP/IP
Settings” (Configuración TCP/IP) en la parte izquierda de su navegador. Luego haga clic en “LAN
Interface” (Interfaz LAN), si la dirección MAC de su PC es una dirección propia, ingrese dicha
dirección y ésta rellenará el campo de “Cone MAC Address” (Dirección MAC clonada). El formato
de la dirección MAC es XX-XX-XX-XX-XX-XX. Haga clic en el botón “Apply Changes” (Aplicar
cambios). Esta operación tomará efecto luego de reiniciar.
3. Deseo usar net meeting, ¿qué debo hacer?
(1) Si usted utiliza Net Meeting como patrocinador, no necesita hacer nada con el router.
(2) Si usted comienza como “responsor”, necesita configurar el Virtual Server (Servidor Virtual) o DMZ
host.
(3) Cómo configurar Virtual Server: Inicie sesión en el router, haga clic en el menú de “Forwarding”
(Reenvío) en la parte izquierda de su navegador y haga clic en el submenú “Port Forwarding”

77
(Reenvío de Puertos). En la página de Reenvío de puertos, ingrese “1720” en el espacio en blanco
debajo de “Service Por” (Puerto de servicio) y su dirección IP debajo de “Dirección IP”, tomando
como ejemplo 192.168.1.169. Haga clic en “Apply Changes” (Aplicar cambios).
(4) Cómo habilitar el host DMZ: Inicie sesión en el router, haga clic en el menú “Firewell Settings”
(Configuración del cortafuegos) en la parte izquierda de su navegador y haga clic en el submenú
“DMZ”. En la página de “DMZ” haga clic en “Enable DMZ” (Habilitar DMZ) e ingrese su dirección IP
en el campo “DMZ Host IP Address” (Dirección IP de host DMZ), tomando como ejemplo
192.168.1.169. Haga clic en “Apply Changes” (Aplicar cambios).
4. Las estaciones inalámbricas no se pueden conectar al router.
(1) Asegúrese que “Disable Wireless LAN Interface” (Deshabilitar la interfaz LAN inalámbrica) no
esté seleccionado.
(2) Asegúrese que el SSID (Nombre de Red) de las estaciones inalámbricas tengan el mismo SSID
(Nombre de Red) que el router.
(3) Asegúrese que las estaciones inalámbricas tengan la clave correcta cuando el router está cifrado.
(4) Si la conexión inalámbrica está preparada pero usted no puede acceder al router, chequee la
dirección IP de sus estaciones inalámbricas.