manual ares ii ingles - acroprint time recorder co. · introduccion 53 iv. ... (office building,...
TRANSCRIPT

Contents
English 6
I. Minimum requirements: 7
II. Ares V Installation (Steps): 7
III. INTRODUCTION 9
Capabilities: 9
System Reports: 9
IV. SYSTEM COMPONENTS: 10
M8000-RB Tour Recorder. 10
M8000-RB Specifications: 10
Touch-memory iButton® 11
Officer & Supervisor ID Keys: 12
Incidents (Messages): 13
Checkpoints: 15
Checkpoint Assembly Mounts (iButton Mounts): 15
Tour Areas: 16
V. Main Screen: 17
VI. M8000-RB Recorder Operation: 18
M8000-RB Setup: 19
Time & Date Setup 19
Daylight Savings Setup: 19
How to Download Readings: 19

www.acroprint.com
2
Memory Delete (Reset) 19
VII. Assignments (Tab) 22
Preparation: 22
Assigning a new data item (one at a time): 22
Assigning a group of new data items: 23
VIII. Booklets (Keypads) 26
IX. Messages (Tab) 29
X. Reports: 31
Filtered Reports: 31
Performance / Exceptions Report: 34
Maximum Unattended Time (Max. UT) 35
Follow-up, Concepts and illustrations. 35
Missed Stations Report: 36
XI. Export: 37
Omissions Summary Report: 38
XII. Password: 39
XIII. Database Manager 40
Functions: 40
Copy: 40
File Nomenclature: 40
Load: 40
Purge: 40
Recommendations: 41
XIV. About (TAB): 42
XV. Import databases from ARES IV to Ares V 42

www.acroprint.com
3
XVI. MOBILE Data Transfer UNIT (T8000-MDTU): 47
How to assign the Download key: 47
How to Download M8000 Recorders to the MDTU: 48
FCC Compliance: 49
XVII. EC Compliance: 49
Español 50
I. REQUERIMIENTOS MINIMOS: 51
II. Ares V pasos de instalacion: 51
III. INTRODUCCION 53
IV. COMPONENTES DEL SISTEMA 53
Programa ARES V 53
iButtons 54
Estaciones de Registro: 55
Instalación de Estaciones de Registro. 55
Más Opciones de Estaciones de Registro: 57
Libretas de Incidentes (Teclado y Libreta): 58
Llaves de identificación para Vigilantes y Supervisores 60
Inicio de Turno (procedimiento recomendado) 60
Fin de Turno (procedimiento recomendado) 60
Registrador M8000-RB 61
Plataforma de Descarga P8000 61
V. Pantalla Principal 62
VI. Registradores 63
Operación del Registrador M8000-RB 63
Como ajustar la hora y la fecha: 64

www.acroprint.com
4
Como borrar la memoria de su Registrador M8000-RB: 64
Como ajustar la hora de ahorro de luz solar (DST) de su Registrador M8000-RB: 64
Como descargar marcaciones de su Registrador M8000-RB: 64
VII. Asignaciones 66
Como efectuar Asignaciones: 66
VIII. Asignación de Libretas de Mensajes: 69
IX. Mensajes: 72
Carpeta de Marcaciones: 74
X. Reportes 76
Reportes Filtrados: 76
Reportes de Desempeño: 77
Reporte de Marcaciones Faltantes: 78
Cuadro de Omisiones: 79
Este reporte le permitirá visualizar la acumulación de omisiones por rangos de fechas. 79
XI. Exportar: 80
XII. Contraseña: 81
XIII. Manejador de bases de datos: 81
Función Copiar: 81
Función Cargar: 81
Nomenclatura Archivos: 81
Nomenclatura: 81
Restauración Temporal: 82
Restauración Definitiva: 82
Purgar: 82
XIV. Acerca de 83

www.acroprint.com
5
XV. IMPORTAR BASES DE DATOS DE Ares IV a Ares V 84
XVI. Plataforma Mobil de Descarga T8000: 89
Como asignar la llave de descarga a la Plataforma T8000: 89
Como descargar Registradores M8000-RB en la plataforma T8000: 89
XVII. FCC Compliance: 90
XVIII. EC Compliance: 90

www.acroprint.com
6
English
Ares V Guard Tour Verification System

www.acroprint.com
7
I. MINIMUM REQUIREMENTS: Ares V runs on Windows XP (SP2 and Higher), Windows Vista; Windows 7, Windows 8 and Windows 8 Tablets. PC mini-mum requirements are: IBM or compatible PC Pentium or higher processor with 2 gigabytes in RAM (preferably with 4 gigabytes in RAM).
II. ARES V INSTALLATION (STEPS):
1. Plug the RJ11 connector of the P8000 download cradle into the DS9490R USB Blue Bridge and connect to a USB port of your PC.

www.acroprint.com
8
Immediately after you plug the DS9490 USB Bridge you might see the Windows messages depicted below, disregard and close those messages. If you are installing on XP disregard this message:
If you are installing on Vista, Windows 7 or Windows 8 disregard and close these two messages:
2. Insert the Ares V CD on your CD drive, an auto-run function will be displayed, select install or run program from your media.
3. If the auto-run (auto play) is not displayed, browse CD to view contents and double click on setup.exe (Application).
4. Follow the installation Instructions. 5. Once the Ares V program and its communications drivers have been installed, you can run the program; to run the
program double click on the icon on your desktop. Also a User’s Manual icon will appear in your desktop screen, double click on the icon to view the manual.

www.acroprint.com
9
III. INTRODUCTION The ARES V Guard Tour Verification System was developed to assist the users of guard tour services in efficiently program-ming and supervising guard patrols. An additional benefit is a considerable reduction in the probability of theft, fire and industrial accidents. ARES V employs proven technology: our ARES V software, the portable M8000-RB Tour Recorder and the touch-memory iButtons®, which are utilized as checkpoints, identification devices for officers and supervisors and for recording inci-dents.
Capabilities:
Accommodates multiple officers, supervisors, recorders, checkpoints and incident messages
Access control (Log IN/Log OUT) of vehicles, equipment, etc.
Password Protected.
Automatic Archive Management.
Repairs Damaged Databases.
Exports Reports
Bilingual operation (English or Spanish) System Reports:
All security tours by date & time.
By name or type of element to be controlled (checkpoint, vehicle, officer, etc.)
By Recorder utilized.
By incident messages or regular messages.
Missed Stations Report.
Performance & Exceptions Report.
Omissions Summary Report.
Exports reports to Windows Excel or other databases.
Lists all parameters (employed components).

www.acroprint.com
10
IV. SYSTEM COMPONENTS: M8000-RB Tour Recorder. The M8000-RB is a portable electronic device designed to “read” and store iButton serial numbers, along with the exact time and date of the reading. The unit downloads the stored readings into any IBM or compatible PC running Microsoft® Windows XP OS and above OS, by means of the P8000 Download Cradle. The M8000-RB is a sturdy device capable of withstanding impacts, rough handling, rain, mud, grease, dust and radio interference. The unit is powered by 3 “AAA” batteries.
M8000-RB
P8000 Download Cradle
Download M8000-RB via P8000 to PC Note: P8000 may come in different colors.
M8000-RB Specifications:
Weight: 150 grams
Size: Length 98.5 mm (3.88”), Width 48 mm (1.9”), Height 34.5 mm (1.36”)
Memory: 64K, Nonvolatile (NVO RAM); 10-year life; 5,460 readings maximum
Power: 3 “AAA” alkaline 1.5-VDC batteries; lasts for 1 year or 500,000 readings.
Casing Material: Glass-Reinforced Polycarbonate (General Electric - Lexan®).
Operation temperature: -40° to +85°C (-40° to +185°F)

www.acroprint.com
11
Touch-memory iButton® The iButton is a microcircuit, encapsulated in a stainless steel, weather-resistant button of great durability and reliability (1,000,000 readings per button). Each iButton is a guaranteed unique, never-to-be-repeated factory-programmed ROM. Its 16-character serial number is maintained in laser-cut poly-silicon links, not as a stored magnetic charge. Because of its design and the strict control of the manufacturing process, the DS1990A iButton is an identifier that cannot be counterfeited. It is appropri-ate for applications where absolute identification is required. Due to its great reliability, the iButton is well known internationally as a universal identifier of persons, objects and events. The dimensions of the iButton are: Height, 5mm; Diameter, 16mm. The serial number of each iButton is physically the number that will identify each checkpoint, officer, supervisor, etc. The 16-character serial number is printed on the metallic surface of each button, starting with two alphanumeric characters located at center left; 12 smaller characters centered below with the final two characters at center right. The Ares V system will automati-cally read and assign each iButton serial number on the Assignments Folder (Tab).
www.acroprint.com
12
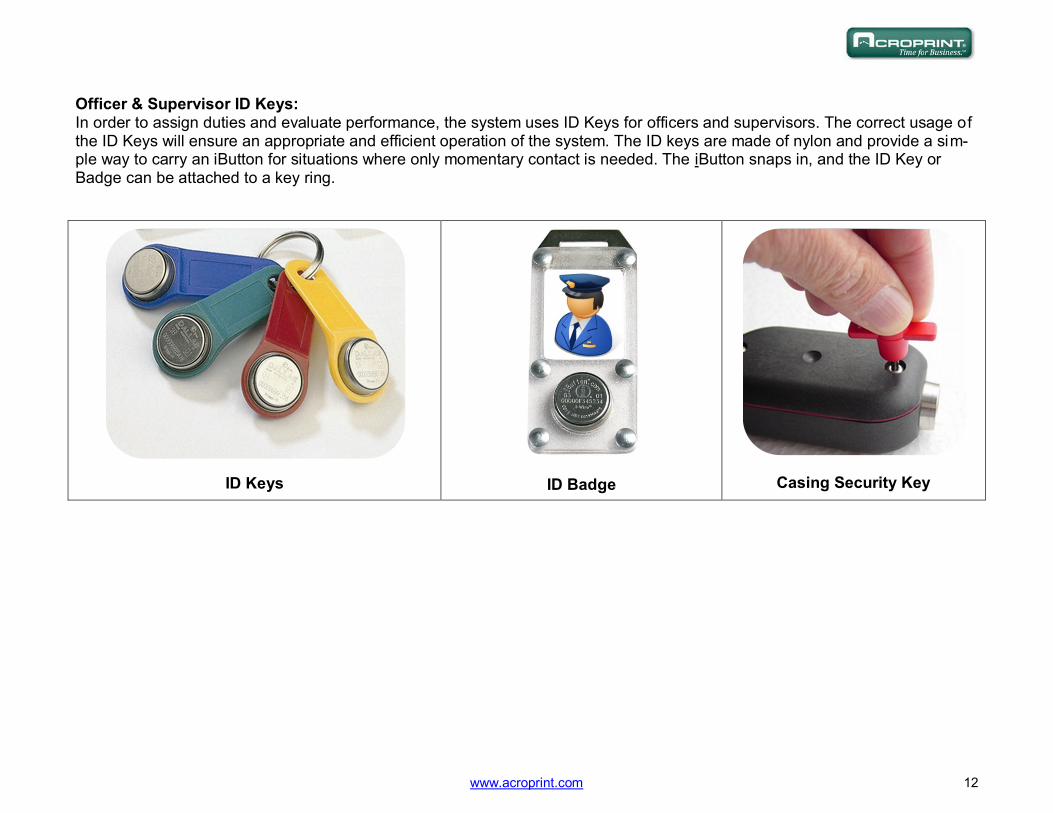
Officer & Supervisor ID Keys: In order to assign duties and evaluate performance, the system uses ID Keys for officers and supervisors. The correct usage of the ID Keys will ensure an appropriate and efficient operation of the system. The ID keys are made of nylon and provide a sim-ple way to carry an iButton for situations where only momentary contact is needed. The iButton snaps in, and the ID Key or Badge can be attached to a key ring.
ID Keys
ID Badge
Casing Security Key
www.acroprint.com
13
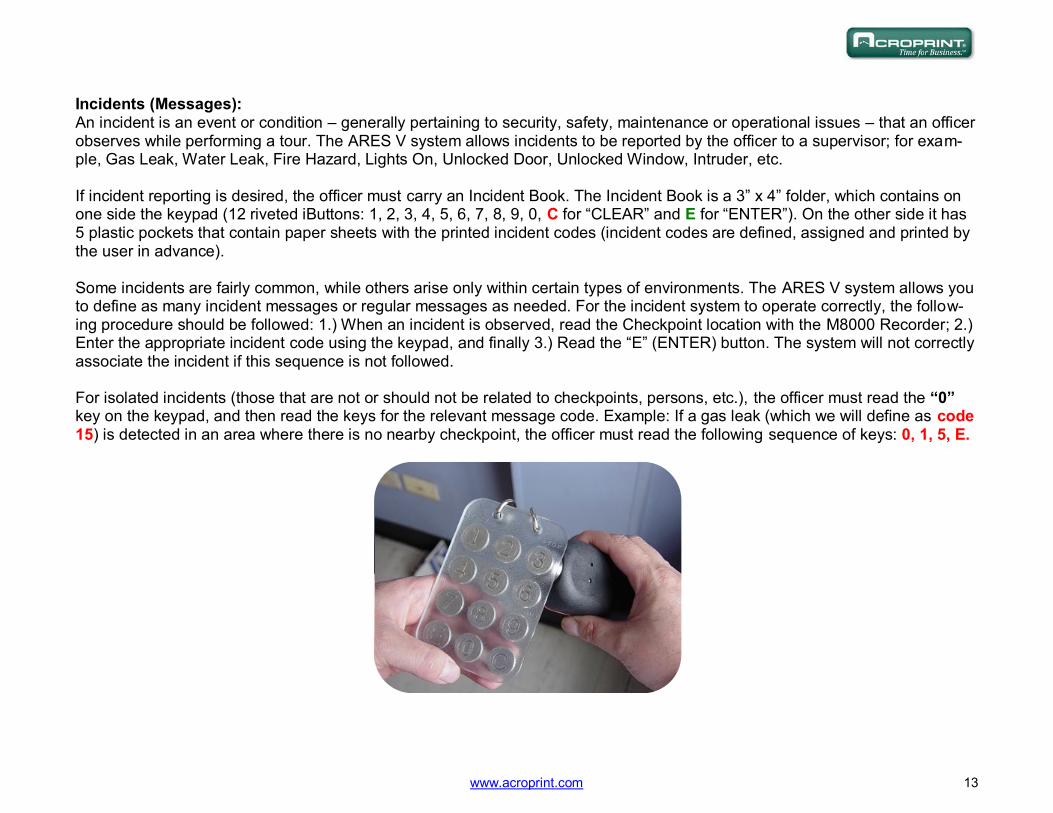
Incidents (Messages): An incident is an event or condition – generally pertaining to security, safety, maintenance or operational issues – that an officer observes while performing a tour. The ARES V system allows incidents to be reported by the officer to a supervisor; for exam-ple, Gas Leak, Water Leak, Fire Hazard, Lights On, Unlocked Door, Unlocked Window, Intruder, etc. If incident reporting is desired, the officer must carry an Incident Book. The Incident Book is a 3” x 4” folder, which contains on one side the keypad (12 riveted iButtons: 1, 2, 3, 4, 5, 6, 7, 8, 9, 0, C for “CLEAR” and E for “ENTER”). On the other side it has 5 plastic pockets that contain paper sheets with the printed incident codes (incident codes are defined, assigned and printed by the user in advance). Some incidents are fairly common, while others arise only within certain types of environments. The ARES V system allows you to define as many incident messages or regular messages as needed. For the incident system to operate correctly, the follow-ing procedure should be followed: 1.) When an incident is observed, read the Checkpoint location with the M8000 Recorder; 2.) Enter the appropriate incident code using the keypad, and finally 3.) Read the “E” (ENTER) button. The system will not correctly associate the incident if this sequence is not followed. For isolated incidents (those that are not or should not be related to checkpoints, persons, etc.), the officer must read the “0” key on the keypad, and then read the keys for the relevant message code. Example: If a gas leak (which we will define as code 15) is detected in an area where there is no nearby checkpoint, the officer must read the following sequence of keys: 0, 1, 5, E.

www.acroprint.com
14

www.acroprint.com
15
Checkpoints: A Checkpoint is a device securely mounted at a location within a particular Tour Area (office building, warehouse, parking lot, shipping dock, etc.) where an officer’s presence is desired at certain predetermined intervals. Each Checkpoint consists of an iButton and its mounting device. When an officer reads a Checkpoint with his assigned M8000-RB, the unique serial number of the Checkpoint is stored in the M8000-RB’s memory, along with the exact time and date of the reading. This data, when downloaded into the Ares V software, will produce all the reports needed to evaluate an officer’s performance. Checkpoint Assembly Mounts (iButton Mounts):
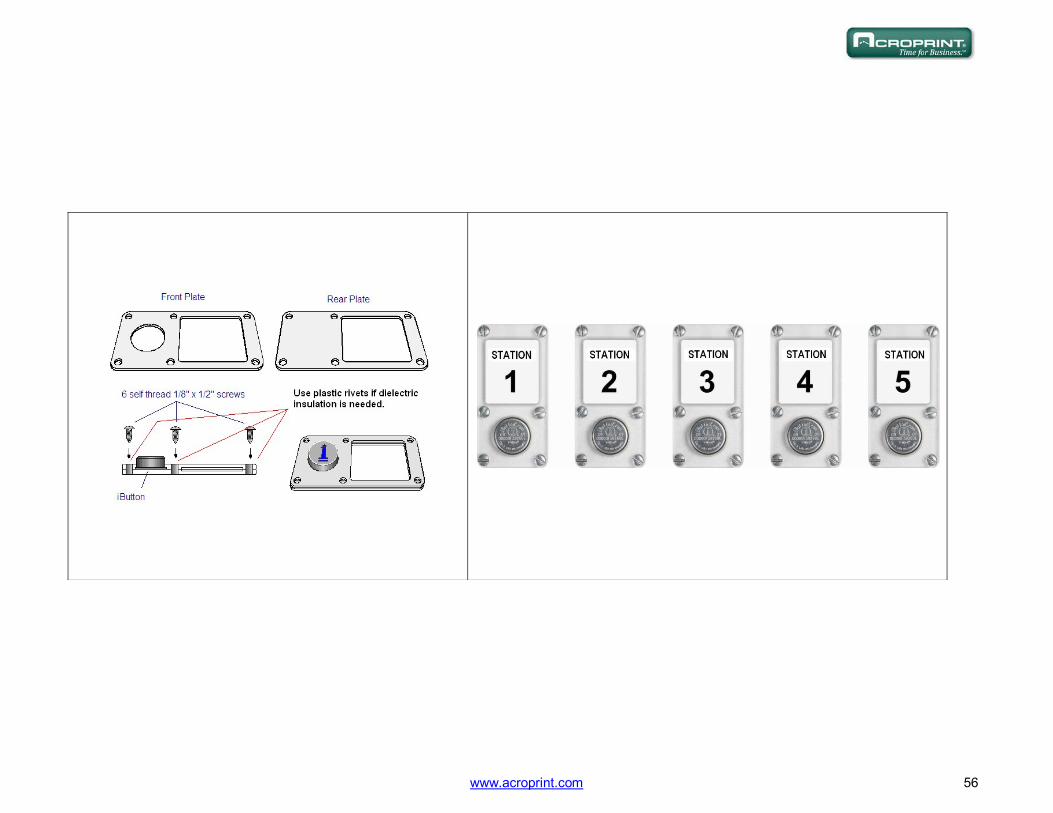
The iButtons come with a multipurpose assembly mount, made of polycarbonate, which can be used to assemble all Check-points. The mount consists of two transparent plates, one front plate and one back plate. The front plate includes a circular re-taining rim to press fit the iButton. Both plates include an internal cavity into which a label or photograph may be inserted. The plates can be assembled together (and/or to any desired surface) with rivets or screws such that all mount contents are secure-ly retained. For wall mounting of Checkpoints, the use of 1/8” self-threading screws (provided with mounts) is recommended.
Transparent Polycarbonate Wall Mount Plates

www.acroprint.com
16
More iButton Wall Mount Options: Tour Areas: A Tour is the physical displacement of an officer through a predetermined area (Tour Area). The size of a Tour Area, the dura-tion of a Tour and the number of Checkpoints per area varies for different users; but a typical Tour Area features: One officer per Tour Area; one M8000-RB per officer; 10 Checkpoints and a tour duration ranging from 45 to 60 minutes. The ARES V sys-tem is capable of handling overlapping tours (several officers touring the same area during the same shift). Overlapping tours can coexist within one Tour Area, or one guard can handle several areas. Beginning an Officer’s Shift (recommended procedure) Before commencing their shifts, officers should identify themselves (Log In) to the system. To Log In, they must first read their ID Key with their assigned M8000-RB and then they can start their tours. Ending an Officer’s Shift (recommended procedure) There is no need to log out, as when the next incoming officer (next shift) logs “IN” the system will recognize the previous offic-es as logged out.
Aluminum iButton Holder Black ABS iButton Mount
www.acroprint.com
17
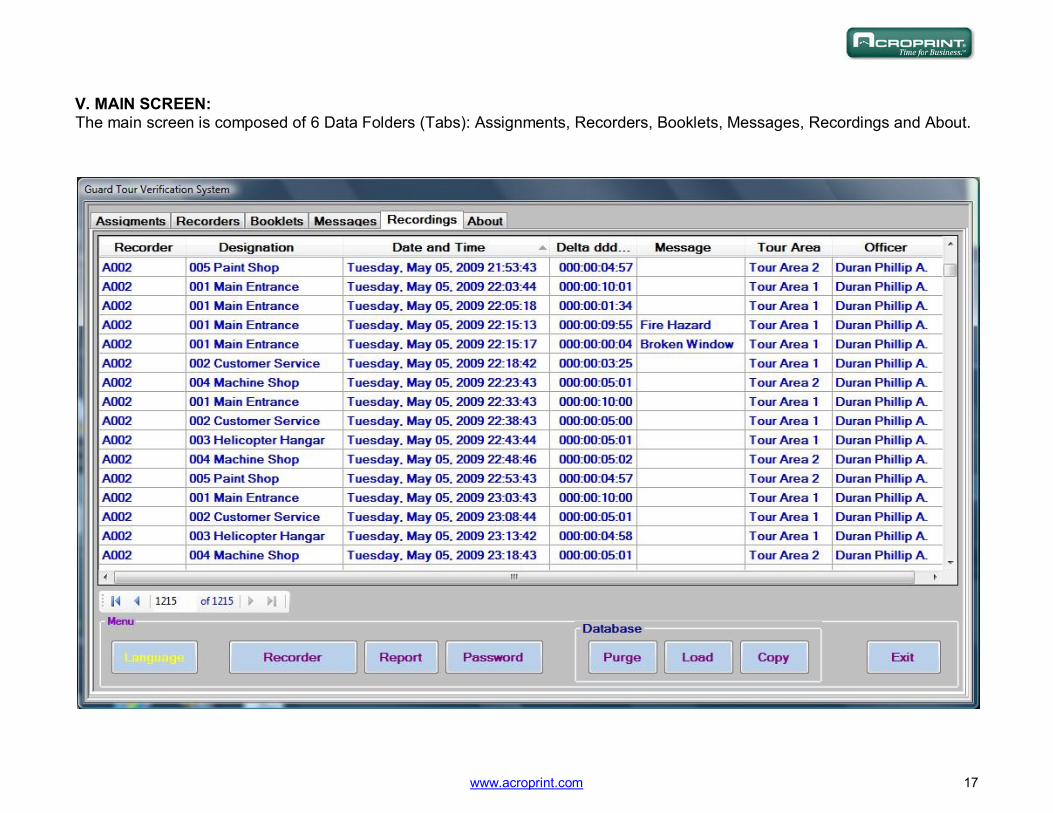
V. MAIN SCREEN: The main screen is composed of 6 Data Folders (Tabs): Assignments, Recorders, Booklets, Messages, Recordings and About.

www.acroprint.com
18
VI. M8000-RB RECORDER OPERATION: The M8000-RB is a portable electronic device designed to “read” and store iButton serial numbers, along with the exact time and date of the reading. It is a sturdy device capable of withstanding harsh environments and impacts. The unit is powered by 3 “AAA” batteries. The recorder has a luminous LED indicator (light emitting diode) and a beeper. To install battery: Open the top casing of the recorder by removing its 2 security screws and connect 3 “AAA” batteries, prefera-bly alkaline. If the batteries have an adequate charge, the unit will emit 5 Green Blinks + 1 Red Blink + 5 Green Blinks To read checkpoints, ID Keys, Incident Books or any other iButtons, simply touch them with the unit`s probe. If a successful reading is made, the M8000-RB will display 2 green blinks of the LED and emit 2 beeps. Low battery: The Recorder will signal a low-battery status by displaying 6 red blinks of the LED and emitting 6 beeps. A new set of batteries will last for one year or 500,000 readings. Full Memory: When the memory of the recorder is full (5,460 readings), the unit will display 5 red blinks of the LED and emit 5 beeps each time you attempt a reading; this means that the unit is no longer recording. In this event, make a full download of data to your PC and then erase the memory to reset; the M8000-RB Recorder will then be ready for the next cycle of new read-ings.
M8000 signals
Condition Blinks Beeps
Normal Start Battery Insertion 5 Green Blinks + 1 Red Blink + 5 Green Blinks 11 beeps
Battery Insertion when memory full 5 Green Blinks + 5 Red Blinks 10 beeps
Recording when memory is full 5 Red Blinks 5 beeps
Normal Recording 2 Green Blinks 2 beeps
Recording when battery has reached a “Low” Status 6 Red Blinks 6 beeps
During connection to PC alternating 1 Red 1 Green No Beeps
During Download Solid Green does not Blink No Beeps
www.acroprint.com
19
M8000-RB Setup:
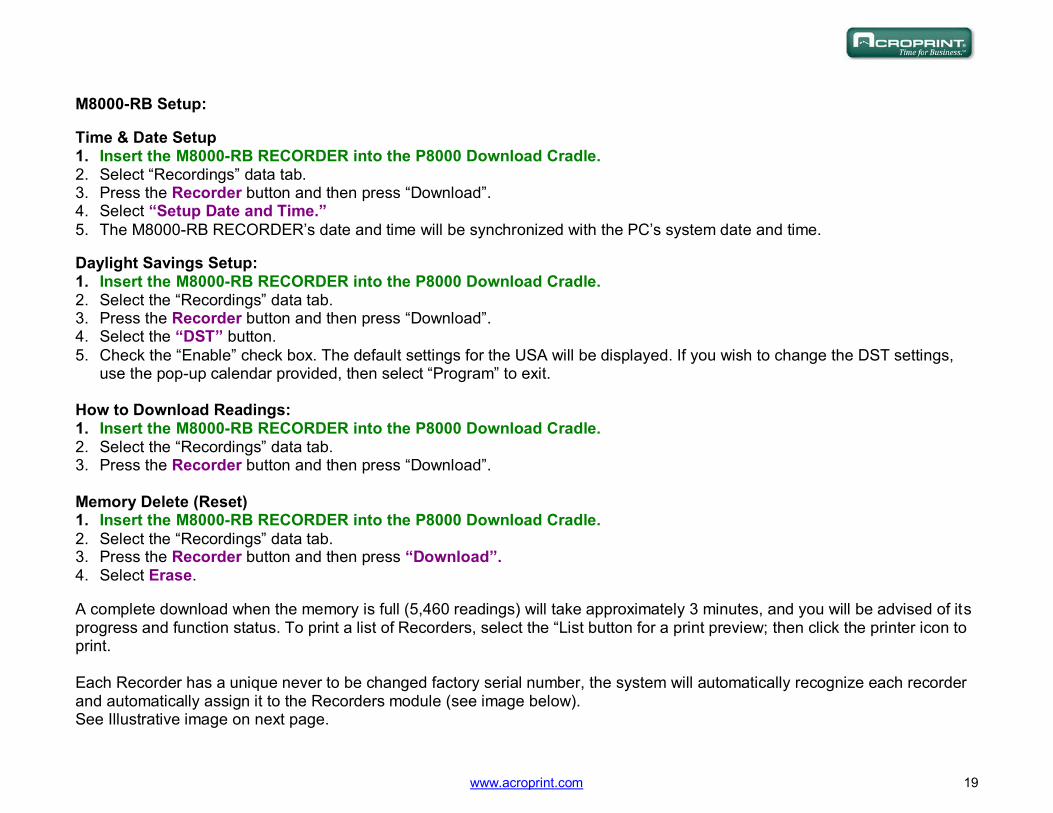
Time & Date Setup 1. Insert the M8000-RB RECORDER into the P8000 Download Cradle. 2. Select “Recordings” data tab. 3. Press the Recorder button and then press “Download”. 4. Select “Setup Date and Time.”
5. The M8000-RB RECORDER’s date and time will be synchronized with the PC’s system date and time.
Daylight Savings Setup: 1. Insert the M8000-RB RECORDER into the P8000 Download Cradle. 2. Select the “Recordings” data tab. 3. Press the Recorder button and then press “Download”. 4. Select the “DST” button.
5. Check the “Enable” check box. The default settings for the USA will be displayed. If you wish to change the DST settings, use the pop-up calendar provided, then select “Program” to exit.
How to Download Readings: 1. Insert the M8000-RB RECORDER into the P8000 Download Cradle. 2. Select the “Recordings” data tab. 3. Press the Recorder button and then press “Download”. Memory Delete (Reset) 1. Insert the M8000-RB RECORDER into the P8000 Download Cradle.
2. Select the “Recordings” data tab. 3. Press the Recorder button and then press “Download”. 4. Select Erase.
A complete download when the memory is full (5,460 readings) will take approximately 3 minutes, and you will be advised of its progress and function status. To print a list of Recorders, select the “List button for a print preview; then click the printer icon to print. Each Recorder has a unique never to be changed factory serial number, the system will automatically recognize each recorder and automatically assign it to the Recorders module (see image below). See Illustrative image on next page.

www.acroprint.com
20

www.acroprint.com
21

www.acroprint.com
22
VII. ASSIGNMENTS (TAB)
Preparation:
Before you begin the assignments (defining the iButtons), the following preparation and verification sequence might be helpful: 1. Make a sketch of the premises and a list of all the sites (Checkpoints), elements and persons to be controlled. 2. With sketch in hand; take a thorough physical tour of the premises. 3. Note on the list the 16-character serial number of each iButton to be installed (Checkpoint) along with its description. 4. The sketch will be useful when you are assigning and installing the iButtons. 5. All Checkpoints are best installed at a height of 45 inches above the floor. Using water sealant around the plate edges will
help protect the ink of the paper labels from being washed out during wet weather. Always use both mount plates. iButton mounts can be installed on walls, doors, furniture, fences, metal surfaces, trees, etc.
The Assignments data tab is used to assign iButtons for all Checkpoints, Watchmen, Supervisors and other elements that are to be controlled.
Assigning a new data item (one at a time):
Note: P8000 Download cradle is manufactured in several colors.
www.acroprint.com
23
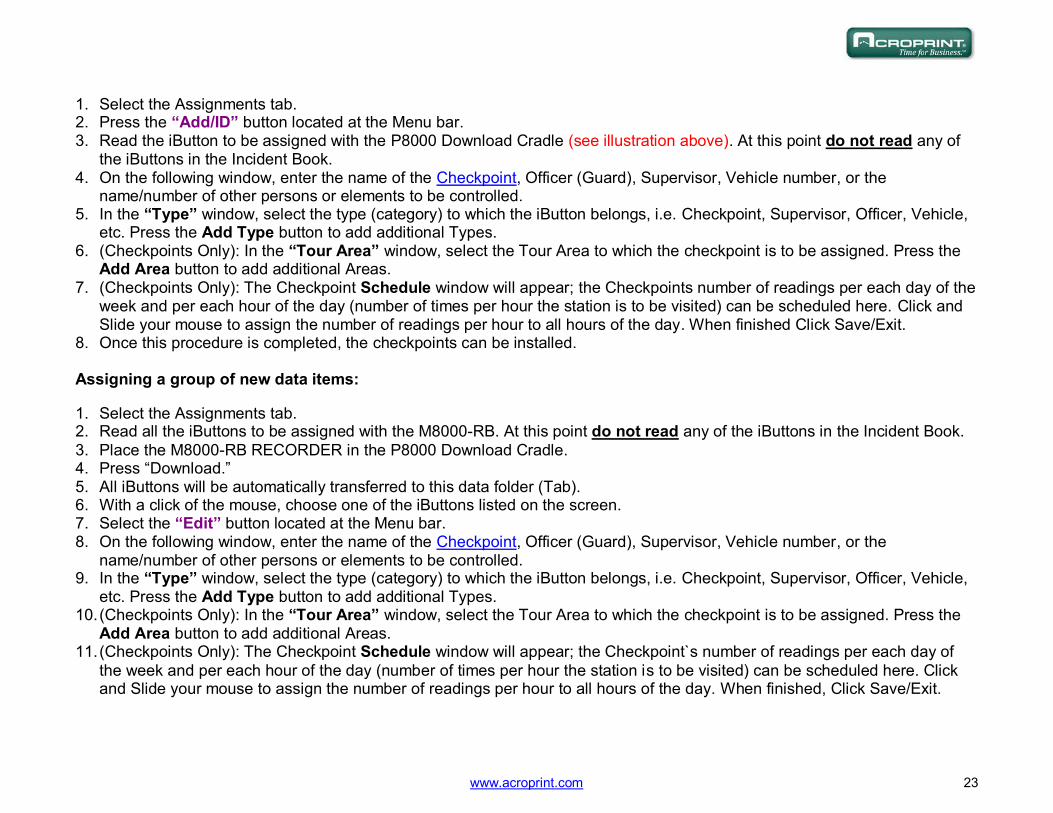
1. Select the Assignments tab. 2. Press the “Add/ID” button located at the Menu bar. 3. Read the iButton to be assigned with the P8000 Download Cradle (see illustration above). At this point do not read any of
the iButtons in the Incident Book. 4. On the following window, enter the name of the Checkpoint, Officer (Guard), Supervisor, Vehicle number, or the
name/number of other persons or elements to be controlled. 5. In the “Type” window, select the type (category) to which the iButton belongs, i.e. Checkpoint, Supervisor, Officer, Vehicle,
etc. Press the Add Type button to add additional Types. 6. (Checkpoints Only): In the “Tour Area” window, select the Tour Area to which the checkpoint is to be assigned. Press the
Add Area button to add additional Areas. 7. (Checkpoints Only): The Checkpoint Schedule window will appear; the Checkpoints number of readings per each day of the
week and per each hour of the day (number of times per hour the station is to be visited) can be scheduled here. Click and Slide your mouse to assign the number of readings per hour to all hours of the day. When finished Click Save/Exit.
8. Once this procedure is completed, the checkpoints can be installed. Assigning a group of new data items:
1. Select the Assignments tab. 2. Read all the iButtons to be assigned with the M8000-RB. At this point do not read any of the iButtons in the Incident Book.
3. Place the M8000-RB RECORDER in the P8000 Download Cradle. 4. Press “Download.” 5. All iButtons will be automatically transferred to this data folder (Tab). 6. With a click of the mouse, choose one of the iButtons listed on the screen. 7. Select the “Edit” button located at the Menu bar. 8. On the following window, enter the name of the Checkpoint, Officer (Guard), Supervisor, Vehicle number, or the
name/number of other persons or elements to be controlled. 9. In the “Type” window, select the type (category) to which the iButton belongs, i.e. Checkpoint, Supervisor, Officer, Vehicle,
etc. Press the Add Type button to add additional Types. 10. (Checkpoints Only): In the “Tour Area” window, select the Tour Area to which the checkpoint is to be assigned. Press the
Add Area button to add additional Areas. 11. (Checkpoints Only): The Checkpoint Schedule window will appear; the Checkpoint`s number of readings per each day of
the week and per each hour of the day (number of times per hour the station is to be visited) can be scheduled here. Click and Slide your mouse to assign the number of readings per hour to all hours of the day. When finished, Click Save/Exit.

www.acroprint.com
24
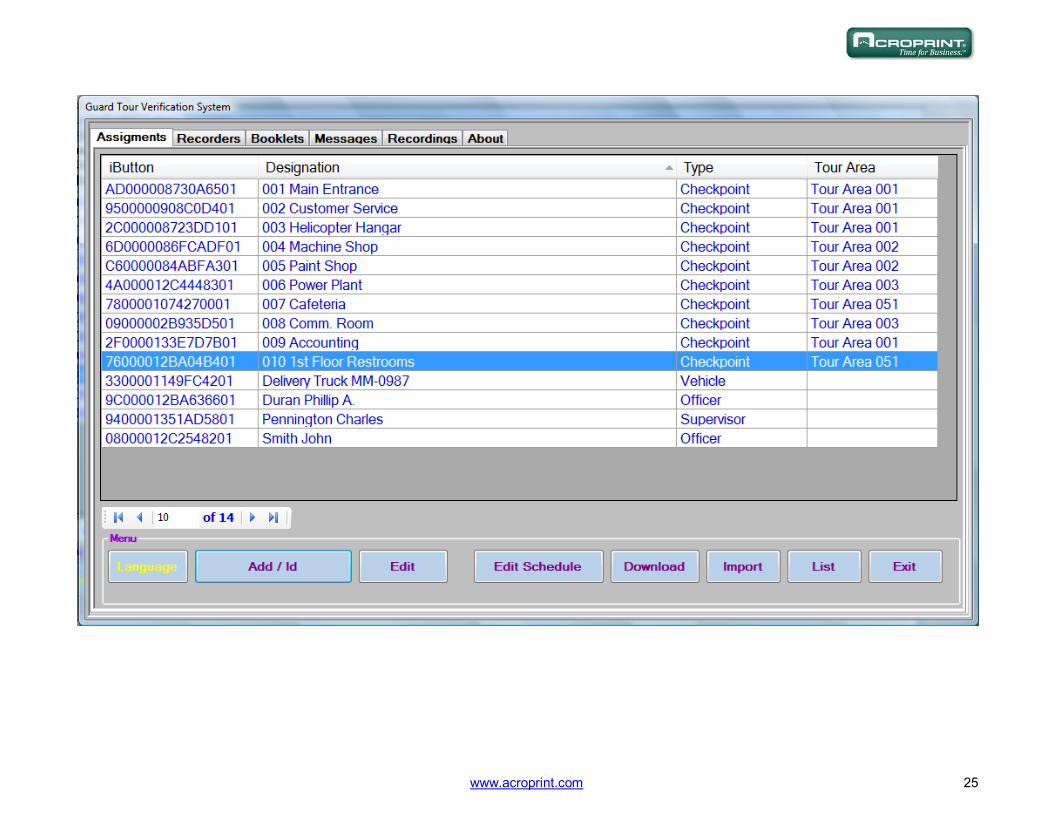
Follow-up: The first column on the left displays the serial numbers of the iButtons. The second column (Designation) displays the names of the Checkpoints, Officers, Supervisors, Vehicles, etc. The third column displays the Type of individual or element to be con-trolled. The fourth column displays the Tour Area (name or number) to which the Checkpoints have been assigned. If you desire a printed list of all “Assignments”, select the “List” button on the menu bar to access a print preview; to print se-
lect the printer icon. Either a simple listing or an expanded listing showing schedules may be selected. Contents of the list can be sorted by iButton, Name, Type or Area; click on the column header to sort.
See next illustration on next page.
www.acroprint.com
25

www.acroprint.com
26
VIII. BOOKLETS (KEYPADS)
How to add a new Keypad, one iButton at a time: 1. Select the “Booklets” Tab 2. Press the “Add / Id” button located in the Menu bar. 3. Read the iButtons of a Keypad Booklet with the P8000 Download Cradle (the software will prompt you to read the
iButtons in the following strict order): Touch key button 0 Touch key button 1 Touch key button 2 Touch key button 3 Touch key button 4 Touch key button 5 Touch key button 6 Touch key button 7 Touch key button 8 Touch key button 9 Touch key button E Touch key button C
To list the assigned Booklets, select the List button on the Menu bar to access a print preview; to print, select the printer icon. See Illustration images on next 2 pages.

www.acroprint.com
27

www.acroprint.com
28

www.acroprint.com
29
IX. MESSAGES (TAB) This Tab enables the user to create, name and assign all types of messages (including incident messages) to be reported. 1. Select the Messages Tab 2. Press the “Add” button 3. Type in the message number Example: 1, 2, 3, etc and press OK.. (This is the message number (code) that must be entered
by the officer or supervisor with the M8000-RB and Incident Book in order to record that message in the tour data.) 4. Type the message name, Example: Water Leak, Gas Leak, Intruder, etc and press the OK. For the message system to function properly, it is important that the User (1) read the Checkpoint where an incident takes place, (2) enter the code for the incident with the M8000 Recorder and keypad, and (3) touch the “E” enter button. For isolated messages (messages that are not or should not be related to Checkpoints, persons or elements), the User must touch the “0” key on the keypad and then enter the message code. Example: if an electrical problem (code 12) is detected in an area where there is no checkpoint nearby, the User would read the following sequence of keys: 0, 1, 2, E. To produce a list of assigned Messages, select the “List” button on the menu bar to access a print preview; to print, select the printer icon. The list of messages can be exported to Excel or in pdf format to be printed and inserted on the Message Booklet & Key Pad (plastic sleeves) see image on page 10.

www.acroprint.com
30

www.acroprint.com
31
X. REPORTS:
The ARES V System generates 4 types of reports:
Filtered Reports.
Performance / Exceptions Report.
Missed Stations Reports.
Omissions Summary.
Filtered Reports: 1. Press the “Reports” button, then the “Filtered Reports” button. 2. The “Selection Filter” window will appear. 3. To clear previous filtering, select the “Reset All Filters” button. 4. To view report only on the screen, select “View Report” 5. To prepare and print the report use the function buttons located at the top left of your screen.
Filters:
Date: Displays readings made within the selected date range.
Hour: Displays readings made within the selected time frame.
Designation: Displays readings by Name (one, several or all).
Recorder: Displays readings by Recorder (one, several or all).
Message: Displays readings associated with a Message (one, several or all).
Type: Displays readings by Type (one, several or all).
Tour Area: Displays all readings made within a Tour Area (one, several or all).
Officer: Displays all readings made by a Guard (one, several or all).

www.acroprint.com
32

www.acroprint.com
33

www.acroprint.com
34
Performance / Exceptions Report: This report allows the user to make a quick and easy evaluation of an officer’s tours. It is focused on the performance of each officer (accountability) and is composed of a rectangular chart containing rows and columns. Figures in red indicate incom-plete tours and omissions. Rules and Conventions:
The Hour header (columns) displays hours of the day from 00 to 23; the 24 columns represent a complete day.
The Max. UT row (Maximum Unattended Time) displays the maximum time per hour (in minutes) during which a checkpoint
has been left unattended.
The RPH row (Recordings per Hour) displays the number of times per hour that a checkpoint has been visited by a specific
officer. The name of the officer appears to the left of the RPH row. The checkpoint’s name appears above the officer’s name.
The Total row summarizes the total number of times a checkpoint has been read by all officers who have visited the check-point. If only one officer is patrolling a particular Area, the RPH and Total values will be the same.
The P-RPH (Programmed Recordings per Hour) row indicates the day’s schedule for that checkpoint.
Checkpoints that belong to a Tour Area will be displayed under its respective Area header.

www.acroprint.com
35
Maximum Unattended Time (Max. UT) Follow-up, Concepts and illustrations.
1. Example A: This Guard was instructed to make 4 recordings (visits) per hour to a particular checkpoint (Recording Station);
he was also instructed to visit this checkpoint spreading evenly the time of his visits within the hour approximately every 00:15 (Fifteen minutes or 4 rounds). He decides he will not get caught (brilliant man!) if he makes all 4 recordings on the first 10 minute gap of the hour. This means he left the Checkpoint Unattended for 00:50 (Fifty) minutes of the hour.
Accordingly the Maximum Unattended Time for this case is 00:50 (Fifty Minutes).
2. Example B: If 4 visits per hour are complied with, this is more or less what the pattern should look like. Note: An average of 15 minutes as time gaps between visits are acceptable, but never instruct guards to make repetitive sequential tours, this is dangerous as the routine can be detected by criminals. The Max. UT for the example below is 15 minutes.
3. Example C: Here the guard was instructed to visit the Checkpoint only once per hour:
On the above example, the Max. UT is 40 minutes. It is the maximum (longest) time gap “within the hour” in which the checkpoint was not visit-ed.
Minutes of the hour 10 10 10 10 10 10
Qty. of Recordings 4 ! 0 0 0 0 0
Minutes of the hour 15 15 15 15
Qty. of Recordings 1 1 1 1
Minutes of the hour 10 10 10 10 10 10
Qty. of Recordings 1
Gaps 20 minutes 40 Minutes

www.acroprint.com
36
Missed Stations Report: This report allows the user to quickly see which checkpoints have been missed during patrols and with what frequency. The report is focused on individual checkpoints.

www.acroprint.com
37
XI. EXPORT: You can export reports to Microsoft Excel spread sheet or to Adobe Acrobat pdf.

www.acroprint.com
38
Omissions Summary Report:
This report displays all the accumulated omissions of all the guards during a selected date span (per each hour of the day). Squares with OK mean full schedule tour compliance (No omissions).

www.acroprint.com
39
XII. PASSWORD: Access to the software may be restricted by requiring a password at start-up. To establish a password, select the Password
button bar located at the bottom of the Recordings Tab Screen; enter your password under “New Password;” verify it under “Verify Password” and press “OK.” The password will be required the next time Ares V is started. To remove the password restriction, clear both the “New Password” and “Verify Password” fields and click “OK.” Ares V has 2 access levels; each level has its own password: 1.) Administrator and 2.) Guest. The Administrator has access to the entire program; the Guest will be able to make Downloads and Reports but will not have access to the “Assignments” Tab.

www.acroprint.com
40
XIII. DATABASE MANAGER Functions:
Copy: Creates a copy of all information contained in the databases. The Backup function automatically compresses all active
databases, copies them to the location you choose and assigns a name to the created file. Note: Every time a Recorder is downloaded an automatic backup will be made and sent to: C:\Acroprint\Ares V\History\Backups File Nomenclature: Mxx00-AA5_FX Security 8-1-173_Jun_09_2006_00-00---Jun_09_2020_23-52 Meaning: 1. Mxx00-AA5: M6000 or M8000 Recorder with Ares V
2. FX Security: Company Name
3. 8-1-173: 8 Items assigned, 1 Recorder, 173 Recordings
4. From: June 9/2006 at 00:00
5. To: June 09/2020 at 23:52
6.zip: Zipped (Compressed File Load: Permits the retrieval of archived data. This stored data can only be managed by the system itself; it is protected by an internal password and cannot be decompressed by external utilities. The Load function opens a window displaying all archived files in the Backup folder C:\Acroprint\Ares V\History\Backups the user selects a file to be restored and clicks “Open.” Back-up files may be restored temporarily to review old data, or permanently to become your current operating database. NOTE: It is strongly recommended to always make a backup of your current data before restoring an archived file. Purge: The Purge command automatically creates a backup and purges recordings from the selected date range. The date range is selected by clicking on a particular date; all prior recordings will be purged. Purged data will not be lost it will be copied

www.acroprint.com
41
to a file located at C:\Acroprint\Ares V\History\Closings. Recommendations: To review historical archives, we recommend you select the function “Restore Temporarily”. We do not recommend you use the function “Restore Permanently” unless you are an advanced user. When you select the said function, you must be fully aware of what you are doing, as you might inadvertently restore a non updated database, (old or with incomplete assignments). The problem materializes in the moment you download recorders employing an incomplete assignments database, some of the punches made by the guards will not show simply because those stations do not show as assigned. If you encounter the above problem, search for the archive which contains your latest assignments and restore it Permanently. Then you can proceed to download recorders without the danger of losing data.

www.acroprint.com
42
XIV. ABOUT (TAB): Contains vendor contact information, software version and manufacturers web page. Vendor’s contact information must be en-tered when software is installed.
XV. IMPORT DATABASES FROM ARES IV TO ARES V Steps for Vista and Windows 7 only: Note: (Procedure for Windows XP does not have “compatibility files” it is straight forward see image 6). 1. Open the path C:\Program Files (x86)\Acroprint\Ares V (se image 1 below). 2. Click on Compatibility files. 3. Create a new directory in C:\ called Temp-Acroprint and copy all the files displayed at “Compatibility Files” into the said directory. (See image 2 be-
low). 4. Run the program Ares V. 5. Enter the about tab and select the button Import “Databases from Ares IV” 6. Select the path C:\Temp-Acroprint and press OK. 7. The export process will commence, press OK 8. The import to Ares V process will commence, press OK.
Image 1

www.acroprint.com
43
Image 2

www.acroprint.com
44
Image 3

www.acroprint.com
45
Image 4
Image 5

www.acroprint.com
46
Image 6

www.acroprint.com
47
XVI. MOBILE DATA TRANSFER UNIT (T8000-MDTU):
The Mobile Data Transfer Unit (MDTU) can collect the data from several M8000-RB readers, which is often desirable in the field. The M8000-RBs can then be immediately returned to service. This makes it unnecessary to carry a portable PC to several sites or to bring the M8000-RBs to a central location for downloading. The memory capacity of the MDTU is 21,842 readings.
How to assign the Download key: 1. Momentarily interrupt battery contact (remove a battery). 2. Touch and hold the iButton to be used as the Download key to the read head as shown. 3. Reconnect battery while maintaining contact between Download key and read head. 4. The MDTU will acknowledge key activation by emitting 8 beeps.

www.acroprint.com
48
How to Download M8000 Recorders to the MDTU: 1. Place the M8000-RB on the MDTU as shown below. 2. Touch the read head of the MDTU with the Download key as shown. 3. Both devices will beep 5 times (with 5 blinks of the green LED) when the download is initiated, and beep 3 times when the
transfer (download) is completed.
www.acroprint.com
49
FCC Compliance: The M8000-RB Portable Time Recorder, T8000 Mobile Data Transfer Unit and P8000 Download Cradle comply with Part 15, Class B of the FCC Rules (Non Intentional Radiators, Class B Digital Devices). Operation is subject to the following two conditions: (1) these devices may not cause harmful interference, and (2) these devic-es must accept any interference received, including interference that may cause undesired operation. Harmful interference (definition): Any emission, radiation or induction that endangers the functioning of a radio navigation ser-vice or of other safety services, or seriously degrades, obstructs or repeatedly interrupts a radio communications service operat-ing in accordance with FCC rules. Changes or modifications to these devices not expressly approved by Acroprint Time Recorder Co. will void the user's authority to operate the equipment.
XVII. EC COMPLIANCE: The M8000-RB Portable Time Recorder, T8000 Mobile Data Transfer Unit and P8000 Download Cradle comply with regulation EN55022 Class B and regulation EN50082-1.

www.acroprint.com
50
Español
Sistema para Control de Vigilantes Ares V

www.acroprint.com
51
I. REQUERIMIENTOS MINIMOS: Ares V corre en Windows XP (SP2 o mas alto), Windows Vista; Windows 7 y Windows 8. Los requerimientos mínimos del PC son: IBM o compatible PC con procesador Pentium o mayor con 2 gigabytes en RAM (preferiblemente 4 gigaby-tes). Para instalar requerirá de conexión a internet.
II. ARES V PASOS DE INSTALACION:
1. Enchufe el conector RJ11 de la plataforma P8000 al conector hembra del DS9490R y conecte este a un puerto USB de su PC.

www.acroprint.com
52
Inmediatamente después de conectar el DS9490 usted podrá ver los mensajes mostrados abajo, ignore y cierre estos mensajes.
En Windows XP.
En Windows Vista y Windows 7 y Windows 8:
2. Inserte su CD de Ares V en el CD drive, haga doble clic en setup.exe (aplicación).
3. Siga las instrucciones de instalación.
4. Una vez que su programa haya sido instalado podrá correr el programa haciendo doble clic en los iconos que quedaran en su escritorio. También vera en su escritorio el icono del manual de usuario.

www.acroprint.com
53
III. INTRODUCCION La misión de su Sistema Ares V es proveerle de una efectiva herramienta para la supervisión de los servicios de vigilancia al cuidado de sus instalaciones. Su beneficio principal consiste en una reducción substancial en la ocurrencia de Robos, Sabote-os, Accidentes Industriales y Siniestros de todo tipo. Llame a su agente de seguros e infórmele de su nueva adquisición; de seguro obtendrá un descuento en las primas de sus pólizas de seguros.
El Sistema para Control de Vigilantes ARES V, se compone de 4 elementos básicos: 1.) Un programa de computador para el proceso de la información recolectada durante las rondas de los vigilantes. 2.) Las etiquetas electrónicas (iButtons) asignados por el sistema a las Llaves de identificación de los supervisores, vigilantes, a las estaciones de registro, y a las libretas de mensajes o incidentes. 3.) Sus Registradores de Ronda modelo “M8000-RB”, 4.) Su Plataforma de Descarga de Datos al PC modelo “P8000”.
IV. COMPONENTES DEL SISTEMA
Programa ARES V
El programa cuenta con 6 carpetas: 1) Asignaciones, 2) Registradores, 3) Libretas, 4) Mensajes, 5) Marcaciones y 6) Acerca de acuerdo a los registros almacenados por el Lector portátil de datos M8000-RB, se podrán visualizar mediante reportes y consultas, la localización y los tipos de eventos ocurridos dentro de las rondas realizadas por los vigilantes. Capacidad:
1. Múltiples Estaciones de Registro 2. Múltiples Áreas de Ronda 3. Múltiples Vigilantes 4. Múltiples Supervisores 5. Permite generar mensajes comunes y / o mensajes de Incidentes por parte de los vigilantes. 6. Permite controlar labores de garita tales como: Control de acceso de personas vehículos y equipos. 7. Consultas y reportes de marcaciones por: Fechas, por Estaciones de Registro (nombre), por Mensajes de Incidentes y por
Tipos de elementos o personas. 8. Reportes de Desempeño y de Omisiones 9. Protegido por clave de acceso. 10. Contiene Administrador de Archivos de respaldo.

www.acroprint.com
54
iButtons Un iButton es un dispositivo electrónico encapsulado en un chasis metálico circular (16 mm de diámetro por 5mm de profundi-dad), el cual contiene un número serial de 16 dígitos grabados por rayo láser en pistas de silicio. El numero serial de cada botón es utilizado como identificador único (su número nunca se repite) de personas, elementos, y eventos etc. Esta tecnología de última generación, desarrollada por Dallas Semiconductor, provee de gran fiabilidad a las tareas de recolección y procesa-miento de datos relacionados a elementos y eventos. Contrario a otros sistemas (código de barra y banda magnética), el IBUTTON no se deteriora fácilmente por ser inmune a interferencias electromagnéticas, luz solar, rozamiento y falsificaciones. Es de gran durabilidad, un millón (1, 000,000) de lecturas por cada iButton. A través del programa ARES V los IBUTTON se convertirán (asignaran) como identificadores únicos de: Estaciones de Registro, Teclados para mensajes de incidentes y Lla-ves de identificación para Supervisores, Vigilantes, personal, vehículos, equipos o cualquier tipo de elementos que se deseen controlar.

www.acroprint.com
55
Estaciones de Registro:
Una estación de registro es un iButton que va instalado de forma permanente y segura, en los puntos específicos los cuales se desea sean vigilados (visitados) por el vigilante durante sus rondas. Dichos puntos son escogidos por su vulnerabilidad a acti-vidades criminales, saboteo y accidentes industriales; por lo que necesitan de cuidado especial. Ej. Puerta principal, oficina de sistemas, terraza, garita principal, bodega de materias primas, escalera principal, Etc. En nuestro Sistema Ares V los iButtons conjuntamente con sus placas de instalación conforman las Estaciones de Registro. Las Estaciones de Registro cada vez que sean tocadas (registradas) por el vigilante con su lector, transmitirán a dicho lector su número (único) de serie. El lector a su vez almacenara el número serial, asignándole la fecha y hora del instante del evento. De esta forma el usuario a través del sistema Ares V, quedara en capacidad de saber el lugar y el momento preciso del registro (que estación fue visitada y cuando). Por favor recuerde: Un vigilante fatigado no trabajara en forma eficiente y su vida se vera puesta en peligro. Los desplazamientos de los vigilantes a lo largo de sus áreas de responsabilidad NUNCA deben seguir patrones repetitivos. Este procedimiento invitara al desastre. El empleo de patrones de rondas tal como el descrito, les permitirá a los criminales establecer qué patrones de ronda emplea cada vigilante y desarrollar sus actividades criminales acorde, como por ejemplo, asesinarlo.
Instalación de Estaciones de Registro.
Para el montaje y empleo de las Estaciones de Registro, Personal, Equipos y Vehículos, los iButton se proveen con sus placas de montaje. Estas son manufacturadas en poli-carbonato transparente; material altamente resistente a la intemperie y maltra-tos. Se utilizan dos: Una placa frontal y una placa trasera. La placa frontal contiene una cavidad con pestaña circular en la cual se inserta el IBUTTON. Ambas placas vienen con una cavidad en la cual se puede insertar membretes o fotografías. Las pla-cas se ensamblan una a la otra (o a cualquier superficie) con remaches o tornillos de tal forma que su contenido queda seguro sin posibilidad de zafarse.
www.acroprint.com
56

www.acroprint.com
57
Más Opciones de Estaciones de Registro:
Estación Metálica en Aluminio Estación Plástica en ABS

www.acroprint.com
58
Libretas de Incidentes (Teclado y Libreta):
Un incidente es un evento perjudicial en potencia, el cual cuando es detectado debe ser reportado por el vigilante al sistema. Su detección temprana puede traducirse en el beneficio de evitar un Accidente o Siniestro: Ej. Incendio en potencia, Puerta Abierta, Cerradura Rota, Ventana Rota, Puerta sin seguro, Luces Prendidas, Corto Circuito, Escape de Gas, Escape de Agua, Etc. Algunos incidentes son comunes a todas las industrias, algunos son particulares por industria. A través de su sistema Ares V UD. quedara en capacidad de definirlos y asignarlos a voluntad de acuerdo a sus requerimientos específicos. La forma co-rrecta de reportar los incidentes por parte del vigilante es: Primero marcar (registrar) la estación donde se está presentando el incidente en cuestión, e inmediatamente después marcar (registrar) el código del incidente. Este orden de procedimiento se debe seguir estrictamente. Si dicho orden (secuencia) no se cumple, el sistema no lograra reconocer y/o asociar la estación (lugar) al incidente y reportara el incidente de todas formas, pero como incidente aislado. Si los usuarios del sistema desean obtener reportes permanentes de incidentes, deben instruir al vigilante a portar a todo mo-mento su LIBRETA DE INCIDENTES Y MENSAJES. Una libreta de Incidentes es una placa la cual lleva remachados a su su-perficie 12 botones (1,2,3,4,5,6,7,8,9, C, 0 y E) C para Clear (Borrar) y E para Enter (aceptar). La libreta también lleva en su interior 5 bolsillos plásticos, en los que deben ir impresos los códigos de cada incidente (a definir e imprimir por el usuario del sistema). Su máxima capacidad es de 9999 códigos diferentes. La forma correcta de reportar los incidentes por parte del vigi-lante es: Primero marcar (registrar) la estación donde se está presentando el incidente en cuestión, e inmediatamente después marcar su respectivo código y después marcar “Enter”, Ej.: 52, ENTER. Cuando se presente una equivocación al digitar un código el vigilante podrá marcar “CLEAR” y después escribir el código deseado.
Libreta de Incidentes (teclado y Libreta)

www.acroprint.com
59

www.acroprint.com
60
Llaves de identificación para Vigilantes y Supervisores Las llaves de identificación consisten de un porta botón plástico de alta durabilidad (Nylon 66) al los cuales van insertados los iButton que identifican cada Vigilante o supervisor. El sistema Ares V está diseñado no solo controlar rondas sino también registrar los inicios y fines de turno de los supervisores y vigilantes (separar responsabilidades). Quien, Que, Como, Cuando y Donde son datos críticos para el profesional de seguri-dad. Para tal efecto recomendamos instruir a ambos Supervisor y Vigilante lo siguiente:
Llaves de Identificación
Escarapela de Identificación
Llave de Seguridad
Inicio de Turno (procedimiento recomendado)
Todos los Vigilantes y Supervisores (sin excepción) antes de comenzar su turno laboral, deberán registrar su entrada al sistema. Para registrarse deberán primero marcar su Llave de identificación con su lector, e inmediatamente después marcar el iButton No. 1 de su teclado de Mensajes (INICIO) Fin de Turno (procedimiento recomendado) Todos los Vigilantes y Supervisores (sin excepción) antes de terminar su turno laboral, deberán registrar su salida del sistema y por ende de su área de responsabilidad. Para registrar su salida deberán primero, marcar su Llave de identificación con su lector e inmediatamente después marcar el iButton No. 3 (FIN) en el teclado de su libreta de mensajes.

www.acroprint.com
61
Registrador M8000-RB Es un dispositivo electrónico diseñado para “leer” los iButton, almacenarlos y luego descargarlos al sistema. Su función es pre-cisamente leer y asociar el número de cada iButton, a la fecha y hora del momento de su lectura. El Registrador de Rondas M8000-RB está diseñado para operar a la intemperie, soportar caídas, golpes y malos tratos. Su capacidad máxima de alma-cenamiento de registros es de 5460 por cada ciclo de llenado. El lector cuenta con un Diodo Emisor de Luz, llamado LED y un sonajero o pito.
Plataforma de Descarga P8000 Es el dispositivo a través del cual se descarga el Registrador M8000-RB al PC. Se puede conectar al puerto serial o al puerto USB.
M8000-RB
Plataforma de descarga P8000
Descarga del M8000-RB via P8000 Note: P8000 viene en colores surtidos.

www.acroprint.com
62
V. PANTALLA PRINCIPAL

www.acroprint.com
63
VI. REGISTRADORES En esta carpeta quedan automáticamente asignados los números de serie de los diferentes registradores M8000-RB. Como ya se indico este proceso de asignación es automático y se efectúa inmediatamente después de realizar la primera descarga de cada registrador (por primera y única vez). El sistema requiere que cada unidad M8000-RB sea registrado para poder discernir la proveniencia de las marcaciones. Operación del Registrador M8000-RB 1. Retire los dos tornillos de seguridad, abra la tapa del lector y conecte 3 baterías tipo AAA. Si la batería esta en buen estado
el lector emitirá 10 pulsos sonoros y 10 pulsos luminosos de color verde por su luz testigo (LED). 2. Para realizar lecturas de Estaciones de Registro, Llaves de Identificación, Libretas de Incidentes, Placas de Identificación
de Vehículos o Equipos, basta solo con tocar cada iButton con el cabezal del lector. Si se efectúa una lectura valida, el lec-tor emitirá dos pulsos verdes conjunta y simultáneamente con dos pulsos sonoros.
3. Cuando su memoria se llene (5460 registros), cada vez que se intente efectuar un registro; el lector emitirá 4 pulsos rojos
conjuntamente con 4 pulsos sonoros, ello significa que no puede efectuar mas lecturas; en tal caso se deberá descargar los datos al computador y luego borrar la memoria del lector para reiniciarla, esta quedara lista para otro ciclo de llenado de 5460 nuevos registros.
4. Cuando su batería se encuentre con carga baja, durante cada registro el lector emitirá 2 pulsos rojos, acompañados de dos
pulsos sonoros, esto significa que la carga de la batería es baja pero esta es todavía utilizable; si el lector emite un solo pulso rojo, esto quiere decir que la batería ya no es utilizable y deberá ser reemplazada por una nueva.

www.acroprint.com
64
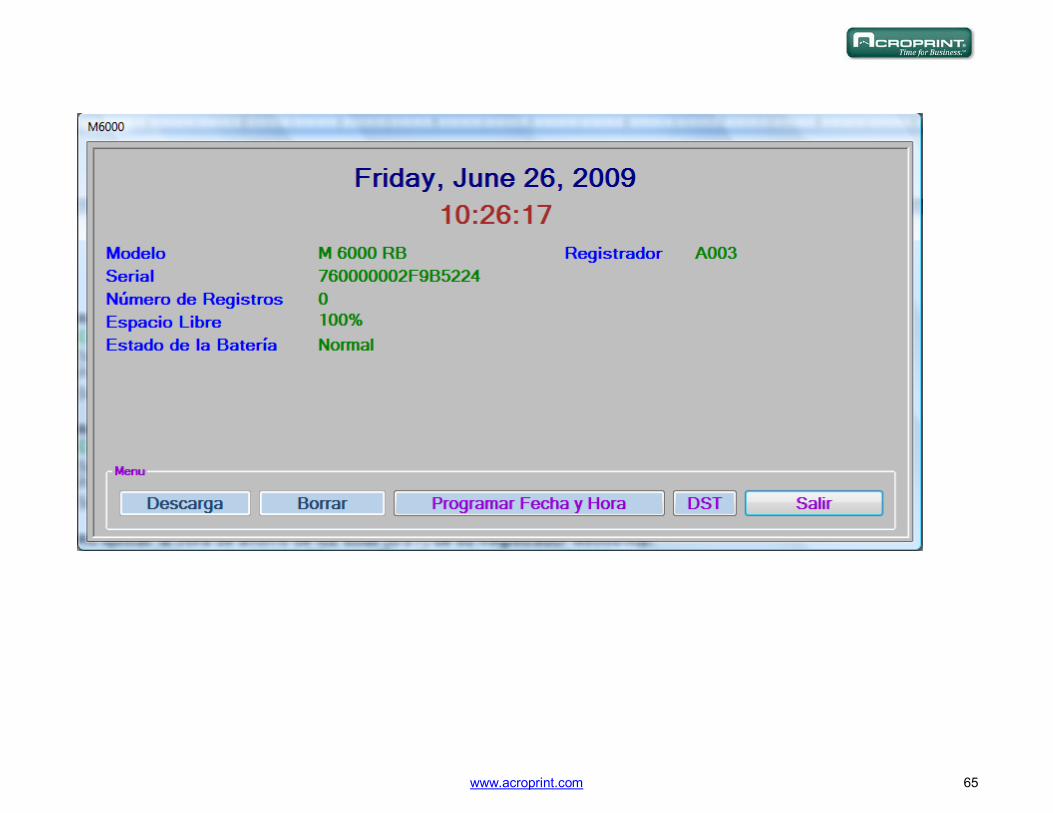
Como ajustar la hora y la fecha: 1. Coloque el registrador M8000-RB en su Plataforma de descarga P8000.
2. Seleccione la carpeta de Marcaciones. 3. Presione el botón “Registrador”, contenido en la barra de botones.
4. Seleccione el botón “Programar Fecha y Hora”, La hora y fecha serán sincronizadas con las de su PC. Como borrar la memoria de su Registrador M8000-RB: 1. Coloque el registrador M8000-RB en su Plataforma de descarga P8000.
2. Seleccione la carpeta de Marcaciones.. 3. Presione el botón “Registrador”, contenido en la barra de botones.
4. Seleccione el botón “Borrar” Como ajustar la hora de ahorro de luz solar (DST) de su Registrador M8000-RB: 1. Coloque el registrador M8000-RB en su Plataforma de descarga P8000.
2. Seleccione la carpeta de “Marcaciones”. 3. Presione el botón “Registrador”, contenido en la barra de botones.
4. Seleccione el botón DST. 5. Seleccione la casilla “Habilitar”. 6. Seleccione la fecha y la hora de inicio y de fin deseadas. 7. Haga clic en Salvar / Salir. Como descargar marcaciones de su Registrador M8000-RB: 1. Coloque el registrador M8000-RB en su Plataforma de descarga P8000. 2. Seleccione la carpeta de Marcaciones. 3. Presione el botón “Registrador”, contenido en la barra de botones. 4. Seleccione el Botón “Descarga”. 5. La pantalla le desplegara la barra de avance de descarga. 6. La pantalla le desplegara las barras de avance de: Descargando Registros, Verificando Integridad y finalmente Agregando
Registros. 7. Una vez terminados los anteriores procesos UD. ya podrá visualizar las marcaciones en la carpeta. 8. Si tiene problemas durante la descarga o no puede descargar sus datos, verifique todos los pasos de la pantalla “errores de
comunicación. Para generar un listado de los componentes asignados a esta carpeta oprima el botón Listar.
www.acroprint.com
65

www.acroprint.com
66
VII. ASIGNACIONES Esta carpeta le permite asignar los iButton al sistema. Estos, podrán ser asignados como: Estaciones de Registro, Vigilantes, Supervisores, Libretas y Teclados de Mensajes, Vehículos, Equipos etc. iButton: Es el número serial de cada uno de los múltiples y diferentes botones que se asignaran al sistema. Al mirar la figura 1 de este manual o cualquiera de los botones IBUTTON proveídos, UD., podrá leer los 16 dígitos o caracteres comenzando por los dos dígitos de la izquierda arriba, continuando con los 12 pequeños de la parte inferior y finalizando con los dos de la dere-cha arriba de la superficie del IBUTTON. Como efectuar Asignaciones:
1. Oprima el Botón “Agregar / Identificar” 2. Lea / Toque el botón que desea asignar, con su Plataforma P8000.

www.acroprint.com
67
3. Le aparecerá la pantalla “Agregar”, teclee el nombre o número (o ambos) de su primera Estación de Registro, Nombre del
Vigilante o el nombre de cualquier persona o elemento a controlar. 4. Seleccione el “Tipo”, si desea añadir “Tipos” adicionales a los desplegados, haga clic en “Agregar Tipo”. 5. (Solo para Estaciones de Registro): Le aparecerá la casilla “Área” desplegándole una lista de Áreas de Ronda. Usted
podrá asignar las estaciones de registro a las diferentes Áreas que UD., desee. Para agregar nuevas Áreas, seleccione el botón “Agregar Área”. Para editar seleccione “Editar Área”.
6. (Solo para Estaciones de Registro): Le aparecerá la pantalla HORARIO SEMANAL, usted podrá programar la cantidad de marcaciones por día de la semana, por hora del día que desee, haga clic en la pantalla y arrastre su raton a voluntad para efectuar la programación.
Procedimiento: Todos los iButtons a la vez (recomendado para usuarios ya expertos)
1. Lea / Toque todos los botones a emplear con su Registrador M8000-RB 2. Oprima “Descargar”
3. Inmediatamente después de oprimir descarga, los iButtons serán asignados automáticamente al sistema. 4. Seleccione con su mouse (ratón) el primer número serial (iButton) de la lista. 5. La pantalla “Editar” le aparecerá, teclee el nombre del elemento a asignar. 6. Seleccione el “Tipo”, si desea añadir “Tipos” adicionales a los desplegados, haga clic en “Agregar Tipo”. 7. (Solo para Estaciones de Registro): Le aparecerá la casilla “Área” desplegándole una lista de Áreas de Ronda. Usted
podrá asignar las estaciones de registro a las diferentes Áreas que UD., desee. Para agregar nuevas Áreas, seleccione el botón “Agregar Área”. Para editar seleccione “Editar Área”.
8. (Solo para Estaciones de Registro): Le aparecerá la pantalla HORARIO SEMANAL, usted podrá programar la cantidad de marcaciones por día de la semana, por hora del día que desee, haga clic en la pantalla y arrastre su raton a voluntad para efectuar la programación.
Para generar un listado de los componentes asignados a esta carpeta oprima el botón Listar.

www.acroprint.com
68

www.acroprint.com
69
VIII. ASIGNACIÓN DE LIBRETAS DE MENSAJES: En esta carpeta se asignan las libretas de mensajes y/o incidentes al sistema: Numero de la libreta: Es el número de cada libreta (campo numérico asignado automáticamente). iButton de Libretas: Cada teclado de cada libreta de incidentes, lleva remachados a su superficie 12 botones 1,2,3,4,5,6,7,8,9,C,0,E. C para “CLEAR” y E para “ENTER”. Cada Botón tiene su propio número serial Único. Atención este procedimiento no acepta
errores, si UD., asigna incorrectamente uno de los dígitos a un numero serial no correspondiente, su libreta quedara inoperan-te, ya que reportara datos erráticos y erróneos. La manipulación de los datos se efectúa a través de la barra de botones.
Asignación, uno a uno (recomendado para principiantes):
Seleccione el Botón “Agregar / Identificar”.
El sistema le desplegara la pantalla “Editar Tecla”
Lea / Toque el botón 0 con el bocín de la Plataforma P8000
Lea / Toque el botón 1 con el bocín de la Plataforma P8000
Lea / Toque el botón 2 con el bocín de la Plataforma P8000
Lea / Toque el botón 3 con el bocín de la Plataforma P8000
Lea / Toque el botón 4 con el bocín de la Plataforma P8000
Lea / Toque el botón 5 con el bocín de la Plataforma P8000
Lea / Toque el botón 6 con el bocín de la Plataforma P8000
Lea / Toque el botón 7 con el bocín de la Plataforma P8000
Lea / Toque el botón 8 con el bocín de la Plataforma P8000
Lea / Toque el botón 9 con el bocín de la Plataforma P8000
Lea / Toque el botón C con el bocín de la Plataforma P8000
Lea / Toque el botón E con el bocín de la Plataforma P8000

www.acroprint.com
70

www.acroprint.com
71

www.acroprint.com
72
IX. MENSAJES: En esta carpeta se asignan los códigos y los nombres de cada mensaje. Estos códigos son los que debe registrar / tocar el vigilante o supervisor cuando desee reportarlos al sistema. Procedimiento de Asignación al sistema: 1) Seleccione el botón “Agregar” 2) Teclee el numero a asignar (código) al mensaje y presione OK. 3) Teclee el nombre del mensaje y presione OK.

www.acroprint.com
73
Definición: Un incidente es un evento perjudicial en potencia, el cual cuando sea detectado deberá ser reportado por el vigilante al siste-ma. Su detección temprana puede traducirse en el beneficio de evitar un Accidente o Siniestro: Ej. Incendio en potencia, Puer-ta Abierta, Cerradura Rota, Ventana Rota, Puerta sin seguro, Luces Prendidas, Corto Circuito, Escape de Gas, Escape de Agua, Empleo de la libreta: Incidentes asociados a Elementos o Personas: La forma correcta de reportar los incidentes y/o mensajes asociados a una estación de registro, persona o vehículo es: 1) Primero: Registrar / Tocar la estación donde sé está presentando el incidente en cuestión, 2) Segundo: Registrar / Tocar el código del incidente. 3) Tercero: Marcar / Tocar E (Enter) El orden de este procedimiento se debe seguir estrictamente: Para registrar mensajes no asociados a Estaciones o personas (mensajes aislados) 1) Primero: Registrar / Tocar el código 0 (cero) 2) Segundo: Registrar / Tocar el código del incidente. 3) Tercero: Marcar / Tocar E (Enter) El orden de este procedimiento se debe seguir estrictamente. El sistema reportara estos mensajes como “Aislados” Cuando se presente una equivocación al digitar un código el vigilante podrá marcar “CLEAR” y después escribir el código de-seado. Este servicio de mensajes es de gran utilidad para evaluar e identificar separadamente los desempeños de cada Su-pervisor y Vigilante. Esto le permitirá exigirle a su personal de seguridad registrarse tanto a su llegada como a su salida. Nota: Los códigos 1, 3, 4 y 6 están reservados exclusivamente; el código 1 para “INICIO”, el código 3 para “FIN”, el código 4 para “ENTRO” y el código 6 para “SALIO”. También le será de gran utilidad para supervisar las labores de garita, o sea, el control de todo lo que entra y todo lo que sale de sus instalaciones. La libreta lleva en su interior 5 bolsillos plásticos, en los cuales deben ir impresos los códigos de cada incidente (a definir e im-primir por el usuario del sistema). Para generar un listado de los componentes asignados a esta carpeta oprima el botón Listar.

www.acroprint.com
74
Carpeta de Marcaciones:
En esta carpeta se adicionan (descargan) y visualizan las marcaciones de las rondas efectuadas por los vigilantes con sus re-lojes.
Procedimiento para adicionar (descargar) marcaciones: 1. Seleccione el botón “Descarga / Programación”. 2. Seleccione el Botón “Descarga”.
3. La pantalla le desplegara la barra de avance de descarga. 4. Una vez termine la descarga, la pantalla le desplegara las barras de avance de de proceso de las bases de datos.o Registros. 5. Una vez terminados los anteriores procesos UD. ya podrá visualizar las marcaciones en la carpeta.
Ver imagen ilustrativa en la próxima pagina.

www.acroprint.com
75

www.acroprint.com
76
X. REPORTES Reportes Filtrados: Este reporte le permitirá seleccionar grupos de datos por filtrado: Por Registrador, por Designacion, por fecha y por hora, men-sajes, Vigilante, Supervisores, etc.

www.acroprint.com
77
Reportes de Desempeño: Los reportes de desempeño le permitirán evaluar rápida y fácilmente las actividades de cada vigilante. Este reporte se compo-ne de un cuadro que contiene columnas y filas. Reglas:
Los encabezados de Hora (columnas) despliegan las horas de 00 a 23. El total de 24 columnas representa un día completo.
Máx. TD (Tiempo Máximo de Desatención). Indica el máximo tiempo en minutos (por cada hora) durante el cual la estación de registro fue desatendida.
RPH (Registros por Hora): Indica la cantidad de marcaciones por hora efectuadas por el Vigilante para una estación en par-ticular. El nombre de la estación aparecerá arriba del nombre de cada Vigilante.
Total: Indica el total de marcaciones efectuadas en la estación, por uno o más Vigilantes. Si solamente un vigilante marca dicha estación, el valor indicado por RPH será el mismo indicado por Total.
Cada grupo de estaciones va encabezado (agrupado) por el Nombre del Área al cual pertenecen.
P-RPH Indica la cantidad de registros programados por hora.

www.acroprint.com
78
Reporte de Marcaciones Faltantes:
Permite detectar y visualizar las marcaciones omitidas por los vigilantes. Califica el desempeño por cada estación.

www.acroprint.com
79
Cuadro de Omisiones:
Este reporte le permitirá visualizar la acumulación de omisiones por rangos de fechas.

www.acroprint.com
80
XI. EXPORTAR: Para exportar reportes seleccione cualquier reporte y siga las instrucciones de la pantalla a seguir. Podrá exportar a Excel y en formato pdf.

www.acroprint.com
81
XII. CONTRASEÑA:
Si UD., desea proteger los datos de su programa UD., podrá generar su propia contraseña (clave de acceso). Seleccione la carpeta de contraseña e ingrese su clave de preferencia. Si pierde su contraseña, por favor contacte al proveedor local de este producto para solicitarle asistencia.
XIII. MANEJADOR DE BASES DE DATOS: Función Copiar:
Permite al usuario crear copias, para contar con respaldo de toda la información contenida en las bases de datos. Cuando di-cha función es activada, el administrador copiara y comprimirá automáticamente todas las bases de datos en actividad, en-viando dicha copia a la unidad de disco y carpeta seleccionada. Función Cargar: Permite al usuario restaurar información histórica residente en las unidades de disco (A:\ B:\ o C:\). Cuando esta función es activada presentara una ventanilla con un listado de los diferentes archivos históricos. El usuario podrá escoger el archivo a restaurar al efectuar un doble clic sobre dicho archivo o con un solo clic y oprimiendo el botón de “abrir”. En el momento de restaurar un archivo histórico, el sistema le preguntara si desea que el archivo a restaurar, se convierta en su base de datos principal y permanente (Restauración Definitiva), o simplemente en archivo temporal para su revisión (Res-tauración Temporal).
Nomenclatura Archivos: Nomenclatura: Mxx00-AA5_FX Security 8-1-173_Jun_09_2006_00-00---Jun_09_2020_23-52 Significado: 1. Mxx00-AA5: M6000 or M8000 Registradores con Ares V
2. FX Security: Nombre Compañia.
3. 8-1-173: 8 Items asignados,, 1 Registrdor (s), 173 Registros.
4. Desde: Junio 09/ 2006 a las 00:00
5. Hasta: Junio 09/2020 a las 23:52
6.zip: Archivo comprimido

www.acroprint.com
82
Restauración Temporal:
Usted podrá restaurar y consultar temporalmente los datos contenidos en el archivo seleccionado. Dicho archivo será descom-primido y activado para poder visualizar (consultar) su contenido. Por razones de seguridad UD., no podrá cambiar dato alguno dentro de este; todas las barras de botones quedaran desactivadas. Para retornar a su base de datos principal seleccione “Base de Datos Normal”. Para restaurar otros archivos históricos (adicionales), seleccione el botón “Restaurar”. Restauración Definitiva:
Al seleccionar esta opción, usted borrara sus bases de datos actuales, reemplazándolas definitivamente por los datos conteni-dos dentro del archivo seleccionado (histórico). Atención: Se recomienda emplear este procedimiento solamente cuando UD. este plenamente consciente que desea desechar definitivamente sus bases de datos actuales. Purgar: Es una herramienta de gran utilidad; cumple dos funciones: 1.) Su programa a través del tiempo y el uso, se tornara lento e ineficiente por llenarse de extensos volúmenes de datos históricos que por su antigüedad, normalmente ya no se requieren. Al seleccionar esta opción, el programa borrara y reiniciara la carpeta “Marcaciones”. 2.) Antes de reiniciar la carpeta, el programa almacenara todos los datos históricos en C:\Acroprint\Ares V\History\Closings de tal forma que UD., pueda restaurarlos cuando lo desee. Podrá restaurarlos en forma definitiva o en forma temporal según sus requerimientos.

www.acroprint.com
83
XIV. ACERCA DE
Esta carpeta contiene los datos del fabricante y proveedor local de su sistema. Estos datos deberán ser tecleados al instalar el programa.

www.acroprint.com
84
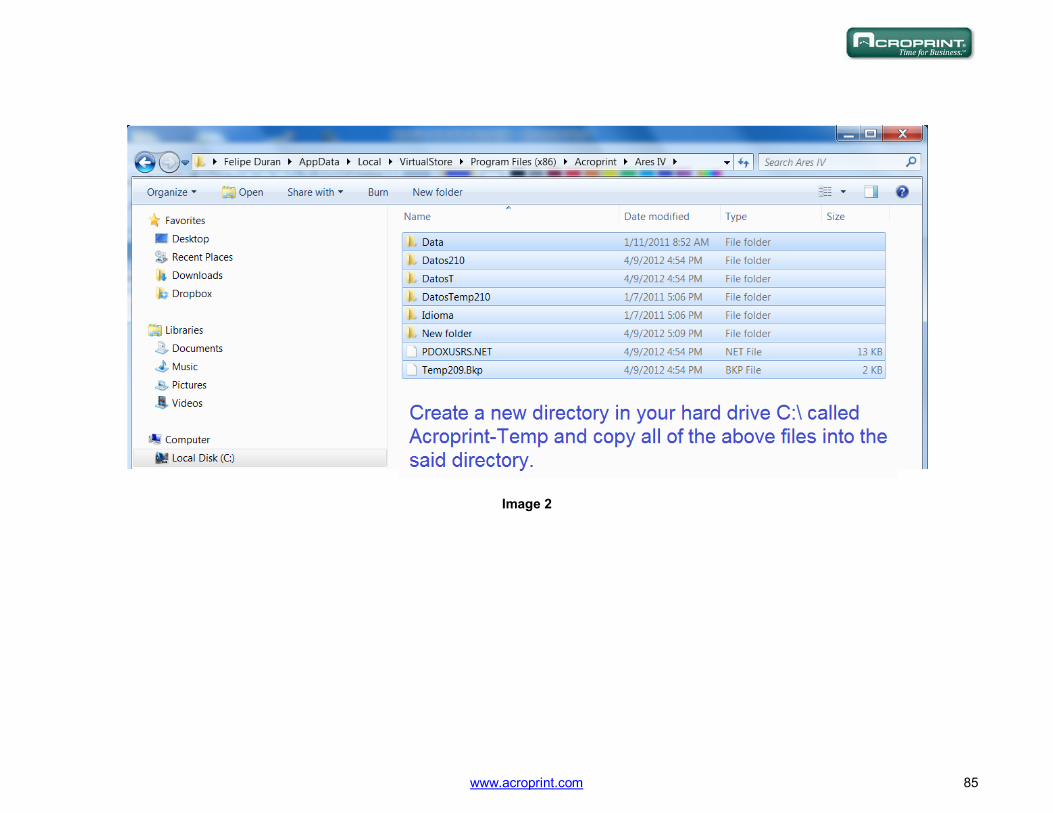
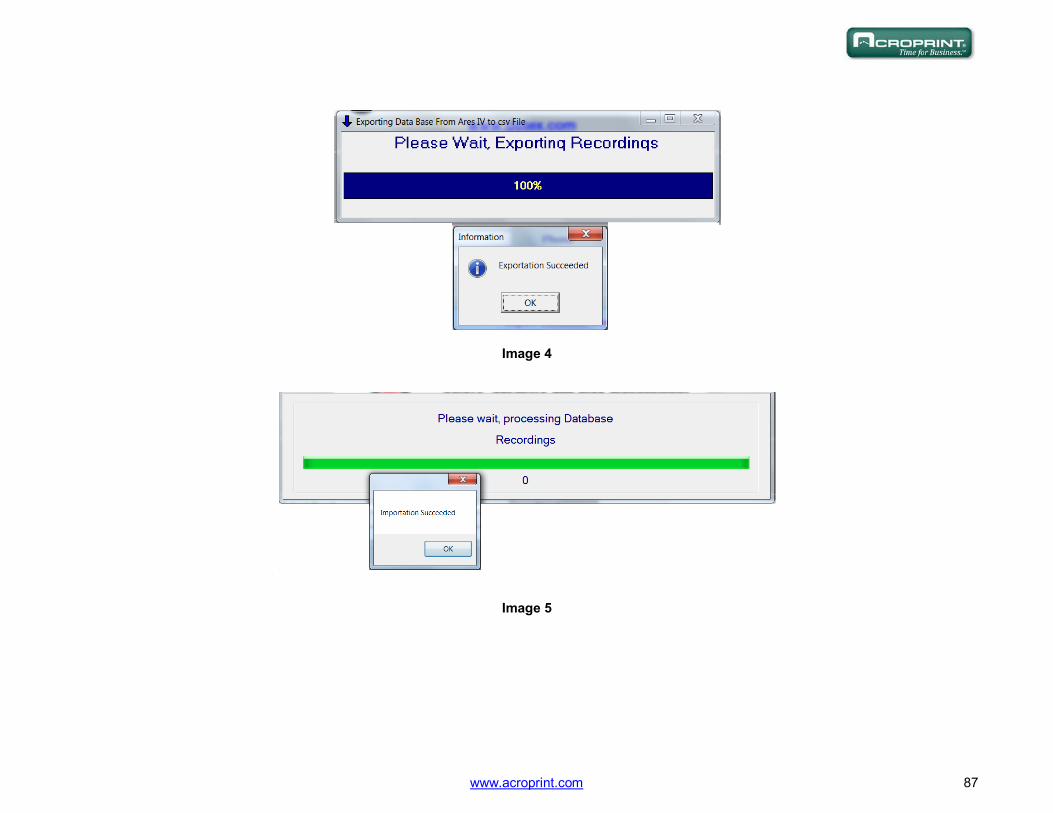
XV. IMPORTAR BASES DE DATOS DE ARES IV A ARES V Pasos para Windows Vista y Windows 7 Solamente. Nota: (Para Windows XP ver imagen 6): 1. Abra el path C:\Program Files (x86)\Acroprint\Reliant Plus (ver imagen 1 abajo). 2. Haga clic en Archivos de Compatibilidad “Compatibility files”. 3. Cree un directorio nuevo en la raíz C:\ y nómbrelo “Temp-Acroprint”, copie todos los archivos contenidos en “Archivos de Compatibilidad” al nuevo
directorio llamado “Temp-Acroprint. (Ver Imagen 2 abajo). 4. Corra el programa Ares V. 5. Seleccione la pestaña “Acerca De” y seleccione “Importar Bases de Datos de Reliant Plus”. 6. Seleccione el directorio C:\Temp-Acroprint y seleccione OK. 7. El proceso de exportación comenzará, presione OK. 8. El Proceso de importación a Ares V comenzara, seleccione OK.
Image 1
www.acroprint.com
85
Image 2

www.acroprint.com
86
Image 3
www.acroprint.com
87
Image 4
Image 5

www.acroprint.com
88
Image 6

www.acroprint.com
89
XVI. PLATAFORMA MOBIL DE DESCARGA T8000:
Esta plataforma móvil les permite a los supervisores descargar varios registradores M8000-RB en dicha plataforma, la capaci-dad de su memoria es de 21000 registros. Esto libera al supervisor de tener que recoger los registradores de los diferentes puntos de ronda (áreas a veces muchos kilómetros aparte), llevarlos a un PC central para efectuar descargas y después de-volverlos a sus áreas de trabajo. Como asignar la llave de descarga a la Plataforma T8000:
1. Deslice la batería hacia atrás (como se ve en la imagen) para interrumpir momentáneamente el contacto. 2. Toque con la llave el cabezal de la plataforma. 3. Suelte la batería para reiniciar el contacto. 4. La plataforma MDTU emitirá 8 pitos indicando activación de la llave. Como descargar Registradores M8000-RB en la plataforma T8000:
1. Conecte el Registrador M8000-RB en la plataforma MDTU (como se ve en la imagen). 2. Toque el cabezal de la plataforma con la llave de descarga. 3. Ambos aparatos emitirán 5 pitos al inicio y al fin de la descarga.

www.acroprint.com
90
XVII. FCC COMPLIANCE: The M8000-RB Portable Time Recorder, Mobile Data Transfer Unit (MDTU) and P8000 Download Cradle comply with Part 15, Class B of the FCC Rules (Non Intentional Radiators, Class B Digital Devices). Operation is subject to the following two conditions: (1) these devices may not cause harmful interference, and (2) these devic-es must accept any interference received, including interference that may cause undesired operation. Harmful interference (definition): Any emission, radiation or induction that endangers the functioning of a radio navigation ser-vice or of other safety services, or seriously degrades, obstructs or repeatedly interrupts a radio communications service operat-ing in accordance with FCC rules. Changes or modifications to these devices not expressly approved by Acroprint Time Recorder Co. will void the user's authority to operate the equipment.
XVIII. EC COMPLIANCE: The M8000-RB Portable Time Recorder, Mobile Data Transfer Unit (MDTU) and P8000 Download Cradle comply with regula-tion EN55022 Class B and regulation EN50082-1.