managing your cms enterprise identity managment … your cms enterprise identity ... then select...
TRANSCRIPT

July 1, 2015 Page 1 of 13
Managing Your CMS Enterprise Identity
Management (EIDM) Account
Table of Contents Forgot User ID ............................................................................................................................................... 2
Forgot Your Password ................................................................................................................................... 3
Viewing Your Profile ...................................................................................................................................... 4
Changing Your Password ............................................................................................................................... 5
Changing Your Email Address ....................................................................................................................... 6
Changing Your Security Questions/Answers ................................................................................................. 7
Changing Your Phone Number ...................................................................................................................... 8
Changing Your Home Address ...................................................................................................................... 9
Approving a Role in EIDM ........................................................................................................................... 10

July 1, 2015 Page 2 of 13
Forgot User ID The following are the basic step-by-step instructions on how to use the Forgot User ID Feature.
1. Navigate to https://portal.cms.gov. The CMS Enterprise Portal page is displayed. 2. Select the ‘Forgot User ID’ link.
3. Provide the information requested and select ‘Next’ to continue.
4. After selecting ‘Next’, the ‘Forgot UserId’ acknowledgement page is displayed. The page
confirms the information entered has been verified and an email with your user ID has been sent to the email address on record. Select ‘OK’ to close the page.

July 1, 2015 Page 3 of 13
Forgot Your Password The following are the basic step-by-step instructions on how to use the Forgot Your Password feature.
1. Navigate to https://portal.cms.gov. The CMS Enterprise Portal page is displayed. 2. Select the ‘Forgot Password’ link.
3. Enter your User ID and select ‘Next’ to continue.
4. Provide the answers to the challenge questions displayed. 5. Enter a new password. Re-enter the new password for ‘Confirm Password’ and select ‘Next’ to
complete the Forgot Password process.
NOTE: Your password must be a minimum of eight (8) and a maximum of twenty (20) characters in length. It must contain at least one (1) letter, one (1) number, one (1) uppercase letter, and one (1) lowercase letter. It cannot contain your user ID. NOTE: You may select ‘Cancel’ at any time to exit out of the ‘Change Password’ process. All information provided, and any change made, will not be saved.

July 1, 2015 Page 4 of 13
6. After selecting ‘Next’, the ‘Forgot Password’ acknowledgement page is displayed. The page verifies the password has been changed and a confirmation email has been sent to the email address on record. Select ‘OK’ to close the page.
Viewing Your Profile The following are the basic step-by-step instructions on how to view your profile information.
1. Navigate to the CMS Enterprise Portal (https://portal.cms.gov), accept the Terms and Conditions and log in with your user ID and password. The ‘Welcome to the CMS Enterprise Portal’ page is displayed.
2. Select the down arrow icon that appears next to your name at the top, right corner of the page. Then select ‘My Profile’ from the drop-down menu to continue.
3. The ‘View My Profile’ page is displayed. Select one of the links on the left to perform a specific
action.

July 1, 2015 Page 5 of 13
Changing Your Password The following are the basic step-by-step instructions on how to change your password.
1. Navigate to the CMS Enterprise Portal (https://portal.cms.gov), accept the Terms and Conditions and log in with your user ID and password. The ‘Welcome to the CMS Enterprise Portal’ page is displayed.
2. Select the down arrow icon that appears next to your name at the top, right corner of the page. Then select ‘My Profile’ from the drop-down menu to continue.
3. The ‘View My Profile’ page is displayed. Select the ‘Change Password’ link. 4. The ‘Change Password’ page is displayed. Enter your old password. Create and enter a new
password of your choice for ‘New Password’.
NOTE: Your password must be a minimum of eight (8) and a maximum of twenty (20) characters in length. It must contain at least one (1) letter, one (1) number, one (1) uppercase letter, and one (1) lowercase letter. It cannot contain your user ID. NOTE: You may select ‘Cancel’ at any time to exit out of the ‘Change Password’ process. All information provided, and any change made, will not be saved.
5. After selecting ‘Next’, the ‘Change Password’ acknowledgement page is displayed. The page verifies the password has been changed, a confirmation email has been sent to the email address on record, and you will need to logout and login with your new password. Select ‘OK’ to close the page. The ‘Change Password’ acknowledgement page and a message your password has been successfully changed are displayed.

July 1, 2015 Page 6 of 13
Changing Your Email Address The following are the basic step-by-step instructions on how to change your email address.
1. Navigate to the CMS Enterprise Portal (https://portal.cms.gov), accept the Terms and Conditions and log in with your user ID and password. The ‘Welcome to the CMS Enterprise Portal’ page is displayed.
2. Select the down arrow icon that appears next to your name at the top, right corner of the page. Then select ‘My Profile’ from the drop-down menu to continue.
3. The ‘View My Profile’ page is displayed. Select the ‘Change Email Address’ link. 4. The ‘Change Email Address’ page is displayed. The current email address on record for the
account is displayed in the old email address section. Enter your new email address in the ‘New Email Address’ section and then reenter the new email address in the ‘Confirm New Email Address’ section. Select ‘Next’ to complete the change email process.
5. After selecting ‘Next’, the ‘Change Email Address’ acknowledgement page is displayed. The
page displays that the email address has been changed. Select ‘OK’ to close the page.
NOTE: You may select ‘Cancel’ at any time to exit out of the ‘Change Email Address’ process. All information provided and any changes made will not be saved.

July 1, 2015 Page 7 of 13
Changing Your Security Questions/Answers The following are the basic step-by-step instructions on how to change your security challenge questions and answers.
1. Navigate to the CMS Enterprise Portal (https://portal.cms.gov), accept the Terms and Conditions and log in with your user ID and password. The ‘Welcome to the CMS Enterprise Portal’ page is displayed.
2. Select the down arrow icon that appears next to your name at the top, right corner of the page. Then select ‘My Profile’ from the drop-down menu to continue.
3. The ‘View My Profile’ page is displayed. Select ‘Change Challenge Questions and Answers’. 4. The ‘Change Challenge Questions and Answers’ page is displayed. Select a question and then
provide an answer of your choosing. Continue to select a question and provide an answer until all three (3) challenge questions have been selected and answered. Select ‘Next’ to complete the ‘Change Challenge Questions and Answers’ process.
5. After selecting ‘Next’, the ‘Change Challenge Questions and Answers’ acknowledgement page
is displayed. The page verifies the challenge questions and answers have been changed and a confirmation email has been sent to the email address on record for the account. Select ‘OK’ to close the page.
NOTE: You may select ‘Cancel’ at any time to exit out of the ‘Change Challenge Questions and Answers’ process. All information provided and any changes made will not be saved.
July 1, 2015 Page 8 of 13
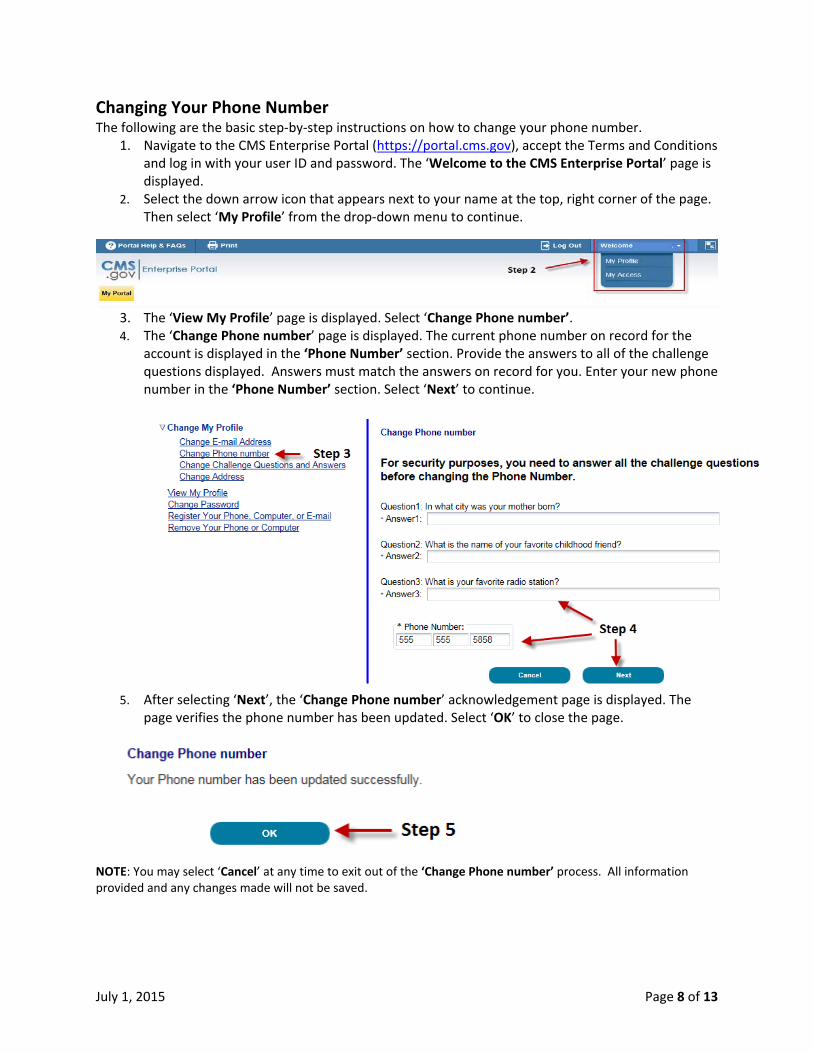
Changing Your Phone Number The following are the basic step-by-step instructions on how to change your phone number.
1. Navigate to the CMS Enterprise Portal (https://portal.cms.gov), accept the Terms and Conditions and log in with your user ID and password. The ‘Welcome to the CMS Enterprise Portal’ page is displayed.
2. Select the down arrow icon that appears next to your name at the top, right corner of the page. Then select ‘My Profile’ from the drop-down menu to continue.
3. The ‘View My Profile’ page is displayed. Select ‘Change Phone number’. 4. The ‘Change Phone number’ page is displayed. The current phone number on record for the
account is displayed in the ‘Phone Number’ section. Provide the answers to all of the challenge questions displayed. Answers must match the answers on record for you. Enter your new phone number in the ‘Phone Number’ section. Select ‘Next’ to continue.
5. After selecting ‘Next’, the ‘Change Phone number’ acknowledgement page is displayed. The
page verifies the phone number has been updated. Select ‘OK’ to close the page.
NOTE: You may select ‘Cancel’ at any time to exit out of the ‘Change Phone number’ process. All information provided and any changes made will not be saved.

July 1, 2015 Page 9 of 13
Changing Your Home Address The following are the basic step-by-step instructions on how to change your home address.
1. Navigate to the CMS Enterprise Portal (https://portal.cms.gov), accept the Terms and Conditions and log in with your user ID and password. The ‘Welcome to the CMS Enterprise Portal’ page is displayed.
2. Select the down arrow icon that appears next to your name at the top, right corner of the page. Then select ‘My Profile’ from the drop-down menu to continue.
3. The ‘View My Profile’ page is displayed. Select ‘Change Address’. 4. The ‘Change Address’ page is displayed. The current home address on record for the account is
displayed in the ‘Home Address’ section. Provide the answers to all of the challenge questions displayed. Answers must match the answers on record for you. Enter your new home address information in the ‘Home Address’ section. Select ‘Next’ to continue.
5. After selecting ‘Next’, the ‘Change Address’ acknowledgement page is displayed. The page
displays that the address has been updated. Select ‘OK’ to close the page.
NOTE: You may select ‘Cancel’ at any time to exit out of the ‘Change Address’ process. All information provided and any changes made will not be saved.
July 1, 2015 Page 10 of 13
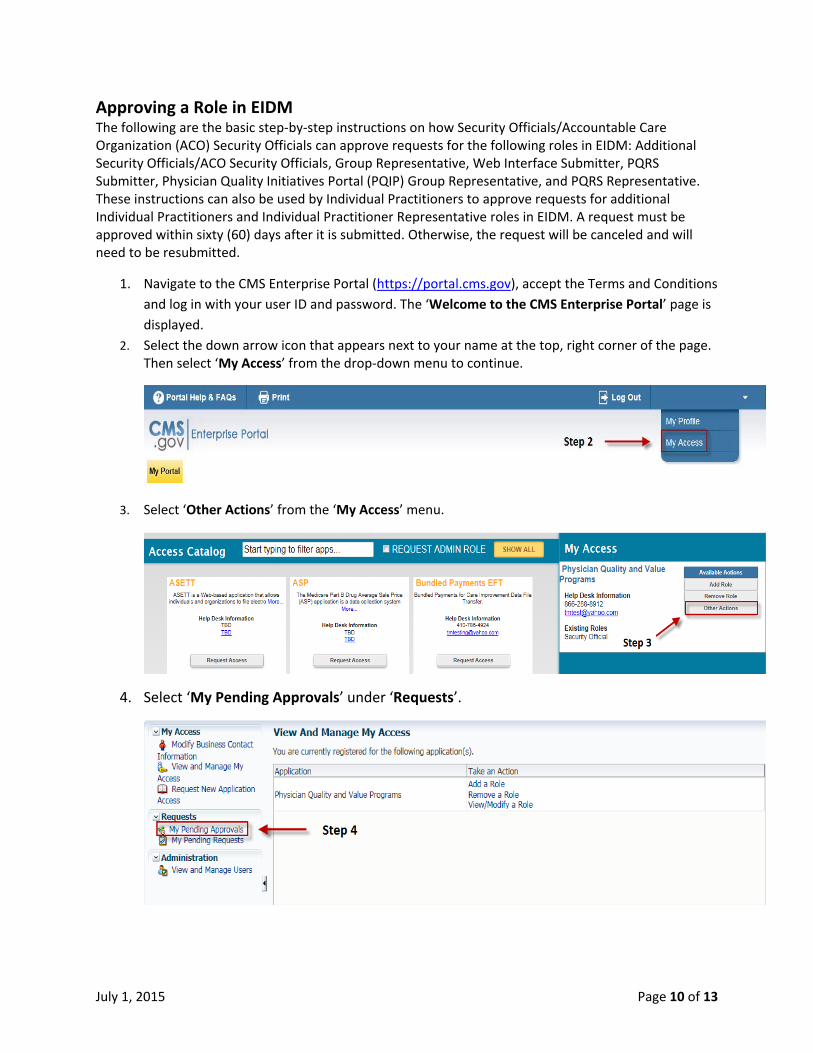
Approving a Role in EIDM The following are the basic step-by-step instructions on how Security Officials/Accountable Care Organization (ACO) Security Officials can approve requests for the following roles in EIDM: Additional Security Officials/ACO Security Officials, Group Representative, Web Interface Submitter, PQRS Submitter, Physician Quality Initiatives Portal (PQIP) Group Representative, and PQRS Representative. These instructions can also be used by Individual Practitioners to approve requests for additional Individual Practitioners and Individual Practitioner Representative roles in EIDM. A request must be approved within sixty (60) days after it is submitted. Otherwise, the request will be canceled and will need to be resubmitted.
1. Navigate to the CMS Enterprise Portal (https://portal.cms.gov), accept the Terms and Conditions and log in with your user ID and password. The ‘Welcome to the CMS Enterprise Portal’ page is displayed.
2. Select the down arrow icon that appears next to your name at the top, right corner of the page. Then select ‘My Access’ from the drop-down menu to continue.
3. Select ‘Other Actions’ from the ‘My Access’ menu.
4. Select ‘My Pending Approvals’ under ‘Requests’.

July 1, 2015 Page 11 of 13
5. The following fields will be displayed on the Pending Approval page: Search Requests
• Requestor First Name Last Name
• Request Details Request Number Submit Date From Submit Date To
• Keyword Search Keywords
Enter valid search criteria and select ‘Search’ or review the requests in the Pending Approvals table to find the desired request.
Note: The Pending Approvals table will be displayed and will include the current requests awaiting approval or will be populated with results matching the search criteria.

July 1, 2015 Page 12 of 13
6. In the Pending Approvals table, select the collapse/expand icon located next to the pending request to display request details. Select the ‘Request Number’ shown in the request details.
Note: Selecting the ‘Request Number’ will display the ‘Approve/Reject Request’ page.
7. Complete the following on the ‘Approve/Reject Request’ page: • Review ‘User Information’ and the ‘Requested Access’ sections of the request. • Enter the ‘Justification for Action’ in the text box under ‘Justification’ and select ‘Approve’.

July 1, 2015 Page 13 of 13
NOTE: There are three (3) actions that can be completed: Select ‘Approve’ to accept the request; ‘Reject’ to decline the request; or ‘Defer’ to take action at a later time. Once an action is selected, you will be returned to the ‘Pending Approvals’ page.
NOTE: A notification will be emailed to the requestor informing them of the action that was completed with their request.
If you have questions or need further assistance, please contact the QualityNet Help Desk by phone at 866-288-8912, TTY 877-715-6222 or by email at [email protected]. Normal business hours are Monday-Friday from 7am to 7pm Central Time.