management hatchery guide - h&n internationalhatchery management guide the hatching egg the...
TRANSCRIPT

HATCHERY
Hatchery Manual
MANAGEMENTGUIDE

Introduction
Why should you study this management guide?
Most people who are involved in commercial hatch-ery practise have seen different management guides and may think ‘if you have seen one, you’ve seen all’. Others take the contents more seriously and expect frequent up-dates to find specific data which apply to the current generation of layers and current manage-ment practices. Newcomers in the business may need more detailed explanations than can be presented in this compact format.
This guide aims at giving the reader a prime under-standing about the processes that are happening inside a hatching egg from the moment of lay until the chick is hatching and finally processed and transported to the rearing farm. Based on this information practise-proven management recommendations are derived.
When applying them to the individual hatchery the local conditions like technical equipment, climate, leg-islation etc. have to be taken into account. The recom-mendation of the machine manufacturer should always be considered.
If you have any questions after reading this guide, we would like to encourage you to contact us. We ap-preciate all advice, feedback and suggestions from our customers.
MANAGEMENTTHE KEY TO PROFIT
1

2 3
HATCHERYMANAGEMENT GUIDE
Chick Processing �����������������������������������������30Chick Temperature . . . . . . . . . . . . . . . . . . . . . . . . . . . . . .30Chick Take-off and Sexing . . . . . . . . . . . . . . . . . . . . . . . .30Day-old-Chick Vaccination . . . . . . . . . . . . . . . . . . . . . . . .31Chick Holding and Transport . . . . . . . . . . . . . . . . . . . . . .33Do the Basics Right . . . . . . . . . . . . . . . . . . . . . . . . . . . . . .34
Hygiene ������������������������������������������������������� 34General hygiene . . . . . . . . . . . . . . . . . . . . . . . . . . . . . . . .34Cleaning . . . . . . . . . . . . . . . . . . . . . . . . . . . . . . . . . . . . . . 36Hatchery Microbiological Monitoring . . . . . . . . . . . . . . .37Do the Basics Right . . . . . . . . . . . . . . . . . . . . . . . . . . . . . .39
Troubleshooting ������������������������������������������40Breakout Analysis . . . . . . . . . . . . . . . . . . . . . . . . . . . . . . .40Practical Troubleshooting based on Technical Service Experience . . . . . . . . . . . . . . . . . . . . . . . . . . . . . .43Do the Basics Right . . . . . . . . . . . . . . . . . . . . . . . . . . . . . .45
Appendix �����������������������������������������������������45Incubation Guidelines . . . . . . . . . . . . . . . . . . . . . . . . . . .45Hatchability Problem Analysis . . . . . . . . . . . . . . . . . . . .46Sexing Guide . . . . . . . . . . . . . . . . . . . . . . . . . . . . . . . . . . .54Conversion of Temperature and Humidity Variables . . .58
TABLE OF CONTENTS
Introduction ��������������������������������������������������1Why should you study this Management Guide? . . . . . . .1
Hatching Egg Handling ���������������������������������4The Hatching Egg . . . . . . . . . . . . . . . . . . . . . . . . . . . . . . . . 4Optimal Egg Storage Condition . . . . . . . . . . . . . . . . . . . . . 6Pre-storage Incubation . . . . . . . . . . . . . . . . . . . . . . . . . . . . 9Disinfecting Hatching Eggs . . . . . . . . . . . . . . . . . . . . . . .10Do the Basics Right . . . . . . . . . . . . . . . . . . . . . . . . . . . . . .11
Setter ������������������������������������������������������������12Single-stage vs. Multi-stage Incubation . . . . . . . . . . . . . .12Pre-warming before Setting . . . . . . . . . . . . . . . . . . . . . . .12Setting Time and Pattern . . . . . . . . . . . . . . . . . . . . . . . . .14Temperature . . . . . . . . . . . . . . . . . . . . . . . . . . . . . . . . . . .15Humidity . . . . . . . . . . . . . . . . . . . . . . . . . . . . . . . . . . . . . . 17Ventilation . . . . . . . . . . . . . . . . . . . . . . . . . . . . . . . . . . . . 20Turning . . . . . . . . . . . . . . . . . . . . . . . . . . . . . . . . . . . . . . . 22Do the Basics Right . . . . . . . . . . . . . . . . . . . . . . . . . . . . . .22
Candling and Transfer ��������������������������������23Candling . . . . . . . . . . . . . . . . . . . . . . . . . . . . . . . . . . . . . .23Transfer . . . . . . . . . . . . . . . . . . . . . . . . . . . . . . . . . . . . . . 23Do the Basics Right . . . . . . . . . . . . . . . . . . . . . . . . . . . . . .25
Hatcher ��������������������������������������������������������25The Hatching Cycle. . . . . . . . . . . . . . . . . . . . . . . . . . . . . .25Monitoring Chick Yield . . . . . . . . . . . . . . . . . . . . . . . . . . .27Hatcher Operation . . . . . . . . . . . . . . . . . . . . . . . . . . . . . .27Do the Basics Right . . . . . . . . . . . . . . . . . . . . . . . . . . . . . .29

HATCHERYMANAGEMENT GUIDE
The Hatching EggThe hatching egg is not “just like any egg”. It contains
a living embryo which has all the genetic potential the R&D department of H&N International has combined over many years of selection.
In order to enable the embryo to express this potential during incubation and in later life as a pullet and laying hen, good hatching egg quality is crucial.
The hatching egg quality is mainly influenced by these factors: Condition and health status of the parent stock flock Age of the parent stock flock Medication Feed quality Water quality Type of housing Climate Percentage and quality of males
Type and cleanness of nest boxes House temperature Collecting of the hatching eggs Storage and handling of the hatching eggs Disinfection of the hatching eggs
The factors are arranged in two groups. The first group determines the quality of the egg at point of lay. This means egg size, shell quality, the nutrients and maternal antibodies transferred to the egg determining albumen and yolk quality and finally the fertility.
The second group of factors affects the hygiene status of the egg and the ability of the embryo to survive storage.
The freshly laid egg has the temperature of the hen’s body (41 °C) and the egg surface is slightly wet. Cooling down to house temperature causes a contraction of the egg contents leading to air entering the egg which creates the air cell.4
Hatching Egg Handling
To minimise the amount of germs penetrating the egg shell during this critical time, it is very important that the egg is laid in a clean nest.
Floor eggs are not regarded as good hatching eggs. It is very likely that they have already been contaminated by manure contact, before they can be collected, cleaned and disinfected.
If you use floor eggs in the hatchery there is a high risk that these eggs will compromise the quality of the other eggs and chicks. Therefore store and incubate floor eggs separately (or at least on the bottom trays) and transfer, pull and process them after dealing with the good qua- lity ones.
5
Second grade eggs which should be rejected, because they are heavily soiled, dirty, bloody, misshappen, thin-shelled, too small or too big, cracked respectively ridged

HATCHERYMANAGEMENT GUIDE
6
Good quality eggs for the hatchery should match the following criteria: Clean egg shell (No manure, litter, feathers or blood) No cracks Well shaped No double yolk Weight range according to hatchery policy (usually 52 –
68 grams and some hatcheries go as low as 48 g) Set with the pointed end downwards
Optimal Egg Storage ConditionWhen an egg is laid, there is already a small embryo
present with approximately 40000 cells. The vitality of this embryo must be preserved until the point when the incubation process finally starts. To achieve this, the eggs have to be handled carefully and temperature ups and downs should be avoided.
Firstly, the development of the embryo that started in the hen’s body has to be stopped. Therefore the egg should slowly cool down below “physiological zero” (26 – 27 °C) within six hours after being laid. This process usu-ally happens inside the nest or on the egg belt. When the ambient temperatures are high (summer) the cooling can be a problem. In practice it means that the egg collection has to be done more frequently to avoid the embryo re-maining at a temperature between 27 °C and 37 °C for too long a time. This temperature range causes an unbalanced development and hence early embryonic mortality. The hatchery staff recognises the early dead during candling as clear eggs. These are often misleadingly classified as infertile.
Also a too quick cooling of the eggs can cause embry-onic mortality.
Once the cell division is stopped the egg needs to cool down further. This is necessary to keep the thinning of the albumen and the amount of necrotic cell deaths under control. Control means that there are different optimal egg storage temperatures depending on storage length.
For eggs that will be set within the next 4 days it is not necessary to keep them at a temperature below 20 °C, 21 – 22 °C is regarded as optimal. This relatively high tem-
perature promotes the thinning of the albumen, which im-proves the gas exchange during early incubation. On the other hand it is low enough to maintain the vitality of the embryo. In most layer hatcheries it is common practise to store the eggs up to 10 days. For this storage length the recommended temperature is 16 – 18 °C. To avoid temper-ature-Ws (ups and downs) when moving the eggs from the farm to the hatchery the truck temperature should be set equal to the farm egg room temperature.
The egg room in the hatchery can be kept at a slightly lower temperature.
For storage beyond 10 days we do not recommend a temperature far below of 16 °C. In most situations this is not cost efficient and creates other problems when it comes to egg setting (egg sweating, long pre-warming time). Condensation on the eggs should be avoided by any means. It allows microorganism to multiply on the wet surface, penetrate the shell and contaminate the egg. It happens when cold stored eggs are brought to a warm environment – for example the setter room – and the egg temperature is lower than the dew point of the surround-ing air. So this is depending on temperature difference and
7
Chart 1: Optimal development of the egg temperature from the moment of lay until setting depending on the storage length
104 / 40
38
36
34
32
30
28
26
24
22
68/ 20
18
16
146 hFarm
12 h 2 dTrans- port
3–4 dHatchery
5–10 d 6 h/12 hPre-warming
Physiological Zero
(°F / °C)

8 9
HATCHERYMANAGEMENT GUIDE
8 9
humidity, but one can roughly say that the temperature increase should not be more than 11 °C in situations with little air movement. As soon as there is considerable air flow over the eggs the risk for egg sweating is minimised.
To preserve the hatchability during long storage it is better to turn the eggs. If there is no automatic equipment installed, turning by hand three times each day is suffi-cient. Additionally it is possible to pre-incubate the eggs before storage to improve the vitality of the embryo. If the eggs are stored on cardboard trays it is beneficial to store the eggs upside down – with the pointed end up. Be care-ful not to transport the eggs like this, because it can cause loose air cells.
Beyond one week of storage, even under optimal con-ditions, the hatchability will drop 0.5 – 1.5 % per day with the percentage increasing as storage extends further. After two weeks of storage, the chick quality will also be im-paired.
Nick Chick/ Super Nick are more negatively affected by long storage than Brown Nick. When using Silver Nick there is a minimum storage length of 3 days before the best hatching potential of the eggs is reached. There is
some evidence that also eggs from young Brown Nick and Nick Chick/ Super Nick flocks benefit from 2 to 3 days storage before being set. Please check under the condition of your operation.
The humidity during storage is not as important as the temperature. If eggs are just stored up to 10 days, 50 – 60 % relative humidity is sufficient. Of course it does no harm if the humidity is higher as long as it is below 80 %. Under conditions of more than 80 % relative humid-ity the growth and spread of fungi is facilitated and should therefore be avoided. However, when eggs are scheduled for long storage a higher humidity will help to avoid exces-sive moisture loss of the eggs. The target value should be 70 – 80 % relative humidity.
Pre-storage IncubationA hen needs approximately 24 hours to produce an
egg. Around 30 minutes after an egg is laid the next fol-licle is ovulated. The follicle falls into the infundibulum where the fertilisation takes place. After that the albumen is added, the egg membranes are formed and the egg shell is composed.
Therefore the eggs arriving at the hatchery are contain-ing an embryo representing already 23.5 hours develop-ment in the hen’s body. However this developmental stage at point of lay is not optimal for long storage. In nature it would be altered by periodical warming of the eggs during the time the hen sits on the nest to produce the next egg of the clutch. In the hatchery it is possible to achieve similar results by incubating the eggs for 6 hours (egg tempera-ture 100 °F) before storage. This leads to further devel-opment of the germinal disk to a stage containing 60000 – 80000 cells. At this stage the embryo is less susceptible to cell death occurring during the storage period.
If the heat-up time of the incubator is longer than 6 hours, the time the eggs are kept on 100 °F should be gradually reduced from 6 hours down to 3 hours for a heat-up time of 12 hours. If the incubator needs more than 12 hours the amount of eggs set for pre-storage incuba-tion should be reduced.
Chart 2: Impact of pre-storage incubation on the hatch-ability of Nick Chick/ Super Nick
43
42
41
40
39
38
37
36
35
34< 7 98 10 11
Storage (days)
Sala
ble
ch
ick
s (%
)
Pre-storage incubation
Normal storage

10 11
HATCHERYMANAGEMENT GUIDE
Before choosing any chemical please make sure that it is labelled for the use in hatcheries and for the desired mode of application.
Eggs can be disinfected on the breeder farm, in the hatchery or both. We recommend to do the disinfection in the hatchery either after egg traying or before egg setting.
If required, a first disinfection can be done shortly after egg collection. Disinfecting the eggs on the breeder farm reduces the microbiological load as soon as possible, but keep in mind that this can not exclude the risk that floor eggs or dirty eggs may have been already contami-nated. In fact what we do is not an egg, but an egg shell disinfection!
Do the Basics Right
1. Hatching eggs are living organisms. Handle them with care!
2. Grade eggs at the farm. Do not send dirty eggs to the hatchery. Floor eggs are no hatching eggs.
3. Do not try to “clean” eggs by using sandpaper or an iron sponge. This will destroy the cuticle and ease the entrance of microorganism.
4. Check temperature at the farm, during transport and in the hatchery. Aim for a steady decline and stable tem-perature. There should be no ups and downs. Check not only air temperature, but also egg temperature with an infrared thermo meter.
5. Eggs intended to be placed on paper trays and palettes need to be cooled down before. Place them soon after arrival to the hatchery on setter trays. This facilitates a more even temperature.
6. To achieve an even temperature allow a good air flow in the storage rooms. Don’t store the eggs directly on the floor, next to the wall or too tight together. Mind direct sunlight entering the room. No water should drop on the eggs from air-conditioner or humidifier units.
7. Avoid using formaldehyde for disinfecting hatching eggs.
8. Especially after long transport to the hatchery, the eggs need to have a 24 hours rest before setting.
Pre-storage incubation can not improve, but can main-tain hatchability. Therefore it starts to make sense using this technique, if eggs are scheduled for a storage period which leads to a noticeable decline in hatchability. This depends on the local conditions of the flock and the stor-age1.
Pre-storage incubation gives best result when it is done with fresh eggs up to two days after lay.
Disinfecting Hatching EggsHatching eggs need to be disinfected, as micro organ-
isms multiply rapidly in the warm and humid climate of a hatchery. A widely used method is fumigation with forma-lin. However this is no longer recommended as it is harm-ful to the embryo, increasing early embryonic death, and it is hazardous to human health. Especially Nick Chick/ Super Nick are susceptible to formalin.
When using formalin keep in mind:
Never fumigate with Formaldehyde within the first 96 hours of incubation!
Never exceed a fumigation time of 30 minutes! Room temperature should be 20 – 25 °C, relative humidity 65 – 75 %.
Re-ventilation of a fumigation chamber has to be done with clean air (not too cold) to avoid the re-contamina-tion of the hatching eggs! Make sure that the equipment has a capacity to re-ventilate the fumigation chamber within a few minutes.
There are modern chemicals available based on glutar-aldehyde and different quaternary ammonia compounds, on stabilised hydrogen peroxide and peracetic acid or just H2O2 that have the same effectiveness. These agents can be sprayed, fogged or vaporised. The most popular meth-od is fogging as it is safe, the fog reaches all the eggs and the eggs do not get wet.
Vaporisation requires less investment in equipment, but chemicals that can be used in a safe manner are not available everywhere.
1 Under conditions causing an improper cooling of the eggs the effect of pre-storage incubation might be negligible or even negative, because the eggs are already containing an embryo at an advanced stage of development.

12 13
HATCHERYMANAGEMENT GUIDE
25 °C (77 °F). Pre-warming is a must, if eggs are going to be set in multi-stage machines to avoid condensation on the egg shells and a big temperature drop for the other eggs. It is also beneficial for single-stage incubation as it accus-toms the embryos to the beginning of incubation and in this way decreases the spread of hatch and reduces early embryonic mortality.
Some hatcheries have a special pre-warming room. This is a good way to heat the eggs evenly and the room can also be used for the egg disinfection before setting.
In the absence of such a room most people put the eggs to warm in the setter room or in the incubator with doors left open. The latter is in most cases not recommended as the limited airflow will cause a non-uniform warming.
As a third possibility many single-stage setters have a pre-heat or/and a delayed start function. Using this, the eggs can be pre-warmed inside the running machine which automatically starts incubation after the preset time. The method is convenient, labour saving and allows a very even temperature during pre-warming. However you have to be aware of what really happens inside the machine. The pre-heat function of most manufacturers quickly in-creases the temperature to the setpoint and then tries to keep the temperature constant. It usually works, but is not exactly what we are looking for. The delayed start function mostly deactivates heating and cooling and just fresh air is sucked in by the running pulsator. Here it depends on the temperature of the incoming air and the heat produced by the electric motor. A temperature over 25 °C should be avoided as fluctuations around “physiological zero” (26 – 27 °C) can lead to increased early embryonic mortality.
Depending on egg mass, egg storage length, storage temperature, flock age and pre-warming method the op-timal pre-warming length differs. The minimum is six hours. As storage length increases or storage tempera-ture decreases pre-warming length should be extended to twelve hours or more. It is no risk to go to 18 – 24 hours as long as the temperature is balanced and not too high.
Single-stage vs� Multi-stage IncubationSingle-stage means that all eggs within an incubator
are set together. So all eggs are in the same embryonic stage. This enables the user to adjust the temperature, hu-midity and ventilation setpoints according to the needs of the embryo, possibly leading to improved hatchability and chick quality. The next benefit is the improved biosecurity as provided by every all-in all-out system. The incubator can be easily cleaned, disinfected and also maintained af-ter each batch of eggs. Finally it can be more flexible if the amount of hatching eggs is not constant for each setting.
For this reason many commercial layer hatcheries and all major breeding companies use single-stage incubation.
In contrast a multi-stage incubator is usually filled with eggs of six different embryonic ages. Therefore the multi-stage incubation environment cannot, by its nature, create optimum conditions for every egg. Temperature, humidity and ventilation are set at a fixed point through-out the whole incubation period.
One advantage of multi-stage incubation is its simplic-ity both with respect to the control system of the incuba-tor as well as the management of incubation. It used to be also superior to single-stage incubation in terms of energy efficiency. Today’s single-stage hatcheries can partly elim-inate this handicap with modern heat recovery systems.
The difference between the two systems is only rele-vant for the first 18–18.5 days of incubation. After transfer the hatcher is always managed in an all-in all-out rhythm.
Pre-warming before SettingPre-warming, often also called pre-heating, is a
procedure after storage and before setting during which the egg temperature is slowly increased to approximately
Setter
14 15
HATCHERYMANAGEMENT GUIDE
setting time if necessary. This will help to maintain a high level of chick quality.
Incubators give best results if they are full, and the eggs are of the same age and from the same flock. This is often not possible and a compromise has to be reached. If the setter is not full, the trolleys should be ‘balanced’ which enables the air flow to work correctly. The top two and bottom two trays can be left empty of eggs but the spaces should be filled with empty trays. Occasionally, it is necessary to have whole trolleys empty but they should be put in complete with empty trays. Another way is to fill with eggs from another flock or another storage time. If different batches of eggs are going to be set together please ask your machine manufacturer for advice and ex-perience with your specific incubator type. Incorrect fill-ing in multistage incubators can create big problems, re-sulting in disappointing results.
TemperatureTemperature is the most important incubation param-
eter. It mainly determines the speed of embryo develop-ment and it has to be kept within a small range to assure optimal hatchability and chick quality. However, the em-bryo temperature rather than the incubator temperature is critical. As this cannot be measured without damaging the egg, the usual practice is to determine the eggshell temperature (EST) with an infrared thermometer. When doing this, it is important to ensure that the measurement is carried out at the “equator” of the egg and not at the top above the air cell. Otherwise, in the case of a developing embryo, the value recorded will be too low.
EST measurement should be taken by suitably trained Staff only. The required sample size is 10 – 15 eggs per trolley and from the middle of a tray. Readings of clear eggs are not relevant for the calculation of the average. One should aim for an EST of 100 °F during the first twelve days of incubation. A fluctuation range of 99.6 to 100.4 °F between the eggs is acceptable.
After the twelfth day, the embryo begins to grow more quickly and to produce more heat. This requires increased ventilation and cooling of the incubator which leads to a greater variation in EST. This effect is reinforced by a high
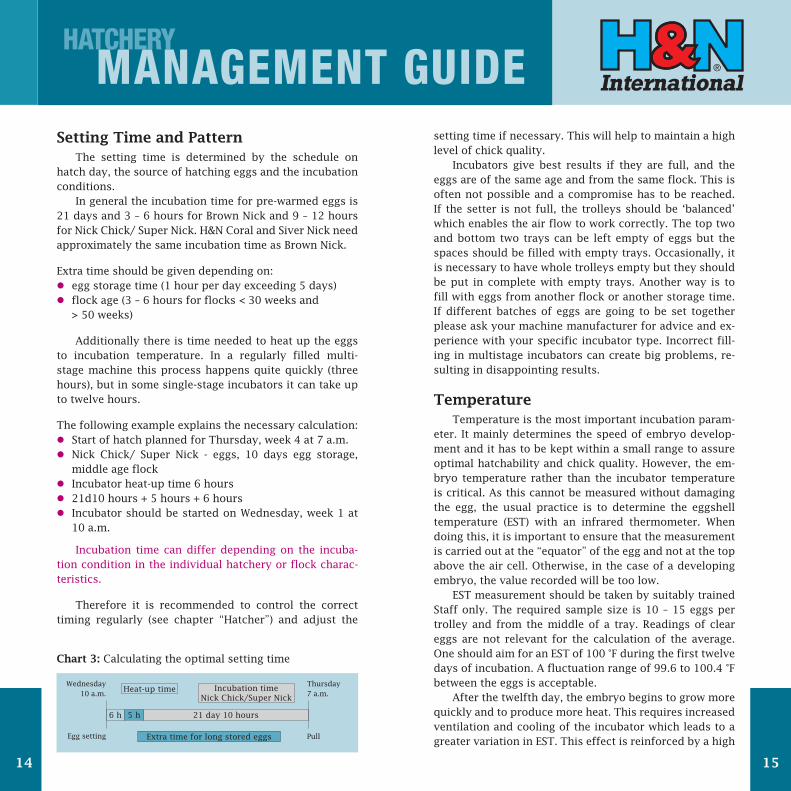
Setting Time and PatternThe setting time is determined by the schedule on
hatch day, the source of hatching eggs and the incubation conditions.
In general the incubation time for pre-warmed eggs is 21 days and 3 – 6 hours for Brown Nick and 9 – 12 hours for Nick Chick/ Super Nick. H&N Coral and Siver Nick need approximately the same incubation time as Brown Nick.
Extra time should be given depending on: egg storage time (1 hour per day exceeding 5 days) flock age (3 – 6 hours for flocks < 30 weeks and
> 50 weeks)
Additionally there is time needed to heat up the eggs to incubation temperature. In a regularly filled multi-stage machine this process happens quite quickly (three hours), but in some single-stage incubators it can take up to twelve hours.
The following example explains the necessary calculation: Start of hatch planned for Thursday, week 4 at 7 a.m. Nick Chick/ Super Nick - eggs, 10 days egg storage,
middle age flock Incubator heat-up time 6 hours 21d10 hours + 5 hours + 6 hours Incubator should be started on Wednesday, week 1 at
10 a.m.
Incubation time can differ depending on the incuba-tion condition in the individual hatchery or flock charac-teristics.
Therefore it is recommended to control the correct timing regularly (see chapter “Hatcher”) and adjust the
Chart 3: Calculating the optimal setting time
Wednesday10 a.m.
Egg setting
Thursday7 a.m.
Pull
21 day 10 hours
Extra time for long stored eggs
6 h 5 h
Heat-up time Incubation time Nick Chick/Super Nick

16 17
HATCHERYMANAGEMENT GUIDE
is (humidity). The starting setpoint is mainly determined by the design of the incubator, which means the air flow inside of the machine, the position of the sensors and the way of calibration. There are setters on the market which require a setpoint of 99.6 °F to achieve an average egg tem-perature of 100 °F and others need to be set at 100.6 °F.
Therefore it is at this point impossible to give a de-tailed recommendation for an incubation program that works with every equipment available and performs well under the individual conditions of each hatchery.
Please seek the advice of your manufacturer and don‘t hesitate to contact also our technical service department to ask for our experience with your incubator model. There is a proposal for an incubation program, experienced with conventional single-stage Petersime equipment, in the ap-pendix of the guide.
Naturally in multi-stage incubators, the EST cannot be controlled in this way because adjusting the incuba-tor temperature always involves a compromise for various stages of incubation.
HumidityHumidity and the way it is provided can influence the
incubation success by several ways. Firstly it affects the moisture loss of the eggs. During
incubation water vapour is lost through the pores of the shell. The rate of water loss is influenced by the egg shell conductance and the water vapour pressure difference be-tween the egg and the surrounding air. The water vapour gradient depends on the temperature and the content of water in the air. At a given temperature the water content of the air can also be recorded as relative humidity or wet bulb temperature.
Practically the moisture loss can be determined by simple weighing, because any weight loss is solely due to the loss of water from the egg. There have recently been automatic egg weighing devices introduced by manufac-turers, but these systems are relatively expensive and still have to prove their technical reliability.
Manual weighing with a simple and cheap electronic scale is effective and has been used for many years.
number of “clear” eggs which do not produce any heat and create relatively cooler areas on the trays.
At this stage, it may be the case that, at an average EST of 100 °F, even eggs with living embryos constantly have an EST below 99.5 °F. These embryos develop slowly and there is a risk that they will be rejected as “pips” or “too fresh chicks” when the chicks are taken off. To avoid this, the average EST should be allowed to increase slowly by 1 – 1.5 °F from the 13th to the 19th day when transfer takes place. As a second advantage this limited rise in egg tem-perature acclimatises the embryonic tissues for the body temperature of the hatched chick (40 °C, 104 °F).
In many hatcheries, there is a tendency to very high EST. However, temperatures over 102 °F have a negative effect on chick quality and can also reduce the hatching rate.
To achieve the desired egg temperature, the incubator temperature has to be lowered step by step during incuba-tion until day 16. From that moment on the heat produc-tion is only slightly increasing until internal pipping and therefore the machine temperature can be kept constant.
In general the overall temperature should decline from day 0 until day 16 by 1.0 – 1.8 °F. The decrease has to be higher the more heat is produced by the embryos (egg size, fertility, oxygen availability), the lower the air speed (in-cubator model) and the lower the heat capacity of the air
Adapted from Janke, Tzschenktke and Boerjan (2004)
Chart 4: Heat production of the embryo per kg egg mass
4
3,5
3
2,5
2
1,5
1
0,5
08 9 10 11 12 13 14 15 16 17 18 19 20 21 22
Incubation time (days)
Heat
pro
du
ctio
n (
W /
kg
)
Broiler
Layer

18 19
HATCHERYMANAGEMENT GUIDE
ble to compensate it by higher humidity during incuba-tion. Therefore not only the amount of moisture loss is important, but also the timing. In multi-stage machines the moisture loss is almost linear, because humidity and ventilation setpoints are fixed. In modern gas tight sin-gle-stage incubators the humidity during the first days of incubation is very high, because the ventilation is usually kept closed. Thus the eggs lose relatively less moisture during the first days, which is compensated by a low hu-midity and hence increased moisture loss during the last week in the setter.
There is no evidence that a slight non-linear weight loss per se influences chick quality or hatchability. But a steep one, when keeping the damper closed in modern gas sealed incubators for more than seven to ten days might be negative for layer type breeds. However some manu-facturer promote it, as it has other benefits that will be discussed in the next paragraphs. The system has been developed for broilers but has not been proven to be very successful with layers.
The second important feature of humidity is the heat capacity of water. Air is able to carry more heat the higher the humidity (content of water) is. This is easy for every-one to notice when pouring water on the rocks in a sauna.
Air with a high heat capacity inside an incubator leads to a more uniform temperature. Of course this is always an advantage, but during the first days of incubation the embryo is very sensitive to environmental changes and hence can benefit most from a stable one. Additionally, a high humidity can be more easily achieved during the early than the later days, because the oxygen requirement of the eggs and hence the ventilation rate is limited.
As becomes clear at this point humidity and ventila-tion settings can’t be discussed separately. Both partly de-pend on each other and on the condition of the incoming air. If the incubator is asked to keep a high humidity, when the ventilation rate is high and the water content of the incoming air is low, it is forced to add a lot of humidity by itself. This water needs to be evaporated, and that takes a high amount of energy. As this energy is provided mainly by the eggs in the machine, it will have a cooling effect on the eggs. The problem with this evaporation is that it hap-
The usual procedure is to mark and weigh 3 – 6 sample trays before setting and reweigh them at transfer. When calculating the percentage do not forget to take into con-sideration the weight of the empty tray. The same trays can be used for examination of embryo mortality and to measure chick yield.
It is also good practise to weigh a whole trolley using a platform weighing machine.
The weight loss until day 18.5 (transfer) should be 12 %, with an acceptable range from 11 – 13 %. This will ensure that the majority of the eggs experience a moisture loss that is high enough to form the air cell necessary for internal pipping without risking the dehydration of the chicks.
If the weight loss differs from 12 % by more than 0.5 % the humidity setpoints can be adjusted for the next incubation period. By rule of thumb the humidity setpoints during incubation should be increased by 1 °F (2 % relative humidity), if the weight loss target is exceeded by 0.5 %. Of course this works also the other way round.
When flocks are ageing the quality of the egg shell is declining and egg shell conductance is increasing. There-fore for eggs from old flocks a higher humidity setpoint is required to avoid excessive moisture loss. The opposite is often seen when dealing with very young flocks that are producing eggs with very thick shells.
If you incubate eggs for the first time without having an idea about the necessary humidity setpoints it makes sense to re-weigh the sample trays during incubation, for example after 7 days. This leaves time to react, if the moisture loss is not on target. As an initial setpoint, which should be adapted by your own experience, we recom-mend on average 53 – 55 % relative humidity or 84 – 85 °F wet bulb reading.
These adjustments are only possible if the incubator is filled with one or at least similar batches of eggs. If dif-ferent flocks or breeds are mixed, it is not possible. Very long stored eggs might require higher humidity settings as they have already lost more moisture during storage (0.1 % per day).
It is generally accepted that high moisture loss dur-ing storage is detrimental, although it would be possi-

20 21
HATCHERYMANAGEMENT GUIDE
Because the machine requirements will vary from day to day, excess air must be allowed to exhaust from the room without passing through the machines.
As the ventilation systems differ, we recommend to always seek the advice of the manufacturer.
The ventilation of the individual incubator should be based on the oxygen requirements of the embryos. These are very limited during the first seven to ten days of incu-bation, rise rapidly after eleven to twelve days and reach a plateau after 17 days. To meet the oxygen demand one can either set the ventilation rate for different stages of incubation or let the damper be steered by a CO2 sensor. The latter has the advantage of automatically adapting the ventilation to the number of fertile eggs in the incubator. Based on observation in practise one should aim at a CO2 value between 0.2 % and 0.4 %. Higher CO2 values up to 1 % are not lethal, but also a positive effect has not been proven for layer chicks. As far as our experience goes, the CO2 is just a hint for the right air exchange. Measuring CO2 can avoid unnecessary ventilation and by this way con-tribute to a stable incubation climate. On the other hand it can also detect ventilation problems. There is probably no specific CO2 value needed for good embryonic devel-opment. By rule of thumb, if the ventilation settings are correct for any one setter or hatcher, the CO2 will be found to be correct.
If one prefers to allow a ventilation range, which is controlled by the humidity, it is a must to set a minimum ventilation rate. It has to be high enough to assure the suf-ficient supply of oxygen and removal of CO2.
Table 1: Air volume guidelines for hatchery ventilation
Room Air exchange (m3 / hour) Air pressure
Egg holding 1 – 2 m3/h per 1000 eggs +
Setter 5 – 10 m3/h per 1000 eggs ++
Hatcher 15 – 20 m3/h per 1000 eggs +
Chick holding 30 – 40 m3/h per 1000 chicks –
Hallways Air exchange within 5 – 10 min. Neutral
Chick Take-off/ Waste / Wash areas
Air exchange within 0.5 – 1 min. – –
pens locally. The eggs that are close to the ventilator and sprayer get all the water and will be cooled a lot. Eggs that are far away will stay warm. This means that high amounts of spraying often lead to non-uniform temperatures of eggs. If water rolls are used instead of sprayers, the effect is less dramatic but will still occur.
The pre-conditioning of the incoming air according to requirements of the incubator (usually temperature 25 °C, humidity 50 % RH) minimise the need for spraying and leads to a more uniform incubation temperature.
One can summarise, that eggs need to loose 11 – 13 % moisture during incubation until day 18.5. This can be achieved by a constant humidity setpoint or by high humidity (87 – 88 °F wet bulb) in the beginning and low humidity towards the end of incubation (81 – 82 °F wet bulb). A slightly non-linear weightloss can be beneficial, if it leads to significantly less spraying in the incubator.
Pay attention that the humidity does not drop too far (35 % RH, 75 °F Wet Bulb) during the second half of incuba-tion. Otherwise the cooling of the eggs can be impaired, because of the low heat capacity.
VentilationThe primary purpose of the ventilation of an incuba-
tor is the supply of oxygen and the removal of CO2. It is also necessary to remove the water vapour evaporated by the eggs. Depending on the machine type it can also be needed for cooling. The fresh air used for ventilation need to be conditioned according to the requirements of the ma-chines in order to allow them to work at their optimum.
With regard to the whole hatchery the ventilation is also crucial for biosecurity. Via air pressure differences one should make sure that no air can flow from dirty areas of a hatchery (chick processing room, fluff chamber, waste) to clean areas (setter room, egg room). Additionally frequent air exchange helps to dilute aerial contamination. Finally one should not forget that ventilation should contribute to provide suitable working condition for the hatchery staff.
The suggested air volumes for setter and hatcher rooms allow for both the requirements of the machines themselves and the room.
22 23
HATCHERYMANAGEMENT GUIDE
CandlingCandling is a means of identifying infertile and early
dead embryos. Trays of eggs are passed over a strong light source which clearly shows infertile and early dead em-bryos. Candling is not routinely done in every hatchery, because it requires extra equipment and labour. However we recommend to candle a sample of each flock weekly to monitor the status of the breeders. If candling percentage exceeds 10 %, then all eggs should be candled, the clear eggs removed and hatcher trays refilled to 95 – 100 %. This will improve the technical results.
Candling is usually done between day 9 and 10 or in-cluded in the transfer routine. If done at transfer often an automatic candling machine with egg remover is used to keep pace. These machines are quite expensive and do not pay off for small hatcheries. Used in many hatcheries is a candling table, which illuminates an entire setter tray from beneath. Ideal for candling samples is a spot candler. It is by far the cheapest and most accurate method, but requires some training and is more time consuming when doing big numbers.
If candling is combined with the breakout of clear eggs, it is the best method to identify fertility (see chap-ter “Breakout analysis” for more details). Eggs set upside down, cracked eggs and other second grade eggs can be also noted at this stage. Such a candling breakout analysis can be an important part of the quality control program of a hatchery.
TransferThe setter trays are designed to maximise the amount
of eggs that can be set in an incubator and to allow an easy turning of the eggs. However they are not suitable for hatching, because of the simple reason that the chicks would fall down from the trays. Therefore the eggs are
TurningDuring natural incubation the adult bird will periodi-
cally rise from the nest to move its eggs around. This turn-ing was recognised to be important for the incubation suc-cess and is implemented in today’s hatchery practise. It is beneficial by preventing the embryo from sticking to the shell membrane and promoting the utilisation of the albumen.
By tradition, eggs are turned hourly by 45° throughout the setter period. The results of trials using more often or less turning are so far inconsistent and turning 24 times per day is still recommended.
Research has shown, that day 3 to 7 is the most critical period for turning, as failures during this time have the highest impact on hatchability. On the other hand, there seems to be no need for further turning after twelve days of incubation. In single-stage incubators, this could save energy by switching off the turning device. To our knowl-edge this is so far not implemented in commercial hatch-ery practise.
Do the Basics Right
1. Do not set eggs the day of lay.
2. Pay attention that no egg sweating occurs when moving the eggs in the setter room.
3. Properly pre-warm the eggs, especially, if they are go-ing to be set in a multi-stage incubator.
4. Only set eggs in well cleaned and maintained machines. Check heaters, coolers, humidifiers, turning device and dampers.
5. Check that the trolleys are properly connected to the turning device.
6. If necessary, add empty trolleys with empty trays to fill up the machine completely.
7. Control the incubator temperature and humidity by us-ing a mercury door thermometer or a good electronic device. Calibrate if necessary.
8. Check egg weight loss and eggshell temperature regu-larly to fine tune the incubation program.
9. Check, if the conditions of the incoming air meet the requirements.
Candling and Transfer

24 25
HATCHERYMANAGEMENT GUIDE
Do the Basics Right
1. Clear eggs are not all infertile. You have to open the eggs to differentiate between infertiles and very early deads.
2. Candling, removal of clear eggs and refilling of the trays is recommended, if percentage of clear eggs ex-ceeds 10 %.
3. The temperature of the transfer room should be at least 25 °C / 77 °F.
4. Egg candling and transfer should not last longer than 30 minutes per trolley.
5. Only transfer eggs into a clean, dry, disinfected and heated up hatcher.
6. Preferably set only one batch of eggs per hatcher.
7. Hatcher baskets have to be clean and dry.
8. Baskets are best warmed inside the hatchers and taken out directly before use.
The Hatching CycleIn the hatcher the eggs will stay for three days. During
this time the embryo will develop into a chick. After 19 days of incubation it will penetrate the inner shell mem-brane and lung respiration will start. The additional avail-able oxygen enables the chick to break through the shell and hatch.
Naturally not all the chicks will hatch at the same time. The time frame during which 99 % of the chicks hatch is called “spread of hatch” or “hatch window”. Even under good conditions it can’t be much shorter than 24 hours. The spread is caused by natural variation in egg quality,
removed from the setter after 18 – 18.5 days, transferred from setter trays to hatcher baskets and put in separate hatcher cabinets. In this way the transfer helps to keep the large quantity of fluff generated during hatching away from the clean areas of the hatchery.
When different batches of eggs are set in one incuba-tor, one should separate them during transfer into differ-ent hatchers (if machine capacities allow). This will har-monise the hatching process, reduce the spread of hatch and improve chick quality. However a completely filled hatcher with different batches of eggs is preferred to one only partly filled.
Very important during transfer is to assure a smooth process. The Staff should understand that the growing chick has used calcium from the shell for growth and shells are very fragile at this stage.
Do not expect any chick from an egg that got cracked.
The temperature in the transfer room should be at least 25 °C / 77 °F and no trolley should be outside of an incubator for more than 30 minutes. If the transfer is well organised, each trolley (approx. 5000 eggs) can be done in less than ten minutes. This avoids an excessive, uneven cooling of the eggs, which would increase the spread of hatch. Of course transfer should only be done into clean, warm and dry hatcher baskets and hatcher cabinets.
Chart 5: Transfer pattern example for three different batches of eggs set in one incubator.
Petersime (2009)
Hatcher
1c
2c
3c
3a
2a
1a
1d
2d
3d
3b
2b
1b
BA C

26 27
HATCHERYMANAGEMENT GUIDE
Monitoring Chick YieldMonitoring the weight of the chicks, and their relation-
ship with the weight of the eggs they came from (chick yield) is another hatchery management tool to control the incubation success and find the optimal setting time for the eggs. It is best done using the trays where egg weight loss has already been monitored. The technique involves counting and then weighing in bulk the Grade-A chicks from a hatcher basket in order to calculate the average chick weight and then the chick yield. Chick yield is the average chick weight divided by the average initial egg weight multiplied by 100. An ideal target for best chick quality is a chick yield of 66 – 67 %.
If the egg weight loss during incubation has been cor-rect, but the chick yield is lower than 65 %, then incuba-tion duration is too long. It needs to be adjusted by set-ting eggs later or by pulling chicks earlier. Every 1% loss in chick yield is equivalent to about four hours extra under optimal condition in the hatcher.
Hatcher OperationIt is beyond the scope of this guide to provide you with
a detailed program for your hatcher. As the design of the machines differ, always seek the advice of your manu-facturer and specify what kind of bird you are hatching. Please consider this chapter as additional information that can help to fine tune the conditions to the needs of the hatching chicks.
Temperature, humidity and ventilation set points are in most hatcheries changed according to time during the hatching cycle. It is either done automatically by a hatcher program or manually. This works and has been proven over many years in commercial practise. However it will never fully optimise the process, as no two batches of eggs are exactly the same and will thus not show the same hatching time. For this reason many incubator manufac-turers strive to enable modern hatchers to monitor CO2 and humidity changes and based on this detect the status of the hatch.
Much more simple, and probably more cost efficient for small and medium size hatcheries, is to open the hatcher one or two times, have a look at the chicks and
egg weight and by varying conditions during egg handling and incubation. The latter especially can cause a hatch window as wide as 2 days or more. By this, chick quality will greatly suffer, because the first hatching chicks will have to wait a long time in the hatcher, before they are pulled, processed, transported and finally get access to feed and water.
The hatch window can be easily monitored by tak-ing out three hatcher baskets at several times during the hatching cycle and counting the number of chicks that hatched so far. 36 hours before pull there should be a maximum 1 % and 24 hours not more than 25 %. Twelve hours before take-off one should aim for approximately 75 % hatched chicks and six hours later for 99 %. Then there is still enough time for the last chicks to dry before they are pulled.
Collecting this information and analysing it helps to find the correct setting time according to egg and flock age. If early or late hatching occurs, one should also keep an eye on the incubation conditions. Are the machines properly calibrated, are they evenly filled, is the tempera-ture of the incoming air on target, is the spraying nozzle working properly and not too often, is the ventilation cor-rect, did any delays occur during transfer, has the tem-perature been lowered too early in the hatcher ...?
Adapted from Rahn, Ar, Paganelli (1979)
Chart 6: The hatching cycle

28 29
HATCHERYMANAGEMENT GUIDE
3. When half of the chicks are hatched the humidity should be approximately 92 °F / 75 %. If it is lower, hu-midification is required to keep it at the target level.
The high humidity helps to achieve an even tempera-ture, slows down the drying process of the chicks and supports the late hatching chicks by keeping the shell membranes soft.
The temperature can be lowered by 0.2 °F. Do not lower the temperature if the hatch is not on time!
4. When all the chicks are hatched one should aim to create optimal conditions for the chicks to wait in the hatcher until pulled. The humidity setpoint can be reduced to 85 °F / 60 %, the ventilation opened to decrease the CO2 level below 0.4 % and finally the temperature should be set according to the optimal body temperature of the chicks (see next chapter).
5. The chicks are ready to be pulled when they are dry, some still showing slightly wet feathers in the neck. The legs of the chicks should feel smooth. They will feel rough when the chicks start to dehydrate.
Do the Basics Right
1. Control the hatcher temperature and humidity by us-ing a mercury door thermometer or a good electronic device.
2. Do not fully rely on electronics! Watch the chicks one or two times during the hatching cycle to judge the condi-tions. Do not be afraid to open the doors. The chicks should be evenly spread and quiet.
3. Even though the humidity is rising during hatch, the cabinet walls and the floor should be kept mostly dry. A wet floor in combination with chick fluff is an ideal breeding ground for germs. Avoid too cold cooling wa-ter, which causes excessive condensation on the coils.
4. Check the chicks in the morning on hatch day to sched-ule the sequence of chick pull. If the chicks in general are too dry or too fresh, search for possible mistakes during incubation. If everything was alright, rearrange the setting times.
change the setpoints, if necessary. Beside the number of chicks hatched so far one should pay attention to the be-haviour. If the condition are alright, the chicks are quiet and evenly spread in the baskets. Of course once the door is opened, or light is switched on the chicks will start to move towards the light.
If the chicks are noisy and/or move towards the pulsa-tor (area with high air speed, cool air) and put their beaks out of the basket, the temperature is too high. If they start panting, it is far too high. If they huddle together in a corner of the basket, it is too cold. In that situation you would later also find many pipped eggs in the baskets at chick take-off.
If you notice lethargic heavily breathing chicks, the CO2-level in the cabinet is too high. This is caused by a low ventilation rate of the hatcher itself or of the hatcher room. Although the CO2 concentration in the room should be close to the one of fresh air (0.036 %), it is normal that the concentration in the cabinets during hatch rises to 0.5 – 0.6 % sometimes up to 0.8 %. Higher values should be avoided as they might compromise chick quality.
In addition to temperature and ventilation, the humid-ity is also important for a successful hatch. The following general guidelines for the hatcher operation includes all three variables:
1. Keeping the damper closed to 15 % and increasing the temperature by 0.2 °F helps to quickly bring the eggs back to incubation temperature after transfer. After six hours one should return to the normal settings, which depend on the incubator model. The humidity is usu-ally kept at 84 °F wet bulb, respectively 55 % RH during this stage. Keep in mind that setpoints might need to be adapted, if you do the transfer earlier or later than usual. The CO2 level is 0.3 – 0.4%.
2. Once the chicks start to hatch you will notice a natural increase of humidity. There is no demand for humidi-fication at this point. If you notice no rise in humidity, check if you need to reduce the ventilation rate. As the ventilation is kept relatively tight to promote the hu-midity build up, also the CO2 level might rise up to 0.7 – 0.8 %. The temperature can be lowered by 0.2 °F.

30 31
HATCHERYMANAGEMENT GUIDE
To achieve optimal conditions during take-off one should consider the following recommendations.
There should be a separate chick take-off room to keep the fluff away from chick vaccination.
From a hygienic point of view taking out the chicks by hand is preferred to the use of a separator.
Do not pull too many trolleys at once. It is a common finding that chicks overheat when chick trolleys are waiting in an aisle or other holding areas with insuf-ficient air movement.
Day-old-Chick VaccinationChicks can be vaccinated in the hatchery by injection,
spray or eye drop. Regardless of the route of administra-tion there are three different factors that influence the success of the vaccination:
1. Physical factors – needle damage/ chilling/ spray par- ticle size
2. Contamination
3. Under/over dosage (inappropriate vaccine strain)
Every layer chick is vaccinated by injection against Marek’s disease. There are several vaccines from different producers available. Check requirements in your country.
The Mareks vaccine virus is cell-associated. That means that the virus is grown in tissue culture and the live cells are harvested and frozen in liquid nitrogen to be able to store them. The viability of these cells must be maintained throughout the preparation and injection to maintain the right vaccine titre. If the cells get killed because of wrong temperature or rough handling (squeezing through small needles) the titre will drop and the chicks will not get the necessary vaccination dosage.
Some practical guidelines are listed below:
There should be dedicated clothes for people working in the vaccine preparation room
Regular control of the nitrogen tank and record in a log-book is necessary
Do not take the entire can out of the tank
Expose only the ampoule(s) to be used
Chick TemperatureThe chicks are now hatched and ready to be processed.
But even a good hatch can still be spoiled. Hygiene, careful chick handling and attention to the chicks are essential for maintaining the best quality. The chicks tell you by their behaviour and noise if they feel good or not. If they do not, the problem should be investigated and solved.
Scientific trials as well as hatchery and brooding prac-tise have shown, that the body temperature of a chick is one indicator for its well being. Occasionally measur-ing the rectal temperature of a representative sample of chicks can help to identify weak points in the process and by this contribute to safeguard chick quality. The rectal temperature of a day-old-chick measured by an infrared ear thermometer should be preferably in a range between 39.5 and 40 °C.
Checking the chick temperature directly after chick pull gives information about the conditions in the hatcher. This can be used to adapt the temperature profile if nec-essary for the next hatch. It is normal that the chick tem-perature drops temporarily during sexing and vaccination. After the processing is completed and the chicks stay in boxes in the holding room the body temperature should be back in the optimal range.
Chick Take-off and SexingAll H&N International varieties on the commercial level
are either colour or feather-sexable. If the breed allows for colour sexing, it is usually done directly at chick take-off, whereas the gender sorting of the other breeds is done as a second process. Those readers who are interested in get-ting more information about the sexing are referred to the appendix of this guide.
Chick Processing

32 33
HATCHERYMANAGEMENT GUIDE
The spray must not look like a steam. Such small drop-lets will be inhaled too deeply, which can results in post-vaccination reactions.
When preparing the vaccine it is important that there is dedicated equipment only for this purpose. Any disin-fectant present can kill the virus. Make sure that the water is of good quality (no chlorine, low mineral content) and that all the chicks are sprayed evenly.
Chick Holding and TransportThe behaviour of the chicks is the best indicator of the
climate conditions during chick holding and transport. Under optimal conditions the chicks are mostly quiet, breathe calmly through the nostrils and are evenly spread within the boxes. If it is too hot the chicks will start pant-ing, which leads to increased moisture loss and dehy-dration. If it is too cold the chicks will huddle together. Chilling is likely if wet chicks (pulled early, vaccinated by spray) are placed in a store with high air speed or too cold temperature.
In general an air temperature between the boxes of 25 – 27 °C (77 – 80 °F) and a relative humidity of 50 – 60 % is recommended. However not the room temperature, but the temperature inside of the boxes is crucial for the well being of the chicks. Usually it should be 33 – 35 °C (91 – 95 °F). So the optimal room temperature differs depending on the air movement in the room, the type of the boxes, the way of stacking and the number of chicks per box. In order to give the chicks a good rest the holding room should be kept dark. Light should be only provided if the chicks received feed.
It is a good practise to check the conditions during holding and transport with a data logger.
If the chicks are scheduled for a long journey they ben-efit from extra moisture, that can be given during vaccina-tion without extra handling. When applying the injection subcutaneously the diluent volume can be increased to 0.5 ml. Of course the vaccine dosage should stay the same. Therefore a different size of diluent bag has to be used. The volume for an intramuscular injection should not be bigger than 0.2 ml to avoid tissue damage.
Thaw ampoules in 27 °C water bath by gently swirling
Best use distilled water in the bath (or clean fresh tap), change it daily
Once vaccine has become liquid, remove ampoule from the water bath
Use new sterile syringe with a new needle (18 Gauge)
Maximum of 5 – 6 ampoules should be prepared at a time
Dry ampoule before opening
Never refreeze thawed vaccine
Diluent should be clear, not cloudy
Gently draw up vaccine from the ampoule and add to the diluent bag
Complete process (thawing + adding to the diluent) in 90 sec or less
Gently swirl and invert the diluent bag several times
Record the time of preparation on diluent bag
Keep the ready prepared bags at a temperature of 15 – 25 °C
During the application of the vaccine it is important to:
Use sterile infusion kits.
Use the vaccine within 2 hours after preparation.
Not allow contaminated air to enter the vaccine bags. Use air inlet filters.
Keep the vaccination equipment clean throughout the hatch day.
Change needles frequently (every hour).
Beside the vaccination against Marek’s disease, often a spray vaccination against Infectious Bronchitis is done at the hatchery. Prior to use, the vaccine is dissolved in wa-ter, after which it expires within hours. Therefore it must be used immediately after preparation. The water serves as a transport medium for the live virus to the chicks.
Once sprayed the virus will attach to the mucosa cells of the chicks’ eyes and upper respiratory tract. The clean-ing of the feathers with the beak will optimise the uptake.
When using spray vaccination it is important that the droplet size is not too small (at least 100 – 150 microns).

34 35
HATCHERYMANAGEMENT GUIDE
Hygiene
plastic doors will help to reduce problems and keep the airflow in different rooms separate. In many hatcheries now, rooms are separated by solid doors but unless con-trolled with sensors they are often left open which alters the pressure and compromises biosecurity. The more so-phisticated the system and design the easier this is but on the other hand there is far more to go wrong and far more nooks and crannies to keep clean, air socks, conduits, pipes, tunnels etc.
The frequency of opening doors should be minimised to prevent air drawing from one room to the other. In criti-cal areas of the hatchery, the air is maintained at a positive pressure, so contamination can not be drawn in through an open door. Doors, including one-way doors, help stop cross contamination between rooms.
Chick fluff can be a problem to human health and good airflow and a specially designed fluff tunnel will re-move fluff which is also a carrier of any disease organisms present in the hatchers. Samples of fluff and also samples of meconium should be regularly monitored in your own or a veterinary laboratory.
The hatchery rooms must be kept clean and this in-cludes all surfaces including the ceilings, ledges and tops of machines. Each room and each machine should be cleaned after use and contact plates should be examined regularly by yourselves or veterinary services to identify any problems. Many hatcheries do not have good enough facilities for filtering air so that bacteria and fungal spores can easily be drawn into the system. The latter can be a problem in some climates and vigilance is necessary. Good monitoring will tell you precisely where a problem might be developing and then you can take action.
It is as well to remember that staff can be carriers of many potential disease bacteria and viruses although it does not affect them in any way. Some hatcheries make a point of checking staff and if a problem is found that person can be kept out of the buildings until treatment has been effective.
As staff do not leave the building for meals it is usual to supply a canteen. In some hatcheries mixing of staff
Do the Basics Right
1. Always pay attention to the behaviour of the chicks. It is the best indicator for their well being.
2. Prepare the vaccine in a separate, clean room.
3. Don’t allow unfiltered air to enter the vaccine bags or bottles.
4. Keep the vaccination equipment clean throughout the hatch day. Change needles regularly.
5. Temperature of the chick processing and holding room should be approximately 25 °C (77 °F).
General HygieneGood hygiene is paramount to good results. Not eve-
ryone has modern, state-of-the-art designer hatcheries but with attention to detail the results can be as good. Start-ing with personnel, they should be provided with shower facilities and clean clothing daily and showering must in-clude the head. The clean clothing should be placed be-yond the shower and the whole ablution block should al-ways be kept very clean. Staff must not leave the building until they stop work.
Visitors should be minimal and must also go through the same process. This must include persons brought in to mend and maintain equipment if it is beyond the experi-ence of your own staff.
In the hatchery itself each section should be kept sepa-rate with mats soaked in disinfectant in each doorway and

36 37
HATCHERYMANAGEMENT GUIDE
Table 2: Room cleaning frequency
Egg receiving / handling room Once every week
Egg storage Once every week
Setter room / hallways Once every week
Setters After each incubation cycle
Egg transfer room After each use
Hatchers After each use
Chick handling rooms After each hatch
Chick despatch room After each use
Racks, trays, baskets, boxes After each use
Egg and chick trucks After each egg / chick delivery
Hatchery Microbiological Monitoring2
Microbiological monitoring is an essential element of any hatchery quality assurance programme for the evalu-ation of cleaning and disinfection procedures. It is crucial to conduct the monitoring programme regularly. Here, guidelines are given describing basic monitoring proce-dures to evaluate the success of hatchery cleaning. A more intense monitoring programme should be used to solve a specific problem and would include egg washes, chick sampling and bacterial identification.
To evaluate the effectiveness of a sanitation pro-gramme, the assessment of cleanliness and sanitation should be performed only after clean up has occurred. For microbial monitoring, use is often made of solidified agar in Petri dishes containing nutrients that match the meta-bolic needs of bacteria and fungi. Bacteria and fungi grow on this media when put in an incubation cabinet. They will multiply and become visible as colonies. The number of these colonies indicates the hygienic state of the surface or air sampled.
Flat surfacesRodac plates are plastic plates of which the bottom
side is filled with agar gel. This agar layer is slightly higher than the edge of the plate so that direct contact is
from one section to another is forbidden yet at mealtimes they all come together!
In a clean hatchery problems are unlikely but wash-ing hands before and after using the canteen and strategi-cally placed disinfectant mats in the doorways will mini-mise any disease problem. Large modern hatcheries are equipped with separate canteens for the staff working in the clean or the dirty area in order to avoid the crossing of people.
As with the ablution block, the canteen should be cleaned daily and waste etc. removed. The canteen should be after the shower block so that the staff can leave their food there before entering the main building.
Develop a good relationship with your veterinary services and be aware of regulations in your own country which might affect the hatchery.
CleaningFor every hatchery room, instructions for cleaning and
disinfection should be formulated and pinned up in the particular room. When formulating instructions for clean-ing rooms and equipment, keep the following aspects in mind:
1. First, all debris such as fluff, blood, eggshells, broken eggs and dirt needs to be removed. Since organic mate-rial inhibits the chemical action of disinfectants, it is very important that all surfaces to be disinfected are free from debris before applying the disinfectant. De-pending on the degree of soiling this is done by:
First dry cleaning with a vacuum or sweeping. Soaking of the surface with a foam-cleaner. PH of the
detergent should be changed periodically (for exam-ple 3 weeks alkaline, 1 week acid) to remove poten-tial biofilms and mineral deposits
Rinsing with water
2. Allow to dry.
3. After the surfaces are clean and dry apply disinfectant. A wet surface will dilute the disinfectant and reduce its efficacy. Read the label closely and follow instructions. Factors affecting the efficiency of disinfectants are: contact time, temperature, concentration, pH, nature of soiling and compatibility with detergents. 2 Incubation Guide Layer Version 2008, Pas Reform.

38 39
HATCHERYMANAGEMENT GUIDE
Table 3: Recommendation for a hatchery monitoring program
Sample type Place of
sampling
Frequency Number
Contact plates Surfaces Every two weeks 20
Contact plates Air Every four weeks 20
Meconium Chick take-off Every hatch 1 pool of
250 chicks
Fluff samples Hatcher Every hatch Every hatcher
Do the Basics Right
1. Make sure staff are trained and understand the impor-tance of good hygiene.
2. Check that incoming eggs are clean.
3. Check that soap/hand disinfectant are available daily and that they are being used.
4. Check that mats are soaked in disinfectant.
5. Physically check for accumulated dust/debris on sur-faces at all levels.
6. Physically check that all filters are cleaned regularly.
7. Check that all doors are closed between rooms.
8. Physically check equipment after cleaning.
made with the surface to be sampled. Remove the cover of the plate, press the agar gently upon the surface to be monitored (do not move while contact is made). The cover should be replaced after the impression is made, taking care not to touch the agar.
To detect fungi one can use Sabarrouhd plates in the identical manner.
Air The same plates can be used to monitor the microbio-
logical status of the air. Expose the plate with the selected media, by carefully placing the plate, media half on the bottom, on a flat surface within the environment to be monitored. Gently remove the cover and let the plate rest. For relatively clean areas, a 10 minute sampling time is sufficient.
The agar plates which are being evaluated for bacterial contamination should be incubated for 48 hours at 37 – 37.5 °C in a microbiological incubator or a setter (place the plates in a plastic bag and set where they will not be dis-turbed). Plates are incubated upside down so that drops of condensation will not fall on the inoculated surface.
After incubation, the colonies on the agar media can be counted and recorded. The evaluation and monitoring of the hygiene conditions should be based on the hatch-ery’s own criteria. In general, excessive colonies indicate poor sanitation procedures or a hatching egg production problem.
For detailed advice on sampling, reading and evaluat-ing agar plates, see instructions and advice of manufactur-ers of agar media.
It is advisable to maintain records of all results so that changes occurring over time can be observed in the differ-ent areas monitored. Also, the results should be carefully compared with liveability data.

40 41
HATCHERYMANAGEMENT GUIDE
Each of the methods has advantages and disadvantages when compared to other methods. The data should be used to continuously control the production procedures and find room for improvement. If a database has been built up, it can be used for a quick and precise trouble-shooting if problems occur.
1. The quickest way to estimate the fertility in a breeder flock is a fresh egg breakout. The eggs can be opened just after lay or after arrival at the hatchery. The dis-advantages of this breakout method are the loss of valuable hatching eggs, possible errors of prediction because of the relatively small sample size (usually 100 eggs per flock) and the one-dimensional informa-tion (fertile or not fertile). It is therefore recommended to limit the use of a fresh egg breakout to situations where a short-term fertility check is required:
Planning the first setting of eggs from a young flock. Problem flocks.
Infertile and unincubated fertile eggs can be differen-tiated quite precisely after some practical training.
A fertile egg
Blastoderm (embryo) always round
Doughnut shape
White symmetrical ring with clear centre
Sometimes white dot present in centre
Larger than blastodisc
A true infertile egg
Blastodisc (unfertilised oocyte) rarely perfectly round
Jagged edges
Usually more vacuoles (bubbles)
Small intense white spot, sometimes granu-lated
Taking the hatching egg quality as given, an embryo needs five things to grow satisfactorily and to develop into a healthy chick:
1. Correct incubation temperature.
2. Adequate supply of oxygen and removal of CO2.
3. Loss of a certain amount of water as moisture vapour.
4. Regular turning.
5. A hygienic environment.
If you have a problem with hatchability or chick qual-ity, check these to find out if it is caused by the hatchery. Detailed information about the conditions 1 – 5 are pro-vided by the previous chapters.
When trying to solve a hatchability problem always be aware that it can be also related to egg handling, egg trans-port or the breeder flock itself. With regard to quality, the performance of the chicks and the mortality during the first week is additionally influenced by the chick handling procedures, vaccination, transport and the brooding con-ditions on the farm. Therefore good communication be-tween the different parts of the production chain is essen-tial to locate and solve any occurring problem.
The exchange of information between the breeder flock manager and the hatchery manager is especially important for the success of a parent stock operation.
Breakout Analysis Breakout analyses are useful hatchery management
procedures that provide valuable information by helping to relate problems to the breeder flock, the egg handling procedures or the hatchery.
There are three procedures for breakout analysis which can be implemented by a quality control person.
Troubleshooting

42 43
HATCHERYMANAGEMENT GUIDE
If breakouts are done regularly with an adequate sample size the use of more categories (Day 1 – 2, Day 3 – 4, Mal formation, Malposition, Internally pipped, Pipped alive vs. dead ...) can provide additional information, which might be overseen using a more simple approach.
All results from breakout analysis should be expressed as percentage of eggs set. So if there are 3 cracked eggs in tray of 150 eggs the result is: 2 %. The breakout data should be analysed by using standards based on the re-sults of the individual hatchery. From time to time the standards should be compared to results achieved in oth-er hatcheries. If you notice elevated percentages in single categories have a look at the appendix where you will find a comprehensive listing of the probable causes.
Practical Troubleshooting based on Technical Service Experience
1. Problems usually show themselves on hatch day, so trouble shooting begins here.
2. If apparently healthy chicks reach the farm but early mortality is seen work backwards.
3. Was the farmer properly prepared? Was early mortality just seen on this farm? If so the problem is likely to be something the farmer hasn’t done or a problem with the transport.
4. What caused the early mortality? Seek veterinary analy-sis. Aspergillosis may be from the chick litter, unhy-gienic transport or disease originating in the hatcher or on the farm.
5. Aspergillosis is most likely to originate from a hatcher which has not been well sanitised or the breeder farm. The inclusion of floor eggs in the setters, dirty nests, litter which contaminates eggs. In the setter and hatch-er, a contaminated egg can spread this disease to other eggs. Salmonella, Staphylococcus and many others can be spread in the same way.
6. E coli, commonly found on veterinary analysis usually develops through stress, getting too hot or too cold during processing and holding before dispatch.
2. The candling breakout analysis offers the most accura-cy in determining fertility. It is also useful in recording other sources of breeder flock or egg handling failures, such as early deads, cracked eggs or eggs set upside down. It is therefore a recommended tool to monitor the week-to-week status of the breeders.
Additionally the candling percentage allows a quite pre-cise prediction of the expected hatch of saleable chicks. As the candling is usually done at day 9 – 10 there is time to react (rearrange settings, shipments ..., search for and solve causes) if a high number of clear eggs is noticed. The sample size should be 4 to 6 trays (at least 600 eggs) from different location inside of one setter.
3. Most often performed in hatcheries is the breakout on hatch days also called hatch debris breakout� It gives a full picture about the pattern of embryo mortality, but infertiles and early deads are difficult to distinguish and there is a time delay of usually 4 weeks (3 weeks incubation + 1 week storage) between the date of lay and the breakout.
To proceed take 4 to 6 hatcher baskets of one flock from different position out of one hatcher. Remove all unhatched eggs and place them on pulp trays. Record the number of cull and dead chicks left in the baskets. Classify the unhatched eggs into appropriate catego-ries, as Infertile, Early dead (day 1 – 7), Mid dead (day 8 – 17), Late dead (>18), Pipped and Contaminated. Ad-ditionally the egg shell should be judged and cracked eggs also recorded.
As already mentioned, the differentiation between in-fertile eggs and very early deads is difficult, because the blastodisc can often not be found. Therefore one needs to judge the appearance of the yolk and the albu-men. If at hatch day the egg looks still like a “table egg” it was most probably infertile. If you deal with a very early dead the yolk colour will slightly change and the albumen will be thinner.
The content of eggs containing embryos that died dur-ing the second week of incubation will often appear black, because of the breakdown of blood. Be careful not to classify these eggs as contaminated as long as they do not emit an odour.

44 45
HATCHERYMANAGEMENT GUIDE
Do the Basics Right
1. If a problem occurs, check the basics first.
2. Collect data regularly – also from good hatching flocks – to create your own database. Keep the records simple enough. You need to work with them.
3. Do not take actions just because of the results of one breakout. Check the same flock again incubated in a different machine or vice versa.
4. Assure a good communication along the production chain, especially between the breeder farms and hatch-ery. This will not prevent problems, but significantly minimise their economic impact.
Incubation GuidelinesThe program was experienced with conventional Pe-
tersime equipment. It also works well with other types of incubators, but needs to be adapted to the individual con-ditions of each hatchery in the light of experience. Always seek the advice of the manufacturer and ask for their rec-ommendations for the incubation of layer eggs.
7. All these diseases can multiply very rapidly during vac-cination. The greatest care needs to be taken here, in regard to equipment, technique and general hygiene.
8. Poor hatch results, from one setter or one hatcher, or the whole hatch must be investigated. Breakout analy-sis will help you here. Obviously diseased chicks may be due to less than ideal conditions on the farm and spread through exploding eggs at any time during incu-bation.
9. Too many late deads or pipped eggs which fail to hatch. Many possibilities e.g. if chicks are stuck to the egg shells and are dry the humidity in the hatcher was too low. Conversely the chicks may be too soft and not alert and unable to hatch due to too much humidity. Formalin disinfection during the hatch often increases late deads. Too high temperature during last days in the setter can also reduce the hatch.
10. Too many early deads may be due to formalin disin-fection being overdone on the farm or in the hatchery. Problems may also be due to feed formulation, vacci-nation or other treatment of the breeding stock. Some of these problems may be solved by, for instance, a new delivery of feed, before the next hatch. Set-ting eggs as soon as they reach the hatchery – allow 24 hours rest, or more if they have been shaken dur-ing transport by rough roads. Fluctuating temperatures from collection to hatchery egg store.
11. Learn to recognise a truly infertile egg. The skill is eas-ily learnt. Complaints of high infertility often are in-ability to recognise the stage before a blood ring is seen.
12. Hatch window is too long. This may lead to some chicks being over dry and some freshly hatched.
13. Any setter or hatcher giving a problem should be thoroughly cleaned and disinfected, very carefully monitored and adjustments made for the next several hatches. Electronic settings can wander which may lead to less than satisfactory results and such things as blocked nozzles and dirty filters which interfere with air flow and humidity control can lead to poor results.
Appendix

46 47
HATCHERYMANAGEMENT GUIDE
Sign Causes
2� SignEggs candle clear;broken out eggs show enlarged germinal disc; no blood. Fertile. Very early dead.
1. Eggs stored too long. They should be stored less than 10 days.
2. Eggs held under poor conditions, temperature too high or too low. Fluctuating temperatures. Tem-perature should be 60 to 65 °F (16 ° to 18 °C).
3. Fumigation improper – too severe or done between 12 and 96 h of incubation. Incorrectly spraying or foaming eggs with disinfectant.
4. Eggs damaged during handling and transport by jarring, tempera-ture shock (temperature increased or decreased too rapidly), etc.
5. Incorrect temperature during the start of incubation.
6. Very young or very old breeders.
7. Breeder flock diseases. 8. Failure of a basic organ system to
develop normally. 9. Egg wash temperature too high.10. Egg-borne infections (e.g., salmo-
nella).11. Drugs, toxins, pesticides, etc.12. Infrequent or incomplete egg col-
lection.
Table 4: Single-stage incubation program
Day °C °F Wet °C Wet °F CO2
1 37.8 100.0 29 84.2 0.1
2 37.7 99.9 29 84.2 0.1
7 37.6 99.7 29 84.2 0.2
12 37.5 99.5 29 84.2 0.3
15 37.4 99.3 29 84.2 0.4
16 37.2 98.9 29 84.2 0.4
Preferable transfer between day 18.0 and 19.0
19 37.1 98.7 30 86 0.6
20 36.8 98.2 31.5 - 35.0 88.7 - 95.0 0.8
21 36.5 97.7 35.0 - 29.0 95.0 - 84.2 0.3
Hatchability Problem Analysis3
Sign Causes
1� SignEggs candle clear;broken out eggs show small white-dot germinal discs;no blood.Infertile
1. Immature males. 2. Too few or too many males 3. Extreme weather conditions. 4. Breeder flock disease. This is
often indicated by rough, mis-shaped, or thin-shelled eggs.
5. Nutritional deficiencies or excesses;
6. Feet and leg problems, bad quality males should be taken out.
7. Certain drugs, pesticides, chemi-cals, toxins, or mycotoxins.
8. Parasites, such as mites. 9. Inadequate floor space.10. Decreased mating frequency, or
no mating, is commonly seen in many of the conditions listed above; this may often be the direct cause of infertility.
11. Inadequate lighting (intensity or day length).
12. Improper artificial insemination procedures (if artificial insemina-tion is used).
3Adapted from Wilson (1996)

48 49
HATCHERYMANAGEMENT GUIDE
Sign Causes
5� SignDead embryos; 7 to 17 days of incubation; each embryo has egg tooth, toenails, feather follicles (8 days), feathers (11 days).
1. Improper incubator temperature, humidity, turning, ventilation.
2. Contamination. 3. Nutritional deficiencies -- ribofla-
vin, vitamin B12, biotin, niacin, pyridoxine, pantothenic acid, phosphorus, boron, or linoleic acid.
6� SignDead embryos >18 days of incubation.
1. Improper incubator temperature, humidity, turning, ventilation.
2. Improper hatcher temperature, humidity, ventilation.
3. Contamination, especially from moulds (aspergillis, etc.).
4. Fumigation too severe or too prolonged.
5. Eggs chilled in transfer, or trans-ferred too late.
6. Broken shell: pre-set, during incu-bation, or at transfer.
7. Nutritional deficiencies -- vitamin D, vitamin A, folic acid, or pan-tothenic acid, riboflavin, vitamin E, selenium, vitamin K, biotin, thiamin, vitamin B12, calcium, phosphorus, manganese, or lino-leic acid.
8. Embryonic malposition; embryo fails to move into proper hatching position (see #11).
9. Embryological development ac-cident. Failure to change to lung respiration and all intra-embry-onic circulation, and/or to retract the intestinal loops and yolk sac. These and other changes are criti-cal at this time.
10. Poor shell quality.11. Breeder diseases.
Sign Causes
3� SignEggs candle clear;broken out eggs show blood ring or small embryo that died before 3 days of incuba-tion; no dark eye visible.
1. Eggs stored too long or under improper temperature.
2. Fumigation improper -- too severe or done between 12 and 96 h of incubation.
3. High temperature in early incuba-tion.
4. Low temperature in early incubation.
5. Eggs damaged during transport by jarring, etc.
6. Breeder flock diseases. 7. Old breeders. 8. Embryological development acci-
dents. 9. Inbreeding, chromosome abnor-
malities.10. Severe nutritional deficiencies,
e.g., biotin, vitamin A, copper, vitamin E, boron, or pan-tothenic acid.
11. Frequently associated with a high incidence of infertility.
12. Drugs, toxins, or pesticides.13. Contamination.14. Embryos less developed at ovipo-
sition
4� SignDead embryos; 3 to 6 days of incubation; yolk sac circu-latory system present, embryo on left side, no egg tooth.
1. See causes 3.1 – 14 2. Lack of ventilation, or sealed
shells, carbon dioxide >1 %. 3. Improper turning -- <1/h or >6/h;
improper turning angle. 4. Vitamin deficiencies -- vitamin
E, riboflavin, biotin, pantothenic acid, or linoleic acid.

50 51
HATCHERYMANAGEMENT GUIDE
Sign Causes
7. Incubator or hatcher temperature too high or too low.
8. Room ventilation system improp-er; high positive pressure or low negative pressure. Such pressures may alter incubator or hatcher ventilation.
10� SignTrays not uni-form in hatch or chick quality.
1. Mix of large and small eggs. 2. Mix of eggs from young and old
breeders. 3. Mix of eggs from different strains
or breeds. 4. Some eggs stored much longer. 5. Lack of uniform ventilation in set-
ter or hatcher. 6. Disease or other stress in one or
more breeder flocks. 7. Variation in egg storage proce-
dures among flocks.
11� Sign Chicks mal position ed. Normal position after 19 days of incubation: embryo’s long axis same as long axis of egg; head in large end of egg; head to the right and under right wing; beak toward air cell; feet toward head.
1. Eggs set small end up or in hori-zontal position.
2. Inadequate or improper turning.
3. High or low incubator temperature.
4. High humidity. 5. Old breeders. 6. Round-shaped eggs or very large
eggs. 7. Nutritional deficiencies,
especially vitamin A and vitamin B12.
Sign Causes
7� SignPipped. Full-term embryo, dead in shell.
1. Low humidity or temperature for a prolonged period.
2. Low humidity during hatching. 3. High temperature during hatch-
ing. 4. Nutritional deficiencies. 5. Breeder diseases. 6. Poor ventilation. 7. Inadequate turning during first
12 days. 8. Injury during transfer. 9. Prolonged egg storage.
8� SignChicks hatch late.
1. Large eggs. 2. Old breeders. 3. Eggs stored too long (1 hour
increase in incubation time/day of storage >5 days).
4. Incubator temperature too low. 5. Weak embryos. 6. Low humidity at the start of incu-
bation.
9� SignSlow, protracted (drawn-out) hatch.
1. Mix in the incubator of eggs stored for long and short periods (1.2 % loss of hatch/day of storage when all eggs set at the same time; only 0.5 % loss/day when eggs stored for long periods are set earlier to allow a longer incubation period).
2. Mix of eggs from young and old breeders.
3. Mix of large and small eggs. 4. Improper egg handling. 5. Hot or cold spots in incubator or
hatcher. Improper working spray-ing nozzles.
6. Fresh air supply with too low temperature.

52 53
HATCHERYMANAGEMENT GUIDE
Sign Causes
13� SignContamination.Exploders
1. Dirty eggs from nest. Dirty nests. 2. Floor eggs. 3. Bad egg shell quality leading to
more hair-line cracks. 4. Rough egg handling leading to
more cracked eggs. 5. Eggs improperly washed; eggs
wiped or cleaned with contami-nated cloth. Cuticle destroyed by sandpaper or iron sponge.
6. Dust from breeder house, cooler, transport, etc.
7. Water condensation on eggs (sweating).
8. Water sprayed, fogged, or splashed on eggs; eggs dipped in contaminated solutions.
9. Contamination from earlier ex-ploders, leakers, or broken eggs.
10. Contamination from handling eggs with dirty hands or equip-ment.
11. Contaminated trays, air filters, water (humidity) system.
Sign Causes
8. Eggs handled or stored improperly.
9. Retarded development.10. Embryos <18 days old may be
in a position different from that for hatching but one normal for their age (for example, the head-between-thighs position). The feet-over-head position is hard to distinguish and may be normal. The beak-over-wing position is maybe also a normal variant. Some malpositions are lethal, oth-ers are not.
12� SignMalformations.
1. Improper egg storage. 2. Jarring of eggs or transporting
large end down. 3. Heredity. 4. Nutritional deficiencies, e.g.,
biotin, riboflavin, zinc, or manganese.
5. Inadequate turning. 6. Improper egg orientation, e.g.,
small end up. 7. High or low incubator tempera-
ture. 8. Breeder diseases. 9. Inadequate ventilation or shells
with low porosity or permeability.

54 55
HATCHERYMANAGEMENT GUIDE
Sexing Guide
Colour sexing – Brown Nick
Most of the males are pure white.
or 2 distinct light stripes with a brown edging
Occasionally they show a slight faint striping on a light ground colour
and sometimes one dark stripe in the middle of the back.
Most of the females are brown with one light stripe in the middle of the back
Occasionally they show one broad light stripe with brown edging on a lighter ground colour
or are uniformly brown.
or seldom have a brown coloured head and a generally lighter colouring of the body.

56 57
HATCHERYMANAGEMENT GUIDE
Females are mostly uniform brown or predominately brown with one light stripe in the middle of the back. Oc-casionally they show one broad light stripe with brown edging on a lighter ground colour. Seldom they have a brown coloured head and a generally lighter colouring of the body.
Males are mostly pure white, sometimes light coloured showing one dark stripe or 4 narrow brown stripes on the back.
Feather sexing – Nick Chick / Super Nick
Males are slow feathering. In cockerel chicks, primaries (2nd row of feathers) are shorter than or of the same length as coverts (1st row of feathers).
Females are fast feather-ing. In the pullet chick, primaries (2nd row of feath-ers) are always longer than coverts (1st row of feath-ers).

HATCHERYMANAGEMENT GUIDE
58
Conversion of Temperature and Humidity Variables
Table 4: °C and °F
°C °F °C °F °C °F
11 51.8 21 69.8 31 87.8
12 53.6 22 71.6 32 89.6
13 55.4 23 73.4 33 91.4
14 57.2 24 75.2 34 93.2
15 59 25 77 35 95
16 60.8 26 78.8 36 96.8
17 62.6 27 80.6 37 98.6
18 64.4 28 82.4 38 100.4
19 66.2 29 84.2 39 102.2
20 68 30 86 40 104
Chart 7: Simplified psychromatic chart
Reading of the chart allows converting dry and wet bulb temperature in relative humidity values. More convenient is the use of a simple software that can be supplied to those readers who are interested. 59
Notes

60
Notes

Am Seedeich 9 • 27472 Cuxhaven • GERMANYPhone +49 (0)4721 564-0 • Fax +49 (0)4721 564-111
Email [email protected] • Internet http://www.hn-int.com
U.S. Marketing Office:321 Burnett Avenue South • Suite 307
Renton • WA 98057-2570 • U.S.A.Phone +1 425 277-2885 • Fax +1 425 277-3479
Email [email protected]
Dat
e: M
arch
2011