making boxes
TRANSCRIPT

MAKING BOXESAuthor(s): Steve GillSource: The Mathematics Teacher, Vol. 77, No. 7 (October 1984), pp. 526-530Published by: National Council of Teachers of MathematicsStable URL: http://www.jstor.org/stable/27964194 .
Accessed: 15/07/2014 07:57
Your use of the JSTOR archive indicates your acceptance of the Terms & Conditions of Use, available at .http://www.jstor.org/page/info/about/policies/terms.jsp
.JSTOR is a not-for-profit service that helps scholars, researchers, and students discover, use, and build upon a wide range ofcontent in a trusted digital archive. We use information technology and tools to increase productivity and facilitate new formsof scholarship. For more information about JSTOR, please contact [email protected].
.
National Council of Teachers of Mathematics is collaborating with JSTOR to digitize, preserve and extendaccess to The Mathematics Teacher.
http://www.jstor.org
This content downloaded from 129.130.252.222 on Tue, 15 Jul 2014 07:57:45 AMAll use subject to JSTOR Terms and Conditions

MAKING BOXES The objective of this article is to help stu dents develop measurement skills using metric units. Needing only construction
paper, a pencil, scissors, and a measuring device, the student can construct a box that will hold paper clips, erasers, or any other small objects. Making the box motivates students to want to measure. Another ob
jective is that the student starts with a two dimensional piece of construction paper and transforms it into a three-dimensional
object. Thus, the activity also helps the stu dent to see spatial relationships from two dimensional patterns.
At first, this activity should be used in a
teacher-directed lesson. The order of pro
gression should be as follows, where / = length, w = width, and A = height:
1. A box with I = w ? h
2. A box with w = A
3. A box with h < w
4. A box of any shape
In my experiences using this technique, I have found that extra care is needed when
cutting the paper. The cuts must be done
exactly as given or the box cannot be con
structed. The students will eventually re
alize, however, that the measurements do not have to be exact for them to be suc
cessful in constructing their boxes. At this
point, the more capable students can be
given formulas to construct boxes of any size by substituting desired dimensions into the formulas. Two worksheets for students are provided?one to make the bottom of the box, the other to make the top.
How to Make a Box of Any Size
To determine the size of paper needed for the bottom of the box :
Let
/ = length of desired box
w = width of desired box
A = height of desired box
lt = length of paper needed
w1 = width of paper needed
The size of the paper will be as follows:
lx = (6 + /) wl = (4A + w)
Steps
1. Always measure three As from the left and three As from the right along lx (fig. 11).
2. Always measure two As up and two As down along wl. Fold on all lines.
3. The first cut is always made down the two rows indicated in figure 11. Cut only until you reach the central rectangle.
4. The second cut always goes only to the previous cut. It is best to cut first down the column indicated in figure 12 and then decide if more paper is to be cut off. With
practice, you will be able to tell. (Note:
\w < < w.) In some cases, an additional cut may be necessary. If xl > /, trim so that
*i ^ Z. Fold as described earlier.
To determine the size of paper for the
top of the box:
Let
I = length of desired box
"Sharing Teaching Ideas" offers practical tips on the teaching of topics related to the secondary school cur
riculum. We hope to include classroom-tested approaches that offer new slants on familiar subjects for the
beginning and the experienced teacher. See the masthead page for details on submitting manuscripts for review.
Mathematics Teacher
This content downloaded from 129.130.252.222 on Tue, 15 Jul 2014 07:57:45 AMAll use subject to JSTOR Terms and Conditions

BOTTOM OF THE BOX NAME
To make the bottom of the box (10 cm 5 cm 5 cm), start with a 40 cm 25 cm piece of construction paper.
1. From the left, measure three 5-cm lengths across the 40-cm side. From the right, measure three 5-cm lengths across the 40-cm side (fig. 1).
2. Measure five 5-cm lengths down the 25-cm side. Fold on all lines.
3. Cut on the dotted lines to get figure 2.
-40cm
25cd
+
5cm Fig. 1 Fig. 2
4. Fold all As onto the corresponding J3s (fig. 3). You now have figure 4.
Fig. 3 Fig. 4
5. Fold all Cs so they form 90? angles with the corresponding Da (fig. 5). Fold all the Ds so they form a 90? angle with E. The Cs should be interlocked by slipping one C into (or alongside) the other (fig. 6).
2.
Fig. 5
6. Fold the Fa up against the Cs. Fig. 6
7. Flip the Gs over the top edge of the Cs and put them against the inside of the Cs.
8. The Ha should lie on top of E.
From the Mathematics Teacher, October 1984
This content downloaded from 129.130.252.222 on Tue, 15 Jul 2014 07:57:45 AMAll use subject to JSTOR Terms and Conditions

TOP OF THE BOX NAME
Start with a 25.5 cm 15.5 cm piece of construction paper.
1. From the left, measure three 2.5-cm lengths along the 25.5-cm side. From the right, measure three 2.5-cm lengths along the 25.5-cm side (fig. 7).
ft 2.5cm
15.5cml
!
2J5?tt\
Fig. 7
2. From the top, measure two 2.5-cm lengths along the 15.5-cm side. From the bottom, measure up two 2.5-cm lengths along the 15.5-cm side. Fold on all lines.
3. Cut on the dotted lines. The paper should look like figure 8.
Fig. 8
4. Fold all As onto the corresponding 25s (fig. 9). You now have figure 10.
\H\
\C\C\
C\
G
\c c
H\
Fig. 9
5. Fold as you did for the bottom of the box
From the Mathematics Teacher, October 1984
Fig. 10
:?steps 4-8.
This content downloaded from 129.130.252.222 on Tue, 15 Jul 2014 07:57:45 AMAll use subject to JSTOR Terms and Conditions

-ir
Fig. 11
Fig. 12
w = width of desired box
A = height of desired box
Z2 = length of paper needed for the top
w2 *= width of paper needed for the top
To establish the measuring constant for the top, recall that the constant used for the bottom was A. But, if A is used as the constant for the top, the top will cover the bottom entirely. If, however, we divide the constant by 2, the top will cover only one half the bottom. So, the measuring constant for the top is A/2 (rounded to the nearest
tenth).
Steps
1. Always measure three (A/2)'s from the left and three (A/2)'s from the right along /2.
2. Always measure two (A/2)'s up and two
(A/2)'s down w2. 3. Fold on all lines.
4. Follow the directions for the bottom
(steps 3 and 4).
After the top has been folded, the re
sulting length and width must be greater than / and w, respectively, if the lid is to fit over the bottom. For a tight-fitting top, let the length after folding be (/ + 0.5 cm) and the width after folding be (w + 0.5 cm).
Now, the formulas for the dimensions of the paper can be derived (fig. 13):
-G) + + 0.5 cm
= 3 + + ?.5 cm,
and
w2 = 4 - + w + 0.5 cm
= 2A + w + 0.5 cm.
Thus, the size of the paper will be as fol lows:
l2 = (3A + 4- 0.5 cm)
w2 = (2 + w + 0.5 cm)
(If the students have problems with fit, you can add a few tenths to the 0.5 cm.)
is
1*0,6 I 1
f
W+?J5 V2
Fig. 13
An Example
Suppose we want a box in which w = A =
\L Let the dimensions of the box be = 15 cm, w = 7.5 cm, and A = 7.5 cm. To make the bottom of the. box, the size of the paper we need is arrived at by substituting the dimensions into the formula
lx = (6A + Z) w? = (4A + w).
October 1984 529
This content downloaded from 129.130.252.222 on Tue, 15 Jul 2014 07:57:45 AMAll use subject to JSTOR Terms and Conditions
So, we get
Zx = (6 7.5 cm) -I-15 cm = 60 cm
and
ii/1=(4x 7.5 cm) + 7.5 cm = 37.5 cm.
Thus, the size of our paper is 60 cm 37.5 cm.
To make the top for the box, the size of the paper we need is also arrived at by sub
stituting the dimensions into the formula
l2 = (3 + I + 0.5 cm) w2 = (2h + n; + 0.5 cm).
So, we get
2 = (3 7.5 cm) + 15 cm + 0.5 cm = 38 cm
and
w2 = (2 7.5 cm) + 7.5 cm + 0.5 cm = 23 cm.
Thus, the size of our paper is 38 cm 23 cm. To complete the box, follow the steps for
measuring and folding that were described earlier.
Steve Gill 739 South Juanita Avenue
Redondo Beach, CA 90277
WHERE DID THE GRAPH GO? The problem with graphing elementary functions with a real domain, say y = f(x), is that there may be real values of for
which there are no real values of y, that is> y is complex. As a result we sometimes tell students that the curve can be graphed in four-dimensional complex space. This state
ment is necessarily (i.e., minimally) true for some functions, such as y = 3x, where y is real if and only if is real, or where y is
purely imaginary if and only if is also
imaginary; consequently, y has nonzero real and imaginary parts if and only if
enjoys these properties. However, in many other situations, four dimensions is over
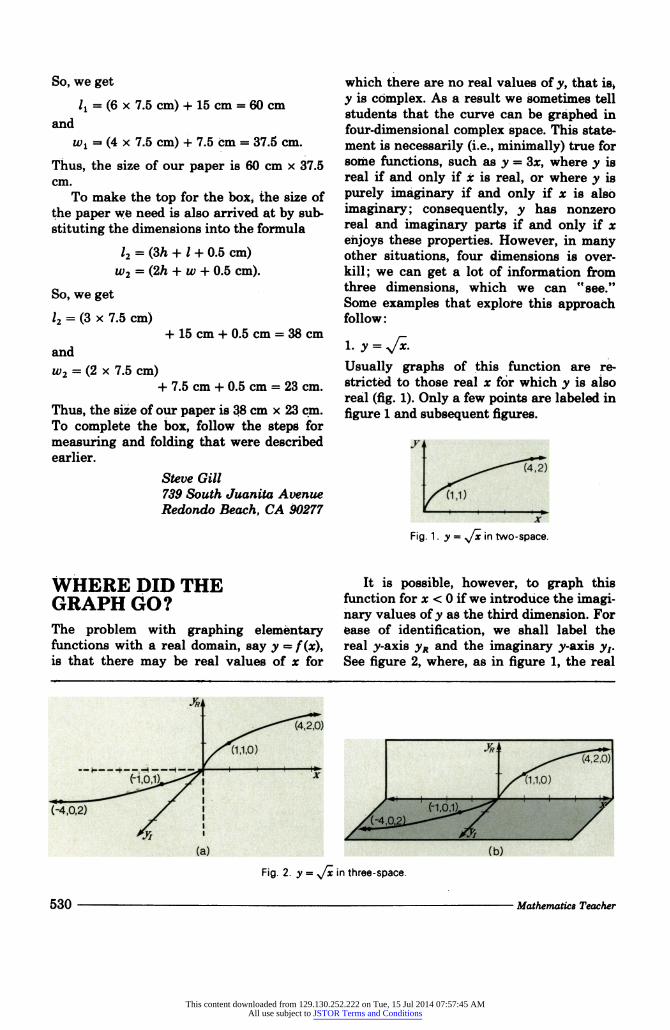
kill; we can get a lot of information from three dimensions, which we can "see." Some examples that explote this approach follow:
l. y = J?. Usually graphs of this function are re stricted to those real for which y is also real (fig. 1). Only a few points are labeled in
figure 1 and subsequent figures.
Fig. 1. y = y/x in two-space.
It is possible, however, to graph this function for < 0 if we introduce the imagi nary values of y as the third dimension. For ease of identification, we shall label the real y-axis yR and the imaginary j^-axis y?. See figure 2, where, as in figure 1, the real
Fig. 2. y = Jx in three-space.
530 Mathematica Teacher
This content downloaded from 129.130.252.222 on Tue, 15 Jul 2014 07:57:45 AMAll use subject to JSTOR Terms and Conditions