make your own - biosciences.unimelb.edu.au · university of melbourne herbarium (melu) school of...
TRANSCRIPT
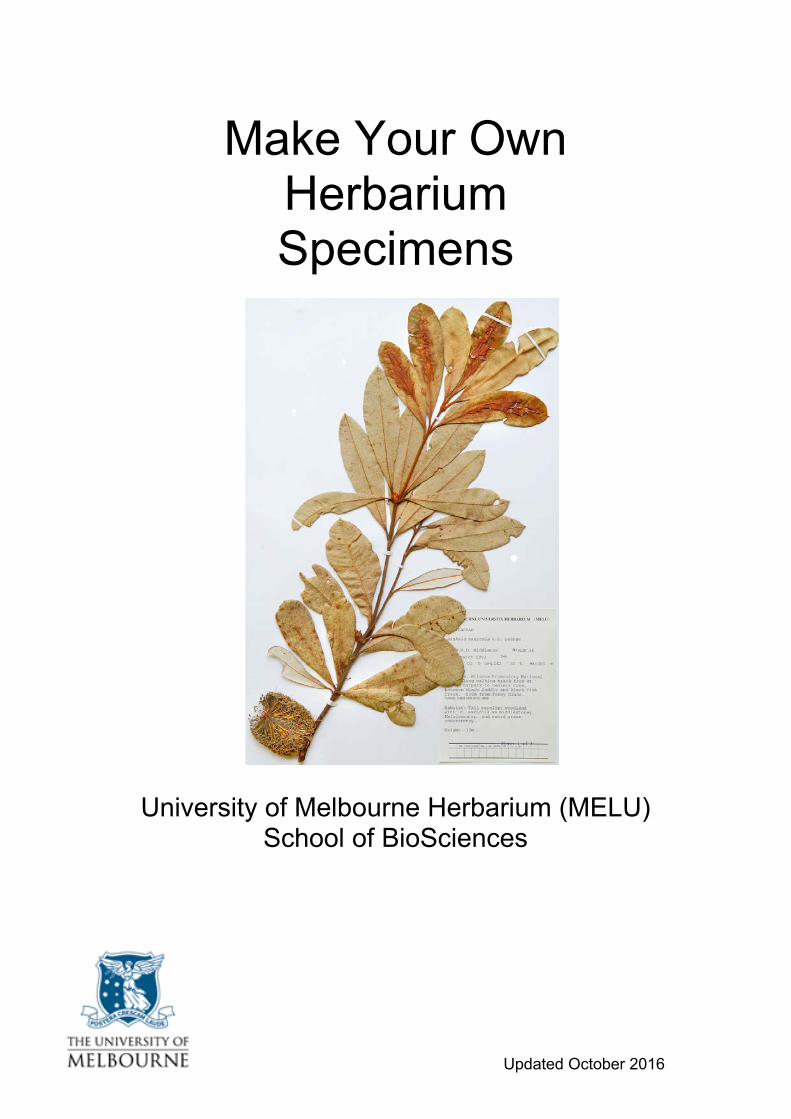
Make Your Own Herbarium Specimens
University of Melbourne Herbarium (MELU) School of BioSciences
Updated October 2016
Make Your Own Herbarium Specimens 2
Contents 1.0 Introduction 3 2.0 Collecting 3 2.1 What to collect ... 3 2.2 Field notes .. 4 2.3 Numbering and tagging .. . 4 2.4 Specimen preservation in the field .. ... 5 2.5 Special collecting requirements .. 5 2.5.1 Collecting ferns, grasses and herbs .. 5 2.5.2 Collecting shrubs and trees .. .. 5 2.5.3 Collecting bryophytes and lichens .. ... ... 6 2.5.4 Collecting fungi ..... 6 2.6 Laws and ethics of collecting .. 6 2.6.1 Laws .. . 6 2.6.2 Ethics and the environment .. . 6 2.6.3 Health and safety .. . .. 7 3.0 Preserving and Pressing .. . 7 3.1 Preserving plants .. . 7 3.1.1 Plant press .. .. 7 3.1.2 Care while drying .. .. . 8 3.1.3 Replacing newspaper and rearranging specimens .. .. 8 3.2 Special preservation requirements .. .. 9 3.2.1 Preserving succulents .. ... 9 3.2.2 Preserving aquatic plants .. . 9 3.2.3 Preserving bryophytes and lichens ... 9 3.2.4 Preserving fungi .. . 10 3.3 Spirit collections .. . . 10 4.0 Mounting .. .. 10 4.1 Mounting card .. . . 10 4.2 Arranging the specimen .. . 11 4.3 Attaching the specimen .. . 11 4.4 Fragment bag/envelope .. . 12 4.5 Attaching the label .. .. 12 4.6 Annotation slips .. ... 12 5.0 Labeling .. 13 5.1 Nomenclature .. .. 13 5.2 Authority .. ... 14 5.3 Collector .. ... 14 5.4 No. .. ... .. 14 5.5 Collection Date .. 14 5.6 Det./Conf. .. . 14 5.7 Locality .. . 14 5.8 Latitude and Longitude .. .. 15 5.9 Alt. .. . 15 5.10 Habitat, habit and other data .. .. 15 6.0 References .. .. 15 6.1 Books .. 15 6.2 Websites .. .. 15
Make Your Own Herbarium Specimens 3
1.0 Introduction
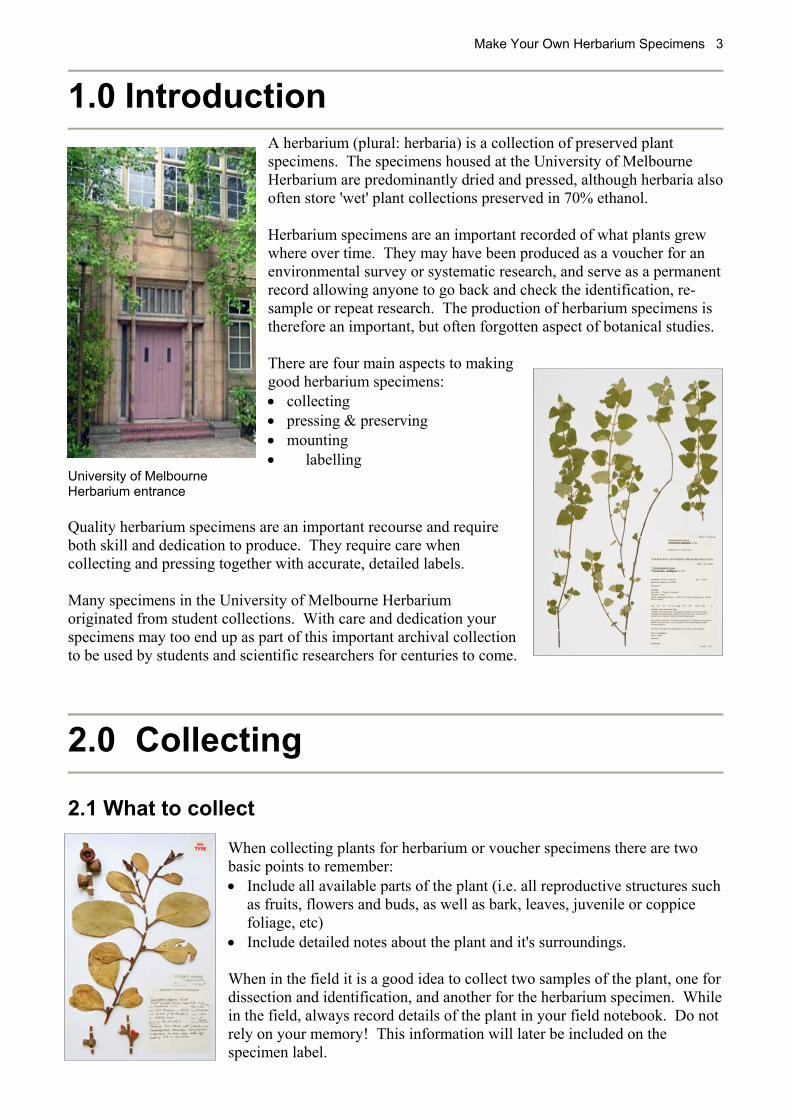
A herbarium (plural: herbaria) is a collection of preserved plant specimens. The specimens housed at the University of Melbourne Herbarium are predominantly dried and pressed, although herbaria also often store 'wet' plant collections preserved in 70% ethanol. Herbarium specimens are an important recorded of what plants grew where over time. They may have been produced as a voucher for an environmental survey or systematic research, and serve as a permanent record allowing anyone to go back and check the identification, re-sample or repeat research. The production of herbarium specimens is therefore an important, but often forgotten aspect of botanical studies. There are four main aspects to making good herbarium specimens: • collecting • pressing & preserving • mounting • labelling
University of Melbourne Herbarium entrance Quality herbarium specimens are an important recourse and require both skill and dedication to produce. They require care when collecting and pressing together with accurate, detailed labels. Many specimens in the University of Melbourne Herbarium originated from student collections. With care and dedication your specimens may too end up as part of this important archival collection to be used by students and scientific researchers for centuries to come.
2.0 Collecting
2.1 What to collect
When collecting plants for herbarium or voucher specimens there are two basic points to remember: • Include all available parts of the plant (i.e. all reproductive structures such
as fruits, flowers and buds, as well as bark, leaves, juvenile or coppice foliage, etc)
• Include detailed notes about the plant and it's surroundings. When in the field it is a good idea to collect two samples of the plant, one for dissection and identification, and another for the herbarium specimen. While in the field, always record details of the plant in your field notebook. Do not rely on your memory! This information will later be included on the specimen label.

Make Your Own Herbarium Specimens 4
Before venturing out in to the field always consider the laws and ethics governing the collection of plant material. Collecting illegally can result in hefty fines and even jail. The ideal specimen for identification and research is an entire plant, roots and all. Leaves alone are virtually useless for most plants. You should try to collect as much of the plant that is practical and possible, given the size of the plant and which parts are most informative. In general aim to collect: • At least the terminal parts of the aerial shoots including leaves and reproductive parts (leaves,
flowers, buds and fruits). • A representative sample (do not simply choose the biggest or prettiest). • More than one specimen from a single plant if the plant is variable (e.g. coppice leaves at the base,
adult leaves higher up). These will be given the same collecting number. • Each herbarium specimen consists of samples taken from a single plant, unless you are collecting a
small plant in which case you can collect many plants from the same location. • Collect at least a couple of specimens of each plant. Put one specimen in a plastic bag and keep it
in the fridge for identification, press the other. There are also specific collecting recommendations for different types of plants: • Herbaceous angiosperms (e.g. grasses and herbs) • Woody plants (shrubs and trees) • Ferns • Algae, lichens, mosses and other cryptogams • Fungi Refer to the notes further on for these. 2.2 Field notes Without detailed, accurate information a herbarium specimen is almost useless. You should write notes while you are in the field collecting. Do not rely on your memory! A hard backed exercise book makes a great field notebook. In your field note book you should: • Use a waterproof pen or pencil so your notes are
not lost in the rain or mist. • Write your contact details in the front cover so the
book can be returned to you if lost. • Stick a copy of a herbarium label in the back
cover to remind you what information is required. • Use one page per specimen so you have plenty of
space if you need to add information later. 2.3 Numbering and tagging Record numbers are used to identify different herbarium specimens to their information in your field notebook. The best numbering system is the simplest: start from number 1 and continue for the rest of your collecting career. Use your initials in front of the number to differentiate your collection from someone else's (eg NDM 133).
As a general rule, the same number is given to parts collected from a single plant on the same day. If small herbs or grasses are being collected, such that several entire plants can fit onto a single sheet of mounting card, these specimens may be given the same collecting number if obtained from the same population on the same day.

Make Your Own Herbarium Specimens 5
Specimen numbers are recorded in your notebook and on a tag that is attached to the specimen to link the two. At the University of Melbourne Herbarium we use small tie-on cardboard tags called jeweler’s or strung tags (pictured). 2.4 Specimen preservation in the field
Mesophytic plants and those with delicate petals, wilt and shrivel quickly once picked. This results in poor quality herbarium specimens. The best but not necessarily most practical way to produce good quality herbarium specimens of these types of plants is to take your plant press into the field and immediately press specimens as you collect them. As this is not always practical or possible, labelling specimens with jeweler’s tags, then storing them in sealed plastic bags out of the sun is ok on cool days.
To maintain specimen quality especially on hot days: • Keep inside the plastic bag humidity by spraying a small amount of water inside the bag. • Dampen some folded handtowel and place this in the bag with the plants. • Put the specimen filled plastic bag straight into an iced cooler or eski. Once picked, most vascular plant specimens will maintain turgor for a few days if kept in a sealed plastic bag in the fridge prior to pressing, however, specimens such as aquatic plants and delicate flowers deteriorate rapidly. These should be kept in extremely humid air, or pickled or pressed immediately. Fungi sweat and become slimy if kept in plastic bags, these need to be dried immediately. 2.5 Special collecting requirements 2.5.1 Collecting ferns, grasses and herbs
When collecting ferns it is essential to collect fertile fronds or fronds with spores on the undersurface. For small plants such as grasses and herbs, collect the entire plant including underground organs (roots, rhizomes, tubers, etc), inflorescences (flowers), infructescences (fruits), and other fertile structures. If the plant is small it is a good idea to collect multiple plants (as long as they all come from the one population). These can all be given the same collecting number and put on the same sheet of herbarium card.
2.5.2 Collecting shrubs and trees In addition to the general points on collecting, it is also a good idea to collect bark either from the trunk or ground, but make sure to note where it came from and how far up the tree. This is especially important for eucalypts. If the plant shows different leaf morphologies due to things like juvenile to adult maturation, or coppicing due to fire or draught, collect the different types of leaves and note where these leaves came from and why you think they are be present.
Make Your Own Herbarium Specimens 6
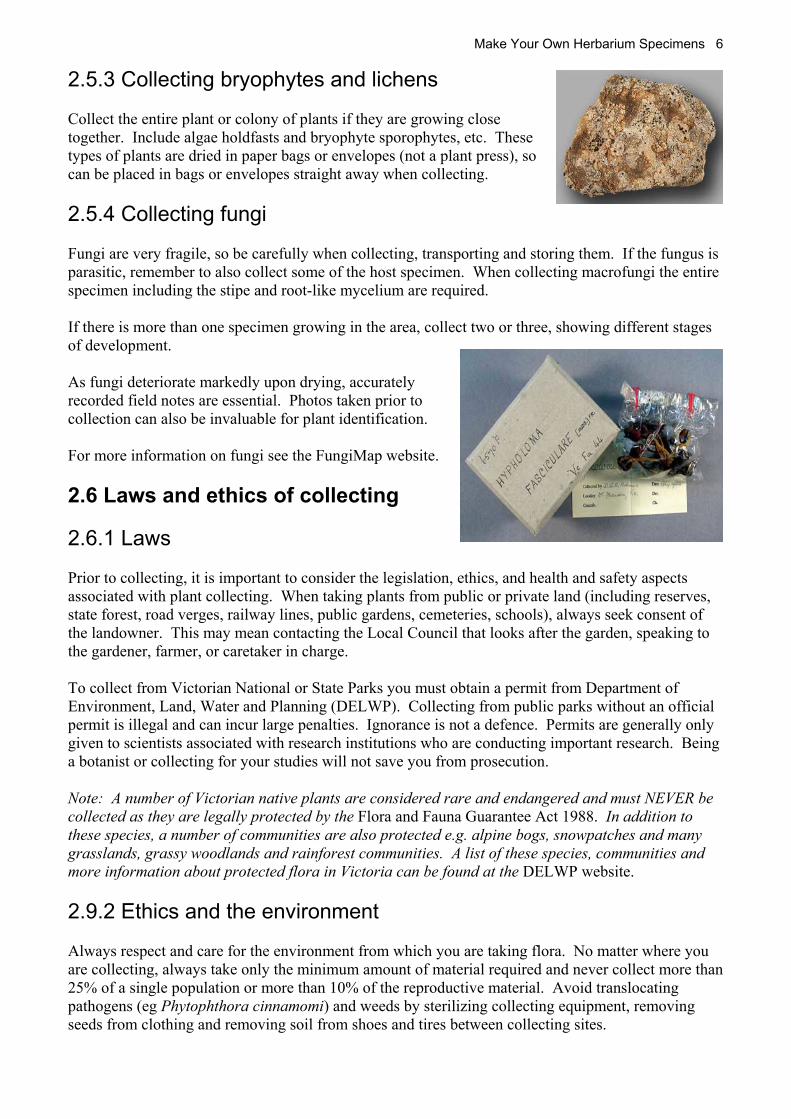
2.5.3 Collecting bryophytes and lichens Collect the entire plant or colony of plants if they are growing close together. Include algae holdfasts and bryophyte sporophytes, etc. These types of plants are dried in paper bags or envelopes (not a plant press), so can be placed in bags or envelopes straight away when collecting. 2.5.4 Collecting fungi Fungi are very fragile, so be carefully when collecting, transporting and storing them. If the fungus is parasitic, remember to also collect some of the host specimen. When collecting macrofungi the entire specimen including the stipe and root-like mycelium are required. If there is more than one specimen growing in the area, collect two or three, showing different stages of development. As fungi deteriorate markedly upon drying, accurately recorded field notes are essential. Photos taken prior to collection can also be invaluable for plant identification. For more information on fungi see the FungiMap website. 2.6 Laws and ethics of collecting 2.6.1 Laws Prior to collecting, it is important to consider the legislation, ethics, and health and safety aspects associated with plant collecting. When taking plants from public or private land (including reserves, state forest, road verges, railway lines, public gardens, cemeteries, schools), always seek consent of the landowner. This may mean contacting the Local Council that looks after the garden, speaking to the gardener, farmer, or caretaker in charge. To collect from Victorian National or State Parks you must obtain a permit from Department of Environment, Land, Water and Planning (DELWP). Collecting from public parks without an official permit is illegal and can incur large penalties. Ignorance is not a defence. Permits are generally only given to scientists associated with research institutions who are conducting important research. Being a botanist or collecting for your studies will not save you from prosecution. Note: A number of Victorian native plants are considered rare and endangered and must NEVER be collected as they are legally protected by the Flora and Fauna Guarantee Act 1988. In addition to these species, a number of communities are also protected e.g. alpine bogs, snowpatches and many grasslands, grassy woodlands and rainforest communities. A list of these species, communities and more information about protected flora in Victoria can be found at the DELWP website. 2.9.2 Ethics and the environment Always respect and care for the environment from which you are taking flora. No matter where you are collecting, always take only the minimum amount of material required and never collect more than 25% of a single population or more than 10% of the reproductive material. Avoid translocating pathogens (eg Phytophthora cinnamomi) and weeds by sterilizing collecting equipment, removing seeds from clothing and removing soil from shoes and tires between collecting sites.
Make Your Own Herbarium Specimens 7
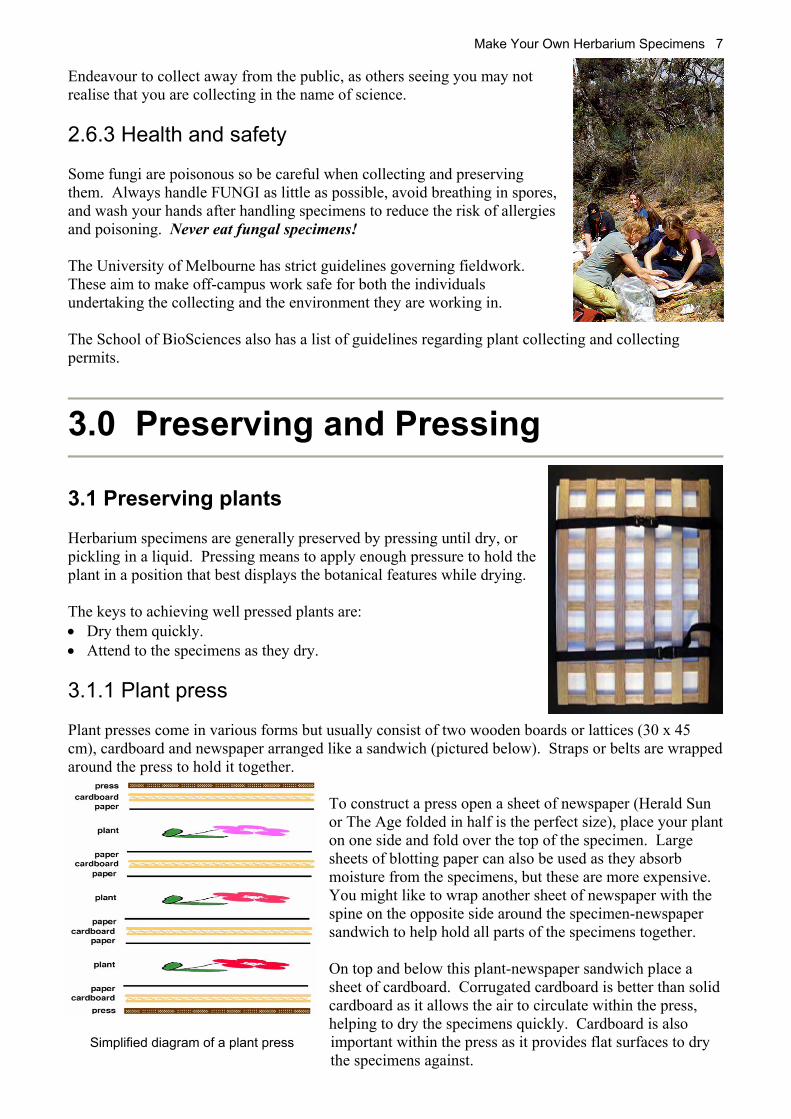
Endeavour to collect away from the public, as others seeing you may not realise that you are collecting in the name of science. 2.6.3 Health and safety Some fungi are poisonous so be careful when collecting and preserving them. Always handle FUNGI as little as possible, avoid breathing in spores, and wash your hands after handling specimens to reduce the risk of allergies and poisoning. Never eat fungal specimens! The University of Melbourne has strict guidelines governing fieldwork. These aim to make off-campus work safe for both the individuals undertaking the collecting and the environment they are working in. The School of BioSciences also has a list of guidelines regarding plant collecting and collecting permits.
3.0 Preserving and Pressing
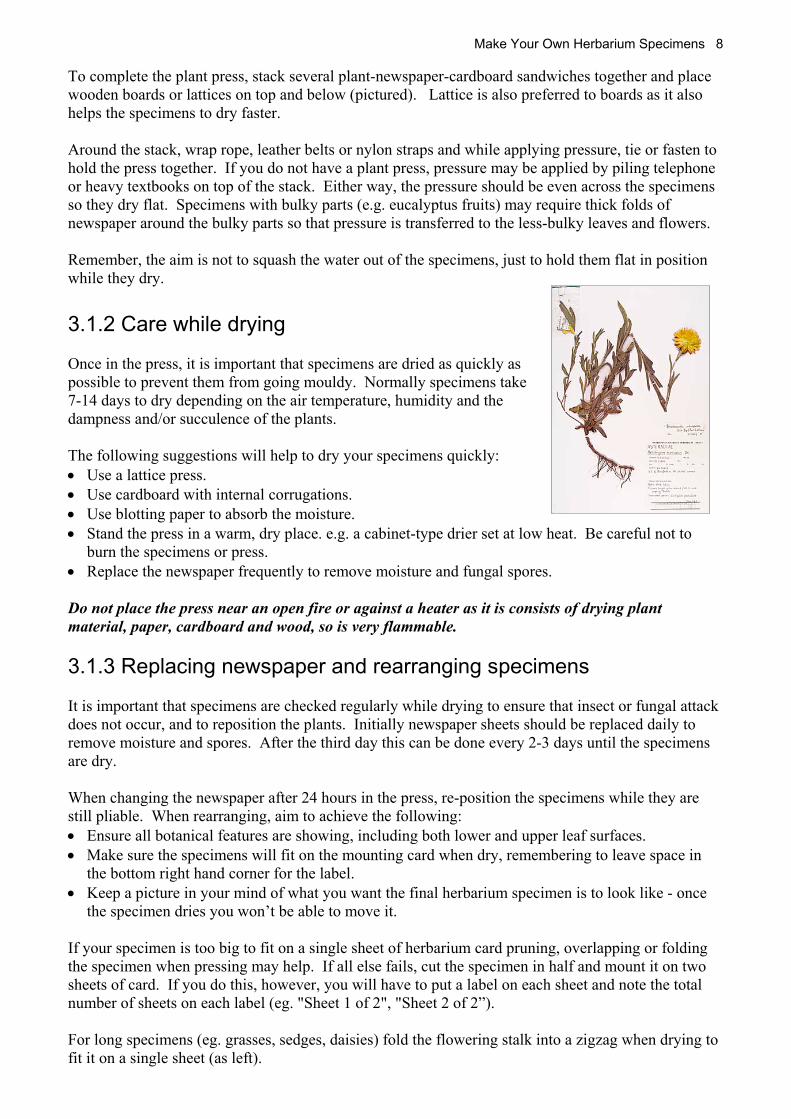
3.1 Preserving plants Herbarium specimens are generally preserved by pressing until dry, or pickling in a liquid. Pressing means to apply enough pressure to hold the plant in a position that best displays the botanical features while drying. The keys to achieving well pressed plants are: • Dry them quickly. • Attend to the specimens as they dry. 3.1.1 Plant press Plant presses come in various forms but usually consist of two wooden boards or lattices (30 x 45 cm), cardboard and newspaper arranged like a sandwich (pictured below). Straps or belts are wrapped around the press to hold it together.
To construct a press open a sheet of newspaper (Herald Sun or The Age folded in half is the perfect size), place your plant on one side and fold over the top of the specimen. Large sheets of blotting paper can also be used as they absorb moisture from the specimens, but these are more expensive. You might like to wrap another sheet of newspaper with the spine on the opposite side around the specimen-newspaper sandwich to help hold all parts of the specimens together. On top and below this plant-newspaper sandwich place a sheet of cardboard. Corrugated cardboard is better than solid cardboard as it allows the air to circulate within the press, helping to dry the specimens quickly. Cardboard is also
Simplified diagram of a plant press important within the press as it provides flat surfaces to dry the specimens against.
Make Your Own Herbarium Specimens 8
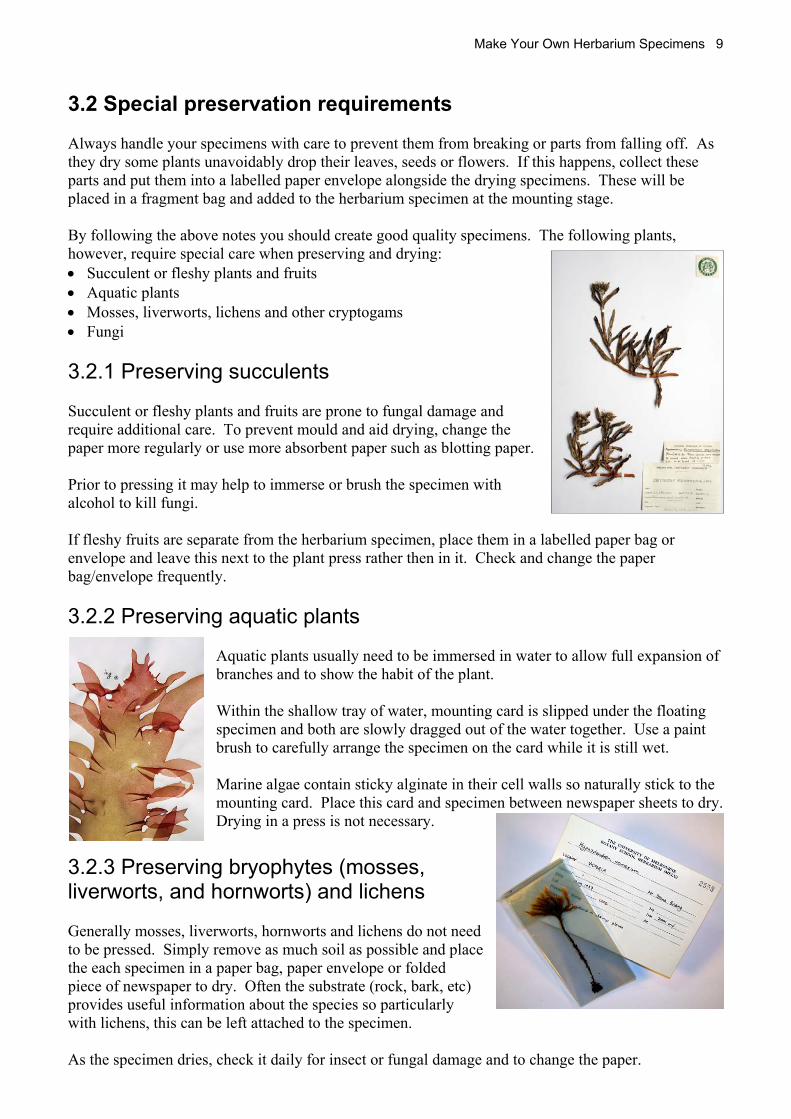
To complete the plant press, stack several plant-newspaper-cardboard sandwiches together and place wooden boards or lattices on top and below (pictured). Lattice is also preferred to boards as it also helps the specimens to dry faster. Around the stack, wrap rope, leather belts or nylon straps and while applying pressure, tie or fasten to hold the press together. If you do not have a plant press, pressure may be applied by piling telephone or heavy textbooks on top of the stack. Either way, the pressure should be even across the specimens so they dry flat. Specimens with bulky parts (e.g. eucalyptus fruits) may require thick folds of newspaper around the bulky parts so that pressure is transferred to the less-bulky leaves and flowers. Remember, the aim is not to squash the water out of the specimens, just to hold them flat in position while they dry. 3.1.2 Care while drying Once in the press, it is important that specimens are dried as quickly as possible to prevent them from going mouldy. Normally specimens take 7-14 days to dry depending on the air temperature, humidity and the dampness and/or succulence of the plants. The following suggestions will help to dry your specimens quickly: • Use a lattice press. • Use cardboard with internal corrugations. • Use blotting paper to absorb the moisture. • Stand the press in a warm, dry place. e.g. a cabinet-type drier set at low heat. Be careful not to
burn the specimens or press. • Replace the newspaper frequently to remove moisture and fungal spores. Do not place the press near an open fire or against a heater as it is consists of drying plant material, paper, cardboard and wood, so is very flammable. 3.1.3 Replacing newspaper and rearranging specimens It is important that specimens are checked regularly while drying to ensure that insect or fungal attack does not occur, and to reposition the plants. Initially newspaper sheets should be replaced daily to remove moisture and spores. After the third day this can be done every 2-3 days until the specimens are dry. When changing the newspaper after 24 hours in the press, re-position the specimens while they are still pliable. When rearranging, aim to achieve the following: • Ensure all botanical features are showing, including both lower and upper leaf surfaces. • Make sure the specimens will fit on the mounting card when dry, remembering to leave space in
the bottom right hand corner for the label. • Keep a picture in your mind of what you want the final herbarium specimen is to look like - once
the specimen dries you won’t be able to move it. If your specimen is too big to fit on a single sheet of herbarium card pruning, overlapping or folding the specimen when pressing may help. If all else fails, cut the specimen in half and mount it on two sheets of card. If you do this, however, you will have to put a label on each sheet and note the total number of sheets on each label (eg. "Sheet 1 of 2", "Sheet 2 of 2”). For long specimens (eg. grasses, sedges, daisies) fold the flowering stalk into a zigzag when drying to fit it on a single sheet (as left).
Make Your Own Herbarium Specimens 9
3.2 Special preservation requirements Always handle your specimens with care to prevent them from breaking or parts from falling off. As they dry some plants unavoidably drop their leaves, seeds or flowers. If this happens, collect these parts and put them into a labelled paper envelope alongside the drying specimens. These will be placed in a fragment bag and added to the herbarium specimen at the mounting stage. By following the above notes you should create good quality specimens. The following plants, however, require special care when preserving and drying: • Succulent or fleshy plants and fruits • Aquatic plants • Mosses, liverworts, lichens and other cryptogams • Fungi 3.2.1 Preserving succulents Succulent or fleshy plants and fruits are prone to fungal damage and require additional care. To prevent mould and aid drying, change the paper more regularly or use more absorbent paper such as blotting paper. Prior to pressing it may help to immerse or brush the specimen with alcohol to kill fungi. If fleshy fruits are separate from the herbarium specimen, place them in a labelled paper bag or envelope and leave this next to the plant press rather then in it. Check and change the paper bag/envelope frequently. 3.2.2 Preserving aquatic plants
Aquatic plants usually need to be immersed in water to allow full expansion of branches and to show the habit of the plant. Within the shallow tray of water, mounting card is slipped under the floating specimen and both are slowly dragged out of the water together. Use a paint brush to carefully arrange the specimen on the card while it is still wet. Marine algae contain sticky alginate in their cell walls so naturally stick to the mounting card. Place this card and specimen between newspaper sheets to dry. Drying in a press is not necessary.
3.2.3 Preserving bryophytes (mosses, liverworts, and hornworts) and lichens Generally mosses, liverworts, hornworts and lichens do not need to be pressed. Simply remove as much soil as possible and place the each specimen in a paper bag, paper envelope or folded piece of newspaper to dry. Often the substrate (rock, bark, etc) provides useful information about the species so particularly with lichens, this can be left attached to the specimen. As the specimen dries, check it daily for insect or fungal damage and to change the paper.

Make Your Own Herbarium Specimens 10
3.2.4 Preserving fungi Fungi are not pressed. They are dried rapidly in paper bags or cardboard boxes. The length of time required for drying varies from a few hours to a few days depending on the fleshiness of the specimen. Macrofungal collections of multiple specimens should include one specimen cut in half longitudinally and a spore print. A spore print is produced by placing the fungal cap gill-side down on a sheet of paper/card and leaving it overnight. During this time the spores will be released which can be useful for identification. For further information regarding fungal herbarium specimens see the Fungi Map website. 3.3 Spirit collections Spirit collections may also be called wet, pickled or alcohol collections. All terms refer to preservation of specimens in a solution to maintain their three dimensional structure. Spirit collections are predominantly used for preserving succulent or delicate structures (eg. petalous flowers or fleshy fruits) that shrivel upon drying, or when the structure or shape of the specimens is required for research (e.g. botanical illustration, microscopy, etc). Until recently, specimens were pickled in F.A.A. (Formaldehyde + Acetic Acid + Alcohol). FAA is no longer used as formalin has been found to be extremely toxic. Today solutions such 70% ethanol (70% ethanol + 30% water) are preferred for wet collections. Sometimes 1% glycerol is added to stop the specimens becoming brittle. Such solutions are safer but protective clothing should still be worn when using ethanol. Ethanol is also highly flammable so precautions need to be taken regarding storage and use.
4.0 Mounting
To mount a herbarium specimen means to stick it onto a sheet of herbarium card. A well mounted specimen should display both artistic and botanical qualities. It should be arranged on the card in a balanced, aesthetically pleasing way, paying attention to: • Orientation and type of mounting card. • Arranging and attaching the specimen/s. • Position of label and accompanying slips. • Keeping loose parts in fragment bag. 4.1 Mounting card Official herbarium specimens are mounted on 29 x 43 cm archival quality (acid free), white mounting card (250 GSM). The direction of the card is "portrait" (vertical).

Make Your Own Herbarium Specimens 11
4.2 Arranging the specimen If pressed correctly, the specimen should fit perfectly on the mounting card. When arranging the specimen: • Leave a 1cm border around the edge of the card to allow
space for holding when picking up. • Single specimens should be centred on the mounting card and
are usually placed vertically or diagonally across the sheet. • Small plants with multiple specimens should be arranged in
evenly spaced rows spread over the whole card. • Orientation of the plants should represent their habit, i.e.
usually flowers to the top and roots towards the bottom. • Flip the specimens onto the side that displays the most
botanical features (i.e. flowers, fruits, both sides of leaves, etc) and sits flattest on the sheet.
4.3 Attaching the specimen Specimens can be attached to the mounting card by gluing, sewing or with tape. Although gluing is the quickest method, it is also the least flexible as glued specimens cannot be removed to expose the underside and cannot be remounted. At the University of Melbourne Herbarium archival white gummed tape is used for mounting. This is purchased in large rolls from which strips are cut at the desired length and width. Gummed tape is like a postage stamp, it must be moistened on the shiny side to become sticky. Once wet the tape dries quickly, particularly on hot days, so think about where you're going to place the tapes before you wet them.
As a rough guide, the width of the tape should equal the width of the branch being stuck down. The tape should be long enough hang over each side of the branch or leaf by 0.5-1cm. Tape does not stick to the plant but merely holds it in place.
When using gummed tape: • Tape should be centred over the branch/stem/leaf with
equal length flaps on each side. • Place tape perpendicular to the branch, stem or midrib of
the leaf. • Do not tape over important botanical features ie ligules,
flowers, fruits, stipules, etc. • Hide tapes under surrounding leaves/branches where
possible. • Extra tape may be needed to support delicate specimen
parts near edges of the card or heavy parts such as woody fruits.
• Each piece of tape should cover only one branch/stem. • Do not place tape within 1cm of the end of a branch or
near the tip of a leaf because as the specimens are moved around they will jiggle loose.
• Use sufficient tape to secure specimen to the card so that it does not move, but not too much as it will destroy the beauty of the specimen. This usually equates to
Volunteer Novita mounting a specimen approximately 3-4 pieces of mounting tape for each 40 cm long main branch.
Make Your Own Herbarium Specimens 12
4.4 Fragment bag/envelope Any parts of the specimen that break off, or seeds that are released during the drying process must be kept. When dry, place loose parts in a small polyethylene plastic ziplock bag or paper envelope, and fasten this to the herbarium card. Points to remember regarding the fragment bags include: • Use the smallest sized bag appropriate to the contents. • Place a small label inside the plastic bag or write on the envelope details such as accession number,
species name, collector and date to identify to which specimen the bag belongs. • Fasten the bag with a plastic paperclip as these don't have sharp edges. Paper envelopes may be
stuck to the mounting card with archival glue. • Place bag/envelope in the top left hand corner of the mounting card, unless this overlaps with the
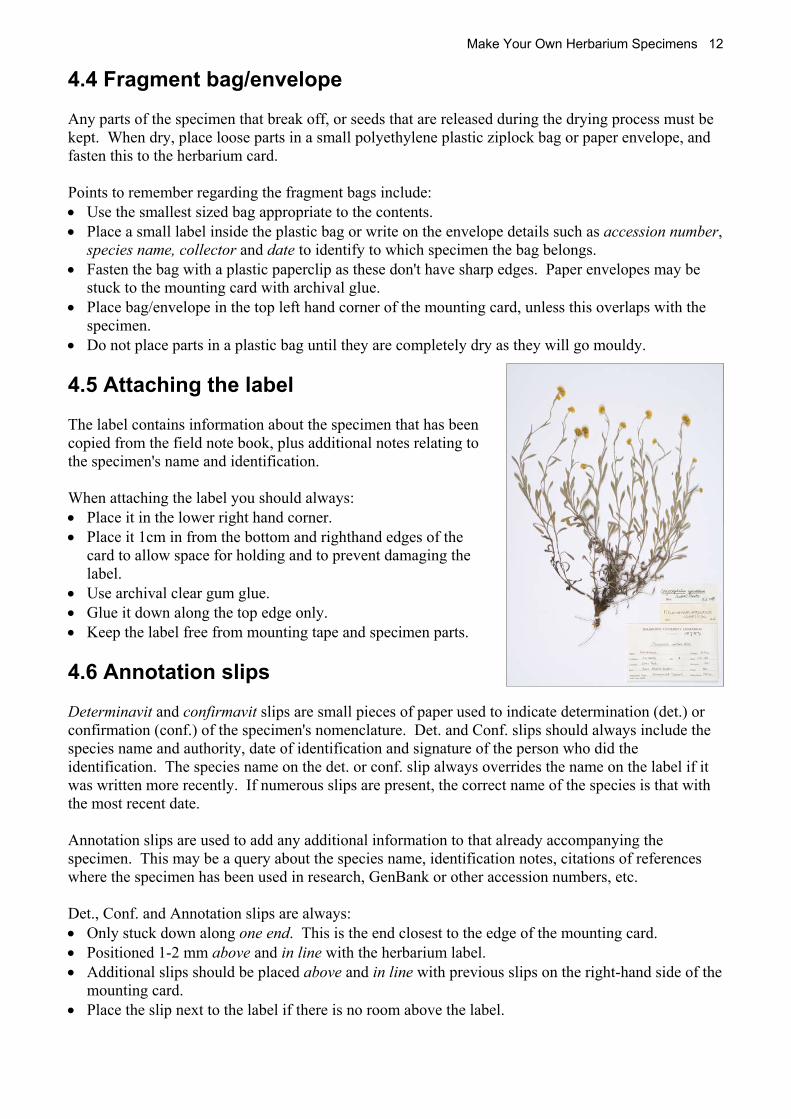
specimen. • Do not place parts in a plastic bag until they are completely dry as they will go mouldy. 4.5 Attaching the label The label contains information about the specimen that has been copied from the field note book, plus additional notes relating to the specimen's name and identification. When attaching the label you should always: • Place it in the lower right hand corner. • Place it 1cm in from the bottom and righthand edges of the
card to allow space for holding and to prevent damaging the label.
• Use archival clear gum glue. • Glue it down along the top edge only. • Keep the label free from mounting tape and specimen parts. 4.6 Annotation slips Determinavit and confirmavit slips are small pieces of paper used to indicate determination (det.) or confirmation (conf.) of the specimen's nomenclature. Det. and Conf. slips should always include the species name and authority, date of identification and signature of the person who did the identification. The species name on the det. or conf. slip always overrides the name on the label if it was written more recently. If numerous slips are present, the correct name of the species is that with the most recent date. Annotation slips are used to add any additional information to that already accompanying the specimen. This may be a query about the species name, identification notes, citations of references where the specimen has been used in research, GenBank or other accession numbers, etc. Det., Conf. and Annotation slips are always: • Only stuck down along one end. This is the end closest to the edge of the mounting card. • Positioned 1-2 mm above and in line with the herbarium label. • Additional slips should be placed above and in line with previous slips on the right-hand side of the
mounting card. • Place the slip next to the label if there is no room above the label.
Make Your Own Herbarium Specimens 13
5.0 Labeling
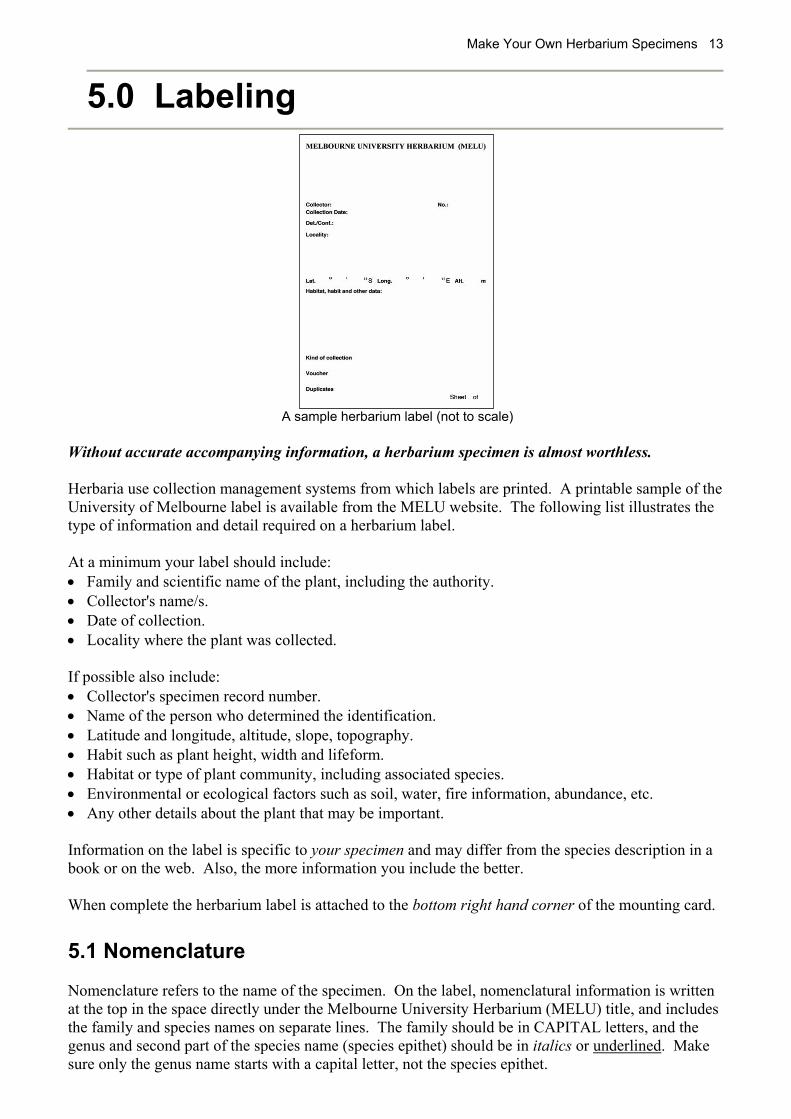
A sample herbarium label (not to scale)
Without accurate accompanying information, a herbarium specimen is almost worthless. Herbaria use collection management systems from which labels are printed. A printable sample of the University of Melbourne label is available from the MELU website. The following list illustrates the type of information and detail required on a herbarium label. At a minimum your label should include: • Family and scientific name of the plant, including the authority. • Collector's name/s. • Date of collection. • Locality where the plant was collected. If possible also include: • Collector's specimen record number. • Name of the person who determined the identification. • Latitude and longitude, altitude, slope, topography. • Habit such as plant height, width and lifeform. • Habitat or type of plant community, including associated species. • Environmental or ecological factors such as soil, water, fire information, abundance, etc. • Any other details about the plant that may be important. Information on the label is specific to your specimen and may differ from the species description in a book or on the web. Also, the more information you include the better. When complete the herbarium label is attached to the bottom right hand corner of the mounting card. 5.1 Nomenclature Nomenclature refers to the name of the specimen. On the label, nomenclatural information is written at the top in the space directly under the Melbourne University Herbarium (MELU) title, and includes the family and species names on separate lines. The family should be in CAPITAL letters, and the genus and second part of the species name (species epithet) should be in italics or underlined. Make sure only the genus name starts with a capital letter, not the species epithet.
Make Your Own Herbarium Specimens 14
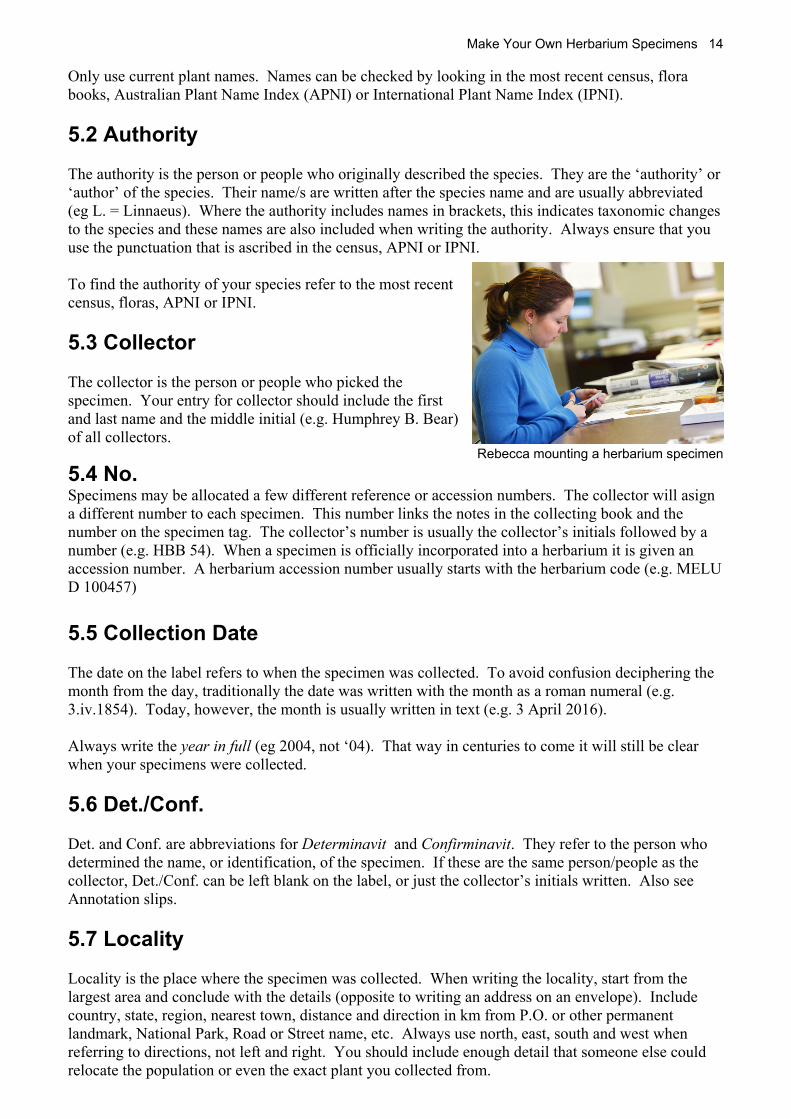
Only use current plant names. Names can be checked by looking in the most recent census, flora books, Australian Plant Name Index (APNI) or International Plant Name Index (IPNI). 5.2 Authority The authority is the person or people who originally described the species. They are the ‘authority’ or ‘author’ of the species. Their name/s are written after the species name and are usually abbreviated (eg L. = Linnaeus). Where the authority includes names in brackets, this indicates taxonomic changes to the species and these names are also included when writing the authority. Always ensure that you use the punctuation that is ascribed in the census, APNI or IPNI. To find the authority of your species refer to the most recent census, floras, APNI or IPNI. 5.3 Collector The collector is the person or people who picked the specimen. Your entry for collector should include the first and last name and the middle initial (e.g. Humphrey B. Bear) of all collectors.
Rebecca mounting a herbarium specimen 5.4 No. Specimens may be allocated a few different reference or accession numbers. The collector will asign a different number to each specimen. This number links the notes in the collecting book and the number on the specimen tag. The collector’s number is usually the collector’s initials followed by a number (e.g. HBB 54). When a specimen is officially incorporated into a herbarium it is given an accession number. A herbarium accession number usually starts with the herbarium code (e.g. MELU D 100457) 5.5 Collection Date The date on the label refers to when the specimen was collected. To avoid confusion deciphering the month from the day, traditionally the date was written with the month as a roman numeral (e.g. 3.iv.1854). Today, however, the month is usually written in text (e.g. 3 April 2016). Always write the year in full (eg 2004, not ‘04). That way in centuries to come it will still be clear when your specimens were collected. 5.6 Det./Conf. Det. and Conf. are abbreviations for Determinavit and Confirminavit. They refer to the person who determined the name, or identification, of the specimen. If these are the same person/people as the collector, Det./Conf. can be left blank on the label, or just the collector’s initials written. Also see Annotation slips. 5.7 Locality Locality is the place where the specimen was collected. When writing the locality, start from the largest area and conclude with the details (opposite to writing an address on an envelope). Include country, state, region, nearest town, distance and direction in km from P.O. or other permanent landmark, National Park, Road or Street name, etc. Always use north, east, south and west when referring to directions, not left and right. You should include enough detail that someone else could relocate the population or even the exact plant you collected from.
Make Your Own Herbarium Specimens 15
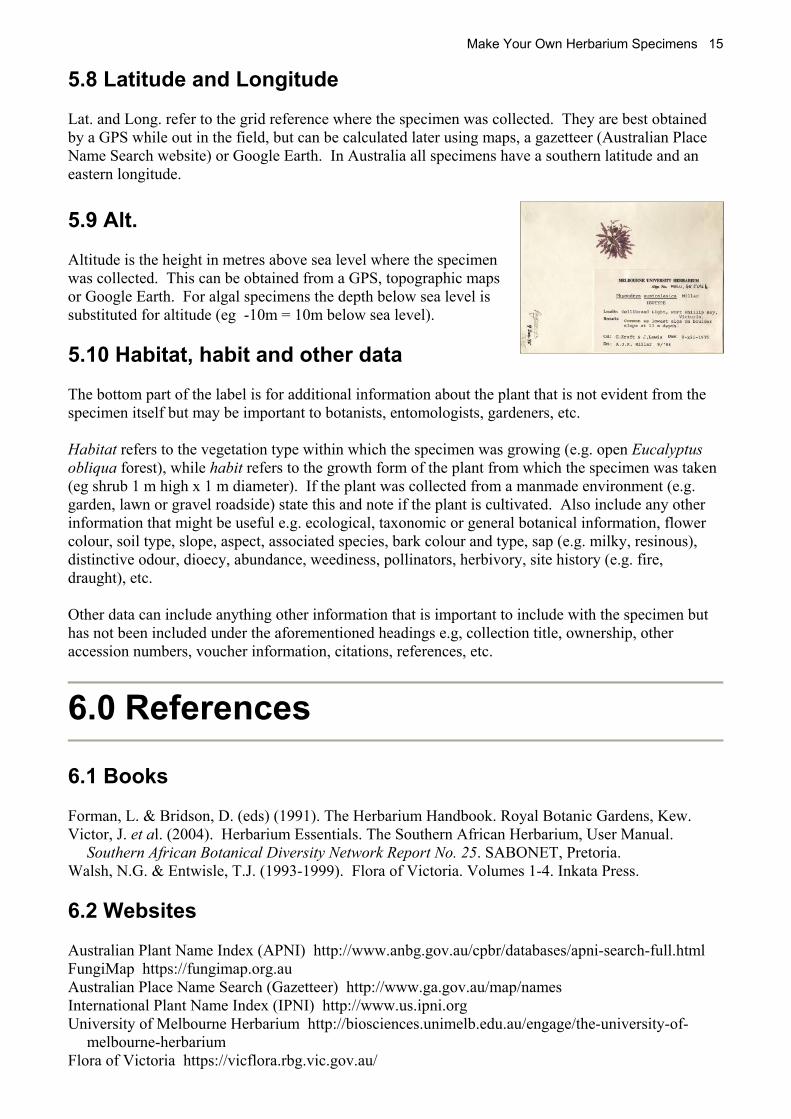
5.8 Latitude and Longitude Lat. and Long. refer to the grid reference where the specimen was collected. They are best obtained by a GPS while out in the field, but can be calculated later using maps, a gazetteer (Australian Place Name Search website) or Google Earth. In Australia all specimens have a southern latitude and an eastern longitude. 5.9 Alt. Altitude is the height in metres above sea level where the specimen was collected. This can be obtained from a GPS, topographic maps or Google Earth. For algal specimens the depth below sea level is substituted for altitude (eg -10m = 10m below sea level). 5.10 Habitat, habit and other data The bottom part of the label is for additional information about the plant that is not evident from the specimen itself but may be important to botanists, entomologists, gardeners, etc. Habitat refers to the vegetation type within which the specimen was growing (e.g. open Eucalyptus obliqua forest), while habit refers to the growth form of the plant from which the specimen was taken (eg shrub 1 m high x 1 m diameter). If the plant was collected from a manmade environment (e.g. garden, lawn or gravel roadside) state this and note if the plant is cultivated. Also include any other information that might be useful e.g. ecological, taxonomic or general botanical information, flower colour, soil type, slope, aspect, associated species, bark colour and type, sap (e.g. milky, resinous), distinctive odour, dioecy, abundance, weediness, pollinators, herbivory, site history (e.g. fire, draught), etc. Other data can include anything other information that is important to include with the specimen but has not been included under the aforementioned headings e.g, collection title, ownership, other accession numbers, voucher information, citations, references, etc.
6.0 References
6.1 Books Forman, L. & Bridson, D. (eds) (1991). The Herbarium Handbook. Royal Botanic Gardens, Kew. Victor, J. et al. (2004). Herbarium Essentials. The Southern African Herbarium, User Manual.
Southern African Botanical Diversity Network Report No. 25. SABONET, Pretoria. Walsh, N.G. & Entwisle, T.J. (1993-1999). Flora of Victoria. Volumes 1-4. Inkata Press. 6.2 Websites Australian Plant Name Index (APNI) http://www.anbg.gov.au/cpbr/databases/apni-search-full.html FungiMap https://fungimap.org.au Australian Place Name Search (Gazetteer) http://www.ga.gov.au/map/names International Plant Name Index (IPNI) http://www.us.ipni.org University of Melbourne Herbarium http://biosciences.unimelb.edu.au/engage/the-university-of-
melbourne-herbarium Flora of Victoria https://vicflora.rbg.vic.gov.au/