m5 csk y11 skills revision guide - university of birminghammedweb4.bham.ac.uk/mbchboffice/mbchb/yr5...
TRANSCRIPT

College of Medical & Dental Sciences
M5‐CSK‐Y11
Clinical Skills Revision Guide 2011‐2012

M5‐CSK‐Y11 2
Contents Page Introduction to the Study Guide 3 1 Infection Control 4 Hand Hygiene 4 Hand washing technique 5 Sterile glove technique 6 Inoculation Injuries 7 Further reading and references 8 2 Arterial Puncture for Blood Gases Sampling 9 Preparation for arterial blood gas sampling 9 Performing the procedure 12 Post sample patient care considerations 15 Further reading and references 16 3 Peripheral Blood Culture Sampling 17 Preparation for a peripheral blood culture sample 17 Performing the procedure 19 Further reading and references 21 4 Inserting a Nasogastric Feeding Tube 23 Preparation for inserting a fine bore nasogastric feeding tube 23 Performing the procedure 25 Removing a fine bore nasogastric feeding tube 30 Difficulties in obtaining aspirate 31 Further reading and references 34 5 Suturing 35 Preparation for wound closure 35 Performing the procedure 41 Post suture care 45 Further reading and references 47

M5‐CSK‐Y11 3
Introduction to the Study Guide During the final year you will attend training at the Medical School Clinical Skills Centre in ELG52. This training session will last one day. You must attend this one day training session and demonstrate your competence at the skills required to the satisfaction of the trainers. Students who fail to demonstrate competence in these skills will be brought to the attention of the Examination Board who may recommend that graduation be delayed until such competence has been demonstrated. Session preparation and attendance Due to the short period available for training it is essential that you complete the preparatory reading contained in this workbook, so that the trainers can concentrate on the practical aspects of the procedures. Session time is limited due to the amount of subject material to be covered throughout the day, so it is imperative that you arrive for this clinical skills training on time. The first part of each training session i.e. a.m. and p.m., will be spent testing your knowledge and preparation for the session using MCQs and short answer questions: The required pass mark for each test is 80%. The training day commences at 08.30hrs (prompt) and finishes no later than 16.00. If you are late for a session or fail an MCQ you will be required to attend that section again at a later date. NB please wear appropriate clinical attire for this session. You will receive the training in small groups of eight to eleven students. This allows time both for questions and practice of the skill. Upon completion of training you will have the opportunity to practise and will be assessed; and providing the required standard is attained, the competence achieved will be recorded in your skills passport. Please Note: This will indicate the ability to perform a skill safely in simulated practice. This does not mean you are competent to perform the procedure on a patient. A trained member of staff must supervise you whilst performing these skills on patients. Infection control issues are detailed at the start of the guide you are expected to familiarise yourselves with these procedures prior to attending the sessions. There are four clinical skills that will be covered during the one day training session. They are: 1. Arterial Blood Gases 2. Blood Cultures 3. Nasogastric Feeding Tube Insertion 4. Basic suturing (Interrupted and mattress suturing) All care is taken to ensure that the material contained in this handbook is correct at the time of going to press. Any updates and alterations will be posted on the MBChB website. Should you find any inaccuracies, omissions or have any other comments, please E mail Andrew MacLennan at [email protected]
• This work book represents the teaching sessions which will occupy the first part of the fifth year.
• In the middle part of the year you will attend the clinical skills centre at the medical school (ELG52) to be tested on your competence in the procedural skills covered in the clinical skills passport. More details about this will be made available separately. Please ensure you take all opportunities to undertake supervised practice in these skills to maintain and develop your competence.
Acknowledgements This Study Guide was produced by Clinical Skills Trainers – Andy MacLennan, Karen Johns, Andy Thorne, Urszula Jesson‐Ward of the University Hospital Birmingham NHS Foundation Trust (UHBFT) and David Morley of the Medical School Education Unit. With kind acknowledgements to: Mr Olufunso Adedeji, Mr. Kesavapilla Subamonian, Dr. Peter Gosling, Dr Pauline Jumaa and Lynne Colagiovanni Consultant Nurse‐Nutrition Support, for their invaluable assistance.

M5‐CSK‐Y10 4
1. Infection Control 1a Hand Hygiene
“Hand hygiene is the most important measure to protect patients, Health Care Workers (HCWs) and the environment from microbial contamination” (WHO May 2009) Saving Lives: reducing infection, delivering clean and safe care (Department of Health, 2007) provides the tools and resources for acute trusts to embed robust infection prevention and control across their organisation. Every acute trust in England has signed up to this programme. It provides the means for trusts to develop an action plan, implement national guidance and demonstrate compliance and progress against these by using a self‐assessment tool and balanced scorecards to reduce all Healthcare Associated Infection (HCAIs) and improve quality and safety. High impact interventions (care bundles) provide the means to ensure that staff undertake clinical procedures correctly, and will be an integral element in all applicable clinical skills. All HCWs have a responsibility to improve hand hygiene at point of care to reduce HCAIs. The point of care represents the time and place at which there is the highest likelihood of transmission of infection via health care staff. The term hand hygiene includes both hand washing with either plain or antibacterial soap and water, and the use of alcohol‐based products containing emollient that do not require the use of water. For routine hand decontamination, in the absence of visible soiling, approved alcohol‐based products are preferred over plain or antibacterial soap and water. Ensure hand gel is rubbed in until dry in accordance with the hand washing technique in section 1b. When there is an outbreak of Norovirus, Clostridium Difficile, or other Diarrhoeal illnesses, hands must be washed with liquid soap and water; hand gel is not effective as a decontaminant against these infections
Figure 1: Five Moments for Hand Hygiene

M5‐CSK‐Y10 5
Figure 2: Five Points of Hand Hygiene
Rings with stones, wrist watches and long sleeved clothes should not be worn for clinical procedures, as this reduces the likelihood of thorough hand washing, and increases areas which may harbour bacteria. Gloves should not be worn routinely, but must be worn when there is potential or actual contact with body fluids, blood or other potentially infectious or hazardous materials. Gloves must be removed after single patient care, and hands must be washed after glove removal. When using soap and water for hand hygiene, to ensure an effective cleansing has been performed, the technique identified (section 1b) should be routinely followed on every hand washing opportunity. 1b Hand Washing Technique
Figure 3: Hand washing Technique
Wash hands using the following 8 steps. Each step consists of 5 strokes rubbing backwards and forwards.
7
3
865
421
7
3
865
421
Wet hands under running water. Take a measure of soap
Work into hands, palm to palm Right hand over back of left and vice versa
Rub palm to palm, fingers interlaced
Back of left fingers to right palms, fingers interlocked and vice versa
Rotational rubbing of right thumb clasped in left hand and vice versa
Rub left palm with clasped fingers of right hand and vice versa
Left wrist with right hand and vice versa
Rinse hands under running water and dry thoroughly

M5‐CSK‐Y10 6
1c Sterile Glove Technique
Pick up one of the gloves with your thumb and forefinger
Pull glove on to your hand, ensuring that you do not touch the outside of the glove
Slip your partially gloved hand underneath the cuff of the second glove
Pull the second glove over your other hand and pull glove up to (gowned) wrist
Slip the fingers of your completely gloved hand under cuff of first hand. Pull glove up to (gowned) wrist
Figure 4: Sterile Glove Technique

M5‐CSK‐Y10 7
1d. Inoculation injuries All health care workers are at risk of inoculation injury during their working day. While injuries can occur in a variety of ways, it is important to note that they can be as a result of bad practice on the part of the operator, e.g. by incorrect disposal of sharps, re‐sheathing of needles or poor technique. A considerable proportion of sharps device injuries are related to staff behaviour and could be avoided by training and education. Incorrect disposal of sharps can cause injury to others. More than one third of reported injuries are sustained by someone who is not the original user of the device. For that reason you MUST NEVER ask another person to tidy away your sharps and NEVER tidy away sharps for another person. An inoculation injury can result from any item which has been contaminated by blood or bodily fluids that penetrates the skin. For instance this can be from a used needle, scalpel blade, broken glassware or spicules of bone or teeth. An inoculation injury can also be caused by a bite, scratch or splash of body fluid to mucocutaneous tissue including the eyes and mouth, as well as through cuts or abrasions, eczema etc. The greatest risk occurs if the sharp implement is a hollow bore needle, which can hold blood or body fluid within the bore, or if the inoculation injury directly accesses an artery or a vein. The risk is further increased if the injury is from a source that is infected with a blood‐borne pathogen. Percutaneous injuries are a major route of exposure to blood‐borne viruses for health care staff. Since 1997 there have been more than 1600 incidents of high risk exposure to blood‐borne pathogens from inoculation injury in the UK alone. Of these incidents, 72% were needle stick injuries. Nurses and midwives were injured in 43% of these incidents and doctors in 35%. Enormous stress can occur as a result of an inoculation injury. The consequences of such an injury can lead to huge lifestyle changes and, in the worse cases even premature death. Reducing the risk of inoculation injury You can protect yourself from sustaining an inoculation injury by adhering to universal precautions at all times when dealing with bodily fluids:
• Gloves should always be worn when dealing with any sharps devices that will come into contact with bodily fluids. If the worker sustains a sharps injury whilst wearing gloves the risks will be reduced by what is called the “wipe effect”. This is where some of the inoculant/blood is wiped off as it penetrates the glove.
• Re‐sheathing of needles must be avoided at all times • A sharps bin should always be taken to the point of use. Sharp devices should not be transported
after use in any other type of container or carried from the patient to the point of disposal, as this increases the risk of inoculation injury to yourself and others.
• For your own health and safety, all inoculation injuries, including bites, scratches and splashes should be reported immediately. It is important to report the incident according to local policy
What to do if you receive an inoculation injury
• Wash the area thoroughly and encourage it to bleed by squeezing the area under a running tap • Inform your line manager and senior colleague • During normal working hours contact the occupational health department or in the community
setting, the practice manager. Records are kept for approximately 25 years • Outside of normal working hours contact A&E. You must then attend the department for your
blood to be taken. Your blood sample will be stored for up to 5 years • With HIV, the optimum time for receiving treatment is within one hour (post exposure
prophylactic) from the time of injury. If the source patient is Hep B positive you should access treatment (immunoglobulin) within 48 hours
• The source patient’s medical team should be notified so that a blood sample from the patient can be requested. Blood will be tested for Hep B and C and HIV once the patient has given their consent
• An incident form should be completed as soon as possible after the event

M5‐CSK‐Y10 8
Further reading and references Infection control DoH (2008) Clean safe care: Reducing infections and saving lives. (285129) [online] Available from http://www.dh.gov.uk/en/Publicationsandstatistics/Publications/PublicationsPolicyAndGuidance/DH_081650 Accessed 29/04/2010 National Patient Safety Agency (2008) National Patient Safety Alert (2nd ed.) NPSA [online]. Available from http://www.npsa.nhs.uk/cleanyourhands/ Accessed 29/04/2010 DoH (2007) Saving Lives delivery programme [online] Available from http://www.dh.gov.uk/prod_consum_dh/groups/dh_digitalassets/@dh/@en/documents/digitalasset/dh_4136275.pdf Accessed 29/04/2010 WHO (2009) Guideline on hand hygiene in healthcare [online]. Available from http://whqlibdoc.who.int/publications/2009/9789241597906_eng.pdf Accessed 29/04/2010

M5‐CSK‐Y10 9
2. Arterial Puncture for Blood Gases Sampling Arterial puncture is a quick and relatively easy clinical procedure which is usually done to measure the adequacy of oxygenation and to assess acid‐base balance. It is often performed on patients with an unexplained deterioration in their mental, respiratory, or haemodynamic status. This acts as a diagnostic tool and determines the severity of a condition to aid a patient’s clinical management. The focus of this section is the practical aspects of taking a blood gas, for information on analysis; please see reference list and useful links. During the procedural skills session, the simulated practice will use the radial artery. 2a Preparation for Arterial Blood Gas Sampling Indications and Contraindications Every medical procedure involves associated risks. Estimating the associated risks and weighing the presumed benefits from the procedure, as well as considering the risks of not performing the intervention, allow caregivers to make a reasoned decision.
Indications Contraindications / concerns • To assess oxygenation in dyspnoea, acute
respiratory disease or exacerbation of chronic respiratory disease, suspected respiratory failure, congestive heart failure, monitor oxygen therapy
• To assess acid‐base status in suspected
respiratory acidosis or alkalosis, suspected metabolic acidosis or alkalosis, monitoring patients on ventilators, or monitoring patients with known acid base abnormalities
• To assess suspected dyshaemoglobinemias for
suspected carboxyhaemoglobinemia or methaemglobinemia
• Anticoagulant therapy • History of a clotting disorder (haemophilia) • History of arterial spasms following previous
puncture • Abnormal or infectious skin processes at or
near the puncture sites • Arterial grafts • Absence of palpable pulse • Poor collateral flow • Trauma to site • Known or suspected aneurysm at the
puncture site • Presence of a surgical shunt or fistula • Scar tissue
Preparation of equipment ‐ the following equipment is required for an arterial puncture:
• Locate blood gas machine and ensure it is available to use (Only use a blood gas machine if you have been trained in its use)
• Gloves (non sterile) and apron • Sharps container • A.B.G. dry heparin self‐venting syringe (with stopper and needle safety device), needle (radial‐
blue/23g, brachial‐blue/23g or green/21g, femoral‐green/21g). Ensure all equipment packaging intact and within expiry date
• Sterile Gauze • Hypoallergenic tape/plaster as appropriate • Skin preparation: 2% chlorhexidine/70% alcohol skin disinfectant,(or follow local Trust policy) • Ice, water and plastic bag if required If the analysis is being performed by the local laboratory, complete an appropriate request form, include date and time of collection and inform the lab prior to sending specimen. The form MUST be completed at the patient’s bedside to avoid mis‐identification of samples, information taken from patient’s wristband. If the analysis is performed at the point of care, attach a sticky label with the patient’s name and registration number to the syringe. This information will be required when measuring the sample to ensure accurate recording of all patient investigations performed.

M5‐CSK‐Y10 10
Preparing the patient
• Patients who require A.B.G. analysis are often very ill and require delicate handling • Get informed consent from the patient, if feasible • Check the patient’s identity; from both the patient’s wrist band and by confirming the details
with the patient whenever possible • Check the patient’s records and ask the patient if they know of any allergies, previous difficulties,
complications, or concerns • Ask the patient if they have a preferred site (if feasible) • Ensure patient comfort and safety is maintained. • Record patient’s temperature and inspired oxygen concentration
Preparation of operator
• Gather required equipment (as above) • Ensure hands are washed thoroughly • Don apron • If delegating the responsibility, ensure that the person you delegate knows where to go and is
competent in using the blood gas machine, or is able to communicate information to an appropriate user, who has been trained in blood gas analysis
Selection of site ‐ The diagram below shows the location of arterial sampling sites.
Figure 1: Site Selection
• The most commonly used site is the Radial artery lying in the wrist area on the thumb side. It is the most easily accessible and causes the minimum discomfort to the patient as it is close to the surface of the skin. When the radial artery cannot be used the femoral artery should be selected.

M5‐CSK‐Y10 11
Rationale for site Artery Rationale Contraindication Insertion Site
Radial • Most often used in conscious patients as access is easy
• Superficial 0.5‐1.0cm beneath the skin
• Pressure easily applied to arrest bleeding
• Absent ulnar circulation –Check Allen’s Test
• Impaired circulation to the hand
• Underlying skeletal trauma • An Arterio‐venous fistula
for dialysis
• Needle inserted at the point of maximum pulsation
• Be aware of the proximity of the radial and ulnar veins to the arteries
Brachial • Alternative to radial artery, but lies deeper at 0.5‐1.5cm from the skin
• Impaired circulation distally, brachial artery is the sole artery (this site is not recommended)
• Fracture around elbow‐infection risks are high
• An A.V. fistula in forearm
• Needle inserted medial to the biceps tendon over the point of maximum pulsation
• Be aware that the median nerve lies medial to the artery
Femoral • Used when previous sites have failed but is the deepest artery 2‐4cms from the skin surface
• When the patient is shocked or peripherally shut down
• Extensive vascular disease‐plaque dislodging may cause an embolism distally
• When the artery has been replaced by a graft
• In children due to risk of septic arthritis and nerve damage
• Lies between the femoral vein medially and the femoral nerve laterally
• Needle inserted at the mid inguinal point 2cm below the inguinal ligament over the point of maximum pulsation
Figure 2: Position of the Artery
General factors to consider when selecting a site
• Condition of artery i.e. is the pulse palpable • Clinical condition of the patient e.g. dehydration, shock, tachycardia/bradycardia (inhibits
palpability) • Patient preference ‐ the patient may be able to tell you the site where access has been made
with ease on previous occasions • Medication e.g. Warfarin, steroids • Patient co‐operation/prior experience • Obesity/malnutrition • Injuries, fractures or paralysis • Skin condition of the patient

M5‐CSK‐Y10 12
Modified Allen’s Test The modified Allen’s Test should be performed on all patients prior to radial arterial puncture to determine collateral blood flow and for medico‐legal reasons. The result should be recorded in patient’s notes, and include length of time return of hand colour occurred.
Elevate patient’s hand, locate radial and ulnar arteries, and apply firm pressure to both
areas.
Patient makes a fist and clenches for 20 seconds.
On opening hand, it should be visibly blanched and white.
Release ulnar compression, observe for time taken to flush to normal colour
Figure 3: Modified Allen's Test
Normal result ‐ Hand colour flushes within 5‐7 seconds indicating adequate collateral
circulation. Abnormal result ‐ Shows inadequate collateral circulation, hand remains white until radial compression released, risk of hand ischaemia if radial spasm or if extended period of pressure required post sample.
If an abnormal result, DO NOT take an arterial puncture at this site. 2b Performing the procedure
• Alcohol gel hands at point of care • Confirm collateral blood flow by performing the modified Allen’s Test • Encourage arterial blood flow and palpable pulse by lowering the patient’s arm, asking the
patient to relax hand and forearm (if patient co‐operative) • Ask the patient to extend their arm, gently extend their wrist and support it on a pad • Ensure gauze is opened and easily accessible • Don gloves • Attach appropriate needle to blood gas syringe, loosen needle casing, and retract syringe to
release plunger

M5‐CSK‐Y10 13
Figure 4: Preparation of Equipment
• Assess the intended site and palpate for pulse, use tips of fingers with non dominant hand for
improved sensitivity of maximum pulsation
Figure 5: Palpate Puncture Site
• Clean the site for 30 seconds using 2% chlorhexidine 70% alcohol and allow to air dry for 30
seconds (or clean as per local Trust policy) Do not re‐palpate once site is cleaned
Figure 6: Clean Puncture Site
• Lean heel of dominant hand into patient’s palm, with the needle bevel uppermost, insert into the artery slowly and smoothly at an angle of approx 30 degrees following the line of the artery, hold the syringe as if holding a pencil
Figure 7: Insert Needle into Radial Artery
• Observe for blood entering the syringe (self venting syringes fill under pressure) (if non pulsatile
consider patients condition or venous sample), be aware some syringes may not be self filling and require you to draw back on syringe
M5‐CSK‐Y10 14
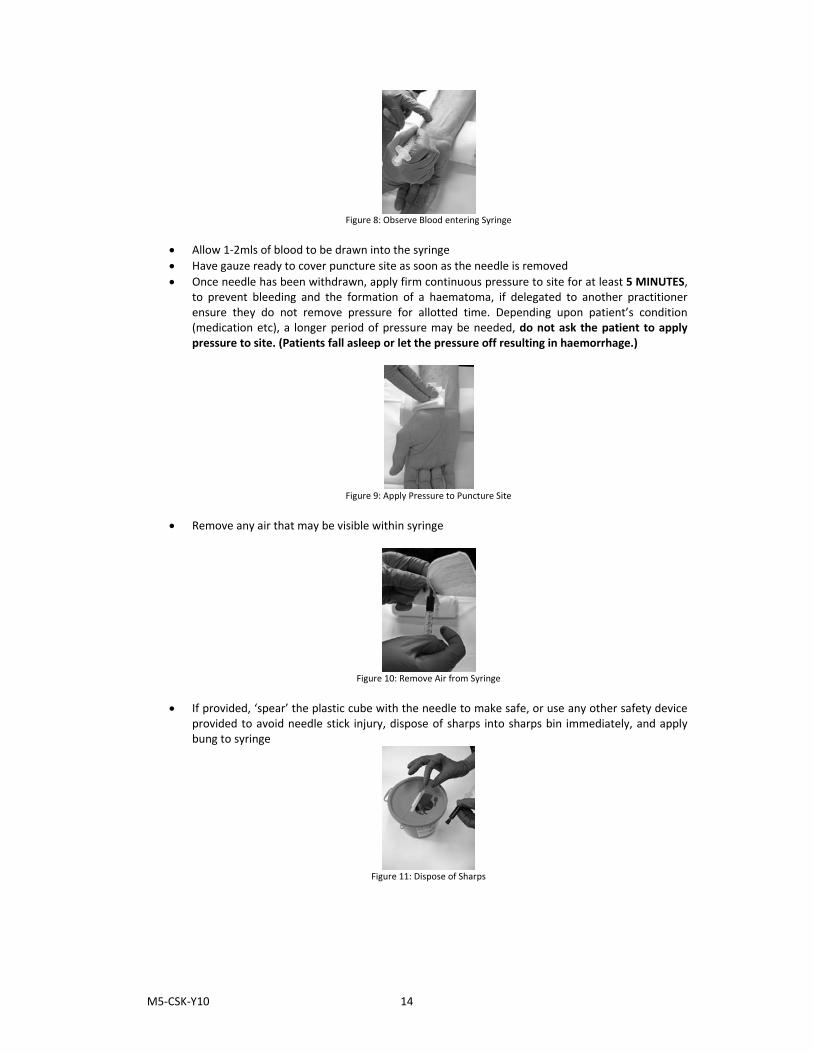
Figure 8: Observe Blood entering Syringe
• Allow 1‐2mls of blood to be drawn into the syringe • Have gauze ready to cover puncture site as soon as the needle is removed • Once needle has been withdrawn, apply firm continuous pressure to site for at least 5 MINUTES,
to prevent bleeding and the formation of a haematoma, if delegated to another practitioner ensure they do not remove pressure for allotted time. Depending upon patient’s condition (medication etc), a longer period of pressure may be needed, do not ask the patient to apply pressure to site. (Patients fall asleep or let the pressure off resulting in haemorrhage.)
Figure 9: Apply Pressure to Puncture Site
• Remove any air that may be visible within syringe
Figure 10: Remove Air from Syringe
• If provided, ‘spear’ the plastic cube with the needle to make safe, or use any other safety device
provided to avoid needle stick injury, dispose of sharps into sharps bin immediately, and apply bung to syringe
Figure 11: Dispose of Sharps
M5‐CSK‐Y10 15
• Mix immediately by inversion. This is essential; otherwise the blood will clot and disable the blood gas machine, causing the service from that blood machine to be halted
• Label the specimen with patient identifier label, and if specimen being sent to lab, date and time recorded. If analysis being performed at point of care, time of recording will be documented on results print out
• Ensure that samples are taken directly for point of care analysis, samples should be stored on iced water/slush if delay of >15 minutes (clinically useful results up to 30 mins if transported this way)
• Ensure syringe is continually inverted on transport to the designated A.B.G. machine, and inverted prior to administration into machine
• Do not dispose of sample until print out obtained, but ensure the sample is kept sealed with no large air bubbles to maintain its integrity
• Enter patient details, including name, registration number and any other requested information into machine
• Document patient results from print out, inform results to appropriate personnel. Ensure all documentation signed and dated
2c. Post Sample Patient Care considerations
• Establish and document treatment plan: remember it is important with all acutely ill patients that sufficient oxygen is provided to prevent hypoxia; the blood gas results will allow further titration of oxygen administration. If accurate pulse oximetry is available this can also be used initially to titrate oxygen delivery, for non COPD patients aim for SpO2 of 94‐98%
• In patients with “COPD or other risk factors for hypercapnic respiratory failure , aim at a saturation of 88‐92% pending blood gas results but adjust to 94‐98% if the Paco2 is normal (unless there is a history of previous hypercapnic respiratory failure requiring NIV (Non Invasive Ventilation) or IPPV (intermittent positive pressure ventilation)) and recheck blood gases after 30‐60 minutes.” British Thoracic Society: Guidelines on the Emergency use of Oxygen in adult patients. http://www.brit‐thoracic.org.uk/clinical‐information/emergency‐oxygen/emergency‐oxygen‐use‐in‐adult‐patients.aspx
NB more detailed information on oxygen therapy can be found at the link above. Always check with individual Trust guidance as this can vary slightly. When using a Venturi valve/mask to deliver smaller or larger percentages a change in the valve type will be required
For higher concentrations of oxygen administration nearer to 100%, non re‐breath masks are used, remember with these and other oxygen masks unlike the venturi system, accurate percentages cannot be established.
Complications • Vascular thrombosis • Distal embolization • Proximal embolization • Vascular spasm • Bleeding or haematoma formation • Pain • Infection • Damage to nearby structures • Damage to the artery • Vaso‐vagal reaction • Venous sample

M5‐CSK‐Y10 16
Further reading and references Arterial Blood Gas Sampling AARC Clinical Practice Guideline. Sampling for Arterial blood Gas Analysis, (Reprinted from Respiratory Care 1992;37:913‐917) online: Available from http://www.rcjournal.com/cpgs/sabgacpg.html (accessed 29th April 2010) Doidge E, (2006). A learning pack on arterial blood gases for new starters and students in neuro high dependency unit. [online] Available from www.leedsneurosurgery.com/HDU/staff/images/aline_student.ppt (Accessed 29th April 2010) Hennessey I & Japp A (2007). Arterial Blood Gases Made Easy. London. Churchill Livingstone Rothman A, Kolkani K (revised 2008) [online] Available from http://www.revise4finals.co.uk/medicine/learn/abg.php (Accessed 29th April 2010) British Thoracic Society: Guideline for the “Emergency use of oxygen in adult patients” http://www.brit‐thoracic.org.uk/clinical‐information/emergency‐oxygen/emergency‐oxygen‐use‐in‐adult‐patients.aspx (Accessed 29th April 2010) NB. The oxygen policies of all Trusts will be based on this guidance: however you should always read local policy to check for minor variants Tortora and Anagnostakos (2003). Principles of Anatomy and Physiology, Tenth Ed. New York Harper Collins

M5‐CSK‐Y10 17
3. Peripheral Blood Culture Sampling Blood Cultures are used to determine the most appropriate antimicrobials for a patient with a suspected bacteraemia. They should not be taken routinely unless clinical signs of sepsis are present. Indicators include:
• Core temperature out of normal range
• Focal signs of infection
• Abnormal heart rate, blood pressure (low or raised) or respiratory rate (raised)
• Chills or rigors
• Raised or very low white blood cell count
• New or worsening confusion False positive results are a continued problem associated with poor practice in the skill of taking blood cultures. False positives are of particular concern as they can lead to incorrect or delayed treatment. Samples showing a false result are due to poor technique and are avoidable; they are usually the result of one or a combination of the following:
• Poor decontamination of operator’s hands: hands must be washed and alcohol gel applied on arrival at the point of care and prior to donning gloves
• Poor decontamination of patient’s skin: skin must be decontaminated for 30 seconds and allowed to air dry for 30 seconds: A cursory wipe of the collection site will stir up microflora already present, it is important that a sufficient clean is carried out to allow the alcohol and chlorhexidine to impregregnate the area. Allowing the alcohol to dry is important to allow the bacteria to be killed
• Contamination of patient’s skin by repalpation post initial cleansing: This will contaminate the site and introduce flora sitting on the operators hands or non sterile gloves
• Contamination of equipment: It is vital that the key parts i.e. the parts that are going to come into contact with the blood sample are not handled to avoid this
• Blood cultures are always taken first to prevent subsequent contamination from additional sample bottles (if required) • Poor decontamination of bottles: The septum of each bottle must be decontaminated with a separate 2% chlorhexidine in 70% alcohol wipe (DoH, 2007) and be allowed to air dry
3a Preparations for Peripheral Blood Culture Sample Preparation of equipment The following equipment is required for obtaining blood cultures:
• Cleaned tray or trolley • Tourniquet/Gloves and apron/Sharps container • Biomerieux holder and butterfly + insert if further samples are required • Blood culture bottles x1 anaerobic, x1 aerobic: check in date and no damage present • Hypoallergenic tape/plaster as appropriate and Sterile Gauze • Skin preparation as per DOH best practice ‐ 2% chlorexidine 70% alcohol skin wipe. X1 per bottle
and x1 per preparation of patient’s skin • Microbiology envelope: ‐ these MUST be completed at the patient’s bedside; labels and
handwriting checked against the patient’s wrist band and verbal confirmation to avoid Mis‐identification of samples • Blood collection adaptor caps must ONLY be used with a winged collection system due to the risk
of backflow of culture medium

M5‐CSK‐Y10 18
Figure 1: Preparing Equipment
Preparation of operator
• Decontaminate hands thoroughly • Gather required equipment (as above) • Put on clean apron
Figure 2: Preparation of Operator
Factors to consider when selecting site
• Previous use of veins • Conditions of veins i.e. are they easily palpable or do they feel sclerosed /hard to the touch? • Clinical condition of the patient e.g. dehydration, shock (as it will be more difficult to get access) • Patients undertaking chemotherapy use opposite arm as high risk of extravasation,
chemotherapy can not be given if phlebotomy has been performed above cannula for 24‐48hrs due to this risk
• Avoid taking samples above an intravenous infusion due to haemodilution and/or extravasation • Avoid sites of previous surgery e.g. side of mastectomy, lumpectomy (due to the risk of lymph
oedema), arteriovenous fistulas Preparing the patient
• Get informed consent from the patient • Check the patient’s identity; from both the patient’s wrist band and by confirming the details
with the patient whenever possible • Check the patient’s records and ask the patient if they know of any allergies, previous bloods
taken this usually highlights any potential difficulties e.g. accessing a vein, needle phobia
Figure 3: Preparing the Patient

M5‐CSK‐Y10 19
3b. Performing the procedure Skin preparation
• Wash your hands with soap and water then dry. Decontaminate with alcohol hand gel rub until dry
• Clean any visibly soiled skin on the patient with soap and water then dry • Apply a clean tourniquet and palpate to identify vein and then loosen tourniquet • Clean skin with a 2% chlorhexidine in 70% isopropyl alcohol 30 second clean 30 second air dry, do
not repalpate after cleaning
Figure 4: Skin Preparation
Equipment preparation
• Label bottles (hand write) with appropriate patient information. Ensure that barcodes on the bottles are not covered by additional labels and that any tear‐off barcode labels are not removed
• Clean the tops of culture bottles with a 2% chlorhexidine in 70% isopropyl alcohol impregnated wipe for 30 seconds and allow to air dry for 30 seconds
Figure 5: Equipment Preparation
Sample collection – Winged Blood Collection Method
• Wash and dry hands again or use alcohol hand rub and don clean gloves
Figure 6: Prepare Hands

M5‐CSK‐Y10 20
• Re‐tighten tourniquet • Attach winged blood collection set to blood collection adaptor cap • Insert needle into prepared site. Do not repalpate after cleaning
Figure 7: Inserting Needle
• Place culture bottle into adaptor cap piercing septum, collecting aerobic and then anaerobic • Hold the culture bottle upright to allow fill level to be seen against graduation lines (minimum
10mls per bottle)
Figure 8: Attaching Culture Bottle
• Remove final blood culture bottle, take further samples if required, then release the tourniquet • Remove needle from the patient and dispose of collection set into sharps bin • Apply pressure to puncture site (discourage patient from bending arm) • Cover the puncture site with an appropriate dressing
Figure 9: Release Tourniquet and Cover Puncture Site
• Dispose of waste and clean equipment as per Trust policy • Remove apron and gloves and wash hands • Record the procedure with indication for culture, time, site of venepunture and any
complications in the Patient’s record

M5‐CSK‐Y10 21
Figure 10: Record Procedure
• It is generally recommended that two sets of blood cultures be taken at separate sites • If central line sepsis is suspected, an initial culture is always taken from a peripheral site • To ensure appropriate antimicrobial prescribing post result, liaise with Microbiology • See DOH recommendations for blood culture withdrawal at:
http://www.clean‐safe‐care.nhs.uk/toolfiles/80_blood%20cultures_v2.pdf
3c. Sample Collection ‐ Needle and Syringe Method: Not considered gold standard (Higher risk of contamination, many Trusts will not allow this method (check with individual Trust policy)
• Wash and dry hands again or use alcohol hand rub and don clean gloves • Do not repalpate after cleaning • Insert needle • Collect sample (10mls per culture bottle) and release tourniquet • Cover the site with an appropriate dressing • If blood is required for further tests, always collect cultures first • Inoculate blood into culture bottles anaerobic first and then aerobic; do not change the needle
between sample collection (if less than 20mls sampled inoculate aerobic bottle first) • Discard needle and syringe into sharps bin • Dispose of waste and clean equipment as per Trust policy • Wash hand post removal of gloves • Record the procedure with indication for culture, time, site of venepunture and any
complications in the patient’s record
Further reading and references Peripheral Blood Culture Sampling Blood Culture: A Key Investigation for Diagnosis of Bloodstream Infections (unknown) [online] Available from http://www.biomerieux‐diagnostics.com/upload/Blood_Culture_Booklet.pdf Accessed 29/04/2010 DoH (2007). Saving Lives: reducing infection, delivering clean and safe care, Taking blood cultures a summary of best practice [online] Available from:http://www.clean‐safecare.nhs.uk/toolfiles/80_blood%20cultures_v2.pdf Accessed 29/04/2010 Recommendations for blood culture collection a summary of good practice (unknown) [online] Available from http://www.biomerieux‐diagnostics.com/upload/Blood_Culture_Protocol.pdf Accessed 29/04/2010

M5‐CSK‐Y10 22
Appendix 1 Information to be checked and written on a Blood Culture Bottle
Information required on microbiology form

M5‐CSK‐Y10 23
4. Inserting a Nasogastric Feeding Tube 4a Preparation for Inserting of Fine Bore Nasogastric Feeding Tube Nasogastric tubes are frequently used in the management of care in a diverse group of patients, both for nutritional support and for the decompression of the abdomen (Takwoingi and Demspter, 2005). Nasogastric feeding is the most common method of maintaining or supplementing a patient’s nutrition when oral intake is inadequate to meet nutritional requirements and where gut function is normal. This is usually used in the short term (up to six weeks) to support the patient during an acute illness. This clinical procedure is mainly carried out by nursing and medical staff, and the insertion of nasogastric feeding tubes must be carried out safely, effectively and with the least discomfort to the patient. Types of Nasogastric Feeding Tubes There are a number of different types of nasogastric tubes currently being used in the clinical areas, so it is imperative as a clinical practitioner to familiarise yourself with the appropriate equipment being utilised in that area. The following list is a guide to assist you in selecting the most suitable nasogastric feeding tube to administer the prescribed treatment for your patients:
• Fine bore tubes: The tube of choice for enteral feeding: o Polyurethane fine bore feeding tube (8FG) o Polyurethane feeding tubes (12FG) are available if regular aspiration of gastric
contents is required (e.g. critical care patients) or if frequent tube blockage is experienced
• Wider bore tubes (>12FG ryles type tubes) o Often used in critical care settings until feed toleration is ensured as they are easier
to aspirate o Usually made from Polyvinyl Chloride (PVC) and should only be in place for a
maximum of 14 days, as after this time the plasticisers begin to leach out of the tube in reaction with the gastric juices. This causes the tube to become hard and brittle, increasing the risk of gastric erosions and ulcerations.
o An alternative tube that could be used is the corflo 12FR o Wide bore tubes (>12FG ryles type tubes) are rarely used for enteral feeding, due to
the following complications: Rhinitis and Pharyngitis Oesophageal strictures Gastric erosion Increased reflux Patient discomfort Difficulty in Swallowing
Indications The following are some reasons why a nasogastric feeding tube could be inserted, this list is not exhaustive. The reasons for inserting the feeding tube should be discussed with the medical team prior to tube insertion:
• Patients with impaired swallowing e.g. o As a result of a stroke o Motor Neurone Disease o Parkinson’s disease o Head injuries
• Altered level of consciousness e.g. o ventilated patients
• To supplement daily oral intake o Cystic Fibrosis o Hyper‐catabolic states, e.g. burns, decompensated liver disease
M5‐CSK‐Y10 24
Contraindications The following contraindications are not all absolute. However, the care of the patient should be discussed with the medical team primarily responsible for their care before a nasogastric tube is inserted:
• Maxillo‐facial surgery • Facial trauma • Facial disease • Oesophageal tumours/surgery • Skull fractures
Anatomy of the Head and Neck
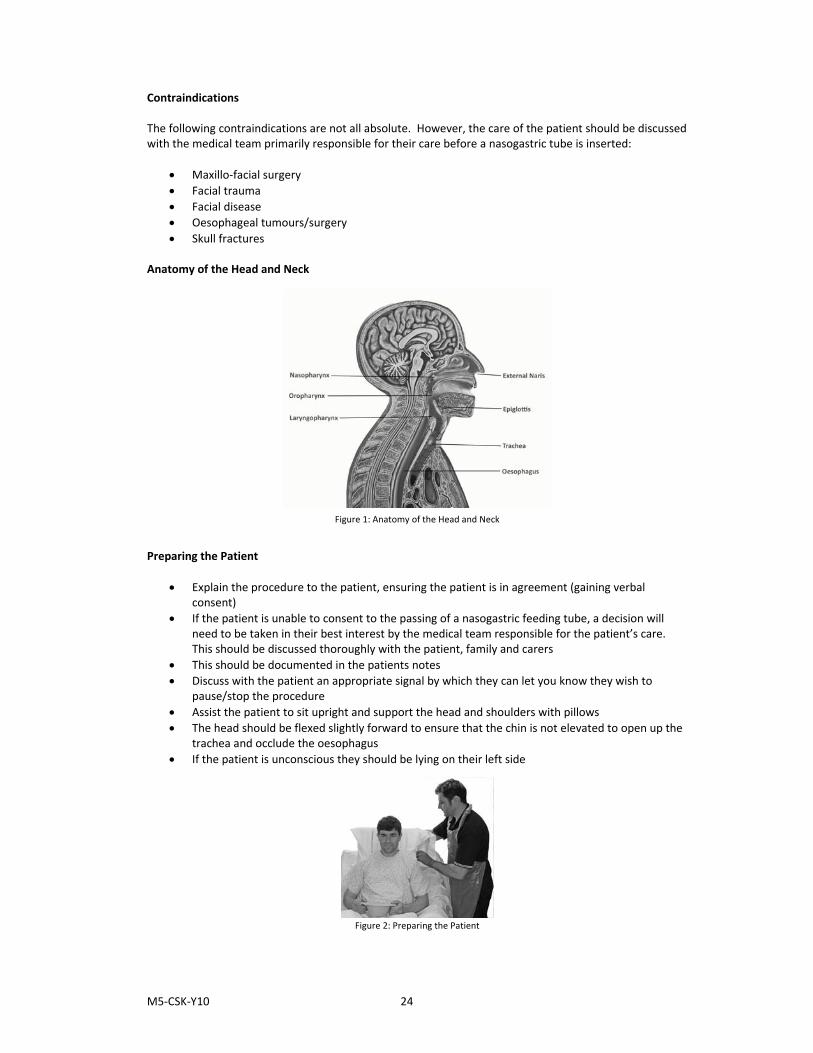
Figure 1: Anatomy of the Head and Neck
Preparing the Patient
• Explain the procedure to the patient, ensuring the patient is in agreement (gaining verbal consent)
• If the patient is unable to consent to the passing of a nasogastric feeding tube, a decision will need to be taken in their best interest by the medical team responsible for the patient’s care. This should be discussed thoroughly with the patient, family and carers
• This should be documented in the patients notes • Discuss with the patient an appropriate signal by which they can let you know they wish to
pause/stop the procedure • Assist the patient to sit upright and support the head and shoulders with pillows • The head should be flexed slightly forward to ensure that the chin is not elevated to open up the
trachea and occlude the oesophagus • If the patient is unconscious they should be lying on their left side
Figure 2: Preparing the Patient

M5‐CSK‐Y10 25
Preparation of Equipment Wash hands thoroughly (see section 1) and collect the following equipment on a clean trolley and take to the patient:
• Apron • Non sterile gloves • Nasogastric feeding tube • 50ml catheter tip / enteral syringe (that is not compatible with intravenous devices) • Glass of water and straw (if appropriate) • pH sticks • Tap water • Fixing tape • Receiver / vomit bowl • Water based lubricant (depending on the type of nasogastric tube)
Figure 3: Preparation of Equipment
Preparation of Operator
• Decontaminate hands with alcohol gel at point of care • Don non sterile gloves and apron
Figure 4: Preparing the Clinical Practitioner
4b Performing the Procedure Measuring the Nasogastric Feeding Tube
• Before inserting the feeding tube, locate the xiphisternum (this is the posterior and smallest of the three divisions of the sternum, situated below the gladiolus and the manubrium also called the xiphoid or xiphoid process)
• Measure the distance from the xiphisternum to the nose and then to the ear lobe o Mark the length of insertion on the feeding tube with a pen o Or note the nearest centimetre marker if there are measurements on the tube

M5‐CSK‐Y10 26
Figure 5: Measuring the Feeding Tube
Lubricating the Nasogastric Feeding Tube
• Lubricate the tip of the feeding tube either with water or with an appropriate water based lubricant (depending on the manufacturers recommendations and/or local policies)
• If the patient’s nasal passages are particularly dry then lubricating along the complete length of the tube may be required and may make the insertion process more comfortable
Figure 6: Lubricating the Feeding Tube
Inserting the Nasogastric Feeding Tube
• Ensure the guide wire for the feeding tube is firmly engaged in the top of the tube NOTE: Not all feeding tubes will require the guide wire to be engaged in the feeding port
• Ask the patient which nostril they would prefer you to use for insertion o Check the nostril for patency
• Insert the tube into the vestibule (chosen nostril) and advance the tube straight backwards along the floor of the nose (inferior meatus) towards the posterior nasopharynx (approximately 8 to 10cm)
Figure 7: Inserting Feeding Tube
• If an obstruction is felt, try rotating the tube and then moving it in a slightly different direction • If you are still unable to pass the tube, then remove and try the other nostril.

M5‐CSK‐Y10 27
Advancing the Nasogastric Feeding Tube to the Predetermined Mark
• As the tube advances down into the nasopharynx ask the patient to swallow water through a straw (when the patient feels the feeding tube at the back of the throat)
o Only ask the patient to swallow water if you are sure they have an intact swallow reflex.
o Swallowing closes the epiglottis and allows the tube to pass into the oesophagus o Encourage patients who are unable to drink water to mimic the action of
swallowing • As the patient swallows advance the tube through the pharynx until you reach the
predetermined mark on the tube
Figure 8: Advancing Tube to the Predetermined Mark
Checking the Positioning of the Nasogastric Feeding Tube
• At this point check the positioning of the tube to confirm it is in the stomach o Inadvertent placement in the trachea / bronchus is possible, especially in patients
who are unconscious or who do not have a swallow reflex • If you are confident that the tube has been correctly positioned, the guide wire may be removed
at this point o Retaining the guide wire for longer than necessary is uncomfortable for the patient o The tube can be visualised on x‐ray if needed without the guide wire in place o Removing the guide wire also makes aspiration of stomach content easier o Correct confirmation of the position of the nasogastric feeding tube is carried out
through aspiration and pH testing WARNING: X‐rays SHOULD NOT be used routinely to confirm the position of the feeding tube. Insufflation of air and auscultation of the epigastrium SHOULD NOT be used to confirm tube position as it is unreliable and is not recommended national guidelines (NPSA, 2005).
• Ask the patient to hold the tube close to the nostril (If they are able to, this will prevent
unnecessary movement of the tube and reduce discomfort to the patient)
Figure 9: Checking the Position of the Tube

M5‐CSK‐Y10 28
• Attach a 50 / 60ml enteral syringe to the appropriate port on the end of the feeding tube. Do not use a smaller size syringe as this creates a stronger suction and increases the risk of the tube collapsing or causing gastric biopsy
• Slowly aspirate fluid from the stomach (only a small amount is required, about 1ml) • Remove the syringe from the end of the tube and replace the cover over the port
Confirming tube position using the pH Value of the Aspirate
• Place two or three drops of aspirate from the syringe onto the pH indicator strip, ensuring that all the test zones are covered
• Allow any excess aspirate on the indicator strip to run off onto a paper towel • Read the value of the pH result within the manufacturers recommended time period, e.g.
o For Merck Serono pH Indicators read off the corresponding pH value within 10 to 60 seconds
• A pH reading of 5.5 or below indicates gastric placement of the feeding tube (NPSA, 2005) o Local guidelines may be different and so should be adhered to
• If the correct pH value cannot be obtained (pH above 5.5) or stomach content cannot be aspirated the ‘troubleshooting’ guide should be referred to in the first instance
• If it is still not possible to confirm position of the feeding tube using aspiration and pH testing, then an x‐ray is advisable
• Please refer to “trouble shooting” in section 4c on page 31 for additional tips and information on how to confirm the position of the feeding tube
Figure 10: Confirming pH Value of Aspirate
Confirming tube position using X‐Ray
• Only use an x‐ray if unable to confirm the position of the feeding tube by aspiration and/or pH testing
• The x‐ray request form should state that the chest x‐ray is to confirm position of the feeding tube • X‐rays should only be reviewed by medical practitioners with sufficient experience and
competency NOTE: X‐Rays should not be used routinely to confirm the position of the feeding tube.
Securing the Nasogastric Feeding Tube
- If you have confirmed that the feeding tube is correctly positioned in the stomach, or you are awaiting an x‐ray, remove the guide wire (if not previously removed) and close the port on the end of the tube with the cap provided
- To maintain tube position secure the feeding tube to the patient’s nose and cheek with tape - Use sufficient tape to prevent accidental removal
M5‐CSK‐Y10 29
Figure 11: Securing the Feeding Tube
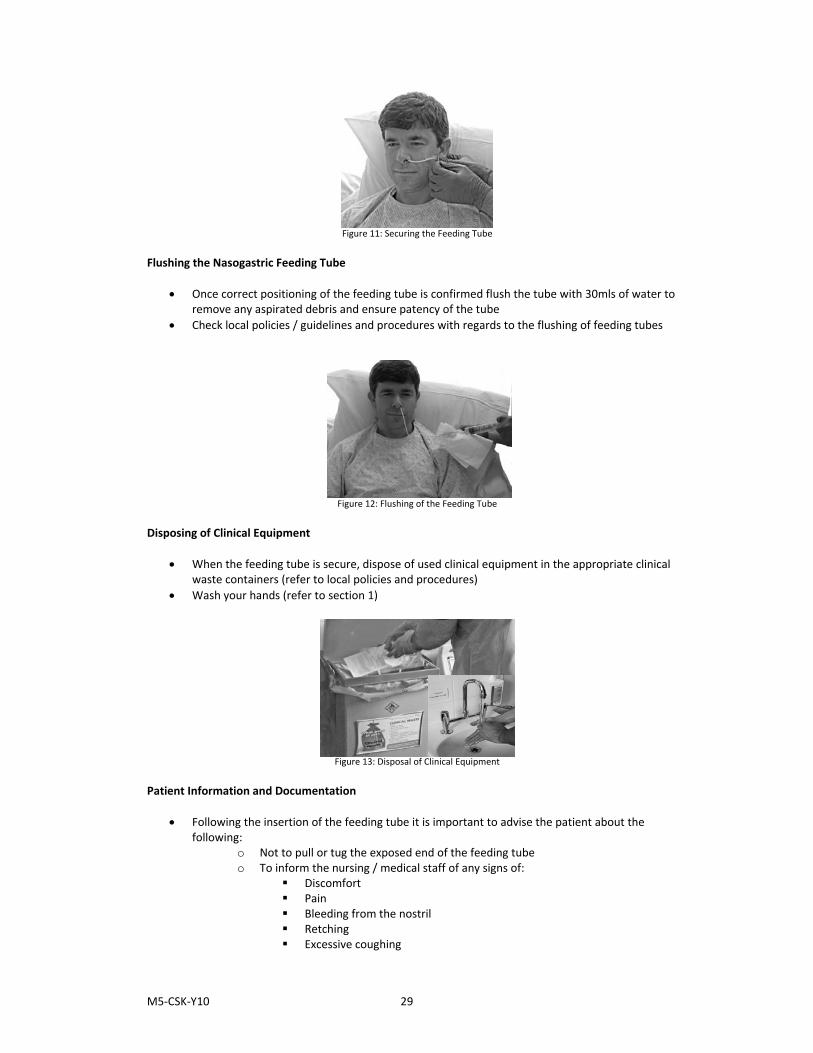
Flushing the Nasogastric Feeding Tube
• Once correct positioning of the feeding tube is confirmed flush the tube with 30mls of water to remove any aspirated debris and ensure patency of the tube
• Check local policies / guidelines and procedures with regards to the flushing of feeding tubes
Figure 12: Flushing of the Feeding Tube
Disposing of Clinical Equipment
• When the feeding tube is secure, dispose of used clinical equipment in the appropriate clinical waste containers (refer to local policies and procedures)
• Wash your hands (refer to section 1)
Figure 13: Disposal of Clinical Equipment Patient Information and Documentation
• Following the insertion of the feeding tube it is important to advise the patient about the following:
o Not to pull or tug the exposed end of the feeding tube o To inform the nursing / medical staff of any signs of:
Discomfort Pain Bleeding from the nostril Retching Excessive coughing

M5‐CSK‐Y10 30
o To inform the nursing / medical staff if the tape securing the feeding tube becomes loose or is no longer in position
• Document the procedure in the nursing and / or medical notes specifying: o Record of verbal consent or if the patient was unable to consent, information
relating to the decision to pass the feeding tube is in the ‘best interest’ of the patient
o Time and date of insertion o Type and size of the tube o External length of feeding tube at nostril o pH value of the aspirate o How correct positioning was confirmed o Result of x‐ray confirming gastric position if unable to aspirate stomach content
CAUTION: CRITICAL CARE PATIENTS ARE AT A HIGHER RISK OF MALPOSITIONED FEEDING TUBES REMEMBER: When inserting nasogastric feeding tubes for patients who are unconscious, sedated or intubated e.g. critical care based patients, there is an increased risk from this group of patients of regurgitation, aspiration and mal‐positioning of the feeding tube. There is also the added complication associated with confirming the position of the feeding tube when aspirating the stomach content. Due to the various therapies or clinical treatments the patient may be receiving, this could affect the production / pH value of the gastric juices. The national guidelines for critical care areas are the same as for all other clinical areas. However, due to the higher risks associated with this group of patients it is suggested that referral to your local policies, procedures and guidelines is necessary to establish the standards required for confirming the correct position of the feeding tube. 4c Removing a Nasogastric Feeding Tube Removal of a Fine Bore Nasogastric Feeding Tube
• Ensure the patient is sitting upright in a comfortable position • Explain to the patient that the removal of the nasogastric feeding tube may be uncomfortable
and could stimulate retching or vomiting • Ensure the patient has a vomit bowl and tissues in preparation for potential retching on removal
of the feeding tube • Carefully remove the tape securing the position of the nasogastric tube • Gently pull on the feeding tube until the end of the nasogastric feeding tube is removed from the
patient’s nostril • This part of the procedure will be more comfortable for the patient if the feeding tube is
removed fairly quickly in one continuous smooth movement
Figure 14: Removing Feeding Tube
M5‐CSK‐Y10 31
• When the nasogastric feeding tube has been removed ensure that the patient is: o Comfortable o No signs of pain o No bleeding from the nostril
• The patient may want to clean their mouth if they have been retching or has vomited during the removal of the feeding tube
Disposing of Clinical Equipment
• Dispose of used clinical equipment in the appropriate clinical waste containers o Refer to local policies and procedures
• Wash your hands (refer to section 1) 4d Difficulties in obtaining aspirate: Problems and Solutions Trouble‐Shooting: Confirming Feeding Tube Position Unable to obtain aspirate
• If possible, ask the patient to turn onto their left side o Altering the patients position may allow the tip of the nasogastric tube to move into
the pool of the gastric fluid • If still unable to obtain aspirate, inject 10 ‐ 20mls of air through the feeding tube using a 50‐60ml
enteral syringe o Injecting air through the feeding tube will dispel any residual fluid, feed, water or
medicine o This process may also dislodge the exit port (tip) of the feeding tube from the
gastric mucosa CAUTION: This is NOT a testing procedure: DO NOT carry out auscultation of air (‘whoosh’ test) to confirm the feeding tube position.
• If obtaining aspirate is still a problem, gently ‘withdraw’ or ‘advance’ the feeding tube by 10 –
20cm o The feeding tube may not be far enough into the stomach for the tip to reach the
gastric pool o The tip of the feeding tube may be coiled within the stomach
• If the patient is alert and their swallowing reflex is intact, and they are eating and drinking, ask the patient to sip a coloured drink and then aspirate the feeding tube
• If you get coloured fluid back then you know the feeding tube is in the stomach • If still unable to confirm the correct position of the feeding tube consider x‐ray
Unable to obtain aspirate with a pH Value 5.5 or below
• If you can obtain aspirate but the pH Value is too high (i.e. 6.0 or above) ‘DO NOT FEED’, wait one hour, aspirate and re‐test
• The gastric acid may have been diluted by recent feed, food, or medication • Waiting one hour will allow the stomach to empty and the pH value to reduce • Check the prescription to see if the patient is on medication that may alter the gastric pH of the
stomach, such as: o Antacids o H2 antagonists o Proton pump inhibitors (PPI)
• If this is the case it may not be possible to get a pH value less than 5.5 • Local policies and procedures should be followed in this instance • If the pH value is greater than 5.5 the following actions could be considered:

M5‐CSK‐Y10 32
o Ask the patient to sip a coloured drink and then aspirate the feeding tube (only if the patient has a safe swallow)
o If you get coloured fluid back then you know the tube is in the stomach o Seeking further advice from senior colleagues o Radiology to confirm the correct position of the feeding tube o Replacement / re‐passing of the feeding tube
CAUTION: If there is ANY query about position and/or the clarity of the colour change on the pH strip, particularly between ranges 5.0 and 6.0, then nasogastric feeding SHOULD NOT commence.

M5‐CSK‐Y10 33
Appendix 1 Flow Diagram Confirming the Correct Position of Nasogastric Feeding Tubes in Adults
Flowchart 1: Confirming correct position of Nasogastric Feeding Tube
Aspirate NOT Obtained
Aspirate Obtained (0.5‐1ml)
Aspirate Obtained (0.5‐1ml)
Aspirate Obtained (0.5‐1ml)
Aspirate NOT Obtained
Aspirate NOT Obtained
pH 6 or Above
pH 5.5 or Below
pH 5.5 or Below
pH 6 or Above
‐ Check if on Acid Inhibiting Medication‐ Check for signs of tube displacement and measure tube length ‐ Reposition or re‐pass tube if required ‐ Aspirate using 50ml Syringe and gentle suction
DO NOT FEED ‐ If possible, turn adult onto side ‐ Inject 10‐20ml air into the tube using syringe ‐ Wait for 15‐30 minutes ‐ Try aspirating again
DO NOT FEED ‐ Advance tube by 10‐20cm ‐ Try aspirating again
DO NOT FEED ‐ Call for advice ‐ Consider replacement / re‐passing of tube and / or checking position by x‐ray
‐ Test on pH Strip or Paper
DO NOT FEED‐ Leave for up to one hour ‐ Try aspirating again
‐Proceed to Feed
Flow Diagram Adapted (NPSA, 2005)

M5‐CSK‐Y10 34
Further reading and references Nasogastric Feeding Tube Insertion Bong, C. L. Macachor, J. D. Hwang, N. C. (2004). Insertion of the Nasogastric Tube Made Easy. American Society of Anesthesiologists. 101,p.266. Bowling, T. (Ed). (2004). Nutritional Support for Adults and Children: a handbook for hospital practice. (pp43‐48). Oxford: Radcliffe Medical Press Ltd. National Institute for Health and Clinical Excellence (2006) Nutrition Support in Adults: Oral nutritional support, enteral tube feeding and parenteral nutrition. NICE [online]. Available from: http://www.nice.org.uk/guidence/cg32/niceguidance/pdf/english [Accessed 29/04/2010] National Patient Safety Agency (2005). Reducing the harm caused by misplaced nasogastric feeding tubes: Interim advice for healthcare staff. NPSA [online]. Available from: http://www.npsa.nhs.uk/nrls/alerts‐and‐directives/alerts/nasogastric‐feeding‐tubes/ [Accessed 29/04/2010]. National Patient Safety Agency (2005). Patient and carer briefing: Patient briefing 05. NPSA [online]. Available from: http://www.npsa.nhs.uk/nrls/alerts‐and‐directives/alerts/nasogastric‐feeding‐tubes/ [Accessed 29/04/2010]. National Patient Safety Agency (2005). Reducing the harm caused by misplaced Nasogastric feeding tubes. Patient Safety Alert 05. NPSA [online]. Available from: http://www.npsa.nhs.uk/nrls/alerts‐and‐directives/alerts/nasogastric‐feeding‐tubes/ [Accessed 29/04/2010] Stroud, M. Duncan, H. Nightingale, J. (2003). Guidelines for enteral feeding in adult hospital patients. Gut. 52(Suppl VII),pp.vii1–vii12. Takwoing, Y.M. Demspter, J.H. (2005). A simple technique for Nasogastric feeding tube insertion. European Archives of Oto‐Rhino‐Laryngology. 262,pp.423–425.

M5‐CSK‐Y10 35
5. Suturing Introduction The aim of effective wound care is to achieve healing without infection, scarring and deformity. Determining the mechanism of injury is critical in assessing a wound and how it should be managed. Aesthetic closure is based on knowledge of healing mechanisms and skin anatomy. An appreciation of suture materials and wound closure technique also help ensure optimal healing and cosmesis. A wide range of suturing options are now available such as synthetic sutures, absorbable, staples, tapes and adhesive compounds. Synthetic sutures and the standardisation of traditional materials now provide superior aesthetic results. The creation of natural glues, surgical staples and tapes now make possible alternative methods of wound closure. 5a Preparation for wound closure • Ensure good approximation of wound edges to minimise scar tissue and healing time • Meticulously debride the wound to minimise the risk of late wound infection • Inspect all wounds carefully for the presence of foreign material and for damage to important structures
such as nerves, tendons, vessels. X‐rays may be of value in identifying glass, gravel and metallic foreign bodies in the wound
• Avoid leaving dead space (pockets of air space in the wound) • Do not suture an old wound (greater than 8 – 12 hours), wounds that are dirty, contaminated or infected,
animal or human bites (Complications can arise from delayed suturing in the primary context) • Practice minimal handling of wound edges • A suture is too tight if it blanches the skin between the thread • To achieve the finest scar and best results, use a large number of fine sutures rather than a few thicker
sutures more widely spread • If wound edges are ragged trim edges of wound where the viability of skin edges is in doubt. Make an
incision in the dermis and trim the excess skin off with tissue scissors.
Figure 1: Wound Examination
Wound healing Three phases of wound healing have been identified and studied on the cellular and molecular level. These 3 phases; inflammation, tissue formation and tissue remodelling, depend on an elaborate cascade of growth factors and cellular components interacting in a directed manner to achieve wound closure. Inflammation The forming of clots in response to disrupted blood vessels leads to the recruitment of inflammatory cells into the wound. This entails a complex interaction between local tissue mediators and cells that migrate into the wound. The inflammatory phase occurs in the first few days as inflammatory cells migrate into the wound.

M5‐CSK‐Y10 36
Tissue Formation Epithelialisation has been shown to occur within the first 12‐24 hours, but further new tissue formation occurs over the next 10‐14 days. Epithelialisation and neovascularisation result from the increase in cellular activity. Stromal elements in the form of extra cellular matrix materials are secreted and organised. The new tissue, called granulation tissue, depends on specific growth factors for further organisation to occur in the completion of the healing process. This physiological process occurs over several weeks to months in a healthy individual. Tissue remodelling Tissue remodelling, in which wound contraction and tensile strength is achieved, occurs in the next 6‐12 months. Surgical wound closure directly apposes the tissue layers to minimise new tissue formation within the wound. Closure can serve both functional and aesthetic purposes such as: • The elimination of dead space by approximating the subcutaneous tissues • Minimising the scar formation by careful epidermal alignment • Prevention of a depressed scar by precise approximation of skin edges If dead space is limited with opposed wound edges, then new tissue has limited room for growth and this reduces scarring. The avoidance of overly tight closures and undue tension contribute to a better result. It should be noted that systemic illness and local factors can affect wound healing. Patient preparation • Assess need for analgesia • Reassure patient and explain the procedure • Obtain informed consent • Check for known allergies • Position patient comfortably lying down and/or as appropriate for wound Equipment The following equipment is required: • Sterile suture pack containing: Needle holder, Tissue forceps, Suture scissors, Gauze and Tray (the contents of suture packs will vary according to manufacturer) • Sterile sheet and Disposable absorbent sheet • Lidocaine 1%, 10 ml syringe, Needles (1x orange/25g, 1x blue/23g) • Cleaning solution e.g. Normasol • Sterile gloves (2 pairs) and Disposable apron • Alcohol‐based hand rub solution • Appropriate suture material, and Non adherent dressing, tape/bandage to protect wound
Figure 2: Preparation of Equipment

M5‐CSK‐Y10 37
Operator preparation • Wash hands • Take trolley with equipment to patient • Gel hands at point of care and put on disposable plastic apron • Place disposable absorbent sheet under area of patient to be sutured to prevent soiling • Open all equipment onto sterile field, don sterile gloves and arrange sterile field
Figure 3: Preparation of Operator
Wound Cleansing and examination Thorough cleaning of the wound is required to prevent delayed healing and further infection. Deeply contaminated wounds will require surgical assessment. Infiltration of Lidocaine hydrochloride 1% may be of use prior to examination and cleaning to reduce patient discomfort. Ensure all drugs are checked by the operator and a second qualified checker.
Figure 4: Checking the Wound
Although there are many suturing techniques, the two main techniques for wound closure demonstrated in the session are Simple Interrupted and Vertical Mattress sutures. It is important to gain good technique in these basic suture techniques in order to move onto more complex wound closure. It is essential to gain the right tension with a suture to prevent tissue strangulation and suture breakage. Suturing Needle
Figure 5: Features of the Needle

M5‐CSK‐Y10 38
Correct holding of equipment
Figure 6: Needle Holder
• The needle holder is
traditionally held with the Thumb and third finger (annular), with index finger down the shaft of the holder to provide control. Click off to open by lifting the annular
• The instrument can also be held with fingers out of the loops
Figure 7: Holding the Needle
• The needle is held
beyond the swage to avoid crushing this hollow section where the needle is attached
• The needle is held with the very tip of the needle holder
Figure 8: Suture Scissors
• Hold with thumb and third finger in the instrument loops, index finger positioned down the shaft to maintain control, approach suture and open and cut keeping instrument flat to tissue
• Ensure short tail cut held and not dropped into wound
Figure 9: Gillies Forceps
• The correct way to
hold the forceps is to use the pencil grip avoid excess pressure when gripping tissue
Information on a Suture Pack
Figure 10: Suture Pack
Choice of Suture Once the decision has been made to suture a wound, an appropriate selection of suture size and material is required to achieve a functional and aesthetic result. There are certain assessments to undertake prior to the selection of the suture with regard to wound, risk of swelling, and the security of the knot required to maintain wound integrity. The following characteristics should be considered to assist in selecting the suture.

M5‐CSK‐Y10 39
Absorbable/non absorbable Absorbable sutures will degrade naturally over time, and are predominantly used for deeper sutures. Sutures that degrade within 60 days are considered to be absorbable. Non‐absorbable are normally used for surface sutures, they resist infection in vulnerable wounds, and provide a strong support to the wound during healing. Tensile Strength Strength relates to the size of the suture, particularly to the knotted component. Ideally, the finest suture available for the wound support and closure should be selected. The greater the suture number (e.g. 6.0) the weaker the suture material becomes. Handling:
o Memory: Some suture material has significant memory – staying in one position which can make tying sutures difficult and reduce knot stability
o Elasticity: An elastic suture material will stretch then returns to its previous length, whereas a labile material will remain at stretched length. This is important to remember when considering the amount of oedema which may be evident or develop at the wound site.
o Knot Strength: This refers to the force required to make the knot slip. Some sutures slide through tissue well, but the knot could unravel easily. Sutures with high memory can be strong but are difficult to handle, making knots less secure.
• Tissue Reaction – This refers to the degree of inflammatory response to the suture. At present catgut is not
being used due to the concerns of unreliability and risk of infection. There are lower inflammatory incidents with the use of synthetic sutures.
• Monofilament/multifilament – Monofilament sutures of a single strand, tend to have significant memory
and can be difficult to handle, but do have a lower infection risk. Multifilaments are of a braided material, and are easier to handle. They can however cause tissue drag and even saw through tissue. Due to the multifilaments, bacteria can be harboured with the material, and should be avoided in contaminated wounds.
Suture size and nature of repair
Size Uses Recommended duration of suture In days
≤7/0 Ophthalmology, microsurgery Usually absorbable 6/0 Face, blood vessels Face 5‐7 5/0 Face, neck, hand‐dorsum, blood vessels Face, neck 5‐7 4/0 Mucosa, scalp, neck, trunk, hands, limbs,
feet, tendons, blood vessels Hand‐palm 5‐7, scalp 5‐7. Arms 7, legs 7. Back 7‐10. Foot‐sole 10‐14
3/0 Limbs, trunk, gut, blood vessels Scalp 5‐7. Arms 7, legs 7. Back 7‐10. 2/0 Fascia, viscera, blood vessels Usually absorbable > 0 Abdominal wall closure, fascia, drain sites,
arterial lines, orthopaedic surgery Usually to secure drain or arterial line, duration dependent on drain or line.
Use of Anaesthetics (Adhere to administration of medicines policies) Anaesthesia is not difficult to accomplish and depends upon the patient’s response to the procedure. Each patient will be different and the amount of anaesthesia required depends upon the weight, mental and physical preparation of the patient. If a patient has a small laceration which requires 1‐2 sutures then the infiltration of local anaesthetic is often more painful than inserting this small number. Speak to the patient and allow them to make an informed decision. Check present drug therapy and refer to the British National Formulary (BNF) for drug interactions and contraindication.

M5‐CSK‐Y10 40
Local anaesthetic, once infiltrated, diffuses across neural sheaths affecting mainly “C” (pain) fibres, and can vary greatly in potency, toxicity and duration of action. It might also be worth administering additional systemic analgesia to support the effectiveness of the local anaesthetic. It is important that sufficient time is given to allow the anaesthetic to take effect; some take longer but have a longer duration of analgesia. Most local anaesthetics cause vasodilatation, by adding a vasoconstrictor e.g. adrenaline, the flow of blood can be reduced, and the efficiency of the anaesthetic is enhanced, by prolonging the effect. It can only be used in low dosage. The addition of adrenaline should be avoided in extremities i.e. ears, nose, lips, fingers, genitalia, and toes to eliminate the risk of ischaemia. Dosage of Local anaesthetics
Max dose Side effects Lignocaine 200mg
20mls 1% 10mls 2%
Arrhythmia CNS toxicity See BNF for further details
Complications (toxicity indicators) of local anaesthetic • Vasovagal syncope • Pallor • Dizziness • Hypotension • Bradycardia • Seizure activity • Inadvertent bolus injection directly into a vessel • Infection • Haematoma formation • Nerve damage Direct Wound Infiltration The correct plane of injection is immediately beneath the dermis at the junction of the subcutaneous tissue. This is often less painful for the patient than piercing the skin. Insert the needle through the open wound into the subcutaneous tissue. The pain of the injection may be reduced by having the anaesthetic solution at body temperature, dripping it into the wound and using a slow injection technique.
Figure 11: Direct Wound Infiltration
• Insert the needle into the open wound directly into the subcutaneous tissue • Gently hold the tissue with the forceps to avoid squeezing and tissue damage. Ensure operators fingers are
well away from the point of the needle to avoid inoculation injury • Withdraw the plunger to ensure you are not in a vessel. Check for flashback, if flashback occurs, remove,
discard needle, syringe and drug and start again. (see injection section) • Great care should be taken to avoid inadvertent injection into a vessel • Depress the plunger to deposit anaesthetic solution into the wound

M5‐CSK‐Y10 41
• Direct infiltration is achieved with multiple adjacent deposits of the anaesthetic solution along the length of the wound
• Repeat the process until wound is anaesthetised Parallel Margin Infiltration Appropriate for grossly contaminated wounds, as it requires fewer needle sticks to the skin. Use the same approach as direct wound infiltration but pierce the skin around the wound and infiltrate anaesthetic intradermally.
Figure 12: Parallel Margin Infiltration
• Infiltrate the anaesthetic parallel to the wound into the dermis • Ensure operators fingers are well away from the point of the needle to avoid inoculation injury • At one end of the wound insert the needle through the skin immediately into the dermis • Advance the needle to the hub • Withdraw the plunger to ensure you are not in a vessel • Withdraw the needle and gently push the anaesthetic into the tissue until the length of the wound is
anaesthetised • Repeat applications may be required to anaesthetise the area to be sutured 5b Performing the Procedure Interrupted Suturing Interrupted sutures and mattress suturing (below) use a number of strands to close a wound. The strand is tied and cut after each suture formation. This method provides the wound with a secure closure: if one breaks or comes out the others remain to maintain wound approximation. Keep the point of the needle at right angles to the intended entrance point approx 0.5cm from the wound edge. Bring the needle out of the centre of the wound by grasping with forceps, aim for a clean bite to come through and out at the base and centre of the wound. Re grip the needle, handling only with the instruments, ready for the second bite For the second bite enter the base of the wound on the opposing side and come up in line and equidistant from the edge of the wound as the first bite, pull the thread through to leave an approx 3cm tail

M5‐CSK‐Y10 42
2Approx 3cm left on tailto allow knot tying
0.5cm0.5cm2
Approx 3cm left on tailto allow knot tying2Approx 3cm left on tailto allow knot tyingApprox 3cm left on tailto allow knot tying
0.5cm0.5cm 0.5cm0.5cm0.5cm0.5cm
Figure 13: Approximating Wound Edge
Tying the knot: Take the long suture end in your left hand, wrap around the needle holder twice away from your body (anticlockwise). Three throws can be applied to reduce slippage. The more throws the less slippage, but greater the risk of infection. Usually 5 throws in total are applied but this will be dependent on the wound and suture material being used. Rotate the needle holder a quarter turn clockwise and take hold of the short end of the suture with the needle holder. Pull the short end towards you and long end away.
Figure 14: Tying the Knot
Remember to tie the knot and keep the needle holder between the short end and the long end (wound centre); always bring the long end of suture material over the needle holder towards the wound centre, to avoid forgetting previous direction of throw. Going in the same direction as the first two throws gives a granny knot which is more likely to slip. Tension the two ends enough to bring the tissue together, aim to approximate tissue, do not strangulate, if blanching or puckering occurs the suture is too tight. Ensure that the first throw remains tensioned. Take the long end which is now on the opposite side to the starting position. Wrap around the needle holder twice back towards your body (clockwise). Turn the needle holder a quarter turn anticlockwise back towards your body and grasp the end of the short tail. Pull the short end through and away from you and the long end towards you. Ensure the knot comes down flat onto the primary throws (to form the square knot) and that no space is left between the knots throws.

M5‐CSK‐Y10 43
Figure 15: Creating the Knot
To secure the knot a further throw is placed. Wrap the long end once around the needle holder away from your body (anticlockwise), and turn the holder a quarter turn clockwise, grasp the short end and pull though (short end towards long end away). After pulling in line with the suture lock the knot by pulling parallel to the wound.
Figure 16: Securing the Knot
Take the ends separately and cut to leave tails that are approx 0.5cm long, do not cut these too short as they risk the knot coming untied if there is any slippage. If they are too long they will interfere with the next suture or dip into the wound. Keep hold of the end when cutting to prevent them falling into the wound and risking infection as a foreign body
Figure 17: Cutting and Creating Tails
Vertical Mattress sutures This suture is useful in closing deep wounds as it reduces the dead space within the wound. Ideal for wounds that are not deep enough for internal sutures but require deep/superficial closure.

M5‐CSK‐Y10 44
Interrupted Sutures, Dead Space and Mattress Sutures
• Basic Interrupted Sutures
• Simple interrupted suture on a
deep wound • Diagram displays dead space
• A vertical mattress suture takes a
deeper bite and a shallow bite bringing two layer of tissue together thereby preventing dead space. The knot tie is the same as for the interrupted suture, but does not cross the wound
Alternative methods of wound closure As discussed at the beginning of this section a thorough assessment of the wound is essential. The aim of wound care is to achieve healing without infection, scarring and deformity. One should also consider patient need and compliance. Alternative methods for wound closure that can be used are steri‐strips and surgical glue. Always ensure good approximation of wound edges to minimise scar tissue and maximise healing.
Figure 18: Steri‐Strips
• Sterile adhesive tapes • Available in different widths • Frequently used with
subcuticular sutures • Should not be used in areas
of tension • Can be used on “V” flap
lacerations, i.e. pre‐tibial
Figure 19: Surgical Glue/Tissue Adhesive
• Effective for simple wounds • Can be applied rapidly • Relatively painless • Dressing not required • Do not use on contaminated
wounds • Various products available

M5‐CSK‐Y10 45
5c Post Suture Care Wound advice Wounds will vary, for example the type of trauma that caused the wound will greatly influence the way the wound responds to healing. E.g. crush injuries swell more and therefore more likely to have devitalised tissue and are more at risk from infection. Wound advice needs to be tailored to the patient, assess their understanding and provide adequate information on wound care, further treatment required and where to go. Requirement for Tetanus Vaccination Types of wounds likely to favour the growth of tetanus organisms include • Wounds or burns that require surgical intervention that is delayed for more than 6 hours • Wounds or burns that show a significant degree of devitalised tissue or a puncture‐type injury, particularly
where there has been contact with soil or manure • Wounds containing foreign bodies • Compounds fractures • Wounds or burns in patients who have systemic sepsis
Further detailed information on Tetanus immunisation can be found in the Department of Health “Green Book” 2010, from which the above information was taken http://www.dh.gov.uk/prod_consum_dh/groups/dh_digitalassets/documents/digitalasset/dh_115269.pdf Wound dressing
Cover wound with an appropriate dressing.

M5‐CSK‐Y10 46
Patient Advice • Supply available literature on wound care • Take analgesia as required • Observe for signs of infection: The risk of infection is high within the first 48hrs
o redness, swelling and increased pain o pus and drainage from wound o warmth in the area of the wound, general fever
• Keep wound clean and dry • Return to, or call Health Care Provider if problems are noticed • Removal of sutures by Health Care Practitioner at prescribed time Removal of Suture Equipment needed: • Sterile dressing pack • Stitch cutter • Sterile forceps (if not contained in dressing pack) • Cleaning solution as required, Normasol • Sterile dressing The procedure • Observe the wound. Are the sutures ready to be removed? • Some wounds require every other suture to be removed to start • Wash hands • Open sterile dressing pack and stitch cutter • Clean as required • Ensure sutures are visible • Holding on to the knot side of the suture with forceps slide the stitch cutter at the base of the suture
(opposite end of knot) and apply gentle pressure to cut through the suture • Repeat process for all sutures • Cover with appropriate dressing as required • Advise patient about after care
Figure 20: Removing a Suture

M5‐CSK‐Y10 47
Further reading and references Suturing Edge, H. Hocking, G (updated 2006) Local anaesthetic pharmacology Anaesthesia UK [online] Available from http://www.frca.co.uk/article.aspx?articleid=100505 (Accessed 29/04/2010) Gunson, T. (2008) Suture Materials [online] Available from http://dermnetnz.org/procedures/sutures.html (Accessed 29/04/2010) Gymek, R. (updated 2007) Local Anaesthesia and Regional Nerve Block Anaesthesia [online] Available from http://www.emedicine.com/derm/topic824.htm (Accessed 29/04/2010) LaMorte, W. (2005) Basic Knot Tying and Suturing: Boston University School of Medicine [online] Available from http://www.bumc.bu.edu/Dept/Content.aspx?DepartmentID=69&PageID=5914 Good clips of hand knot tying as well as general suture information (Accessed 29/04/2010) MacKay‐Wiggin, J. (updated 2009) Suturing Techniques/Materials [online] Available from http://www.emedicine.com/derm/topic828.htm (Accessed 29/04/2010) DOH Green Book Taylor, B. Bayat, A. (2003) Basic Plastic Surgery Techniques and Principles Student BMJ [online] Available from http://archive.student.bmj.com/search/pdf/03/08/sbmj271.pdf (Accessed 29/04/2010) Trott.A.T. (2005), Wounds and Lacerations Emergency Care and Closure, 3rd edition. London. Mosby What is skin glue? http://www.nhs.uk/chq/Pages/2552.aspx?CategoryID=72&SubCategoryID=727 (Accessed 29/04/2010)