m40-gas mask · web viewwhen the filter is attached to the filter mount, it opens the self-sealing...
TRANSCRIPT

UNITED STATES MARINE CORPSFIELD MEDICAL TRAINING BATTALION
CAMP LEJEUNE, NC 28542-0042
FMST 301
THE M-50 FIELD PROTECTIVE MASK
TERMINAL LEARNING OBJECTIVE 1. Given a CBRN environment, a field protective mask (SL-3 complete), CBRN alarm and CBRN incident indicator, or an order to mask, employ the Field Protective Mask (FPM) within a time limit of nine seconds of the issuance of the alarm, CBRN incident indicator, or an order. (HSS-CBRN-2001)
ENABLING LEARNING OBJECTIVES
1. Without the aid of reference, given a description or list, identify the components of the Field Protective Mask, without any errors, per Unit Maintenance Manual for Chemical-Biological Mask M-50. (HSS-CBRN-2001a)
2. Without the aid of reference, given a description or list, identify procedures to fit the Field Protective Mask, to ensure proper seal and fitment per Unit Maintenance Manual for Chemical-Biological Mask M-50. (HSS-CBRN-2001b)
3. Without the aid of reference, given a Field Protective Mask and exposure to irritant gas in a gas chamber or simulated combat environment, don and clear the gas mask within a time limit of 9 seconds. (HSS-CBRN-2001c)
4. Without the aid of reference, given a description or list, maintain the Field Protective Mask, within 80% accuracy per Unit Maintenance Manual for Chemical-Biological Mask M-50. (HSS-CBRN-2001d)
3-1

1. COMPONENTS OF THE M50 FIELD PROTECTIVE MASK (FPM). Before we discuss the components of the FPM there are some general characteristics that need to be addressed. The M50 Joint Service General Purpose Mask (JSGPM) is a filtered air mask, meaning that there is no external or “supplied” air to the mask.
a. Characteristics of the M-50 FPM.
(1) The M-50 FPM is designed to provide 24 hours of continuous head-eye-respiration for protection against chemical agents, biological agents, radiological particulates, and toxic industrial chemicals.
(2) The M50 FPM will not protect the wearer against industrial gases such as ammonia or carbon monoxide. It is not effective in confined spaces, where the oxygen content of the air is low.
(3) The M50 FPM allows the wearer the capability of drinking water while worn.
(4) The M50 FPM comes in three (3) sizes: small, medium and large. The size mark is located on the top left portion of the mask.
b. Components of the M-50 FPM. When you receive your FPM, you should inspect the following components for serviceability (See fig. 1):
Figure 1. Components of the M-50 FPM
(1) Face piece. The face piece is the foundation of the protective mask. The following components are molded/assembled into the butyl/silicone rubber face piece: face seal; chin cup; head harness tabs; a flexible, single piece eyelens made of polyurethane; openings for the front module assembly, filter mount assemblies and a storage receptacle for the drink coupler. Buckles are attached to the head harness tabs for attaching the head harness to the face piece.
(2) Nosecup. The nosecup is made of injection-molded silicone rubber and assists in controlling the flow of air throughout the mask to minimize fogging of the eyelens during
3-2
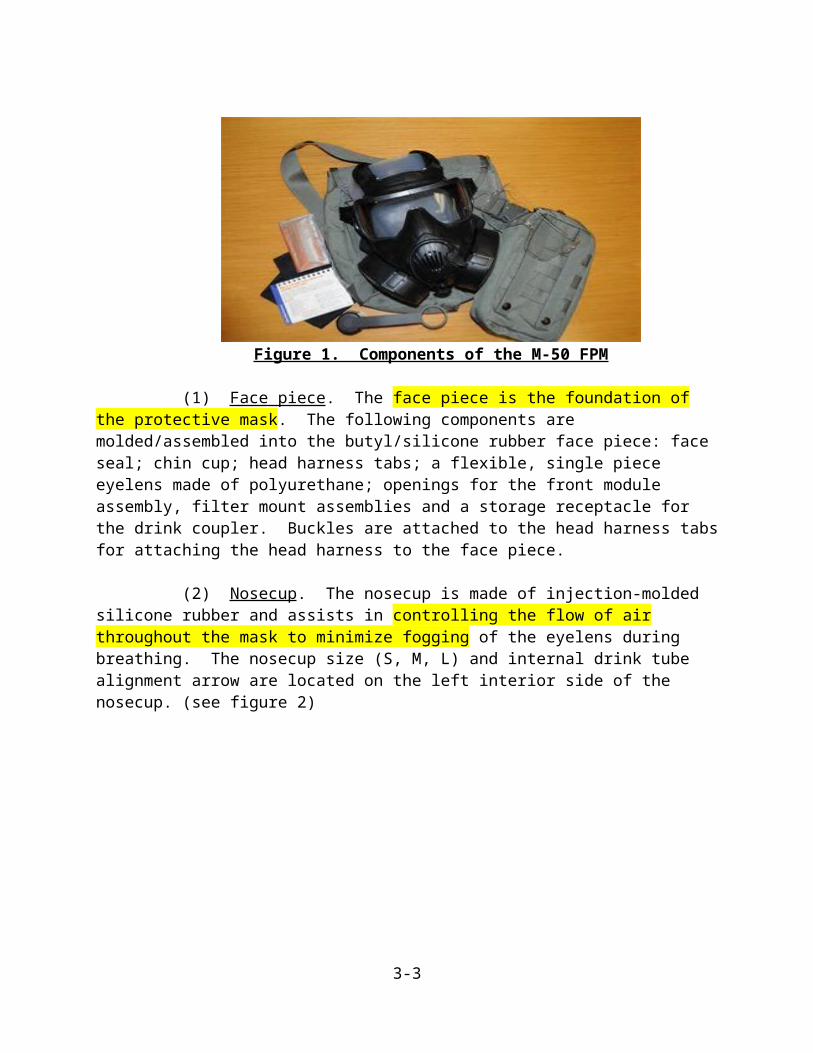
breathing. The nosecup size (S, M, L) and internal drink tube alignment arrow are located on the left interior side of the nosecup. (see figure 2)
Figure 2. Nosecup of the M-50 FPM
(3) Head Harness. The head harness is constructed of elasticized side straps with a skullcap attached by loops to the brow strap slots. The temple and cheek straps are attached to buckles on the face piece.
Figure 3. Head Harness
(4) Front Module. The front module consists of a plastic housing (Front Module Main Body) that integrates the inlet/outlet disk valve and drink system components. The outlet valve cover assembly fits over the front module main body and protects the drinking system and outlet disk valve. There are three inlet/outlet disk valves contained in the face piece assembly. One releases exhaled air and two (one located on the left filter mount and one on the right filter mount) serve as inlet valves, which permits filtered air to enter the mask.
(5) Self-sealing Disk Valve. There are two self-sealing disk valves in the face piece assembly. They are located on the exterior of the face piece assembly and attach to the front of the left and right filter mounts. The M61 filters are attached to the filter mounts using a twist and lock mechanism. When the filter is attached to the filter mount, it opens the self-sealing disk valve permitting filtered air to pass through the inlet disk valve during inhalation. When the
3-3

filter is removed, the self-sealing disk valve closes, preventing air from entering into the mask. The self-sealing disk valves are clear in color for identification purposes.
(6) Drinking system. The drinking system is integrated into the front module main body and consists of an external drink tube fitted with a drink coupler to link to the water canteen and an internal drink tube fitted inside the mask. A lever arrangement opens the drink tube safety shutoff valve and causes the internal drink tube to swing to the wearer’s mouth.
(7) Filter Mounts, Left and Right. The filter mounts are designed to allow quick installation and removal of the M61 filter.
(8) M61 filters. Twin M61 filters, one installed on each side of the mask, provide protection from CBRN agents. The M61 filter assembly bodies are constructed from injection-molded plastic. The M61 filters contain an activated carbon media and a high efficiency particulate filter. (see fig. 4)
Figure 4. M61 Filters
(9) Clear Outsert Assembly. The Clear Outsert assembly protects the eyelens against scratching or other damage. It has the same contour as the eyelens and clips over the eyelens using outsert locking tabs that will not interfere with vision. The clear outsert will be stowed attached to the mask.
(10) Voice-emitter: The face blank is equipped with a voice-emitter, which transmits the user’s voice outside the face blank. Additional communication pieces that may be used include the Audio Frequency Amplifier and Audio Frequency Amplifier Adapter, the Microphone Adapter, and the Air Traffic Controller (ATC) Microphone. These may be plugged into the communications port of the M50.
(11) Mask Carrier . The Mask Carrier provides for storage and carriage of the face piece assembly, clear outsert assembly, operator cards, waterproofing bag, protective hood, hose assembly, microphone and microphone adapter and extension strap.
(12) Waterproof Bag. Keeps the mask dry when required by climate or mission.
(13) Face form. Maintains mask shape. Should be used when storing the mask for greater than 30 days.
(14) Protective Hood. Made of flame-resistant material that protects the wearer from CBRN vapors, aerosols, and liquids. Additionally, the protective hood provides a short period of
3-4

protection during emergency escape from fires. The hood attaches to the mask and is placed over the wearer’s head. The mask is stowed with the hood attached.
c. Accessories of the M50 FPM.
(1) Water canteen cap. Provides the capability to connect the drink coupler to the warfighter’s canteen for drinking purposes.
(2) Vision Correction Assembly. The Vision Correction assembly consists of a Vision support frame that attaches to the inside of the mask and is used to mount and adjust the Vision Correction spectacle support Frame containing the warfighter’s corrective lenses as required.
(3) M291 decontaminating kit. Used for personal decontamination. It will be discussed further during the lesson covering MOPP Gear.
2. FITTING THE M-50 FIELD PROTECTIVE MASK. Before the mask can be donned and cleared, adjustments must be made to the head harness so that it fits properly. The adjustment steps are:
a. Completely loosen all head harness straps and pull the head harness over the front of the face piece.
b. Place your chin in the chin cup and hold the face piece against your face.
c. Grasp the harness tab and pull the head harness over your head while holding the mask firmly against your face. Be sure that the head harness pad is centered at the back of your head. Straps should lie flat against your head.
d. Tighten the straps with short-jerky pulls to the rear in the following sequence: brow straps, cheek straps, and temple straps. Ensure the head harness pad stays centered at the back of your head.
e. Release the mask assembly; it should not slip down. If mask assembly slips, readjust the straps as necessary until it remains in place.
f. The edges of the mask should be flat against the face and not rolled under (run finger inside mask seal to remove).
g. Using the negative pressure test, check for leaks:
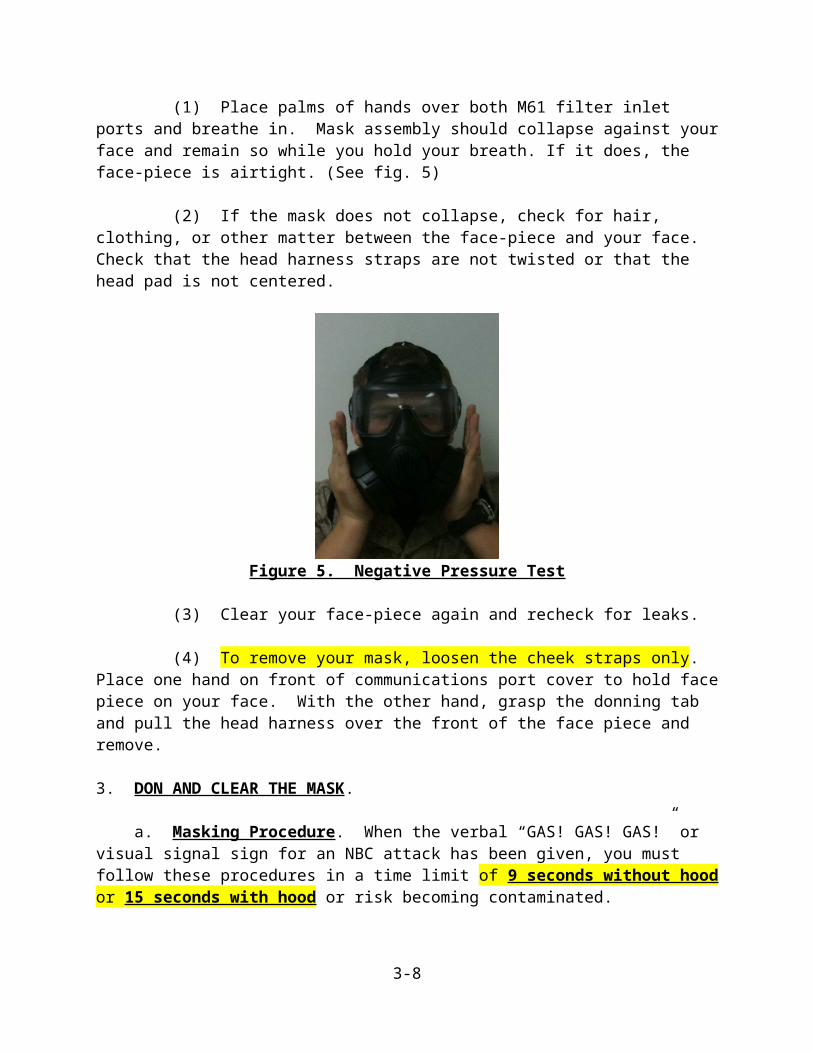
(1) Place palms of hands over both M61 filter inlet ports and breathe in. Mask assembly should collapse against your face and remain so while you hold your breath. If it does, the face-piece is airtight. (See fig. 5)
3-5
(2) If the mask does not collapse, check for hair, clothing, or other matter between the face-piece and your face. Check that the head harness straps are not twisted or that the head pad is not centered.
Figure 5. Negative Pressure Test
(3) Clear your face-piece again and recheck for leaks.
(4) To remove your mask, loosen the cheek straps only. Place one hand on front of communications port cover to hold face piece on your face. With the other hand, grasp the donning tab and pull the head harness over the front of the face piece and remove.
3. DON AND CLEAR THE MASK.
a. Masking Procedure. When the verbal “GAS! GAS! GAS!” or visual signal sign for an NBC attack has been given, you must follow these procedures in a time limit of 9 seconds without hood or 15 seconds with hood or risk becoming contaminated.
(1) Close your eyes, stop breathing, and hold your breath.
(2) Remove your headgear.
(3) If you are wearing glasses, take them off.
(4) Open carrier and grab the mask. The mask is stored with the head harness pulled over the front of the mask.
(5) Raise the mask to your face and place your chin firmly in the chin cup.
(6) Grasp the head harness tab and pull the head harness over your head. Be sure your ears are between the temple straps and cheek straps. Pull down the head harness at the back as far as possible so that the brow straps are tight and temple straps are approximately parallel to the ground.
3-6

(7) Tighten the cheek straps one at a time or both at the same time, ensuring straps lay flat against your head.
(8) Clear the field protective mask.
(9) Cover the outlet valve with the palm of one hand. (see fig. 6)
(10) Blow out hard to ensure that any contaminated air is forced out around the edges of the mask assembly.
Figure 6. Clearing the Mask
(11) Conduct the negative pressure test. With both hands, locate and cover the M61 filter air inlet ports on both canisters and breathe in. The mask should collapse against your face and remain there while you hold your breath. If the face piece collapses consider it airtight.
(12) Resume breathing.
(13) After completing these steps the following actions should be taken:
(a) Put on your helmet. Be sure not to upset the seal between your face-piece and the side of your face when putting on helmet.
(b) Close the carrier.
(c) Continue your mission.
b. Unmasking. Remove your mask only when competent authority issues the “UNMASK” command. The following steps accomplish this:
(1) Hold your rifle between your legs; remove your helmet placing it on the ground next to you.
(2) Loosen cheek straps.
3-7
(3) Place one hand on the front of the voice-mitter-emitter to hold the face-piece on your face and with the other hand grasp the donning tab and pull the head harness over the front of the face-piece and remove the face piece. Put your helmet back on your head.
(4) Continue your mission.
4. Using the drinking system of the M50 FPM.
a. Prior to using the drinking system, use M8 chemical agent detector paper to check for contamination. If contamination is detected, decontaminate the drinking tube and the canteen cap with the M291 decontamination kit. After decontamination, recheck the surfaces with M8 chemical agent detector paper.
b. Steady the mask with one hand and pull the drink coupler out of coupler receptacle below the front module main body.
c. Open retaining strap on water canteen cap.
d. Push drink coupler into canteen cap so that the seal snaps into the groove in the cap.
e. Turn drink tube lever on front module assembly upward until it stops and is fully opened. This will position the internal drink tube in front of your mouth so that you can grasp it between your lips. (See fig. 7a)
f. Blow to create positive pressure. You should feel some resistance.
g. If the system does not leak, raise and invert the canteen. You can now drink water from the canteen. (See fig. 7b)
Figure 7a Figure 7b
3-8

h. After several swallows, stop drinking and lower the canteen. Blow into the internal drink tube to prevent the canteen from collapsing. Repeat drinking procedure as desired.
i. To disconnect the drinking system, turn the cantten upright and clear water from the external drink tube by blowing into the internal drink tube. Release the tube from your mouth and turn the drink lever on the front module assembly downward until it stops and is fully closed (which repositions internal drink tube away from mouth). Firmly grasp the drink coupler and pull the canteen down and away to disconnect the coupler. Close the retaining strap on water canteen cap and replace drink coupler into receptacle below the front module assembly.
5. MAINTAIN THE GAS MASK. a. Stowing the M-50 FPM. Properly stowing the mask will ensure that it remains serviceable and easily accessible when your life depends on it. The operator cards and waterproofing bag are stored in a pocket on the front of the mask carrier. The mask is stowed in the mask carrier main stowage area. The following steps will be used when stowing the mask in the M-50 Carrier:
(1) Check that the eye-lens out-serts are installed on the face-piece. Abrasives, such as sand and grit, will scratch the eye lenses.
(2) Check that your face-piece is dry and free of oils and solvents before stowing.
(3) Check that the interior of the carrier is free of dirt and trash or other unauthorized items.
(4) Hold face piece in a horizontal position.
(5) Pull head harness over front of face piece.
(6) Hold the face piece upright and put it in the carrier with the lenses facing away from your body.
(7) Close the carrier.
(8) Store your face piece in its carrier and put it in a cool, dry, dark place, preferably hooking it on the short strap.
b. Wearing Your Carrier. There are three ways to carry the M-50 Field Protective Mask and Carrier:
(1) The shoulder sling configuration.
(2) Waist belt configuration. The following steps will be used:
(a) Put waist strap D-ring around waist and attach to hook on carrier. Adjust strap.
3-9

(b) Bring leg strap from back and around inside of leg.
(c) Pass leg strap through round ring, hook to D-ring, and adjust strap.
(3) Modular Lightweight Load Carrying Equipment (MOLLE) 1 or 2 Fighting Load Carrier (FLC) configuration.
c. Cleaning the M-50 FPM.
(1) Wash mask anytime it needs cleaning. A white or rust colored waxy film is not dirt; it is from the preservatives built in the rubber. It will bleed off as long as the face-piece is good.
(2) Required materials: soft cloths, soft bristle brushes, warm soapy water, and warm clear water.
(3) Procedural Steps:
(a) Remove the canister by unscrewing it from mask.
(b) Dip clean, soft cloth in warm soapy water and wring it out. Wash mask inside and out. Wash voicemitter, outlet valve cover, and inlet valve assemblies. Be careful with rubber disks.
(c) Rinse cloth in clear, warm water and wring it out. Wipe all washed parts.
(d) Dry all parts and mask with dry, soft cloth. Use brush in hard to reach areas.
(e) Replace parts taken off. Make sure rubber disks are snug and flat. Clean the lenses using polish or warm, soapy water.
d. Canister Replacement. Replace the canister if:
(1) Canister has a time patch assembly or “indicator” that informs lets user know it is time to replace canister.
(2) It has been immersed in water.
(3) Canister has splits, or cuts, a bent or split thread connector, or has been crushed.
(4) You feel excessive resistance to breathing and inspection shows that the canister is clogged with foreign matter.
(5) Your unit commander directs replacement of canister.
(6) The filter lot becomes unserviceable.
3-10

(7) Every 30 days after initiation to toxic chemical operations and after each confirmed blood agent attack.
REFERENCE(S):
MCWP 3-37.2: MTTP for NBC ProtectionTM 09204G/09205G-OI/1: Operator & Field Maintenance Manual for M50 Mask
3-11

Field Protective Mask Review
1. List three accessory items associated with the M-40 Field Protective Mask?
2. Identify the first step in donning your gas mask once you have received word of possible contamination?
3. Once the order is given to don the Field Protective Mask, how long do you have to don your gas mask without a hood?
4. Once the order is given to don the Field Protective Mask, how long do you have to don your gas mask with a hood?
3-12