m1171 sinea2.0montageanleitungen.eu/m1171.pdf · poland romania russia slowakei jacek kozakiewicz...
TRANSCRIPT
1
Sinea 2.0M1171
burgbad GmbH, Grafenberg, Morsbacher Str. 15, D-91171 GredingT +49 (0) 84 63-901-0, F +49 (0) 84 [email protected], www.burgbad.com
BALTIC STATES BELGIUM GREAT BRITAIN NETHERLANDSArunas Jazukevicius burg belux bvba burgbad GmbH burg belux bvbaP.d. 290 Brugsesteenweg 238 U.K. office Brugsesteenweg 238LT-44004 Kaunas B-8800 Roeselare PO Box 1093 8800 RoeselareMobil: 00370/68630313 T: 0032/51/231990 Northampton Belgium F: 0032/51/229339 NN2 1AX Tel: 0031/26/3263240 United Kingdom T: 0044/1604/844133 F: 0044/1604/842940
POLAND ROMANIA RUSSIA SLOWAKEIJacek Kozakiewicz Sönke Martin burgbad GmbH Robert TurcanBosmanska 29 S.C. Reallize Consult Grafenberg Družstevná 367/180 888 Gdansk 75, Varful Inalt str. Morsbacher Str. 15 972 12 Nedožery - BrezanyMobil: 0048/502/125110 013132 Bukarest D-91171 Greding T: 00421/46/5485589 Mobil: 0040/722/654654 T: 0049/8463/901-0 Mobil: 00421/905318249 F: 0040/31/8059904
UKRAINE FRANCE Lesia Khelemendyk burgbad france S.A.SSaksaganskogo str. 89a, of 1 Siège social: Zl Le Poirier01004 Kiew 28210 Nogent Le Roitel/fax: +38(044)225-41-17 T: 02 37 38 85 [email protected] F: 02 37 51 43 94
MONTAGE- UND BEDIENUNGSANLEITUNGFITTING INSTRUCTIONS AND OPERATING MANUALMANUEL DE MONTAGE ET D‘UTILISATIONMONTAGE- EN BEDIENINGSHANDLEIDINGISTRUZIONI PER L‘USO E IL MONTAGGIOРУКОВОДСТВО ПО МОНТАЖУ И ЭКСПЛУАТАЦИИ

2
MONTAGEHINWEISE / ASSEMBLY INSTRUCTIONS
GB Below you will find important information for installing and handling bathroom furniture, as well as safety instructions. It is essential that you read and make note of these before installing the furniture. We can accept no responsibility for damages that are the result of failure to adhere to these instructions.
1. Our products may only be installed by a specialist craftsman for sanitary facilities or by another competent person.2. If you notice damage on the products, they should still be installed. If a part cannot be installed due to significant damage, all preparations for installation should still be made and the installation rails, hooks and hanger bolts should be attached. Our factory customer service does not undertake drilling.3. The fastening materials (screws, wall plugs) are designed for solid, sufficiently load-bearing walls. In other installation situations, special fastenings must be used accordingly. Hanger bolts are not included in the delivery!4. Do not remove the protective film until the furniture set has been fully installed. Vacuum up or rinse off any drilling dust; never wipe it from the washbasin. Do not place any tools or sharp-edged or heavy objects on the washbasin.5. High gloss surfaces are fully hardened within three weeks of the protective film being removed. Please treat them with particular care during this period and do not clean or wipe them (no microfiber cloth).6. No drilling dust can be allowed onto the pull-out rails! Furniture should therefore only be hung after drilling, or taken down again before drilling.7. The products must be attached at all the installation points provided. 8. The installation dimensions refer to the top edge of finished flooring. All dimensions in mm.9. Electrical installations may only be conducted by a specialist, taking DIN 57100/VDE 0100 Part 701 into account. Plug connections, lighting and sockets must be checked.10. Doors and drawers must be adjusted after installation. This subsequent adjustment is part of normal maintenance depending on the use and loading of the items of furniture and is not a reason for complaint.11. Please clean the furniture before handover! Remove drilling dust, labels and adhesive residues!12. Check the water and siphon connections for tightness!13. In order to prevent water from penetrating between the wall and the wash basin, the connecting edge to the wall must be sealed with a silicone joint. Use only neutrally bonded (solvent-free) silicon.14. The function, handling and care of the products must be explained to the owner. 15. Drywalls and plasterboard walls must have an adequate load bearing capacity.
Nachfolgend finden Sie wichtige Informationen zur Montage und für den Umgang mit Badmöbeln sowie Sicherheitshinweise. Le-sen und beachten Sie diese unbedingt, bevor Sie die Möbel montieren. Für Schäden, die aufgrund von herunterfallenden Möbeln oder Möbelteilen (Türen, Glasböden, Spiegeltüren) durch Nichtbeachtung entstehen, können wir keinerlei Haftung übernehmen.
1. Das Montieren unserer Produkte darf nur von einem Sanitär-Fachhandwerker oder einer anderen fachkundigen Person durchgeführt werden.2. Sollten Sie Beschädigungen an Produkten feststellen, sind diese trotzdem zu montieren. Wenn ein Teil aufgrund von starker Beschädigung nicht montierbar ist, so sind sämtliche Montagevorbereitungen zu treffen sowie Montageschienen, Haken und Stockschrauben anzubringen. Unser Werkskundendienst nimmt keine Bohrungen vor. 3. Das Befestigungsmaterial (Schrauben, Dübel) ist für massive, ausreichend tragfähige Wände ausgelegt. Bei anderen Einbausituationen müssen entsprechende Spezialbefestigungen verwendet werden. Stockschrauben sind im Lieferumfang nicht enthalten!4. Schutzfolie erst nach der fertigen Montage der Möbelanlage entfernen. Bohrstaub ggfs. absaugen oder abschwemmen, niemals vom Waschtisch abwischen. Keine Werkzeuge, scharfkantige oder schwere Gegenstände auf den Waschtisch ablegen. 5. Hochglanzoberflächen härten nach dem Entfernen der Schutzfolie innerhalb von 3 Wochen vollständig aus. Bitte in diesem Zeitraum besonders vorsichtig behandeln und nicht reinigen oder abwischen (kein Mikrofasertuch).6. Es darf kein Bohrstaub auf die Auszugsschienen gelangen! Deshalb dürfen Möbel erst nach dem Bohren aufgehängt werden, oder müssen vor dem Bohren wieder abgehängt werden.7. Die Produkte müssen an allen vorgesehenen Montagepunkten befestigt werden. 8. Die Montagemaße beziehen sich auf Oberkante fertiger Fußboden. Alle Maße in mm.9. Elektroinstallationen dürfen nur vom Fachmann unter Berücksichtigung der DIN57100/VDE0100 Teil 701 durchgeführt werden. Steckverbindungen, Beleuchtung und Steckdosenanschluss müssen geprüft werden.10. Türen und Schubladen müssen nach der Montage einjustiert werden. Das Nachjustieren gehört zu den üblichen Wartungsaufgaben je nach Nutzung und Beladung der Möbelteile und ist kein Beanstandungsgrund. 11. Möbel bitte vor Übergabe reinigen! Bohrstaub, Etiketten und Klebereste entfernen!12. Wasser- und Siphonanschluss auf Dichtigkeit prüfen.13. Um das Eindringen von Wasser zwischen Wand und Waschtisch zu vermeiden, muss die Anschlusskante zur Wand mit einer Silikonfuge abgedichtet werden. Verwenden Sie ausschließlich neutral vernetztes (lösemittelfreies) Silikon.14. Die Funktion, Handhabung und Pflege der Produkte muss dem Besitzer erklärt werden.15. Bei Trocken- und Leichtbauwänden ist auf eine tragfähige Unterkonstruktion zu achten.
D

3
INSTRUCTIONS DE MONTAGE / MONTAGEAANWIJZINGEN
Vous trouverez ci-après des informations importantes pour le montage et la manipulation des meubles de salle de bain, ainsi que des consignes de sécurité.Veuillez impérativement lire et respecter ces instructions avant de monter les meubles.Nous ne pourrons assumer aucune responsabilité pour les dommages qui résulteraient du non-respect de ces instructions.
1. Le montage de nos produits ne pourra être confié qu‘à un technicien spécialiste des équipements sanitaires ou à une autre personne qualifiée.2. Dans le cas où vous constateriez la présence de défauts sur les produits, vous devez les monter quand même. Si une des pièces n‘est pas en état d‘être montée en raison d‘un défaut majeur, vous devez préparer tous les éléments nécessaires au montage et poser/installer des rails de montage, crochets et vis sans tête à filetage partiel bois. L‘atelier du service après-vente n‘effectue pas de travaux de perçage. 3. Le matériel de fixation (vis, chevilles) est prévu pour des murs/parois épais et suffisamment solides. Pour une utilisation sur des murs ne répondant pas à ces critères, des fixations spéciales adaptées doivent être utilisées. Les vis sans tête à filetage partiel bois ne sont pas fournies.4. Le film protecteur ne doit pas être retiré avant le montage complet des éléments du meuble. Si nécessaire, aspirer ou rincer la poussière produite par le perçage. Ne jamais essuyer la poussière du meuble sous vasque. Ne poser aucun outil ou objet lourd ou pointu sur la surface du meuble sous vasque.5. Le durcissement complet des surfaces laquées intervient dans les 3 semaines qui suivent le retrait du film protecteur. Pendant ce laps de temps, traiter le meuble avec la plus grande précaution et éviter de le nettoyer ou de l‘essuyer (ne pas utiliser de tissu en microfibres).6. Veiller à ce qu‘aucune poussière ne tombe dans les glissières ! Par conséquent, les meubles ne doivent être fixés/suspendus qu‘une fois tous les trous percés ou doivent être décrochés avant de percer d‘autres trous.7. Les produits doivent être fixés à tous les emplacements prévus. 8. Les mesures de montage sont indiquées par rapport à la surface supérieure du sol. Elles sont exprimées en mm.9. Les installations électriques doivent impérativement être confiées à un électricien et respecter la norme DIN57100/VDE0100 partie 701. L‘état des prises de courant, de l‘éclairage et des fiches électriques doit être contrôlé.10. Une fois montés, le positionnement des portes et des tiroirs doit être ajusté. Ce réglage relève des tâches d‘entretien courantes et dépend de l‘utilisation et de la charge des meubles et ne peut en aucun cas être un motif de réclamation.11. Nettoyer les meubles avant leur mise à disposition. Retirer la poussière de perçage, les étiquettes et les traces de colle.12. Vérifier l‘étanchéité au niveau de la prise d‘eau et du siphon.13. Pour éviter que l’eau ne pénètre entre le mur et la vasque, il faut réaliser un joint en silicone entre le bord de la vasque et le mur. Utiliser uniquement du silicone (sans solvant) neutre et ramifié.14. Le fonctionnement, la manipulation et l‘entretien des produits doivent être expliqués à leur propriétaire. 15. Pour les cloisons sèches et de construction légère, s‘assurer que la sous-construction est solide.
F/B
NL/B Hierna vindt u belangrijke informatie betreffende de montage en het correct behandelen van uw badmeubelen evenals veiligheid-stips. Lees deze goed door voordat u de meubelen monteert. Voor schade ontstaan door het niet volgen van deze aanwijzingen kunnen wij niet aansprakelijk gesteld worden.
1. De montage van onze producten mag alleen door een ervaren vakman of een ander vakkundig persoon uitgevoerd worden.2. Als u schade vaststelt aan een product, moet dit product toch gemonteerd worden. Wanneer de beschadiging zo erg is dat een onderdeel niet gemonteerd kan worden, moeten alsnog montagemaatregelen getroffen worden, zoals het plaatsen van montagerails, het aanbrengen van haken en stokschroeven. Onze monteurs voeren geen boringen uit.3. Het bevestigingsmateriaal (schroeven, pluggen) is ontworpen voor massieve wanden met voldoende draagkracht. Bij andere inbouwsituaties moeten speciale bevestigingen gebruikt worden. Wastafelbouten zijn niet in de leveringsomvang inbegrepen!4. Haal de beschermfolie pas van de meubelen als ze volledig gemonteerd zijn. Boorstof eventueel opzuigen of (wegschuren) verwijderen, nooit van de wastafel wegvegen. Geen gereedschap, zware voorwerpen of voorwerpen met scherpe kanten op de wastafel leggen.5. Hoogglanzende oppervlakken harden binnen 3 weken na het verwijderen van de folie helemaal uit. Wees in deze periode heel voorzichtig met deze oppervlakken. Niet schoonmaken of afstoffen (geen microvezeldoek).6. Er mag geen stof in de ladegeleiders komen! Hang de meubelen dus pas op, ná het boren of verwijder de meubelen weer voordat u gaat boren. 7. De producten moeten aan alle geplande montagepunten bevestigd worden.8. De montageafmetingen gelden voor de aan de bovenkant afgewerkte vloer. Alle afmetingen zijn vermeld in mm.9. Alleen een vakkundige elektromonteur mag de elektrotechnische installaties monteren in overeenstemming met DIN57100/VDE0100 deel 701. Stopcontacten, verlichting en wandcontactaansluitingen moeten gecontroleerd worden. 10. Deuren en lades moeten na montage correct afgesteld worden. Het afstellen is één van de standaard onderhoudswerkzaamheden en is afhankelijk van het gebruik en de belasting van de meubelstukken. Afstellen kan nooit een reden zijn tot het indienen van een klacht.11. Meubelen voor overdracht schoonmaken. Boorstof, etiketten en kleefresten verwijderen!12. Controleer de wateraansluiting en sifon op lekken!13. Om te voorkomen dat er water tussen de wand en wastafel terecht komt, moet de aansluitrand met de wand met een siliconenvoegmiddel worden afgedicht. Gebruik hiervoor een neutraal (oplosmiddelvrij) silicone.14. De functie, het gebruik en onderhoud moeten aan de eigenaar uitgelegd worden. 15. Bij scheidingswanden en lichte constructies moet het draagvermogen van de ondergrond gecontroleerd worden.

4
ISTRUZIONI PER IL MONTAGGIO / ИНСТРУКЦИИ ПО МОНТАЖУ
Ниже Вы найдёте важные сведения о монтаже и обращении с мебелью для ванных комнат, а также указания по технике безопасности. Перед началом монтажа обязательно прочтите и соблюдайте все указания. За ущерб, возникший в результате несоблюдения наших указаний, мы не можем принять на себя никакой ответственности.
1. Монтаж наших изделий разрешается выполнять только мастеру-сантехнику или другому квалифицированному специалисту.2. Если Вы обнаружите повреждения на изделиях, их всё равно следует смонтировать. Если какую-либо деталь из-за сильных повреждений невозможно смонтировать, то необходимо выполнить все подготовительные монтажные работы, а также установить монтажная шина, крюки и винты-шурупы. Наша заводская сервисная служба не выполняет работ по сверлению.3. Крепёжный материал (винты, дюбели) рассчитаны на массивные стены, обладающие достаточной несущей способностью. Если условия монтажа отличаются от названных, следует использовать соответствующие специальные крепления. Винты-шурупы не входят в комплект поставки!4. Защитную плёнку следует удалить только по завершению монтажа мебели. Пыль от сверления при необходимости отсосать пылесосом или смыть струёй воды, ни в коем случае не стирать с умывальника. Не класть на умывальник инструменты, предметы с острыми краями или тяжёлые предметы.5. Поверхности с зеркальным блеском полностью затвердевают после удаления защитной плёнки в течение 3 недель. Просьба обращаться с ними в течение этого времени особенно осторожно, не чистить и не вытирать (не пользоваться салфетками из микроволокна).6. Пыль от сверления не должна попасть на выдвижные планки! Поэтому мебель можно устанавливать только после сверления, или же перед сверлением её необходимо убрать.7. Изделия должны быть закреплены за все предусмотренные для этого монтажные точки. 8. Установочные размеры соотнесены с верхней кромкой готового пола. Все размеры указаны в мм.9. Электромонтажные работы разрешается выполнять только специалисту с соблюдением стандарта DIN57100/VDE0100, часть 701. Штекерные соединения, освещение и подключение к розетке должны быть проверены.10. Дверцы и выдвижные ящики после монтажа необходимо отъюстировать. Юстировка относится к обычным процедурам по обслуживанию в зависимости от интенсивности использования и степени нагрузки предметов мебели, и не является поводом для рекламации.11. Перед сдачей работ очистить мебель! Удалить пыль от сверления, этикетки и остатки клея!12. Проверить герметичность присоединения к водоснабжению и к сифону!13. Для предотвращения проникновения воды между стеной и умывальником следует загерметизировать место примыкания кромки умывальника к стене силиконом. Используйте силикон только с нейтральной полимеризацией (без растворителей).14. Владельцу необходимо разъяснить принцип работы, порядок обращения и правила ухода за изделиями. 15. Если выполнены стены из гипсокартона или облегчённых конструкций, необходимо позаботиться о прочной несущей конструкции.
RUS
I Si riportano di seguito informazioni importanti per il montaggio e la manipolazione degli arredi da bagno con relative avvertenze di sicurezza. Esse devono essere assolutamente lette ed osservate prima di montare gli arredi. Di eventuali danni causati dall‘inosservanza delle stesse non ci si assume alcun tipo di responsabilità.
1. Il montaggio dei nostri prodotti può essere effettuato solo da personale specializzato nell‘installazione di sanitari o da altra persona qualificata.2. In caso di danni riscontrati sui prodotti occorre comunque procedere al montaggio degli stessi. Qualora una parte di essi non dovesse essere montabile a causa dell‘entità dei danni, dovranno essere effettuati tutti i preparativi per il montaggio e installate le guide per il montaggio, i ganci e le viti a doppia filettatura. Il nostro servizio di assistenza tecnica non pratica fori.3. Il materiale di fissaggio (viti, tasselli) è specifico per pareti solide e dotate di sufficiente capacità portante. In altre situazioni di montaggio occorre utilizzare materiali di fissaggio specifici. Le viti a doppia filettatura non sono fornite in dotazione!4. Rimuovere la pellicola protettiva solo una volta terminato il montaggio di tutti gli elementi. Eventualmente aspirare o scaricare con l‘acqua la polvere prodotta nel praticare i fori, non rimuoverla mai dal lavabo passandovi sopra con panni o simili. Non appoggiare sul lavabo utensili, né oggetti acuminati o pesanti.5. Le superfici lucide induriscono completamente entro 3 settimane dalla rimozione della pellicola protettiva. In questo arco di tempo trattarle con particolare cura e non lavarle né pulirle con panni o simili (evitare l‘uso di panni in microfibra).6. Impedire il deposito di polvere di foratura nelle guide degli estraibili! Per questo motivo gli arredi possono essere appesi solo dopo aver praticato i fori e devono essere smontati di nuovo prima di praticare altri fori.7. I prodotti devono essere fissati in tutti i punti di montaggio previsti.8. Le misure di montaggio si riferiscono al bordo superiore del pavimento finito. Tutte le dimensioni sono espresse in mm.9. Le installazioni elettriche possono essere effettuate solo da un esperto nel rispetto della normativa DIN57100/VDE0100 parte 701. I collegamenti a spina, l‘illuminazione e l‘allacciamento alle prese di corrente devono essere controllati.10. Ante e cassetti, successivamente al montaggio, devono essere registrati. La registrazione successiva rientra nelle normali operazioni di manutenzione a seconda dell‘utilizzo e del carico cui sono sottoposti i componenti d‘arredo e non costituisce un motivo giustificato di reclamo.11. Pulire i mobili prima della consegna! Rimuovere la polvere prodotta dai fori, le etichette e i residui di adesivo!12. Controllare la tenuta dell‘allacciamento dell‘acqua e del sifone!13. Per evitare la penetrazione di acqua tra la parete e il lavabo, occorre sigillare il bordo di collegamento alla parete con una giuntura in silicone. Utilizzare esclusivamente silicone neutro reticolato (senza solvente).14. Devono essere spiegate al proprietario la funzione, la manipolazione e la cura dei prodotti.15. Per le pareti in cartongesso e quelle divisorie, fare attenzione alla sottostruttura portante.

5
MONTAGEVORBEREITUNG / PREPARATIONS FOR FITTING / PRÉPARATION DU MONTAGE / VOORBEREIDING VAN DE MONTAGE / PREPARAZIONE AL MONTAGGIO / ПОДГОТОВКА К МОНТАЖУ
2.1 2.2
43
BIS ZUM ENDE TILL THE ENDÀ FOND
MUSTERAUFTRAG
000000/0/0 18
404122 76327 47 kg
1
i
MONTAGEABLAUF / ORDER OF INSTALLATION / ORDRE DE MONTAGE / MONTAGEVOLGORDE SEQUENZA DI MONTAGGIO / ПОСЛЕДОВАТЕЛЬНОСТЬ МОНТАЖАE
2
1 1.1
15
EINHÄNGEPOSITION / MOUNTING POSITION / POSITION DE MONTAGE
3 4
i
!

6
MONTAGEABLAUF / ORDER OF INSTALLATION / ORDRE DE MONTAGE / MONTAGEVOLGORDE SEQUENZA DI MONTAGGIO / ПОСЛЕДОВАТЕЛЬНОСТЬ МОНТАЖАE
5.1
CLICK!
A
B
C5.2
Protective �lm Protective �lm Protective �lmProtective �lm Protective �lm Protective �lmProtective �lm Protective �lm Protective �lmProtective �lm Protective �lm Protective �lmProtective �lm Protective �lm Protective �lmProtective �lm Protective �lm Protective �lmProtective �lm Protective �lm Protective �lmProtective �lm Protective �lm Protective �lmProtective �lm Protective �lm Protective �lmProtective �lm Protective �lm ProtecProtective �lm Protective �lm ProtecProtective �lm Protective �lm Prote
6 HOCHGLANZ FRONTEN / HIGH GLOSS FRONTS / FAÇADES BRILLANTES
i
STOCKSCHRAUBE: NICHT IM LIEFERUMFANG ENT-HALTEN / Screw: Not included in delivery / Tirefonds non fournis / Wastafelbouten: Niet bijgeleverd / Vite fissaggio lavabo: non contenuto /шуруп-шпилька: не входит в комплект поставки
DÄMPFERVERSTELLUNG / ADJUSTMENT OF DAMPER / RÉGLAGE DE L’ARMORTISSEUR / DEMPER VERSTELLINGREGOLAZIONE DE L’ARMORTIZZATORE / РЕГУЛЯЦИЯ АМОРТИЗАТОРА
LEICHTE STUFE - FÜR LEICHTE UND SCHMALE TÜREN Low level – for light and small doors Reglage léger – pour portes légères et étroites Lichtste niveau – voor lichte en smalle deuren Tappa debole–per porte facili e strette Низкий уровень – для легких и узких дверей
MITTLERE STUFE/WERKSEINSTELLUNG – FÜR STANDARDTÜREN
Middle level/factory setting – for standard doors
Reglage moyen – pour portes standards
Middelste niveau / fabrieksinstelling – voor standaad deuren
Tappa medio/regolazione di fabricca–per ante standard
Средний уровень/заводской стандарт – для стандартных дверей
SCHWERE STUFE – FÜR GROSSE UND SCHWERE TÜREN
High level –for large and heavy doors
Reglage fort – pour portes grandes et lourdes
Zwaarste niveau – voor grote en zware deuren
Tappa pesante –per porte grandi e pesanti
Высокий уровень – для больших и тяжелых дверей
7
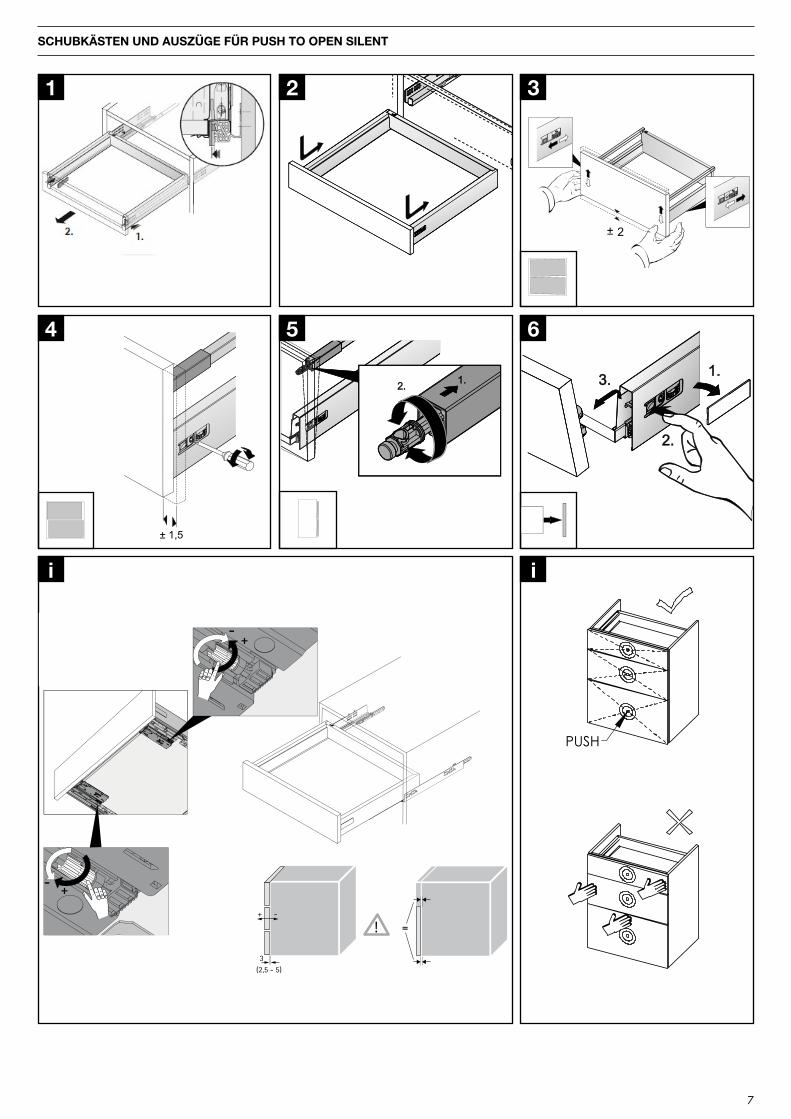
SCHUBKÄSTEN UND AUSZÜGE FÜR PUSH TO OPEN SILENT
2.2. 1.1.
± 1,5
1 2
± 2
3
4 5
1.1.
2.2.
3.3.
6
+-
+-
=!
(2,5 - 5)3
+ -
i
PUSHPUSH
i
PUSHPUSH

8
PUSH CATCHES AND MAGNETIC
CATCHESK PUSH TECH
click
click
K PUSH TECH
PATENT PENDINGREGISTERED DESIGN
2 min. 2 min.
+6-0,45
7,5 max.
37 long version
20 medium version
14 short version
WITH MAGNETfor cabinets using unsprung hinges or negative hinges.
For details refer to“K PUSH TECH AND K LOCK DOOR PLATES“.
For details refer to“K PUSH TECH AND K LOCK DOOR PLATES“.
WITH BUFFERfor cabinets using sprung hinges.
INSTALLATION TO BE EMBEDDED INSIDE THE PANEL
VERSIONS ADJUSTMENTS
Door plate
Door plate
INSTALLATION THROUGH ADAPTER HOUSING
2 min. 1,4 min.
37 long version
20 medium version
14 short version
+6-0,45
7,5 max.
8,5
WITH MAGNETfor cabinets using unsprung hinges or negative hinges.
WITH BUFFERfor cabinets using sprung hinges.
ADJUSTMENTSVERSIONS
recommended fi xing at least 2 countersunk head wood screws Ø 3,5x16 mm
K PUSH TECH is the fully renewed and extended program of automatic opening systems for doors without handles or knobs.A special inner mechanism provides a very silent, yet powerful utilization, granting a long durability which makes it perfectly suitable for a wide range of doors.K PUSH TECH is available with buffer, for cabinets using sprung hinges, and with magnet, for cabinets using unsprung hinges or negative hinges. The aesthetic of buffers is now improved and the range of catch plates for version with magnet is even wider.It comes with a fresh new and even more captivating design, together with an extended program, including an innovated range of spring strengths, in order to guarantee the correct functioning even with large and heavy doors, and three lengths of the output paths: Short – 14 mm, Medium – 20 mm, Long – 37 mm. The same reference can be installed either concealed or visible, fi xed with adapter housing.The visible versions’ package is composed of: push-to-open system, adapter plate and adapter housing. The new adapter housing allows to pre-install K PUSH TECH with the plate on the side of the cabinet and leave the ejector pin deactivated during its handling and transportation.The suitability of the small adapter housing for both short and medium size versions guarantees a simplifi ed stock management.It comes with a wide range of colors: white, grey 19 and black anthracite. Gap between door and cabinet is reduced: activation gap is 1,4 mm. Ring thickness is 0,6 mm.
www.italianaferramenta.com
Increased adjustment feature: +6 / -0.45 mm. Beyond this negative adjustment the spring is deactivated. This feature allows to disable the ejector pin for safety reasons.Perception of steps indicating the adjustment of the ejector pin: every step-stop position adjusts the door gap by 0.15 mm. A click-stop indicates the maximum adjustment range. These features prevent any undesired change of position of the ejector pin during its utilization. Reduced depth of drill hole (10 mm less) for the long concealed version.Full-automatic mounting templates, bringing a signifi cant advantage in productivity.Possibility of installation in tight drill-holes- Perfect functioning assured even with hole diameters with small tolerance.New adapter housing- The new adapter plates suit with current drilling pattern.- The fi xing of the adapter plate can be carried out with common self-tapping fl at head screws and euro screws.- The adapter plate can be used as template for the spot-drilling.Highest magnet strength available in the market.New high performing materials to withstand unusual stresses and to avoid parts’ damages. The new magnets are installed completely fl ush with the head of the ejector pin, in order to avoid any scratches on the door plates.
PATENT PENDING, REGISTERED DESIGN
SPIEGEL-AUFHÄNGER / MIRROR HOOK / CROCHET POUR MIROIR / SPIEGELOPHANGER / SISTEMA DI AGGANCIO PER SPEC-CHIO / ПОДВЕСКА ДЛЯ ЗЕРКАЛА
TIP-ON-VERSTELLUNG FÜR DREHTÜREN / TIP-ON ADJUSTMENT / RÉGLAGE TIP-ON / TIP-ON-SYSTEEM / REGOLAZIONE TIP-ON / РЕГУЛИРОВКА СИСТЕМЫ ОТКРЫВАНИЯ И ЗАКРЫВАНИЯ НАЖАТИЕМ
MINERALGUSS-WASCHTISCH / MINERAL CAST WASHBASIN / PLAN DE TOILETTE EN PIERRE DE SYNTHÈSE / WASTAFEL MINERAALS-TEEN / LAVABO IN RESINA MINERALE / УМЫВАЛЬНИК ИЗ МИНЕРАЛЬНОГО ЛИТЬЯ
SILICON
3
24H
1 2

9
������
��
��
������
������
������
��
��
������
������
������
��
��
������
������
LED-SENSORSCHALTER MIT ZWEISTUFIGEM DAUERLICHT / ADJUSTMENT OF BRIGHTNESS ON LED SENSOR ALLUMAGE/EXTINCTION ET RÉGLAGE DE L´INTENSITÉ PAR INTERRUPTEUR LEDLED-SENSORSCHAKELAAR MET HELDERHEIDS INSTELLING / ACCENSIONE I SPEGNIMENTO E REGOLAZIONE DELL INTENSITA LUMINOSA A LED (SEMPRE ACCESO, INTENSITA VARIABILE)СЕНСОРНЫЙ ВЫКЛЮЧАТЕЛЬ LED С ДВУХСТУПЕНЧАТЫМ СВЕТОМ
LED-WASCHTISCHUNTERSCHRANKBELEUCHTUNG / LED-LIGHTING OF VANITY UNIT / ECLAIRAGE LED DU MEUBLE SOUS-VASQUE / LED-VERLICHTING VOOR WASTAFELONDERKAST / ILLUMINAZIONE A LED MOBILE SOTTOLAVABO
ON/OFF

10
Sensor-55X
2,5 x 10 mm
2,5 x 25 mm
ø 10
LED
1
3 4
4
2
5
6
A
A A
B
A
A
A
B
B
B
1x < 1 sec. 1x < 1 sec.
LED LED
LED LED
2700K 6400K
LED LED LED
LED
LED LED
6400K 2700K
LED LED LED
LED
LED-SENSORSCHALTER MIT LICHTTEMPERATUR-STEUERUNG / LED SENSOR SWITCH WITH LIGHT TEMPERATURE CONTROL / COMMUTATEUR DE DÉTECTION À LED AVEC COMMANDE DE LA TEMPÉRATURE DE L‘ÉCLAIRAGE / LEDSENSORSCHAKELAAR MET LICHTTEMPERATUURSTURING / IINTERRUTTORE CON SENSORE A LED E CONTROLLO DELLA TEMPE-RATURA DI LUCE / СВЕТОДИОДНЫЙ СЕНСОРНЫЙ ВЫКЛЮЧАТЕЛЬ С РЕГУЛИРОВКОЙ ЦВЕТОВОЙ ТЕМПЕРАТУРЫ

11
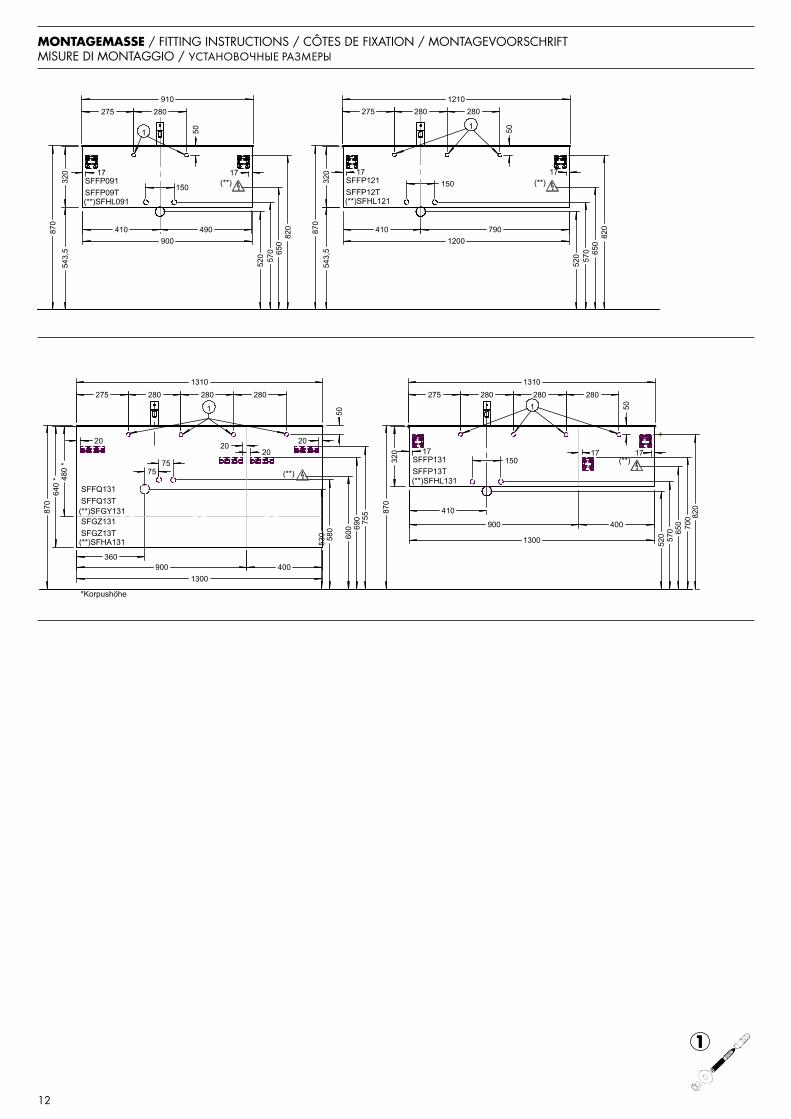
MONTAGEMASSE / FITTING INSTRUCTIONS / CÔTES DE FIXATION / MONTAGEVOORSCHRIFT MISURE DI MONTAGGIO / УСТАНОВОЧНЫЕ РАЗМЕРЫ
755
580
5
30
75 75
20 20
1200
280 280
870
195
0
800
200
0
50
640
*
20 20
1200 / 1300 / 1500
787
1
950
20 20
20 20
386
1
600
600
360 840
480
*
600
1210 275
1650
1
*Korpushöhe
SFFQ121SFFQ12T
SFGZ121SFGZ12T
(**)
(**)SFHA121
SFHC120/130/150SFHD120/130/150
HSIN060HSIN06T(**)SFGY121
755
870
580
5
30
195
0
130
0
158
0
640
*
20 20
280 50
800
400 / 900
75 75
20 20
900
490
400 400
385
9
70
160
0 3
85
20 20
20 20
200
0
360 540
480
*
600
275 910
1650
1
(**)
*Korpushöhe
SFHC040/090
SFFQ091SFFQ09T
SFGZ091SFGZ09T
(**)SFGY091
(**)SFHA091
UHIB040UHIB04TUHIC040UHIC04T
HSIL040HSIL04THSIM040HSIM04T
SFHD040/090
1
12
MONTAGEMASSE / FITTING INSTRUCTIONS / CÔTES DE FIXATION / MONTAGEVOORSCHRIFT MISURE DI MONTAGGIO / УСТАНОВОЧНЫЕ РАЗМЕРЫ
1
520
5
70
280
900 410 490
50
320
5
43,5
8
70
150
543
,5
320
8
70
1200 410 790
150
520
5
70
50
280 280
17 17 17 17
820
820
910 275 275
650
650
1210
SFFP091SFFP09T
SFFP121SFFP12T
1
(**)SFHL121(**)SFHL091
(**) (**)
1
640
*
1300
870
280 280 280
580
5
30 6
90
755
75 75
20
50
20
50
570
5
20
275 280 280 280
150
410
320
1300
870
700
17 17
820
360
480
*
600
400
400 900
900
275 1310 1310
20 20
650
17
*Korpushöhe
SFFQ131SFFQ13T
(**)SFGY131SFGZ131SFGZ13T
(**)
1 1
SFFP131SFFP13T
(**)SFHA131
(**)SFHL131
(**)

13
MONTAGEMASSE / FITTING INSTRUCTIONS / CÔTES DE FIXATION / MONTAGEVOORSCHRIFT MISURE DI MONTAGGIO / УСТАНОВОЧНЫЕ РАЗМЕРЫ
1
530
5
80
700
7
55
50
75 75 75
20 20 20
20
750 750 1500
640
*
280 370 280
870
375 750 375
650
75
480
*
290
1510
290
600
* Korpushöhe
(**)
SFFQ151SFFQ15T
SFGZ151SFGZ15T
(**)SFGY151
(**)SFHA151
1
520
5
70
50
280 370 280
1500
425
750 750
425 650
150 150
870
3
20
543
,5 7
80
25 25
307,4 272,6 1510
650
25 25
SFFP151SFFP15T(**)SFHL151
(**)
1

14
MONTAGEMASSE / FITTING INSTRUCTIONS / CÔTES DE FIXATION / MONTAGEVOORSCHRIFT MISURE DI MONTAGGIO / УСТАНОВОЧНЫЕ РАЗМЕРЫ
1
735
620
5
70
50
200 280
660
850
30 20
400
150
198
0
183
5
800
400
70 70
210 450
670
(**)
620
1650
SIHT040
SFHB067SFHB06T(**) SFHM067
Version rechts
1
(**)

15
Sine
a 2.
0-M
onta
ge 0
8/20
• T
echn
isch
e Ä
nder
unge
n vo
rbeh
alte
n. /
Sin
ea 2
.0 fi
tting
instr
uctio
ns 0
8/20
• S
ubje
cts
to te
chni
cal c
hang
es.
Instr
uctio
ns d
e m
onta
ge S
inea
2.0
08/
20 •
Sou
s ré
serv
e de
mod
ifica
tions
PFLEGEHINWEISE / CARE INSTRUCTIONS / INTRUCTIONS D’ENTRETIEN
D Die Badmöbel sind für eine lange Lebensdauer im Badezimmer konzipiert. Um langjährige Freude an unseren Qualitätsprodukten zu haben, bitten wir Sie folgende Hinweise zu berücksichtigen:
1. Installation Duschabtrennung zwingend vorgeschrieben, wenn die Möbel direkt an Wanne/Duschbereich anschließen2. ausreichend lüften (Fenster, Lüftung)3. überströmendes Wasser vermeiden, bzw. sofort beseitigen
Reinigung der Badmöbel, Spiegel und Glasflächen, Mineralguss und Keramik: Zur schonenden Reinigung von Holz-, Kunststoff-, Lack- und Keramikoberflächen empfehlen wir ein sauberes, weiches, feuchtes Tuch. (kein Mikro-fasertuch!) Verschüttete Substanzen sollten sofort entfernt werden. Besonders hartnäckige Flecken (Fett, Kosmetik etc.) lassen sich ohne Rückstände mit 1%iger Seifenlauge oder Feinspülmittel entfernen. Anschließend Fläche trocken reiben. Es ist darauf zu achten, dass an den Rändern und Rückseiten keine Tropfenrückstände verbleiben. Grundsätzlich sind für die Pflege von Hochglanzoberflächen keine Scheuermittel und keine Pflege-mittel, die alkoholhaltige Stoffe beinhalten, zu verwenden.
Hochglanzoberflächen härten nach dem Entfernen der Schutzfolie innerhalb von 3 Wochen vollständig aus. Bitte in diesem Zeitraum besonders vorsichtig behandeln und nicht reinigen oder abwischen.
Bei stärkerer Verschmutzung von Mineralguss, Keramik oder Glas verwenden Sie bitte einen milden Flüssigreiniger (ohne Alkohol und Scheuer-milch), z.B. Essigreiniger von Frosch und warmes Wasser. Bitte achten Sie darauf, dass die Wassertemperatur 65°C nicht übersteigt.Vermeiden Sie, dass diese hochwertigen Materialien mit harten und kantigen Gegenständen in Berührung kommen.Keine heißen Gegenstände auf die Platten stellen! Um den Glanz der Mineralgussoberfläche zu erhalten, empfehlen wir von Zeit zu Zeit hochwertige Autopolitur aufzutragen und nachzupolieren, z.B. SONAX Xtreme Polish & Wax 2 Hybrid NPT.
1. 2. 3.
GB The bathroom furniture is design for a long service life in the bathroom. We ask that you follow the instructions below to ensure that you can enjoy our high quality products for many years:
1. The installation of a shower wall is essential if the furniture is installed directly next to the tub/shower area2. Ensure sufficient ventilation (windows, ventilator)3. Avoid or immediately mop up overflowing water
Cleaning the bathroom furniture, mirrors and glass surfaces, mineral cast and ceramic: We recommend a clean, soft, damp cloth (no microfiber cloth!) for gently cleaning wood, plastic, painted and ceramic surfaces. Particularly stubborn stains (oils, cosmetics etc.) should be removed immediately. This can be done without residue using 1% soapy water or fine washing-up liquid. Then rub the surface dry. Take care that no droplets of residue remain on the edges and backs. No scouring agents or care products containing alcoholic substances should be used to clean high gloss surfaces.
High gloss surfaces are fully hardened within three weeks of the protective film being removed. Please treat them with particular care during this period and do not clean or wipe them.
In the case of heavy soiling on mineral cast, ceramic or glass, please use a mild liquid cleaner (without alcohol or cream cleaner) such as the vinegar-based cleaner from Frosch, with warm water. Please ensure that the water is not hotter than 65°C.Do not allow these premium materials to come into contact with hard or sharp-edged objects.Do not place hot objects on the plates!In order to retain the sheen of the mineral cast surface, we recommend applying a high quality car polish such as SONAX Xtreme Polish & Wax 2 Hybrid NPT and polishing it from time to time.
F/B Les meubles sont conçus pour être utilisés pendant de longues années dans les salles de bain. Afin de profiter pleinement et durablement de la qualité de nos produits, veuillez suivre les recommandations suivantes:
1. Installation impérative d‘un pare-douche lorsque le meuble est en contact direct avec le bac à douche ou la baignoire.2. Assurer une aération suffisante (fenêtre, système de ventilation)3. Éviter les projections d‘eau ou sécher immédiatement la zone aspergée.
Nettoyage des meubles de salle de bain, des miroirs et des surfaces miroirs, des vasques en résine ou en céramique:Pour un entretien respectueux des surfaces en bois, en plastique, en céramique ou laquées, nous vous recommandons d‘utiliser un chiffon doux, humide et propre. (Jamais de tissu en microfibres !) Retirer immédiatement les tâches tenaces (résidus gras, cosmétiques, etc.) et éliminer tout résidu avec une infime quantité (1 %) de lessive ou de produit à vaisselle doux. Essuyer ensuite la surface jusqu‘à ce qu‘elle soit sèche. Vérifier qu‘aucune trace de goutte ne reste sur les bords ou sur les panneaux arrière. D‘une manière générale, éviter l‘emploi de crèmes à récurer ou de produits d‘entretien contenant de l‘alcool sur les surfaces laquées.
Le durcissement complet des surfaces brillantes intervient dans les 3 semaines qui suivent le retrait du film protecteur. Pendant ce laps de temps, traiter le meuble avec la plus grande précaution et éviter de le nettoyer ou de l‘essuyer.
Si les surfaces en résine, en céramique ou les vitres sont particulièrement encrassées, utiliser un produit d‘entretien liquide (sans alcool et sans crème à récurer), par ex. le nettoyant au vinaigre de Frosch et de l‘eau tiède. Veiller à ce que la température de l‘eau ne dépasse pas 65°C.Éviter de mettre en contact les surfaces composées de matériaux de qualité supérieure avec des objets durs et pointus.Ne pas poser d‘objets chauds ou brûlants sur le plateau du meuble sous vasque!Afin de prolonger la brillance des surfaces laquées, nous vous recommandons d‘appliquer de temps en temps un peu de polish pour auto (par ex. SONAX Xtreme Polish & Wax 2 Hybrid NPT) et de lustrer la surface.

16
Sine
a 2.
0-M
onta
ge 0
8/20
• T
echn
isch
e w
ijzig
inge
n vo
orbe
houd
en /
. Mon
tagg
io S
inea
2.0
08/
20М
онта
ж S
inea
2.0
08/
20
VERZORGINGSINSTRUCTIES / CURA E MANUTENZIONE / УКАЗАНИЯ ПО УХОДУ
NL/B De badkamermeubelen zijn ontworpen voor een lange levensduur in de badkamer. Wanneer u de onderstaande aanwijzingen opvolgt, kunt u nog heel lang plezier hebben van uw meubelen:
1. Wanneer de meubelen dicht op de wasbak of douche geïnstalleerd zijn, is het plaatsen van een doucheafscheiding sterk aan te raden.2. Zorg voor voldoende verluchting (vensters, ventilatie)3. Zorg ervoor dat er geen water op de meubelen stroomt. Bij overstromend water dit water direct opnemen.
Schoonmaken van de badkamermeubelen, spiegels en glazen oppervlakken, minerale composieten of keramiek: Voor het schoonmaken van houten, kunststoffen oppervlakken, lak- en keramiekoppervlakken adviseren wij u om een schone, zachte, vochtige doek (geen microvezeldoek!) te gebruiken. Vooral hardnekkige vlekken (vet, cosmetica, etc.) moeten direct verwijderd worden. Met een zeeploogoplossing van 1% of een fijn spoelmiddel kunnen hardnekkige vlekken gemakkelijk verwijderd worden. Daarna het oppervlak droog wrijven. Zorg ervoor dat op de randen of aan de achterkant geen druppels blijven staan. Gebruik voor het schoonmaken van hoogglanzende oppervlakken geen schuurmiddelen of alcoholhoudende stoffen.
Hoogglanzende oppervlakken harden binnen 3 weken na het verwijderen van de folie helemaal uit. Wees in deze periode heel voorzichtig met deze oppervlakken. Niet schoonmaken of afstoffen (geen microvezeldoek).
Gebruik bij sterke vervuiling van minerale composieten, keramiek of glas een milde vloeibare reinger (zonder alcohol of schuurmiddel) bijv. azijnreiniger van Frosch en warm water. Let erop dat het water niet warmer is dan 65°C.Vermijd harde of scherpe voorwerpen bij deze hoogwaardige materialen.Plaats geen hete voorwerpen op de wastafels!Als u op de minerale composietoppervlakken regelmatig wat autopolish zoals bijv. SONAX Xtreme Polish & Wax 2 Hybrid NPT, aanbrengt en het oppervlak napolijst, blijft de glans van het oppervlak langer behouden.
1. 2. 3.
I Gli arredi da bagno sono studiati per garantire una lunga durata nell‘ambiente bagno. Per poter apprezzare a lungo tutte le qualità dei nostri prodotti, si prega di osservare le seguenti avvertenze:
1. installazione obbligatoria di divisoria se gli arredi vengono montati in posizione adiacente alla zona della vasca/doccia2. aerare a sufficienza (finestre, ventilazione)3. evitare fuoriuscite d‘acqua, eliminare immediatamente l‘acqua stagnante
Pulizia degli arredi da bagno, dello specchio e delle superfici in vetro, della resina minerale e della ceramica:per la pulizia delicata di superfici in legno, materiale plastico, smaltate e di ceramica si consiglia l‘uso di un panno pulito morbido e umido. (Evitare l‘uso di panni in microfibra!) Le macchie di sporco particolarmente ostinato (grasso, cosmetici, ecc) devono essere rimosse immediatamente e senza lasciare residui con una soluzione all‘1% di acqua e sapone o detersivo per stoviglie delicato. Infine asciugare la superficie strofinando. È importante accertarsi che su bordi e parti posteriori non rimangano residui né gocce. In linea generale per la cura delle superfici lucide non si devono utilizzare agenti abrasivi né prodotti che contengono sostanze alcoliche.
Le superfici lucide induriscono completamente entro 3 settimane dalla rimozione della pellicola protettiva. In questo arco di tempo trattare il materiale con particolare cura senza lavarlo né pulirlo con panni o simili (evitare l‘uso di panni in microfibra).
In presenza di sporco particolarmente intenso su resina minerale, ceramica o vetro, utilizzare un detergente liquido delicato (non contenente alcool né crema abrasiva), ad esempio il detergente all‘aceto di Frosch ed acqua tiepida. Accertarsi che la temperatura dell‘acqua non superi i 65°C.Evitare che questi materiali di pregiata qualità vengano a contatto con oggetti duri e spigolosi.Non appoggiare oggetti molto caldi sui pannelli/ripiani!Per preservare la lucentezza della superficie in resina minerale, si consiglia l‘uso, di tanto in tanto, di un‘emulsione autolucidante come ad esem-pio Xtreme Polish & Wax di SONAX 2 Hybrid NPT.
RUS Мебель для ванных комнат рассчитана на длительный срок службы в ванной комнате. Чтобы иметь возможность много лет с удовольствием пользоваться нашими качественными изделиями, мы просим Вас соблюдать следующие указания:
1. Если мебель вплотную примыкает к ванне или душевой зоне, в обязательном порядке предписана установка душевого ограждения.2. Проветривать в достаточной степени (окна, вентиляция)3. Избегать переливания воды через край, если же это случилось – немедленно удалить перелившуюся воду.
Очистка ванной мебели, зеркал и стеклянных поверхностей, минерального литья и керамики:Для щадящей очистки деревянных, пластиковых, лакированных и керамических поверхностей мы рекомендуем чистую, мягкую, влажную салфетку (ни в коем случае не салфетка из микроволокна!). Особенно стойкие пятна (жир, косметика и т.д.) следует удалять немедленно. Такие пятна без остатка удаляются 1%-ым мыльным раствором или щадящим моющим средством. Затем насухо вытереть все поверхности. Следует следить за тем, чтобы по краям и на обратной стороне не оставалось следов от брызг. Для ухода за поверхностями с зеркальным блеском принципиально не следует использовать абразивные чистящие средства и средства по уходу, содержащие спирт.
Поверхности с зеркальным блеском полностью затвердевают после удаления защитной плёнки в течение 3 недель. Просьба обращаться с ними в течение этого времени особенно осторожно, не чистить и не вытирать.
При значительном загрязнении минерального литья, керамики или стекла используйте мягкое жидкое чистящее средство (без спирта и абразивных средств), например, уксусное средство «Фрош», и тёплую воду. Следите за тем, чтобы температура воды не превышала 65 °С.Не допускайте, чтобы эти ценные материалы не(delete it!) вступали в контакт с твёрдыми и острыми предметами.Не класть на поверхности горячие предметы!Для сохранения блеска поверхностей из минерального литья мы рекомендуем время от времени наносить на них высокосортную автополитуру (напр., SONAX Xtreme Polish & Wax 2 Hybrid NPT. и полировать.