m maannuuuaaalll oonnn cceeee 0 33333300lll … 330l...staad pro. environment introduction to staad...
TRANSCRIPT

0
Department of Civil and Environmental Engineering
North South University
MMMAAANNNUUUAAALLL OOONNN
CCCEEEEEE 333333000LLL
SSSTTTRRRUUUCCCTTTUUURRRAAALLL AAANNNAAALLLYYYSSSIIISSS
&&& DDDEEESSSIIIGGGNNN LLLAAABBB
SSSTTTAAAAAADDD PPPrrrooo...

CEE 330L: Structural Analysis and Design Lab, NSU
1
TABLE OF CONTENTS
SL. No. Topic Name Page No.
1. Chapter-I
STAAD Pro. environment
Introduction to STAAD Pro. environment
2-5
2. Chapter-II
Various finite elements and cross-sectional shapes
6-10
3. Chapter-III
Two Dimensional Portal frame under vertical and horizontal loads
11-20
4. Chapter-IV
Truss Analysis
Roof Truss Analysis
Bridge Truss Analysis
21-37
5. Chapter-V
Multi-storied building frame
38-54

CEE 330L: Structural Analysis and Design Lab, NSU
2
CHAPTER-I
INTRODUCTION TO STAAD Pro. ENVIRONMENT
STAAD Pro. Stands for Structural Analysis And Design Program
All structural analysis software generally consists of three parts:
▪ Pre Processing: Generates the model, assembles and organizes all data needed for the analysis.
▪ Processing: Calculates displacements, member forces, reactions, stresses, etc.
▪ Post Processing: Displays the results.
STAAD.Pro Workflow Process:
The process of modeling and designing in STAAD.Pro can be summarized into the following general
workflow process, which is suggested inherently by the on-screen organization of the tabs within the
program:
1. Basic Geometry: Define the basic geometry of the structure using beams, columns, plates
and/or solid elements.
2. Section Properties: Define the sizes of members by width, depth, cross sectional shape, etc.
3. Materials Constants: Specify material such as timber, steel, concrete, or aluminum to define
Poisson’s Ratio, Coefficient of Thermal Expansion, density, etc.
4. Member Specifications: Define member orientations, member offsets, member releases where
moment transfer is to be limited or eliminated, and conditions that only allow a partial
transfer of certain types of forces such as tension-only.
5. Supports: Define support locations and boundary conditions including moment fixity, support
stiffness, and support angle.
6. Loads: Assign loads such as self-weight, dead, live, wind and seismic, and define load
combinations.
7. Analysis Instructions: Indicate the type of analysis to be performed (regular analysis, P-delta,
Buckling, Pushover, etc.) and define associated options.
8. Post Processing Commands: Extract analysis results, review deflected shapes, prepare shear
and moment diagrams, generate tables to present results, etc.
9. Design Commands: Specify (for steel, concrete, timber, etc.)

CEE 330L: Structural Analysis and Design Lab, NSU
3
The STAAD.Pro Start Page is displayed as following
Fig 1.1: Start Page of STAAD Pro.
STAAD Pro. key features:
(A) = Title bar (B) = Menu bar
(C) = Toolbars (D) = Mode bar
(E) = Page Control (F) = View window
(G) = Data area (H) = Status bar
Fig 1.2: For STAAD Pro. Key features

CEE 330L: Structural Analysis and Design Lab, NSU
4
Some most Usable Toolbars and icon views:
Whole section view
3D Rendered view
Elevation view Plan view Isometric view
Add beam cursor Modeling view Post processing mode
Node cursor Beam cursor
Translational Repeat
Symbols and Levels Loads Dimensions
Fig 1.3: STAAD Pro. Toolbars and icon views

CEE 330L: Structural Analysis and Design Lab, NSU
5
Fig 1.4: Properties Page
Fig 1.4: Load & Definition Page
Fig 1.4: Supports Page

CEE 330L: Structural Analysis and Design Lab, NSU
6
CHAPTER-II
CROSS SECTIONAL SHAPES FOR VARIOUS FINITE ELEMENTS
General
To design a building structure, bridge structure or any other structures use multiple elements that can be
characterized as beams, columns, trusses etc. These structural elements have some cross-section size and
shape to build up the total shape of the structures. The behavior of a structural member is dictated by its
material, cross sectional size and shape of the elements and its geometry. Depending on different
materials they have different cross sectional shape;
• Rectangular Section
• T-Section
• I-Section
• Channel-Section
• Circular-Section
• Triangular Section
• Wide flanged Shape
• Standard Channel
• Angle
• Structural Tee etc.
Rectangular Section T-Section I-Section Channel-Section Circular-Section
Triangular Section W
Wide flanged Shape
C
Standard Channel
L
Angle
WT or ST
Structural Tee
Fig: 2.1 Two dimensional cross section of various finite elements

CEE 330L: Structural Analysis and Design Lab, NSU
7
▪ Some American Standard Steel cross-sections and their properties
1. Angles - Equal Legs
Size
(in x in)
Dimensions Static Parameters
Depth( h )
(in)
Thickness(s)
(in)
Sectional Area
(in2)
Weight
(lbf/ft)
Moment of Inertia(Ix)
(in4)
12 x 12
12 1 3/8 30.9 105 410.0
12 1 1/4 28.3 96.4 377.5
12 1 1/8 25.6 87.2 344.1
12 1 22.9 77.8 310.4
10 x 10
10 1 3/8 25.6 87.1 232.1
10 1 1/4 23.5 79.9 215.1
10 1 1/8 21.2 72.3 196.2
10 1 19.0 64.7 177.3
10 7/8 16.7 56.9 157.6
10 3/4 14.4 49.1 137.2
8 x 8
8 1 1/8 16.7 56.9 98.0
8 1 15.0 51.0 89.0
8 7/8 13.2 45.0 79.6
8 3/4 11.4 38.9 69.7
8 5/8 9.6 32.7 59.4
8 9/16 8.7 29.6 54.1
8 1/2 7.8 26.4 48.6
6 x 6
6 1 11.0 37.4 35.5
6 7/8 9.7 33.1 31.9
6 3/4 8.4 28.7 28.2
6 5/8 7.1 24.2 24.2

CEE 330L: Structural Analysis and Design Lab, NSU
8
2. American Standard Steel Channels:
Designation Dimensions Static Parameters
Moment of Inertia Elastic Section Modulus
Imperial
(in x lb/ft)
Depth
- h -
(in)
With
- w -
(in)
Web
Thickness (s)
(in)
Sectional
Area
(in2)
Weight
(lbf/ft)
Ix
(in4)
Iy
(in4)
Sx
(in3)
Sy
(in3)
C 15 x 50 15 3.716 0.716 14.7 50 404 11.0 53.8 3.78
C 15 x 40 15 3.520 0.520 11.8 40 349 9.23 46.5 3.37
C 15 x 33.9 15 3.400 0.400 9.96 33.9 315 8.13 42.0 3.11
C 12 x 30 12 3.170 0.510 8.82 30 162 5.14 27.0 2.06
C 12 x 25 12 3.047 0.387 7.35 25 144 4.47 24.1 1.88
C 12 x 20.7 12 2.942 0.282 6.09 20.7 129 3.88 21.5 1.73
C 10 x 30 10 3.033 0.673 8.82 30 103 3.94 20.7 1.65
C 10 x 25 10 2.886 0.526 7.35 25 91.2 3.36 18.2 1.48
C 10 x 20 10 2.739 0.379 5.88 20 78.9 2.81 15.8 1.32
C 10 x 15.3 10 2.600 0.240 4.49 15.3 67.4 2.28 13.5 1.16
C 9 x 20 9 2.648 0.448 5.88 20 60.9 2.42 13.5 1.17
C 9 x 15 9 2.485 0.285 4.41 15 51.0 1.93 11.3 1.01
C 9 x 13.4 9 2.433 0.233 3.94 13.4 47.9 1.76 10.6 0.96
C 8 x 18.75 8 2.527 0.487 5.51 18.75 44.0 1.98 11.0 1.01
C 8 x 13.75 8 2.343 0.303 4.04 13.75 36.1 1.53 9.03 0.85
CEE 330L: Structural Analysis and Design Lab, NSU
9
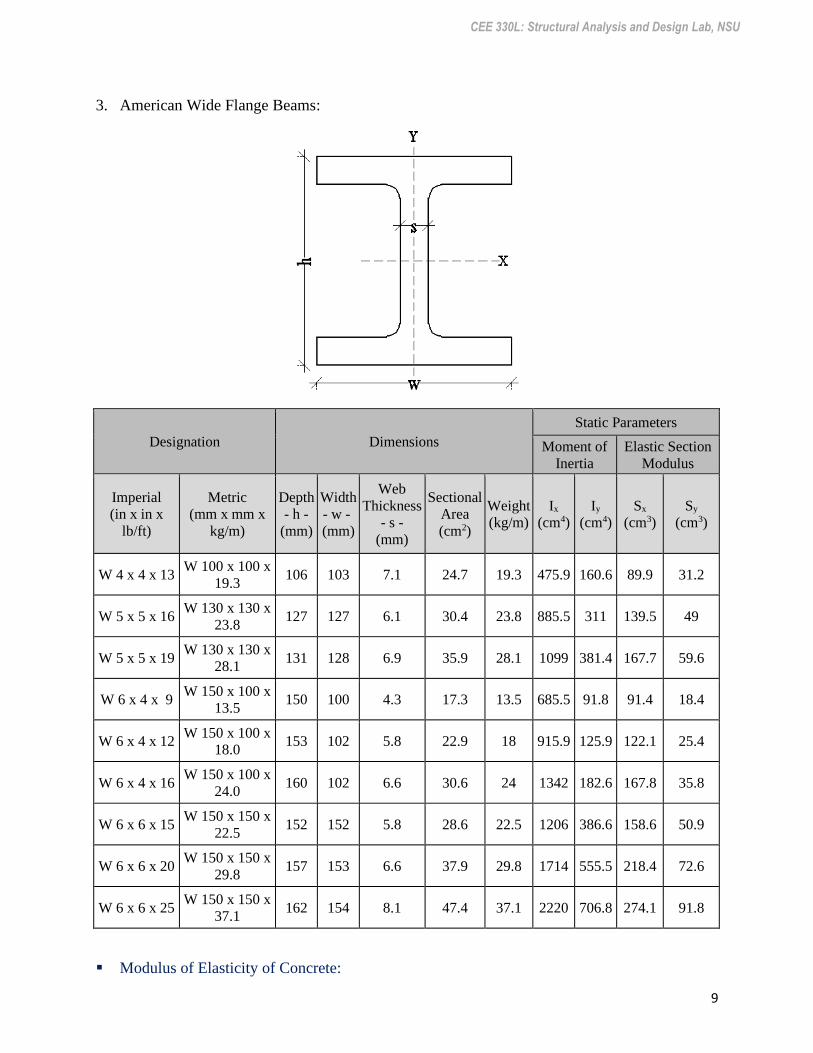
3. American Wide Flange Beams:
Designation Dimensions
Static Parameters
Moment of
Inertia
Elastic Section
Modulus
Imperial
(in x in x
lb/ft)
Metric
(mm x mm x
kg/m)
Depth
- h -
(mm)
Width
- w -
(mm)
Web
Thickness
- s -
(mm)
Sectional
Area
(cm2)
Weight
(kg/m)
Ix
(cm4)
Iy
(cm4)
Sx
(cm3)
Sy
(cm3)
W 4 x 4 x 13 W 100 x 100 x
19.3 106 103 7.1 24.7 19.3 475.9 160.6 89.9 31.2
W 5 x 5 x 16 W 130 x 130 x
23.8 127 127 6.1 30.4 23.8 885.5 311 139.5 49
W 5 x 5 x 19 W 130 x 130 x
28.1 131 128 6.9 35.9 28.1 1099 381.4 167.7 59.6
W 6 x 4 x 9 W 150 x 100 x
13.5 150 100 4.3 17.3 13.5 685.5 91.8 91.4 18.4
W 6 x 4 x 12 W 150 x 100 x
18.0 153 102 5.8 22.9 18 915.9 125.9 122.1 25.4
W 6 x 4 x 16 W 150 x 100 x
24.0 160 102 6.6 30.6 24 1342 182.6 167.8 35.8
W 6 x 6 x 15 W 150 x 150 x
22.5 152 152 5.8 28.6 22.5 1206 386.6 158.6 50.9
W 6 x 6 x 20 W 150 x 150 x
29.8 157 153 6.6 37.9 29.8 1714 555.5 218.4 72.6
W 6 x 6 x 25 W 150 x 150 x
37.1 162 154 8.1 47.4 37.1 2220 706.8 274.1 91.8
▪ Modulus of Elasticity of Concrete:

CEE 330L: Structural Analysis and Design Lab, NSU
10
According to ACI Code the modulus of elasticity of concrete E c can be calculated by the formula given
below:
𝐸𝑐 = 33 𝑊𝑐1.5 √𝑓 ′
𝑐 psi (Ib/in2)
Or, 𝐸𝑐 = 0.04 𝑊𝑐1.5 √𝑓 ′
𝑐 MPa (N/mm2)
With normal-weight, normal-density concrete these two relations can be simplified to
𝐸𝑐 = 57000 √𝑓 ′𝑐 psi (Ib/in2)
𝐸𝑐 = 4700 √𝑓 ′𝑐 MPa (N/mm2)
Where,
Ec = Modulus of elasticity of concrete (Ib/in2) or MPa
𝑓 ′𝑐 = Specified 28-day compressive strength of concrete (Ib/in2) or MPa
Wc = Concrete Weight.
CHAPTER-III
TWO DIMENSIONAL PORTAL FRAMES
CEE 330L: Structural Analysis and Design Lab, NSU
11
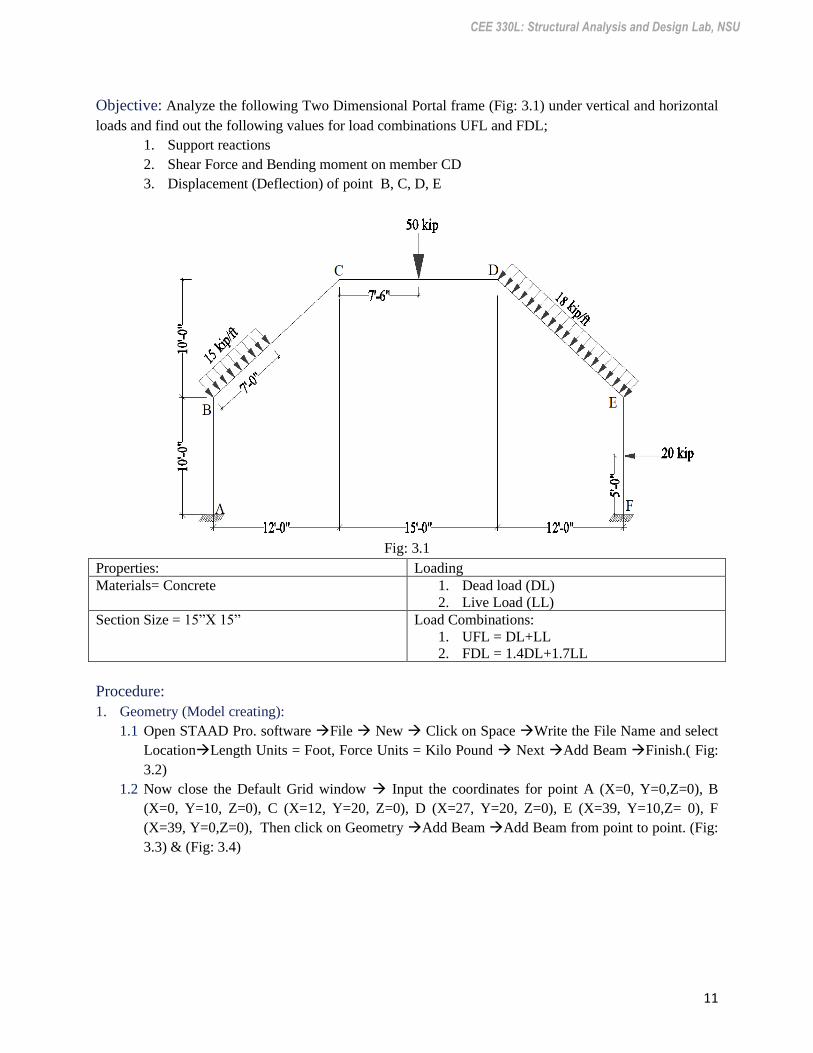
Objective: Analyze the following Two Dimensional Portal frame (Fig: 3.1) under vertical and horizontal
loads and find out the following values for load combinations UFL and FDL;
1. Support reactions
2. Shear Force and Bending moment on member CD
3. Displacement (Deflection) of point B, C, D, E
Fig: 3.1
Properties: Loading
Materials= Concrete 1. Dead load (DL)
2. Live Load (LL)
Section Size = 15”X 15” Load Combinations:
1. UFL = DL+LL
2. FDL = 1.4DL+1.7LL
Procedure:
1. Geometry (Model creating):
1.1 Open STAAD Pro. software →File → New → Click on Space →Write the File Name and select
Location→Length Units = Foot, Force Units = Kilo Pound → Next →Add Beam →Finish.( Fig:
3.2)
1.2 Now close the Default Grid window → Input the coordinates for point A (X=0, Y=0,Z=0), B
(X=0, Y=10, Z=0), C (X=12, Y=20, Z=0), D (X=27, Y=20, Z=0), E (X=39, Y=10,Z= 0), F
(X=39, Y=0,Z=0), Then click on Geometry →Add Beam →Add Beam from point to point. (Fig:
3.3) & (Fig: 3.4)

CEE 330L: Structural Analysis and Design Lab, NSU
12
Fig: 3.2
Fig: 3.3

CEE 330L: Structural Analysis and Design Lab, NSU
13
Fig: 3.4
2. General (Define & Assign):
2.1 Property: Define →Rectangle →Material = CONCRETE → YD = 1.25 ft (15”), ZD =1.25 ft
(15”) → Add →Close then for Assign select the property and click on Assign to View →Assign
→ Yes. (Fig: 3.5)
2.2 Support: Create →Fixed →Add. (Fig: 3.6)
Now for Assign click on the Support type →Select the Support point in Beam →Assign to
Selected Nodes →Assign →Yes.
2.3 Load & Definitions: Load Cases Details → Add → Loading Type = Dead →Title = Dead Load
or DL → Add → Again Loading Type = Live →Title = Live Load or LL → Add → Close. (Fig:
3.7)
• DL →Add →Self weight →Direction = Y, Factor = -1→Add →Close. Then
SELFWEIGHT Y-1 →Assign To View →Assign →Yes. (Fig: 3.8)
• For Given loads: Again Live Load or LL →Add →Member Load →Uniform Force
→W1 = -15 kip, d1= 0 ft, d2=8 ft →Direction = Y(Local) →Add →Close, then click on
defined force and select the required Beam → Assign to selected Beams →Assign →Yes.
(Fig: 3.9 & Fig: 3.10)
• The same process follow for other Trapezoidal, Concentrated and Uniform distributed
forces.
• Load Combination: Load Cases Details → Add →Define Combinations →Name = UFL
→Select DL → click on > and input ai = 1, LL → click on > and input ai = 1→ Add

CEE 330L: Structural Analysis and Design Lab, NSU
14
• Name = FDL →Select DL → click on > and input ai = 1.4, LL → click on > and input ai
= 1.7→ Add (Fig: 3.11)
Fig: 3.5
Fig: 3.6

CEE 330L: Structural Analysis and Design Lab, NSU
15
Fig: 3.7
Fig: 3.8

CEE 330L: Structural Analysis and Design Lab, NSU
16
Fig: 3.9
Fig: 3.10

CEE 330L: Structural Analysis and Design Lab, NSU
17
Fig: 3.11
3. Analysis and Result:
• From left side click on Analysis/Print →Static Check or All →Add →Close
• At Menu bar →Analyze →Run Analysis →Go to post processing mode →Done →Selected load
cases = DL+LL →Apply →OK. (Fig: 3.12 & Fig: 3.13)
• For Support Reactions use node cursor and double click on the support point →Reactions. Then
get the Table for all Support Reactions. (Fig: 3.14)
• For Beam Forces: From left side click on Beam →Graphs the find out Bending moment, Shear
force, and Axial force by clicking on required Beam from the following. ( Fig: 3.15)
• For Displacement (Deflection) of point go to Result (from Menu bar) →Deflection. use node
cursor and Double click on the required point by using Node cursor →Displacements. Then get
the Table for all Node Displacements. (Fig: 3.16)
Fig: 3.12

CEE 330L: Structural Analysis and Design Lab, NSU
18
Fig: 3.13
Fig: 3.14
Fig: 3.15

CEE 330L: Structural Analysis and Design Lab, NSU
19
Fig: 3.16
…………………………………………………******……………………………………………………

CEE 330L: Structural Analysis and Design Lab, NSU
20
Practice on Frame Analysis:
1. Analyze the following 2D Portal frame under vertical and horizontal loads and find out the following
values for load combinations UFL and FDL;
a) Support reactions for support A & E
b) Displacement (Deflection) of point B, C, D
c) Shear Force and Bending moment on member BC
Fig: 3.17
Properties:
Materials= Concrete
Section Size = 12”X 15”
2. Analyze the following 2D Portal frame under vertical and horizontal loads and find out the following
values;
a) Support reactions
b) Displacement (Deflection) of point B, C, D
c) Shear Force and Bending moment on member BC
Fig: 3.18

CEE 330L: Structural Analysis and Design Lab, NSU
21
CHAPTER-IV
TRUSS ANALYSIS
A. Roof Truss
Objective: Analyze the following Roof Truss (Fink Type) and find out the following values for Live
Load LL;
1. Support reactions
2. Forces for the members a, b, c, d, e
Fig. 4.1: Two Dimensional View of the Roof Truss (Fink Type)
Properties:
Materials= Steel
All members are Japanese Angle = L 60X60X4
Fig. 4.2: Three Dimensional View of the Roof Truss (Fink Type)

CEE 330L: Structural Analysis and Design Lab, NSU
22
Procedure:
1. Geometry (Model creating):
1.1 Open STAAD Pro. software →File → New → Click on Truss →Write the File Name and select
Location→Length Units = Foot, Force Units = Kilo Pound → Next →Add Beam →Finish.(Fig:
4.3)
1.2 Now close the Default Grid window → input coordinates value for all nodes like 1st Node point
(X=0, Y=0,Z=0), 2nd Node point (X=10, Y=5,Z=0), 3rd Node point (X=12, Y=0,Z=0), 4th Node
point (X=20, Y=10,Z=0), 5th Node point (X=24, Y=0,Z=0) and similarly others nodes Then click
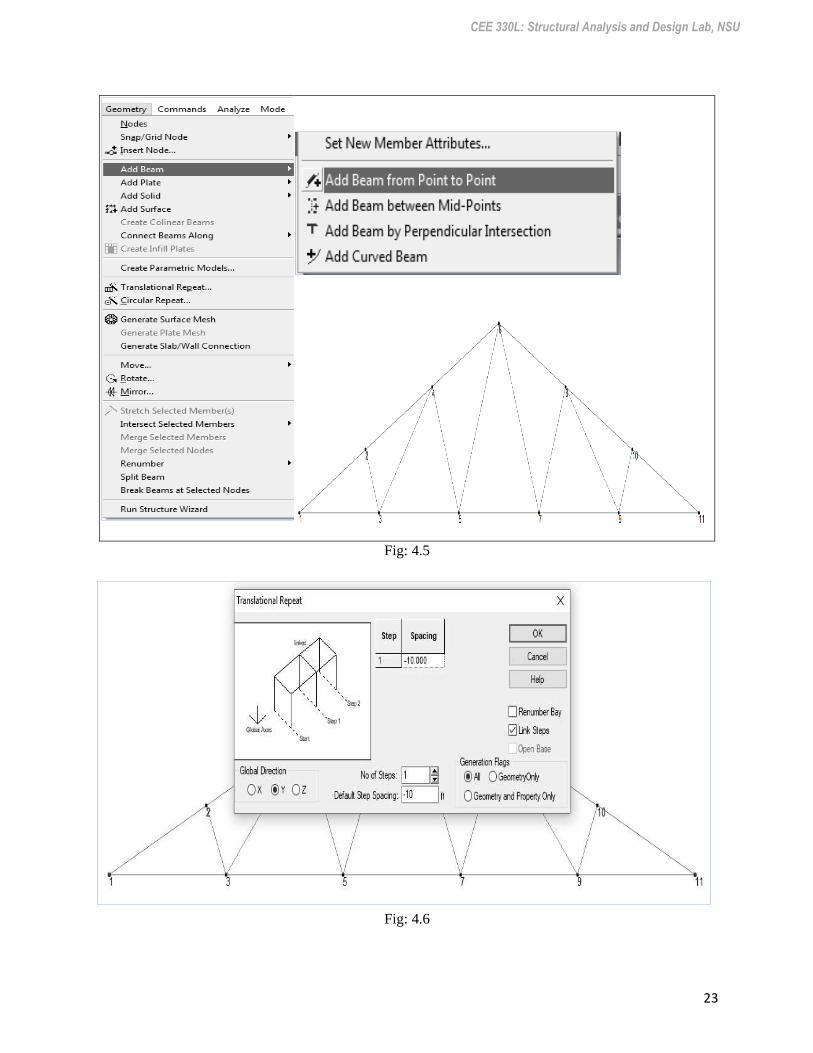
on Geometry →Add Beam →Add Beam from point to point. (Fig: 4.4) & (Fig: 4.5)
1.3 Now Select the Nodes 1 & 11 (in View window) by using node cursor →Translational Repeat →
Global Direction =Y → No. of Steps = 1 → Spacing= -10(-ve) → Click on Link Steps → OK
(Fig: 4.6)
Fig: 4.3
Fig: 4.4
CEE 330L: Structural Analysis and Design Lab, NSU
23
Fig: 4.5
Fig: 4.6
CEE 330L: Structural Analysis and Design Lab, NSU
24
2. General (Define & Assign):
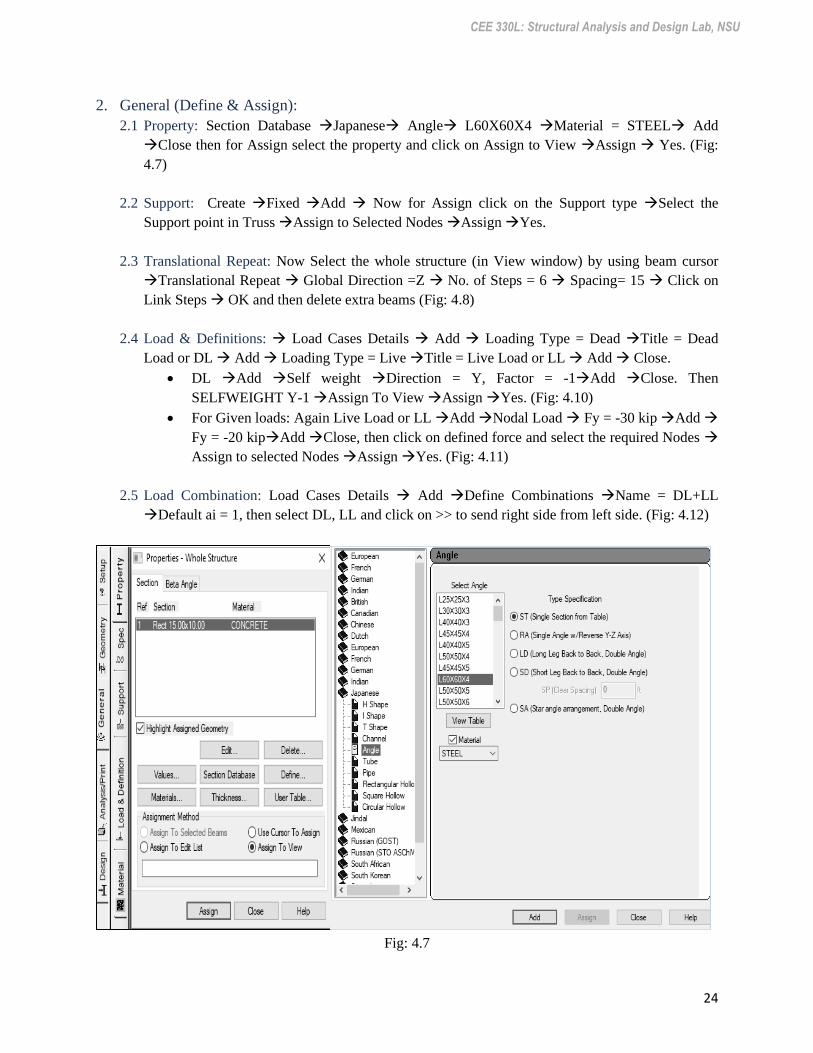
2.1 Property: Section Database →Japanese→ Angle→ L60X60X4 →Material = STEEL→ Add
→Close then for Assign select the property and click on Assign to View →Assign → Yes. (Fig:
4.7)
2.2 Support: Create →Fixed →Add → Now for Assign click on the Support type →Select the
Support point in Truss →Assign to Selected Nodes →Assign →Yes.
2.3 Translational Repeat: Now Select the whole structure (in View window) by using beam cursor
→Translational Repeat → Global Direction =Z → No. of Steps = 6 → Spacing= 15 → Click on
Link Steps → OK and then delete extra beams (Fig: 4.8)
2.4 Load & Definitions: → Load Cases Details → Add → Loading Type = Dead →Title = Dead
Load or DL → Add → Loading Type = Live →Title = Live Load or LL → Add → Close.
• DL →Add →Self weight →Direction = Y, Factor = -1→Add →Close. Then
SELFWEIGHT Y-1 →Assign To View →Assign →Yes. (Fig: 4.10)
• For Given loads: Again Live Load or LL →Add →Nodal Load → Fy = -30 kip →Add →
Fy = -20 kip→Add →Close, then click on defined force and select the required Nodes →
Assign to selected Nodes →Assign →Yes. (Fig: 4.11)
2.5 Load Combination: Load Cases Details → Add →Define Combinations →Name = DL+LL
→Default ai = 1, then select DL, LL and click on >> to send right side from left side. (Fig: 4.12)
Fig: 4.7

CEE 330L: Structural Analysis and Design Lab, NSU
25
Fig: 4.8
Fig: 4.10

CEE 330L: Structural Analysis and Design Lab, NSU
26
Fig: 4.11
Fig: 4.12

CEE 330L: Structural Analysis and Design Lab, NSU
27
3. Analysis and Result:
• From left side click on Analysis/Print →Static Check or All →Add →Close
• At Menu bar →Analyze →Run Analysis →Go to post processing mode →Done →Selected load
cases = DL+LL →Apply →OK. (Fig: 4.13 & Fig: 4.14)
• For Support Reactions use node cursor and double click on the support point →Reactions. Then
get the Table for all Support Reactions. (Fig: 4.15)
• For Beam Forces: From left side click on Beam →Graphs the find out Axial force by clicking on
required Beam from the following (Fig: 4.16)
Fig: 4.13
Fig: 4.14

CEE 330L: Structural Analysis and Design Lab, NSU
28
Fig: 4.15
Fig: 4.16

CEE 330L: Structural Analysis and Design Lab, NSU
29
B. Bridge Truss
Objective: Analyze the following Bridge Truss (Pratt Type) and find out the following values;
1. Support reactions
2. Forces for the members a, b, c
Fig. 4.17: Two Dimensional View of the Bridge Truss (Pratt Type)
Properties:
All members are Japanese I shape = I 150X75X6
Fig. 4.18: Three Dimensional View of the Bridge Truss (Pratt Type)

CEE 330L: Structural Analysis and Design Lab, NSU
30
Procedure:
1. Geometry (Model creating):
1.1 Open STAAD Pro. software →File → New → Click on Truss →Write the File Name and select
Location→Length Units = Foot, Force Units = Kilo Pound → Next →Add Beam →Finish. (Fig:
4.19)
Fig: 4.19
CEE 330L: Structural Analysis and Design Lab, NSU
31
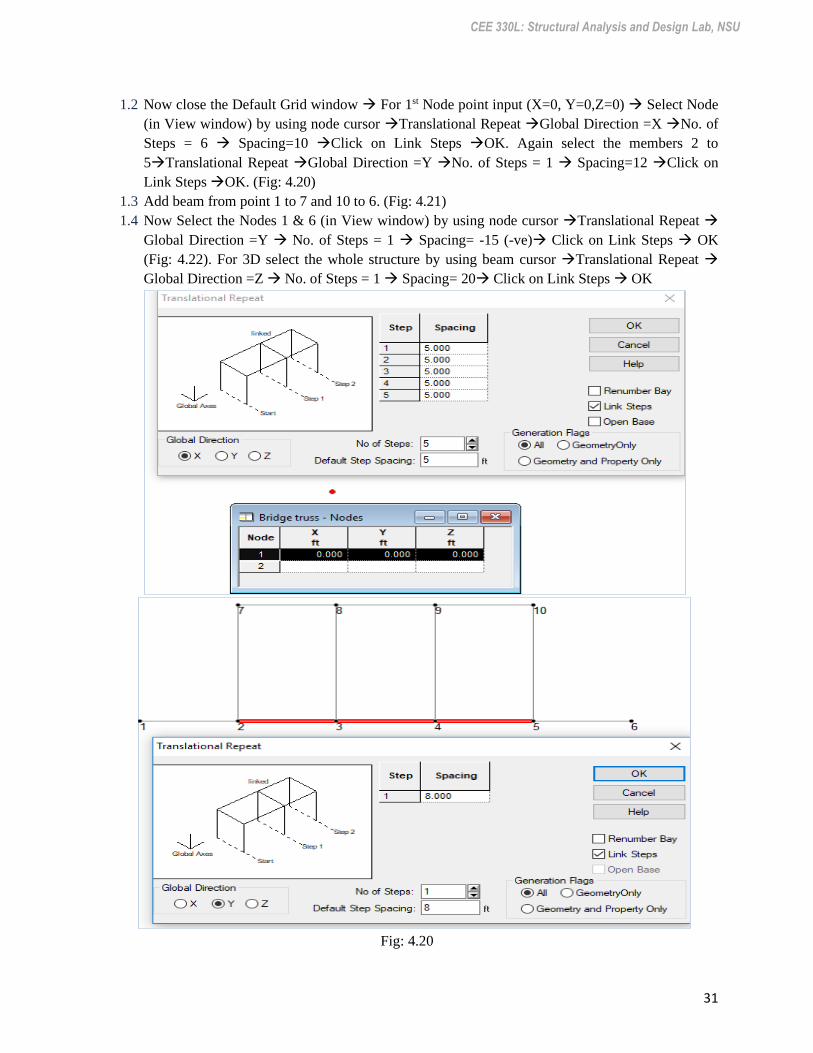
1.2 Now close the Default Grid window → For 1st Node point input (X=0, Y=0,Z=0) → Select Node
(in View window) by using node cursor →Translational Repeat →Global Direction =X →No. of
Steps = 6 → Spacing=10 →Click on Link Steps →OK. Again select the members 2 to
5→Translational Repeat →Global Direction =Y →No. of Steps = 1 → Spacing=12 →Click on
Link Steps →OK. (Fig: 4.20)
1.3 Add beam from point 1 to 7 and 10 to 6. (Fig: 4.21)
1.4 Now Select the Nodes 1 & 6 (in View window) by using node cursor →Translational Repeat →
Global Direction =Y → No. of Steps = 1 → Spacing= -15 (-ve)→ Click on Link Steps → OK
(Fig: 4.22). For 3D select the whole structure by using beam cursor →Translational Repeat →
Global Direction =Z → No. of Steps = 1 → Spacing= 20→ Click on Link Steps → OK
Fig: 4.20

CEE 330L: Structural Analysis and Design Lab, NSU
32
Add beam from point 1 to 7 and 10 to 6
Fig: 4.21
Fig: 4.22
2. General (Define & Assign):
2.1. Property → Section Database →Japanese→ I Shape→ I 150X75X6 →Material = STEEL→ Add
→Close then for Assign select the property and click on Assign to View →Assign → Yes. (Fig:
4.23)
2.2. Support → Create →Fixed →Add → Now for Assign click on the Support type →Select the
Support point in Truss →Assign to Selected Nodes →Assign →Yes.

CEE 330L: Structural Analysis and Design Lab, NSU
33
Fig: 4.23
2.3 Now Select the whole structure (in View window) by using beam cursor →Translational Repeat
→ Global Direction =Z → No. of Steps = 1 → Spacing= 20 → Click on Link Steps → OK and
then delete extra beams (Fig: 4.24)
Fig: 4.24
2.4 Load & Definitions → Load Cases Details → Add → Loading Type = Dead →Title = Dead Load
or DL → Add → Loading Type = Live →Title = Live Load or LL → Add → Close. (Fig: 4.25)
• DL →Add →Self weight →Direction = Y, Factor = -1→Add →Close. Then
SELFWEIGHT Y-1 →Assign To View →Assign →Yes. (Fig: 4.26)

CEE 330L: Structural Analysis and Design Lab, NSU
34
• For Given loads: Again Live Load or LL →Add →Nodal Load → Fy = -20 kip →Add →
Fy = -40 kip→Add →Close, then click on defined force and select the required Nodes →
Assign to selected Nodes →Assign →Yes. (Fig: 4.27)
2.5 Load Combination: Load Cases Details → Add →Define Combinations →Name = DL+LL
→Default ai = 1, then select DL, LL and click on >> to send right side from left side. (Fig: 4.28)
Fig: 4.25
Fig: 4.26

CEE 330L: Structural Analysis and Design Lab, NSU
35
Fig: 4.27
Fig: 4.28

CEE 330L: Structural Analysis and Design Lab, NSU
36
3 Analysis and Result:
• From left side click on Analysis/Print →Static Check or All →Add →Close
• At Menu bar →Analyze →Run Analysis →Go to post processing mode →Done →Selected load
cases = DL+LL →Apply →OK. (Fig: 4.29 & Fig: 4.30)
• For Support Reactions use node cursor and double click on the support point →Reactions. Then
get the Table for all Support Reactions.
• For Beam Forces: From left side click on Beam →from Graphs find out Axial force by clicking
on required Beam.
Fig: 4.29
Fig: 4.30
37
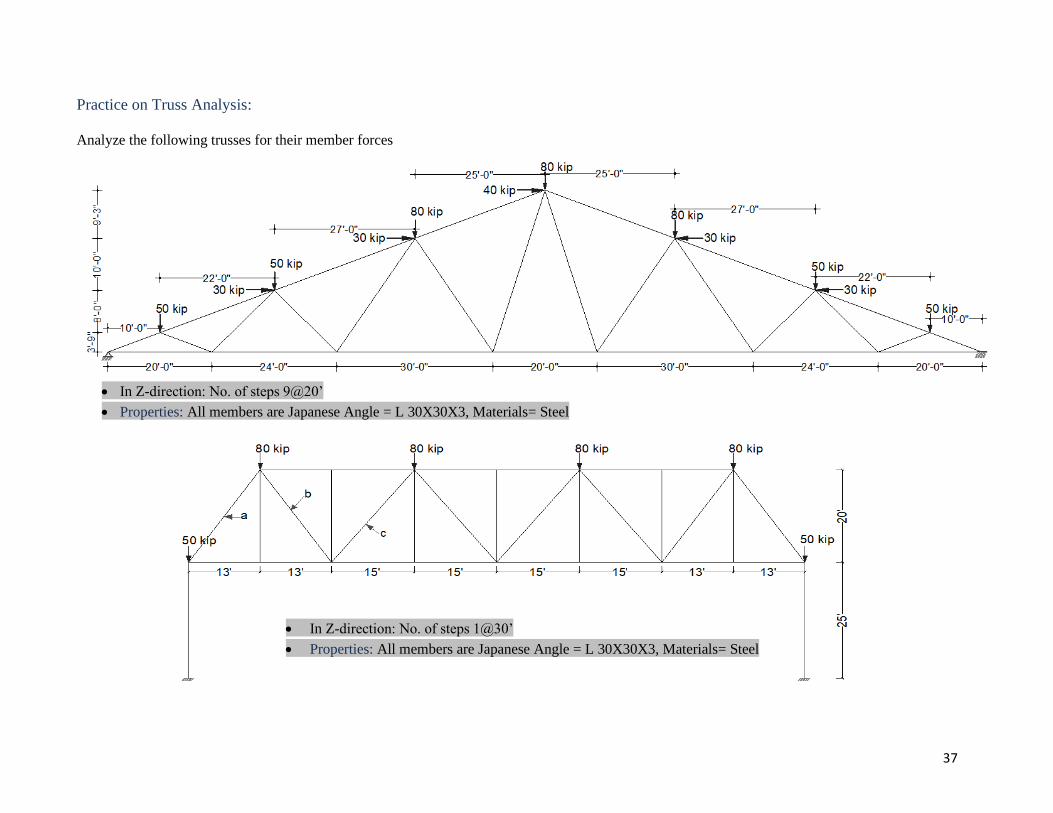
Practice on Truss Analysis: Analyze the following trusses for their member forces
• In Z-direction: No. of steps 1@30’
• Properties: All members are Japanese Angle = L 30X30X3, Materials= Steel
• In Z-direction: No. of steps 9@20’
• Properties: All members are Japanese Angle = L 30X30X3, Materials= Steel

38
CHAPTER-V
MULTI STORIED BUILDING FRAME UNDER ALLLOADS
Objective: Analyze the following 7-Storied residential building under all loads and Columns, Beams
forces and support reactions for foundation design.
Fig: 5.1 Typical Floor Plan

CEE 330L: Structural Analysis and Design Lab, NSU
39
Fig: 5.2 Column LayoutPlan
Fig: 5.3 Beam LayoutPlan
Fig: 5.4 Elevation View

CEE 330L: Structural Analysis and Design Lab, NSU
40
Table 5.1 Geometry and Loads:
Properties: Load Definitions:
Column: C1= 12”X15”
C2=12”X18”
C3=12”X20”
Beam: GB = 10”X18”
FB = 10”X20”
Varenda Beam: 6” X 6”
• All supports are fixed support
• Bottom story height = 8’-0”
• Typical story height = 10’-0”
• Top story for lift & stair = 8’-0”
1. Seismic Definition: (Dhaka zone)
EQx & EQz
2. Wind Definitions: (for Dhaka)
Wx & Wz
*Wind speed for Dhaka zone = 210 km/hr = 130 mile/hr
3. Dead Load:
Self weight (Factor=1)
Total floor weight = 130 psf
(Slab weight+ Floor Finish + Partition wall load)
Wall load on beams (W) = 416 Ib/ft (for 5” brick wall)
4. Live Load: LL = 40 psf
Load Combinations:
UFL = DL+LL
FDL = 1.2*DL+1.6*LL
FDLEQx = 0.9*DL+1.2*LL+1.32*EQx
FDLEQz = 0.9*DL+1.2*LL+1.32*EQz
FDLWx = 0.9*DL+1.2*LL+1.2*Wx
FDLWz = 0.9*DL+1.2*LL+1.2*Wz
Procedure:
1. Geometry (Model creating):
1.1 Open the STAAD Pro. software and click on New Project →Space →File name →Location
(select your file location to save) →Length unit select Foot and KiloPound →Next →Add Beam
→Finish.
1.2 Column & Beam Layout:
1.2.1 Close the default Grid system and at the right side input your first node point coordinates
as (X Y Z)=(0 0 0) (Figure: 5.2). After than select the node by using node cursor
→Geometry →Translational Repeat →Select Global Direction = X → No of Steps = 3 →
now write down the column spacing from your Column Layout Plan as (Step1 =19.5,
Step2 =8.5, Step3 =19.5) →Link Steps →OK. (Figure: 5.2)
1.2.2 After than select the total beam by using Beam cursor →Geometry →Translational
Repeat →Select Global Direction = Z → No of Steps = 1 → now write down the column
spacing from your Column Layout Plan as (Step1 =15.667 ft) →Link Steps →OK.
(Figure: 5.3)
1.2.3 Now select the column node no 5 & 8 from the 2nd row →Geometry →Translational
Repeat →Select Global Direction = Z → No of Steps =2 → now write down the column
spacing from your Column Layout Plan as (Step1 =12.25, Step2 =11) →OK (Figure:
5.4). Again select the column node no 9 & 10 by using node cursor →Geometry
→Translational Repeat →Select Global Direction = X → No of Steps =3 → now write
down the column spacing from your Column Layout Plan as (Step1 =13.25, Step2 =21,
Step1 =13.25) →OK (Figure: 5.5)

CEE 330L: Structural Analysis and Design Lab, NSU
41
Fig: 5.2
Fig: 5.3

CEE 330L: Structural Analysis and Design Lab, NSU
42
Fig: 5.4
Fig: 5.5
1.2.4 For create beam layout: Go to Geometry →Add Beam →Add Beam from Point to Point
and then connect the nodes points each other as the given Beam layout plan. Again for
interesting beam go to Geometry →Add Beam →Add Beam by Perpendicular
Intersection. (Figure: 5.6 and 5.7)
1.2.5 Veranda Create: Now select the node no 12 →Geometry →Translational Repeat →Select
Global Direction = X→ No of Steps =1 → now write down the Veranda length as (Step1
= -10.5) →OK (Figure: 5.8).
1.2.6 Again select the beam from node no 12 to 19 by using beams cursor →Geometry
→Translational Repeat →Select Global Direction = Z → No of Steps =1 → now write
down the now write down the Veranda width as (Step1 =3) →Click on Link Steps →OK
(Figure: 5.9). And similarly create another Veranda.
1.2.7 Now Story Create: Select whole structure →Geometry →Translational Repeat →Select
Global Direction = Y→ No of Steps =8(7 stoy+1 is bottom story for base)→ Default Step
Spacing = 10(Typical story height) and Step1 = 8) →Click on Link Steps →OK (Figure:
5.10).
1.2.8 Then delete the unnecessary columns from veranda and inside of the plan by selecting
them (use Delete button from keyboard).

CEE 330L: Structural Analysis and Design Lab, NSU
43
Fig: 5.6
Fig: 5.7

CEE 330L: Structural Analysis and Design Lab, NSU
44
Fig: 5.8
Fig: 5.9
Fig: 5.10

CEE 330L: Structural Analysis and Design Lab, NSU
45
2 General (Define & Assign):
2.1 Support Create and Assign:
2.1.1 Click on View from +Z →Select the all bottom Story beams → Delete →Ok →Yes
2.1.2 From left side Click on General →Support →Create → Fixed →Add. (Fig: 5.11)
2.1.3 Select S2 Support 2 →Select all bottom Nodes by using Node Cursor →Assign to
Selected Nodes →Assign →Yes. (Fig: 5.12)
Fig: 5.11
Fig: 5.12

CEE 330L: Structural Analysis and Design Lab, NSU
46
2.2 Property (Beam, Column creates):
2.2.1 Same processes follow for other columns and Beams.
2.2.2 Column & Beam Define: From left side Click on General →Property →Define
→Rectangle →YD=1.25 ft, ZD=1 ft (For column C1) →Add. (Fig: 5.13)
2.2.3 Same processes follow for other columns and Beams.
2.2.4 (Here YD is depth of Beams and columns and ZD is width of Beams and columns)
2.3 Column & Beam Assign: Click on each of the property →Select the member from view as your
given layout →Assign to selected beams →Assign →Yes.
2.4 Load & Definition: In STADD Pro. must be follow the sequence as 1. Earthquake, 2. Wind load,
then 3. Dead load and 4. Live load.
2.4.1 Earthquake Definition: Load & Definition → Definitions →Seismic Definitions →Add
→Type: UBC 1994 →Then write down the parameter values as your given data building
category →Add→Self weight Factor = 1→Add Then click on Floor Weights →Pressure
= -0.17(Slab weight 75+FF 30+ PW 25+LL 40 =170 psf= 0.17 ksf) and Y range 0 to 78
→Add →Close. (Fig: 5.14 and Fig: 5.15)
2.4.2 Wind Load Definitions: Load & Definition → Definitions →Add →Type:1, Comments:
X-Direction →Add → TYPE 1, Comments: Z-Direction → Add→ Close.
a. TYPE1: X-Direction→Add →Calculate as per ASCE-7→Input the Common
data→Apply→Main building data according to your Project→Apply →Ok Add
→Close. (Fig: 5.16 and Fig: 5.17)
b. Same process follow for TYPE2: Z-Direction.
2.4.3 Load Cases Details:
Add →Number =1, Loading Type = Seismic, Title = EQx →c
Number =2, Loading Type = Seismic, Title = EQz →Add
Number =3, Loading Type = Wind, Title = WX →Add
Number =4, Loading Type = Wind, Title = WZ →Add
Number =5, Loading Type = Dead, Title = DL →Add
Number =6, Loading Type = Live, Title = LL →Add →Close
2.4.4 Assign all loads as
• EQx →Add →Seismic Load →X-direction, Factor =1
• EQz →Add →Seismic Load →Z-direction, Factor =1
• WX →Add →Wind Load →X-direction, Factor =1 →Y Range, Minimum =8,
Maximum = 78 →Add→Close
• WX →Add →Wind Load →Z-direction, Factor =1 →Y Range, Minimum =8,
Maximum = 78 →Add→Close
• DL →Add→Self weight → Factor= -1 →Add→Close →?SELF WEIGHT Y-1
→Assign to view →Assign
• DL →Add→Floor Load → Pressure (input total floor load with negative sign) then Y
Range, Minimum =8, Maximum = 78 →Add→Close
• LL →Add→Floor Load → Pressure (input total floor load with negative sign) then Y
Range, Minimum =8, Maximum = 78 →Add→Close
2.5 Load Combinations: Load cases details →Add → Define Combinations →Name: DL+LL or
other combinations as required then select the load name from the Available load cases and send
from left to right side →Input necessary factors →Add→Close. (Fig: 5.21). Otherwise use the
Auto Load Combinations according to ACI Code and Add.

CEE 330L: Structural Analysis and Design Lab, NSU
47
Fig: 5.13
Fig: 5.14
Fig: 5.15

CEE 330L: Structural Analysis and Design Lab, NSU
48
Fig: 5.16
Fig: 5.17
Fig: 5.18

CEE 330L: Structural Analysis and Design Lab, NSU
49
Fig: 5.19
Fig: 5.20
Fig: 5.21

CEE 330L: Structural Analysis and Design Lab, NSU
50
3 Analysis and Result:
• From left side click on Analysis/Print →Static Check or All →Add →Close
• At Menu bar →Analyze →Run Analysis →Go to post processing mode →Done →Selected load
cases = DL+LL →Apply →OK. (Fig: 4.29 & Fig: 4.30)
• For Support Reactions use node cursor and double click on the support point →Reactions. Then
get the Table for all Support Reactions. (Fig: 4.31)
• For Beam Forces: From left side click on Beam →from Graphs find out Axial force by clicking
on required Beam.
Fig: 5.22
Fig: 5.23

CEE 330L: Structural Analysis and Design Lab, NSU
51
Fig: 5.24
**********END***********

CEE 330L: Structural Analysis and Design Lab, NSU
52
Practice on Building Analysis:
Analyze the following 10-Storied residential building under all loads and find out the following items.
i) Support reaction of the indicated column for load combination UFL
ii) Shear force and Bending moment for the beam AB at 1st story for load combination FDL
For Define and Assign
Properties: Load Definitions:
1. Column: C1= 15”X15”
2. Beam: GB = 10”X15”
FB = 10”X20”
▪ All supports are fixed support
▪ Bottom story height = 7’-0”
▪ Typical story height = 10’-0”
▪ Top story for Stair Top= 8’-0”
1. Seismic Definition: (Dhaka zone)
EQ+x & EQ+z
2. Wind Definitions: (for Dhaka)
W+x W-x & Wz
Wind speed for Dhaka zone = 210 km/hr =130mile/hr
3. Dead Load:
Self weight (Factor=1)
Total Floor weight (Slab wt.+FF+PW) = 130 psf =
0.130 ksf
Wall load on beams (W) = 425 Ib/ft (for 5” brick
wall)
4. Live Load: LL = 60 psf
Load Combinations:
1. UFL = DL+LL
2. FDL = 1.4*DL+1.7*LL
3. FDLEQx = 1.05*DL+1.275*LL+1.4025*EQx
4. FDLEQz = 1.05*DL+1.275*LL+1.4025*EQz
5. FDLWx = = 1.05*DL+1.275*LL+1.275*Wx
6. FDLWz = 1.05*DL+1.275*LL+1.275*Wz
A B

CEE 330L: Structural Analysis and Design Lab, NSU
53
Procedure:
1. Input the first node (0,0,0) and go or clock to view from +Y
2. Select this node →go to Transitional repeat→ X direction → Steps=3 → Spacing =18’→Link
steps→ok
3. Using beam cursor select the whole beam→ go to Transitional repeat→ Z direction → Steps=3
→ Spacing 1st step =14’ 2nd step =10’ and 3rd step = 16’→Link steps→ok
4. Using beam cursor select the whole grid→ go to Transitional repeat→Y direction → Steps=12 →
Spacing =10’ and 1st step = 7’ and last step = 8’→Link steps→ok →Delete the unnecessary part
→then delete the beams in base.
5. Now for top story: Click on view from +Z then Select the top story only by dragging beam cursor
→View →view selected object only →view from +Y →then delete the other portion without stair
and lift space.
6. Go to General →Property → define →rectangle →(ZD=……., YD=……..)→Add→close. Here
define your all properties like Columns, Beams etc.
7. Now click on column property → Select(from menu bar) →Beams parallel to Y →Assign to the
selected beams → Assign→yes.
8. Then click on Beam property → Select(from menu bar) →Beams parallel to X → again
Select(from menu bar) → Beams parallel to Z → View →view selected object only → view from
+Z →Then select bottom beams for GB or others beam for FB →Assign to the selected beams →
Assign→yes.
9. Support →create → Fixed →Add →Close →click on support (S2) →select all bottom most nodes
of the building by using node cursor → Assign to the selected nodes → Assign→yes.
10. Load & Definition →Definition →Seismic definition →Add →UBC 1994 →(input all factors of
your building type according to BNBC codes like Zone factor, Importance factor, Rw factor, site,
CT value etc.) →Add →Selfwt factor =1 →Add →Floor weights →input the pressure as the sum
of floor load and live load with (-ve) sign →Y Range Minimum=0 and Mximum = total height of
the building →Add →close.
11. For wind load → Definition →Wind definition →Add →Type 1, wind X → Add →Type 2, wind
Z → Add →close.
Type 1, wind X →Add →calculate as per ASCE- 7 →Common data= Basic wind speed,
Exposure category B, Building structure →Apply →Main building data →input your Building
height, Building Length along the direction of Wind(L), Building Length normal to the direction
of Wind(B), Enclosed building →Apply →Ok→Close
Again Type 2, wind Z →Add →calculate as per ASCE- 7 →Common data= Basic wind speed,
Exposure category B, Building structure →Apply →Main building data →input your Building
height, Building Length along the direction of Wind(L), Building Length normal to the direction
of Wind(B), Enclosed building →Apply →Ok→Close
12. Now Load cases Details →Add →
i) Loading type: Seismic, Title: EQ+X →Add
ii) Loading type: Seismic, Title: EQ+Z →Add
iii) Loading type: Wind, Title: W+X →Add
iv) Loading type: Wind, Title: W-X →Add
v) Loading type: Wind, Title: W+Z →Add

CEE 330L: Structural Analysis and Design Lab, NSU
54
vi) Loading type: Dead, Title: DL →Add
vii) Loading type: Live, Title: LL →Add →Close.
13. Now EQ+X →Add →Seismic loads →X direction,(for EQ+Z, Z direction) factor=1
→Add→close
14. W+X →Add→ Wind loads →X direction, factor=1 →define Y range ( Minimum &
Maximum)→ Add→close
15. W-X →Add→ Wind loads →X direction, factor= -1 →define Y range ( Minimum &
Maximum)→ Add→close
16. W+Z →Add→ Wind loads →Z direction, factor=1 →define Y range ( Minimum & Maximum)→
Add→close
17. DL →Add → Self weight, Y direction (Factor = -1) →Add →close
18. DL →Add → Floor load →Pressure(input with –ve sign), Y Range (Minimum & Maximum)
→Add →close
19. DL →Add → Member loaf →Uniform force→W1(input with –ve sign)→Add →close then
Select →Beams parallel to X and Z → View→ view selected object only →view from +Z
→Select the Beams with out (GB+Roof+ S. top) →Assign to the selected beams → Assign→yes.
20. LL → Pressure(input with –ve sign), Y Range (Minimum & Maximum) →Add →Close.
For Load Combinations:
21. Load cases Details →Add →Define Combinations →Name: FDLEQx → then click on DL and
send it right side→ ai=1.05 →LL and send it right side → ai=1.275→ EQ+x and send it right side
→ ai=1.4025 →Add →close.
22. Do the other combinations in this way.
Analysis & Result:
23. Analysis/Print→Statics check→Add →close →Analyze →Run Analysis →Go to post processing
mode →Done
24. For beam/column result click on beam →Graph (then select your indicated beam or column
according to story and see on right side and find out)
………………………………………………End………………………………………………………