ltfs for microsoft windows user guide - tandberg data · 2014-11-18 · 1introduction...
TRANSCRIPT

LTFS for Microsoft Windows UserGuide
AbstractThis guide provides information about LTFS for Microsoft Windows, which is an implementation of theLinear Tape File System (LTFS) to present an LTO-5 or LTO-6 tape drive and media as a disk volume,accessed via a drive letter.
Doc. Part number: EH969-90942First edition: March 2014

Legal and notice information
© Copyright 2012–2014 Hewlett-Packard Development Company, L.P.Confidential computer software. Valid license required for possession, use or copying.Consistent with FAR 12.211 and 12.212, Commercial Computer Software, ComputerSoftware Documentation, and Technical Data for Commercial Items are licensed to theU.S. Government under vendor's standard commercial license.Acknowledgements
Microsoft®, Windows®, Windows 7®, Windows Vista®, Windows 8®, and WindowsServer® are U.S. registered trademarks of Microsoft Corporation.
Linear Tape-Open, LTO, LTO Logo, Ultrium and Ultrium Logo are trademarks of HP,Quantum, and IBM in the US, other countries or both.

Contents1 Introduction..................................................................................................5
Features...............................................................................................................................5Intended usage.....................................................................................................................5Architecture.........................................................................................................................5Supported configurations......................................................................................................6
2 Installation and configuration....................................................................7Downloading and installing LTFS..........................................................................................7Uninstalling LTFS.................................................................................................................7
3 Using LTFS....................................................................................................9Mapping a tape drive to a drive letter....................................................................................9Mount options....................................................................................................................10Index updates.....................................................................................................................11Cartridge utilities................................................................................................................12File permissions..................................................................................................................13File names..........................................................................................................................13Limitations.........................................................................................................................13Working with Windows Explorer.........................................................................................13Removing the LTFS volume.................................................................................................16Using the FormatWizard.....................................................................................................16Using the CheckWizard.......................................................................................................19Using the UnformatWizard.................................................................................................21
4 Troubleshooting.........................................................................................23General..............................................................................................................................23Errors during configuration.................................................................................................23Explorer windows not refreshing.........................................................................................23
5 Frequently asked questions......................................................................25
Contents 3

4
1 IntroductionThis guide provides information about LTFS software, which is an implementation to aid the use ofthe Linear Tape File System (LTFS). LTFS makes tape self-describing, file-based, and easy-to-use, andallow users to use standard file operations on tape media to access, manage and share files with aninterface that behaves like a hard disk. In addition, LTFS provides the ability to share data acrossplatforms, as you would with a USB drive or memory stick.
NOTE: A firmware update may be required. LTFS will check and tell you if your tape drive needsupdating.
Features• Allows you to use LTO media as a disk.
• Based on Open Source LTFS software with Graphical User Interface (GUI) components addedfor usability.
• Precompiled application versions provided for supported platforms.
• Source code available for the open source LTFS software.
• Supported on Microsoft Windows.
Intended usageLTFS presents the contents of the tape as a disk volume. However it is important to bear in mind thatit is not a true disk, and so there are some best practices to follow to ensure satisfactory performanceand a good user experience:
• LTFS is designed to work best in a single-user environment, where only one user is copying filesto or from the tape.Multiple users or processes trying towrite or read at the same timewill resultin poor performance because of the sequential access nature of tape.
• For the same reasons, do not share the tape drive between different systems. A single tape driveshould be connected to a single host bus adapter (HBA).
• The expected usage model is to transfer large files between systems, by mounting the tape onone system,writing the files, unmounting,mounting on the second system, and reading the files.Treating the tape volume as a true random access device (for example frequently reading andupdating individual files) will not perform as well as streaming large files to and from tape.
ArchitectureThe various components in the LTFS application are shown in the following diagram.
Features 5

Supported configurationsLTFS supports:
• LTO-5 Ultrium tape drives with SAS interfaces
• LTO-6 Ultrium tape drives with SAS interfaces
• Microsoft Windows 7 and Windows Vista (x86 and x64)
• Microsoft Windows Server 2008 and 2008R2 (x86 and x64)
• Microsoft Windows 8 (x86 and x64)
• Microsoft Windows Server 2012 (x64)
NOTE: Consult your provider for the latest details on supported operating system configurationsand supported HBA and hardware configurations.
6 Introduction

2 Installation and configurationWhen using LTFS with LTO tape drives, you need the following components:
• An LTO-5 or LTO-6 tape drive connected to a supported SAS HBA
• Adrive firmware revision that supports dual partitioning. HP L&TT should be used if a firmwareupdate is required.
• The latest tape driver installed
• The software package installer executable.
NOTE: You can download HP L&TT from http://www.hp.com/support/tapetools.
Downloading and installing LTFSTo use the precompiled binaries:
• Download the installer appropriate to your operating system.
• When the download has completed, run the installer. Note that administrator privileges may berequired depending on your system configuration.
• Follow the installer steps until the installation is complete.
The executables will be installed into a new menu group under LTFS. For the next steps, see “UsingLTFS” (page 9).
Uninstalling LTFSIf you want to remove the software from your system, follow these steps:1. Unmount any LTFS file system you currently have mounted (see “Removing the LTFS volume”
(page 16))2. Open the Windows Control Panel and select Uninstall a program.3. From the list of installed software, select LTFS and then click the Uninstall button.
Downloading and installing LTFS 7

8

3 Using LTFSMapping a tape drive to a drive letter
Before you can access the tape cartridge as a volume, you must first establish a mapping between thetape drive and a Windows drive letter. To do this, run the LTFS Configuration Tool located in theLTFS program group.
NOTE: The toolmay request administrative privileges, depending on your system security policies.
The configuration window will appear on your system:
By default the first usable tape drive found on your system is selected, along with the first unuseddrive letter. Change the selections as desired, then to mount with all the default options, click Createmapping. This results in the following actions:1. The configuration tool checks that the drive is accessible and usable.2. The tool attempts to verify that your system has suitableHBAdriver support for LTFS operation.3. The tool looks for a currently loaded tape cartridge. If a cartridge is found, it is checked to see if
it is formatted as an LTFS volume. If not, you are offered the option of formatting the cartridgebefore proceeding. It is recommended that you should accept this option.
Mapping a tape drive to a drive letter 9

4. Once a formatted cartridge is detected, or if no cartridge is present, the file system service isstarted and the window is updated to reflect the new configuration. The following screenshotillustrates a typical view after a mapping has been established:
5. When the mapping has been established, you can close or minimize the configuration tool.
AWindows Explorerwindowwill now include an LTFS volume. The first time you access this drivevolume there will be a slight delay whilst the index is loaded and checked, but from then on thedrive volume may be accessed as normal.
Mount optionsInmost circumstances the default options are suitable and you do not need to change them.Howeverfor flexibility you can modify them if you wish. The options are as follows:
• Mount read-only – If you select this option, the cartridge contents are readable but cannot bemodified. This provides a “software”write-protectmechanism; the same effect can be achievedusing the “hardware” write protect tab on the tape cartridge.
• Remount at system start-up – The normal behavior is to configure the service so that itautomatically restarts when the system boots up. Unselect this checkbox if you do not want
10 Using LTFS

this to happen (for example, if this is a temporary setup where the tape drive will be removedafter the system is shut down).
• Advanced options – this opens a further window where you can adjust less common options.
NOTE: Some of these options may have a noticeable impact on performance and in generalshould not be changed.
◦ Support ticket folder: This is the location where drive logs are stored. These logs aregenerated on each unmount and whenever an error is detected. The application will keepthe ten most recent logs and automatically delete any older logs. These logs may be usefulto support personnel but otherwise can be ignored.
◦ Enable verbose logging: This is not required in normal operation and you should only useit when requested by support personnel, as it will have an adverse effect on performance.
◦ Enable extended verbose logging: This adds a further level of detail to logfile entries.
◦ Thumbnails:WhenWindows encounters a folder full of files, it attempts to build thumbnailsto represent the content of each file. This is not desirable in an LTFS volume, because it maytake many minutes or even hours to generate the thumbnails. So by default LTFS tells theoperating system that the volume is in the “offline” state, which prevents automaticthumbnail creation. You can turn this off if desired, but be aware that it will have a severeeffect on the time needed to open and browse folders.
◦ • Index capture: This option allows you to keep a copy of the latest index from tape on thelocal disk. Enable the check box and enter the path to the folder where you would like tokeep the index file after the tape is unmounted.
◦ Index updates: This allows you to control when indexes are written to tape; see “Indexupdates” (page 11) for more details.
◦ Index partition usage: The LTFS format allows for data files to be written in the indexpartition, which if used carefully may improve access times for frequently-used files.However, in general you should leave this setting in its default state.
Index updatesAccessing data stored on tape relies on an up-to-date index being available. LTFS offers three differentmechanisms for updating the copy of the index stored on tape. The default setting is to write a copyof the index to tape periodically while writing data; the index is written every five minutes. You canchange the time interval to everyminute. Thismethod of index update reduces thewindowof exposureto power-loss events, since there will be an index on tape no more than five minutes old (if using thedefault interval).
The second option is to write the index to tape only when a volume is removed. In normal operationthis is sufficient, since the LTFS usage model requires the volume to be unmounted after use, so thereis always a valid index. However, if power is removed from the drive without unmounting, forexample, through an unplanned power outage or accidental unplugging, the volume will be left inan inconsistent state, and all files added since the last dismount operation will be inaccessible. TheCheckWizard utility may be able to recover the file data to the _ltfs_lostandfound directory,but the metadata (filename, access dates, and so on) will be lost.
The final mechanism provided in LTFS is to update the index every time a file is closed after writing.This further reduces the exposurewindow to a single file, or (if several processes are using the volumesimultaneously) to the number of files being written concurrently. However, this does add someoverhead, both in terms of the tape capacity used for each index, and also in terms of performancesince the writing of the index will take bandwidth away from writing data. These overhead effectswill become more severe with smaller file sizes.
Index updates 11

In most cases the default behavior offers the best solution, but the options allow you to modify thebehavior for a particular situation. The following table summarizes the options available for choosingwhen the index is updated:
Potential drawbacksPotential benefitsIndex is flushed to tape...
Exposure to the risk of power failureduring writing.
Minimal capacity overhead.When the volume is unmounted.
Some capacity overhead since theindex is written more frequently.
Exposure to the risk of powerfailure, limited to the last nminutes.
Every nminutes during writing(default: n=5).
Negligible impact on performance.
Greater capacity and performanceoverhead, especially if writing smallfiles.
Exposure to the risk of powerfailure is limited to a single file(more if several processes are
When any file open for writing isclosed.
writing to different filesconcurrently).
Cartridge utilitiesThe cartridge utilities button opens a furtherwindowwhere you can access the utilities for formattingthe tape, etc.
• Load: Physically loads the tape which is already presented to the drive.
• Unload: Physically ejects the LTFS volume from the tape drive. The file system will continueto run, but attempting to access the volumewhile no cartridge is present will result in the errormessage “The device is not ready”. When a formatted LTFS cartridge is loaded into the drive,the index will be read and checked, and then the volume may again be accessed.
• Format: Starts the FormatWizard to guide you through the steps and options of creating afresh volume on the current cartridge;more information is given in “Using the FormatWizard”(page 16).
12 Using LTFS
• Unformat: Runs the UnformatWizard to guide you through the steps and options of removingthe LTFS format from the tape.
• Check: Runs the Error-checking tool which scans the volume for consistency and can correctcertain problems with the format; see “Using the CheckWizard” (page 19) for more details.
File permissionsThe LTFS applicationmanages a common set of file permissions for all files and users; file and directoryownership is not recorded to tape media. The only permission that is tracked is write-protectinformation.
File namesTomaintain compatibilitywhen copying files betweenmultiple platforms, it is strongly recommendedthat do youdo not use the following characters LTFS filenames, directory names, or extended attributes:* ? < > : " | / \
Limitations• When the tape cartridge is almost full, further write operations will be prevented. The free space
on the tape (for example, as reported by Explorer) will indicate that there is still some capacityavailable, but that is reserved for updating the index when the tape is unmounted.
• Future mounts of a cartridge that is almost full (that is, it has passed the point at which “earlywarning” is reported) will mount as Read Only, to prevent further modifications that may notfit on the tape. This status is cleared when the cartridge is reformatted (using mkltfs) or whenthe volume is rolled back, erasing the history.
Working with Windows ExplorerOnce the mapping has been established and an LTFS-formatted cartridge loaded, you can access thecontents of the cartridge either at a command prompt or through Windows Explorer. The followingscreenshot shows an LTFS volume viewed in an Explorer window:
File permissions 13
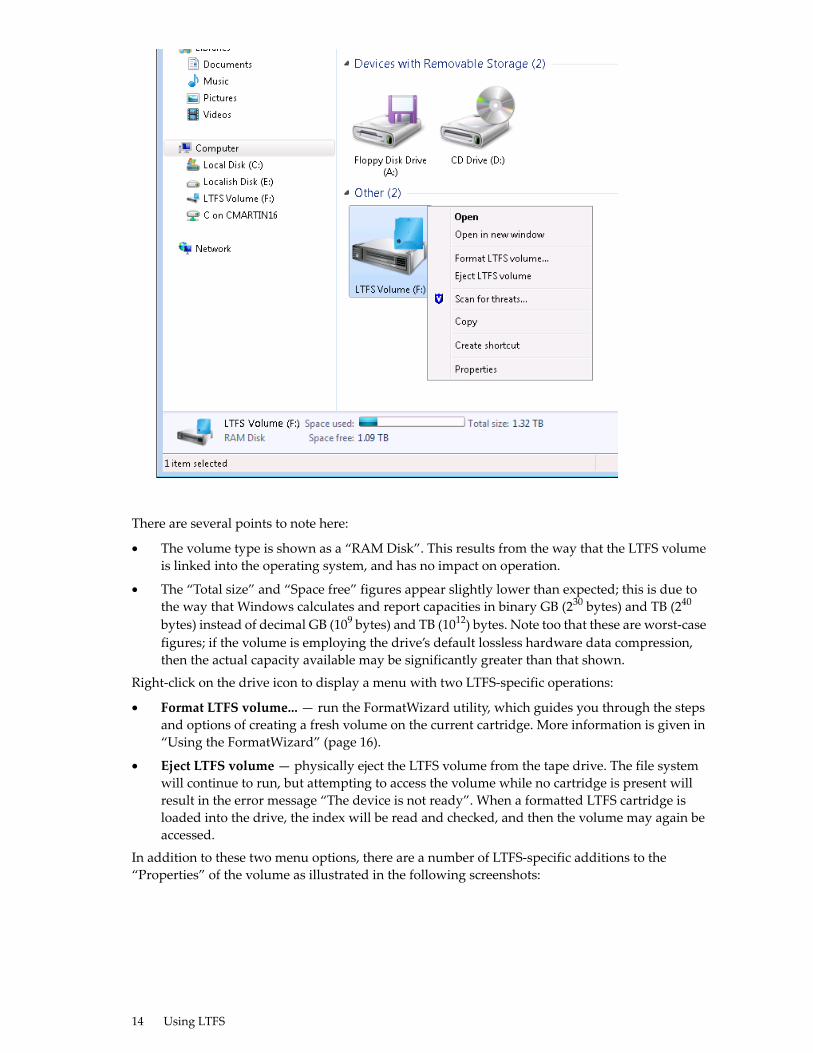
There are several points to note here:
• The volume type is shown as a “RAM Disk”. This results from the way that the LTFS volumeis linked into the operating system, and has no impact on operation.
• The “Total size” and “Space free” figures appear slightly lower than expected; this is due tothe way that Windows calculates and report capacities in binary GB (230 bytes) and TB (240
bytes) instead of decimal GB (109 bytes) and TB (1012) bytes. Note too that these are worst-casefigures; if the volume is employing the drive’s default lossless hardware data compression,then the actual capacity available may be significantly greater than that shown.
Right-click on the drive icon to display a menu with two LTFS-specific operations:
• Format LTFS volume...— run the FormatWizard utility, which guides you through the stepsand options of creating a fresh volume on the current cartridge. More information is given in“Using the FormatWizard” (page 16).
• Eject LTFS volume— physically eject the LTFS volume from the tape drive. The file systemwill continue to run, but attempting to access the volume while no cartridge is present willresult in the error message “The device is not ready”. When a formatted LTFS cartridge isloaded into the drive, the index will be read and checked, and then the volume may again beaccessed.
In addition to these two menu options, there are a number of LTFS-specific additions to the“Properties” of the volume as illustrated in the following screenshots:
14 Using LTFS

The comments given above about the Explorer view (file system type, capacity figures) also apply tothe information shown on the General tab.
Working with Windows Explorer 15

The LTFS Tools tab gives access to several utilities for interacting with the volume:
• The Error-checking tool scans the volume for consistency and can correct certain problemswith the format; see “Using the CheckWizard” (page 19) for more details.
• The Format volume tool starts the FormatWizard to guide you through the steps and optionsof creating a fresh volume on the current cartridge; more information is given in “Using theFormatWizard” (page 16).
• The Configuration tool brings up the same window used when the volume was mapped, andis a convenient way to terminate and remove the volume.
NOTE: This may require administrative privileges depending on your system’s policies andsettings.
The LTFS Details tab provides information about the tape drive, the LTFS volume, and also thecartridge lifetime usage.
Removing the LTFS volumeThere are two different ways of removing the LTFS volume:
• You can physically eject the cartridge from the drive by right-clicking on the drive and selectingthe option to Eject LTFS volume. In this case the drive letter will remain reserved, althoughit cannot be accessed until another LTFS cartridge is loaded into the drive.
• You can run the configuration tool again, and click Remove at the top of the window. Thiswill unmount the volume (but leave the cartridge in the tape drive) and then terminate theservice. The drive letter is then released and can no longer be accessed. Follow the stepsdescribed in “Mapping a tape drive to a drive letter” (page 9) to set up a new LTFS volume.
Using the FormatWizardBefore you can use an LTO-5 or LTO-6 cartridge with LTFS, it must be prepared by formattingaccording to the LTFS specification. The LTFSFormatWizard application helps to select appropriate
16 Using LTFS

options and settings and then formats the tape. You can run it from the context menu, from the LTFSTools tab in the drive properties, or from the LTFS program group.
CAUTION: Read all the text on the wizard dialog windows carefully. Completing this wizard willirretrievably destroy all tape contents.
NOTE: If you execute the FormatWizard while no LTFS volume is mapped to a drive letter, thewizard may require administrative privileges (depending on system security policies and settings).Runningwith insufficient privilegeswill result in an inability to “see” the tape drive and consequentlyno formatting can be performed. If this occurs, right-click on the executable and select Run asadministrator.
1. The initial screen presents information about the operation that has been started.2. The next window allows you to select a tape drive and related options.
The first drive on the system (or the one being used by the mounted file system, if any) will beselected by default; change the selection to use a different tape drive.
NOTE: Only drives suitable for use with LTFS are shown in the list.
By default the drive’s lossless hardware data compression engine will be enabled. You can turnit off if desired, in which case all writes and reads to this cartridge will bypass the compressionengine.
The other option on this screen allows you to request that more detail is shown during the formatoperation.
3. The next window contains options related to the cartridge format.
Using the FormatWizard 17

Both of these fields are optional, and are intended to provide a method of identifying thecartridge. Tape serial number should be nomore than six alphanumeric characters (A–Z, 0–9).Volume name is a free-format text string.
The Advanced button leads to a further set of options; however it is recommended that youleave these at their default settings for all normal usage.
4. The final window summarizes the format operation that you have defined using the wizard.
When you click Finish, the following operations take place:a. If the file system is currently mounted, it is unmountedb. A “Progress” dialog window is created.c. The format operation starts.d. All tape contents are removed and a fresh (empty) index written to the cartridge.e. If the file system was mounted, the new cartridge is mounted.f. When the Progress dialog shows that the format is complete, you can close the window.
18 Using LTFS
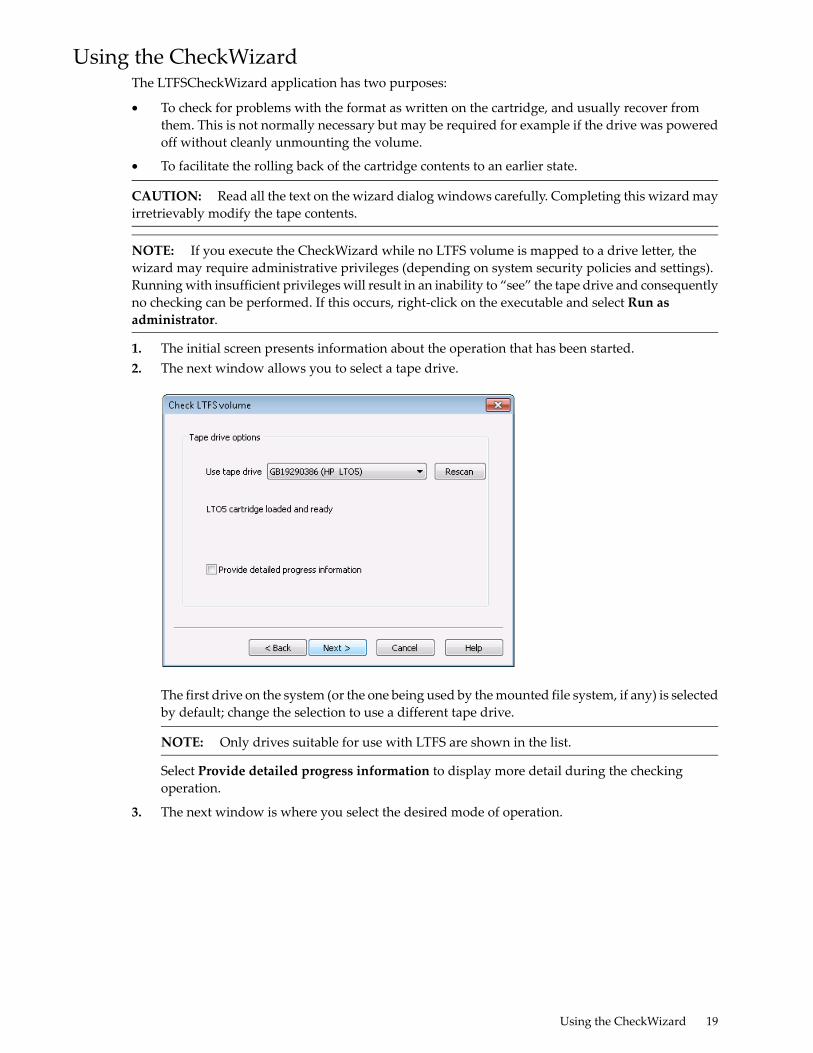
Using the CheckWizardThe LTFSCheckWizard application has two purposes:
• To check for problems with the format as written on the cartridge, and usually recover fromthem. This is not normally necessary but may be required for example if the drive was poweredoff without cleanly unmounting the volume.
• To facilitate the rolling back of the cartridge contents to an earlier state.
CAUTION: Read all the text on the wizard dialog windows carefully. Completing this wizardmayirretrievably modify the tape contents.
NOTE: If you execute the CheckWizard while no LTFS volume is mapped to a drive letter, thewizard may require administrative privileges (depending on system security policies and settings).Runningwith insufficient privilegeswill result in an inability to “see” the tape drive and consequentlyno checking can be performed. If this occurs, right-click on the executable and select Run asadministrator.
1. The initial screen presents information about the operation that has been started.2. The next window allows you to select a tape drive.
The first drive on the system (or the one being used by themounted file system, if any) is selectedby default; change the selection to use a different tape drive.
NOTE: Only drives suitable for use with LTFS are shown in the list.
Select Provide detailed progress information to display more detail during the checkingoperation.
3. The next window is where you select the desired mode of operation.
Using the CheckWizard 19
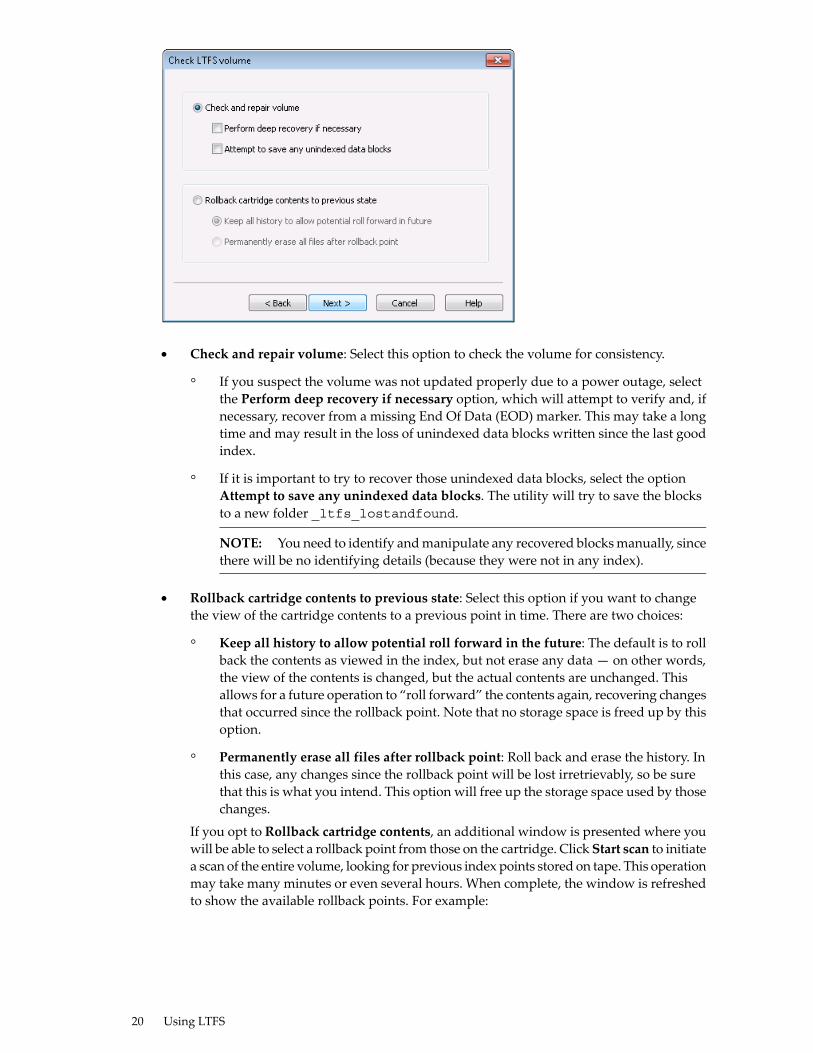
• Check and repair volume: Select this option to check the volume for consistency.
If you suspect the volume was not updated properly due to a power outage, selectthe Perform deep recovery if necessary option, which will attempt to verify and, if
◦
necessary, recover from a missing End Of Data (EOD) marker. This may take a longtime and may result in the loss of unindexed data blocks written since the last goodindex.
◦ If it is important to try to recover those unindexed data blocks, select the optionAttempt to save any unindexed data blocks. The utility will try to save the blocksto a new folder _ltfs_lostandfound.
NOTE: You need to identify andmanipulate any recovered blocksmanually, sincethere will be no identifying details (because they were not in any index).
• Rollback cartridge contents to previous state: Select this option if you want to changethe view of the cartridge contents to a previous point in time. There are two choices:
◦ Keep all history to allow potential roll forward in the future: The default is to rollback the contents as viewed in the index, but not erase any data — on other words,the view of the contents is changed, but the actual contents are unchanged. Thisallows for a future operation to “roll forward” the contents again, recovering changesthat occurred since the rollback point. Note that no storage space is freed up by thisoption.
◦ Permanently erase all files after rollback point: Roll back and erase the history. Inthis case, any changes since the rollback point will be lost irretrievably, so be surethat this is what you intend. This option will free up the storage space used by thosechanges.
If you opt to Rollback cartridge contents, an additional window is presented where youwill be able to select a rollback point from those on the cartridge. Click Start scan to initiatea scan of the entire volume, looking for previous index points stored on tape. This operationmay take many minutes or even several hours. When complete, the window is refreshedto show the available rollback points. For example:
20 Using LTFS

Select a rollback point and clickNext.
4. A summary of the operation to be carried out is displayed. For example:
When you click Finish, the following operations take place:a. If the file system is currently mounted, it is unmounted.b. A Progress dialog window is created.c. The check or rollback operation starts.d. The Progress dialog is updated as the operation proceeds to completion.e. If the file system was mounted, the checked or updated volume will be re-mounted
5. When the Progress dialog shows that the operation is complete, you can close the window.
Using the UnformatWizardCAUTION: This operation will permanently remove all data present on the cartridge, so only useit if this is what you intend.
You do not normally need to use the UnformatWizard. Its purpose is to remove the LTFS format froma cartridge and return it to a single partition, so that the cartridge can be usedwith a different software
Using the UnformatWizard 21

application. This utility is similar to the FormatWizard, but is much simpler, since there is only oneoption affecting operation (to eject the cartridge from the drive once the format has been removed).
NOTE: The UnformatWizard may request administrative privileges to execute (depending onsystem security policies and settings).
22 Using LTFS

4 TroubleshootingGeneral
If problems occur during the operation of LTFS or the underlying LTFS utilities, entries may be madein the system log (either Application or System, depending on the nature of the problem). The Sourcemay be shown as LTFS or as FUSE4WinSvc, again depending on exactly what the problem was.
If there is a problem with tape drive interaction, LTFS will attempt to create a snapshot of the drive’sinternal state at the time of failure. A snapshot may also be taken at unmount time. This will be storedin the log directory specified by the Configuration tool (by default this is \ProgramData\Hewlett-Packard\LTFS\). These files are not otherwise used by LTFS and you can safely removethem from the system, if they are not needed for troubleshooting. Note that the software only keepthe ten most recent snapshots, deleting older logfiles as necessary.
LTFS requires the LTO tape drive to be powered up and connected to the system. This can be verifiedusing the Windows Device Manager. If the tape drive is not shown, then check cabling, power, andso on. LTFS will not be able to operate until the drive is detected.
Similarly, the Windows driver must be installed and associated with the tape drive before LTFS cancommunicate with it. You can install the driver from the CD-ROM that shipped with the drive, ordownload it from hp.com.
Errors during configurationEnsure that no other application is using the tape drive. If another application has control of the tapedrive when the configuration tool attempts to create a mapping, you may see one or more of thefollowing error messages:
• An error occurred while checking the drive status. Please try again.
• Operation failed, failed to get exclusive access. Device may be busy.
• Drive is inaccessible, The parameter is incorrect.
In each case, a typical resolution is to find and close the other application that is accessing the tapedrive. Other questions to consider are:
• Is the drive is connected and visible in Device Manager?
• Has the user the administrative privileges required to perform the operation?
If the configuration utility determines that the current cartridge is not formatted for use with LTFS,a question is displayed, asking you if you wish to format before proceeding. If you answer NO (donot format), the mapping will be created but the cartridge will not be formatted, and so will not beaccessible. At this point you must either format the cartridge (starting the FormatWizard manually)or else eject the cartridge and replace it with one that is already formatted for LTFS.
Explorer windows not refreshingWhen the contents of the cartridge are altered by one of the Wizard utilities, any open Explorerwindows may be closed automatically (for example if the format is removed from a cartridge).However, in some cases the Explorerwindowmaynot be updated, even though a refreshwas requestedby the software. In this case you need to refresh the window manually (F5 or View→Refresh).
General 23

24

5 Frequently asked questionsQ: How do I get LTFS?
A: All application downloads and documentation are available from your tape drive supplier.
Q: What are the minimum system requirements?
A: Any server that fulfills the needs of the supported configurations detailed in “Supportedconfigurations” (page 6).
Q: Does LTFS support DDS/DAT devices?
A:No. Only LTO-5 and LTO-6 drives are supported with LTFS.
Q: Why doesn’t LTFS work with my LTO-4 or earlier drives?
A: LTFS relies on a drive feature called partitioning, which was added to the LTO-5 format. It is notpart of the LTO-4 or earlier tape formats and they cannot be used.
Q: Can I use LTO-4 media in my LTO-5 or LTO-6 drive?
A:LTO-5 drives can load, read and write LTO-4 media, and LTO-6 drives can load and read (but notwrite) LTO-4 media. However, the LTO-4 format does not support partitioning, so LTO-4 mediacannot be used with LTFS.
Q: Can I use WORMmedia with LTFS?
A:No, WORMmedia cannot be partitioned and so cannot be used with LTFS.
Q: Can I uninstall LTFS?
A: Yes. You can remove LTFS software using the normal Windows Control Panel procedures.
Q: Where do I go if I have a problem?
A: For most common issues, see Troubleshooting (page 23). If this does not address the issue, callsupport.
Q: Does LTFS replace my existing backup software?
A: In most cases it is recommended that you continue to use your existing backup application. LTFSprovides a goodmethod of storing and transporting large files but is not generally a direct replacementfor a backup application.
Q: Is source code available for LTFS?
A: Yes, full source code for the LTFS components is released under the terms of the LGPLv2.1 andcan be obtained from your supplier. However, customers who choose to download and build theirown versions of the LTFS application are not supported.
Q: Why are all my files on my LTFS volume shown with a gray cross in Windows Explorer?
A: This is because they are being reported in the Offline state to prevent Windows from trying tobuild thumbnails. See “Thumbnails“ in “Mount options” (page 10).
25

26