ltc 8600 ltc 8800 02 - bosch security...
TRANSCRIPT

ENInstruction ManualAllegiant Microprocessor-based Video Switcher/Con-trol SystemsCPU Firmware Version 10.0
LTC 8600, LTC 8800 Series


LTC 8600 | LTC 8800 Series | en iii
Bosch Security Systems, Inc. Instruction Manual F.01U.127.393 | 2.0 | 2009.03
Table of Contents
1 Safety ..................................................................................................................................................... 1
2 Unpacking .............................................................................................................................................. 92.1 Parts List ................................................................................................................................................ 9
3 Service ................................................................................................................................................. 10
4 Description .......................................................................................................................................... 11
5 Allegiant Feature Summary Table ....................................................................................................... 13
6 System Components ............................................................................................................................ 156.1 LTC 8601 Series Systems..................................................................................................................... 156.2 LTC 8800 Series Systems..................................................................................................................... 15
7 System Accessory Components .......................................................................................................... 177.1 LTC 8540/00 Alarm Interface Unit........................................................................................................ 177.2 LTC 8568 and LTC 8768 Signal Distribution Units ............................................................................... 177.3 IntuiKey Series KBD-Universal Keyboard .............................................................................................. 177.4 KBD-Rack Keyboard Mounting Kit......................................................................................................... 177.5 LTC 8555 Series Keyboards.................................................................................................................. 187.6 LTC 8558/00 Keyboard Extension Cable .............................................................................................. 187.7 LTC 8557 Series Keyboard Extension Kits............................................................................................ 187.8 LTC 8560 and LTC 8561 Series Receiver/Driver Units ......................................................................... 187.9 AutoDome Series.................................................................................................................................. 187.10 LTC 8569, LTC 8570, LTC 8571, LTC 8572 Series Code Merger Units ................................................ 197.11 LTC 8770 Switcher Follower Series ..................................................................................................... 197.12 LTC 8712 Series Console Port Expander Units .................................................................................... 197.13 LTC 8713 Alarm Port Expander Units ................................................................................................... 197.14 LTC 8714, LTC 8715 Series Keyboard Port Expander Units................................................................. 197.15 LTC 8780 Series Data Converter Units................................................................................................. 207.16 LTC 8781 Series Data Converter Units................................................................................................. 207.17 LTC 8016/90 Bilinx™ Data Interface Unit ............................................................................................. 207.18 LTC 8785 Series Code Converters ....................................................................................................... 207.19 LTC 8782 Series Code Translator Units ............................................................................................... 217.20 LTC 8808/00 Series Video Interconnect Panel..................................................................................... 217.21 LTC 8059/00 Master Control Software ................................................................................................ 217.22 LTC 8850/00 Windows Based Graphical User Interface Software ....................................................... 217.23 SFT-INTSRV Allegiant Integration Software .......................................................................................... 217.23.1 Integration Server ................................................................................................................................. 227.23.2 Virtual Allegiant Satellite Application Software .................................................................................... 227.23.3 Allegiant Satellite SDK .......................................................................................................................... 227.24 LTC 8506/00 PC-to-Console Port RS-232 Cable................................................................................... 237.25 LTC 8508/01 Ribbon-to-BNC Interface Cable....................................................................................... 237.26 Logging Printer ..................................................................................................................................... 23
iv en | LTC 8600 | LTC 8800 Series
F.01U.127.393 | 2.0 | 2009.03 Instruction Manual Bosch Security Systems, Inc.
8 Installation Procedure .........................................................................................................................288.1 Main CPU Bay Installation .................................................................................................................... 288.2 Video Input Modules............................................................................................................................. 288.3 Video Output Modules.......................................................................................................................... 298.4 CPU Module.......................................................................................................................................... 298.5 Camera and Monitor Video Connections .............................................................................................. 308.5.1 LTC 8600 Series and LTC 8800 Series Video Input Connections ......................................................... 308.6 Termination Practices........................................................................................................................... 318.6.1 LTC 8600 Series or LTC 8800 Series Video Input Terminations ........................................................... 328.6.2 LTC 8802 Series Monitor Expansion Bay Video Input Connections .....................................................328.6.3 LTC 8802 Series Monitor Expansion Bay Data Connections ................................................................338.6.4 Monitor Output Video Connections ...................................................................................................... 33
9 Optional Accessories Installation ....................................................................................................... 349.1 General Accessory Installation ............................................................................................................. 349.2 Logging Printer Option Installation ...................................................................................................... 349.3 Computer Interface Installation............................................................................................................ 34
10 Satellite Configuration Installations ...................................................................................................3610.1 Satellite Site “Trunk Line” Monitor Outputs......................................................................................... 3610.2 Main Site “Trunk Line” Video Inputs..................................................................................................... 3710.3 Control Data Lines in Satellite Systems ............................................................................................... 3710.4 Satellite Site Programming Requirements............................................................................................ 3710.5 Main Site Programming Requirements ................................................................................................. 3810.6 Special Programming for “Cascaded” Satellite System Configurations ............................................... 4010.7 Alarm Inputs in Satellite Systems......................................................................................................... 41
11 Feature Selection ................................................................................................................................. 42
12 Main Power Connections .................................................................................................................... 43
13 Video Monitor Display .........................................................................................................................4513.1 Time/Date............................................................................................................................................. 4513.2 Monitor Title/System Status Display .................................................................................................... 4613.2.1 System Status Display ..........................................................................................................................4613.2.2 Locations 1, 2, and 3 - Alarm Indication ............................................................................................... 4613.2.3 Location 4 - Monitor Arm Status Indication .......................................................................................... 4613.2.4 Location 5 - Camera Arm Status Indication .......................................................................................... 4613.2.5 Location 6 - Error Indication ................................................................................................................. 4613.2.6 Location 7 - Remote Lock Indication ....................................................................................................4713.2.7 Location 8 - Monitor Lock Indication ....................................................................................................4713.2.8 Location 9 - Sequence Type Indication .................................................................................................4713.2.9 Locations 10 and 11 - Sequence Number ............................................................................................. 4713.2.10 Location 12 - Sequence Status Indication ............................................................................................ 4813.3 Monitor Title ......................................................................................................................................... 4813.4 Broadcast Message............................................................................................................................... 4813.5 Program Prompts ................................................................................................................................. 4813.6 Camera Number.................................................................................................................................... 4913.7 Camera Title ......................................................................................................................................... 4913.8 Video Loss Detection............................................................................................................................ 49

LTC 8600 | LTC 8800 Series | en v
Bosch Security Systems, Inc. Instruction Manual F.01U.127.393 | 2.0 | 2009.03
14 Factory Default Settings ...................................................................................................................... 5014.1 User Selectable DIP Switch Settings for Main CPU Bay....................................................................... 5014.1.1 Upper CPU DIP Switch S1 .................................................................................................................... 5014.1.2 Middle CPU DIP Switch S2 ................................................................................................................... 5114.1.3 Lower CPU DIP Switch S3 .................................................................................................................... 5314.2 User Selectable DIP Switch Settings for LTC 8816/00 Data Receiver Modules used in
LTC 8802 Series Monitor Expansion Bays ............................................................................................ 5414.2.1 Upper Data Receiver DIP Switch S1 ..................................................................................................... 5414.2.2 Middle Data Receiver DIP Switch S2 .................................................................................................... 5514.2.3 Lower Data Receiver DIP Switch S3 ..................................................................................................... 55
15 User Information .................................................................................................................................. 5615.1 User Priority Levels............................................................................................................................... 5615.2 User Priority Access Table .................................................................................................................... 57
16 Alarm Information ................................................................................................................................ 5816.1 General ................................................................................................................................................. 5816.2 Basic Alarm Response Mode ................................................................................................................ 5816.3 Auto Build Alarm Response Mode ........................................................................................................ 5816.4 Sequence and Display Alarm Response Mode...................................................................................... 5816.5 Alarm Activated Pre-position ................................................................................................................ 5916.6 Sample Alarm Responses ..................................................................................................................... 5916.7 Alarm Relay Response .......................................................................................................................... 61
17 Keyboard Operation ............................................................................................................................ 6217.1 General ................................................................................................................................................. 6217.2 System Commands............................................................................................................................... 6217.2.1 Keyboard Log-in Procedure .................................................................................................................. 6217.2.2 Keyboard Log-off Procedure ................................................................................................................. 6317.3 Switcher Commands ............................................................................................................................ 6317.4 Controlling Camera Movement............................................................................................................. 6317.4.1 Focus and Iris Lens Control .................................................................................................................. 6317.4.2 Lock or Unlock Control of a Camera .................................................................................................... 6317.4.3 Lock or Unlock Control of a Monitor .................................................................................................... 6417.4.4 Recording a Camera Pre-position Scene .............................................................................................. 6417.4.5 Recalling a Camera Pre-position Scene ................................................................................................ 6417.4.6 Activate/Deactivate Auxiliary Function ................................................................................................. 6417.5 Alarm Commands ................................................................................................................................. 6517.5.1 Arm/Disarm Individual Alarms .............................................................................................................. 6517.5.2 Arm/Disarm All Alarms .......................................................................................................................... 6617.5.3 Arm/Disarm Monitor ............................................................................................................................. 6617.5.4 Alarms Acknowledgement .................................................................................................................... 6617.6 Sequence Control................................................................................................................................. 6617.6.1 Load/Clear a Sequence ........................................................................................................................ 6617.6.2 Run a Sequence .................................................................................................................................... 6717.6.3 Stop a Running Sequence .................................................................................................................... 6717.6.4 Controlling Sequence Direction ........................................................................................................... 6717.7 Sequence Programming ....................................................................................................................... 6817.7.1 Programming a Simple Camera Sequence ........................................................................................... 6817.7.2 Programming a SalvoSwitching Camera Sequence .............................................................................. 70
18 Keyboard User Functions .................................................................................................................... 7118.1 General Information ............................................................................................................................. 71
vi en | LTC 8600 | LTC 8800 Series
F.01U.127.393 | 2.0 | 2009.03 Instruction Manual Bosch Security Systems, Inc.
19 Maintenance Information .................................................................................................................... 8319.1 Cleaning the Keyboard ......................................................................................................................... 8319.2 AC Line Voltage Input Selection ........................................................................................................... 8319.3 AC Line Fuse Replacement ................................................................................................................... 8419.4 Power Supply Fuse Replacement ......................................................................................................... 8419.5 Replacement of Memory Backup Batteries........................................................................................... 84
20 Character ROM Tables for LTC 8600 and LTC 8800 ...........................................................................86
21 ERROR MESSAGES .............................................................................................................................. 99
22 Troubleshooting Guide ......................................................................................................................10222.1 Main Bay Checkout ............................................................................................................................. 10222.2 Keyboard Checkout ............................................................................................................................ 10322.3 Video Monitor Display Checkout ........................................................................................................ 10322.4 Remote Receiver/Driver Functions Inoperative .................................................................................. 10422.5 No Alarm Response ............................................................................................................................ 10422.6 CPU Software Version Numbers ......................................................................................................... 104
23 GLOSSARY OF TERMS .......................................................................................................................105
Appendix A Satellite Systems ............................................................................................................................. 107
Appendix B Installation Checklists ....................................................................................................................114
Appendix C Quick Reference Cable Interconnections ......................................................................................115
Appendix D Main Bay Rear Panel Connector Pin-outs ......................................................................................117
LTC 8600 | LTC 8800 Series | 1
Bosch Security Systems, Inc. Instruction Manual F.01U.127.393 | 2.0 | 2009.03
1 Safety
Important Safety InstructionsRead, follow, and retain for future reference all of the following safety instructions. Heed all warnings on the unit and in the operating instructions before operating the unit.1. Cleaning - Unplug the unit from the outlet before cleaning. Follow any instructions
provided with the unit. Generally, using a dry cloth for cleaning is sufficient, but a moist fluff-free cloth or leather shammy may also be used. Do not use liquid cleaners or aerosol cleaners.
2. Heat Sources - Do not install the unit near any heat sources such as radiators, heaters, stoves, or other equipment (including amplifiers) that produce heat.
3. Ventilation - Any openings in the unit enclosure are provided for ventilation to prevent overheating and ensure reliable operation. Do not block or cover these openings. Do not place the unit in an enclosure unless proper ventilation is provided, or the manufacturer's instructions have been adhered to.
4. Water - Do not use this unit near water, for example near a bathtub, washbowl, sink, laundry basket, in a damp or wet basement, near a swimming pool, in an outdoor installation, or in any area classified as a wet location. To reduce the risk of fire or electrical shock, do not expose this unit to rain or moisture.
5. Object and liquid entry - Never push objects of any kind into this unit through openings as they may touch dangerous voltage points or short-out parts that could result in a fire or electrical shock. Never spill liquid of any kind on the unit. Do not place objects filled with liquids, such as vases or cups, on the unit.
6. Lightning - For added protection during a lightning storm, or when leaving this unit unattended and unused for long periods, unplug the unit from the wall outlet and disconnect the cable system. This will prevent damage to the unit from lightning and power line surges.
7. Controls adjustment - Adjust only those controls specified in the operating instructions. Improper adjustment of other controls may cause damage to the unit. Use of controls or adjustments, or performance of procedures other than those specified, may result in hazardous radiation exposure.
8. Overloading - Do not overload outlets and extension cords. This can cause fire or electrical shock.
9. Power cord and plug protection - Protect the plug and power cord from foot traffic, being pinched by items placed upon or against them at electrical outlets, and its exit from the unit. For units intended to operate with 230 VAC, 50 Hz, the input and output power cord must comply with the latest versions of IEC Publication 227 or IEC Publication 245.
10. Power disconnect - Units with or without ON/OFF switches have power supplied to the unit whenever the power cord is inserted into the power source; however, the unit is operational only when the ON/OFF switch is in the ON position. The power cord is the main power disconnect device for switching off the voltage for all units.

2 | LTC 8600 | LTC 8800 Series
F.01U.127.393 | 2.0 | 2009.03 Instruction Manual Bosch Security Systems, Inc.
11. Power sources - Operate the unit only from the type of power source indicated on the label. Before proceeding, be sure to disconnect the power from the cable to be installed into the unit.– For battery powered units, refer to the operating instructions.– For external power supplied units, use only the recommended or approved power
supplies.– For limited power source units, this power source must comply with EN60950.
Substitutions may damage the unit or cause fire or shock.– For 24 VAC units, voltage applied to the unit's power input should not exceed ±10%,
or 28 VAC. User-supplied wiring must comply with local electrical codes (Class 2 power levels). Do not ground the supply at the terminals or at the unit's power supply terminals.
– If unsure of the type of power supply to use, contact your dealer or local power company.
12. Servicing - Do not attempt to service this unit yourself. Opening or removing covers may expose you to dangerous voltage or other hazards. Refer all servicing to qualified service personnel.
13. Damage requiring service - Unplug the unit from the main AC power source and refer servicing to qualified service personnel when any damage to the equipment has occurred, such as:– the power supply cord or plug is damaged;– exposure to moisture, water, and/or inclement weather (rain, snow, etc.);– liquid has been spilled in or on the equipment;– an object has fallen into the unit;– unit has been dropped or the unit cabinet is damaged;– unit exhibits a distinct change in performance;– unit does not operate normally when the user correctly follows the operating
instructions.14. Replacement parts - Be sure the service technician uses replacement parts specified by
the manufacturer, or that have the same characteristics as the original parts. Unauthorized substitutions may cause fire, electrical shock, or other hazards.
15. Safety check - Safety checks should be performed upon completion of service or repairs to the unit to ensure proper operating condition.
16. Installation - Install in accordance with the manufacturer's instructions and in accordance with applicable local codes.
17. Attachments, changes or modifications - Only use attachments/accessories specified by the manufacturer. Any change or modification of the equipment, not expressly approved by Bosch, could void the warranty or, in the case of an authorization agreement, authority
to operate the equipment.
LTC 8600 | LTC 8800 Series | 3
Bosch Security Systems, Inc. Instruction Manual F.01U.127.393 | 2.0 | 2009.03
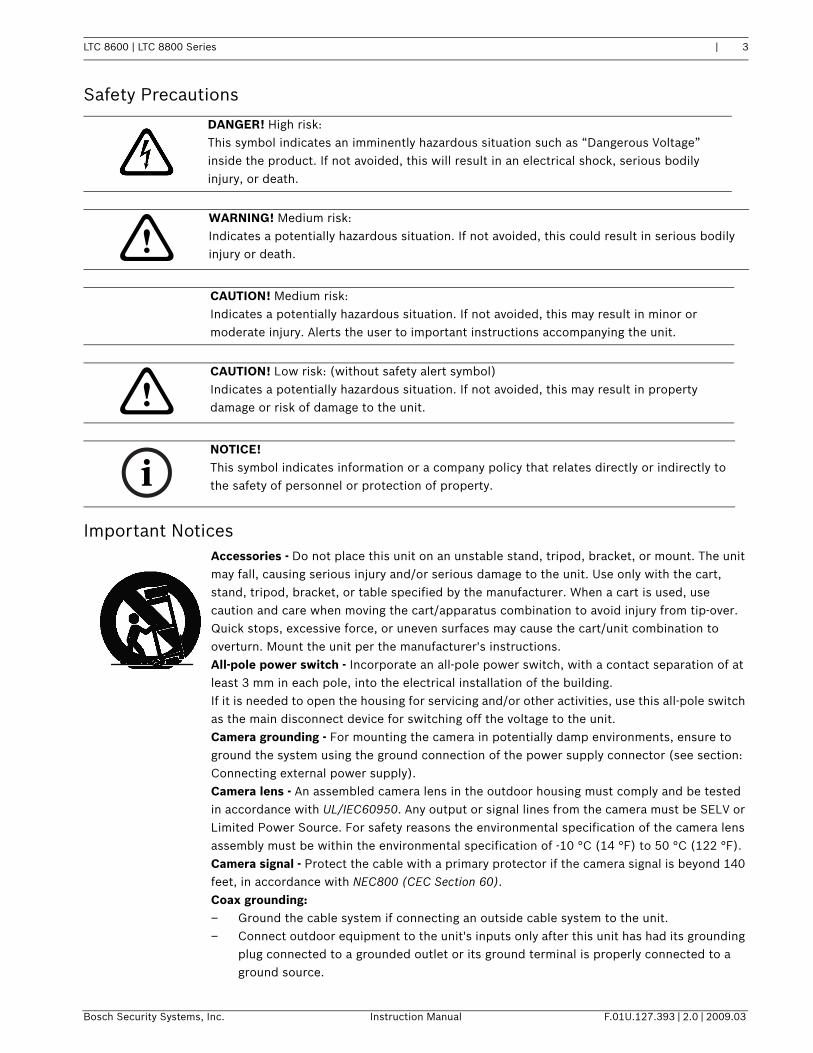
Safety Precautions
Important NoticesAccessories - Do not place this unit on an unstable stand, tripod, bracket, or mount. The unit may fall, causing serious injury and/or serious damage to the unit. Use only with the cart, stand, tripod, bracket, or table specified by the manufacturer. When a cart is used, use caution and care when moving the cart/apparatus combination to avoid injury from tip-over. Quick stops, excessive force, or uneven surfaces may cause the cart/unit combination to overturn. Mount the unit per the manufacturer's instructions.All-pole power switch - Incorporate an all-pole power switch, with a contact separation of at least 3 mm in each pole, into the electrical installation of the building.If it is needed to open the housing for servicing and/or other activities, use this all-pole switch as the main disconnect device for switching off the voltage to the unit.Camera grounding - For mounting the camera in potentially damp environments, ensure to ground the system using the ground connection of the power supply connector (see section: Connecting external power supply).Camera lens - An assembled camera lens in the outdoor housing must comply and be tested in accordance with UL/IEC60950. Any output or signal lines from the camera must be SELV or Limited Power Source. For safety reasons the environmental specification of the camera lens assembly must be within the environmental specification of -10 °C (14 °F) to 50 °C (122 °F).Camera signal - Protect the cable with a primary protector if the camera signal is beyond 140 feet, in accordance with NEC800 (CEC Section 60).Coax grounding:– Ground the cable system if connecting an outside cable system to the unit.– Connect outdoor equipment to the unit's inputs only after this unit has had its grounding
plug connected to a grounded outlet or its ground terminal is properly connected to a ground source.
DANGER! High risk:This symbol indicates an imminently hazardous situation such as “Dangerous Voltage” inside the product. If not avoided, this will result in an electrical shock, serious bodily injury, or death.
!WARNING! Medium risk:Indicates a potentially hazardous situation. If not avoided, this could result in serious bodily injury or death.
CAUTION! Medium risk:Indicates a potentially hazardous situation. If not avoided, this may result in minor or moderate injury. Alerts the user to important instructions accompanying the unit.
!CAUTION! Low risk: (without safety alert symbol)Indicates a potentially hazardous situation. If not avoided, this may result in property damage or risk of damage to the unit.
iNOTICE! This symbol indicates information or a company policy that relates directly or indirectly to the safety of personnel or protection of property.

4 | LTC 8600 | LTC 8800 Series
F.01U.127.393 | 2.0 | 2009.03 Instruction Manual Bosch Security Systems, Inc.
– Disconnect the unit's input connectors from outdoor equipment before disconnecting the grounding plug or grounding terminal.
– Follow proper safety precautions such as grounding for any outdoor device connected to this unit.
U.S.A. models only - Section 810 of the National Electrical Code, ANSI/NFPA No.70, provides information regarding proper grounding of the mount and supporting structure, grounding of the coax to a discharge unit, size of grounding conductors, location of discharge unit, connection to grounding electrodes, and requirements for the grounding electrode.
Your Bosch product was developed and manufactured with high-quality material and components that can be recycled and reused. This symbol means that electronic and electrical appliances, which have reached the end of their working life, must be collected and disposed of separately from household waste material. Separate collecting systems are usually in place for disused electronic and electrical products. Please dispose of these units at an environmentally compatible recycling facility, per European Directive 2002/96/EC.Environmental statement - Bosch has a strong commitment towards the environment. This unit has been designed to respect the environment as much as possible.Electrostatic-sensitive device - Use proper CMOS/MOS-FET handling precautions to avoid electrostatic discharge.NOTE: Wear required grounded wrist straps and observe proper ESD safety precautions when handling the electrostatic-sensitive printed circuit boards.Fuse rating - For security protection of the device, the branch circuit protection must be secured with a maximum fuse rating of 16A. This must be in accordance with NEC800 (CEC Section 60).Grounding and polarization - This unit may be equipped with a polarized alternating current line plug (a plug with one blade wider than the other blade). This safety feature allows the plug to fit into the power outlet in only one way. If unable to insert the plug fully into the outlet, contact a locally certified electrician to replace the obsolete outlet. Do not defeat the safety purpose of the polarized plug.Alternately, this unit may be equipped with a 3-pole grounding plug (a plug with a third pin for earth grounding). This safety feature allows the plug to fit into a grounded power outlet only. If unable to insert the plug into the outlet, contact a locally certified electrician to replace the obsolete outlet. Do not defeat the safety purpose of the grounding plug.Moving - Disconnect the power before moving the unit. Move the unit with care. Excessive force or shock may damage the unit and the hard disk drives.Outdoor signals - The installation for outdoor signals, especially regarding clearance from power and lightning conductors and transient protection, must be in accordance with NEC725 and NEC800 (CEC Rule 16-224 and CEC Section 60).Permanently connected equipment - Incorporate a readily accessible disconnect device in the building installation wiring.Pluggable equipment - Install the socket outlet near the equipment so it is easily accessible.PoE - Never supply power via the Ethernet connection (PoE) when power is already supplied via the power connector.Power disconnect - Units have power supplied whenever the power cord is inserted into the power source. The power cord is the main power disconnect for all units.
iNOTICE! This device is intended for use in public areas only.U.S. federal law strictly prohibits surreptitious recording of oral communications.
LTC 8600 | LTC 8800 Series | 5
Bosch Security Systems, Inc. Instruction Manual F.01U.127.393 | 2.0 | 2009.03
Power lines - Do not locate the camera near overhead power lines, power circuits, or electrical lights, nor where it may contact such power lines, circuits, or lights.SELVAll the input/output ports are Safety Extra Low Voltage (SELV) circuits. SELV circuits should only be connected to other SELV circuits.Because the ISDN circuits are treated like telephone-network voltage, avoid connecting the SELV circuit to the Telephone Network Voltage (TNV) circuits.Video loss - Video loss is inherent to digital video recording; therefore, Bosch Security Systems cannot be held liable for any damage that results from missing video information. To minimize the risk of lost digital information, Bosch Security Systems recommends multiple, redundant recording systems, and a procedure to back up all analog and digital information.
FCC & ICES INFORMATION (U.S.A. and Canadian Models Only, CLASS A)This device complies with part 15 of the FCC Rules. Operation is subject to the following conditions:– this device may not cause harmful interference, and– this device must accept any interference received, including interference that may cause
undesired operation.NoteThis equipment has been tested and found to comply with the limits for a Class A digital device, pursuant to Part 15 of the FCC Rules and ICES-003 of Industry Canada. These limits are designed to provide reasonable protection against harmful interference when the equipment is operated in a commercial environment. This equipment generates, uses, and radiates radio frequency energy and, if not installed and used in accordance with the instruction manual, may cause harmful interference to radio communications. Operation of this equipment in a residential area is likely to cause harmful interference, in which case the user will be required to correct the interference at his expense.Intentional or unintentional modifications, not expressly approved by the party responsible for compliance, shall not be made. Any such modifications could void the user's authority to operate the equipment. If necessary, the user should consult the dealer or an experienced radio/television technician for corrective action.The user may find the following booklet, prepared by the Federal Communications Commission, helpful: How to Identify and Resolve Radio-TV Interference Problems. This booklet is available from the U.S. Government Printing Office, Washington, DC 20402, Stock No. 004-000-00345-4.
INFORMATIONS FCC ET ICES (commercial applications)(modèles utilisés aux États-Unis et au Canada uniquement, CLASSE A)Ce produit est conforme aux normes FCC partie 15. la mise en service est soumises aux deux conditions suivantes:– cet appareil ne peut pas provoquer d'interférence nuisible et– cet appareil doit pouvoir tolérer toutes les interférences auxquelles il est soumit, y
compris les interférences qui pourraient influer sur son bon fonctionnement.AVERTISSEMENT: Suite à différents tests, cet appareil s’est révélé conforme aux exigences imposées aux appareils numériques de Classe A en vertu de la section 15 du règlement de la Commission fédérale des communications des États-Unis (FCC). Ces contraintes sont
iNOTICE! This is a class A product. In a domestic environment this product may cause radio interference, in which case the user may be required to take adequate measures.

6 | LTC 8600 | LTC 8800 Series
F.01U.127.393 | 2.0 | 2009.03 Instruction Manual Bosch Security Systems, Inc.
destinées à fournir une protection raisonnable contre les interférences nuisibles quand l'appareil est utilisé dans une installation commerciale. Cette appareil génère, utilise et émet de l'energie de fréquence radio, et peut, en cas d'installation ou d'utilisation non conforme aux instructions, générer des interférences nuisibles aux communications radio. L’utilisation de ce produit dans une zone résidentielle peut provoquer des interférences nuisibles. Le cas échéant, l’utilisateur devra remédier à ces interférences à ses propres frais.Au besoin, l’utilisateur consultera son revendeur ou un technicien qualifié en radio/télévision, qui procédera à une opération corrective. La brochure suivante, publiée par la Commission fédérale des communications (FCC), peut s’avérer utile : « How to Identify and Resolve Radio-TV Interference Problems » (Comment identifier et résoudre les problèmes d’interférences de radio et de télévision). Cette brochure est disponible auprès du U.S. Government Printing Office, Washington, DC 20402, États-Unis, sous la référence n° 004-000-00345-4.AVERTISSEMENT: Ce produit est un appareil de Classe A. Son utilisation dans une zone résidentielle risque de provoquer des interférences. Le cas échéant, l’utilisateur devra prendre les mesures nécessaires pour y remédier.
DisclaimerUnderwriter Laboratories Inc. (“UL”) has not tested the performance or reliability of the security or signaling aspects of this product. UL has only tested fire, shock and/or casualty hazards as outlined in UL's Standard(s) for Safety for Closed Circuit Television Equipment, UL 2044. UL Certification does not cover the performance or reliability of the security or signaling aspects of this product.UL MAKES NO REPRESENTATIONS, WARRANTIES, OR CERTIFICATIONS WHATSOEVER REGARDING THE PERFORMANCE OR RELIABILITY OF ANY SECURITY OR SIGNALING RELATED FUNCTIONS OF THIS PRODUCT.DisclaimerUnderwriter Laboratories Inc. (“UL”) has not tested the performance or reliability of the security or signaling aspects of this product. UL has only tested fire, shock and/or casualty hazards as outlined in UL's Standard(s) for Safety for Information Technology Equipment, UL 60950-1. UL Certification does not cover the performance or reliability of the security or signaling aspects of this product.UL MAKES NO REPRESENTATIONS, WARRANTIES, OR CERTIFICATIONS WHATSOEVER REGARDING THE PERFORMANCE OR RELIABILITY OF ANY SECURITY OR SIGNALING-RELATED FUNCTIONS OF THIS PRODUCT.
CopyrightThis user guide is the intellectual property of Bosch Security Systems, Inc. and is protected by copyright.All rights reserved.TrademarksAll hardware and software product names used in this document are likely to be registered trademarks and must be treated accordingly.
i
NOTICE! This user guide has been compiled with great care and the information it contains has been thoroughly verified. The text was complete and correct at the time of printing. The ongoing development of the products may mean that the content of the user guide can change without notice. Bosch Security Systems accepts no liability for damage resulting directly or indirectly from faults, incompleteness or discrepancies between the user guide and the product described.

LTC 8600 | LTC 8800 Series | 7
Bosch Security Systems, Inc. Instruction Manual F.01U.127.393 | 2.0 | 2009.03
Customer Support and ServiceIf this unit needs service, contact the nearest Bosch Security Systems Service Center for authorization to return and shipping instructions.Service CentersUSARepair CenterTelephone: 800-566-2283Fax: 800-366-1329E-mail: [email protected] ServiceTelephone: 888-289-0096Fax: 585-223-9180E-mail: [email protected] SupportTelephone: 800-326-1450Fax: 585-223-3508 or 717-735-6560 E-mail: [email protected]: 514-738-2434 Fax: 514-738-8480 Europe, Middle East, Africa RegionRepair CenterTelephone: 31 (0) 76-5721500Fax: 31 (0) 76-5721413E-mail: [email protected] RegionRepair CenterTelephone: 65 63522776Fax: 65 63521776E-mail: [email protected] ServiceTelephone: 86 (0) 756 7633117 or 86 (0) 756 7633121Fax: 86 (0) 756 7631710E-mail: [email protected] and more informationFor additional information and warranty queries, please contact your Bosch Security Systems representative or visit our website at www.boschsecurity.com.

8 | LTC 8600 | LTC 8800 Series
F.01U.127.393 | 2.0 | 2009.03 Instruction Manual Bosch Security Systems, Inc.
LTC 8600 | LTC 8800 Series en | 9
F.01U.127.393 | 2.0 | 2009.03 Instruction Manual Bosch Security Systems, Inc.
2 Unpacking
This equipment should be unpacked and handled with care. If an item appears to have been damaged in shipment, notify the shipper. Verify that all parts shown in the Parts List have been included. If any items are missing, notify your Bosch Secu-rity Systems Sales or Customer Service Representative.
The original packing carton is the safest container in which to transport the unit. Save it for possible future use.
2.1 Parts List
The following table lists the components:
Qty Item
1 LTC 8601 Series or LTC 8801 Series Main CPU card cage1 LTC 8610/01 CPU module or LTC 8810/01 CPU module1 LTC 8805 Series Power Supply1 AC power cord (either for 120 VAC or 220 - 240 VAC)1 Fuse kit1 This installation manual
10 | en LTC 8600 | LTC 8800 Series
Bosch Security Systems, Inc. Instruction Manual F.01U.127.393 | 2.0 | 2009.03
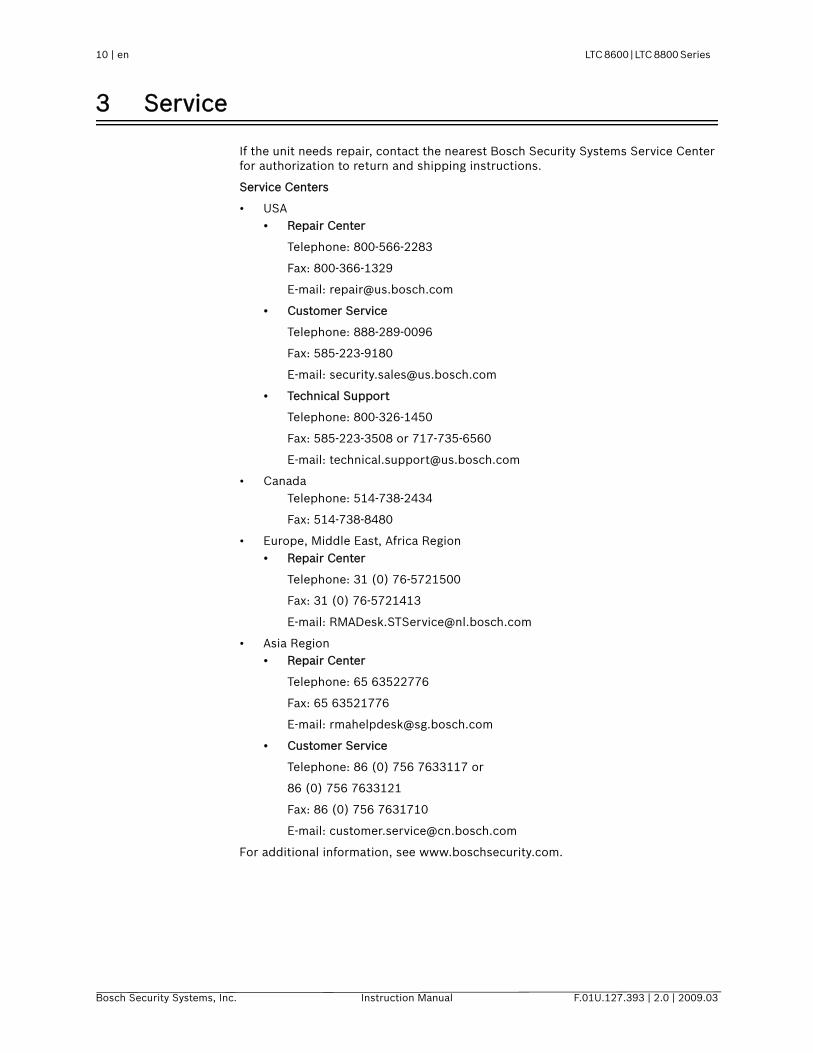
3 Service
If the unit needs repair, contact the nearest Bosch Security Systems Service Center for authorization to return and shipping instructions.
Service Centers
• USA• Repair Center
Telephone: 800-566-2283
Fax: 800-366-1329
E-mail: [email protected]
• Customer Service
Telephone: 888-289-0096
Fax: 585-223-9180
E-mail: [email protected]
• Technical Support
Telephone: 800-326-1450
Fax: 585-223-3508 or 717-735-6560
E-mail: [email protected]
• CanadaTelephone: 514-738-2434
Fax: 514-738-8480
• Europe, Middle East, Africa Region• Repair Center
Telephone: 31 (0) 76-5721500
Fax: 31 (0) 76-5721413
E-mail: [email protected]
• Asia Region• Repair Center
Telephone: 65 63522776
Fax: 65 63521776
E-mail: [email protected]
• Customer Service
Telephone: 86 (0) 756 7633117 or
86 (0) 756 7633121
Fax: 86 (0) 756 7631710
E-mail: [email protected]
For additional information, see www.boschsecurity.com.
LTC 8600 | LTC 8800 Series en | 11
F.01U.127.393 | 2.0 | 2009.03 Instruction Manual Bosch Security Systems, Inc.
4 Description
These Allegiant video switcher/control systems combine both switching and com-puter technology to provide powerful performance and unique system features for the security user. Offering full matrix switching capability, these systems can be programmed to display the video from any camera on any monitor, either manually or via independent automatic switching sequences.
The LTC 8600 Series Allegiant system can handle up to 128 cameras and 16 moni-tors in a full crosspoint configuration. It can also accommodate 512 alarm points, up to 16 keyboards, a computer system console port, and a logging printer port.
The LTC 8800 Series Allegiant system can handle up to 256 cameras and 64 moni-tors in a full crosspoint configuration. It can also accommodate 1024 alarm points, up to 32 keyboards, a computer system console port, and a logging printer port.
These systems can be programmed with up to 60 sequences that can be run inde-pendently of each other, in either a forward or reverse direction. Any of the sequences can utilize the SalvoSwitching capability where any number of system monitors may be selected to switch as a synchronized group. Using the optional LTC 8059/00 Master Control Software (MCS) package or the LTC 8850/00 Bosch Graph-ical User Interface (GUI), sequences can be made to activate and deactivate auto-matically, based upon the time of day and the day of week.
The series supports variable speed control and full programming functions of Aut-oDome® Series dome cameras. In addition, support for on-site receiver/driver units provide operators with control of pan, tilt, zoom, multiple pre-positions, four (4) auxiliaries, autopan, and random scan using conventional camera/lens/housings.
With the addition of an external LTC 8540/00 Alarm Interface unit, an external con-tact closure or logic level can be used to automatically display any camera. Any mon-itor or group of monitors can be set to display cameras under alarm conditions. The base system contains three (3) built-in alarm response modes: basic, auto-build, and sequence and display. In addition to these three (3) modes, the PC based soft-ware packages offer the ability to combine any or all three (3) standard modes. Alarm video may be selected to reset either manually or automatically. In addition, a 16-character alarm title can be selected to appear instead of the camera title during alarm conditions.
System operation and programming is accomplished using a full-function, ergonom-ically designed keyboard. Multiple keyboards may be used in the system. Built-in operator priority levels and the ability to restrict certain operators from controlling designated functions provide maximum flexibility.
These systems include a 48-character on-screen display for time-date, camera num-ber, camera ID (16 characters), and monitor (12 characters) or status information. A user selectable option provides the ability to display a 3rd line of on-screen text. This 3rd line can be configured to display up to 24 additional camera title charac-ters (40 characters total) or a 12-character monitor title.
The on-screen display is also user selectable to operate in “6-digit Camera ID” mode. When enabled, 2-digit “site numbers” are displayed in addition to the 4-digit camera number. The 2-digit site number feature is especially useful when groups of cameras are located in separate buildings, floors, or other common areas.
When programming camera ID and monitor titles, over 1000 different characters are available.
Enhanced programming and switching features can be obtained by utilizing a stan-dard Windows® equipped PC and the optional LTC 8059/00 MCS package or the LTC 8850/00 GUI Software. A user friendly spreadsheet format provides the ability to enter camera titles, enter operator names, schedule up to 64 timed events, change
12 | en LTC 8600 | LTC 8800 Series
Bosch Security Systems, Inc. Instruction Manual F.01U.127.393 | 2.0 | 2009.03
system parameters, program camera sequences, install lockouts, and access the advanced alarm handling screens with speed and efficiency. The programmed infor-mation may then be transferred into the Allegiant system, stored on disk, or printed from a PC.
The LTC 8850/00 Bosch GUI Software is designed around an intuitive graphic-based interface. This software provides high performance programming, control, and mon-itoring of all system functions by using on-screen icons to reflect real time status of the devices controlled by the system.
The LTC 8850/00 GUI Software also provides the ability to monitor system status events. System alarms, switching functions, sequence events, and keyboard actions, and video loss information can be viewed in real time on the PC screen and, if desired, logged to the PC hard drive. The LTC 8850/00 GUI Software can also be used to enable a special on-screen icon for identifying controllable cameras.
The CPU inside these matrix switchers supports powerful macro capabilities. The macros can be activated using system keyboards, system time event functions, alarm activations, and via special function icons in the LTC 8850/00 GUI Software.
These systems can serve as the master switcher in a SatelliteSwitch configuration. This innovative feature enables a single master Allegiant system to communicate with remotely located “Satellite” systems. Any Allegiant system model can serve as a remote Satellite switcher. This powerful feature permits the design of a distributed matrix video switching system with control at one central location and individual control at the local sites. The main control site can view/control local cameras plus cameras located at any of the remotely distributed Satellite sites. The Satellite sites can view/control only cameras associated with their own site.

LTC 8600 | LTC 8800 Series en | 13
F.01U.127.393 | 2.0 | 2009.03 Instruction Manual Bosch Security Systems, Inc.
5 Allegiant Feature Summary Table
These Allegiant Series systems are available in two (2) operating configurations: a base system and the base system with an optional PC based software package. The base system includes features required for most switching/controller systems.
The addition of the optional LTC 8059/00 MCS or optional LTC 8850/00 GUI Soft-ware package enables the user to customize the system's configuration using a menu driven program run on any personal computer using Microsoft® Windows NT®, Windows 2000 or Windows XP.
The following TABLE lists available features.
FeatureBase System
With Optional Allegiant PC-Based Software
1. Full camera switching/control on all monitors Y Y2. Multiple keyboards (up to 16 with LTC 8600; 32 with
LTC 8800) Y Y
3. Multiple alarm inputs (up to 512 with LTC 8600; 1024 with LTC 8800)
Y Y
4. Three (3) user-selectable pre-defined alarm response modes Y Y5. Full control of on-site receiver/drivers Y Y6. SalvoSwitching feature Y Y7. 60 Programmable sequences Y Y8. Alarm call-up of pre-position scenes Y Y9. RS-232 Interface ports for computer, logging printer, etc. Y Y10. Keyboard log-on/log-off function Y Y11. User-selectable password security Y Y12. 16-Character camera titles and 12-character monitor titles Y Y13.User-selected 40 character camera titles using third line of on-
screen textY N
14.User-selectable 2-digit site plus 4-digit camera mode Y Y15. Format selection time/date format Y Y16. Local keyboard test function Y Y17. Table and sequence printout feature Y Y18. Parameter designation for RS-232 communication Y Y19. Integral video loss detection N Y20. Satellite configurations N Y21. Restrict user/keyboard access to cameras N Y22. Restrict user/keyboard access to receiver/drivers N Y23. Restrict user access to keyboard N Y24. Restrict user/keyboard access to monitors N Y25. Designate user name and ID number N Y26. Designate zoned alarm call-ups N Y27. Powerful alarm response features N Y28. Designate displayed camera number N Y29. Designate receiver/driver functions on alarm N Y30. Program 64 time activated events N Y31. Designate receiver/driver functions in sequences N Y32. Broadcast monitor messages N Y33. Alarm title designation N Y34. Personal computer displayed monitoring of system status N Y

14 | en LTC 8600 | LTC 8800 Series
Bosch Security Systems, Inc. Instruction Manual F.01U.127.393 | 2.0 | 2009.03
In addition, these systems provide the capability to control on-site receiver/driver units and the AutoDome Series of integral pan/tilt/zoom/cameras.
These systems contain a logging printer output port, so an inexpensive RS-232 serial printer or some other form of logging software can be used to capture log data. This provides a permanent record showing time and date of changes to system status, such as:
• Incoming alarms
• Acknowledgment of alarms by users
• Loading sequences
• User log-on to keyboard or console port
• Console broadcast message
• Console transfer of system tables
• Activation of time event functions
• Power up reset message
• Video loss message
The printer may also be used to provide a hard copy of all system configuration Tables and Sequences.
LTC 8600 | LTC 8800 Series en | 15
F.01U.127.393 | 2.0 | 2009.03 Instruction Manual Bosch Security Systems, Inc.
6 System Components
6.1 LTC 8601 Series Systems
• LTC 8601 Series Main CPU BayA modular equipment bay which contains the system's microprocessor module (LTC 8610/01), the power supply module (LTC 8805 Series), and several video input and video output modules (see below).
• LTC 8621/00 Video Input ModuleIndividual cards placed in LTC 8601 Series bays to accept inputs from cameras and other video sources. Each card provides 16 video input channels with switch selectable terminations.
• LTC 8834/00 Video Output ModulesIndividual cards placed in LTC 8601 Series bays to provide video outputs to monitors and DVRs. Each card provides four (4) video output channels.
• LTC 8600 Series System CapacitiesUp to eight (8) video input modules; 16 inputs per module.
Up to four (4) video output modules; four (4) outputs per module.
Total: 128 inputs and 16 outputs.
Satellite configuration input capacity: 1152.
6.2 LTC 8800 Series Systems
• LTC 8801 Series Main CPU BayA modular equipment bay which contains the system's microprocessor module (LTC 8810/01), the power supply module (LTC 8805 Series), and several video input and video output modules (see below).
• LTC 8802 Series Monitor Expansion BayA modular equipment bay which contains a Data Receiver module (LTC 8816/01), the power supply module (LTC 8805 Series), and several video input and video output modules (see below). The Monitor Expansion bay is required in system configurations having more than 32 monitors. The Monitor Expansion bay can also accommodate up to eight (8) additional keyboards.
• LTC 8821/00 Video Input ModuleIndividual cards placed in LTC 8801 Series or LTC 8802 Series bays to accept inputs from cameras and other video sources. Each card provides 32 video input channels with switch selectable terminations.
• LTC 8834/00 Video Output ModulesIndividual cards placed in LTC 8801 Series or LTC 8802 Series bays to provide outputs to monitors and DVRs. Each card provides four (4) video output chan-nels.
• LTC 8800 Series System Capacities

16 | en LTC 8600 | LTC 8800 Series
Bosch Security Systems, Inc. Instruction Manual F.01U.127.393 | 2.0 | 2009.03
• LTC 8801 Main Bay:
Up to eight (8) video input modules; 32 inputs per module.
Up to eight (8) video output modules; four (4) outputs per module.
Subtotal: 256 inputs and 32 outputs on main bay.
• Monitor Expansion Bay:
Up to eight (8) video input modules (duplicating modules on main bay).
Up to eight (8) extra output modules (providing four (4) additional outputs each).
Subtotal: 32 extra outputs added on to the main bay's outputs.
• Total:
256 maximum inputs; 64 maximum outputs.
Satellite configuration input capacity: 2304.

LTC 8600 | LTC 8800 Series en | 17
F.01U.127.393 | 2.0 | 2009.03 Instruction Manual Bosch Security Systems, Inc.
7 System Accessory Components
The Allegiant Series accessory products provide many optional features to the base system. A brief description of accessory products is provided below. Complete specification information can be found in respective product data sheets. Applica-ble accessories are designed to be compatible throughout the Allegiant Series.
7.1 LTC 8540/00 Alarm Interface Unit
The LTC 8540/00 is an alarm gathering unit which accepts up to 64 dry contact clo-sures or logic level inputs from remote sensing devices such as door contacts, PIRs, etc. and then reports this alarm information to the main CPU bay. Alarm inputs may be configured in groups of 32 to accept either normally open or normally closed contacts. The LTC 8540/00 unit provides eight (8) relay outputs which can be used to drive external alerting devices, DVR's, and other devices.
7.2 LTC 8568 and LTC 8768 Signal Distribution Units
The signal distribution is a main site control code distribution and line driver units are available for communicating to receiver/drivers, switcher followers, and Alle-giant Satellite systems. The LTC 8568/00 Signal Distribution Unit provides 32 sepa-rate outputs for driving up to 256 remote devices. Either “star” or “daisy chain” wiring configurations may be used. The LTC 8768/00 Signal Distribution unit is sim-ilar to the LTC 8568/00, except that it provides 64 separate outputs for driving up to 512 remote devices.
7.3 IntuiKey Series KBD-Universal Keyboard
The IntuiKey KBD-UNIVERSAL is a full function keyboard used for control and pro-gramming of the Allegiant Series matrix switchers. Backlit LCD screens provide multi-language display of softkey menus and status information. Integral variable speed joystick and zoom lens controls are standard for operating fixed or variable speed pan/tilt/zoom equipped cameras. Both Allegiant RS-485 and Allegiant RS-232 keyboard protocols are supported.
In addition to the Allegiant Series, the KBD-UNIVERSAL model IntuiKey can be used to simultaneously control Divar Series DVRs, System4 Series multiplexers, and access ADIM based DVR control screens.
7.4 KBD-Rack Keyboard Mounting Kit
Rack-mounting kit designed to provide vertical, horizontal, or inclined mounting for IntuiKey keyboards.
18 | en LTC 8600 | LTC 8800 Series
Bosch Security Systems, Inc. Instruction Manual F.01U.127.393 | 2.0 | 2009.03
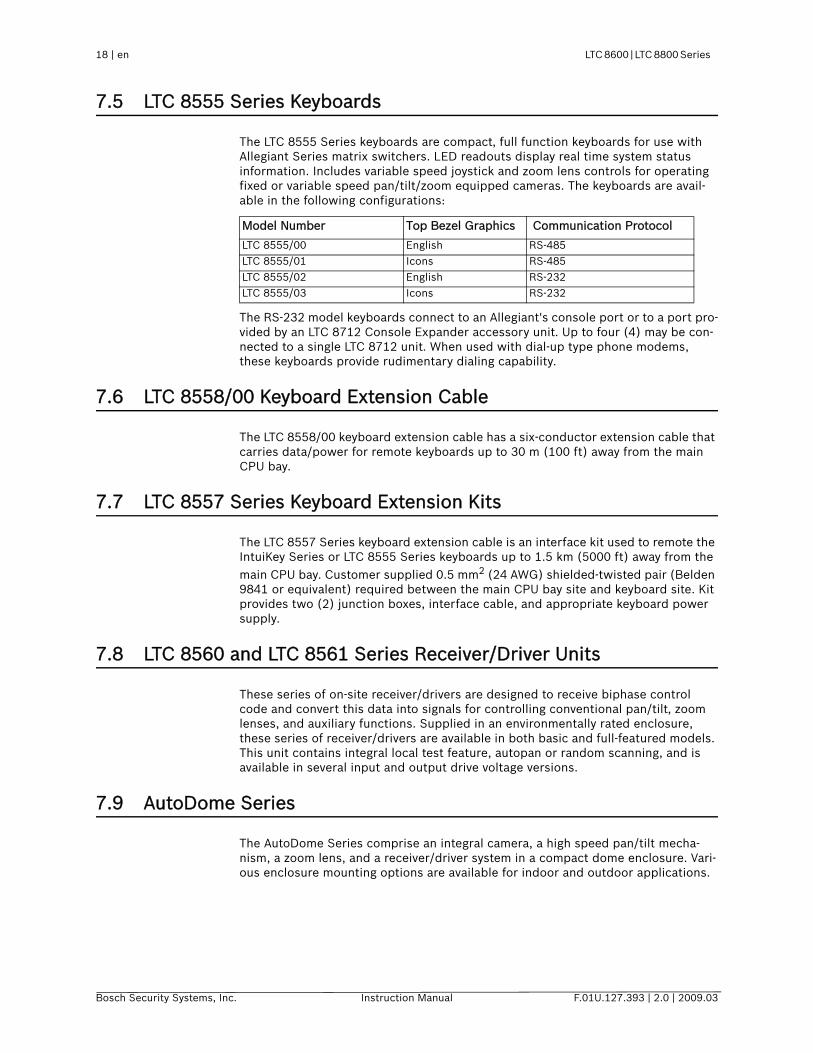
7.5 LTC 8555 Series Keyboards
The LTC 8555 Series keyboards are compact, full function keyboards for use with Allegiant Series matrix switchers. LED readouts display real time system status information. Includes variable speed joystick and zoom lens controls for operating fixed or variable speed pan/tilt/zoom equipped cameras. The keyboards are avail-able in the following configurations:
The RS-232 model keyboards connect to an Allegiant's console port or to a port pro-vided by an LTC 8712 Console Expander accessory unit. Up to four (4) may be con-nected to a single LTC 8712 unit. When used with dial-up type phone modems, these keyboards provide rudimentary dialing capability.
7.6 LTC 8558/00 Keyboard Extension Cable
The LTC 8558/00 keyboard extension cable has a six-conductor extension cable that carries data/power for remote keyboards up to 30 m (100 ft) away from the main CPU bay.
7.7 LTC 8557 Series Keyboard Extension Kits
The LTC 8557 Series keyboard extension cable is an interface kit used to remote the IntuiKey Series or LTC 8555 Series keyboards up to 1.5 km (5000 ft) away from the main CPU bay. Customer supplied 0.5 mm2 (24 AWG) shielded-twisted pair (Belden 9841 or equivalent) required between the main CPU bay site and keyboard site. Kit provides two (2) junction boxes, interface cable, and appropriate keyboard power supply.
7.8 LTC 8560 and LTC 8561 Series Receiver/Driver Units
These series of on-site receiver/drivers are designed to receive biphase control code and convert this data into signals for controlling conventional pan/tilt, zoom lenses, and auxiliary functions. Supplied in an environmentally rated enclosure, these series of receiver/drivers are available in both basic and full-featured models. This unit contains integral local test feature, autopan or random scanning, and is available in several input and output drive voltage versions.
7.9 AutoDome Series
The AutoDome Series comprise an integral camera, a high speed pan/tilt mecha-nism, a zoom lens, and a receiver/driver system in a compact dome enclosure. Vari-ous enclosure mounting options are available for indoor and outdoor applications.
Model Number Top Bezel Graphics Communication Protocol
LTC 8555/00 English RS-485LTC 8555/01 Icons RS-485LTC 8555/02 English RS-232LTC 8555/03 Icons RS-232

LTC 8600 | LTC 8800 Series en | 19
F.01U.127.393 | 2.0 | 2009.03 Instruction Manual Bosch Security Systems, Inc.
7.10 LTC 8569, LTC 8570, LTC 8571, LTC 8572 Series Code Merger Units
These series are control code merger and line driver units used to combine Allegiant biphase control code from two (up to four with LTC 8570 and LTC 8572 versions) systems for communicating to AutoDome Series cameras, receiver/drivers, switcher/followers, and Allegiant Satellite systems. The LTC 8569, LTC 8570 Series provides 32 separate outputs capable of driving up to 256 remote devices. The LTC 8571, LTC 8572 Series provides 64 separate outputs capable of driving up to 512 remote devices. Either “star” or “daisy chain” wiring configurations may be used. The unit will accept signal input either from an Allegiant main CPU bay, LTC 8568/00 output, LTC 8780 biphase output, or an output from another LTC 8569, LTC 8570 Series or LTC 8571, LTC 8572 Series unit. Multiple units may be cascaded to obtain additional outputs.
7.11 LTC 8770 Switcher Follower Series
The LTC 8770 Series is an accessory unit which provides relay contact closures cor-responding to cameras displayed on system monitors. The LTC 8770 may be config-ured to follow manual activations, non-alarmed video, alarmed video, or both. Each unit provides 24 relay contact outputs. In addition, six (6) functional operating modes are available, including one user activated test mode.
7.12 LTC 8712 Series Console Port Expander Units
The LTC 8712 Series “expands” an Allegiant system's console port to permit up to four external computing devices to communicate with the system via RS-232 proto-col. Any computing device that can normally communicate directly with an Allegiant via its RS-232 console port can be used with these port expanders. The external devices may consist of PCs running the Allegiant system's MCS package, the Alle-giant GUI, access control systems, Allegiant RS-232 protocol keyboards, or other devices utilizing the Allegiant system's Command Console Language (CCL).
7.13 LTC 8713 Alarm Port Expander Units
The LTC 8713 Series interfaces to the alarm port of an Allegiant system to permit additional LTC 8540/00 Alarm Interface units to be connected. In a LTC 8500 sys-tem, two (2) LTC 8540/00 units can be connected to a LTC 8713 Series unit provid-ing up to 128 alarm inputs. In LTC 8600 systems, up to eight (8) LTC 8540 Series units can be connected to three (3) LTC 8713 Series unit providing up to 512 alarm inputs. In LTC 8800 systems, up to sixteen LTC 8540 Series units can be connected to five (5) LTC 8713 Series unit providing up to 1024 alarm inputs.
7.14 LTC 8714, LTC 8715 Series Keyboard Port Expander Units
The LTC 8714 Series and the LTC 8715 Series are port expander accessory units used to provide additional keyboard capacity for LTC 8600 and LTC 8800 Series Alle-giant systems. A single LTC 8714 Series unit can be used to interface up to eight (8) additional keyboards in an LTC 8600 series Allegiant system. In LTC 8800 systems, up to three (3) LTC 8714 Series units can be connected to a single LTC 8715 Series to provide a quantity of 24 “port expanded” keyboards for a total of 32 system key-boards. Alternatively, all 32 system keyboards can be connected using four(4) LTC 8714 Series units and a single LTC 8715 Series unit.

20 | en LTC 8600 | LTC 8800 Series
Bosch Security Systems, Inc. Instruction Manual F.01U.127.393 | 2.0 | 2009.03
7.15 LTC 8780 Series Data Converter Units
The LTC 8780 Series are accessory units that convert the Allegiant system's biphase control code into RS-232, or converts RS-232 back to biphase code. This provides the capability of transmitting the control code over conventional RS-232 transmis-sion mediums such as phone modems, fiber optics, microwaves, etc. The unit will accept the biphase control code generated by an Allegiant main CPU bay, an LTC 8568/00 Signal Distribution unit, or an output from an LTC 8569, an LTC 8570, an LTC 8571, or an LTC 8572 Series Code Merger unit.
7.16 LTC 8781 Series Data Converter Units
The LTC 8781 Series are accessory units that decode the Allegiant system's encoded time/date information generated on the biphase control code line and con-vert it into an RS-422 GPS format. This time/date information can be used to inter-face into external time/date inserter products (such as the Kalatel KTS-53-16), which are designed to be synchronized via a GPS signal.
7.17 LTC 8016/90 Bilinx™ Data Interface Unit
The LTC 8016/90 Allegiant Bilinx Data Interface unit is an accessory used for com-municating over-the-coax, with up to 16 Bilinx-capable AutoDome and/or Dinion™ Series cameras. The LTC 8016 provides complete control of pan/tilt/zoom, auxilia-ries, and pre-position functions of Bilinx enabled AutoDome Series cameras. In addition, complete programming of Dinion Series cameras and AutoDomes via their on-screen menus is supported. Bilinx technology also supports camera-generated event reporting to the Allegiant. This connection allows remote alarm inputs and motion event data to be sent by the camera to the Allegiant without the need for additional wiring between the camera site and the main control location. The LTC 8016 can also be used to transmit Bilinx communications over a number of video transmission systems. Example devices include fiber optic links and external balun devices that use CAT5 twisted pair cables for video communication.
7.18 LTC 8785 Series Code Converters
The LTC 8785 Series code converter units are designed for use in older Allegiant systems that have been upgraded to support 'variable speed' control code protocol. The LTC 8785 units are used to provide a source of 'fixed speed' control code when the system is generating the newer 'variable speed' control code preferred by the AutoDome Series of PTZ cameras. The LTC 8785 would receive the variable speed control code from the Allegiant via its LTC 8568/00 Signal Distribution unit and con-vert it into the appropriate fixed speed control code. The 'fixed speed' control code outputs from the LTC 8785 Series connect to the older TC8561 Series receiver/driv-ers using the existing field cabling.

LTC 8600 | LTC 8800 Series en | 21
F.01U.127.393 | 2.0 | 2009.03 Instruction Manual Bosch Security Systems, Inc.
7.19 LTC 8782 Series Code Translator Units
The LTC 8782 Series code translators are accessory units that convert biphase code to other manufacturers’ control codes, or convert other manufacturers’ codes to biphase. Many of the most popular protocol codes are supported, including Pelco®, Vicon®, American Dynamics®, Sensormatic®, Kalatel®, Diamond Electronics®, and Javelin®. Fixed and variable speed codes are supported where applicable.
7.20 LTC 8808/00 Series Video Interconnect Panel
The LTC 8808/00 Series video interconnect panel is an optional accessory item which provides certain Allegiant system models the ability to loop their video inputs. This patch panel contains 32 BNC connectors on front for external video connections, and two 16-contact ribbon connectors on the rear. Two (2) 16-conduc-tor ribbon cables are included for interfacing the patch panel to the video looping connectors found on the rear panel of the equipment bays. The patch panel is one standard EIA 19-inch rack unit high, and one unit wide.
7.21 LTC 8059/00 Master Control Software
The Allegiant LTC 8059/00 MCS brings the familiarity of the personal computer to those who supervise closed circuit television systems. Running on a Windows based compatible computer, this software is the human interface that makes it quick and easy to configure an entire Allegiant system.
With the MCS package, users can set and change an Allegiant's system parameters; program camera sequences; lock cameras, monitors, remotes, and keyboards from certain users; and perform many other system control features. Users can also view system activity with real time monitoring of the system status, and if desired, log this information to a file stored on the hard drive.
7.22 LTC 8850/00 Windows Based Graphical User Interface Software
The LTC 8850/00 GUI Software is a PC-based program designed for complete con-trol and programming of the Allegiant Series of matrix switchers. With a mouse click on an icon, operators can easily take control of system hardware devices, including cameras, monitors, and alarms. Jumping from one map to another is easily accom-plished using special link icons. System Administrators can easily call-up the included Allegiant LTC 8059/00 MCS module for entering the Allegiant system's camera titles, sequences, alarm responses, and many other configuration features. Communication between the GUI workstations and an Allegiant system can be made using an RS-232 link, or via a Windows based-PC network.
7.23 SFT-INTSRV Allegiant Integration Software
The SFT-INTSRV software CD contains three (3) distinct software packages that can be used to integrate external devices with an Allegiant system matrix switcher. Please refer to the following sections for details:
22 | en LTC 8600 | LTC 8800 Series
Bosch Security Systems, Inc. Instruction Manual F.01U.127.393 | 2.0 | 2009.03
7.23.1 Integration ServerThe Integration Server is a versatile software package used to integrate multiple systems that are not ordinarily compatible with each other. These systems can include video switchers, point of sale systems, fire/burglar alarms, access control, or HVAC systems. Devices can be interfaced using any of the following three (3) methods: serial RS-232 connection, digital I/O card, or directly to an Allegiant Switcher via the LTC 8059 MCS program. The Integration Server software is pro-grammed to recognize events as they occur in real time from one or more systems, based upon one of the three (3) integration methods mentioned above. It then reacts to those events by sending commands to another system or systems.
7.23.2 Virtual Allegiant Satellite Application SoftwareThe Virtual Allegiant Satellite Application (VASA) is Bosch's strategic product that allows existing Allegiant customers to transition gradually to pure IP technologies rather than a total and instantaneous replacement. VASA acts as the integration bridge between an existing Allegiant and the new digital based CCTV system (the 'satellite') that uses digital video encoders and decoders. With VASA, the new IP technology is totally transparent to the existing Allegiant users who continue to use their Intuikey CCTV keyboards for video switching and PTZ control on classic analog monitors.
VASA supports the Allegiant LTC 8100 through the LTC 8900 Series matrix switch-ers. In addition to PTZ control, VASA provides auxiliary and preposition control of the IP-based cameras. VASA improves the ROI on existing capital assets, removes the need for training, and reduces the risk for adopting new technology by incre-mentally adding to the system. The integration is seamless and the transition is designed to be imperceptible.
7.23.3 Allegiant Satellite SDKThe Allegiant Satellite Software Development Kit (SDK) is a fully supported set of libraries, documentation, and samples targeted at PC-based application software that is used to control 3rd party CCTV matrix systems or manage IP-based digital video networks. Since the SDK can be used to create customized solutions for unique, specific problems, customers looking to integrate an Allegiant matrix sys-tem with products offered by other manufacturers is readily accomplished. For the thousands of existing Allegiant customers, it also provides a bridge to integrate or expand their systems with IP based products gradually rather than a total and instantaneous replacement.
When operating in an Allegiant satellite system configuration, an Allegiant master generates switching and PTZ data that is typically used to control a remote Allegiant satellite matrix. Using the SDK, the video switching commands and PTZ data from the master system are converted into an ActiveX interface allowing developers to easily translate this information into formats used to control other original equip-ment manufacturer's (OEM) systems. The SDK also supports an ability to translate repetitive type Allegiant PTZ commands to their indefinite equivalents, resulting in reduced interface traffic and lower bandwidth demands when controlling IP based networks.
The level of integration available with the SDK results in a robust interface that pro-vides transparent operation to the existing Allegiant operators. Operators continue to use their existing CCTV keyboards for selecting video and control of PTZ devices on the Allegiant monitors. This type of solution improves the return of investment on existing capital assets, removes the need for training, and reduces the risk for adopting new technology by incrementally adding to the system.
The SDK is compatible with all models of the Allegiant Series switchers. In addition to video switching commands and PTZ control, auxiliaries and prepositions are also supported. The SDK is supplied with five sample applications. Three (3) applica-tions use C++ to demonstrate incorporating the SDK in a console, an ATL, and an MFC application. In addition, samples using Visual Basic®, and Microsoft's .NET Framework are included.

LTC 8600 | LTC 8800 Series en | 23
F.01U.127.393 | 2.0 | 2009.03 Instruction Manual Bosch Security Systems, Inc.
7.24 LTC 8506/00 PC-to-Console Port RS-232 Cable
The LTC 8506/00 is an RS-232 grade cable with 9-pin D-connectors on each end that is used to connect an Allegiant's system's console port to a standard PC COM port. This cable is included in the Allegiant LTC 8059 MCS and the LTC 8850 Allegiant GUI packages. Length is approximately 3 m (10 ft).
7.25 LTC 8508/01 Ribbon-to-BNC Interface Cable
The LTC 8508/01 is a 1 m (3 ft) video interface cable with a 34-pin ribbon cable on one end and 16 male BNC connectors on the other end. This cable can be used to loop up to 16-channels of video signals from digital video recorders such as the Divar, Dibos, and DesaXL, or other BNC equipped devices to the ribbon cable con-nectors located on the rear panels of the LTC 8600 and LTC 8800 Series bays.
7.26 Logging Printer
An optional RS-232 serial printer may be connected to these systems to provide a permanent record of significant system status changes. Time and date is printed for system events such as alarms, start-up after power failure, sequence loading, opera-tor log-on/log-off to keyboards, and download of information from the optional MCS. The printer may also be used to obtain hard copies of all system tables and sequences.
NOTE The printer port does not provide a standardized pin-out connection. If desired, a cable can be made up at installation, by following the cable pin-out information pro-vided at the end of this manual.
24 | en LTC 8600 | LTC 8800 Series
Bosch Security Systems, Inc. Instruction Manual F.01U.127.393 | 2.0 | 2009.03
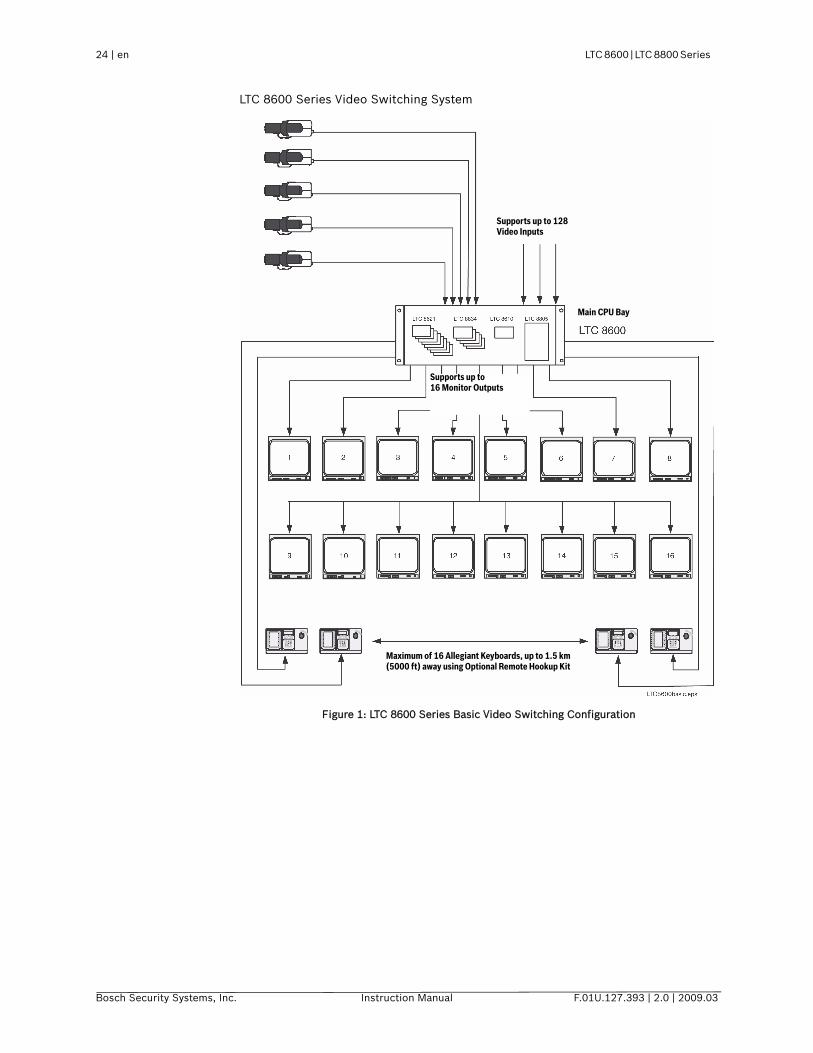
LTC 8600 Series Video Switching System
Figure 1: LTC 8600 Series Basic Video Switching Configuration
Maximum of 16 Allegiant Keyboards, up to 1.5 km (5000 ft) away using Optional Remote Hookup Kit
Main CPU Bay
Supports up to 128 Video Inputs
Supports up to 16 Monitor Outputs
LTC 8600 | LTC 8800 Series en | 25
F.01U.127.393 | 2.0 | 2009.03 Instruction Manual Bosch Security Systems, Inc.
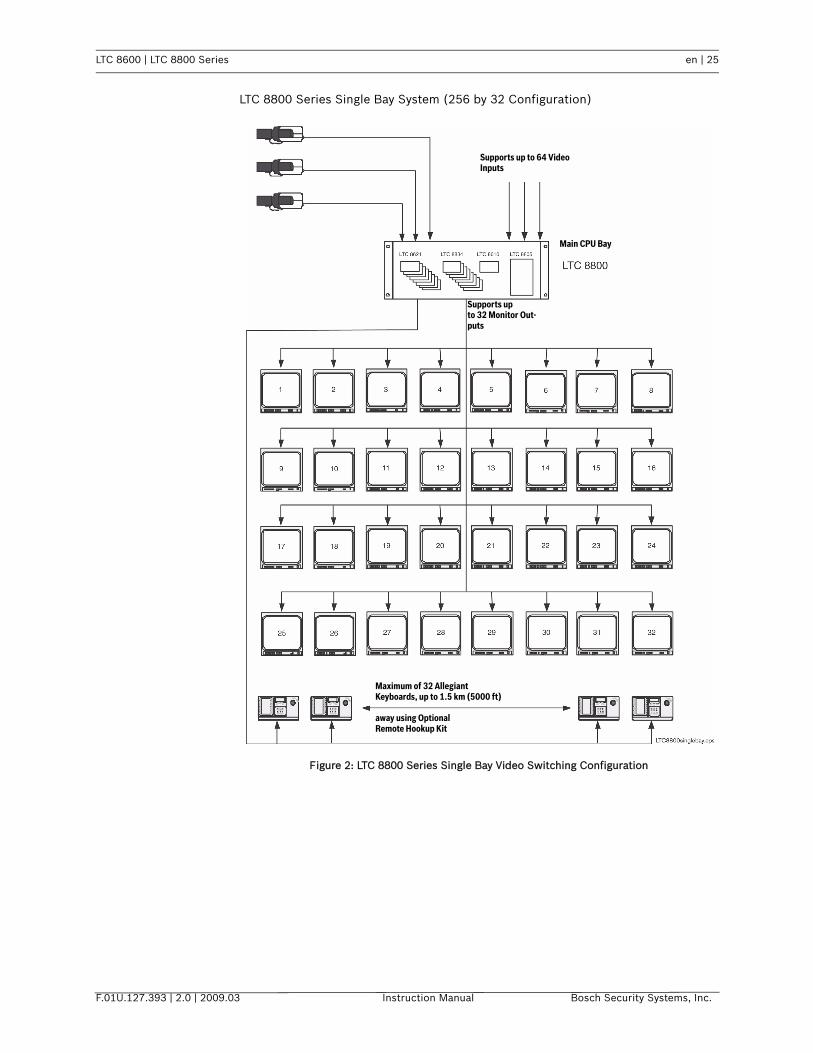
LTC 8800 Series Single Bay System (256 by 32 Configuration)
Figure 2: LTC 8800 Series Single Bay Video Switching Configuration
Main CPU Bay
Supports up to 32 Monitor Out-puts
Maximum of 32 Allegiant Keyboards, up to 1.5 km (5000 ft)
away using Optional Remote Hookup Kit
Supports up to 64 Video Inputs

26 | en LTC 8600 | LTC 8800 Series
Bosch Security Systems, Inc. Instruction Manual F.01U.127.393 | 2.0 | 2009.03
LTC 8800 Series Dual Bay System (256 by 64 Configuration)
Figure 3: LTC 8800 Series Dual Bay Video Switching Configuration
Supports up to 256 Video Inputs
Coax Ribbon Jumper Cables Supplied
Supports up to 64 Monitor Outputs
Maximum of 32 Allegiant Keyboards, up to 1.5 km (5000 ft) away using Optional Remote Hookup Kit
Control Data
Monitor Expansion BayMain CPU Bay
LTC 8600 | LTC 8800 Series en | 27
F.01U.127.393 | 2.0 | 2009.03 Instruction Manual Bosch Security Systems, Inc.
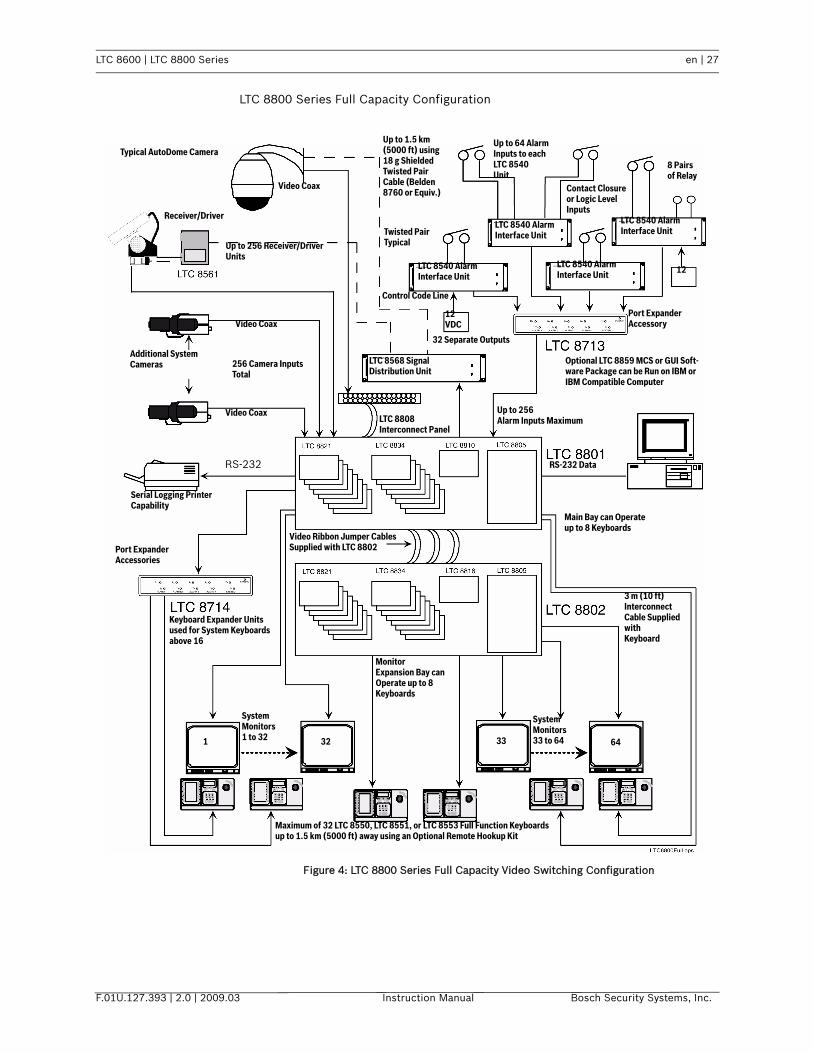
LTC 8800 Series Full Capacity Configuration
Figure 4: LTC 8800 Series Full Capacity Video Switching Configuration
Typical AutoDome Camera
Optional LTC 8859 MCS or GUI Soft-ware Package can be Run on IBM or IBM Compatible Computer
Main Bay can Operate up to 8 Keyboards
3 m (10 ft)Interconnect Cable Supplied with Keyboard
Video Coax
Video Coax
Video Coax
256 Camera Inputs Total
32 Separate Outputs
Control Code Line
Twisted Pair Typical
Contact Closure or Logic Level Inputs
Additional System Cameras
RS-232 RS-232 Data
Up to 256 Alarm Inputs Maximum
Up to 256 Receiver/Driver Units
Up to 1.5 km (5000 ft) using 18 g Shielded Twisted Pair Cable (Belden 8760 or Equiv.)
Serial Logging Printer Capability
12 VDC
LTC 8808 Interconnect Panel
Video Ribbon Jumper Cables Supplied with LTC 8802Port Expander
Accessories
Keyboard Expander Units used for System Keyboards above 16
Monitor Expansion Bay can Operate up to 8 Keyboards
LTC 8540 Alarm Interface Unit
LTC 8540 Alarm Interface Unit
LTC 8540 AlarmInterface Unit
LTC 8540 Alarm Interface Unit
Port Expander Accessory
Receiver/Driver
LTC 8568 Signal Distribution Unit
1 32 33 64
System Monitors 33 to 64
System Monitors 1 to 32
8 Pairs of Relay
12
Up to 64 Alarm Inputs to each LTC 8540 Unit
Maximum of 32 LTC 8550, LTC 8551, or LTC 8553 Full Function Keyboards up to 1.5 km (5000 ft) away using an Optional Remote Hookup Kit

28 | en LTC 8600 | LTC 8800 Series
Bosch Security Systems, Inc. Instruction Manual F.01U.127.393 | 2.0 | 2009.03
8 Installation Procedure
8.1 Main CPU Bay Installation
Before discarding the shipping cartons, verify that the various pieces of equipment have no evidence of carrier damage.
CAUTION Do not apply power to the equipment until instructed to do so.
1. Remove the front panel of the main CPU bay and the front panels of any sup-plied expansion bay (LTC 8802 Series) by loosening the four (4) corner fasten-ers.
2. Install the power supply in far right position of the main CPU bay insuring proper alignment and seating of the module into the rear mating connector. Ver-ify that the power supply ON/OFF switch is in the OFF position. Repeat this procedure for any supplied LTC 8802 Series Monitor Expansion bay.
3. Install the four screws and star washers (supplied) on the rear panel of the bay(s) surrounding the power supply line cord to fasten the power supply securely in place.
CAUTION If the allegiant card cage is to be transported, the main power supply should be removed to prevent possible damage to the bay's internal parts.
4. If the bay(s) are to be installed into a standard 19-inch EIA rack, remove the four (4) rubber bumper foot pads found on the bottom of the bay before install-ing the unit in the rack. Four (4) holes are provided for mounting the bay(s) in the rack. If any LTC 8802 Series Monitor Expansion bay is supplied, it should be located as close as possible to the LTC 8801 Series Main CPU bay to facilitate cable interconnections.
5. Install the LTC 8600 Series, the LTC 8800 Series, and the LTC 8802 Series Moni-tor Expansion bays so that there is at least 9 cm (3.5 in.) of clearance above and below the bay. This clearance is necessary to allow for proper cooling of the system. Failure to provide proper clearance may cause the equipment to exceed its recommended operating temperature range.
NOTE An LTC 8802 Series Monitor Expansion bay should be located close enough to the TC8801 so that you can connect the units with the supplied 2 m (6 ft) data intercon-nect cable
8.2 Video Input Modules
Termination switches on the Video Input Modules (VIM) must be set to the correct position prior to installation. If necessary, see Section 8.6 “Termination Practices,” on page 31 prior to actually installing the VIM on these systems.
The appropriate number of VIMs should be installed in the main bay starting with the left most slot. If the LTC 8802 Series Monitor Expansion Bay is being used, it should receive the same number of VIMs as the main bay. If less than full capacity is

LTC 8600 | LTC 8800 Series en | 29
F.01U.127.393 | 2.0 | 2009.03 Instruction Manual Bosch Security Systems, Inc.
being used, the modules should be inserted in a left-to-right manner so that the lower camera numbers are used first.
Figure 5: Typical Video Input Module Insertion
The VIMs are identical and are interchangeable within the designated VIM slots without having to make any changes to the module.
8.3 Video Output Modules
Counting from left to right beginning with slot 9, install the appropriate number of Video Output Modules (VOM) into these slots. If fewer than the maximum number of VOMs are installed, there will be empty slots between the Input and the Output Modules, so make sure that the VOMs are inserted into the correct slots.
Figure 6: Typical Video Output Module Insertion
If the LTC 8802 Series Monitor Expansion Bay is being used, it should be loaded with VIMs in the same fashion. The Main CPU Bay should be FULLY loaded with 8 output modules before putting output modules into the Monitor Expansion Bay. Remaining output modules are inserted into the Monitor Expansion Bay starting at slot 9. If fewer than the maximum number of outputs are being used, the Monitor Expansion Bay may contain fewer Output Modules than the Main CPU Bay.
All VIMs are identical and are interchangeable within the designated VOM slots.
8.4 CPU Module
The slot to the left of the power supply in the main CPU bay is reserved for the sys-tem CPU module.
NOTE The CPU module contains two (2) lithium batteries mounted on the component side of the printed circuit board. A red rectangular insulating tag may be installed in between the top of the batteries and the battery holder clip. This tag prevents bat-tery drainage during stocking. Remove tag if so equipped.
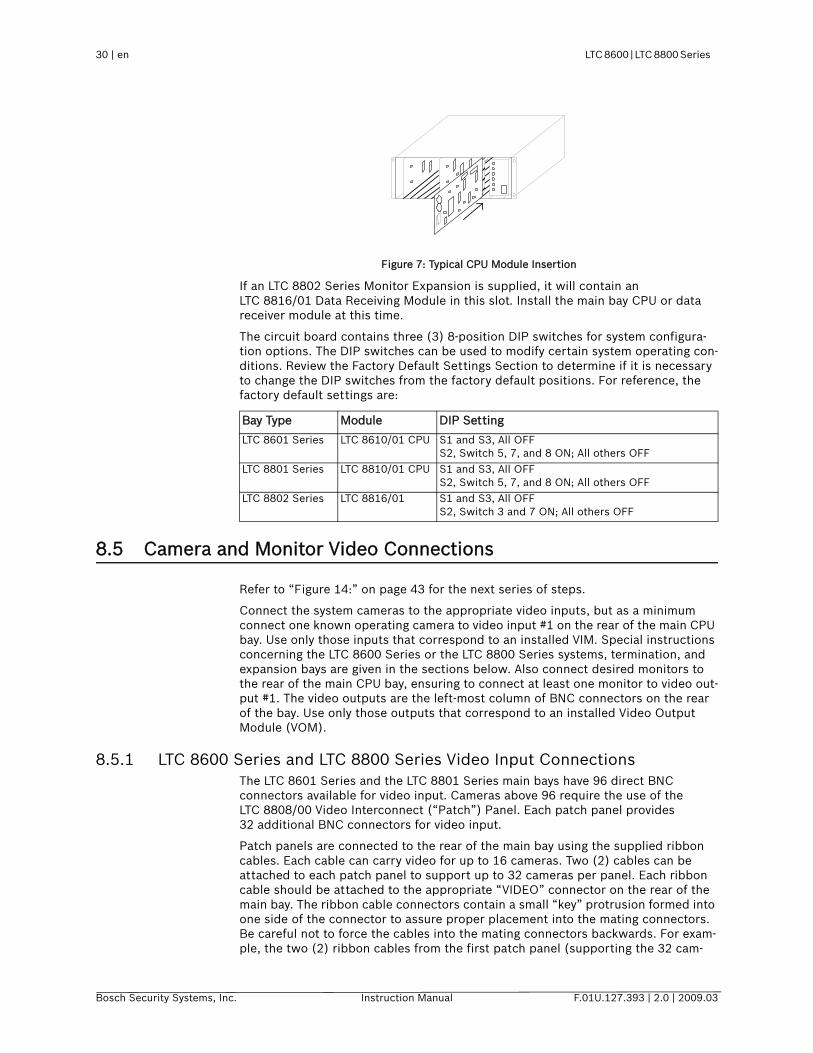
30 | en LTC 8600 | LTC 8800 Series
Bosch Security Systems, Inc. Instruction Manual F.01U.127.393 | 2.0 | 2009.03
Figure 7: Typical CPU Module Insertion
If an LTC 8802 Series Monitor Expansion is supplied, it will contain an LTC 8816/01 Data Receiving Module in this slot. Install the main bay CPU or data receiver module at this time.
The circuit board contains three (3) 8-position DIP switches for system configura-tion options. The DIP switches can be used to modify certain system operating con-ditions. Review the Factory Default Settings Section to determine if it is necessary to change the DIP switches from the factory default positions. For reference, the factory default settings are:
8.5 Camera and Monitor Video Connections
Refer to “Figure 14:” on page 43 for the next series of steps.
Connect the system cameras to the appropriate video inputs, but as a minimum connect one known operating camera to video input #1 on the rear of the main CPU bay. Use only those inputs that correspond to an installed VIM. Special instructions concerning the LTC 8600 Series or the LTC 8800 Series systems, termination, and expansion bays are given in the sections below. Also connect desired monitors to the rear of the main CPU bay, ensuring to connect at least one monitor to video out-put #1. The video outputs are the left-most column of BNC connectors on the rear of the bay. Use only those outputs that correspond to an installed Video Output Module (VOM).
8.5.1 LTC 8600 Series and LTC 8800 Series Video Input ConnectionsThe LTC 8601 Series and the LTC 8801 Series main bays have 96 direct BNC connectors available for video input. Cameras above 96 require the use of the LTC 8808/00 Video Interconnect (“Patch”) Panel. Each patch panel provides 32 additional BNC connectors for video input.
Patch panels are connected to the rear of the main bay using the supplied ribbon cables. Each cable can carry video for up to 16 cameras. Two (2) cables can be attached to each patch panel to support up to 32 cameras per panel. Each ribbon cable should be attached to the appropriate “VIDEO” connector on the rear of the main bay. The ribbon cable connectors contain a small “key” protrusion formed into one side of the connector to assure proper placement into the mating connectors. Be careful not to force the cables into the mating connectors backwards. For exam-ple, the two (2) ribbon cables from the first patch panel (supporting the 32 cam-
Bay Type Module DIP Setting
LTC 8601 Series LTC 8610/01 CPU S1 and S3, All OFFS2, Switch 5, 7, and 8 ON; All others OFF
LTC 8801 Series LTC 8810/01 CPU S1 and S3, All OFFS2, Switch 5, 7, and 8 ON; All others OFF
LTC 8802 Series LTC 8816/01 S1 and S3, All OFFS2, Switch 3 and 7 ON; All others OFF
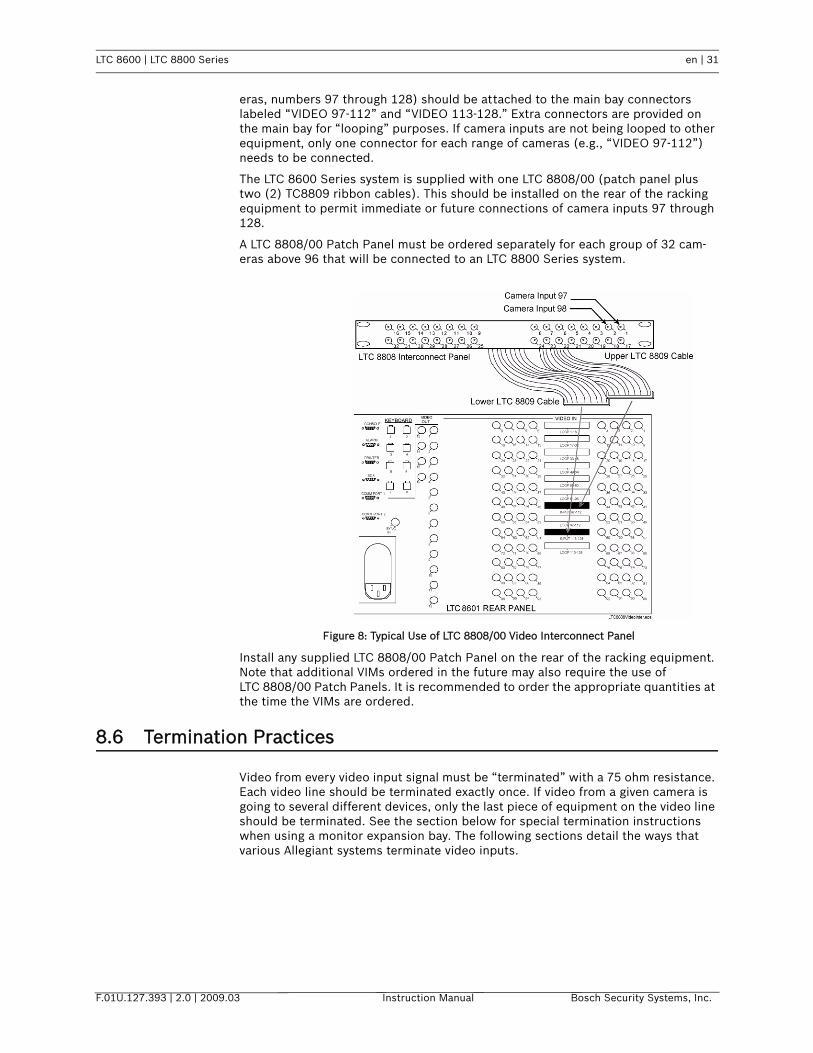
LTC 8600 | LTC 8800 Series en | 31
F.01U.127.393 | 2.0 | 2009.03 Instruction Manual Bosch Security Systems, Inc.
eras, numbers 97 through 128) should be attached to the main bay connectors labeled “VIDEO 97-112” and “VIDEO 113-128.” Extra connectors are provided on the main bay for “looping” purposes. If camera inputs are not being looped to other equipment, only one connector for each range of cameras (e.g., “VIDEO 97-112”) needs to be connected.
The LTC 8600 Series system is supplied with one LTC 8808/00 (patch panel plus two (2) TC8809 ribbon cables). This should be installed on the rear of the racking equipment to permit immediate or future connections of camera inputs 97 through 128.
A LTC 8808/00 Patch Panel must be ordered separately for each group of 32 cam-eras above 96 that will be connected to an LTC 8800 Series system.
Figure 8: Typical Use of LTC 8808/00 Video Interconnect Panel
Install any supplied LTC 8808/00 Patch Panel on the rear of the racking equipment. Note that additional VIMs ordered in the future may also require the use of LTC 8808/00 Patch Panels. It is recommended to order the appropriate quantities at the time the VIMs are ordered.
8.6 Termination Practices
Video from every video input signal must be “terminated” with a 75 ohm resistance. Each video line should be terminated exactly once. If video from a given camera is going to several different devices, only the last piece of equipment on the video line should be terminated. See the section below for special termination instructions when using a monitor expansion bay. The following sections detail the ways that various Allegiant systems terminate video inputs.

32 | en LTC 8600 | LTC 8800 Series
Bosch Security Systems, Inc. Instruction Manual F.01U.127.393 | 2.0 | 2009.03
8.6.1 LTC 8600 Series or LTC 8800 Series Video Input TerminationsEach VIM card for an LTC 8600 Series or an LTC 8800 Series system has DIP switches for selecting the termination of each individual video line. To terminate an input line, make sure that the appropriate DIP switch on the VIM card is ON. If non-terminated operation is required for looping purposes, turn the switch OFF (Switch 1 corresponds to the first video input channel of the card).
If looping video inputs are desired, the LTC 8600 Series and the LTC 8800 Series systems may utilize the LTC 8808/00 Video Interconnect Panel. Both bays provide video looping connections which interface to the LTC 8808/00 using coax type rib-bon cables supplied with the patch panel. Each LTC 8808/00 provides looping capa-bility for up to 32 video inputs.
8.6.2 LTC 8802 Series Monitor Expansion Bay Video Input ConnectionsIf an LTC 8802 Series monitor expansion bay is supplied, each video input signal that is connected to the LTC 8801 Series main CPU bay must also be connected to the same numbered input on the monitor expansion bay.
With the LTC 8802 Series monitor expansion bay, ribbon cable connectors are pro-vided for the video inputs. Video is to be looped from the main bay into the expan-sion bay through 16 LTC 8809/00 ribbon cables. Connect all LTC 8809/00 ribbon cables from the appropriate “VIDEO” ribbon cable connector on the main bay to the corresponding “VIDEO” ribbon cable connector on the monitor expansion bay. The ribbon cable connectors contain a small “key” protrusion formed into one side of the connector to assure proper placement into the mating connectors. Be careful not to force the cables into the mating connectors backwards.
IMPORTANT The Termination DIP switches on the VIM cards installed in the main bay must be turned OFF. This will make the main bay inputs non-terminated, and the expansion bay will provide the termination for the video inputs.
Figure 9: Typical LTC 8809/00 Cable Connections
KEYBOARD VIDEO IN
1
3
5
7
2
4
6
8
CONSOLE
ALARM
PRINTER
SDA
COMM PORT 1
COMM PORT 2
13
VIDEO OUT
24
9101112
17181920
25262728
33343536
41424344
49505152
575860
65666768
73747576
81828384
899092939496
85868788
77787980
69707172
616264
53545556
45464748
37383940
29303132
21222324
13141516
5678
1
SYNC
32 25 18 6
7
8
9
10
11
122431
2330
2229
2128
2027
1926
5
4
3
2
17
16
15
14
13LOOP 1-16
LOOP 17-32
LOOP 33-48
LOOP 49-64
LOOP 65-80
LOOP 81-96
INPUT 97-112
LOOP 97-112
INPUT 113-128
LOOP 113-128
INPUT 129-144
LOOP 129-144
INPUT 145-160
LOOP 145-160
LOOP 241-256
INPUT 241-256
INPUT 225-240
LOOP 225-240
LOOP 209-224
INPUT 209-224
LOOP 193-208
INPUT 193-208
LOOP 177-192
INPUT 177-192
LOOP 161-176
INPUT 161-176
59
9195
63
KEYBOARD VIDEO IN
1
3
5
7
2
4
6
8
CONSOLE
COMM PORT 2
13
VIDEO OUT
24
9101112
17181920
25262728
33343536
41424344
49505152
575860
65666768
73747576
81828384
899092939496
85868788
77787980
69707172
616264
53545556
45464748
37383940
29303132
21222324
13141516
5678
1
SYNC
32 25 18 6
7
8
9
10
11
122431
2330
2229
2128
2027
1926
5
4
3
2
17
16
15
14
13LOOP 1-16
LOOP 17-32
LOOP 33-48
LOOP 49-64
LOOP 65-80
LOOP 81-96
INPUT 97-112
LOOP 97-112
INPUT 113-128
LOOP 113-128
INPUT 129-144
LOOP 129-144
INPUT 145-160
LOOP 145-160
LOOP 241-256
INPUT 241-256
INPUT 225-240
LOOP 225-240
LOOP 209-224
INPUT 209-224
LOOP 193-208
INPUT 193-208
LOOP 177-192
INPUT 177-192
LOOP 161-176
INPUT 161-176
59
9195
63
LTC 8801
LTC 8802
LTC 8809/00
COM

LTC 8600 | LTC 8800 Series en | 33
F.01U.127.393 | 2.0 | 2009.03 Instruction Manual Bosch Security Systems, Inc.
8.6.3 LTC 8802 Series Monitor Expansion Bay Data ConnectionsThe LTC 8802 Series Monitor Expansion Bay is supplied with a 1 m (3 ft) data com-munication interconnect cable. Install this cable between the Comm1 port on the LTC 8801 Series Main CPU bay, and the Comm1 port on the LTC 8802 Series Moni-tor Expansion Bay.
8.6.4 Monitor Output Video ConnectionsJust like camera inputs, monitor outputs on the Allegiant system are designed to be terminated. Each monitor output expects to be connected to a 75 ohm load. This is the regular load typically provided by a normal monitor. If a monitor output line is “looped” through several monitors or other equipment, the system installer should make sure that only the last unit on the line is terminated.

34 | en LTC 8600 | LTC 8800 Series
Bosch Security Systems, Inc. Instruction Manual F.01U.127.393 | 2.0 | 2009.03
9 Optional Accessories Installation
9.1 General Accessory Installation
There are many accessory products available for the Allegiant Series, including key-boards, alarm interface units, control code signal distribution units, etc. If applica-ble, these products can be installed at the same time as the main CPU bay installation, or postponed until later. In some cases, products are designed to be racked in close proximity to the main CPU bay, so appropriate rack space should be reserved.
Please refer to the instructions supplied with the specific accessory product for complete installation details.
9.2 Logging Printer Option Installation
NOTE Although the exact installation procedure for each printer varies, the following steps are generally required. Be sure to save the printer reference manual for procedures not covered.
1. Switch the main power OFF to the printer.
2. Install the ribbon cartridge and paper if necessary.
3. Set any configuration switches for your particular printer to match the format provided by the Allegiant system. Note that the system communication protocol can be changed using the Keyboard User Functions (described later in this man-ual) or with the optional Allegiant LTC 8059 MCS package. The factory default values are as follows:
NOTE The required interconnect cable utilizes a custom pinout. Refer to the Appendix Section of this manual for wiring details.
4. Attach the 25-pin male D-type connector side of the RS-232 cable to the con-nector on the printer.
5. Attach the 9-pin male connector side of the cable to the Allegiant CPU bay con-nector marked “PRINTER”.
6. Apply power to the printer.
7. Verify logging printer action by ‘loading’ a previously stored sequence into a monitor, activating an alarm, or performing a system reset. Any of these actions should cause printouts to occur.
9.3 Computer Interface Installation
NOTE Although the exact installation procedure for each computer varies, the following steps are generally required. Be sure to save the computer reference manual for pro-cedures not covered here. Switch the main power OFF to the computer.
Baud rate -- 115200Stop bits -- 1Data bits -- 8Parity -- None

LTC 8600 | LTC 8800 Series en | 35
F.01U.127.393 | 2.0 | 2009.03 Instruction Manual Bosch Security Systems, Inc.
1. If using an Allegiant software package, attach the PC security key provided with the software to an available port on the computer.
The supplied interconnect cable utilizes a custom pinout. If it ever becomes necessary to replace the cable, it can be ordered separately using part number: LTC 8506/00. Alternatively, a cable can be configured using the information found in the Appendix Section of this manual.
2. Attach one end of the supplied RS-232 interface cable to the main Allegiant CPU bay connector marked Console (or another port that has been configured to operate as a Console port).
3. Attach the other end of the cable to an available serial port (COMM PORT 1 or COMM PORT 2) on the rear of the computer.
4. Apply power to the computer and allow it to boot up its operating system before inserting the software disc.
5. Refer to the applicable Allegiant software manual for complete programming instructions.
6. The communication settings of the PC must match those of the Allegiant. The Allegiant communication settings can be changed using Keyboard User Func-tion 30 (described later in this manual), or may have been previously set using the Master Control Software. The factory default values are as follows:
Baud Rate 115200Stop Bits 1Data Bits 8Parity None

36 | en LTC 8600 | LTC 8800 Series
Bosch Security Systems, Inc. Instruction Manual F.01U.127.393 | 2.0 | 2009.03
10 Satellite Configuration Installations
Due to the many variations possible, only general guidelines can be covered for installing satellite systems. Refer to the Appendix Section of this manual, the LTC 8850/00 GUI Software manual, or the LTC 8059/00 MCS package manual for additional configuration and programming information on satellite systems.
Figure 10: Satellite Concept Configuration
10.1 Satellite Site “Trunk Line” Monitor Outputs
At each of the remote satellite sites, a desired number of monitor outputs from the switcher must be assigned as trunk lines. The number of trunk lines can range from 1 to the maximum number of monitor outputs provided by the switcher. Note that the number of trunk lines coming from a satellite site determines the maximum number of cameras from that site which may be viewed simultaneously at the main site. If operators will be stationed at the satellite site, they should be prevented from accessing the monitor outputs designated as trunk lines. This prevention can be accomplished via the Monitor Lockout Tables in either the LTC 8059/00 MCS or the LTC 8850/00 GUI Software (see below).
Central Control Station
Satellite System
#1
Satellite System
#6
SatelliteSystem
#2
Satellite System
#3
Satellite System
#4
Satellite System
#5
VideoVi
deo
Video
Video
Video
The central station can view/control cameras located at any site. The satellite sites can view/control cameras located only within their own site.
Vid
eo
DataD
ata
Dat
a
Data
Data
Data

LTC 8600 | LTC 8800 Series en | 37
F.01U.127.393 | 2.0 | 2009.03 Instruction Manual Bosch Security Systems, Inc.
10.2 Main Site “Trunk Line” Video Inputs
At the main site, video trunk line connections coming from each of the remote site(s) should be connected (and properly terminated) using an available video input at the main bay. There are no programming restrictions concerning their con-nections, but a sense of order can be maintained if a group of video inputs are used at the upper end of the system’s designed capacity. This technique allows the main system to be more easily expanded in the future with additional local cameras or trunk lines. As an example, assume there are a total of eight (8) trunk lines coming from all satellite sites which are connected to a main site system designed for 32 inputs. Inputs 25 to 32 can be reserved for the trunk lines, leaving inputs 1 to 24 for local camera connections. If there will be no local camera inputs, the trunk lines can start at the first video input.
10.3 Control Data Lines in Satellite Systems
Each satellite site must be provided with an Allegiant biphase control data line com-ing from the Signal Distribution located at the main site. This data line carries all pan/tilt/zoom control commands, in addition to the switching commands generated by the main site switcher. The control data line should be connected to a LTC 8780 Series Data Converter unit, which provides address decoding functions for the sat-ellite site. An LTC 8780 Series is required for each satellite site, and must be given a unique site address number. If operators stationed at the satellite site are permitted to control pan/tilt/zoom-equipped cameras, an LTC 8569 Series Code Merger unit must be installed at the satellite site. In order for each site to have control over pan/tilt/zoom-equipped cameras, the Code Merger combines code generated by the main and satellite sites. The LTC 8780 Series can then be connected to one of the data outputs of the LTC 8569 Series unit.
10.4 Satellite Site Programming Requirements
The optional LTC 8059/00 MCS or the optional LTC 8850/00 GUI Software is required to properly program a satellite system.
Programming the satellite sites is usually limited to designating their logical camera numbers to appropriate values via the Camera ID Table of the MCS or GUI Software. Note that no duplicate logical camera numbers are permitted anywhere in the sys-tem. Allegiant logical camera designations can be renumbered to any four-digit num-ber on all Allegiant Series systems, except the LTC 8500 Series, which is limited to three (3) digits. Few other restrictions exist. These camera numbers are the num-bers entered at both the satellite and the main site keyboards when camera selec-tions are made. On any AutoDome Series camera or conventional pan/tilt/zoom-equipped camera, this logical number must also be entered as the receiver/driver's site address number.

38 | en LTC 8600 | LTC 8800 Series
Bosch Security Systems, Inc. Instruction Manual F.01U.127.393 | 2.0 | 2009.03
Figure 11: Satellite Site Sample Program Showing Logical Camera Numbers and Titles
To maintain a sense of order, it is preferable to program a satellite for a range of camera numbers. For example, in a three (3) Allegiant type satellite system, the first satellite can be programmed for camera numbers 51 to 100. Satellite two can be programmed for camera numbers 101 to 131, and satellite three can use numbers 151 to 185.
If necessary, the Keyboard-to-Monitor Lockout Table in the LTC 8059/00 MCS or the LTC 8850/00 GUI Software can be programmed in the satellite switcher to prevent any local operators from inadvertently accessing the satellite's monitor outputs being used as trunk lines.
If operators will be stationed at the satellite site, camera titles should be entered into the switcher. If desired, these titles can be selected (explained below) to appear at the main site.
The only other requirement is to ensure that the console ports of all Allegiant type satellites have been set to the correct baud rate and the handshake option disabled (CTS = off). This is done via a system keyboard (see Keyboard User Function 30), the Parameters-System screen of the LTC 8059/00 MCS or the LTC 8850/00 GUI Software (make sure CPU DIP Switch S2 is set to the ON position).
10.5 Main Site Programming Requirements
At the main site, the Camera ID Table must be programmed to ensure proper satel-lite operation. It is easiest to start with the trunk line inputs. For each trunk line, the satellite's monitor output number and its bay address must be entered (same num-ber as the satellite's LTC 8780 address).
Camera numbers should be programmed next. No duplicate logical camera numbers are allowed anywhere in the entire system. If the system will include many local cameras, it is recommended to designate remote cameras (i.e., those located at sat-ellite sites) using numbers above the main bay's physical video inputs (9+ on LTC 8100 Series, 17+ on LTC 8200 Series, 33+ on LTC 8300 Series, 65+ on LTC 8500, 129+ on LTC 8600, 257+ on LTC 8800 Series, 4097+ on LTC 8900 Series). Enter the desired camera number, (the satellite bay that it is actually connected to), and select if either a local title will be used, or if the remotely generated title will be used.
For satellite camera entries, only those numbers representing actual cameras need to be entered. For example, all 16 cameras associated with a LTC 8200 switcher do not need to be entered if only five cameras are actually connected to the switcher. If desired, a few extra camera number lines in the table may be reserved at this time for future expansion. If a local title is specified, the camera's title can also be entered at this time. Designate any local camera numbers appropriately, and enter their corresponding titles.
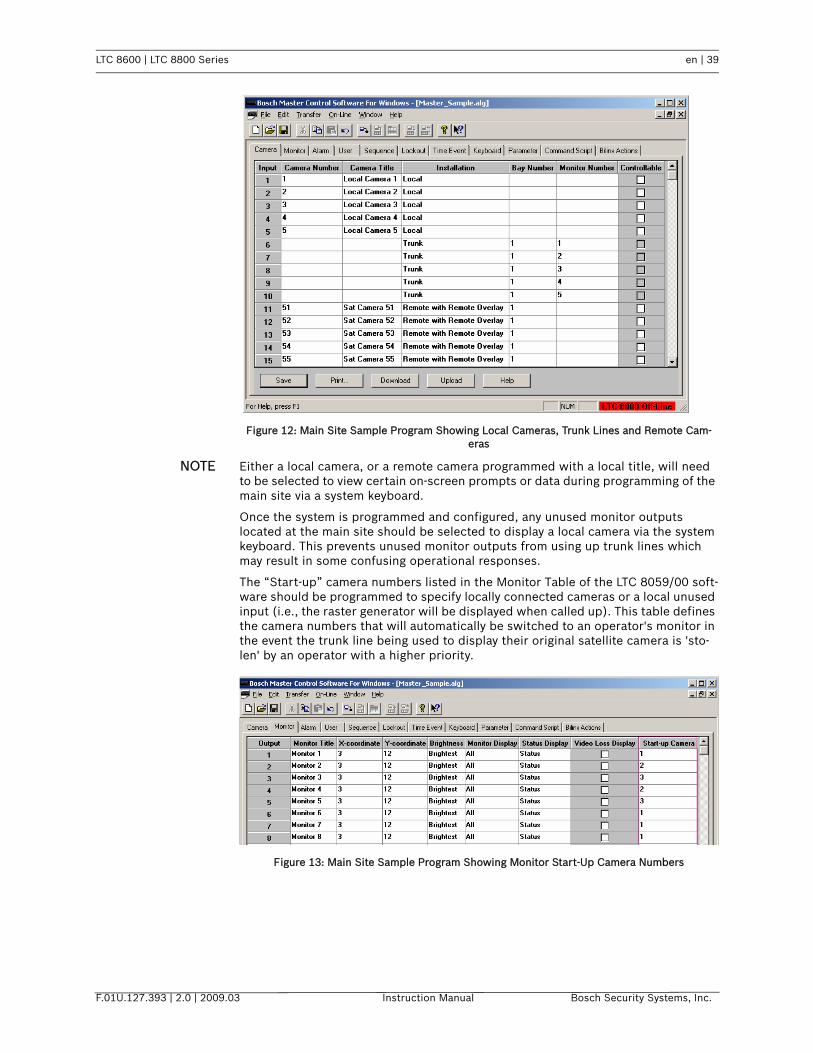
LTC 8600 | LTC 8800 Series en | 39
F.01U.127.393 | 2.0 | 2009.03 Instruction Manual Bosch Security Systems, Inc.
Figure 12: Main Site Sample Program Showing Local Cameras, Trunk Lines and Remote Cam-eras
NOTE Either a local camera, or a remote camera programmed with a local title, will need to be selected to view certain on-screen prompts or data during programming of the main site via a system keyboard.
Once the system is programmed and configured, any unused monitor outputs located at the main site should be selected to display a local camera via the system keyboard. This prevents unused monitor outputs from using up trunk lines which may result in some confusing operational responses.
The “Start-up” camera numbers listed in the Monitor Table of the LTC 8059/00 soft-ware should be programmed to specify locally connected cameras or a local unused input (i.e., the raster generator will be displayed when called up). This table defines the camera numbers that will automatically be switched to an operator's monitor in the event the trunk line being used to display their original satellite camera is 'sto-len' by an operator with a higher priority.
Figure 13: Main Site Sample Program Showing Monitor Start-Up Camera Numbers

40 | en LTC 8600 | LTC 8800 Series
Bosch Security Systems, Inc. Instruction Manual F.01U.127.393 | 2.0 | 2009.03
10.6 Special Programming for “Cascaded” Satellite System Configurations
In a 3-tier cascaded satellite system, it is highly recommended for the system design to have more trunks lines between the intermediate master/satellite system and the 3rd level satellite system than there are between the top level master system and the intermediate system. In systems where this is not the case, it is likely that oper-ators at top level master and the intermediate master/satellite will end up fighting for trunk lines coming from the 3rd level satellite system.
There are two user configuration options available (starting in CPU firmware version 8.70) to eliminate or at least significantly reduce conflicts between operators when this type of system is being used.
Option 1: Using Factory default settings, previously selected satellite cameras remain on trunk lines even after the operator switches back to a local camera view. Although this mode of operation is more desirable in standard systems because it minimizes delays when previous satellite cameras are reselected, it is not advanta-geous to use in cascaded systems. In cascaded systems, all available trunk lines coming from the 3rd level satellite system may become used up, making them unavailable to the operators at the intermediate system.
In this situation, keyboard User Function 41 should be set to the NO REM CAM CACHE option at the master site location. In this mode, after the top level operator selects a locally connected camera, the trunk line between the top level and the intermediate level system will immediately be reset to its Start-up camera (as defined in the Monitor Table of the LTC 8059/00 MCS). This action frees the trunk line between the intermediate level system and the 3rd level system so it will be available if needed by an operator at the intermediate level system.
For the monitors being used as trunk lines in the intermediate system, it is important for the “Start-up” camera numbers listed in the Monitor Table of the LTC 8059/00 software to be programmed to specify cameras connected locally or a local unused input (i.e., the raster generator will be displayed when called up). This action ensures that no trunk line is used when a monitor switches to the Start-up camera.
Option 2: If the top level master system and intermediate level system in a cascade configuration can or will be set to operate as “Dual Master” systems, a priority based satellite camera feature can be configured.
In default cascaded satellite system configurations, satellite switching commands are not associated with a user priority level. When a switching command sent from a master site is received by a satellite, the switch selection can immediately be over-ridden by operators at the satellite location who have any priority level. This situa-tion is more likely to be encountered in 3-tier Satellite systems that do not have a good distribution of trunk lines (i.e., more between the top level system and the intermediate level system than there are between the intermediate system and the 3rd tier satellite).
Since dual master configurations support bi-directional communications, it is possi-ble to set keyboard User Function 41 to use the SAT nnn PRIORITY option for both the top level and intermediate level master systems. The satellite number assigned to the system that is currently being programmed must be specified here. This fea-ture will enable use of the operator’s user priority to determine if access to a desired satellite camera is provided or not. For instance, if no trunk lines are avail-able and an operator requesting a satellite camera has a higher priority than at least 1 of the existing operators, the requested camera will be switched. If the operator does not have sufficient priority, they will receive an error message (i.e., error 81) via the satellite communication path, and their camera will switch to the Start-up camera specified in the Monitor Table.

LTC 8600 | LTC 8800 Series en | 41
F.01U.127.393 | 2.0 | 2009.03 Instruction Manual Bosch Security Systems, Inc.
10.7 Alarm Inputs in Satellite Systems
Any alarm inputs to the main site, which have been programmed to activate cameras located at satellites, will operate normally except when limited by the number of trunk lines available. The software automatically determines trunk usage depending on the priority level of operators currently viewing satellite cameras. Alarm inputs applied at a satellite site will not activate the alarm video at the main site. If the application requires alarms located at a satellite to activate video at the main site, the remote alarms must be brought back to the main site. If necessary, the main site's LTC 8540/00 Alarm Interface unit can be remotely located via an RS-232 link. Since the Alarm Interface capability is an integral part of the LTC 8100, LTC 8200, and LTC 8300 Series, this is not possible if an LTC 8100, LTC 8200, or LTC 8300 Series system is being used as the main site system. If more than one satellite site contains alarms, multiple LTC 8540/00 Alarm Interfaces can be remotely located. The number of alarm interfaces which can be remoted is limited only by the capac-ity of the main site system to support this capability.

42 | en LTC 8600 | LTC 8800 Series
Bosch Security Systems, Inc. Instruction Manual F.01U.127.393 | 2.0 | 2009.03
11 Feature Selection
Certain user-selectable features can provide enhanced Allegiant system operation capabilities. Any desired changes can be made now or delayed until specific system requirements become more apparent. Refer to the Factory Default Settings Section for a full description of these features and selection instructions.
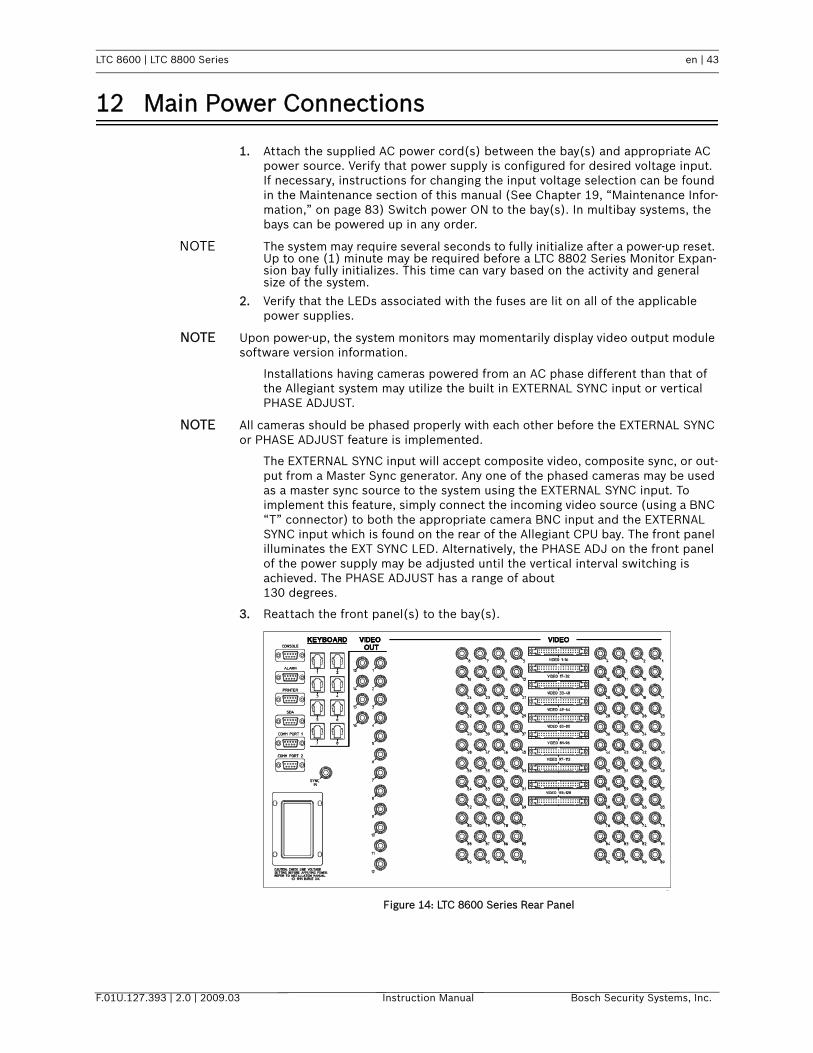
LTC 8600 | LTC 8800 Series en | 43
F.01U.127.393 | 2.0 | 2009.03 Instruction Manual Bosch Security Systems, Inc.
12 Main Power Connections
1. Attach the supplied AC power cord(s) between the bay(s) and appropriate AC power source. Verify that power supply is configured for desired voltage input. If necessary, instructions for changing the input voltage selection can be found in the Maintenance section of this manual (See Chapter 19, “Maintenance Infor-mation,” on page 83) Switch power ON to the bay(s). In multibay systems, the bays can be powered up in any order.
NOTE The system may require several seconds to fully initialize after a power-up reset. Up to one (1) minute may be required before a LTC 8802 Series Monitor Expan-sion bay fully initializes. This time can vary based on the activity and general size of the system.
2. Verify that the LEDs associated with the fuses are lit on all of the applicable power supplies.
NOTE Upon power-up, the system monitors may momentarily display video output module software version information.
Installations having cameras powered from an AC phase different than that of the Allegiant system may utilize the built in EXTERNAL SYNC input or vertical PHASE ADJUST.
NOTE All cameras should be phased properly with each other before the EXTERNAL SYNC or PHASE ADJUST feature is implemented.
The EXTERNAL SYNC input will accept composite video, composite sync, or out-put from a Master Sync generator. Any one of the phased cameras may be used as a master sync source to the system using the EXTERNAL SYNC input. To implement this feature, simply connect the incoming video source (using a BNC “T” connector) to both the appropriate camera BNC input and the EXTERNAL SYNC input which is found on the rear of the Allegiant CPU bay. The front panel illuminates the EXT SYNC LED. Alternatively, the PHASE ADJ on the front panel of the power supply may be adjusted until the vertical interval switching is achieved. The PHASE ADJUST has a range of about 130 degrees.
3. Reattach the front panel(s) to the bay(s).
Figure 14: LTC 8600 Series Rear Panel
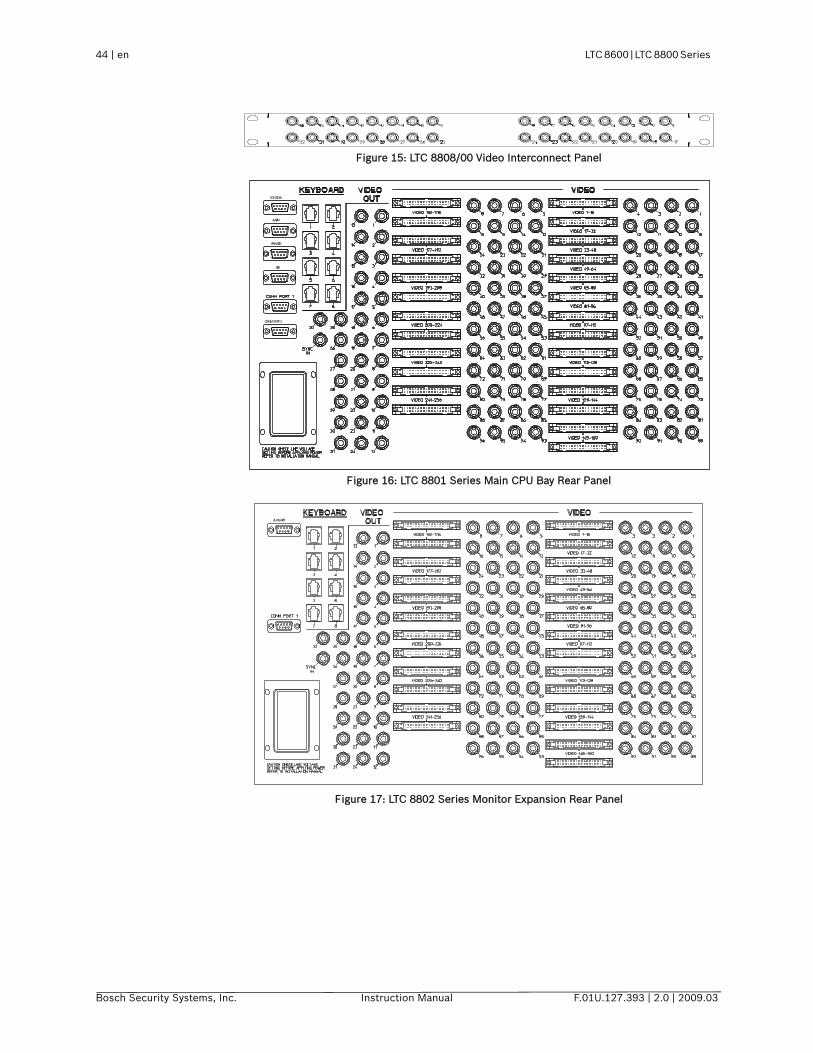
44 | en LTC 8600 | LTC 8800 Series
Bosch Security Systems, Inc. Instruction Manual F.01U.127.393 | 2.0 | 2009.03
Figure 15: LTC 8808/00 Video Interconnect Panel
Figure 16: LTC 8801 Series Main CPU Bay Rear Panel
Figure 17: LTC 8802 Series Monitor Expansion Rear Panel
CONSOLE
ALARM
PRINTER
SDA
COMM PORT 2
AUXILIARY

LTC 8600 | LTC 8800 Series en | 45
F.01U.127.393 | 2.0 | 2009.03 Instruction Manual Bosch Security Systems, Inc.
13 Video Monitor Display
The Allegiant Series systems feature an integral text overlay with two or three rows of 24 characters each. There are over 2000 different characters that can be dis-played. See Chapter 20, “Character ROM Tables for LTC 8600 and LTC 8800,” on page 86
NOTE If no video signal is present, a new line will appear stating: VIDEO NOT PRESENT.
The display is broken down into seven areas as shown in the figure
Figure 18: Monitor Overlay Display
NOTE The Monitor Overlay Display shows all six digits including leading zeros for a camera number in 6-digit mode. In 4 digit mode, the camera number display depends on the setting of the Miscellaneous Parameter option as set in the Master Control Soft-ware.
13.1 Time/Date
The time/date display is generated by the system CPU microprocessor module. It is crystal controlled and battery protected for one year (minimum) without power. The display is updated once per second and all monitors update simultaneously. The time/date message is always on the right side of the video display with the time on the top line. Time displays hours, minutes, and seconds, and can be set to either 12-hour or 24-hour operation. The date is available in three (3) user-selectable formats:
1. U.S. Format - The order for the American date display is: MM/DD/YY. (Default for 120 VAC systems)
2. International Format - The order for the international date display is: DD/MM/YY (Default for 220-240 VAC systems)
3. Asian Format - The order for the Asian date display is: YY/MM/DD
XXXX Status/Title 12:00:00Camera Title 11-26-90
Extended Camera Title/Monitor Title
xx
User-selectable 2-digit “Site” Number Mode
12-character SystemStatus Display or
Monitor Title
CameraNumber
12- or 24-hourTime Display
16-characterCamera Title
User-selectableThird Line Mode
3 SelectabFormats:(MM-DD-YDD-MM-YYY-MM-D
PM
46 | en LTC 8600 | LTC 8800 Series
Bosch Security Systems, Inc. Instruction Manual F.01U.127.393 | 2.0 | 2009.03
13.2 Monitor Title/System Status Display
The monitor title/system status display area is a 12-column display to the right of the camera number. It is unique on each of the monitors. It has different uses, some of which may be selected by the user at a keyboard location. The various uses are described below.
13.2.1 System Status Display If this display is selected (factory default), it allows the Allegiant system to dynami-cally inform the user of the system status. The 12-column display is divided into smaller message columns (see figure below), in which special characters inform the user of the following:
• if the switcher is running or stopped
• the switcher’s direction
• if a monitor or remote camera is locked
• the alarm status of the camera and monitor.
13.2.2 Locations 1, 2, and 3 - Alarm IndicationWhen the monitor overlay is in the status display mode, locations 1 through 3 indi-cate if a camera on the monitor is in the alarm mode. If the on-screen camera is cur-rently in alarm mode, an ALM message will flash in a box at this location mode. If no cameras are currently in alarm mode on this monitor, these spaces are blank. Note that when a monitor has cameras in alarm mode, pressing [NEXT], [RUN], or [PRE-VIOUS] on the keyboard will move you through the alarm sequencer rather than the regular camera sequencer. The alarm switcher status will be displayed in location 6 using described symbols.
13.2.3 Location 4 - Monitor Arm Status IndicationIn the MONITOR ARMED location, the characters SM or DM will appear if the moni-tor is armed for alarm. SM means that the monitor is a “step” or “sequence” moni-tor, and will automatically step through multiple alarm videos. DM indicates that the monitor is a “display” or “review” monitor, which will collect alarm videos from one or more step monitors.
When an alarm occurs, the alarmed camera's video will replace the current display of the monitor. If the monitor is not armed, this location will be blank.
13.2.4 Location 5 - Camera Arm Status IndicationIn the CAMERA ARMED location characters CA are displayed if the camera being viewed is armed for alarm on that monitor. If the alarm signal associated with this camera becomes active, the camera will be displayed on the appropriate armed monitors.
13.2.5 Location 6 - Error IndicationThis location is used to indicate an error on the part of the user. When a user error occurs, this location will display an ERR symbol. The specific error number will appear in locations 7 and 8. The error number will also appear in the Camera Num-ber Display field on the keyboard. The display will return to normal after a few sec-onds have passed, or if the user presses [Enter] on the keyboard.
LTC 8600 | LTC 8800 Series en | 47
F.01U.127.393 | 2.0 | 2009.03 Instruction Manual Bosch Security Systems, Inc.
Location 6 is also used to indicate the sequencing direction when alarms occur. One of four of the following character combinations will be displayed:
a. ^R indicates the alarms are sequencing in a forward direction.
b. RV indicates the alarms are sequencing in a reverse direction.
c. ^S indicates the sequencing of alarms has stopped, but if started again
would sequence in a forward direction.
d. SV indicates the sequencing of alarms has stopped, but if started again
would sequence in a reverse direction.
Location 6 can also be used to display a symbol to indicate pan/tilt/zoom equipped cameras. Using the keyboard (see User Function 35), or the optional LTC 8059/00 MCS, controllable cameras can be individually selected to display a “” symbol in location 6 whenever they are viewed on a system monitor.
13.2.6 Location 7 - Remote Lock IndicationThis location will display characters RL to indicate that control over the movements of the camera being viewed have been “locked” by a user. Control over this camera is now possible only by the user who locked the camera or by a user with higher pri-ority. If the camera is not locked, the icon will not be displayed. If a user error has occurred, this location will temporarily hold part of the error number.
13.2.7 Location 8 - Monitor Lock IndicationThis location will display characters ML to indicate that the monitor has been “locked” by a user. The camera currently being viewed can not be changed except by the user who locked the monitor or one with higher priority. If the monitor is not locked, the icon will not be displayed. If a user error has occurred, this location will temporarily hold part of the error number.
13.2.8 Location 9 - Sequence Type IndicationThis location is used to display the type of sequence currently “loaded” on the mon-itor. An “absolute sequence” is indicated by the characters AS which means that the monitors programmed in the sequence program refer to the exact monitor(s) from which the sequence may be run. Sequences created using the system keyboards are always of this type, so absolute sequences are the only type possible in a base sys-tem. Sequences designated as “relative sequences” are designated by the charac-ters RS in this location. These sequences run on any monitor or group of monitors and can be programmed only using the optional LTC 8059/00 MCS package or the optional LTC 8850/00 GUI Software package with a personal computer.
13.2.9 Locations 10 and 11 - Sequence NumberThe sequence number currently active for the monitor is displayed in these two locations. This number is between 1 and 60, or 00 to indicate that no sequence is loaded.
48 | en LTC 8600 | LTC 8800 Series
Bosch Security Systems, Inc. Instruction Manual F.01U.127.393 | 2.0 | 2009.03
13.2.10 Location 12 - Sequence Status IndicationThis location indicates the status of the sequence “active” in the monitor. There are four possible character combinations:
a. ^R indicates the current sequence is sequencing in a forward direction.
b. RV indicates the current sequence is sequencing in a reverse direction.
c. ^S indicates the sequence is stopped, but if started again would sequence
in a forward direction.
d. SV indicates the sequence is stopped, but if started again would sequence
in a reverse direction.
13.3 Monitor Title
The monitor message is a stationary 12-character title which may be placed on a monitor instead of the system status display. A specific monitor message can be programmed using the keyboard (see User Function 17), the optional LTC 8059/00 MCS package, or the optional LTC 8850/00 GUI Software package.
Table 1: Format of Monitor Overlay's System Status Display
13.4 Broadcast Message
The operator of the personal computer can send a message using the optional LTC 8059/00 MCS package or the optional LTC 8850/00 GUI Software package to all the monitors in the system. This message may be up to 24 characters long, and can be used to notify all users at all monitor locations of important information. The mes-sage, along with its beginning and ending time and date, is also printed out on the logging printer, if one is connected; and any acknowledgment from users is also recorded. The broadcast duration may be set for 1 to 60 seconds. The message is displayed on a line by itself.
13.5 Program Prompts
During entry of sequence programming using the keyboard, the Allegiant system prompts the user on the monitor his keyboard is currently “controlling”. The display will return to its previous form when the user leaves the programming mode.
1 2 3 4 5 6 7 8 9 10 11 12A A A M C E R M A S S Sl l l o a r e o b e e ea a a n m r m n s q q qr r r o /m m m A A r L L R N N S
r r / o o e u u tm m D c c l m m a
l k kRvw

LTC 8600 | LTC 8800 Series en | 49
F.01U.127.393 | 2.0 | 2009.03 Instruction Manual Bosch Security Systems, Inc.
13.6 Camera Number
The left-most display on the top line shows the camera number. This number is gen-erated by the system and is always displayed. Each number is unique and identifies this camera when using the keyboard for video call-ups.
In base systems, this number is the same as the numbered BNC connector that the camera is plugged into on the rear of the bay (physical camera number). However, the optional LTC 8059/00 MCS package or the optional LTC 8850/00 GUI Software package can be used to change this number to any unique number between 1 and 9999.
The option to display a 2-digit site number above the 4-digit camera number is user-selectable. This “6-digit Camera ID” mode is especially useful when groups of cam-eras are located in separate buildings, floors, or other common areas.
13.7 Camera Title
The camera identification display is the first 16 characters of the lower line. These 16 characters label each camera. Each camera has its own title, which is displayed whenever that camera is called-up for viewing. The characters can be entered from the keyboard (see User Function 9) or may be entered from the personal computer keyboard using the optional LTC 8059/00 MCS package or the optional LTC 8850/00 GUI Software package. A user selectable option provides the ability to display a 3rd line of on-screen text. This third line can be configured to display up to 24 additional camera title characters (40 characters total) or a 12-character monitor title. There are over 4000 different characters that can be displayed. See Chapter 20, “Charac-ter ROM Tables for LTC 8600 and LTC 8800,” on page 86.
13.8 Video Loss Detection
The Allegiant system is capable of detecting loss of video. When the unit detects lost video, the respective monitor display a VIDEO NOT PRESENT message.
NOTE It may take up to five (5) seconds for the unit to display the video loss message when a video source is disconnected.

50 | en LTC 8600 | LTC 8800 Series
Bosch Security Systems, Inc. Instruction Manual F.01U.127.393 | 2.0 | 2009.03
14 Factory Default Settings
As the Allegiant system is shipped from the factory, certain features are placed in a default configuration. The installer can select some of these features at the time of system installation/configuration. Generally the default configuration represents the simplest mode of operation, allowing the user to become familiar with the system before any advanced features are selected. The default settings are described in the sections below.
14.1 User Selectable DIP Switch Settings for Main CPU Bay
NOTE After changing any of the following switches, the system must either be powered OFF and ON or reset using the keyboard (see user function 15).
14.1.1 Upper CPU DIP Switch S1System CPU modules contain three (3) 8-position DIP switches. The settings of the upper DIP switch do not need to be changed from their factory default positions except when using a Console Port Expander accessory unit or if a problem is encountered when downloading new firmware into the CPU. For reference, the functions are as follows:
• Switch 1 and 2 of S1These switches are not used in these systems and should be left OFF.
• Switch 3 of S1This switch should be set to ON if an LTC 8712 Series Console Port Expander is connected to the Allegiant’s console port. This selection can also be set using either the MCS or the PC-based GUI Software package.
• Switch 4 of S1Use this switch to set the communication baud rate that the Allegiant will use when connected to a LTC 8712 Series Console Port Expander. It is only applica-ble when DIP switch 3 is in the ON position. When set to ON, the baud rate will be 57,600 bps (recommended setting). When OFF, the baud rate follows the setting determined via DIP switch 8 of the lower CPU DIP switch. If switch 8 of the lower DIP switch is OFF, the baud rate defaults to 19,200 bps. If switch 8 of the lower DIP switch is ON, the user programmed baud setting is used, but the user setting must be 19,200 baud or higher in order to operate.
• Switch 5 of S1In the ON position, this switch is used to force the CPU into a “boot” mode so it is ready to accept a download of an operating system program via its console port. This setting should not be changed unless a problem has been encoun-tered while attempting to download a new operating system program. When this mode is enabled, the baud rate is fixed to 115200 and hardware handshake is ON.
• Switch 6, 7, and 8 of S1These switches do not currently provide user selectable options and should be left OFF.
DIP Switch Number Factory Default Setting “Upper” S1 DIP Switch Function1 OFF Not Used2 OFF Not Used3 OFF Console Expander Use4 OFF Console Expander Mode5 OFF Boot Mode6 OFF Not Used7 OFF Not Used8 OFF Not Used

LTC 8600 | LTC 8800 Series en | 51
F.01U.127.393 | 2.0 | 2009.03 Instruction Manual Bosch Security Systems, Inc.
14.1.2 Middle CPU DIP Switch S2The middle DIP switch provides several user-selectable options. These options are as follows:
• Switch 1 of S2This switch is not used in these systems and should be left OFF.
• Switch 2 of S2If switch 2 is turned ON, the alarm port on the rear of the main Allegiant bay is configured as an auxiliary console port. This auxiliary port allows the alarm port (in addition to the regular console port) to communicate with the optional LTC 8059/00 MCS package or the optional LTC 8850/00 GUI Software package.
The port can also be used to control the Allegiant system via the Console Com-mand Language (documented in the optional CCL manual). The normal console port and the alarm port (when switch 2 is on) may be used to control the Alle-giant system simultaneously. Communications parameters (baud & handshake) for the alarm port can be set using the keyboard (see User Function 32), with the optional LTC 8059/00 MCS package or with the optional LTC 8850/00 GUI Software package.
Note that the pin-out of the alarm port differs from that of the console port, so the cable supplied with the optional LTC 8059/00 MCS package or with the optional LTC 8850/00 GUI Software package can not be used when interfacing with the alarm port. If necessary, See Chapter Appendix D, “Main Bay Rear Panel Connector Pin-outs,” on page 117 for the alarm port pin-outs.
• Switch 3 of S2This switch setting is ignored if DIP switch 7 (described below) is set to ON. Current systems utilize a “variable speed” keyboard communication protocol. Older systems and keyboards were limited to using “fixed speed” keyboard communication protocols. In addition, there were two types of fixed speed pro-tocols available. By default, newer CPUs are set to operate using “six poll byte” variable speed mode, but if a newer CPU is installed into an older system, the existing keyboards would not operate with this format. This option switch is provided to support backward compatibility with the older style keyboards.
When this switch is set to OFF, the CPU in an LTC 8600 Series system communi-cates with the system keyboards using a “four poll byte” protocol when this switch is OFF. When it is on, the keyboard communication uses an “eight poll byte” protocol. For LTC 8800 Series systems, the settings are reversed: “eight poll bytes” when OFF, “four poll bytes” when ON.
This option is a global system setting that determines the communication pro-tocol that will be used for all keyboards connected to the system.
DIP Switch Number Factory Default Setting “Middle” S2 DIP Switch Function
1 OFF Reserved2 OFF Alarm Port Mode3 OFF Old Keyboard Modes4 OFF Printer Port Mode5 ON Security Feature6 OFF Not Used7 ON Keyboard Protocol Mode8 ON Communication Parameters

52 | en LTC 8600 | LTC 8800 Series
Bosch Security Systems, Inc. Instruction Manual F.01U.127.393 | 2.0 | 2009.03
For reference, the following table lists the Allegiant Series keyboard models and the protocol supported by each:
• Switch 4 of S2This switch allows the printer port on the rear of the main Allegiant bay to be configured as an auxiliary console port when it is turned ON. See the descrip-tion above regarding switch 2 for information on using an auxiliary console port. The printer port has the same pin-out as the normal console port, so the con-sole cable supplied with the optional LTC 8059/00 MCS package or with the optional LTC 8850/00 GUI Software package may be used to interface with the printer port when switch 4 is ON. Communication parameters (baud & hand-shake) for the printer port can be set using a keyboard (see User Function 31), or with the optional LTC 8059/00 MCS package or with the optional LTC 8850/00 GUI Software package.
NOTE This feature can also be implemented via the PRT2CON CCL command using an external PC, dumb terminal or other computing device. Refer to the Allegiant Com-mand Console Language (CCL) manual for complete information about using CCL commands.
• Switch 5 of S2This switch controls the system security modes. When this switch is set to ON, the system log-in features can be controlled using keyboard User Function 27 and User Function 28 (refer to the section on Keyboard User Functions for com-plete information). Users with Priority 1 can access keyboard User Function 27 to select if the system keyboard log-in feature is enabled or disabled. When enabled, the system keyboards require each user to log-in to the system and to log-off the system. All users are required to enter a user number and the correct password before the system permits interaction.
Users with Priority 1 can also access User Function 28 to select if the console port log-in feature is enabled or disabled. When enabled, any external PC or other computing device is required to log-in to the system and to log-off the sys-tem. All users are required to enter a user number and the correct password before the system permits interaction
If this switch is turned OFF or if the features are disabled using User Functions 27 and 28, the system keyboards and the console port are always online with the system.
NOTE When changing from the no 'log-on' mode to the 'log-on' mode, all system keyboards are initially 'logged-off'.
Keyboard model Supported protocols
TC8550KB 4 poll byteTC8550KB-8 8 poll byteTC8550 4 or 8 poll byteTC8550A, TC8551A, TC8553 4, 6, or 8 poll byteTC8554, TC8555 4, 6, or 8 poll byteLTC 8553 Series 4, 6, or 8 poll byteLTC 8555 Series 4, 6, or 8 poll byteIntuiKey KBD-Universal 6 poll byte
LTC 8600 | LTC 8800 Series en | 53
F.01U.127.393 | 2.0 | 2009.03 Instruction Manual Bosch Security Systems, Inc.
• Switch 6 of S2This switch is currently not used and should be left OFF.
• Switch 7 of S2This switch controls the system keyboard polling mode. When switch 7 is ON (factory default), the CPU communicates with all system keyboards via a “6 poll byte” communication protocol. This format provides variable speed pan/tilt control for AutoDome-equipped camera sites. Refer to the information for Switch 3, above, for more details.
NOTE The variable speed mode is not compatible with the pre-1996 TC8561 receiver/driv-ers without using an LTC 8785 Series code converter unit.
Dip switch 7 can be turned OFF (usually at system installation) to allow opera-tion with the older fixed speed-only type keyboards that are able to communi-cate only using the older format. In this mode, the system can communicate with the older TC8561 Series of receiver/drivers without using the LTC 8785 code converter unit. Note that the fixed speed keyboard mode allows access to only the first 63 auxiliary and pre-position functions. This is not an issue on older receiver/driver versions, but may pose a problem if the system must be expected to access all functions available in the AutoDome Series of pan/tilt/zoom dome cameras or the higher preposition numbers in current versions of Allegiant receiver/drivers.
• Switch 8 of S2This switch controls the protocol settings of the external RS-232 port which connect to the Console, Printer, and Alarm.
If the switch is turned OFF, the system uses the factory default settings for the RS-232 data communication protocols as listed below.
With switch 8 ON, any RS-232 port protocols changed using the keyboard (see User Function 30), the optional LTC 8059/00 MCS package, or the optional LTC 8850/00 GUI Software package are active.
Users with Priority Level 1 can also use the keyboard (see User Function 29) to reset any changed protocols back to the default settings (see below).
Switch 8 also controls the activation of a “boot screen” Command Script pro-gram previously downloaded into the CPU's memory. Command Scripts are user-defined programs designed to provide special system functions or features at system startup or reset. If the switch setting is OFF, any existing boot screen function will not be activated.
The default (DIP switch 8 OFF or after activation of Keyboard User Function 29) data communication settings for the Allegiant system are listed below.
14.1.3 Lower CPU DIP Switch S3The lower CPU dip switch does not currently provide any user selectable options, and all settings should be left in their OFF position.
Settings Console Port Printer Port Alarm Port Keyboard Ports
Baud Rate 115200 115200 19,200 9600Stop Bits 1 1 1 --Data Bits 8 8 8 --Parity None None None --Handshake Yes No No --

54 | en LTC 8600 | LTC 8800 Series
Bosch Security Systems, Inc. Instruction Manual F.01U.127.393 | 2.0 | 2009.03
14.2 User Selectable DIP Switch Settings for LTC 8816/00 Data Receiver Modules used in LTC 8802 Series Monitor Expansion Bays
NOTE After changing any of the following switches, the system must be powered off and on using the LTC 8802 Series monitor expansion main power switch.
14.2.1 Upper Data Receiver DIP Switch S1LTC 8816/00 data receiver modules supplied in the LTC 8802 Series bays contain three (3) 8-position DIP switches. The settings of the upper DIP switch do not need to be changed from their factory default positions except when it is necessary to change the factory default format for the internal raster generator or if a problem occurs downloading new firmware into the data receiver module. The following table list these functions:
• Switch 1 of S1This switch selects the frequency of the internal raster generator used for dis-play of on-screen text during video loss conditions. When set to OFF, the raster is generated at 60 Hz (default for 120 VAC models). When ON, the raster is gen-erated at 50 Hz (default for 220-240 VAC models). To set the DIP switch changes. power the unit OFF and then turn the unit ON.
• Switch 2, 3, and 4 of S1These switches are not used in these systems and should be left OFF.
• Switch 5 of S1In the ON position, this switch forces the data receiver into a “boot” mode so it can accept a download of an operating system program via its console port. When this mode is enabled, the baud rate is fixed to 115200 and hardware handshake is ON.
• Switch 6, 7, and 8 of S1These switches do not currently provide user selectable options and should be left OFF.
DIP Switch Number Factory Default Setting “Upper” S1 DIP Switch Function
1 ON/OFF Raster Generator Mode2 OFF Not Used3 OFF Not Used4 OFF Not Used5 OFF Boot Mode6 OFF Not Used7 OFF Not Used8 OFF Not Used

LTC 8600 | LTC 8800 Series en | 55
F.01U.127.393 | 2.0 | 2009.03 Instruction Manual Bosch Security Systems, Inc.
14.2.2 Middle Data Receiver DIP Switch S2The lower DIP switch provides certain user-selectable options. These options are as follows:
• Switch 1 of S2This switch is reserved and should be left OFF.
• Switch 2 and Switch 3 of S2Up to eight (8) system keyboards can be connected to the rear panel of the LTC 8802 Series Monitor Expansion Bay. DIP switches 2 and 3 determine the system keyboard group that can be assigned. Follow the table below to select the desired group.
• Switch 4 and Switch 5 of S2These switches are reserved and should always be left OFF.
• Switch 6 of S2When switch 6 is ON, the LTC 8816/00 data receiver module communicates with system keyboards using the newer “6 poll byte” protocol. This format is required to provide variable speed pan/tilt control capability for AutoDome equipped camera sites. If it is necessary to communicate to older system key-boards that are only compatible with fixed speed keyboard protocols, place the switch in the OFF position.
• Switch 7 of S2This switch determines the operational mode of the LTC 8816/00 and must always be left ON.
• Switch 8 of S2This switch determines the operational mode of the LTC 8816/00 and must always be left OFF.
14.2.3 Lower Data Receiver DIP Switch S3• The lower DIP switch does not currently provide any user-selectable options,
and all settings should be left in their OFF position.
DIP Switch Number Factory Default Setting S2 DIP Switch Function
1 OFF Reserved2 OFF Keyboard Group3 ON Keyboard Group4 OFF Reserved5 OFF Reserved6 ON Keyboard Mode7 ON Operational Mode8 OFF Operational Mode
Switch 2 Switch 3 Keyboard Group
Off Off ReservedOff On Keyboards 9-16 (Default)On Off Keyboards 17-24On On Keyboards 25-32
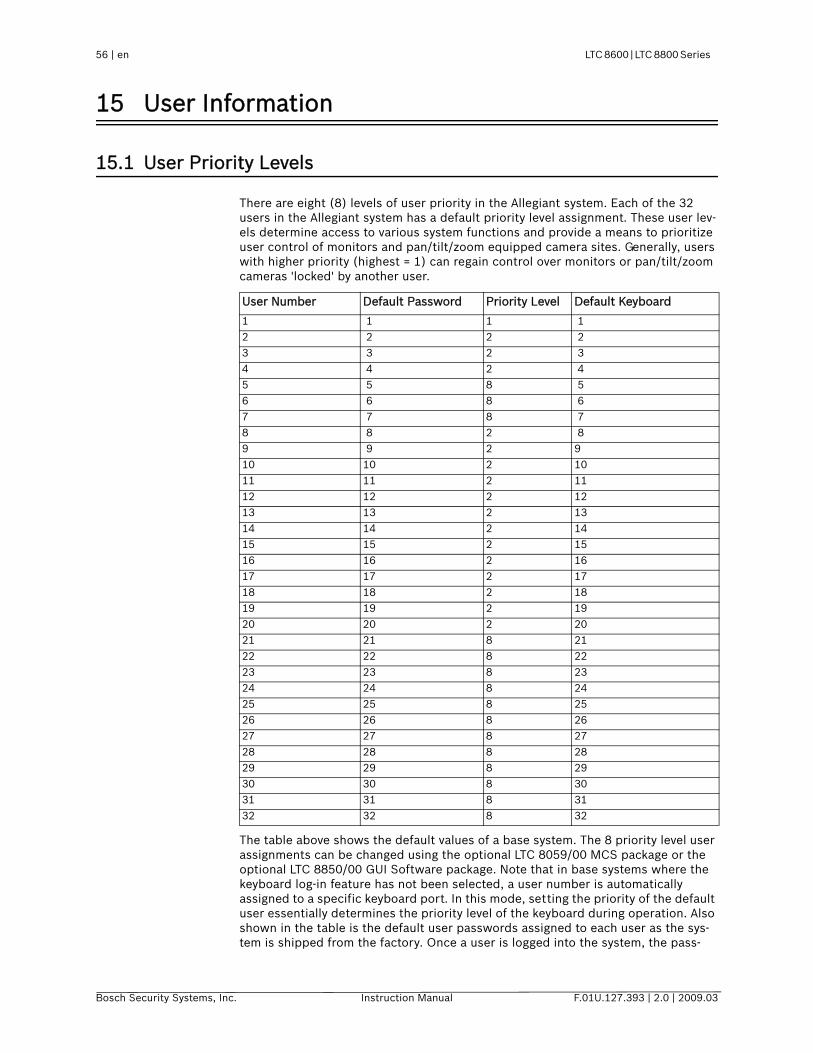
56 | en LTC 8600 | LTC 8800 Series
Bosch Security Systems, Inc. Instruction Manual F.01U.127.393 | 2.0 | 2009.03
15 User Information
15.1 User Priority Levels
There are eight (8) levels of user priority in the Allegiant system. Each of the 32 users in the Allegiant system has a default priority level assignment. These user lev-els determine access to various system functions and provide a means to prioritize user control of monitors and pan/tilt/zoom equipped camera sites. Generally, users with higher priority (highest = 1) can regain control over monitors or pan/tilt/zoom cameras 'locked' by another user.
The table above shows the default values of a base system. The 8 priority level user assignments can be changed using the optional LTC 8059/00 MCS package or the optional LTC 8850/00 GUI Software package. Note that in base systems where the keyboard log-in feature has not been selected, a user number is automatically assigned to a specific keyboard port. In this mode, setting the priority of the default user essentially determines the priority level of the keyboard during operation. Also shown in the table is the default user passwords assigned to each user as the sys-tem is shipped from the factory. Once a user is logged into the system, the pass-
User Number Default Password Priority Level Default Keyboard
1 1 1 12 2 2 23 3 2 34 4 2 45 5 8 56 6 8 67 7 8 78 8 2 89 9 2 910 10 2 1011 11 2 1112 12 2 1213 13 2 1314 14 2 1415 15 2 1516 16 2 1617 17 2 1718 18 2 1819 19 2 1920 20 2 2021 21 8 2122 22 8 2223 23 8 2324 24 8 2425 25 8 2526 26 8 2627 27 8 2728 28 8 2829 29 8 2930 30 8 3031 31 8 3132 32 8 32

LTC 8600 | LTC 8800 Series en | 57
F.01U.127.393 | 2.0 | 2009.03 Instruction Manual Bosch Security Systems, Inc.
word can be changed using the keyboard (see User Function number 10). Refer to the specific section of the operation instructions for exact procedures of using key-board User Functions. Although the table indicates 32 possible users, only 16 key-boards are supported in LTC 8600 Series systems.
15.2 User Priority Access Table
The following table shows system function access as it applies to the eight (8) levels of users.
Priority Level
System Function 1 2 to 7 8
Switch Video On Monitors Yes Yes YesControl Pan/Tilt/Zoom Camera Yes Yes YesLock Monitor Yes Yes YesLock Pan/Tilt/Zoom Camera Yes Yes YesAcknowledge Alarms Yes Yes YesPerform Keyboard Test Yes Yes YesShow Keyboard Number Yes Yes YesActivate Keyboard Beeper Yes Yes YesChange User Password Yes Yes YesProgram Sequences Yes Yes NoPosition Video Overlay Display Yes Yes NoSet Overlay Display Brightness Yes Yes NoSelect Overlay Display Type Yes Yes NoSet System Time/Date Yes Yes NoProgram Pre-positions Yes Yes NoSet Time/Date Format Yes No NoSet Camera and Monitor Titles Yes No NoEnable 3-Line Title Mode Yes No NoEnable 6-Digit Camera ID Mode Yes No NoCamera Vertical Phase Set Yes No NoEnable Time Events Yes No NoReset System Yes No NoPrintout Tables and Sequences Yes No NoDefault Monitor Overlay Yes No NoSelect Alarm Response Mode Yes No NoSelect Printer Mode Yes No NoDesignate Alarm Monitor Type Yes No NoSelect Keyboard Log-in Yes No NoSelect Console Log-in Yes No NoConfigure/Reset RS-232 Ports Yes No No
58 | en LTC 8600 | LTC 8800 Series
Bosch Security Systems, Inc. Instruction Manual F.01U.127.393 | 2.0 | 2009.03
16 Alarm Information
16.1 General
The ability to automatically switch video in response to an external signal (usually a contact closure) is a necessary feature in any video switching system. The Allegiant system permits users with Priority Level 1 to select any 1 of 3 predefined alarm response modes (via keyboard User Function 19). A description of these three (3) modes appears below. Pictorial examples of the three (3) alarm responses are also shown on the following pages.
The system can also be programmed with a wide variety of alarm response charac-teristics using the optional LTC 8059/00 MCS package or the optional LTC 8850/00 GUI Software package.
16.2 Basic Alarm Response Mode
In the Basic alarm response mode, any or all of the monitors can be selected as alarm display monitors. Each alarm can then be armed to display its camera(s) on any set of armed monitors. Multiple alarms, on the same monitor, will sequence at a 1 second rate. Note that monitors and alarms can be armed and disarmed individu-ally as required. Alarmed video automatically clears when the alarm input signal is reset.
16.3 Auto Build Alarm Response Mode
This mode uses a set of monitors as alarm display monitors. All system monitors may be armed if desired. Each triggered alarm will display its alarm video on a dif-ferent monitor, starting with the lowest numbered armed monitor. If all the armed monitors are already displaying alarm video, subsequent alarms will build on the existing alarmed monitors; and each monitor will sequence through its alarm videos at a 1 second rate. Note that monitors and alarms can be armed and disarmed indi-vidually as required. Alarmed video will automatically clear when the alarm input signal is reset.
16.4 Sequence and Display Alarm Response Mode
This mode designates two monitors as alarm response monitors. Monitor #1 is the DISPLAY monitor (also called a REVIEW monitor) and monitor #2 is the SEQUENCE (or STEP) monitor. The first alarm appears on both monitors and additional alarms begin to sequence at a 1 second rate on the SEQUENCE monitor. The DISPLAY monitor holds the first alarmed camera video until manually acknowledged through the keyboard. When the first video is cleared from the DISPLAY monitor, the next alarmed video (“next” meaning the camera that enters an alarmed state second) is displayed until cleared; operation continues in this manner. Note that alarms can be armed and disarmed individually as required. Note also that all alarms must be man-ually cleared; the presence of alarm video is not dependent upon the duration of the alarm input signal to the system.

LTC 8600 | LTC 8800 Series en | 59
F.01U.127.393 | 2.0 | 2009.03 Instruction Manual Bosch Security Systems, Inc.
16.5 Alarm Activated Pre-position
Alarm activated pre-position capability exists in each of the three (3) alarm response modes. This enables a pan/tilt/zoom equipped camera to automatically position itself to a preprogrammed scene as a result of an alarm signal. When using conventional pan/tilt equipped devices and zoom lenses, they must have the neces-sary options for pre-position control. The system default is to activate pre-position #16 of the system camera receiving an alarm. Using the optional LTC 8059/00 MCS package or the optional LTC 8850/00 GUI Software package, the user can configure a response to alarms as required.
16.6 Sample Alarm Responses
Basic Mode
In the Basic alarm response mode, cam-eras are individually armed for each alarm monitor.
Monitors and their respectively armed cameras are programmed individually.
Multiple alarms on monitors are sequenced automatically.
Alarmed video remains on monitors for duration of alarm input signal.
Auto-Build Mode
In the Auto-Build alarm response mode, alarms “build-up” on armed monitors as new alarms are received.
Any number of monitors may be armed.
Multiple alarms on monitors are sequenced automatically. Alarm video remains on monitors for duration of alarm input signal.
Alarm Status Alarm Station Display
1st Alarm Video associated with 1st
alarm is displayed on any or all appropriately armed monitors.
2nd Alarm Video associated with 2nd
alarm is displayed on any or all appropriately armed monitors.
3rd Alarm Video associated with 3rd alarm is displayed on any or all appropriately armed monitors.
Alarm Status Alarm Station Display
1st Alarm Video associated with 1st alarm is displayed on monitor # 1 (if armed).
2nd Alarm Video associated with 2nd alarm is displayed on monitor # 2 (if armed).
3rd Alarm Video associated with 3rd alarm is displayed on monitor # 3 (if armed).
.
.
.
8th Alarm Video associated with 8th alarm is displayed on monitor # 8 (if armed).
9th Alarm Video associated with 9th alarm is sequenced with video of 1st alarm on monitor # 1.
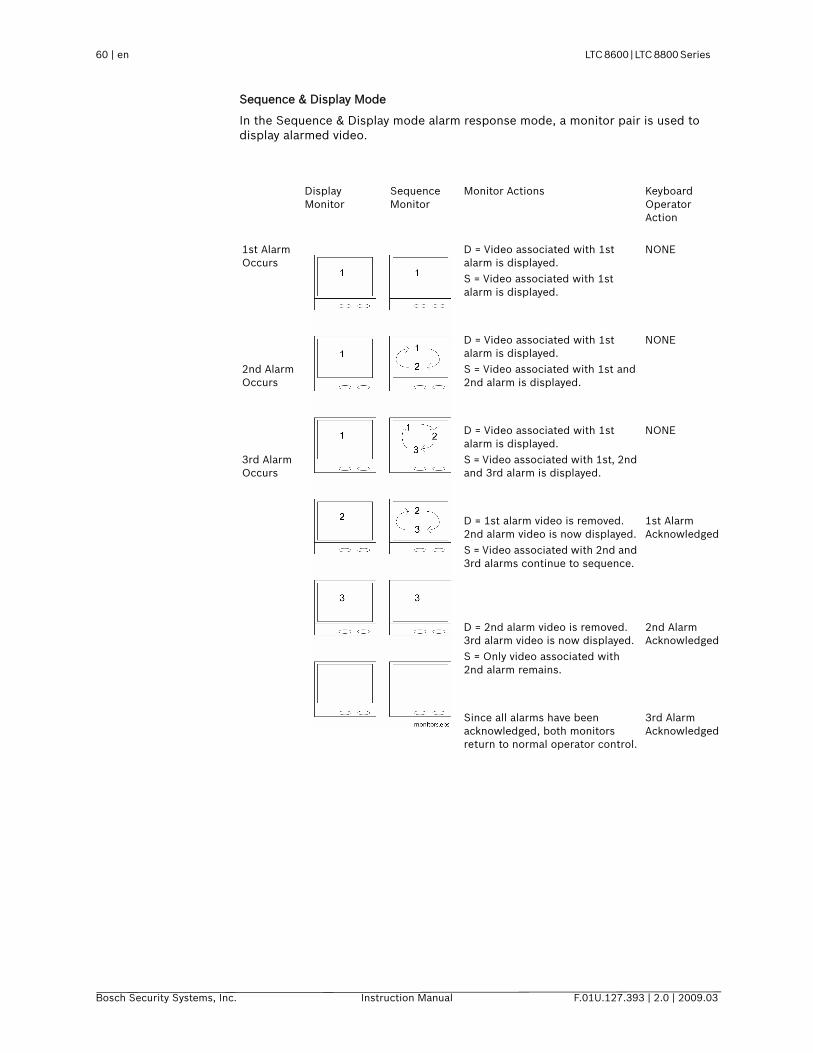
60 | en LTC 8600 | LTC 8800 Series
Bosch Security Systems, Inc. Instruction Manual F.01U.127.393 | 2.0 | 2009.03
Sequence & Display Mode
In the Sequence & Display mode alarm response mode, a monitor pair is used to display alarmed video.
Display Monitor
Sequence Monitor
Monitor Actions Keyboard Operator Action
1st Alarm Occurs
D = Video associated with 1st alarm is displayed.
NONE
S = Video associated with 1st alarm is displayed.
D = Video associated with 1st alarm is displayed.
NONE
2nd Alarm Occurs
S = Video associated with 1st and 2nd alarm is displayed.
D = Video associated with 1st alarm is displayed.
NONE
3rd Alarm Occurs
S = Video associated with 1st, 2nd and 3rd alarm is displayed.
D = 1st alarm video is removed. 2nd alarm video is now displayed.
1st Alarm Acknowledged
S = Video associated with 2nd and 3rd alarms continue to sequence.
D = 2nd alarm video is removed. 3rd alarm video is now displayed.
2nd Alarm Acknowledged
S = Only video associated with 2nd alarm remains.
Since all alarms have been acknowledged, both monitors return to normal operator control.
3rd Alarm Acknowledged

LTC 8600 | LTC 8800 Series en | 61
F.01U.127.393 | 2.0 | 2009.03 Instruction Manual Bosch Security Systems, Inc.
16.7 Alarm Relay Response
Allegiant alarm responses include the ability to trigger isolated alarm relay outputs from an LTC 8540/00 Alarm Interface unit. An alarm output is typically used to acti-vate the alarm input of a security Digital Video Recorder (DVR) or other alerting device. In this type of scenario, a DVR is programmed to change recording speeds from a slower rate to a faster rate upon alarm activation. Operation of the relay out-puts from the LTC 8540 Alarm Interface unit depends on the system configuration for responding to alarm events. The alarm output relays behave according to the fol-lowing conditions:
1. Relay 1 activates if the system uses the Basic alarm response mode and an alarm occurs on any system monitor. Relay 1 deactivates after all alarms have been removed from the inputs. Relay 1 also deactivates if the system (monitor or alarms) is disarmed by an operator via the keyboard. Pressing [Acknowledge] on the system keyboard does not deactivate Relay 1 since the alarm video fol-lows the contact applied to the unit in this alarm response mode. Other relays are not used in this mode.
2. Relay 1 activates if the base system is set to use the Sequence & Display alarm response mode and an alarm occurs on any system monitor. Relay 1 deactivates after all alarm videos have been acknowledged (by pressing the [Acknowledge] key) via system operator(s) from all system monitors. Relay 1 also deactivates if the system is disarmed (either the monitor or the alarm(s)) by an operator via the keyboard. Removal of the alarm input does not deactivate Relay 1 since the alarm video(s) are not dependent on duration of the contact applied to the unit in this alarm response mode. Other relays are not used in this mode.
3. If the base system uses the Autobuild alarm response mode and an alarm occurs on system monitors, the relay corresponding to the monitor number acti-vates for the duration that the corresponding alarm input is applied to the unit. The relay deactivates if the monitor associated with the relay or if the alarm(s) being displayed on the monitor is disarmed by an operator via the keyboard. Pressing [Acknowledge] on the system keyboard does not deactivate the relays since the alarm video follows the contact applied to the unit in this alarm response mode.
4. If the Alarm Group table screen, in the PC- based LTC 8059/00 MCS package or the LTC 8850/00 GUI Software, contains an alarm group that includes monitors and the monitor option has been selected in the Relay Action column, the corre-sponding relay activates for the duration the alarm video remains on the moni-tor. The relay deactivates if the associated monitor (or the alarm(s) being displayed on the monitor) is disarmed by an operator via the keyboard. Pressing [Acknowledge] on the system keyboard does not deactivate the relay unless this feature has been selected for the associated alarm group. If the Monitor option has been set to 1 in the group table, only Relay 1 activates when monitors in that alarm group become alarmed.
62 | en LTC 8600 | LTC 8800 Series
Bosch Security Systems, Inc. Instruction Manual F.01U.127.393 | 2.0 | 2009.03
17 Keyboard Operation
17.1 General
Primary operation of an Allegiant switcher is controlled via the system keyboard. The two types of keyboards currently available are:
• Conventional LTC 8555 Series (incorporates LEDs and pushbuttons).
• IntuiKey model (uses dynamic LCD menu screens).
General operation steps for both keyboard models follows. Refer to the individual instruction manuals supplied with the keyboard for additional information.
As the system is supplied from the factory, various user selectable features are set to a default state. See Chapter 14, “Factory Default Settings,” on page 50 for com-plete feature descriptions. Since these features are user selectable and can have a significant effect on the operation of the system, it is important to take note of any changes that may be in effect.
17.2 System Commands
17.2.1 Keyboard Log-in ProcedureKeyboard modes:
• Factory default, a keyboard is ready for use as soon as power is applied to the system.
• System operator must log-on to a keyboard to access the system. When a sys-tem is configured to use the keyboard log-on, operators must be pre-assigned a user number and password. Up to 32 user numbers are available, each having default priority level. User specific priority levels can be changed only via the optional PC-based LTC 8059/00 MCS package or the LTC 8850/00 GUI Soft-ware. Refer to the software manual for complete details.
If the log-on feature is enabled and an operator is not logged-in, LED keyboards show flashing dashes in their display. IntuiKey keyboards prompt for entry of a user number when attempting to enter the main Allegiant softscreen menu.
Enter your assigned user number via the numeric keypad and press [Enter]. When prompted, enter the password. Invalid passwords cause the keyboard to revert to its initial state. Once the log-in is successful, the keyboard will show camera and monitor numbers in its display.
Upon logging in, the monitor controlled by the keyboard may automatically switch to a pre-assigned camera number. This function is only applicable if enabled by the system administrator (via the optional MCS package) and may not function if the monitor is running a sequence and/or in an alarm condition.
NOTE The information below applies to both IntuiKey keyboards and the LTC 8555 Series keyboards. Where applicable, button designations specific to IntuiKey keyboards are shown in plain text. Equivalent button designations that apply to the LTC 8555 Series keyboards are placed in brackets ([ ]) immediately after the IntuiKey button text.

LTC 8600 | LTC 8800 Series en | 63
F.01U.127.393 | 2.0 | 2009.03 Instruction Manual Bosch Security Systems, Inc.
17.2.2 Keyboard Log-off Procedure If the log-in feature has not been enabled, this action is not applicable. If the feature has been enabled, press: User Log-off [User, then OFF].
Any priority based remote control or monitor locks made by the user will automati-cally be released at time of log-off.
17.3 Switcher Commands
• Camera Selection: Enter a camera number for viewing and press [Enter]. (The keyboard default mode is the camera mode).
• If the Allegiant is configured to operate in “6-digit Camera ID” mode, up to 6 digits can be entered. If the new camera is at the same “site” as the current camera, simply enter 1 to 4 camera number digits.
If the desired camera is at a different “site”, 5 or 6 digits must be entered. The first and second digits would be the site number and the remaining 4 digits, including any leading zeros would be the camera number at that site.
• Monitor Selection: Press MON [Monitor], enter a monitor number and press [Enter].
17.4 Controlling Camera Movement
Camera positioning is controlled via an eight-way joystick on the right-hand side of the keyboard. This joystick controls the camera pan/tilt (if equipped), moves the camera up, down, left, right, or diagonally. Moving the joystick up and to the right simultaneously moves the camera in a diagonal direction.
Rotate the joystick knob to control the zoom lens in or out. The direction of its response depends on the camera/lens model and certain system configuration set-tings that are determined at installation. Up to four pan/tilt/zoom commands may be sent to a remote camera site at a time (Example - Zoom In, Focus Far, Pan Left, and Tilt Down). All three (3) zoom lens functions can also be sent simultaneously (Example - Zoom Out, Focus Near, Iris Open).
17.4.1 Focus and Iris Lens ControlThe lens control buttons are on the right side of the keyboard. The camera's zoom lens (if equipped) is controlled to focus near or far, and open or close the iris (if the lens supports manual iris operation).
17.4.2 Lock or Unlock Control of a CameraWhen using IntuiKey keyboards, press [Device Lockout], located on the main Alle-giant menu screen to enter a menu screen for these options. With the LTC 8555 Series keyboards, press [Lock], then [ON] to lock a camera. To unlock a camera, press [OFF]. If the camera to be locked is not the one currently being viewed, enter the camera number via the numeric keyboard (but do not press [Enter]) before pressing [Lock].
If the Status option is enabled, the section of the onscreen overlay between the camera number and the time shows RL, indicating the camera is locked. Activating a camera lock immediately prevents other operators (unless they have a higher prior-ity) from controlling the locked pan/tilt/zoom camera. Remember to unlock the camera when finished so other operators can access it.

64 | en LTC 8600 | LTC 8800 Series
Bosch Security Systems, Inc. Instruction Manual F.01U.127.393 | 2.0 | 2009.03
17.4.3 Lock or Unlock Control of a Monitor• When using IntuiKey keyboards, press [Device Lockout], located on the main
Allegiant menu screen for these options.
• With LTC 8555 Series keyboards, press [Monitor], [Lock], then [ON] to lock a mon-itor or [OFF] to unlock the monitor. If the monitor to be unlocked is not the one currently being controlled by the keyboard, enter the monitor number (but do not press [Enter]) after you press [Monitor].
If the Status option is enabled, the section of the on-screen overlay between the camera number and the time shows ML indicating the monitor is locked. This status prevents other operators from changing the video on the monitor being used (unless they have a higher priority). Remember to unlock the monitor when finished so other operators can access it. If an operator with a higher priority accesses a locked monitor and switches to a different camera, the lock is automatically removed.
17.4.4 Recording a Camera Pre-position SceneSelect a camera with pan/tilt/zoom control and with preposition options. Using the joystick and lens controls, adjust the camera to view the scene you wish to store. When using IntuiKey keyboards, press [Camera Control], located on the main Alle-giant menu screen to enter a menu screen with this option. Press Set Shot [Set], then select the scene number via the numeric keypad, and press [Enter]. The camera position is stored for recall later.
If an AutoDome Series camera is being used, certain pre-position commands are also used to activate operational features/functions. Refer to the AutoDome opera-tion manual for complete information.
If an Allegiant conventional receiver/driver is being controlled, the pan/tilt and zoom lens must have the necessary options for pre-position operation. On certain models of AutoDomes and Allegiant Receiver/Driver Series, it is possible to disable a previously stored pre-position, or remove it from a pre-position tour, by pressing Set Shot [Set], the digit 9, followed by the 2-digit pre-position number. Refer to infor-mation supplied with the device to determine if it supports this feature.
NOTE Alarm activations are defaulted to call preposition scene 16.
17.4.5 Recalling a Camera Pre-position SceneSelect the camera to be activated. Press [Shot], enter a previously stored camera position number via the numeric keypad, then press [Enter]. The camera automati-cally returns to the previously stored position. If a second pre-position is called prior to the completion of the first, the camera will move directly to the second shot.
If the AutoDome Series camera is being used, certain pre-position commands are also used to activate operational features/functions. Refer to the AutoDome opera-tion manual for complete information.
17.4.6 Activate/Deactivate Auxiliary FunctionWhen using IntuiKey keyboards, press [Camera Control], on the main Allegiant menu screen to enter a menu containing these options. To turn on an auxiliary function of a remote camera device, press Aux ON [ON], enter the number of the auxiliary you would like to activate and then press [Enter]. Holding the [Enter] key down causes the auxiliary function to be sent repeatedly. This capability is useful when the auxiliary is activating a housing window washer function, or a temporary light source.
To turn OFF an auxiliary function of a remote camera device, press Aux OFF [OFF], enter the number of the auxiliary you would like to deactivate and then press [Enter].

LTC 8600 | LTC 8800 Series en | 65
F.01U.127.393 | 2.0 | 2009.03 Instruction Manual Bosch Security Systems, Inc.
With the AutoDome Series of cameras, auxiliary commands are used to activate/deactivate certain operational features/functions. Refer to the AutoDome camera manual for complete information on features supported by the model.
In the Allegiant Receiver/Driver Series, the first four auxiliaries correspond to relay outputs. Option switches in the receiver/driver can configure these to operate as either latching or momentary type functions. If configured for the latching type, the auxiliary stays on once it is activated until it is turned OFF. If configured as momen-tary, the auxiliary remains on only as long as the [Enter] key is pressed. Auxiliary out-puts 2 through 4 can also be configured as a contact closure, 24 VAC, or as line voltage. Auxiliary number 5 controls the DITHER function, detailed below. Auxiliary number 6 corresponds to an internal receiver/driver AUTOPANNING feature, previ-ously enabled by an option switch inside the receiver/driver.
DITHER is a legacy Allegiant receiver/driver feature designed to extend the life of tube-based low-light level cameras. Its function was to prevent bright lights in the scene from burning a spot on the camera imager. When this feature is active and the pan/tilt is not moved for a period of about two minutes, the receiver/driver automat-ically pans right for approximately 0.5 seconds. Two minutes later, a pan left occurs, and the cycle continues until disabled. The feature is enabled by an option switch in the receiver/driver, and is controlled by the auxiliary 5 function. To activate the DITHER function, turn [ON] auxiliary 5. To deactivate the feature, turn OFF auxiliary 5. When first enabled, the pan/tilt unit makes one short left/right cycle to indicate that the DITHER function has been activated. Note that a camera in the DITHER mode will accumulate a viewing error if left unattended for a long period of time, so occasionally a manual adjustment of the pan/tilt may be required.
17.5 Alarm Commands
17.5.1 Arm/Disarm Individual AlarmsAlarm commands control the system's automatic video switching capabilities, in response to alarm signals.
When using IntuiKey keyboards, press [Alarm Control], located on the main Allegiant menu screen, to enter a menu screen with these options. To arm an individual alarm on the monitor currently controlled by the IntuiKey, press [Arm Alarm], enter the alarm number to be armed via the numeric keypad, then press [Enter]. To disarm an individual alarm when using the IntuiKey, press [Disarm Alarm], enter the alarm num-ber to be disarmed via the numeric keypad, then press [Enter].
To arm/disarm an individual alarm when using an LTC 8555 Series keyboard, press Alarm, enter in the alarm number to be armed via the numeric keypad, and then press [ON] to arm the alarm, or [OFF] to disarm it. The camera number activated by an alarm, by default, is the same as the alarm number, although this relationship can be changed via the optional Allegiant PC-based MCS package. When the alarm num-ber does not match the camera number, it is important to specify the alarm number when using this command. The monitor status display (if enabled) shows CA (cam-era/alarm armed) whenever an armed camera is selected.
66 | en LTC 8600 | LTC 8800 Series
Bosch Security Systems, Inc. Instruction Manual F.01U.127.393 | 2.0 | 2009.03
17.5.2 Arm/Disarm All AlarmsPress [Alarm Control], located on the main Allegiant menu screen to enter the menu screen containing these options. When using the IntuiKey keyboard:
• To arm all alarms currently controlled on the monitor, press [Arm All Alarms].
• To disarm all alarms, press [Disarm All Alarms].
When using the LTC 8555 Series keyboard:
• To arm all alarms, press [User]. Then, press [Alarm] and then press [ON].
• To disarm all alarms, press [OFF].
17.5.3 Arm/Disarm MonitorWhen using the IntuiKey keyboard:
• Press [Alarm Control], located on the main Allegiant menu screen to enter the screen with these options.
• To arm the monitor currently controlled, press [Arm Monitor].
• To disarm the monitor, press [Disarm Monitor].
When using the LTC 8555 Series keyboard:
• To arm the monitor, press [User]. Then, press [Monitor] and then press [ON] to arm all alarms.
• To disarm all alarms, press [OFF].
NOTE Alarm video appears on a monitor only if the monitor is armed and the alarm is armed for that monitor. The monitor status display (if enabled) will show MA (moni-tor armed).
17.5.4 Alarms AcknowledgementBell [Ack] is provided so system operators can respond to alarms from the keyboard. Press Bell [Ack] when the keyboard is beeping (due to an alarm condition) to silence the beeper. Depending on alarm configuration programming, subsequent pressing of Bell [Ack] either clears an alarm video from the monitors or has no effect.
17.6 Sequence Control
17.6.1 Load/Clear a SequenceTo load a previously programmed sequence to run on your monitor, press Load Sequence [Seq], enter the desired sequence number (1 to 60), then press [Enter]. Note that loading a sequence does not automatically start the sequence running. Since sequences may be programmed to use more than one monitor, all required monitors must be available. If a sequence is already on a monitor, the operator who loaded it originally (or an operator with a higher priority) is permitted to load a new sequence on the monitor(s). Others will receive an error message.
To clear a monitor sequence, press Load sequence [Seq], then press [Enter]. Only the operator who originally loaded it (or an operator with a higher priority) is permitted to clear a monitor sequence. Others will receive an error message. If enabled, the status display area of the monitor indicates the sequence number in the appropriate location. If no sequence is currently loaded, 00 is displayed.
LTC 8600 | LTC 8800 Series en | 67
F.01U.127.393 | 2.0 | 2009.03 Instruction Manual Bosch Security Systems, Inc.
17.6.2 Run a SequenceTo run a sequence currently loaded on a monitor, press Start Sequence [Run]. If the sequence is stopped, the command starts sequencing. Direction of the sequencing is indicated in the monitor status display (if enabled), by a directional arrow and the letter R to the right of the sequence number. If Start Sequence [Run] is pressed while a sequence is already running, the switcher goes immediately to the next step in the sequence. Holding down Start Sequence [Run] produces a quick-scan effect. If Start Sequence [Run] is depressed when no sequence is loaded, an error results. If the monitor is in alarm, Start Sequence [Run] controls switching of alarm video rather than a loaded sequence.
17.6.3 Stop a Running SequenceTo stop a sequence that is currently running, press Hold Sequence [Hold]. The moni-tor status display shows a S to the right of the sequence number. If the sequence is already stopped, pressing Hold Sequence [Hold] has no effect. If no sequence is cur-rently loaded, pressing Hold Sequence [Hold] results in an error condition. If the mon-itor is in alarm, Hold Sequence [Hold] stops the alarm switcher rather than a loaded sequence.
17.6.4 Controlling Sequence DirectionThe direction of a sequence can be set to run either forward or reverse. It is also possible to manually step forward or reverse through a stopped sequence.
These actions work as follows:
If Next Sequence Step [Next] is pressed with the sequence in the stop state, the sequence switches forward and remains stopped. If the sequence is running when Next Sequence Step [Next] is pressed, it immediately goes to the next step and con-tinues to run. The same is true for the Previous Sequence Step [Prev] button, but in the reverse direction. If either Next Sequence Step [Next] or Previous Sequence Step [Prev] is held down, quick-scan switching at a rate of approximately two steps per second will take place. When sequences are first loaded, their direction defaults to forward.
If Previous Sequence Step [Prev] is pressed while a camera sequence is running, it reverses the sequence. If Previous Sequence Step [Prev] is pushed while in a hold mode, and the display is showing the forward prompt, the first push changes the direction only, and a second push then switches to the previous step.
The same is true for Next Sequence Step [Next] in the opposite direction. The monitor status display shows an arrow pointing either up or down to indicate the sequence direction. The arrow will be to the right of the sequence number, either above or below the sequence run R or stopped S indicator. If the monitor is in alarm, Previous Sequence Step [Prev] and Next Sequence Step [Next] control the alarm switcher rather than the loaded sequence.
If no sequence is loaded, pressing Next Sequence Step [Next] or Previous Sequence Step [Prev] automatically steps the switcher through the camera numbers in numeri-cal order.

68 | en LTC 8600 | LTC 8800 Series
Bosch Security Systems, Inc. Instruction Manual F.01U.127.393 | 2.0 | 2009.03
17.7 Sequence Programming
17.7.1 Programming a Simple Camera SequenceThe Allegiant system has powerful sequencing capabilities. Using a system key-board, it is possible to enter sequences to run on a single or on multiple monitors. As long as valid camera and monitor numbers are used, they can be entered into a sequence randomly. More powerful features are available when sequences are pro-grammed via the PC-based LTC 8059 MCS, including receiver/driver activation as part of a sequence step.
Sequence programming is limited only by the amount of CPU memory reserved for storing the sequence steps.
The current limit for these Allegiant models is 3000 steps. Comparing a sequence to a spreadsheet, a simple sequence would consist of three (3) columns as follows:
Sequence programming is best described by going through the above example. To enter the programming mode, press Program Sequence [Prog]. Enter an available sequence number (1 to 60 for these Allegiant models), then press [Enter]. The on-screen monitor display changes to the following format:
1st Line = Site ** S0001 L0001 Time(Ignore)
2nd Line = >C0001< M001 D02 Date(Ignore)
** 2-digit site number will be displayed only if 6-digit camera ID is mode is enabled.
The top line of the display always indicates the current step being viewed in the S0001 section. The total length of the sequence is displayed in the L0001 section. When programming a new sequence, the camera number that was being viewed before entering the programming mode is automatically placed between the > < prompts, as in the example C0001 above. Now enter the 1st camera of the sequence into this position. If 6-digit camera ID mode is enabled, five or six digits must be entered. If the camera number is correct, no action is necessary. If not, enter the desired camera number via the keypad and press [Enter].
Using the joystick, move RIGHT one step. The prompts will shift over to the monitor number shown in the example M001. The monitor that was being controlled by the keyboard before entering the programming mode is defaulted to this position. If cor-rect, no action is necessary. If not, enter the desired monitor number via the key-pad, and press [Enter].
Move RIGHT again. The prompts now shift over to the dwell time shown in the example D02. The default dwell time for a new sequence is always two (2) seconds. If a different dwell period is desired, change the value to any number between 1 and 60. One line is now complete. Press Next Step [Next] to add a second line. The cam-era number increments automatically, while the monitor number and dwell remain the same as the first line. Since this line is correct, no change is necessary and Next Step [Next] may be pressed three (3) more times until line five (5) is reached. The joystick can be used to move around within the spreadsheet, but only the Next Step [Next] key can add new lines.
Continue entering camera, monitor, and dwell times in this fashion until finished. If you only want to store the sequence for future use and then exit the programming
CAMERA MONITOR DWELL
1 1 22 1 23 1 24 1 25 1 2

LTC 8600 | LTC 8800 Series en | 69
F.01U.127.393 | 2.0 | 2009.03 Instruction Manual Bosch Security Systems, Inc.
mode, press Exit/Save [Prog]. Press Exit/Run [Run], to exit the programming mode, store the sequence into memory, and start the sequence running. The switcher steps through the five (5) steps in the order shown, and repeats the sequence when it reaches the last step.
To program a sequence to run once through all its steps and then stop, enter the value 62 for the dwell time in the last step and press [Enter]. The dwell display will change to STP, meaning stop. To program a sequence to run once through all its steps and then unload itself, enter the value 63 for the dwell time in the last step, and press [Enter]. The dwell display will change to ULD, meaning unload.
To edit an existing sequence, press Program Sequence [Prog], enter the existing sequence number, then press [Enter]. You can insert a line into a sequence by navi-gating down to the line where inserting a new line, and press Insert Step [ON]. A new line identical to the one you are on is added to the next step. To delete a step, navi-gate to the line to be deleted, and press Delete Current Step [OFF]. To delete all steps below the line you are viewing, press Delete From Here To End [Lock]. (Be careful with this feature!)
It is also possible to erase a sequence: Press Delete From Here To End [Lock] while on the first line of the sequence. Then press Delete Current Step [OFF]. The sequence will be erased, and the programming mode is automatically exited.
Sequence Function Summary
All programming key functions for the LTC 8555 Series are summarized in the fol-lowing table:
Key Description
PROG Selects or terminates program modeCLEAR Clears current entryENTER Stores current entryPREV Stores entry and move up one stepNEXT Stores entry and move down one step; add new step if necessaryON Insert step before current stepOFF Delete current stepUP Move up one stepDOWN Move down one step, if step already existsLEFT Move prompt left one cellRIGHT Move prompt right one cellLOCK Erase all steps after current stepRUN Exit, store, load, and run current sequence
70 | en LTC 8600 | LTC 8800 Series
Bosch Security Systems, Inc. Instruction Manual F.01U.127.393 | 2.0 | 2009.03
17.7.2 Programming a SalvoSwitching Camera SequenceA SalvoSwitching sequence can be used to switch a group of monitors simultane-ously as a synchronized group. To program a Salvo sequence, enter the program-ming mode as described above for a simple camera sequence. By definition, Salvo sequencing involves more than one monitor. An example of a simple Salvo sequence that switches cameras on three (3) monitors simultaneously is shown below:
In general, follow the instructions used for the simple camera sequence (described above), but instead of entering a number of seconds for steps that must switch instantly, enter 61 and press [Enter]. This causes the switcher to automatically change to the salvo abbreviation SLV. Dwell time (in seconds) is entered only when you reach the step containing the last monitor that will be switched within the syn-chronized group.
CAMERA MONITOR DWELL1 1 SLV2 2 SLV3 3 27 1 SLV8 2 SLV9 3 221 1 SLV22 3 SLV23 3 2
LTC 8600 | LTC 8800 Series en | 71
F.01U.127.393 | 2.0 | 2009.03 Instruction Manual Bosch Security Systems, Inc.
18 Keyboard User Functions
18.1 General Information
User functions are keyboard operations which are used infrequently, but provide important system options.
NOTE: Certain functions are restricted to certain user priority levels. Additional information on user priority levels can be found in the See Chapter 15, “User Infor-mation,” on page 56. To execute these user functions, select the desired function, and follow the general steps below.
For IntuiKey keyboards, User Functions are accessed using the following procedure:
1. From the main Allegiant screen, press [User Functions] (softkey).
2. Use Previous or Next to navigate to the desired function or press the [Enter User Command] key and enter the desired number.
3. Press the desired softkey.
For LTC 8555 Series keyboards, User Functions are accessed using the following procedure:
1. Press [User] and verify the indicator lights.
2. Using the numeric keypad, enter the desired User Function number.
3. Press [Enter]. Note that the keyboard camera display shows F followed by the selected function number.
4. Follow the directions for the specific user function (described in its section, herein). In many cases, the joystick is used to select options
5. Press [User] to exit back to normal mode.USER 2 ENTER
The above example accesses User Function #2 as described below.
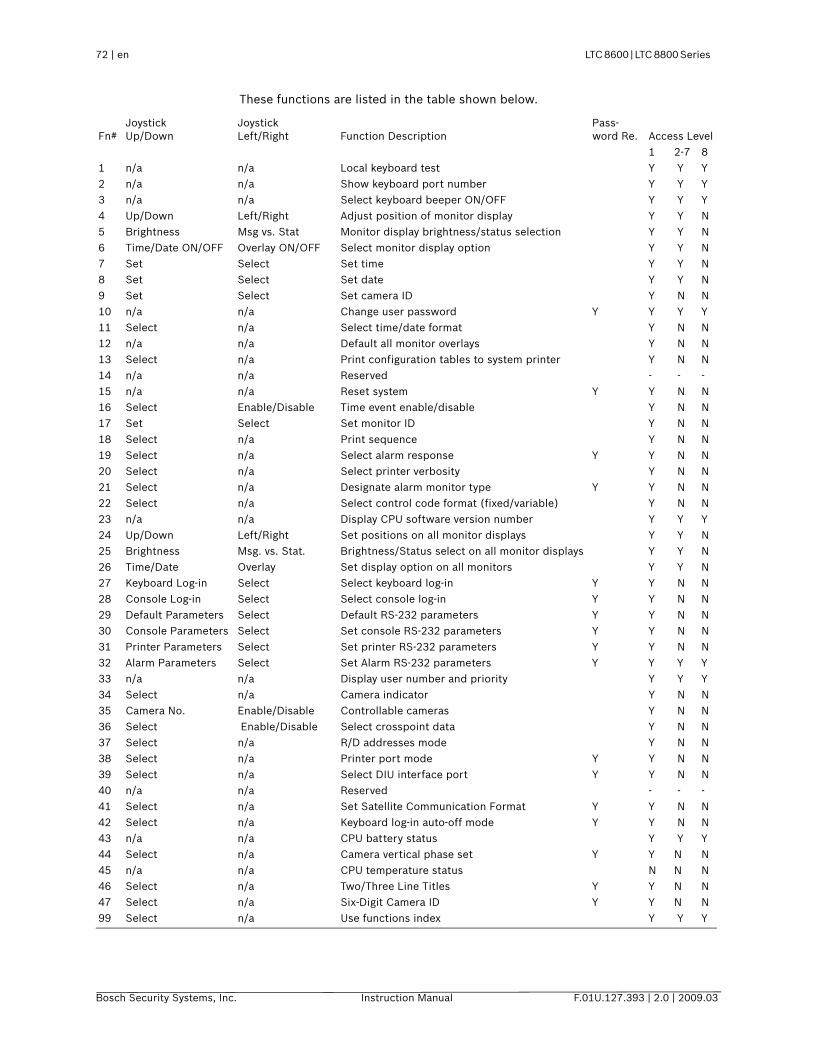
72 | en LTC 8600 | LTC 8800 Series
Bosch Security Systems, Inc. Instruction Manual F.01U.127.393 | 2.0 | 2009.03
These functions are listed in the table shown below.
Fn#Joystick Up/Down
Joystick Left/Right Function Description
Pass-word Re. Access Level
1 2-7 81 n/a n/a Local keyboard test Y Y Y2 n/a n/a Show keyboard port number Y Y Y3 n/a n/a Select keyboard beeper ON/OFF Y Y Y4 Up/Down Left/Right Adjust position of monitor display Y Y N5 Brightness Msg vs. Stat Monitor display brightness/status selection Y Y N6 Time/Date ON/OFF Overlay ON/OFF Select monitor display option Y Y N7 Set Select Set time Y Y N8 Set Select Set date Y Y N9 Set Select Set camera ID Y N N10 n/a n/a Change user password Y Y Y Y11 Select n/a Select time/date format Y N N12 n/a n/a Default all monitor overlays Y N N13 Select n/a Print configuration tables to system printer Y N N14 n/a n/a Reserved - - -15 n/a n/a Reset system Y Y N N16 Select Enable/Disable Time event enable/disable Y N N17 Set Select Set monitor ID Y N N18 Select n/a Print sequence Y N N19 Select n/a Select alarm response Y Y N N20 Select n/a Select printer verbosity Y N N21 Select n/a Designate alarm monitor type Y Y N N22 Select n/a Select control code format (fixed/variable) Y N N23 n/a n/a Display CPU software version number Y Y Y24 Up/Down Left/Right Set positions on all monitor displays Y Y N25 Brightness Msg. vs. Stat. Brightness/Status select on all monitor displays Y Y N26 Time/Date Overlay Set display option on all monitors Y Y N27 Keyboard Log-in Select Select keyboard log-in Y Y N N28 Console Log-in Select Select console log-in Y Y N N29 Default Parameters Select Default RS-232 parameters Y Y N N30 Console Parameters Select Set console RS-232 parameters Y Y N N31 Printer Parameters Select Set printer RS-232 parameters Y Y N N32 Alarm Parameters Select Set Alarm RS-232 parameters Y Y Y Y33 n/a n/a Display user number and priority Y Y Y34 Select n/a Camera indicator Y N N35 Camera No. Enable/Disable Controllable cameras Y N N36 Select Enable/Disable Select crosspoint data Y N N37 Select n/a R/D addresses mode Y N N38 Select n/a Printer port mode Y Y N N39 Select n/a Select DIU interface port Y Y N N40 n/a n/a Reserved - - -41 Select n/a Set Satellite Communication Format Y Y N N42 Select n/a Keyboard log-in auto-off mode Y Y N N43 n/a n/a CPU battery status Y Y Y44 Select n/a Camera vertical phase set Y Y N N45 n/a n/a CPU temperature status N N N46 Select n/a Two/Three Line Titles Y Y N N47 Select n/a Six-Digit Camera ID Y Y N N99 Select n/a Use functions index Y Y Y
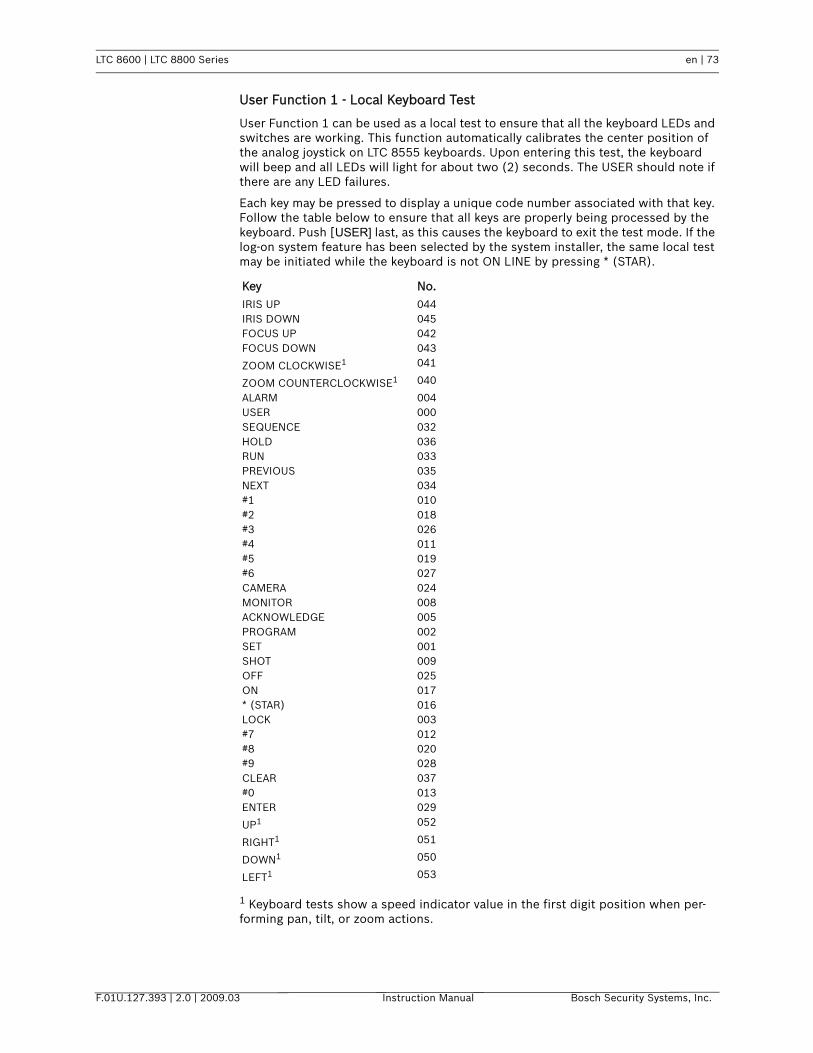
LTC 8600 | LTC 8800 Series en | 73
F.01U.127.393 | 2.0 | 2009.03 Instruction Manual Bosch Security Systems, Inc.
User Function 1 - Local Keyboard Test
User Function 1 can be used as a local test to ensure that all the keyboard LEDs and switches are working. This function automatically calibrates the center position of the analog joystick on LTC 8555 keyboards. Upon entering this test, the keyboard will beep and all LEDs will light for about two (2) seconds. The USER should note if there are any LED failures.
Each key may be pressed to display a unique code number associated with that key. Follow the table below to ensure that all keys are properly being processed by the keyboard. Push [USER] last, as this causes the keyboard to exit the test mode. If the log-on system feature has been selected by the system installer, the same local test may be initiated while the keyboard is not ON LINE by pressing * (STAR).
1 Keyboard tests show a speed indicator value in the first digit position when per-forming pan, tilt, or zoom actions.
Key No.IRIS UP 044IRIS DOWN 045FOCUS UP 042FOCUS DOWN 043
ZOOM CLOCKWISE1 041
ZOOM COUNTERCLOCKWISE1 040
ALARM 004USER 000SEQUENCE 032HOLD 036RUN 033PREVIOUS 035NEXT 034#1 010#2 018#3 026#4 011#5 019#6 027CAMERA 024MONITOR 008ACKNOWLEDGE 005PROGRAM 002SET 001SHOT 009OFF 025ON 017* (STAR) 016LOCK 003#7 012#8 020#9 028CLEAR 037#0 013ENTER 029
UP1 052
RIGHT1 051
DOWN1 050
LEFT1 053

74 | en LTC 8600 | LTC 8800 Series
Bosch Security Systems, Inc. Instruction Manual F.01U.127.393 | 2.0 | 2009.03
User Function 2 - Show Keyboard Port Number
User Function 2 may be used to identify which port a keyboard is plugged into. After entering User Function 2, read the keyboard port number from the monitor display on the keyboard. If using the LTC 8555 Series keyboard, press [User] to exit.
User Function 3 - Select Keyboard Beeper ON/OFF
When User Function 3 is selected, the keyboard user may enable/disable the key-board audio beeper. If using the LTC 8555 Series keyboard, press [ON] to enable the beeper or [OFF] to disable it. Press [User] to exit. Upon power up of the keyboard and whenever the Allegiant system undergoes a reset, this setting is set to [ON].
User Function 4 - Adjust Position of Monitor Overlay
User Function 4 allows the characters on the video monitor display to be positioned from the keyboard. Only the display on the monitor that the keyboard is currently connected to is affected. If using the LTC 8555 Series keyboard, use the joystick to position the display as required. Press [Enter] to store the position. Press [User] to exit.
User Function 5 - Monitor Display Brightness/Status Selection
The white portion of the characters on the video monitor display may be made brighter or dimmer by the User Function 5. Only the display on the monitor that the keyboard is currently connected to is affected. After entering the mode, there are four possible settings. If using the LTC 8555 Series keyboard, moving the joystick up increases the brightness, and moving it down decreases the brightness.
The User Function 5 also permits selection of either the status display or a 12-char-acter monitor message to appear in the first line of the monitor display. The status display indicates alarm, sequence, and lockout information regarding the monitor. The monitor message is a stationary display. This means the display will not change as video is switched from camera to camera on the monitor. After entering the mode, move the joystick left to select monitor message format, and right to select status format. If using LTC 8555 Series keyboard, to exit the mode, press [User].
User Function 6 - Select Monitor Display Option
User Function 6 allows the user to remove the time and date (the left side of the dis-play), or the entire display from the individual monitor. If using the LTC 8555 Series keyboard, move the joystick down to blank the time and date from the screen. This is sometimes desirable when a signal from a DVR with its own time and date is being used. Move the joystick up to add the time and date back. Move the joystick left to blank the left side portion of the display from the monitor, and right to return it. Refer to User Function 5 to verify brightness level. Press [User] to exit the mode.
User Function 7 - Set Time
User Function 7 enables user setting of the time displayed on all system monitors. After entering the mode, use the joystick to select hours, minutes, or seconds in an edit line (displayed on the monitor screen). If using the LTC 8555 Series keyboard, moving the joystick up or down counts the data item up or down; moving right or left selects between data items. NEXT is used to set the seconds to zero. If [NEXT] is pressed when the seconds are over 30, the minute count (shown on the operating clock display) is incremented. If [NEXT] is pressed when the seconds are under 30, the minutes are left unaffected. Press [Enter] to update the time displayed on all sys-tem monitors, and press [User] to exit the mode.

LTC 8600 | LTC 8800 Series en | 75
F.01U.127.393 | 2.0 | 2009.03 Instruction Manual Bosch Security Systems, Inc.
User Function 8 - Set Date
User Function 8 enables the user to set the date displayed on all system monitors. If using the LTC 8555 Series keyboard, use the joystick to select the day, month, or year in an edit line (displayed on the monitor screen). Move the joystick up or down to count the data item up or down; move right or left selects between the data items. If using the LTC 8555 Series keyboard, press [Enter] to update the date dis-played on all system monitors. Press [User] to exit the mode.
User Function 9 - Set Camera ID
User Function 9 permits entry of a 16-character camera identification message. This message appears on the video monitor display whenever the specific camera is called up for viewing. If desired, this message can be used to identify the particular scene being viewed. See Chapter 20, “Character ROM Tables for LTC 8600 and LTC 8800,” on page 86 for the various characters available. After entering the mode, users with priority level 1 can use the joystick to move right or left to select the character to be changed. The selected character will be identified by a box with a question mark inside it. The first line of the video monitor screen indicates the code number of the character selected. Move the joystick up or down to step through the Character ROM Table, or enter the character's number (as identified in the tables) via the numeric keypad, and press [Enter]. Once the title has been set, press [Enter] to store it to memory. If using the LTC 8555 Series keyboard, press [User] to exit the mode.
User Function 10 - Change USER Password
User Function 10 is used to change an operator's keyboard log-on access password. This feature is only required in systems where the system installer has enabled the keyboard log-in security feature. After entering the mode, the video monitor display prompts for the current password OLD PASSWORD. Enter the current user pass-word via the numeric keypad, and press [Enter]. If the system does not accept the old password, the system remains at this prompt. If the entered password is valid, the display changes to the NEW PASSWORD prompt for entry of the new password (up to six (6) numerals) via the numeric keypad, then press [Enter]. Leave this step blank if no password is desired. If none is used, at log-on, press [Enter] at the P prompt. To safeguard against typographical errors, the system prompts VERIFY PASSWORD requiring reentry of the new password. If the entered passwords do not agree, the system prompts for reentry and verification of the new password. If the two password entries agree, the video monitor prompt indicates PASSWORD UPDATED.
Press [User] to exit the mode.
User Function 11 - Select Time/Date Format
User Function 11 is used to set the time and date format used throughout the sys-tem. The two (2) formats of time available are - 12-hour mode and 24-hour mode. The date is available in a MM-DD-YY format (U.S.), a DD-MM-YY format (Interna-tional), and a YY-MM-DD format (Asian). After entering the mode, move the joystick up or down to select the desired format. If using the LTC 8555 Series keyboard, press [Enter] to converts the system to the format chosen, then press [User] to exit the mode.
User Function 12 - Default All Monitor Overlays
User Function 12 is used to reset all monitor overlays to default characteristics; bot-tom center of screen, and full brightness. After entering the mode, press [Enter] to reset all monitor overlays. If using the LTC 8555 Series keyboard, press [User] to exit.

76 | en LTC 8600 | LTC 8800 Series
Bosch Security Systems, Inc. Instruction Manual F.01U.127.393 | 2.0 | 2009.03
User Function 13 - Print System Configuration Tables
Use this function to print the contents of the various system configuration tables. Move the joystick up and down to select a table, then press [Enter] to send it to the printer port. If using the LTC 8555 Series keyboard, press [User] to exit.
User Function 14 - Reserved Function
User Function 15 - System Reset
The system may be reset from the keyboard. After entering this mode, the video monitor screen indicates RESET SYSTEM. Enter the password via the numeric key-pad, and press [Enter]. The system will then reset. If using the LTC 8555 Series key-board, press [User] to exit the mode without resetting the system.
NOTE: The system should be reset whenever a change is made on the main CPU module's DIP switches. Alternatively, the main power to the CPU bay may be switched off for ten (10) seconds, then restored. Depending on the size and com-plexity of the system, several seconds may be required before operation is restored. This time is due to the amount of initialization tasks being performed, and is consid-ered normal.
User Function 16 - Time Event Enable/Disable
Use this function to enable or disable any of the programmed time event functions. Up to 64 time event functions can be programmed with the optional LTC 8059/00 MCS, or the LTC 8850/00 GUI Software. Moving the joystick up and down steps through a table of the 64 time events. If an event has been programmed, moving the joystick to the right enables the event, and to the left disables it. The current status of an enabled time event is displayed by this user function.
User Function 17 - Set Monitor ID
User Function 17 is used to enter a (12-character) monitor identification message for display in the top line of the monitor overlay display on any system monitor(s). This monitor title will be visible on the display regardless of the camera currently being viewed. This message can be used to identify the particular monitor or a group of cameras assigned to this monitor. See Chapter 20, “Character ROM Tables for LTC 8600 and LTC 8800,” on page 86 for the available characters.
After entering the mode, the joystick is moved right or left to select the character to be changed. The selected character is identified by a box with a question mark inside it. The first line of the video monitor display indicates the code number of the character selected. Move the joystick up or down to step through the Character ROM Table, or enter the character's number identified in the Tables via the numeric keypad, then press [Enter]. Once the monitor title has been set, press [Enter] to store it to memory. If using the LTC 8555 Series keyboard, press [User] to exit the mode. The user may select between this monitor message and the status display by using the User 5 Function described above.
User Function 18 - Print Sequence
Use this function to print the contents of a programmed sequence. Use the joystick to select the desired sequence, then press [Enter] to print it to the printer port. Only those sequences currently existing in memory will be shown in the list. If using the LTC 8555 Series keyboard, press [User] to exit.
User Function 19 - Select Alarm ResponseUse this function to reset the system alarm configuration tables to one of these pre-defined alarm response modes: BASIC, AUTOBUILD, or SEQUENCE & DISPLAY. Move the joystick up or down to select the desired mode, then enter your user pass-word on the numeric keypad. Press [Enter] to update the alarm system. If using the LTC 8555 Series keyboard, press [User] to exit.
NOTE Existing alarm configuration data will be lost when mode is changed.

LTC 8600 | LTC 8800 Series en | 77
F.01U.127.393 | 2.0 | 2009.03 Instruction Manual Bosch Security Systems, Inc.
User Function 20 - Select Printer Verbosity
Use this function to select between print modes; Limited Printing and Full Printing. This selection determines the amount of information printed during alarm process-ing. Both modes print alarm activation and deactivation messages, but Full Printing goes into much more detail. Use the joystick to select the desired mode, then press [Enter]. If using the LTC 8555 Series keyboard, press [User] to exit without changing the print mode.
User Function 21 - Designate Alarm Monitor Type
Use this function to designate the monitor currently controlled by the keyboard as either a STEP monitor or a REVIEW monitor. This function can only be used in the predefined SEQUENCE & DISPLAY alarm response mode (see ALARM INFORMA-TION section) to select which monitor is the STEP (also called SEQUENCE) moni-tor, and which is the REVIEW (also called DISPLAY) monitor. To designate a monitor as the STEP or REVIEW monitor, enter User Function 21, then move the joystick up or down to select the monitor type. Enter your password on the keyboard and press [Enter]. If using the LTC 8555 Series keyboard, press [User] to exit. After selecting new STEP and REVIEW monitors, the previous ones may be disarmed (Arm/Disarm Monitor instructions).
User Function 22 - Select Control Code Format
This function designates whether variable speed pan/tilt and zoom commands are enabled (Factory Default Setting). In most cases, there is no need to disable this function. Move the joystick up or down to select the desired setting, then press [Enter]. If using the LTC 8555 Series keyboard, press [User] to exit.
User Function 23 - Display CPU Software Version Number
Use this function to display the revision number of the Allegiant's CPU software on the monitor screen.
User Function 24 - Set Positions on All Monitor Displays
This function is similar to User Function 4, except it changes the monitor display positions of all monitors in the system. After entering User Function 24, use the joy-stick to position the display as required on the monitor controlled by the keyboard. Press [Enter] to store and change all system monitor displays to this position. If using the LTC 8555 Series keyboard, press [User] to exit.
User Function 25 - Set Brightness on All Monitor Displays
This function is similar to User Function 5, except it changes the monitor display brightness of all monitors in the system. The white portion of the characters on the video monitor displays may be made brighter or dimmer via the User Function 25. Move the joystick up to increase brightness, or down to decrease brightness. Once the display on the monitor that the keyboard is currently controlling is adjusted, press [Enter] to change all system monitors to the same setting. Press [User] to exit the mode.
The User Function 25 mode can also select either the status display or a 12-charac-ter monitor message to appear in the first line of the monitor display. The status dis-play indicates alarm, sequence, and lockout information regarding the monitor. The monitor message is a stationary display; the display will not change as video is switched from camera to camera on the monitor. After entering the mode, move the joystick left to select the monitor message format, or right to select the status for-mat on the monitor the keyboard is controlling. Press [Enter] to change all system monitors to the same setting. If using the LTC 8555 Series keyboard, press [User] to exit.

78 | en LTC 8600 | LTC 8800 Series
Bosch Security Systems, Inc. Instruction Manual F.01U.127.393 | 2.0 | 2009.03
User Function 26 - Set Display Option On All Monitors
This function is similar to User Function 6, except it selects the monitor display option of all monitors in the system. The User Function 26 mode allows removal of the time and date, the left side of the display, or to remove the entire display from the system monitors. Move the joystick down to blank the time and date from the screen. This is sometimes desirable when a DVR with its own time and date is being used as a video source. Move the joystick up to add the time and date back again. Move the joystick left to blank the left side of the display from the monitor and right to return it. Refer to User Function 5 or 25 to verify brightness level. Press [Enter] to update all system monitors to the selected format. If using the LTC 8555 Series key-board, press [User] to exit.
User Function 27 - Select Keyboard Log-in
This function controls the system's keyboard log-in feature. Move the joystick up or down to select the mode for the system to function in. If the log-in feature is enabled (MUST USE KBD PWD is selected), the system keyboards require each user to log-in and log-off the system. All users are required to enter a user number and correct password to interact with the system. If the log-in feature is disabled (NO KBD PWD LOGIN is selected), system keyboards are always online with the system. Once selection is made, exit the User Function mode and reset the system either via keyboard User Function 15, or by removing and restoring the main AC power to the system. Once the system has been reset, the keyboard log-in function will be active and all system keyboards will need to be logged-in to access the system.
User Function 28 - Select Console Log-in
This function controls the system's external console port log-in feature. After enter-ing the mode, move the joystick up or down to select the mode in which the system should function. If the log-in feature is enabled (MUST USE CON PWD is selected), any external PC or other computing device will be required to log-in to communicate with the system. External computing devices are required to enter a user number and correct password. If the console log-in feature is disabled (NO CON PWD LOGIN is selected), the console port is available for communication.
Once the selection is made, exit the User Function mode and reset the system, either via keyboard User Function 15 or by removing and restoring the main AC power to the system. Once the system has been reset, the console log-in function is active, and all external computing devices need to log-in to access the system.
User Function 29 - Reset RS-232 Parameters to Default
This function returns the system's external RS-232 ports to a known default state. After entering the mode, enter a valid password. The system will reset after placing the RS-232 protocols back to the default state. See Chapter 14, “Factory Default Settings,” on page 50 for additional information.
User Function 30 - Set Console RS-232 Parameters
This function is used to set the RS-232 baud rate and handshake options for the sys-tem's console port. Upon entry to this mode, the current settings are displayed. Move the joystick up/down to select the baud rate, and left/right to select the hand-shake option. After being changed, the port is also automatically set to eight data bits, no parity, and one stop bit. Once new settings have been selected, enter the user password and press [Enter]. If using the LTC 8555 Series keyboard, press [User] to exit.
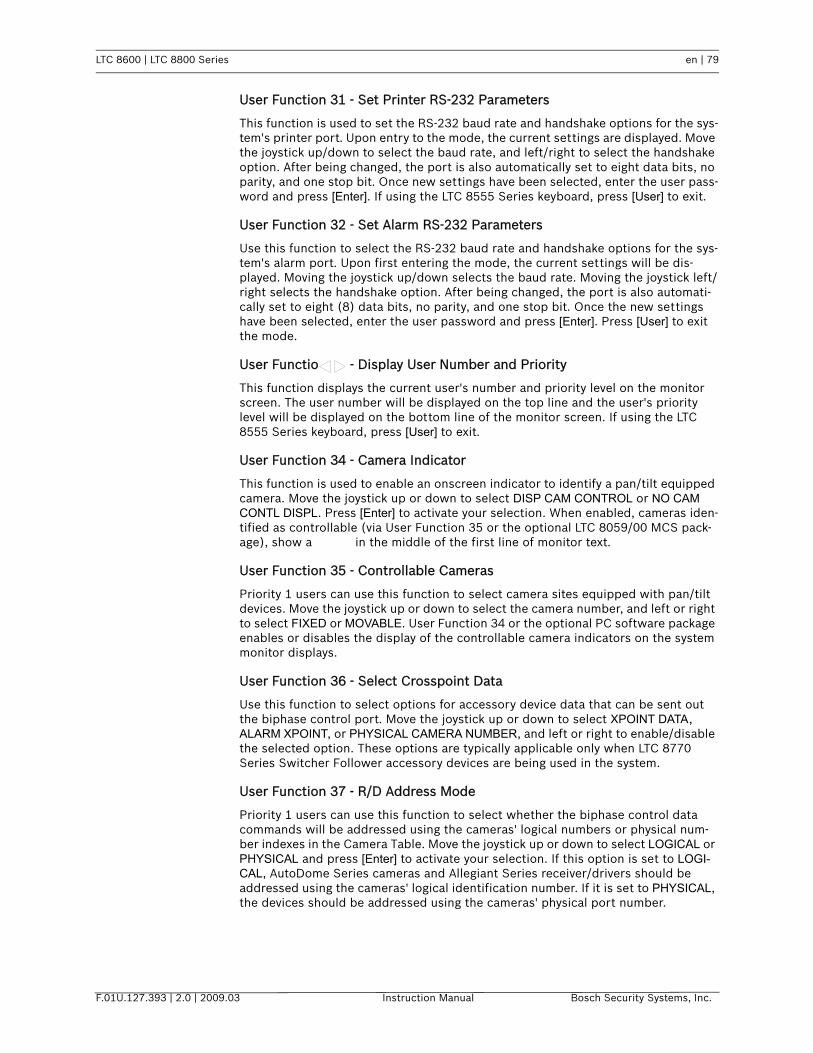
LTC 8600 | LTC 8800 Series en | 79
F.01U.127.393 | 2.0 | 2009.03 Instruction Manual Bosch Security Systems, Inc.
User Function 31 - Set Printer RS-232 Parameters
This function is used to set the RS-232 baud rate and handshake options for the sys-tem's printer port. Upon entry to the mode, the current settings are displayed. Move the joystick up/down to select the baud rate, and left/right to select the handshake option. After being changed, the port is also automatically set to eight data bits, no parity, and one stop bit. Once new settings have been selected, enter the user pass-word and press [Enter]. If using the LTC 8555 Series keyboard, press [User] to exit.
User Function 32 - Set Alarm RS-232 Parameters
Use this function to select the RS-232 baud rate and handshake options for the sys-tem's alarm port. Upon first entering the mode, the current settings will be dis-played. Moving the joystick up/down selects the baud rate. Moving the joystick left/right selects the handshake option. After being changed, the port is also automati-cally set to eight (8) data bits, no parity, and one stop bit. Once the new settings have been selected, enter the user password and press [Enter]. Press [User] to exit the mode.
User Function 33 - Display User Number and Priority
This function displays the current user's number and priority level on the monitor screen. The user number will be displayed on the top line and the user's priority level will be displayed on the bottom line of the monitor screen. If using the LTC 8555 Series keyboard, press [User] to exit.
User Function 34 - Camera Indicator
This function is used to enable an onscreen indicator to identify a pan/tilt equipped camera. Move the joystick up or down to select DISP CAM CONTROL or NO CAM CONTL DISPL. Press [Enter] to activate your selection. When enabled, cameras iden-tified as controllable (via User Function 35 or the optional LTC 8059/00 MCS pack-age), show a in the middle of the first line of monitor text.
User Function 35 - Controllable Cameras
Priority 1 users can use this function to select camera sites equipped with pan/tilt devices. Move the joystick up or down to select the camera number, and left or right to select FIXED or MOVABLE. User Function 34 or the optional PC software package enables or disables the display of the controllable camera indicators on the system monitor displays.
User Function 36 - Select Crosspoint Data
Use this function to select options for accessory device data that can be sent out the biphase control port. Move the joystick up or down to select XPOINT DATA, ALARM XPOINT, or PHYSICAL CAMERA NUMBER, and left or right to enable/disable the selected option. These options are typically applicable only when LTC 8770 Series Switcher Follower accessory devices are being used in the system.
User Function 37 - R/D Address Mode
Priority 1 users can use this function to select whether the biphase control data commands will be addressed using the cameras' logical numbers or physical num-ber indexes in the Camera Table. Move the joystick up or down to select LOGICAL or PHYSICAL and press [Enter] to activate your selection. If this option is set to LOGI-CAL, AutoDome Series cameras and Allegiant Series receiver/drivers should be addressed using the cameras' logical identification number. If it is set to PHYSICAL, the devices should be addressed using the cameras' physical port number.

80 | en LTC 8600 | LTC 8800 Series
Bosch Security Systems, Inc. Instruction Manual F.01U.127.393 | 2.0 | 2009.03
User Function 38 - Printer Port Mode
This function allows configuration of the system's PRINTER port for use with a LTC 8712 Series Console Port Expander accessory device. Move the joystick up or down to select the printer port function; NORMAL or EXPANDED. Press [Enter] to activate your selection. Reset the system for this setting to take effect.
User Function 39 - Select DIU Interface Port
Use this function to select the switcher's interface port to be connected to an exter-nal LTC 8016/90 Allegiant Bilinx Data Interface accessory unit. Move the joystick up or down until the desired port for use as a data interface (DIU) is displayed. Press [Enter] to configure the port. If using the LTC 8555 keyboard, press [User] to exit the mode.
User Function 40 - Reserved Function
User Function 41 - Set Satellite Communication Format
This function provides three (3) configuration options that determine the behavior and content of the data commands issued by a master system to a satellite system. In most cases, it is only necessary to change the default setting if using a multi-level cascaded Allegiant satellite system configuration. (see Section Appendix A “Satel-lite Systems,” on page 107 for more information on satellite system configurations.)
Detailed descriptions of these options are listed below.
After entering the mode, move the joystick up or down to select the desired option. Enter a valid user password, and press [Enter].
• CACHE REM CAM option (default factory setting). In this mode, satellite com-mands are issued repetitively, regardless of whether the satellite camera is still being viewed by an operator. This mode of operation is more desirable in stan-dard systems because it minimizes delays when previous satellite cameras are reselected. It is not recommended for use in cascaded systems. In cascaded systems, this mode could result in all available trunk lines coming from the 3rd level satellite system to become used up, making them unavailable to the opera-tors at the intermediate system.
• NO REM CAM CACHE option. In this mode, after the top level operator selects a locally connected camera, the trunk line between the top level and the interme-diate level system will immediately be reset to its start-up camera (as defined in the Monitor Table of the LTC 8059/00 MCS). This in turn frees up the trunk line between the intermediate level system and the 3rd level system so it will be available if needed by an operator at the intermediate level system.
In addition, this option changes the behavior of how the system determines which trunk line to use. When this option is not used, a new trunk line (if avail-able) will be used for each camera selection. When this option is enabled, an operator's monitor will use the same trunk from the same bay as different cam-eras are selected, as long as no other operator is viewing the same satellite camera. In 3-tier cascaded satellite systems, this feature minimizes the use of trunk lines by the top level Master system. This is especially advantageous when the operator at the Master site is viewing cameras from the 3rd level satellite. Since this will result in less trunk lines being used up, the intermediate Master/Satellite system will have more access to trunk lines from the 3rd level satellite.
• SAT nnn PRIORITY option. If the top level master system and intermediate level system in a cascade configuration can or will be set to operate as “Dual Master” systems, a priority based satellite camera selection feature can be configured. In a default cascaded satellite system configuration, satellite switching com-mands are not associated with a user priority level. When a switching command sent from a master site is received by a satellite, the switch selection can imme-
LTC 8600 | LTC 8800 Series en | 81
F.01U.127.393 | 2.0 | 2009.03 Instruction Manual Bosch Security Systems, Inc.
diately be overridden by operators at the satellite location having any priority level. This situation is more likely to be encountered in 3-tier satellite systems that do not have a good distribution of trunk lines (i.e., more between the top level system and the intermediate level system than there are between the inter-mediate system and the 3rd tier satellite).
Since dual master configurations support bi-directional communications, selecting the SAT nnn PRIORITY option for both the top level and intermediate level master systems will result in the generation of priority based satellite com-mands.
The satellite number assigned to the system that is currently being programmed must be specified for the nnn value. This feature will enable use of the opera-tor's user priority to determine if access to a desired satellite camera is pro-vided or not. For instance, if no trunk lines are available and an operator requesting a satellite camera has higher priority than at least 1 of the existing operators, the requested camera will be switched. If the operator does not have sufficient priority, they will receive an error message (i.e., error 81) via the sat-ellite communication path, and their camera will switch to the start-up camera specified in the Monitor Table.
In addition, the same behavior for selecting trunk lines as described in the NO REM CAM CACHE option is applicable to this option. An operator's monitor will use the same trunk from the same bay as different cameras are selected, as long as no other operator is viewing the same satellite camera.
User Function 42 - Keyboard Log-in Auto-off Mode
Priority 1 users can use this function to select a keyboard log-off feature to automat-ically log a keyboard off after a pre-selected time of inactivity. After entering the mode, move the joystick up or down to select the desired time period. Enter a valid password, and press [Enter]. If using the LTC 8555 keyboard, press [User] to exit the mode.
User Function 43 - CPU Battery Status
Use this function to view the condition of the batteries used to backup CPU mem-ory. Once the function is entered, the condition is displayed on the monitor text dis-play. If using the LTC 8555 keyboard, press [User] to exit the mode.
User Function 44 – Camera Vertical Phase Set
NOTE: This feature requires the following:
1. LTC 8621 or LTC 8821 video input modules having firmware 5.30 or later.
2. Dinion series of cameras using Bilinx communications.
3. AutoDome series of cameras using either Bilinx or Biphase data communica-tions.
4. LTC 8016/90 Bilinx Data Interface unit having firmware 1.01 or later.
5. All cameras configured to use Line Lock mode.
Priority 1 users can use this function to automatically adjust the phase interval delay of compatible cameras connected to the system. This will result in roll-free switching as the cameras are manually selected or automatically sequenced on sys-tem monitors.
After entering the function, the joystick down/up is used to select either an individ-ual camera to adjust or all cameras. Enter a valid user password number and press [Enter] to activate the adjustment process.

82 | en LTC 8600 | LTC 8800 Series
Bosch Security Systems, Inc. Instruction Manual F.01U.127.393 | 2.0 | 2009.03
Some minor disturbance of the video images may be visible for 1 or 2 seconds while the cameras are being adjusted. If no changes are noticed, check to make sure that you have compatible devices in your system.
If using an LTC 8555 keyboard, press [User] to exit the mode.
User Function 45 – CPU Temperature StatusUse this function to view the condition of the CPU temperature. Once the function is entered, the condition is displayed on the monitor text display.
If using the LTC 8555 keyboard, press [User] to exit the mode.
User Function 46 – Two/Three Line TitlesUse this function to enable a third line of on-screen text. This new line can be used to display up to 24 additional camera title characters, providing a total of 40 charac-ters (or 20 'double width' characters) for each camera. Alternatively, this line can be used to display the 12-character Monitor title.
Once the function is entered, move the joystick up/down to select the desired option. Enter a valid user password, and press [Enter]. The on-screen display of some system monitors may take up to 1 minute before changing.
After enabling/disabling this feature, it is recommended to enter User Function 24 (see above) to adjust vertical height of the on-screen text to the desired position.
Note: At time of this publication, the available version of the PC-based LTC 8059 Master Control Software only supports user programming of the standard 16 char-acters of the camera titles. The additional 24 characters can only be programmed using User Function 9 (see above) or via third party RS-232 serial interface utilizing the Allegiant Command Console Language (CCL) commands.
User Function 47 – Six-digit Camera IDUse this function to enable/disable “6-digit Camera ID” mode. When enabled, 2-digit “site numbers” are displayed in addition to the 4-digit camera number. The 2-digit site number feature is especially useful when groups of cameras are located in separate buildings, floors, or other common areas.
By default, all 6-digit camera numbers are assigned to site “00” and the remaining digits correspond to the standard 4-digit camera numbers. Use the PC-based LTC 8059 Master Control Software to enter unique 6-digit camera numbers for each sys-tem camera. When enabled, all keyboard based camera selections and Sequence programming must be done using the 6-digit number.
Once the function is entered, move the joystick up/down to select the desired option. Enter a valid user password, and press [Enter]. The on-screen display of some system monitors may take up to 1 minute before changing.
Note: This feature requires firmware versions released for certain system compo-nents in March 2009. If necessary, compare firmware versions against the list of components below to determine if the feature is available in your system:
User Function 99 – User Function IndexThis function is an index listing of all Keyboard User Functions. Move the joystick up or down to view an abbreviated description of the function number currently shown in the first line of the monitor display. Only those functions available to the user (based on their priority level) will be displayed.
COMPONENT Firmware VersionLTC 8x10/01 series CPU/Data Receiver modules 10.05 or laterIntuikey keyboard firmware 1.93 or laterLTC 8555 keyboard firmware 5.90 or laterLTC 8834/00 Video Output Module 3.30LTC 8059/00 Master Control Software 2.90
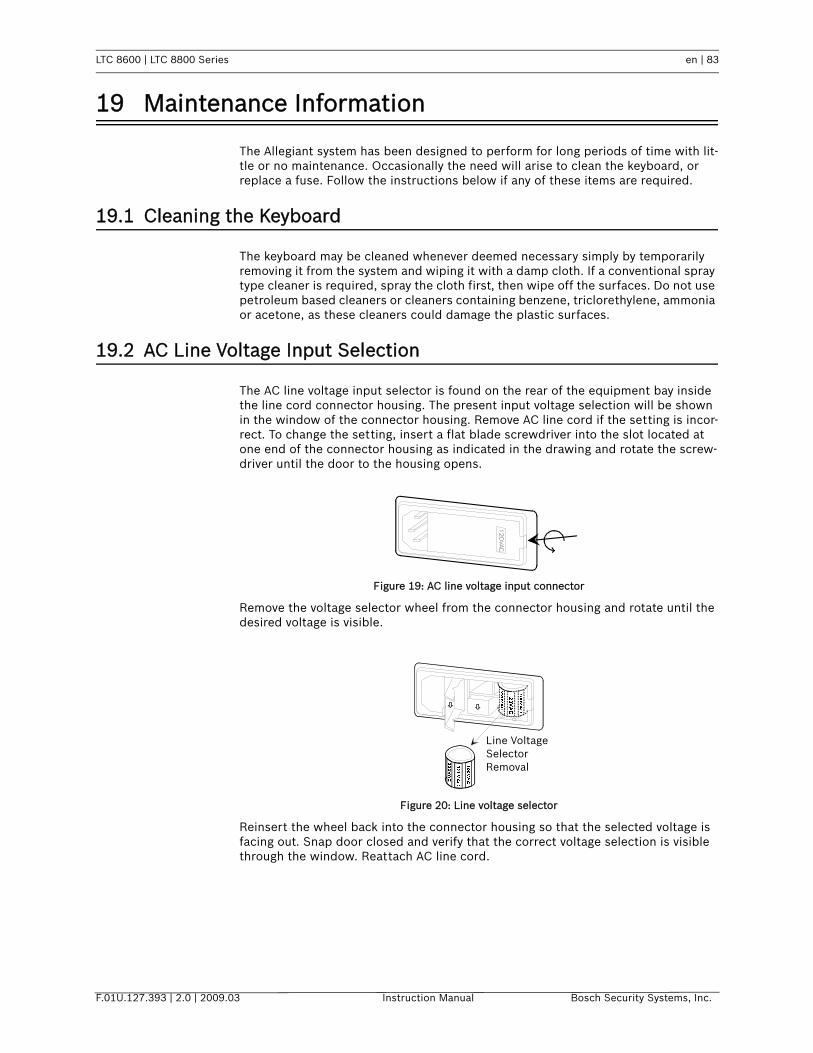
LTC 8600 | LTC 8800 Series en | 83
F.01U.127.393 | 2.0 | 2009.03 Instruction Manual Bosch Security Systems, Inc.
19 Maintenance Information
The Allegiant system has been designed to perform for long periods of time with lit-tle or no maintenance. Occasionally the need will arise to clean the keyboard, or replace a fuse. Follow the instructions below if any of these items are required.
19.1 Cleaning the Keyboard
The keyboard may be cleaned whenever deemed necessary simply by temporarily removing it from the system and wiping it with a damp cloth. If a conventional spray type cleaner is required, spray the cloth first, then wipe off the surfaces. Do not use petroleum based cleaners or cleaners containing benzene, triclorethylene, ammonia or acetone, as these cleaners could damage the plastic surfaces.
19.2 AC Line Voltage Input Selection
The AC line voltage input selector is found on the rear of the equipment bay inside the line cord connector housing. The present input voltage selection will be shown in the window of the connector housing. Remove AC line cord if the setting is incor-rect. To change the setting, insert a flat blade screwdriver into the slot located at one end of the connector housing as indicated in the drawing and rotate the screw-driver until the door to the housing opens.
Figure 19: AC line voltage input connector
Remove the voltage selector wheel from the connector housing and rotate until the desired voltage is visible.
Figure 20: Line voltage selector
Reinsert the wheel back into the connector housing so that the selected voltage is facing out. Snap door closed and verify that the correct voltage selection is visible through the window. Reattach AC line cord.
Line VoltageSelectorRemoval
Line Voltage Selector Removal

84 | en LTC 8600 | LTC 8800 Series
Bosch Security Systems, Inc. Instruction Manual F.01U.127.393 | 2.0 | 2009.03
19.3 AC Line Fuse Replacement
The AC line fuse on Allegiant power supply models is found on the rear of the equip-ment bay near the line cord connector. Power supply models for 220-240 VAC input version may contain a circuit breaker equipped power switch which can be reset directly from the front. If the line fuse needs to be replaced in a 120 VAC model power supply, remove the line cord from the system. Insert a flat blade screwdriver into the slot located at one end of the connector housing and rotate the screwdriver until the door to the housing opens. Remove fuse holder from housing as shown in drawing.
Figure 21: Allegiant power supply AC line fuse
Remove fuse from holder and replace with fuse of same rating for continued protec-tion. Reinstall fuse holder into connector housing in the same orientation as indi-cated by the arrow on the door cover. Snap door closed. After replacing fuse, verify system start-up and operation.
19.4 Power Supply Fuse Replacement
The main power supply is located in the far right side of the equipment bay. Remove the front panel of the bay by loosening the four fasteners. Locate the fuse to be replaced by observing the green LED indicators. Note which LED indicators are not lit, then turn OFF the main power switch located on the power supply. Replace fuses associated with LEDs which were not lit. Switch on the main power switch and verify that all LEDs are now lit. Replace front panel.
19.5 Replacement of Memory Backup Batteries
General operational notes
• Low battery conditions are indicated by LED on CPU and on-screen flashing “?? ?? ??” of time/date fields.
• Battery status can be check by keyboard operator using Keyboard User Func-tion 43.
• Batteries are checked by CPU once per day at midnight, upon power up, and after system reset.
• If batteries are replaced without power off/on (of at least 10 seconds) or reset of CPU, LED and on-screen indicators will not display normal until next mid-night is reached.
CAUTION Lithium batteries should be replaced by qualified service personnel only.
The memory backup batteries are located on the main CPU card located next to the power supply module in the main CPU bay. The batteries provide RAM memory backup for a period of at least one year. They are only active when main AC power to the system has been lost. The RAM memory is used to store system operational data
FuseRemoval
Fuse Removal

LTC 8600 | LTC 8800 Series en | 85
F.01U.127.393 | 2.0 | 2009.03 Instruction Manual Bosch Security Systems, Inc.
which is frequently changing, including time/date and system crosspoint data (i.e., which camera is currently being displayed on which monitor). More vital system data such as camera titles, alarm settings, user information and passwords, etc. is stored in non-volatile memory that is not affected by the condition of the batteries or the main AC power.
Remove the front panel of the main CPU bay by loosening the four fasteners. The two batteries are mounted on the front edge of the CPU card and are about 25 mm (1 in.) in diameter. Insert a small flat blade screwdriver into the slot on one of the battery holder sockets and gently pry the battery from the holder until it can be removed by your fingers. Replace old battery with new battery by lifting the retain-ing clip up while inserting the battery into the socket. Insure that the negative side of the battery contacts the socket by seating the battery until it is somewhat flush with the level of the battery holder. Repeat procedure for other battery.
Verification of the system's time and date and sequence programming should be made to insure no information was lost. Refer to the appropriate section of the instruction manual if any reprogramming is required.
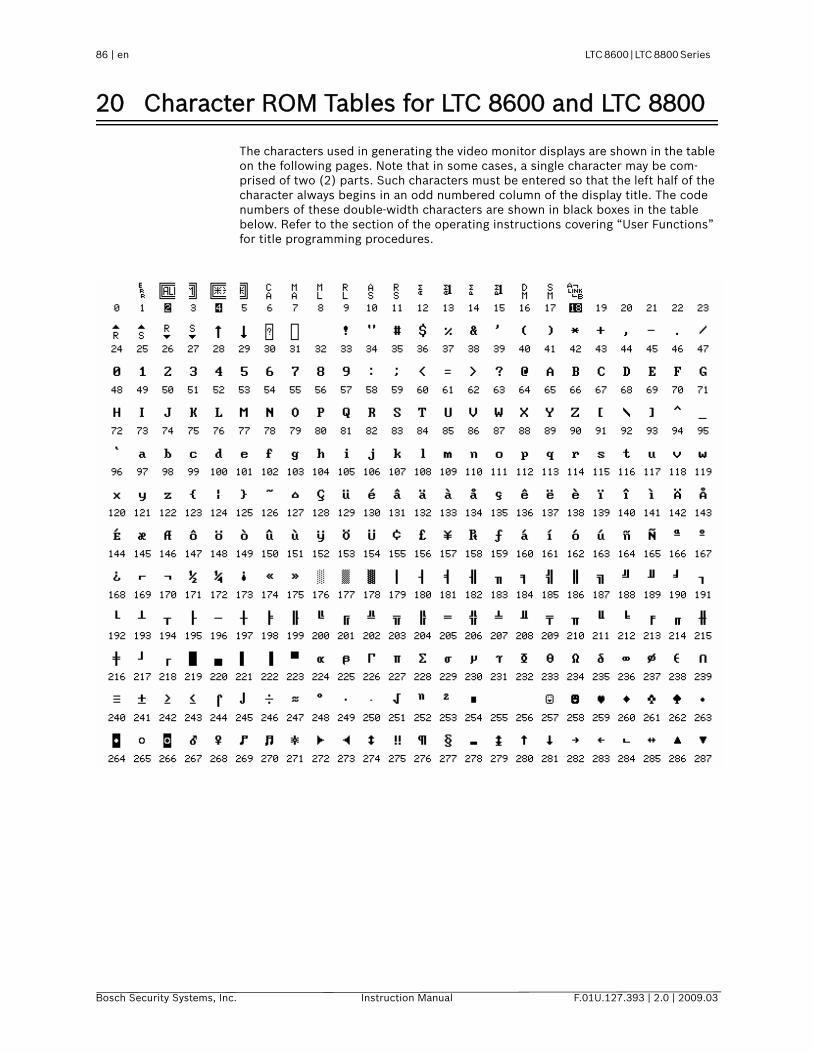
86 | en LTC 8600 | LTC 8800 Series
Bosch Security Systems, Inc. Instruction Manual F.01U.127.393 | 2.0 | 2009.03
20 Character ROM Tables for LTC 8600 and LTC 8800
The characters used in generating the video monitor displays are shown in the table on the following pages. Note that in some cases, a single character may be com-prised of two (2) parts. Such characters must be entered so that the left half of the character always begins in an odd numbered column of the display title. The code numbers of these double-width characters are shown in black boxes in the table below. Refer to the section of the operating instructions covering “User Functions” for title programming procedures.

LTC 8600 | LTC 8800 Series en | 87
F.01U.127.393 | 2.0 | 2009.03 Instruction Manual Bosch Security Systems, Inc.

88 | en LTC 8600 | LTC 8800 Series
Bosch Security Systems, Inc. Instruction Manual F.01U.127.393 | 2.0 | 2009.03

LTC 8600 | LTC 8800 Series en | 89
F.01U.127.393 | 2.0 | 2009.03 Instruction Manual Bosch Security Systems, Inc.
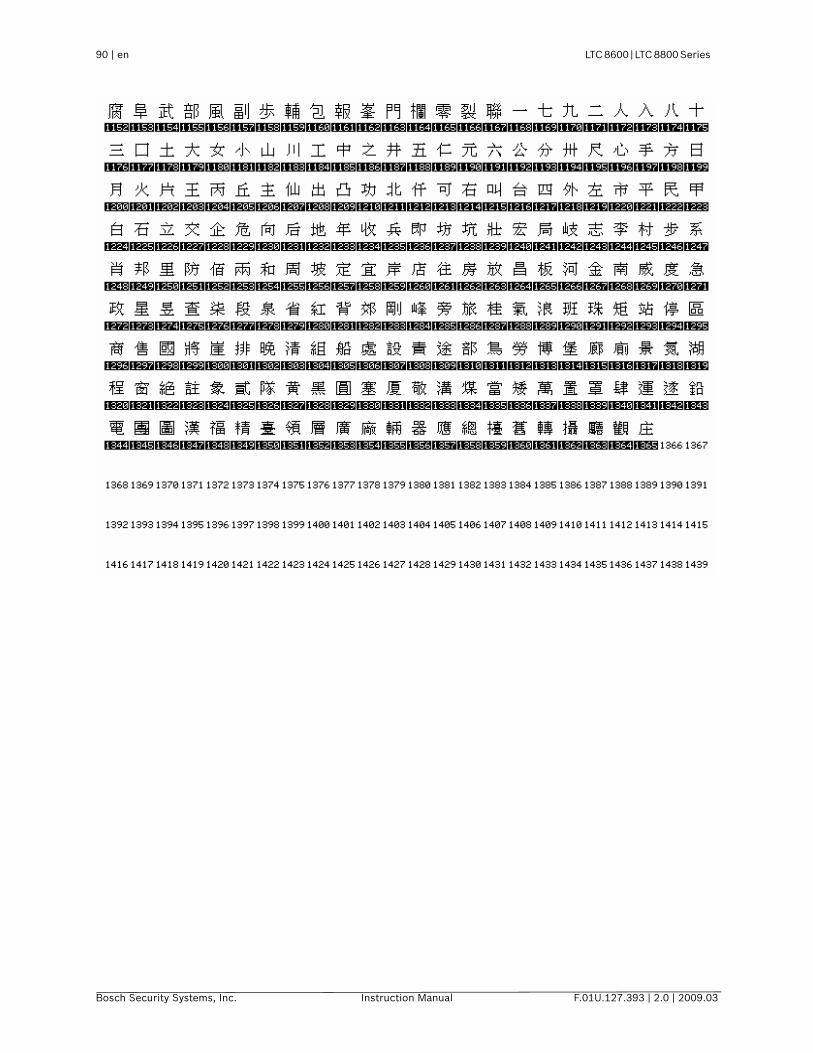
90 | en LTC 8600 | LTC 8800 Series
Bosch Security Systems, Inc. Instruction Manual F.01U.127.393 | 2.0 | 2009.03
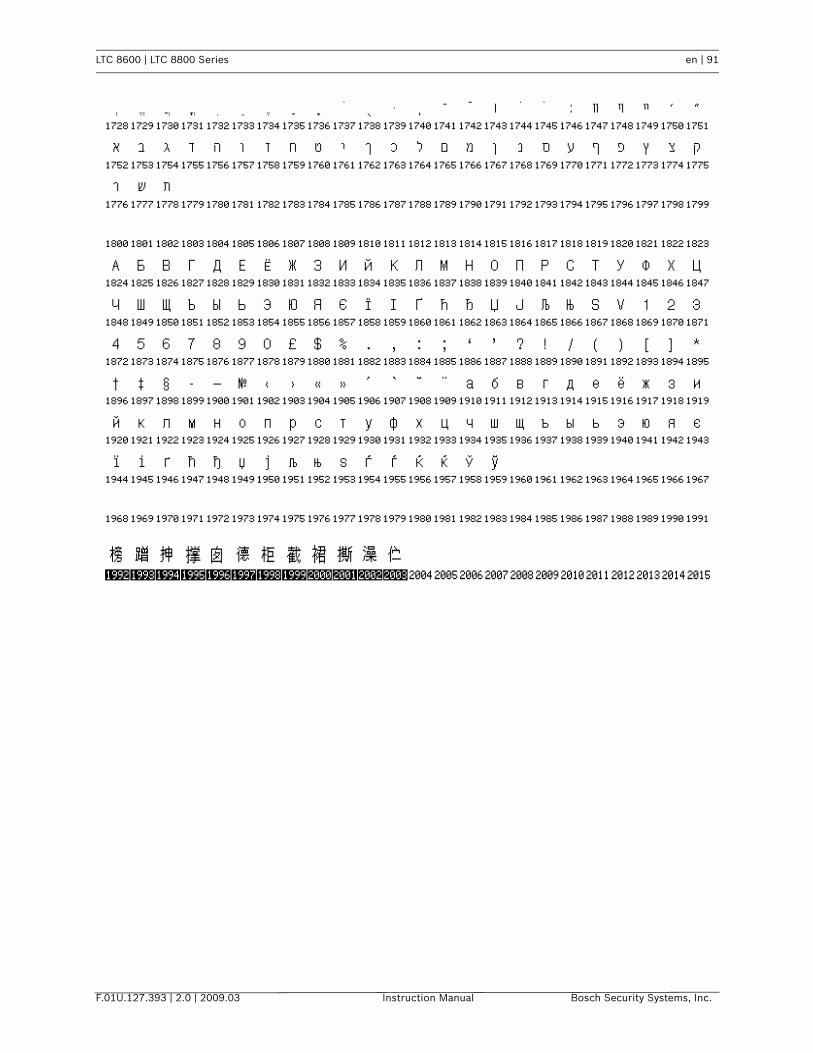
LTC 8600 | LTC 8800 Series en | 91
F.01U.127.393 | 2.0 | 2009.03 Instruction Manual Bosch Security Systems, Inc.
92 | en LTC 8600 | LTC 8800 Series
Bosch Security Systems, Inc. Instruction Manual F.01U.127.393 | 2.0 | 2009.03

LTC 8600 | LTC 8800 Series en | 93
F.01U.127.393 | 2.0 | 2009.03 Instruction Manual Bosch Security Systems, Inc.

94 | en LTC 8600 | LTC 8800 Series
Bosch Security Systems, Inc. Instruction Manual F.01U.127.393 | 2.0 | 2009.03
LTC 8600 | LTC 8800 Series en | 95
F.01U.127.393 | 2.0 | 2009.03 Instruction Manual Bosch Security Systems, Inc.

96 | en LTC 8600 | LTC 8800 Series
Bosch Security Systems, Inc. Instruction Manual F.01U.127.393 | 2.0 | 2009.03
LTC 8600 | LTC 8800 Series en | 97
F.01U.127.393 | 2.0 | 2009.03 Instruction Manual Bosch Security Systems, Inc.

98 | en LTC 8600 | LTC 8800 Series
Bosch Security Systems, Inc. Instruction Manual F.01U.127.393 | 2.0 | 2009.03

LTC 8600 | LTC 8800 Series en | 99
F.01U.127.393 | 2.0 | 2009.03 Instruction Manual Bosch Security Systems, Inc.
21 ERROR MESSAGES
• Error 01 - Invalid camera requestThe camera number entered from the keyboard does not exist. If using the optional LTC 8850 GUI Software or the optional LTC 8059 MCS, make sure the number exists in the Camera Identification Table. Download the table to be sure.
• Error 02 - Invalid monitor requestThe monitor number entered from the keyboard does not exist. Enter a valid monitor number.
• Error 03 - Locked remote deviceThe remote device requested cannot be controlled because it is locked by a user with equal or higher priority. Check with the other users or request that a higher priority user unlock the remote device.
• Error 04 - Monitor lockedThe monitor requested cannot be accessed because it is locked by a user with equal or higher priority. Check with the other users or request that a higher pri-ority user unlock the monitor.
• Error 05 - Remote device access restrictedRemote locked out by Remote Lockout Table.
• Error 06 - Monitor Access RestrictedMonitor locked out by Monitor Lockout Table.
• Error 10 - Access deniedA function was requested that requires a higher user priority. Only a Priority 2 user or a supervisor with Priority 1 may access this function.
• Error 11 - Access deniedA function was requested for which your user priority is too low. Only a supervi-sor with Priority 1 may access this function.
• Error 15 - Invalid user functionThe function number requested from the keyboard is invalid. Refer to the User Function Table for a listing of the valid user function numbers.
• Error 20 - Acknowledge deniedThe ACKNOWLEDGE button has been pressed by a user without the authority to acknowledge alarms.
• Error 21 - Incorrect acknowledgeIn order to properly acknowledge an alarm event, the keyboard must be switched to a monitor that is displaying the alarms.
• Error 22 - Acknowledge disabledAlarms on this monitor can not be acknowledged, because that capability has been disabled by the system programmer.
• Error 23 - Camera not in alarmThe camera displayed on the monitor is not an alarm video; only alarm-gener-ated video can be acknowledged.
• Error 24 - Keyboard not enabled for acknowledgeThis keyboard may not acknowledge alarm video on this monitor; it has been disabled by the system programmer.

100 | en LTC 8600 | LTC 8800 Series
Bosch Security Systems, Inc. Instruction Manual F.01U.127.393 | 2.0 | 2009.03
• Error 25 - Alarm switcher runningAlarm video may only be acknowledged if the alarm switcher is not running; press [HOLD] to stop the switcher.
• Error 50 - SEQUENCE not availableThe user tried to load a switcher sequence that does not exist. This is a good way to tell from the keyboard which sequence numbers are unused when desir-ing to add one.
• Error 51 - SEQUENCE requestA request was made to load an ABSOLUTE type sequence without the keyboard being on one of the monitors in that sequence. Because inadvertent loading of monitors should be avoided, the user is required to switch his keyboard to one of the monitors used by the sequence. The PROGRAM mode may be used to review what monitors are used in the sequence.
• Error 52 - SEQUENCE requestA request was made to load a RELATIVE type sequence on too high of a monitor number; the monitors used by the sequence would extend past the highest monitor. Try switching to a lower monitor number before Loading the sequence.
• Error 53 - Switcher emptyThe user has tried to control a sequence using the NEXT, PREV, RUN, or HOLD keys without there being a sequence loaded.
• Error 55 - SEQUENCE priorityThe switcher sequence being requested or cleared requires monitors that are in use by a user of equal or higher priority. Contact a user with higher priority or have the system administrator clear the monitors in question.
• Error 56 - SEQUENCE requestThe user has tried to load a sequence that is being edited in the PROGRAM mode. Once editing is completed, the sequence may be loaded.
• Error 58 - SEQUENCE requestThe sequence being requested is a relative sequence, and the user is only allowed access to absolute sequences.
• Error 60 - PROGRAM requestThe user has tried to program a sequence that is currently running. The sequence must first be stopped before any editing can be performed.
• Error 62 - PROGRAM requestThe user has tried to program a new sequence when the system is out of sequence memory space. Delete unused sequences and then program the new sequence.
• Error 63 - PROGRAM requestSome other user is already programming a sequence on this monitor.
• Error 70 - Monitor not allocated to alarm monitor groupThis monitor can not be used for alarm operations; it has not been designated as alarm-capable by the system programmer.
• Error 71 - Step monitor requiredA group of alarm monitors may not have an armed Review (display) monitor without having armed Step (sequence) monitors.
• Error 78 - Must enter alarm numberA specific alarm number must be entered when arming or disarming an alarm.

LTC 8600 | LTC 8800 Series en | 101
F.01U.127.393 | 2.0 | 2009.03 Instruction Manual Bosch Security Systems, Inc.
• Error 80 - Trunk not available An attempt was made to access a remote camera connected to a satellite sys-tem, but no unused trunk lines are currently available. Depending on system configuration and certain user options, the operator's monitor may automati-cally switch to the default camera programmed into the Start-up column of the Monitor Table when this error occurs.
• Error 81 - Satellite Trunk Seized The camera currently viewed has changed because an operator with a higher priority has selected a different camera that seized the trunk line from the satel-lite. The operator's monitor will automatically be switched to the default cam-era programmed into the Start-up column of the Monitor Table.
• Error 89 - internal stack errorA stack overflow within the system has occurred. Report this to the manufac-turer.
• Error 90 - Keyboard entry undefinedThe keyboard entry is not defined. Check the appropriate section of the instruc-tion manual for the desired operation and try again.
• Error 92 - Keyboard entry out of rangeThe data entered for a valid command was not in the range allowed by the sys-tem. Check the appropriate section of the instruction manual for the acceptable ranges for the command in question and try again.
• Error 94 - Keyboard entry invalid An invalid character has been received from the keyboard. Usually this would indicate a communications error. Verify that the keyboard-to-system cable is not producing an intermittent connection.
• Error 95 - Keyboard entry incompleteThe control sequence sent from the keyboard was incomplete. Usually this would indicate a communications error. Verify that the keyboard-to-system cable is not producing an intermittent connection.
• Error 96 - * (STAR) undefinedThe * key has been pressed, but there is no definition for this button.
Warning Messages
• Hi/Low Temperature AlertThe Allegiant CPU is equipped with a temperature sensor. If the ambient CPU temperature drops below -10 degrees C or goes above +55°C, an on-screen “Temperature Alert” message will appear on the system monitors and the sys-tem keyboards will begin to beep.

102 | en LTC 8600 | LTC 8800 Series
Bosch Security Systems, Inc. Instruction Manual F.01U.127.393 | 2.0 | 2009.03
22 Troubleshooting Guide
The Allegiant system has been designed to perform reliably for long periods of time. All circuitry consists of state-of-the-art components designed around a modular concept. The modular concept allows quick location and replacement of suspect circuits. If system troubleshooting becomes necessary, follow the guidelines:
22.1 Main Bay Checkout
1. Main power switch is ON and power LED indicator is not lit: Check main line fuse on rear of main bay. Refer to Maintenance Information Section for replace-ment instructions.
2. Any of the green LED indicators located on the front of the main power supply is out: Replace blown fuses associated with any unit fuse indicators.
3. The CPU contains several LEDs that are used to indicate its health and status. Please refer to chart below for details:
4. Intermittent video output or system operation: Verify all circuit card modules are properly seated in their respective rack connectors.
5. Power Supply LEDs lit, but no power indication on modules or accessory devices: Verify proper seating of power supply within the card cage. Verify that supplied retaining screws are installed.
LED Name Functional Description / Troubleshooting Information
CPU ACT. Random green blinking indicates normal CPU activity. If always ON or always OFF, the CPU is not functioning due to a serious problem with the CPU or the system power supply.
BATT LOW Lights red to indicate low or dead CPU battery condition. Replace batteries, per procedure described in Maintenance Information section.
TEMP CRIT Lights red to indicate extremely high or extremely low CPU temperature con-dition. This would occur if the system is installed in an unsuitable environ-ment or if there is a serious fault with the CPU causing it to overheat.
LAN LINk/ACT Not used.LAN 100BASET Not used.LAN DUP/COL Not used.SDU ACT Random green flashing indicates control data is being sent out Biphase port.CONSOLE Lights green to indicate device is attached to system RS-232 CONSOLE port.PRINTER Lights green to indicate device is attached to system RS-232 PRINTER port.ALARM Lights green to indicate device is attached to system RS-232 ALARM port.LED1 Lights RED when data is being written to FLASH memory. This would occur
whenever changes are made to user-defined settings, such as camera title programming, alarm table re-configurations, downloads from Master Control Software, etc.
LED2 Not used.LED3 Not used.LED4 Not used.LED5 Not used.LED6 Not used.LED7 Not used.LED8 Random green blinking indicates normal keyboard polling communication
activity. If not blinking, it would indicate a problem with the CPU.
LTC 8600 | LTC 8800 Series en | 103
F.01U.127.393 | 2.0 | 2009.03 Instruction Manual Bosch Security Systems, Inc.
22.2 Keyboard Checkout
1. No keyboard display indicators: Check interconnect cable for cut or broken wires between keyboard and main CPU bay. Replace cable if necessary. Relo-cate keyboard connector on main CPU bay to another keyboard input port. Replace keyboard.
2. Keyboard indicators lit but keyboard is inoperative: Verify keyboard is logged-on to the system (if log-on feature has been enabled). Check interconnect cable for cut or broken wires between keyboard and main CPU bay. Replace cable if nec-essary. Relocate keyboard connector on main CPU bay to another keyboard input port. Replace keyboard.
3. Limited keyboard functions: If possible, perform a local keyboard test to verify operation of all keys. See Chapter 15, “User Information,” on page 56. If a local test cannot be performed, replace the keyboard.
Users of the optional LTC 8850 GUI Software or the optional LTC 8059 MCS package should refer to lockout tables to determine if problem is related to user restriction tables. If table settings are verified and no discrepancies are found, replace keyboard.
4. Keyboard Joystick not centered: If the analog joystick of the system keyboard becomes un-centered due to normal wear, it can be re-calibrated. If using the IntuiKey keyboard, go to the Keyboard Control menu and press [Joystick Auto Calibrate]. If using the LTC 8555 Series keyboard, refer to the User Function 1 procedure. (See Chapter 15, “User Information,” on page 56).
22.3 Video Monitor Display Checkout
1. No video display on any monitor: Verify proper CPU operation as described above under Main Bay Checkout Section.
2. No video display on some monitors: Verify operational camera is selected on suspect monitors. Confirm monitor is operational. Check monitor coax connec-tions. Verify coax connection to correct monitor output on rear of main bay. Replace video output module.
3. Poor video on monitor: Check monitor for proper termination. Check operation of known good camera directly to monitor.
4. Partial or no on-screen alphanumeric display: Check user selectable brightness feature (via USER 5 keyboard function) and then verify alphanumeric display has been enabled (via USER 6 keyboard function). Position the overlay with USER 4 function.
5. Time and Date portion of the on-screen display alternates with “?? ?? ??”, and the LED on the front panel indicates a low battery condition: Replace CPU bat-teries.

104 | en LTC 8600 | LTC 8800 Series
Bosch Security Systems, Inc. Instruction Manual F.01U.127.393 | 2.0 | 2009.03
22.4 Remote Receiver/Driver Functions Inoperative
1. All receiver/drivers and functions inoperative: Verify power LED indicator on Signal Distribution Unit is lit. If not, check fuses on front of main CPU bay power supply. Verify the Code LED indicator flickers when control is activated by the keyboard. If not, replace Signal Distribution Unit.
2. Individual receiver/driver non-operative: Check green LED indicator on fuse bracket in receiver/driver box. This signifies that AC power is applied by the keyboard. If not, check shielded-twisted-pair cable between Signal Distribution Unit and receiver/driver box. Confirm camera address setting in receiver/driver corresponds to same camera number as selected by the keyboard. Perform internal receiver/driver local test to verify operation of receiver/driver circuitry and pan/tilt/zoom wiring.
3. AutoDome series dome cameras are not operating in a variable speed fashion: Verify CPU DIP switch 7 is selected for variable speed mode.
22.5 No Alarm Response
1. No system alarms operative: Verify power LED indicator on Alarm Interface Unit is lit. If not, check fuses on front of main CPU bay power supply. Verify the Alarm LED indicator lights and the audible buzzer sounds (if enabled) only when an 'alarm' is applied to the unit. If not, replace Alarm Interface unit.
2. Individual cameras/monitors not responding when alarmed: Ensure desired cameras are properly armed on the appropriate armed monitors in the system. Verify alarming device and cable to Alarm Interface unit intact.
3. Incorrect system alarm response: Verify that the desired alarm response mode has been selected. Refer to the section on Select User Functions for instruc-tions.
22.6 CPU Software Version Numbers
During the evolution of the system, there have been various CPU software versions released. In certain troubleshooting cases, Factory Technical Support personnel may ask for the version of the CPU. If it becomes necessary to obtain a CPU soft-ware version number, follow the steps below:
CPUs supplied in systems sold after 1995 (having 1, 2, or 3 8-position DIP switches):
1. Using a system keyboard, an operator with a level 1 priority can enter keyboard User Function 23. Press the [User] key. Enter 23 using the numeric keypad, then press the [Enter] key.
2. The CPU version numbers will be displayed on the overlay of the monitor cur-rently being controlled by the keyboard. Record number for future reference.
Very Old or current CPU Versions (having 1 or 2 8-position DIP switches):
1. Remove the front panel of the main CPU bay by loosening the four corner fas-teners.
2. Turn OFF main AC power switch on power supply.
3. The CPU module is located next to the power supply. Pull out CPU module from the card cage until IC's containing white labels are visible. The white labels con-tain copyright information and software version numbers. Record all numbers from label for future reference.
4. Re-install the CPU module and switch ON main AC power.
5. Re-attach front panel.

LTC 8600 | LTC 8800 Series en | 105
F.01U.127.393 | 2.0 | 2009.03 Instruction Manual Bosch Security Systems, Inc.
23 GLOSSARY OF TERMS
Auxiliary
An auxiliary is an additional function of the remote receiver/driver which permits on/off control of outputs available to the user. In the Allegiant system, there are four relay outputs available which can be configured for contact closures, 24 VAC output, or LINE voltage output. They can also be set to activate either momentarily or in a latching mode.
Command Script
A unique feature of the Allegiant system wherein a section of nonvolatile memory can be used to store specialized user-defined programming. A program of this type could then provide custom features which ordinarily would not be obtainable.
Dither
A receiver/driver feature which provides added protection to very low light level cameras by periodically panning a few degrees left and right automatically.
Lockouts
The ability of a switcher/controller system to restrict access of operations to certain system functions or features. The Allegiant system has two modes of lockouts. The first mode is based on operator priority level. This allows a higher priority level operator to lockout lower level operators from either viewing or controlling specific cameras. The second mode involves LTC 8059 Master Control Software setups which can:
• Restrict operators/keyboards from viewing/accessing any camera.
• Restrict operators/keyboards from controlling/accessing any pan/tilt.
• Restrict operators from using certain keyboards.
• Restrict operators/keyboards from accessing certain monitors.
Log-on, Log-off
A selectable feature of the Allegiant system which requires operators to enter a User number and an optional password into the keyboard prior to having access to sys-tem operations.
Matrix Switching
The ability of a switching system to display any camera on any monitor or the same camera on all monitors.
Phased Cameras
Properly integrated cameras which give a roll-free video display when switching from one camera to the next in a sequential switcher system. Phased cameras are the result of line-locked cameras being powered from the same AC power, externally synchronized, or vertically phased adjusted on cameras equipped with this option.
Pre-position
The ability to store the position of a pan/tilt and zoom lens so that the same desired scene can be later recalled automatically. With the Allegiant system, there can be multiple preset scenes stored for each pan/tilt camera. For each scene, the pan, tilt, zoom, and focus settings are stored.
SalvoSwitching
The ability of the Allegiant system to switch multiple video monitors as a synchro-nized group. Since multiple monitors switch together, the operator can view multi-ple scenes of a specific area or zone before switching to the next area.

106 | en LTC 8600 | LTC 8800 Series
Bosch Security Systems, Inc. Instruction Manual F.01U.127.393 | 2.0 | 2009.03
Sequence
A series of camera scenes that can be preprogrammed to automatically switch. The Allegiant system can store up to 60 separate sequences, with each one capable of having a random camera order, individual camera dwell times, and SalvoSwitching steps.
Time Event
An Allegiant system feature (available with the LTC 8850 GUI Software or the LTC 8059 MCS) that enables various system functions to be periodically activated automatically. Event functions such as monitor message broadcasts, sequence and switching operations, receiver/driver actions, message printing, alarm settings, and execution of custom factory programming can be stored in the system memory to be executed at a pre-determined time. The task can be specified to begin on a spe-cific year, month, day, and time, and can be programmed to repeat at intervals rang-ing from every five minutes up to a year.
Vertical Interval Switching
Vertical Interval switching is a method of switching video from camera to camera during the vertical blanking interval period of the video signal. This minimizes visual switching disturbances such as rolling, jitter, video flashes, etc. and eliminates frame information loss when used with VCR machines.
LTC 8600 | LTC 8800 Series en | 107
F.01U.127.393 | 2.0 | 2009.03 Instruction Manual Bosch Security Systems, Inc.
Appendix A Satellite Systems
A satellite system configuration is usually used for a medium to large distributed system, or to obtain extremely large matrix sizes configured more conventionally. Typically, a single Main control site can be used to view/control cameras located both locally and at various remote satellite sites. Since up to 256 satellite sites can be linked to a single Main control site, very large, distributed systems can be achieved. If the satellite systems are located at the same site as the Main system, the result is a large conventional-type system.
In a satellite configuration, the Main control site can view/control any camera in the entire system, but the remote satellite sites can only view/control cameras associ-ated with their own site. Satellites may be configured to operate either indepen-dently or, with no local viewing/control capability.
It is also possible to configure satellite systems where each site can view/control cameras from anywhere in the system. For a two (2) site system, this is referred to as a dual master configuration. In the same manner, triple and quadruple master system configurations can also be configured. Cascaded satellite systems, where a Main site has a satellite which is a master to another satellite is another available scenario. In fact, it is possible to configure systems that include a mixture of any or all of the above scenarios.

108 | en LTC 8600 | LTC 8800 Series
Bosch Security Systems, Inc. Instruction Manual F.01U.127.393 | 2.0 | 2009.03
Figure 22: Possible Allegiant Satellite System Configurations
Any Allegiant Series switcher model (LTC 8100, LTC 8200, LTC 8300, LTC 8500, LTC 8600, LTC 8800, or LTC 8900) can be used as a main site or a satellite site unit. All products are standard models, and the only special requirement is to use either the optional LTC 8059/00 MCS or the optional LTC 8850/00 GUI Software package for initial programming of each Allegiant system.
An Allegiant biphase control data line from the code distribution unit at the Main site must be provided to each satellite site. This data line carries all pan/tilt/zoom control commands, in addition to the switching commands generated by the Main site switcher. The control data line should be connected to a LTC 8780 Series Data Converter to provide address decoding functions for the satellite site. If operators at the satellite site are permitted to control pan/tilt/zoom-equipped cameras, a
Allegiant Satellite
Allegiant Satellite
Allegiant Satellite
Allegiant Satellite
Allegiant Master
Allegiant Master
Allegiant Master
Allegiant Master
Allegiant Master
Allegiant Satellite
Allegiant Master
Allegiant Satellite/ Master
Allegiant Master
Allegiant Master
Typical Master/Multiple Satellite Configuration
Dual Master Configuration
Quadruple Master Configuration
All Masters can view/con-trol all cam-eras
Satellite can view/ control only local cameras
Master can view /control all cameras
Both Masters can view/ control all cameras
Satellite can view/ control only local cameras
‘Cascaded’ Satellite Configuration
Satellite/Master can view/control local and Satellite’s cameras

LTC 8600 | LTC 8800 Series en | 109
F.01U.127.393 | 2.0 | 2009.03 Instruction Manual Bosch Security Systems, Inc.
LTC 8569 Series Code Merger must be installed at the satellite site. The Code Merger combines code generated by the main site and the satellite site, so both sites have control over pan/tilt/zoom-equipped cameras located at the satellite site. The LTC 8780 Series unit can then be connected to one of the data outputs of the LTC 8569 Series unit.
One or more monitor outputs from each satellite system are used as video trunk lines to link the remote sites to the Main site. The number of trunk lines from a sat-ellite site determines the maximum number of cameras from that site that may be viewed simultaneously at the Main site. A satellite switcher model must be selected so that it provides the desired number of local monitor outputs plus the number of monitor outputs that will be used as trunk lines.
The Main site switcher must include sufficient camera inputs for local cameras plus trunk lines. The maximum physical number of camera inputs or monitor outputs used as trunk lines cannot exceed the capacity of the system. A single Main site switcher can control multiple satellite sites up to its video input limit. If full matrix switching is required at the Main site, the number of trunk lines from each satellite site must equal the number of monitors connected to the Main site switcher. Multi-ple independently controlled Main site systems can be combined to provide large numbers of monitor outputs at the Main site. System capacities are listed below:
Since Main site Allegiant Series switchers support access to a large quantity of remote satellite cameras, they provide additional logical camera numbers for identi-fying the location of the satellite camera inputs in the system. These logical camera numbers can also include titles which would appear on the Main site's monitors for any remote cameras. Since each camera (anywhere in the system) must have a unique camera number, logical camera numbers together with physical camera inputs make up the total system camera capacity. Thus, there is a trade-off between the total number of Main site cameras and the number of inputs used as trunk lines.
The more inputs used as trunk lines, the fewer there are for use as direct camera inputs.
The Main site system must be programmed via the MCS LTC 8059/00 or the LTC 8850/00 GUI to identify camera trunk line inputs as well as remote satellite cameras. All systems must be configured with no duplicate camera numbers any-where in the system. The installer should verify that the camera numbers pro-grammed into the Start-up Camera field of the Monitor table are suitable for viewing by respective operators. If there are Lockouts programmed into the system, specify-
System TypeMax. Camera Inputs
Max. Monitor Outputs
Max. No. of Satellite Sites
LTC 8100 Series 8 2 8LTC 8200 Series 16 5 16LTC 8300 Series 32 6 32LTC 8500 Series 64 8 64LTC 8600 Series 128 16 128LTC 8800 Series 256 64 256LTC 8900 Series 4096 512 256
Model No. Maximum Number System Cameras*
LTC 8100 Series 264LTC 8200 Series 272LTC 8300 Series 288LTC 8500 Series 320LTC 8600 Series 1152LTC 8800 Series 2304LTC 8900 Series 6144*Camera inputs at all sites, plus trunk lines.

110 | en LTC 8600 | LTC 8800 Series
Bosch Security Systems, Inc. Instruction Manual F.01U.127.393 | 2.0 | 2009.03
ing a neutral camera would prevent the situation where a restricted camera could be switched to a restricted operator's monitor when their trunk line is stolen. For this feature to operate properly, the start-up camera numbers must be locally con-nected cameras or a local unused input (i.e., the raster generator will be displayed when called-up).
In addition, it is recommended to program Lockouts for all system keyboards so that they do not have access to unused monitor outputs. This prevents operators from inadvertently selecting a satellite camera on a non-existent monitor which will result in a trunk link becoming used up, possibly making less trunk lines available for valid selections.
Keyboard User Function 41 (See Chapter 15, “User Information,” on page 56) offers additional programming options if a multi-level cascaded Allegiant satellite system configuration is being used.
Any alarm inputs to the Main site configured to activate satellite cameras operate normally except when limited by the number of available trunk lines. The software automatically determines trunk usage, depending on the priority level of operators currently viewing satellite cameras.
Alarm inputs applied at a satellite site will NOT activate alarm video at the Main site. If the application requires alarms located at a satellite to activate video at the Main site, the Main site's LTC 8540/00 Alarm Interface unit must be remotely located. Multiple LTC 8540/00 Alarm Interfaces may be remoted via the LTC 8713 alarm port expander accessory, located at the Main switcher site in LTC 8800 and LTC 8900 systems. Up to two (2) LTC 8540/00 alarm interfaces with a LTC 8713 alarm port expander can be used in a LTC 8600 system. One LTC 8540/00 can be used in LTC 8500 systems. Since the LTC 8100, LTC 8200, and LTC 8300 Series contain an inte-gral alarm interface, the remote alarm interface application does not apply.
A unique time and date synchronizing feature provided in the Time Event table of the MCS or the GUI Software may be programmed into the Main site switcher. This permits periodic synchronizing of the time and date to all remote switchers in the system based on the Main site's clock.
A conceptual diagram of a satellite switching system is follows:

LTC 8600 | LTC 8800 Series en | 111
F.01U.127.393 | 2.0 | 2009.03 Instruction Manual Bosch Security Systems, Inc.
Conceptual Diagram of Allegiant Satellite Switching System
Figure 23: Conceptual Diagram of Allegiant Satellite Switching System
Typical IntuiKey Keyboard
Video
Biphase Data
Typical Fixed Cameras
Data Converter Unit
Signal Distribution Unit
Code Merger Unit
Biphase Data Lines to all Local P/T/Z Camera Sites
Typical System Monitors (Local and/or Remote Video)
Typical P/T/Z Camera
Typical Allegiant ‘Satellite’ Site
Video
Typical P/T/Z Camera
Video
Video
Video
Video
Console Port
Typical Fixed Cameras
Biphase Control and Sat-ellite Data
1 Biphase Date Line to each Remote Satel-lite Site
Typical System Monitors (Local Video Only)
Incoming Video Trunk Lines from all Satel-lite Sites
Alarm Interface Unit
Typical Alarm Input Con-tact (Activates Local Alarms Only)
Biphase Data Lines to all Local P/T/Z Camera Sites
Typical Alarm Input Con-tact (Activates Local or Satellite Cameras)
IntuiKey Keyboard (P/T/Z Control of Local Cameras Only)
Biphase Control and Satellite Data
Monitor Output(s)
VideoInput(s)
Alarm Interface UnitTypical ‘Main’ Allegiant Control Site

112 | en LTC 8600 | LTC 8800 Series
Bosch Security Systems, Inc. Instruction Manual F.01U.127.393 | 2.0 | 2009.03
Conceptual Diagram of Dual Master Allegiant Satellite System
Figure 24: Conceptual Diagram of Dual Master Allegiant Satellite System
Typical Fixed Cameras
Typical IntuiKey Keyboard
Video
Video
Video
Video
Biphase Data Console Port
Data Converter Unit
Signal Distribution UnitBiphase Control and Sat-ellite Data
Code Merger Unit
Typical Biphase Data Lines to all Local P/T/Z Cameras
Typical System Monitors (Local and/or Remote Video)
Video Trunk Lines
Biphase Data Lines Between Sites
Typical System Monitors (Local and/or Remote Video)
Video
Video
Video
Biphase Data
Biphase Data
Code Merger Unit
Data Converter UnitTypical IntuiKey Keyboard
Biphase Control and Sat-ellite Data
Typical Fixed Cameras
Typical P/T/Z Camera
Typical Allegiant ‘Master’ System
Typical Allegiant ‘Master’ System
Biphase Data Lines to all Local P/T/Z Camera Sites
Console Port
Signal Distribution Unit

LTC 8600 | LTC 8800 Series en | 113
F.01U.127.393 | 2.0 | 2009.03 Instruction Manual Bosch Security Systems, Inc.
Conceptual Diagram of Cascaded Allegiant Satellite System
Figure 25: Conceptual Diagram of Cascaded Allegiant Satellite System
Typical IntuiKey Keyboard
Typical IntuiKey Keyboard
Typical IntuiKey Keyboard
Typical System Monitors (Video from Local Site Only)
Multiple Video Trunk Lines
Biphase Data Line to 3rd Level Satellite
Typical Biphase Data Line to all Local P/T/Z Cameras
Typical P/T/Z Camera
Typical Allegiant Satellite, Site 3
Biphase Data
Console Port
Biphase Data
Video
Video
Console Port Biphase Data
Biphase Data
Biphase Data
Video
Code Merger Unit
Data Converter Unit
Data Converter Unit
Typical Biphase Data Line to all Local P/T/Z Cameras
Typical P/T/Z Camera
Typical System Monitors (Video from Sites 2 and 3)
Typical System Monitors (Video from all Sites)
Typical Allegiant ‘Primary’ Master Site 1
Typical Biphase Data Line to all Local P/T/Z Cameras
Signal Distribution Unit
1 or More Video Trunk Lines
Biphase Data Line to Intermediate Master/Satellite
Typical Allegiant ‘Intermediate’ Master/Satellite, Site 2
Typical P/T/Z Camera
Code Merger Unit

114 | en LTC 8600 | LTC 8800 Series
Bosch Security Systems, Inc. Instruction Manual F.01U.127.393 | 2.0 | 2009.03
Appendix B Installation Checklists
A simplified guide for those who are already familiar with installing and program-ming Allegiant systems.
MAIN BAY HARDWARE INSTALLATION
Unpack equipment and verify that items have been received without carrier damage.Install power supply (do not turn ON) and CPU module.If applicable, install bay into EIA 19-inch rack (remember to remove rubber bumper foot pads.Install video input module(s) following proper termination procedures. Install video output module(s).Connect camera inputs and monitor outputs to appropriate connections on equip-ment bay(s).Connect system keyboards, any alarm interface unit(s), and any signal distribution unit to main bay.Set CPU DIP switches to activate desired features.Apply main AC power to equipment.Verify system is operating properly then begin appropriate programming.
PROGRAMMING VIA SYSTEM KEYBOARD
Enter system time (User Function 7) and date (User Function 8). Enter Camera ID titles (User Function 9), and if desired, adjust monitor overlay displays (User Function 4, 5, & 6 or 24, 25 & 26).Enter desired Sequences.Configure and test alarm response mode.
SATELLITE CONFIGURATION HARDWARE INSTALLATION
Main Site:Install main Allegiant bay and appropriate accessory products accordingly. Verify biphase control code line is run to each satellite site.Attach trunk line inputs, local camera inputs, and monitor outputs to main Allegiant bay. Apply main AC power to equipment.Program Camera ID table using LTC 8059 Master Control Software package.Switch all unused monitor outputs located at main site to display a 'local' camera input.
Satellite Site(s):Install satellite switcher and appropriate accessory products accordingly.Connect biphase code line to LTC 8780 Data Converter unit and configure according to desired satellite address and switcher's baud rate.If necessary, program satellite switcher for desired camera titles and any other related requirements.
LTC 8600 | LTC 8800 Series en | 115
F.01U.127.393 | 2.0 | 2009.03 Instruction Manual Bosch Security Systems, Inc.
Appendix C Quick Reference Cable Interconnections
C.1 Main Bay Video
COAX-All video input and output connections to the Allegiant system should be made using a good grade of RG59U, RG6, or RG11U coaxial cable using BNC con-nectors. The following guidelines should be used to insure selection of the proper cable type:
1. Center conductor of copper, not copper weld or steel. Use stranded wire where there will be cable movement as with pan/tilts, elevators, etc.
2. Copper braided shield at 93% coverage or better.
3. Cable impedance of 75 ohms.
4. Select cable based on target of no more than 15 ohms of center conductor resistance. A typical value for RG59U is 15 ohms per 300 m (1000 ft), therefore maximum cable run should be no more than 300 m (1000 ft). RG11U/RG6 is typically rated for 6 ohms per 300 m (1000 ft) which permits runs up to 760 m (2500 ft).
5. Use video amplifiers to extend cable distances beyond maximum limitations listed above.
C.2 Keyboards
• The keyboard comes supplied with 3 m (10 ft) of 6 conductor phone type cable with RJ-11 connectors. The cable plugs directly into the rear of the system's main bay on one end and into the back of the keyboard on the other end. Both data and power for the keyboard travel over this cable.
• An optional 30 m (100 ft) cable is also available.
• An optional kit which permits the keyboard to be extended beyond 30 m (100 ft) is available and uses customer supplied shielded twisted pair. The kit consists of two “breakout” boxes which convert from the phone type cables to the shielded twisted pair and also provide for local keyboard power. Maximum distance using 24 gauge wire (Belden 9841 or equivalent) is typically 1.5 km (5000 ft).
C.3 Alarm Interface Unit
CONNECTION TO MAIN BAY
The Alarm unit is supplied with a 3 m long (10 ft) multiconductor cable with 9-pin D-type connectors. Power to the Alarm unit is provided by the Allegiant's main bay using the supplied cable. There are provisions to remote the bay which would then require local 12 VAC power and a minimal 3 wire RS-232 communication link.
ALARM INPUTS
The alarm inputs can be dry contact closures or logic levels. Connection to the Alarm unit is made to removable screw type terminal blocks and the use of simple twisted pair wire is acceptable.

116 | en LTC 8600 | LTC 8800 Series
Bosch Security Systems, Inc. Instruction Manual F.01U.127.393 | 2.0 | 2009.03
C.4 Signal Distribution Unit
CONNECTION TO MAIN BAY
The Distribution unit is supplied with a 3 m long (10 ft) multiconductor cable with 9-pin D-type connectors. Power to the unit is provided by the Allegiant's main bay using the supplied cable. The cable should not be extended so it is recommended that the unit be located close to the main bay.
DISTRIBUTION OUTPUTS
Only shielded twisted pair wire should be used between the Distribution unit and the camera site receiver/drivers. Connection to the Distribution unit is made to removable screw terminal type blocks. Each output is rated to handle up to eight receiver/driver loads as in a daisy chain configuration to a maximum of 1.5 km (5000 ft) using a 18 gauge wire (Belden 8760 or equivalent).
C.5 Receiver/Drivers
CODE INPUT
The code input is supplied by the shielded twisted pair cable from the Signal Distri-bution unit. This is connected to a removable screw terminal type block which has provisions for “looping” the code cable to another receiver/driver.
OUTPUT CONNECTIONS
All pan/tilt and lens connections will require multiconductor cable. Refer to the appropriate specification sheet for cable gage, number of conductors required, and maximum distances allowable. The lens cables and any pre-position cables should be kept shielded from other signal wires to minimize interference.

LTC 8600 | LTC 8800 Series en | 117
F.01U.127.393 | 2.0 | 2009.03 Instruction Manual Bosch Security Systems, Inc.
Appendix D Main Bay Rear Panel Connector Pin-outs
Console Port RS-232 Pin-outs
Pin # Designation 1 CHASSIS GND 2 Rx 3 Tx 4 CTS 5 RTS 6 NO CONNECTION 7 DATA GND 8 NO CONNECTION 9 NO CONNECTION
Alarm Port RS-232 Pin-outs
Pin # Designation 1 RTS 2 Tx 3 CHASSIS GND 4 DATA GND 5 DATA GND 6 Rx 7 CTS 8 12 VAC 9 12 VAC
Keyboard RS-485 Ports
Pin # Designation 1 12 VAC 2 GND 3 -DATA 4 +DATA 5 GND 6 12 VAC
Printer Port RS-232 Pin-outs
Pin # Designation 1 CHASSIS GND 2 Rx 3 Tx 4 CTS 5 RTS 6 NO CONNECTION 7 DATA GND 8 NO CONNECTION 9 NO CONNECTION

118 | en LTC 8600 | LTC 8800 Series
Bosch Security Systems, Inc. Instruction Manual F.01U.127.393 | 2.0 | 2009.03
• The LTC 8506/00 cable (used to connect the Allegiant's console port to an external PC) uses the following pin-outs:
• For reference, a cable to connect the Allegiant's printer port to an external serial printer would use the following pin-outs:
Code Port Pin-outsPin # Designation 1 +DATA 2 -DATA 3 GND 4 GND 5 GND 6 NO CONNECTION 7 NO CONNECTION 8 12 VAC 9 12 VAC
COMM PORT 1 And COMM PORT 2(Not Applicable To All Systems)
Pin # Designation1 CHASSIS GND2 +TXD3 -TXD4 +RXD5 -RXD6 GND7 GND8 GND9 GND
9-Pin Male (Console)
Allegiant Designation 9-Pin Female (PC Side)
1 Chassis GND None2 Receive Data 33 Transmit Data 24 CTS 15 RTS 86 No Connection None7 Data GND 58 No connection None9 No connection None
(pins 4 & 6 jumpered) (pins 1 & 7 jumpered)
9-Pin Male Printer(Printer)
Allegiant Designation 25-Pin Female (Printer Side)
1 Chassis GND 12 Receive Data 23 Transmit Data 34 CTS 4,85 RTS 56 No Connection None7 Data GND 78 No connection None9 No connection None
(pins 6 & 20 jumpered)

• 2009 Bosch Security Systems, Inc.F.01U.127.393 | Updated March 17, 2009 | Data subject to change without notice
AmericasBosch Security Systems130 Perinton ParkwayFairport, New York, 14450 USAPhone: +1 888-289-0096
+1 [email protected]://www.boschsecurity.us
Europe, Middle East, AfricaBosch Security Systems B.V.P.O. Box 800025600 JB Eindhoven, The NetherlandsPhone: + 31(0) 40 2577 284Fax: +31 (0) 40 2577 [email protected]://www.boschsecurity.com
Asia-PacificBosch Security Systems Pte Ltd38C Jalan PemimpinSingapore 577180Phone: +86 (0) 756 7633117Fax: +86 (0) 756 [email protected]://www.boschsecurity.com