lotuslive qsg reseller - meetingconnect.net · a lotuslive meetings presentation and saved into the...
TRANSCRIPT

Last modified on: 3/16/2009
IBM LotusLive Meetings Quick Start Guide
Starting a meeting with IMB LotusLive Meetings is easy because you can start it from anywhere and at anytime. There’s no reason to carry your laptop or copies of your presentation with you because once you load your materials in to LotusLive Meetings, it’s all there when you are ready to start your meeting, with just the click of a button. This guide provides the basic information necessary to start a LotusLive Meetings conference.
Logging In To begin using LotusLive Meetings, go to http://www.meetingconnect.net/lotuslive as shown in Figure A. There are separate login forms for Starting and Joining. To start a meeting complete the Start a Meeting form (Figure B), using the Owner ID and Web PIN you received via email. Participants will use the conference code only.
Figure A. LotusLive Meetings login
Figure B. Join a Meeting and Start a Meeting forms

PRESENTER CONTROLS
After you have successfully logged in, you are presented with a conference window. At the top of the conference window is a toolbar (Figure C) containing buttons used to conduct and manage web conferences.
Starting a Web Conference Since LotusLive Meetings does not require pre-planning or scheduling, once you have logged into your account, you can immediately start a conference.
To start a conference:
1 Click Start on the toolbar. A dialog window opens displaying instructions for inviting participants to join the conference. If you do not start the conference, you will be prompted to start the conference.
Figure C. Host window with prompt to start the conference
Figure D. Toolbar (Host controls) prior to starting conference Figure E. Toolbar (Host controls) after conference has been started

2 Instruct participants to visit the conference entry page (http://www.meetingconnect.net/lotuslive) to complete the login form using the conference code that you provide them with from the start dialog window. If the conference is not started yet, the participants will enter a “waiting room” area. When the conference is started they will automatically be entered into the conference.
Figure F. Waiting room
3 As each user logs in to the conference, the user’s name appears in the roster.
Publishing a Document Once you have logged in to your LotusLive Meetings account you can either start a web conference or you can prepare for a conference by publishing Microsoft® PowerPoint®, Word, or Excel documents. LotusLive also includes support for Adobe .PDF and Open Document Format (.ODF) documents.
Figure G. Document Publishing submenu

Figure H. Document Publishing “Publish a File” window Publishing documents:
1 Select Publish on the presenter toolbar. 2 Select Browse from the Publish a File dialog window. 3 Select a document file path using the file explorer window. 4 Select Publish File in the Publish a File dialog window.
After you complete these steps, your document is automatically copied and converted into a LotusLive Meetings presentation and saved into the presentation library. A status bar indicates the publishing progress. Once publishing is complete, the first page of your document appears in the conference window. Presenting previously published documents:
1 Select Publish on the presenter toolbar 2 The Publish a File window will appear. Click the radio button next to the file you
wish to present from the titles in “Your file list” 3 Select Present
Or
1 Select the Document Publishing sub-menu located on the Publish button on the presenter toolbar. A drop down menu will appear. (Figure G.)
2 Select the thumbnail of the file you wish to present 3 The first slide of presentation will appear on the presenter and participant
windows

Deleting a Presentation
You may choose to delete a presentation anytime in the future using the Publish feature. To delete a published document:
1 Select Publish on the toolbar 2 Select the presentation in the Published Documents list 3 Select Delete
Using Presentation Tools
To Use Navigation Tools:
Figure I. Navigation Tools “Next” submenu Use the Previous and Next buttons on the toolbar to index slide by slide through a presentation, document sections or worksheets.
Use the “Next Slide” and “Previous Slide” submenu(s) to jump directly to a specific slide.
To use Annotation Tools: Use the Pointer button to toggle the pointer tool on and off when you want to highlight the content of your presentation.
To turn off the pointer, select Pointer again. Pointers can be “stamped” on slides by clicking the pointer on the slide. To clear stamped pointers, advance to the next slide
Use the Highlighter button when you want to annotate the content of your presentation in real time.
Choose from 15 marker colors by clicking on the down arrow on the Highlighter button. To turn off the marker, select Highlighter again. To clear the highlighted annotation, advance to the next slide.

Application Sharing
The Share button allows you to share specific applications or your entire desktop, thereby enabling your participants to view changes as you make them and to see applications unique to your desktop. Once you select Share you will receive a dialog box that shows a list of your currently running applications (Figure J).
Note: The Application Sharing feature requires the host to receive a conferencing plug-in component. If this is your first time using Application Sharing, please read the System requirements section of this Quick Start guide.
Figure J. Application Sharing window the host may choose to share the entire desktop or specific applications
To share an individual application:
1 Select one or more applications from the list by selecting the box next to the active application(s).
2 Select “Choose the applications to share.” 3 Select Share Selected.
To share all applications:
1 Select “Share the entire desktop.” 2 Select Share Selected..
To stop sharing:
1 Open/restore the LotusLive Meetings application window. 2 Select Cancel.
Or

1 Double click the icon for Application Sharing in the system tray. 2 Select Stop Sharing. Or
1 Select the orange Shared button on the title bar of the window that is being
shared.
Allowing Control of your desktop If you would like to allow a participant to make changes to your shared application, you must give control to that participant.
To transfer control to a participant:
1 Click the Participant’s name in the roster. 2 Select Give Control.
To regain control of the application:
1 Select the participant’s name in the roster and choose Disable Control. *NOTE: The Performance Setting option allows you to optimize application sharing performance and quality. The options are as follows:
Auto (Recommended) - Auto adjust setting from low to high depending upon bandwidth responsiveness. High Quality – This setting has true color, the best appearance, and requires the most bandwidth. May cause delays on slower connections. Best Speed - Fastest transfer speed but 16 colors and some reduction in image quality. This setting is ideal for slower connections such as dial-up.
Scheduling a Conference with Outlook LotusLive Meetings, Microsoft OutlookTM Integration allows a host to schedule web conferences using Microsoft Outlook. Adding web conferencing to an Outlook meeting is as simple as clicking the LotusLive button in a Microsoft Outlook Calendar Appointment or Meeting Request.
To schedule a conference using Outlook:
1 Install the Outlook Add-On by downloading and installing the LotusLive Meetings Options Kit and selecting the "Outlook Add-On" option during installation.
*Note: You must temporarily close Outlook while installing this feature.
2 Access the scheduling feature of Outlook. - From the calendar feature in Microsoft Outlook, open a calendar appointment or
Meeting Request. You may do so by selecting the File menu, next select New, and then Appointment or Meeting Request.

- You may also create a new appointment by double clicking on a specific date and time on your calendar. An Outlook Appointment or Meeting Request dialog window will open.
3 Select Invite Attendees on the toolbar. Insert e-mail addresses and meeting details just as you would through the Meeting feature of Outlook.
4 Set a reminder for your web conference so you will be able to login before the
conference is scheduled to begin.
5 Select the LotusLive button at the upper left-hand corner of the Outlook appointment window. This will open the Web Conference Details window. A dialog window will open with a tab for web and audio conference details.
6 Ensure that your web conference account information is correct in the fields provided. You may also assign one or two memos if you require them for post conference reporting, and audio bridge dial in information if needed.
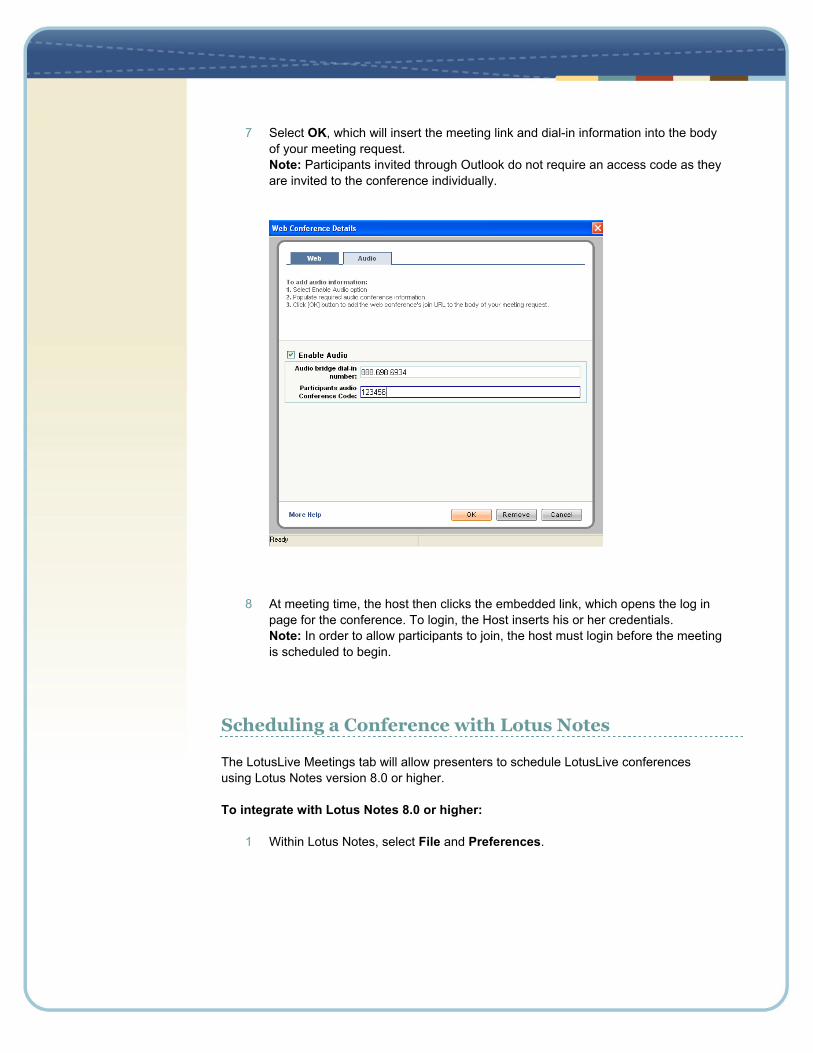
7 Select OK, which will insert the meeting link and dial-in information into the body
of your meeting request. Note: Participants invited through Outlook do not require an access code as they are invited to the conference individually.
8 At meeting time, the host then clicks the embedded link, which opens the log in
page for the conference. To login, the Host inserts his or her credentials. Note: In order to allow participants to join, the host must login before the meeting is scheduled to begin.
Scheduling a Conference with Lotus Notes The LotusLive Meetings tab will allow presenters to schedule LotusLive conferences using Lotus Notes version 8.0 or higher. To integrate with Lotus Notes 8.0 or higher:
1 Within Lotus Notes, select File and Preferences.

2 Select Mail from the left hand column.
3 Select Calendar & To Do.
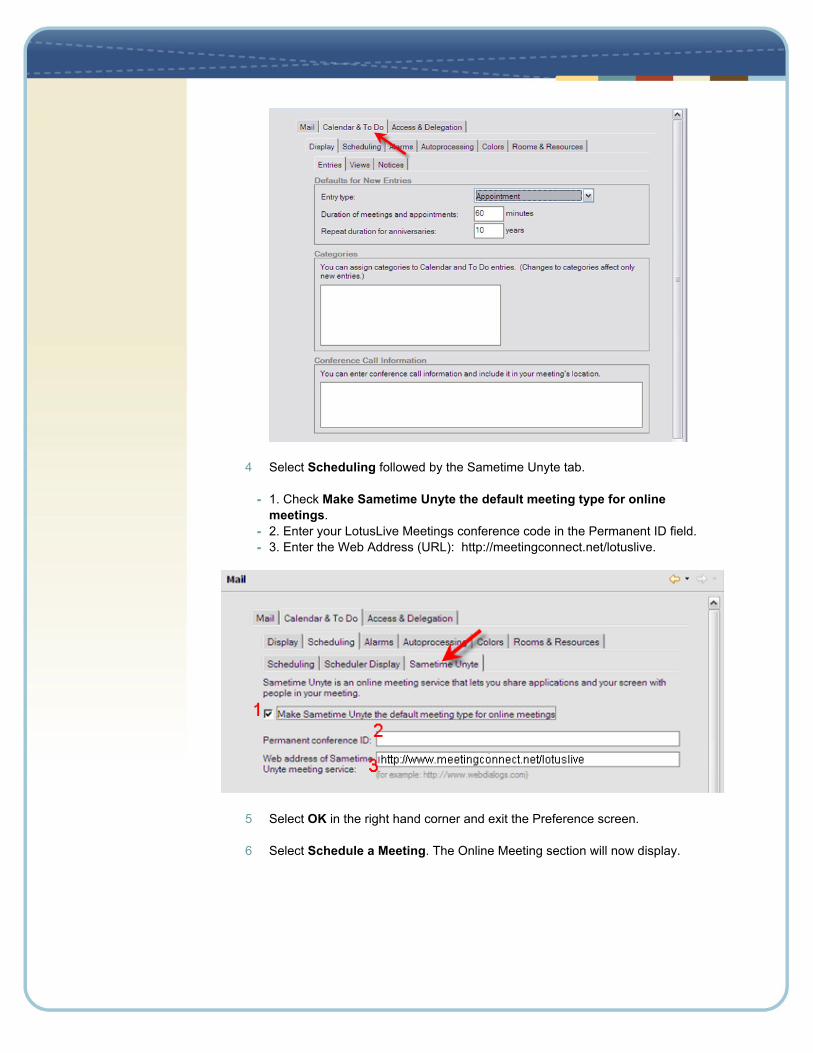
4 Select Scheduling followed by the Sametime Unyte tab.
- 1. Check Make Sametime Unyte the default meeting type for online meetings.
- 2. Enter your LotusLive Meetings conference code in the Permanent ID field. - 3. Enter the Web Address (URL): http://meetingconnect.net/lotuslive.
5 Select OK in the right hand corner and exit the Preference screen.
6 Select Schedule a Meeting. The Online Meeting section will now display.

7 Select OK. The web conference details are inserted into the body of the conference request. The text includes a link for users to join the conference.
8 You must manually add your audio conferencing details to the invitation so
participants can also access the audio portion of your meeting

Ending a Conference
When you are finished with your meeting: Select Stop on the toolbar to conclude the conference and disconnect all participants. At this point, you are still logged in and can start a new conference. If you are finished, you can log out of your account by selecting Sign Out on the toolbar. For additional help, access the online help by selecting Help on your LotusLive Meetings toolbar.