loops and arrays - grahamhall.orggrahamhall.org/delphi/seven.pdf · loops and arrays when a...
TRANSCRIPT

88
SEVEN
Loops and Arrays When a computer program is running, it is often necessary for program lines
to be repeated a number of times. This is done by means of a loop
structure.
Delphi provides several different kinds of loop - we meet the commonest of
these in the next section...
The FOR..TO..DO loop To illustrate how lines of program can be repeated, we will write a program
to randomly select lottery numbers. Begin by setting up a sub-directory
called LOTTERY. Start a new Delphi project and save this into the sub-
directory.
Use the Object Inspector to Maximize the form, and drag the grid to nearly
fill the screen. Add a button and panel to the form. Give the button the
caption 'Press to choose your lottery numbers'. Remove the caption from
the panel:

89
Set the 'Visible' property for the panel to False. Add a memo box to the
panel, and the label 'Your lucky lottery numbers are: ':
Blank out the memo box by using the Object Inspector. Double-click in the
right hand column alongside 'Lines' to bring up the string list editor. Rub
out the text then click OK.
Now we can turn our attention to generating the lottery numbers. There
should be six numbers chosen randomly in the range 1-49.
Create an event handler procedure for the button then add the lines of
program:
procedure TForm1.Button1Click(Sender: TObject);
var
i,n:integer;
begin
panel1.visible:=true;
memo1.clear;
randomize;
for i:=1 to 6 do
begin
n:=random(49)+1;
memo1.lines.add(inttostr(n));
end;
end;

90
This is quite a complicated piece of program, so it is best to explain it with
the help of a flowchart:
KEY to the symbols used in the flowchart
start/stop processing input/output decision
start
initialise the random number generator
find a random number in the range 1-49
display the random number
have
6 numbers been
found yet?
stop
yes
no

91
The line:
panel1.visible:=true;
makes the panel appear, along with the memo box and label components.
We then blank out any entries in the memo box with:
memo1.clear;
The program is going to use random numbers, so it is first necessessary to
initialise the random number generator in the computer. This is done by the
command:
randomize;
The next section of the program involves a loop which operates six times:
for i:=1 to 6 do
begin
{this section of the program is repeated}
end;
Notice how we use an integer variable (in this case called i ) to keep track
of the number of times the loop operates. This variable is known as the
'loop counter'.
Inside the loop, the first line uses the random command:
for i:=1 to 6 do
begin
n:=random(49)+1;
memo1.lines.add(inttostr(n));
end;
The random number generator gives a number between a minimum of 0 and
a maximum which is one less than the number in brackets. Random(49)
therefore gives a number in the range 0-48. Since we actually want a
number between 1 and 49, we must add one to this result.
The random number is then added to the memo box and displayed.
Compile and Run the program:

92
A new set of random numbers is produced each time the button is pressed.
You might notice a problem with the program - sometimes a number occurs
more than once. We will return to the lottery program at the end of the
chapter to solve this, but there are a few more programming techniques
which must be learned first.
The next example program uses a FOR..TO..DO loop to display
multiplication tables. Set up a sub-directory called MULTIPLY and save a
new Delphi project into it. Maximize the form, and drag the grid to nearly
fill the screen.
Place a spin edit component a memo box on the form. Add a label with the
caption 'Multiplication table for ':
Create an event handler by double-clicking the spin edit component. Add
the lines of program:
procedure TForm1.SpinEdit1Change(Sender: TObject);
var
i,a,b:integer;
textline:string;
begin
memo1.clear;
a:=spinedit1.value;
93
for i:=1 to 12 do
begin
b:=a*i;
textline:=inttostr(i);
textline:=textline +' times ';
textline:=textline + inttostr(a);
textline:=textline +' is ';
textline:=textline + inttostr(b);
memo1.lines.add(textline);
end;
end;
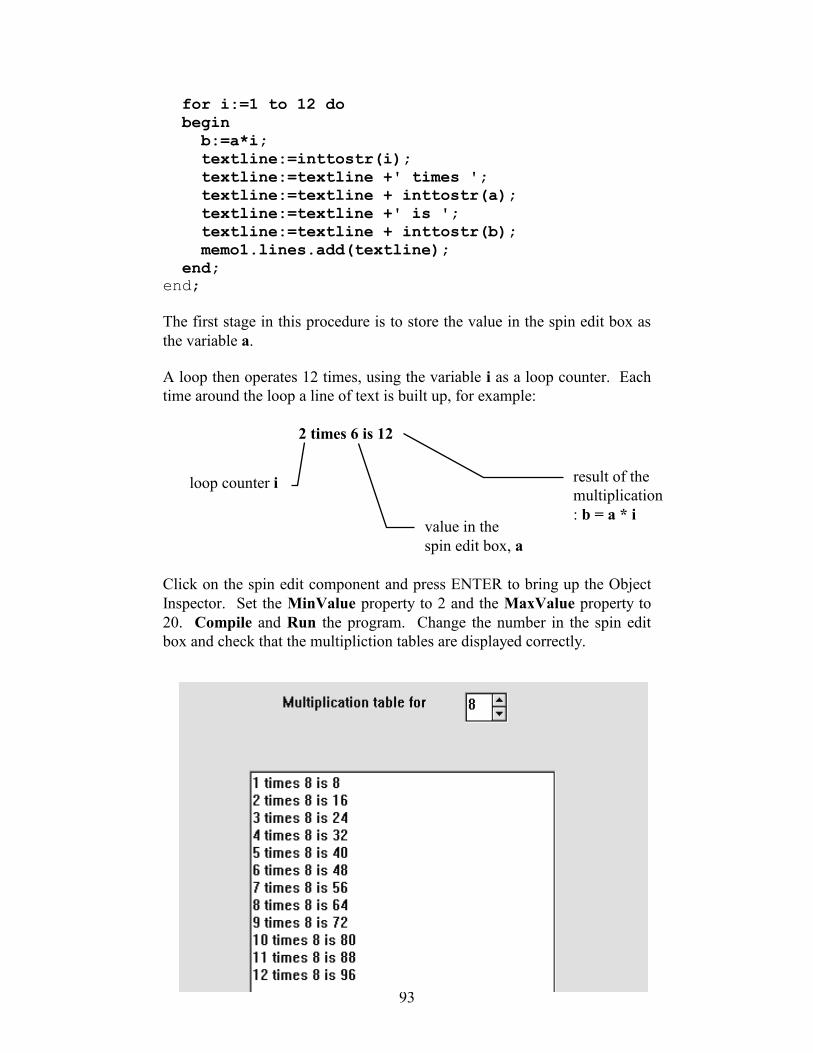
The first stage in this procedure is to store the value in the spin edit box as
the variable a.
A loop then operates 12 times, using the variable i as a loop counter. Each
time around the loop a line of text is built up, for example:
2 times 6 is 12
Click on the spin edit component and press ENTER to bring up the Object
Inspector. Set the MinValue property to 2 and the MaxValue property to
20. Compile and Run the program. Change the number in the spin edit
box and check that the multipliction tables are displayed correctly.
loop counter i
value in the
spin edit box, a
result of the
multiplication
: b = a * i
94
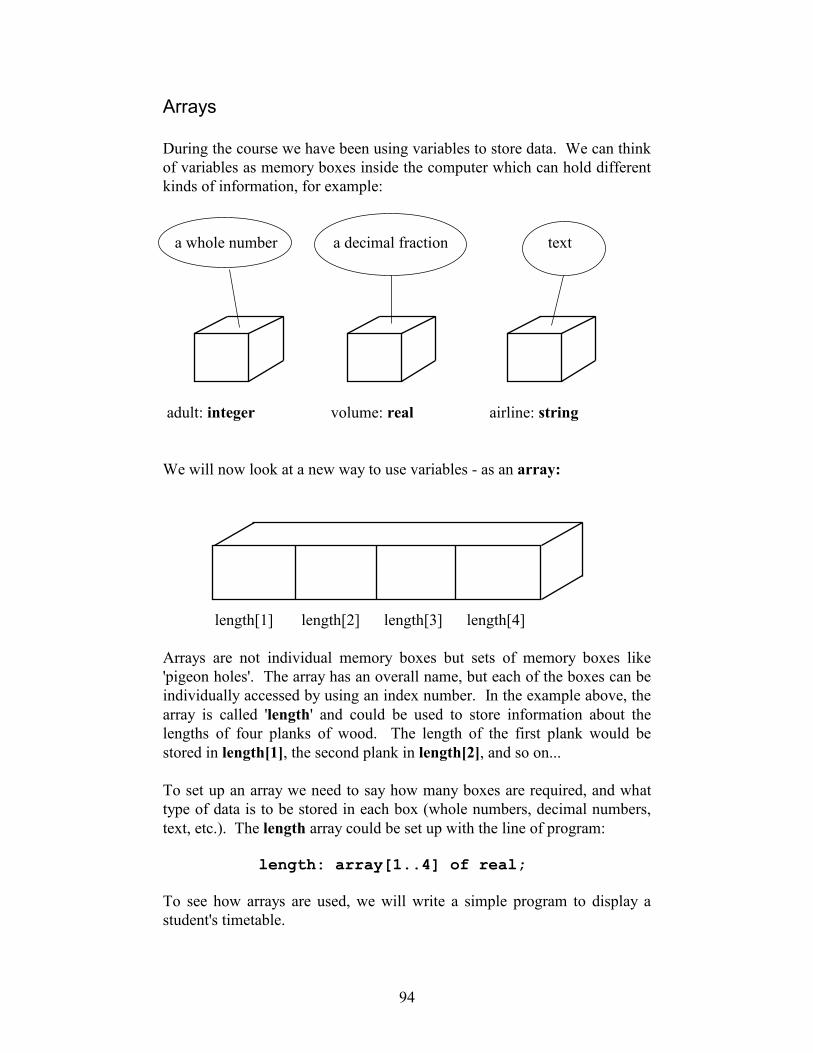
Arrays During the course we have been using variables to store data. We can think
of variables as memory boxes inside the computer which can hold different
kinds of information, for example:
a whole number a decimal fraction text
adult: integer volume: real airline: string
We will now look at a new way to use variables - as an array:
length[1] length[2] length[3] length[4]
Arrays are not individual memory boxes but sets of memory boxes like
'pigeon holes'. The array has an overall name, but each of the boxes can be
individually accessed by using an index number. In the example above, the
array is called 'length' and could be used to store information about the
lengths of four planks of wood. The length of the first plank would be
stored in length[1], the second plank in length[2], and so on...
To set up an array we need to say how many boxes are required, and what
type of data is to be stored in each box (whole numbers, decimal numbers,
text, etc.). The length array could be set up with the line of program:
length: array[1..4] of real;
To see how arrays are used, we will write a simple program to display a
student's timetable.

95
A student has the following lessons each Monday:
lesson subject
1 geography
2 French
3 French
4 maths
5 computing
6 computing
You are asked to produce a program which allows the student to enter a
lesson number and the corresponding subject will be displayed.
Begin by setting up a sub-directory LESSONS and save a Delphi project
into it. Place a spin edit component and an edit box on the form. Use the
Object Inspector to set the Font property for both components to Times
Roman : 16 point, or a similar type face.
Set the MinValue property for the spin edit component to 1, and the
MaxValue to 6.
We can store the lesson information in a six-box array:
geography French French maths computing computing
lesson[1] lesson[2] lesson[3] lesson[4] lesson[5] lesson[6]

96
Set up the array in the Public declarations section of the program:
public
{ Public declarations }
lesson:array[1..6] of string;
end;
Double-click the screen grid to produce a FormCreate event handler. This
will be used to copy the subject names into the lesson array when the
program first runs. We can also initialise the spin edit component and edit
box to show lesson 1:
procedure TForm1.FormCreate(Sender: TObject);
begin
lesson[1]:='geography';
lesson[2]:='French';
lesson[3]:='French';
lesson[4]:='maths';
lesson[5]:='computing';
lesson[6]:='computing';
spinedit1.value:=1;
edit1.text:=lesson[1];
end;
The only task left is to produce an event handler for the spin edit component
so that the correct subject will be displayed each time the lesson number is
changed. Double-click the spin edit, then add the following lines to the
procedure:
procedure TForm1.SpinEdit1Change(Sender: TObject);
var
n:integer;
begin
n:=spinedit1.value;
edit1.text:=lesson[n];
end;
This selects the text in the array box corresponding to the number shown in
the spin edit window. Compile and test the finished program:

97
Using loops to access arrays
Loop structures are an important way of putting data into each box of an
array, or searching through the array boxes. To show how loops are used,
we will set up a program to record the exam marks for a group of students
and calculate the average mark.
Create a new sub-directory EXAMMARKS and save a Delphi project into
it. Use the Object Inspector to maximize Form1, and drag the grid to nearly
fill the screen.
Place a panel near the top of the form, then add a spin edit component and a
label saying 'Number of students'. Put a button alongisde with the caption
'OK'. Use the Object Inspector to blank out the caption for the panel, and
make sure the Visible property of the panel is set to True. The purpose of
this part of the program is to input the number of students sitting the
examination:
Click on the spin edit component and use the Object Inspector to set the
MinValue to 1 and the MaxValue to 30.
Compile and test the program, then click the cross on the top border to
return to the Delphi editing screen.

98
We are now going to add components to input the exam results, and display
the average mark. Begin by adding a second panel, as shown above. Use
the Object Inspector to blank out the caption on the panel and set the
Visible property to False.
At the right of the panel put a button with the caption 'calculate average
mark'. Below this add an edit box, and a label with the caption 'Average
mark:'.
On the left hand side of the panel we are going to place a string grid
component - this can be found on the ADDITIONAL menu:
Put the string grid onto the panel, then press ENTER to bring up the Object
Inspector. Set the ColCount property to 1 and the FixedCols property to 0.
One column of boxes should now be shown in the string grid.
Using the Object Inspector for the string grid, double-click on Options to
bring up a list and set the goEditing property to 'True'.
Drag the edges of the string grid so that it is just wider than the column of
boxes, as shown in the illustration above.
Let's now think about how the information will be stored in the computer.
The user of the program will set the spin edit box to show the number of
students sitting the examination - this number can be stored in an integer
variable called 'students'. We will also need an array called 'marks' with
sufficient boxes to hold the exam marks for all the students. Set up these
variables in the public declarations section:
public { Public declarations }
students:integer;
mark:array[1..30] of integer;
end;
string grid

99
The program begins with the user entering the number of students then
pressing the 'OK' button. At this point, a number of things need to happen.
The first of these are:
panel 1 disappears and is replaced by panel 2, which displays the string
grid ready for entry of the exam marks,
the variable 'students' should be set to the value in the spin edit box,
we need to set up enough rows in the string grid for all the marks to be
entered.
Double-click the 'OK' button to create an event handler and add the lines of
program:
procedure TForm1.Button1Click(Sender: TObject);
begin
panel1.visible:=false;
panel2.visible:=true;
students:=spinedit1.value;
stringgrid1.rowcount:=students+1;
end;
Compile and run the program. Set the spin edit value to 16 then click the
'OK' button. The string grid should appear and will contain 16 boxes for
entry of the exam marks. Try out the scroll bar alongside the grid, then
return to the Delphi editing screen.

100
The exam marks for each student should initially be set to zero. This can be
done in the 'OK' button click procedure by a FOR..TO..DO loop which
repeats for each box of the marks array. Add the lines:
procedure TForm1.Button1Click(Sender: TObject);
var
i:integer;
begin
panel1.visible:=false;
panel2.visible:=true;
students:=spinedit1.value;
stringgrid1.rowcount:=students+1;
for i:=1 to students do
mark[i]:=0;
stringgrid1.setfocus;
end;
Notice how the loop counter value i is used to change the array index each
time around the loop.
The last line in the procedure:
stringgrid1.setfocus;
moves the cursor to the string grid ready for the data entry to begin.
One final task before testing the program is to put a heading 'mark %' in
the grey box at the top of the string grid. Do this by double-clicking on the
dotted grid of the form to produce an 'OnCreate' event handler. Add the
line:
procedure TForm1.FormCreate(Sender: TObject);
begin
stringgrid1.cells[0,0]:='mark %';
end;
This makes use of the numbering system for the boxes (cells) of the string
grid - columns and rows are numbered from zero in the top left corner:
column 0 column 1 . . .etc
row 0
row 1
row 2
column 0 row 0

101
Compile and run the program. Set the Number of students to 16, then press
'OK'. Begin entering some marks in the string grid, in a similar way to a
spreadsheet. The column of figures should scroll up and down, but notice
that the heading in the first cell is fixed:
Return to the Delphi editing screen. We can now work on the calculation
part of the program. The figures entered in the string grid must first be
transferred into the marks array.
Click on the string grid and press ENTER to bring up the Object Inspector.
Click the 'Events' tab and look down the list to find 'OnKeyUp':

102
Double click in the right hand column alongside 'OnKeyUp' to produce an
event handler procedure. Add the lines:
procedure TForm1.StringGrid1KeyUp(Sender:TObject;
var Key: Word;Shift: TShiftState);
var
n:integer;
begin
n:= stringgrid1.row;
if stringgrid1.cells[0,n]='' then
mark[n]:=0
else
mark[n]:=strtoint(stringgrid1.cells[0,n]);
end;
This is similar to the method used to transfer values from an edit box into a
single integer variable. The line:
n:= stringgrid1.row;
sets n to be the number of the row in the string grid where data has just been
entered. If the cell on that row is blank then the corresponding mark will be
set to zero:
if stringgrid1.cells[0,n]='' then
mark[n]:=0
otherwise the text from the cell will be converted to an integer number and
stored in the mark array:
mark[n]:=strtoint(stringgrid1.cells[0,n]);
In this way, each value entered in the string grid will be transferred to the
corresponding box in the mark array:
cell[0,1]
cell[0,2]
cell[0,3]
cell[0,4]
. . . .
67 mark[1]
58 mark[2]
71 mark[3]
39 mark[4]

103
start
set the mark total to zero
initialise the loop counter i = 1
convert the average to text,
and display in the edit box
have
all marks been
added yet?
stop
yes
no
Add the mark for student i to the total
add 1 to i
calculate the average mark:
average = total / students
104
We finally need a procedure to find the average mark for the group of
students. Double-click the 'calculate average mark' button to create an
event handler and add the lines of program to do this:
procedure TForm1.Button2Click(Sender: TObject);
var
total,average,i:integer;
begin
total:=0;
for i:=1 to students do
total:=total+mark[i];
average:=round(total/students);
edit1.text:=inttostr(average);
stringgrid1.setfocus;
end;
This calculation is illustrated by the flowchart on the previous page.
Compile, run and test the completed program using suitable data. Check
with a calculator that the average mark has been calculated correctly.
Railway timetable
For our last program in this chapter we will make further use of the string
grid component, this time to display a timetable for the railway service
between Machynlleth and Pwllheli.
The objective of the program is to input the departure time of a train from
Machynlleth, then use information about the journey times between stations
to calculate the arrival time at each of the other stations along the route.
Set up a new sub-directory TIMETABLE, then save a Delphi project into it.
Use the Object Inspector to maximize the form, then drag the grid to nearly
fill the screen.
Place an image box on the grid and display the file ROUTES.BMP as
shown below.

105
Add the label 'Departure time from Machynlleth' and below this two edit
boxes and the labels 'Hours' and 'Minutes'. Also add a button with the
caption 'show timetable'.
Place a string grid below the edit boxes. Use the Object Inspector to set the
string grid properties:
Fixed Cols 0
ColCount 3
RowCount 7
DefaultColWidth 100
ScrollBars None
We will now add column headings and a list of the stations. Double-click
the dotted grid of the form to produce an event handler and add the lines:
procedure TForm1.FormCreate(Sender: TObject);
begin
stringgrid1.cells[1,0]:='Hours';
stringgrid1.cells[2,0]:='Mins';
stringgrid1.cells[0,1]:='Machynlleth';
stringgrid1.cells[0,2]:='Tywyn';
106
stringgrid1.cells[0,3]:='Barmouth';
stringgrid1.cells[0,4]:='Harlech';
stringgrid1.cells[0,5]:='Porthmadog';
stringgrid1.cells[0,6]:='Pwllheli';
end;
Compile and run the program. Check that the station names are correctly
listed in the first column of the string grid.
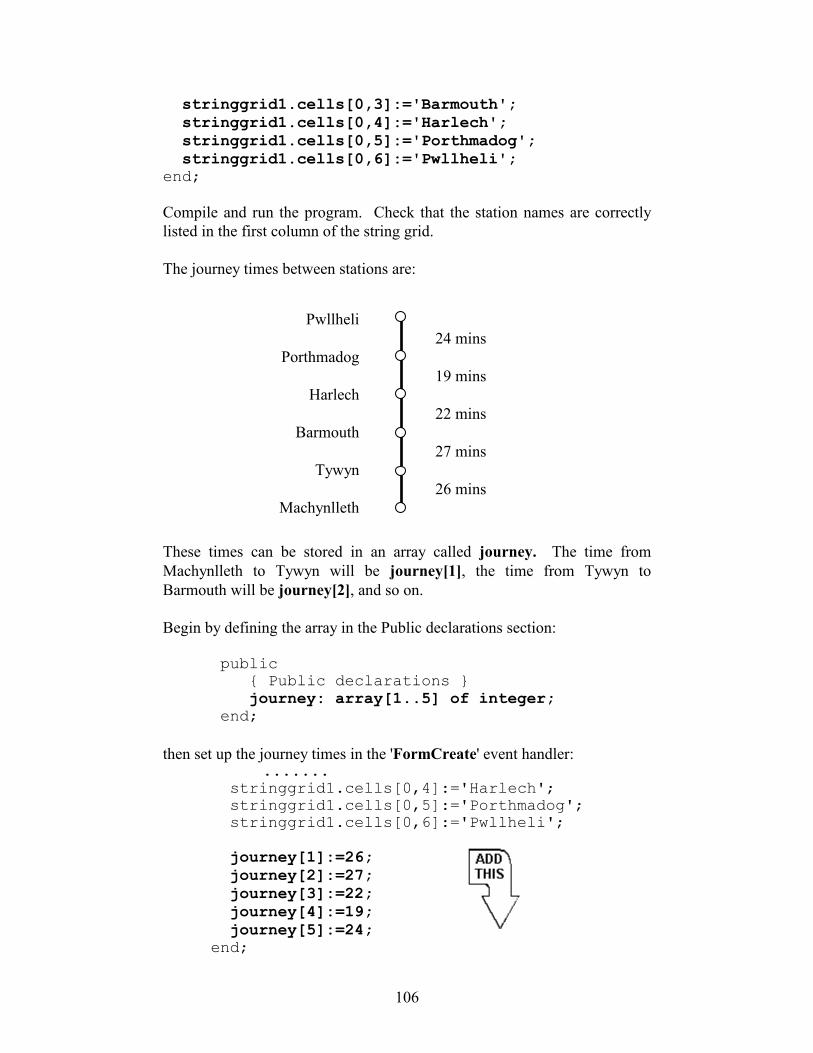
The journey times between stations are:
These times can be stored in an array called journey. The time from
Machynlleth to Tywyn will be journey[1], the time from Tywyn to
Barmouth will be journey[2], and so on.
Begin by defining the array in the Public declarations section:
public
{ Public declarations }
journey: array[1..5] of integer;
end;
then set up the journey times in the 'FormCreate' event handler: ....... stringgrid1.cells[0,4]:='Harlech';
stringgrid1.cells[0,5]:='Porthmadog';
stringgrid1.cells[0,6]:='Pwllheli';
journey[1]:=26;
journey[2]:=27;
journey[3]:=22;
journey[4]:=19;
journey[5]:=24;
end;
Pwllheli
Porthmadog
Harlech
Barmouth
Tywyn
Machynlleth
24 mins
19 mins
22 mins
27 mins
26 mins
107
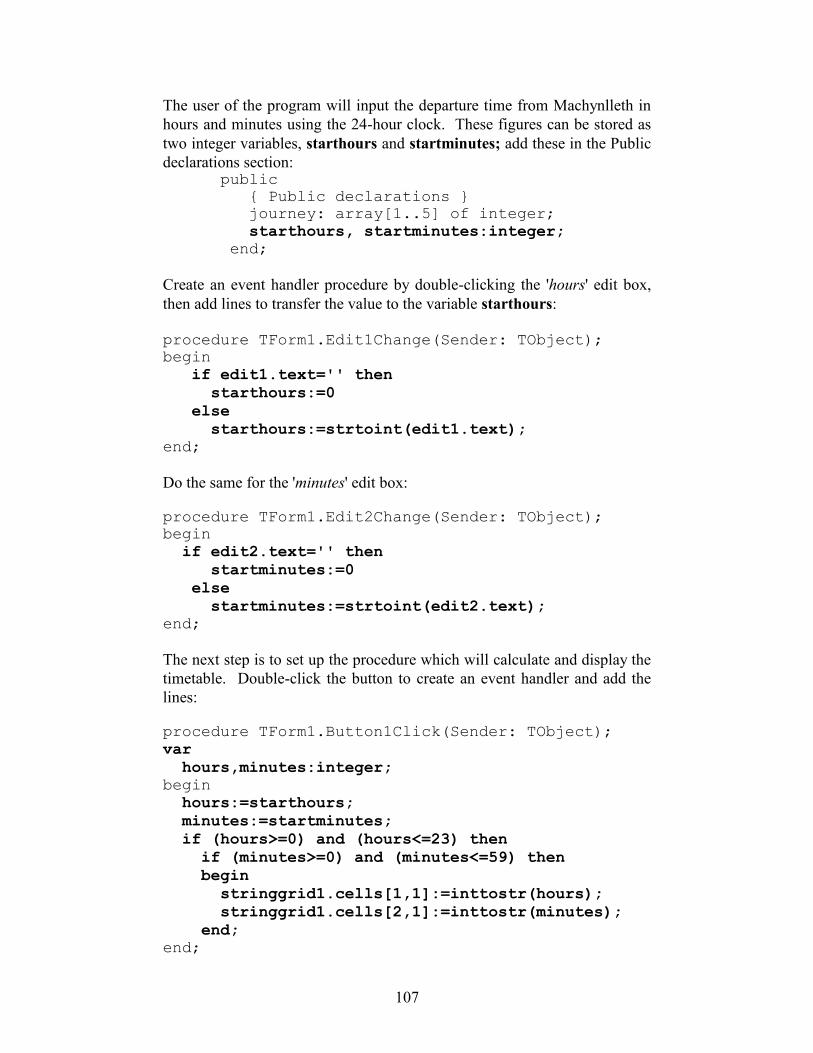
The user of the program will input the departure time from Machynlleth in
hours and minutes using the 24-hour clock. These figures can be stored as
two integer variables, starthours and startminutes; add these in the Public
declarations section: public
{ Public declarations }
journey: array[1..5] of integer;
starthours, startminutes:integer;
end;
Create an event handler procedure by double-clicking the 'hours' edit box,
then add lines to transfer the value to the variable starthours:
procedure TForm1.Edit1Change(Sender: TObject);
begin
if edit1.text='' then
starthours:=0
else
starthours:=strtoint(edit1.text);
end;
Do the same for the 'minutes' edit box:
procedure TForm1.Edit2Change(Sender: TObject);
begin
if edit2.text='' then
startminutes:=0
else
startminutes:=strtoint(edit2.text);
end;
The next step is to set up the procedure which will calculate and display the
timetable. Double-click the button to create an event handler and add the
lines:
procedure TForm1.Button1Click(Sender: TObject);
var
hours,minutes:integer;
begin
hours:=starthours;
minutes:=startminutes;
if (hours>=0) and (hours<=23) then
if (minutes>=0) and (minutes<=59) then
begin
stringgrid1.cells[1,1]:=inttostr(hours);
stringgrid1.cells[2,1]:=inttostr(minutes);
end;
end;

108
This procedure begins with some 'error trapping' to avoid incorrect data
being accepted. The IF . . conditions check that an hours value between 0
and 23 has been entered, and that the minutes value is between 0 and 59.
The calculation is only carried out if these conditions are true.
The lines of program:
stringgrid1.cells[1,1]:=inttostr(hours);
stringgrid1.cells[2,1]:=inttostr(minutes);
display the departure time on the 'Machynlleth' line of the string grid.
Compile and run the program to test the data entry, then return to the editing
screen.
We can now use a FOR . . TO . . DO loop to add on the journey time and
display the arrival at each of the other stations. The loop repeats five times,
for each leg of the journey.
Add lines to the ButtonClick procedure as shown below:

109
procedure TForm1.Button1Click(Sender: TObject);
var
hours,minutes,i:integer;
begin
hours:=starthours;
minutes:=startminutes;
if (hours>=0) and (hours<=23) then
if (minutes>=0) and (minutes<=59) then
begin
stringgrid1.cells[1,1]:=inttostr(hours);
stringgrid1.cells[2,1]:=inttostr(minutes);
for i:=1 to 5 do
begin
minutes:=minutes+journey[i];
if minutes>59 then
begin
minutes:=minutes-60;
hours:=hours+1;
end;
stringgrid1.cells[1,1+i]:=inttostr(hours);
stringgrid1.cells[2,1+i]:=inttostr(minutes);
end;
end;
end;
The line:
minutes:=minutes + journey[i];
adds the journey time to the next station.
If the number of minutes becomes greater than 59, we need to move to the
next hour. This is done by the lines:
if minutes>59 then
begin
minutes:=minutes-60;
hours:=hours+1;
end;
Finally we display the new hours and minutes values on the next row of the
string grid. The loop counter variable i is used to give the correct row
number where the data will be printed:
stringgrid1.cells[1,1+i]:= inttostr(hours);
stringgrid1.cells[2,1+i]:= inttostr(minutes);
row number, which increases
each time around the loop
110
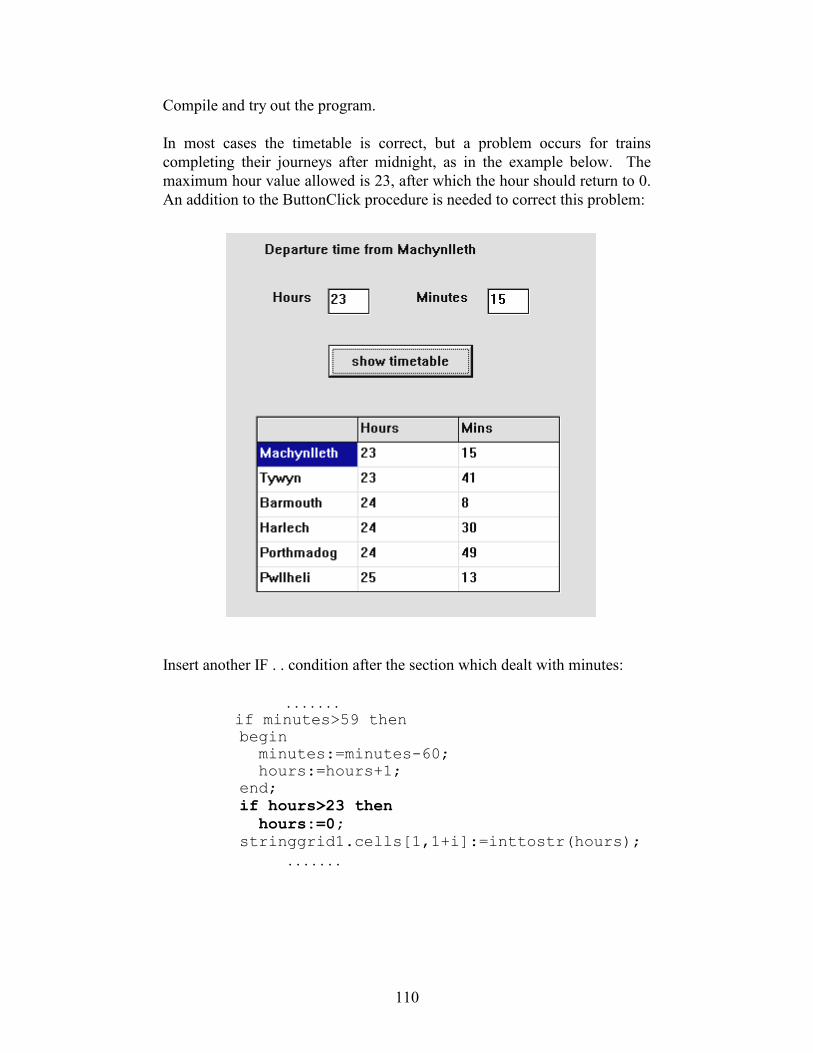
Compile and try out the program.
In most cases the timetable is correct, but a problem occurs for trains
completing their journeys after midnight, as in the example below. The
maximum hour value allowed is 23, after which the hour should return to 0.
An addition to the ButtonClick procedure is needed to correct this problem:
Insert another IF . . condition after the section which dealt with minutes:
. . . . . . . if minutes>59 then begin
minutes:=minutes-60;
hours:=hours+1;
end;
if hours>23 then
hours:=0;
stringgrid1.cells[1,1+i]:=inttostr(hours);
. . . . . . .

111
Compile, run and test the completed program. This should now show all
times correctly:
Before finishing the chapter we have one more task to complete...
An improved lottery number program You may remember a problem with the lottery
program we produced earlier: the same number might be selected more than
once. We can now solve this, and also improve the screen display for the
program.
Reload the project saved in the LOTTERY sub-directory. First we will
change the screen display so that the lottery numbers are shown as a row of
numbered balls:
Go to the Form1 screen and double-click the 'Choose numbers' button to
bring up the event handler procedure. Delete the lines beginning 'panel1.'
and 'memo1.'. Add the lines shown below:
procedure TForm1.Button1Click(Sender: TObject);
var
i,n:integer;
begin
randomize;
canvas.font.name:='Times New Roman';
canvas.font.size:=18;
for i:=1 to 6 do
begin
n:=random(49)+1;
canvas.ellipse(100+i*80,200,150+i*80,250);

112
canvas.textout(114+i*80,210,inttostr(n));
end;
end;
The lines:
canvas.font.name:='Times New Roman';
canvas.font.size:=18;
set the type face to Times New Roman, 18 point size. The line:
canvas.ellipse(100+i*80,200,150+i*80,250);
draws a circle with a background colour white. The position of the circle
depends on the loop counter i. Each circle is 80 screen units further to the
right. The line:
canvas.textout(114+i*80,210,inttostr(n));
converts the lottery number n into a text string, then displays it in the circle.
Return to the Form1 grid. Click on the panel containing the string list and
label, then press the DELETE key to remove these components which are
no longer needed.
Compile and run the program. Check that the number display works, but
notice that there is still the problem of the same number occuring more than
once. Return to the Delphi editing screen.
To avoid duplication of numbers, the stategy we can follow is:
Record each number in an array
Before accepting a new number, check that it isn't already in the
array - if so, choose again!
The flow chart for the number selection is quite complicated:

113
add 1 to i
display this lottery number
stop
set used to 'false'
get a random number n in the range 1-49
is this the first
lottery number? yes
no
select the first lottery
number in the array
is this the same as
the new number? yes
is used = 'true'? yes
set used to 'true'
another
lottery number to
check? yes
select the next
lottery number
in the array no
have six
numbers been
selected?
yes
store new number n in array box num[i]
start
initialise the loop counter i = 1
no
no
no

114
The selection of numbers involves several loops. We can make use of a
Boolean variable 'used' to check whether each new number has already been
used:
used = true means 'the number has already been used - choose again'
used = false means 'this is the first time the number has been chosen'
When we select the first lottery number there is no need for a check to be
made. We just store the number in the array box NUM[1].
For the second lottery number, we must check if it is the same as NUM[1],
and go back to choose a different number if necessary. Once a different
number is selected, this will be stored as NUM[2].
For the third number, we must check that it is different to both NUM[1] and
NUM[2].... and so on until all six lottery numbers have been chosen. In
this way, they will all be different. Try to follow how this works on the
flowchart. Go to the Button click procedure and add the lines:
procedure TForm1.Button1Click(Sender: TObject);
var
i,j,n:integer;
num:array[1..6] of integer;
used:boolean;
begin
randomize;
canvas.font.name:='Times New Roman';
canvas.font.size:=18;
for i:=1 to 6 do
begin
repeat
used:=false;
n:=random(49)+1;
if i>1 then
begin
for j:=1 to i-1 do
begin
if num[j]=n then
used:=true;
end;
end;
until used=false;
num[i]:=n;
canvas.ellipse(100+i*80,200,150+i*80,250);
canvas.textout(114+i*80,210,inttostr(n));
end;
end;

115
Compile and run the program. Click the button a number of times to select
sets of lottery numbers. Convince yourself that the six numbers in each set
are always different.
SUMMARY
In this chapter you have:
used a FOR..TO..DO looop to repeat sections of program a specified
number of times
used the random number generator
seen how a loop structure can be represented on a program flowchart
made use of the loop counter variable in calculations which take place
inside the loop
seen how sets of data can be stored in arrays
used index values to save data in particular memory locations within an
array
used index values to display data from particular memory locations of an
array
set up a string grid by specifying the number of columns and rows
required
accessed particular cells of a string grid using the column and row index
numbers
used a FOR..TO..DO loop to copy data into all the memory locations of
an array
used a FOR..TO..DO loop to find the total of a set of integers in an array
seen examples of error trapping which can be built into a program