longwall 20 to 21 co manual - underground...
TRANSCRIPT

LONGWALL 20
TO
LONGWALL 21
CHANGEOVER
RECOVERY MANUAL

RECOVERY

Table Of Contents
Page
Storage/Routes 610....................................................... 4
Chock storage............................................................... 5
Overhauls ..................................................................... 6
13th
Last Pass to Last Pass (inc. Heusker Mesh)............ 7 – 20
Maingate Drive............................................................. 21
Shearer ......................................................................... 21 & 23
Nylon Bretby................................................................ 22
AFC chain .................................................................... 22, 24 – 25
Panline ......................................................................... 22 – 23
DAC cable & unit......................................................... 27
Lighting........................................................................ 28
Face cables & hoses...................................................... 28
CIU & CIU cable.......................................................... 28
Goaf Plate..................................................................... 28
Maingate Cables ........................................................... 29–30
Stageloader................................................................... 30 – 32
Chock Recovery ........................................................... 33 – 46
Pantech......................................................................... 47 – 50
Safe lifting………………………………………………51 – 54

4

5

6
Longwall 20 to 21 Changeover
Items to go the surface and be sent away
1. Tailgate Drive ............................................................................ Rotate Motor and New
Carport
2. 1600mm Shearer Drums............................................................. Repairs
3. Shearer ....................................................................................... Ranging Arm, Skid Shoe
and Rack Wheel repairs
4. M/G Drive.................................................................................. Repairs
5. Main Gate Drive Transmission ................................................... Repairs
6. Swan Neck.................................................................................. Repairs
7. BSL Tensionable End ................................................................. repairs
8. Goose Neck Sections .................................................................. Repairs
9. Nylon Bretby .............................................................................. Repairs and reloading with
Shearer cable and hose
Items to go to the surface
10. Roof Supports (# 18, 20, 29, 30, 46, 51, 55, 58,72, 74,79, 84, 86,
94, 102, 111, 114, 116, 117 & 122)… ........................................ Repairs to Carriages
11. Roof Supports (# 9, 37, 38, 83, 87, 107, 113, 124, 129 & 145).... Leg Replacement
12. Roof Support (# 153).................................................................. Side Shield Replacement
13. Boot End .................................................................................... Install piece of belt
14. Mini Pans ................................................................................... Repairs
15. DCB No 1 ................................................................................... Repairs
16. DCB No 2 ................................................................................... Repairs
17. Hydraulic Tank........................................................................... Repairs
18. No 3 Pump ................................................................................. Service
19. No 1 & 2 Pump........................................................................... Service
20. No 1 Transformer........................................................................ Service
21. No 2 Transformer........................................................................ Service
22. All Cables .................................................................................. Testing and repairs
23. All Hoses ................................................................................... Repairs and reloading
24. CIU’s and DAC’s ....................................................................... Testing and repairs
25. Convertor Boxes and Lights ....................................................... Testing and repairs
26. Turntable & Vertical Bretby ....................................................... Repairs and store
27. Rigid Bretby............................................................................... Clean and Store
28. Mid-Face Pans No 76-77 & 78-79 ............................................... Repairs
29. AFC Chain ................................................................................. Repairs & Reloading
30. BSL Chain.................................................................................. Repairs & Reloading

7

8

9

10

11
13th
LAST PASS
CUTTING HEIGHT
2.5m with the cutting stick at 900mm
SETTING UP THE FACE
a) Cut a full pass using Bi-Di shearing. Don’t leave a bench of coal on the floor.
b) Advance the chocks leaving every 4th
chock back (to bolt the starter rope).
c) Leave the shearer at the T/G.
d) Do not advance the panline.
e) Isolate power to AFC. All persons working on AFC are to use the Locked Box.
TRANSPORT OF HEUSKER MESH THROUGH THE FACE-LINE
f) Position the Heusker Mesh trailer at the T/G drive so the mesh has smooth exit from
the trailer.
g) Stand a timber prop at the T/G face corner to prevent the Heusker Mesh from being
damaged when it is dragged onto the face.
h) Drag and man handle the BLUE painted end of the Heusker Mesh until it is at the
M/G end of the shearer. The BLUE painted end of the Heusker Mesh indicates the
M/G end of the Mesh.
i) With the small roll to the top, attach the Heusker Mesh to the T/G drum using two
10mm high tensile chains. Leave two men at the Mesh trailer and one man at the T/G
DAC Cadlock.
j) Slowly drag the Heusker Mesh along the face in front of the AFC panline ensuring it
does not twist i.e. small roll stays on top of the larger roll. The shearer driver is to
keep in constant contact with the man at the T/G DAC to ensure the Mesh is O.K.
k) Leave a man at #78 chock and when the red paint mark on the Mesh (which indicates
the centre of the Mesh) reaches the centre of 78/79 PAN JOINT, stop the shearer as
the Mesh is now in it’s bolt-up position ready to hang.
LIFTING HEUSKER MESH TO THE ROOF
l) Check that there are no twists in the roll, if any then straighten the roll out, as it will
slow down the job later.
m) Cut the white external ties, the mini-roll is then separated from the main roll and the
steel starter rope is exposed.
n) Starting at mid point, #78 and #82 chock (two crews) lift the steel starter rope on top
of two Wombats. The Wombats then together lift this rope and the slack Heusker
Mesh from the mini roll to the roof. Once pinned in position, two other bolters then
drill and set a 1.2m bolt and plate each, which pins the Heusker Mesh to the roof.
o) Now move the Wombats 4 chocks in either direction, lift the starter rope to the roof
again, then install another 2 bolts and plates. Continue until the gate ends are reached.
SECURING HEUSKER MESH ROLL TO UNDERSIDE OF CANOPIES
p) The Heusker Mesh roll comes with ‘tails’ fitted from the starter rope. Once the mini-
roll had been lifted and pinned to the roof, these tails will be exposed and will line up
with the winches mounted on the chocks.
q) Once joined the winches are wound up and the main roll of Heusker Mesh is lifted to
the underside of the chock canopies.
r) The AFC should be examined from end to end to ensure that all materials have been
removed prior to restart.
s) Advance the panline.

12
12th
LAST PASS
CUTTING HEIGHT
2.5m with the cutting stick at 900mm
a) Depending on the prevailing roof conditions, cut the maximum number of chocks
without causing the roof to fall using BI-DI shearing.
b) As soon as practicable after the roof has been exposed lower the Heusker Mesh one
web.
c) Using the adjacent control toggle switches (do not use contact advance) sequentially
fully advance the chocks ensuring they do not snag the mesh then set to the roof.
Sequence (b) and (c) can be done whilst cutting continues.
d) Winch the Heusker Mesh back to the underside of the canopies.
e) Advance the panline.
f) Double chock where possible especially in areas where the roof has fallen.
g) If large cavities have formed in the roof install 1.8m bolts into the ends and face of
the cavity to prevent it from getting larger.
h) The AFC should be examined from end to end to ensure that all materials have been
removed prior to restart.
11th
– 9th
LAST PASS
CUTTING HEIGHT
2.5m with the cutting stick at 900mm
a) Same as 12th
last pass but do not double chock the 9th
last pass.
13
8th
LAST PASS
CUTTING HEIGHT
2.5m with the cutting stick at 900mm
Bolting stations at #27, #54, #68, #88, #108, #122 & #144 chocks.
a) Depending on the prevailing roof conditions, cut the maximum number of chocks
without causing the roof to fall using BI-DI shearing.
b) As soon as practicable after the roof has been exposed lower the Heusker Mesh one
web.
c) Using the adjacent control toggle switches (do not use contact advance) sequentially
fully advance the chocks ensuring they do not snag the mesh then set to the roof.
Sequence (b) and (c) can be done whilst cutting continues. d) Do a clean up run if required
e) Do not advance the panline.
f) Isolate power to AFC. All persons working on AFC are to use the Locked Box.
g) Lower the mesh roll 750mm and use a Wombat to pin the mesh roll
750mm from the tip of the canopies.
h) Use the adjustable square steel props to hold the mesh roll in place
before removing the Wombat.
i) Install W-straps in the inverted position (so they don’t cut the Mesh)
parallel to the face with a 1.8m fully encapsulated mild steel roof
bolt. Bolts to be spaced at 1.5m centres and angled towards the face
(see support diagrams on page No8 & 9).
j) Start installing roof bolts into the ‘W’ strap except the last hole
where the next ‘W’ is to be joined.
k) Before installing the next ‘W’ strap, drill 1.8m hole in the last hole of
the ‘W’ strap just installed then insert a 1.8m roof bolt through the
first of the next strap to be installed and into the hole already drilled.
Spin and set the bolt but do not tighten (if this bolt is tightened now
the strap is unlikely to remain parrel to the face).
l) Hold the strap parrel to the face with a Pogo Stick. Install the next
bolt into the strap and tighten.
m) Take the bolter back and tighten the bolt joining the two straps. n) Winch the Heusker Mesh back to the underside of the canopies.
o) Install additional bolts where required.
p) Advance the panline.
q) The AFC should be examined from end to end to ensure that all materials have been
removed prior to restart.

14
7th
LAST PASS (See diagram on page #8)
CUTTING HEIGHT
2.5m with the cutting stick at 900mm
a) Depending on the prevailing roof conditions, cut the maximum number of chocks
without causing the roof to fall using BI-DI shearing.
b) As soon as practicable after the roof has been exposed lower the Heusker Mesh one
web.
c) Using the adjacent control toggle switches, fully advance each chock ensuring they
do not snag the mesh then set to the roof.
Sequence (b) and (c) can be done whilst cutting continues. d) Do a clean up run if required.
e) Do not advance the panline.
f) Isolate power to AFC. All persons working on AFC are to use the
Locked Box.
g) Lower the mesh roll 750mm and use a Wombat to pin the mesh roll
750mm from the tip of the canopies.
h) Use the adjustable square steel props to hold the mesh roll in place
before removing the Wombat.
i) Install 1.8m fully encapsulated mild steel roof bolts with inverted
butterfly plates on the edge and as close as possible to the tip of the
fully advanced chocks otherwise the shearer cutter drums will foul
the mesh (see diagrams on page No7 & 9).
j) Install additional bolts in front of the mesh where any roof has fallen or face spalled.
k) Winch the Heusker Mesh back to the underside of the canopies.
l) The AFC should be examined from end to end to ensure that all materials have been
removed prior to restart.
m) Advance the panline.
n) Continue removing the roll pins from the Eickotrack. Replace with 4 ” x .5 ” bolts
and washers.

15
6th
LAST PASS
CUTTING HEIGHT
2.5m with the cutting stick at 900mm
a) Depending on the prevailing roof conditions, cut the maximum number of chocks
without causing the roof to fall using BI-DI shearing. b) As soon as practicable after the roof has been exposed lower the Heusker Mesh one
web.
c) Using the adjacent control toggle switches, fully advance all the chocks in the area
just cut ensuring they do not snag the mesh then set to the roof.
Sequence (b) and (c) can be done whilst cutting continues. d) Do a clean up run if required.
e) Do not advance the panline.
n) Isolate power to AFC. All persons working on AFC are to use the
Locked Box.
o) Lower the mesh roll 750mm and use a Wombat to pin the mesh roll
750mm from the tip of the canopies.
p) Use the adjustable square steel props to hold the mesh roll in place
before removing the Wombat.
q) Install 1.8m fully encapsulated mild steel roof bolts with inverted
butterfly plates in the middle and as close as possible to the tip of the
fully advanced chocks otherwise the shearer cutter drums will foul
the mesh (see diagrams on page No7 & 9).
f) Install additional bolts in front of the mesh where any roof has fallen or face spalled.
g) Winch the Heusker Mesh back to the underside of the canopies.
h) The AFC should be examined from end to end to ensure that all materials have been
removed prior to restart.
i) Advance the panline.

16
5th
LAST PASS (See diagram on page #8)
CUTTING HEIGHT
2.5m with the cutting stick at 900mm
Same as 7th
Last Pass.
WORK LIST AFTER 5th
LAST PASS
1. Continue removing the roll pins from the Eickotrack. Replace with 4 ” x 5 ” bolts
and washers.
2. Disconnect lights on Pantec and BSL.
4th
LAST PASS
(See diagram on page #9)
CUTTING HEIGHT
2.5m with the cutting stick at 900mm
Same as 6th
Last Pass.
3rd
LAST PASS
(See diagram on page #8)
CUTTING HEIGHT
2.5m with the cutting stick at 900mm
Same as 7th
Last Pass except an additional bolt is to be installed at each chock for the first
10m along the face from the M/G and T/G roadway. See diagram on page No 8.
THE CHOCKS ARE NOW IN THEIR FINAL POSITION AFTER THEY HAVE
BEEN ADVANCED ON THIS PASS.
WORK LIST AFTER 3rd
LAST PASS
1. Continue removing the roll pins from the Eickotrack. Replace with 4 ” x 5 ” bolts
and washers.
3. Disconnect No.1 and No.2 light circuits.
4. Remove converter boxes from chocks.

17
2nd
LAST PASS
CUTTING HEIGHT
2.5m with the cutting stick at 900mm
Bolting stations at #27, #54, #68, #88, #108, #122 & #144 chocks.
a) Depending on the prevailing roof conditions cut the maximum number of chocks
without causing the roof to fall.
b) Leave the shearer at the tailgate
DO NOT ADVANCE THE CHOCKS
c) Do a clean up run if required.
d) Isolate power to AFC. All persons working on AFC are to use the Locked Box.
e) Lower the Heusker Mesh in the zone just cut.
f) Use the adjustable square steel props to hold the Mesh in place to bolt.
g) Bolt the roof with inverted butterfly plates and 1.8m fully encapsulated mild steel
bolts on 1.5m spacings.
h) Alternate the position of bolts on each pass from the centre to the edge of the chock
canopies. An additional bolt is to be installed at each chock for the first 10m along
the face from the M/G and T/G roadway. (see support diagrams on page No 8).
i) Install additional bolts in poor roof where required.
j) Winch the Heusker Mesh back to the underside of the canopies.
k) The AFC should be examined from end to end to ensure that all materials have been
removed prior to restart.
WORK LIST AFTER 2nd
LAST PASS
DO A CLEAN UP RUN FROM THE M/G TO THE T/G. PUSH THE
M/G OVER USING THE RELAY BAR EXTENSION PIECES AND
FORM A SNAKE ENDING AT No 135 CHOCK THEN CUT BACK TO
THE M/G.
1. Unhook every relay bar from the panline. Replace the front pin, washers and lynch
pins into the appropriate holes in the relay bars. Lay out the relay bar extension
pieces as we go.
2. Insert the relay bar extension every 3rd
chock and push the panline over, working
from the maingate to the tailgate. Move the relay bar extensions along the face until
the entire panline is fully pushed over.
NOTE: The short extensions are for the maingate and tailgate.
3. Continue removing the roll pins from the Eickotrack. Replace with 4 ” x 5 ” bolts
and washers.
4. Undo the Rigid Bretby joining bolts and remove the Vertical Bretby side plates
when the Pantech is in its final position.

18
THE LAST PASS
CUTTING HEIGHT
2.5m with the cutting stick at 900mm
SECQUENCE No 1
If roof conditions allow cut from #155 chock to #125 chock using Bi-Di.
a) Do a clean up run if required.
b) Isolate power to AFC. All persons working on AFC are to use the Locked Box.
c) Lower the Heusker Mesh in the zone just cut.
d) Use the adjustable square steel props to hold the Mesh in place to bolt.
e) Bolt the roof with inverted butterfly plates and 1.8m fully encapsulated mild steel
bolts on 1.5m spacings and an additional butterfly and 1.8m roof bolt into the Mesh
where the roof and coal face meet. This additional bolt will make the Mesh hang
down and against the coalface.
f) Alternate the position of bolts on each pass from the centre to the edge of the chock
canopies. An additional bolt is to be installed at each chock for the first 10m along
the face from the M/G and T/G roadway. (see support diagrams on page No 7, 8 &
9).
g) While roof bolting this sequence set-up two Rib Borers in the zone just cut.
SECQUENCE No 2
• If roof conditions allow cut from #125 chock to #100 chock using Bi-Di.
• Support same as ‘Sequence No 1 except for:
While roof bolting this sequence, lower the Heusker Mesh down the
face and install a 1.2m rib bolt into the coal face in a ‘W’ pattern at every
chock from #155 chock to #125 chock.
SECQUENCE No 3
• If roof conditions allow cut from #100 chock to #75 chock using Bi-Di.
• Support same as ‘Sequence No 1 except for:
While roof bolting this sequence, lower the Heusker Mesh down the
face and install a 1.2m rib bolt into the coal face in a ‘W’ pattern at every
chock from #125 chock to #100 chock.
SECQUENCE No 4
• If roof conditions allow cut from #75 chock to #50 chock using Bi-Di.
• Support same as ‘Sequence No 1 except for:
While roof bolting this sequence, lower the Heusker Mesh down the
face and install a 1.2m rib bolt into the coal face in a ‘W’ pattern at every
chock from #100 chock to #75 chock.

19
SECQUENCE No 5
• If roof conditions allow cut from #50 chock to #25 chock using Bi-Di.
• Support same as ‘Sequence No 1 except for:
While roof bolting this sequence, lower the Heusker Mesh down the
face and install a 1.2m rib bolt into the coal face in a ‘W’ pattern at every
chock from #75 chock to #50 chock.
SECQUENCE No 6
• If roof conditions allow cut from #25 chock to #3 chock using Bi-Di.
• Support same as ‘Sequence No 1 except for:
While roof bolting this sequence, lower the Heusker Mesh down the
face and install a 1.2m rib bolt into the coal face in a ‘W’ pattern at every
chock from #50 chock to #25 chock then #25 chock to #3 chock.
LAST PASS
EXTRA BOLT TO PIN
MESH AGAINST FACE
FACE
WORK LIST DURING AND AFTER THE LAST PASS
1. Complete Eickotrack roll pin removal and replacement with 4 ” x 5 ” bolts.
2. Undo the Rigid Bretby joining bolts and remove the Vertical Bretby side plates when
the Pantech is in its final position.
3. Unbolt one side of every second AFC Sandwich plate.
4. Remove every second goaf and face side AFC dog bone (location tagged on pan
sets).
5. Remove the Heusker Mesh winch and rollers.

20
WORK LIST AFTER THE LAST PASS
6. Run AFC and BSL chains to clear coal then position joining links on the AFC at the
M/G and T/G and the BSL drive and non-drive sprockets.
7. Break the AFC chain (see M/G drive removal).
8. Break the BSL chain (see M/G drive removal).
9. Remove the Longwall belt via the loop take up.
10. Connect recovery pressure hose to No 1 chock. Lower pressure to 200 Bar.
11. Haul the shearer and locate the maingate drum at No 14 chock. Ranging arms are to
be in the level position ready for loading onto the transporter.

21
All the face equipment is to be recovered via the Maingate starting
with the Maingate Drive.
MAINGATE DRIVE REMOVAL PROCEDURE
• Ensure M/G drive is cleaned down.
• Ensure top AFC chain Rudd links at N0 3 chock.
• Ensure BSL chain Rudd links at non-drive sprocket.
• Distension AFC and BSL chains. Break the top AFC chain at N0 3 chock. Connect the
T/G pony drive and pull the top AFC chain around the M/G drive sprocket.
• Break the BSL chain at the non-drive sprocket and pull the top chain back to clear the
M/G drive. Pull the bottom BSL chain back from the delivery end using the 3 tonne Pull
Lift until it clears the Main Gate drive. Don’t drop chain on the boot end.
• Electricity, hydraulics, compressed air and water should be disconnected and tagged.
• Connect the 25mm hydraulic hose from the recovery pump to N0 1 chock.
• Remove cable and hose ducting covers from around the M/G drive and Swan Neck.
• Remove cables and hoses from the M/G drive and Swan Neck and hang on the outbye rib
of 2c/t.
• Remove the top and side covers to expose the M/G drive motor and gearbox.
• Break the M/G drive from the Swan Neck by removing the four flat dog bones and 50mm
pin located on the pillar side of the gearbox.
• Pack timber under the M/G Drive motor and gearbox then remove all bolts (bottom ones
first) connecting it to the M/G Drive. Chain motor so it does not move with the Drive.
• Pull the M/G drive back to clear the Swan Neck.
• Remove the four flat dog bones that join the M/G drive to the Ramp pan.
• Connect a 915 Eimco to the M/G drive and transport to pit bottom.
• Load the motor and gearbox onto a trailer, secure and send to surface.
• Return all chains and pull lifts to the orange recovery trailer.
SHEARER REMOVAL

22
• Shearer is to be left with the Maingate drum at No 14 chock with both ranging arms level.
• Pans are to be removed in sets of two to No 13 chock inclusive.
• Remove outrigger, disconnect cable and water hose.
• As the Shearer Transporter passes the DCB in 2c/t 611 stub start running out the miner
cable (already on transporter) to the shearer. Plug the cable into the DCB and Shearer.
• Adjust face position to 100m; disable the cutter motors and cable pull switch.
• Remove the Maingate Cowl and Cutter Drum, load and secure onto a trailer.
• Align tracking sections on the AFC and shearer transporter by raising the pans and
packing timber under pans. Four (4) pans have been left on the maingate side of the
shearer to allow sufficient room to raise and level the AFC pans.
• The shearer transporter must be exactly aligned with the raised pans (there is no adaptor
plate) before the shearer can be trammed on.
• After the shearer transporter is aligned, the shearer can be powered and hauled on. Once
loaded disconnect the shearer cable and load the miner cable back onto the Shearer
Transporter.
• Transport shearer outbye, remove the Tailgate Cowl and Cutter Drum, load and secure.
NYLON BRETBY REMOVAL
• Disconnect the Shearer cable and water hose at mid-face.
• Disconnect the Nylon Bretby anchor at No 77 chock.
• From the Maingate end, reel-up the nylon bretby complete with cable and hose onto the
RED reel using the re-reeler and EJC 130 Eimco. Send bretby to the surface.
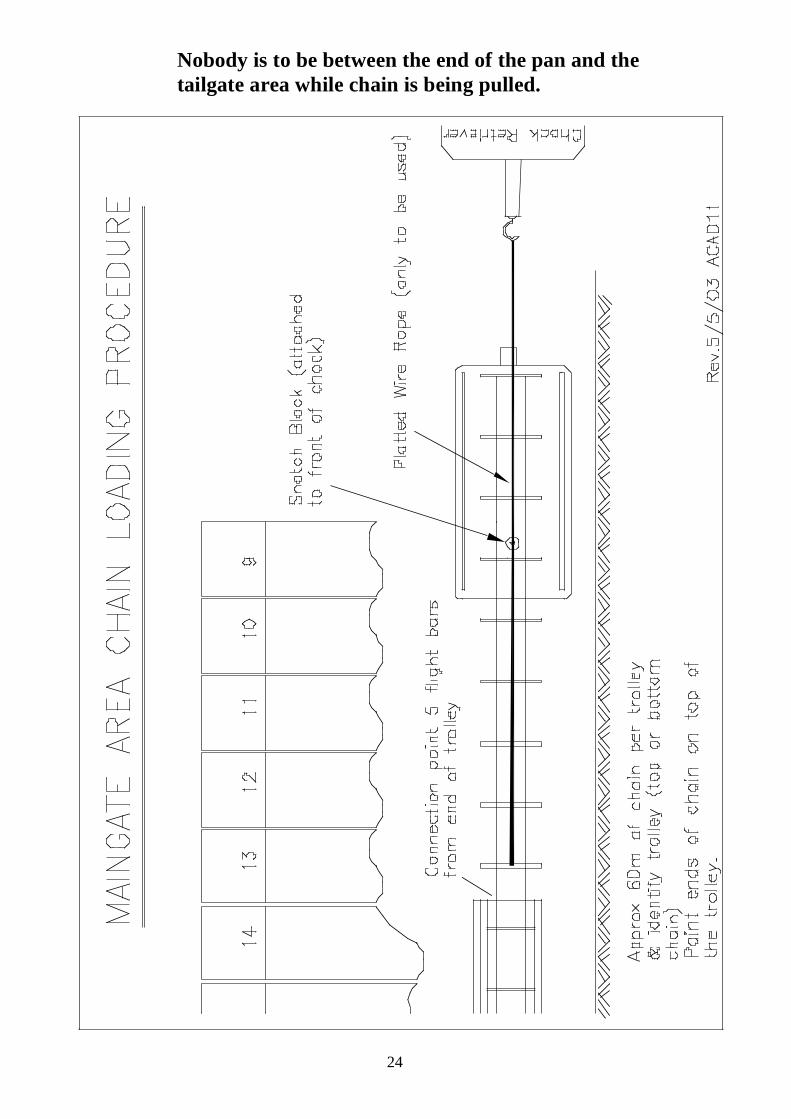
AFC CHAIN REMOVAL
• Position an empty chain trolley one trolley length from No 14 pan.
• Pull top chain layering chain onto trolley. Each trolley will hold up to 60 metres of chain.
• Secure the end of the chain to the trolley before transporting. Send each trolley the to
surface as it is filled. Once on the surface the chain will be repaired and reloaded.
As the bottom chain is being pulled, work from the tailgate disconnecting dog bones and
sandwich plates – tie dog bones securely onto pans.
• When pulling chain the “pull points” are between the 4th
and 5th flyght bar from the end of
the trolley, see diagram. There will be four (4) trolleys of top chain and five (5) trolleys of
bottom chain. Take extra care when pulling the AFC chain.

23
24
Nobody is to be between the end of the pan and the
tailgate area while chain is being pulled.

25
#152
'E'
700
1c/t
2c/t
#6
#13
#14
GOAF
'A'
611

26

27
AFC PAN REMOVAL
• Continue removing the dog bones from the face and goaf of the pans and tie the dog bones
securely to the pans for transport.
• Remove Eickotrack pins and Eickotrack and tie securely to pans for transportation.
• Unbolt one side of the sandwich plate at the break point.
• The hoses and small cables (25mm hoses, 2 methanometer, CO2 monitor and flow switch
cables) are to be removed from the spill plates and placed neatly onto the chock pontoons.
• Remove the 2 x AFC T/G cables from the spill plate pins and place neatly at the back of
the chock pontoons.
• Secure the spill plate pins to the pans.
• The shearer M/G to mid-face cable will be removed from the spill plate and placed neatly
at the back of the chock pontoons.
• Place remaining hydraulic (2), water (2) and air (1) hoses neatly at the back of the chock
pontoons.
• Break the pan line into sets of two (2) pans except for No 152 pan, which is a single pan
(see pan diagram). Each break point has been marked with red paint.
• Pans are to be removed via the Maingate in sets of two using two EJC 130 Eimcos and
two QDS Pan Pickers.
• AFC pans are to be removed and stored in their numerical order (No 6 – 152 pan) in 715.
DAC CABLE and UNIT REMOVAL
• Disconnect cables from DAC units and place staples in the bag provided.
• Fit plastic caps to cable plugs and unit sockets.
• Remove cables from chocks, roll up and tie. Leave cables in chocks.
• Unbolt units from brackets and brackets from chocks.
• Leave units and brackets in chocks.
• Once pans are removed load DAC units, cables and ‘L’ brackets into wire baskets (as
marked), which will be on stonedust trolley.
• Send the stonedust trolley with baskets to the surface.
LIGHTING

28
• Unplug lights from convertor boxes and fit caps to plugs and sockets, roll up and tie cable.
Tag any light fitting that may require repairs and send/take to surface each shift.
• Place all serviceable lights on chock pontoons.
• Disconnect 110v supply cable and zip tie plastic bags over gland ends.
• Roll up and tie cable. Place on chock pontoons.
• Remove convertor boxes from brackets and store neatly in the chock.
• Cables, light fittings and convertor boxes will be sent to the surface.
FACE CABLE and HOSE REMOVAL
• Once pans have been removed load all face cables face hoses onto trolleys or pods and
send to surface.
CIU and CIU CABLE REMOVAL
• Unplug ‘inchock’ and ‘interchock’ from CIU’s and valve packs.
• Place staples in separate bags provided.
• Cap plugs, roll up and tie cables, leave cables in chocks.
• Remove CIU’s, complete with mounting plate, from chock brackets and refit locking cap
screw to it.
• Fit plastic caps to CIU sockets.
• Store CIU in chock.
• Once pans are removed load CIU’s, cables and mounting brackets into bins (as marked),
which will be on white stonedust trolley.
• Send the trolley to surface.
GOAF PLATE REMOVAL
• Unbolt and remove pins from the goaf plate. Remove the goaf plate from the Tailgate
Drive using a pull lift.
• Put pins and bolts back in place and send goaf plate to the surface after the Tailgate Drive
has been removed.
TAILGATE DRIVE REMOVAL (Mechanical)

29
• Position and break AFC chain once AFC, BSL and belt has been run clean.
• Remove the dog bones from face and goaf side of AFC at the connection between the
Tailgate drive and the AFC pan, between No 153 and N
o 152 chocks.
• Tie the dog bones securely to the pans.
• Pull the Tailgate Drive out via the Maingate using the Chock Retriever or 915Eimco.
TAILGATE DRIVE REMOVAL (Electrical)
• Disconnect DAC cable running between cadlock at No 152 chock and Tailgate Drive, fit
plastic caps to the plugs and sockets, roll up and tie cable.
• Disconnect short DAC cables on Tailgate Drive, fit plastic caps to all plugs and sockets.
• Remove water flow and ‘pony drive’ junction boxes complete with their respective
switches and cables. Roll up and tie cable.
• Leave all above gear at No 152 chock.
• Unplug Tailgate Drive motor cables; bag plugs and pull back clear of Tailgate Drive.
MAINGATE CABLE REMOVAL
Power Cables
• Remove all plugs, from 1100-volt manifold and plug in all test plugs.
• Unplug cables from:
i. BSL motor
ii. Crusher motor
• Bag all plugs.
• Power cables to be loaded into ‘wide’ MPV pods or high sided trolley and sent to surface.
Small Cables

30
• Lighting Cables to have been disconnected, if not disconnect at convertor boxes. Roll up
the two roadway cables and load into pods or high-sided trolley.
• DAC Cables to be disconnected from lockouts and cadlocks on BSL in maingate, No 4
chock, 321 console and at couplers. Bag plugs, roll up cables and load into pods/high
sided trolley. Couplers are to be bagged and brought to surface.
• CIU roadway cables to be disconnected at joins, plugs bagged and cables rolled up and
loaded into pods or high-sided trolley.
• Disconnect AFC water flow switch, crusher stand still, methanometer and CO2 cables at
‘J’ box on maingate drive and roundabout, roll up and load out.
• ‘J’ box at the roundabout can be removed with AFC water flow switch, crusher stand still,
methanometer and CO2 outbye cables in place together with Fras hose.
IT MAY BE NECESSARY TO CUT THE ‘FRAS’ HOSE PROTECTING THE DAC, CIU
AND LIGHTING CABLES BEFORE REMOVAL.
BEFORE POWER IS REMOVED FROM PANTECH
• Ensure BSL and belt have been run completely clean.
• Position a set of joining links at the drive and non-drive sprockets.
• Slacken the BSL chain by withdrawing the tensionable section of the BSL and break the
chain at the drive sprocket.
BOOT DISMANTLE
• Remove belt from boot.
• Disconnect sequence cable from boot switch Remove switch and mounting bracket from
bridge and send to surface.
• Remove bridge from boot.
• Lift boot towards roof using the bootjacks making sure it is high enough to remove both
pins located on each side of BSL (as shown in diagram).
• Connect 2 x 3 tonne pull lifts to each side of the BSL lifting lugs.
• Fit both towing wheels and hubs.
• Lower boot with hydraulic jacks, connect towbar, disconnect hydraulic hoses, remove
control valve bank and place onto boot. Use 913 Eimco with special tow hitch and
transport to surface.
BSL CHAIN REMOVAL
• The BSL chain will be removed once the rigid bretby and boot end have removed.

31
• The BSL chain is to be removed from the drive end using a plaited wire rope and EJC130
Eimco to pull it into an MPV pod positioned one pod length in front of the delivery end.
• Send to the surface for reloading.
BSL REMOVAL
• Remove the Vertical Bretby and load onto trailer. Transport to pit bottom.
• Remove Turntable and load onto trailer. Transport to pit bottom.
• Remove remaining cable/hose trays and lay against rib.
• Remove bolts (painted red) from BSL Tensionable End to Goose Neck.
• Back special trailer under BSL Tensionable End. Lower 3 tonne pull lifts until the
Tensionable End is sitting on trailer.
• Chain BSL Tensionable End down to trailer and transport to pit bottom.
• Remove bolts (painted red) from the small section of Goose Neck.
• Remove small section of Goose Neck (as shown in diagram) onto trailer. Transport to pit
bottom.
• The next section should be broken at the crusher by removing bolts (painted red) and
loaded onto a trailer. Transport to pit bottom.
• Remove crusher with 915 forks after breaking the two dog bones (painted red). Transport
to 36c/t B-A 610.
• Remove Mini Pans with 915 Eimco after breaking the dog bones (painted red).
Transport to pit bottom.
• Remove Swan Neck with 915 Eimco and transport to pit bottom.
• Load all cable/hose trays and transport to pit bottom.

32
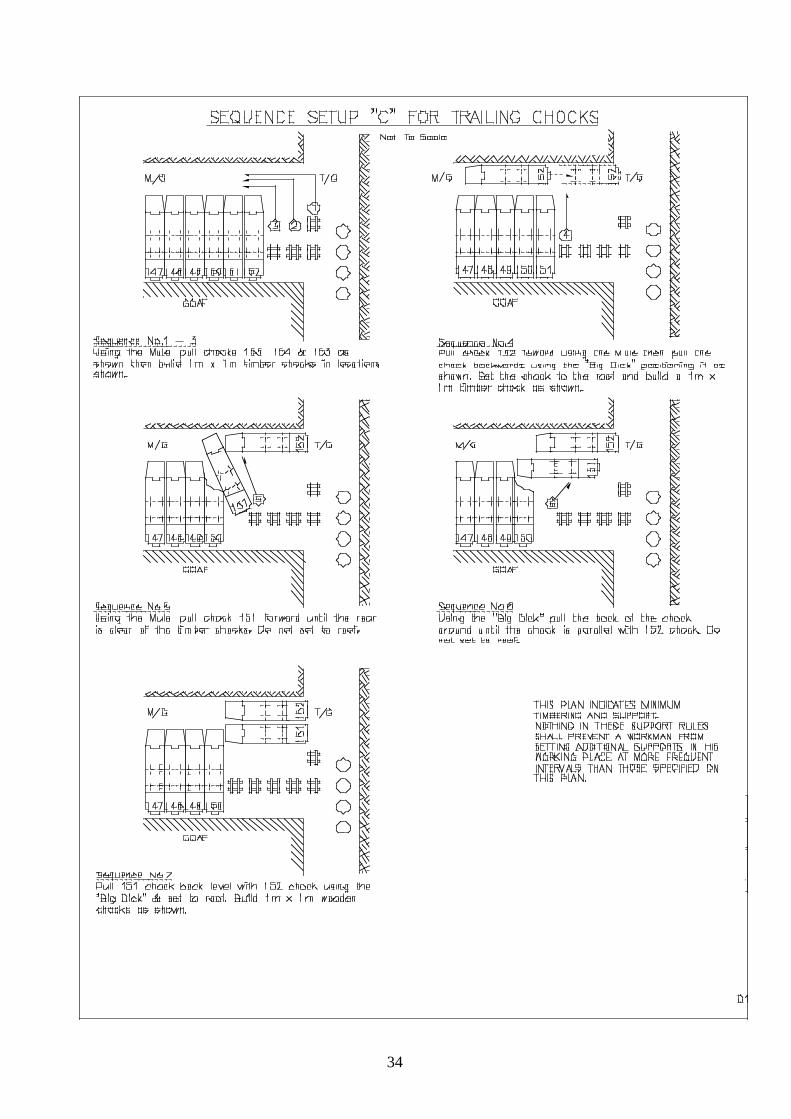
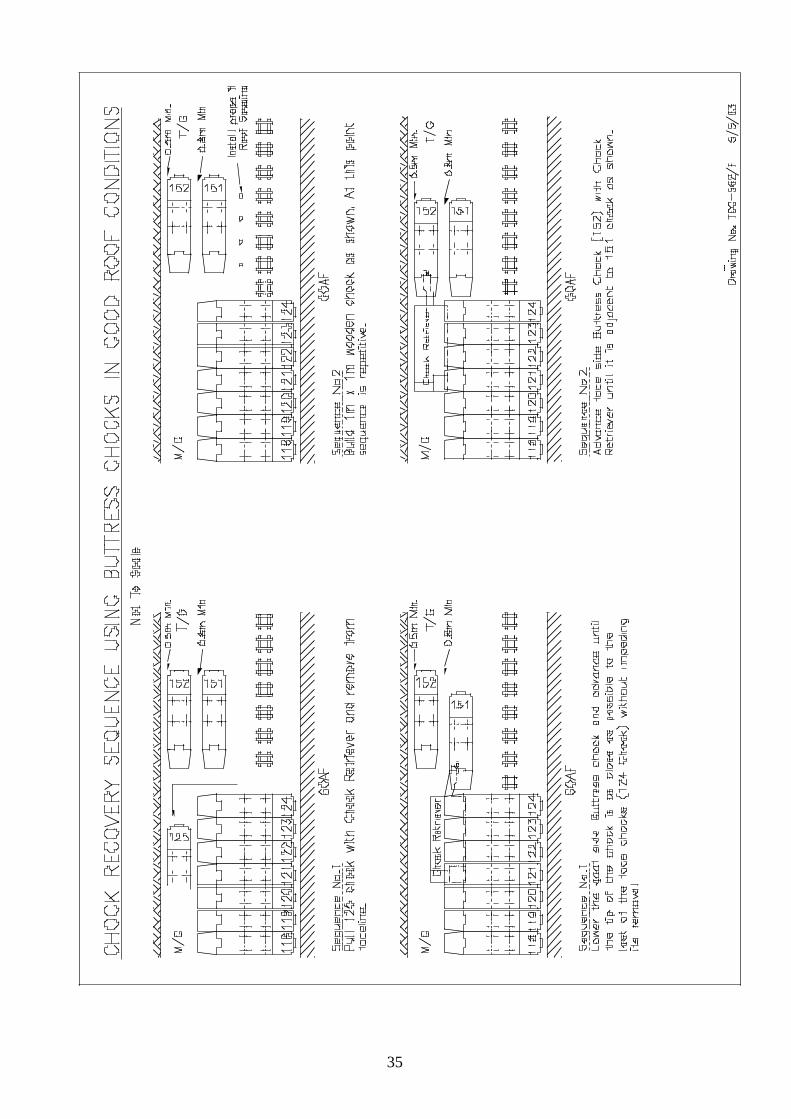
CHOCK REMOVAL

33
• Disconnect DAC lockouts and cadlocks, CIU’s and Lighting circuits and remove units
from chocks.
• Load out cables and hoses from chock pontoons onto trailers.
• Load all DAC lockouts and cadlocks, CIU’s, lighting convertor boxes, light fittings,
interchock, inchock, DAC and lighting cables into containers on stonedust trailer.
• All chocks are to be recovered via the maingate.
• Check that the recovery power pack unloader valves are set at 200 bar.
• Connect recovery hydraulic power pack to No 1 chock.
• Pull side shields in, level canopy tip and lower chocks to 1.7 metres.
ENSURE CHOCK IS MEASURED FRONT AND REAR WITH MEASURING STICK
• Put wooden (1m x 50mm x 150mm) lagging beneath the relay bar and on top of the
pontoons to support the relay bar during transportation.
• Loop hoses to back of chock manifold and replace staples.
• Connect wander lead as shown in hydraulic hosing diagram to pull chocks from No 155,
154 and 153. Return fluid to be dumped on ground.
• Once chock No 153 has been removed set-up N
o 152 and 151 as buttress chocks.
• Chocks No 153, 145, 129, 124, 122, 117, 116, 114, 113, 111, 107, 102, 94, 87, 86, 84, 83,
79, 74, 72, 58, 55, 51, 46, 38, 37, 30, 29, 20, 18 and 9 are to be sent to the surface for
repairs.
• Old chocks No 69, 70, 71, 73, 74, 75, 76, 77, 77, 78, 79 and 80 are to be installed as new
face chocks No. 141, 142, 143, 144, 145, 146, 147, 148, 149, 150, 151 and 152. These
twelve (12) chocks will be recovered and sold at the completion of L/W 21.
• Old maingate chocks No. 1, 2, 3 and 4 are to be installed as NEW maingate chocks No 1,
2, 3, and 4. Store at 20c/t B-C N-W.
• Old tailgate chocks No 155, 154, and 153 are to be installed as NEW tailgate chock N
o
155 and 154 (No 153 T/G chock to surface for repairs). Store at 18c/t B-C N-W.
34
35

36

37

38

39

40

41
700
'E'#155
1c/t
2c/t
611
'A'
#1
GOAF

42

43

44
INSTRUCTIONS AND HYDRAULIC HOSING DIAGRAMS TO SUPPLY
HYDRAULIC PRESSURE TO THE LONGWALL FACE.
Chock # 1
Supply from Recovery pump Ring Main to Tailgate
1) Uncouple all hoses from the maingate side of No 1 chock manifold.
2) Couple the pressure supply hose from the recovery pump into the 25mm pressure port of
No 1 chock and ‘T’ off to the 25mm Ring Main hose run to the Tailgate.
3) Blank off the second 25mm pressure port on No 1 chock.
4) Uncouple all hoses from the tailgate side of No 145 chock manifold.
5) Connect wander leads ready for removal (see diagram for chock removal on next page)
PILOT
RETURN
RETURN
PRESSURE
PRESSURE

45
INSTRUCTIONS AND HYDRAULIC HOSING DIAGRAMS FOR CHOCK
REMOVAL
Open Return Looped
Around Ready to Insert
After Chock Collapsed
Isolation Valve
13mm Wander Lead Chock to be Removed
1) Uncouple all hoses from the maingate side of manifold.
2) Couple the Wander Lead into one 25mm pressure port and 20mm pilot port
3) Loop all inter-chock hoses back to maingate side of chock.
4) Cap 20mm pilot hose and one 25mm pressure hose with valves.
5) Fit remaining 25mm pressure hose into maingate side of manifold.
6) Leave both returns open
7) Lower chock to correct height (1.6m) use measuring stick to check.
8) Retract side shields.
9) Retract push ram until wedge is fully retracted and canopy is level. 10) Isolate valve on wander lead..
11) Open capping on inter-chock hose to decay hydraulic pressure in chock.
12) Uncouple wander lead.
13) Ensure all inter-chock hoses have been looped back into the manifold and at least one leg
of the staple has been inserted.
PILOT
RETURN
RETURN
PRESSURE
PRESSURE
PILOT
RETURN
RETURN
PRESSURE
PRESSURE
PILOT
RETURN
RETURN
PRESSURE
PRESSURE
PILOT
RETURN
RETURN
PRESSURE
PRESSURE

46
INSTRUCTIONS AND HYDRAULIC HOSING DIAGRAM FOR
BUTTRESS CHOCKS.
Isolation
Valve
1) The ring main hose will have been disconnected on the maingate side of No 155 chock.
Fit an isolation valve to the end of the hose run from the maingate side of No 155 chock to
the maingate.
2) Couple a 25mm pressure hose to the isolation valve and run the hose to the face side of
the manifold of the face side chock.
3) Couple the 25mm pressure hose into the pressure port of the face side chock and ‘T’ off to
the 20mm pilot port.
4) Blank off the second 25mm pressure port on the face side chock and loop a 32mm return
hose to both of the 32mm return ports on the face side manifold of the face side chock.
5) Couple hoses between the two buttress chocks.
6) Loop a 25mm pressure hose between the pressure port on the goaf side of the manifold of
the goaf side chock and blank off the 20mm pilot port.
7) The 32mm return ports of the goaf side chock are left open to atmosphere.
8) In the maingate, couple the maingate end of the 25mm ring main into a ‘T’ off the 25mm
pressure supply hose from the recovery pump.
9) Make sure ladder ring main hoses, fittings and valves have been removed from No 52 and
No 100 chocks and the ring main at the same location and the hoses reconnected through.
10) Make sure that the pressure of the recovery pump is set to the correct pressure (200 Bar
max).
11) As buttress chocks are advanced the supply hose to the chocks are to have the ties undone
and the hose rolled up. Drop excess hoses out when possible.
PILOT
RETURN
RETURN
PRESSURE
PRESSURE
PILOT
RETURN
RETURN
PRESSURE
PRESSURE
47
PA
NT
EC
H A
RR
AN
GE
ME
NT
LO
NG
WA
LL 1
9 &
20
Pum
p N
o. 3
Hyd
raul
ic
76
.5 m
etr
es
Fa
ce
Lin
e
57 m
etre
s to
7m
2m
Con
trol S
led
7m
2m
3.5
m
D.C
.B. N
o. 2
D.C
.B. N
o. 1
7m
2m
7m
1m
She
arer
Wat
er P
ump
Dra
win
g N
o.
PD
63.
dwg
2/
8/01
Pum
ps N
o. 1
& 2
Hyd
raul
ic
7m
1m
1m
Tan
k
Hyd
raul
ic
7m
7m
2mT
x N
o. 2
2m
7m
2m
2m
Tx
No.
1S
led
Pul
l

48
PANTEC REMOVAL
CONROL SLED REMOVAL
• Check all small cables have been either disconnected or pulled back and packed onto
control sled. Bag and identify cable connections.
• Check No. 1 light circuit cable to the face has been disconnected from control sled
convertor box. Leave incoming 110 volt supply connected with plug and cable pulled
back onto the sled.
• Unplug all multi pin plugs from PLC marshalling enclosure, bag plugs and pull clear.
• Disconnect joining links and fit white drawbar.
• Place tag marked ‘inbye end’ on inbye end of control sled.
• Remove control sled and send to surface.
No 1 DCB REMOVAL
• Pull the five 110 volt receptacles, two methanometer bypass cables and two multi pin
plugs and cables back, wrap around DCB. Tie each cable individually at corners of DCB
and to ‘S’ hooks on top of DCB. Pantech lighting supply cable and plug to the convertor
box can be left connected and stored on the sled.
• Pull the six 1100 volt receptacles and cables back, wrap around DCB. Tie each cable
individually at corners of DCB and to ‘S’ hooks on top of DCB.
• Disconnect joining links.
• Pull all cables clear of DCB.
• Fit drawbar and remove DCB.
• Transport to surface.
No 2 DCB REMOVAL
• Pull the two methanometer bypass cables and two multi pin plugs and cables back onto
sled wrapping cables around sled and securing with rope.
• Disconnect joining links.
• Pull all cables clear of DCB.
• Fit blue drawbar and remove DCB.
• Transport to surface.
SHEARER WATER PUMP REMOVAL

49
• Disconnect power cable and hang in rib.
• Disconnect multi pin PLC cable at stop/start station. Roll up cable for transportation to the
surface.
• Check all hoses are disconnected.
• Disconnect joining links.
• Pull all cables clear of sled.
• Fit drawbar and remove pump.
• Transport to surface.
HYDRAULIC PUMP REMOVAL
• Unplug all power cables and load onto rib.
• Check all hoses are disconnected.
• Disconnect, bag and roll up all control cables. Transport to the surface safely.
• Disconnect joining links.
• Pull all cables clear of sled.
• Fit drawbar and remove pump.
• Transport to surface.
No 1 TRANSFORMER REMOVAL
• Check HT power has been isolated and tagged at circuit breaker.
• Disconnect incoming and 14 metre flex. HT cable and hang in the rib.
• AFC water flow switch, crusher stand still, methanometer and CO2 Disconnect the two
1100 volt feeder cables and hang in the rib.
• Disconnect joining links.
• Pull all cables clear of transformer.
• Fit red drawbar and remove transformer.
• Transport to surface
No 2 TRANSFORMER REMOVAL
• Check HT power has been isolated and tagged at circuit breaker.

50
• Disconnect the 14m flex. HT cable and hang in rib.
• Disconnect the two 1100 volt feeder cables and hang in the rib.
• Disconnect joining links.
• Pull all cables clear of transformer.
• Fit red drawbar and remove transformer.
• Transport to surface.

51

52
53

54

55
INSTALLATION

Table Of Contents
Page
Panline ......................................................................... 57 - 63
Face Cables .................................................................. 64 - 65
Chock Installation......................................................... 66 - 67
Maingate Drive............................................................. 67
Maingate Cable Handling ............................................. 68
Stageloader................................................................... 69 – 70
Hauhinco Hydraulic Pump Set-out................................ 71
Cable arrangement in Rigid Bretby............................... 72
Pantec........................................................................... 73 – 79
Shearer ......................................................................... 80 – 81
Longwall Cable Numbers ............................................. 82 – 83
Dowlight & DAC ......................................................... 84 – 85
Chock Control .............................................................. 86
Face Power Cables ....................................................... 87
Converter Box .............................................................. 88
Chock Lighting & AFC Control ................................... 89
Small Cables ................................................................ 90
Pantec Power Cables .................................................... 91
Wire Rope Slings.......................................................... 92 – 95

57

58
AFC PANLINE INSTALLATION PROCEDURE
Install the ramp pan first.
Pans with yellow tags indicating pan number are to be installed in the numbered
location. These pans include the M/G & T/G re-routers.
PANS:
- Clean the bottom race before transporting.
- Transported in sets of two using two EJC 130 Eimcos with a QDS
Pan Picker attached.
- The bottom AFC chain is to be pulled using a 915 Eimco and not the
Pan Picker.
- The first 24 pans to be installed are in 19c/t 611.
- Then relocate the T/G re-router pans from the 715 bleeder to 19c/t
611 which will clear the way to the remaining standard pans.
- Install pans as recovered except those with yellow tags.
NOTE: The 26mm chain used to thread through the bottom race of the AFC pans is on
the Ramp Pan.
Sequence A
1. Position the Ramp Pan lining the spill plates up with the survey line on the roof (see
diagram on page 63).
2. Set two timber props against the bottom of the M/G end of No14 pan. This is to prevent
the pans from being pushed forward as each successive pan set is installed. The props are
to be set to allow free travel of the bottom AFC chain into the bottom race.
3. Position the bottom AFC chain trailer with the 38m (approx) lengths of old 26mm chain
attached close to the M/G end of the Ramp Pan.
4. Pull one end of the 26mm chain through the pan set until there is approx. 4m of chain
through the other side (enough to feed through the next pan set).
5. Prior to installing the next pan set, pull the 26mm chain through the bottom race.
6. Line up and level the next pan set to be installed by rotating the Pan Picker. Keep hands
and feet clear then join the pan sets.
7. Fit the face and chock side dog bones with their keeper plates and lynch pins.
8. Line the spill plates with the survey line on the roof (see diagram).
9. Install the Eicko Track bar onto the clogs with its two pins and roll pins.
10. Bolt the sandwich plate to the spill plates.
11. Check that the panline has not moved towards the maingate. If it has then pull it back.
This will not have to be checked once sufficient pans have been installed to anchor the
panline in position.

59
12. Repeat steps 4 to 11 until there is no slack 26mm chain remaining.
13. Connect the 26mm chain to the 915 Eimco at the T/G end of the panline and pull the
bottom AFC chain through until the first flyght bar is visible at the end of the T/G end
panline.
14. Replace the 39m (approx.) length of BSL chain with a 6m (approx.) length of 26mm
chain. This short length of 26mm chain is attached to the 38m length.
Sequence B
15. Repeat steps 4 to 11 installing pans and bottom AFC chain to #145 chock.
16. Pull the bottom AFC chain remaining on the trailer to the T/G leaving 1m at the M/G.
17. Push the slack bottom AFC chain into the AFC pan race at the T/G. This can be achieved
by using a 2m length of 50mm x 150mm lagging against a flyght bar at the last pan and
the rear of the Eimco. Push one flyght into the bottom race at a tome.
Sequence C
18. After the shearer has been installed, install the T/G re-router pan sets and bottom AFC
chain as above and again leaving 1m of slack AFC chain at the T/G end of the panline.
NOTE:
Ensure there is still bottom AFC chain hanging out the M/G end of the
Ramp Pan.

60

61

62
AFC Cable Installation
After the M/G cables have been installed, the tailgate motor cables and shearer (M/G to mid face)
cable can now be installed into the AFC spill plates. See spill plate diagram.
Slack mid-face shearer cable is to be stored neatly and securely at mid-face and the plugs covered
to prevent water intrusion.
Face Hose Installation
After the M/G 50mm slimline air and water and shearer water hose has been installed, join to the
face 50mm slimline air and water and the mid-face shearer water hose and install into the AFC
spill plates. See spill plate diagram.
Position the 25mm air and water outlets so they are accessible.
Install the pressure and return ring main hoses into No1 chock and N
o155 chock.

63
Chock Installation
Chock Control Installation
CIU to be installed on every chock bolted to mounting bracket using four M6 x 25mm set screws.
Inchock cable is to be connected between CIU and valve pack using a thin layer of protective
grease.
Interchock cable is to be connected between CIU on adjacent chock using a thin layer of
protective grease. Cables are to be suspended on rubber straps with DAC and lighting cables.
Note: Stagger chock cables (three metre) to be installed between No. 2 and No. 3 chocks and
No. 152 and No. 153 chocks.
Termination plug to be fitted on the outgoing interchock cable socket of No. 155 chock CIU.
Address plugs to be fitted to plug PL15 using protective grease provided. Apply a thin layer of
grease to the socket on the CIU. The number on the back of the address plug must correspond to
the chock location number on the face ie No. 34 chock must have No. 34 address plug installed
on CIU.
DAC Installation
Cadlock is to be fitted to No. 4, a lockout is to be fitted to No. 8 chock, Cadlock is to be fitted to
No. 12 then units to be installed every fourth chock.
The cadlock is to be followed by two lockouts then another cadlock and so on.
At the T/G a cadlock is fitted to No. 152 chock.
See installation diagram.
Maingate Drive Installation
Install three sets of three re-router pans. See pan diagram.
Install ramp pan. Align ramp pan with re-router pan, MR7, sigma section join and fit dog bones.
Install maingate drive. Align with end of ramp pan join and fit dog bones.
Note: Dog bones are flat type and there are two dog bones on each side of the drive.
Install the maingate drive motor and gearbox.
Install the swan neck section. Align with drive and fit dog bones and pins. Couple the
transmission to the drive.
Install the cable duct along the swan neck, around the drive and along the ramp pan.

64

65
BSL Installation
The BSL will be installed from the maingate drive (swan neck section) outbye.
Install mini pans onto the swan neck section of maingate drive, align the sigma section of
raceway and join. Fit dog bones to both sides.
Install crusher with motor and gearbox on the walkway side. Align the sigma section of raceway,
join and fit dog bones.
Install Gooseneck section (No. 2 & 3). Align sigma section of raceway, support outbye end of
gooseneck and bolt inbye end to crusher.
Install Gooseneck section No. 1.
Install Stageloader section.
Install BSL chain.
Install boot end and lower stage loader section onto boot end.
Install turn around section at inbye end of the Stageloader.
Install cable duct to gooseneck section to maingate.
Install Vertical bretby.

66

67

68

69
PA
NT
EC
H A
RR
AN
GE
ME
NT
Pum
p N
o. 3
Hyd
raul
ic
76
.5 m
etr
es
2m
Fa
ce
Lin
e
57
me
tre
s to
7m
Con
trol S
led
1m
2m
2m
7m
3.5
m7
m7
m
D.C
.B. N
o. 2
D.C
.B. N
o. 1
She
arer
Wat
er P
ump
Dra
win
g N
o.
PD
63.
dwg
5/
9/02
2m
1m
1m
7m
7m
7m
Pum
ps N
o. 1
& 2
Hyd
raul
ic
Tan
k
Hyd
raul
ic
Tx
No.
2
2m
2m
7m
2m
Tx
No.
1S
led
Pul
l

70
"Bu
llho
se"
to S
limlin
e C
ou
plin
g
Fac
e A
ir C
oupl
ing
@ #
6 C
hock
MA
ING
AT
E H
OS
E S
CH
EM
AT
IC
No.
1 C
hock
Fac
e W
ater
Cou
plin
g @
#6
Cho
ck
Hyd
rau
lic P
ilot
Hyd
rau
lic P
ress
ure
Fa
ceS
he
are
r
Co
mp
ress
ed
Air
Hyd
rau
lic R
etu
rn
Wa
ter
Con
trol
Sle
dD
.C.B
. No.
2
Dra
win
g N
o.
PD
63/
B.d
wg
5/
9/02
Hyd
raul
ic P
ilot
(20m
m H
yd.
Hos
e)
Hyd
rau
lic P
ress
ure
(2
5m
m S
limlin
e)
Fa
ceS
he
are
rC
om
pre
sse
d A
ir (
50
mm
Slim
line
)
Hyd
rau
lic R
etu
rn (
32
mm
Slim
line
)
Wa
ter
(50
mm
Slim
line
)
Pum
ps N
o. 1
& 2
Hyd
rau
lic
Pum
p N
o. 3
Wat
er P
ump
Sh
ea
rer
D.C
.B. N
o. 1
Hyd
rau
lic
Ta
nk
Hyd
rau
lic
Tx
No.
2T
x N
o. 1
Pu
ll
Sle
d

71

72

73

74

75

76
Shearer Installation
The shearer is to be installed at the tailgate.
The maingate drum and cowl is to be fitted prior to taking the shearer into the face line.
Take shearer into face line and height permitting the tailgate drum and cowl can be fitted.
Pans are to be lifted to align tracking sections on the AFC and Shearer transported by raising the
pans and packing timber under pans.
The shearer transporter must be exactly aligned with the AFC panline before the shearer can be
trammed onto the AFC.
Connect a 300amp jumper cable between the shearer and power tram.
Start power tram and shearer and tram shearer onto AFC pans. Tram the shearer along pans until
the tailgate end of the shearer is four (4) pans from the end of the pans.
Shutdown power tram and disconnect jumper from shearer. Load jumper onto power tram and
send to pit bottom
Fit outrigger and connect cable, the high-pressure water hose and nylon bretby.

77

78

79

80
AUSTRAL COAL

81
Drawing No. PD 61.dwg 27/7/01
BMA at
Pull Station
"J" Box BMA BMA BMA BMA "J" Box
Console
Cadlock Lockout CadlockCadlock
Coupler
Coupler
Tail EndUnit
Lockout
Lockout
Cadlock
Lockout
Cadlock
Lockout
Cadlock
Tail End
Unit
Chain
tensioner
Flow
Switch
8 metre
8 metre
8 metre
8 metre
8 metre
8 metre
8 metre
8 metre8 metre8 metre
64 metre cable
2 x 15 metre or 1 x 30m cable
Chain
tensioner
Flow
Switch
15
me
tre
or
3x8
me
tre
ca
ble
s
8 m
etre
EQUIPMENT LIST
ITEMS A.F.C. B.S.L. PANTECH TOTAL
UNITS
CadlocksB.M.A.LockoutsTail End Units
TOTAL
13-241
38
13
1
38
-24 24
38
13
1
-13
1
38
-24
1
4 core
Other
3
-Pantech
TOTAL 63
LOCATION
Channel B B.S.L.Channel A A.F.C.
CABLES
Standard
567 2
-
66
TYPE
TOTAL
579
Notes
1. Standard cable length - 8 metres2. Roadway cable lengths - 64 metres3. Short cable for T.E.U. - 0.5 metres
Pantech D.A.C. isCommunications Only.
D.A.C. INSTALLATION
1 metre
1 metre
1 metre
47 metre cable

82
AUSTRAL COAL

83
241
SL
/
120m
m
240
/
120m
m
240
/
120m
m
241
/
150m
m
241
/
150m
m
241
/
150m
m
241
/
35m
m
241
/
35m
m
TY
PE
/SIZ
E
FA
CE
PO
WE
R C
AB
LES
- M
id-f
ace
to S
hear
er
- M
/G t
o M
id-f
ace
- M
an
ifold
to
M/G
TL
S C
5 to
C6
TL
S B
3 &
B4
TL
S A
3 &
A4
CR
USH
ER
CR
USH
ER
TA
ILG
AT
E D
RIV
E
- M
anifo
ld t
o M
/G
MA
ING
AT
E D
RIV
E
SH
EA
RE
R
ST
AG
E L
OA
DE
R
- M
/G t
o T
/G m
otor
USE
TL
C A
1 &
A2
TL
MC
B1
to B
4
TL
MC
A1
to A
4
TL
MC
A1
to A
4
TL
SL
A1
& A
2
CA
BLE
NU
MB
ER
TL
C A
1
MIA
GA
TE
DR
IVE
MO
TO
RTL
S B
4
TL
TC
B2
TL
TC
B3
Dra
win
g N
o.
PD
102
.dw
g
11/9
/02
11
7 M
etr
es
11
6 M
etr
es
86
Me
tre
s
72
Me
tre
s
86
Me
tre
s
23
0 M
etr
es
69
Me
tre
s
76
Me
tre
s
LEN
GT
H
MID
-FA
CE
SH
EA
RE
R
TL
S C
8T
AIL
GA
TE
DR
IVE
MO
TO
R
FA
CE
PO
WE
R C
AB
LE IN
ST
ALL
AT
ION
TL
SL
A2
B.S
.L.
TL
TC
A4
TL
TC
A3
1100
Vol
t M
AN
IFO
LD
TL
S A
4
No.
5 C
hock
Join
ers
o
pp
osi
te

84

85

86
21
on C
ontro
l Sle
d
Mar
shal
ling
Box
Seq
uenc
e
2C
O S
enso
rs
Sto
p/S
tart
Pum
pT
o H
yd.
on E
mul
sion
Tan
k
mou
nted
on
No.
4 c
hock
, as
is
to b
e lo
cate
d in
the
mai
ngat
e,
the
met
hano
met
er s
enso
rs a
re
For
hom
atro
pal v
entil
atio
n
Hyd
raul
ic P
umps
Mar
shal
ling
Box
No.
3N
o. 2
No.
1
Enc
losu
re
P.L
.C.
PLC
Mai
n
Enc
losu
reM
arsh
allin
g
Rev
ised
5/9
/02
Dra
win
g N
o.
PD
60.
dwg
3/
8/01
Cru
sher
Sen
sor
BS
L S
enso
r
on B
oot
Bel
t Sw
itch
Fro
m la
st
SM
ALL
CA
BLE
INS
TA
LLA
TIO
N
Met
hano
met
ers
stop
/sta
rt
She
arer
Wat
er
Dup
line
Enc
losu
re
Con
sole
DA
C
at R
ound
abou
t
Met
hano
met
er C
able
s
"J" B
ox
CO
Sen
sors
2Sen
sor H
eads
Met
hano
met
er1 2

87
SLE
D
PA
NT
EC
H P
OW
ER
CA
BLE
S
- T
x N
o. 2
to
D.C
.B.
No.
2
- T
x N
o. 1
to
D.C
.B.
No.
1
- W
ater
Pum
p to
Man
ifold
.
- N
o. 3
Pum
p to
Man
ifold
.
- N
o. 2
Pum
p to
Man
ifold
.
- N
o. 1
Pum
p to
Man
ifold
.
- N
o. 1
Tx
to N
o. 2
Tx.
CA
BLE
S
D.C
.B. F
EE
DE
R
CA
BLE
S
PU
MP
TF
425
- 46
& 4
7
TF
425
- 43
& 4
4
TL
P3
A1
& A
2
TL
P3
A1
& A
2
TL
P2
A1
& A
2
TL
P1
A1
& A
2
TL
HT
C1
TO
C3
HIG
H T
EN
SIO
N -
Fee
der
Cab
les
USE
TL
HT
A1
TO
A4
CA
BLE
NU
MB
ER
S
Re
vise
d
11
/9/0
2
Dra
win
g N
o. P
D 5
9.dw
g
26/7
/01
at
11
00
vo
lt m
an
ifold
.
rest
rain
ed
re
cep
tica
lsan
d fit
ted
with
300
A
glan
ded
into
D.C
.B.
for
each
D.C
.B.
Six
15
0m
m C
ab
les
24
1 /
24
0m
m
24
1 /
24
0m
m
24
1 /
25
mm
47
me
tre
s
52
me
tre
s
29
me
tre
s
24
1 /
25
mm
24
1 /
25
mm
24
1 /
25
mm
26
0 /
50
mm
40
me
tre
s
55
me
tre
s
55
me
tre
s
14
me
tre
s
26
0 /
50
mm
TY
PE
/ S
IZE
90
me
tre
s
LEN
GT
H
for
each
D.C
.B.
and
fitte
d w
ith 5
5A 1
10V
at
11
0 v
olt
ma
nifo
ld.
rest
rain
ed
re
cep
tica
ls
glan
ded
into
D.C
.B.
Fiv
e 1
0m
m
Ca
ble
s2
PA
NT
EC
H P
OW
ER
CA
BLE
INS
TA
LLA
TIO
N
TF
425
- 43
TL
HT
A_
PU
LL S
LED
TR
AN
SF
OR
ME
R
No.
1
TR
AN
SF
OR
ME
R
No.
2
TL
HT
C_
TF
425
- 44
No.
1 D
.C.B
.N
o. 2
PU
MP
No.
1 P
UM
PE
MU
LSIO
N T
AN
K
TF
425
- 47
TF
425
- 46
WA
TER
PU
MP
No.
3 P
UM
P
TL
P3
A2
TL
P1
A2
TL
P1
A1
No.
2 D
.C.B
.
TL
WP
A1
CO
NT
RO
L

88

89

90

91